Harbor Freight Crossbar Dent Repair Kit Product Manual
Manual for the 66957 Crossbar Dent Repair Kit 66957 Crossbar Dent Repair Kit
2015-05-27
: Harbor-Freight Harbor-Freight-Crossbar-Dent-Repair-Kit-Product-Manual-723660 harbor-freight-crossbar-dent-repair-kit-product-manual-723660 harbor-freight pdf
Open the PDF directly: View PDF ![]() .
.
Page Count: 2
CROSS BAR
DENT REPAIR KIT
66957
INSTRUCTIONS AND
PRECAUTIONS
Distributed exclusively by Harbor Freight Tools®.
3491 Mission Oaks Blvd., Camarillo, CA 93011
Visit our website at: http://www.harborfreight.com
SAVE THESE
INSTRUCTIONS.
READ ALL
PRECAUTIONS AND
INSTRUCTIONS.
Copyright© 2009 by Harbor Freight Tools®. All
rights reserved. No portion of this document or any
artwork contained herein may be reproduced in any
shape or form without the express written consent of
Harbor Freight Tools. Diagrams within this document
may not be drawn proportionally. Due to continuing
improvements, actual product may differ slightly from the
product described herein. Tools required for assembly
and service may not be included.
For technical questions or replacement parts,
please call 1-800-444-3353.
Please note: Harbor Freight Tools is not
responsible for damage to vehicle nish result-
ing from use of this product.
SPECIFICATIONS
Glue Gun 120VAC / 60 Hz / .33 A
Crossbar Adjustment 3” min. to 5” max.
UNPACKING
When unpacking, make sure that the item is
intact and undamaged. If any parts are missing or
broken, please call Harbor Freight Tools at
1-800-444-3353 as soon as possible.
IMPORTANT SAFETY
INFORMATION
Wear ANSI-approved safety goggles and 1.
heavy-duty work gloves during use.
Contains glue; keep away from children. 2.
This product is not a toy. Do not allow chil-
dren to play with or near this item.
Use as intended only.3.
Inspect before every use; do not use if parts 4.
are loose or damaged.
Maintain product labels and nameplates. 5.
These carry important safety information.
If unreadable or missing, contact Harbor
Freight Tools for a replacement.
INSTRUCTIONS
Read the ENTIRE IMPORTANT
SAFETY INFORMATION section at the
beginning of this document including
all text under subheadings therein
before set up or use of this product.
Insert Glue Stick (2) into Glue Gun (1). Plug 1.
in Glue Gun and allow to warm up for ten to
fteen minutes before use.
Using clean cloth (not included), clean dent 2.
area with Release Agent (3). Then apply
heated glue from Glue Gun to end of desired
Pull Tab (4).
Place Pull Tab on center of dent and hold 3.
there for ten seconds. WARNING! Do NOT
push Pull Tab against dent.
Place Cross Bar (5) over Pull Tab, setting 4.
Adjusters (9) to desired length. Thread
Wing Nut (6) onto end of Pull Tab. Continue
to twist Wing Nut until dent is raised. Stop
when dent returns to normal surface level.
Unthread Wing Nut and remove Cross Bar 5.
and Pull Tab from surface. Apply two drops
of Release Agent to spot of dried glue. Use
Scraper to peel off softened glue patch.
If a high spot has been created, use a ham-6.
mer (not included) and lightly tap Dowel (8)
against raised spot until desired smoothness
is reached.
Note: 7. The Repair Kit will not repair ALL kinds
of dents, regardless of size. The Repair Kit
will also not work on aluminum panels or
surfaces.
SKU 66957 For technical questions, please call 1-800-444-3353. Page 2
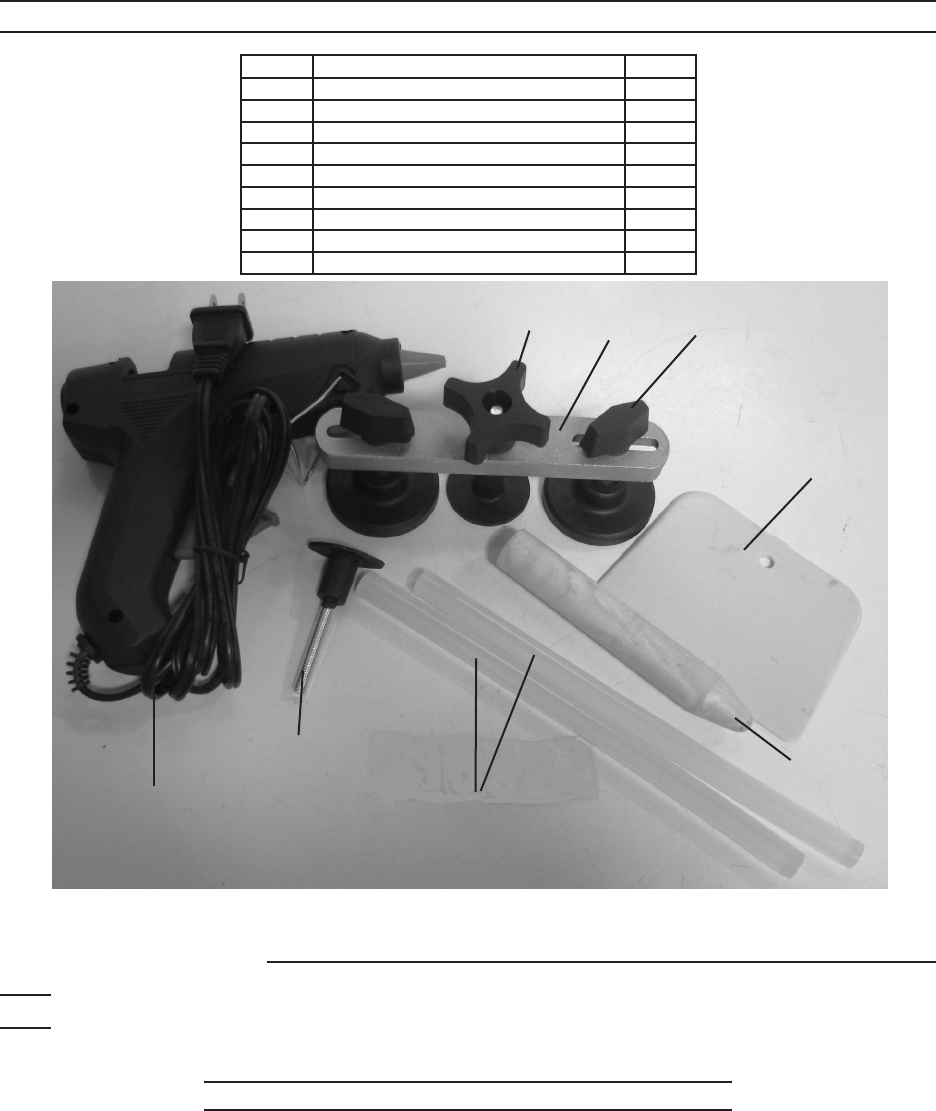
PARTS LIST & DIAGRAM
Part Description Qty.
1 Glue Gun 1
2 Glue Stick 3
3 Release Agent 1
4 Pull Tab 2
5 Cross Bar 1
6 Wing Nut 1
7 Scraper 1
8 Dowel 1
9 Adjuster 2
Record Serial Number Here:
Note: If product has no serial number, record month and year of purchase instead.
Note: Some parts are listed and shown for illustration purposes only, and are not available individually as
replacement parts.
PLEASE READ THE FOLLOWING CAREFULLY
THE MANUFACTURER AND/OR DISTRIBUTOR HAS PROVIDED THE PARTS LIST AND ASSEMBLY DIAGRAM IN
THIS DOCUMENT AS A REFERENCE TOOL ONLY. NEITHER THE MANUFACTURER OR DISTRIBUTOR MAKES ANY
REPRESENTATION OR WARRANTY OF ANY KIND TO THE BUYER THAT HE OR SHE IS QUALIFIED TO MAKE ANY REPAIRS
TO THE PRODUCT, OR THAT HE OR SHE IS QUALIFIED TO REPLACE ANY PARTS OF THE PRODUCT. IN FACT, THE
MANUFACTURER AND/OR DISTRIBUTOR EXPRESSLY STATES THAT ALL REPAIRS AND PARTS REPLACEMENTS SHOULD
BE UNDERTAKEN BY CERTIFIED AND LICENSED TECHNICIANS, AND NOT BY THE BUYER. THE BUYER ASSUMES ALL
RISK AND LIABILITY ARISING OUT OF HIS OR HER REPAIRS TO THE ORIGINAL PRODUCT OR REPLACEMENT PARTS
THERETO, OR ARISING OUT OF HIS OR HER INSTALLATION OF REPLACEMENT PARTS THERETO.
12
7
65
48
Please note:
Release Agent (3)
not shown.
9
