Harman Becker Automotive Systems BE9410 Bluetooth Handsfree Car Kit with WLAN User Manual
Harman Becker Automotive Systems Bluetooth Handsfree Car Kit with WLAN
Contents
- 1. User MAnual
- 2. User Manual
User MAnual

MMI Navigation plus Englisch Nordamerika 11.2009
MMI Navigation plus
Operating Instructions
MMI high B8, for internal use only

© 2009 AUDI AG
It has always been Audi's policy to continuously improve its products.
Audi, therefore, reserves the right to make changes in design and
specifications, and to make additions or improvements in its prod-
ucts without incurring any obligation to install them on products
previously manufactured. Text, illustrations and specifications in this
book are based on the most up-to-date information available at the
time of printing.
May not be reproduced or tra
written consent of AUDI AG.
A
to alteration or amendment.
Editorial deadline: 08/28/2
0
For the sake of the e
n
Printed on environmentally f
r
rine, recyclable)
MMI high B8, for internal use only

Foreword
You have decided on the Audi MMI Navigation plus - thank you very much
for your confidence in us.
With your new Audi, you are receiving a vehicle with a state-of-the art system that allows you the
change the vehicle's settings and operate the electronic equipment using a Multi Media Interface
called the Audi MMI.
We recommend that you read these Operating Instructions carefully so that you quickly get to know
all of the functions and possibilities that the MMI offers and are able to make full use of them while
driving.
Please note that these operating instructions are a supplement to your vehicle Owner's Manual and
should only be used in conjunction with your current vehicle Owner's Manual.
Should you have any further questions about the MMI in your vehicle, please ask your authorized Audi
dealer for assistance.
We hope you enjoy driving your Audi.
AUDI AG
MMI high B8, for internal use only

Table of contents2
Table of contents
About this book . . . . . . . .
MMI components . . . . . .
Overview . . . . . . . . . . . . . . . . . . . . .
Controls at a glance . . . . . . . . . . .
MMI: Multi Media Interface . . . . .
Traffic safety tips . . . . . . . . . . . . .
Tips on caring for the MMI . . . . .
Drives . . . . . . . . . . . . . . . . . . . . . . . .
Introduction . . . . . . . . . . . . . . . . .
Overview of drives . . . . . . . . . . . . .
CD/DVD mode general
information . . . . . . . . . . . . . . . . . .
Memory card general information
Jukebox . . . . . . . . . . . . . . . . . . . . . .
CD/DVD drive . . . . . . . . . . . . . . . . .
CD changer . . . . . . . . . . . . . . . . . . .
Memory card reader . . . . . . . . . . .
Audi music interface . . . . . . . . . . .
Aux-in connection . . . . . . . . . . . . .
Cell phone prep . . . . . . . . . . . . . . .
Introduction . . . . . . . . . . . . . . . . .
Starting . . . . . . . . . . . . . . . . . . . . .
MMI control panel . . . .
General operation . . . . . . . . . . . .
All MMI menus at a glance . . . . .
Switching on/off . . . . . . . . . . . . . .
Operating the system . . . . . . . . . .
MMI Display . . . . . . . . . . . . . . . . . .
Adjusting the volume . . . . . . . . . .
Adjusting the sound . . . . . . . . . . .
Setting the time . . . . . . . . . . . . . .
Restarting the MMI (Reset) . . . . .
Additional settings . . . . . . . . . . . .
Listening to the radio . . . . . . . .
Introduction . . . . . . . . . . . . . . . . .
System information . . . . . . . . . . .
Starting radio mode . . . . . . . . . . .
Activating your Satellite Radio
service . . . . . . . . . . . . . . . . . . . . . .
Selecting frequency band . . . . . .
Selecting a station from the
station list . . . . . . . . . . . . . . . . . . .
Selecting the station . . . . . . . . . .
Scanning stations . . . . . . . . . . . . .
Storing stations . . . . . . . . . . . . . .
Selecting a stored station . . . . . .
Moving stored stations . . . . . . . .
Additional settings . . . . . . . . . . . .
Playing media . . . . . . . . . . . . . . . .
Introduction . . . . . . . . . . . . . . . . .
Starting Media mode . . . . . . . . . .
Selecting source . . . . . . . . . . . . . .
Selecting a folder . . . . . . . . . . . . .
Selecting a track . . . . . . . . . . . . . .
Fast forward/rewind . . . . . . . . . .
Next/previous track or chapter .
Track information . . . . . . . . . . . . .
Repeat options . . . . . . . . . . . . . . .
Shuffle . . . . . . . . . . . . . . . . . . . . . .
DVD main menu . . . . . . . . . . . . . .
DVD full screen display . . . . . . . .
DVD parental control . . . . . . . . . .
Pausing/continuing playback . . .
Additional settings . . . . . . . . . . . .
Directory . . . . . . . . . . . . . . . . . . . . . .
Introduction . . . . . . . . . . . . . . . . . .
Opening the directory . . . . . . . . . .
Storing a new directory entry . . .
Importing directory entries . . . . .
Exporting address cards . . . . . . . .
Using a directory entry . . . . . . . . .
Editing a directory entry . . . . . . . .
Managing profiles . . . . . . . . . . . . .
Additional settings . . . . . . . . . . . .
Calling . . . . . . . . . . . . . . . . . . . . . . . .
Introduction . . . . . . . . . . . . . . . . . .
Starting Telephone mode . . . . . . .
Dialing a telephone number . . . . .
Answering/ignoring a call . . . . . .
Ending a call . . . . . . . . . . . . . . . . . .
Storing a phone number in the
directory . . . . . . . . . . . . . . . . . . . . .
Dialing stored phone numbers . .
Deleting local call lists . . . . . . . . .
Bluetooth settings . . . . . . . . . . . . .
Additional settings . . . . . . . . . . . .
Navigating . . . . . . . . . . . . . . . . . . . .
Introduction . . . . . . . . . . . . . . . . . .
Starting Navigation mode . . . . . .
Entering a destination . . . . . . . . .
Stopping route guidance . . . . . . .
Display . . . . . . . . . . . . . . . . . . . . . . .
Storing a destination . . . . . . . . . . .
Loading a destination . . . . . . . . . .
Additional settings . . . . . . . . . . . .
Calling up traffic information .
Introduction . . . . . . . . . . . . . . . . . .
Calling up TMC traffic reports . . .
4
6
7
7
7
7
8
9
9
9
11
12
12
14
14
16
17
21
22
22
22
26
28
28
28
29
29
33
34
36
37
38
40
40
40
41
41
42
43
43
44
45
45
46
46
48
48
48
48
49
49
50
50
51
51
52
52
53
53
54
55
57
57
57
57
58
60
61
63
66
68
69
69
69
70
72
72
73
74
74
75
75
78
78
79
79
85
86
87
89
90
95
95
95
MMI high B8, for internal use only

Table of contents 3
MMI components MMI control panel Multifunction steering wheel Voice recognition system
Multifunction steering
wheel . . . . . . . . . . . . . . . . . . . . . .
General operation . . . . . . . . . . . . .
Introduction . . . . . . . . . . . . . . . . . .
Adjusting the volume . . . . . . . . . .
Listening to the radio . . . . . . . . . .
Playing media . . . . . . . . . . . . . . . . .
Calling . . . . . . . . . . . . . . . . . . . . . . .
Navigating . . . . . . . . . . . . . . . . . . .
Name tag . . . . . . . . . . . . . . . . . . . .
Voice recognition
system . . . . . . . . . . . . . . . . . . . . .
Voice recognition system . . . . .
Introduction . . . . . . . . . . . . . . . . . .
General operation . . . . . . . . . . . . .
Calling . . . . . . . . . . . . . . . . . . . . . . .
Using addresses . . . . . . . . . . . . . . .
Navigating . . . . . . . . . . . . . . . . . . .
Alphabetical index . . . . .
98
98
98
99
99
100
102
105
105
106
107
107
108
110
111
112
116
MMI high B8, for internal use only
About this book4
About this book
This book contains important information, tips, suggestions and
warnings for using your vehicle.
Keep this book in your vehicle at all times. This is especially important
if you loan your vehicle to others or sell it.
This book describes the equipment range specified for this model at
the time of the editorial deadline. Individual items of equipment may
not yet be available at the time of printing or may only be offered in
certain countries.
Some sections in this book do not apply to all vehicles. When this is
the case, the beginning of the section indicates the validity, for
example “Applies to vehicles: with telephone”. Optional equipment is
also identified with an asterisk “*”.
The illustrations are designed as schematic images. Some of the
details on your vehicle may look slightly different than illustrated.
There is a Table of Contents at the beginning of this book that lists
all of the topics covered in this book in the order that they appear.
There is also an alphabetically arranged Index at the end of this book.
All directions such as “left”, “right”, “front” and “rear” are based on
the vehicle's direction of travel.
* Optional equipment.
The section continues on the next page.
Marks the end of a section.
®Registered trademarks are identified with ®. The absence of this
symbol does not warrant unrestricted use of a term.
⇒ Cross reference to a “WARNING” within a section. If a page
number is indicated, the WARNING is located outside of the section.
WARNING
Text with this symbol contains information about safety and how
to reduce the risk of serious personal injury or death.
Note
Text with this symbol contains information about avoiding damage to
your vehicle.
For the sake of the environment
Text with this symbol contains information on protecting the envi-
ronment.
Tips
Text with this symbol contains additional useful information.
MMI high B8, for internal use only

About this book 5
MMI components MMI control panel Multifunction steering wheel Voice recognition system
MMI high B8, for internal use only
Overview6
Fig. 1 MMI controls
MMI high B8, for internal use only
Overview 7
MMI components MMI control panel Multifunction steering wheel Voice recognition system
Overview
Controls at a glance
The various MMI controls are located centrally in the
cockpit and are easy to reach.
Multifunction steering wheel . . . . . . . . . . . . . . . . . . . . .
Driver information system . . . . . . . . . . . . . . . . . . . . . . .
MMI Display . . . . . . . . . . . . . . . . . . . . . . . . . . . . . . . . . . .
MMI drives . . . . . . . . . . . . . . . . . . . . . . . . . . . . . . . . . . . .
On/Off knob . . . . . . . . . . . . . . . . . . . . . . . . . . . . . . . . . . .
MMI control panel . . . . . . . . . . . . . . . . . . . . . . . . . . . . . .
Tips
•Please note that this manual only describes MMI components.
You can find additional information on operating your vehicle in your
vehicle Owner's Manual.
•On vehicles with right-hand drive steering*, the layout of the
controls differs somewhat from what is shown here ⇒page 6, fig. 1.
The symbols for the controls are the same.
MMI: Multi Media Interface
The Audi Multi Media Interface, or MMI for short,
combines various communication and entertainment
systems in your Audi.
Through the MMI, you can listen to the radio and CDs and connect
portable audio devices*. The MMI also has two memory card readers
and an internal hard drive where you can store your favorite music.
The navigation system can guide you to your destination using the
shortest route, or you can add up to three stopovers. Or you can
follow your own tour plan with up to nine intermediate destinations.
Information about traffic conditions is taken into account during
route guidance. You can also use many of the functions on your cell
phone. The MMI also combines many driver assistance systems in
your vehicle.
There are several ways you can access the wide range of MMI func-
tions in your vehicle. You can access all of the functions through the
MMI control panel with its intuitive controls. You can also comfort-
ably access the MMI functions that you use most frequently through
the multifunction steering wheel or voice recognition system.
Traffic safety tips
Audi recommends only performing important functions such as
entering a navigation destination when the vehicle is stationary.
Always remember to stop using the MMI if necessary to ensure your
safety and the safety of other drivers.
WARNING
•Driving requires your complete and undivided attention. As the
driver, you have complete responsibility for safety in traffic. Only
use the MMI system when traffic conditions permit and always in
a way that allows to maintain complete control over your vehicle.
•Adjust the volume of the audio system so signals from outside
the vehicle such as police and fire sirens can be heard easily at all
times.
•Obey all applicable laws regarding use of telephones in
vehicles.
A
198
A
298
A
329
A
49
A
528
A
629
MMI high B8, for internal use only

Overview8
Tips on caring for the MMI
The Cleaning and Protection chapter in your vehicle owner's manual
provides instructions on caring for and cleaning the MMI
components.
MMI high B8, for internal use only
Drives 9
MMI components MMI control panel Multifunction steering wheel Voice recognition system
Drives
Introduction
The MMI is equipped with a CD/DVD drive, a CD changer*, two
memory card readers and a Jukebox. You can also connect a
portable audio device (such as an iPod or USB storage device)
to the Audi music interface* and operate it through the MMI
control panel.
Overview of drives
Eject button
CD/DVD slot
button
Memory card reader
The MMI drives are located in the center console and are started and
operated through the MMI ⇒page 48. Opening the card reader cover
with the button ⇒fig. 2 provides access to both memory
card readers.
The CD/DVD drive, Jukebox, memory card reader and USB storage
device connection* support the following audio file properties:
Fig. 2 MMI drives
A
1
A
2
A
3OPEN
A
4
OPEN
A
3
MP3 Files WMA files AAC files
Format MPEG-1 Layer 3
MPEG-2 Layer 3
Version 7, 8 and 9 MPEG-4
Profile LC - Low Com-
plexity
File
extension
.mp3 .wma .m4a
File
system
Memory card and USB storage device: FAT or FAT32
method, only one partition
CD/DVD drive: Joliet (CDs single session and multises-
sion; DVDs only single session)
Standard ISO 9660-Level 1 and 2
Bit rates 32 to 320 kbits/s and variable bit rates in sampling fre-
quencies from 8 to 48 kHz
Playlist
format
M3U and PLS
MMI high B8, for internal use only

Drives10
WARNING
The card reader must always be closed while driving for safety
reasons.
Tips
•The Jukebox does not support playlists.
•The more files/folders/playlists are on a medium, the longer it
will take to load the audio files. Audi recommends using storage
mediums that only contain audio files.
•To decrease the time it takes to load audio files, create subfolders
(for example according to artist or album).
•To access audio files as quickly as possible, Audi recommends
using SD cards that are class 4 or higher.
•For compressing MP3 files, Audi recommends a bit rate of at least
160 kbit/s.
•When playing MP3 files with a variable bit rate, there may be a
discrepancy between the play time displayed and real time.
•The MMI drives do not support files protected by DRM.
•The functionality of individual storage mediums may be limited
due to the variety of blank CDs/DVDs available and the various capac-
ities.
•Audio CDs or video DVDs with copy protection or CDs/DVDs that do
not conform to the standard may not play or playback may be limited.
CDs that conform to the standard have the logo “Compact Disc Digital
Audio” on the CD.
•Multisession CDs may not play or playback may be limited. Audi
recommends finalizing the recording process when creating multi-
session CDs.
•Specific characters (such a those in ID3 tag information) display
differently depending on the MMI system language and cannot
always be guaranteed.
•Never store important data on the memory cards, Jukebox,
CDs/DVDs or portable audio devices. Audi is not responsible for
damaged or lost files.
•Please note that audio files are subject to copyright laws.
Number of
files
CD/DVD drive: max. 1000 files per medium and direc-
tory
Jukebox: max. 3000 files total
USB storage device and memory card: max. 4000 files
total and max. 1000 files per directory
Sup-
ported
media
Memory card reader: Memory cards with a capacity up
to 32 GB
CD/DVD drive: Audio CDs, MP3/WMA/AAC CDs with a
capacity up to 700 MB
MP3/WMA/AAC DVDs in DVD-5, -9, -10, -14 and -18
formats,
Standard DVD-V and DVD-V compatible DVD-A
Audi music interface: iPod ⇒page 19,
USB storage device ⇒page 20
Metadata ID3 tag
up to 50 charac-
ters
WMA tag
up to 50 charac-
ters
Metadata sup-
port
MP3 Files WMA files AAC files
MMI high B8, for internal use only
Drives 11
MMI components MMI control panel Multifunction steering wheel Voice recognition system
CD/DVD mode general information
This general information applies to CDs and DVDs.
Requirements for good sound quality
To ensure good, high-quality sound reproduction and to prevent
damage to the drives, please observe the following:
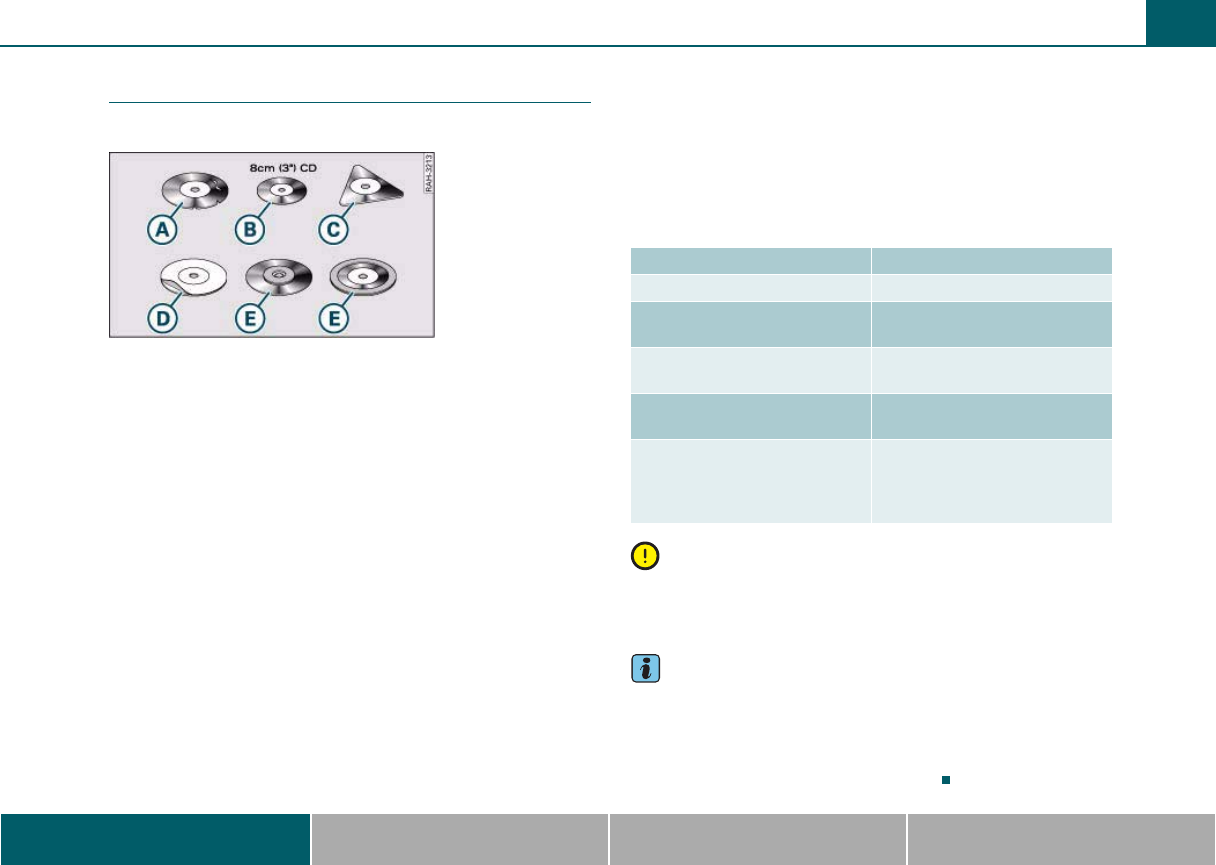
•Do not use damaged or scratched CDs/DVDs .
•Do not use single CDs/DVDs (3 inch/8 cm diameter) .
•Do not use CDs/DVDs that are not round (shape CDs/DVDs) .
•Do not add any labels .
•Do not use protective rings .
•Do not use dirty CDs/DVDs.
•Do not use protective CD/DVD file or stabilizer.
•Always keep CDs/DVDs in a protective sleeve and do not expose to
direct sunlight.
Cleaning drives, CDs and DVDs
Clean CDs/DVDs with a soft, lint-free cloth. Wipe the CD/DVD in a
straight line from the center toward the outer edge. Dirty areas can
be cleaned with a commercial CD cleaner or isopropyl alcohol. Never
use gasoline, paint thinner, or record cleaner since they can damage
CDs/DVDs.
Using laser equipment
Laser equipment is divided into safety classes 1 to 4 in accordance
with DIN IEC 76 (CO) 6/VDE 0837. The various types of audio equip-
ment installed conform to safety class 1. The laser uses so little
power or is shielded so there is no danger when it is used correctly.
Read error message
A read error message in the display may be caused by the following:
Note
Labels on the inner hub of a CD/DVD can loosen when exposed to high
temperatures and damage the drive. Do not leave CDs/DVDs that
have labels on the inner hub in the drive when they are not playing.
Tips
•CD/DVD playback may be temporarily unavailable if outside
temperatures are extremely hot or cold. A thermal protection switch
is installed to protect the CD/DVD and the laser.
•Do not remove the cover from the device. The device does not
contain any parts that the owner can repair.
Fig. 3 CDs/DVDs that
must not be used
A
A
A
B
A
C
A
D
A
E
Problem Solution
The CD/DVD is dirty. Clean the CD/DVD.
The CD/DVD is scratched. Replace the CD/DVD with one
that is not scratched.
The CD/DVD was inserted upside
down.
Insert the CD with the label side
facing up.
Condensation has formed on the
CD/DVD.
Wait until the CD/DVD is dry.
The mechanism for the drive is
malfunctioning.
Please see your authorized Audi
dealer or other qualified work-
shop to have the malfunction
repaired.
MMI high B8, for internal use only
Drives12
Memory card general information
Both SD and MMC memory cards can be used.
The memory card reader has been tested with many of the products
available on the market. However, in isolated cases it is possible that
individual memory cards may not be recognized.
Always keep the memory card in a suitable case to protect it from
dirt, dust particles and other damage.
Note
Only use one-piece memory cards. If adapter cards (memory cards
with more than one piece) are used, the card could fall out of the
adapter when driving because of vibrations. Individual pieces could
then become stuck in the drive.
Jukebox
Introduction
The MMI is equipped with a Jukebox that has 10 GB of memory avail-
able for audio files. Jukebox mode is started and operated through
the MMI ⇒page 48.
For information on the properties of supported file formats, refer to
⇒page 9.
Tips
•Please note that music files are subject to copyright law. Reset the
Jukebox to the original default settings when selling your vehicle
⇒page 38.
•When the vehicle is at an altitude above approximately 3000
meters, the MMI hard drive shuts down temporarily to protect it.
Navigation mode and the Jukebox are not available when that
happens. All of the MMI functions will be available again as usual
once you start the engine again at a location below 3000 meters.
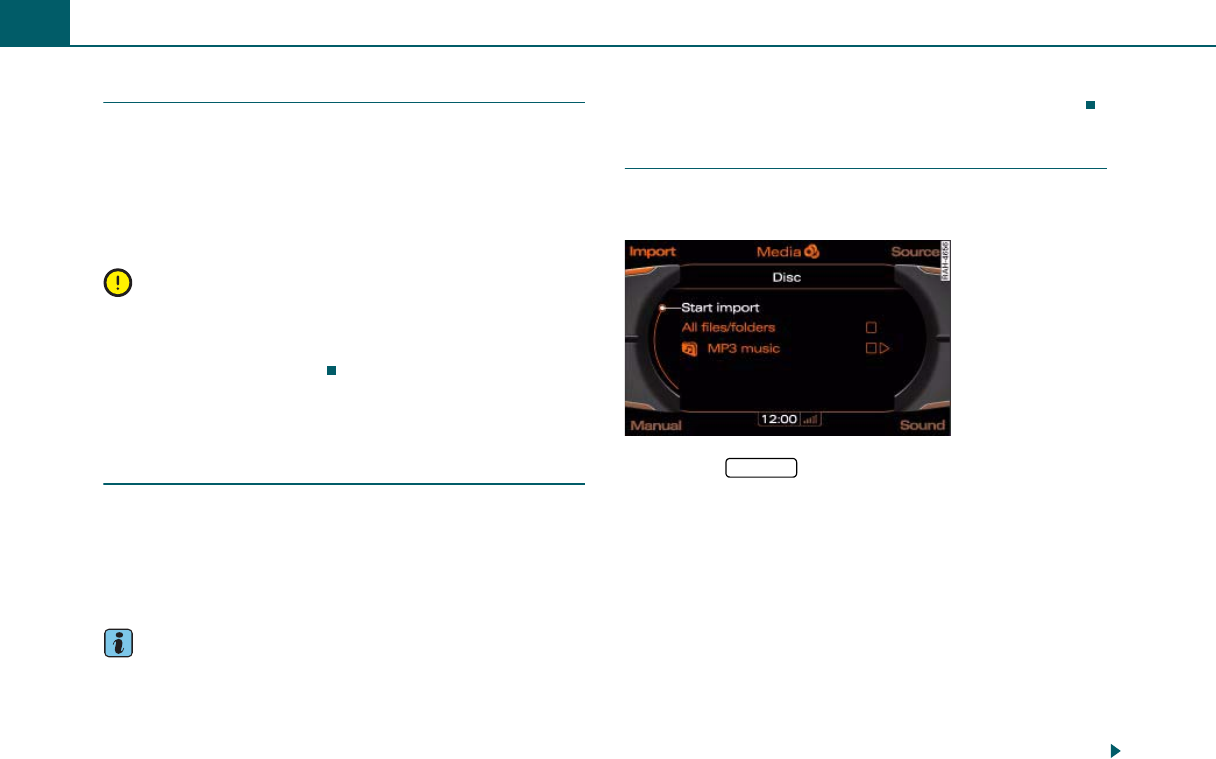
Importing files
Audio files on a CD/DVD ROM in the CD/DVD drive, a USB
storage device* or a memory card can be imported.
– Press the function button.
– Press the Import control button.
– Turn the control knob to a source (such as SD/MMC,
CD/DVD or USB) and press the knob. After checking the
selected source, the MMI display shows a file structure.
–Turn the control knob to All files/folders or select indi-
vidual files for import and press the control knob.
– To start the import, turn the control knob in the top direc-
tory level to Start import. The progress of the import is
shown in the MMI display.
You can select all of the files in a folder for import by turning the
control knob to select the folder and then press and hold the knob.
Fig. 4 Importing files
MEDIA
MMI high B8, for internal use only
Drives 13
MMI components MMI control panel Multifunction steering wheel Voice recognition system
The Jukebox automatically sorts music files during import into artist,
album, title and genre folders using the stored metadata (such as ID3
tags).
If the Jukebox does not contain any files, a message appears in the
MMI display with the option Import new tracks. Press the control
knob to enter the import menu.
You can stop the import at any time by selecting Cancel with the
control knob and pressing it. The import will also be cancelled if you
switch off the MMI, remove the source (such as SD/MMC, CD/DVD or
USB) or start the engine during the import. Tracks that have already
been imported remain stored in the Jukebox.
Tips
•Only import audio files when the engine is running.
•Playing and importing audio files in the CD/DVD drive at the same
time can lead to limitations in playback or importing. Audi recom-
mends playing audio files in the CD/DVD drive once the import is
completed successfully.
•Importing from a CDDA (Compact Disc Digital Audio or typical
store bought CD) Compact disc or DVD-A DVD Disc to the Jukebox is
not supported.
•Importing music files directly from an iPod to the Jukebox is not
supported.
•The Jukebox does not provide an export function due to legal
reasons.
•Files that are already present are automatically overwritten when
importing.
•Files/tracks without stored metadata are listed as unknown. Audi
recommends importing audio files with their accompanying meta-
data (such as ID3 tags).
Erasing files
Requirement: The media mode must be activated ⇒page 48
and the Jukebox must contain audio files.
– Press the function button.
–Turn the control knob to Delete jukebox and press the
knob.
–Turn the control knob to All files/folders or select indi-
vidual files or folders for import and press the control
knob.
– To erase selected files/folders, turn the control knob in
the top directory level to Start deletion and press the
knob.
–Turn the control knob to Yes and press the knob. The
progress of the deletion is shown in the MMI display.
You can select all of the files in a folder for deletion by turning the
control knob to select the folder and then press and hold the knob.
Jukebox playback stops during the deletion process and starts again
automatically once the deletion is complete.
Tips
If functionality is restricted, reset the Jukebox to the default settings
⇒page 38.
SETUP
MMI high B8, for internal use only
Drives14
CD/DVD drive
Introduction
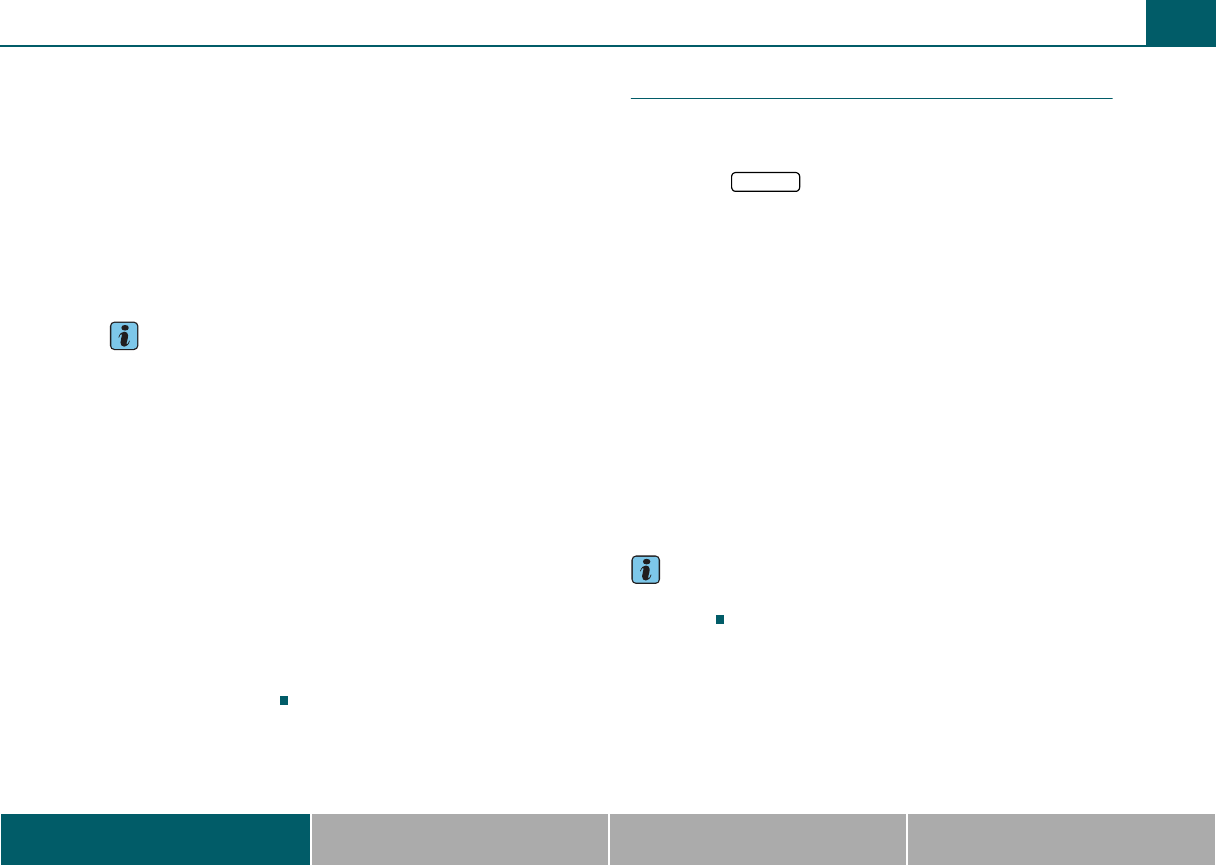
Eject button
CD/DVD slot
The CD/DVD drive is located in the center console. Audio CDs,
CDs/DVDs with audio files and video DVDs can be loaded in the
CD/DVD drive. CD/DVD mode is started and operated through the
MMI ⇒page 48.
For information on the properties of supported file formats, refer to
⇒page 9.
Loading a CD/DVD
Never force a CD/DVD into the drive. The CD/DVD is pulled
in automatically.
– Make sure there is no CD/DVD in the drive ⇒fig. 5.
– Slide the CD/DVD with the writing facing up straight into
the drive .
Ejecting a CD/DVD
– Press the eject button ⇒fig. 5. The CD/DVD is ejected.
The CD/DVD is pulled in again automatically if it is not removed from
the slot within 12 seconds of ejecting it.
CD changer
Applies to vehicles: with CD changer
Introduction
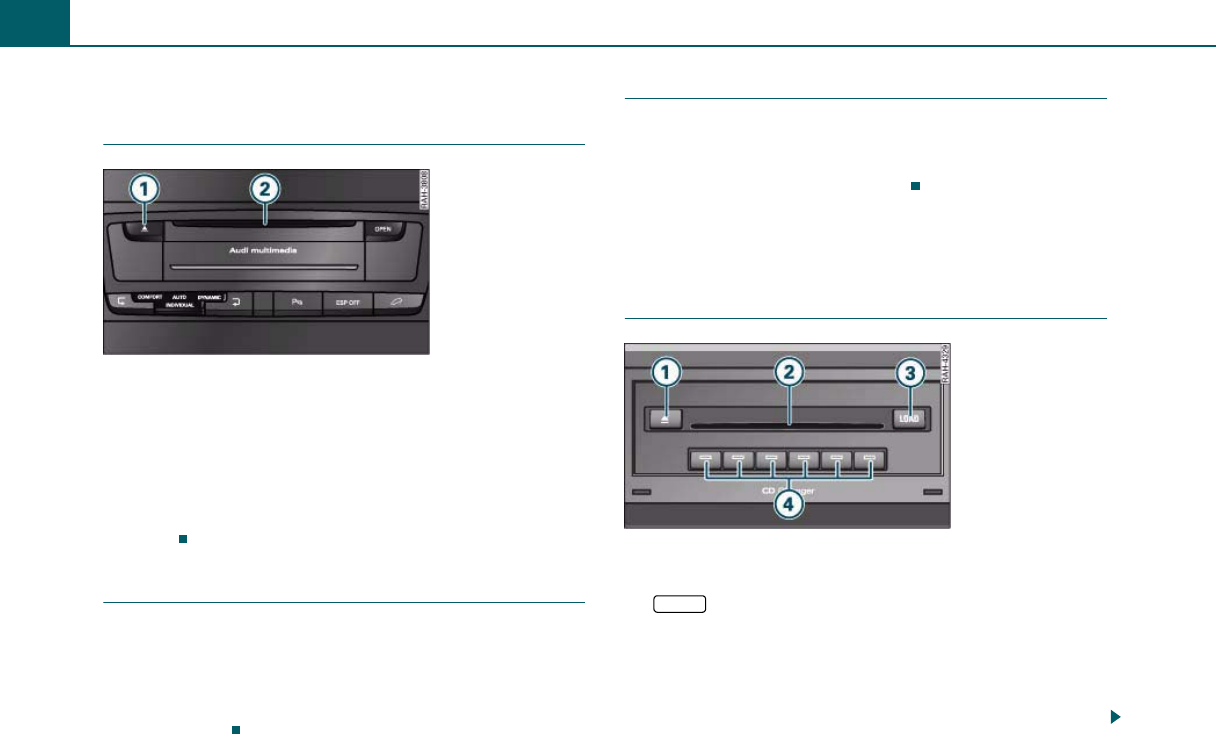
Eject button
CD slot
button
Position buttons with LEDs
The CD changer is located in the glove compartment. Audio CDs or
MP3/WMA CDs can be loaded into the CD changer. CD mode is started
and operated through the MMI ⇒page 48.
The CD changer supports the following file formats:
Fig. 5 CD/DVD drive
A
1
A
2
A
2
A
2
A
1
Fig. 6 CD changer
A
1
A
2
A
3LOAD
A
4
MMI high B8, for internal use only
Drives 15
MMI components MMI control panel Multifunction steering wheel Voice recognition system
Tips
•Please follow the instructions for handling CDs ⇒page 11.
•The CD changer does not support playlists and files with DRM
protection.
•The functionality of individual storage mediums may be limited
due to the variety of blank CDs available and the various capacities.
•Audio CDs with copy protection or CDs that do not conform to the
standard for audio CDs may not play or playback may be limited. CDs
that conform to the standard have the logo “Compact Disc Digital
Audio” on the CD.
Applies to vehicles: with CD changer
Loading a CD
Never force a CD into the drive. The CD is pulled in automati-
cally.
Loading a CD
– Press the button ⇒page 14, fig. 6. The red
LEDs at the side of the CD slot blink when the CD
changer is ready to be loaded.
– Slide the CD straight into the slot with the label facing
up. The CD is automatically loaded in the next empty posi-
tion in the CD changer. The LED in the corresponding
button illuminates.
Loading all CDs
– Press and hold the button for more than two
seconds.
– Wait until the red LEDs at the side of the CD slot begin
blinking.
– Slide all six CDs one at a time straight into the slot with
the label facing up.
Loading the CD in a specific empty position
– Press the button . The LED in the button for
an empty position will blink.
– Press one of the blinking buttons .
– Wait until the LEDs at the side of the CD slot begin
blinking.
– Slide the CD straight into the slot with the label facing
up.
MP3 Files WMA files
Format MPEG-1 Layer 3
MPEG-2 Layer 3
Version 7, 8 and 9
File
extension
.mp3 .wma
Standard ISO 9660-Level 1 and 2
File system Joliet (single session and multisession)
Number of
files/
directories
Max. 255 files per directory, max. 255 directories,
total of no more than 512 files and directories per
medium
Bit rates 32 to 320 kbits/s and variable bit rate and variable
bits in sampling frequencies from 8 to 48 kHz
Supported
media
Audio CDs and MP3/WMA CDs with a capacity of
700 MB
Metadata ID3 tag
up to 30 characters
WMA tag
up to 30 characters
LOAD
A
3
A
2
A
2
A
4
LOAD
A
3
A
2
A
2
LOAD
A
3
A
4
A
4
A
2
A
2
MMI high B8, for internal use only

Drives16
Loading a CD into a specific occupied position
– Press the button . The LEDs in the buttons
for occupied positions will illuminate.
– Press one of the illuminated buttons . The corre-
sponding CD is ejected.
– Remove the CD from the CD slot .
– Slide the CD you would like to load straight into the CD slot
with the label facing up.
If you press the button a second time while all CDs are
being loaded, the loading procedure stops.
Applies to vehicles: with CD changer
Ejecting a CD
Ejecting a CD
– Press the eject button twice to eject the current CD
⇒page 14, fig. 6.
– To eject any of the CDs, press the eject button and then
one of the illuminated buttons .
Ejecting all CDs
– Press and hold the eject button for more than two
seconds. All the CDs are ejected one at a time.
The CD is pulled back into the CD changer automatically if you do not
remove it from the CD slot within 30 seconds after ejecting it.
Memory card reader
Introduction
The MMI is equipped with two memory card readers ⇒page 9, fig. 2.
SC/MMC memory cards can be loaded in the memory card reader.
Memory card mode is started and operated through the MMI
⇒page 48.
For information on the properties of supported file formats, refer to
⇒page 9.
WARNING
The card reader must always be closed while driving for safety
reasons.
Tips
Please follow the instructions for handling memory cards
⇒page 12.
Inserting a memory card
– Press the button. The card reader cover opens.
LOAD
A
3
A
4
A
4
A
2
A
2
LOAD
A
3
A
1
A
1
A
4
A
1
Fig. 7 Inserting a
memory card
OPEN
MMI high B8, for internal use only
Drives 17
MMI components MMI control panel Multifunction steering wheel Voice recognition system
– Slide the memory card in the card reader slot with the
label side up (contact surface down) ⇒page 16, fig. 7.
The angled corner of the memory card must point toward
the right front.
– Then push the memory card into the slot until it clicks into
place.
WARNING
The card reader must always be closed while driving for safety
reasons.
Removing a memory card
– Press on the memory card briefly. The card is released
from the slot.
– Remove the memory card.
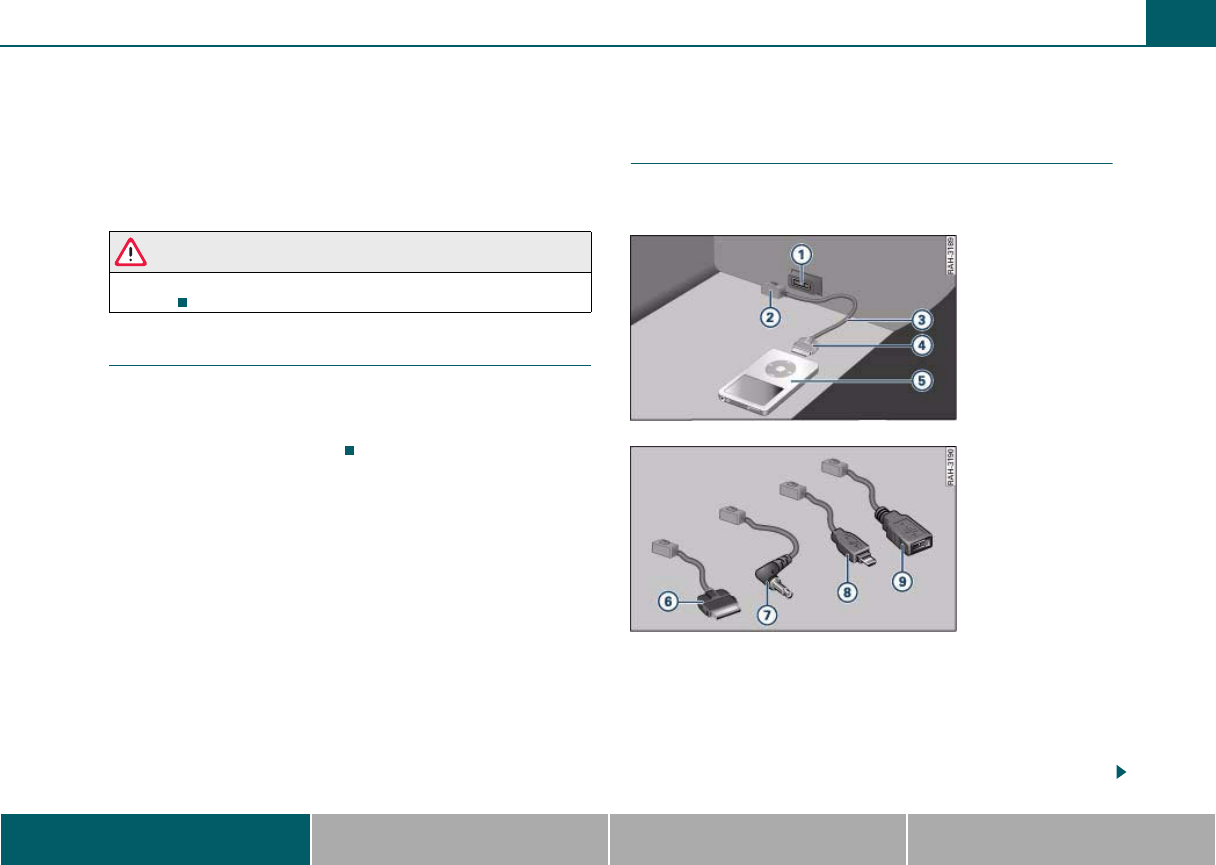
Audi music interface
Applies to vehicles: with Audi music interface
Introduction
Various portable audio devices can be connected to the
Audi music interface.
Interface on Audi music interface
Jack for connecting to the Audi music interface
Adapter cable* (such as iPod adapter cable*)
iPod jack on iPod adapter cable*
iPod
iPod adapter cable*
A
1
Fig. 8 Audi music
interface with iPod
adapter cable and iPod
Fig. 9 Audi music
interface: Adapter
cable
A
1
A
2
A
3
A
4
A
5
A
6
MMI high B8, for internal use only
Drives18
3.5 mm stereo jack adapter cable*
Mini USB adapter cable*
USB adapter cable*
The Audi music interface is located in the glove compartment. The
Audi music interface is started and operated using the
button ⇒page 48.
You can connect a portable audio device such as an MP3 player to the
Audi music interface using a special adapter cable*. You can purchase
adapter cables* from your authorized Audi dealer or an electronics
store.
Note
•Extremely high or low temperatures which can occur inside vehi-
cles can damage portable audio devices or affect their performance.
Never leave a portable audio device in the vehicle in extremely high or
low temperatures.
•Handle the adapter cable carefully. Do not allow it to be pinched.
Tips
For up-to-date information on the Audi music interface, visit
www.audiusa.com/mp3.
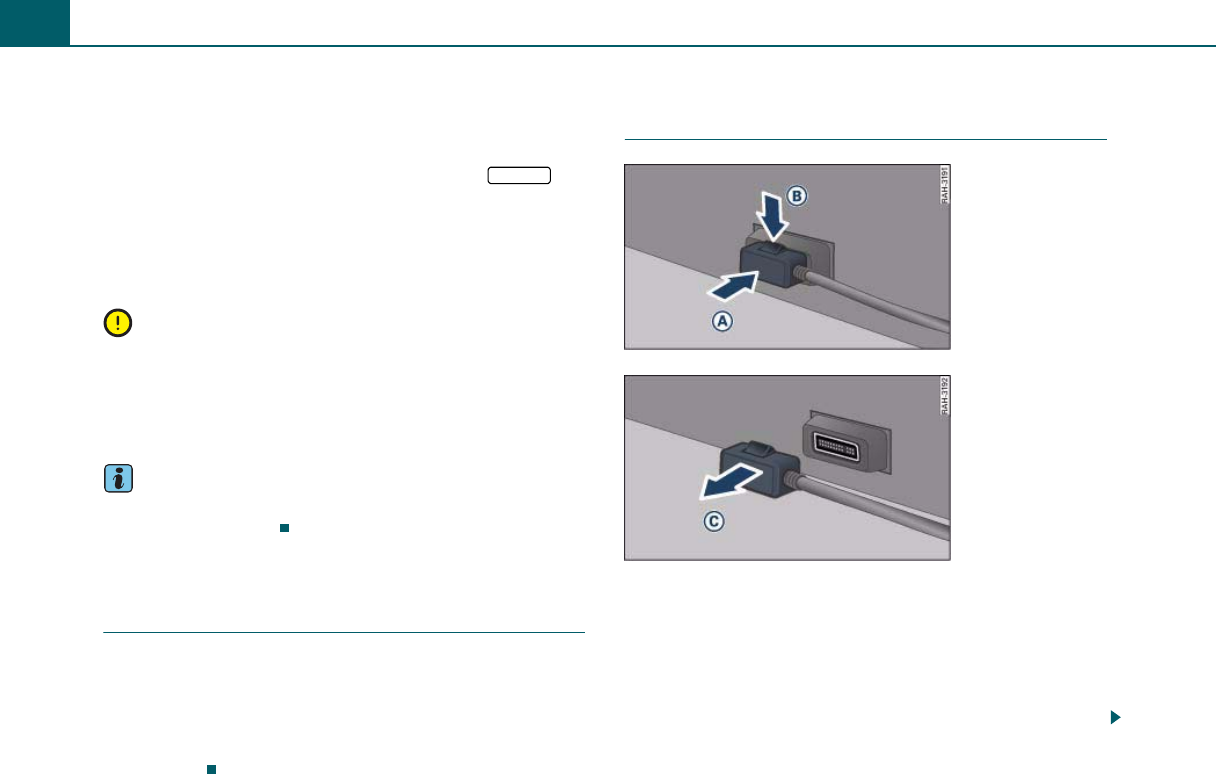
Applies to vehicles: with Audi music interface and adapter cable
Connecting the adapter cable to the Audi
music interface
– Open the glove compartment.
– Connect the adapter cable to the Audi music interface
⇒page 17, fig. 8.
– Then connect the portable audio device to the Audi music
interface.
Applies to vehicles: with Audi music interface and adapter cable
Disconnecting the adapter cable from the
Audi music interface
Requirement: The glove compartment must be open.
– Press the jack ⇒fig. 10 into the Audi music interface*
while pressing the release catch on the jack down. The
jack is released.
– Hold the release catch down while pulling the jack out of
the Audi music interface ⇒fig. 11.
A
7
A
8
A
9
MEDIA
Fig. 10 Adapter cable:
releasing the jack on
the Audi music inter-
face
Fig. 11 Adapter cable:
removing the released
jack from the Audi
music interface
A
A
A
B
A
C
MMI high B8, for internal use only
Drives 19
MMI components MMI control panel Multifunction steering wheel Voice recognition system
Note
Remove the connector from the Audi music interface carefully so it is
not damaged.
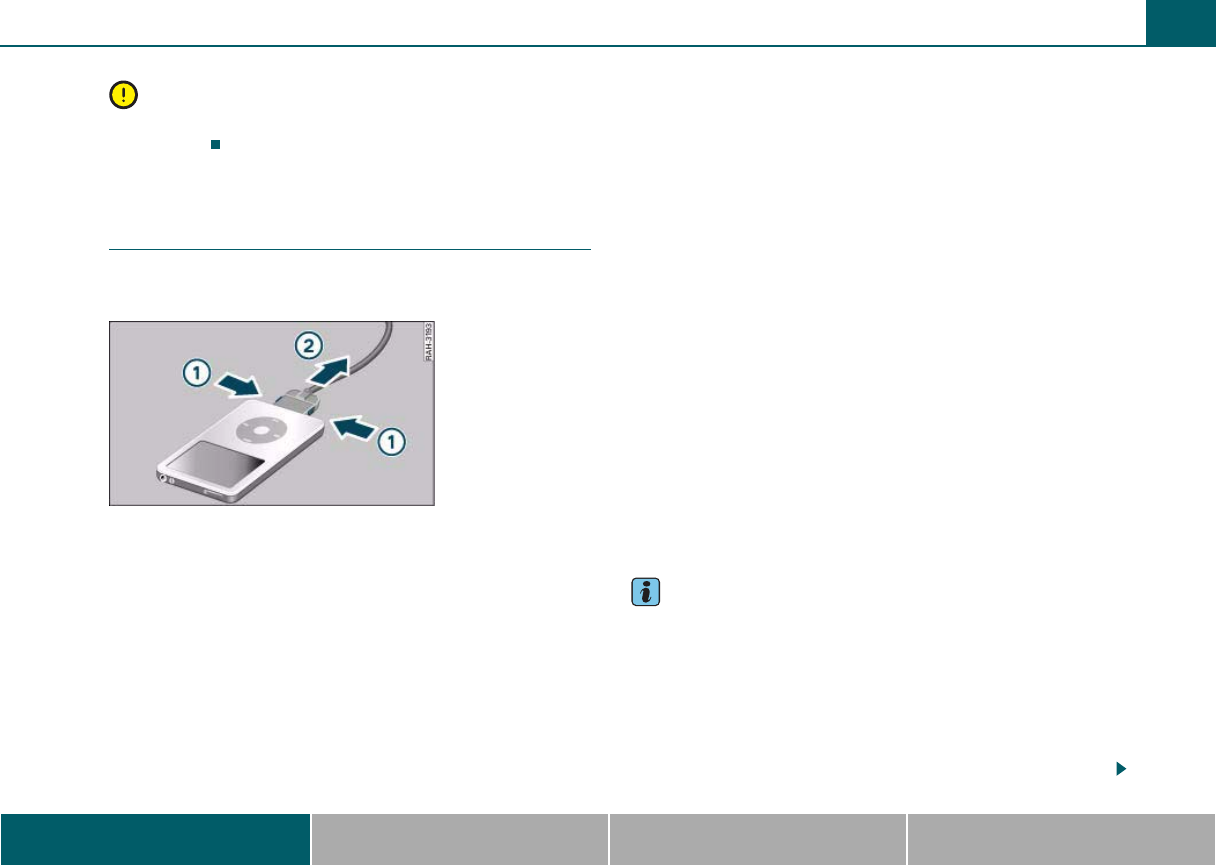
Applies to vehicles: with Audi music interface and iPod adapter cable
Connecting an iPod using the iPod adapter
cable
The iPod is connected to the Audi music interface with the
iPod adapter cable.
Connecting the iPod jack
– Connect the iPod adapter cable* to the iPod.
Disconnecting the iPod jack
– Press the buttons to release the catch ⇒fig. 12.
– Carefully pull the jack out of the iPod .
When the vehicle ignition is on, the iPod battery charges through the
iPod adapter cable* once the iPod is connected to the Audi music
interface.
The following iPods can be connected to the iPod adapter cable*:
•iPod mini - (version 1.3.0 and higher)
•iPod nano 1G, 2G, 3G and 4G
•iPod 4G - fourth generation (version 1.2.1 and higher)
•iPod 5G - fifth generation Video
•iPod 6G - sixth generation classic
•iPod touch
•iPhone
Other iPod versions (such as the iPod shuffle) cannot be connected
with the iPod adapter cable*. These can be connected as portable
audio devices with the optional 3.5 mm stereo jack adapter cable*
⇒page 20.
Connect the adapter cable to the Audi music interface first and then
connect the portable audio device to the Audi music interface.
The MMI does not support the following iPod functions:
•Rating music tracks
•Skipping to a certain place in a track
•Adding tracks to the “On-the-go” playlist
•Displaying the “Compilations” folder. Also, tracks marked with
“Part of a Compilation” are not entered into the artist list if the
compilation was activated in the iPod.
•Marking viewed/new Podcasts
Tips
•Only use the adapter cable with the number 4F0 051 510 K to
connect an iPod.
•Problems with the iPod can affect operation of the MMI. Reset
your iPod if this is the case (refer to the iPod instruction manual).
•For additional information on operating the iPod through the
MMI, refer to ⇒page 48.
•Refer to the iPod instruction manual for important information on
operating your iPod.
Fig. 12 Disconnecting
the iPod jack from the
iPod
A
1
A
2
MMI high B8, for internal use only

Drives20
•Audi recommends updating the iPod software to the latest
version.
Applies to vehicles: with Audi music interface and USB/Mini USB adapter cable
Connecting a portable audio device with
the USB/Mini USB adapter cable
You can connect various USB storage devices to the Audi
music interface with a USB/Mini USB adapter cable.
The Audi music interface supports USB storage devices from “USB
Device Subclasses 1 and 6”. The manufacturer of the storage device
can provide information about its “USB Device Subclass”.
The following USB storage devices are supported:
•USB sticks
•USB MP3 players that do not require any special driver software
•External USB flash memory
•External USB hard disks (HDD) - 1", 1.8", 2.5" - drives with an oper-
ating/continuous current of 500 mA maximum
For information on the properties of supported file formats, refer to
⇒page 9.
For instruction on operating the USB storage device through the
MMI, refer to ⇒page 48.
Tips
•MTP players and USB hubs are not supported.
•Do not use USB extension cables or adapters. They may affect the
functionality.
•Functionality is not guaranteed for portable audio devices that do
not meet the USB 2.0 specification.
•The USB storage device connection was tested with a variety of
products on the market. However, it is possible that some memory
cards may not be recognized.
•An iPod cannot be connected to the Audi music interface with a
USB adapter cable*. An iPod adapter cable* ⇒page 17 must be
used.
Applies to vehicles: with Audi music interface and 3.5 mm stereo jack adapter cable
Connecting a portable audio device with
the 3.5 mm stereo jack adapter cable
You can connect portable audio devices (such as MP3
players) to the Audi music interface with the 3.5 mm
stereo jack adapter cable.
– Insert the 3.5 mm stereo jack in the headphone socket on
the portable audio device. Audio playback takes place
through the vehicle sound system.
If the external audio input or Audi music interface is already selected
as the Source ⇒page 48, fig. 45, you may hear static when
connecting or disconnecting the 3.5 mm stereo jack or the audio
device connected to the stereo jack. To avoid this static, either mute
the portable audio device ⇒page 33 or switch to another audio
source (such as radio ⇒page 41 or CD) before connecting or discon-
necting the device.
Tips
We recommend adjusting the volume of the portable audio device to
approximately 70 percent of the maximum output. The volume can
be adjusted (for example at the radio volume) ⇒page 55.
MMI high B8, for internal use only
Drives 21
MMI components MMI control panel Multifunction steering wheel Voice recognition system
Aux-in connection
Applies to vehicles: with Aux-in connection
Introduction
A portable audio device is connected to the Aux-in
connection with a 3.5 mm stereo jack.
The Aux-in connector is located in the center armrest. It is compatible
with portable audio devices with a 3.5 mm stereo jack. Correct func-
tion of all portable audio devices cannot be guaranteed.
Note
Extremely high or low temperatures which can occur inside vehicles
can damage portable audio devices or affect their performance.
Never leave a portable audio device in the vehicle in extremely high or
low temperatures.
Tips
For information on operating the audio device, see the manufac-
turer's instructions.
Applies to vehicles: with Aux-in connection
Connecting or removing an audio device
Requirement: The MMI must be switched on ⇒page 28.
– Connect the audio device with a 3.5 mm stereo jack* and
insert the extension cable in the Aux-in connection.
– Press the function button.
–Press the Source control button.
– Turn the knob to external audio input press it ⇒page 48.
External audio source active will appear in the MMI
display when the device is recognized successfully.
Static can occur when connecting or disconnecting the 3.5 mm stereo
jack. To avoid this static, either mute the portable audio device or
switch to another audio source (such as radio or CD) before
connecting or disconnecting the device.
You select audio files using the controls on the audio device. You can
adjust the volume using the on/off knob ⇒page 33, the input level
function ⇒page 55, the multifunction steering wheel ⇒page 99 or
directly on the audio device.
WARNING
Driving requires your complete and undivided attention. As the
driver, you have complete responsibility for safety in traffic. Never
operate a portable audio device while driving because this
increases the risk of an accident.
Tips
•We recommend adjusting the volume of the portable audio device
to approximately 70 percent of the maximum output.
•The vehicle battery discharges when the engine is stopped and the
audio device is switched on.
MEDIA
MMI high B8, for internal use only
Cell phone prep22
Cell phone prep
Applies to vehicles: with cell phone prep
Introduction
A cell phone is paired with the cell phone prep via Blue-
tooth.
The factory-installed cell phone package in the vehicle allows
you to connect particular GSM or CDMA cell phones via Blue-
tooth ⇒page 23. Calls can be made wirelessly through the
cell phone prep hands-free system. You can operate your cell
phone through the MMI control panel ⇒page 69, multifunc-
tion steering wheel ⇒page 102 or voice recognition system
⇒page 106.
WARNING
•Medical experts warn that cell phones can interfere with the
function of pacemakers. Always maintain a minimum distance of
20 centimeters between the cell phone antenna and the pace-
maker.
−Do not carry the cell phone in a pocket directly over the pace-
maker when the phone is switched on.
−Switch the cell phone off immediately if you suspect it may
be interfering with the pacemaker.
•Do not use voice recognition system ⇒page 106 in emergen-
cies because your voice may change in stressful situations. It may
take longer to dial the number or the system may not be able to
dial it at all. Dial the emergency number manually.
Note
•Obey all applicable laws regarding use of telephones in vehicles.
•Switch your cell phone off in areas where use of cell phones is
prohibited.
•Switch your cell phone off in areas at risk for an explosion. These
locations are not always clearly marked. They may include gas
stations, equipment that stores or transports fuel or chemicals, or
locations where fuel vapors (such as propane or gasoline vapor in
vehicles or buildings), chemicals or large quantities of dust particles
(such as flour or sawdust) may be present in the air. This also applies
to all other locations where you would normally switch your vehicle
off.
Tips
•The telephone functions depend on whether your cell phone is
compatible with the cell phone prep or not and if the cell phone
service provider supports these functions.
•For up-to-date information on the cell phone prep, visit
www.audiusa.com/telephone or your authorized Audi dealer.
•The cell phone prep is designed for use in GSM and CDMA
networks.
Starting
Applies to vehicles: with cell phone prep
Introduction
Bluetooth must be activated to establish a Bluetooth connection
between the cell phone prep and the cell phone. Your cell phone must
be visible to others ⇒page 75.
The cell phone must be paired one time with the cell phone prep in
the vehicle. The steps required for this procedure depend on the cell
MMI high B8, for internal use only
Cell phone prep 23
MMI components MMI control panel Multifunction steering wheel Voice recognition system
phone you are using. First, the system searches for available Blue-
tooth devices within range ⇒page 23.
Pairing Bluetooth-compatible devices
There must not be any other Bluetooth devices connected to the cell
phone prep during the pairing procedure. The cell phone that will be
paired must not be connected to any other Bluetooth device. Also
follow the instructions displayed on your cell phone.
There may be several cell phones paired with the cell phone prep, but
only one cell phone at a time can be actively connected to the cell
phone prep.
The Bluetooth connection range is limited to inside the vehicle. It also
depends on the current circumstances and on interference with other
devices.
Establishing and disconnecting the Bluetooth
connection
An operational cell phone which has been bonded to the cell phone
package is automatically connected after the ignition is switched on.
For some cell phones you have to confirm the connection.
The Bluetooth connection is disconnected after the ignition key is
removed.
Tips
For current information on pairing cell phones with the cell phone
prep, visit www.audiusa.com/telephone or your authorized Audi
dealer.
Applies to vehicles: with cell phone prep
Searching for Bluetooth-compatible
devices
There are two ways to search for Bluetooth-compatible
devices.
Requirement: The MMI Bluetooth function must be activated
⇒page 75.
Searching for cell phones
– Make sure the Bluetooth in your cell phone is activated.
Your cell phone must be visible to others.
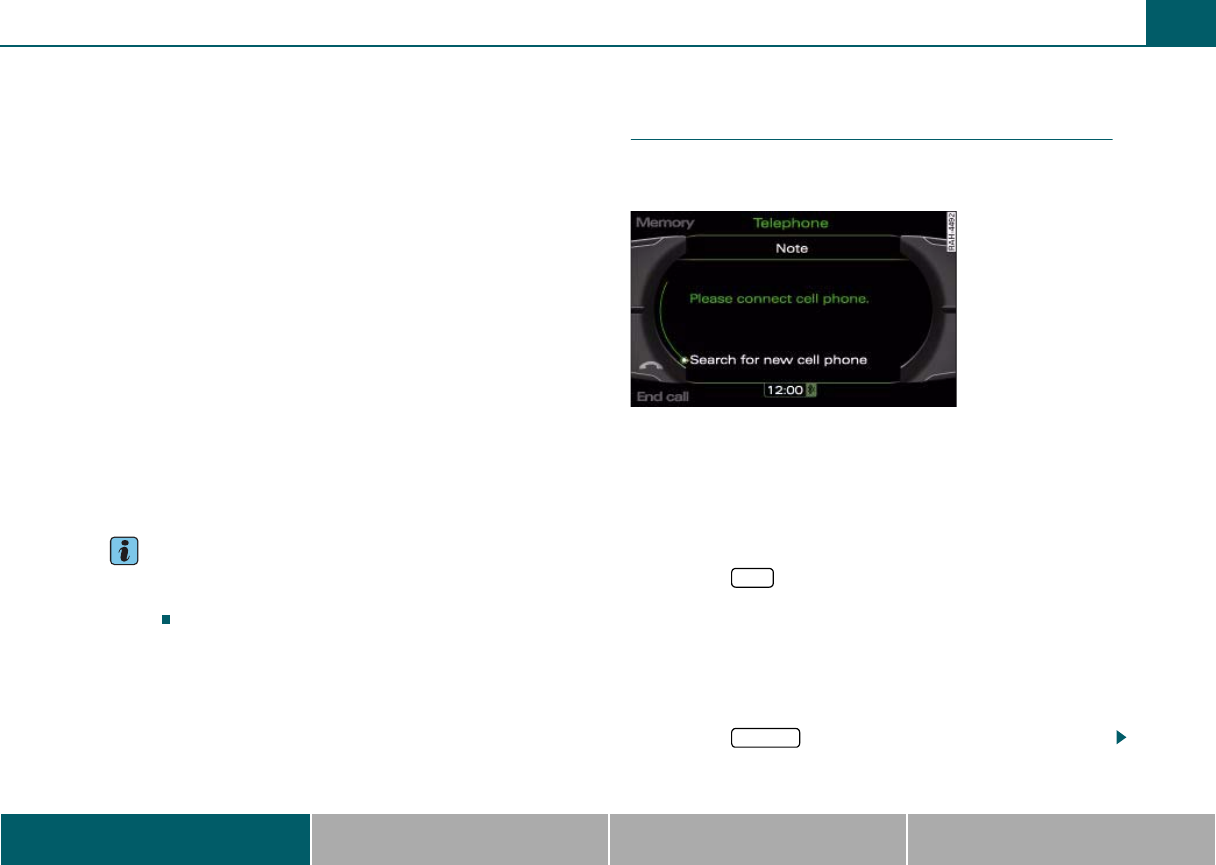
– Press the function button. The message Please
connect cell phone appears in the MMI display.
–Turn the control knob to Search for new cell phone
⇒fig. 13 and press the knob. The available Bluetooth cell
phones are shown in the MMI display.
Searching for Bluetooth devices
– Press the function button.
Fig. 13 Searching for
new cell phones
TEL
SETUP
MMI high B8, for internal use only
Cell phone prep24
–Press the Bluetooth control button. The Bluetooth menu
appears in the MMI display.
– Turn the control knob to Find Bluetooth devices and press
the knob. The available Bluetooth devices are shown in the
MMI display.
The Find Bluetooth devices function shows all of the Bluetooth
devices within range in the MMI display.
Tips
The MMI only recognizes some cell phones through the Find Blue-
tooth devices function.
Applies to vehicles: with cell phone prep
Pairing a cell phone
Bluetooth technology allows a cell phone to be connected
wirelessly to the vehicle MMI.
Requirement: An available cell phone must be shown in the
MMI display ⇒page 23.
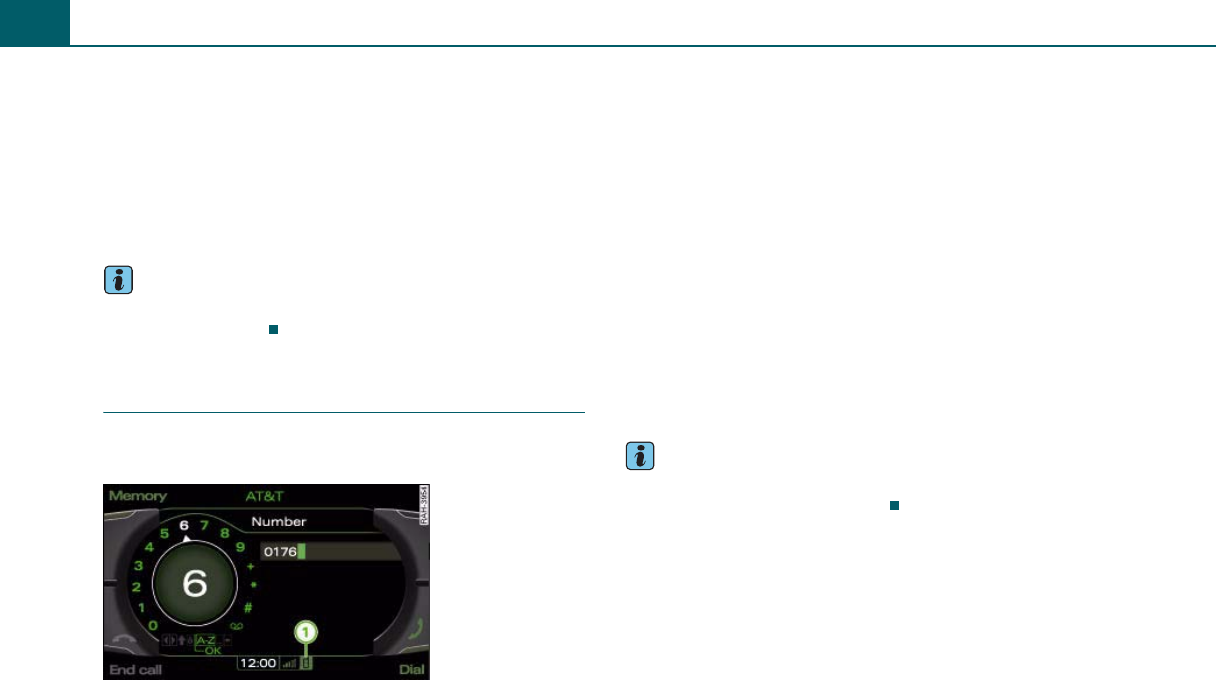
– Turn the control knob to a cell phone and press the knob.
– To pair the cell phone, turn the control knob to Handsfree
and press the knob. A 4-digit PIN is shown on the MMI
display.
– To enter the 4-digit PIN that is displayed, select Yes. Enter
the PIN in the cell phone when the vehicle is stationary.
The time allowed for entering the PIN is limited to approx-
imately 30 seconds, or
– To enter any 4- to 16-digit PIN, select No. Enter any 4- to
16-digit pin in the speller ⇒page 31. Then enter that PIN
in the cell phone when the vehicle is stationary. The time
allowed for entering the PIN is limited to approximately
30 seconds.
– Confirm the pairing on the cell phone if requested. The cell
phone symbol ⇒fig. 14 appears in the status line of
the MMI display when the pairing process is complete.
Tips
You can find additional information about connecting your cell phone
in your cell phone operator's manual.
Fig. 14 The cell phone
is paired with the cell
phone prep and
connected.
A
1
MMI high B8, for internal use only
Cell phone prep 25
MMI components MMI control panel Multifunction steering wheel Voice recognition system
Applies to vehicles: with cell phone prep
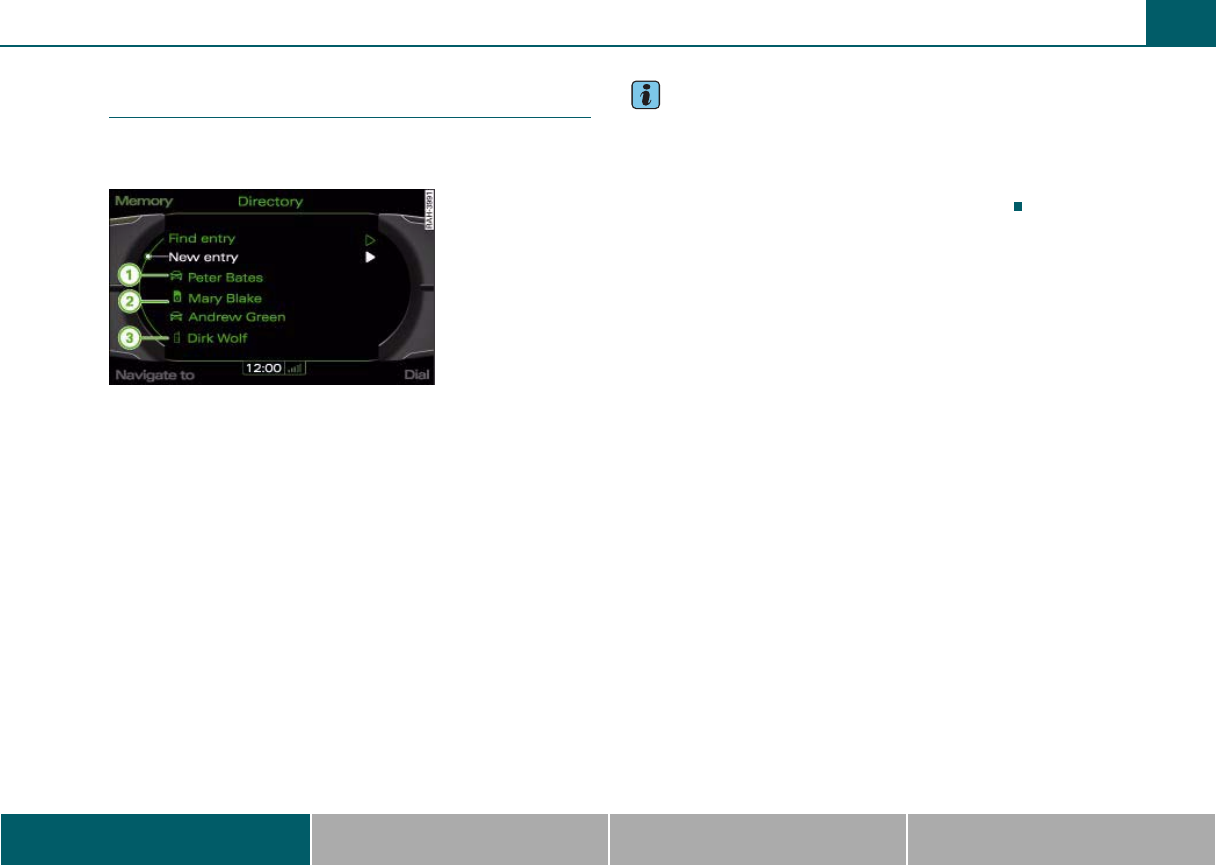
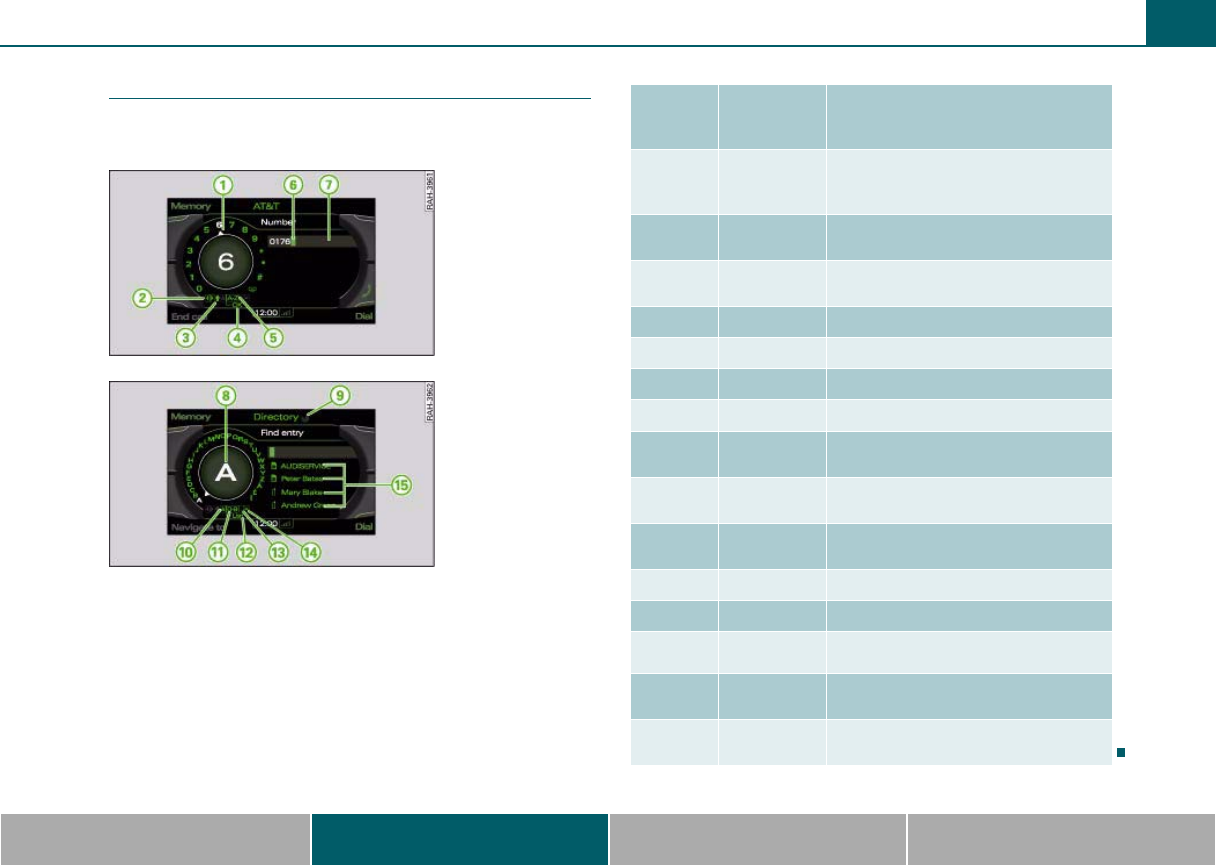
Directory entries
The cell phone entries are automatically loaded in the
MMI.
Loading directory entries
The directory entries load automatically in the MMI after the ignition
is switched on. This loading process can last several minutes and
depends on the number of entries in the directory.
Directory entries can be stored in a general profile and in up to four
personal profiles ⇒page 67.
Displaying directory entries
The directory entries are displayed in alphabetical order and identi-
fied with a symbol:
Local MMI memory
SIM card
Cell phone
Private and business entries with land line, cell phone and fax catego-
ries can be saved in the address cards.
Tips
•The directory entry display in the MMI depends on the cell phone
used.
•The directory entries from the cell phone may not be transferred
in alphabetical order. If there are too many directory entries, entries
with different first letters may be missing in the MMI.
Fig. 15 Searching for
an entry in the direc-
tory
A
1
A
2
A
3
MMI high B8, for internal use only
General operation26
Fig. 16 Overview of MMI menus
MMI high B8, for internal use only
General operation 27
Fig. 17 Overview of MMI menus
MMI high B8, for internal use only
General operation28
General operation
All MMI menus at a glance
In the menu structure ⇒page 26, fig. 16 and ⇒page 27, fig. 17 you
can find the options that can be selected for the individual main func-
tions.
Tips
The menu items shown may differ depending on your vehicle's
equipment.
Switching on/off
Vehicles without comfort key*
– To switch the MMI on, switch the ignition on. The menu
for the last main function selected is displayed. The last
selected audio/video source begins playing.
– To switch the MMI off, remove the ignition key. Your
settings are saved.
Vehicles with comfort key*
– Press the button to switch the
MMI on ⇒page 29, fig. 19.
– Press the button twice to switch
the MMI off ⇒page 29, fig. 19. Your settings are saved.
Manual operation
– Press the On/Off knob briefly to switch the MMI on
⇒fig. 18.
– To switch the MMI off, press and hold the On/Off knob
until the MMI switches off.
An MMI that has been switched off manually does not switch on again
automatically the next time the ignition is switched on.
The MMI can still be operated for approximately ten minutes after
switching the ignition off. If you do not press any function button,
control button, or the control knob on the MMI control panel within
this time, the MMI automatically switches off again.
Tips
•With the engine not running and a low battery charge, MMI
switches off automatically.
•If you only press the On/Off knob briefly, the selected audio
source is muted ⇒page 33.
Fig. 18 On/Off knob
START ENGINE STOP
START ENGINE STOP
MMI high B8, for internal use only

General operation 29
MMI components MMI control panel Multifunction steering wheel Voice recognition system
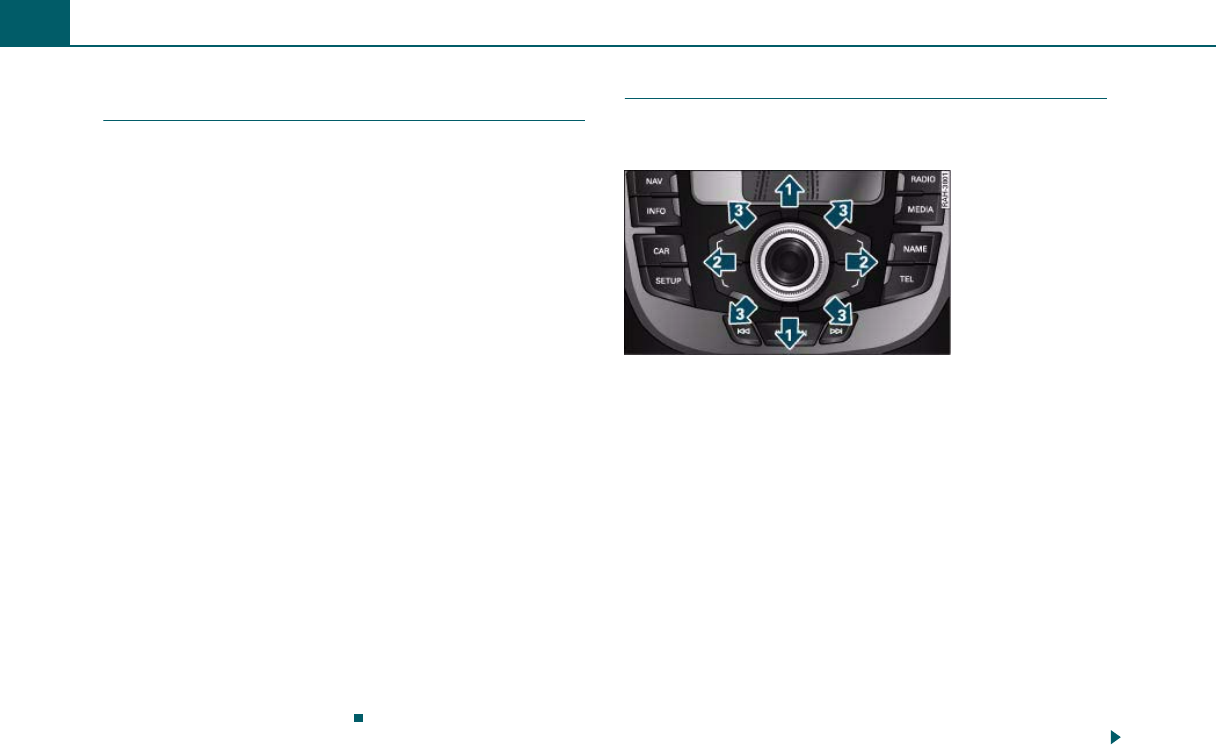
Operating the system
Press and turn the buttons on the MMI control panel to
perform the MMI functions.
Fig. 19 Buttons on the MMI control panel
Function buttons
Press a function button to start an operating mode. For example,
press the function button to start the Radio mode.
You can open additional settings for the active operating mode using
the function button.
Control knob with joystick
Turn the control knob to the left or right and press it to select a menu
item in the MMI display. You can use the joystick to move the
crosshairs in a map or to control the DVD menu ⇒page 32.
Control buttons
To access the function shown in one of the four corners of the display,
press the control button corresponding to this display corner. For
example, the upper right control button corresponds to the upper
right corner of the display ⇒fig. 19.
Return button
Press the button to cancel a selection you have not yet
confirmed or to return to the next higher menu level.
Arrow buttons
Press the or button to select the previous/next radio
station.
Press the button to select the next track on a CD or a connected
iPod. Press the button within the first ten seconds a track is
playing to return to the previous track and after ten seconds to return
to the beginning of the current track.
Press and hold the or button while in CD mode to fast
forward or rewind.
MMI Display
“Standard” menus
A
1
RADIO
SETUP
A
2
A
3
A
4
RETURN
A
5
I I
I
I
I I
Fig. 20 Navigation
Setup
MMI high B8, for internal use only
General operation30
A menu appears in the MMI display after you press a function button
⇒page 29.
Legend
Symbol/
Descrip-
tion
Explanation
Title line
Selected mode (such as Radio
⇒fig. 21)
Setup display: Setup menu for the
selected mode (for example Navigation
Setup ⇒page 29, fig. 20).
On vehicles with the cell phone prep*,
the cellular service provider is dis-
played.
TMC symbol Reception of TMC traffic reports
⇒page 95.
Arrows
pointing
up/down
Indicate there are additional menu
items (scroll forward/back).
Cursor Shows a line selected in a menu.
Selected text A menu item you have selected has a
white background.
Options box Options for the menu item selected.
Fig. 21 Radio
submenu
A
1
A
2
A
3
A
4
A
5
A
6
Arrow Points to additional options or possible
settings.
Temperature
display
Temperature selected on vehicles with
an automatic air conditioning system.
Signal
strength bar* Cell phone connection quality
Display cor-
ners
Show selectable functions.
You perform the functions using the
control buttons. The top right corner of
the display corresponds to the top right
control button.
Subtitle Tells you about a selected option (e.g.
radio station preference).
Control wheel
Is operated by turning and pressing the
control knob.
Mute symbol The active audio source is muted.
Time Set time.
Bluetooth
symbol* Active Bluetooth connection.
Legend
Symbol/
Descrip-
tion
Explanation
A
7
A
8
A
9
A
10
A
11
A
12
A
13
A
14
A
15
MMI high B8, for internal use only
General operation 31
MMI components MMI control panel Multifunction steering wheel Voice recognition system
Speller
You can enter addresses, navigation destinations and
telephone numbers with the speller.
With some functions in the directory, it is necessary to enter letters
or numbers in Telephone* or Navigation mode. The number speller
⇒fig. 22 or the letter speller ⇒fig. 23 appears in the display.
While you are making your entry, you can switch as needed from
numbers to letters or from letters to numbers by turning the control
knob 0-9 ⇒fig. 23 or A-Z ⇒fig. 22 and pressing the knob.
All of the symbols for entering letters and numbers are explained in
the table below:
Fig. 22 Number
speller: entering a tele-
phone number
Fig. 23 Letter speller:
searching for a direc-
tory entry
A
11
A
5
Legend
Symbol/
Descrip-
tion
Explanation
Selection
arrow
Puts a white background behind the
selected element and shows it enlarged
in the entry ring.
Moves the cursor forward/backward in
the entry field.
Switches from lower case to upper
case.
OK Confirms the entry.
A-Z Switches from number to letter entry.
Cursor Marks the current editing position.
Entry field Shows the current entry
Entry ring Shows the character selected with the
selection arrow enlarged.
Update sym-
bol Indicates the data is updating.
âIndicates a list with special characters
depending on the language.
0-9 Switches from letter to number entry.
LIST Shows a list of suggestions.
Inserts a space in the entry field.
Deletes the character to the left of the
white highlighted cursor.
List with sug-
gestions Lists suggestions in alphabetical order.
A
1
A
2
A
3
A
4
A
5
A
6
A
7
A
8
A
9
A
10
A
11
A
12
A
13
A
14
A
15
MMI high B8, for internal use only
General operation32
Entering letters, numbers and symbols
using the speller
For an overview of the speller, refer to ⇒page 31.
Entering numbers, letters, and symbols
–Turn the control knob with the selection arrow
⇒page 31, fig. 22 to the letter, number or symbol. Your
selection is shown enlarged in the entry ring
⇒page 31, fig. 23.
– To accept the letter, the number or the symbol, press the
control knob. Your entry appears in the entry field
⇒page 31, fig. 22.
– When you have entered all the digits, turn the control
knob to OK ⇒page 31, fig. 22 and press the knob.
Deleting numbers, letters, and symbols
– Turn the control knob with the selection arrow to
⇒page 31, fig. 23.
– To delete the last digit in the entry field, press the control
knob.
– To delete all the digits in the entry field, hold the control
knob down until no digits show in the entry field.
In some cases such as in the Navigation menu, the selection of letters
may be limited to available entries. Only letters that are part of an
available word can be selected.
Enter special characters such as the hyphen or period) with the
number speller ⇒page 31, fig. 22.
Joystick
You can move the crosshairs in a map or control the main
menu for a video DVD with the joystick.
Requirement: A map must be visible in the MMI display
⇒page 86 or a video DVD must be playing ⇒page 48.
Moving the crosshairs in a map
– To move the crosshairs in a map vertically ⇒fig. 24,
move the joystick up or down.
– To move the crosshairs in a map horizontally , move the
joystick to the right or left.
– To move the crosshairs in a map diagonally , move the
joystick up or down to the right or left.
Controlling the DVD main menu
– Press the Manual control button.
–Turn the control knob to MENU (display main menu)
⇒page 52 and press the knob. The DVD main menu is
shown in the MMI display.
A
1
A
8
A
7
A
4
A
14
Fig. 24 MMI control
panel: possible joystick
movements
A
1
A
2
A
3
MMI high B8, for internal use only
General operation 33
MMI components MMI control panel Multifunction steering wheel Voice recognition system
– Move the joystick up or down or right or left to
select a menu item.
– Press the control knob to confirm the menu selection.
DVD mode continues.
Switching the MMI display on/off
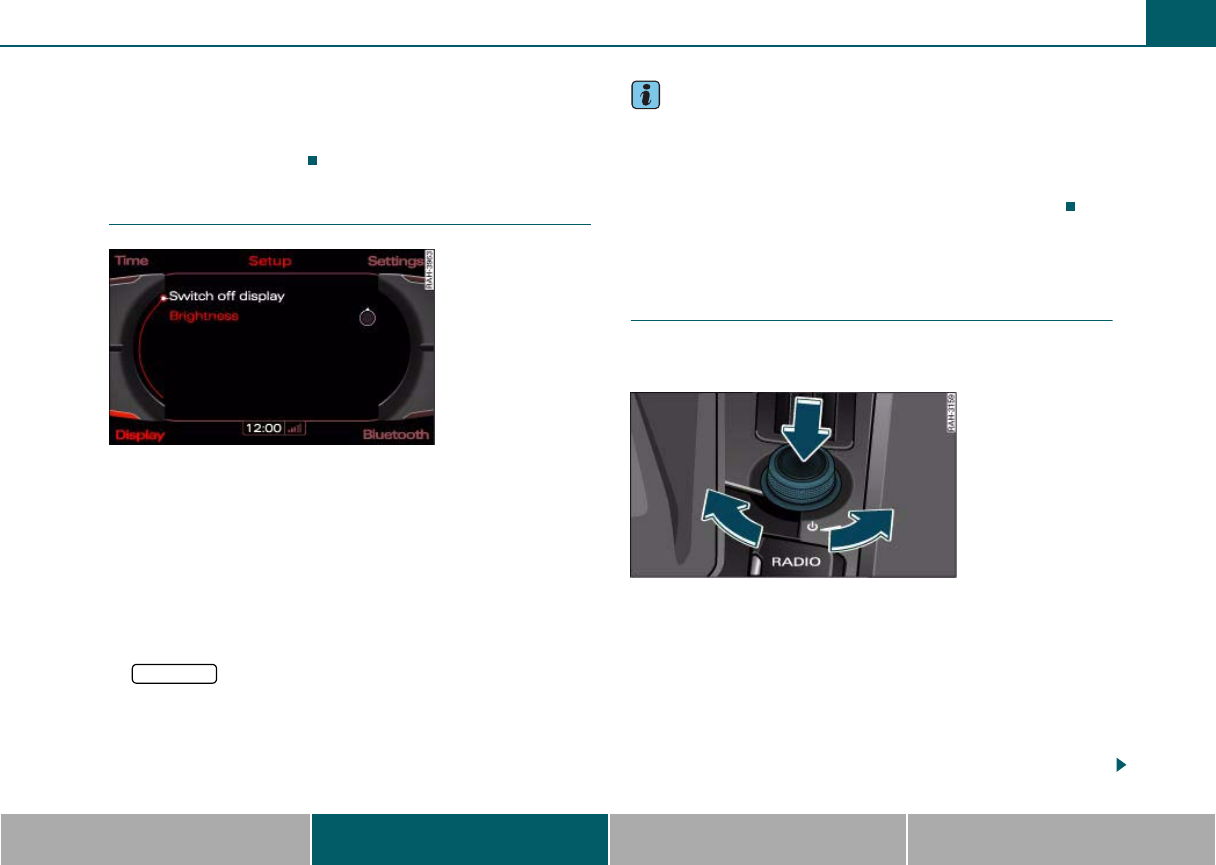
Switching the MMI display off
–Press the Display control button while in a setup menu.
–Turn the control knob to Switch off display ⇒fig. 25 and
press the control knob. The display switches off.
Switching the MMI display on
– Press or turn the control knob, or
– Press the function button, a control button or the
button.
Tips
•On vehicles with the cell phone prep*, if a call is made while the
MMI display is switched off, the display will switch on automatically
and remain on for the duration of the call.
•You can also change stations or find a selected audio/video source
with the arrow buttons when the MMI display is switched off.
Adjusting the volume
Active audio/video source
You can adjust the volume or mute the audio/video
sources using the On/Off knob.
Adjusting the volume
– Turn the On/Off knob to the right or left ⇒fig. 26. The
adjusted volume is stored.
Muting
– Press the On/Off knob briefly. A speaker symbol with a line
through it appears in the MMI display. An active
audio/video source is stopped.
A
1
A
2
Fig. 25 Switching the
MMI display off
RETURN
Fig. 26 Adjusting the
volume and muting
the audio/video
sources
MMI high B8, for internal use only
General operation34
– To cancel the muting, press or turn the On/Off knob
briefly.
Volumes that are too high or too low are automatically set to a prede-
termined level when the MMI is switched on.
Tips
You can also adjust the volume using the right thumb wheel on the
multifunction steering wheel without taking your hands off the
⇒page 99.
Additional audio sources
The volume of the navigation announcements, voice
recognition system and telephone* can be adjusted indi-
vidually.
–Press the Sound control button while in the Media or
Radio menu ⇒fig. 27.
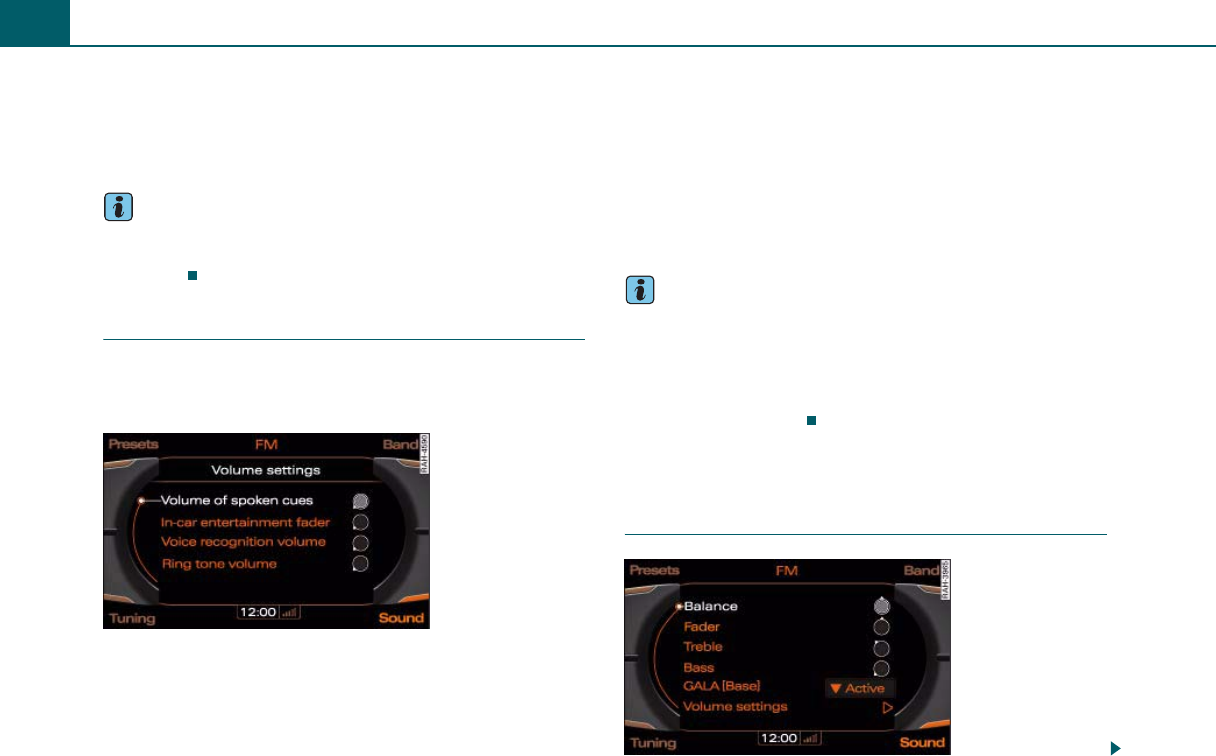
– Turn the control knob to Volume settings.
– Press the control knob. The Volume settings menu
appears in the MMI display ⇒fig. 27.
– Turn the control knob to a menu item such as Voice
recognition volume and press the knob.
– Turn the control knob to the left or right to adjust the
volume as desired.
– Press the control knob to confirm the setting.
The system automatically plays a test announcement while you are
adjusting the volume.
Tips
•With the In-car entertainment fader, you can lower the volume of
the active audio/video source during navigation announcements or
when the Audi parking system* is active ⇒page 39.
•On vehicles with a VDA-compatible phone upgrade, you will
achieve the best sound quality if you adjust the input volume on the
device to a medium level.
Adjusting the sound
Basic settings
Fig. 27 Volume
settings
Fig. 28 Selecting
balance
MMI high B8, for internal use only
General operation 35
MMI components MMI control panel Multifunction steering wheel Voice recognition system
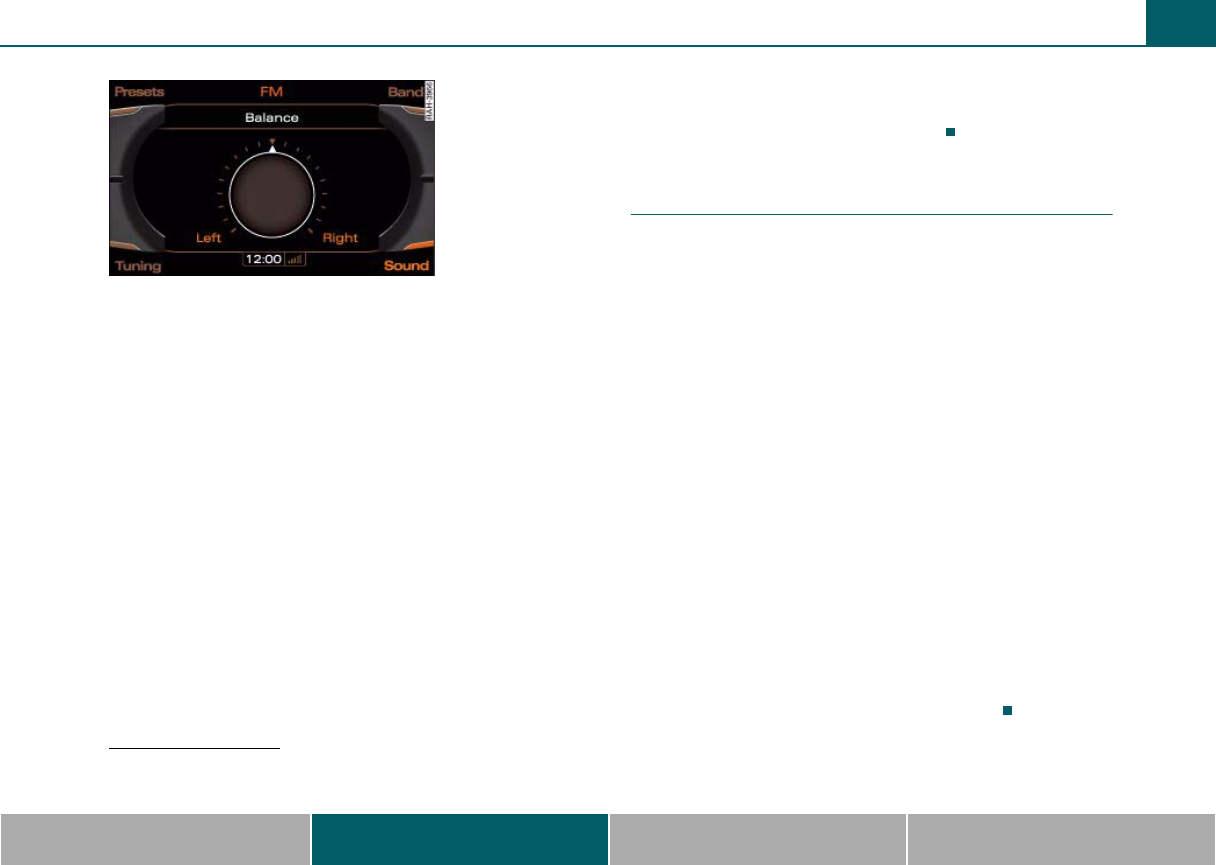
–Press the Sound control button while in the Media or
Radio menu ⇒page 34, fig. 28.
– Turn the control knob to a menu item such as Balance
⇒page 34, fig. 28 and press the knob. The selected menu
item is shown enlarged in the MMI display ⇒fig. 29.
– Turn the control knob to the right or the left to adjust the
sound characteristics.
– Press the control knob to confirm the setting.
The following sound adjustments are possible:
•Balance (right/left sound ratio)
•Fader (front/rear sound ratio)
•Treble
•Bass
•GALA (speed compensated volume)
•Subwoofer* (additional bass amplification)1)
•DSP* ⇒page 35
•DSP Bang & Olufsen* ⇒page 36
•Volume settings (for additional audio sources) ⇒page 34
Treble and bass settings apply to the active mode. The balance and
fader settings are independent of the mode.
Applies to vehicles: with DSP
Digital Signal Processing (DSP)
With Sound Focus, the sound can be optimized for the
listener. GALA adjusts the volume and the sound charac-
teristics to the vehicle speed.
Displaying the DSP menu
– Press the Sound control button while in the Media or
Radio menu.
– Turn the control knob to DSP and press the knob. The DSP
menu appears in the MMI display.
Sound Focus
– Turn the control knob to Sound Focus and press the knob.
– To achieve a symmetrical sound distribution, turn the
control knob to All and press the knob.
– To achieve a driver-oriented sound distribution, turn the
control knob to Driver and press the knob.
GALA
–Turn the control knob to GALA and press the knob.
–Turn the control knob to Active or Inactive.
– Press the control knob to save your setting.
1) The subwoofer* cannot be adjusted on vehicles with the Bang & Olufsen*
sound system.
Fig. 29 Adjusting
balance
MMI high B8, for internal use only
General operation36
Applies to vehicles: with DSP Bang & Olufsen - Surround Sound
DSP Bang & Olufsen®
With Sound Focus, the sound can be optimized for the
listener. Surround Level regulates the volume of the
surround effect.
Displaying the DSP Bang & Olufsen menu
–Press the Sound control button while in the Media or
Radio menu.
– Turn the control knob to DSP Bang & Olufsen and press
the knob. The DSP Bang & Olufsen menu appears in the
MMI display.
Sound Focus
– Turn the control knob to Sound Focus and press the knob.
– To adjust the sound so it is the same for the entire vehicle
interior, turn the control knob to All and press the knob.
– To achieve a driver-oriented sound distribution, turn the
control knob to Driver and press the knob.
– To adjust the sound so it is oriented to the front or rear of
the vehicle, turn the control knob to Front/Rear and press
the knob.
Surround Level
– Turn the control knob to Surround level and press the
knob.
– To change the surround effect, turn the control knob to
the right or left and press the knob.
GALA Plus
– Turn the control knob to GALA Plus and press the knob.
–Turn the control knob to Active or Inactive.
– Press the control knob to save your setting.
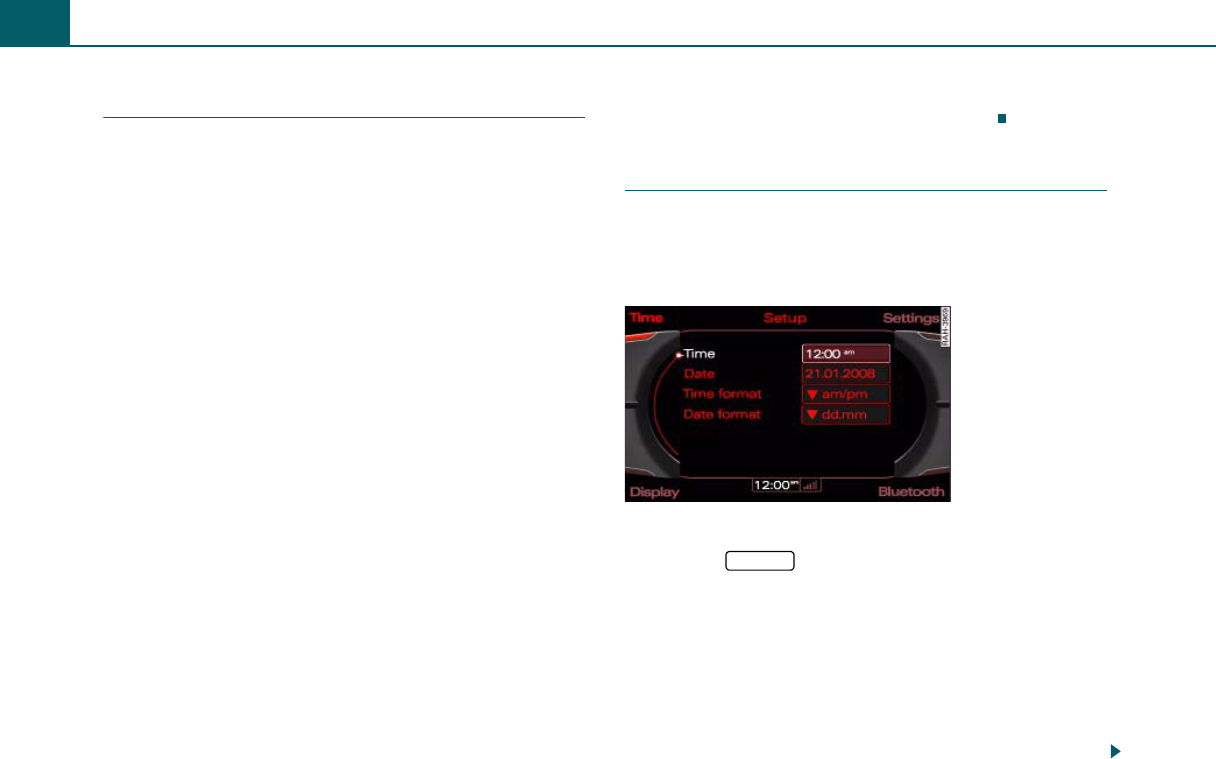
Setting the time
You can choose between the quartz clock and the radio
clock*. You enter the time and date yourself with the
quartz clock. The radio clock* sets the time and date
automatically.
Opening the time setting menu
– Press the function button.
– Press the Time control button. The time setting menu
appears in the MMI display.
Selecting the time source*
–Turn the control knob to Time source and press the knob.
–Turn the control knob to quartz or radio clock* and press
the knob. The radio clock* source is indicated by the “radio
clock reception signal” in the tachometer.
Fig. 30 Setting time
SETUP
MMI high B8, for internal use only
General operation 37
MMI components MMI control panel Multifunction steering wheel Voice recognition system
Setting the time with quartz time source
– Turn the control knob to Time and press the knob
⇒page 36, fig. 30. The hour display is highlighted in
white in the MMI display.
– To set the hour, turn the control knob to the left or right
and press the knob. The minute display is highlighted in
white in the MMI display.
– To set the minutes, turn the control knob to the left or
right.
– Press the control knob to save the time you have set.
Setting the date with quartz time source
– Turn the control knob to Date and press the knob
⇒page 36, fig. 30. The day display is highlighted in white
in the MMI display.
– To set the day, turn the control knob to the left or right
and press the knob. The month display is highlighted in
white in the MMI display.
– To set the month, turn the control knob to the left or right
and press the knob. The year display is highlighted in
white in the MMI display.
– To set the year, turn the control knob to the left or right.
– Press the control knob to complete the date entry.
Setting the time format
– Turn the control knob to Time format and press the knob
⇒page 36, fig. 30.
– Turn the control knob to 24h or am/pm.
– Press the control knob to save your setting.
Setting the date format
– Turn the control knob to Date format and press the knob.
– To adjust the date format “Day.Month”, turn the control
knob to dd.mm and press the knob ⇒page 36, fig. 30.
– To adjust the date format “Month/Day”, turn the control
knob to mm/dd and press the knob.
Tips
If the radio clock* does not receive a radio signal for three days, it
automatically switches to the quartz clock.
Restarting the MMI (Reset)
MMI functionality is restored with a specific button
combination.
– Press and hold the function button , the
control knob and the upper right control button at
the same time.
– Release the buttons. The MMI system switches off and
then restarts.
Fig. 31 Button combi-
nation to restart the
MMI
SETUP
A
1
A
2
A
3
MMI high B8, for internal use only
General operation38
Additional settings
MMI menu language
– Select: function button > Settings control
button > Menu language.
The displays in the MMI display and driver information system and
the language for the navigation announcements and voice recogni-
tion system can be changed.
English, French and Spanish are available.
Measurement units
– Select: function button > Settings control
button > Measurement units.
The following measurement units can be set in the MMI display and
driver information system.
•Distance (miles or kilometers)
•Speed (mph or km/h)
•Temperature (°F or °C)
•Pressure (psi or bar)
•Consumption (mpg (US), l/100 km, mpg (UK) or km/l)
•Volume (gallon (US), liter or gallon (UK)
Voice recognition system
– Select: function button > Settings control
button > Voice recognition.
Short dialogue
When Short dialogue is activated, a shorter form of the voice recog-
nition announcements is used.
Input signal
You can switch the Beep input signal during a dialogue on or off.
Individual training
Individual training improves the recognition function of the voice
recognition system by adapting it to your voice or pronunciation.
Individual training is comprised of 40 speech entries that consist of
commands and sequences of numbers.
For an overview of all voice commands, refer to ⇒page 107.
Delete all name tags
All of the name tags you have stored (spoken names or telephone
numbers) are erased.
Tips
Individual training can only be performed when the vehicle is
stationary.
Default settings
– Select: function button > Settings control
button > Default settings.
You can reset the following functions to the default setting:
•Sound settings
•Radio
•Media settings
•Jukebox
•Directory
SETUP
SETUP
SETUP
SETUP
MMI high B8, for internal use only

General operation 39
MMI components MMI control panel Multifunction steering wheel Voice recognition system
•Telephone*
•Bluetooth*
•Navigation settings
•Navigation memory
•Voice recognition
After selecting the functions, turn the control knob to Reset systems.
Confirm your entry by turning the control knob to Yes and pressing it.
You can also reset all of the functions listed to the factory default
settings by activating the Select all option.
If you reset the Jukebox to default settings, all of the music files are
deleted and the Media settings are reset.
MMI display brightness
– Select: function button > Display control button
> Brightness.
You can adjusting the brightness of the display by turning the control
knob to the right or left.
Version information
– Select: function button > Settings control
button > Version information.
This function shows the MMI and navigation software version.
Data password
– Select: function button > Settings control
button > Data password.
You can protect your personal data such as directory entries, naviga-
tion destinations and name tags with a personal password. If the unit
is replaced, you can only transfer your personal data to the new MMI
unit using your password.
Tips
If you do not assign a personal password, “MMI3G” is stored in the
MMI automatically as the password.
In-car entertainment fader
– Select: function button > function
button > In-car entertainment fader.
With the In-car entertainment fader, you can lower the volume of
the active audio/video source during navigation announcements or
when the Audi parking system* is active.
You can also adjust the In-car entertainment fader in the Radio, Navi-
gation or Car modes.
SETUP
SETUP
SETUP
MEDIA SETUP
MMI high B8, for internal use only
Listening to the radio40
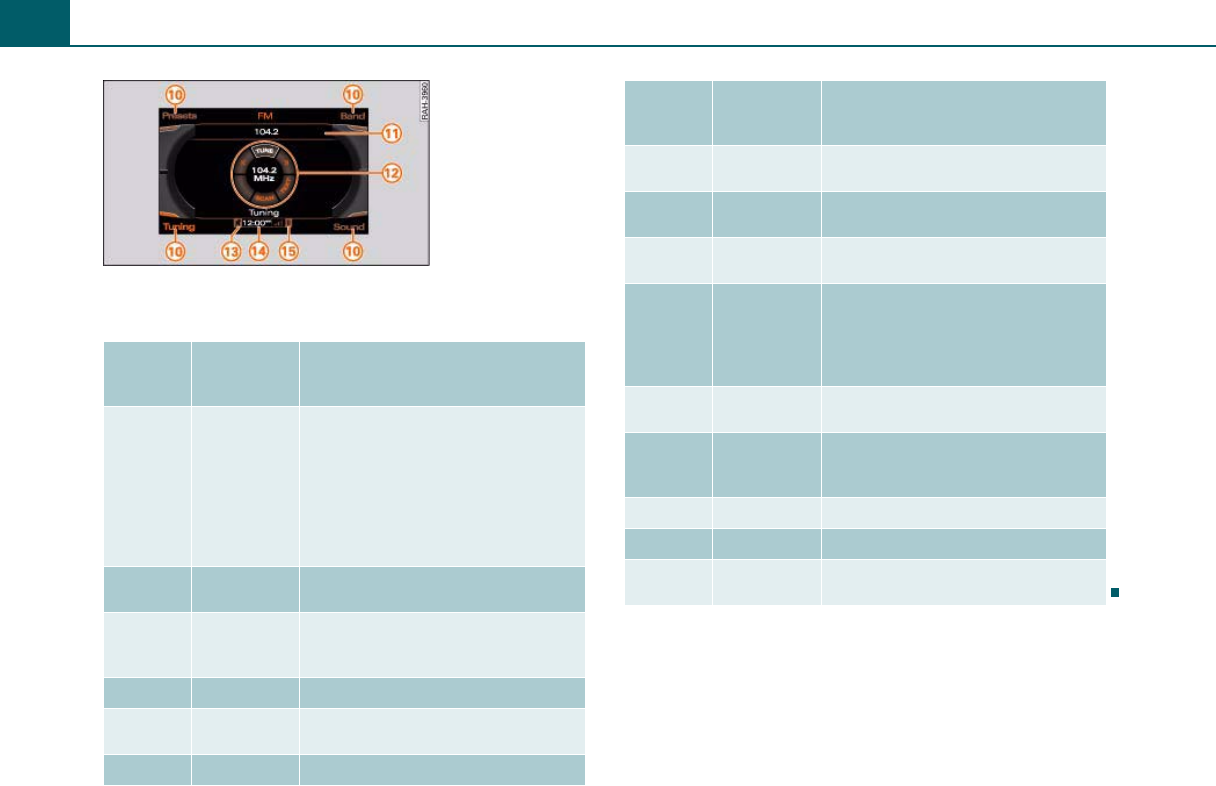
Listening to the radio
Introduction
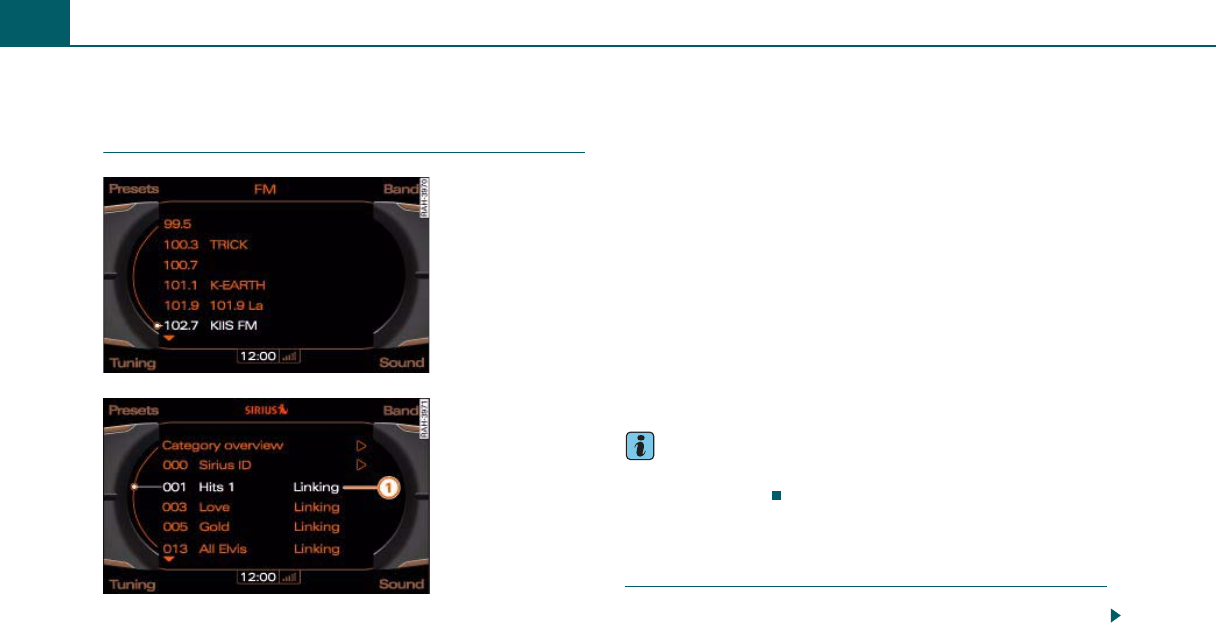
The radio has three bands: FM, AM and Sirius* (satellite radio). The
receivable stations are shown on a radio station list and can be
selected directly. You can select the next receivable station on the
MMI control panel by pressing a button or playing all stations for a
few seconds (SCAN). You can also save your favorite stations in a
preset list in any order.
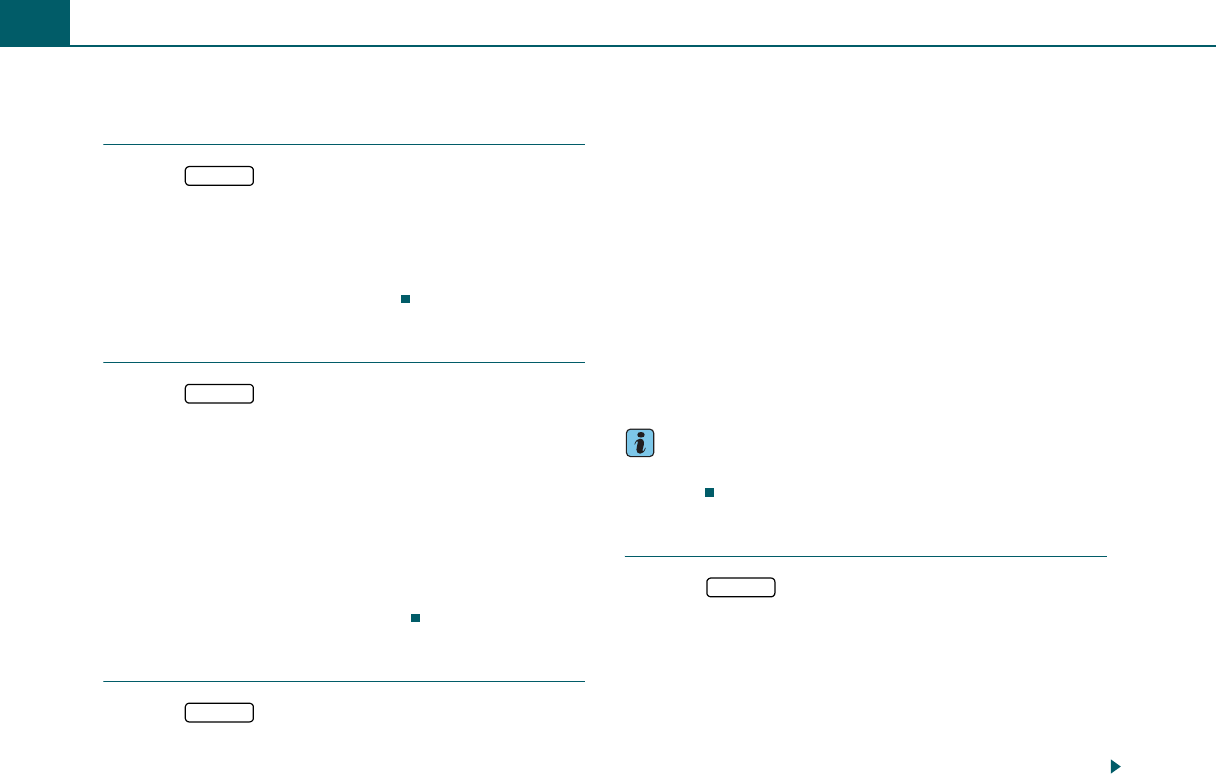
FM band
The FM station list (maximum 75 stations) is updated automatically.
AM band
The AM station list (maximum 165 stations) must be updated manu-
ally ⇒page 41, fig. 35.
The stations in the station list are still displayed after leaving the
reception area. Reception is lost.
Sirius (satellite radio)*
The Sirius provider automatically updates the Sirius* station list
(maximum 224 channels). If the last channel playing is no longer
available after a station list update, channel 184 will play automati-
cally.
If reception is lost, stations that cannot be received will be identified
with the symbol ⇒fig. 33. The symbol disappears when the radio
stations are received again.
Tips
To receive satellite programs, you must contract the Sirius* service
provider ⇒page 41.
Applies to vehicles: with Satellite Digital Audio Radio Service
System information
The following system messages can be displayed:
Fig. 32 FM station list
Fig. 33 Sirius station
list during loss of
reception
A
1
MMI high B8, for internal use only
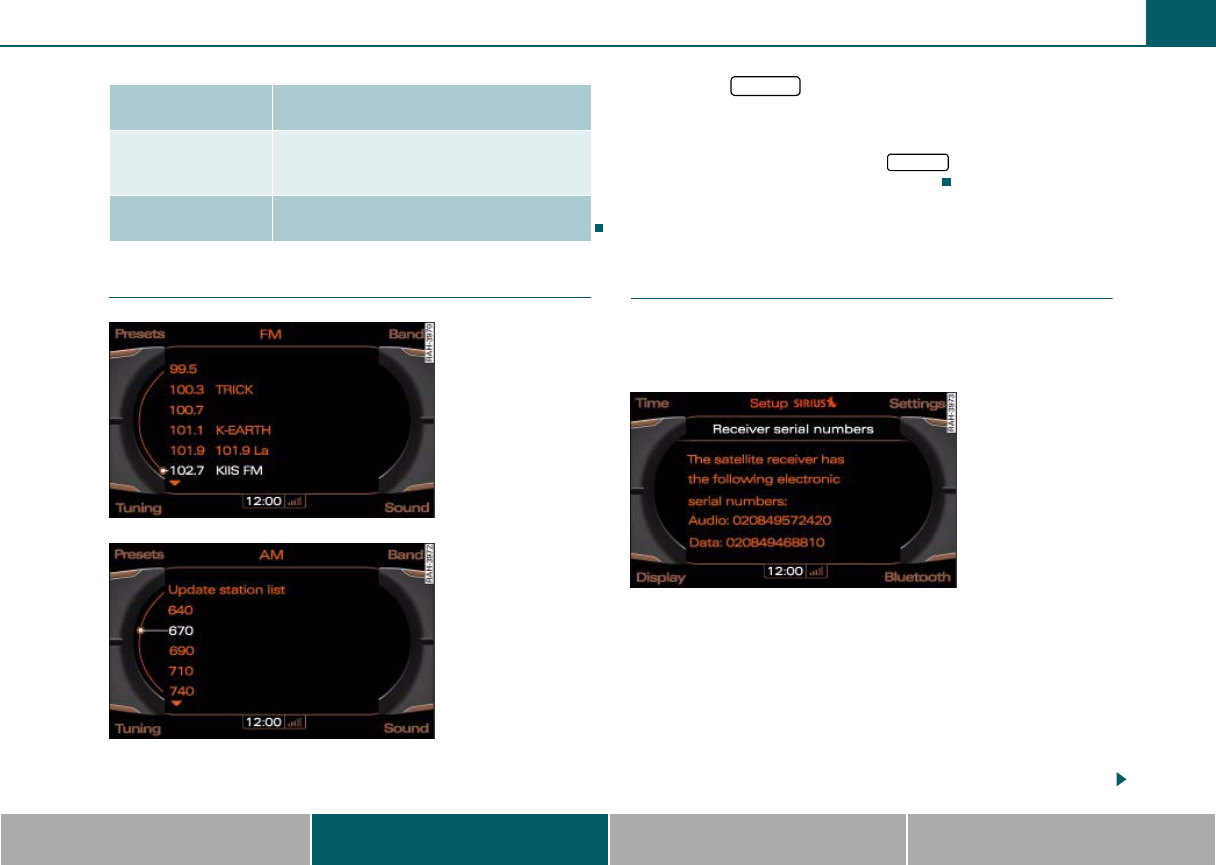
Listening to the radio 41
MMI components MMI control panel Multifunction steering wheel Voice recognition system
Starting radio mode
Requirement: The MMI must be switched on ⇒page 28.
– Press the function button. The list of stations or
the last active radio menu appears in the MMI display.
The menu that was open the last time you listened to the radio is
shown in the MMI display. Press the function button again
while in radio mode to open the station list.
Applies to vehicles: with Satellite Digital Audio Radio Service
Activating your Satellite Radio
service
In order to be able to receive satellite programs and
traffic message channel (TMC), this service must be
enabled.
In order to have the service enabled at your provider, you
need the electronic serial number (ESN) of the tuner. To show
the electronic serial numbers in the display:
Sirius station list
– Press the Band control button.
–Turn the control knob to Sirius and press the knob. The
station list is displayed.
System mes-
sages
Meaning
ANTENNA No antenna is connected to the tuner, or
there are loose plug contacts on the
antenna cable.
LINKING The tuner is presently not receiving any sat-
ellite signal.
Fig. 34 Station list in
the FM band
Fig. 35 Station list in
the AM band
RADIO
RADIO
Fig. 36 Receiver serial
numbers
MMI high B8, for internal use only
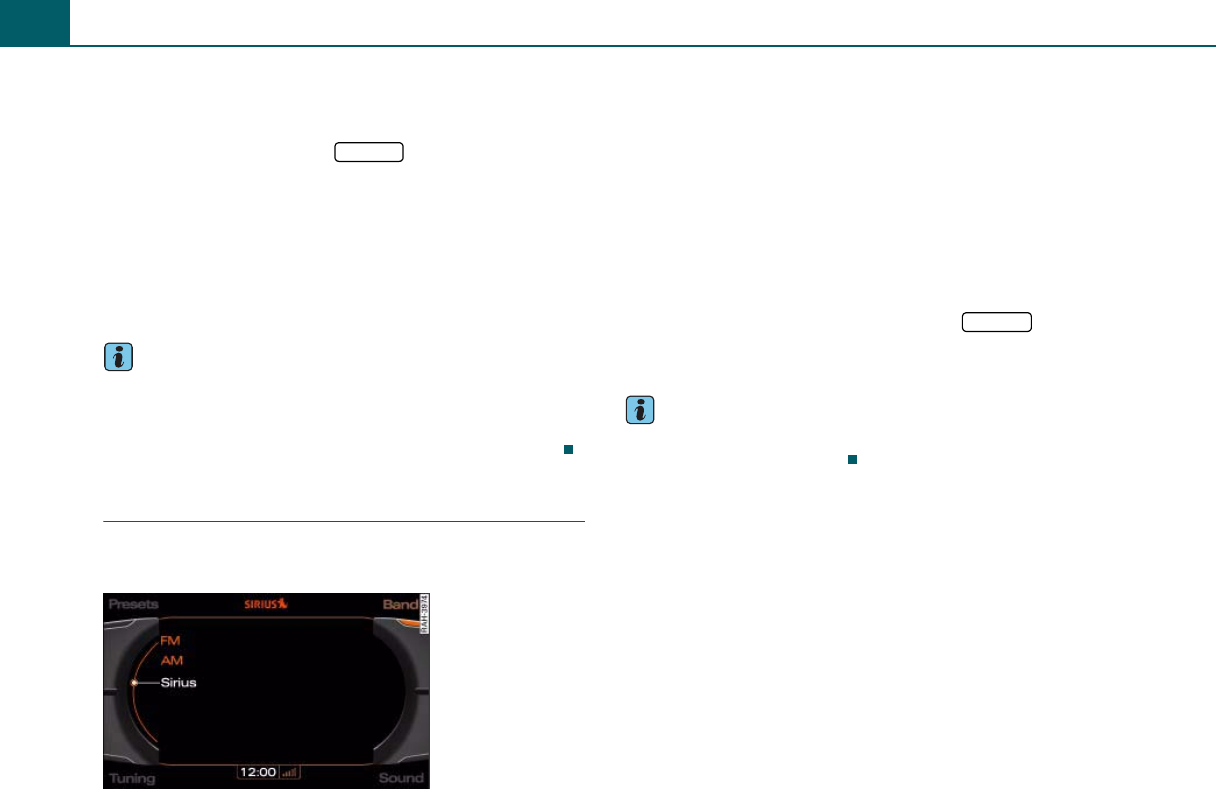
Listening to the radio42
– Turn the knob to 000 Sirius ID and press the knob.
Setup menu
– Press the function button in the Satellite Radio
menu.
– Select Receiver serial numbers by turning the control
knob and press the control knob.
The display shows two serial numbers:
•Audio - serial number for the Sirius radio program
•Data - serial number for TMC traffic reports
Tips
•Objects such as buildings, tunnels, bridges, terrain, other vehicles
or objects on the roof of the vehicle can result in decreased perfor-
mance.
•Satellite Radio reception is not available in Alaska and Hawaii.
Selecting frequency band
The MMI has three bands: FM, AM and satellite radio*
(Sirius)
Requirement: The radio is on ⇒page 41.
Band control button
– Press the Band control button.
– Turn the control knob to the desired frequency band.
– Press the control knob to select the frequency band. The
current frequency band is indicated in the title line of the
MMI display.
RADIO function button
– To select the frequency band, press the function
button repeatedly until the desired frequency band is
shown in the title line of the MMI display.
Tips
You can select the frequency band with the multifunction steering
wheel just as easily ⇒page 99.
SETUP
Fig. 37 Frequency
bands
RADIO
MMI high B8, for internal use only
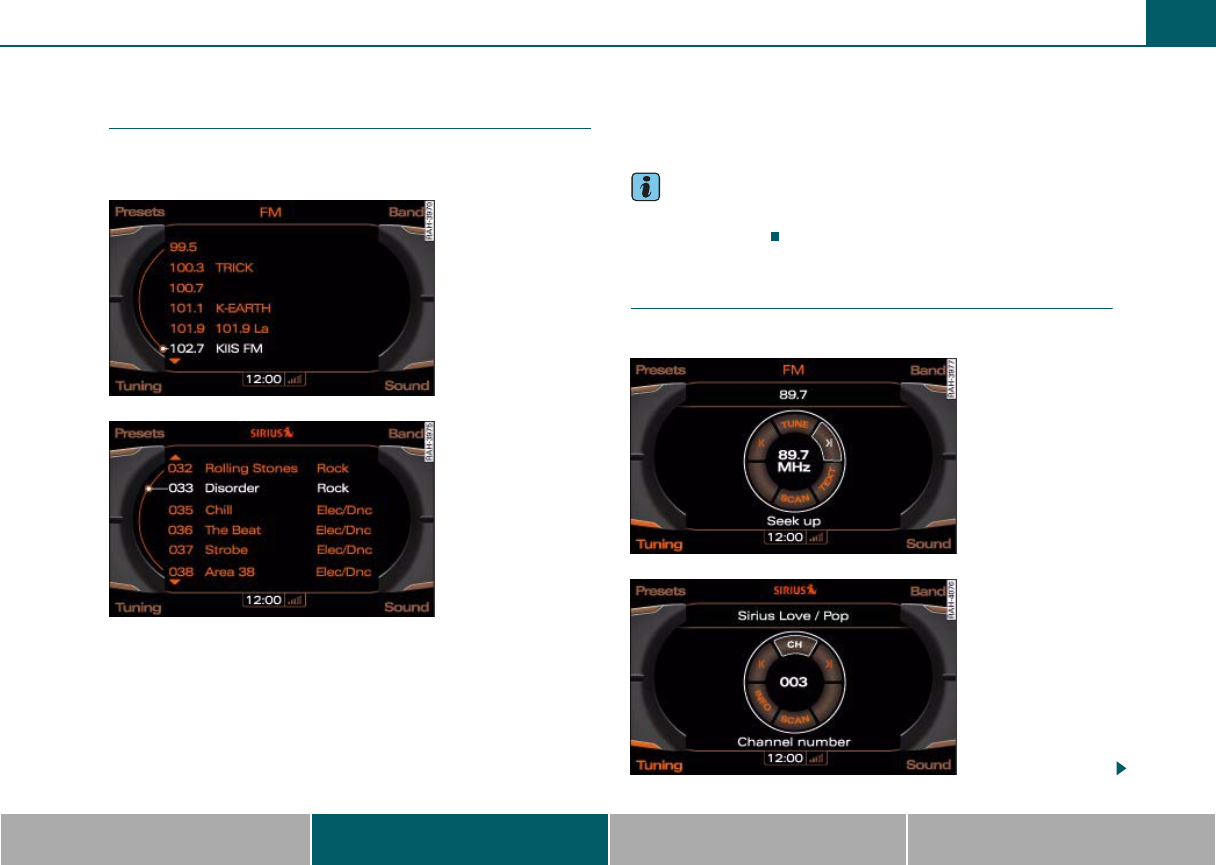
Listening to the radio 43
MMI components MMI control panel Multifunction steering wheel Voice recognition system
Selecting a station from the
station list
The receivable stations for the selected frequency band
are displayed in the station lists.
Requirement: The desired frequency band is selected
⇒page 42 and receivable radio stations are shown in the
MMI display ⇒fig. 38.
– Turn the control knob to the desired radio station.
– Press the control knob to select the station.
To update the station list in the AM band, turn the control knob to
Update station list ⇒page 41, fig. 35 and press the knob. The
station lists in the FM band and Sirius* band (satellite radio) are
updated automatically.
Tips
You can also perform this function with the multifunction steering
wheel ⇒page 100.
Selecting the station
Press the knob to select the next station.
Fig. 38 Station list in
the FM band
Fig. 39 Station list in
the Sirius band
Fig. 40 Automatic
station search forward
(FM band)
Fig. 41 Selecting the
station (Sirius band)
MMI high B8, for internal use only
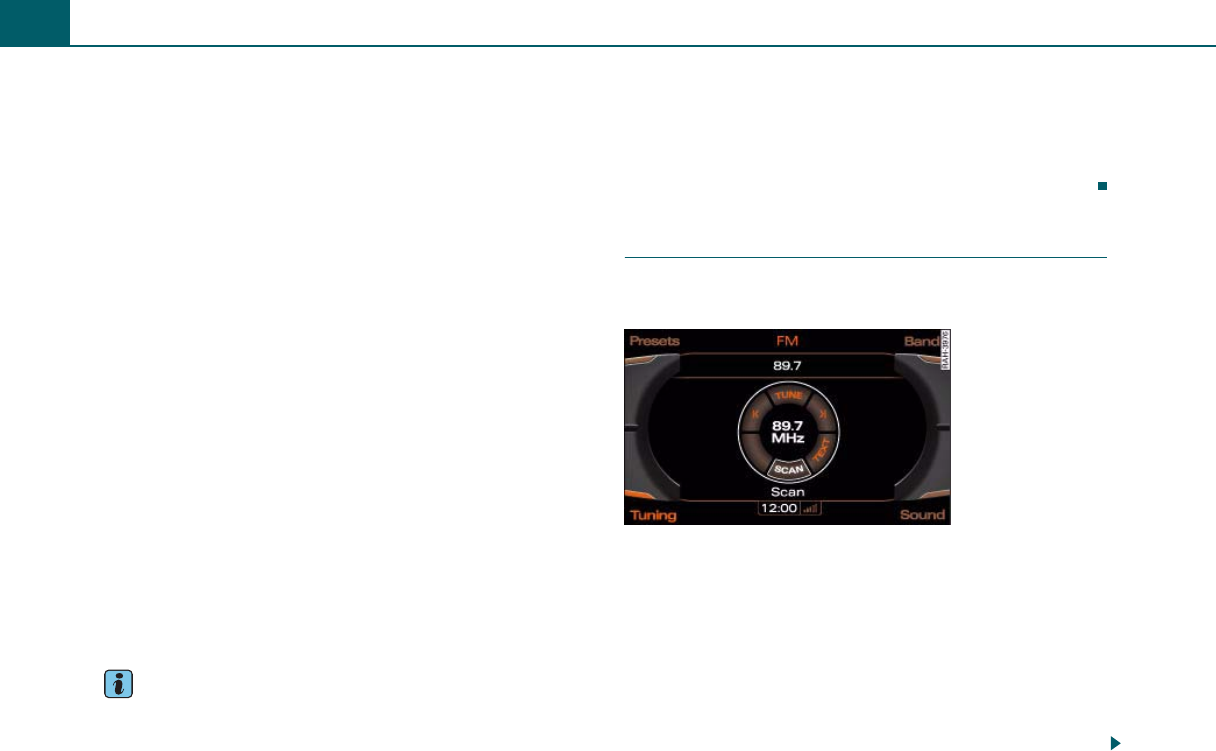
Listening to the radio44
Requirement: The desired frequency band must be selected
⇒page 42.
Selecting the next available station (FM/AM
band)
–Press the Tuning control button.
– Turn the control knob to >| (Seek up) ⇒page 43, fig. 40 or
|< (Seek down).
– Press the control knob. The next receivable station is
selected.
Selecting the frequency manually (FM/AM
band)
–Press the Tuning control button.
– Turn the control knob to TUNE and press the knob.
– To adjust the frequency in small stages, turn the control
knob to the right or left.
Selecting the channel (Sirius band)
–Press the Tuning control button.
–Turn the control knob to CH (Channel number) ⇒page 43,
fig. 41 and press the knob.
– Turn the control knob to the right or left to skip to the
next/previous channel in station list.
Tips
•When in the Sirius band, use the >| (Seek up)/|< (Seek down) func-
tion to switch to the Next/Previous station in the station list.
•You can also press the arrow buttons on the MMI control panel
briefly to switch to the previous/next station in the station list
⇒page 29.
•A station with poor reception will no longer be displayed in the
station list once you switch to a different station. However, you can
save the station and select it again from the station list ⇒page 45.
Scanning stations
Using the SCAN function, the receivable stations are
played for a few seconds.
Requirement: The desired frequency band must be selected
⇒page 42.
– Press the Manual control button.
– Turn the control knob to SCAN (Scan) and press the knob.
– Press the control knob again to stop the scan function.
– Press the Manual control button. Turn the control knob to
SCAN (Scan) and press the knob. The current station is
selected.
Fig. 42 SCAN function
MMI high B8, for internal use only
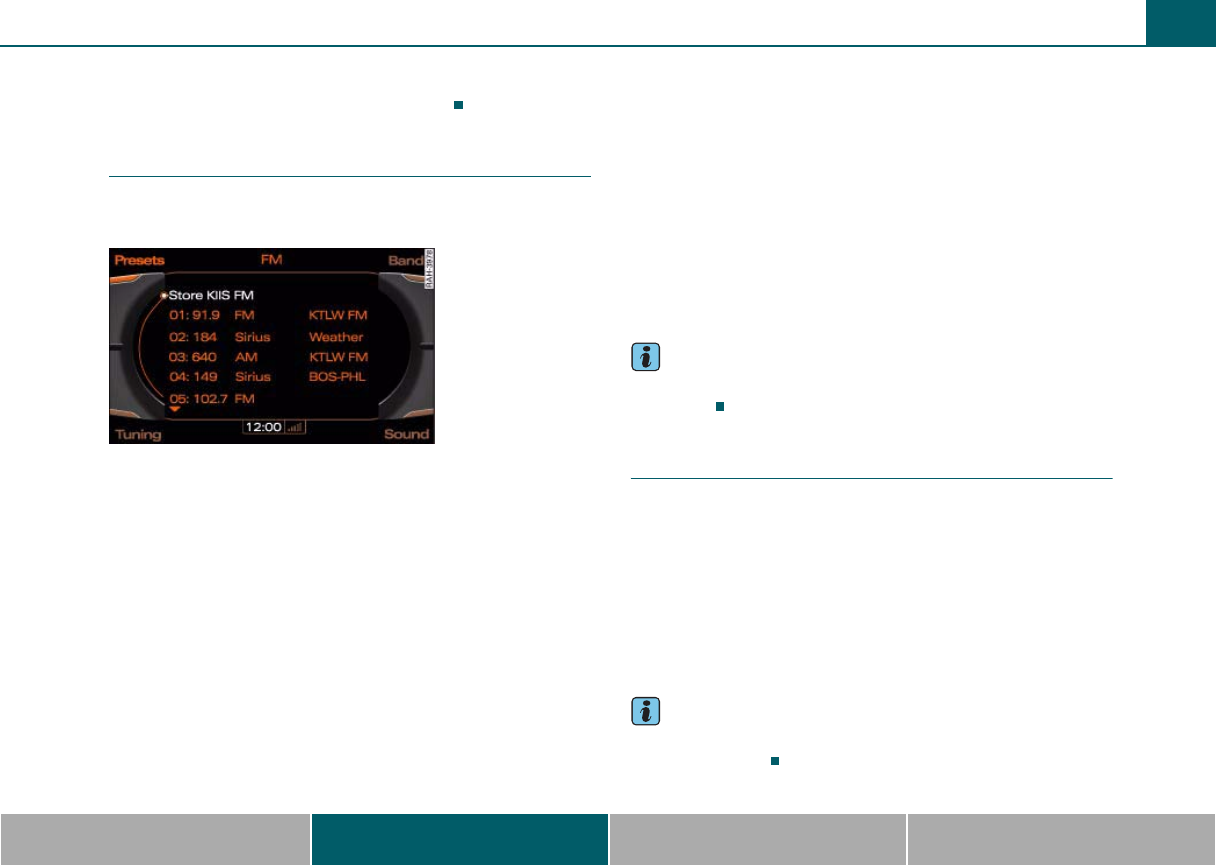
Listening to the radio 45
MMI components MMI control panel Multifunction steering wheel Voice recognition system
If the scan function is activated in the AM band, the AM band station
list will also be updated during the scan process.
Storing stations
The preset list can contain up to 50 stations from all
frequency bands.
Requirement: A station list must be displayed ⇒page 43,
fig. 38.
Using the control knob
– Press and hold the control knob until the station is stored
in the next available position in the preset list and Store
Station name here appears in the MMI display.
– To change the position in the preset list, turn the control
knob to the left or right.
– Press the control knob to store the station in the selected
position.
Using the Memory control button
– Press the Memory control button. Store Station name
here appears in the MMI display ⇒fig. 43.
– Press the control knob. The selected station is stored in
the next available position in the preset list and Store
Station name here appears in the MMI display.
– To change the position in the preset list, turn the control
knob to the left or right.
– Press the control knob to store the station in the selected
position.
Tips
You can delete an individual station or all stations from the preset list
⇒page 46.
Selecting a stored station
Requirement: A station must be stored in the preset list
⇒page 45.
– Press the Memory control button. The preset list is
displayed.
– To select a station from the preset list, turn the control
knob to the station.
– Press the control knob. The station is selected.
Tips
Also try selecting a stored station using the multifunction steering
wheel ⇒page 100.
Fig. 43 Storing
stations
MMI high B8, for internal use only

Listening to the radio46
Moving stored stations
Requirement: A station must be stored in the preset list
⇒page 45.
–Press the Memory control button. The preset list is
displayed.
– Turn the control knob to a station and press the knob.
– Turn the control knob to Move Station name and press the
knob. The station is stored in the next available position in
the preset list and Store Station name here appears in the
MMI display.
– To change the position in the preset list, turn the control
knob to the left or right.
– Press the control knob to store the station in the selected
position.
Additional settings
Station names
Requirement: The FM frequency band must be selected
⇒page 42.
– Select: function button > function
button > Station names.
Scrolling station names
Scrolling text transmitted by the FM stations is shown in the MMI
display.
Fixed station names
Scrolling text transmitted by the FM stations is not shown in the MMI
display. Only the current section of the scrolling text is displayed.
Station names off
Text transmitted by the FM stations is not shown in the MMI
display.
Deleting memory entries
Requirement: A frequency band must be selected ⇒page 42
and a station must be stored in the preset list ⇒page 45.
– Select: function button > function
button > Delete presets > Delete individually or Delete all
entries.
Delete individually
Select Delete individually by turning and pressing the control knob.
Then select the station to be deleted and press the control knob.
Delete all entries
Select Delete all entries by turning and pressing the control knob. All
stored stations are deleted from the preset list.
Displaying radio text
Requirement: The FM frequency band must be selected
⇒page 42.
– Select: function button > Tuning control button
> TEXT (Radio text).
Radio texts are additional information transmitted by some stations
(e.g. station name, artist or track).
RADIO SETUP
RADIO SETUP
RADIO
MMI high B8, for internal use only

Listening to the radio 47
MMI components MMI control panel Multifunction steering wheel Voice recognition system
Applies to vehicles: with Satellite Digital Radio Service
Track information
Requirement: Satellite Radio must be activated ⇒page 42.
– Select: function button > Tuning control button
> INFO (Info).
Some radio stations transmit additional information about the
program. For example, information about the artist or album could
be displayed.
Applies to vehicles: with Satellite Digital Radio Service
Station info
Requirement: Satellite Radio must be activated ⇒page 42.
– Select: function button > function
button > Station info > On or Off.
If information is available for the current track (such as artist or
album), it will be displayed in a pop-up window if this function is
activated.
Applies to vehicles: with Satellite Digital Radio Service
Station sorting
Requirement: The Sirius frequency band must be selected
⇒page 42.
– Select: function button > function
button > Station sorting.
Channel number
The stations are listed by channel number in ascending order.
Channel name
The station categories are listed in the main menu in alphabetical
order.
Category and channel no.
The stations are listed by category and than by channel number.
Category and chan. name
The stations are listed by category and than by channel name.
Tips
The stations that are displayed in the stations list can be filtered
according to your personal desires as to type of program.
Applies to vehicles: with Satellite Digital Radio Service
Category filter
Requirement: Satellite Radio must be activated ⇒page 42.
– Select: function button > function
button > Category filter.
The stations that are displayed in the station list can be filtered
according to your personal desires as to type of program. The selec-
tion of program categories depends on what your provider offers.
If you select the option Deactivate filter, all filter options are deacti-
vated and all available channels are displayed in the satellite station
list.
RADIO
RADIO SETUP
RADIO SETUP
RADIO SETUP
MMI high B8, for internal use only
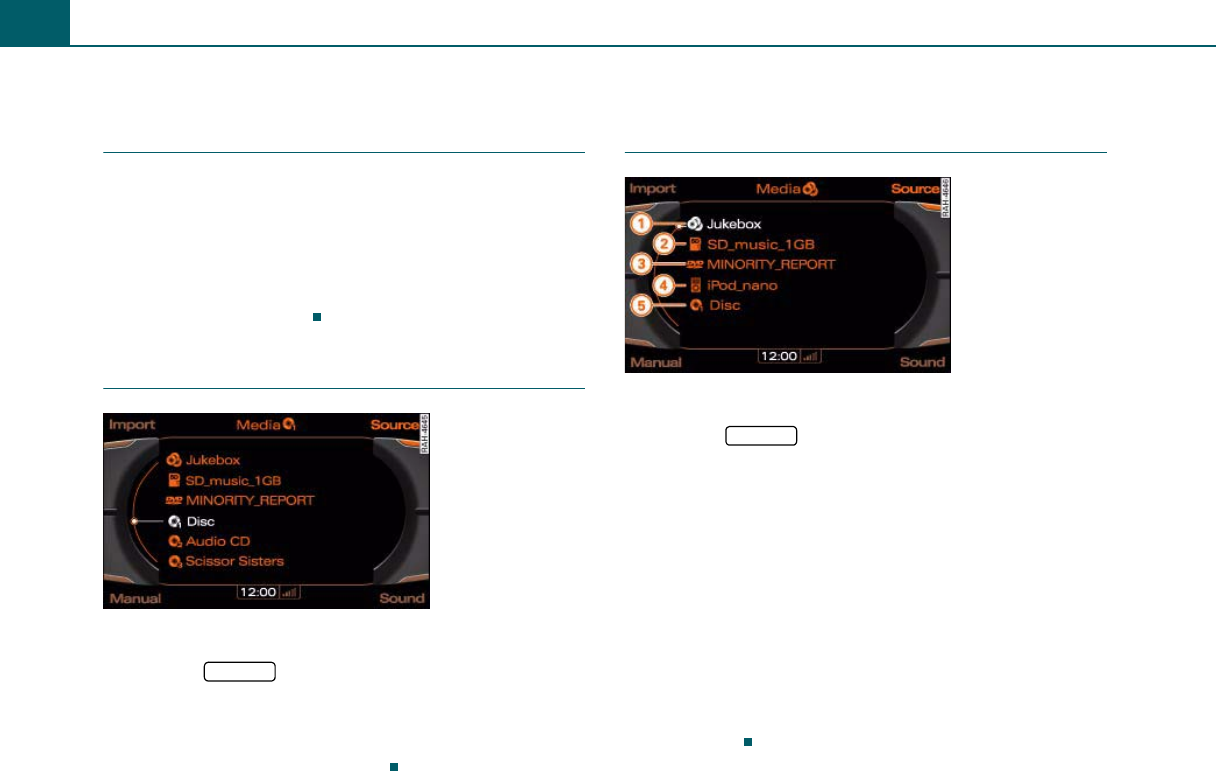
Playing media48
Playing media
Introduction
You can start and operate the CD/DVD drive, CD changer*, Jukebox,
memory card reader and a portable audio device* (such as an iPod or
USB storage device) using the MMI control panel. Different functions
are available depending on the active source and the medium
inserted. For example, you can select individual tracks or folders
directly, play the tracks in random order or display information stored
in an ID3/WMA/AAC tag with the current track (such as the artist,
album, title, year and genre).
Starting Media mode
Requirement: The MMI must be switched on ⇒page 28.
– Press the function button. The source overview
⇒fig. 44 or the track that was playing the last time media
mode was active will be shown in the MMI display.
– If the source overview is not shown in the MMI display,
press the Source control button.
Selecting source
Requirement: A source must contain an audio or video file.
– Press the function button.
– Press the Source control button.
– Turn the control knob to a source and press the knob. The
track list or folder structure for the selected source is
shown in the MMI display.
– Turn the control knob to a track or a folder and press the
knob.
Possible sources are:
Jukebox
Memory card
CD/DVD drive
Audi music interface* (such as an iPod) or external audio input
CD changer*
Fig. 44 Audio/video
source overview
MEDIA
Fig. 45 List of
possible audio/video
sources
MEDIA
A
1
A
2
A
3
A
4
A
5
MMI high B8, for internal use only
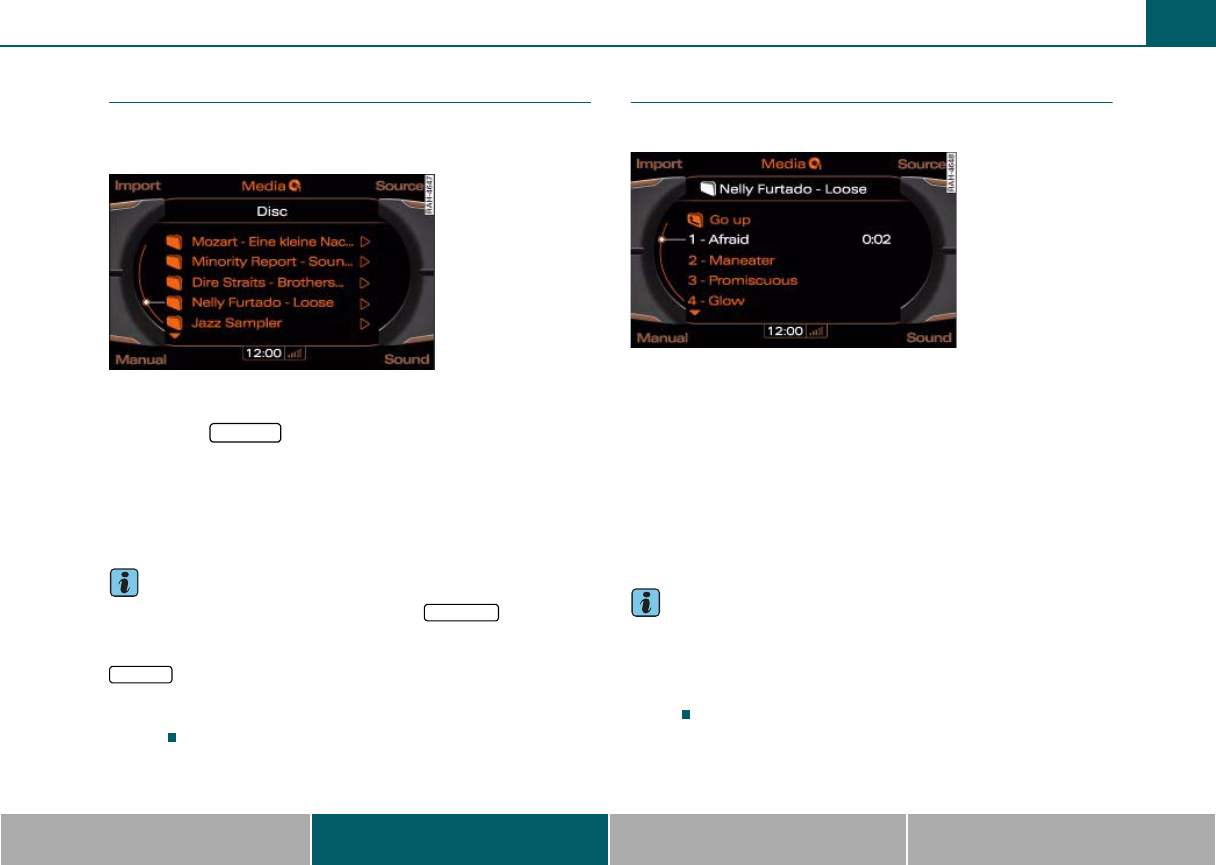
Playing media 49
MMI components MMI control panel Multifunction steering wheel Voice recognition system
Selecting a folder
The folders for the active audio source are shown in the
MMI display.
Requirement: The selected source must contain audio files.
– Press the function button. The folder structure
for the selected source is displayed ⇒fig. 46.
– Turn the control knob to a folder.
– Press the control knob to select the folder. The tracks in
the folder are displayed.
Tips
•To reach the next highest level, press the button or
turn the control knob to the Up folder and press the knob.
•To reach the highest level in the folder structure, press the
function button.
•You can scroll through long lists of folders quickly by turning the
control knob quickly. The scrolling speed depends on the number of
folders.
Selecting a track
The track with the play time is shown in the MMI display.
Requirement: An audio CD or a folder must be selected
⇒page 49.
– Turn the control knob to a track ⇒fig. 47.
– Press the control knob to select the track. The track will
play.
If metadata (such as an ID3 tag) is available for a current track (such
as the artist, album or track), it will be displayed in a pop-up window.
The Display track info function must be activated ⇒page 55.
Tips
•You can also perform this function with the multifunction steering
wheel ⇒page 101.
•You can scroll through long lists of tracks quickly by turning the
control knob quickly. The scrolling speed depends on the number of
tracks.
Fig. 46 Folder struc-
ture for an MP3 CD.
MEDIA
RETURN
MEDIA
Fig. 47 Track list
MMI high B8, for internal use only
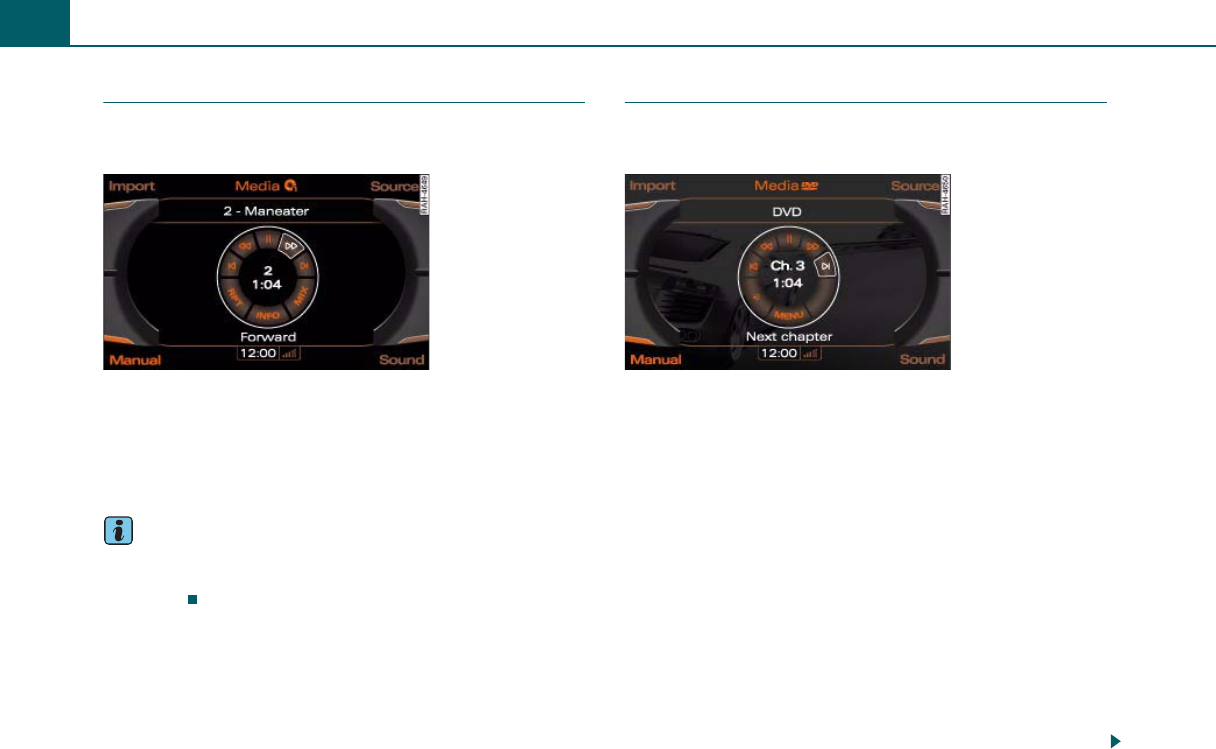
Playing media50
Fast forward/rewind
You can skip forward or back within a tracking using fast
forward/rewind.
Requirement: An audio file or a video DVD must be playing.
–Press the Manual control button.
– Turn the control knob to (Forward) ⇒fig. 48 or
(Rewind) and hold the knob down.
Tips
You can also press and hold the arrow buttons on the MMI control
panel to fast forward or rewind within a track or video DVD
⇒page 29.
Next/previous track or chapter
This function makes it possible to skip to the previous or
next track or chapter within an audio/video source.
Requirement: An audio file or a video DVD must be playing.
Previous/next track
– Press the Manual control button.
–Turn the control knob to (Next track) or (Previous
track).
– Press the control knob to skip to the previous/next track.
The track will play.
Next/previous chapter (video DVD)
– Press the Manual control button.
– Turn the control knob to (Next chapter) or (Previous
chapter).
– Press the control knob to skip to the previous/next
chapter.
Fig. 48 Fast forward
in a CD Fig. 49 Next chapter
MMI high B8, for internal use only
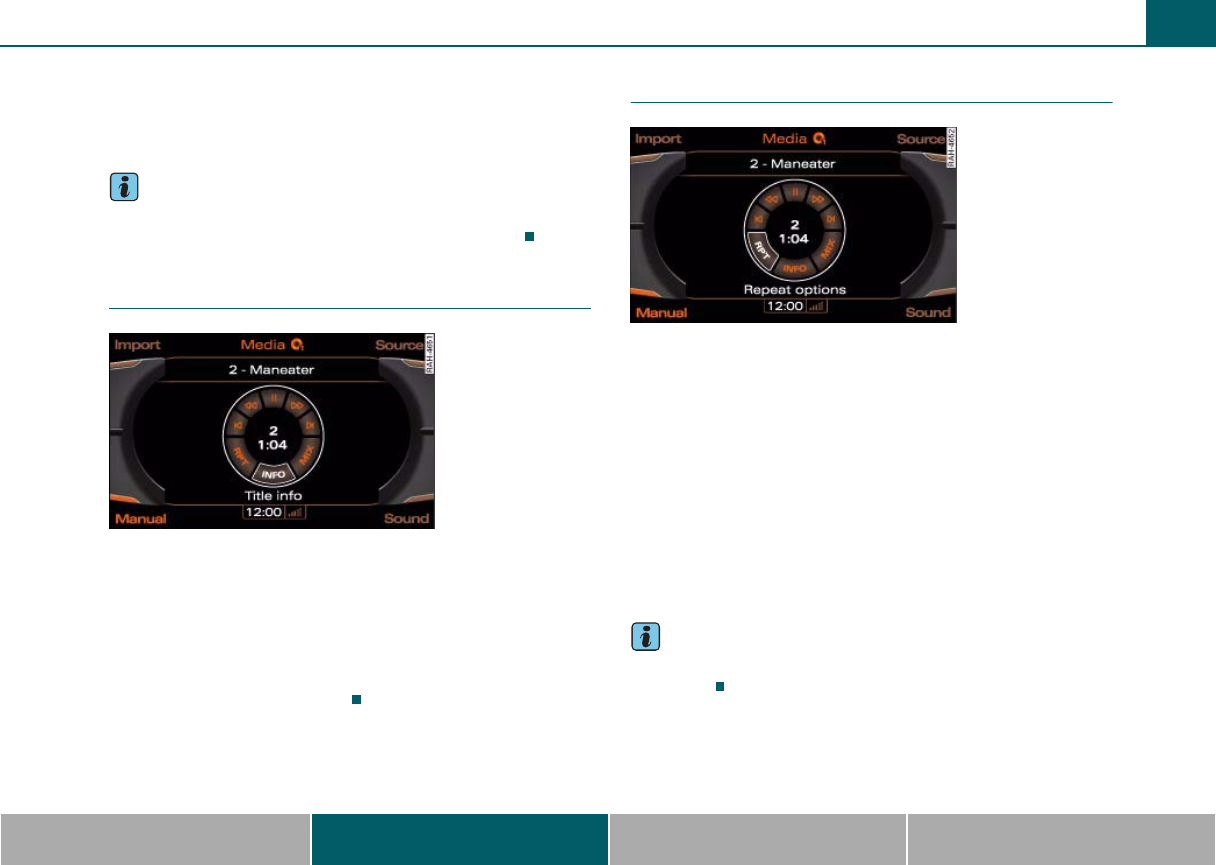
Playing media 51
MMI components MMI control panel Multifunction steering wheel Voice recognition system
If you select Previous track/Previous chapter within 10 seconds after
a track has started to play, the previous track will start playing. If you
press it after 10 seconds, the current track will begin playing again
from the beginning.
Tips
You can also press the arrow buttons on the MMI control panel briefly
to switch to the previous/next track or chapter ⇒page 29.
Track information
Requirement: And audio file must be playing ⇒page 49.
–Press the Manual control button.
– Turn the control knob to INFO (Title information)
⇒fig. 50 and press the knob.
Metadata/tag informationstored with the current track (such as
artist, album or title) is displayed.
Repeat options
Requirement: And audio file must be playing ⇒page 49.
– Press the Manual control button.
–Turn the control knob to RPT (Repeat options) ⇒fig. 51
and press the knob.
The following functions can be selected for repeat:
•Off - the Repeat options are switched off.
•Medium - if a CD is playing in the CD changer*, the tracks on the
CD will repeat.
•Folder - the tracks in the folder will repeat.
•Track - the current track playing will repeat.
Tips
Shuffle also depends on the settings for the repeat options
⇒page 52.
Fig. 50 Track informa-
tion
Fig. 51 Repeat
MMI high B8, for internal use only
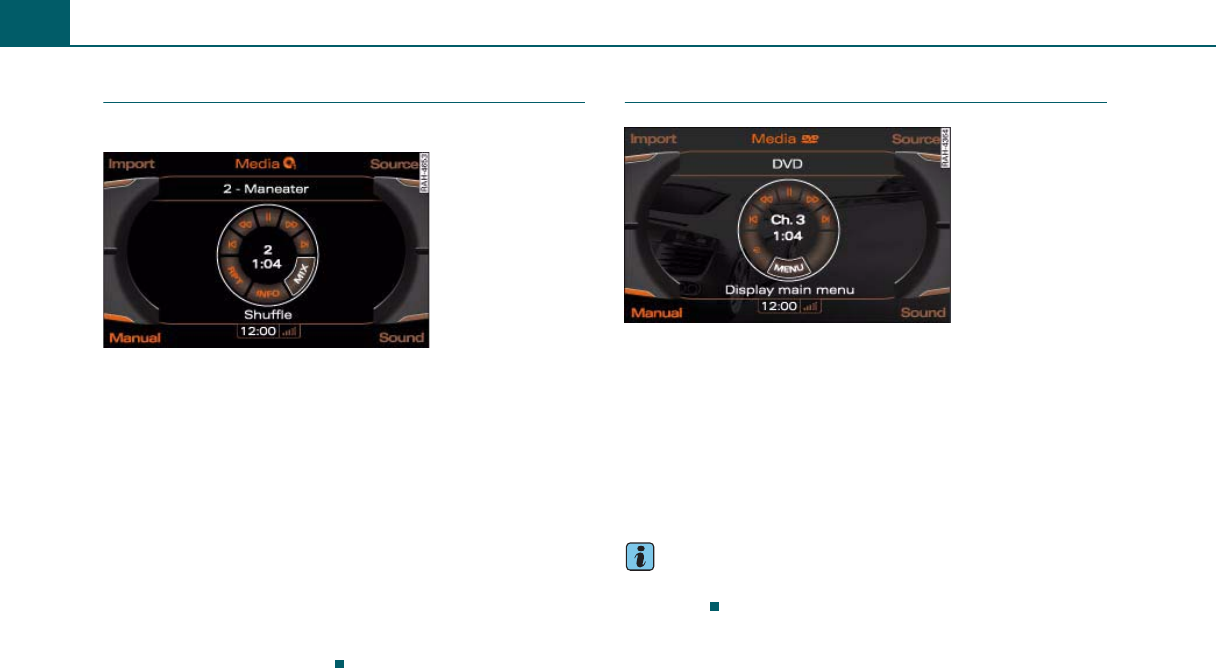
Playing media52
Shuffle
You can play the tracks in random order.
Requirement: An audio file must be playing ⇒page 49 and
Repeat options must be selected.
–Press the Manual control button.
– Turn the control knob to Shuffle ⇒fig. 52 and press the
knob.
•Off repeat option - all of the files in the active audio source play in
random order. First the tracks on the current CD in the CD changer*
are played in random order and then the tracks on the remaining CDs
are.
•Medium repeat option - if a CD is playing in the CD player*, the
tracks on the CD play in random order.
•Folder repeat option - the tracks in the current track list with
audio files play in random order.
DVD main menu
Requirement: A video DVD must be playing ⇒page 48.
– Press the Manual control button.
–Turn the control knob to MENU (Display main menu)
⇒fig. 53 and press the knob. The DVD main menu is
shown in the MMI display.
– To select a menu item, turn the control knob to the item
and press the knob.
Tips
You can also control the DVD main menu with the joystick
⇒page 32.
Fig. 52 Shuffle
Fig. 53 DVD main
menu
MMI high B8, for internal use only
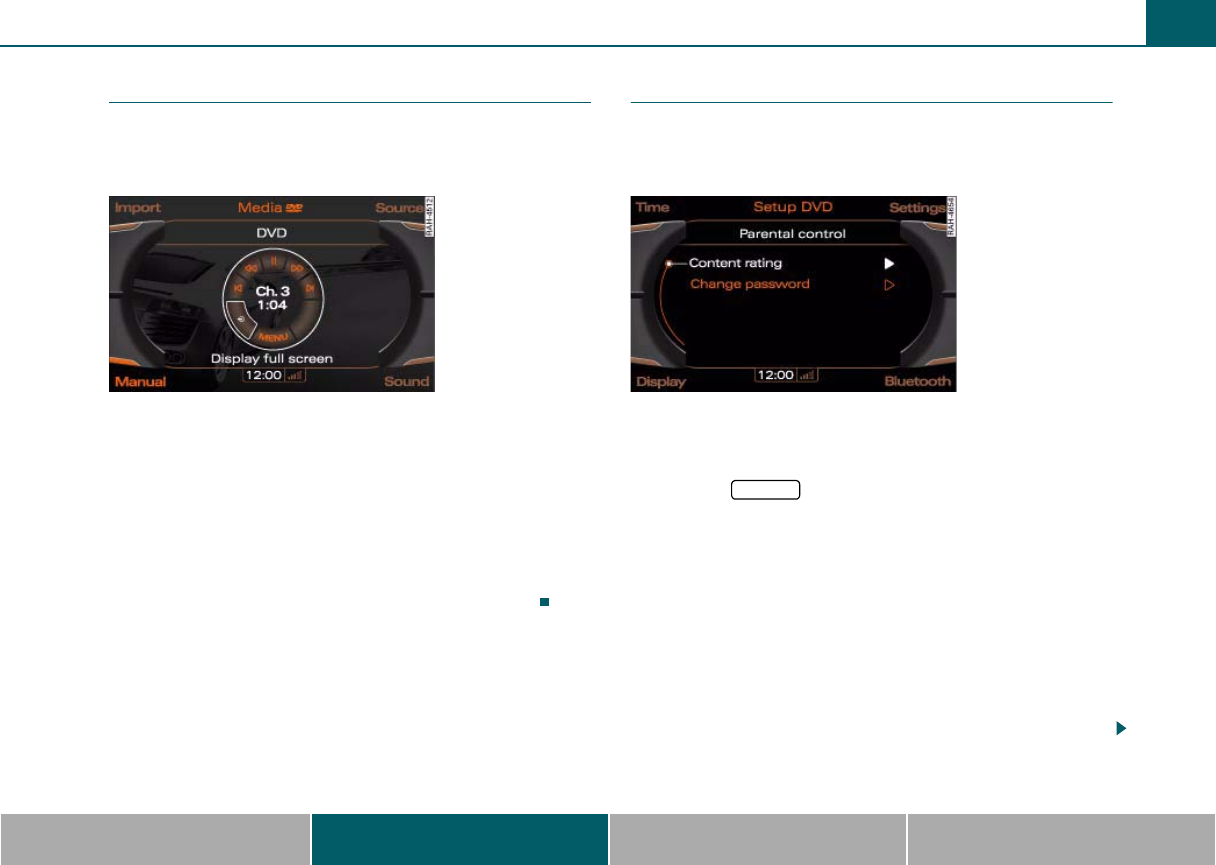
Playing media 53
MMI components MMI control panel Multifunction steering wheel Voice recognition system
DVD full screen display
The video image is only displayed when the vehicle is
stationary for safety reasons. You can still hear the
sound.
Requirement: A video DVD must be playing ⇒page 48 and
the vehicle must be stopped.
–Press the Manual control button.
– Turn the control knob to (Display full screen) ⇒fig. 54
and press the knob. The video image expands to fill the
entire MMI display.
– To deactivate the full screen display, turn the control knob
back to (Display full screen) and press the knob.
DVD parental control
You can restrict the playback of video DVDs with the
parental control. The settings are protected by a pass-
word.
Requirement: A video DVD must be playing ⇒page 48.
Selecting the content rating
– Press the function button.
–Turn the control knob to Parental control and press the
knob.
– Enter the password using the speller.
–Select OK in the speller and press the control knob to
confirm your entry.
–Turn the control knob to Content rating and press the
knob.
– Turn the control knob to a level (such as Level 5) and press
the knob. The selected level is stored.
Fig. 54 DVD full
screen
Fig. 55 Selecting the
content rating
SETUP
MMI high B8, for internal use only
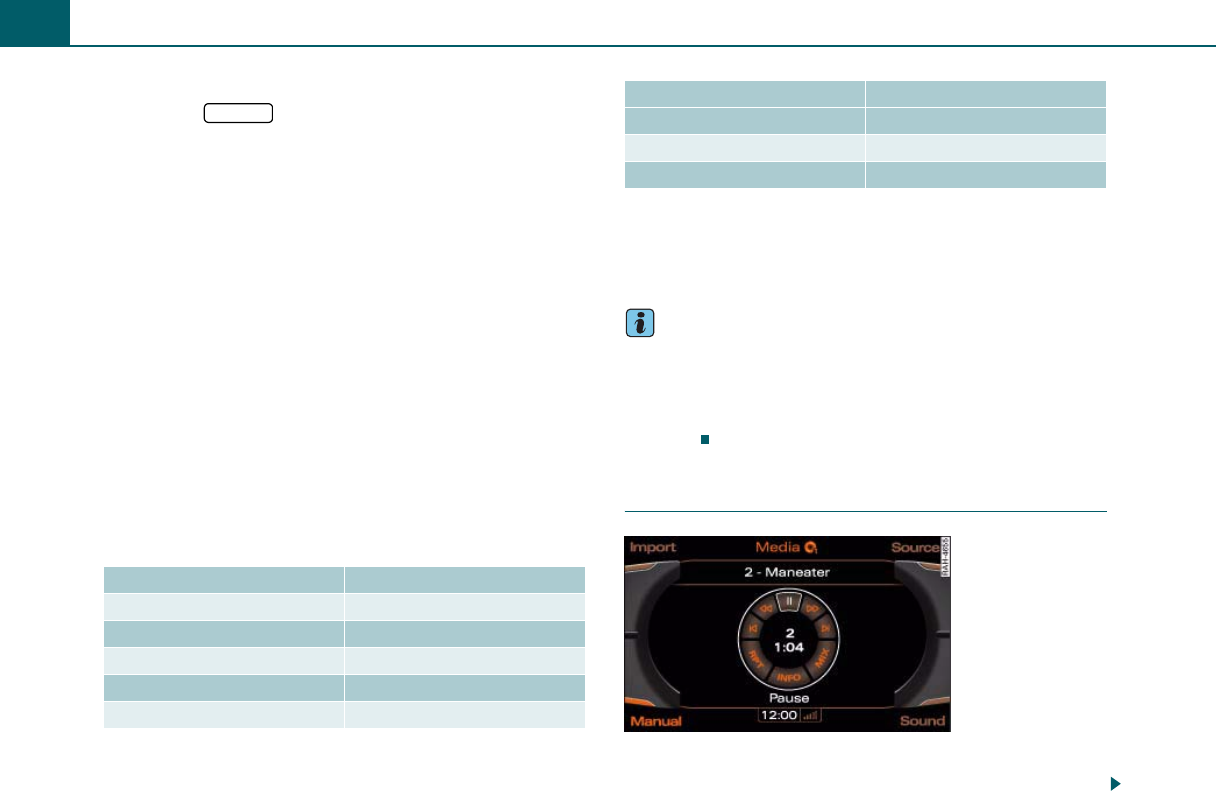
Playing media54
Change password
– Press the function button.
– Turn the control knob to Parental control and press the
knob.
– Enter the password using the speller.
– Select OK in the speller and press the control knob to
confirm your entry.
– Turn the control knob to Change password and press the
knob.
– Enter the new parental control password using the
speller.
– Select OK in the speller and press the control knob.
– Enter the new parental control password again.
– Select OK in the speller and press the control knob to
confirm your entry. The new password is stored.
In accordance with the Motion Picture Association of America
(MPAA), the following eight levels can be selected for Parental
control:
If you select Level 5, for example, for the parental control level, all
DVDs from level 1-5 can be played. Video DVDs with a higher level will
not play.
The Off setting deactivates all restrictions.
Tips
•The password “1234” is set for the Parental control at the factory.
•Password entry will be locked for approximately one minute if you
enter the incorrect password three times in a row.
•Only your authorized Audi dealer can reset the parental control
password.
Pausing/continuing playback
Requirement: An audio file or a video DVD must be playing
⇒page 49.
Parental Level Description
Level 1 - G Unrestricted audience
Level 2 Most audiences
Level 3 - PG Mature young audience
Level 4 - PG-13 Teenage audience
Level 5 Mature teenage audience
SETUP Level 6 - R Mature audience
Level 7 - NC-17 Adult audience
Level 8 - Adult Most restricted audience
Parental Level Description
Fig. 56 Pausing/conti
nuing playback
MMI high B8, for internal use only
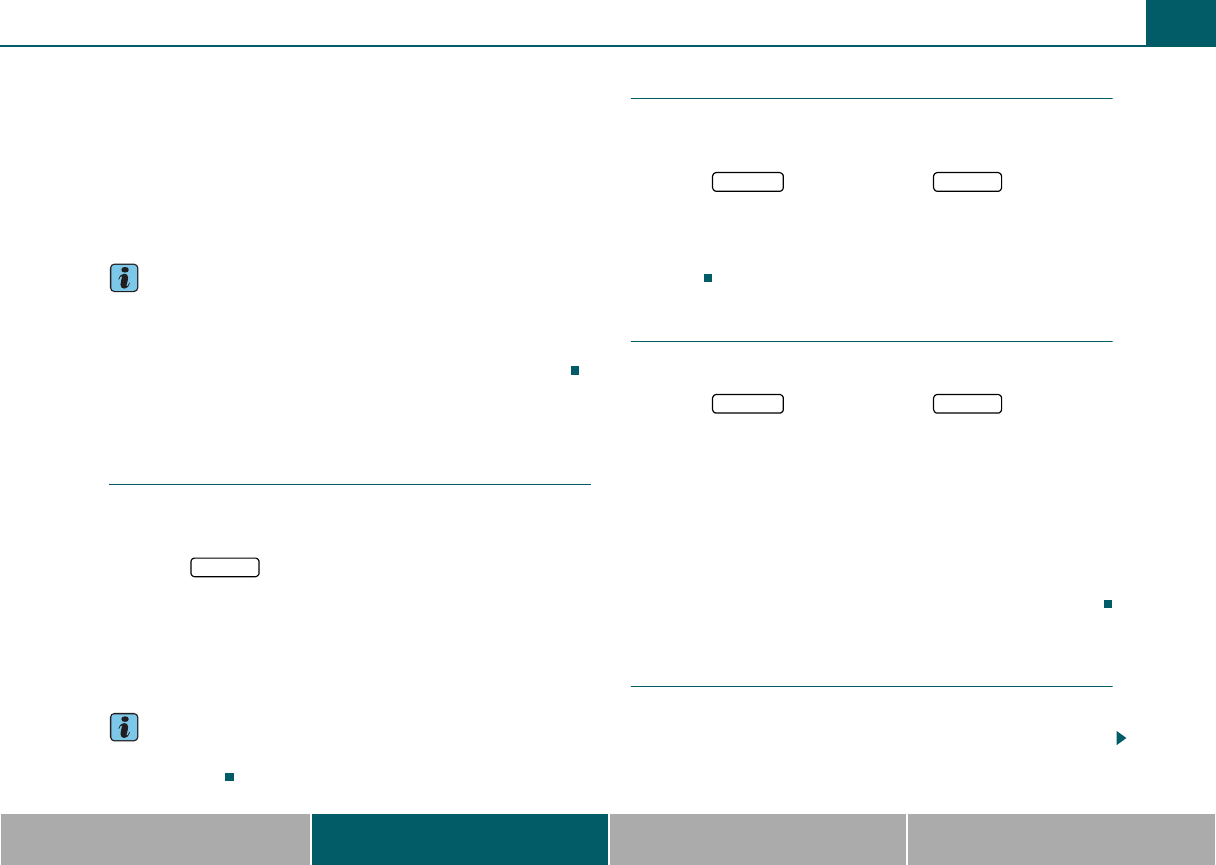
Playing media 55
MMI components MMI control panel Multifunction steering wheel Voice recognition system
–Press the Manual control button.
– Turn the control knob to || (pause) ⇒page 54, fig. 56 and
press the knob. Playback is paused and the mute symbol
⇒page 30, fig. 21 appears in the status line of the
MMI display.
– Turn the control knob to || (pause) again and press the
knob.
Tips
•You can also pause and continue playback in the active audio
source with the On/Off knob ⇒page 99.
•You can also perform this function with the multifunction steering
wheel without removing your hands from the wheel ⇒page 101.
Additional settings
Track display
Requirement: A folder with audio files must be playing
⇒page 49.
– Select: function button > Track display
File name
The name of the file is displayed without the file extension.
Track name
The track name, for example from the ID3 tag, is displayed.
Tips
The Track display function is not available for the Jukebox or a
connected iPod.
Displaying track information
Requirement: A folder with audio files must be playing
⇒page 49.
– Select: function button > function
button > Display track info.
If information is available for the current track (such as artist or
album), it will be displayed in a pop-up window if this function is
activated.
Aspect ratio
Requirement: A video DVD must be playing ⇒page 48.
– Select: function button > function
button > Aspect ratio.
The following functions can be selected for the aspect ratio:
•Automatic adjustment - the aspect ratio is adjusted automati-
cally. The image width varies depending on film format.
•Standard (4:3) - the DVD image is displayed in 4:3 format.
•Widescreen (16:9) - the DVD image is displayed in 16:9 format.
•Zoom - the DVD image is expanded to fill the complete display.
•Cinemascope - the image is displayed in the 1:2.35 aspect ratio.
Applies to vehicles: with Audi music interface or Aux-in connection
Input level
Requirement: A portable audio device must be connected
with the 3.5 mm stereo jack adapter cable* ⇒page 20.
A
15
SETUP
MEDIA SETUP
MEDIA SETUP
MMI high B8, for internal use only

Playing media56
– Select: function button > Source External audio
input/Audi music interface > function button >
Input level.
The volume of the portable audio device is adapted to the MMI. Audi
recommends adjusting the volume of the portable audio device to 70
percent of the maximum output.
MEDIA
SETUP
MMI high B8, for internal use only
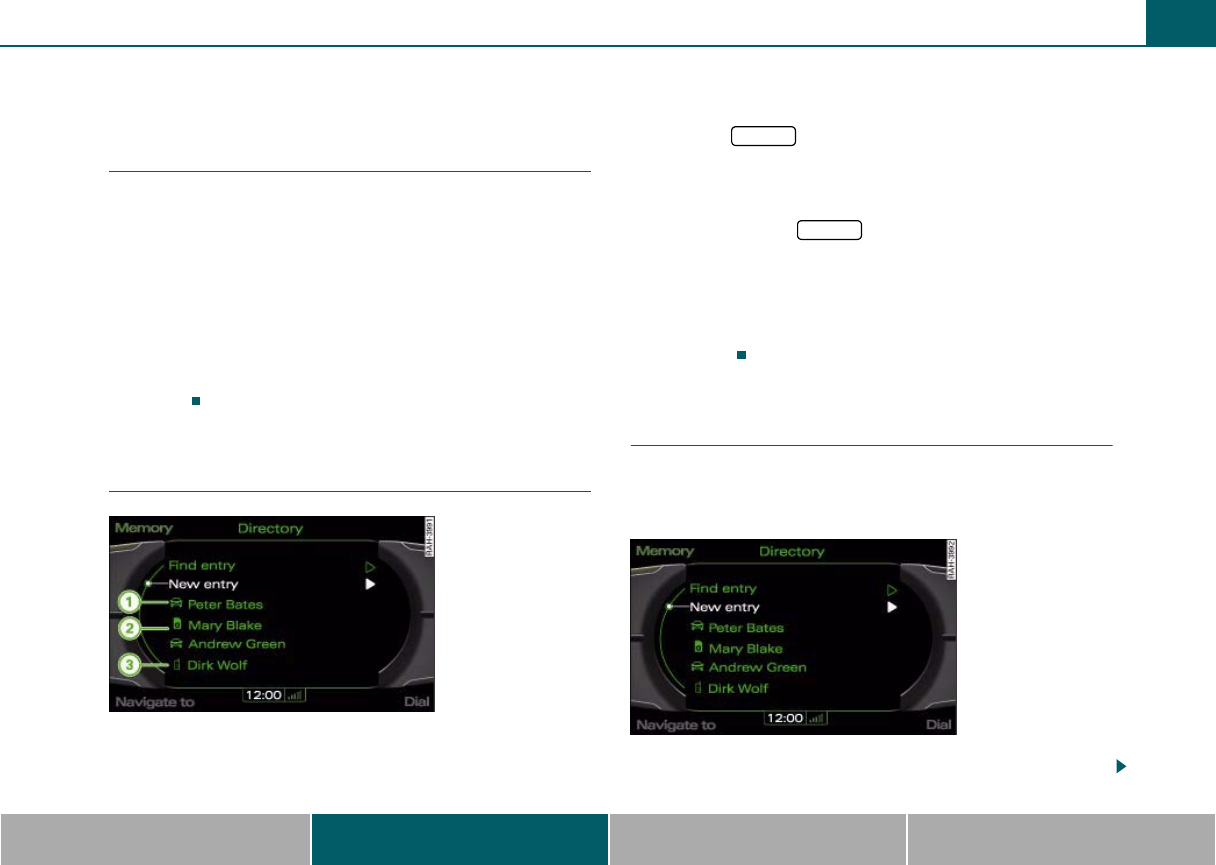
Directory 57
MMI components MMI control panel Multifunction steering wheel Voice recognition system
Directory
Applies to vehicles: with cell phone prep
Introduction
The MMI contains an extensive directory. You can manage up to
5,000 entries with the directory ⇒page 68. You can transfer up to
2000 directory entries from your cell phone to the MMI via Bluetooth.
The imported directory entries are stored in the general profile or in
your personal profile in the MMI ⇒page 66. You can also manually
store up to 100 entries per profile in the MMI local memory.
You can store up to five telephone numbers (land line, cell and fax)
for each entry. You can store a private and work navigation destina-
tion in the local MMI memory for up to 100 entries. You can then use
these entries directly from the directory for communication and
navigation.
Applies to vehicles: with cell phone prep
Opening the directory
Requirement: The MMI must be switched on ⇒page 28.
– Press the function button. A list of entries
⇒fig. 57 or the last active directory menu appears in the
MMI display.
–If a list of entries ⇒fig. 57 does not appear in the MMI
display, press the function button again.
The directory entries are displayed in alphabetical order and identi-
fied with a symbol ⇒fig. 57.
Local MMI memory
SIM card
Cell phone
Applies to vehicles: with cell phone prep
Storing a new directory entry
You must enter a name for the new entry first. Then you
can enter additional optional information such as tele-
phone numbers, address or navigation destination.
Requirement: The directory must be open ⇒page 57.
Fig. 57 List of entries
NAME
NAME
A
1
A
2
A
3
Fig. 58 Storing a new
entry
MMI high B8, for internal use only
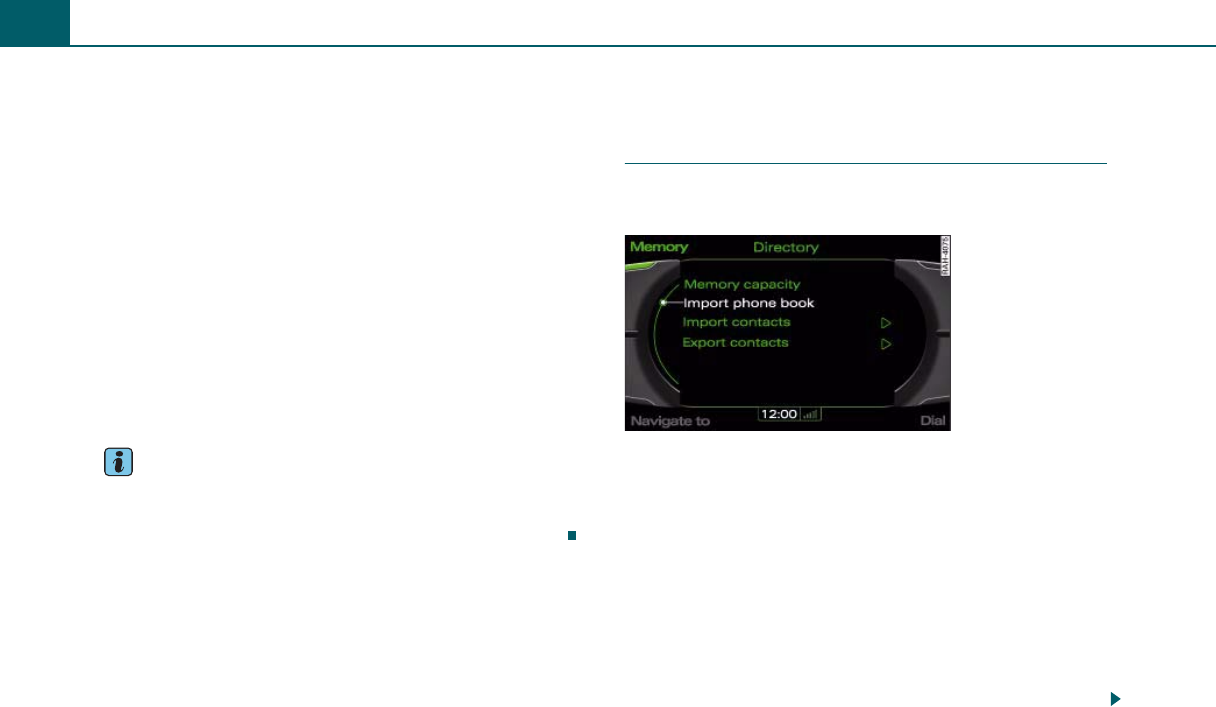
Directory58
– Turn the control knob to New entry ⇒page 57, fig. 58
and press the knob. An input field appears in the MMI
display.
– Press the control knob to open the Name field. The speller
appears in the MMI display ⇒page 31.
– Enter the name using the speller, then select OK in the
speller and press the knob to confirm your entry. The input
field appears again in the MMI display.
– To enter additional data, select a field with the control
knob and follow the instructions above.
You can store up to five telephone numbers in an address card. You
can also assign a Type (Business or Private) and a Category (Land
line, Cell or Fax) to a telephone number. You can also identify a
frequently used telephone number as a Preferred phone number.
That number is then displayed first in the open address card.
Tips
•Entries are stored automatically during input.
•The new entry is stored in the local memory for the current profile.
The local memory for the current profile is limited to 100 entries.
Importing directory entries
Applies to vehicles: with cell phone prep
Importing a phone book
Directory entries from a cell phone can be imported into
the directory manually.
Requirement: The directory must be open ⇒page 57 and the
cell phone prep ⇒page 22 must be active.
– Press the Memory control button.
–Turn the control knob to Import phone book ⇒fig. 59
and press the knob. The phone book in the connected cell
phone is imported.
If you have not created a personal profile ⇒page 66, the phone book
will be imported into the personal profile. When connecting a cell
phone, the existing entries are overwritten with the entries in the cell
phone that is currently connected. Up to 2,000 entries can be
imported into the general profile.
Fig. 59 Importing a
phone book
MMI high B8, for internal use only
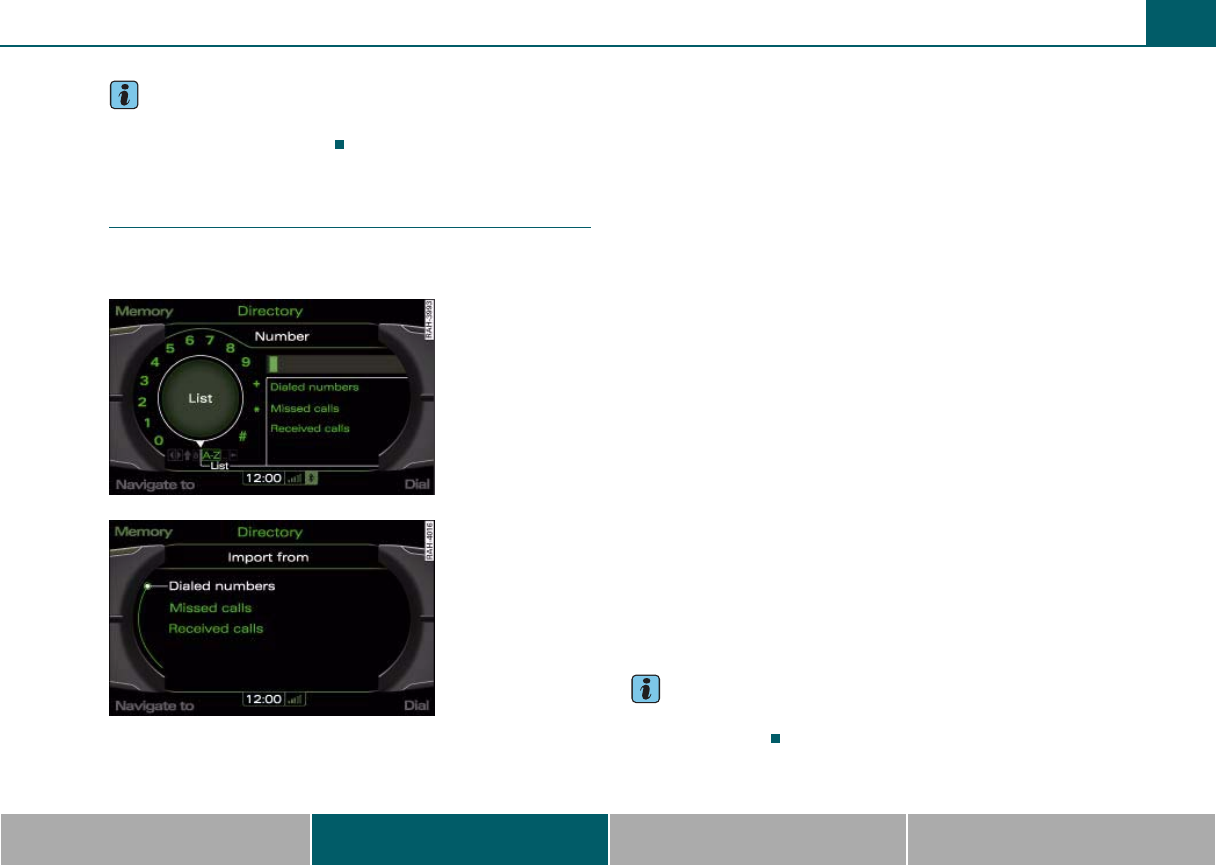
Directory 59
MMI components MMI control panel Multifunction steering wheel Voice recognition system
Tips
The directory entries in the current profile are updated automatically
when a cell phone is connected.
Applies to vehicles: with cell phone prep
Importing a phone number
You can import a phone number for an existing entry in
the directory.
Requirement: A new entry must stored in the directory
⇒page 57 or an existing entry in the local MMI memory will
be edited ⇒page 63.
–Turn the control knob to Phone numbers and press the
knob.
–Turn the control knob to New phone number and press
the knob. An input field appears in the MMI display.
– Turn the control knob to Number and press the knob. The
speller appears in the MMI display.
–Select List ⇒fig. 60 in the speller and press the control
knob. The Import from menu appears in the MMI display
⇒fig. 61.
– Turn the control knob to a call list (for example Dialed
numbers ⇒fig. 61) from which the phone number will be
imported and press the knob. A list of phone numbers
appears in the MMI display.
– Turn the control knob to a phone number and press the
knob. The phone number is imported into the address card
and stored automatically.
You can also enter a phone number directly in the Number field using
the speller without using the import function.
If the functions are grayed out, make sure your cell phone is paired
with the cell phone prep. Also make sure there are phone numbers in
the call lists on your cell phone.
Tips
The import function depends on the cell phone. Grayed out functions
cannot be selected.
Fig. 60 Entering the
phone number using
the speller
Fig. 61 Transferring
the number from the
call lists
MMI high B8, for internal use only

Directory60
Applies to vehicles: with cell phone prep
Importing address cards
Address cards in vCard format (.vcf) can be imported into
the directory with a memory card or a USB storage
device*.
Requirement: The directory must be open ⇒page 57 and a
memory card must be inserted in the memory card reader
⇒page 16 or a USB storage device must be connected to the
Audi music interface* using a USB adapter cable* ⇒page 20.
–Press the Memory control button.
– Turn the control knob to Import contacts and press the
knob.
– Turn the control knob to SD card 1, SD card 2 or USB
storage device and press the knob.
– Turn the control knob to All entries or a certain entry in
the list ⇒fig. 62 and press the knob.
– Turn the control knob to Import entries and press the
knob to import the selected entry or all entries.
– To search for an entry in the cell phone directory, turn the
control knob to Find entry. The speller appears in the MMI
display ⇒page 31.
– Enter the name using the speller, then select OK in the
speller and press the knob to confirm your entry.
Tips
•The address import depends on the cell phone. Only structured
addresses that have information regarding country, city, ZIP code
and street can be imported.
•You can check the directory memory capacity at any time
⇒page 68.
•The imported address cards are stored in the local memory for the
current profile.
Applies to vehicles: with cell phone prep
Exporting address cards
Directory entries can be exported to a memory card or
USB storage device in vCard format (.vcf).
– Press the Memory control button.
–Turn the control knob to Export contacts and press the
knob.
–Turn the control knob to an entry in the list or All entries
and press the knob.
– To search for an entry, turn the control knob to Find entry
⇒fig. 62. The speller appears in the MMI display
⇒page 31.
Fig. 62 Importing
address cards
MMI high B8, for internal use only
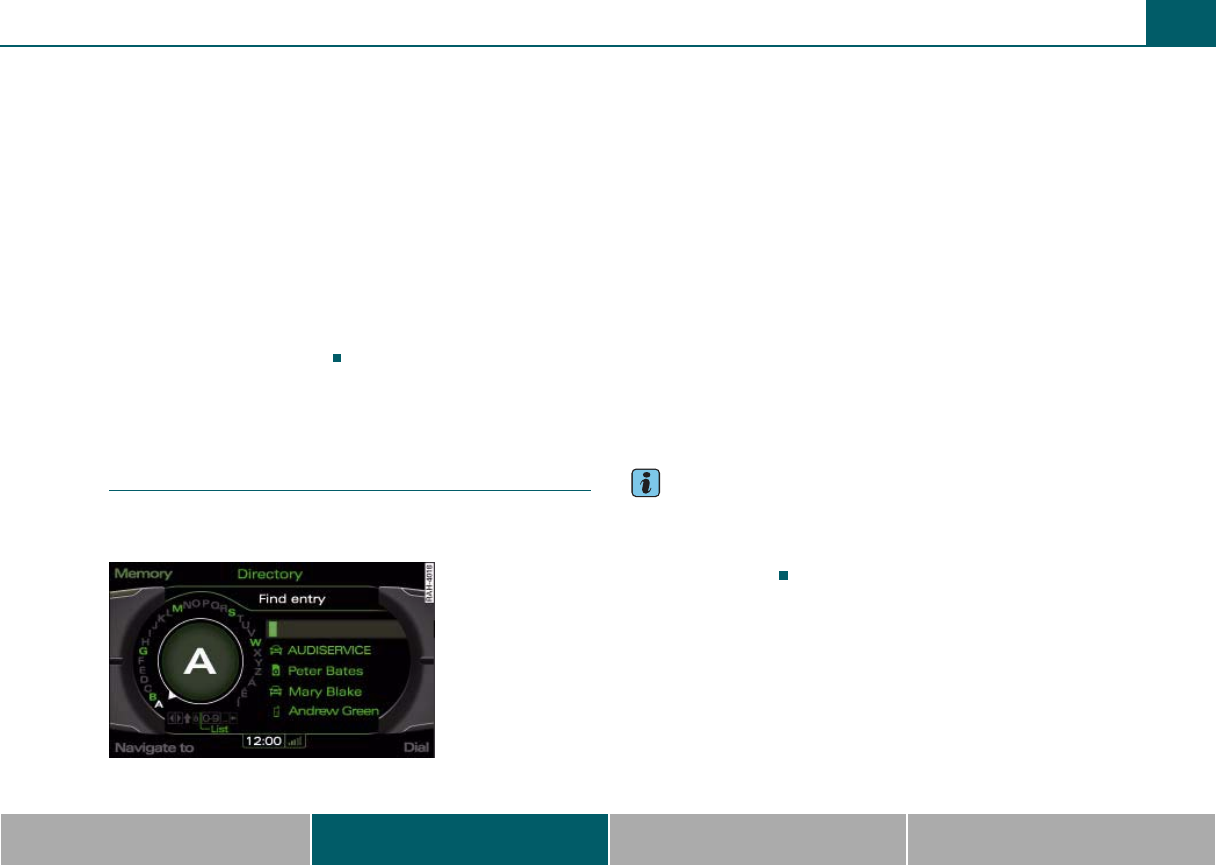
Directory 61
MMI components MMI control panel Multifunction steering wheel Voice recognition system
– Enter the name using the speller, then select OK in the
speller and press the knob to confirm your entry. The entry
is selected.
– Turn the control knob to Export entries individually or
Export packed entries and press the knob.
– Turn the control knob to the source SD card 1, SD card 2
or USB storage device and press the knob.
You can export packed directory entries or individual entries.
•Export entries individually - a vCard file (.vcf) is created for each
directory entry during the export.
•Export packed entries - only one vCard file (.vcf) is created for all
directory entries during export.
Using a directory entry
Applies to vehicles: with cell phone prep
Searching
You can select an entry directly from a list or search for it
using the speller.
Requirement: The directory must be open ⇒page 57 and
entries must be displayed ⇒page 57.
Selecting an entry from a list
– Turn the control knob to an entry ⇒page 57, fig. 58 and
press the knob. The address card is shown in the MMI
display.
Searching for an entry using the speller
–Turn the control knob to Find entry ⇒fig. 63 and press
the knob. The speller appears in the MMI display
⇒page 31.
– Enter a name using the speller, or
– Select a name in the speller from LIST.
–Select OK in the speller and press the control knob to
confirm your entry.
Tips
•You can change, delete ⇒page 64, call up or navigate to
⇒page 62 an existing entry.
•You can also search for an entry easily using the voice recognition
system ⇒page 111.
Fig. 63 Searching for
an entry
MMI high B8, for internal use only
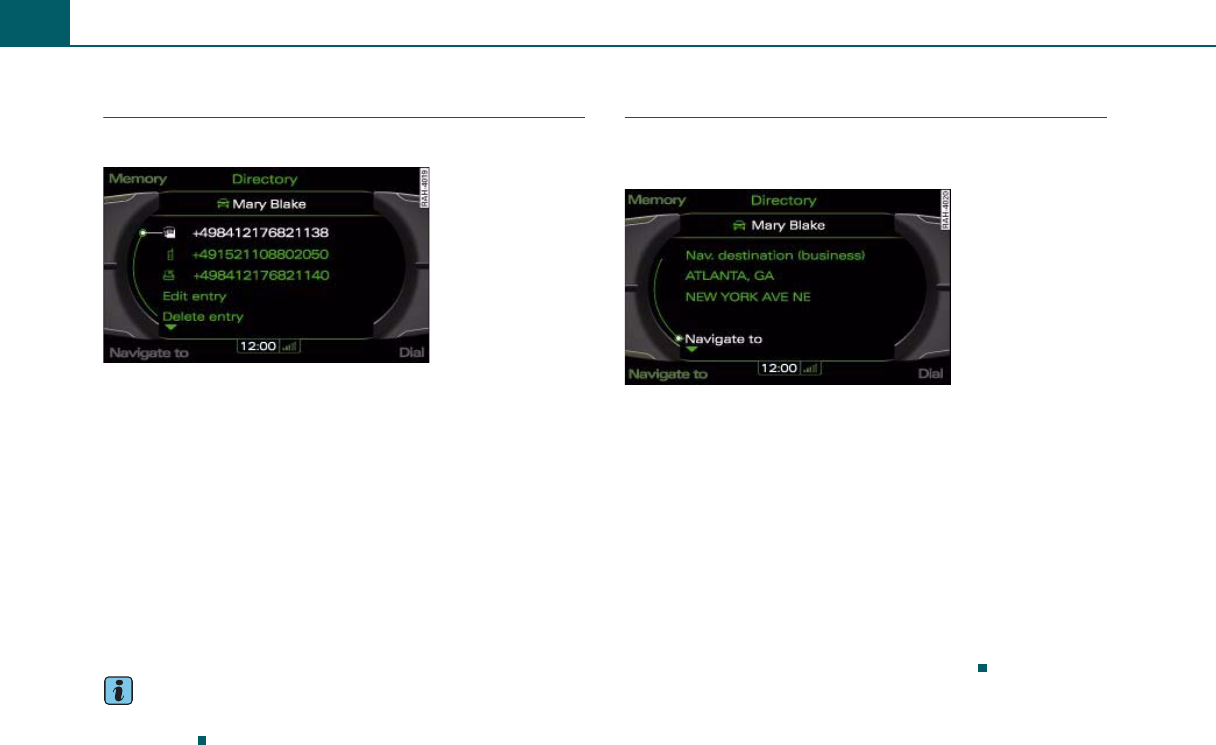
Directory62
Applies to vehicles: with cell phone prep
Selecting
You can make calls to entries with phone numbers.
Requirement: The directory must be open and list of direc-
tory entries must be displayed ⇒page 57.
– Turn the control knob to an entry and press the knob. The
address card appears in the MMI display.
– Turn the control knob to a phone number ⇒fig. 64 and
press the Dial control button. The call is made, or
– Press the control knob. The telephone menu appears in
the MMI display with the speller and the selected phone
number.
– Select OK in the speller and press the control knob. The
connection is established.
Tips
You can also make calls easily using the voice recognition system
⇒page 111.
Applies to vehicles: with cell phone prep
Navigating
You can navigate directly to entries in the directory that
have navigation destinations.
Requirement: The directory must be open ⇒page 57 and
must contain stored entries with private or personal naviga-
tion destinations ⇒fig. 65.
–Turn the control knob to an entry and press the knob.
– If an entry contains two navigation destinations (private
and business), turn and press the control knob to select a
navigation destination.
– Press the Navigate to control button, or
–Turn the control knob to Navigate to ⇒fig. 65 and press
the knob. The navigation menu appears in the MMI display
with the selected navigation destination.
Fig. 64 Calling up an
entry Fig. 65 Selecting a
navigation destination
MMI high B8, for internal use only
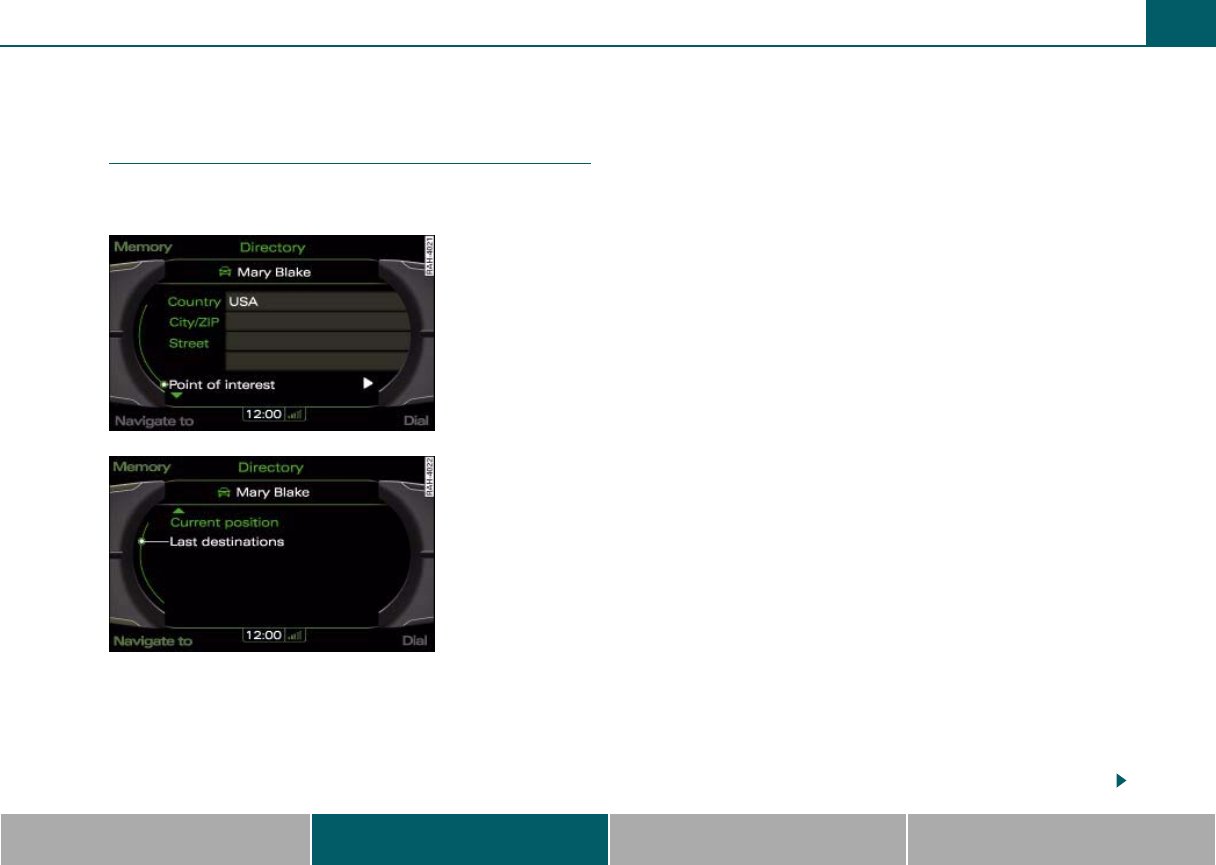
Directory 63
MMI components MMI control panel Multifunction steering wheel Voice recognition system
Editing a directory entry
Applies to vehicles: with cell phone prep
Storing a navigation destination
You can store a business and a personal navigation desti-
nation for an existing entry in the directory.
Requirement: An address card must be open for editing
⇒fig. 66 and a private/business navigation destination must
be selected or a new entry must be created ⇒page 57.
Entering a navigation destination
–Turn the control knob to Create nav. destination and
press the knob. The input field is shown in the MMI display
⇒fig. 66.
– Turn the control knob to Country and press the knob. A list
of countries appears in the MMI display.
– Turn the control knob to a country and press the knob. The
land is entered in the input field.
– To enter additional data, select a field with the control
knob and follow the instructions above. Your entries are
automatically stored in the address card.
Selecting from an address
–Turn the control knob to Create nav. destination and
press the knob. The stored address is automatically set as
the navigation destination.
Selecting from last destinations
–Turn the control knob to Create nav. destination and
press the knob. The input field is shown in the MMI display
⇒fig. 66.
–Turn the control knob to Last destinations ⇒fig. 67 and
press the knob. A list of the last destinations appears in
the MMI display.
– Turn the control knob to a navigation destination and
press the knob. The navigation destination is stored in the
address card.
Setting based on the current position
–Turn the control knob to Create nav. destination and
press the knob. The input field appears ⇒fig. 66.
Fig. 66 Navigation
destination input field
Fig. 67 Setting a navi-
gation destination
from the last destina-
tions
MMI high B8, for internal use only
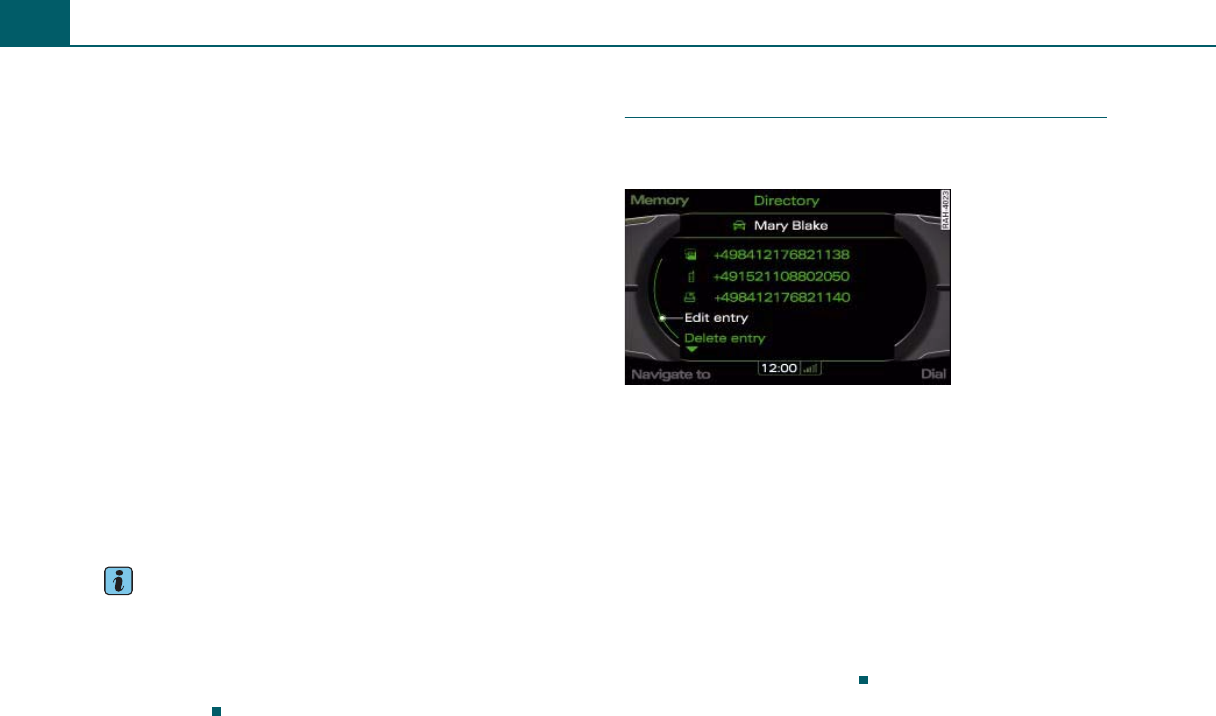
Directory64
– Turn the control knob to Current position ⇒page 63,
fig. 67 and press the knob. The data for the current posi-
tion is set as the navigation destination.
Selecting from points of interest
– Turn the control knob to Create nav. destination and
press the knob. The input field is shown in the MMI display
⇒page 63, fig. 66.
– Turn the control knob to Point of interest ⇒page 63,
fig. 66 and press the knob.
– Turn the control knob to Top categories for example and
press the knob.
A private and a business navigation destination can be assigned to
each directory entry. You can call up the stored navigation destina-
tions in the Navigation menu using the Memory control button (Load
from directory) ⇒page 89.
You can find the next rest stop, gas station, Audi dealer or hospital
under the Top destinations menu item. The Point of interest
⇒page 63, fig. 66 menu item contains additional submenus that you
can use to create navigation destinations. For more information
about the submenus, refer to ⇒page 82.
Tips
•You can also display a navigation destination as a Favorite. The
navigation destination is then displayed in the destination entry
menu under the Navigation menu ⇒page 90.
•Entries that have an assigned navigation destination are stored in
the local memory for the current profile. The current profile is limited
to 100 entries.
Applies to vehicles: with cell phone prep
Changing an entry
You can edit the entries in the MMI local memory at any
time.
Requirement: An address card must be open ⇒fig. 68.
–Turn the control knob to Edit entry ⇒fig. 68 and press the
knob. An input field appears in the MMI display.
– Select a field with the control knob and press the knob to
edit the entry data.
You cannot edit directory entries from the cell phone memory directly
in the MMI. To edit an entry from the cell phone, turn the control
knob to Copy for editing and press the knob. A copy of the entry is
stored in the MMI memory.
The MMI cannot automatically update changed directory entries in
the connected cell phone. Audi recommends editing cell phone
entries directly in the cell phone.
Fig. 68 Editing an
entry
MMI high B8, for internal use only
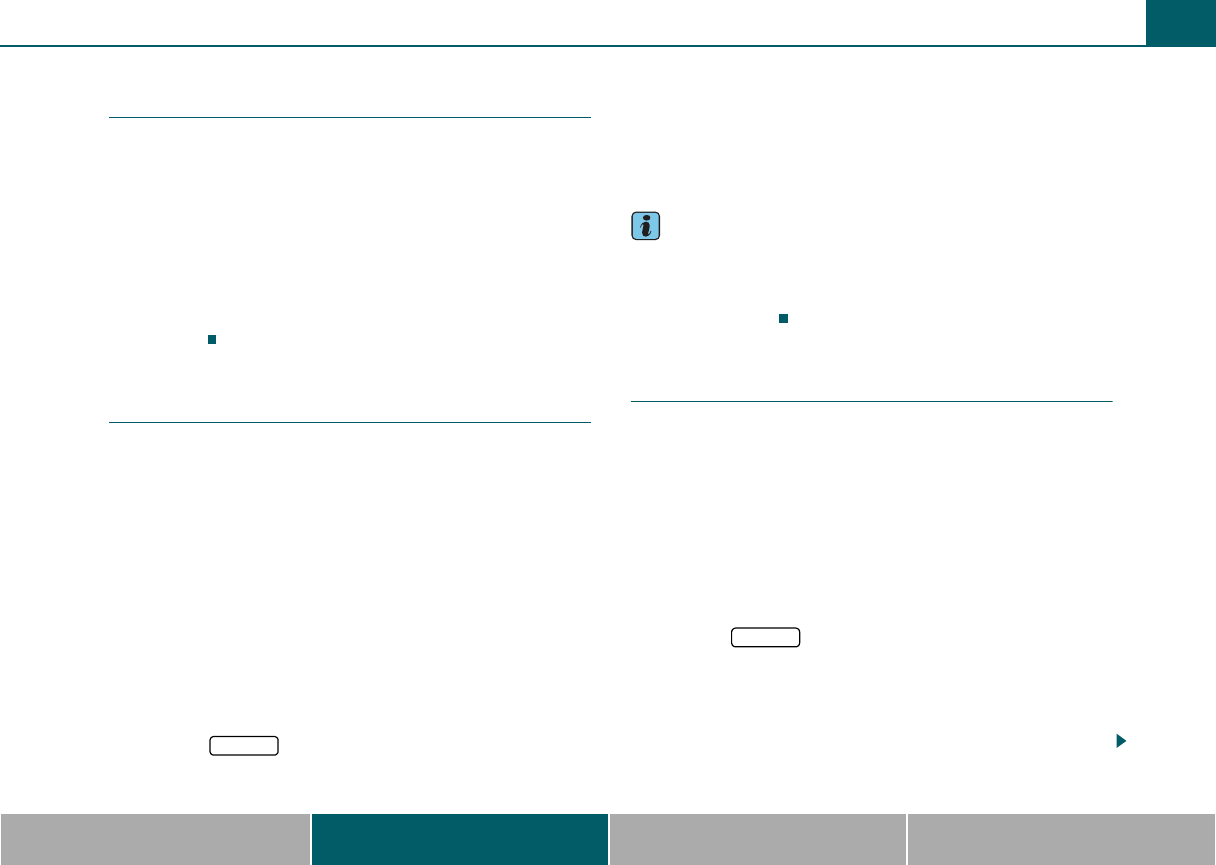
Directory 65
MMI components MMI control panel Multifunction steering wheel Voice recognition system
Applies to vehicles: with cell phone prep
Deleting an entry
You can delete the entries in the MMI local memory at
any time.
Requirement: An address card must be open ⇒page 64,
fig. 68.
– Turn the control knob to Delete entry ⇒page 64, fig. 68
and press the knob.
– Turn the control knob to Yes and press the knob to delete
an entry. The entry is deleted from the MMI local
memory.
Applies to vehicles: with cell phone prep
Reading a name
The MMI automatically creates a name tag for each entry
in the directory. You can also assign up to 50 personal
name tags for address cards using the voice recognition
system.
Requirement: The directory must be open ⇒page 57.
Reading in an address card
– Turn the control knob to an entry and press the knob. The
address card is shown in the MMI display.
– Turn the control knob to Read name and press the knob.
The name is read.
Reading in the SETUP menu
– Press the function button.
– Turn the control knob to Read voice memos and press the
knob. A list with personal name tags appears in the MMI
display.
– Turn the control knob to an entry and press the knob. The
name tags are played.
Tips
•You can only assign and store personal name tags using the voice
recognition system ⇒page 112.
•You can also read all the names easily using the voice recognition
system ⇒page 112.
Applies to vehicles: with cell phone prep
Deleting a name tag
Requirement: The directory must be open ⇒page 57.
Deleting in the address card
– Turn the control knob to an entry and press the knob. The
address card is shown in the MMI display.
–Turn the control knob to Delete name tag and press the
knob. The name tag is deleted.
Deleting in the SETUP menu
– Press the function button.
–Turn the control knob to Delete voice memos and press
the knob.
– Turn the control knob to Delete individually or Delete all
entries and press the knob.
SETUP
SETUP
MMI high B8, for internal use only
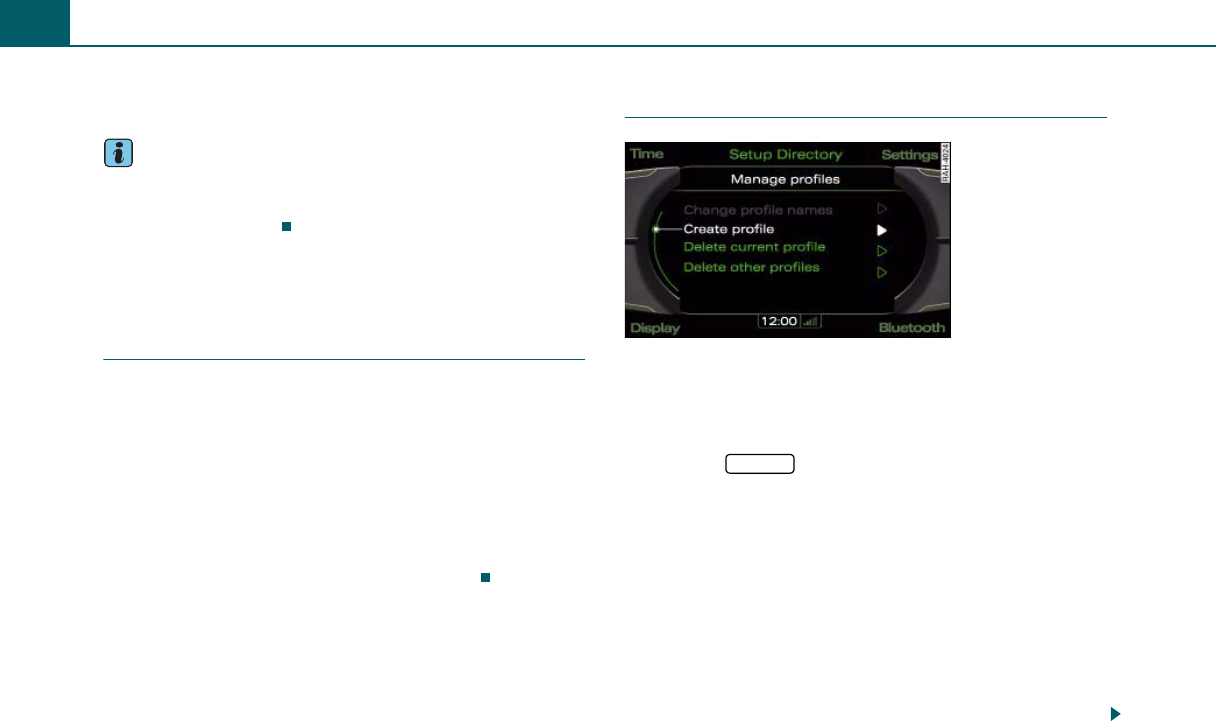
Directory66
– Turn the control knob to Yes and press the knob to begin
the deletion process.
Tips
•You can only delete personal assigned name tags.
•There is another way to delete all name tags. For more informa-
tion, refer to ⇒page 38.
Managing profiles
Applies to vehicles: with cell phone prep
Introduction
A general profile and up to four personal profiles are available in the
directory.
A personal profile is useful if you will be connecting different cell
phones to the MMI. In the personal profile, you have immediate
access to the cell phone directory entries when you connect the
phone. The directory entries are updated automatically in the back-
ground.
The entries for the connected cell phone are loaded into the general
profile. When that happens, the entries from the last cell phone that
was connected to the general profile are overwritten.
Applies to vehicles: with cell phone prep
Creating a profile
Requirement: The directory must be open ⇒page 57, the
cell phone prep ⇒page 22 must be activated and the auto-
matic import of cell phone directory entries must be
complete.
– Press the function button.
–Turn the control knob to Manage profiles and press the
knob.
–Turn the control knob to Create profile ⇒fig. 69 and
press the knob. The profile name is shown in the MMI
display.
–Turn the control knob to Yes and press the knob to store
the profile.
The Bluetooth name of the connected cell phone is automatically set
as the profile name. However, you can assign your own profile names
⇒page 67.
Fig. 69 Creating a
profile
SETUP
MMI high B8, for internal use only
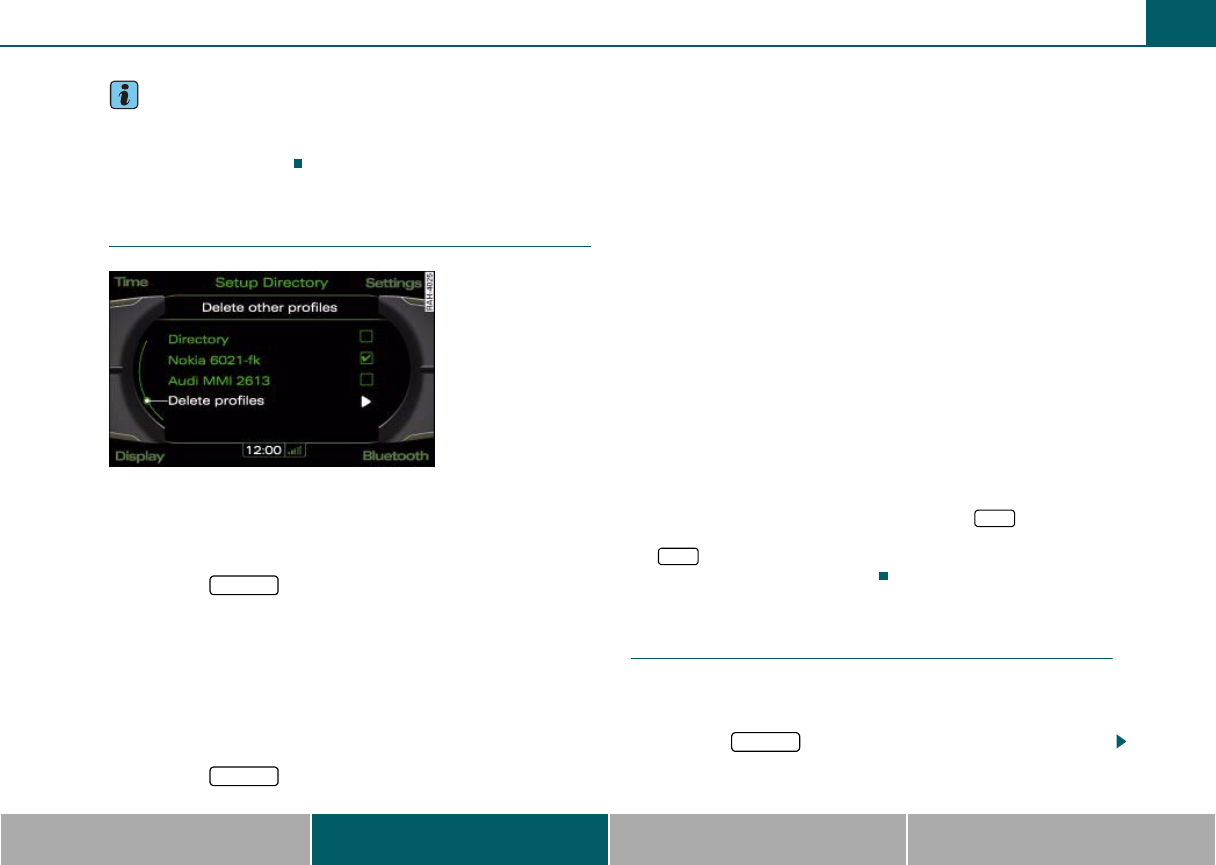
Directory 67
MMI components MMI control panel Multifunction steering wheel Voice recognition system
Tips
The Create profile menu item is only available when a cell phone is
connected. In addition, there must not be a profile already stored for
the connected cell phone.
Applies to vehicles: with cell phone prep
Deleting profiles
Requirement: The directory must be open ⇒page 57 and a
profile must be stored in the MMI ⇒page 66.
Deleting the current profile
– Press the function button.
– Turn the control knob to Delete current profile and press
the knob.
– Turn the control knob to Delete current profile
⇒page 66, fig. 69 and press the knob. All directory
entries for the current profile are deleted.
Deleting other profiles
– Press the function button.
– Turn the control knob to Delete current profile and press
the knob.
–Turn the control knob to Delete other profiles ⇒fig. 70
and press the knob. A list with all of the stored profiles
and the directory for the general profile appears in the
MMI display. The current profile is not displayed in the list.
– Turn the control knob to a stored profile or Directory and
press the knob.
–Turn the control knob to Delete profiles and press the
knob.
– Confirm your entry by turning the control knob to Yes and
pressing it. The speller appears in the MMI display to enter
the ID number.
– Enter the last seven characters of your vehicle's VIN with
the speller.
–Select OK in the speller and press the control knob to
confirm your entry.
You can find the Vehicle ID number (VIN) in the menu or the
vehicle registration. To obtain the Vehicle ID number (VIN), press
the function button. Turn the control knob to Vehicle ID
number (CAR) and press the knob.
Applies to vehicles: with cell phone prep
Changing profile names
Requirement: The directory must be open ⇒page 57 and a
profile must be stored in the MMI ⇒page 66.
– Press the function button.
Fig. 70 Deleting other
profiles
SETUP
SETUP
CAR
CAR
SETUP
MMI high B8, for internal use only

Directory68
– Turn the control knob to Delete current profile and press
the knob.
– Turn the control knob to Change profile names and press
the knob. The speller appears in the MMI display with the
profile name in the input field.
–Turn the speller to and press the control knob until the
profile name in the input field is deleted.
– Enter a new profile name using the speller, then select OK
in the speller and press the knob to confirm your entry.
Additional settings
Applies to vehicles: with cell phone prep
Memory capacity
– Select: function button > Memory control button
> Memory capacity.
The Memory capacity for the current profile and the entire memory is
displayed.
You can manage up to 5,000 entries with the directory. You can
import up to 2000 entries into the general profile or your personal
profile. You can also manually store up to 100 entries per profile in
the MMI local memory.
NAME
MMI high B8, for internal use only
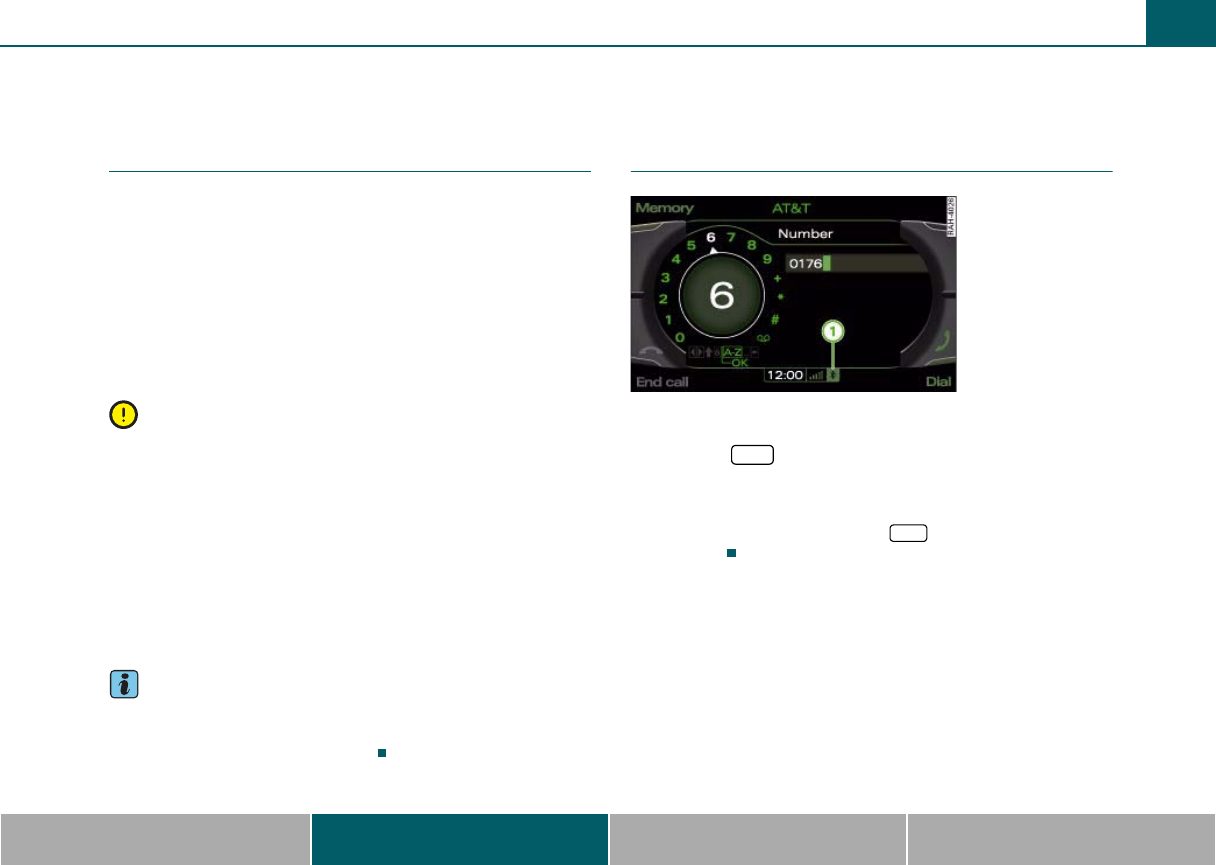
Calling 69
MMI components MMI control panel Multifunction steering wheel Voice recognition system
Calling
Applies to vehicles: with cell phone prep
Introduction
You can use a cell phone comfortably with the MMI. Many functions
you are familiar with from your cell phone are available: you can
answer and end calls or place them on hold. You can also access the
MMI directory and the cell phone directory.
The active audio source is muted during an incoming/outgoing call
and the drive is paused ⇒page 33. After the call has ended, the audio
source is restored to the previous volume level.
If you do not want to hear navigation announcements during a phone
call, you can switch off that option ⇒page 93.
Note
•Switch the phone system off through the Telephone Setup menu
in areas where cell phone usage is prohibited. Obey all applicable
instructions and regulations.
•Switch your cell phone off in areas at risk for an explosion. These
locations are not always clearly marked. They may include gas
stations, equipment that stores or transports fuel or chemicals, or
locations where fuel vapors (such as propane or gasoline vapor in
vehicles or buildings), chemicals or large quantities of dust particles
(such as flour or sawdust) may be present in the air. This also applies
to all other locations where you would normally switch your vehicle
off.
Tips
The telephone functions depend on the cell phone service provider
and the cell phone you are using. You can obtain more information
from your cell phone service provider.
Applies to vehicles: with cell phone prep
Starting Telephone mode
Requirement: The MMI must be switched on ⇒page 28.
– Press the function button. The speller ⇒fig. 71 or
the last active Telephone menu appears in the MMI
display.
You open the speller by pressing the function button in tele-
phone mode.
Fig. 71 Speller for
entering a phone
number
TEL
TEL
MMI high B8, for internal use only
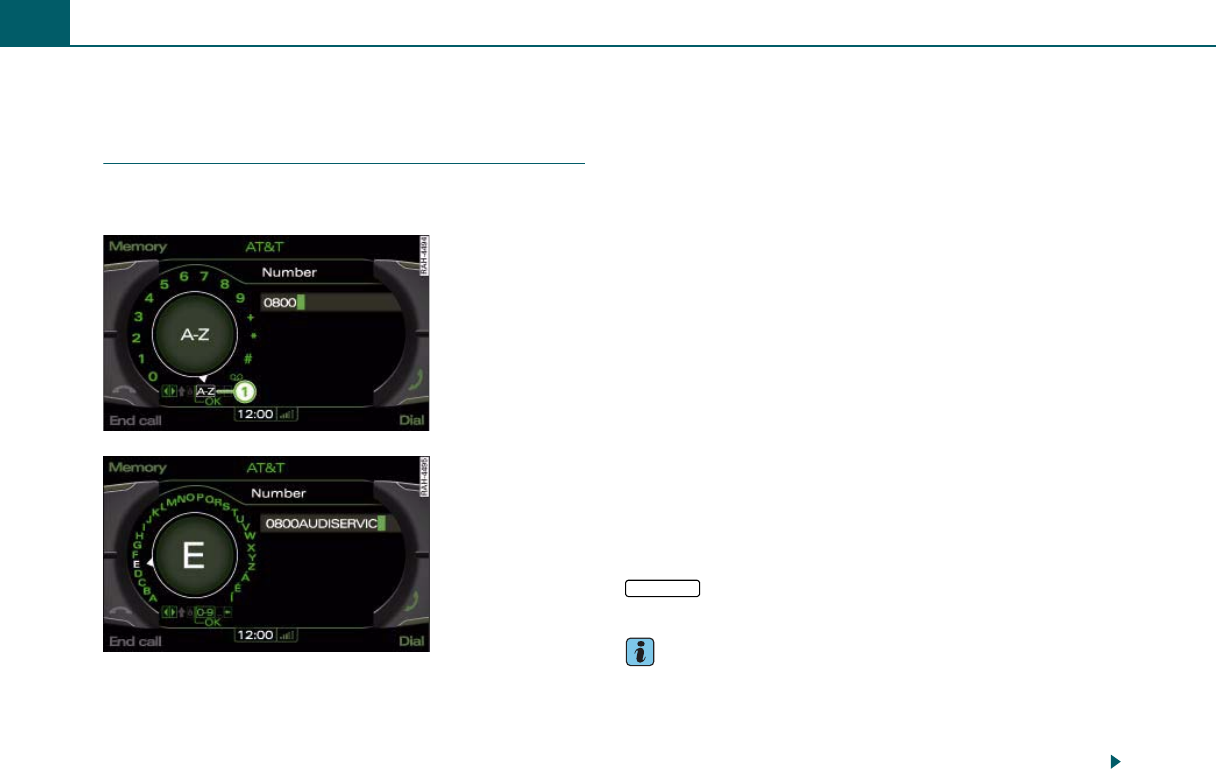
Calling70
Dialing a telephone number
Applies to vehicles: with cell phone prep
Directly through the speller
The speller can be used to enter a phone number directly
as a series of numbers or letters.
Requirement: Telephone mode must be active ⇒page 22
and the speller must appear in the display ⇒fig. 72.
Entering the phone number as a sequence of
numbers
– Enter the phone number using the speller.
– Confirm your entry by selecting OK in the speller and
pressing, or
– Press the Dial control button. As the number is being
dialed, the audio source is muted.
Entering the phone number as a sequence of
letters
– Enter an area code with the speller.
– To change to the letter speller, turn the speller to A-Z
⇒fig. 72 and press the control knob.
– Use the speller to enter a series of letters such as AUDIS-
ERVICE ⇒fig. 73.
– Confirm your entry by selecting OK in the speller and
pressing, or
– Press the Dial control button. The entered telephone
number is dialed.
If you enter a phone number incorrectly, you can press on the
button to completely delete the number you entered in
the speller.
Tips
•DTMF tones can be entered directly through the speller or loaded
from the stored phone numbers ⇒page 71.
•The audio source is muted during an incoming/outgoing call. The
mute symbol is shown in the MMI display status bar ⇒page 30,
fig. 21.
Fig. 72 Entering tele-
phone numbers using
the number speller
Fig. 73 Entering tele-
phone numbers using
the letter speller
A
1
RETURN
MMI high B8, for internal use only
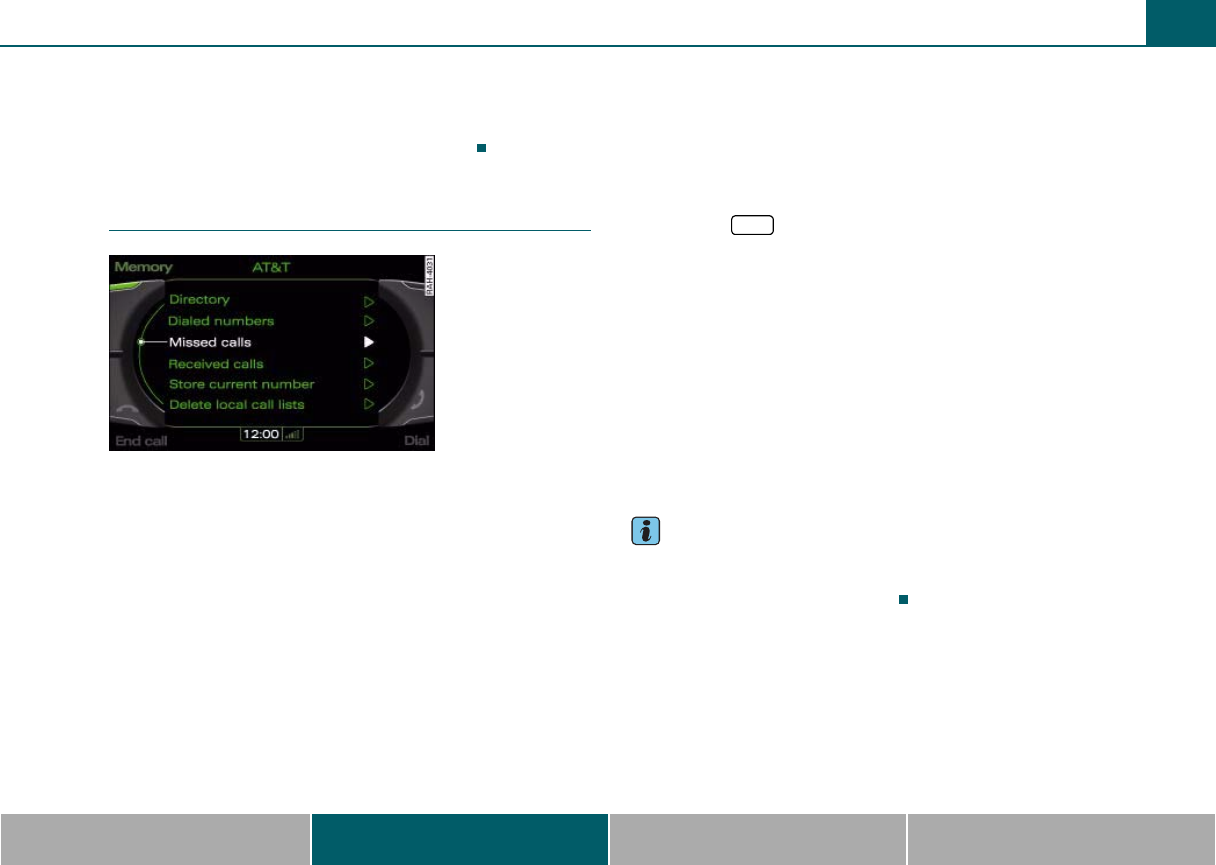
Calling 71
MMI components MMI control panel Multifunction steering wheel Voice recognition system
•If you switch Off voice guidance while in navigation mode, naviga-
tion commands will not play during a call ⇒page 93.
•If you have switched the MMI display off, it will switch on auto-
matically and remain on for the duration of the call.
Applies to vehicles: with cell phone prep
From a list
Requirement: Telephone mode must be active ⇒page 22.
Searching and calling telephone numbers in a
list
–Press the Memory control button.
– Turn the control knob to Directory, Dialed numbers,
Missed calls or Received calls.
– Press the control knob. The phone numbers from the
selected list appear in the MMI display.
– Turn the control knob to the desired telephone number.
– Press the control knob. The selected telephone number is
copied to the speller.
– To initiate the call, turn the speller to OK and press the
control knob, or
– Press the Dial control button.
Dialed number list quick display and calling a
number
– Press the function button. The speller is shown in
the MMI display. There is no telephone number in the
entry field of the speller.
– Press the Dial control button. The Dialed numbers list
appears in the MMI display.
– Turn the control knob to the desired telephone number.
– Press the control knob. The selected telephone number is
copied to the speller.
– To initiate the call, turn the speller to OK and press the
control knob, or
– Press the Dial control button.
Tips
The telephone functions depend on the cell phone service provider
and the cell phone you are using. You can obtain more information
from your cell phone service provider.
Fig. 74 Dialing a
phone number from a
list
TEL
MMI high B8, for internal use only
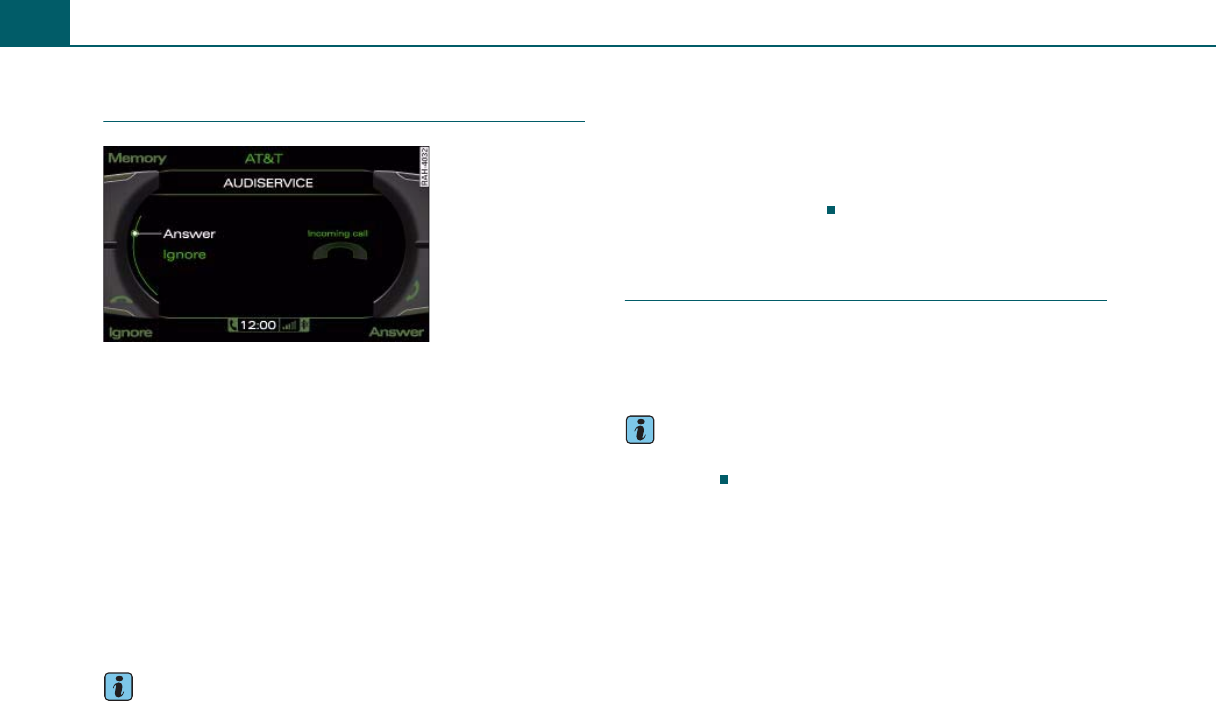
Calling72
Applies to vehicles: with cell phone prep
Answering/ignoring a call
Requirement: An incoming call.
Answering a call
– Turn the control knob to Answer and press the knob, or
–Press the Answer control button.
Ignoring a call
– Turn the control knob to Ignore and press the knob, or
–Press the Ignore control button.
The Name, Phone number or Unknown appears in the display
depending on whether the caller has been stored in the directory and
if the phone number has been transmitted.
Tips
•You can accept an incoming call during an active call. The active
call is placed on hold automatically.
•The audio source is muted during an incoming/outgoing call. The
mute symbol is shown in the MMI display status bar ⇒page 30,
fig. 21.
•If you would not like to hear navigation announcements during a
phone call, you can switch them off ⇒page 93.
•A call can also be answered/ignored using the multifunction
steering wheel ⇒page 104.
Applies to vehicles: with cell phone prep
Ending a call
Requirement: You have an active call or are dialing a call.
– To end a phone call or to cancel dialing, press the End call
button ⇒page 73, fig. 76.
Tips
A call can also be ended using the multifunction steering wheel
⇒page 103.
Fig. 75 Answering an
incoming call
MMI high B8, for internal use only
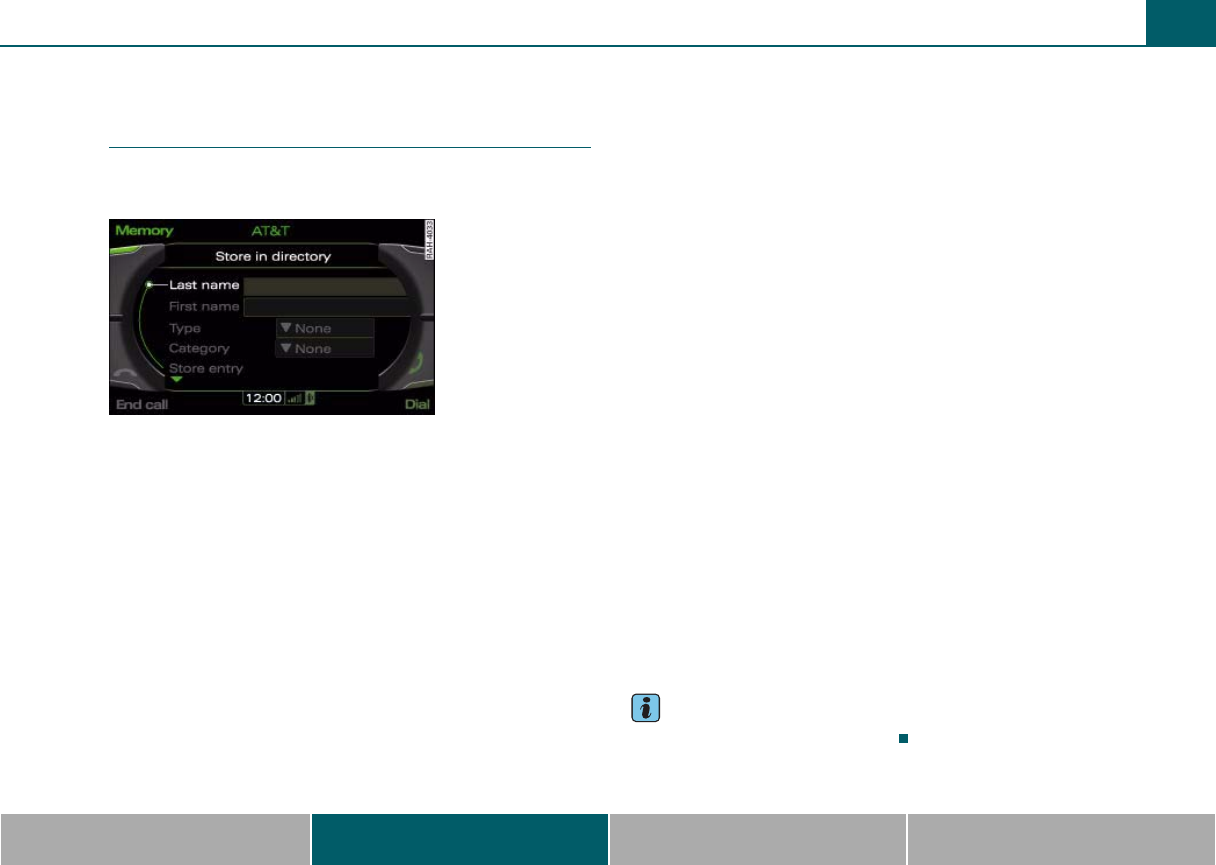
Calling 73
MMI components MMI control panel Multifunction steering wheel Voice recognition system
Applies to vehicles: with cell phone prep
Storing a phone number in the
directory
A new phone number or a number from the call lists can
be stored in the directory
Requirement: Telephone mode must be active ⇒page 22.
New phone number
– Enter a new phone number in the speller ⇒page 70.
–Press the Memory control button ⇒fig. 76.
– Turn the control knob to Store current number and press
the knob.
– To create a new entry, turn the control knob to New entry
⇒page 57, fig. 58 and press the control knob ⇒page 57,
or
– To add a phone number to an existing entry, turn the
control knob to Find entry and press the knob ⇒page 61,
or
– Turn the control knob to an entry in the list and press the
knob. The address card opens.
–Turn the control knob to Store entry and press the knob.
The phone number is stored.
Phone number from a call list
– Press the Memory control button.
–Turn the control knob to Dialed numbers, Received calls
or Missed calls.
– Press the control knob. The available phone numbers are
listed in the display.
– Turn the control knob to the phone number that will be
stored and press the knob.
–Turn the control knob to Store and press the knob.
– To create a new entry, turn the control knob to New entry
⇒page 57, fig. 58 and press the control knob ⇒page 57,
or
– To add a phone number to an existing entry, turn the
control knob to Find entry and press the knob ⇒page 61,
or
– Turn the control knob to an entry in the list and press the
knob. The address card opens.
–Turn the control knob to Store entry and press the knob.
The phone number is stored.
Tips
You can edit the directory ⇒page 57.
Fig. 76 Storing the
phone number in the
directory
MMI high B8, for internal use only
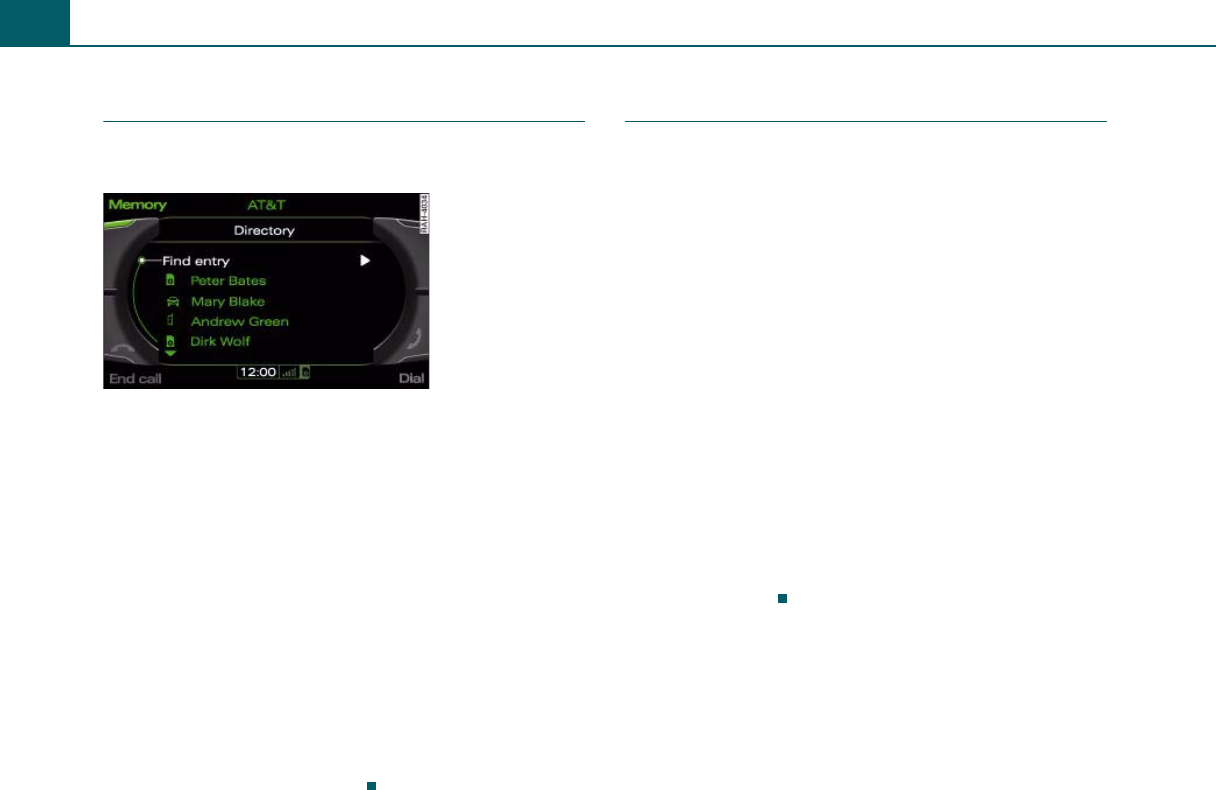
Calling74
Applies to vehicles: with cell phone prep
Dialing stored phone numbers
You can dial a phone number from the call lists or from
the MMI directory.
Requirement: Telephone mode must be started ⇒page 22
and a phone number must be stored.
–Press the Memory control button.
– Turn the control knob to Directory, for example.
– Press the control knob. Find entry and a list of stored
entries appear in the MMI at the same time ⇒fig. 77.
– Turn the control knob to Find entry ⇒fig. 77 and press
the knob. The speller appears in the display so you can
enter names, or
– Turn the control knob to a name from the list and press
the control knob. The phone number is shown in the MMI
display.
– To dial the phone number, press the control knob and then
select OK in the speller and press the knob, or
–Press the Dial control button.
Applies to vehicles: with cell phone prep
Deleting local call lists
Requirement: Telephone mode must be active ⇒page 22.
Delete individually
– Press the Memory control button.
–Turn the control knob to Delete local call lists and press
the knob.
–Turn the control knob to Dialed numbers, Missed calls or
Received calls and press the knob.
– Turn the control knob to Yes and press the knob to delete
a call list.
Delete all entries
– Press the Memory control button.
–Turn the control knob to Delete local call lists and press
the knob.
–Turn the control knob to Delete all entries and press the
knob.
– Turn the control knob to Yes and press the knob to delete
all the call lists.
Fig. 77 Searching
stored telephone
numbers
MMI high B8, for internal use only
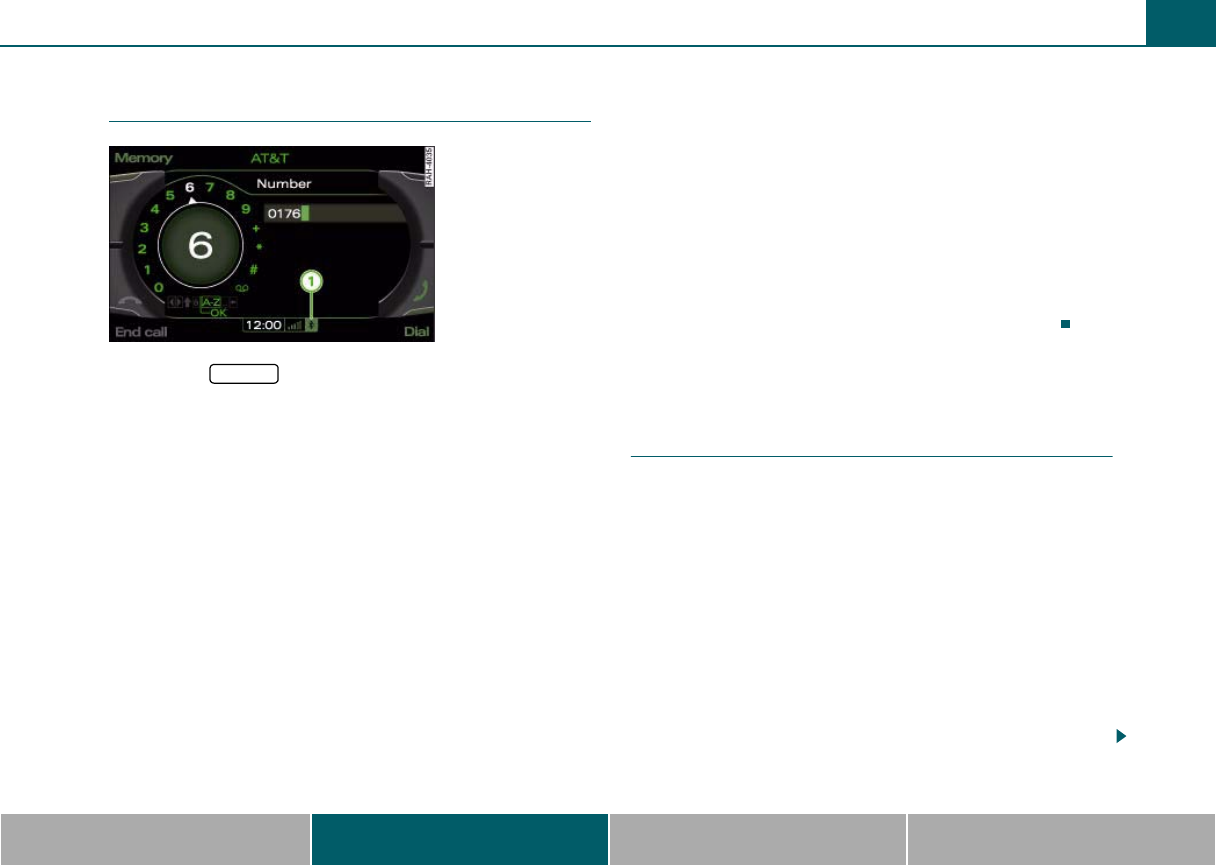
Calling 75
MMI components MMI control panel Multifunction steering wheel Voice recognition system
Applies to vehicles: with cell phone prep
Bluetooth settings
– Press the function button.
–Press the Bluetooth control button. The Bluetooth
settings menu is shown in the MMI display.
Switching Bluetooth on/off
The MMI Bluetooth function can be switched On or Off. The Blue-
tooth symbol ⇒fig. 78 appears in the MMI display when the func-
tion is switched on.
Discovery mode
The visibility of the cell phone prep or cell phone can be switched On
or Off. When auto is selected, the cell phone prep is visible to cell
phones for approximately five minutes when the vehicle is stopped
and the ignition key is inserted. The visibility switches off after that.
However, it is still possible to establish a Bluetooth connection with
cell phones that have already been paired when the visibility is
switched off. The function should be switched off when the pairing
process is complete so the cell phone prep is not visible to others.
Find Bluetooth devices
The system searches for lists Bluetooth devices that are within range.
Paired devices
Bluetooth devices that have been paired with the MMI are listed. The
active connected Bluetooth device is identified with the Bluetooth
symbol.
To delete paired Bluetooth devices individually, select the device and
delete it with the Delete device function.
Bluetooth name
The name of the vehicle cradle for your cell phone prep (such as “AUDI
MMI 2613”) is displayed and can be changed.
Delete Bluetooth devices
All paired cell phones can be deleted by confirming with Yes.
Additional settings
Applies to vehicles: with cell phone prep
Options during a call
Requirement: There must be an active phone call ⇒page 70.
– Select the Options control button.
Switching the microphone off and on
When the microphone is Mute the connected party cannot hear
anything from your phone. However, you can hear your connected
party. Mute off appears in the MMI display.
Accepting another call
If another call comes in during an active call, the Answer and Ignore
functions appear in the MMI display.
If you select Answer, the active call is put on hold and the incoming
call is active. If you select Ignore, the incoming call will be ignored.
Fig. 78 Bluetooth
symbol
SETUP
A
1
MMI high B8, for internal use only

Calling76
Replacing a call
If a call comes in while you have an active call and another call on
hold, the Replace and Ignore functions appear in the MMI display.
If you select Replace, the active call will be replaced with the
incoming call. If you select Ignore, the incoming call will be ignored.
A call on hold remains in queue.
The display in the MMI may still be visible for a few seconds
depending on the cell phone in use. If you use the Replace or Ignore
functions in the MMI while the display is still visible, the current tele-
phone call will be ended.
Tips
The Call waiting function must be activated in your cell phone to be
alerted to an incoming call during an active call. The call options
depend on the cell phone and service provider.
Applies to vehicles: with cell phone prep
Telephone settings
– Select the function button > function
button > Telephone settings.
Ring tone volume
You can increase (Vol. -) or decrease (Vol. +) the ring tone volume.
Call volume
The call volume can be adjusted.
Applies to vehicles: with cell phone prep
Call options
– Select the function button > function
button > Call options.
3-way calling (GSM)
Up to six parties can participate in a conference call.
You begin a conference call with the 3-way calling (GSM) option. The
parties on hold and the active party are added to the conference call.
Auto redial
•On - a phone number will be redialed automatically up to five
times if it is busy. Automatic redial can be cancelled with the End call
function.
•Off - a phone number is not redialed if it is busy.
Auto answer
•On - An incoming call is answered automatically. This can be
ignored with the Ignore function if the call was not answered auto-
matically.
•Off - An incoming call is not answered automatically.
Invert call lists
The telephone numbers in the call lists are sorted according to the
time they called. Switching this function on will sort them in the
opposite order.
Applies to vehicles: with cell phone prep
Voicemail number
– Select: function button > function button >
Voicemail number.
Enter the voicemail number with the speller or from a List (directory)
and store with OK.
When a voicemail number is stored, the voicemail can be accessed
with the symbol in the speller.
This service must be set up and activated in advance in the cell phone
network. You can obtain more information from your cell phone
service provider.
TEL SETUP
TEL SETUP
TEL SETUP
MMI high B8, for internal use only

Calling 77
MMI components MMI control panel Multifunction steering wheel Voice recognition system
Tips
The mailbox number depends on the cell phone service provider.
MMI high B8, for internal use only
Navigating78
Navigating
Introduction
Let the “Global Positioning System” (GPS) lead you to
your destination!
Studying complicated maps, skimming through confusing atlases -
that is all in the past! Now simply enter your desired destination in
the navigation system and follow the directions given. Or you can
navigate to your destination with up to nine stopovers.
The system provides directions in the form of spoken cues that
inform you about all driving maneuvers early enough to perform
them. In what language would you like to hear the navigation
announcements? You can choose from English, French and Spanish.
You can repeat the current navigation announcement by pressing the
right thumbwheel on the multifunction steering wheel ⇒page 105.
The route is shown on a map in the MMI display ⇒page 86. You can
also display information about your route in the driver information
system ⇒page 87.
You do not want to follow one of the directions? No problem! The
navigation system recalculates the route based on the current vehicle
position. If when dynamic route is activated, the navigation system
takes traffic reports into account so you can reach your destination
more quickly.
The navigation system will notify you if your vehicle is in a location the
system does not recognize (such as a parking lot or parking garage).
WARNING
•The demands of traffic require your full attention. Refer to and
follow the guidelines provided in ⇒page 7, “Traffic safety tips”.
•Obey all traffic laws when driving.
•The route calculated by the navigation system is a recommen-
dation for reaching your destination. Obey traffic lights, stopping
restrictions, one-way streets, lane change restrictions, etc.
Note
•If the driving directions conflict with traffic laws, obey the traffic
laws.
•Adjust the volume of the navigation system so signals from
outside the vehicle such as police and fire sirens can be heard easily at
all times.
Tips
•Snow and objects on the GPS antenna or shade from trees and
large buildings can prevent satellite reception and affect the
system's ability to determine the vehicle position. Several deacti-
vated or malfunctioning satellites can also interrupt GPS reception
and affect the system's ability to determine the vehicle position.
•When the vehicle is at an altitude above approximately 3000
meters, the MMI hard drive shuts down temporarily to protect it.
Navigation mode and the Jukebox are not available when that
happens. All of the MMI functions will be available again as usual
once you start the engine again at a location below 3000 meters.
•Because street names sometimes change, the names stored in the
MMI may in rare cases differ from the actual street name.
•Contact your authorized Audi dealer for information on updating
the navigation information.
WARNING (continued)
MMI high B8, for internal use only
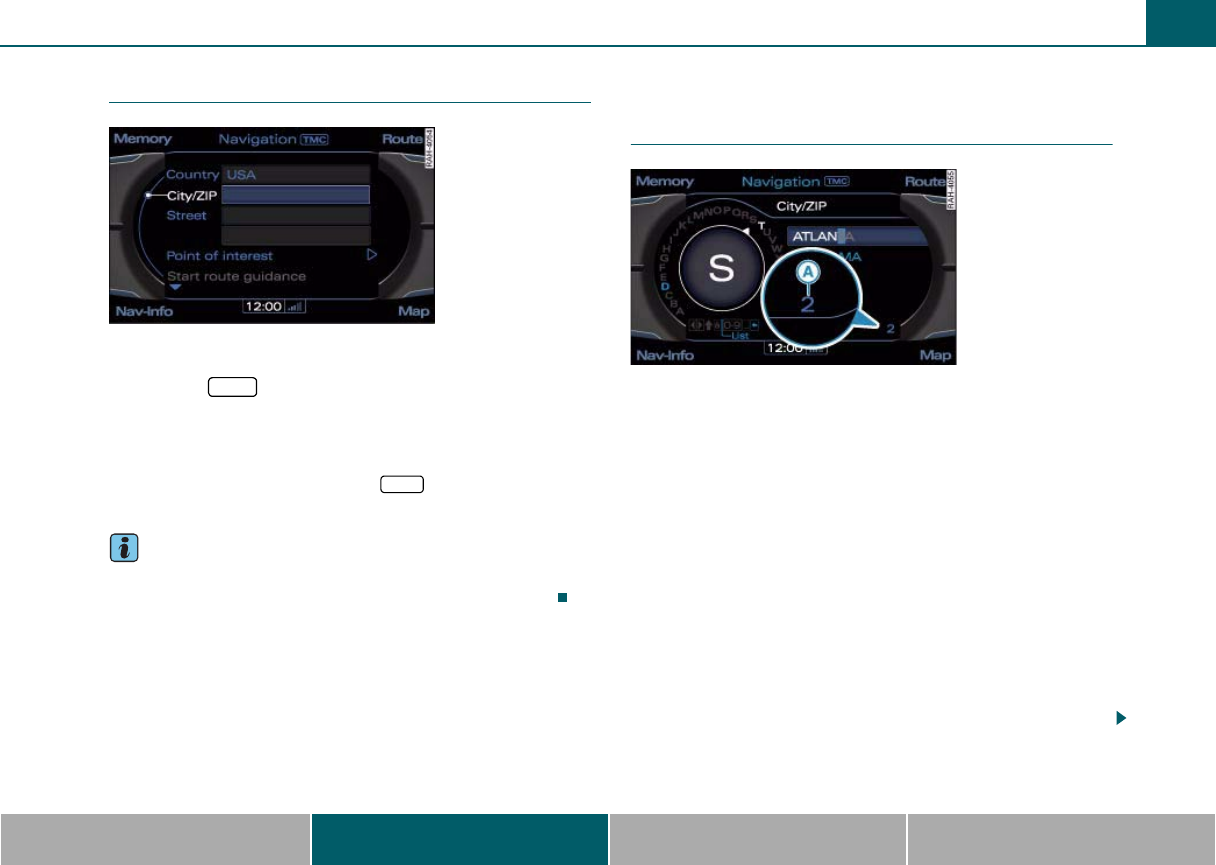
Navigating 79
MMI components MMI control panel Multifunction steering wheel Voice recognition system
Starting Navigation mode
Requirement: The MMI must be switched on ⇒page 28.
– Press the function button. The input field ⇒fig. 79
or the last active navigation menu appears in the MMI
display.
The menu that was open the last time you used the navigation system
is shown in the MMI display. Press the function button again
while in Navigation mode to switch to the input field.
Tips
The navigation system can be opened in demo mode for simulations
or planning purposes when the vehicle is stationary ⇒page 94.
Entering a destination
Tips for entering a destination
Cities
When making an entry with the speller, the system suggest cities
that you have entered in the past. The suggested city is shown in the
speller input field ⇒fig. 80. Additional cities that match your entry
are listed below. The number of cities found is displayed at the
bottom right ⇒fig. 80.
If the desired city is shown in the speller input field or the list below,
you can press and hold the control knob to switch to the city list.
Street
You can also begin entering a destination with the street name. From
the list of suggestions that follows, select a city in which you would
like to enter a street or select the menu item In all cities to search for
a streets independent of the location. When entering the street, the
system suggests street names that match the entry.
After selecting the street, you can define the destination in detail by
entering an Intersection or House number.
Fig. 79 Entry field
NAV
NAV
Fig. 80 Entering the
destination using the
speller
A
A
MMI high B8, for internal use only
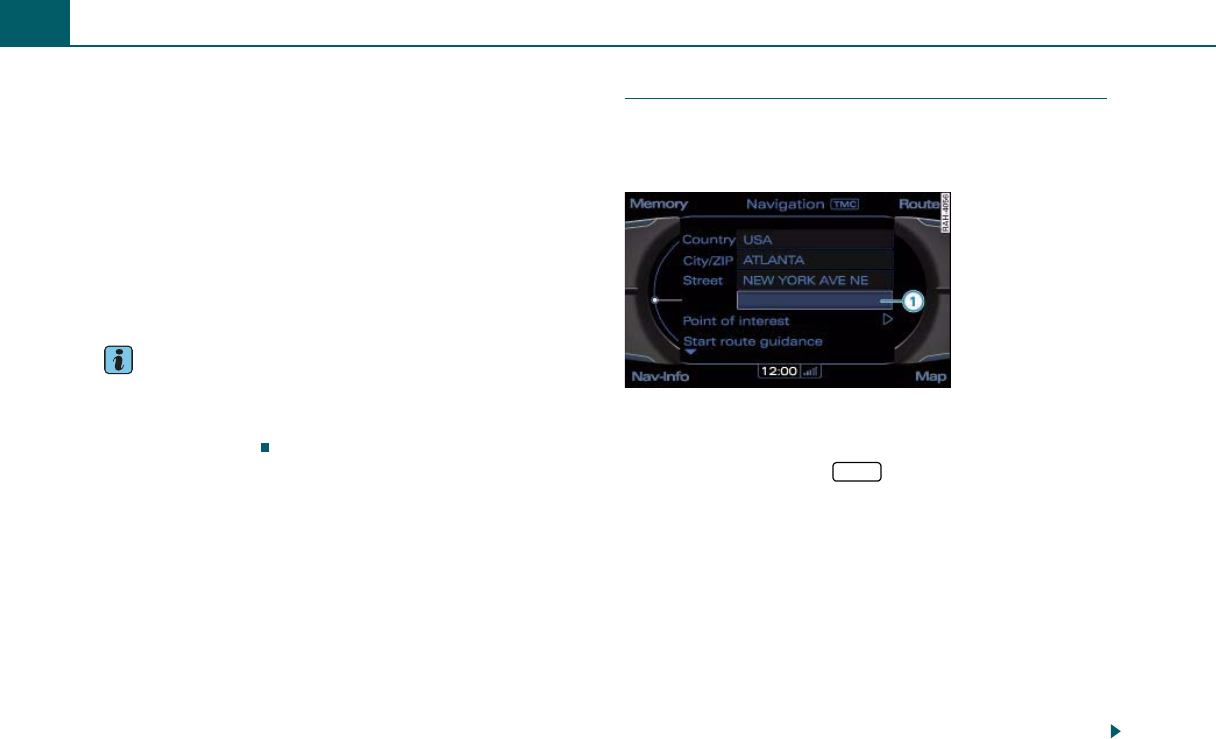
Navigating80
Points of interest in a city
By selecting a point of interest, you can select landmarks and public
places (hospitals, movie theaters, recreation areas, etc.) as destina-
tions.
Downtown (end entry)
The navigation system calculates the route to the center of the city
entered.
Select destination on map
You can select a new destination from the map by moving the
crosshairs horizontally, vertically or diagonally with the joystick
⇒page 32 ⇒page 81.
Tips
Has your route or tour plan changed? No problem! Simply select the
destination/stopover with he control knob and press the knob. You
can now Drive to this destination now or Change, Move or Delete the
destination/stopover.
Entering a destination with an address
A single destination always consists of a region and city.
You can pinpoint the destination more closely by entering
a street name or point of interest.
Requirement: Navigation mode must be active ⇒page 79.
– If the input field ⇒page 79, fig. 79 is not shown in the
MMI display, press the function button.
– Turn the control knob to Region and press the knob. A list
of regions is displayed.
– Turn the control knob to select a region and press the knob
to enter that region into the input field.
–Turn the control knob to City/ZIP and press the knob. The
speller appears in the MMI display ⇒page 31.
– Enter the city or ZIP code using the speller and confirm the
entry with OK.
– To complete the entry, turn the control knob to
Downtown (end entry) and press the knob, or
Fig. 81 Entering a
house number/inter-
section
NAV
MMI high B8, for internal use only

Navigating 81
MMI components MMI control panel Multifunction steering wheel Voice recognition system
– To enter additional information about the destination or
to enter a stopover, turn the control knob to Street or
Point of interest in city and press the knob.
– Entering additional information.
– To start route guidance, turn the control knob to Start
route guidance and press the knob. The route criteria and
then the map with three possible routes ⇒page 85,
fig. 86 are shown in the MMI display.
– To select a route, turn the control knob to the left or right
and press the knob.
To enter a house number or intersection after you have completed
entering your destination, turn and press the control knob to select
the line ⇒page 80, fig. 81 and complete your entry.
Tips
To repeat the last navigation announcement, press the Nav-Info
control button ⇒page 91 or the right thumbwheel on the multifunc-
tion steering wheel ⇒page 99.
Setting a destination from the map
A point on the map can be selected as a destination or
stopover, stored in the directory or called up*.
Requirement: Navigation mode must be active ⇒page 79.
– Press the Map control button. A map is shown in the MMI
display.
– Slide the crosshairs ⇒fig. 82 horizontally, vertically or
diagonally with the joystick to the desired destination
⇒page 32.
– Press the control knob. The map side menu is activated.
A
1
Fig. 82 Changing the
destination with the
crosshairs
Fig. 83 Setting a map
location as the destina-
tion
MMI high B8, for internal use only

Navigating82
– Turn the control knob to Opt. menu and press the knob.
The Map position menu is displayed.
– Turn the control knob to Set as destination and press the
knob.
– Turn the control knob to Set as single destination or Set
as stopover ⇒page 84 and press the knob.
– To start route guidance, turn the control knob to Start
route guidance and press the knob. The route criteria and
then the map with three possible routes ⇒page 85,
fig. 86 are shown in the MMI display.
– To select a route, turn the control knob to the left or right
and press the knob.
If a destination is not present in the navigation data, you can move
the crosshairs to the location of the desired city and set the geodata
as a destination or add an entry in the directory.
Tips
•If you stop moving the crosshairs for a moment, additional infor-
mation about the position of the crosshairs (such as city or street
name if available) will be displayed.
•Turn the control knob to the left or right to increase or decrease
the map scale in order to locate the desired destination more quickly
with the crosshairs.
Entering a point of interest
Points of interest can be selected in the input field when
entering single destinations. Six search categories are
available.
Requirement: Navigation mode must be active ⇒page 79.
–Turn the control knob to Point of interest ⇒page 80,
fig. 81 and press the knob. A list with search categories for
points of interest appears in the MMI display.
–Turn the control knob to Top categories for example and
press the knob.
– Turn the control knob to a category such as Next parking
lot.
– Press the control knob. A list, for example of parking lots,
appears in the MMI display. Arrows indicate the direction
and the distance from the vehicle to the point of interest.
–Turn the control knob to a point of interest that is
displayed and press the control knob. Details about the
point of interest are displayed.
– To set the point of interest as a destination, turn the
control knob to Set as destination and press the knob.
– To start route guidance, turn the control knob to Start
route guidance and press the knob. The route criteria and
then the map with three possible routes ⇒page 85,
fig. 86 are shown in the MMI display.
– To select a route, turn the control knob to the left or right
and press the knob.
Additional search categories are:
In immediate vicinity
The point of interest is within the immediate vicinity of the vehicle.
Points of interest can be selected from various categories. This func-
tion is useful when planning stopovers.
In vicinity of destination
The point of interest is in the vicinity of a destination that has been
entered. For example, you can find a hotel in the destination city with
MMI high B8, for internal use only
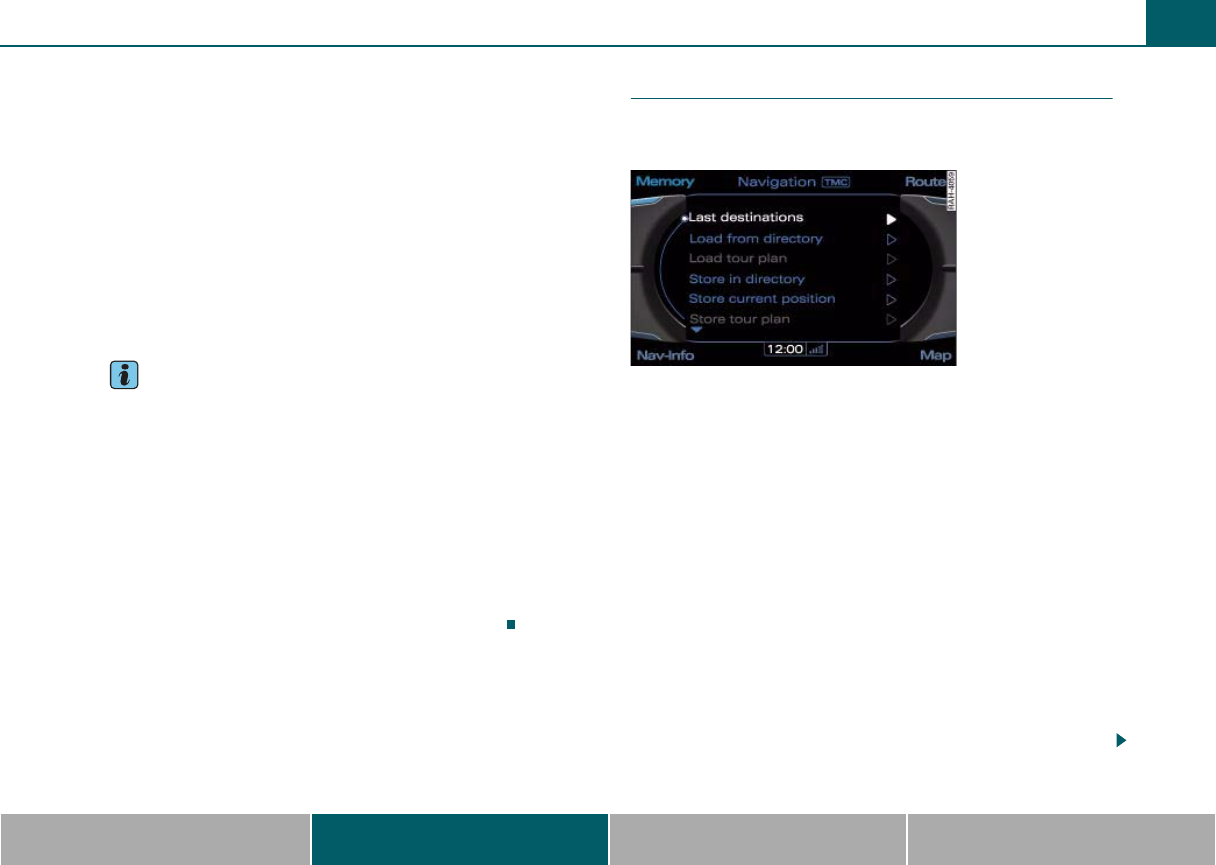
Navigating 83
MMI components MMI control panel Multifunction steering wheel Voice recognition system
this function. Points of interest can be selected from various catego-
ries.
In new city
Enter the name of the city using the speller. You can either search for
the point of interest by name or select it from various categories. This
function is useful for searching for points of interest in a city indepen-
dent from the destination.
Nationwide
You can either search for the point of interest by name or select it
from various categories. The point of interest is independent from
the vehicle position and navigation destination. For example, you can
navigate to an airfield in the selected country using this function.
Tips
•The points of interest in the Top categories, In immediate vicinity
and In vicinity of destination search categories are sorted according
to straight-line distance. The distance from the vehicle to the point of
interest is updated automatically.
•When calculating the distance to a point of interest, the straight-
line distance (empty arrow) is displayed first and then the actual
driving distance (solid arrow). The points of interested are sorted
according to straight-line distance from your current location.
•Some list entries cannot be displayed completely in the MMI
display because they have too many letters/numbers. If you select
these entries with the control knob, a separate window containing
detailed information about the selected entry will open.
Entering a destination from the memory
Your previous destinations are stored automatically and
be loaded directly as navigation destinations.
Requirement: Navigation mode must be active ⇒page 79.
– Press the Memory control button ⇒fig. 84.
–Turn the control knob to Last destinations ⇒fig. 84.
– Press the control knob. A list with the last destinations
you entered appears in the MMI display.
– Turn the control knob to select a destination.
– Press the control knob. The destination data is set as a
destination/stopover.
– To start route guidance, turn the control knob to Start
route guidance and press the knob. The route criteria and
then the map with three possible routes ⇒page 85,
fig. 86 are shown in the MMI display.
– To select a route, turn the control knob to the left or right
and press the knob.
Fig. 84 Loading the
last destination
MMI high B8, for internal use only
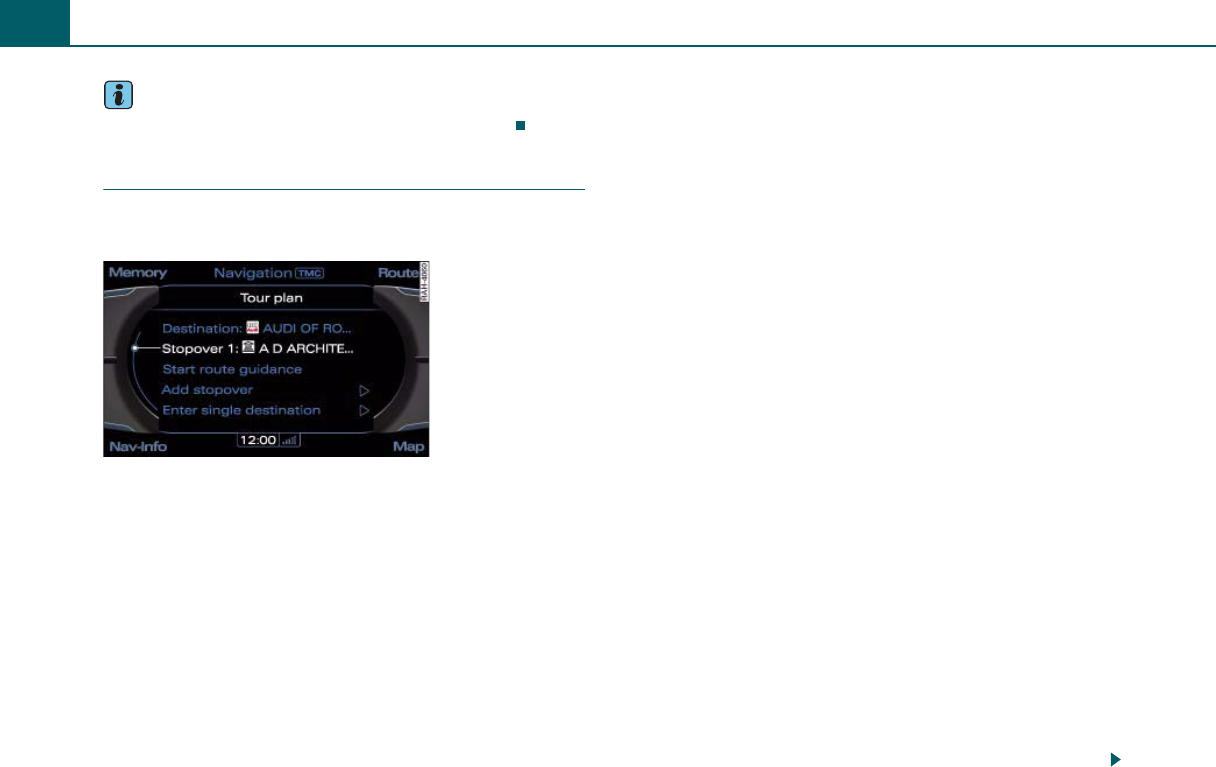
Navigating84
Tips
The list of previous destinations can be erased ⇒page 94.
Entering a stopover
You can include up to nine stopovers and the end destina-
tion in the tour plan.
Requirement: The Navigation mode must be started
⇒page 79, a destination must be entered ⇒page 79 and
the input field must be displayed ⇒page 79, fig. 79.
Entering stopover with an address
– Turn the control knob to Add stopover and press the knob.
– Enter the stopover ⇒page 80.
– Turn the control knob to Set as stopover and press the
knob.
– To select the desired location in the tour plan, turn the
control knob to the left or right and press the knob
⇒fig. 85.
– To start route guidance, turn the control knob to Start
route guidance and press the knob. The route criteria and
then the map ⇒page 86 are displayed in the MMI display.
Setting a stopover from the map
– Press the Map control button. A map is shown in the MMI
display.
– Select a stopover in the map ⇒page 81, fig. 82.
–Turn the control knob to Set as stopover and press the
knob.
– To select the desired location in the tour plan, turn the
control knob to the left or right and press the knob
⇒fig. 85.
– To start route guidance, turn the control knob to Start
route guidance and press the knob. The route criteria and
then the map ⇒page 86 are displayed in the MMI display.
Setting a stopover from the memory
– Turn the control knob to Add stopover and press the knob.
– Select a destination from the list of the last destinations
you entered ⇒page 83.
– Press the control knob. The destination data is set as the
stopover.
– To select the desired location in the tour plan, turn the
control knob to the left or right and press the knob
⇒fig. 85.
– To start route guidance, turn the control knob to Start
route guidance and press the knob. The route criteria and
then the map ⇒page 86 are displayed in the MMI display.
Fig. 85 Tour plan
MMI high B8, for internal use only
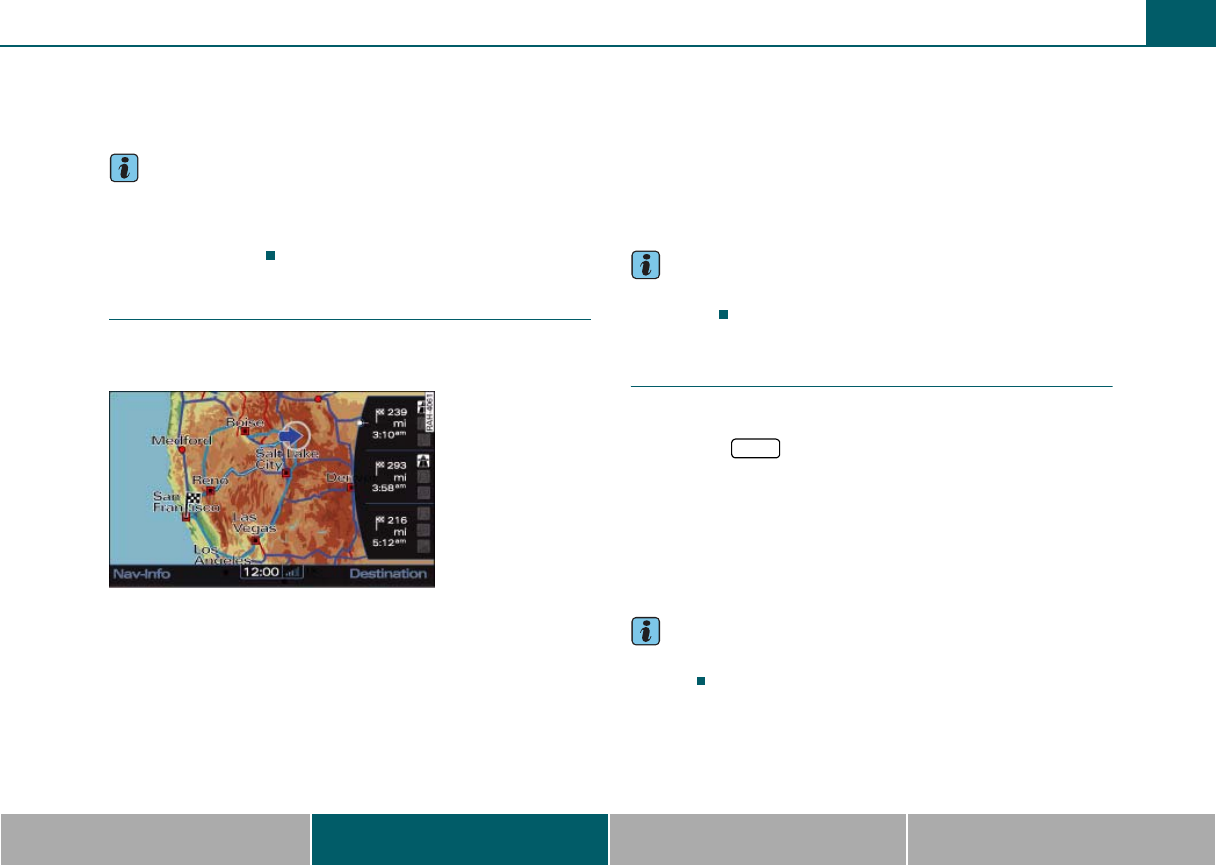
Navigating 85
MMI components MMI control panel Multifunction steering wheel Voice recognition system
To delete all stopovers from the tour plan, turn the control knob to
Enter single destination and confirm the message in the MMI display
with Yes.
Tips
Has your route or tour plan changed? No problem! Simply select the
destination/stopover with he control knob and press the knob. You
can now Drive to this destination now or Change, Move or Delete the
destination/stopover.
Alternative route
Select your preferred route to a single destination from
up to three suggested routes.
The route highlighted after switching to the map display is the route
that was calculated according to the route criteria you selected
⇒page 91. For example, if you have selected Short in the Route
options menu, the shortest route is highlighted. If possible, three
alternative routes with the same route criteria will be offered for your
selection.
The suggested routes and your criteria are displayed in the route side
menu in the MMI display.
Information applicable to the route you have selected is highlighted
in white:
•Distance to the destination and calculated arrival time
•Symbols for using highways, toll roads or ferries on the planned
route
You can select the possible routing in the alternative routes by
turning and pressing the control knob.
Tips
The routes may overlap if there are only a few routes available to the
destination.
Stopping route guidance
Requirement: Route guidance must be active ⇒page 79.
– Press the function button, or
– Press the Dest. control button.
–Turn the control knob to Stop route guidance and press
the knob.
You can also stop route guidance by entering a new destination
⇒page 80.
Tips
The data and settings remain entered when route guidance is
stopped.
Fig. 86 Suggested
routes
NAV
MMI high B8, for internal use only

Navigating86
Display
In the MMI display
If you press the Map control button once route guidance has started,
the map with inactive side menu ⇒fig. 87 will appear in the MMI
display.
In this view, you can turn the control knob to the right or left to
increase or decrease the map scale. You can move the crosshairs in
the map with the joystick to select a city ⇒page 32.
Press the control knob to activate the side menu ⇒fig. 88. You can
now change the map display in the side menu. Turn the control knob
to the desired location and press the knob.
Press the button to leave the side menu.
Direction. The map is either oriented to the north or according to
the dir. of travel ⇒page 92. You can switch between north and
the direction of travel by selecting the direction in the active side
menu and pressing the control knob. This setting is saved.
Scale. Turn the control knob to the left or right to decrease or
increase the scale. You can also change the scale in the active side
menu.
Distance to destination/stopover
Calculated arrival time to the destination/stopover
TMC status display
Altitude display
Dest. control button. Change to input field ⇒page 79, fig. 79 or
the tour plan ⇒page 84, fig. 85.
Examples of selected map contents
Vehicle location
Display of the geocoordinates where the crosshairs are located
(latitude and longitude)
If you select the map content with the crosshairs, available infor-
mation such as the address, telephone number or traffic reports
will be displayed.
Move along the route. This function can be used while route guid-
ance is active. Turn the control knob to the left or right to move
the map along the current route.
Map location menu. The location of the crosshairs can be set at
the destination or stopover, stored in the directory or called up
⇒page 81. The geocoordinates (latitude and longitude) of the
crosshairs are displayed.
Tips
You can choose between four map types ⇒page 92.
Fig. 87 Map with inac-
tive side menu
Fig. 88 Map with
active side menu
RETURN
A
1
A
2
A
3
A
4
A
5
A
6
A
7
A
8
A
9
A
10
A
11
A
12
A
13
MMI high B8, for internal use only
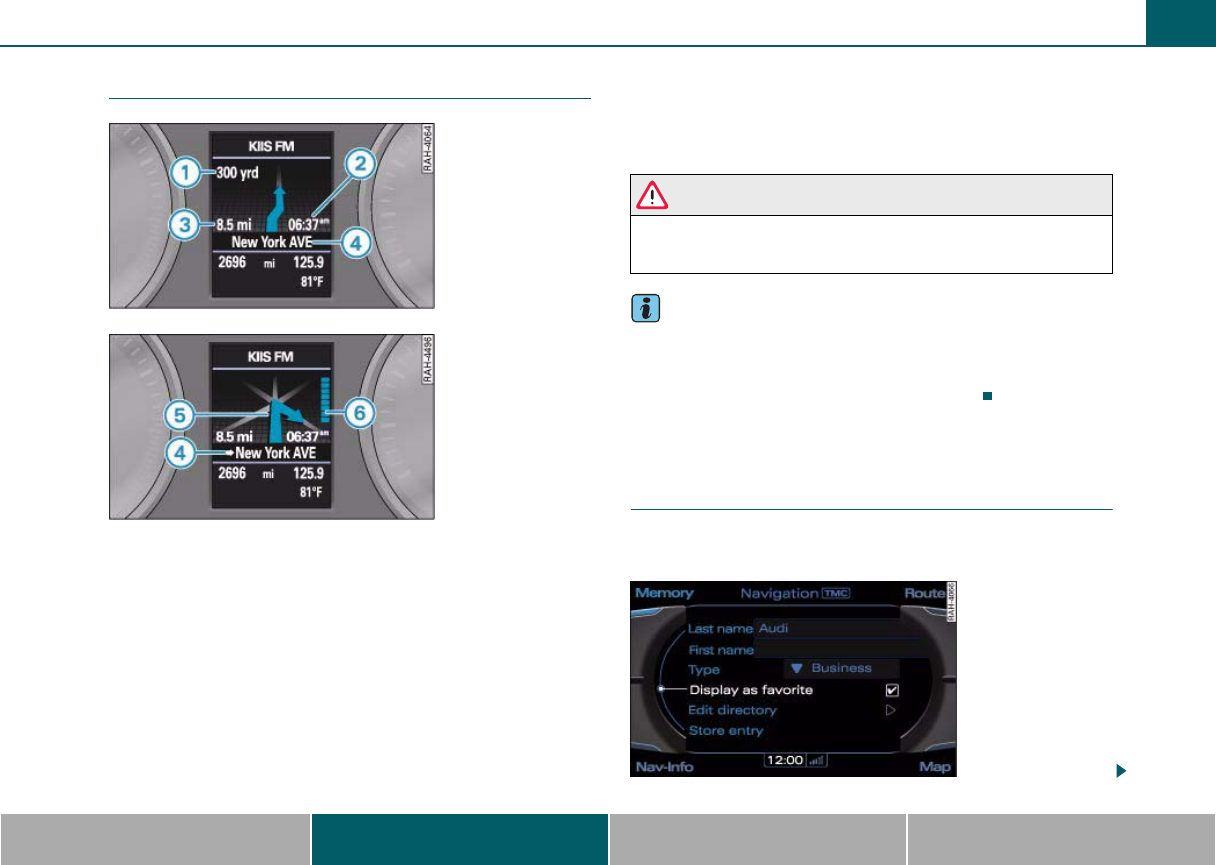
Navigating 87
MMI components MMI control panel Multifunction steering wheel Voice recognition system
In the driver information system
Once you have entered a destination or tour and started route guid-
ance, the navigation information will be displayed in the driver infor-
mation system. If you select another function such as the radio with
the multifunction steering wheel, the navigation will be replaced
with the selected function ⇒page 98.
Distance until change of direction
Calculated arrival time
Total mileage to the destination/stopover
Name of the current highway or street. An arrow in front of the
street name indicates that you should turn onto that street.
Maneuver arrow. An upcoming turn is also indicated.
Bar graph. A bar graph appears when a direction arrow is
displayed. The fewer bars are shown, the shorter the distance is
until the turn.
WARNING
The route calculated by the navigation system is a recommenda-
tion for reaching your destination. Obey traffic lights, stopping
restrictions, one-way streets, lane change restrictions, etc.
Tips
An exclamation mark “!” in front of the street name indicates that the
information about this street or this section of the route is not
complete in the navigation data that the MMI contains. Obey traffic
laws such as one-way streets or pedestrian zones.
Storing a destination
In the directory (single destination)
A single destination can either be stored as a new address
car or assigned to an existing one.
Fig. 89 Lane display
Fig. 90 Turn display
A
1
A
2
A
3
A
4
A
5
A
6
Fig. 91 Address card
MMI high B8, for internal use only

Navigating88
Requirement: You must enter a single destination
⇒page 79.
Storing a destination as a new address card
–Press the Memory control button.
– Turn the control knob to Store in directory and press the
knob.
– Turn the control knob to New entry and press the knob. An
input field appears ⇒page 87, fig. 91.
– Turn the control knob to Name and press the knob. The
speller appears in the MMI display ⇒page 31.
– Enter the name with the speller.
– Enter additional data.
– Turn the control knob to Store entry and press the knob.
Assigning the destination to an existing
address card
–Press the Memory control button.
– Turn the control knob to Store in directory and press the
knob.
– To assign the destination to an address card, turn the
control knob to an entry, or
– Turn the control knob to Find entry and press the knob to
search for an address card. The speller appears in the MMI
display ⇒page 31.
– Enter the name of the entry you would like to search for, or
– Turn the control knob in the speller to LIST and press the
knob. All stored directory entries are listed.
– Turn the control knob to the desired entry and press the
knob. The address card opens.
–Turn the control knob to Store entry and press the knob.
If you have already stored a destination for an existing address card,
the new destination automatically overwrites the old destination.
Check the box for the display as top destination function to access
the destination quickly. Top destinations are listed in the input menu
⇒page 79, fig. 79 and can be selected there directly.
Tips
•You can use the Edit directory function to access the address card
to enter more information ⇒page 63.
•For information on managing the directory, refer to ⇒page 57.
Storing a tour plan
Tour plans can be stored and loaded later as a new navi-
gation destination.
Requirement: You have entered a tour plan ⇒page 79.
– Press the Memory control button.
–Turn the control knob to Store tour plan.
– Press the control knob. The speller appears in the MMI
display ⇒page 31.
– Enter a name for the tour plan using the speller.
–Select OK in the speller and press the control knob. The
tour plan entered is stored.
If the Store tour plan function is grayed out, either the tour memory
is full or no tour plan was entered. Please delete any tours you do not
need from the memory ⇒page 90 or enter a tour plan.
MMI high B8, for internal use only
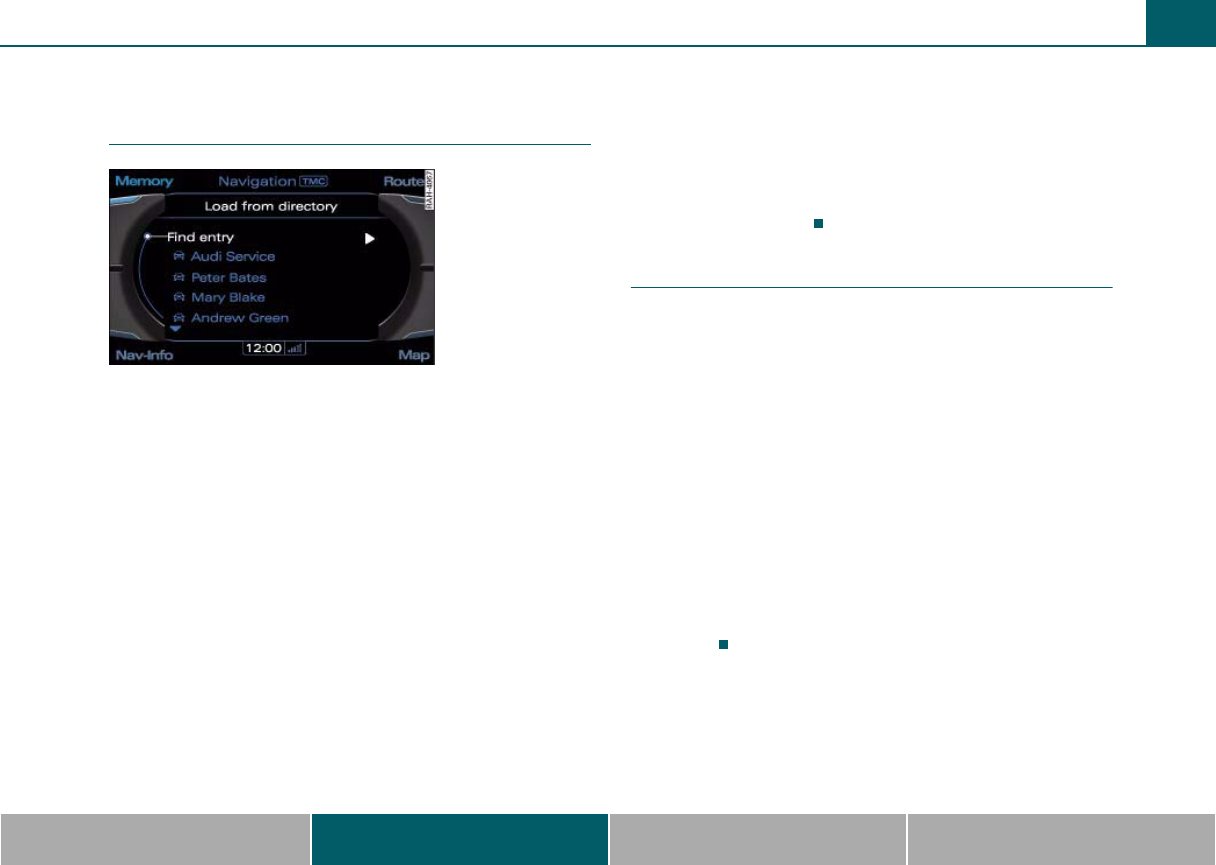
Navigating 89
MMI components MMI control panel Multifunction steering wheel Voice recognition system
Loading a destination
Loading from the directory
Requirement: Navigation mode must be started ⇒page 79
and a navigation destination must be stored in the directory
⇒page 63.
–Press the Memory control button.
– Turn the control knob to Load from directory.
– Press the control knob. A list of entries appears in the MMI
display ⇒fig. 92.
– To select a destination from the list, turn the control knob
to an entry and press the knob, or
– Turn the control knob to Find entry and press the knob to
search for an entry. You can now search for a name using
the speller.
– To start route guidance, turn the control knob to Start
route guidance and press the knob. The route criteria and
then the map ⇒page 86 with three possible routes
⇒page 85, fig. 86 are shown in the MMI display. An arrow
appears in the driver information system.
– To select a route, turn the control knob to the left or right
and press the knob.
Loading a tour plan
Stored tour plans can be loaded as a new navigation
destination.
Requirement: Navigation mode must be started ⇒page 79
and a tour must be stored ⇒page 88.
– Press the Memory control button.
–Turn the control knob to Load tour plan.
– Press the control knob. A list of entries appears in the MMI
display.
– To select a tour from the list, turn the control knob to an
entry and press the knob, or
– To start route guidance, turn the control knob to Start
route guidance and press the knob. The route criteria and
then the map ⇒page 86 are displayed in the MMI
display.
Fig. 92 Loading a
destination from the
directory
MMI high B8, for internal use only
Navigating90
Display traffic reports in the map
Traffic reports can be displayed in the map.
Requirement: Navigation mode must be active ⇒page 79.
– Press the function button.
– Turn the control knob to Map content and press the knob.
–Turn the control knob to Traffic information and press the
knob.
The traffic information is displayed in the map with colored lines:
orange lines: slow traffic
green lines: free flow traffic
red lines: stop and go
A colored warning symbol in the map indicates there is a traffic
incident directly ahead.
In addition to traffic reports, you can also display () or hide addi-
tional information such as expressway exits, 3D landmarks or restau-
rants in the map.
Additional settings
Top destination
– Select: the function button.
You can activate the Display as top destination function () when
storing a navigation destination in the directory. Top destinations are
displayed at the end of the input field ⇒page 79, fig. 79 and can be
selected directly when entering a destination.
Store current position
– Select: function button > Memory control button >
Store current position.
The current vehicle position is added to a new/existing entry in the
directory.
Deleting a tour plan
– Select: function button > Memory control button >
Delete tour plan.
Stored tour plans can be deleted individually.
Route list
– Select: function button > Route control button >
Route list.
The route list is only visible when route guidance is active. It contains
the following information:
Fig. 93 Traffic reports
display in the map
SETUP
A
1
A
2
A
3
A
4
NAV
NAV
NAV
NAV
MMI high B8, for internal use only
Navigating 91
MMI components MMI control panel Multifunction steering wheel Voice recognition system
•Information on the route characteristics
•Length of the route sections
•Street names
On longer route sections, additional information may be displayed
such as possible junctions when driving on highways.
Route criteria
– Select: function button > Route control button >
Route criteria.
The route is calculated based on various criteria.
Alternative routes
The option to select from up to three suggested routes to a single
destination can be switched on () or off.
Dyn. route
When dynamic route is switched on, the route is adapted automati-
cally2) according to traffic conditions.
If the system does not calculate a detour even though you have
selected Dynamic route on and a traffic jam was reported on the
calculated route, then the detour the system calculated would take
more time than the time spent waiting in the traffic jam.
Route options
You can select a short, fast or economical route.
Highway/Toll road/Ferry
Select the avoid option if the navigation system should not include
expressways, toll roads or ferries when calculating a route.
Tips
If avoiding a criterium makes route guidance impossible, that crite-
rium will still be used when calculating the route.
Avoiding a route
– Select: function button > Route control button >
Avoid route from here.
When route guidance is active, the calculated route will avoid the
area you have specified. The navigation system calculates an alterna-
tive route.
You can adjust the length of the route to be avoided by turning the
control knob.
When you restart route guidance, the area to be avoided must be
entered again if you would still like to avoid it.
Tips
If the MMI does not calculate an alternative route, that means one is
not available.
Information
– Select: function button > Nav-Info control button.
When route guidance is active, you will receive the following informa-
tion about your destination:
•Receivable satellites
•Data about the vehicle location: current street, data about the
geographical location of the vehicle (latitude and longitude, altitude)
•Destination city/stopovers
2) Only with a valid SDARS subscription.
NAV
NAV
NAV
MMI high B8, for internal use only

Navigating92
•Calculated arrival time to the destination/stopover
•Distance to destination/stopover
The last navigation announcement is repeated.
Calling: (telephone number)*
If telephone numbers for a point of interest are stored in the MMI
navigation data and your vehicle is equipped with a factory installed
telephone*, you can call the selected point of interest. For example,
you can make reservations at a restaurant before you reach your
destination.
Map display
– Select: function button > function button
> Map display.
Day
The map is displayed with a light background.
Night
The map is displayed with a dark background.
Auto
The map display changes from day to night when the headlights are
switched on.
Orientation
– Select: function button > function button
> Orientation.
North3)
The map is oriented to the north.
Dir. of travel
The map is oriented to the direction of travel. At a scale of 100 km,
the map is oriented to the north.
Auto
At a scale up to 1.5 miles (2.41 km), the map is oriented to the direc-
tion of travel. At a scale greater than 1.5 miles (2.41 km), the map is
oriented to the north.
Map type
– Select: function button > function button
> Map type.
Destination
The destination is marked with a destination flag. The map indicates
the destination is oriented to the north.
Position 2D
The current vehicle position is displayed. The map orientation corre-
sponds to the setting in the Orientation menu ⇒page 92.
Position 3D
The current vehicle position is displayed in a three-dimensional
terrain map. The Dir. of travel orientation is automatically selected
⇒page 92. The map orientation is set to North when the scale is 100
km or greater. At a scale between 30 - 100 m, the display will show
three-dimensional city models and landmarks.
NAV SETUP
NAV SETUP
3) Only possible in the 2D map type display
NAV SETUP
MMI high B8, for internal use only

Navigating 93
MMI components MMI control panel Multifunction steering wheel Voice recognition system
Overview
The entire route from the vehicle location to the destination is
displayed on the map. The map scale depends on the length of the
route. The map is oriented to the north.
Automatic zoom
– Select: function button > function button
> Autom. zoom.
When automatic zoom is switched on, the map automatically zooms
to the intersection. This provides a detailed display and makes it
easier to recognize the streets. The map is oriented to the direction
of travel when it is zoomed in. The three-dimensional city model is
hidden for a short time.
Additional information
– Select: function button > function button
> Addit. info.
On
The Route and Exit information is displayed on the map.
Route
Information on upcoming maneuvers or traffic reports are displayed
in the left half of the map. The right half of the map continues to
show the map display you have selected.
Exit
The left half of the map contains a window that shows expressway
exits. The right half of the map continues to show the map display
you have selected. Parallel to this, the window also shows an
enlarged view of the intersection area.
The updated distance to the turn is displayed next to the enlarged
view. The name of the street you will turn onto, the street number
and/or name of the exit and the direction of travel are also displayed
at the same time.
Off
No additional info is shown in the MMI display.
Voice guidance
– Select: function button > function button
> Voice guid..
The navigation announcements in the navigation mode can be
Complete or Compact.
With off, only important announcements are played during route
guidance. You can press the right thumbwheel ⇒page 98, fig. 95
to play a navigation announcement.
Spoken cues (phone)
– Select: function button > function button
> Spoken cue.
With the Off (phone) setting, navigation announcements play during
route guidance but they do not play during a phone call.
Volume of spoken cues
– Select: function button > function button
> Volume of spoken cues.
NAV SETUP
NAV SETUP
NAV SETUP
A
4
NAV SETUP
NAV SETUP
MMI high B8, for internal use only

Navigating94
Turn the control knob to the left or right to adjust the volume of the
navigation announcements. Press the control knob to leave the
menu.
Presentation mode
– Select: function button > function button
> Set starting point or Demo mode.
You enter a starting point manually when you would like to calculate
a route starting from a location other than the vehicle position, for
example. Start demo mode to simulate route guidance. The demo
mode helps you effectively plan and display a route by showing map
contents or route criteria.
Tips
Route simulation guidance in demo mode is only displayed when the
vehicle is stationary for safety reasons.
Deleting last destinations
– Select: function button > Memory control button >
Delete last destinations.
The destinations you have entered last are automatically stored
⇒page 83. They can be deleted individually or all at once.
NAV SETUP
NAV
MMI high B8, for internal use only
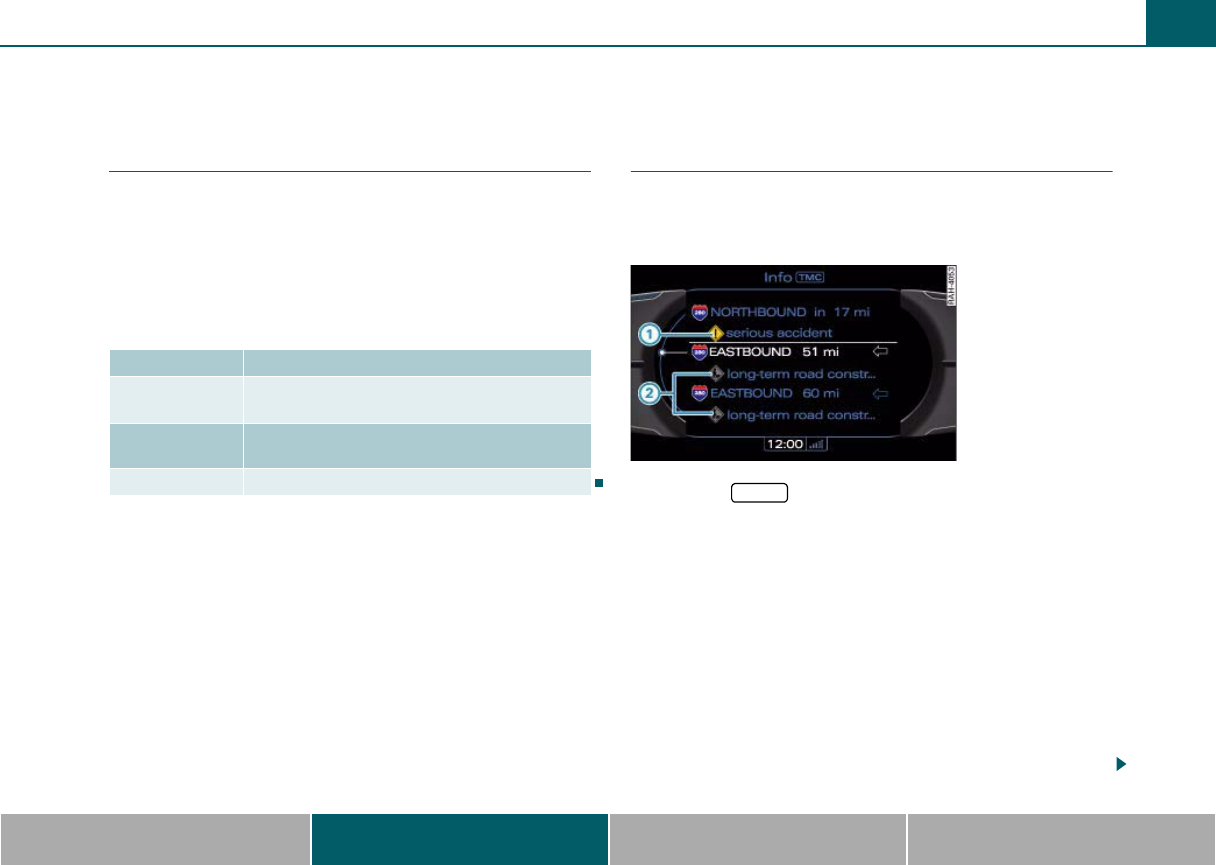
Calling up traffic information 95
MMI components MMI control panel Multifunction steering wheel Voice recognition system
Calling up traffic information
Applies to vehicles: with Satellite Digital Audio Radio Service
Introduction
TMC traffic reports can be shown in the MMI display through Sirius*
(satellite radio) ⇒page 41. This happens automatically and silently.
Even more practical is the fact that the MMI uses these messages
when dynamic route is switched on to navigate around traffic prob-
lems such as traffic jams, when possible ⇒page 91.
Traffic report reception is indicated by the TMC symbol in the title line
in the Navigation and Info modes:
Applies to vehicles: with Satellite Digital Audio Radio Service
Calling up TMC traffic reports
The TMC traffic reports are sorted according to the
distance from the current position. Traffic reports for an
active route are displayed first.
– Press the function button.
– Turn the control knob to an entry.
– Press the control knob. A detailed view is displayed.
– To call up the next traffic report in the detailed view, turn
the control knob to Next message and press the knob.
When route guidance is active, traffic reports that affect your route
are displayed in order based on distance and marked with a colored
symbol ⇒fig. 94. A traffic incident that is immediately head is
displayed first.
All remaining traffic reports are listed last with a grayed-out symbol
and sorted according to straight-line distance from the current posi-
tion ⇒fig. 94.
TMC symbol Explanation
The TMC symbol
is displayed
TMC stations are available and dynamic naviga-
tion is switched on ⇒page 91.
The TMC Symbol
is crossed out
TMC stations are not available and dynamic nav-
igation is switched on.
No TMC symbol Dynamic navigation is switched off.
Fig. 94 Calling up
traffic reports
INFO
A
1
A
2
MMI high B8, for internal use only

Calling up traffic information96
Traffic reports that are especially important such as a driver driving
the wrong way are displayed automatically in the MMI display. Press
the button or the control knob to cancel the report.
When route guidance is deactivated, traffic reports are displayed
with a colored symbol and sorted according to distance from the
current position.
Tips
To use the traffic message channel (TMC), you must contract the
Sirius* service provider ⇒page 41.
RETURN
MMI high B8, for internal use only

Calling up traffic information 97
MMI components MMI control panel Multifunction steering wheel Voice recognition system
MMI high B8, for internal use only
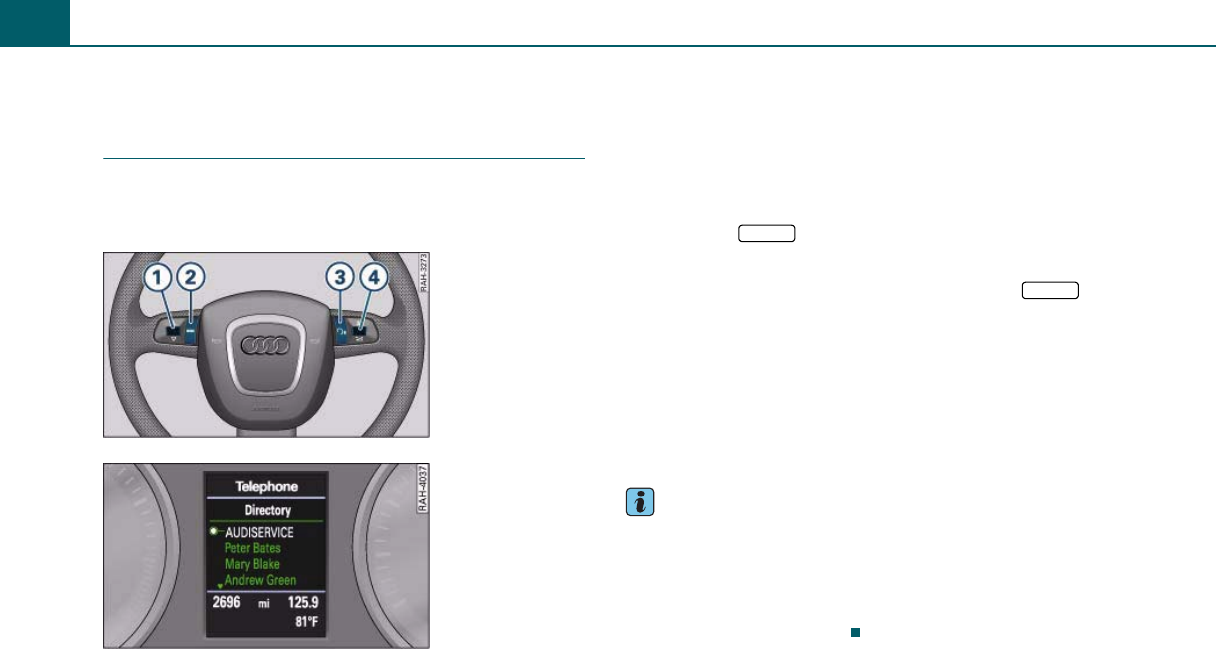
General operation98
General operation
Introduction
You can call up and control the MMI functions such as
Navigation, Telephone*, Radio, Media or the voice recog-
nition system with the multifunction steering wheel.
With the multifunction steering wheel, you can control selected func-
tions of the active audio source, telephone* or navigation with active
route guidance without taking your hands off the wheel. It's very
convenient!
The functions are shown in the driver information system ⇒fig. 96.
You can also switch the voice recognition system on and off and
change the volume with the multifunction steering wheel.
It is operated by pressing and rolling the buttons to ⇒fig. 95.
•Pressing the button multiple times changes between
navigation, the telephone* and the active audio source. The function
is also displayed in the driver information system ⇒fig. 96. You can
exit the submenu for the active function by pressing the
button.
•You can select a submenu for the active function by rolling the left
thumbwheel .
•The voice recognition system is activated by pressing the Talk
button . Pressing and holding the Talk button again ends the
dialogue.
•Rolling the right thumbwheel up/down increases/decreases
the volume.
Tips
•You can switch the navigation display off with the reset button on
the windshield washer stalk. Comprehensive information on this
topic can be found in the Owner's Manual of your vehicle.
•The trip computer is also displayed in the driver information
system. Comprehensive information on this topic can be found in the
Owner's Manual of your vehicle.
Fig. 95 Controls on
the multifunction
steering wheel
Fig. 96 Display in the
driver information
system
A
1
A
4
MODE
A
2
MODE
A
1
A
3
A
4
MMI high B8, for internal use only
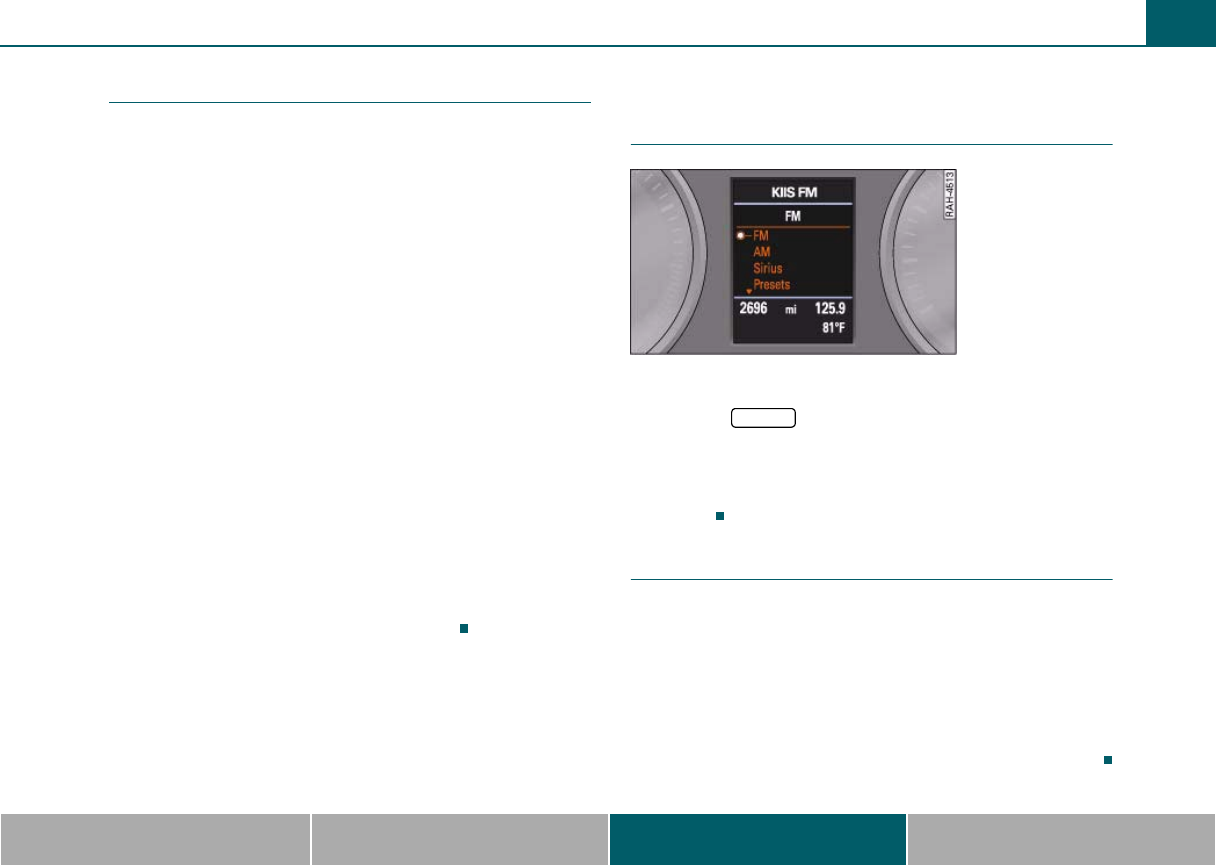
General operation 99
MMI components MMI control panel Multifunction steering wheel Voice recognition system
Adjusting the volume
You can change the volume of the active audio source and
the navigation announcements with the multifunction
steering wheel.
Requirement: The MMI must be switched on ⇒page 28.
Increasing and decreasing the volume
– Roll the right thumbwheel ⇒page 98, fig. 95
up/down.
Muting
– To mute the MMI, roll the right thumbwheel down
until a speaker symbol with a line through it appears in the
status line in the MMI display. If the drive is active, it will
be stopped.
– Roll the right thumbwheel up to deactivate the mute or
pause function. The drive that was stopped will start
playing again.
Navigation announcements
– Press the right thumbwheel . The last navigation
announcement is repeated.
– To change the volume, roll the right thumbwheel up or
down while an announcement is playing.
Listening to the radio
Selecting the radio
Requirement: The radio is on ⇒page 41.
– Press the button ⇒page 98, fig. 95 until the
radio menu appears in the driver information system
⇒fig. 97.
For detailed information about the radio function, refer to
⇒page 40.
Selecting the frequency band
The three frequency bands FM, AM and Sirius* (satellite
radio) are displayed in the title line of the driver informa-
tion system.
Requirement: The radio menu is displayed ⇒page 99.
– Roll the left thumbwheel ⇒page 98, fig. 95 down to a
frequency band.
– Press the left thumbwheel to select the frequency band.
A
4
A
4
A
4
A
4
Fig. 97 Frequency
band list
MODE
A
2
A
1
MMI high B8, for internal use only
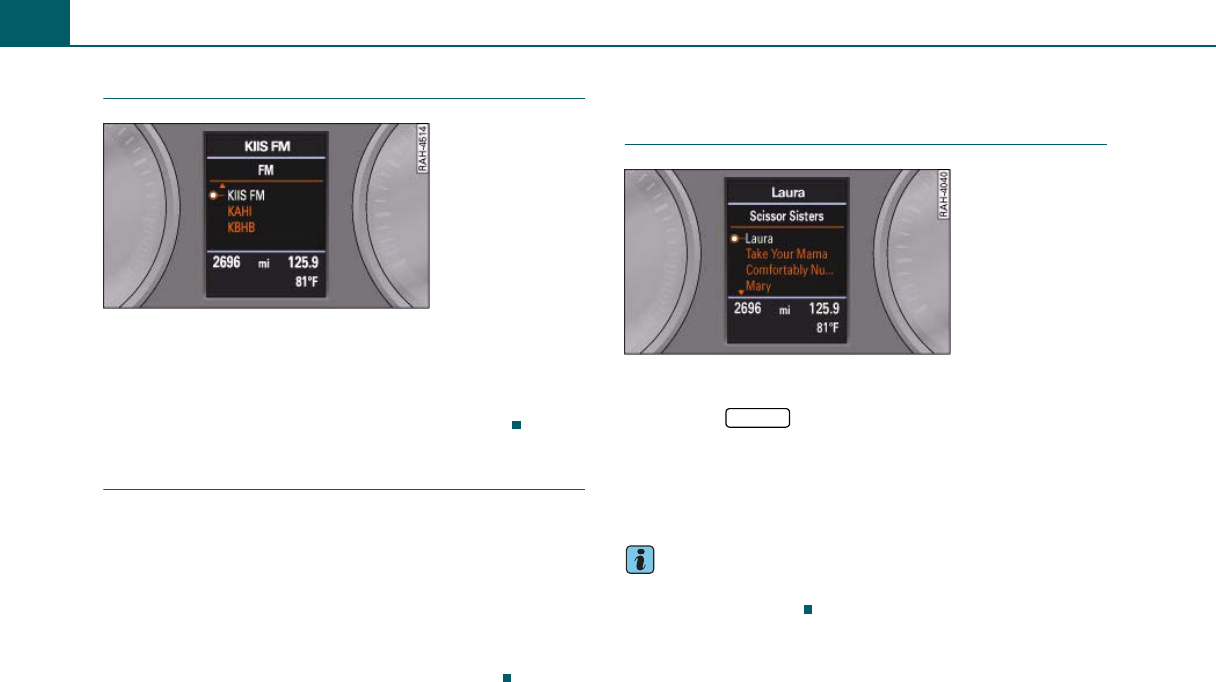
General operation100
Selecting a station from the station list
Requirement: The radio menu is displayed ⇒fig. 98.
– Roll the left thumbwheel ⇒page 98, fig. 95 down/up
to a radio station.
–Press the left thumbwheel to select the station.
Selecting a stored station
Requirement: The radio menu is displayed ⇒fig. 98 and a
station is stored in the preset list ⇒page 45.
–Roll the left thumbwheel ⇒page 98, fig. 95 to
Memory.
– Press the left thumbwheel. The preset list is displayed.
– Roll the left thumbwheel to a radio station and press the
left thumbwheel. The radio station is selected.
Playing media
Calling up media
Requirement: The selected source must contain audio files.
– Press the button ⇒page 98, fig. 95 repeat-
edly until a track list ⇒page 101, fig. 101 or folder struc-
ture ⇒page 49 appears in the driver information system.
For detailed information about the media function, refer to
⇒page 48.
Tips
Select an audio source or a CD in the CD changer* through the MMI
control panel⇒page 15.
Fig. 98 Radio menu
A
1
A
1
Fig. 99 Track list
MODE
A
2
MMI high B8, for internal use only
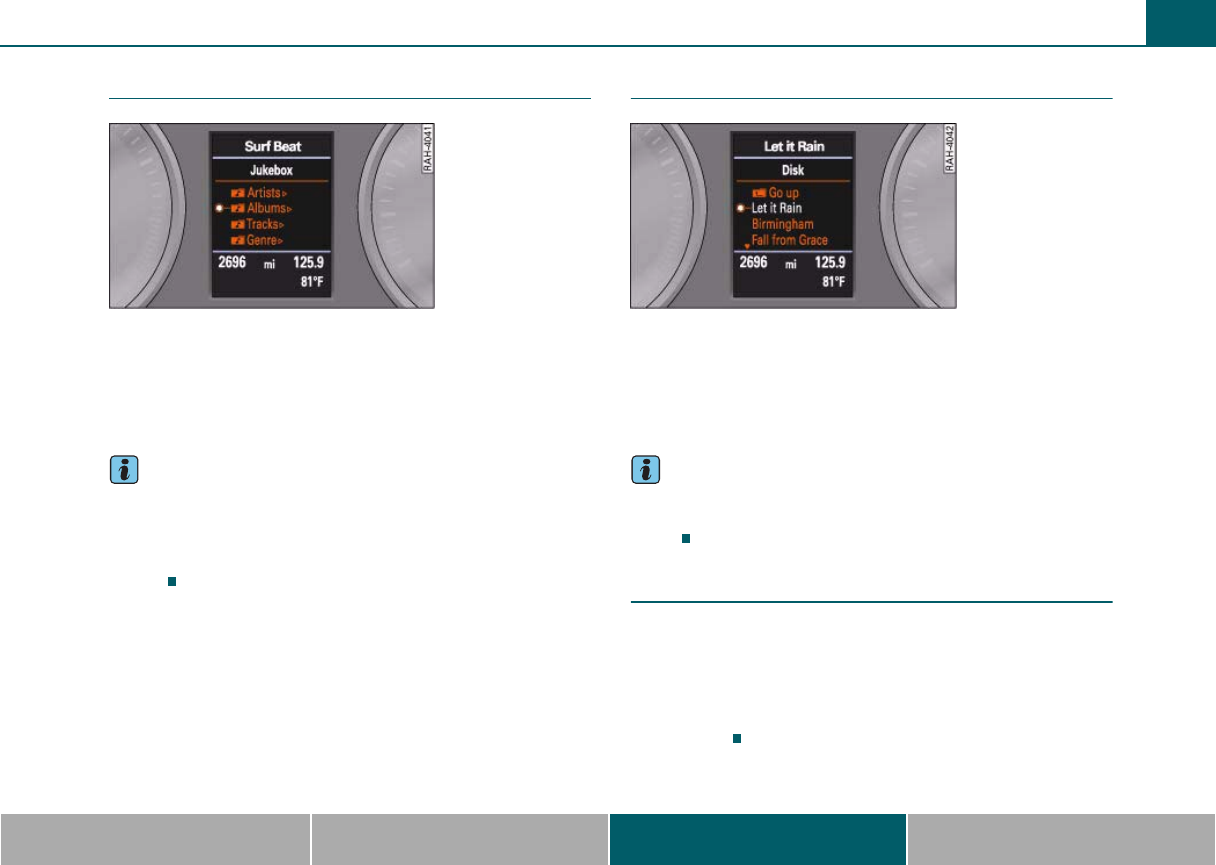
General operation 101
MMI components MMI control panel Multifunction steering wheel Voice recognition system
Selecting a folder
Requirement: A folder must be displayed ⇒fig. 100.
– Roll the left thumbwheel ⇒page 98, fig. 95 to a folder
⇒fig. 100.
– Press the left thumbwheel to select the folder.
Tips
•To move to the next highest level, turn the left thumbwheel to the
folder Go up ⇒fig. 101 and press the thumbwheel.
•You can scroll through long lists of folders quickly by turning the
control knob quickly. The scrolling speed depends on the number of
folders.
Selecting a track
Requirement: Tracks must be displayed ⇒fig. 101.
–Roll the left thumbwheel ⇒page 98, fig. 95 to a track
⇒fig. 101.
– Press the left thumbwheel to select the track.
Tips
You can scroll through long lists of tracks quickly by turning the
control knob quickly. The scrolling speed depends on the number of
tracks.
Pausing/resuming playback
Requirement: And audio file must be playing ⇒page 48.
– Turn the right thumbwheel ⇒page 98, fig. 95 all the
way down to pause playback.
– Turn the right thumbwheel all the way up to resume
playback.
Fig. 100 Jukebox
folder structure
A
1
Fig. 101 Track list
A
1
A
4
MMI high B8, for internal use only
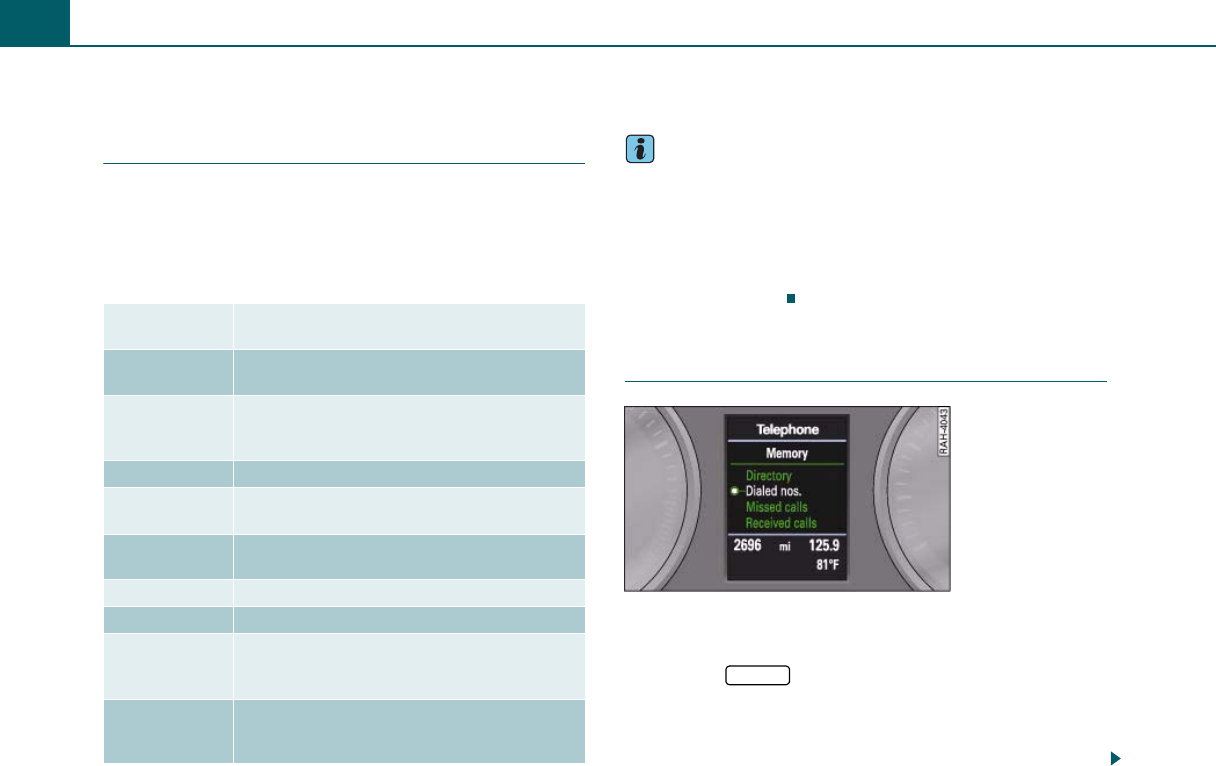
General operation102
Calling
Applies to vehicles: with cell phone prep
Introduction
Calling in the vehicle has become an everyday activity. You can
operate all of the relevant telephone functions safely and easily using
the multifunction steering wheel.
The following messages could appear in the driver information
system:
Would you like to learn more about operating the telephone in your
vehicle? You will find a detailed description in ⇒page 69.
Tips
•The telephone functions can only be controlled on the multifunc-
tion steering wheel if the telephone equipment was installed at the
factory.
•The telephone functions depend on the cell phone and whether
they are supported by your cell phone service provider or not. Refer to
www.audiusa.com/bluetooth (www.audicanada.ca/technology) for
compatible phone list.
Applies to vehicles: with cell phone prep
Selecting telephone
Requirement: The cell phone package ⇒page 22 has been
activated.
– Press the button until the Telephone menu
appears in the driver information system ⇒fig. 102.
The following options are shown in the telephone menu:
•Directory: contains the MMI directory entries ⇒page 57.
Please
wait ...
The connection between the MMI and the paired
cell phone is being established.
No
connection
There is no connection to the phone network.
Call There is an incoming call. The caller's phone
number will also be displayed if it was transmit-
ted.
Busy The number dialed is busy.
Automatic
redial
The last number dialed is dialed again automati-
cally after a brief waiting period.
Telephone is
switched off
The telephone is switched off.
Connecting The connection is established.
End call The connection has ended.
No
entries
available
The directory does not contain any entries or the
entries have not been read into the MMI.
Please
connect
phone
The telephone is not connected with the vehicle.
Fig. 102 Telephone
menu
MODE
MMI high B8, for internal use only
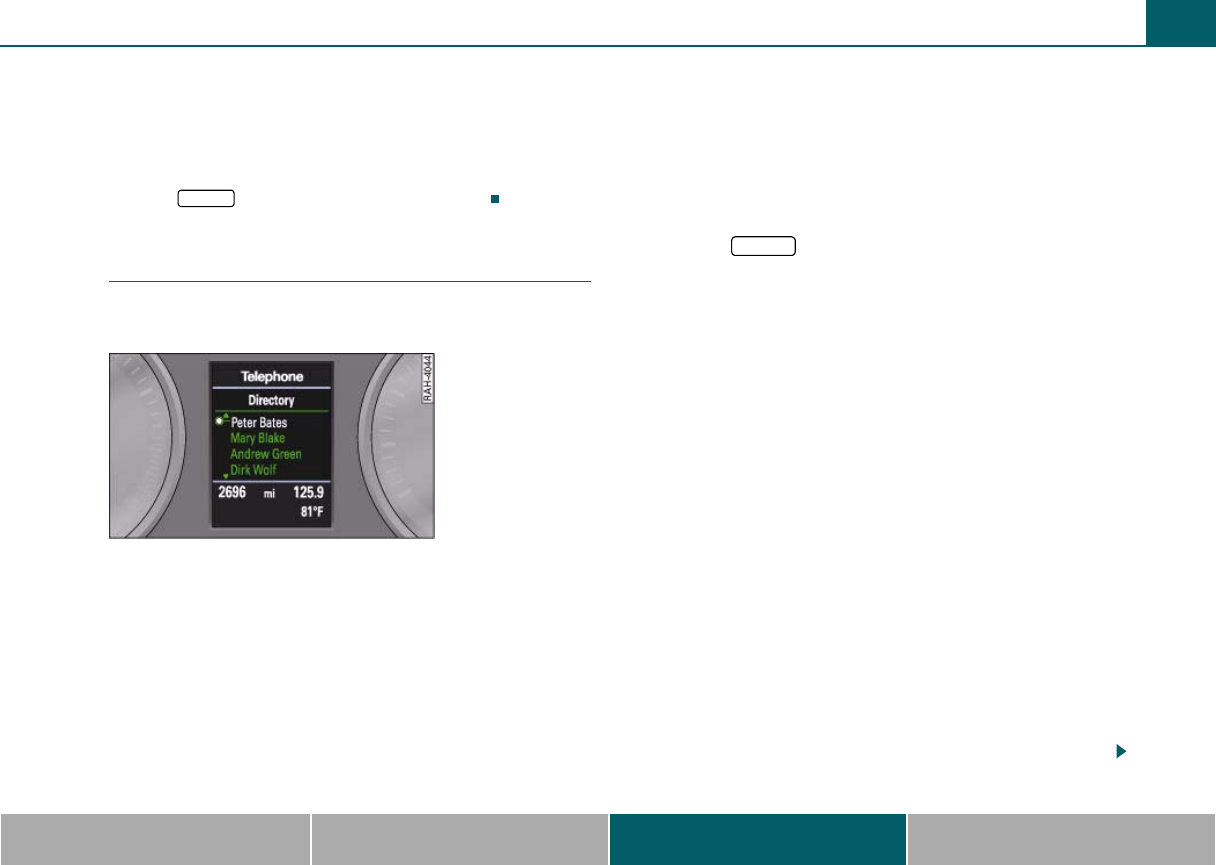
General operation 103
MMI components MMI control panel Multifunction steering wheel Voice recognition system
•Dialed numbers: contains the telephone numbers dialed most
recently.
•Missed calls: contains the most recent calls not received.
•Received calls: contains the most recently received calls.
You can dial the selected phone number directly from the call lists.
Press the button to close an open call list.
Applies to vehicles: with cell phone prep
Dialing a phone number and ending a call
Phone numbers stored in the directory and in the call lists
can be dialed.
Requirement: The Telephone menu is displayed ⇒page 102,
fig. 102.
Calling
– Roll the left thumbwheel ⇒page 98, fig. 95 to Dialed
numbers, Directory, Missed calls or Received calls
⇒page 102, fig. 102.
– Press the left thumbwheel. A list with entries appears in
the driver information system ⇒fig. 103.
– Roll the left thumbwheel to an entry and press the left
thumbwheel.
Making another call
– Roll the left thumbwheel ⇒page 98, fig. 95 to Hold
and press the left thumbwheel. The phone call is placed on
hold.
– Press the button ⇒page 98, fig. 95 until the
Telephone menu ⇒page 102, fig. 102 is displayed in the
driver information system.
– Roll the left thumbwheel either to one of the call lists or
the Directory and press the left thumbwheel ⇒fig. 103. A
list with entries appears in the driver information system.
– Roll the left thumbwheel to the entry and press the left
thumbwheel. All telephone numbers stored for that entry
are displayed.
– Roll the left thumbwheel to a phone number and press the
left thumbwheel. The phone call is made and the active
audio sources is muted.
Ending a call
– Roll the left thumbwheel to End call and press the left
thumbwheel.
If several phone numbers are stored in a directory entry, the list with
stored numbers is displayed first when the entry is selected. Roll the
left thumbwheel to the desired phone number and press the left
thumbwheel.
When you have ended an active call, the call on hold remains on hold.
Select Resume and press the left thumbwheel to resume the call on
hold.
MODE
A
2
Fig. 103 List of direc-
tory entries
A
1
A
1
MODE
A
2
A
1
MMI high B8, for internal use only
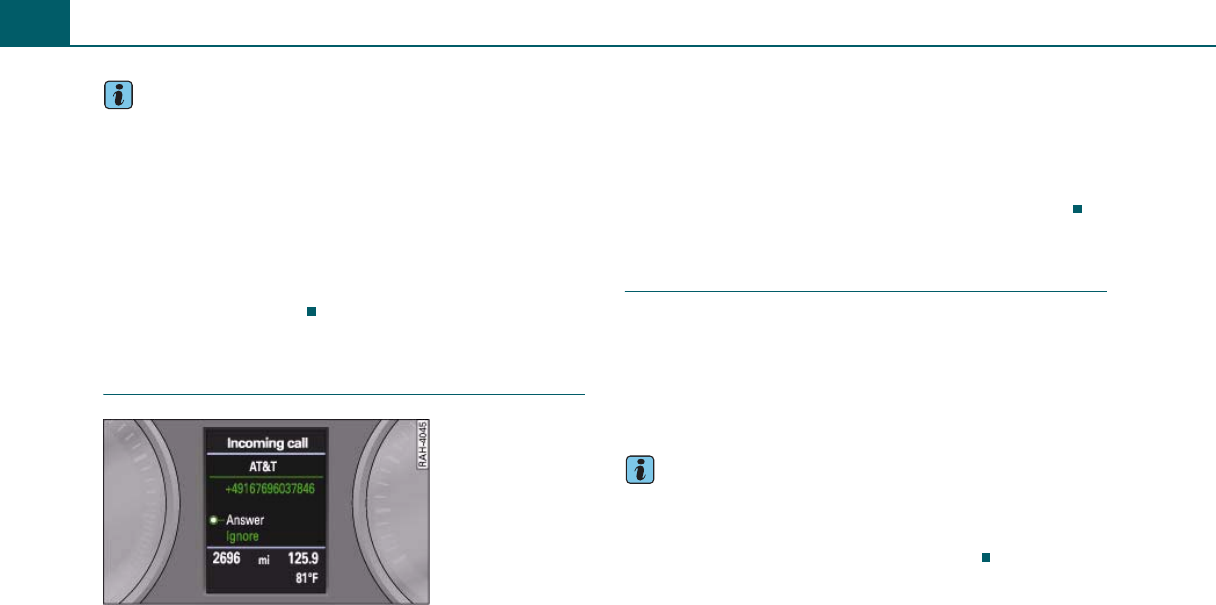
General operation104
Tips
•The multifunction steering wheel can only be used to dial stored
telephone numbers. Enter a new phone number using the MMI
speller ⇒page 70 or the voice recognition system ⇒page 110.
•The telephone functions depend on the cell phone service provider
and the cell phone you are using. You can obtain more information
from your cell phone service provider.
•If you activate Off (phone) while in navigation mode, navigation
announcements will not play during a call ⇒page 93.
•You can scroll through the directory entries quickly in blocks by
rolling the left thumbwheel.
Applies to vehicles: with cell phone prep
Answering/ignoring a call
Requirement: There must be an incoming call ⇒fig. 104.
Answering a call
– Roll the left thumbwheel ⇒page 98, fig. 95 to Answer
and press the left thumbwheel.
Ignoring a call
– Roll the left thumbwheel to Ignore and press the left
thumbwheel.
The Name, Phone number or Unknown appears in the driver informa-
tion system display depending on whether the caller has been stored
in the directory and if the phone number has been transmitted.
Applies to vehicles: with cell phone prep
Options during a call
When there is an incoming call during an active phone call, the
Replace and Ignore functions appear in the driver information
system.
If you select Replace, the active call will be replaced with the
incoming call. If you select Ignore, the incoming call will be ignored.
A call on hold remains in queue.
Tips
The Call waiting function must be activated in your cell phone to be
alerted to an incoming call during an active call. The call options
depend on the cell phone and service provider. You can obtain more
information from your cell phone service provider.
Fig. 104 Incoming
call
A
1
MMI high B8, for internal use only
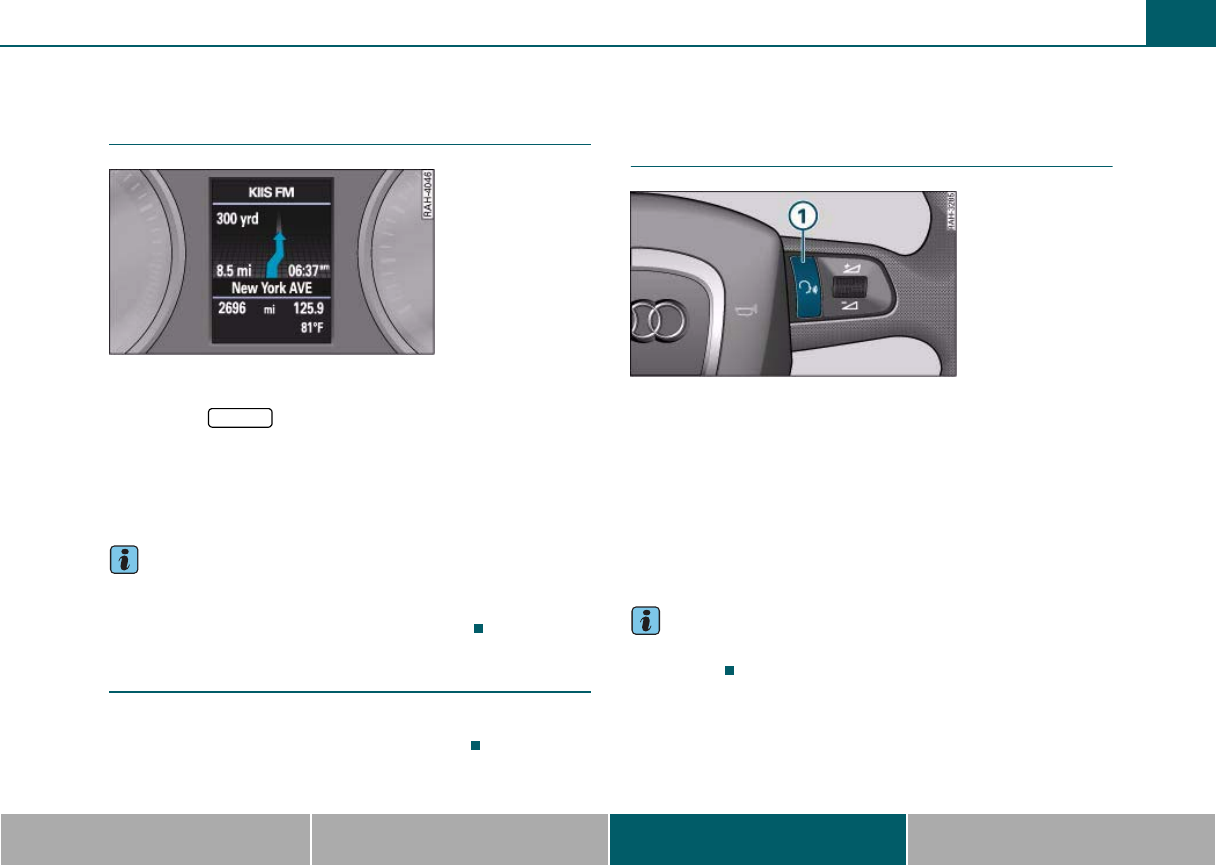
General operation 105
MMI components MMI control panel Multifunction steering wheel Voice recognition system
Navigating
Calling up navigation
Requirement: Navigation mode must be active ⇒page 79.
–Press the button ⇒page 98, fig. 95 until navi-
gation appears in the driver information system
⇒fig. 105.
For detailed information about the navigation function, refer to
⇒page 78.
Tips
You can switch the navigation display off with the reset button on the
windshield washer stalk. Comprehensive information on this topic
can be found in the Owner's Manual of your vehicle.
Repeating navigation announcements
– Press the right thumbwheel ⇒page 98, fig. 95 to
repeat the last navigation announcement.
Name tag
Switching the voice recognition system on
and off
Switching on
– Press button ⇒fig. 106.
Switching off
– Press and hold the button until the message Cancel plays.
The input signal Beep plays when the system is ready for dialogue.
Then the desired functions can be selected using voice commands
⇒page 107.
Tips
For a detailed description of the voice recognition system, refer to
⇒page 107.
Fig. 105 Navigation
in the driver informa-
tion system
MODE
A
2
A
4
Fig. 106 Multi-func-
tion steering wheel:
Talk button
A
1
MMI high B8, for internal use only
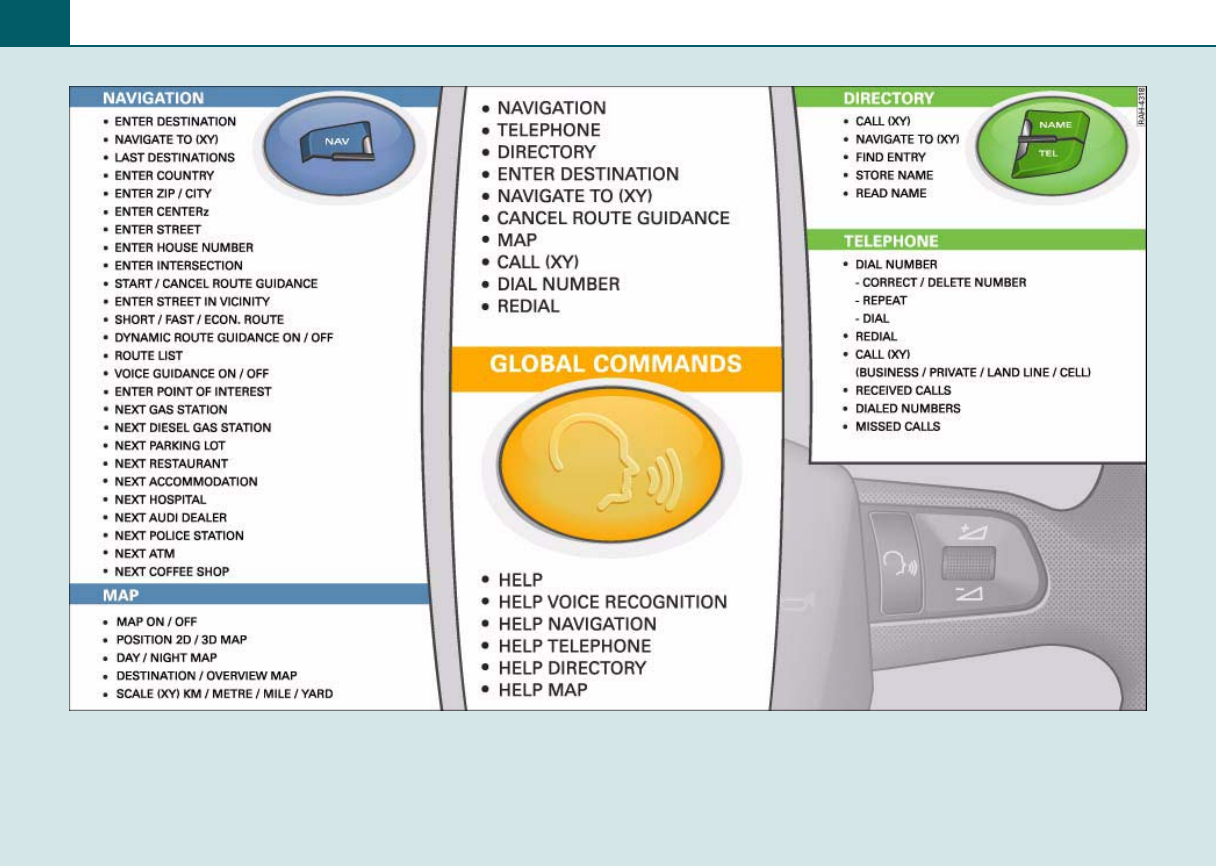
Voice recognition system106
Fig. 107 Voice recognition system command overview
MMI high B8, for internal use only
Voice recognition system 107
MMI components MMI control panel Multifunction steering wheel Voice recognition system
Voice recognition system
Introduction
You can control many MMI functions through the voice
recognition system.
With the voice recognition system, you can switch between the
various modes easily by voice, for example for Navigation to Tele-
phone*. In conjunction with hands-free operation it is not necessary
to pick up the cell phone. The voice recognition system recognizes
commands and numbers regardless of the speaker.
Individual training improves the recognition function of the voice
recognition system by adapting it to your voice or pronunciation
⇒page 38.
The voice recognition system automatically creates a name tag for
each entry in the directory. Using the voice recognition system, you
can select the private or business address of an entry as a navigation
destination or call up the entry. You can also access other functions:
you can call up call lists, view the route list for a destination or show
the map view in the MMI display ⇒page 112.
It is okay if you do not know a particular command. Simply say the
command HELP when the voice recognition system is switched on.
The system will tell you the commands that are possible at that time
or give you a tip ⇒page 108. For the most important voice recogni-
tion system commands, refer to the command overview ⇒page 106,
fig. 107.
In which language would you like to use the voice recognition
system? You can choose from English, French and Spanish
⇒page 38.
For the system to understand you
•Speak clearly and distinctly at a normal volume. Speak louder
when there is loud ambient noise.
•Pronounce the commands evenly and do not leave long pauses.
•Do not speak a command when the voice recognition system is
making an announcement.
•Close the doors, the windows and the sunroof* to reduce ambient
noise. Make sure that passengers are not speaking when you are
giving a voice command.
•Do not direct the air vents toward the hands-free microphone that
is close to the front interior lights.
•Only use the system from the driver's position since the hands-
free microphone is oriented toward that position.
Unrecognized voice commands
The systems reacts to your input with audible feedback. If a voice
command is not recognized, the system asks Pardon? and asks you to
repeat the command. After the third unsuccessful attempt, you will
hear the message Cancel and the dialog ends.
WARNING
•Please devote your full attention to driving. As the driver, you
have complete responsibility for safety in traffic. Only use the
functions in such a way that you always maintain complete control
over your vehicle in all traffic situations.
•Do not use voice recognition in emergencies because your voice
may change in stressful situations. It may take longer to dial the
number or the system may not be able to dial it at all. Dial the
emergency number manually.
MMI high B8, for internal use only
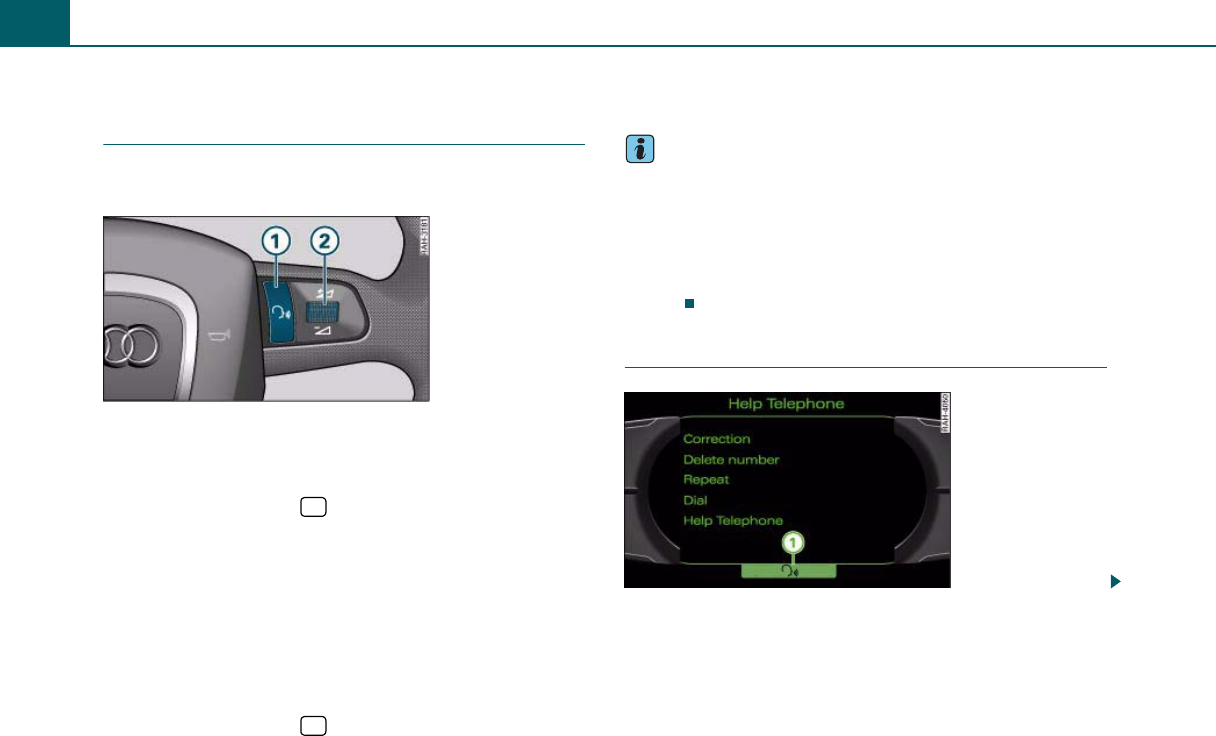
Voice recognition system108
General operation
Switching on and off
You can switch the voice recognition system on and off
with the multifunction steering wheel.
Requirement: The ignition and the MMI must be switched on
⇒page 28, the A/C system must not be activated and you
must not have a phone call in progress.
– Press the Talk button ⇒fig. 108 on the multifunc-
tion steering wheel briefly to switch the voice recognition
system on. The input signal Beep indicates that the voice
recognition system is ready. The status symbol
⇒fig. 109 appears in the MMI display. An active audio
source is muted.
– Say the desired command.
– To switch the voice recognition system off, speak the
command CANCEL, or
– Press the Talk button ⇒fig. 108 and hold it down
until you hear the message Cancel.
You can shorten a message by pressing the talk button and speaking
a new command.
Tips
•You can also deactivate the voice recognition system by pressing
any button on the MMI control panel in the center console
⇒page 29.
•Traffic announcements do not play during the dialog.
•The dialog stops when there is an incoming phone call and will
continue if you ignore the call. The dialog is cancelled if you answer
the call.
Operating the system
Fig. 108 Talk button
and right thumbwheel
A
1
A
1
A
1
Fig. 109 Help texts in
the MMI display
MMI high B8, for internal use only
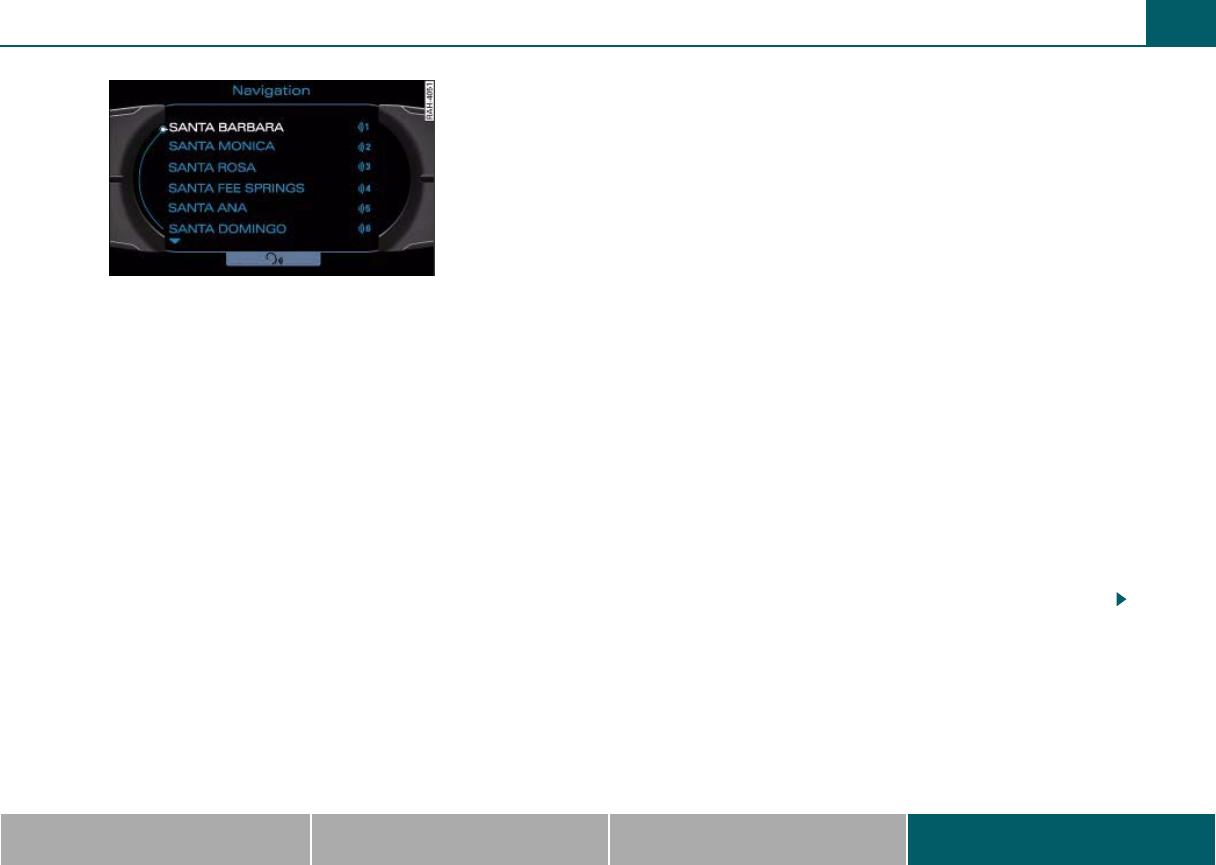
Voice recognition system 109
MMI components MMI control panel Multifunction steering wheel Voice recognition system
Commands
The voice recognition system uses two types of commands:
•Commands for the active mode such as LAST DESTINATIONS in
the Navigation mode
•Global commands (regardless of mode) such as NAVIGATION
The command overview ⇒page 106, fig. 107 provides an overview of
the most important voice recognition system commands.
Selecting an entry from a list
The entries in a list such as missed calls, directory entries, street
names, etc. are shown in the MMI display with item numbers
⇒fig. 110. You can select a line by saying the line number, such as
LINE FOUR or repeating one of the entries shown in the MMI display.
You can also select a line through the MMI control panel by turning
the control knob to an entry and pressing the knob.
You can scroll through the list displayed with the commands NEXT
PAGE/PREVIOUS PAGE or FIRST PAGE/LAST PAGE.
Voice guidance
To switch voice guidance on or off during route guidance, say the
command VOICE GUIDANCE ON or VOICE GUIDANCE OFF. Use the
COMPACT VOICE GUIDANCE command to shorten the announce-
ment.
Adjusting the volume
To adjust the voice recognition system volume with the multifunction
steering wheel, turn the right thumbwheel ⇒page 108, fig. 108
up or down while an announcement is playing.
You can also adjust the voice recognition system volume by pressing
the Sound control button while in the radio/media menu ⇒page 34.
Help commands
You can say a help command when the voice recognition system is
switched on ⇒page 108. Possible help commands are:
•HELP
•HELP SPEECH DIALOGUE SYSTEM
•HELP DIRECTORY
•HELP TELEPHONE*
•HELP NAVIGATION
•HELP MAP
Say the command BACK to return to the main help menu.
System-guided help
If the voice recognition system is switched on ⇒page 108 but you do
not give a command, the system gives the prompt Please enter a
command or say help. If you still do not give a command, the voice
recognition system offers possible commands.
Example of system-guided help (the telephone* function is acti-
vated):
Fig. 110 Selecting an
entry from the list
A
2
MMI high B8, for internal use only

Voice recognition system110
Tips
•You can interrupt a voice recognition system announcement at
any time by pressing the Talk button on the multifunction steering
wheel ⇒page 108, fig. 108 and enter a new command.
•You can also adjust the volume by the turning the On/Off knob
⇒page 33.
Calling
Applies to vehicles: with cell phone prep
Starting telephone mode
Requirement: The MMI telephone function must be active
⇒page 22 and the voice recognition system must be
switched on ⇒page 108.
–Say TELEPHONE. Telephone mode starts. The voice recog-
nition system remains switched on for approximately five
seconds to accept an additional command.
Applies to vehicles: with cell phone prep
Dialing a phone number
Requirement: The voice recognition system must be switched
on ⇒page 108.
–Say DIAL NUMBER.
– Enter a group of numbers such as “0-1-7-2-2”. The system
repeats the block of numbers and displays them in the
MMI.
–Say DELETE to delete the last block of numbers.
–Say DIAL to dial the number.
Tips
You can correct incorrect entries when entering a telephone number
with the CORRECTIONcommand.
Applies to vehicles: with cell phone prep
Calling
Requirement: The voice recognition system must be switched
on ⇒page 108.
– To call the phone number stored in a directory entry, say
CALL (XY), for example CALL “JOHN SMITH”. The tele-
phone number is dialed.
Operation/
Commands
Voice recognition system
announcement
Press talk button
briefly Input signal: Beep
No command given Please enter a command or say help
HELP
Please choose one of the following top-
ics. You can press the talk button at any
time to enter a command.
All telephone commands
Important telephone commands
Commands for phoning
Commands for the call lists
MMI high B8, for internal use only

Voice recognition system 111
MMI components MMI control panel Multifunction steering wheel Voice recognition system
If several phone numbers are stored in an address card, you add the
command BUSINESS LAND LINE, BUSINESS MOBILE, PRIVATE
LAND LINE or PRIVATE MOBILE, for example CALL JOHN SMITH
PRIVATE MOBILE.
Tips
When an address card is open, you can dial a phone number with the
command CALL PRIVATE or CALL BUSINESS ⇒page 111.
Applies to vehicles: with cell phone prep
Additional telephone mode commands
Requirement: The voice recognition system must be switched
on ⇒page 108.
Accessing call lists
–Say NUMBERS DIALED, RECEIVED CALLS or MISSED
CALLS. The call list is shown in the MMI display. You can
dial a number by saying the line number.
Redialing
–Say REDIAL. The last numbered dialed is called.
Using addresses
Opening the directory
Requirement: The voice recognition system must be switched
on ⇒page 108.
–Say DIRECTORY. The directory opens. The voice recogni-
tion system remains switched on for approximately five
seconds to accept an additional command.
Using an entry
Requirement: The voice recognition system must be switched
on ⇒page 108.
Searching for/opening an entry
–Say FIND ENTRY.
– Say the name of the address card if prompted by the voice
recognition system. The address card opens.
Calling up an entry
– To call the phone number stored in a directory entry, say
CALL (XY), for example CALL “JOHN SMITH” ⇒page 110.
The telephone number is dialed.
Navigating to an entry
–Say NAVIGATE TO (XY) such as NAVIGATE TO “JOHN
SMITH”. If a navigation destination is assigned to an
address card, that destination is entered and route guid-
ance begins.
Tips
You can start route guidance when an address card is open with the
commands NAVIGATE TO PRIVATE ADDRESS or NAVIGATE TO
BUSINESS ADDRESS. You can also dial phone numbers with the
commands CALL PRIVATE or CALL BUSINESS.
MMI high B8, for internal use only

Voice recognition system112
Storing a voice memo
The MMI creates a name tag for each entry in the direc-
tory. You can also assign up to 50 personal name tags for
address cards.
Requirement: An address card must be open ⇒page 111 and
the voice recognition system must be switched on
⇒page 108.
–Say STORE NAME.
– Say the personal name tag.
– Repeat the personal name tag if prompted by the voice
recognition system. The personal name tag is stored in the
MMI.
Name tags can only be stored using the voice recognition system. The
name tags do not change the data stored in the directory.
You must repeat the name tag with the same pronunciation and
volume. Assign clear, distinct names as name tags.
Do not include any long pauses in name tags.
Reading name tags
You can have name tags read.
Requirement: An address card must be open ⇒page 111 and
the voice recognition system must be switched on
⇒page 108.
–Say READ NAME. The personal name tag is read.
Tips
You can also listen to personal name tags for address cards through
the MMI control panel ⇒page 65.
Deleting personal name tags
Deleting in the address card
–Turn the control knob to Delete name tag and press the
knob while the address card is open ⇒page 111. The
personal name tag is deleted.
Deleting in the SETUP menu
– Press the function button. A list of entries
appears in the MMI display.
– Press the function button.
–Turn the control knob to Delete voice memos and press
the knob.
– Turn the control knob to Delete individually or Delete all
entries and press the knob.
–Turn the control knob to Yes and press the knob to begin
the deletion process.
Navigating
Starting navigation mode
Requirement: The voice recognition system must be switched
on ⇒page 108.
–Say NAVIGATION. Navigation mode starts. The voice
recognition system remains switched on for approxi-
mately five seconds to accept an additional command.
NAME
SETUP
MMI high B8, for internal use only

Voice recognition system 113
MMI components MMI control panel Multifunction steering wheel Voice recognition system
Entering a destination
The voice recognition system offers two ways to enter
destinations: system-guided destination entry or
entering individual commands.
Requirement: The voice recognition system must be switched
on ⇒page 108.
System-guided destination entry
–Say ENTER DESTINATION. The input field appears in the
MMI display ⇒page 79, fig. 79.
– Say the desired city when prompted.
– Say the desired street when prompted.
– Say the desired house number when prompted, or
–Say START ROUTE GUIDANCE to navigate to the destina-
tion entered.
Entering individual commands
– To enter the country, say ENTER COUNTRY and say the
country name.
– To enter the town, say ENTER TOWN and say the name of
the town.
– To enter the street, say ENTER STREET and say the
complete name of the street, such as NORTH FIFTH
AVENUE.
– To enter a street in the current town, say ENTER STREET
IN VICINITY and say the complete name of the street,
such as NORTH FIFTH AVENUE.
– To enter the house number, say ENTER HOUSE NUMBER
and say the house number one digit at a time.
–Say START ROUTE GUIDANCE to navigate to the destina-
tion entered.
It may take a few seconds to search the location. The MMI display will
then show a list of possible city names. You can select the desired
location by saying the line number, such as LINE FOUR or turning and
pressing the control knob. You can scroll through the list of location
names with the commands NEXT PAGE/PREVIOUS PAGE. Because
many countries have several cities with the same name, it may be
necessary to select the city from a list again ⇒page 109.
Tips
•Once a city is entered into the input field, you can start route guid-
ance to the city center by press the talk button and saying START
ROUTE GUIDANCE. You can also start route guidance through the
MMI control panel ⇒page 80.
•You can also switch the voice recognition system on and enter a
command during active route guidance and messages about driving
maneuvers.
•For additional information on navigation functions, refer to
⇒page 78.
Points of interest
Requirement: The voice recognition system must be switched
on ⇒page 108.
–Say ENTER SPECIAL DESTINATION.
– After the announcement Please enter the search area, say
IN IMMEDIATE VICINITY, IN VICINITY OF DESTINA-
TION, IN NEW TOWN or NATIONWIDE. A list with point
of interest categories appears in the MMI display.
MMI high B8, for internal use only

Voice recognition system114
– To select an entry from the list, say the line number, for
example LINE TWO or say the name of the entry. The point
of interest is set as the navigation destination.
–Say START ROUTE GUIDANCE to navigate to the destina-
tion entered.
The following top destinations can be set directly as navigation desti-
nations:
•NEXT GAS STATION
•NEXT DIESEL GAS STATION
•NEXT PARKING LOT
•NEXT RESTAURANT
•NEXT ACCOMMODATION
•NEXT HOSPITAL
•NEXT AUDI DEALER
•NEXT POLICE STATION
•NEXT ATM
•NEXT COFFEE SHOP
•NEXT AIRPORT
•NEXT TRAIN STATION
Tips
You can scroll through the list displayed with the commands NEXT
PAGE/PREVIOUS PAGE or FIRST PAGE/LAST PAGE.
Map options
You can use the voice recognition system to control many
map view functions in the MMI display.
Requirement: The voice recognition system must be switched
on ⇒page 108.
Map option commands include:
General options
•MAP ON/OFF - The map is displayed or hidden in the MMI display.
•DAY/NIGHT MAP - The map background is light/dark ⇒page 92.
•ADDITIONAL INFO ON/OFF - Upcoming turns with calculated
distance are displayed when route guidance is active.
Map type
•POSITION 2D /3D MAP - The current vehicle position is shown in
a two/three dimensional map ⇒page 92.
•DESTINATION MAP - The map shows the destination ⇒page 92.
•DETAIL MAP - The current vehicle position is shown in the map
with 1 km scale. This function is only available through the voice
recognition system.
•OVERVIEW MAP - The entire route from the starting point to the
destination is shown on the map ⇒page 92.
Orientation
•ORIENTATION NORTH - The map is oriented to the north
⇒page 92.
•ORIENTATION IN DIRECTION OF TRAVEL - The map is oriented to
the direction the vehicle is traveling ⇒page 92.
•ORIENTATION AUTOMATIC - The map is oriented in the direction
of travel at a scale less than 2.5. At a scale greater than 2.5 km, the
map is oriented to the north ⇒page 92.
Zoom
•INTERSECTION ZOOM ON/OFF - The map is displayed in zoom
mode at intersections ⇒page 93.
•ZOOM OFF - Switched the activated map zoom mode off.
•MAP LARGER/SMALLER - The map display is changed.
•SCALE (XY), for example SCALE 5 km - The map scale is changed.
Available scales are 50 m, 100 m, 200 m, 500 m, 1 km, 2 km, 5 km,
MMI high B8, for internal use only
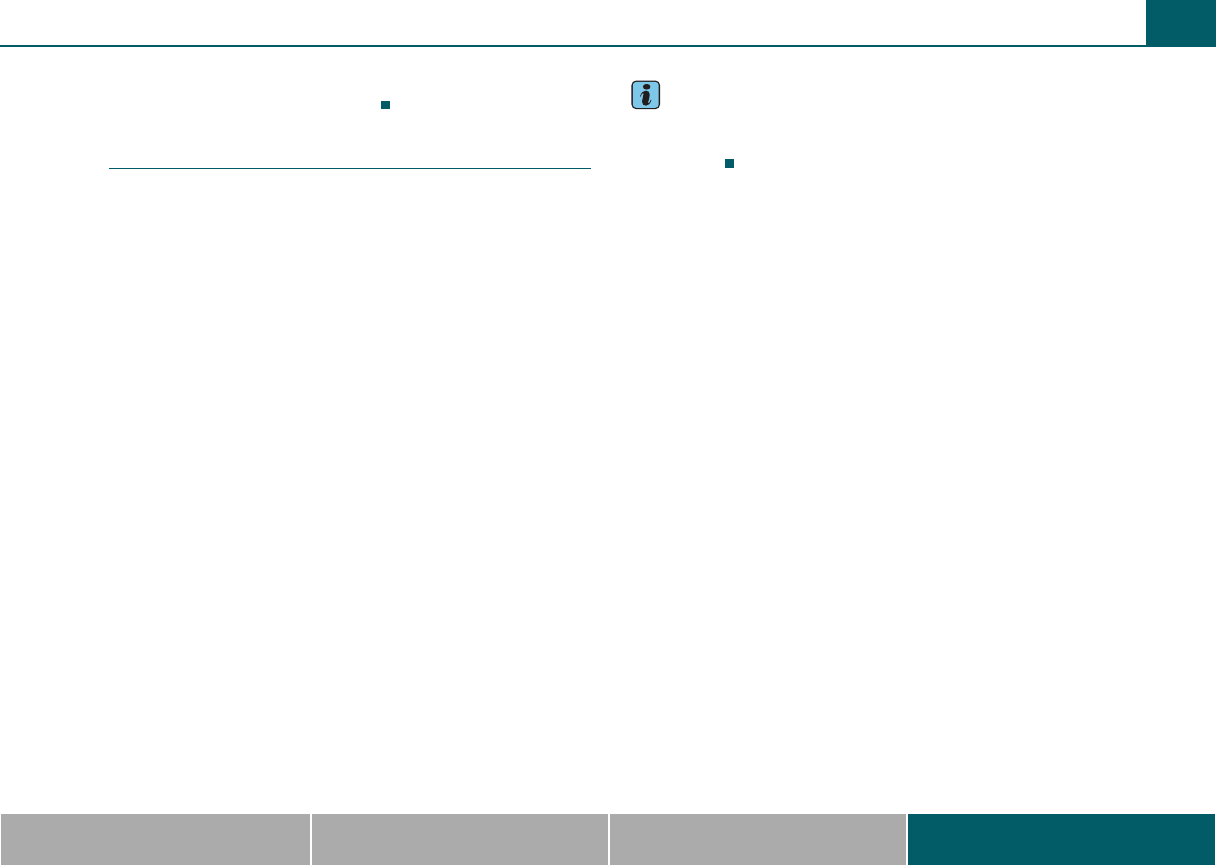
Voice recognition system 115
MMI components MMI control panel Multifunction steering wheel Voice recognition system
10 km, 20 km, 50 km, 100 km, 200 km and 500 km. Units of measure
are kilometers/meters or miles/yards.
Additional navigation commands
Requirement: The voice recognition system must be switched
on ⇒page 108.
Route guidance
–Say START/STOP ROUTE GUIDANCE. Route guidance
starts or stops.
Calling up navigation lists
–Say LAST DESTINATIONS or TOP DESTINATIONS. Follow
the instructions from the voice recognition system.
Dynamic route guidance
–Say DYNAMIC ROUTE GUIDANCE ON/OFF. Dynamic route
guidance is switched on or off.
Route criteria
–Say: FAST ROUTE, ECONOMICAL ROUTE or SHORT
ROUTE. The route is calculated according to various
criteria, or
–Say: ROUTE LIST. The route list can be viewed when route
guidance is active.
Navigating to a directory entry
–Say NAVIGATE TO (XY) such as NAVIGATE TO “JOHN
SMITH”. If a navigation destination is assigned to an
address card, that destination is entered and route guid-
ance begins.
Tips
To switch voice guidance on or off when route guidance is active, say
the command VOICE GUIDANCE ON or VOICE GUIDANCE OFF
⇒page 108.
MMI high B8, for internal use only

Alphabetical index116
A
AAC files . . . . . . . . . . . . . . . . . . . . . 12, 14, 16
Accepting a call . . . . . . . . . . . . . . . . . . . . . 76
Activate your Satellite Radio service . . . . . 41
Addit. info
MMI control panel . . . . . . . . . . . . . . . . 93
Addresses
MMI control panel . . . . . . . . . . . . . . . . 57
Voice recognition system . . . . . . . . . . 111
Adjusting volume
MMI control panel . . . . . . . . . . . . . . . . 34
Alternative route
on/off . . . . . . . . . . . . . . . . . . . . . . . . . . 91
Selecting . . . . . . . . . . . . . . . . . . . . . . . . 85
AM
Selecting frequency band . . . . . . . . . . . 40
Answering/ignoring a call
MMI control panel . . . . . . . . . . . . . . . . 72
Multifunction steering wheel . . . . . . . 104
Aspect ratio . . . . . . . . . . . . . . . . . . . . . . . . 55
Audi music interface
Connecting the adapter cable . . . . . . . 18
Repeat . . . . . . . . . . . . . . . . . . . . . . . . . . 51
Starting . . . . . . . . . . . . . . . . . . . . . . . . . 17
Audi music interface adapter cable . . . . . . 18
Audio source . . . . . . . . . . . . . . . . . . . . . . . . 48
Automatic zoom
Voice recognition system . . . . . . . . . . 114
Automatic zoom (Navigation) . . . . . . . . . . 93
Aux-in connection
Connecting/removing an audio device . 21
MMI control panel . . . . . . . . . . . . . . . . 48
Avoiding a route . . . . . . . . . . . . . . . . . . . . . 91
B
Balance (sound) . . . . . . . . . . . . . . . . . . . . . 34
Band . . . . . . . . . . . . . . . . . . . . . . . . . . . . . . 42
Bass (sound) . . . . . . . . . . . . . . . . . . . . . . . . 34
Bluetooth
Bluetooth name . . . . . . . . . . . . . . . . . . 75
Cell phone prep . . . . . . . . . . . . . . . . . . . 22
Delete Bluetooth devices . . . . . . . . . . . 75
Discover Mode . . . . . . . . . . . . . . . . . . . . 75
Find Bluetooth devices . . . . . . . . . . . . . 75
Paired devices . . . . . . . . . . . . . . . . . . . . 75
Switching on/off . . . . . . . . . . . . . . . . . . 75
Brightness
MMI display . . . . . . . . . . . . . . . . . . . . . . 39
Buttons
MMI control panel . . . . . . . . . . . . . . . . 29
Multifunction steering wheel . . . . . . . . 98
C
Call lists . . . . . . . . . . . . . . . . . . . . . . . . . . . 76
Delete . . . . . . . . . . . . . . . . . . . . . . . . . . 74
MMI control panel . . . . . . . . . . . . . . . . 71
Multifunction steering wheel . . . . . . . 102
Voice recognition system . . . . . . . . . . 111
Call options . . . . . . . . . . . . . . . . . . . . . . . . . 76
Call volume . . . . . . . . . . . . . . . . . . . . . . . . . 76
Calling
MMI control panel . . . . . . . . . . . . . 69, 70
Multifunction steering wheel . . . . . . . 102
Voice recognition system . . . . . . . . . . 110
Calling up navigation lists (voice recognition
system) . . . . . . . . . . . . . . . . . . . . . . . 115
Calls
MMI control panel . . . . . . . . . . . . . . . . 71
Multifunction steering wheel . . . . . . . 103
Care
CD/DVD . . . . . . . . . . . . . . . . . . . . . . . . . 11
Memory cards . . . . . . . . . . . . . . . . . . . . 12
MMI control panel . . . . . . . . . . . . . . . . . 8
Category filter (Satellite Radio) . . . . . . . . 47
CD
Ejecting . . . . . . . . . . . . . . . . . . . . . . . . . 14
Ejecting (CD changer) . . . . . . . . . . . . . . 16
Handling tips . . . . . . . . . . . . . . . . . . . . . 11
Loading . . . . . . . . . . . . . . . . . . . . . . . . . 14
Loading (CD changer) . . . . . . . . . . . . . . 15
MMI control panel . . . . . . . . . . . . . . . . 48
Multifunction steering wheel . . . . . . . 100
Repeat . . . . . . . . . . . . . . . . . . . . . . . . . . 51
CD changer . . . . . . . . . . . . . . . . . . . . . . . . . 14
CD/DVD drive . . . . . . . . . . . . . . . . . . . . . . . 14
Cell phone
with hands-free profile . . . . . . . . . . . . . 24
with hands-free profile (cell phone prep) .
22
Cell phone package
Calling (multifunction steering wheel) . . .
102
MMI high B8, for internal use only

Alphabetical index 117
MMI components MMI control panel Multifunction steering wheel Voice recognition system
Cell phone prep
Calling (MMI control panel) . . . . . . . . . 69
Calling (voice recognition system) . . . 110
Pairing cell phone . . . . . . . . . . . . . . . . . 24
Searching for Bluetooth devices . . . . . . 23
Starting . . . . . . . . . . . . . . . . . . . . . . . . . 22
Chapter (drive)
Next/previous chapter . . . . . . . . . . . . . . 50
Cleaning
CD/DVD . . . . . . . . . . . . . . . . . . . . . . . . . 11
Control button . . . . . . . . . . . . . . . . . . . . . . 29
Control knob . . . . . . . . . . . . . . . . . . . . . . . . 29
Controls
MMI control panel . . . . . . . . . . . . . . . . . 29
Multifunction steering wheel . . . . . . . . 98
Overview . . . . . . . . . . . . . . . . . . . . . . . . . . 7
D
Data password . . . . . . . . . . . . . . . . . . . . . . 39
Date . . . . . . . . . . . . . . . . . . . . . . . . . . . . . . . 36
Default settings
MMI control panel . . . . . . . . . . . . . . . . . 38
Delete Bluetooth devices . . . . . . . . . . . . . . 75
Deleting local call lists . . . . . . . . . . . . . . . . 74
Deleting recent calls
MMI control panel . . . . . . . . . . . . . . . . . 74
Demo mode . . . . . . . . . . . . . . . . . . . . . . . . . 94
Dialed numbers
MMI control panel . . . . . . . . . . . . . . . . . 71
Multifunction steering wheel . . . . . . . 102
Dialing a phone number
MMI control panel . . . . . . . . . . . . . 70, 71
Multifunction steering wheel . . . . . . . 103
Voice recognition system . . . . . . . . . . 110
Dialing phone numbers
MMI control panel . . . . . . . . . . . . . . . . . 74
Dialing stored phone numbers . . . . . . . . . . 74
Directory
Multifunction steering wheel . . . . . . . 102
Directory entries
Cell phone prep . . . . . . . . . . . . . . . . . . . 25
Directory entry
Calling (voice recognition system) . . . 111
calling up (MMI control panel) . . . . . . . 62
Change . . . . . . . . . . . . . . . . . . . . . . . . . . 64
Deleting . . . . . . . . . . . . . . . . . . . . . . . . . 65
Editing . . . . . . . . . . . . . . . . . . . . . . . . . . 63
Importing . . . . . . . . . . . . . . . . . . . . . . . 60
Navigating (MMI control panel) . . . . . . 62
Navigating (voice recognition system) . . .
111, 115
Search/open (voice recognition system) .
111
searching (MMI control panel) . . . . . . . 61
Store new . . . . . . . . . . . . . . . . . . . . . . . . 57
Voice memo . . . . . . . . . . . . . . . . . . . . . 112
Directory memory capacity . . . . . . . . . . . . . 68
Discover Mode . . . . . . . . . . . . . . . . . . . . . . . 75
Display
See Driver information system . . . . . . . 98
See MMI Display . . . . . . . . . . . . . . . . . . 29
Displaying track information . . . . . . . . . . . 55
Driver information system . . . . . . . . . . . . . 98
Drives
Audi music interface . . . . . . . . . . . . . . . 17
Aux-in connection . . . . . . . . . . . . . . . . . 21
CD changer . . . . . . . . . . . . . . . . . . . . . . . 14
CD/DVD . . . . . . . . . . . . . . . . . . . . . . . . . 14
File formats . . . . . . . . . . . . . . . . . . . . . . . 9
Jukebox . . . . . . . . . . . . . . . . . . . . . . . . . 12
Memory card reader . . . . . . . . . . . . . . . 16
MMI control panel . . . . . . . . . . . . . . . . . . 9
DSP . . . . . . . . . . . . . . . . . . . . . . . . . . . . . . . 35
DSP Bang & Olufsen . . . . . . . . . . . . . . . . . . 36
DTMF tones
MMI control panel . . . . . . . . . . . . . . . . . 70
DVD . . . . . . . . . . . . . . . . . . . . . . . . . . . . . . . 14
Ejecting . . . . . . . . . . . . . . . . . . . . . . . . . 14
Full screen display . . . . . . . . . . . . . . . . . 53
Handling tips . . . . . . . . . . . . . . . . . . . . . 11
Loading . . . . . . . . . . . . . . . . . . . . . . . . . 14
Main menu . . . . . . . . . . . . . . . . . . . . . . . 52
Multifunction steering wheel . . . . . . . 100
Parental control . . . . . . . . . . . . . . . . . . . 53
Dynamic Navigation
Voice recognition system . . . . . . . . . . 115
Dynamic route
MMI control panel . . . . . . . . . . . . . . . . . 91
E
Edit (directory) . . . . . . . . . . . . . . . . . . 64, 65
Editing (directory) . . . . . . . . . . . . . . . . . . . . 68
Ending a call
MMI control panel . . . . . . . . . . . . . . . . . 72
Multifunction steering wheel . . . . . . . 103
MMI high B8, for internal use only

Alphabetical index118
Entering a destination . . . . . . . . . . . . . . . . 79
Address . . . . . . . . . . . . . . . . . . . . . . . . . 80
Alternative route . . . . . . . . . . . . . . . . . . 85
Avoiding a route . . . . . . . . . . . . . . . . . . 91
from the map . . . . . . . . . . . . . . . . . . . . 81
Load last destination . . . . . . . . . . . . . . 83
Loading a destination from the directory .
89
Loading a tour plan . . . . . . . . . . . . . . . . 89
Point of interest . . . . . . . . . . . . . . . . . . 82
Setting a starting point . . . . . . . . . . . . 94
Tips . . . . . . . . . . . . . . . . . . . . . . . . . . . . 79
Top destination . . . . . . . . . . . . . . . . . . . 90
Voice recognition system . . . . . . . . . . 113
Entering a point of interest
MMI control panel . . . . . . . . . . . . . . . . 82
Voice recognition system . . . . . . . . . . 113
Entering destination
Tour plan . . . . . . . . . . . . . . . . . . . . . . . . 84
with stopover . . . . . . . . . . . . . . . . . . . . 84
Entering stopover . . . . . . . . . . . . . . . . . . . . 84
External
Audio devices . . . . . . . . . . . . . . . . . . . . 20
Bluetooth device . . . . . . . . . . . . . . . . . . 75
F
Fader (sound) . . . . . . . . . . . . . . . . . . . . . . . 34
Fast forward in a track (drive) . . . . . . . . . . 50
File formats . . . . . . . . . . . . . . . . . . . . . . . . . 9
Files
Erasing . . . . . . . . . . . . . . . . . . . . . . . . . . 13
Importing . . . . . . . . . . . . . . . . . . . . . . . 12
FM
Selecting frequency band . . . . . . . . . . . 40
Folder
Repeat . . . . . . . . . . . . . . . . . . . . . . . . . . 51
Selecting (MMI control panel) . . . . . . . 49
Selecting (multifunction steering wheel) .
101
Folder structure . . . . . . . . . . . . . . . . . . . . . 49
Frequency . . . . . . . . . . . . . . . . . . . . . . . . . . 43
Full screen (DVD) . . . . . . . . . . . . . . . . . . . . 53
Function button . . . . . . . . . . . . . . . . . . . . . 29
G
GALA . . . . . . . . . . . . . . . . . . . . . . . . . . . . . . 35
I
Importing a phone number . . . . . . . . . . . . 59
In immediate vicinity (point of interest) . . 82
In new city (point of interest) . . . . . . . . . . 82
In vicinity of destination (point of interest) . .
82
In-car entertainment fader . . . . . . . . . . . . 39
Volume . . . . . . . . . . . . . . . . . . . . . . . . . 34
INFO
MP3 CD/Audi music interface . . . . . . . . 51
Sirius track information . . . . . . . . . . . . 47
Traffic information . . . . . . . . . . . . . . . . 95
Information (Navigation) . . . . . . . . . . . . . 91
Input level . . . . . . . . . . . . . . . . . . . . . . . . . 55
Intersection zoom
Voice recognition system . . . . . . . . . . 114
Invert call lists . . . . . . . . . . . . . . . . . . . . . . 76
iPod . . . . . . . . . . . . . . . . . . . . . . . . . . . . . . . 19
MMI control panel . . . . . . . . . . . . . . . . 48
Multifunction steering wheel . . . . . . . 100
J
Joystick . . . . . . . . . . . . . . . . . . . . . . . . . . . . 32
Jukebox . . . . . . . . . . . . . . . . . . . . . . . . . . . . 12
Erasing files . . . . . . . . . . . . . . . . . . . . . . 13
Importing files . . . . . . . . . . . . . . . . . . . 12
L
Laser devices . . . . . . . . . . . . . . . . . . . . . . . 11
Last calls
Multifunction steering wheel . . . . . . . 103
Last destinations
Delete . . . . . . . . . . . . . . . . . . . . . . . . . . 94
Load . . . . . . . . . . . . . . . . . . . . . . . . . . . . 83
Loading from the directory (navigation) . . 89
M
Main menu (DVD) . . . . . . . . . . . . . . . . . . . . 52
Making other calls
Multifunction steering wheel . . . . . . . 103
Manual location entry . . . . . . . . . . . . . . . . 94
Map content
MMI control panel . . . . . . . . . . . . . . . . 90
Voice recognition system . . . . . . . . . . 114
Map display . . . . . . . . . . . . . . . . . . . . . . . . 86
MMI control panel . . . . . . . . . . . . . . . . 92
Voice recognition system . . . . . . . . . . 114
MMI high B8, for internal use only

Alphabetical index 119
MMI components MMI control panel Multifunction steering wheel Voice recognition system
Map options
MMI control panel . . . . . . . . . . 90, 92, 93
Voice recognition system . . . . . . . . . . 114
Map orientation
MMI control panel . . . . . . . . . . . . . . . . . 92
Voice recognition system . . . . . . . . . . 114
Map type
MMI control panel . . . . . . . . . . . . . . . . . 92
Voice recognition system . . . . . . . . . . 114
Map zoom (voice recognition system) . . . 114
Measurement units . . . . . . . . . . . . . . . . . . . 38
Memory (radio)
Delete stations . . . . . . . . . . . . . . . . . . . 46
Moving stations . . . . . . . . . . . . . . . . . . . 46
Selecting a station (MMI control panel) . .
45
Selecting a station (multifunction steering
wheel) . . . . . . . . . . . . . . . . . . . . . . . . 100
Storing stations . . . . . . . . . . . . . . . . . . . 45
Memory card
Handling tips . . . . . . . . . . . . . . . . . . . . . 12
Inserting/removing . . . . . . . . . . . . 16, 17
MMI control panel . . . . . . . . . . . . . . . . . 48
Repeat . . . . . . . . . . . . . . . . . . . . . . . . . . 51
Memory card reader . . . . . . . . . . . . . . . . . . 16
Inserting/removing a memory card 16, 17
Missed calls
MMI control panel . . . . . . . . . . . . . . . . . 71
Multifunction steering wheel . . . . . . . 102
MMI . . . . . . . . . . . . . . . . . . . . . . . . . . . . . . . . 7
Components . . . . . . . . . . . . . . . . . . . . . . . 7
Menu overview . . . . . . . . . . . . . . . . . . . . 28
Restarting . . . . . . . . . . . . . . . . . . . . . . . 37
Switching on/off . . . . . . . . . . . . . . . . . . 28
MMI control panel . . . . . . . . . . . . . . . . . . . 29
MMI Display
Standard menus . . . . . . . . . . . . . . . . . . 29
MMI display
Brightness . . . . . . . . . . . . . . . . . . . . . . . 39
Joystick . . . . . . . . . . . . . . . . . . . . . . . . . . 32
Navigation display . . . . . . . . . . . . . . . . . 86
Speller . . . . . . . . . . . . . . . . . . . . . . . . . . 31
Switching on/off . . . . . . . . . . . . . . . . . . 33
MMI menu overview . . . . . . . . . . . . . . . . . . 28
Moving stored stations . . . . . . . . . . . . . . . . 46
MP3
MMI control panel . . . . . . . . . . . . . . . . . 48
Multifunction steering wheel . . . . . . . 100
MP3 files . . . . . . . . . . . . . . . . . . . . 12, 14, 16
MP3 player . . . . . . . . . . . . . . . . . . . . . . . . . 20
Multifunction steering wheel . . . . . . . . . . . 98
Mute
MMI control panel . . . . . . . . . . . . . . . . . 33
Multifunction steering wheel . . . . . . . . 99
Muting
MMI control panel . . . . . . . . . . . . . . . . . 33
N
Name tags
Calling directory entry . . . . . . . . . . . . . 111
deleting . . . . . . . . . . . . . . . . . . . . . . . . 112
Erasing . . . . . . . . . . . . . . . . . . . . . . . . . . 38
Reading . . . . . . . . . . . . . . . . . . . . . . . . 112
Names
Navigating to a directory entry . . . . . . 111
Nationwide (point of interest) . . . . . . . . . . 82
Nav Info (Navigation) . . . . . . . . . . . . . . . . . 91
Navigating
MMI control panel . . . . . . . . . . . . . 62, 78
Multifunction steering wheel . . . . . . . 105
Voice recognition system . . . . . . . . . . 112
Navigation announcement
Volume . . . . . . . . . . . . . . . . . . . . . . . . . . 34
Navigation announcement volume . . . . . . 34
Navigation announcements . . . . . . . . . . . . 78
Repeating . . . . . . . . . . . . . . . . . . . . . . . 105
Volume . . . . . . . . . . . . . . . . . . . . . . . . . . 34
Navigation destination
Store in the directory . . . . . . . . . . . . . . 63
Storing . . . . . . . . . . . . . . . . . . . . . . 87, 88
See also Entering a destination . . . . . . 79
Navigation display
Driver information system . . . . . 87, 105
MMI display . . . . . . . . . . . . . . . . . . . . . . 86
Next station
Radio (MMI control panel) . . . . . . . . . . 43
O
Options . . . . . . . . . . . . . . . . . . . . . . . . . . . . 75
Multifunction steering wheel . . . . . . . 104
Orientation (map)
MMI control panel . . . . . . . . . . . . . . . . . 92
Voice recognition system . . . . . . . . . . 114
MMI high B8, for internal use only

Alphabetical index120
P
Paired devices . . . . . . . . . . . . . . . . . . . . . . . 75
Parental control (DVD) . . . . . . . . . . . . . . . . 53
Pause (drive)
MMI control panel . . . . . . . . . . . . . . . . 54
Multifunction steering wheel . . . . . . . 101
Pausing/continuing playback . . . . . . . . . . . 54
Phone book
See Addresses . . . . . . . . . . . . . . . . . . . . 57
Phone number
importing into the directory . . . . . . . . . 59
Storing in the directory . . . . . . . . . . . . . 73
Presentation mode
Demo mode . . . . . . . . . . . . . . . . . . . . . . 94
Setting a starting point . . . . . . . . . . . . 94
Q
Quartz clock . . . . . . . . . . . . . . . . . . . . . . . . 36
R
Radio
Category filter (Satellite Radio) . . . . . . 47
MMI control panel . . . . . . . . . . . . . . . . 40
Multifunction steering wheel . . . . . . . . 99
Station info (Satellite Radio) . . . . . . . . 47
Station sorting (Satellite Radio) . . . . . 47
System information (Satellite Radio) . 40
Radio clock . . . . . . . . . . . . . . . . . . . . . . . . . 36
Radio station on the MMI control panel
Frequency . . . . . . . . . . . . . . . . . . . . . . . 43
Next station . . . . . . . . . . . . . . . . . . . . . 43
Scanning . . . . . . . . . . . . . . . . . . . . . . . . 44
Seek . . . . . . . . . . . . . . . . . . . . . . . . . . . . 43
Selecting from the memory . . . . . . . . . 45
Storing . . . . . . . . . . . . . . . . . . . . . . . . . . 45
Radio station on the multifunction steering
wheel
Selecting from memory . . . . . . . . . . . 100
Selecting from station list . . . . . . . . . 100
Radio stations on the MMI control panel
Moving . . . . . . . . . . . . . . . . . . . . . . . . . . 46
Selecting from the station list . . . . . . . 43
Radio text . . . . . . . . . . . . . . . . . . . . . . . . . . 46
Read error messages (CD/DVD) . . . . . . . . . 11
Received calls
MMI control panel . . . . . . . . . . . . . . . . 71
Multifunction steering wheel . . . . . . . 102
Receiver serial numbers . . . . . . . . . . . . . . . 41
Recent calls
MMI control panel . . . . . . . . . . . . . . . . 71
Redial . . . . . . . . . . . . . . . . . . . . . . . . . . . . . 76
Voice recognition system . . . . . . . . . . 111
Repeat . . . . . . . . . . . . . . . . . . . . . . . . . . . . . 51
Repeat options . . . . . . . . . . . . . . . . . . . . . . 51
Repeating a command . . . . . . . . . . . . . . . . 38
Replacing a call . . . . . . . . . . . . . . . . . . . . . 75
Multifunction steering wheel . . . . . . . 104
Reset . . . . . . . . . . . . . . . . . . . . . . . . . . . . . . 37
Restart (MMI) . . . . . . . . . . . . . . . . . . . . . . . 37
Rewind in a track (drive) . . . . . . . . . . . . . . 50
Ring tone volume . . . . . . . . . . . . . . . . . 34, 76
Route criteria
MMI control panel . . . . . . . . . . . . . . . . 91
Voice recognition system . . . . . . . . . . 115
Route guidance
Changing . . . . . . . . . . . . . . . . . . . . . . . . 79
in the driver information system . . . . . 87
In the MMI display . . . . . . . . . . . . . . . . 86
Stopping . . . . . . . . . . . . . . . . . . . . . . . . 85
Route list . . . . . . . . . . . . . . . . . . . . . . . . . . 90
Route options
MMI control panel . . . . . . . . . . . . . . . . 91
Voice recognition system . . . . . . . . . . 115
Route plan
See Tour plan . . . . . . . . . . . . . . 84, 88, 89
S
Safety . . . . . . . . . . . . . . . . . . . . . . . . . . . . . . 7
when calling . . . . . . . . . . . . . . . . . . . . . 69
when navigating . . . . . . . . . . . . . . . . . . 78
Satellite Digital Audio Radio Service
Activate your Satellite Radio service . . 41
Category filter . . . . . . . . . . . . . . . . . . . . 47
Station info . . . . . . . . . . . . . . . . . . . . . . 47
Station sorting (Satellite Radio) . . . . . 47
Satellite radio
Selecting frequency band . . . . . . . . . . . 40
SCAN . . . . . . . . . . . . . . . . . . . . . . . . . . . . . . 44
Scrolling text . . . . . . . . . . . . . . . . . . . . . . . 46
SD
Multifunction steering wheel . . . . . . . 100
SDARS
See Selecting frequency band . . . . . . . 40
MMI high B8, for internal use only

Alphabetical index 121
MMI components MMI control panel Multifunction steering wheel Voice recognition system
Seek (radio) . . . . . . . . . . . . . . . . . . . . . . . . . 43
Selecting frequency band
MMI control panel . . . . . . . . . . . . . . . . . 42
Selecting source
Audi music interface . . . . . . . . . . . . . . . 48
Aux-in . . . . . . . . . . . . . . . . . . . . . . . . . . . 48
CD changer . . . . . . . . . . . . . . . . . . . . . . . 48
CD/DVD . . . . . . . . . . . . . . . . . . . . . . . . . 48
Jukebox . . . . . . . . . . . . . . . . . . . . . . . . . 48
Memory card . . . . . . . . . . . . . . . . . . . . . 48
Selecting the frequency band
Multifunction steering wheel . . . . . . . . 99
Selecting the language
MMI control panel . . . . . . . . . . . . . . . . . 38
Selecting the menu language
MMI control panel . . . . . . . . . . . . . . . . . 38
Set from last destinations . . . . . . . . . . . . . 63
Setting a starting point . . . . . . . . . . . . . . . 94
Setting the volume
Multifunction steering wheel . . . . . . . . 99
Setup radio
Category filter (Satellite Radio) . . . . . . 47
Station info (Satellite Radio) . . . . . . . . 47
Station sorting (Satellite Radio) . . . . . . 47
Show the next report . . . . . . . . . . . . . . . . . 95
Shuffle . . . . . . . . . . . . . . . . . . . . . . . . . . . . . 52
Sirius
Selecting frequency band . . . . . . . . . . . 40
Software version
MMI control panel . . . . . . . . . . . . . . . . . 39
Navigation . . . . . . . . . . . . . . . . . . . . . . . 39
Sound
Basic settings . . . . . . . . . . . . . . . . . . . . . 34
DSP . . . . . . . . . . . . . . . . . . . . . . . . . . . . . 35
DSP Bang & Olufsen . . . . . . . . . . . . . . . 36
Volume . . . . . . . . . . . . . . . . . . . . . . . . . . 34
Sound Focus . . . . . . . . . . . . . . . . . . . . 35, 36
Speller . . . . . . . . . . . . . . . . . . . . . . . . . . . . . 31
Spoken cues
On/Off (phone) . . . . . . . . . . . . . . . . . . . 93
Volume . . . . . . . . . . . . . . . . . . . . . . . . . . 93
Start/stop route guidance (voice recognition
system) . . . . . . . . . . . . . . . . . . . . . . . 115
Starting
Cell phone prep . . . . . . . . . . . . . . . . . . . 22
Starting Navigation mode
MMI control panel . . . . . . . . . . . . . . . . . 79
Starting navigation mode
Voice recognition system . . . . . . . . . . 112
Starting radio mode . . . . . . . . . . . . . . . . . . 41
Starting Telephone mode
MMI control panel . . . . . . . . . . . . . . . . . 69
Starting telephone mode
Voice recognition system . . . . . . . . . . 110
Station info (Satellite Radio) . . . . . . . . . . . 47
Station list (radio)
Selecting a station (multifunction steering
wheel) . . . . . . . . . . . . . . . . . . . . . . . . 100
Selecting station list (MMI control panel)
43
Update . . . . . . . . . . . . . . . . . . . . . . . . . . 43
Station name (radio) . . . . . . . . . . . . . . . . . . 46
Station sorting (Satellite Radio) . . . . . . . . 47
Stereo jack . . . . . . . . . . . . . . . . . . . . . . . . . . 20
Store current position . . . . . . . . . . . . . . . . 90
Storing a destination
in the directory . . . . . . . . . . . . . . . . . . . 87
Subwoofer (sound) . . . . . . . . . . . . . . . . . . . 34
Surround Level . . . . . . . . . . . . . . . . . . . . . . 36
Switching on/off
MMI control panel . . . . . . . . . . . . . . . . . 28
Voice recognition system . . . . . . . . . . 108
Switching the microphone on/off . . . . . . . 75
System information (Satellite Radio) . . . . 40
T
Talk button (multifunction steering wheel) .
105, 108
Telephone settings . . . . . . . . . . . . . . . . . . . 76
TEXT (radio) . . . . . . . . . . . . . . . . . . . . . . . . . 46
Time . . . . . . . . . . . . . . . . . . . . . . . . . . . . . . . 36
Tips
Caring for your MMI control panel . . . . . 8
Handling CDs/DVDs . . . . . . . . . . . . . . . . 11
Handling memory cards . . . . . . . . . . . . 12
Traffic safety . . . . . . . . . . . . . . . . . . . . . . 7
TMC . . . . . . . . . . . . . . . . . . . . . . . . . . . . . . . 95
Top destination . . . . . . . . . . . . . . . . . . 87, 90
Top destinations . . . . . . . . . . . . . . . . . . . . . 63
Tour plan
Deleting . . . . . . . . . . . . . . . . . . . . . . . . . 90
Entering . . . . . . . . . . . . . . . . . . . . . . . . . 84
Entering stopover . . . . . . . . . . . . . . . . . 84
Loading . . . . . . . . . . . . . . . . . . . . . . . . . 89
Storing . . . . . . . . . . . . . . . . . . . . . . . . . . 88
MMI high B8, for internal use only

Alphabetical index122
Track
Repeat . . . . . . . . . . . . . . . . . . . . . . . . . . 51
Selecting (MMI control panel) . . . . . . . 49
Selecting (multifunction steering wheel) .
101
Track (drive)
Fast forward/rewind . . . . . . . . . . . . . . . 50
Next/previous track . . . . . . . . . . . . . . . 50
Track display . . . . . . . . . . . . . . . . . . . . . . . . 55
Track information . . . . . . . . . . . . . . . . . . . . 51
Track information (Sirius INFO) . . . . . . . . . 47
Traffic information . . . . . . . . . . . . . . . . . . . 95
Traffic reports . . . . . . . . . . . . . . . . . . . . . . 95
display in the map . . . . . . . . . . . . . . . . . 90
Traffic safety . . . . . . . . . . . . . . . . . . . . . . . . 7
Treble (sound) . . . . . . . . . . . . . . . . . . . . . . 34
U
Units . . . . . . . . . . . . . . . . . . . . . . . . . . . . . . 38
USB
MMI control panel . . . . . . . . . . . . . . . . 48
Multifunction steering wheel . . . . . . . 100
USB storage device . . . . . . . . . . . . . . . . . . . 20
V
Version
MMI software . . . . . . . . . . . . . . . . . . . . 39
Navigation software . . . . . . . . . . . . . . . 39
Video source . . . . . . . . . . . . . . . . . . . . . . . . 48
VNC . . . . . . . . . . . . . . . . . . . . . . . . . . . . . . . 36
Voice guidance
Off/Complete/Compact . . . . . . . . . . . . 93
Voice memos
Storing . . . . . . . . . . . . . . . . . . . . . . . . . 112
Voice recognition system . . . . . . . . . . . . . 107
Adjusting volume . . . . . . . . . . . . . . . . 108
Command types . . . . . . . . . . . . . . . . . 108
Deleting a name tag . . . . . . . . . . . . . . . 65
Help . . . . . . . . . . . . . . . . . . . . . . . . . . . 108
Reading a name . . . . . . . . . . . . . . . . . . 65
Repeating a command . . . . . . . . . . . . . 38
Selecting an entry from the list . . . . . 108
Storing a voice memo . . . . . . . . . . . . . 112
Switching on/off . . . . . . . . . . . . . . . . . 105
Volume . . . . . . . . . . . . . . . . . . . . . . . . . 34
Voicemail number . . . . . . . . . . . . . . . . . . . 76
Volume
during a navigation announcement . . . 34
Telephone . . . . . . . . . . . . . . . . . . . . . . . 34
Voice recognition system . . . . . . . 34, 108
Volume balancing . . . . . . . . . . . . . . . . . . . 36
W
WMA files . . . . . . . . . . . . . . . . . . . . 12, 14, 16
MMI high B8, for internal use only