Harman Consumer BT0100FX Freedom Bluetooth Headphone User Manual
Harman Consumer, Inc. Freedom Bluetooth Headphone
Users Manual
jbl reference series 610
User Guide
English .........................2
Deutsch ........................ 9
Français .......................15
Español ...................... 21
Italiano ....................... 27
Dutch ......................... 33
Korean ........................39
Norwegian ................. 45
Danish ......................... 51
Japanese ..................... 57
Simplifi ed Chinese .....63
Bluetooth® wireless headphones for iPod
®
JBLREF610DGLE
JBLREF610HDST

2
2
Read these instructions, heed all warnings, and keep for future reference.
Do not use this apparatus near water.
Clean only with dry cloth.
Do not block any ventilation openings; a minimum distance of 10mm around the
entire apparatus is required for suffi cient ventilation.
No naked fl ame sources such as lighted candles should be placed on or near
apparatus.
Attention should be drawn to the environmental aspects of battery disposal.
Apparatus is to be used in moderate climates only.
Do not install near any heat sources such as radiators, heat registers, stoves or other
apparatuses (including amplifi ers) that produce heat.
Do not defeat the safety purpose of the polarized or grounding-type plug. A polar-
izing plug has two blades with one wider than the other. A grounding-type plug has
two blades and a third grounding prong. The wide blade or third prong is provided
for safety. If the provided plug does not fi t into your outlet, consult an electrician for
replacement of the obsolete outlet.
Protect the power cord from being walked on or pinched, particularly at the plugs and
convenience receptacles, and at the point where they exit from the apparatus.
Only use attachments/accessories specifi ed by the manufacturer.
Unplug this apparatus during lightning storms or when unused for long periods of
time.
Refer all servicing to qualifi ed service personnel. Servicing is required when the appa-
ratus has been damaged in any way, such as power-supply cord or plug is damaged,
liquid has been spilled or objects have fallen into the apparatus, or the apparatus has
been exposed to rain or moisture, does not operate normally, or has been dropped.
TO PREVENT THE RISK OF ELECTRIC SHOCK, DO NOT REMOVE THE COVER
(OR BACK). THERE ARE NO USER-SERVICEABLE PARTS INSIDE THIS UNIT.
PLEASE REFER SERVICING TO QUALIFIED HARMAN CONSUMER GROUP, INC.
SERVICE PERSONNEL.
Never remove grille covers in order to service the speaker system. The speaker
system does not contain any user-serviceable parts.
•
•
•
•
•
•
•
•
•
•
•
•
•
•
•
Important Safety Instructions
Please read the following precautions before use:
CAUTION
!ATTENTION!
It is considered good practice to
connect the AC charger cable to your
headphone prior to plugging charging
device into power source.
WARNING: TO PREVENT FIRE OR ELECTRICAL SHOCK HAZARD, DO NOT EXPOSE THIS PRODUCT TO RAIN
OR MOISTURE.
WARNING: THE APPARATUS SHOULD NOT BE
EXPOSED TO DRIPPING OR SPLASHING AND NO OBJECTS FILLED WITH LIQUID, SUCH AS VASES, SHOULD
BE PLACED ON THE APPARATUS.
THE EXCLAMA-
TION POINT
WITHIN THE
TRIANGLE IS A
WARNING SIGN
ALERTING YOU
TO IMPORTANT
INSTRUCTIONS
ACCOMPANYING
THE PRODUCT.
CAUTION: TO REDUCE
THE RISK OF SHOCK, DO
NOT REMOVE COVER.
NO USER-SERVICEABLE
PARTS INSIDE. REFER
SERVICING TO QUALIFIED
SERVICE PERSONNEL.
THE LIGHTNING
FLASH AND
ARROWHEAD
WITHIN THE
TRIANGLE IS A
WARNING SIGN
ALERTING YOU
TO DANGEROUS
VOLTAGE INSIDE
THE PRODUCT.
RISK OF ELECTRIC SHOCK
DO NOT OPEN
Safety Instructions
Headphone/earphone listening at high volume levels may cause permanent damage to your hearing. Always set the volume control to the lowest level before
Headphone/earphone listening at high volume levels may cause permanent damage to your hearing. Always set the volume control to the lowest level before
switching to different sources (tuner, CD player, MP3 player, etc.) or before plugging in the headphones/earphones. For your safety, do not use headphones/ear-
switching to different sources (tuner, CD player, MP3 player, etc.) or before plugging in the headphones/earphones. For your safety, do not use headphones/ear-
phones while driving or cycling.
phones while driving or cycling.
Welcome
Thank you for purchasing
Thank you for purchasing the JBL Reference Series 610 wireless headphone system. These headphones incorporate 60 years of JBL’s professional audio experi-
ence and technology, setting a new standard for Bluetooth® wireless headphone systems.
Introduction
JBL is proud to bring you the JBL Reference Series 610 wireless headphone system. This wireless headphone system streams high-fi delity digital sound from your
audio device to your headphones. With the included Bluetooth® transmitter attached to your iPod,® you can stream music to your JBL 610 wireless headphones
as far as 10 meters away from the music source. With no wires to tangle or restrict your movement, and the volume and track controls conveniently located on the
headphones, the JBL Reference Series 610 is both the ultimate in portable audio convenience and the pinnacle of audio quality.
The JBL Reference 610 is compatible with most Bluetooth®-enabled devices, music players, cell phones and laptops. Enabled with Bluetooth® A2DP (Advanced
Audio Delivery Protocol) and AVRCP (Audio/Video Remote Control Protocol), the JBL 610 can stream high-quality sound. The JBL Reference Series 610 has raised
the bar for high-performance, wireless, portable headphone systems and has earned the right to be a part of the JBL Reference Series family.
jbl reference series 610
FCC Declaration of Conformity Statement
This device complies with Part 15 of the FCC Rules. Operation is subject to the following two conditions: (1) This device may not cause harmful interference; and (2)
This device complies with Part 15 of the FCC Rules. Operation is subject to the following two conditions: (1) This device may not cause harmful interference; and (2)
this device must accept any interference received, including interference that may cause undesired operation.
this device must accept any interference received, including interference that may cause undesired operation.
Radio and Television Interference
This equipment has been tested and found to comply with the limits for a Class B digital device, pursuant to Part 15 of the FCC Rules. These limits are designed to
This equipment has been tested and found to comply with the limits for a Class B digital device, pursuant to Part 15 of the FCC Rules. These limits are designed to
provide reasonable protection against harmful interference in a residential installation. This equipment generates, uses and can radiate radio frequency energy and,
provide reasonable protection against harmful interference in a residential installation. This equipment generates, uses and can radiate radio frequency energy and,
if not installed and used in accordance with the instructions, may cause harmful interference to radio communications. However, there is no guarantee that interfer-
if not installed and used in accordance with the instructions, may cause harmful interference to radio communications. However, there is no guarantee that interfer-
ence will not occur in a particular installation.
ence will not occur in a particular installation.
If this equipment does cause interference to radio or television reception, which can be determined by turning the equipment off and then on, the user is encouraged
If this equipment does cause interference to radio or television reception, which can be determined by turning the equipment off and then on, the user is encouraged
to try to correct the interference by one or more of the following measures:
to try to correct the interference by one or more of the following measures:
•
• Reorient or relocate the receiving antenna.
• Increase the separation between the equipment and receiver.
• Increase the separation between the equipment and receiver.
• Connect the equipment to a different outlet so that the equipment and receiver are on different branch circuits.
• Connect the equipment to a different outlet so that the equipment and receiver are on different branch circuits.
• Consult the dealer or an experienced radio/TV technician for help.
• Consult the dealer or an experienced radio/TV technician for help.
Changes or modifi cations not expressly approved by JBL could void the user’s authority to operate the equipment.
Changes or modifi cations not expressly approved by JBL could void the user’s authority to operate the equipment.
The antenna(s) used for this transmitter must not
The antenna(s) used for this transmitter must not
be co-located or operating in conjuntion with any other antenna or transmitter.
be co-located or operating in conjuntion with any other antenna or transmitter.
fcc regulations
FCC Caution: Any changes or modifications not expressly approved by the party responsible for compliance could void the user's
authority to operate this equipment.
The antenna(s) used for this transmitter must not be co-located or operating in conjunction with any other antenna or transmitter.

3
3
JBL Reference
JBL Reference Series
610 Headphones
610 Headphones
Carrying Case
Carrying Case
Bluetooth Transceiver
Bluetooth Transceiver
Stereo Phono Adapter
Stereo Phono Adapter
Dual Airline Adapter
Dual Airline Adapter
Battery Charger
Battery Charger
1.75-Meter Optional Audio Cable
1.75-Meter Optional Audio Cable
1.
2.
3.
4.
5.
6.
7.
Package Contents
To optimize your JBL 610 headphone system’s performance, the unit must be fully charged prior to operation.
Select the proper regional AC adapter plug and assemble onto your battery charger by sliding the plug into the receptacle cavity.
Select the proper regional AC adapter plug and assemble onto your battery charger by sliding the plug into the receptacle cavity.
(To remove the adapter plug, press the release lever on the charger housing and slide plug in the direction shown.)
(To remove the adapter plug, press the release lever on the charger housing and slide plug in the direction shown.)
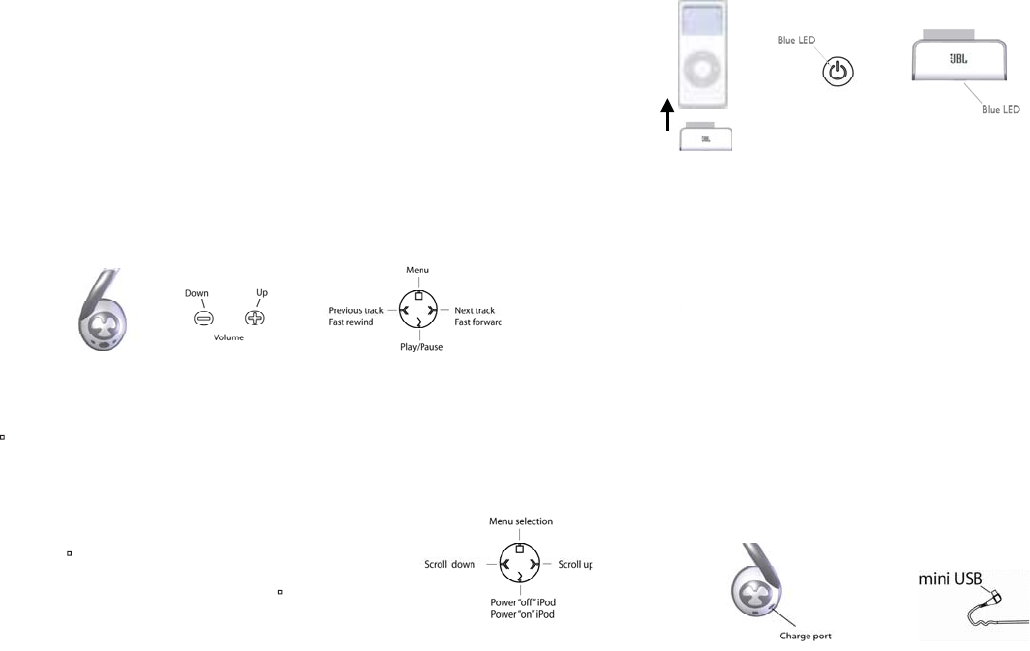
Connect the mini USB plug on your battery charger to the charge port located on the left ear cup of your headphones.
Connect the mini USB plug on your battery charger to the charge port located on the left ear cup of your headphones.
Connect to power outlet and begin charging. Your headphones should reach a complete charge in three (3) hours.
Connect to power outlet and begin charging. Your headphones should reach a complete charge in three (3) hours.
1.
2.
3.
Charging Your Headphones
using your jbl reference series 610 wireless headphones
Push and hold
to remove adapter
1.
1.
2.
2.
3.
3.
4.
4.
5.
5.
6.
6.
7.
7.
4
4
The JBL Reference Series 610 is designed for use with iPod generations 4G and above. For your hearing safety, please adjust your iPod volume to the minimum
position prior to powering up your headphones.
Power “On” your headphones by pressing the power button located on the left ear cup. The blue LED on the headphone will light up (at fi rst solid, followed
Power “On” your headphones by pressing the power button located on the left ear cup. The blue LED on the headphone will light up (at fi rst solid, followed
by three consecutive, quick fl ashes – indicating that headphones are ready to be “discovered”). Plug in your dongle after headphone system is in discoverable
by three consecutive, quick fl ashes – indicating that headphones are ready to be “discovered”). Plug in your dongle after headphone system is in discoverable
mode. The LED on the mating transceiver will start to blink rapidly, indicating pairing with each other. (To power “Off” headphones, press power button.)
mode. The LED on the mating transceiver will start to blink rapidly, indicating pairing with each other. (To power “Off” headphones, press power button.)
Connect the Bluetooth transceiver to the mating Omni connector on the base of your iPod. Connecting the transceiver will automatically power up your iPod.
Connect the Bluetooth transceiver to the mating Omni connector on the base of your iPod. Connecting the transceiver will automatically power up your iPod.
Once the headphones and Bluetooth transceiver are paired and connected, the blue LED on the headphones and the transceiver’s LED will blink slowly and
Once the headphones and Bluetooth transceiver are paired and connected, the blue LED on the headphones and the transceiver’s LED will blink slowly and
intermittently. You are now ready to use your wireless headphone system.
intermittently. You are now ready to use your wireless headphone system.
(Note: Pairing of the headphones and transceiver may take up to one minute.)
(Note: Pairing of the headphones and transceiver may take up to one minute.)
If Bluetooth connection is lost due to moving out of transmission range, move closer to the iPod and press the play/pause button “>”. It will re-pair to the
If Bluetooth connection is lost due to moving out of transmission range, move closer to the iPod and press the play/pause button “>”. It will re-pair to the
Bluetooth transceiver.
Bluetooth transceiver.
1.
2.
3.
4.
Starting Up Your Headphones and the Bluetooth Transceiver
Blue LED
Blue LED
The navigation controls are all conveniently located on the right ear cup.
Navigating Your Headphone Controls
Music Playing Mode
Menu mode brings up a second tier of iPod navigation features, which let you roam through your iPod
menus.
1. Push menu button (
1. Push menu button (
) once to take you to the menu mode.
) once to take you to the menu mode.
2. To scroll “up” (<<) or “down” (>>) the menu, hold down the proper feature button until you reach your
2. To scroll “up” (<<) or “down” (>>) the menu, hold down the proper feature button until you reach your
selection.
selection.
3. To make a selection from the menu list, push and hold the menu button (
3. To make a selection from the menu list, push and hold the menu button (
).
).
4. In the menu mode, pressing and holding play/pause “>” allows you to turn your iPod on or off remotely
4. In the menu mode, pressing and holding play/pause “>” allows you to turn your iPod on or off remotely
from your headphones.
from your headphones.
Menu Mode Features
Menu Mode
Power button
The JBL Reference Series 610 headphones can also be used with other Bluetooth music devices. The
Bluetooth product must be enabled with the A2DP (Advanced Audio Distribution Profi le). This will allow
streaming of music to your headphones. A Bluetooth device with both A2DP and AVRCP (Audio/Video
Remote Control Profi le) will stream music and allow functionality of the “Music Playing Mode” control
features.
Make sure headphone power is “Off” and transceiver is disconnected from the iPod.
Make sure headphone power is “Off” and transceiver is disconnected from the iPod.
Turn headphone power back “On” and wait for solid LED, then three quick fl ashes – indicating that the
Turn headphone power back “On” and wait for solid LED, then three quick fl ashes – indicating that the
headphone system is in “discoverable” mode.
headphone system is in “discoverable” mode.
To pair your Bluetooth-enabled device to the headphones, please refer to your user’s manual for the
To pair your Bluetooth-enabled device to the headphones, please refer to your user’s manual for the
proper setup procedure.
proper setup procedure.
When your audio device requests a passcode to pair with the JBL Reference Series 610 headphone
When your audio device requests a passcode to pair with the JBL Reference Series 610 headphone
system, enter the numerical sequence “0000”.
system, enter the numerical sequence “0000”.
Note: The headphone control features may be limited when used with devices other than your iPod, due to
Note: The headphone control features may be limited when used with devices other than your iPod, due to
the varying designs and possible remote control
the varying designs and possible remote control
limitations of your audio device.
limitations of your audio device.
1.
2.
3.
4.
For situations when you are not able to use your Bluetooth wireless mode to stream music, the JBL
Reference Series 610 headphones can be connected to your audio device through the included audio
cable. Make sure the volume on your audio device is turned to the minimum position, to ensure hear-
ing safet y, prior to connecting your headphones.
1. Turn the power “Off” on your headphones.
1. Turn the power “Off” on your headphones.
2. Plug the mini USB connector on your audio cable into the headphone charging port.
2. Plug the mini USB connector on your audio cable into the headphone charging port.
3. Plug the 3.5mm mini stereo jack end into the audio device’s mating port.
3. Plug the 3.5mm mini stereo jack end into the audio device’s mating port.
4. The control features buttons will not be functional when the headphone system is used with the
4. The control features buttons will not be functional when the headphone system is used with the
audio cable.
audio cable.
Using Your Headphones With Other Bluetooth Devices
Using Your Headphones in Passive Mode
The volume “_” and “+” buttons are controlled by pressing to make your selection. Repeated pressing will reduce or increase volume, as
The volume “_” and “+” buttons are controlled by pressing to make your selection. Repeated pressing will reduce or increase volume, as
desired. If you do not notice a change in the volume, make sure your iPod does not have a low battery.
desired. If you do not notice a change in the volume, make sure your iPod does not have a low battery.
Located on the four-position toggle switch are:
Located on the four-position toggle switch are:
_ (
_ (
) “menu” (push once to take you to menu mode)
) “menu” (push once to take you to menu mode)
_ (<<) “previous track” (push once), “fast rewind” (press and hold)
_ (<<) “previous track” (push once), “fast rewind” (press and hold)
_ (>>) “next track” (push once), “fast forward” (push and hold)
_ (>>) “next track” (push once), “fast forward” (push and hold)
_ (>) “play/pause” (press once to play, once to pause)
_ (>) “play/pause” (press once to play, once to pause)
1.
2.

5
5
troubleshooting your jbl reference series 610
Symptom when used with
Bluetooth transceiver
Possible Problem Solution Note
Sound Quality
Headphone system is not
powered “On”.
Press down power button.
Blue LED should go from solid
to three consecutive, fast blinks,
indicating that it’s ready to be
“discovered” by transceiver or
other audio source.
No sound from headphones.
Rechargeable headphone bat-
tery is low.
Charge headphones by following
the battery charging directions in
this User Guide.
If blue LED on headphones
continues to blink rapidly after
headphone system has paired,
it is indicating a low battery. A
monotone will also be sounded
every 5 seconds for low bat-
tery alert.
Bluetooth transceiver is not
receiving power.
Make sure iPod power is on
and the transceiver connector is
engaged correctly.
Blue LED on transceiver should
start blinking.
iPod battery is low. Charge your iPod in accordance
with the battery charging
directions given in your iPod
user’s guide.
Bluetooth transceiver is not
connected properly.
Make sure transceiver is
connected properly.
If using audio cable, connection
at mini USB or 3.5mm audio
inlet end may not be connected
properly.
Make sure connectors are mat-
ing correctly to your headphones
and audio device.
Headphone has lost the link with
the Bluetooth transceiver.
1. Press the play/pause button
and the headphone system will
re-pair itself with the transceiver.
2. Move back to within Blue-
tooth connection range.
3. Unplug your transceiver and
replug it in to initiate
connection.
Blue LED should start blinking
rapidly (indicating pairing). You
may have lost the link because
you are too far from the iPod.
Move closer and try again.
No sound from headphones.
Sound comes from only one
side/channel.
Volume is low and will not
increase when “+” feature is
selected.
The iPod may have a low battery. Charge iPod according to iPod
charging instructions.
Your iPod may have a maximum
volume setting that is “On”.
See whether you have iPod
maximum volume setting.
Headphone controls have
intermittent operation.
Bluetooth transceiver is not
connected properly.
Make sure transceiver is
connected properly.
May be moving out of Bluetooth
range.
Move closer to iPod. Bluetooth does not have good
transmission through metal
or water.
The iPod may have a low battery. Charge iPod according to iPod
charging instructions.
Moving out of transmission
range.
Move closer to the iPod or
change position.
Sound drops in and out.
Distortion (static, crackling or
hissing sounds).
Noise may be caused by interfer-
ence from a monitor, cell phone
or other transmitting device.
Turn monitor off to see
whether noise is eliminated. Use
headphones further away from
monitor.
If using audio cable, headphone
system may be overdriven by an
amplifi ed audio source.
Ensure that the JBL Reference
Series 610 is connected to an
appropriate source device. Make
sure cables are inserted snugly
into receptacles. Reduce volume
on the audio source.
Headphone battery is low. Charge headphones by following
the battery charging directions in
this User Guide.
If blue LED on headphones
continues to blink rapidly after
headphone system has paired,
it is indicating a low battery. A
monotone will also be sounded
every 5 seconds for low bat-
tery alert.
Symptom when used with
Bluetooth transceiver
Possible Problem Solution Note

6
6
Symptom when used with
Bluetooth transceiver
Possible Problem Solution Note
Pairing
Audio device does not support
A2DP profi les.
Audio device is not compatible.
Verify with manufacturer.
Audio device does not pair with
headphones.
Headphone system is not
powered “On”.
Press down on power button.
Blue LED should go from solid
to three consecutive, fast blinks,
indicating that it’s ready to be
“discovered” by transceiver or
other audio source.
Disconnect transceiver from
iPod and turn headphone power
“Off”, then back “On”.
If LED has intermittent, slow
blinks on both dongle and
headphones, both devices are
connected. If you wish to
re-pair, please follow initial
pairing instruction.
iPod battery is low. Charge headphones by following
the battery charging directions in
this User Guide.
If blue LED on headphones
continues to blink rapidly after
headphone system has paired,
it is indicating a low battery. A
monotone will also be sounded
every 5 seconds for low bat-
tery alert.
Sound Quality
Headphone controls do not work
with Bluetooth audio device.
Control Features
Audio device is not compatible
with AVRCP profi le.
Audio device is not compatible.
Verify with manufacturer.
Audio device does not recognize
some control features.
Contact your audio device manu-
facturer to check limitations.
Because of the large variation in
design, the control features may
be limited due to restrictions on
your audio device.
Headphone controls have
limited operation.
Headphone system has lost the
link with the audio device.
Follow your audio device’s user
guide instructions to re-pair the
Bluetooth connection.
No sound from headphones.
If using audio cable, connection
at mini USB or 3.5mm audio
inlet end may not be connected
properly.
Make sure connectors are mat-
ing correctly to your headphone
and audio device. Make sure
headphone power is “Off”.
Sound drops in and out. Moving out of transmission
range.
Move closer to audio device or
change position.
Audio device is dropping
transmission.
Contact audio device manufac-
turer for guidance.
Headphone battery is low. Charge headphones by following
the battery charging directions in
this User Guide.
If blue LED on headphones
continues to blink rapidly after
headphone system has paired,
it is indicating a low battery. A
monotone will also be sounded
every 5 seconds for low bat-
tery alert.
Symptom when used with
Bluetooth transceiver
Possible Problem Solution Note
Headphone system is still paired
to Bluetooth transceiver.
If using audio cable, headphone
system may be overdriven by an
amplifi ed audio source.
Ensure that the JBL Reference
Series 610 is connected to an
appropriate source device. Make
sure cables are inserted snugly
into receptacles. Reduce volume
on the audio source.
Distortion (static, crackling or
hissing sounds).
Noise may be caused by interfer-
ence from a monitor, cell phone
or other transmitting device.
Turn monitor off to see
whether noise is eliminated. Use
headphones further away from
monitor.
Manufacturer: Harman Consumer Group, Inc.
Model Name: JBL Reference Series 610
Available in: White/Black with Chrome
Features Sensitivity: 96dB SPL/mW @ 1kHz
Input Requirement, iPod Dongle: iPod Dongle connected to iPod models 4th generation and above
Input Requirement, iPod Dongle: Bluetooth A2DP and AVRCP profile streaming
Drivers: Two 40mm neodymium drivers
Input Power: 2 x 50mW maximum power
Frequency Response: 20Hz – 20kHz (–10dB)
Dimensions: Diameter – 102mm, hardwire audio cable – 1.75m
Weight: 212g without cord
Input Impedance: 32 ohms
Wireless Compatibility: Most Bluetooth-enabled audio devices with A2DP and AVRCP profiles
Hardwired Compatibility: Audio devices with 3.5mm mini audio jack connection
Battery Usage: 8–10 hrs continuous play
Technical Specifi cations
Federal Communication Commission Interference Statement
This equipment has been tested and found to comply with the limits for a Class B digital device, pursuant to Part
15 of the FCC Rules. These limits are designed to provide reasonable protection against harmful interference in a
residential installation. This equipment generates, uses and can radiate radio frequency energy and, if not
installed and used in accordance with the instructions, may cause harmful interference to radio communications.
However, there is no guarantee that interference will not occur in a particular installation. If this equipment does
cause harmful interference to radio or television reception, which can be determined by turning the equipment off
and on, the user is encouraged to try to correct the interference by one of the following measures:
- Reorient or relocate the receiving antenna.
- Increase the separation between the equipment and receiver.
- Connect the equipment into an outlet on a circuit different from that
to which the receiver is connected.
- Consult the dealer or an experienced radio/TV technician for help.
FCC Caution: Any changes or modifications not expressly approved by the party responsible for compliance could
void the user's authority to operate this equipment.
This device complies with Part 15 of the FCC Rules. Operation is subject to the following two conditions: (1) This
device may not cause harmful interference, and (2) this device must accept any interference received, including
interference that may cause undesired operation.
The antenna(s) used for this transmitter must not be co-located or operating in conjunction with any other antenna
or transmitter.
IC Caution
Operation is subject to the following two conditions: (1) this device may not cause interference, and (2) this device
must accept any interference, including interference that may cause undesired operation of the device.
This device and its antenna(s) must not be co-located or operating in conjunction with any other antenna or
transmitter.