Harman Consumer ONAIRWILO Wireless Speaker with iPhone Dock User Manual USer Manual
Harman Consumer, Inc. Wireless Speaker with iPhone Dock USer Manual
UserManual.wiki
>
Harman Consumer
>
ONAIRWILO User Manual
USer Manual
Navigation menu
Upload a User Manual
Namespaces
Wiki Guide
HTML
PDF
Info
Views
User Manual
Discussion / Help
Navigation

![13www.jbl.comEnglishUse the Up, Down and OK buttons to select a language for the JBL On Air Wireless’s display. The JBL On Air Wireless’s interface will immediately change to the selected language.Regional SettingsSelecting “Regional Settings” displays the Region screen:This menu sets the JBL On Air Wireless’s FM radio-frequency band and tuning increments to match the FM broadcasts in your region. Use the Up, Down and OK buttons to select the region you live in.NetworkSelecting “Network” displays the Network Setup screen:This menu provides access to all of the JBL On Air Wireless’s network settings. Use the Up and Down buttons to scroll through the list. Use the OK button to select items, and use the Left button to return to the previous menu screen.• Refresh (Left Soft) button: Press this button to search for all available networks or refresh the list of available networks. The JBL On Air Wireless will automatically connect to the network that was used most recently. If that network is unavailable, it will connect to the next most recently used network and so forth.• Info (Center Soft) button: Press this button to display the IP information for the system’s current network settings.• Edit (Right Soft) button: Press this button to make changes in an existing network’s setup or to enter information for a new network manually. See Appendix: Manual Network Setup, on page 17, for complete instructions.• Wi-Fi: Select this option to turn the Wi-Fi function on and off. When you turn the Wi-Fi function on, the JBL On Air Wireless will automatically search for available Wi-Fi networks.• [Network Name 1 – 4]: The display screen lists each available network. The currently-selected network is indicated by a check mark. The bars indicate the strength of the Wi-Fi network connection. To select a network, use the Up, Down and OK buttons. If the network that you select has no security, then the JBL On Air Wireless will attempt to connect to the network. If the network has saved settings (e.g., password, IP settings), then the JBL On Air Wireless will attempt to connect to the network using these settings. If the network requires a password and the JBL On Air Wireless has not saved a password, it will display the Settings – Network Password screen so you can enter the password. See Appendix: Manual Network Setup, on page 17, for more information.](https://usermanual.wiki/Harman-Consumer/ONAIRWILO/User-Guide-1393931-Page-13.png)
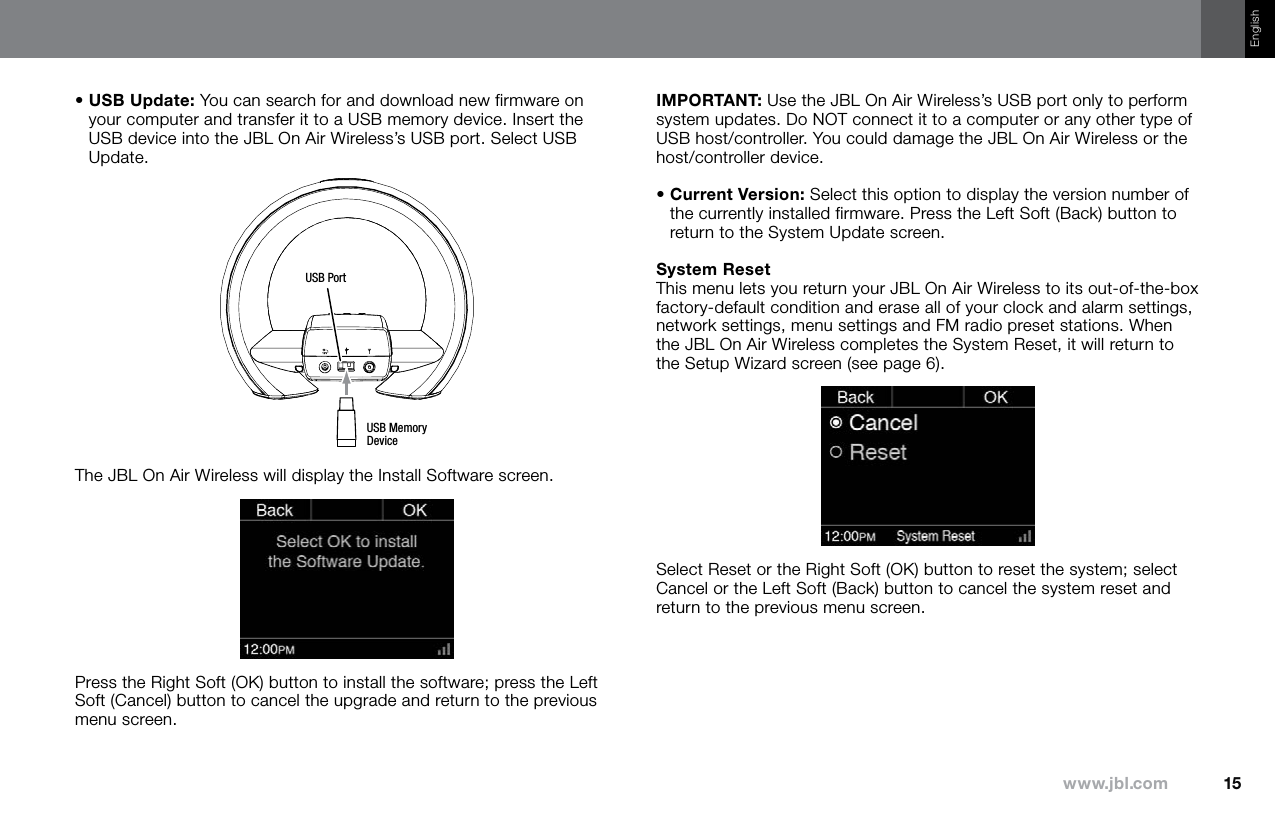
![14• Wi-Fi Protected Setup™ (WPS): If your network router is WPS-compatible, select this option to set up and configure the JBL On Air Wireless to work with your network automatically.• Add Network: Select this option to add a network manually. See Appendix: Manual Network Setup, on page 17, for more information. NOTE: If the JBL On Air Wireless is searching for available Wi-Fi networks when you select Add Network, the search will immediately stop.• Name [Device]: Select this option to change your JBL On Air Wireless’s default device name to one of your own choosing. The Name screen will appear.Use the Up, Down, Left, Right and OK buttons to select letters on the keypad to enter the new name. Press the Center Soft (Delete) button to backspace a character, press the Right Soft (Save) button to save the new name or use the Left Soft (Back) button to return to the previous menu screen without changing the device name.System UpdateThis menu allows you to update your JBL On Air Wireless’s firmware to the latest version.• Internet Update: Select this option to search for and download the latest firmware from the server. If a new firmware version is available, the JBL On Air Wireless will automatically download and install it. During downloading and installation, the JBL On Air Wireless will display a progress bar.If the download and installation are successful, the progress bar will turn green. If the download and installation fail, the progress bar will turn red, and you will have to repeat the procedure from the System Update screen.NOTE: The JBL On Air Wireless will automatically attempt to contact the Internet server once a day in the evening and determine if a new firmware version is available. If so, it will automaticaly download and install the new firmware as described above.](https://usermanual.wiki/Harman-Consumer/ONAIRWILO/User-Guide-1393931-Page-14.png)
![20www.jbl.com© 2010 HARMAN International Industries, Incorporated. All rights reserved. Features, specifications and appearance are subject to change without notice.JBL is a trademark of HARMAN International Industries, Incorporated, registered in the United States and/or other countries. Apple, iPhone, iPod, iPod nano, iPod classic, iTunes and iPod touch are trademarks of Apple Inc., registered in the U.S. and other countries. iPod/iPhone not included. “Made for iPod” and “Made for iPhone” mean that an electronic accessory has been designed to connect specically to iPod and iPhone, respectively, and has been certied by the developer to meet Apple performance standards. Apple is not responsible for the operation of this device or its compliance with safety and regulatory standards.Wi-Fi is a registered trademark of the Wi-Fi Alliance. Wi-Fi Protected Setup is a trademark of the Wi-Fi Alliance.Part No.: 950-0309-001 Rev.: AHARMAN Consumer, Inc. 8500 Balboa Boulevard, Northridge, CA 91329 USAFederal Communication Commission Interference StatementThis equipment has been tested and found to comply with the limits for a Class B digitaldevice, pursuant to Part 15 of the FCC Rules. These limits are designed to providereasonable protection against harmful interference in a residential installation. This equipmentgenerates, uses and can radiate radio frequency energy and, if not installed and used inaccordance with the instructions, may cause harmful interference to radio communications.However, there is no guarantee that interference will not occur in a particular installation. Ifthis equipment does cause harmful interference to radio or television reception, which can bedetermined by turning the equipment off and on, the user is encouraged to try to correct theinterference by one or more of the following measures:• Reorient or relocate the receiving antenna.• Increase the separation between the equipment and receiver.• Connect the equipment into an outlet on a circuit different from that to which the receiveris connected.• Consult the dealer or an experienced radio/TV technician for help.FCC Caution: Any changes or modifications not expressly approved by the party responsiblefor compliance could void the user's authority to operate this equipment.This device complies with Part 15 of the FCC Rules. Operation is subject to the following twoconditions: (1) This device may not cause harmful interference, and (2) this device mustaccept any interference received, including interference that may cause undesired operation.FCC/IC Radiation Exposure Statement:This equipment complies with FCC/IC RSS-102 radiation exposure limits set forth for anuncontrolled environment. This equipment should be installed and operated with minimumdistance 20cm between the radiator & your body.This Class [B] digital apparatus complies with Canadian ICES-003.Cet appareil numérique de la classe [B] est conforme à la norme NMB-003 du Canada.](https://usermanual.wiki/Harman-Consumer/ONAIRWILO/User-Guide-1393931-Page-20.png)