Harman AVR1710AN AV Receiver User Manual
Harman International Industries, Inc AV Receiver Users Manual
Harman >
Users Manual
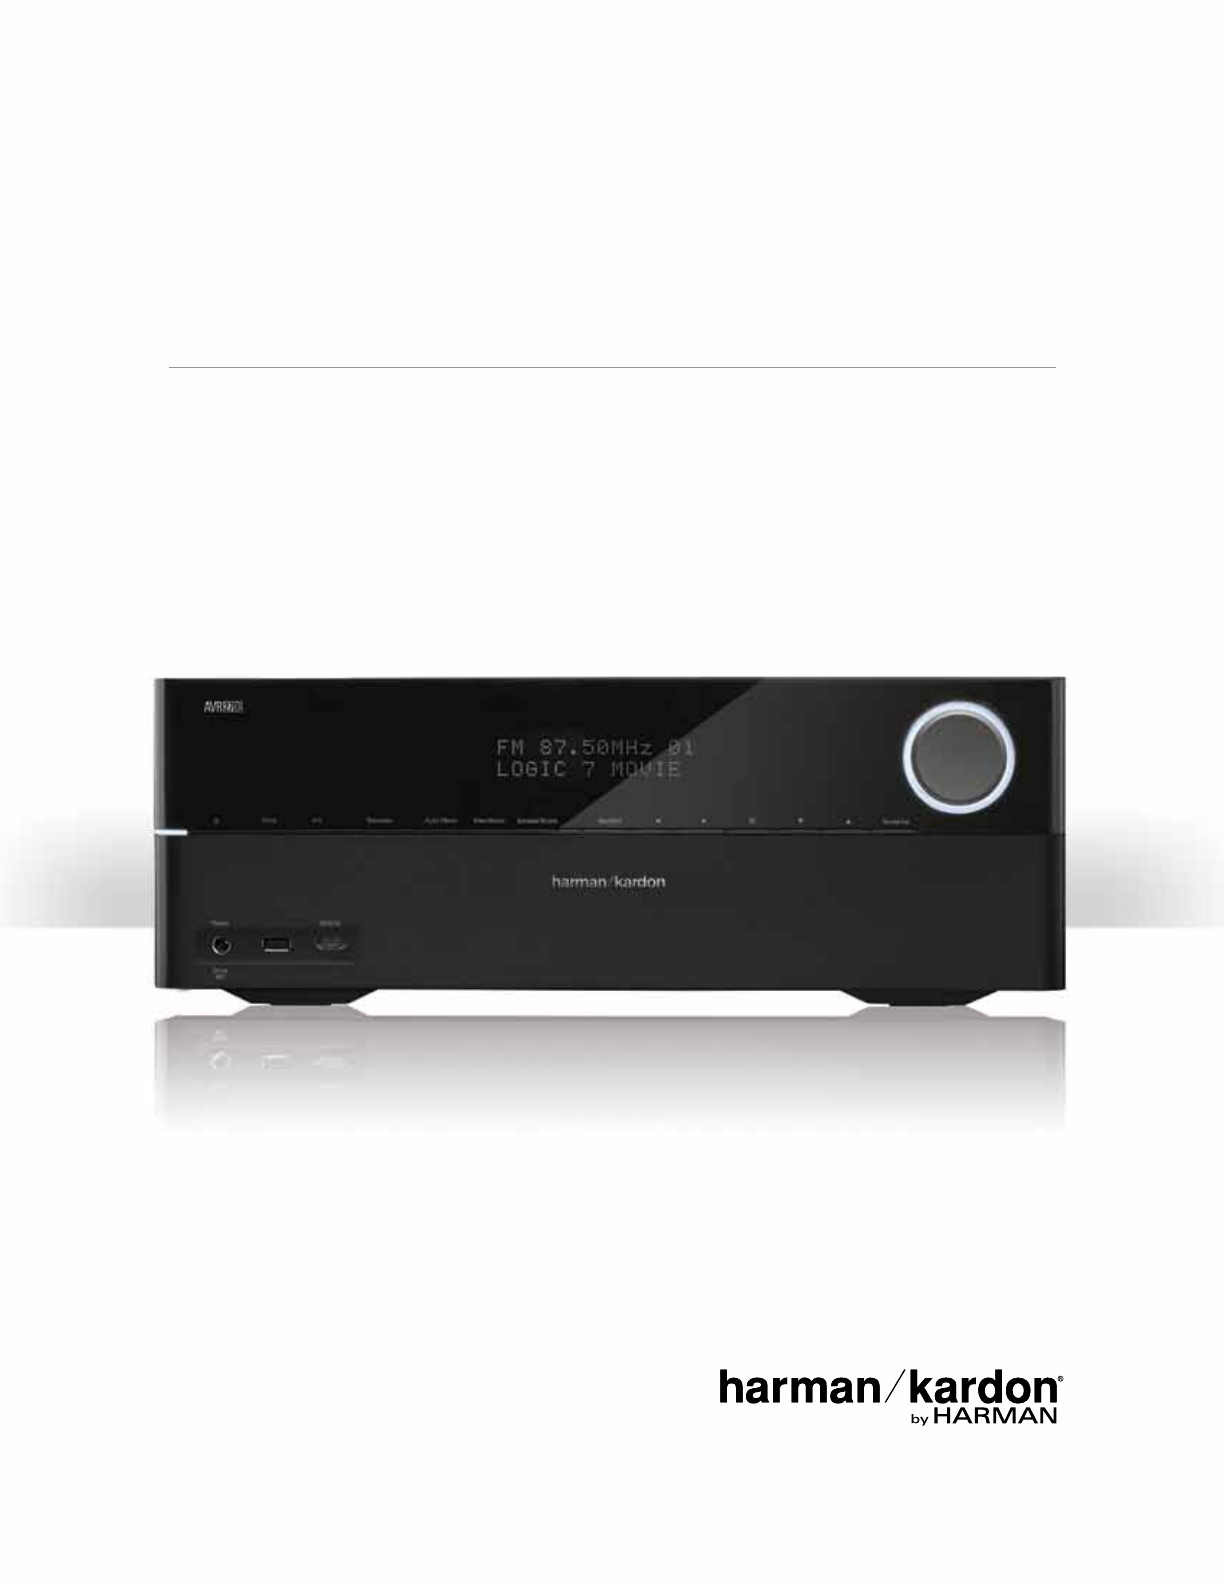
Audio/Video Receiver
AVR 1710, AVR 171-230, AVR 171-230C,
AVR 1610, AVR 161-230, AVR 161-230C,
AVR 1510, AVR 151-230, AVR 151-230C
Quick-Start Guide
FPO
AVR
2
Introduction, Speaker Placement and Connections
Introduction
Thank you for choosing a Harman Kardon product!
This quick-start guide contains all the information you need to connect and set up your
new Harman Kardon audio/video receiver (AVR).
To conserve our natural resources, your AVR does not include a printed owner’s manual.
An owner’s manual containing complete information about operating all of your new
AVR’s features is available at our Web site. Go to www.harmankardon.com and download
the AVR 1710/AVR 171-230/AVR171-230C/AVR 1610/AVR 161-230/AVR 161-230C
Owner’s Manual or the AVR 1510/AVR 151-230/AVR 151-230C Owner’s Manual.
Place the AVR
• Place the AVR on a rm and level surface. Be certain that the surface and any mounting
hardware can support the AVR’s weight.
• Provide proper space above, below, behind and to the sides of the AVR for ventilation. Maintain
a clearance of at least 12" (30cm) on each side of, above and behind the unit.
• If you install the AVR in a cabinet or other enclosed area, provide cooling air within the cabinet.
Under some circumstances, a fan may be required.
• Do not obstruct the ventilation slots on the top of the AVR or place objects directly over them.
• Do not place the AVR directly on a carpeted surface.
• Do not place the AVR in moist or humid locations, in extremely hot or cold locations, in areas
near heaters or heat registers, or in direct sunlight.
Connections
CAUTION: Before making any connections to the AVR, ensure that the AVR’s AC cord is
unplugged from the AVR and the AC outlet. Making connections with the AVR plugged
in and turned on could damage the speakers.
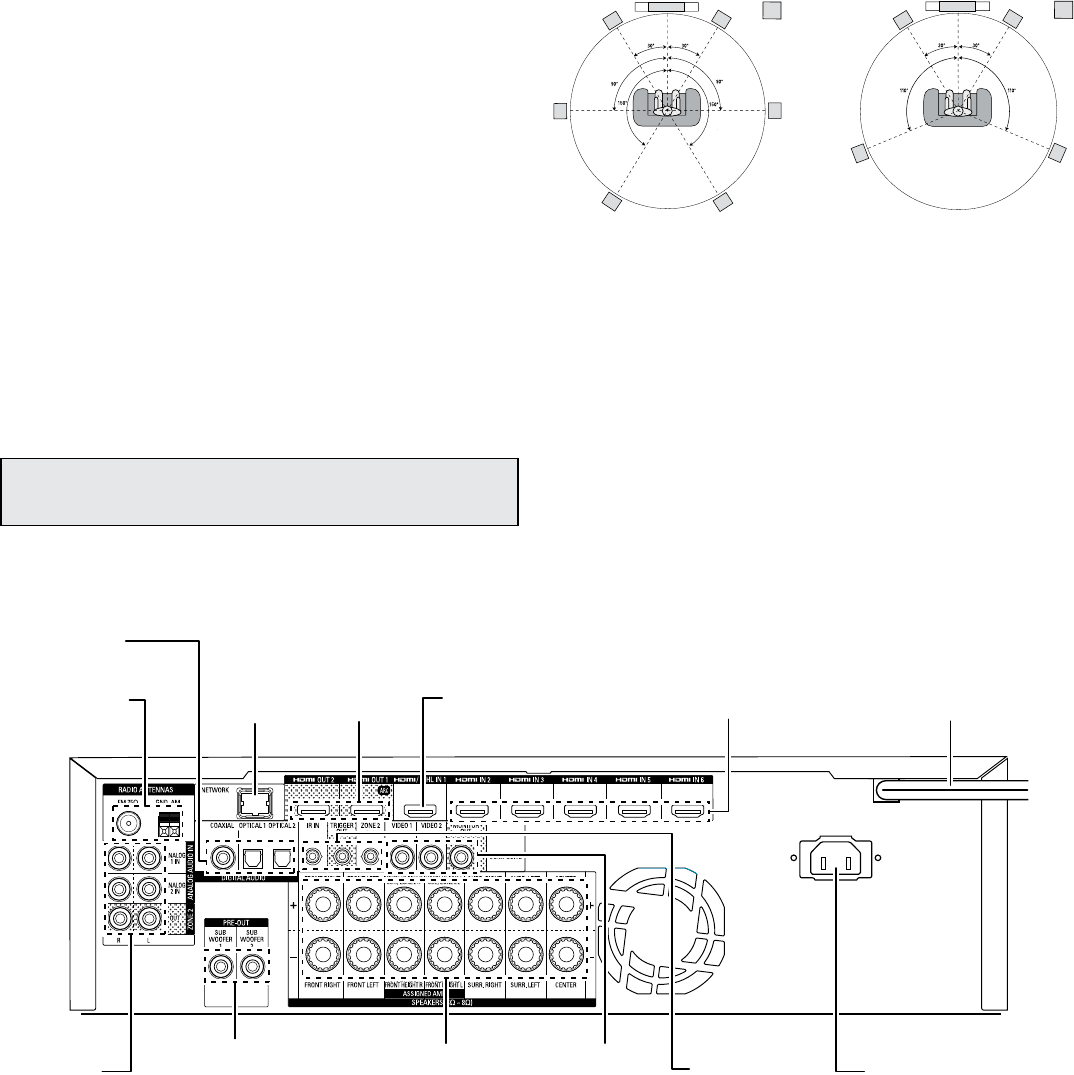
Place Your Speakers
Determine the locations for your system’s speakers according to their manufacturer’s
directions and the layout of your listening room. Use the illustrations below as a guide for
7.1-channel and 5.1-channel systems.
Speaker Positioning for
7.1-Channel Systems
SL SR
FRFL
TV SUB
C
SBL SBR
SL SR
FRFL
TV SUB
C
Speaker Positioning for
5.1-Channel Systems
For more detailed speaker placement information, including the use of front height speakers
with the Dolby Pro Logic IIz mode, download the complete AVR 1710/AVR 171-230/
AVR171-230C/AVR 1610/AVR 161-230/AVR 161-230C Owner’s Manual or the AVR 1510/
AVR 151-230/AVR 151-230C Owner’s Manual, from www.harmankardon.com.
Radio Antenna
Connectors
AVR 1710/AVR 171
HDMI Output
Connectors HDMI/MHL/
Input Connector Power Cord
(AVR 1710)
HDMI Input
Connectors
Network
Connector
Analog Audio
Connectors
Subwoofer
Pre-Out
Connectors
Speaker
Connectors
Digital Audio
Connectors
Analog Video
Connectors
AC Input
Connector
(AVR 171)
IR and Trigger
Connectors
3
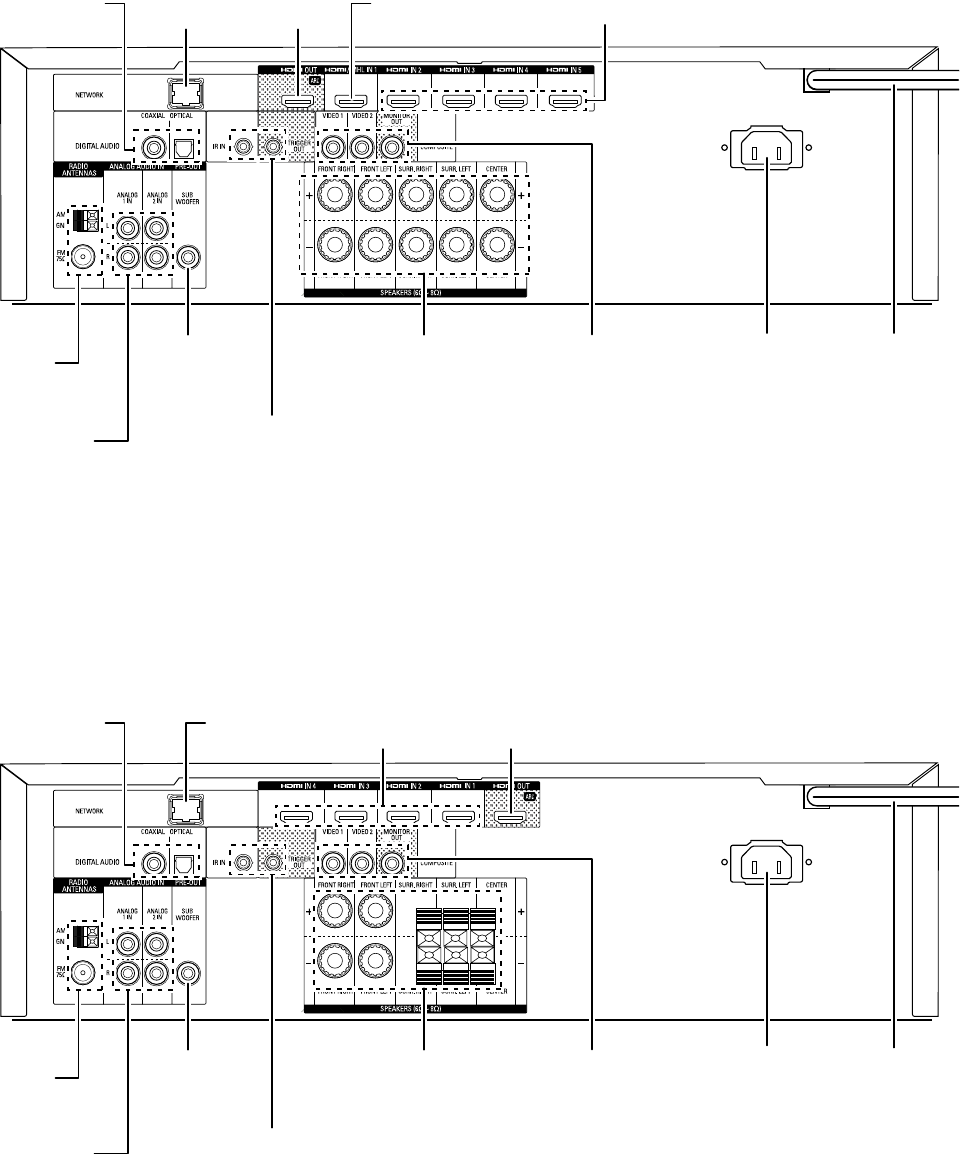
AVR Connections
AVR 1610/AVR 161
Radio Antenna
Connectors
HDMI Output
Connectors HDMI/MHL/
Input Connector
Power Cord
(AVR 1610)
HDMI Input
Connectors
Network
Connector
Analog Audio
Connectors
Subwoofer
Pre-Out
Connectors
Speaker
Connectors
Digital Audio
Connectors
Analog Video
Connectors AC Input
Connector
(AVR 161)
IR and Trigger
Connectors
AVR 1510/AVR 151
Radio Antenna
Connectors
HDMI Output
Connector
HDMI Input
Connectors
Power Cord
(AVR 1510)
Network
Connector
Analog Audio
Connectors
Subwoofer
Pre-Out
Connectors
Speaker
Connectors
Digital Audio
Connectors
Analog Video
Connectors AC Input
Connector
(AVR 151)
IR and Trigger
Connectors
AVR
4
Connections
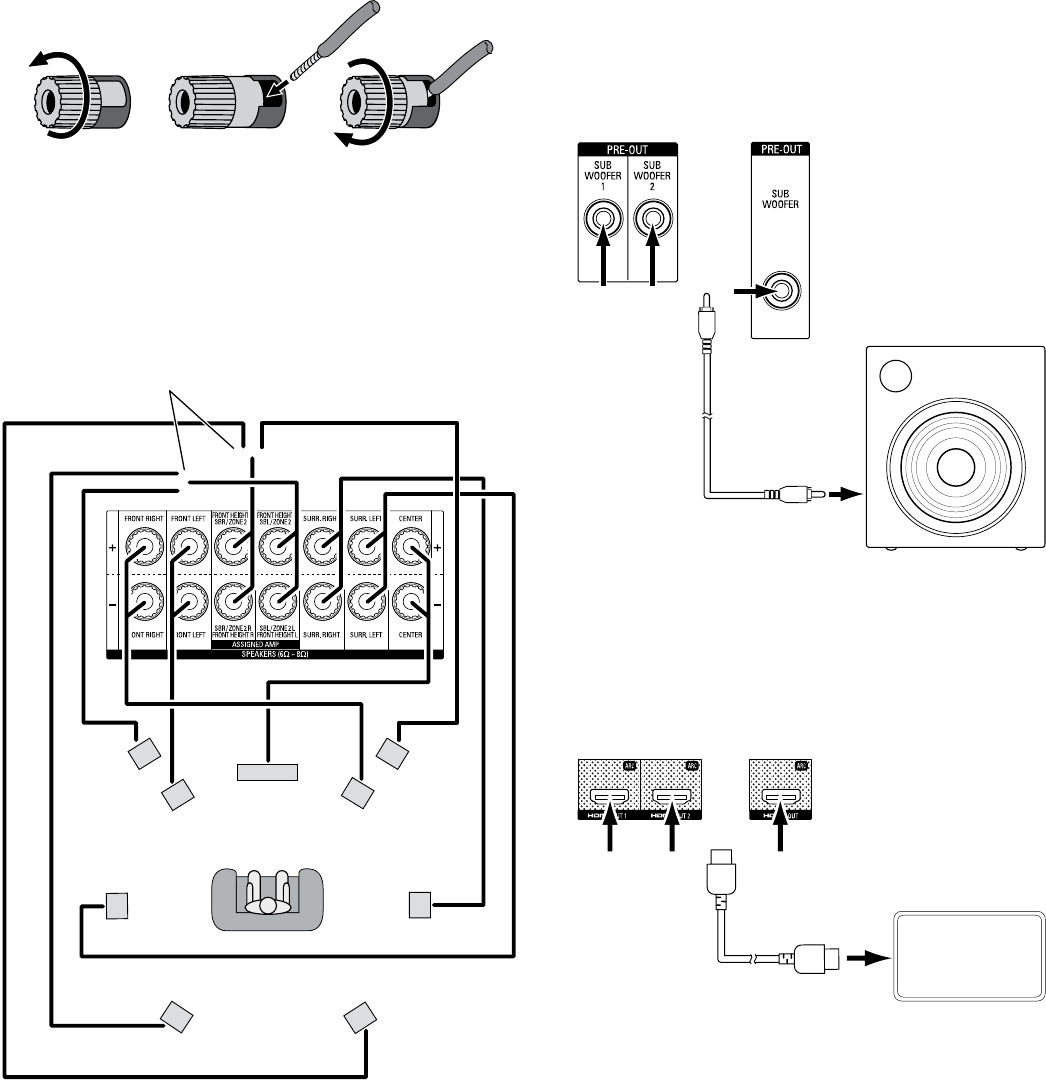
Connect Your Speakers
How to use the AVR speaker terminals:
1. Unscrew Cap 2. Insert Bare Wire 3. Tighten Cap
Always connect the colored (+) terminal on the AVR to the (+) terminal on the speaker
(usually red), and the black (–) terminal on the AVR to the (–) terminal on the speaker
(usually black).
IMPORTANT: Make sure the ( + ) and ( – ) bare wires do not touch each other or the other
terminal. Touching wires can cause a short circuit that can damage your AVR.
Connect the speakers as shown in the illustration.
SL
FHL
SR
FHR
FRFL
C
SBL SBR
AVR 1710/AVR 171 Only:
Connect Surround Back L/R Speakers
-OR- Front Height L/R Speakers Here
Connect Your Subwoofer
Use a single RCA audio cable to connect your subwoofer to AVR’s Sub Woofer Pre-Out
connector, as shown in the illustration at the top of the next column. (For the AVR 1710/
AVR 171-230/AVR 171-230C you can use either the Sub Woofer 1 or Sub Woofer 2
connector when you’re using a single subwoofer, or you may connect two subwoofers
for increased bass performance in larger listening rooms.) Consult your subwoofer’s user
manual for specic information about making connections to it.
AVR 1710/
AVR 171 AVR 1610/AVR1510/
AVR 161/AVR 151
Powered
Subwoofer
Single
RCA Audio Cable
(not supplied)
Use either
connector
Connect Your TV or Video Display
If your TV has an HDMI connector: Use an HDMI cable (not included) to connect it to
the AVR’s HDMI Out connector. (For the AVR 1710/AVR 171 you can use either HDMI Out
connector.) You do not need to make any other connections to your TV from the AVR or
from any of your video source components.
AVR 1710/AVR 171 AVR 1610/AVR 161/
AVR 1510/AVR 151
TV
HDMI Cable
(not supplied)
Use either
connector
AVR 1710/AVR 171 only: Connect a single TV to either of the HDMI Out connectors. If
you have a second TV you can connect it to the AVR’s HDMI Out 2 connector. Both TVs
will display the same picture.
Note: If your TV is equipped with the HDMI Audio Return Channel Function, you can feed
its sound to the AVR via the HDMI Out connection’s Audio Return Channel, and it will not
require additional audio connections to the AVR. Refer to the complete Assign the HDMI
Audio Return Channel, on page 9.
5
AVR Connections
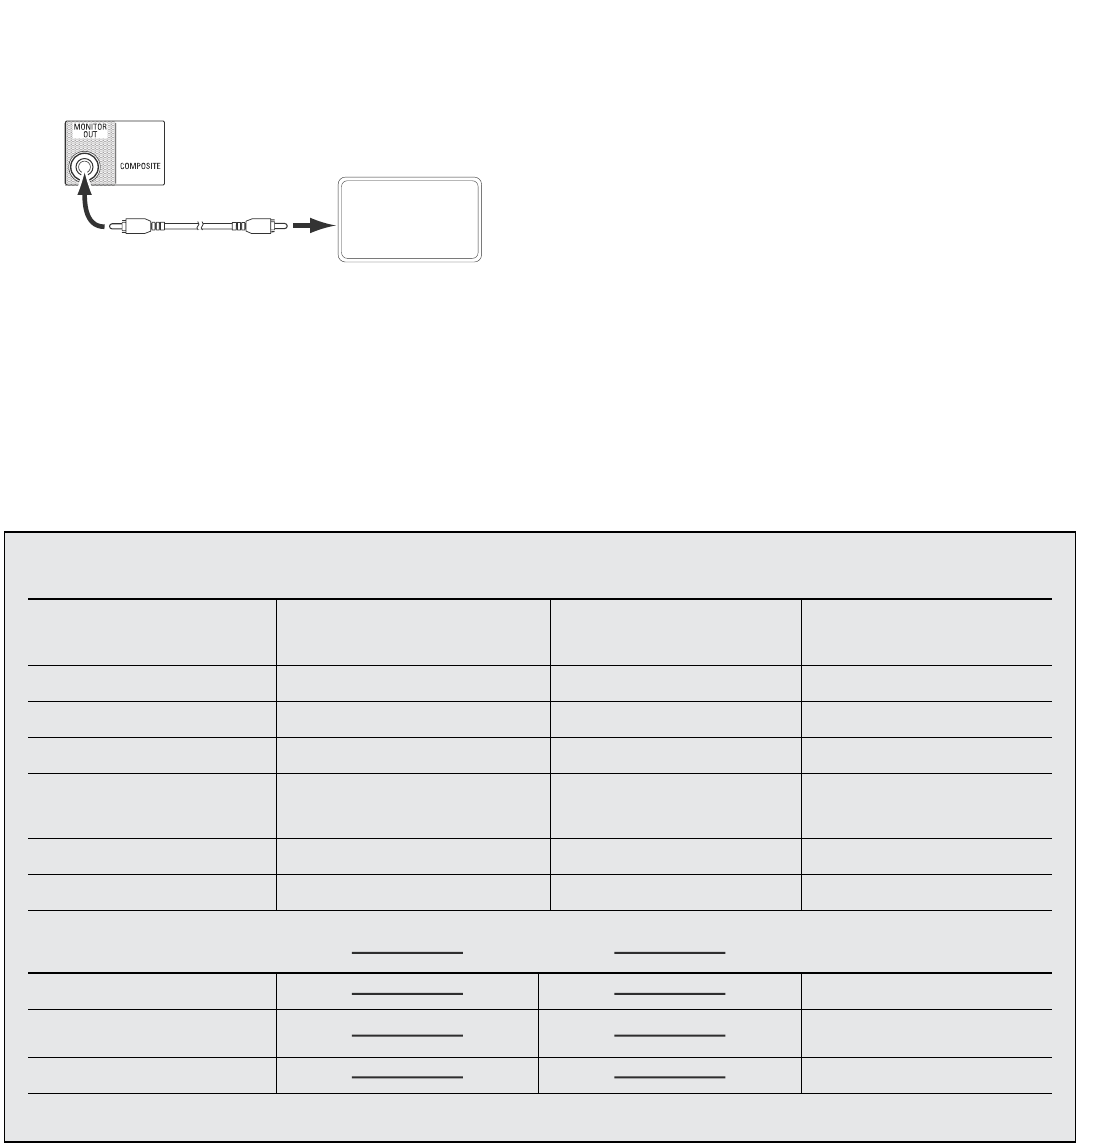
If your TV does not have an HDMI connector: Use a composite video cable (not
included) to connect the AVR’s Composite Monitor Out connector to your TV’s composite
video connector.
TV
Composite Video Cable
(not supplied)
AVR Composite
Monitor Out Connector
Note: The HDMI connection to your TV is preferred. If you use the composite video
connection to your TV, you will not be able to view the AVR’s on-screen menus and will
need to use the AVR’s front-panel display to set up the AVR.
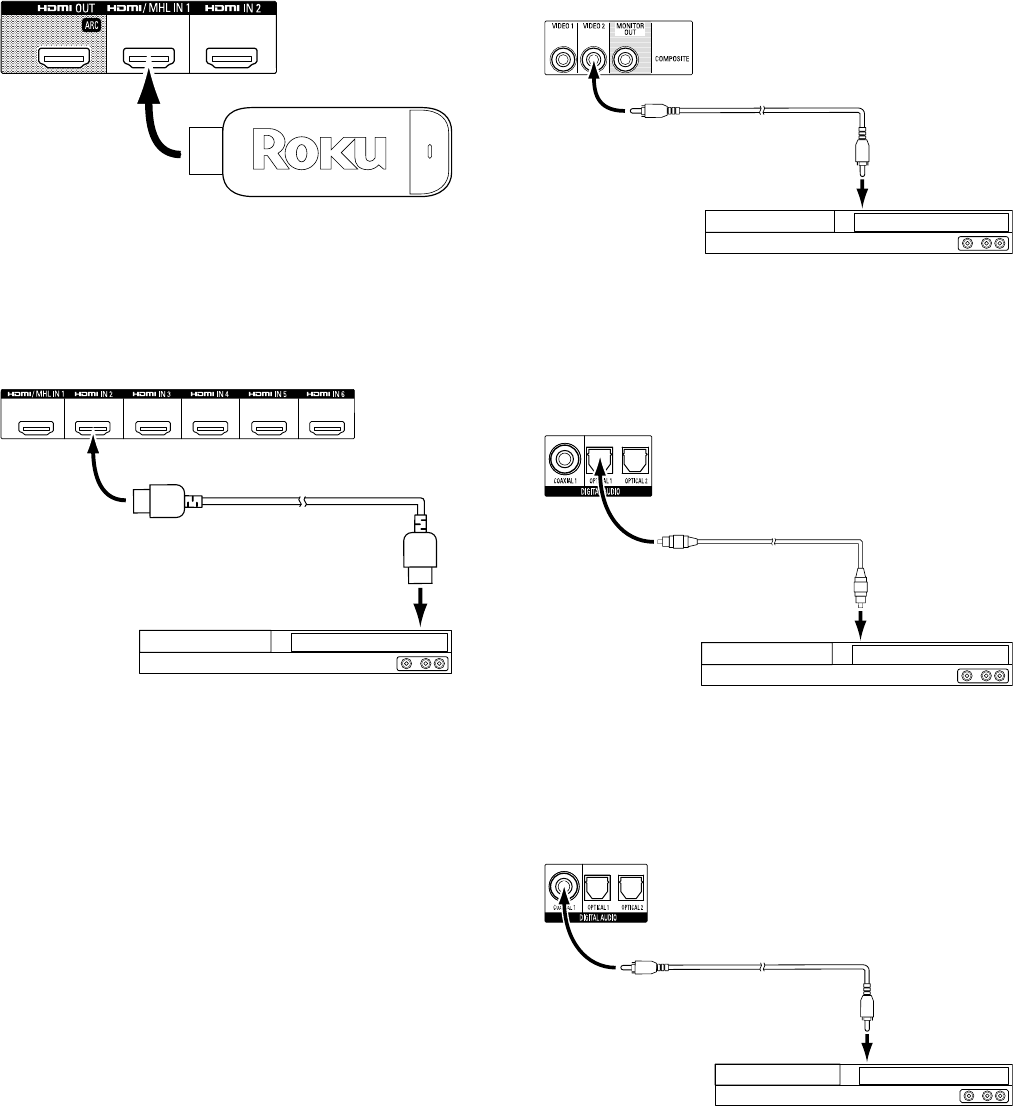
Connect Your Audio and Video Source Devices
Source devices are components where a playback signal originates, e.g. a Blu-ray
Disc™ or DVD player; a cable, satellite or HDTV tuner; etc. Your AVR has several different
types of input connectors for your audio and video source devices: HDMI, composite
video, optical digital audio, coaxial digital audio and analog audio. The connectors are
not labeled for specic types of source devices; they are labeled numerically, so you can
connect your devices according to your individual system’s make-up.
Your AVR’s various source buttons have default assignments to different input connectors
(listed in the “Default Connector(s)” column of the table below). For ease of setup, you
should connect each source device to the connector where the corresponding default
source button is assigned (e.g., connect your Blu-ray Disc player to HDMI 2).
However, you can connect your source devices as you wish and re-assign any of the
input connections to any of the Source Buttons listed in the table according to where you
actually connect each of your source devices.
As you connect your various source devices, ll out the “Connected Device” column
in the table – it will make it easier for you to assign the various source buttons after
you have completed making all of the connections. (You will make any changes to the
source-button assignments and ll in the “Assigned Connector(s)” column later in the
setup process.)
Note: You cannot assign connectors to the Network, Radio , TV and USB source buttons.
Source Button Default Connector(s) Assigned Connector(s) Connected Device
MHL
(AVR 1710/AVR 171/AVR 1610/AVR 161);
Server (AVR 1510/AVR 151)
HDMI 1
Disc HDMI 2
Cable/Sat HDMI 3
STB HDMI 4
Game
HDMI 5
(AVR 1710/AVR 171/AVR 1610/AVR 161);
Composite 2/Analog 2 (AVR 1510/AVR 151)
Aux Composite 1/Analog 1
Audio None/Analog 2
Monitor Output Connector Connected Device
HDMI Out 1
HDMI Out 2
(AVR 1710/AVR 171 only)
Composite Video Monitor Out
Source Buttons and Assigned Connectors
AVR
6
Connections
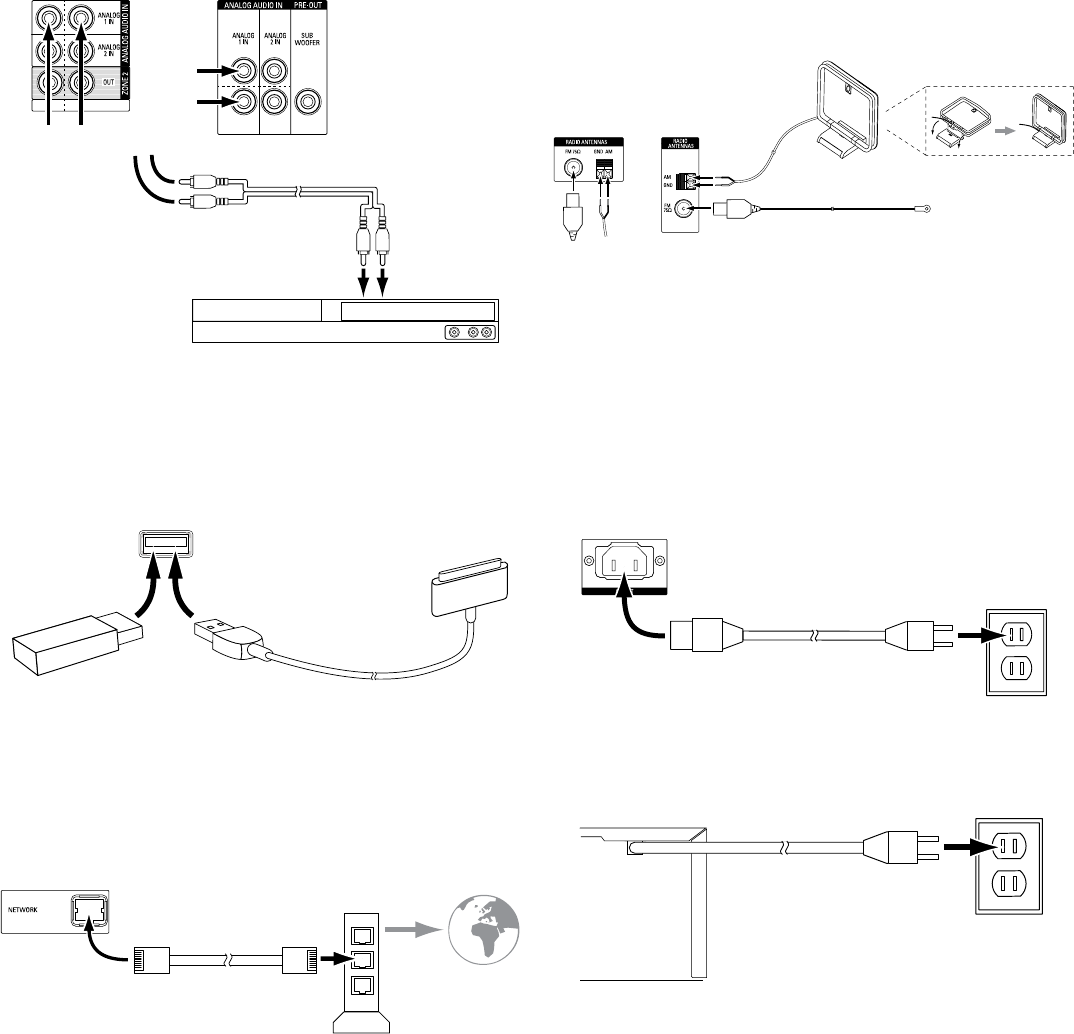
ROKU Streaming Stick (AVR 1710/AVR 171/AVR 1610/AVR 161 only):
If you have a Roku Streaming Stick, insert it into the AVR’s HDMI/MHL In connector.
NOTE: Do not insert the Streaming Stick into any other HDMI In connector.
AVR HDMI/MHL
In Connector
Roku® Streaming Stick
HDMI Devices
If any of your source devices have HDMI connectors, using them will provide the best
possible video and audio performance quality. Since the HDMI cable carries both digital
video and digital audio signals, you do not have to make any additional audio connections
for source devices you connect via HDMI connectors.
AVR HDMI IN Connectors
HDMI Cable
(not supplied)
To HDMI
Output
HDMI-Equipped Source Device
Composite Video Devices
Use composite video connectors for video source devices that don’t have HDMI or
component video connectors. You will also need to make an audio connection from the
source device to the AVR.
AVR Analog
Video Connectors
Composite Video Cable
(not supplied)
To Composite
Video Output
Composite Video-Equipped Source Device
Optical Digital Audio Devices
If your non-HDMI source devices have optical digital outputs, connect them to the AVR’s
optical digital audio connectors. NOTE: Make only one type of digital connection (HDMI,
optical or coaxial) from each source device.
AVR Digital
Audio Connectors
Optical Digital Audio
Cable (not supplied)
To Optical Digital
Audio Output
Optical-Equipped Source Device
Coaxial Digital Audio Devices
If any of your non-HDMI source devices have coaxial digital outputs, connect them to
the AVR’s coaxial digital audio connector. NOTE: Make only one type of digital connection
(HDMI, optical or coaxial) from each source device.
AVR Digital
Audio Connectors
Coaxial Digital Audio
Cable (not supplied)
To Coaxial Digital
Audio Output
Coaxial-Equipped Source Device
7
AVR Connections
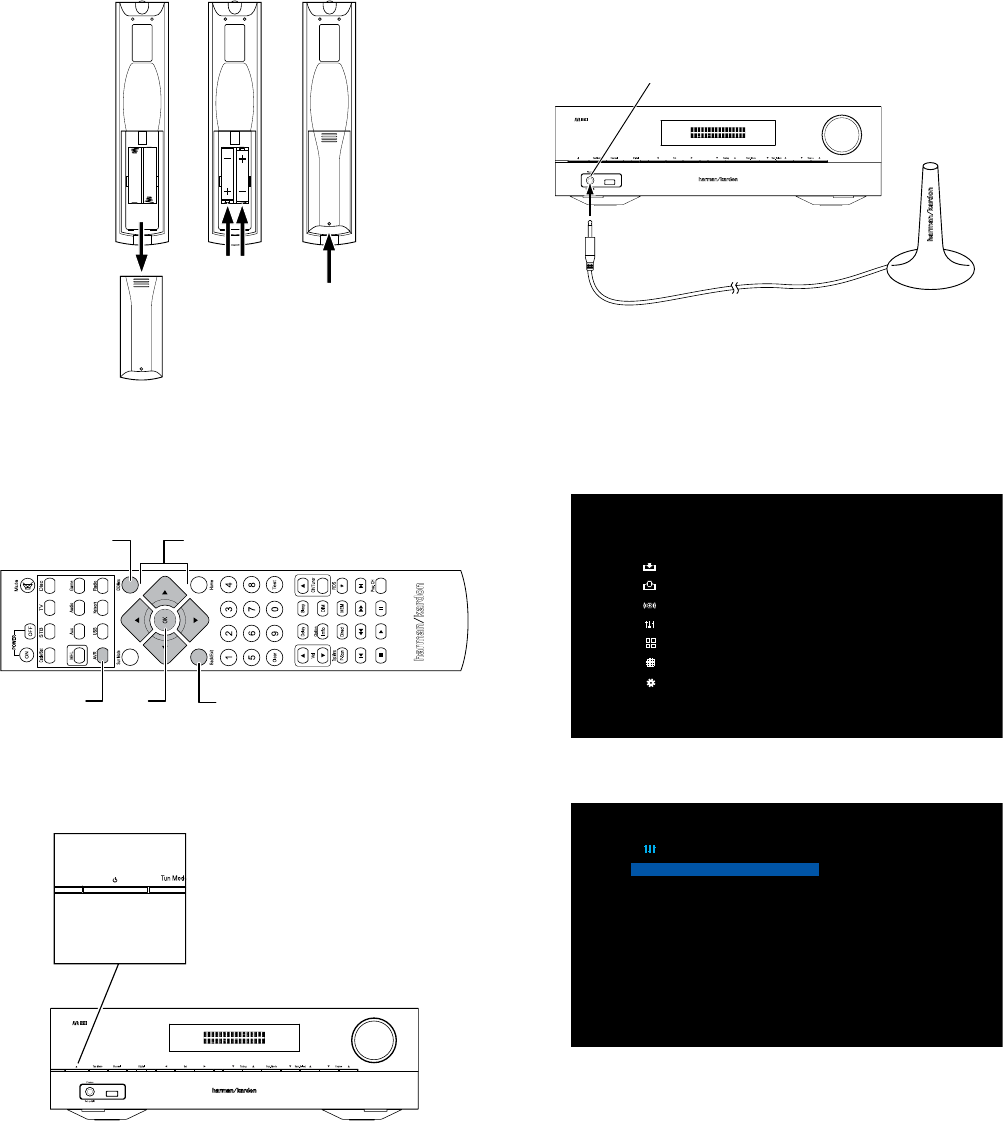
Analog Audio Devices
Use the AVR’s analog audio connectors for source devices that don’t have HDMI or digital
audio connectors.
AVR 1710/AVR 171
Analog Audio
Connectors
AVR 1610/AVR 161/
AVR 1510/AVR 151
Analog Audio Connectors
Stereo Audio Cable
(not supplied)
To Stero Analog
Audio Output
Analog Source Device
USB and iOS Devices
Use the AVR’s front-panel USB port to connect an iPod, iPhone or iPad using an Apple
cable (not supplied) or to directly connect a USB memory stick. You can play audio les
from the device or memory stick and use the AVR’s remote to control playback.
AVR Front-Panel
USB Port
Apple Cable
(not supplied)
USB
Memory
Stick
Connect Your Home Network
Use a Cat. 5 or Cat. 5E cable (not supplied) to connect the AVR’s Network connector to
your home network to enjoy AirPlay™, Internet radio and content from DLNA®-compatible
devices that are connected to the network.
AVR
Network
Connector Network
Modem
Cat. 5/5E Cable
(not supplied)
To Home
Network
and Internet
Connect the Radio Antennas
• Connect the supplied FM antenna to the AVR’s FM 75Ω antenna connector. For the best
reception, extend the FM antenna as far as possible.
• Bend and fold the base of the supplied AM antenna as shown and connect the antenna
wires to the AVR’s AM and Gnd connectors. (You can connect either wire to either
connector.) Rotate the antenna as necessary to minimize background noise.
AVR 1710/
AVR171
Antenna
Connectors
AVR 1610/
AVR161/
AVR 1510/
AVR 151
Antenna
Connectors
AM Antenna
(supplied)
FM Antenna (supplied)
Bend and fold base
NOTE: To connect multi-zone, remote IR and trigger equipment, please download
the AVR 1710/AVR 171-230/AVR171-230C/AVR 1610/AVR 161-230/AVR 161-230C
Owner’s Manual or the AVR 1510/AVR 151-230/AVR 151-230C Owner’s Manual from
www.harmankardon.com.
Connect to AC Power
AVR 171/AVR 161/AVR 151:
Connect the supplied AC power cord to the AVR’s AC Input connector and then to a
working, non-switched AC power outlet.
AVR AC
Input Connector
Power Cord
(supplied)
AC Power
Outlet
AVR 1710/AVR 1610/AVR 1510:
Connect the AVR’s power cord to a working, nonswitched AC power outlet.
AVR
Power Cord
AC Power
Outlet
AVR
8
Connections
Set Up the AVR
Install the Batteries in the Remote Control
Remove the remote control’s battery cover, insert the two supplied AAA batteries as shown in
the illustration, and replace the battery cover.
1. Remove
Cover 2. Insert
Batteries 3. Replace
Cover
NOTE: Remove the protective plastic from the AVR’s front panel so it doesn’t reduce the
remote control’s effectiveness.
Using the Remote Control
You will be using the following remote control buttons to congure your AVR:
Left/Right/Up/Down
Buttons
Back/Exit
Button
AVR
Button OK
Button
OSD/Menu
Button
Turn On the AVR
Press the front-panel Power button.
Power Button
Configure the AVR for Your Speakers:
AVR 1710/AVR 171/AVR 1610/AVR 161
Note: The on-screen menus shown in this guide may differ slightly from your AVR’s actual
menu screens.
Before you use your AVR you need to congure it to work with your particular speaker
system. Your AVR’s EZSet/EQ™ Plus system uses the supplied EzSet/EQ microphone to
automatically detect the capabilities of each connected speaker and optimize the AVR’s
performance for them. Before beginning, be sure you have correctly connected your
speakers to the AVR.
1. Plug the supplied EzSet/EQ™ microphone into the AVR’s Headphone connector.
AVR Headphone Connector
EzSet Microphone (supplied)
2. Place the microphone at ear height in your listening position.
3. Turn on your TV and select the TV input where you connected the AVR in Connect Your
TV, on page 3.
4. Press the remote control’s AVR button, then press the OSD/Menu button. The AVR’s
on-screen display (OSD) setup menu will appear on the TV. (Note: If you have used
a composite video connection to your TV, the OSD menus will not appear on your TV.
Follow the steps below using the AVR’s front-panel display.)
MASTER MENU
Source Select
Source Setup
Surround Mode
Speaker Setup
Zone2
Network
System Setup
5. Use the remote’s arrow and OK buttons to select “Speaker Setup.”
Speaker Setup
Auto Setup: EZ Set
Manual Setup
6. Select “Auto Setup: EZ Set.”
7. Select “Continue.”
8. Follow the instructions that appear on the screens. Remain quiet while the test noise
plays through the speakers.
9
AVR
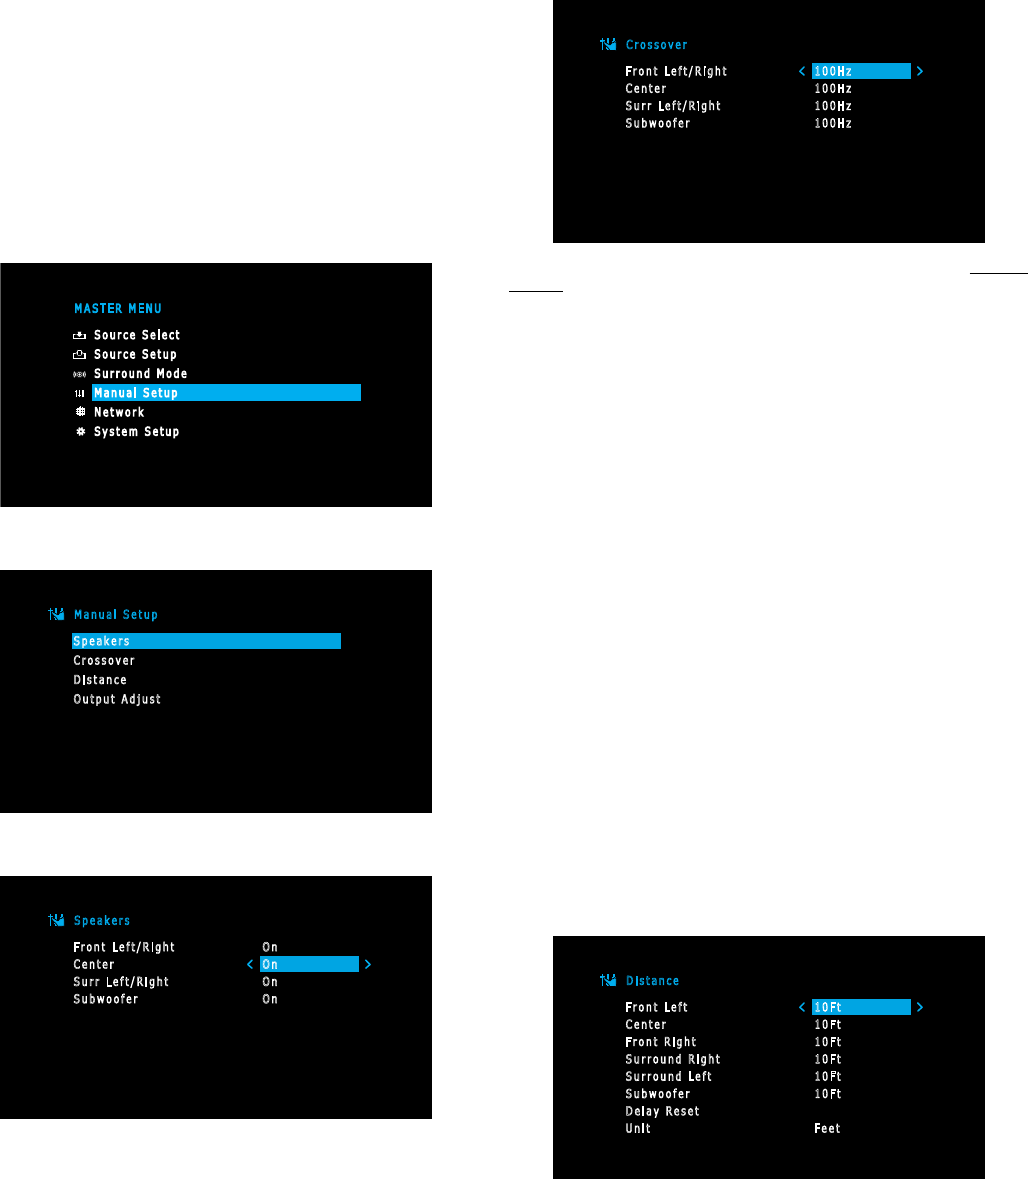
Configure the AVR for Your Speakers: AVR 1510/AVR 151
Note: The on-screen menus shown in this guide may differ slightly from your AVR’s actual
menu screens.
Before you use your AVR you need to congure it to work with your speakers and to
compensate for the acoustic characteristics of your room. Before beginning, place your
loudspeakers as explained in the Place Your Speakers section, on page 2, and connect
them to the AVR as explained in the Connect Your Speakers section, on page 3.
1. Turn on your TV and select the TV input where you connected the AVR in Connect Your
TV, on page 3.
2. Press the remote control’s OSD/Menu button. The AVR’s on-screen display (OSD) setup
menu will appear on the TV. (Note: If you have used a composite video connection to
your TV, the OSD menus will not appear on your TV. Follow the steps below using the
AVR’s front-panel display.)
MASTER MENU
Source Select
Source Setup
Surround Mode
Manual Setup
Network
System Setup
3. Use the remote’s arrow and OK buttons to select “Manual Setup.”
Manual Setup
Speakers
Crossover
Distance
Output Adjust
4. Select “Speakers.”
Speakers
Front Left/Right
Center
Surr Left/Right
Subwoofer
On
On
On
On
5. Use the Up/Down buttons to select a speaker group and use the Left/Right buttons to
select “On” when the speakers are present in the system, or”Off” for positions where
no speakers are installed. The Front Left & Right setting is always On and may not be
disabled. (Note: The settings in this menu affect the remainder of the speaker setup
process and the availability of various surround modes.)
6. Press the Back/Exit button to return to the Manual Setup screen, then select
“Crossover.”
Crossover
Front Left/Right
Center
Surr Left/Right
Subwoofer
100Hz
100Hz
100Hz
100Hz
Consult the technical specications for all of your speakers and locate their frequency
response, usually given as a range, e.g., 100Hz – 20kHz (±3dB). Write down the lowest
frequency that each of your speakers is capable of playing (100Hz in the above example).
7. Use the Left/Right buttons to set each speaker group’s Crossover Frequency to the
frequency that most closely matches the frequency you noted above in the speaker’s
specications. If the speaker’s crossover frequency is lower than 40Hz, select the rst
option, “Large.” (This setting doesn’t refer to the speaker’s physical size but to its
frequency response, which is also called “full range.”)
• We recommend that you set the Subwoofer Crossover to the same frequency you use
for the Front Left/Right speaker setting.
Your AVR will divide the source signal at the crossover frequency; all information above
that crossover point will be played through your system’s speakers, and all information
below the crossover point will be played through the subwoofer. This way, each
loudspeaker in your system will perform at its best, delivering a more powerful and
enjoyable sound experience.
• If you set the Front Left/Right speakers to “Large”, select one of the three following
settings for the subwoofer:
L/R+LFE: This setting sends all low-frequency information to the subwoofer, including
a) low-frequency information that is also played through the front left and right
speakers and b) the special LFE (low-frequency effects) channel information that is
present on some DVDs, Blu-ray discs and other digital programming.
LFE: This setting plays low-frequency information contained in the full-range program
channels through the front left and right speakers, and directs only the LFE-channel
information to the subwoofer.
OFF: Select this setting when no subwoofer is in use. All low-frequency information will
be sent to the front left and right speakers.
8. When you’re nished, press the Back/Exit button to return to the Manual Setup screen,
then select “Distance.”
Distance
Front Left
Center
Front Right
Surround Right
Surround Left
Subwoofer
Delay Reset
Unit
10Ft
10Ft
10Ft
10Ft
10Ft
10Ft
Feet
Connections

AVR
10
Connections
9. Measure the distance from each speaker to the listening position, and write it down.
(Even if all of your speakers are the same distance from the listening position, you will
need to do this.)
10. Enter the distance that you measured from each speaker to the listening position.
Select a speaker, then use the Left/Right buttons to change the measurement.
You can enter distances between 0 and 30 feet (9.1m). The default distance for all
speakers is 10 feet.
• If you want to use metric measurements, select “Unit” and use the Left/Right buttons
to change the units to meters.
11. When you’re nished, press the OSD/Menu button to exit the menu system.
Assign Connectors to the AVR’s Source Buttons
1. Review the input connections you listed on the Source Buttons and Assigned
Connectors table, on page 4. Note what changes (if any) you want to make from the
default connector assignments that appear on the list.
2. Turn on your TV and select the TV input where you connected the AVR in Connect Your
TV, on page 3.
3. Press the remote control’s OSD/Menu button. The AVR’s on-screen display (OSD) setup
menu will appear on the TV. (Note: If you have used a composite video connection to
your TV, the OSD menus will not appear on your TV. Follow the steps below using the
AVR’s front-panel display.)
MASTER MENU
Source Select
Source Setup
Surround Mode
Speaker Setup
Zone2
Network
System Setup
4. Use the remote’s arrow and OK buttons to select “Source Setup” and use the left/right
arrow buttons to select a source button with connectors that you want to re-assign.
Source Setup
Source
Title
Video In
Audio In
Tone
Bass
Treble
Night Mode
Lip Sync
Disc
HDMI 2
HDMI 2
OFF
0
0
OFF
0mS
5. Select “Video In” and select the video input connector you want to assign to the source
button. Press the OK button. NOTE: If you select an HDMI connector as the Video Input,
the Audio Input will automatically change to the same HDMI connector. You cannot use
a different audio input with an HDMI video input.
Source Setup
Source
Title
Video In
Audio In
Tone
Bass
Treble
Night Mode
Lip Sync
Disc
HDMI 3
HDMI 3
OFF
0
0
OFF
0mS
6. If you have not selected an HDMI connection for Video In, select “Audio In” and select
the audio input connector you want to assign to the source button. Press the OK button.
Source Setup
Source
Title
Video In
Audio In
Tone
Bass
Treble
Night Mode
Lip Sync
Disc
Composite 1
Optical 1
OFF
0
0
OFF
0mS
7. Press the remote’s Back/Exit button and repeat steps 3 – 6 for the remaining source
buttons with connectors you want to re-assign.
You are now ready to enjoy your AVR!
IMPORTANT: For complete information about using all of your audio/video
AVR’s features and capabilities, download the AVR 1710/AVR 1610/
AVR 171-230/AVR 161-230/AVR 171-230C/AVR 161-230C Owner’s
Manual or AVR 1510/AVR 151-230/AVR 151-230C Owner’s Manual from
www.harmankardon.com.
For easy control of your AVR with a hand-held device, download the free app
from iTunes App Store for compatible Apple products, or from Google Play for
compatible Android powered smartphones and tablets.
General Specifications
Power consumption
(AVR 1710/AVR 171):
(AVR 1610/AVR 161):
(AVR 1510/AVR 151):
<0.5W (standby); XXXW (maximum)
<0.5W (standby); XXXW (maximum)
<0.5W (standby); XXXW (maximum)
Dimensions (W x H x D): 17-5/16" x XX" x XX"
(440mm x XXmm x XXmm)
Weight
(AVR 1710/AVR 171):
(AVR 1610/AVR 161):
(AVR 1510/AVR 151):
XX lb (XXkg)
XX lb (XXkg)
XX lb (XXkg)
HARMAN International Industries, Incorporated
8500 Balboa Boulevard, Northridge, CA 91329 USA
516.255.4545 (USA only)
Made in P.R.C.
© 2013 HARMAN International Industries, Incorporated. All rights reserved.
Harman Kardon is a trademark of HARMAN International Industries, Incorporated, registered in the United States and/or other countries.
EzSet/EQ is a trademark of HARMAN International Industries, incorporated.
Android is a trademark of Google Inc. Use of this trademark is subject to Google Permissions.
Apple, iPhone, iPod, iPod touch, iTunes and Macintosh are trademarks of Apple Inc., registered in the U.S. and other countries.
DLNA is a registered trademark of the Digital Living Network Alliance.
Manupactured under license under U.S. Patent Nos: 5,956,674; 5,974,380; 6,226,616; 6,487,535; 7,212,872; 7,333,929; 7,392,195; 7,272,567
& other U.S. and worldwide patents issued & pending. DTS-HD, the Symbol, & DTS-HD and the Symbol together are registered trademarks of
DTS, Inc. Product includes software. © DTS, Inc. All Rights Reserved.
Manufactured under license from Dolby Laboratories. Dolby, Pro Logic, and the double-D symbol are trademarks of Dolby Laboratories.
Google is a trademark of Google Inc.
HDMI, the HDMI logo and High-Definition Multimedia Interface are trademarks or registered trademarks of HDMI Licensing LLC in the
United States and other countries.
Roku is a registered trademarks of Roku, Inc. All rights reserved.
Features, specifications and appearance are subject to change without notice.
Part #: 960-0287-001, Rev. A www.harmankardon.com
FPO
For All Products:
1. Read these instructions.
2. Keep these instructions.
3. Heed all warnings.
4. Follow all instructions.
5. Do not use this apparatus near water.
6. Clean only with a dry cloth.
7. Do not block any ventilation openings.
Install this apparatus in accordance with
the manufacturer’s instructions.
8. Do not install this apparatus near any heat
sources such as radiators, heat registers,
stoves or other apparatus (including
amplifiers) that produce heat.
9. Do not defeat the safety purpose of
the polarized or grounding-type plug. A
polarized plug has two blades with one
wider than the other. A grounding-type
plug has two blades and a third grounding
prong. The wide blade or the third prong
is provided for your safety. If the provided
plug does not fit into your outlet, consult an
electrician for replacement of the obsolete
outlet.
10. Protect the power cord from being walked
on or pinched, particularly at plugs,
convenience receptacles and the point
where they exit from the apparatus.
11. Use only attachments/accessories specified
by the manufacturer.
12. Use only with the cart, stand,
tripod, bracket or table
specified by the manufacturer
or sold with the apparatus.
When a cart is used, use caution when
moving the cart/apparatus combination to
avoid injury from tip-over.
13. Unplug this apparatus during lightning
storms or when unused for long periods
of time.
14. Refer all servicing to qualified service
personnel. Servicing is required when the
apparatus has been damaged in any way,
such as when the power-supply cord or
plug is damaged, liquid has been spilled or
objects have fallen into the apparatus, or
the apparatus has been exposed to rain or
moisture, does not operate normally or has
been dropped.
15. Do not expose this apparatus to dripping or
splashing, and ensure that no objects filled
with liquids, such as vases, are placed on
the apparatus.
16. To disconnect this apparatus from the AC
mains completely, disconnect the power-
supply cord plug from the AC receptacle.
17. The mains plug of the power-supply cord
shall remain readily operable.
18. Do not expose batteries to excessive heat
such as sunshine, fire or the like.
RISK OF ELECTRIC SHOCK. DO NOT OPEN.
THE LIGHTNING FLASH WITH AN ARROWHEAD
SYMBOL, WITHIN AN EQUILATERAL TRIANGLE,
IS INTENDED TO ALERT THE USER TO THE
PRESENCE OF UNINSULATED “DANGEROUS
VOLTAGE” WITHIN THE PRODUCT’S ENCLOSURE
THAT MAY BE OF SUFFICIENT MAGNITUDE TO
CONSTITUTE A RISK OF ELECTRIC SHOCK TO
PERSONS.
THE EXCLAMATION POINT WITHIN AN
EQUILATERAL TRIANGLE IS INTENDED TO
ALERT THE USER TO THE PRESENCE OF
IMPORTANT OPERATING AND MAINTENANCE
(SERVICING) INSTRUCTIONS IN THE LITERATURE
ACCOMPANYING THE PRODUCT.
WARNING: TO REDUCE THE RISK OF FIRE
OR ELECTRIC SHOCK, DO NOT EXPOSE THIS
APPARATUS TO RAIN OR MOISTURE.
CAUTION
FCC AND IC STATEMENT FOR
USERS (USA AND CANADA
ONLY)
This device complies with part 15 of the FCC Rules. Op-
eration is subject to the following two conditions: (1) This
device may not cause harmful interference, and (2) this
device must accept any interference received, including
interference that may cause undesired operation.
This Class B digital apparatus complies with Canadian
ICES-003.
Cet appareil numérique de la classe B est conforme à la
norme NMB-003 du Canada.
Federal Communication Commis-
sion Interference Statement
This equipment has been tested and found to comply with
the limits for a Class B digital device, pursuant to Part
15 of the FCC Rules. These limits are designed to pro-
vide reasonable protection against harmful interference
in a residential installation. This equipment generates,
uses and can radiate radio frequency energy and, if not
installed and used in accordance with the instructions,
may cause harmful interference to radio communications.
However, there is no guarantee that interference will not
occur in a particular installation. If this equipment does
cause harmful interference to radio or television recep-
tion, which can be determined by turning the equipment
off and on, the user is encouraged to try to correct the
interference by one or more of the following measures:
• Reorient or relocate the receiving antenna.
• Increase the separation between the equipment and
receiver.
• Connect the equipment into an outlet on a circuit differ-
ent from that to which the receiver is connected.
• Consult the dealer or an experienced radio/TV techni-
cian for help.
Caution: Changes or modifications not expressly ap-
proved by HARMAN could void the user’s authority to op-
erate the equipment.
For Products That Transmit RF
Energy:
FCC AND IC INFORMATION FOR USERS
This device complies with Part 15 of the FCC rules and
Industry Canada license-exempt RSS 210. Operation is
subject to the following two conditions: (1) This device
may not cause harmful interference; and (2) this device
must accept any interference received, including interfer-
ence that may cause undesired operation.
FCC/IC Radiation Exposure Statement
This equipment complies with FCC/IC RSS-102 radiation
exposure limits set forth for an uncontrolled environ-
ment. This equipment should be installed and operated
with minimum distance 20cm between the radiator &
your body.
For Products with Radio Re-
ceivers That Can Use an Ex-
ternal Antenna (USA ONLY):
CATV (Cable TV) or Antenna Grounding
If an outside antenna or cable system is connected to
this product, be certain that it is grounded so as to pro-
vide some protection against voltage surges and static
charges. Section 810 of the National Electrical Code
(NEC), ANSI/NFPA No. 70-1984, provides information with
respect to proper grounding of the mast and supporting
structure, grounding of the lead-in wire to an antenna dis-
charge unit, size of grounding conductors, location of an-
tenna discharge unit, connection to grounding electrodes
and requirements of the grounding electrode.
Note to CATV System Installer:
This reminder is provided to call the CATV (cable TV)
system installer’s attention to article 820-40 of the NEC,
which provides guidelines for proper grounding and, in
particular, specifies that the cable ground shall be con-
nected to the grounding system of the building, as close
to the point of cable entry as possible.
IMPORTANT SAFETY INSTRUCTIONS
For CD/DVD/Blu-ray Disc™
Players:
Caution:
This product uses a laser system. To prevent direct
exposure to the laser beam, do not open the cabinet
enclosure or defeat any of the safety mechanisms
provided for your protection. DO NOT STARE INTO THE
LASER BEAM. To ensure proper use of this product, please
read the owner’s manual carefully and retain it for future
use. Should the unit require maintenance or repair, please
contact your local Harman Kardon service center. Refer
servicing to qualified personnel only.
FOR ALL EU COUNTRIES:
For products that include audio out
Prevention of hearing loss
Caution: Permanent hearing loss may occur if earphones
or headphones are used at high volume for prolonged
periods of time.
For France, the products have been tested to comply with
the Sound Pressure Level requirement laid down in the
applicable NF EN50332-1:2000 and/or EN50332-2:2003
standards as required by French Article L.5232-1.
Note: To prevent possible hearing damage, do not listen at
high volume levels for long periods.
WEEE Notice
The Directive on Waste Electrical and Electronic
Equipment (WEEE), which entered into force as European
law on 13th February 2003, resulted in a major change in
the treatment of electrical equipment at end-of-life.
The purpose of this Directive is, as a first priority, the
prevention of WEEE, and in addition, to promote the reuse,
recycling and other forms of recovery of such wastes so
as to reduce disposal.
The WEEE logo on the product or on its box indicating
collection for electrical and electronic equipment consists
of the crossed-out wheeled bin, as shown below.
This product must not be disposed of or dumped with your
other household waste. You are liable to dispose of all your
electronic or electrical waste equipment by relocating
over to the specified collection point for recycling of such
hazardous waste. Isolated collection and proper recovery
of your electronic and electrical waste equipment at the
time of disposal will allow us to help conserving natural
resources. Moreover, proper recycling of the electronic
and electrical waste equipment will ensure safety of
human health and environment. For more information
about electronic and electrical waste equipment disposal,
recovery, and collection points, please contact your local
city center, household waste disposal service, shop from
where you purchased the equipment, or manufacturer of
the equipment.
RoHS Compliance
This product is in compliance with Directive 2011/65/EU
of the European Parliament and of the Council of 8 June
2011 on the restriction of the use of certain hazardous
substances in electrical and electronic equipment.
For Products That Include Batteries
EU Batteries Directive 2006/66/EC
A new battery directive 2006/66/EC on Battery and
Accumulator replacing directive entered into force on the
26th September 2008. The directive applies to all types
of batteries and accumulators (AA, AAA, button cells, lead
acid, rechargeable packs) including those incorporated
into appliances except for military, medical and power
tool applications.
The directive sets out rules for collection, treatment,
recycling and disposal of batteries, and aims to
prohibit certain hazardous substances and to improve
environmental performance of batteries and all operators
in the supply chain.
Instructions for Users on Re-
moval, Recycling and Disposal
of Used Batteries
To remove the batteries from your equipment or remote
control, reverse the procedure described in the owner’s
manual for inserting batteries.
For products with a built-in battery that lasts for the
lifetime of the product, removal may not be possible
for the user. In this case, recycling or recovery centers
handle the dismantling of the product and the removal
of the battery. If, for any reason, it becomes necessary to
replace such a battery, this procedure must be performed
by authorized service centers.
In the European Union and other locations, it is illegal to
dispose of any battery with household trash. All batteries
must be disposed of in an environmentally sound
manner. Contact your local waste-management officials
for information regarding the environmentally sound
collection, recycling and disposal of used batteries.
WARNING: Danger of explosion if battery is incorrectly
replaced. To reduce risk of fire or burns, don’t
disassemble, crush, puncture, short external contacts,
expose to temperature above 60°C (140°F), or dispose
of in fire or water. Replace only with specified batteries.
The symbol indicating ‘separate collection’ for all batteries
and accumulators shall be the crossed-out wheeled bin
shown below:
In case of batteries, accumulators and button cells
containing more than 0.0005 % mercury, more than 0.002
% cadmium or more than 0.004 % lead, shall be marked
with the chemical symbol for the metal concerned: Hg,
Cd or Pb respectively. Please Refer to the below symbol:
For All Products Except Those with
Wireless Operation:
HARMAN International hereby declares that this equipment
is in compliance with the EMC 2004/108/EC Directive,
LVD 2006/95/EC Directive, ErP 2009/125/EC Directive and
RoHS 2011/65/EU Directive. The declaration of conformity
may be consulted in the support section of our Web site,
accessible from www.harmankardon.com.
For All Products with Wireless
Operation:
HARMAN International hereby declares that this equipment
is in compliance with the essential requirements and
other relevant provisions of Directive 1999/5/EC, ErP
2009/125/EC Directive and RoHS 2011/65/EU Directive
The declaration of conformity may be consulted in
the support section of our Web site, accessible from
www.harmankardon.com.
IMPORTANT SAFETY INSTRUCTIONS
HARMAN International Industries, Incorporated
8500 Balboa Boulevard, Northridge, CA 91329 USA
516.255.4545 (USA only)
© 2012 HARMAN International Industries, Incorporated. All rights reserved.
Harman Kardon is a trademark of HARMAN International Industries, Incorporated, registered in the United States and/or other countries.
Blu-ray Disc is a trademark of the Blu-ray Disc Association. Features, specifications and appearance are subject to change without notice. www.harmankardon.com