Harman BDS577 Blu-RAY DISC SYSTEM User Manual MANUAL
Harman International Industries, Inc Blu-RAY DISC SYSTEM MANUAL
Harman >
Contents
- 1. MANUAL WARNING RE0.01
- 2. MANUAL
MANUAL
Quick-Start Guide
Audio/video receiver
BDS 275/BDS 277/BDS 575/BDS 577
FPO
BDS X75
BDS
2
Introduction and Connections
Thank you for choosing a Harman Kardon® product!
This quick-start guide contains all the information you need to connect and set up your
new BDS Blu-ray Disc™ receiver.
To conserve our natural resources, your BDS receiver does not include a printed
owner’s manual. An owner’s manual containing complete information about operating
all of your new Blu-ray Disc receiver’s features is available at our Web site. Go to www.
harmankardon.com and download the BDS Blu-ray Disc Receiver Owner’s Manual.
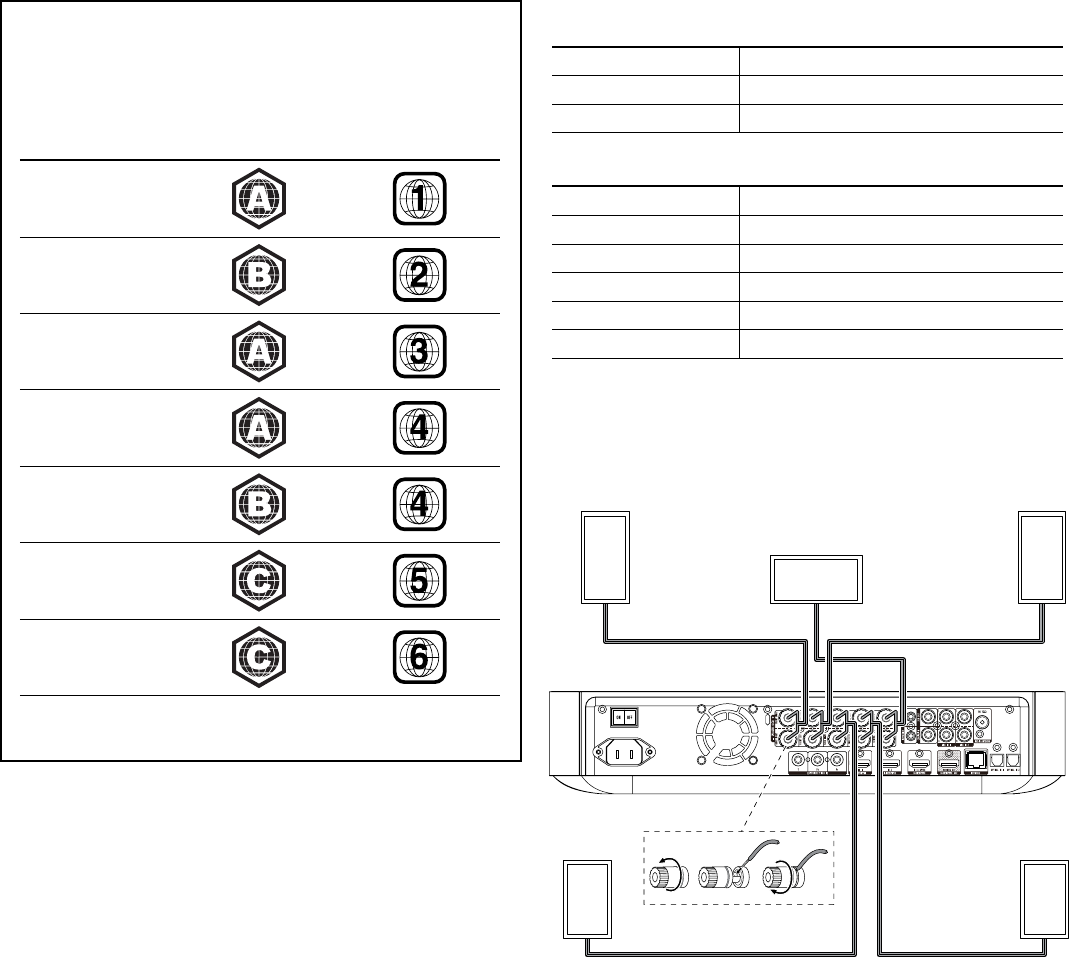
Your BDS receiver is designed to be compatible with region management
information that is encoded on most Blu-ray Disc recordings and DVD recordings.
Your receiver will only play discs that contain region coding for the area where your
receiver was shipped and intended for sale:
Area Where Sold Blu-ray Disc
Region Code
DVD Region Code
USA, Canada
Europe, Middle East
Korea, S.E. Asia
Mexico, Latin America
Australia, New Zeland
Russia, India
China
For example, BDS receivers shipped to and sold in the USA will only play Blu-ray
Discs that contain region code A and DVD discs that contain region code 1.
Connections
Connect the Satellite Speakers
CAUTION: Before making any connections to the BDS receiver, ensure that the
receiver’s AC cord is unplugged from the receiver and the AC outlet. Making
speaker connections with the receiver plugged in and turned on could damage
your speakers.
Speakers and receivers have corresponding (+) and (–) connection terminals.
BDS 275/BDS 277
white left channel (+)
red right channel (+)
black (–) on both channels
BDS 575/BDS 577
white front left (+)
red front right (+)
blue surround left (+)
gray surround right (+)
green center (+)
black (–) on all channels
Most speakers use red to denote the (+) terminal and black for the (–) terminal.
Be sure to connect each speaker identically: (+) on the speaker to (+) on the receiver and
(–) on the speaker to (–) on the receiver. Miswiring one or more speakers results in thin
sound, weak bass and a poor stereo image.
Front Right
Speaker
Front Left
Speaker
BDS Receiver
(BDS 575 shown)
Center
Speaker*
Surround Right
Speaker*
* Used only with BDS 575/BDS 577 receiver
Surround Left
Speaker*
IMPORTANT: Make sure the (+) and (–) bare wires do not touch each other or the
other terminal. Touching wires can cause a short circuit that can damage the
receiver.
3
BDS
English
Connections
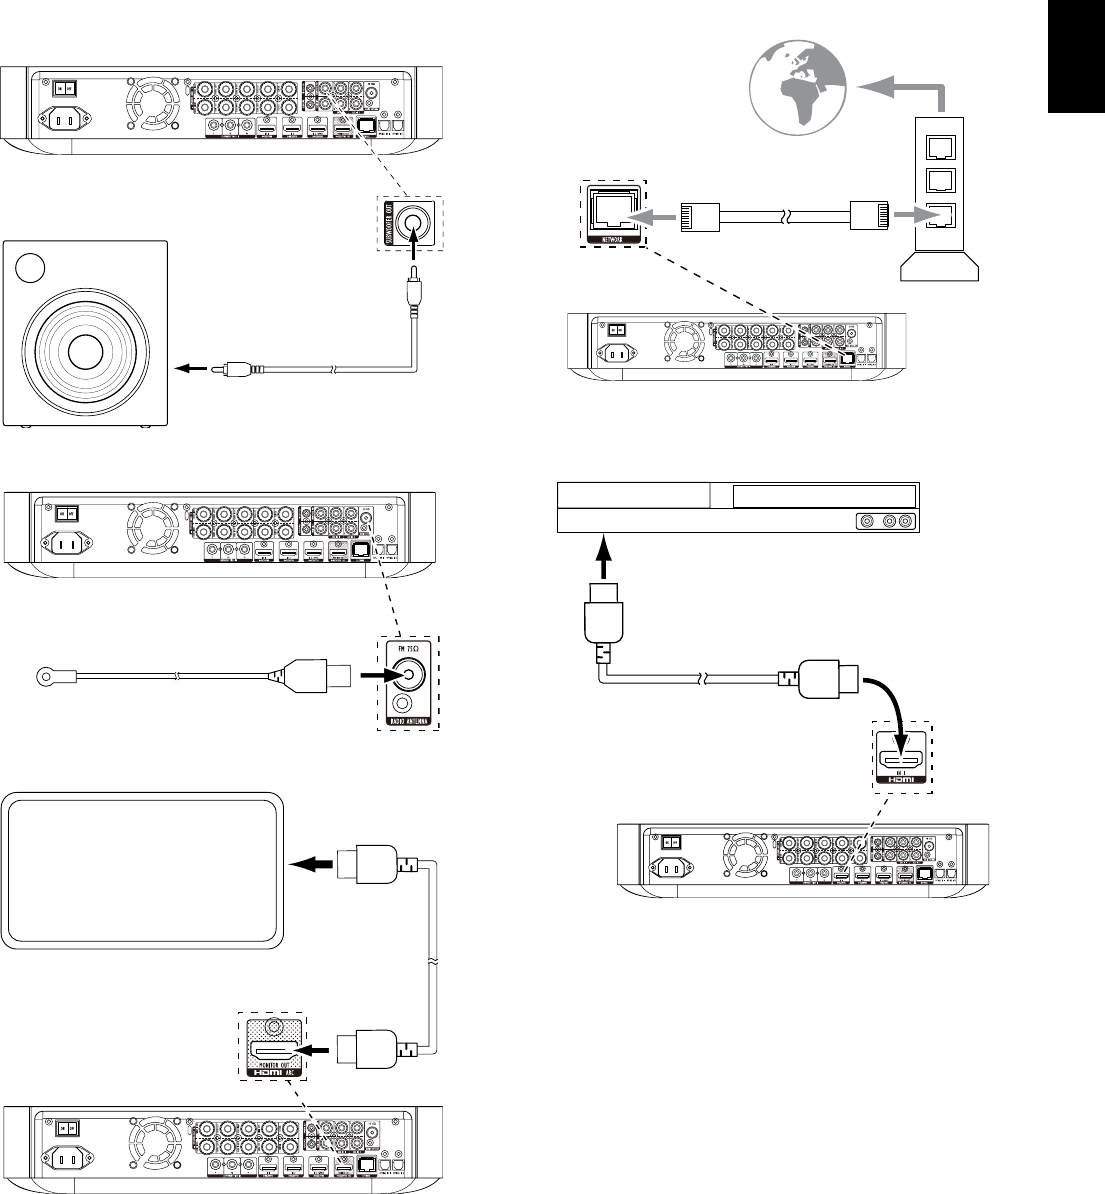
Connect the Subwoofer
IMPORTANT: Do not plug the subwoofer’s AC power cord into an AC outlet at this time.
Mono RCA
Audio Cable
(not supplied)
Powered
Subwoofer
Connect the Radio Antenna
FM Antenna
Connect a TV or Video Display
TV
HDMI® Cable
(supplied)
NOTE: If your TV supports the HDMI Audio Return Channel and you have HDMI devices
(such as an Internet connection) already connected directly to your TV, you can feed their
sound to the BDS receiver via the HDMI Monitor Out connector’s Audio Return Channel,
and they will not require additional connections to the receiver.
Connect to Your Home Network
To
Internet
Network
Modem
Cat. 5/5E
Connecting Your HDMI® Source Devices
HDMI-Equipped
Source Device
To HDMI
Output
HDMI Cable
(not supplied)
BDS
4
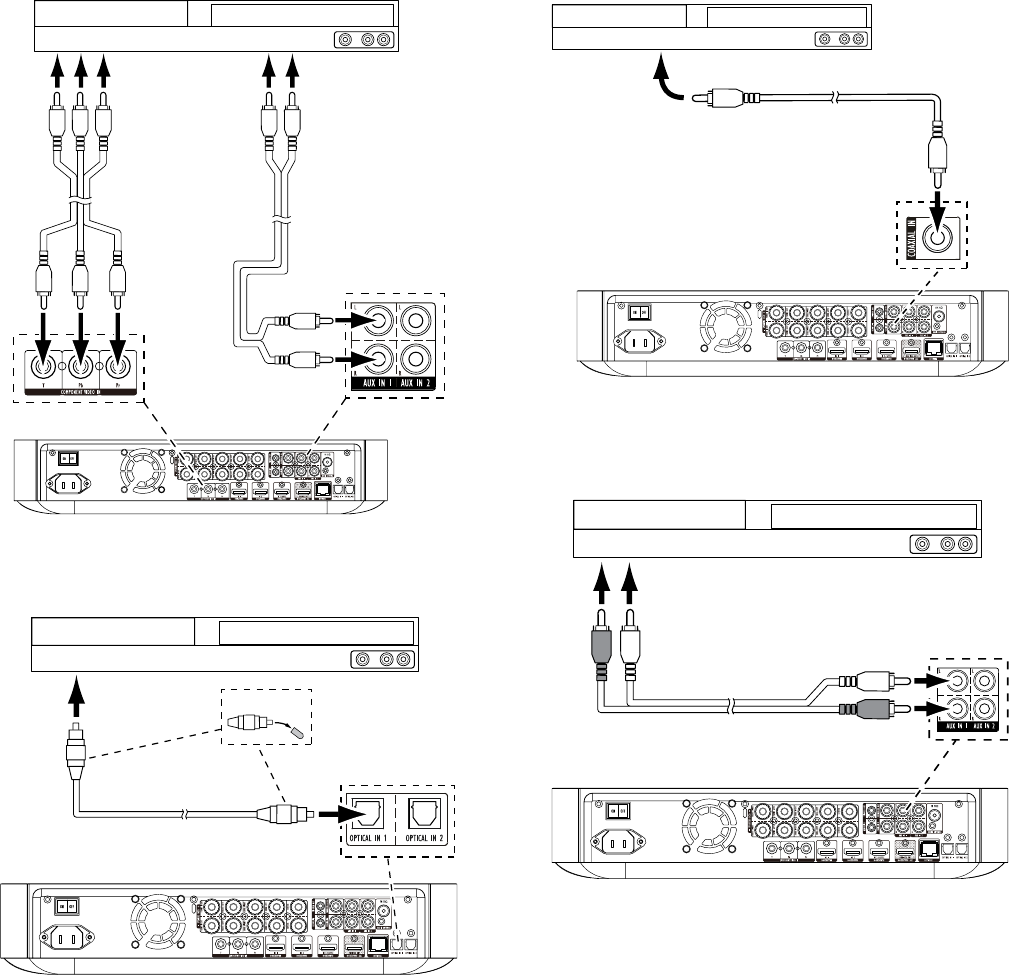
Connections
Connecting Your Component Video Source Device
Component Video-Equipped
Source Device*
To Component
Video Outputs
To Analog
Audio Outputs
Component Video
Cable (not supplied)
Stereo Audio
Cable (not supplied)
Connecting Your Optical Digital Audio Source Devices
Optical Digital-Equipped
Source Device
Remove Caps
To Optical Digital
Audio Output
Optical Digital Audio
Cable (not supplied)
Connecting Your Coaxial Digital Audio Source Device
Coaxial Digital-Equipped
Source Device
To Coaxial Digital
Audio Output
Coaxial Digital Audio
Cable (not supplied)
Connecting Your Analog Audio Source Devices
To Stereo Analog
Audio Output
Stereo Audio
Cable (not supplied)
Analog
Source Device

5
BDS
English
Connections and Receiver Setup
Connect the AC Power
110V – 240V,
50Hz/60Hz
Receiver
Set Up the Receiver
Install the Batteries in the Remote Control
1. 2. 3.
Turn On the Receiver
Set the receiver’s Main Power switch in the “On” position.
Receiver
Main Power
Switch
To set up your BDS receiver you will use the remote to navigate through the on-screen
menus and to make selections from them.
OK
PROGRAM
BOOKMARK THUMBNAIL
ZOOM
TOP MENU
SURROUND
VOL
VOL
POP-UP
DISPLAY
POWERTV
DISC
HDMI 1 HDMI 2 HDMI 3
COMP
USB
AUX
RADIO
EJECT
APPLE
CH CH
Home
Button
OK
Button Cursor
Controls
Back
Button
• Use the Cursor Up/Down buttons to navigate through the menu list. When an item is
highlighted, a blue border will appear around it.
• To select a highlighted item, press the OK button. The screen will change depending
on your selection.
• To return to the previous screen, press the Back button.
BDS
6
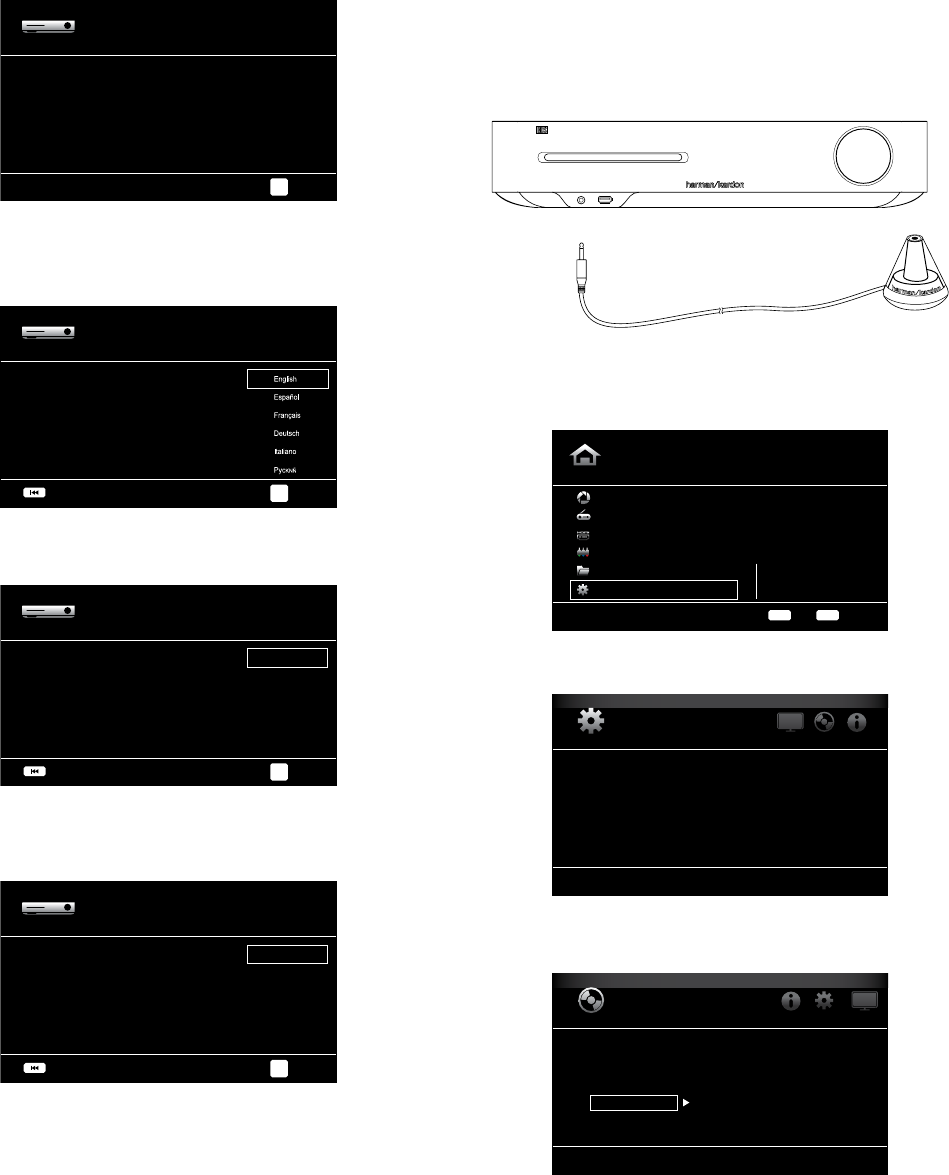
Setup Wizard and Configuring the Receiver
Setup Wizard
When you turn your BDS receiver on for the first time, the on-screen menu will display
the Setup Wizard.
Setup Wizard
Welcome to the Harman Kardon BDS Setup Wizard.
Some simple information is needed to ensure you get
the best experience from your product.
You can adjust these settings later in addition to
making changes to more advanced settings by selecting
‘Settings’ from the Home Menu.
Page 1/5
Next
OK
Before you can use your BDS system you need to set the language and make a few basic
settings so that the BDS receiver’s video output will work properly with your TV.
Press the OK button, and the Wizard’s language screen will appear.
Setup Wizard
Please select which language you would like the BDS
menus to appear in.
Page 2/5
Next
Previous
OK
After setting the language you want the on-screen menus to appear in, press the OK
button, and the Wizard’s TV resolution screen will appear.
Setup Wizard
Please select the highest resolution that your TV supports.
If you are unsure, select ‘Auto’.
Upon making a selection the screen will be changed to the
chosen resolution. You will be presented with the resolution
or ‘Cancel’ to return to the prevouus resolution. If the screen
remains blank, please wait 15 seconds without pressing
anything and the system will automatically return to the
previous resolution.
Auto
480p/576p
720p
1080i
1080p
Page 3/5
Next
Previous
OK
After selecting your TV’s highest resolution, press the OK button, and the Wizard’s aspect-
ratio screen will appear. NOTE: If you are unsure of your display’s highest resolution,
select “Auto” and the BDS receiver will select the optimal resolution for you.
Setup Wizard
Please select the best aspect ratio that fits your TV.
Please see the owner’s manual for additional explanation.
16 : 9 Full
16 : 9 Normal
4 : 3 Pan & Scan
4 : 3 Letterbox
Page 4/5
Next
Previous
OK
After selecting the aspect ratio that best fits your TV, press the OK button to save your
settings and then press it again to exit the Setup Wizard.
Configure the Receiver for Your Speakers
Before you use your BDS receiver you need to configure it to work with your particular
speaker system. The BDS receiver’s EZSet/EQ™ system uses the supplied EzSet/EQ
microphone to perform this important step automatically. Before beginning, be sure you
have correctly connected your speakers to the BDS receiver. IMPORTANT: Press the
remote’s “Disc” input button before performing the EZ Set/EQ procedure. The EZ
Set/EQ procedure is only available when the Disc input is selected.
1. Plug the supplied EzSet/EQ microphone into the BDS receiver’s Headphone connector.
EzSet/EQ Microphone
(supplied)
Headphone Connector
2. Place the microphone at ear height in your main listening position.
3. Press the remote control’s Home button. The receiver’s Home Menu screen will appear
on the TV.
Home Menu
Picasa
FM Radio
HDMI input
Component input
Playlist
Settings
Type: Settings
10 / 10
OPTIONS
HOME
Exit
Option
4. Use the Cursor and OK buttons to highlight and select Settings. The General Settings
menu will appear.
SYSTEM SETTINGS
System
Language
Playback
Parental Control
Network
Select to adjust general settings
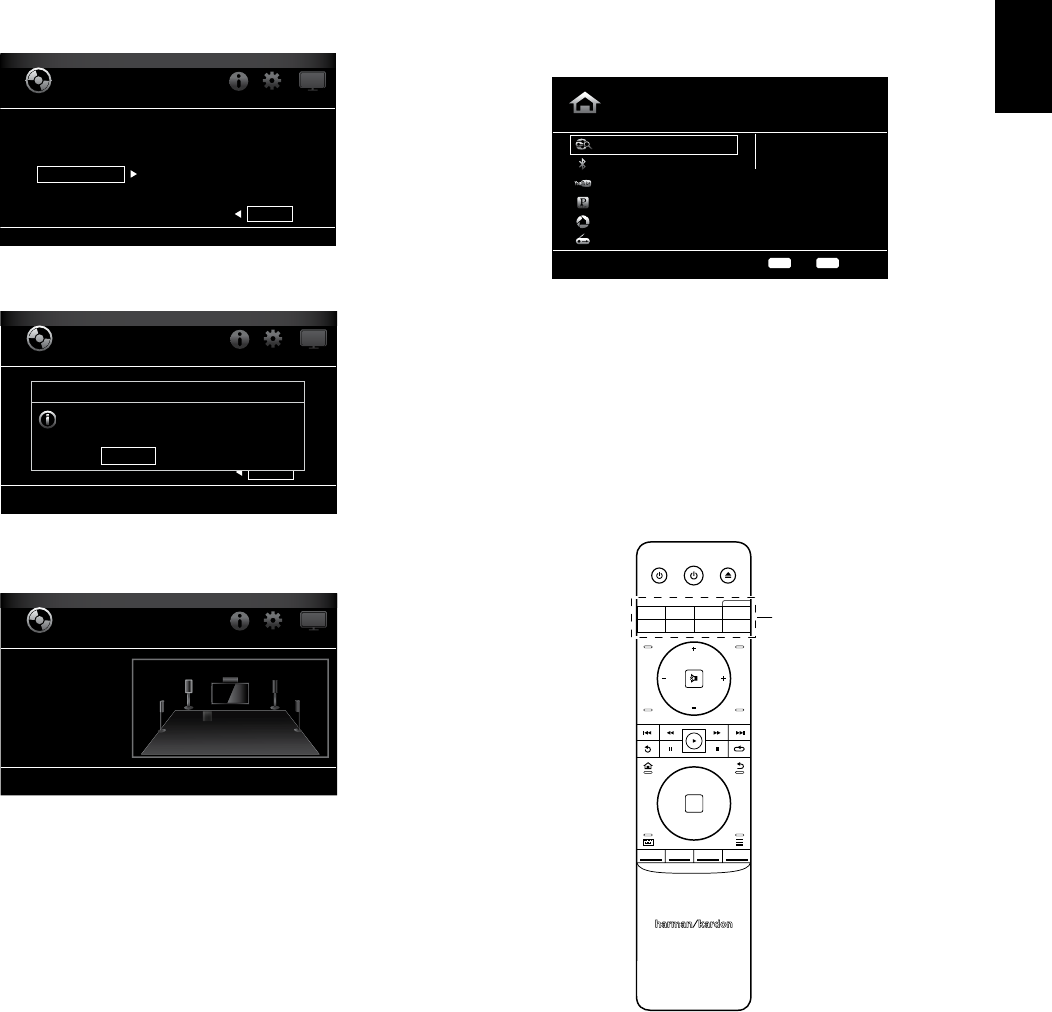
5. Use the right Cursor button to select Audio Settings, then use the down Cursor button
to select Speaker Settings. The Speaker Settings screen will appear.
Audio Settings
Tone Controls
Audio Output
Speaker Settings
EzSet/EQ
Manual Configuration
2.0
2.0
Select to adjust speaker settings
7
BDS
English
Configuring the Receiver, and Using the Receiver
6. Press the right Cursor button to select EzSet/EQ, then use the cursor buttons to select
the configuration of your speaker system.
Audio Settings
Tone Controls
Audio Output
Speaker Settings
EzSet/EQ
Manual Configuration
Off
2.0
2.1
3.1
5.1
The EzSet/EQ automatic setup can calibrate the BDS system and configure the loudspeakers
parameters automatically to get the best sound performance.
7. Press the OK button, then press it again to select Continue in the EzSet/EQ (Automatic
Setup) box that appears.
Audio Settings
Off
2.0
2.1
3.1
5.1
The EzSet/EQ automatic setup can calibrate the BDS system and configure the loudspeakers
parameters automatically to get the best sound performance.
EzSet/EQ (Automatic Setup)
Continue Cancel
Please plug the microphone into the system and then place it at
ear level at your desired listening position. If a Subwoofer is
connected, set the level control (on the Sub) to half.
8. Remain silent while the test noise plays through the speakers. As the test noise
circulates among the speakers the screen will show which speaker is being tested.
Audio Settings
Left (0.0dB, 0.0m/0 ft)
Right (0.0dB, 0.0m/0 ft)
Tone Controls
Audio Output
Speaker Settings
SUB
L
LS RS
R
C
9. When the testing process is completed, the “Testing...” message on the screen will
change to “All test done!”
10. Press the Back button to exit the EzSet/EQ test procedure.
NOTE: If the test fails, the “Testing...” message on the screen will change to “Test failed,
please make sure the speaker is connected correctly and room is silent, then retest.”
Press the Back button, make sure all speakers are correctly connected and perform the
test again from Step 6. Make sure that the room remains silent during the test.
Using the BDS Receiver
Press the remote’s Home button to display the Home Menu screen:
Home Menu
DLNA Search
Bluetooth
Leanback
Pandora
Picasa
FM Radio
Type: Dina Search
01 / 10
OPTIONS
HOME
Exit
Option
The available sources are listed on the left. If a disc has been inserted into the receiver’s
built-in disc slot, it will appear on the list as “Blu-ray Disc,” “DVD Video”, “CDDA” or “Data
Disc” (audio or data CD-R disc). If you have inserted a USB device into the receiver’s USB
port, it will appear on the list as “USB.”
NOTE: Digital and analog audio sources connected to the receiver’s rear-panel optical
digital, coaxial digital and analog inputs will not appear on the list but can be selected
using the remote’s “Aux” Source Selector button (see below).
To select a source from the list, use the Cursor Up/Down buttons to highlight the desired
source, then press the OK button to select it.
You can also select some sources directly by pressing their Source Selector buttons on
the remote.
Source Selector
Buttons
OK
PROGRAM
BOOKMARK THUMBNAIL
ZOOM
TOP MENU
SURROUND
VOL
VOL
POP-UP
DISPLAY
POWERTV
DISC
HDMI 1 HDMI 2 HDMI 3
COMP
USB
AUX
RADIO
EJECT
APPLE
CH CH
For complete information about using all of your BDS system’s features, you can
download the
BDS 275/BDS 277/BDS 575/BDS 577 Blu-ray Disc™ Receiver
Owner’s Manual
from www.harmankardon.com.