Harman BE2838 Automotive Infotainment Unit with Bluetooth/WLAN User Manual Users manual With Title Page 3
Harman International Industries, Inc. Automotive Infotainment Unit with Bluetooth/WLAN Users manual With Title Page 3
Harman >
Contents
- 1. Users manual - With Title Page - 1.pdf
- 2. Users manual - With Title Page - 2.pdf
- 3. Users manual - With Title Page-3.pdf
Users manual - With Title Page-3.pdf
SCREEN ADJUSTMENT
ADJUSTING BRIGHTNESS
The brightness of the screen can be adjusted. (→P.62)
CHANGING BETWEEN DAY AND NIGHT
MODE
Depending on the ambient brightness and/or position of the
headlight switch, the screen changes to day or night mode.
NOTE
l7-inch with Navi system only: Regardless of the position of
the headlight switch, the screen mode of map screen can be
changed. (→P.174)
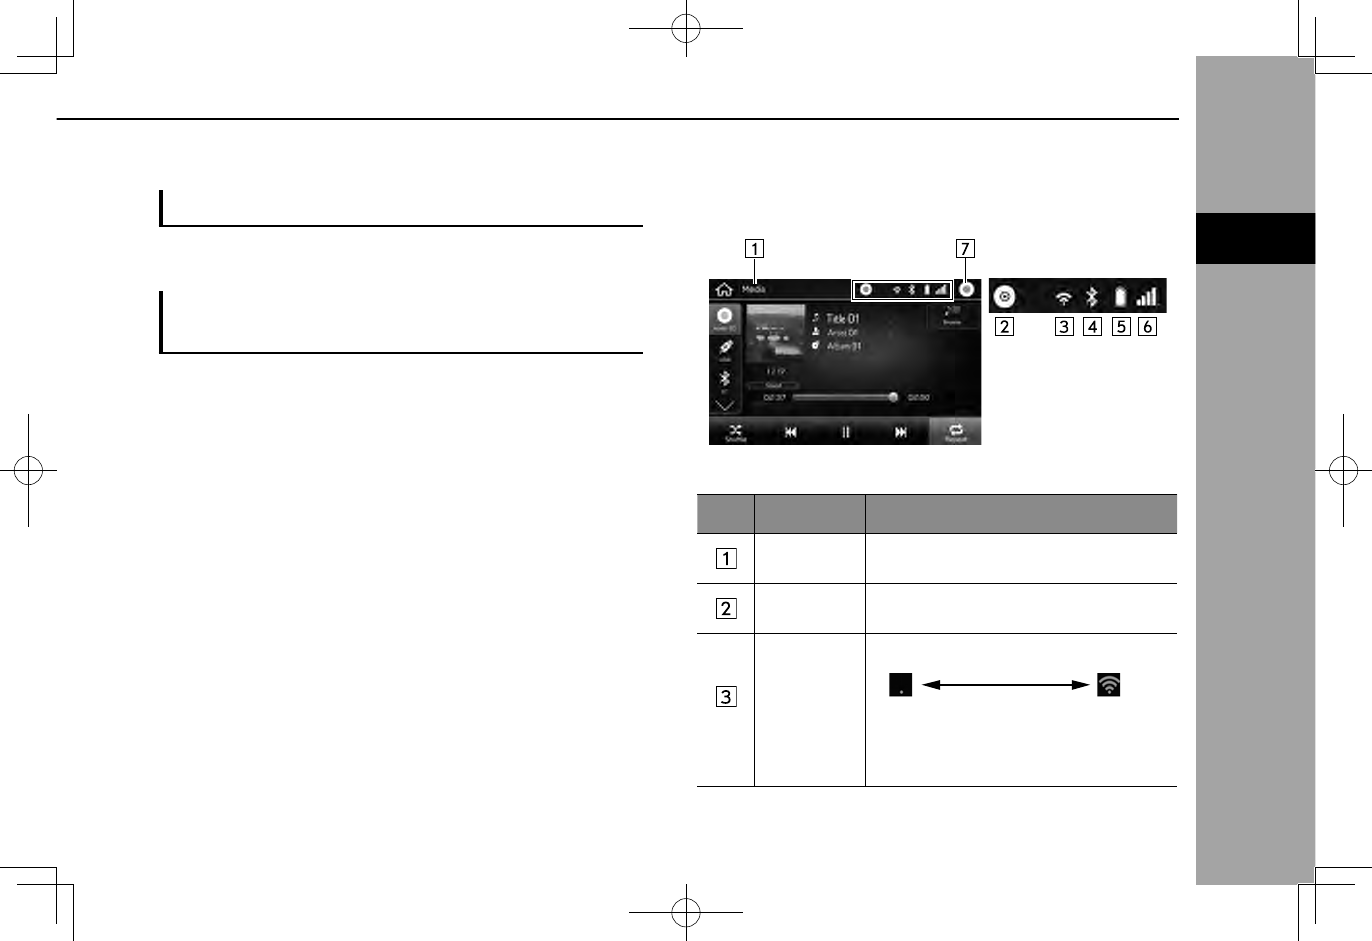
STATUS DISPLAY
The status of the Bluetooth connection, etc. is displayed on
the screen.
No. Name Conditions
Screen
hierarchy Displays the screen context.
CD indicator This icon is displayed when a disc has
been inserted.
*
The level
of Wi-Fi®
reception
When Wi-Fi® function is off, no item is
displayed.
BASIC INFORMATION BEFORE OPERATION
41
BASIC FUNCTION
2
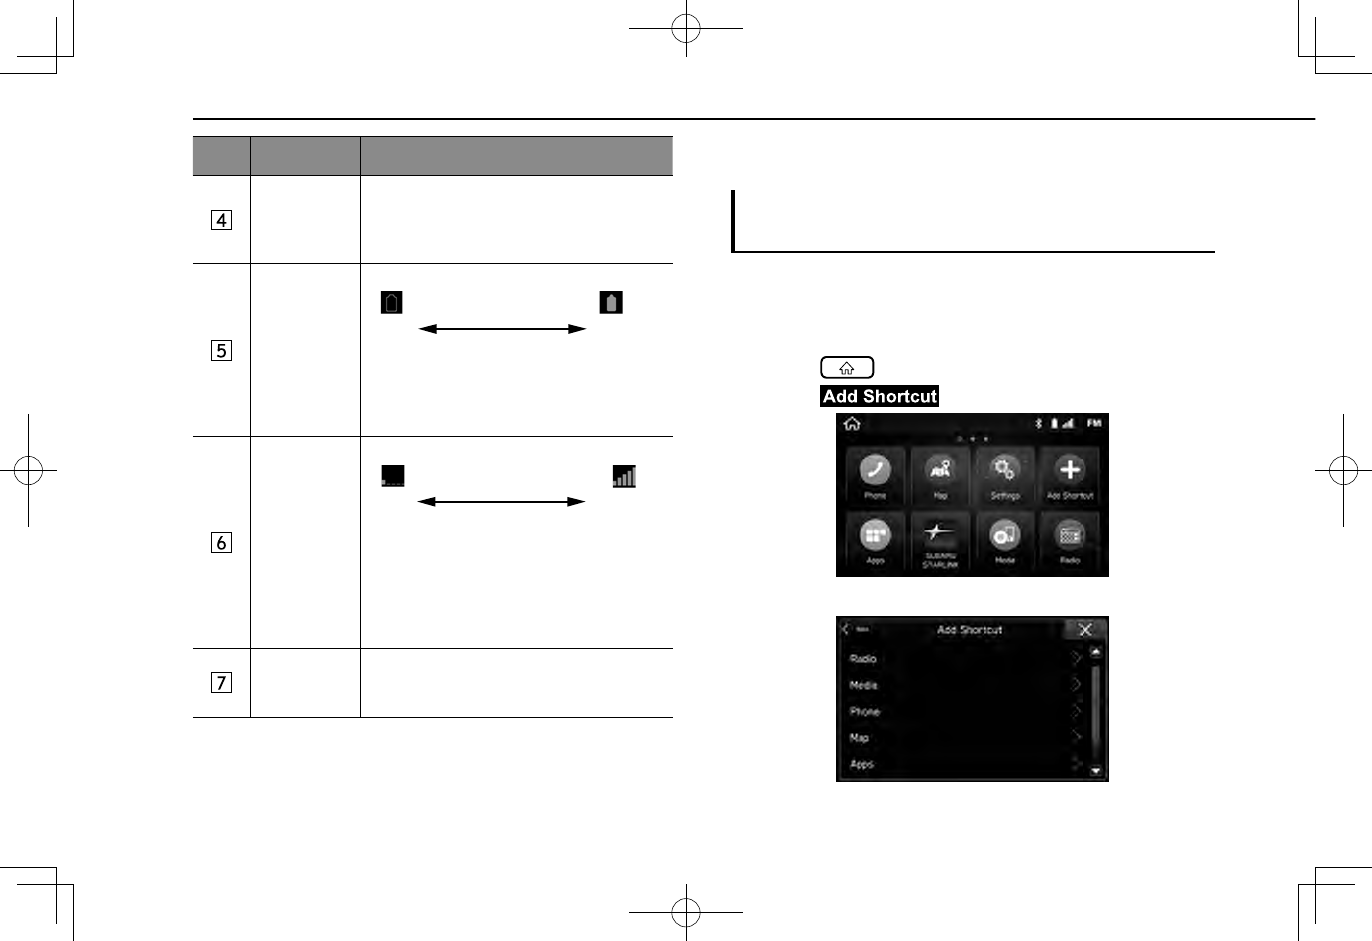
No. Name Conditions
The
Bluetooth
connection
indicator
This icon is displayed when the Bluetooth
connection is established.
Remaining
battery
charge
Low Full
The amount displayed does not always
correspond with the amount displayed on
the Bluetooth device.
Reception
level
Poor Excellent
The level of reception does not always
correspond with the level displayed on
the cellular phone. The level of reception
may not be displayed depending on the
phone you have.
Active audio
source
Select to display the active audio source
information, radio frequency, and name of
the artist and track currently playing, etc.
*: 7-inch with Navi system/7-inch system only
HOME SCREEN OPERATION
ADDING SHORTCUT ICONS TO THE HOME
SCREEN
Shortcut icons for various functions can be added to the
home screen when the home screen shortcut function is
turned on. (→P.62)
1.
Select .
2.
Select (Add Shortcut).
3.
Select the desired function.
BASIC INFORMATION BEFORE OPERATION
42
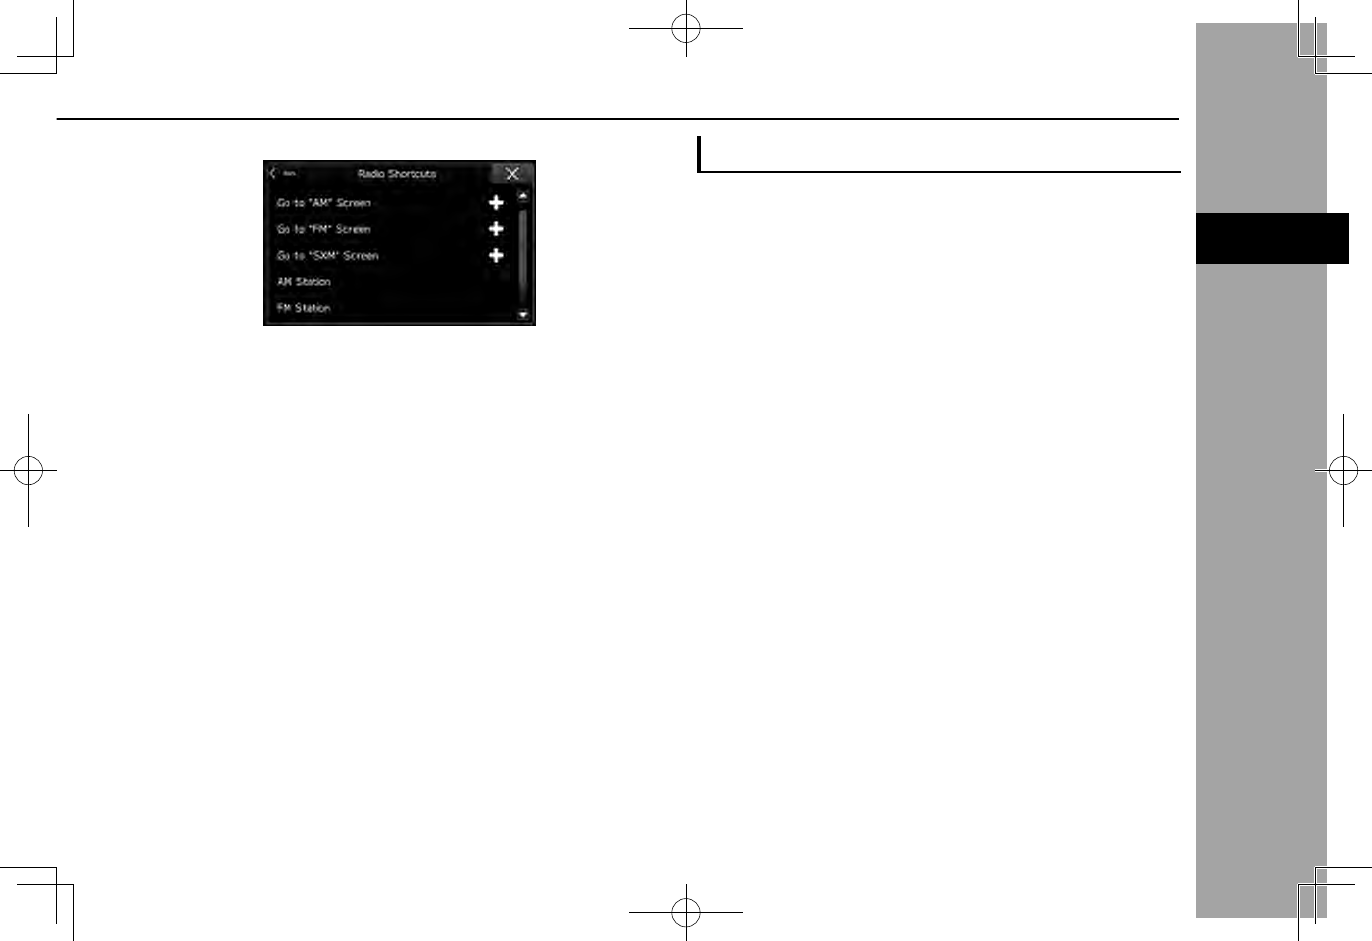
4.
Select the desired shortcut function.
●Depending on the function, select other items and
enter necessary information.
5.
Check that the shortcut icon is displayed on the home
screen.
NOTE
lThe home screen has 3 pages, and shortcut icons can be added
to each page. The page can be changed by swiping.
MOVING AND DELETING SHORTCUT ICONS
Users can rearrange the home screen buttons when the
home screen shortcut function is turned on. (→P.62)
1.
Select and hold the shortcut icon.
XWhen moving shortcut icons
2.
Drag the button to the desired position.
●User can move buttons to another page by dragging
them to the corresponding end of the screen if the
number of buttons allows for multiple pages.
XWhen deleting shortcut icons
2.
Drag the button to the bottom of the screen.
BASIC INFORMATION BEFORE OPERATION
43
BASIC FUNCTION
2
Bluetooth® SETTINGS
44
Bluetooth® SETTINGS
REGISTERING A Bluetooth PHONE/
DEVICE FOR THE FIRST TIME
The Bluetooth® word mark and logos are registered
trademarks owned by Bluetooth SIG, Inc.
To use the hands-free system or the Bluetooth audio
system, it is necessary to register a Bluetooth phone/device
with the system.
Once the Bluetooth phone/device has been registered, it is
possible to use the hands-free system and the Bluetooth
audio system.
This operation cannot be performed while driving.
For details on registering a Bluetooth phone/device:
→P.48
1.
Turn the Bluetooth connection setting of your Bluetooth
phone/device on.
●This function is not available when the Bluetooth
connection setting of your Bluetooth phone/device is
set to off.
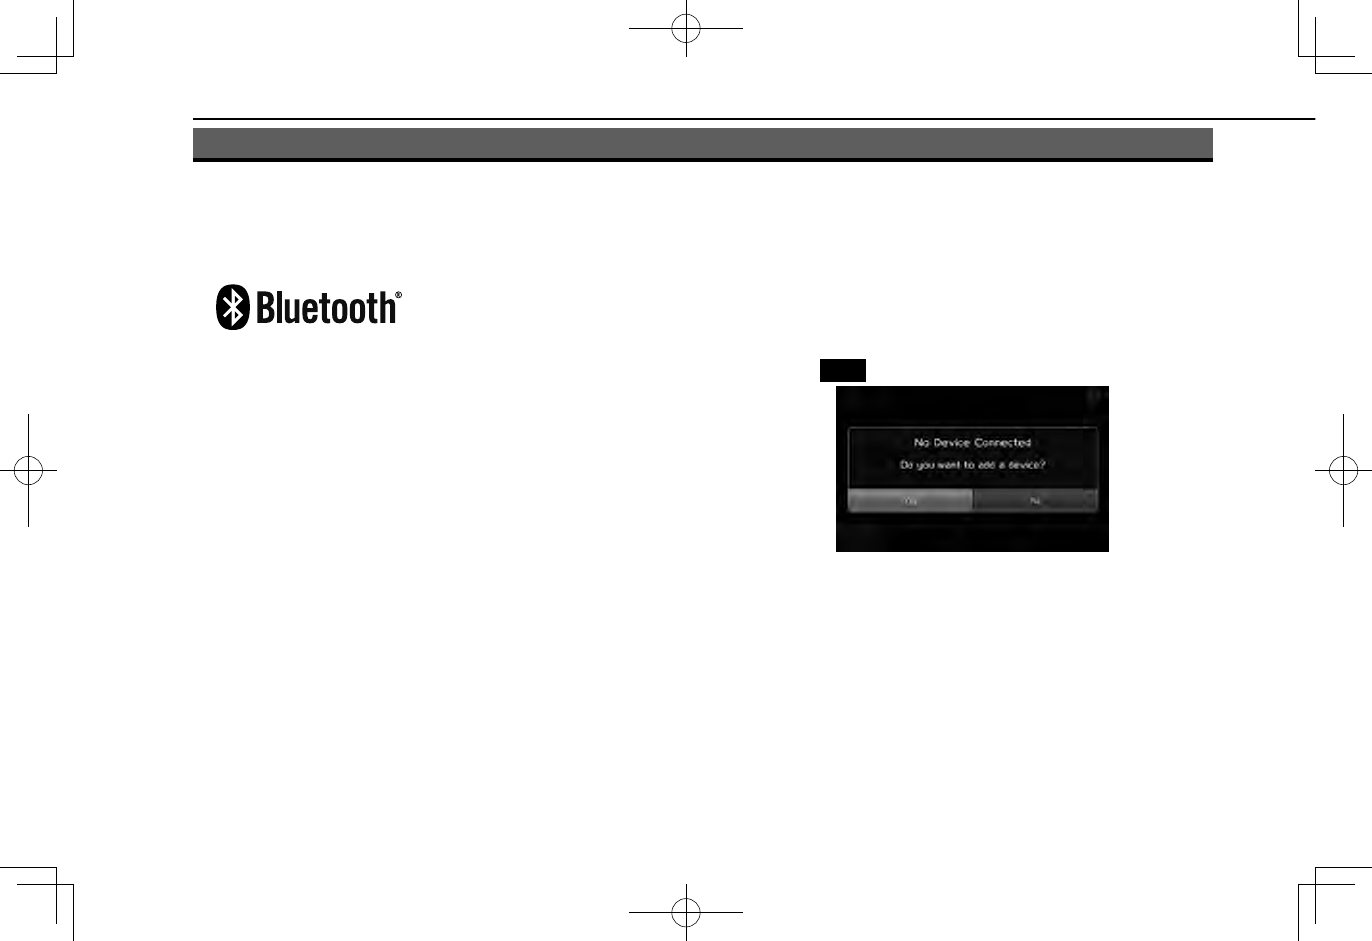
2.
Display the phone screen (→P.78) or the Bluetooth
audio operation screen (→P.63).
3.
Select
Yes
(Yes) to register a Bluetooth phone/device.
4.
Follow the steps in “REGISTERING A Bluetooth
PHONE/DEVICE” from “STEP 3” to “STEP 7” .
(→P.48)
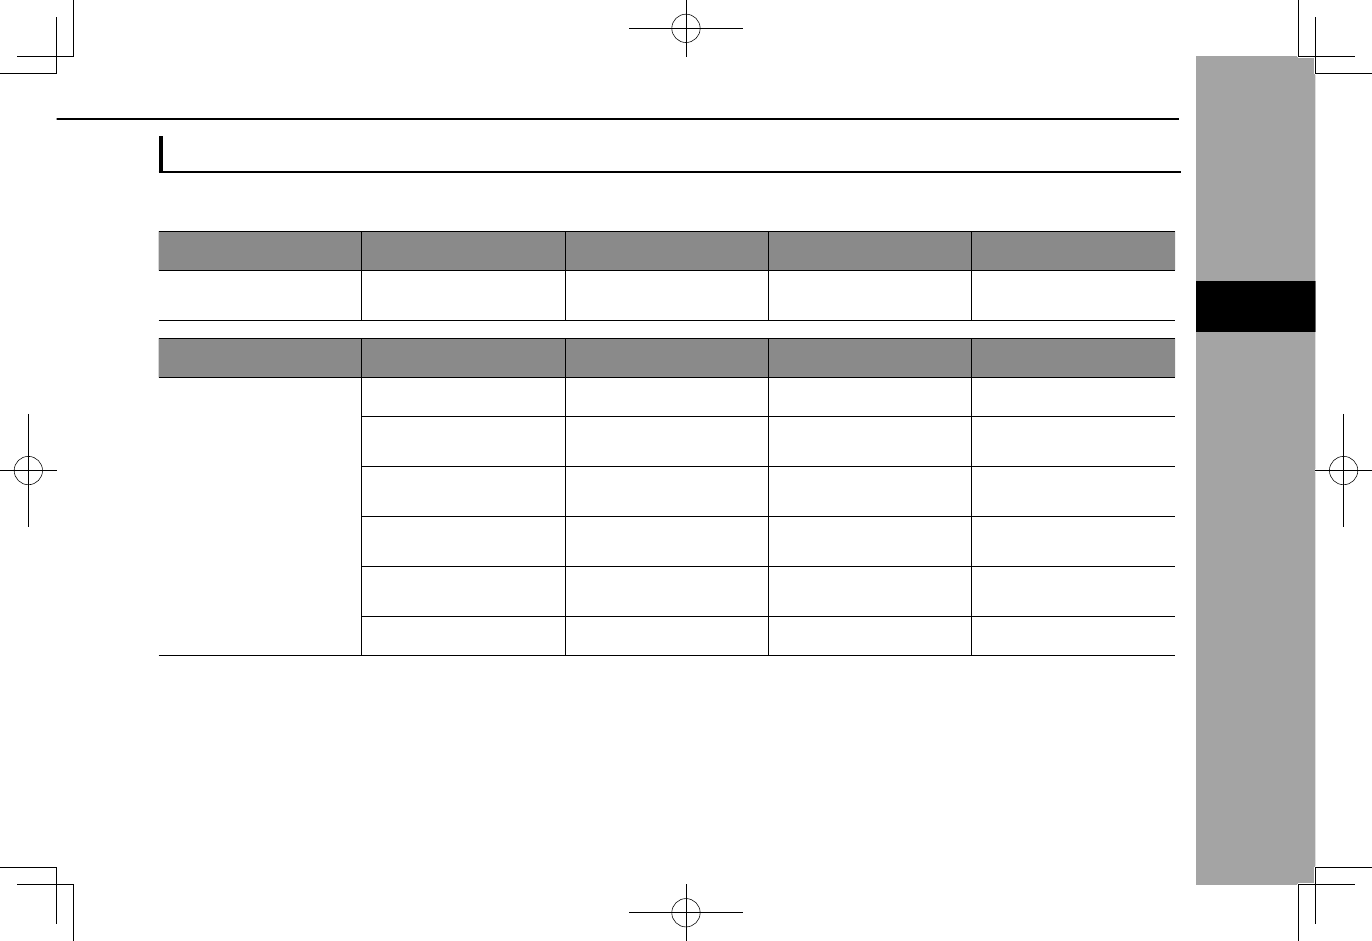
PROFILES
This system supports the following services.
Bluetooth Device Spec. Function Requirements Recommendations
Bluetooth Phone/Device Bluetooth Specication Registering a Bluetooth
phone/device Ver. 1.1 Ver. 3.0 +EDR
Bluetooth Device Prole Function Requirements Recommendations
Bluetooth Phone
HFP (Hands-Free Prole) Hands-free system Ver. 1.0 Ver. 1.6
PBAP (Phone Book
Access Prole) Transferring the contacts Ver. 1.0 Ver. 1.1.1
MAP (Message Access
Prole) Bluetooth phone message - Ver. 1.0
PAN (Personal Area
Networking Prole) APPS function - PAN 1.0
DUN (Dial-Up Network
Prole) APPS function - DUN 1.1
SPP (Serial Port Prole) APPS function - Ver. 1.1
3
Bluetooth® SETTINGS
45
SETTINGS
3
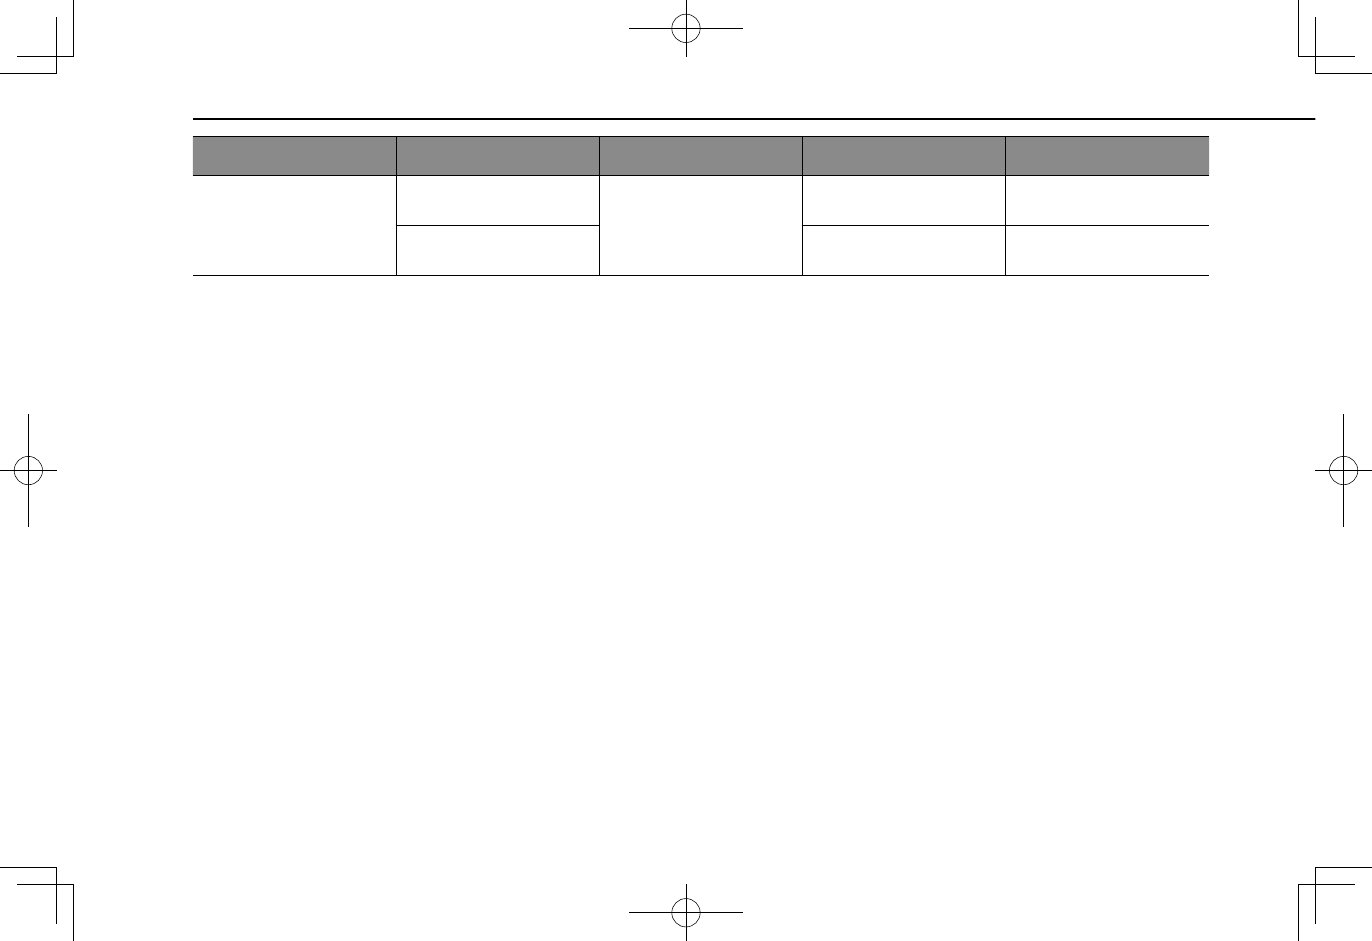
Bluetooth Device Prole Function Requirements Recommendations
Bluetooth Device
A2DP (Advanced Audio
Distribution Prole) Bluetooth audio system
Ver. 1.0 Ver. 1.2
AVRCP (Audio/Video
Remote Control Prole) Ver. 1.0 Ver. 1.4
NOTE
lIf your cellular phone does not support HFP, registering the Bluetooth phone or using PBAP, MAP or SPP proles individually will not be
possible.
lIf the connected Bluetooth phone/device version is older than recommended or incompatible, the Bluetooth phone/device function may not
work properly.
Bluetooth® SETTINGS
46
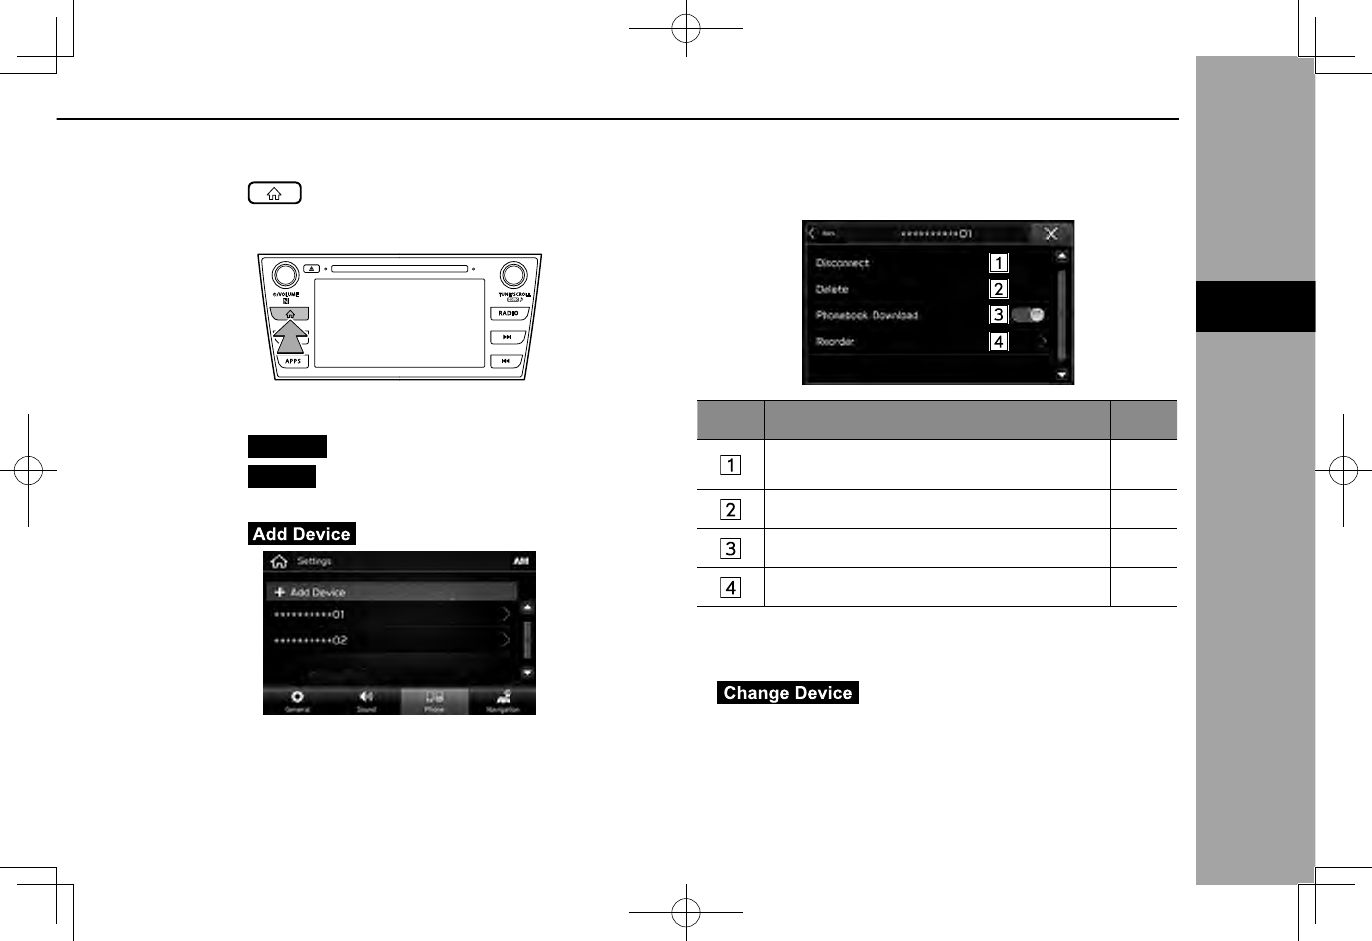
Bluetooth SETTINGS
1.
Select .
2.
Select
Settings
(Settings).
3.
Select
Phone
(Phone).
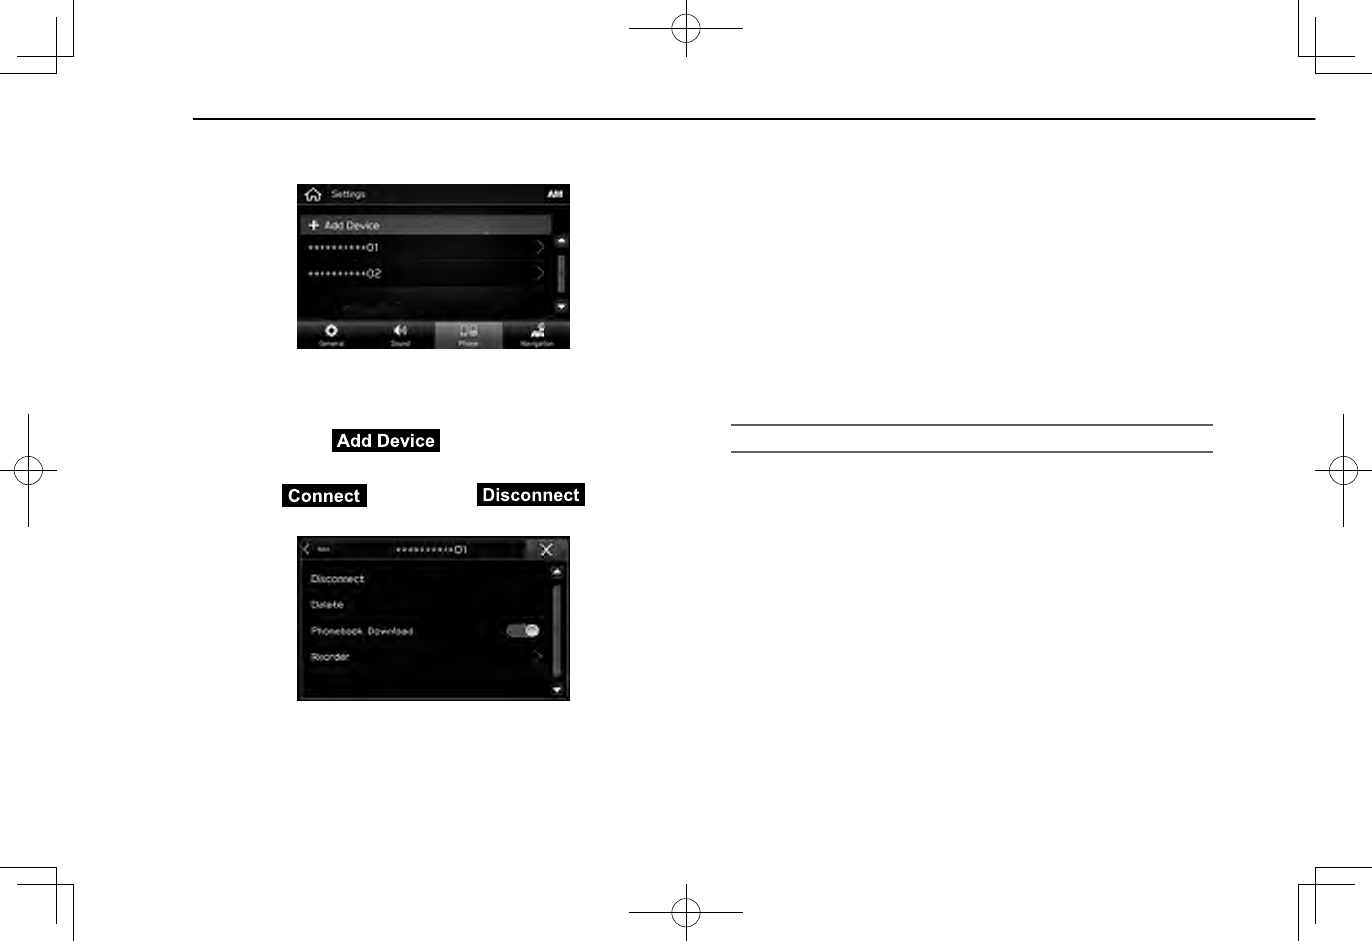
XWhen registering a Bluetooth phone/device
4.
Select (Add Device).
●For details on registering a Bluetooth phone/device:
→P.48
XWhen setting the Bluetooth phone/device
4.
Select the desired Bluetooth phone/device.
5.
Select the item to be set.
No. Function Page
Connecting or disconnecting Bluetooth
phones/devices 49
Deleting Bluetooth phones/devices 51
Setting phonebook download 52
Setting the automatic connection priority 52
NOTE
lThe phone settings screen can also be displayed by selecting
(Change Device) on the phone overview
screen (→P.78) or Bluetooth audio operation screen
(→P.63).
3
Bluetooth® SETTINGS
47
SETTINGS
3
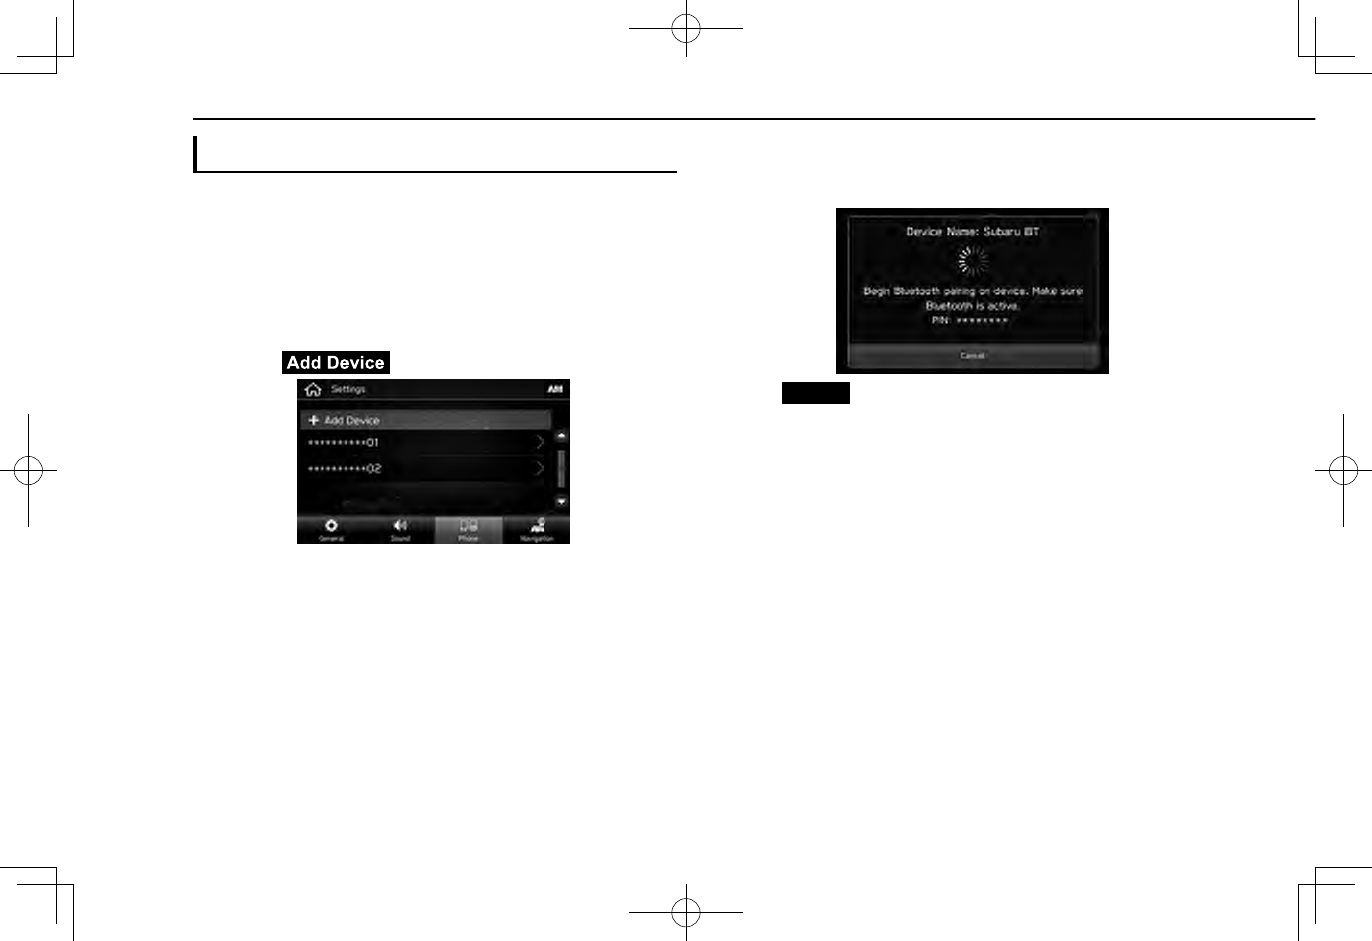
REGISTERING A Bluetooth PHONE/DEVICE
Up to 5 Bluetooth phones/devices can be registered.
Bluetooth compatible phones (HFP) and devices (AVP) can
be registered simultaneously.
This operation cannot be performed while driving.
1.
Display the phone settings screen. (→P.47)
2.
Select (Add Device).
●If a message appears, follow the guidance on the
screen.
3.
When this screen is displayed, search for the device
name displayed on this screen on the screen of your
Bluetooth phone/device.
●
Cancel
(Cancel): Select to cancel the registration.
●For details on operating the Bluetooth phone/device,
see the manual that comes with it.
4.
Register using your Bluetooth phone/device.
●A PIN-code is not required for SSP (Secure Simple
Pairing) compatible Bluetooth phones/devices.
Depending on the type of Bluetooth phone/device
being connected, a message conrming registration
may be displayed on the Bluetooth phone’s/device’s
screen. Respond and operate the Bluetooth phone/
device according to the conrmation message.
●7-inch with Navi system/7-inch system only:
Registration of NFC compatible devices is completed
when they are held near the audio system.
Bluetooth® SETTINGS
48
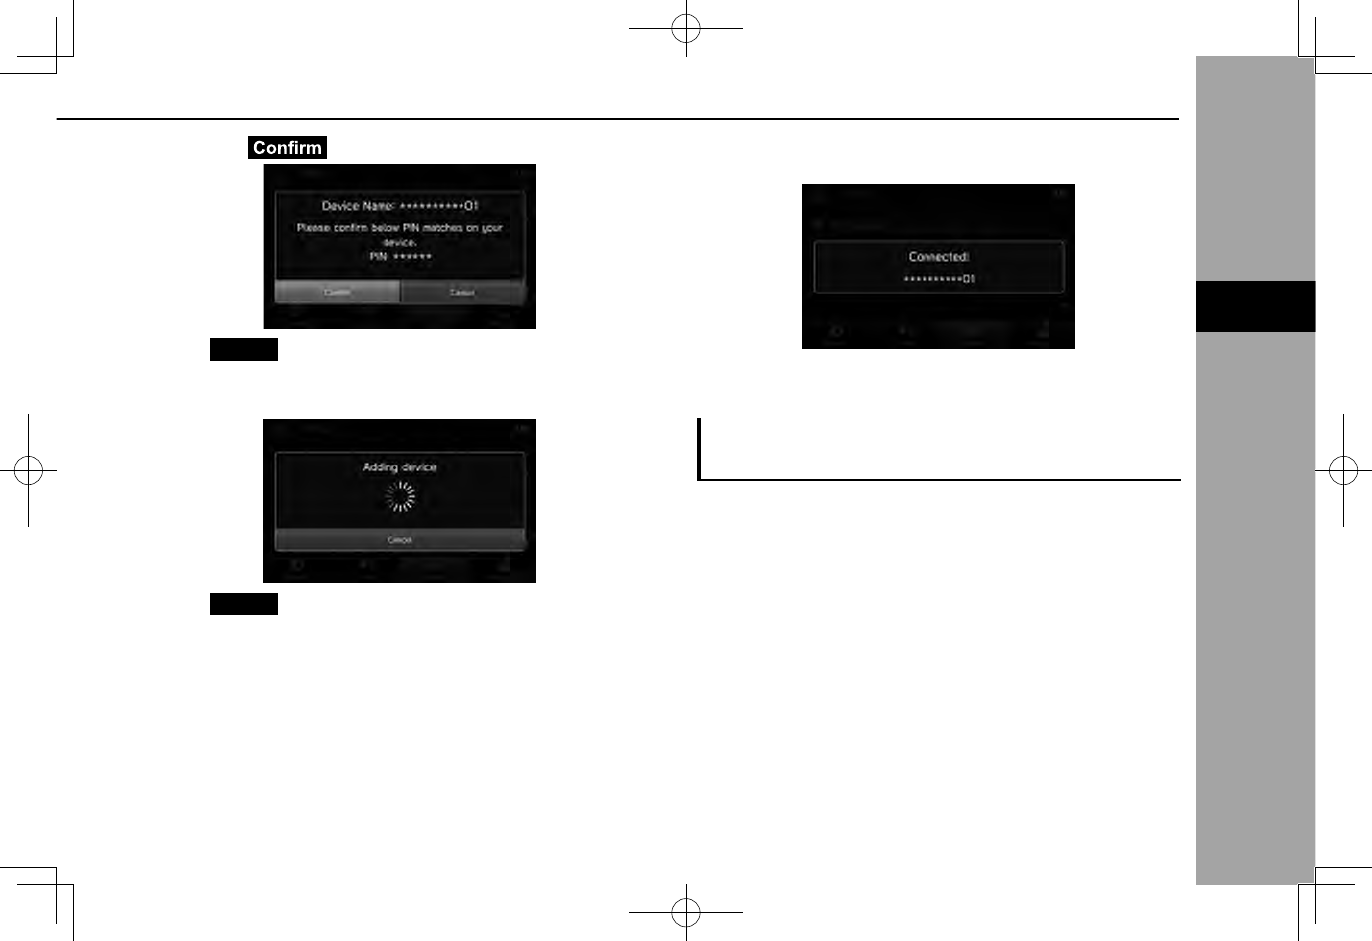
5.
Select (Conrm).
●
Cancel
(Cancel): Select to cancel the registration.
6.
Check that the following pop-up screen may be
displayed.
●
Cancel
(Cancel): Select to cancel the registration.
● If a conrmation message appears asking whether
to transfer the phone’s contact data to the system,
select the appropriate button.
7.
Check that the following pop-up screen is displayed
when the connection is complete.
●If an error message appears, follow the guidance on
the screen to try again.
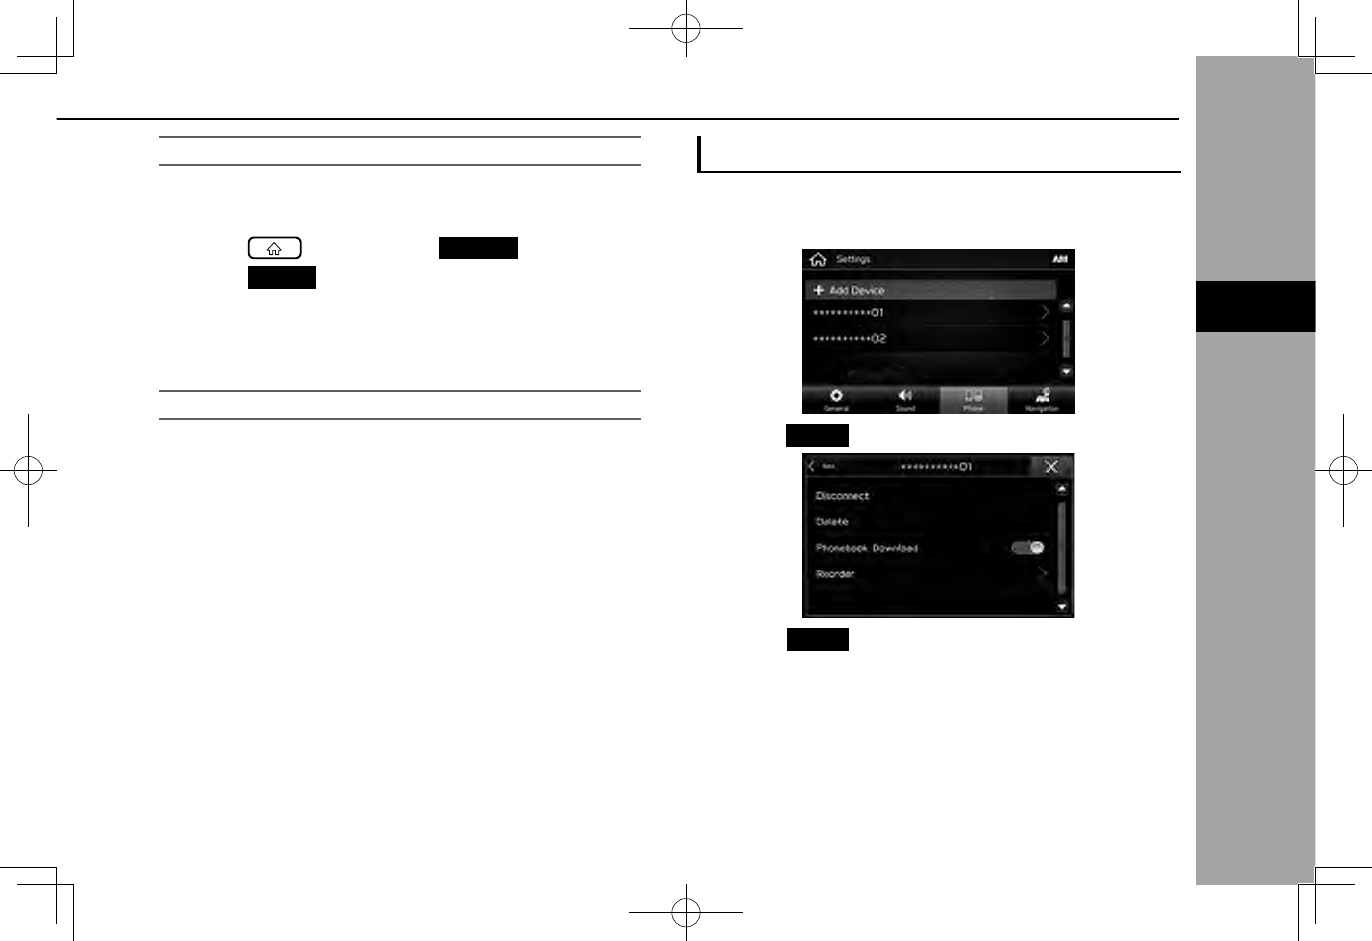
CONNECTING OR DISCONNECTING
Bluetooth PHONE/DEVICE
Up to 5 Bluetooth phones/devices (Phones (HFP) and
devices (AVP)) can be registered.
If more than 1 Bluetooth phone/device has been registered,
select which Bluetooth phone/device to connect to.
1.
Display the phone settings screen. (→P.47)
3
Bluetooth® SETTINGS
49
SETTINGS
3
2.
Select the Bluetooth phone/device to be connected or
disconnected.
●“Connected (Connected)” is displayed next to the
currently connected Bluetooth phone/device.
●If the desired Bluetooth phone/device is not on the
list, select (Add Device) to register the
Bluetooth phone/device. (→P.48)
3.
Select (Connect) or
(Disconnect).
4.
Check that “Connected (Connected)” is displayed next
to the Bluetooth phone/device when the connection is
complete.
●If an error message appears, follow the guidance on
the screen to try again.
NOTE
lIt may take time if the Bluetooth phone/device connection is
carried out during Bluetooth audio playback.
lDepending on the type of Bluetooth phone/device being
connected, it may be necessary to perform additional steps on
the Bluetooth phone/device.
AUTO CONNECTION MODE
Leave the Bluetooth phone/device in a location where the
connection can be established.
●When the ignition switch is in the “ACC” or “ON”
position, the system searches for a nearby registered
Bluetooth phone/device.
●The system will connect with the registered Bluetooth
phone/device that was last connected, if it is nearby.
Bluetooth® SETTINGS
50
CONNECTING MANUALLY
When the auto connection has failed, it is necessary to
connect Bluetooth phones/devices manually.
1.
Select , and then select
Settings
(Settings).
2.
Select
Phone
(Phone).
3.
Follow the steps in “CONNECTING OR
DISCONNECTING Bluetooth PHONE/DEVICE” from
“STEP 2”. (→P.49)
RECONNECTING THE Bluetooth PHONE/DEVICE
If a Bluetooth phone/device is disconnected due to poor
reception from the Bluetooth network when the ignition
switch is turned to the “ACC” or “ON” position, the system
automatically reconnect the Bluetooth phone/device.
●If a Bluetooth phone/device is disconnected on
purpose, such as turning it off, this does not happen.
Reconnect the Bluetooth phone/device manually.
DELETING Bluetooth PHONES/DEVICES
1.
Display the phone settings screen. (→P.47)
2.
Select the desired Bluetooth phone/device.
3.
Select
Delete
(Delete).
4.
Select
Delete
(Delete) when the conrmation message
appears.
3
Bluetooth® SETTINGS
51
SETTINGS
3
SETTING PHONEBOOK DOWNLOAD
When this function is activated, the phonebook data of the
connected phone will be downloaded automatically.
1.
Display the phone settings screen. (→P.47)
2.
Select the Bluetooth phone to be set.
3.
Select to turn “Phonebook Download (Phonebook
Download)” on/off.
NOTE
lThe prole version of the connected Bluetooth phone may not be
compatible with transferring phonebook data. For details, contact
your SUBARU dealer.
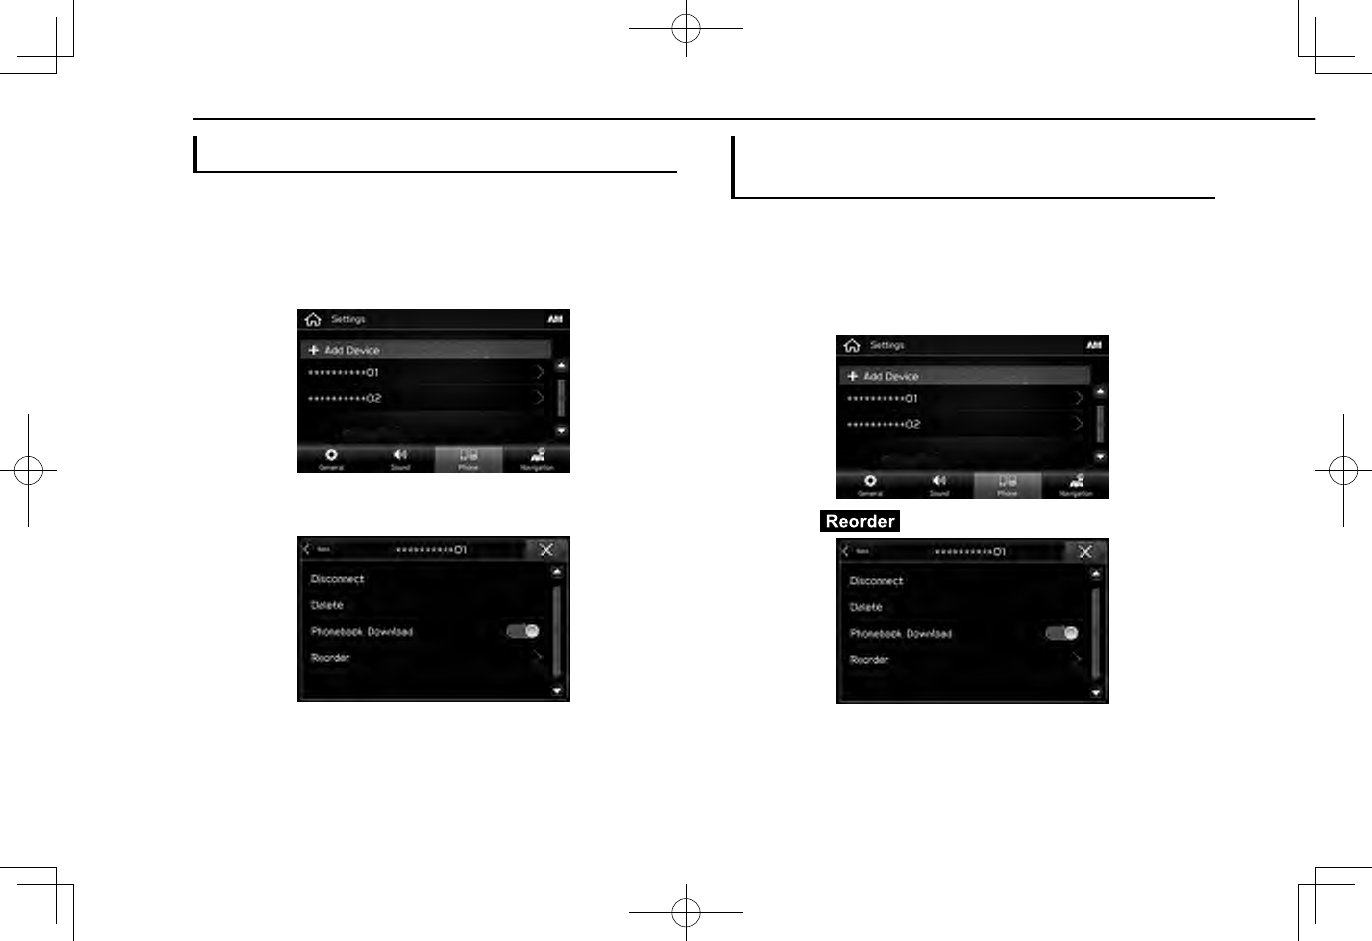
SETTING THE AUTOMATIC CONNECTION
PRIORITY
The automatic connection priority of the registered Bluetooth
phones/devices can be changed.
1.
Display the phone settings screen. (→P.47)
2.
Select the Bluetooth phone/device to be set.
3.
Select (Reorder).
Bluetooth® SETTINGS
52
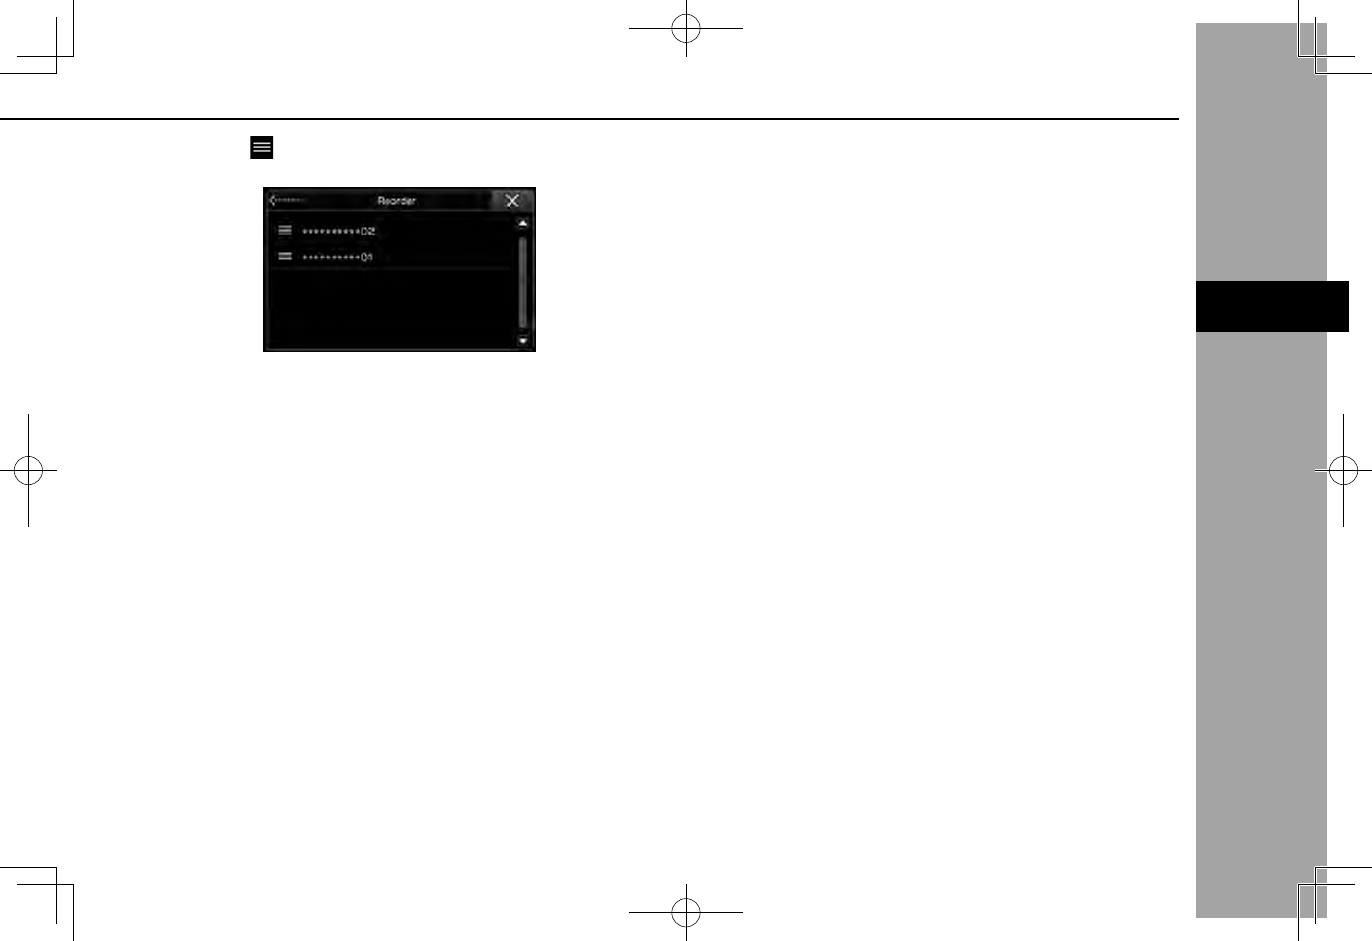
4.
Select next to the desired Bluetooth phone/device,
and then drag it to the desired position.
3
Bluetooth® SETTINGS
53
SETTINGS
3
SETTING Wi-Fi® CONNECTION (7-inch with
Navi system/7-inch system only)
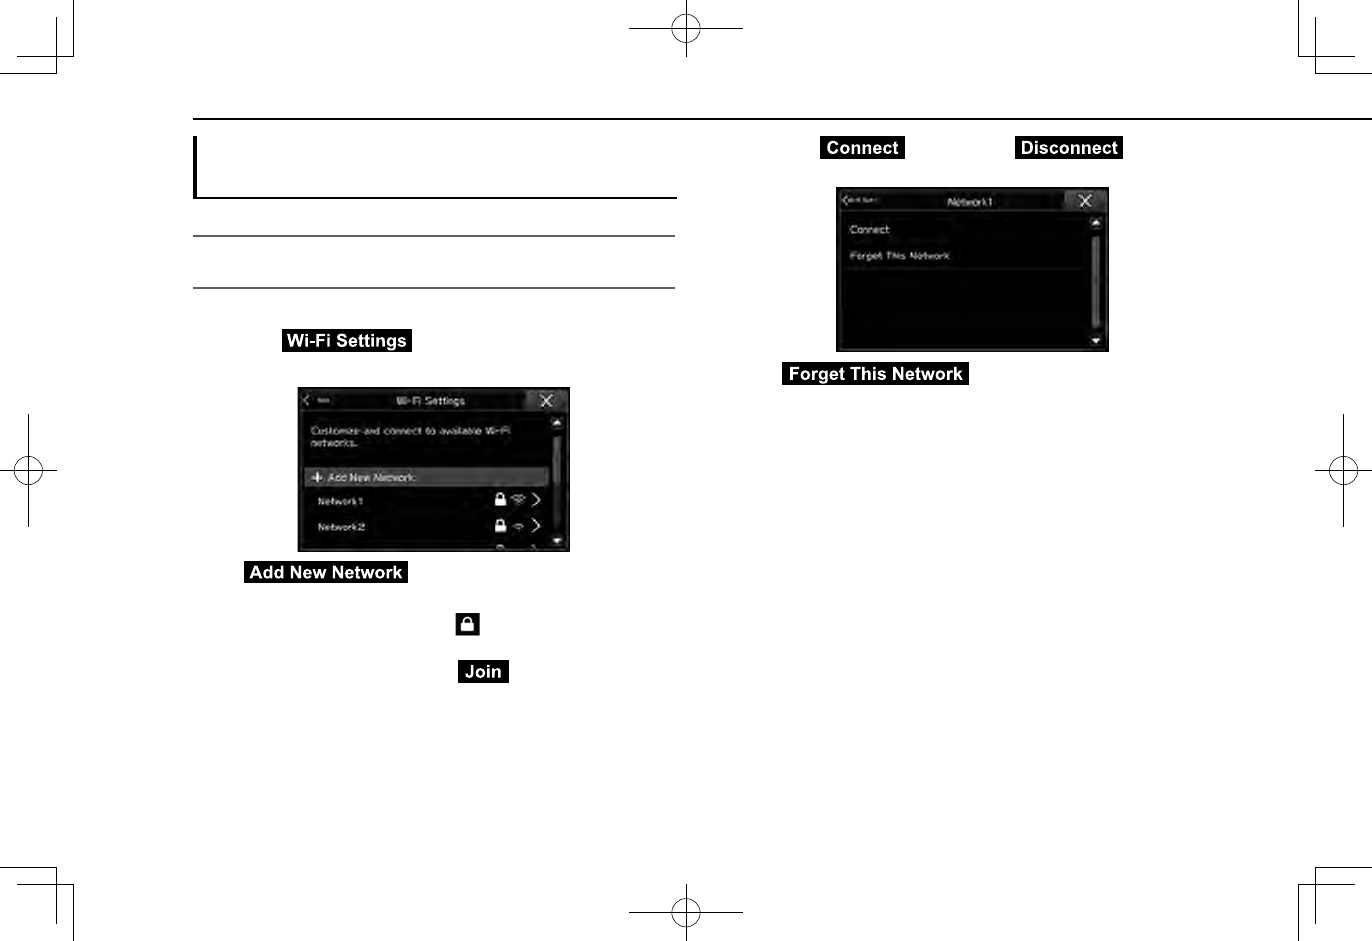
CONNECTING OR DISCONNECTING A Wi-Fi®
NETWORK
1.
Display the general settings screen. (→P.62)
2.
Select (Wi-Fi Settings).
3.
Select the desired network.
● (Add New Network): Select to
add a Wi-Fi® network (→P.55)
●When a network with is selected and the
password entry screen is displayed, enter the
password, and then select (Join).
4.
Select (Connect) or
(Disconnect).
● (Forget This Network): Select
to delete the item.
5.
Check that a conrmation message appears when the
connection is complete.
●If an error message appears, follow the guidance on
the screen to try again.
54
OTHER SETTINGS
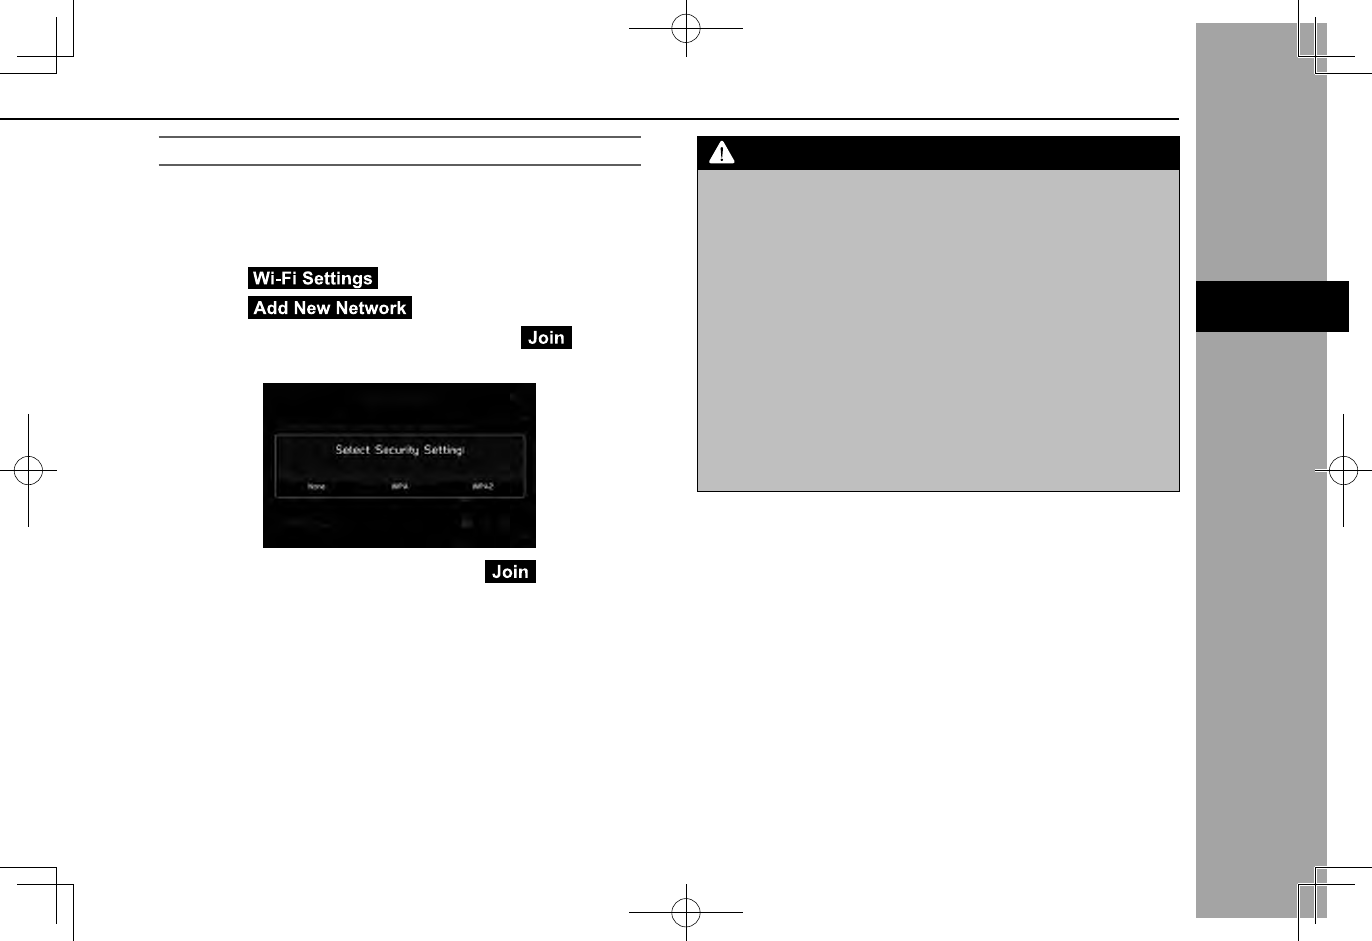
ADDING A Wi-Fi® NETWORK
Available networks which are not displayed by searching
can be added.
1.
Display the general settings screen. (→P.62)
2.
Select (Wi-Fi Settings).
3.
Select (Add New Network).
4.
Enter the network name, and then select (Join).
5.
Select the security type.
6.
Enter the password, and then select (Join).
7.
Check that a conrmation message appears when the
connection is complete.
WARNING
lUse Wi-Fi® devices only when safe and legal to do so.
lThis system is tted with Wi-Fi® antennas. People with
implantable cardiac pacemakers, cardiac resynchronization
therapy-pacemakers or implantable cardioverter debrillators
should maintain a reasonable distance between themselves
and the Wi-Fi® antennas. The radio waves may affect the
operation of such devices.
lBefore using Wi-Fi® devices, users of any electrical medical
device other than implantable cardiac pacemakers, cardiac
resynchronization therapy-pacemakers or implantable
cardioverter debrillators should consult the manufacturer
of the device for information about its operation under the
inuence of radio waves.
Radio waves could have unexpected effects on the operation
of such medical devices.
NOTE
lCommunication standards:
• 802.11b
• 802.11g
• 802.11n (2.4GHz/5GHz*)
• 802.11a*
• 802.11ac*
*: Depending on the country, this specication may not be available.
lSecurity:
• WPATM
• WPA2TM
lWPA and WPA2 are registered mark of the Wi-Fi Alliance®.
55
SETTINGS
3
OTHER SETTINGS
MEDIA OPERATION
56
MEDIA OPERATION
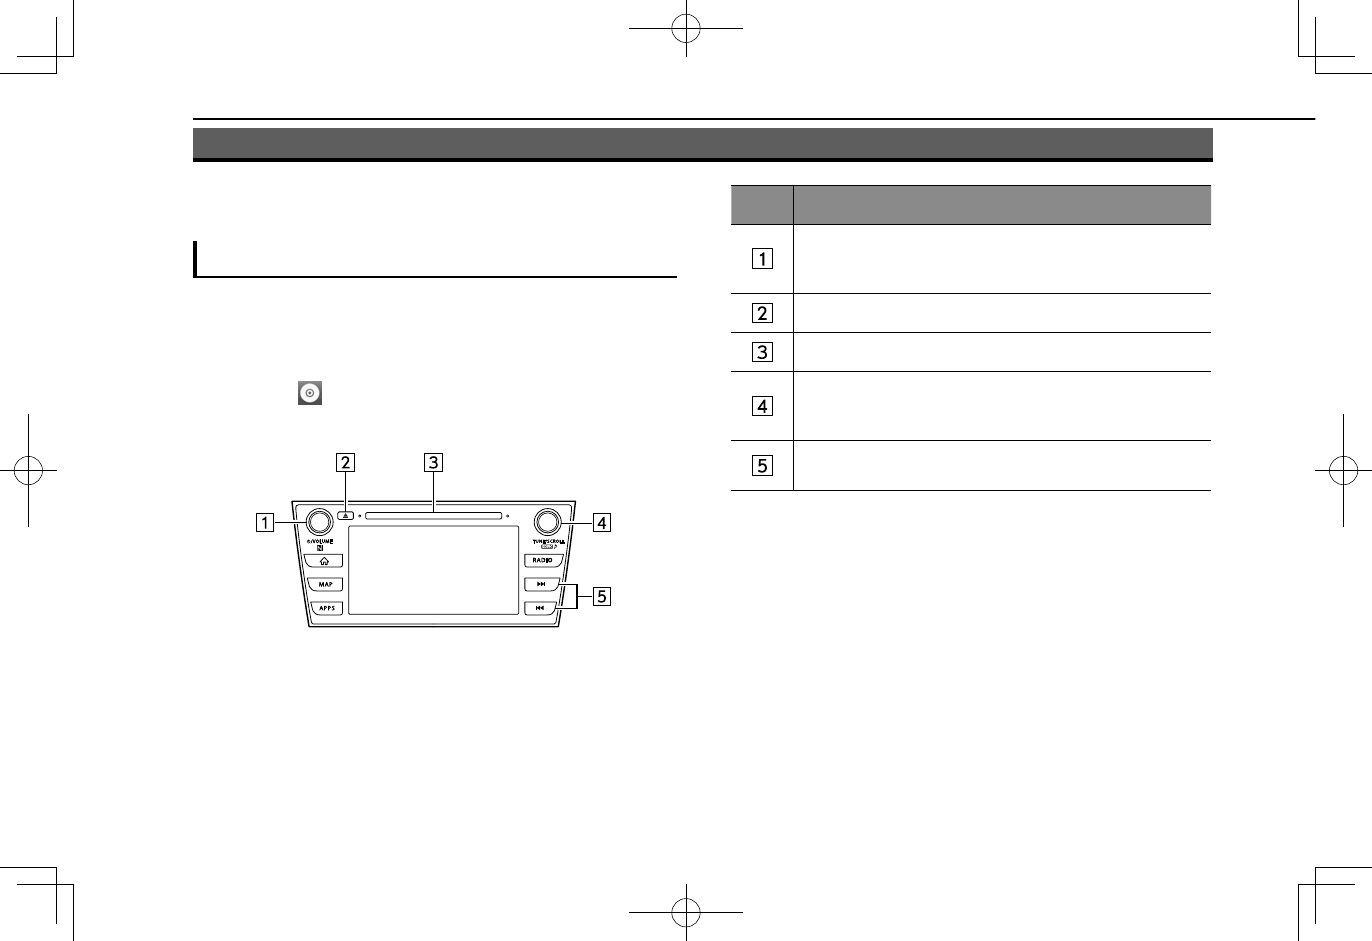
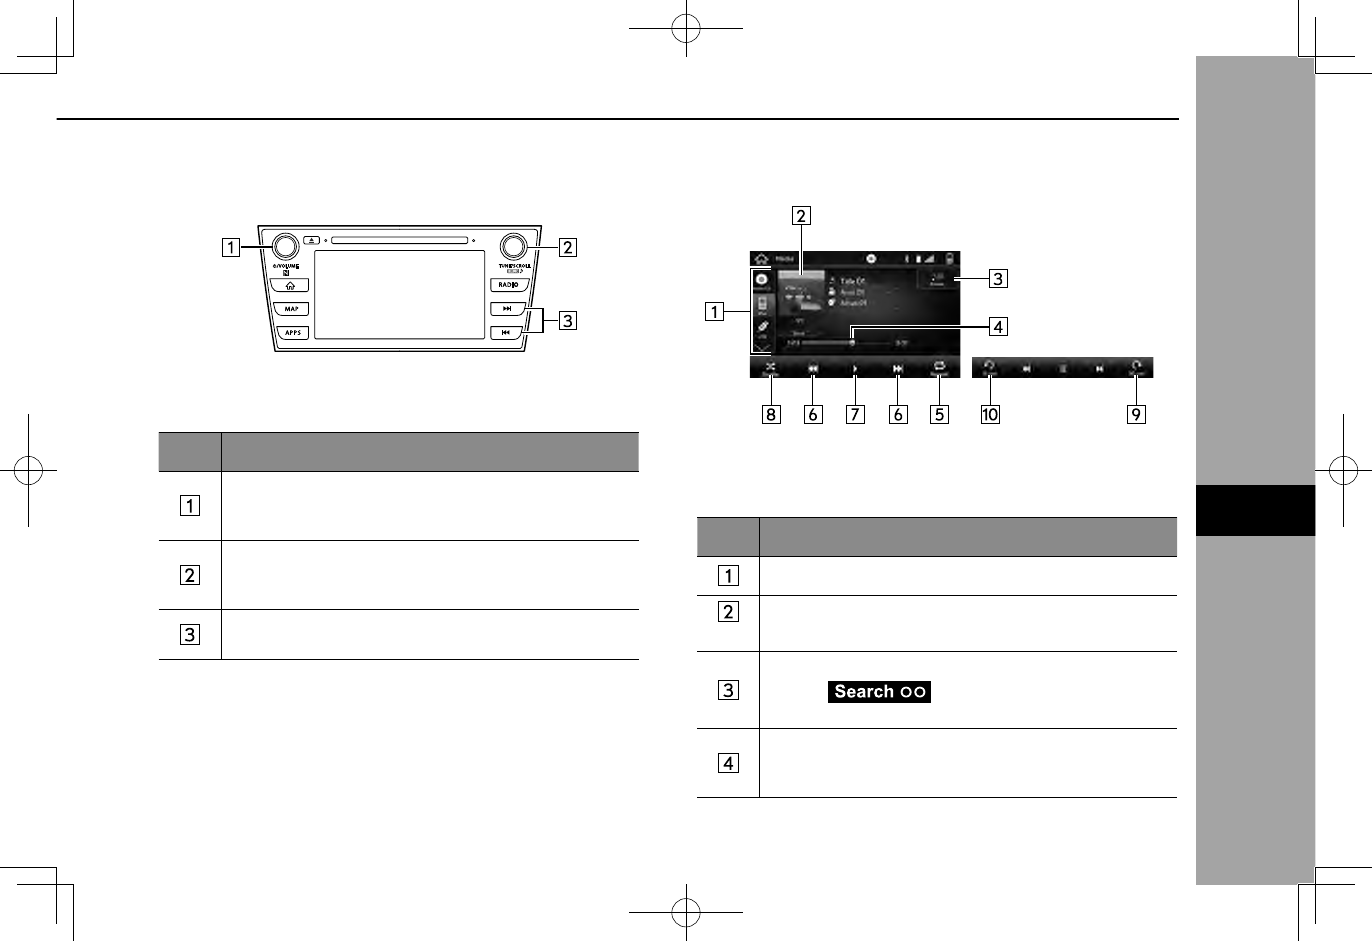
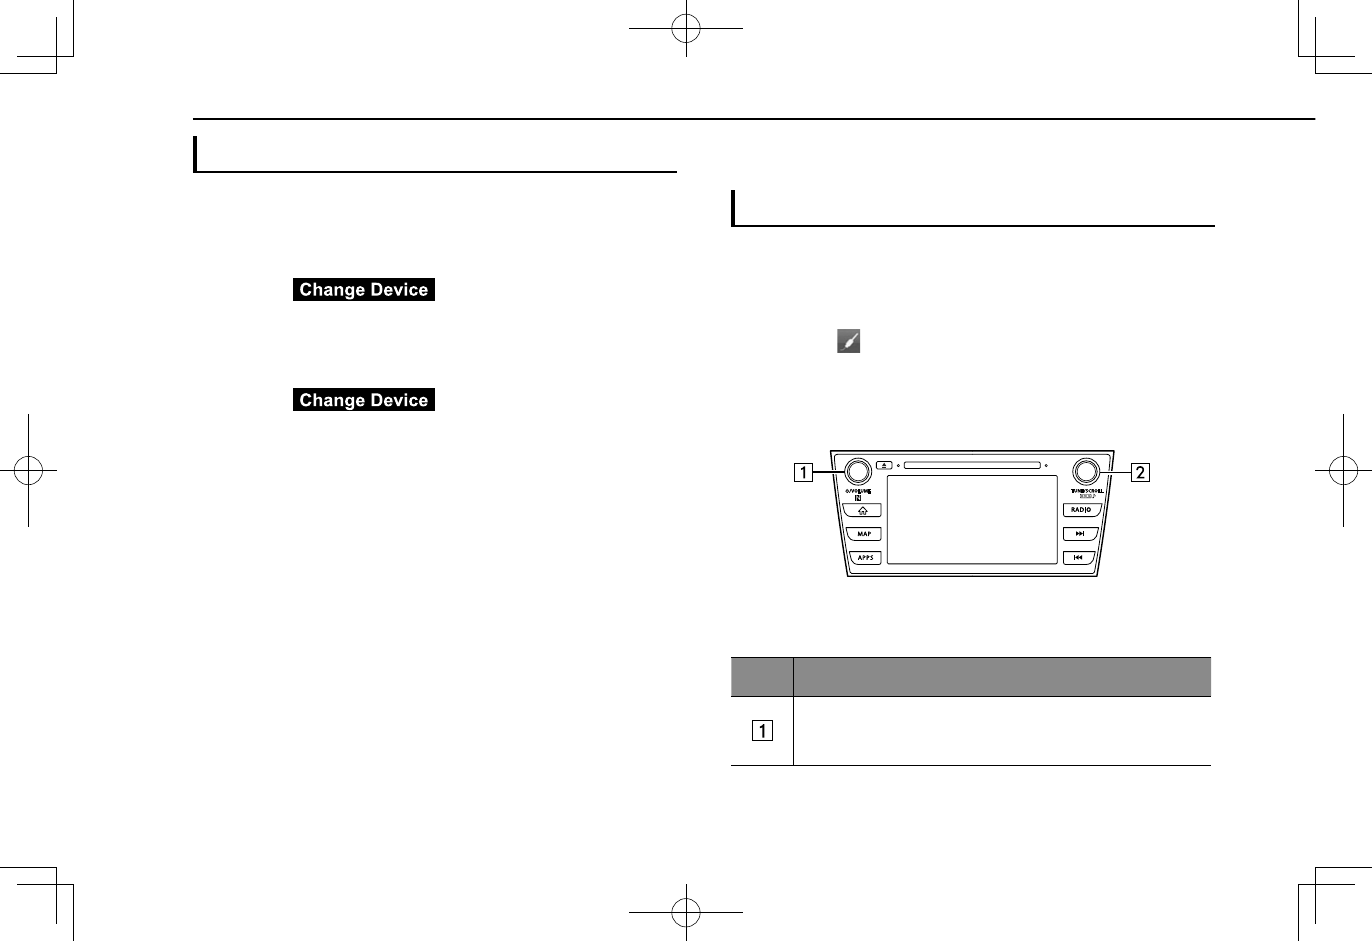
CD
OVERVIEW
The CD operation screen can be accessed with the
following methods:
● Insert a disc. (→P.35)
●Select on the “Media (Media)” screen. (→P.79)
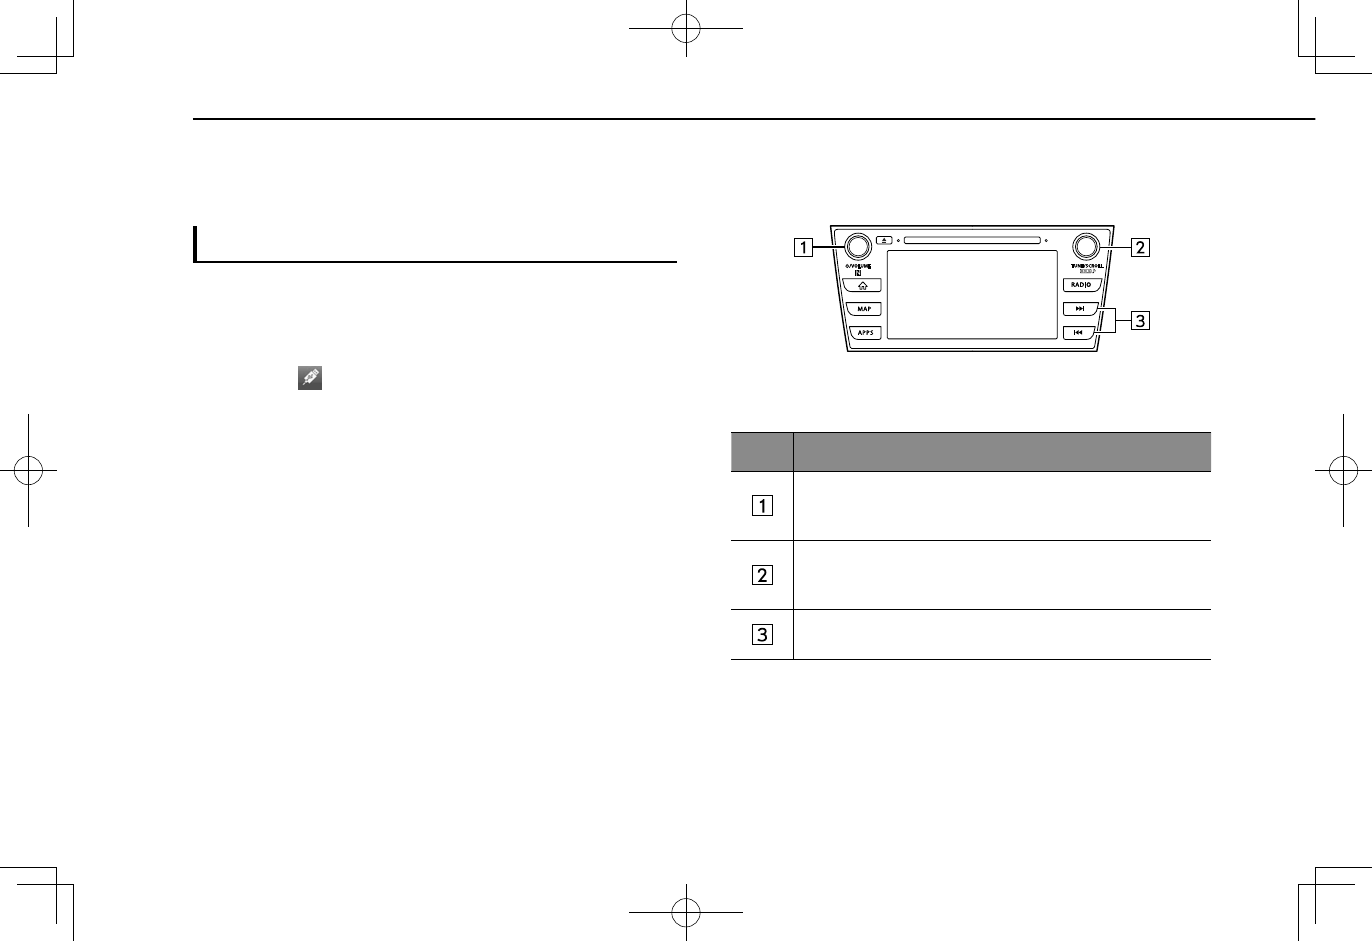
XControl panel
No. Function
Turn to adjust volume.
Press to mute the audio system.
Press and hold to turn the audio system on/off.
Press to eject a disc.
Disc slot
Turn to change a track.
Press and hold to display the sound settings screen.
(→P.72)
Select to change a track.
Select and hold to fast forward/rewind.
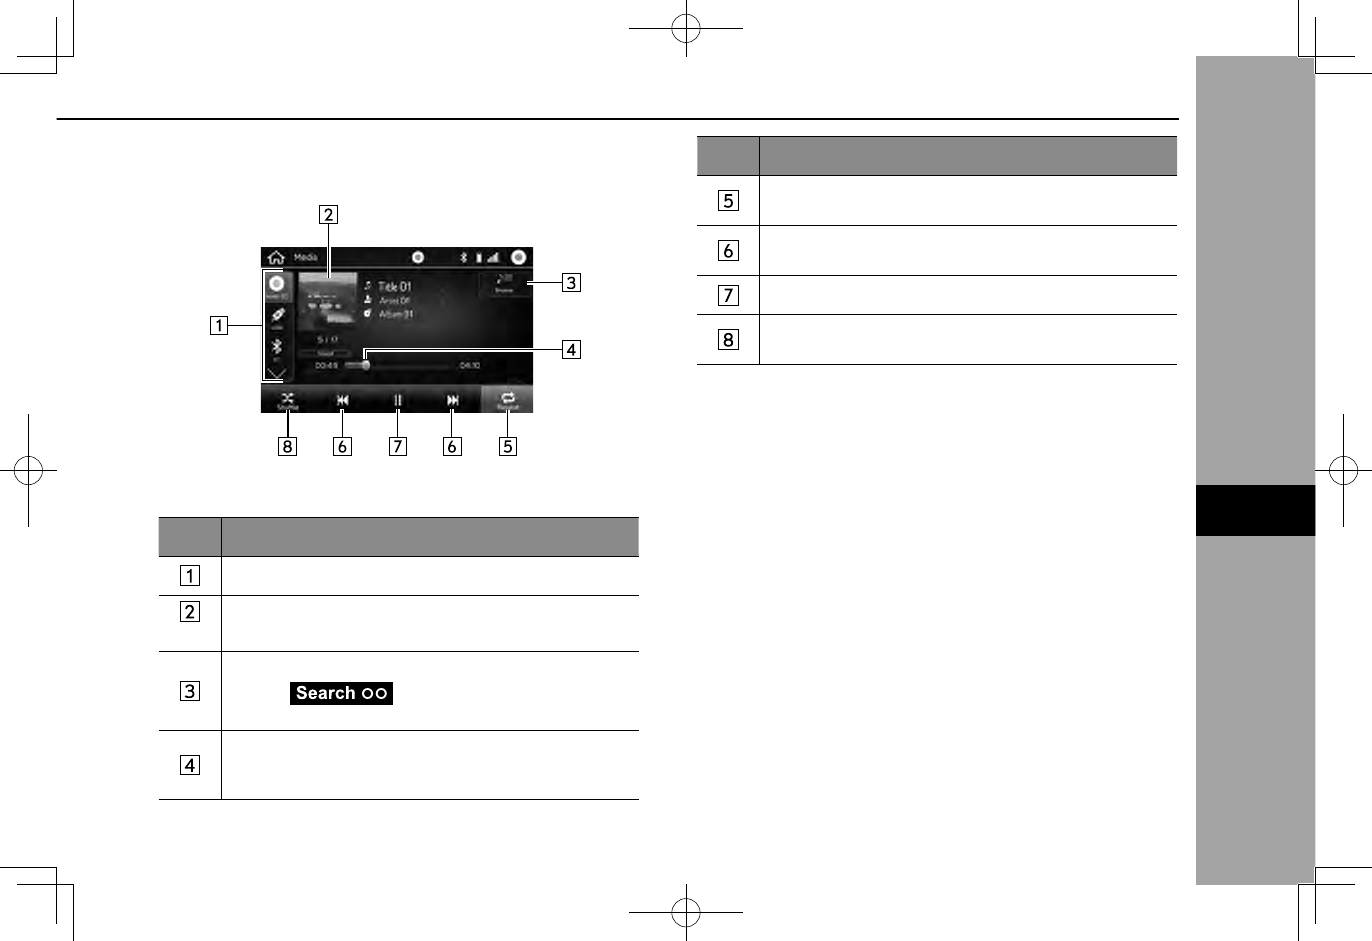
XControl screen
No. Function
Select to switch between other media sources.
*
Displays cover art.
Select to display the play mode selection screen.
• Select (Search OO) to narrow down the
search for tracks in each play mode.
Shows progress.
The playback location can be changed by dragging the
sliders.
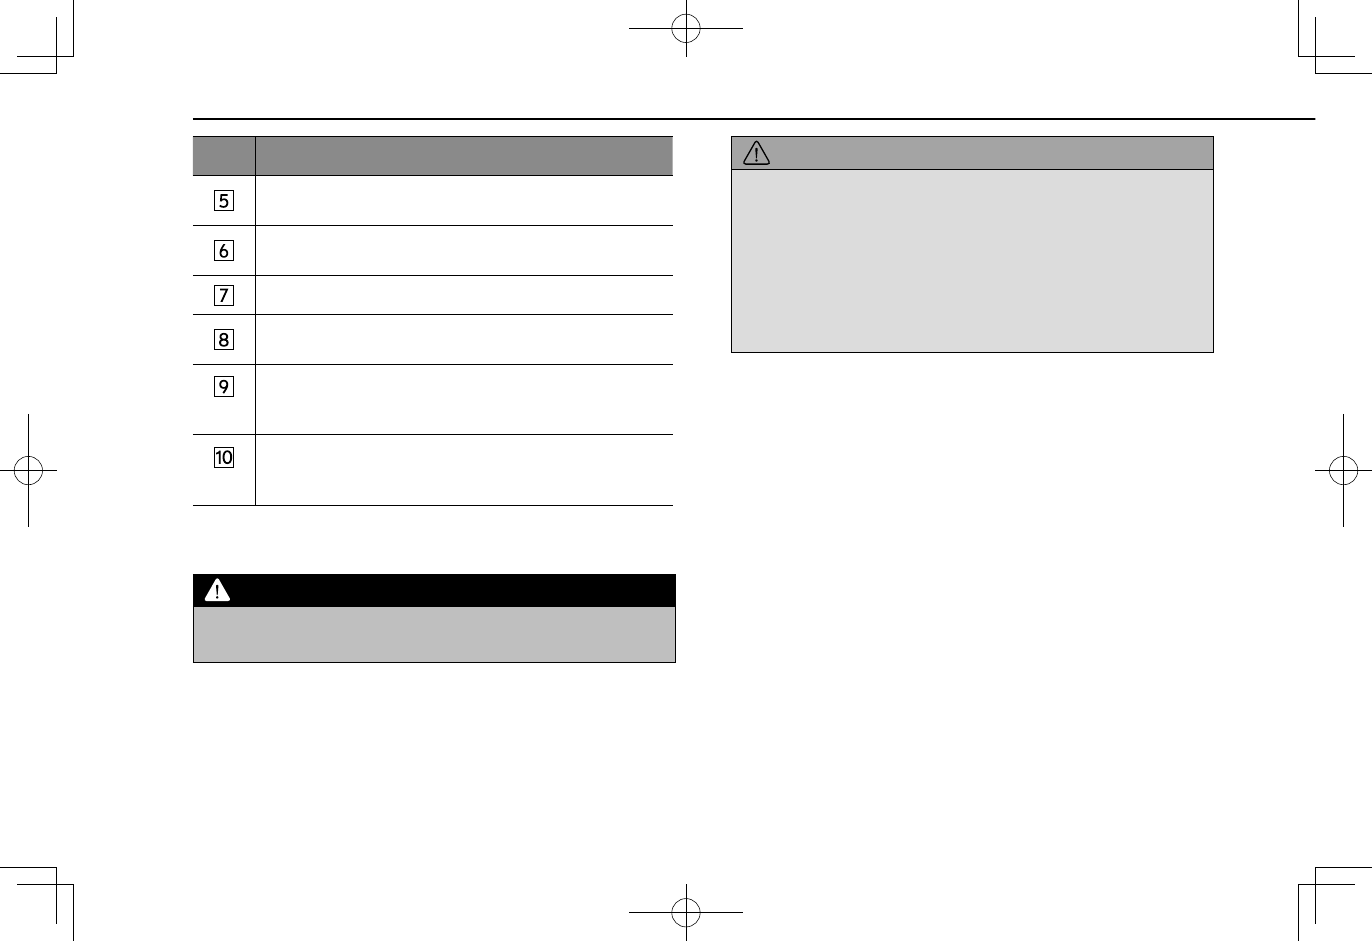
No. Function
Select to enable/disable repeat playback of the track
currently playing.
Select to change a track.
Select and hold to fast forward/rewind.
Select to pause/play.
Select to enable/disable random playback for the tracks
currently playing on the CD.
*: 7-inch with Navi system/7-inch system only
NOTE
lIf a disc contains CD-DA les and MP3/WMA/AAC les, only the
CD-DA les can be played back.
lIf a CD-TEXT disc is inserted, the title of the disc and track will
be displayed.
lDepending on the disc or music le being played, the cover art
may not be displayed.
MEDIA OPERATION
57
AUDIO
6
USB MEMORY
Audio les on the USB memory device can be played back.
OVERVIEW
The USB Audio playback screen can be accessed with the
following methods:
● Connect a USB memory device. (→P.36)
●Select on the “Media (Media)” screen. (→P.79)
XControl panel
No. Function
Turn to adjust volume.
Press to mute the audio system.
Press and hold to turn the audio system on/off.
Turn to change a track.
Press and hold to display the sound settings screen.
(→P.72)
Select to change a track.
Select and hold to fast forward/rewind.
MEDIA OPERATION
58
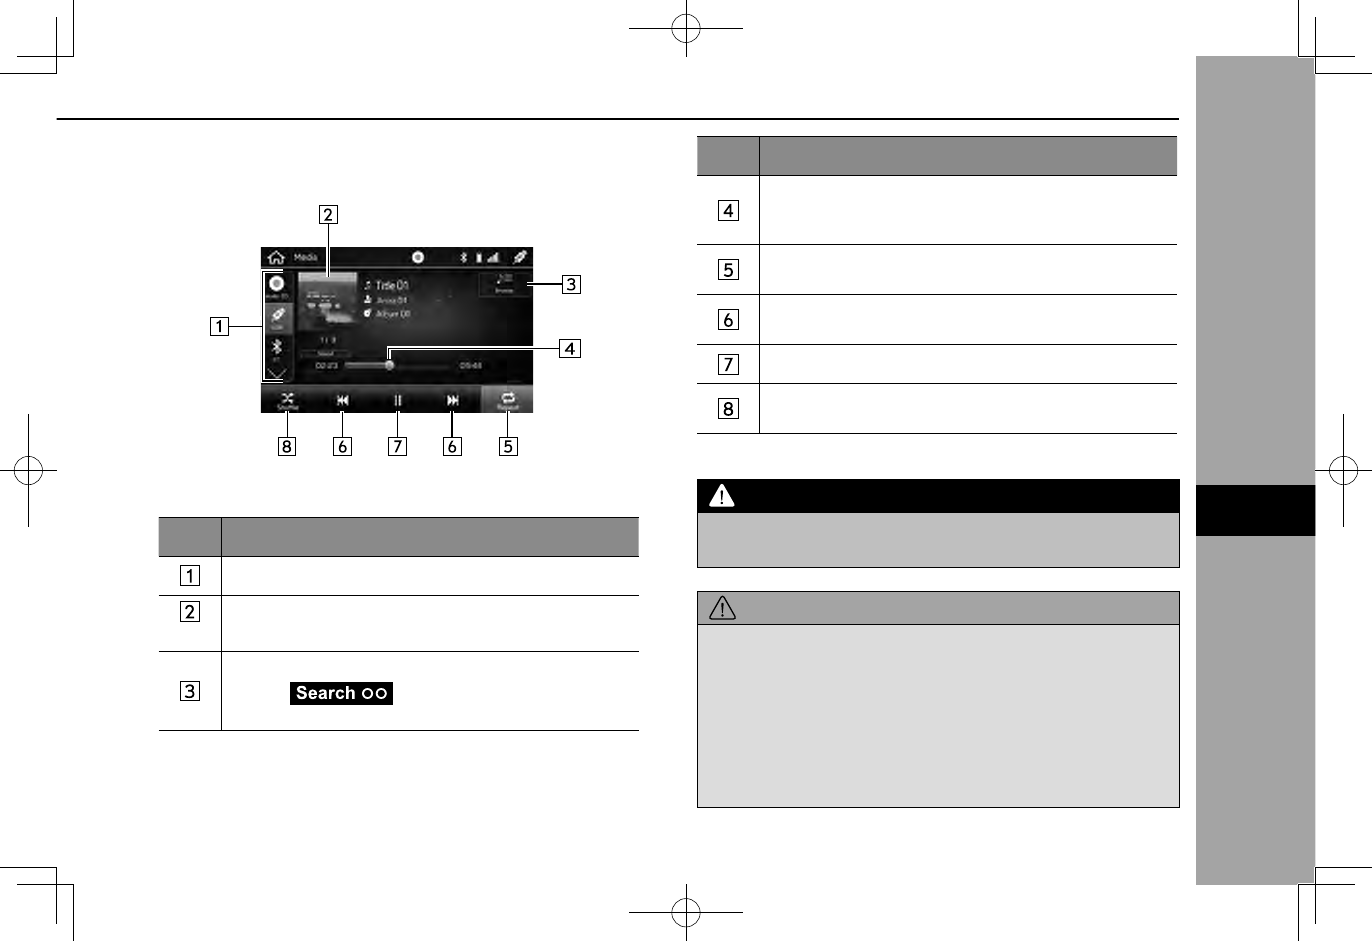
XControl screen
No. Function
Select to switch between other media sources.
*
Displays cover art.
Select to display the play mode selection screen.
• Select (Search OO) to narrow down the
search for tracks in each play mode.
No. Function
Shows progress.
The playback location can be changed by dragging the
sliders.
Select to enable/disable repeat playback of the track
currently playing.
Select to change a track.
Select and hold to fast forward/rewind.
Select to pause/play.
Select to enable/disable random playback for the tracks
currently playing from the USB memory device.
*: 7-inch with Navi system/7-inch system only
WARNING
lDo not operate the player’s controls or connect the USB
memory device while driving.
CAUTION
lDo not leave your portable player in the vehicle. In particular,
high temperatures inside the vehicle may damage the portable
player.
lDo not push down on or apply unnecessary pressure to the
portable player while it is connected as this may damage the
portable player or its terminal.
lDo not insert foreign objects into the port as this may damage
the portable player or its terminal.
MEDIA OPERATION
59
AUDIO
6
NOTE
lDepending on the device or music le being played, the cover art
may not be displayed.
iPod
When an iPod is connected, you can play iPod music les.
On this unit, you can perform operations such as selecting
a le from a list or changing to the random playback mode.
At devices which support Apple CarPlay, turn Apple CarPlay
off in the device side Restrictions settings.
OVERVIEW
The iPod operation screen can be accessed with the
following methods:
● Connect an iPod. (→P.36)
●Select on the “Media (Media)” screen. (→P.79)
MEDIA OPERATION
60
XControl panel
No. Function
Turn to adjust volume.
Press to mute the audio system.
Press and hold to turn the audio system on/off.
Turn to change a track.
Press and hold to display the sound settings screen.
(→P.72)
Select to change a track.
Select and hold to fast forward/rewind.
XControl screen
No. Function
Select to switch between other media sources.
*1
Displays cover art.
Select to display the play mode selection screen.
• Select (Search OO) to narrow down the
search for tracks in each play mode.
Shows progress.
The playback location can be changed by dragging the
sliders.
MEDIA OPERATION
61
AUDIO
6
No. Function
Select to enable/disable repeat playback of the track
currently playing.
Select to change a track.
Select and hold to fast forward/rewind.
Select to pause/play.
Select to enable/disable random playback for the tracks
currently playing on the iPod.
*2
Select to fast forward the current content item in xed
intervals.
*2
Select to rewind the current content item in xed
intervals.
*1: 7-inch with Navi system/7-inch system only
*2: Display when playing Audiobooks or Podcasts
WARNING
lDo not operate the player’s controls or connect the iPod while
driving.
CAUTION
lDo not leave your portable player in the vehicle. In particular,
high temperatures inside the vehicle may damage the portable
player.
lDo not push down on or apply unnecessary pressure to the
portable player while it is connected as this may damage the
portable player or its terminal.
lDo not insert foreign objects into the port as this may damage
the portable player or its terminal.
NOTE
lWhen an iPod is connected using a genuine iPod cable, the iPod
starts charging its battery.
lIf playing iPod music, perform operation at the system. Certain
functions may not be available if played directly from the
iPod. Furthermore, depending on the connected iPod, certain
functions may not be available.
lDepending on the iPod or music le being played, the cover art
may not be displayed.
lWhen an iPod is connected and the audio source is changed to
iPod mode, the iPod will resume playing from the same point it
was last used.
lTracks selected by operating a connected iPod may not be
recognized or displayed properly.
MEDIA OPERATION
62

Bluetooth AUDIO
The Bluetooth audio system enables users to play music
les stored on Bluetooth devices through the vehicle
speakers via wireless communication.
This audio system supports Bluetooth, a wireless data
system capable of playing portable audio music without
cables. If your device does not support Bluetooth, the
Bluetooth audio system will not function.
OVERVIEW
The Bluetooth audio operation screen can be accessed by
selecting on the “Media (Media)” screen. (→P.79)
Depending on the type of portable player connected, some
functions may not be available and/or the screen may look
differently than shown in this manual.
XControl panel
No. Function
Turn to adjust volume.
Press to mute the audio system.
Press and hold to turn the audio system on/off.
Turn to change a track.
Press and hold to display the sound settings screen.
(→P.72)
Select to change a track.
Select and hold to fast forward/rewind.
MEDIA OPERATION
63
AUDIO
6
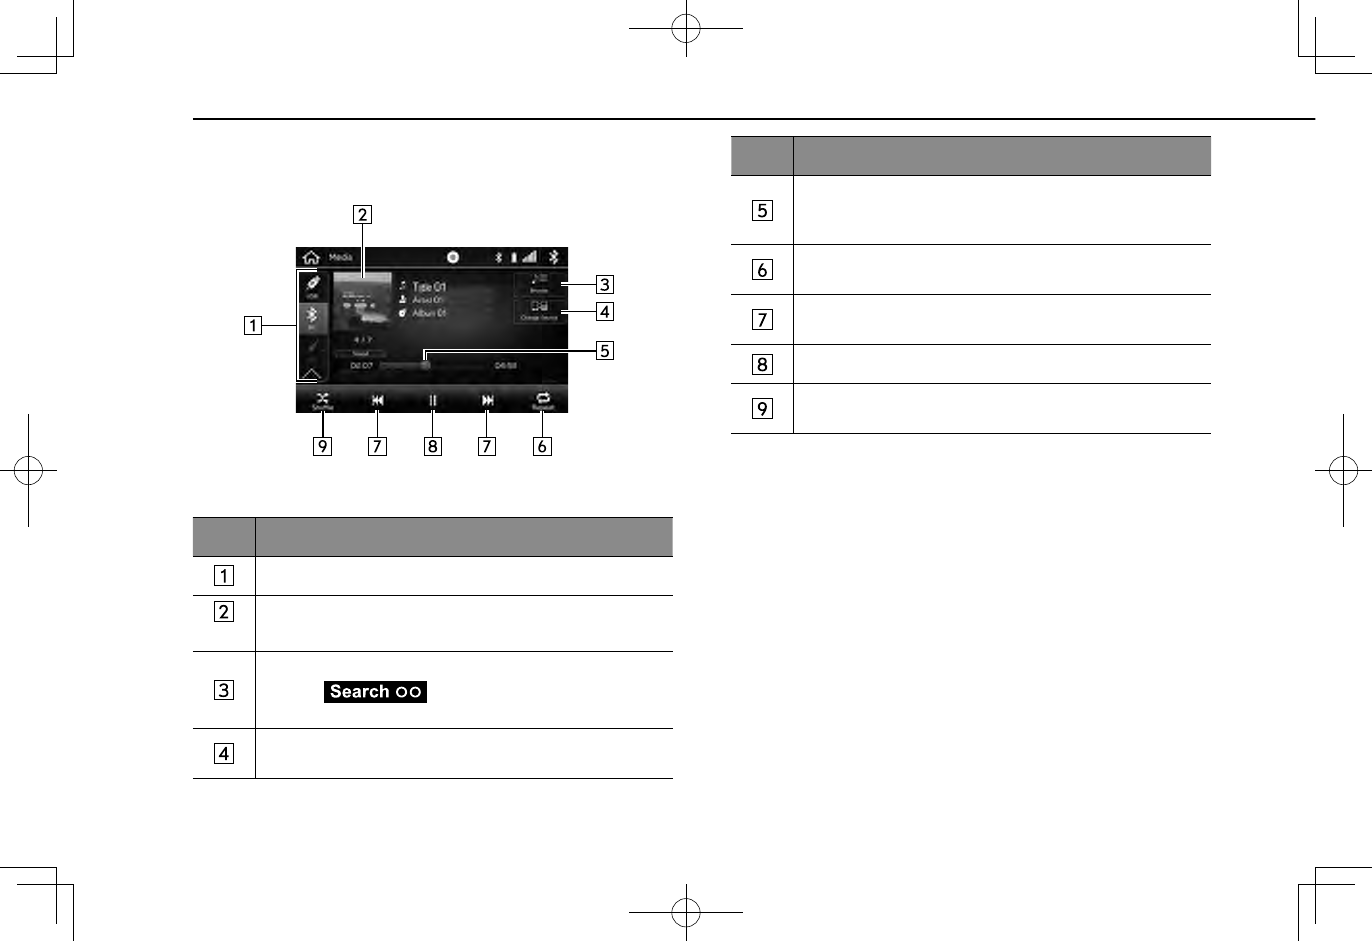
XControl screen
No. Function
Select to switch between other media sources.
*
Displays cover art.
Select to display the play mode selection screen.
• Select (Search OO) to narrow down the
search for tracks in each play mode.
Select to display the “Change Device (Change Device)”
screen. (→P.66)
No. Function
Shows progress.
The playback location can be changed by dragging the
sliders.
Select to enable/disable repeat playback of the track
currently playing.
Select to change a track.
Select and hold to fast forward/rewind.
Select to pause/play.
Select to enable/disable random playback for the tracks
currently playing on the Bluetooth device.
*: 7-inch with Navi system/7-inch system only
MEDIA OPERATION
64
WARNING
lDo not operate the player’s controls or connect to the
Bluetooth audio system while driving.
lThis system is tted with Bluetooth antennas. People with
implantable cardiac pacemakers, cardiac resynchronization
therapy-pacemakers or implantable cardioverter debrillators
should maintain a reasonable distance between themselves
and the Bluetooth antennas. The radio waves may affect the
operation of such devices.
lBefore using Bluetooth devices, users of any electrical
medical device other than implantable cardiac pacemakers,
cardiac resynchronization therapy-pacemakers or implantable
cardioverter debrillators should consult the manufacturer
of the device for information about its operation under the
inuence of radio waves. Radio waves could have unexpected
effects on the operation of such medical devices.
CAUTION
lDo not leave your portable player in the vehicle. In particular,
high temperatures inside the vehicle may damage the portable
player.
NOTE
lDepending on the Bluetooth device that is connected to the
system, the music may start playing when selecting while
it is paused. Conversely, the music may pause when selecting
while it is playing.
lIn the following conditions, the system may not function:
• The Bluetooth device is turned off.
• The Bluetooth device is not connected.
• The Bluetooth device has a low battery.
lIt may take time to connect the phone when Bluetooth audio is
being played.
lFor operating the portable player, see the instruction manual that
comes with it.
lIf the Bluetooth device is disconnected due to poor reception
from the Bluetooth network when the ignition switch is turned
to the “ACC” or “ON” position, the system will automatically
reconnect to the portable player.
lIf the Bluetooth device is disconnected on purpose, such as it
was turned off, this does not happen. Reconnect the portable
player manually.
lBluetooth device information is registered when the Bluetooth
device is connected to the Bluetooth audio system. When
selling or disposing of the vehicle, remove the Bluetooth audio
information from the system. (→P.62)
lDepending on the Bluetooth device or music le being played,
the cover art may not be displayed.
lIf the Bluetooth device does not play automatically when
connected, device operation may be necessary.
MEDIA OPERATION
65
AUDIO
6
CONNECTING A Bluetooth DEVICE
To use the Bluetooth audio system, it is necessary to
register a Bluetooth device with the system.
XRegistering an additional device
1.
Select (Change Device) on the
Bluetooth audio control screen.
2.
For more information: →P.48
XSelecting a registered device
1.
Select (Change Device) on the
Bluetooth audio control screen.
2.
Select the Bluetooth device to be connected.
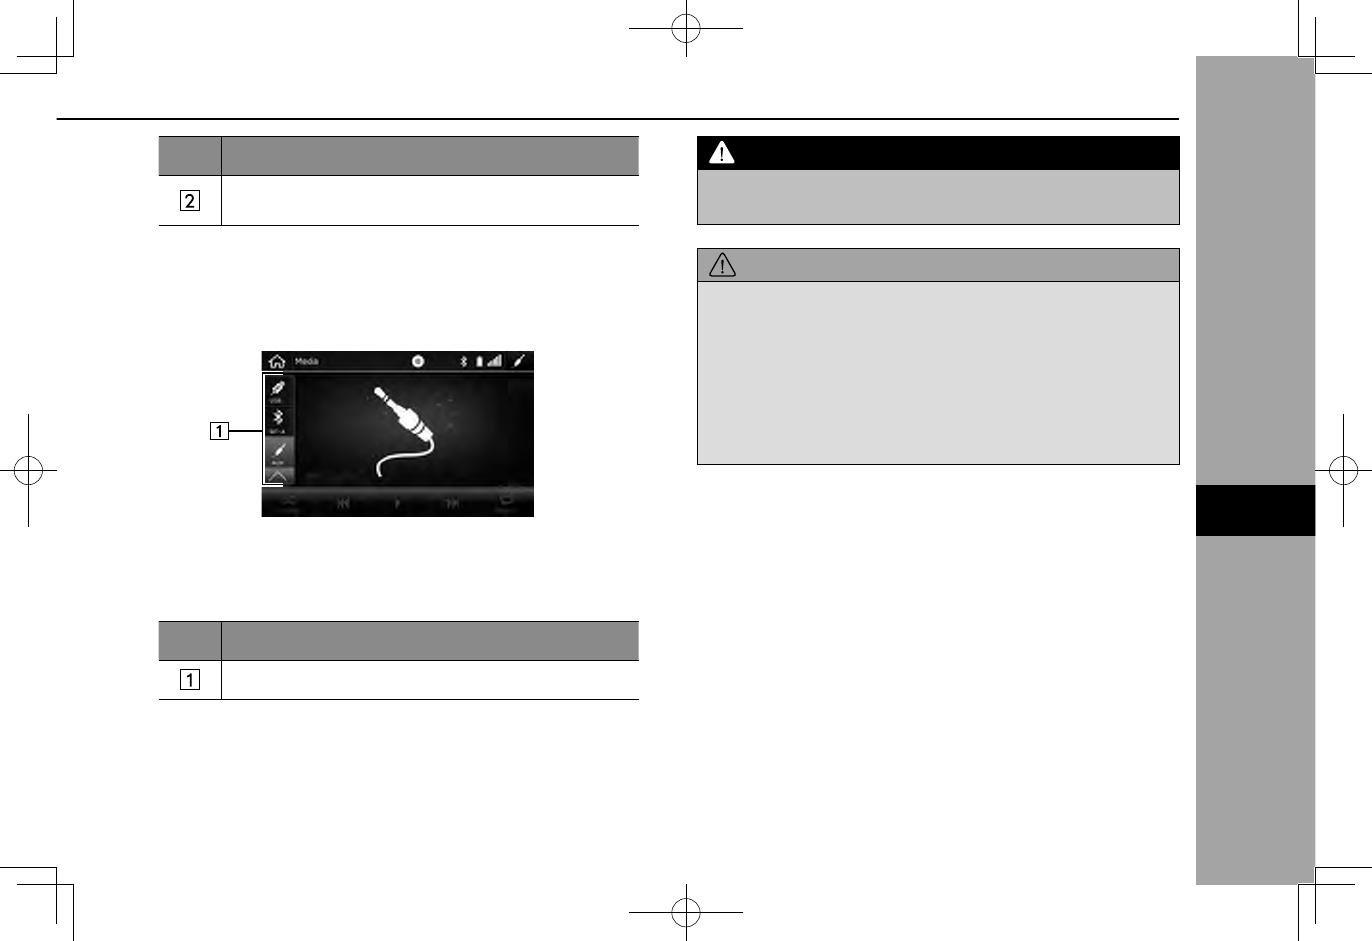
AUX
OVERVIEW
The AUX operation screen can be accessed with the
following methods:
● Connect a portable audio device. (→P.36)
●Select on the “Media (Media)” screen. (→P.79)
XControl panel
No. Function
Turn to adjust volume.
Press to mute the audio system.
Press and hold to turn the audio system on/off.
MEDIA OPERATION
66
No. Function
Press and hold to display the sound settings screen.
(→P.72)
XControl screen
No. Function
Select to switch between other media sources.
WARNING
lDo not operate the player’s controls or connect the portable
audio device while driving.
CAUTION
lDo not leave portable audio device in the vehicle. The
temperature inside the vehicle may become high, resulting in
damage to the player.
lDo not push down on or apply unnecessary pressure to
the portable audio device while it is connected as this may
damage the portable audio device or its terminal.
lDo not insert foreign objects into the port as this may damage
the portable audio device or its terminal.
MEDIA OPERATION
67
AUDIO
6
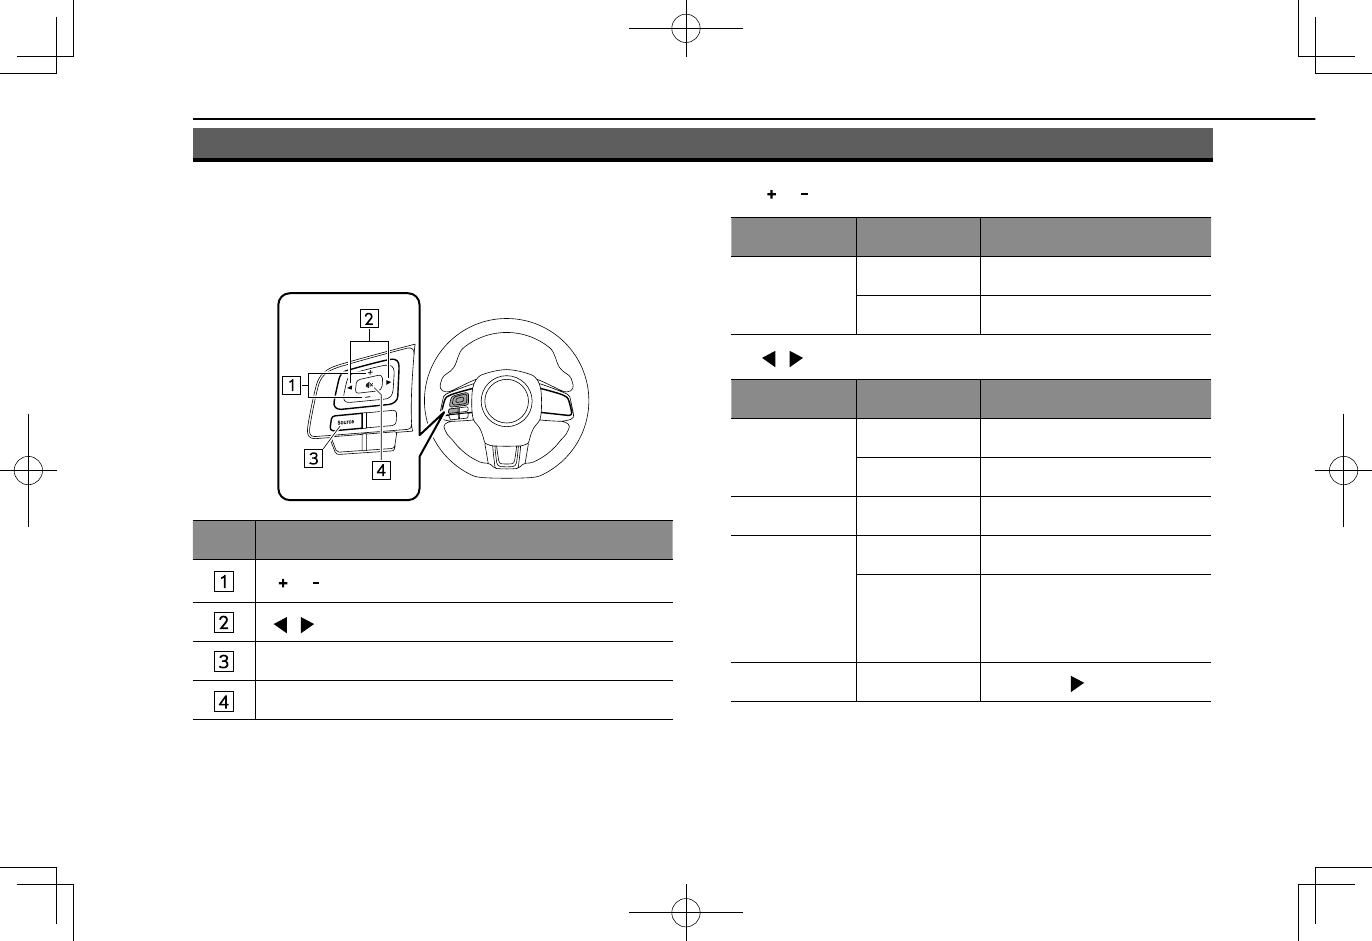
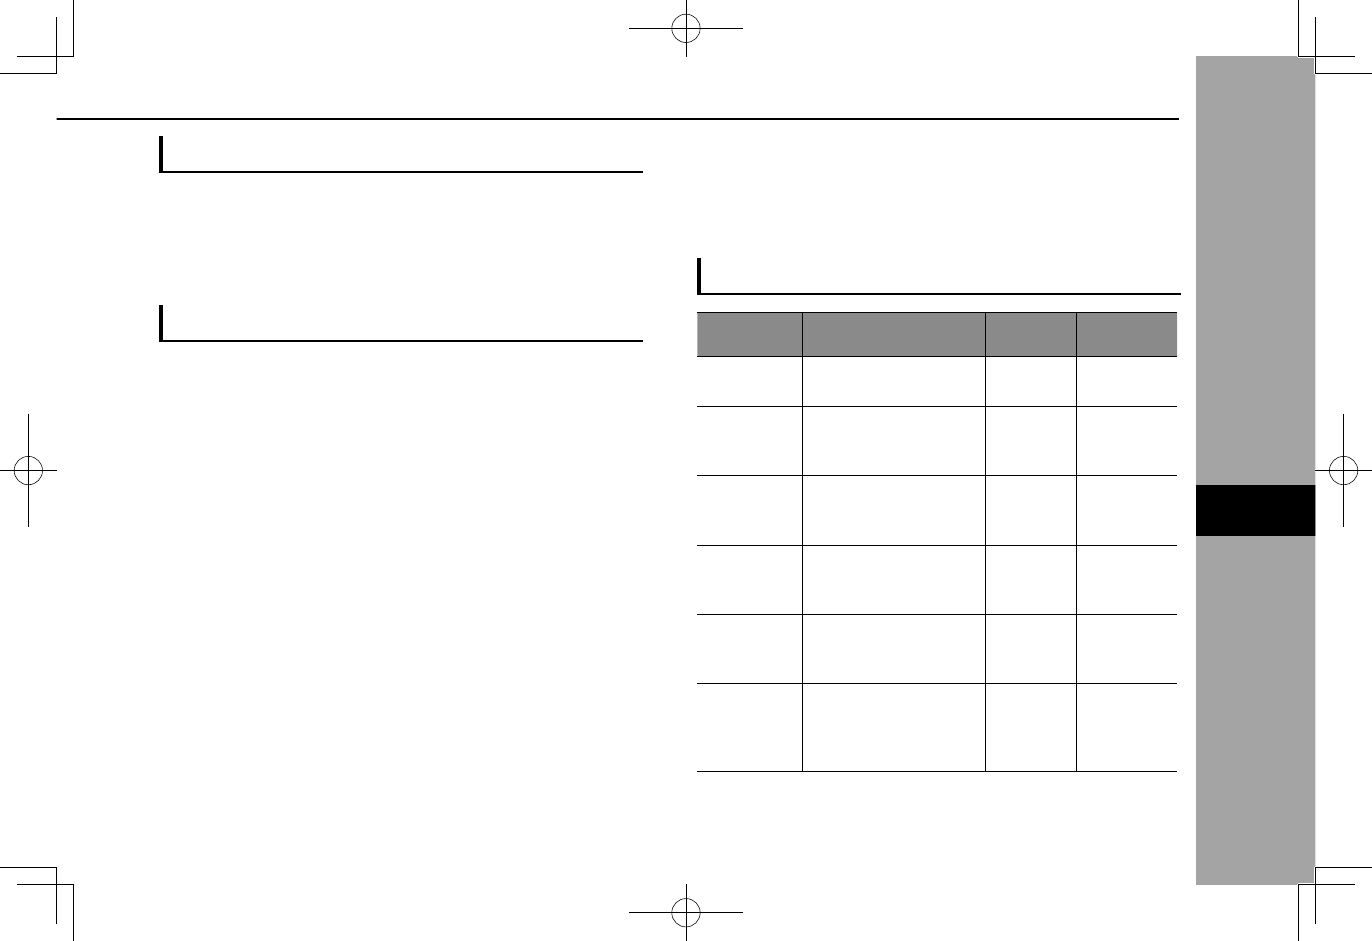
AUDIO REMOTE CONTROLS
STEERING WHEEL CONTROLS
Some parts of the audio system can be controlled using the
steering wheel controls.
No. Switch
“ / ” switch
“ / ” switch
“Source” switch
Mute switch
X“ / ” switch
Mode Operation Function
Volume
Press Volume up/down
Press and hold Volume up/down continuously
X“ / ” switch
Mode Operation Function
AM/FM Radio,
SiriusXM®
Press Preset channel up/down
Press and hold Seek up/down continuously
aha Press Content up/down
Audio CD,
MP3/WMA/
AAC disc,
USB, iPod,
Bluetooth
audio
Press Change a track
Press and hold Fast forward/rewind
Pandora* Press Track up (“ ”only)
*: Pandora is only available in certain countries. Please visit pandora.com/
legal for more information.
AUDIO REMOTE CONTROLS
68
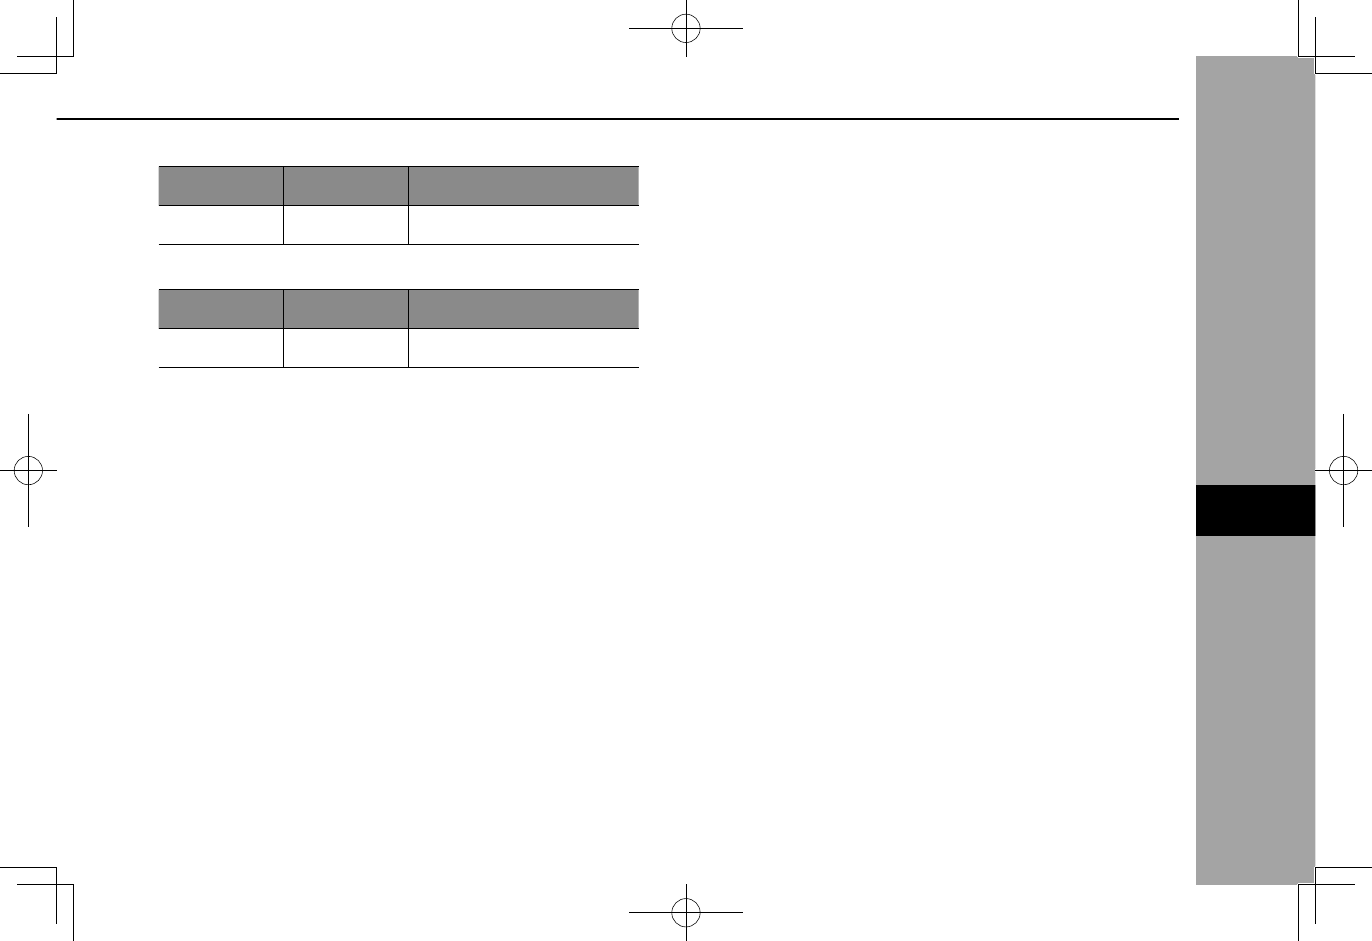
X“Source” switch
Mode Operation Function
All Press Change audio modes
XMute switch
Mode Operation Function
All Press Mute/unmute
NOTE
lIn the aha, Pandora* and SUBARU STARLINK mode, some
operation may be done on the screen depend on the selected
APPS.
*: Pandora is only available in certain countries. Please visit pandora.com/
legal for more information.
AUDIO REMOTE CONTROLS
69
AUDIO
6
TIPS FOR OPERATING THE AUDIO SYSTEM
OPERATING INFORMATION
CAUTION
lTo avoid damage to the audio system:
• Be careful not to spill beverages over the audio system.
• Do not put anything other than an appropriate disc into the
disc slot.
NOTE
lThe use of a cellular phone inside or near the vehicle may cause
a noise from the speakers of the audio system which you are
listening to. However, this does not indicate a malfunction.
RADIO
Usually, a problem with radio reception does not mean there
is a problem with the radio — it is just the normal result of
conditions outside the vehicle.
For example, nearby buildings and terrain can interfere
with FM reception. Power lines or phone wires can interfere
with AM signals. And of course, radio signals have a limited
range. The farther the vehicle is from a station, the weaker
its signal will be. In addition, reception conditions change
constantly as the vehicle moves.
Here, some common reception problems that probably do
not indicate a problem with the radio are described.
TIPS FOR OPERATING THE AUDIO SYSTEM
70
FM
Fading and drifting stations: Generally, the effective range
of FM is about 25 miles (40 km). Once outside this range,
you may notice fading and drifting, which increase with
the distance from the radio transmitter. They are often
accompanied by distortion.
Multi-path: FM signals are reective, making it possible for
2 signals to reach the vehicle’s antenna at the same time. If
this happens, the signals will cancel each other out, causing
a momentary utter or loss of reception.
Static and uttering: These occur when signals are blocked
by buildings, trees or other large objects. Increasing the
bass level may reduce static and uttering.
Station swapping: If the FM signal being listened to is
interrupted or weakened, and there is another strong station
nearby on the FM band, the radio may tune in the second
station until the original signal can be picked up again.
AM
Fading: AM broadcasts are reected by the upper
atmosphere — especially at night. These reected signals
can interfere with those received directly from the radio
station, causing the radio station to sound alternately strong
and weak.
Station interference: When a reected signal and a signal
received directly from a radio station are very nearly the
same frequency, they can interfere with each other, making
it difcult to hear the broadcast.
Static: AM is easily affected by external sources of electrical
noise, such as high tension power lines, lightening or
electrical motors. This results in static.
SiriusXM®
●Cargo loaded on the roof luggage carrier, especially
metal objects, may adversely affect the reception of
SiriusXM® Satellite Radio.
● Alternation or modications carried out without
appropriate authorization may invalidate the user’s
right to operate the equipment.
TIPS FOR OPERATING THE AUDIO SYSTEM
71
AUDIO
6
CD PLAYER AND DISC
●Extremely high temperatures can keep the CD player
from working. On hot days, use the air conditioning
system to cool the inside of the vehicle before using
the player.
●Bumpy roads or other vibrations may make the CD
player skip.
●If moisture gets into the CD player, the discs may
not be able to be played. Remove the discs from the
player and wait until it dries.
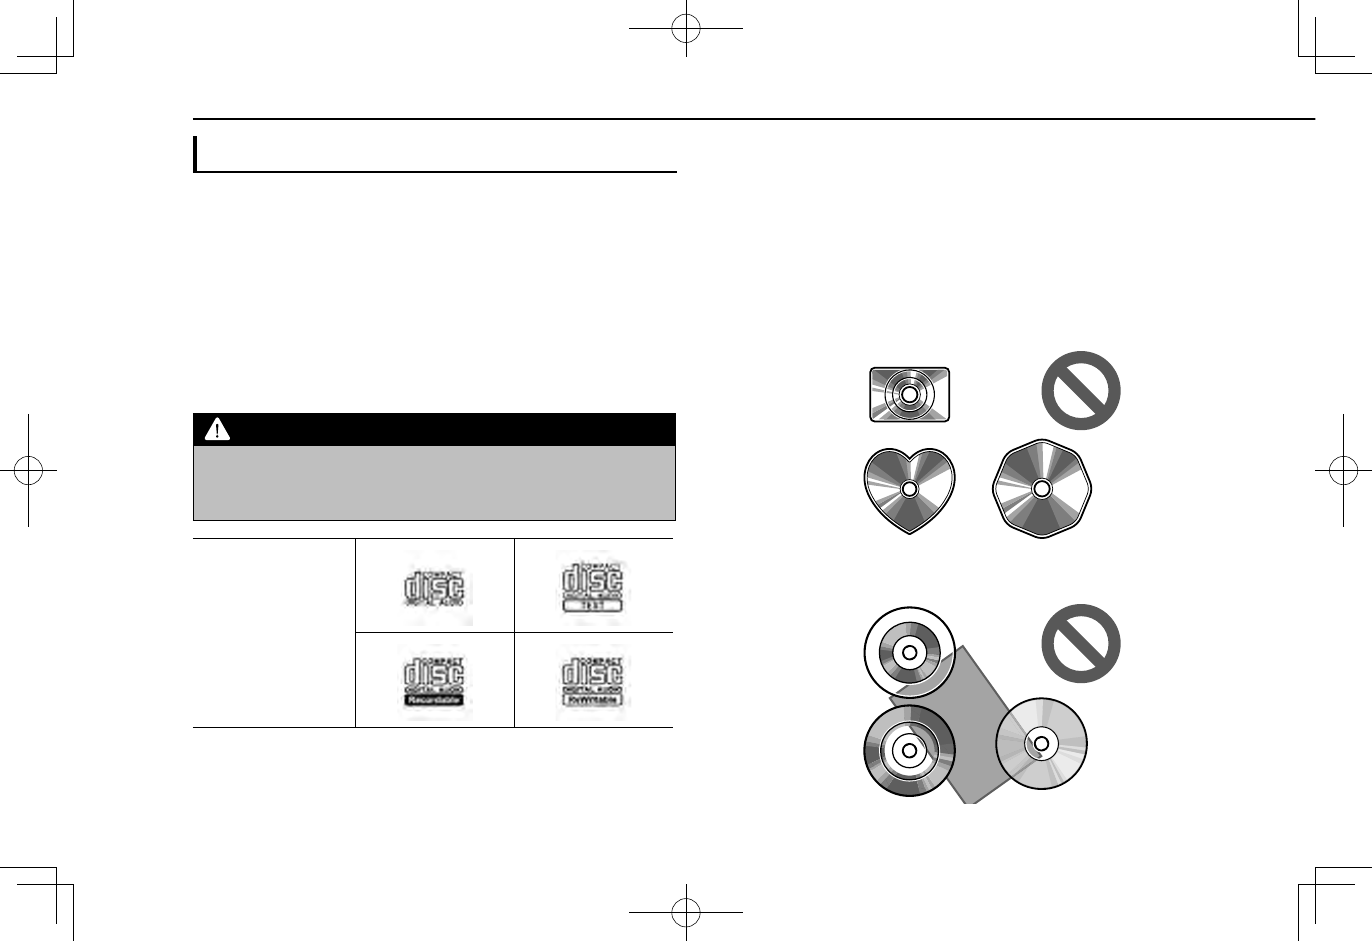
WARNING
lCD players use an invisible laser beam which could cause
hazardous radiation exposure if directed outside the unit. Be
sure to operate the player correctly.
Audio CDs
●Use only discs marked as shown above. The
following products may not be playable on your
player:
• SACD
• dts CD
• Copy-protected CD
• Video CD
XSpecial shaped discs
XTransparent/translucent discs
TIPS FOR OPERATING THE AUDIO SYSTEM
72
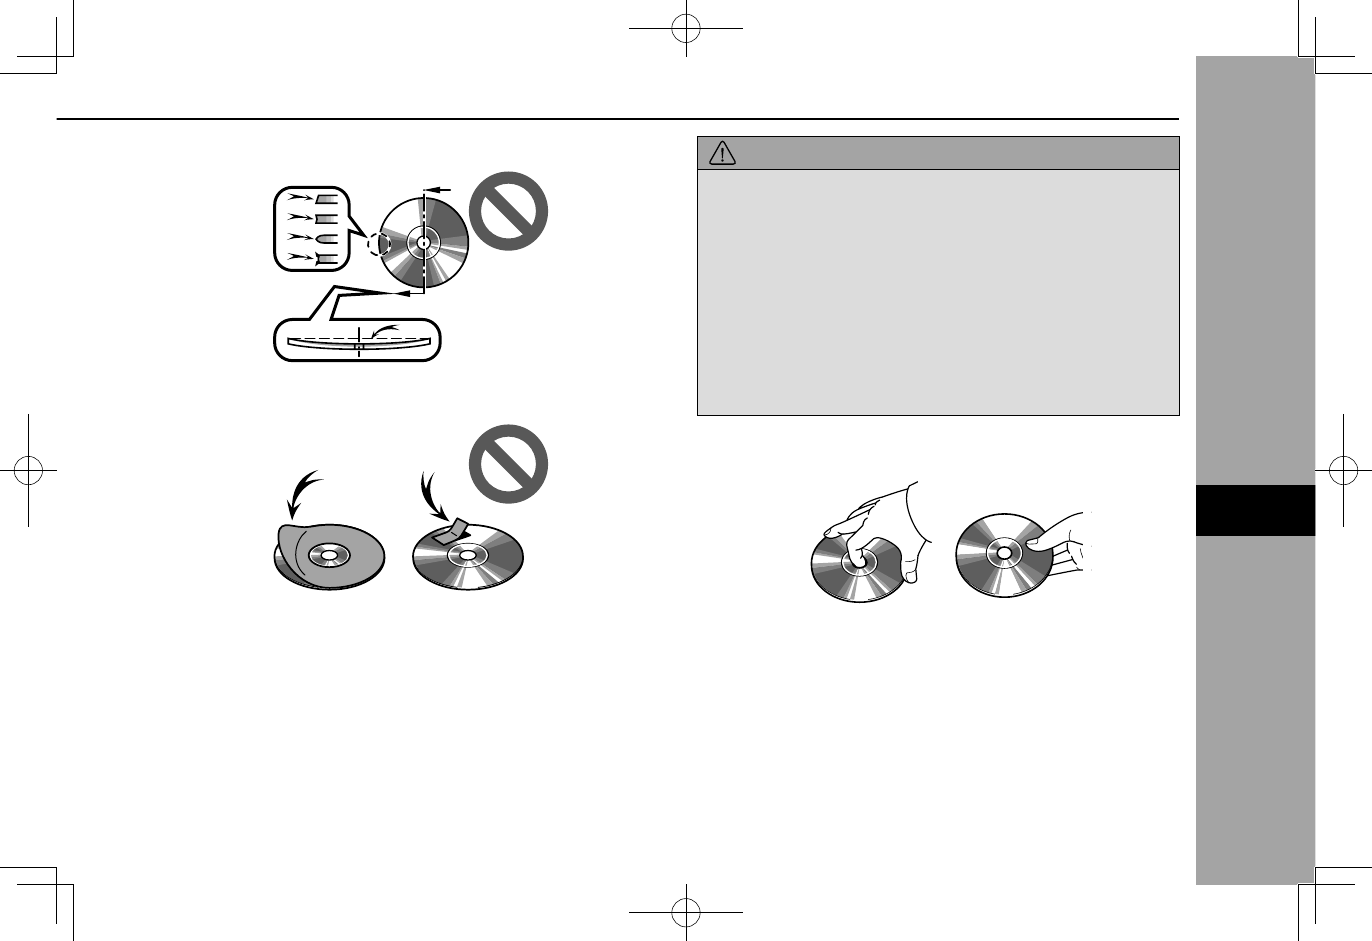
XLow quality discs
XLabeled discs
CAUTION
lDo not use special shaped, transparent/translucent,
low quality or labeled discs such as those shown in the
illustrations. The use of such discs may damage the player, or
it may be impossible to eject the disc.
lThis system is not designed for use of Dual Discs. Do not use
Dual Discs because they may cause damage to the player.
lDo not use discs with a protection ring. The use of such discs
may damage the player, or it may be impossible to eject the
disc.
lDo not use printable discs. The use of such discs may
damage the player, or it may be impossible to eject the disc.
CorrectWrong
●Handle discs carefully, especially when inserting
them. Hold them on the edge and do not bend them.
Avoid getting ngerprints on them, particularly on the
shiny side.
TIPS FOR OPERATING THE AUDIO SYSTEM
73
AUDIO
6
●Dirt, scratches, warping, pin holes or other disc
damage could cause the player to skip or to repeat a
section of a track. (To see a pin hole, hold the disc up
to the light.)
●Remove discs from the players when not in use.
Store them in their plastic cases away from moisture,
heat and direct sunlight.
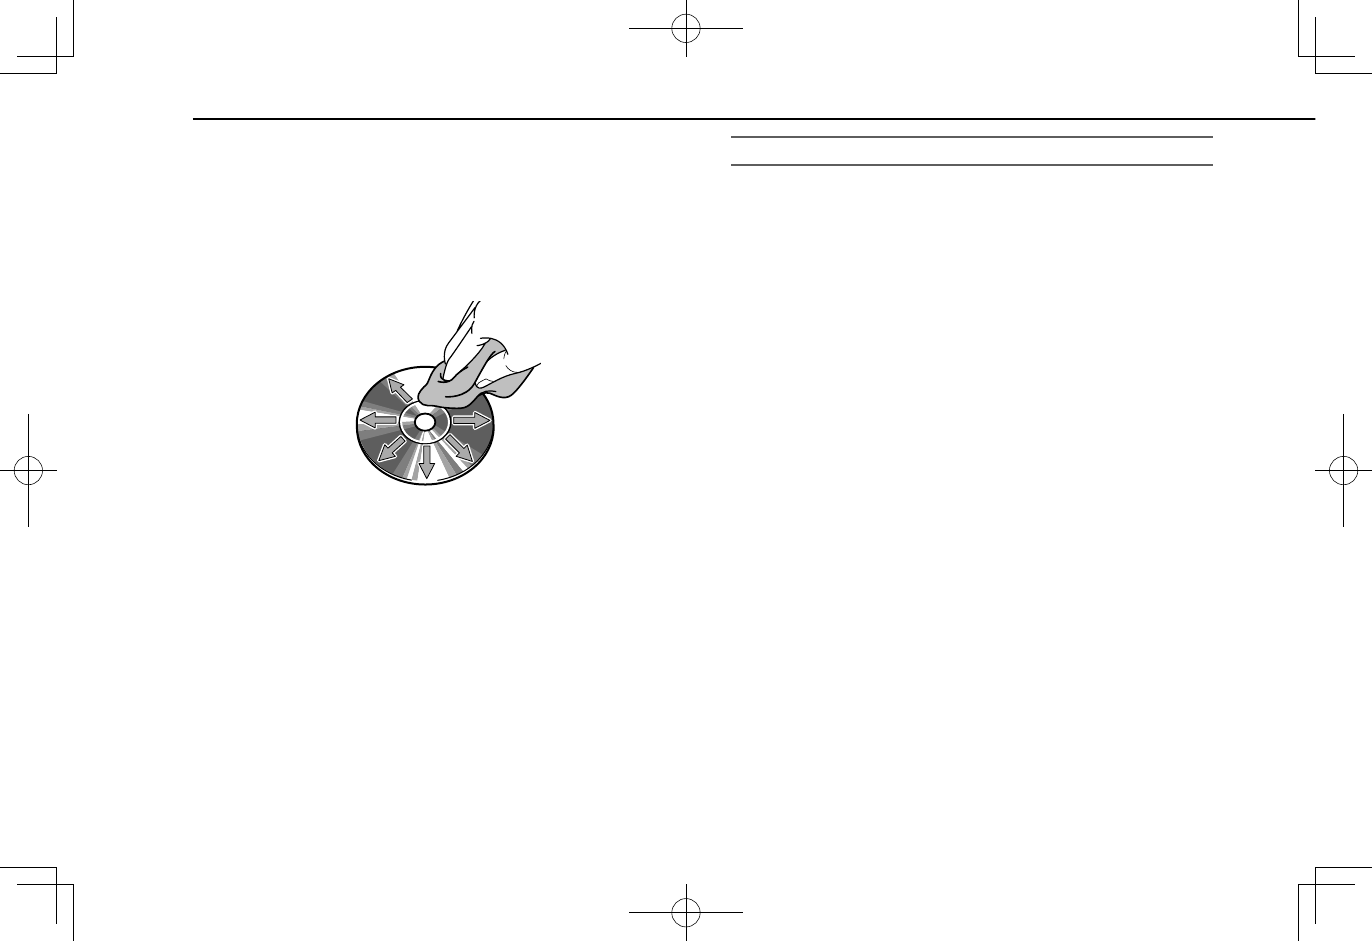
To clean a disc: Wipe it with a soft, lint-free cloth that has
been dampened with water. Wipe in a straight line from
the center to the edge of the disc (not in circles). Dry it
with another soft, lint-free cloth. Do not use a conventional
record cleaner or anti-static device.
CD-R/RW DISCS
●CD-R/CD-RW discs that have not been subject to
the “nalizing process” (a process that allows discs
to be played on a conventional CD player) cannot be
played.
●It may not be possible to play CD-R/CD-RW discs
recorded on a music CD recorder or a personal
computer because of disc characteristics, scratches
or dirt on the disc, or dirt, condensation, etc. on the
lens of the unit.
●It may not be possible to play discs recorded on a
personal computer depending on the application
settings and the environment. Record with the
correct format. (For details, contact the appropriate
application manufacturers of the applications.)
●CD-R/CD-RW discs may be damaged by direct
exposure to sunlight, high temperatures or other
storage conditions. The unit may be unable to play
some damaged discs.
●If you insert a CD-RW disc into the player, playback
will begin more slowly than with a conventional CD or
CD-R disc.
●Recordings on CD-R/CD-RW cannot be played using
the DDCD (Double Density CD) system.
TIPS FOR OPERATING THE AUDIO SYSTEM
74
USB MEMORY DEVICE
●USB communication formats: USB 2.0 HS (480
Mbps) and FS (12 Mbps)
●File formats: FAT 16/32
●Correspondence class: Mass storage class
iPod
The following iPod®, iPod nano®, iPod touch® and
iPhone® devices can be used with this system.
Made for
●iPod touch (5th generation)
●iPod nano (7th generation)
●iPhone 4s
●iPhone 5
●iPhone 5s
●iPhone 6
●iPhone 6s
●iPhone 6 Plus
●iPhone 6s Plus
●iPhone SE
●Depending on differences between models or
software versions etc., some models might be
incompatible with this system.
●iPod video is not supported.
●For USA customers, please visit www.subaru.com for
details. Outside of the USA customers, contact your
local dealer to arrange a demonstration in order to
conrm whether or not the phone can be paired with
the vehicle.
FILE INFORMATION
Codec Description Channels Container/
Extension
MPEG-4
AAC LC 8-48 kHz sampling rate
8-320 kbps CBR, VBR Mono and
stereo .3gp, .m4a,
.aac, .mp4
MPEG-4 HE
AAC
16-48 kHz sampling
rate
8-320 kbps CBR, VBR
Mono and
stereo .3gp, .m4a,
.aac, .mp4
MPEG-4 HE
AAC v2
16-48 kHz sampling
rate
8-320 kbps CBR, VBR
Mono and
stereo .3gp, .m4a,
.aac, .mp4
MP3 8-48 kHz sampling rate
8-320 kbps CBR, VBR
Mono,
Stereo,
and Joint .mp3
WMA2/7/8/
9/9.1/9.2
16-48 kHz sampling
rate
8-320 kbps CBR, VBR
Mono and
stereo .wma, .asf
PCMWAVE
8 bit and 16bit
8000,16000,and
44100Hz
sampling frequency
Mono and
stereo .wav
TIPS FOR OPERATING THE AUDIO SYSTEM
75
AUDIO
6
●The player is compatible with VBR (Variable Bit Rate).
●MP3 (MPEG Audio Layer 3), WMA (Windows Media
Audio) and AAC (Advanced Audio Coding) are audio
compression standards.
● This system can play AAC/AAC+ v2/MP3/WMA les
on CD-R, CD-RW discs, USB memory device, and
Bluetooth device.
●This system can play disc recordings compatible with
ISO 9660 level 1 and level 2 and with the Romeo and
Joliet le system.
● When naming an AAC/AAC+ v2/MP3/WMA le, add
an appropriate le extension (.mp3/.wma/.m4a).
● This system plays back les with .mp3/.wma/.m4a
le extensions as AAC/AAC+ v2/MP3/WMA les
respectively. To prevent noise and playback errors,
use the appropriate le extension.
● This system can play only the rst session when
using multi-session compatible CDs.
● MP3 les are compatible with the ID3 Tag Ver. 1.0,
Ver. 1.1, Ver. 2.2 and Ver. 2.3 formats. This system
cannot display disc title, track title and artist name in
other formats.
● WMA/AAC les can contain a WMA/AAC tag that is
used in the same way as an ID3 tag. WMA/AAC tags
carry information such as track title and artist name.
● This system can play back AAC les encoded by
iTunes.
● The sound quality of MP3/WMA les generally
improves with higher bit rates. In order to achieve a
reasonable level of sound quality, discs recorded with
a bit rate of at least 128 kbps are recommended.
●The MP3/WMA player does not play back MP3/
WMA les from discs recorded using packet write
data transfer (UDF format). Discs should be recorded
using “pre-mastering” software rather than packet-
write software.
●m3u playlists are not compatible with the audio
device.
●MP3i (MP3 interactive) and MP3PRO formats are not
compatible with the audio device.
● When playing back les recorded as VBR (Variable
Bit Rate) les, the play time will not be correctly
displayed if the fast forward or rewind operations are
used.
●It is not possible to check folders that do not include
AAC/AAC+ v2/MP3/WMA les.
TIPS FOR OPERATING THE AUDIO SYSTEM
76
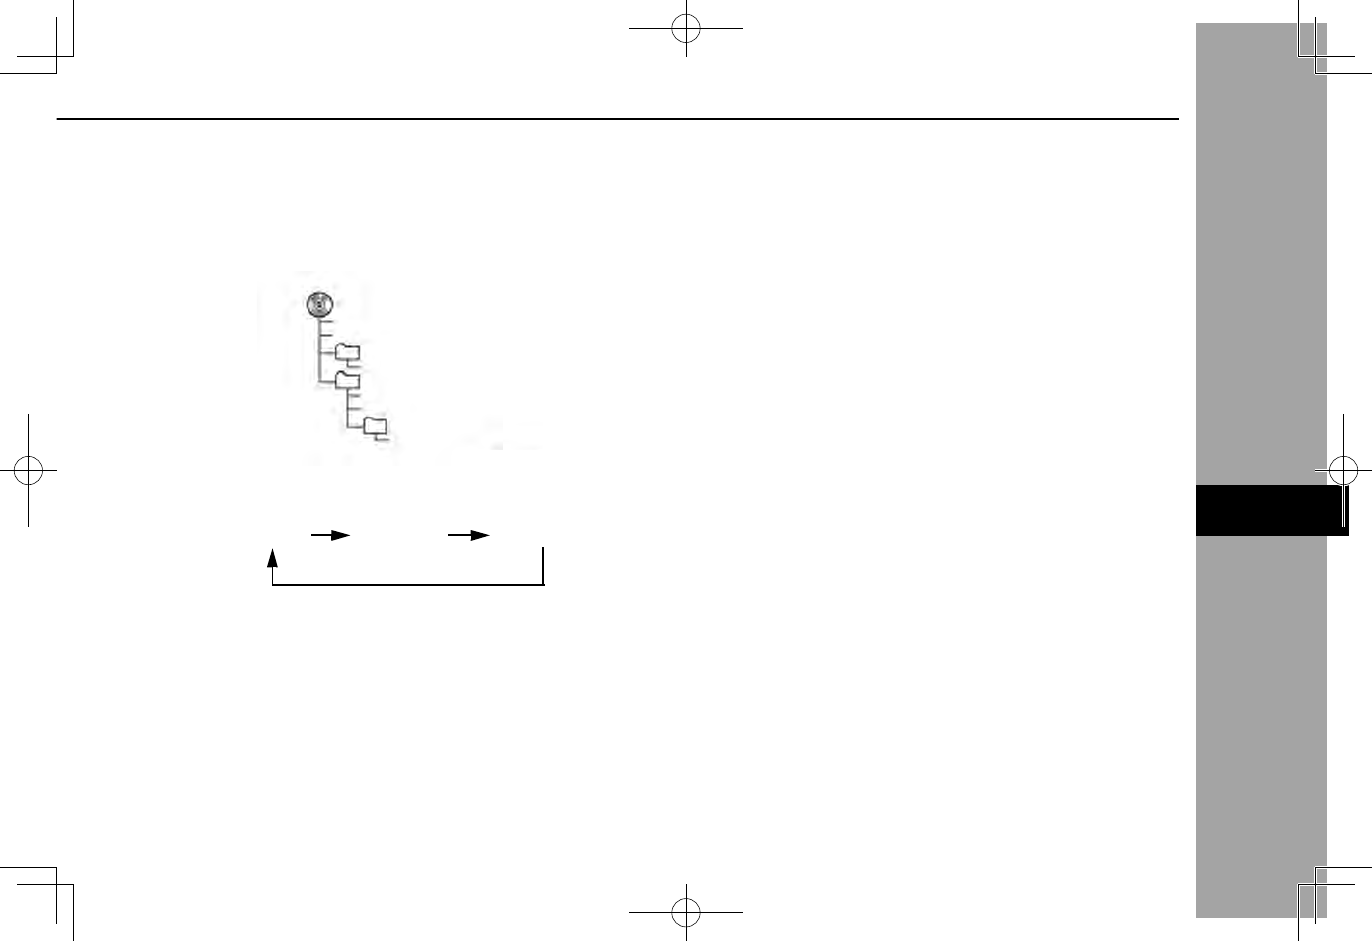
● AAC/AAC+ v2/MP3/WMA les in folders up to 3 levels
deep can be played. However, the start of playback
may be delayed when using discs containing
numerous levels of folders. For this reason, we
recommend creating discs with no more than 2 levels
of folders.
001.mp3
002.wma
Folder 1
003.mp3
Folder 2
004.mp3
005.wma
Folder 3
006.m4a
●The play order of the compact disc with the structure
shown above is as follows:
001.mp3 002.wma . . .006.m4a
●The order changes depending on the personal
computer and AAC/AAC+ v2/MP3/WMA encoding
software you use.
TIPS FOR OPERATING THE AUDIO SYSTEM
77
AUDIO
6
END USER LICENSE AGREEMENT
78
END USER LICENSE AGREEMENT
END USER LICENSE AGREEMENT
79
APPENDIX/WHAT TO DO IF/INDEX
9
CERTIFICATION
CERTIFICATION
SiriusXM® Satellite Radio
●© 2016 Sirius XM Radio Inc. Sirius, XM, SiriusXM and
all related marks and logos are trademarks of Sirius XM
Radio Inc. All other marks, channel names and logos are
the property of their respective owners. All rights reserved.
SiriusXM DATA SERVICE
Neither SiriusXM nor Subaru is responsible for any errors
or inaccuracies in the SiriusXM data services or its use in
vehicle.
RADIO WAVE COMMUNICATIONS
XU.S.A.
●This device complies with part 15 of the FCC Rules.
Operation is subject to the following two conditions: (1)
This device may not cause harmful interference, and
(2) this device must accept any interference received,
including interference that may cause undesired
operation.
WARNING
lFCC WARNING
Changes or modications not expressly approved by the party
responsible for compliance could void the user’s authority to
operate the equipment.
lCAUTION: Radio Frequency Radiation Exposure
This equipment complies with FCC radiation exposure limits
set forth for an uncontrolled environment and meets the FCC
radio frequency (RF) Exposure Guidelines. This equipment
should be installed and operated keeping the radiator at
least 20cm or more away from person’s body in normal use
position.
lCo-location: This transmitter must not be co-located or
operated in conjunction with any other antenna or transmitter.
CERTIFICATION
80
XCanada
●This device complies with Industry Canada’s licence-
exempt RSSs. Operation is subject to the following two
conditions:
(1) This device may not cause interference; and
(2) This device must accept any interference, including
interference that may cause undesired operation of the
device.
Le présent appareil est conforme aux CNR d’Industrie
Canada applicables aux appareils radio exempts de
licence. L’exploitation est autorisée aux deux conditions
suivantes:
(1) l’appareil ne doit pas produire de brouillage;
(2) l’utilisateur de l’appareil doit accepter tout brouillage
radioé lectrique subi, même si le brouillage est
susceptible d’en compromettre le fonctionnement.
WARNING
lCAUTION: Radio Frequency Radiation Exposure
This equipment complies with IC radiation exposure limits set
forth for an uncontrolled environment and meets RSS-102 of
the IC radio frequency (RF) Exposure rules. This equipment
should be installed and operated keeping the radiator at
least 20cm or more away from person’s body (excluding
extremities: hands, wrists, feet and ankles).
ATTENTION: l’exposition aux rayonnements radiofréquence
- Cet équipement est conforme aux limites d’exposition
aux rayonnements énoncées pour un environnement non
contrôlé et respecte les règles d’exposition aux fréquences
radioélectriques (RF) CNR-102 de l’IC. Cet équipement doit
être installé et utilisé en gardant une distance de 20cm ou
plus entre le dispositif rayonnant et le corps (à l’exception des
extrémités: mains, poignets, pieds et chevilles).
CERTIFICATION
81
APPENDIX/WHAT TO DO IF/INDEX
9
XMéxico
●La operación de este equipo está sujeta a las siguientes
dos condiciones: (1) es posible que este equipo o
dispositivo no cause interferencia perjudicial y (2) este
equipo o dispositivo debe aceptar cualquier interferencia,
incluyendo la que pueda causar su operación no
deseada.
Gracenote (7-inch with Navi system/7-inch
system only)
●Gracenote®, Gracenote logo and logotype, and the
“Powered by Gracenote” logo are either registered
trademarks or trademarks of Gracenote, Inc. in the United
States and/or other countries.
●Music and recognition technology and related data are
provided by Gracenote®.
Gracenote is the industry standard in music recognition
technology and related content delivery.
For more information, please visit www.gracenote.com.
CERTIFICATION
82