Harman CNMSB200TC Soundbar User Manual 72 0SB200 QSGB1
Harman International Industries, Inc Soundbar 72 0SB200 QSGB1
Harman >
MANUAL RE0.01
CINEMA SB200
powered soundbar speaker
QUICK-START GUIDE
THANK YOU FOR CHOOSING THIS JBL®
PRODUCT
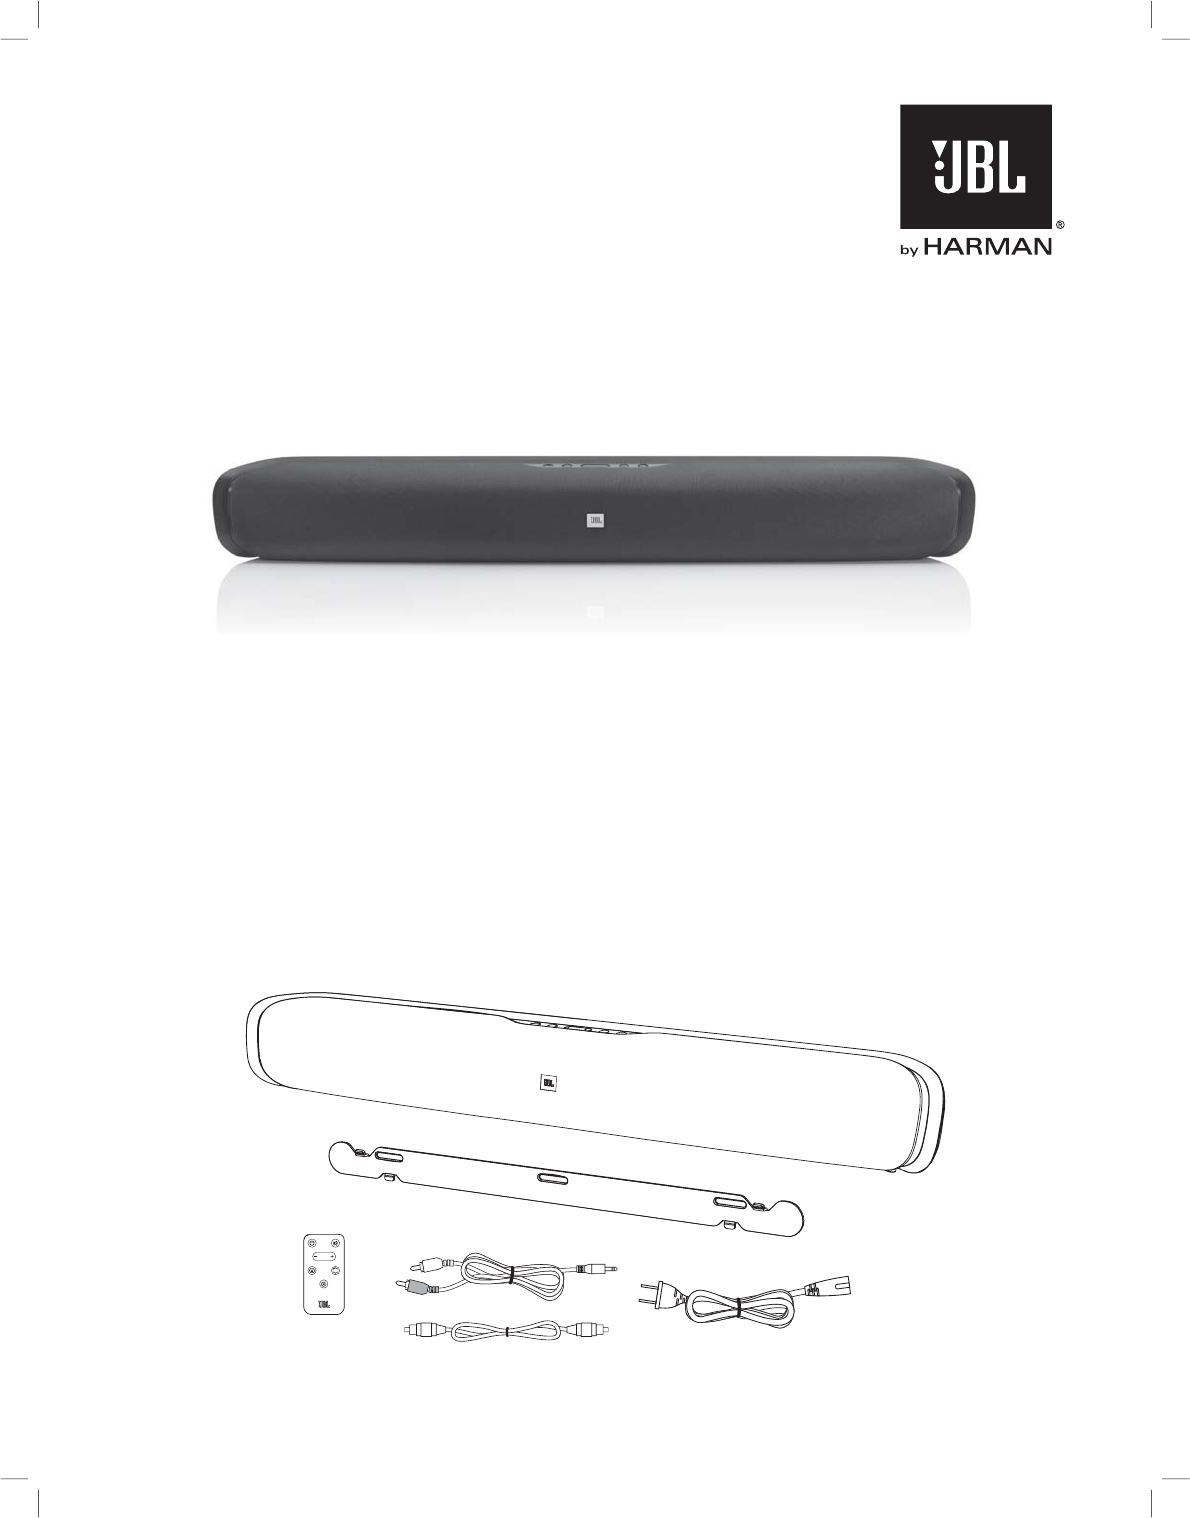
The JBL Cinema SB200 powered soundbar speaker is a complete,
integrated sound system that will dramatically improve the sound
of programs you watch on your television. It can mount on a wall
or sit on a shelf and includes all of the cables you need to connect
it to your TV and your cable/satellite tuner or disc player.
We’re confident that this JBL system will provide every note
of enjoyment that you expect – and that when you think about
purchasing additional audio equipment for your home, car or
office, you will once again choose JBL products.
This quick-start guide contains all the information you need to set
up, connect and adjust your new speaker system. For more in-
depth information, go to our Web site: www.jbl.com.
INCLUDED ITEMS
BASS
1x
1x
1x
1x 1x
1x
www.jbl.com
English
3
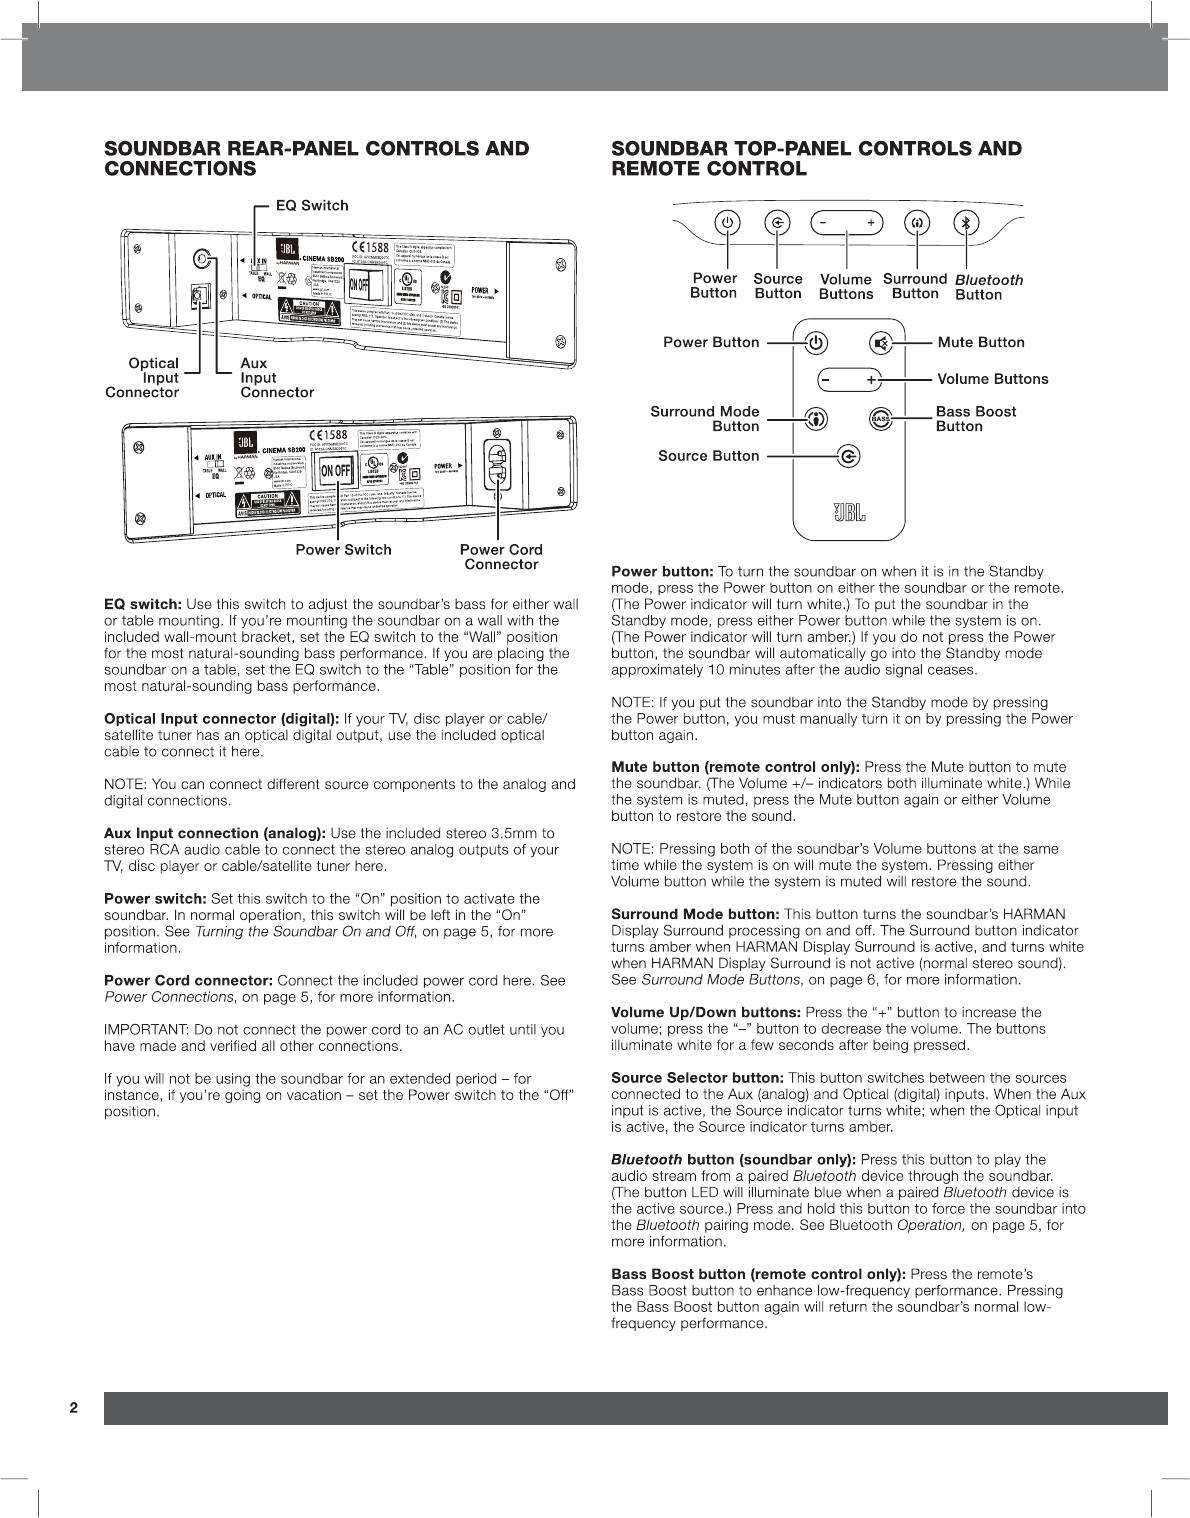
SOUNDBAR PLACEMENT
PLACING THE SOUNDBAR ON A TABLE
If your TV is placed on a table, you can place the soundbar on the table
directly in front of the TV stand, centered with the TV screen. As long
as the surface of the table is flat, the soundbar will rest on its rubber
bumpers.
q2DSSGDRNTMCA@QR$0RVHSBGHMSGDf3@AKDtONRHSHNM2DDSoundbar
Rear-Panel Controls and Connections, on page 2.
WALL-MOUNTING THE SOUNDBAR
If your TV is attached to a wall, you can use the included wall-mount
bracket to mount the soundbar on the wall directly below the TV
screen.
1. Determine the location for the soundbar on the wall. Make sure that
the top of the soundbar will not block your view of the TV screen
when it is mounted on the wall.
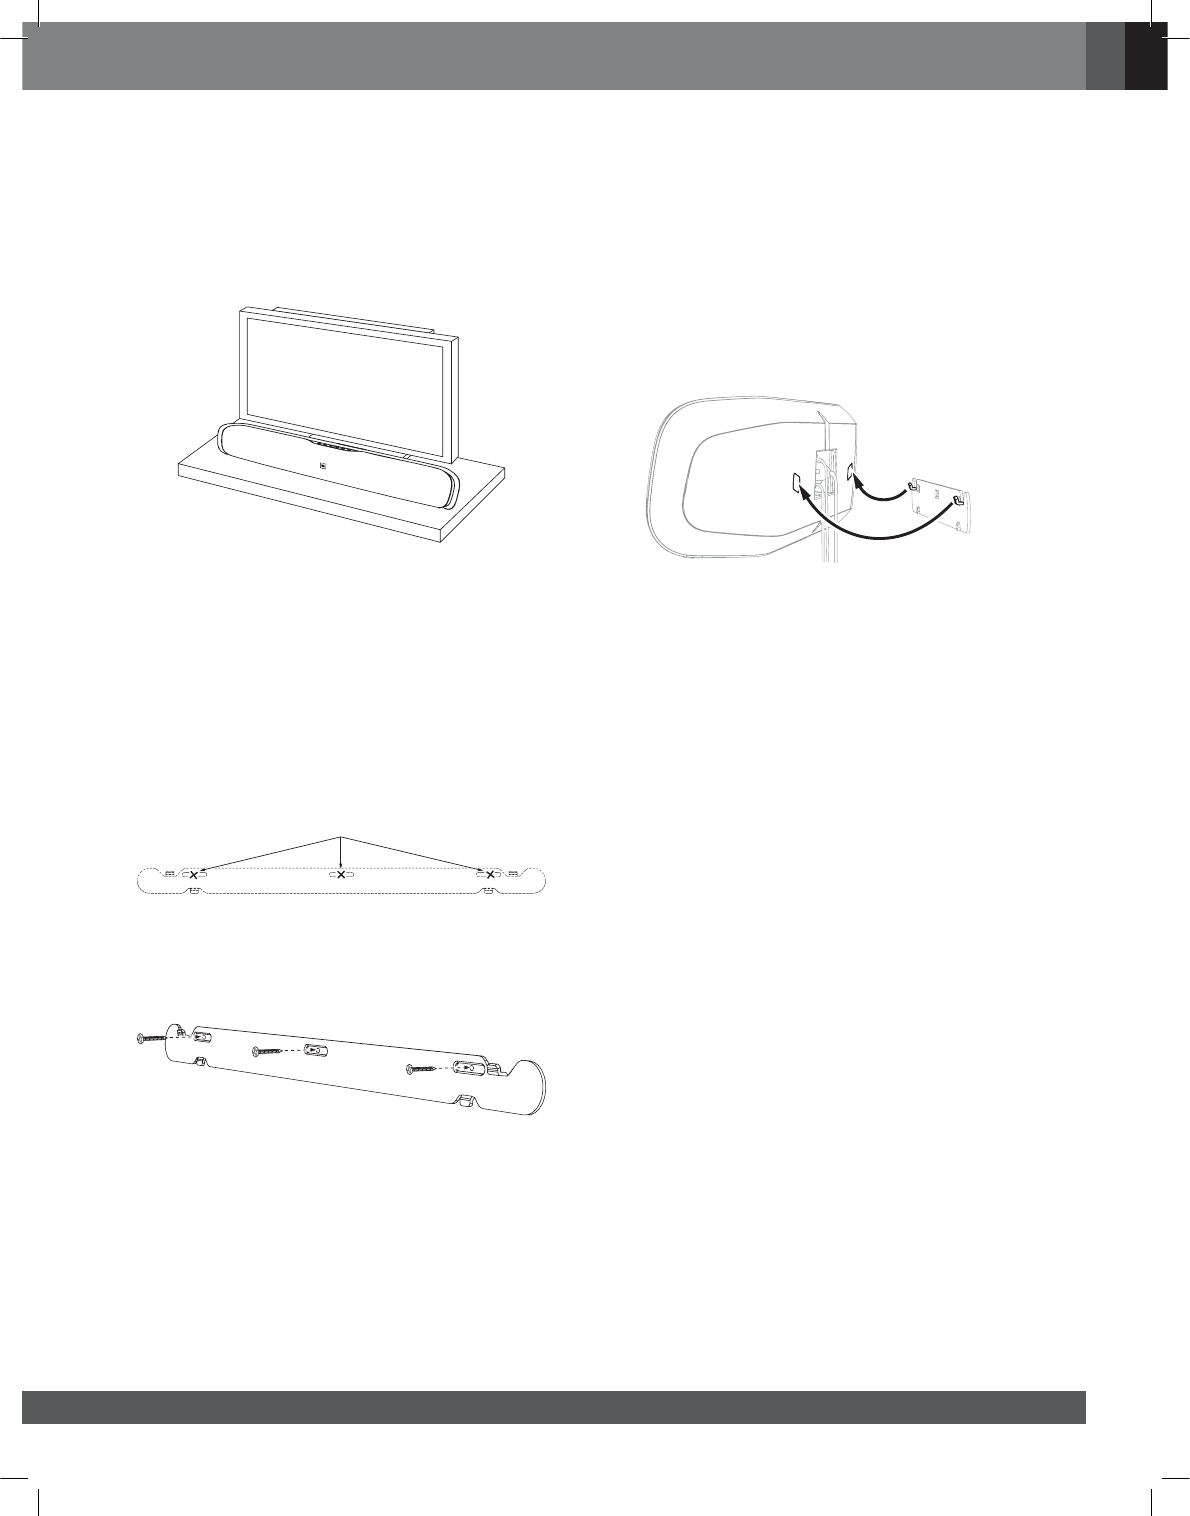
2. Hold the bracket against the wall as a template and mark the
locations of the soundbar wall-mount bracket holes on the wall. The
three holes should be evenly spaced 7-1/16" (18cm) apart, and the
bracket slots are designed to accept 4mm screws. Make sure that
the holes are at the same height. See the illustration below.
Mark Three Bracket Hole Locations
7-1/16" (18cm) Apart
3. Making sure that the bracket’s flat side is against the wall, attach
the wall-mount bracket to the wall at the locations you marked,
using hardware that is appropriate for the wall’s construction and
materials. Note that the soundbar weighs 7.5 lb (3.4kg). Be sure to
use hardware that can support this weight.
4. After reading the Connections section on page 4, connect all cables
to the soundbar.
IMPORTANT: Do NOT plug the soundbar’s power cord into an AC
outlet at this time.
q2DSSGDRNTMCA@QR$0RVHSBGHMSGDf6@KKtONRHSHNM@MCRDSSGD
soundbar’s Power switch in the “On” position. See Soundbar Rear-
Panel Controls and Connections, on page 2.
5. Attach the soundbar to the bracket by sliding the bracket’s upper
tabs into the slots on the back of the soundbar. The soundbar’s slots
allow you to adjust the soundbar’s angle on the wall to ensure that it
is level.
Insert Tabs on Bracket
into Slots on Soundbar
4
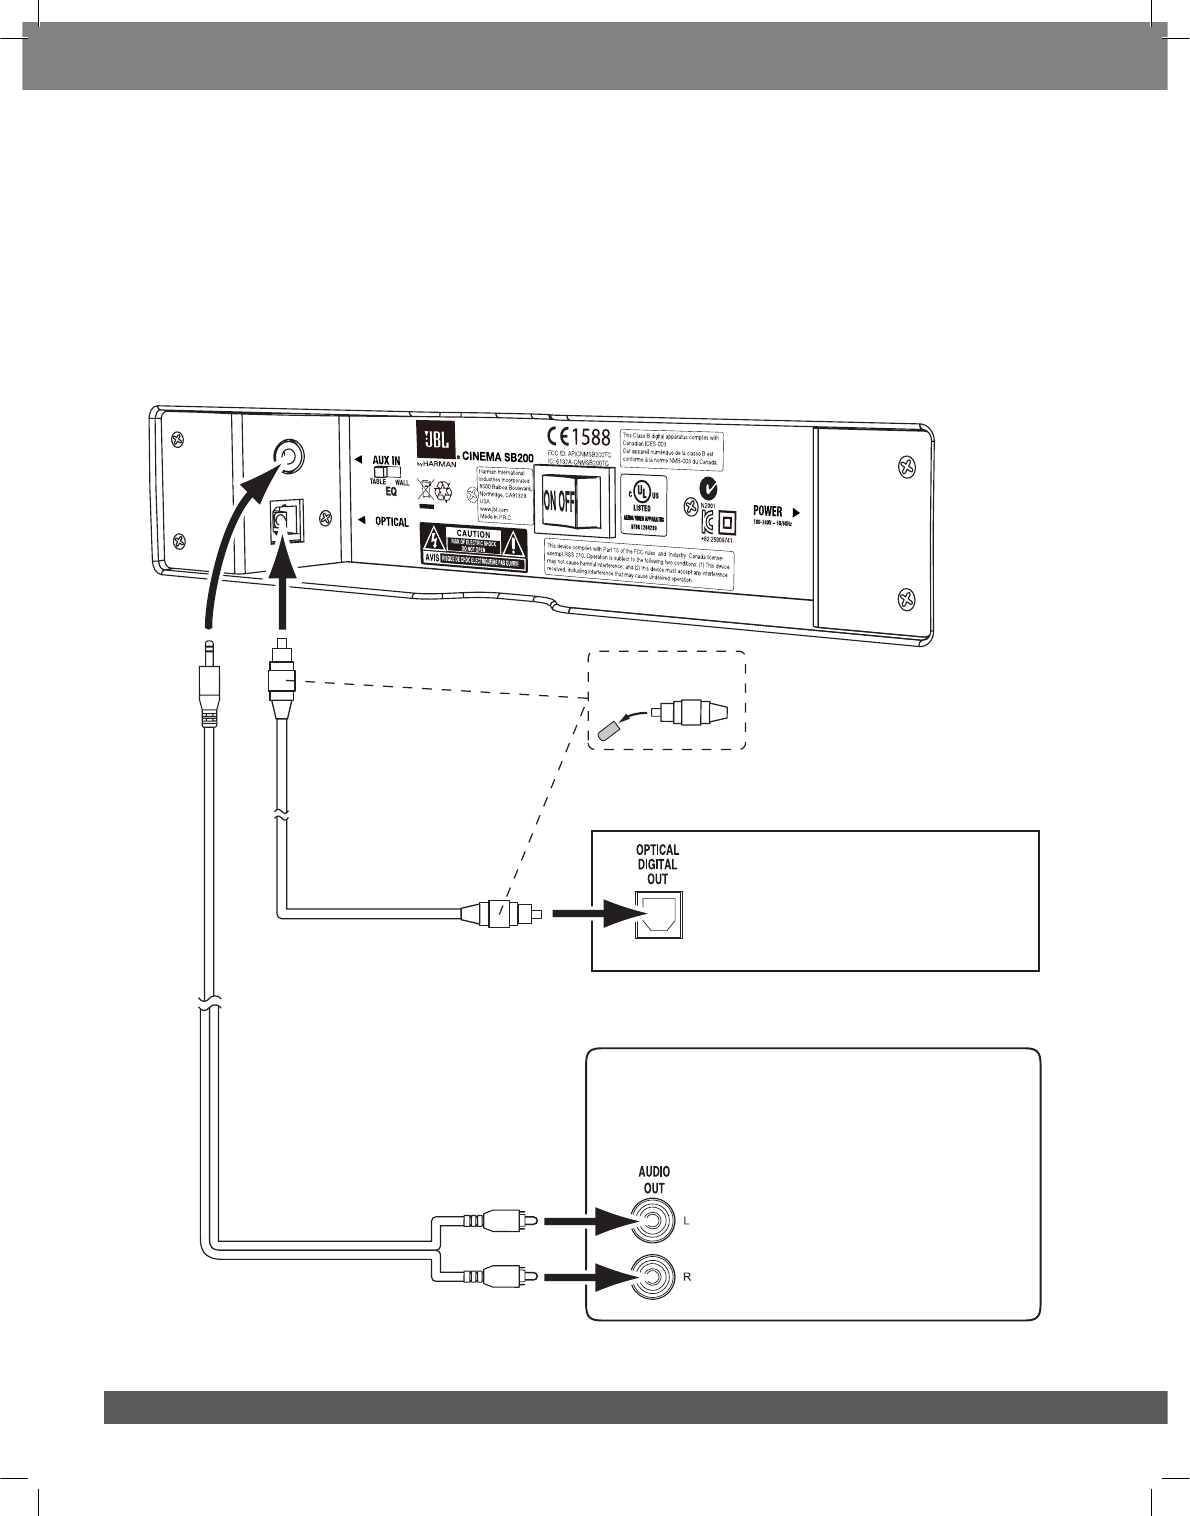
CONNECTIONS
SOURCE CONNECTIONS
Analog: Use the supplied stereo audio cable to connect the soundbar’s
Aux (analog) input to your TV’s stereo audio output. If your TV has two
sets of audio output jacks, use the set that has a fixed (not variable)
output level. This will let you turn your TV’s speakers all the way off
while the TV still supplies a constant audio signal to the soundbar.
Digital: If your disc player, cable tuner or satellite tuner has an optical
digital output, you can use the supplied optical digital audio cable to
connect it to the soundbar’s Optical (digital) input.
NOTE: If your disc player, cable tuner or satellite tuner does not have an
optical digital output, you can connect its analog audio output to your
TV. The TV will send its audio signal to the soundbar through the analog
connection described above.
Optical
Cable
(supplied)
Audio Cable
(supplied)
TV
Disc Player or Cable/Satellite Tuner
Remove Caps
www.jbl.com
English
5
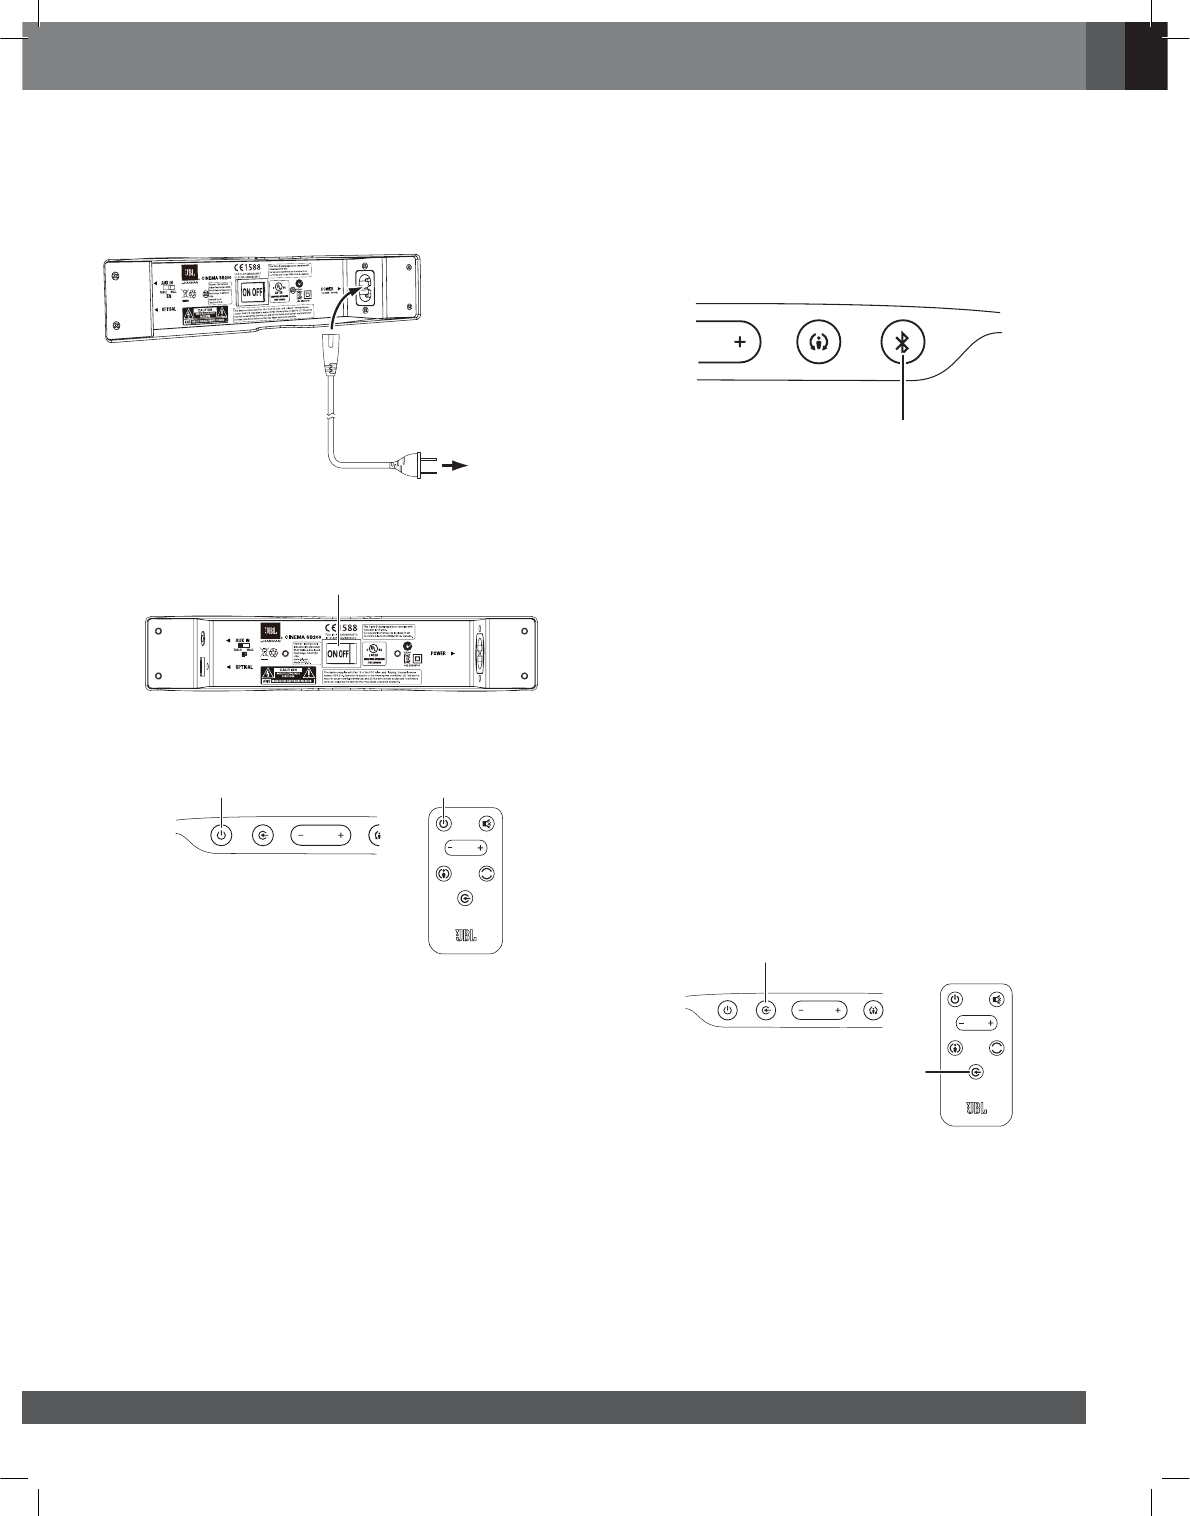
POWER CONNECTIONS
After verifying that all of the source connections have been made properly,
plug the supplied power cord into the soundbar’s Power Cord connector,
and plug the other end into an active,
unswitched
AC outlet. Do NOT plug
this cord into the accessory outlet found on some audio components.
Power Cord
(supplied)
To Unswitched
AC Outlet
USING YOUR SOUNDBAR SYSTEM
TURNING THE SOUNDBAR ON AND OFF
Set the soundbar’s Power switcn to the “On” position.
100-240V ~ 50/60Hz
Power Switch
Press the Power button on either the soundbar or the remote to turn
the soundbar on. To put the soundbar in the Standby mode, press
either Power button while the soundbar is on.
BASS
Power Button Power Button
If you do not press the Power button, the soundbar will automatically go
into the Standby mode approximately 10 minutes after the audio signal
ceases. NOTE: If you have put the soundbar into the Standby mode by
pressing the Power button, you must manually turn it on by pressing
the Power button again. If the soundbar has automatically gone into
the Standby mode 10 minutes after the audio signal has ceased, it will
automatically turn itself on when it receives an audio signal at either
input connection.
If you will be away from home for an extended period of time, or if
you will not be using the soundbar for an extended period, set the
soundbar’s Power switch to the “Off” position.
BLUETOOTH OPERATION
To wirelessly stream audio to the soundbar from a Bluetooth-enabled
device:
1. Confirm that the soundbar is in the Bluetooth pairing mode (the
Bluetooth button LED will be flashing blue). If the LED is not flashing
blue, press and hold the Bluetooth button until its LED begins to
flash blue.
Bluetooth Button
2. Place the device in the pairing mode. Use the device’s Bluetooth
pairing menu to pair it with the soundbar. (The soundbar will appear
as “SB200” in the device’s menu.) If the device requires a passcode,
use 0000.
3. When the soundbar’s Bluetooth button LED illuminates constantly,
it is paired with the device and you can stream audio via Bluetooth
from the device to the soundbar.
To disconnect the Bluetooth device, press and hold the soundbar’s
Bluetooth button until the LED begins flashing. To pair the soundbar
with a different Bluetooth-enabled device, repeat Steps 1 – 3 with the
new device.
Notes on Bluetooth operation:
q8NTB@ML@MT@KKXRVHSBGRNTQBDRSNSGDO@HQDCBluetooth device by
pressing the soundbar’s Bluetooth button.
q(EXNTRVHSBGSGDRNTMCA@QSN@CHEEDQDMSRNTQBDVGHKD@O@HQDC
Bluetooth device is streaming to the soundbar, the soundbar will
send a Stop command and the Bluetooth device will stop streaming.
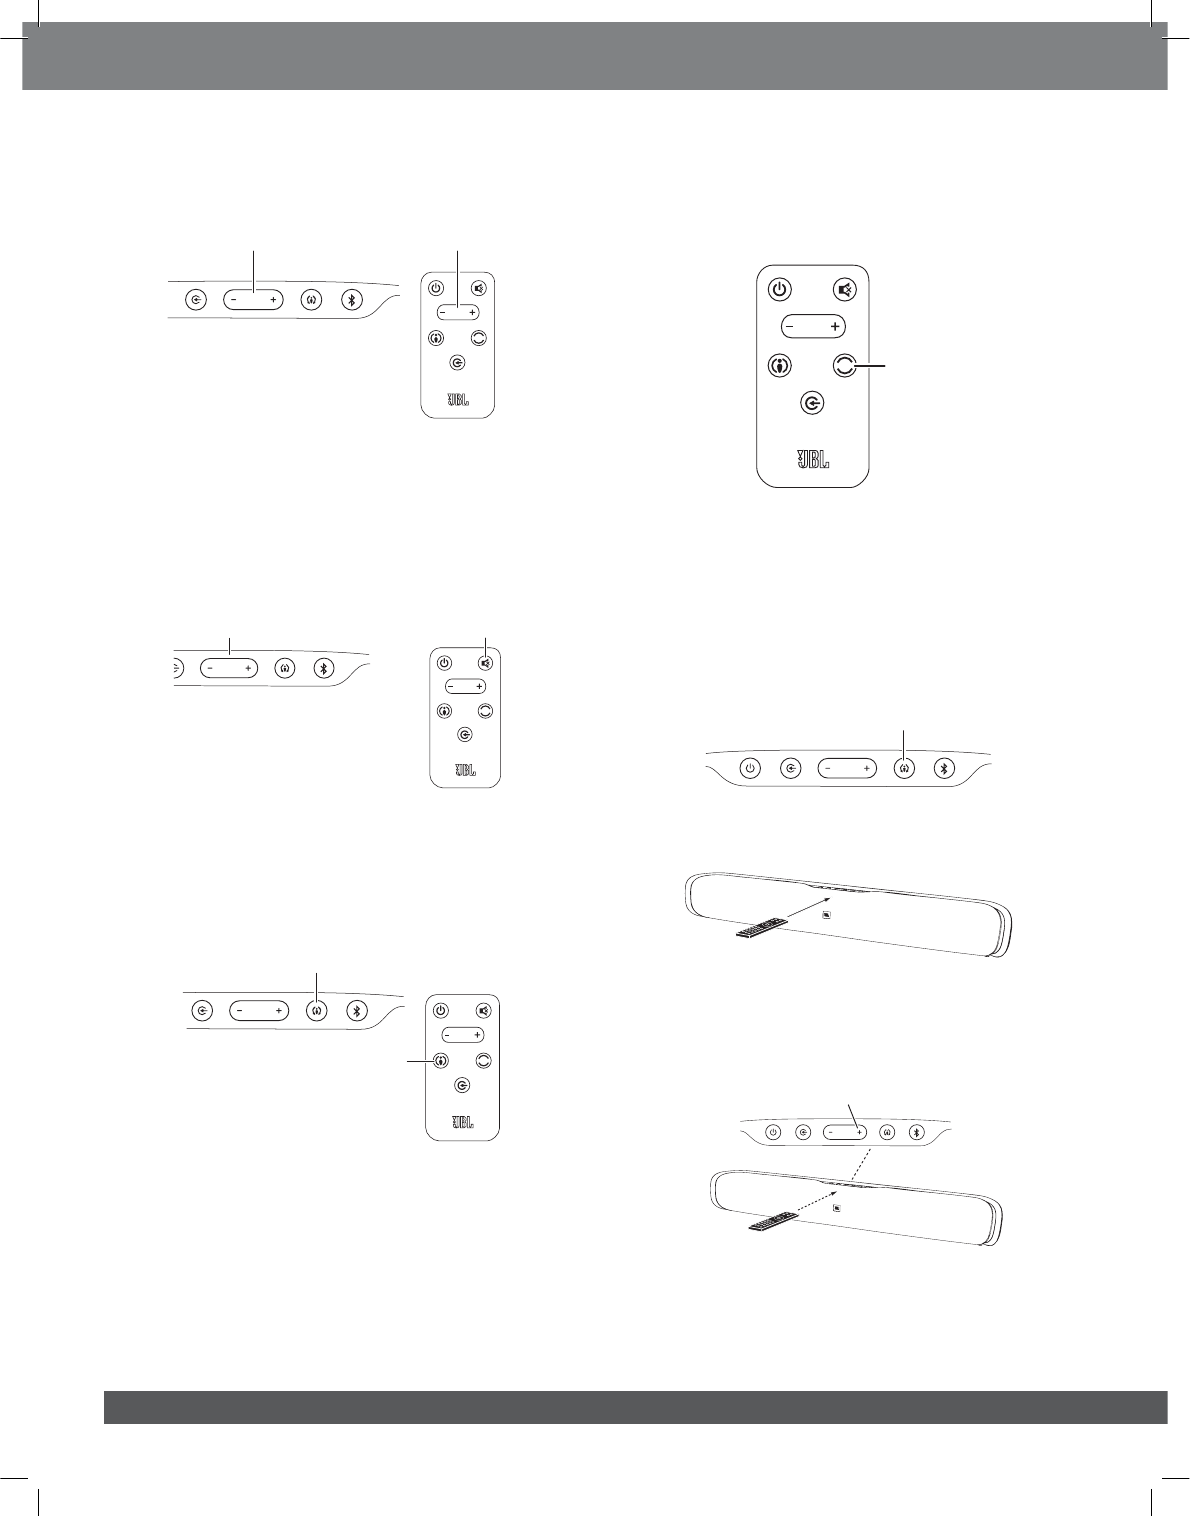
SWITCHING SOURCES
Press the soundbar’s or remote’s Source button to switch between
the devices you connected to the Aux input and Optical input and a
device streaming audio via Bluetooth. When the Aux input is active the
soundbar’s Source indicator will illuminate white; when the Optical input
is active the soundbar’s Source indicator will illuminate amber.
BASS
Source Button
Source
Button
6
ADJUSTING THE SYSTEM’S VOLUME
Press the soundbar’s or remote’s Volume + and – buttons to raise and
lower the system’s volume one step at a time. Hold down the buttons
to continuously raise or lower the volume.
BASS
Volume Buttons Volume Buttons
For the best sound, we recommend turning your TV’s built-in speakers
off. Consult your TV’s owner’s manual to find out how to do this.
MUTING THE SYSTEM
Momentarily press both of the soundbar’s Volume buttons at the
same time, or press the remote’s Mute button to mute the system.
(Both Volume indicators illuminate.) Momentarily press either of the
soundbar’s Volume buttons or press the remote’s Mute button again to
un-mute the system. (The Volume indicators turn off.)
BASS
Both Volume Buttons Mute
Button
CHANGING THE SURROUND MODE
Press the soundbar’s or remote’s Surround Mode indicator to switch the
sound between normal stereo (the Surround Mode indicator lights white)
and HARMAN Display Surround (the Surround Mode indicator lights
amber). The HARMAN Display Surround setting will produce a complete
surround-sound experience for anyone sitting in front of and several
feet away from the soundbar. Although it is particularly effective when
watching movies, you can also try the HARMAN Display Surround setting
for music.
BASS
Surround Mode Button
Surround Mode
Button
BOOSTING THE BASS
Press the remote’s Bass Boost button to enhance low-frequency
performance, resulting in bass with more impact, which you may
prefer while watching movies or listening to music. There is no harm in
experimenting with this control. Pressing the Bass Boost button again
will return the soundbar’s normal low-frequency performance.
BASS
Bass Boost
Button
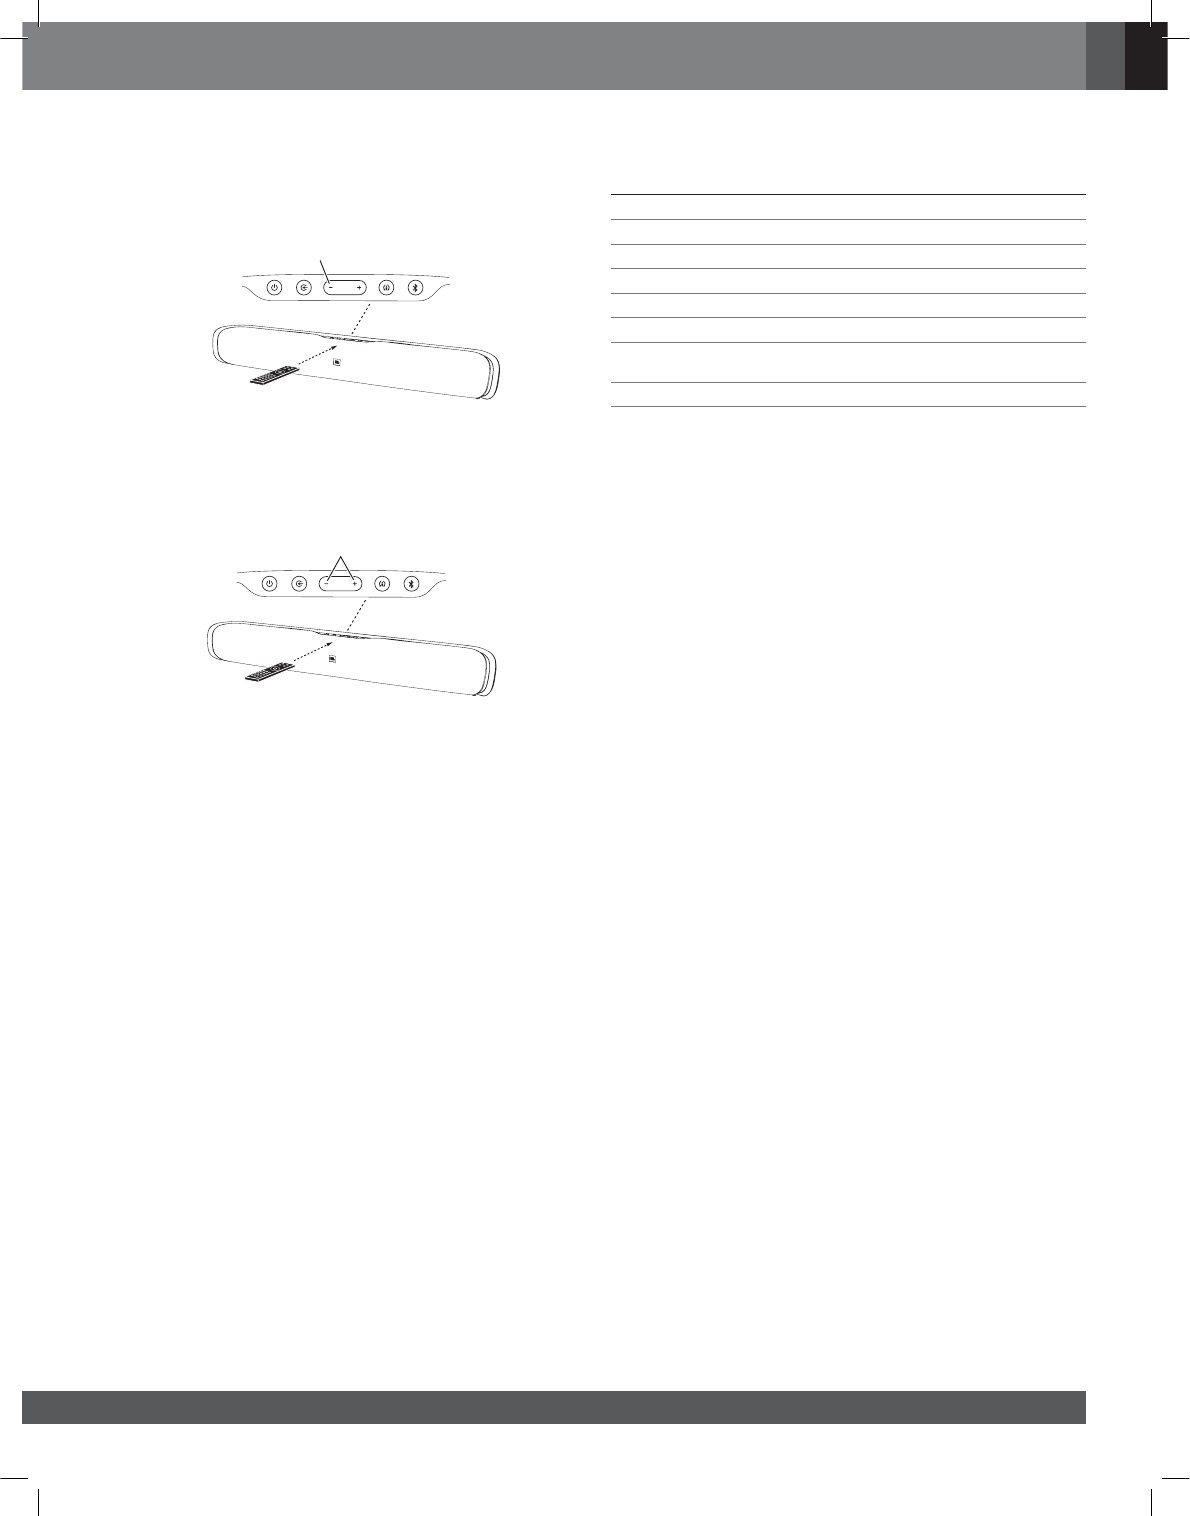
LEARNING YOUR TV REMOTE’S VOLUME AND
MUTE COMMANDS
You can program the soundbar so it will respond to your TV remote’s
volume up, volume down and mute commands. This will let you control
both the soundbar and your TV with a single remote. Before you begin
to program the soundbar, have your TV remote in hand.
1. Press and hold the soundbar’s Surround button until the button
begins flashing amber.
Press and Hold Until
Button Flashes Amber
2. Hold your TV’s remote approximately 12” (30cm) from the front of the
soundbar and aim the remote directly at the soundbar:
TV
Remote
30cm
(12")
q/QDRRSGD35QDLNSDRUNKTLDTOATSSNMVGHKDOQDRRHMF@MCGNKCHMF
the soundbar’s Volume + button. If the programming was successful
the soundbar’s Surround button will change from amber to solid
white for one second, then will return to flashing amber.
A) Hold Down Soundbar’s
Volume + Button
B) Press TV Remote’s
Volume Up Button
www.jbl.com
English
7
q/QDRRSGD35QDLNSDRUNKTLDCNVMATSSNMVGHKDOQDRRHMF@MC
holding the soundbar’s Volume – button. If the programming was
successful the soundbar’s Surround button will change from amber
to solid white for one second, then will return to flashing amber.
A) Hold Down Soundbar’s
Volume – Button
B) Press TV Remote’s
Volume Down Button
q/QDRRSGD35QDLNSDRLTSDATSSNMVGHKDOQDRRHMF@MCGNKCHMFSGD
soundbar’s Volume + and Volume – buttons at the same time. If the
programming was successful the soundbar’s Surround button will
change from amber to solid white for one second, then will return to
flashing amber.
A) Hold Down Soundbar’s
Volume + and – Button
B) Press TV Remote’s
Mute Button
3. When you’re finished, press and hold the soundbar’s Surround
button until the button stops flashing amber.
The soundbar will now respond to your TV remote’s volume and mute
commands.
SPECIFICATIONS
CINEMA SB200 POWERED SOUNDBAR SPEAKER
Low-frequency transducer: One 3-1/2" (89mm) cone per channel
High-frequency transducer: One 1" (25mm) dome per channel
Amplifier power: 60 watts peak per channel
Frequency response: 55Hz – 23kHz (-6dB)
Power requirement: 100V – 240V, 50Hz/60Hz, 60W
Power consumption: <0.5W (standby); 60W (maximum)
Dimensions (H x W x D): 4-9/16" x 35-1/2" x 4-1/16"
(116mm x 901mm x 103mm)
Weight (shipping): 11.5 lb (5.1kg)