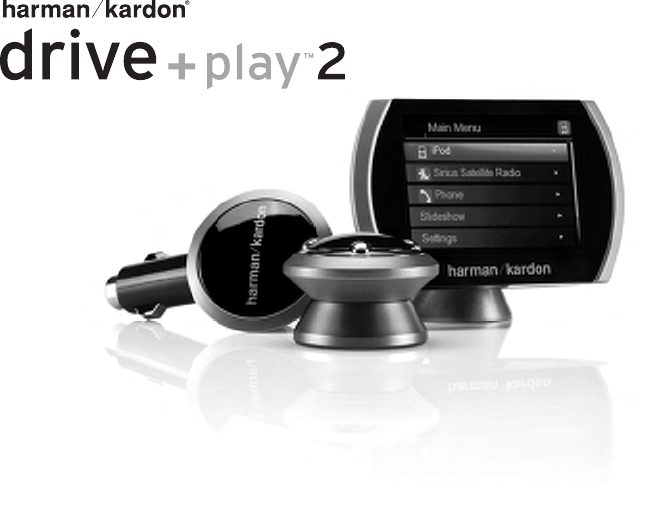
Harman DP2USWC Drive + Play 2 User Manual Manual
Harman International Industries, Inc Drive + Play 2 Manual
Harman >
Manual
Quick-Start Guide

Quick-Start Guide 3
Important!
WARNING: Operation of any feature of this device while driving could be dangerous. Always be careful and attentive to your vehicle and the
trac around you. Obey all trac laws and observe safe driving practices.
Do not connect or disconnect your portable music player or program the Drive + Play 2 system while driving. Always pull o the road and park
in a safe position before browsing your portable music player or adjusting the settings on the Drive + Play 2 system.
Do not use headphones while operating any vehicle. The Drive + Play 2 system audio output is not suitable for driving headphones and is
intended to output a signal appropriate for an audio system’s line-level input jack or FM antenna input.
This device complies with Part 15 of the FCC Rules. Operation is subject to the following two conditions: (1) This device may not cause harmful
interference, and (2) this device must accept any interference received, including interference that may cause undesired operation. This equipment
has been tested and found to comply with the limits for a Class B Digital Device, pursuant to Part 15 of the FCC Rules. These limits are designed to
provide reasonable protection against harmful interference in a residential installation. This equipment generates and can radiate radio frequency
energy and, if not installed and used in accordance with the instructions, may cause harmful interference to radio communications. However, there
is no guarantee that interference will not occur in a particular installation. If this equipment does cause harmful interference to radio or television
reception, which can be determined by turning the equipment o and on, the user is encouraged to try to correct the interference by one or more of
the following measures:
• Reorient or relocate the receiving antenna.
• Increase the separation between the equipment and receiver.
• Connect the equipment into an outlet on a circuit dierent from that to which the receiver is connected.
• Consult the dealer or an experienced radio/TV technician for help.
Any changes or modications not expressly approved by the party responsible for compliance could void the user’s authority to operate the
equipment.
Quick-Start Guide 3
Cigarette Lighter Hub
Lighter Extension Cable
Hard-Wire Power Cable
Audio Cable
USB Adapter
iPod Cable
Display Screen
Display Cable
Display Mounting Base
Wired FM Transmitter Adapter
Wireless Control Knob
CR2032 Battery
Adhesive Mounting Pads (2)
Alcohol Cleaning Pads (2)
Mounting Screws (10)
Hex Keys (1.5mm and 3mm)
Quick-Start Guide
Warranty Card
Connecting the iPod®
Always hold the Drive + Play 2 system’s iPod dock connector by its sides and gently insert (or remove) the dock connector. Never use excessive force
to insert or remove the connector, or damage to your iPod may occur.
Lost Data
About Installation
IMPORTANT: The Drive + Play 2 system should be installed according to these instructions and relevant federal, state or local laws and regulations,
which the purchaser should determine prior to installation or use. For safety reasons, do not attempt to disable any safety function incorporated in
this device. Any alteration of this device may cause serious injury and shall void the warranty.
Although we recommend professional installation for your Harman Kardon Drive + Play 2 system, this product is also designed for do-it-yourself
installation, especially when using the wireless FM transmission method. The enclosed instructions explain how to install the Drive + Play 2 system in
a general sense, but they do not show the exact methods for your particular vehicle. After reading this guide, if you feel uncomfortable in performing
the necessary steps to install the product, consider asking your car-audio dealer about professional installation options.
Your Package Should Include:
Important!
Quick-Start Guide 5
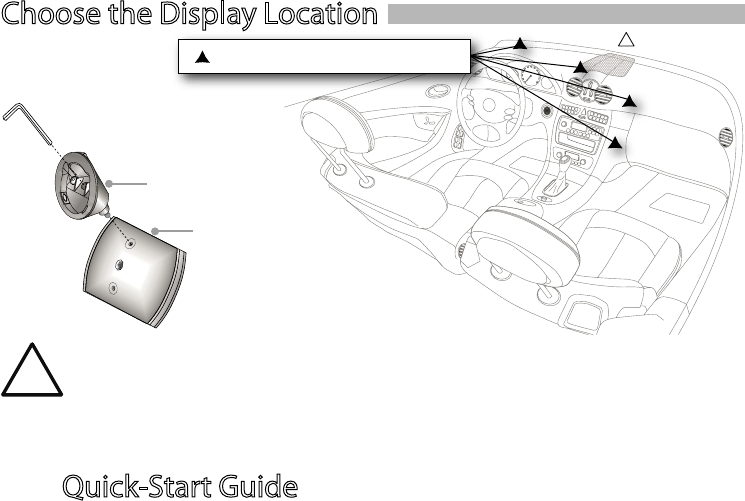
Choose the Display Location
Change Display Base Mount
only if needed for your chosen
mounting location
The installation of this device between the driver and the windshield or otherwise in any manner that obstructs the driver’s clear view of the
road or trac conditions is dangerous and may be prohibited by law. Do not install this device in any manner that impairs the safe operation
of the vehicle.
The display should be positioned to eliminate glare and reections, and should be as close as possible to the driver’s normal line of sight, as long as such
positioning does not otherwise obstruct the driver’s view or impair the safe operation of the vehicle. Do not place device on the vehicle’s dashboard
unsecured. Do not install this device on any air bag panels or in the deployment eld of any air bags. For safety reasons, do not attempt to disable any safety
function incorporated in this device. Any alteration of this device may cause serious injury and shall void the warranty.
Select Display Mounting Location
Loosen 3mm screw in
center of the base.
Move base to the top
mounting hole.
Tighten screw again to
secure base.
See below
Quick-Start Guide
4
Quick-Start Guide 4
Quick-Start Guide 5
Stick adhesive pad to
base rst, then clean
surface of mounting
location with supplied
alcohol pad.
Mounting
Plate
Insert mounting plate
into display base and
tighten hex set screw.
Align mounting plate to
location and attach with 3
screws. Make sure the arrow
points toward the front of
the car.
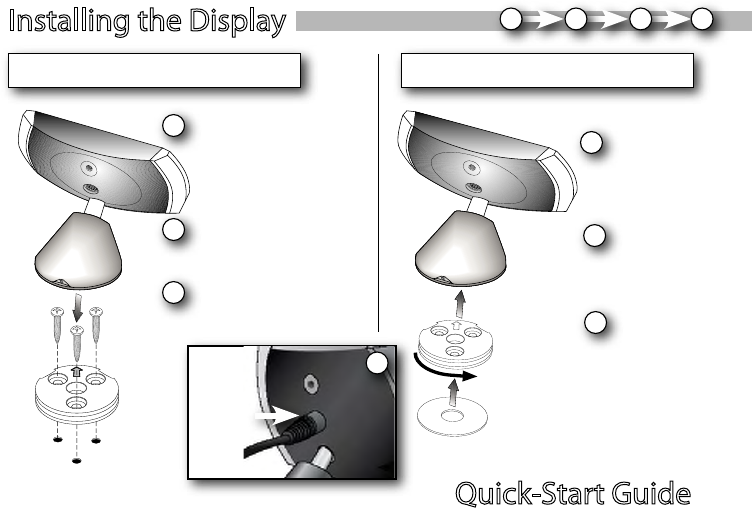
Installing the Display 12
Mounting with Screws Mounting with Adhesive Pad
3
1
Tighten the hex screw to lock
the display base onto the
mounting plate.
2Place display base onto
mounting plate and rotate
into desired position.
3
1
Mounting
Plate
Peel adhesive pad and
press display rmly
into desired location.
2
Base
Base
Adhesive
Pad
Plug cable
into display
After
Mounting 4
34
Hex Screw
Hex Screw
Quick-Start Guide 7
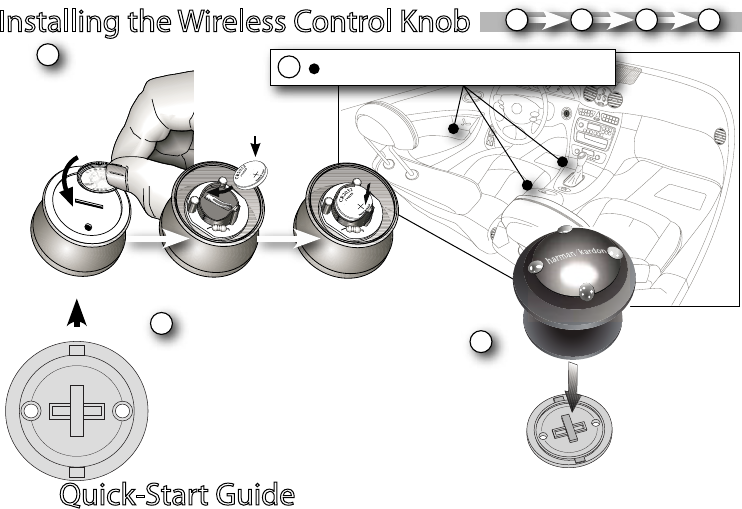
Installing the Wireless Control Knob
Install Control
Knob Battery
2
Mount Control Knob Base
12
CR2032/DL2032
Use a coin to remove
the bottom cover.
Push the knob down
onto the base, and
turn clockwise to lock
it into place. The knob
can be removed by
turning the bottom
counterclockwise.
3
Attach Control
Knob to Base
Orient the base so that the arrow is
facing the front of the car.
You can either screw the base to
the mounting location or use the
supplied adhesive pad.
If you use the adhesive pad, you
must FIRST CLEAN the surface with
the supplied alcohol cleaning pad.
3
4
Toward front of car
Select Control Knob Mounting Location
1
4
Quick-Start Guide
6
Quick-Start Guide 6
Quick-Start Guide 7
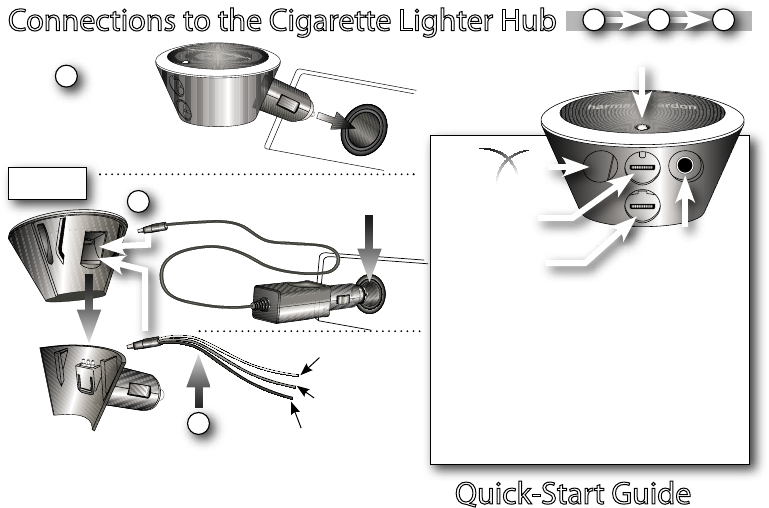
Connections to the Cigarette Lighter Hub
Expansion Port
123
3
1
Display
iPod
Audio
Output
Audio Output Options
1. If using the built-in wireless FM transmitter, leave the audio
output jack empty.
2. To wire directly to your vehicle’s antenna, plug the supplied
FM Transmitter Adapter into the audio output jack. See
diagram on next page.
3. To wire into an AUX input, connect the included audio cable’s
3.5mm plug to the audio output jack and then into your
vehicle’s AUX input.
Power Indicator
Direct Cigarette
Lighter Plug-In
2Cigarette Lighter Extension Cable
Hard-Wired
Installation
YELLOW = Constant
source of +12V
RED = Switched source
of +12v (ACC)
BLACK = Ground
Plug into vehicle.
Detach lighter stalk.
Options
Stalk ts tightly. Some force is
required to separate.
Quick-Start Guide 9
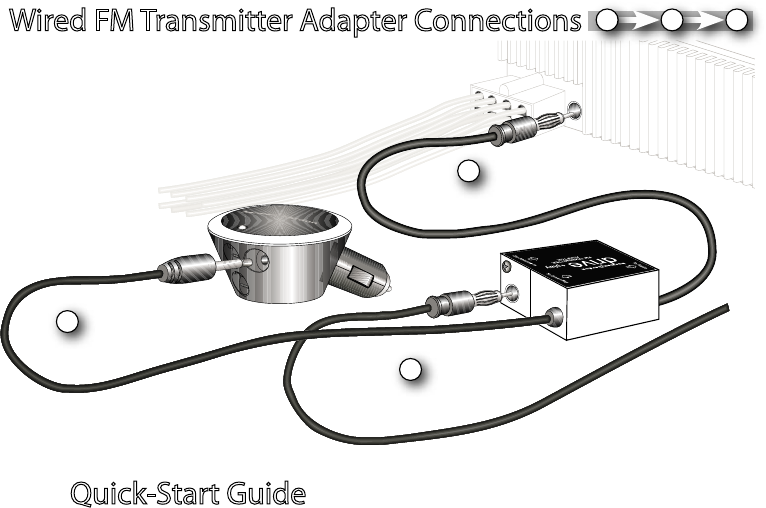
Wired FM Transmitter Adapter Connections
1
2
3
Connect in the line between
vehicle antenna and radio.
Plug the adapter into
the back of radio or
FM tuner location.
Plug the vehicle’s
antenna into FM
Transmitter Adapter.
Connect FM
Transmitter Adapter to
Drive + Play 2 System.
If your car’s audio system does not provide an auxiliary input and there is no third-party adapter available, use the Drive + Play 2 system’s wired FM Antenna
Adapter for the best audio performance.
123
Quick-Start Guide
8
Quick-Start Guide 8
Quick-Start Guide 9
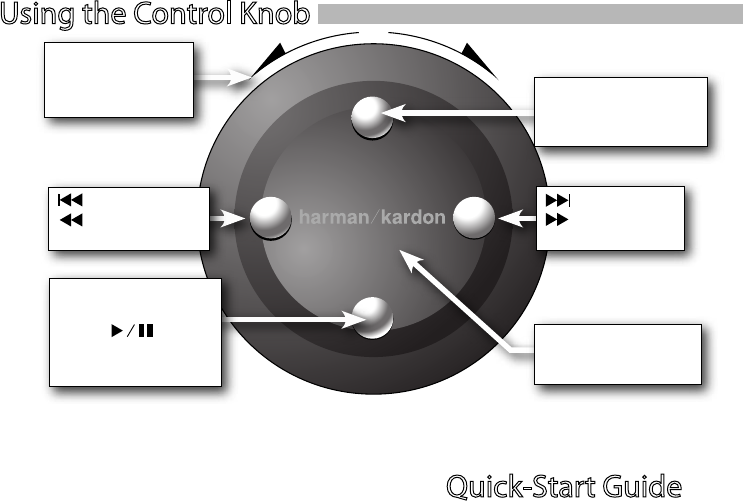
Using the Control Knob
Press once to toggle
PLAY/PAUSE
Press and hold for 2
seconds to turn ON/OFF
Next
Press and hold
to FFWD
Show Previous Menu
(Press and hold to show
special features)
Press to select the
highlighted menu item
Previous
Press and hold to
REWIND
Rotate ring to move
the highlight bar on
the screen
Note - If Drive + Play 2 is turned o with the bottom button it must be turned back on that way!
If the control knob is unresponsive, try pressing the top, center, and right buttons simultaneously for 2 seconds, then turn the outer ring
until the highlight bar moves. If the control knob is still unresponsive, try a fresh CR2032-type battery.
Quick-Start Guide 11
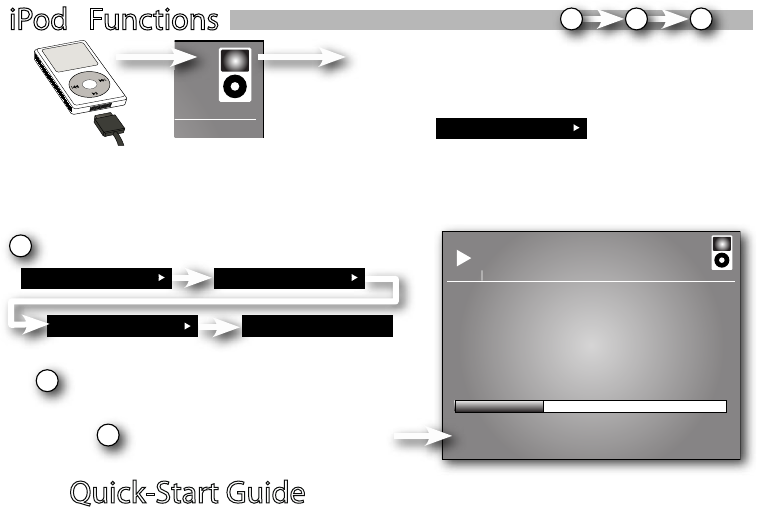
iPod® Functions
iPod Connection Conrmation
When your iPod is successfuly connected, the iPod icon appears in the
top-right corner of the display. “iPod” will also appear as the rst menu
item.
Playing Music
1
iPod
Your iPod Name Name of Song
The Drive + Play 2 system is designed to make navigating the menus on your iPod simple and intuitive. Select
menu items using the scroll wheel and press the center button to select.
Select “iPod” from source menu.
2Browse list and select song.
Now Playing
Name of Song
Artist
Album
0:55 -2:08
Playlists
3View current selection on the screen.
iPod
123
Quick-Start Guide
10
Quick-Start Guide 10
Quick-Start Guide 11
Name of Song
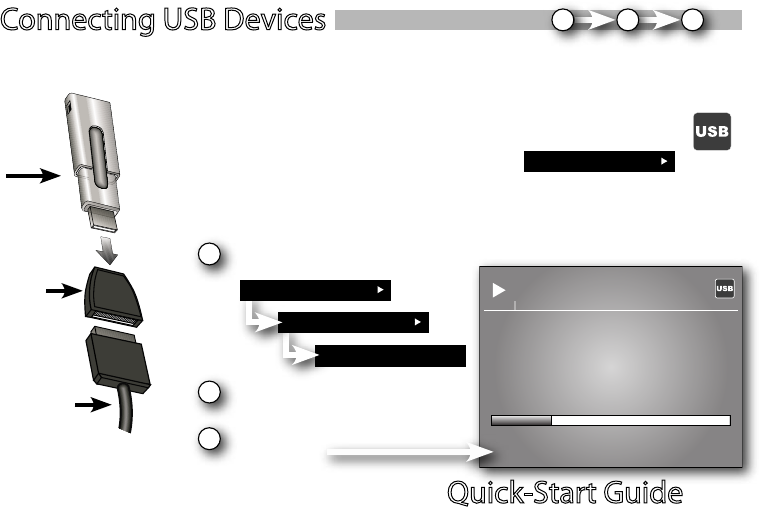
Connecting USB Devices
USB
Storage
Device
USB
Adapter
iPod Cable
USB Drive Connection Conrmation
The Drive + Play 2 system is compatible with USB Flash Memory devices and other USB
devices. For a complete list of compatible devices, please visit www.driveandplay2.com.
When your USB Drive is successfuly connected, the USB icon appears in the top-
right corner of the display. “USB Drive” will also appear as the rst menu item.
1Select “USB Drive” from source menu.
Name of Folder
Playing Music
Now Playing
Name of Song
Artist
Album
0:38 -2:08
2Select song.
3View current selection on
the screen.
USB Drive
123
If your music les contain ID3 tags, you can browse just like browsing the iPod (see
previous page). If no ID3 tags are contained in the les, use the folder structure described
below.
USB Drive
Quick-Start Guide 13
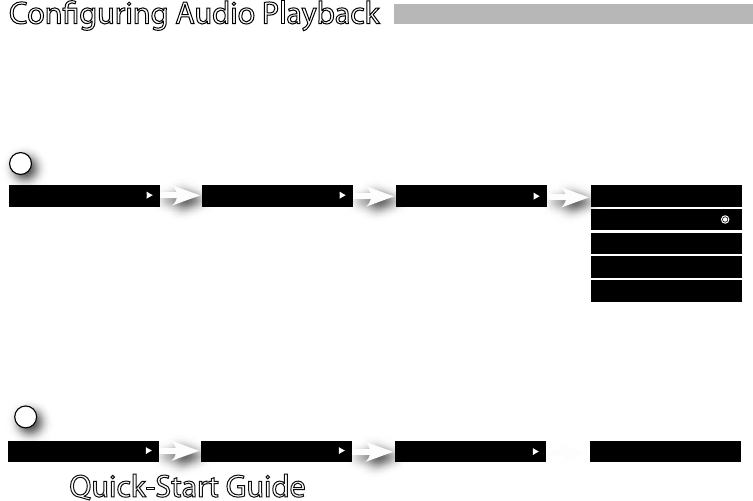
Conguring Audio Playback
Wireless FM Transmitter or Wired FM Antenna Adapter
1
Settings System Settings FM Transmitter Enable Yes
If you use the built-in wireless FM transmitter, no additional wired audio connection is necessary. To use the
wired FM Antenna Adapter, you will need to wire it into your vehicle’s FM Antenna connection rst, then
complete these steps. Either way, you must enable and select the FM transmitter frequency to hear audio
through your vehicle’s FM radio. Remember, you may try several frequencies for the best result.
Enable the FM Transmitter and Select FM Frequency Preset
Once you have selected an FM preset, tune your FM radio to that same station. you should hear audio playback clearly.
If that frequency is not playing music clearly, select another preset by locating a frequency on your radio that is only
static and save that as a preset. This will oer the clearest path for the Drive + Play 2 system’s audio playback.
Line-Output Audio Connections
To use the Line-Out audio connection, the FM Transmitter must rst be disabled using the steps shown.
Following that, you will need to connect into your head unit’s AUX input. Many vehicles may require a third-
party adapter (not included) to provide this type of connection.
1
Settings System Settings FM Transmitter Enable No
Disable the FM Transmitter
Preset 1 : 88.1
Preset 2 : 88.7
Preset 3 : 107.9
Add Preset
Quick-Start Guide
12

Quick-Start Guide 12
Quick-Start Guide 13
Letter Seek
This feature allows you to quickly browse alphabetically sorted lists, such as Artist, Playlists and Songs in the
iPod.
Large letter appears on the screen
1Press and hold
top menu
button in an
alpabetically
sorted list
2
Turn the ring to advance the letters manually
or, press the “Next” or “Previous” buttons
to begin automatic scrolling.
Press “Select” to
advance to the rst
menu item that
begins with the
displayed letter.
Artist
ABBA
Billy Idol
Bon Jovi
Coldplay
Def Leppard
A
3
4
1234
Quick-Start Guide 15
Channel Lineup
1. Hip Hop
2. Electronic
3. Blues
4. Jazz
5. Rock
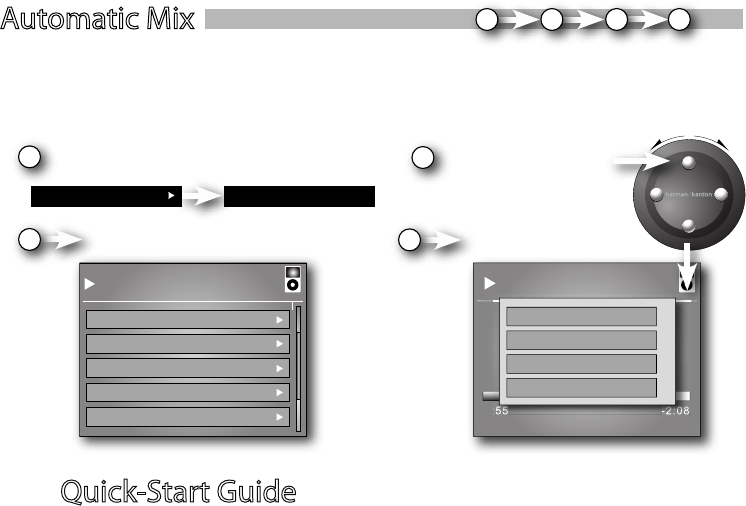
Automatic Mix
1Select “iPod” and then select “Automatic Mix”.
iPod Automatic Mix
Now Playing
Name of Song
Artist
Album
0:55 -2:08
More like this
Less like this
Play something else
Press and hold top
menu button during
Automatic Mix playback
to congure content.
3
2Browse list and select channel. Congure the channel.
4
Now your iPod plays the channel . This lets you customize the content.
Drive + Play 2 system creates channels automatically, and you can rene the channel content during playback.
Choose “More like this” to place a higher priority on songs similar to the current selection. Choose “Less
like this” to place a lower priority on songs similar to the current selection. Choose “Play something else” to
reprioritize selections to something dierent than the song that’s currently playing.
1234
Quick-Start Guide
14
Quick-Start Guide 14
Quick-Start Guide 15
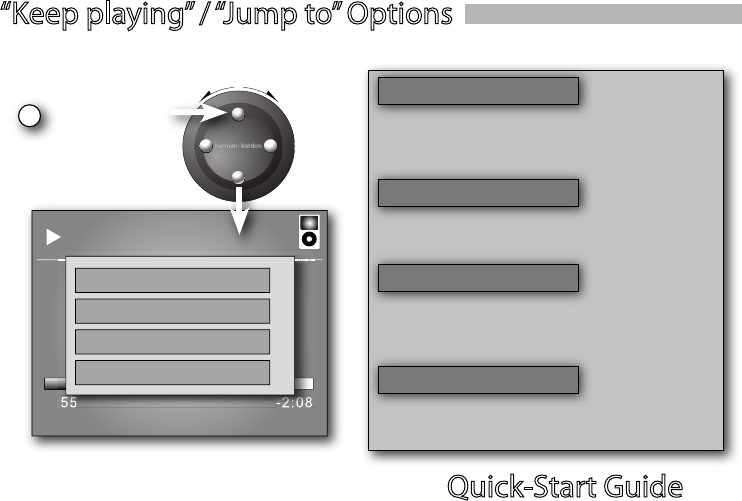
“Keep playing” / “Jump to” Options
1
This feature allows you to continue playing songs from the current artist or album without leaving the “Now
Playing” screen.
Press and hold
top menu button
during playback.
Now Playing
Name of Song
Artist
Album
0:55 -2:08
Keep playing artist
Jump to artist
Keep playing album
Jump to album
Keep playing artist
This feature will continue playing the current
song, then play the remaining songs by that artist
in order.
Jump to artist
This feature will stop playing the current song and
begin playing all the songs by that artist in order.
Keep playing album
This feature will continue playing the current
song, then begin playing the remaining songs on
that album in order.
Jump to album
This feature will stop playing the current song and
begin playing all the songs on that album in order.
For customer and technical support, call
516.255.4545
250 Crossways Park Drive, Woodbury, New York 11797
www.harmankardon.com
©2007 Harman International Industries, Incorporated. All rights reserved
Part No. DP2QSGNA001 HDMDP200106 MWC
A Harman International Company
QSG_NA_Rev_1.1
Troubleshoot problems, download updates, and
www.driveandplay2.com
Please Recycle
Troubleshooting
Harman Kardon is a registered trademark, and Drive + Play 2 is a
trademark, of Harman International Industries, Incorporated.
iPod is a registered trademark of Apple Computer, Inc.
This Class B digital apparatus complies with Canadian ICES-003.
Cet appareil numérique de la classe B est conforme à la norme
NMB-003 du Canada.

2006/8/16
v1.0
FCC
Federal Communication Commission Interference Statement
This equipment has been tested and found to comply with the limits for a Class B digital
device, pursuant to Part 15 of the FCC Rules. These limits are designed to provide
reasonable protection against harmful interference in a residential installation. This
equipment generates, uses and can radiate radio frequency energy and, if not installed
and used in accordance with the instructions, may cause harmful interference to radio
communications. However, there is no guarantee that interference will not occur in a
particular installation. If this equipment does cause harmful interference to radio or
television reception, which can be determined by turning the equipment off and on, the
user is encouraged to try to correct the interference by one of the following measures:
- Reorient or relocate the receiving antenna.
- Increase the separation between the equipment and receiver.
- Connect the equipment into an outlet on a circuit different from that
to which the receiver is connected.
- Consult the dealer or an experienced radio/TV technician for help.
FCC Caution: Any changes or modifications not expressly approved by the party
responsible for compliance could void the user's authority to operate this equipment.
This device complies with Part 15 of the FCC Rules. Operation is subject to the following
two conditions: (1) This device may not cause harmful interference, and (2) this device
must accept any interference received, including interference that may cause undesired
operation.
IMPORTANT NOTE:
FCC Radiation Exposure Statement:
This equipment complies with FCC radiation exposure limits set forth for an uncontrolled
environment. This equipment should be installed and operated with minimum distance
20cm between the radiator & your body.
This transmitter must not be co-located or operating in conjunction with any other antenna
or transmitter.

2006/8/16
v1.0
IC
Industry Canada statement:
This device complies with RSS-210 of the Industry Canada Rules. Operation is subject to
the following two conditions:
(1) This device may not cause harmful interference, and (2) this device must accept any
interference received, including interference that may cause undesired operation.
IMPORTANT NOTE:
Radiation Exposure Statement:
This equipment complies with IC radiation exposure limits set forth for an uncontrolled
environment. This equipment should be installed and operated with minimum distance
20cm between the radiator & your body.