Harman SB400CGG Powered Soundbar Speaker User Manual
Harman International Industries, Inc Powered Soundbar Speaker
Harman >
User Manual
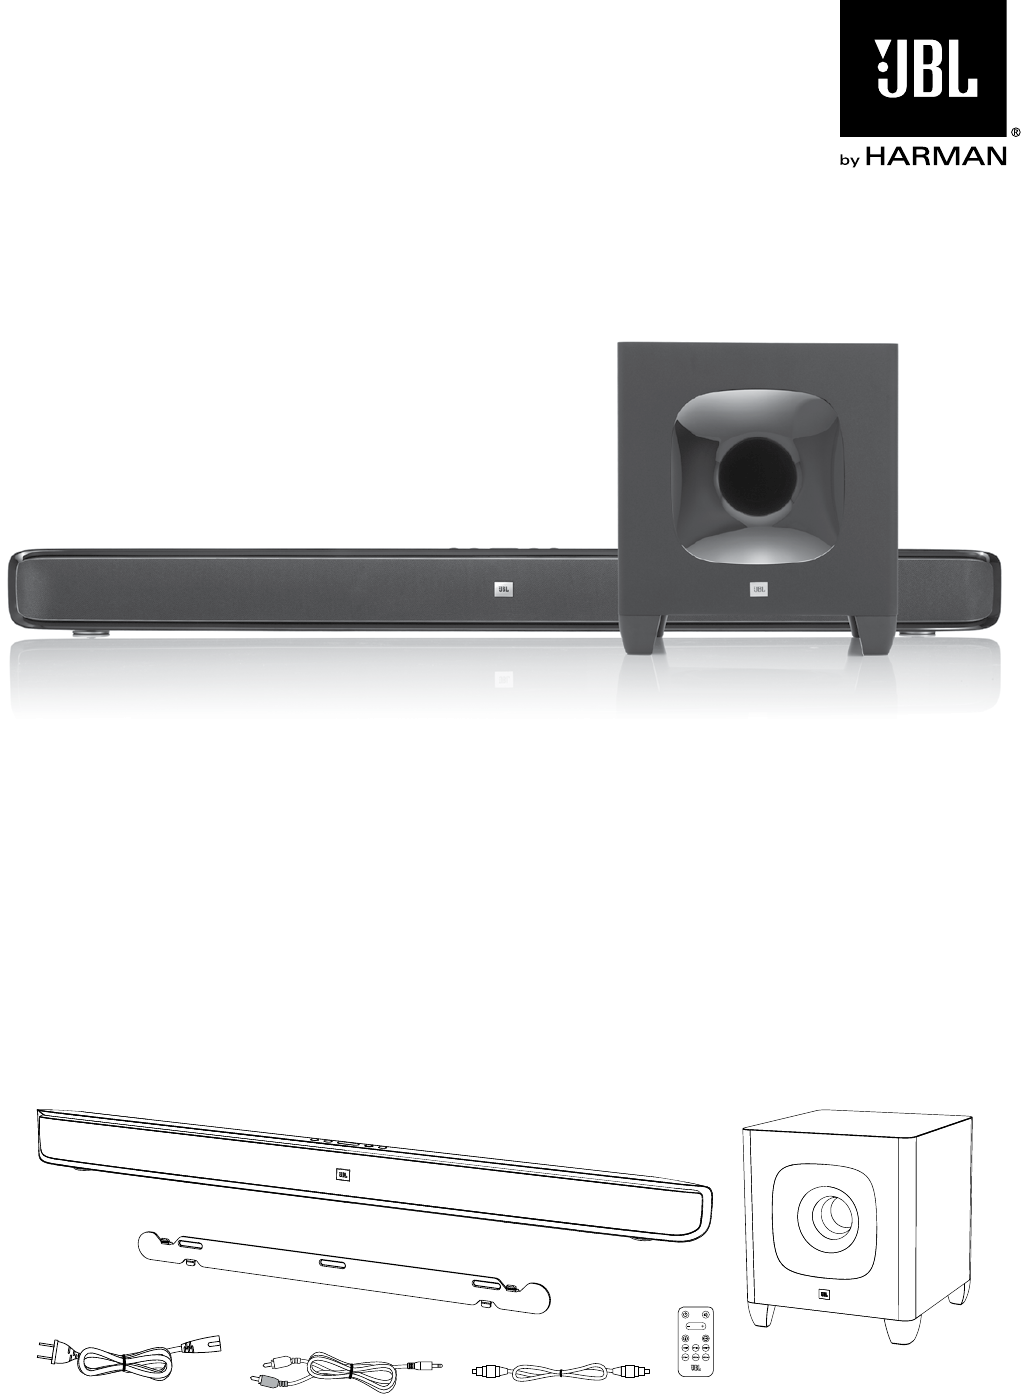
CINEMA SB400
powered soundbar speaker
ThANk You For ChooSINg ThIS JBL®
ProduCT
The JBL Cinema SB400 powered soundbar speaker system
is a complete, integrated sound system that will create an
extraordinarily realistic cinema experience in your own living
room. The powered soundbar unit can mount on a wall or sit on
a shelf and includes all of the cables you need to connect it to
your TV and your cable/satellite tuner or disc player. The wireless
subwoofer unit supplies all of your entertainment's drama and
impact, and can be placed anywhere without needing to be
connected to the soundbar unit.
We’re confident that this JBL system will provide every note
of enjoyment that you expect – and that when you think about
purchasing additional audio equipment for your home, car or
office, you will once again choose JBL products.
This quick-start guide contains all the information you need to set
up, connect and adjust your new speaker system. For more in-
depth information, go to our Web site: www.jbl.com.
INCLudEd ITEMS
1x
1x
1x2x 1x 1x
1x
quICk-STArT guIdE

2
SouNdBAr rEAr-PANEL CoNTroLS ANd
CoNNECTIoNS
Power
Switch
Power Cord
Connector EQ
Switch
HDMI Input
Connectors
Pairing Button
and LED
HDMI ARC
TV Out Connector
Optical Input
Connector
Aux Input
Connector
Power switch: Set this switch to the “On” position to activate the
soundbar. In normal operation, this switch will be left in the “On”
position. See
Turning the Soundbar On and Off
, on page 5, for more
information.
Power Cord connector: Connect the included power cord here. See
Power Connections
, on page 5, for more information.
HDMI® Input connectors: HDMI connections transmit digital audio
and video signals between devices. If you have source devices with
HDMI connectors, using them will provide the best possible audio and
video performance quality.
HDMI ARC TV Out connector: If your TV has an HDMI input, use an
HDMI cable (not supplied) to connect it to the soundbar's HDMI ARC
TV Out connector. The soundbar will pass video from source devices
connected to its HDMI Input connectors, along with its own on-screen
information display to the TV. If your TV is equipped with the HDMI
Audio Return Channel (ARC) Function, you can feed its sound to the
soundbar via the HDMI ARC TV Out connection, and it will not require
additional audio connections to the soundbar. The ARC signal is active
when the HDMI TV source is selected.
Pairing button and LED: Press the Pairing button to initiate wireless
pairing between the soundbar and the wireless subwoofer. See Pairing
the Units for Wireless Operation, on page 6, for more information.
EQ switch: Use this switch to adjust the soundbar’s bass for either wall
or table mounting. If you’re mounting the soundbar on a wall with the
included wall-mount bracket, set the EQ switch to the “Wall” position
for the most natural-sounding bass performance. If you are placing the
soundbar on a table, set the EQ switch to the “Table” position for the
most natural-sounding bass performance.
Aux Input connection: Use the included stereo 3.5mm to stereo RCA
audio cable to connect the stereo analog outputs of your TV, disc player
or cable/satellite tuner here.
Optical Input connector: If your TV, disc player or cable/satellite tuner
has an optical digital output, use the included optical cable to connect
it here.
IMPORTANT: Do not connect the power cord to an AC outlet until you
have made and verified all other connections.
If you will not be using the soundbar for an extended period – for
instance, if you’re going on vacation – set the Power switch to the “0”
(off) position.
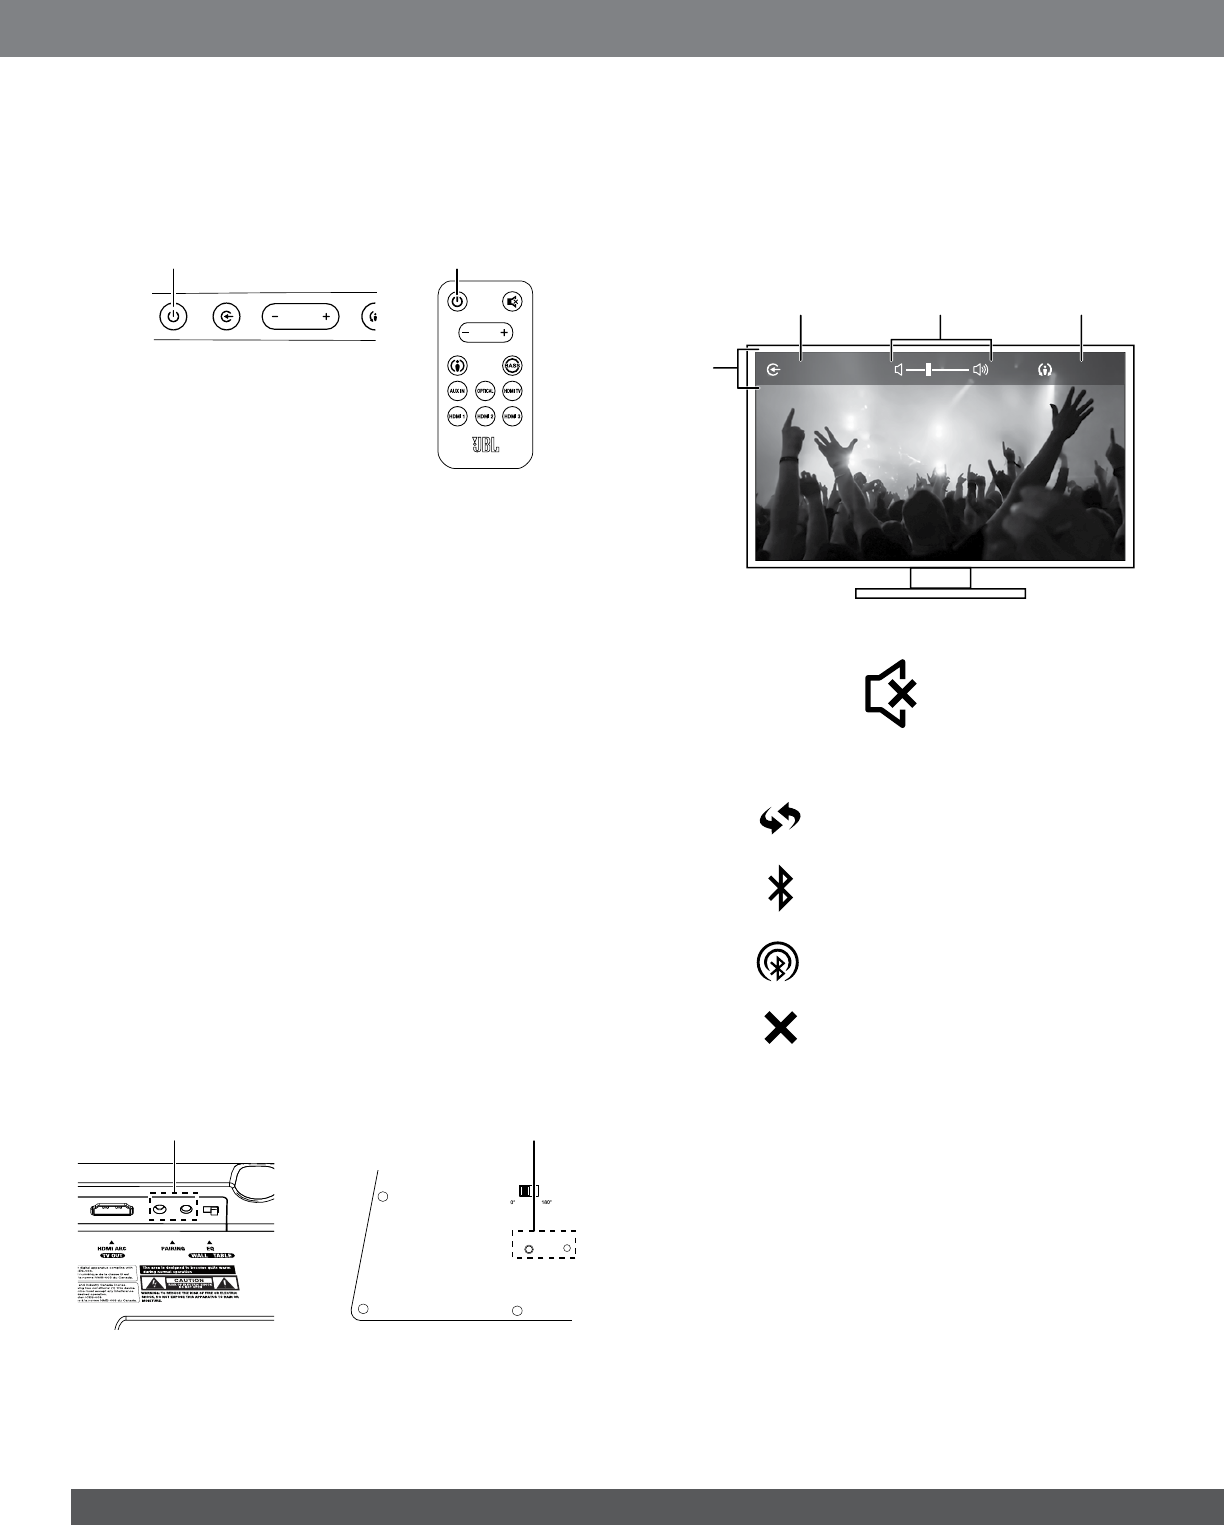
SouNdBAr ToP-PANEL CoNTroLS ANd
rEMoTE CoNTroL
Volume
Buttons
Source Indicator
LEDs
Source
Button
Surround
ModeButton
Bluetooth
Button
Power
Button
Volume Buttons
Surround Mode
Button
Power Button Mute Button
Bass Boost
Button
Source Buttons
Power button: To turn the system on when the soundbar is in the
Standby mode, press the Power button on either the soundbar or
the remote. (The Power indicator will turn white.) To put the system
in the Standby mode, press either Power button while the system is
on. (The Power indicator will turn amber.) The subwoofer will remain
on for approximately ten minutes after the soundbar goes into the
Standby mode. If you do not press the Power button, the soundbar
and the subwoofer will both automatically go into the Standby mode
approximately 10 minutes after the audio signal ceases.
NOTE: If you put the soundbar into the Standby mode by pressing
the Power button, you must manually turn it on by pressing the Power
button again. If the soundbar automatically goes into the Standby
mode 10 minutes after the audio signal ceases, it will automatically
turn on whenever the soundbar detects an audio signal at either input
connection.
Mute button (remote control only): Press the Mute button to mute
the system. (The Volume +/– indicators both illuminate white.) While the
system is muted, press the Mute button again or either Volume button
to restore the sound.
NOTE: Pressing both of the soundbar’s Volume buttons at the same
time while the system is on will mute the system. Pressing either
Volume button while the system is muted will restore the sound.
Surround Mode button: This button turns the soundbar’s HARMAN
Display Surround processing on and off. The Surround button indicator
turns amber when HARMAN Display Surround is active, and turns white
when HARMAN Display Surround is not active (normal stereo sound).
See
Changing the Surround Mode
, on page 7, for more information.
Volume buttons: Press the “+” button to increase the volume; press
the “–” button to decrease the volume. The buttons illuminate white for
a few seconds after being pressed.
Source button: This button cycles between the sources in the
following order: Bluetooth, Aux, Optical, HDMI TV, HDMI 1, HDMI 2,
HDMI 3, Bluetooth, etc. The active source's Source Indicator LED will
illuminate.
Note: The remote has an individual selector button for each source
except Bluetooth.
www.jbl.com
English
3
Bluetooth button (soundbar only): Press this button to play the
audio stream from a paired Bluetooth device through the soundbar. (The
Bluetooth Source Indicator LED will illuminate when a paired Bluetooth
device is the active source.) Press and hold this button to force the
soundbar into the Bluetooth pairing mode. See Bluetooth Operation, on
page 7, for more information.
Bass Boost button (remote control only): Press the remote’s
Bass Boost button to enhance low-frequency performance. Pressing
the Bass Boost button again will return the soundbar’s normal low-
frequency performance.
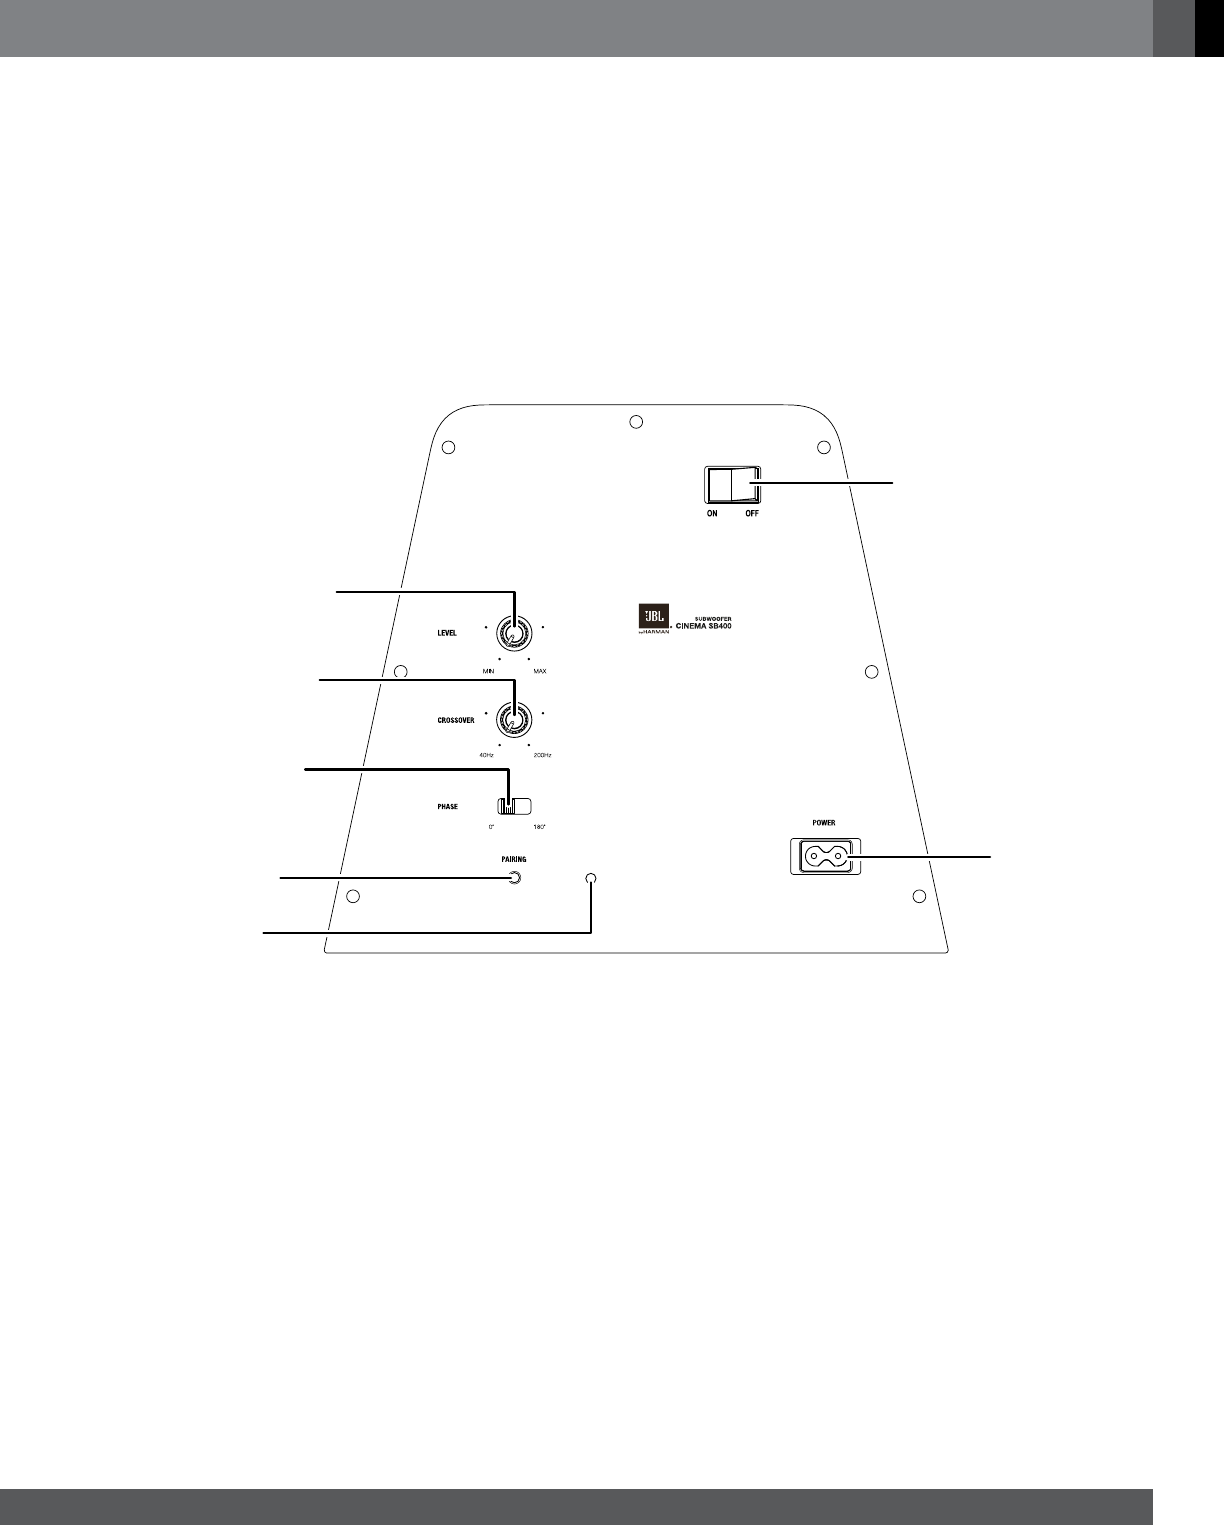
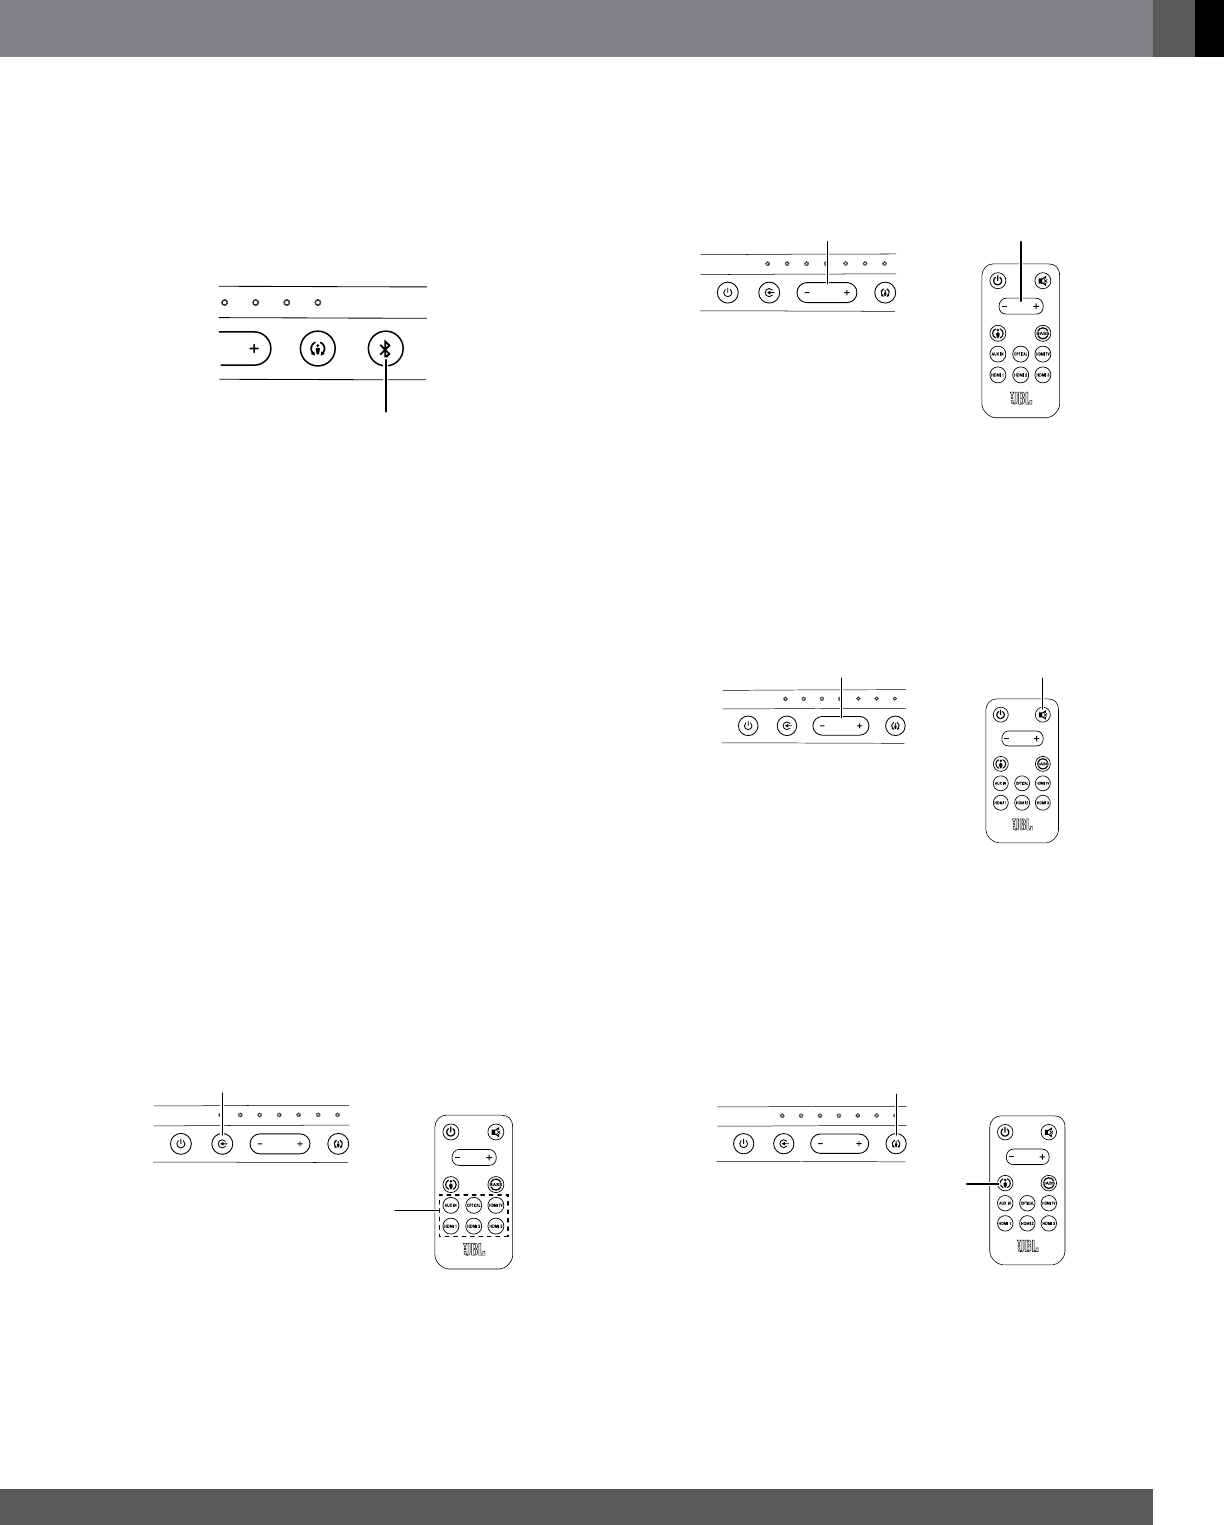
SuBWooFEr CoNTroLS ANd CoNNECTIoNS
Subwoofer Level control: Use this control to balance the subwoofer’s
volume with that of the soundbar. Turn the knob clockwise to increase
the subwoofer’s volume; turn it counterclockwise to decrease the
subwoofer’s volume.
Crossover control: This knob adjusts the subwoofer’s cutoff between
40Hz and 200Hz.The higher you set the Cutoff control, the higher
in frequency the subwoofer will operate and the more its bass will
“overlap” that of the soundbar. This adjustment helps achieve a smooth
transition of bass frequencies between the subwoofer and the soundbar
for a variety of different rooms and subwoofer locations. See Subwoofer
Crossover control, on page 8, for more information.
Phase switch: This switch determines whether the subwoofer driver’s
piston-like action moves in and out in phase with the speakers in the
soundbar. If the subwoofer were to play out of phase with the soundbar
speakers, some of the sound waves produced by the subwoofer or
soundbar could be canceled, reducing bass performance and sonic
impact. This phenomenon depends in part on the relative placement of
the speakers in the room. See Subwoofer Phase switch, on page 8, for
more information.
Wireless Pairing switch and LED: Press this switch to initiate
wireless pairing between the subwoofer and the soundbar. See Pairing
the Units for Wireless Operation, on page 6, for more information.
• The LED lights blue continuously when the subwoofer is on and
linked to the soundbar.
• The LED slowly flashes blue when the subwoofer is on and the
wireless link is not established between the subwoofer and the
soundbar.
• The LED rapidly flashes blue during the wireless pairing process.
Power switch: Set this switch to the “On” position to activate the
subwoofer. In normal operation, this switch will be left in the “On”
position. See Turning the Subwoofer On and Off, on page 6, for more
information.
If you will not be using the subwoofer for an extended period – for
instance, if you’re going on vacation – set the Power switch to the “Off”
position.
Power Cord connector: Connect the included power cord here and
into an active, unswitched AC outlet. See Power Connections, on page
5, for more information.
IMPORTANT: Do not connect the power cord to an AC outlet until
you have made and verified all other connections.
Power
Switch
Subwoofer Level
Control
Crossover
Control
Phase
Switch
Wireless Pairing
Button
Wireless Pairing
LED
Power Cord
Connector
4
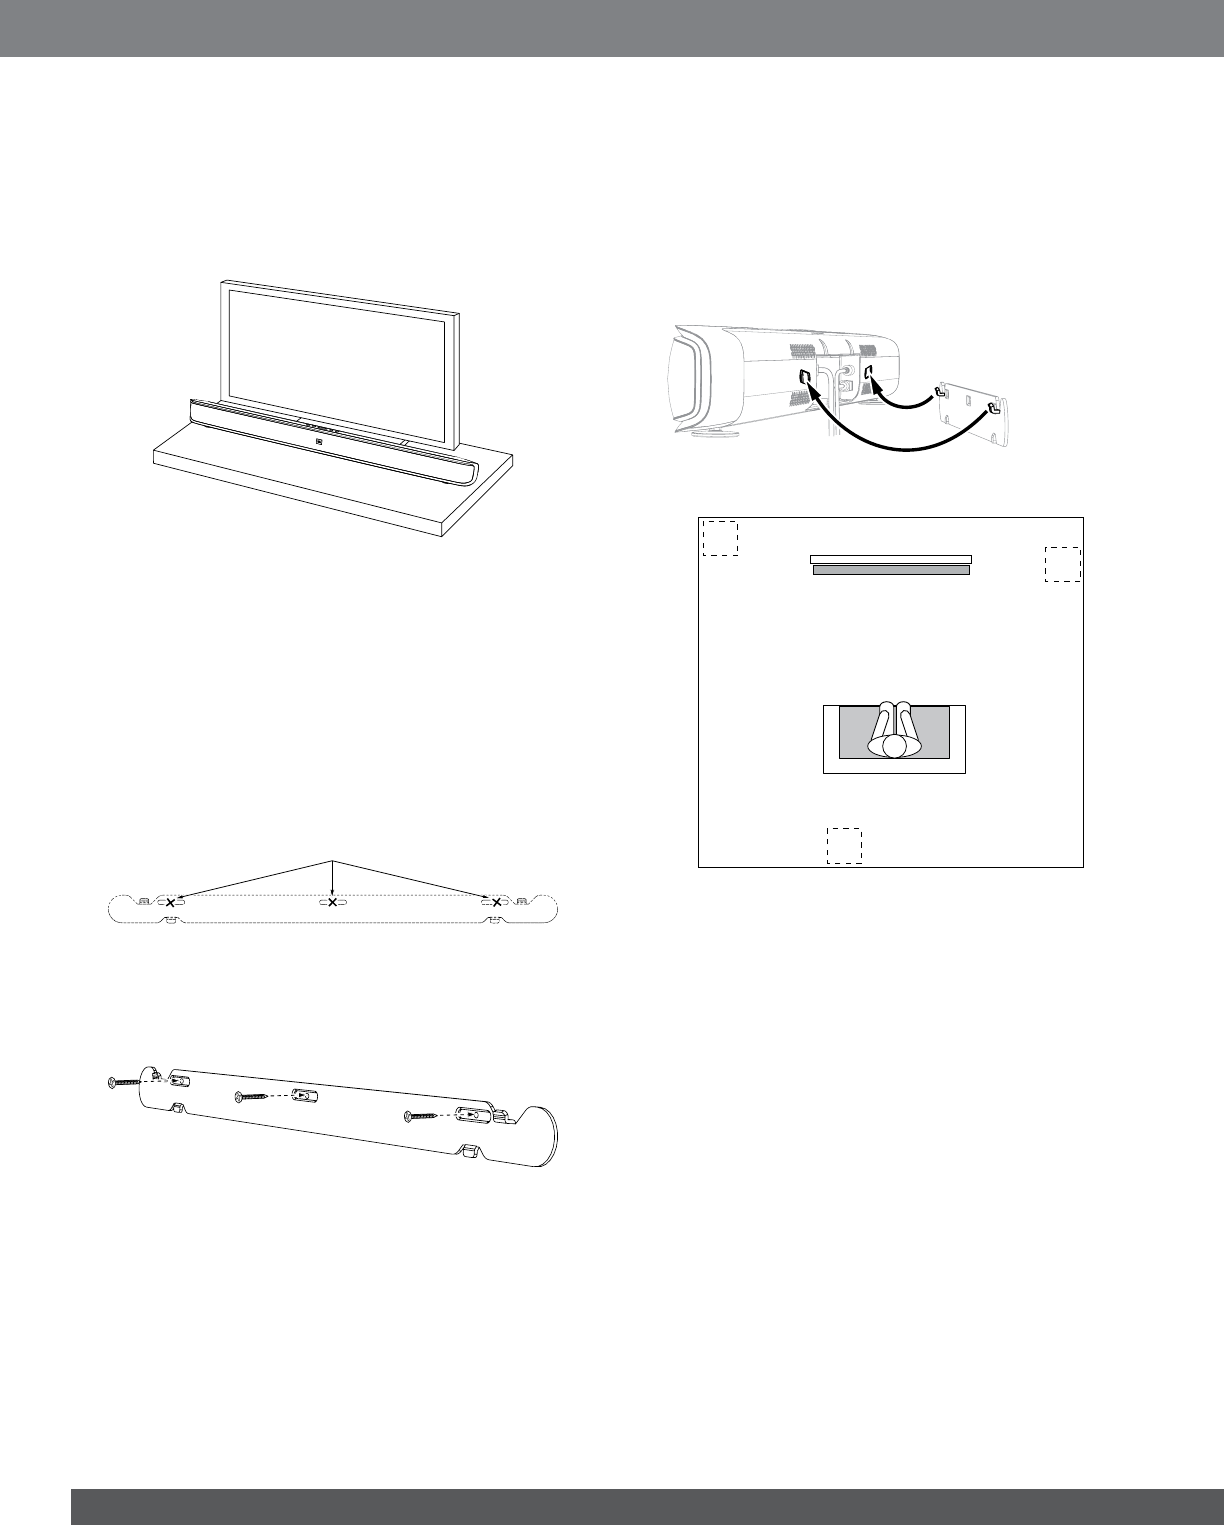
SouNdBAr PLACEMENT
PLACING THE SOUNDBAR ON A TABLE
If your TV is placed on a table, you can place the soundbar on the table
directly in front of the TV stand, centered with the TV screen. As long as
the surface of the table is flat, the soundbar will rest on its metal feet .
• Set the soundbar’s EQ switch in the “Table” position. See Soundbar
Rear-Panel Controls and Connections, on page 2.
WALL-MOUNTING THE SOUNDBAR
If your TV is attached to a wall, you can use the included wall-mount
bracket to mount the soundbar on the wall directly below the TV
screen.
1. Determine the location for the soundbar on the wall. Make sure that
the top of the soundbar will not block your view of the TV screen
when it is mounted on the wall.
2. Hold the bracket against the wall as a template and mark the
locations of the soundbar wall-mount bracket holes on the wall. The
three holes should be evenly spaced 7-1/16" (18cm) apart, and the
bracket slots are designed to accept 4mm screws. Make sure that
the holes are at the same height. See the illustration below.
Mark Three Bracket Hole Locations
7-1/16" (18cm) Apart
3. Making sure that the bracket’s flat side is against the wall, attach
the wall-mount bracket to the wall at the locations you marked,
using hardware that is appropriate for the wall’s construction and
materials. Note that the soundbar weighs 7.3 lb (3.3kg). Be sure to
use hardware that can support this weight.
4. After reading the Connections section on page 5, connect all cables
to the soundbar.
IMPORTANT: Do NOT plug the soundbar’s power cord into an AC
outlet at this time.
• Set the soundbar’s EQ switch in the “Wall” position, and set the
soundbar’s Power switch in the “On” position. See Soundbar Rear-
Panel Controls and Connections, on page 2.
5. Attach the soundbar to the bracket by sliding the bracket’s upper
tabs into the slots on the back of the soundbar. The soundbar’s slots
allow you to adjust the soundbar’s angle on the wall to ensure that it
is level.
Insert Tabs on Bracket
into Grooves in Soundbar
SuBWooFEr PLACEMENT
1
2
3
The performance of a subwoofer is directly related to its placement in
the listening room and its physical position relative to the other speakers
in the system. While it is true that in general our ears do not hear
directional sounds at the low frequencies where subwoofers operate,
when installing a subwoofer within the limited connes of a room, the
reections, standing waves and absorptions generated within the room
will strongly inuence the performance of any subwoofer system. As a
result, the specic location of the subwoofer in the room does become
important to the amount and quality of bass that is produced.
For example, placing the subwoofer next to a wall generally will increase
the amount of bass in the room; placing it in a corner (1) generally will
maximize amount of bass in the room. However, corner placement
can also increase the destructive effect of standing waves on bass
performance. This effect can vary depending on the listening position –
some listening positions may yield very good results while others may
have far too much (or too little) bass at certain frequencies.
In many rooms, placing the subwoofer along the same plane as the
soundbar (2) can produce the best integration between the sound
of the subwoofer and that of the soundbar. In some rooms, the best
performance could even result from placing the subwoofer behind the
listening position (3).
We strongly recommend that you experiment with placement before
choosing a final location for your subwoofer. One way you can
determine the best location for the subwoofer is by temporarily placing
it in the listening position and playing music with strong bass content.
Move around to various locations in the room while the system is
playing (putting your ears where the subwoofer would be placed), and
listen until you find the location where the bass performance is best.
Place the subwoofer in that location.
www.jbl.com
English
5
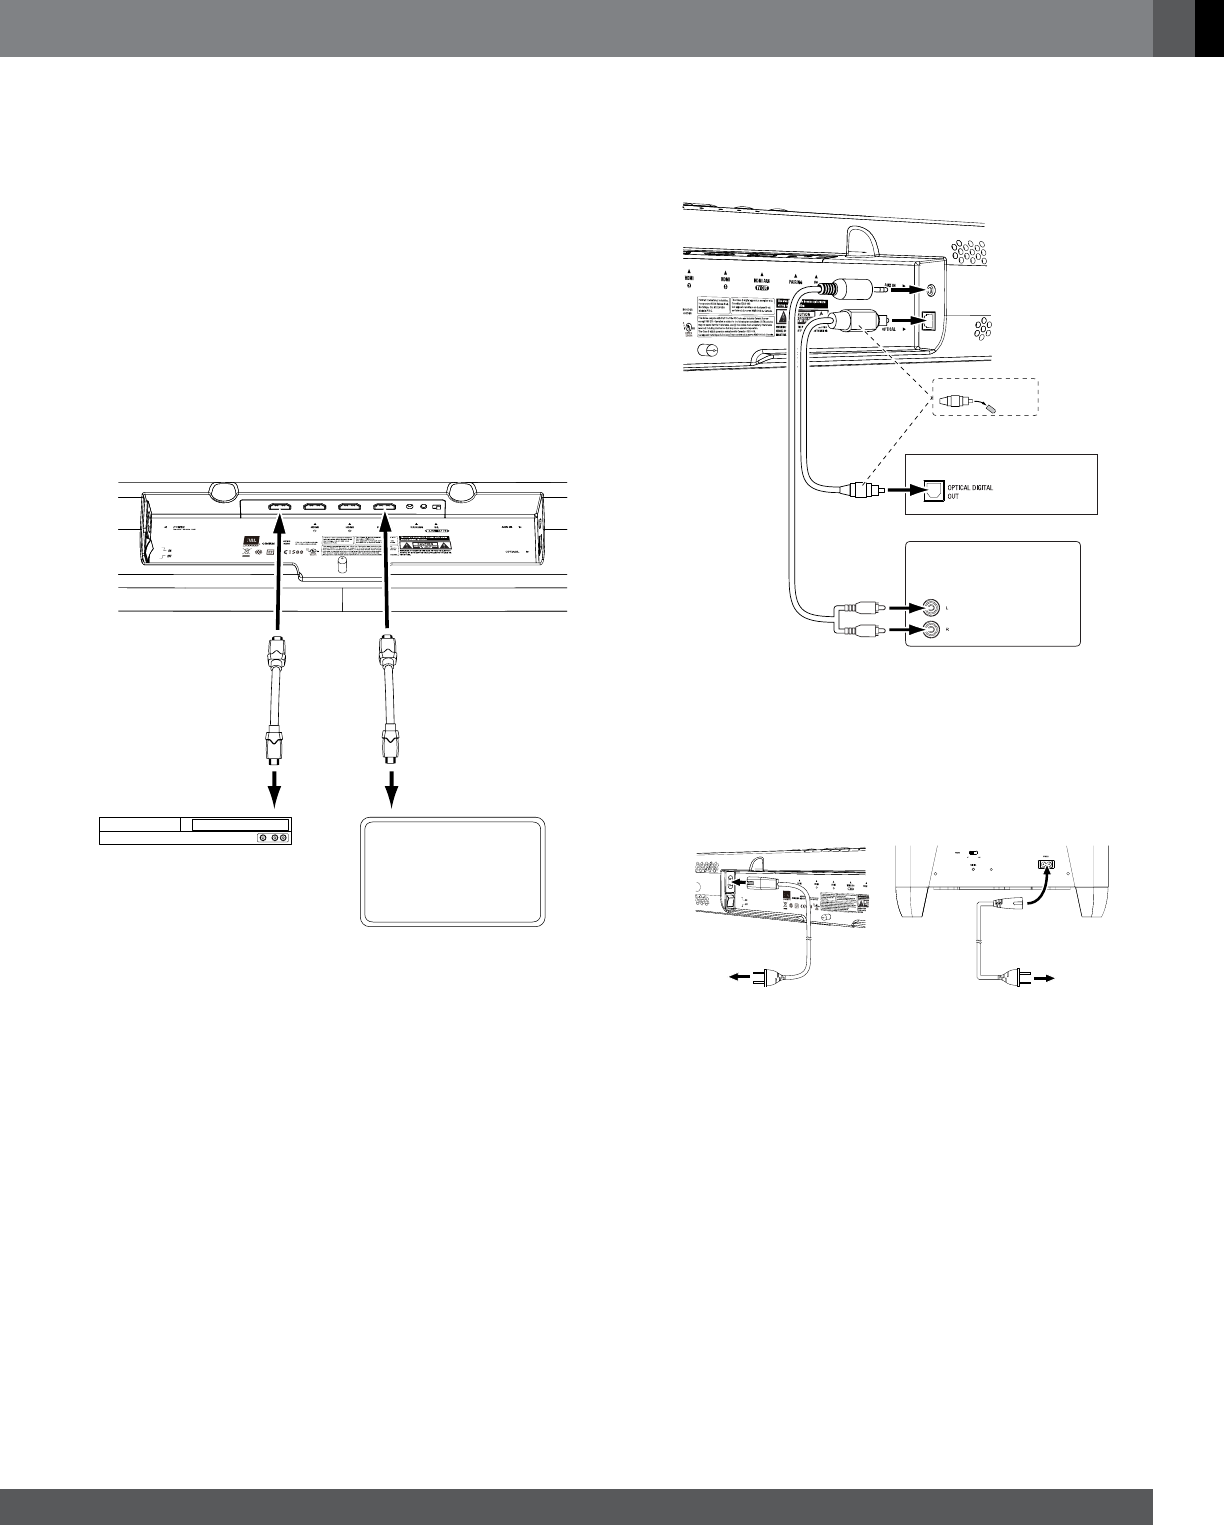
CoNNECTIoNS
SOUNDBAR AUDIO/VIDEO CONNECTIONS
HDMI ARC TV Out: If your TV has an HDMI input, use an HDMI
cable (not supplied) to connect it to the soundbar’s HDMI ARC TV
Out connection. The soundbar will pass video from source devices
connected to its HDMI Input connectors, along with its own on-screen
display information, to the TV. If your TV is equipped with the HDMI
Audio Return Channel (ARC) Function, you can feed its sound to the
soundbar via the HDMI ARC TV Out connection, and it will not require
additional audio connections to the soundbar. The ARC signal is active
when the HDMI TV source is selected.
NOTE: The soundbar’s on-screen information display (OSD) only
appears through the HDMI ARC TV Out connector. If you want to
see the soundbar’s OSD you need to connect its HDMI ARC TV Out
connector to your TV even if you are not connecting any HDMI video
source devices to the soundbar’s HDMI In 1/2/3 connectors (below).
See On-Screen Information Display, on page 6, for more information.
To
HDMI In
1/2/3
HDMI-Equipped
Source Device
HDMI-Equipped
TV
To
HDMI ARC
TV Out
HDMI In 1/2/3: If any of your source devices have HDMI connectors,
connect them to the soundbar’s HDMI In 1/2/3 connectors for the best
possible video and audio performance quality. Since the HDMI cable
carries both digital video and digital audio signals, you do not have to
make any additional audio connections for source devices you connect
via HDMI connectors.
Aux In and Optical In connections: If your TV and source devices
do not have HDMI connections, you can use the supplied audio cable
and optical cable to connect your TV and one source device to the
soundbar’s Aux In and Optical In connectors, respectively.
AUDIO
OUT
Audio
Cable
(supplied)
Optical
Cable
(supplied) Disc Player or Cable/
Satellite Tuner
TV or Analog Source Device
Remove Caps
NOTE: If your source devices have HDMI connectors, using them will
provide superior audio quality.
POWER CONNECTIONS
After verifying that all of the source connections have been made properly,
plug the supplied power cords into the soundbar’s and subwoofer’s
Power Cord connectors, and plug the other ends into active,
unswitched
AC outlets. Do NOT plug this cords into the accessory outlet found on
some audio components.
To
Unswitched
AC Outlet
To
Unswitched
AC Outlet
Power
Cord
(supplied)
Power
Cord
(supplied)
6
uSINg Your SouNdBAr SYSTEM
TURNING THE SOUNDBAR ON AND OFF
Set the soundbar’s Power switcn to the “On” position. Press the Power
button on either the soundbar or the remote to turn the soundbar on.
To put the soundbar in the Standby mode, press either Power button
while the soundbar is on.
Power Button Power Button
If you do not press the Power button, the soundbar will automatically
go into the Standby mode approximately 10 minutes after the audio
signal ceases. NOTE: If you have put the soundbar into the Standby
mode by pressing the Power button, you must manually turn it on by
pressing the Power button again. If the soundbar has automatically
gone into the Standby mode 10 minutes after the audio signal has
ceased, it will automatically turn itself on when it receives an audio
signal at either input connection.
If you will be away from home for an extended period of time, or if
you will not be using the soundbar for an extended period, set the
soundbar’s Power switch to the “Off” position.
TURNING THE SUBWOOFER ON AND OFF
Set the subwoofer’s Power switch to the “On” position. Once the
subwoofer and soundbar have been paired (see Pairing the Units
for Wireless Operation, below) the subwoofer will turn on when the
soundbar turns on and will remain on for approximately one minute
after the soundbar enters the Standby mode, or for approximately 15
minutes after the audio signal ceases.
If you will be away from home for an extended period of time, or if you
will not be using the system for an extended period, set the subwoofer’s
Power switch to the “Off” position.
PAIRING THE UNITS FOR WIRELESS OPERATION
After turning the soundbar and subwoofer on for the first time, you will
need to “pair” the subwoofer and soundbar so they both operate at the
same wireless frequency. To pair the units, press the Wireless Pairing
switches on both units within 30 seconds of each other. The units will
communicate with each other and operate at the same frequency.
PAIRING
PHASE
Soundbar
Pairing Switch
and LED
Subwoofer
Pairing Switch
and LED
NOTE: The maximum wireless operating distance between the
soundbar and subwoofer is approximately 50 feet (15.3m).
ON-SCREEN INFORMATION DISPLAY
The soundbar’s on-screen information display (OSD) will appear on the
screen of a TV connected to the HDMI ARC TV Out connector to verify
operating status. The OSD will overlay on top of the TV’s video program
for five seconds after you press a button on the soundbar or remote,
then will disappear. (When you select an audio-only source connection
(Aux, Optical, Bluetooth), the OSD information will overlay a JBL splash
screen.)
HDMI 2 Music Mode
OSD
Overlay
Current
Source
Volume
Status
Sound
Mode
• Mute: When the audio signal is muted, the OSD will display the
following icon:
• Bluetooth: The OSD will disolay the following icons during
Bluetooth operation:
Bluetooth Pairing
Bluetooth Connected
Bluetooth Streaming
Bluetooth Not Connected
In addition to the status information, the OSD will also display
messages if the selected HDMI connection can’t be detected or if the
video signal is lost.
www.jbl.com
English
7
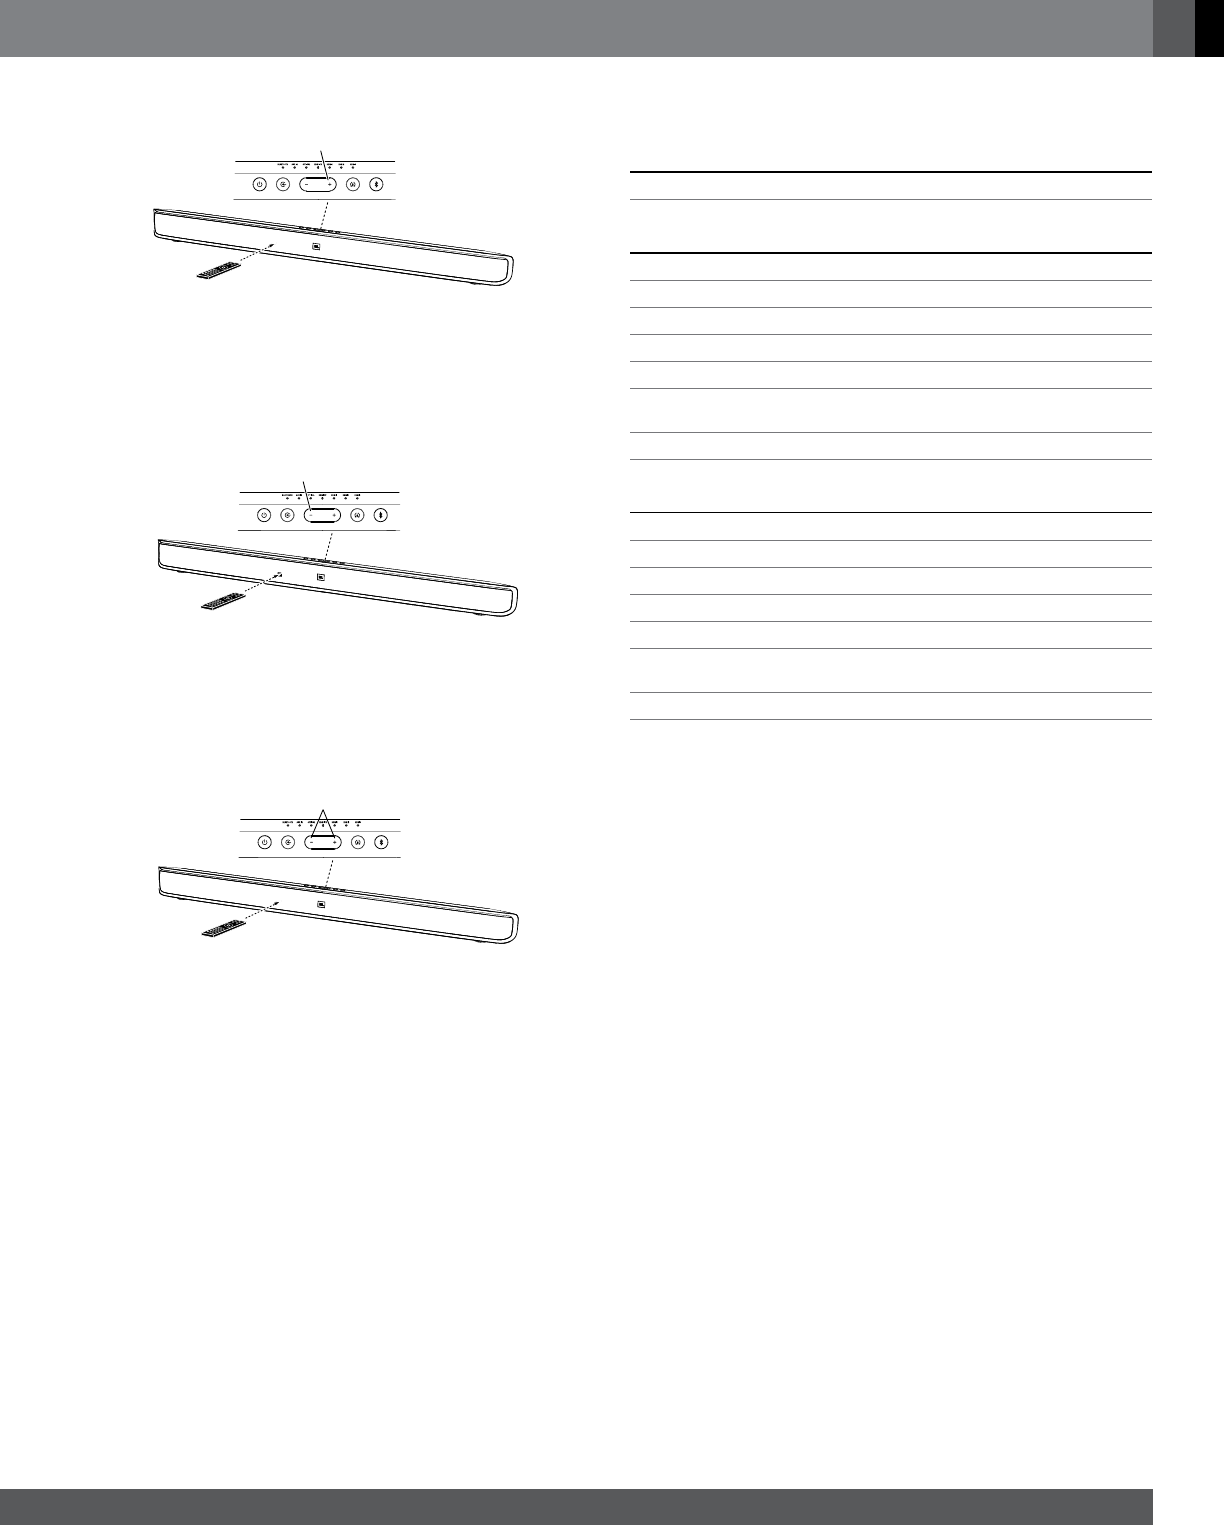
BLUETOOTH OPERATION
To wirelessly stream audio to the soundbar from a Bluetooth-enabled
device:
1. Confirm that the soundbar is in the Bluetooth pairing mode (the
Bluetooth button LED will be flashing blue). If the LED is not flashing
blue, press and hold the Bluetooth button until its LED begins to
flash blue.
HDMI3HDMI2HDMI1HDMI TV
Bluetooth Button
2. Place the device in the pairing mode. Use the device’s Bluetooth
pairing menu to pair it with the soundbar. (The soundbar will appear
as “SB400” in the device’s menu.) If the device requires a passcode,
use 0000.
3. When the soundbar’s Bluetooth button LED illuminates constantly,
it is paired with the device and you can stream audio via Bluetooth
from the device to the soundbar.
To listen to audio from the Bluetooth device, press the Source button
repeatedly until the Bluetooth Source Indicator LED illuminates (see
Switching Sources, below).
To disconnect the Bluetooth device, press and hold the soundbar’s
Bluetooth button until the LED begins flashing. To pair the soundbar
with a different Bluetooth-enabled device, repeat Steps 1 – 3 with the
new device.
Notes on Bluetooth operation:
• You can manually switch sources to the paired Bluetooth device by
pressing the soundbar’s Bluetooth button.
• If you switch the soundbar to a different source while a paired
Bluetooth device is streaming to the soundbar, the soundbar will
send a Stop command and the Bluetooth device will stop streaming.
SWITCHING SOURCES
Press the soundbar’s Source button to cycle between the sources in
the following order: Bluetooth, Aux, Optical, HDMI TV, HDMI 1, HDMI 2,
HDMI 3, Bluetooth, etc. (The remote has an individual selector button
for each source except Bluetooth.) The active source’s Source Indicator
LED will illuminate.
HDMI TV
HDMI1 HDMI2 HDMI3
OPTICALAUX INBLUETOOTH
Source Button
Source
Buttons
ADJUSTING THE SYSTEM’S VOLUME
Press the soundbar’s or remote’s Volume + and – buttons to raise and
lower the system’s volume one step at a time. Hold down the buttons
to continuously raise or lower the volume.
HDMI TV
HDMI1 HDMI2 HDMI3
OPTICALAUX INBLUETOOTH
Volume Buttons Volume Buttons
For the best sound, we recommend turning your TV’s built-in speakers
off. Consult your TV’s owner’s manual to find out how to do this.
MUTING THE SYSTEM
Momentarily press both of the soundbar’s Volume buttons at the same
time, or press the remote’s Mute button to mute the system. (Both
Volume indicators illuminate and the OSD displays the Mute icon.)
Momentarily press either of the soundbar’s Volume buttons or press
the remote’s Mute button again to un-mute the system. (The Volume
indicators turn off.)
HDMI TV
HDMI1 HDMI2 HDMI3
OPTICALAUX INBLUETOOTH
Both Volume Buttons Mute
Button
CHANGING THE SURROUND MODE
Press the soundbar’s or remote’s Surround Mode indicator to switch
the sound between normal stereo (the Surround Mode indicator lights
white and the OSD displays “Music” as the sound mode) and HARMAN
Display Surround (the Surround Mode indicator lights amber and the OSD
displays “Movie” as the sound mode). The HARMAN Display Surround
setting will produce a complete surround-sound experience for anyone
sitting in front of and several feet away from the soundbar. Although it is
particularly effective when watching movies, you can also try the HARMAN
Display Surround setting for music.
HDMI TV
HDMI1 HDMI2 HDMI3
OPTICALAUX INBLUETOOTH
Surround Button
Surround
Button
8
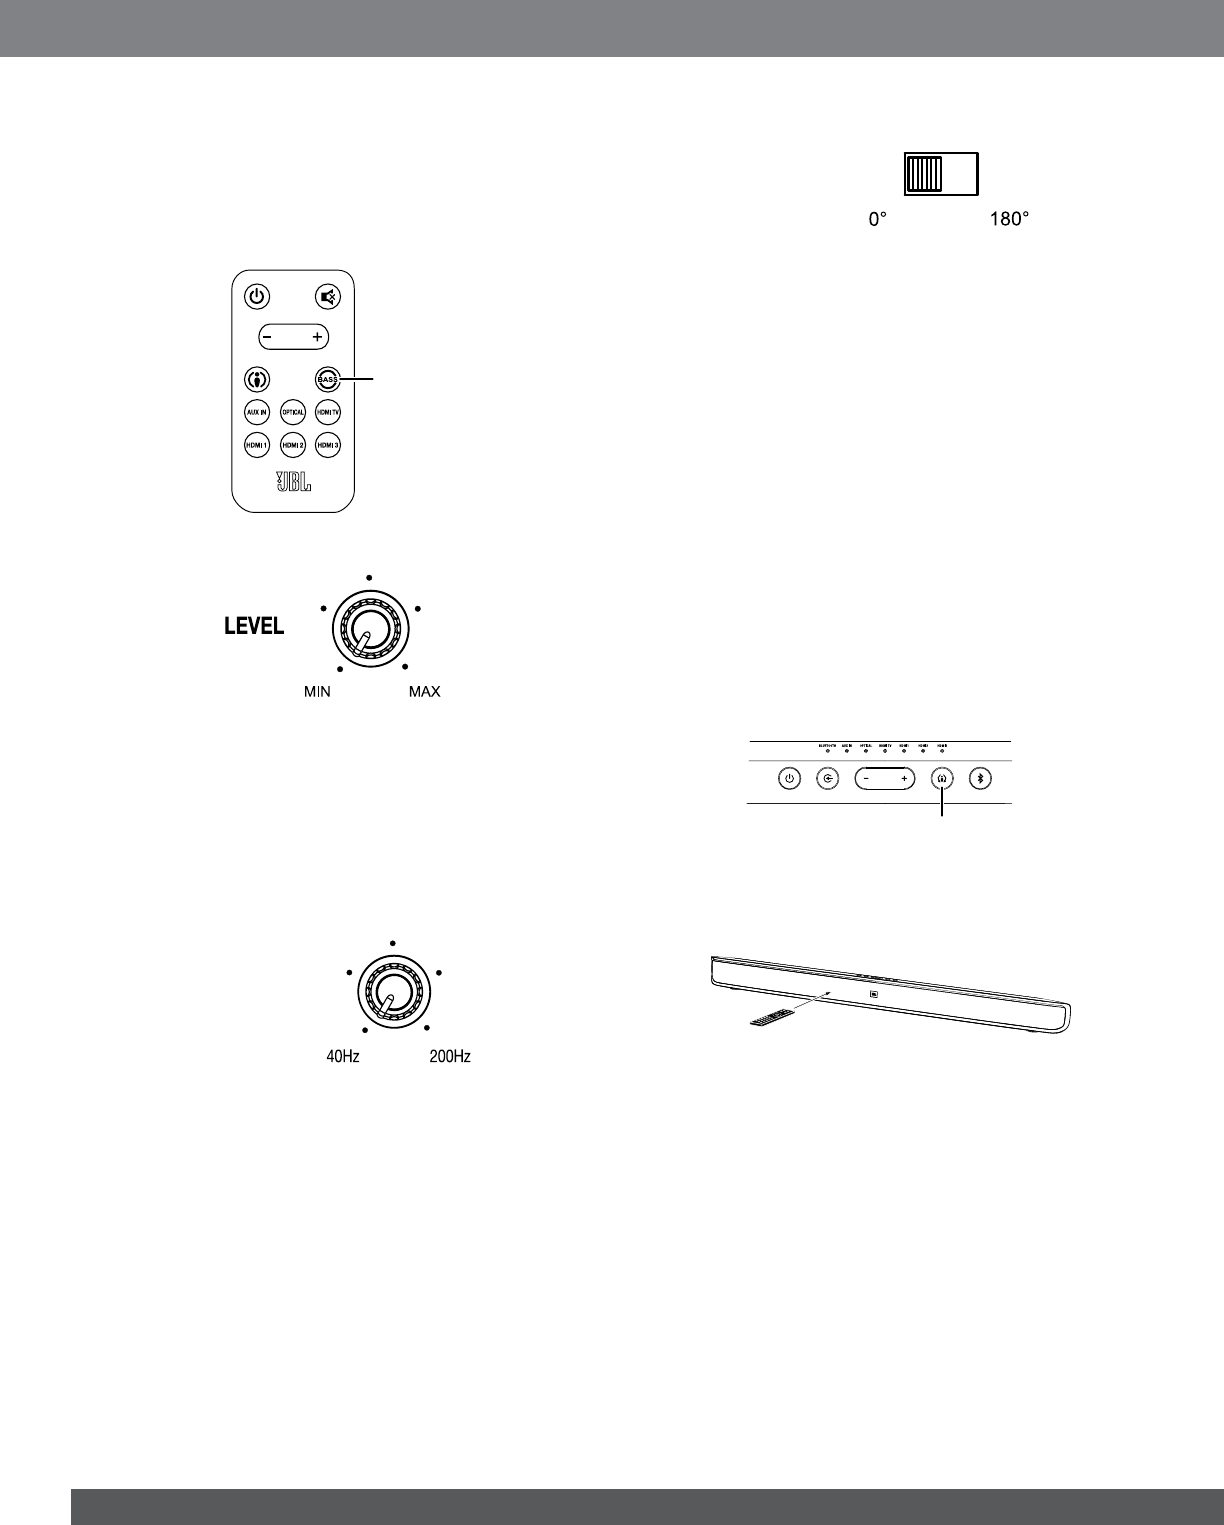
BooSTINg ThE BASS
Press the remote’s Bass Boost button to enhance low-frequency
performance, resulting in bass with more impact, which you may prefer
while watching movies or listening to music. The OSD will display “Bass
On” as the sound mode. There is no harm in experimenting with this
control. Pressing the Bass Boost button again will return the soundbar’s
normal low-frequency performance.
Bass Boost
Button
SUBWOOFER LEVEL CONTROL
Use the subwoofer’s Level knob to balance the bass with the rest of the
sound. Play music or movies that you are familiar with, and adjust the
subwoofer’s Level knob so the bass sounds balanced on both music and
lms. Listen to several different music recordings and lm soundtracks
that contain strong bass passages, and nd a setting for the Level knob
that doesn’t over-emphasize the bass or make it sound weak.
Once you find a setting for the subwoofer’s Level knob that balances
the bass with the rest of the sound, you shouldn’t have to change it.
SUBWOOFER CROSSOVER CONTROL
CROSSOVER
The subwoofer’s Crossover control adjusts the subwoofer’s cutoff
between 40Hz and 200Hz. The higher you set the Crossover control,
the higher in frequency the subwoofer will operate and the more its
bass will “overlap” that of the soundbar. This adjustment helps achieve
a smooth transition of bass frequencies between the subwoofer and the
soundbar for a variety of different rooms and subwoofer locations.
To set the Crossover control, listen for the smoothness of the bass. If
the bass seems too strong at certain frequencies, try a lower Crossover
control setting. If the bass seems too weak at certain frequencies, try a
higher Crossover control setting.
SUBWOOFER PHASE SWITCH
PHASE
This switch determines whether the subwoofer’s piston-like action
moves in and out in phase with the speakers in the soundbar. If the
subwoofer were to play out of phase with the soundbar speakers, some
of the sound waves produced by the soundbar and subwoofer could
be canceled out at some frequencies, reducing bass performance
and sonic impact. This phenomenon depends in part on the relative
placement of the soundbar and subwoofer in the room.
Although there is no absolutely correct setting for the Phase switch, in
most cases it should be left in the “0°” position. When the subwoofer is
properly in phase with the soundbar speakers, the sound will be clearer
and have more impact. It will make percussive sounds like drums,
piano and plucked strings sound more lifelike. The best way to set the
Phase switch is to listen to music that you are familiar with and adjust
the switch so that drums and other percussive sounds have maximum
impact.
LEArNINg Your TV rEMoTE’S VoLuME ANd
MuTE CoMMANdS
You can program the soundbar so it will respond to your TV remote’s
volume up, volume down and mute commands. This will let you control
both the soundbar and your TV with a single remote. Before you begin
to program the soundbar, have your TV remote in hand.
1. Press and hold the soundbar’s Surround button until the button
begins flashing amber.
Press and Hold Until
Button Flashes Amber
2. Hold your TV’s remote approximately 12” (30cm) from the indicated
locatation at the front of the soundbar and aim the remote directly at
the soundbar:
TV
Remote
30cm
(12")
• Press the TV remote’s volume up button while pressing and holding
the soundbar’s Volume + button. If the programming was successful
the soundbar’s Surround button will change from amber to solid
white for one second, then will return to flashing amber.
www.jbl.com
English
9
A) Hold Down Soundbar’s
Volume + Button
B) Press TV Remote’s
Volume Up Button
• Press the TV remote’s volume down button while pressing and
holding the soundbar’s Volume – button. If the programming was
successful the soundbar’s Surround button will change from amber
to solid white for one second, then will return to flashing amber.
A) Hold Down Soundbar’s
Volume – Button
B) Press TV Remote’s
Volume Down Button
• Press the TV remote’s mute button while pressing and holding the
soundbar’s Volume + and Volume – buttons at the same time. If the
programming was successful the soundbar’s Surround button will
change from amber to solid white for one second, then will return to
flashing amber.
A) Hold Down Soundbar’s
Volume + and – Button
B) Press TV Remote’s
Mute Button
3. When you’re finished, press and hold the soundbar’s Surround
button until the button stops flashing amber.
The soundbar will now respond to your TV remote’s volume and mute
commands.
SPECIFICATIoNS
CINEMA SB400 SYSTEM
Frequency response: 38Hz – 20kHz (–6dB)
CINEMA SB400 POWERED SOUNDBAR SPEAkER
Midrange transducers: Two 2-1/4" (57mm) cones per channel
High-frequency transducer: One 1" (25mm) dome per channel
Amplifier power: 60 watts peak per channel
Power requirement: 100V – 240V, 50Hz/60Hz, 60W
Power consumption: <0.5W (standby); 60W (maximum)
Dimensions (H x W x D): 3-3/4" x 43-5/16" x 2-1-2"
(95mm x 1100mm x 64mm)
Weight (shipping): 7.3 lb (3.3kg)
CINEMA SB400 POWERED SUBWOOFER
Low-frequency transducer: One 8" down-firing cone
Amplifier power: 100 watts
Enclosure type: Ported
Power requirement: 100V – 240V, 50/60Hz, 100W
Power consumption: <0.5W (standby); 100W (maximum)
Dimensions (H x W x D): 14" x 13" x 12-5/8"
(355mm x 329mm x 320mm)
Weight (shipping): 23.1 lb (10.5kg)

HARMAN International Industries, Incorporated
8500 Balboa Boulevard, Northridge, CA 91329 USA
© 2012 HARMAN International Industries, Incorporated. All rights reserved. JBL is a
trademark of HARMAN International Industries, Incorporated, registered in the United
States and/or other countries.
The Bluetooth word mark and logo are registered trademarks and are owned by the
Bluetooth SIG, Inc., and any use of such marks by HARMAN International Industries,
Incorporated, is under license.
Manufactured under license from Dolby Laboratories. Dolby and the double-D symbol
are trademarks of Dolby Laboratories.
All Rights Reserved. Features, specifications and appearance are subject to change
without notice.
Part No. 950-0475-001 Rev: A www.jbl.com