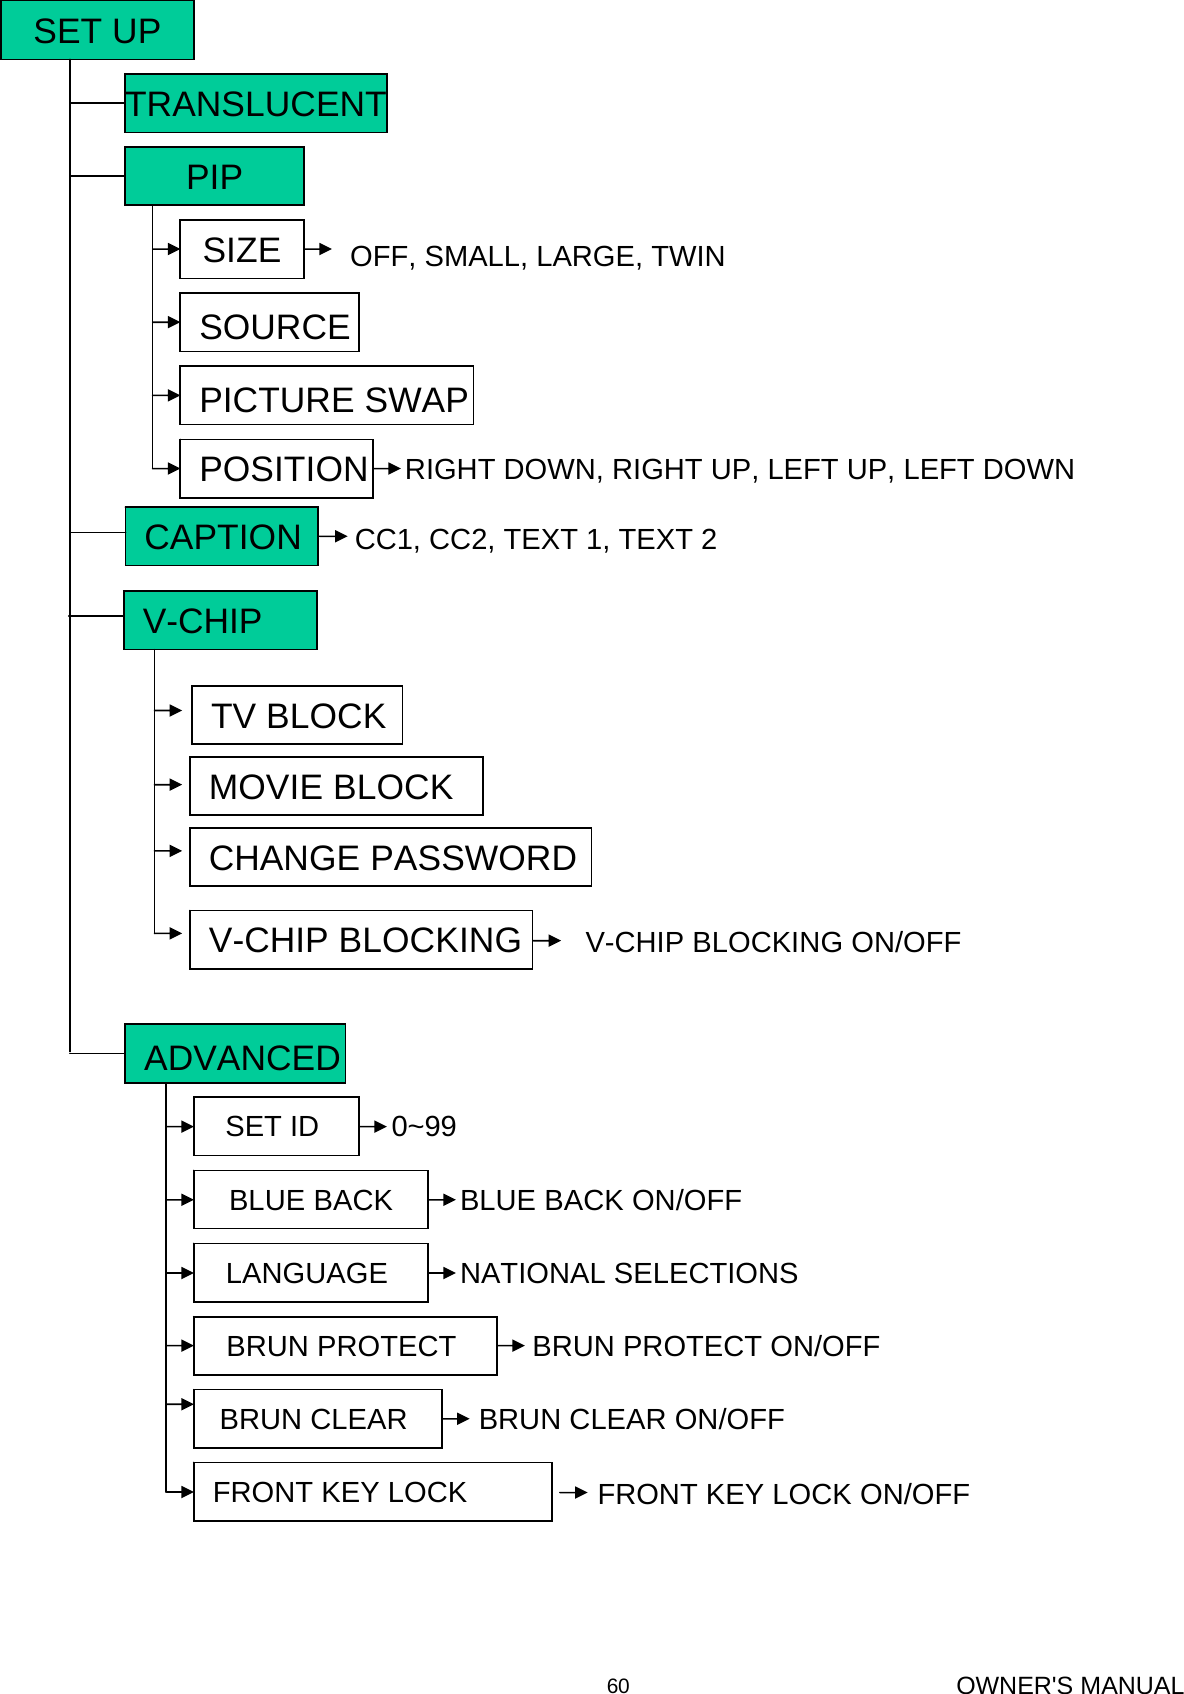
Harsper HL-320V LCD Monitor TV User Manual ATT E MANUAL
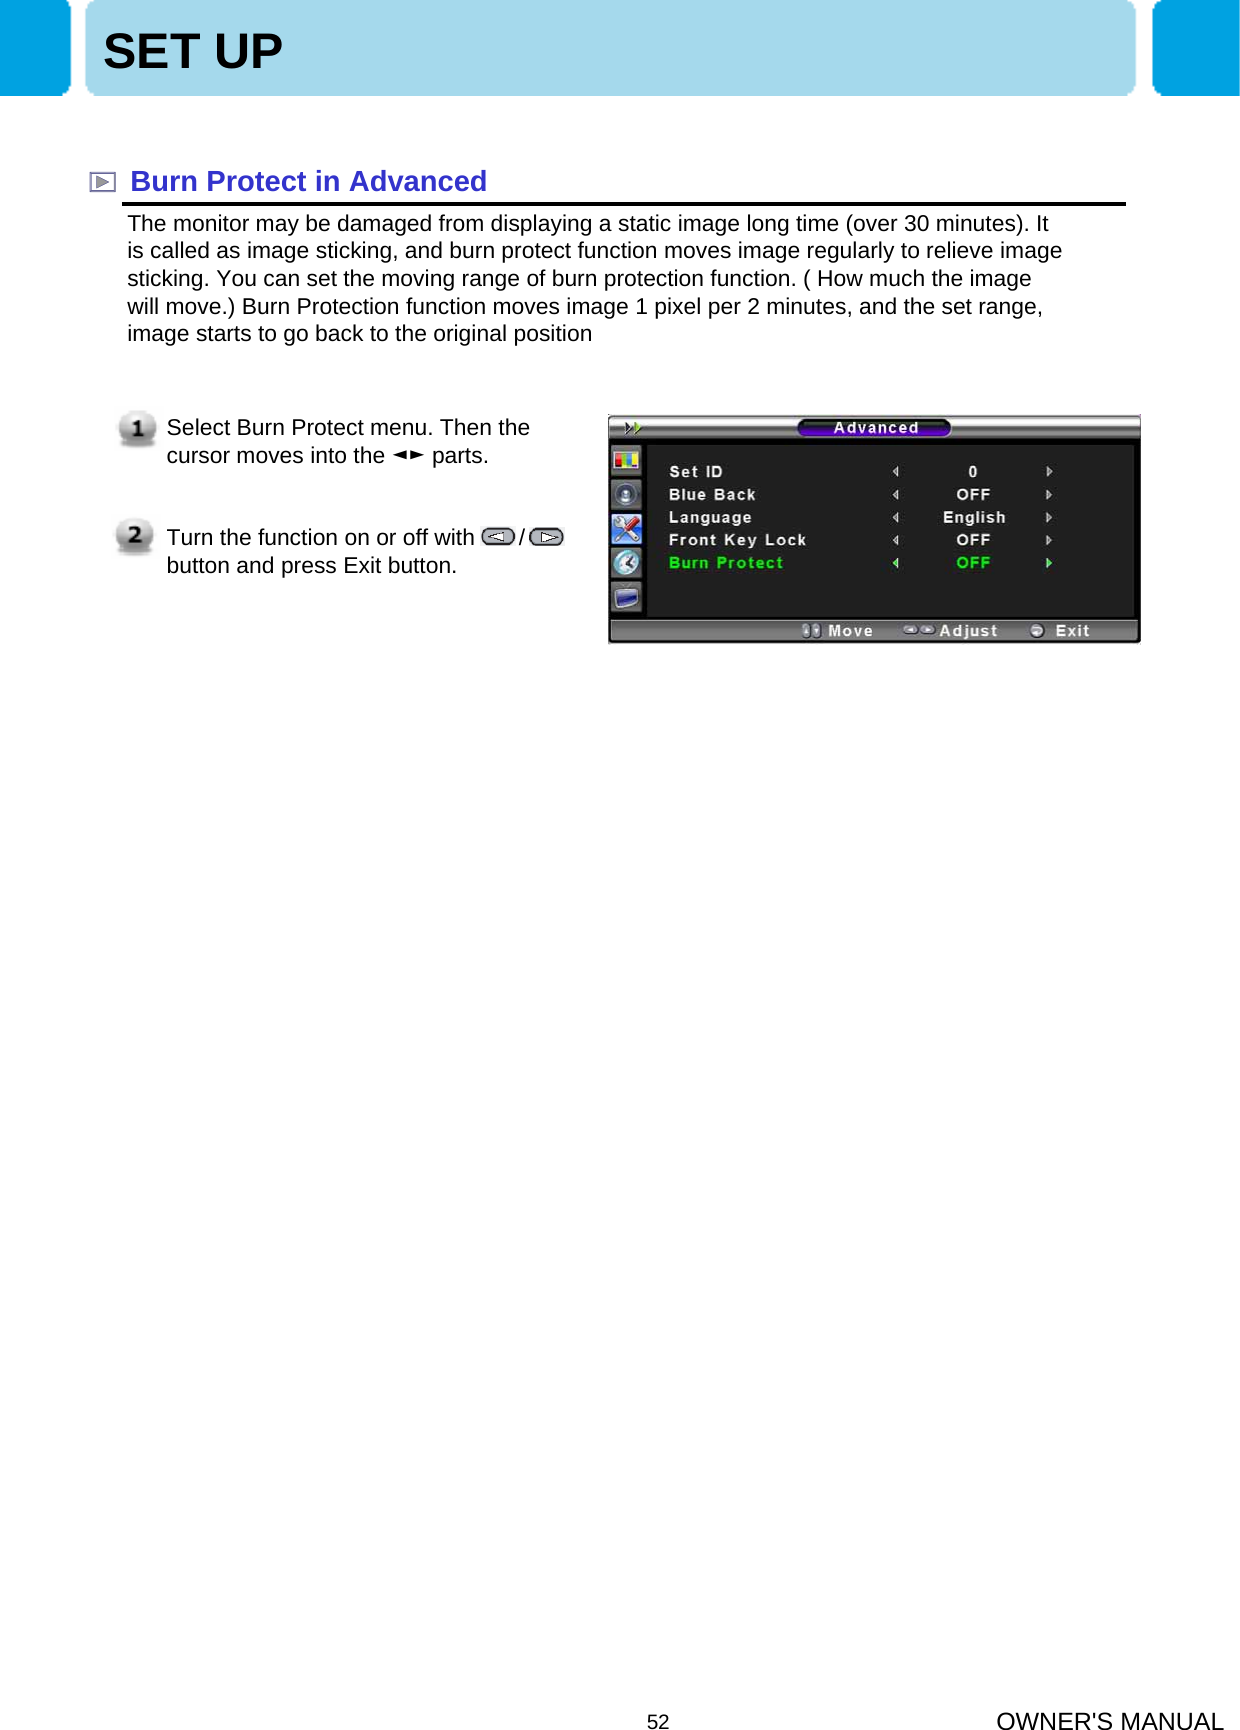
Harsper Co., Ltd. LCD Monitor TV ATT E MANUAL
UserManual.wiki
>
Harsper
>
HL 320V User Manual
Users Manual
Navigation menu
Upload a User Manual
Namespaces
Wiki Guide
HTML
PDF
Info
Views
User Manual
Discussion / Help
Navigation
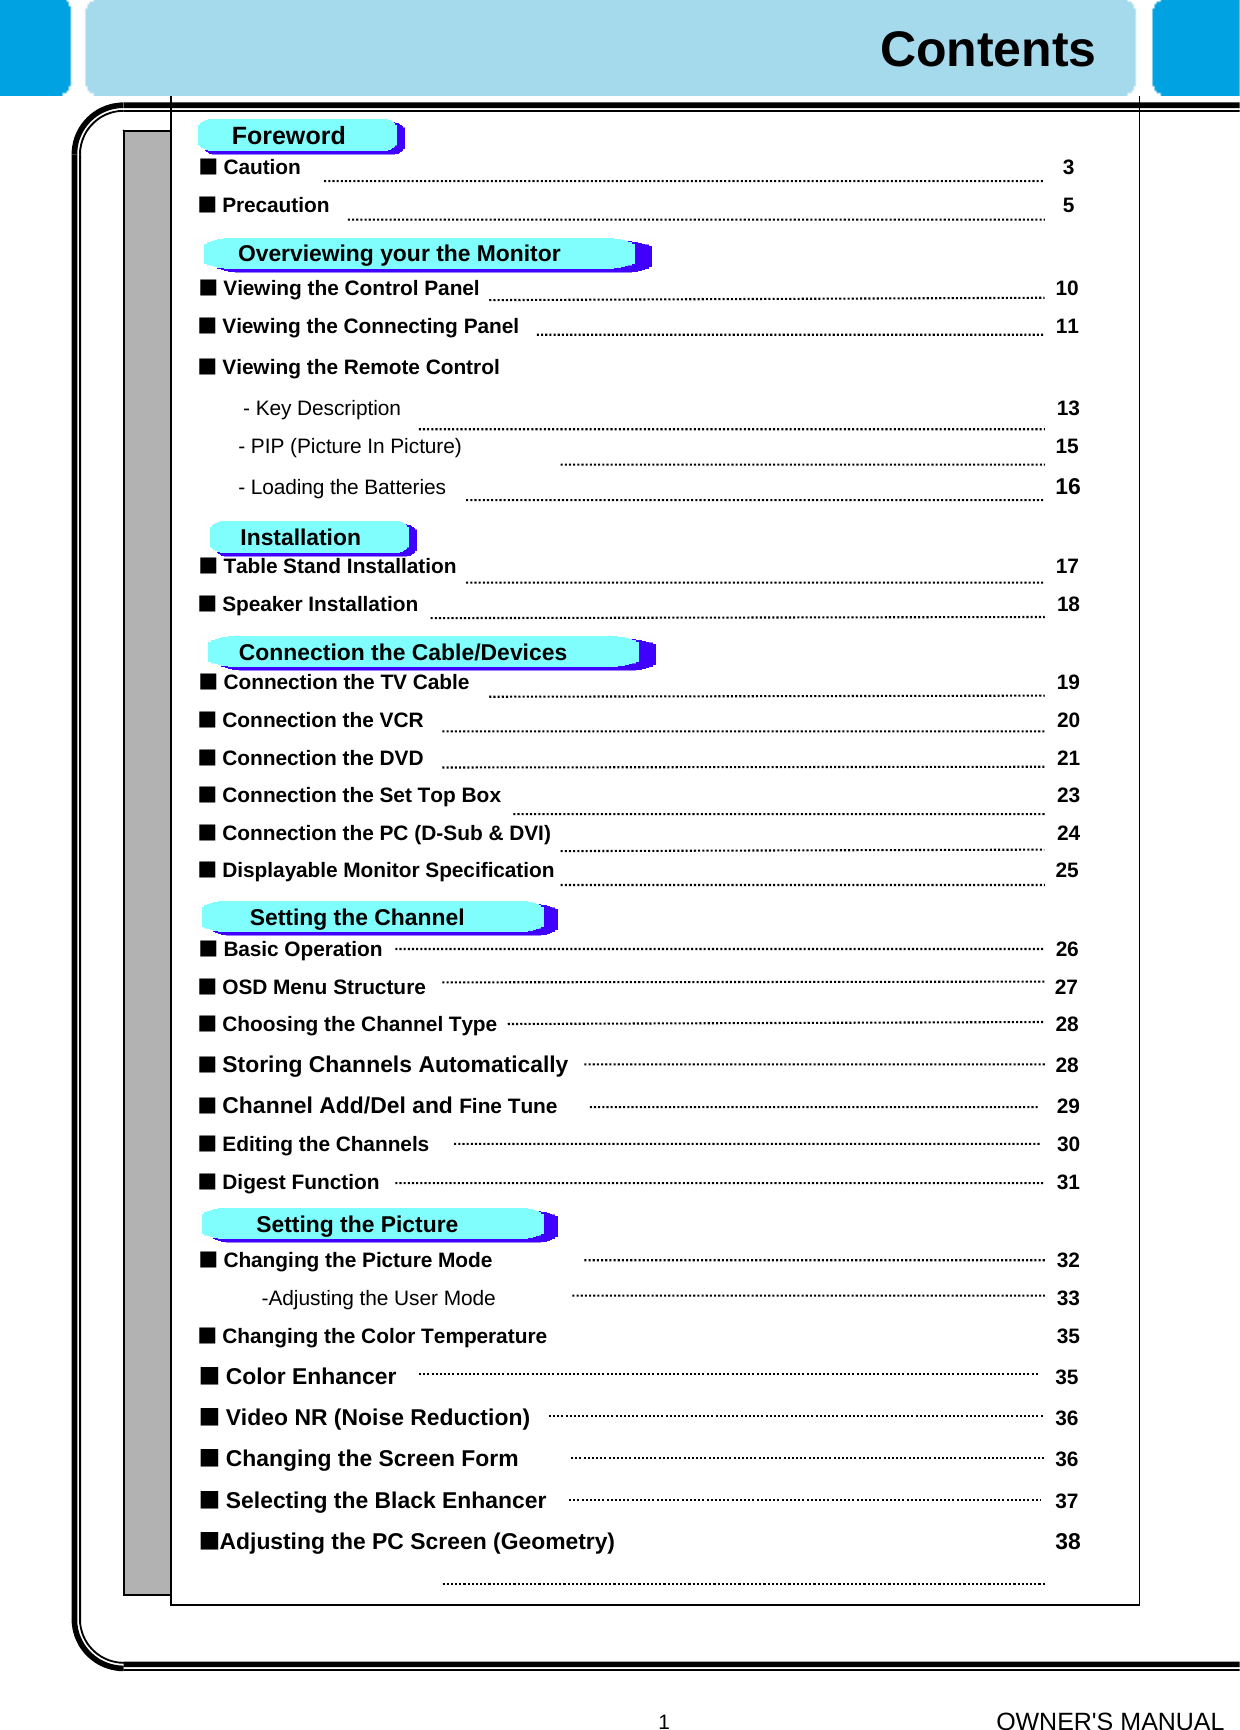

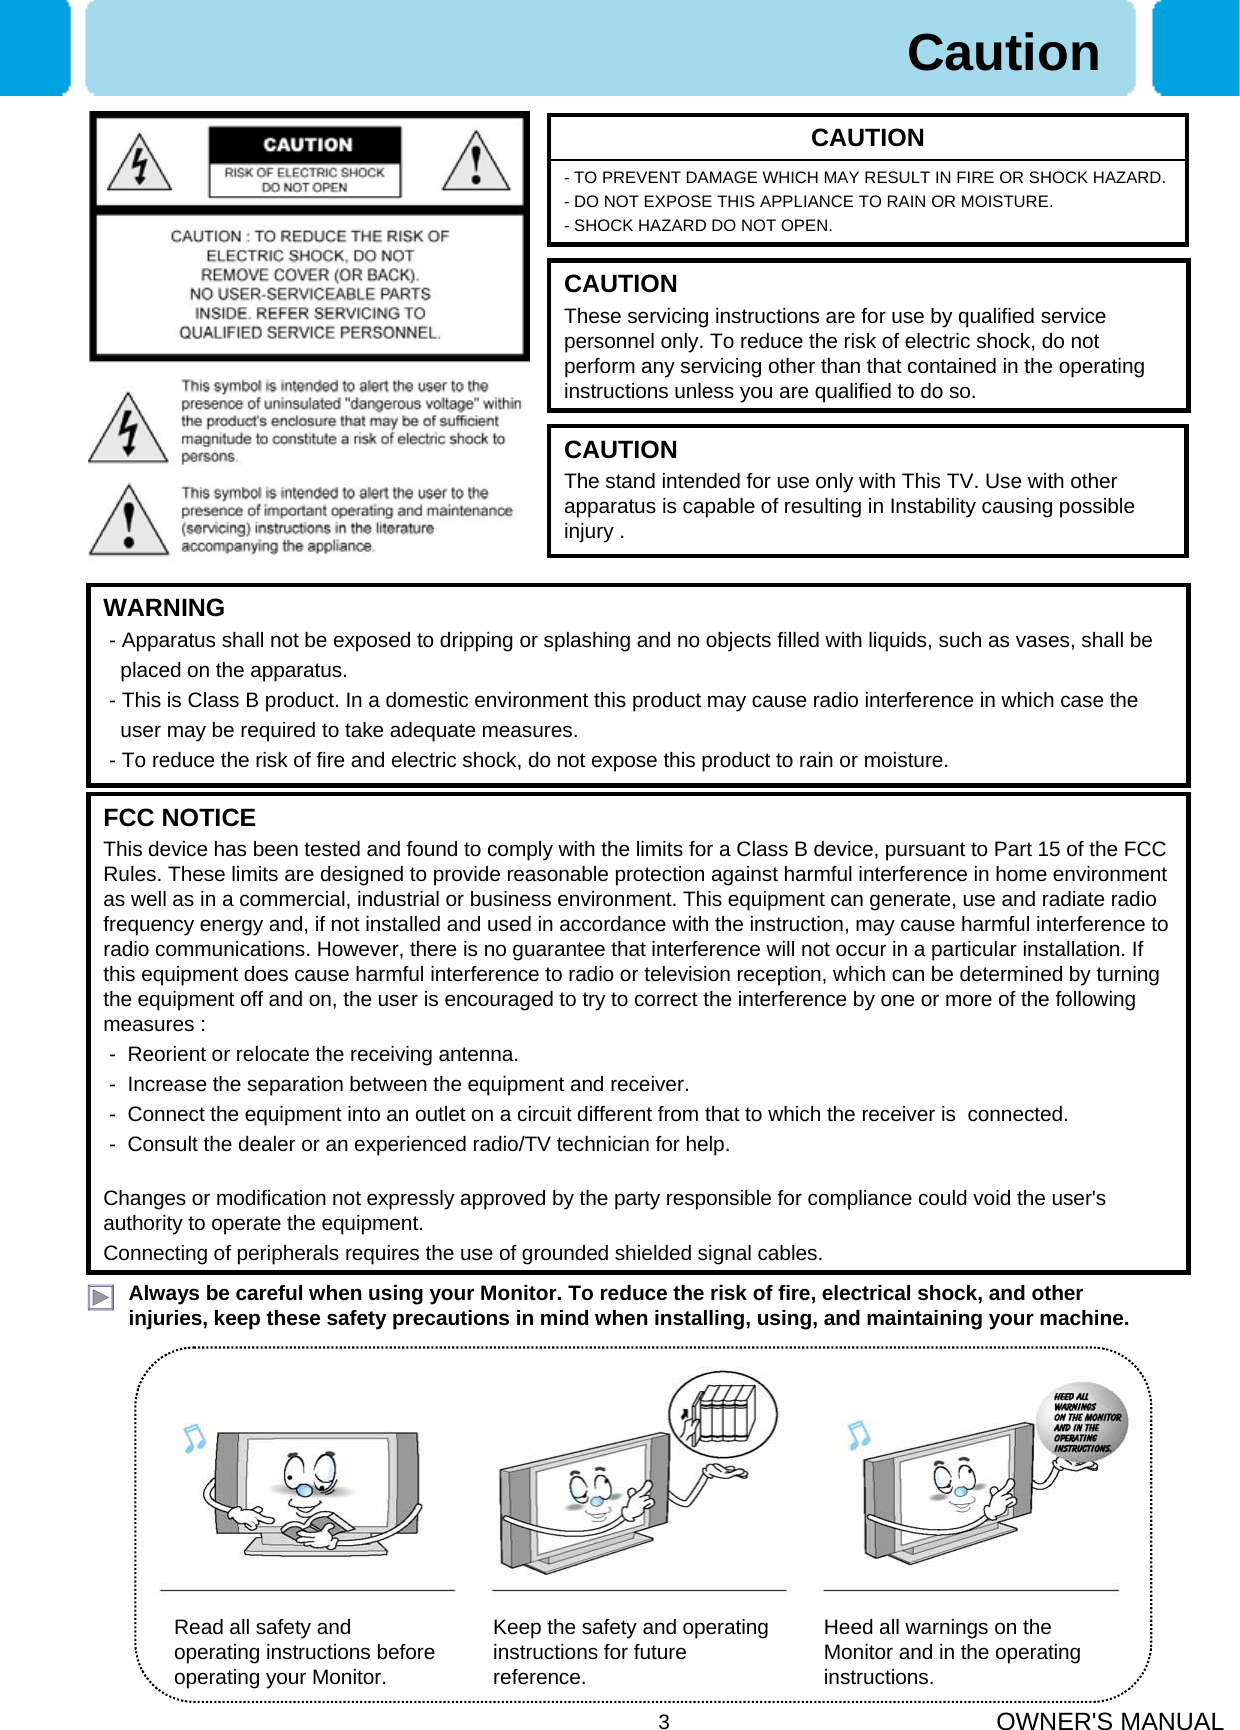


![OWNER'S MANUAL68Selectable 5 Mode (Warm1,2, Normal, Cool1,2)Color temperature 480i/p(60Hz) , 576ip(50Hz), 720p(60Hz) , 1080i(50,60Hz) HDTV InputFavorite channel programming, Time Set, Set the Sleep timerprogrammingTV/CATV (ATSC)Tuner ModuleAdvanced motion digital / Motion-Adaptive De-interlace process, Digital progressive line scaling.VideoMultiple input compatibleInput compatibleAdvanced multi-windows viewing PIP(picture in picture) with four selectable window positions on Video modePIP1280 X 1024 / 60Hz Max Input Resolution 600 cd/㎡Brightness1200:1Contrast Ratio852x480 Physical Pixel Pixel FormatVariable 4 Modes (4:3 Mode/ 16:9 X 3 Modes)Display Mode32-Inch 16 : 9 Diagonal ScreenDisplay SizeFunction and Display Specification992(W) X 554.6(H) X 270(D) / 24 kgWith Stand and Speaker792(W) X 554.6(H) X 270(D) / 20 kgWith Stand792(W) X 486.6(H) X 101(D) / 18 kgMain OnlyDimension / WeightFront OSD Key Control, Remote control, RS232C ControlExternal ControlBuilt-in amplifier and two speaker(7Watt/Typ.) systems (optional),Selectable fixed/variable audio output(optional)AudioMiscellaneousSpecification – 32” LCD[HP-3210V]32” LCD TV150 WattPower consumptionAC 100 ~ 240V 50/60HzInput PowerPower ConsumptionSPDIF (Optical) X 1Port (5.1 Channel)SPDIF PortHDMI X 1PortHDMI PortMini D-Sub 9Pin X 1PortExternal Control Port Cinch Type X 4Port(Stereo L/R), Head Phone Jack X 1PortSpeaker OutputRCA X 6PortAudio Input/OutputMini D-Sub 29Pin X 1Port / HDTV Input(480p, 576p, 720P(50/60Hz), 1080i(50/60Hz))HDCP (Factory Option)DVI InputMini D-Sub 15Pin X 1Port / HDTV Input(480p, 576p, 720P(50/60Hz), 1080i(50/60Hz))PC InputMini Din 4Pin X 1PortS-Video InputRCA X 2Port (Y, Pb/Cb, Pr/Cr : 480i, 480p, 576i, 576p, 720p, 1080i)Component1,2 InputRCA X 4Port(AV Input 1,2,3/ AV Output 1)Composite Input/OutputRF/CATV (ATSC)TV1,2 InputConnectivity](https://usermanual.wiki/Harsper/HL-320V/User-Guide-586591-Page-69.png)
![OWNER'S MANUAL69Selectable 5 Mode (Warm1,2, Normal, Cool1,2)Color temperature 480i/p(60Hz) , 576ip(50Hz), 720p(60Hz) , 1080i(50,60Hz) HDTV InputFavorite channel programming, Time Set, Set the Sleep timerprogrammingTV/CATV (ATSC)Tuner ModuleAdvanced motion digital / Motion-Adaptive De-interlace process, Digital progressive line scaling.VideoMultiple input compatibleInput compatibleAdvanced multi-windows viewing PIP(picture in picture) with four selectable window positions on Video modePIP1280 X 1024 / 60Hz Max Input Resolution 600 cd/㎡Brightness1200:1Contrast Ratio1024x768 Physical Pixel Pixel FormatVariable 4 Modes (4:3 Mode/ 16:9 X 3 Modes)Display Mode37-Inch 16 : 9 Diagonal ScreenDisplay SizeFunction and Display Specification1108(W) X 625(H) X 270(D) / 30 kgWith Stand and Speaker915(W) X 625(H) X 270(D) / 26 kgWith Stand915(W) X 557(H) X 102(D) / 24 kgMain OnlyDimension / WeightFront OSD Key Control, Remote control, RS232C ControlExternal ControlBuilt-in amplifier and two speaker(7Watt/Typ.) systems (optional),Selectable fixed/variable audio output(optional)AudioMiscellaneousSpecification – 37” LCD[HL-3710V]37” LCD TV180 WattPower consumptionAC 100 ~ 240V 50/60HzInput PowerPower ConsumptionSPDIF (Optical) X 1Port (5.1 Channel)SPDIF PortHDMI X 1PortHDMI PortMini D-Sub 9Pin X 1PortExternal Control Port Cinch Type X 4Port(Stereo L/R), Head Phone Jack X 1PortSpeaker OutputRCA X 6PortAudio Input/OutputMini D-Sub 29Pin X 1Port / HDTV Input(480p, 576p, 720P(50/60Hz), 1080i(50/60Hz))HDCP (Factory Option)DVI InputMini D-Sub 15Pin X 1Port / HDTV Input(480p, 576p, 720P(50/60Hz), 1080i(50/60Hz))PC InputMini Din 4Pin X 1PortS-Video InputRCA X 2Port (Y, Pb/Cb, Pr/Cr : 480i, 480p, 576i, 576p, 720p, 1080i)Component1,2 InputRCA X 4Port(AV Input 1,2,3/ AV Output 1)Composite Input/OutputRF/CATV (ATSC)TV1,2 InputConnectivity](https://usermanual.wiki/Harsper/HL-320V/User-Guide-586591-Page-70.png)
![OWNER'S MANUAL70Selectable 5 Mode (Warm1,2, Normal, Cool1,2)Color temperature 480i/p(60Hz) , 576ip(50Hz), 720p(60Hz) , 1080i(50,60Hz) HDTV InputFavorite channel programming, Time Set, Set the Sleep timerprogrammingTV/CATV (ATSC)Tuner ModuleAdvanced motion digital / Motion-Adaptive De-interlace process, Digital progressive line scaling.VideoMultiple input compatibleInput compatibleAdvanced multi-windows viewing PIP(picture in picture) with four selectable window positions on Video modePIP1280 X 1024 / 60Hz Max Input Resolution 500 cd/㎡Brightness1000:1Contrast Ratio1366x768 Physical Pixel Pixel FormatVariable 4 Modes (4:3 Mode/ 16:9 X 3 Modes)Display Mode40-Inch 16 : 9 Diagonal ScreenDisplay SizeFunction and Display Specification1185(W) X 666(H) X 270(D) / 43.8 kgWith Stand and Speaker985(W) X 666(H) X 270(D) / 30.8 kgWith Stand985(W) X 598(H) X 101.5(D) / 29 kgMain OnlyDimension / WeightFront OSD Key Control, Remote control, RS232C ControlExternal ControlBuilt-in amplifier and two speaker(7Watt/Typ.) systems (optional),Selectable fixed/variable audio output(optional)AudioMiscellaneousSpecification – 40” LCD[HL-4010V]40” LCD TV250 WattPower consumptionAC 100 ~ 240V 50/60HzInput PowerPower ConsumptionSPDIF (Optical) X 1Port (5.1 Channel)SPDIF PortHDMI X 1PortHDMI PortMini D-Sub 9Pin X 1PortExternal Control Port Cinch Type X 4Port(Stereo L/R), Head Phone Jack X 1PortSpeaker OutputRCA X 6PortAudio Input/OutputMini D-Sub 29Pin X 1Port / HDTV Input(480p, 576p, 720P(50/60Hz), 1080i(50/60Hz))HDCP (Factory Option)DVI InputMini D-Sub 15Pin X 1Port / HDTV Input(480p, 576p, 720P(50/60Hz), 1080i(50/60Hz))PC InputMini Din 4Pin X 1PortS-Video InputRCA X 2Port (Y, Pb/Cb, Pr/Cr : 480i, 480p, 576i, 576p, 720p, 1080i)Component1,2 InputRCA X 4Port(AV Input 1,2,3/ AV Output 1)Composite Input/OutputRF/CATV (ATSC)TV1,2 InputConnectivity](https://usermanual.wiki/Harsper/HL-320V/User-Guide-586591-Page-71.png)
![OWNER'S MANUAL71Selectable 5 Mode (Warm1,2, Normal, Cool1,2, User)Color temperature 480i/p(60Hz) , 576ip(50Hz), 720p(60Hz) , 1080i(50,60Hz) HDTV InputFavorite channel programming, Time Set, Set the Sleep timerprogrammingTV/CATV (ATSC)Tuner ModuleAdvanced motion digital / Motion-Adaptive De-interlace process, Digital progressive line scaling.VideoMultiple input compatibleInput compatibleAdvanced multi-windows viewing PIP(picture in picture) with four selectable window positions on Video modePIP1280 X 1024 / 60Hz Max Input Resolution 600 cd/㎡Brightness1200:1Contrast Ratio1366x768 Physical Pixel Pixel FormatVariable 4 Modes (4:3 Mode/ 16:9 X 3 Modes)Display Mode42-Inch 16 : 9 Diagonal ScreenDisplay SizeFunction and Display Specification1256(W) X 712(H) X 305(D) / 41 kgWith Stand and Speaker1056(W) X 712(H) X 305(D) / 37 kgWith Stand1056(W) X 648(H) X 102(D) / 38 kgMain OnlyDimension / WeightFront OSD Key Control, Remote control, RS232C ControlExternal ControlBuilt-in amplifier and two speaker(7Watt/Typ.) systems (optional),Selectable fixed/variable audio output(optional)AudioMiscellaneousSpecification – 42” LCD[HL-4210V]42” LCD TV180 WattPower consumptionAC 100 ~ 240V 50/60HzInput PowerPower ConsumptionSPDIF (Optical) X 1Port (5.1 Channel )SPDIF PortHDMI X 1PortHDMI PortMini D-Sub 9Pin X 1PortExternal Control Port Cinch Type X 4Port(Stereo L/R), Head Phone Jack X 1PortSpeaker OutputRCA X 6PortAudio Input/OutputMini D-Sub 29Pin X 1Port / HDTV Input(480p, 576p, 720P(50/60Hz), 1080i(50/60Hz))HDCP (Factory Option) DVI InputMini D-Sub 15Pin X 1Port / HDTV Input(480p, 576p, 720P(50/60Hz), 1080i(50/60Hz))PC InputMini Din 4Pin X 1PortS-Video InputRCA X 2Port (Y, Pb/Cb, Pr/Cr : 480i, 480p, 576i, 576p, 720p, 1080i)Component1,2 InputRCA X 4Port(AV Input 1,2,3/ AV Output 1)Composite Input/OutputRF/CATV (ATSC)TV1,2 InputConnectivity](https://usermanual.wiki/Harsper/HL-320V/User-Guide-586591-Page-72.png)
![OWNER'S MANUAL72Selectable 5 Mode (Warm1,2, Normal, Cool1,2, User)Color temperature 480i/p(60Hz) , 576ip(50Hz), 720p(60Hz) , 1080i(50,60Hz) HDTV InputFavorite channel programming, Time Set, Set the Sleep timerprogrammingTV/CATV (ATSC)Tuner ModuleAdvanced motion digital / Motion-Adaptive De-interlace process, Digital progressive line scaling.VideoMultiple input compatibleInput compatibleAdvanced multi-windows viewing PIP(picture in picture) with four selectable window positions on Video modePIP1280 X 1024 / 60Hz Max Input Resolution 450 cd/㎡Brightness1000:1Contrast Ratio1366x768 Physical Pixel Pixel FormatVariable 4 Modes (4:3 Mode/ 16:9 X 3 Modes)Display Mode46-Inch 16 : 9 Diagonal ScreenDisplay SizeFunction and Display Specification1318(W) X 735.8(H) X 305(D) / 58.7 kgWith Stand and Speaker1118(W) X 735.8(H) X 305(D) / 53.7 kgWith Stand1118(W) X 672.4(H) X 101.5(D) / 48.7 kgMain OnlyDimension / WeightFront OSD Key Control, Remote control, RS232C ControlExternal ControlBuilt-in amplifier and two speaker(7Watt/Typ.) systems (optional),Selectable fixed/variable audio output(optional)AudioMiscellaneousSpecification – 46” LCD[HL-4610V]46” LCD TV220 WattPower consumptionAC 100 ~ 240V 50/60HzInput PowerPower ConsumptionSPDIF (Optical) X 1Port (5.1 Channel )SPDIF PortHDMI X 1PortHDMI PortMini D-Sub 9Pin X 1PortExternal Control Port Cinch Type X 4Port(Stereo L/R), Head Phone Jack X 1PortSpeaker OutputRCA X 6PortAudio Input/OutputMini D-Sub 29Pin X 1Port / HDTV Input(480p, 576p, 720P(50/60Hz), 1080i(50/60Hz))HDCP (Factory Option) DVI InputMini D-Sub 15Pin X 1Port / HDTV Input(480p, 576p, 720P(50/60Hz), 1080i(50/60Hz))PC InputMini Din 4Pin X 1PortS-Video InputRCA X 2Port (Y, Pb/Cb, Pr/Cr : 480i, 480p, 576i, 576p, 720p, 1080i)Component1,2 InputRCA X 4Port(AV Input 1,2,3/ AV Output 1)Composite Input/OutputRF/CATV (ATSC)TV1,2 InputConnectivity](https://usermanual.wiki/Harsper/HL-320V/User-Guide-586591-Page-73.png)
