User Manual

Contents
Plasma TV
1
What Is A Plasma Display Panel? .................................................................................................................. 2
What Are The Advantages Of Plasma?......................................................................................................... 3
Important Safety Information .......................................................................................................................... 4
Overview Of Your New PDP ............................................................................................................................ 8
OSD Button.................................................................................................................................................. 8
OSD Key Function....................................................................................................................................... 8
Connecting To External Equipment ........................................................................................................... 9
RS-232C Configurations............................................................................................................................. 10
Accessories ....................................................................................................................................................... 12
Optional Extras.................................................................................................................................................. 13
Controls Of The Remote Control.................................................................................................................... 14
Loading The Batteries ................................................................................................................................. 15
Reception Range Of Remote Control ........................................................................................................ 15
Monitor Installation........................................................................................................................................... 16
Wall Mount Installation................................................................................................................................... 16
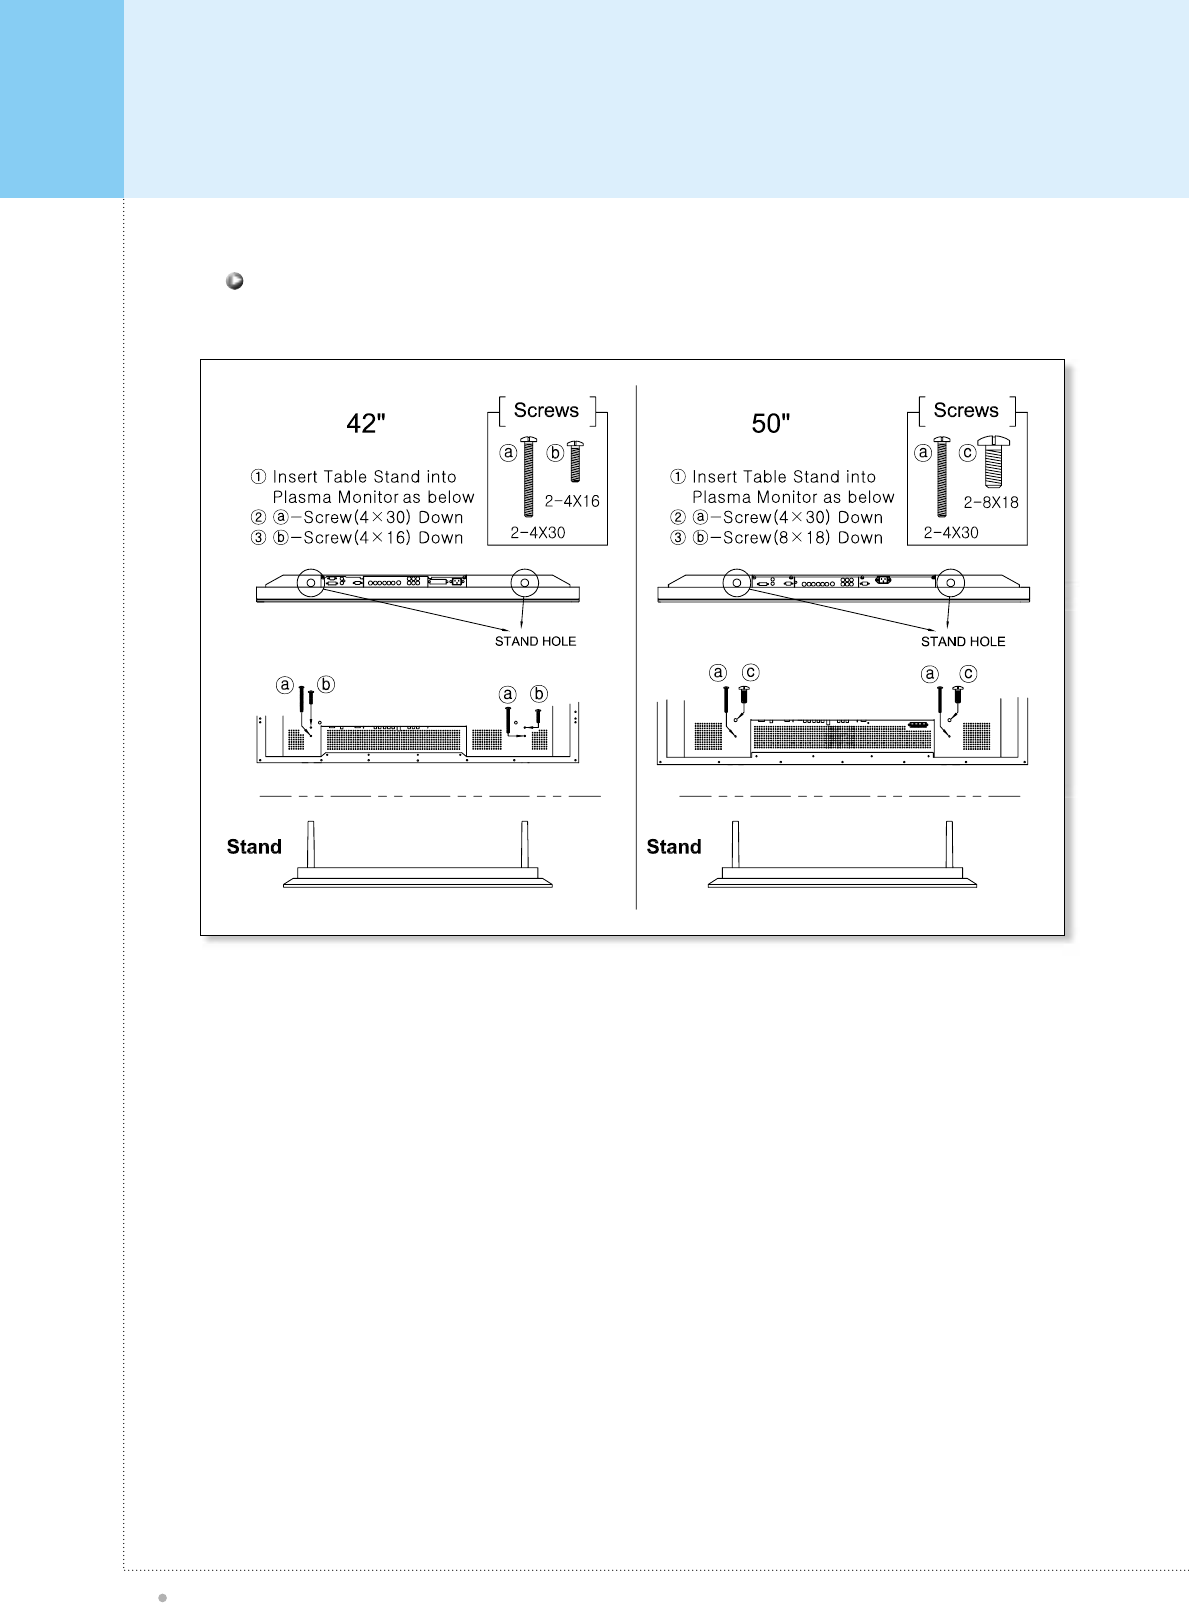
Table Stand Installation.................................................................................................................................. 23
Speaker Installation........................................................................................................................................ 25
Watching TV....................................................................................................................................................... 26
Watching VCR.................................................................................................................................................... 27
Watching DVD.................................................................................................................................................... 28
Connecting The PC........................................................................................................................................... 29
Displayable Monitor Specification ................................................................................................................. 30
Basic Operation................................................................................................................................................. 31
Turning The Monitor TV On And Off .......................................................................................................... 31
TV Channel Selection ................................................................................................................................. 31
Volume Control............................................................................................................................................ 31
OSD Structure.................................................................................................................................................... 32
PICTURE (TV&VIDEO)...................................................................................................................................... 33
PICTURE (PC) .................................................................................................................................................... 35
SOUND (TV&VIDEO+PC) ................................................................................................................................. 37
MISC (TV&VIDEO+PC)...................................................................................................................................... 38
TV SET-UP.......................................................................................................................................................... 40
PIP (PC)............................................................................................................................................................... 41
Hot Key Function By Remote Control........................................................................................................... 42
Specification ...................................................................................................................................................... 43
Troubleshooting................................................................................................................................................ 45
United Status Retail Warranty Card............................................................................................................... 46
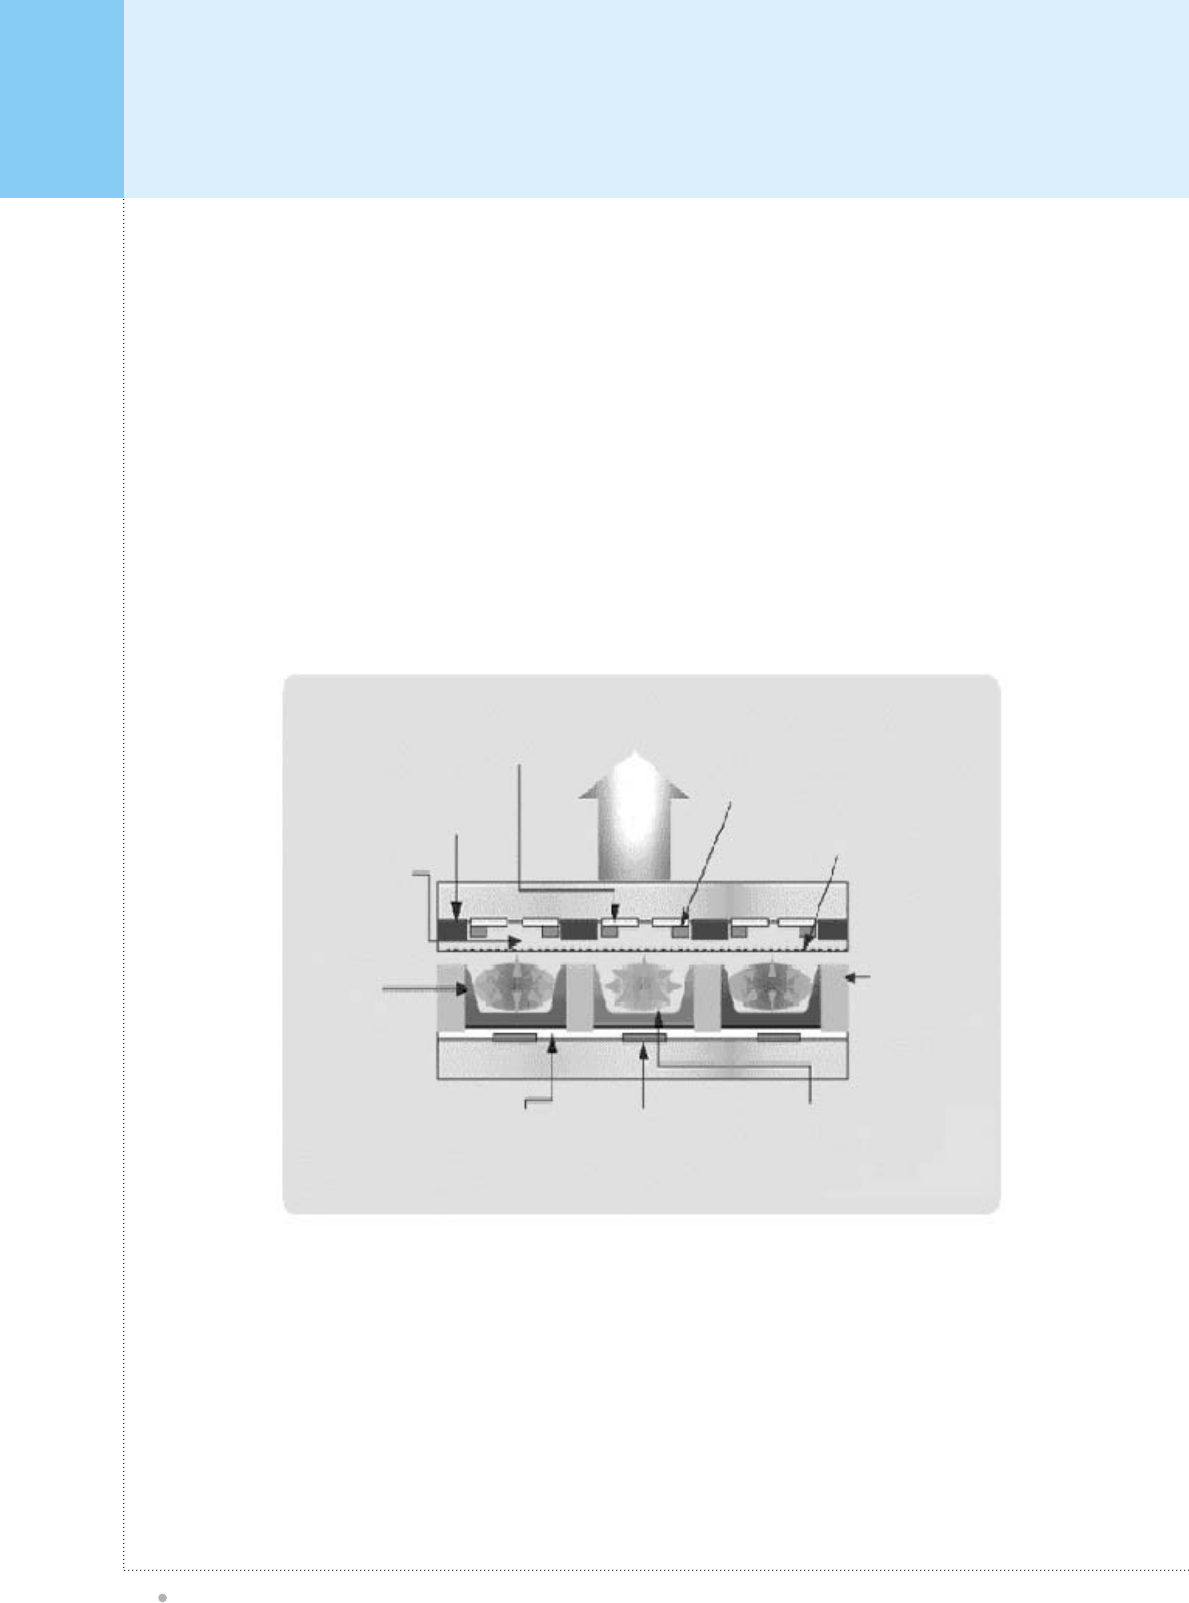
What Is A Plasma Display Panel?
Plasma TV
2
Plasma Monitor is the most advanced display solution for digital A/V integration used for
Information Displays, Conference System as well as Home Theater. In the plasma image
producing system, gas is confined in a 0.1mm-width space between two glass substrates with
transparent electrodes. When voltage is applied between the electrode pairs, it causes an
emission of ultraviolet light. This light reacts with RGB phosphors to produce multiple colors that
are displayed as the final image. Plasma is an array of cells, known as pixels, which are
composed of three sub-pixels, corresponding to the colors red, green and blue. Gas in a plasma
state is used to react with phosphors in each sub-pixel to produce colored light (red, green or
blue). Each sub-pixel is individually controlled by advanced electronics to produce over 16 million
different colors. This means that you get perfect, easily viewable images in a display that is 3.3
inches thin.
Transparent
Electrode(ITO)
ITO width / Gap / Snape Visitle Light Bus Electrode
Low resistance materiel
Bus width
Bus positon
Protection Layer(MgO)
MgO quality & Thickness
quality
Barrier Rit
Unbalanced pitch
Stripe / well type
Rib height
SB / FB / EB type
Black Stripe
BM / NO BM.
Dislectric layer
Delectric Thickness
Transmittance
Dlelectric shape
Phosphor
Phosphor thickness
long life phosphor
White-back
W/B material &
reflection ratio
Address Electrode
Photo / Screen printing
The width of address
Gas Discharge
Gas mixture & pressure
Gatter test
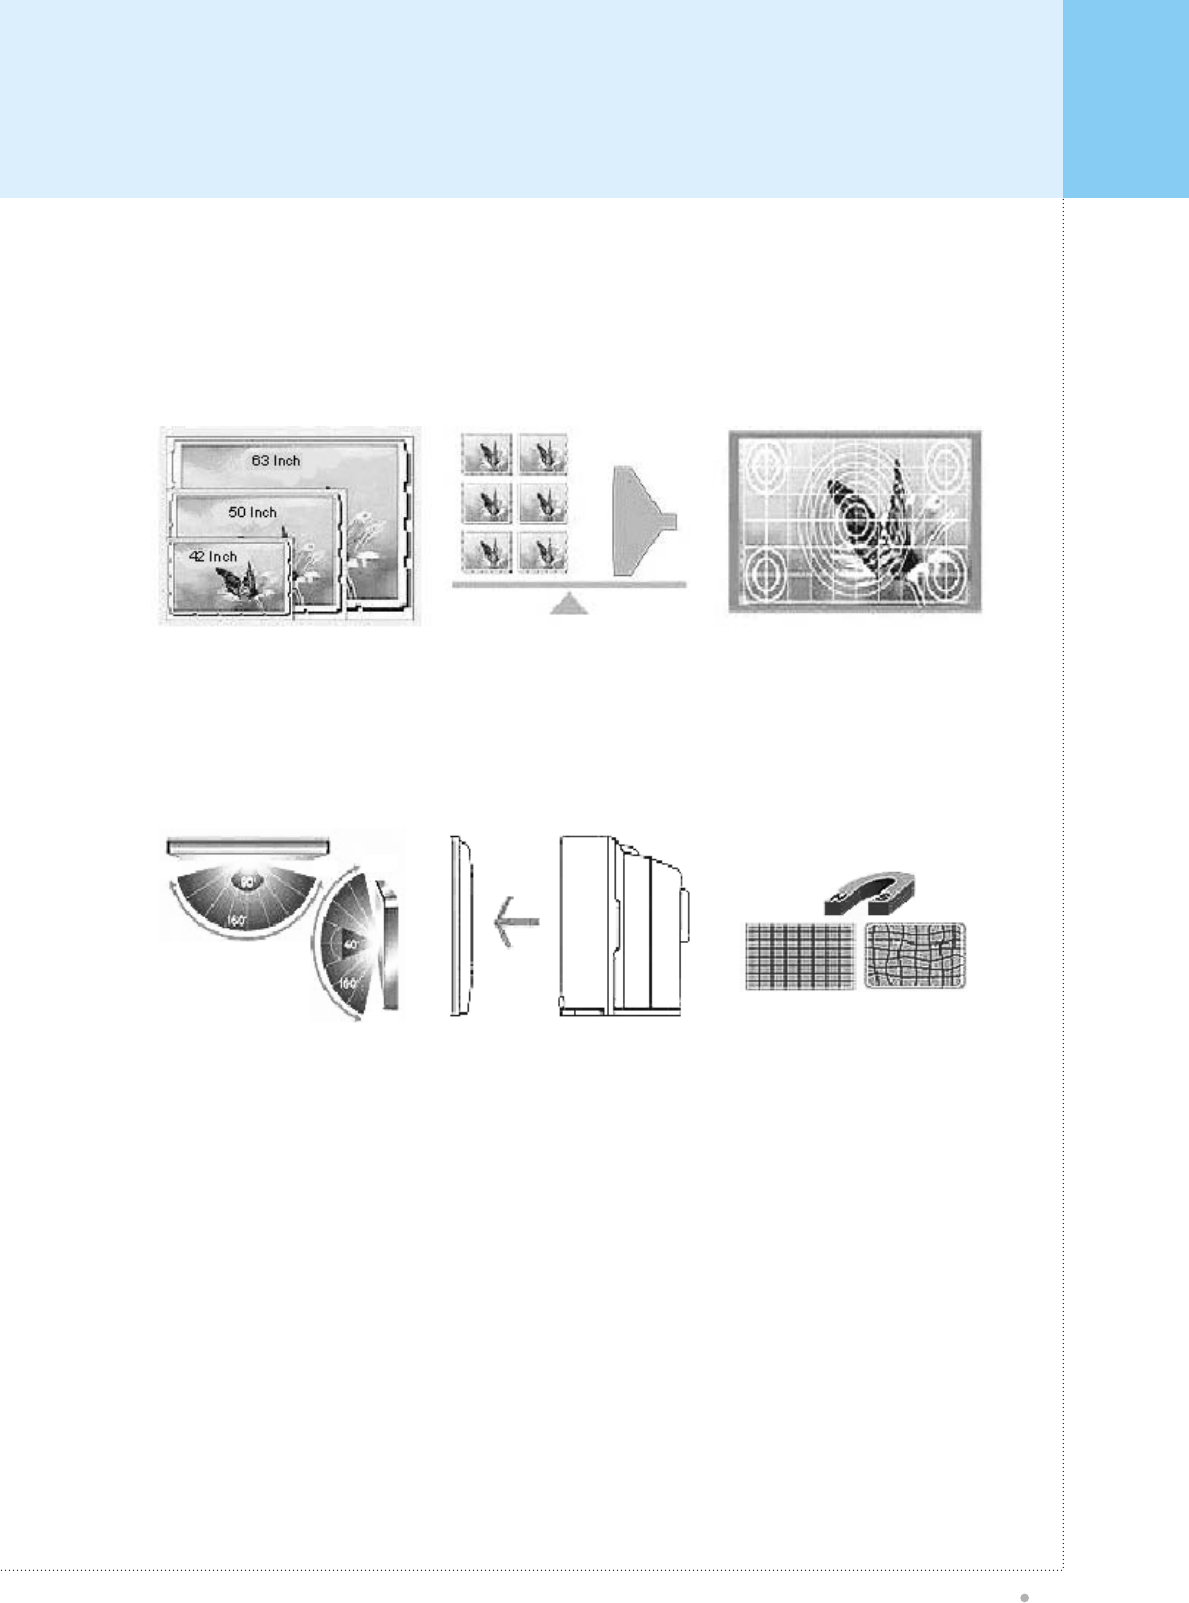
What Are The Advantages Of Plasma?
Plasma TV
3
<Large Size>
PDP
160o
PDP
<Light Weight> <Good Uniformity>
1/6 CRT
<Wide View Angle> <Slim Size>
PDP CRT
<None Distortion with magetic filed>
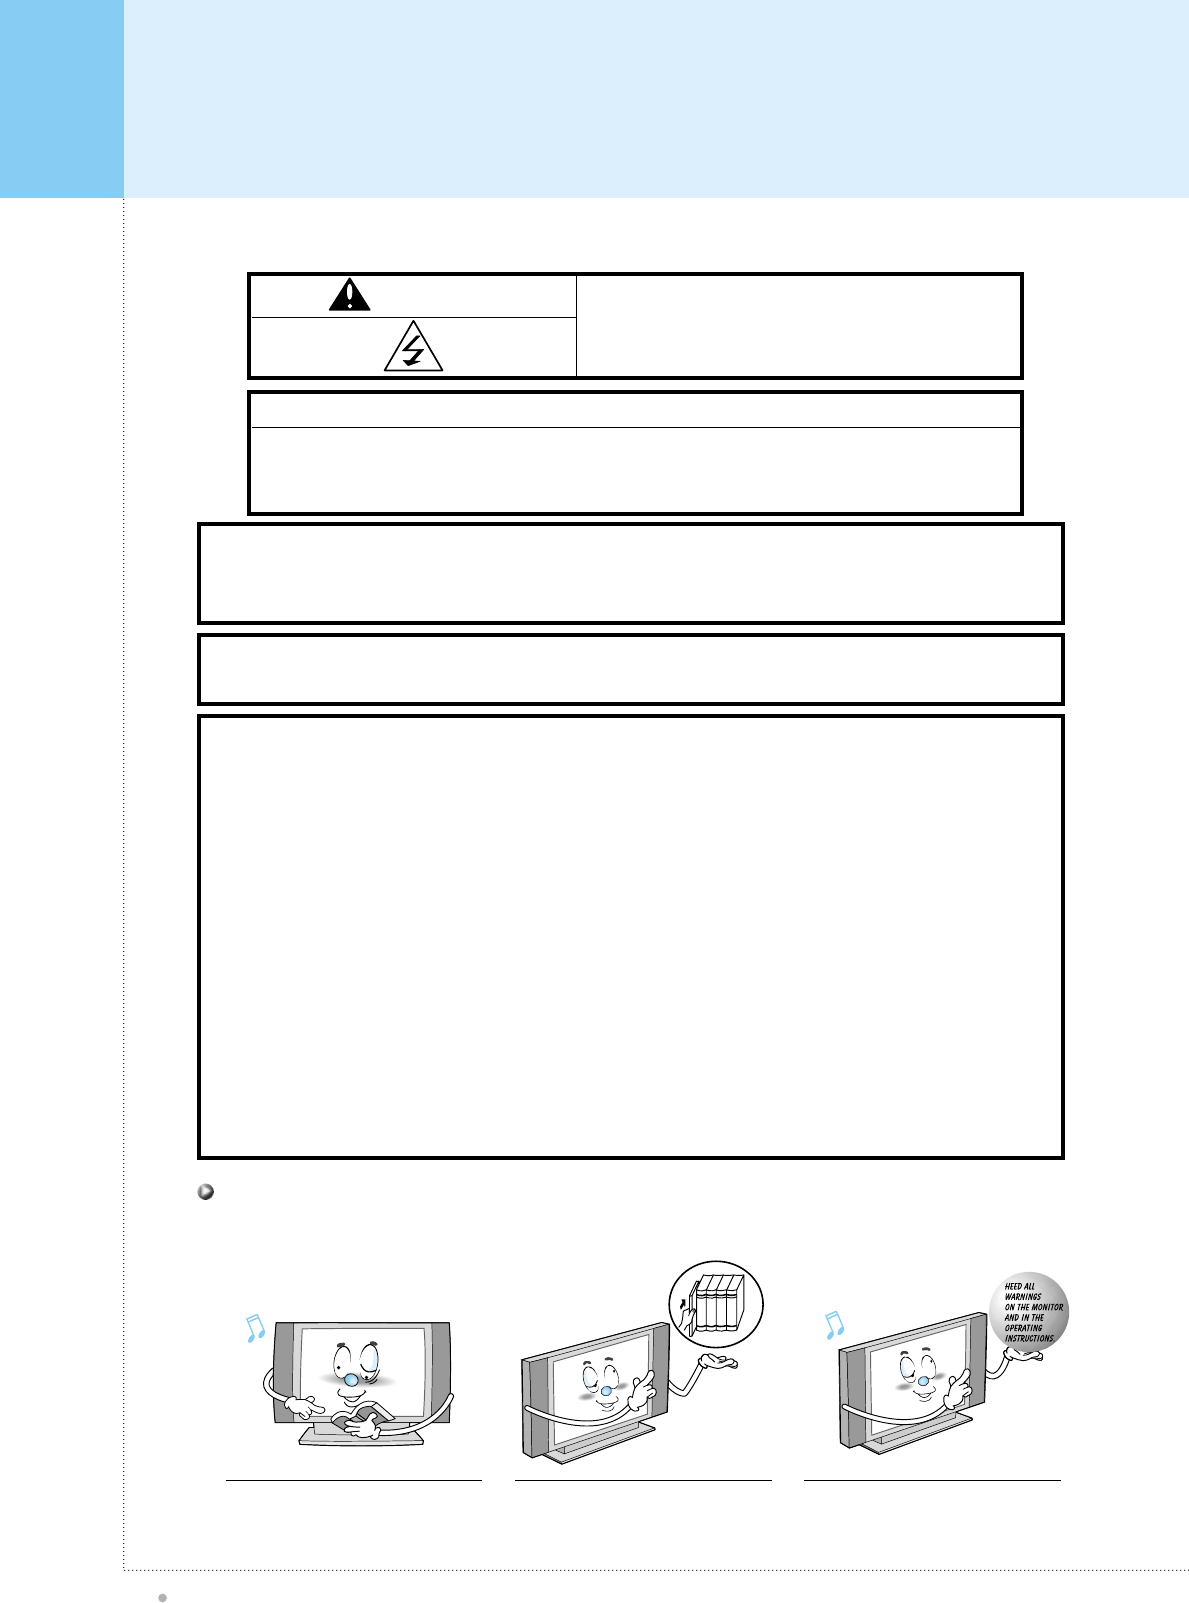
Important Safety Information
Plasma TV
4
WARNING HIGH VOLTAGE
RISK OF ELECTRIC SHOCK
DO NOT OPEN.
CAUTION
- TO PREVENT DAMAGE WHICH MAY RESULTIN FIRE OR SHOCK HAZARD.
- DO NOT EXPOSE THIS APPLIANCE TO RAIN OR MOISTURE.
- SHOCK HAZARD DO NOT OPEN.
WARNING
This is Class B product. In a dommestic environment this product may cause radio interference in which case
the user may be required to take adequate measures.
FCC NOTICE
This device has been tested and found to comply with the limits for a Class B device, pursuant to Part 15 of the
FCC Rules. These limits are designed to provide reasonable protection against harmful interference in a
commercial, industrial or business environment. This equipment can generate, use and radiate radio frequency
energy and, if not installed and used in accordance with the instruction, may cause harmful interference to
radio communications. However, there is no guarantee that interference will not occur in a particular
installation. If this equipment does cause harmful interference to radio or television reception, which can be
determined by turning the equipment off and on, the user is encouraged to try to correct the interference by one
or more of the following measures :
- Reorient or relocate the receiving antenna.
- Increase the separation between the equipment and receiver.
- Connect the equipment into an outlet on a circuit different from that to which the receiver is connected.
- Consult the dealer or an experienced radio/TV technician for help.
Changes or modification not expressly approved by the party responsible for compliance could void the user's
authority to operate the equipment.
Connecting of peripherals requires the use of grounded shielded signal cables.
WARNING
To reduce the risk of fire and electrics shock, do not expose this product to rain or moisture.
Read all safety and operating
instructions before operating your
Monitor.
Keep the safety and operating
instructions for future reference. Heed all warnings on the Monitor and
in the operating instructions.
Always be careful when using your Monitor. To reduce the risk of fire, electrical shock,
and other injuries, keep these safety precautions in mind when installing, using, and
maintaining your machine.
Important Safety Information
Plasma TV
5
Follow all operating and use
instructions. Unplug the Monitor from the wall
outlet before cleaning. Use a damp
cloth; do not use liquid or aerosol
cleaners.
Never add any attachments and/or
equipment without approval of the
manufacturer. Such additions can
increase the risk of fire, electric
shock, or other personal injury.
Do not use the Monitor where contact with
or immersion in water is a possibility, such
as near bath tubs, sinks, washing machines,
swimming pools, etc.
Do not place the Monitor on an unstable
cart, stand, tripod, bracket, table, or
floor where it can fall. A falling Monitor
can cause serious injury to a child
or adult, and serious damage to the
appliance. Use only with a cart,
stand, tripod, bracket, or table
recommended by the manufacturer
or sold with the Monitor. Follow the
manufacturer's manufacturer or sold
with the Monitor. Follow the
manufacturer's recommended by the
manufacturer. Move the Monitor and cart with care. Quick stops,
excessive force, and uneven surfaces can make the unit and cart
unsteady and likely to overturn.
Provide ventilation for the Monitor. The unit is designed
with slots in the cabinet for ventilation to protect it from
overheating. Do not block these openings with any object,
and do not place the Monitor on a bed, sofa, rug, or other
similar surface. Do not place it near a radiator or heat
register. If you place the Monitor on a rack or bookcase,
ensure that there is adequate ventilation and that you've
followed the manufacturer's instructions for mounting.
Use only the accessory cord designed for this product to
prevent shock. The power supply voltage rating of this
product is AC100-240V, the power cord attached conforms
to the following power supply voltage. Use only the power
cord designated by our dealer to ensure Safety and EMC.
When it is used by other power supply voltage, power cable
must be changed. Consult your product dealer.
Important Safety Information
Plasma TV
6
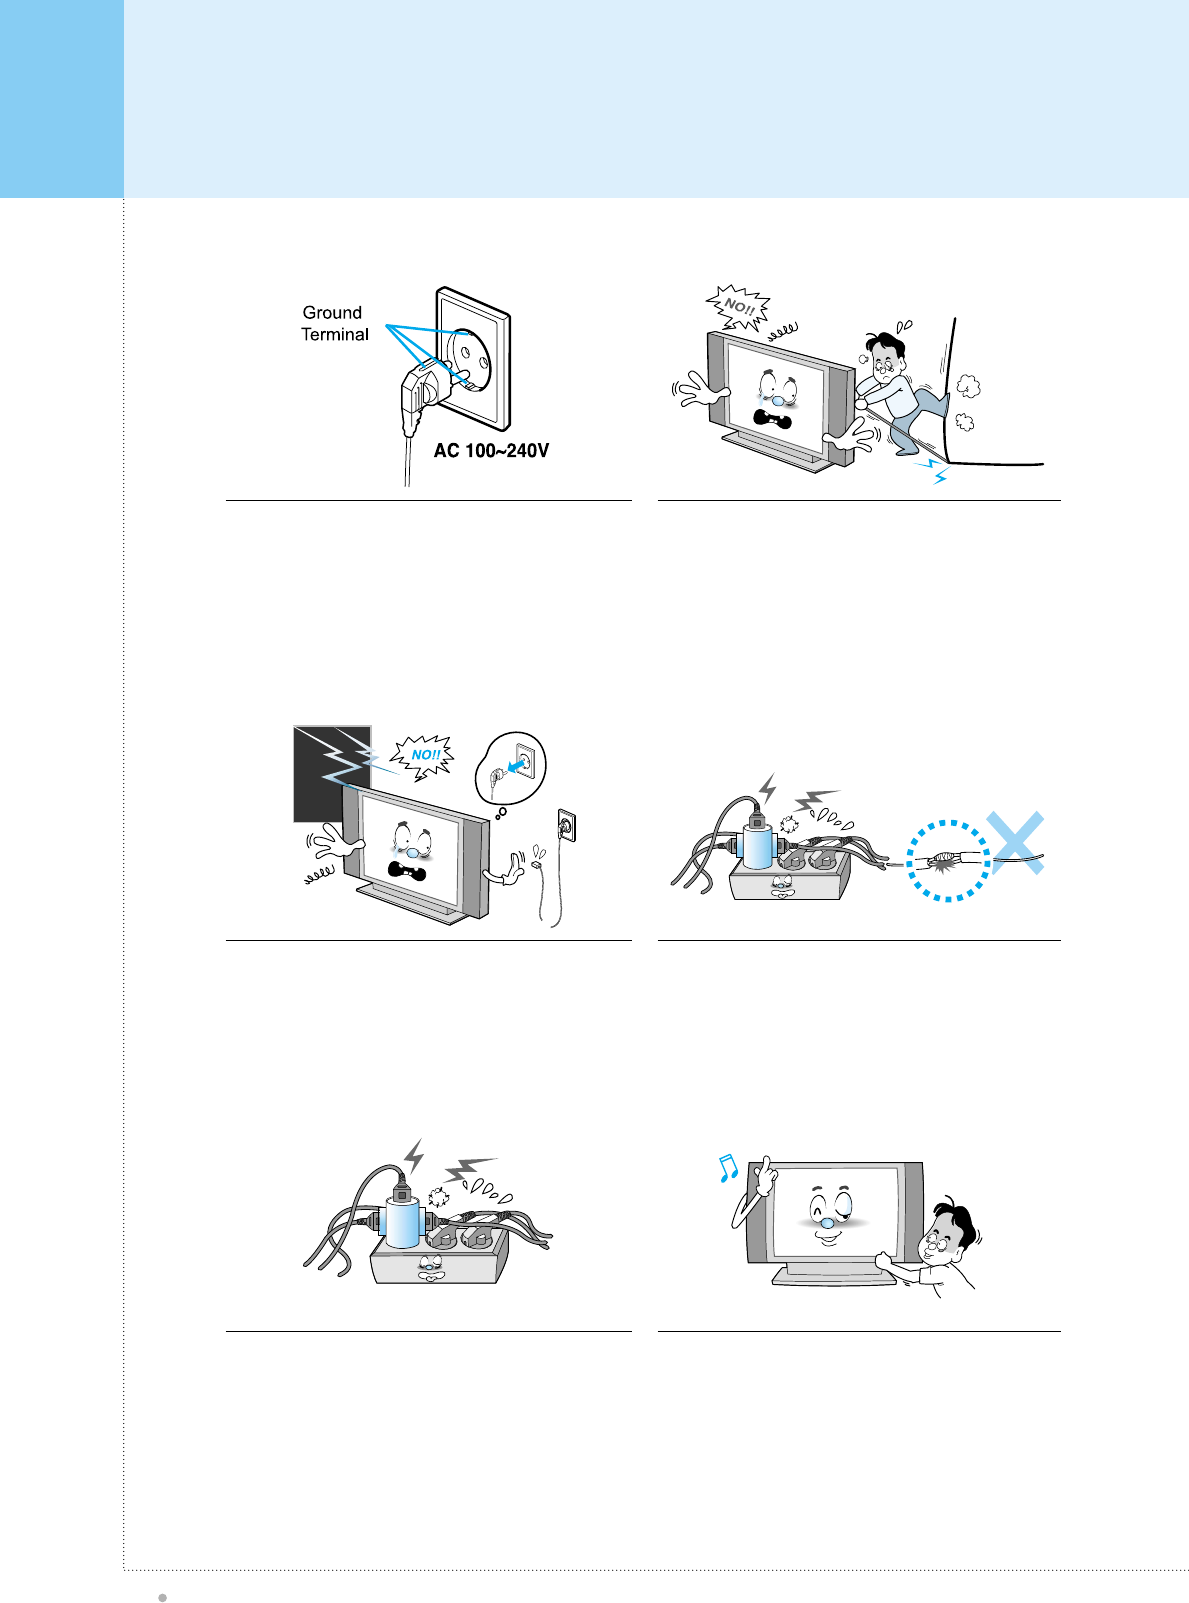
Unplug the Monitor from the wall outlet and disconnect the
antenna or cable system during a lightning storm or when left
unattended and unused for long periods of time. This will
prevent damage to the unit due to lightning and power-line
surges.
Protect the power cord. Power supply cords should be
routed so that they won't be walked on or pinched by
objects placed on or against them. Pay particular attention
to cords at plugs, convenience receptacles, and the point
where they exit from the unit.
Do not overload the wall outlet or extension cords.
Overloading can result in fire or electric shock. Do not insert anything through the openings in the unit,
where they can touch dangerous voltage points or damage
parts. Never spill liquid of any kind on the Monitor.
Use only a grounded or polarized outlet. For your safety, this
Monitor is equipped with a polarized alternating current line
plug having one blade wider than the other. This plug will fit
into the power outlet only one way. If you are unable to insert
the plug fully into the outlet, try reversing the plug. If the plug
still does not fit, contact your electrician to replace your outlet.
Avoid overhead power lines. An outside antenna system
should not be placed in the vicinity of overhead power lines
or other electric light or power circuits or where it can fall into
such power lines or circuits. When installing an outside
antenna system, be extremely careful to keep from touching
the power lines or circuits. Contact with such lines can be fatal.
Important Safety Information
Plasma TV
7
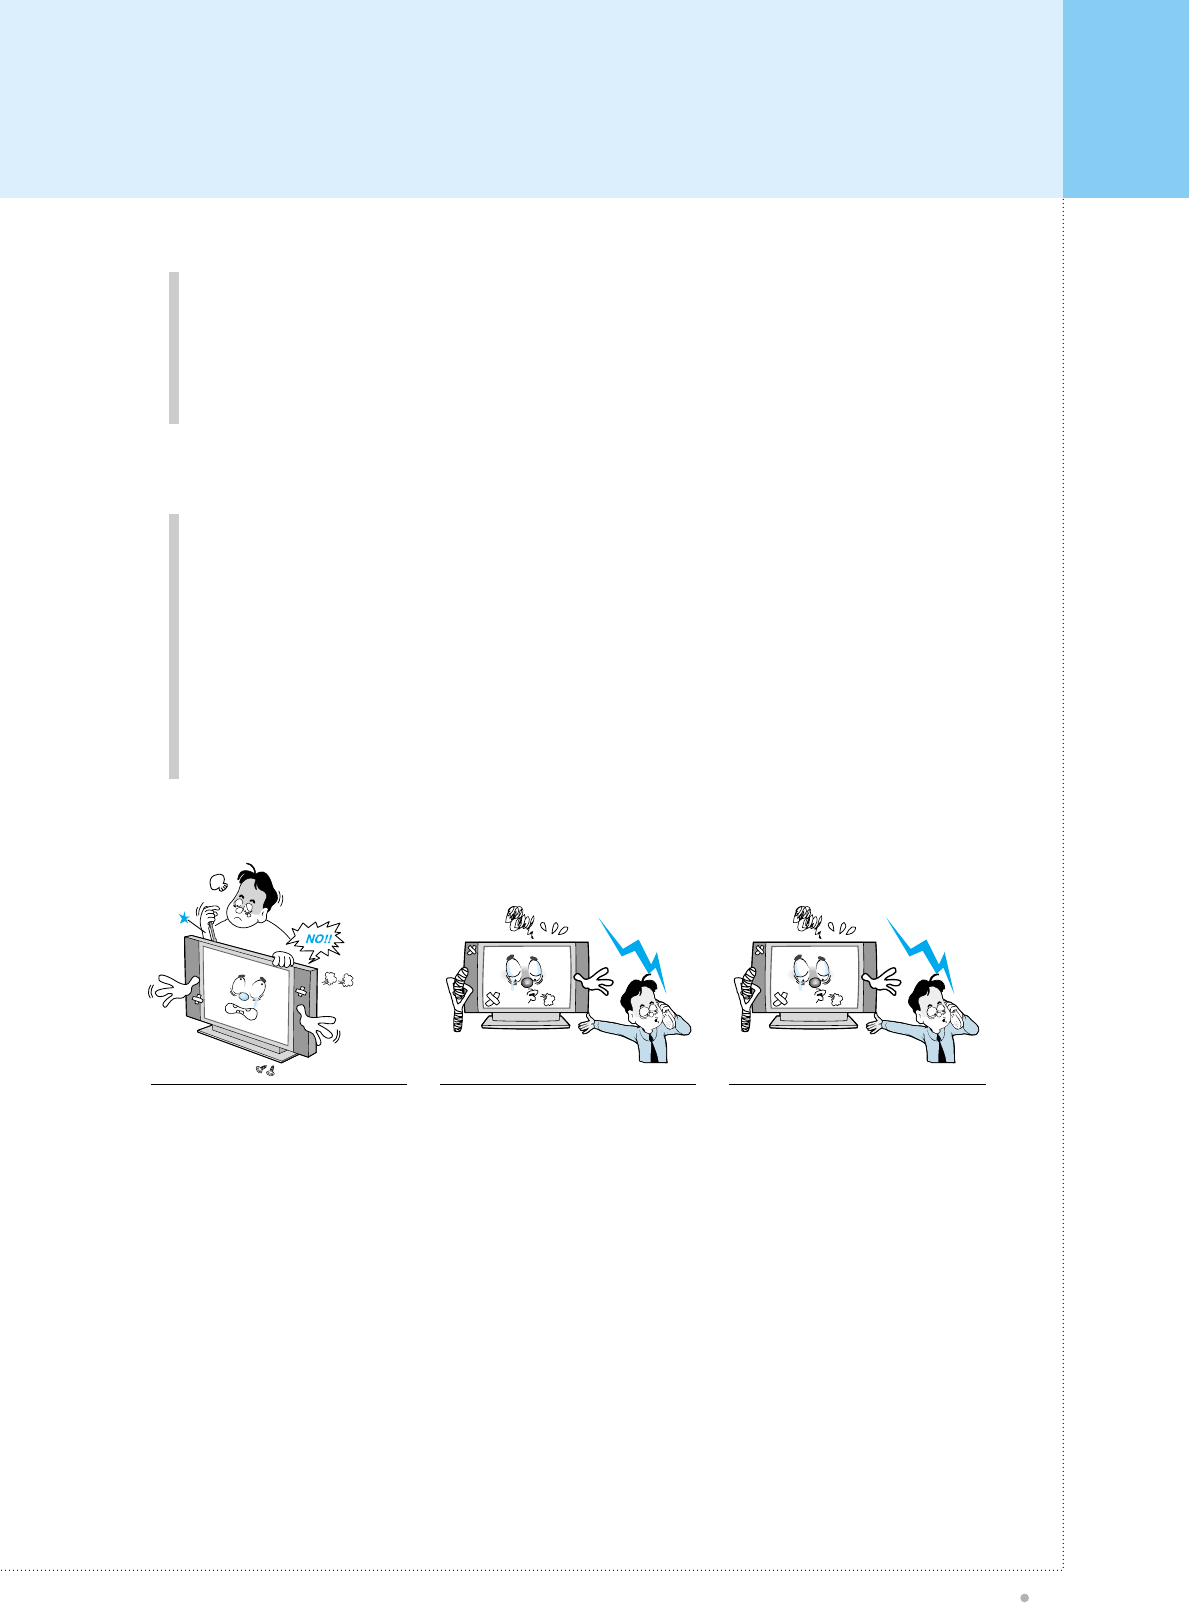
Ground outdoor antennas. If an outside antenna or cable system is connected to the Monitor, be sure the
antenna or cable system is grounded so as to provide some protection against voltage surges and built-up
static charges. Section 810 of the National Electrical Code, ANSI/NFPA No.70-1984, provides information
about proper grounding of the mast and supporting structure, grounding of the lead-in wire to an antenna
discharge unit, size of grounding conductors, location of antenna discharge unit, connection to grounding
electrodes, and requirements for the grounding electrode.
Upon completion of any service or
repairs to this Monitor, ask the
service technician to perform safety
checks to determine that the Monitor
is in a safe operating condition.
If you make adjustments yourself,
adjust only those controls that are
covered by the operating instructions.
Adjusting other controls may result in
damage and will often require
extensive work by a qualified
technician to restore the Monitor to
normal.
When replacement parts are
required, be sure the service
technician uses replacement parts
specified by the manufacturer or
those that have the same
characteristics as the original part.
Unauthorized substitutions may result
in additional damage to the unit.
Do not attempt to service the Monitor yourself. Refer all servicing to qualified service
personnel. Unplug the unit from the wall outlet and refer servicing to qualified service
personnel under the following conditions:
• when the power-supply cord or plug is damaged
• if liquid has been spilled on the unit or if objects have fallen into the unit
• if the Monitor has been exposed to rain or water
• if the Monitor does not operate normally by following the operating instructions
• if the Monitor has been dropped or the cabinet has been damaged
• when the Monitor exhibits a distinct change in performance
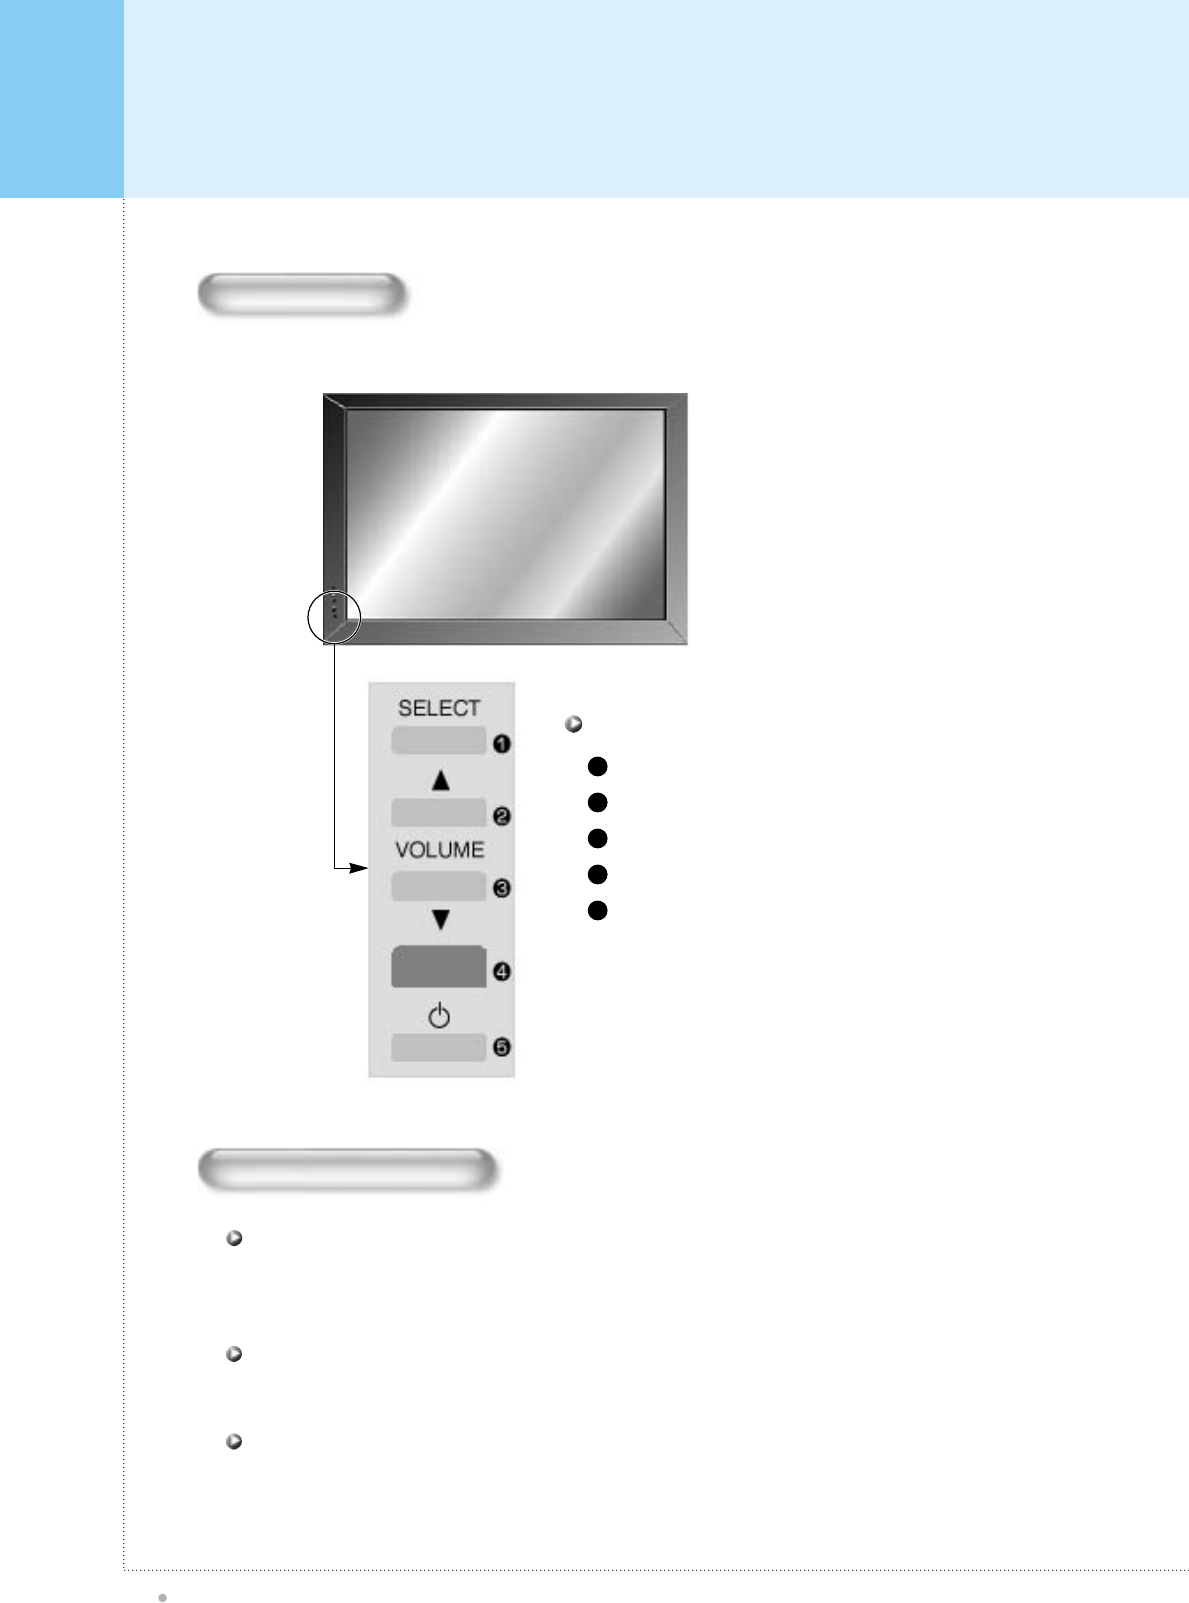
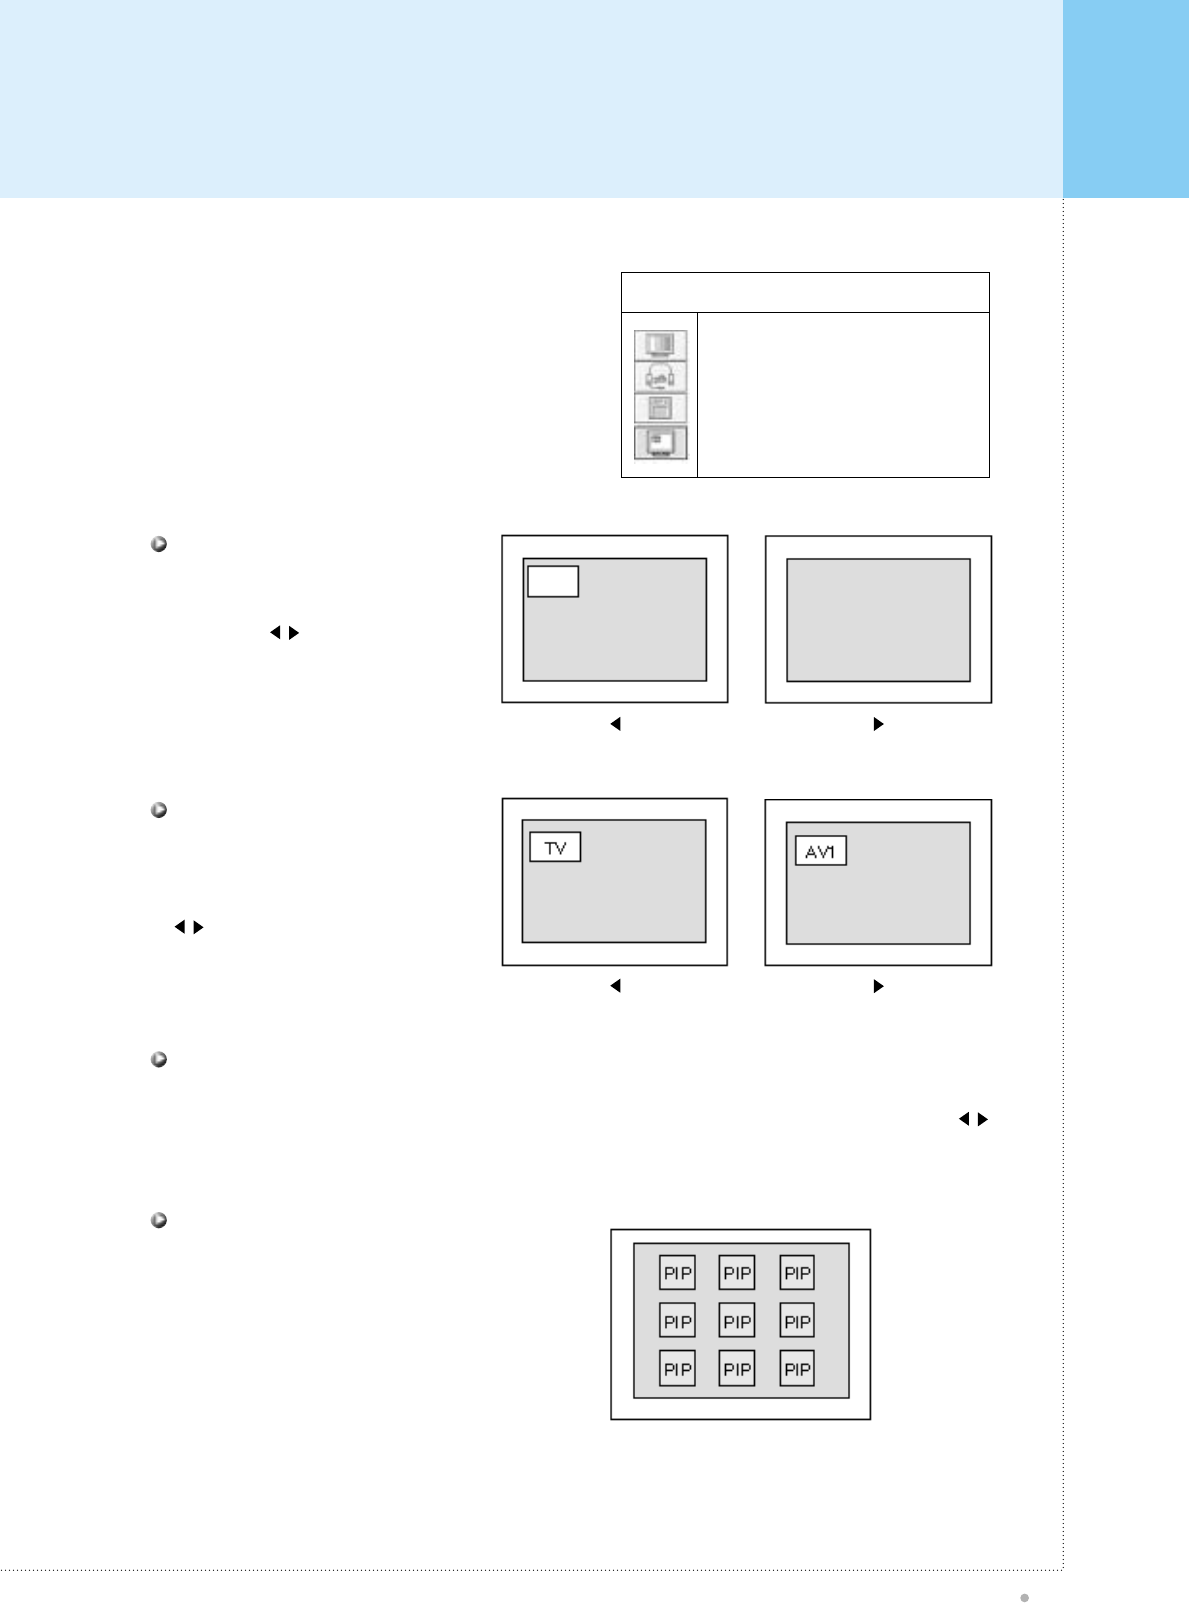
Input Signal Source Select
Audio Volume Up
Audio Volume Down
Remote Sensor & Power Indicator
Power (Stand By)
OSD Button & Function
1
2
3
4
5
Overview Of Your New PDP
Plasma TV
8
OSD Button
<Front Panel>
OSD Key Function
Select the signal source from multiple input source such as TV, AV1, AV2, S-Video, Component and Analog
RGB.
SELECT
Change the audio level in normal display mode and move the scroll bar in Source select control menu.
VOL- / VOL
Turn on and off the main power.
AUDIO INPUT TERMINAL
Overview Of Your New PDP
Plasma TV
9
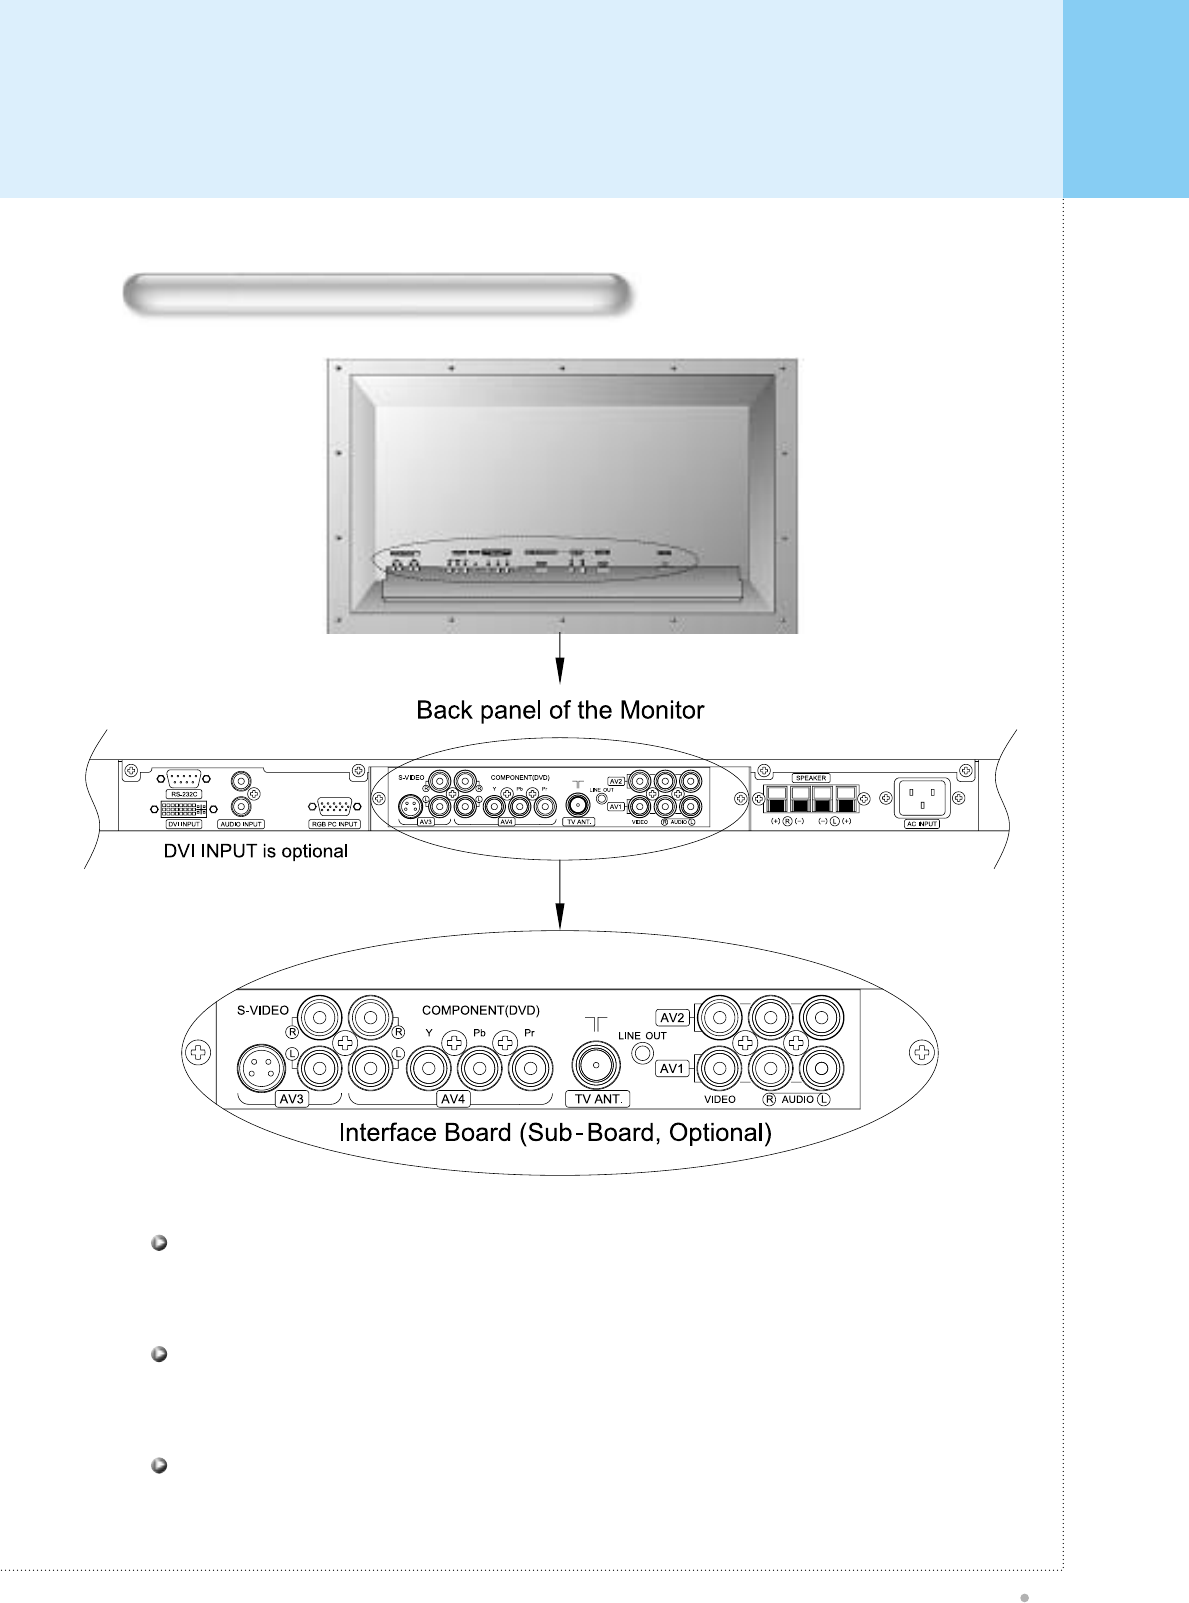
Connecting To External Equipment
Connects to the computer monitor's (analog RGB) output terminal. Cables connecting the PC vary according
to the type of machine, so consult your product dealer.
RGB PC INPUT TERMINAL (VGA/SVGA/XGA)
Connects to the audio output terminal of a video deck or similar device.
AUDIO INPUT TERMINAL
Firmly insert the accessory power cord as far as it will go into the power input terminal. Firmly push the power
cord plug as far as it will go into the power socket.
AC(POWER) INPUT TERMINAL
Overview Of Your New PDP
Plasma TV
10
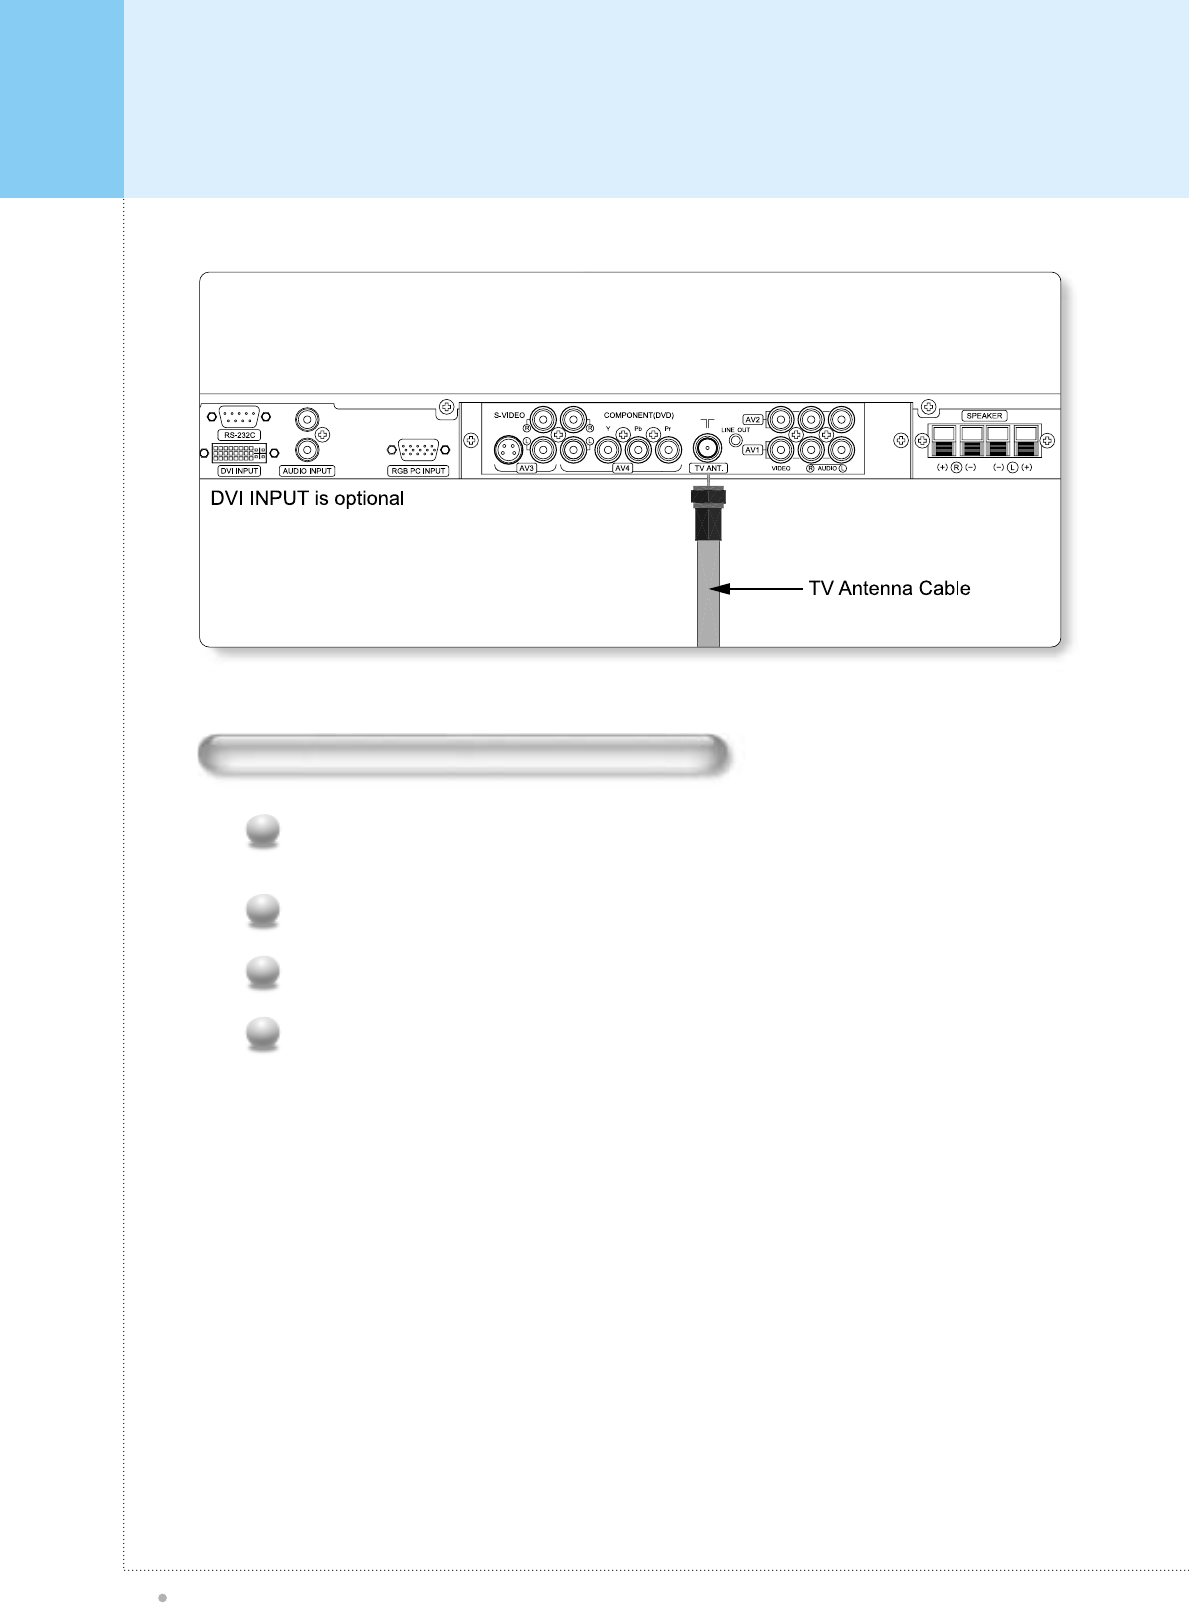
• When connecting separately purchased BNC terminals,
conversion connectors are required between the pin
jacks and the BNC terminals, so purchase these also.
• Cables connecting the PC vary according to the type of
machine, so consult your product dealer.
AUDIO INPUT
VIDEO INPUT
S-VIDEO INPUT
COMPUNENT VIDEO INPUT
RGB INPUT
RS-232C
Pin Jack
BNC
S terminal
BNC
15-pin mD-sub
9-pin D-sub
Connectors
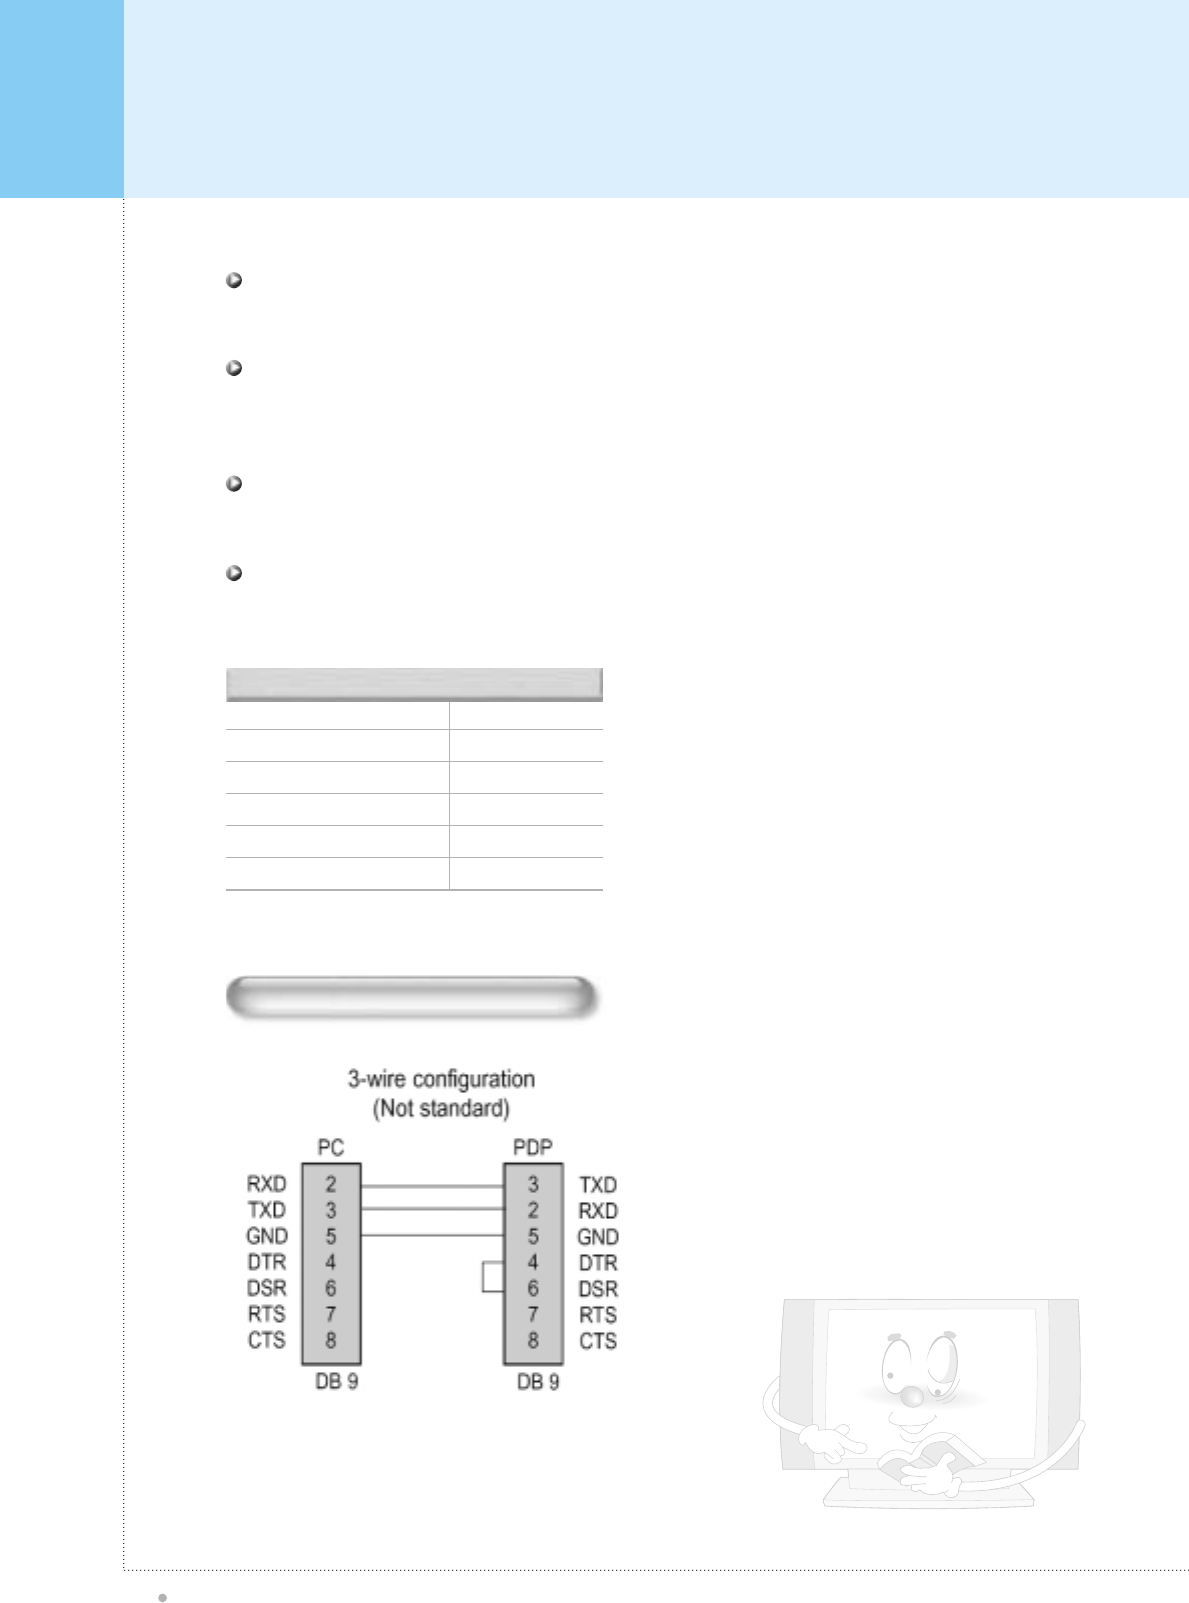
RS-232C Configurations
Connects DVI Computer Source (Digital Signal) here.
DVI INPUT(Optional)
The Interface board is not equipped on PDP monitor. Contact your dealer for buying optional item.
AV INPUT
Audio signal output for external audio amplifier.
Line Out
Control the monitor's functions externally by external equipment. Connects to the computer RS-232C output
terminal.
RS-232C INPUT TERMINAL
Overview Of Your New PDP
Plasma TV
11
L
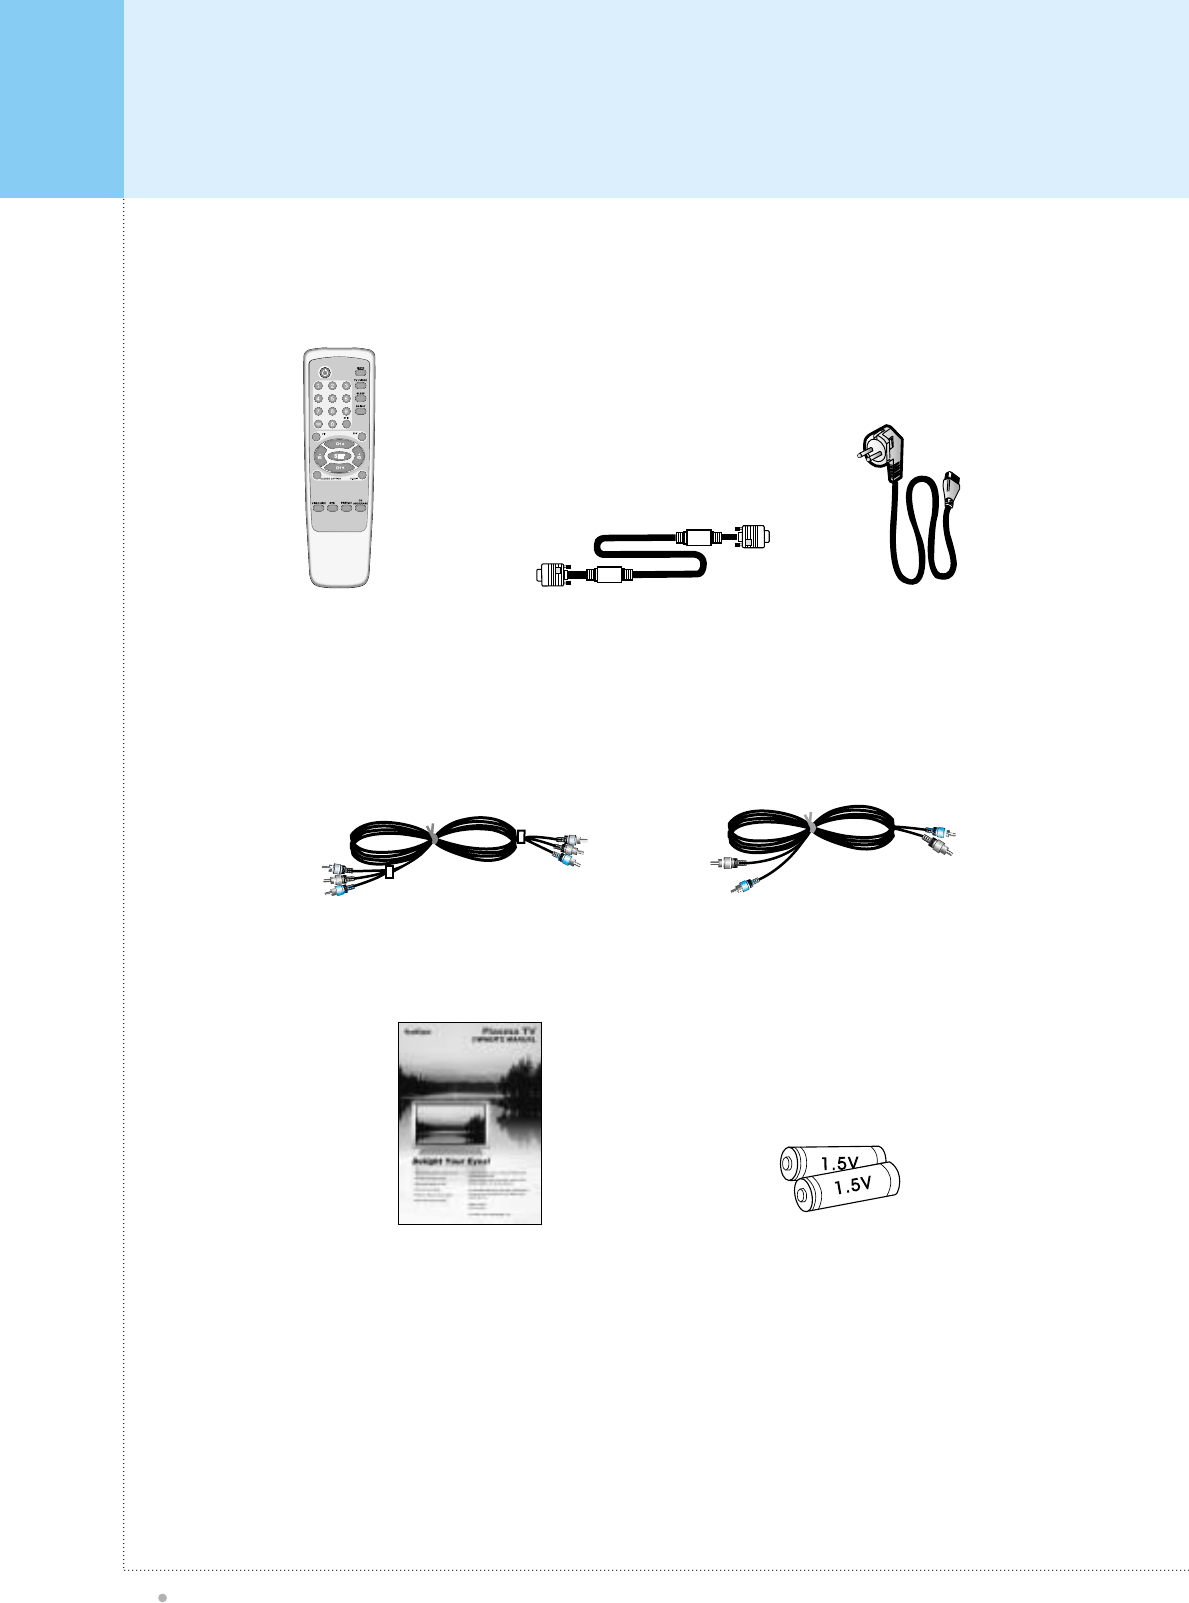
Accessories
Plasma TV
12
Remote Control Handset D-sub 15 pin cable Power Cord
Video Cable Audio Cable
Owner's Manual Alkaline batteries
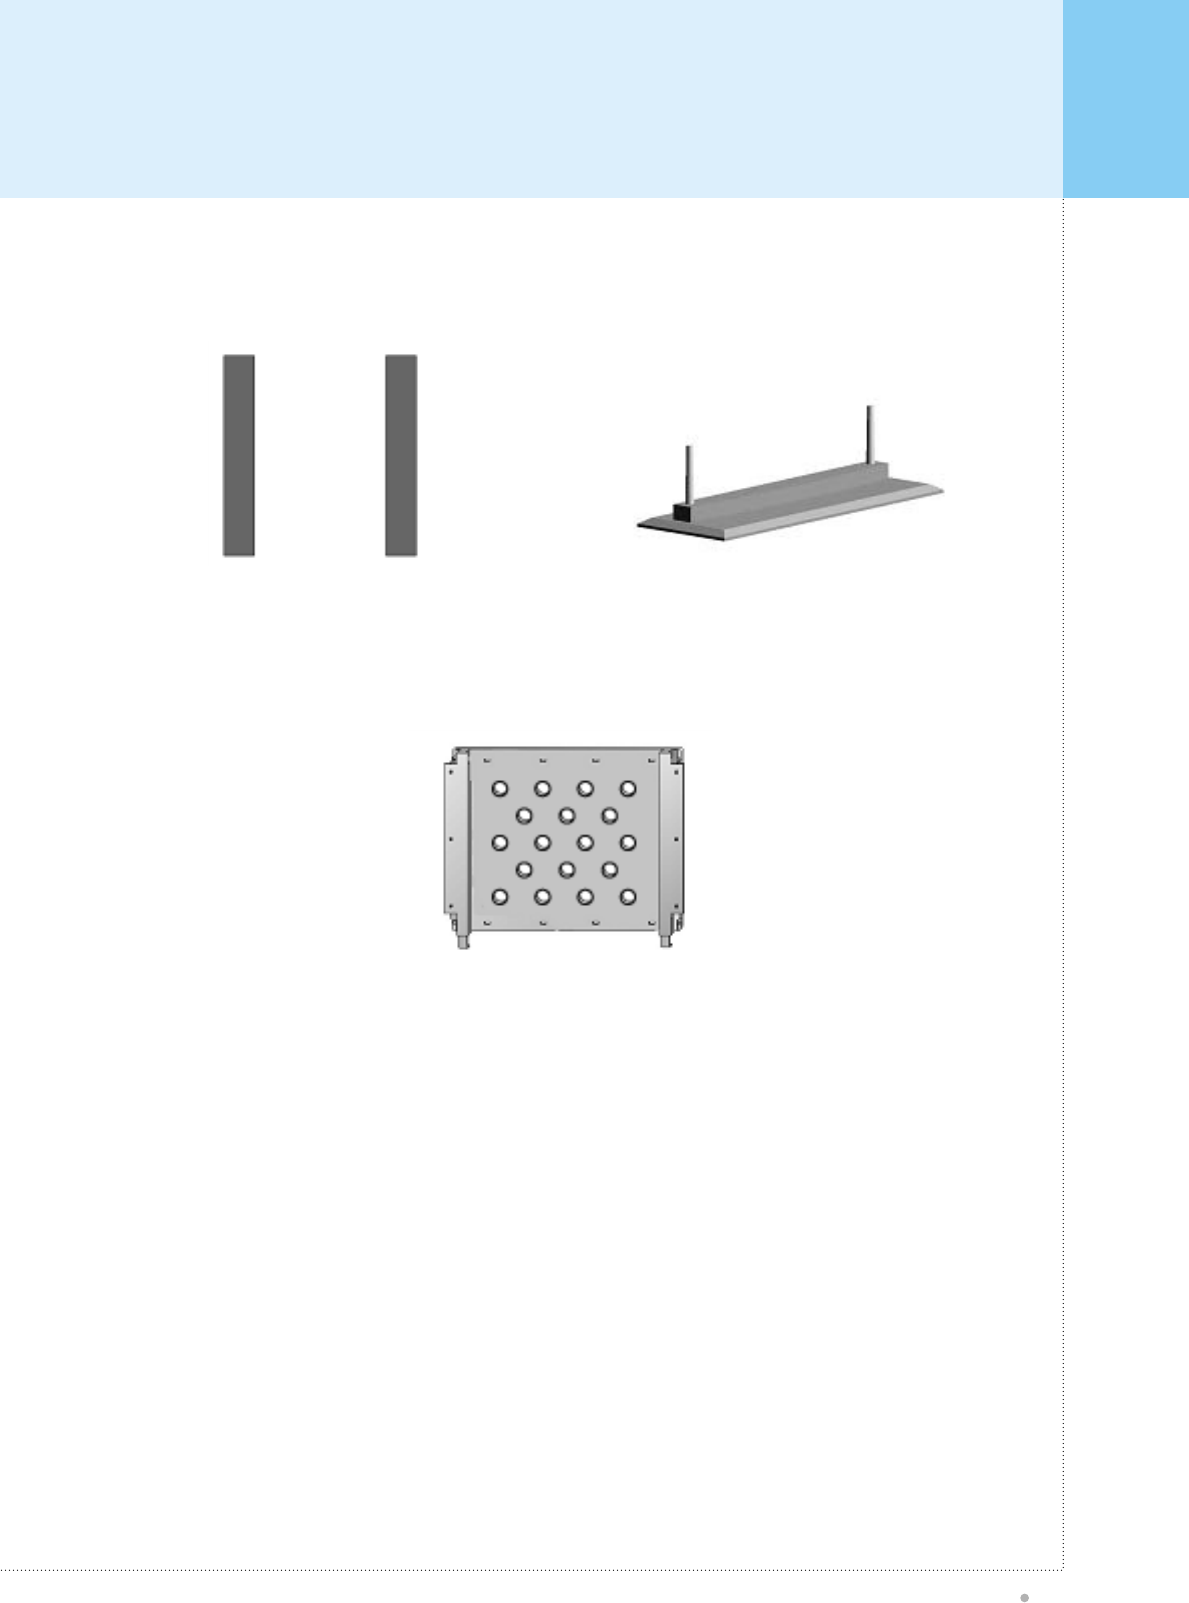
Optional Extras
Plasma TV
13
Side Mount Speaker Table Stand
(type United)
Fixed Wall
Mount Bracket
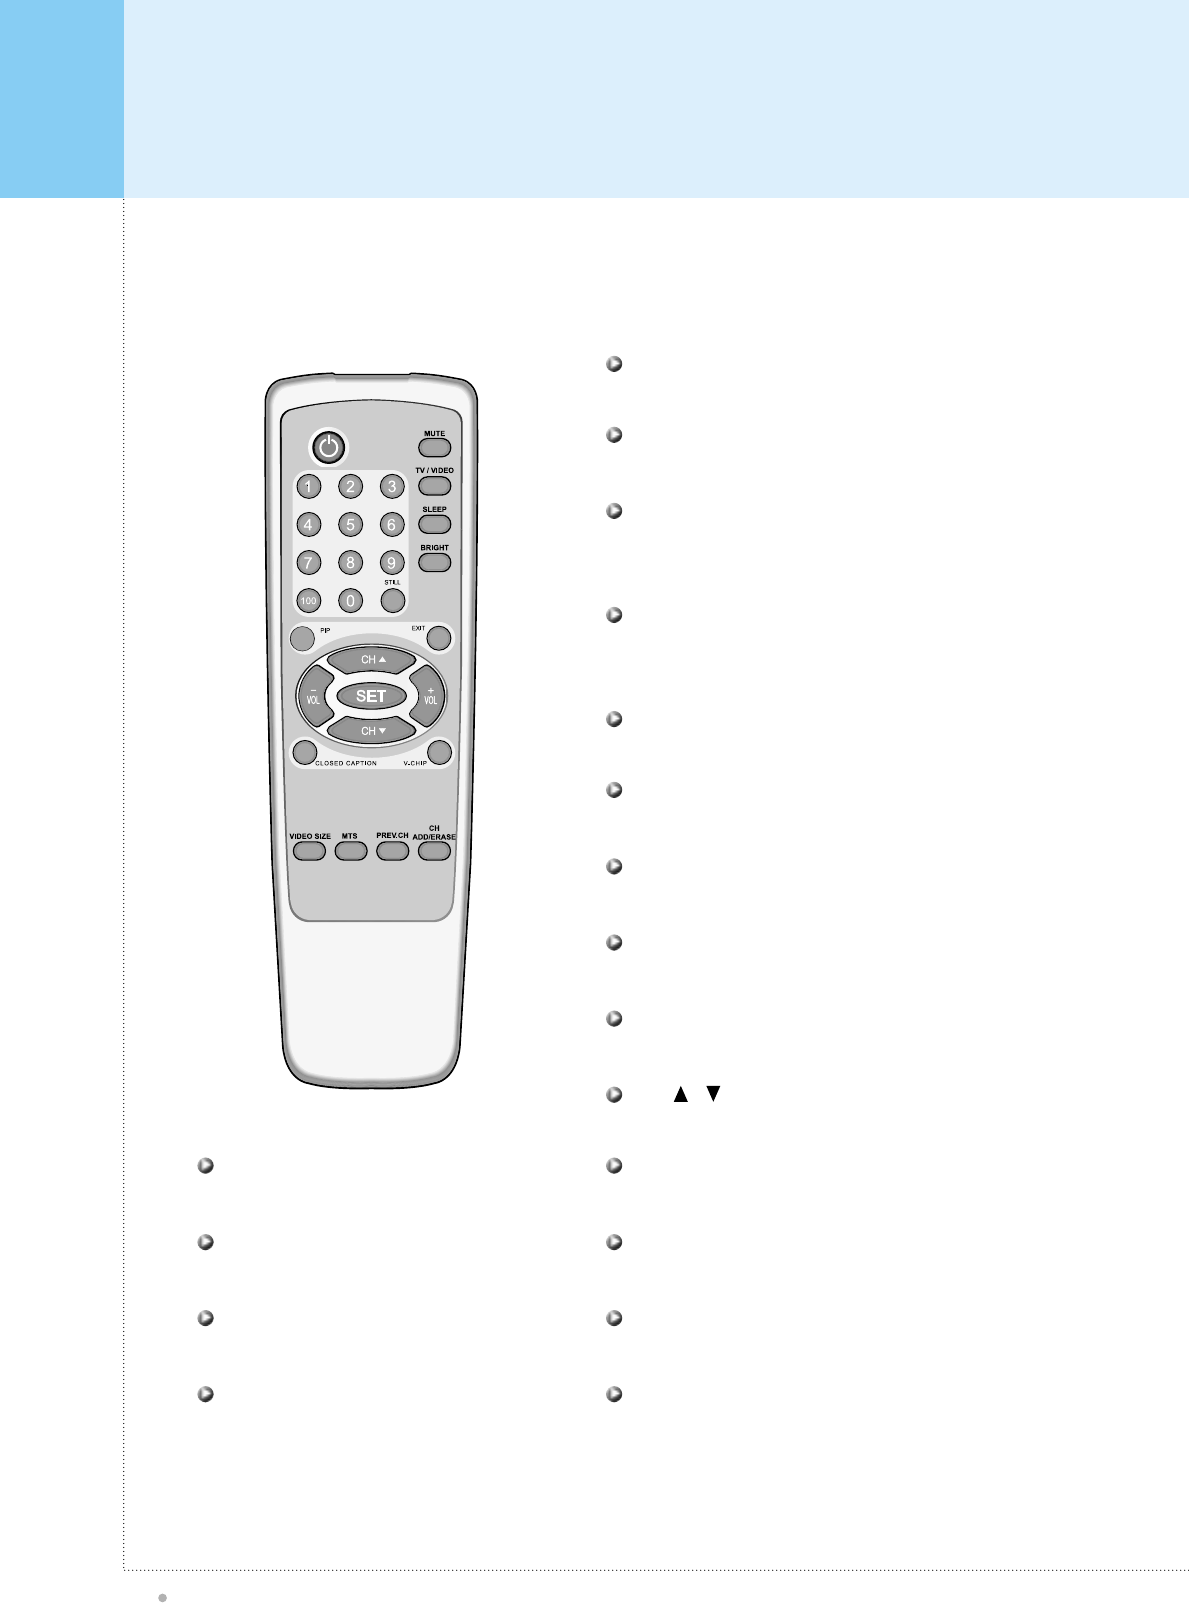
Controls Of The Remote Control
Plasma TV
14
When using the Remote Control aim it at the Remote Control sensor of the Plasma TV.
Turns on and off the main power
POWER
Mute on / off
MUTE
Change the brightness
BRIGHT
Activate the temporary pause
STILL
Activate PIP function on PC Mode
PIP
Direct TV channel number input
Number key
Exit from the current OSD menu or sub-menu
EXIT
Change the TV channel on TV mode up or down
CH /
Change the audio level, increase or decrease
VOL+ / VOL-
Activate the OSD window, enter the sub-menu
SET
Activate the closed caption function
CLOSED CAPTION
Activate the V-Chip function
V-CHIP
Change the image size setting, ie; 16:9, 4:3, etc.
VIDEO SIZE
Exit from the current OSD menu or sub-menu
MTS
Go back to previous TV channel
PREV.CH.
Edit the TV Channel preset
CH ADD/ERASE
Select the signal source from multiple input source of TV,
AV1, AV2, S-Video, Component and Analog RGB
TV / VIDEO
TV off time setting, push button for 30 min, 60 min, 90 min
and 180 min
SLEEP
Controls Of The Remote Control
Plasma TV
15
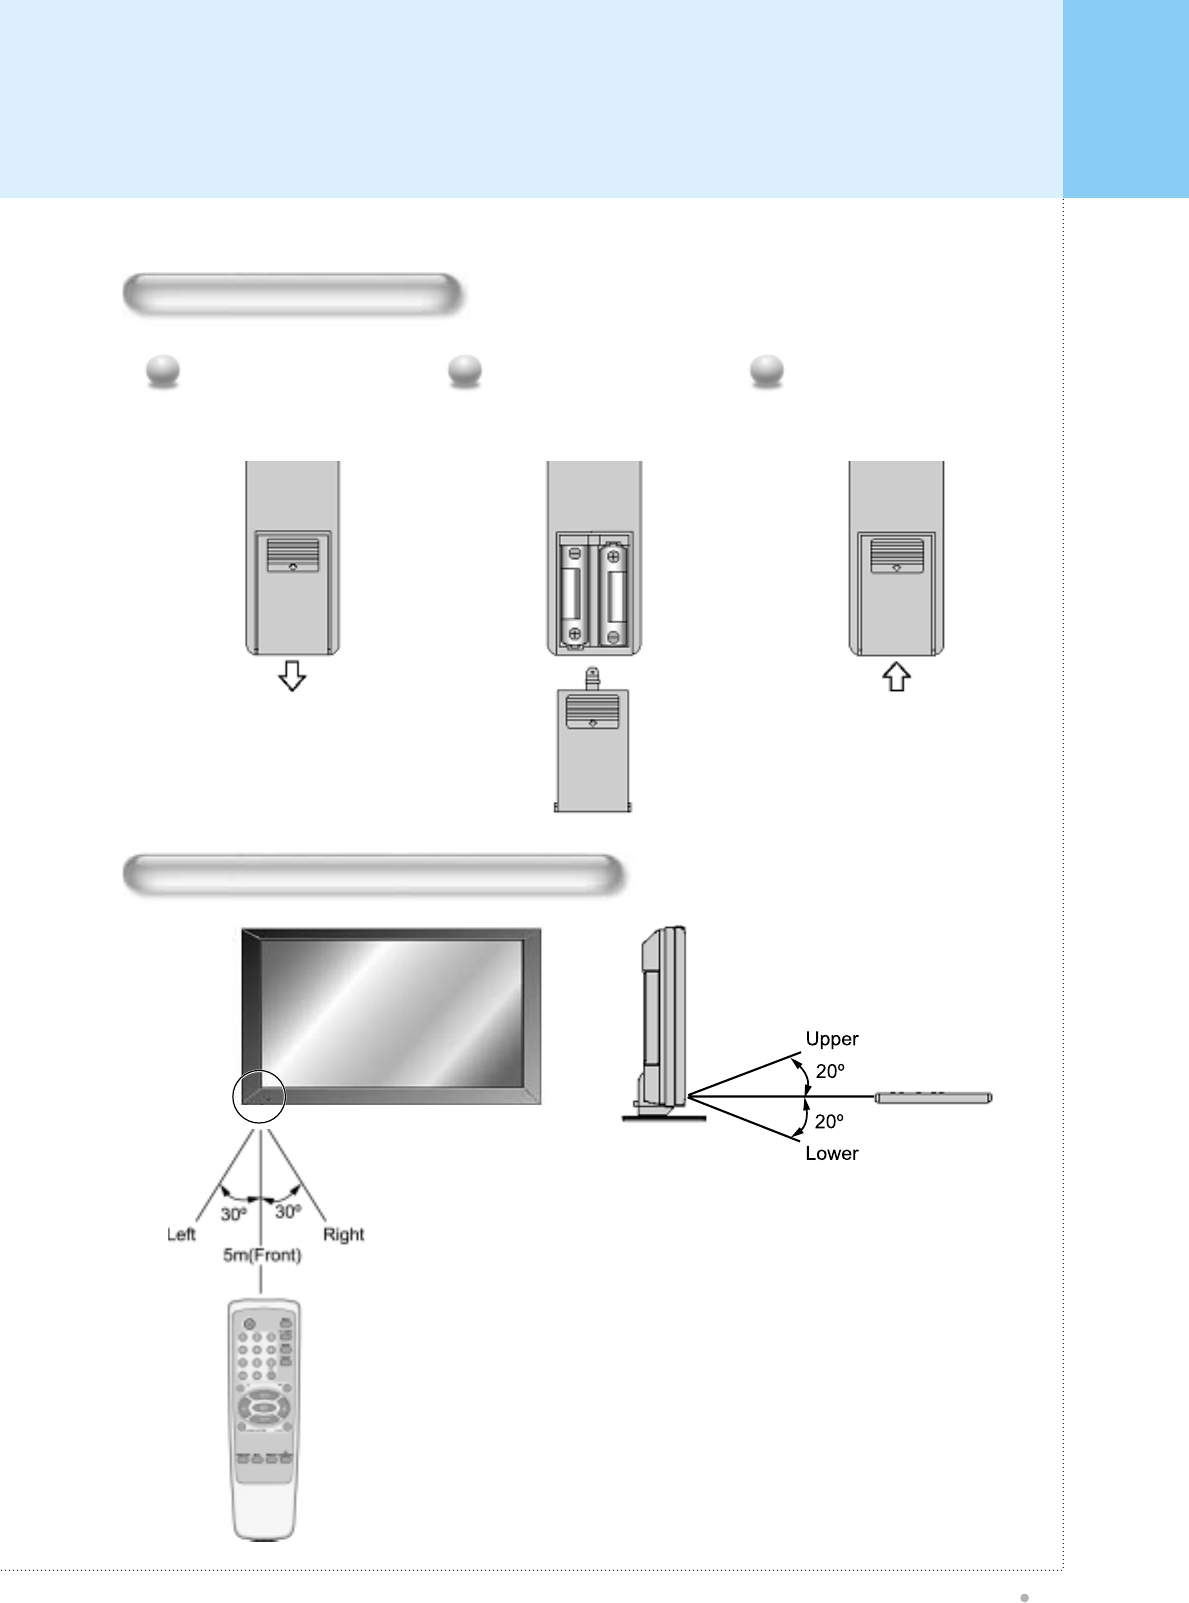
Loading The Batteries
Press on the cover and slide
in the direction of the arrow.
1
Load two AA batteries, taking
care that the + and - ends face
the correct direction.
2
Close the cover until it clicks.
3
Reception range of remote control
Monitor Installation
Plasma TV
16
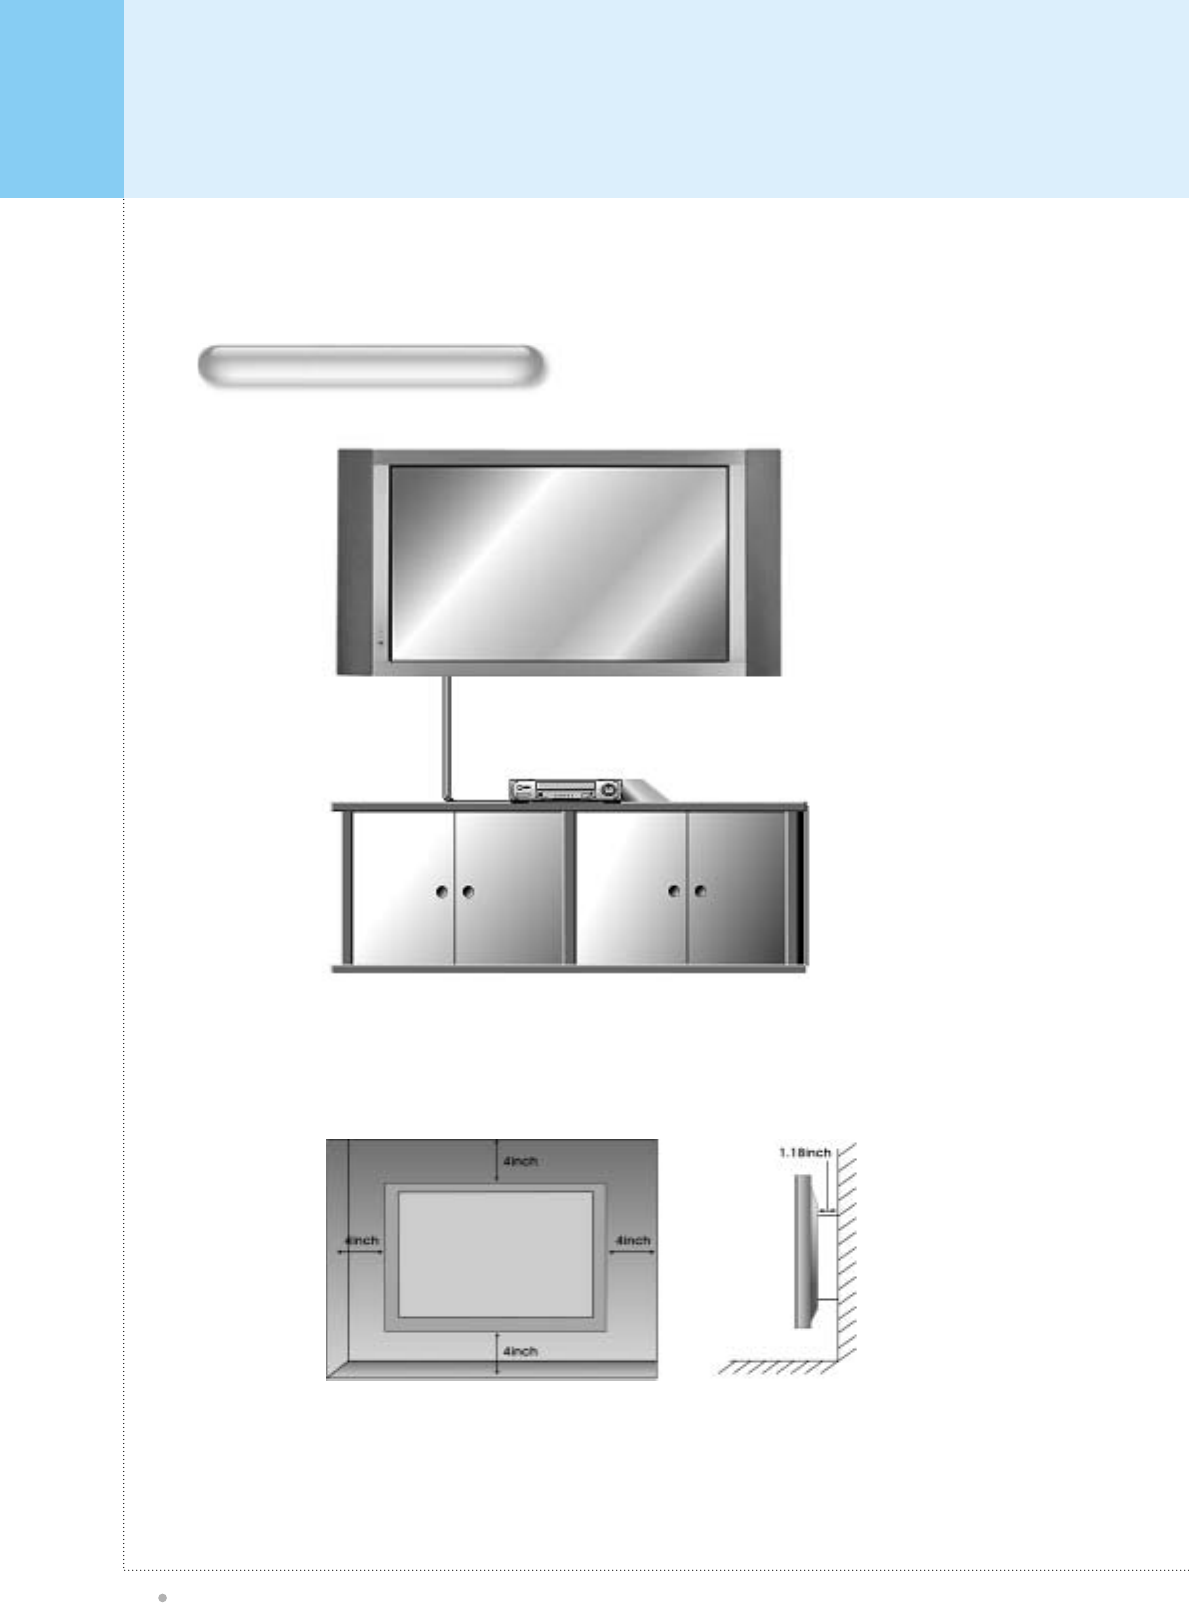
Wall Mount Installation
The Monitor can be installed in various ways such as Wall Mounting type, Table Stand type, etc..
• Install this monitor only in a location where adequate ventilation is available.
<The monitor can be installed on the wall as the picture above>
Monitor Installation
Plasma TV
17
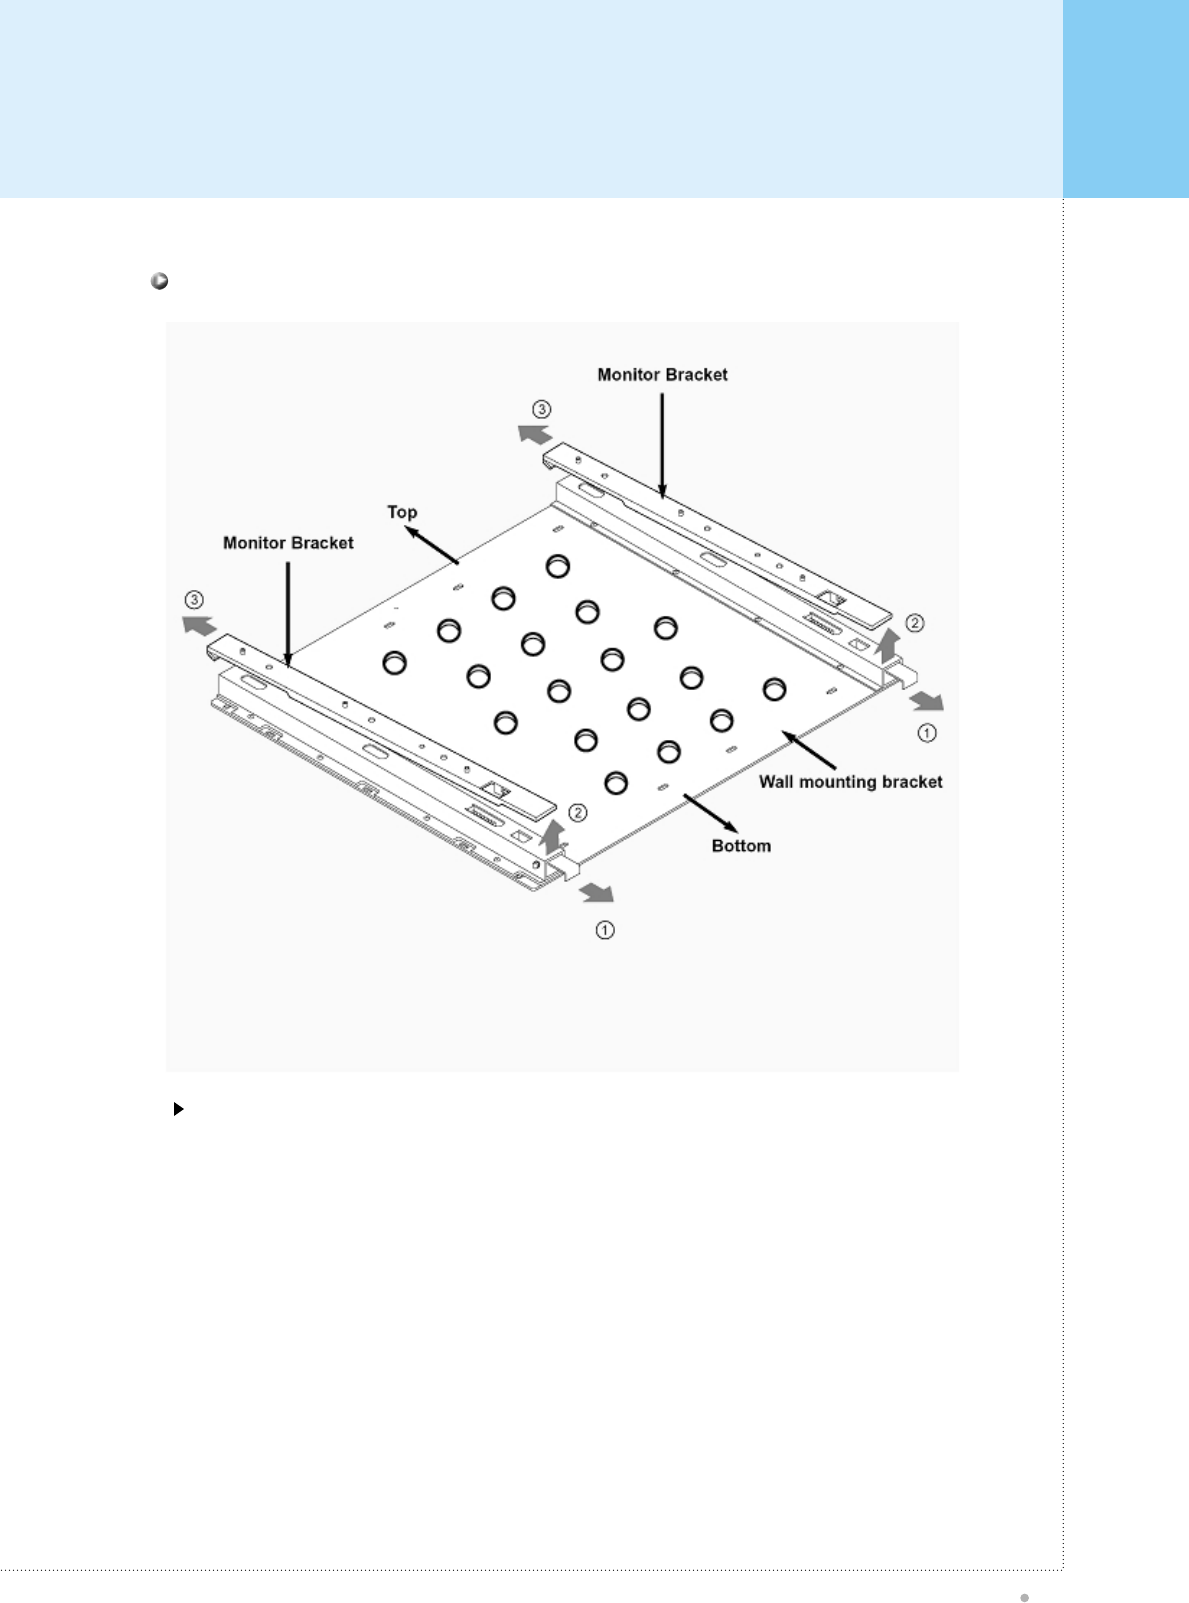
Installation
Detach the monitor brackets from the wall mounting bracket:
Pull the monitor brackets in the direction shown by arrow 1.
Lift the monitor brackets in the direction shown by arrow 2.
Lift the monitor brackets off the mounting frame in the direction shown by arrow 3.
Monitor Installation
Plasma TV
18
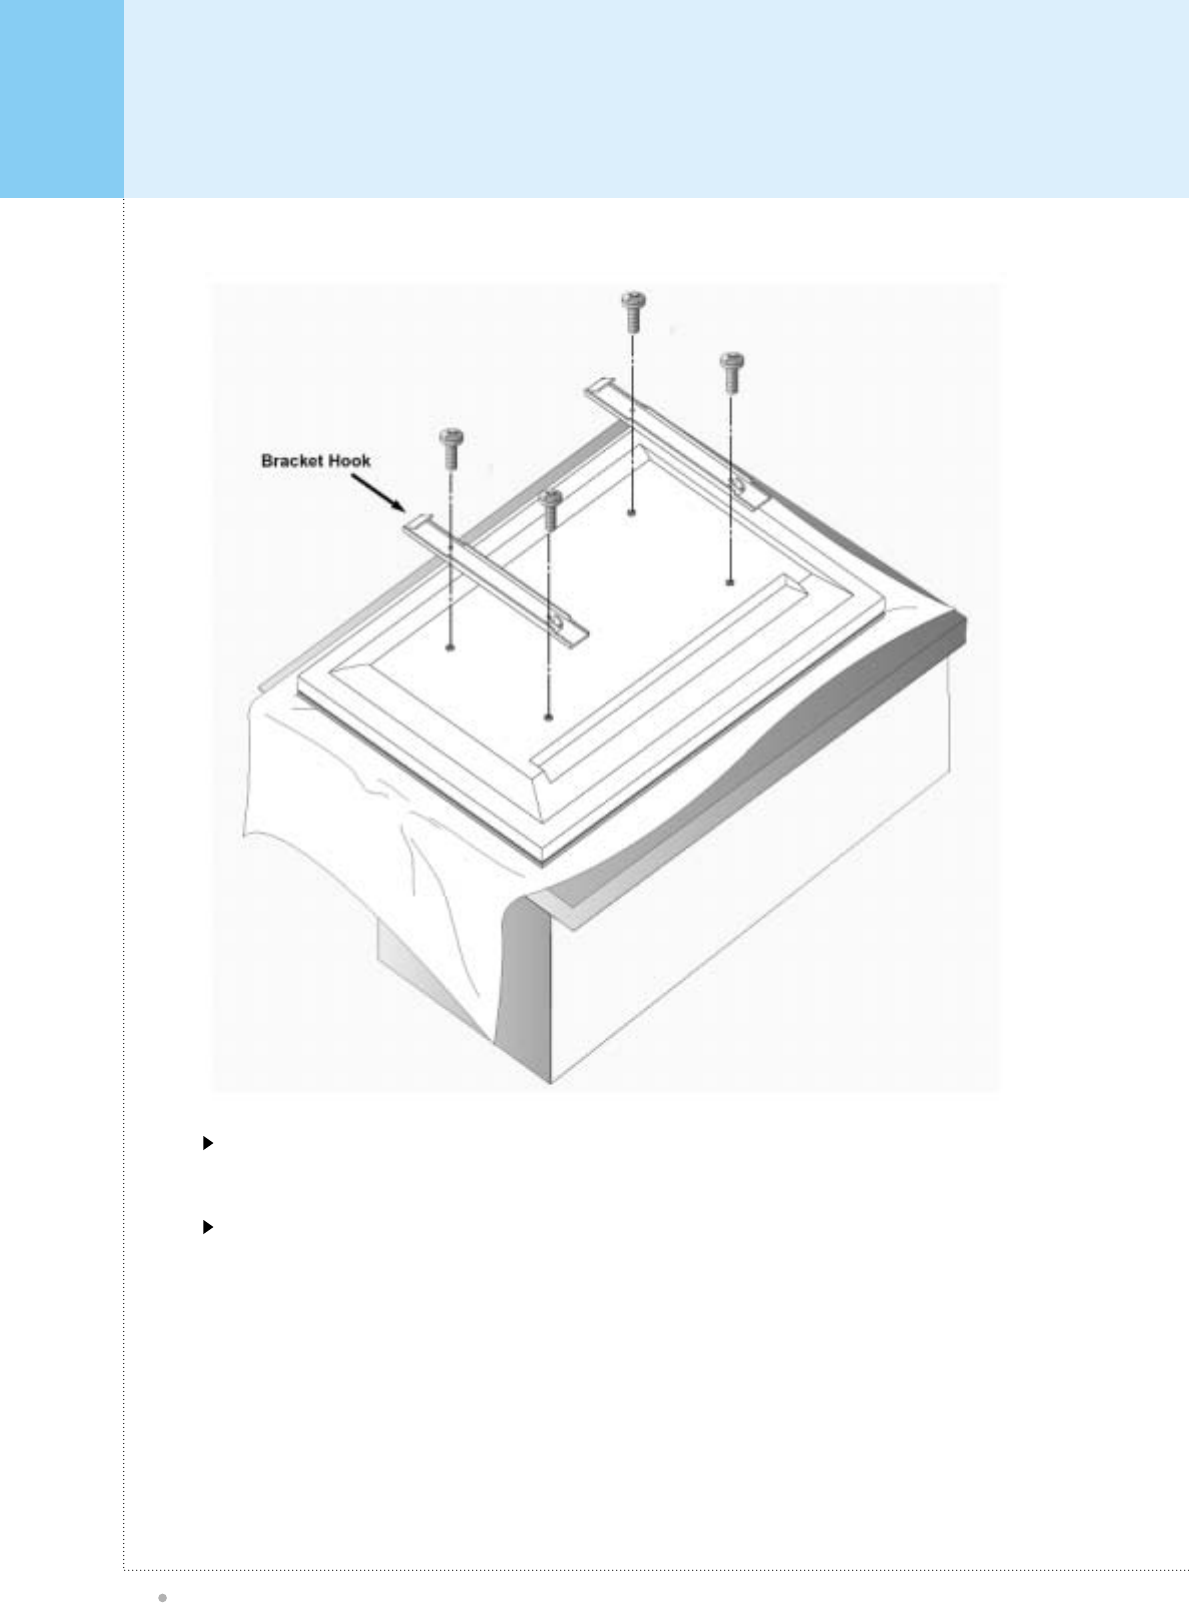
AS shown above, carefully place the Monitor screen side down on a cushioned surface that will protect the
monitor and screen from damage.
Insert the monitor brackets on the monitor as shown above. Install the 4 bolts securely, in the back of the monitor
in the holes provided. Be sure the bracket hooks are at the top side of the monitor.
Monitor Installation
Plasma TV
19
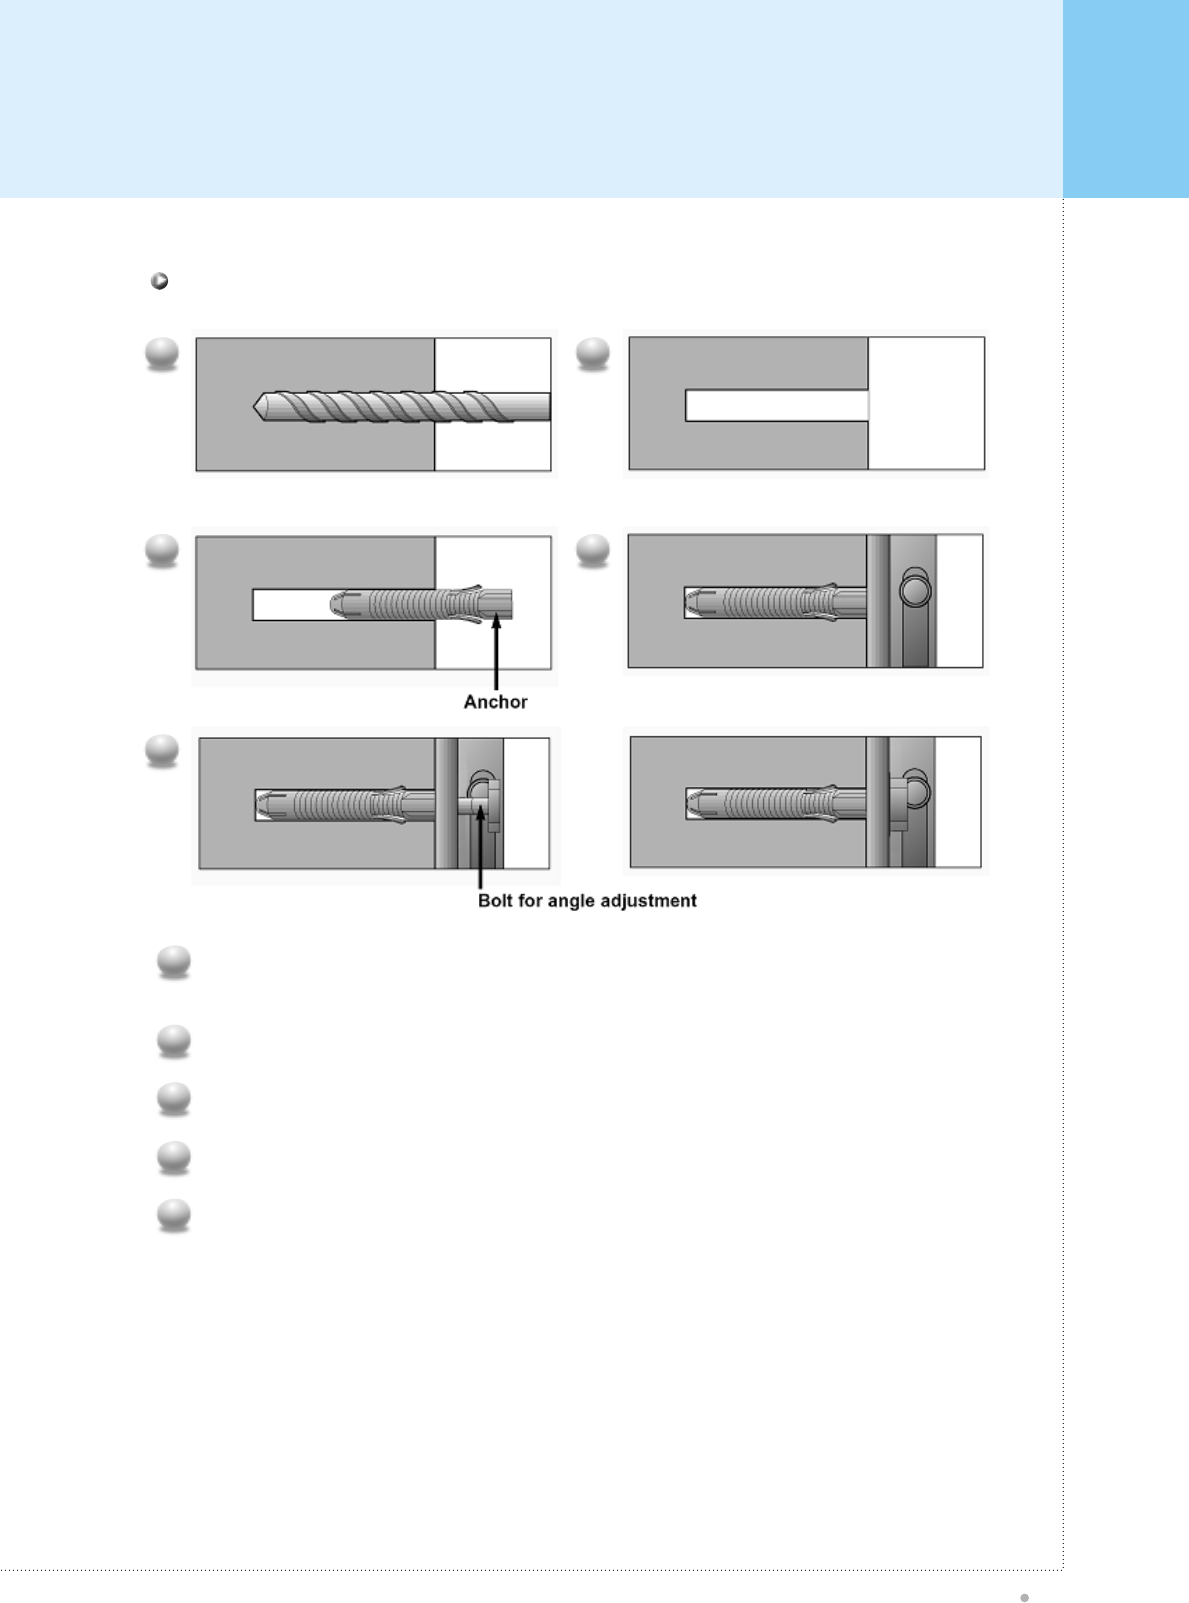
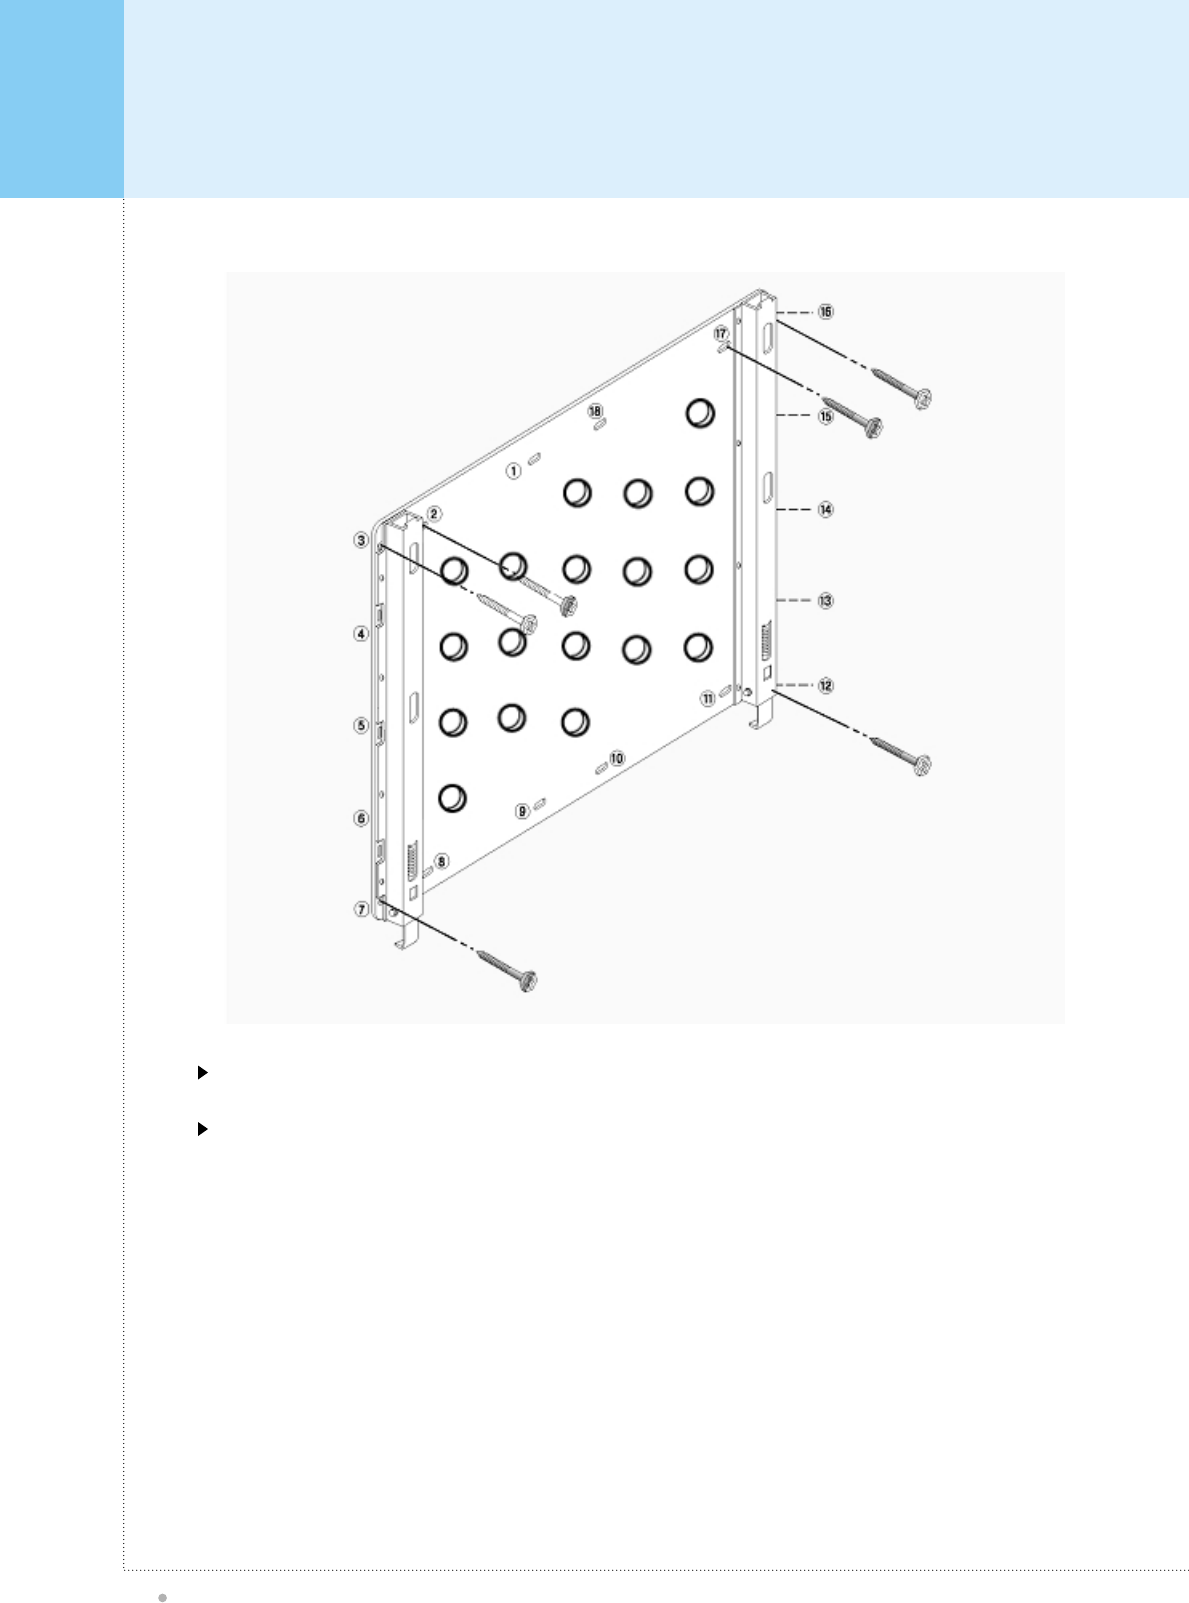
Drill the 6 hole positions as shown on page 21. Using an 8 mm drill appropriate for the material on the
wall, drill each hole to a depth of 80mm~100mm.
1
Clean each drilled hole.
2
Insert an anchor supplied with the wall mounting bracket into each hole.
3
Mount the wall mounting bracket on the wall using the 6 washers and bolts supplied.
4
Adjust the bolt head angles as necessary, see above.
5
1 2
3 4
5
How to fix anchors and bolts
Monitor Installation
Plasma TV
20
Bolt the monitor wall-mount frame to the wall as shown above using holes 2, 3, 7, 12, 16, and 17.
If it is necessary to use different holes than the ones indicated above, use only up to two (2) other holes.
Monitor Installation
Plasma TV
21
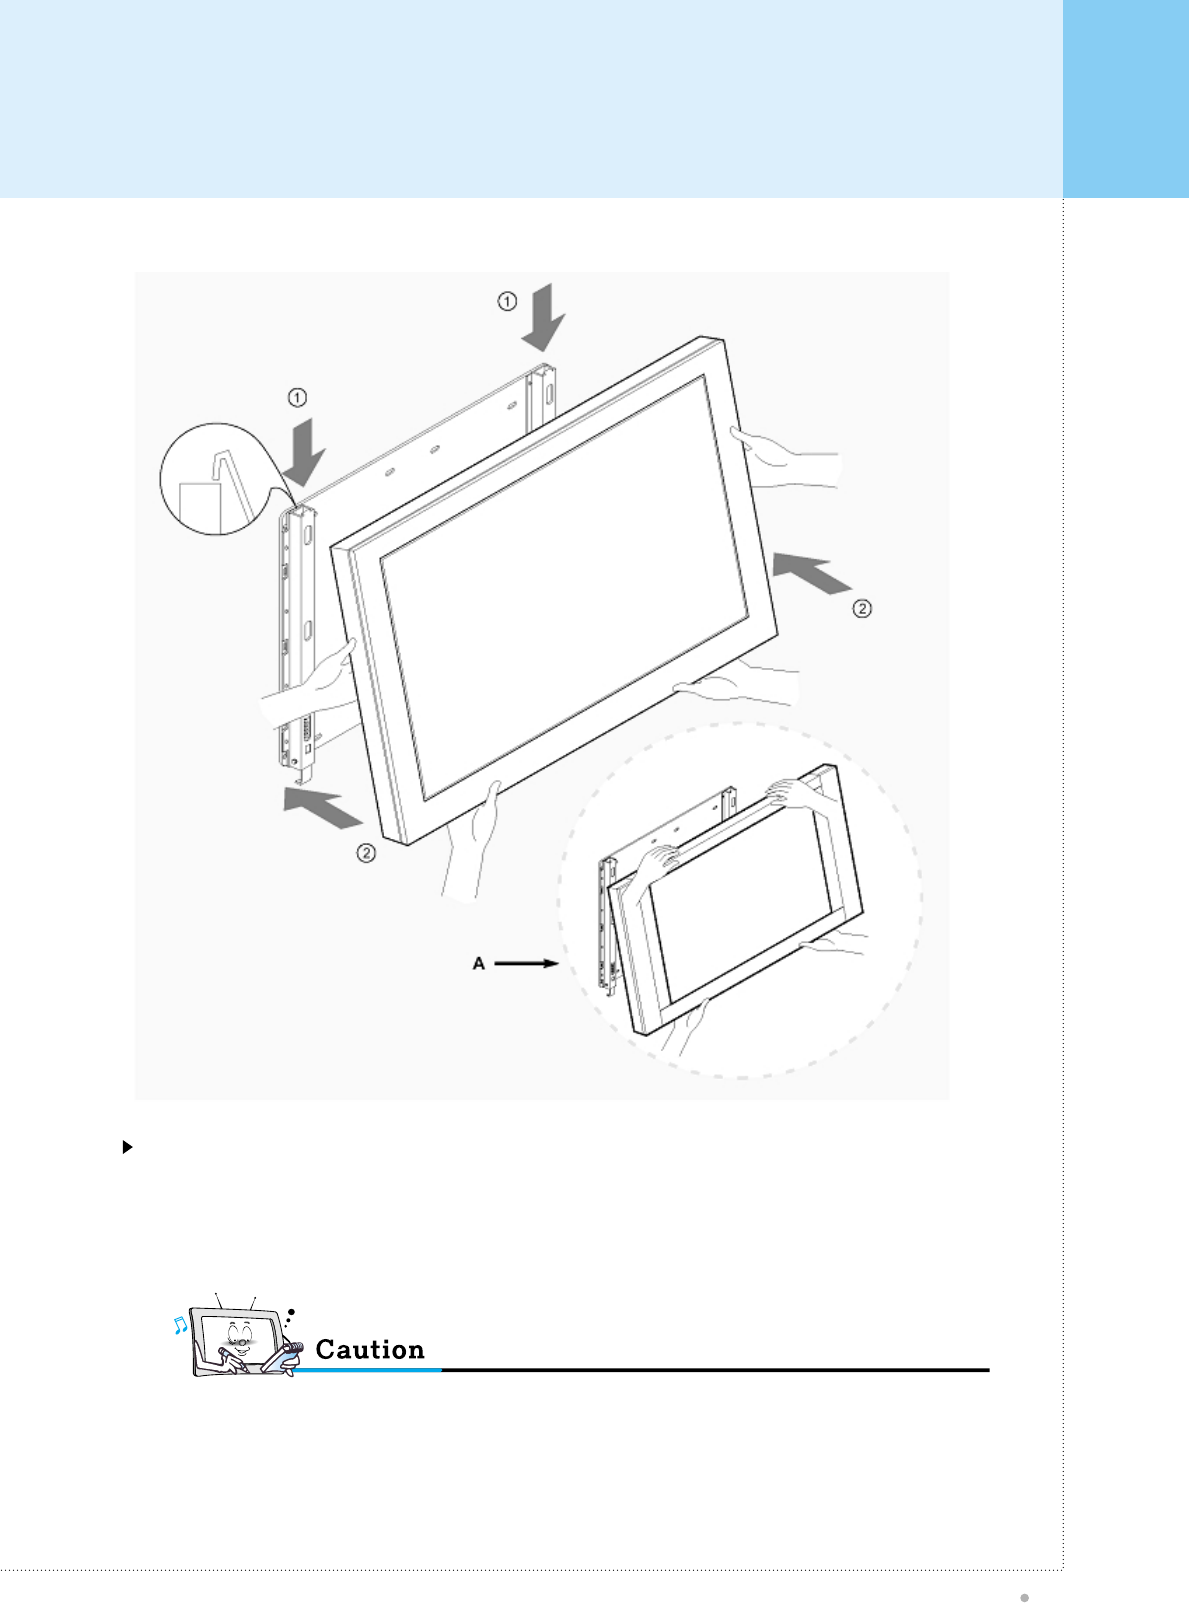
See A above, two people who are capable of lifting the weight of the monitor should do the following:
Carefully lift up the monitor and place it in position on the wall mounting bracket securely as shown by arrow 1.
Push the bottom of the monitor toward the wall as shown in arrow 2, so that the monitor will “click” into position
onto the wall mounting bracket.
• Be sure to lift a monitor / speakers assembly by the monitor only, do not lift using only the speakers.
Monitor Installation
Plasma TV
22
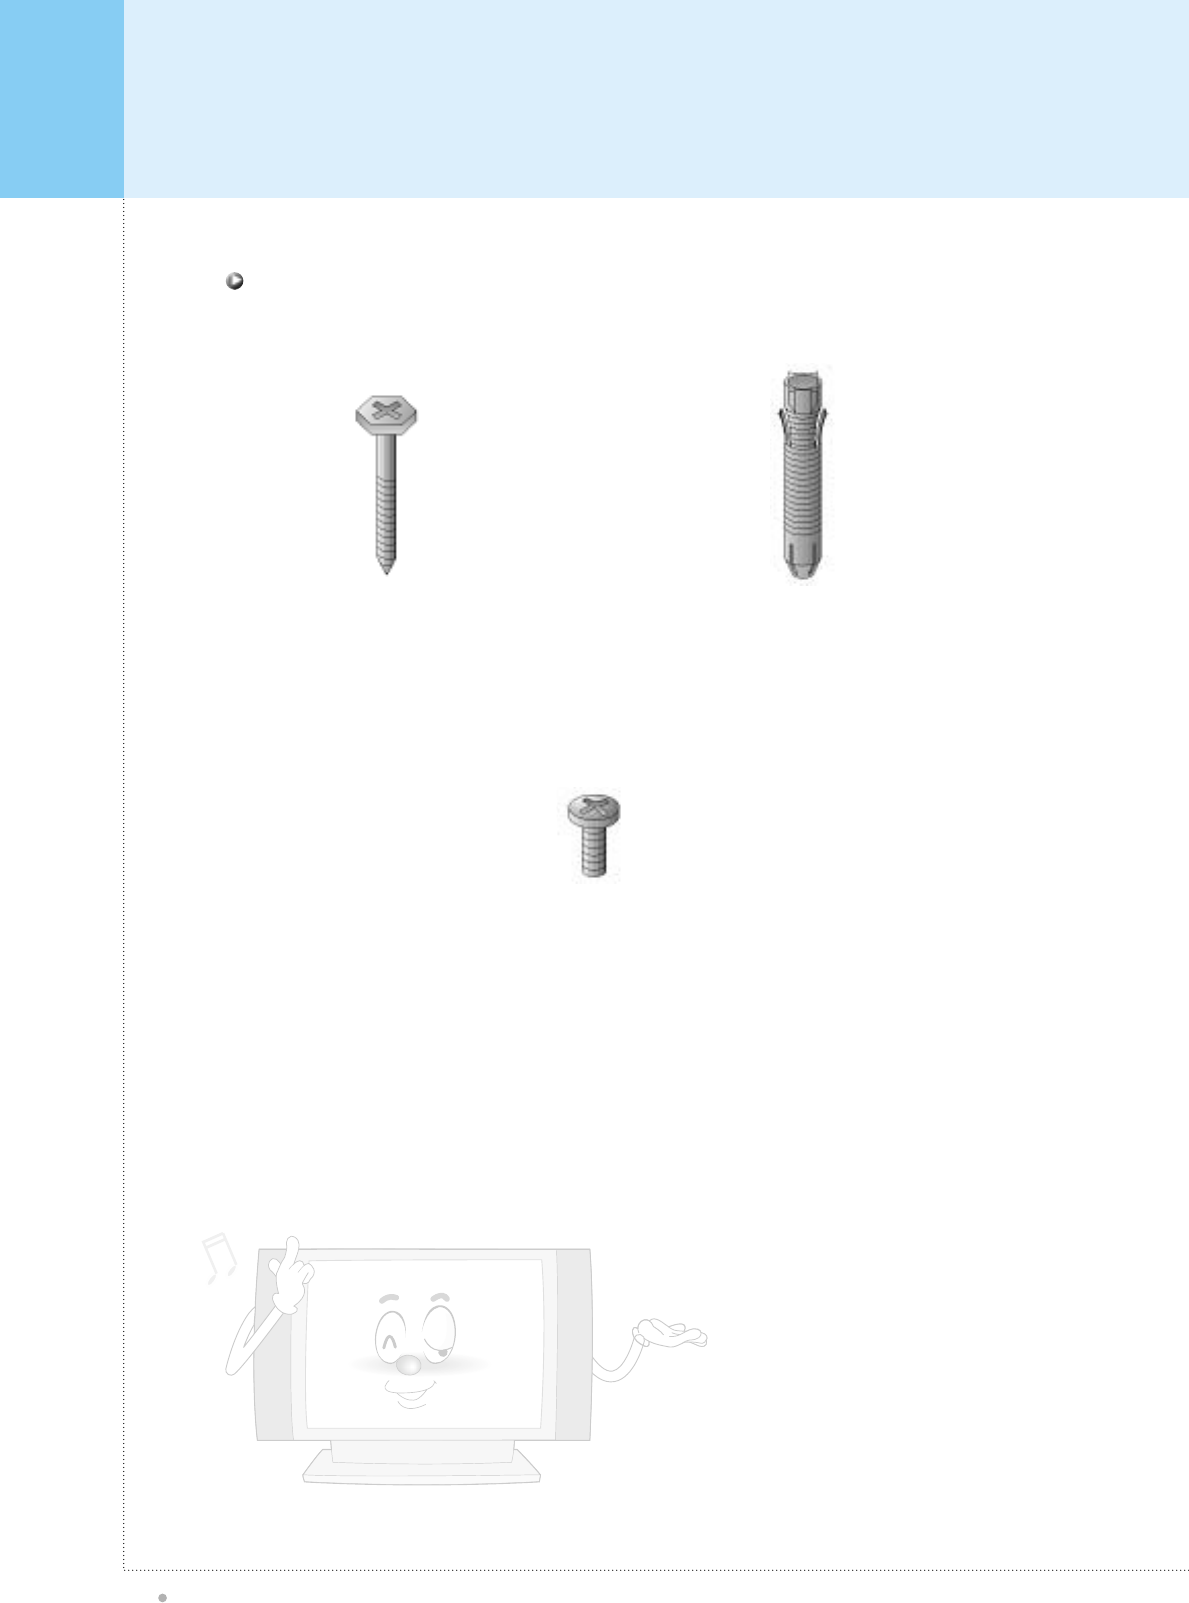
4-Monitor Bracket
Bolts
Wall Mount Accessories
6-Wall Anchor
Bolt Sleeves
6-Bolts for Wall
mounting bracket
Monitor Installation
Plasma TV
23
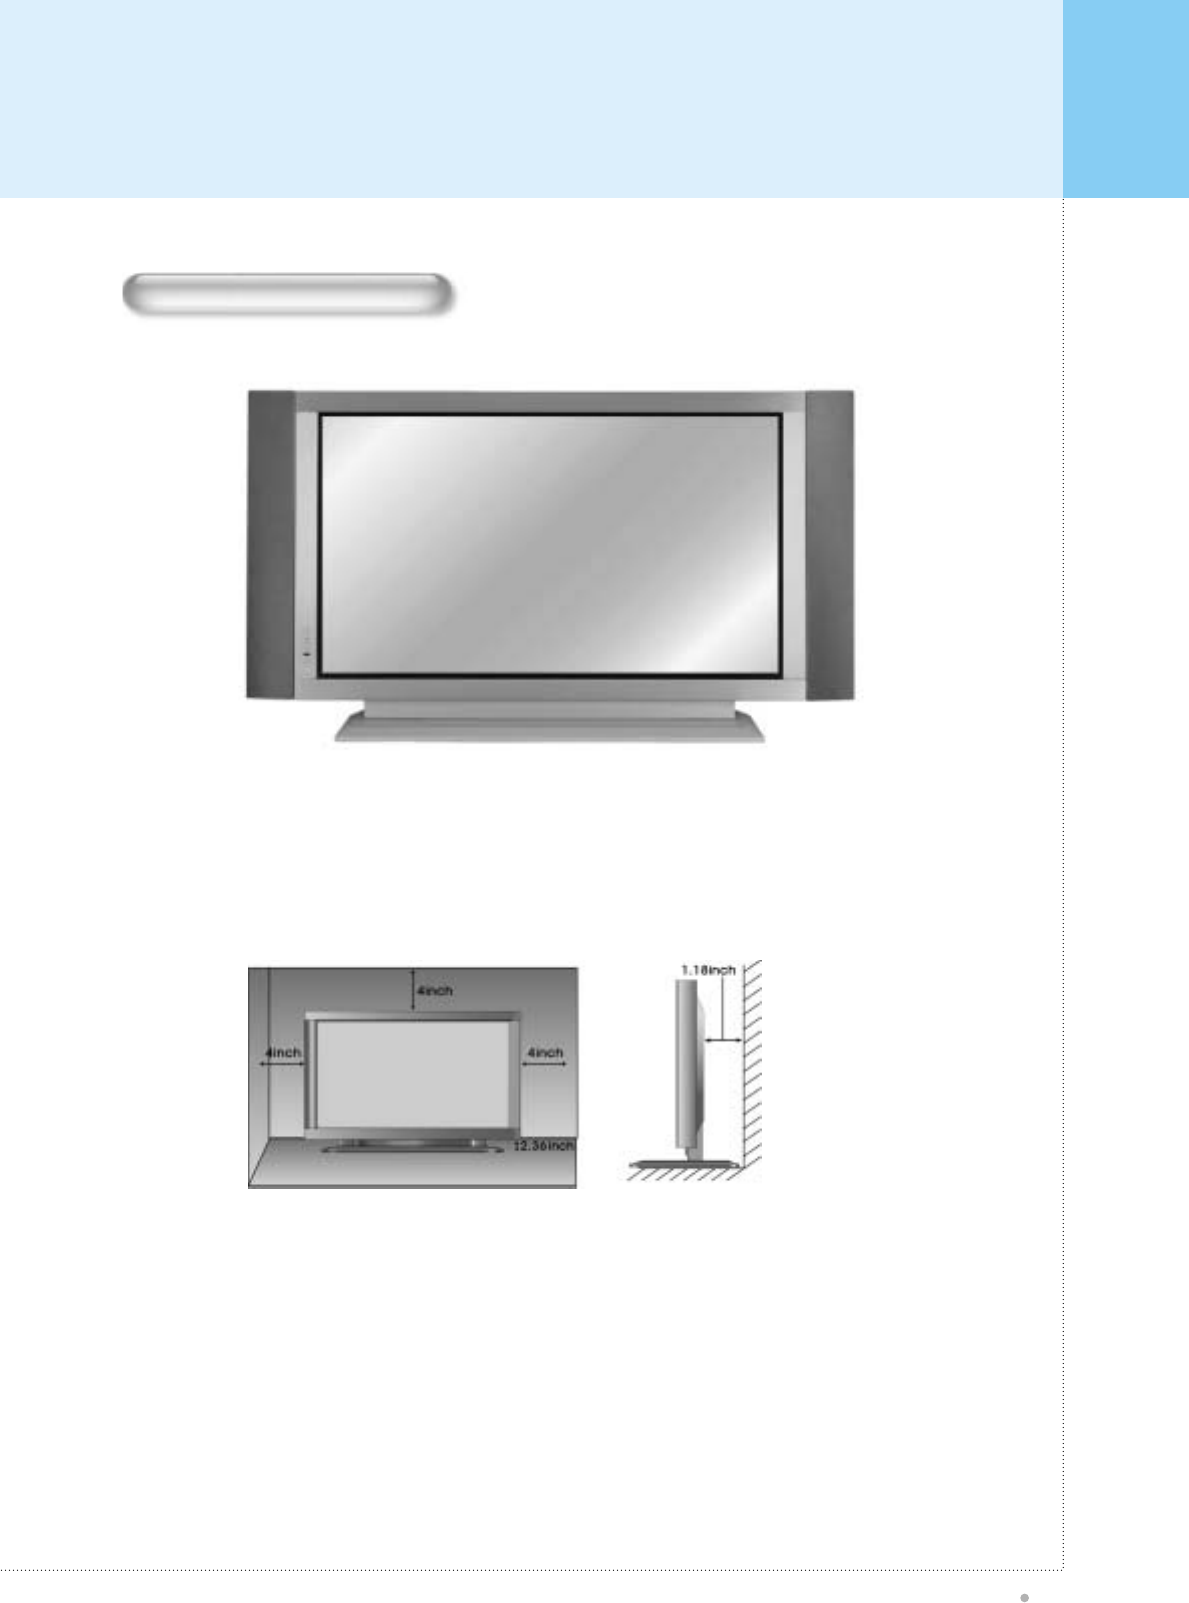
• Table Stand mount minimum allowable clearances for adequate ventilation.
<The Monitor can be installed on a desk as shown above.>
Table Stand Installion
Monitor Installation
Plasma TV
24
Installation
Monitor Installation
Plasma TV
25
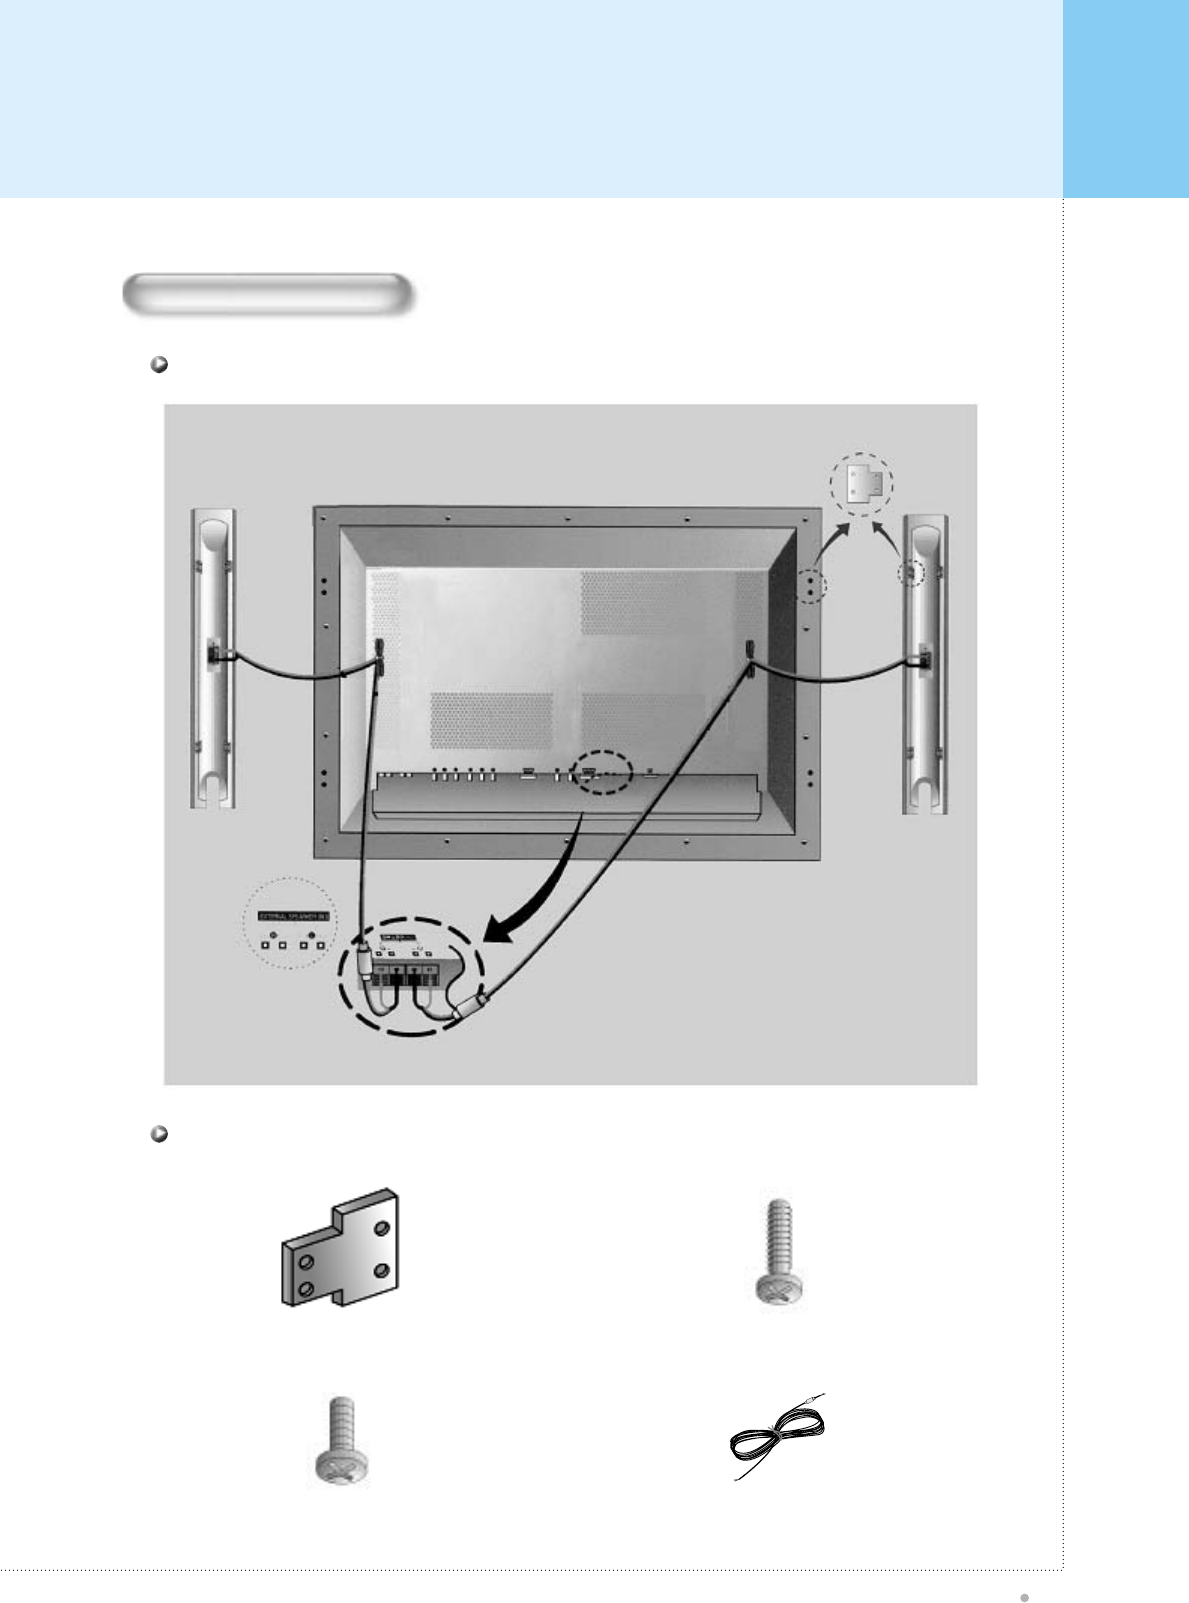
Installation
Speaker Accessories
4-Iron Plates (Mount speakers to monitor) 8-4 X 16 Long Bolts (Attach iron plates to speakers)
8-4 X 8 Short Bolts (Attach iron plates to monitor) 2-Speaker Wires
Speaker Installion
Watching TV
Plasma TV
26
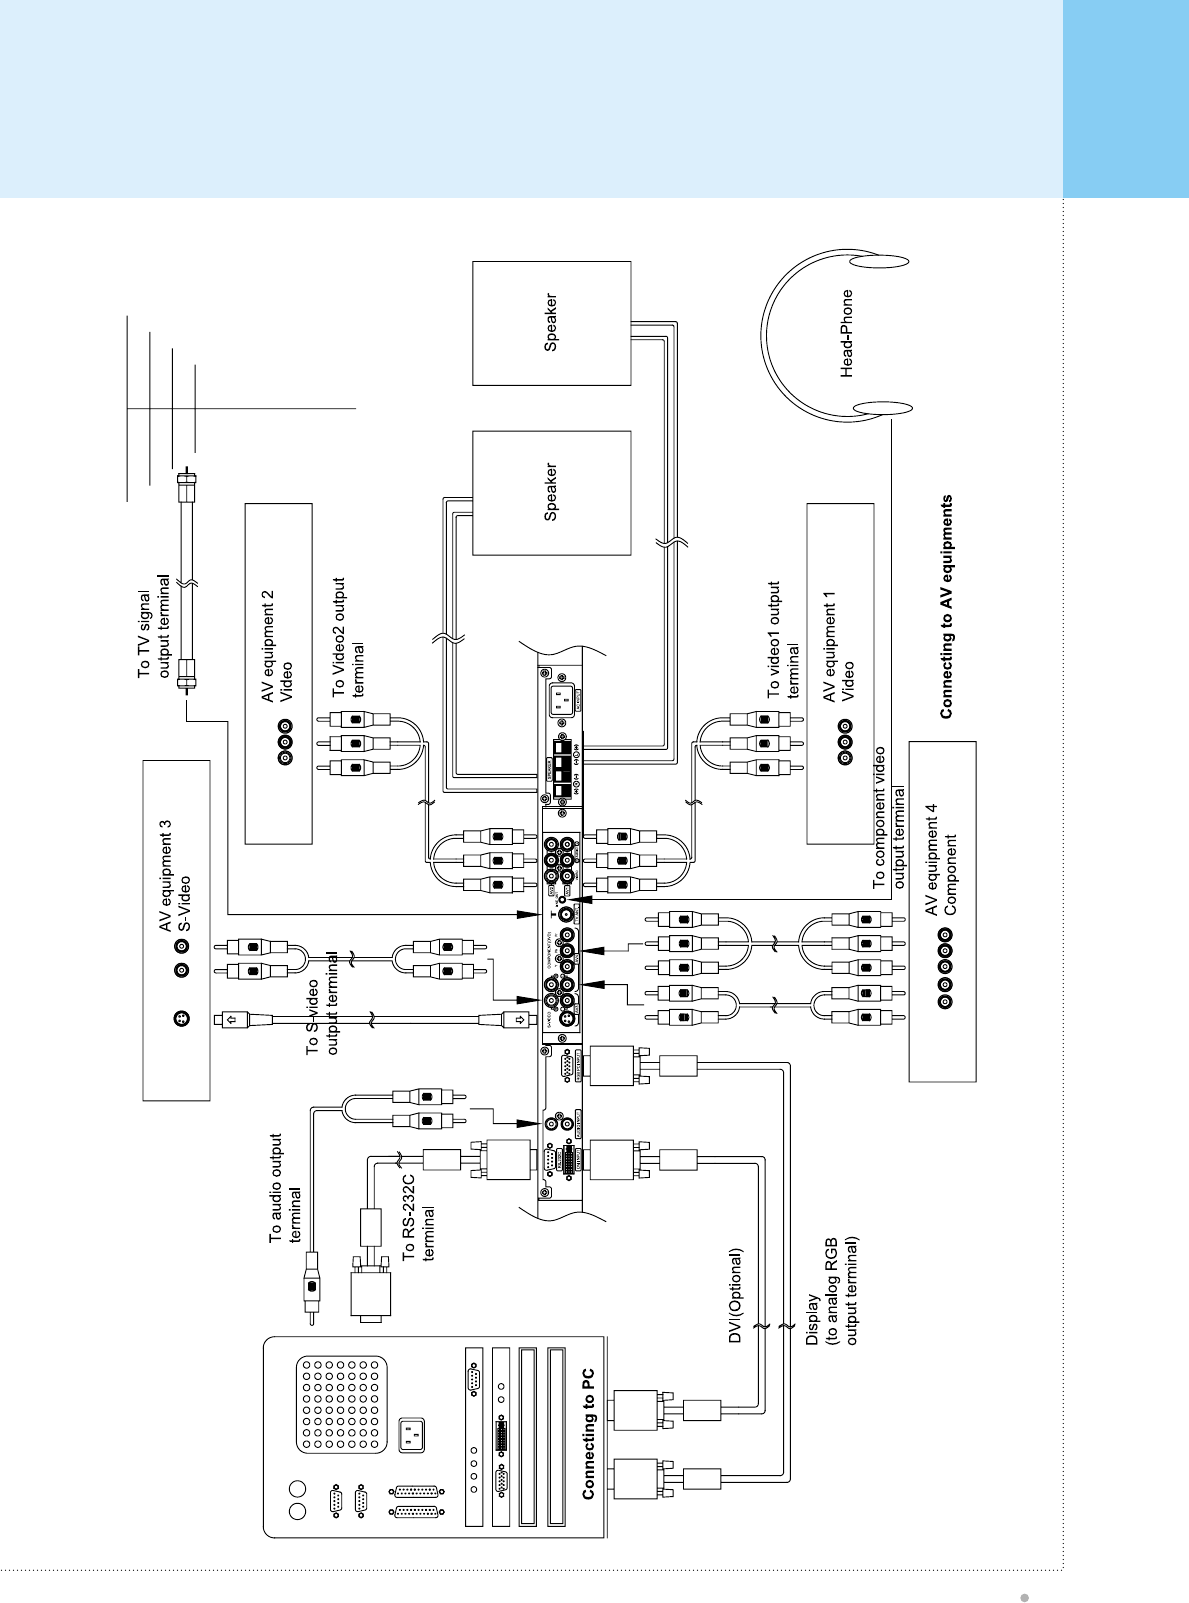
To watch TV (When the Interface board is installed.)
Make sure if the signal source is TV. Press TV/VIDEO button on the remote control and select TV on
OSD.
1
Use CH+, CH- button or numeric button to change TV program for your channel selection.
2
You can watch the previous channel by pressing PREV.CH. Button on Remote Control.
3
Also, you can tune to cable service provided channels using the cable box. For further information
regarding cable TV service, contact cable TV service provider(s).
4
Watching VCR
Plasma TV
27
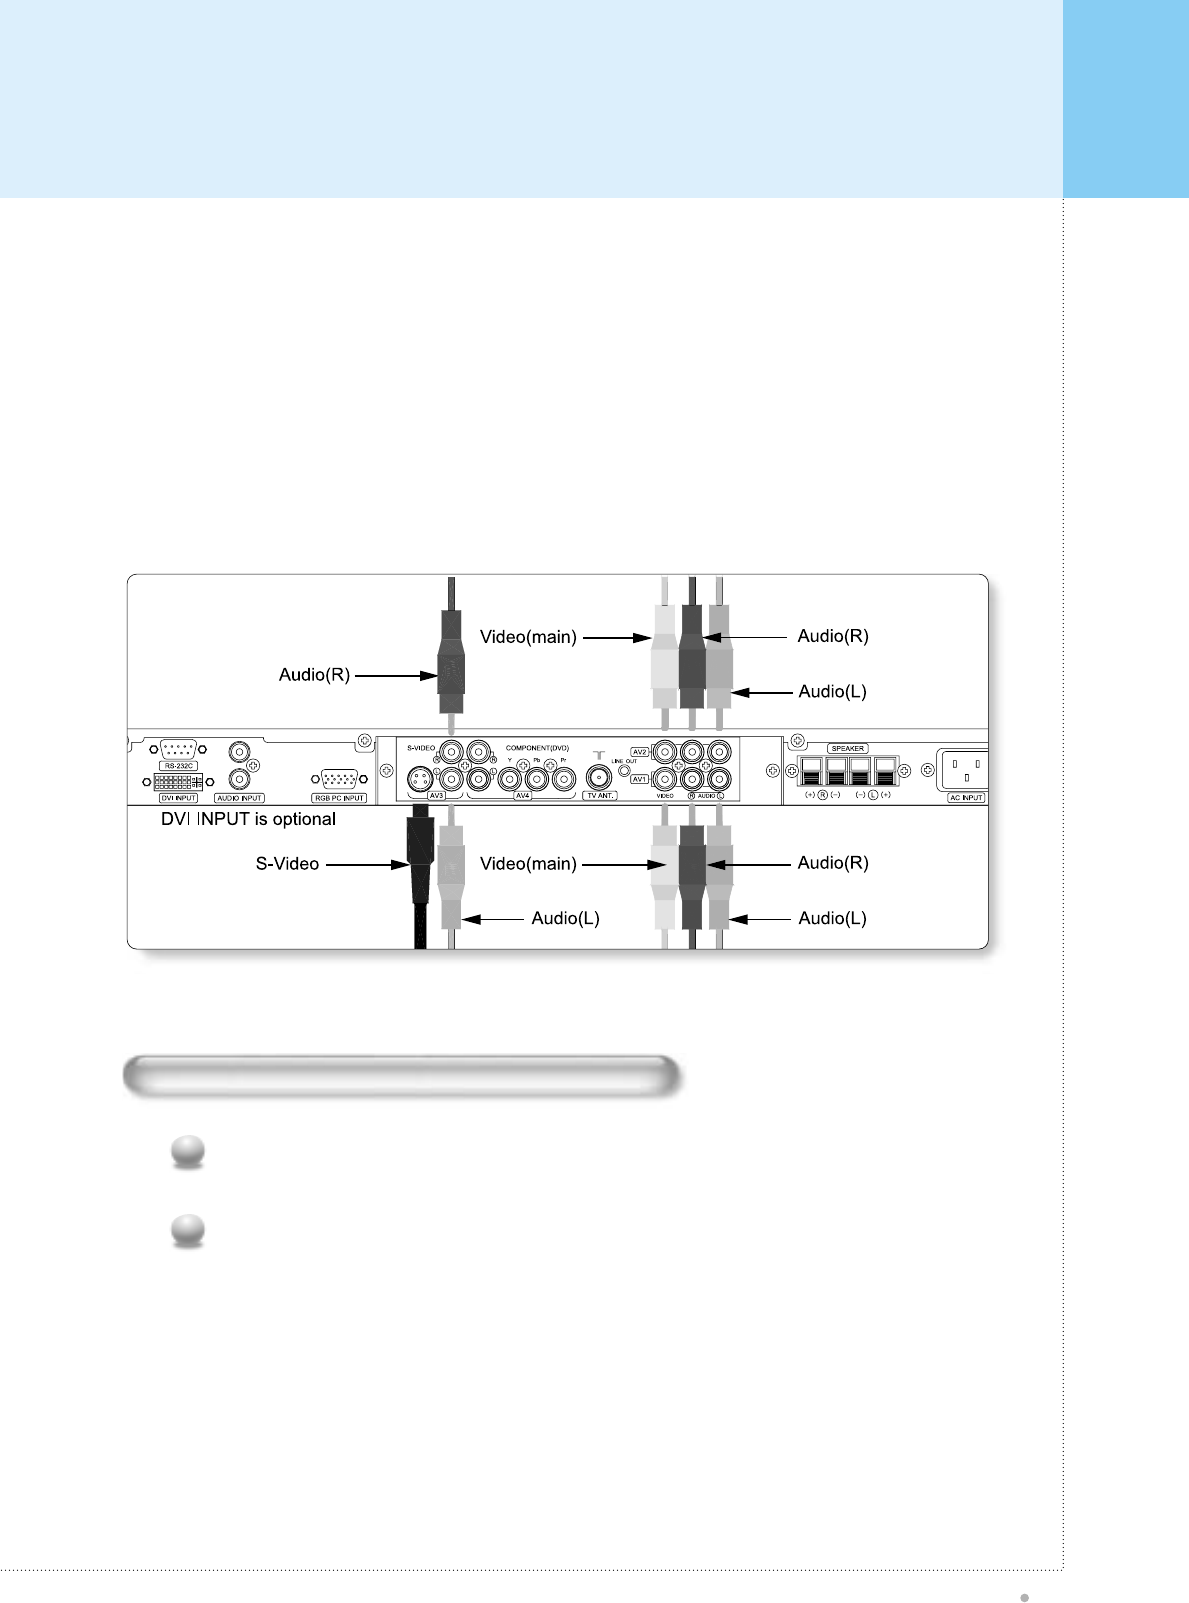
To watch VCR (When the Interface board is installed.)
Press TV/ Video button on the remote control and select Video Sources. (When connection with
S-Video, select the S-Video.)
1
Insert a video tape into the VCR and press the PLAY button on the VCR.
2
When connecting the Plasma Monitor with external equipments, match the colors of connecting ports (Video -
yellow, Audio(L) - white, Audio(R) - red).
If you have a mono VCR, connect the audio cable from the VCR to the AUDIO(L/MONO) input of the Plasma
Monitor.
If you connect an S-VIDEO VCR to the S-VIDEO input, the picture quality is improved; compared to connecting a
regular VCR to the Video input.
Avoid having a fixed image remain on the screen for a long period of time. Typically a frozen still picture from a VCR
4:3 picture format or if a CH label is present.
<To avoid picture noise (interference), leave an adequate distance between the VCR and monitor.>
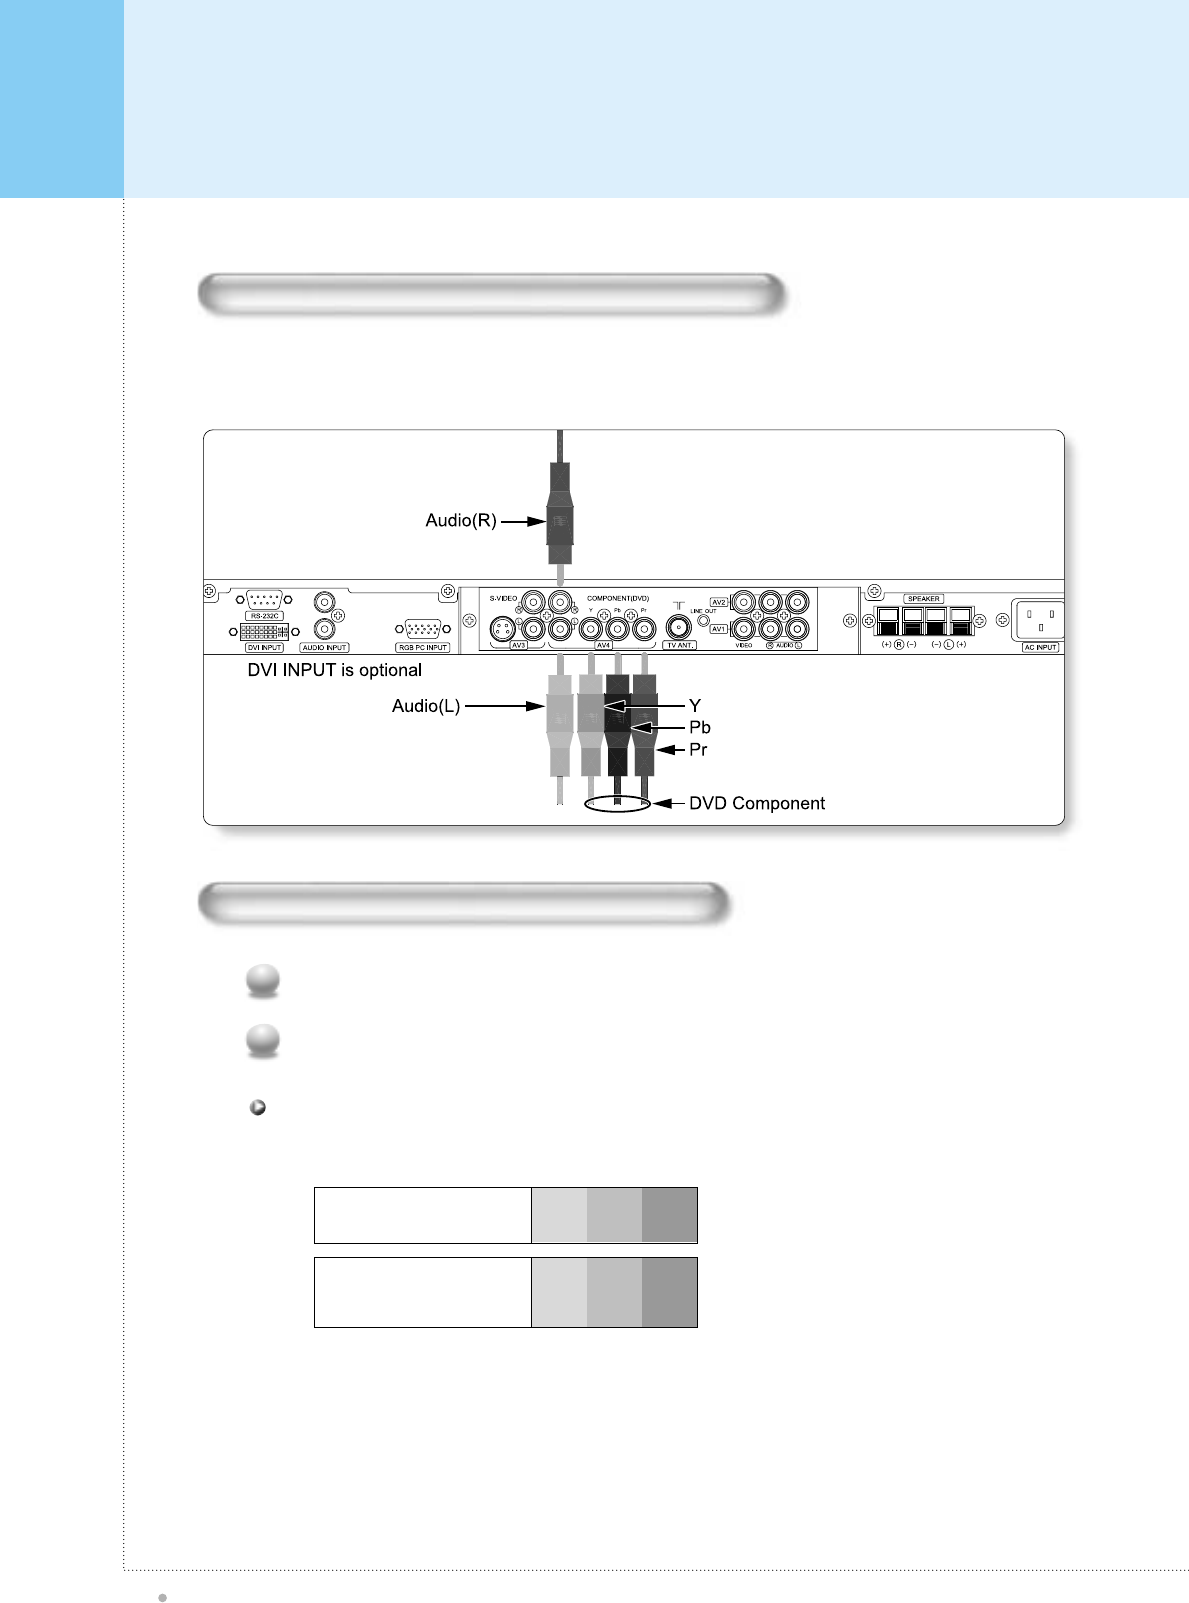
Watching DVD
Plasma TV
28
How to connect (When the Interface board is installed.)
Connect DVD video inputs to Y, PB, PRof COMPONENT (DVD INPUT) and audio inputs to Audio sockets of AV
INPUT.
How to use (When the Interface board is installed.)
Press TV / Video button on the remote control of the monitor to select Component.
1
Try this after turning on the DVD player.
2
Component ports of the
Monitor YPBPR
Video output ports
of DVD player
Y
Y
Y
Y
Pb
B-Y
Cb
PB
Pr
R-Y
Cr
PR
You can get better picture quality if you connect DVD player with component input ports as below.
Component Input ports
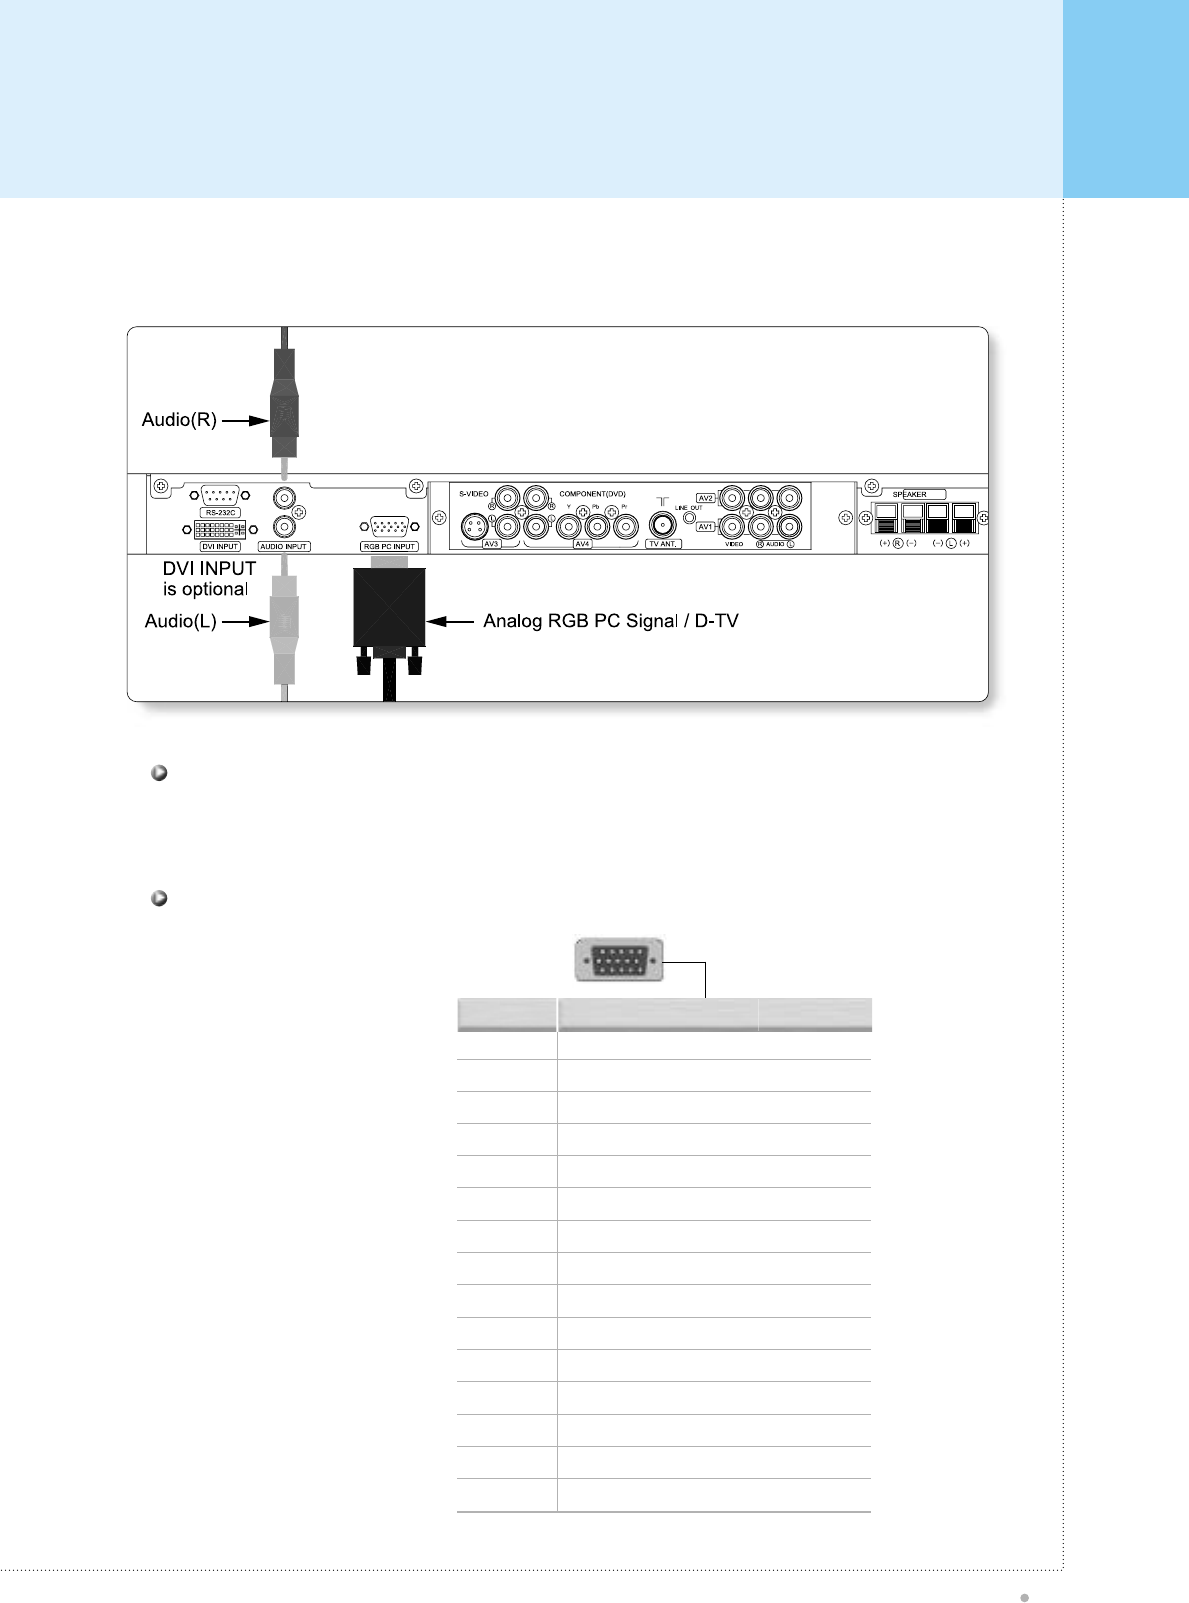
Connecting The PC
Plasma TV
29
You can enjoy vivid picture and sound with connecting a PC with the Monitor.
1
2
3
4
5
6
7
8
9
10
11
12
13
14
15
Red (R)
Green (G)
Blue (B)
Grounding
Grounding (DDC)
Red (R) Grounding
Green (G) Grounding
Blue (B) Grounding
Reserved
Sync Grounding
Grounding
Data (DDC)
Horizontal sync.
Vertical sync.
Clock (DDC)
Pin No. Description
• Connect a PC (15pin) cable between the Video Output jack on the PC and the RGB in (15p D-SUB) on the
PDP.
Connecting a PC to the PDP
• 15Pin Signal Cable
(based on protruded pin)
Pin Configuration
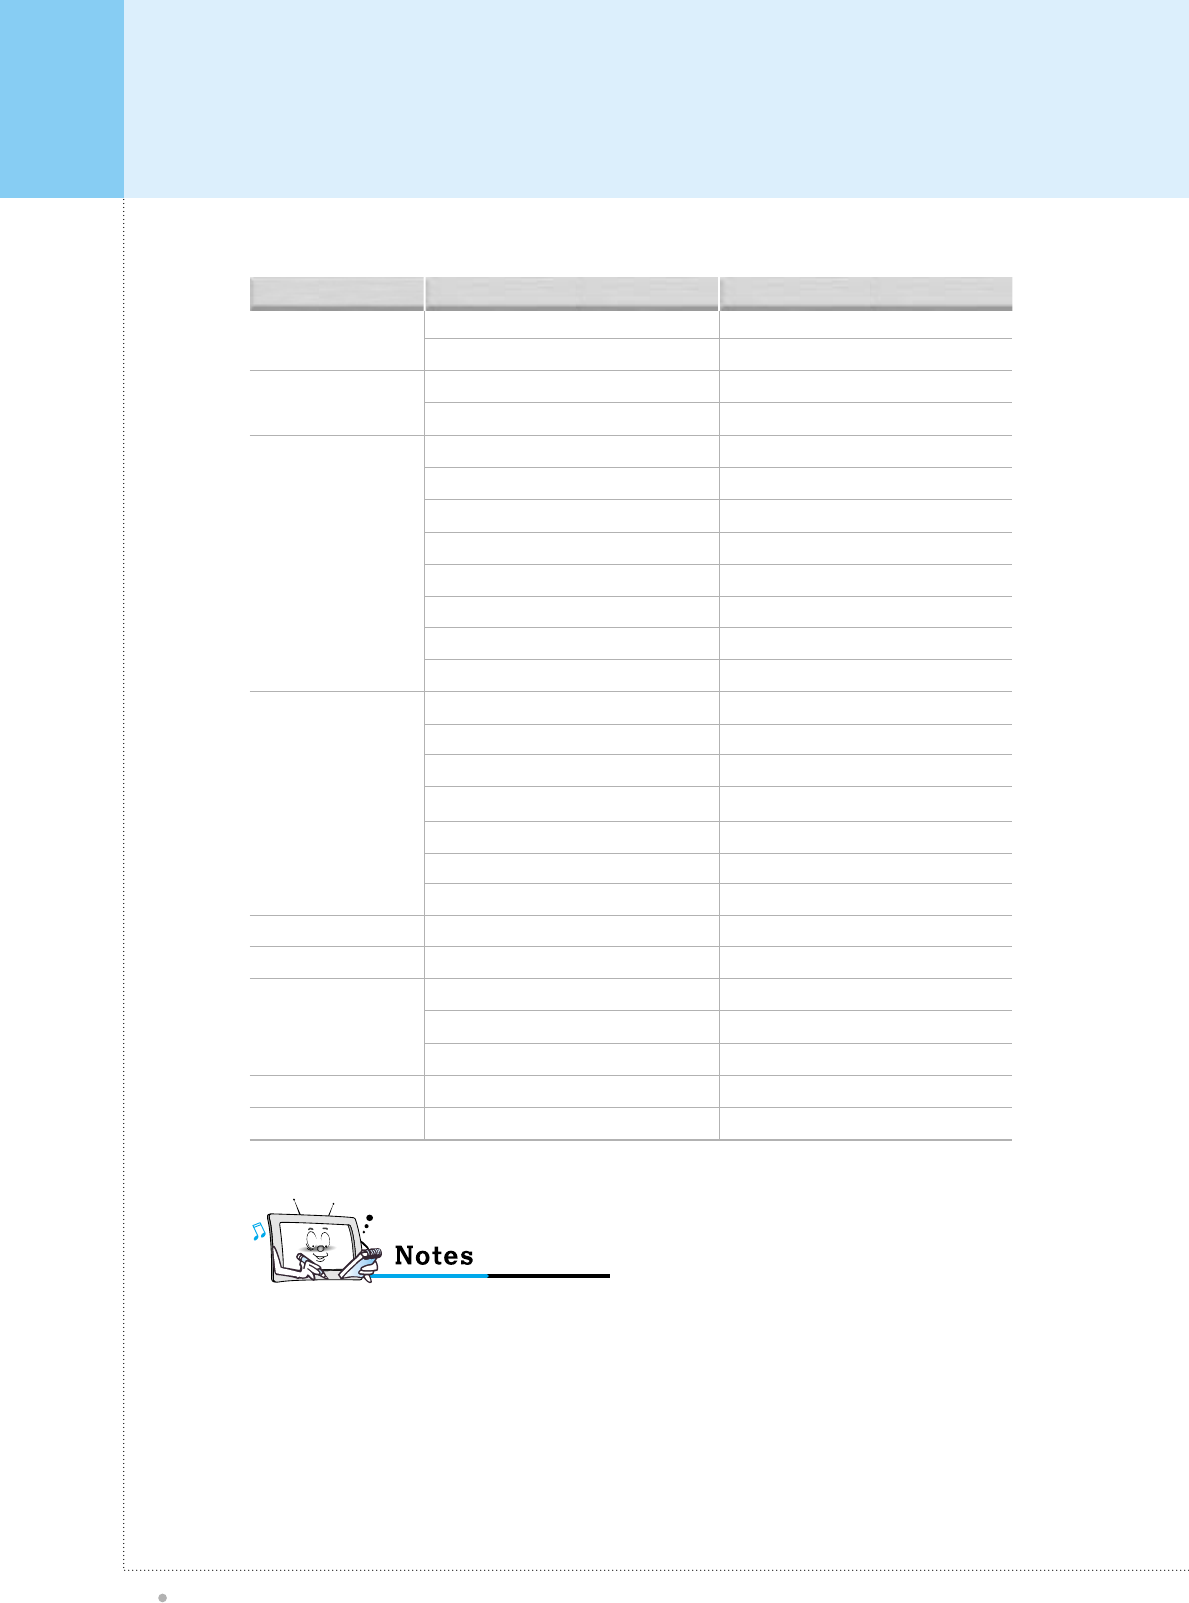
Displayable Monitor Specification
Plasma TV
30
640 X 350
640 X 400
640 X 480
800 X 600
832 X 624
852 X 480
1024 X 768
1280 X 1024
1366 X 768
31.468
37.861
31.469
37.927
31.469
35.000
37.861
37.500
43.269
45.913
53.011
64.062
35.156
37.879
48.077
46.875
53.674
56.000
64.016
49.725
31.468
48.363
56.476
60.023
64.000
48.387
Resolution Horizontal Frequency (KHz)
70.09
85.08
70.08
85.03
59.94
66.66
72.80
75.00
85.00
90.03
100.04
120.00
56.25
60.31
72.18
75.00
85.06
90.00
100.00
74.55
60.05
60.00
70.06
75.02
60.00
60.00
Vertical Frequency (Hz)
• Synchronization input form : separate
• 852 x480 : 42" Native Resolution
Horizontal Polarity is Positive(+)
Vertical Polarity is Negative(-)
• 1366 x768 : 50" Native Resolution
Horizontal Polarity is Positive(+)
Vertical Polarity is Negative(-)
Basic Operation
Plasma TV
31
Turning The Monitor TV On And Off
Press the Power button on the remote control. The PDP will turn on and you will be ready to use it's features.
You can also use the Power button on the front of the PDP.
• If your Monitor isn't turned on when the power button is pressed: Press the MODE button to check if the Monitor mode has
been chosen
TV Channel Selection
Make sure if the signal source is TV.
1
Use CH+, CH- button or numeric button to change TV program for your channel selection.
2
You can watch the previous channel by pressing PREV.CH. Button on Remote Control.
3
Volume Control
Use VOL+ / VOL- button
Press MUTE button on Remote Control.
OSD Structure
Plasma TV
32
• OSD (On Screen Display) allows user to control or adjust various features and settings in accordance with his/her
preferences.
• Press the SET button on the Remote Control, you may see the OSD.
e.g.) OSD menu on the video background
PICTURE
TV & VIDEO
BRIGHTNESS
CONTRAST
COLOR
HUE
SHARPNESS
TEMPERATURE
PC
BRIGHTNESS
CONTRAST
H-POSITION
V-POSITION
PHASE
H-SIZE
AUTO ADJUST
MISC
VIDEO SIZE
OSD SHEET
OSD POSITION
SLEEP
SOUND
VOLUME
TREBLE
BASS
BALANCE
PIP
PIP ON/OFF
VIDEO SOURCE
AUDIO SOURCE
PIP POSITION
TV SETUP
MODE
AUTO CHANNEL
FINE TUNE
MTS
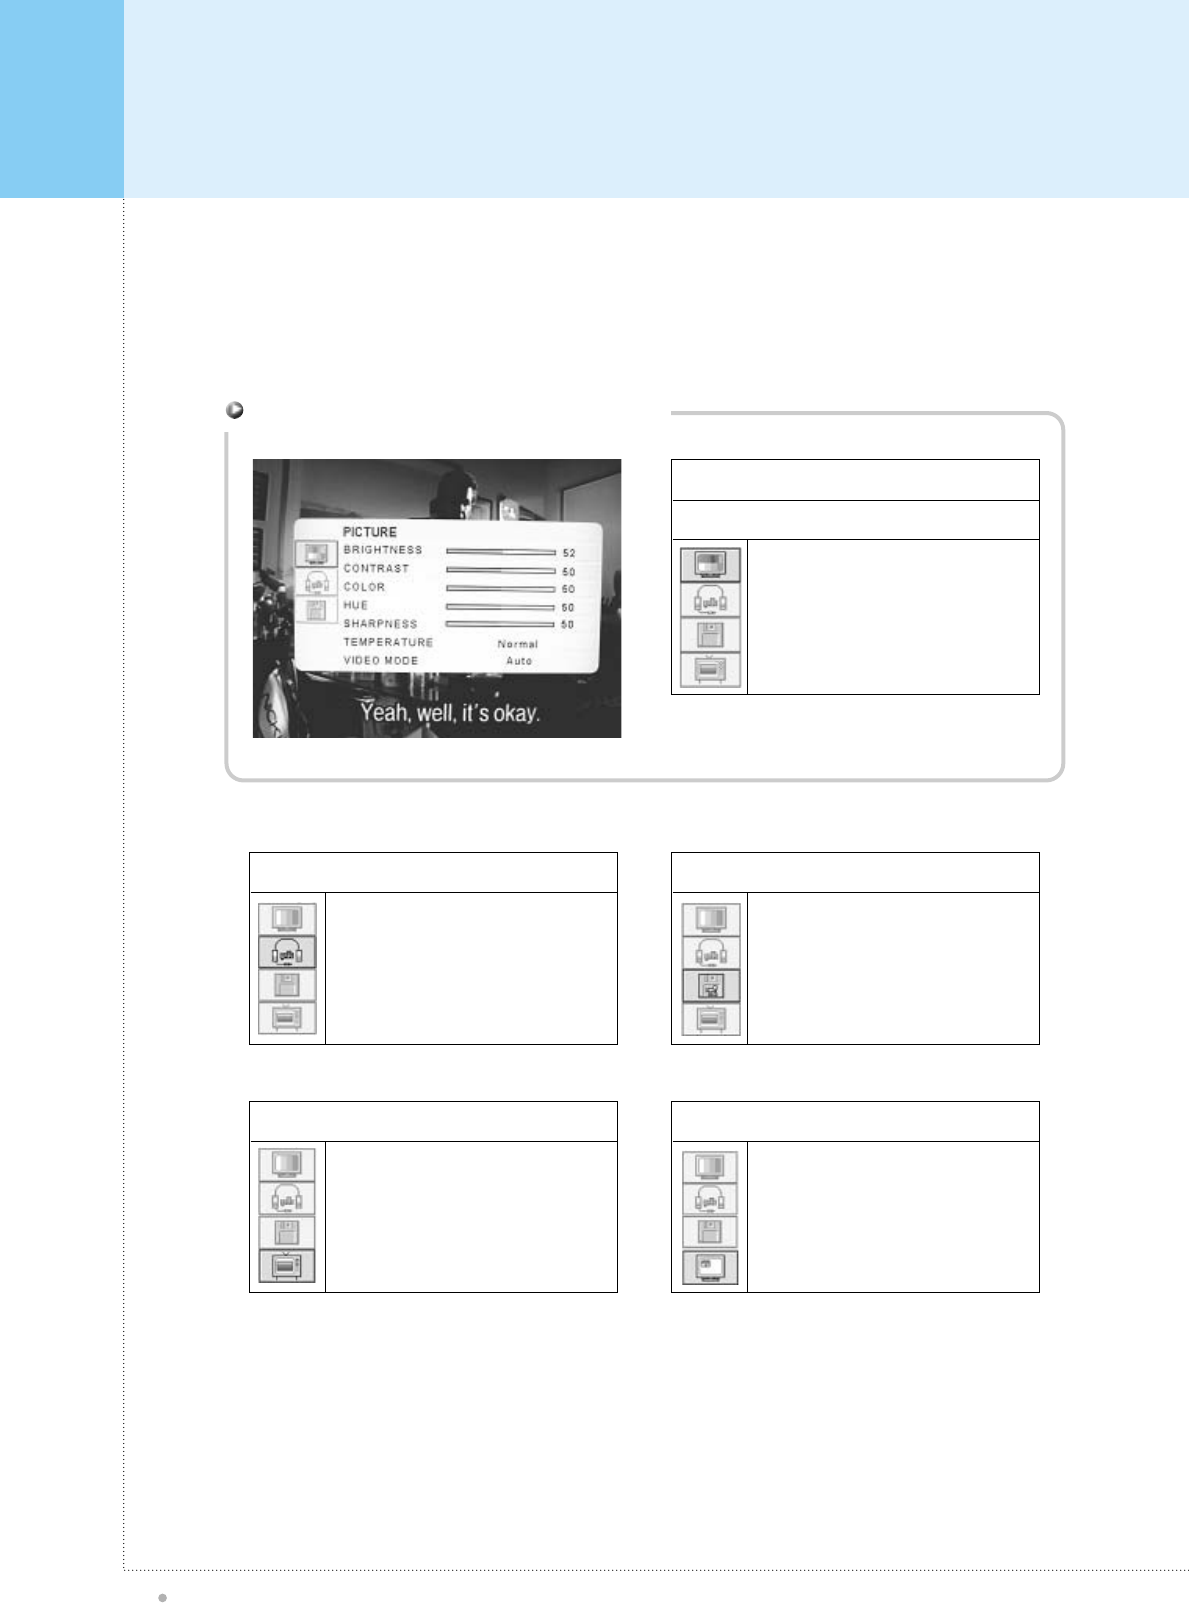
PICTURE (TV & VIDEO)
Plasma TV
33
PICTURE
BRIGHTNESS
CONTRAST
COLOR
HUE
SHARPNESS
TEMPERATURE
Adjust Brightness, Contrast, Color, Hue,
Sharpness, Temperature on OSD menu.
Press SET button to activate OSD.
1
Press SET button again to get into PICTURE
main menu.
2
Dark Bright
Distinct Vague
Decrease Increase
Control the brightness of display
by using left and right button.
BRIGHTNESS
Control the contrast of display.
CONTRAST
Control the color saturation of display.
COLOR
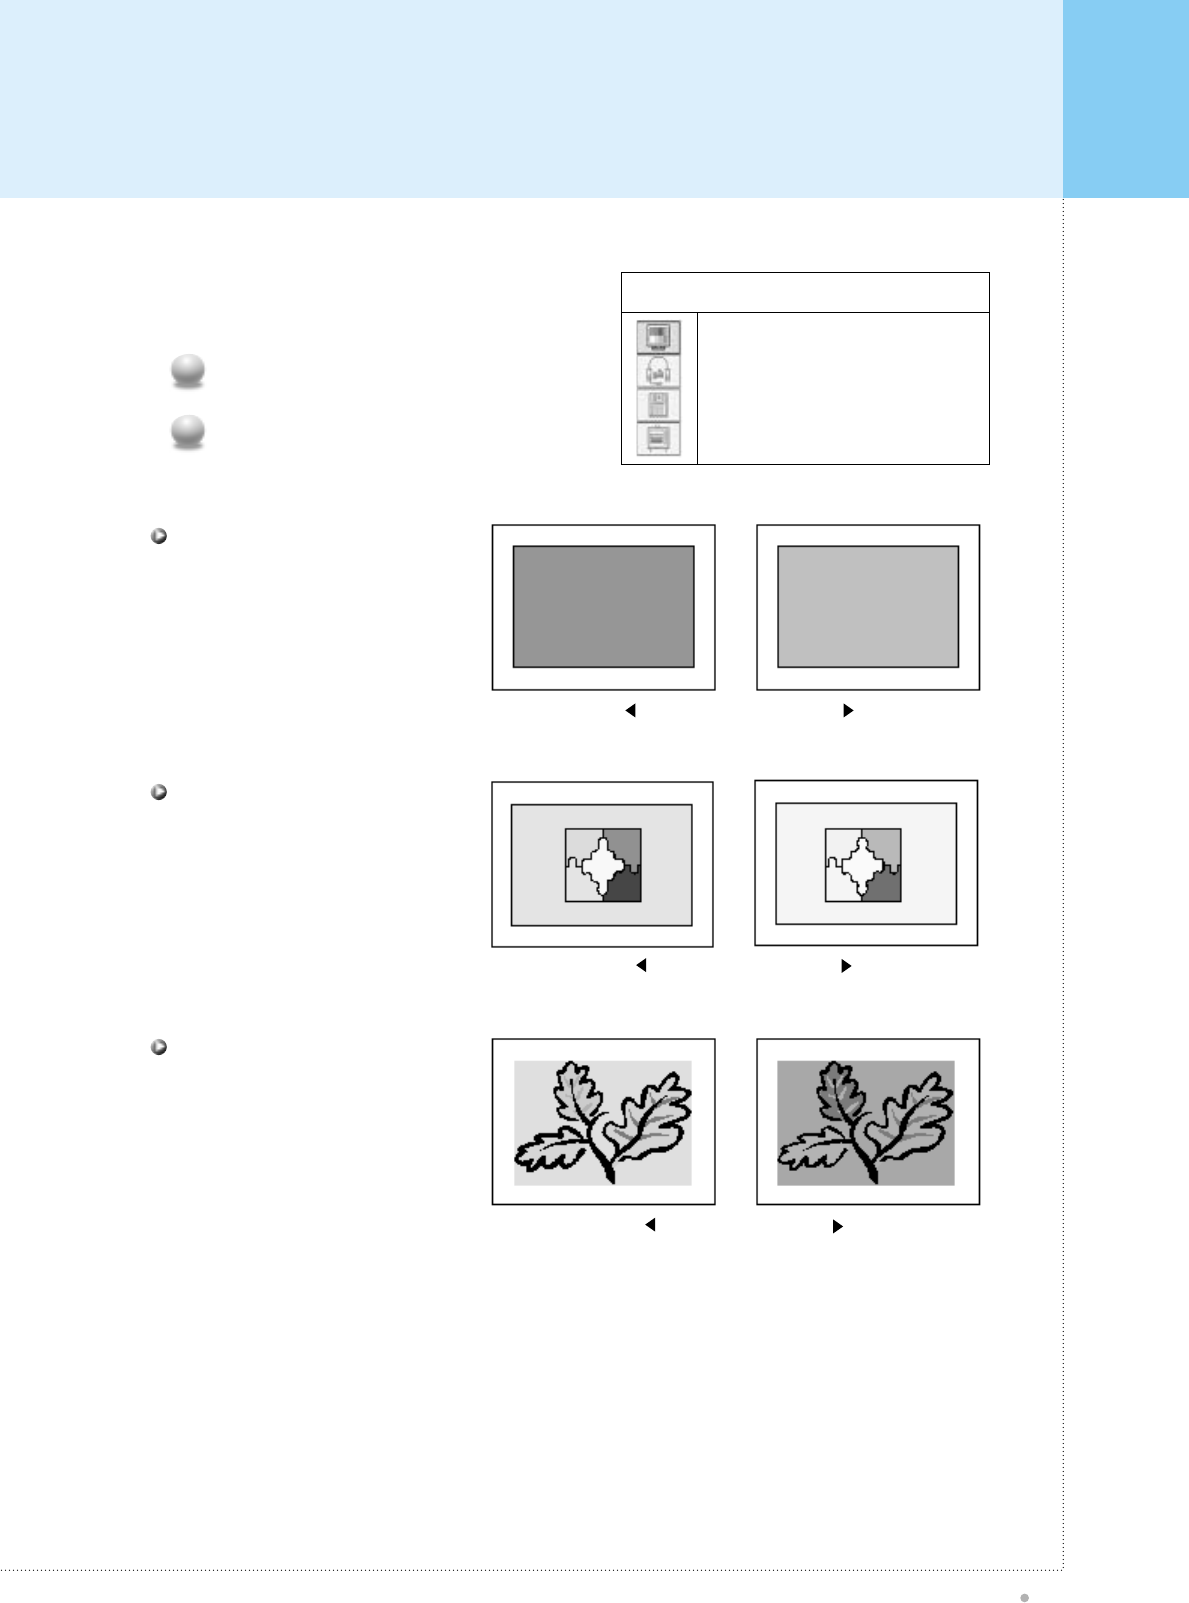
PICTURE (TV & VIDEO)
Plasma TV
34
PICTURE
BRIGHTNESS
CONTRAST
COLOR
HUE
SHARPNESS
TEMPERATURE
Bluish Greenish
• Hue means that it is a difference of color toward Blue or Red color direction.
Less sharp Sharp
Warm Cold
Control the color appearance
from neutral to red or green or Blue.
HUE
Control the sharpness of image edge.
SHARPNESS
Select the color temperature of screen
image from Warm, Cool and Normal.
TEMPERATURE
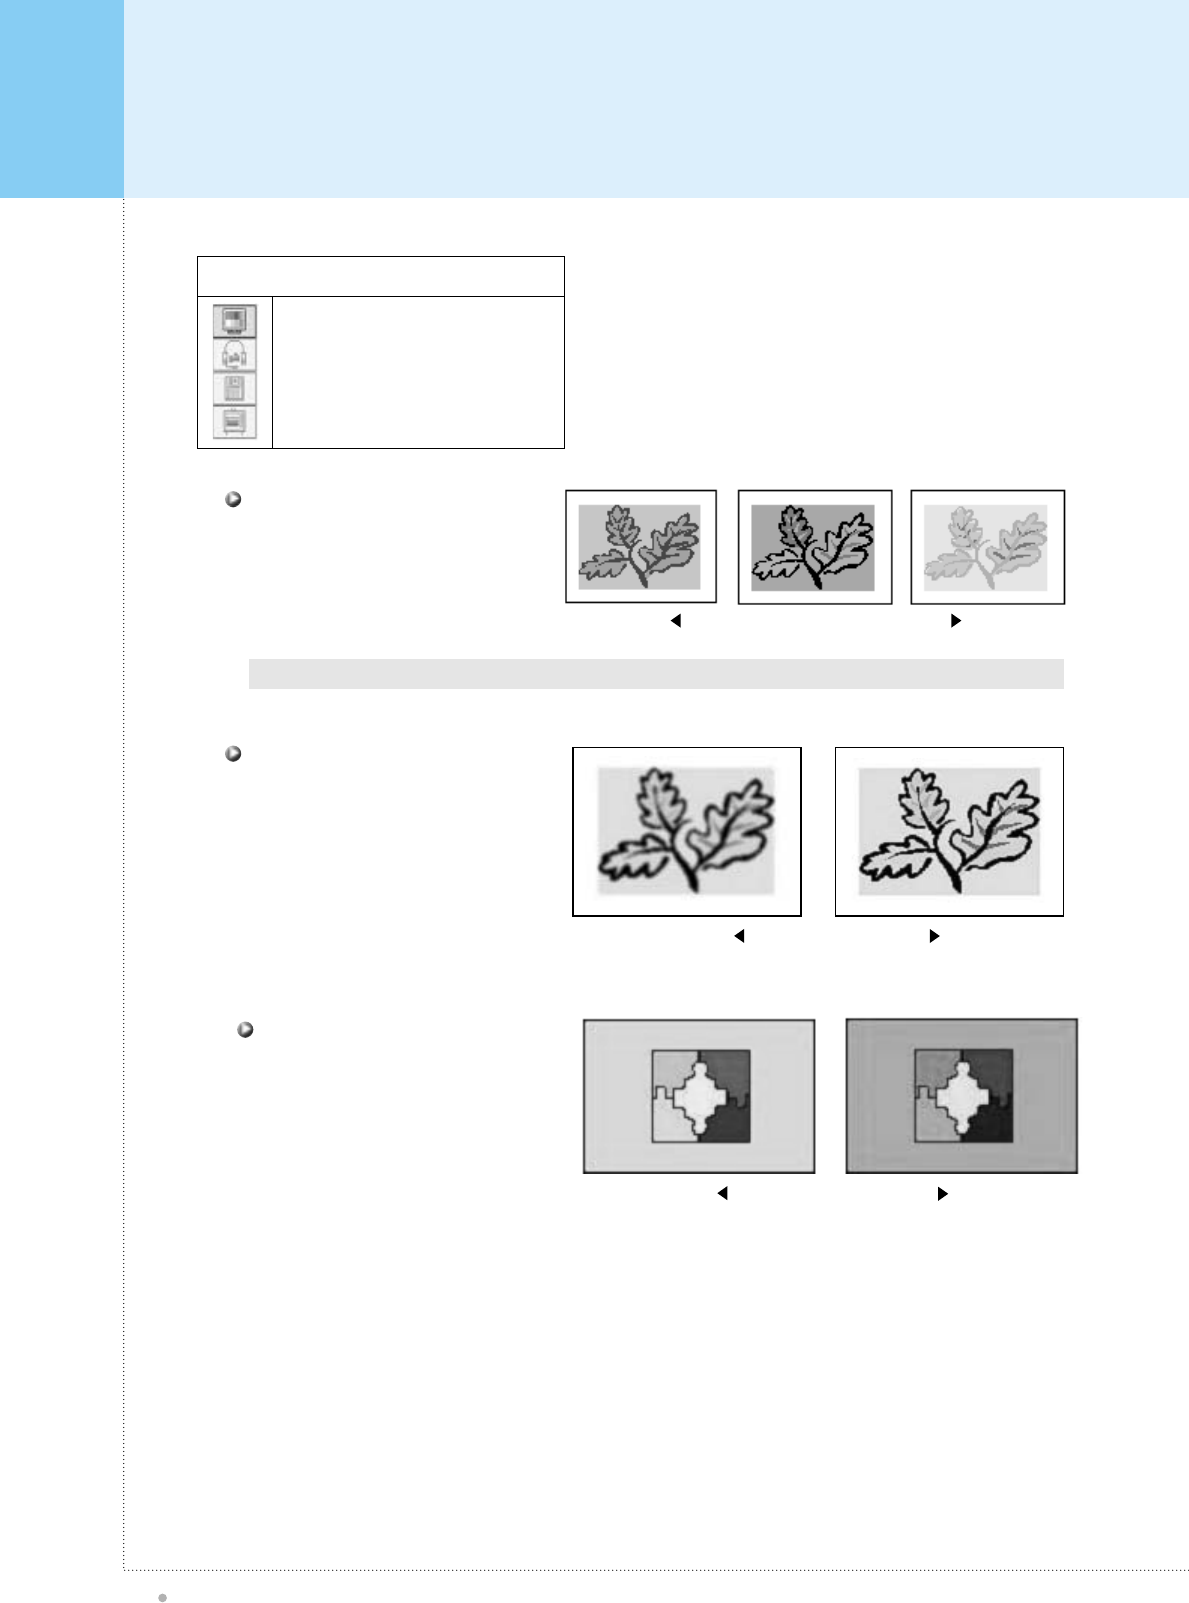
PICTURE (PC)
Plasma TV
35
PICTURE
BRIGHTNESS
CONTRAST
H-POSITION
V-POSITION
PHASE
H-SIZE
AUTO ADJUST
Adjust Brightness, Contrast, H-Position, V-
Position on OSD menu.
Press SET button to activate OSD.
1
Press SET button again to get into PICTURE
main menu.
2
Dark Bright
Distinct Vague
Control the brightness of display.
BRIGHTNESS
Control the contrast of display.
CONTRAST
Moving the center of display image.
After selecting Position menu,
you can move the image using
VOL -/+ buttons.
H-POSITION
Moving the center of display image.
After selecting Position menu,
you can move the image using
VOL -/+ buttons.
V-POSITION
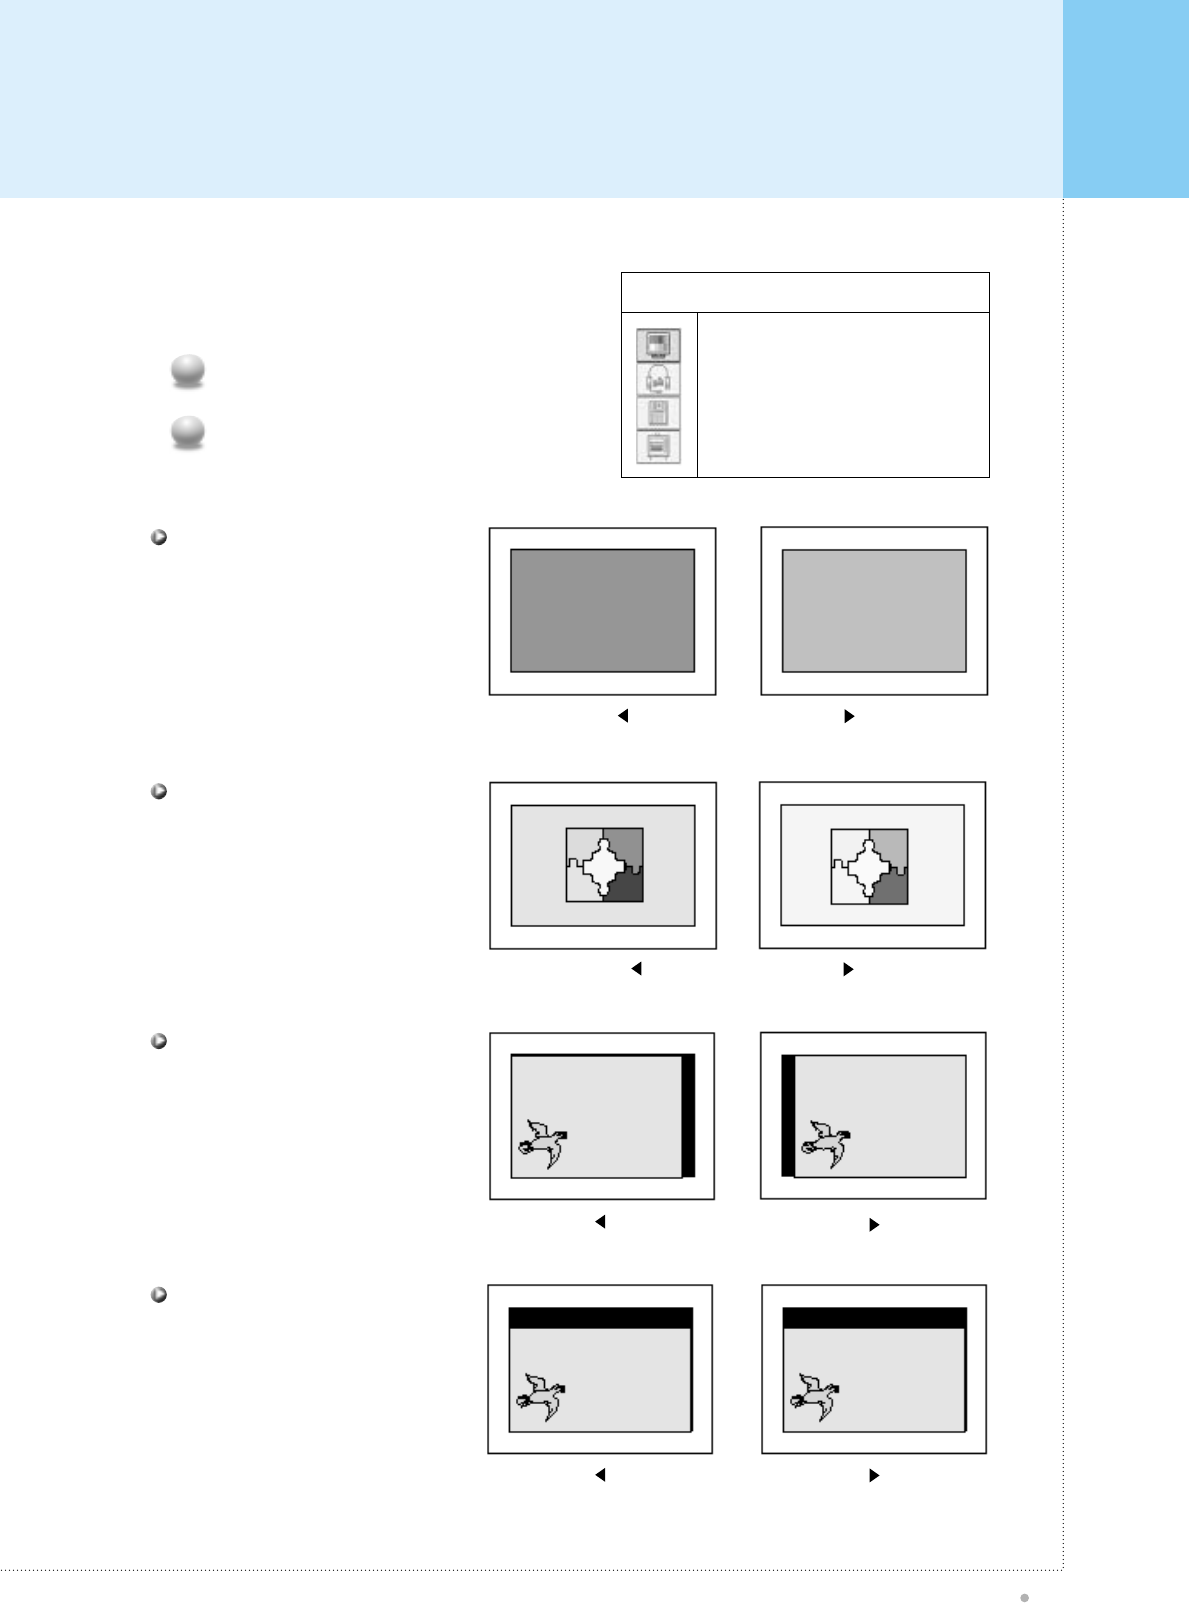
PICTURE (PC)
Plasma TV
36
PICTURE
BRIGHTNESS
CONTRAST
H-POSITION
V-POSITION
PHASE
H-SIZE
AUTO ADJUST
Mismatch Match
Mismatch Match
Fine tuning of display accuracy
on the screen. Only available when
you are in PC/HD input mode.
PHASE
Adjust the horizontal size of display.
Only available when you are in PC/HD
input mode.
H-SIZE
Automatically adjust picture position and eliminate any image shaking.
Auto Adjust
SOUND (TV & VIDEO + PC)
Plasma TV
37
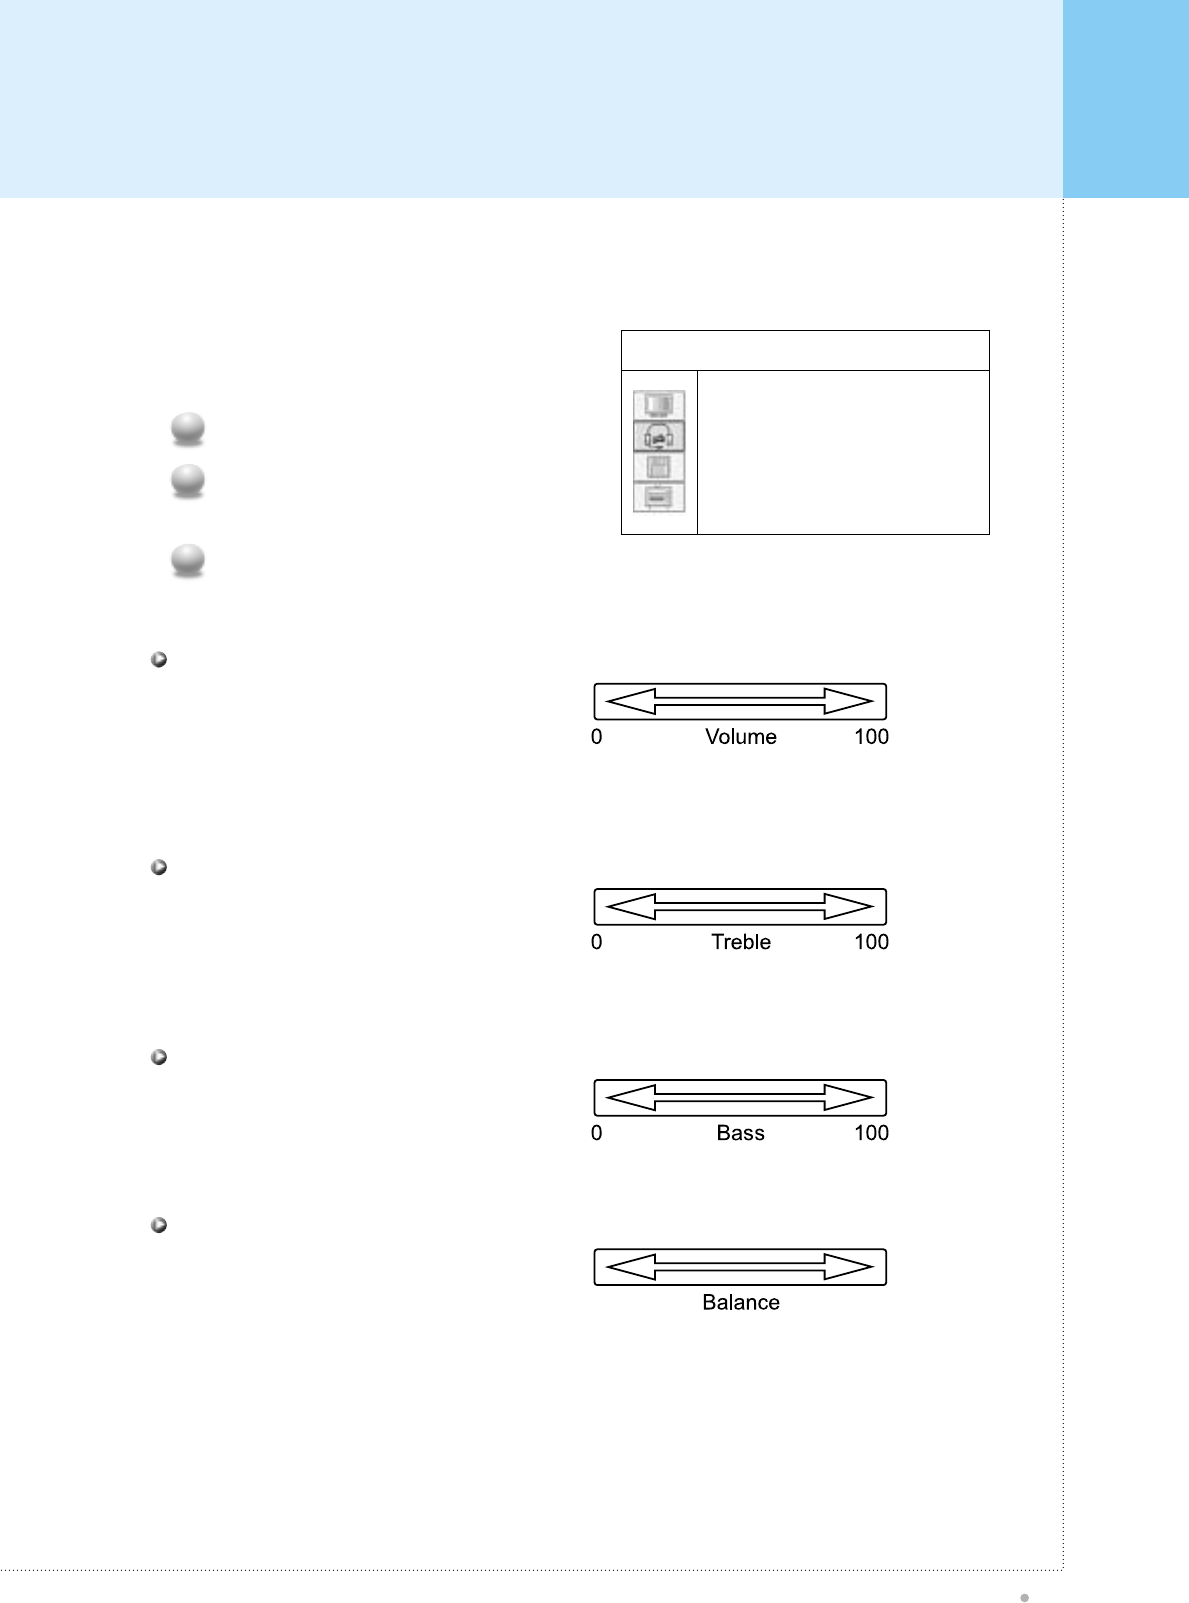
- Control 'Volume, Treble, Bass and Balance'
SOUND
VOLUME
TREBLE
BASS
BALANCE
Adjust the Volume, Treble, Bass and Balance
on OSD menu.
Press SET button to activate OSD.
1
Use DOWN button to go to SOUND main
menu.
2
Press SET button again to get into SOUND
main menu.
3
Control the amount of volume of sound. Ranges
from 0 to 100
VOLUME
Control the high frequency component of the
sound. Ranges from 0 to 100
TREBLE
Control the low frequency component of the
sound. Ranges from 0 to 100
BASS
Control the left and right sound balance.
BALANCE
MISC (TV & VIDEO + PC)
Plasma TV
38
Image scaling, OSD display & time setting. MISC
VIDEO SIZE OSD
SHEET
OSD POSITION
SLEEP
Opaque Translucent
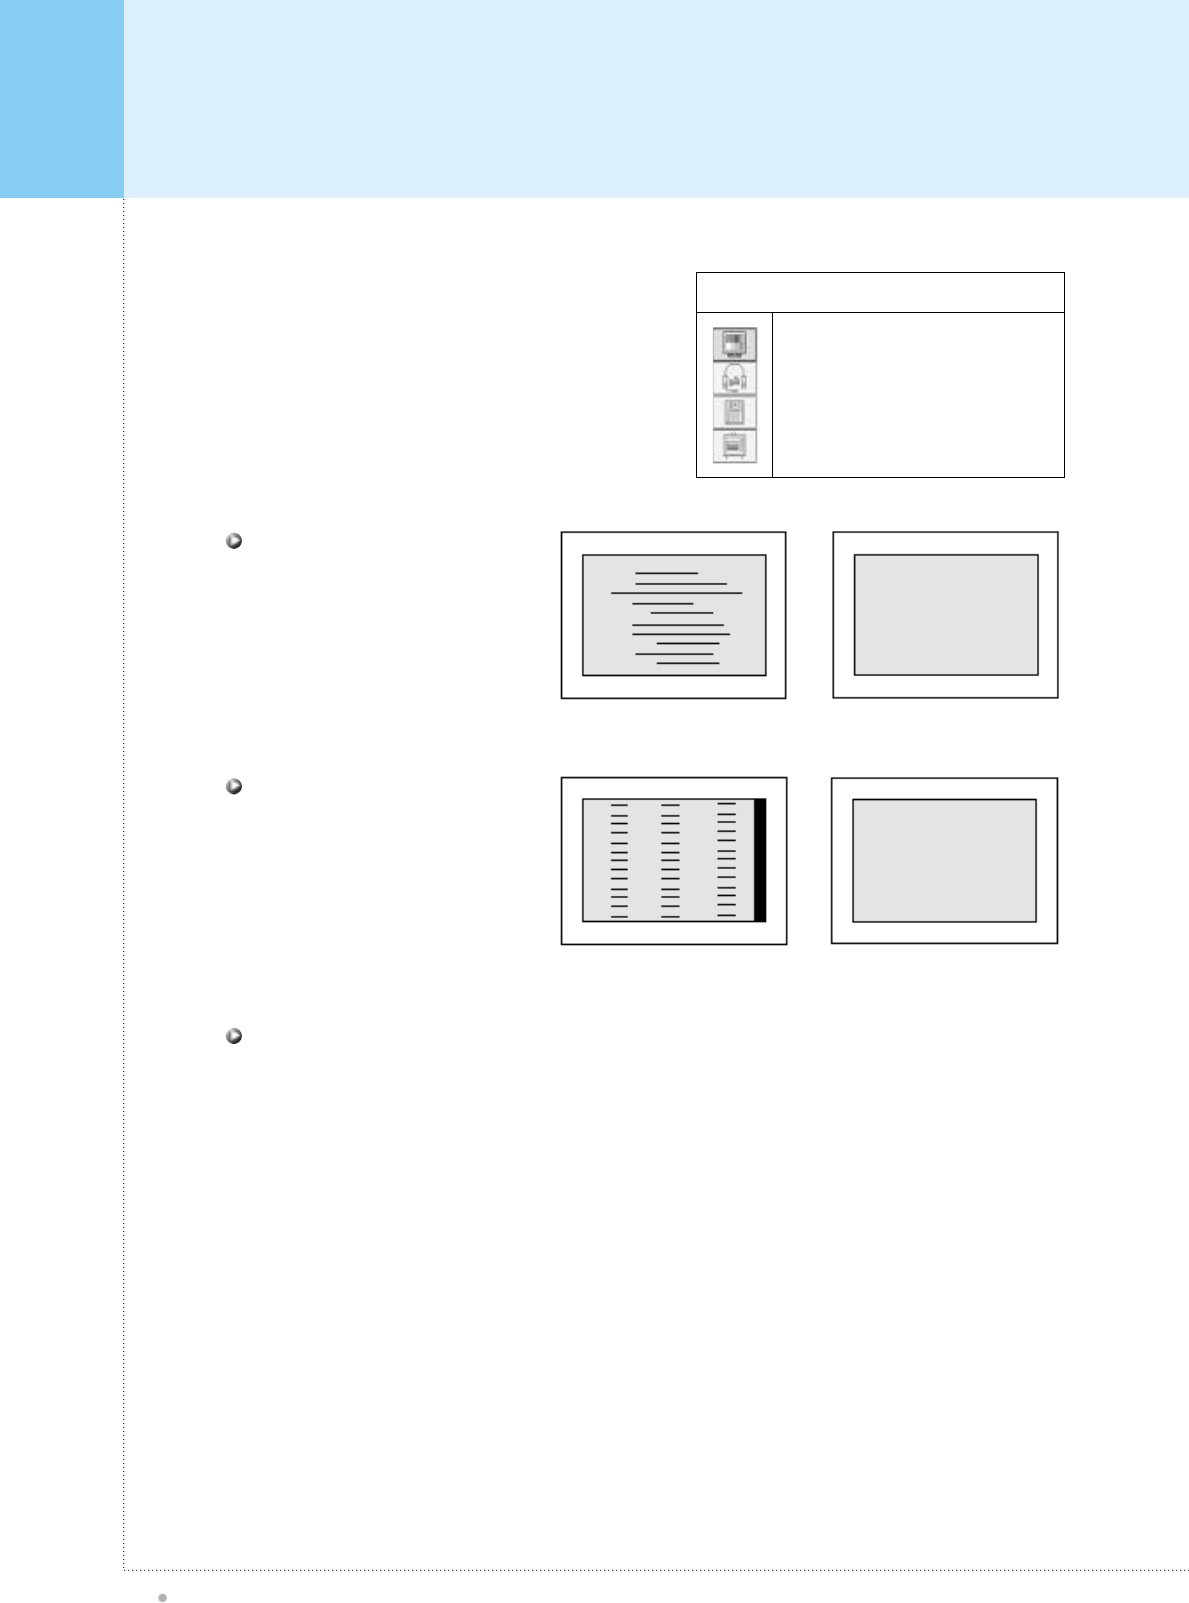
You can change the scaling size of video on MISC main menu and VIDEO SIZE sub menu or by pressing V-
SIZE button on Remote Control.
Fill Screen
Fill the screen regardless of incoming aspect ratio
Fit to Aspect
Fit the screen with the same aspect ratio as signal source
Letter Box
Expand letter box contents to full screen. But you will notify the display quality worse than original mode due
to the loss resolution caused by image expansion. (use only with letter box contents)
TV mode
Zooming more like a classical TV size, which is over-scanned.
VIDEO SIZE
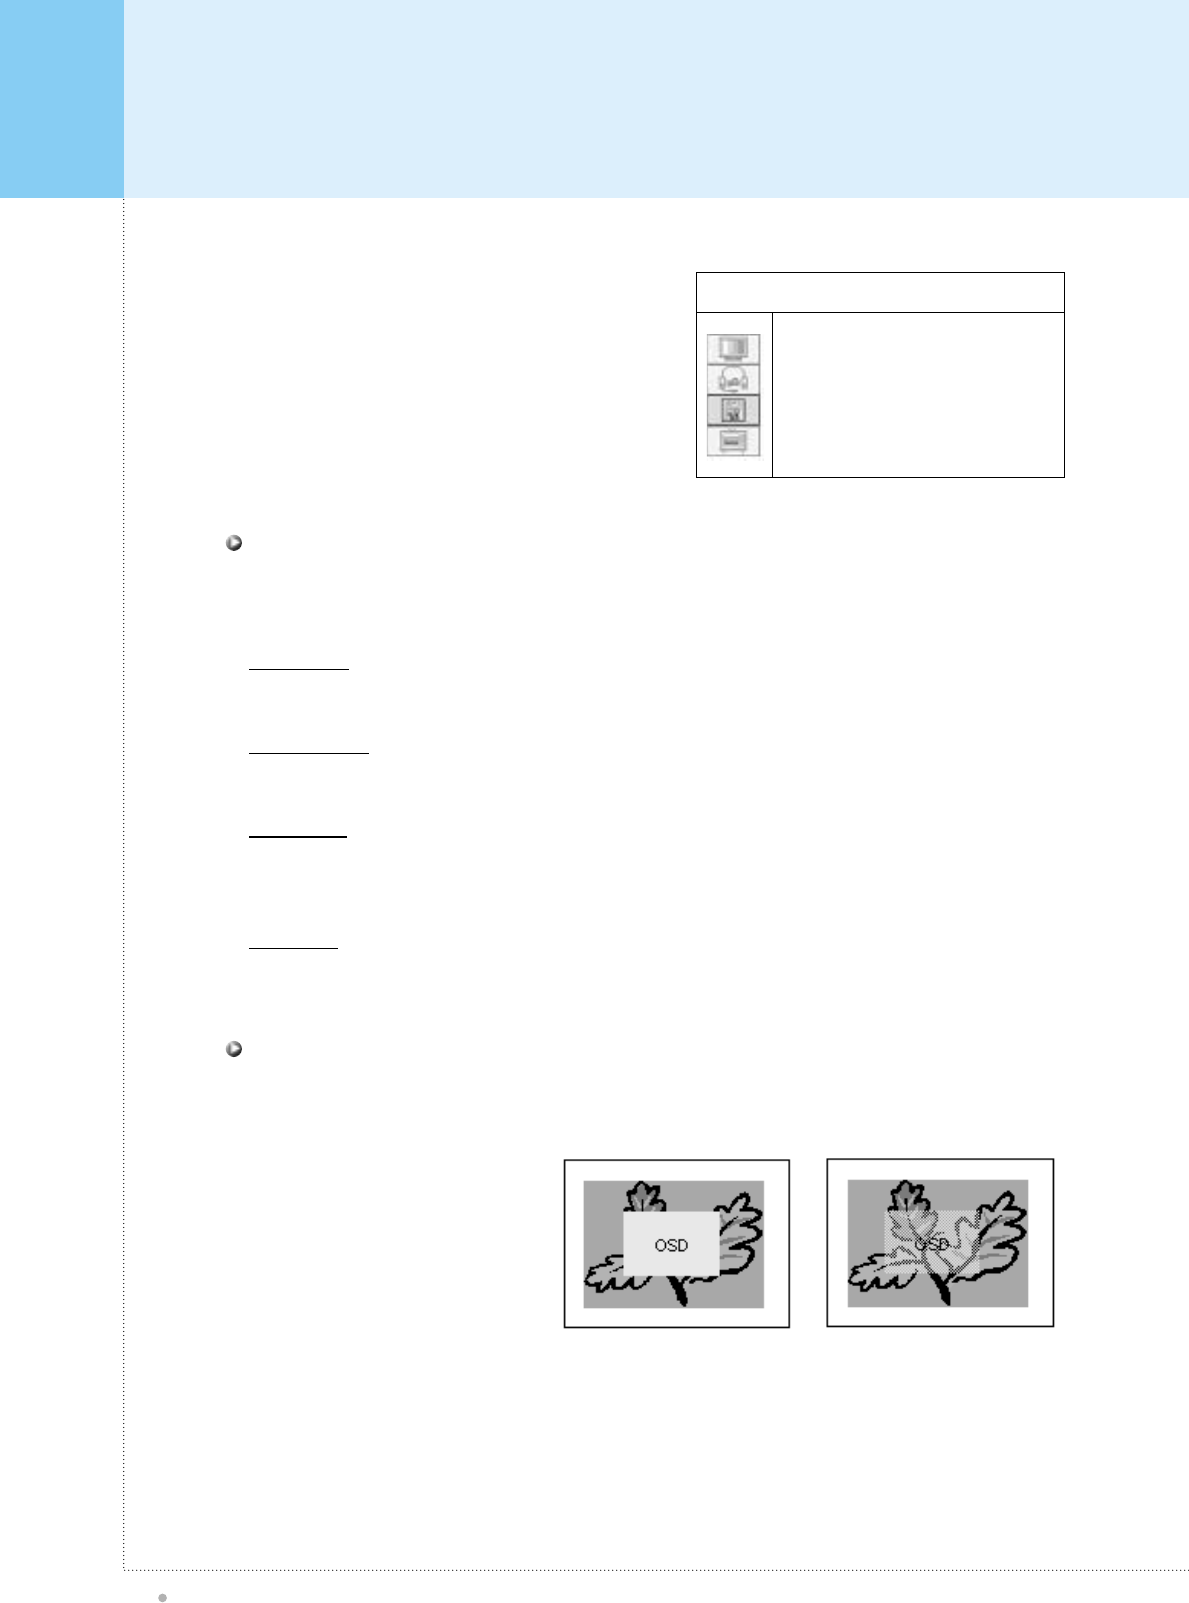
Select the background pattern of OSD. "Opaque" and "Translucent" can be selected. "Opaque" set the OSD
background as solid color. "Translucent" set the OSD background as half transparent.
OSD SHEET
Changes the Transparency of
background color of OSD window.

MISC (TV & VIDEO + PC)
Plasma TV
39
Image scaling, OSD display & time setting. MISC
VIDEO SIZE OSD
SHEET
OSD POSITION
SLEEP
Select OSD position among nine preset positions
OSD POSITION
Select your desirable setting time to turn off the TV automatically. 30 min, 60 min, 90 min, 180 min and “Off”
can be selected. The timer will start to count down just after you select.
SLEEP: 30min > 60min > 90min > 180min
TV SET-UP
Plasma TV
40
TV CHANNEL SETUP
MODE
AUTO CHANNEL
FINE TUNE
MTS
select “Air” or “Cable”. If your TV set is connected antenna, select “AIR”, If you TV set is connected to the
CABLE TV, select “CABLE”
MODE
You can manually adjust the tuning precision by suing this function.
FINE TUNE
Select the audio mode on TV broadcasting. “AUTO”, “STEREO”, “MONO”, “L1” and “L2” can be selected. If
you select “AUTO”, the TV set will select stereo mode if the channel broadcast in stereo mode, mmono mode
otherwise” If you want to set sound mode as “MONO”, the set will sounds as mono mode even if the channel
broadcasts with stereo mode. If the channel is broadcasting in Bi-lingual mode and if you want to listen to
secondary language, you should select “L2”. The TV set will sounds with default language otherwise.
MTS
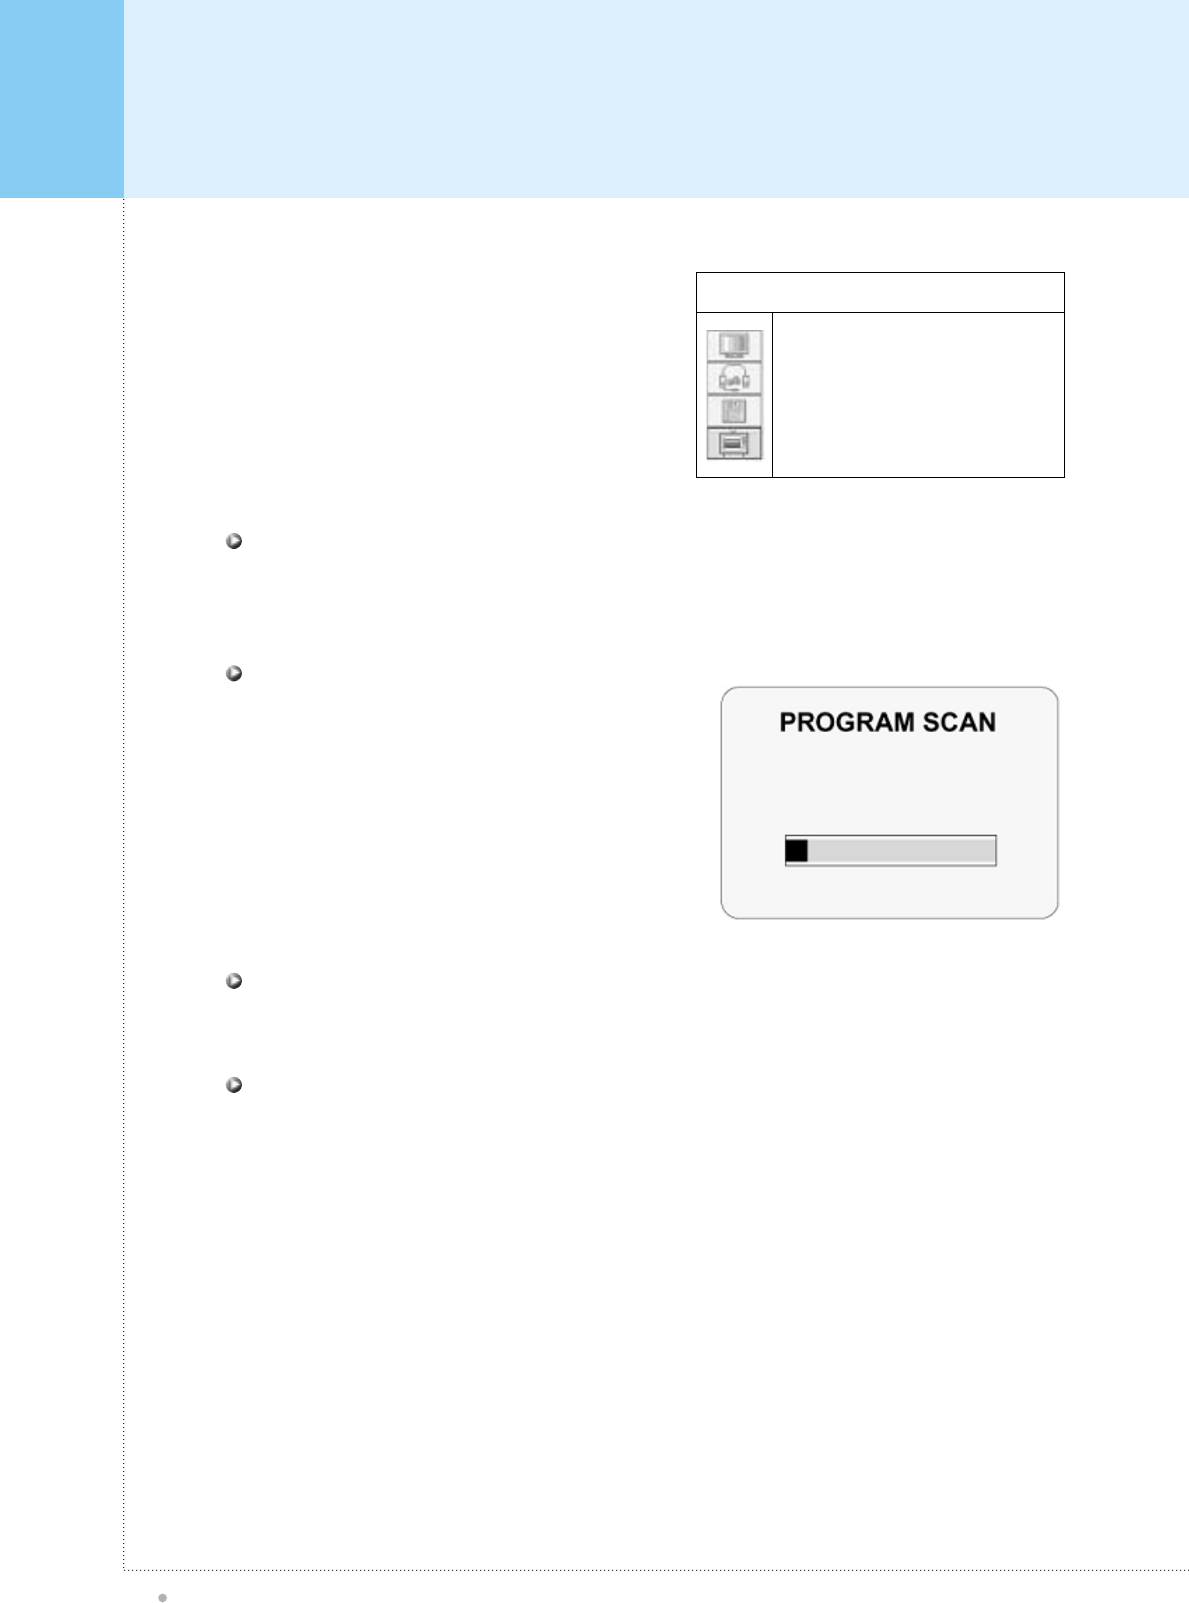
If you select “AUTO CHANNEL”, TV set will
automatically scan available channel.
If you want to exit auto channel scan, press “exit” key
on IR Remote Control.
AUTO CHANNEL
PIP (PC)
Plasma TV
41
PIP
PIP ON/OFF
VIDEO SOURCE
AUDIO SOURCE
PIP POSITION
Select ON/OFF the PIP mode.
You can choose ON/OFF
mode using keys.
PIP(Picture in Picture) ON/OFF
Select the PIP video source.
After selecting video source menu,
you can change the source using
keys.
(TV>AV1>AV2>SVIDEO>COMPONENT)
VIDEO SOURCE
Select PIP position among nine preset positions.
PIP POSITION
Select the audio source. When you select ‘PIP’ mode, you will hear PIP audio source.
When you select ‘Main’ mode, you will hear Analog RGB audio source.you can change the source using
keys.
AUDIO SOURCE
Hot Key Function By Remote Control
Plasma TV
42
INPUT PASSWORD
V-CHIP MAIN
MPAA
TV GUIDELINE
PASSWORD
Press SET
Press SET
Press SET
TV GUIDELINE
TV-Y
TV-Y7
TV-G
TV-PG
TV-14
TV-MA
CONTENT
SHOW
SHOW
SHOW
SHOW
SHOW
SHOW
Press SET
INPUT PASSWORD
G
PG
PG-13
R
NC-17
X
SHOW
SHOW
SHOW
SHOW
SHOW
SHOW
BLOCK CONTENT
D
L
S
L
FV
SHOW
SHOW
SHOW
SHOW
SHOW
PASWORD CHANGE
OLD
NEW
RETRY
Push Closed Caption button to activate closed caption menu. Use arrow control keys to
access 2 channels of Closed Captions and 2 channels of Text.
CLOSED CAPTION
Push Closed Caption button to activate closed caption menu. Use arrow control keys to
access 2 channels of Closed Captions and 2 channels of Text.
V-CHIP
Select the block level.
you can change the ‘SHOW’, ‘BLOCK’
by using VOLUME( ) keys.
MPAA RATING
Select the TV guideline.
you can change the ‘SHOW’, ‘BLOCK’
by using VOLUME( ) keys.
TV GUIDELINE
You can change the ‘SHOW’, ‘BLOCK’
by using VOLUME( ) keys.
BLOCK CONTENT
(TV GUIDELINE CONTENT)
You can change the password.
(4 characters)
PASSWORD CHANGE
Specification
Plasma TV
43
Function and Specification
42-inch diagonal screen
Variable 4:3 / 16:9 image aspect ratios (4 modes)
16:9 Panoramic mode
852 x480 physical pixels
800:1 contrast ratio
Brightness:630cd/m
2
PC monitor support up to 1280 x1024 60hz
181-Channel Cable-Ready TV tuner (NTSC in USA)
Advanced multi-window viewing:
Picture-In Picture(PIP) with four selectable window positions
on PC mode
Multiple input compatible
Advanced Motion digital processor
Motion-Adaptive Deinterlace Procesor
Digital progressive line scaling
3:2 Pull-Down for Film Scan Conversion
Digital 3D comb filter (NTSC in USA)
NTSC TV/CATV Tuner Module
Closed Caption decoding (NTSC in USA)
Favorite channel programming
Channel lock/V-chip (NTSC in USA)
High Definition Component Video inputs: 480 i/p, 720p, 1080i
DVD Component Port : 480 i/p
Automatic frequency detection
Selectable color temp. settings:Warm, Cool, User
Miscellaneous
Built-in audio amplifier and two 7W speakers / Optional
Selectable fixed/variable audio output / Optional
Quiet fanless operation
Input phase clock adjustment
Front panel lock (via RS-232)
Function and Specification
50-inch diagonal screen
Variable 4:3 image aspect ratios (4 modes)
16:9 Panoramic mode
1366 x768 physical pixels
590:1 contrast ratio
Brightness:560cd/m
2
PC monitor support up to 1280 x1024 60hz
181-Channel Cable-Ready TV tuner (NTSC in USA)
Advanced multi-window viewing:
Picture-In Picture(PIP) with four selectable window positions
on PC mode
Multiple input compatible
Advanced Motion digital processor
Motion-Adaptive Deinterlace Procesor
Digital progressive line scaling
3:2 Pull-Down for Film Scan Conversion
Digital 3D comb filter (NTSC in USA)
NTSC TV/CATV Tuner Module
Closed Caption decoding (NTSC in USA)
Favorite channel programming
Channel lock/V-chip (NTSC in USA)
High Definition Component Video inputs: 480 i/p, 720p, 1080i
DVD Component Port : 480 i/p
Automatic frequency detection
Selectable color temp. settings:Warm, Cool, User
Miscellaneous
Built-in audio amplifier and two 7W speakers / Optional
Selectable fixed/variable audio output / Optional
Quiet fanless operation
Input phase clock adjustment
Front panel lock (via RS-232)
42” Plasma TV Display Panel 50” Plasma TV Display Panel
Specification
Plasma TV
44
Connectivity:
Composite:RCA-pin x2
Component video signal : YPbPr x1
S-video : Mini DIN 4-pin x1
RGB input : D-sub 15-pin x1, HD / SD
Audio input : RCA-pin Type(L/R) x5:Full support seperated
audio input
Speaker output : Cinch Conn Type(L/R) x1(4cinch
connectors type)
Audio system : Stereo
Control Ports : RS-232 D-sub 9-pin x1
DVI input : DVI Cable / Optional
Accessories
Full function remote control
Table stand / Optional
Side-mount Speakers / Optional
Dimensions : (W xHxD) unit : mm
1050 x635 x87 (Main only)
1250 x635 x87 (With stand, without Speaker)
1050 x708 x299 (With stand and speaker)
Weight:
40kg (Main only)
47kg (With stand, without Speaker)
49.7kg (With stand and Speaker)
Working Enviroment
Power : AC 110~240V, 50/60Hz
Power Consumption : 380 Watts
Temperation
Operation : 0
o
c~35
o
c(32
o
F~90
o
F)
Storage : -15
o
c~60
o
c(5
o
F~140
o
F)
Huminity
Operation : 20~70%
Storage : 20~80%
Pressure
Operation : 800~1114hPa
Storage : 600~1114hPa
Connectivity:
Composite:RCA-pin x2
Component video signal : YPbPr x1
S-video : Mini DIN 4-pin x1
RGB input : D-sub 15-pin x1, HD / SD
Audio input : RCA-pin Type(L/R) x5:Full support seperated
audio input
Speaker output : Cinch Conn Type(L/R) x1(4cinch
connectors type)
Audio system : Stereo
Control Ports : RS-232 D-sub 9-pin x1
DVI input : DVI Cable / Optional
Accessories
Full function remote control
Table stand / Optional
Side-mount Speakers / Optional
Dimensions : (W xHxD) unit : mm
1210 x733 x88 (Main only)
1450 x733 x88 (With stand, without Speaker)
1450 x802 x299 (With stand and speaker)
Weight:
52kg (Main only)
57kg (With stand, without Speaker)
61kg (With stand and Speaker)
Working Enviroment
Power : AC 110~240V, 50/60Hz
Power Consumption : 380 Watts
Temperation
Operation : 0
o
c~35
o
c(32
o
F~90
o
F)
Storage : -15
o
c~60
o
c(5
o
F~140
o
F)
Huminity
Operation : 20~70%
Storage : 20~80%
Pressure
Operation : 800~1114hPa
Storage : 600~1114hPa
42” Plasma TV Display Panel 50” Plasma TV Display Panel
Troubleshooting
Plasma TV
45
Before you call a service technician, please scan this list of problems and possible solutions. It may save
you time and money.
No picture & No sound
Picture OK & No sound
The remote control doesn't work
No or Poor color or Poor picture
The image is too light or too dark
The image is too large or too small
No output from one of the speakers
Strange sound form the Monitor
Check whether the Monitor is turned on.
Power cord inserted into wall outlet?
Plug another product’s power cord into the wall outlet where
the Monitor’s power cord was plugged in.
Press the VOLUME( ) button.
Check the audio input signal.
Check to see if there is any object between the Plasma
Display and the remote control causing obstruction.
Check to see if the batteries are installed with the correct
polarities.
Select Color in the Picture and press VOLUME ( ) button.
Keep a certain distance between the Monitor and the VCR.
Activate any function to restore the brightness of the picture.
Check to see that both the monitor and the source are
plugged in and turned on.
Adjust the Brightness or Contrast settings.
Adjust the Size settings.
Adjust Balance in the Sound Menu.
Typical sound due to normal Monitor operation, Monitor is not
faulty.
Problem Quick Action for Possible Solution

United States Retail Warranty
Plasma TV
46
All branded Products shall be free from defects in, materials for a period of twelve (12) months from the date
of purchase from an authorized Dealer and for a period of three (3) months for workmanship. This non-
transferable warranty shall cover the original purchaser. This warranty shall cover normal usage conditions. Any
product sold and / or used for a commercial application shall have a limited 90-day warranty for all parts and labor.
To obtain warranty services in domestic USA and worldwide please call (954) 749-3100 for a manufacturer's return
for service authorization. Return for service number and an original proof of purchase shall accompany all product
returns for service.
This warranty does not cover shipping charges, risk of loss during shipment, and export taxes, custom duties and
taxes, or any other charges associated with transportation of the product to and from the repair facility.
S-Squared retains the right to assess all warranty claims and to determine if damages are covered by the warranty.
In case of a claim that is not covered by the warranty, you will be contacted to determine whether S-Squared should
repair the damage for a fee or whether the product should be returned to you as received by S-Squared.
During the warranty period, S-Squared may repair or replace defective parts with new or, at S-Squared's option,
serviceable used or reconditioned parts that are equivalent to new parts in performance. All exchanged parts and
products replaced under this warranty will become the property of S-Squared.
All returns of LCD product shall be shipped double boxed as to prevent damage in transport and insured for full
purchases value.
All returns of Plasma products shall be shipped strapped, upright on a palette as to prevent damage in transport as
well as insured for full purchases value.
Please send all domestic USA returns to S-SQUARED's US domestic warranty service center at 5375 Hiatus Road,
Sunrise, Florida 33351.
For service in all territories outside of domestic USA, please contact your respective importer/distributor.
This limited warranty excludes all product(s) that has been damaged or rendered defective (a) as a result of
accident, misuse, or abuse; (b) operation outside the usage parameters stated in the product's User's Guide; (c) by
the use of parts not manufactured or sold by S-Squared; (d) by modification of the product, or (e) as a result of
service by anyone other than an authorized S-Squared service provider. S-Squared is not responsible for damages
caused by the loss of any programs, data, or removable storage media.
S-Squared is not liable for any damages caused by the product or the failure of the product to perform, including any
lost profits, lost savings, incidental damages, or consequential damages. S-Squared is not liable for any claim made
by a third party or made by you for a third party. This limitation applies whether damages are sought, or a claim
made, under this warranty or as a loss claim (including negligence and strict product liability), a contract claim, or
is a product of S2Technologies,LLC>(S2)
www.flatcentral.com

United States Retail Warranty
Plasma TV
47
any other claim. This limitation of liability will be effective even if S-Squared or an authorized representative of S-
Squared has been advised by you of the possibility of any such damages. This limitation of liability, however, will not
apply to claims for personal death or injury.
THIS WARRANTY IS THE ONLY WARRAN–TY BY S-SQUARED WITH RESPECT TO PRODUCTS
AND NO OTHER WARRANTIES, CONDITIONS, REPRESENTATIONS OR GUARANTEES OF ANY KIND,
WHETHER BY LAW OR CUSTOM, WRITTEN OR ORAL, EX–PRESSED OR IMPLIED, INCLUDING WITHOUT
LIMITATION, ANY IMPLIED WARRANTY OF MERCHANTABILITY OR FITNESS FOR PURPOSE, CONDI–
TION OR DESIGN, OR CONFORMANCE WITH SAMPLE, SHALL APPLY.
Any LCD or PDP display with more than 4 dead (or fixed color) pixels shall be considered a factory defect.
A product of S2 Technologies, LLC
954.749.3100 URL : www.flatcentral.com
Memo
Plasma TV
48