User Manual
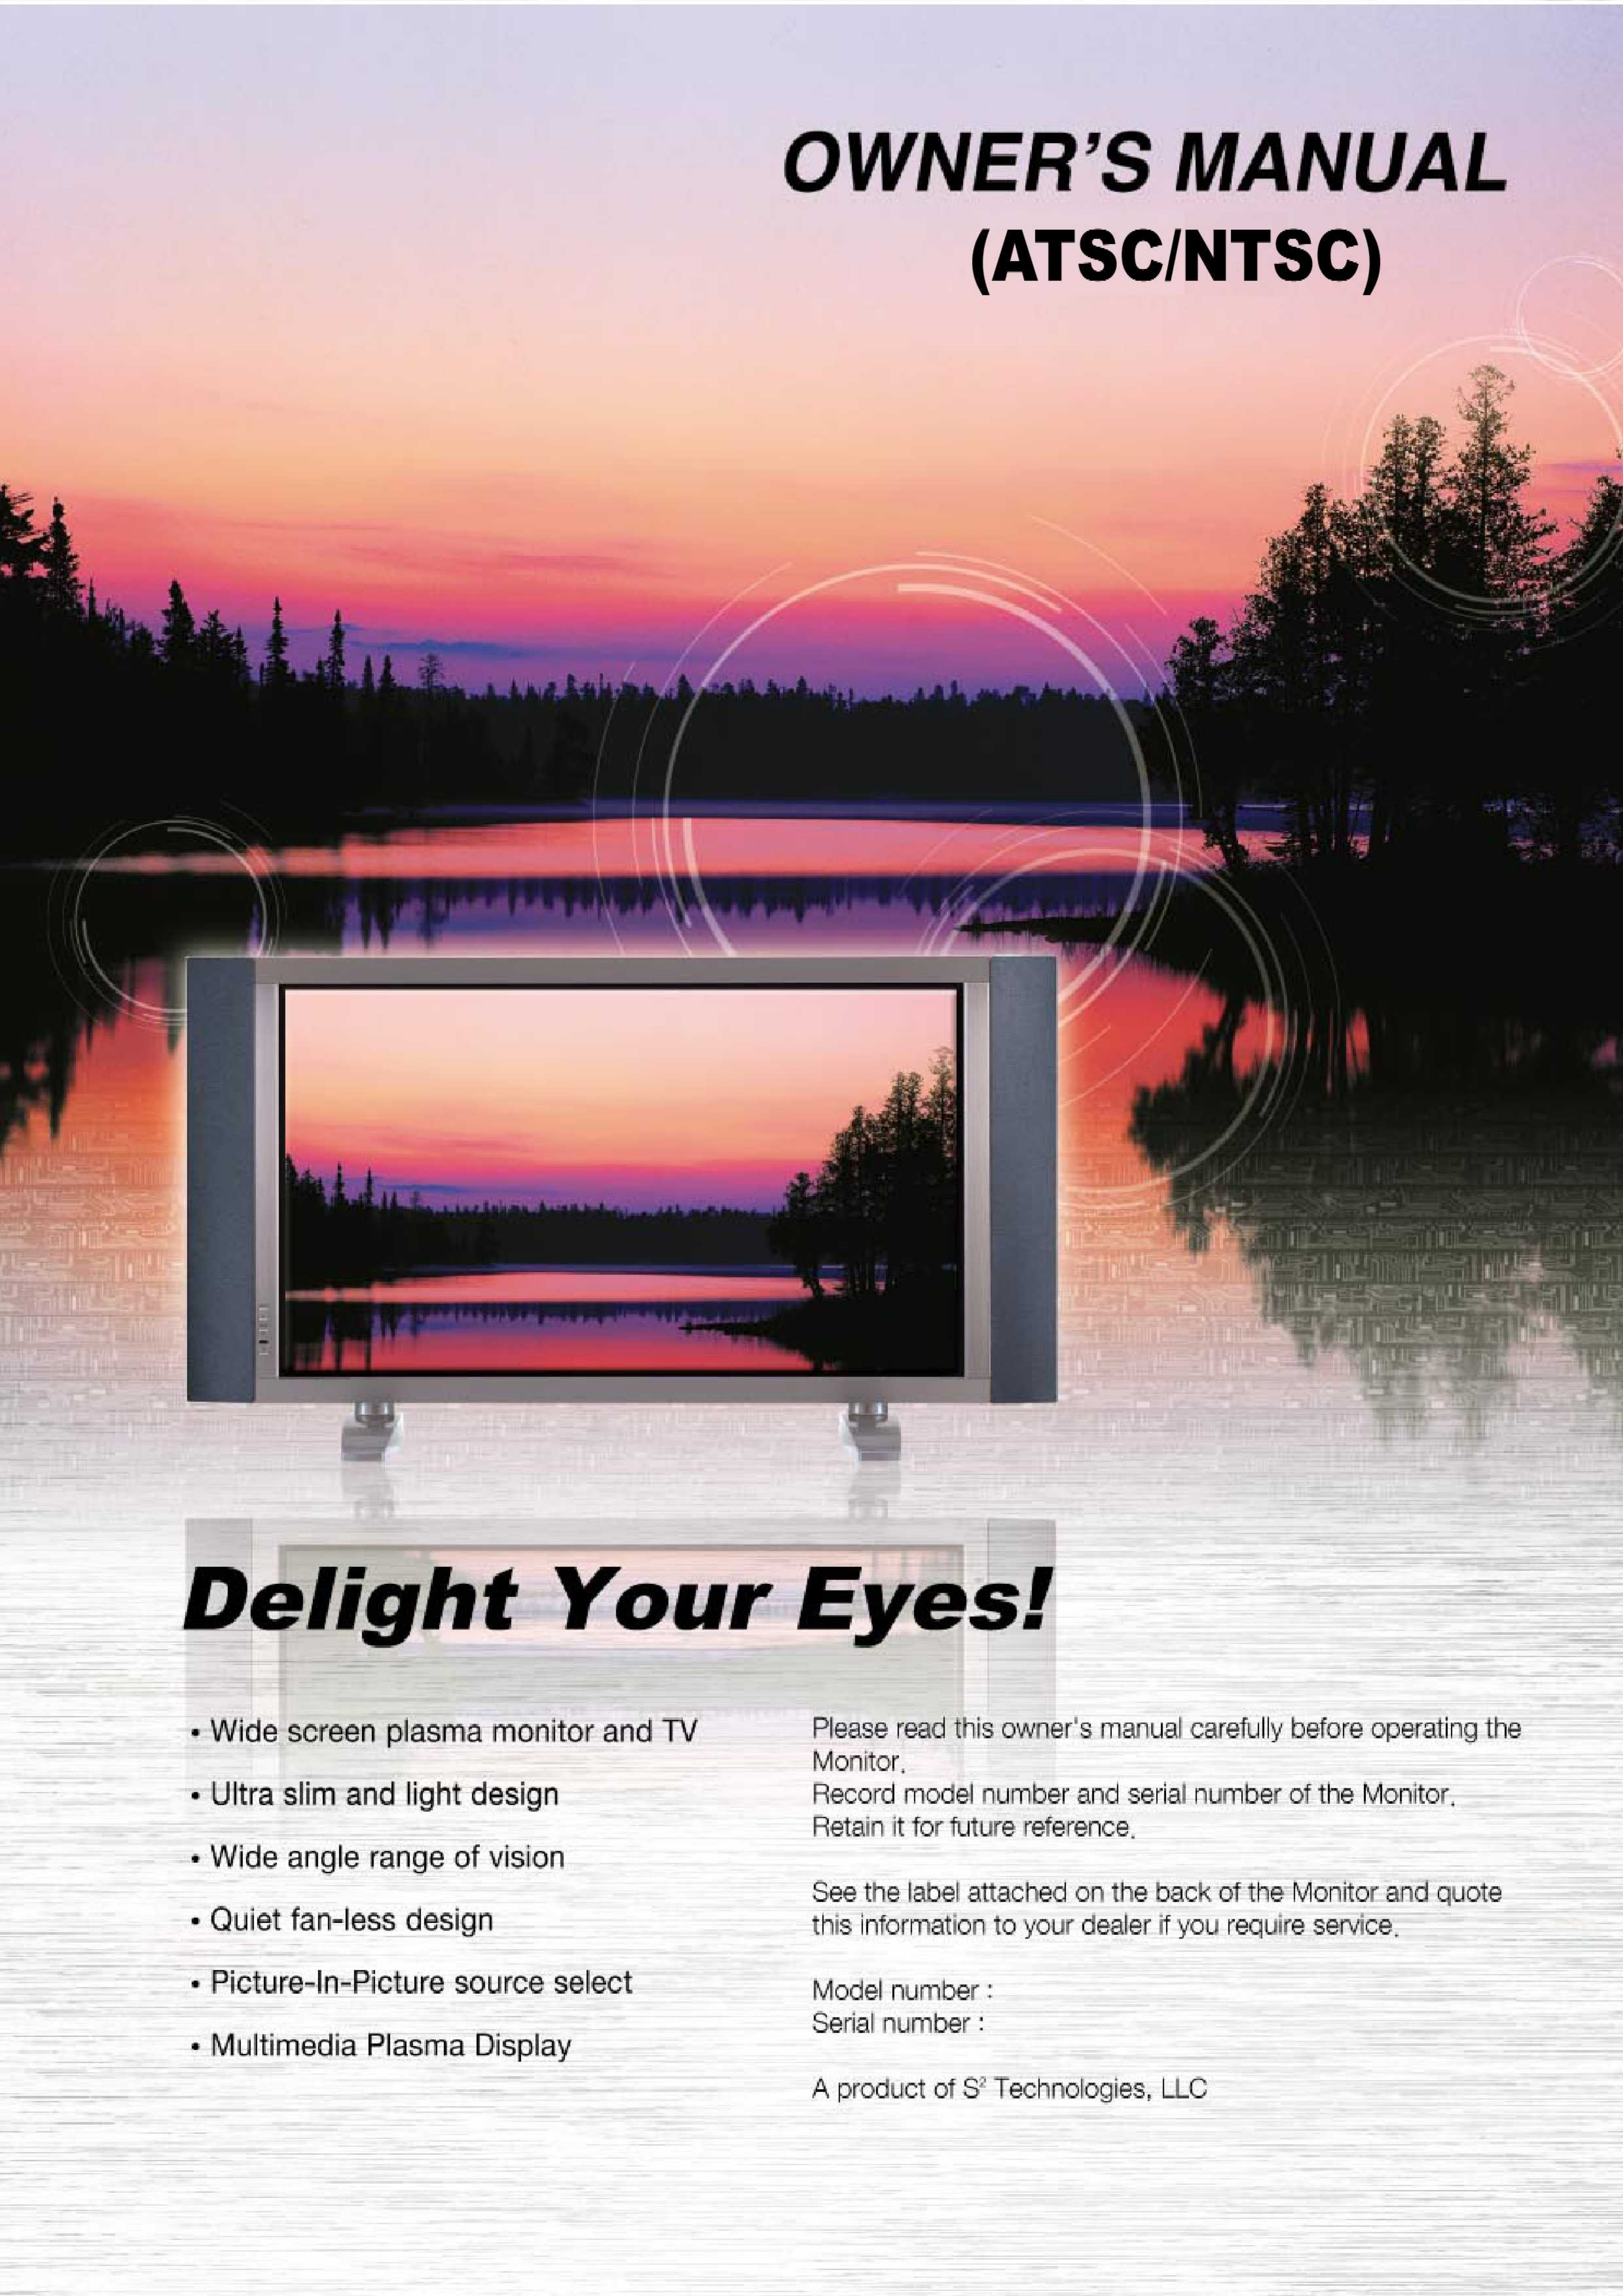

OWNER'S MANUAL
1
Contents
2
7
7
7
8
9
10
11
12
14
14
15
15
25
27
31
31
32
32
33
33
33
34
35
36
37
37
37
37
38
39
44
53
57
61
65
67
69
70
Important Safety Information ……………………………………………………....
Overview Of Your New PDP ……………………………………………………………..
OSD Button ……………………………………………………………………………....
OSD Key Function ……………………………………………………………………...
Connecting To External Equipment ………………………………………………....
RS-232C Configurations ……………………………………………………………....
Accessories ………………………………………………………………………………….
Optional Extras …………………………………………………………………………......
Remote Control ……………………………………………………..……………………
Loading The Batteries ……………………………………………………...................
Reception Range Of Remote Control ……………………………………………....
Monitor Installation …………………………………………………….............................
Wall Mount Installation (optional) …………………………………………………....
Table Stand Installation (optional) …………………………………………………...
Speaker Installation (optional) ……………………………………………………......
Watching TV ……………………………………………………........................................
To watch TV (When the Interface board is installed) …………………………....
Watching VCR …………………………………………………….....................................
To watch VCR (When the Interface board is installed) ………………………….
Watching DVD …………………………………………………….....................................
How to connect (When the Interface board is installed) ………………………...
How to use( When the Interface board is installed) ……………………………...
Watching Set Top Box ……………………………………………................................
Connecting The PC …………………………………………………................................
Displayable Monitor Specification ……………………………………………………....
Basic Operation ……………………………………………………..................................
Turning The Monitor TV On / Off ……………………………………………………
TV Program Selection ……………………………………………………...................
Volume Control ……………………………………………………...............................
OSD Structure …………………………………………………….....................................
CHANNEL(TV) ……………………………………………………....................................
PICTURE …………………………………………………….............................................
SOUND ……………………………………………………................................................
CAPTION …………………………………………………….............................................
SET UP ……………………………………………………................................................
Viewing the Picture-in-Picture ……………………………………………………..........
Specification ……………………………………………………........................................
Troubleshooting ……………………………………………………..................................
Warranty Card ..………………………………………………….................................….
OWNER'S MANUAL
2
Important Safety Information
The violation of this instruction may cause serious
injuries and even death. HIGH VOLTAGE
RISK OF ELECTRIC SHOCK DO NOT OPEN.
WARNING
- TO PREVENT DAMAGE WHICH MAY RESULT IN FIRE OR SHOCK HAZARD.
- DO NOT EXPOSE THIS APPLIANCE TO RAIN OR MOISTURE.
- SHOCK HAZARD DO NOT OPEN.
CAUTION
WARNING
This is Class B product. In a domestic environment this product may cause radio interference in which case the user
may be required to take adequate measures.
WARNING
To reduce the risk of fire and electric shock, do not expose this product to rain or moisture.
FCC NOTICE
This device has been tested and found to comply with the limits for a Class B device, pursuant to Part 15 of the FCC
Rules. These limits are designed to provide reasonable protection against harmful interference in home environment
as well as in a commercial, industrial or business environment. This equipment can generate, use and radiate radio
frequency energy and, if not installed and used in accordance with the instruction, may cause harmful interference to
radio communications. However, there is no guarantee that interference will not occur in a particular installation. If
this equipment does cause harmful interference to radio or television reception, which can be determined by turning
the equipment off and on, the user is encouraged to try to correct the interference by one or more of the following
measures :
- Reorient or relocate the receiving antenna.
- Increase the separation between the equipment and receiver.
- Connect the equipment into an outlet on a circuit different from that to which the receiver is connected.
- Consult the dealer or an experienced radio/TV technician for help.
Changes or modification not expressly approved by the party responsible for compliance could void the user's
authority to operate the equipment.
Connecting of peripherals requires the use of grounded shielded signal cables.
Always be careful when using your Monitor. To reduce the risk of fire, electrical shock, and other
injuries, keep these safety precautions in mind when installing, using, and maintaining your machine.
Read all safety and operating
instructions before operating your
Monitor.
Keep the safety and operating
instructions for future reference. Heed all warnings on the Monitor
and in the operating instructions.
OWNER'S MANUAL
3
Important Safety Information
Follow all operating and use
instructions. Unplug the Monitor from the
wall outlet before cleaning. Use
a damp cloth; do not use liquid
or aerosol cleaners.
Never add any attachments and/or
equipment without approval of the
manufacturer. Such additions can
increase the risk of fire, electric
shock, or other personal injury.
Do not place the Monitor on an unstable cart, stand,
tripod, bracket, table, or floor where it can fall. A
falling Monitor can cause serious injury to
a child or adult, and serious damage to
the appliance. Use only with a cart,
stand, tripod, bracket, or table
recommended by the manufacturer
or sold with the Monitor. Move the
Monitor and cart with care. Quick
stops, excessive force,and uneven
surfaces can make the unit and cart
unsteady and likely to overturn.
Do not use the Monitor where contact
with or immersion in water is a possibility,
such as near bath tubs, sinks, washing
machines, swimming pools, etc.
This plasma display
is designed to be
mounted horizontally
(wide viewing).
Any inquiry regarding
its vertical position
should be forwarded to
the manufacture
directly
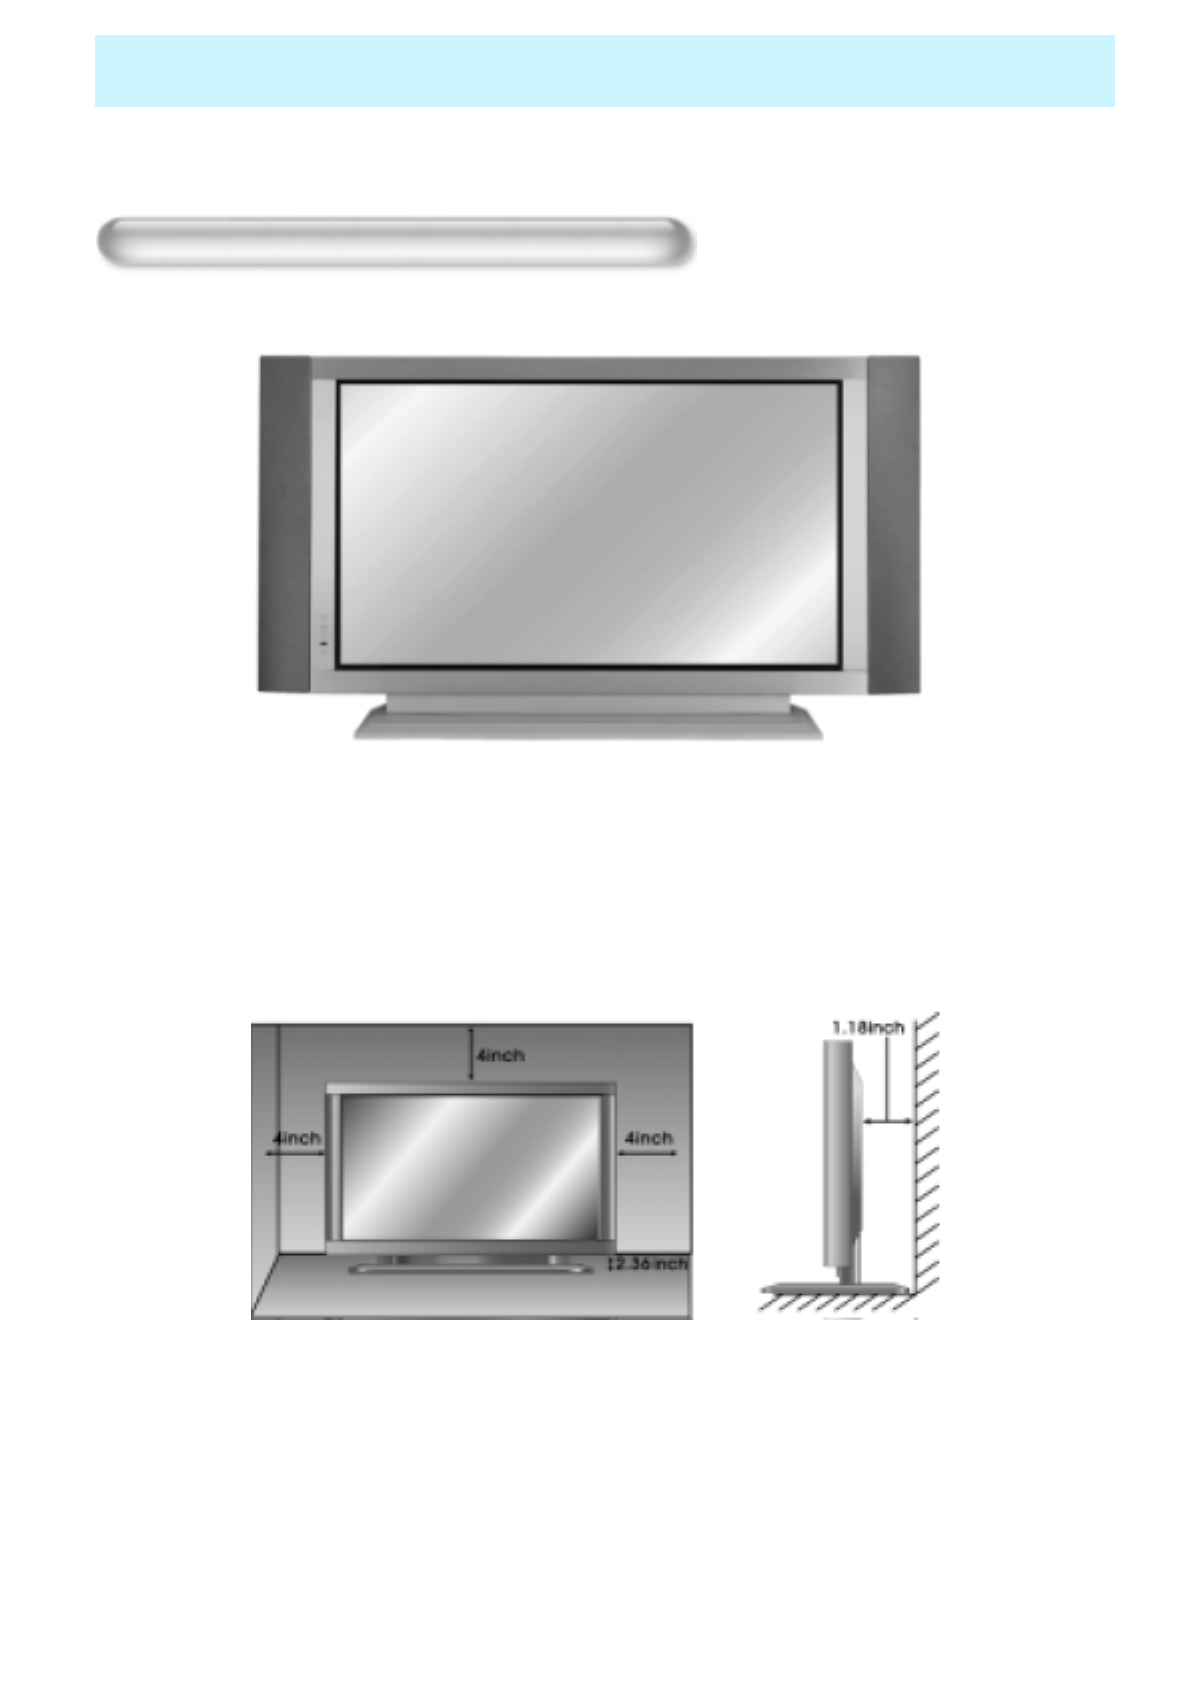
When installing the Monitor on a table, be careful not to
place the edge of its stand.
- This may cause the Monitor to fall, causing serious injury
to a child or adult, and serious damage to the Monitor.
OWNER'S MANUAL
4
Important Safety Information
Provide ventilation for the Monitor. The unit is designed
with slots in the cabinet for ventilation to protect it from
overheating. Do not block these openings with any
object, and do not place the Monitor on a bed, sofa, rug
or other similar surface. Do not place it near a radiator
or heat register. If you place the Monitor on a rack or
bookcase, ensure that there is adequate ventilation
and that you've followed the manufacturer's
instructions for mounting.
Use only the accessory cord designed for this product
to prevent shock. The power supply voltage rating of
this product is AC100-240V, the power cord attached
conforms to the following power supply voltage. Use
only the power cord designated by our dealer to ensure
Safety and EMC. When it is used by other power
supply voltage, power cable must be changed. Consult
your product dealer.
Use only a grounded or polarized outlet. For your
safety, this Monitor is equipped with a polarized
alternating current line plug having one blade wider
than the other. This plug will fit into the power outlet
only one way. If you are unable to insert the plug fully
into the outlet, try reversing the plug. If the plug still
does not fit, contact your electrician to replace your
outlet.
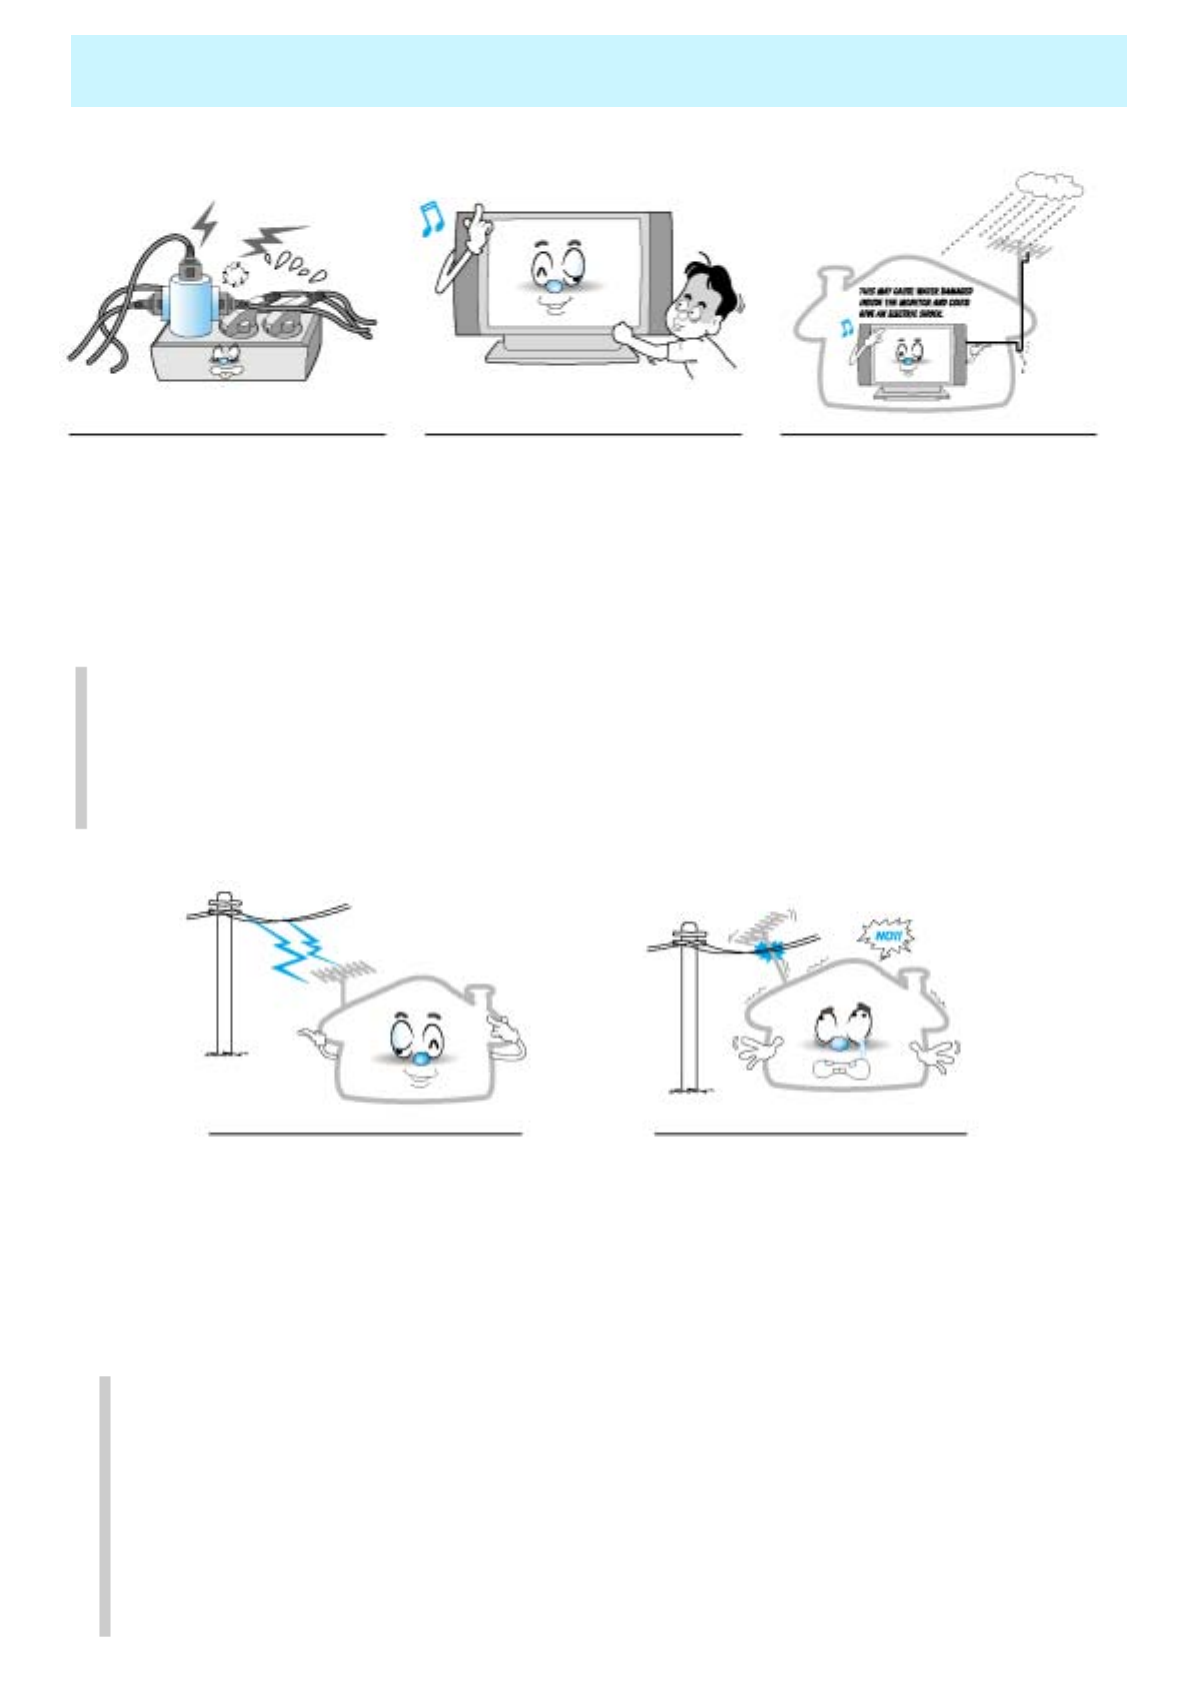
Avoid overhead power lines. An outside antenna
system should not be placed in the vicinity of overhead
power lines or other electric light or power circuits or
where it can fall into such power lines or circuits. When
installing an outside antenna system, be extremely
careful to keep from touching the power lines or circuits.
Contact with such lines can be fatal.
Unplug the Monitor from the wall outlet and disconnect
the antenna or cable system during a lightning storm or
when left unattended and unused for long periods of
time. This will prevent damage to the unit due to
lightning and power-line surges.
Protect the power cord. Power supply cords should be
routed so that they won't be walked on or pinched by
objects placed on or against them. Pay particular
attention to cords at plugs, convenience receptacles,
and the point where they exit from the unit.
OWNER'S MANUAL
5
Important Safety Information
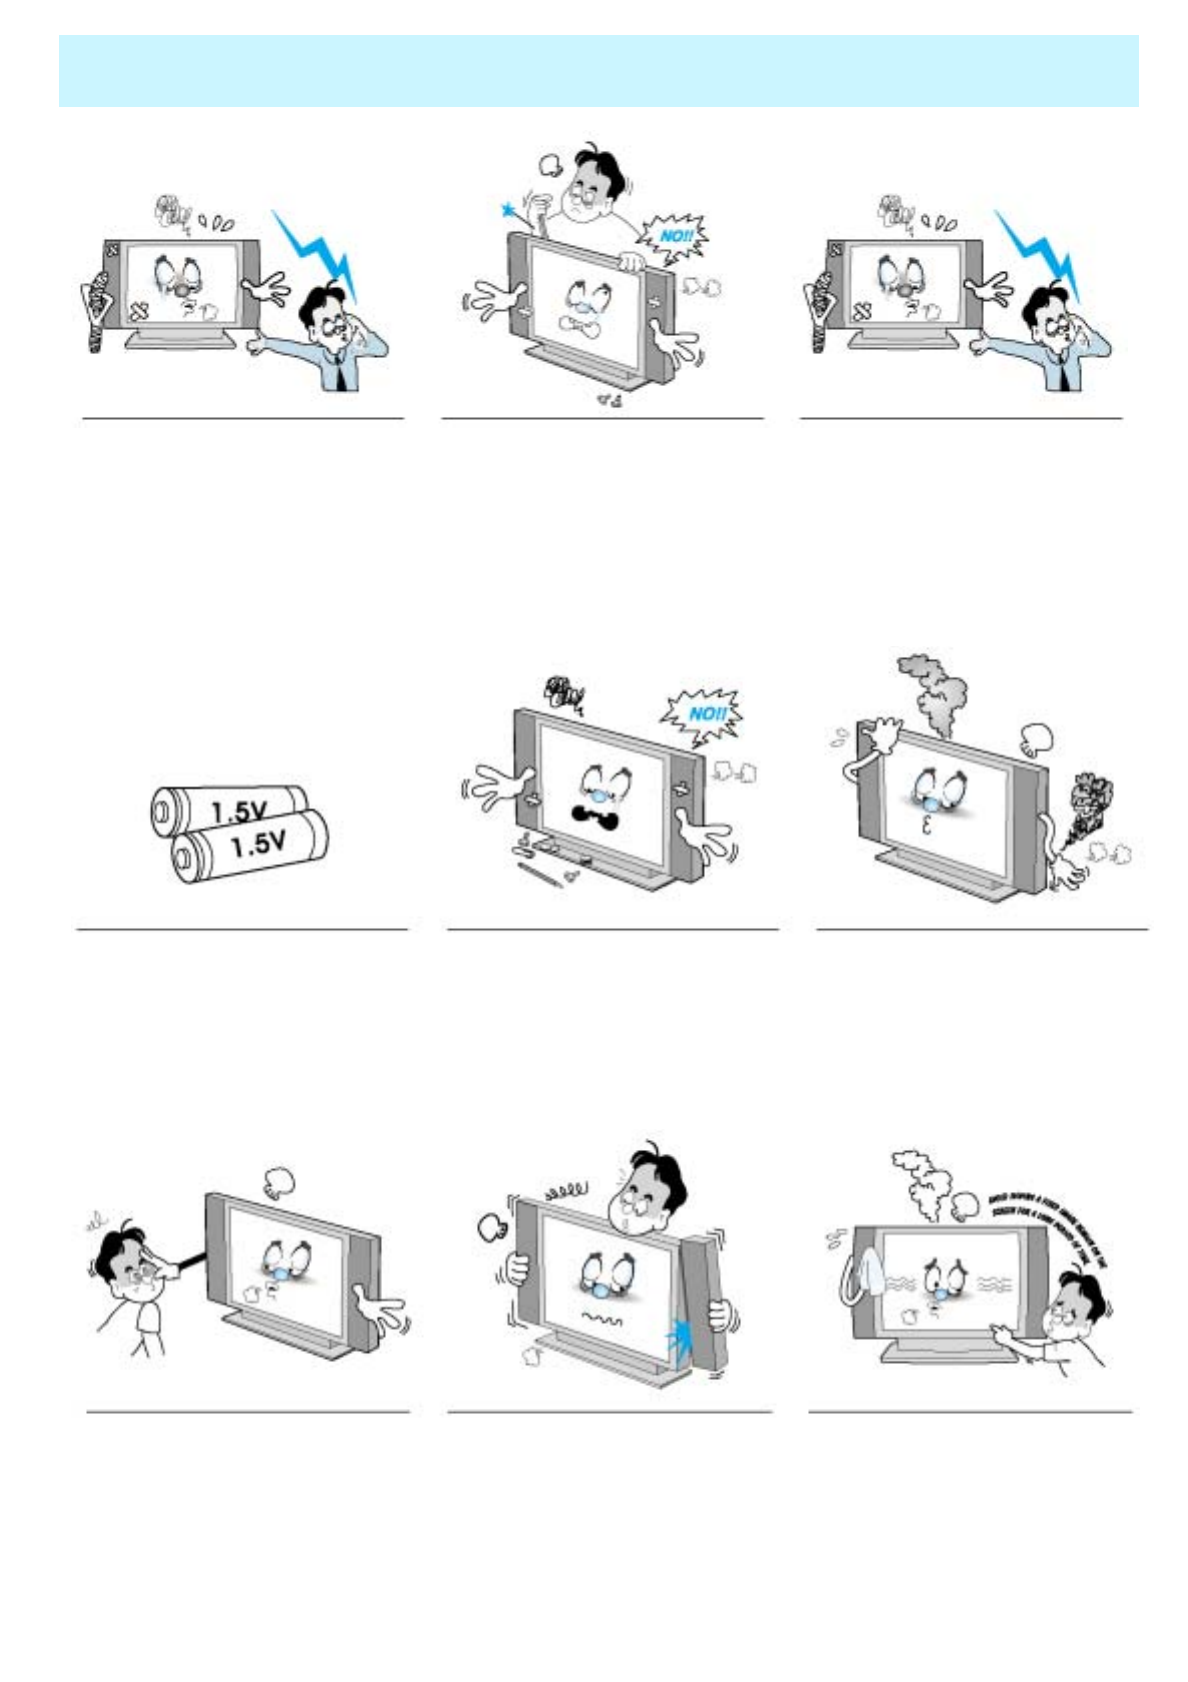
Do not overload the wall outlet or
extension cords. Overloading can
result in fire or electric shock.
Do not insert anything through the
openings in the unit, where they can
touch dangerous voltage points or
damage parts. Never spill liquid of
any kind on the Monitor.
Bend antenna cable between inside
and outside building to prevent rain
from flowing in.
-This may cause water damaged
inside the Monitor and could give an
electric shock.
Ground outdoor antennas. If an outside antenna or cable system is connected to the Monitor, be sure the
antenna or cable system is grounded so as to provide some protection against voltage surges and built-up
static charges. Section 810 of the National Electrical Code, ANSI/NFPA No.70-1984, provides information
about proper grounding of the mast and supporting structure, grounding of the lead-in wire to an antenna
discharge unit, size of grounding conductors, location of antenna discharge unit, connection to grounding
electrodes, and requirements for the grounding electrode.
Do not place an outside antenna in
the vicinity of overhead power lines,
other electric light or power circuits.
- This may cause an electric shock.
There should be enough distance
between an outside antenna and
power lines to keep the former from
touching the latter even when the
antenna falls.
- This may cause an electric shock.
Do not attempt to service the Monitor yourself. Refer all servicing to qualified service
personnel. Unplug the unit from the wall outlet and refer servicing to qualified service
personnel under the following conditions:
• when the power-supply cord or plug is damaged
• if liquid has been spilled on the unit or if objects have fallen into the unit
• if the Monitor has been exposed to rain or water
• if the Monitor does not operate normally by following the operating instructions
• if the Monitor has been dropped or the cabinet has been damaged
• when the Monitor exhibits a distinct change in performance
OWNER'S MANUAL
6
Important Safety Information
When replacement parts are required,
be sure the service technician uses
replacement parts specified by the
manufacturer or those that have the
same characteristics as the original
part. Unauthorized substitutions may
result in additional damage to the unit.
Upon completion of any service or
repairs to this Monitor, ask the
service technician to perform safety
checks to determine that the
Monitor is in a safe operating
condition.
If you make adjustments yourself,
adjust only those controls that are
covered by the operating instructions.
Adjusting other controls may result in
damage and will often require
extensive work by a qualified
technician to restore the Monitor to
normal.
Only use the specified batteries.
-This make cause damaged the
Monitor or could give an electric
shock.
Do not place anything containing
liquid on top of the Monitor.
- This may cause a fire or could
give an electric shock.
In case of smoke or strange smell
from the Monitor, switch it off, unplug
it from the wall outlet and contact
your dealer or service center.
- This may cause a fire or could give
an electric shock.
Avoid having a fixed image remain
on the screen for a long period of
time. Typically a frozen still picture
from a VCR, 4:3 picture format or
if a CH label is present; the fixed
image may remain visible on the
screen.
The distance between eyes and the
screen should be about 5~7 times as
long as diagonal length of the screen.
- If not, eyes will strain.
When moving the Monitor
assembled with speakers do not
carry holding the speakers.
-This may cause the Monitor to fall,
causing serious injury to a child or
adult, and serious damage to the
Monitor.
OWNER'S MANUAL
7
Overview Of Your New PDP
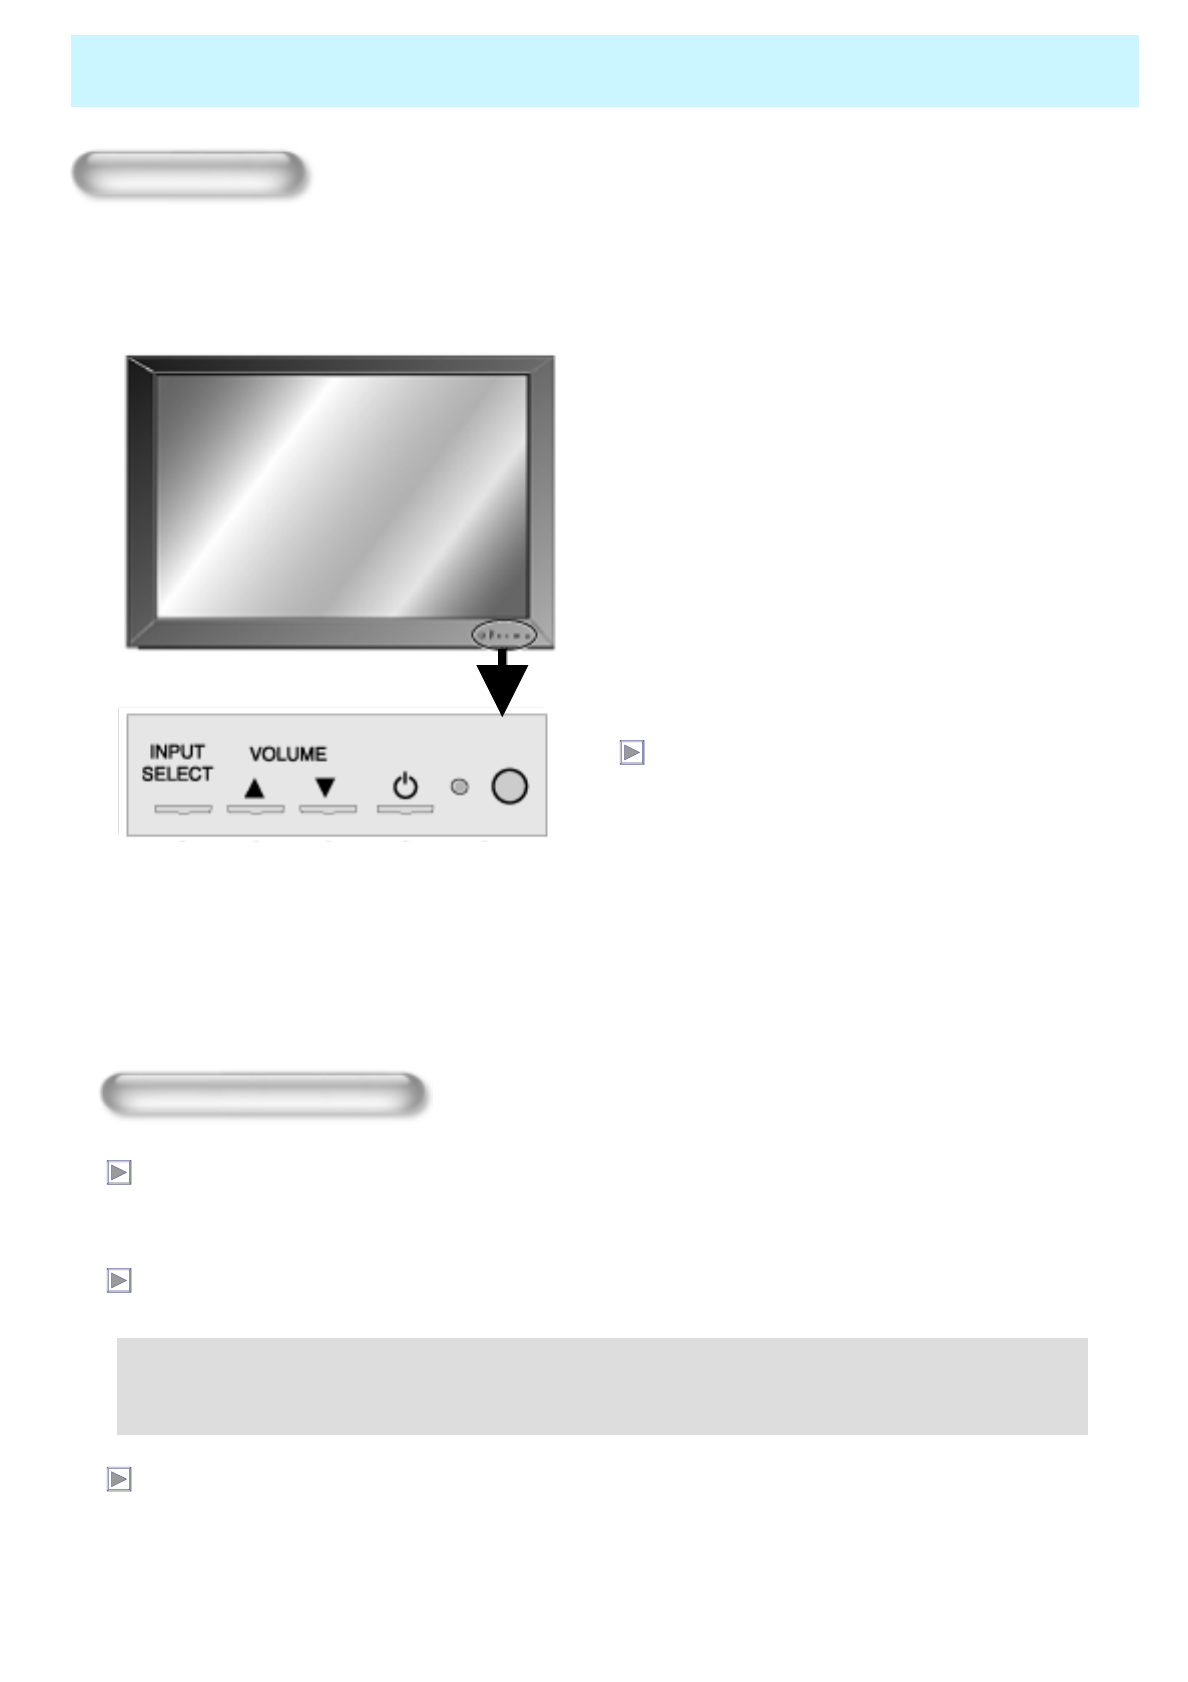
OSD Button
< Front Panel >
nop q r
OSD Button & Function
nInput Signal Source Select
oAudio Volume Up
pAudio Volume Down
qPower (Stand By)
rRemote Sensor & Power Indicator
OSD Key Function
SELECT
Select the signal source from multiple input sources such as TV, AV1, S-Video, AV2, Component1,
Component2, PC and DVI.
VOL- / VOL+
Change the audio level in normal display mode and move the scroll bar in Volume control menu.
• These buttons are used to change the channel.
- If you press ▲button first, you can control volume up(▲) and down(▼) until OSD disappears.
- If you press ▼button first, you can control channel up(▲) and down(▼) until OSD disappears.
Power On/Off
Turn on and off the main power.
OWNER'S MANUAL
8
Overview Of Your New PDP
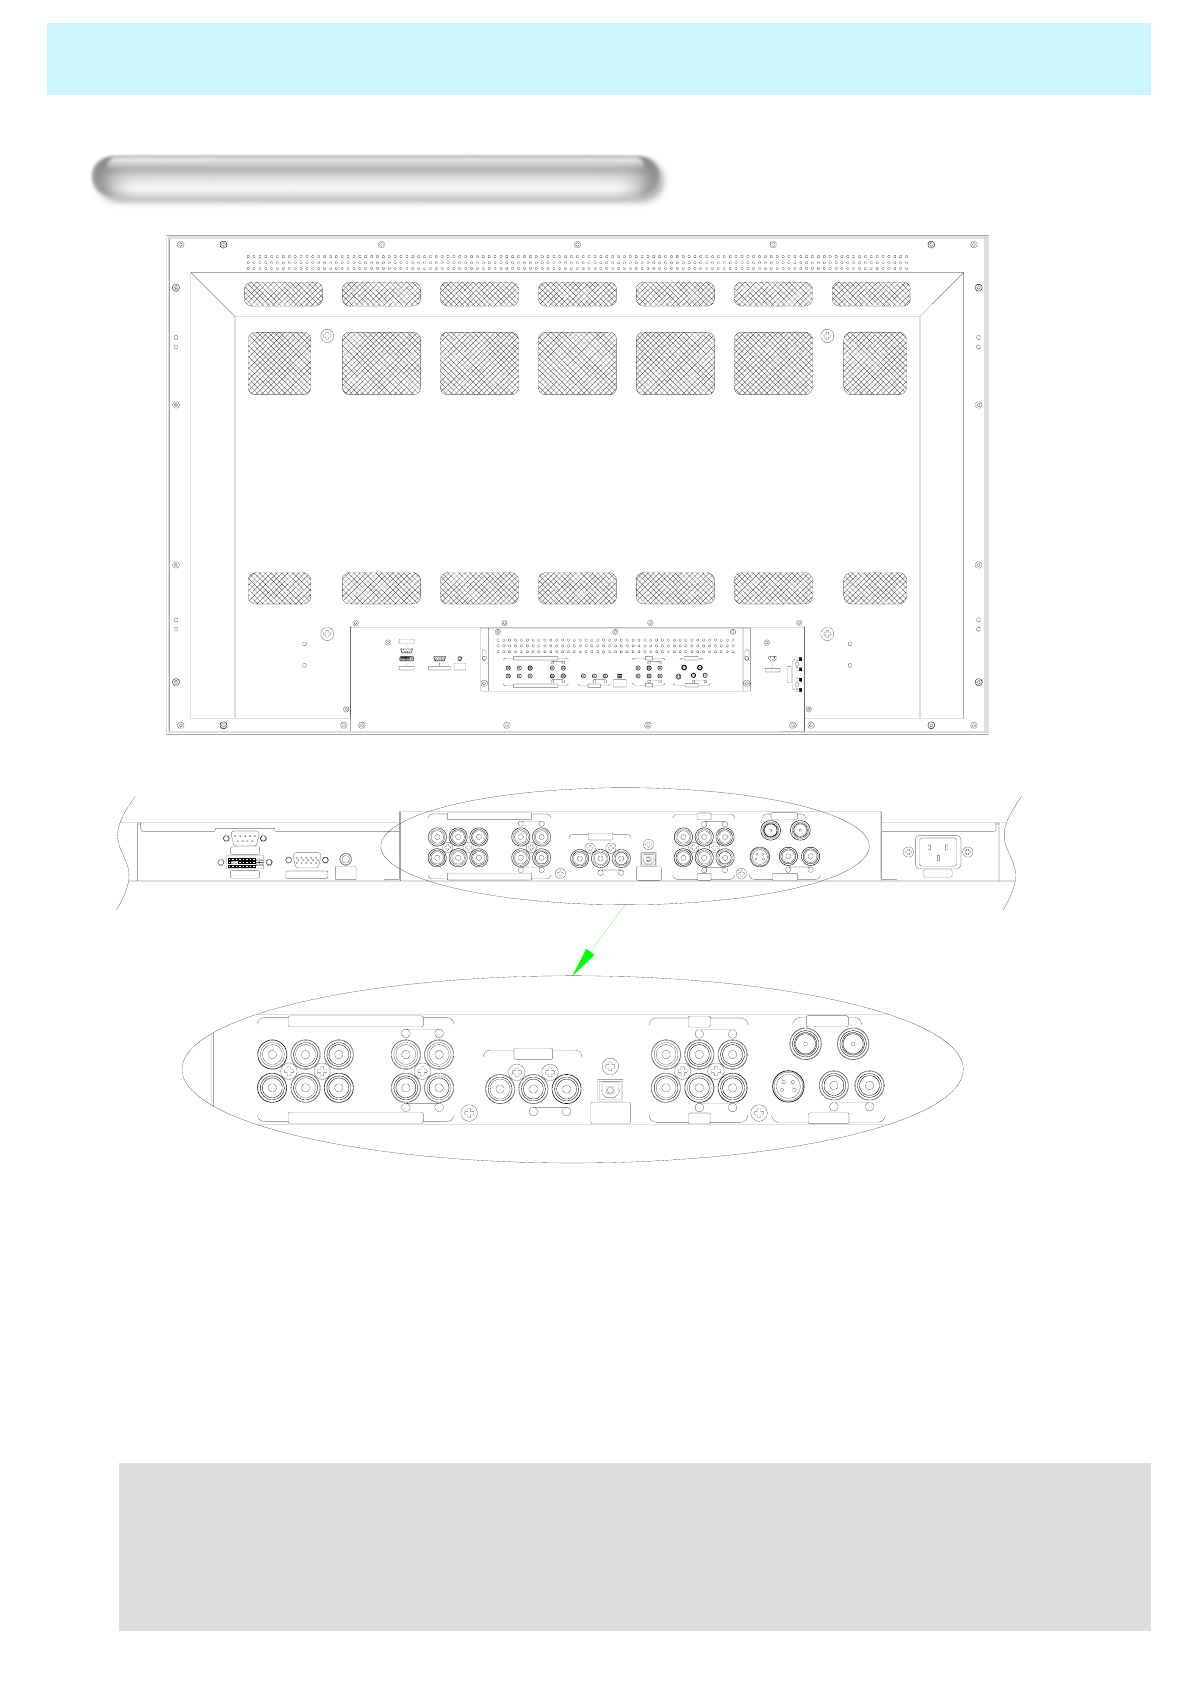
Connecting To External Equipment
CABLE AIR
YPrPb R
AUDIO
LR
AUDIO
LRAUDIOLR
AUDIO
L
VIDEO VIDEO S-VIDEO
YPrPb RAUDIOLRAUDIOLVIDEO
ANT. IN
AV2
AV1
S-VIDEO
OPTICAL
SPDIF
COMPONENT2 (480p,720p,1080i)
COMPONENT1 (480i)
AV OUT
PC/DVI
AUDIO AC INPUT
RS-232C
RGB PC INPUT
DVI INPUT
CABLE AIR
YPrPb R
AUDIO
LR
AUDIO
LR
AUDIO
LR
AUDIO
L
VIDEO VIDEO S-VIDEO
YPrPb R
AUDIO
LR
AUDIO
L
VIDEO
ANT. IN
AV2
AV1
S-VIDEO
OPTICAL
SPDIF
COMPONENT2 (480p,720p,1080i)
COMPONENT1 (480i)
AV OUT
Back panel of the Monitor
AUDIO
AVOUT
COMPONE NT2 (4 80p,7 20p,1080i)
YPbPr RAUDIOLLVIDE O
COMPONENT1(480i)
YPbPr RAUDIOL
AUDI O
S -VIDEOAV2
OPTICAL
SPDIF
RVIDEORAUDIOLL
S-VIDEO R
AV1
VIDEO RAU DIOL
ANT . IN
CABLE AIR
AC INPUT
DVIINPUT
RS-23 2C
RGB PC INPUT PC/DVI
AUDIO
LR
SPEAKER
•RS-232C INPUT TERMINAL
Control the monitor's functions externally by external equipment. Connects to the computer
RS-232C output terminal.
•DVI Input Terminal
Receives the digital video signals from a set top box or PC.
- HDCP
HDCP(High-bandwidth Digital Content Protection) is a system for protecting DVD content
outputted via DVI from being copied. It provides a secure digital link between a video
source(PC, DVD . etc) and a display device(TV, projector . etc). Content is encrypted at the
source device to prevent unauthorized copies from being made.
OWNER'S MANUAL
9
Overview Of Your New PDP
•RGB PC Input Terminal
Connects to the computer monitor's (analog RGB or DTV receiver) output terminal. Cables
connecting the PC vary according to the type of machine, so contact your product dealer.
•PC/DVI Audio Input Terminal
Connects to the audio output terminal of PC or Set Top box (earphone type)
•Component Input 1 (480i)
Connects to a component output terminal of VCRs or DVD player or Set Top box.
•Component Input 2 (480p, 720p, 1080i)
Connects to a component output terminal of a progressive DVD player or DTV Set Top box.
•AV Input
The Interface board is not equipped on PDP monitor. Contact your dealer for buying
optional item
•OPICAL (SPDIF) Digital Audio Out Jack
Use an optical digital cable to connect to a compatible Dolby Digital receiver.
•S-Video Input Terminal
Connects to a S-Video output terminal of a S-VHS, VCRs or DVD players.
•ANT. IN (TV Antenna Terminal)
- Air : The cable from an off-air TV antenna (not from the satellite dish) connects to this jack.
Both standard analog (NTSC) and high definition digital (ATSC) program broadcasts can
be received through a single antenna connected to this jack.
- Cable : The RG-6 cable from cable TV provider (if you have one) connects to this jack.
•AC(POWER) Input Terminal
Firmly insert the accessory power cord as far as it will go into the power input terminal.
Firmly push the power cord plug as far as it will go into the power socket.
Connectors
AUDIO INPUT
VIDEO INPUT
S-VIDEO INPUT
COMPONENT VIDEO INPUT
RGB INPUT
RS-232C
RCA Pin Jack
RCA Pin Jack
Pin Did
RCA Pin Jack
15-pin D-sub
9-pin D-sub
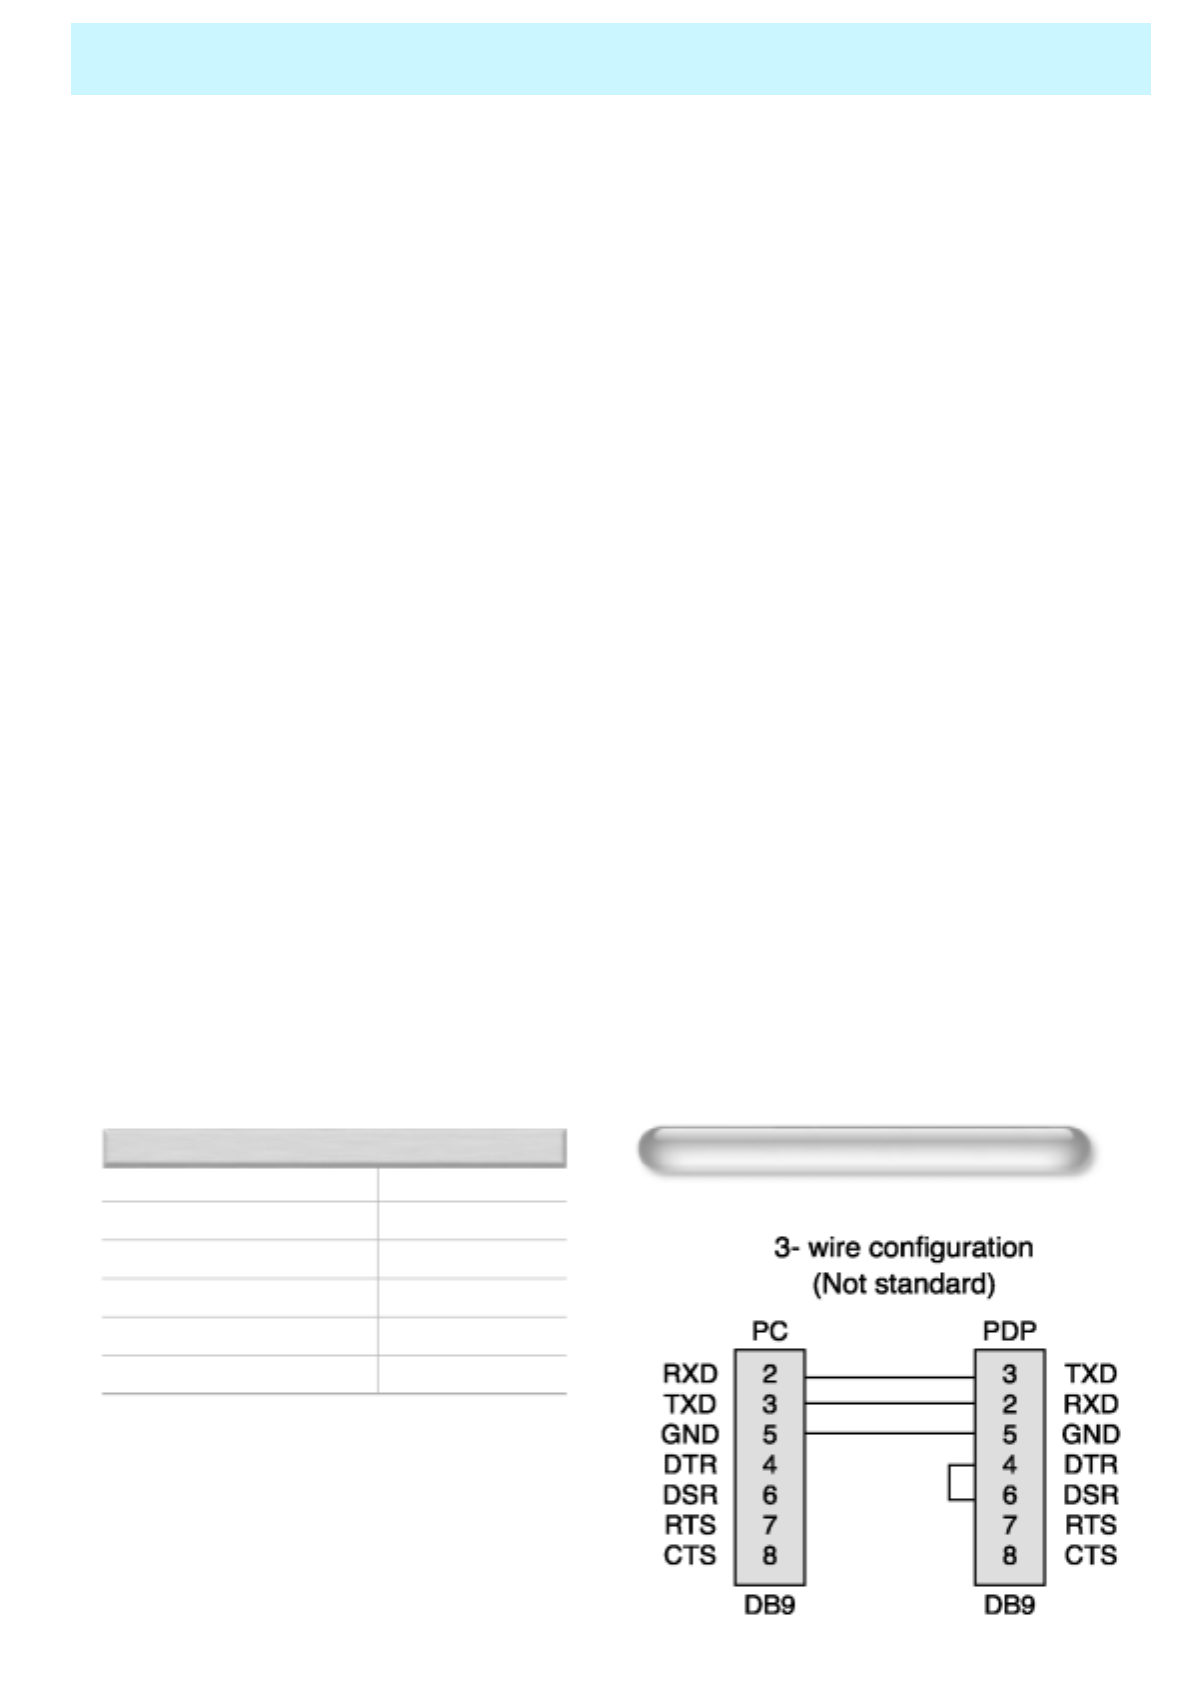
RS-232C Configurations
• Cables connecting the PC vary according to the
type of machine, so consult your product dealer.
(If the cable is different to the picture, inquire
your PC service center)
OWNER'S MANUAL
10
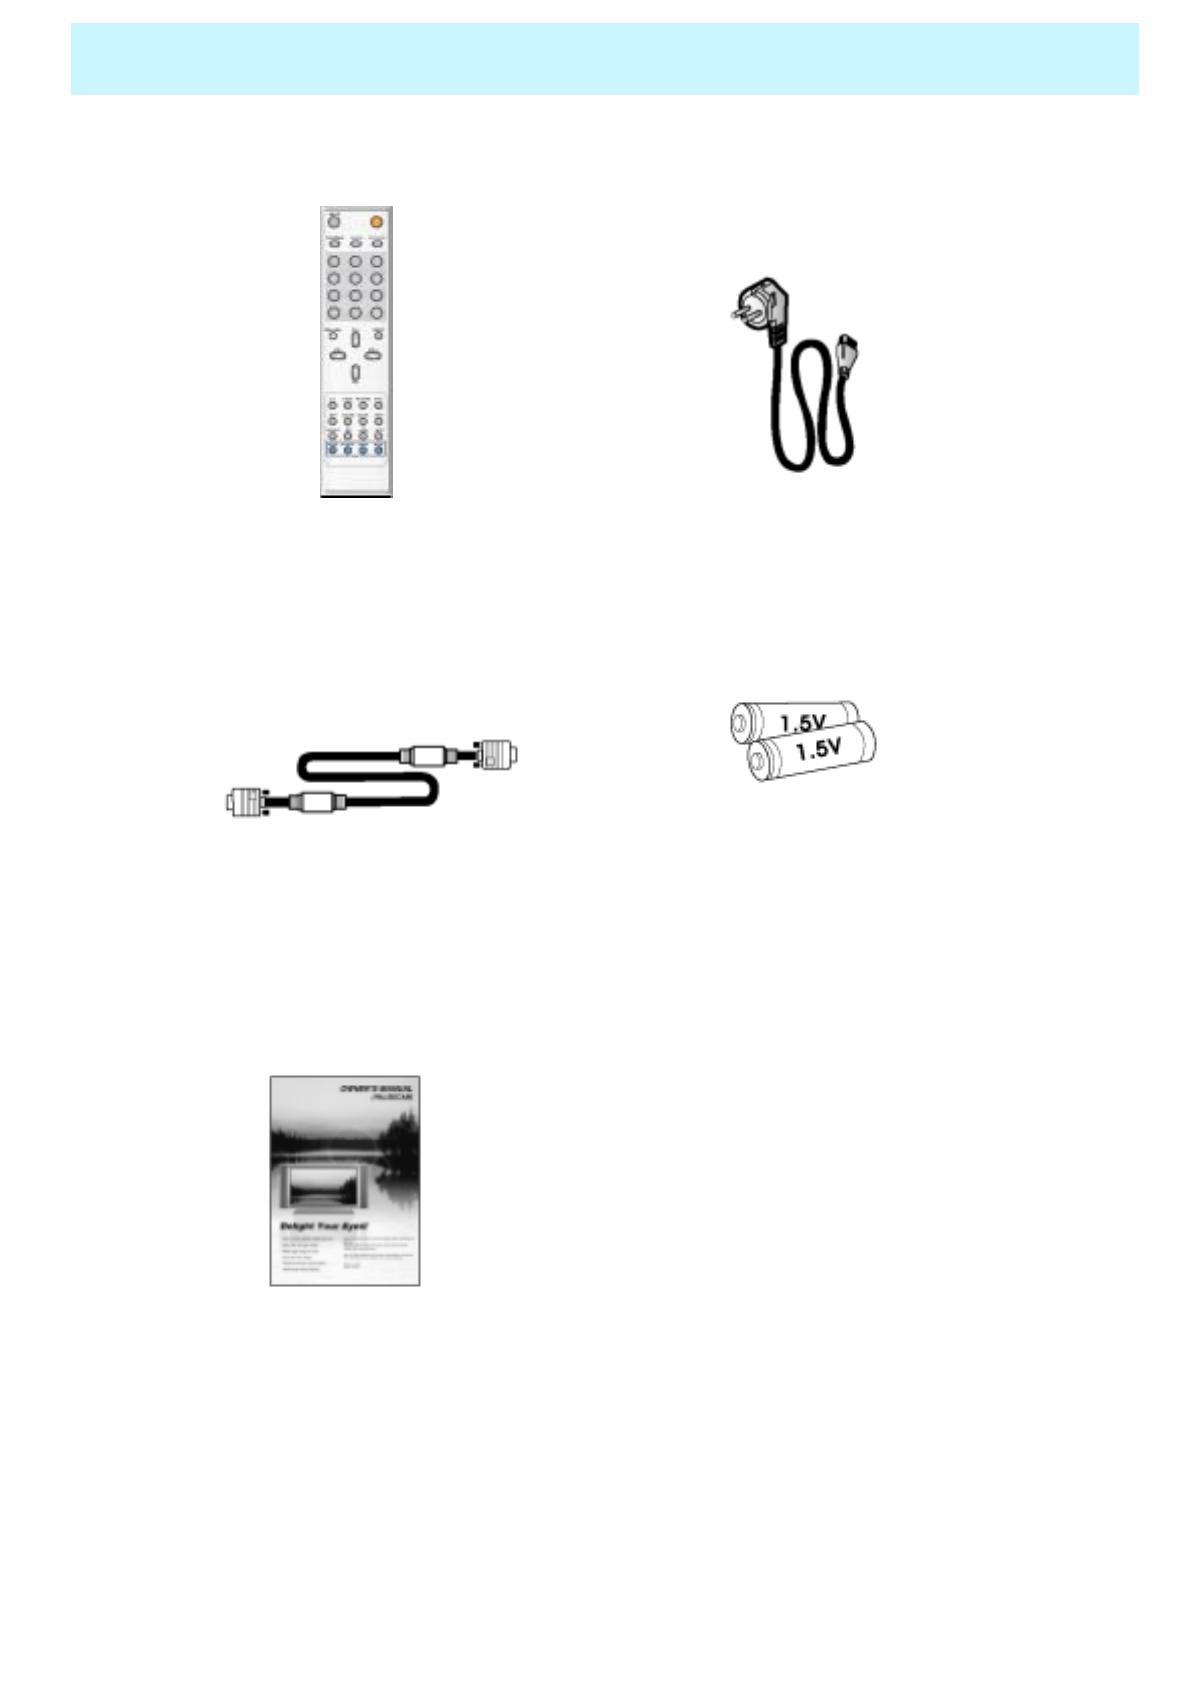
Accessories
Remote Control Handset Power Cord
D-sub 15 pin VGA cable Alkaline Batteries
Owner's Manual
OWNER'S MANUAL
11
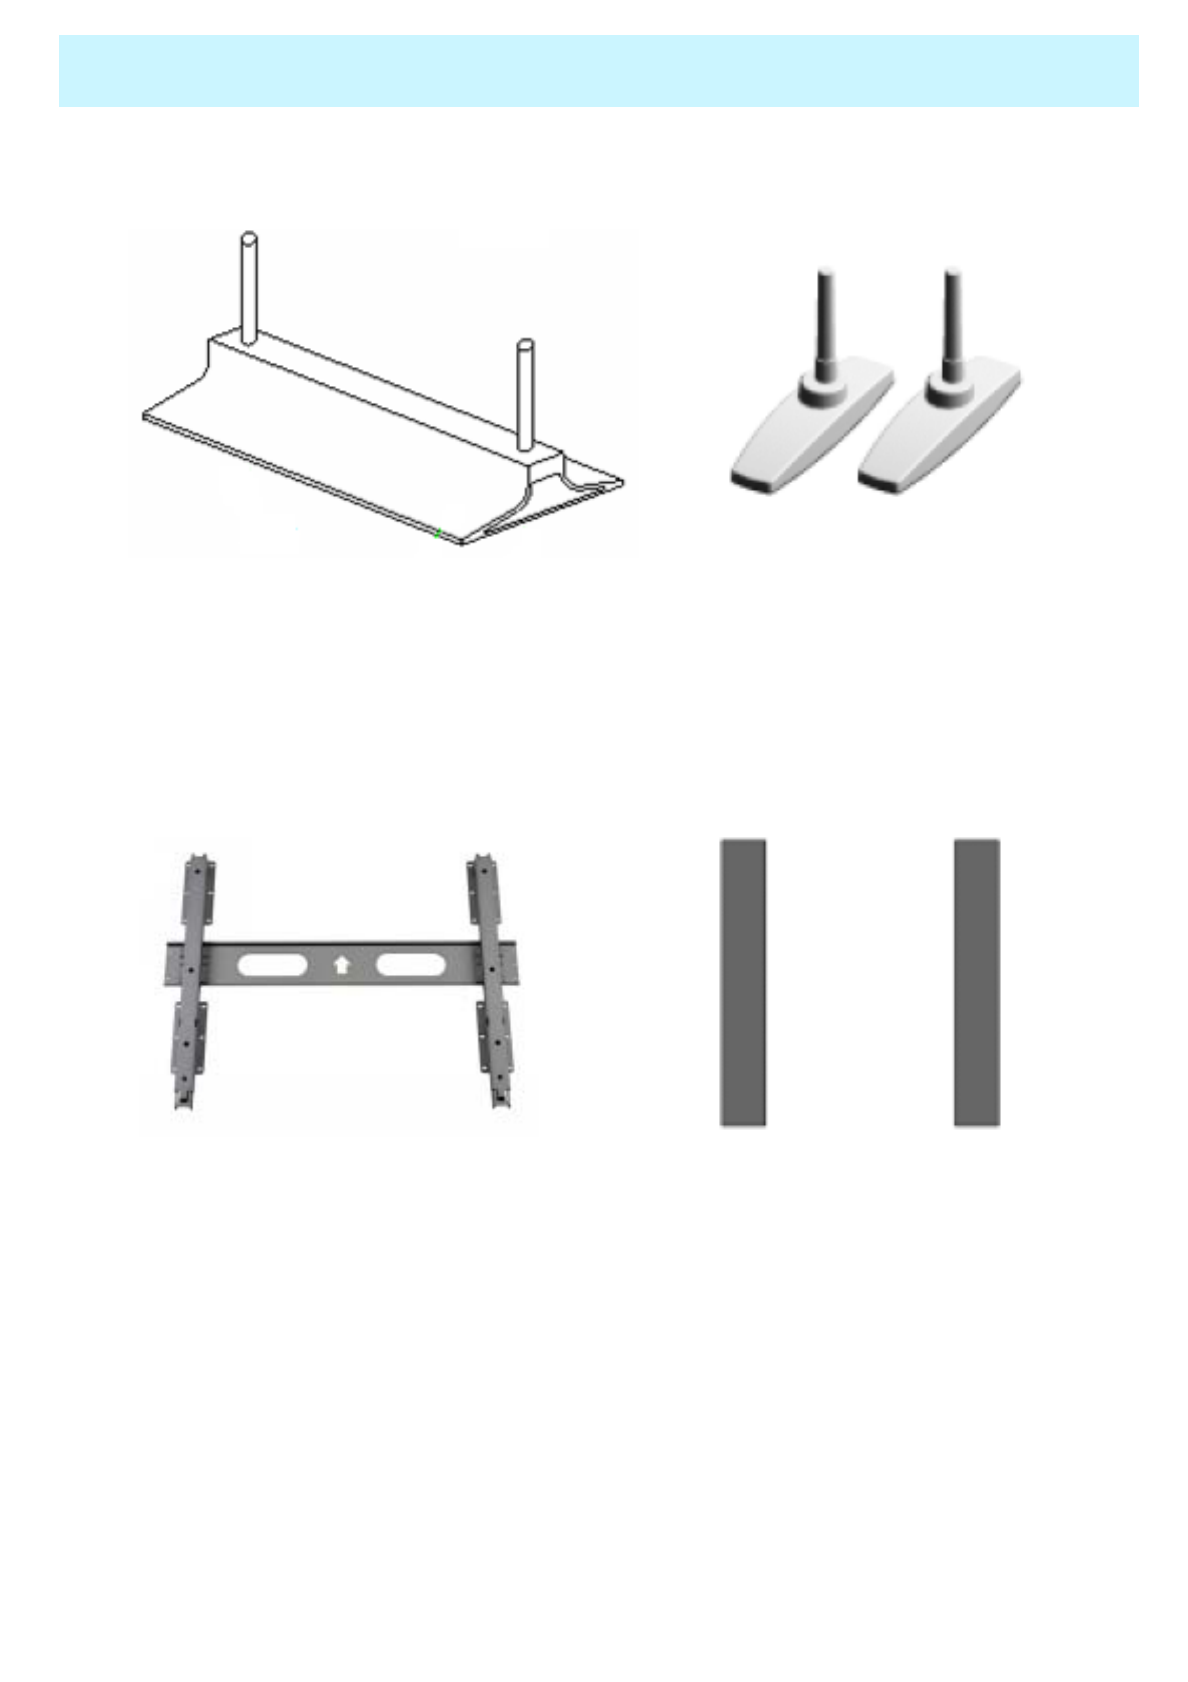
Optional Extras
Table Stand
(Type United) Table Stand
(type Separated)
Fixed Wall
Mount Bracket Side Mount Speaker
OWNER'S MANUAL
12
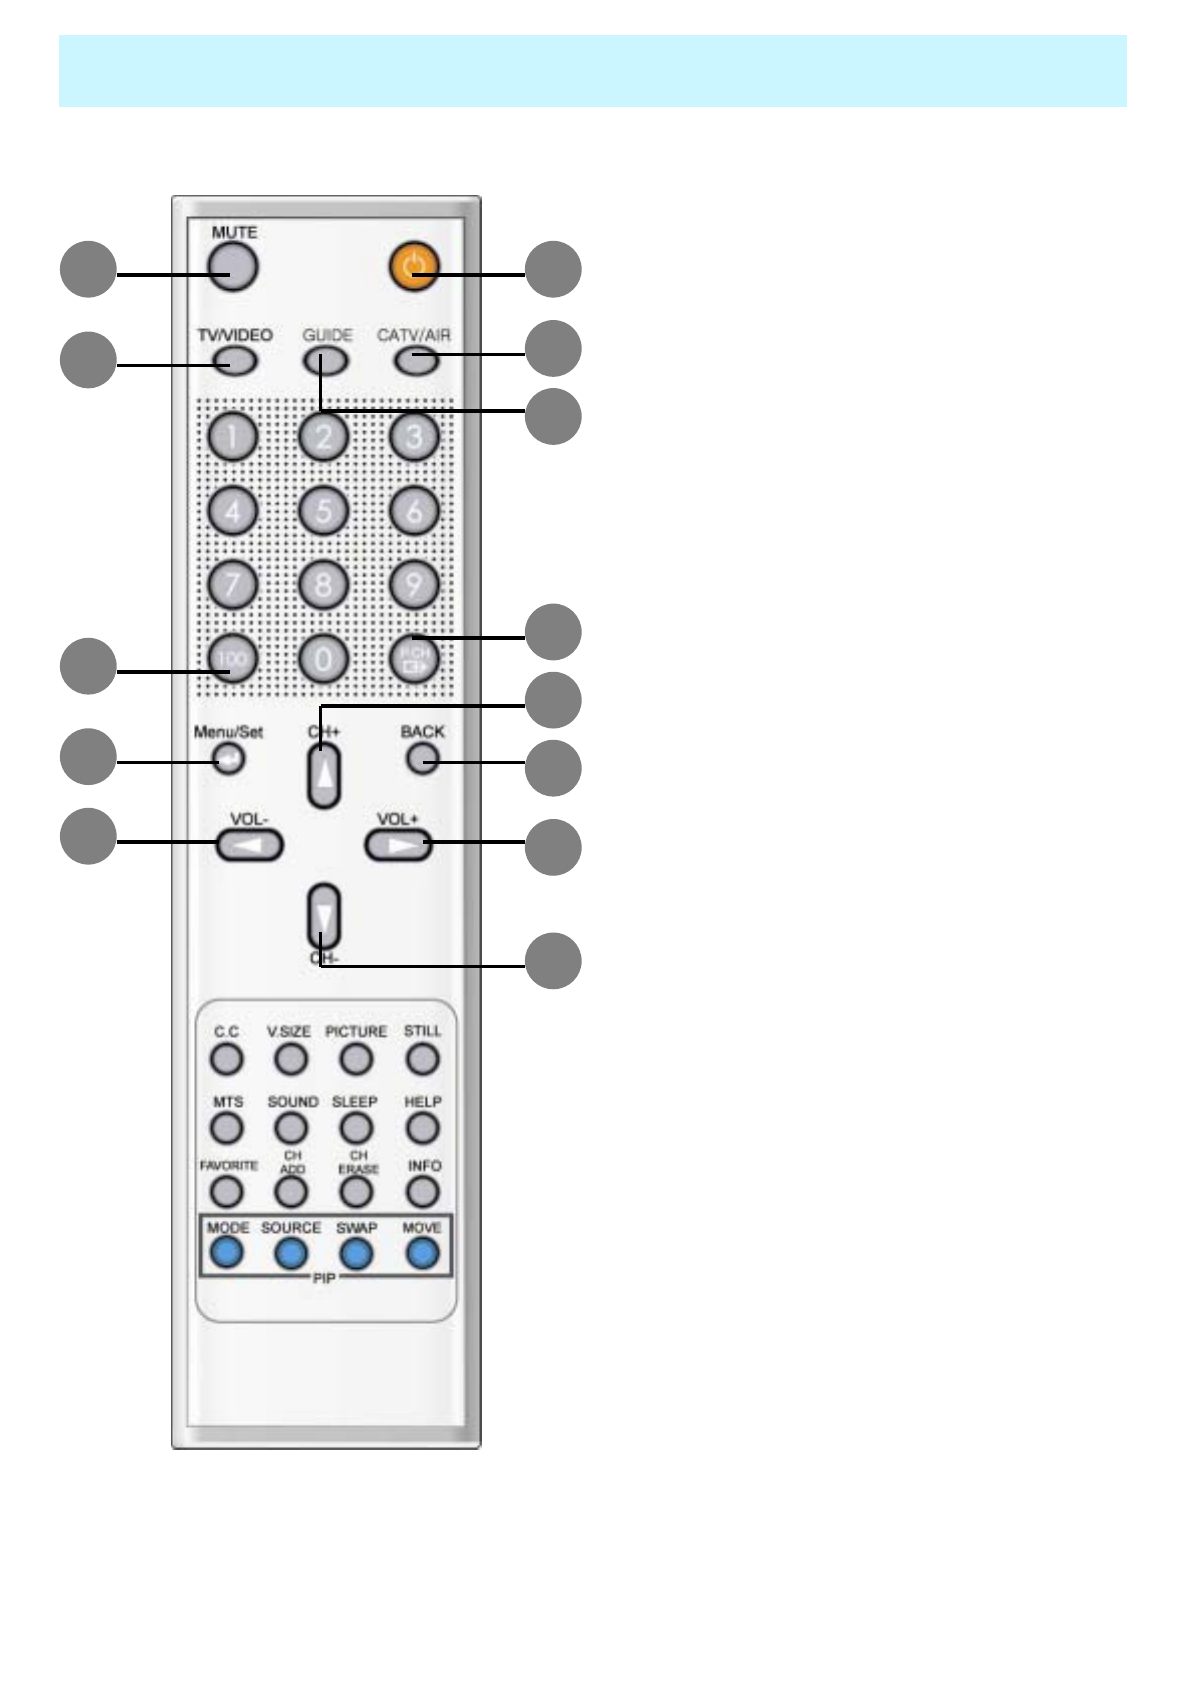
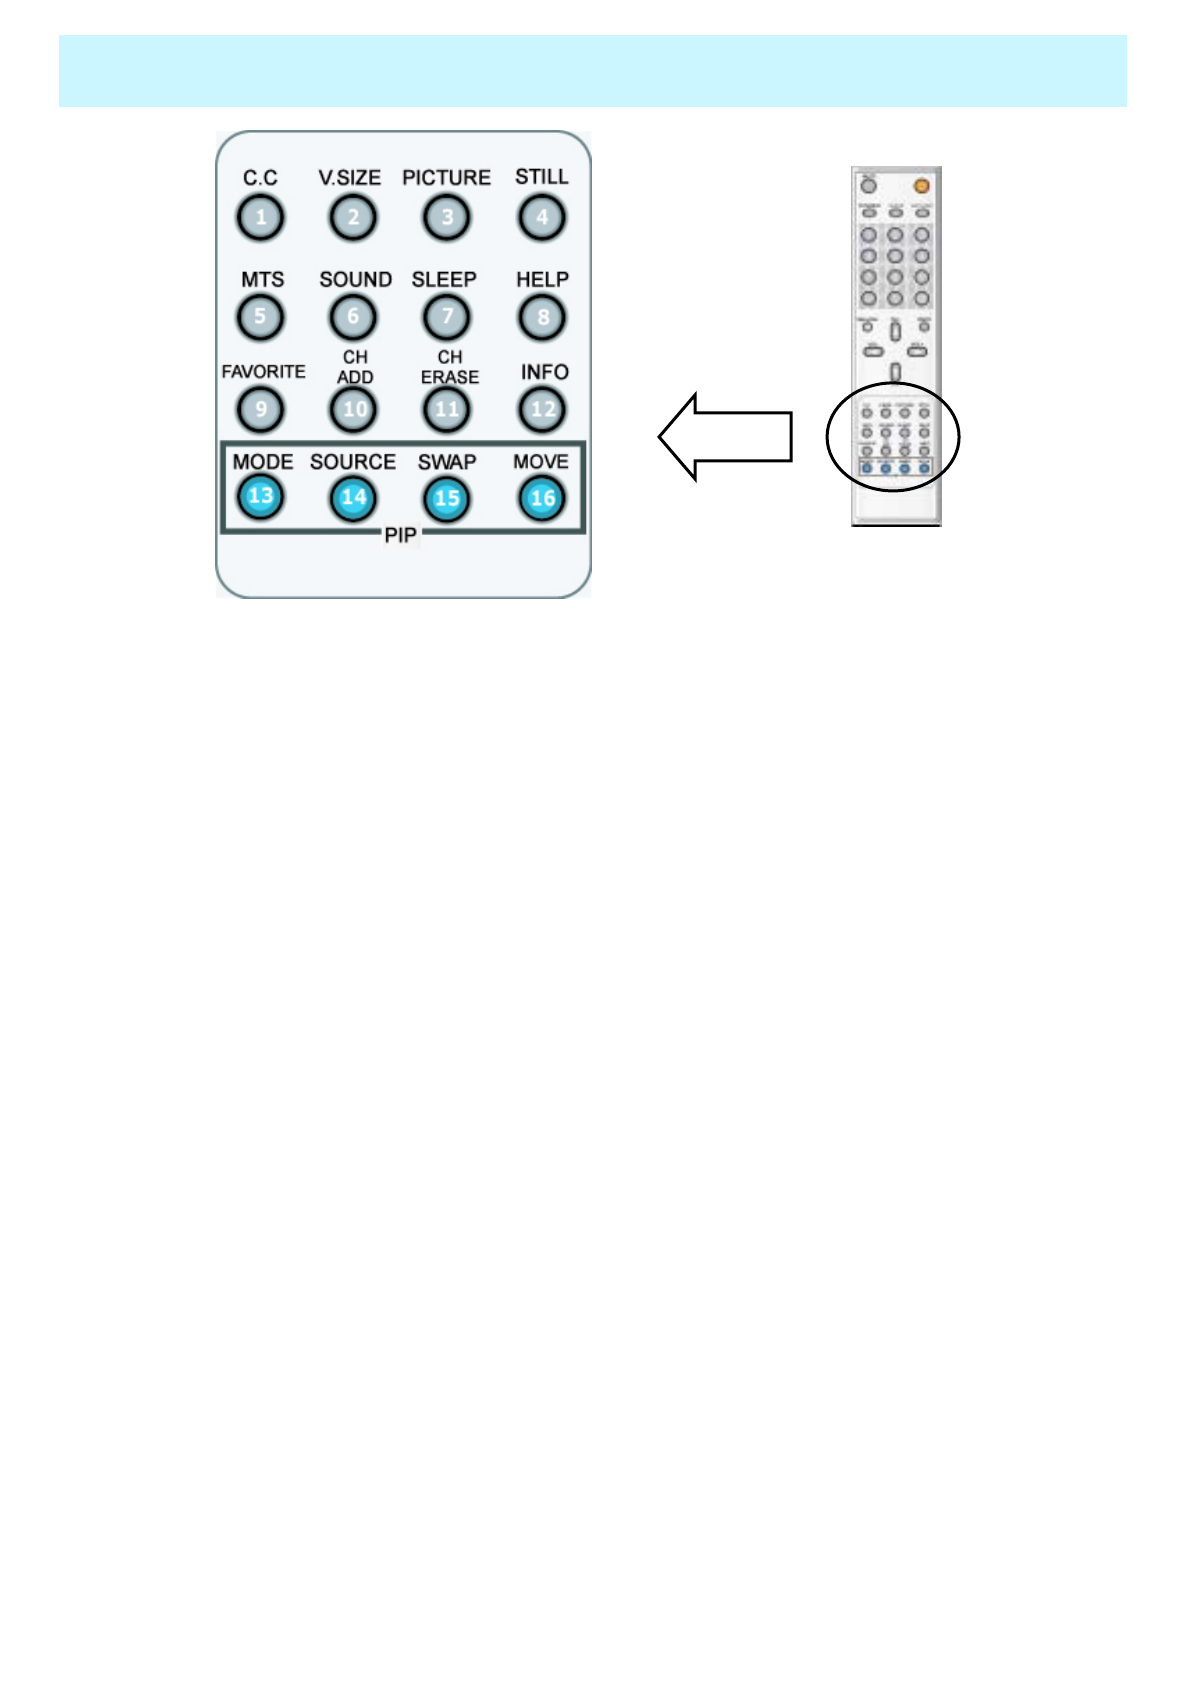
Remote Control
•2. MUTE
Temporarily interrupt the sound or restore it.
•3. TV / VIDEO
Press to display all of the available video sources
( e.g. TV, AV1, AV2, S-Video, Component1,
Component2, PC and DVI)
•1. POWER
Turns the PDP on and off.
•6. 100
Press to select channels over 100.
For example, to select channel 121, press “100”,
then press “2” and “1”.
•7. P.CH (EXIT)
Turns to the previous channel.
Or EXIT all OSD menus. (Used in OSD menu only.)
•8. MENU/SET
Display the main OSD menu.
And this button is used to select a mode in OSD.
•9. BACK
Go to the previous OSD menu.
•10. CH+
Switch to upper channel.
“c” button when OSD menu is enable.
1
5
4
7
10
9
12
11
2
3
•4. GUIDE
Press to see the digital broadcasting information.
( Available only Digital Channels)
•5. CATV/AIR
Press to select CATV or AIR(terrestrial broadcast).
6
8
13
•11. CH-
Switch to lower channel.
“d” button when OSD menu is enable.
•12. VOL+
Increase the volume level.
“f” button when OSD menu is
enable.
•13. VOL-
Decrease the volume level.
“e” button when OSD menu is
enable.
OWNER'S MANUAL
13
Remote Control
•9. FAVORITE
Press to see the favorite channels.
•1. C.C
Press to see the Closed Caption.
•10. CH ADD
Press to add Channel in the memory
•2. V.SIZE
Press to change Screen Size.
(Full -> Zoom1 -> Zoom2-> Pillar)
•11. CH ERASE
Press to erase Channel in the memory
•3. PICTURE
Press to change Picture Mode.
(Custom -> Standard -> Sharp -> Mild)
•12. INFO
Press to display information on the PDP screen.
•4. STILL
Press to pause the current screen, press
once again for reset. •13. MODE
Press to make the PIP window large or
small ( window -> half -> off)
•5. MTS ( Multichannel Television Stereo )
Press to choose mono, stereo or SAP
(Separate Audio Program) •14. SOURCE
Press to select one of the available signal
sources for the PIP window.
•6. SOUND
Press to change Sound Mode.
(Custom -> Standard -> Music -> Movie
->Speech) •15. SWAP
Exchanges the video signal that is currently
displayed on the main screen with the signal
in the PIP window.
•7. SLEEP
Press to choose a preset time interval for
automatic shutoff. (10min. -> 20min. -> …
-> 360 min.) •16. MOVE
Press to move the PIP window to any of the
four corners of the screen
•8. HELP
Press to see the Help message.
(Only in OSD menu.)
OWNER'S MANUAL
14
Controls Of The Remote Control
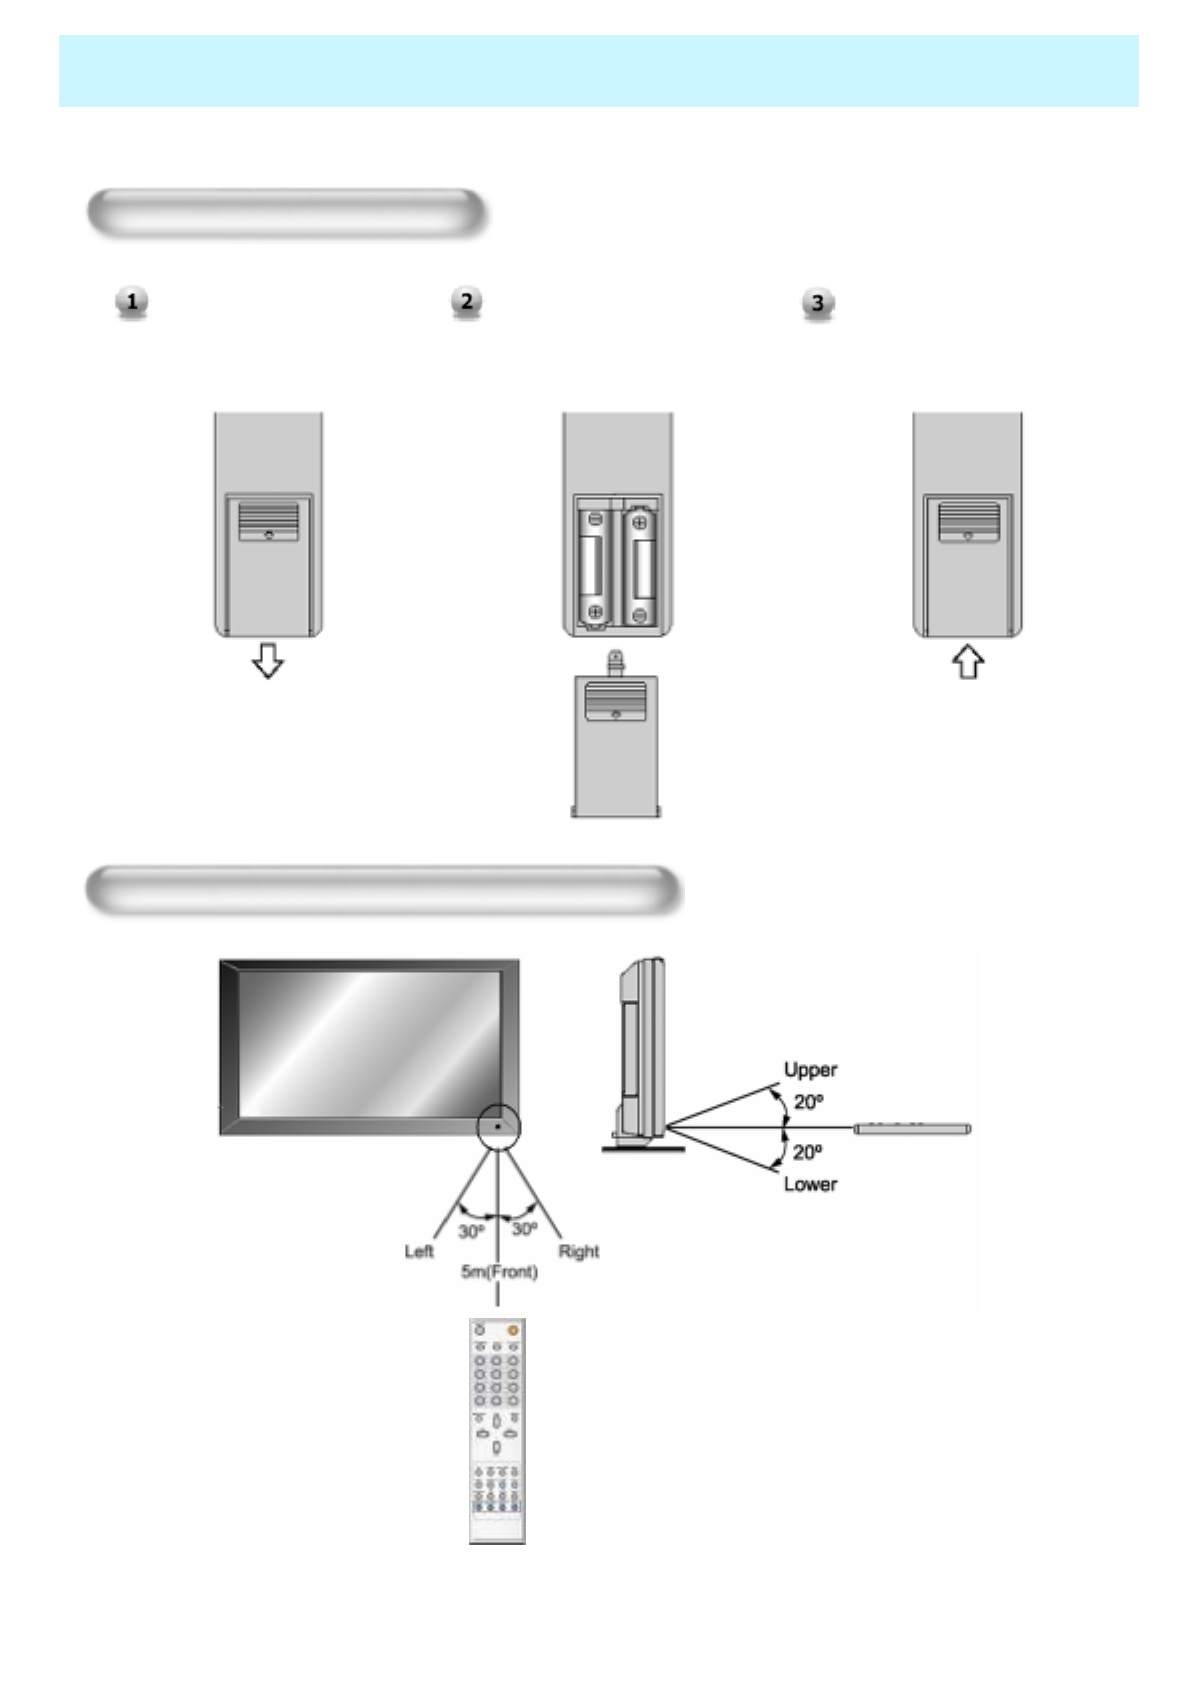
Loading The Batteries
Press on the cover and slide
in the direction of the arrow. Load two AAA batteries,
taking care that the + and -
ends face the correct
direction.
Close the cover until it clicks.
Reception range of remote control
OWNER'S MANUAL
15
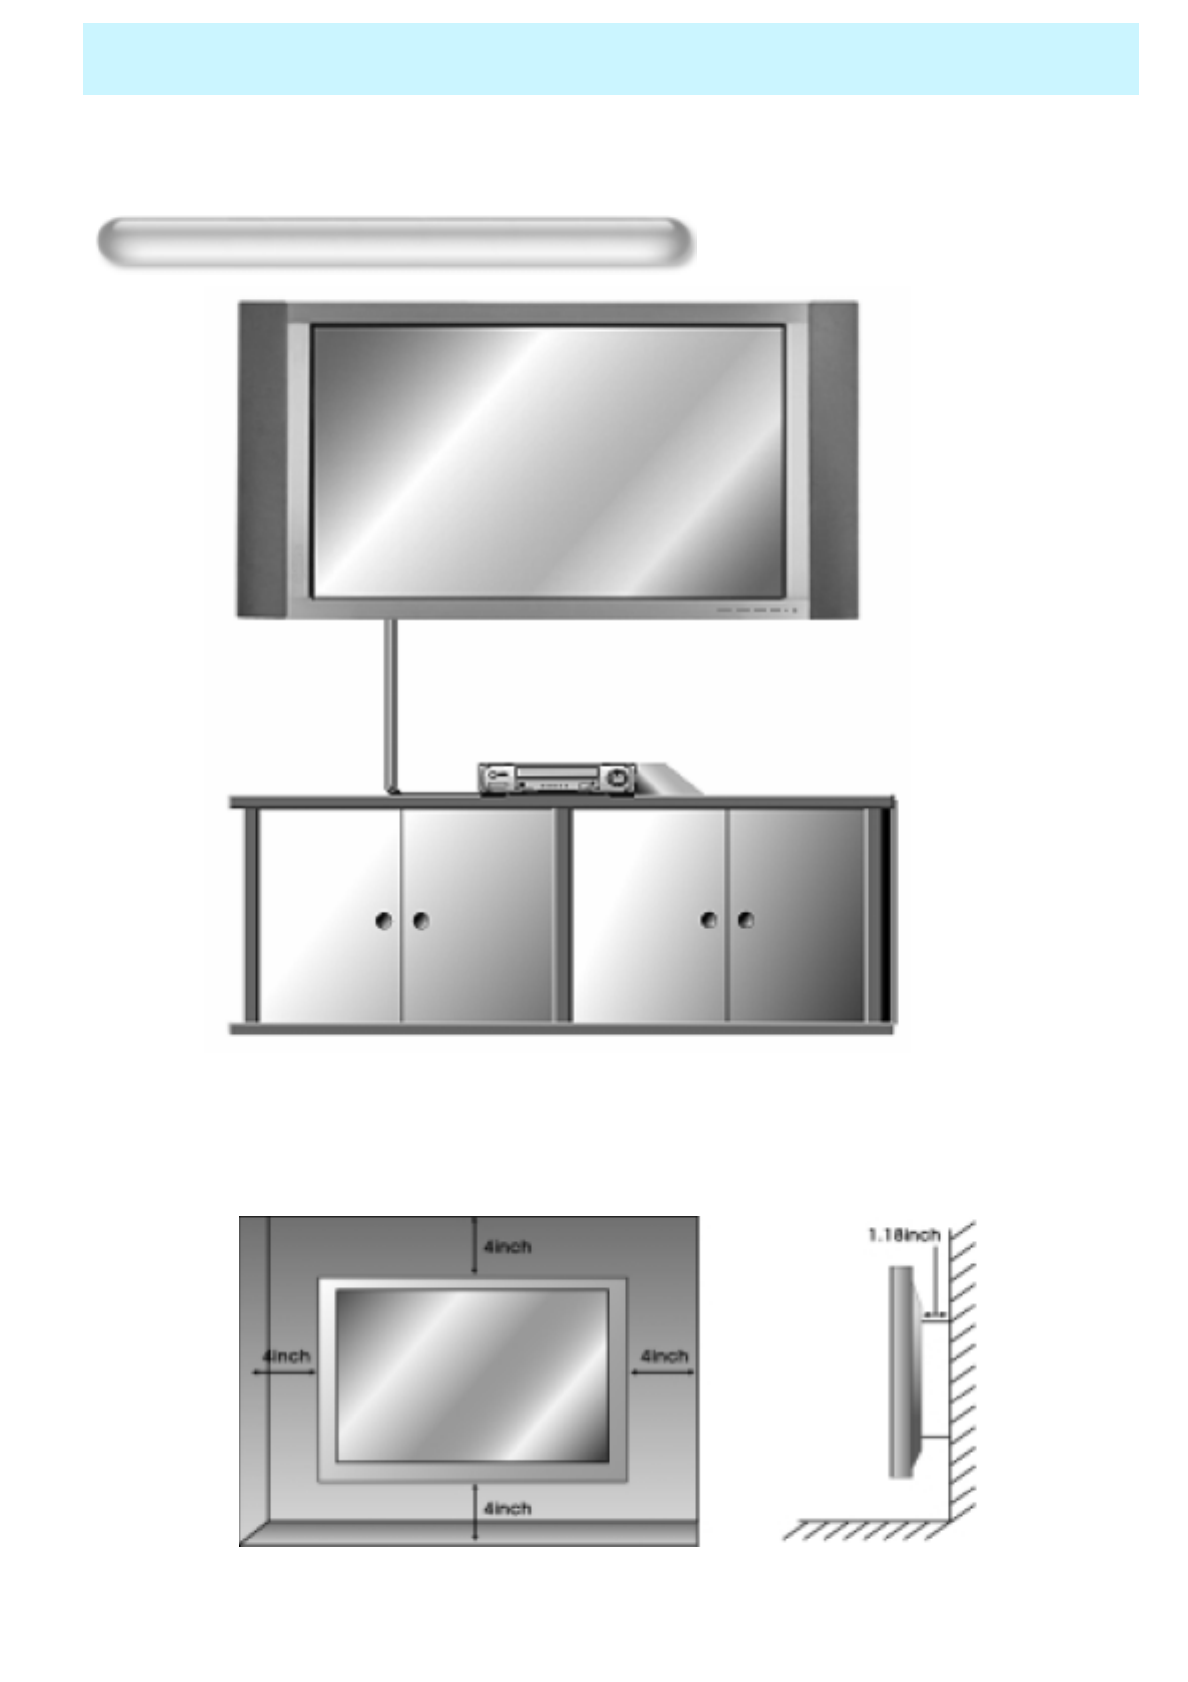
Monitor Installation
The Monitor can be installed in various ways such as Wall Mounting type, Table Stand type, etc..
Wall Mount Installation(optional)
<The monitor can be installed on the wall as the picture above>
• Install this monitor only in a location where adequate ventilation is available.

OWNER'S MANUAL
16
Monitor Installation
Type-A
Installation
►Detach the monitor brackets from the wall mounting bracket:
Pull the monitor brackets in the direction shown by arrow 1.
Lift the monitor brackets in the direction shown by arrow 2.
Lift the monitor brackets off the mounting frame in the direction shown by
arrow 3.
OWNER'S MANUAL
17
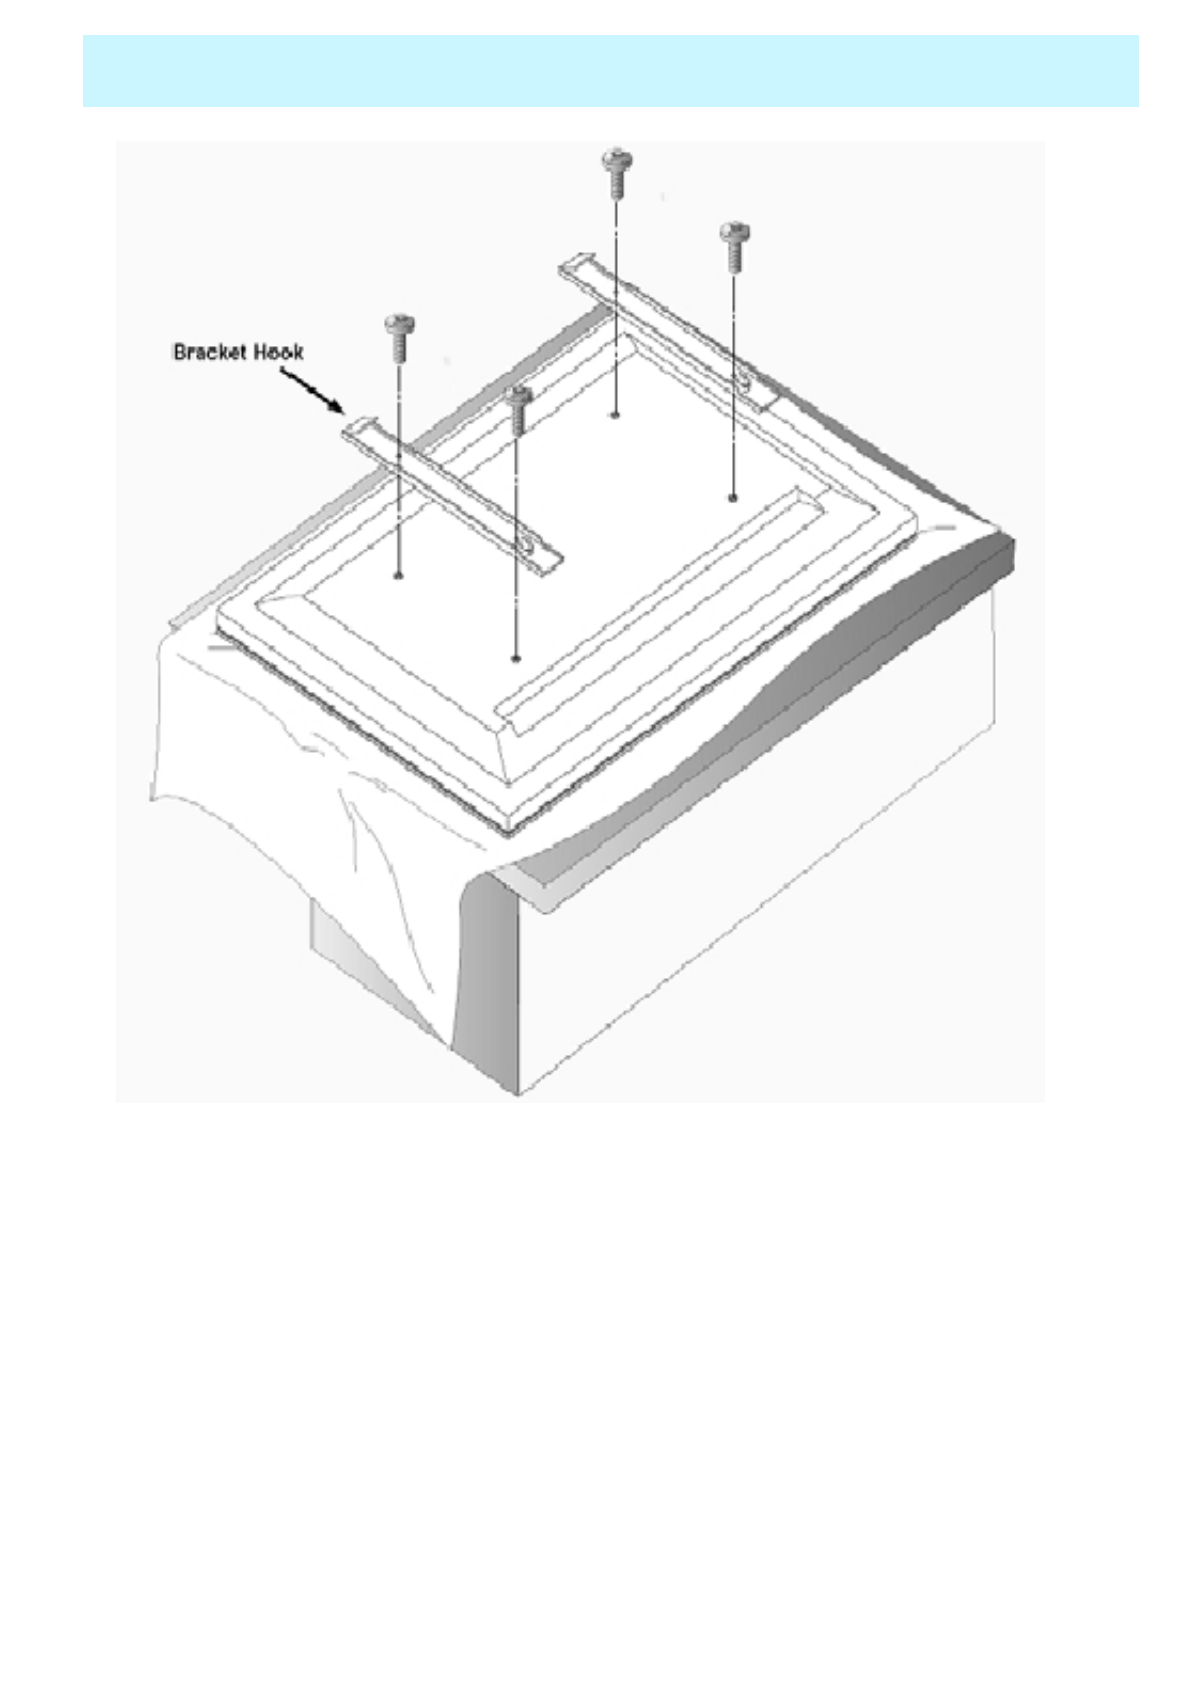
Monitor Installation
•As shown above, carefully place the Monitor screen side down on a cushioned
surface that will protect the monitor and screen from damage.
• Insert the monitor brackets on the monitor as shown above. Install the 4 bolts
securely, in the back of the monitor in the holes provided. Be sure the bracket
hooks are at the top side of the monitor.
OWNER'S MANUAL
18
Monitor Installation
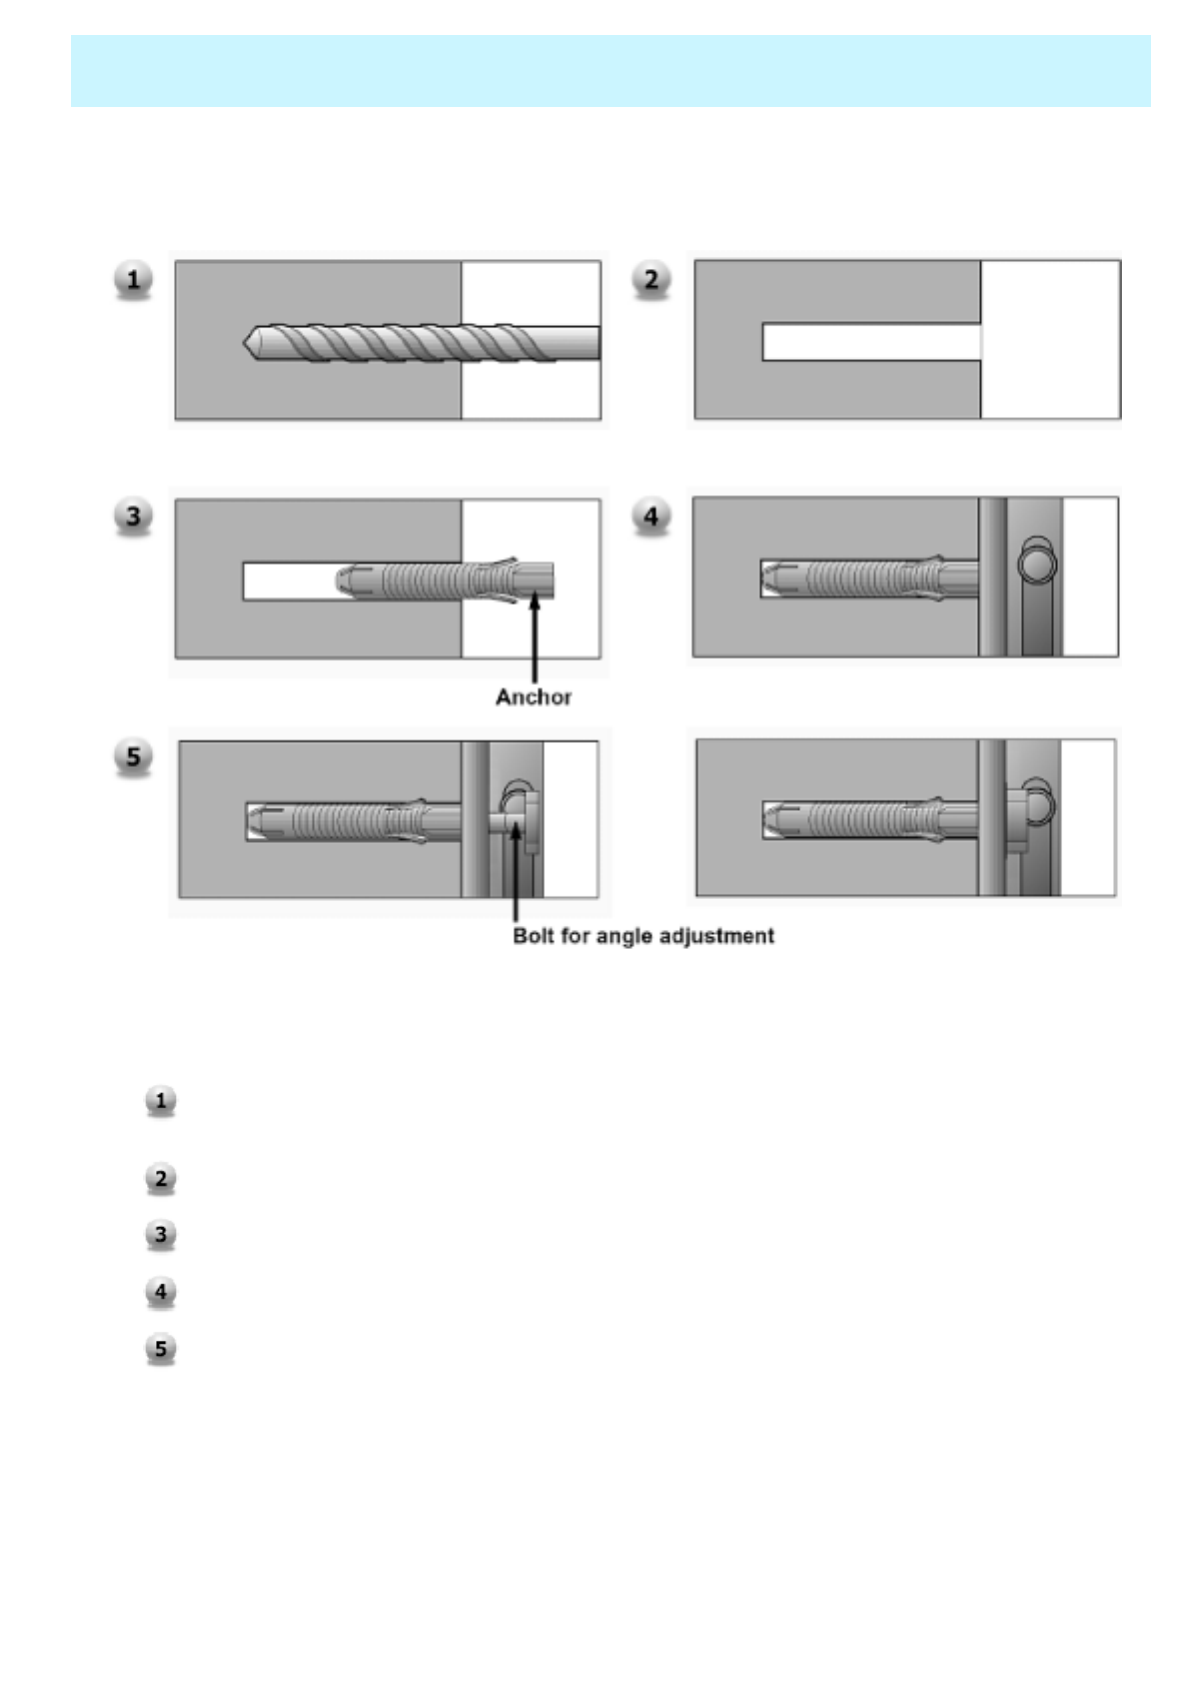
•How to fix anchors and bolts
Drill the 6 hole positions as shown on page 19. Using an 8 mm drill appropriate for the material on the
wall, drill each hole to a depth of 80mm~100mm.
Clean each drilled hole.
Insert an anchor supplied with the wall mounting bracket into each hole.
Mount the wall mounting bracket on the wall using the 6 washers and bolts supplied.
Adjust the bolt head angles as necessary, see above.
OWNER'S MANUAL
19
Monitor Installation
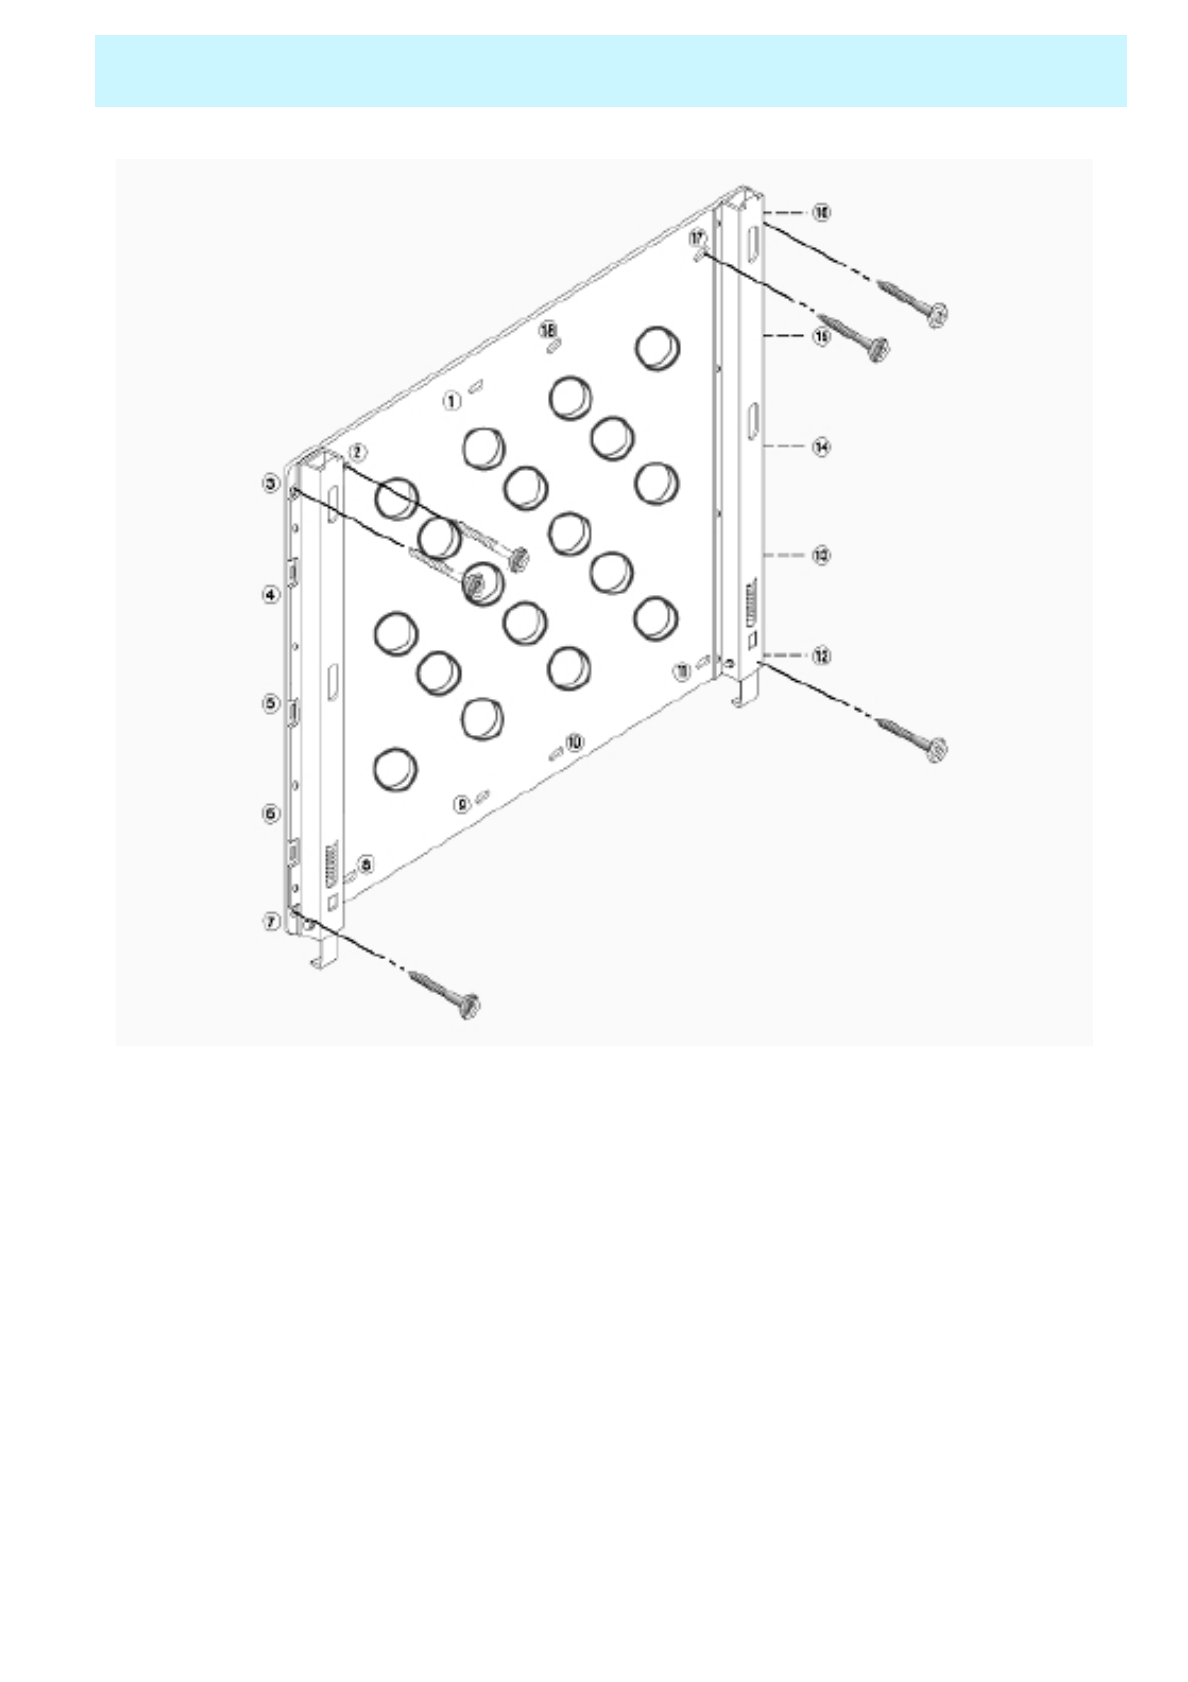
•Bolt the monitor wall-mount frame to the wall as shown above using holes 2, 3, 7,
12, 16, and 17.
• If it is necessary to use different holes than the ones indicated above, use only
up to two (2) other holes.
OWNER'S MANUAL
20
Monitor Installation
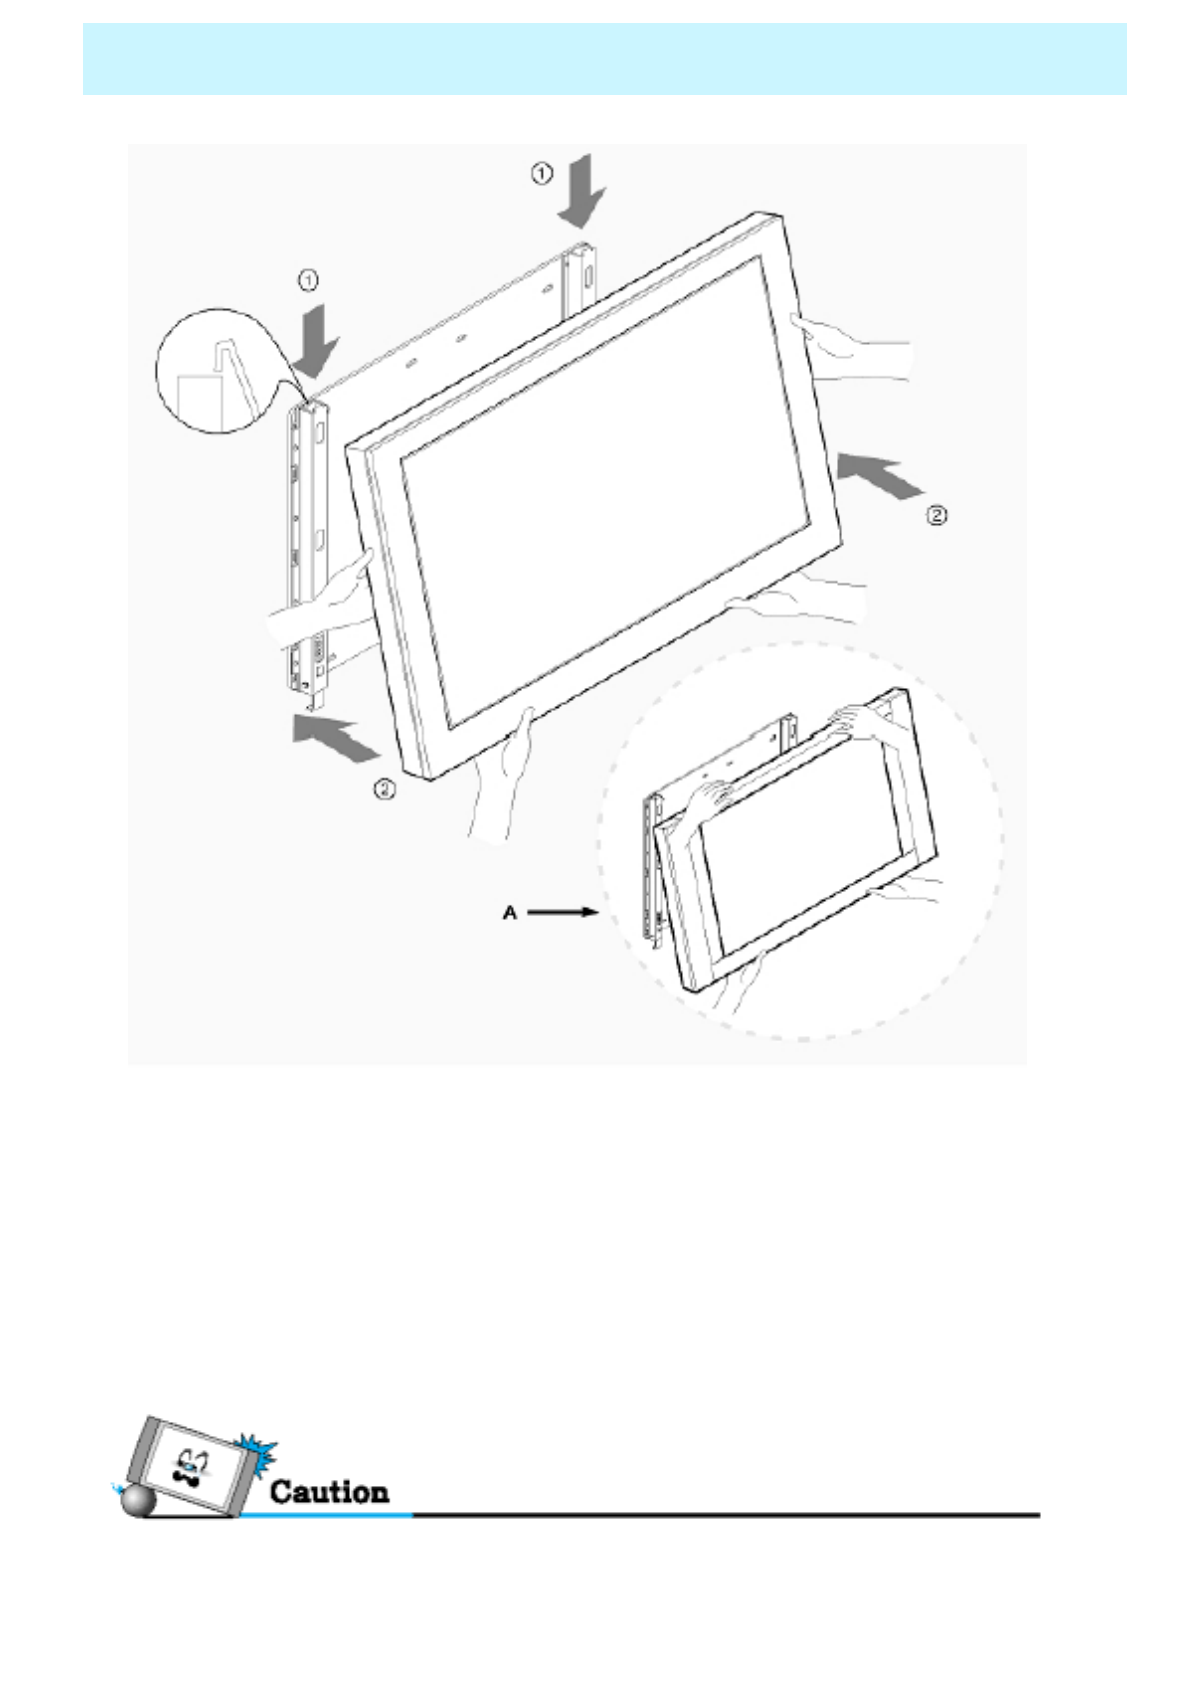
See A above, two people who are capable of lifting the weight of the
monitor should do the following:
Carefully lift up the monitor and place it in position on the wall mounting
bracket securely as shown by arrow 1.
Push the bottom of the monitor toward the wall as shown in arrow 2, so that
the monitor will “click” into position
onto the wall mounting bracket.
• Be sure to lift a monitor / speakers assembly by the monitor only, do not lift using only
the speakers.

OWNER'S MANUAL
21
Monitor Installation
•Wall Mount Accessories
6-Bolts for Wall
mounting bracket 6-Wall Anchor
Bolt Sleeves

OWNER'S MANUAL
22
Monitor Installation
Type-B
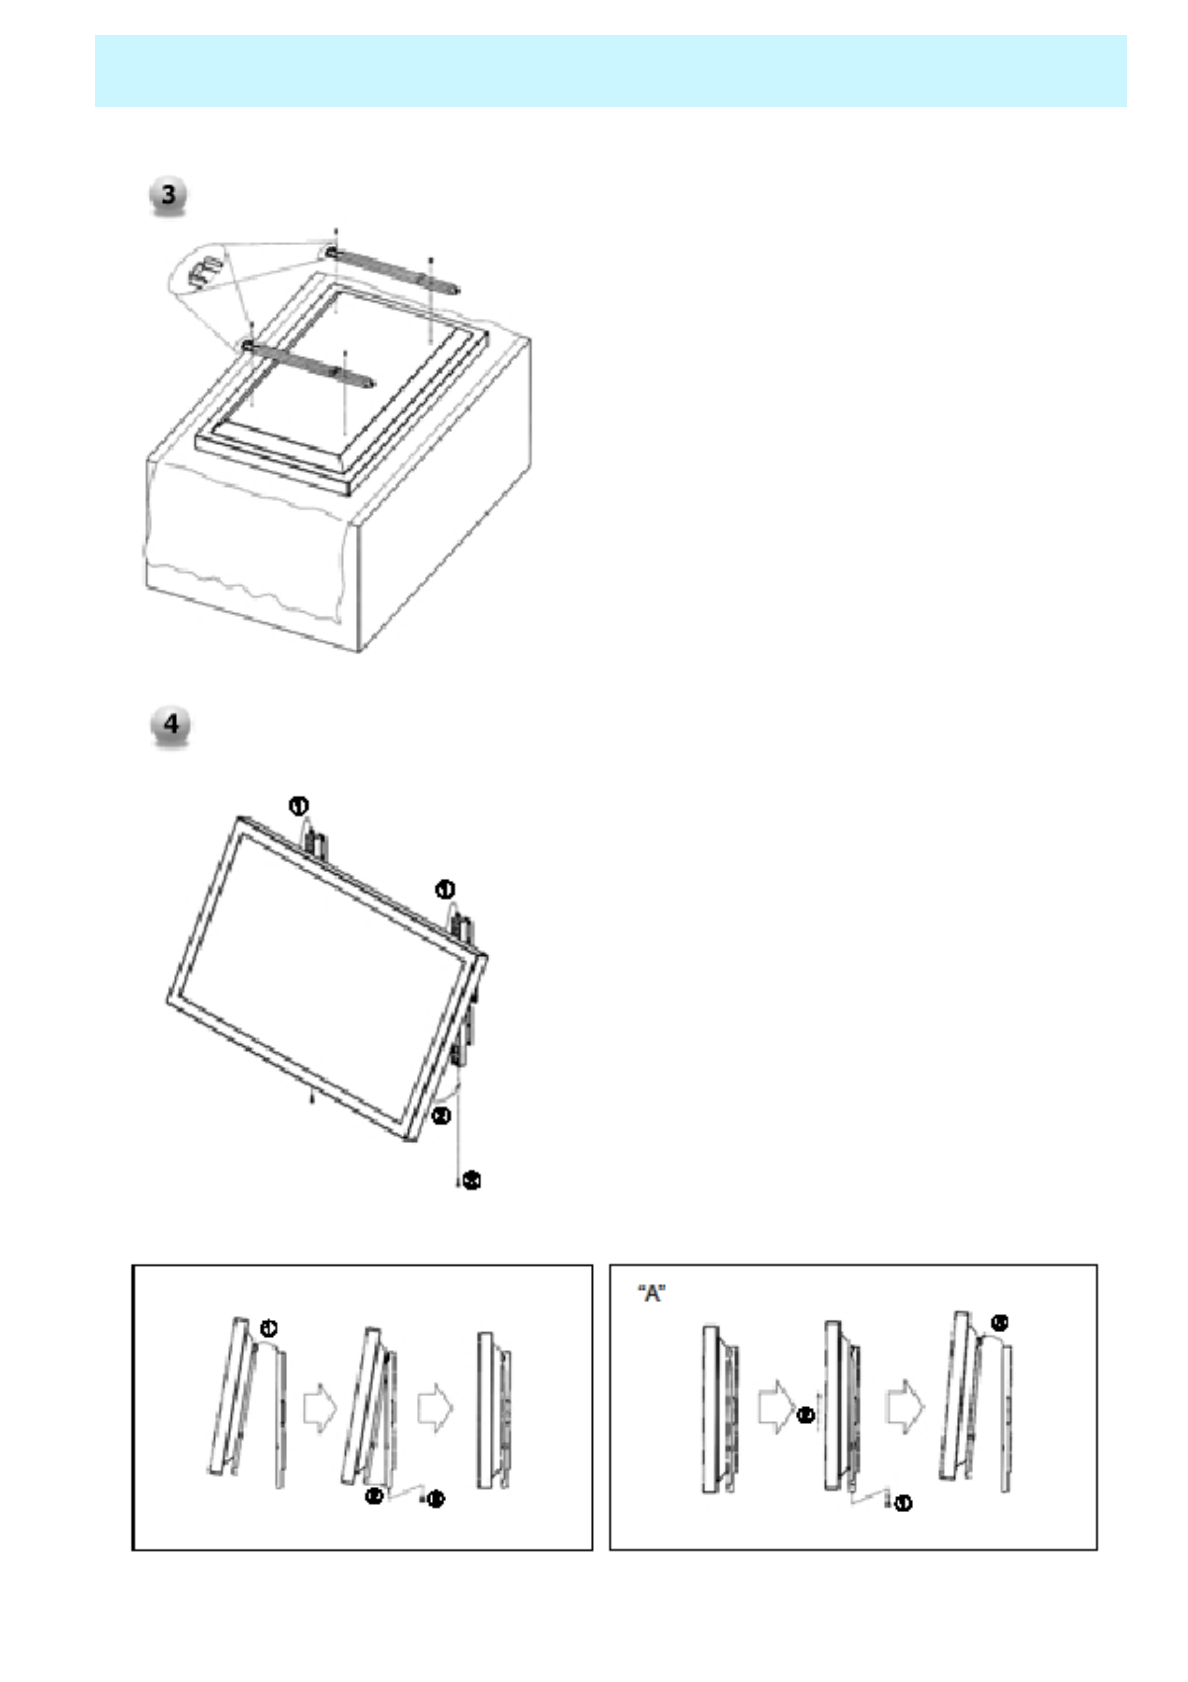
1. Before installation of monitor,
Assemble to the same inch of the
PDP shown as left(2).
2. Lift the monitor brackets off the
mounting frame shown as arrow 1.
1. Drill the 8 hole positions shown as
left. Using an 8mm drill appropriate
for the material on the wall, drill each
hole to a depth of exceed 80mm.
2. Clean each drill hole.
3. Insert an anchor supplied with the
wall mounting bracket into each hole.
4. Mount the wall mounting bracket on
the wall using the 8 screws supplied.
OWNER'S MANUAL
23
Monitor Installation
1. Shown as left, carefully place the monitor
screen side down on a cushioned surface that
will protect the monitor and screen from
damage.
2. Insert the monitor brackets on the monitor
shown as left. Install the 4 bolts securely, in the
back of the monitor in the holes provided. Be
sure the bracket hooks are at the top side of the
monitor. (for 42" PDP)
1. Two people who are capable of lifting the weight of
the monitor should do the following :
Carefully lift up the monitor and place it in position on
the wall mounting bracket securely shown as by arrow
Push the bottom of the monitor toward the wall as
shown in arrow2. so that the monitor will “click” into
position onto the wall mounting bracket.
2. Wall mounting bracket and monitor bracket should
combine together by bolt shown as left.
3. Caution : Be sure to lift a monitor/speakers assembly
by the monitor only, do not lift using only the speakers.
4. When separate the monitor, follow shown as below
“A”.

OWNER'S MANUAL
24
Monitor Installation
Wall mount accessories
ANCHOR 8EA SCREW 8EA BOLT 6EA
M8 x 30L BOLT 6EA
M4 x 6L
OWNER'S MANUAL
25
Monitor Installation
Table Stand Installation(optional)
<The Monitor can be installed on a desk as shown above.>
• Table Stand mount minimum allowable clearances for adequate ventilation.

OWNER'S MANUAL
26
Monitor Installation
•Installation
OWNER'S MANUAL
27
Monitor Installation
Speaker Installation
•42" Speaker Installation (Optional)
• Be sure monitor power is turned off before making any connections.
Place the speakers in the position you want. Install the speaker wires on the monitor and speaker. Be
sure to connect the positive “+” wire to the “+” input and the negative “-” wire to the “–” input. Connect
left monitor input to left speaker and right monitor input to right speaker. Any extra speaker wire length
remaining can be bunched into the wire holders provided.
(Caution: Once installed, the speaker wire holders lock into position and can’t be removed.)
OWNER'S MANUAL
28
Monitor Installation
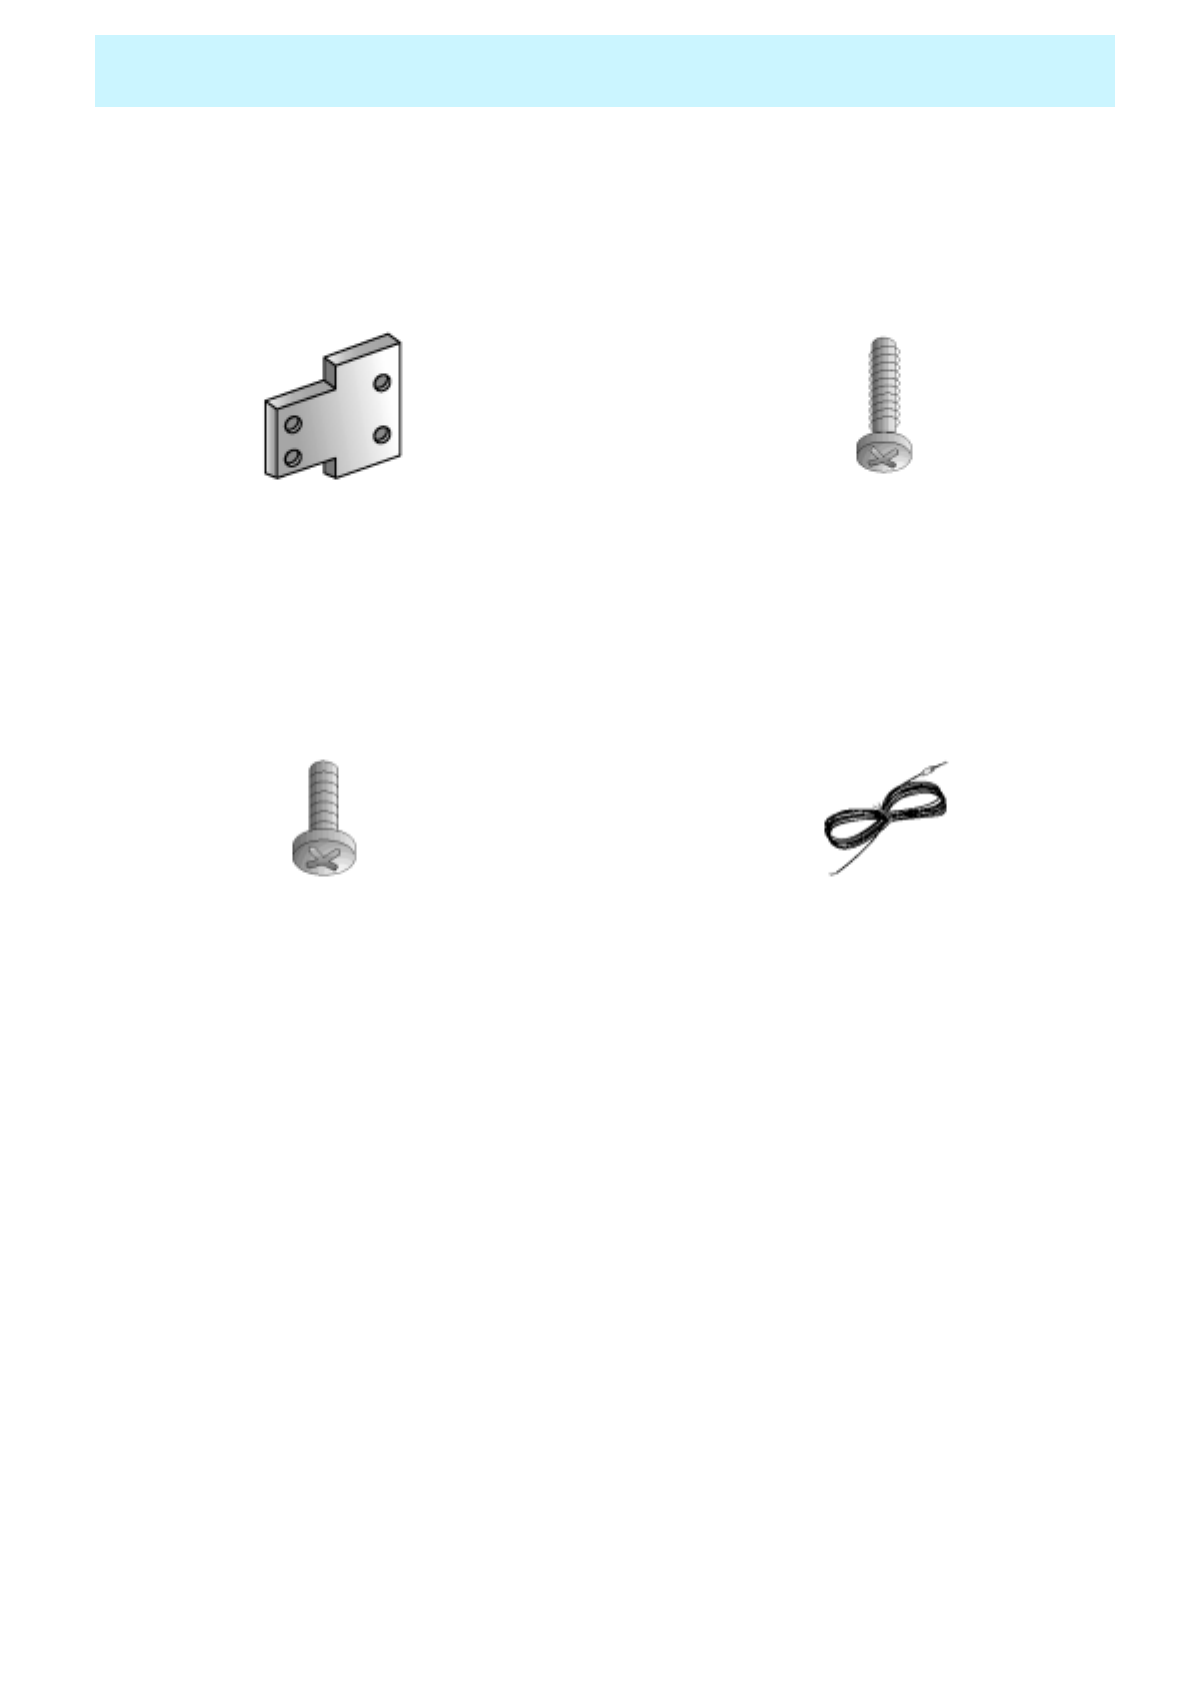
•Speaker Accessories
4-Iron Plates (Mount speakers to monitor) 8-4 x 16 Long Bolts (Attach iron plates to speakers)
8-4 x 8 Short Bolts (Attach iron plates to monitor) 2-Speaker Wires
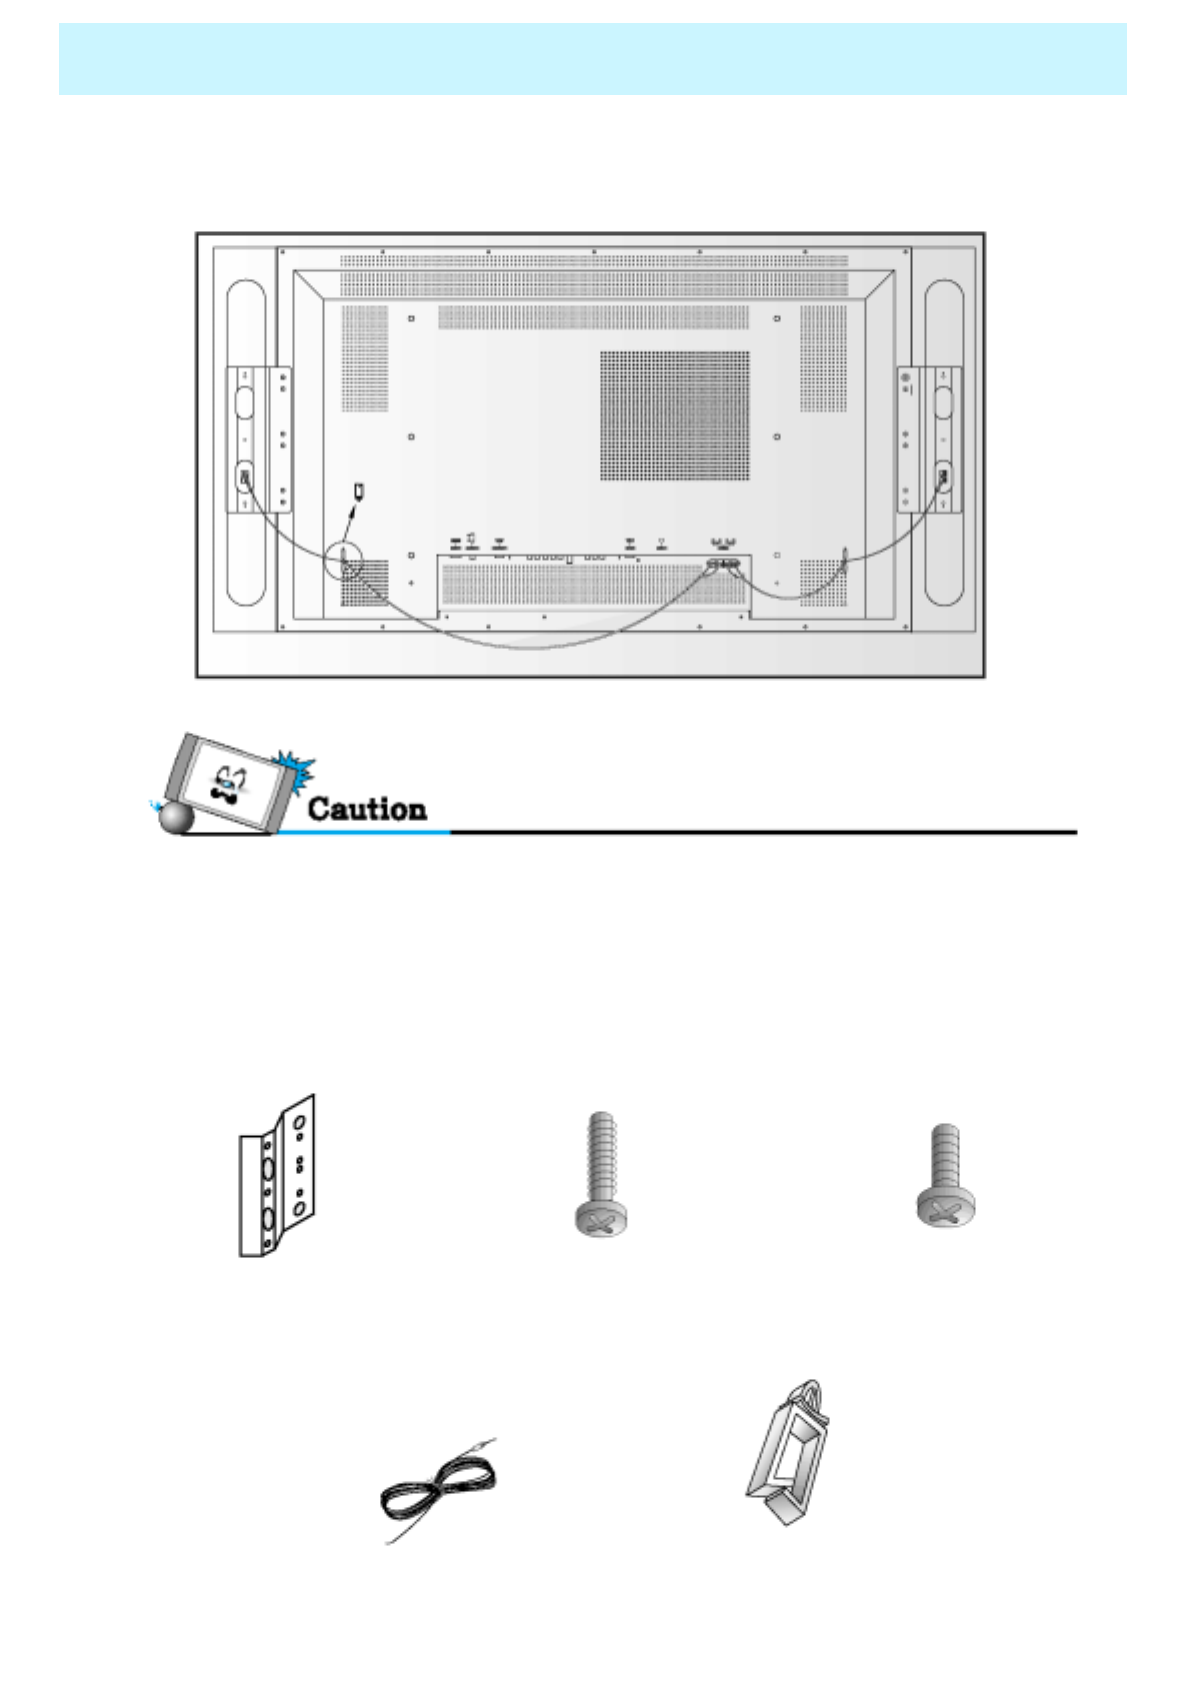
OWNER'S MANUAL
29
Monitor Installation
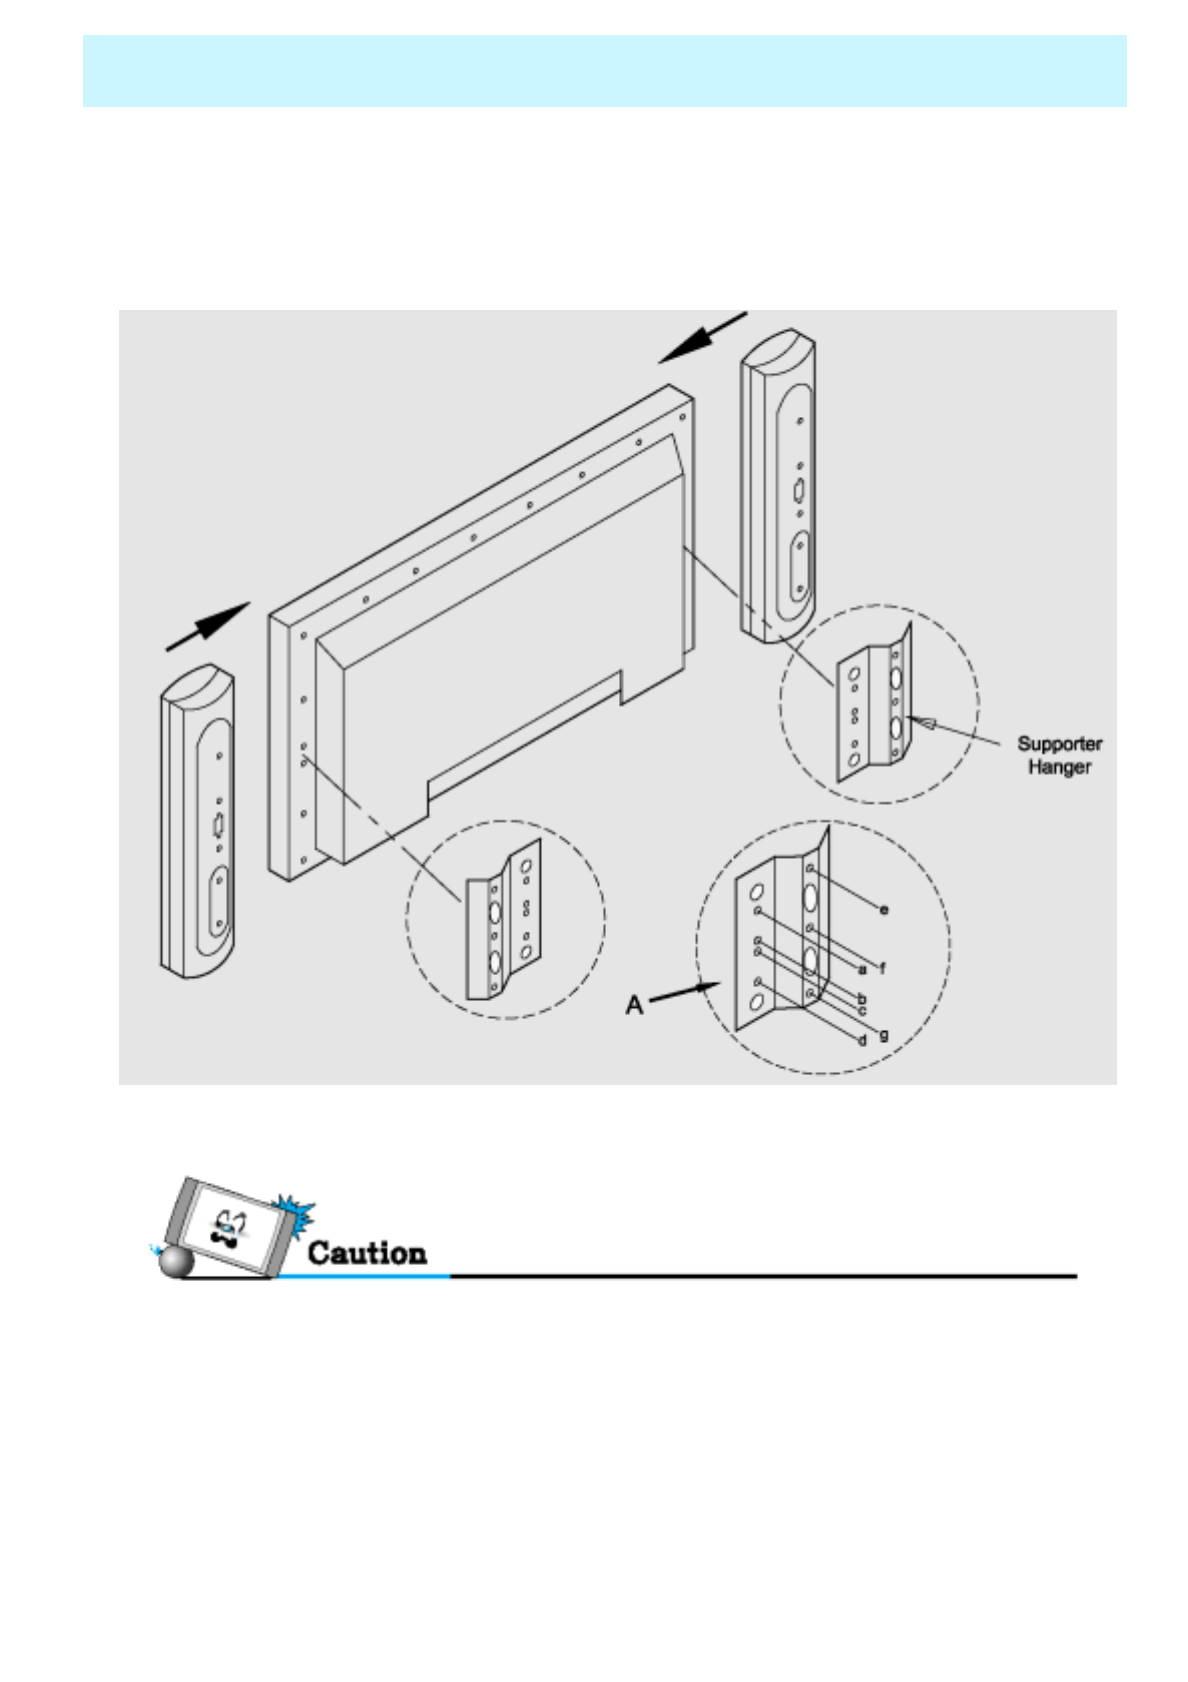
•50" Speaker Installation (Optional)
• Match red to red, black to black of Speaker / TV
• Always lift the monitor itself (not the speakers) when handling or moving the monitor after speakers
have been installed.
Assemble the monitor to speaker with using the supporter hanger and bolt. As shown above A,
assemble the a and b of supporter hanger to the monitor with using the bolt(M4x8). Assemble the c, d
and e to the speaker with using the bolt(4x16). If the bolts are tightened too much, the product could
be damaged.
OWNER'S MANUAL
30
Monitor Installation
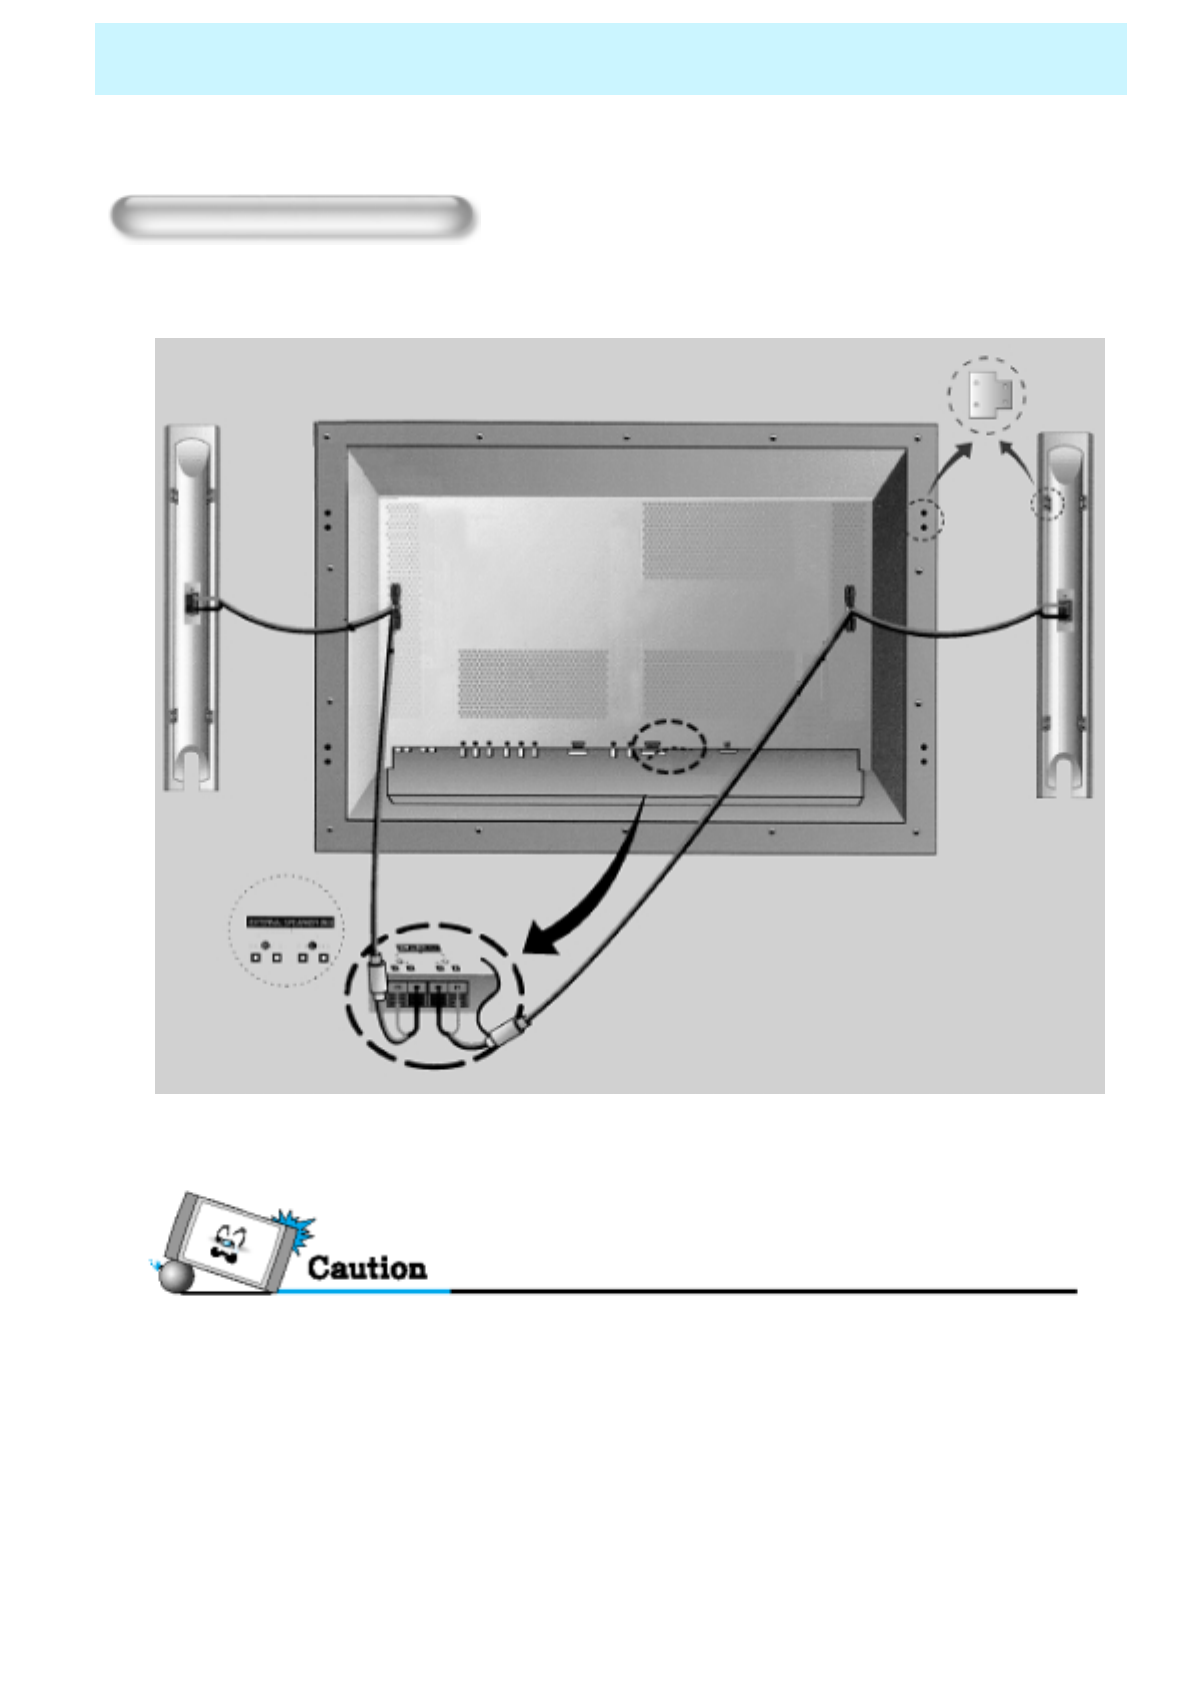
•Connecting Speakers to the Monitor using the speakers wires provided
• Be sure monitor power is turned off before making any connections. Place the speakers in the position
you want. Install the speaker wires on the monitor and speaker. Be sure to connect the positive "+" wire
to the "+" input and the negative "-" wire to the "-" input. Connect left monitor input to left speaker and
right monitor input to right speaker. Any extra speaker wire length remaining can be bunched into the
wire holders provided. (Caution: Once installed, the speaker wire holders lock into position and can't be
removed.)
•Accessories
2 - Supporter Hanger
(Mount speakers to
Monitor.)
8 - M4X8 Bolts
(Attach Supporter
Hanger to monitor.)
6 - 4X16 Bolts
(Attach Supporter
Hanger to speakers.)
2-Speaker Wires 2 - Speaker Wire Holders
(for arranging the
speaker wires.)
OWNER'S MANUAL
31
RGB PC INPUT
DVI INPUT
CABLE AIR
YPrPb R
AUDIO
LR
AUDIO
LRAUDIOLR
AUDIO
L
VIDEO VIDEO S-VIDEO
YPrPb R
AUDIO
LRAUDIOLVIDEO
ANT. IN
AC INPUT
RS-232C
PC/DVI
AUDIO AV2
AV1
S-VIDEO
OPTICAL
SPDIF
COMPONENT2 (480p,720p,1080i)
COMPONENT1 (480i)
AV OUT
TV Antenna Cable
CATV AIR
Watching TV
To watch TV (When the Interface board is installed.)
Connect the signal source to TV input. Press TV/VIDEO button on the remote control and select
TV on OSD.
Use CH+, CH- button or numeric button to change TV program for your program selection.
You can watch the previous program by pressing P.CH Button on Remote Control.
Also, you can tune to cable service provided programs using the cable box. For further
information regarding cable TV service, contact cable TV service provider(s).

OWNER'S MANUAL
32
Watching VCR
AC INPUT
RS-232C
RGB PC INPUT
DVI INPUT
CABLE AIR
YPrPb R
AUDIO
LR
AUDIO
LR
AUDIO
LR
AUDIO
L
VIDEO VIDEO S-VIDEO
YPrPb R
AUDIO
LRAUDIOLVIDEO
ANT. IN
AV2
AV1
S-VIDEO
OPTICAL
SPDIF
COMPONENT2 (480p,720p,1080i)
COMPONENT1 (480i)
AV OUT
PC/DVI
AUDIO
AV1
AV2 S-Video
When connecting the Plasma Monitor with external equipments, match the colors of connecting
ports (Video -yellow, Audio(L) - white, Audio(R) - red).
If you have a mono VCR, connect the audio cable from the VCR to the AUDIO(L/MONO) input of the
Plasma Monitor.
If you connect an S-VIDEO VCR to the S-VIDEO input, the picture quality is improved; compared to
connecting a regular VCR to the Video input.
Avoid having a fixed image remain on the screen for a long period of time. Typically a frozen still
picture from a VCR 4:3 picture format or if a CH label is present.
<To avoid picture noise (interference), leave an adequate distance(over 3m) between the VCR and monitor.>
To watch VCR (When the Interface board is installed.)
Press TV/ Video button on the remote control and select Video Sources.
Insert a video tape into the VCR and press the PLAY button on the VCR.
OWNER'S MANUAL
33
Watching DVD
How to connect (When the Interface board is installed.)
AC INPUT
RS-232C
RGB PC INPUT
DVI INPUT
CABLE AIR
YPrPb RAUDIOLR
AUDIO
LRAUDIOLRAUDIOL
VIDEO VIDEO S-VIDEO
YPrPb R
AUDIO
LR
AUDIO
L
VIDEO
ANT. IN
AV2
AV1
S-VIDEO
OPTICAL
SPDIF
COMPONENT2 (480p,720p,1080i)
COMPONENT1 (480i)
AV OUT
PC/DVI
AUDIO
Connect DVD video inputs to Y, Pb, Pr of COMPONENT (DVD INPUT) and audio inputs to Audio
sockets of AV INPUT.
Component1 (480i)
Component2 (480p, 720p, 1080i)
How to use (When the Interface board is installed.)
Turn on the DVD player.
Press TV / Video button on the remote control of the monitor
to select Component1 or Component2(for Progressive).
OX1080i
OX720p
OX480p
XO480i
Component2Component1
•Component Input ports
You can get better picture quality if you connect DVD player with component input ports as below.
Component ports of the
Monitor
Video output ports
of DVD player
Y PBPR
Y Pb Pr
Y B-Y R-Y
Y Cb Cr
Y PBPR
HDCP
HDCP(High-bandwidth Digital Content Protection) is a system for protecting DVD content outputted
via DVI from being copied. It provides a secure digital link between a video source(PC, DVD . etc) and
a display device(TV, projector . etc). Content is encrypted at the source device to prevent unauthorized
copies from being made.
• Normal DVD source is based on 480i, which should be through normal YPbPr of Component signal.
OWNER'S MANUAL
34
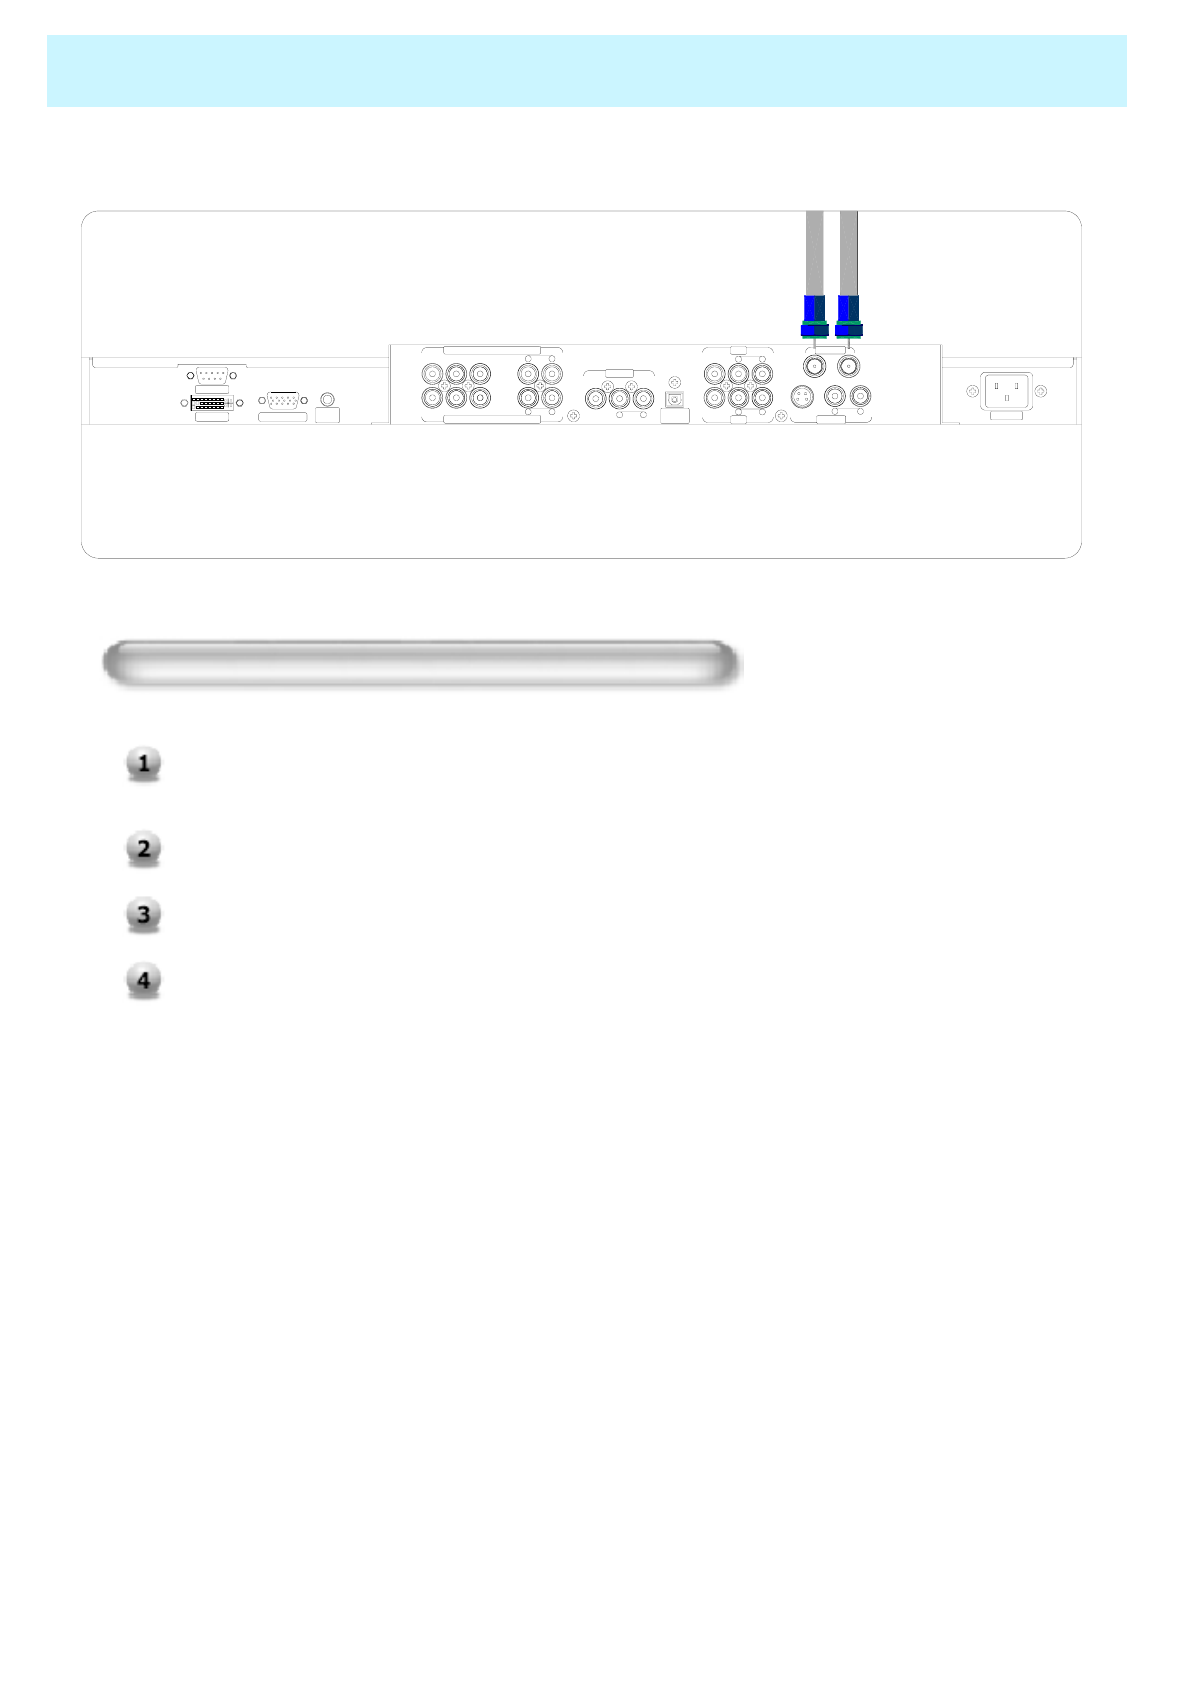
Watching Set Top Box
How to connect (When the Interface board is installed.)
Connect Set Top Box video inputs to COMPONENT, PC or DVI. And audio inputs to Audio sockets
of AV INPUT.
AC INPU T
RS-2 32C
RGB PC INPUTDVIINPUT
CABLE AIR
YPrPb R
AUDIO
LR
AUDIO
LRAUDIOLRAUDIOL
VIDEO VIDEO S-VIDEO
YPrPb RAUDIOLRAUDIOLVIDEO
ANT. IN
AV2
AV1
S-VIDEO
OPTICAL
SPDIFCOMPONENT2 (480p,720 p,1080i)
COMPO NENT1 (480i)
AV OUT
PC/DVI
AUDIO
Component1 (480i)
Component2 (480p, 720p, 1080i)
PC(D-Sub 15pin)DVI
How to use (When the Interface board is installed.)
Turn on the Set Top Box.
Toggle TV / Video button on the remote control of the monitor to select
Component1, Component2, PC or DVI.
OWNER'S MANUAL
35
AC INPUT
RS-232C
RGB PC INPUT
DVI INPUT PC/DVI
AUDIO
CABLE AIR
YPrPb RAUDIOLR
AUDIO
LRAUDIOLR
AUDIO
L
VIDEO VIDEO S-VIDEO
YPrPb R
AUDIO
LRAUDIOLVIDEO
ANT. IN
AV2
AV1
S-VIDEO
OPTICAL
SPDIF
COMPONENT2 (480p,720p,1080i)
COMPONENT1 (480i)
AV OUT
PC (D-Sub 15pin)
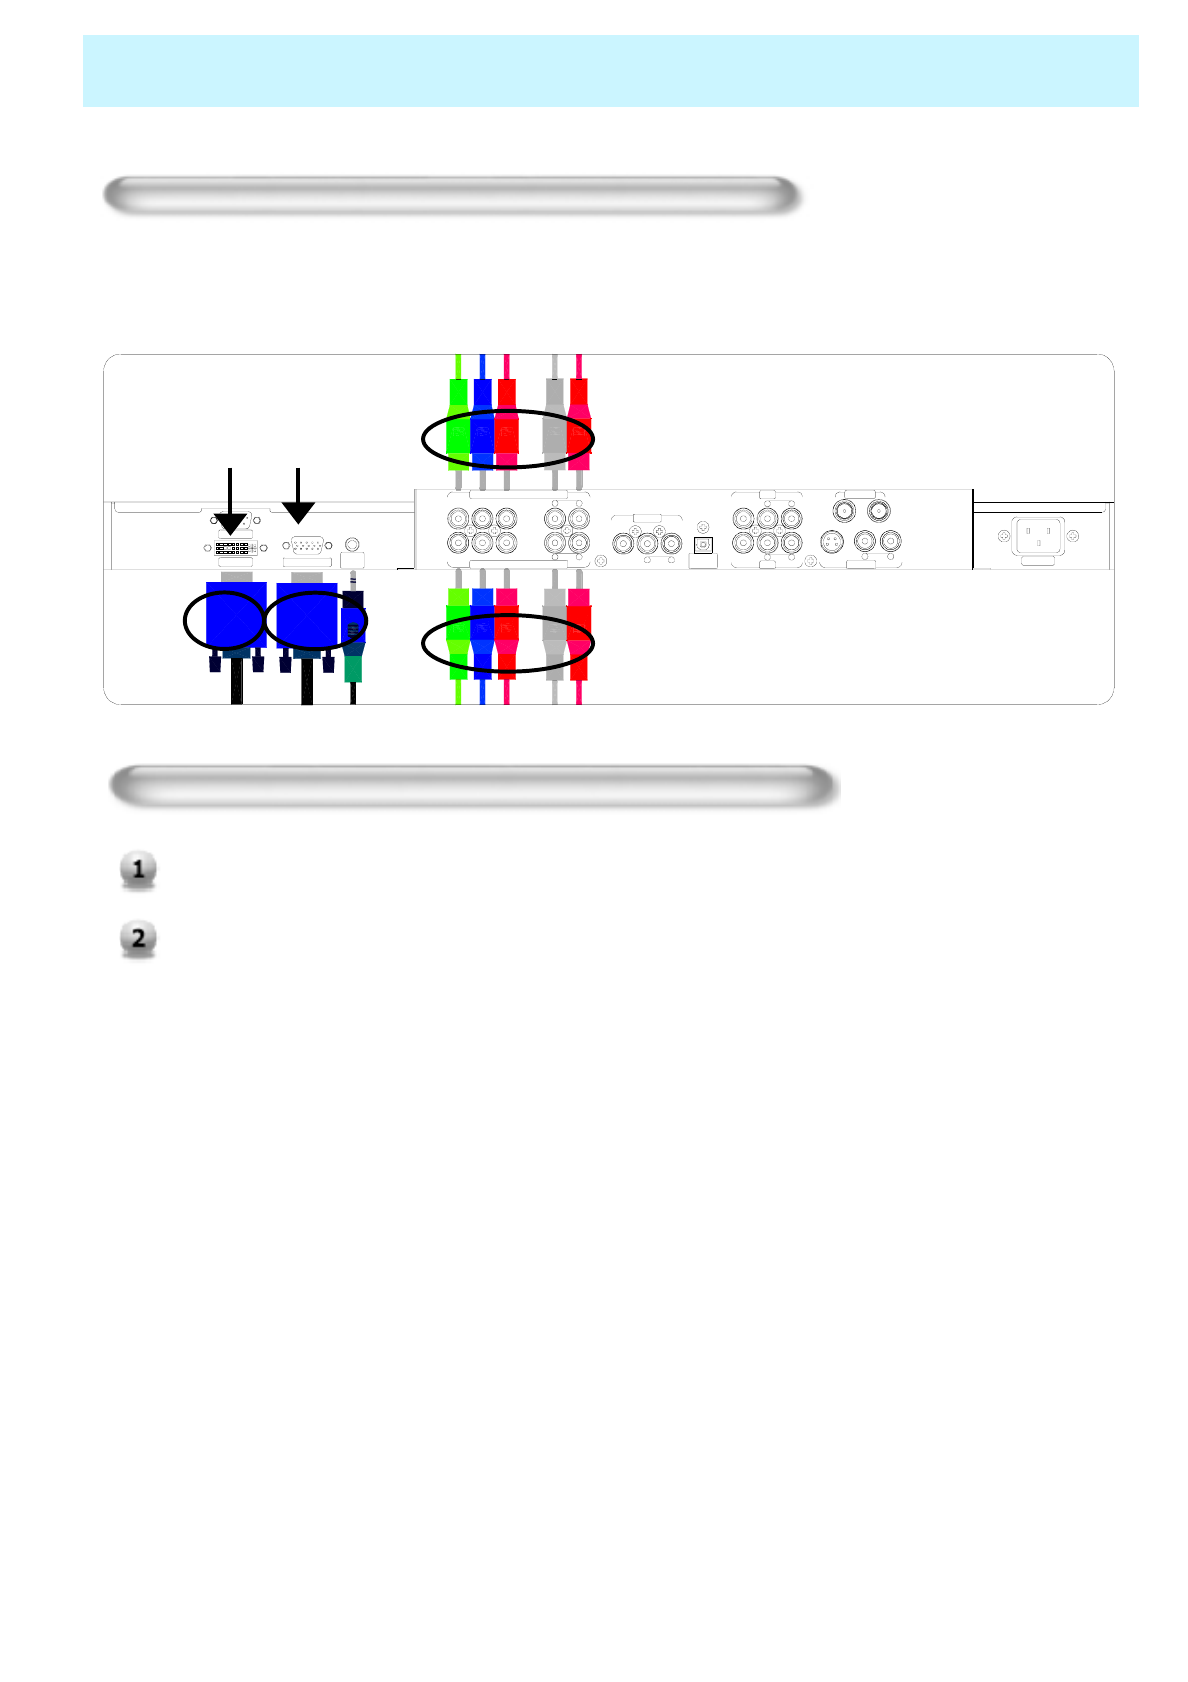
Connecting The PC
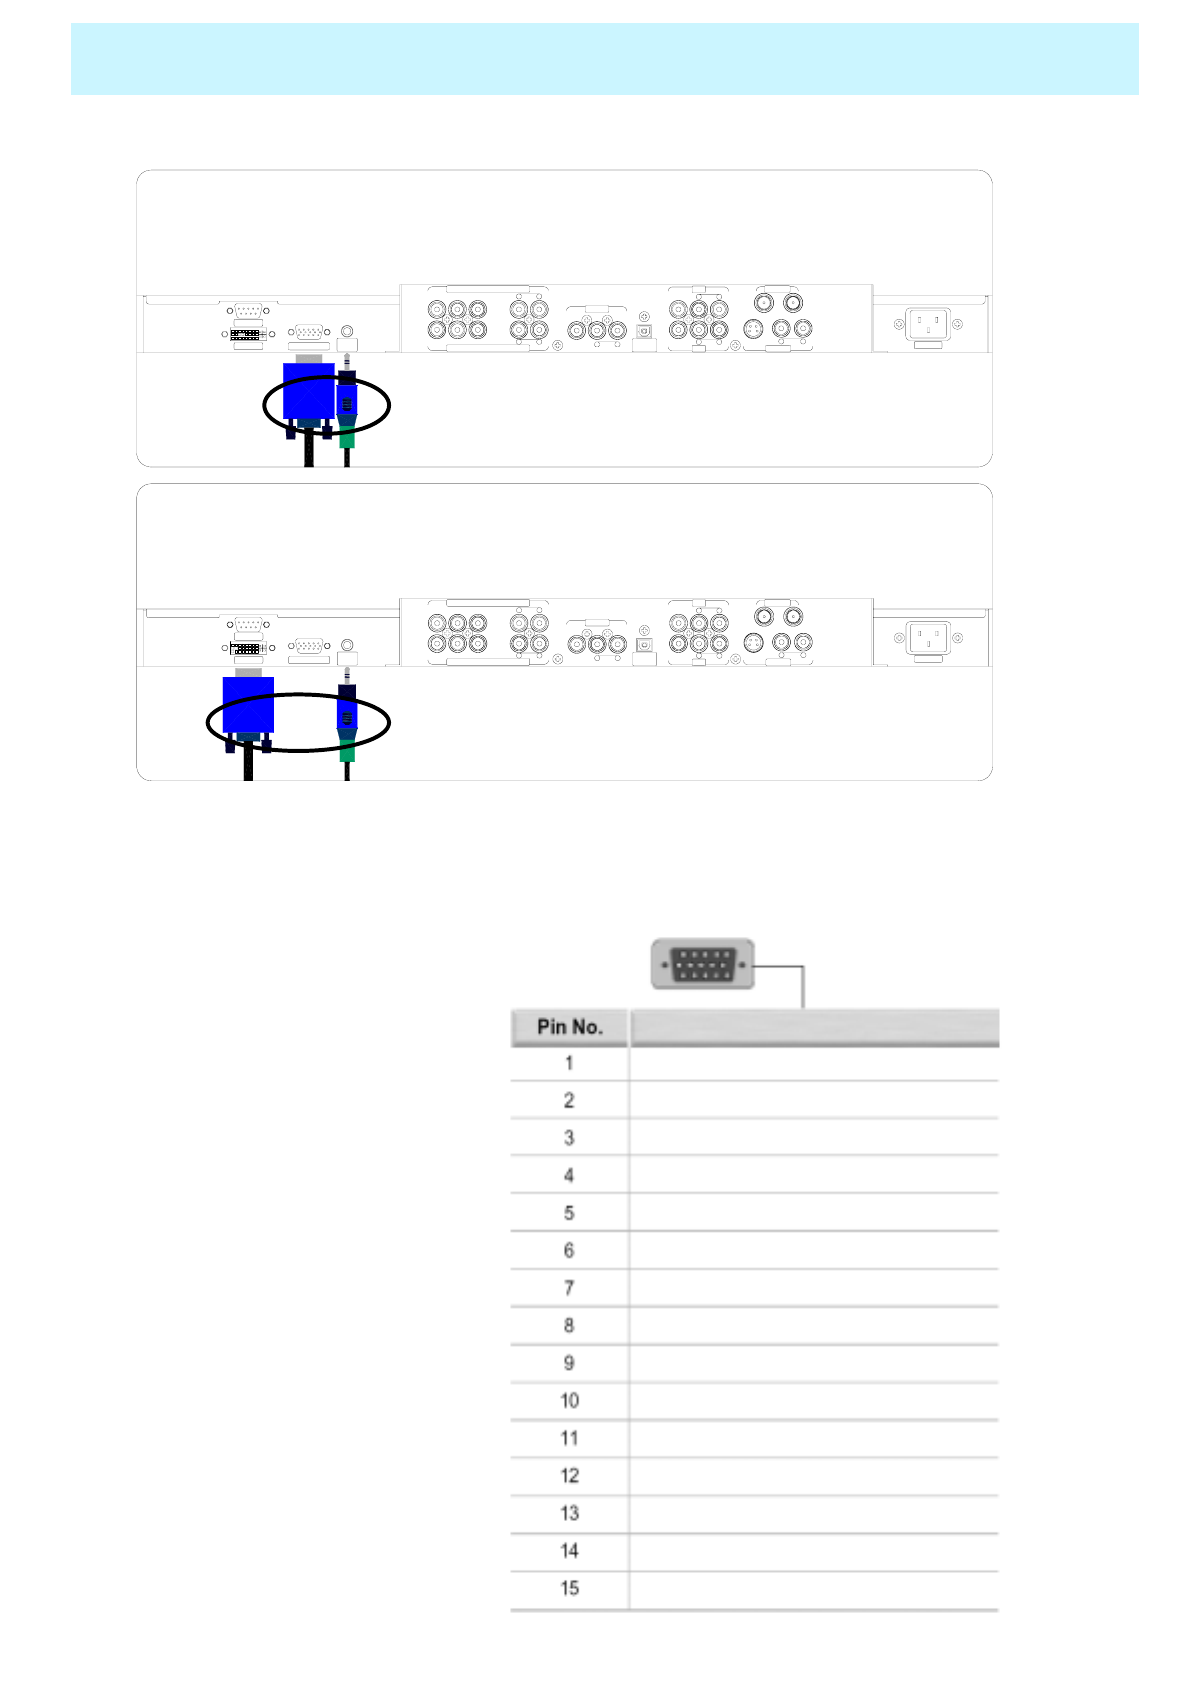
You can enjoy vivid picture and sound with connecting a PC with the Monitor.
XConnecting a PC to the PDP
• Connect a PC (15pin) cable between the Video Output jack on the PC and the RGB (480i/p, 720p, 1080i) in
(15p D-SUB) on the PDP.
XPin Configuration
• 15Pin Signal Cable
(based on protruded pin)
XTo watch the PC screen
1. Turn on PDP and press TV/VIDEO
Button to select the PC MODE
2. Turn on PC and check for PC
requirements
3. Adjust the PC screen
CABLE AIR
YPrPb R
AUDIO
LR
AUDIO
LR
AUDIO
LRAUDIOL
VIDEO VIDEO S-VIDEO
YPrPb RAUDIOLR
AUDIO
L
VIDEO
ANT. IN
AV2
AV1
S-VIDEO
OPTICAL
SPDIFCOMPONENT2 (480p,720p,1080i)
COMPONENT1 (480i)
AV OUT
PC/DVI
AUDIO AC INPUT
RS-232C
RGB PC INPUT
DVI INPUT
DVI
Red (R)
Green (G)
Blue (B)
Grounding
Grounding (DDC)
Red (R) Grounding
Green (G) Grounding
Blue (B) Grounding
Reserved
Sync Grounding
Grounding
Data (DDC)
Horizontal sync.
Vertical sync.
Clock (DDC)
Description
OWNER'S MANUAL
36
Displayable Monitor Specification
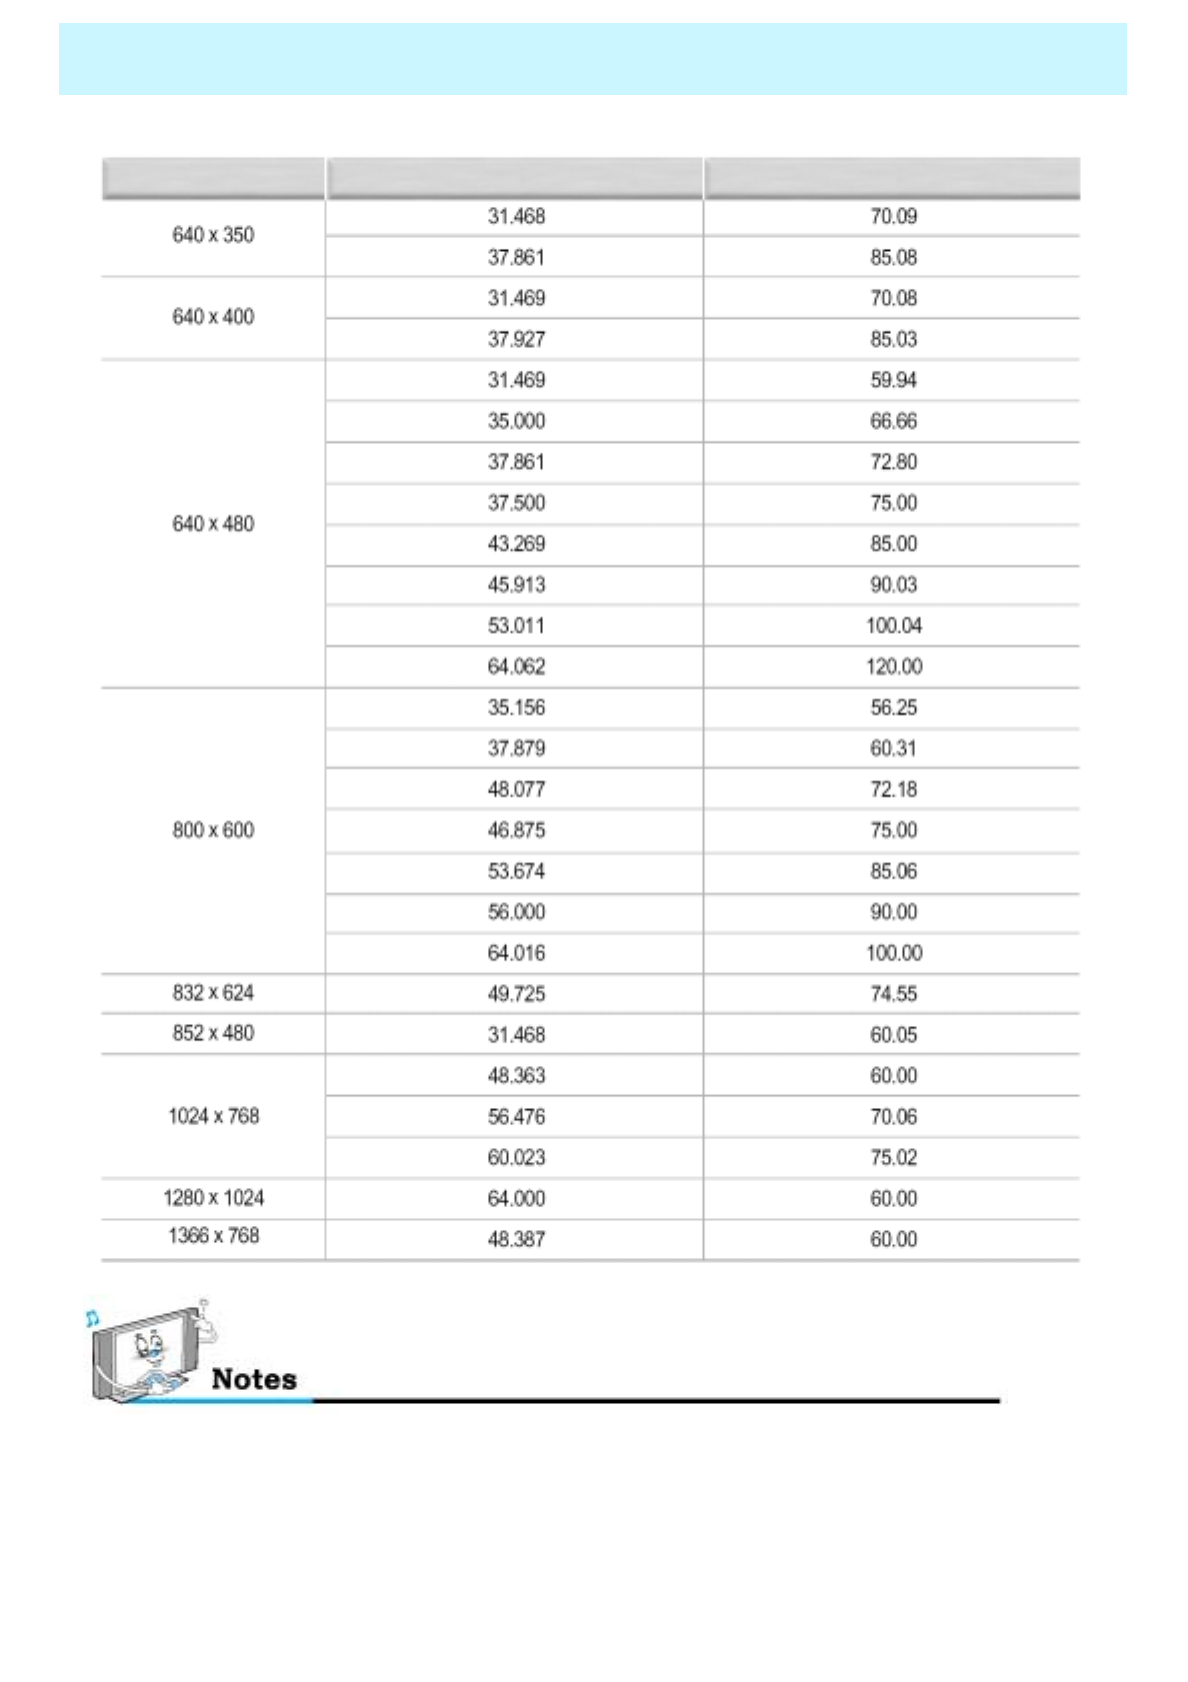
Resolution Horizontal Frequency (KHz) Vertical Frequency (Hz)
• Synchronization input form : separate
• 852 x 480 : 42" Native Resolution
Horizontal Polarity is Positive(+)
Vertical Polarity is Negative(-)
• 1366 x 768 : 50" Native Resolution
Horizontal Polarity is Positive(+)
Vertical Polarity is Negative(-)
•The PDP operates abnormally if a non-standard video
format is selected.
•Depending on the manufacturer, your PC screen might
appear differently.(and depending on your particular
version of Windows).
Check your PC instruction book for information about
connecting your PC to a PDP.
OWNER'S MANUAL
37
Basic Operation
Turning The Monitor TV On And Off
Press the Power button on the remote control. The PDP will turn on and you will be ready to use it's
features. You can also use the Power button on the front of the PDP.
TV Program Selection
Connect the signal source to TV input. Press TV/Video button on the remote control and select
TV on OSD.
Use CH+, CH- button or numeric button to change TV program for your program selection.
You can watch the previous program by pressing P. CH Button on Remote Control.
Also, you can tune the cable service, provided programs while using the cable box. For further
information regarding cable TV service, contact your TV service provider(s).
Volume Control
Use VOL+ / VOL- button
Press MUTE button on Remote Control.
OWNER'S MANUAL
38
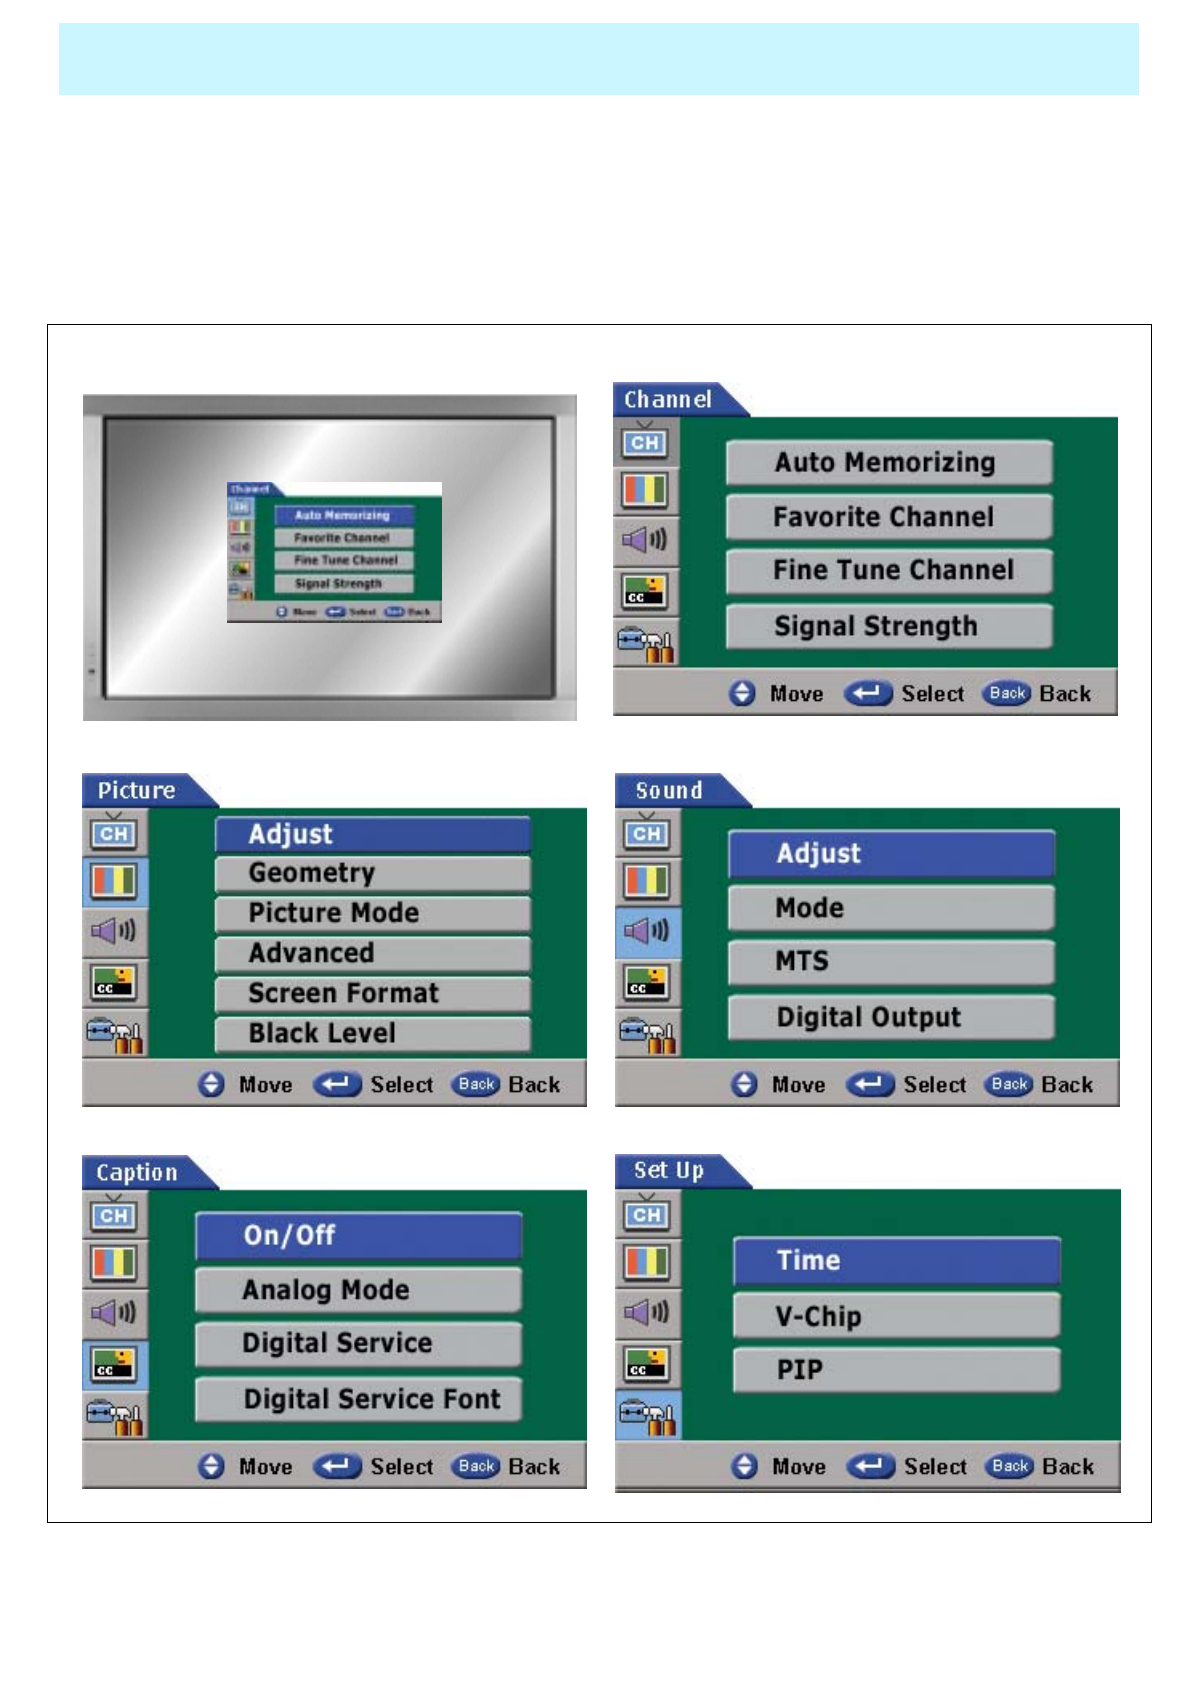
OSD Structure
• OSD (On Screen Display) allows users to control or adjust various features and settings in
accordance with his/her preferences.
• Press the Menu/Set button on the Remote Control, you may see the OSD.
e.g.) OSD menu on the video background
OWNER'S MANUAL
39
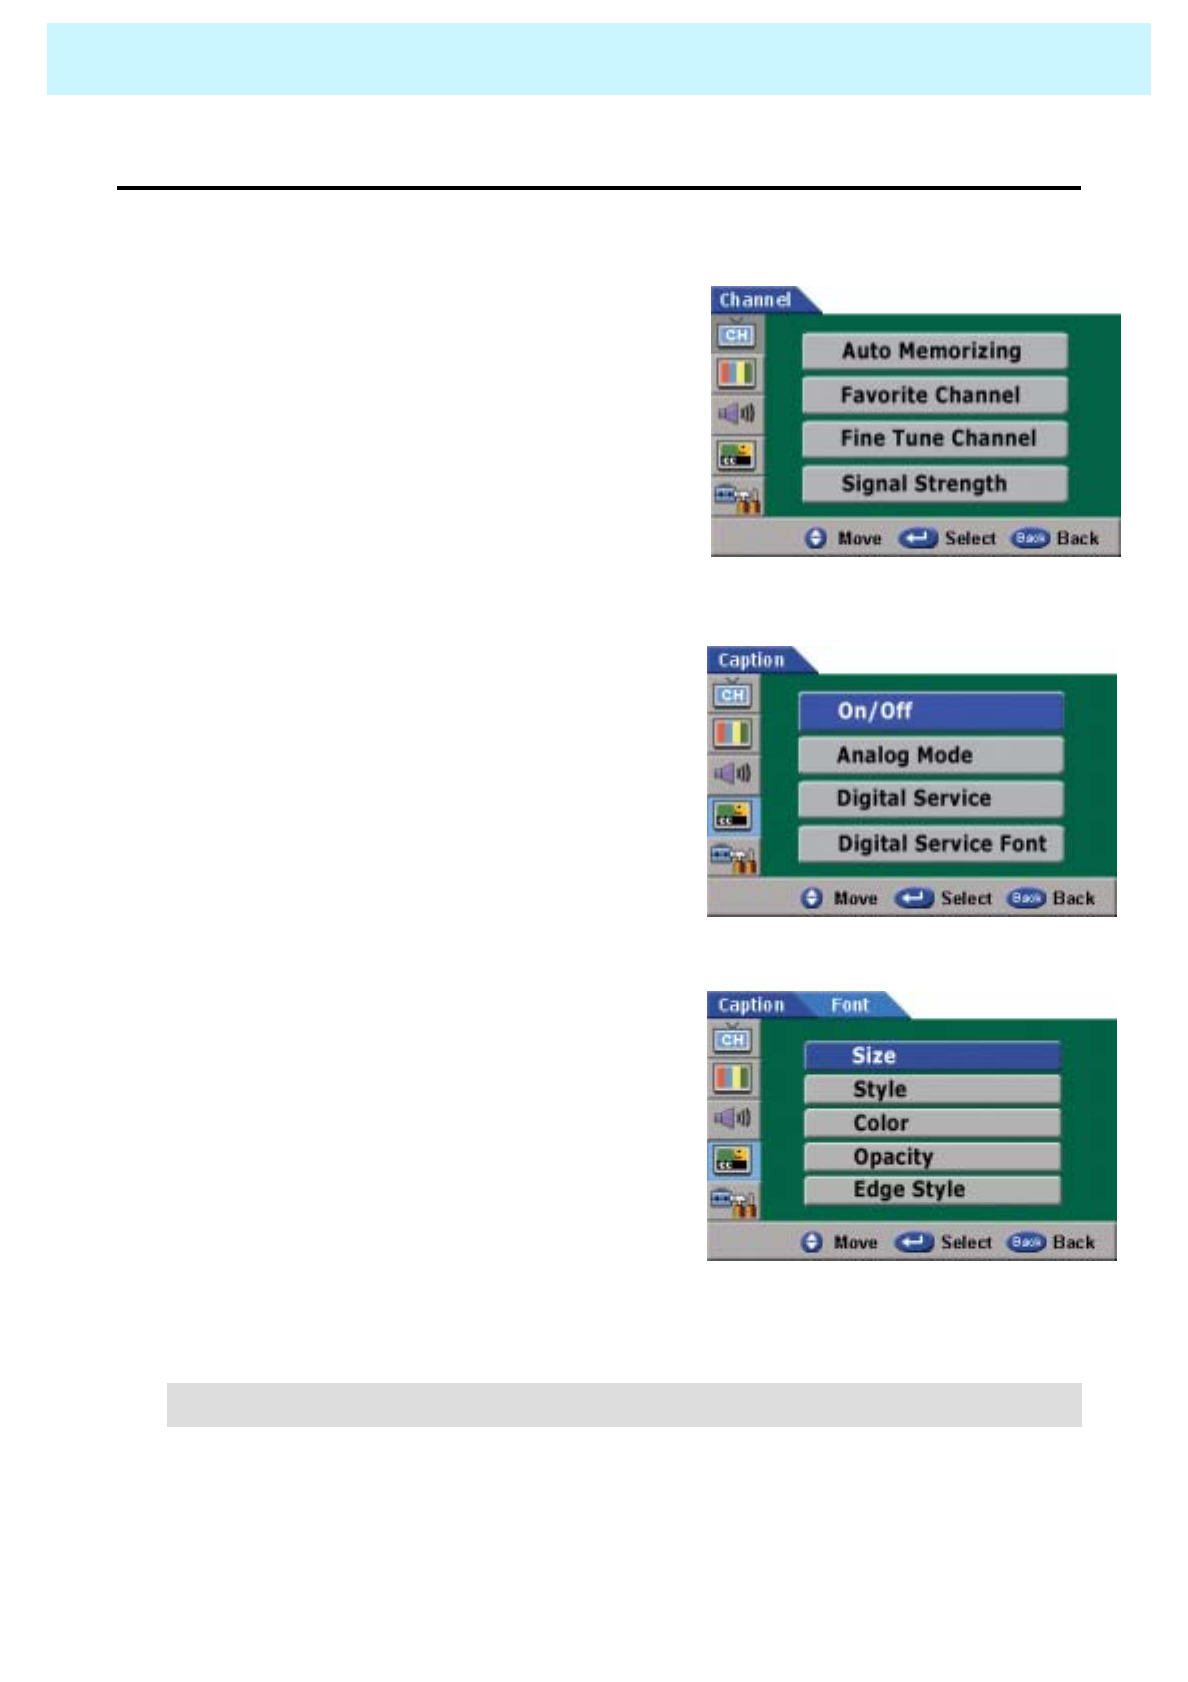
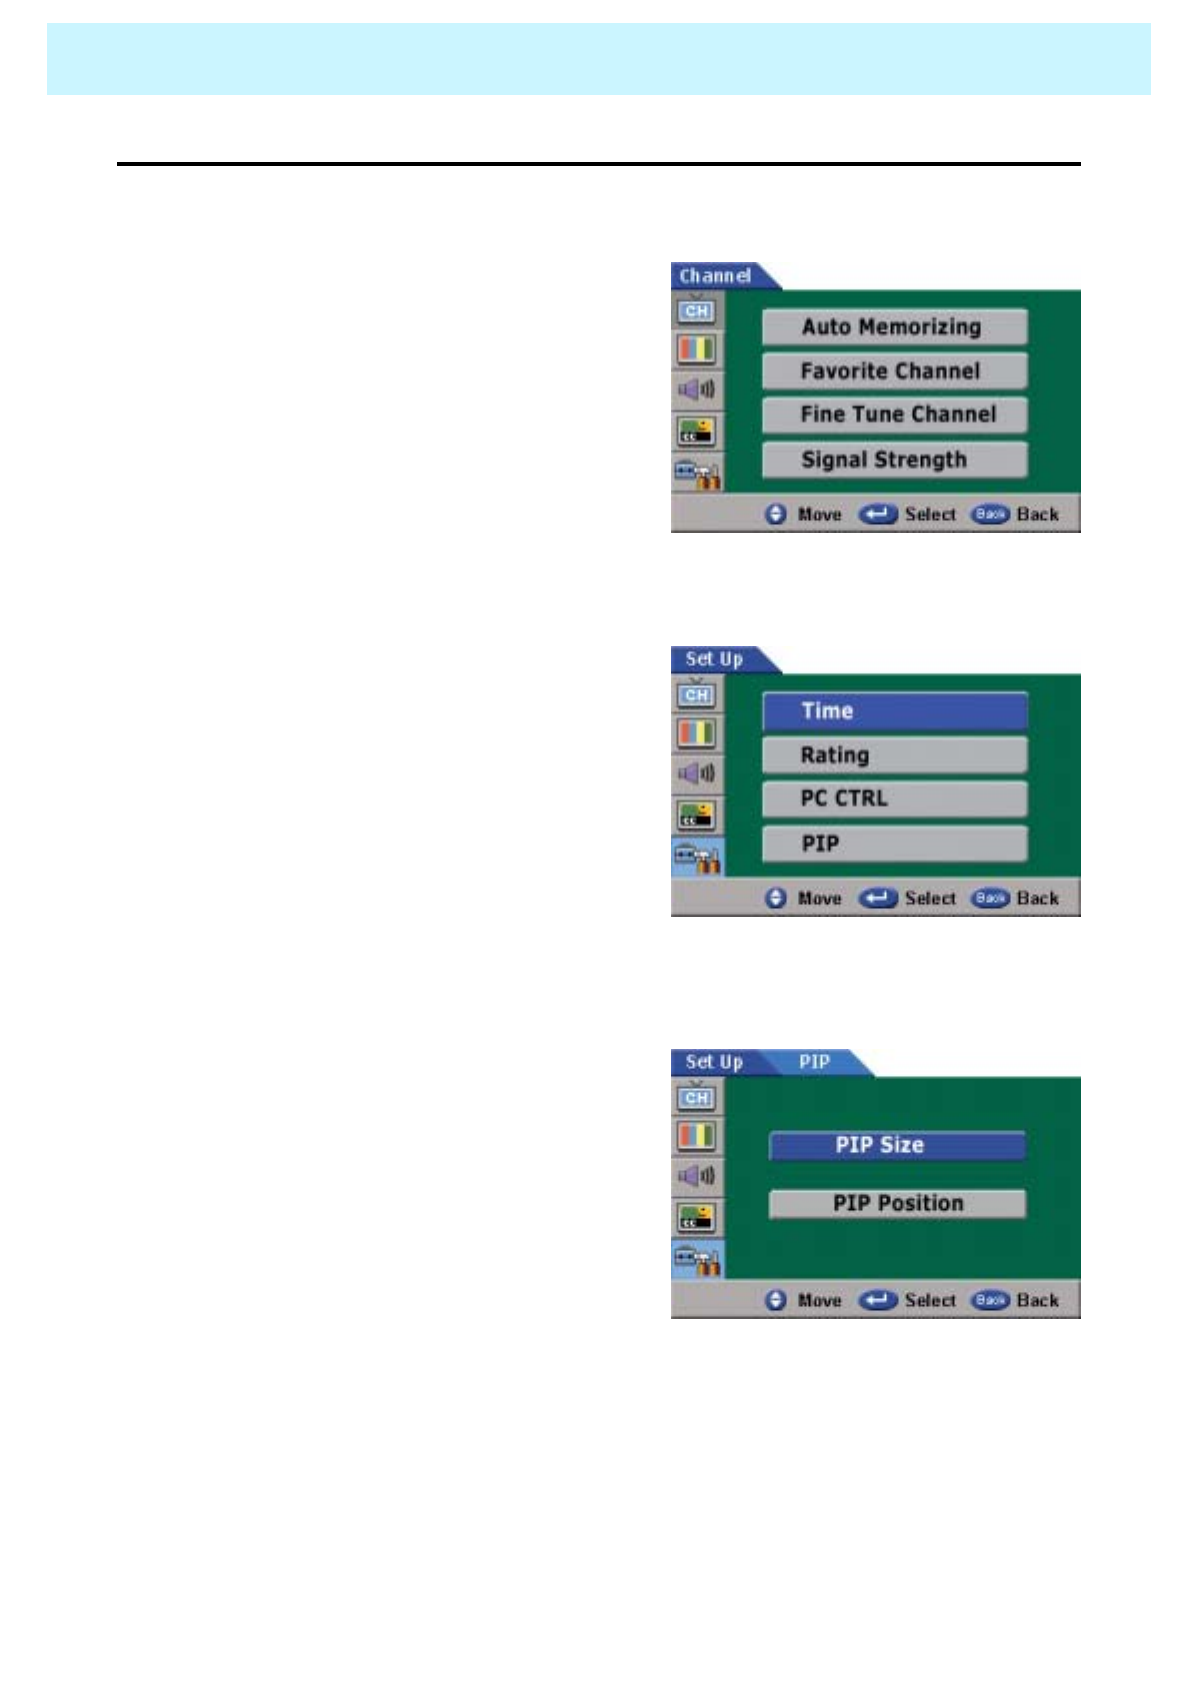
CHANNEL (TV)
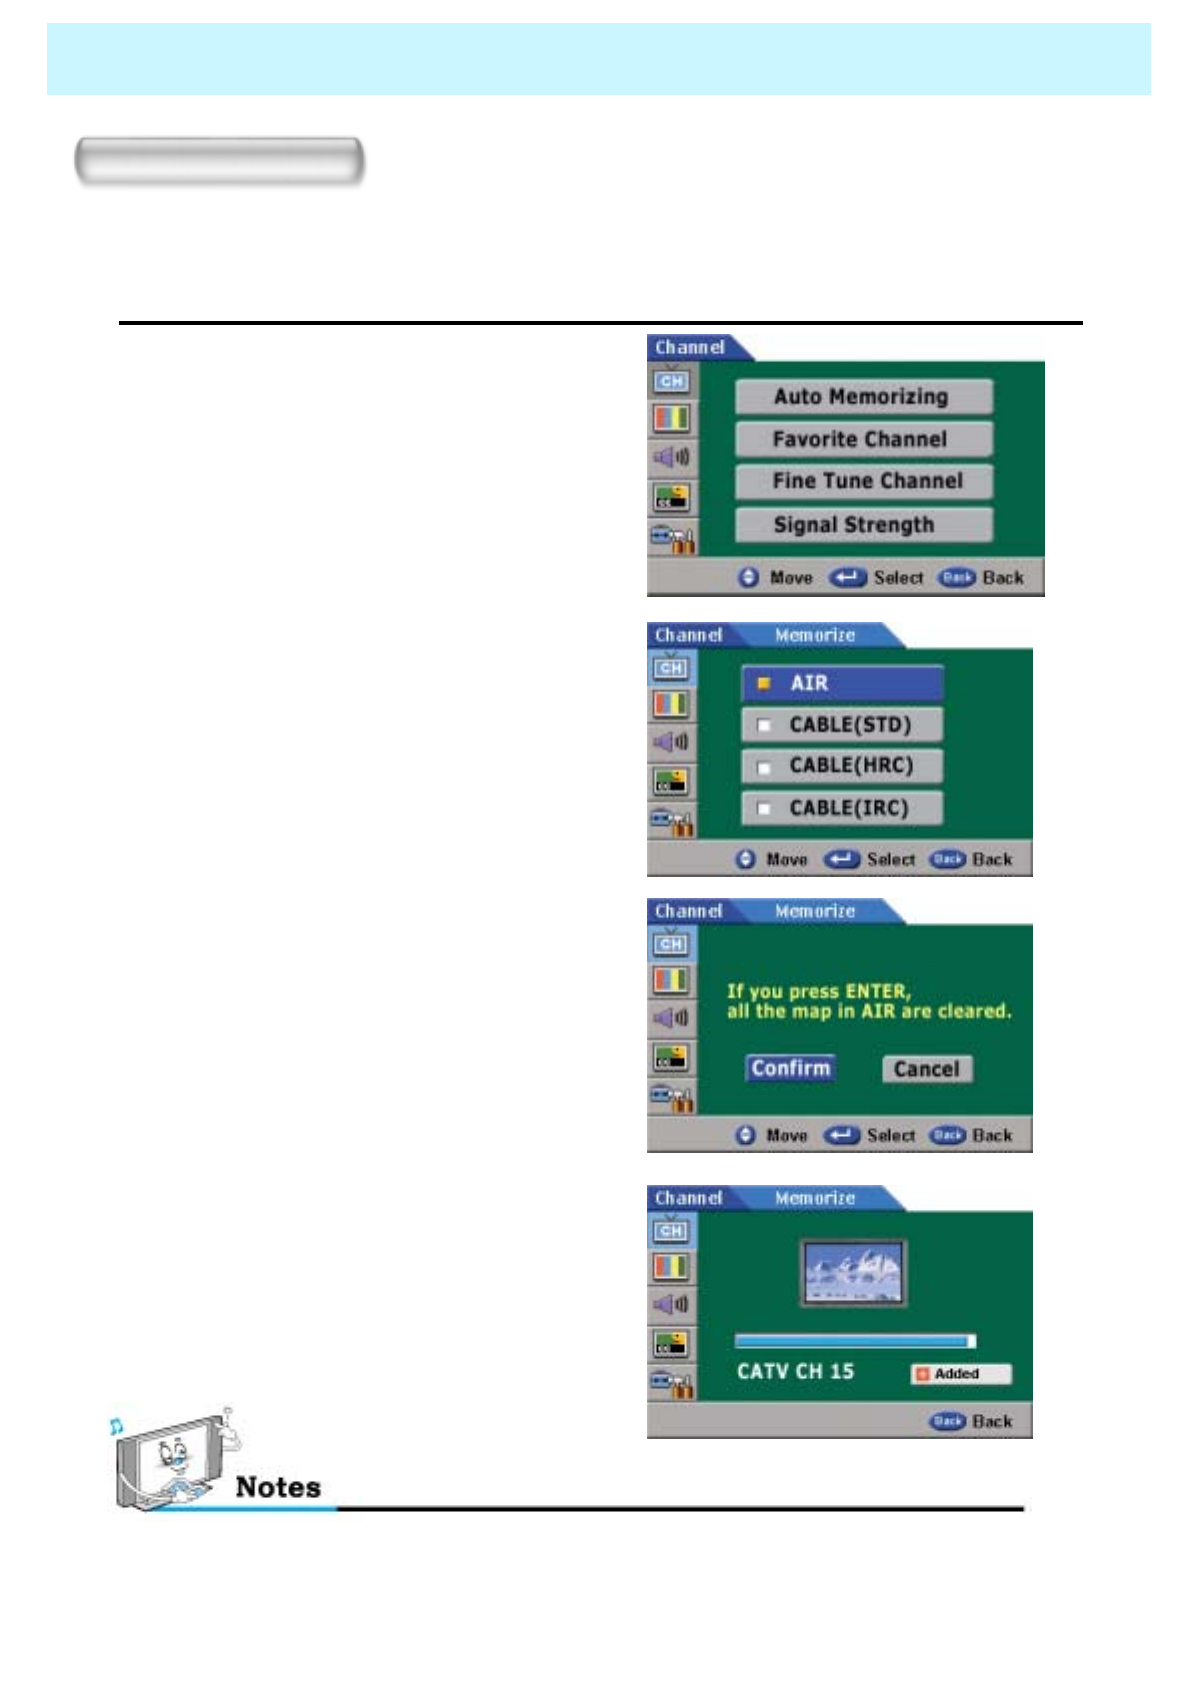
Store TV channels
You can now search for and store the TV channels in two different ways : using Auto Memorizing or
Manual Memorizing.
•Auto Memorizing
1. Press Menu/set button to display
OSD.
2. Press Menu/set button again to
get into Channel Menu.
3. Press Auto Memorizing button.
4 Select the Video Signal Source :
Before your PDP can begin
memorizing the available channels,
you must specify the type of signal
source that is connected to the
PDP (If you are not sure, contact
your CATV company)
5 Press Menu/set button again to
start Auto Memorizing
6 The PDP automatically cycles through
all of the available channels and stores
them in memory. (Press Back button at
any time to interrupt the memorization
process. But Channels will be
memorized by the time it is cancelled)
STD, HRC and IRC identify various types of cable TV system. Contact your local cable
company to identify the type of cable system that exists in your particular area.
OWNER'S MANUAL
40
CHANNEL (TV)
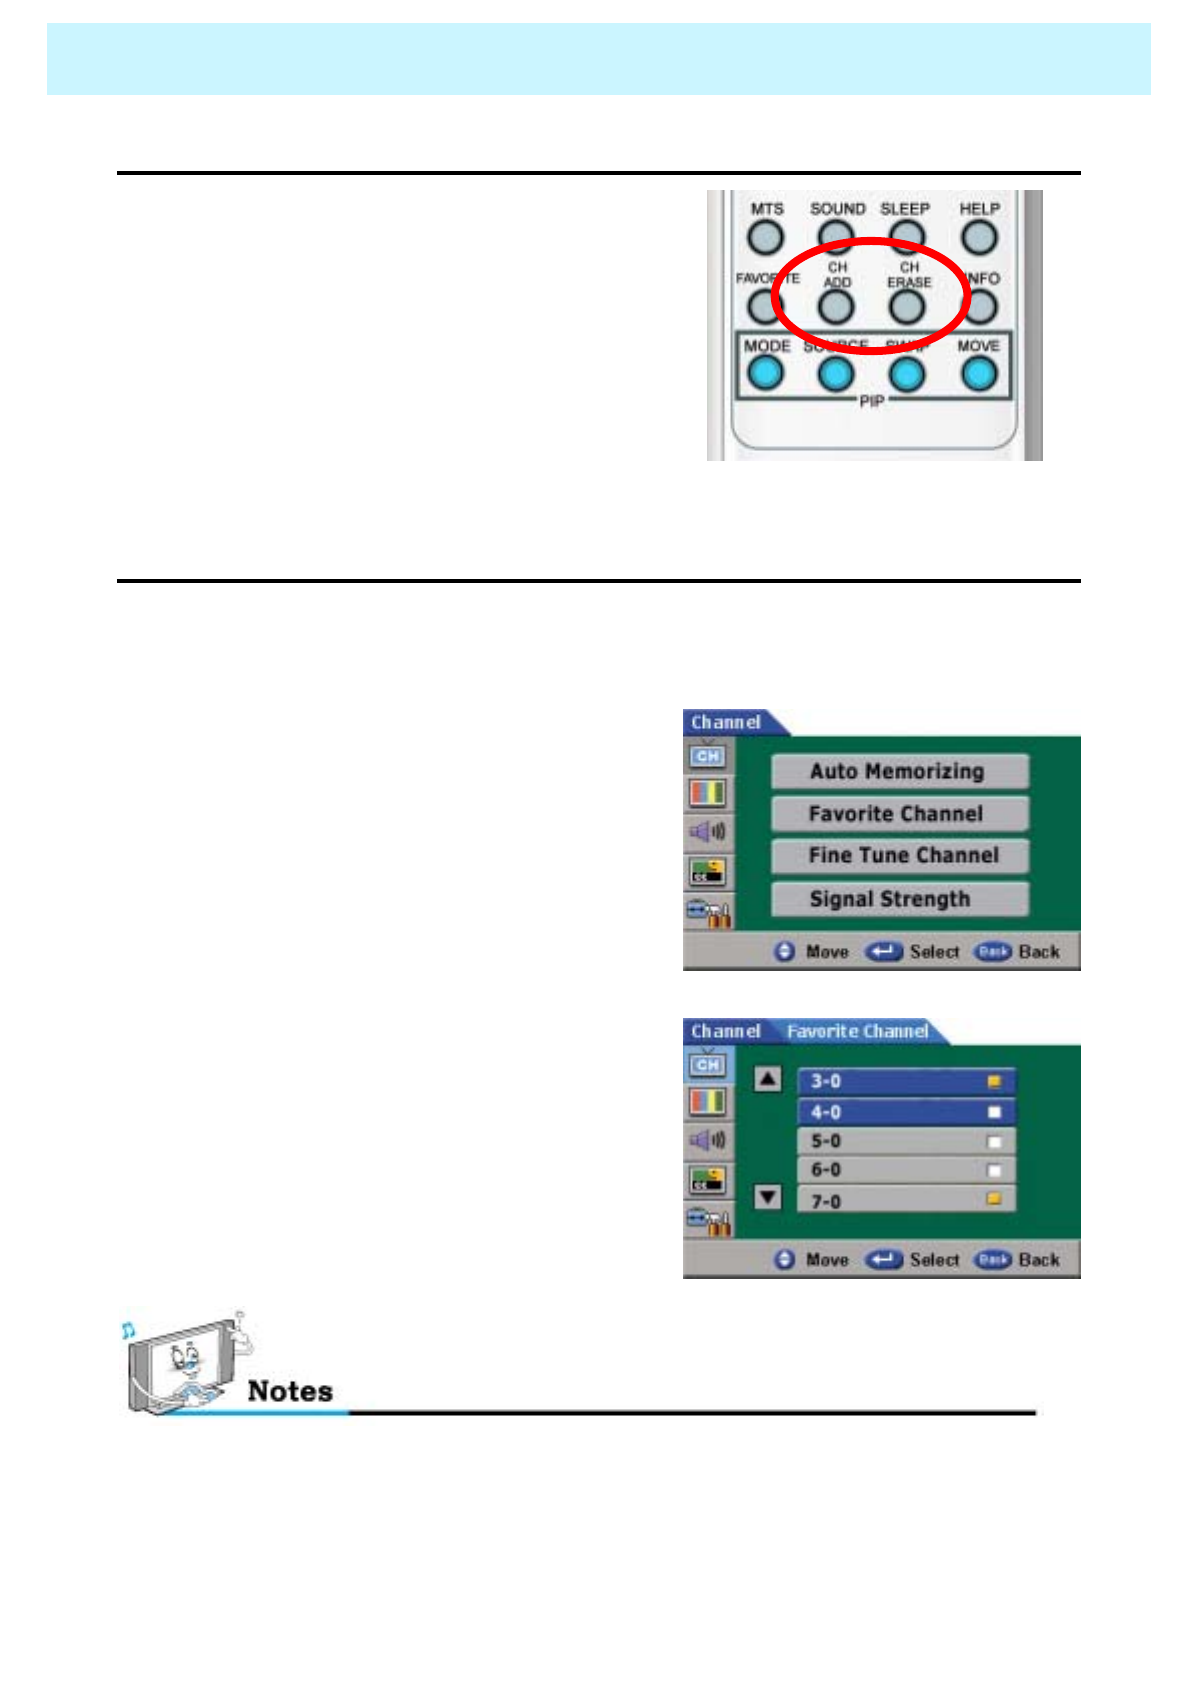
•Adding and Erasing Channels (Manual Method)
1. Use the number buttons to directly select the
channel that will be added or erased.
2. Press the CH ADD or CH ERASE button (Remote)
•Favorite Channel
- You can store of your favorite channels for each available input source (such as TV or CATV).
Then, when you press the FAVORITE button on the remote control, the PDP display only the
favorite channels you previously stored, allowing you to quickly and easily find frequently wanted
channels.
-you can view any channel (including an erased
channel) by using the number buttons on the
remote control.
1. Press Menu/set button and press Menu/set
button again to get into Channel Menu.
Press dbutton to select Favorite Channel,
then press Menu/set button.
2 Select your favorite channel with cord
button.
3 Press Menu/set button to add or delete
favorite channels.
4 You can watch you favorite channels by
pressing FAVORITE button on the remote
control.
Only memorized channels can be set as Favorite Channels.
OWNER'S MANUAL
41
CHANNEL (TV)
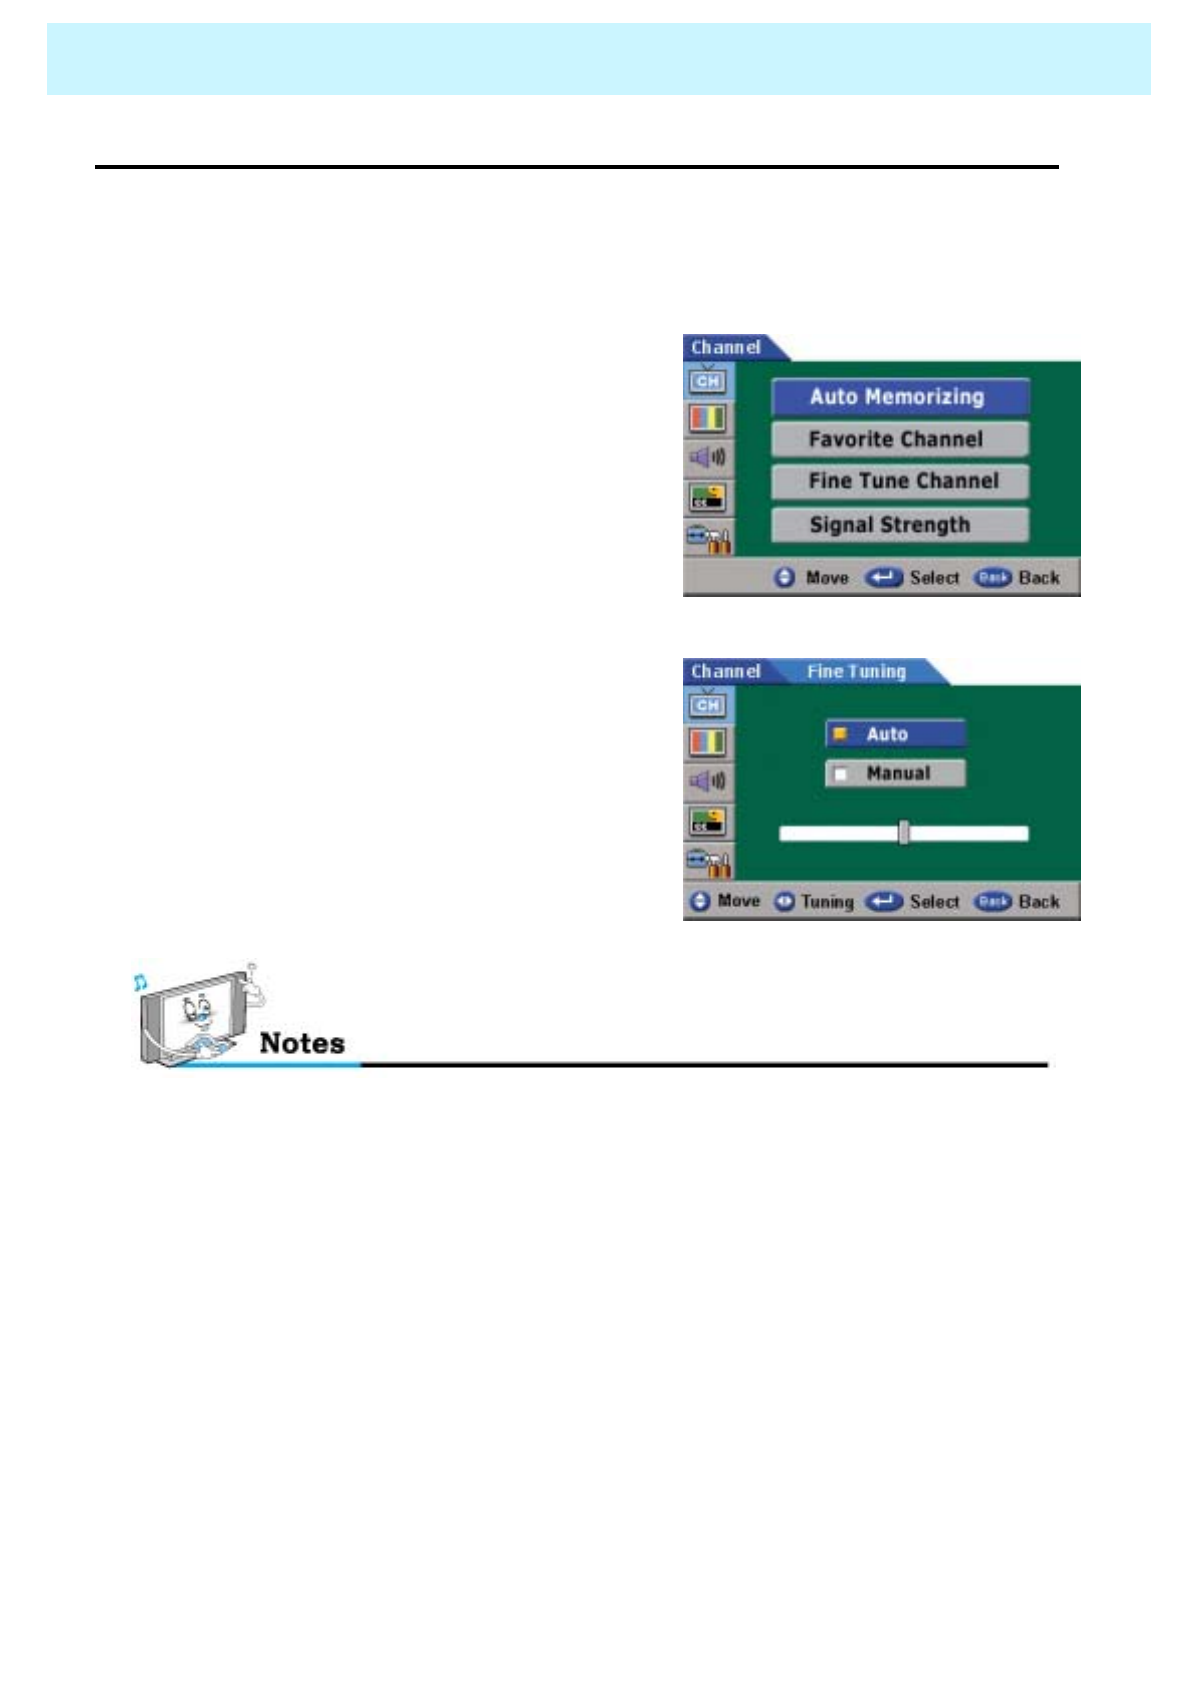
•Fine Tune Channel (Analog)
- The Fine Tuning function lets you automatically or manually adjust the PDP’s tuner if you have
difficulty tuning analog Channels.
1. Press Menu/set button and press Menu/set button
again to get into Channel Menu. Press dbutton to
select Fine Tune Channel, then press Menu/set
button.
2Press cordbuttons to select Auto or Manual
menu.
3 Auto Fine Tuning automatically sets up the fine
tuning setting and Manual Fine Tuning sets up
Manually by pressing for ebutton to adjust
the fine tuning.
Only analog TV channels can be fine tuned.
OWNER'S MANUAL
42
CHANNEL (TV)
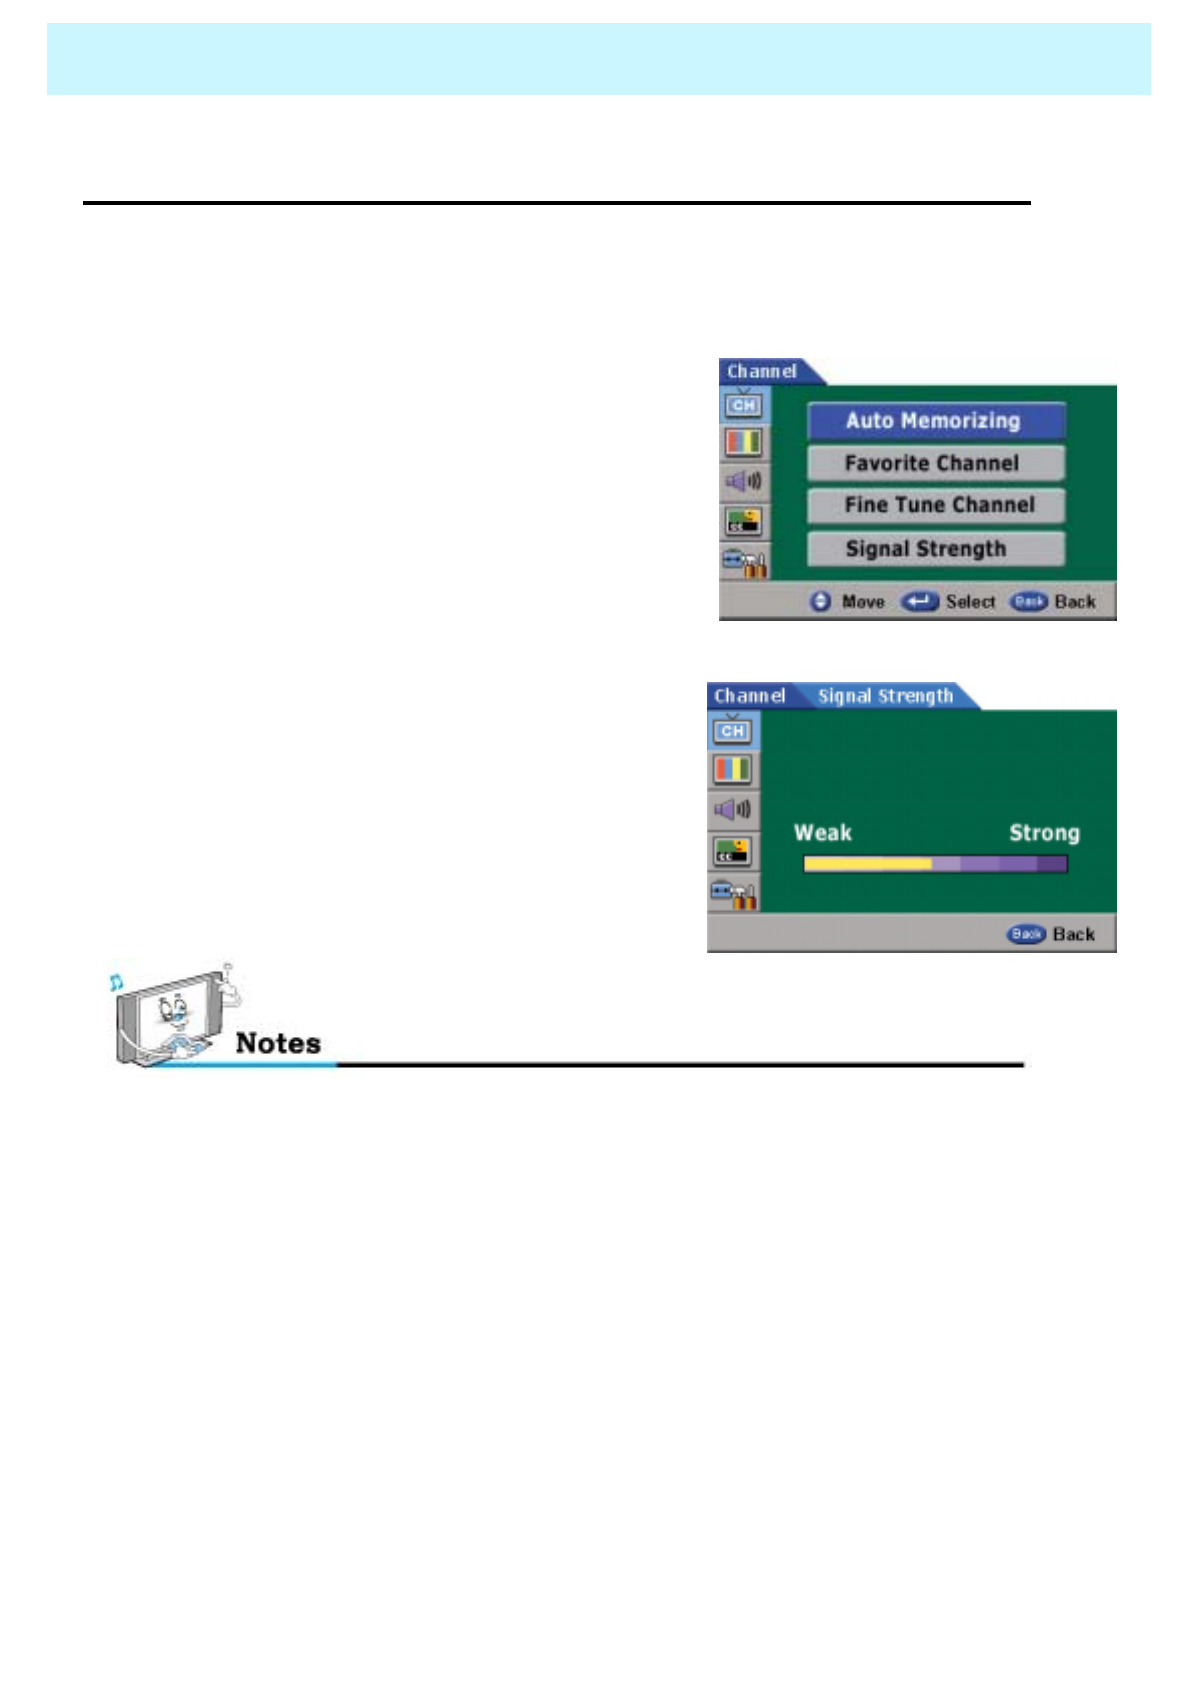
•Signal Strength
-Unlike analog channels, which can vary in reception quality from “snowy” to “clear”, digital
(HDTV) Channels have either perfect reception quality or you will not receive them at all. So,
unlike analog channels, you cannot fine tune a digital channel. You can, however, adjust your
antenna or cable to improve the reception of available digital channels.
1. Press Menu/set button and press dbutton to
select Signal Strength, then press Menu/set
button
2If the signal Strength Meter indicates that the
Signal is weak, physically adjust your antenna or
cable to increase the signal strength. Continue
to adjust the antenna until you find the best
position with the strongest signal.
- This function is not available in the analog channels.
- “No Signal” may appear on the screen depending on the broadcasting station conditions,
even though an incoming broadcasting signal exist.
OWNER'S MANUAL
43
CHANNEL (TV)
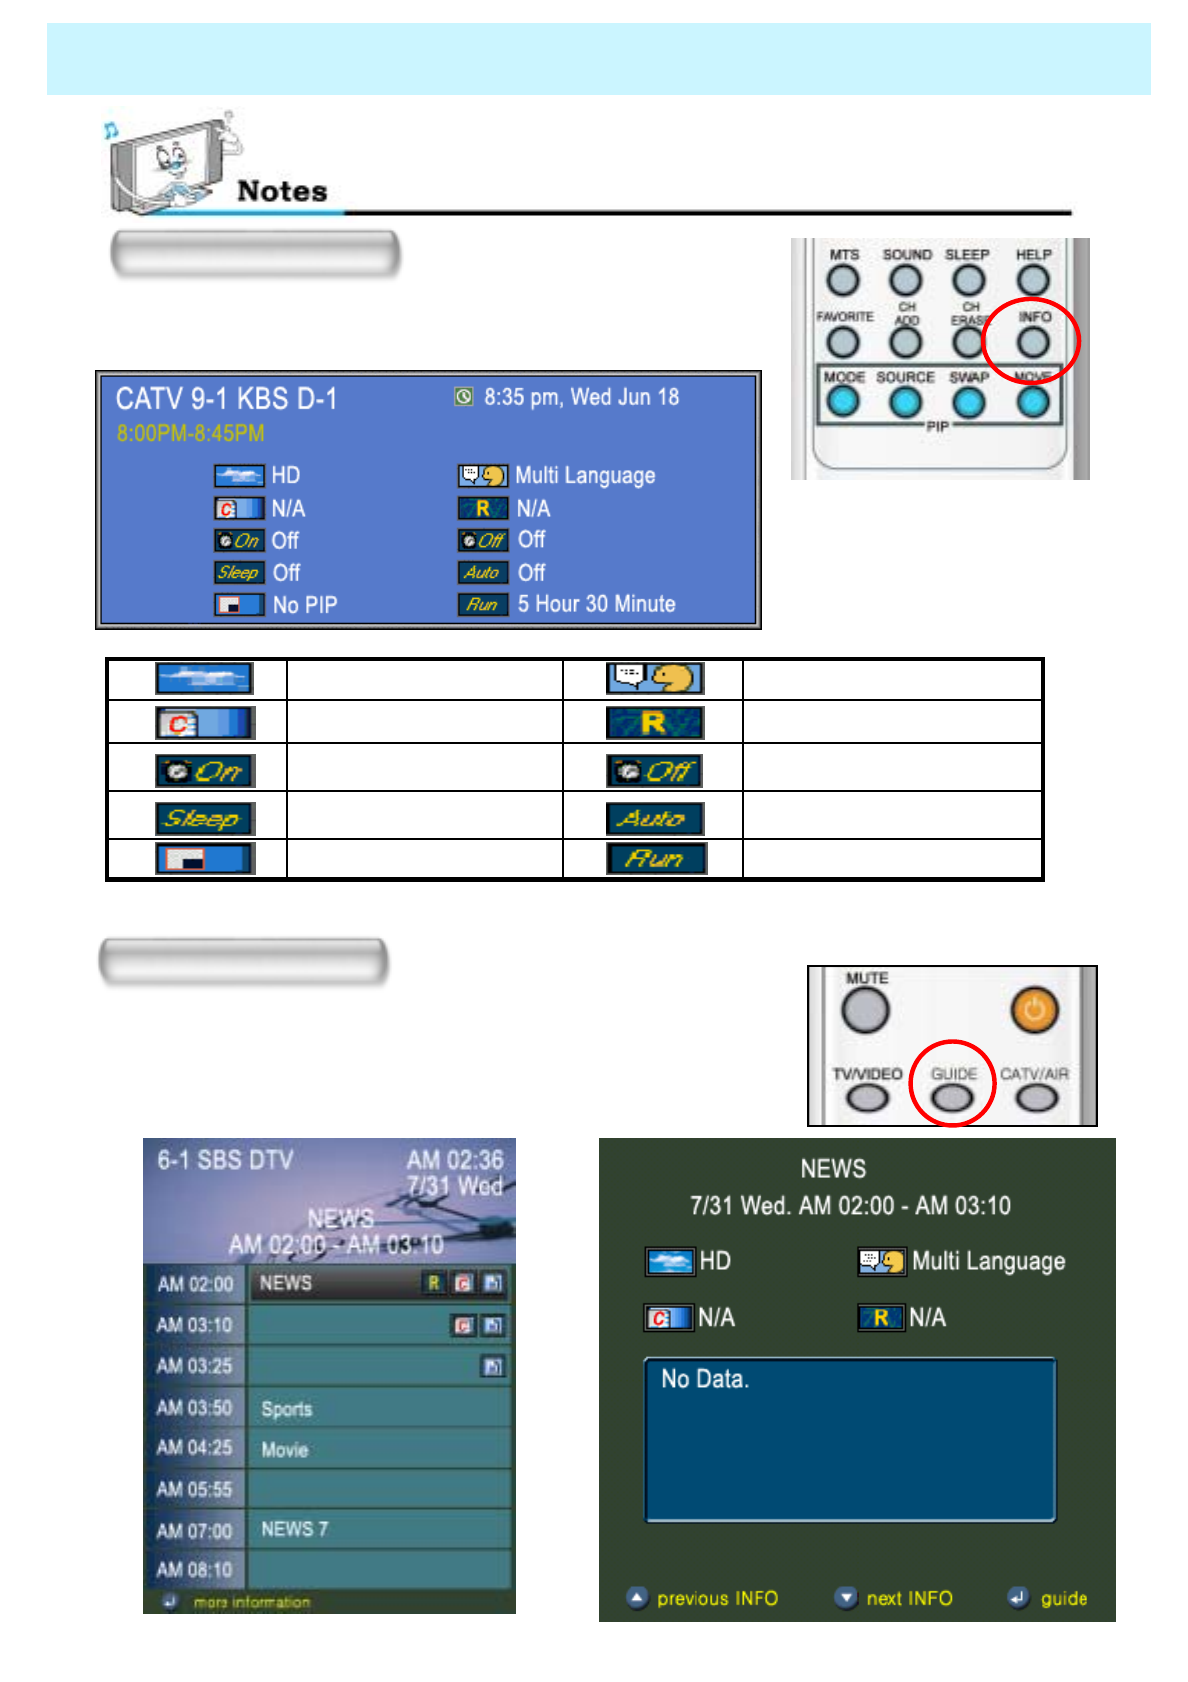
If you press the “INFO” button on the remote control, you can
see the general information about the display.
INFO
If you press the “GUIDE” button on the remote control, you can see
the information like program schedule and other information about
the channel (This function is not available in the analog channels.)
GUIDE
Running time of Set Top boxPIP / Double window
Auto TimeSleep Time
Time OffTime on
RatingCaption service
MTSHD/SD

OWNER'S MANUAL
44
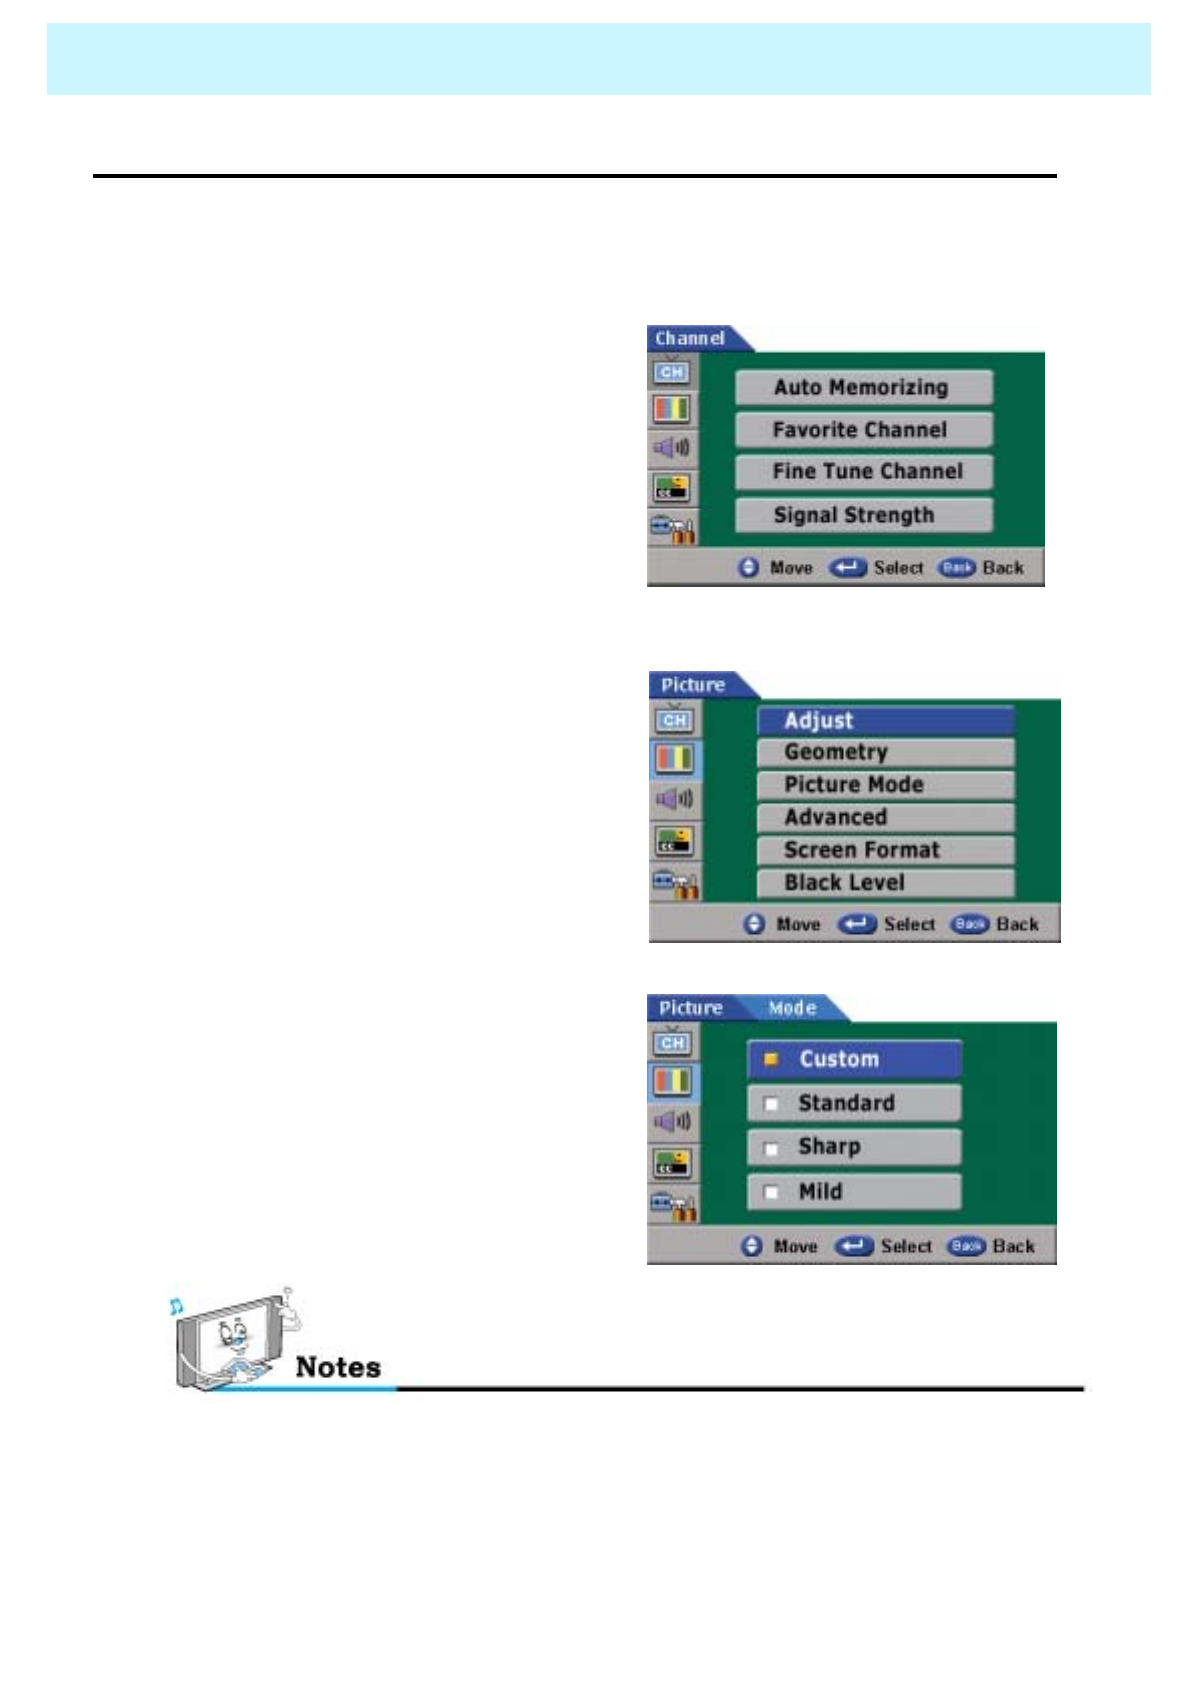
PICTURE
Picture Mode is to set up or adjust Picture Adjust, Mode, Video Noise Reduction, Screen Format and
Burn Protection.
•Adjust
You can use the OSD menu to change the Contrast, Brightness, Color, Tint and Sharpness
according to personal preference.
1. Press Menu/set button
2. Press the dbutton to select Picture then
press the Menu/set button.
3. Press Menu/set button again to get
into Adjust menu.
4. Press cordbutton to select a particular
item then press for ebutton to increase
or decrease the value of a particular item.
OWNER'S MANUAL
45
PICTURE
•Contrast
Adjust brightness difference between
bright part of the screen and dark part.
Distinct ◀▶Vague
•Brightness
Adjust brightness of the screen.
Dark ◀▶Bright
•Color
Adjust deep and light color of the screen.
Decrease ◀▶Increase
•Tint
Adjust balance between green and
yellow
Green color is deeper◀▶Red color is deeper
•Sharpness
Adjust vividness of the screen.
Less sharp ◀▶Sharp
OWNER'S MANUAL
46
PICTURE
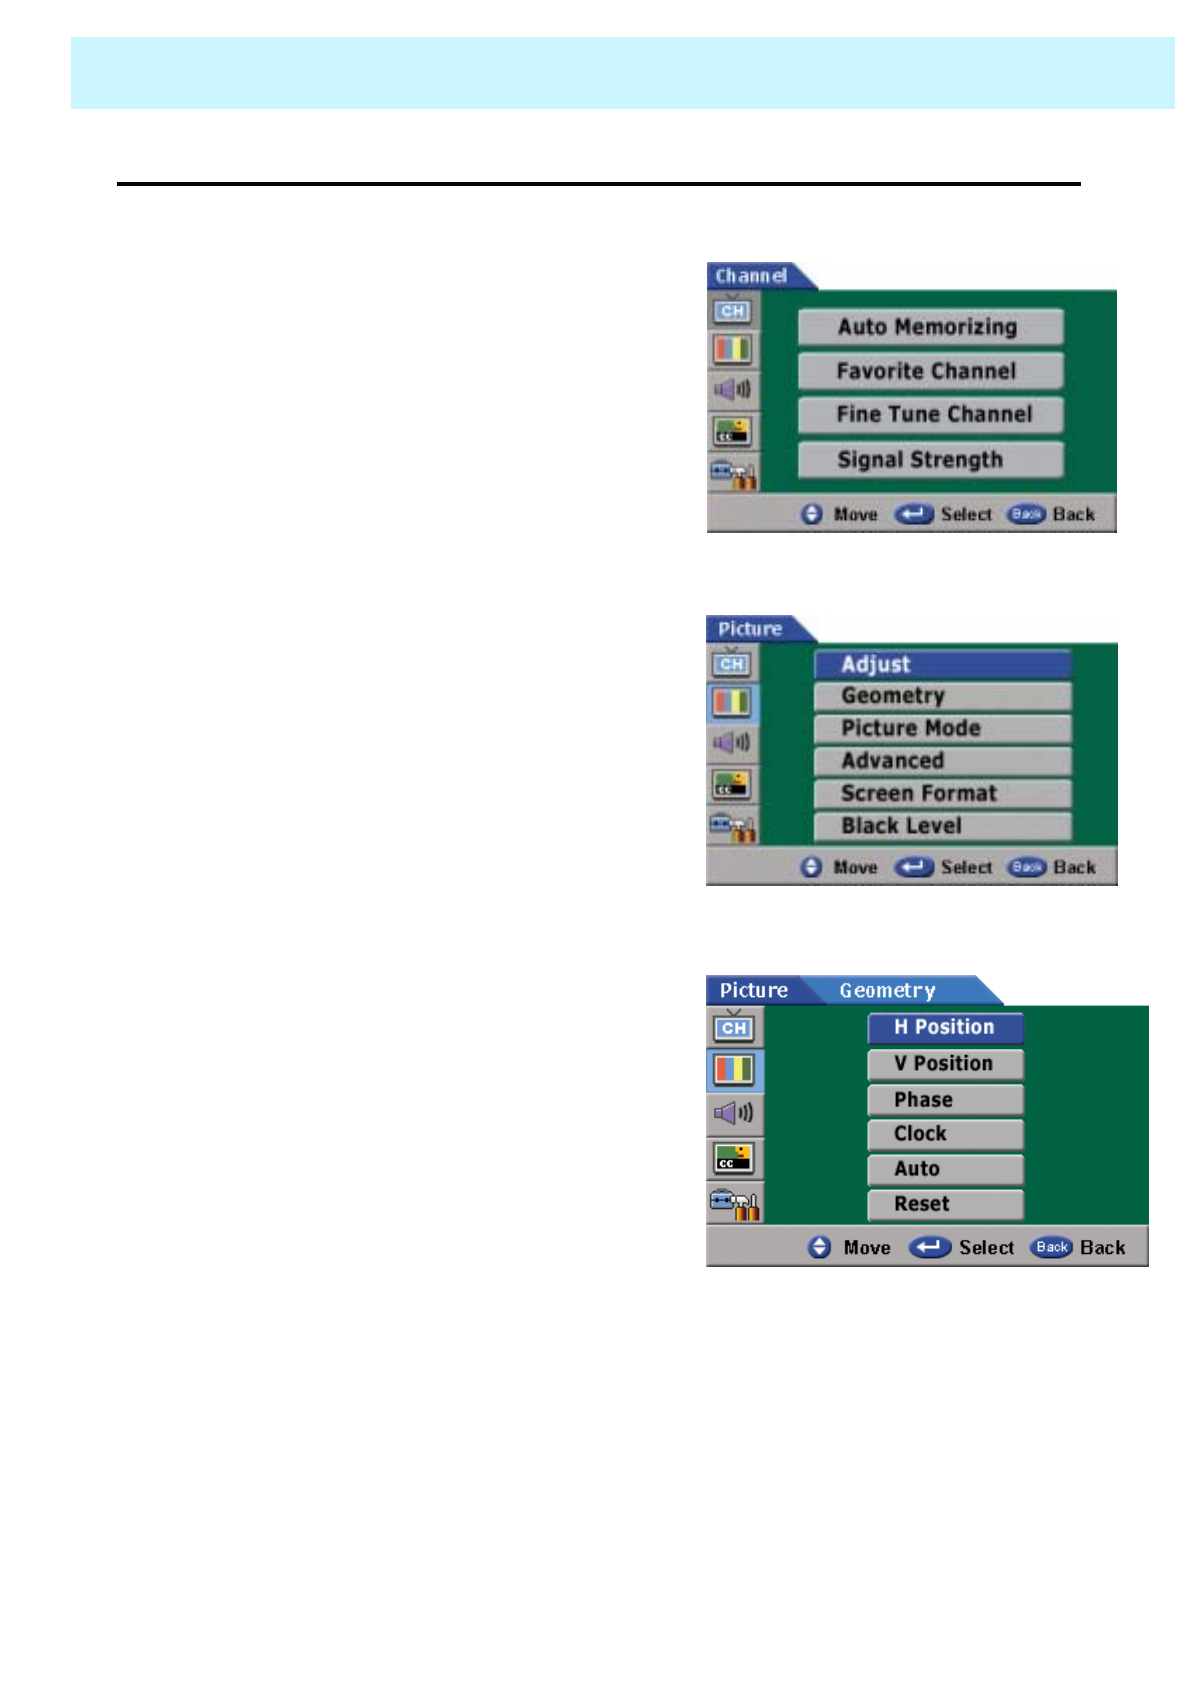
•Geometry
- This mode is to set up PC screen control.
1. Press Menu/set button
2. Press the dbutton to select Picture, then
press Menu/set button
3. Press the dbutton to select Geometry,
then press Menu/set button
-Auto
to set up the value of "H- position", "V position",
"Phase" and "Clock" automatically.
- Reset
to reset "H position", "V position", "Phase" and
"Clock" to previous value.
4. Geometry
OWNER'S MANUAL
47
PICTURE
H-POSITION
Press the H-Position button to adjust
the horizontal position.
◀▶
V-POSITION
Press the V-Position button to adjust
the vertical position.
◀▶
PHASE
Press the Phase button to adjust
the phase.
Mismatch Match
CLOCK
Press the Clock button to adjust
the horizontal clock.
Mismatch Match
OWNER'S MANUAL
48
PICTURE
•Picture Mode
- Your PDP has three automatic picture settings (“Standard”, “Sharp” and “Mild”) that are preset
at the factory. You can activate either Standard, Sharp or Mild by pressing “Picture” on the
remote control (or by making a selection from the menu). Or you can select “Custom” which
automatically recalls your personalized picture settings.
1. Press Menu/set button
2. Press the dbutton to select Picture then
press the Menu/set button.
3. Press the dbutton to select Picture
Mode, then press the Menu/set
button.
4. Press the cordbutton to select the
“Custom”, “Standard”, “Sharp” or “Mild”
picture setting then press Menu/set
button.
Alternative method : Simply press the “Picture” button on the remote control to select
one of the automatic picture settings.
OWNER'S MANUAL
49
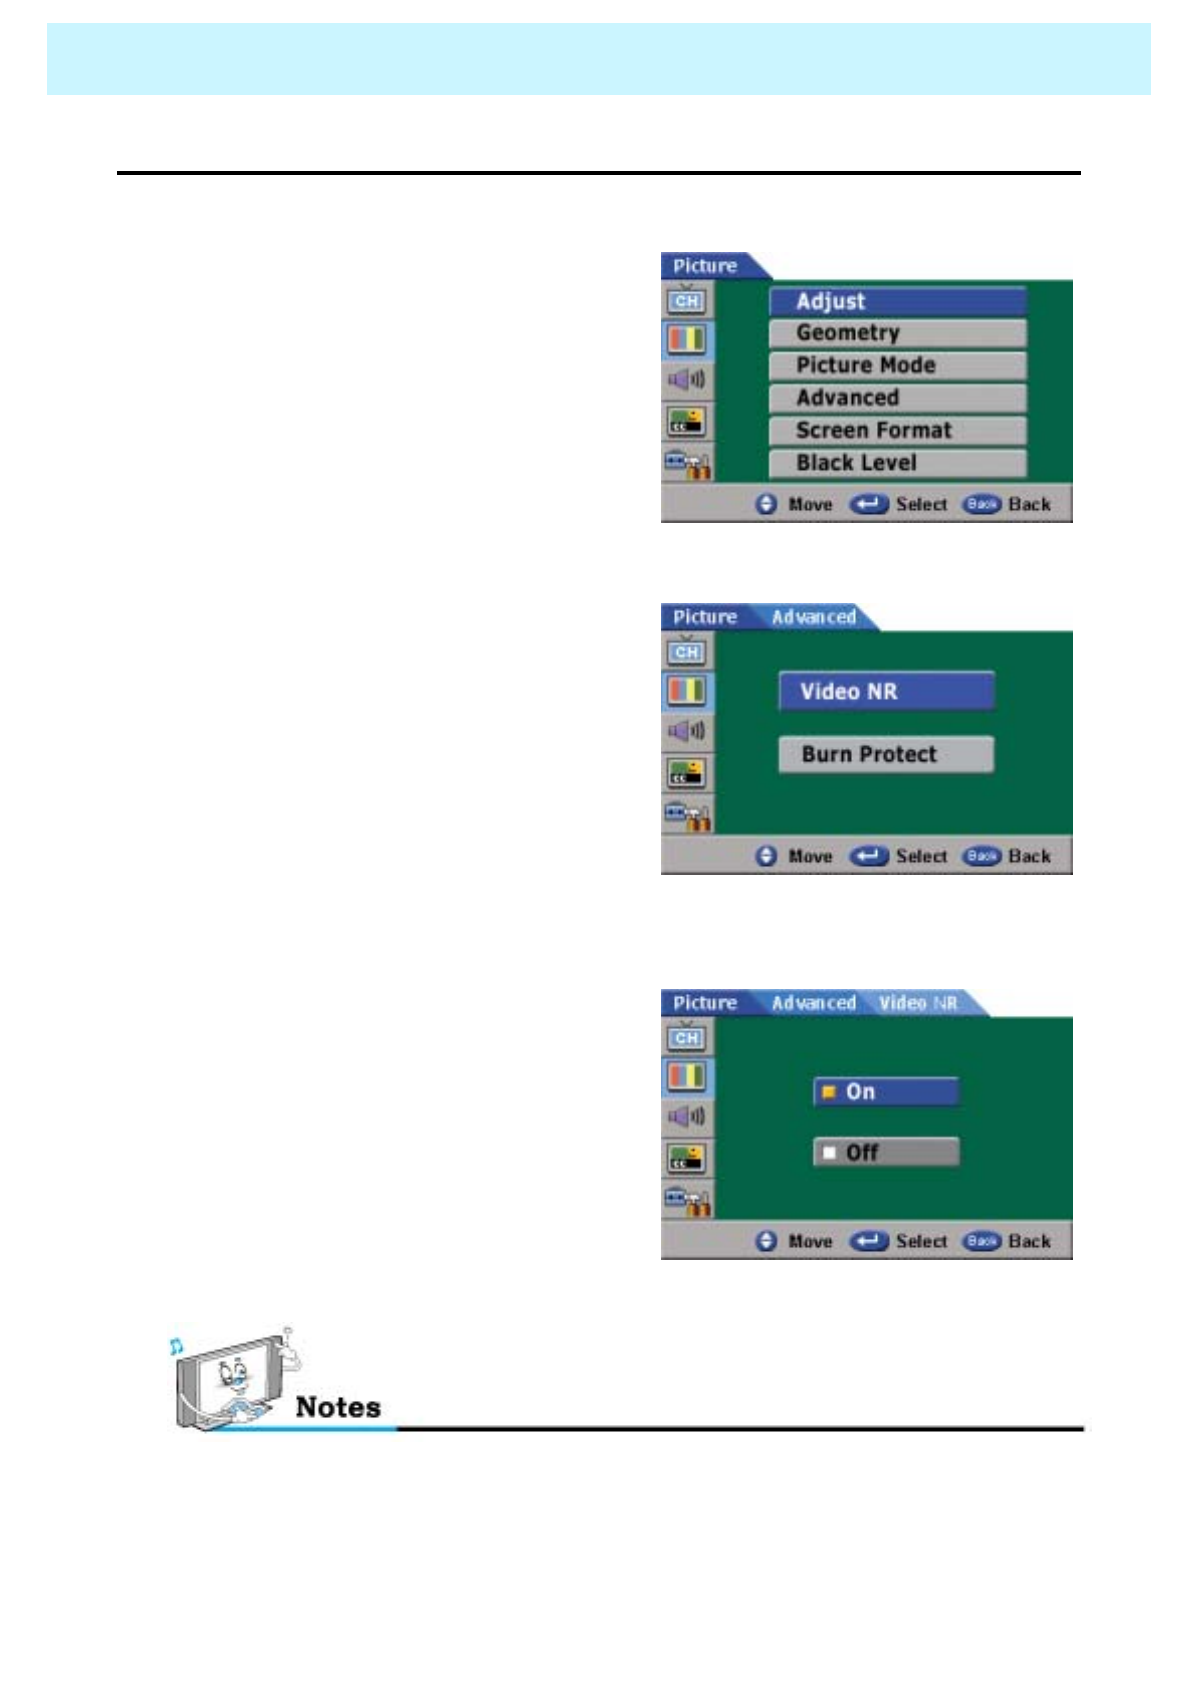
PICTURE
•Video NR
- This function automatically filters out and reduces the image noise and improves picture quality
where receiving weak signals.
1. Press Menu/set button
2. Press the dbutton to select Picture then
press the Menu/set button.
3. Press the dbutton to select Advanced,
then press the Menu/set button.
4. Press the dbutton to select Video
NR, then press the Menu/set button.
5. Press the cordbutton to choose On
or Off, then press Menu/set button.
This function is not available in the digital channels.
OWNER'S MANUAL
50
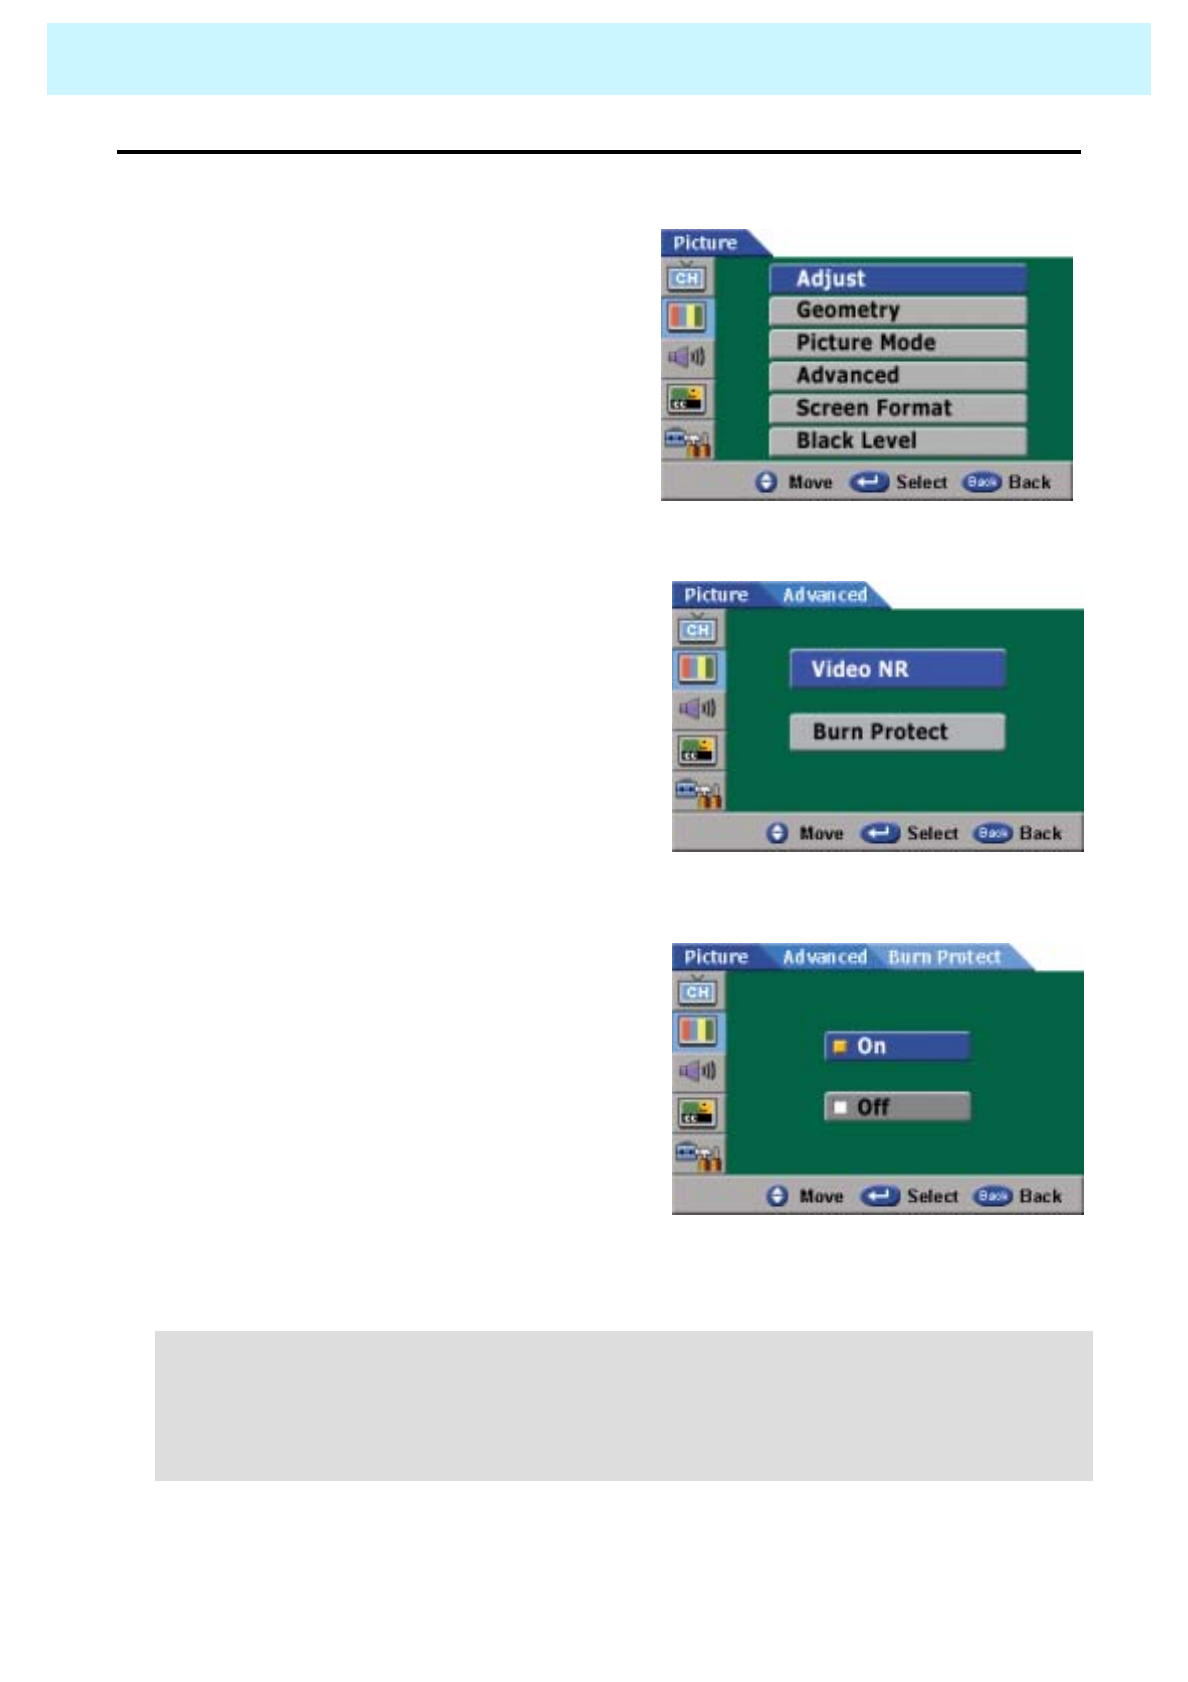
PICTURE
•Burn Protect
- You can protect your screen from a static image by Burn Protect function.
1. Press Menu/set button
2. Press the dbutton to select Picture then
press the Menu/set button.
3. Press the dbutton to select Advance,
then press the Menu/set button.
4. Press the dbutton to select Burn
Protect, then press the Menu/set
button.
4. Press the cordbutton to choose On or
Off, then press Menu/set button.
• Burn protection is to avoid displaying the same image long time.
• To avoid displaying a static image long time, image moves horizontally 1 pixel per minute.
A pixel moves to left 4 points first and return, then moves to right 4 points. After 16 minutes,
burn protection moving is complete and the pixel return to its original position. The moving
is repeated until PDP set be power-off.
OWNER'S MANUAL
51
PICTURE
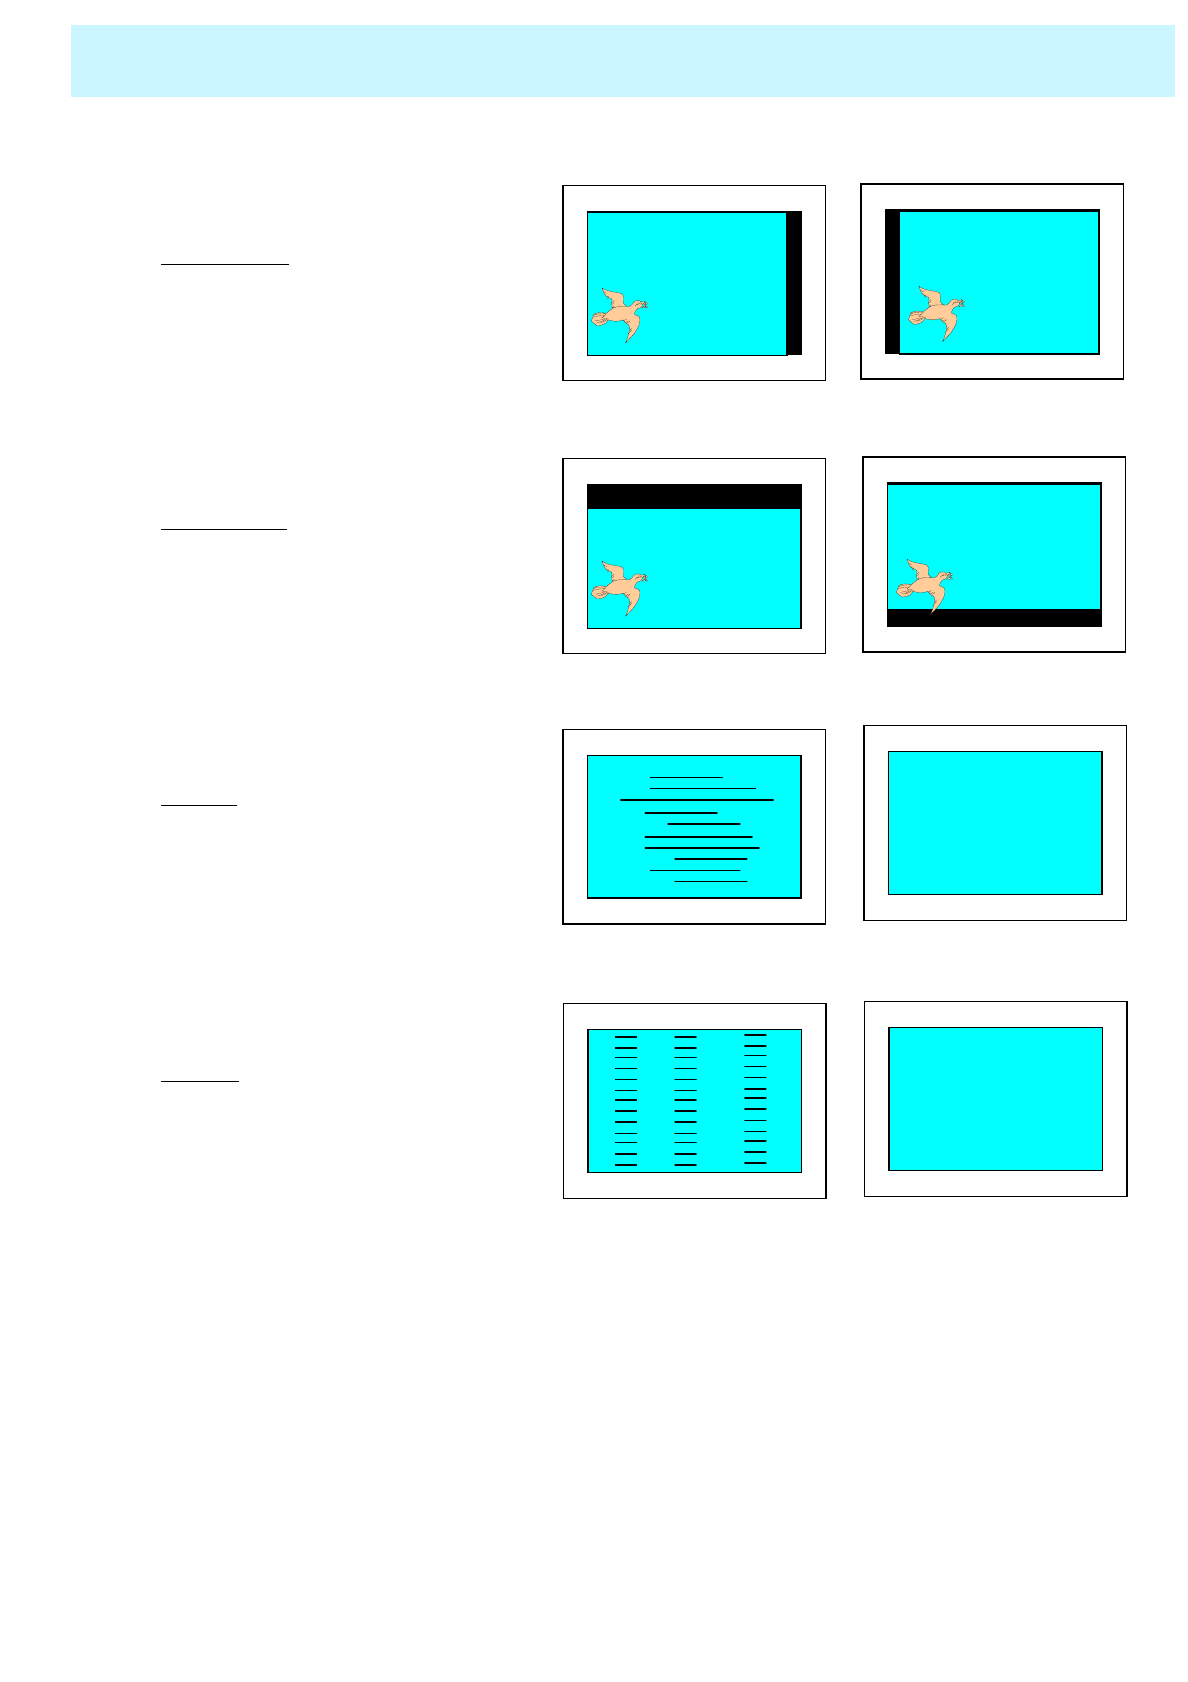
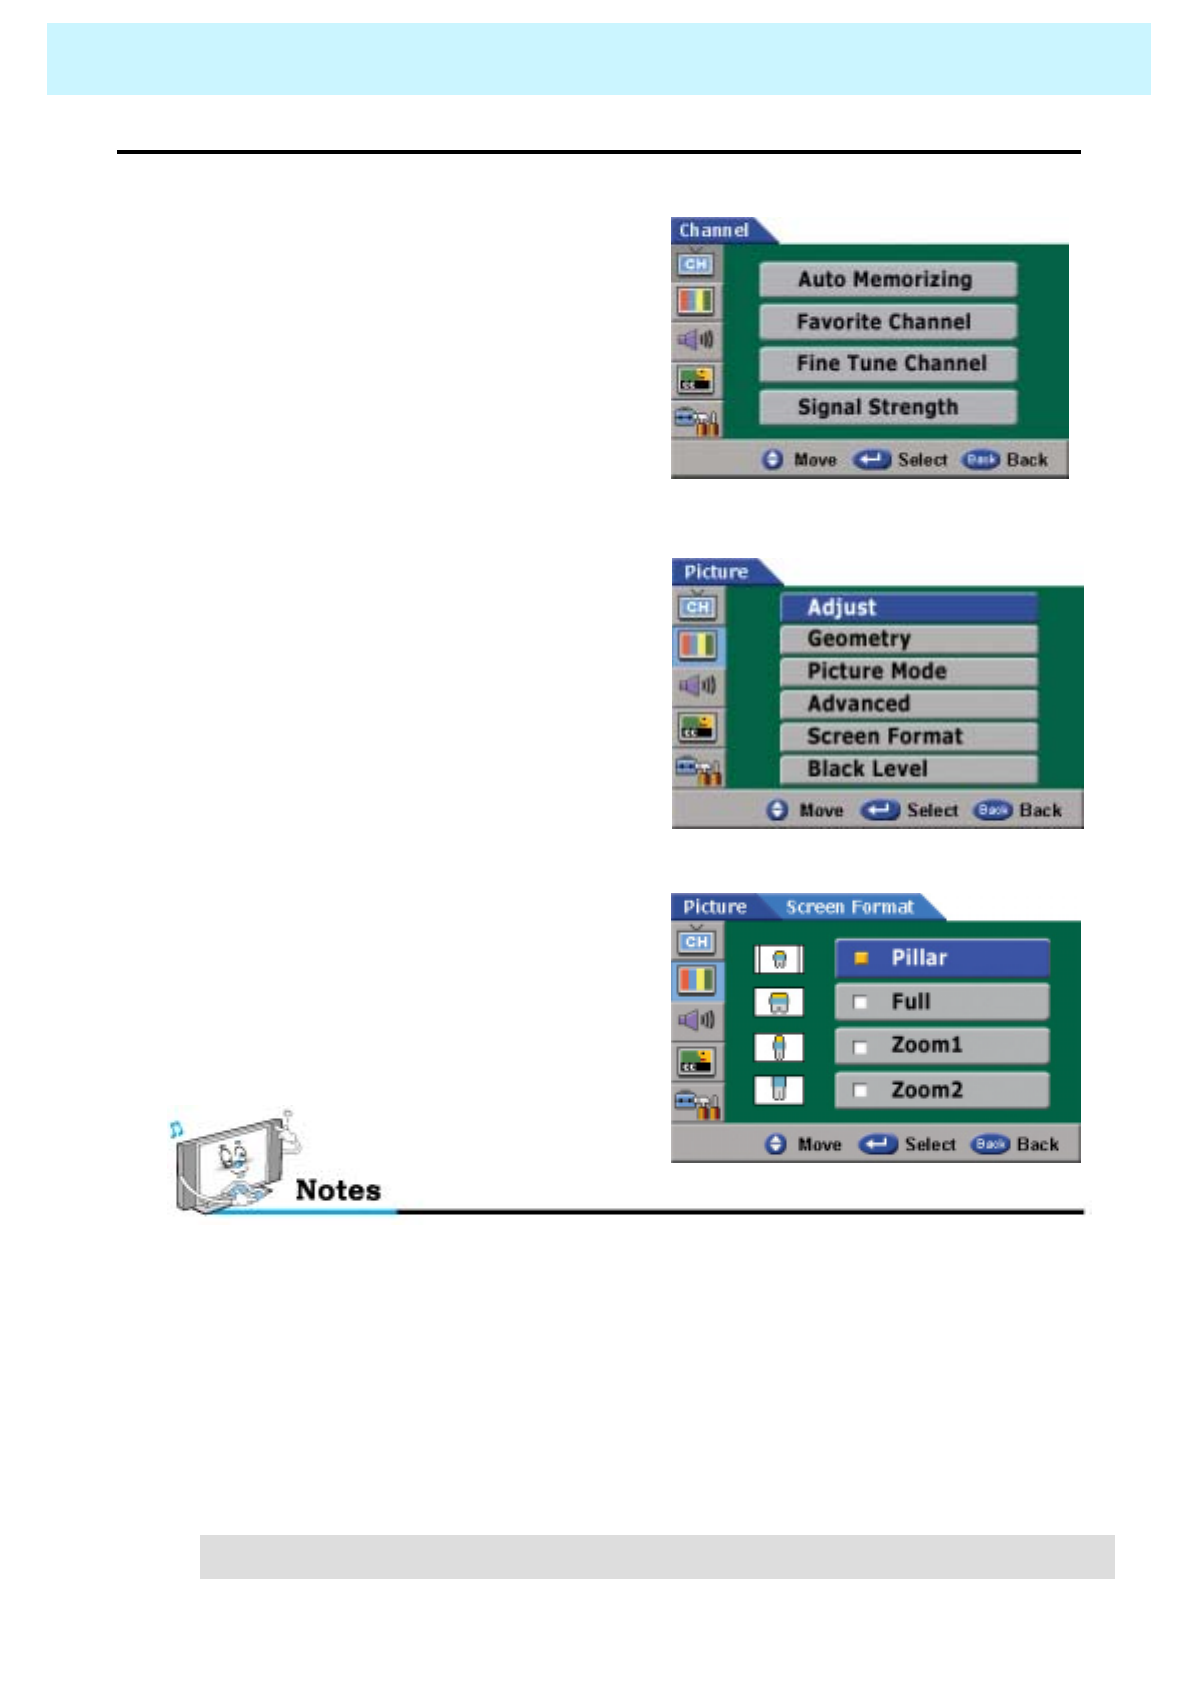
•Screen Format
- Your PDP has four Screen Formats (“Pillar”, “Full”, “Zoom1” and “Zoom2”)
1. Press Menu/set button
2. Press the dbutton to select Picture then
press the Menu/set button.
3. Press the dbutton to select Screen
Format, then press the Menu/set button.
- Pillar
Pillar box shows 4:3 image on 16:9 screen with left and right side appearing in black color.
- Full
Full expands 4:3 images horizontally and shows it on 16:9 screen.
In this case, image looks wider than actual image.
- Zoom1
Zoom1 expands 4:3 image vertically and shows it on 16:9 screen.
Top and bottom part of image does not appear on the screen.
- Zoom2
Zoom2 expands 4:3 image vertically and horizontally in uniform and shows it on 16:9
screen.
4. Press the cordbutton to select the
“Pillar”, “Full”, “Zoom1” or “Zoom2”,
then press Menu/set button.
• In the digital channels, only ‘pillar’ and ‘full’ are available.
OWNER'S MANUAL
52
PICTURE
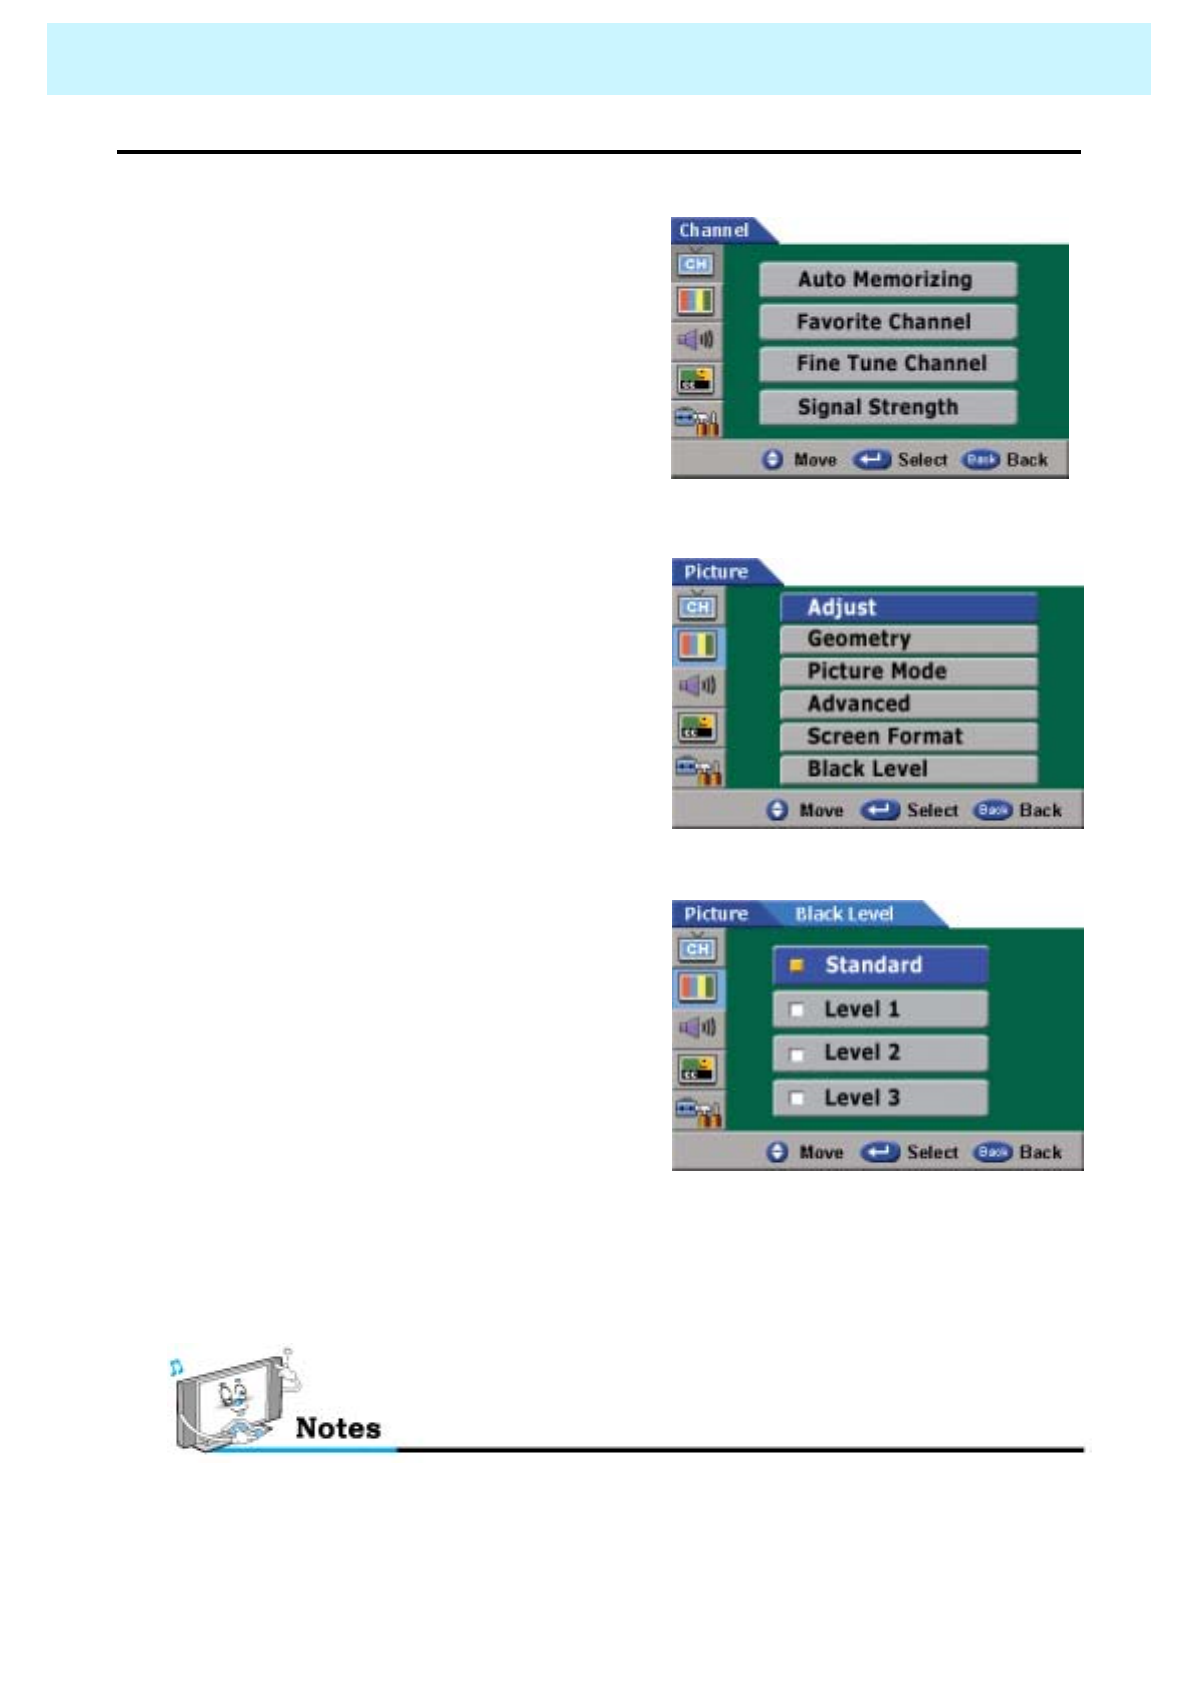
•Black Level
- This function improves the quality of dark images.
1. Press Menu/set button
2. Press the dbutton to select Picture then
press the Menu/set button.
3. Press the dbutton to select Black
Level, then press the Menu/set button.
4. Press the cordbutton to select the
“Standard”, “Level1”, “Level2” or
“Level3”, then press Menu/set
button.
- Standard(default value) : Shows the best image in dark areas.
- When the level changes from 1 to 3, the screen lights up. And the dark area looks better.
OWNER'S MANUAL
53
SOUND
Sound Mode is to set up sound level you prefer, to adjust the custom sound and set the mode, to
select multi-track sound both analog broadcasting and digital broadcasting, and digital output.
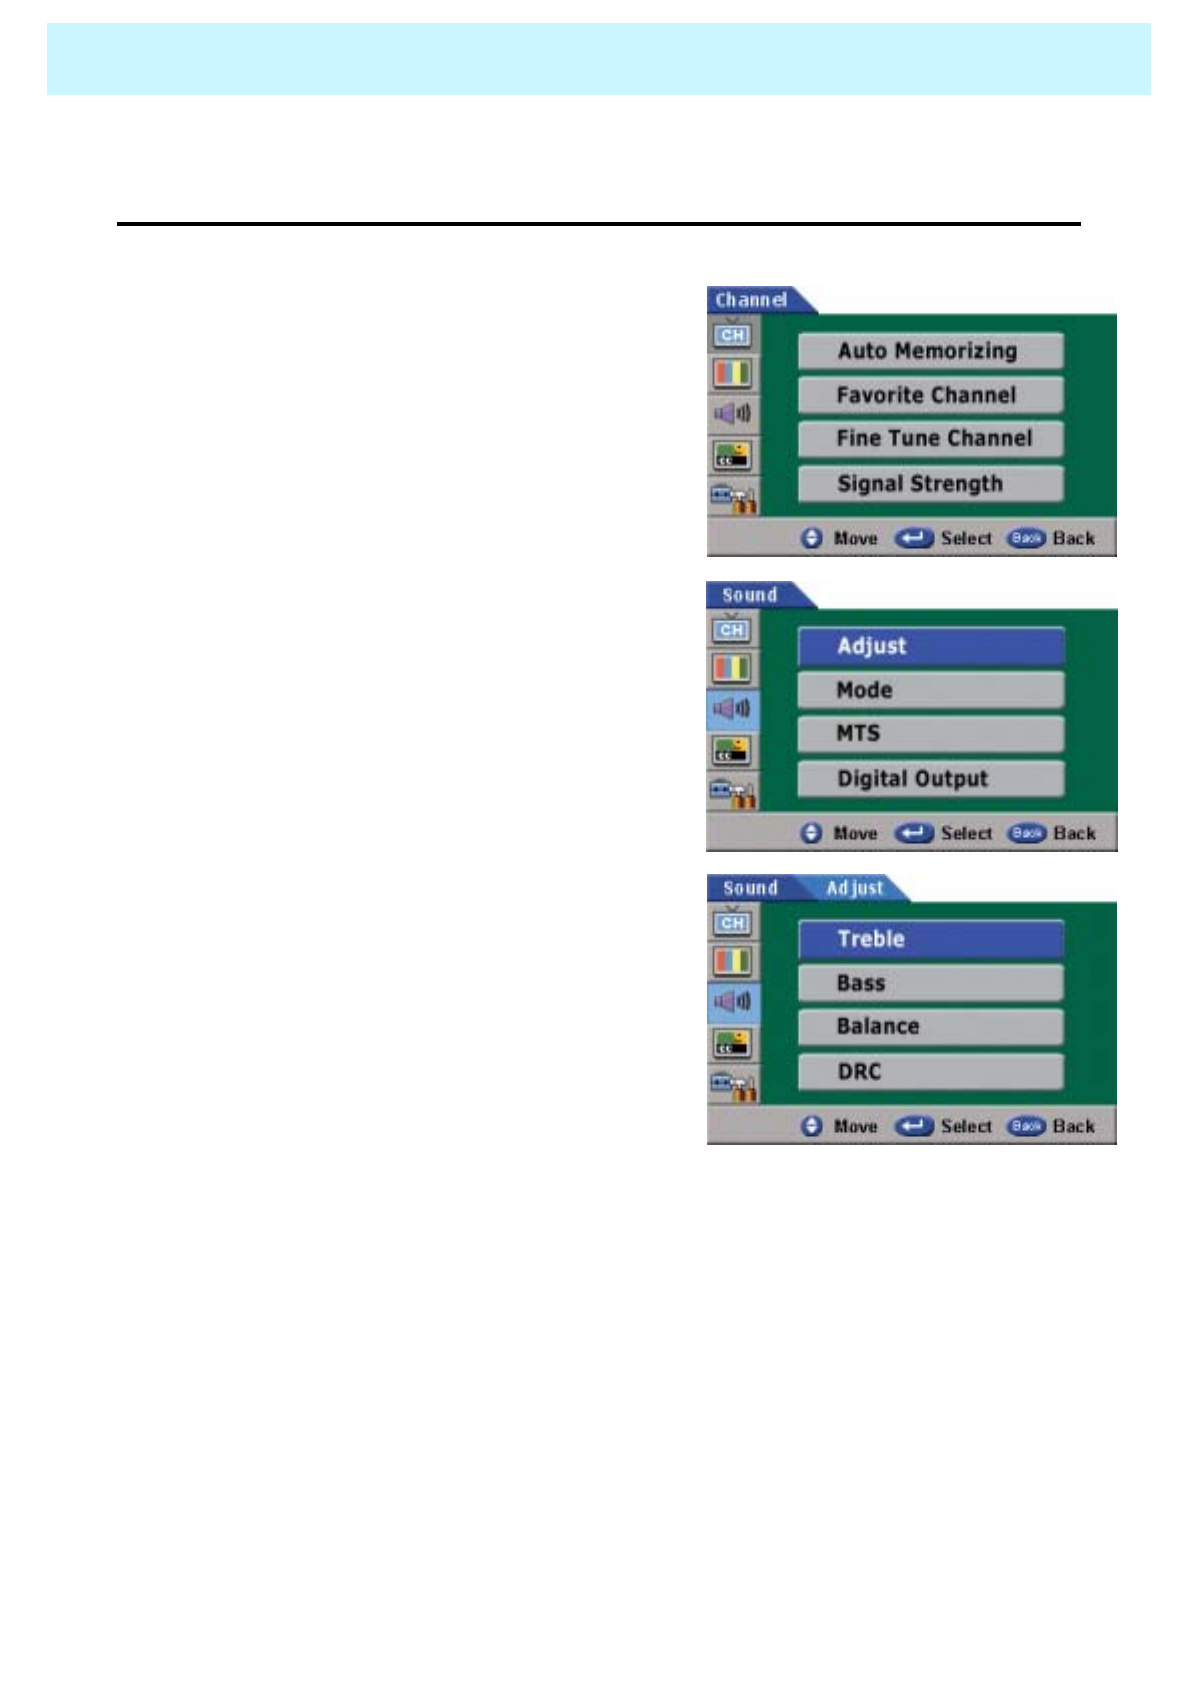
•Adjust
You can use the OSD menu to change the Treble, Bass, Balance and DRC according to
your preference.
1. Press Menu/set button
2. Press the dbutton to select Sound, then
press Menu/set button
3. Press Menu/set button again to get into
Adjust menu.
4. Press the cordbutton to select a
particular item then press the for
ebutton to increase or decrease the
value of a particular item.
- Treble
This function is to adjust the loud sound in sound signal.
Adjust range is from 0 to 100.
-Bass
This function is to adjust the low sound in sound signal.
Adjust range is from 0 to 100.
- Balance
This function is to adjust the sound strength left and right speaker.
Adjust range is from 0 to 100.
- DRC (Dynamic Range Compression)
This function is to set up optimum volume automatically according to program
(news, music, movie, etc.). Press "On" to activate DRC. If not, press "Off".
OWNER'S MANUAL
54
SOUND
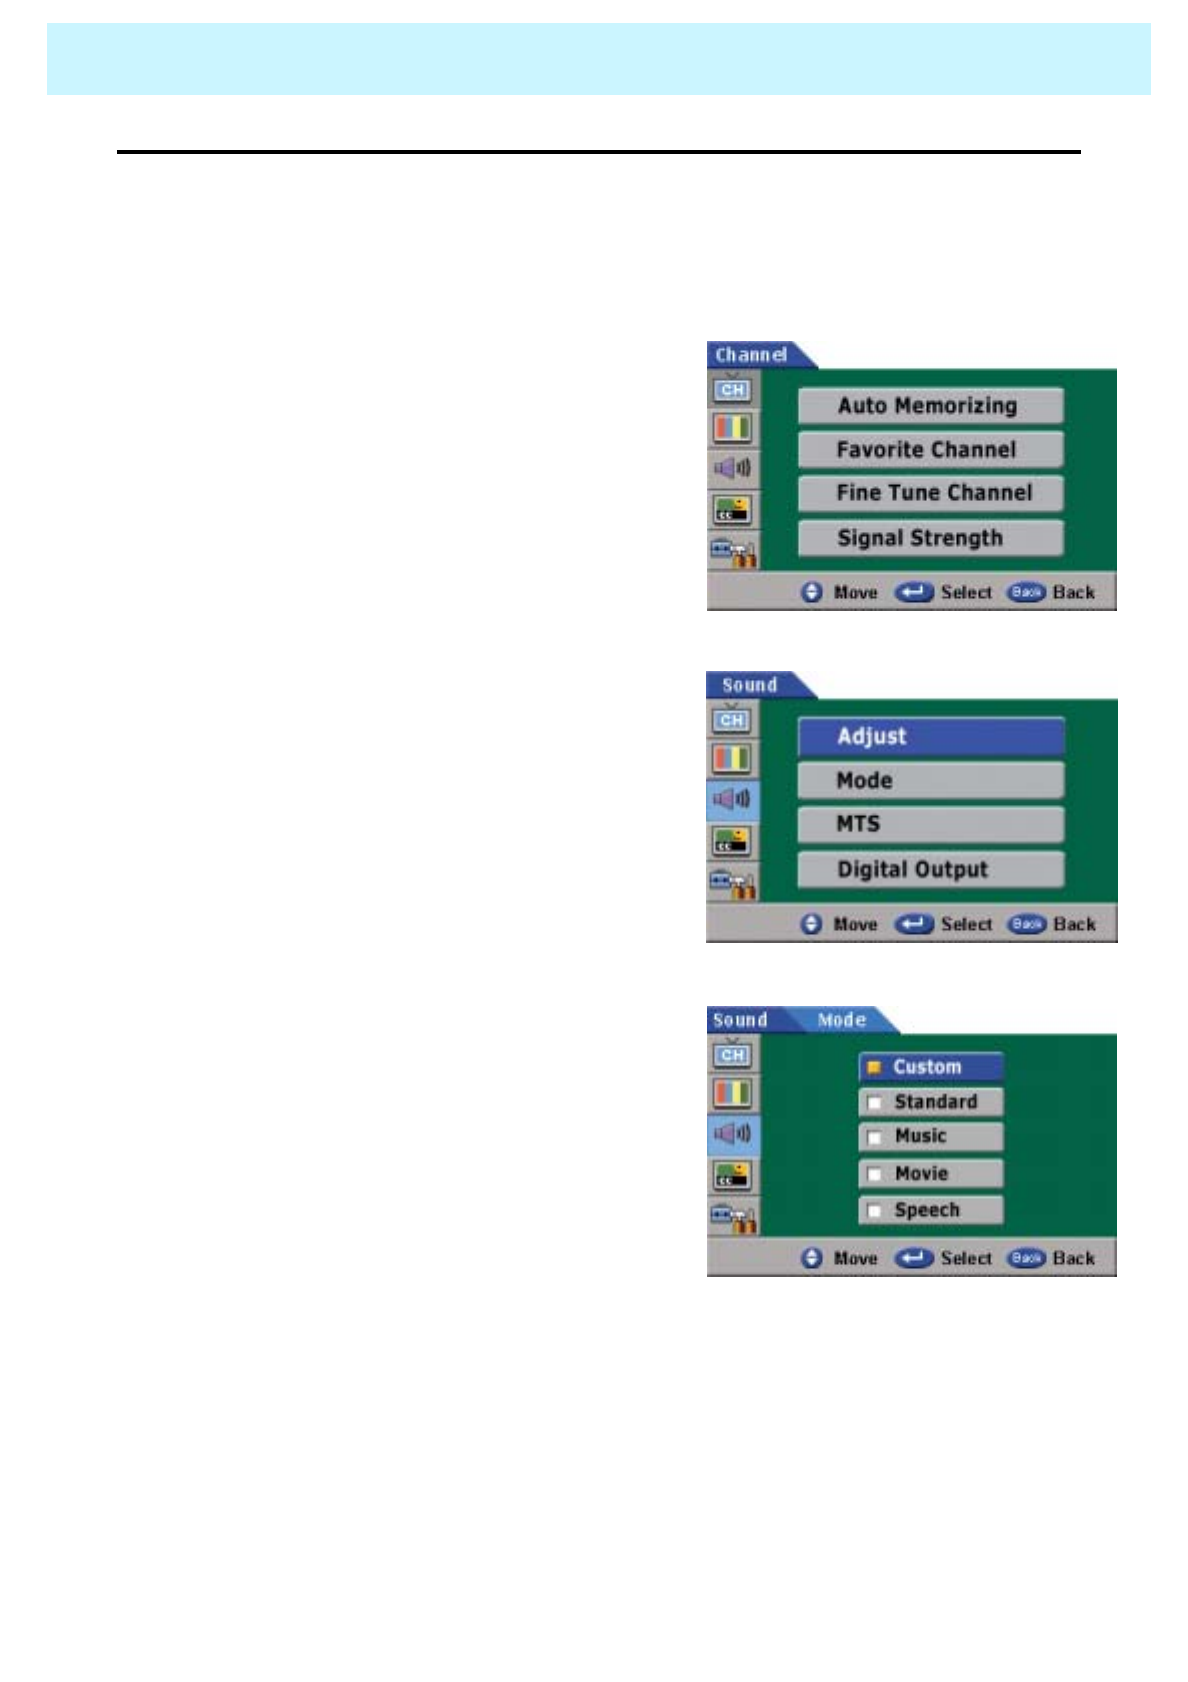
•Mode
- Your PDP has four automatic sound settings (“Standard”, “Music”, “Movie” and “Speech”) that are
preset at the factory. You can activate either Standard, Music, Movie or Speech by pressing
“SOUND” on the remote control (or by making a selection from the menu) or you can select
“Custom” which automatically recalls your personalized sound settings.
1. Press Menu/set button
2. Press the dbutton to select Sound, then
press Menu/set button
3. Press the dbutton to select Mode, then
press the Menu/set button.
4. Press the cordbutton to select the
“Custom”, “Standard”, “Music”, “Movie” or
“Speech” then press the Menu/set button.
OWNER'S MANUAL
55
SOUND
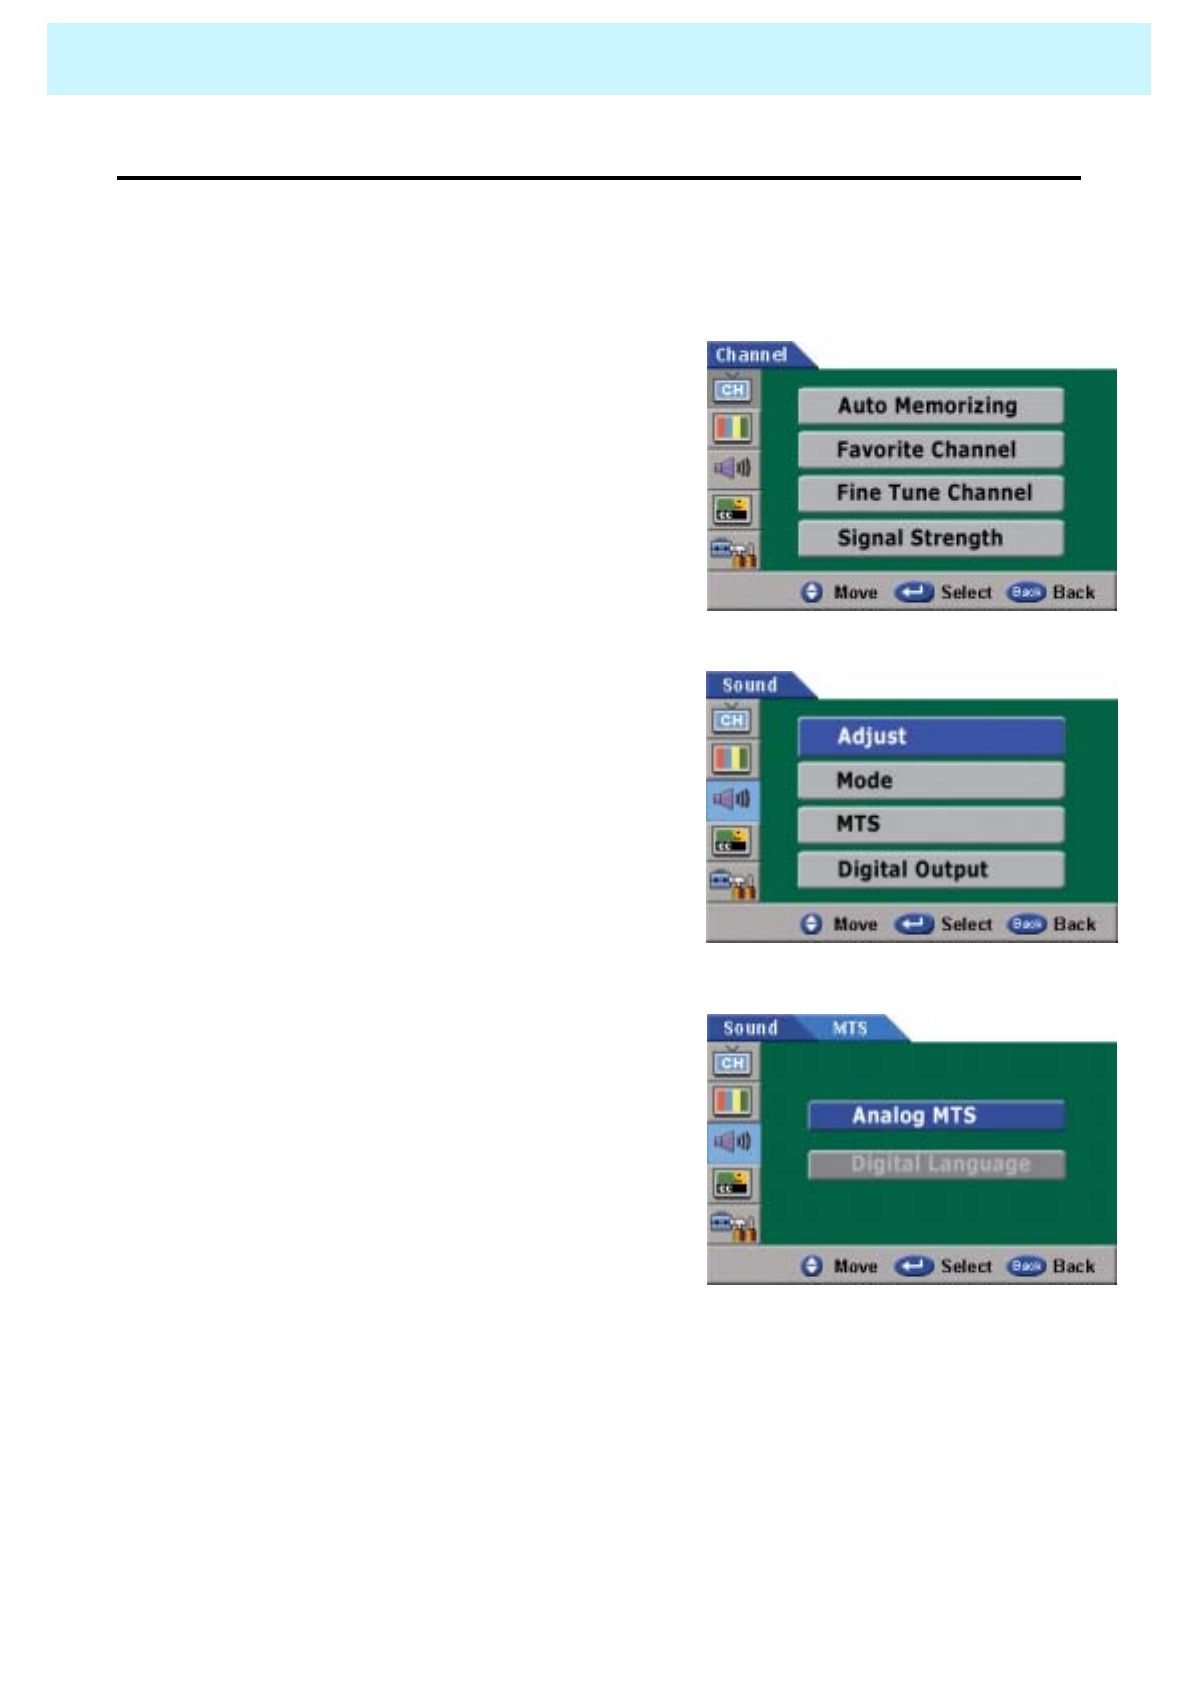
•MTS
- Select sound signal from analog broadcasting and digital broadcasting.
In analog broadcasting, mono, stereo and SAP are available.
In digital broadcasting, English, Spanish and French are available.
1. Press Menu/set button
2. Press the dbutton to select Sound, then
press Menu/set button
3. Press the dbutton to select MTS, then
press the Menu/set button.
4. Press the cordbutton to select
“Analog MTS“ or “Digital Language”.
- Analog MTS
Select sound signal from analog broadcasting and digital broadcasting. In analog
broadcasting, mono, stereo and SAP are available.
- Digital Audio Language
Select sound signal (language) from digital broadcasting. Available languages are English,
Spanish and French.
OWNER'S MANUAL
56
SOUND
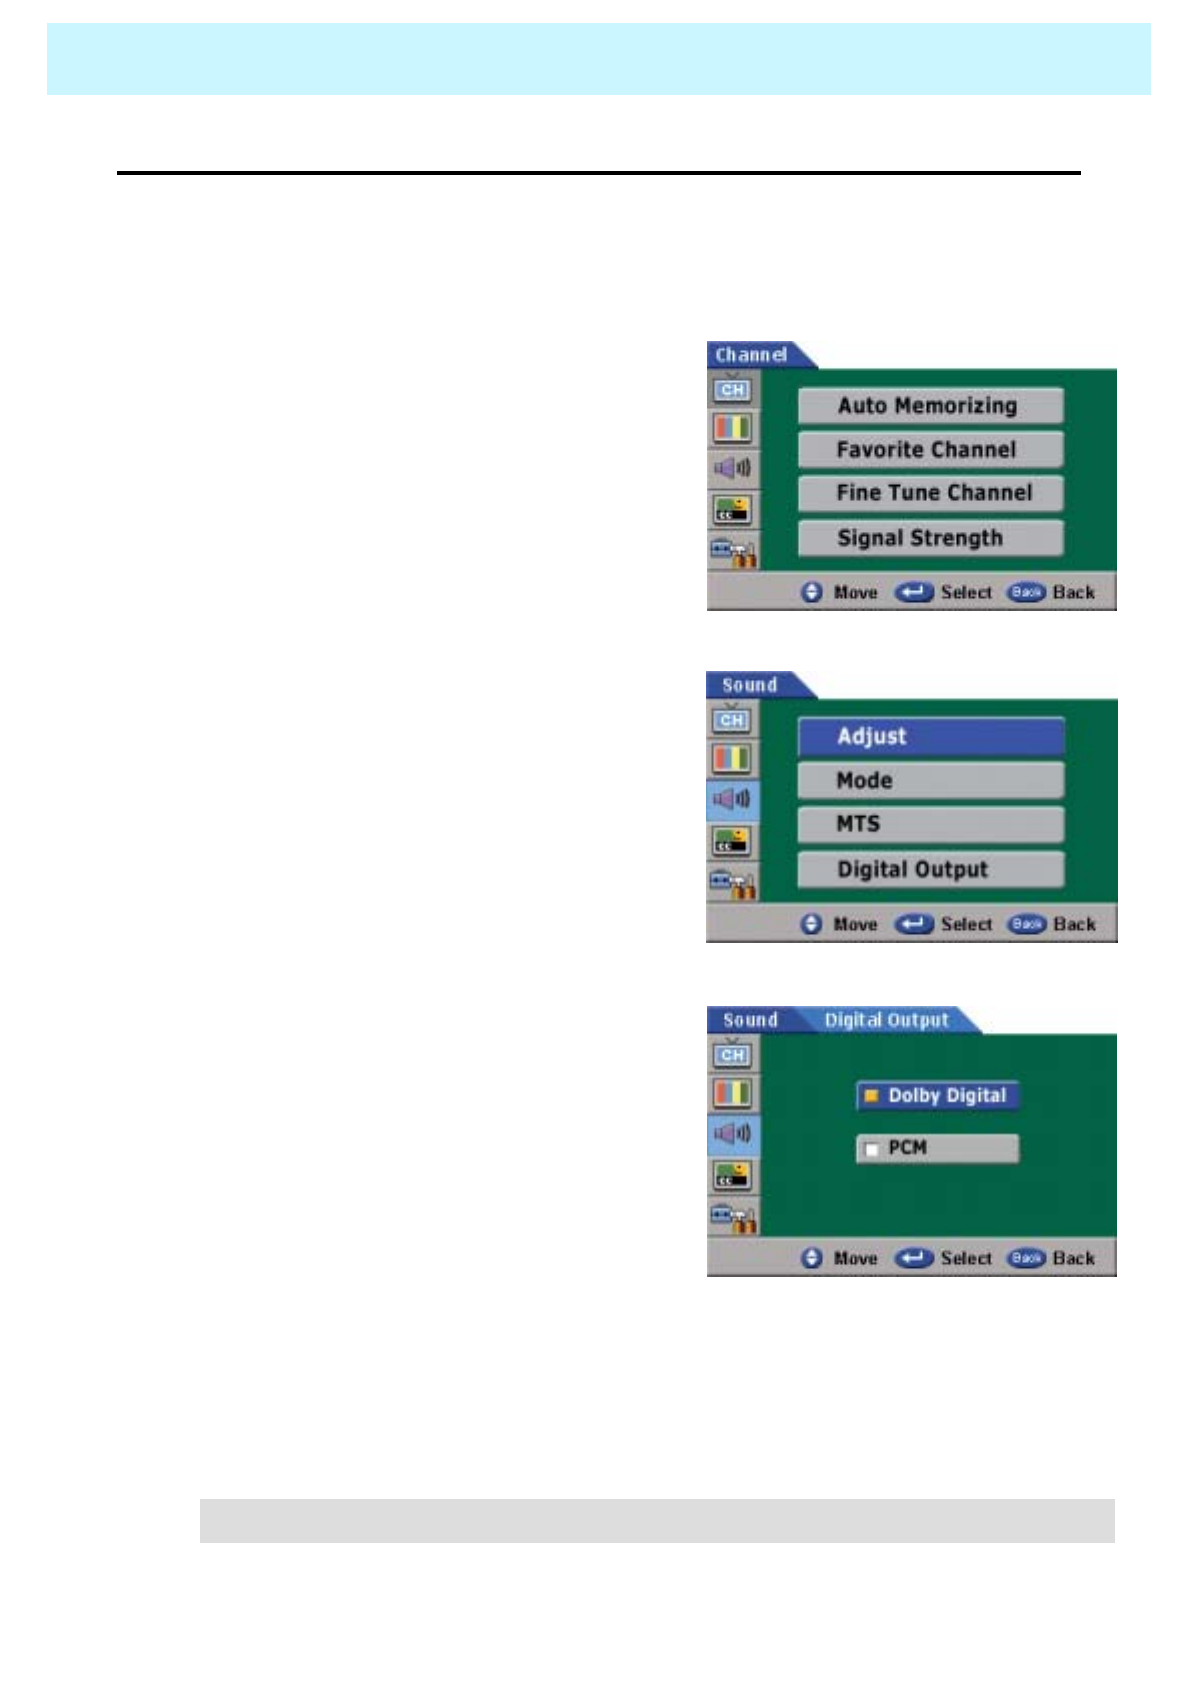
•Digital Output
- In digital broadcasting, when Dolby digital is selected, viewer can listen to 5.1 channel
audio sound connected to digital audio amp on external side.
1. Press Menu/set button
2. Press the dbutton to select Sound, then
press Menu/set button
3. Press the dbutton to select Digital Output,
then press the Menu/set button.
4. Press the cordbutton button to select
“Dolby Digital“ or “PCM”.
- Dolby digital is selected
You can listen to 5.1 channel audio sound connected to digital audio amp on external side.
- PCM is selected
Existing analog audio signal is converted to digital audio signal, offering improved sound.
• In analog broadcasting, only PCM is activated.
OWNER'S MANUAL
57
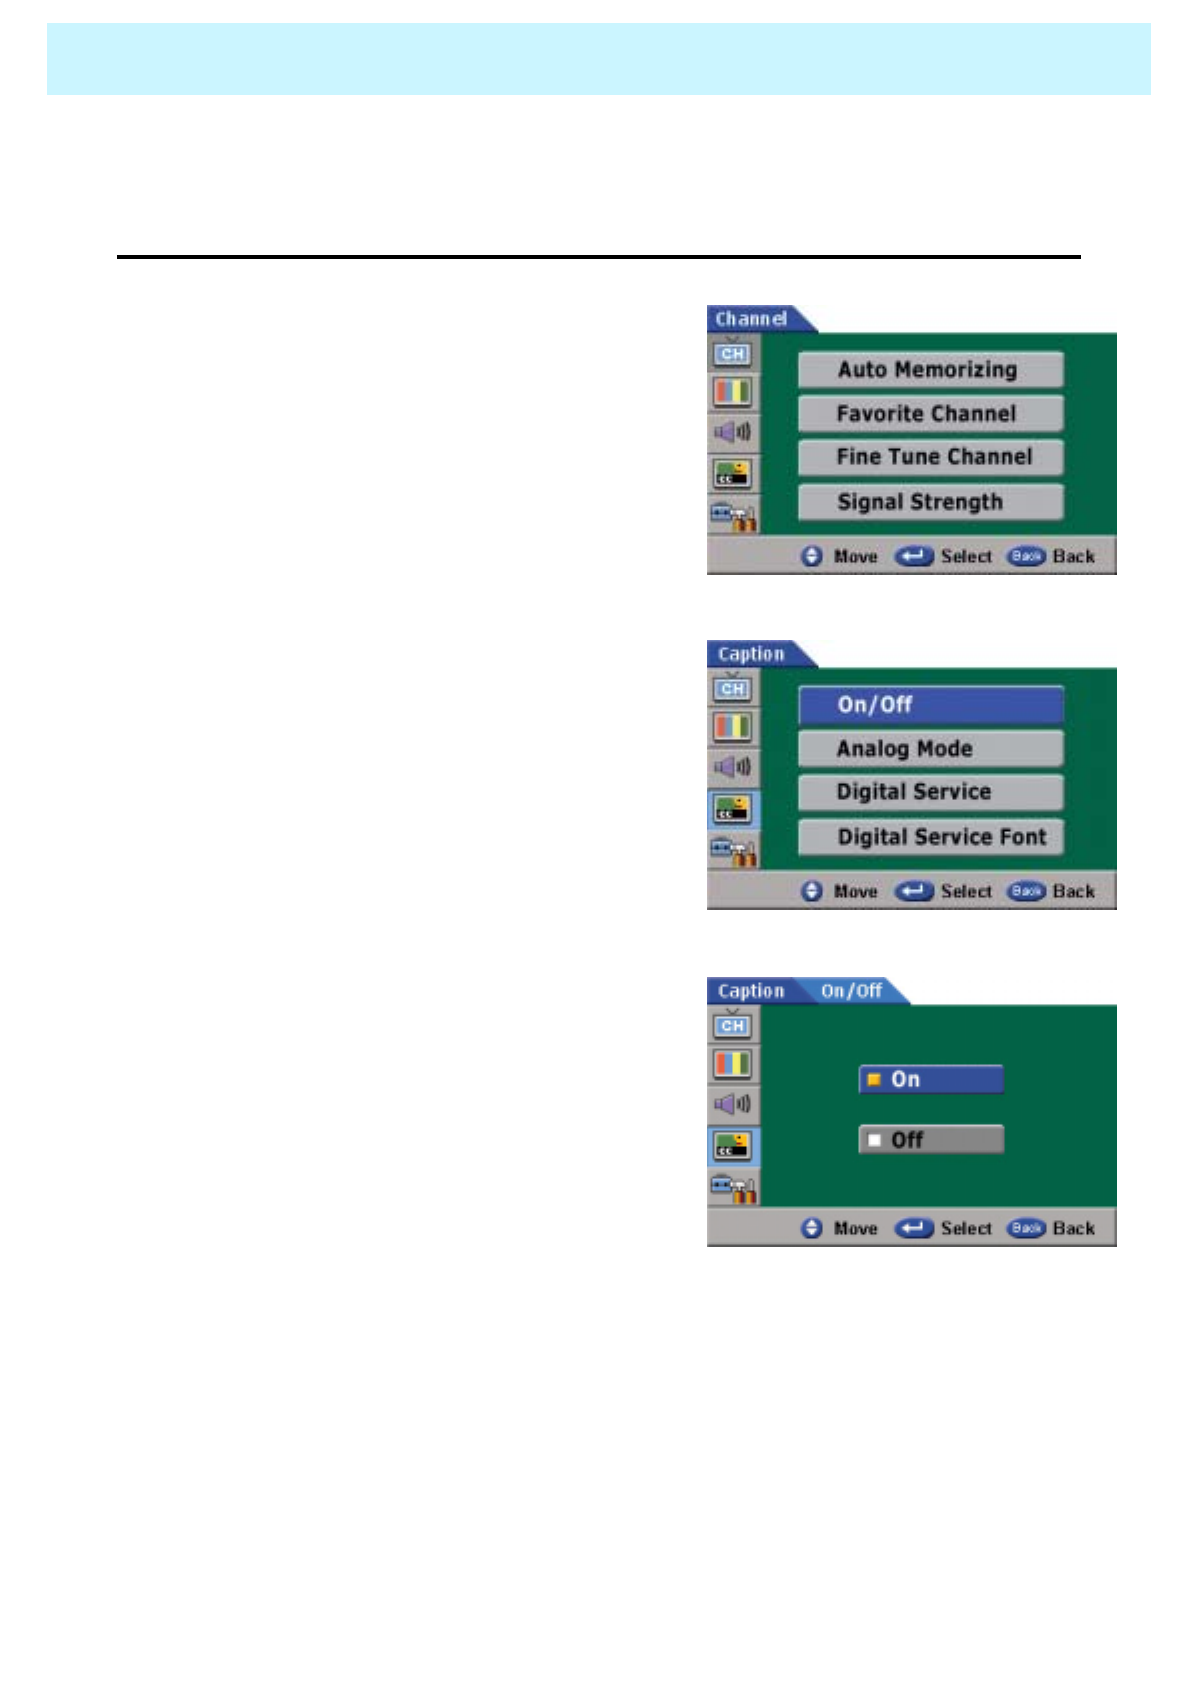
CAPTION
Your PDP provides caption function.
In the digital channels, caption font tuning is available.
•On/Off
1. Press Menu/set button
2. Press the dbutton to select Caption, then
press Menu/set button
3. Press Menu/set button again to select On/Off.
4. Press the cordbutton to choose On or Off,
then press Menu/set button.
OWNER'S MANUAL
58
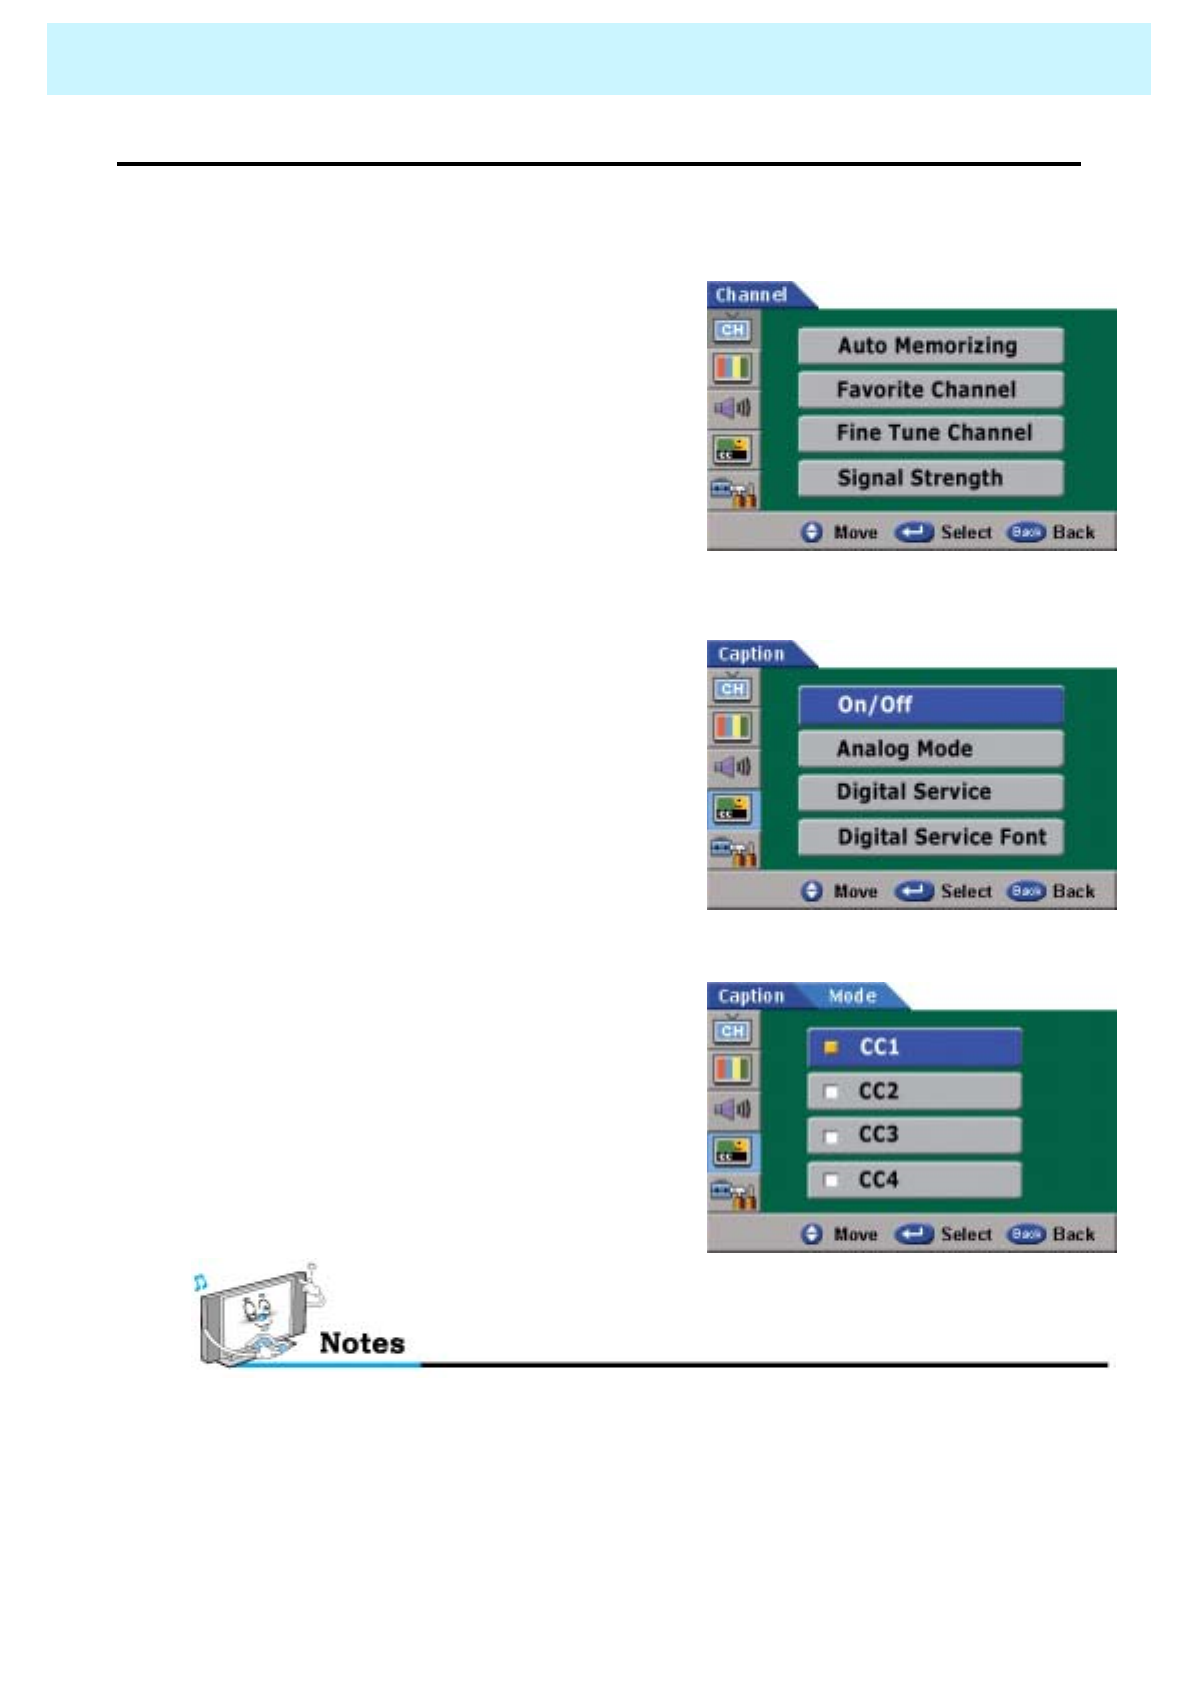
CAPTION
•Analog Mode
- Analog Mode is available in the analog channels and external input.
1. Press Menu/set button
2. Press the dbutton to select Caption, then
press Menu/set button
3. Press the dbutton to select Analog Mode,
then press Menu/set button
4. Press the cordbutton to select among “CC1”,
“CC2”, “CC3” or “CC4”
- The caption feature does not work in the digital channels.
- The availability of caption depends on the program being broadcasted.
OWNER'S MANUAL
59
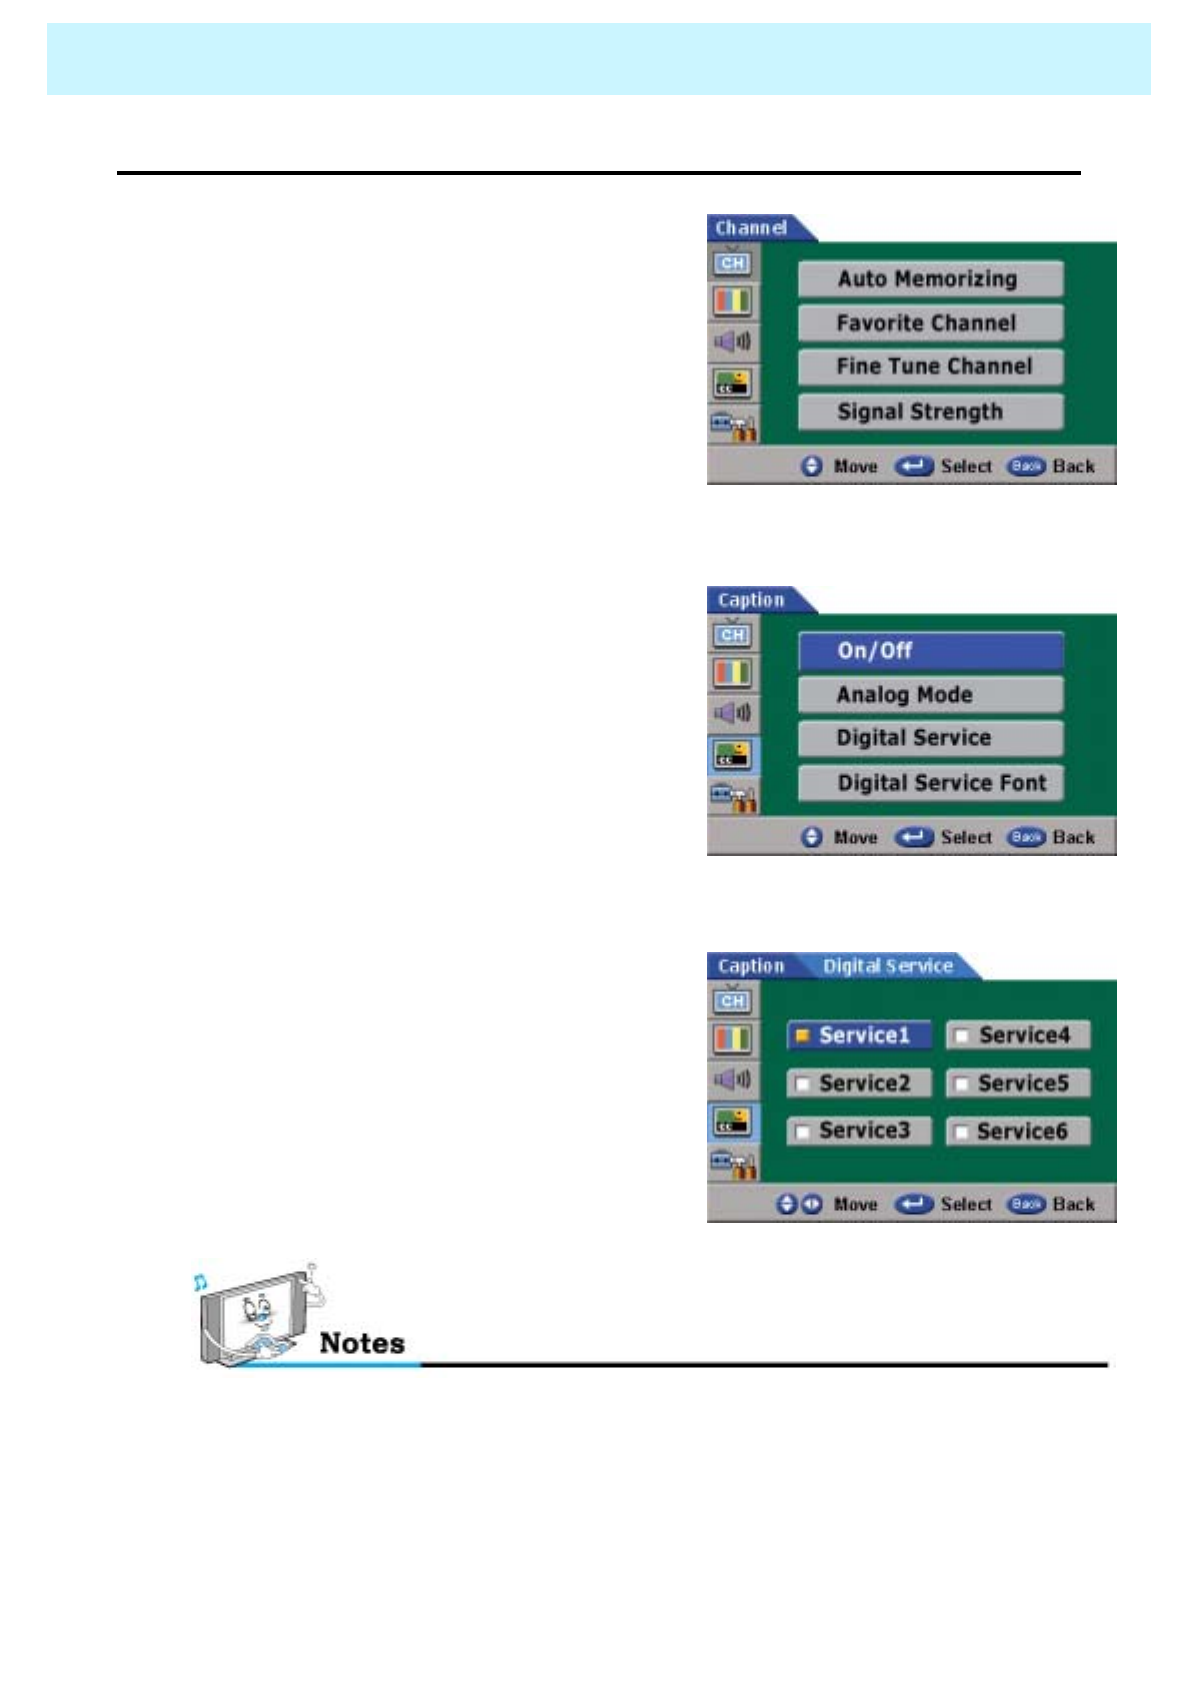
CAPTION
•Digital Service
- Digital Service is not available in the analog channels.
1. Press Menu/set button
2. Press the dbutton to select Caption, then
press Menu/set button
3. Press the dbutton to select Digital Service,
then press Menu/set button
4. Press the cordbutton to select among
Service 1~Service 6.
- The option consists of Service 1 ~ Service 6. The default is Service 1. Either the
reading level or the language may change depending on the service option.
OWNER'S MANUAL
60
CAPTION
•Digital Service Font
- Your PDP provides various kind of Caption Font in the Digital Channels. You can select your
favorite size, style, color, opacity and edge style.
1. Press Menu/set button
2. Press the dbutton to select Caption, then
press Menu/set button
3. Press the dbutton to select Digital Service
Font, then press Menu/set button
4. Press the cordbutton to select a particular
item then press the cordbutton to select a
particular item.
• This function is not selected in the analog channels.
OWNER'S MANUAL
61
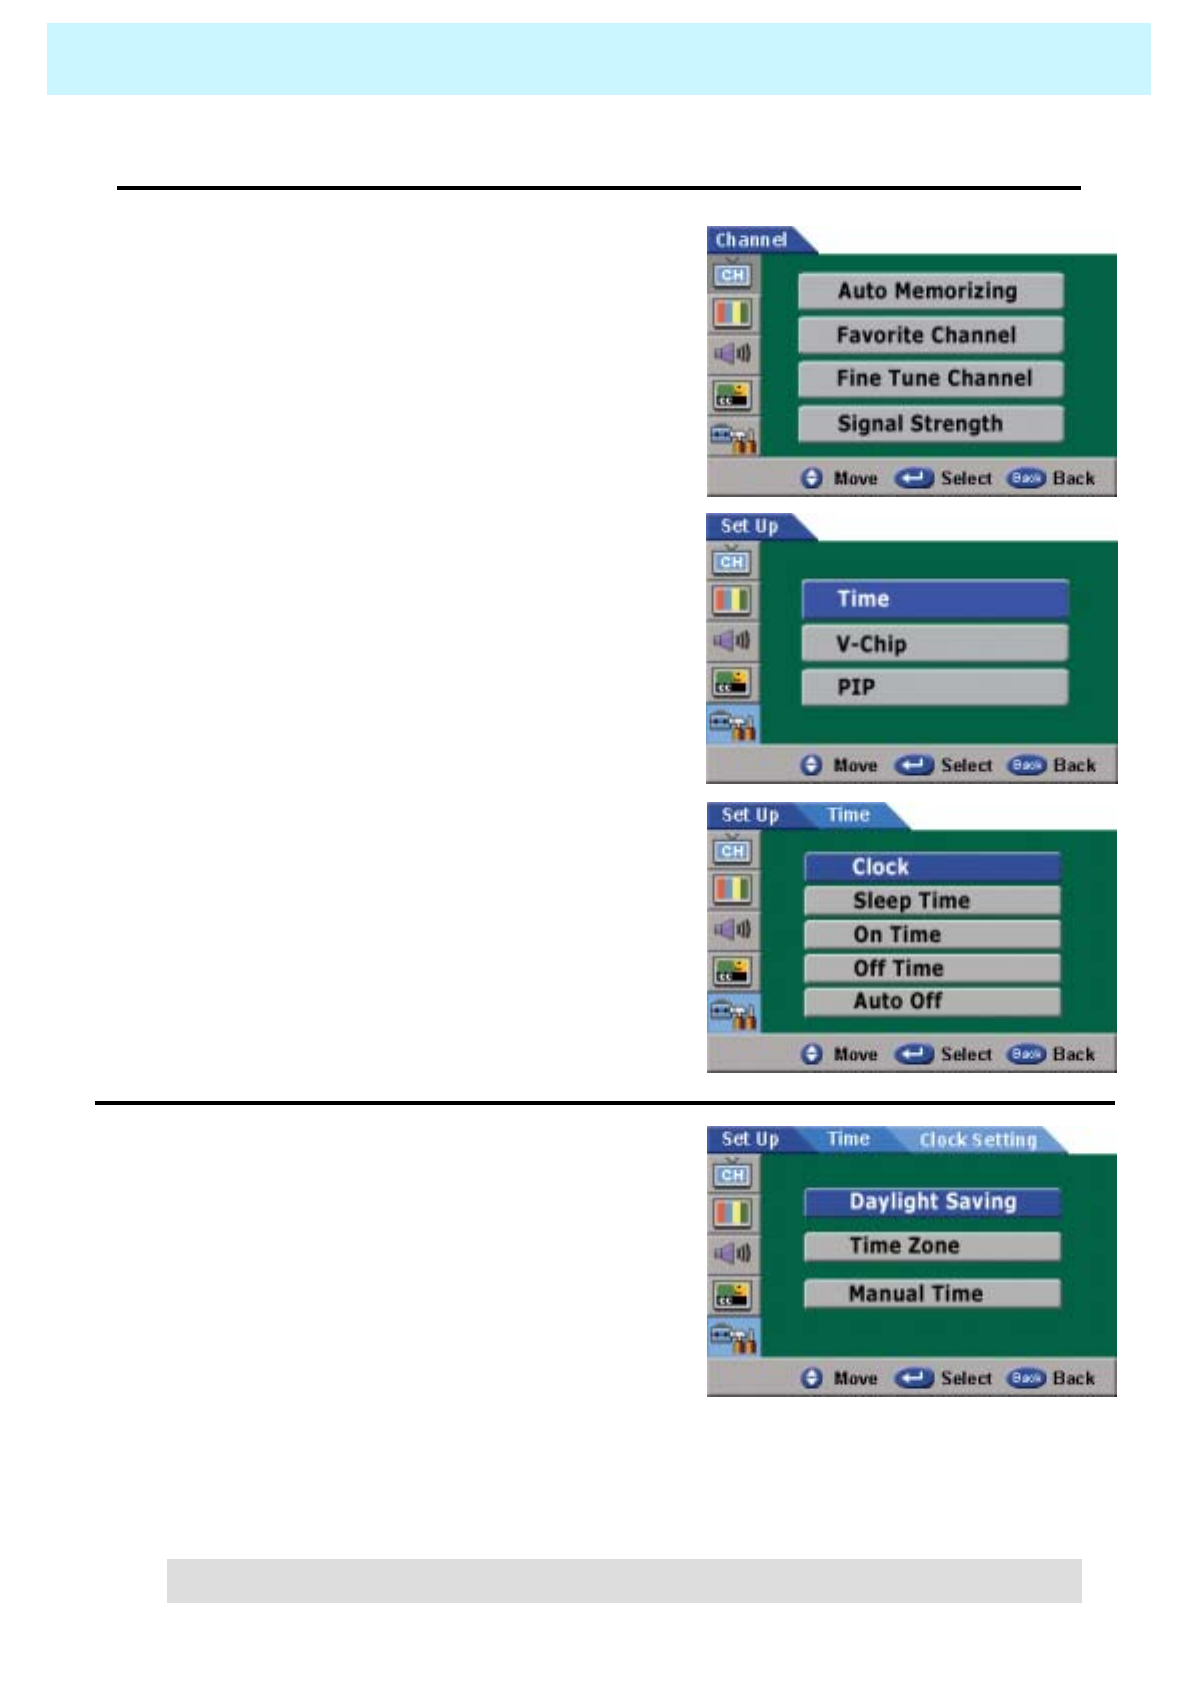
SET UP
Set up mode is to set up all options related to time, PIN change, rating set up, PIN size and position
•Time
- In the time mode, you can set up clock, sleep time, on time, off time and auto off.
1. Press Menu/set button
2. Press the dbutton to select Set up, then
press Menu/set button
3. Press Menu/set button again to get into
Time mode.
4. Press the dordbutton to select a
particular item then press Menu/set button
1. Clock
- Daylight Saving
Press "Yes" to activate daylight saving. If not,
press "No". When daylight saving information from
the broadcast signal is set to on and daylight saving
flag is also set to on, it does work daylight saving
practically.
- Time Zone
Select time zone where the user live.
- Manual Time Setting
You can set up time manually.
( When auto set up time is wrong or user wants to set up time, user set up present time manually)
• "Manual” Time does not work in case of receiving time data automatically.
OWNER'S MANUAL
62
SET UP
2. Sleep Time
You can set your PDP to automatically turn off after a
preset interval.
If you turn off the PDP TV in the state of setting up
sleep time and turn on again, sleep time erased
therefore set up again.
3. On Time
This PDP can be set to turn on automatically at
specific time that you choose.
Before using the timer, you must set the PDP’s
clock as described previously.
4. Off Time
This PDP can be set to turn off automatically at
specific times that you choose.
Before using the timer, you must set the PDP’s clock
as described previously.
5. Auto Off
If you select "On“, the PDP TV turned off
automatically if the signal does not exist.
OWNER'S MANUAL
63
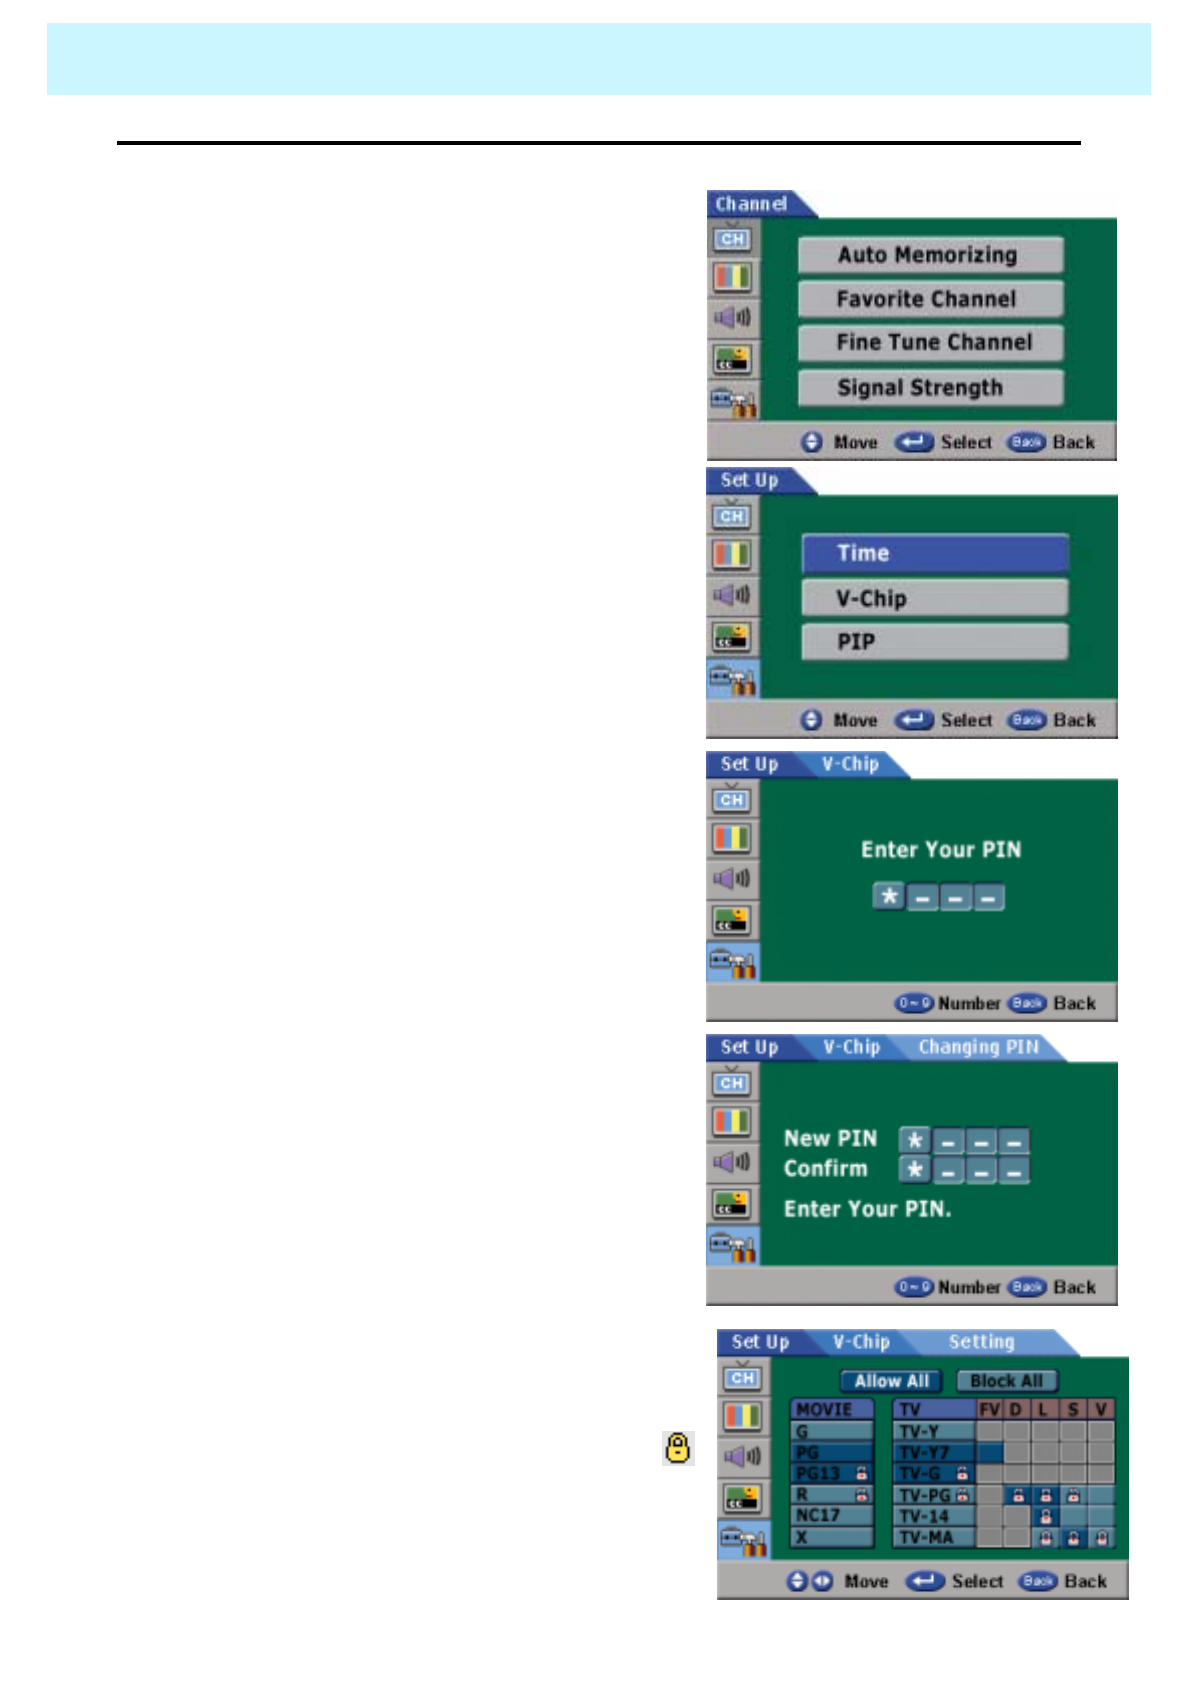
SET UP
•V-Chip
- Access to channels and programs is controlled by a password
( I.g. A 4-digit secret code that is defined by the user)
1. Press Menu/set button
2. Press the dbutton to select Set up, then
press Menu/set button
3. Press the dbutton to select V-Chip, then
press Menu/set button
4. When PIN (Personal Identification Number)
entered correctly, it provides authority for PIN
change and V-Chip settings up.
PIN consists of 4 digits. Initial default value
is "0000".
If entered PIN is not correct, Enter the exact
PIN again in order to change PIN and set up
the V-Chip.
5. Changing PIN :
You can change PIN. And enter the new PIN
number and confirm the PIN
6. V-Chip Setting :
You can independently lock the TV ratings. The
locked TV ratings are indicated by the symbol
press the c/d/f/ebuttons and Menu/set
button to activate the appropriate restrictions for
TV V-Chip system
MPAA V-Chip is based on age.
TV-PG V-Chip is based on both age and content.
OWNER'S MANUAL
64
SET UP
•PIP
- You can set up PIP size and position
1. Press Menu/set button
2. Press the dbutton to select Set up, then
press Menu/set button
3. Press the dbutton to select PIP, then
press Menu/set button
4. PIP Size :
You can choose one of the PIP size
( small, standard or large)
PIP Position :
You can choose the PIP position
(lower right, upper right, upper left
or lower left.)
OWNER'S MANUAL
65
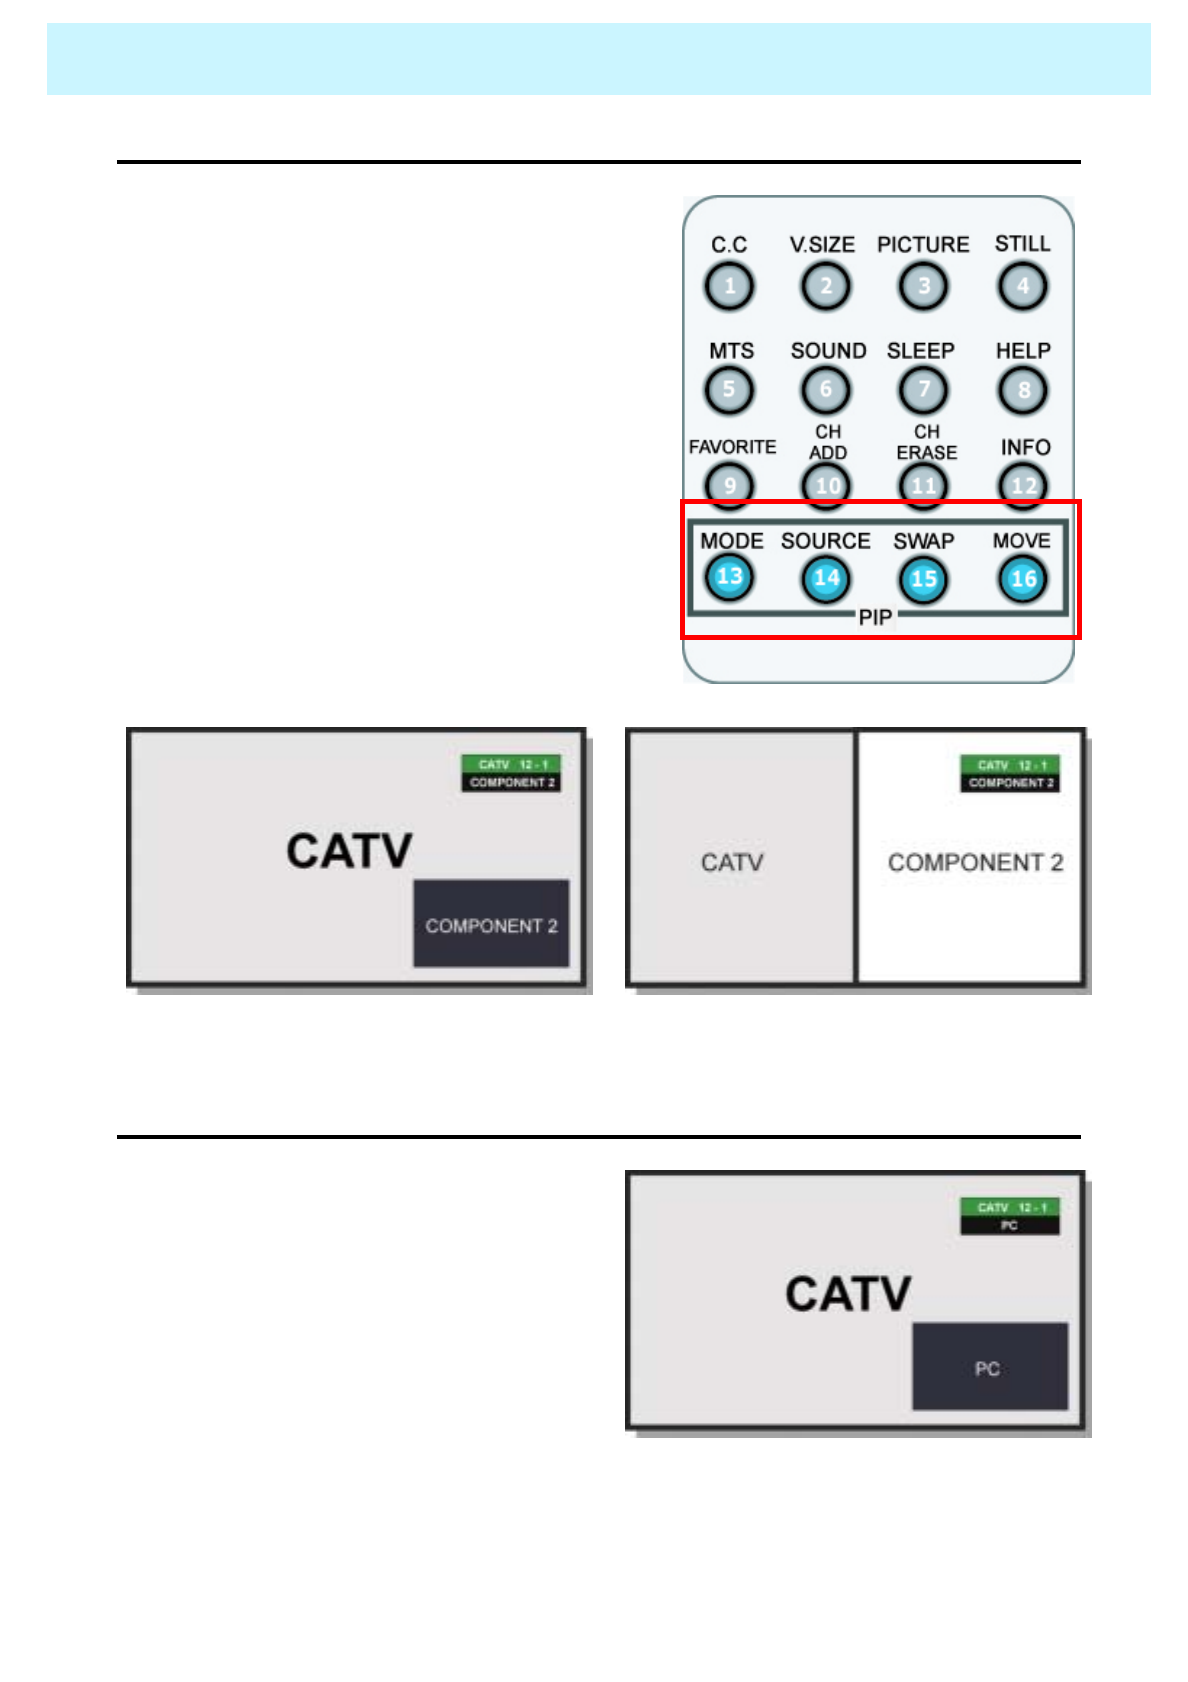
Viewing the Picture-in-Picture
•PIP on/off
1. PIP On :
Press the MODE button on your remote.
2. PIP MODE :
PIP function has two modes. If you press MODE
button one time, the PIP mode goes to window mode.
And you press the MODE button twice, the PIP mode
goes to double screen mode.
3. PIP Off :
If you press MODE button one more time, the PIP
function ends.
PIP – Window Mode PIP – Double Screen Mode
•PIP Source Select
1. PIP Source Change :
Press SOURCE button to change the PIP
screen source. Main screen source does
not change.
PIP Source : PC
OWNER'S MANUAL
66
Viewing the Picture-in-Picture
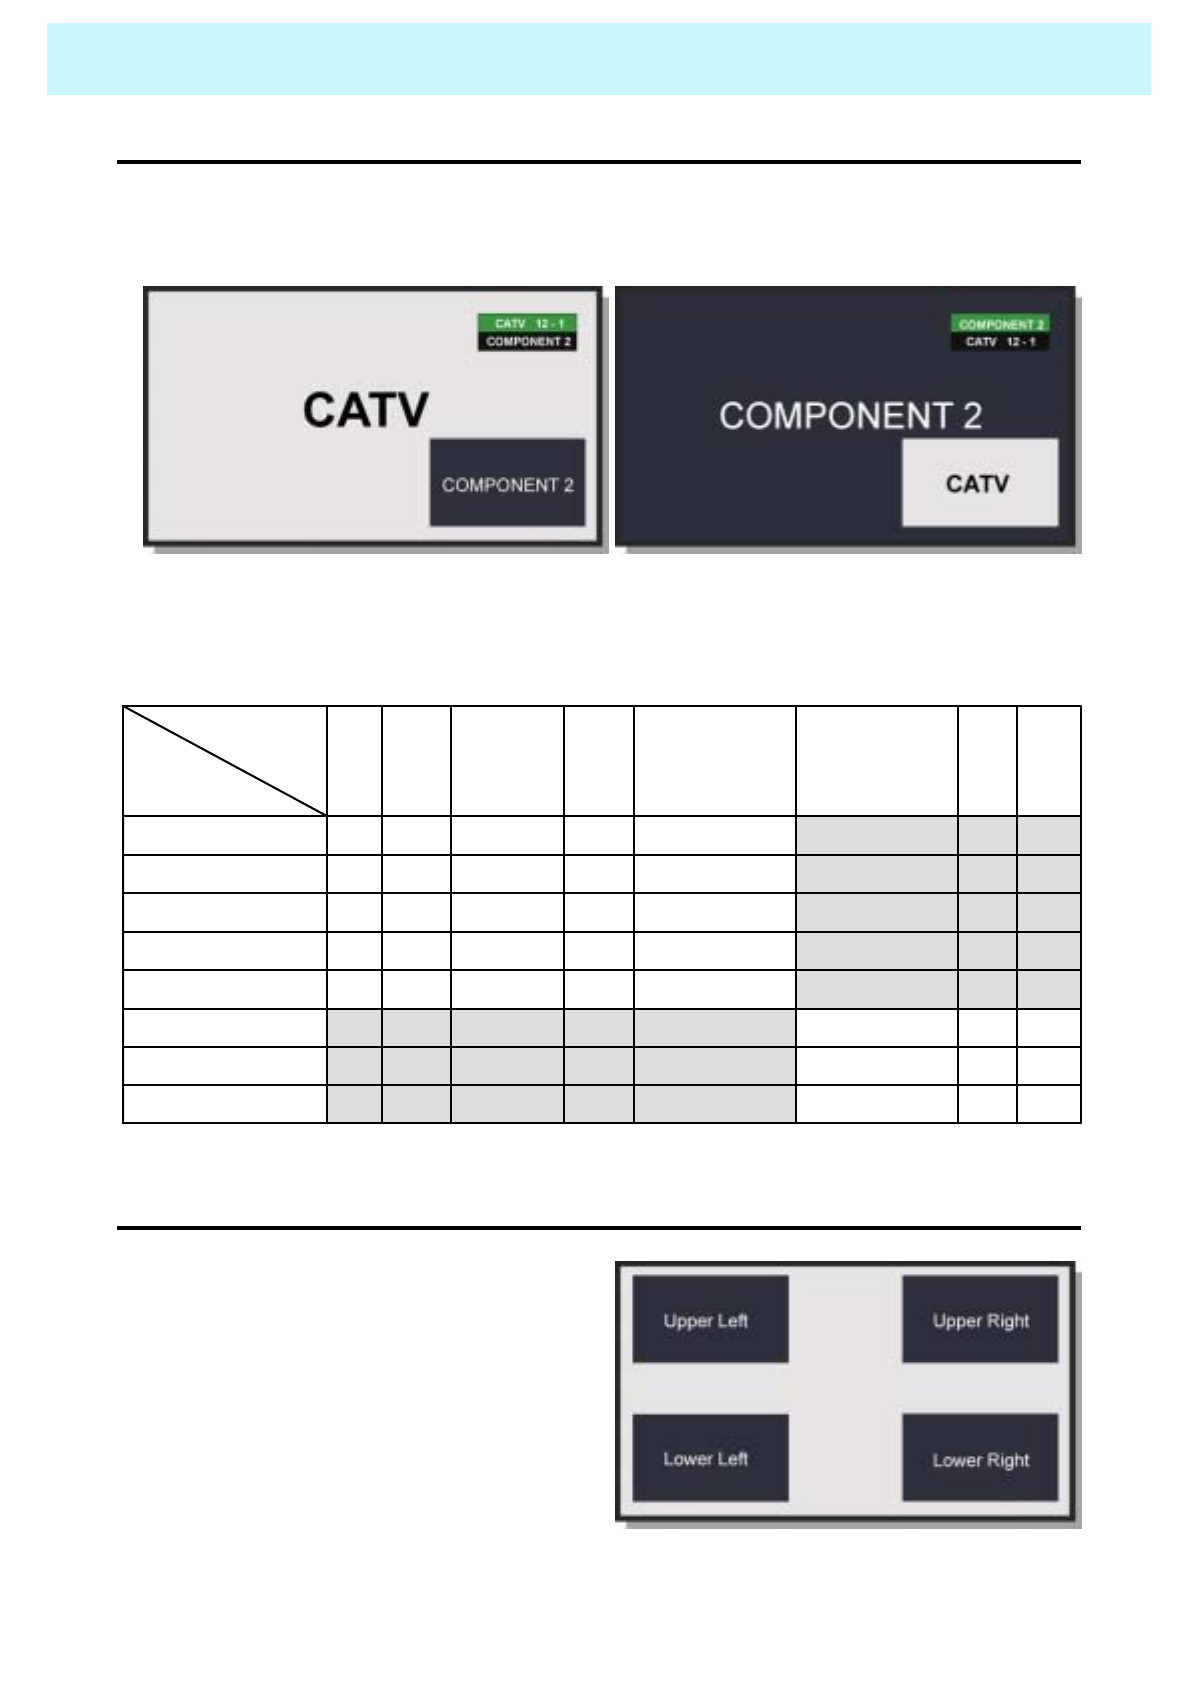
•PIP Swap
1. PIP Swap :
Press the SWAP button to switch between the Main Screen and PIP Screen.
PIP Swap - before PIP Swap - after
O : PIP and Swap Operate
X : PIP doesn’t Operate
PIP Settings
xxxoooooDVI
xxx
oooooPC
xxx
oooooComponent2
oooxxxxxComponent1
oooxxxxxAV2
oooxxxxxS-Video
oooxxxxxAV1
oooxxxxxTV
DVIPCComponent2Component1AV2S-VideoAV1TV
Main Screen
PIP Screen
•PIP Position (MOVE)
1. Quick way to control the PIP position :
Just toggle MOVE button on your remote.
Selective PIP positions are
lower right, upper right, upper left or lower left.
PIP Source : PC
OWNER'S MANUAL
67
Specification
Selectable color temp. settings:Warm, Cool, UserSelectable color temp. settings:Warm, Cool, User
MiscellaneousMiscellaneous
Quiet fanless operationQuiet fanless operation
Input phase clock adjustmentInput phase clock adjustment
Automatic frequency detectionAutomatic frequency detection
High Definition Component Video inputs: 480 i/p,
720p, 1080i
High Definition Component Video inputs: 480 i/p,
720p, 1080i
Program lock/V-chip (NTSC)Program lock/V-chip (NTSC)
Favorite channel programmingFavorite channel programming
Closed Caption decoding (NTSC)Closed Caption decoding (NTSC)
Digital 3D comb filter (NTSC)Digital 3D comb filter (NTSC)
3:2 Pull-Down for Film Scan Conversion3:2 Pull-Down for Film Scan Conversion
Digital progressive line scalingDigital progressive line scaling
Motion-Adaptive Deinterlace ProcessorMotion-Adaptive Deinterlace Processor
Advanced Motion digital processorAdvanced Motion digital processor
Multiple input compatibleMultiple input compatible
Picture-In Picture(PIP) with four selectable window
positions on PC mode
Picture-In Picture(PIP) with four selectable
window positions on PC mode
Advanced multi-window viewingAdvanced multi-window viewing
181-Program Cable-Ready TV tuner (ATSC/NTSC)181-Program Cable-Ready TV tuner
(ATSC/NTSC)
PC monitor support up to 1280 x 1024 60hzPC monitor support up to 1280 x 1024 60hz
Brightness:800cd/m2Brightness:700cd/m2
900:1 contrast ratio1000:1 contrast ratio
1366 x 768 physical pixels852 x 480 physical pixels
Variable 4:3 / 16:9 image aspect ratios (4 modes)Variable 4:3 / 16:9 image aspect ratios (4 modes)
50-inch diagonal screen42-inch diagonal screen
Function and SpecificationFunction and Specification
50” Plasma TV Display Panel42” Plasma TV Display Panel

OWNER'S MANUAL
68
Specification
Operation : 800~1114hPaOperation : 800~1114hPa
TemperatureTemperature
Operation : 0oC ~ 35oC(32oF ~ 90oF)Operation : 0oC ~ 35oC(32oF ~ 90oF)
Storage : -15oC ~ 60oC(5oF ~ 140oF)Storage : -15oC ~ 60oC(5oF ~ 140oF)
Power : AC 110~240V, 50/60HzPower : AC 110~240V, 50/60Hz
Power Consumption : 540 WattsPower Consumption : 380 Watts
HumidityHumidity
Operation : 20~70%Operation : 20~70%
Storage : 20~80%Storage : 20~80%
PressurePressure
Storage : 600~1114hPaStorage : 600~1114hPa
Working EnvironmentWorking Environment
55.5kg (With stand and Speaker)41.5kg (With stand and Speaker)
55kg (With stand, without Speaker)41kg (With stand, without Speaker)
52kg (Main only)38kg (Main only)
Weight:Weight:
1416 x 798 x 299 (With stand and speaker)1246 x 702 x 299 (With stand and speaker)
1216 x 798 x 299 (With stand, without Speaker)1046 x 702 x 299 (With stand, without Speaker)
1216 x 732 x 88 (Main only)1046 x 635 x 87 (Main only)
Dimensions : (W x H x D) unit : mmDimensions : (W x H x D) unit : mm
Side-mount Speakers / OptionalSide-mount Speakers / Optional
Table stand / OptionalTable stand / Optional
Full function remote controlFull function remote control
AccessoriesAccessories
DVI input : DVI CableDVI input : DVI Cable
Control Ports : RS-232 D-sub 9-pin x 1Control Ports : RS-232 D-sub 9-pin x 1
Audio system : StereoAudio system : Stereo
Speaker output : Cinch Conn Type(L/R) x
1(4cinch connectors type)
Speaker output : Cinch Conn Type(L/R) x
1(4cinch connectors type)
Audio input : RCA-pin Type(L/R) x 5:Full support
separated audio input
Audio input : RCA-pin Type(L/R) x 5:Full support
separated audio input
RGB input : D-sub 15-pin x 1(480i/p, 720p, 1080i)RGB input : D-sub 15-pin x 1(480i/p, 720p, 1080i)
S-video : Mini DIN 4-pin x 1S-video : Mini DIN 4-pin x 1
Component video signal : YPbPr x 2Component video signal : YPbPr x 2
Composite:RCA-pin x 2 , Composite:RCA-pin x 2,
Connectivity:Connectivity:
50” Plasma TV Display Panel42” Plasma TV Display Panel
OWNER'S MANUAL
69
Troubleshooting
Before you call a service technician, please scan this list of problems and possible solutions. It
may save you time and money.
Check the digital signal strength and input antenna.Digital broadcasting screen
problem
Typical sound due to normal Monitor operation, Monitor is not
faulty.
Strange sound form the Monitor
Adjust Balance in the Sound Menu.No output from one of the speakers
Adjust the Size settings.The image is too large or too small
Adjust the Brightness or Contrast settings.The image is too light or too dark
Select Color in the Picture and press VOLUME( X) button.
Keep a certain distance between the Monitor and the VCR.
Activate any function to restore the brightness of the picture.
Check to see that both the monitor and the source are plugged
in and turned on.
No or Poor color or Poor picture
Check to see if there is any object between the Plasma
Display and the remote control causing obstruction.
Check to see if the batteries are installed with the correct
polarities.
The remote control doesn't work
Press the VOLUME( X) button.
Check the audio input signal.
Picture OK & No sound
Check whether the Monitor is turned on.
Power cord inserted into wall outlet?
Plug another product’s power cord into the wall outlet where the
Monitor’s power cord was plugged in.
No picture & No sound
Quick Action for Possible SolutionProblem
OWNER'S MANUAL
70
Warranty Card
1-Year Limited Warranty
Warranty Service is only available in the country of original purchase. This is an
important document. Attach your bill of sale to this card and keep it in a safe place.
Your bill of sale is your warranty.
Our warranty remains in effect for one year from the date of the first consumer purchase.
WHO IS PROTECTED BY THIS WARRANTY
Our warranty protects the original owner and all subsequent owners, provided that our
product was purchased from an authorized dealer
A copy of the original dated bill of sale must be presented whenever warranty service is
required.
WHAT IS COVERED BY THIS WARRANTY
Except as specified below, the warranty covers all defects in material and workmanship. The
following are not covered: damage caused by accident, misuse, abuse, product modification
or neglect; damage occurring during shipment; damage from failure to follow instructions
contained in the instruction manual; damage resulting from the performance of repairs by
someone not authorized by us; damage by natural disaster such as lightening, flood etc.;
damage caused by installation of parts that do not conform to the specification; units used for
other than home and office use; units not used for their intended purpose; any claims based
on misrepresentations by the seller; products sold on an “as-is”or final sales basis; or the
cost of installing, removing, or reinstalling the unit. Our liability is limited to the repair or
replacement, at our option, if any defective product and shall not include incidental or
consequential damages. We reserve the right to replace a discontinued model. Any
replacement units or parts may be new or rebuilt.
TO OBTAIN WARRANTY SERVICE
If you require warranty service, please return the product to your dealer.