Harvest One FLARF60 Wireless Flash User Manual
Harvest One Limited Wireless Flash
Users Manual

User Manual
Manual
Flash
RF60

2 3
Table of Content 1. Getting to know RF60
Thank you for purchasing Cactus
Wireless Flash RF60. The RF60 is a
to command your lights off camera,
lights at any angle, direction and
distance – the possibilities are
endless!
–Built-in
Wireless Commander and
Receiver;
–R e m ot e C o n tr ol
Zooms;
–Group Control
Group Alias;
–Optical SlaveDelay feature;
– u p t o a Gu id e N u m b er of
60 meters;
– Wireless
Flash Transceiver;
– feature;
–High-speed Sympathy mode provides
2. Caution and Warnings
Before using the product, read the
-
rect and safe use and to help prevent
d a m a g e of Ca ct u s R F60.
1. Turn OFF all your equipments (Cac-
tus units and cameras, etc.) be-
fore changing batteries or making
connection.
4 5
this instruction manual;
4. Do not permanently store the pro-
duct in a high temperature envi-
ronment (i.e. under strong direct
sunlight, near cooking stoves /
oven).
5. C act u s R F 60 s h o u l d n ot b e su b -
merged in liquid or exposed to
h eav y r a i n u n le ss it i s pr o p e rl y
protected.
6. Do not operate the device in the
fumes.
into the eyes of someone at close
range.
the driver of a moving car.
3. Major Specifications
–G uid e N u m b er (IS O 100) i n m et er:
Zoom (mm) 24 28 35 50 70 80 105
GN (meter) 33 34 38 45 53 57 60
GN (feet) 108 112 124 147 174 186 195
–Motor Zooms: 24mm – 28mm – 35mm –
50mm – 70mm – 80mm – 105mm
–
1/1 1/2 1/4 1/8 1/16 1/32 1/64 1/128
1/2+0.3 1/4 +0.3 1/8 +0.3 1/16 +0.3 1/32 +0.3 1/64 +0.3 1/128 +0.3
1/2 +0.7 1/4 +0.7 1/8 +0.7 1/16 +0.7 1/32 +0.7 1/64 +0.7 1/128 +0.7
–Flash Durations: 1/300s – 1/20,000s
–
Slave (S)
–Working Radio Frequency: 2.4GHz
–Number of Channels: 16
–Number of Groups: 4
–Maximum Wireless Effective Dis-
tance: 200 meters
–Built in Optical Slave Mode: S1
–
alkaline or Ni-MH), rechargeable
Ni-MH for best performance
–Flash count per battery cycle: 100-
–Recycle time: 0.1-5.0 seconds
–Color temperature: 5600k +/- 200k
–Operating temperature: -20°C to
+50°C
–Dimensions: 205 x 83 x 61mm
–
4. Package Content
Cactus RF50 Flash (1)
Cactus Flash Stand FS-2 (1)
Cactus Flash Carrying Case FC-3 (1)
User Manual (1)
(illustratio n T.B.A)
6 7
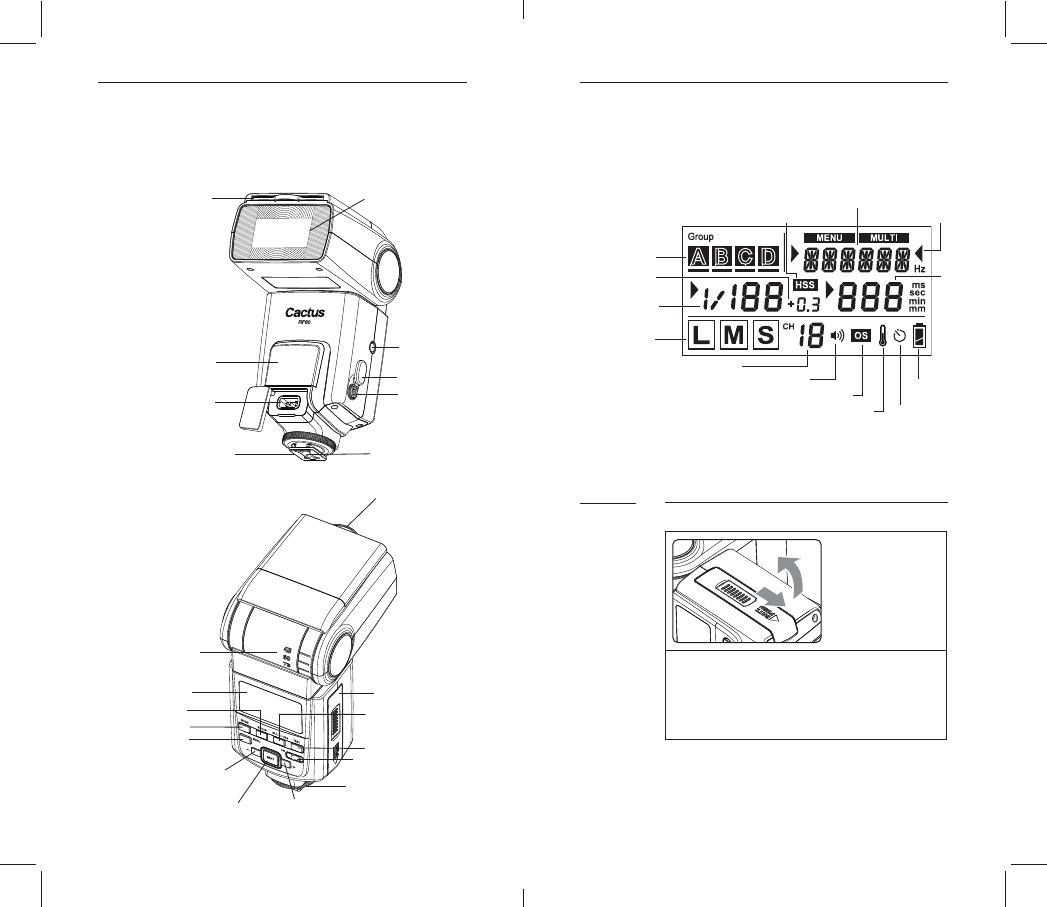
5. Nomenclature
(RETRACTED)
BRACKET MOUNTING
CHARGING SOCKET
MOUNTING FOOT
CONTACTS
BOUNCE CARD
MODE BUTTON
MENU BUTTON
- BUTTON
NEXT BUTTON
+ BUTTON
ON/OFF SWITCH
TEST BUTTON/
DOOR
GROUP BUTTON
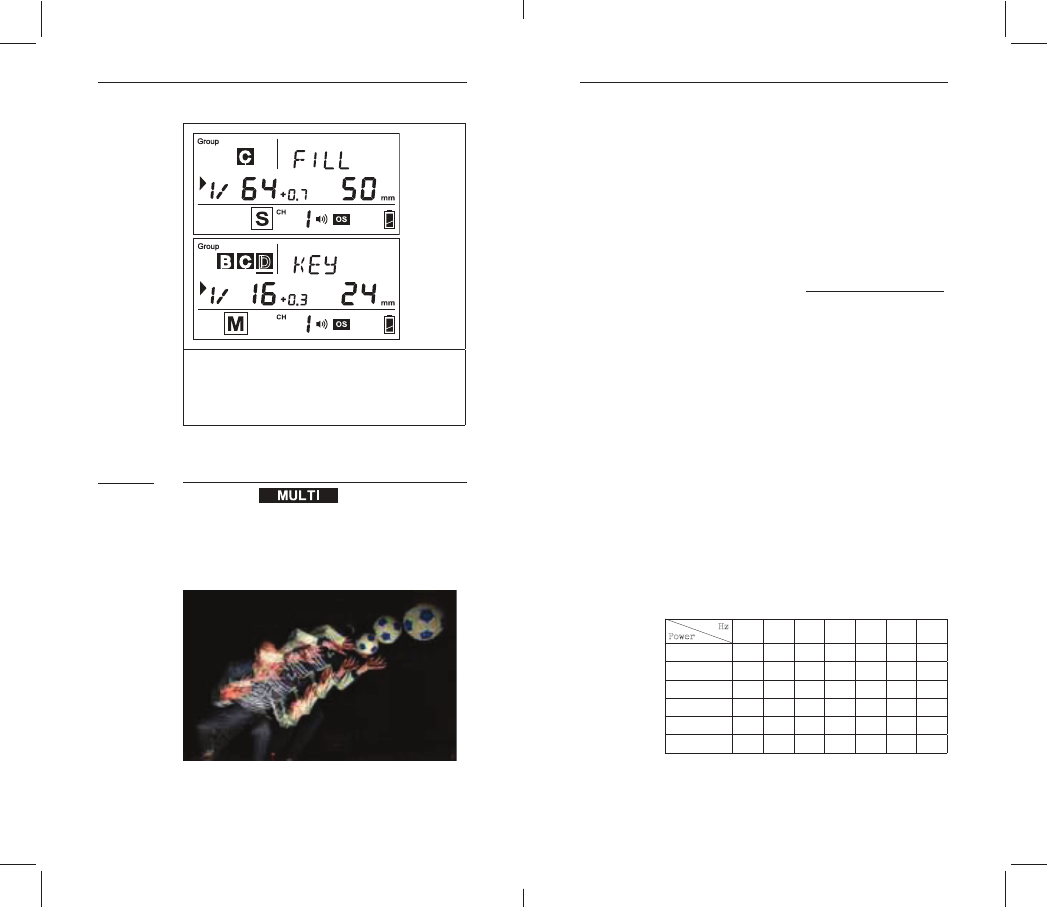
6. LCD Panel
7. Getting Started
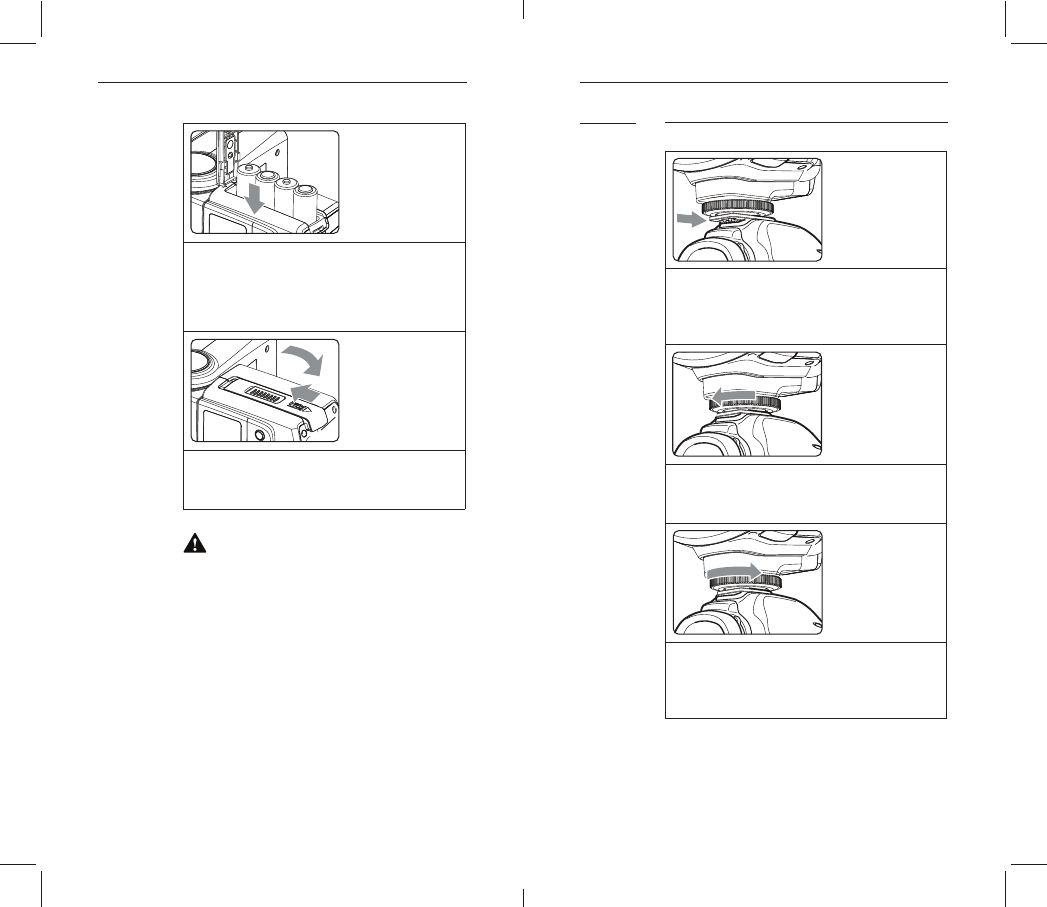
Inserting Batteries
1. O p en the cover.
Use your thumb to press the bat-
tery compartment door, and slide
the door.
7.1
MODE
BEEP STATUS
INDICATOR
HIGH TEMPERATURE
WARNING
MAIN POWER
INCREMENT
MODE ICON
TEXT AREA
INDICATORS
ZOOM
8
2. Install the batteries.
Make sure the positive (+) and
negative (-) battery contacts
in the compartment.
3. Close the cover.
C au t io n
1.
the same brand. When replacing
batteries, replacing all four at
one time.
2. AA-sized alkaline, Ni-HM or lithium
batteries can be used.
3. If you change batteries after
hot.
Attaching to the Camera
1. Attach the Flash.
-
2. Secure the Flash.
mounting foot until it locks up.
3. Detach the Flash.
the mounting foot until it is
loosened.
7.2
10 11
Turning on the Power Switch
Flash starts charging.
disabled. Please change the bat-
teries immediately.
Section 12.3).
7.3 C aution
1.
after a certain period of idle use,
may damage batteries. Therefore,
is not used for long periods of
time. AA-sized alkaline, Ni-HM or
lithium batteries can be used.
2. To avoid overheating and degrading
-
for at least 10 minutes.
inner overheating prevention fun-
ction may be activated to prolong
the recycling time to about 8 – 20
-
return to normal.
Adjusting Flash Head
the surface before illuminating the
behind the subject for a more natural
looking shot. This is called a bounce
7.4
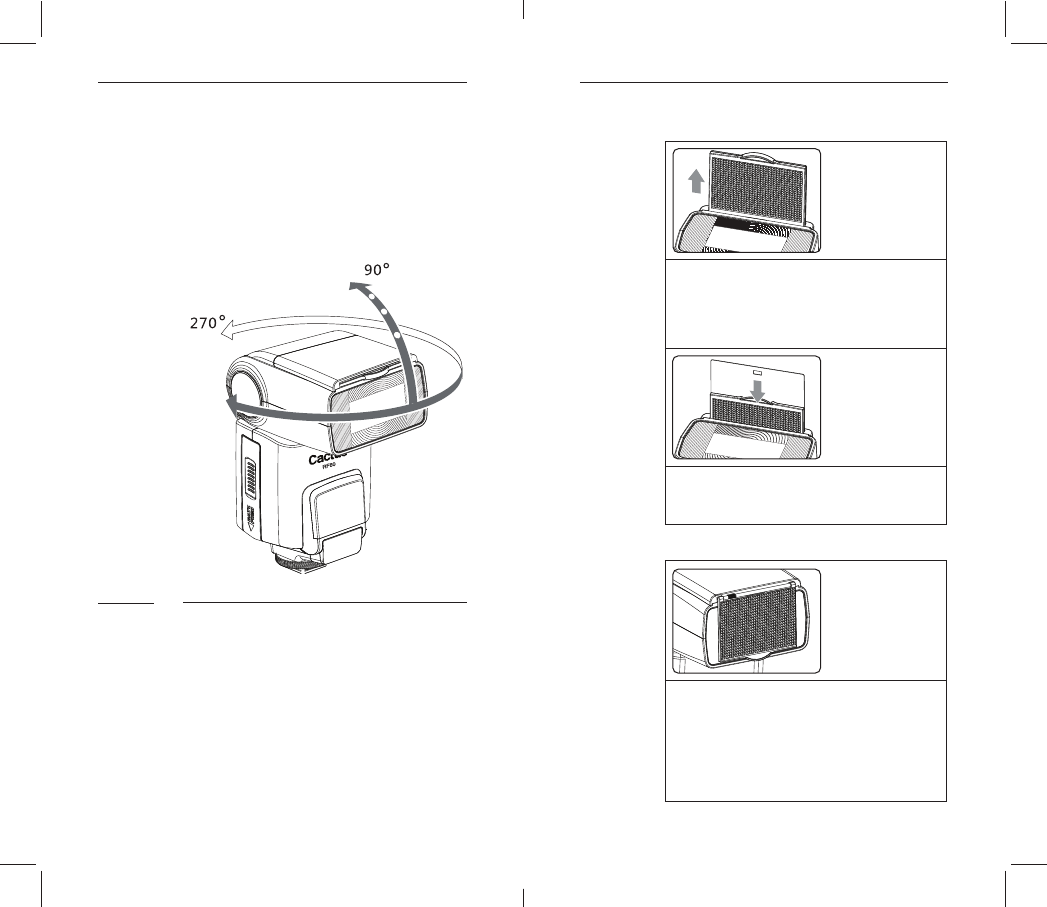
12 13
vertically. Horizontally, it can be
tu r n it t o a sati sf y i n g a n g le v er ti-
cally and horizontally.
Bounce Card and Wide Angle Diffuser
There is a set of bounce card and
Bounce card is useful for strengthe-
-
7.5
Using Bounce Card
-
out at the same time.
ready for use.
Using Wide Angle Diffuser
come out at the same time.
2. Push the bounce card back in.
-
m i n ati n g a t 14 m m co ve ra g e.
14 15
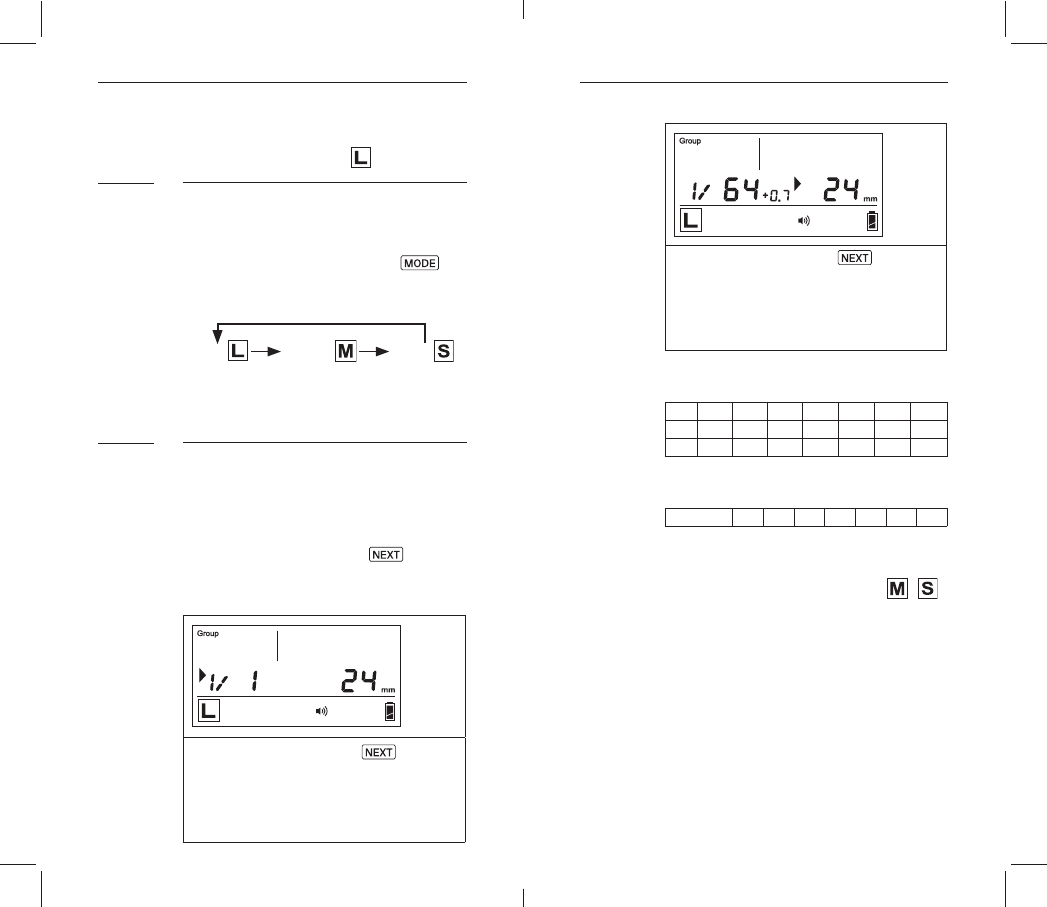
8. On-camera Operation:
Local Mode
Choosing Local Mode
There are 3 operating modes in RF60,
Mode
b utt o n t o ch o os e t he a p pr o pr iat e
mode. The mode indicator turns in the
-
Adjusting Power and Zoom
right. The selection indicator Ź
level or zoom. Press the Next button
order to adjust a setting of an item.
Next until
the selection indicator Ź is poin-
8.1
8.2
To adjust zoom, press Next until
the selection indicator Ź is
pointing to the zoom value (i.e.,
decrease the zoom range.
1/1 1/2 1/4 1/8 1/16 1/32 1/64 1/128
1/2+0.3 1/4 +0.3 1/8 +0.3 1/16 +0.3 1/32 +0.3 1/64 +0.3 1/128 +0.3
1/2 +0.7 1/4 +0.7 1/8 +0.7 1/16 +0.7 1/32 +0.7 1/64 +0.7 1/128 +0.7
Zoom (mm) 24 28 35 50 70 80 105
9. Wireless Flash: Master
and Slave Modes
With a built-in RF (Radio Frequency)
module, the RF60 has the capability
mode and the other RF60 units in
Slave mode.
16 17
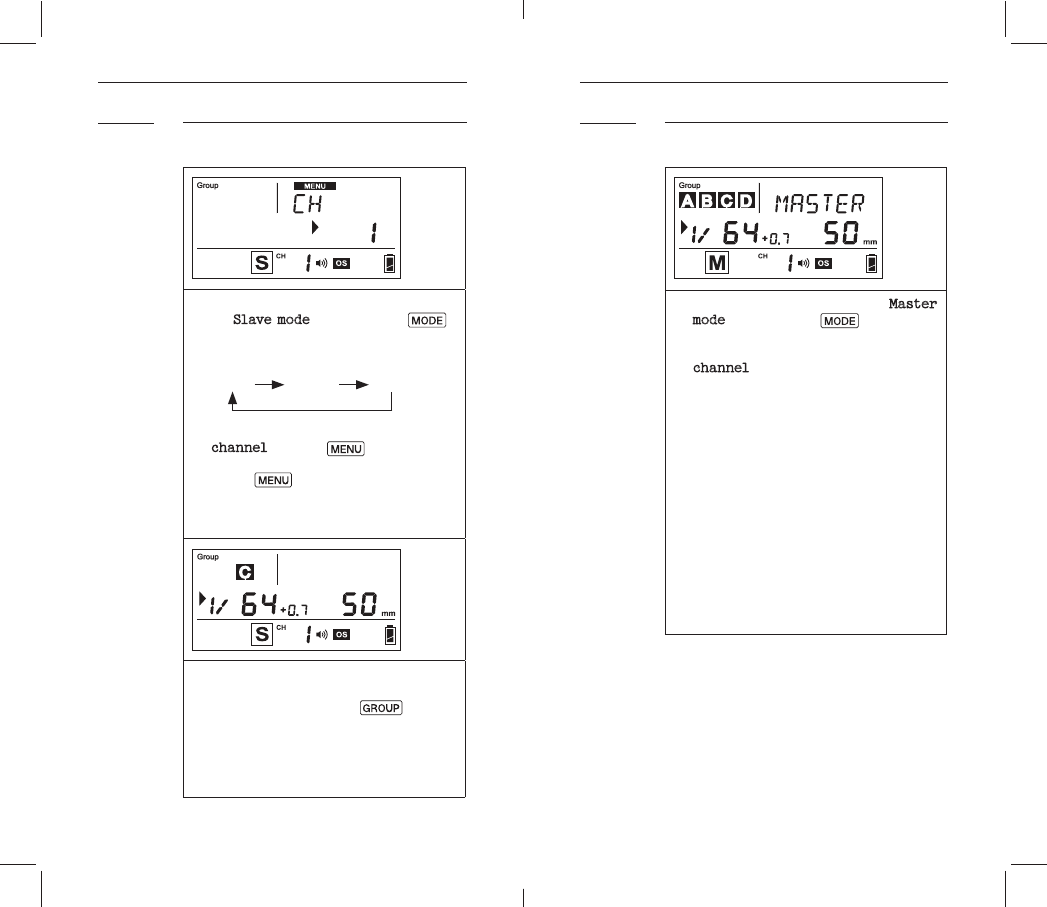
Setting Up RF60 Slave
to
Sl a ve m o d e b y pr e ssi n g Mode.
sequence:
2. Set all RF60 to the same
channel. Press Menu, use + or –
b utt o n t o s e l e ct th e R F c h a n n el.
Press
Menu t o g o b ac k t o m ai n
screen. The selected chan-
status bar.
3. Assign RF60 Slave units to
eit h e r g r o u p A, B, C o r D. P r es s
Group to select the group for
each RF60. Each press of the
change group in the sequence of
9.1 Commanding with RF60 Master
1. Set the on-camera RF60 to Master
mode by pressing Mode (see S e c-
2. S et R F60 Ma st er t o t he sa m e
channel as RF60 Slave units (see
3. Check the group status on the
group panel. Only activated
or D boxes.
4. On RF60 Master, you can change
D group.
5. The default group is the Master
RF60 itself. In the display, the
group is selected in the group
group activation status.
9.2
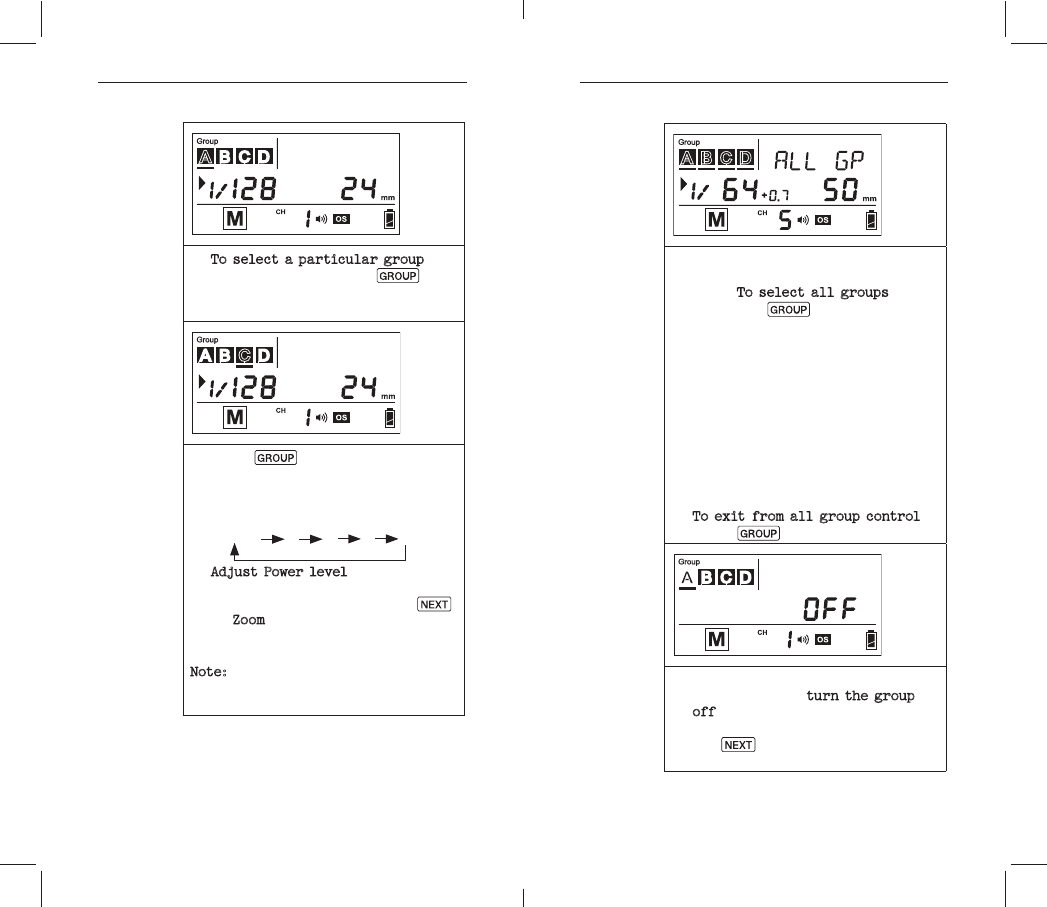
18
6. To select a particular group for
remote control, press Group and
the group selection indicator
7. P r e ss Group
next group, i.e., group B. Each
select next group in the fol-
M a s te r A B C D
8. of th e M a st er
using + or – button. Press Next
to
Z o o m
+ or – button.
Note:-
being selected.
all active groups at the same
time. To select all groups, long
press the Group button.
10.All selection indicators of the
level as you do for a single
group. The changes in both set-
all active groups, including the
12.To exit from all group control,
press Group button once.
-
ticular group, turn the group
off by selecting the group (see
step 2 and 3) and long pressing
the
Next

20 21
Note: The RF60 Master can also be
turned off by long pressing the
Next b utt o n i n th e M a st er g r ou p.
Once turned off, the RF60 Master
command RF60 Slaves to change set-
14.To tu r n on a g r o u p a g ai n, se l e ct
the group (see step 2 and 3) and
long press the Next button. The
15.Press the shutter on camera and
the RF60 Master and Slave units
-
ting as you have set in the RF60
Master.
10. Group Aliases
group alias for users to choose for
the particular slave groups accor-
ding to the purpose of each. The cho-
text area beside the group icons. The
the group is selected.
The group aliases available for se-
lection include:
– RIGHT – BACK – FRONT
1. To set group alias, select the
alias, then press the Group and
Menu button simultaneously.
2. The selection indicator and
the text area. Press + or – but-
ton to scroll through the group
aliases available for selection.
3. Pr ess Next or Menu
alias and exit.
4. Repeat 1-3 to set aliases in all
the Cactus RF60. To prevent con-
fusion, make sure that you have
set the same aliases for the
same group in all RF60 units.
22 23
a pp e a r i n Sl av e m o d e or M a st er
-
lected.
11. Advanced Operation
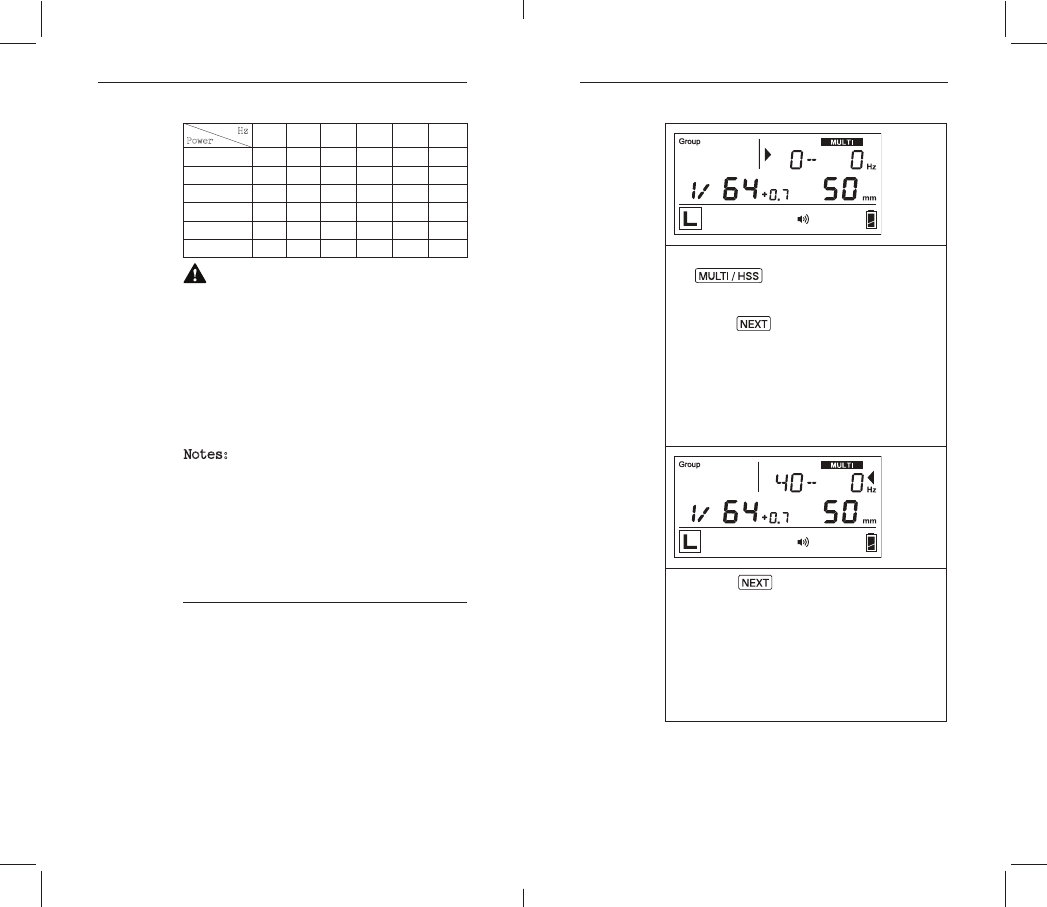
Multi Flash
In Multi mode, a rapid series of
capture multiple images of a moving
subject in a single frame.
In Multi mode, you can change the:
Flash frequency per second in Hz
Zoom
11.1
represents the number of times the
the shutter speed you have in mind,
you could determine the appropriate
frequency.
S h ut t e r N o. of 1
picture at a shutter speed of 0.5
10 ti m es p e r s ec o n d (i.e., 10 H z), t h e
-
frequency of 100Hz, the shutter speed
should be set at 1/10 second.
level.
Maximum Number of Multi Flashes
Hz
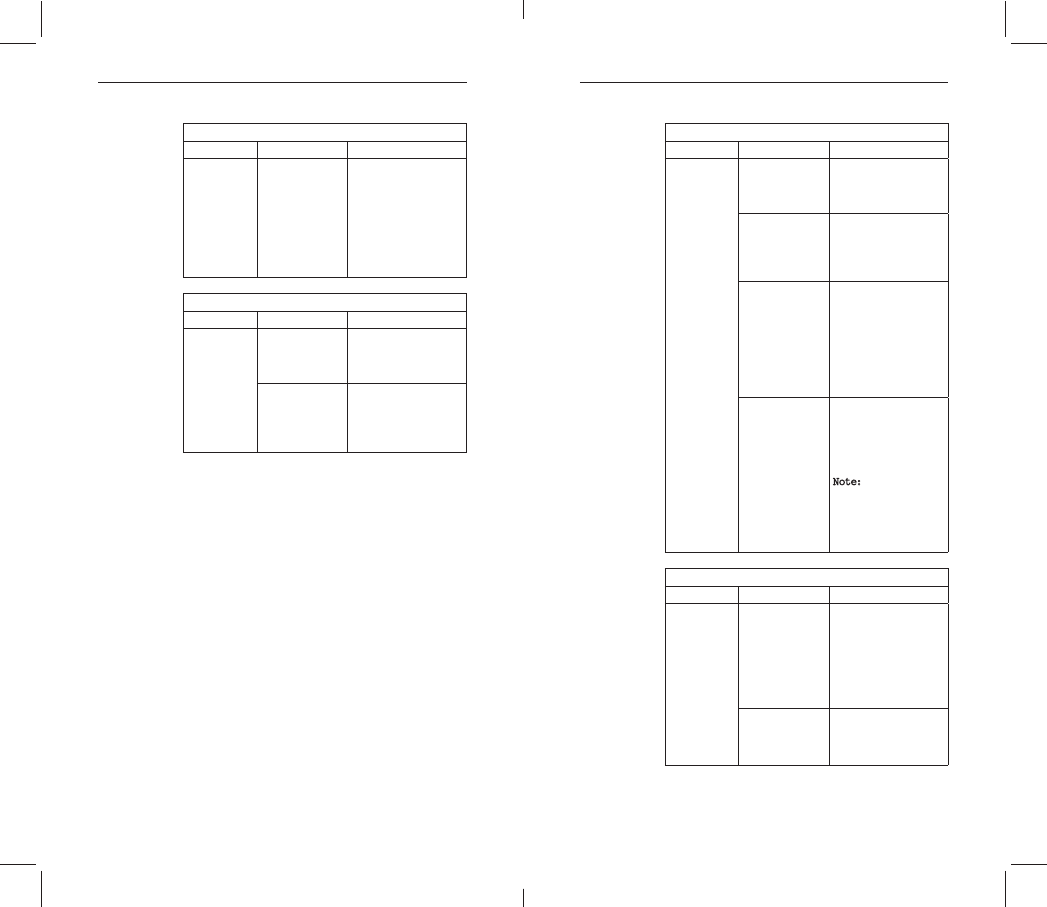
123456-78-9
1/4 7 6 5 4 4 3 3
1/8 14 14 12 10 8 6 5
1/16 30 30 30 20 20 20 10
1/32 60 60 60 50 50 40 30
1/64 90 90 90 80 80 70 60
1/128 100 100 100 100 100 90 80
x
=
24 25
Hz
10 11 12-14 15-19 20-50 60-199
1/4 22222 2
1/8 4 4 4 4 4 4
1/16 88888 8
1/32 20 20 20 18 16 12
1/64 50 40 40 35 30 20
1/128 70 70 60 50 40 40
T o av oi d o v er h e ati n g, do no t u s e
Multi Flash more than 10 times in
succession. After using Multi Flash
for at least 15 minutes. Overuse of
Multi Flash may cause over-tempe-
-
perature drops to a safe level.
Notes:
1.
dark background.
2. -
3.
mode camera shutter.
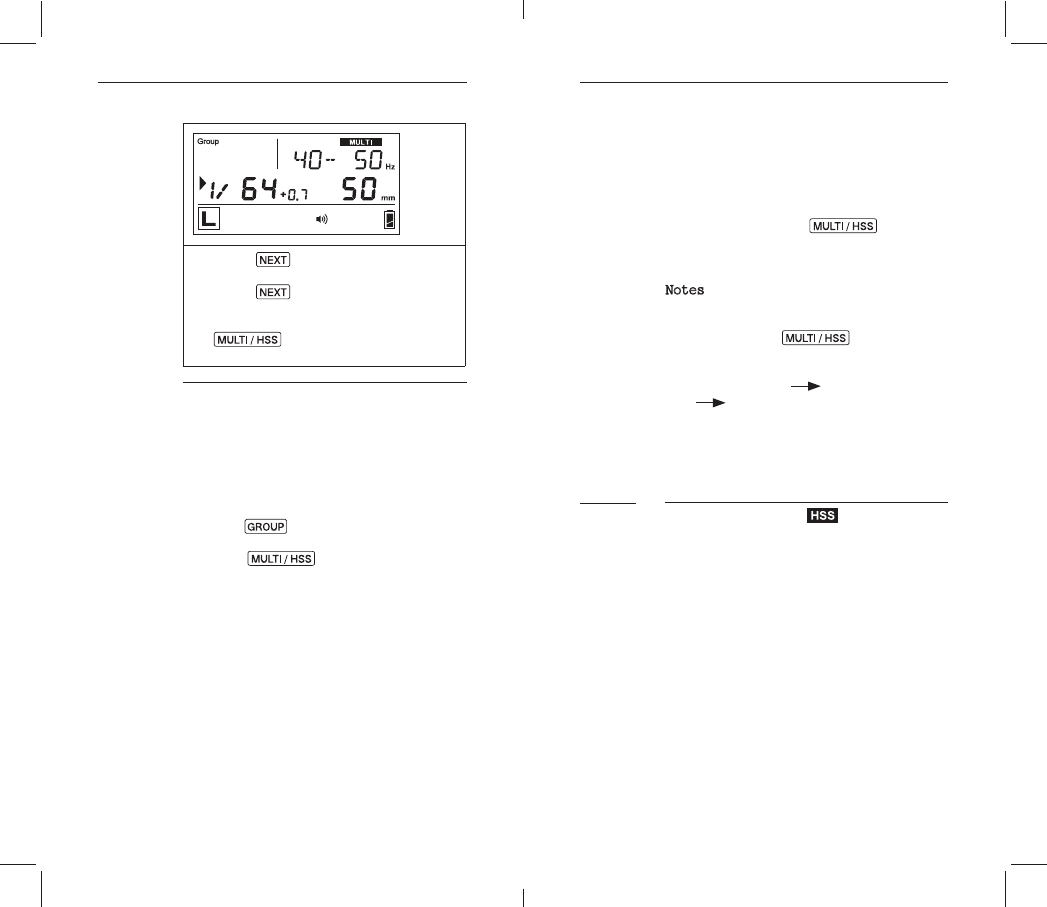
11.1.1 Multi Flash in Local Mode
Once you have determined the shutter
1. To enter Multi Mode, press
Multi/HSS
Hz icons.
2. P re ss Next until the selec-
tion indicator Ź points to the
beginning of the text area. The
value before the hyphen repre-
mode.
3. Press + to increase or – to de-
4. Pr ess Next until the selection
indicator Ź points to the right
of the text area. The value
after the hyphen represents the
Multi mode.
5. Press + to increase or – to
second.
26 27
6. Pr ess Next
level (see Section 8.1).
7. P r e ss Next to adjust the Zoom
(se e Section 8.1).
8. To exit Multi mode, press
Multi/HSS
main screen.
11.1.2 Multi Flash in Master and Slave Modes
channel.
1. To enter Multi mode in RF60 Master,
press Group
displayed as the group name.
2. Press
Multi/HSS button once. The
in Multi Flash mode.
3.
-
to both Master and Slave units in
all active groups. Whenever the
particular slave group (see table
Maximum Number of Multi Flashes),
4. -
1/4, the Slave RF60 set at those
Multi mode.
5. To exit Multi mode, press Group
to Master, press Multi/HSS button
mode.
Notes:
1. Multi mode and HSS mode (see Sec-
tion 11.2) are exclusive options.
Pressing the Multi/HSS button
-
N o r m a l F l a s h M u lti Fl a s h
H S S F la s h
2.
o n l y b e s ele ct e d i n t he M a st er
the RF60 Master and all RF60 Slaves
in the active group(s).
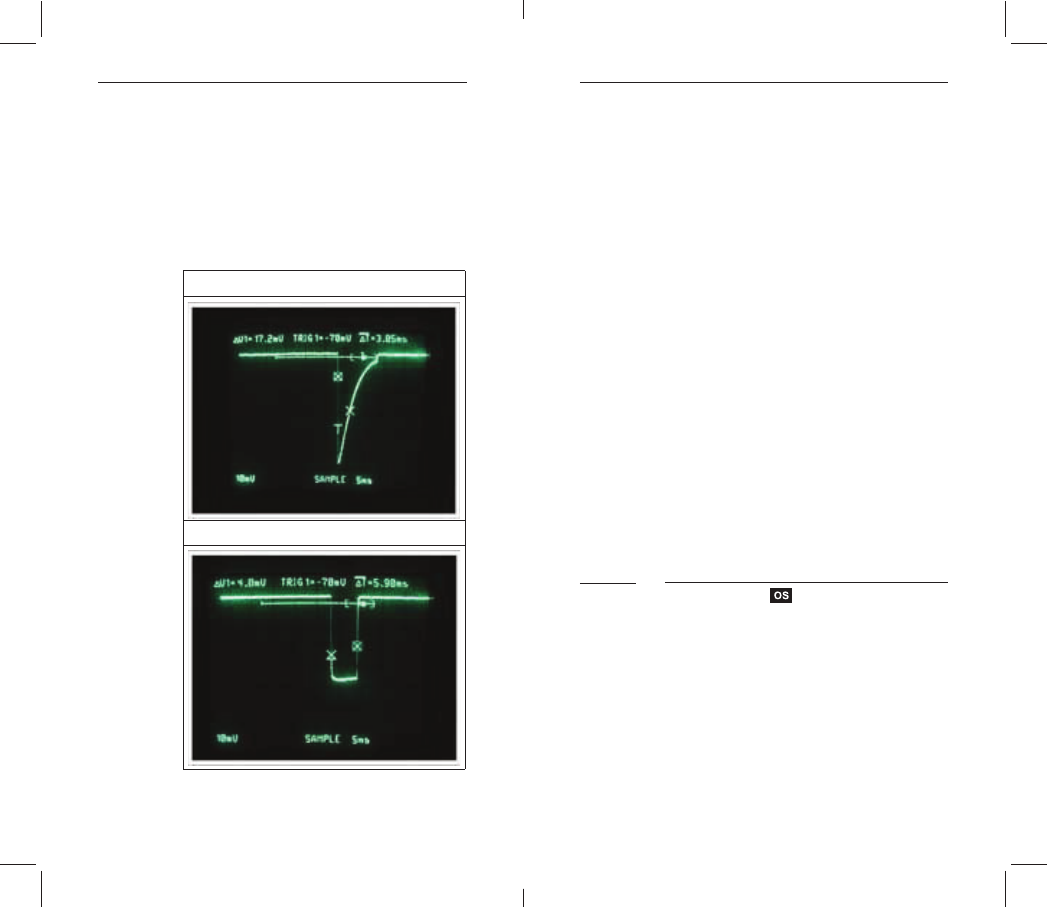
HSS Sympathy Mode
-
ports High Speed Sync, such as HSS
mode on a Canon and FP mode, or Focal
the RF60 offers a HSS Sympathy Mode
-
lessly.
enables synchronization at shor-
ter shutter speeds, i.e. the shut-
x-sync speed.
11.2
28
Instead of delivering one burst of
light, RF60 units deliver several
smaller bursts over a time interval
as short as 1/125 of a second. This
-
sor even though the shutter is never
fully open at any moment.
Normal Flash
HSS Flash
To set up RF60 in HSS Sympathy Mode,
FP capability.
1.
hot shoe.
2.
by pressing Multi / HSS button
optical slave trigger in OS1 (the
HSS mode automatically.
3.
head.
4. T a ke a t est sh ot b y pr e s si n g th e
camera shutter button.
5.
picture, set the Delay Timer of the
RF60 Master to 10ms and then 20ms,
range of 10ms to 60ms.
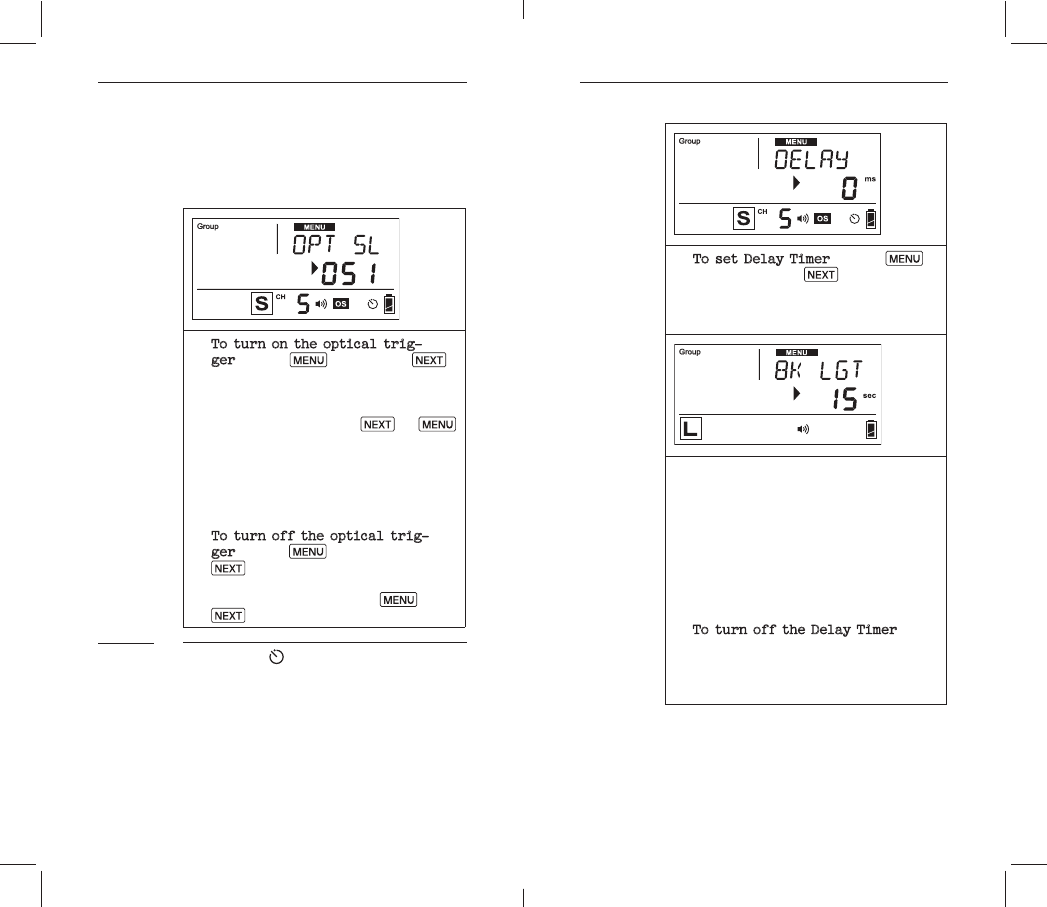
Optical Trigger
Optical trigger can act as an alter-
native trigger mechanism from radio
si g n a l. It i s ve r y u s ef u l i n c a p-
(see Section 11.4) could manipulate
Three optical trigger modes OS1, OS2
and OS3 are available for selection:
11.3
30 31
-
1. To turn on the optical trig-
ger, press Menu then press Next
-
lection area. Press Next or Menu
status bar of the main screen
trigger modes has been turned
on.
3. To turn off the optical trig-
ger, press Menu and then press
Next buttons until the text area
Menu or
Next
Delay Timer
Master or Slave mode. The Delay Timer
delays the trigger response for the
curtain sync to create a different
lighting effect, Delay Timer is help-
ful for your creation.
11.4
1. To set Delay Timer, press Menu
then press the Next button until
selection indicator Ź points at
the value in ms.
2. Use + or – button to set the
Delay Timer in millisecond (ms)
second.
o n t h e m a i n s cr e e n st at us b a r
set.
4. To turn off the Delay Timer,
then disappear from the status
bar on the main screen.
32 33
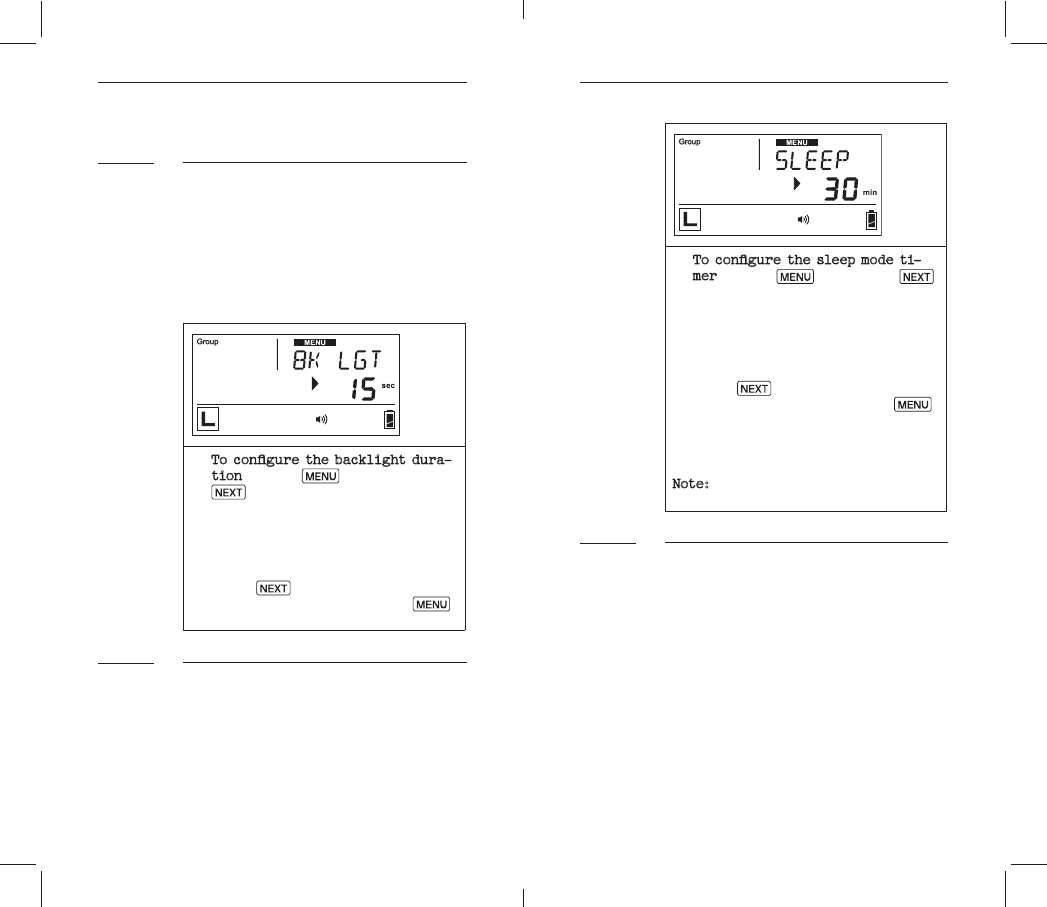
12. Personalizing RF60
LCD Backlight
energy saving, there is a timer set-
ting that automatically turns off the
backlight.
1. -
tion, press Menu, and press
Next
t o c h o o s e f r o m O F F, 5 s e c, 15
sec, and ON.
3. Pr ess Next -
gure other items, or press Menu
Sleep
To prevent unnecessary energy con-
off RF60 after use, the sleep timer
-
12.1
12.2
1. -
mer, press Menu, and press Next
-
t o n s t o c h o o se f r o m OF F, 15 m i n,
or 60 min.
the sleep mode.
3. Pr ess Next -
gure other items, or press Menu
press any button once.
Note:
Quick Flash
menu.
-
c u r a cy i s y ou r pr i m e c on ce r n.
12.3
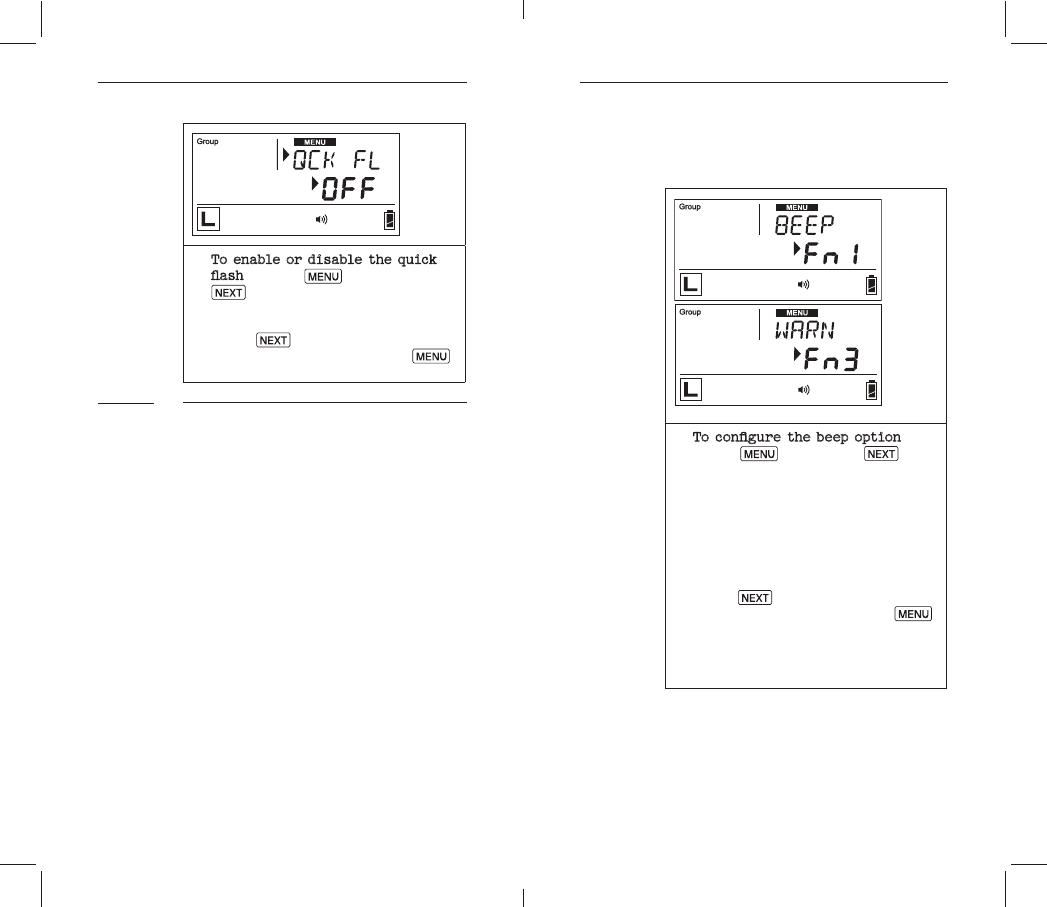
34 35
1. To enable or disable the quick
, press Menu, and press
Next
to choose OFF and ON.
2. P re ss Next -
gure other items, or press Menu
Beep
b ui lt -i n b u zz e r of R F 60 a l so r e m i n ds
-
habit:
OFF
R F60 do e s n ot b e e p i n a n y ci r c u m s-
tance.
fully charged.
than the selected level.
12.4
has been enabled (see Section 12.3).
1. ,
press Menu, and press Next
Then use + or – buttons to
+ or – buttons, the abbreviation
the text area.
3. Pr ess Next -
gure other items, or press Menu
Fn3 is selected.
36 37
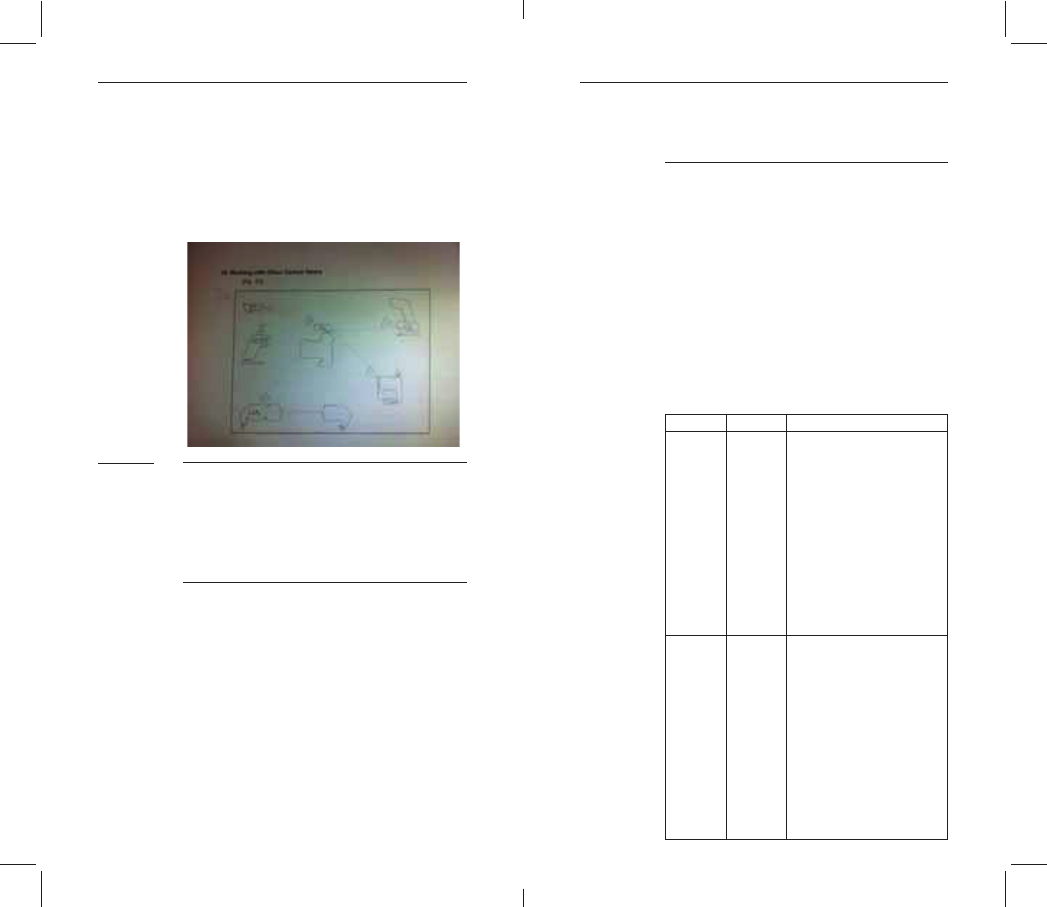
13. Working with Cactus
Triggers
Cactus V6
-
c o m m a n d e a c h o t he r, i n eit he r M a st er
or Slave mode.
13.1.1 RF60 as Slave
Cactus RF60 can be remotely comman-
example, assign a RF60 to group A,
13.1
level in either relative or absolute
13.1.2 RF60 as Master
Users may assign RF60 as master on
-
ger and command other RF60 Slave and
and zoom of RF60 Slave, zoom control
RX units.
-
tures supported in each pairing
option:
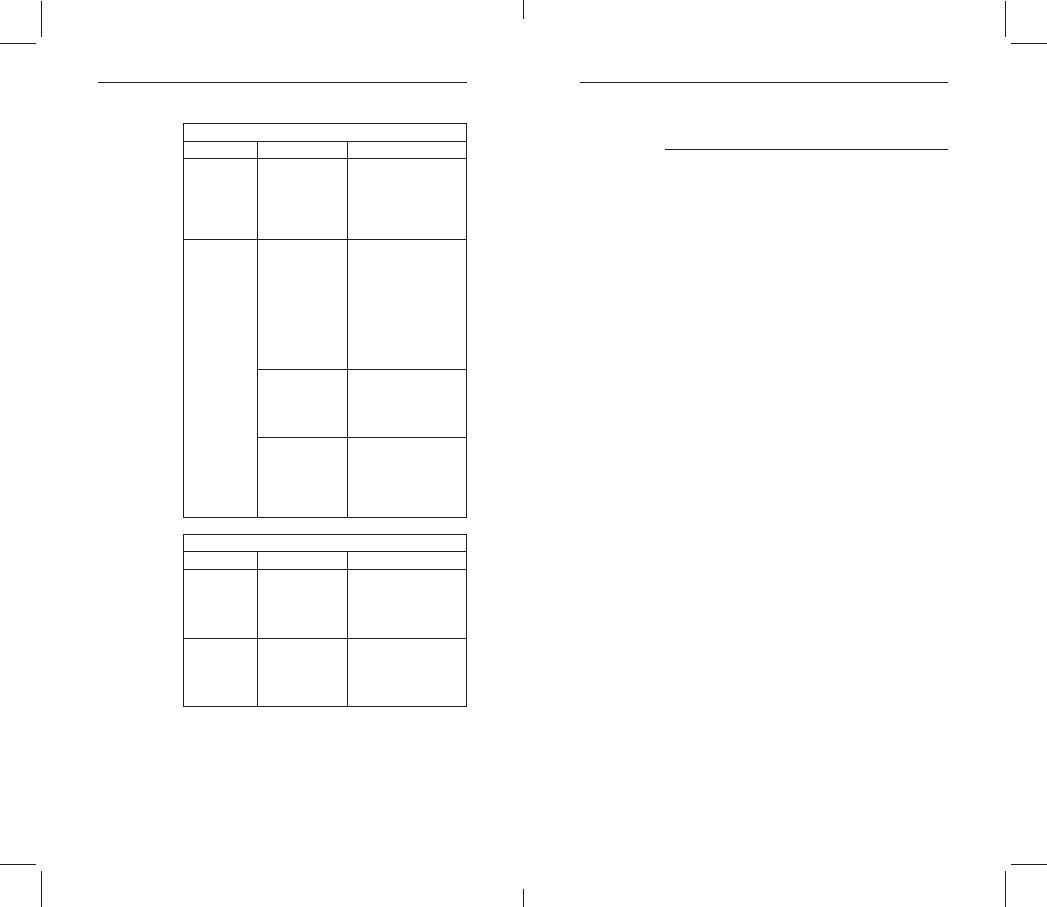
TX (Master) RX (Slave) N ote
R F 6 0
in 4 groups;
levels of of Slaves (RX)
in 4 groups;
from 1/128 to 1/1 full
X Commanding the zoom
of RF60;
R F 6 0
in 4 groups;
levels of of Slaves (RX)
in 4 groups;
from 1/128 to 1/1 full
-
X Commanding the Zoom
of RF60;

38
Cactus V5, LV5
same 2.4GHz, 16-channel platform.
i n a n y g r o u p: A, B, C or D. Si m i l a rly,
Slave set in any group.
14. Ex ternal Power
-
ter recycling time and longer dura-
1.
R F60 a n d plu g i n Ca ct us ex t e r n a l
battery EP-1.
2. Install AA batteries into the bat-
tery compartment.
13.2 15. Optional Accessories
1. Cactus Wireless Flash Transceiver
2. Cactus Wireless Flash Transceiver
3.
4. Cactus Mini USB cable MU-1
5. Cactus External Battery Pack EP-1
16. Troubleshooting
Before reading this section, ensure
t h at Ca ct u s R F6 0 h a s b e e n s et u p cor -
If problem persists after conducting
the troubleshooting steps, contact
your seller directly for further as-
sistance.
1. F l a s h c a n n ot b e c h a r g e d
Symptom Possible Cause Solution
No Flash
Ready
Signal
Batteries are
installed in
-
tion
Install batteries
in the correct
direction
Batteries are
nearly or have
already been
used up
of AA batteries
Tempera-
-
ning signal
appears in
Too many
short interval
rest for at least 15
minutes
40 41
Symptom Possible Cause Solution
off
Sleep mode is
activated
- Press any button
on RF60 once to
sleep mode
- Check the Sleep
-
ti o n i n M en u a n d
revise it (see
Section 12.2)
Symptom Possible Cause Solution
Flash Ready
or keeps on
Flash is not
attached
securely to
camera
hot shoe securely
on the camera
Electrical
contacts of
camera are
dirty
Clean the contacts
Symptom Possible Cause Solution
Flash Ready
or keeps on
Channel mis-
match
the same channel
Group mismatch Make sure the group
assigned to the
activated on the
Background
radio interfe-
rence
- Set both trans-
ceivers to an-
other channel
- Change setup
location as
interference may
come from other
equipment in the
surrounding area
Beyond 200m
effective
range
- Make sure Master
200m (656 ft) of
each other
Note: The effective
range of 200m (656
ft) may not be
achieved in the
presence of radio
interference
Symptom Possible Cause Solution
Black frame
appears in
pictures
Shutter speed
is faster than
x-sync limita-
tion
- Adjust the
speed to the max-
imum supported
x-sync speed
- Set up RF60 in
HSS Sympathy mode
(see Se ction 11.3)
Delay timer
has been set
incorrectly
Turn off the delay
timer or adjust the
delay timer to cor-
rect sync time
42 43
Symptom Possible Cause Solution
Poor hot shoe
connection
- Adjust tightness
of hot shoe
contact
- Clean hot shoe
contact of RF60
Background
radio interfe-
rence
- Set both Master
to another chan-
nel
- Change setup
location as
interference may
come from other
equipment in the
surrounding area
Master and
are placed too
close to each
other
Place the Master
at least 20cm apart
and retry
Optical Trig-
ger has been
and triggered
by unexpected
ambient light
optical trigger, as
those environments
Symptom Possible Cause Solution
-
Warning
beep (if
enabled)
fully charged
- Turn off quick
- Fire subsequent
Ready Sig-
nal takes
longer than
usual to
turns on
Batteries are
nearly or have
already been
used up
of AA batteries
17. Notices
NOTICES FOR CUSTOMERS IN THE U.S.A.
Federal Communications Commission (FCC)
Radio Frequency Interference Statements.
This equipment has been tested and found
digital device, pursuant to Part 15 of
the FCC Rules. These limits are designed
to provide reasonable protection against
harmful interference in a residential
installation. This equipment generates,
uses and can radiate radio frequency
energy and, if not installed and used in
cause harmful interference to radio com-
-
particular installation.
If this equipment does cause harmful
interference to radio or television recep-
the equipment off and on, the user is
encouraged to try to correct the inter-
measures:
-
tenna.
equipment and receiver.
the receiver is connected.
-
44 45
MADE IN CHINA
the FCC Rules. Operation is subject to
device may not cause harmful interfe-
rence, and (2) this device must accept
any interference received, including
interference that may cause undesired
operation.
R&TTE Declaration of Conformity (DOC)
-
responsibility that the product:
Cactus Wireless Flash RF60
-
rements and other
relevant requirements of the R&TTE Direc-
This product Cactus Wireless
the provisions of EU Council Di-
the product must be disposed
separately at the end of product
cycle. Do not dispose this product
18. Warranty
-
ranty.
condition in its original container, is
of one (1) year from the date of original
purchase, defective parts or a defective
Wireless Flash returned to our authorized
dealers, as applicable, and proven to be
-
authorized dealers.
the Wireless Flash is used in conjunction
shall have no responsibility.
encountered in normal use of the Wireless
Flash, and does not apply in any of the
Flash due to abuse, mishandling,
improper packaging by you, altera-
tion, accident, electrical current
-
nance or environmental instructions
(c) Receive services performed by someone
authorized dealers.

46 47
damage, sand/corrosion damage, bat-
scratches, abrasions or damage to the
body, or damage to the hot shoe or
resulted from misuse, abuse or failure
to operate the Wireless Flash as set
forth in the operating instructions.
-
-
-
-
MITED GREATER IN AMOUNT THAN THE PURCHASE
WHOM IT WAS PURCHASED AS A GIFT, AND STA-
Corporate Office:
FO TAN, HONG KONG
st EDITION)
You are cautioned that changes or
modifications not expressly approved by the
party responsible for compliance could void
your authority to operate the equipment.