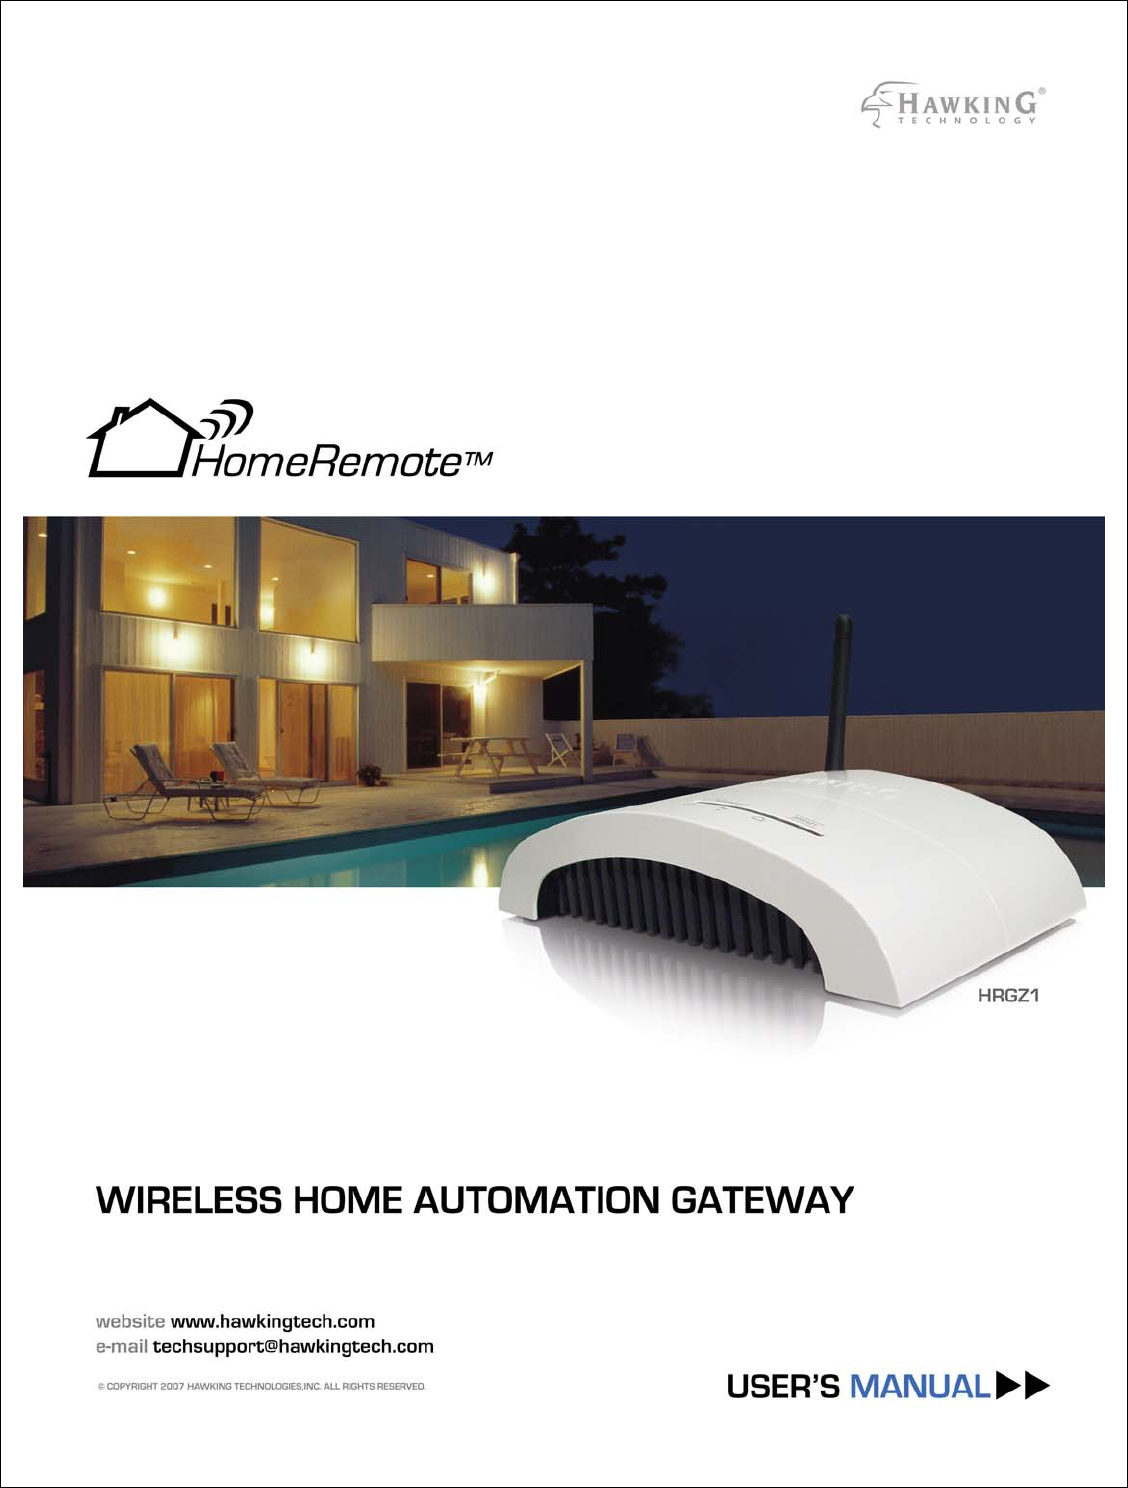
Hawking Technologies HRGZ1 HomeRemote Wireless Home Automation Gateway User Manual
Hawking Technologies, Inc. HomeRemote Wireless Home Automation Gateway Users Manual
Users Manual
1

2
Limited Warranty
Hawking Technology guarantees that every HRGZ1 HomeRemote Gateway is free from physical defects in material
and workmanship under normal use for two (1) years from the date of purchase. If the product proves defective
during this two-year warranty period, call Hawking Customer Service in order to obtain a Return Authorization
number. Warranty is for repair or replacement only. Hawking Technology does not issue any refunds. BE SURE
TO HAVE YOUR PROOF OF PURCHASE. RETURN REQUESTS CAN NOT BE PROCESSED WITHOUT
PROOF OF PURCHASE. When returning a product, mark the Return Authorization number clearly on the outside
of the package and include your original proof of purchase.
IN NO EVEN SHALL HAWKING TECHNOLOGY’S LIABILTY EXCEED THE PRICE PAID FOR THE
PRODUCT FROM DIRECT, INDIRECT, SPECIAL, INCIDENTAL OR CONSEQUENTIAL DAMAGES
RESULTING FROM THE USE OF THE PRODUCT, ITS ACCOMPANYING SOFTWARE OR ITS
DOCUMENTATION.
Hawking Technology makes no warranty or representation, expressed, implied or statutory, with respect to its
products or the contents or use of this documentation and all accompanying software, and specifically disclaims its
quality, performance, merchantability, or fitness for any particular purpose. Hawking Technology reserves the right
to revise or updates its products, software, or documentation without obligation to notify any individual or entity.
Please direct all inquiries to:techsupport@hawkingtech.com
Federal Communication Commission
Interference Statement
This equipment has been tested and found to comply with the limits for a Class B digital device, pursuant to Part 15
of FCC Rules. These limits are designed to provide reasonable protection against harmful interference in a
residential installation. This equipment generates, uses, and can radiate radio frequency energy and, if not installed
and used in accordance with the instructions, may cause harmful interference to radio communications. However,
there is no guarantee that interference will not occur in a particular installation. If this equipment does cause harmful
interference to radio or television reception, which can be determined by turning the equipment off and on, the user
is encouraged to try to correct the interference by one or more of the following measures:
1. Reorient or relocate the receiving antenna.
2. Increase the separation between the equipment and receiver.
3. Connect the equipment into an outlet on a circuit different from that to which the receiver is connected.
4. Consult the dealer or an experienced radio technician for help.
FCC Caution
This device and its antenna must not be co-located or operating in conjunction with any other antenna or transmitter.
This device complies with Part 15 of the FCC Rules. Operation is subject to the following two conditions: (1) this
device may not cause harmful interference, and (2) this device must accept any interference received, including
interference that may cause undesired operation.
Any changes or modifications not expressly approved by the party responsible for compliance could void the
authority to operate equipment.

3
Table of Contents
Table of Contents ............................................................................................................................ 3
1 - Introduction ............................................................................................................................... 5
2 - Product Contents........................................................................................................................ 5
3 - What is Z-Wave Technology? ................................................................................................... 6
4 - System Requirements ................................................................................................................ 6
5 - System Diagram ........................................................................................................................ 7
6 - HRGZ1 – HomeRemote Wireless Internet Gateway Overview ................................................ 8
6.1 - Gateway Front Panel (LEDs) ............................................................................................. 8
6.2 - Gateway Back Panel ........................................................................................................... 9
7 - HomeRemote Handheld Remote Control ................................................................................ 10
8 - First Time Setup ...................................................................................................................... 11
9 - HomeRemote Setup Wizard Walk-Through ........................................................................... 12
9.1 - Introduction ...................................................................................................................... 12
9.2 - Hardware Setup ................................................................................................................ 13
9.3 - Locate the Gateway .......................................................................................................... 13
9.4 - Network Setup .................................................................................................................. 13
9.5 - Password Setup ................................................................................................................. 14
9.6 - Software Update ............................................................................................................... 14
9.7 - Clock Setup....................................................................................................................... 14
9.8 - Wireless Home Automation Setup Overview .................................................................. 15
9.9 - Home Layout Setup .......................................................................................................... 15
9.10 - Adding Modules and Devices......................................................................................... 15
9.11 - Transfer Settings to the Gateway .................................................................................... 16
9.12 - Customizing / Naming Modules and Devices ................................................................ 16
9.13 - Notification Setup ........................................................................................................... 16
9.14 - Notification Setup / User Accounts ................................................................................ 17
9.15 - Custom Web-Address ..................................................................................................... 17
9.16 - Internet Access Setup (Router Configuration) ............................................................... 17
9.17 - Internet Access Setup (Manual Setup) ........................................................................... 18
9.18 - Cell Link Setup ............................................................................................................... 18
9.19 - TZO DDNS Service........................................................................................................ 18
9.20 - Setup Complete............................................................................................................... 19
10 - Setting Up the Handheld Remote Control ............................................................................. 20
11 - Using other Z-Wave Remote Controls .................................................................................. 21
12 - How to use the HomeRemote Web-Based Interface ............................................................. 22
12.1 - Home Status Page ........................................................................................................... 22
12.2 - Control Page ................................................................................................................... 24
12.3 - Device Management ....................................................................................................... 25
12.3.1 - Setting up Scenes ..................................................................................................... 26
12.3.2 - Alerts and Notifications ........................................................................................... 26
12.3.3 - Linking Devices ....................................................................................................... 27
12.4 - Recent Activity ............................................................................................................... 28
12.5 - Setup Page ...................................................................................................................... 29
12.5.1 - Clock Setup.............................................................................................................. 29
12.5.2 - Creating Rooms / Areas ........................................................................................... 30

4
12.5.3 - Add / Edit or Remove Devices ................................................................................ 30
12.5.4 - Notification Setup .................................................................................................... 32
12.5.5 - Adding Network Cameras ....................................................................................... 34
12.5.6 - Network Settings / IP Address / Login Setup .......................................................... 35
12.5.7 - Firmware Upgrades ................................................................................................. 36
12.5.8 - Saving and Loading Profiles.................................................................................... 37
12.5.9 - Resetting the Gateway ............................................................................................. 38
12.5.10 - TZO/DDNS Configurations .................................................................................. 38
13 - Using the HomeRemote Cell Link Service ........................................................................... 39
13.1 - Subscription Requirements ............................................................................................. 39
13.2 - Setting up Cell Link (First Time Use) ............................................................................ 39
13.3 - Software Security ........................................................................................................... 40
13.4 - Navigating the Cell Link Customer Web Portal ............................................................. 40
13.5 - Launching Cell Link from your Cell Phone ................................................................... 41
13.6 - Activate your Phone and Software ................................................................................. 42
13.7 - Navigating Menus and Executing Commands with your Cell Phone ............................ 42
13.7.1 - Viewing Cameras using Cell Link ........................................................................... 43
13.7.2 - Other Devices (Thermostats, Window Shades etc…) ............................................. 44
13.8 - Cell Link Options Menu and Navigation Tips ............................................................... 45
13.8.1 - Set Cell Link PIN / Disable PIN .............................................................................. 45
13.8.2 - Reset Cell Link ........................................................................................................ 45
13.8.3 - BlackBerry® Connection Options and Select Button ............................................. 45
13.8.4 - Connection Options ................................................................................................. 46
13.8.5 - Select Button............................................................................................................ 46
13.8.6 - Demo/Active Mode ................................................................................................. 46
13.8.7 - Help ......................................................................................................................... 46
13.8.8 - About ....................................................................................................................... 46
13.9 - Exiting Cell Link ............................................................................................................ 47
13.10 - Customer Support ......................................................................................................... 47
14 - HomeRemote Accessories (Compatible Z-Wave Devices) ................................................... 47
14.1 - Lighting .......................................................................................................................... 47
14.2 - Electrical Appliances ...................................................................................................... 48
14.3 - Climate Control .............................................................................................................. 49
14.4 - Window Shades .............................................................................................................. 49
14.5 - Security ........................................................................................................................... 49
14.6 - Access Control ................................................................................................................ 50
14.7 - Remote Controls ............................................................................................................. 50
15 - Frequently Asked Questions .................................................................................................. 51
15.1 - General Questions ........................................................................................................... 51
15.2 - Remote Control and Z-Wave Modules ........................................................................... 51
15.3 - HomeRemote Gateway Installation ................................................................................ 53
15.4 - HomeRemote Gateway Web Interface ........................................................................... 54
15.5 - HomeRemote Cell Link Interface and Web Portal ......................................................... 55
16 – HomeRemote Gateway Specifications and Ranges .............................................................. 57

5
1 - Introduction
Thank you for your purchase of the Hawking Technologies HomeRemote™ Home Automation /
Control Gateway. This manual will give you detailed instructions on all you need to know to
setup, maintain and expand your HomeRemote System. With your HomeRemote Gateway and
handheld Remote Control you will be able to control, monitor and secure your home from
anywhere in the world. The HomeRemote Gateway connects your Z-Wave™ home accessories
to the internet for easy control via a cellular phone or the HomeRemote web-based interface.
With the HomeRemote System you will be able to:
- Customize the HomeRemote interface to match the exact layout of your home
- Customize the names of your rooms and devices
- Control and monitor lights, windows, doors, window shades, air conditioning, electrical
appliances and much, much more…
- Keep an eye on your kids and pets while away
- Secure your business and ensure that no lights are on when not needed
- Secure your home while away on vacation
- Schedule lights and appliances to activate on a set interval
- Be alerted when any activity is detected within your home via cell phone text message or
E-mail
- Set scenes for the control of multiple devices with the touch of a button (i.e. for romantic
mood setting or movie watching lighting schemes)
The possibilities of applications for the HomeRemote system are endless. Customize one for
your lifestyle today.
2 - Product Contents
The purchase of your HRGZ1 HomeRemote Wireless Home Automation Gateway includes the
following units. Please take the time now to check that your packaging is not missing any items.
1 x HomeRemote Gateway
1 x HomeRemote Handheld Remote Control (Batteries not included)
1 x Ethernet Cable
1 x Power Adapter
1 x Installation CD
1 x Home Planning Guide / Remote Control Quick Reference Guide
1 x Getting Started Installation Guide

6
3 - What is Z-Wave Technology?
Z-Wave is an award-winning home control wireless standard. Using fail-safe wireless mesh
technology, Z-Wave provides reliable and secure connections for all Z-Wave devices within the
home. The HomeRemote System uses Z-Wave technology to communicate with home control
devices and modules. To ensure that the Home Control devices you purchase are compatible
with the HomeRemote System, make sure to look for the Z-Wave logo on the module plastic or
packaging.
Z-Wave is a next-generation wireless "ecosystem" that lets all your home electronics talk to each
other, and to you, via remote control and the HomeRemote Gateway. It uses simple, reliable,
low-power radio waves that easily travel through walls, floors and cabinets. Z-Wave
functionality can be added to almost any electronic device in your house, even devices that you
wouldn't ordinarily think of as "intelligent," such as appliances, window shades, thermostats and
home lighting.
Z-Wave unifies all your home electronics into an integrated wireless network, with no
complicated programming and no new cables to run. Any Z-Wave enabled device can be
effortlessly added to this network, and many non-Z-Wave devices can be made compatible by
simply plugging them into a Z-Wave accessory module. In seconds, your device gets joined to
the network and can communicate wirelessly with other Z-Wave modules and controllers.
Because Z-Wave operates on its own unique frequency, it will not interfere with other wireless
equipment in your home, like cordless telephones and Wi-Fi routers. And because Z-Wave is a
modular system, you can build your network one device at a time, one room at a time, or the
whole house at once. The choice is yours, and the possibilities are nearly endless. Best of all, Z-
Wave technology is extremely affordable, giving you powerful home control that you can
integrate yourself in moments, at a fraction of the cost of conventional smart home technologies.
4 - System Requirements
Before you begin the installation you will need to make sure you have the following items:
- Broadband Internet Service (such as Cable Modem or DSL)
- Home Network Router with Available LAN port (802.11b or 802.11g Wireless Router
required to connect HomeRemote Wireless Video Camera wirelessly)
- Windows 98SE, 2K, ME or XP or Macintosh OSX 10.2 or later computer with Internet
access
- Available CD-Rom or DVD-Rom drive (Setup CD)
- Any Z-Wave Home Automation modules and devices you wish to add to your system
- 4 x AAA Batteries for the Handheld Remote Control
- (Optional) If you plan to use the Cell Link service you will need to have an Internet
enabled cellular phone. (If you have not subscribed to a data plan you may be charged
per data usage by your cellular carrier)
7
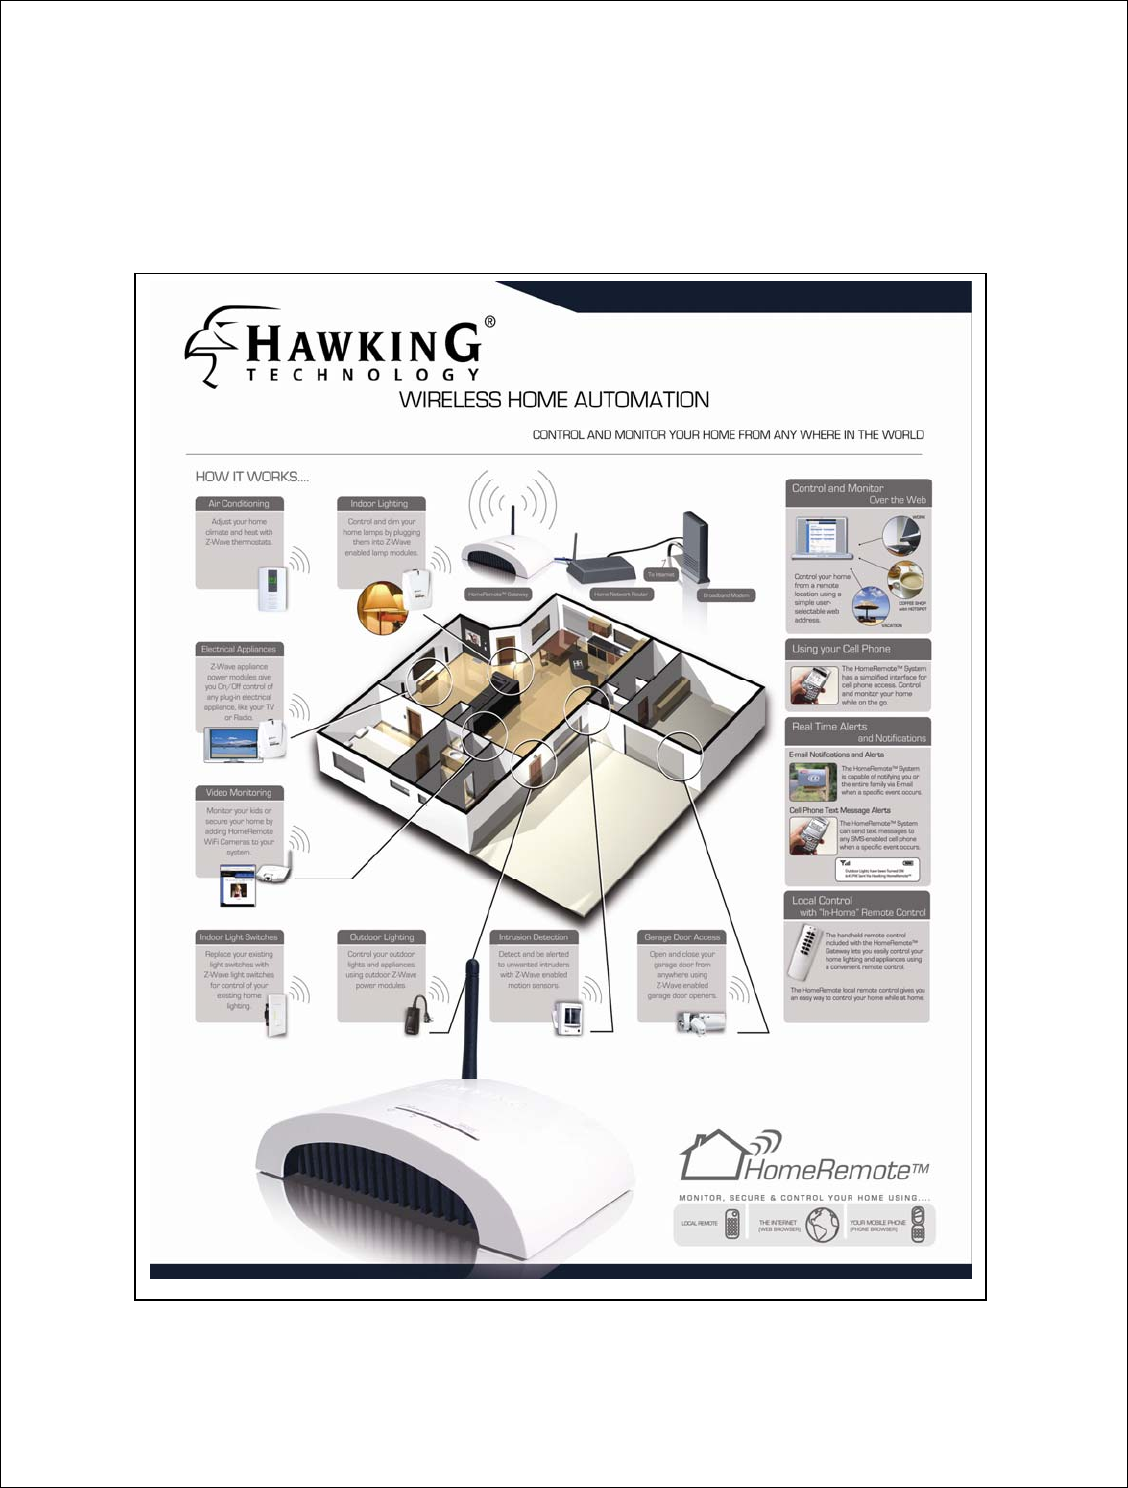
5 - System Diagram
The HomeRemote System gives you remote control of your home from anywhere in the world.
Using Z-Wave technology, the HomeRemote System is customizable to your specific needs and
lifestyle.
8
6 - HRGZ1 – HomeRemote Wireless Internet Gateway
Overview
The HomeRemote Wireless Internet Gateway acts as the brain of your home control system. It
connects your home to the internet and manages all devices within your system.
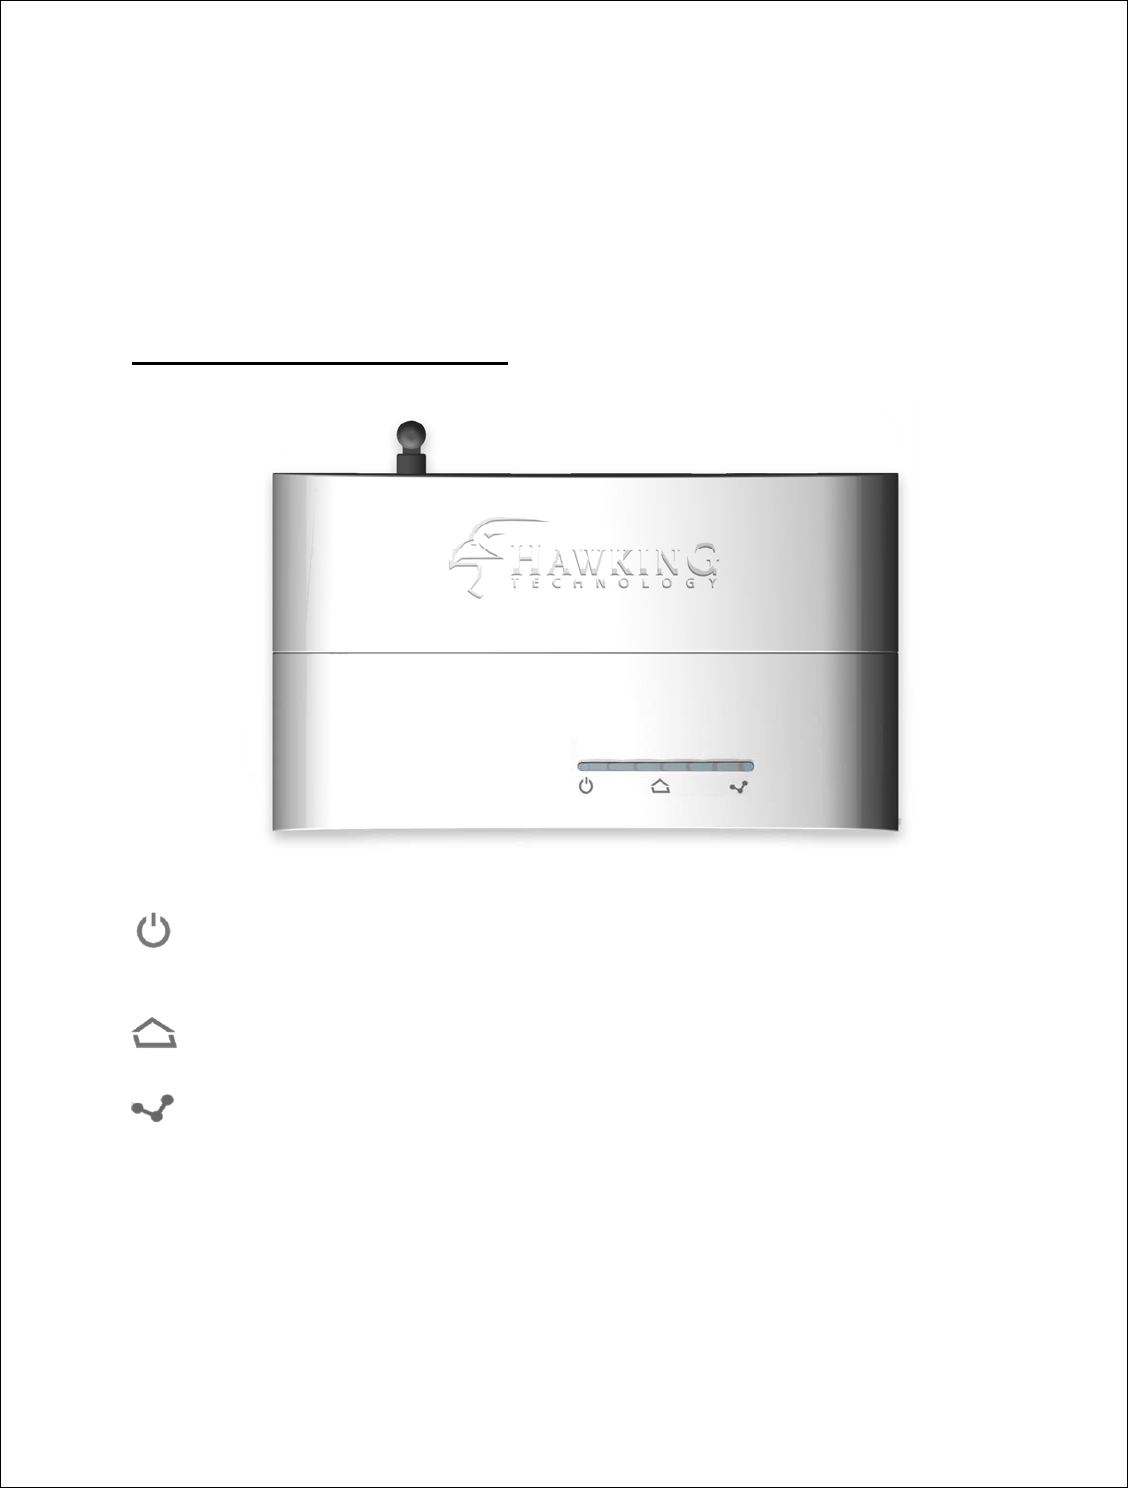
6.1 - Gateway Front Panel (LEDs)
Power LED – Solid blue light when the power adapter is attached and working.
Z-Wave Activity LED – Blinks when activity between home control devices is initiated.
Home Network LED – Solid light when a link is established between your home network
and the HomeRemote Gateway.
9
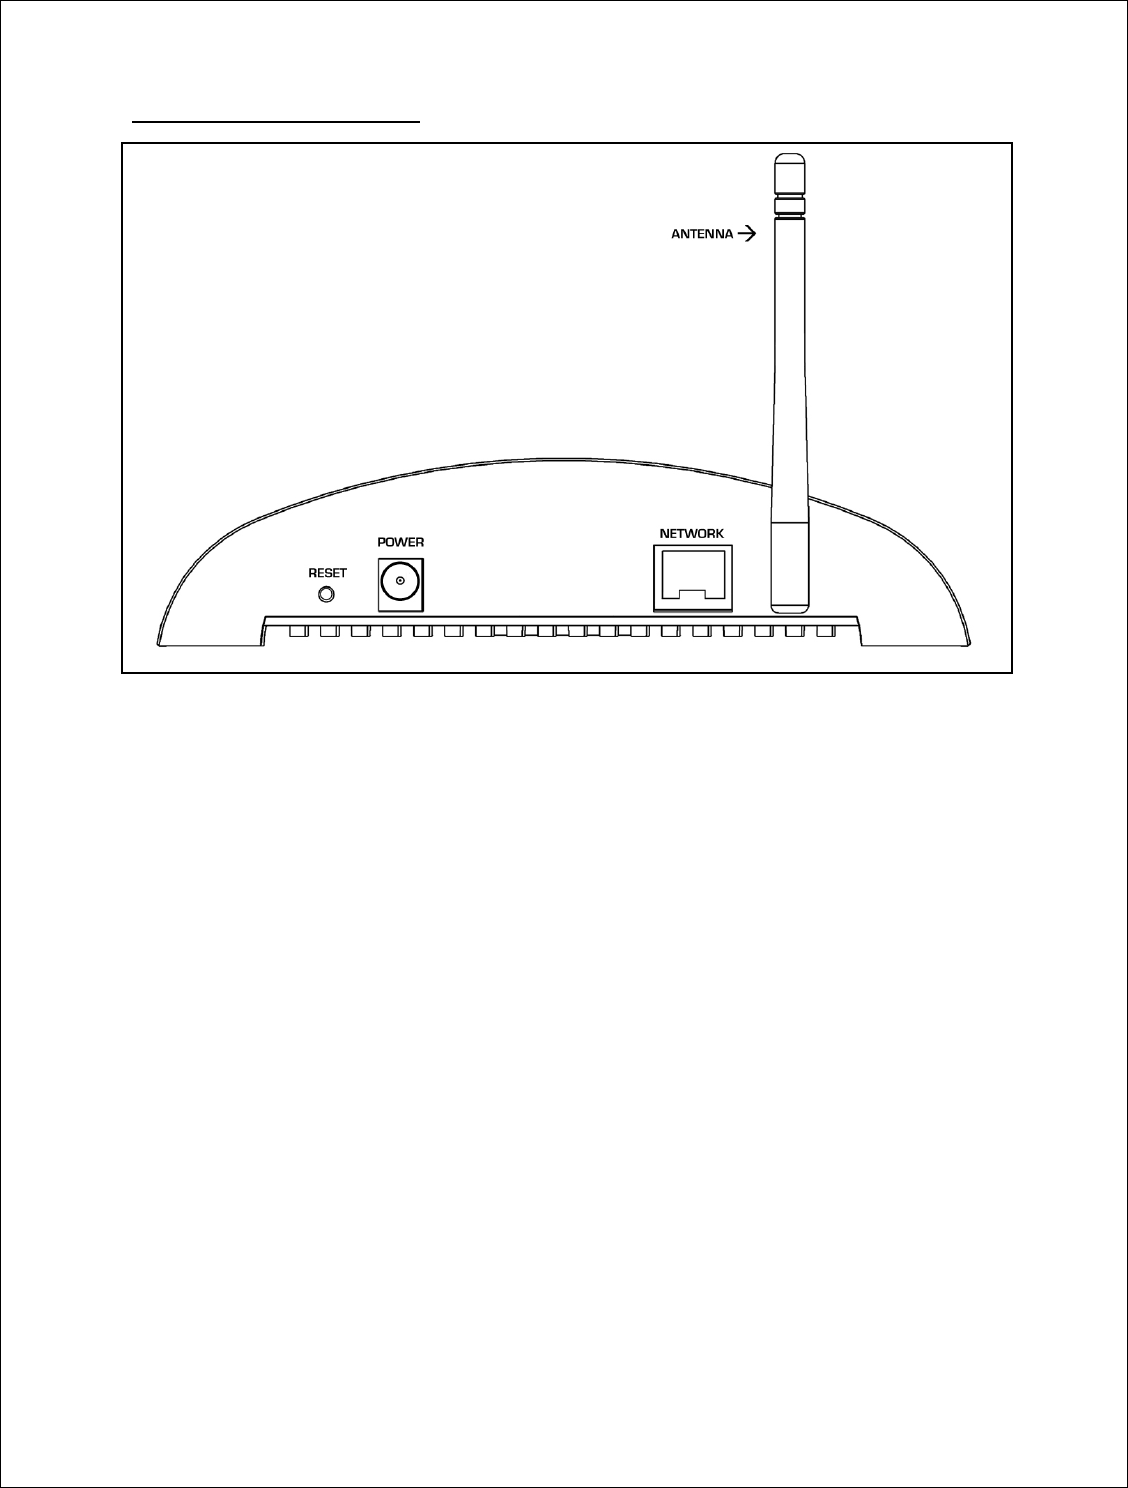
6.2 - Gateway Back Panel
RESET – The reset button can reboot (when pressed for 1 second) your HomeRemote
Gateway when an error occurs or your HomeRemote Gateway stops functioning
for some reason. A small pin or paper clip may be required to access the recessed
button. When held for over 10 seconds, the Gateway will reset itself to the
original default settings and all prior configurations will be lost.
POWER – The power jack is used for connecting your power adapter to.
NETWORK – The port is for connecting your HomeRemote Gateway to an available LAN port
on your home router. The Network port accepts standard RJ-45 Ethernet cabling.
ANTENNA – The antenna on the HomeRemote Gateway is a non-removable antenna used for
sending out wireless commands to your Z-Wave home control modules.
10
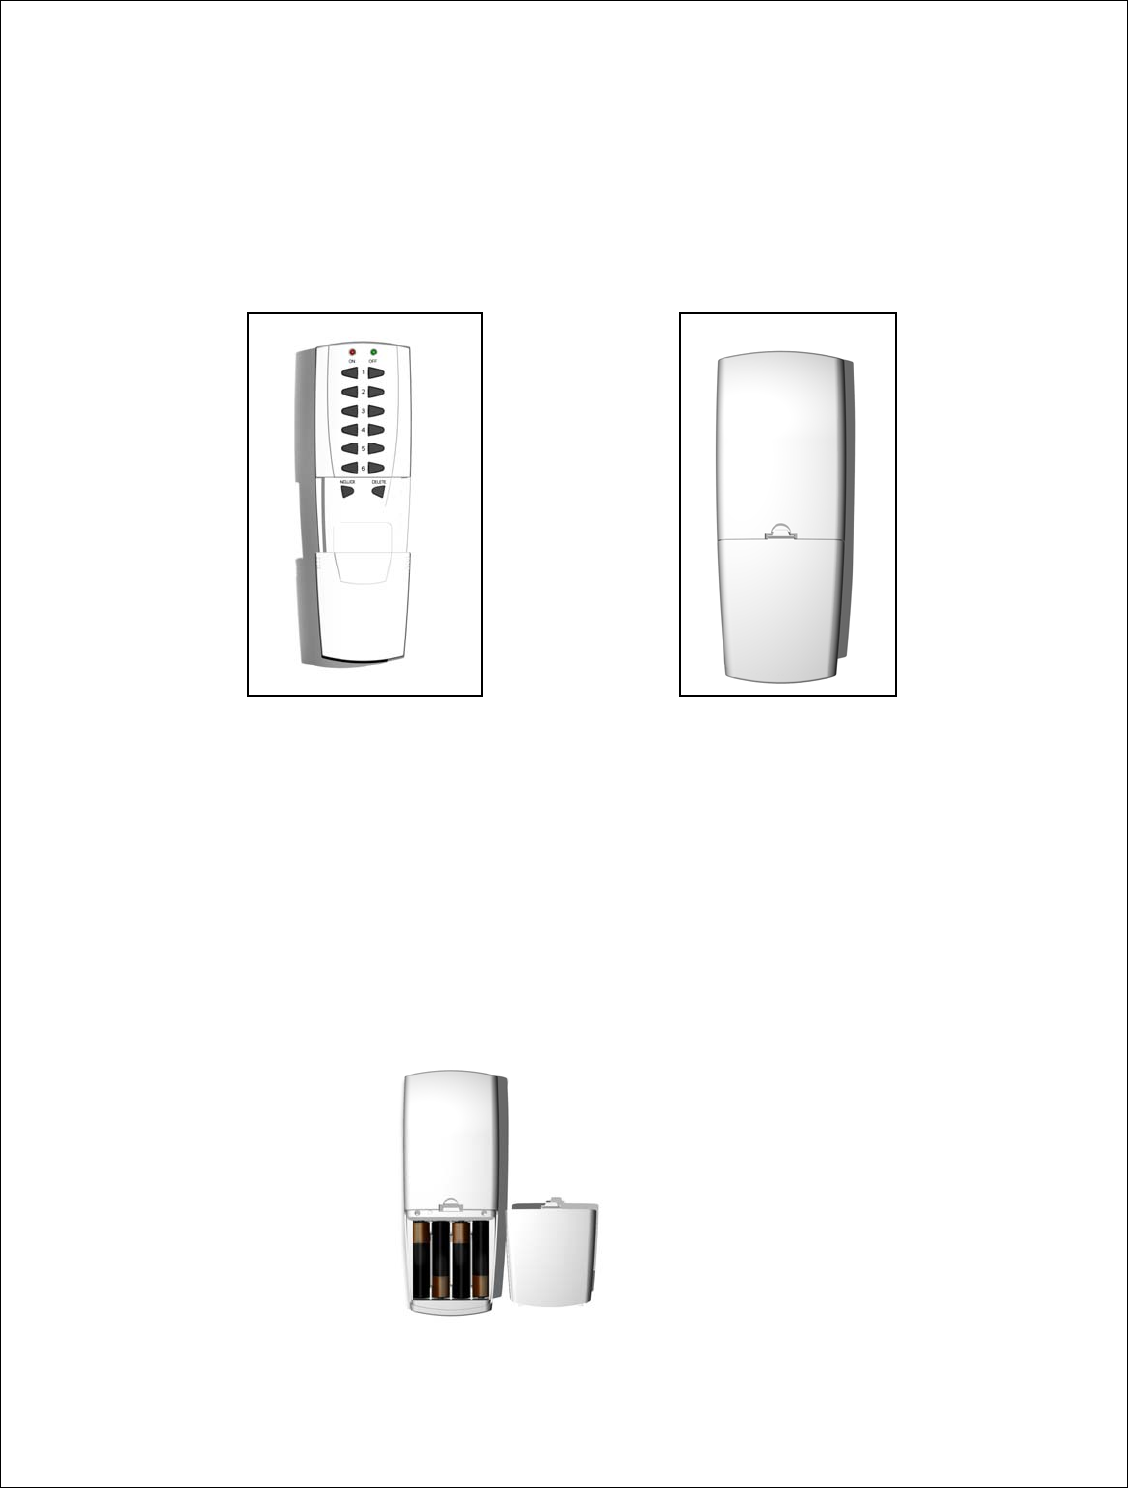
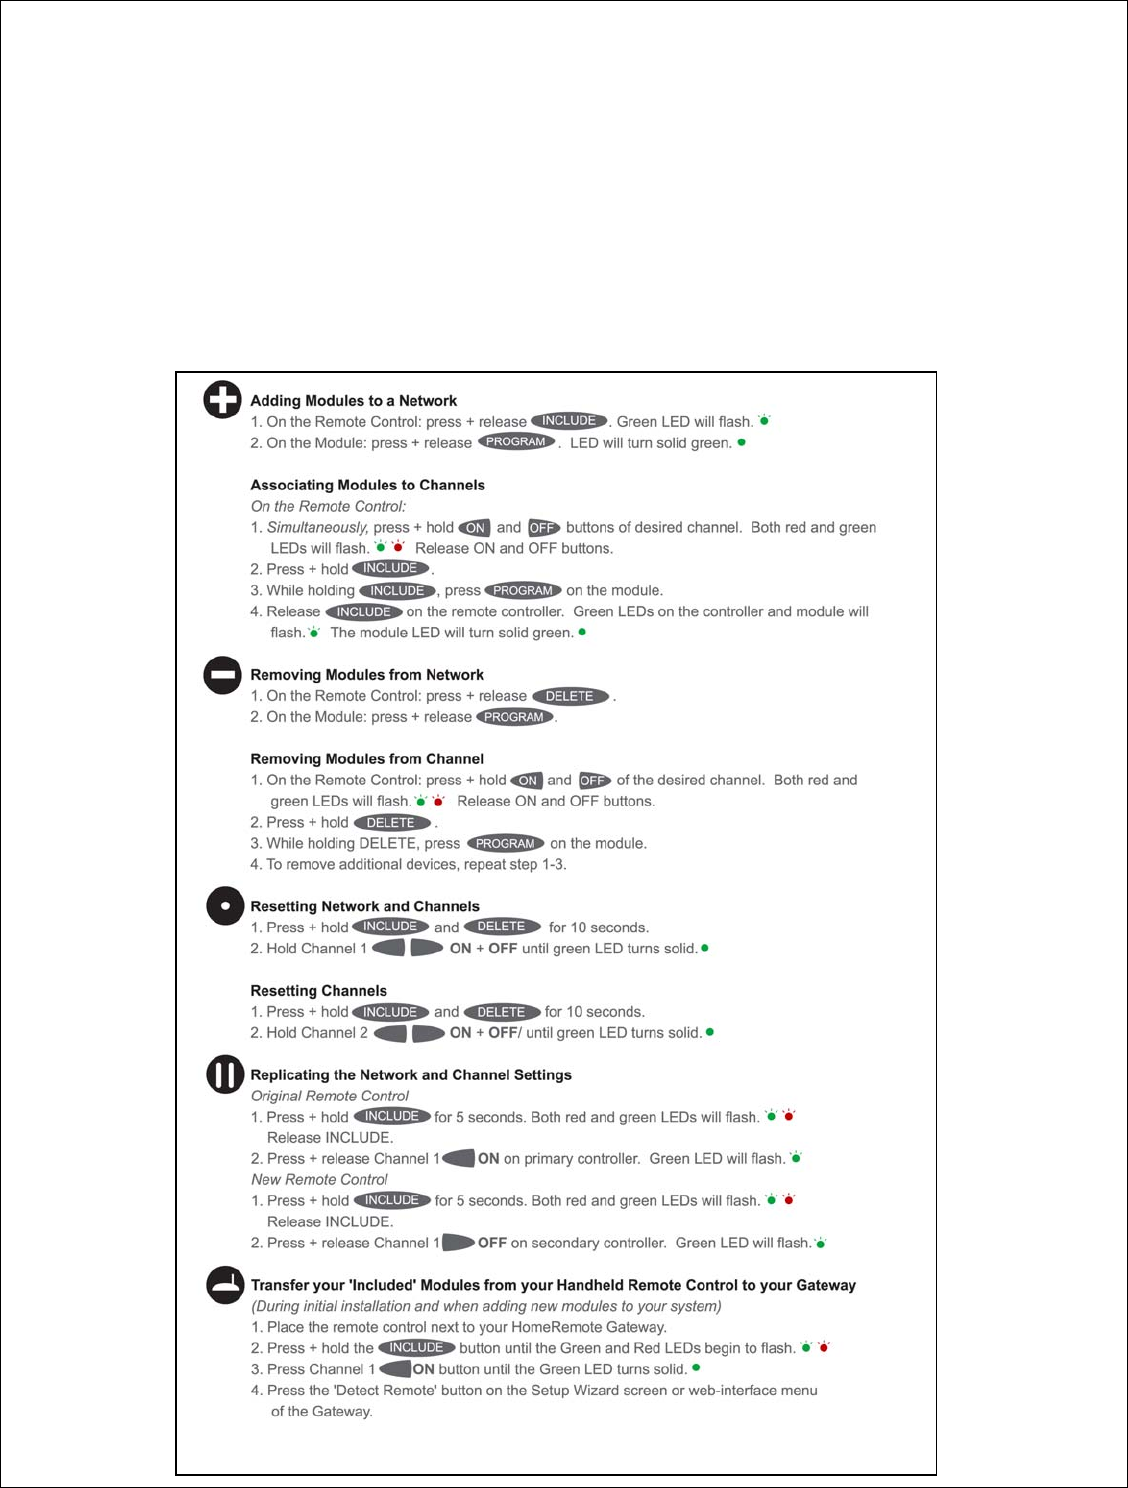
7 - HomeRemote Handheld Remote Control
The Handheld Remote Control is used to add and remove Z-Wave devices from your home
control system. The remote is also used for convenient control your home appliances and lights
while at home.
Front Panel Back Panel
The remote control is organized by ‘Channels’ which are the buttons ranging from 1 through 6
and each Channel has a single ON button and OFF button. A ‘Channel’ can be associated with a
single wireless device or multiple devices. By pushing the ON or OFF button will turn ON all
devices in the Channel or OFF all devices in the Channel. The ‘Include’ button is used for
configuring the remote control and the ‘Delete’ button is used for removing devices from the
remote control.
Preparing to use your Handheld Remote Control
Before you begin your initial setup you will need to place 4 AAA batteries into the battery
compartment on the back of the remote as shown below.
(Batteries are not included)
11
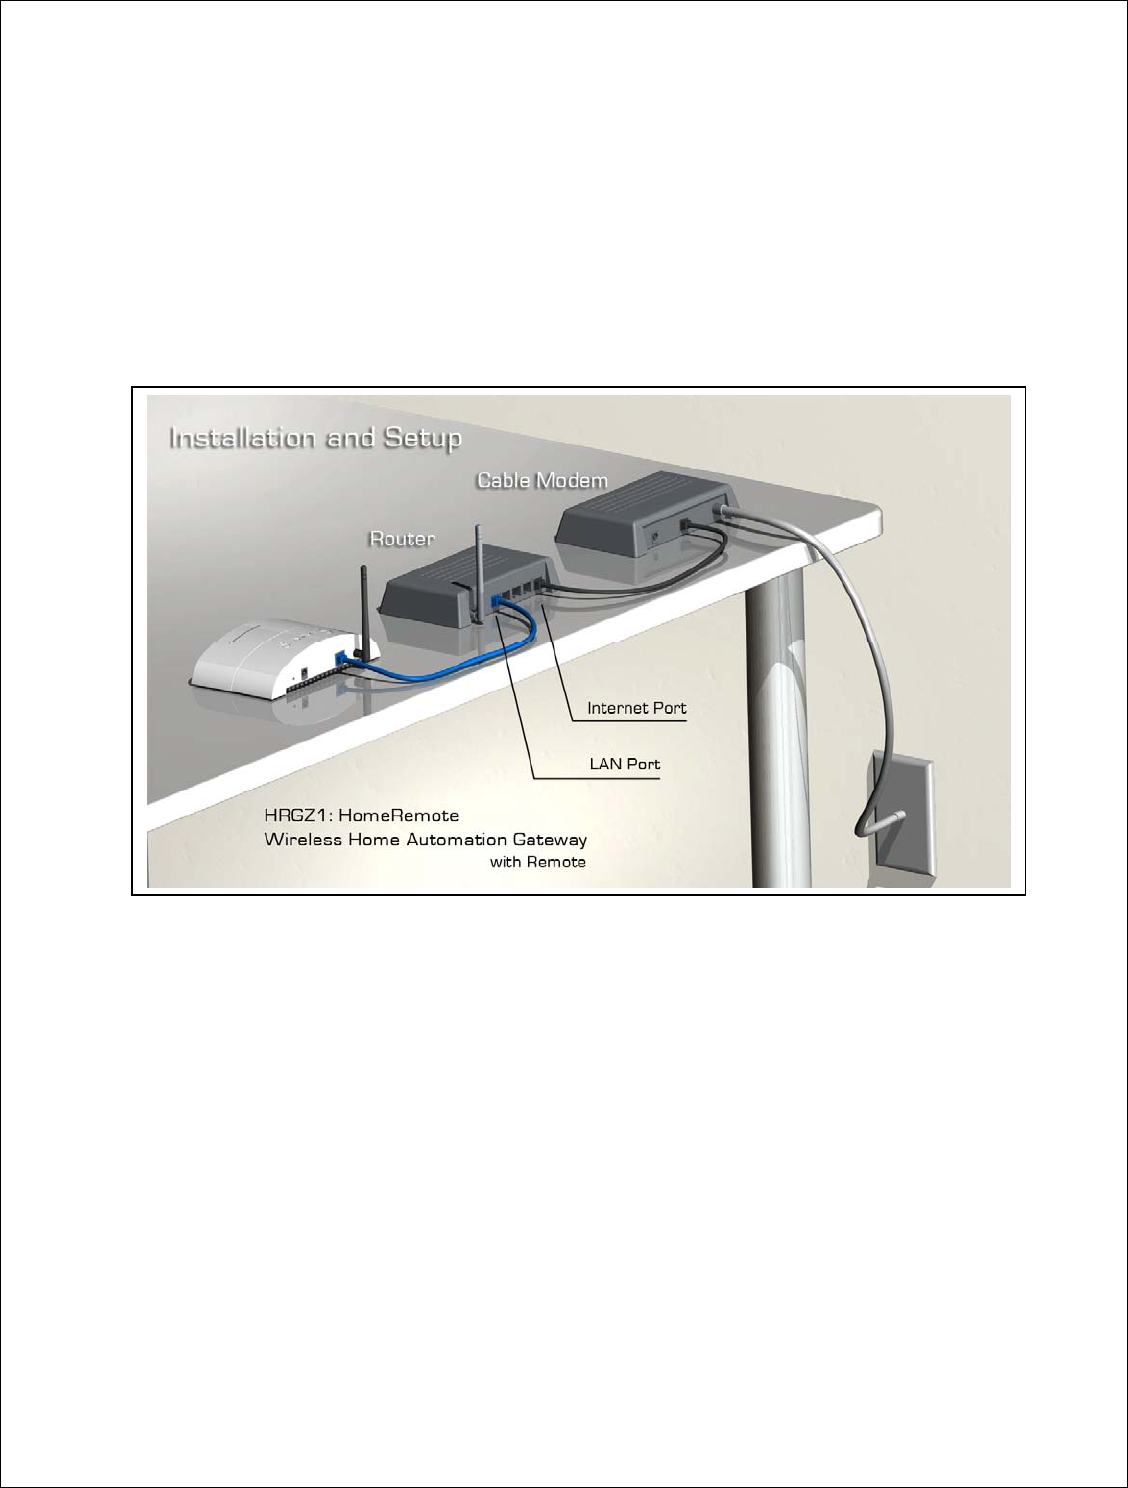
8 - First Time Setup
The first time you setup your HomeRemote system you will need to locate the included Setup
CD and the HomeRemote Gateway. Make sure that you have all the requirements before
installing the Gateway (see System Requirements).
Before placing the CD into your CD-Rom drive you will need to connect the hardware. Locate
the HomeRemote Gateway, Power Adapter and Ethernet Cable from your packaging. Connect
the HomeRemote Gateway to your home router as shown below.
When you have verified that there is power to the Gateway and the connection to the router has
been made locate the Setup CD and place it into your PC.
A menu page should load automatically. If it does not, locate your CD-Rom or DVD-Rom drive
icon to browse the contents on the Setup CD and click “autoload.”
12
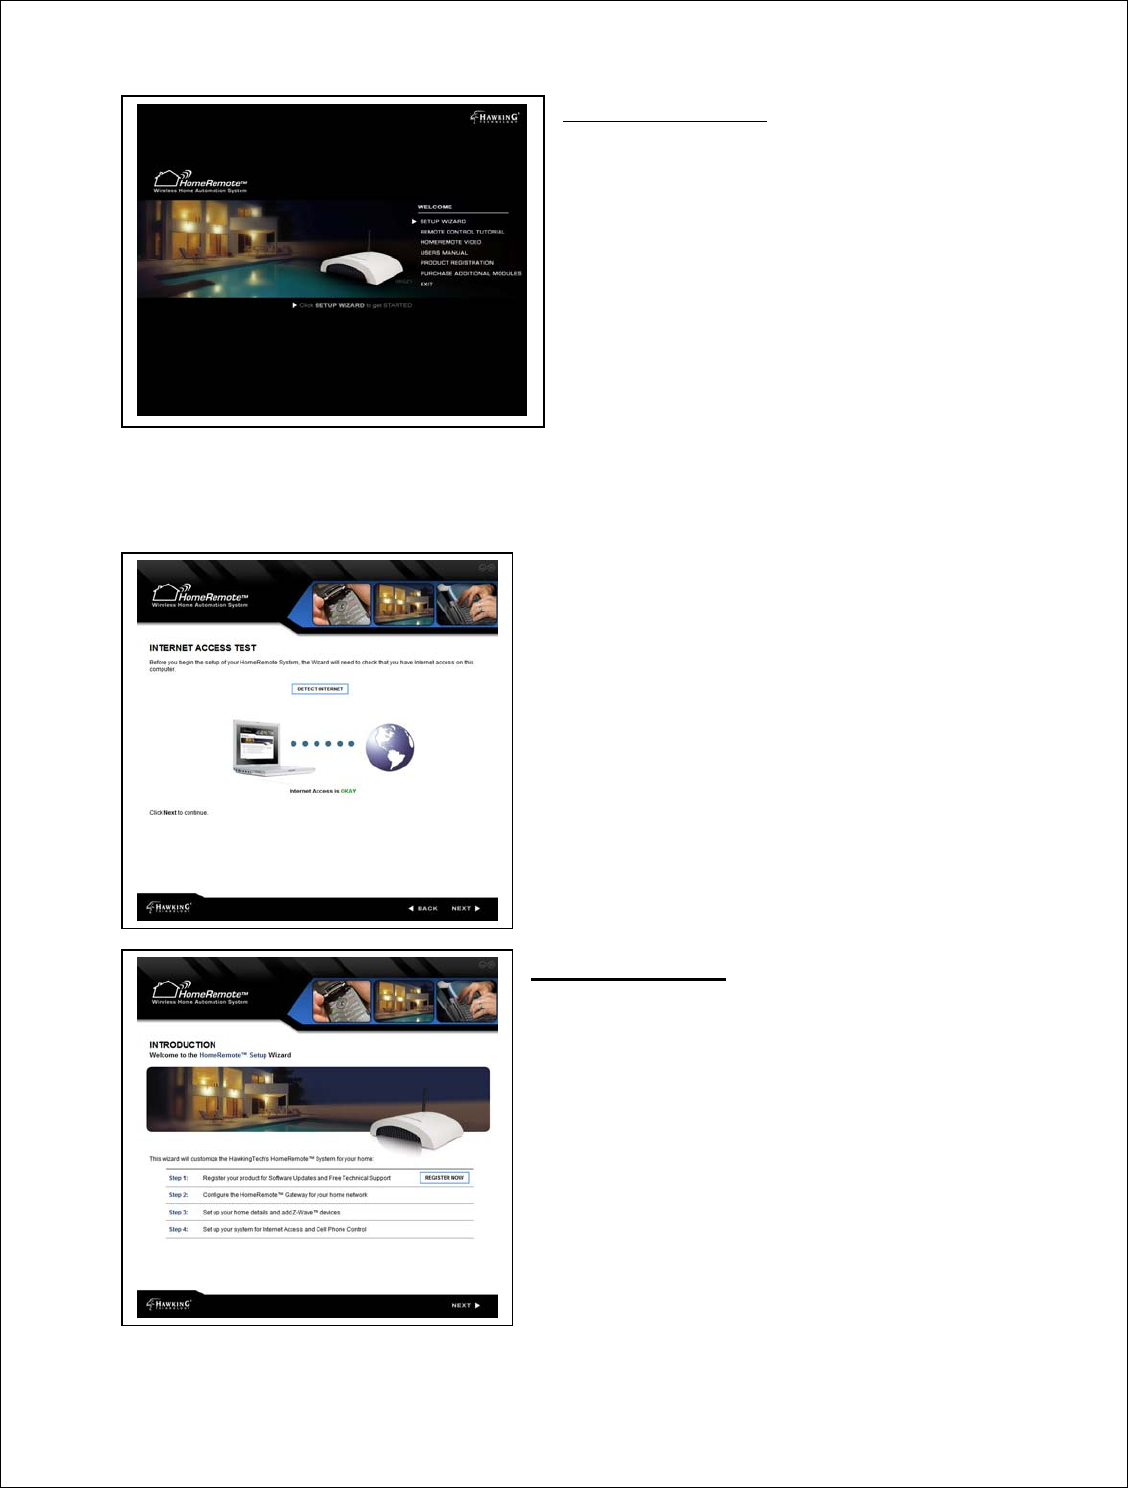
Autoload Menu Page
Select “Setup Wizard” from the menu page and
follow the steps to begin the setup process.
The Autoload menu page also gives you the option
to view video tutorials on how to setup and use your
remote control, view the User’s Manual, register
your product and purchase extra modules from
Hawking Technologies.
9 - HomeRemote Setup Wizard Walk-Through
(Also in the Getting Started guide)
The Setup Wizard will first check that the Internet
connection to your computer is working. The Wizard
will not allow you to continue until it confirms that
Internet access is OK.
Once your Internet connection has been confirmed
click NEXT to continue.
9.1 - Introduction
The Introduction page gives you an overview of the
installation process. You will need to register your
product before continuing with the installation process.
Registering your product gives you Software Updates
and free Technical Support.
Click Next to continue after you have registered your
product.
13
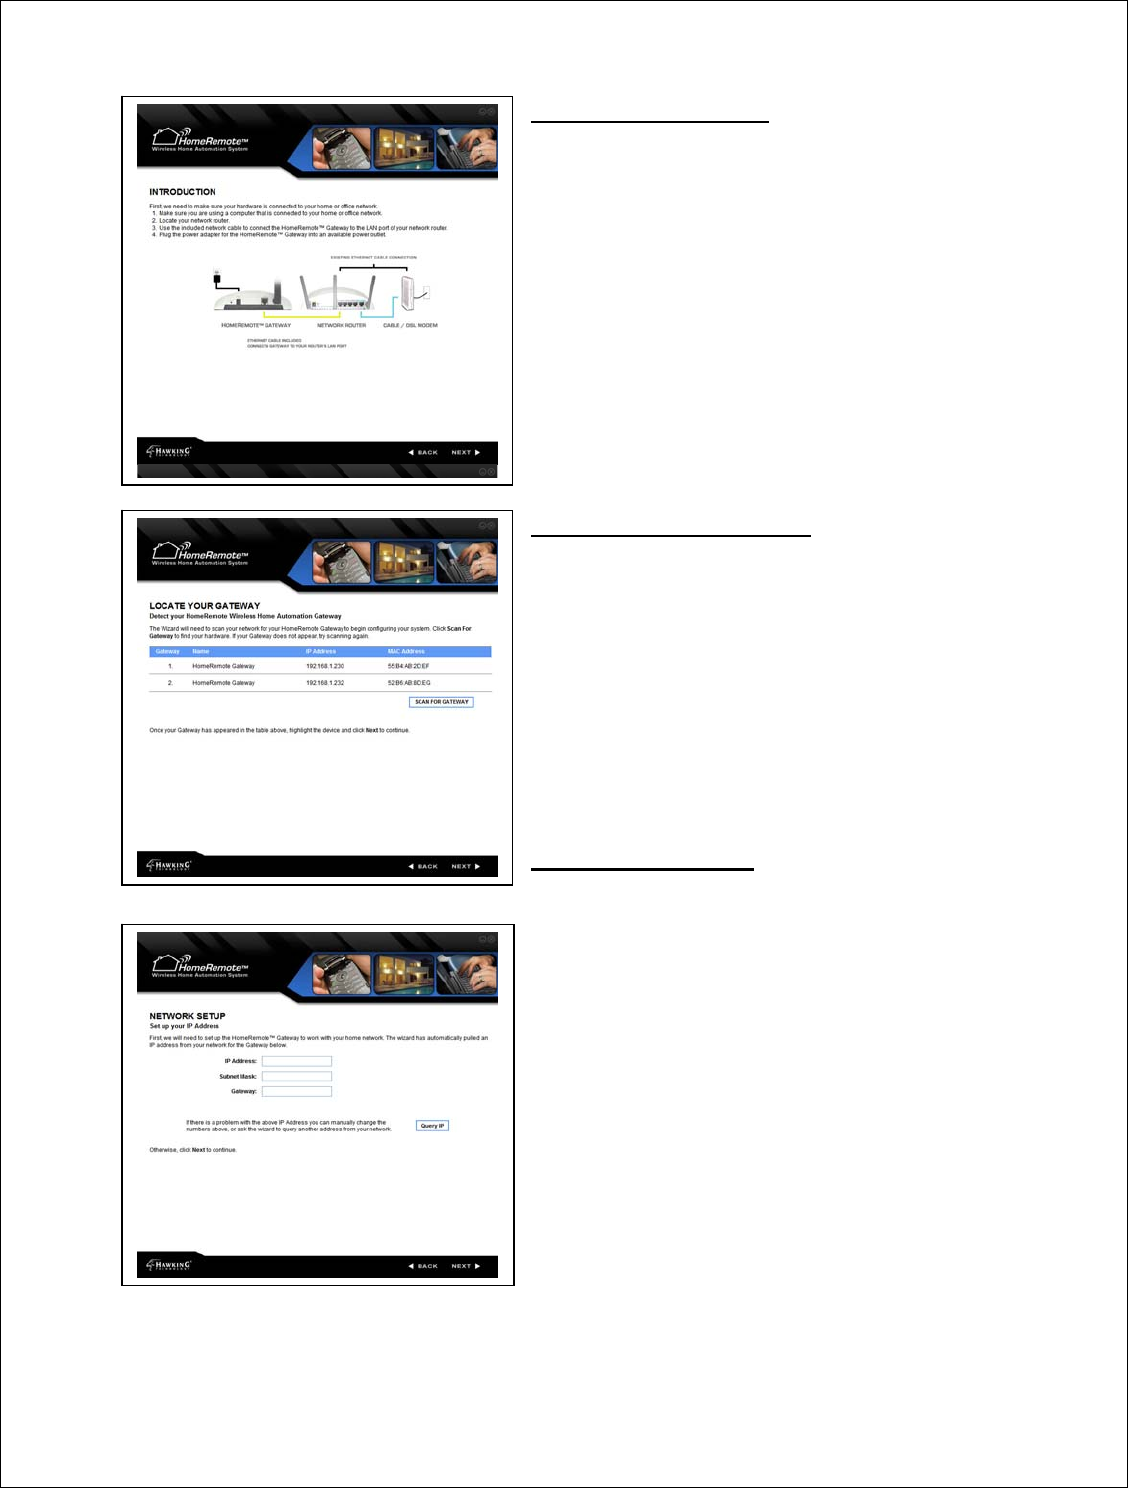
9.2 - Hardware Setup
The Hardware setup page will guide you through the
correct setup of your HomeRemote Gateway to your
home router. Follow the diagram to correctly connect
your Gateway and then click Next.
If there is something wrong with your hardware setup,
the Setup Wizard will let you know and give you
instructions on how to correct your setup.
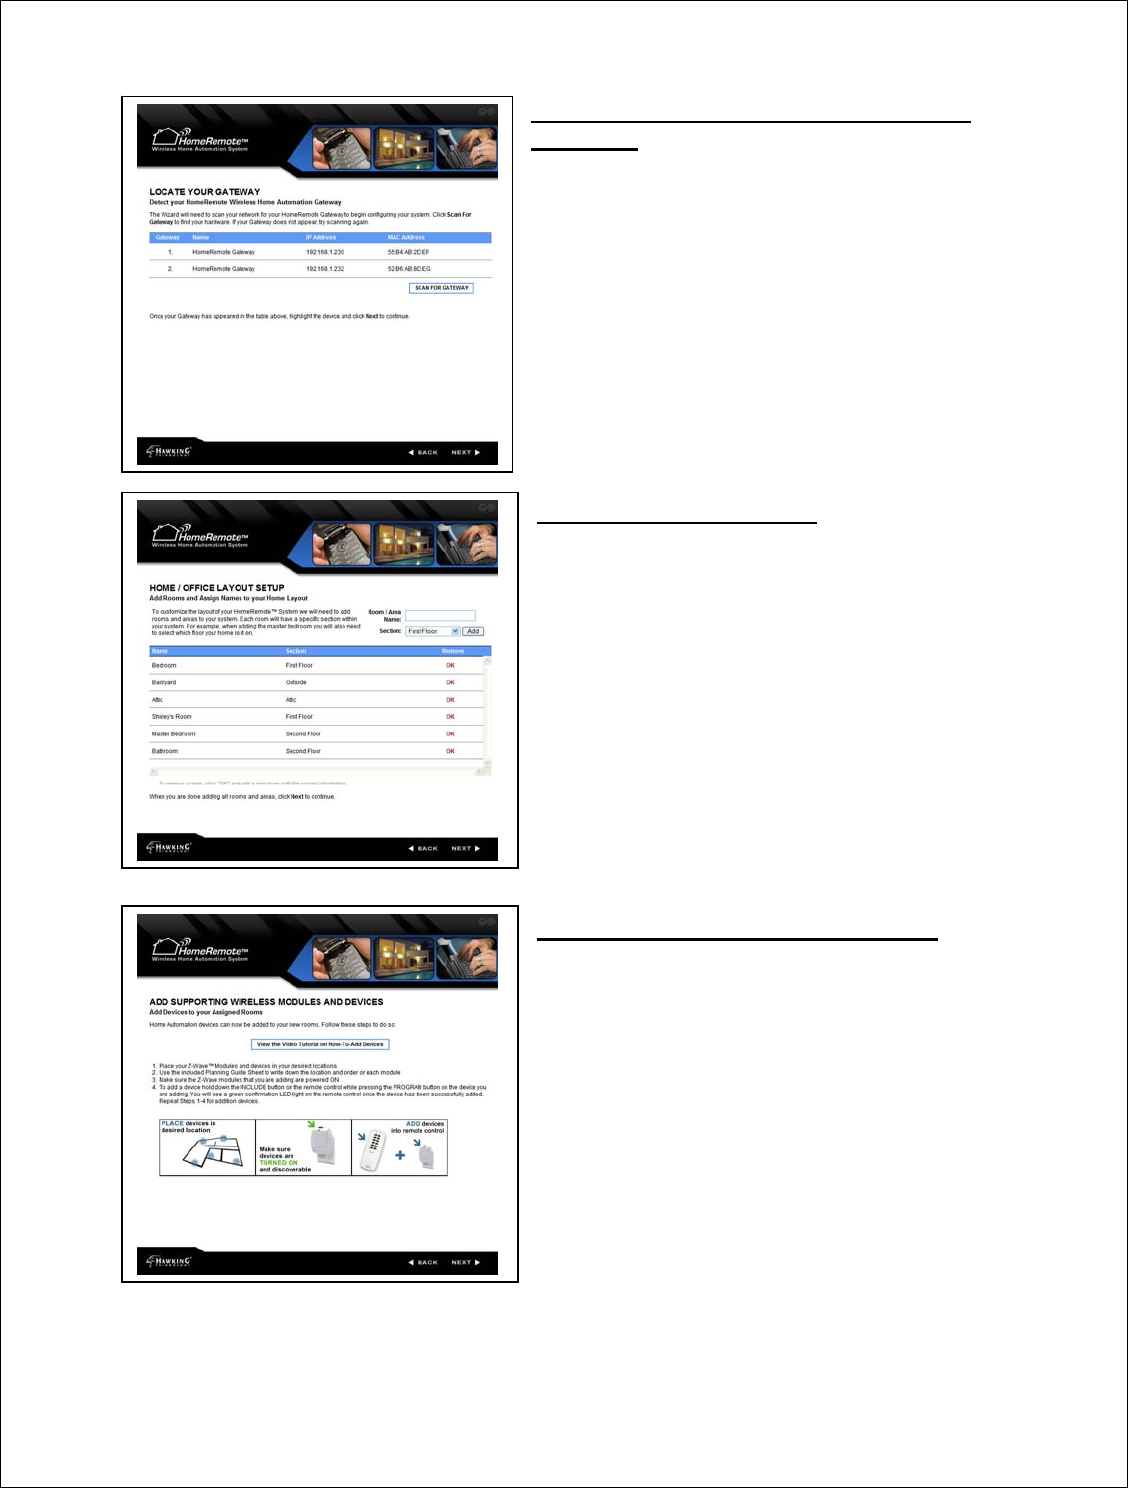
9.3 - Locate the Gateway
The Locate the Gateway page will scan your network
for your Gateway. If your hardware connections have
been setup correctly the Gateway should appear in the
table on the page. Highlight the Gateway and click
NEXT to continue.
9.4 - Network Setup
The Network Setup page will go over your current
network settings. The Setup Wizard will pull an IP
Address from your router’s DHCP server or your
computers IP address (in the case that you are using a
Static IP network) and assign itself an IP in the same
subnet. If the IP address does not automatically appear
you may click Query IP to have the wizard select
another IP Address.
Click Next to continue.
14
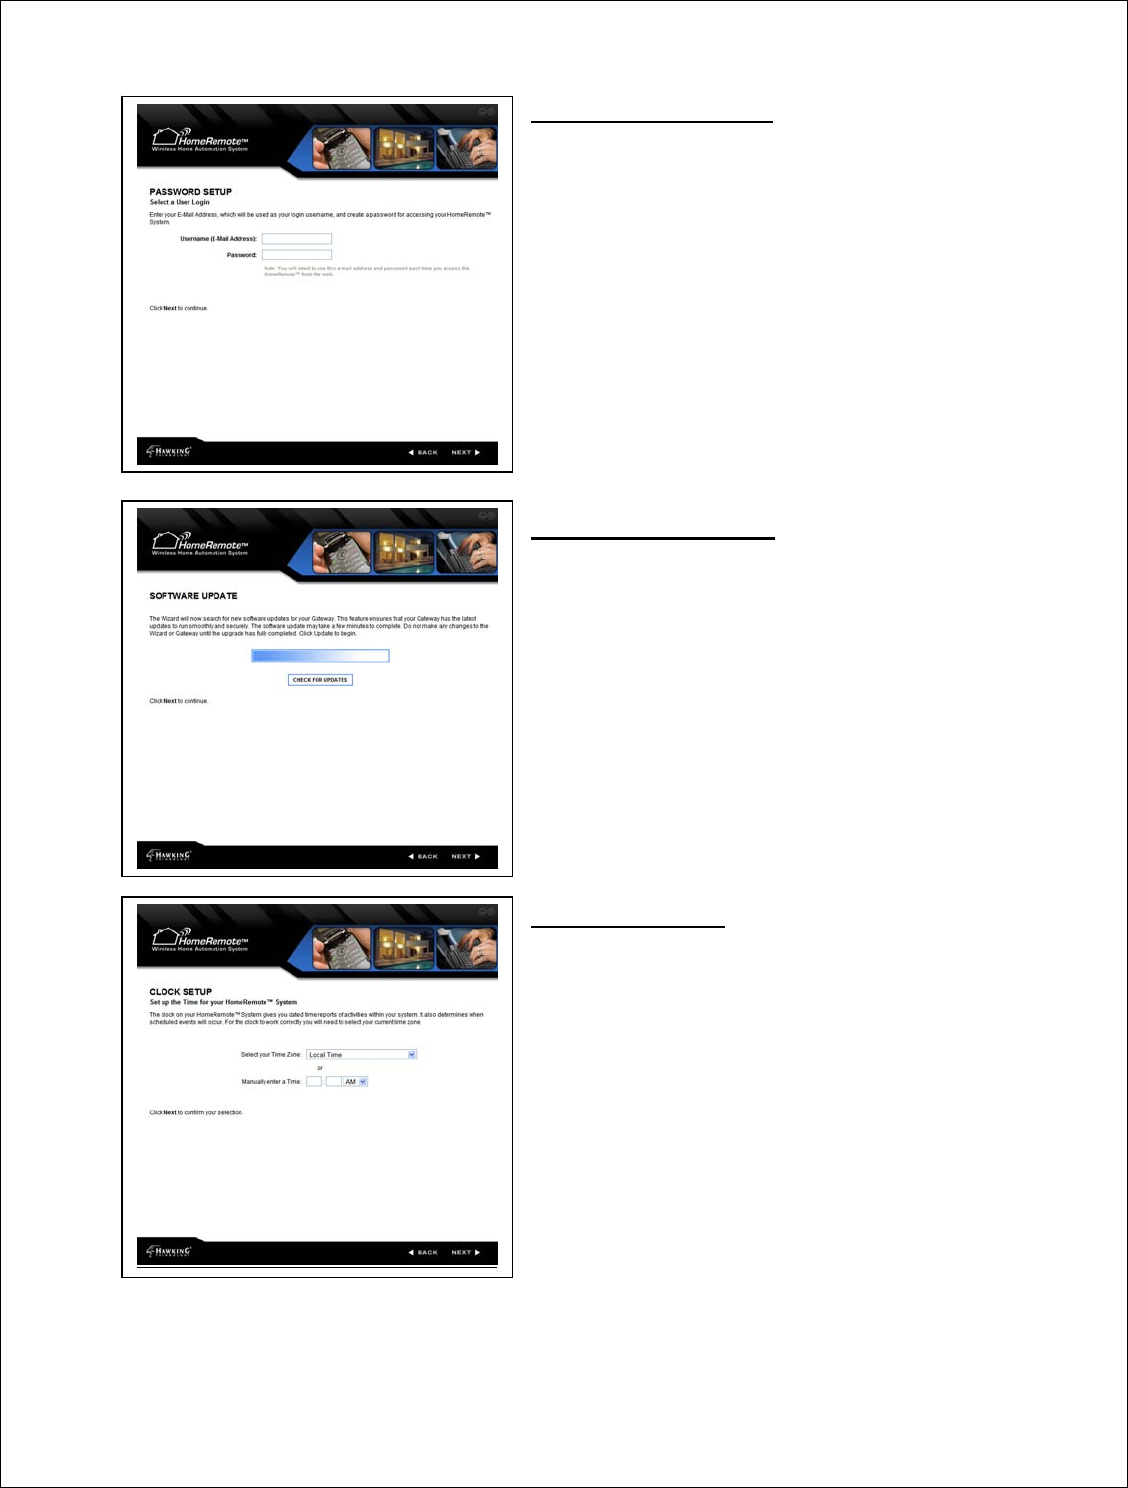
9.5 - Password Setup
The HomeRemote Gateway uses your Email address as
your username and a password that you create to access
the interface. Select a password that is easy to
remember, but hard for someone to guess. A
combination of letters and numbers is recommended
(up to 15 characters). After you have selected your
Username and Password click Next.
9.6 - Software Update
The Setup Wizard will now automatically check for the
latest software for the HomeRemote Gateway. The
software updates contain new features and more
reliable software for your HomeRemote Gateway to
run on. The upgrade may take a few minutes so be
patient. Click NEXT when the update has completed.
9.7 - Clock Setup
The Clock Setup page will customize the HomeRemote
clock to your current time zone. Select the Time Zone
from the drop down menu and click Next, or manually
input your time and click Next.
15
9.8 - Wireless Home Automation Setup
Overview
After you have successfully completed the setup of
your Gateway to your home network, the Home
Control setup will begin. This page gives you an
overview of the steps necessary to customize the
HomeRemote system to your home.
9.9 - Home Layout Setup
The Home Layout setup page lets you customize the
system with the specific rooms within your house.
The HomeRemote Gateway organizes your home with
your custom room names along with the section of
your home that each room is in. For example, a
sample room would be Living Room. The section of
the Living Room would be the 1st Floor. When you
are finished adding in the rooms, click Next to move
on.
9.10 - Adding Modules and Devices
After you have setup the rooms in your home, you will
need to add devices and modules to these rooms.
Click the link to watch the Video Tutorial for detailed
instructions on how to do this.
You will need to use the included Home Planning
Guide here to document each module that you add to
your home. (This will be used later for organizing and
naming your devices and modules)
16
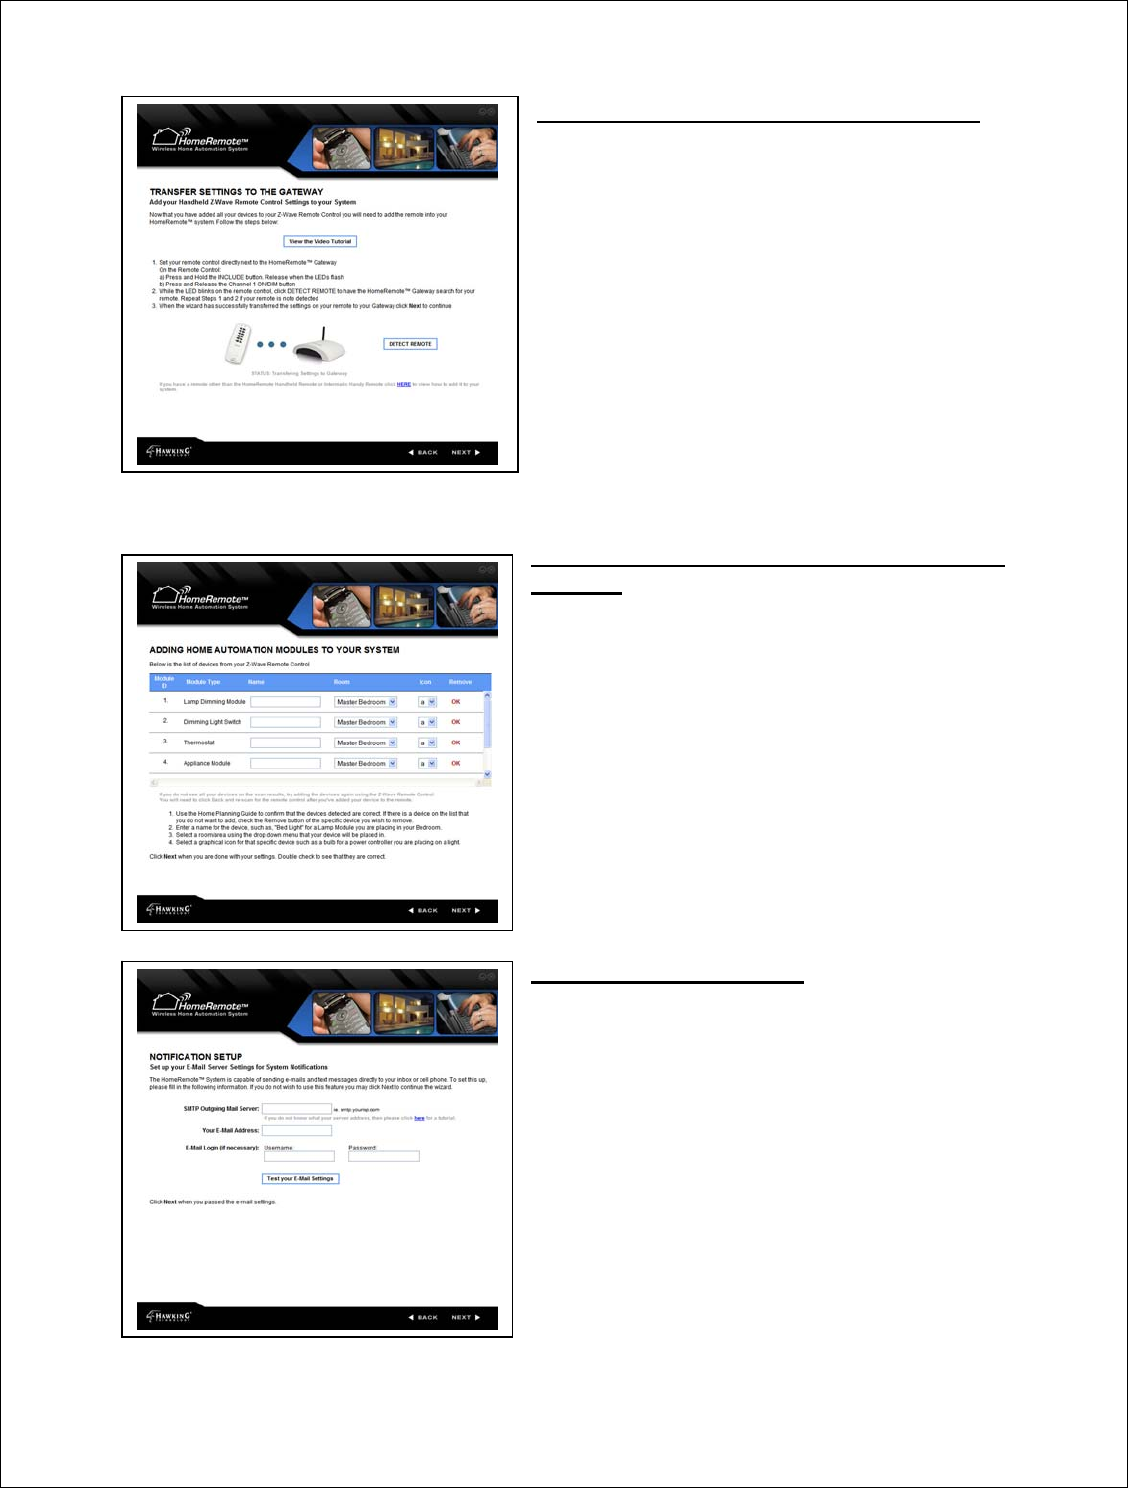
9.11 - Transfer Settings to the Gateway
After you have finished adding your modules and
devices to your Handheld Remote Control, the
Transfer Settings page will add the settings to your
Gateway. Click the link to watch the Video Tutorial
for detailed instructions on how to do this.
Place the Remote Control next to the Gateway and
hold the INCLUDE button down until the LEDs begin
to flash. Next push the Channel 1 ON button and
release (the Green LED should remain solid) Click the
Detect Remote button on the Wizard page to begin the
transfer.
9.12 - Customizing / Naming Modules and
Devices
When the Setup Wizard finishes transferring the
settings to your Gateway from your Handheld Remote,
the modules will be listed in the order that they were
added in the Setup Wizard customizing modules page.
For each module you will need to create a custom name
(i.e. Floor Lamp), select a Room that the module is
installed in and select a graphical Icon for the module.
When you have finished click Next to move on.
9.13 - Notification Setup
The Notification Setup page guides you through the
setup of your outgoing mail server for use with the
HomeRemote Alerts and Notifications feature. If you
do not know what your Internet Service Provider’s
Outgoing Mail Server is click the link on the Wizard
page to see the online tutorial. Next you will need to
enter any Email address (this will be the “From” Email
address used when sending text messages and E-mails)
that you have as well as a login and password if
necessary. Test your Email settings to confirm that are
correct, then click Next.
17
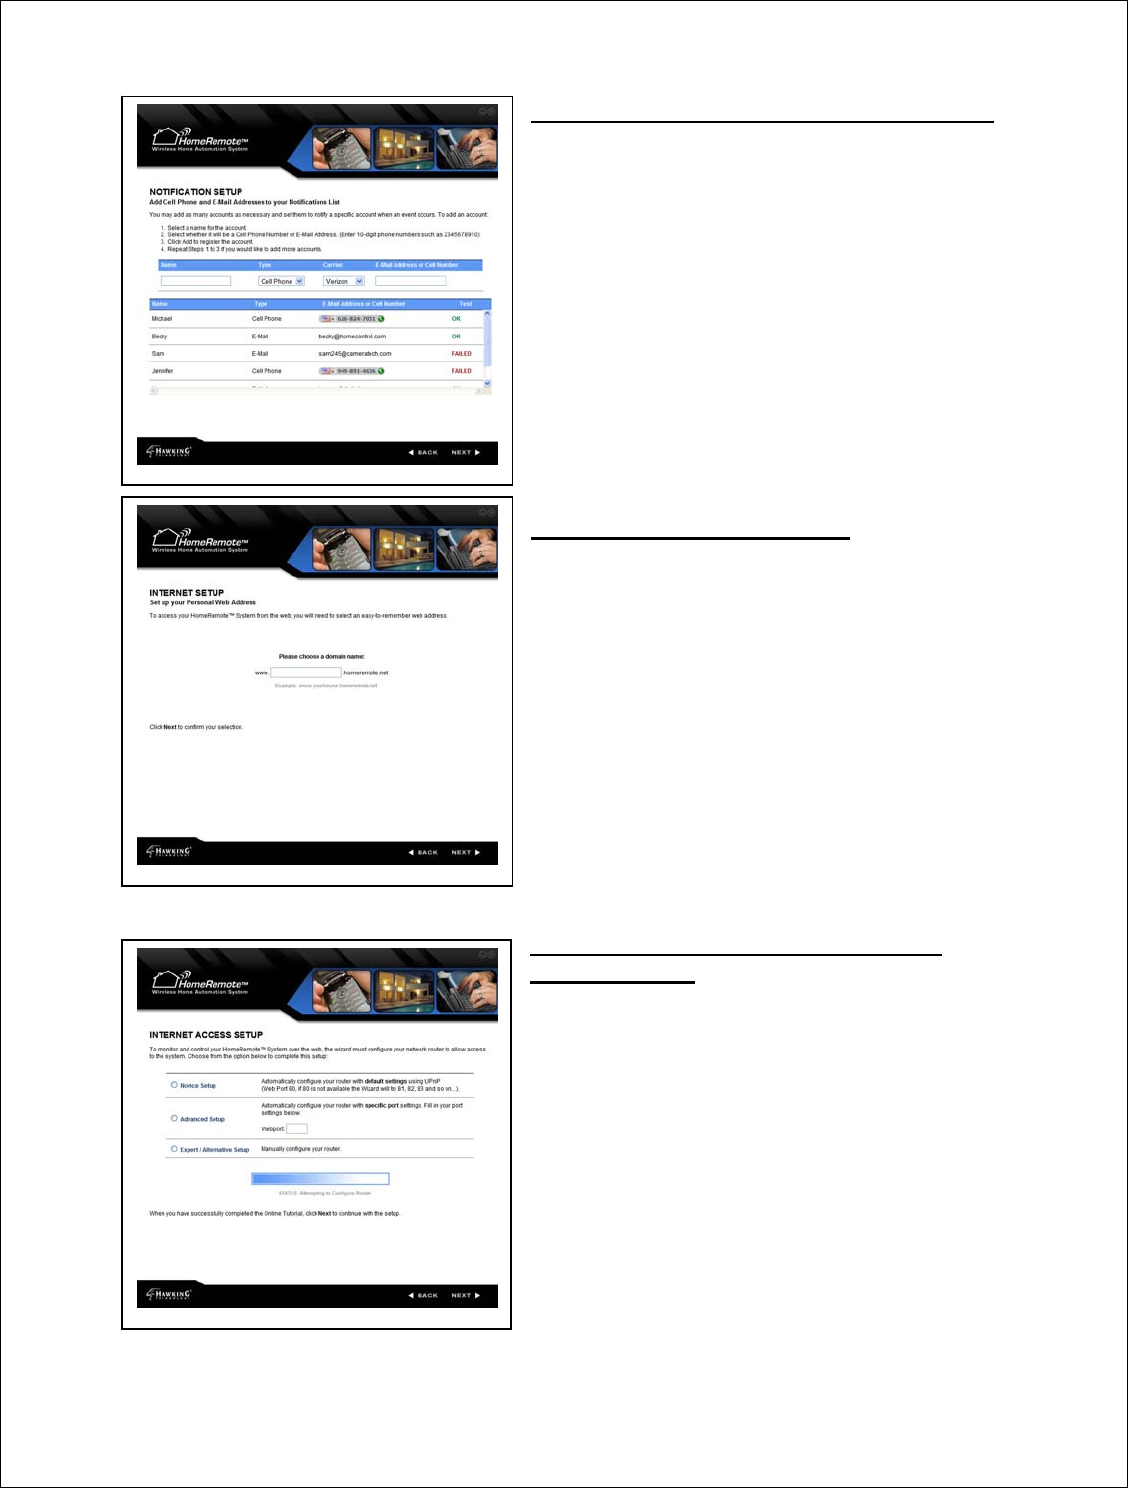
9.14 - Notification Setup / User Accounts
Notification accounts are used to determine where the
Alerts and Notifications from your HomeRemote
system get delivered to. There are two types of
accounts to setup: Email and SMS Text Message. To
setup an account, enter a name for the account (i.e.
Sidd’s Cell Phone) select the type of account (i.e. Cell
Phone), select the cellular carrier of the cell phone (i.e.
Verizon) and enter the 10-digit cell phone number
without dashes. After you have finished adding your
Notification user accounts click Next to move on.
9.15 - Custom Web-Address
The Internet Setup page is where you will select a
custom web address for accessing your HomeRemote
system from when using an Internet web browser (i.e.
Internet Explorer)
Select a name such as, “myhome” and click Next to
continue.
Note: If the name you have selected is already taken
the Setup Wizard will notify you and ask for another
name.
9.16 - Internet Access Setup (Router
Configuration)
The Internet Access Setup page will configure your
router to allow Internet access of your HomeRemote
System. It is recommended that you select the Novice
setup to allow the Setup Wizard to automatically
attempt to configure your router. If you are a more
advanced user and wish to customize your router
settings you may click Advanced setup to enter your
own web port or Manual to see instructions on how to
manually configure your router.

18
9.17 - Internet Access Setup (Manual Setup)
In the event that the Router configuration fails the
Wizard will display help page letting you know that the
configuration has failed. If this happens, simply click
on the link to view the Step-by-Step tutorial on how to
manually configure your home Router. The tutorial
will provide step-by-step instructions with pictures on
how to easily open a port on your router.
9.18 - Cell Link Setup
The Cell Link Setup page will guide you through the
initial installation of your cellular phone. Your
purchase of the HomeRemote Gateway gives you a free
trial of the service which allows you to control your
HomeRemote system from your cellular phone. If you
have HomeRemote Cameras installed on your network
you will be able to view them on your cell phone as
well. Click the Set Up Cell Link button to continue.
(View the Cell Link Setup portion of this Manual for
more instructions)
9.19 - TZO DDNS Service
The HomeRemote Gateway uses TZO’s award winning
DDNS service to allow you to select your custom
domain. TZO’s DDNS service also helps keep track of
your Internet IP Address so that you do not have to.
Your purchase of the HomeRemote Gateway gives you
a free trial of this service. You may choose to pre-pay
for this service to avoid any interruption in your
service. Click the Pre-Pay button to do so.
19
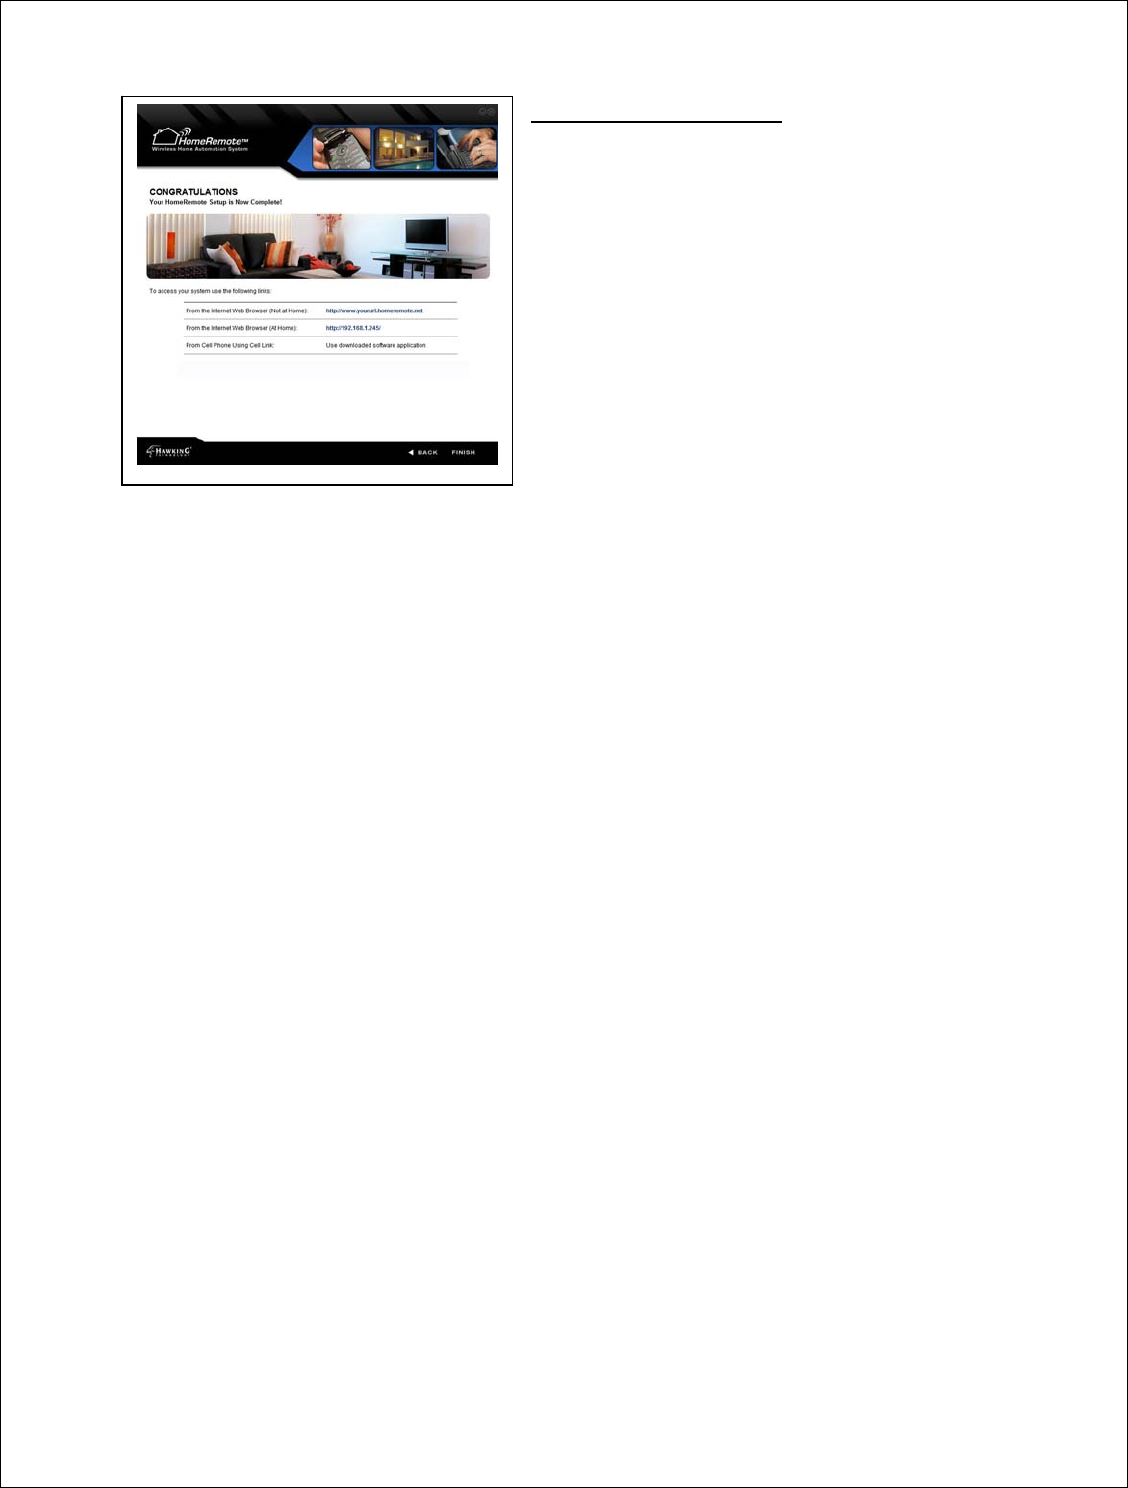
9.20 - Setup Complete
Your Setup is now complete. The final Wizard page
gives you the links you will use to access your
HomeRemote System from your home, the Internet as
well as your Cellular phone.
Note: When using a web-browser to access your
HomeRemote System from your home, you will need
to enter the local IP address of the Gateway instead of
your custom domain name. When viewing from the
internet remotely, you can use your custom domain
name that you selected earlier.
20
10 - Setting Up the Handheld Remote Control
The HomeRemote Handheld Remote Control is a powerful and convenient tool for use around
your home to control a single device or multiple devices with the touch of a single button. The
remote is capable of dimming lights, raising window shades or turning off electrical appliances
all at once.
The instructions below will give you detailed instructions on how to customize the remote towards your
preferences.

21
11 - Using other Z-Wave Remote Controls
There are many Z-Wave capable / HomeRemote Compatible remote controls on the market.
Most Z-Wave capable remote controls are compatible with the HomeRemote System. Remote
controls, such as those from Logitech Harmony, Monster Central and GE SmartHome will all
work with your HomeRemote System. You will need to carefully read the user’s manual that
came with your 3rd party remote control and find the section that guides you through setting up a
secondary controller or replicating your controller.
To add the settings from your 3rd party remote control to the HomeRemote Gateway you will
need to find the ‘Replicating’ feature on your remote. During the Setup Wizard step that asks
you to transfer settings from your HomeRemote Handheld Remote Control to the Gateway you
will instead use your 3rd party remote control and put it into replicating mode. Then push the
Detect remote button on the wizard and the transfer should begin. You can also do this to
replicate the settings from your 3rd party remote to your HomeRemote Handheld Remote Control
and vice versa.
22
12 - How to use the HomeRemote Web-Based Interface
This section of the manual will guide you through using your web browser to access the
HomeRemote System. To access the HomeRemote System from a web-browser from a
computer within your home, you will need to type the IP Address of your Gateway into the
address bar of the browser. For example, if your Gateway was setup on 192.168.1.230 then you
would type http://192.168.1.230 into your web browser. If you are trying to access your
HomeRemote System remotely over the web, you would type in your custom web address. For
example, www.myhome.homeremote.net. After you have accessed your Gateway you will be
prompted for your username and password.
The HomeRemote Web-Based Interface is your central control panel to your home. From the
Web Interface you will be able to adjust your configurations, add and remove Z-Wave devices,
control and monitor your appliances and cameras, as well as setup your alerts and notifications.
The Web-Based interface gives you total control over your features and records all activity
within your home.
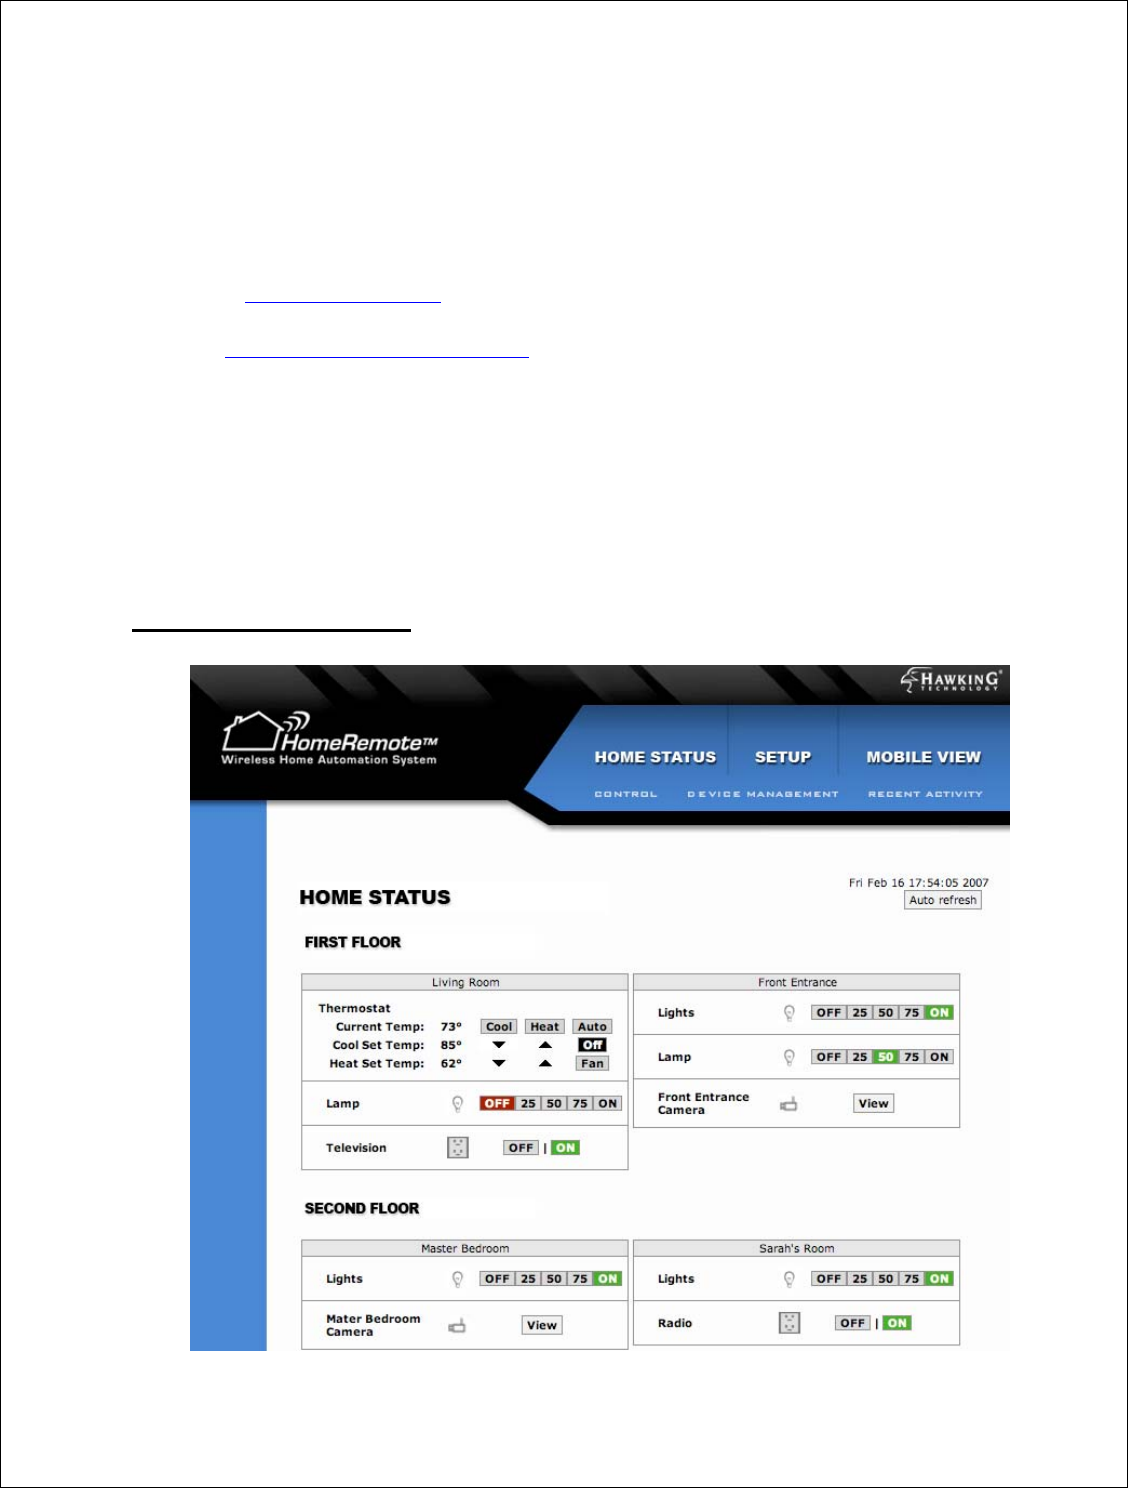
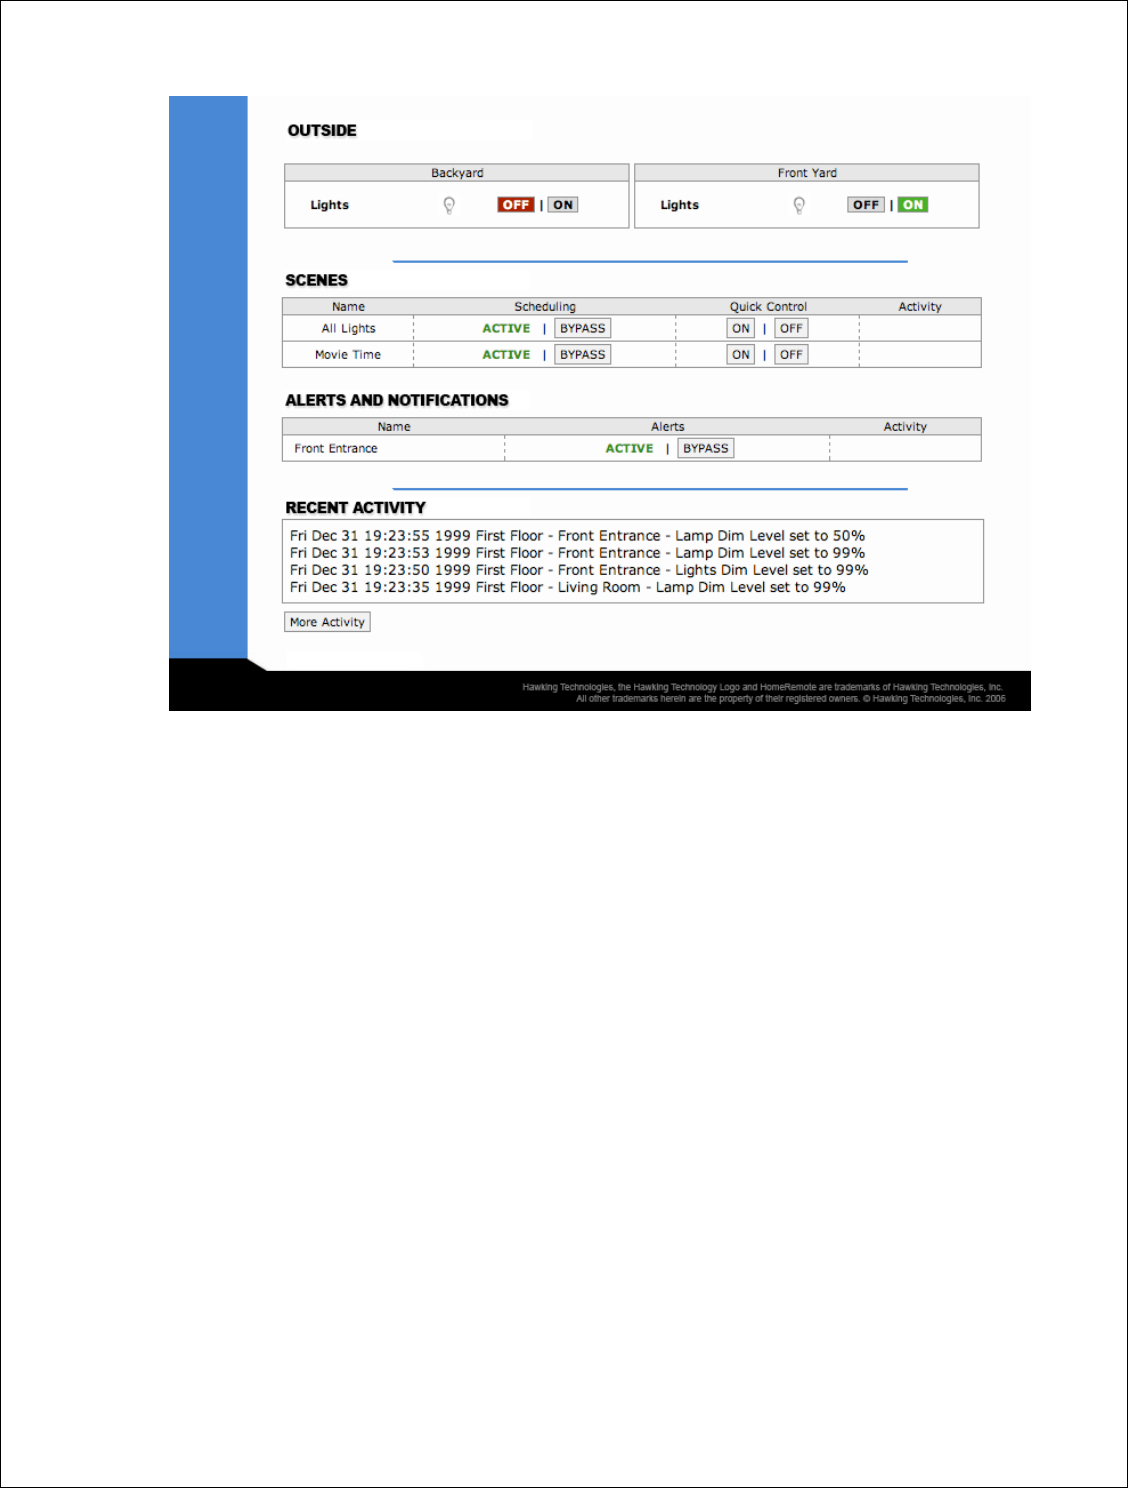
12.1 - Home Status Page
23
The Home Status page is a snapshot of your home’s current status. This is the first page you will
see each time you logon to your HomeRemote Web Interface. The Web Interface is the portal to
your home from any internet enabled web browser. From here you are able to control any
modules and monitor all devices within your system. You can view HomeRemote Wireless
Video Cameras that you have setup, control Scenes (a group of devices with specific settings
controlled by a single button), Alerts and Notifications and view Recent Activity within your
system.
The Home Status page is organized by the Rooms you previously setup using the Setup Wizard
as well as the devices placed within those Rooms. Each device is given a custom name and
graphical icon. Each Room is placed in a Section (such as 1st Floor). The Room settings and
Devices names can be re-edited in the “Setup” page if something changes within your system
later on. The Home Status page also gives you the option to Activate or Bypass any Scenes or
Alerts that you have setup. This features lets you easily change when you wish to be notified of
changes within your home (such as when you leave your home).
When controlling lights with dimming capabilities you will be able to set the dim level by using
your mouse to select your specific dim level. Clicking the mouse will activate that module to the
setting you specified (i.e. Lights to 50%) Standard appliances will have a basic ON/OFF control.
Thermostats are controlled from the Web Interface are controlled similarly to how you would on
a normal thermostat. Select the mode and the desired temperature setting and HomeRemote will
change your thermostat accordingly.
24
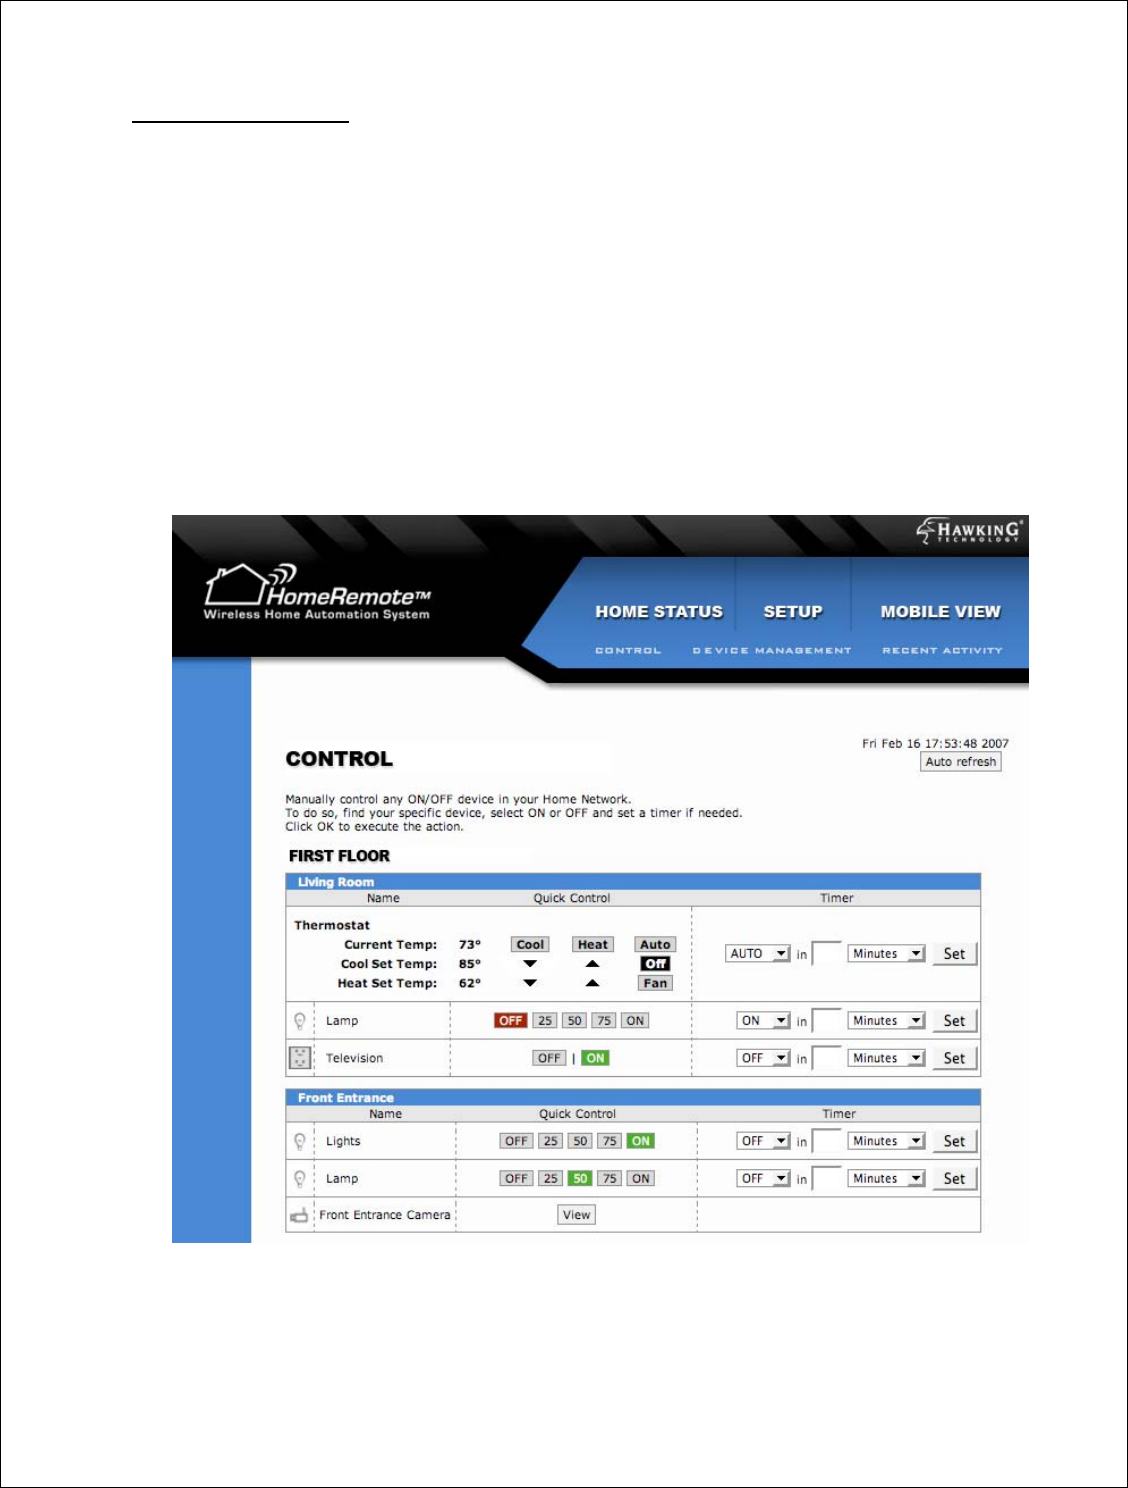
12.2 - Control Page
The Control Page gives you full Control of all Devices in your HomeRemote network. In
addition to simple control, the Control page gives you the option to set “Timers” on all devices.
The Quick Timers can be set in intervals from 1 minute to many hours. Quick Timers are great
for turning lights or appliances Off before leaving your home or going to bed.
You can control your thermostats, set temperatures and modes using “Timers” from the Control
page. Scenes can also be set using “Timers” from the Control page. Say for example you are
leaving your home and you wish to turn off all lights after you’ve left your home to avoid
walking around in the dark. You would scroll down to the Scene you have created for All
Lights, set the action to OFF and pick however many minutes you think it will take for you to
leave you home and then click SET.
25
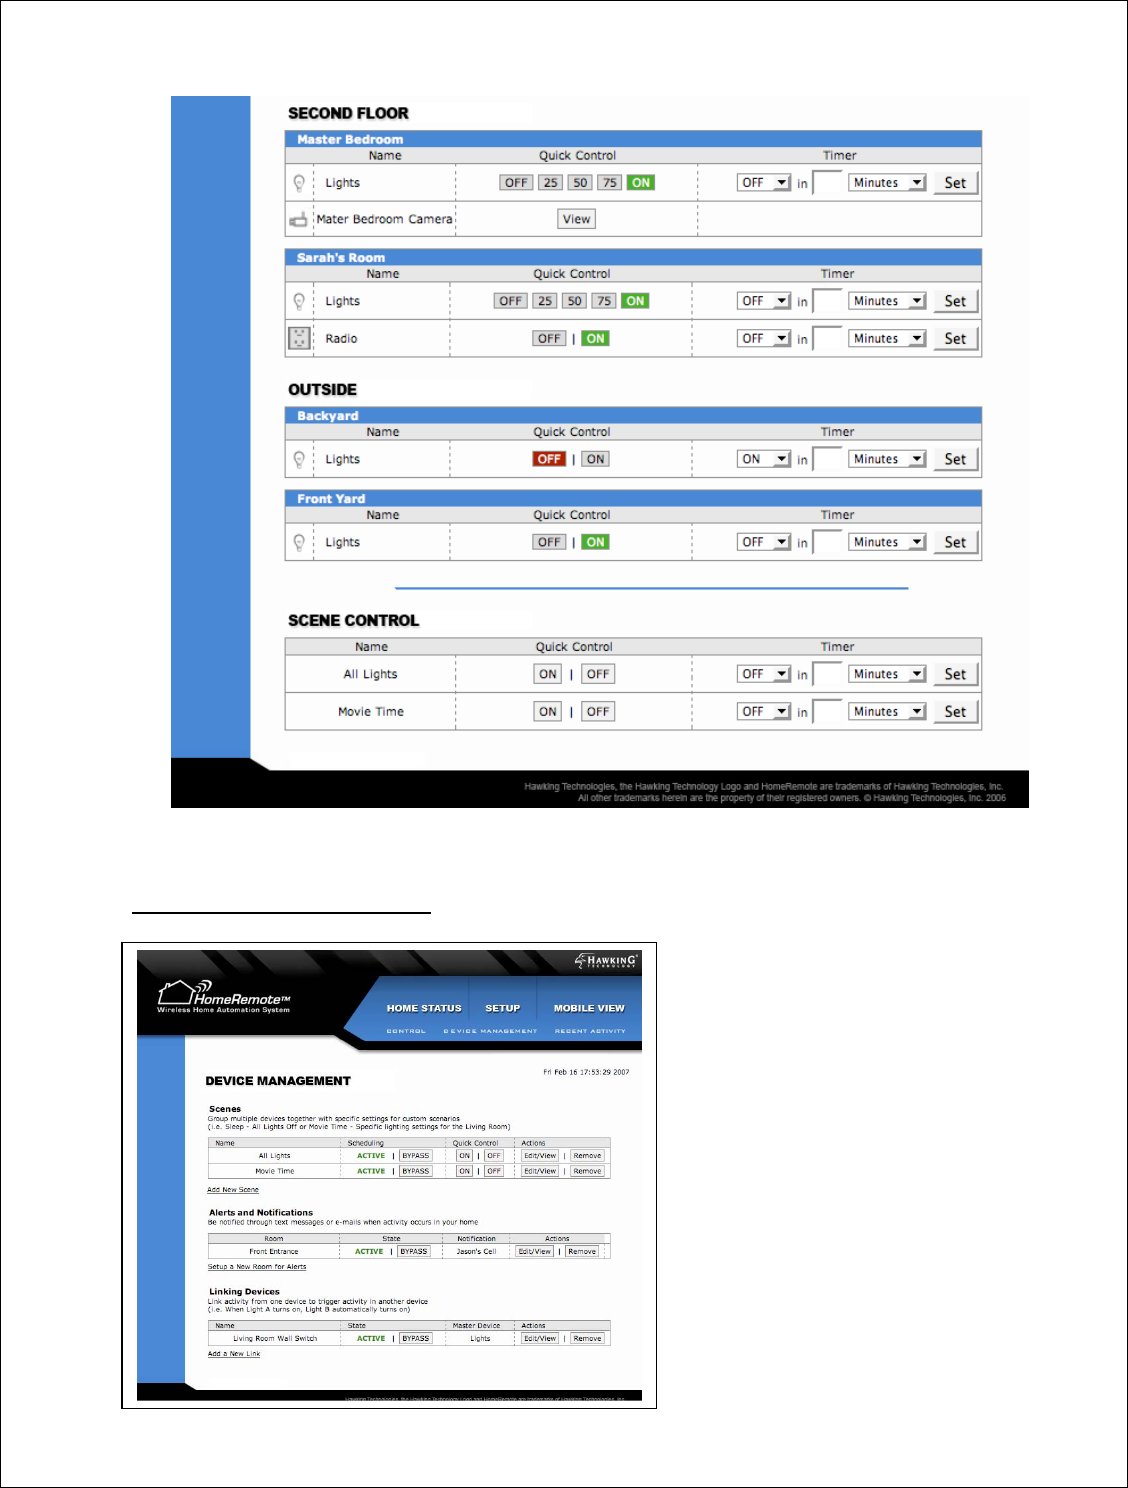
12.3 - Device Management
The Device Management Page lets you
customize Scenes, Alerts and
Notifications as well as Link Devices.
The Device Mangement Page allows
you to:
Set “Scenes” to control multiple devices
with the push of a single button
Set “Alerts and Notifications” for
security alerts from the HomeRemote
System to your Email or Cell Phone
Link Devices to one another so there is
a chain reaction when one device is
activated
26
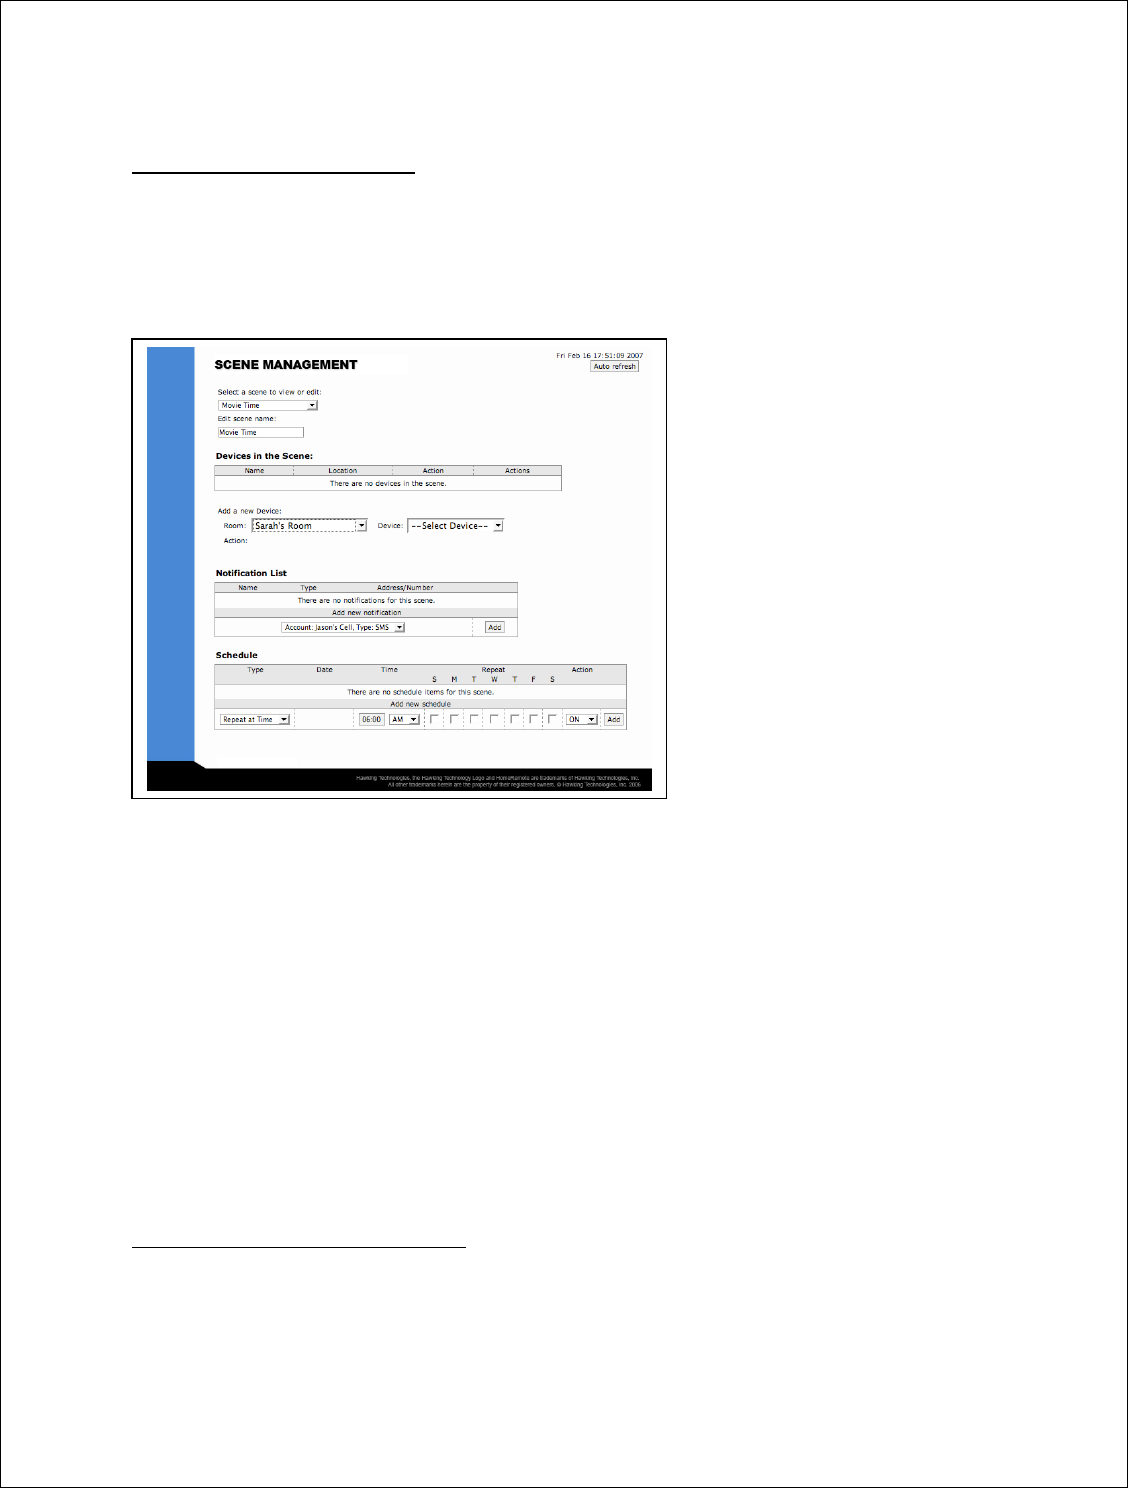
12.3.1 - Setting up Scenes
A Scene is a single or group of Devices set to custom levels that is activated with one button, or
single mouse click. Scenes can be used for many applications such as, turning off all lights
before going to bed, setting a lighting scene for watching a movie or settings a dinner scene for
mood lighting. To setup a Scene click “Create a New Scene” on the Device Management Page.
1) Name the Scene that you will be
creating. (i.e. Movie Time)
2) Add the devices and settings for
the devices into your Scene. To do
this click the Room and then select
the Device from the right drop
down bar. Once the device has
been added select the action and
setting you wish the device to be
in when you activate your scene.
3) Add more devices if needed to
complete your “Scene”
The Scene Management page allows you to be notified when a Scene has been activated in your
home. To do this you can select a Notification account from your Notification List. If you do
not have any Notification accounts see the Notification and Alerts Setup section of this manual.
The Scene Management page also allows for scheduling of your “Scenes” For example, if you
are away from vacation you can set up an Outdoor Lighting scene to turn ON everyday at a given
time and OFF at a given time to make it appear like somebody is home.
You can create multiple Scenes with many devices in each Scene.
Note: Scenes created on your Gateway will not be transferred to your Handheld Remote Control
or vice versa. You will need to create your Scenes individually for the Remote Control and the
HomeRemote Gateway.
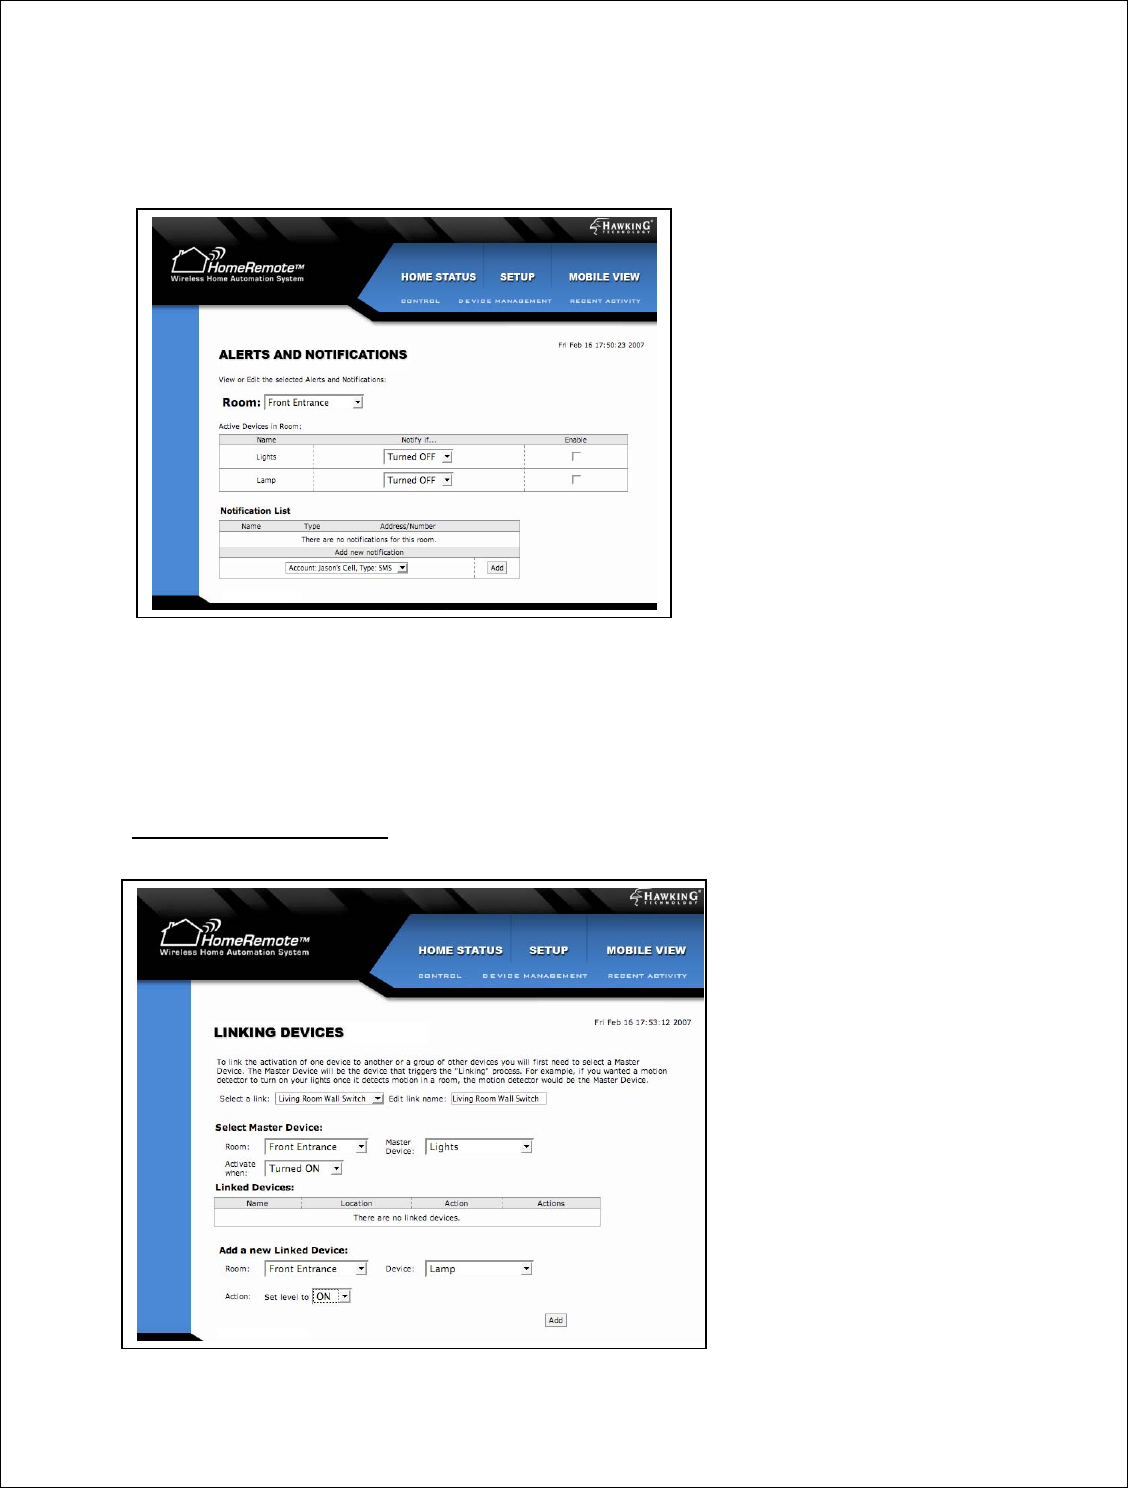
12.3.2 - Alerts and Notifications
Before you begin using the Alerts and Notifications page you will need to setup your
Notification Settings in the Setup page. If you have not done so, please do so first before
continuing.
27
The HomeRemote System is capable of sending a text message or an E-mail to you when a
specific event occurs. You can customize which events you wish to be notified of and you can
choose who gets notified. The Alerts and Notifications page is organized by Room.
1) Select the Room
2) The devices within that room will
appear below. Select which
events you wish to be notified of
and then click Enable to activate
the device for notifications
3) Select the Notification accounts
you wish authorize to receive
alerts regarding these events.
You may add Alerts and Notifications for every Room within your home. You will be able to
easily Bypass or turn off these alerts from the Home Status in the case that you do not wish to
receive them at a given time.
12.3.3 - Linking Devices
In the case that you wish to have
one device activate another device
in a chain reaction the Linking
Devices feature will allow you to
do so. This feature is used for
many different applications. For
example, if you have a Z-Wave
Wall Switch installed in your home
and you wish to have the wall
switch control other devices such
as a lamp that you have attached to
a Z-Wave Lamp Module, the
Linking Devices feature can be
easily setup to do this. Or if you
wish to have a Z-Wave Wall
Switch turn on or off all lights
within your home you can do so as
well.

28
The Linking Devices feature is organized by a single MASTER DEVICE and a single or
multiple LINKED DEVICES. The MASTER DEVICE is the catalyst to activate or deactivate
your LINKED DEVICES.
1) Choose a name for your Link
2) Select the Room that your Master device is located in
3) Select the Master Device from the drop down list to the right
4) Select the Activity of your Master Device that will initiate the Linking
5) Select the Room of your first Linked Device from the bottom table
6) Select the device to be linked from the drop down list to the right
7) Select the Activity that you wish to occur when the Master Device has been activated, then click ADD
8) After you have added the first Linked Device you can repeat steps 5 to 7 to add as many Linked Devices as
you wish. (Note: the more Linked Devices you have the longer it will take to execute all links)
12.4 - Recent Activity
The Recent Activity records all activity and events that occur within your HomeRemote System.
For example, if a light module was turned on, the Recent Activity page would have a record of it
and when it happened. View this page to troubleshoot something from the past or see events that
have happened within your home while you were away. The Recent Activity page also records
system events such as a change in your network settings or configurations. This is used for
troubleshooting network issues.
29
12.5 - Setup Page
The Setup Page used to adjust your Gateways internal settings. From here you are able to adjust
your local network settings, add or remove rooms, add new devices, change the clock time,
reconfigure your notification settings, save and load profiles, update your firmware, reset the
entire Gateway and change your DDNS settings and Web-address settings. It is highly
recommended that you do not change these settings unless understand the effects of your
changes.
12.5.1 - Clock Setup
The internal Clock of your HomeRemote
Gateway is set to automatically update itself
using the Internet. You have the choice to
manually set your time, however it is
recommended that you use the time servers
set in the Gateway.
If you see that your time is incorrect and
you are using the time servers in the
Gateway you may want to choose your
correct Time Zone to have it reflect your
current time.The Clock is used for your
Scheduled events and time stamping the
events that occur within your system.
30
12.5.2 - Creating Rooms / Areas
The Setup Wizard will guide you through
the initial setup of your home and rooms,
however if you wish to make any changes
to your initial configuration you may do
so here.
To add a new room type the name of your
room in the box and select the section of
your home the room is in. Then click
Add.
To remove a room, click the Remove button next to the room you wish to remove.
Note: If you remove a room that devices are currently listed under, you will need to assign the
devices to another room in order to continue using them.
12.5.3 - Add / Edit or Remove Devices
The Add/Edit or Remove Devices page gives you information on all devices currently within
your system. This page allows you to change the name of your current devices as well as
remove devices that are no longer used. You can edit the name and location of any device any
time.
Expanding your System with new devices
The Setup Wizard will guide you through the initial setup of your new devices, however in the
case that you add new devices to your system at a later time you will need to use this page to do
so. When adding additional devices to your system you will first need to Include them into your
Handheld Remote Control. If you do not know how to do this, see the section in the manual that
goes over Adding Devices using your Remote Control.
After you have added the new devices into your remote control, place the Handheld Remote
Control physically next to the Gateway. On the remote control press and hold the Include button
until the Red and Green LEDs begin to flash simultaneously. Next press the Channel 1 ON
button on the Remote Control and the Green LED should begin to blink.
On the Adding Devices page scroll to the bottom and click Detect Remote while the Green LED
on the Remote Control is still blinking. You will have to do this rather fast to ensure a
connection. The interface should give you the status of the transfer. If the transfer fails try these
steps again.
31
When successful, the list of all your devices, including your old devices will appear in the page.
Reset Z-Wave Controller
To clear all devices from your Gateway, in the event that you wish to install your devices all
over again, or when performing maintenance on your system you can select the Reset Z-Wave
Controller button. However, it is recommended that you do not do this if your system is

32
currently functioning normally. The Reset Controller feature will remove all devices, device
settings, scenes, notifications and alerts, linked devices and controls from your Gateway.
12.5.4 - Notification Setup
The Notification Setup page shows your current notification settings that were originally setup
during your initial Setup Wizard run. This page will allow you to change the settings of your
mail server and add, edit or remove your notification accounts.
The HomeRemote Gateway uses your Outgoing E-Mail Server to send out alerts and
notifications to your cell phone and E-mail account. The use of your Internet Service Provider’s
Outgoing E-Mail Server is highly recommended (i.e. Cox, Comcast, Time Warner etc…). Using
your Yahoo, Hotmail, Gmail, or other public free mail services’ Outgoing mail servers may not
work since these companies regularly block the use of their Outgoing Mail Servers. If you are
not familiar with your Internet Service Provider’s Outgoing Mail Server you can check with your
Service Provider or view the tutorial on the Hawking website on how to do so.
(www.hawkingtech.com/mailservertutorial)
The SMTP Port normally used by Outgoing Mail Servers is 25. However, in the case that your
Service Provider’s mail server does not use 25 you may change this in the field listed on the
page.
The Email address may be any Email address you choose. This can be your Yahoo, Gmail or
any other Email address you currently have.
Some Mail Servers will require that you login (rarely). In the case that your mail server requires
this, you may enter the information in the corresponding fields.
33
Adding Notification Accounts
Notification Accounts are used to determine where the Alerts and Notifications are sent to. For
example, when you setup an Alert you will choose the Notification Accounts that will receive
those alerts. To add a new Notification Account simply type the name of the account such as,
Bob’s Cell Phone, select the notification type (either Email or Text Message) and then enter the
Email address or cell phone number (when entering a cell phone number you will need to select
the cell phone carrier as well). When entering in a cell phone number do not use a 1 before the
number or any dashes. Simply type the 10 digit phone number. When entering in an E-mail
address, type the full E-mail address.
Click Add when you are done with the first account and then repeat these steps to add more
accounts. You will now be able to select these accounts in the Device Management / Alerts and
Notifications page when configuring your Alerts.
Note: If a user has both a cell phone and E-mail that you wish to enter you will need to create a
separate account for each (i.e. Bob’s Cell Phone and Bob’s E-mail)
34
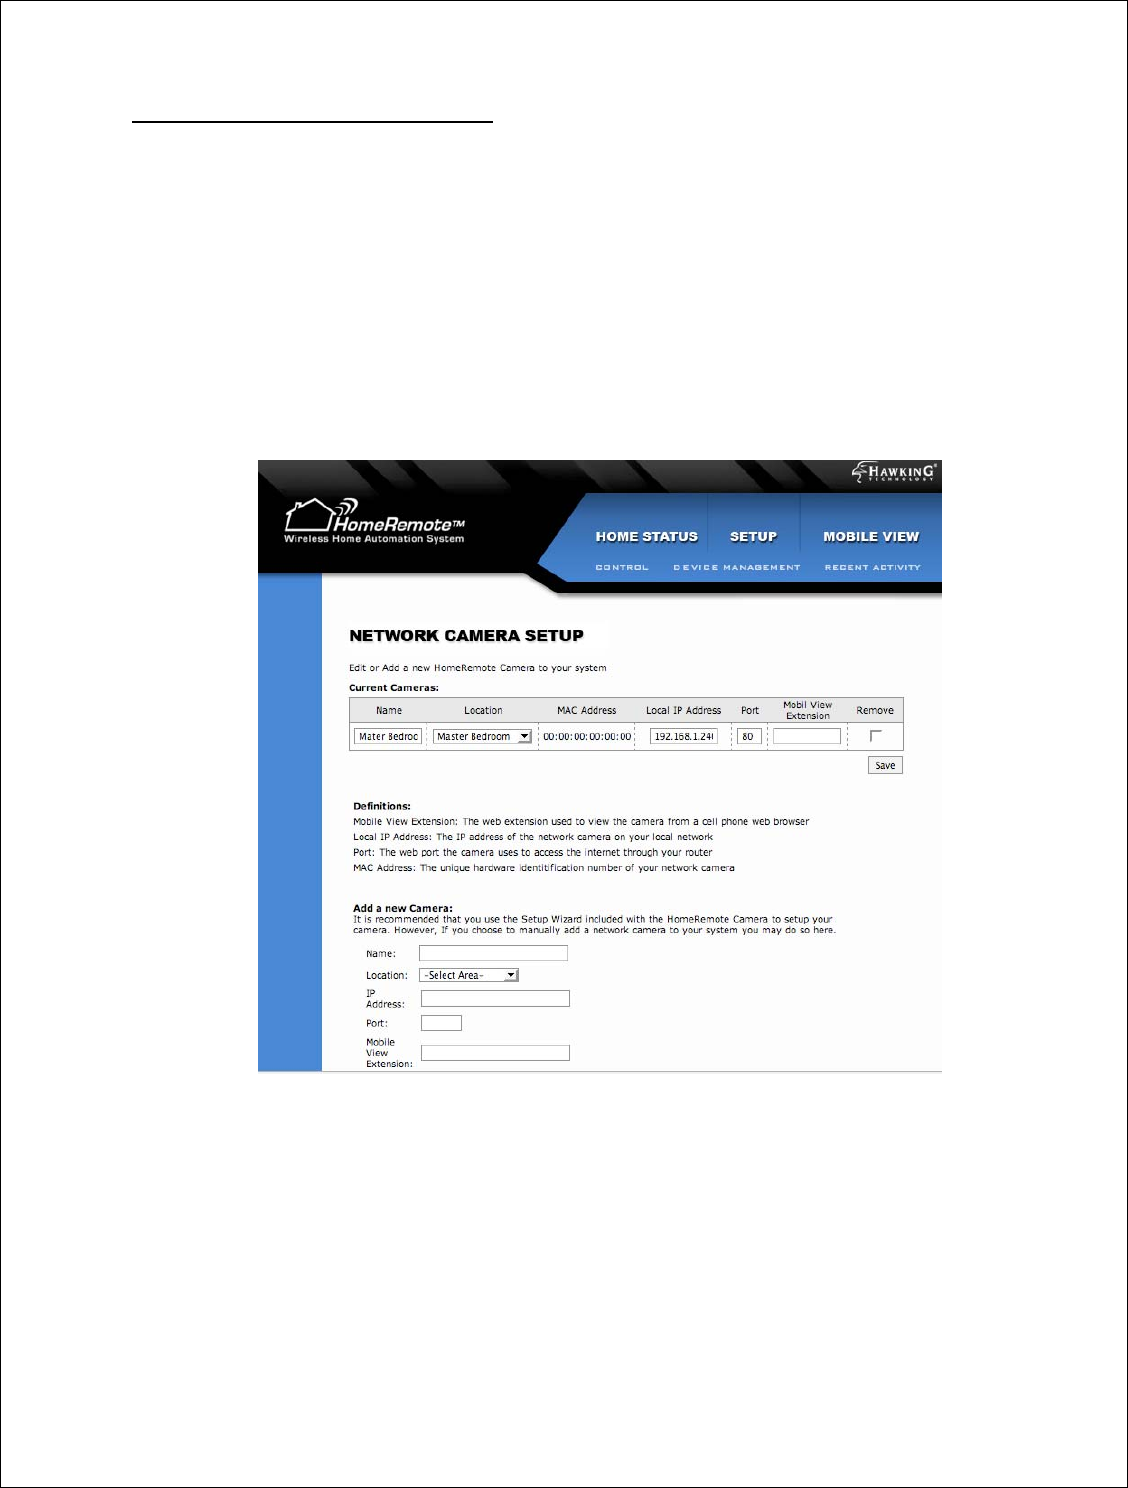
12.5.5 - Adding Network Cameras
When adding a Network Camera to your HomeRemote System, the Setup Wizard that is
included with the HomeRemote Camera is used to setting up your Camera. In the event that the
Camera requires maintenance or you wish to manually setup a HomeRemote Video Camera you
can use the Network Camera Setup page to do so. When adding a camera, you will need to
assign it a name, a location (i.e. Living Room) from your list of assigned Rooms as well as a
web port number that is setup for the use of your camera through your router (typically 82 or 83
etc…). The Mobile View Extension is used for web based snapshots viewed from a cellular
phone web browser or standard web browser. From this page you are also able to adjust the
settings of previously installed cameras. You can change the Room location or name of the
camera as it appears on your HomeRemote web-based interface.
35
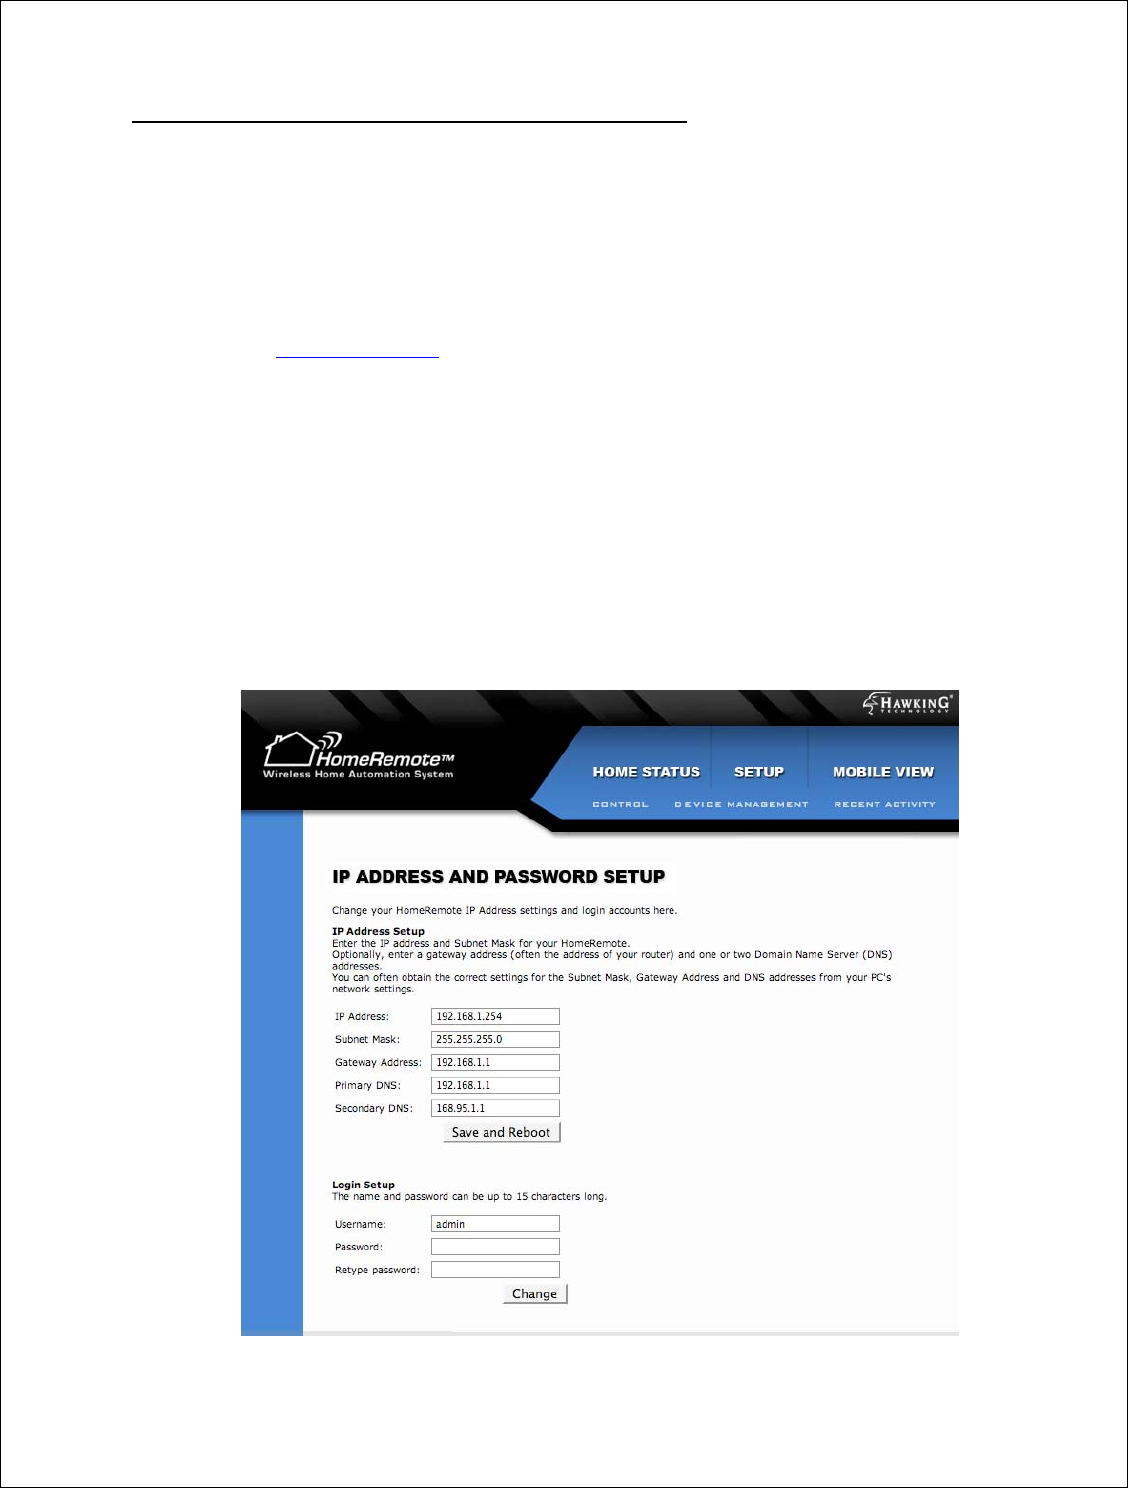
12.5.6 - Network Settings / IP Address / Login Setup
The network IP Address of your HomeRemote Gateway can be adjusted here. It is
recommended that you do not change these settings unless you understand the effects of your
change.
IP Address: This is the local IP address of your HomeRemote Gateway. The IP Address of your Gateway needs to
be in the same subnet as your home network/router. If it is in a different subnet you will not be able to access the
Gateway. The IP address of your Gateway is what you will use to access your Gateway from your home using a
web browser (i.e. http://192.168.1.230 - the default IP Address of the HomeRemote Gateway)
Subnet Mask: The Subnet Mask is the range of logical addresses within the address space that is assigned to an
organization. In order for your Gateway to work within your home network, this setting MUST be the same as your
home router. The default Subnet Mask of the HomeRemote Gateway is 255.255.255.0
Gateway Address: The Gateway Address is the address of your home router. This address tells the HomeRemote
Gateway where to look for your home router to access the internet. If you do not know the IP address of your home
router, you can contact Technical support to find out.
Primary/Secondary DNS: The Domain Name Server setting is used to help the HomeRemote Gateway navigate
the internet and translate IP addresses. To find your DNS settings you will need to locate the DNS used by your
home router. DNS settings usually come with a primary DNS and a secondary DNS address.
36
Login Setup
To change your password on your HomeRemote Gateway you will need to type in your new
password and then retype the same password. Click Change and you will be required to use your
new password to login.
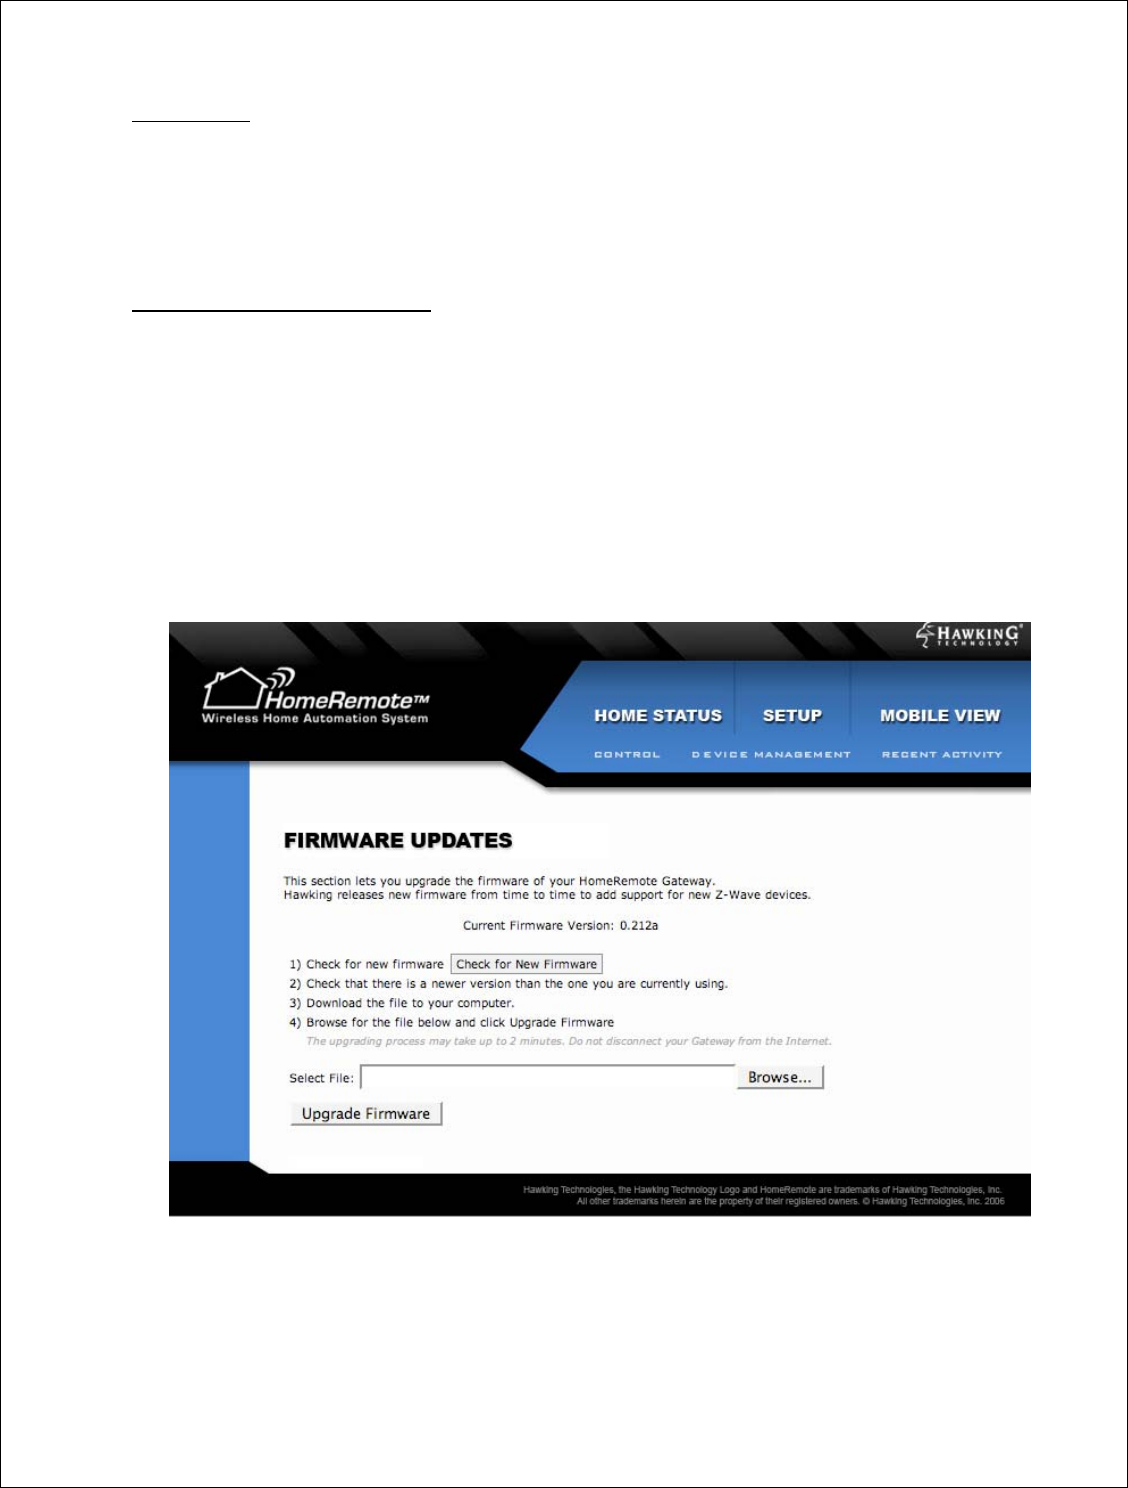
12.5.7 - Firmware Upgrades
Every so often, Hawking Technologies will release a new firmware to add new features and
benefits to your HomeRemote Gateway. The firmware is a file that is downloaded and installed
to your Gateway that the Gateway uses to operate. The Firmware Updates page shows you your
current firmware version as well as a location to upgrade your existing firmware. To check for
new firmware, simply click the Check for New Firmware button, download the firmware file to
your computer’s hard drive, Select Browse on the interface and locate the downloaded file.
Click Upgrade Firmware to confirm the upgrade. Note: the upgrade may take several minutes.
DO NOT remove any plugs or adjust any settings during this time. Doing so may damage the
Gateway and cause to stop working.
37
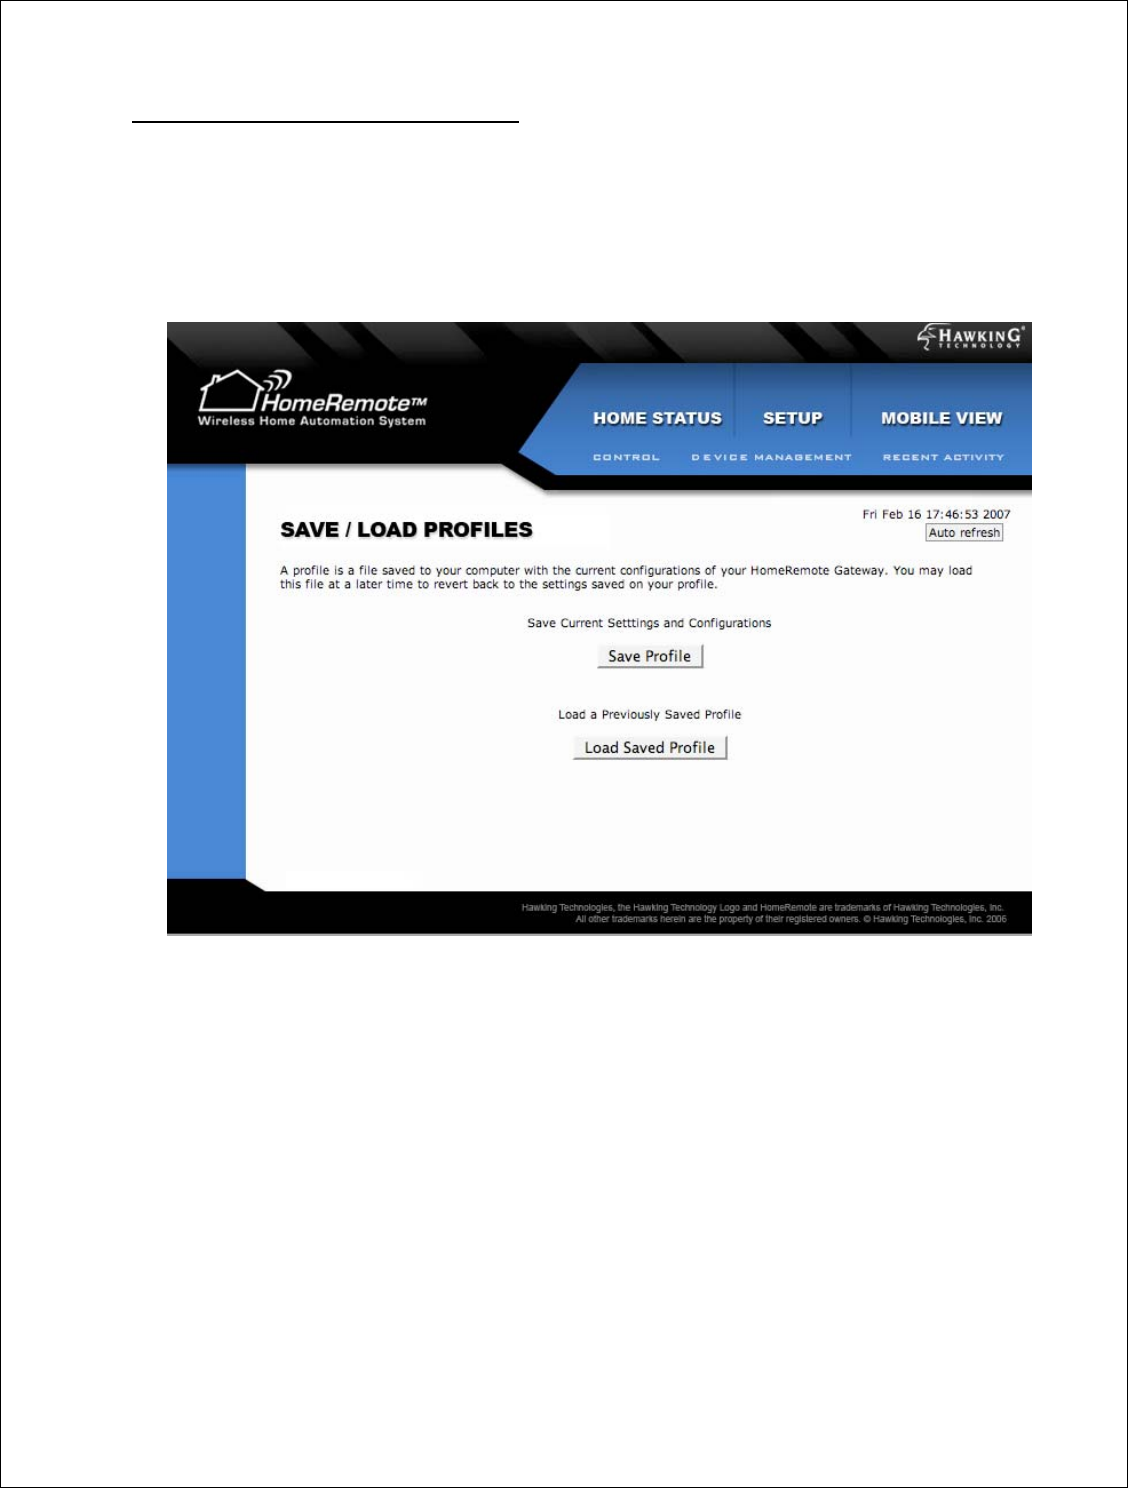
12.5.8 - Saving and Loading Profiles
The Save and Load Profile page lets you save your current settings (Rooms, devices, Alerts,
Notifications, Scenes etc…) to a single file on your computer’s hard drive. At a later time you
may reload this file to restore the settings saved to the Profile file. This feature is used as a back
up feature in the case that something goes wrong with your Gateway. It is recommended that
you save a Profile after you have setup your home settings for the first time.
38
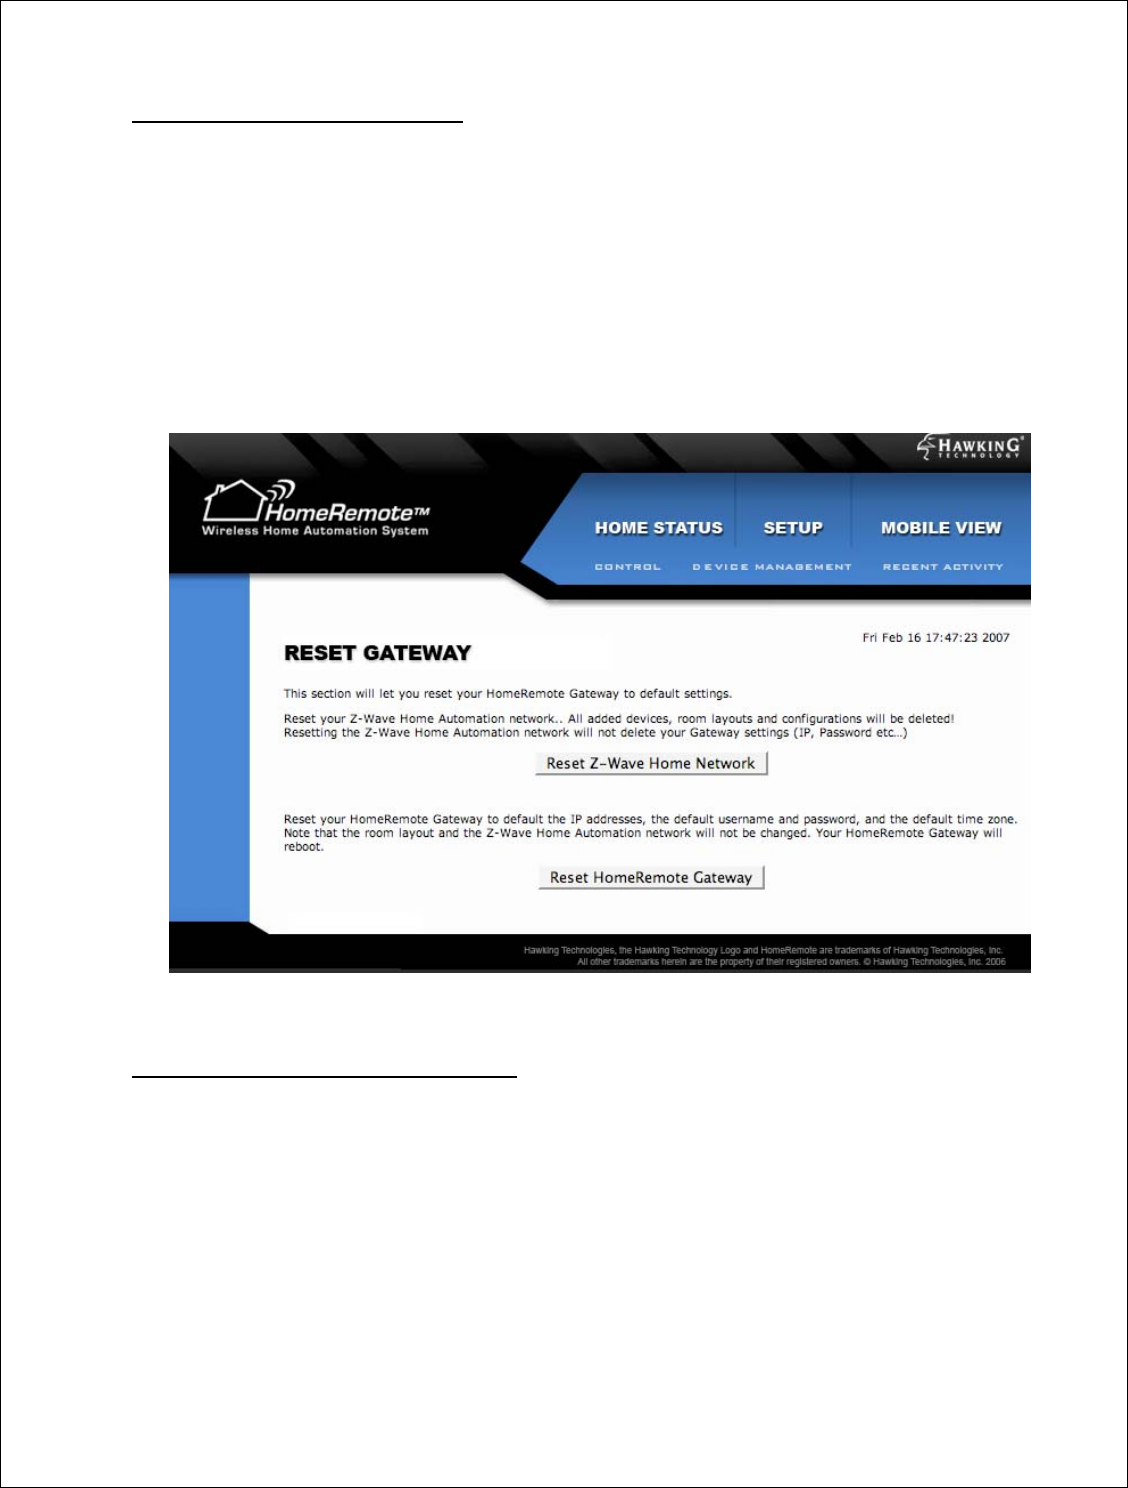
12.5.9 - Resetting the Gateway
In the Reset Gateway page you can reset your Gateway to default settings or reset only your Z-
Wave network settings to remove all modules within your network. It is recommended that you
do not use this feature unless you understand the effects of your changes. Resetting the Z-Wave
Home Network will remove all modules, module names and settings from your Gateway. You
will need to re-add these modules in from your remote control. The Reset HomeRemote
Gateway feature will reset your Z-Wave Network settings along with all other settings on your
Gateway. The HomeRemote Gateway will be reset to the original settings when you first
purchased the product. All information will have to be reconfigured in order for the Gateway to
work.
12.5.10 - TZO/DDNS Configurations
The TZO Dynamic Domain Name Server configuration page shows you your current DDNS and
custom domain name settings. The HomeRemote Gateway uses TZO’s award winning DDNS
service to constantly monitor your Internet IP address for changes so you do no have to worry
about it. You simply need to remember your custom domain name created during the Setup
Wizard process.
39
13 - Using the HomeRemote Cell Link Service
The Cell Link Service is a premium service offered by HomeRemote that allows for control and
monitoring of your HomeRemote system from your cellular phone. The configurations from
your HomeRemote Gateway are transferred to the web and sent to your cell phone via an
installable application on your cell phone. This section will go over the setup of the Cell Link
Service as well as instructions on how to use the program on your cell phone.
13.1 - Subscription Requirements
Cell Link requires that you subscribe to a prepaid service that provides cellular connectivity to
your home automation system and delivers live video to your cell phone. The subscription
service will be billed to you when you register your Cell Link software to as many cellular
phones as you wish without incurring additional Cell Link subscription costs. Your purchase of
the HomeRemote Gateway will give you a free trial of the Cell Link Service for a predefined
amount of time.
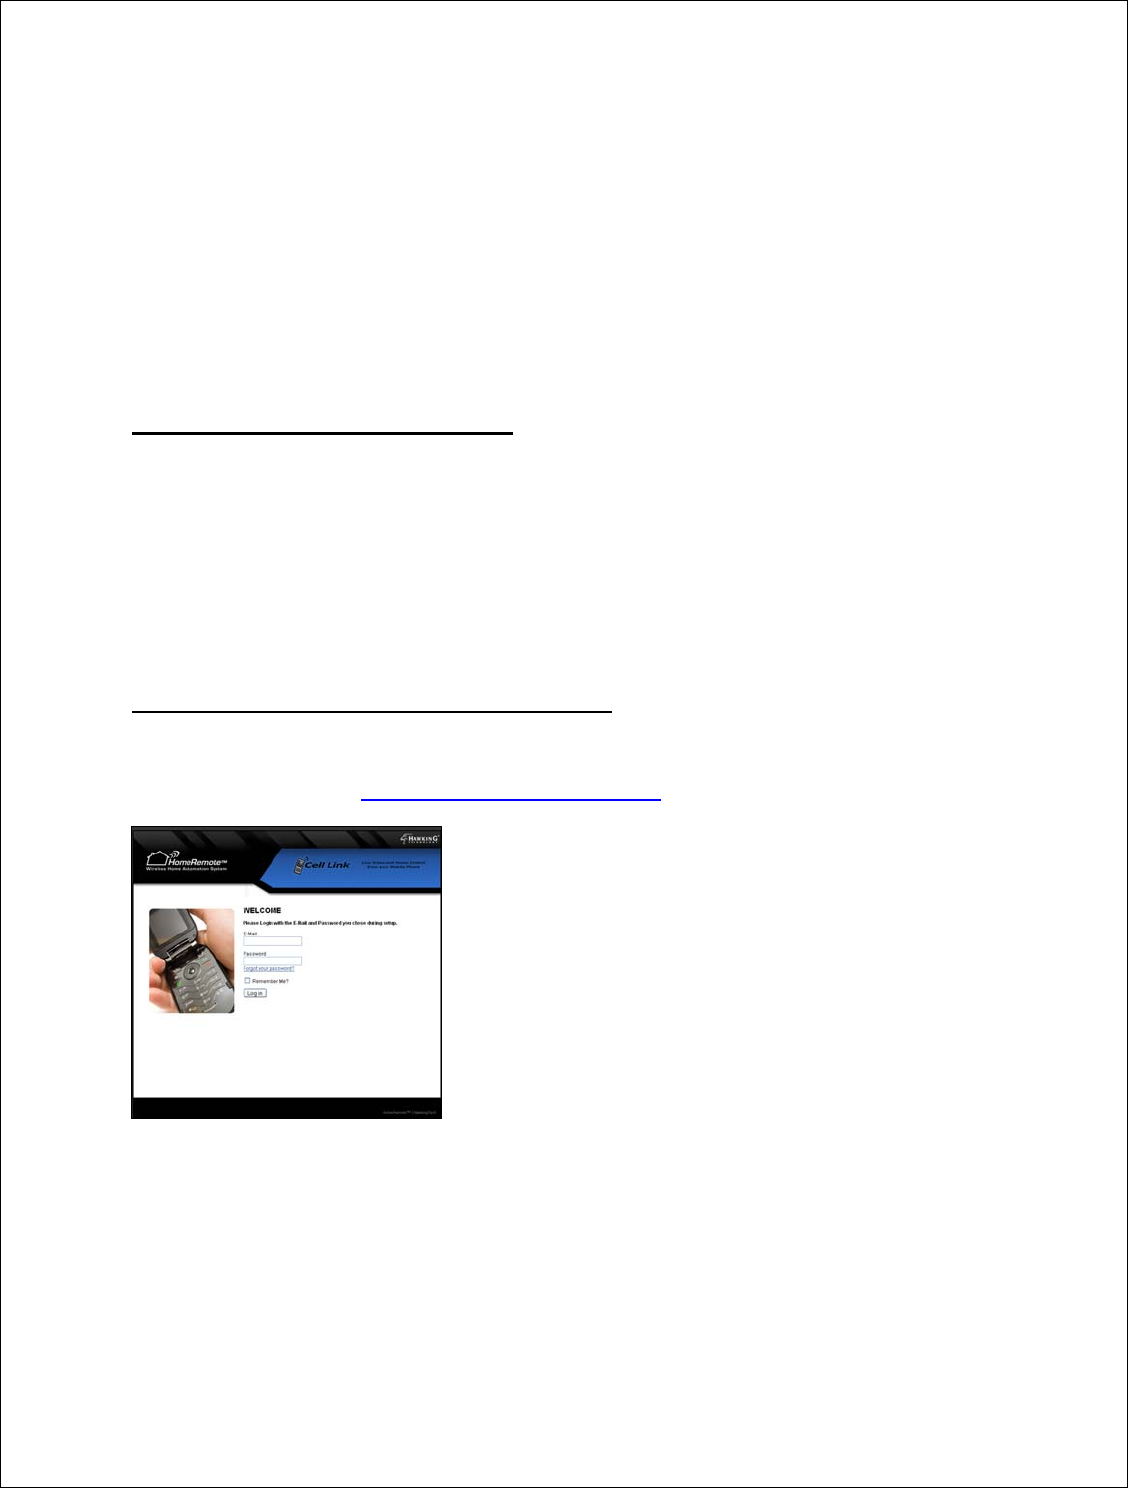
13.2 - Setting up Cell Link (First Time Use)
At the end of the Setup Wizard, the Cell Link setup page will guide you to a web site to setup
your Cell Link service (www.cell-link.homeremote.net)
Enter your Email Address (Username) and the Password that
you defined when completing the Setup Wizard to log in to the
site.
You will be directed to a New User page that will help you
select which cell phone you current have.
First you will need to select your current cellular carrier. If
you’re carrier is not listed in the list, select “My Carrier is not
Listed.”
After you have selected the carrier you will need to select the manufacturer of your phone. You
can check this by looking at the brand name on your cellular phone. If your cell phone’s
manufacturer is not listed select ‘My manufacturer is not listed.”
Next you will select the model number of your cellular phone. If you do not know the model
number you can check by removing the battery from your phone and looking at the
manufacturer’s label behind the battery. There will be a section that states the model number of
your phone. If you do not know or cannot find the model number select “My model is not
listed,”
40
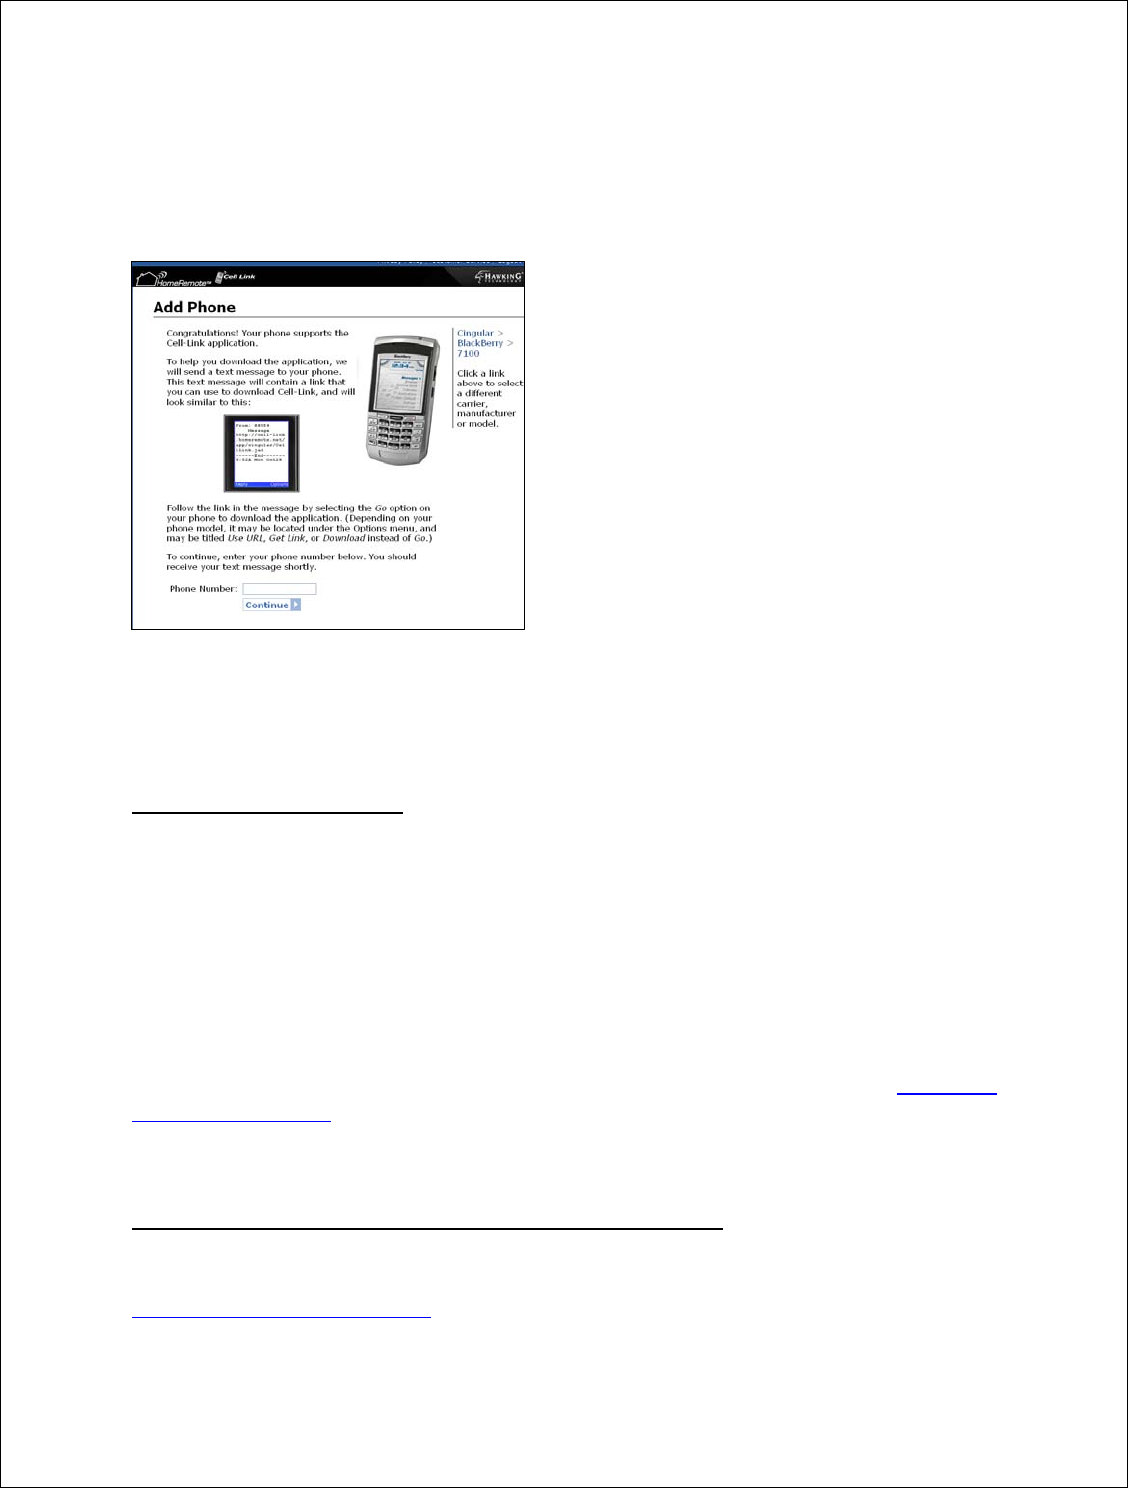
Lastly, if you have selected that your carrier, manufacturer or model is not listed or if you’ve
completed the setup thus far, you will need to enter your cell phone number and click Continue.
The Cell Link Service will send a text message to your phone. This text message will contain a
link that you can use to download Cell Link and will look similar to this.
When you have received the text message, follow the
link in the message by selecting the Go option on your
phone to download the application. (Depending on
your phone model, it may be located under the
Options menu, and may be titled Use URL, Get Link,
or Download instead of Go)
A tutorial on how to do this for your cell phone should
appear after you enter your cell phone number and
click ‘Continue.’
Your purchase of the HomeRemote Gateway gives
you a free trial of the Cell Link service. This trial
period requires that you select a future subscription
plan and enter your credit card information below. Your credit card will not be charged until
your free trial period is over. You may cancel your free trial at any time by logging into your
Cell Link account. If you continue using Cell Link after your free trial period, your credit card
will be automatically charged at the beginning of each cycle.
13.3 - Software Security
Cell Link is designed to allow your phone (and other phones on your account) to securely access
your HomeRemote system. This is accomplished by assigning a unique passkey to your phone
such that the Cell Link network can properly verify that your phone is authorized to control your
HomeRemote System. This unique passkey is assigned to your phone when you activate the Cell
Link Service you have downloaded. The activation process automatically assigns your unique
passkey; you only need to follow the instructions in the Cell Link customer portal and on your
phone to complete this process. This step only needs to be completed one time for each phone
on which you load the Cell Link software. If your phone gets reset or you need to reinstall the
Cell Link software, you will need to activate your software again. Please go to www.cell-
link.homeremote.net and log into your account to add phones or reinstall the Cell Link
application.
13.4 - Navigating the Cell Link Customer Web Portal
After you have completed the setup procedure for your Cell Link service you can access
www.cell-link.homeremote.net to manage your account, add more cell phones, manage
additional HomeRemote Gateways (for multiple homes) and change your profile.

41
The ‘My Gateway’ page lists all HomeRemote Gateways
that you have associated to your Cell Link account. You
can edit the names of your Gateway here and make
adjustments to your current subscription or add a new
subscription to a new Gateway.
The ‘My Phones’ tab gives you a list of all cell phones
added to your Cell Link service. Here you can add more
cell phones to your account, change the names of your cell
phones and Activate new cell phones. When adding a new
cell phone to your HomeRemote Cell Link service you
must Activate it before you can use it. To do this click the
‘Activate Phone’ link and follow the instructions on that
page.
The ‘Activation’ page will give you detailed instructions
on how to activate your phone. You will need to first make
sure the Cell Link software is installed on your phone
correctly. Open the application from your phone (section
13.5) and click the menu button to access the menu list.
Click on Activate and enter the activation code provided on
the Activation page. You only need to do this once for each
phone you add to the system. This step is also explained in
detail in section 13.6.
13.5 - Launching Cell Link from your Cell Phone
Cell Link is launched through the “Applications” menu on your cell phone. The menu can have
different titles depending on the model of your phone. Some common names are “Games and
Applications,” “Games,” or “Java Applications.”
Once the Cell Link application is downloaded to your phone it should appear in the list of
applications in this menu. Some phones allow you to assign ‘Soft Keys’ to certain applications
via the setup or customization menus. For example, the Cell Link application can be setup to
start by selecting the Right or Left ‘Soft Key’ on your phone. Once you have found the

42
application in the menu, it can be launched as any other application, by scrolling to the
application name and selecting ‘OK’ or ‘Select.’
13.6 - Activate your Phone and Software
After you have loaded the application you will need to Activate your software from the
‘Options’ menu. If ‘Activate’ does not appear in the Options menu then your software has
already been activated and does not need to be activated again unless you have problems
accessing your HomeRemote System from your phone. When you select ‘Activate’ your phone
will prompt you for your 12-digit activation code. Your phone will then send this code to the
Cell Link database for verification and notify you that “Activation was successful.” This code
can only be provided via the Cell Link customer portal website. If you do not have an activation
code you may acquire one by logging into your account at www.cell-link.homeremote.net and
clicking on the ‘My Phones’ tab to reinstall your software. This will send a message to your
phone, as well as generate a new activation code. If the Cell Link software is already on your
phone and you are just activating it, you do not need to follow the message link on you phone to
download the software again. Just enter the new 12-digit activation code on your phone. (Note:
Activation codes are only valid for one activation, and they expire after 24 hours)
The HomeRemote Gateway constantly updates your Cell Link application with the latest changes
to your system. This means that if you add a new module to your system the next time you load
your Cell Link application the new module will be included in your Cell Link application. Here
is a quick walk through of how to navigate the Cell Link interface.
13.7 - Navigating Menus and Executing Commands with your Cell Phone
Selecting Functions Using Your Phone Controls
There are generally three methods of controlling the functions of Cell-Link.
1) Most modern cellular phones have navigation keys (up, down, left, right) as well as an ‘OK’
or select button. These navigation keys can be used to highlight and select icons within Cell-Link
application.
2) Another method of selecting icons and executing functions within the Cell-Link application is
to utilize the alphanumeric keypad (number buttons) on your cell phone. (2 – Up, 4 – Left, 6 –
Right, 8 – Down)
3) Lastly, you can activate “Short Cut Keys” within Cell-Link by selecting the
“Enable Shortcuts” option from the Cell-Link main menu. These shortcuts are assigned to the
most commonly used functions within Cell-Link, and instructions
are displayed on your phone when you activate this feature.
43
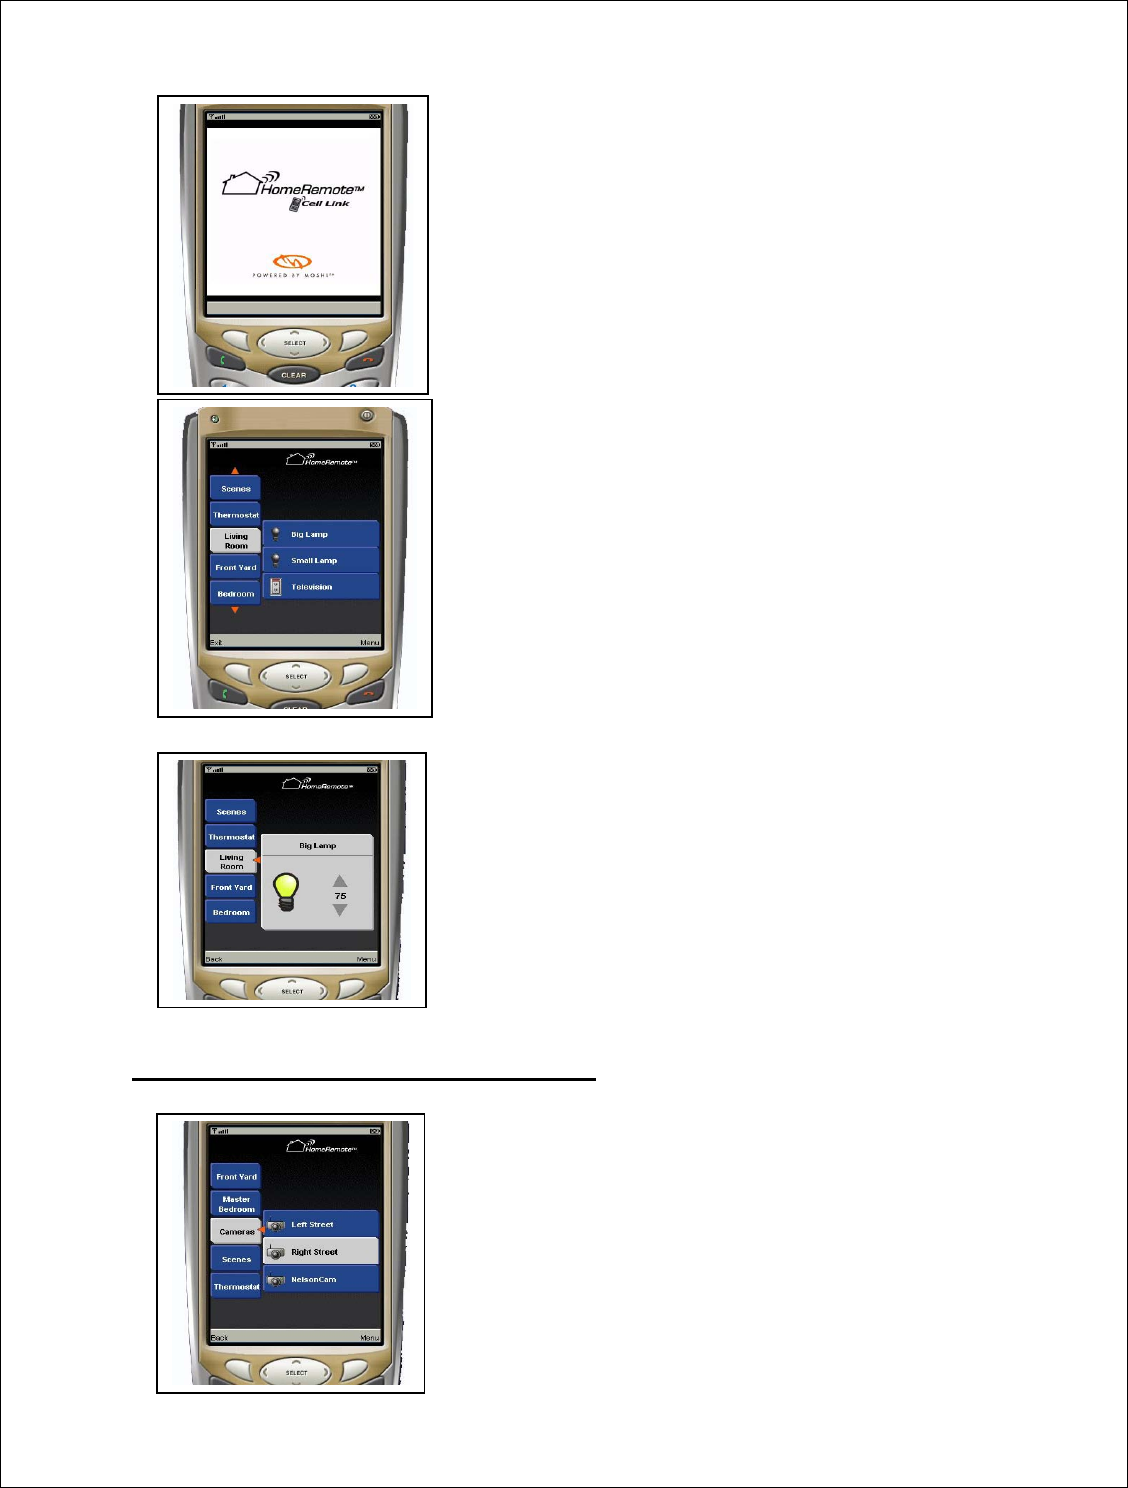
Once you locate the Cell Link application on your cell phone
press ‘Select’ to run the program.
During the initial boot up, Cell Link will establish a connection
with your HomeRemote Gateway to retrieve any changes in
your home layout.
Note: You may incur charges for Internet Access from your
cellular carrier if you currently do not have a data plan on your
cell phone service.
When the application loads you will see your Room layout on
the left navigation bar. Use your keypad to scroll up and down
through your Rooms, Scenes and Cameras. As you go over
each Room with your cell phone the list of devices in each
Room will appear on the right.
To select these devices simply push the right arrow key on your
cell phone to navigate through your devices.
When scrolling through your devices, push the Select button on
your phone to access the specific device. This will load the
screen to adjust the setting on your device.
For example, the “Big Lamp” in the phone to the left can be
adjusted using the up and down arrow pads to change the light
dim level from OFF to 50% to ON. When the setting has been
set, push the Select button to confirm and the Cell Link service
will execute the command.
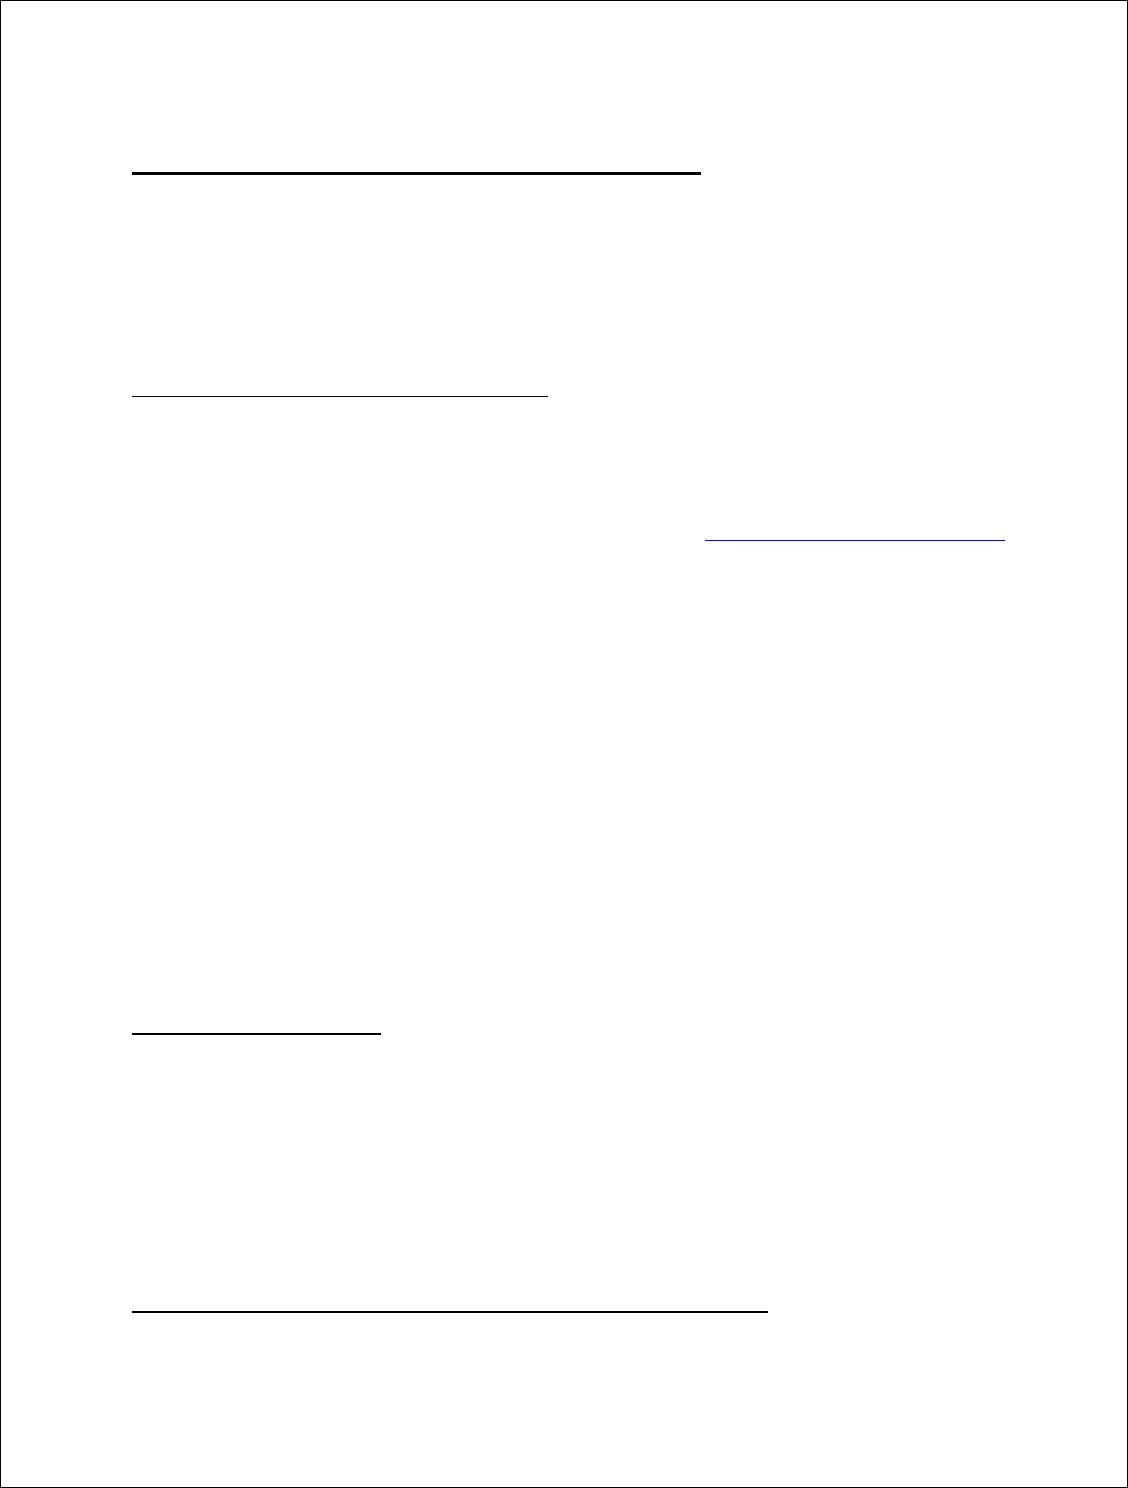
13.7.1 - Viewing Cameras using Cell Link
If you have a HomeRemote Video Camera setup on your system
you will be able to view live video from your cell phone.
Navigate using your arrow keys to find the Cameras selection or
locate your camera under the Room you have it installed in. Use
the arrow keys on your phone to go to the devices menu (by
pushing right) and select the camera you wish to view
The Cell Link application will create a secure connection to your
camera and begin feeding live video from your camera. You
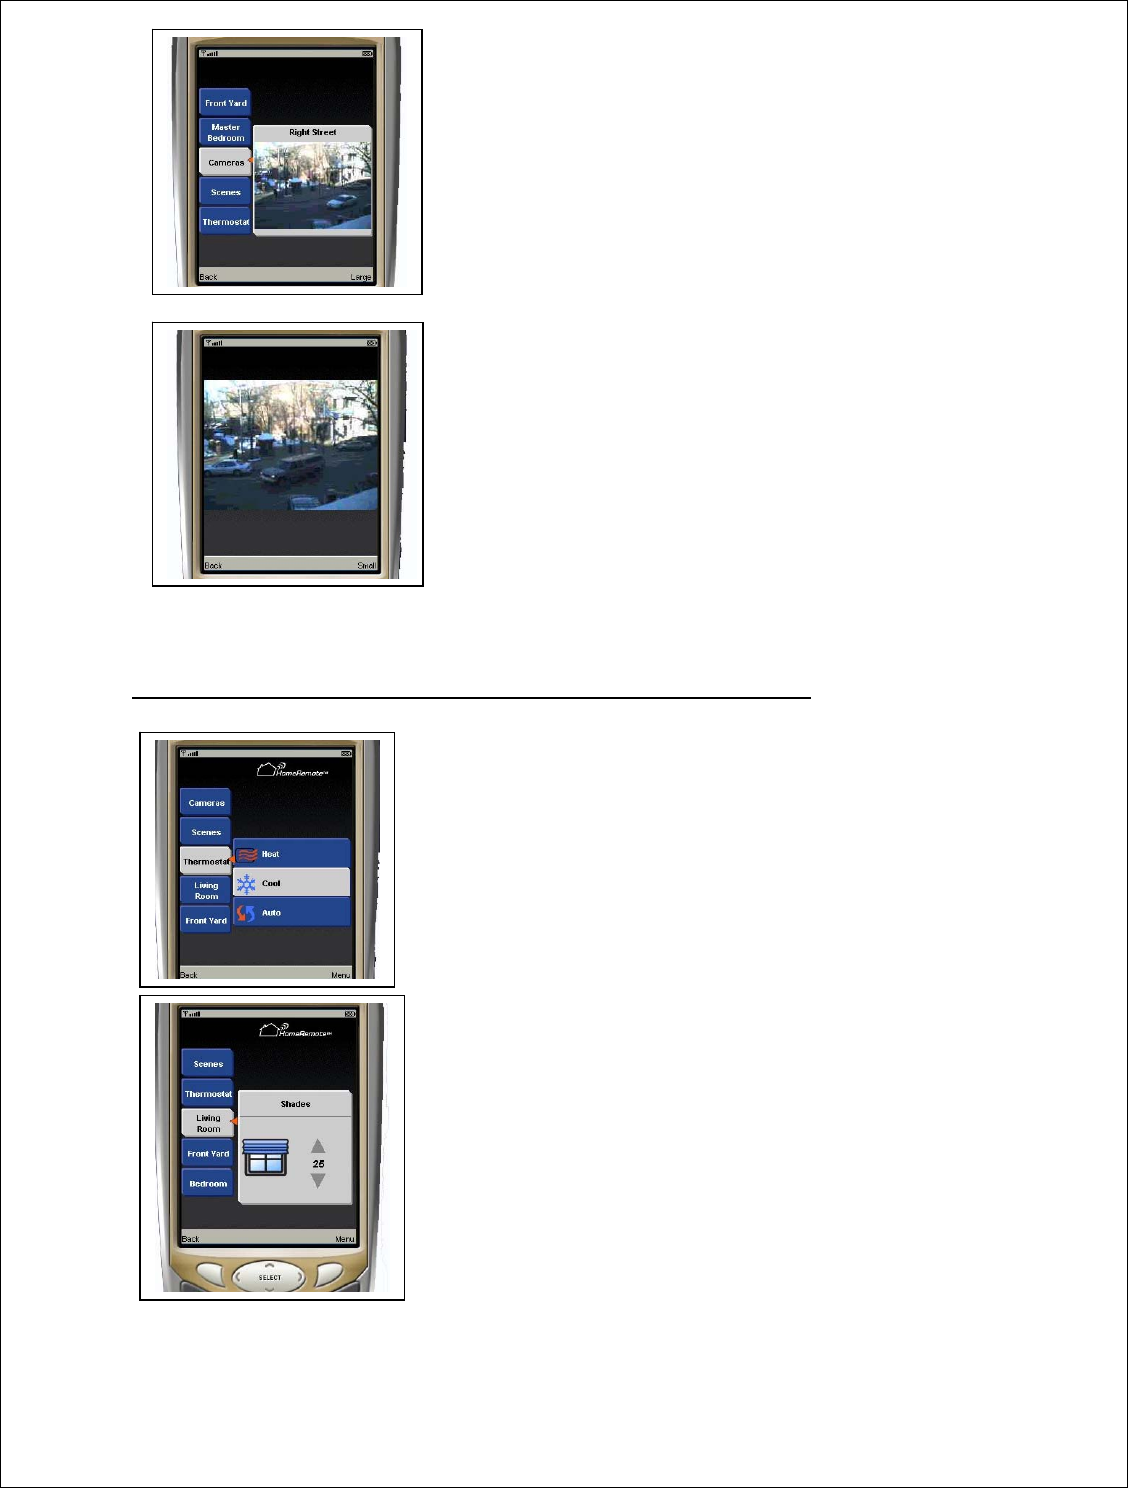
44
can view this screen full sized by selecting the ‘Large’ button on
the bottom right using your cell phone buttons.
Note: Video quality and speed will vary depending on your
cellular carrier broadband technology offering, cell phone model,
geographical location and cellular data plan. It is recommended
you use a 3G phone with broadband Internet access for the best
quality video on your cell phone.
Installation and setup of HomeRemote Video Cameras for your
Cell Link account is very simple. Simply run the Setup Wizard
included with your camera. This will configure the camera to
your current HomeRemote Gateway. Once this is completed,
the Cell Link application will automatically update itself with
your latest settings the next time you run the program from your
phone. Cell Link will automatically create a ‘Cameras’ tab to
view all cameras in your system. Additionally you will be able
to find your cameras by navigating the menus of each room.
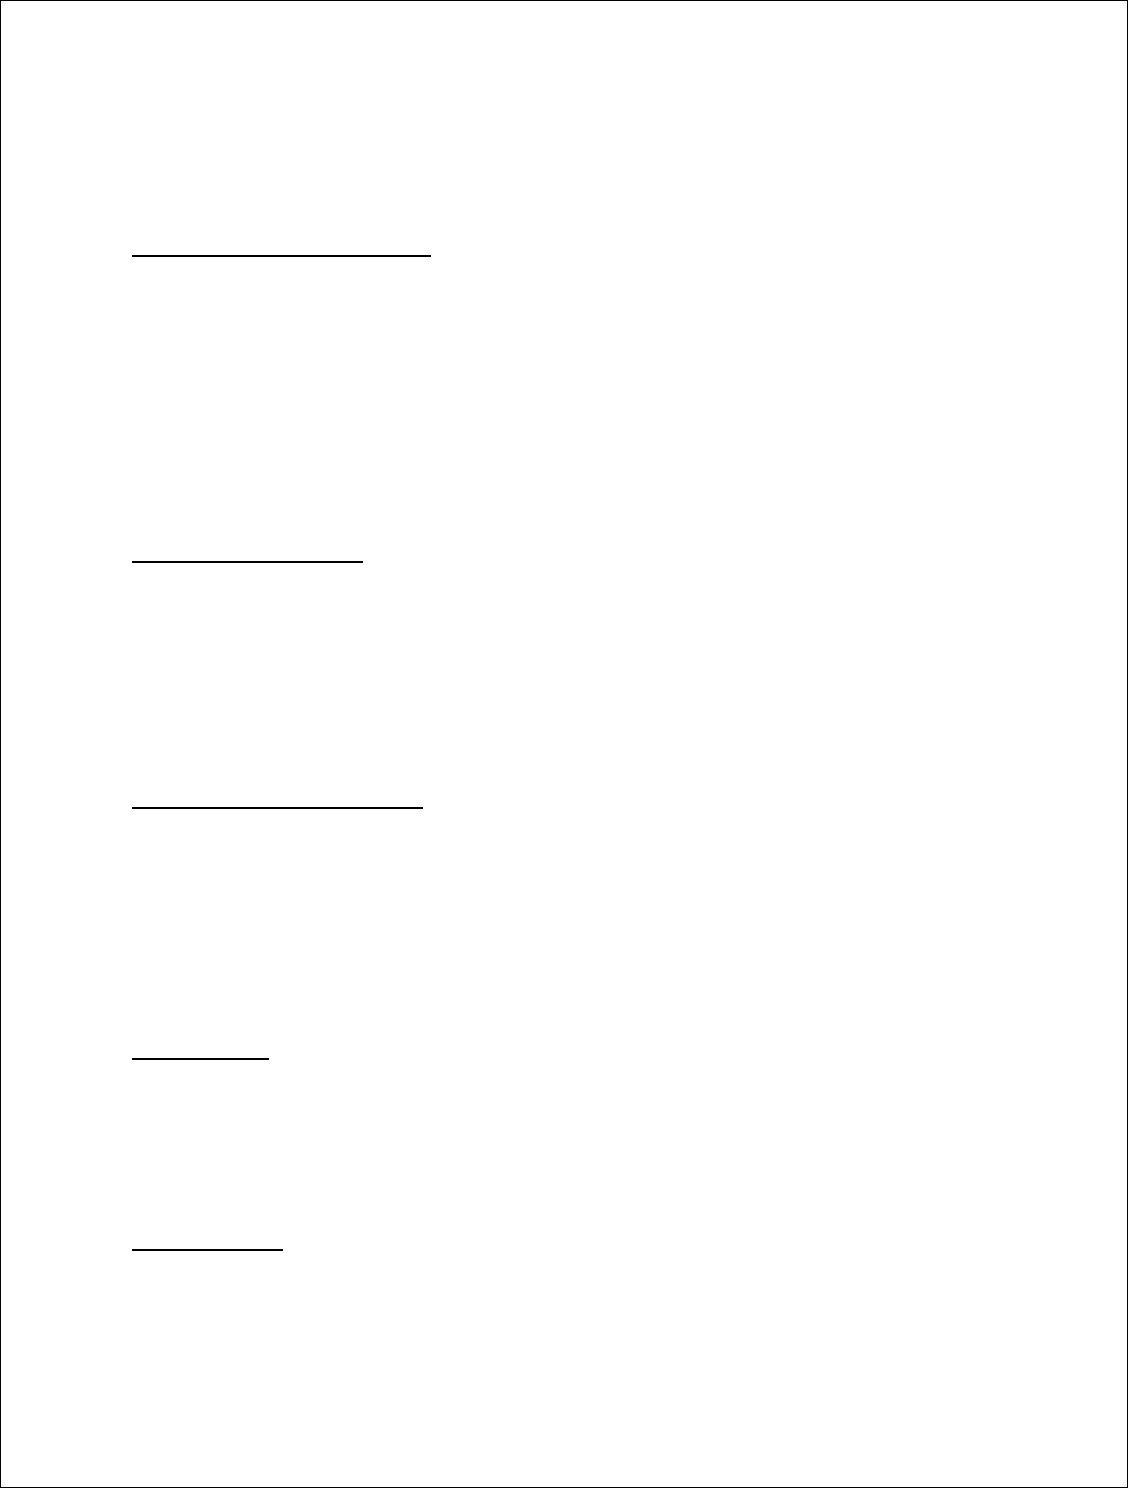
13.7.2 - Other Devices (Thermostats, Window Shades etc…)
The Cell Link service is capable of controlling virtually any device
installed on your HomeRemote System. Navigation of each is the
same as turning on and off a light in a Room.
In the Thermostat menu, current status is shown. To change mode,
select Current Mode with the OK key, then choose the new mode
by highlighting and using the OK button. To adjust the set point,
select Current Set Point. Adjust the temperature by using the up and
down navigational keys, and set using the OK key. Select Fan to
adjust the fan setting to either Auto or On by using the up and
down navigational keys, and set using the OK key.
Window Shade operation is similar to turning lights on and off.
Use the up and down arrows to select a height that you wish the
window shade to be set to and click ‘Select’ when the desired
height is reached.
45
13.8 - Cell Link Options Menu and Navigation Tips
The Cell Link Main Menu contains functions that you can use to customize the setup of your
phone. Items such as a Personal Identification Number (PIN) or activation of short cut codes can
be turned on or off to fit your needs. Depending on the model of your phone, these menu options
may appear in a different order than listed below, but they will function as described.
13.8.1 - Set Cell Link PIN / Disable PIN
For security purposes, you can setup a PIN that will prevent unauthorized people from accessing
the Cell Link software on your phone. It is important to note that no personal information is
contained within the Cell Link application, and at no time is personal information transmitted
from your phone or the Cell Link application. (Please visit www.cell-link.homeremote.net for
details about our privacy policy)
The default configuration of Cell Link has the PIN feature disabled. If you would like to set a
PIN code that you must enter each time you use Cell Link, you must select ‘Set PIN’ from the
Cell Link Main Menu. When you select ‘Set PIN’ you will be prompted to enter a 4-digit
number code. You must then verify this code by entering it a second time. Your phone will
display the message “Your PIN has been set.” Please remember your PIN or write it down and
keep it in a safe place. (If you forget your PIN, you must call customer service at 888-202-
3344).
When you select ‘Disable PIN’ your phone will display the message “Your PIN has been
disabled.” The next time that you open Cell Link you will not be prompted to enter your PIN.
Your phone will display the Cell Link Main Menu. (Note: If you disable the PIN feature, an
unauthorized user that has access to your cellular phone may be able to utilize the Cell Link
software to access your HomeRemote System.
13.8.2 - Reset Cell Link
Cell Link can also be reset to its default configuration by selecting the ‘Reset’ command from
the Options Menu. This selection requires your confirmation and you will be prompted to select
‘Yes’ to continue. YOU SHOULD ONLY DO THIS WHEN INSTRUCTED TO DO SO BY
CUSTOMER SERVICE. This option will delete the configuration file from your phone and you
will need to re-activate your software. You will not be able to control your HomeRemote system
until you have re-activated.
13.8.3 - BlackBerry® Connection Options and Select Button
There are some Options Menu commands that are specific to BlackBerry® devices.
46
These commands enable the Cell-Link application to properly send commands over the internet
as well as make use of the ‘thumb wheel’ navigation control on the
BlackBerry® device.
13.8.4 - Connection Options
If you have a BlackBerry® device, it is necessary to set the connection settings of your
BlackBerry® so Cell-Link can access the internet to communicate with your home automation
system. You may set these connection settings by selecting the ‘Connection Options’ command
in the Options Menu. You will then be prompted to select your cellular carrier. If you do not see
your cellular carrier, you can try the ‘Direct TCP’ option. If you are still having issues
controlling your home automation system with your
BlackBerry®, please contact customer service at 1.888.202.3344.
13.8.5 - Select Button
For a BlackBerry® device, the ‘Select’ command is always located at the top of the Options
Menu. This allows you to use the thumb wheel to navigate through the Cell-Link menus. You
may make a selection by depressing the thumb wheel. This brings up the Options Menu. Since
‘Select’ is at the top, depressing the thumb wheel a second time will navigate the menus and
execute functions.
13.8.6 - Demo/Active Mode
Demo Mode may be activated if you wish to temporarily show someone the Cell-Link menus. In
this mode, no signals will be sent over the network to your home automation system. You can
activate this mode by selecting the ‘Demo Mode’ command from the Options Menu. You can
enter Active Mode again for normal home automation system control by selecting the ‘Active
Mode’ command from the Options Menu.
13.8.7 - Help
Cell-Link’s on-screen help describes the basic function of the software and can be used as a
reference if you need a reminder on how to navigate the screens. These help screens can be
accessed via the ‘Help’ command on the Options Menu.
13.8.8 - About
This command displays the current software version of Cell-Link, as well as some information
that may be useful to customer care if you are experiencing issues with your system. You can
access this information by selecting the ‘About’ command from the Options Menu.

47
13.9 - Exiting Cell Link
There are two methods by which you can exit the Cell-Link application.
1) From any screen or menu the application will exit if the red “hang-up” or “End” button is
pressed.
2) From the Main Menu, there is ‘Soft Key’ option for the “EXIT” function. Pressing the ‘Soft
Key’ associated with this function will exit the application. The Cell-Link application will also
close if you receive a phone call while using Cell-Link.
13.10 - Customer Support
Network Outages: Cellular networks occasionally experience periods of ‘service outage’ or
abnormally high amounts of traffic that hinders the ability to send data over periods of time.
Because your Cell-Link system utilizes these cellular networks, in rare occasions it may not be
able to send commands to your HomeRemote system due to cellular network outages or busy
network traffic. The Cell-Link system is designed to minimize these instances, and will ‘try’
three times to send your command if for some reason it cannot contact your HomeRemote
system. In the case of three consecutive failed attempts to contact your HomeRemote system, the
Cell-Link system will notify you that your command was unsuccessful. There will be a delay in
the response from when you push the Select button and when the response is received as the
service attempts to connect to your HomeRemote System.
Customer Support: The customer portal should be able to walk you through any difficulties
with downloading the application to your phone and activation. For further assistance, please
contact Hawking Technology Tech Support at 1.888.202.3344.
14 - HomeRemote Accessories (Compatible Z-Wave Devices)
The HomeRemote Wireless Home Automation System from Hawking Technologies is
compatible with any Z-Wave enabled wireless home control, home automation device, sensor or
module. There are hundreds of accessories from many manufacturers in the market to expand
your HomeRemote solution with. This section of the manual will guide you through a few of
these product categories and products. Installation of these accessories will vary from one
manufacturer to another, however there will always be a ‘Program’ or ‘Discovery’ button for
each of these devices. This button is used to ‘Include’ the Z-Wave enabled device into your
network. For more information on any of the products and categories listed below, please visit
the HomeRemote website at www.homeremote.net.
14.1 - Lighting
Wireless Light Switches – Z-Wave enabled Wireless Light Switches replace your current
indoor light switches to allow for control of pre-wired lights within your home. These high

48
quality light switches come in different designs, colors, wiring configurations and sizes to fit
your home’s specific needs. When used with the HomeRemote Device Linking feature, a
Wireless Light Switch can be linked not only to control your pre-wired home lighting, but also
any other Z-Wave enabled device in your home, such as a lamp in another location. Installation
of a Wireless Light Switch is just like any other light switch. Simply turn off the power going
into your home from an outside breaker box, remove the original light switch, install the Z-Wave
light switch and restore the power to your home. (Note: If you are unfamiliar with installing
light switches, it is highly recommended you do not do this without support from a certified
electrician) After the unit has been installed use your HomeRemote Handheld Remote Control
to Include the switch into your network by pressing the ‘Program’ button on the light switch
(usually just the ON/OFF toggle of the light switch) together with the ‘Include’ button on your
remote control.
Wireless Plug-In Lamp Modules – Wireless Plug-In Lamp Modules give you convenient
control your existing plug-in lamps and plug-in lights. To install them, simply plug the Lamp
module into an available power outlet and plug the power cord from your lamp into the outlet on
the Lamp Module. Use the ‘Program’ on the Lamp Module to ‘Include’ the module into your
network. Most Plug-In Lamp Modules can support dimming of your lights as well.
Wireless Outdoor Lighting Module – The Outdoor Light Module is similar to the Plug-in
Lamp Modules except that they are designed for use with your plug-in outdoor lights. Outdoor
Light Modules are typically used with Christmas lights, floor lighting, outdoor lamps and any
other outdoor electrical appliance. They have weather proof enclosures made to withstand
outdoor conditions. Installation and setup is the same as with the Lamp Modules. Simply plug
them into an available power outlet, plug in your outdoor lights to the outlet on the Outdoor
Lighting Module, then use the ‘Program’ button on the module to ‘Include’ it into your network.
Outdoor Lighting Modules typically do not support the dimming feature.
14.2 - Electrical Appliances
Electrical Appliance Power Module – Similar in design and function as the Wireless Lamp
Module, the Electrical Appliance Power Module supports electrical appliances up to a specified
wattage (usually on the packaging). The Electrical Appliance Power Module is typically used
for controlling radios, kitchen appliances, irons and any other appliance that you would want
remote control of. Installation and setup is as simple as plugging the module into an available
power outlet and plugging your electrical appliance into an the available power outlet on the
Electrical Appliance Power Module. The ‘Program’ button should be located somewhere on the
outside of the enclosure.
Power Outlet – Z-Wave enabled Power Outlets function similarly to Electrical Appliance Power
Modules however they provide a look that you are accustomed to in your home. Z-wave power
outlets replace your current in home power outlets for instant control using your HomeRemote
remote control, web browser interface or cell phone. Installation of a Power Outlet is similar to a
Wall Switch. You will need to first turn off the power coming into your home to avoid electrical
shock. Remove the existing power outlet from the wall. Install the Z-Wave enabled Power
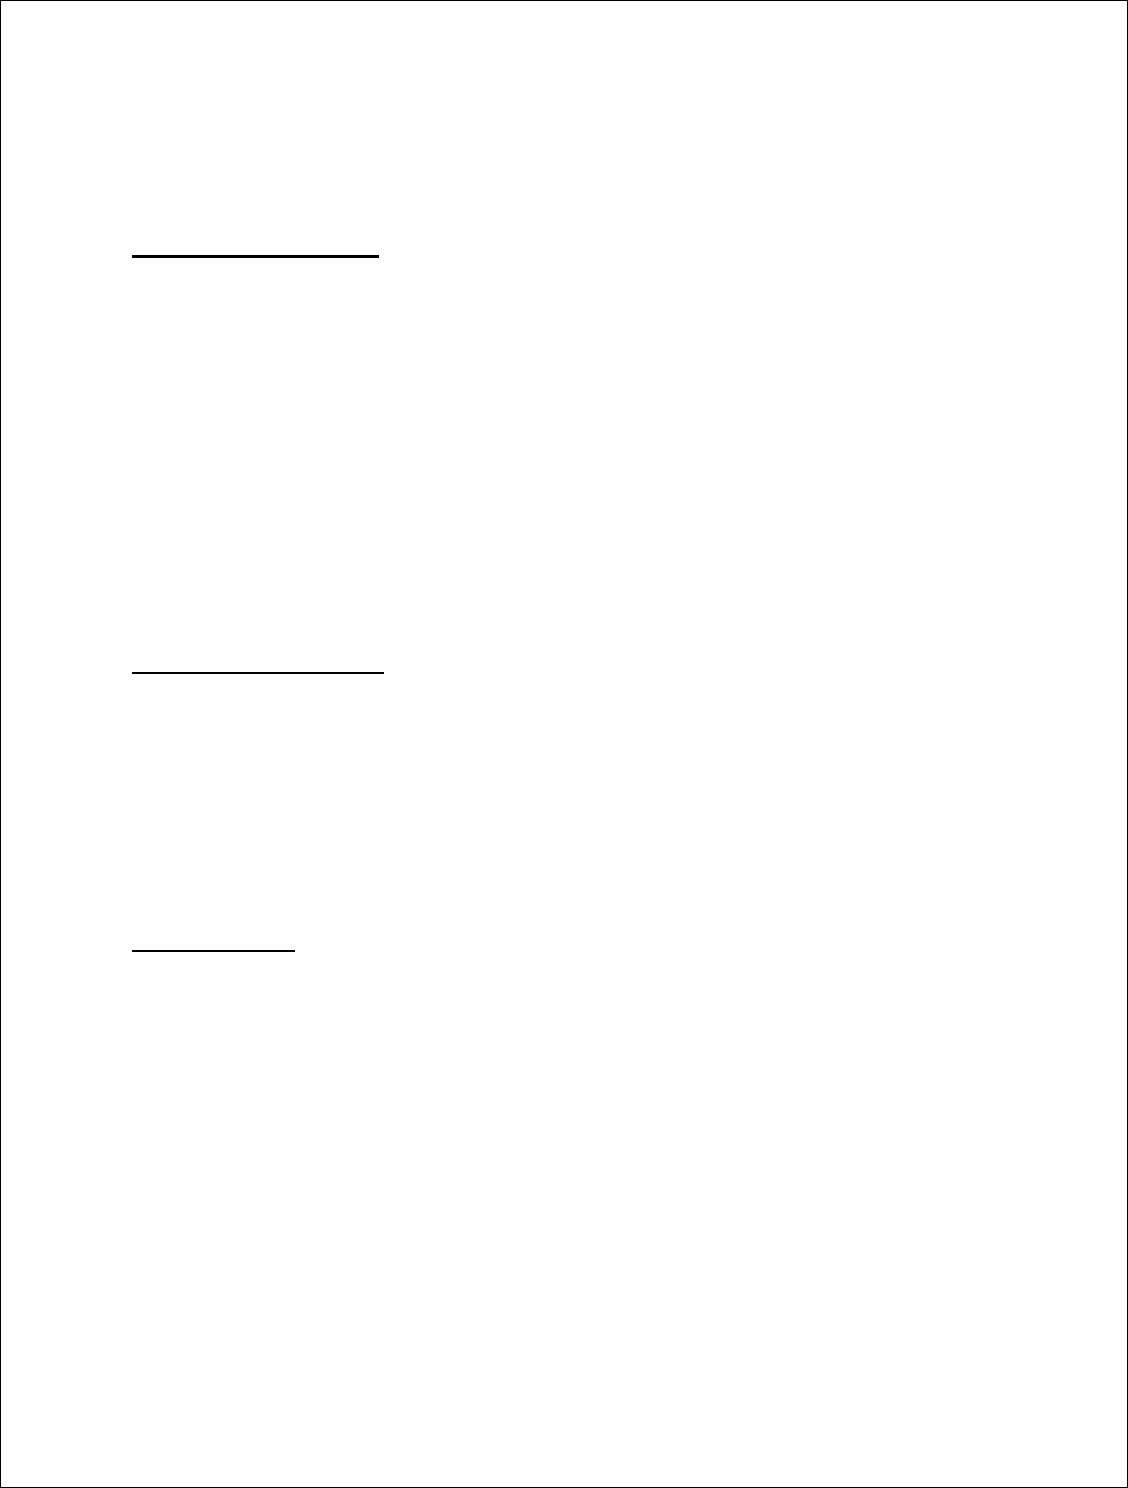
49
Outlet and use the ‘Program’ button located in the middle of the outlet to ‘Include’ it into your
network. Z-Wave Power Outlets are typically used to control any electrical appliance or plug in
lamp.
14.3 - Climate Control
Thermostat – Remotely control your home temperature and climate with Z-Wave enabled
Wireless Thermostats. The HomeRemote System, when used with a Z-Wave thermostat, gives
you the ability to control your home temperature before you leave your work, or heat up your
home from your bed using your cell phone. Installation of Z-Wave Thermostats is just like
installing a standard thermostat. It is recommended that you carefully read the instructions
included with your Z-Wave Thermostat before installing. The ‘Program’ button on Z-Wave
thermostats is usually a button on the thermostat such as the ‘Hold’ button. However you should
check your user’s manual to be sure. Include the thermostat into your network works like any
other device. Use your HomeRemote Remote Control next to the thermostat; push the ‘Include’
button on the remote then the ‘Program’ button on the thermostat.
14.4 - Window Shades
Window Shades – Z-Wave enabled Window Shade motors allow for control of custom made
window shades using your Handheld Remote Control, the HomeRemote Web Interface or your
cell phone. Imagine controlling ambient daylight in your home as easily as you can control your
electrical lights. Installation of Z-Wave enabled Window Shades is normally done by dealers
specialized in custom window shades. The ‘Program’ button is normally located on the receiver
module of the motor.
14.5 - Security
Motion Detector – Z-Wave enabled Wireless PIR (Motion) Sensors allow for remote scene
control based on detected motion. When paired with a Motion Detector the HomeRemote
System is capable of notifying you when motion is detected within a room trigger devices to turn
on when motion is detected or sound an alarm. Motion Detectors can be set as Master Devices
for linking the activation of other modules using the Device Linking feature. Installation of Z-
Wave Wireless Motion Sensors is plug-and-play. The ‘Program’ button is normally on the back
of the unit.
Hawking HomeRemote Cameras – The addition of a Hawking HomeRemote Wireless Video
Camera gives you access to live video from anywhere in the world via your cell phone or web
browser. Record playback or view live video using the included management software and
utilities. The Hawking HomeRemote Wireless Video Cameras integrate seamlessly with the
HomeRemote System. Installation is simplified with a step-by-step Setup Wizard.

50
14.6 - Access Control
Garage Door Opener – Z-Wave enabled Garage Door Openers give you control of your garage
door from anywhere in the world using the HomeRemote Gateway. Installation of these units
depends on the manufacturer and model. It may require professional installation.
14.7 - Remote Controls
Remote Controls – There are many Z-wave enabled remote controls in the market ranging from
simple, small and convenient remotes to universal remotes that not only control your lighting but
also your television and media centers. In the case that you wish to upgrade the remote or add
another remote to your HomeRemote System, you will have a large selection to choose from.
Manufacturers such as Intermatic®, GE®, Logitech®, Monster Cable®, UEI® and many more
create a complete line of intelligent Z-Wave remote controls for your home. Configurations
from your current HomeRemote Remote Control are easily transferred to your new remote
control with the touch of a few buttons.
For more information on additional Z-Wave devices to customize your HomeRemote System
with please visit www.hawkingtech.com/hrstore.php.

51
15 - Frequently Asked Questions
15.1 - General Questions
Question: What is home automation and home control?
Answer: Home automation and home control is the use of technology in the home to make life more
comfortable by automating normal home appliances and activities. Home automation and home control
allows you to control features of your home, including lighting, audio equipment, heating/air conditioning
and appliances.
Question: What is meant by a “Scene”?
Answer: HomeRemote and your Handheld Remote Control allow you to set a particular “scene”
triggering several actions. For example, one scene may raise the lights at a specific time in the morning
and another scene may dim the lights in the evening. Each scene can be custom programmed to fit your
lifestyle.
Question: Is Z-Wave Wireless Technology secure?
Answer: Z-Wave wireless technology used with your HomeRemote System creates a unique
identification code for your home network called a Home ID. Anybody without this secure code cannot
access your system or control your home devices.
Question: Does the HomeRemote System cause interference with my other wireless appliances?
Answer: No. The HomeRemote System runs on a special 900Mhz frequency that does not interfere with
cordless phones, Wi-Fi or any other communication device.
Question: What is the product warranty
Answer: Yes, Hawking provides a 1-year limited warranty on all materials and workmanship.
Question: What is meant by lighting controls?
Answer: Lighting controls refer to turning lights on and off or dimming lights from a convenient location
throughout the home. Light controls allow you to control all types of lighting, including low voltage,
fluorescent and incandescent lights.
Question: How far will a signal travel?
Answer: With an open field or no interference, the radio frequency signal will travel 250 feet. The
average distance that signal will travel in a house is between 75 to 125 feet.
Question: What if I want my wireless signal to go further?
Answer: Most Z-Wave devices feature a built in repeater. If there is signal interference from the
controller to a device, the controller will route the signal to bounce off of or repeat to other Z-Wave
devices until it successfully finds a path to the desired device.
15.2 - Remote Control and Z-Wave Modules
Question: How do I move a module from one location to another?
Answer: You will need to first Delete the module from your network using the remote control. Then add
the module in it’s new location. Last you will need to transfer the new module from your remote to your
Gateway. (see the manual for instructions on how to do this)

52
Question: How many devices can I control with the remote control?
Answer: The Handheld Remote Control can hold a total of 96 devices and each Channel can control up to
16 devices.
Question: What if the light or appliance that I’m trying to control does not turn on?
Answer: Check to see if the device is turned on. Check to see if the bulb has failed. Try replacing the
batteries on the remote control.
Question: I had a power outage and my dimmer module didn’t automatically turn on.
Answer: It’s normal for the dimmer modules to remain off after a power interruption. Press the ON/OFF
button on the unit or controller to turn the module ON again. If the module is programmed to turn ON
again, on the next program cycle it will properly respond to that command.
Question: If my lights are on and I have a power outage, will the lights come back on when the power is
restored?
Answer: Some modules will turn back on to the previous state. Others will not turn back on unless you
manually turn them on, use a remote control or Gateway web interface to turn on the device.
Question: I am trying to include a module and it keeps coming up unsuccessful. What am I doing wrong?
Answer: Delete the module from the network by pressing the PROGRAM button on the module and the
delete button on the primary controller. If the controller shows that the delete was successful, follow the
procedure to include the module.
Question: I have several channels programmed to turn on at sunset and off at individual times. The first
channel will turn on, but not the others. Why?
Answer: It is recommended that when programming ON times, you use only one channel with sunset
selected as the ON time. Then assign all the modules to that channel, thus turning all of them on at sunset.
Each channel can be turned off at various times by using additional events for off settings.
Question: How do I set the dim level of a light module and associate it to a button on the remote?
Answer: While adding the module to a channel on your remote control by pressing the ON and OFF
buttons of the desired channel, hold the INCLUDE button on the remote. With your other hand press and
hold the PROGRAM button on the module until your dim level is set. Make sure your lamp is on the ON
position so you can see the dim level. Once the dim level has been reached release the INCLUDE button
on the remote.
Question: What if I lose my Handheld Remote controller?
Answer: Your HomeRemote Gateway will still function normally, however if you wish to add more
modules and expand your system you can purchase another controller and delete all modules from the
previous network. Just follow the deleting the network instructions in the manual.

53
15.3 - HomeRemote Gateway Installation
Question: I have added a lot of devices with my remote control and transferred them to my Gateway with
the wizard. There are too many being displayed and I don’t know which one is which?
Answer: You forgot to use the Home Planning Guide while adding in your modules. When you add a
network with a lot of devices, things tend to get messy. The Home Planning Guide is used to organize
your network so you know which module is which. Go back and reset your remote control and delete the
modules on your network. As you are adding the modules in again use the Home Planning Guide to note
the location and name of each module so you can use this to figure out which module is which when
transferring them to the Gateway. It is important you write them down on the HPG in the order they are
added as the module numbers on the left of the HPG will correspond to the module numbers when you
transfer them to the Gateway.
Question: The Setup Wizard is not detecting my Gateway. What do I do?
Answer: Check to see that your hardware connection is ok. Make sure the Power LED on the Gateway is
on and the Network LED on the Gateway is on (located on the right of the led bar). If not make sure that
the power adapter of the Gateway is plugged in and the Ethernet cable from the Gateway to your home
router is plugged in securely. There should be a light on the router corresponding to the LAN port number
you are using that will light up when the connection is detected. Try the detection again with the wizard.
Question: The Setup Wizard didn’t query an IP address for me. What do I do?
Answer: Click on the Query IP button on the IP address wizard page. If this does not work you will need
to enter your own IP address manually. From a Windows PC, click START, click RUN, type CMD in the
field and click OK. A black terminal screen should appear. In the terminal screen type IPCONFIG and
hit enter. An IP Address, Subnet Mask and Gateway number should appear. For example:
IP Address: 192.168.0.2 Subnet Mask: 255.255.255.0 Default Gateway; 192.168.0.1
On the IP Address page in the Wizard use the same IP address except for the last digit (2 in the example)
Choose a number higher than 200 (In the example you would choose 192.168.0.201 as the IP address for
the Gateway) Use the same Subnet Mask and Default Gateway and type it into the Wizard. Click NEXT.
Question: I have two bedrooms on the same floor. How do I set this up in the Wizard?
Answer: You will need to create two unique names for each room. Try the name of the person the room
belongs to, such as Bob’s Room
Question: The video tutorial for adding devices and transferring settings to the remote control do not
work for me. What do I do?
Answer: The video files on the Setup Wizard are AVI video files. You will need a media player installed
on your computer that can play these file formats. Download and install Windows Media Player or any
other media player software that supports AVI video files. Click the link again to play the videos.
Question: When I transfer the settings from the remote control to the Gateway using the Wizard the
detection fails. What do I do?
Answer: Try placing the remote control directly next to the Gateway. For security reasons the wireless
signal is reduced to close proximity connections only to avoid your signal being detected outside your
home. Try the detection again with the remote less than 1 foot from the Gateway. Press and hold the
INCLUDE button on the remote until both the red and green LEDs on the remote control blink. The press
the Channel 1 ON button until the green LED remains solid. Press the Detect button on the Wizard to
begin detection.

54
Question: After the Setup Wizard has detected my remote control network and transferred the settings
over, the modules listed are not in the order that I have installed them. How do I tell which module is
which?
Answer: This sometimes happens when the remote control you are using has been previously used to
install another network. If you have previously used your remote control for installing other modules you
will need to reset your remote control and try the detection and transfer to the Gateway again after you’ve
re-added all your modules. Or you may continue with the Wizard installation and test each module by
turning them ON and OFF with the HomeRemote Web Interface to figure out which module is which and
name them accordingly. (You can adjust the names and test which module is which in the SETUP tab of
the HomeRemote Web Interface. In the SETUP page go to ADD/REMOTE DEVICES and name your
devices here)
Question: How do I setup my Notification settings? My Email test always fails.
Answer: You are probably using a SMTP Outgoing Mail server that is incorrect. To view the tutorial on
how to find the correct SMTP Outgoing Mail Server go to www.hawkingtech.com/mailservertutorial.php
15.4 - HomeRemote Gateway Web Interface
Question: I can’t access my HomeRemote Gateway Web Inteface from a home computer. What’s
wrong?
Answer: This likely because you are trying to use your custom web address to access the Gateway. This
will not work if you are using a computer that is connected to your home network. To access the interface
from you home network you will need to enter the IP address into the address bar of your internet web
browser. If you do not know what your IP address is, you can run the Setup Wizard CD and click next a
few times until you get to the Gateway detection page. Once the Wizard detects your Gateway it will list
an IP address next to it. Copy this IP address and use it when accessing your Gateway from within your
home.
Question: The Home Status page is responding very slowly. How do I fix this?
Answer: If you have many Z-Wave modules in your network or one is out of reach or no longer working,
this can cause lag in your network speed as the network continuously tries to contact the module. Figure
out which module is causing problems and delete it from your network using the remote control. If you
wish to add it in a new location (if it is in functioning condition) you can do so with your remote control.
You will need to access the ‘Setup’ page on the web interface to re-add the module to your home layout.
Question: I forgot my login to my Gateway. What do I do?
Answer: Go to www.cell-link.homeremote.net, on the login page there should be a link that says: ‘Forgot
Password.’ Click this link, enter your Email and your password will be emailed to you shortly.
Question: Device Linking takes a long time to adjust all devices. Why is this?
Answer: Device Linking works in a chain reaction fashion. The Master device will send a command to
the next device and so on. If you have a large Linking setup it may take awhile to change all modules
successfully. The less modules you have the faster the feature will work.
Question: How do I create a Scene, Alert or Device Link?
Answer: Go to the Device Management page on the web interface and click on the link that will add the
feature you wish to add.
Question: How do I set schedules for single modules or a group of modules?

55
Answer: Setting schedules for your HomeRemote system is done through your Scenes. If you wish to
only schedule one module to turn on or off you would need to create a Scene with only a single module in
it. To set the schedule for this Scene, use the scheduling menu in the Scene setup page.
Question: How do I schedule or turn my alerts off?
Answer: From the ‘Home Status’ page there is the option of ‘BYPASSING’ any Scene or Alert you have
previously created. Bypassing will basically turn off this feature. For Scenes ‘bypassing’ will bypass a
previously scheduled event for the Scene. For Alerts, ‘bypassing’ will bypass the alert and the user will
not receive the alert while the notification is bypassed.
Question: Where do I go to add more devices to my system?
Answer: If you are planning on expanding your system with more modules, you will need to use the web
interface to do so. First add the new modules into your remote control. Next access the Setup page of the
web interface, go to ‘Setup,’ then go to Add / Remove Devices and transfer your settings from your
remote to your Gateway. Name the new devices as they are added in.
Question: How do I set a one time schedule?
Answer: Under the Control page you can set Quick Timers. Quick Timers allow your system to set a
ON/OFF activity for single use. For example, if you are leaving the house and you want all lights off after
you leave so you don’t fall in the dark. You can do so by using a 5 minute Quick Timer.
Question: Can more than one person access the HomeRemote Web Inteface at the same time?
Answer: Yes. Multiple instances of the interface running is not a problem. However you may want to be
careful how many people you give access to for security purposes.
15.5 - HomeRemote Cell Link Interface and Web Portal
Question: What is Cell-Link?
Answer: Cell-Link allows you to control your Hawking HomeRemote home automation system through a
graphical interface on your cellular phone. Cell-Link provides virtually unlimited range for the customer
to monitor and control their HomeRemote home automation system including monitoring of IP cameras.
Question: How do I get Cell-Link software on my cell phone?
Answer: Cell-Link software can be downloaded over the air, similar to how ringtones, pictures and games
are downloaded to cell phones. A text message is sent to the phone with a link that can typically be
followed by “Go”, “Go To”, "Follow URL" or a similar command. Goto www.cell-link.homeremote.net
for specific instructions on how to download Cell-Link to your phone.
Question: With which cellular carriers is Cell-Link compatible?
Answer: Cell-Link works with most phones on the Cingular, Sprint, Nextel and T-Mobile networks.
Cell-Link does not currently work on phones for Verizon or Alltel, but check back often to see if these
carriers are added. To help us get approved with Verizon or Alltel, submit your feedback here.
Question: Do I need an internet data plan associated with my cellular voice plan?
Answer: Yes, because Cell-Link uses the internet to send data back and forth between your phone and
your home, an internet data plan is necessary. Some cellular carriers offer ‘a la carte’ data plans that allow
you to send data over the internet and pay for each usage rather than a fixed monthly fee for a fixed
amount of data usage. However, it may be more cost effective to add a data plan to your voice plan in
order to use the Cell-Link system. If you do not have a data plan and your carrier does not offer an ‘a la
carte’ method of sending data, you will have to contact your cellular carrier to add a data plan to your
phone.

56
Question: What do I do if I change cellular service providers?
Answer: Go to the “My Phones” tab to add your new phone to your subscription and remove the old one.
If you change cellular carriers, you may not be able to carry-over your Cell-Link subscription if the new
carrier is not compatible
Question: What do I do if I change my phone number?
Answer: If your phone number changes then you must download the Cell-Link software to your phone
again to update our records and allow your new phone number to be recognized by our system. You must
also change your primary mobile phone number in the ‘My Account’ section of the Cell-Link Customer
Portal. . Go to the “My Phones” tab to add your new phone to your subscription and remove the old one.
Question: I lost my phone. How do I disable Cell-Link on my old phone?
Answer: Log into the Customer Portal at www.cell-link.homeremote.net, select the “My Phones” tab.
Select “Remove This Phone” in the information box for the phone you want to remove.
Question: What do I do if I get a new phone?
Answer: If you get a new phone then you must download the Cell-Link software to your new phone and
get a new activation code through the Customer Portal to allow your new phone to control and monitor
your home automation system. Go to the “My Phones” tab to add your new phone to your subscription
and remove the old one.
Question: Do I need a special cell phone to make Cell-Link work?
Answer: Cell-Link works with most modern cell phones that are capable of connecting to the internet.
Most phones with color displays have this capability, but it depends on the make and model of your phone
as well as your cellular carrier. Most cellular carriers have this information available through their
website. You may also test your phone’s compatibility by downloading the Cell-Link demo and selecting
Test Connection from the Menu.
Question: Can more than one phone control my home? How do I add another phone to my Cell-Link
system?
Answer: Multiple phones can control one home automation system! Login to the Cell-Link Customer
Portal to add another phone to your Cell-Link account. Select the “My Phones” tab and “Add Phone” to
add a phone. Follow the steps in the wizard to complete the addition.

57
16 – HomeRemote Gateway Specifications and Ranges
Management Software Ranges:
• Maximum Z-Wave modules that can be added to the Gateway: 232
• Maximum Cameras that can be added to the Gateway: 32
• Maximum Scenes that can be added to the Gateway: 64
• Maximum Thermostats that can be added to the Gateway: 16
• Maximum amount of modules that can be added to Scenes: 1024
• Maximum amount of Rooms/Areas that can be added to the Gateway: 64
• Maximum amount of Schedules that can be set: 128
• Maximum amount of Notification User Accounts: 16
• Maximum Login Password length: 16
Network Specifications:
• 100T Base-TX Fast Ethernet
• Z-Wave US Operating Frequency
Hardware Interface:
• LAN Port: (1) RJ-45, 10/100M, Auto-sensed
• One non-removable antenna (Z-Wave)
• External Power Supply Connector
• LEDs: Power, Z-Wave activity and Network connection
• Reset Button
HTTP/Utility:
• Web Management Interface
• CD based Setup Wizard
• Web based cellular management utility (Cell Link)
Dimensions:
• Gateway: 6.6”" x 3.75" x 1.6" (L x D x H)
• Giftbox: 10.5” x 3.5” x 7.5” (L x D x H)
• Remote: 6” x 2.25” x 0.75” (L x D x H)
Operating Environment:
• Temperature: 0 - 40o C / 32 - 104o F
• Humidity: 85% RH
Certifications:
• FCC, CE