Hawking Technologies HWU9DD Hi-Gain USB Wireless-G Dish Adapter User Manual HRPro QIG
Hawking Technologies, Inc. Hi-Gain USB Wireless-G Dish Adapter HRPro QIG
User Manual

QUICK INSTALLATION GUIDE
Hi-GainTM Wireless-G USB Network Dish Adapter Part No. HWU9DD
www.hawkingtech.com
© 2008 Hawking Technologies, Inc. All rights reserved. All trademarks herein are the property of their respective owners. Apple and Mac are registered trademarks of Apple Computer, Inc. No aliation implied or expressed.
Start Here
XZX
Important: Do not connect the USB adapter until you install the driver from the CD
and are instructed to do so. Otherwise, the USB adapter may not operate correctly.
Find Your Operating System
(See the reverse side for Mac Installation Instruction. Refer the manual on the install CD for Windows XP Instruction)
Windows Vista /7
Windows XP
Connect To A Wireless Network [Using Hawking Wireless Utility]
Package Contents
• 1 x Wireless-G USB Dish Adapter
• USB Extension Cable
• CD: User Manual & Driver (Mac & PC)
Requirements
• PC or Mac Laptop or Desktop
• Windows XP/Vista or Max OS X 10.4 or later
• One Available USB port
• An available Wireless 802.11b/g/n Network
Pac
k
age Contents
•
1 x Wireless-G USB Dish Adapter
•
USB Extension Cable
•
CD: User Manua
l
& Driver
(
Mac & PC
)
R
equirements
•
P
C
or Mac Laptop or Des
k
to
p
•
Win
d
ows XP/Vista or Max OS X 10.4 or
l
ater
•
One Avai
l
a
bl
e USB port
•
An avai
l
a
bl
e Wire
l
ess 802.11
b
/g/n Networ
k
1.
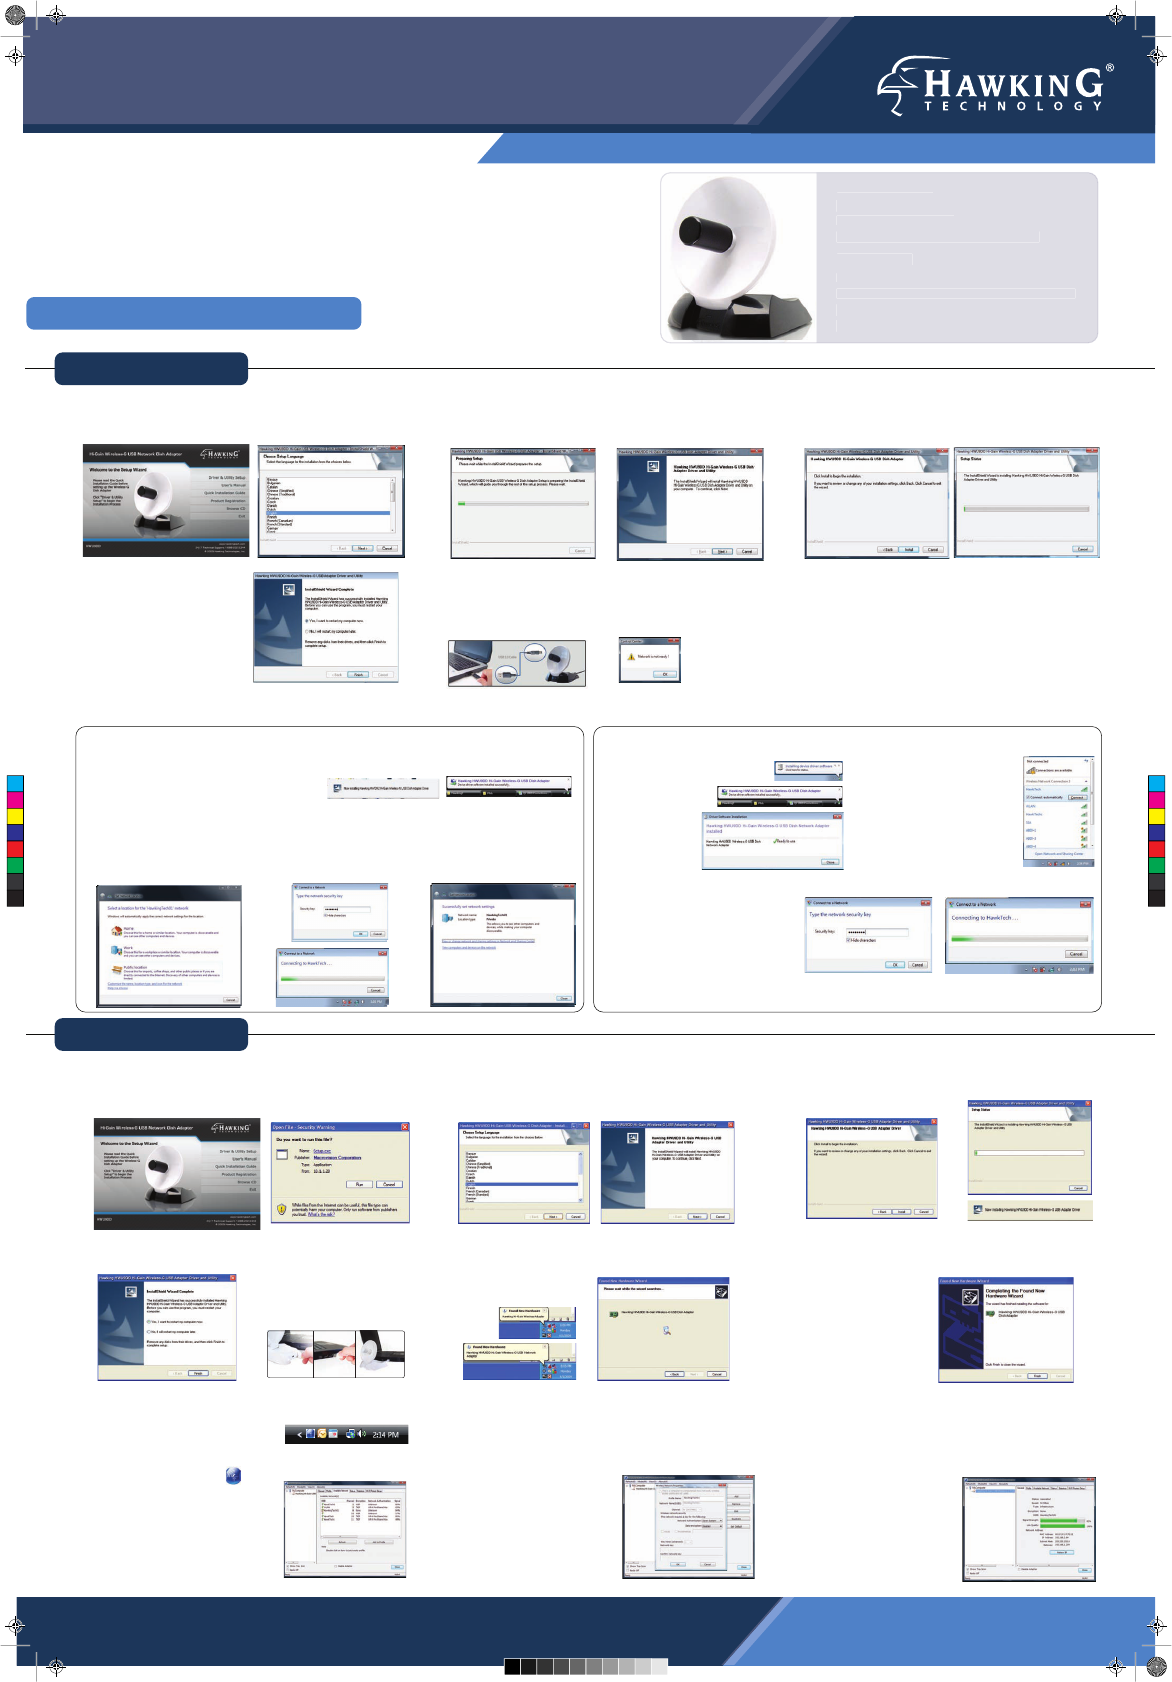
Insert the Setup CD and a menu page will
automatically appear on your screen. Select Driver
& Utility Install. Then, select a language and “next”.
2.
Wait until the installation completes. Then select
“Next” in the following screen.
3.
If you want to change any settings, click Back.
Otherwise, click “Install” and wait while the Wizard
installs the HWU9DD Driver and Utility.
4.
When the installation is
complete you may be
prompted to restart your
computer.
5.
After the restart, plug in your Adapter. Windows will
indicate that your network is not ready, select OK.
6
. It is recommended for Windows 7 and Vista users to
use the Windows Zero Conguration Utility. To
connect, go to “Connect To A Wireless Network...”
A. To manually connect to a
network, go to your system tray
on your bottom right hand corner and click on the
Hawking Wireless icon .
B. From the Hawking Hi-Gain USB
Wireless-G Dish Adapter
Wireless Utility. Select the
“Available Network” tab. Then
choose a Wireless Network.
If your desired network is password protected, please
enter your password in the Network key eld and
re-enter it in the Conrm network key eld.
C.
Congratulations! You are now connected. To view
your link status, click on the General tab. For more
information, please refer to the User’s Manual on the
CD.
Connect To A Wirelelss Network (Windows Vista)
1. The Adapter will automatically search
and locate an open network. Select a
location for the network.
2. Select a location for your network. If your selected network is
encrypted/password protected, please enter the network security key and click “OK”.
If you don’t have the network security key, please contact your network
administrator.
Connect To A Wireless Network (Windows 7)
1. The Adapter will
automatically
search and
locate an open
network.
Select a location
for the network.
2. Select a location for your
network. You can locate
search for the available
network by clicking on the
wireless icon on your
system tray (bottom-right
corner).
3. If your selected network is
encrypted /password protected,
please enter the network security
key and click “OK”. If you don’t
have the network security key,
please contact your network
administrator.
1.
Insert the Setup CD and a menu page will
automatically appear on your screen. When
prompted, select “Run” to continue.
2.
Select a language, then click “next”. Wait until the
setup completes, then select “Next” on the
following screen.
3.
Click “Install” and wait while the installer congures
the HWU9DD Driver and
Utility.
4.
Restart your computer when prompted to do so.
Plug in the HWU9DD after your computer restarts.
5.
Your computer will recognize the HWU9DD adapter,
please wait while it locates the newly installed
driver.
6.
Finally select “Finish” to complete your software
installation.
C
M
Y
CM
MY
CY
CMY
K
HWU9DD_PC_Final.pdf 6/29/2009 3:51:53 PM

Installation for Mac OSX
Hi-Gain
TM
Wireless-G USB Network Dish Adapter Part No. HWU9DD
Support Information
Tel: 1.888.202.3344 Email: techsupport@hawkingtech.com RMA: rma@hawkingtech.com www.hawkingtech.com
Important: Do not connect the USB adapter until you install the driver from the CD and
are instructed to do so. Otherwise, the USB adapter may not operate correctly. Be sure to
save all your work before continuing. Your computer will automatically restart after the
driver installation.
Mac OS 10.4 or later
The Installation Screens may vary depending on your Mac OS.
Package Contents
• 1 x Wireless-G USB Dish Adapter
• USB Extension Cable
• CD: User Manual & Driver (Mac & PC)
Requirements
• PC or Mac Laptop or Desktop
• Windows XP/Vista or Max OS X 10.4 or later
• One Available USB port
• An available Wireless 802.11b/g/n Network
Packa
g
e Contents
•
1 x Wireless-G USB Dish Ada
p
ter
•
USB Extension Cable
•
CD: User Manual & Driver
(
Mac & PC
)
Requ
i
rements
•
P
C or Mac Laptop or Des
k
top
•
Win
d
ows XP
/
Vista or Max OS X 10.4 or
l
ater
•
One Avai
l
a
bl
e USB por
t
•
An avai
l
a
bl
e Wire
l
ess 802.11
b
/g/n Networ
k
1.
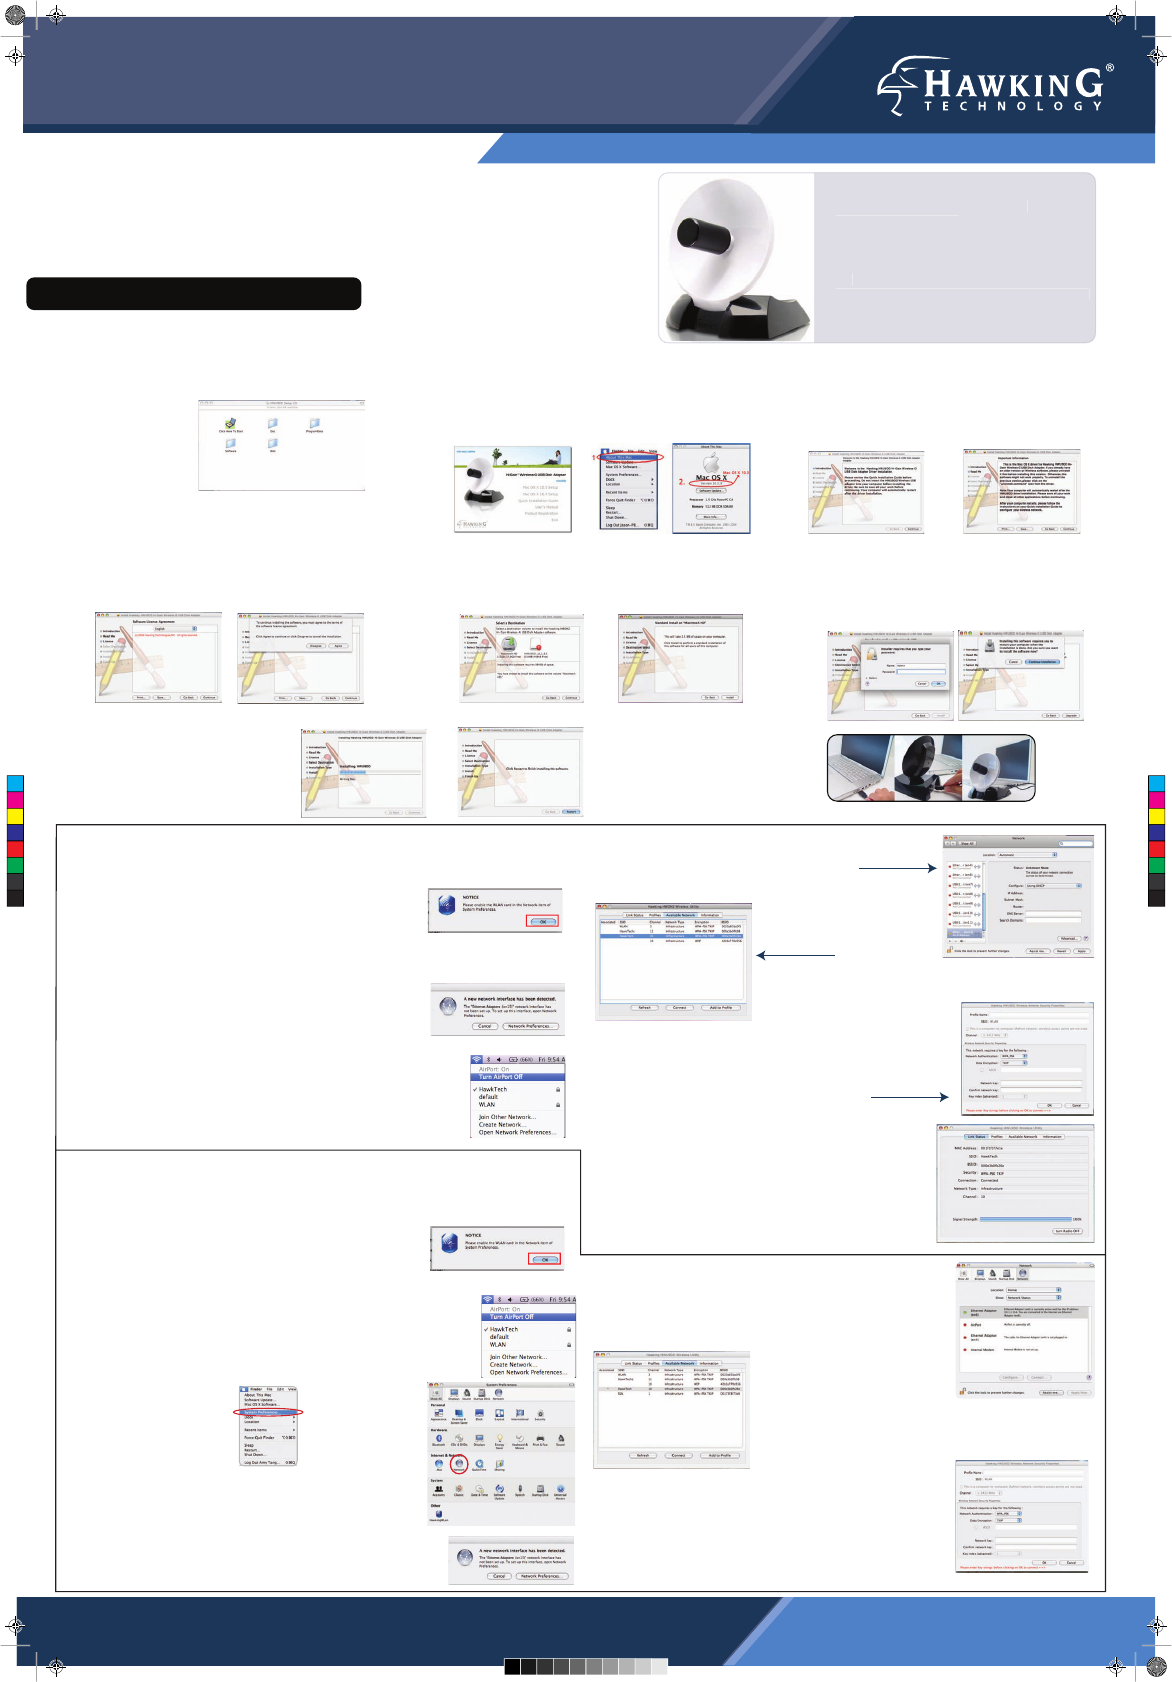
Insert the Setup CD and a menu page will
automatically appear on your screen. Select “Click
Here To Start”.
2.
Select the Mac OS X consistent with your computer.
If you are uncertain about which Mac OS you are
using, click on the APPLE icon on the upper-left
corner of the Finder Menu bar and select “About
this Mac” to view your current Mac OS X version.
3.
Welcome to the Hawking HWU9DD Hi-Gain Adapter
Driver Installer. Select “Continue”. Read the
Important information in the following screen and
click “Continue”.
4.
Software License Agreement: select
“Continue” and “Agree” in the following
screen.
5.
Select a destination and click “Continue”.
Select “Install ” on the following screen.
6.
If your computer is password protected,
please enter your password to continue.
Then, select “Continue Installation” in the
following screen.
7.
Please wait while the wizard
installs the HWU9DD Driver.
Select “Restart” when
prompted.
8.
Plug
in the Hawking
Wireless-G Adapter after
your computer restarts.
Connect To A Wireless Network (Mac 10.5 or later)
A.
After plugging in the Adapter, the Hawking HWU9DD Wireless Utility will
automatically pop up. You will be asked to enable
your WLAN card. When the NOTICE appears,
select “OK”. Then, select “Network Preferences.”
Please note the “Ethernet Adapter (en15)”network interface. You will need
to enable this in the Network preference. The screen
above shows “Ethernet Adapter (en15)” network
interface, however the en number will vary from
one computer to another.
B.
Enabling the USB Adapter in your Network Preferences.
Note: In order for the Wireless-N Adapter to work
properly, you must turn off any previously installed airport
cards. To do this, go to the top right hand corner of your
finder and select “Turn Airport Off”.
C.
Select “Ethernet Adapter (....).” Then click “Apply.”
D.
In the “Available Network”tab, select a wireless
network and click on “Connect.”
Encryption/ Password Protected: If your
selected network is password protected, please enter
the network key and confirm it.
F.
Congratulations! You are now connected. To view
your link status go to “Link Status” tab. For more
information, please refer to the manual located in
the CD.
Connect To A Wireless Network (Mac 10.4~10.4.9)
A.
After plugging in the Adapter, the Hawking HWU9DD Wireless Utility will
automatically pop up. You will be asked to enable
your WLAN card. When a NOTICE comes up,
select “OK”.
B.
Enabling the USB Adapter in your Network Preferences.
Note: In order for the Wireless-G Adapter to work properly,
you must turn off any previously installed airport cards. To do
this, go to the top right hand corner of your finder and select
“Turn Airport Off”.
a) Click on the APPLE
icon in the top
left-hand corner and
then select SYSTEM
PREFERENCES.
C.
A New Network Port has been detected.
a
b
D.
Select the Newly Installed Port and click “Apply.”
F.
Now go to the Hawking HWU9DD Wireless
Utility and select a wireless network and click on
“Connect.”
Encryption/ Password Protected: If your selected
network is password protected, please enter the
network key and confirm it.
b) Select
the NETWORK
icon
C
M
Y
CM
MY
CY
CMY
K
HWU9DD_MAC_Final.pdf 6/25/2009 12:08:36 PM
Federal Communication Commission Interference Statement
This equipment has been tested and found to comply with the limits for a Class B digital device, pursuant to
Part 15 of the FCC Rules. These limits are designed to provide reasonable protection against harmful
interference in a residential installation. This equipment generates, uses and can radiate radio frequency
energy and, if not installed and used in accordance with the instructions, may cause harmful interference to
radio communications. However, there is no guarantee that interference will not occur in a particular
installation. If this equipment does cause harmful interference to radio or television reception, which can be
determined by turning the equipment off and on, the user is encouraged to try to correct the interference by one
of the following measures:
z Reorient or relocate the receiving antenna.
z Increase the separation between the equipment and receiver.
z Connect the equipment into an outlet on a circuit different from that to which the receiver is connected.
z Consult the dealer or an experienced radio/TV technician for help.
FCC Caution: Any changes or modifications not expressly approved by the party responsible for compliance
could void the user's authority to operate this equipment.
This device complies with Part 15 of the FCC Rules. Operation is subject to the following two conditions: (1)
This device may not cause harmful interference, and (2) this device must accept any interference received,
including interference that may cause undesired operation.
This device and its antenna(s) must not be co-located or operating in conjunction with any other antenna or
transmitter.
FCC Radiation Exposure Statement:
This equipment complies with FCC radiation exposure limits set forth for an uncontrolled environment. This
equipment should be installed and operated with minimum distance 20cm between the radiator & your body.