Hawking Technologies HWUN1 Wireless -N USB 2.0 Adapter User Manual HWUN1 Manual
Hawking Technologies, Inc. Wireless -N USB 2.0 Adapter HWUN1 Manual
UserManual.wiki
>
Hawking Technologies
>
HWUN1 User Manual
Manual
Navigation menu
Upload a User Manual
Namespaces
Wiki Guide
HTML
PDF
Info
Views
User Manual
Discussion / Help
Navigation


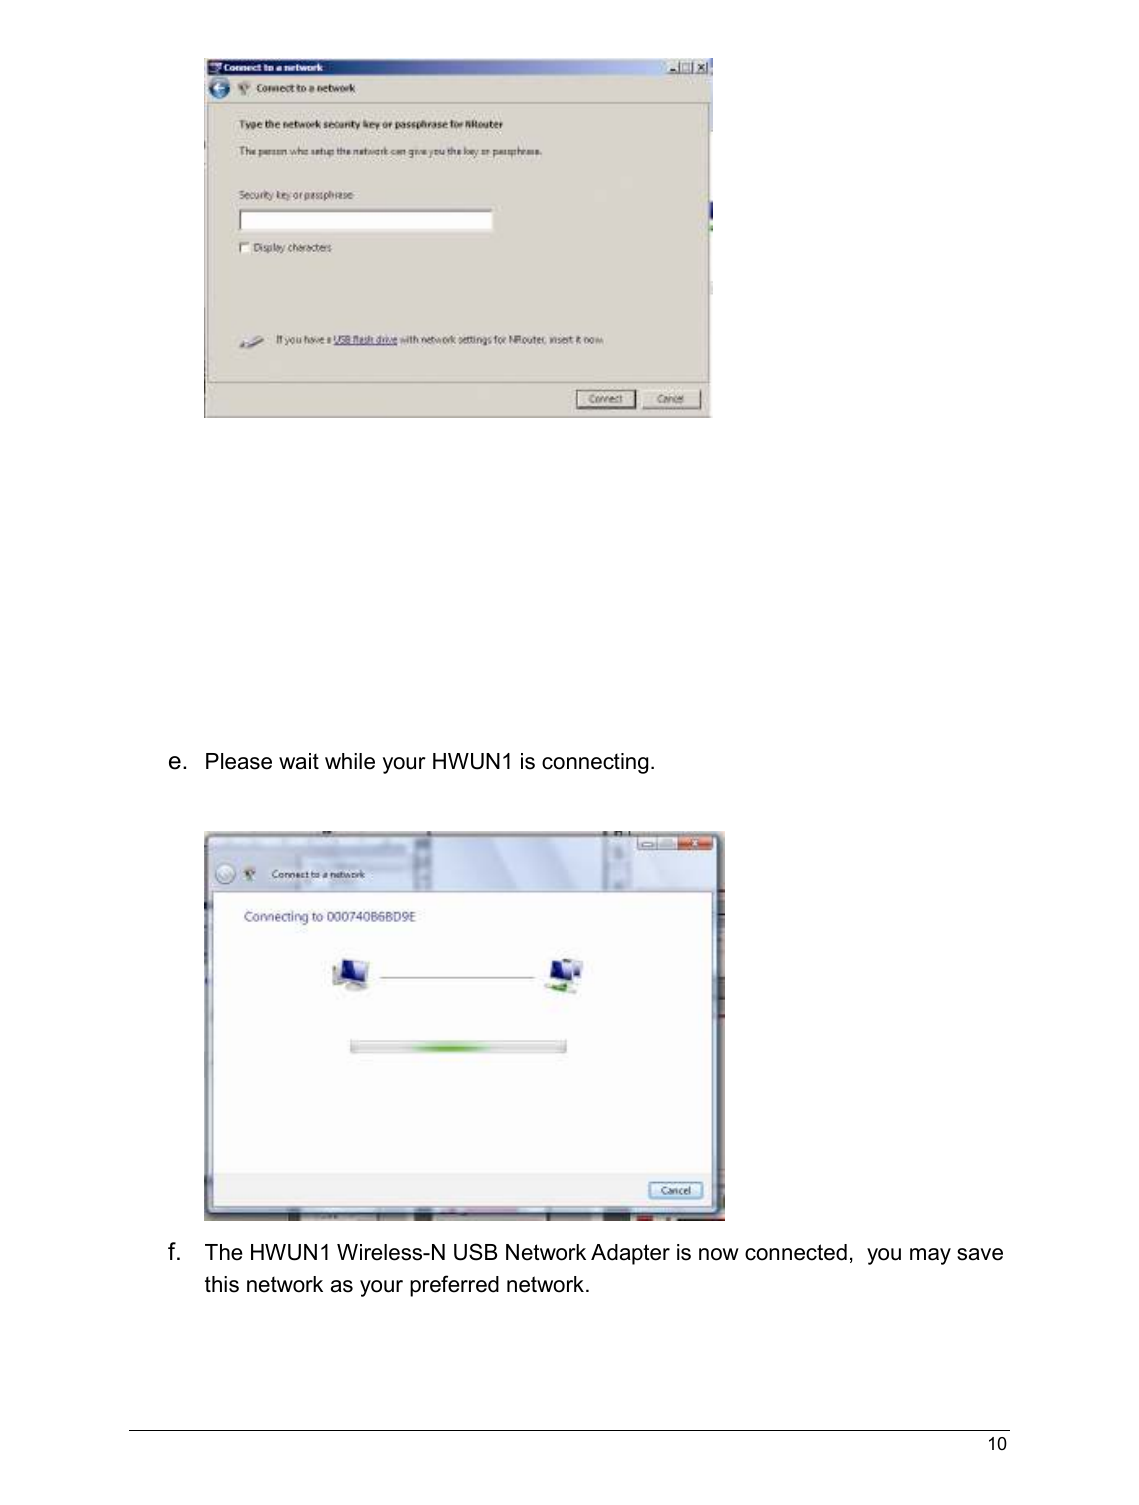

![17 7. SETUP WLAN (WIN 2000/XP) – Using Hawking Configuration-Utility Prerequisite: • Your home/office environment should have a wireless LAN Access Point (AP) that is available for your use. • You should readily have the (security keys) to connect to those Wireless LAN Access Points (AP) Configuration utility will first automatically link with the Wireless AP if there is no security key required. If the connection is successful, a message will appear on taskbar. 1. The following steps guide you on how to initially setup a wireless network connection. The Hawking Configuration Utility should appear on the bottom right taskbar. Select the [General] tab. a. If your Wireless Router supports [DHCP] function, please select both [Obtain an IP address automatically] and [Obtain DNS server address automatically]. b. If the router does not support [DHCP] function, you have to configure the IP and DNS settings.](https://usermanual.wiki/Hawking-Technologies/HWUN1/User-Guide-917401-Page-17.png)
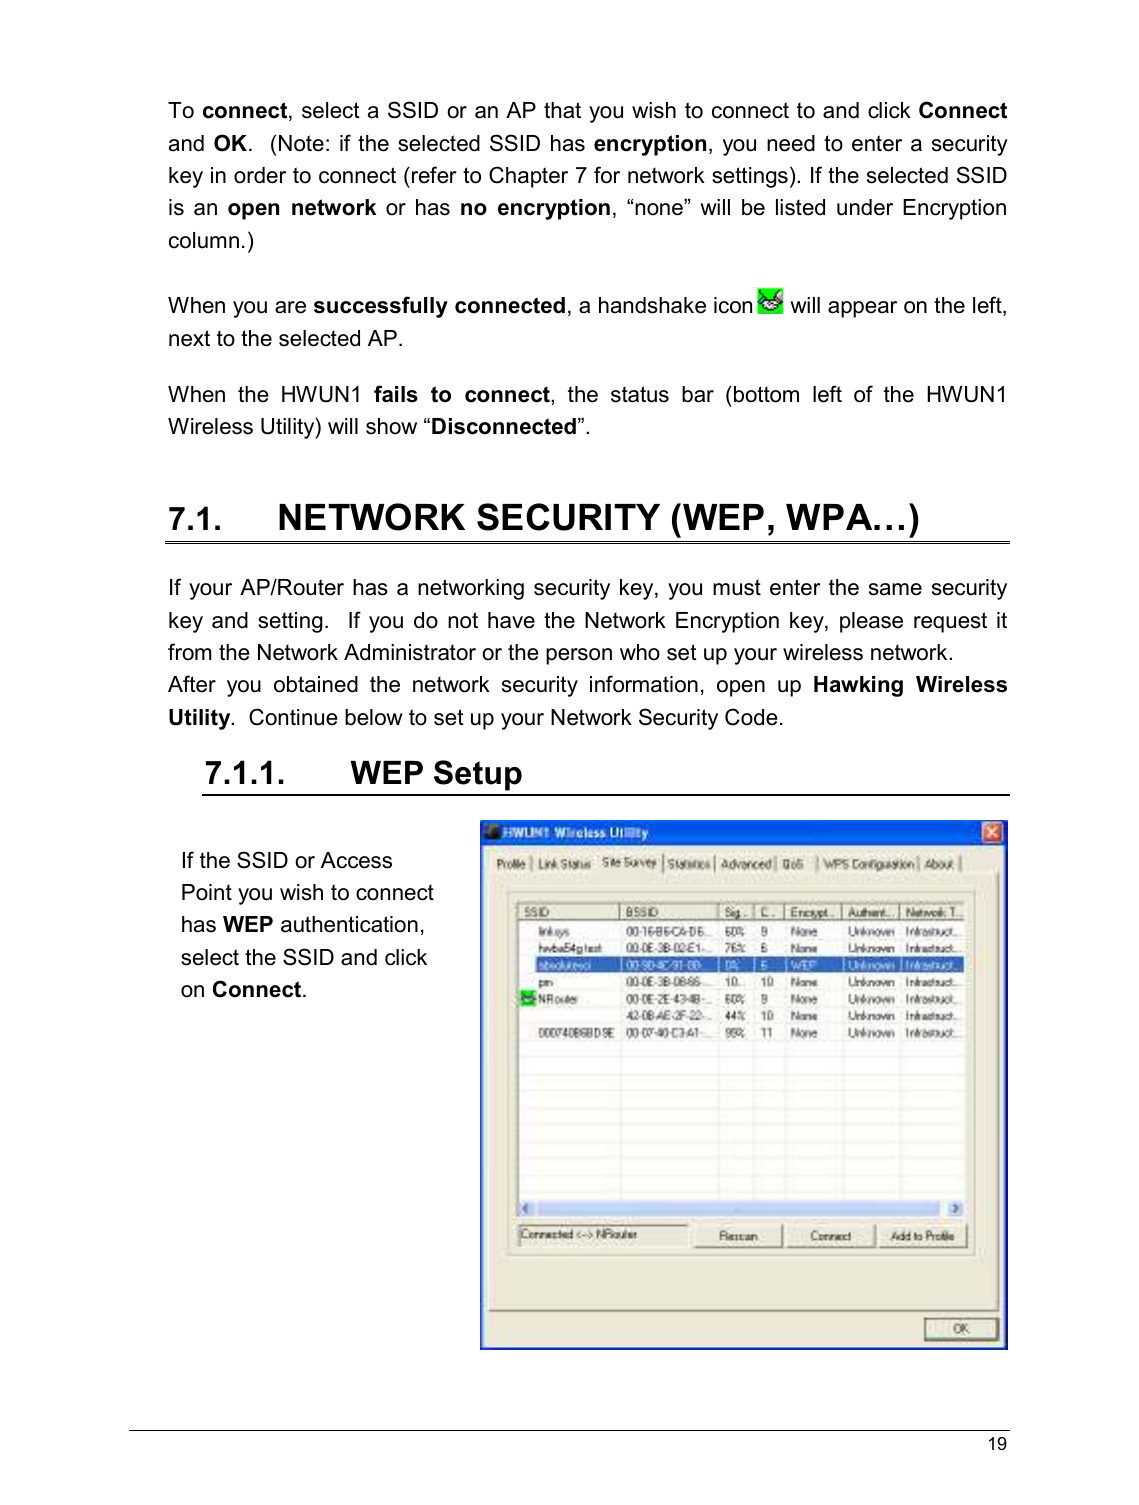
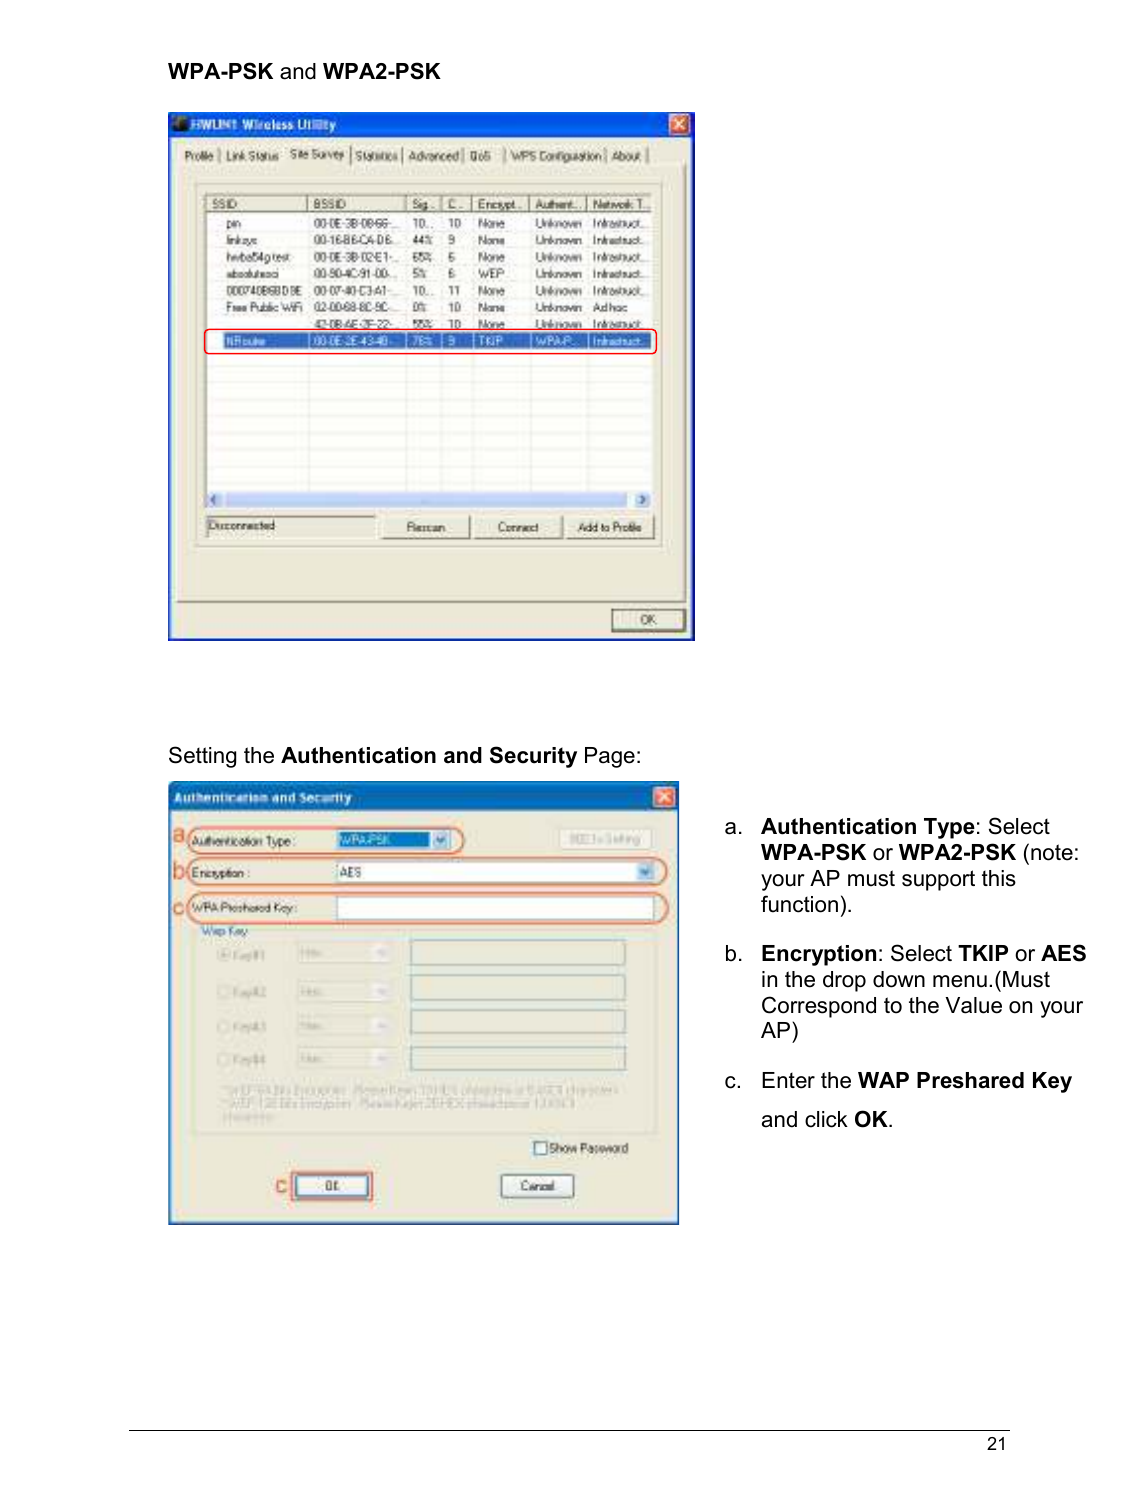
![20 An Authentication and Security Window (figure 7.1b) should appear shortly. Figure 7.1b WEP Setup Instructions: (All settings should correspond with settings of the wireless AP that you are connecting to.) a. Authentication Type field: indicates the authentication type of the AP/Router. Please confirm the setting of the AP/Router. • Open: WEP open system is based on request and grant. It is essentially no authentication. • Shared: WEP shared key is based on request, challenge, challenge response, grant/deny. b. Encryption field: Select WEP c. Enter in AP encryption keys (64/128bits) in the box Key1~Key4. Please accept the auto selected setting of [Hex]/ [ASCII]. d. Select the current AP encryption keys from Key1~Key4. e. Press [OK] to finish setting. 7.1.2. WPA Setup WPA encryption type can be divided into WPA-PSK, WPA2-PSK, WPA (also known as WPA-EAP), and WPA2 (also known as WPA2-EAP). All settings should correspond with the wireless AP that you wish to connect to.](https://usermanual.wiki/Hawking-Technologies/HWUN1/User-Guide-917401-Page-20.png)

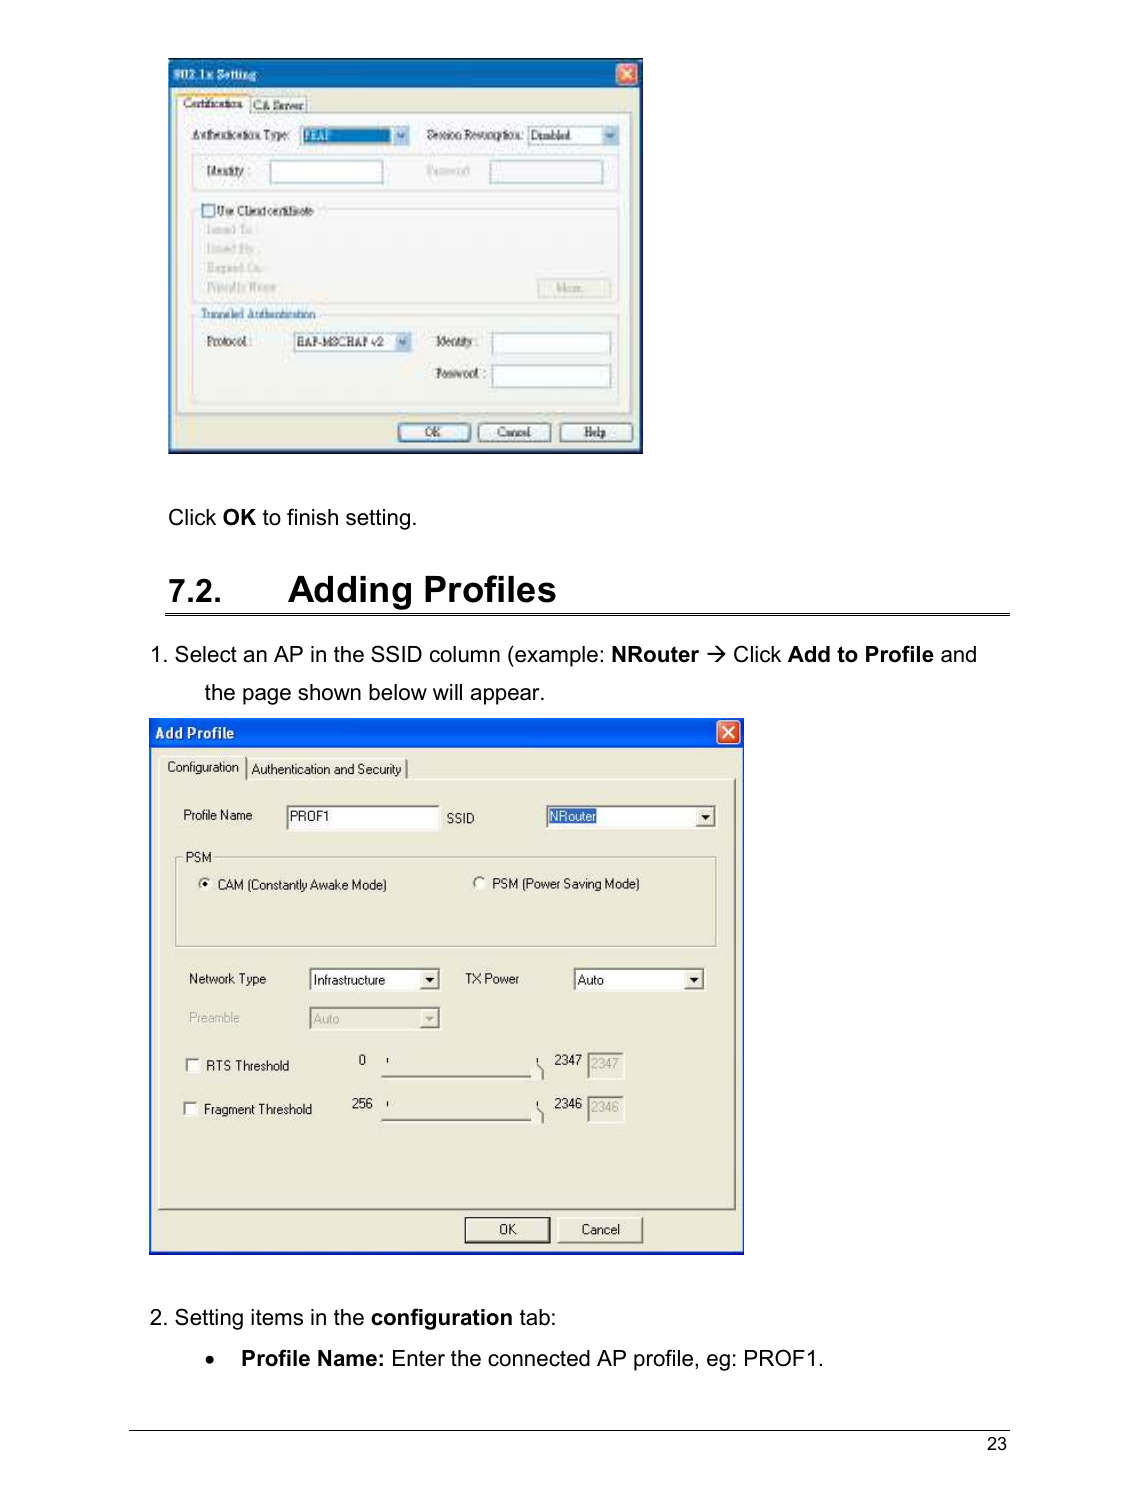
![24 • SSID: Click the drop-down menu and select one AP. You can also enter the AP manually. • PSM: When CAM is selected, it indicates that the product is not in power saving status. When PSM is selected, the product is in power saving status. (Only select it under Infrastructure network type). • Network Type: [Infrastructure] or [Ad Hoc] type. We recommend you to select [Infrastructure]. • Transmit power: the amount of power used by a radio transceiver to send the signal out. • [RTS Threshold] and [Fragment Threshold]: We recommend you to use the default value 2312. User can adjust threshold numbers by sliding the bars or key in the values directly. 3. Click OK and the set AP will appear in the Profile tab. • Add: Click Add to add a new profile. • Delete: to delete a profile, select one profile name and click Delete. • Edit: to edit the setting of a profile, select the profile and click Edit. • Activate: to activate the selected profile, select the profile and click Activate.](https://usermanual.wiki/Hawking-Technologies/HWUN1/User-Guide-917401-Page-24.png)
![27 9. Advanced Settings TX-Burst: Turbo Mode. When it is checked and the HWUN1 Wireless N-Adapter is connected to an Access Point with TX-Burst function, the transmission throughput will be improved. (Note: This only works with Access Point that supports this function) Enable TCP Window Size : When checked, the reception speed will improve.) Fast Roaming at ___ dBm: Will enter roaming mode when dBm reaches defined level. CCX 2.0: Open CCX (supports Cisco Compatible Extensions function). Check it after making sure the Wireless AP supports it. Turn on CCKM: Open CCKM function (Cisco Key Management). Enable Radio Measurements: Open the function of CCK Monitor AP Channel. Non-Serving Channel Measurements: Select and start to monitor the channels on which the AP is not transmitting Turn off RF: Disable wireless radio. Turn on RF: Enables wireless radio. Apply: Click this when finished with the settings. Wireless mode: Select wireless network mode (speed) - 802.11b/g mixed: Automatically detect 11b or 11g - 802.11b only: Frequency only 11b - 802.11b/g/n mixed: Automatically detect 11b or 11g or 11n In order to keep the connection stable, please select [Auto] to automatically confirm which mode the wireless network is working.](https://usermanual.wiki/Hawking-Technologies/HWUN1/User-Guide-917401-Page-27.png)
![28 10. Statistics The Statistics tab displays detailed information about Wireless LAN TX/RX. • Transmit Statistics: Statistic of transmitted frames. • Receive Statistics: Statistic of received frames. • [Reset Counters]: Click [Reset Counter] to start over at zero the statistic numbers of transmitting and receiving data.](https://usermanual.wiki/Hawking-Technologies/HWUN1/User-Guide-917401-Page-28.png)
![29 11. Link Status This tab displays the information of the Wireless connection status. • Status: Displays the linked AP name and MAC address. When [Disconnect] appears in this box, the connection is failed. • Extra Info: link status and strength. • Channel: Current channel in use. • Link Speed: Shows current transmit rate and receive rate. • Throughput: Displays transmit and receive throughput value. • Link Quality: Displays connection quality based on signal strength and TX/RX packet error rate. • Signal Strength 1 & 2: Receive signal strength, user can choose to display as percentage or dBm format • Noise Level: Display noise signal strength.](https://usermanual.wiki/Hawking-Technologies/HWUN1/User-Guide-917401-Page-29.png)


![39 PRODUCT SUPPORT INFORMATION Thank you for choosing Hawking Technologies. Please do not hesitate to contact us if you have any questions regarding the installation of your product. We’re here to help you 24 hours a day, 7 days a week! PHONE SUPPORT • 888.202.3344 Toll-Free 24/7 Technical Support Line (US & Canada Only) WEBSITE SUPPORT • http://www.hawkingtech.com/support You’ll find: (a) Firmware/Driver updates with the latest features and news on your product (b) Frequently Asked Questions (FAQs) with answers to common asked questions about your product.] EMAIL SUPPORT • techsupport@hawkingtech.com DOCUMENT SUPPORT • Product User’s Manual (Normally located on the product CD) You’ll find detail install instruction on your product and default user name and password. RMA (RETURN MERCHANDISE AUTHORIZATION) • http://www.hawkingtech.com/support/customerservice.php CUSTOMER SERVICE • Email: customerservice@hawkingtech.com • Tel: 949.790.0800 ext:1000 We want to hear from you! We hope you will have a wonderful experience using our hawking product. If there is any concern, please email us at customerservice@hawkingtech.com.](https://usermanual.wiki/Hawking-Technologies/HWUN1/User-Guide-917401-Page-39.png)