Health O Meter Hdm585 02 Owner S Manual
Health-O-Meter-Bfm945-01-Owner-S-Manual health-o-meter-bfm945-01-owner-s-manual
2014-07-05
: Health-O-Meter Health-O-Meter-Hdm585-02-Owner-S-Manual health-o-meter-hdm585-02-owner-s-manual health-o-meter pdf
Open the PDF directly: View PDF ![]() .
.
Page Count: 2
1
3
4
2
WEIGHT
WEIGHT
MONIT
MONITORING
ORING
SCALE
SCALE
UUsseerr’’ss
MMaannuuaall
Model HDM585
Back of the Scale
1. Select pounds (LB) or kilograms (KG)
2. Place the scale on a flat surface. A hard
surface is best for maximum accuracy.
1. Hold down the “SET/SAVE” button until the HOUR starts blinking.
2. Press or hold down the “SCROLL/HISTORY” button to choose the desired HOUR.
3. Press the “SET/SAVE” button. MINUTES will start blinking.
4. Press or hold down the “SCROLL/HISTORY” button to choose the desired
MINUTES.
1
3
4
2
11
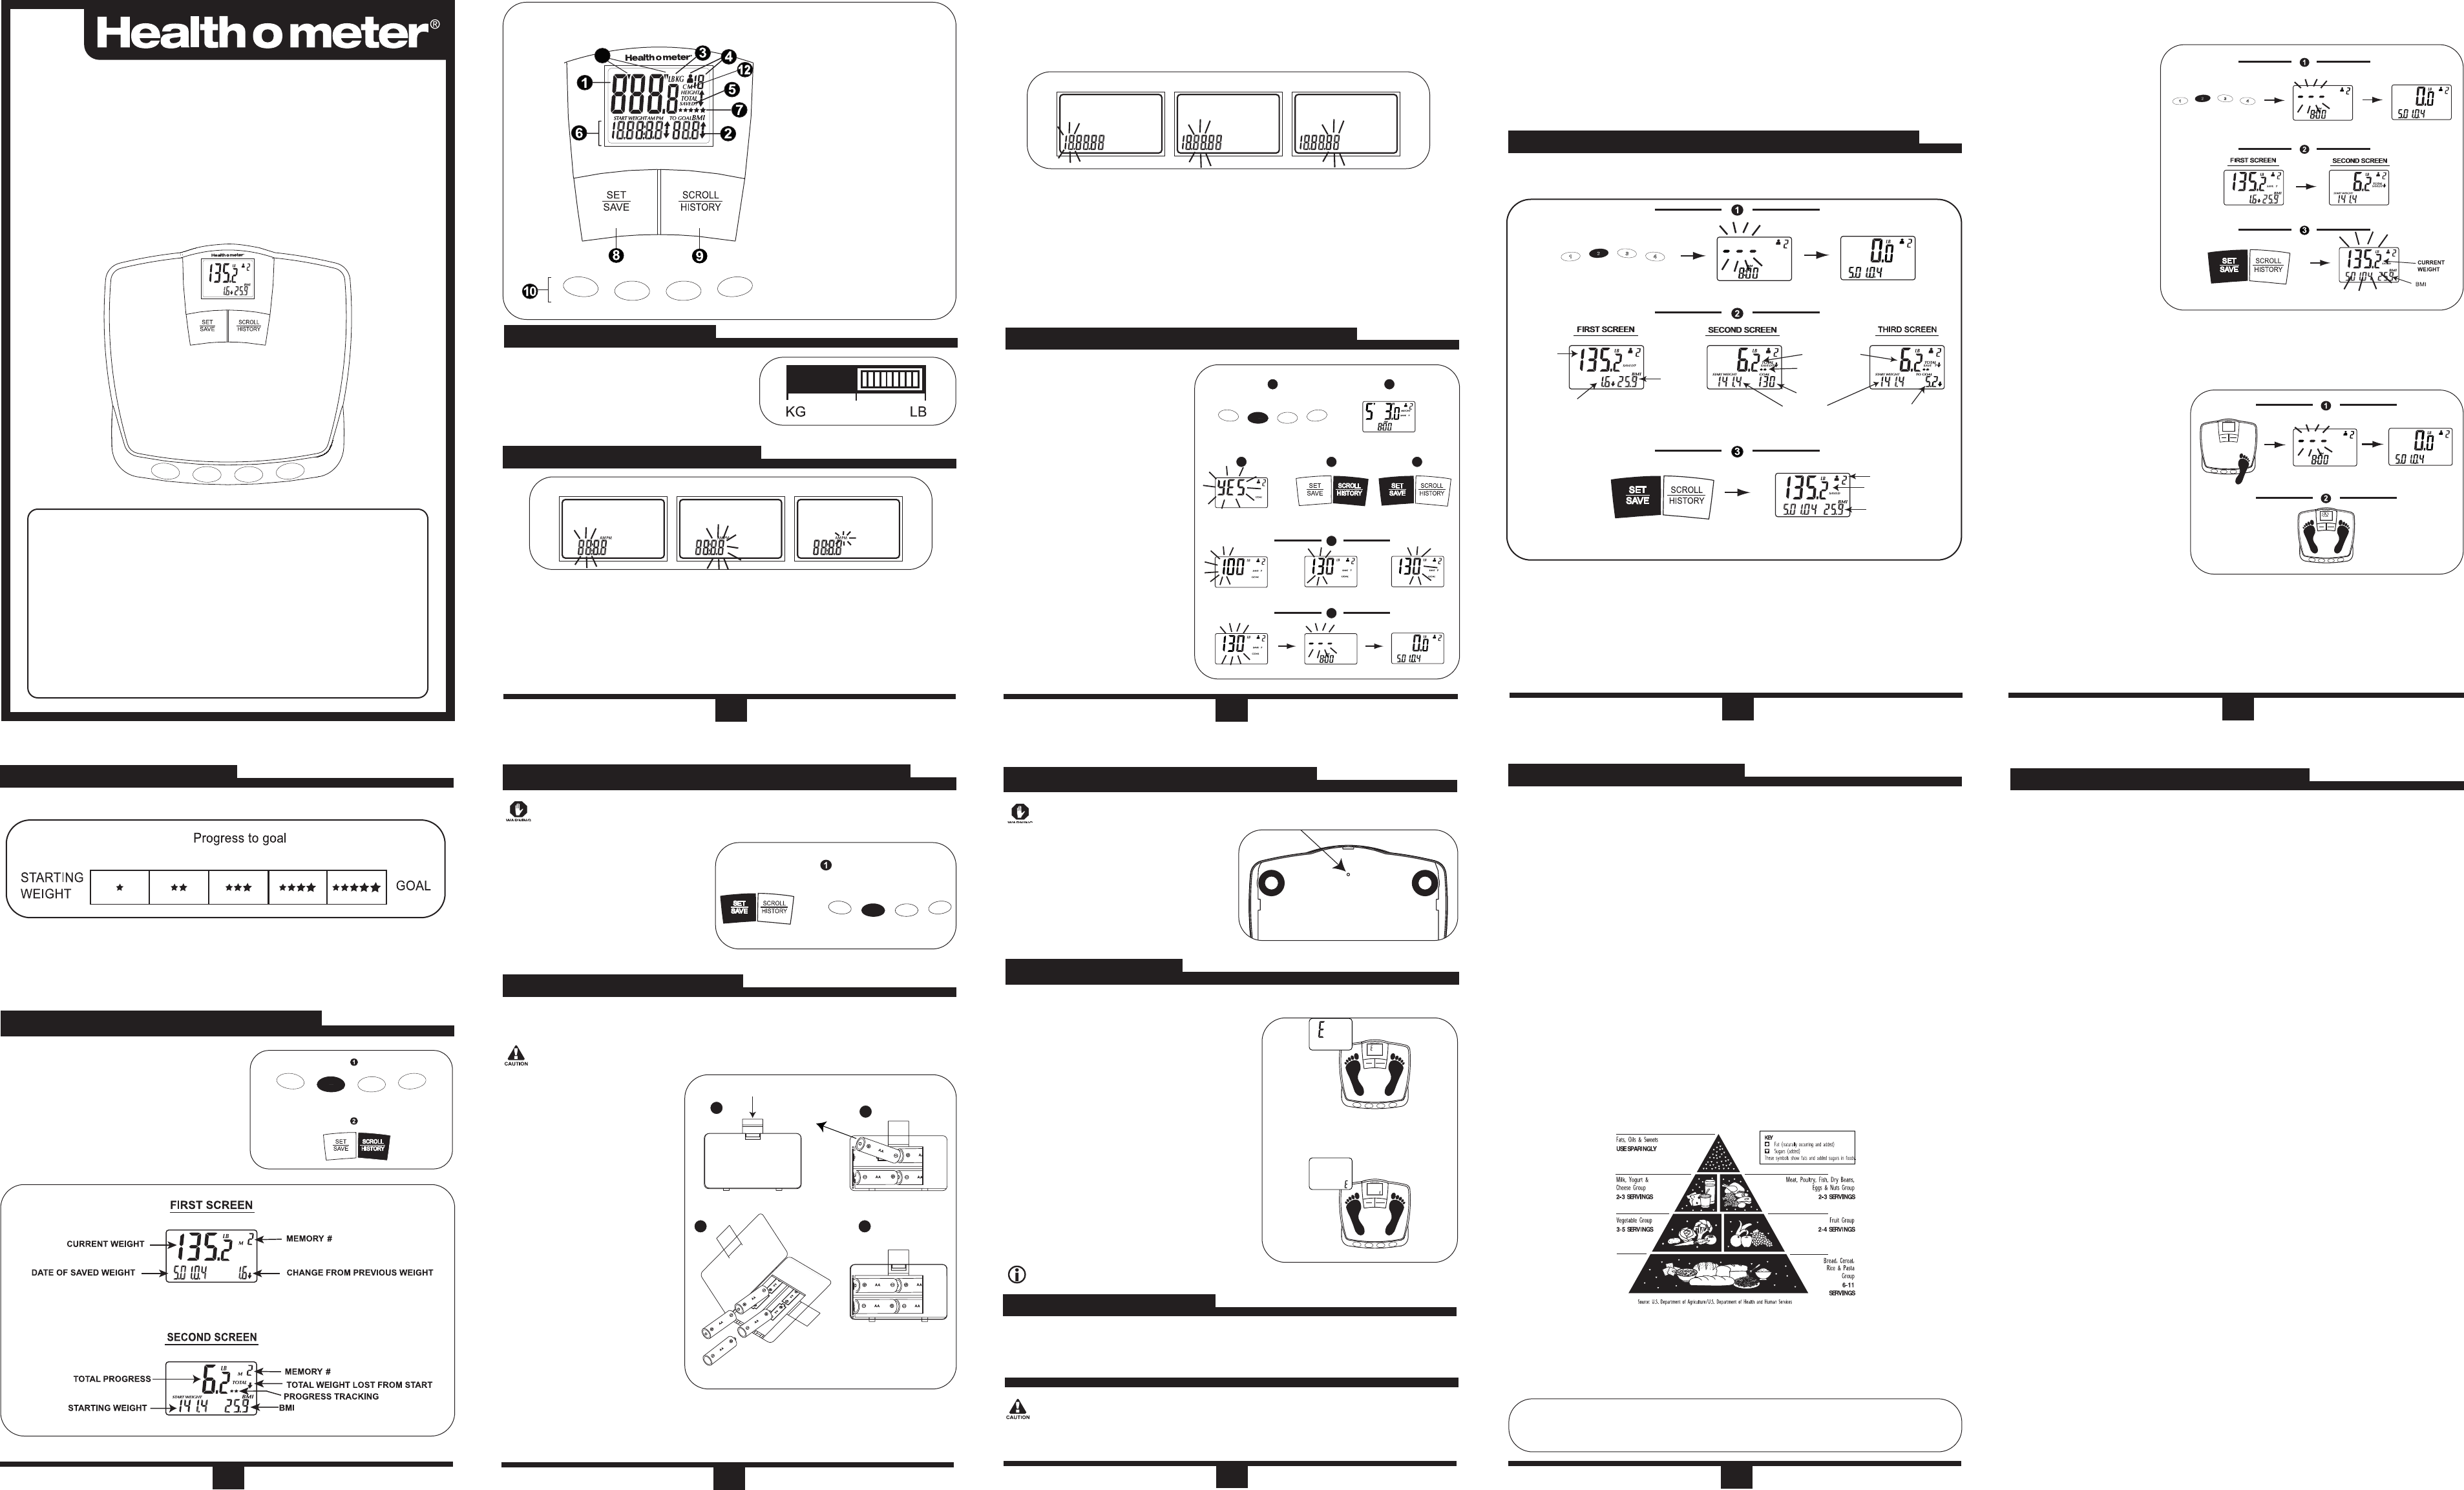
KEYS AND ICONS 1. Weight/Height Readout
2. Goal, BMI, difference in weight
compared to goal, and change
from previous reading.
3. Unit of Measure: Pounds (LB)
or Kilograms (KG)
4. User number and memory
indicator
5. Information ready to be saved
6. Time/Date, start weight and
difference in weight compared
to previously saved weight
7. Progress tracking stars
8. SET/SAVE button
9. SCROLL/HISTORY button
10. User buttons
11. Height displayed in feet and
inches
12. Height displayed in
Centimeters
SET TIME
FIRST
FIRST TIME SETUP
TIME SETUP
ADJUSTING
ADJUSTING TIME
TIME AND D
AND DA
ATE
TE
1
PR
PROGRAMMING/RESETTING
OGRAMMING/RESETTING Y
YOUR PR
OUR PROFILE
OFILE
5. Press the “SET/SAVE” button. "AM" or "PM" will start blinking.
6. Press the “SCROLL/HISTORY” button to choose "AM" or "PM".
7. Press the “SET/SAVE” button. Now your clock is set.
1. Press and hold the desired
user button until the height icon
starts flashing.
2. Press the “SCROLL/HISTORY”
button to choose the desired
FEET (or CENTIMETERS in KG
mode). Then press the
“SET/SAVE” button.
3. Press the “SCROLL/HISTORY”
button to choose the desired
INCHES. Then press the
“SET/SAVE” button. “YES”
will start blinking.
Now you are ready to set your
weight goal.
4. Press the “SCROLL/HISTORY”
button to select “YES” or “NO”.
NOTE: You can set a goal (by
selecting “YES”) or just
track your weight (by
selecting “NO”).
4
6
7
53
21
1
3
4
2
2
A. MONITORING YOUR WEIGHT OVER TIME AND
COMPARING IT TO YOUR GOAL.
1. Press one of the “USER” buttons. Display will show TIME and DATE; then it will
calibrate ("-
-
-
-
-
-") and will show "00..0" with either "LB" or "KG"
2. Step on the scale and position your feet in a manner that will distribute your weight
evenly over the entire scale platform. Stand still while reading the display. Three
screens will be displayed.
3. Step off the scale and press the “SET/SAVE” button to save your reading.
5. Press the “SET/SAVE” button to store your selection.
6. Now enter your desired goal weight. Scroll to choose your desired weight and press
the “SET/SAVE” to store it.
NOTE:
Each digit is set separately, until you have programmed your goal weight.
7. The display will flash “SAVED” twice, followed by “-
-
-
-
-
-”. Then the scale will
calibrate to “00.0”with either “LB” or “KG”.
8. Your goal has been saved and the scale is ready for use.
3
USING
USING Y
YOUR
OUR WEIGHT MONIT
WEIGHT MONITORING SCALE
ORING SCALE
CURRENT WEIGHT
BMI
MEMORY #
CHANGE FROM PREVIOUS
SAVED WEIGHT
CURRENT
WEIGHT
BMI
GOAL
STARTING WEIGHT
TOTAL
PROGRESS
WEIGHT LEFT TO
ACHIEVE YOUR GOAL
PROGRESS
TRACKING
B. MONITORING YOUR WEIGHT OVER TIME WITHOUT
SETTING YOUR GOAL
1. Press one of the
“USER” buttons.
Display will show TIME
and DATE; then it will
calibrate ("-
-
-
-
-
-") and
will show "00..0" with
either "LB" or "KG".
2. Step on the scale and
position your feet in a
manner that will
distribute your weight
evenly over the entire
scale platform. Stand
still while reading the
display. Two screens
will be displayed.
3. Step off the scale and
press the “SET/SAVE”
button to save your
reading.
C. WEIGHING WITHOUT SELECTING A USER BUTTON
1. Tap on the scale platform. The
scale will calibrate "-
-
-
-
-
-", and
then will display "00..0" and
either "LB" or "KG".
2. Step on the scale and
position your feet in a manner
that will distribute your weight
evenly over the entire scale
platform. The LCD display will
flash "-
-
-
-
-
-" several times for
approximately 3 seconds
before displaying your weight.
Stand still while reading the
display.
If you would like to save your reading (only if your profile has been
set):
1. STEP OFF THE SCALE.
2. Press the “USER” button where you want to save the information.
3. Press the “SET/SAVE” button to save it.
1
3
4
2
SET
SAVE
SCROLL
HISTORY
1
3
4
2
SET
SAVE
SCROLL
HISTORY
4
NOTE:
Two screens will be displayed
for each record.
1. Press the desired “USER” button.
2. Press the “SCROLL/HISTORY” button to
scroll down the list of saved records.
REVIEWING SA
REVIEWING SAVED RECORDS (HIST
VED RECORDS (HISTOR
ORY)
Y)
1
3
4
2
The display will award you up to five stars based on your progress:
For example, when you achieve 20 % of the difference between your start weight and
your goal, one star will be shown. When you achieve 40%, 2 stars will be shown, and
so forth until you reach your goal.
20+ % 40+ % 60+ % 80+ % 100 %
TRA
TRACKING
CKING Y
YOUR PR
OUR PROGRESS
OGRESS
5
PLEASE DO NOT RETURN THIS PRODUCT TO ANY OF THE ADDRESSES
SHOWN OR TO THE PLACE OF PURCHASE.
Sunbeam Products, Inc, ("Sunbeam") warrants that for a period of ten years from the date
of purchase, this product will be free from defects in material and workmanship. Sunbeam,
at its option, will repair or replace this product or any component of the product found to be
defective during the warranty period. Replacement will be made with a new or
remanufactured product or component. If the product is no longer available, replacement
may be made with a similar product of equal or greater value. This is your exclusive
warranty. This warranty is valid for the original retail purchaser from the date of initial retail
purchase and is not transferable. Keep the original sales receipt. Proof of purchase is
required to obtain warranty performance. Sunbeam dealers, service centers, or retail stores
selling Sunbeam products do not have the right to alter, modify or any way change the
terms and conditions of this warranty. This warranty does not cover normal wear of parts or
damage resulting from any of the following: negligent use or misuse of the product, use on
improper voltage or current, use contrary to the operating instructions, disassembly, repair
or alteration by anyone other than Sunbeam or an authorized Sunbeam service center.
Further, the warranty does not cover: Acts of God, such as fire, flood, hurricanes and
tornadoes.
What are the limits on Sunbeam's Liability?
Sunbeam shall not be liable for any incidental or consequential damages caused by the
breach of any express, implied or statutory warranty or condition.
Except to the extent prohibited by applicable law, any implied warranty or condition of
merchantability or fitness for a particular purpose is limited in duration to the duration of the
above warranty.
Sunbeam disclaims all other warranties, conditions or representations, express, implied,
statutory or otherwise. Sunbeam shall not be liable for any damages of any kind resulting
from the purchase, use or misuse of, or inability to use the product including incidental,
special, consequential or similar damages or loss of profits, or for any breach of contract,
fundamental or otherwise, or for any claim brought against purchaser by any other party.
Some provinces, states or jurisdictions do not allow the exclusion or limitation of incidental
or consequential damages or limitations on how long an implied warranty lasts, so the
above limitations or exclusion may not apply to you.
This warranty gives you specific legal rights, and you may also have other rights that vary
from province to province, state to state or jurisdiction to jurisdiction.
How to Obtain Warranty Service
If you have any question regarding this warranty or would like to obtain warranty service,
please call 1-800-672-5625, or visit us at www.healthometer.com and a convenient service
center address will be provided to you.
In the U.S.A, this warranty is offered by Sunbeam Products, Inc. located in Boca Raton,
Florida 33431.
PLEASE DO NOT RETURN THIS PRODUCT TO ANY OF THE ADDRESSES
SHOWN OR TO THE PLACE OF PURCHASE.
© 2004 Sunbeam Products, Inc. All rights reserved. Health o meter®is a trademark of Sunbeam
Products, Inc. Boca Raton, FL 33431.
Printed in China. 35018 03/04
Weight exceeding the capacity (400 lb/182 kg) may damage your
scale. This product is designed for personal use only. Not for
commercial or industrial use. This unit is not waterproof; avoid
contact with excessive moisture.
This unit includes four (4) AA batteries. When "L
LO
O" appears on the display, replace
all batteries.
Removing the batteries
will reset the Date and
Time but the recorded
data will not be
affected.
Battery Replacement
a) Locate the battery cover on
the back of the scale. Push
the locking tab and pull the
battery cover up.
b) Use the tip of a pen to loosen
each battery. Hold the scale at
an angle to allow the batteries
to slide out.
c) Insert four new batteries,
pressing them firmly into their
slot.
d) Replace the battery cover.
e) Set the Time/Date (see
ADJUSTING TIME AND DATE).
b
c d
a
REPLA
REPLACING
CING THE B
THE BA
ATTERIES
TTERIES
This process will erase the
records for the selected user.
NOTE:
You will be prompted to reset
your height and goal.
1. Press the “SET/SAVE” button and
a “USER” button at the same time
for 3 seconds. All your history will be
erased. The scale will prompt you to
reset your profile. For further
instructions, please see page 2.
1
3
4
2
RESETTING
RESETTING AN INDIVIDU
AN INDIVIDUAL USER’S HIST
AL USER’S HISTOR
ORY D
Y DA
AT
TA
A10
10 YEAR LIMITED
YEAR LIMITED W
WARRANTY
ARRANTY
If "EE" appears on the upper row of the display:
• You may have stepped on the scale before it
displayed "00.0"
• The scale cannot detect a stable weight.
Stand still while weighing.
• The load has exceeded the scale's capacity
(400 lb/182 kg).
If "EE" appears on the lower row of the display:
• The BMI is out of range (5 - 70).
NOTE:
Display will turn off automatically in 20
seconds if no key is pressed.
I
T IS NORMAL FOR YOUR WEIGHT TO VARY
DURING THE DAY AND FROM ONE DAY
TO ANOTHER.
TR
TROUBLESHOO
OUBLESHOOTING
TING
1
3
4
2
SET
SAVE
SCROLL
HISTORY
1
3
4
2
SET
SAVE
SCROLL
HISTORY
67
All data will be lost. Erased data
cannot be recovered.
Make sure the LCD display is turned off.
1. Turn the scale over.
2. Using a pin, press the button inside the
small hole located near the top for 3
seconds. The scale's
memory has been reset.
COMPLETEL
COMPLETELY RESETTING
Y RESETTING THE SCALE
THE SCALE
Periodically wipe the scale surface down with a DRY cloth to remove dust.
CARING FOR
CARING FOR Y
YOUR SCALE
OUR SCALE
Health and fitness isn’t just about counting calories and cutting fat out of your diet. It is about a balanced
combination of eating right and exercising: neither dieting nor exercising alone will give you the kind of
results you get when they are used together. To achieve a healthy lifestyle, you must set realistic fitness
goals and reduce the number of calories you take in, regardless of whether they come from foods high
in protein, carbohydrates, etc.
When you go on a diet, you may lose weight, but you’ll also lose beneficial muscle and bone tissue.
Instead, reduce the number of calories you are taking in by eating more healthful foods, and include
exercise in your regular routine to lose weight faster by burning fat. Exercise makes you feel better; it
helps improve circulation, relieves stress, and speeds up your metabolism. So create a plan of exercise
and diet appropriate for your needs, body type, and general health. Soon you’ll see how this powerful
combination makes it easier to look and feel your best.
How does extra weight affect my health?
Extra weight can put you at higher risk for some health problems such as:
• Type 2 diabetes (high blood sugar)
• High blood pressure
• Heart disease and stroke
• Some types of cancer
• Sleep apnea (when breathing stops for short periods during sleep)
Consult with your health care professional for more information.
Helpful Eating Tips
• Make sure no more than 30% of your daily calories come from fat, with no more than
10% saturated fat.
• Never skip meals! Instead, eat sensible portions at every meal and use small, low calories snacks
between meals to help control hunger.
• Learn to read food labels and follow recommended serving sizes.
• Balance your calorie intake with your activity level. Eat less on low activity days than you do on days
where you enjoy rigorous exercise.
• Follow the USDA's Food Pyramid as your guide to a healthy, balanced eating plan.
Helpful Exercise Tips
• Set goals. Write down what you want to achieve in the short and long term.
• Make exercise a habit. Choose a time every day - even 30 minutes - and stick to it.
• Vary your workout. Mix up your activities to avoid burn out.
• Recruit a friend! Working out as a team keeps you both motivated.
NOTE: These materials are not intended to replace advice from your doctor or fitness professional. Please
consult with your physician before beginning any fitness program or fat or weight reduction program. Individual
weight loss will vary. Health o meter® takes no responsibility for individual results, or any claim
made by a third party.
Y
YOUR HEAL
OUR HEALTHY LIFESTYLE
THY LIFESTYLE
8
8. Press or hold down the “SCROLL/HISTORY” button to choose the desired
MONTH.
9. Press the “SET/SAVE” button.
10. Press or hold down the “SCROLL/HISTORY” button to choose the desired DAY.
11. Press the “SET/SAVE” button.
12. Press or hold down the “SCROLL/HISTORY” button to choose the desired YEAR.
13. Press the “SET/SAVE” button. You have setup time and date.
SET DATE
PLEASE READ CAREFULLY AND SAVE
Congratulations on your purchase of this Health o meter® weight
monitoring scale. It is so much more than just a scale! You can
monitor your Body Mass Index (BMI), weight, weight changes and
progress to your personal goal. It stores personal information for up
to 4 different users. Also, you can save up to ten records for each
user.
The Health o meter®weight monitoring scale can help you in
achieving your physical best by providing body weight readings and
monitoring your weight over time.
Un peso mayor a la capacidad de la balanza (400 lb/182 kg) puede
dañar su unidad. Este producto está diseñado para uso personal
únicamente, no para uso comercial ni industrial. Esta unidad no es
resistente al agua. Evite el humedad excesiva.
Si aparece "EE"en la línea superior de la pantalla:
• Probablemente se paró sobre la balanza antes
de que apareciera “00..0”.
• La balanza no pudo detectar su peso. No se
mueva mientras se está pesando.
• Se excedió la capacidad de la balanza (400
lb/182 kg).
Si aparece "EE"en la línea inferior de la pantalla:
• El índice de masa corporal (BMI) está fuera del
rango (5 - 70).
NOTA:
La balanza se apagará automáticamente si
no se presiona nungún botón durante 20
segundos.
ES NORMAL QUE EL PESO VARIE DURANTE
EL DIA,Y DE UN DIA PARA OTRO.
CORRECCIÓN DE F
CORRECCIÓN DE FALLAS
ALLAS
Periódicamente limpie la superficie de su balanza con un paño SECO.
CUID
CUIDADO DE LA B
ADO DE LA BALANZA
ALANZA
Este proceso eliminará de
la memoria los registros
del usuario seleccionado.
NOTA:
El peso deseado deberá ser reprogramado.
1. Presione simultáneamente el botón
“SET/SAVE” y el botón del
número de usuario deseado. La
balanza mostrará “YES". Una vez
que haya programado su peso
deseado ó seleccionado “NO”, la
balanza mostrará "-
-
-
-
-
-".
C. USO DE LA BALANZA SIN SELECCIONAR UN
NÚMERO DE USUARIO
1. Pulse con el pie en la
plataforma de la balanza. La
balanza se calibrará "-
-
-
-
-
-" y
luego mostrará “00..0”con
"LB" ó "KG".
2. Párese sobre la balanza y
coloque sus pies de tal forma
que su peso quede distribuido
uniformemente sobre toda la
plataforma de la balanza. La
pantalla titilará "-
-
-
-
-
-" por
aproximadamente 3
segundos y luego mostrará
su peso. No se mueva
durante este proceso.
Si desea guardar su información (únicamente cuando su perfil esté
programado):
1. BAJESE DE LA BALANZA.
2. Pulse el botón con su número de usuario.
3. Pulse el botón “SET/SAVE” para almacenar la información.
B. MONITOREO DEL PESO A LO LARGO DEL
TIEMPO SIN PROGRAMAR SU PESO DESEADO
1. Pulse el botón con el
número del usuario
deseado. La balanza
mostrará HORA y FECHA,
luego se calibrará ("-
-
-
-
-
-") y
mostrará "00..0" con "LB" ó
"KG".
2. Párese sobre la balanza y
coloque sus pies de tal
forma que su peso quede
distribuido uniformemente
sobre toda la plataforma.
No se mueva durante este
proceso. Se mostrarán dos
pantallas.
3. Bájese de la balanza y
pulse el botón “SET/SAVE”
para guardar la información.
1
3
4
2
B
BALANZA CON
ALANZA CON
MONIT
MONITOREO DE PESO
OREO DE PESO
MMaannuuaall
ddeell
UUssuuaarriioo
Modelo HDM585
Parte trasera de la balanza
1. Selecccione libras (LB) ó kilogramos (KG)
2. Coloque la balanza sobre una superficie
plana. Es preferible una superficie firme para
mayor precisión.
1. Mantenga presionado el botón “SET/SAVE” hasta que la hora comience a titilar.
2. Pulse ó mantenga presionado el botón “SCROLL/HISTORY” para seleccionar la
HORA deseada.
3. Pulse el botón “SET/SAVE” para guardar.
4
. Pulse ó mantenga presionado el botón “SCROLL/HISTORY” para seleccionar los
MINUTOS deseados.
5. Pulse el botón “SET/SAVE” para guardar.
1
3
4
2
11
AJUSTE DE HORA
CONFIGURA
CONFIGURACIÓN INICIAL
CIÓN INICIAL
PR
PROGRAMA
OGRAMACIÓN DE HORA
CIÓN DE HORA Y FECHA
Y FECHA
1
PR
PROGRAMA
OGRAMACIÓN / REPR
CIÓN / REPROGRAMA
OGRAMACIÓN DEL PERFIL
CIÓN DEL PERFIL
6. Pulse el botón “SCROLL/HISTORY” para seleccionar "AM" ó "PM".
7. Presione el botón “SET/SAVE” para guardar. Ahora el reloj está programado.
1. Mantenga presionado el botón
del usuario deseado hasta que el
ícono de altura comience a titilar.
2. Pulse “SCROLL/HISTORY”
para seleccionar los PIES
deseados (ó CENTÍMETROS en
el modo de KG); y luego
presione el botón “SET/SAVE”
para guardar.
3. Pulse “SCROLL/HISTORY”
para seleccionar las PULGADAS
deseadas; y luego presione el
botón “SET/SAVE” para
almacenar. “YES” comenzará a
titilar.
Ahora ya puede programar su peso
deseado.
4. Pulse “SCROLL/HISTORY”
para seleccionar “YES” ó “NO”.
NOTA:
Usted puede programar el
peso deseado (seleccionan-
do “YES”) ó solamente
llevar registro de su peso
(seleccionando “NO”).
2
A. MONITOREO DEL PESO A LO LARGO DEL TIEMPO Y
COMPARACIÓN CON SU PESO IDEAL
1. Pulse el botón con el número del usuario deseado. La balanza mostrará la HORA y
FECHA, luego se calibrará ("-
-
-
- - -") y mostrará "0
0.0
.0" con “LB” ó “KG”.
2. Párese sobre la balanza y coloque sus pies de tal forma que su peso quede
distribuido uniformemente sobre toda la plataforma. La pantalla titilará "-
-
-
- - -" por
aproximadamente 3 segundos y luego mostrará su peso. No se mueva durante este
proceso. La balanza mostrará tres diferentes pantallas.
3. Bájese de la balanza y pulse el botón "SET/SAVE" para guardar la información.
5. Pulse el botón “SET/SAVE” para almacenar su selección.
6. Pulse el botón “SCROLL/HISTORY” hasta llegar a su peso deseado y pulse el
botón “SET/SAVE” para almacenar la información.
NOTA: Cada dígito es programado individualmente, hasta programar su peso deseado.
7. La pantalla mostrará “SAVED” dos veces, seguido de “-
-
-
-
-
-”. La balanza se
calibrará a “00.0”con “LB” ó “KG”.
8. Su peso deseado ha sido almacenado y la balanza esta lista para ser usada.
3
UTILIZANDO LA B
UTILIZANDO LA BALANZA DE MONIT
ALANZA DE MONITOREO DE PESO
OREO DE PESO
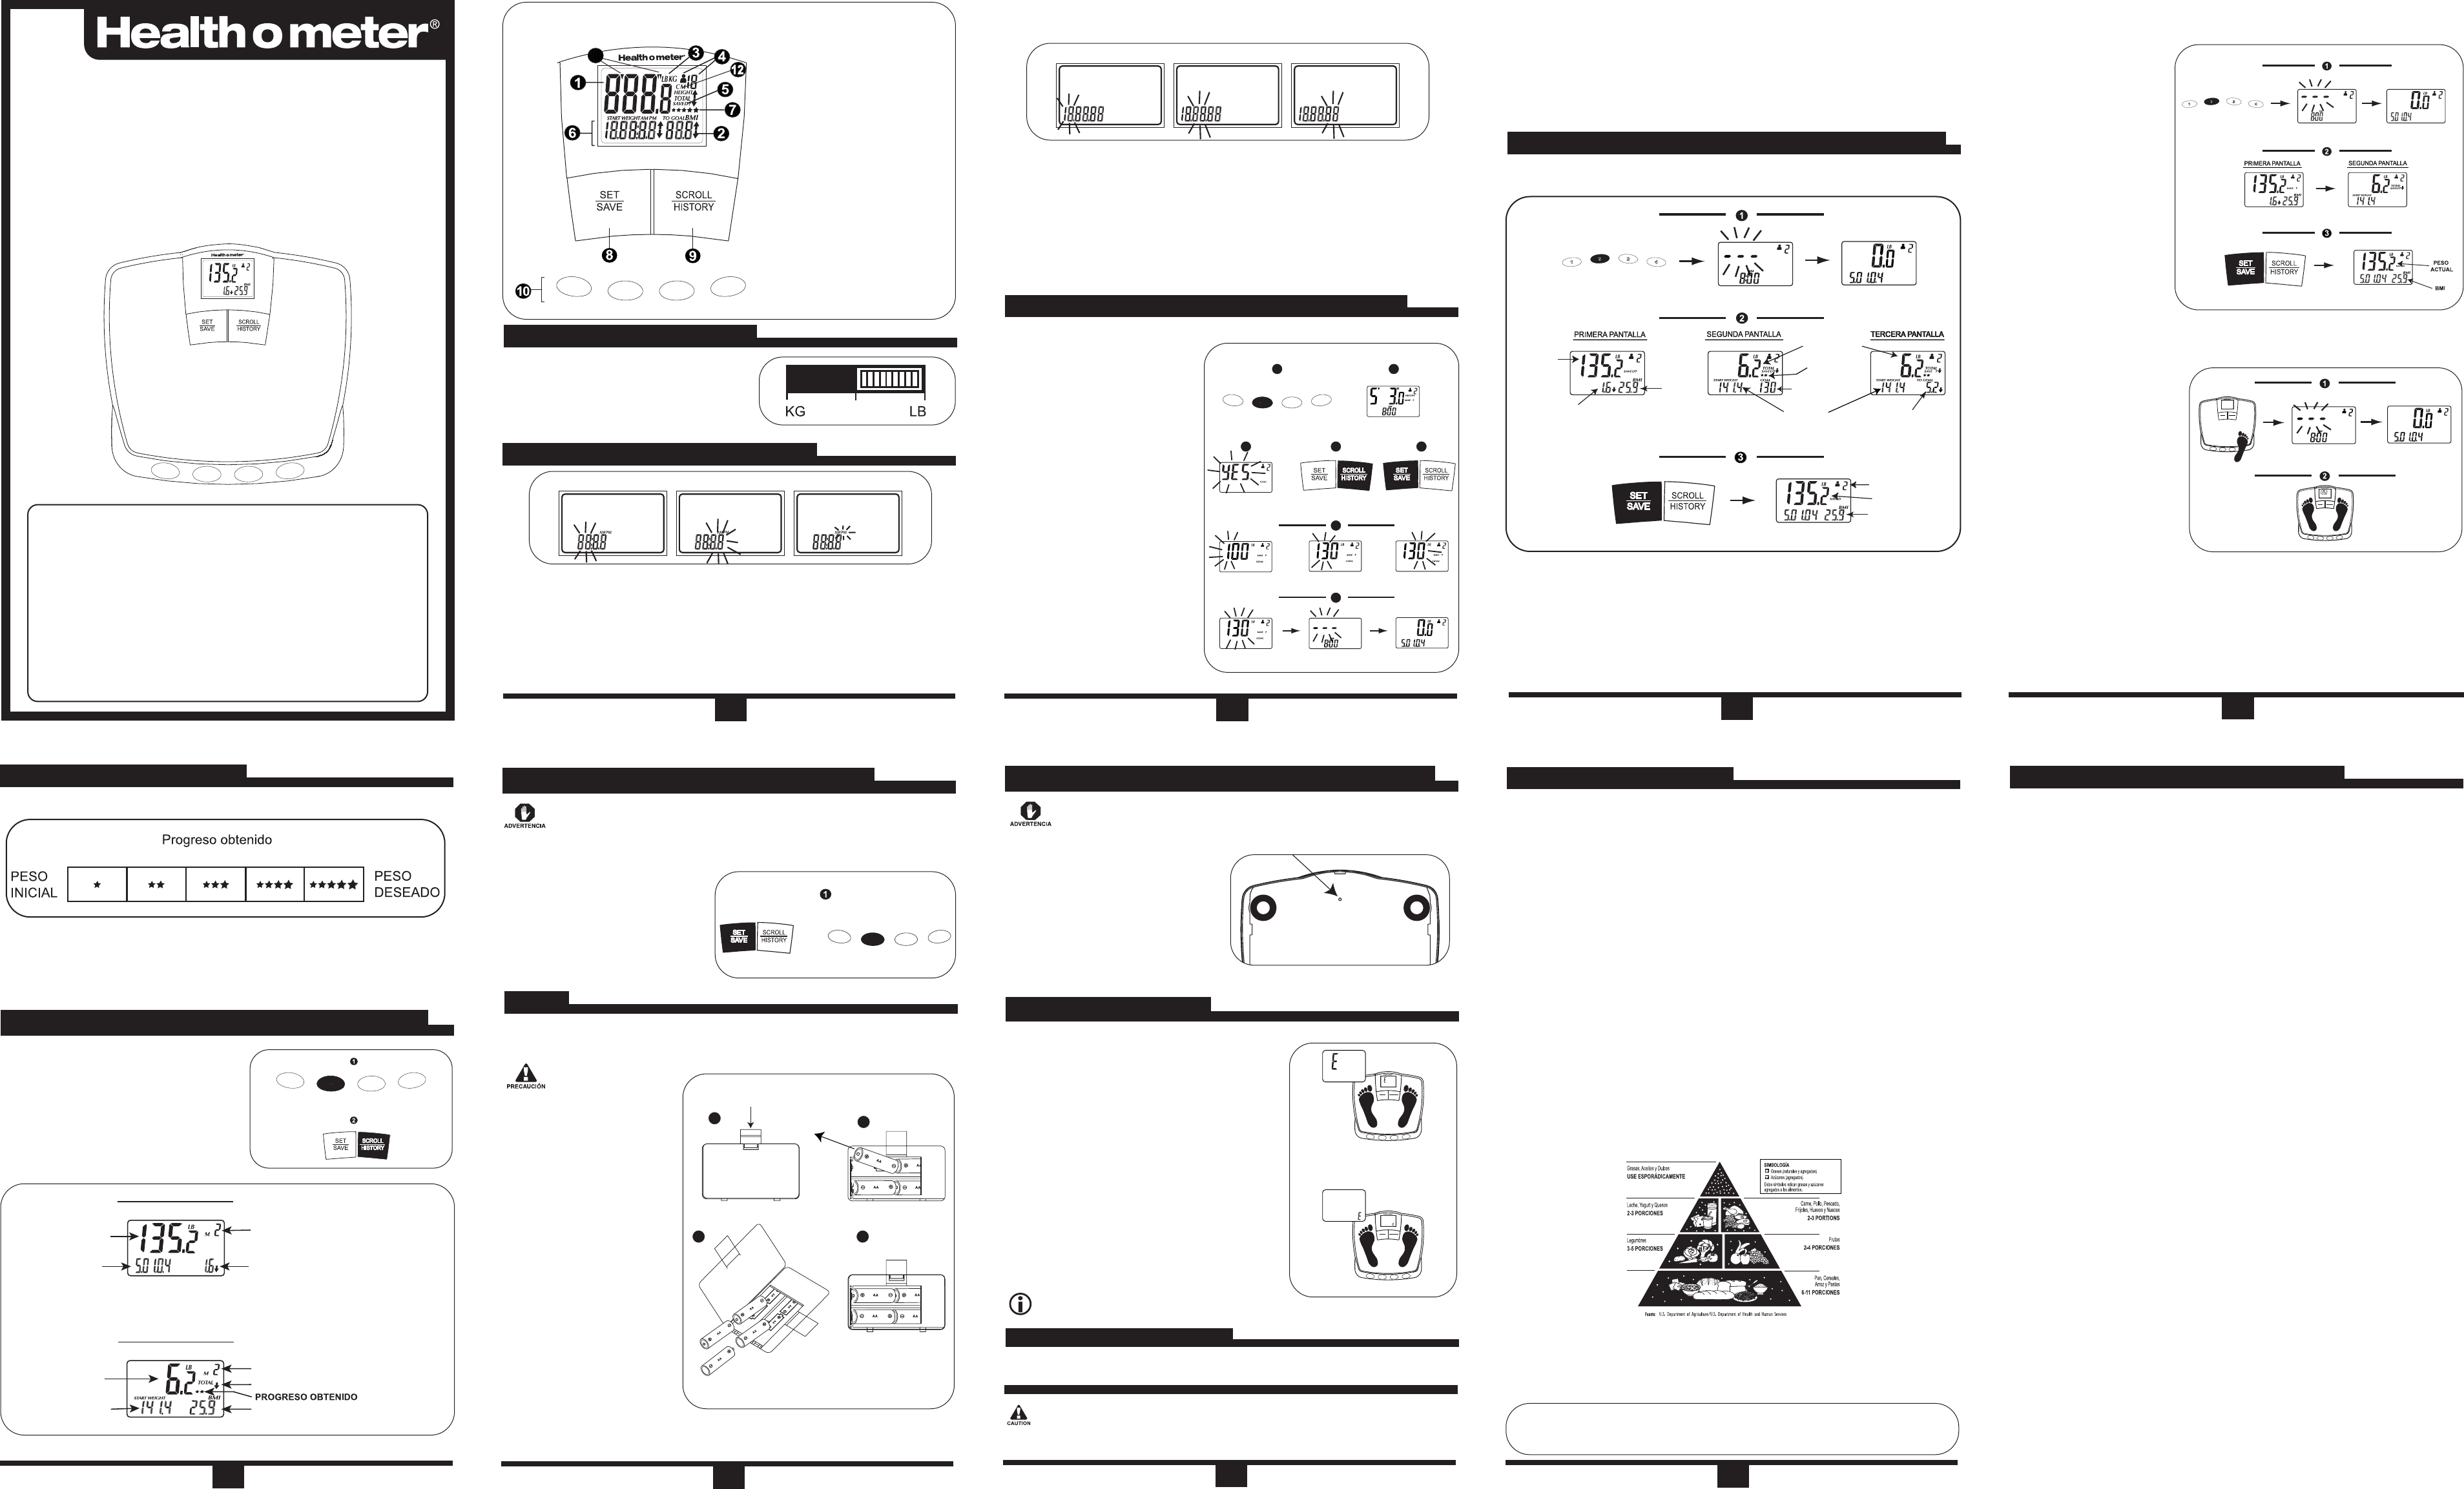
No. DE USUARIO
PESO ACTUAL
PESO
ACTUAL
BMI
PESO
DESEADO
PESO INICIAL
PROGRESO
TOTAL
DIFERENCIA
CON SU PESO
DESEADO
DIFERENCIA CON LA
LECTURA ANTERIOR
BMI
PROGRESO
OBTENIDO
1
3
4
2
SET
SAVE
SCROLL
HISTORY
1
3
4
2
SET
SAVE
SCROLL
HISTORY
4
NOTA:
Se mostrarán dos pantallas por
cada registro.
1. Pulse el número del usuario deseado.
2. Pulse el botón "SCROLL/HISTORY" para
ver los registros almacenados.
SEGUNDA PANTALLA
PRIMERA PANTALLA
PESO ACTUAL
FECHA EN QUE SE
ALMACENA LA LECTURA
No. DE MEMORIA
DIFERENCIA CON LA
LECTURA ANTERIOR
PESO INICIAL
No. DE MEMORIA
PESO TOTAL PERDIDO DESDE EL COMIENZO
BMI
PROGRESO TOTAL
REVISIÓN DE REGISTR
REVISIÓN DE REGISTROS
OS ALMA
ALMACEN
CENADOS (HIST
ADOS (HISTORIA)
ORIA)
1
3
4
2
La pantalla le premiará con hasta cinco estrellas dependiendo de su progreso:
Por ejemplo, cuando obtenga el 20% de la diferencia entre su peso inicial y su peso
deseado, aparecerá una estrella en la pantalla. Cuando obtenga 40%, 2 estrellas y asi
sucesivamente hasta alcanzar su peso deseado.
20+ % 40+ % 60+ % 80+ % 100 %
REGISTRANDO SU PR
REGISTRANDO SU PROGRESO
OGRESO
5
1
3
4
2
ELIMIN
ELIMINA
ACIÓN DEL HIST
CIÓN DEL HISTORIAL DE UN USU
ORIAL DE UN USUARIO
ARIO
67
8. Pulse ó mantenga presionado el botón “SCROLL/HISTORY” para seleccionar el
MES deseado.
9. Pulse el botón “SET/SAVE” para guardar.
10. Pulse ó mantenga presionado el botón “SCROLL/HISTORY” para seleccionar el
DÍA deseado.
11. Pulse el botón “SET/SAVE” para guardar.
12. Pulse ó mantenga presionado el botón “SCROLL/HISTORY” para seleccionar el
AÑO deseado.
13. Pulse el botón “SET/SAVE” para guardar.
SET DATE
POR FAVOR LEA Y GUARDE ESTAS INSTRUCCIONES
Felicitaciones por su adquisición de la balanza Health o meter® para
monitoreo del peso. ¡Es más que una simple balanza! Esta balanza
permite llevar registro del peso, del índice de masa corporal (BMI), y
de las variaciones de peso así como del progreso comparado con el
peso deseado para 4 usuarios diferentes. Además, la balanza
almacena hasta 10 registros por cada usuario .
La balanza Health o meter®para monitoreo del peso le puede
ayudar a alcanzar el físico deseado mediante la medición de su
peso y el monitoreo de las variaciones de peso a lo largo del tiempo.
ÍCONOS Y BOTONES 1. Indicador de Peso y Altura
2. Peso deseado, Indice de masa
corporal (BMI), diferencia en peso
comparado con su peso deseado,
y diferencia con la lectura anterior
3. Unidad de Medida: Libras (LB) ó
Kilogramos (KG)
4. Número del Usuario y número de
memoria
5. Información lista para ser
almacenada
6. Fecha/Hora, peso inicial y
diferencia en peso comparado con
la lectura anterior
7. Indicadores del Progreso obtenido
(estrellas)
8. Botón SET/SAVE
9. Botón SCROLL/HISTORY
10. Botones de Usuario
11. Altura mostrada en pies y pulgadas
12. Altura mostrada en centímetros
4
6
7
53
21
1
3
4
2
Esta balanza incluye cuatro (4) pilas AA. Cuando aparezca "LL0" en la pantalla,
reemplace todas las pilas.
Al retirar las pilas,
no se pierde la
información alma-
cenada. Solo se
requiere ajustar la
Fecha/Hora.
Reemplazo de las pilas
a) Localice la cubierta de las
pilas en la parte trasera de la
balanza. Presione la lengüeta
y retire la cubierta de las
pilas.
b) Libere cada una de las pilas
mientras sostiene la balanza
inclinada para que salgan de
su casilla.
c) Inserte 4 pilas nuevas, presio-
nándolas firmemente en su
lugar.
d) Coloque nuevamente la
cubierta de las pilas.
e) Configure la Hora/Fecha (Vea
PROGRAMACIÓN DE HORA
Y FECHA)
PILAS
PILAS
b
c d
a
Toda la información será
eliminada y no podrá ser
recuperada.
Asegúrese que la balanza esté apagada.
1. Volteé la balanza a la parte trasera.
2. Utilizando un alfiler, presione durante
3 segundos el botón localizado dentro
del pequeño orificio del cerca de la
parte superior de la balanza. La
memoria de la balanza se borrará
completamente.
ELIMIN
ELIMINA
ACIÓN
CIÓN T
TO
OT
TAL DE LA MEMORIA DE LA B
AL DE LA MEMORIA DE LA BALANZA
ALANZA
1
3
4
2
SET
SAVE
SCROLL
HISTORY
1
3
4
2
SET
SAVE
SCROLL
HISTORY
NOTA: No es el objetivo de este material el reemplazar los consejos de su médico o entrenador.
Por favor
consulte a su médico antes de comenzar cualquier programa de ejercicios o de reducción de peso/grasa. La
pérdida de peso individual puede variar dependiendo de cada persona. Health o meter® no será
responsable por los resultados individuales, ni por ninguna aseveración realizada por
terceras personas.
Una buena salud y condición física no solo se logra contando las calorías y reduciendo el consumo de
grasas en su dieta alimenticia. Consiste en una combinación balanceada de una buena alimentación y
un ejercicio adecuado. Realizar solamente una dieta o exclusivamente ejercicio no le darán los
resultados que la combinación de ambos le brinda. Para lograr un estilo de vida saludable, debe fijar
metas realistas y reducir la cantidad de calorías que consume, sin importar de donde provienen
(proteínas, carbohidratos, etc.).
Realizar dietas para perder peso origina la pérdida de tejido óseo y muscular beneficioso. Es preferible
reducir la cantidad de calorías e ingerir alimentos más saludables, además de incluir rutinas regulares
de ejercicio para perder peso al quemar la grasa acumulada. El ejercicio le hará sentir mejor ya que
aumenta el metabolismo, mejora la circulación de la sangre y reduce el estrés. Los músculos queman
grasa, tanto cuando se encuentran haciendo ejercicio, como cuando se encuentran en reposo.
Desarrolle un plan de ejercicios y dieta alimenticia apropiado para sus necesidades, complexión y
condición general de salud. En corto tiempo verá como esta poderosa combinación le hará sentir y lucir
mejor.
¿Cómo afecta a mi salud el peso extra?
El peso extra aumenta el riesgo de desarrollar problemas de salud tales como:
• Diabetes Tipo 2 (Azúcar alta en la sangre)
• Alta presión arterial
• Infartos y enfermedades cardíacas
• Algunos tipos de cáncer
• Apneas de sueño (cuando deja de respirar por cortos periodos de tiempo mientras duerme).
Consulte a su médico para mayor información.
Consejos útiles para la Alimentación
• Asegúrese de que las calorías diarias provenientes de grasa no excedan el 30%, con un máximo del
10% de grasa saturada.
• ¡Nunca se salte sus comidas! Mejor ingiera porciones apropiadas en cada comida y alimentos bajos
en calorías entre comidas para ayudar a saciar el hambre.
• Lea las etiquetas en la comida y el tamaño de las raciones recomendadas.
• Balancee el consumo de calorías con su nivel de actividades. Coma menos en los días con menor
actividad y más en los días con ejercicio riguroso.
• Siga la pirámide de alimentos publicada por el Departamento de Agricultura de los Estados Unidos.
Consejos útiles para el ejercicio
• Fije objetivos y escriba las metas que quiere alcanzar a corto y largo plazo
• Haga ejercicio habitualmente. Aparte un periodo determinado cada día – aun cuando solo
sean 30 minutos.
• Varíe su rutina de ejercicios y sus actividades para evitar desmotivarse.
• Solicite la ayuda de un amigo. El ejercicio en grupo ayuda a mantener la motivación.
UN
UNA
A VID
VIDA SAL
A SALUD
UDABLE
ABLE
8
GARANTÍA LIMIT
GARANTÍA LIMITAD
ADA DE 10
A DE 10 AÑOS
AÑOS
FAVOR DE NO DEVOLVER ESTE PRODUCTO AL LUGAR DE LA COMPRA NI A
LAS DIRECCIONES MENCIONADAS EN ESTE DOCUMENTO.
Sunbeam Products, Inc, ("Sunbeam") garantiza que por un período de diez años a partir de
la fecha de compra, este producto estará libre de defectos en material y mano de obra.
Sunbeam, a su opción, reparará o substituirá este producto o cualquier componente del
producto que se encuentre defectuoso durante el período de la garantía. El reemplazo será
hecho con un producto o componente nuevo o remanufacturado. Si el producto no está más
disponible, el reemplazo se puede hacer con un producto similar de valor igual o mayor. Ésta
es su garantía exclusiva. Esta garantía es válida para el comprador al por menor original a
partir de la fecha de la compra al por menor inicial y no es transferible. Mantenga el recibo
original de venta. Se requiere comprobante de compra para obtener el servicio de la
garantía. Los distribuidores de Sunbeam, los centros de servicio, o las tiendas al por menor
que venden productos de Sunbeam no tienen derecho de alterar, ni modificar ni cambiar de
ninguna manera los términos y las condiciones de esta garantía. Esta garantía no cubre el
desgaste normal de piezas o los daños resultantes de cualquier de lo siguiente: negligencia,
uso erróneo del producto, uso en voltaje incorrecto o uso contrario a las instrucciones de
funcionamiento, desarmado, reparación o alteración por cualquier persona con excepción de
Sunbeam o de un centro de servicio autorizado de Sunbeam. Además, la garantía no cubre:
Actos de Dios, tales como incendio, inundación, huracanes y tornados.
¿Cuáles son los límites en la responsabilidad de Sunbeam?
Sunbeam no será responsable por ningún daño fortuito o consecuente causado por el
incumplimiento de cualesquiera de las garantías o condiciones expresas, implicitas o
estatutarias.
Excepto hasta donde lo prohíba la ley aplicable, cualquier garantía o condición implicada de
comerciabilidad o aptitud para un propósito particular se limita en duración a la duración de
la garantía antedicha. Sunbeam rechaza cualquier otra garantía, condición o representación,
expresa, implicita, estatutaria o de otra manera.
Sunbeam no será responsable por ningún daño de cualquier tipo que resulte de la compra,
utilización o uso erróneo de, o inhabilidad de utilizar el producto incluyendo daños o pérdidas
de ganancias fortuitos, especiales, consecuentes o similares, ni por ningún incumplimiento
del contrato, fundamental o de otra manera, ni por ninguna demanda puesta contra el
comprador por cualquier otra parte.
Algunas provincias, estados o jurisdicciones no permiten la exclusión o la limitación de
daños fortuitos o consecuentes o limitaciones en cuanto al tiempo de duración de una
garantía implicada, por lo que las limitaciones o la exclusión antedichas pueden no aplicarse
a usted. Esta garantía le da derechos legales específicos, y usted puede también tener otros
derechos que varíen de provincia a provincia, de estado a estado o de jurisdicción a
jurisdicción.
Cómo Obtener Servicio de Garantía
Si usted tiene cualquier pregunta con respecto a esta garantía o quisiera obtener servicio de
garantía, por favor llame al teléfono 1-800-672-5625, o visite nuestro sitio Web en
www.healthometer.com y le será proporcionada la dirección de un centro de servicio
conveniente.
En E.E.U.U., esta garantía es ofrecida por Sunbeam Products, Inc. situada en Boca Raton,
Florida 33431.
FAVOR DE NO DEVOLVER ESTE PRODUCTO AL LUGAR DE LA COMPRA NI A
LAS DIRECCIONES MENCIONADAS EN ESTE DOCUMENTO.
© 2004 Sunbeam Products, Inc. Todos los derechos reservados. Health o meter®es una marca
registrada de Sunbeam Products, Inc. Boca Raton, Florida 33431. Impreso en China.
