HeathCo WLTRX3011 Wireless Door Chime Receiver User Manual Manual
HeathCo LLC Wireless Door Chime Receiver Manual
HeathCo >
User Manual
alert
wireless plug-in doorbell
with smartphone notifications
Owner’s Manual

2
Thank You for Purchasing Notifi™ Doorbell System
Welcome to Notifi by HeathZenith. This manual will help setup the Notifi system. Please read and understand this entire manual
before attempting to assemble, install, or operate the Notifi system. For additional support and videos, go to
www.heath-zenith.com/notifi.
IMPORTANT INFORMATION
• Minimum system requirement for the Notifi app is iOS 9.0 or higher and Android 5.0 or higher.
Notifi Alert Features
• Smart Phone Notifications
• Programmable Muting
Introduction
Table of Contents
INTRODUCTION .............................3
SETUP ................................... 4-6
HOW TO USE ............................ 7-10
CARE AND CLEANING ......................10
FAQS .................................. 11-12
To maintain the compliance with the RF exposure guideline, place the base unit at least 7.875" (20 cm) from nearby persons.
CAUTION
3
Introduction
Specifications
Power Requirements:
Chime: 120 VAC, 60 Hz
Push Button: Type CR2032 3V battery (included)
Push Button Transmission Range: 100 feet
Volume: Adjustable
Number of Tunes: 11
Operating Temperature: -13 to +120°F (-25°C to +50C)
Minimum System Requirements for the Notifi App: iOS 9.0 or higher and Android 5.0 or higher, Broadband Internet
Connection with Home Wi-Fi®: Download speed is 3 MB/s and upload speed is 1 MB/s
You Will Need
• Password for your home network
• Broadband Internet connection with home Wi-Fi router
• Phillips screwdriver
• Flat-head screwdriver
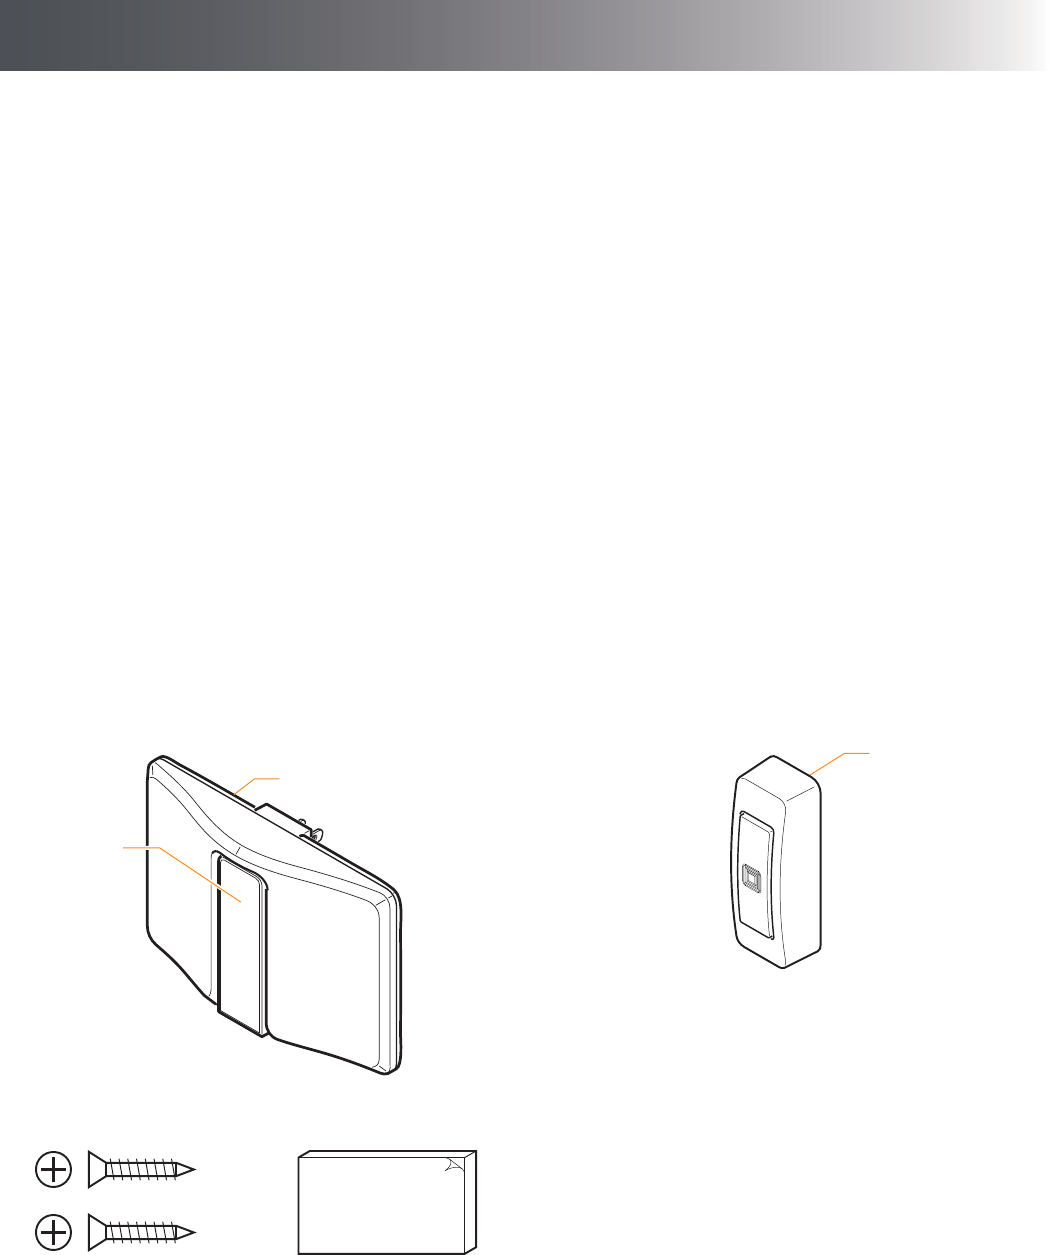
Carton Inventory
Notifi Alert Chime
Push Button
LED Indicator
Screws (#6 x 3/4") and Double-Sided Tape (for Push Button)
4
1
Setup
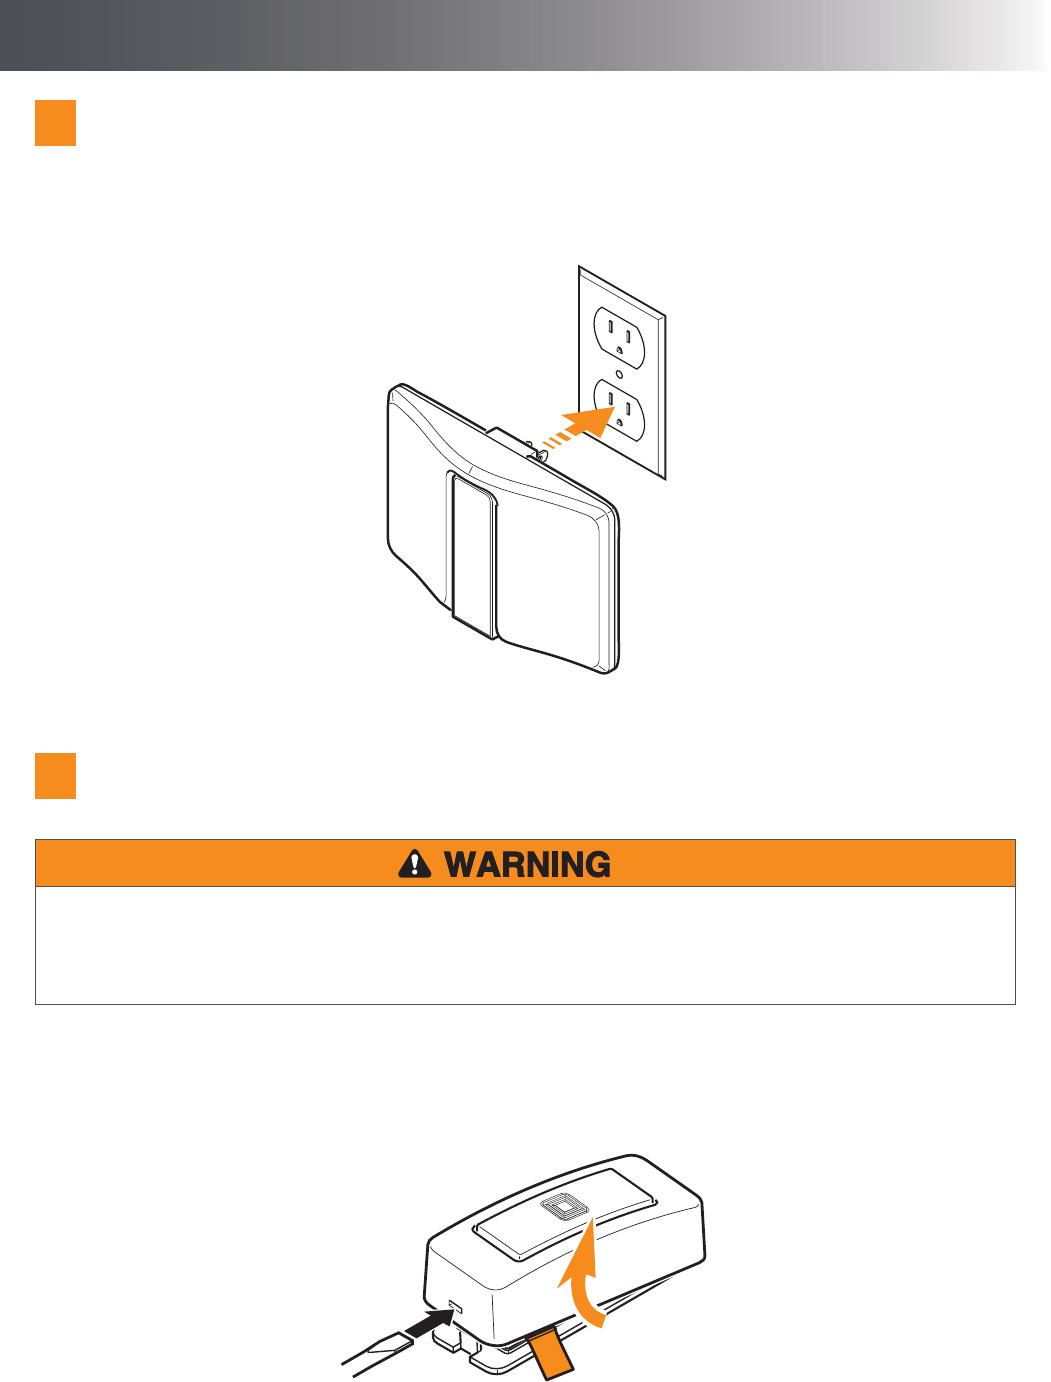
Remove the Notifi Alert Push Button Battery Tab
To prevent possible SERIOUS INJURY or DEATH:
• NEVER allow small children near batteries.
• If battery is swallowed, immediately notify doctor.
1. Remove the backplate of the Notifi Alert push button by pushing in tab on the bottom with a small flathead screwdriver (not
included).
2. Remove the orange battery tab.
Install the Notifi Alert Chime
1. Plug in the chime at the desired location. NOTE: It is recommended that the chime be plugged into the bottom wall
receptacle with the chime hanging below the receptacle as shown.
2
5
Setup
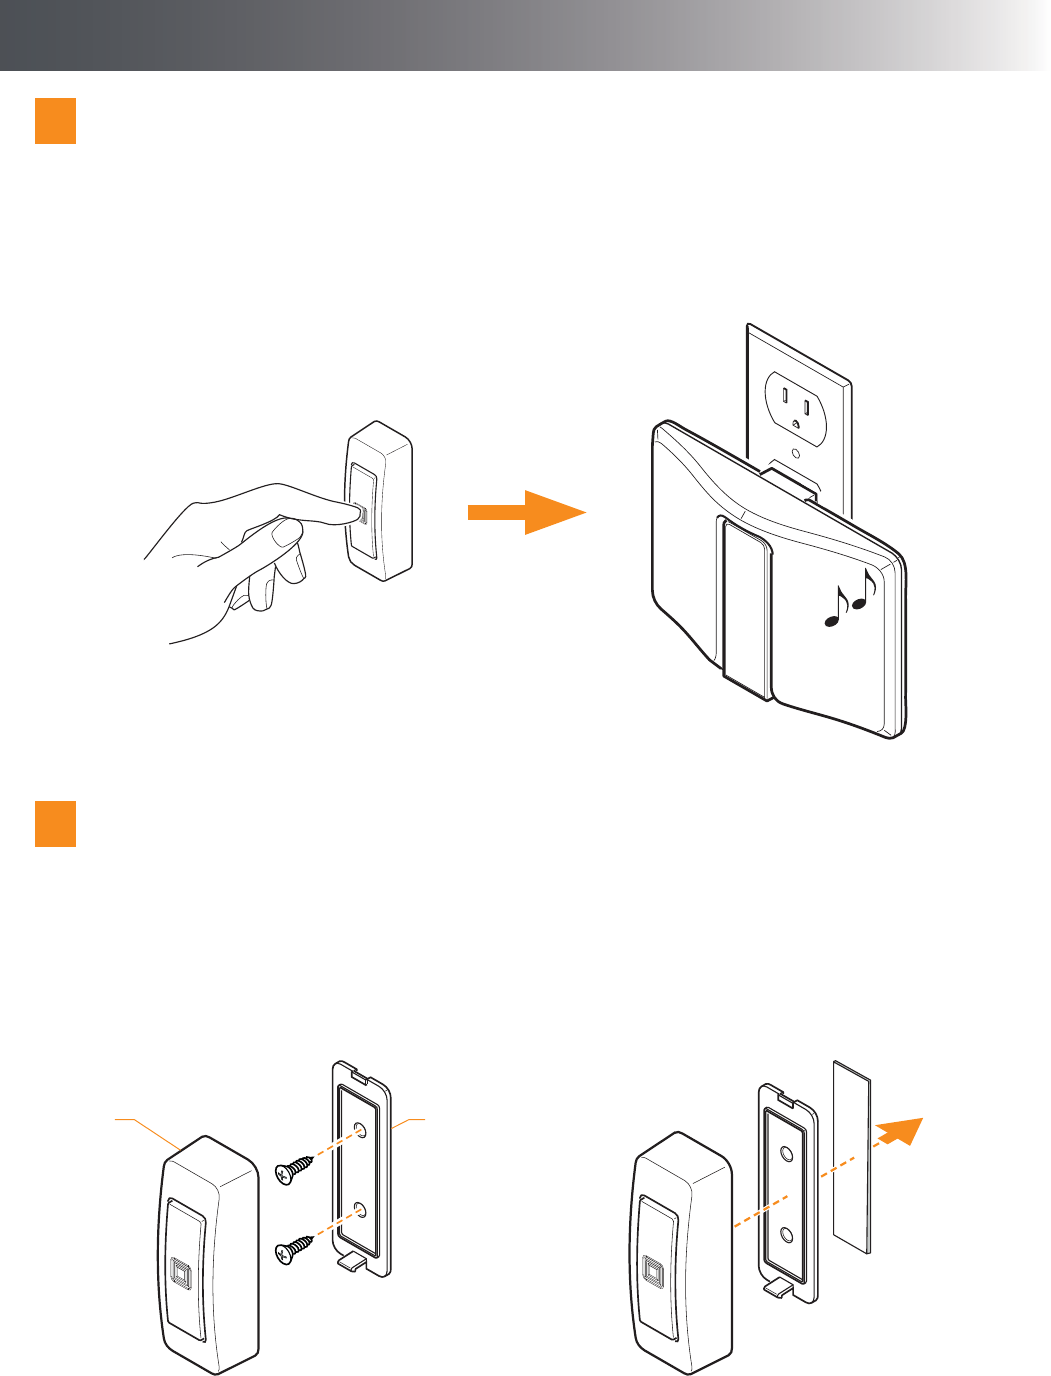
Test the Notifi Alert Push Button and Chime
IMPORTANT: Do not permanently mount the push button until the push button and chime are working properly.
1. Temporarily position the push button where it will be mounted.
2. Press the push button to verify the chime and push button work correctly.
3. If the chime does not sound, move the chime closer to the push button and test again.
3
Install the Notifi Alert Push Button
1. Secure the push button backplate to the door jamb or wall with screws or double-sided tape.
2. Slide the top of the Notifi Alert push button cover down onto the backplate and press the bottom of the push button cover
against the backplate until it snaps onto the backplate.
4
DOUBLE-SIDED TAPE INSTALLSCREW INSTALL
Remove material in screw holes (if needed)
before mounting with screws.
Push Button
Cover
Push Button
Backplate

6
6
Setup
Download the Notifi App
iOS Devices
Go to the App StoreSM and search for the “Notifi Connected Products” app and download.
Android Devices
Go to the Google Play™ store and search for the “Notifi Connected Products” app and download.
Setup the Notifi App
IMPORTANT: Your home password will be required during this process.
1. On your mobile device, go to Settings > Wi-Fi. Select the “Notifi Alert XXXX” (“XXXX” represents the unique MAC address
of each Notifi Alert Chime) from the available Wi-Fi networks.
2. Once connected, open the Notifi app. The app will detect your new Notifi system.
3. Select “YES” to start the setup and the app will guide you through the remaining steps.
NOTE: Your username will be your email. Your password must be a minimum of 8 characters or a maximum of 12 characters.
Alpha numeric and/or special characters may be used. IMPORTANT: The password must include at least 1 number and 1 letter.
5
7
How to Use
Systems Tab
The Systems tab is the “home screen” for all of your Notifi systems. From here you can access the following choices:
• Notifi systems – The Systems tab lists all Notifi systems available. Tap on the desired Notifi system to view a live camera
view.
• mute unmute – Selecting the “Mute” button will immediately mute your chime. Muting the chime from this location will
override any scheduled mute settings. Select “Unmute” to return to the scheduled mute settings.
• – Selecting the “Gear” icon next to a Notifi system will allow you to adjust different settings for that Notifi system.
• Add Notifi System – At the bottom of the list of Notifi systems is this selection. Tap on “Add Notifi System” to learn how
to add additional systems to your Notifi app.
• Logout – You may choose to logout of the Notifi app if you want to open the app on another device. Also, once logged out,
you will be asked to log back in if you receive a notification from a Notifi system on this device.
• Need help? – Selecting this link will take you to the Notifi FAQ website where you will have access to additional help features
as well as contacting HeathZenith technical service department.
• i – Tap on this icon to access additional information about the Notifi app.
Events
An event is created when the push button is pressed or an accessory is activated. To view an event, tap the Events tab.
Then tap the name of the Notifi system you would like to view events for. The events will be listed chronologically.
To delete an event, swipe left across the event you wish to delete. Then tap the trashcan icon .
Notifi Software Updates
Whenever a firmware update is available for a Notifi product, the “gear” icon next to the applicable product on the
“Systems” screen will change to a download icon . This icon will remain on the screen until the firmware update has
been completed. NOTE: A reminder pop-up screen will also appear each time you log into the Notifi app reminding you that a
firmware update is available. This pop-up screen will continue to appear until the firmware has been updated.
Alert LED Indicator
The Notifi Alert has a LED indicator on the face of the chime. This LED indicator offers additional information as to the status of
the Notifi Alert chime. See the FAQ section on page 12 for additional details.
Notification Settings
> Feature Settings > Notifications
The notifications settings screen allows you to enable, schedule, and disable push notifications and email notifications.
IMPORTANT: With any setting changes make sure you press the Save button Save in the upper right corner if you want to keep
your changes.

8
How to Use
Mute Settings
> Feature Settings > Mute Settings
The Notifi system allows you to mute your chime from within the Notifi app. The mute settings allow you to schedule times
during the day when the chime should be muted.
Default (2 Hour): Mutes the chime for a period of two hours from the time this selection is made. This selection may be turned
OFF at any time.
Weekday: Allows for a specific time during the day to be selected to mute the chime. The scheduled time is applied to all
selected days. This selection may be turned OFF at any time.
Weekend: Allows for quick scheduling of weekend only times when the chime is to be muted. This selection may be turned OFF
at any time.
IMPORTANT: The chime can be muted quickly from the Systems selection tab by selecting “Mute” under the selected Notifi
system. Any scheduled mute settings will be overridden while the chime is muted from the Systems tab. Select “Unmute” to
return to the scheduled mute settings.
IMPORTANT: With any setting changes make sure you press the Save button Save in the upper right corner if you want to keep
your changes.
Volume Setting
> Feature Settings > Speaker Volume
The Notifi Alert’s speaker volume can be adjusted by using the slide control at the bottom of the app screen.
System Name/Photo Icon
> Advanced Settings > System Name/Photo
The Notifi systems on your account can be renamed at any time.
A photo can be added to represent each Notifi system on your mobile device. The photo will be placed inside the blue circle icon
next to the selected Notifi system. NOTE: The photo is stored on the Notifi server and will appear on any device logged into or
sharing this account.
IMPORTANT: With any setting changes make sure you press the Save button Save in the upper right corner if you want to keep
your changes.
Add a Notifi Accessory
> Advanced Settings > Add Notifi Accessory
Up to 10 wireless accessories (sold separately) may be linked to your Notifi Alert. Follow the instructions on the screen to
connect each new accessory.
9
Multiple Users
> Advanced Settings > Manage Multiple Users
The Notifi system allows you to control multiple “guest” users within your account. These users will receive notifications when
the Notifi Alert is activated. The “guest” users will not be able to access any of the Notifi settings you have setup.
To add a “guest” user to your multiple user list, tap the “Add Viewers” button and type their email address in the “To:” field, then
tap the “Send” button. The “guest” user will receive an email inviting them to view your system. They will need to download the
Notifi app and create their own account before they are able to access your Notifi system.
You can turn off their access to your Notifi system at any time by tapping their username in the list. You can turn it back on by
tapping their username again.
Factory Reset
> Advanced Settings > Factory Reset
This selection will reset the Notifi Alert chime back to the original factory setting. NOTE: Once the Notifi Alert has been factory
reset, the Notifi Alert chime can be used on a different account.
When resetting the Notifi Alert chime:
• The Notifi Alert chime will be reset to factory settings and will no longer be connected to your wi-fi or the Notifi app.
• All events will be deleted from your account.
• All settings will be deleted.
• The Notifi Alert chime will be removed from your Heath/Zenith account.
NOTICE
Accessory Name/Photo Icon
Systems Tab > Notifi System > Accessory* > > Accessory Name/Photo
* Tap the arrow next to the Notifi system to show the Notifi accessories connected to that system.
The Notifi accessories on your account can be renamed at any time.
A photo can be added to represent each Notifi accessory on your mobile device. The photo will be placed inside the blue circle
icon next to the selected Notifi accessory. NOTE: The photo is stored on the Notifi server and will appear on any device logged
into or sharing this account.
IMPORTANT: With any setting changes make sure you press the Save button Save in the upper right corner if you want to keep
your changes.
How to Use

10
How to Use
Care and Cleaning
Chime and Push Button
Use a dry cloth to clean the chime and push button. Do not use any fluids on the chime or push button.
Accessory Sounds
Systems Tab > Notifi System > Accessory* > > Sounds
* Tap the arrow next to the Notifi system to show the Notifi accessories connected to that system.
The Notifi Alert chime has eleven tunes available for each accessory. A unique sound can be assigned to each accessory.
Auld Lang Syne Beethoven’s Fifth Birthday Celebration
Ding-Dong Ding Relax Triplet
Short Westminster Shorty We Wish You A Merry Christmas
Westminster Whittington
Deleting a Notifi Accessory
Systems Tab > Notifi System > Accessory* > > Delete Accessory
* Tap the arrow next to the Notifi system to show the Notifi accessories connected to that system.
This selection will delete the currently selected Notifi accessory. To reconnect the accessory to a Notifi system, go to “Add a
Notifi Accessory”.
Deleting a Notifi System
Systems Tab > Notifi System
NOTE: When a Notifi device has been physically damaged and is no longer working, this process will remove the system from
the Notifi app.
• Remove power from the damaged device (either unplug the device or remove the TRANS wire from the chime, if a wired
system).
• Slide the Notifi system name on the Systems Tab to the left.
• Tap the trashcan icon to delete the system.

11
FAQs
WHY WON’T THE NOTIFI SYSTEM CONNECT TO MY WIRELESS NETWORK (HOME ROUTER)?
To resolve issues with the Notifi Alert System not connecting to the home router:
• Using your mobile device, test the Wi-Fi signal at the location of the Notifi Chime. If the Wi-Fi signal at the chime is low,
move the Alert chime closer to the router or get a Wi-Fi extender.
• Verify you are connecting to the correct wireless network and inputting the correct network password. If you are unsure of
your network password, contact the router manufacturer.
• Verify if there is a firewall device installed (e.g. SonicWall, Zywall). If there is a firewall, the UDP timeout (UDP port 80 and
443) must be set to 180 seconds or greater for both inbound and outbound. If you are unsure how to set these, contact the
firewall manufacturer.
• If any changes have been made to the wireless network name, password or security, you must setup the Notifi System again.
Unplug the Notifi Alert chime for 30 seconds and plug the chime back into the wall outlet. Follow step 6 in the Setup section
to reconnect the chime to your app.
WHY AM I NOT RECEIVING NOTIFICATIONS?
• Ensure that your Notifi System is online and the blue LED on the Alert chime has a steady glow.
• Ensure notifications for your device is turned ON.
• Ensure that your mobile device has a data connection (Wi-Fi or cellular data).
• Ensure that the notifications settings in the Notifi App is turned on. Within the Notifi app, follow:
> Feature Settings > Notifications
NOTE: Check notification scheduling to ensure notifications have not been turned OFF.
• NOTE: Unplug the Alert chime for 30 seconds and plug back in. Wait 5 minutes for the Notifi system to fully boot and
recheck.
WHY DOES MY CHIME NOT RING WHEN I PRESS THE PUSH BUTTON?
• Ensure that the power is ON to the chime.
• Ensure the battery in the push button is good and the battery is installed correctly.
• Move the chime closer to the push button and test again.
• The chime and push button are not synced. Re-sync the chime and push button.
• Check mute scheduling to ensure the chime is not muted.
WHY IS MY ALERT CHIME SOUNDING IF NO TRANSMITTERS ARE BEING ACTIVATED?
Your Alert chime is receiving interference from another wireless device. Follow the steps below to reset your push button’s code
and re-sync the push button to the chime. NOTE: If more than one accessory is connected to the Alert chime, each accessory
must be reset in the same manner as the push button described below.
Remove the push button from the Notifi app:
• On the Systems tab, slide the push button to the left and press “Delete”.
Reset the push button:
• Remove the push button battery.
• Press and hold the push button for 10 to 15 seconds within 60 seconds after installing the battery into the push button.
Re-sync the push button and the Alert chime:
• After performing the steps above, use the Accessory Settings ( > Advanced Settings > Add Notifi Accessory) to re-sync
the push button (and any additional accessories) to the chime.

12
FAQs
WHAT ARE THE DIFFERENT LED INDICATORS?
The LED indicator on the Alert chime shows different Notifi Alert status indicators:
LED INDICATOR ISSUE
Blinks twice – pause – blinks twice continuously. Wi-Fi not connected during initial installation.
Glows steady Blue. Wi-Fi is connected.
LED indicator is off. Push button is pressed.
Slow blinking continuously. Wi-Fi not connected after initial installation.

PMN: WLTRX3011
This device complies with Part 15 of the FCC Rules and RSS-210 of Industry Canada. Operation is subject to the following two conditions: (1) this device may not
cause harmful interference, and (2) this device must accept any interference received, including interference that may cause undesired operation.
The user is cautioned that changes or modifications not expressly approved by the party responsible for regulatory compliance could void the user’s authority to
operate the equipment.
NOTE: This equipment has been tested and found to comply with the limits for a Class B digital device, pursuant to part 15 of the FCC Rules. These limits are designed
to provide reasonable protection against harmful interference in a residential installation. This equipment generates, uses and can radiate radio frequency energy
and, if not installed and used in accordance with the instructions, may cause harmful interference to radio communications. However, there is no guarantee that
interference will not occur in a particular installation. If this equipment does cause harmful interference to radio or television reception, which can be determined by
turning the equipment off and on, the user is encouraged to try to correct the interference by one or more of the following measures:
—Reorient or relocate the receiving antenna.
—Increase the separation between the equipment and receiver.
—Connect the equipment into an outlet on a circuit different from that to which the receiver is connected.
—Consult the dealer or an experienced radio/TV technician for help.
1 Year Limited Warranty
This is a “Limited Warranty” which gives you specific legal rights. You may also have other rights which vary from state to state or
province to province.
For a period of one year from the date of purchase, any malfunction caused by factory defective parts or workmanship will be cor-
rected at no charge to you.
Not Covered - Repair service, adjustment and calibration due to misuse, abuse or negligence, batteries, and other expendable items
are not covered by this warranty. Unauthorized service or modification of the product or of any furnished component will void this
warranty in its entirety. This warranty does not include reimbursement for inconvenience, installation, setup time, loss of use, unau-
thorized service, or return shipping charges.
This warranty covers only HeathCo LLC assembled products and is not extended to other equipment and components that a custom-
er uses in conjunction with our products.
THIS WARRANTY IS EXPRESSLY IN LIEU OF ALL OTHER WARRANTIES, EXPRESS OR IMPLIED, INCLUDING ANY WARRANTY,
REPRESENTATION OR CONDITION OF MERCHANT ABILITY OR THAT THE PRODUCTS ARE FIT FOR ANY PARTICULAR PURPOSE
OR USE, AND SPECIFICALLY IN LIEU OF ALL SPECIAL, INDIRECT, INCIDENTAL, OR CONSEQUENTIAL DAMAGES. REPAIR OR RE-
PLACEMENT SHALL BE THE SOLE REMEDY OF THE CUSTOMER AND THERE SHALL BE NO LIABILITY ON THE PART OF HEATHCO
LLC FOR ANY SPECIAL, INDIRECT, INCIDENTAL, OR CONSEQUENTIAL DAMAGES, INCLUDING BUT NOT LIMITED TO ANY LOSS OF
BUSINESS OR PROFITS, WHETHER OR NOT FORESEEABLE.
Some states or provinces do not allow the exclusion or limitation of incidental or consequential damages, so the above limitation or
exclusion may not apply to you.
Please keep your dated sales receipt, it is required for all warranty requests.
Apple and the Apple logos are trademarks of Apple Inc., registered in the U.S., and other countries. App Store is a service mark of Apple Inc.
Google Play is a trademark of Google Inc.
Android is a trademark of Google Inc.
Wi-Fi® is a registered trademark of Wi-Fi Alliance
© Copyright 2017 HeathCo LLC – All Rights Reserved
209187-01
Please call 1-800-858-8501 (English speaking only) for assistance before returning product to store.
8:00 AM to 5:00 PM CST (M-F).
You may also write* to:
HeathCo LLC
P.O. Box 90045
Bowling Green, KY 42102-9045
ATTN: Technical Service
* If contacting Technical Service, please have the following information available:
Model Number, Date of Purchase, and Place of Purchase.