users manual
Optical Mouse User Manual
Welcome
Thank you for selecting this product! This mouse is one kind
of newly developed wireless RF mice in our company, and it uses
the global-used frequency of 27.045MHz ±3kHz. The
comfortable and perfect shape is designed according to
somatology. With it, you can get rid of the bondage of wires and
enjoy your beautiful life from the high technology.
Product Features
1. Radio frequency 27MHz,enjoy more freely your wireless
space。
2. It has 256 ID code, there is no interference with
neighbouring mice being used at the same time.
3. Automatically go into sleep mode when mouse left idle for
a period of time. Hence prolong battery life。
4. Super mini built-in receiver, outstanding design。
Systems Compatibility
IBM PC & its compatible computer and Windows
me/2000/XP;no drivers need.
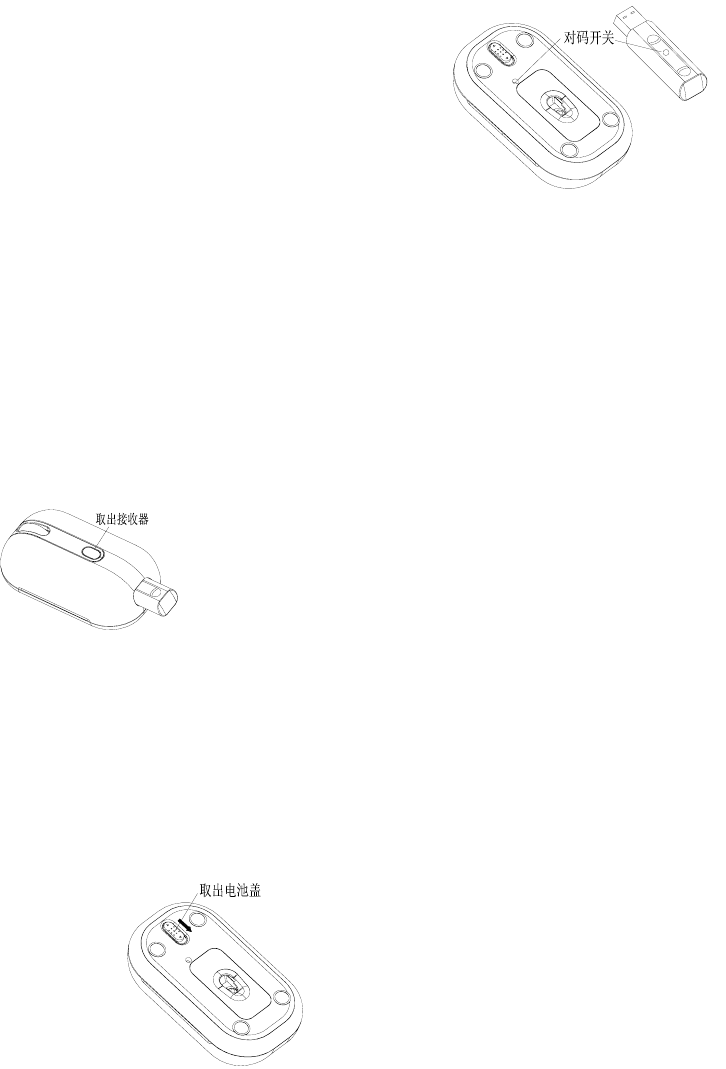
Build-in mini receiver
As below picture, pressing the receiver-out button and the
receiver can spring out automatically. if you push the receiver
back to the transmitter, power will be cut down automatically.
Battery Installation
1. Please prepare two PCS new AAA alkaline
batteries。
2. As below picture, slide the button of the battery
cover towards you and pull the battery cover
out。
3. Please insert the batteries correctly according to
the polarity mark of the battery compartment.
4. Put the battery covers back onto the mouse.
When “click” sound is heard, it means it is
securely locked.
Receiver Installation
1. Please use extended cable, and put the receiver
and transmitter on one desktop, in this way, you
may have higher working efficiency.
2. If you use PS/2 connector, please use the USB
to PS/2 adaptor and connect with the connector
before your computer start-up.
3. For laptop, you may connect the receiver directly
with the USB connector.
Step of data connection
1. Please move the mouse near to the receiver.
2. Press the ID button of receiver top by hand , the
red LED beside ID button starts to flash slowly.
Press the ID button of mouse bottom with some
hard and acuate object within 10 seconds, the
receiver light will flash very fast, a few seconds
later it will be stopped. You may start to use it。
3. Working distance: within 0.6-1.5 m。
Attention
1. Please don’t move the mouse too far away from
the receiver in order to work more smoothly..
2. You’d better use the mouse on the white desk, in
this way the battery can be used longer time or if
you travel outside。
3. This mouse has a power saving sleep
mode .Press any key or scroll the wheel to wake
up the mouse from its sleep mode。
4. If you want to turn off the mouse power, press
the ID switch of the mouse for 3 seconds. To
turn the power back on, please the ID switch
once again.
5. The optical mouse may not work on smooth
surface, glass, any reflecting surface or 3D
mouse pad.
6. If fresh batteries are changed within 10 seconds,
no need to repeat the ID setup. otherwise, need
to repeat ID setup.
7. You can place the receiver in the mouse when
you want to carry the mouse on business, and
press the switch of ID for a long time so as to
switch off the power。
Caution
Any changes or modifications to this unit without
approval from the manufacturer will void the
warranty and can lead to broken equipment.。
Note
This equipment has been tested and found to comply
with the limits for a class B digital device, compliant
to part 15 of the FCC Rules. These limits are
designed to provide reasonable protection against
harmful interference in a residential installation. This
equipment generates, uses and can radiate radio
frequency energy and, if not installed and used in
accordance with the instruction, may cause harmful
interference to radio communications. However,
there is no guarantee that interference will not occur
in a particular installation. If this equipment does
cause harmful interference to radio or television
reception, which can be determined by turning the
equipment off and on, the user is encouraged to try
to correct the interferent by one or more of the
following measures:
Adjust the orientation of the receiving antenna.
Increase the distance between the equipment and
receiver.
Connect the equipment into an outlet on a circuit
difference from the one to which the receiver is
connected.
Consult the dealer or an experienced radio/TV
technician for help.