Hehui Safety Manufacture Y6600 BLINC POD; MODEL: Y6600 User Manual
Shanghai Hehui Safety Products Manufacture Co., LTD. BLINC POD; MODEL: Y6600
Users Manual
Bluetooth stereo headset user guide
Bluetooth Introduction:
The Bluetooth headset is a portable headset solution based on Bluetooth wireless technology.
Bluetooth wireless technology is a short-range radio communication technology intended to
replace the cables connecting electronic devices. The technology uses a globally available
frequency range intended to ensure communication compatibility worldwide.
Caution:
Listening at full volume to music or voice through a headset may damage your hearing.
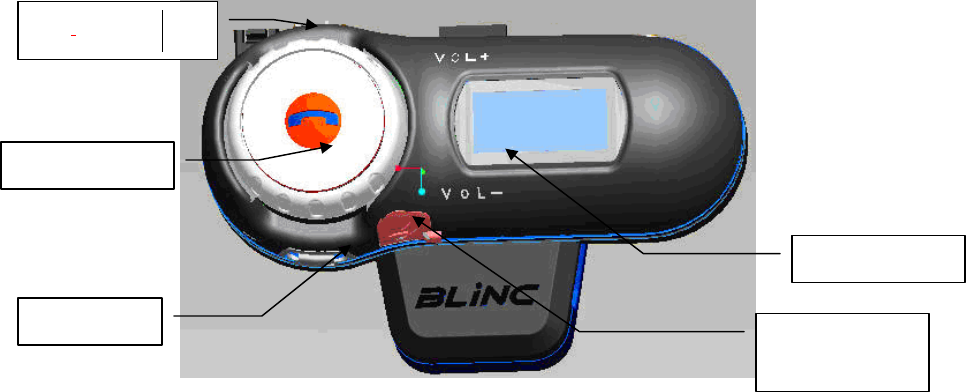
BlueToothHeadSet Control Buttons and Display Screen:
BUTTON_MFB Multifunction Button
BUTTON_VOL+ Volume Increase
BUTTON_VOL- Volume Decrease
BUTTON_MP3_Preview MP3 Preview----preview MP3
BUTTON_MP3_Next MP3 Next----Pause MP3 playing/Next MP3
In this Bluetooth headset design, the three buttons above were integrate to a Control Button.
Middle is Multifunction Button(BUTTON_MFB), which can be use to control several headset
functions. You can turn the Control Button to adjust speaker volume(BUTTON_VOL+/-), more
detail as follow, you can turn deasil to increase volume , also you can turn anticlockwise to
decrease volume.
Bluetooth headset supports profiles and functions:
Hands-Free Profile(HFP), HeadSet Profile(HSP), Advanced Audio Distribution Profile(A2DP),
Audio/charger
socket
LED LIGHT
Control Button
mp3/ preview
MP3 next

Bluetooth Intercom function,FM radio.
To use your headset, your phone or music device should
support the following Bluetooth profiles:
Profile Description
HFP(Hands-freeProfile
)
Providing a wireless means for both
remote control of the Mobile Phone by
the Hands-Free device and voice
connections between the Mobile Phone
and the Hands-Free device.
A2DP (Advanced Audio
Distribution Profile)
AVRCP
Stereo music streaming.
MP3 CONTROL
Bluetooth Interference Issues:
The quality of Bluetooth transmission may also be affected by the position of your music device.
Should you experience choppy or distorted audio, move the position of your music device or
phone to a different location until the signal improves.
Getting started:
Before you can use your headset, you should first:
Charge the headset battery.
Connect Audio Plug
Pair the headset with a device, for example, a mobile phone.
Charging:
The headset comes with a built-in rechargeable battery. We recommend that you charge the battery
before using the headset for the first time.
Connect the charger to the device.
The charging time is about 2 hours.During charging,Red LED is on. When the battery is fully
charged, Red LED is off. When you using the headset, if you hear a cadent tone, and Red LED is
flashed , battery needs recharging.
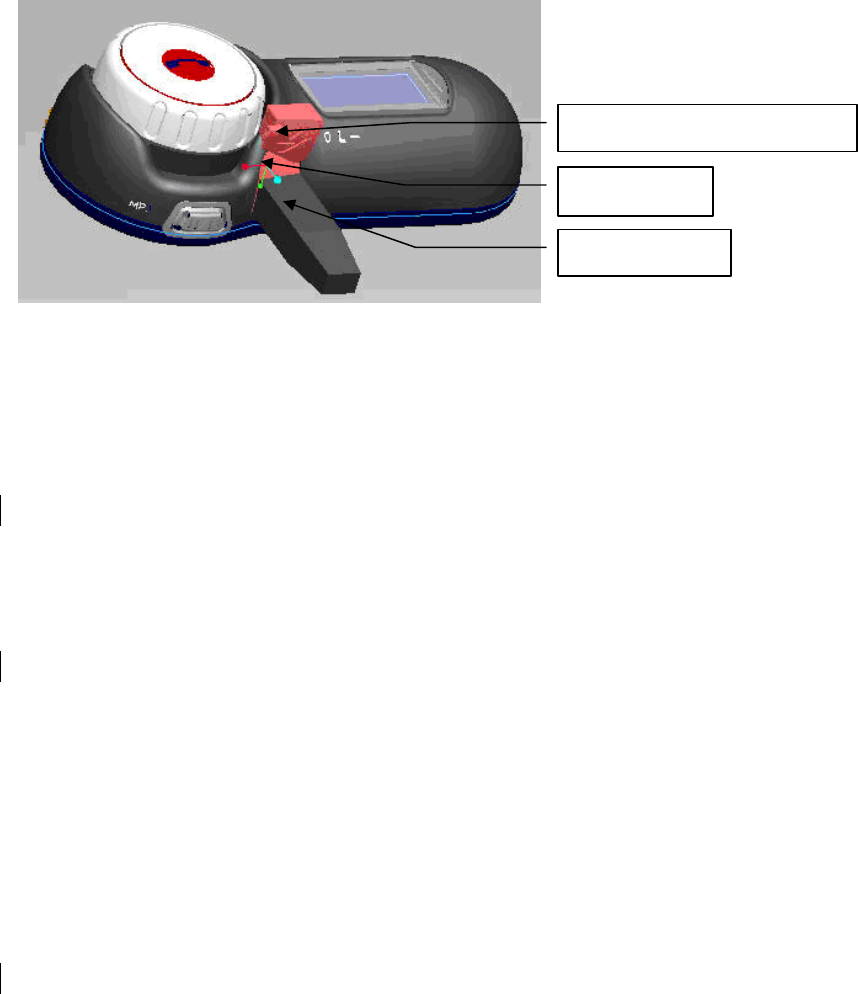
To charge, please use the handle on Charging Port Rubber Cover gently pull out the Cover,
Expose the Charging Port and Plug the Charger Plug into the BlueTooth headset’s Charging Port.
At this time Red LED is on when the battery is charging. As Figure2 shown.
Connect Audio plug:
Connect Audio plug is the same as the charger.
Figure 2
To turn the headset on:
Press and hold the Multifunction Button(BUTTON_MFB) for approximately 2 seconds until
you hear a short low tone followed by a short high tone. Blue LED is flashed.
When turned on, the headset automatically establishes handsfree phone and streaming music
connections with the last connected Bluetooth devices (phone and/or music devices).
To turn the headset off:
Press and hold the Multifunction Button(BUTTON_MFB) for about 5 seconds until will hear a
short high tone followed by a short low tone.
To pairing the headset with a phone:
Before using the headset,you should pair the headset to your mobile phone.
The phone enter the searching BlueDevice mode and with the headset turned off, press and hold
the Multifunction Button(BUTTON_MFB) for about 5 seconds until Blue led and Red led is
flashed aterntively.
Operate the phone to discover and connect the headset. The headset passkey is 0000. If pairing
success.
Pairing, done only once. Each time you use your headphones, it will be automatically connected to
your phone.
Note:Before enter pairing mode,please make sure other BlueDevices are closed.
Charging Port
Charging Port Rubber Cover
Charging Plug
Using the headset
Listening to music:
Your headset allows you to listen to stereo music from your Bluetooth streaming music source.
Note: When placing or receiving calls, music playing from a Bluetooth music source is
automatically paused. When the call is finished, music playing is resumed.
STOP/PAUSE music:
Press and hold MP3 Button 2 second when MP3 is playing.
RESTART music:
Press and hold MP3 Next Button 2 second if MP3 is paused using MP3 Button.
SELECT PRVIEW music:
Press MP3 preview button.
SELECT NEXT music:
Press MP3 next button
To answer a call using the call handling button:
When the headset rings, and display Call number ,press the Multifunction
Button(BUTTON_MFB) to answer the incoming call .
Terminate call:
Press the Multifunction Button(BUTTON_MFB) to terminate call.
To reject a call:
When the headset rings, press and hold the Multifunction Button(BUTTON_MFB) until you
hear a long beep.
Note: this function valid only if your phone support Hands-Free Profile.
Voice Dial:
If headset in idle time, press and hold the Multifunction Button(BUTTON_MFB) until you hear
a long beep,then release.
Adjusting Volume:
To increase speaker volume, turn the Control Button deasil once can increase a volume level ,
repeatedly, until you reach the desired volume level.
To decrease speaker volume, turn the Control Button anticlockwise once can decrease a volume
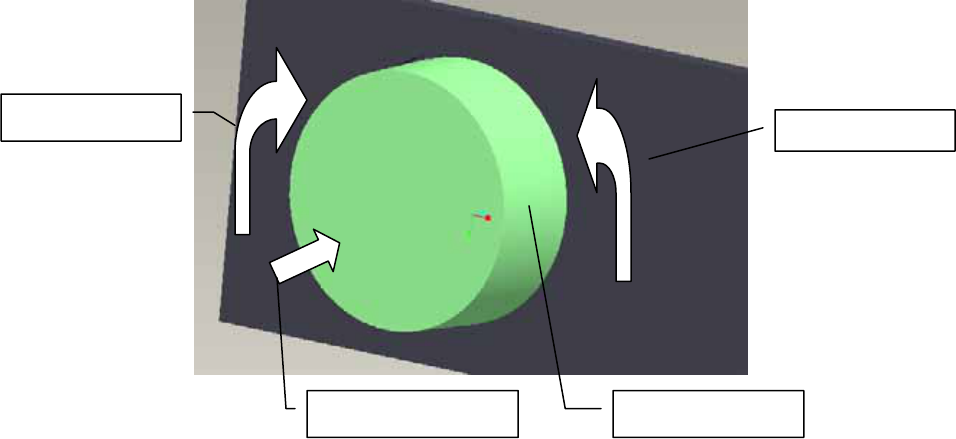
level , repeatedly, until you reach the desired volume level.
You can adjust the headset speaker volume during a call, or the ring volume when you are not
engaged in a call.
Figure 4
To transfer the sound to the phone:
During a call using your headset, press and hold the Multifunction Button(BUTTON_MFB)for
about 2 seconds.If your headset work with HeadSetProfile, you just need turn down your headset.
Transferring sound from phone to headset:
If you make a call using your phone, you can transfer the sound to the headset if the headset is on,
press and h1old the Multifunction Button(BUTTON_MFB) about 2 seconds.
How to use Bluetooth Intercom function
First-Time Use:
First time to use Bluetooth Intercom function, before two headsets want to make intercom call,
they should be pair each other. If pair succeed and link message not lost, they can use Intercom
function to call just needn’t pair again.
Note: When placing or receiving calls, intercom is automatically terminated. When the call is
finished, intercom can’t be resumed.
How to pair for Intercom:
Headset is in power on status(wait 5 seconds after power on headset) turn and hold the Control
Button deasil (or anticlockwise) about 5 seconds until Blue LED and Red LED is flashed
aterntivrly and headset(master role) enter Inquire mode. Then headset(slave role) should press and
Control Button
Volume Decrease
Volume Increase
Multifunction Button
hold the Control Knob about 5 seconds to enter Pair mode.In suitable radio range, they can finish
the pair process automatically.
If pair completed, headset(master role) will make a intercom call to headset(slave role)
automatically. About 3 or 4 times ring rang, headset(slave role) can answer the call automatically.
During call, each one can press the Control Knob to terminate the call. Aslo ,they all have a pair
record about the other, so both can initiate a call to the other optionally.
How to make a Intercom Call:
Master Role:
Not active call status, press the Multifunction Button(BUTTON_MFB), headset will enter
Intercom mode. Headset will initiate a intercom call to the last paired headset automatically, so it
works as master role., press the Multifunction Button(BUTTON_MFB) to terminate the call.
And if headset (master role) play A2DP music from phone before enter Intercom mode, while end
up Intercom call, headset (master role) will reconnect to mobile phone and play music go on (But
for some manufacturers Bluetooth phone’s issue, headset can’t restart music playing, for this issue,
you need restart headset playing manually).
Slave Role:
Not in active call state, it accept the connection request from headset(master role).
About 3 or 4 times ring rang, headset(slave role) will answer the incoming call automatically.
Or you can press the Multifunction Button(BUTTON_MFB) to answer the incoming call
manually. Headset (slave role )can press the Multifunction Button(BUTTON_MFB) to
terminate the call. And if headset (slave role) play A2DP music from mobile phone before
Intercom call, while end up Intercom call, headset (slave role) will reconnect to phone and
play music go on (But for some manufacturers Bluetooth phone’s issue, headset can’t restart
music playing, for this issue, you need restart headset playing manually).
Reset button for system halted.
How to mount the headset
Package Contents
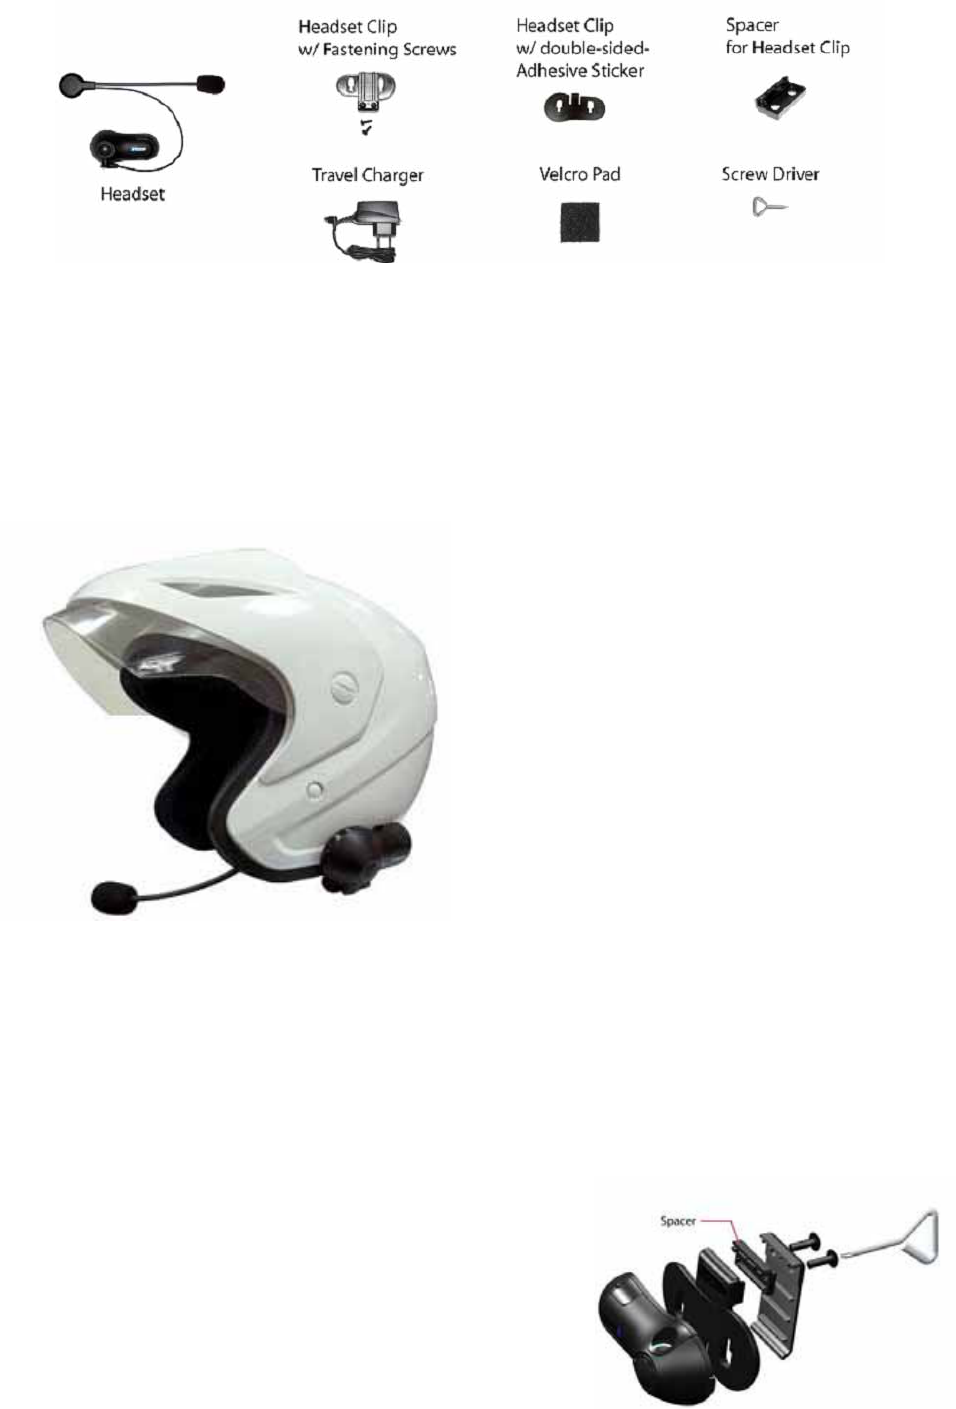
Installing the Clip Mount
Important: There are 2 types of Headset Clips
included in this package. Either can be used with
full or open faced helmets, on either side of the
helmet.
- Headset Clip Mount with Fastening Clamp.
(removable)
- Headset Clip Mount with Adhesive. (fixed)
Use the one which best suits your helmets
design.
Using the Headset Clip Mount with Fastening Clamp
1. Using the providedscrew driver, loosen the Clips’ screws enough to allow the Clip to slide
onto either side of the Helmets’ shell.
2. Make sure you put the clip under the helmets padding.
3. Adjust the Clip until you find the best location for your helmet.
4. Tighten the screws to hold the clip firmly in place.
Note: If the helmet’s shell is too thick, the Spacer
(provided) may be needed to put in between the 2 parts of
the Headset Clip, as shown in the picture .Use the additional
longer screws (provided) for this purpose.
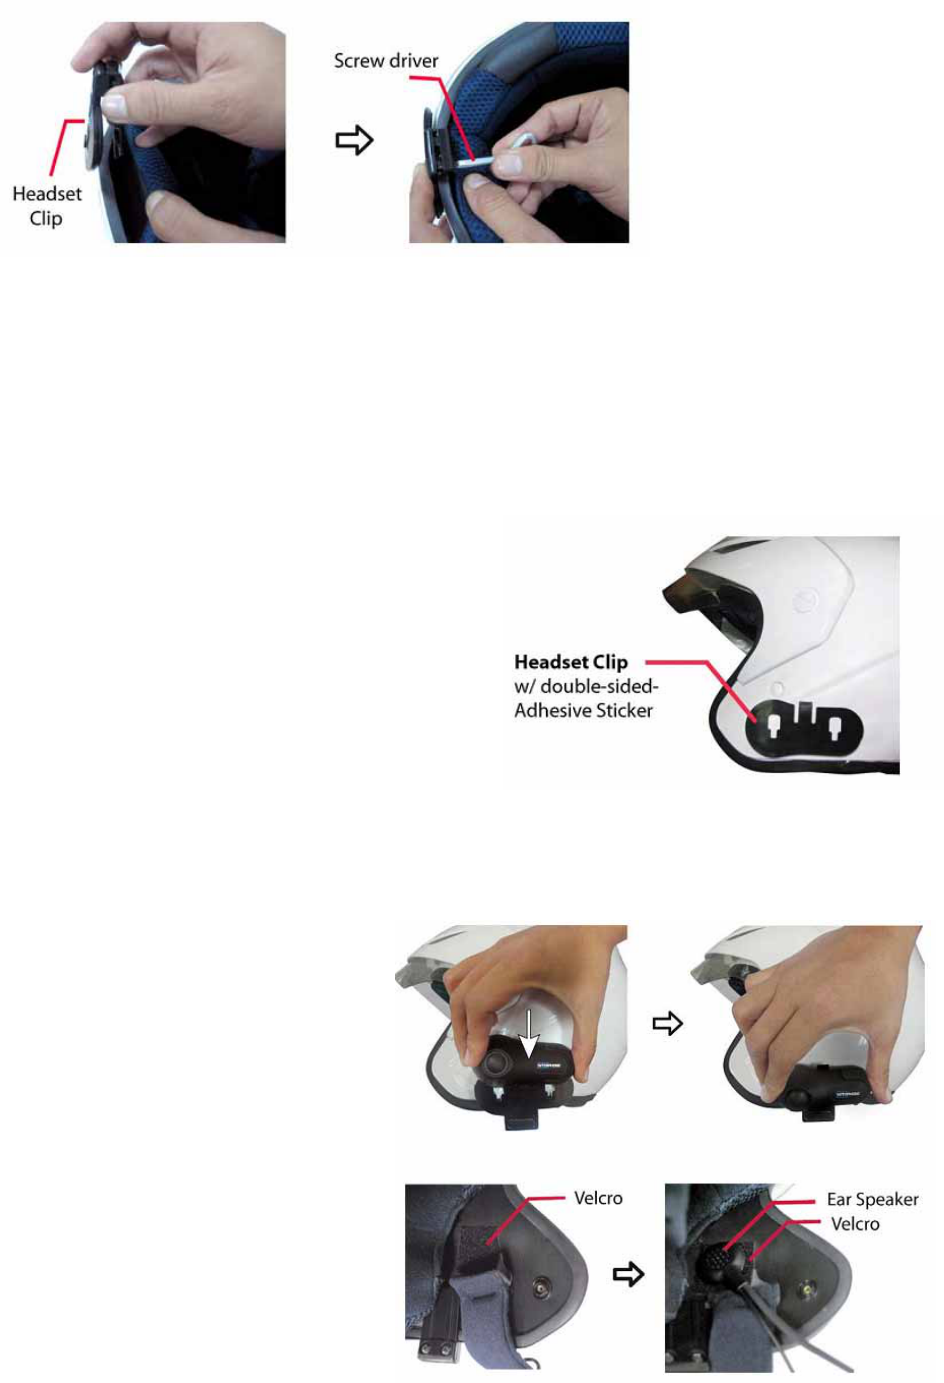
Using the Headset Clip Mount with Adhesive
1. Before removing the protective strip from the double-sided adhesive, find the best location to
place the Headset Clip Mount.
2. Clean the part of the helmet that the Headset Clip Mount with Adhesive will be attached to.
Remove any dirt or grease. Do not use cleaners that may damage the helmet or that will leave an
oily residue. Make sure the surface is dry before continuing.
3. Check again the positioning of the clip. Once it is
mounted it will not be possible to move without
making the adhesive unusable. So please take care
when choosing its position.
4. Note that the small section of the two holes/slots
in the Clip must be faced towards the bottom of the
helmet. As shown in the picture to the right.
5. Remove the protective strip from the double-sided
adhesive and carefully attach the Clip to the outside
shell of the helmet.
Mounting the Headset
1. Take your headset and slide it down
into the slots in the Headset Clip Mount.
Make sure that it’s perfectly fitted and
locked into place by trying to extract it,
pulling upwards.
2. Now you need to attach the speaker
and microphone arm to the inside of the
helmet. Take the Velcro pad which the
speaker will attach to, and test for the
best position to fix it. The Velcro Pad
should be fixed at the height of your ear
in the helmets ear pocket. You will

need to put the helmet on a few times to find the optimum position to apply the pad. When the
correct positioning is found, remove the protective strip and apply the Velcro Pad.
Quick removal of the Headset
Remove the Headset by pushing down the lock as shown
and then take out the Headset in an upward motion.
Dimension: 8cm*3cm*2.5cm
FCC ID: VWUY6600
IMPORTANT REGULATORY INFORMATION
This device complies with Part 15 of the FCC Rules:
Operation is subject to the following two conditions:
1. This device may not cause harmful interference and
2. This device must accept any interference that is received, including any interference that may
cause undesired operation.
NOTE: THE MANUFACTURER IS NOT RESPONSIBLE FOR ANY RADIO OR
TV INTERFERENCE CAUSED BY UNAUTHORIZED MODIFICATIONS TO
THIS EQUIPMENT. SUCH MODIFICATIONS COULD VOID THE USER'S
AUTHORITY TO OPERATE THE EQUIPMENT