Heraeus Electro Nite DL5W Digilance V User Manual Digilance V
Heraeus Electro-Nite Co. Digilance V Digilance V
Users Manual
HERAEUS
Instruction and Operating Manual
Temperature Measuring Unit
Digilance V
Document Version: 1.01
Date of Issue: 26 November 2018
Original instructions
26 November 2018 Digilance V page 1 of 21
File name: Digilance V_1.01
Version: 1.01
All instrument boards contain electronic components that can be damaged by electrostatic discharge. These
boards should only be handled by qualified personnel. The necessary safety precautions and security guidelines
must be observed during maintenance and service on the instrument.
Trademarks: All brand names and product names included in this manual are trademarks, registered
trademarks, or trade names of their respective holders.
PosithermP
P and Checkmate are registered trademarks of Heraeus Electro-Nite.
© 2018 Heraeus Electro-Nite
This manual is copyrighted by Heraeus Electro-Nite. No part of this document
may be reproduced, transmitted, transcribed, stored in any retrieval system, or
translated into any language by any means without the express written
permission of Heraeus Electro-Nite.
Heraeus Electro-Nite makes no warranties as to the contents of this
documentation and specifically any implied warranties of merchantability or
fitness for any particular purpose.
Heraeus Electro-Nite further reserves the right to alter the specification of the
product without obligation to notify any person or organization of these
changes.
Improvements or instrument changes added after this document was printed
are to be found on one or more pages enclosed at the end of this manual.
We ask you to take note of these extra sheets.

Page 2 of 21 Digilance V 26 November 2018
File name: Digilance V_1.01
Version: 1.01

26 November 2018 Digilance V page 3 of 21
File name: Digilance V_1.01
Version: 1.01
Table of contents
1 Safety and usage notes ................................................................................................................................... 4
1.1 General ..................................................................................................................................................... 4
1.2 Qualified personnel ................................................................................................................................... 4
1.3 Danger notices .......................................................................................................................................... 4
1.4 Proper usage ............................................................................................................................................ 5
1.5 RoHS regulations ...................................................................................................................................... 5
1.6 WEEE regulations ..................................................................................................................................... 5
1.7 Battery ...................................................................................................................................................... 6
1.8 Disposal of instrument or parts ................................................................................................................. 6
1.9 CE-Declaration of Conformity ................................................................................................................... 7
1.10 ISED Canada and FCC Compliance Notice .............................................................................................. 7
2 Introduction ...................................................................................................................................................... 8
3 Transportation .................................................................................................................................................. 9
3.1 Instrument transport mode ........................................................................................................................ 9
3.2 Shipping of ESD-sensitive modules .......................................................................................................... 9
3.3 Packaging the instrument ......................................................................................................................... 9
3.4 Shipment of Lithium Ion Batteries in the Instrument ................................................................................. 9
4 Standard Operation ........................................................................................................................................ 10
4.1 First Use ................................................................................................................................................. 10
4.2 Lance Installation .................................................................................................................................... 11
4.2.1 TC Wire Color Codes ....................................................................................................................... 11
4.3 Performing Measurements ...................................................................................................................... 12
4.3.1 Measurement Evaluation ................................................................................................................. 12
4.4 Measurement History .............................................................................................................................. 13
4.5 Additional Measurement Information ...................................................................................................... 13
4.5.1 Working with Heat Numbers ............................................................................................................ 13
4.5.2 Working with Measurement Places .................................................................................................. 13
4.6 Battery Charging ..................................................................................................................................... 14
4.7 Power Management ................................................................................................................................ 15
5 Instrument Configuration ................................................................................................................................ 16
5.1 Configuration Login ................................................................................................................................. 16
5.2 Configuration Parameters ....................................................................................................................... 16
6 Advanced Operation (Wireless) ..................................................................................................................... 17
7 Maintenance .................................................................................................................................................. 18
7.1 Procedures for maintenance and repair .................................................................................................. 18
7.2 Guidelines for Handling (ESD) ................................................................................................................ 18
7.3 Cleaning notes ........................................................................................................................................ 18
7.4 Battery .................................................................................................................................................... 18
7.5 Performing a test measurement with a Checkmate ................................................................................ 18
7.6 Calibrating the system ............................................................................................................................ 18
8 Troubleshooting ............................................................................................................................................. 19
9 Technical data ................................................................................................................................................ 20
10 Spare Parts ................................................................................................................................................ 21
Page 4 of 21 Digilance V 26 November 2018
File name: Digilance V_1.01
Version: 1.01
1 Safety and usage notes
1.1 General
This manual provides the information required to use the instrument. It is written for technically qualified
personnel such as engineers, programmers, or maintenance specialists who have been specially trained and
who have the specialized knowledge required in the field of instrumentation, electronics, and control.
This manual is an integral part of the instrument or device even if, for logistical reasons, it has to be ordered
separately. For the sake of clarity, not all details of all versions of the instrument or device are described, nor can
it cover all conceivable cases regarding installation, operation, and maintenance. If you require further
information, or face special problems that have not been dealt with in sufficient detail in this manual, contact
Heraeus Electro-Nite.
We would also point out that the contents of this manual shall not become a part of, or modify, any prior or
existing agreement, commitment, or legal relationship. The Purchase Agreement contains the complete and
exclusive obligations of Heraeus Electro-Nite. Any statements contained in this manual do not create new
warranties or restrict the existing warranty.
1.2 Qualified personnel
Only qualified personnel should be allowed to work on this instrument or device. Non-compliance with the
warnings contained in this manual or appearing on the instrument or device itself can result in severe personal
injury or damage to property. Qualified personnel include:
• System planning and design engineers who are familiar with the safety concepts of automation equipment,
instruments, or electronic devices.
• Operating personnel who have been trained to work with automation equipment, instruments, or electronic
devices, and are conversant with the content of the manual in as far as it is connected with the actual operation
of the instrument or device.
• Commissioning and service personnel who are trained to repair such equipment, instruments, or electronic
devices, and who are authorized to energize, de-energize, clear, ground, and tag circuits, equipment, and
systems in accordance with established safety practices.
1.3 Danger notices
The notices and guidelines that follow are intended to ensure personal safety, as well as protecting the
instrument or device and any connected equipment against damage.
The safety notices are warnings for protection against loss of life (yours or service personnel) or for protection
against damage to property and are highlighted in this manual by the terms and pictograms defined here. The
terms used in this manual and marked on the instrument or device itself have the following significance:
Danger: Indicates that death, severe personal injury, or substantial property damage will result if proper
precautions are not taken.
Warning: Indicates that death, severe personal injury, or substantial property damage can result if proper
precautions are not taken.
Caution: Indicates that minor personal injury or property damage can result if proper precautions are not taken.
Note: Indicates important information about the product, its operation, or a part of the manual to which special
attention is drawn.
Attention: Hints in this documentation to special safety-related guidelines, which equate to the safety level of
Caution and Note.
This pictogram, is intended to alert the user to the presence of important operating and
maintenance (servicing) instructions on the literature accompanying the instrument or
device.
This pictogram is used in relation to Danger, Warning, and Caution notices.
26 November 2018 Digilance V page 5 of 21
File name: Digilance V_1.01
Version: 1.01
1.4 Proper usage
• The instrument or instrument components may only be used for the applications described in the manual or
the technical description, and only in combination with the equipment, components, and devices of other
manufacturers as far as this is recommended or permitted by Heraeus Electro-Nite.
• The instrument described has been developed, manufactured, tested, and the manual compiled in keeping
with the relevant safety standards. Consequently, if the handling instructions and safety guidelines described
for planning, installation, operation, and maintenance are adhered to, the instrument or device, under normal
conditions, will not be a source of danger to property or life.
1.5 RoHS regulations
All electrical devices sold in the European market from the 1 July 2006 must fulfil the EU Directive 2002/95/EC,
and RoHS 2 directive 2011/65/EU, on the Restriction of the use of certain Hazardous Substances in Electrical
and Electronic Equipment (RoHS) as well as the national laws derived from it. According to the definition in
Annex IB of the EU Directive 2012/19/EU WEEE, Heraeus Electro-Nite measuring instruments and analysis
devices belong to category 9 - monitoring and control instruments.
All Heraeus Electro-Nite instruments placed on the market after 1 July 2006 do not contain materials prohibited
according to the RoHS directive.
Affected parts and components are identified and adapted to the statutory requirements and other substances in
those parts and components are utilized where necessary. The quality and usability of our devices are not
affected.
The adaptations are usually not visible, although adapted primary housing parts can show different surface color.
1.6 WEEE regulations
Heraeus Electro-Nite devices are exclusively for commercial use and may not be transferred to private use.
Devices must be disposed of according to the national, statutory regulations for commercial electrical scrap. You
must also follow the EU Directive WEEE regulations and their national conversion. If in doubt, ask your national
importer or Heraeus Electro-Nite.
All old Heraeus Electro-Nite devices can be deposited at Heraeus Electro-Nite premises, free of charge and
using a certificated disposal company. The customer pays only for the carriage.
According to the EU Directive 2002/96/EC Waste Electrical and Electronic Equipment (WEEE),
all electrical devices sold in the European market from the 13 August 2005 must be marked with
a special symbol. This symbol (crossed out waste disposal receptacle with thick black bar
underneath) indicates to the customer that the device must not be placed in household waste,
but must be either deposited at a collection place for commercial scrap or returned to the
manufacturer.
Page 6 of 21 Digilance V 26 November 2018
File name: Digilance V_1.01
Version: 1.01
1.7 Battery
All batteries and cells require proper disposal. Do not discard in conventional trash disposal. The disposal of
batteries and cells should be in compliance of local environmental guidelines and regulations.
The Digilance V contains a Lithium Ion battery and therefore requires certain precautions.
Warning:
• Do not open, disassemble or deform the battery.
• Avoid shorting the battery contacts.
• Do not immerse the battery in water.
• Do not expose to, or dispose of the battery in fire.
• Do not carry out any soldering work on batteries (danger of explosion).
• Avoid excessive physical shock or vibration to the battery.
• Keep the battery out of the reach of children.
• Never use a battery that appears to have suffered abuse.
• Battery must be charged in appropriate charger only.
• Never use a modified or damaged charger.
• Store battery in a cool, dry and well-ventilated area.
• To prevent fire or shock hazard, do not expose battery to rain or moisture.
• Batteries must be disposed of as classified waste.
• Maximum ambient temperature of the battery is 100°C.
Warning:
• Do not heat the Digilance V or battery above 100°C.
• Battery may ignite, explode, leak or heat causing personal injury.
1.8 Disposal of instrument or parts
If the instrument has to be discarded, think about the following recycling issues. The device consists of several
components that can be disposed of separately:
• The electronic cards for electronic recycling
• The housing for metal recycling
• The battery pack
For further disposal information, follow the local legislation.
26 November 2018 Digilance V page 7 of 21
File name: Digilance V_1.01
Version: 1.01
1.9 CE-Declaration of Conformity
Heraeus Electro-Nite International N.V.
Centrum Zuid 1105
3530 Houthalen
Belgium
Declares that:
Instrument: Digilance V
Complies with the essential provisions of the following EU-directives:
• Directive 2014/30/EU concerning electromagnetic compatibility (EMC).
• Directive 2014/35/EU concerning electrical equipment designed for use within certain voltage limits (LVD).
• Directive 2015/863/EU RoHS 3
• Radio equipment directive (RED) 2014/53/EU
1.10 ISED Canada and FCC Compliance Notice
Section applies only to Wireless Models.
The enclosed device complies with Part 15 of the FCC Rules and Industry Canada License Exempt RSS
Standard(s). Operation is subject to the following two conditions: (1) This device may not cause harmful
interference, and (2) This device must accept any interference received, including interference that may cause
undesired operation.
Any changes or modifications in construction of this device which are not expressly approved by the party
responsible for compliance could void the user’s authority to operate this equipment.
This equipment has been tested and found to comply with the limits for a Class B digital device, pursuant to Part
15 of the FCC Rules. These limits are designed to provide reasonable protection against harmful interference in a
residential installation. This equipment generates uses and can radiate radio frequency energy and, if not
installed and used in accordance with the instructions, may cause harmful interference to radio communications.
However, there is no guarantee that interference will not occur in a particular installation. If this equipment does
cause harmful interference to radio or television reception, which can be determined by turning the equipment off
and on, the user is encouraged to try to correct the interference by one of the following measures:
• Reorient or relocate the receiving antenna.
• Increase the separation between the equipment and receiver.
• Connect the equipment into an outlet on a circuit different from that to which the receiver is connected.
• Consult the dealer or an experienced radio/TV technician for help.
Under Industry Canada regulations, this radio transmitter may only operate using an antenna of a type and
maximum (or lesser) gain approved for the transmitter by Industry Canada. To reduce potential radio interference
to other users, the antenna type and its gain should be so chosen that the equivalent isotropically radiated power
(e.i.r.p.) is not more than that necessary for successful communication.
This portable transmitter with its antenna complies with FCC/IC RF exposure limits for general population /
uncontrolled exposure.
Page 8 of 21 Digilance V 26 November 2018
File name: Digilance V_1.01
Version: 1.01
2 Introduction
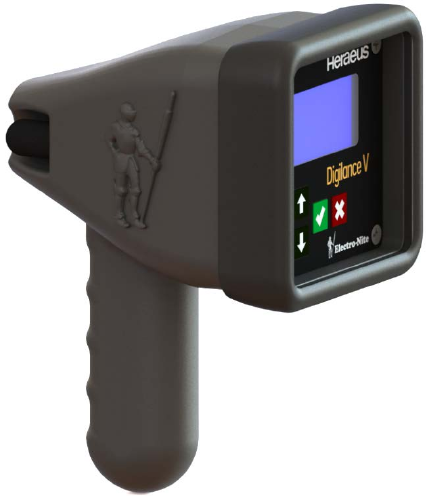
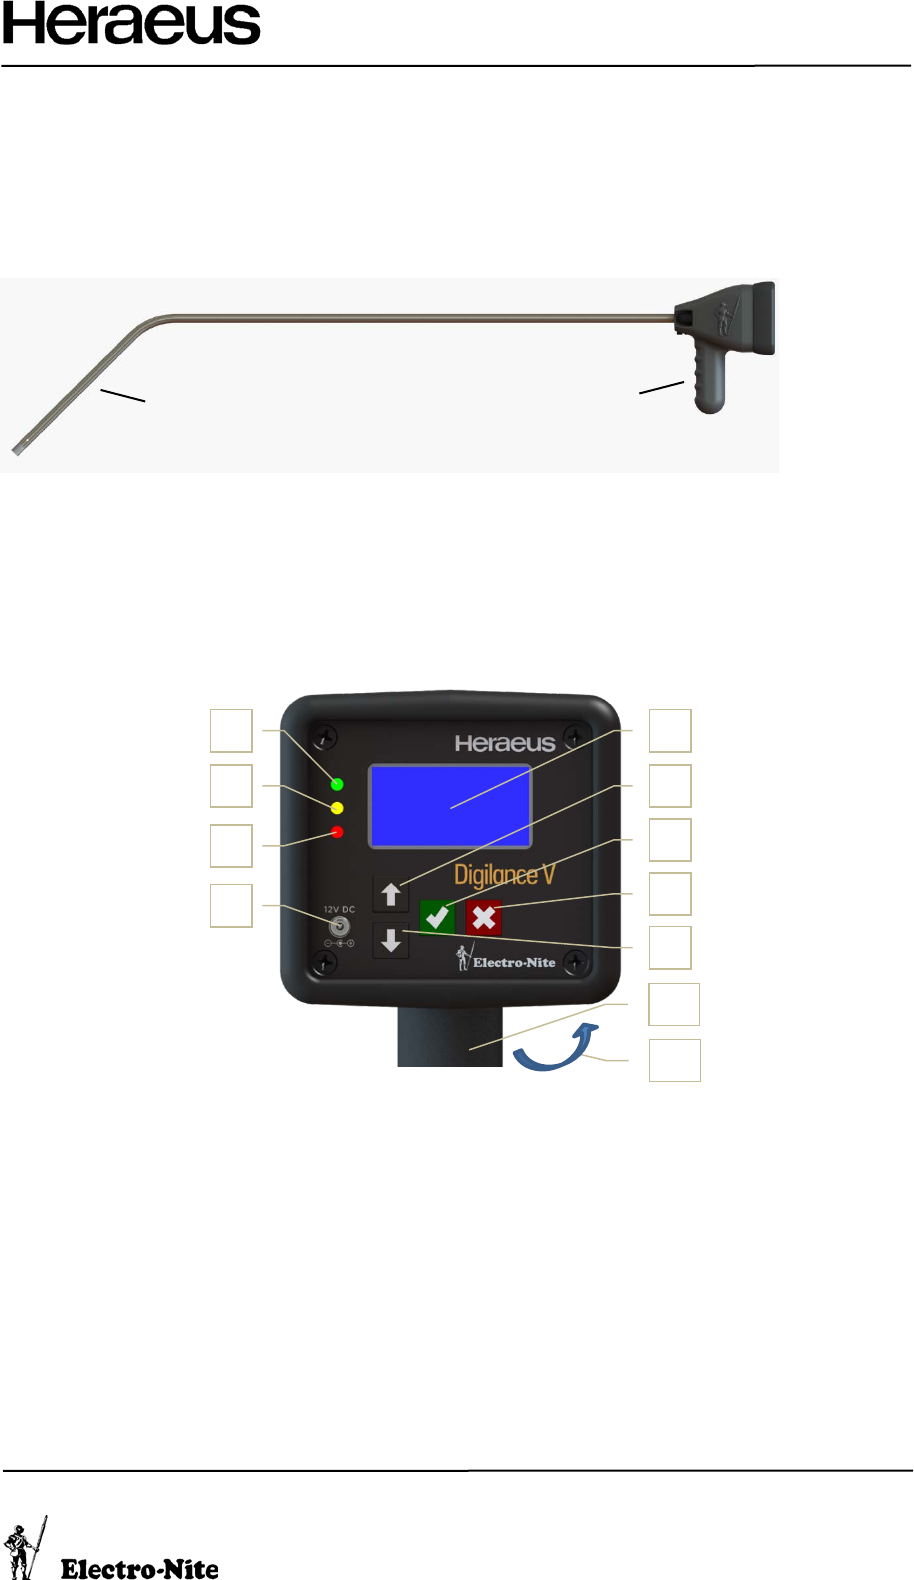
The Digilance V is a hand-held instrument for the measurement of molten metal temperatures. Used with
disposable thermocouples the instrument can measure temperatures from 300°C to 2300°C. Various pole
lengths are available depending on the application.
Housed in a robust Aluminum case, the precision electronics are protected from the difficult environmental
conditions encountered in the molten metals industry.
The instrument has the option to connect to a wireless receiver box, which enables communication and data
storage possibilities using Heraeus Electro-Nite software. The instrument also stores measurement results
internally for downloading via the wireless interface.
1. Green LED indicates that the instrument is ready for the next measurement.
2. Yellow LED indicates that a measurement is in progress.
3. Red LED indicates that a measurement is ready and the sensor can be taken out of the molten media.
4. Battery Charging Jack for 12 Volt power supply.
5. Display for reading measurements and setting parameters.
6. Scroll button up.
7. Start instrument button / Confirm button.
8. Menu button / Cancel button.
9. Scroll button down.
10. Handgrip.
11. Accelerometer to wake the instrument (only after 1st start-up).
Digilance
Immersion Lance
1 5
2
3
4
6
7
8
9
10
11

26 November 2018 Digilance V page 9 of 21
File name: Digilance V_1.01
Version: 1.01
3 Transportation
Report damage during or immediately after delivery to the transport company and to Heraeus Electro-Nite. Take
all necessary steps to prevent further damage.
3.1 Instrument transport mode
When transporting the instrument, it can be set to transport mode. When set into transport mode the
accelerometer is deactivated, so the instrument will remain Powered-Off to conserve battery life.
Procedure:
1. Set to Transport Mode (See Section ‘Power Management’).
2. The Transport Mode can be set by pressing and holding and for 3 seconds, from any display
screen.
3. When the instrument is reactivated by pressing and holding for 3 seconds, the transport mode is
deactivated.
3.2 Shipping of ESD-sensitive modules
VLSI chips (MOS technology) are used in practically all Heraeus Electro-Nite electronic modules. These VLSI
components are, by their nature, very sensitive to over voltages and thus to electrostatic discharge (ESD).
Anti-static packing material must always be used when storing and dispatching modules and components. If the
container itself is not conductive, the modules must be wrapped in a conductive material such as conductive
foam, anti-static plastic bag, aluminum foil, or paper. Normal plastic bags or foil should not be used under any
circumstances. For modules with built-in batteries, ensure that the conductive packing does not touch or short-
circuit the battery connections: if necessary cover the connections with insulating tape or material.
3.3 Packaging the instrument
Since the instrument or device is a high-quality electronic and/or measurement unit, it should only be dispatched
in its original packing. If the original packing is no longer present, then it is advisable to properly pack the device
in a sufficiently large box lined with a shock-absorbing material such as PUR foam, polystyrene flakes, or similar.
The shock-absorbing layer should have a minimal thickness of 10cm on all sides. Before packing the instrument
or device, it must be wrapped in paper or plastic film.
For overseas transportation, the instrument or device should be sealed into an air-tight plastic film, ideally with a
desiccant added. These packing recommendations also apply when returning the instrument or device to the
manufacturer.
3.4 Shipment of Lithium Ion Batteries in the Instrument
The instrument contains a Lithium Ion Battery Pack that is compliant with UN Manual of Tests and Criteria, Part
III, sub-section 38.3.
As the battery pack (2 cells, 25Wh) is contained within the instrument, it may be shipped without special warning
labels according to UN 3481, Section II of PI 967.
In order to maintain compliance with transportation regulations, the instrument Battery Pack should always be
shipped inside of the housing.
Additional regulations will apply to Battery Packs shipped outside of the device.
Please refer to your transporter to confirm specific regulations.
Page 10 of 21 Digilance V 26 November 2018
File name: Digilance V_1.01
Version: 1.01
4 Standard Operation
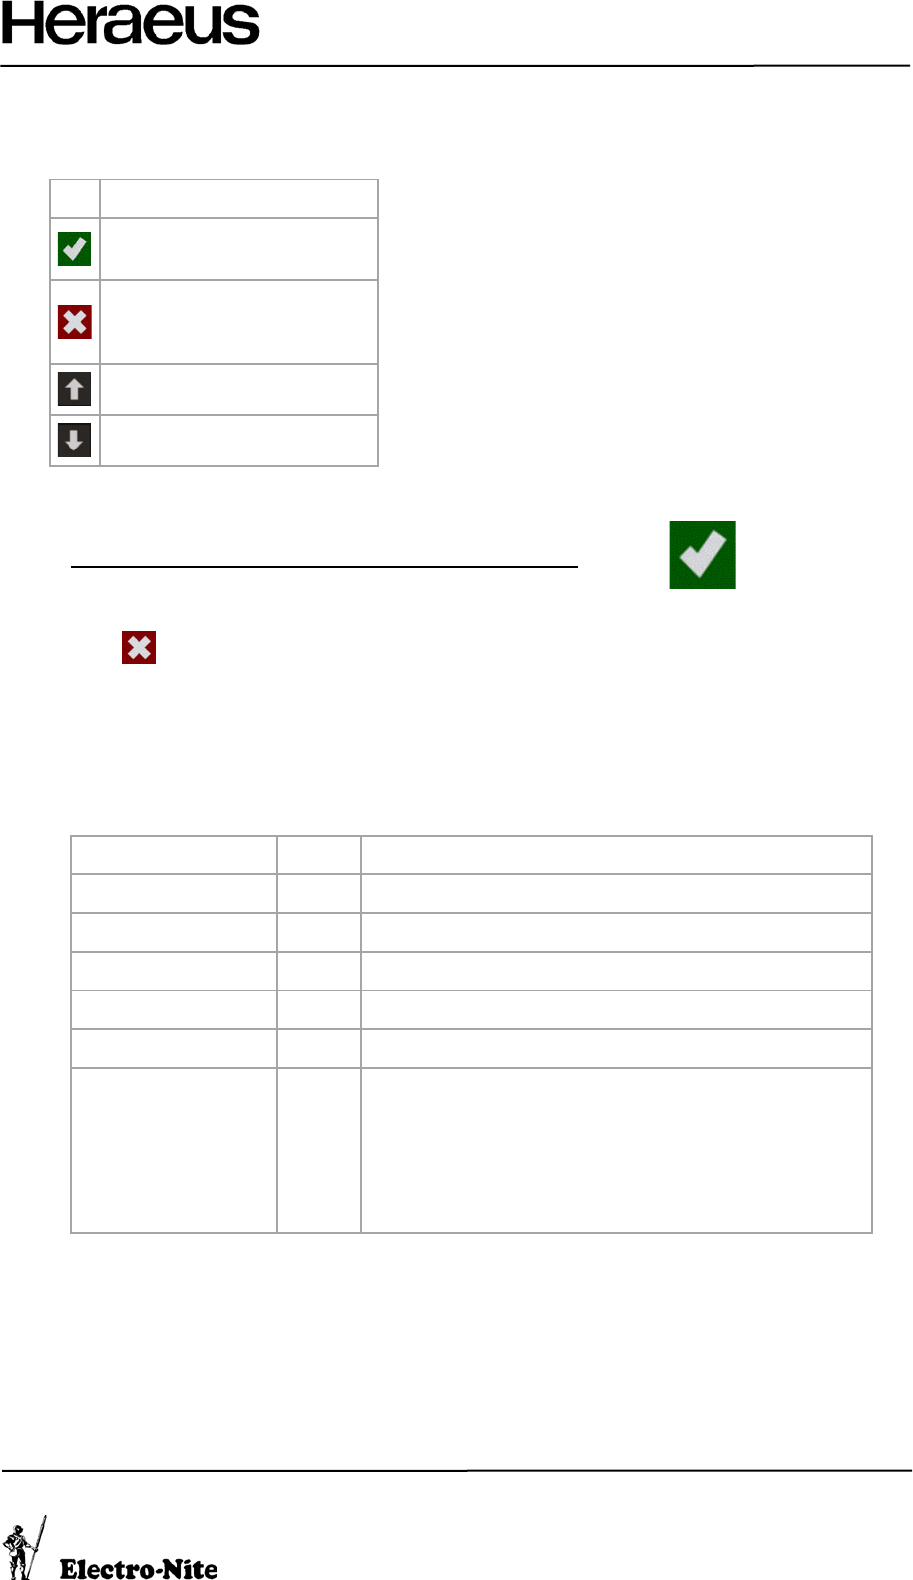
The four keys on the Digilance front panel are used to interact with the device:
Key
Primary Functions
• Enter
• Power On/Off
• Cancel
• Exit
• Access Main Menu
• Scroll Up
• Scroll Down
4.1 First Use
• To Activate the Digilance for the First Time, Press and Hold
o After the initial activation, the instrument will Power-On by movement
• Press to the access the Main Menu and the following options
o History
o Configuration Login
o Instrument Info
o Battery Info
o Wireless Info (optional)
• Prior to using the instrument, it is recommended to confirm the following instrument settings (See
Section ‘Instrument Configuration’):
Configuration Section
ID
Function
Thermocouple Type
1.1
S / B / K / R / D
Thermocouple Table
1.2
ITS90 / IPTS68 / IPTS48
Temperature Units
1.3
°C / °F
Time
1.4
Time Value Set in 24hr format
Date
1.5
Date Value Set in DD/MM/YY format
Measurement Mode
2.3
The Measurement Cycle is Reset dependent on the
Measurement Mode
• DIP: Reset after the Thermocouple is replaced – For
use with Single-Use Probes
• MULTI: Reset when the Temperature drops by the
amount of the Stop Difference below the Start Condition
– For use with Multi-Use Probes
26 November 2018 Digilance V page 11 of 21
File name: Digilance V_1.01
Version: 1.01
4.2 Lance Installation
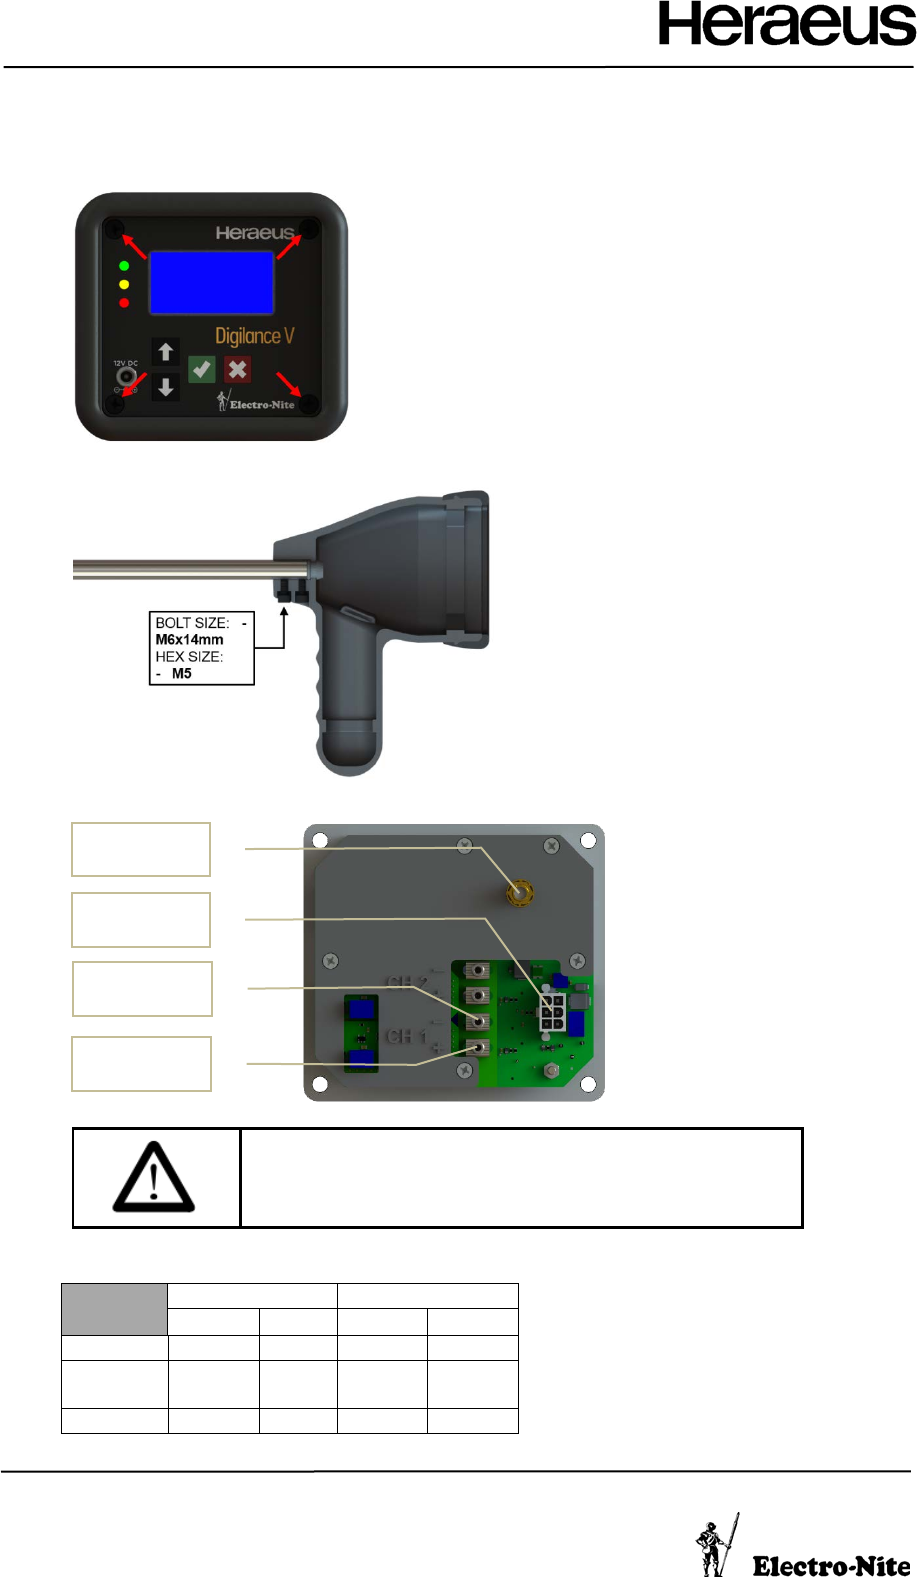
1. Open the Digilance V by removing the 4 Screws at the Corners of the Front Plate
2. Insert the Lance Pipe and secure with the 2 Bolts
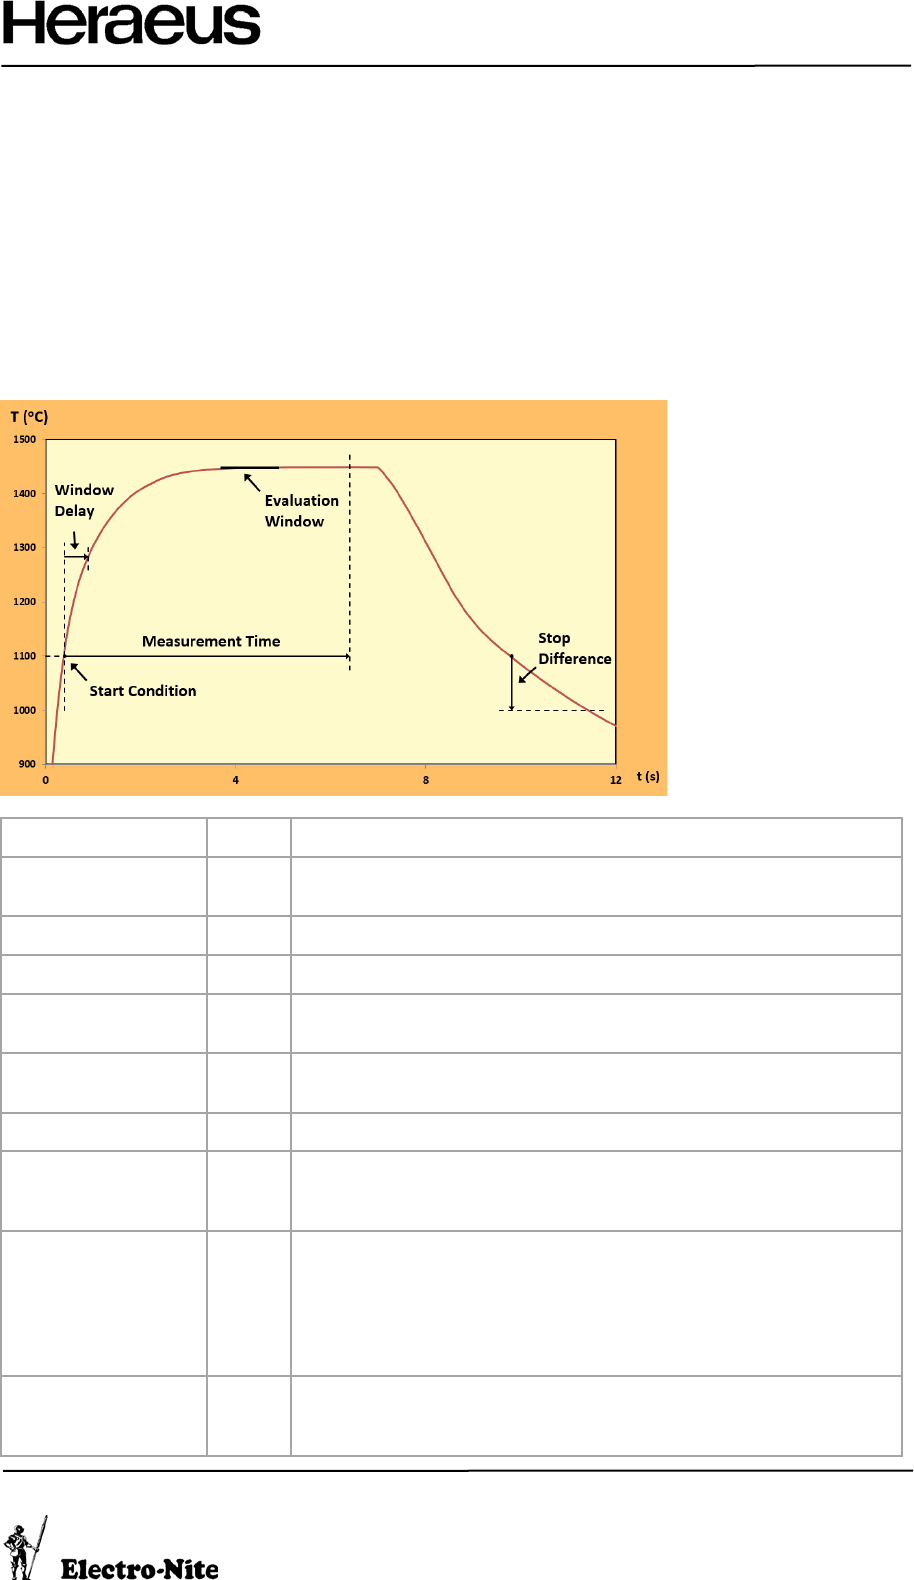
3. Connect the cables from the Housing to the Instrument Assembly according to the diagram
• Conductive Shielding of the Thermocouple Extension
Cable may not extending into the instrument housing.
• This could create a short circuit of the electronic
components or measurement circuit.
4.2.1 TC Wire Color Codes
EU
US
T+
T-
T+
T-
Type S/R
Orange
White
Black
Red
Type B
Grey
White
Grey
*Black*
Red
*White*
Type K
Green
White
Yellow
Red
* Color of Contact Block Lead Wires*
Antenna
Connection
Battery Pack
Connection
Thermocouple
Positive (+)
Thermocouple
Negative (-)
Page 12 of 21 Digilance V 26 November 2018
File name: Digilance V_1.01
Version: 1.01
4.3 Performing Measurements
• The instrument will activate automatically when moved.
• Place a thermocouple onto the lance. The Green LED indicates that the system is Ready to measure.
• Dip the thermocouple tip into the molten metal:
o The Yellow LED indicates that the measurement is Active.
o The Red LED and a Buzzer indicate that the measurement is Complete.
• The measurement result is shown on the display.
• The instrument will shut down automatically, depending on the Power Management Settings (See
Section ‘Power Management’.
4.3.1 Measurement Evaluation
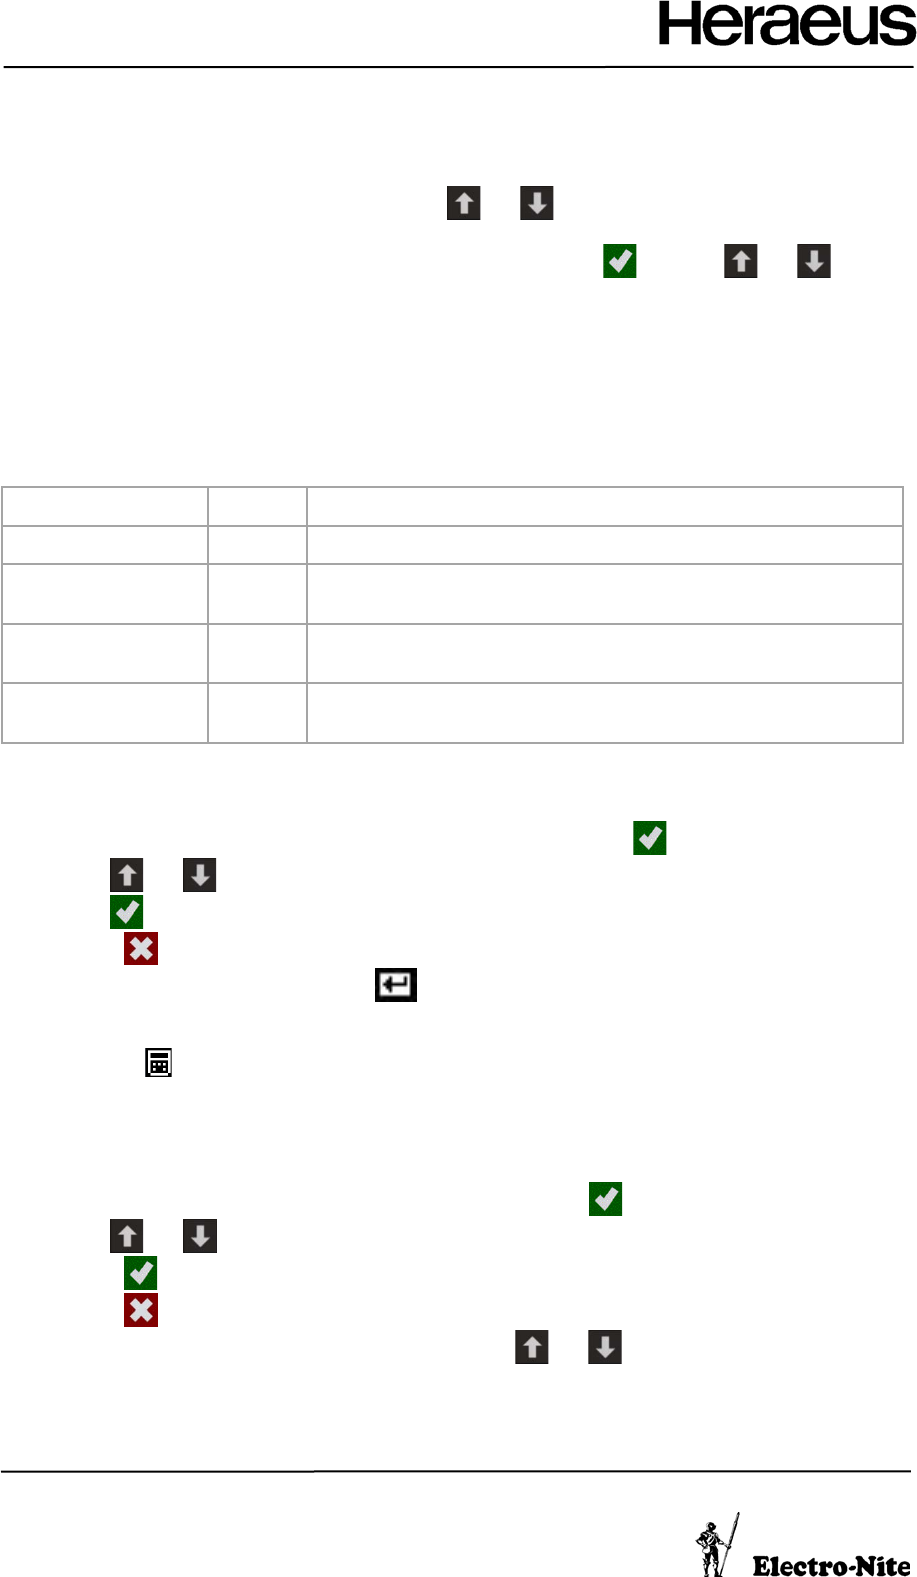
Configuration Section
ID
Function
Measuring Time
2.1.1
If Evaluation Window Criteria is not met, the Measurement will end after
the Measuring Time
Start Condition
2.1.2
Measurement Starts when the Measured Temperature exceeds this value
Stop Difference
2.1.3
See Measurement Mode ‘MULTI’
End Signal Duration
2.1.4
Controls the length of time that the Buzzer and Red Light will signal the
end of the measurement
Window
2.2
Temperature Result will be selected when the Measured Temperature
stays within the Window Height for the Window Length time
Window Delay
2.2.3
The Evaluation is not started until after the Window Delay time
Window Mode
2.2.4
Temperature Result can be calculated as either the Mean (Average) or the
Mid-Point ((Min+Max)/2) of the Temperature Values in the Evaluation
Window by selecting the Window Mode
Measurement Mode
2.3
The Measurement Cycle is Reset dependent on the Measurement Mode
• DIP: Reset after the Thermocouple is replaced – For use with Single-
Use Probes
• MULTI: Reset when the Temperature drops by the amount of the
Stop Difference below the Start Condition – For use with Multi-Use
Probes
Display Precision
3.3
Measurement Results are evaluated with one-tenth of a degree precision.
Setting this parameter to ‘No’ will cause the result to be displayed to the
nearest one degree.
26 November 2018 Digilance V page 13 of 21
File name: Digilance V_1.01
Version: 1.01
4.4 Measurement History
The Digilance stores the last 500 measurements in the History section, accessed from the Main Menu.
• Scroll through the Measurement Results using and when the result list (e.g. ‘1 of 500’) is
highlighted
• Additional measurement information can be accessed by pressing and using and to
change pages, when the page number (e.g. ‘Page 1’) is highlighted
• Measurement Result can be re-transmitted using Page 3 of the History (Only Wireless Devices)
• The Measurement History can only be cleared by the Administrator (See Section ‘Instrument
Configuration’)
4.5 Additional Measurement Information
The Digilance has the possibility to label measurements with additional information, such as Heat Number and
Place, to connect the results with the production process.
Configuration Section
ID
Function
Set Heat Number
3.1.1
Configure the Heat Number Value (Alphanumeric, 10 digits)
Display Heat Number
3.1.2
If set to ‘Yes’ it is possible to enter Heat Numbers from the Main
Measurement Display
Set Place1 – 8
3.2.1 – 8
Configure the List of Eight Measurement Place Names (Alphanumeric,
10 digits)
Display Place
3.2.9
If set to ‘Yes’ it is possible to select the Measurement Place from the
Main Measurement Display
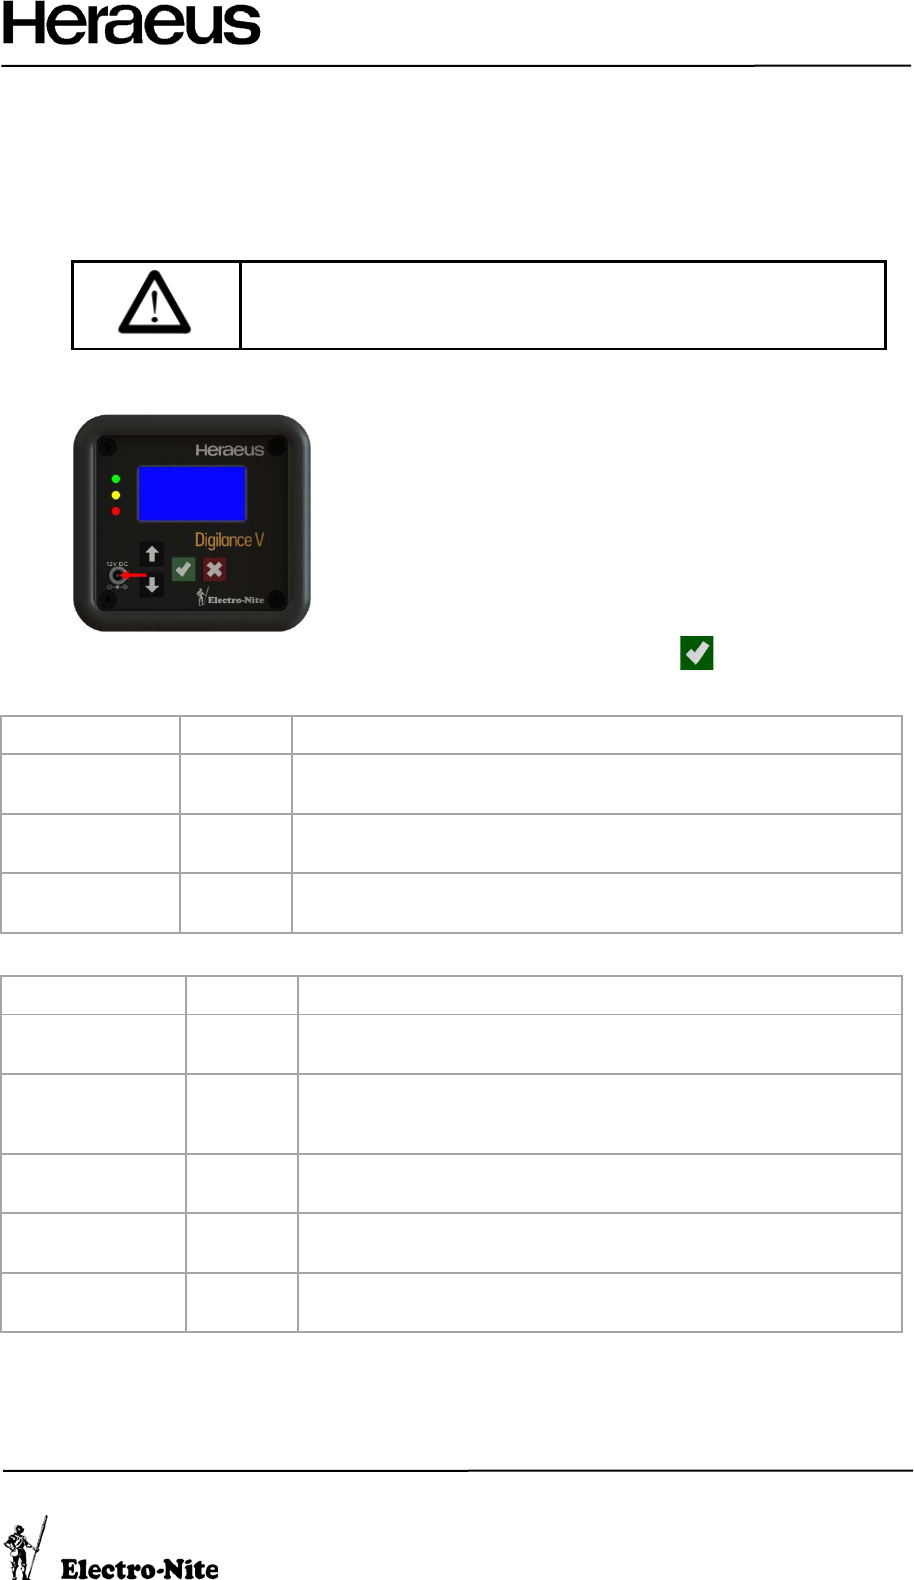
4.5.1 Working with Heat Numbers
• Set Parameter ‘Display Heat Number’ (3.1.2) to ‘Yes’
• On the Main Measurement Display, edit the Heat Number by pressing
• Use and to adjust the value for each digit
• Use to advance to the next digit
• Press to exit the edit function and finalize the Heat Number value
• Once a new Heat Number is entered, will appear next to the value until a measurement is taken
• When Checkmate Measurements are detected:
o The Heat Number will be stored as 9999999999
o will be displayed after the Heat Number
4.5.2 Working with Measurement Places
• Configure the Place Names in Parameters ‘Set Place1 – 8’ (3.2.1 – 8)
• Set Parameter ‘Display Place’ (3.2.9) to ‘Yes’
• On the Main Measurement Display, select the Place by pressing
• Use and to scroll through the list of Places
• Press to confirm selection
• Press to cancel
If both Heat Number and Measurement Place are activated, use and to toggle between the two options
on the Main Measurement Display.
Page 14 of 21 Digilance V 26 November 2018
File name: Digilance V_1.01
Version: 1.01
4.6 Battery Charging
The Digilance utilizes a Lithium Ion Battery Pack. The Battery Pack monitors the conditions and cell output, in
order to protect the Battery Cells from Damage, such as Short Circuit or Excessive Temperatures.
• The Charge Level of the Digilance Battery Pack is show in the Upper-Left Corner of the Display.
• Information on the Status of the Battery Pack can be found in the Main Menu
Warning
:
• Exchange the battery when the Battery State of Health is
below 50%.
• Charge the Battery Pack with included Power Supply (12V DC, 2A) by connecting the Power Supply
Plug to the Charging Jack:
• During the Charging Process, the Charge Status can be viewed by pressing
Charging Process:
Display Message
LED
Status
Setup Charging
Yellow
(Blinking)
Displayed when the Power Supply is initially connected to the device
Charging ...%
Green
(Blinking)
Charge Level Indication
Battery Full 100%
Green
(Stable)
Battery is Fully Charged
Charging Errors:
Display Message
LED
Status
No Charge Power
Yellow
(Blinking)
Power Supply is connected to the device, but there is no charging current
Battery Too Cold
Yellow
(Blinking)
Battery Temperature is below charging limit (0°C)
If the Battery is Too Cold, the charge current is used to heat the pack,
charging will initiate when the temperature is above the minimum limit.
Battery Too Hot
Yellow
(Blinking)
Battery Temperature is above charging limit (45°C)
Over temperature
Yellow
(Blinking)
Battery Temperature is above maximum limit (60°C)
Charging Error
Yellow
(Blinking)
There is a problem with the Battery Pack. Check state of health of
battery. Consult Heraeus Electro-Nite.
26 November 2018 Digilance V page 15 of 21
File name: Digilance V_1.01
Version: 1.01
4.7 Power Management
After the initial activation, the instrument will Power-On by movement. This behavior can be adjusted with the
Power Management settings (See Section ‘Instrument Configuration’):
Configuration Section
ID
Function
Awake Time
4.1
Determines how long the instrument will remain awake after activity.
Set the values to ‘ALWAYS’ to manually power the instrument On and Off.
Motion Sensitivity
4.2
Controls the accelerometer sensitivity, to avoid that the instrument is
powered On by vibrations.
Transport Mode
4.3
• Transport Mode can be activated by:
o By pressing and holding and for 3 seconds
o By setting Configuration Option 4.3 to ‘Yes’
• If Transport Mode is active, the instrument must be re-activated by
pressing and holding
Page 16 of 21 Digilance V 26 November 2018
File name: Digilance V_1.01
Version: 1.01
5 Instrument Configuration
Configuration can be accessed from the Main Menu.
• Press to the access the Main Menu
• Select ‘Configuration’, and Login
• Scroll through the menu using and .
• Use to edit an item or confirm a selection and to cancel or exit the menu.
5.1 Configuration Login
• The standard password for the instrument is 2 4 4 8
• A special password is required to access the Administrator Section. Contact your local Heraeus Electro-
Nite sales representative to access these parameters.
5.2 Configuration Parameters
ID
Configuration Section
Options
Default (EU)
Default (US)
1
Instrument Setup
1.1(L) (R)
TC Type
S / B / K / R / D
See Table
Below
See Table
Below
1.2(L) (R)
TC Table
ITS90 / IPTS68 / IPTS48
ITS90
ITS90
1.3(L) (R)
Temperature Unit
°C / °F
°C
°F
1.4
Time
1.4.1(L) (R)
Time Format
AM/PM, 24hr
24hr
AM/PM
1.4.2
Set Time
1.5
Date
1.5.1(L) (R)
Date Format
DD/MM/YY, MM/DD/YY
DD/MM/YY
MM/DD/YY
1.5.2
Set Date
2
Evaluation
2.1
Timing & Start
2.1.1
(L) (R)
Measuring Time
4 – 60 s
6s
10s
2.1.2(L) (R)
Start Condition
200 – 1200 °C
1100°C
500°C
2.1.3(L) (R)
Stop Difference
0 – 200 °C
100°C
100°C
2.1.4(L) (R)
End Signal Duration
0.5 – 10 s
2s
2s
2.2
Window
2.2.1(L) (R)
Window Height
0.2 – 10 °C
3°C
3°C
2.2.2(L) (R)
Window Length
0.2 – 5 s
1.2s
1.2s
2.2.3(L) (R)
Window Delay
0.0 – 5 s
0.5s
0.5s
2.2.4(L) (R)
Window Mode
Average, (Min-Max)/2
Average
Average
2.3(L) (R)
Measurement Mode
DIP/MULTI
DIP
MULTI
3
Display Setup
3.1
Heat Number
3.1.1
Heat Number
Alphanumeric, 10 digits
0000000000
0000000000
3.1.2(R)
Display Heat Number
Yes/No
No
No
3.2
Place
3.2.1
Place
Alphanumeric, 10 digits
- FURNACE
01
- FURNACE 01
…
… … … …
3.2.8
Place
Alphanumeric, 10 digits
- FURNACE
08
- FURNACE 08
3.2.9
(R)
Display Place
Yes/No
No
No
3.3(R)
Display Precision
Yes/No
No
No
26 November 2018 Digilance V page 17 of 21
File name: Digilance V_1.01
Version: 1.01
ID
Configuration Section
Options
Default (EU)
Default (US)
4
Power Management
4.1(L) (R)
Awake Time
Always – 180s
15s
15s
4.2(L) (R)
Motion Sensitivity
LOW/MID/HIGH
Mid
Mid
4.3
Transport Mode
Yes/No
No
No
5(W)
Communication
(Wireless Versions Only)
5.1(R)
Wireless ID
1 – 39
35
35
5.2(R)(W)
Wireless Mode
Wireless Off
MC Telegram
Data Telegram
MC Telegram & Data
Telegram
MC Telegram
MC Telegram
5.3(R)(W)
Data Telegram
Telegram 1
Telegram 2
Telegram 3
Programmable Telegram
Telegram 1
Telegram 3
5.4(W)
Melt Control ID
Alphanumeric, 6 digits
Production
Serial Number
Production
Serial Number
6
Service
6.1
Device Status
Hardware Status Screen
6.2
Load Standard Parameters
Yes/No
No
No
6.3
Reset All Parameters
Yes/No
No
No
6.4
Temperature Offset
-5.0°C to +5.0°C
0°C
0°C
7(A)
Administrator
7.1(A)
Region Preference
EU/US
EU
US
7.2(A)
Calibrate System
Yes/No
No
No
7.3(A)
Clear Result History
Yes/No
No
No
7.4(W)(A)
Laird System ID
No (Automatic) or 1 – 39
No
No
• (R) – Reset to Default by Reset All Parameters
• (L) – Reset to Default by Load Standard Parameters
• (W) – Wireless Instruments Only
• (A) – Administrator Access Only
Default TC Type Table
Part Number
Default TC Type
3102001X
TYPE S
3102002X
TYPE R
3102003X
TYPE B
3102004X
TYPE K
6 Advanced Operation (Wireless)
• Wireless Communication Options are only available for device Model DL5W
• Information on Wireless Communication Configuration can be found in the Wireless Communication
Appendix
Page 18 of 21 Digilance V 26 November 2018
File name: Digilance V_1.01
Version: 1.01
7 Maintenance
7.1 Procedures for maintenance and repair
If measurement or testing work is to be carried out on an active unit, your national accident prevention rules and
regulations must be observed. Use only suitable electrical tools.
Warning:
• Repairs may only be carried out by Heraeus Electro-Nite service personnel. For replacement
purposes, use only parts or components contained in the spare parts list or listed in the Spare
Parts. Unauthorized opening of equipment and improper repairs can result in loss of life or
severe personal injury as well as substantial property damage.
• Do not throw batteries into an open fire and do not solder on batteries (danger of explosion).
• Only use replacement battery packs supplied by Heraeus Electro-Nite.
7.2 Guidelines for Handling (ESD)
VLSI chips (MOS technology) are used in practically all Heraeus Electro-Nite electronic modules. These VLSI
components are, by their nature, very sensitive to over voltages and thus to electrostatic discharge (ESD).
This pictogram and warning label is used on cabinets, subracks, and packing and suggests that
modules are susceptible to ESD.
Before starting maintenance or installation make sure that you have sufficient protection against
ESD.
Electronic devices can be destroyed by voltage and energy levels that are far below the level perceptible to
human beings. Such voltages can occur when a component or a module is touched by a person who has not
been electrostatically discharged. In most cases, the components subjected to such over voltages, cannot be
immediately detected as faulty; the fault occurs only after a long period in operation.
7.3 Cleaning notes
The instrument can be cleaned with a damp cloth and mild detergent.
7.4 Battery
Warning:
• Battery should not be replaced. The only allowed replacement is by the one specified in
the ‘
• Spare Parts’ list
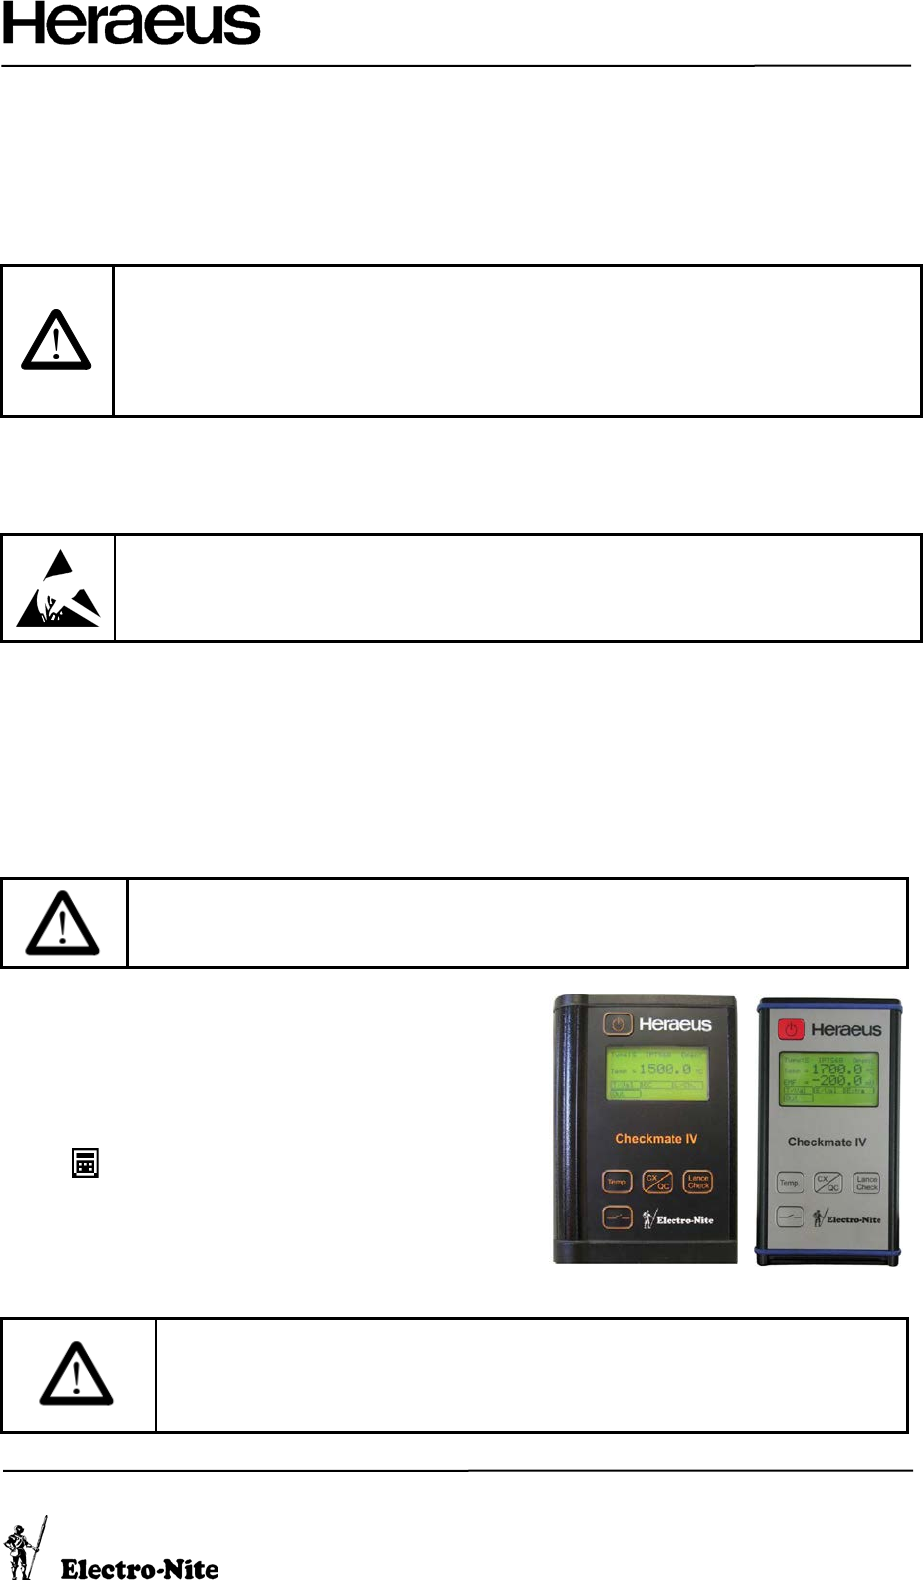
7.5 Performing a test measurement with a Checkmate
A Checkmate instrument is used to check the basic function of
Heraeus Electro-Nite instrumentation.
The Digilance the burnout is set to negative, and the Checkmate
should also be set to negative.
When Checkmate Measurements are detected:
• Heat Number will be stored as 9999999999
• will be displayed after the Heat Number
More information about the configuration of the Checkmate can be
found in its user manual.
7.6 Calibrating the system
Warning:
• ONLY AUTHORISED PERSONNEL MAY CALIBRATE THE SYSTEM.
• The instrument is calibrated prior to delivery.
• Calibration should be performed yearly.
• Before calibration, ensure the instrument is acclimatized.
26 November 2018 Digilance V page 19 of 21
File name: Digilance V_1.01
Version: 1.01
8 Troubleshooting
Fault/Warning Sign
Possible Cause
Remedy / required action
With sensor plugged in, the
instrument fails to signal Ready.
Sensor defective.
Contact piece defective.
Compensating cable
defective.
Exchange the sensor.
Exchange the contact piece.
Exchange compensating cable.
After dipping the sensor, the
instrument signals no
measurement.
Polarity of the measuring
cable reversed.
Connect the cable correctly.
Setup charging
Charging is configuring.
Wait a few seconds for the setup is
configured.
Charging ..%
Battery is charging.
None.
Battery Full 100%
Battery is fully charged.
None.
No charge power
Adapter is connected but no
power is supplied.
Apply power to the adapter.
Overtemperature
Temperature is too high.
Battery Temperature is above maximum
limit (60°C). Lower the instrument
temperature.
Battery too cold
Battery is too cold for
charging.
Battery Temperature is below charging
limit (0°C). The charge current is used to
heat the pack, charging will initiate when
the temperature is above the minimum
limit.
Battery too hot
Battery is too hot for charging.
Battery Temperature is above charging
limit (45°C). Lower the instrument
temperature.
Charging error
Error occurred during
charging; no charging
possible.
Check state of health of battery.
Consult Heraeus Electro-Nite.
Transport mode
Accelerometer is switched off.
Accelerometer will be switched on as
soon as the instrument is switched on by
pressing the green button.
Error TC Break
Thermocouple is broken.
Apply a new thermocouple.
Check lance wiring and contact block if
errors continue.
Error No Eval
No evaluation possible
because the measurement
values are not in the set
window and the end time is
reached.
Review the window settings.
Error No CJT
Not possible to compensate
the measurement for cold
junction temperature because
no cold junction temperature
was measured.
Reference temperature measurement
within instrument is defective.
Consult Heraeus Electro-Nite.
Error Out of range
Measured temperature is out
of range for the configured TC
type.
Check TC type and start temperature.
Page 20 of 21 Digilance V 26 November 2018
File name: Digilance V_1.01
Version: 1.01
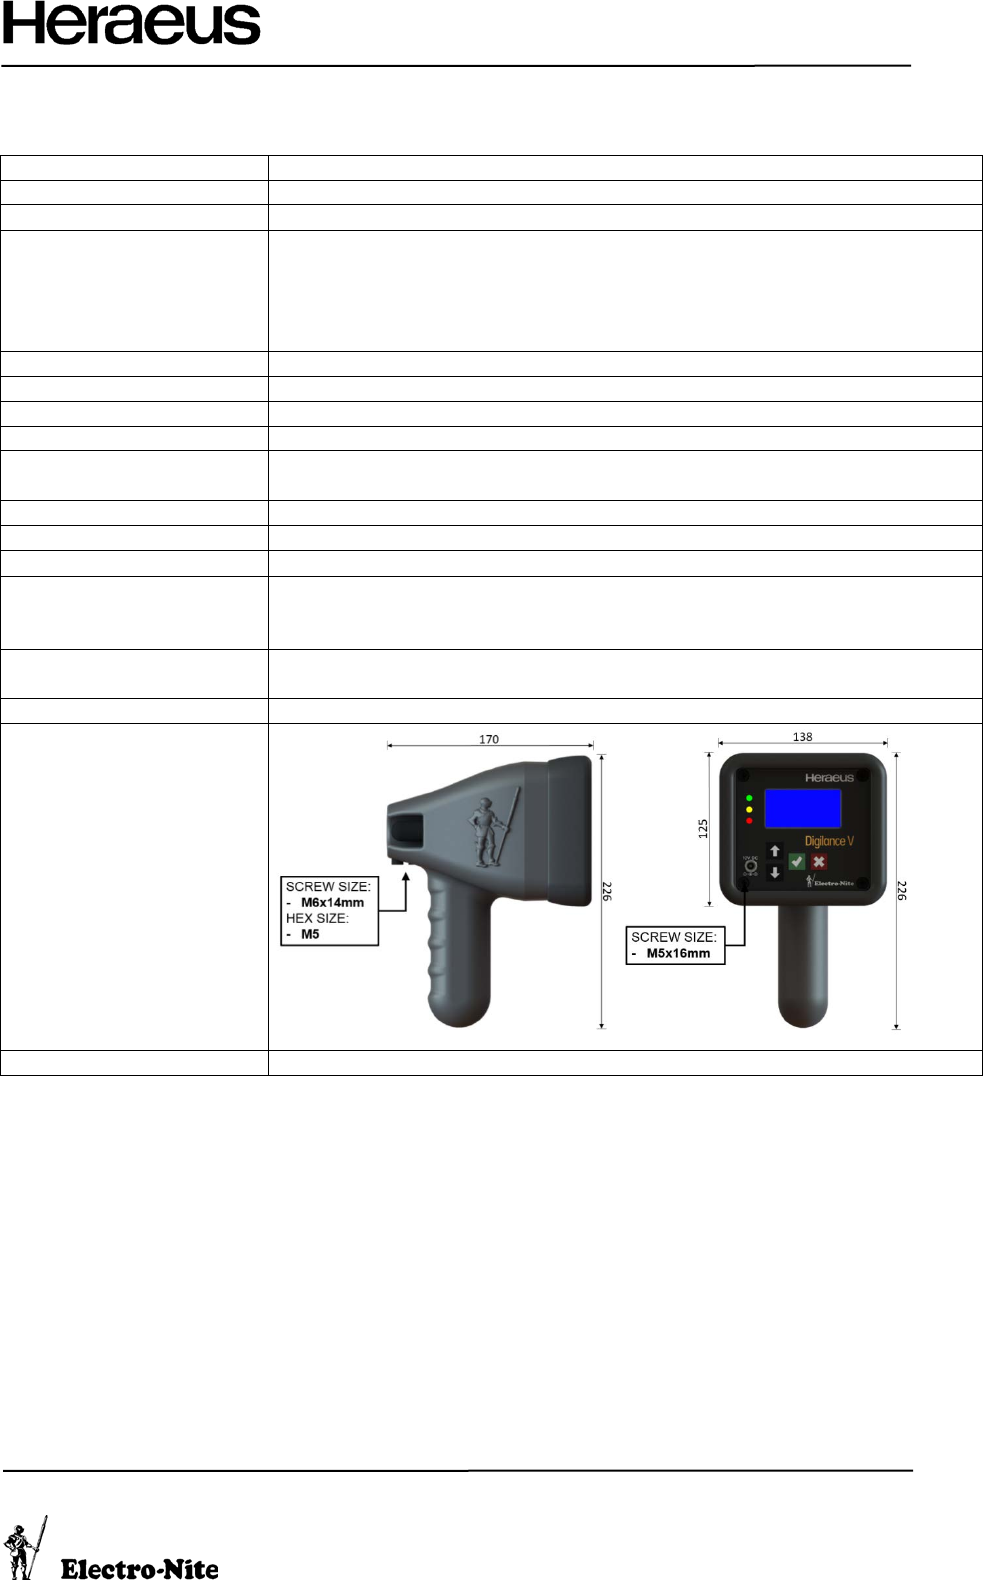
9 Technical data
Measurement Application
Single or Multi-dip temperature measurement
Measurement Channel
One analog input
Sample Rate
10 samples/second
Measurement Range
Type S (Pt 10%Rh / Pt)
Type R (Pt 13%Rh / Pt)
Type B (Pt 30%Rh / Pt 6%Rh)
Type K (Ni-Cr / Ni)
Type D (W / Re)*
400 to 1768°C (752 to 3214°F)
400 to 176
8°C (752 to 3214°F)
400 to 1820°C (752 to 3308°F)
400 to 137
2°C (752 to 2502°F)
400 to 2300°C (752 to 4172°F)
According to
IEC 60584
*ASTM 988
Thermocouple Tables
IPTS 48 / IPTS 68 / ITS 90
Thermocouple Accuracy
Better than +/- 1°C between 0°C and 50°C ambient temperature
Display Resolution
Configurable 1° or 0.1°
Display Units
°C or °F
Data Storage 500 measurement results with heat number and date/time storage.
Transfer of stored data using wireless technology.
Power Supply
Lithium Ion Battery Pack (3.5Ah – 7.2V)
Charging Voltage
12V DC, 2A MAX
Battery Life
40 operating hours (nominal)
Wireless Communication
(optional)
Range of 100 meters - line of sight
Frequency hopping 2.4 GHx ISM unlicensed band technology
Max 10 mW transmit power
Operating Ambient
Temperature Range
-20°C (-4°F) to 60°C (140°F), max. 90% RH non-condensing
Environmental Protection
IP55 (with lance installed)
Size
Weight (without lance)
1.9kg (4.2lbs)
26 November 2018 Digilance V page 21 of 21
File name: Digilance V_1.01
Version: 1.01
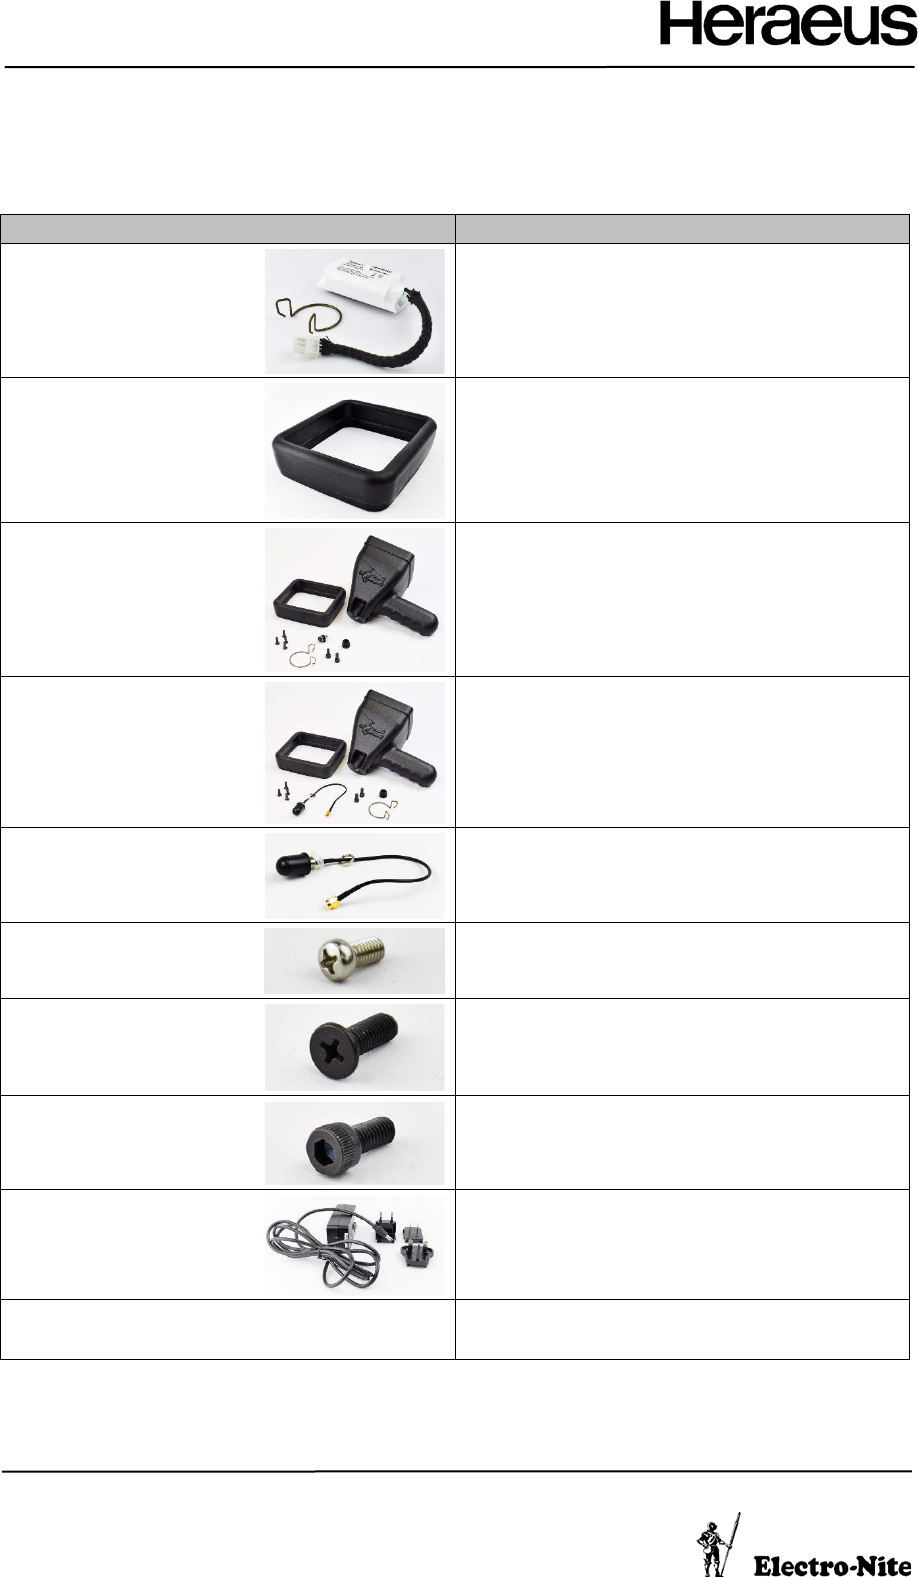
10 Spare Parts
When ordering spare parts, always provide the instrument type and instrument serial number.
Description
UCS (Part Number)
Battery Pack Replacement
31600257
Rubber Boot
31600258
Standard Housing
Replacement
31600259
Wireless Housing
Replacement
31600260
Antenna Assembly
31600261
Thermocouple Lug Screw
31600262
Front Plate Screw
31600263
Lance Bolt
31600264
Power Supply
31320010
Lances and Cable
Assemblies
Contact your local representative for information