Hewlett Packard Enterprise 55010016-1 Wireless Access Point User Manual 43 32 0000 01 AG CN3200 en
Hewlett-Packard Co Wireless Access Point 43 32 0000 01 AG CN3200 en
Contents
- 1. Installation Manual Part 1
- 2. Installation Manual Part 2
Installation Manual Part 2

Chapter 15: Customizing the public access interface 194
DRAFT
Source code for the internal pages
This section presents commented source code for the default internal pages.
Important: Do not create your own pages by saving a page from within your web
browser. The server side code is removed when you do this and the resulting
pages will not work. Use the examples in this section or those on the CD in
\HTML\Colubris\Internal as the basis for your pages.
Login page <!-- Colubris -->
<!-- Default -->
<!-- iPass
<WISPAccessGatewayParam>
<Redirect>
<MessageType>100</MessageType>
<ResponseCode><% iPassGetRedirectResponseCode(); %></ResponseCode>
<AccessProcedure><% iPassGetAccessProcedure(); %></AccessProcedure>
<LocationName><% iPassGetLocationName(); %></LocationName>
<AccessLocation><% iPassGetAccessLocation(); %></AccessLocation>
<LoginURL><% iPassGetLoginUrl(); %></LoginURL>
<AbortLoginURL><% iPassGetAbortLoginUrl(); %></AbortLoginURL>
</Redirect>
</WISPAccessGatewayParam>
-->
<!DOCTYPE HTML PUBLIC "-//W3C//DTD HTML 4.01 Transitional//EN"
"http://www.w3.org/TR/1999/REC-html401-19991224/loose.dtd">
<html lang="en">
<head>
<meta http-equiv="content-type" content="text/html; charset=iso-8859-1">
<meta http-equiv="Expires" CONTENT="0">
<meta http-equiv="Cache-Control" CONTENT="no-cache">
<meta http-equiv="Pragma" CONTENT="no-cache">
<title>Login</title>
<style type="text/css">
<!--
.labels {
font-family: verdana, sans-serif;
}
#title {
font-size: 14px;
color: #000000;
padding-left: 5px;
}
#tags {
font-size: 10px;
color: #000000;
}
#error {
font-size: 12px;
color: #CC0000;
font-weight: bold;
}
#input {
font-family: verdana, sans-serif;
font-size: 11px;
Chapter 15: Customizing the public access interface 195
DRAFT
width: 120px;
color: #003366;
}
#submit {
font-family: verdana, sans-serif;
font-size: 10px;
font-weight: bold;
color: #003366;
}
-->
</style>
<script language="Javascript">
//Make sure the required information was entered
function setfocus() {
if (document.forms[0]) {
document.forms[0].elements[0].focus();
}
}
//-->
</script>
</head>
<body bgcolor="#FFFFFF" onLoad="setfocus();">
<form action="/goform/HtmlLoginRequest" method="POST">
<table border="0" width="99%" height="70%" cellspacing="0" cellpadding="0">
<tr><td align="center" valign="middle">
<table border="0" width="300" cellspacing="0" cellpadding="3">
<tr bgcolor="#FFFFFF">
<td>
<img src="/logo.gif" alt="" width="125" height="50" border="0">
</td>
</tr>
<tr>
<td align="center">
<span class="labels" ID="title">
<%GetAuthenticationErrorMessage();%>
<%GetRadiusReplyMessage();%>
<%GetMsChapV2Failed();%>
</span>
</td>
</tr>
</table>
<br>
<table border="0" width="300" cellspacing="0" cellpadding="3" bgcolor="#CC0033">
<tr>
<td align="center" valign="middle" colspan="2">
<table border="0" width="300" cellspacing="0" cellpadding="4" bgcolor="#E6E6E6">
<tr>
<td align="right">
<span class="labels" ID="tags">Username:</span>
</td>
<td>
<input type="text" name="username" maxlength="30" size="32">
</td>
<td> </td>
</tr>
<tr>
<td align="right">
<span class="labels" ID="tags">Password:</span>

Chapter 15: Customizing the public access interface 196
DRAFT
</td>
<td>
<input type="password" name="password" maxlength="30" size="32">
</td>
<td valign="bottom">
<input type="submit" name="login" value="Go >>">
</td>
</tr>
<tr>
<td>
<input type="hidden" name="original_url" value=<%GetOriginalUrl();%>>
</td>
</tr>
</table>
</td>
</tr>
</table>
</td></tr>
</table>
</form>
</body>
</html>
Transport page <!-- Colubris -->
<!-- Default -->
<!-- iPass
<WISPAccessGatewayParam>
<AuthenticationReply>
<MessageType>120</MessageType>
<ResponseCode><% iPassGetLoginResponseCode(); %></ResponseCode>
<ReplyMessage><% GetRadiusReplyMessage(); %></ReplyMessage>
<LogoffURL><% iPassGetLogoffUrl(); %></LogoffURL>
</AuthenticationReply>
</WISPAccessGatewayParam>
-->
<!DOCTYPE HTML PUBLIC "-//W3C//DTD HTML 3.2 Final//EN">
<html>
<head>
<meta http-equiv="content-type" content="text/html; charset=iso-8859-1">
<meta http-equiv="Expires" CONTENT="0">
<meta http-equiv="Cache-Control" CONTENT="no-cache">
<meta http-equiv="Pragma" CONTENT="no-cache">
<meta http-equiv="refresh" content="1; URL=<%GetWelcomeUrl();%>">
<title>Transport</title>
<script type="text/javascript" language="Javascript">
<!--
function opensessionwin(whichone) {
// Define the size of your remote window in pixels with "width" and "height."
remote =
window.open("","sessionwin","width=240,height=400,toolbar=0,location=0,directories=0,status=0,me
nubar=0,scrollbars=1,resizable=1");
if (remote.blur) remote.focus();
// Put the full url of your remote document where you see "URL".
remote.location.href = "<%GetSessionUrl();%>";

Chapter 15: Customizing the public access interface 197
DRAFT
if (remote.opener == null) remote.opener = window;
remote.opener.name = "opener";
}
//-->
</script>
</head>
<body onload="opensessionwin();" bgcolor="#FFFFFF">
<font face="verdana, arial, helvetica" size="2">
<h4>This should take 1 second...</h4>
If you are not redirected within a few seconds, please <a href="<%GetWelcomeUrl();%>">click here</
a>.
If you have JavaScript disabled and the session page doesn't appear, please <a
href="<%GetSessionUrl();%>">click here</a>.
</font>
</body>
</html>
Session page <!-- Colubris -->
<!-- Default -->
<!DOCTYPE HTML PUBLIC "-//W3C//DTD HTML 3.2 Final//EN">
<html>
<head>
<meta http-equiv="content-type" content="text/html; charset=iso-8859-1">
<meta http-equiv="Expires" CONTENT="0">
<meta http-equiv="Cache-Control" CONTENT="no-cache">
<meta http-equiv="Pragma" CONTENT="no-cache">
<% SetSessionRefreshInterval("20");%>
<title>Session</title>
</head>
<body bgcolor="#FFFFFF">
<table border="0" cellpadding="0" cellspacing="5" align="center" style="border:1px dotted #CC0000">
<tr>
<td colspan="2" align="center"> <img src="/logo.gif" alt="" width="125" height="50"
border="0"></td>
</tr>
<tr>
<td colspan="2">
<font face="verdana" size="3"><b>Session</b></font>
</td>
</tr>
<tr>
<td colspan="2" align="center">
<hr noshade size="1" color="#CCCCCC">
<font face="verdana" size="1" color="#FF0000">
Please bookmark this page for logout
</font>
<hr noshade size="1" color="#CCCCCC">
</td>
</tr>
<tr>
<td align="right"><font face="verdana" size="1">Status:</font></td>
<td><font face="verdana" size="1"><b><% GetSessionStateMessage(); %></b></font></td>
</tr>
<tr>
<td align="right"><font face="verdana" size="1">Session Time (Cur/Left/Max):</font></td>

Chapter 15: Customizing the public access interface 198
DRAFT
<td><font face="verdana" size="1"><b><% GetSessionTime(); %> / <%
GetSessionRemainingTime(); %> / <% GetMaxSessionTime(); %></b></font></td>
</tr>
<tr>
<td align="right"><font face="verdana" size="1">Idle time (Cur/Left/Max):</font></td>
<td><font face="verdana" size="1"><b><% GetSessionIdleTime(); %> / <%
GetSessionRemainingIdleTime(); %> / <% GetMaxSessionIdleTime(); %></b></font></
td>
</tr>
<tr>
<td align="right"><font face="verdana" size="1">Received Packets (Cur/Left/Max):</font></td>
<td><font face="verdana" size="1"><b><% GetSessionInputPackets(); %> / <%
GetSessionRemainingInputPackets(); %> / <% GetMaxSessionInputPackets(); %></
b></font></td>
</tr>
<tr>
<td align="right"><font face="verdana" size="1">Received Octets (Cur/Left/Max):</font></td>
<td><font face="verdana" size="1"><b><% GetSessionInputOctets(); %> / <%
GetSessionRemainingInputOctets(); %> / <% GetMaxSessionInputOctets(); %></b></
font></td>
</tr>
<tr>
<td align="right"><font face="verdana" size="1">Transmit Packets (Cur/Left/Max):</font></td>
<td><font face="verdana" size="1"><b><% GetSessionOutputPackets(); %> / <%
GetSessionRemainingOutputPackets(); %> / <% GetMaxSessionOutputPackets(); %></
b></font></td>
</tr>
<tr>
<td align="right"><font face="verdana" size="1">Transmit Octets (Cur/Left/Max):</font></td>
<td><font face="verdana" size="1"><b><% GetSessionOutputOctets(); %> / <%
GetSessionRemainingOutputOctets(); %> / <% GetMaxSessionOutputOctets(); %></
b></font></td>
</tr>
<tr>
<td colspan="2" align="right" valign="bottom">
<form action="/goform/HtmlLogout" method="post" >
<input type="submit" name="logoutsession" value="Logout">
</form>
</td>
</tr>
</table>
</body>
</html>
Fail page <!-- Colubris -->
<!-- Default -->
<!-- iPass
<WISPAccessGatewayParam>
<LogoffReply>
<MessageType>130</MessageType>
<ResponseCode><% iPassGetLogoutResponseCode(); %></ResponseCode>
</LogoffReply>
</WISPAccessGatewayParam>
-->
<!DOCTYPE HTML PUBLIC "-//W3C//DTD HTML 3.2 Final//EN">
<html>
<head>
<meta http-equiv="Expires" CONTENT="0">
<meta http-equiv="Cache-Control" CONTENT="no-cache">
<meta http-equiv="Pragma" CONTENT="no-cache">
Chapter 15: Customizing the public access interface 199
DRAFT
<title>Window</title>
</head>
<body bgcolor="#FFFFFF">
<table border="0" cellpadding="0" cellspacing="0" width="178" style="border:1px dotted #CC0000">
<tr>
<td colspan="2"> <img src="/logo.gif" alt="" width="125" height="50" border="0"></td>
</tr>
<tr>
<td> </td>
<td><font face="verdana" size="1"><b><%GetAuthenticationErrorMessage();%></b></font></td>
</tr>
</table>
</body>
</html>

Chapter 15: Customizing the public access interface 200
DRAFT
Source code for the external pages
Sample external pages are provided on the CD in the folder
\HTML\Colubris\External. Three versions are included for each page: HTML,
ASP, and PHP.
Welcome page HTML
<!--
This file remains on your webserver and is fully customisable by you.
You also have access to the CGI variables which are defined in the URL
that calls this page.
For example, in this file the calling welcome-url is:
welcome-url=https://207.35.116.198:8888/colubris-php/
welcome.php?site=%s&user=%u&wantedurl=%o
-->
<html>
<head>
<title>Welcome</title>
</head>
<body>
Welcome
</body>
</html>
ASP
<!--
This file remains on your webserver and is fully customisable by you.
You also have access to the CGI variables which are defined in the URL
that calls this page.
For example, in this file the calling welcome-url is:
welcome-url=https://207.35.116.198:8888/colubris-php/
welcome.php?site=%s&user=%u&wantedurl=%o
-->
<%@ Language=VBScript %>
<%
site = Request("site")
user = Request("user")
wantedurl = Request("wantedurl")
%>
<html>
<head>
<title>Welcome</title>
</head>
<body>
Welcome <%=user%>, to <%=site%>
<br>
The URL you were trying to access was <a href="<%=wantedurl%>"><%=wantedurl%></a>.
</body>
</html>

Chapter 15: Customizing the public access interface 201
DRAFT
PHP
<!--
This file remains on your webserver and is fully customisable by you.
You also have access to the CGI variables which are defined in the URL
that calls this page.
For example, in this file the calling welcome-url is:
welcome-url=https://207.35.116.198:8888/colubris-php/
welcome.php?site=%s&user=%u&wantedurl=%o
-->
<? /*
PHP makes QUERY STRING variables immediatly available to any
PHP scripts you embed in your file.
*/ ?>
<html>
<head>
<title>Welcome</title>
</head>
<body>
Welcome <? echo $user; ?>, to <? echo $site; ?>
<br>
The URL you were trying to access was <a href="<? echo $wantedurl; ?>"><? echo $wantedurl; ?></
a>.
</body>
</html>
Goodbye page HTML
<!--
This file remains on your webserver and is fully customisable by you.
For example, in this file the calling goodbye-url is:
goodbye-url=https://207.35.116.198:8888/colubris-php/goodbye.php?site=%s&user=%u
-->
<html>
<head>
<title>Logout</title>
</head>
<body>
Thank you.
</body>
</html>
ASP
<!--
This file remains on your webserver and is fully customisable by you.
For example, in this file the calling goodbye-url is:
goodbye-url=https://207.35.116.198:8888/colubris-php/goodbye.php?site=%s&user=%u
-->
<%@ Language=VBScript %>
<%
site = Request("site")
user = Request("user")

Chapter 15: Customizing the public access interface 202
DRAFT
wantedURL = Request("wantedURL")
%>
<html>
<head>
<title>Logout</title>
</head>
<body>
Thank you <%=user%>
</body>
</html>
PHP
<!--
This file remains on your webserver and is fully customisable by you.
You also have access to the CGI variables which are defined in the URL
that calls this page.
For example, in this file the calling goodbye-url is:
goodbye-url=https://207.35.116.198:8888/colubris-php/goodbye.php?site=%s&user=%u
-->
<? /*
PHP makes QUERY STRING variables immediatly available to any
PHP scripts you embed in your file.
*/ ?>
<html>
<head>
<title>Logout</title>
</head>
<body>
Thank you <? echo $user; ?>.
</body>
</html>
Login Error page HTML
<!--
This file remains on your webserver and is fully customisable by you.
You also have access to the CGI variables which are defined in the URL
that calls this page.
For example, in this file the calling login-err-url is:
login-err-url=https://207.35.116.198:8888/colubris-php/login-error.php?site=%s&user=%u
-->
<html>
<head>
<title>Login Error</title>
</head>
<body>
There has been a login error.
Chapter 15: Customizing the public access interface 203
DRAFT
</body>
</html>
ASP
<!--
This file remains on your webserver and is fully customisable by you.
You also have access to the CGI variables which are defined in the URL
that calls this page.
For example, in this file the calling login-err-rl is:
login-err-url=https://207.35.116.198:8888/colubris-php/login-error.php?site=%s&user=%u
-->
<%@ Language=VBScript %>
<%
site = Request("site")
user = Request("user")
wantedurl = Request("wantedurl")
%>
<html>
<head>
<title>Login Error</title>
</head>
<body>
Sorry <%=user%><br>
There has been a login error.
</body>
</html>
PHP
<!--
This file remains on your webserver and is fully customisable by you.
You also have access to the CGI variables which are defined in the URL
that calls this page.
For example, in this file the calling login-err-url is:
login-err-url=https://207.35.116.198:8888/colubris-php/login-error.php?site=%s&user=%u
-->
<? /*
PHP makes QUERY STRING variables immediately available to any
PHP scripts you embed in your file.
*/ ?>
<html>
<head>
<title>Login Error</title>
</head>
<body>
Sorry <? echo $user; ?>.<br>
There has been a login error.
</body>
</html>

Chapter 15: Customizing the public access interface 204
DRAFT
Remote login page <!DOCTYPE HTML PUBLIC "-//W3C//DTD HTML 4.01 Transitional//EN"
"http://www.w3.org/TR/1999/REC-html401-19991224/loose.dtd">
<html lang="en">
<head>
<meta http-equiv="content-type" content="text/html; charset=iso-8859-1">
<meta http-equiv="Expires" CONTENT="0">
<meta http-equiv="Cache-Control" CONTENT="no-cache">
<meta http-equiv="Pragma" CONTENT="no-cache">
<title>Login</title>
<style type="text/css">
<!--
.labels {
font-family: verdana, sans-serif;
}
#title {
font-size: 14px;
color: #000000;
padding-left: 5px;
}
#tags {
font-size: 10px;
color: #000000;
}
#error {
font-size: 12px;
color: #CC0000;
font-weight: bold;
}
#input {
font-family: verdana, sans-serif;
font-size: 11px;
width: 120px;
color: #003366;
}
#submit {
font-family: verdana, sans-serif;
font-size: 10px;
font-weight: bold;
color: #003366;
}
-->
</style>
<script language="Javascript">
//Make sure the required information was entered
function setfocus() {
if (document.forms[0]) {
document.forms[0].elements[0].focus();
}
}
//-->
</script>
</head>
<body bgcolor="#FFFFFF" onLoad="setfocus();">
<form action="https://cn3000.wireless.colubris.com:8090/goform/HtmlLoginRequest"
method="POST">
Chapter 15: Customizing the public access interface 205
DRAFT
<table border="0" width="99%" height="70%" cellspacing="0" cellpadding="0">
<tr><td align="center" valign="middle">
<table border="0" width="300" cellspacing="0" cellpadding="3">
<tr bgcolor="#FFFFFF">
<td>
<img src="/logo.gif" alt="" width="125" height="50" border="0">
</td>
<td valign="bottom" align="right">
<span class="labels" ID="title">
</td>
<td valign="bottom" align="right">
<span class="labels" ID="title">
</td>
<td valign="bottom" align="right">
<span class="labels" ID="title">
</td>
</tr>
</table>
<br>
<table border="0" width="300" cellspacing="0" cellpadding="3" bgcolor="#CC0033">
<tr>
<td align="center" valign="middle" colspan="2">
<table border="0" width="300" cellspacing="0" cellpadding="4" bgcolor="#E6E6E6">
<tr>
<td align="right">
<span class="labels" ID="tags">Username:</span>
</td>
<td>
<input type="text" name="username" maxlength="30" size="32">
</td>
<td> </td>
</tr>
<tr>
<td align="right">
<span class="labels" ID="tags">Password:</span>
</td>
<td>
<input type="password" name="password" maxlength="30" size="32">
</td>
<td valign="bottom">
<input type="submit" name="login" value="Go >>">
</td>
</tr>
</table>
</td>
</tr>
</table>
</td></tr>
</table>
</form>
</body>
</html>
Chapter 15: Customizing the public access interface 206
DRAFT

Chapter 16: Customizing CN3200 and customer settings 207
DRAFT
Chapter 16: Customizing CN3200 and customer settings
Chapter 16
Customizing CN3200 and customer settings
This chapter presents a summary of the configuration settings you can
define to customize the operation of your public access network and
customer accounts.

Chapter 16: Customizing CN3200 and customer settings 208
DRAFT
Overview
The CN3200 uses a third-party RADIUS server to store configuration settings for
customer accounts, accounting data, as well as certain operating settings for the
public access network. The configuration settings are stored in profiles, which
you must create before the public access interface can be used.
The minimum setup you must define is as follows:
• Define RADIUS client settings for the CN3200
Any device that uses the authentication services of a RADIUS server is called
a RADIUS client. Therefore, each CN3200 is considered to be a RADIUS client
and you must define client settings for each one that you intend to install.
See page 213 for details.
• Create a RADIUS profile for the CN3200
Before it can activate the public access interface, the CN3200 must log into a
RADIUS server and retrieve certain operating settings which you must define.
Therefore, you must create at least one RADIUS profile for use by the CN3200.
If you have multiple CN3200s, they can all be associated with a single RADIUS
profile.
See page 214 for details.
• Create a RADIUS profile for one or more customers
The customer profile is used to authenticate customers when they login. It
contains settings that define the characteristics of their account.
Chapter 16: Customizing CN3200 and customer settings 209
DRAFT
RADIUS attributes
Attributes are configuration parameters that you can attach to a RADIUS profile.
The CN3200 supports standard RADIUS attributes and a Colubris Networks
vendor-specific attribute.
Standard RADIUS
attributes
The CN3200 supports the following RADIUS attributes. (Attributes starting with
MS are Microsoft and are not standard.)
Interim accounting updates
To enable interim accounting updates for each customer you must define a value
for the RADIUS attribute Acct-Interim-Interval. This sets the frequency with which
the CN3200 will send accounting information to the RADIUS server.
Access Request
• Acct-Session-Id
• NAS-Port
• NAS-Port-Type
• User-Name
• Calling-Station-Id
• Called-Station-Id
• User-Password
• CHAP-Password
• CHAP-Challenge
• MSCHAP-Challenge
• MSCHAP-Response
• MSCHAPv2-Response
• EAP-Message
• State
• NAS-Identifier
• NAS-Ip-Address
• Framed-MTU
• Connect-Info
• Service-Type
• Message-Authenticator
Access Accept
• MS-MPPE-Recv-Key
• MS-MPPE-Send-Key
• Service-Type
• EAP-Message
• Class
• Idle-Timeout
• Session-Timeout
• Acct-Interim-Interval
• Tunnel-type
• Tunnel-meduim-type
• Tunnel-private-group
Access Reject
• MSCHAP-Error
• Reply-Message
• EAP-Message
Access Challenge
• EAP-Message
• State
Accounting Request
•User-Name
• NAS-Port
• NAS-Port-Type
• NAS-Identifier
• NAS-Ip-Address
• Acct-Status-Type
• Calling-Station-Id
• Called-Station-Id
• Acct-Event-Timestamp
• Acct-Delay-Time
• Acct-Session-Id
• Acct-Authentic
• Acct-Session-Time
• Acct-Input-Octets
• Acct-Input-Gigawords
• Acct-Input-Packets
• Acct-Output-Octets
• Acct-Output-Gigawords
• Acct-Output-Packets
• Acct-Terminate-Cause
• Class
• Framed-Ip-Address
Accounting Response
• No attribute

Chapter 16: Customizing CN3200 and customer settings 210
DRAFT
Colubris Networks
vendor-specific
attributes
In certain cases, the set of standard RADIUS attributes needs to be extended to
specify custom settings for specific types of equipment. These are called vendor-
specific attributes. Colubris Networks has defined two vendor-specific attributes
to support special features on the CN3200, such as the customization of the web
interface and the security certificate. This attribute are:
• Colubris-AVPair
• Colubris-Intercept
These attributes conform to RADIUS RFC 2865.
You may need to define these attributes on your RADIUS server if they are not
already present. In this case, you need to specify the following:
Colubris-AVPair
• SMI network management private enterprise code = 8744
• Vendor-specific attribute type number = 0
• Attribute type = string
Colubris-Intercept
• SMI network management private enterprise code = 8744
• Vendor-specific attribute type number = 1
• Attribute type = integer
Attribute value summary
The following values are permitted for the Colubris-AVPair attribute. These
values are described in greater detail later in this chapter and in Chapter 15.
Important: It is important to specify the attribute values exactly as shown below.
Adding extra spaces between options will result in errors.
CN3200 profile
access-list=
name,action,protocol,address,port,[account,[interval]]
use-access-list=usename
white-list=protocol,address,[port]
ssl-certificate=URL [%s] [%n]
configuration-file=URL [%s] [%n]
mac-address=address[,username[,password]]
default-user-idle-timeout=seconds
default-user-smtp-redirect=hostname:port
default-user-session-timeout=seconds
login-page= URL_of_page
transport-page= URL_of_page
session-page= URL_of_page
fail-page= URL_of_page
logo= URL_of_gif_file
messages= URL_of_text_file
welcome-url= URL_of_page [placeholder]
goodbye-url= URL_of_page [placeholder]
login-err-url= URL_of_page [placeholder]
login-url= URL_of_the_page [placeholder]
ssl-noc-certificate= URL_of_the_Certificate
ssl-noc-ca-certificate= URL_of_the_certificate
Customer profile
smtp-redirect=hostname:port
use-access-list=usename
one-to-one-nat=value
max-input-packets=value
max-output-packets=value
max-input-octets=value
max-output-octets=value
welcome-url= URL_of_page [placeholder]
goodbye-url= URL_of_page [placeholder]
login-err-url= URL_of_page [placeholder]
group=value
essid=value

Chapter 16: Customizing CN3200 and customer settings 211
DRAFT
RADIUS limitations The maximum number of attributes the CN3200 can receive in one request is
limited by the maximum packet size of the UDP protocol which is 64K. Some
networks may drop fragmented UDP packets which may leave you with less than
the maximum size.

Chapter 16: Customizing CN3200 and customer settings 212
DRAFT
Terminate-Acct-
Cause values
Terminate Acct Cause values are supported as follows:
ID Cause Notes
1 User Request Supported. Indicates that the customer logged
out.
2 Lost Carrier Supported. Indicates that the client station is no
longer alive.
4 Idle Timeout Supported. Customer exceeded the idle timeout
value defind for the session.
5 Session Timeout Supported. Customer exceeded maximum time
defined for the session.
6 Admin Reset Supported. Customer session was terminated by
the CN3200 administrator via SNMP or the
management tool.
7 Admin Reboot Not Supported. (not applicable)
8 Port Error Supported. If two customers are detected using
the same IP address, both are logged out with
this error. Another cause is if an error is
encountered in an access list definition. For
example, an invalid host was specified.
9 NAS Error Not Supported. (not applicable)
10 NAS Request Not Supported. (not applicable)
11 NAS Reboot Supported. Customer was logged out because
the CN3200 was restarted.
12 Port Unneeded Not Supported. (not applicable)
13 Port Preempted Not Supported. (not applicable)
14 Port Suspended Not Supported. (not applicable)
15 Service
Unavailable
Not Supported. (not applicable)
16 Callback Not Supported. (not applicable)
17 User Error Supported. An 801.1x client initiated a second
authentication request for a customer, and this
request was refused.
18 Host Request Not Supported. (not applicable)
0x8744
(34628
decimal)
Termination Colubris-specific termination cause. See page
229 for details.
Chapter 16: Customizing CN3200 and customer settings 213
DRAFT
Creating a RADIUS client entry for the CN3200
Any device that uses the authentication services of a RADIUS server is called a
RADIUS client (or RAS client on some systems). Therefore, each CN3200 is
considered to be a RADIUS client and you must define client settings for each
one that you intend to install.
Configuration
settings
You may need to supply the following information when setting up a RADIUS
client entry:
• Client IP address: This is the IP address assigned to the CN3200’s Internet
port. If the CN3200 is using a PPTP connection to communicate with the
RADIUS server, then this is the address assigned to the CN3200 by the PPTP
server.
• Shared secret: Secret the CN3200 will use to authenticate the packets it
receives from the RADIUS server.
Managing shared
secrets
If you are using a PPPoE, DHCP, or PPTP VPN connection when communicating
with the RADIUS server, make sure that the shared secret for each CN3200 is
the same. Also, ensure that all possible IP addresses have been configured on
the RADIUS server.
The username and password assigned to each CN3200 can be different,
enabling you to differentiate between devices.

Chapter 16: Customizing CN3200 and customer settings 214
DRAFT
Creating a profile for the CN3200 on the RADIUS server
Before it can activate the public access interface, the CN3200 must log into a
RADIUS server and retrieve certain operating settings that you must define.
Therefore, you must create at least one RADIUS profile for use by the CN3200. If
you have multiple CN3200s, they can all be associated with a single RADIUS
profile.
Supported standard
RADIUS attributes
This section presents all standard RADIUS attributes that are supported by a
CN3200 profile.
Note: In the following definitions, strings are defined as 1 to 253 characters in
length.
Access request
• Acct-Session-Id (32-bit unsigned integer): Random value generated per
authentication by the CN3200.
• NAS-Identifier (string): The NAS ID set on the Security > RADIUS page for the
RADIUS profile being used.
• NAS-Ip-Address 32-bit unsigned integer): The IP address of the port the
CN3200 is using to communicate with the RADIUS server.
• NAS-Port (32-bit unsigned integer): Always 0.
• NAS-Port-Type (32-bit unsigned integer): Always set to 19, which represents
WIRELESS_802_11.
• Calling-Station-Id (string): The MAC address of the CN3200’s LAN port in IEEE
format. For example: 00-02-03-5E-32-1A.
• Called-Station-Id (string): The MAC address of the CN3200’s LAN port in IEEE
format. For example: 00-02-03-5E-32-1A.
• User-Name (string): The username assigned to the CN3200 on the Security >
Authentication page.
• User-Password (string): The password assigned to the CN3200 on the
Security > Authentication page. Encoded as defined in RFC 2865. Only
present when the authentication method for the RADIUS profile is set to PAP.
• CHAP-Password (string): The password assigned to the CN3200 on the
Security > Authentication page. Encoded as defined in RFC 2865. Only
present when the authentication method for the RADIUS profile is set to CHAP.
• CHAP-Challenge (string): Randomly generated by the product. As defined in
RFC 2865. Only present when the authentication method for the RADIUS
profile is set to CHAP. Length = 19 bytes.
• MSCHAP-Challenge (string): As defined in RFC 2433. Only present when the
authentication method for the RADIUS profile is set to MSCHAPv1 or
MSCHAPv2. Length = 8 bytes.
• MSCHAP-Response (string): As defined in RFC 2433. Only present when the
authentication method for the RADIUS profile is set to MSCHAPv1. Length =
49 bytes.
• MSCHAPv2-Response (string): As defined in RFC 2759. Only present when
the authentication method for the RADIUS profile is set to MSCHAPv2. Length
= 49 bytes.
• EAP-Message (string): As defined in RFC 2869. Only present when the
authentication method for the RADIUS profile is set to EAP-MD5.

Chapter 16: Customizing CN3200 and customer settings 215
DRAFT
• State (string): As defined in RFC 2865.
• Framed-MTU (32-bit unsigned integer): Hard-coded to 1496.
• Connect-Info (string): The string "HTTPS".
• Service-Type (32-bit unsigned integer): As defined in the config.cfg file. Token
name = service-type-device.
• Message-Authenticator (string): As defined in RFC 2869. Always present even
when not doing an EAP authentication. length = 16 bytes.
• Colubris-AVPair: See the description in the section that follows.
Access accept
• Acct-Interim-Interval (32-bit unsigned integer): When present, it enables the
transmission of RADIUS accounting requests of the Interim Update type.
Specify the number of seconds between each transmission.
• Session-Timeout (32-bit unsigned integer): Maximum time a session can be
active. The CN3200 re-authenticates itself when this timer expires. Omitting
this attribute or specifying 0 will disable the feature. (Note that the
authentication interval is also configurable on the Security > Authentication
page.
• Idle-Timeout (32-bit unsigned integer): Not supported.
• Class (string): As defined in RFC 2865.
• EAP-Message (string): Only supported when authentication is EAP-MD5. Note
that the content will not be read as the RADIUS Access Accept is overriding
whatever indication contained inside this packet.
• Colubris-AVPair: See the description in the section that follows.
Access reject
None.
Access challenge
None.
Accounting request
Accounting information is generated by default. To disable accounting support,
open the Security > Authentication -> Advanced Settings page.
• Acct-Session-Id (32-bit unsigned integer): Random value generated by the
CN3200.
• NAS-Identifier (string): The NAS ID set on the Security > RADIUS page for the
profile being used.
• NAS-Ip-Address (32-bit unsigned integer): The IP address of the port the
CN3200 is using to communicate with the RADIUS server.
• NAS-Port (32-bit unsigned integer): Always 0.
• NAS-Port-Type (32-bit unsigned integer): Always set to 19, which represents
WIRELESS_802_11.
• Calling-Station-Id (string): The MAC address of the CN3200’s LAN port in IEEE
format. For example: 00-02-03-5E-32-1A.
• Called-Station-Id (string): The MAC address of the CN3200’s LAN port in IEEE
format. For example: 00-02-03-5E-32-1A.
Chapter 16: Customizing CN3200 and customer settings 216
DRAFT
• User-Name (string): The RADIUS username assigned to the CN3200 on the
Security > Authentication page.
• Class (string). As defined in RFC 2865.
• Framed-IP-Address (32-bit unsigned integer): IP Address of the CN3200’s LAN
port.
• Acct-Status-Type (32-bit unsigned integer): Supported values are Accounting-
On (7) and Accounting-Off (8).
• Acct-Event-Timestamp (32-bit unsigned integer): As defined in RFC 2869.
• Acct-Delay-Time (32-bit unsigned integer): As defined in RFC 2869.
• Acct-Authentic (32-bit unsigned integer): Always set to 1 which means
RADIUS.
Accounting response
None.
Colubris-AVPair
attribute
For each CN3200 profile you can specify one or more instances of a Colubris-
AVPair attribute that will be returned upon successful authentication (RADIUS
Accept). Possible values for all instance are grouped into the following
categories:
The value of a Colubris-AVPair attribute is always a string. These strings are
always of the form: <item>=<value>
Access lists Access lists enable you to create public areas on your network that all customers
can browse, and protected areas that are restricted to specific customer
accounts or groups.
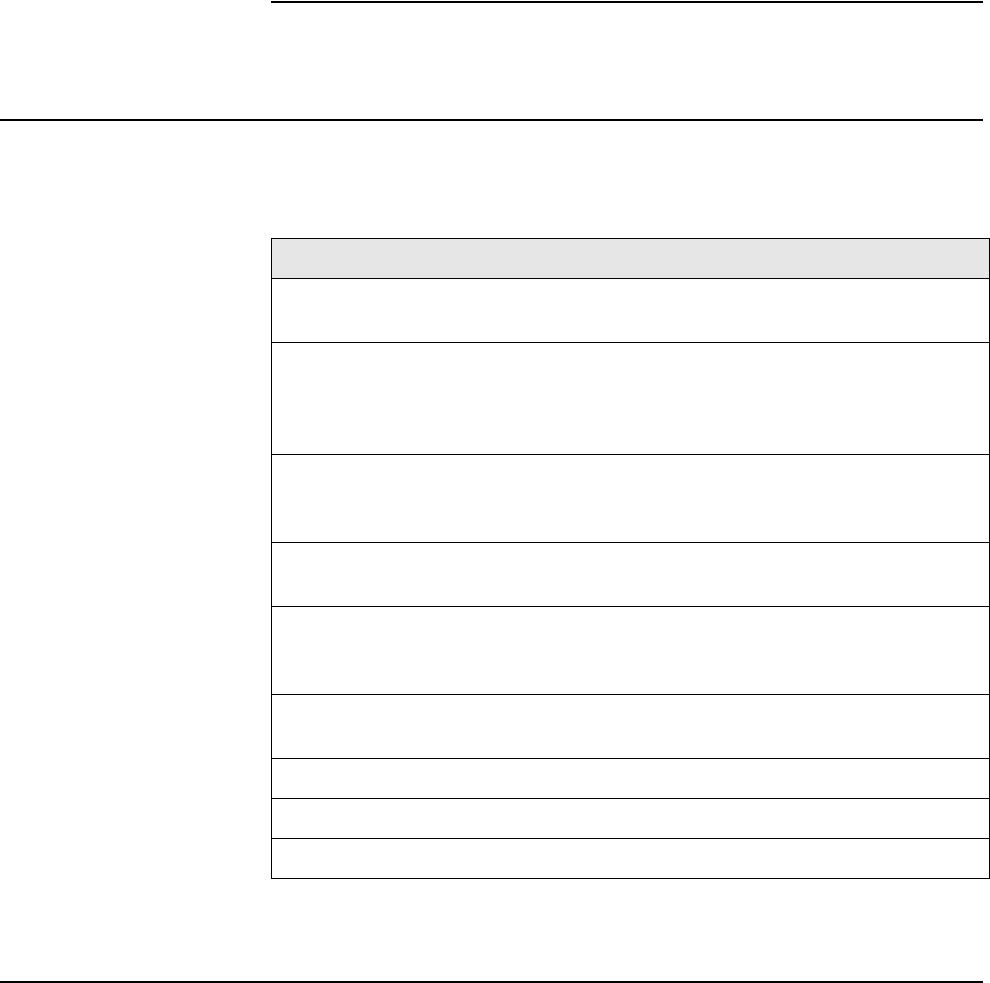
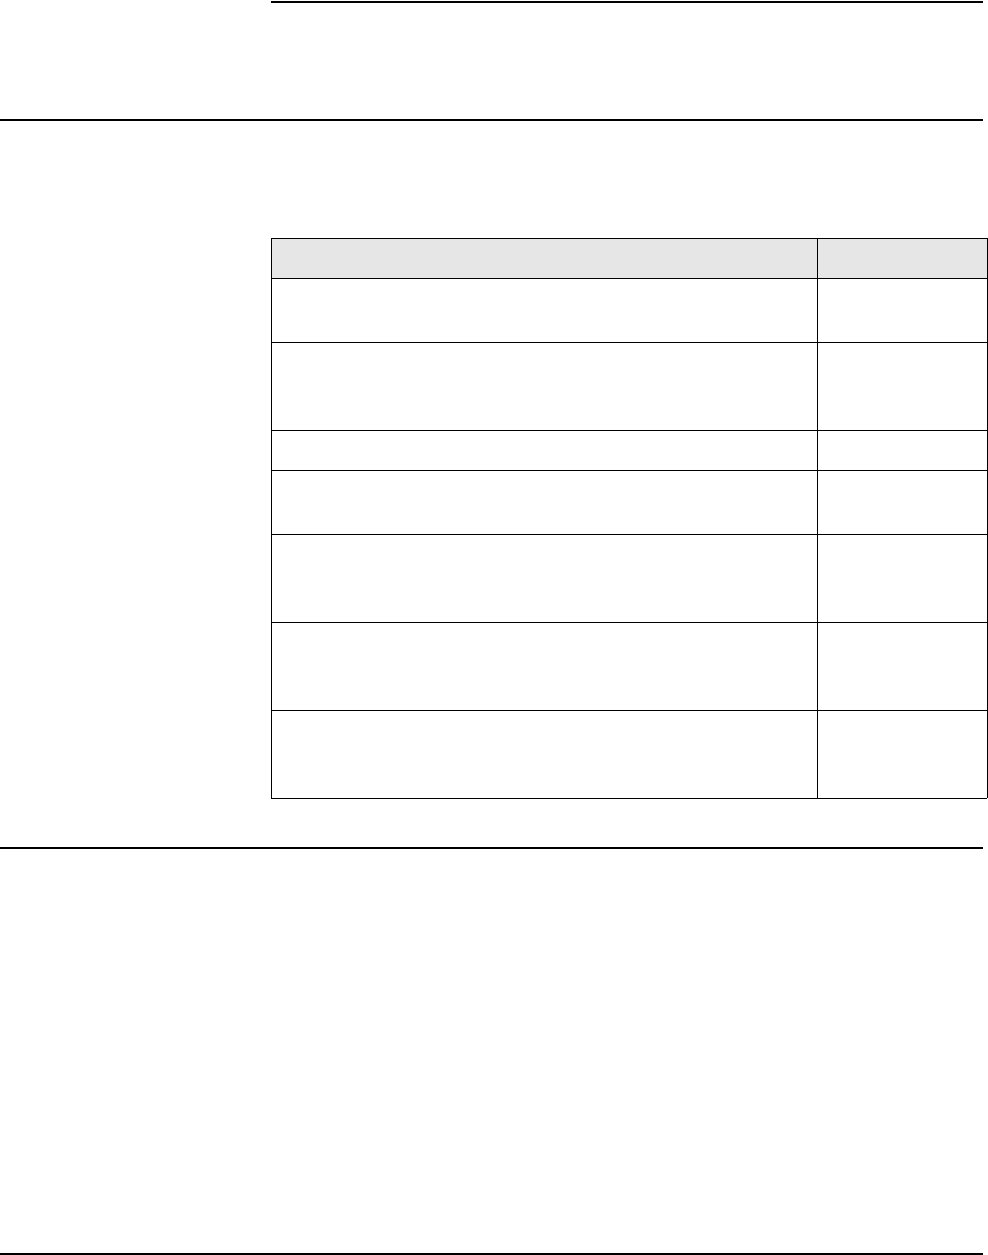
Feature Description
Custom HTML pages and
URLs, and supporting files
Enables you to customize the public access
interface. See Chapter 15 for details.
Access list Enables you to create one or more access
groups which define the set of network
resources that are available to authenticated
customers.
White list The white list defines the set of network
resources that are available to customers before
they are authenticated.
Custom security certificate Enables you to replace the Colubris Networks
certificate with your own.
Configuration file Enables you to store a configuration file at a
central location to automatically update all your
CN3200s.
MAC authentication Enables you to authenticate devices based on
their MAC addresses.
Default user idle timeout Default idle timeout for all customers.
Default user session timeout Default session timeout for all customers.
Default SMTP server Default SMTP server to use for email redirection.
Chapter 16: Customizing CN3200 and customer settings 217
DRAFT
Each access list is a set of rules that governs how the CN3200 controls access to
network resources. You can create multiple access lists, each with multiple rules
to manage the traffic on your public access network.
Default setting
By default no access lists are defined. This means that:
• Unauthenticated customers cannot reach any network resources other than
the CN3200 login page.
• Authenticated customer have access to any network resource connected to the
CN3200’s Internet port.
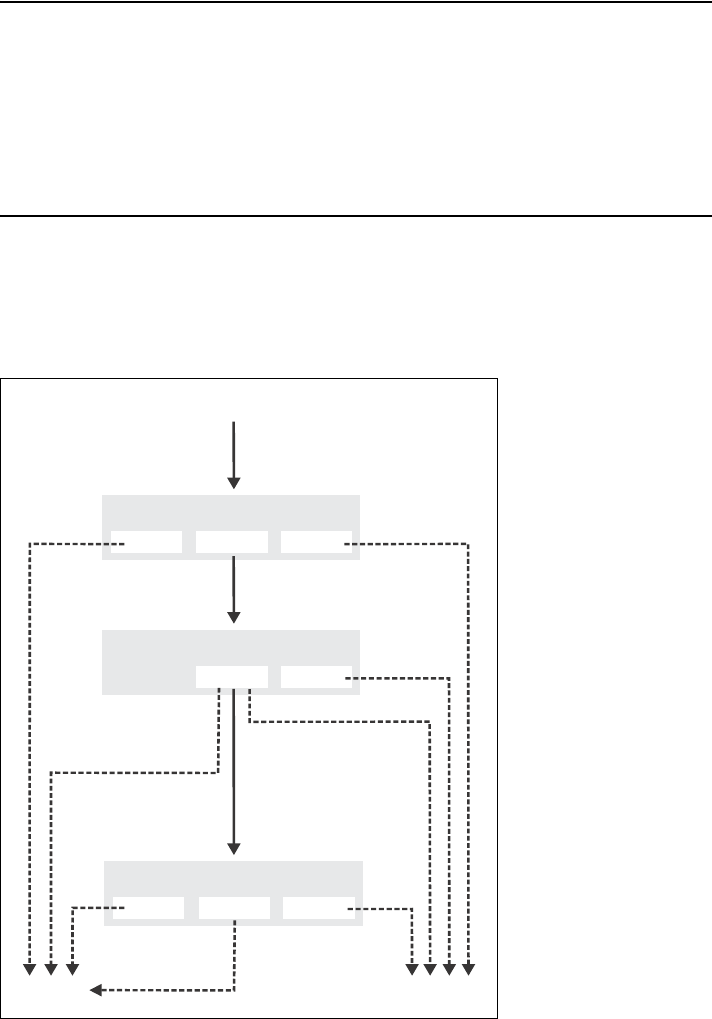
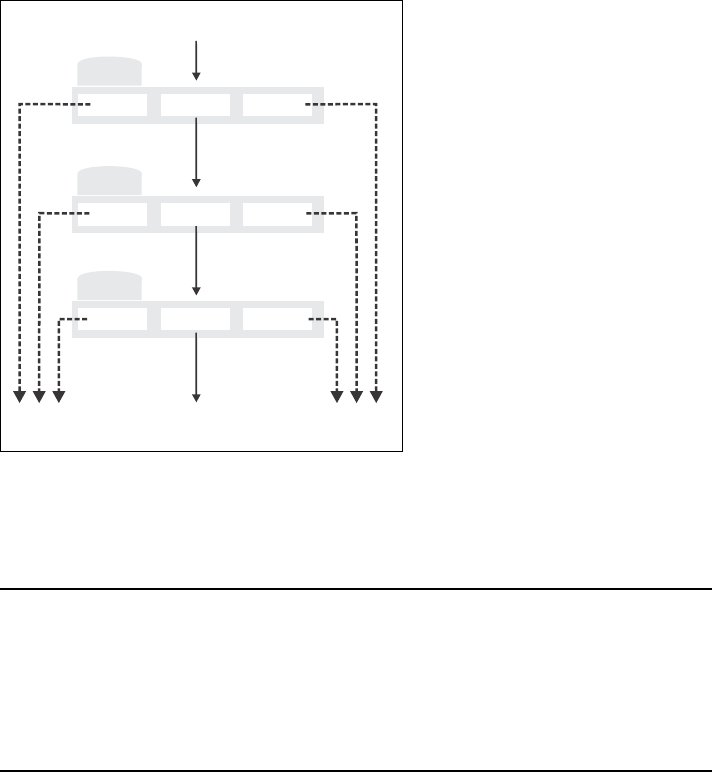
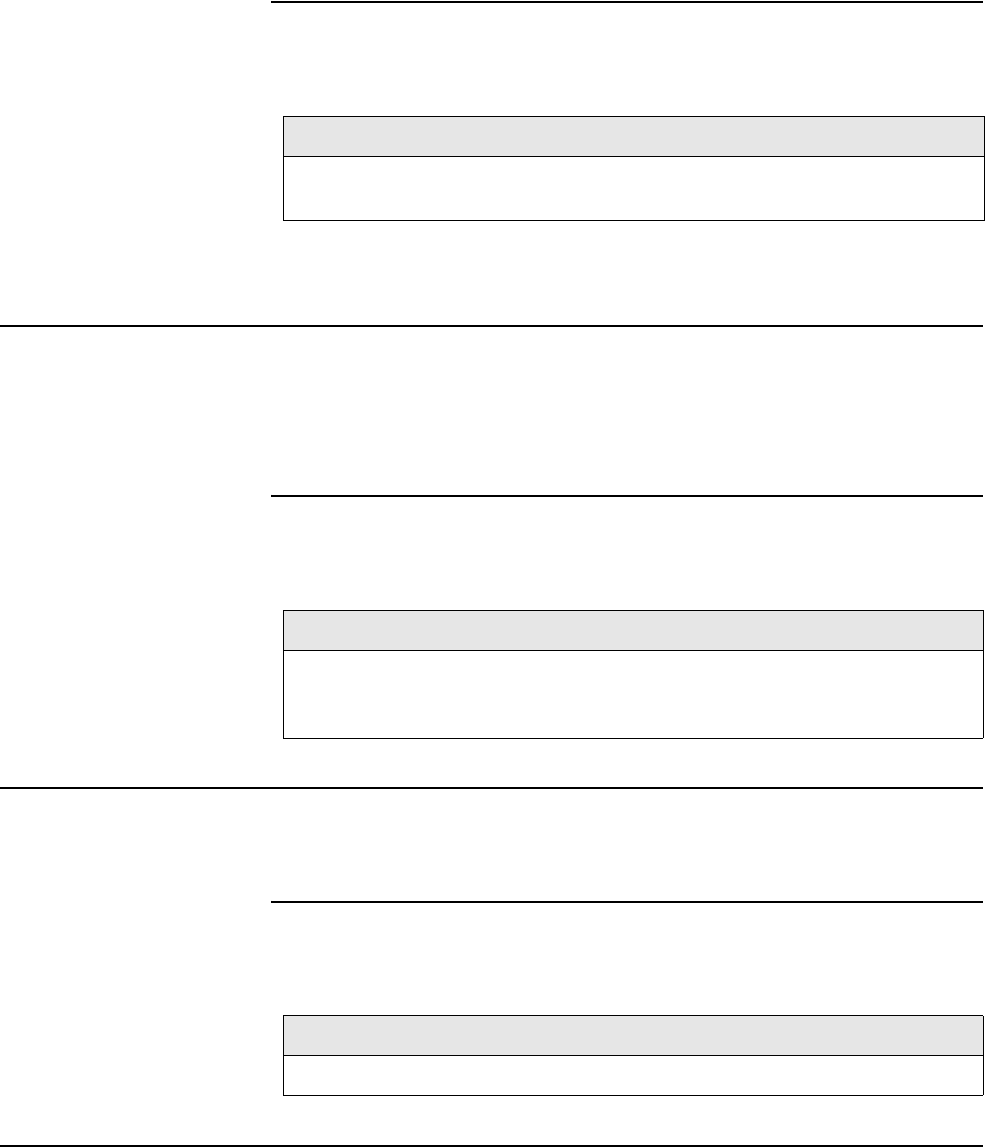
How access lists work
Each customer and each access point can be associated with its own access list.
Incoming traffic cascades through the currently active lists. Traffic that is
accepted or denied by a list is not available to the list that follows it. Traffic that
passes through all lists without being accepted or denied is dropped.
How traffic flows through the access lists.
Note: The white list is a less-powerful version of the access list that is maintained
for compatibility with previous releases. Its functionality is completely superseded
by the access list feature. The access list feature should be used in its place.
Customer session
Site Profile Access List
DENY NO MATCH ACCEPT
Customer Profile Access List
DENY NO MATCH ACCEPT
White List
NO MATCH ACCEPT
Authenticated and
an access list exists
Authenticated and no
user access list exists
Unauthenticated
Internet portDropped
Chapter 16: Customizing CN3200 and customer settings 218
DRAFT
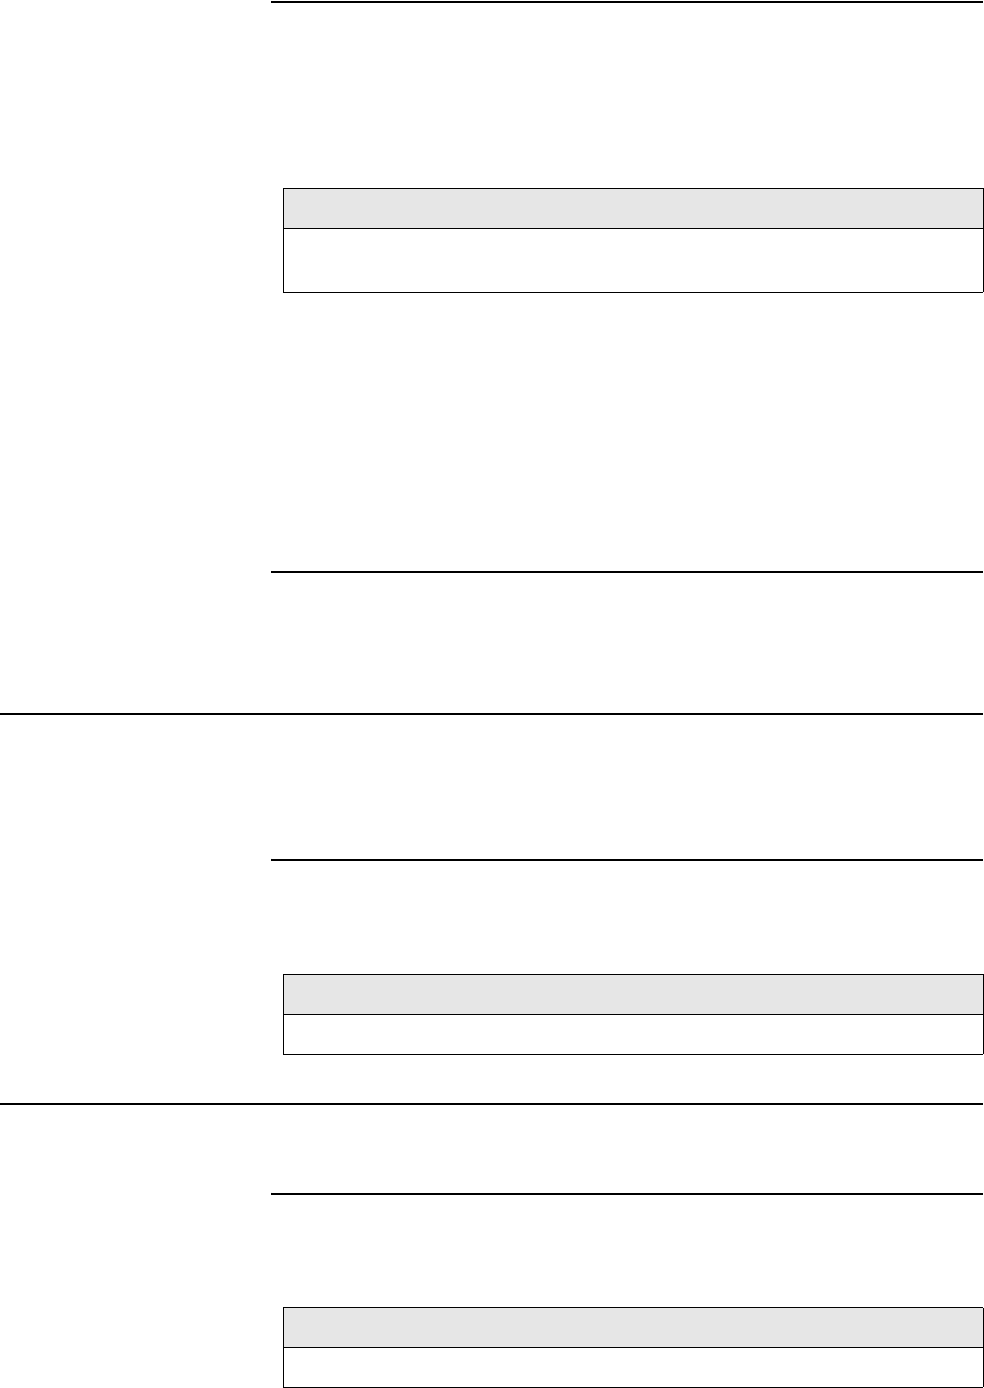
Within each access list, traffic cascades through the list rules in a similar manner.
How traffic flows through the access list rules.
Rules are numbered according to the order in which they are added. Only data
that is not accepted or denied by a rule is available to the next rule in the list.
Accounting support
Each rule in an access list can be configured with an account name for billing
purposes. The CN3200 will send billing information based on the amount of
traffic matched by the rule.
This lets you create rules to track and bill traffic to particular destinations.
Tips on using the access list
With certificates
• If you replaced the default SSL certificate on the CN3200 with one signed by a
well-known CA, you should define the access list to permit access to the CA
certificate for all non-authenticated customers. This enables the customer’s
browser to verify that the certificate is valid without displaying any warning
messages.
• Customers may have configured their web browsers to check all SSL
certificates against the Certificate Revocation List (CRL) maintained by the CA
that issued the certificate. The location of the CRL may be configured in the
browser, or embedded in the certificate. The access list should be configured
to permit access to the CRL, otherwise the customer’s browser will time out
before displaying the login page.
Remote login page
If you are using the remote login page feature, make sure that access to the web
server hosting the page must is granted to all unauthenticated customers.
SMTP redirect
If an unauthenticated customer establishes a connection to their email server, the
SMTP redirect feature will not work once the customer logs in. The customer’s
email will still be sent to the original email server.
To avoid this, do not use an access list to open TCP port 25 for unauthenticated
customers.
DENY
DENY
DENY
NO MATCH
NO MATCH
NO MATCH
ACCEPT
ACCEPT
ACCEPT
DENY NO MATCH ACCEPT
Rule 1
Rule 2
Rule 3
Incoming traffic

Chapter 16: Customizing CN3200 and customer settings 219
DRAFT
Defining and activating access lists
Access lists are defined by adding the following Colubris-AVPair value string to
the RADIUS profile for a CN3200.
access-list=value
Access lists are activated by adding the following Colubris-AVPair value string to
the RADIUS profile for a CN3200 or a customer.
use-access-list=value
You can define up to 32 access lists. Only one list can be active per profile.
The access list is applied before the white list.
Colubris-AVPair value string
access-list=
name,action,protocol,address,port,[account,[interval]]
use-access-list=usename
Where:
Parameter Description
name Specify a name (up to 32 characters long) to identify the access list
this rule applies to. If a list with this name does not exist, a new list
is created. If a list with this name exists, the rule is added to it.
usename Specify the name of an existing access list. This list is activated for
the current profile. Lists are checked in the order they are activated.
action Specify what action the rule takes when it matches incoming traffic.
Two options are available:
•ACCEPT - Allow traffic matching this rule.
•DENY - Reject traffic matching this rule.
protocol Specify the protocol to check: tcp, udp, icmp, all
address Specify one of the following:
• IP address or domain name (up to 107 characters in length)
• Subnet address. Include the network mask as follows:
address/subnet mask For example: 192.168.30.0/24
• Use the keyword all to match any address.
• Use the keyword none if the protocol does not take an address
range (ICMP for example).
port Specify a specific port to check or a port range as follows:
•none - Used with ICMP (since it has no ports).
•all - Check all ports.
•1-65535[:1-65535] - Specify a specific port or port range.
account Specify the name of the customer account the CN3200 will send
billing information to for this rule. Account names must be unique
and can be up to 32 characters in length.
interval Specify time between interim accounting updates. If you do not
enable this option, accounting information is only sent when a
customer connection is terminated. Range: 5-99999 seconds in 15
second increments.

Chapter 16: Customizing CN3200 and customer settings 220
DRAFT
Note: Spaces can be used instead of commas as separators.
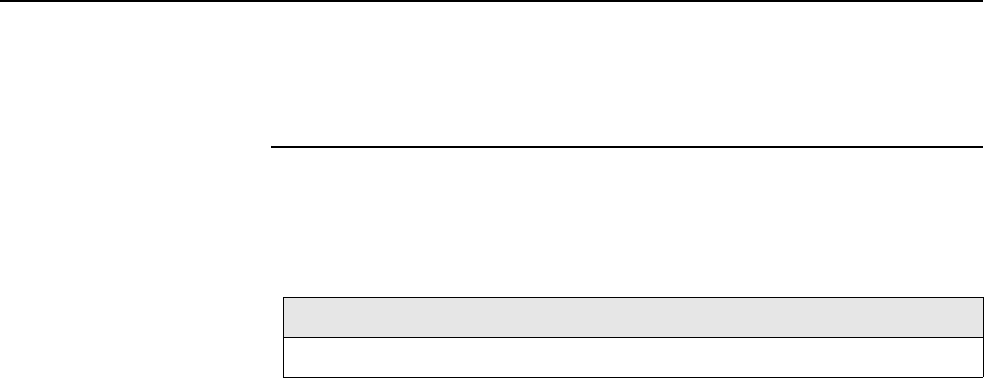
Example
This topology shows wireless deployment for a fictitious university campus.
The RADIUS profile for the CN3200 contains:
access-list=everyone,ACCEPT,tcp,192.168.50.2,80
access-list=students,ACCEPT,tcp,192.168.50.1,80,students_reg,500
access-list=students,ACCEPT,all,192.168.40.0/24,all
access-list=students,DENY,all,192.168.20.0/24,all
access-list=students,DENY,all,192.168.30.0/24,all
access-list=students,ACCEPT,all,all.all,student_internet_use,5000
access-list=faculty,ACCEPT,tcp,192.168.50.1,80,faculty_reg,500
access-list=faculty,ACCEPT,all,192.168.30.0/24,all
access-list=faculty,DENY,all,192.168.20.0/24,all
access-list=faculty,DENY,all,192.168.40.0/24,all
access-list=faculty,ACCEPT,all,all.all,faculty_internet_use,5000
use-access-list=everyone
The RADIUS profile for the students contains:
use-access-list=students
The RADIUS profile for the faculty contains:
use-access-list=faculty
This definition creates three access lists: everyone, students, and faculty.
Everyone
This list applies to all users (students, teachers, guests), whether they are
authenticated or not. This is because the list is active on the CN3200, which is
accomplished with the entry:
use-access-list=everyone
It enables everyone to access the public web server.
Students
This list applies to authenticated students only. It is composed of the following
entries:
access-list=students,ACCEPT,tcp,192.168.50.1,80,students_reg,500
Enables web traffic to the registration web server. Accounting data is recorded in
the account students_reg.
access-list=students,ACCEPT,all,192.168.40.0/24,all
Enables traffic to reach the student segment.
access-list=students,DENY,all,192.168.20.0/24,all
access-list=students,DENY,all,192.168.30.0/24,all
These two entries deny access to the faculty subnet and the NOC.
access-list=students,ACCEPT,all,all.all,student_internet_use,5000
Enables all other traffic to reach the Internet (via routers on the backbone LAN
and the router in the NOC). If this last rule did not exist, this traffic would be
dropped.

Chapter 16: Customizing CN3200 and customer settings 221
DRAFT
Faculty
This list applies to authenticated faculty members only. It is composed of the
following entries:
access-list=faculty,ACCEPT,tcp,192.168.50.1,80,faculty_reg,500
Enables web traffic to the registration web server. Accounting data is recorded in
the account faculty_reg.
access-list=faculty,ACCEPT,all,192.168.30.0/24,all
Enables traffic to reach the faculty segment.
access-list=faculty,DENY,all,192.168.20.0/24,all
access-list=faculty,DENY,all,192.168.40.0/24,all
These two entries deny access to the student subnet and the NOC.
access-list=faculty,ACCEPT,all,all.all,faculty_internet_use,5000
Enables all other traffic to reach the Internet (via routers on the backbone LAN
and the router in the NOC). If this last rule did not exist, this traffic would be
dropped.
White list A white list enables you to specify the set of network resources that an
unauthenticated customer has access to. You can define a specific white list for
each CN3200. These definitions are automatically implemented by the CN3200
by adding the appropriate rules to the firewall.
Note: The white list has been superseded by the access list feature. However,
the white list remains supported for backwards compatibility.
Colubris-AVPair value string
white-list=protocol,address,[port]
Where:
Note: Spaces can be used instead of commas as separators.
The white list applies to the CN3200 itself, and all client stations connected to it.
This means that if you are using customized URLs for the public access interface,
the URLs for the Login Error and Goodbye pages must specify hosts that are
included in the white list.
You can specify up to 128 Colubris-AVPair values containing white list definitions.
Parameter Description
protocol Specify the protocol to allow traffic on: tcp, udp, icmp, all.
address Specify the IP address or domain name of a host, or the IP
address of a subnet. Use the keyword all to match any
address. When specifying an IP subnet you must include the
network mask in the following format:
address/subnet mask
port1 Specify the specific port to allow traffic on, or a range. Not valid if
the all option is used for protocol. Use the following syntax to
specify a range:
1-65535[:1-65535]
A range must be suppled for tcp or udp. A single port must be
specified for icmp.
Chapter 16: Customizing CN3200 and customer settings 222
DRAFT
Examples
white-list=all,192.168.1.10
white-list=tcp,adm.colubris.com,80:90
white-list=udp,192.168.1.0/255.255.255.0,8090:8090
white-list=tcp,192.168.1.0/24,443
Custom SSL
certificate
The CN3200 can retrieve a custom SLL security certificate to replace the
Colubris Networks certificate that is included by default. For more information on
certificates, see Chapter 14.
Colubris-AVPair value string
ssl-certificate=URL [%s] [%n]
Where:
By using the following placeholder, you can customize the URL for each CN3200.
This is useful when you need to update multiple units.
The certificate is encoded using PKCS#12 format, and will contain:
• the private key of the web server
• the certificate of the web server
The file is locked using a password.
Example
ssl-certificate=http://www.colubris.com/%s_certificate
Configuration file The CN3200 can retrieve and load a new configuration file automatically, based
on an URL you specify.
Colubris-AVPair value string
configuration-file=URL [%s] [%n]
Where:
By using the following placeholder, you can customize the URL for each CN3200.
This is useful when you need to update multiple units.
Example
configuration-file=http://www.colubris.com/%s_configfile
Parameter Description
URL Specify the URL that points to the new certificate.
Placeholder Description
%s The login name assigned to the CN3200.
%n The NAS ID assigned to the CN3200.
Parameter Description
URL Specify the URL that points to the new configuration file.
Placeholder Description
%s The login name assigned to the CN3200.
%n The NAS ID assigned to the CN3200.
Chapter 16: Customizing CN3200 and customer settings 223
DRAFT
MAC authentication The CN3200 can authenticate devices based on their MAC address. This is
useful for authenticating devices that do not have a web browser (cash registers,
for example). It can also be used to authenticate the CN300.
To make use of this feature you need to define a RADIUS user account for each
device as follows:
• username: Set this to the username you specified in the mac-address value
string. If no username is specified, set the account name to the MAC address
of the device. Use dashes to separate characters in the address. For example:
00-20-E0-6B-4B-44.
• password: Set this to the password you specified in the mac-address value
string. If no password is specified, set this to the same password that is used
for the user account you defined for the CN3200 on the Security >
Authentication page.
Important: The username and password are not encrypted for transmission so it
is important that the link with the RADIUS server is secure.
Colubris-AVPair value string
mac-address=address[,username[,password]]
Where:
Example
Consider the scenario where several CN300s are installed with a CN3200. If the
CN300s are going to perform firmware upgrades from a remote web or FTP
server, they will need to log in to the public access network. By using MAC-based
authentication, this can easily be accomplished. (This also requires that the
access list on the CN3200 permits access to the web or FTP server.)
Default user idle
timeout
Use this to set the default idle timeout for all customers whose RADIUS profile
does not contain a value for the RADIUS attribute idle-timeout.
Colubris-AVPair value string
default-user-idle-timeout=seconds
Where:
Parameter Description
address Specify the MAC address of the device to authenticate. Use
dashes to separate characters in the address. Do not use
colons (:). For example: 00-20-E0-6B-4B-44.
username Specify the username to associate with this MAC address.
Maximum 253 alphanumeric characters. The username field
cannot contain a comma.
password Specify the password to associate with this MAC address.
Maximum 253 alphanumeric characters. The password field
cannot contain a comma.
Parameter Description
seconds Specify the maximum amount of time a customer session
can be idle. Once this time expires, the session is
automatically terminated. A value of 0 means no timeout.
Chapter 16: Customizing CN3200 and customer settings 224
DRAFT
Default user
session timeout
Use this to set the default session timeout for all customers whose RADIUS
profile does not contain a value for the RADIUS attribute session-timeout.
Colubris-AVPair value string
default-user-session-timeout=seconds
Where:
Default SMTP
server
Use this to set the default SMTP server address for all customer sessions. This
address is used if a specific server is not set for a particular customer. See page
228 for details.
Colubris-AVPair value string
default-user-smtp-redirect=hostname:port
Where:
Parameter Description
seconds Specify the maximum amount of time a customer session
can be connected. Once this time expires, the session is
automatically terminated. A value of 0 means no timeout.
Parameter Description
hostname Specify the the IP address or domain name of the e-mail
server. Maximum length is 253 characters.
port Specify the the on the e-mail server to relay to. Range: 1 to
65535.

Chapter 16: Customizing CN3200 and customer settings 225
DRAFT
Creating customer profiles on the RADIUS server
You must create at least one RADIUS customer profile. Multiple customer
accounts can be associated with a single RADIUS profile.
Supported RADIUS
attributes
This section presents all RADIUS and Colubris attributes that are supported by
for a CN3200 profile.
Note: In the following definitions, strings are defined as 1 to 253 characters in
length.
Access request
• Acct-Session-Id (32-bit unsigned integer): Random value generated by the
CN3200.
• NAS-Identifier (string): The NAS ID set on the Security > RADIUS page for the
profile being used.
• NAS-Ip-Address (32-bit unsigned integer): The IP address of the port the
CN3200 is using to communicate with the RADIUS server.
• NAS-Port (32-bit unsigned integer): A virtual port number starting at 1.
Assigned by the CN3200.
• NAS-Port-Type (32-bit unsigned integer): Always set to 19, which represents
WIRELESS_802_11.
• Calling-Station-Id (string): The MAC address of the CN3200’s LAN port in IEEE
format. For example: 00-02-03-5E-32-1A.
• State (string): As defined in RFC 2865.
• Framed-MTU (32-bit unsigned integer): Hard-coded value of 1496. The value is
always four bytes lower than the wireless MTU maximum which is 1500 bytes
in order to support IEEE802dot1x authentication.
• Connect-Info (string): The string "HTTPS".
• Service-Type (32-bit unsigned integer): As defined in the config.cfg file. Token
name = service-type-user.
• Message-Authenticator (string): As defined in RFC 2869. Always present even
when not doing an EAP authentication. length = 16 bytes.
• User-Name (string): The username assigned to the customer or a device when
using MAC authentication.
• User-Password (string): The password supplied by a customer or device when
logging in. Encoded as defined in RFC 2865. Only present when the
authentication method for the RADIUS profile is set to PAP.
• CHAP-Password (string): The password assigned to the CN3200 on the
Security > Authentication page. Encoded as defined in RFC 2865. Only
present when the authentication method for the RADIUS profile is set to CHAP.
• CHAP-Challenge (string): Randomly generated by the product. As defined in
RFC 2865. Only present when the authentication method for the RADIUS
profile is set to CHAP. Length = 19 bytes.
• MSCHAP-Challenge (string): As defined in RFC 2433. Only present when the
authentication method for the RADIUS profile is set to MSCHAPv1 or
MSCHAPv2. Length = 8 bytes.
• MSCHAP-Response (string): As defined in RFC 2433. Only present when the
authentication method for the RADIUS profile is set to MSCHAPv1. Length =
49 bytes.

Chapter 16: Customizing CN3200 and customer settings 226
DRAFT
• MSCHAPv2-Response (string): As defined in RFC 2759. Only present when
the authentication method for the RADIUS profile is set to MSCHAPv2. Length
= 49 bytes.
• EAP-Message (string): As defined in RFC 2869. Only present when the
authentication method for the RADIUS profile is set to EAP-MD5.
• Colubris-AVPair: See the description in the section that follows.
Access accept
• Acct-Interim-Interval (32-bit unsigned integer): When present, it enables the
transmission of RADIUS accounting requests of the Interim Update type.
Specify the number of seconds between each transmission.
• Session-Timeout (32-bit unsigned integer): Maximum time a session can be
active. The CN3200 re-authenticates itself when this timer expires. Omitting
this attribute or specifying 0 will disable the feature. (Note that the
authentication interval is also configurable on the Security > Authentication
page.
• Idle-Timeout (32-bit unsigned integer): Maximum idle time in seconds allowed
for the customer. Once reached, the customer session is terminated with
termination-cause IDLE-TIMEOUT. Omitting the attribute or specifying 0
disables the feature.
• Class (string): As defined in RFC 2865.
• EAP-Message (string): Only supported when authentication is EAP-MD5. Note
that the content will not be read as the RADIUS Access Accept is overriding
whatever indication contained inside this packet.
• MS-MPPE-Recv-Key: As defined by RFC 3078.
• MS-MPPE-Send-Key: As defined by RFC 3078.
• Tunnel-type: Only used when assigning a specific VLAN number to a
customer. In this case it must be set to "VLAN".
• Tunnel-medium-type = Only used when assigning a specific VLAN number to a
customer. In this case it must be set to "802".
• Tunnel-private-group = Only used when assigning a specific VLAN number to a
customer. In this case it must be set to the VLAN number.
Access reject
• MSCHAP-Error (string): A MSCHAP specific error as defined by RFC 2433.
• Reply-Message (string): This string (as defined in RFC 2865) is recorded and
passed as is to the GetReplyMessage() asp function. Only a single instance is
supported.
• EAP-Message (string): Only supported when authentication is EAP-MD5 or
with IEEE802dot1x. Note that the content will not be read as the RADIUS
Access Reject is overriding whatever indication contained inside this packet.
As defined in RFC 2869.
• Colubris-Intercept: See the description in the section that follows.
• Colubris-AVPair: See the description in the section that follows.
Access challenge
• EAP-Message (string): One or more occurrences of this attribute is supported
inside the same packet. All occurrence are concatenate and transmitted to the
IEEE802dot1x client as is. As defined in RFC 2869.
• State (string): As defined in RFC 2865.

Chapter 16: Customizing CN3200 and customer settings 227
DRAFT
Accounting request
Accounting information is generated by default. To disable accounting support,
open the Security > Authentication page.
• Acct-Session-Id (32-bit unsigned integer): Random value generated by the
CN3200.
• NAS-Identifier (string): The NAS ID set on the Security > RADIUS page for the
profile being used.
• NAS-Ip-Address (32-bit unsigned integer): The IP address of the port the
CN3200 is using to communicate with the RADIUS server.
• NAS-Port (32-bit unsigned integer): A virtual port number starting at 1.
Assigned by the CN3200.
• NAS-Port-Type (32-bit unsigned integer): Always set to 19, which represents
WIRELESS_802_11.
• Calling-Station-Id (string): The MAC address of the CN3200’s LAN port in IEEE
format. For example: 00-02-03-5E-32-1A.
• The MAC address of the wireless port the customer is associated with.Class
(string): As defined in RFC 2865.
• User-Name (string): The username assigned to the customer or to a device
when using MAC authentication.
• Framed-IP-Address (32-bit unsigned integer): IP Address of the customer’s
station.
• Acct-Status-Type (32-bit unsigned integer): Supported value are Start (1),
Interim Update (3), and Stop (2).
• Acct-Event-Timestamp (32-bit unsigned integer): As defined in RFC 2869.
• Acct-Delay-Time (32-bit unsigned integer): As defined in RFC 2865.
• Acct-Authentic (32-bit unsigned integer): Always set to 1 which means
RADIUS.
• Acct-Session-Time (32-bit unsigned integer): Number of seconds this session
since this session was authenticated. Only present when Acct-Status-Type is
Interim-Update or Stop.
• Acct-Input-Octets (32-bit unsigned integer): Low 32-bit value of the number of
octets/bytes received by the customer. Only present when Acct-Status-Type is
Interim-Update or Stop.
• Acct-Input-Gigawords (32-bit unsigned integer): High 32-bit value of the
number of octets/bytes received by the customer. Only present when Acct-
Status-Type is Interim-Update or Stop.
• Acct-Input-Octets (32-bit unsigned integer): Number of packets received by the
customer. Only present when Acct-Status-Type is Interim-Update or Stop.
• Acct-Output-Octets (32-bit unsigned integer): Low 32-bit value of the number of
octets/bytes sent by the customer. Only present when Acct-Status-Type is
Interim-Update or Stop.
• Acct-Output-Gigawords (32-bit unsigned integer): High 32-bit value of the
number of octets/bytes sent by the customer. Only present when Acct-Status-
Type is Interim-Update or Stop. As defined in 2869.
• Acct-Output-Octets (32-bit unsigned integer): Number of packets sent by the
customer. Only present when Acct-Status-Type is Interim-Update or Stop.
• Acct-Terminate-Cause (32-bit unsigned integer): Termination cause for the
session See RFC 2866 for possible values. Only present when Acct-Status-
Type is Stop.
Chapter 16: Customizing CN3200 and customer settings 228
DRAFT
Accounting response
None.
Colubris-AVPair
attribute
For each customer profile you can specify one or more instances of a Colubris-
AVPair attribute that will be sent when requesting authentication (RADIUS
Requrest) or returned upon successful authentication (RADIUS Accept).
Possible values for all instance are grouped into the following categories:
Colubris-Intercept
attribute
For each customer profile, you can specify the Colubris-Intercept attribute to
redirect traffic from this customer into a GRE tunnel.
Attribute value
• 0: Do not intercept customer traffic.
• 1: Intercept customer traffic and redirect into GRE tunnel.
Setting up an intercept
1. Open the Network > GRE page and define a tunnel to carry th e intercepted
traffic.
2. Open the Wireless > WLAN profiles page and click the appropiate WLAN
profile.
3. Enable the Intercepted user traffic option in the Traffic Tunneling (GRE)
box, and set it to the GRE tunnel you just defined.
SMTP redirection The CN3200 is able to provide SMTP email service on a per-customer basis.
This enables customers to send e-mail while on the road without the restrictions
imposed by most ISPs regarding the source address of outgoing mail. It works by
intercepting the call to a customer’s e-mail server and redirecting it to an SMTP
server that you configure.
Feature Description RADIUS packet
SMTP redirection Activates support for the CN3200 e-
mail redirection feature.
Access accept
URLs for custom
HTML pages
Enables you to customize the public
access interface for a particular
customer. See Chapter 15 for details.
Access accept
Access list Activates support for an access list Access accept
One-to-one NAT Activates support for one-to-one NAT
(See page 90 for details).
Access accept
Quotas Enables upload and download limits
to be set individually for each
customer.
Access accept
Group name Sends the group name of the wireless
access point the customer is
associated with.
Access request
SSID Sends the SSID of the wireless
access point the customer is
associated with.
Access request
Chapter 16: Customizing CN3200 and customer settings 229
DRAFT
Important: For mail redirection to work, the customer's email server name must
be publicly known. If the e-mail server name cannot be resolved, mail redirection
will fail.
Important: If an unauthenticated customer establishes a connection to their
email server, the SMTP redirect feature will not work once the customer logs in.
The customer’s email will still be sent to the original email server. To avoid this,
do not use an access list to open TCP port 25 for unauthenticated customers.
Colubris-AVPair value string
smtp-redirect=address
Where:
Example
smtp-redirect=smtp.colubris.com
Access list An access list is a set of rules that govern how the CN3200 controls customer
access to network resources. Access lists are defined in the profile for the
CN3200 (see page 216) and are activated in the customer profiles as needed.
Only one access list can be activated per profile. Access lists are applied before
any white lists.
Colubris-AVPair value string
use-access-list=usename
Where:
One-to-one NAT Add this attribute if the customer requires a unique IP address when NAT is
enabled on the CN3200. For more information see “One-to-one NAT” on
page 90.
Colubris-AVPair value string
one-to-one-nat=value
Where:
Quotas These attributes let you define upload and download limits for each customer.
Limits can be defined in terms of packets or octets (bytes).
Parameter Description
address Specify the IP address or domain name of the e-mail server
which will be used to send outgoing redirected mail.
Parameter Description
usename Specify the name of an existing access list. This list is
activated for the current profile. Lists are checked in the order
they are activated.
Parameter Description
value Set this to 1 to activate one-to-one NAT support.
Chapter 16: Customizing CN3200 and customer settings 230
DRAFT
Colubris-AVPair value string
max-input-packets=value
max-output-packets=value
max-input-octets=value
max-output-octets=value
Where:
When a customer session is terminated based on a quota, a new non-standard
termination cause is used. The value for this termination cause is 0x8744. You
can customize this by modifying the value of "quota-exceeded-cause" in the
"IPRULESMGR" section of the configuration file. See Chapter 16 for instructions
on how to do this.
The text value of for the termination cause is defined in the message.txt file under
the token "stat-quota-exceeded". The default value for this token is "Logged out.
(Quota Exceeded.)". This value can be displayed with the ASP function
GetAuthenticationErrorMessage(). See page 184 for details.
Displaying quota information
A series of ASP functions are available that enable you to display quota
information on the session page. For details, see “Session quotas” on page 188.
Group name This feature only applies when location-aware authenticaiton is being used
(Security > Authentication > Advanced).
Add this attribute to have the CN3200 send the group name of the access point
the customer is associated with in the Access request packet.
Colubris-AVPair value string
group=value
Where:
SSID Add this attribute to have the CN3200 send the SSID of the access point the
customer is associated with in the Access request packet.
Colubris-AVPair value string
ssid=value
Where:
Parameter Description
value For packets: 32-bit unsigned integer value.
For octets: 64-bit unsigned integer value.
Parameter Description
value Name of the access point the customer is associated with.
Parameter Description
value SSID of the access point the customer is associated with.
Chapter 16: Customizing CN3200 and customer settings 231
DRAFT
VLAN support Set the following standard RADIUS attributes to assign VLAN numbers on a per-
customer basis.
Note: The CN3200 does not directly support VLANs. VLAN support is available
when usingg CN300s as satellites stations only.
RADIUS attributes
tunnel-type=VLAN
tunnel-medium-type=802
tunnel-type=value
Where:
Parameter Description
value VLAN number to assign.

Chapter 16: Customizing CN3200 and customer settings 232
DRAFT
Creating administrator profiles on the RADIUS server
If you want to support multiple administrator names and passwords, you must
use a RADIUS server to manage them. The CN3200 only supports a single
admin name and password internally.
Important: Improper configuration of the administrator profile could expose the
CN3200 to access by any customer with a valid account. The only thing that
distinguishes an administrative account from that of a standard customer account
is the setting of the service type. Make sure that a customer is not granted
access if service type is not Administrative,
This is the reason why it may be prudent to use RADIUS Server 2 to handle
administrator logins. This practice reduces the risk of a bad configuration on the
RADIUS server side creating a security hole.
Supported RADIUS
attributes
Admin Access Request
• User-Name (string): The username assigned to the customer or a device when
using MAC authentication.
• NAS-Identifier (string): The NAS ID set on the Security > RADIUS page for the
profile being used.
• Service-Type (32-bit unsigned integer): As defined in RFC 2865. Set to a value
of 6, which indicates SERVICE_TYPE_ADMINISTRATIVE.
• Framed-MTU (32-bit unsigned integer): Hard-coded value of 1496. The value is
always four bytes lower than the wireless MTU maximum which is 1500 bytes
in order to support IEEE802dot1x authentication.
• MSCHAP-Challenge (string): As defined in RFC 2433. Only present when the
authentication scheme on the Security > RADIUS page is set to MSCHAPv1
or MSCHAPv2. Length = 8 bytes.
• MSCHAP-Response (string): As defined in RFC 2433. Only present when the
authentication scheme on the Security > RADIUS page is set to MSCHAPv1.
Length = 49 bytes.
Admin Access Accept
• None supported.
Admin Access Reject
• None supported
Admin Access Challenge
• None supported
Admin Accounting Request
• Not supported
Admin Accounting Response
• Not supported

Chapter 17: Sample setup - Backend software 233
DRAFT
Chapter 17: Sample setup - Backend software
Chapter 17
Sample setup - Backend software
This chapter provides step-by-step instructions for installing and
configuring the necessary backend software to support a public access
hotspot. You can use this setup as a platform to experiment with the
CN3200 feature set.
IMPORTANT: Before reading this chapter you should familiarize
yourself with the concepts discussed in Chapter 15 and Chapter 16.

Chapter 17: Sample setup - Backend software 234
DRAFT
Overview
This sample will be constructed using the following components:
• a fully-functional evaluation version of Funk Steel Belted Radius Server
• an SSL-capable version of the Apache open source web server
• a win32 version of PHP
• a win32 version of MySQL open source database software
• various HTML pages, scripts, RADIUS profiles designed to illustrate how to
exploit the information provided by a CN3200 in a backend system, including
creation of SSL certificates,
• a set of PHP scripts for easy administration of the database
CAUTION The installation described in this chapter should not be used in a live setup
without making the appropriate changes to guarantee the security of the web
server and other components. If you do not know how to do this yourself, you
should contact a security expert for assistance. It is beyond the scope of this
document to address these security issues.
Important: Apache 1.2.x should never be used in a production environment on a
Windows server.
IN NO EVENT SHALL COLUBRIS NETWORKS INC. BE LIABLE TO ANY PARTY FOR DIRECT, INDIRECT, SPECIAL, INCIDENTAL, OR
CONSEQUENTIAL DAMAGES ARISING OUT OF THE USE OF THIS SOFTWARE AND ITS DOCUMENTATION, EVEN IF COLUBRIS
NETWORKS INC. HAS BEEN ADVISED OF THE POSSIBILITY OF SUCH DAMAGE. COLUBRIS NETWORKS INC. SPECIFICALLY
DISCLAIMS ANY WARRANTIES, INCLUDING, BUT NOT LIMITED TO, THE IMPLIED WARRANTIES OF MERCHANTABILITY AND
FITNESS FOR A PARTICULAR PURPOSE. THE SOFTWARE PROVIDED HEREUNDER IS ON AN "AS IS" BASIS FOR NON-
PRODUCTION USE ONLY, AND COLUBRIS NETWORKS INC. HAS NO OBLIGATION TO PROVIDE MAINTENANCE, SUPPORT,
UPDATES, ENHANCEMENTS, OR MODIFICATIONS.
Prerequisites Software
• Windows 2000 Professional, Server, or Advanced Server (with Service Pack
3), and all recommended updates
• Steel Belted Radius v 4.0 from Funk Software (evaluation version)
•PHP
•MySQL
• phpMyAdmin
• The Colubris Backend archive.
See “Retrieve software” on page 237 for information on obtaining this software.
Hardware
• a network hub
• a second network hub or a cross-over cable
• a computer capable of running Windows 2000 Professional, Server, or
Advanced Server, connected to the hub
• optionally, you can add a second computer capable of running a web server
• a CN3200
• a second computer with a JavaScript-enabled web browse
Skills
• Familiarity with the installation and operation of TCP/IP-based networks.
• Basic knowledge of Windows 2000, including how to use a Windows
command-line session.

Chapter 17: Sample setup - Backend software 235
DRAFT
Equipment setup
This section illustrates the hardware setup that was used to create the sample
backend configuration described in this chapter. If you duplicate this setup, you
will not have to change any of the IP addresses supplied in the example.
Topology The goal of this setup is to simulate a working environment with the least amount
of equipment. To this end, the ‘public network’ is considered to be any device
connected to the LAN port on the CN3200. The ‘protected network resources’
are connected to the Internet port on the CN3200. In this example, both Server 1
and Server 2 are on the protected network. Server 1 is used to host a remote
login page and a RADIUS server. Server 2 is used to simulate an external web
server.
See “Wiring details” on page 358 for information on how to build an x-over cable.
To test the setup when installation and configuration is complete, you will use the
client station to browse the web server installed on Server 2. The CN3200 will
intercept the request and redirect the web browser to the public access login
page. After you log in, the CN3200 will display the welcome page. This page will
contain the URL of the originally requested web server (Server 2). You can then
click the URL to reach Server 2.

Chapter 17: Sample setup - Backend software 236
DRAFT
About the
components
Server 1
Server 1 hosts the remote login page and RADIUS server. The following software
is installed on it:
• Funk Steel Belted Radius Server
• Apache web server with SSL support (OpenSA package)
• PHP server-side scripting language
• MySQL database
• Colubris Backend archive which contains configuration files for RADIUS and
MySQL as well as new pages for public access interface
Server 2
Server 2 is can be used to test the setup once it is complete. You should install a
web server on this computer. This example uses IIS running on Windows 2000
professional.
If you are only using one server, then Server 1 already has a web server running
on it.
Client station
The client station is required to test the setup once it is complete. It requires a
web browser. The DHCP server on the CN3200 will assign an IP address to this
computer.
Chapter 17: Sample setup - Backend software 237
DRAFT
Step 1: Retrieve software
Server 1 Create temporary directory on Server 1. For this example, use the directory
c:\opensource.
Download the following software into this directory.
• Funk Steel Belted Radius Server v4.04 (funk.com)
Evaluation version (not open source)
• OpenSA v1.0.4
http://www.opensa.org/files/1.0.4/opensa_1.0.4bin.exe
Contains Apache web server and SSL support
• PHP v4.3.2
http://www.php.net/downloads.php
Filename is php-4.3.2-Win32.zip
• phpMyAdmin v.2.5.2-pl1
http://sourceforge.net/projects/phpmyadmin/
Filename is phpMyAdmin-2.5.2-pl1-php.zip
If this version is not available, then you may be able to find it here:
http://museum.php.net/win32
• MySQL v3.23.49 or higher (www.mysql.com)
• MySQL Connector/ODBC v3.51.06
http://www.mysql.com
• Colubris Backend archive (backend.zip). This file is available on the CD or on
the Colubris web site in the Support section.
Server 2 No software other than Windows 2000 Professional, Server, or Advanced Server
(with Service Pack 3) is required.

Chapter 17: Sample setup - Backend software 238
DRAFT
Step 2: Install configure software on Server 1
Windows 2000 1. Install Windows 2000 Professional, Server, or Advanced Server and then
install Service Pack 3. Make sure you also install all the latest updates.
2. Disable the IAS and IIS services on Windows 2000 Server, or Advanced
Server. This is required so that they do not conflict with Steel-Belted Radius
and Apache.
3. Connect Server 1 to the hub and assign a static IP address to it. For this
example, use the address 192.168.2.99.
4. Shut down and restart Server 1.
Colubris backend
archive
1. Extract the contents of backend.zip into a working directory. For this
example, use the directory c:\colubris.
2. If the address of Server 1is not 192.168.2.99, then:
•Edit c:\colubris\radius\example.rif, and replace all instances of the
address 192.168.2.99 with the IP address (or domain name) of Server 1.
•Edit c:\colubris\web\demo-php\login.php, and replace all instances of
the address 192.168.2.99 with the IP address (or domain name) of Server
1.
•Edit c:\colubris\web\demo-php\noc\noc.asp, and replace all instances of
the address 192.168.2.99 with the IP address (or domain name) of Server
1.
•Edit c:\colubris\web\demo-php\upload\login.html, and replace all
instances of the address 192.168.2.99 with the IP address (or domain
name) of Server 1.
Note: In a production setup you should use the domain name to identify Server 1
to avoid getting security warnings from web browsers due to X.509 certificate
inconsistencies.
Steel-Belted Radius 1. Retrieve Funk Steel Belted Radius Server v4.04 Evaluation version, from
funk.com.
2. Run the executable installation file and accept all default installation settings.
When prompted, select the 30 day trial.
Important
If you encounter the following error message when trying to start the Steel-Belted
Radius NT Service:
Services: Error 1068: The dependency service or group failed to
start.
Refer to Tech Note RD230 on the Funk web site for a solution.
http://notesnt.funk.com/TechNotenewweb.nsf/0/
6aa7095c3c6b0e4f85256aca0003b458?OpenDocument
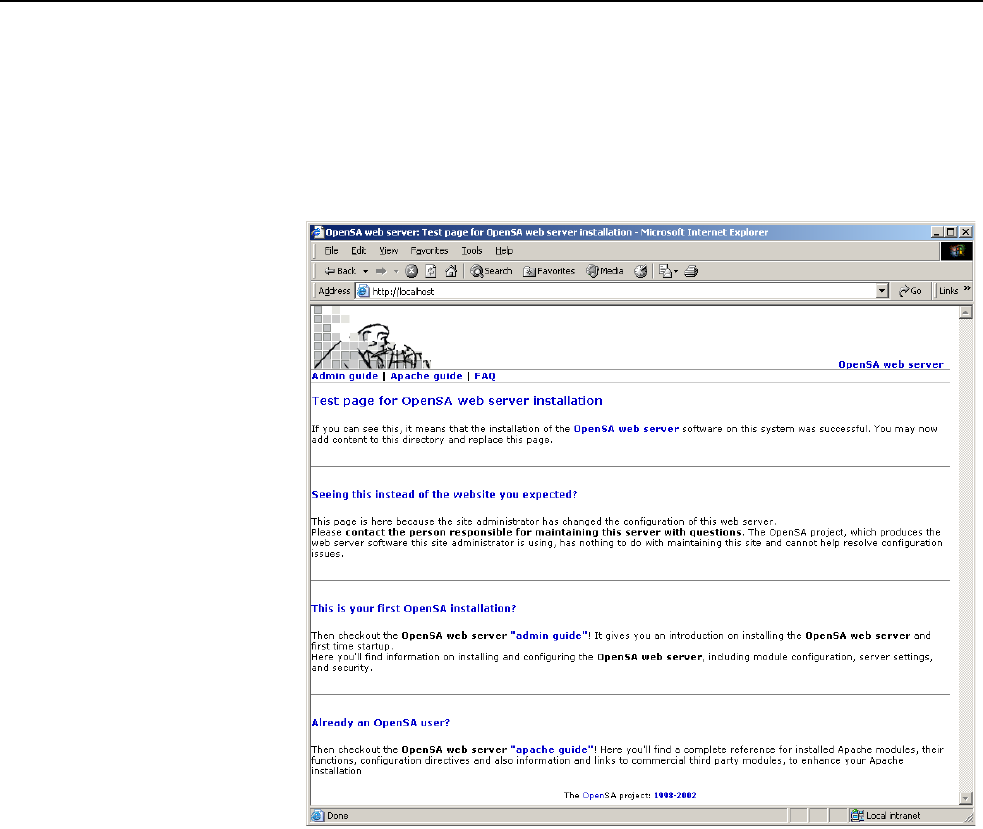
Chapter 17: Sample setup - Backend software 239
DRAFT
Apache 1. Run c:\opensource\opensa_1.0.4bin.exe and accept all default installation
settings.
2. After installation is complete, open a Windows command-line session.
3. Run c:\opensa\apache\apache.exe. This starts the web server.
4. Launch your web browser and point it to: http://localhost
The following page should open:
5. Close the command-line session. This stops the Apache server.
6. Launch a new command-line session.
7. Run c:\opensa\apache\apache.exe –D SSL. This starts Apache in secure
mode.
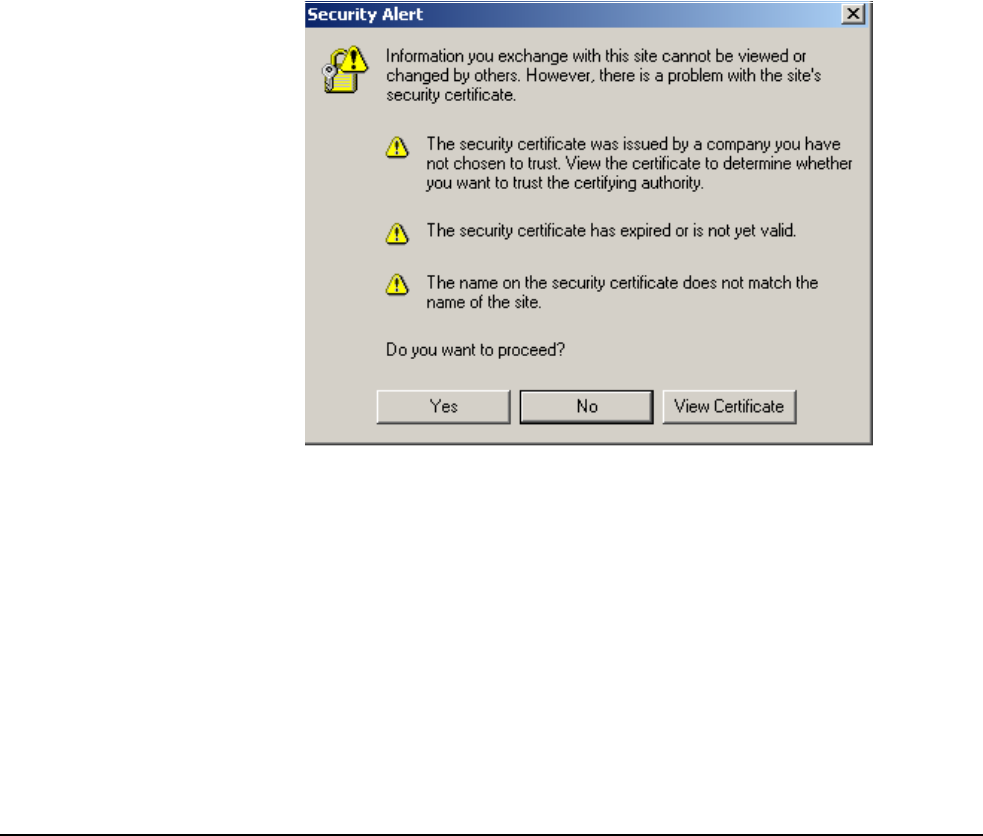
Chapter 17: Sample setup - Backend software 240
DRAFT
8. Point your web browser to: https://localhost
The following message box should open:
This message is displayed because:
• the default SSL certificate that comes with the OpenSA version of Apache
does not match the DNS name present in the certificate
and
• the default SSL certificate has not been signed by a certificate authority
known to your web browser.
Later in this example, instructions are provided for eliminating this message.
9. Click Yes. The OpenSA test page will open again. This time in an HTTPS
session.
10. Close the command-line session Apache is running in.
Sample pages Sample pages are provided to enable you to modify the public access interface
as described in Chapter 15: Customizing the public access interface. Install these
sample pages as follows:
1. Copy the directory c:\colubris\web\demo-php to the directory
c:\opensa\apache\htdocs
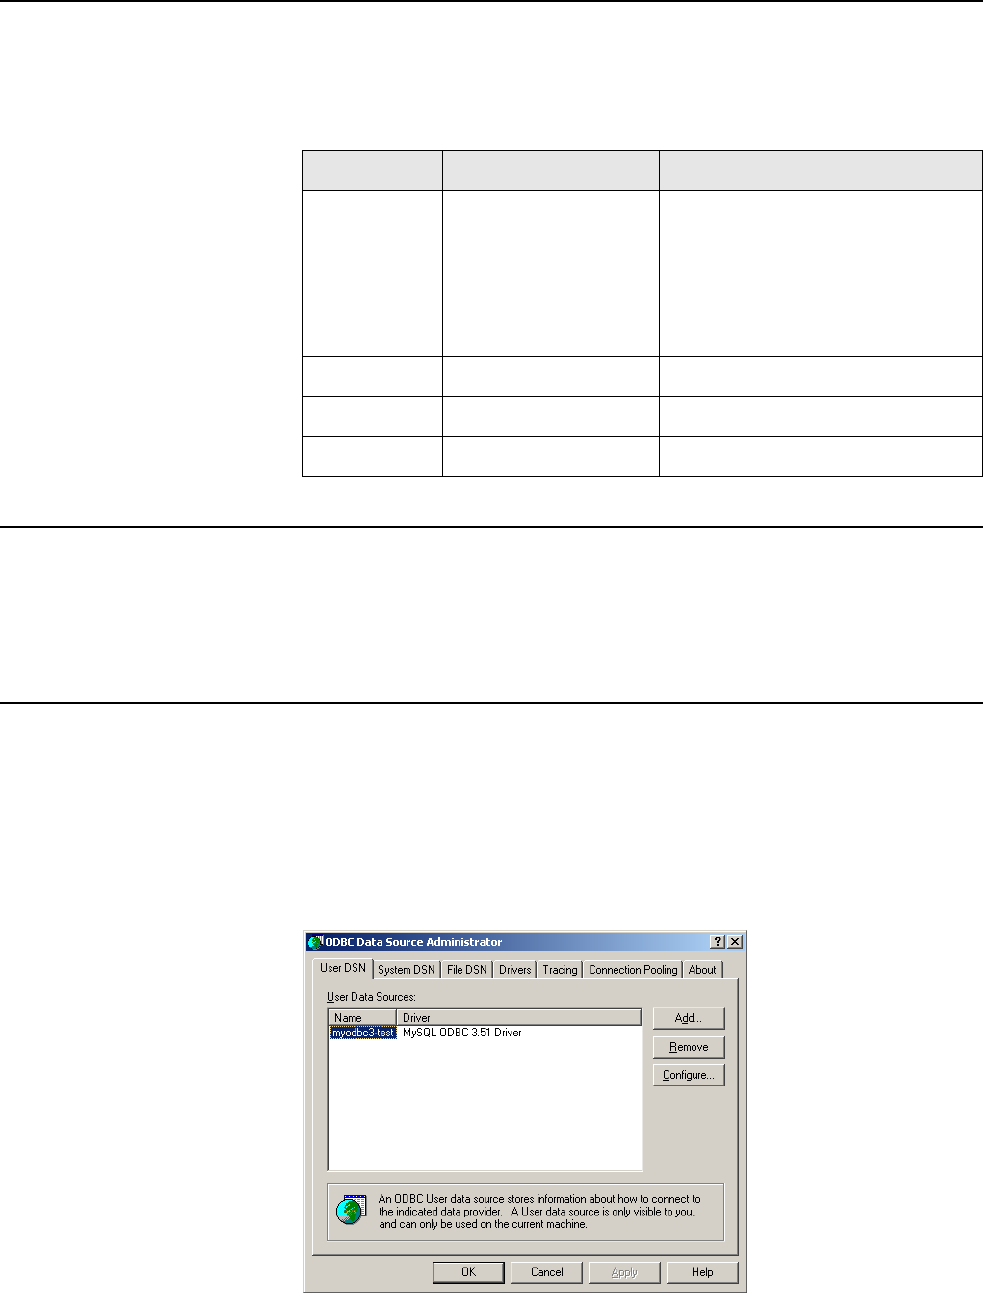
Chapter 17: Sample setup - Backend software 241
DRAFT
PHP 4.2.3 1. Extract php-4.x.x-Win32.zip into c:\
2. Rename c:\php-4.x.x to c:\php.
3. Copy the following files as indicated. If you are prompted to replace the files,
do so.
MySQL 1. Extract mysql-4.0.14b-win.zip into a temporary directory, and then run
setup.exe. Accept all default installation options.
2. Double click MyODBC-3.51.06.exe. Accept all default installation options.
At the end of the installation procedure, MySQL will be installed in c:\mysql.
Configure the OBDC
data source
The OBDC database acts as the repository for all the parameters for each user
account. The Steel-Belted Radius server retrieves account information from the
database and uses the database to maintain accounting and usage information
for each user.
1. Open a command-line session.
2. Run odbcad32.exe.
The following window opens:
File Source Target
php.ini c:\colubris\php\ %SystemRoot%
This is typically \WINNT. You can
check the actual location using
the following command in a
command-line session: echo
%systemroot%.
phpinfo.php c:\colubris\php\ c:\OpenSA\Apache\htdocs
php4ts.dll c:\Php c:\OpenSA\Apache\
httpd.conf c:\colubris\Apache c:\OpenSa\Apache\conf\
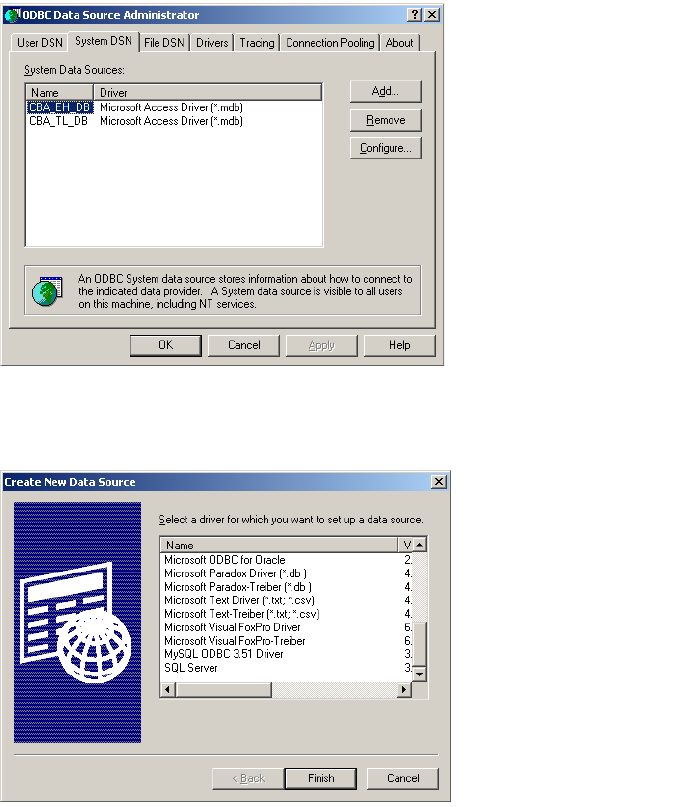
Chapter 17: Sample setup - Backend software 242
DRAFT
3. Click the System DSN tab.
4. Click Add.
5. Select MySQL ODBC 3.51 Driver, then click Finish.
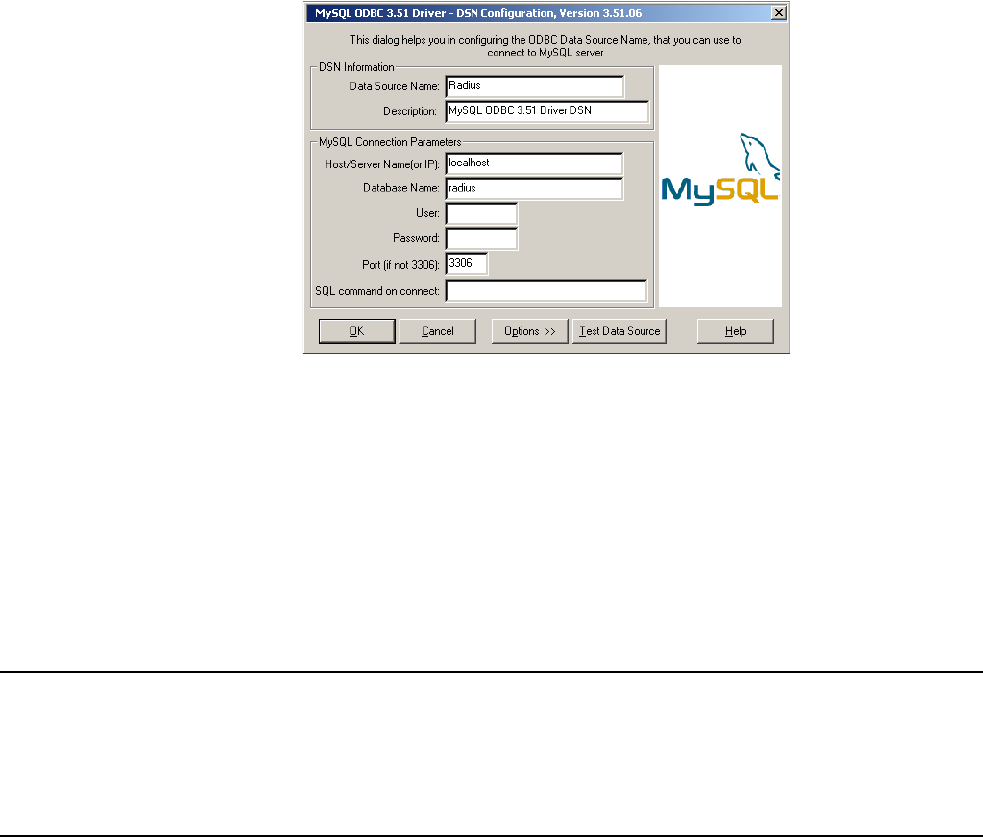
Chapter 17: Sample setup - Backend software 243
DRAFT
6. Fill in the appropriate fields in the Driver configuration window as follows:
• Data Source Name: Name of the datasource. For this example, it must be
set to Radius.
• Host / Server Name (or IP): Location of the datasource. For this example, it
must be set to localhost.
• Database name: Name of the database. For this example, it must be set to
radius.
7. Click OK.
8. Click OK.
phpMyAdmin 1. Extract phpMyAdmin-2.5.2-pl1-php.zip into the
directory: c :\OpenSA\Apache\htdocs.
2. Rename:\OpenSA\Apache\htdocs\phpMyAdmin-2.5.2-pl1 to
phpMyAdmin.
Setting the path To adjust the path, do the following:
1. Right-click My Computer on the desktop.
2. Click Properties.
3. Click Advanced.
4. Click Environment Variables.
5. In the System variables window, click the Path entry, and then click Edit.
6. Make sure that the Variable value field terminates as follows:
;c:\Php;c:\Php\dlls;C:\OpenSA\Apache;C:\OpenSA\OpenSSL\bin;c:\M
ySQL\bin
Important: The order of the entries in this field must be as illustrated above, and no duplicate
entries must exist.
7. Click OK, OK, OK.
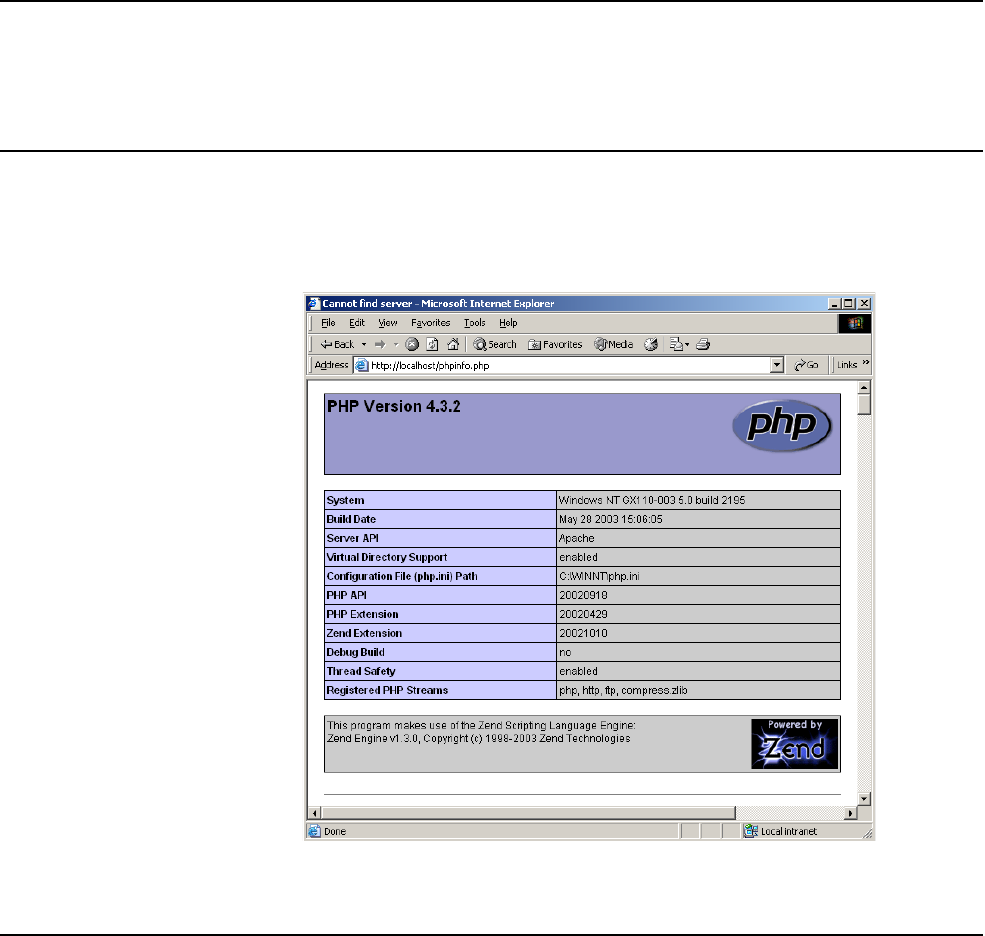
Chapter 17: Sample setup - Backend software 244
DRAFT
Start mysql 1. Run c:\mysql\bin\winmysqladmin.exe
2. When prompted to enter a username and password click Cancel.
3. Shut down and restart Server 1.
Test PHP 1. Open a command-line session.
2. Run c:\opensa\apache\apache.exe -D SSL.
3. Point your web browser to http://localhost/phpinfo.php. The following page
opens:
4. Close the command-line session Apache is running in.
Create the sample
RADIUS database
A batch file is provided that will automatically create the database entries needed
for this example. This saves you the trouble of making these entries manually.
1. Start a windows command-line session.
2. Change to the directory: c:\colubris\mysql\
3. Run the batch file: createdb.cmd
For example:
mysqladmin: DROP DATABASE radius failed;
error: 'Can't drop database 'radius'. Database doesn't exist'
Database "radius" created
Displaying users present in database
u_username u_user_type
hotspot 1
user 2
admin 4
www.noc-cn3000.com 1
Note: It is normal to see the following error when the createdb.cmd is run the first
time: DROP DATABASE radius failed
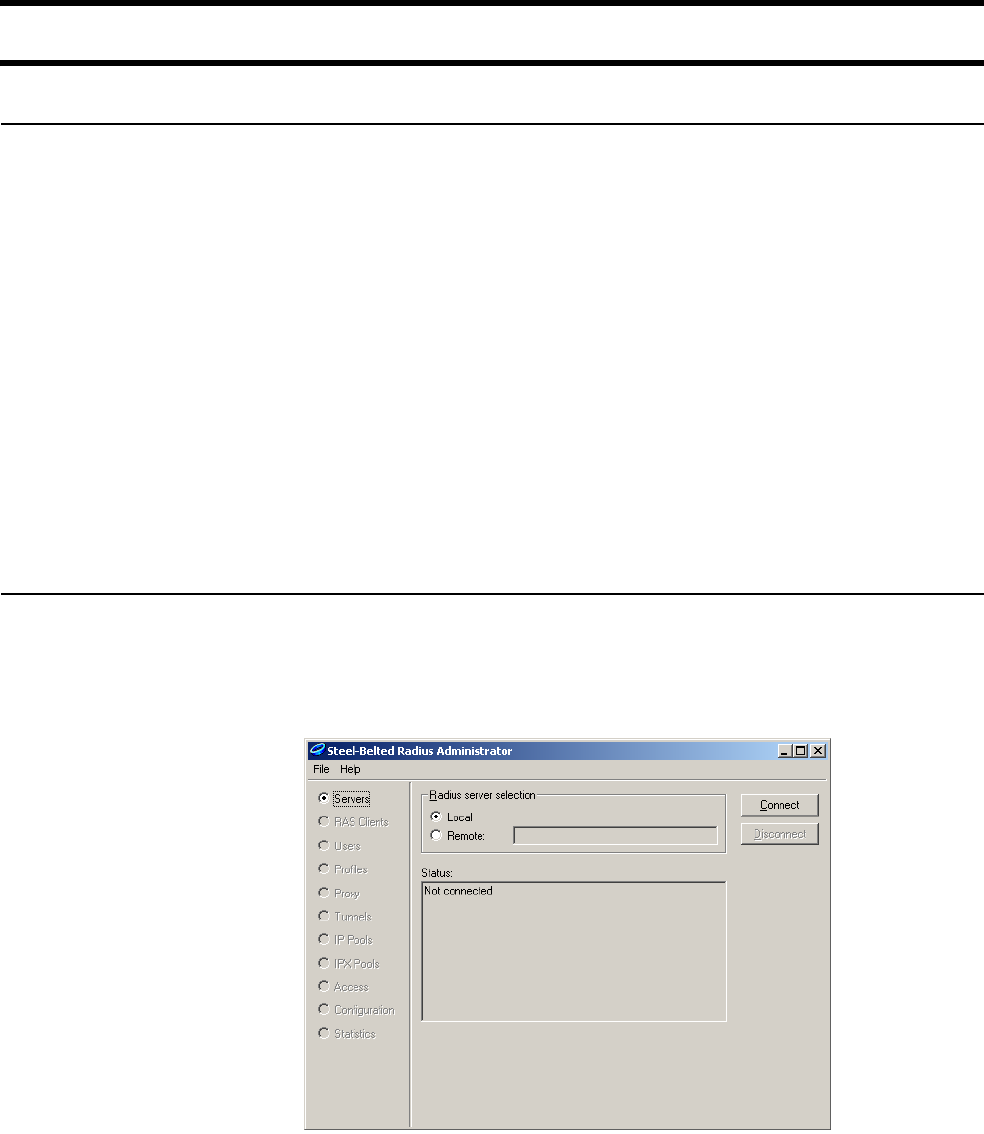
Chapter 17: Sample setup - Backend software 245
DRAFT
Step 3: Configure Steel-Belted Radius on Server 1
Modify the default
configuration files
The backend.zip file contains modified configuration settings for the Steel-Belted
Radius server to make it work in this example.
1. Open a command-line session.
2. Execute the command: net stop “Steel-Belted Radius”
This stops the Steel-Belted Radius server. (It was automatically started after
installation.)
3. Copy the following files from c:\colubris\radius\ to c:\radius\service\.
• Sqlacct.acc
• Sqlacct2.acc
• Sqlauth.aut
If you are prompted to replace the files, do so.
4. If you are using an older version of Steel-Belted Radius, you should also copy
the files in c:\colubris\radius\older_version\ to c:\radius\service\.
Start and connect to
the server
1. Open a command-line session.
2. Execute the command: net start “Steel-Belted Radius”
3. On the Start menu, click Steel-Belted Radius, then click Steel-Belted
Radius Administrator. The following window opens.
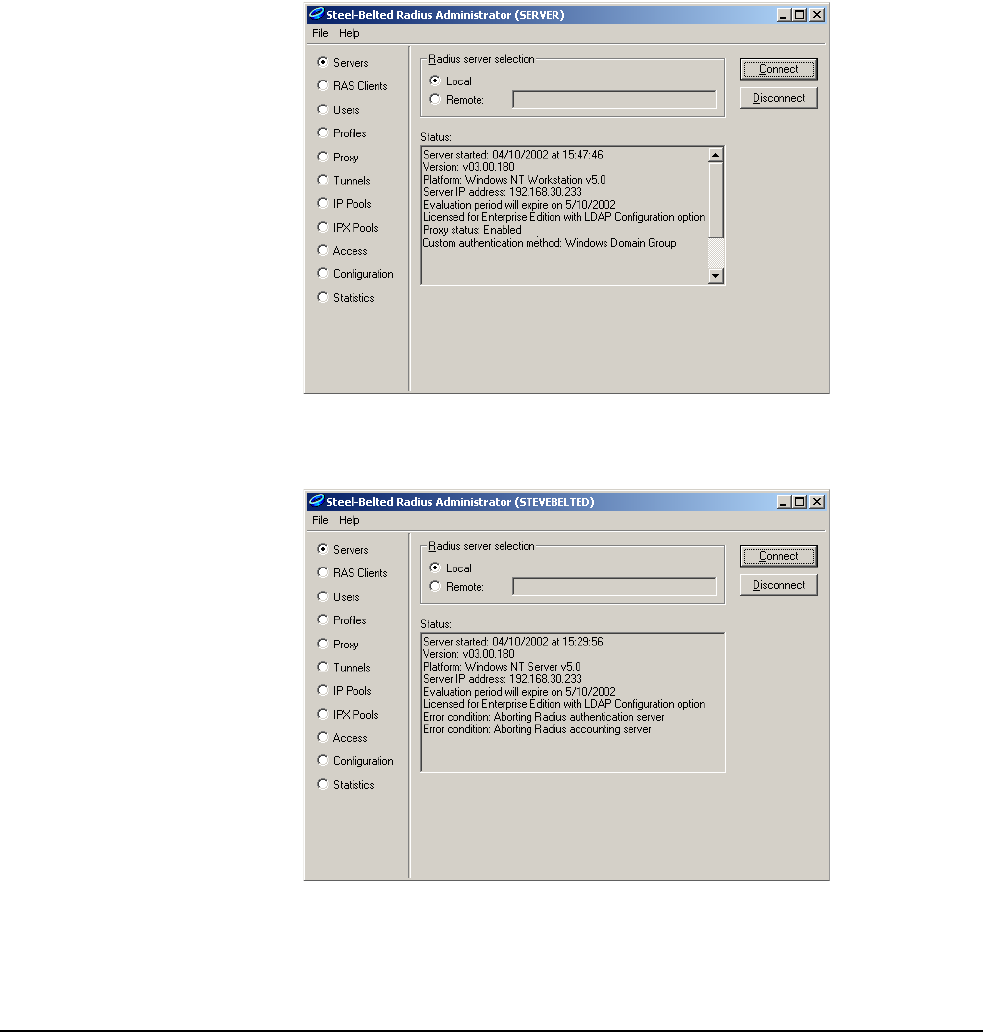
Chapter 17: Sample setup - Backend software 246
DRAFT
4. Click Connect. This connects you to the Steel-Belted Radius server.
If you see any error messages in the Status window, you must resolve them
before continuing. For example:
One common error is to forget to terminate the IAS and IIS services and then
reboot. These services will continue to interfere with the Steel-Belted Radius
server until you reboot.
Define a RAS client
for the CN3200
Any device that uses the services of a RADIUS server to perform authentication
tasks is called a RADIUS client, and must have its own RAS Client settings.
To complete this section you need to know the IP address assigned to the
Internet port on the CN3200. For this example, use the address 192.168.2.1.
1. Select RAS Clients.
2. Click Add.
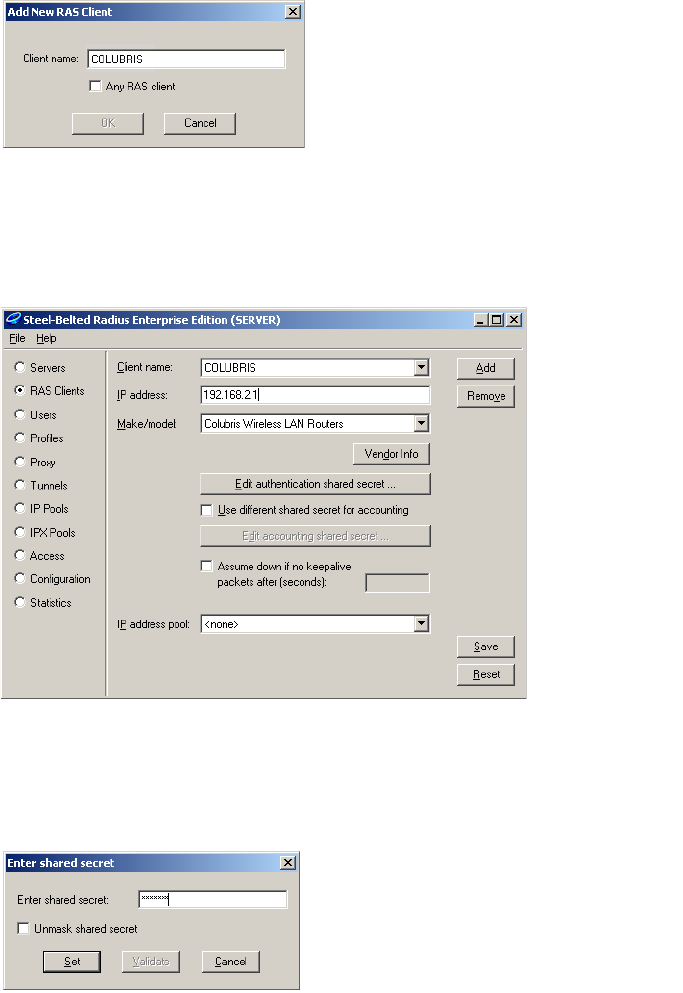
Chapter 17: Sample setup - Backend software 247
DRAFT
3. Choose a name for the CN3200. For this example, use the name COLUBRIS.
This is a nickname that is used by Steel-Belted Radius to identify the client
and is not configured on the CN3200.
4. Click OK.
5. Specify the address of the CN3200’s Internet port. For this example, specify
192.168.2.1.
6. Set Make/model to Colubris Wireless LAN Routers.
7. Click Edit authentication shared secret.
8. Specify a carefully chosen shared secret. In a production environment you
should use a combination of at least eight uppercase/lowercase letters as
well as digits. For simplicity, this example uses the shared secret: secret.
9. Click Set.
10. Click Save.
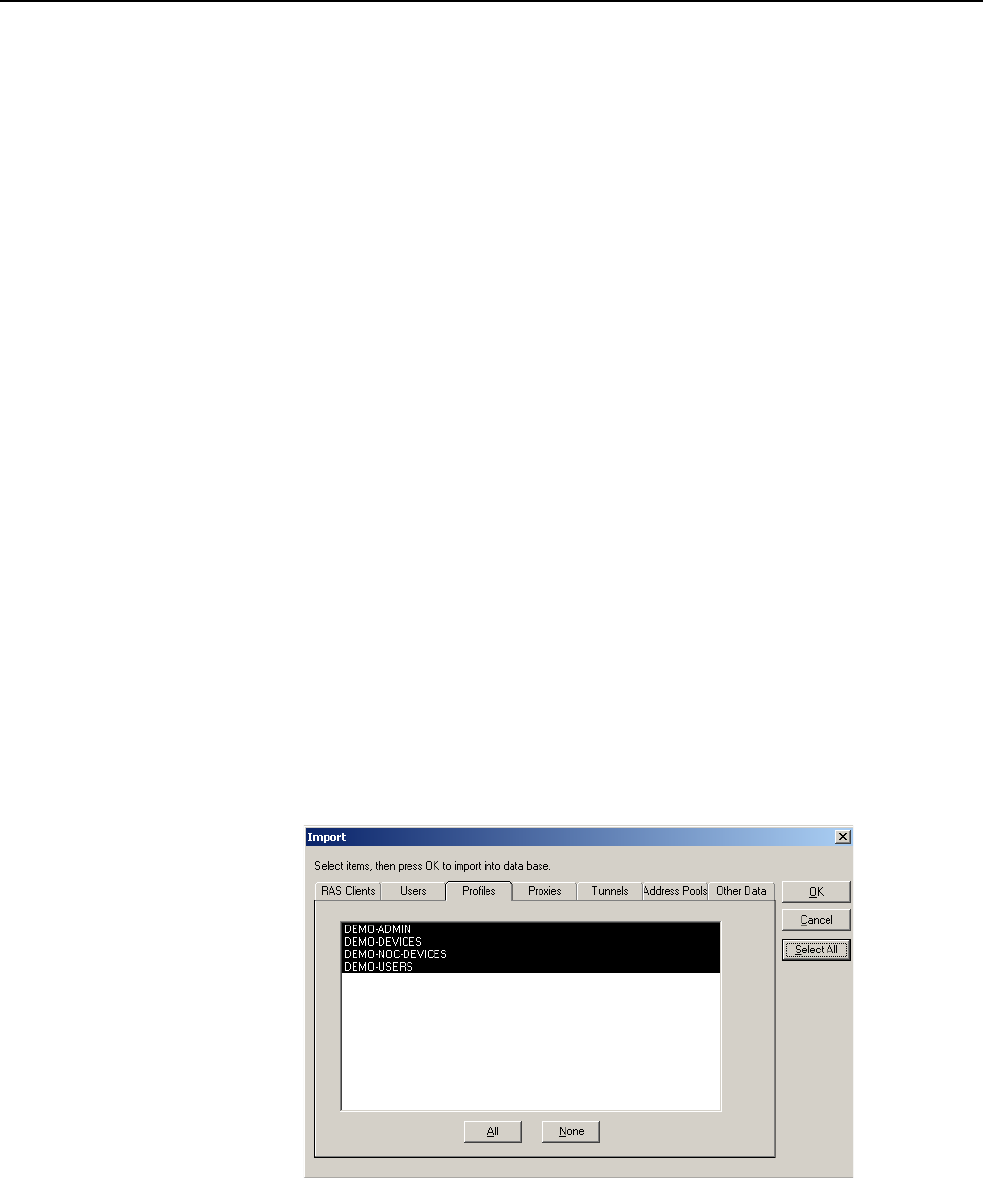
Chapter 17: Sample setup - Backend software 248
DRAFT
Create RADIUS
profiles
RADIUS profiles must be created for each user group that will be authenticated
on the public access interface. Rather than enter this information manually, you
can import it from the .rif (Radius Interchange Format) files that are included in
the archive.
This will create four profiles:
DEMO-DEVICES
This is the profile used by the CN3200.
• login name: hotspot
• password: hotspot
DEMO-USERS
Profile used by customers of the public access network.
• login name: user
• password: user
DEMO-ADMIN
Profile used by administrators who want to login to the management tool on the
CN3200.
• login name: admin
• password: admin
DEMO-NOC-DEVICES
This is the profile used by the CN3200 when configured for NOC authentication.
• login name: www.noc-cn3000.com
• password: www.noc-cn3000.com
1. On the File menu, click Import.
2. Select the file example.rif in c:\colubris\radius\.
3. Click the Profiles tab, click Select All, then click OK.
This returns you to the main screen. Leave this window open and proceed to
the next section.
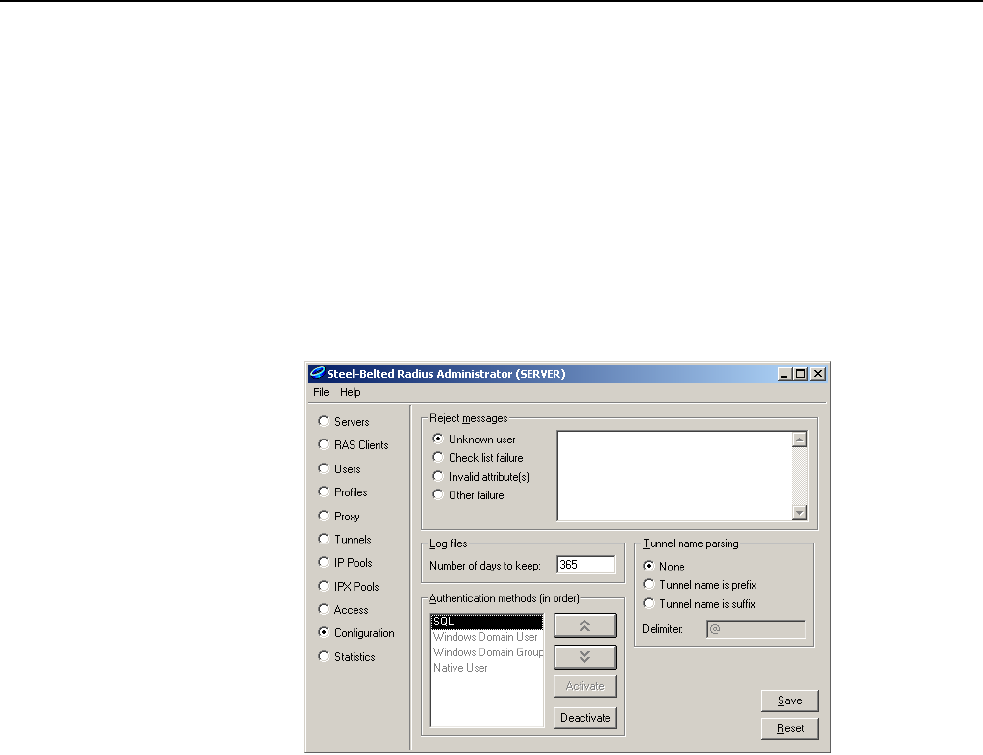
Chapter 17: Sample setup - Backend software 249
DRAFT
Update the Steel-
Belted Radius
configuration
1. Return to the Steel-Belted Radius Configurator window.
2. Click Servers.
3. Click Disconnect.
4. Open a command-line session and execute the command:
net stop “Steel-Belted Radius”
net start “Steel-Belted Radius”
5. Return to the Steel-Belted Radius Configurator window.
6. Click Connect.
7. Click Configuration
8. In the Authentication methods box, select SQL and click Activate (if it is
not already active). Deactivate all other authentication methods.
9. Click Save.

Chapter 17: Sample setup - Backend software 250
DRAFT
Step 4: Install web server certificates on Server 1
Certificates enable client station to validate the identity of a web server. Refer to
Chapter 14: SSL certificates for complete discussion of certificates and examples
on how to create them. You can use the sample provided with this demo in
c:\colubris\certificates or create your own. Once you have created your
certificates install them as explained in this section.
Install the public
key certificate
The web server public key certificate will be contained in a password-protected
file. To avoid entering the password every time you start the server, you should
decrypt the certificate before installing it.
1. Open a command-line session.
2. Go to the directory c:\colubris\certificates.
3. Run the command: decryptkey certificate > server.key
Replace certificate with the name of the certificate file. If you are using the
sample provided, the PEM pass phrase is: www.company.com. For example:
C:\colubris\certificates>decryptkey www.company.com >
server.key
read RSA key
Enter PEM pass phrase:
writing RSA key
The unencrypted certificate is written to server.key.
4. Copy server.key to c:\OpenSA\Apache\conf\ssl.key\. Overwrite an existing
file if prompted.
Install the private
key certificate
The web server public key certificate will be contained in a .pem file.
1. Open a command-line session.
2. Copy the certificate file (.pem) to the file server.crt. For example:
c:\colubris\certificates>copy www.company.com.pem server.crt
3. Copy server.crt to c:\OpenSA\Apache\conf\ssl.crt\. Overwrite an existing
file if prompted.
Verify the
certificates
1. Launch a command-line session.
2. Edit the file c:\WINNT\system32\drivers\etc\hosts file and add the following
line:
192.168.2.99 www.company.com
If you generated your own certificate replace www.company.com with the
name you specified in your certificate.
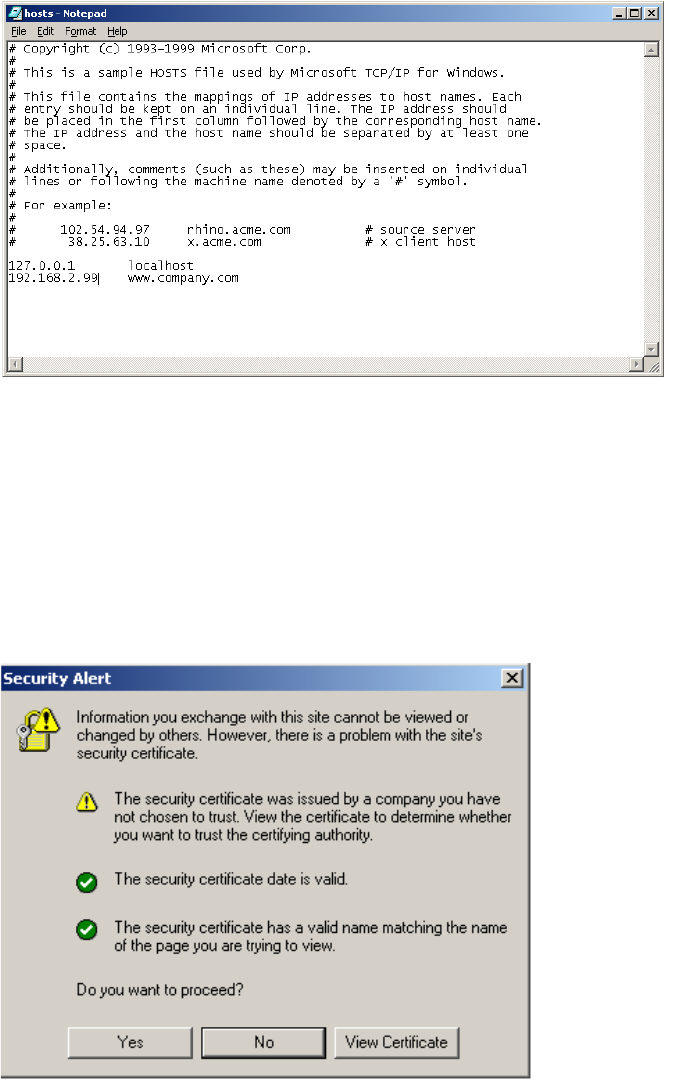
Chapter 17: Sample setup - Backend software 251
DRAFT
3. Go to the directory: c:\OpenSA\Apache
4. Stop the web server with the command: apache -k stop.
5. Restart the web server in SSL mode with the command: apache.exe –D
SSL
6. Close all active web browsers.
7. Open a new browser window and point it to: https://www.company.com
Depending on how you obtained the key, you may see the following message
box:
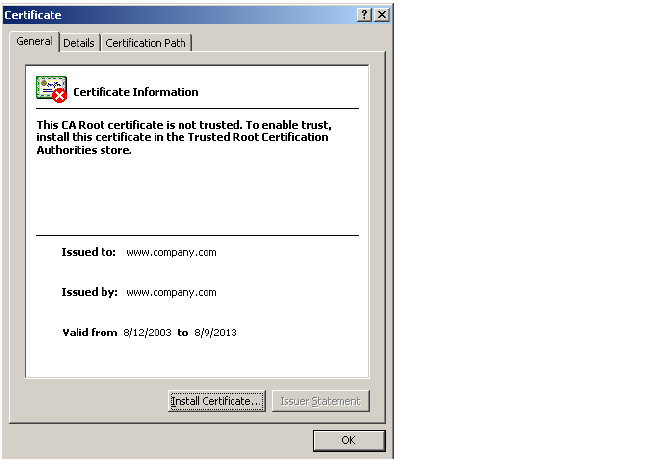
Chapter 17: Sample setup - Backend software 252
DRAFT
8. Click View Certificate. You should see the details of the certificate you just
installed. For example:

Chapter 17: Sample setup - Backend software 253
DRAFT
Step 5: Install and configure the CN3200
Follow the directions in Chapter 4: Installation then continue with the instructions
in this section.
Start Apache Make sure that the Apache web server is running. If not, then:
1. Launch a new command-line session.
2. Run c:\opensa\apache\apache.exe –D SSL. This starts Apache in secure
mode.
Assign a static
address
Perform the following steps using the CN3200 Management tool.
1. On the Network menu, click Ports.
2. Click Internet port in the table.
3. Select Static and then click Configure.
4. Make the following settings:
• IP address: Assign an address. For this example, use the address:
192.168.2.1
• Address mask: Assign an appropriate mask. For this example, use the
mask: 255.255.255.0.
• Default gateway: Leave blank. In a real setup this would be set to the
address of the router providing access to the Internet.
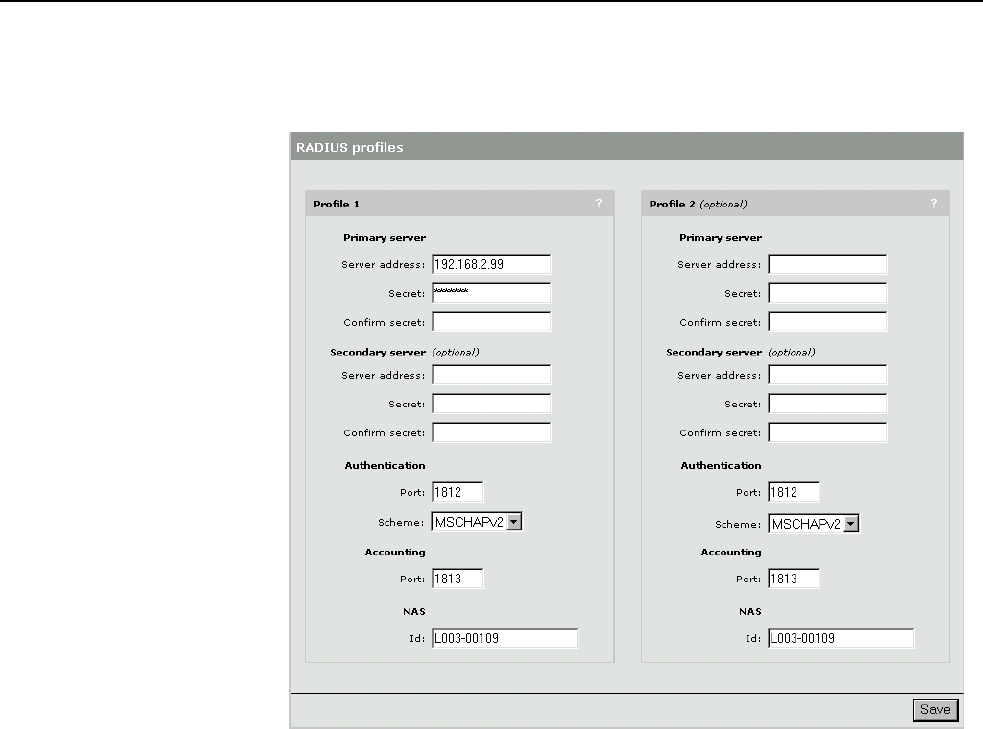
Chapter 17: Sample setup - Backend software 254
DRAFT
Configure RADIUS
settings
The CN3200 must be configured to communicate with the Steel-Belted Radius
server. For a detailed explanation of configuration issues, see Chapter 16:
“Customizing CN3200 and customer settings” on page 207.
1. On the Security menu, click RADIUS. The RADIUS settings page opens.
2. Configure the following parameters:
• Primary server address: Specify the address of Server 1. For this example,
use the address: 192.168.2.99
• Primary server secret: Specify the secret you defined on when configuring
Steel-Belted Radius. For this example, use the secret: secret
3. Click Save.
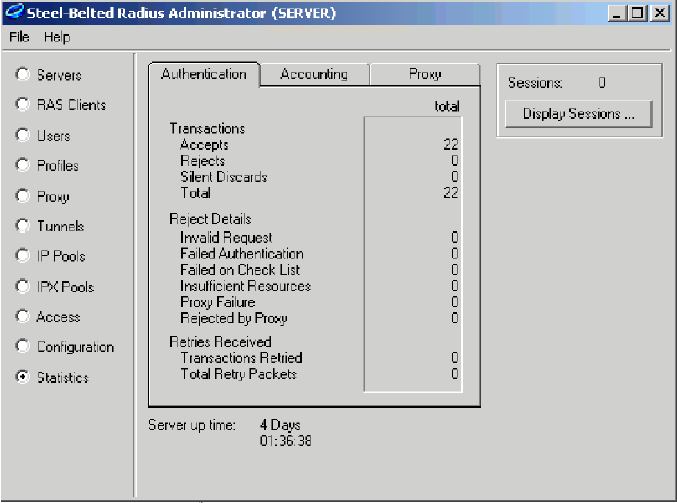
Chapter 17: Sample setup - Backend software 255
DRAFT
4. Click Authentication. The Authentications settings page opens.
5. In the Customers box, set Authenticate via to RADIUS profile 1.
6. Configure the CN3200 box as follows:
•Authenticate via: Set to RADIUS profile 1.
•Login name: Set to hotspot.
•Password: Set to hotspot.
7. Enable Authenticate customers with 802.1x.
8. Click Save. The CN3200 will attempt to connect to the Steel-Belted Radius
server. If successful, the status light will change from red to green.
You can use the Statistics page on the Steel-Belted Radius Administrator to
view progress of the connection.
When you click the Save button in the management tool, the number of
Accepts should be incremented. That means that all settings are properly
configured on the CN3200 and Steel-Belted Radius.
If the number of Rejects is incremented instead, there may be a problem with
a badly set username and/or password. Check the log file in
c:\radius\service. It is named yyyymmdd.log, where yyyy is the year, mm
is the month and dd the day. For example, 20030822.log for August 22, 2003.
If the number of Silent Discards is incremented, it probably means that
either the IP address of the CN3200 and/or the shared secret has not been
properly configured on the RAS client tab.
You can increase the amount of information in the log file by changing the
following values in the c:\radius\service\radius.ini file, and restarting Steel-
Belted Radius:
[Configuration]
LogLevel = 0
TraceLevel = 0
Change both values from 0 to 2.

Chapter 17: Sample setup - Backend software 256
DRAFT
Certificates You can replace the certificate that is installed on the CN3200 with your own to
eliminate the warning message clients see when they try to login to the public
access interface. Refer to Chapter 14: SSL certificates for complete discussion of
certificates and examples on how to create and install them.
Important: Do not install the same certificate as the one installed on your web
server. You need to use a valid signed certificate to remove the warning

Chapter 17: Sample setup - Backend software 257
DRAFT
Step 6: Install and configure software on Server 2
Server 2 will be used to test if the customer is successfully redirected to the
originally requested page.
1. Install Windows 2000 Professional, Server, or Advanced Server, and then
install Service Pack 3.
2. Make sure that IIS is running.
3. Connect Server 2 to the hub and assign a static IP address to it. For this
example, use the address 192.168.2.100.
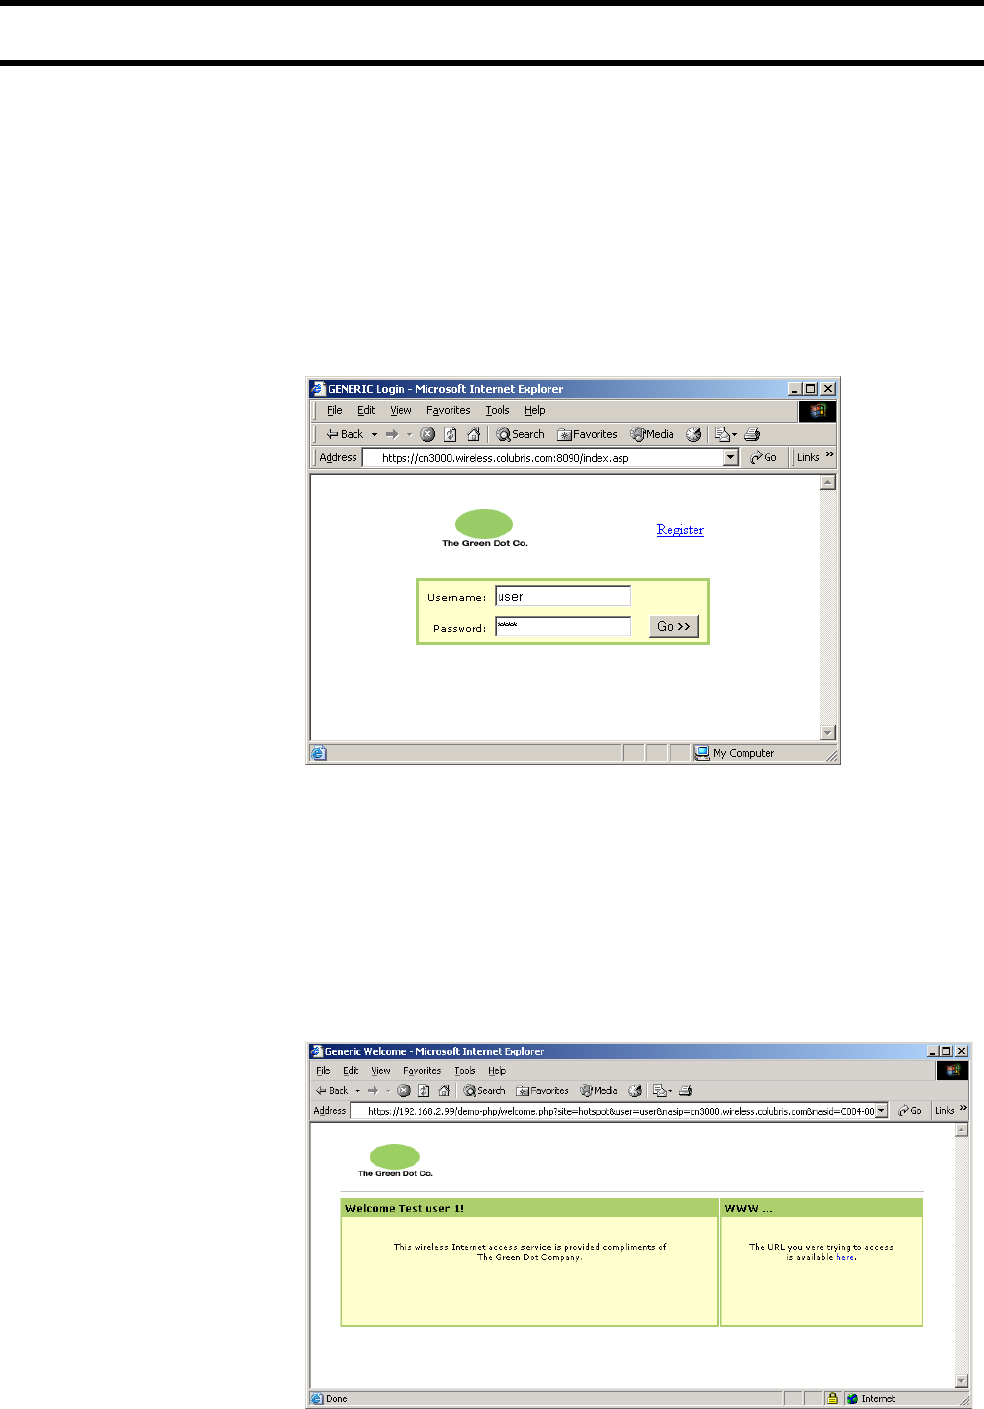
Chapter 17: Sample setup - Backend software 258
DRAFT
Step 7: Test the installation
To test the installation you will use the client station to log onto the public access
interface. For this to work, the CN3200 must be configured as the clients default
gateway. If you set up your equipment to match the setup of this example, this is
automatic. If not, adjust the configuration of the client accordingly.
1. Start the client station’s web browser and enter the IP address (or domain
name) of Server 2.
2. The CN3200 should intercept the URL and redirect the browser to the login
page. You should see the modified login page shown below. (Depending on
the type of certificate you installed on the CN3200 you may see a security
warning first.)
If you see the default login page (Register does not appear), it means that the
CN3200 could not retrieve the URLs for the modified pages. Click Tools in
the management tool and examine the messages in the log file to fix the
error.
The register button shows how to register an unauthenticated customer using
a remote, secure web page.
3. To login, specify user as both the username and password.
4. Once you have been authenticated, the welcome page should open.
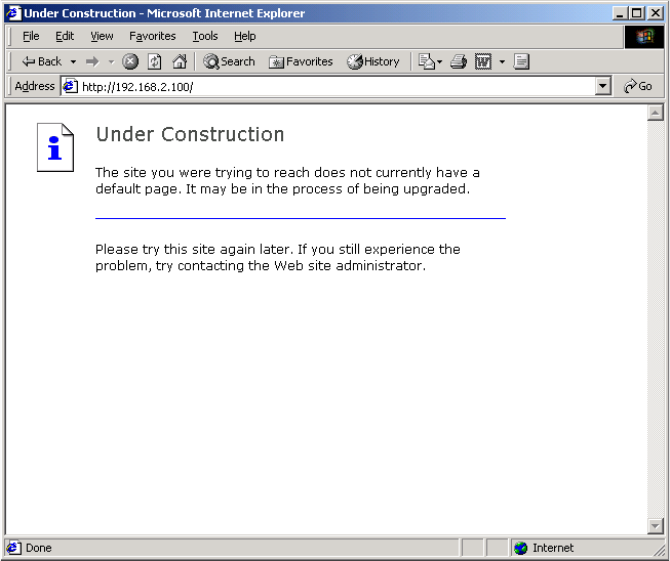
Chapter 17: Sample setup - Backend software 259
DRAFT
5. Click the link. You will be redirected to the web server on Server 2.
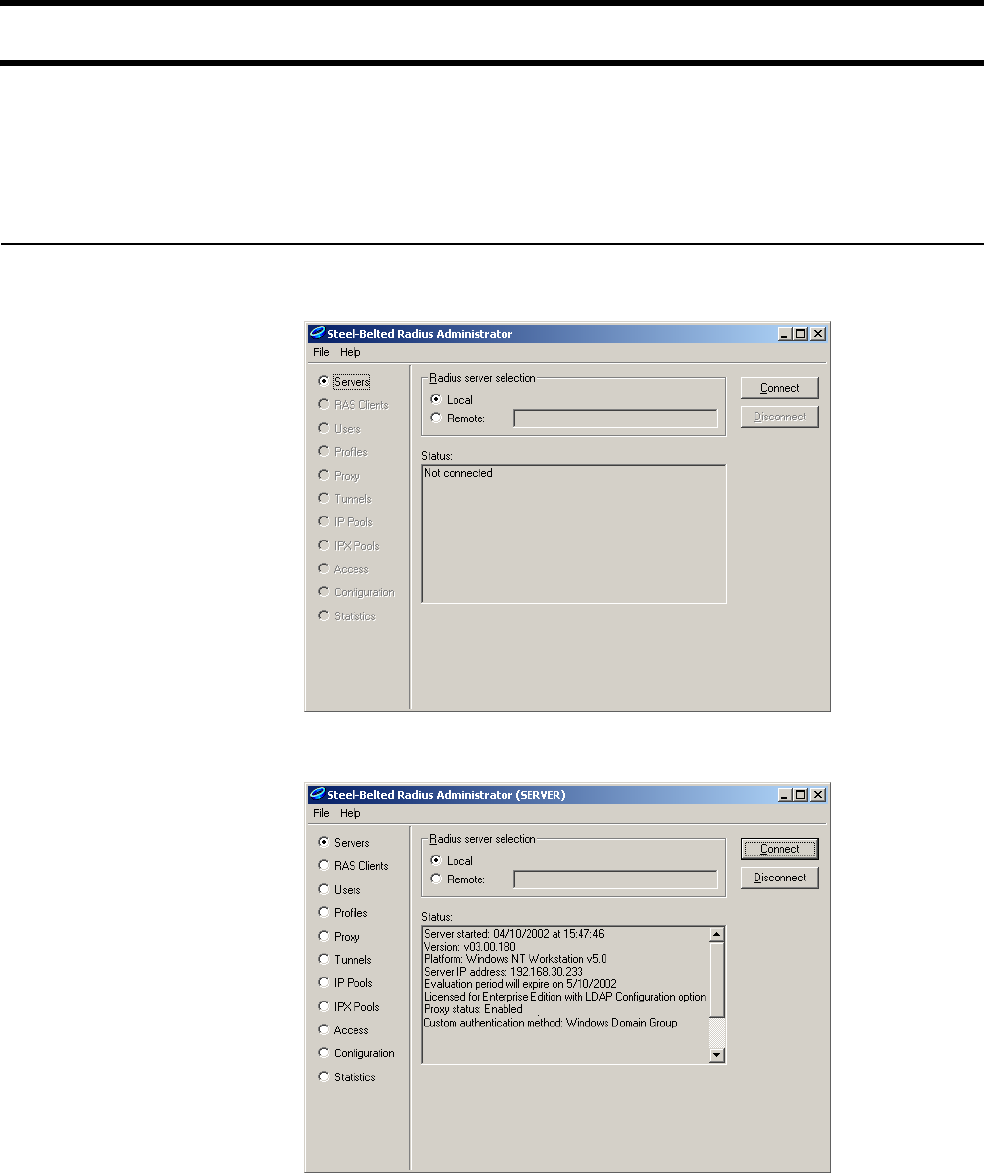
Chapter 17: Sample setup - Backend software 260
DRAFT
Step 8: Test the remote login page feature
The sample files you installed on Server 1 also include definitions to allow testing
of the remote login page feature. This feature enables the CN3200 to redirect
customers to a remote URL to login instead of using the internal login page. For
more information see “Using a remote login page” on page 173.
Enable the remote
login feature
1. On the Start menu, click Steel-Belted Radius, then click Steel-Belted
Radius Administrator. The following window opens.
2. Click Connect. This connects you to the Steel-Belted Radius server.
3. Click Profiles.
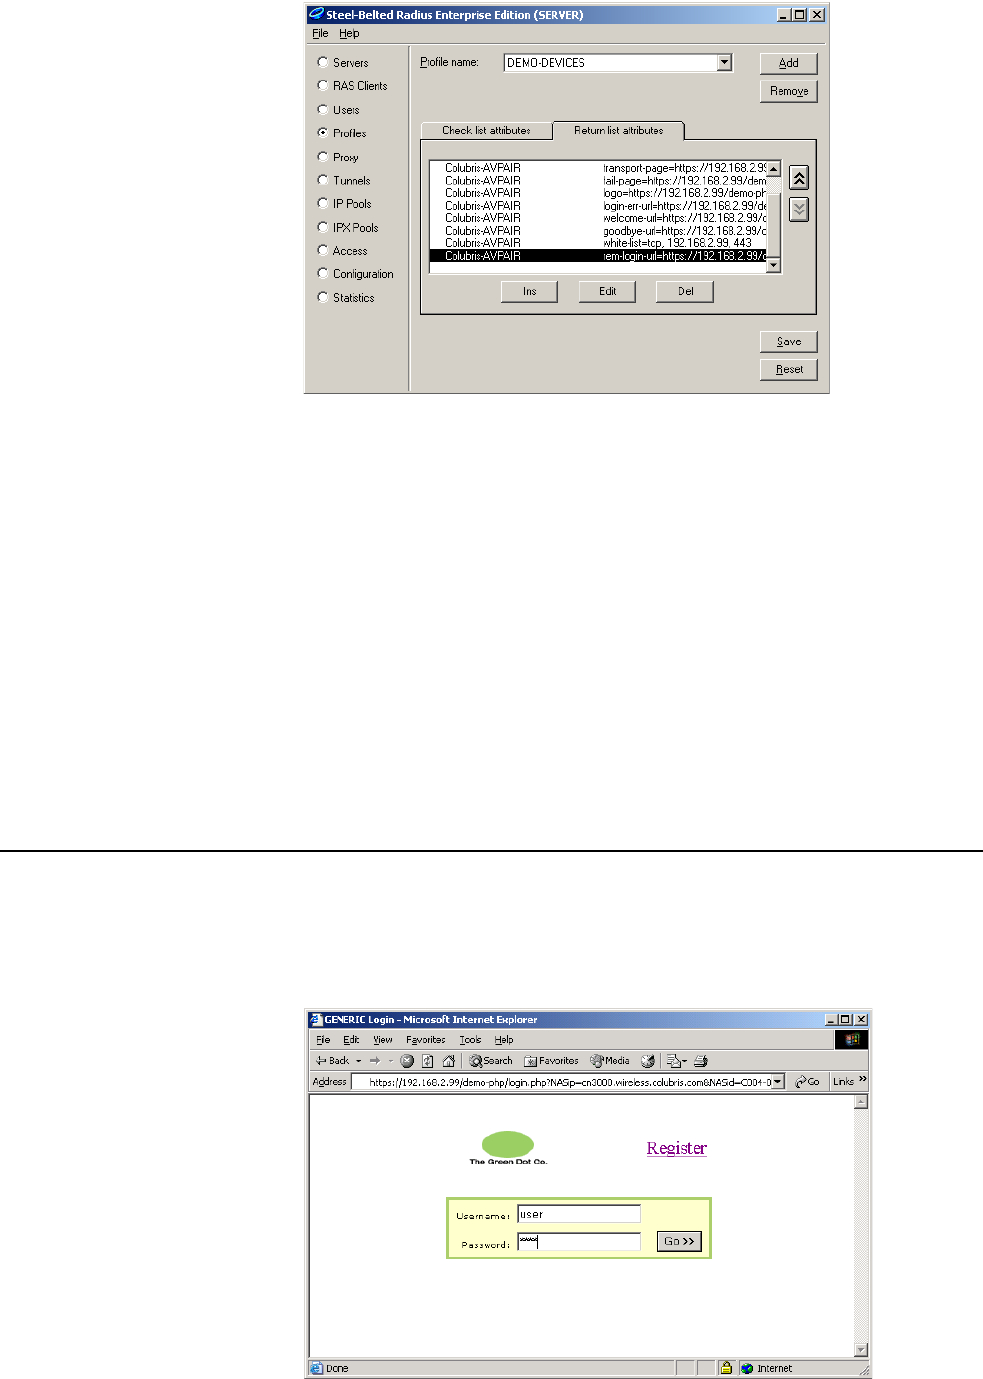
Chapter 17: Sample setup - Backend software 261
DRAFT
4. Select DEMO-DEVICES.
5. Click the Return list attributes tab and remove the rem- in front of rem-
login-url:
login-url=https://192.168.2.99/demo-php/
login.php?NASip=%i&NASid=%n&original_url=%o
6. This overrides the setting for the login-page = entry in the RADIUS profile.
However, it is good practice to remove the login-page entry.
7. Click OK.
8. Click Save.
9. Open the CN3200’s management tool and go to the Security >
Authentication page.
10. Click Force Authenticate.
11. Wait about 1 minute before continuing to let the CN3200 download the
change
Test the remote
login feature
1. Start the client station’s web browser and enter the IP address (or domain
name) of Server 2.
2. The CN3200 should intercept the URL and redirect the browser to the remote
login page on 192.168.2.99. (Depending on the type of certificate you
installed on the CN3200 you may see a security warning first.)

Chapter 17: Sample setup - Backend software 262
DRAFT
The register button shows how to register an unauthenticated customer using
a remote, secure web page.
3. To login, specify user as both the username and password. The Welcome
page should open.
4. Click the link. You should be redirected to the web server on Server 2.

Chapter 17: Sample setup - Backend software 263
DRAFT
Step 9: Test the NOC authentication feature
The sample files you installed on Server 1 also include definitions that enable you
to test the NOC authentication feature. This feature allows you to validate
customer logins using a remote server instead of using the CN3200. See page
176 for a description of this feature and its benefits.
Enable NOC
authentication
1. Open the CN3200’s management tool.
2. On the Security menu, click Authentication, then click the Advanced
Settings button.
3. Enable NOC Authentication.
4. Select the Internet Port as the Active Interface.
5. Click Save.
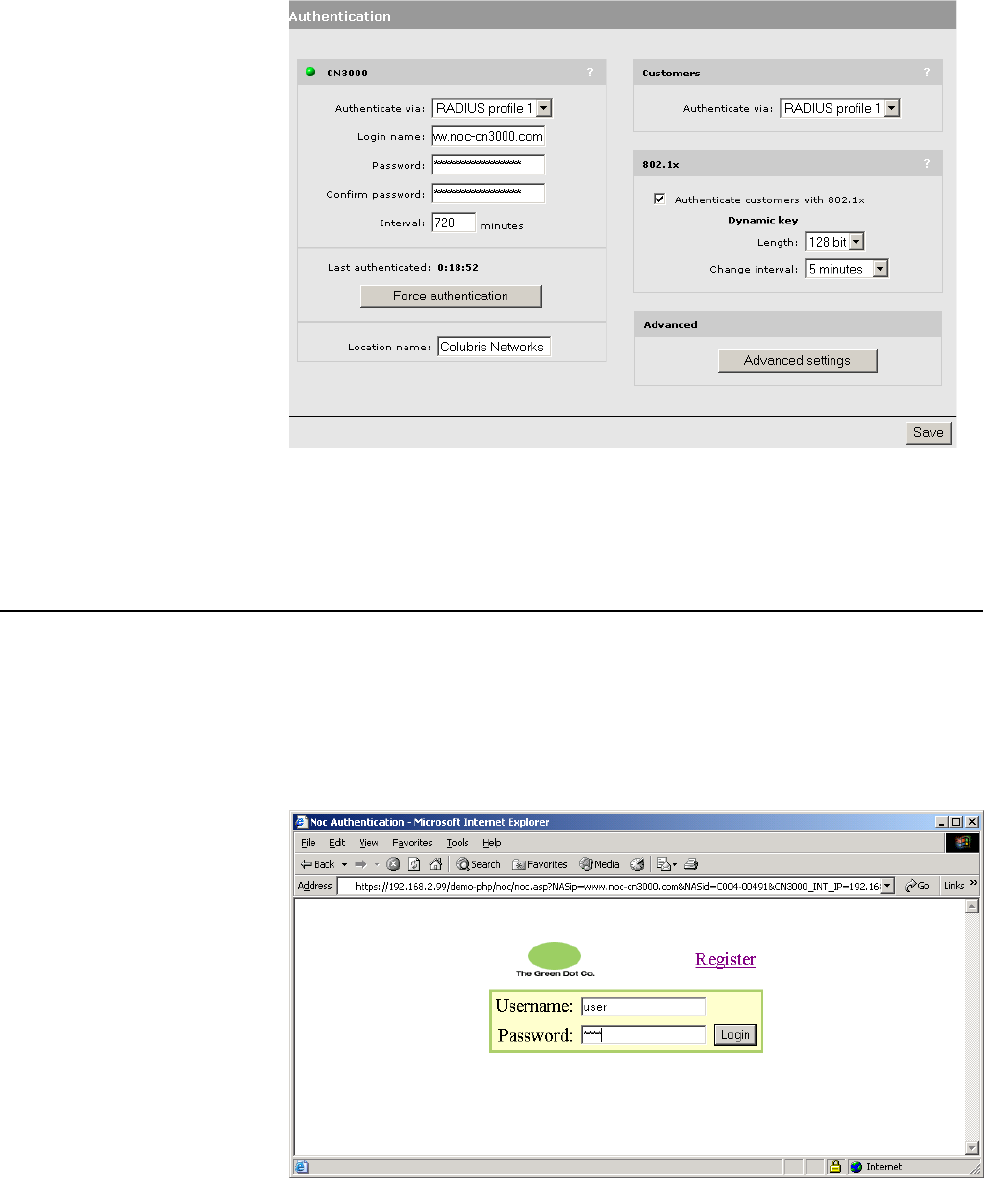
Chapter 17: Sample setup - Backend software 264
DRAFT
6. On the Security menu, click Authentication.
7. Specify www.noc-cn3000.com for Login name and Password.
8. Click Save.
9. Wait about 1 minute for the CN3200 to download the changes.
Test NOC
authentication
1. Start the client station's web browser and enter the IP address (or domain
name) of Server 2.
2. The CN3000 should intercept the URL and redirect the browser to the remote
NOC login page on 192.168.2.99.
(Depending on the type of certificate you installed on Server 2 you may see a
security warning first.)
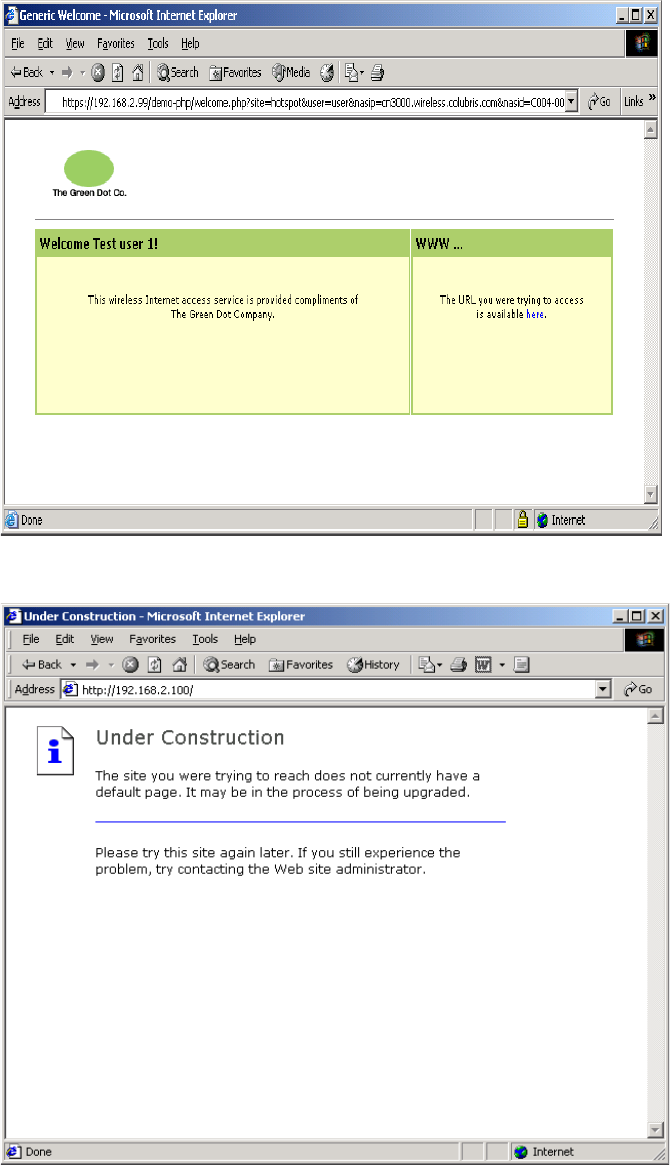
Chapter 17: Sample setup - Backend software 265
DRAFT
3. To login, specify user as both the username and password. The Welcome
page should open.
4. Click the link. You should be redirected to the web server on Server 2.
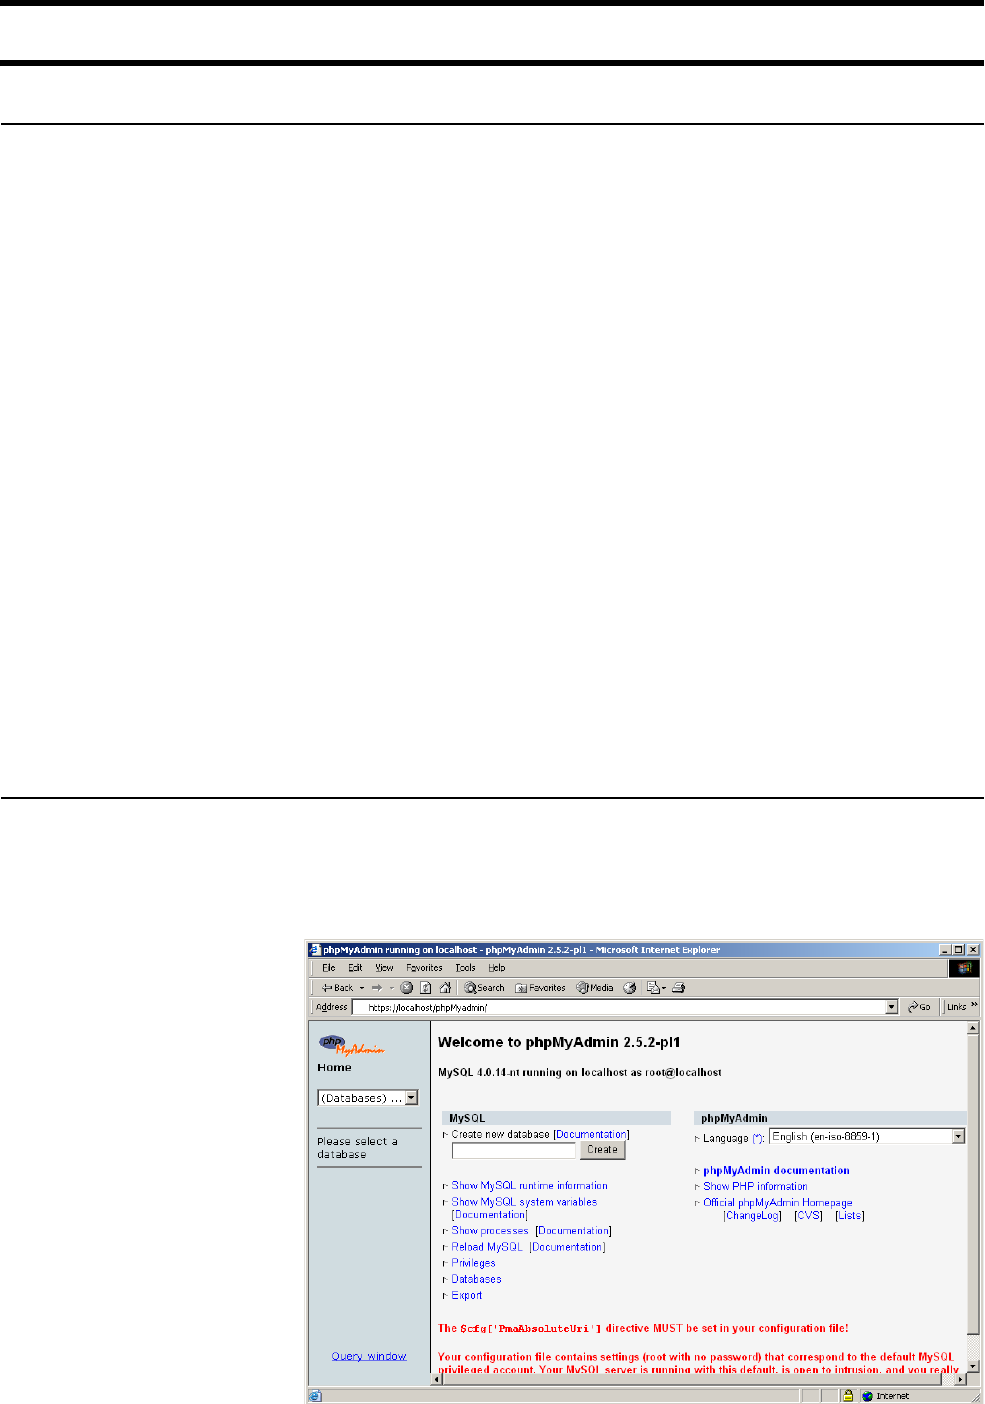
Chapter 17: Sample setup - Backend software 266
DRAFT
Tools
Batch files Several batch files are included in c:\colubris\scripts to make management of
the web server, MySQL database, and Steel-Belted Radius easier when using a
command-line session. To use this files place them into a directory that appears
in your path.
Apache
apache-start.cmd
apache-ssl-start.cmd
apache-stop.cmd
apache-restart.cmd
If you installed OpenSA in a different location than c:\, edit the scripts and
change the value of the APACHEDIR variable to your installation directory.
Mysql
mysql-start.cmd
mysql-stop.cmd
mysql-restart.cmd
Steel-Belted Radius
radius-start.cmd
radius-stop.cmd
radius-restart.cmd
Starting services
mysql-restart.cmd
apache-restart.cmd
radius-restart.cmd
phpMyadmin phpMyadmin provides an easy-to-use interface to the MySQL database. You can
use this interface to add or edit user accounts. The following is a quick overview.
1. Point your web browser to: https://localhost/phpMyAdmin
The following screen opens:

Chapter 17: Sample setup - Backend software 267
DRAFT
2. Select radius in the column on the left side of the page.
3. Click users on the left and then click the Browse tab.
• By clicking Edit, you can modify the information for an existing user.
• You can add a new user by clicking:
•Insert new row, and fill in all the parameters,
or
•Edit an existing user, modify its parameters, then choose Insert as new
row and click the Go button. Note that in this case, you should clear the
field u_user_id, since this is a primary key for the user table. Duplicates
are not allowed for this field.
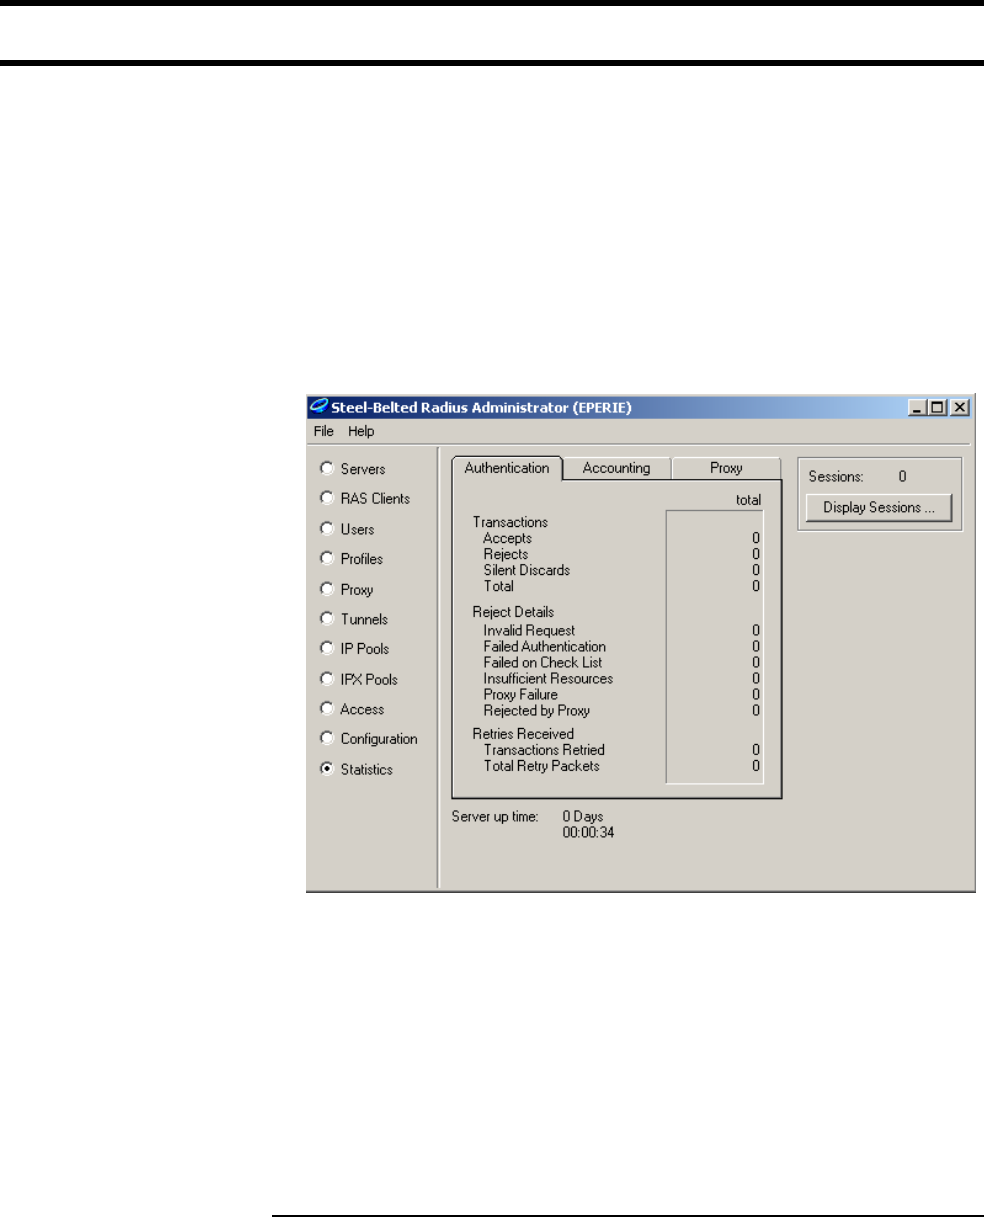
Chapter 17: Sample setup - Backend software 268
DRAFT
Troubleshooting
The CN3200’s authentication system is not up.
1. The IP address for the RADIUS server may be incorrect: check that a
RADIUS server has been configured in the CN3200’s Security > RADIUS
configuration panel, and that the RADIUS server is reachable from the
CN3200.
One way to do this is to ping its IP address using Tools > Ping. If the ping
fails, verify the connection between the CN3200 and the RADIUS server.
2. Check that the RADIUS server is receiving authentication requests from the
CN3200. Launch the Steel-Belted Radius administrator, connect to the
server, and go to Statistics.
• If the total number of Transactions is 0, the CN3200 is not properly
connected to the server, either directly or through other networking devices.
• If the number of Silent Discards is non-zero, it means the CN3200 and the
server have a different shared secret. They should always be the same.
• If the number of Rejects is non-zero, it means the CN3200 is using an
invalid login name/password pair.
• If the number of Accepts is non-zero, it means the positive answer from the
server is not being received by the CN3200. There may be routing
problems between the CN3200 and the RADIUS server.
There is a timeout while the customer is being redirected to
the login page.
In the case, the URL displayed in the address field of the customer’s web browser
is of the form: https://dnsname:8090/index.asp, it means the CN3200 has been
able to perform a DNS reverse-lookup, but the customer’s computer is not able to
resolve the resulting name.

Chapter 17: Sample setup - Backend software 269
DRAFT
There is probably something wrong with the configuration of the DNS for the
entry related to the CN3200.
After logout, the goodbye page cannot be displayed
Check that the IP address and port number for the web server hosting the
goodbye page is defined in the access list for the RADIUS profile for the CN3200.
Chapter 17: Sample setup - Backend software 270
DRAFT

Chapter 18: Sample setup - Steel-Belted Radius 271
DRAFT
Chapter 18: Sample setup - Steel-Belted Radius
Chapter 18
Sample setup - Steel-Belted Radius
This chapter provides a walkthrough of a sample RADIUS configuration
using Steel-Belted Radius.
The CN3200 is compliant with RFC 2865 and RFC 2866 and will work
with a variety of RADIUS servers. This example is for illustrative purposes
only and does not imply that you need to use Steel-Belted Radius over
any other brand.
IMPORTANT: Before reading this chapter you should familiarize
yourself with the concepts discussed in in Chapter 15 and Chapter 16.
Chapter 18: Sample setup - Steel-Belted Radius 272
DRAFT
Overview
This sample will be constructed using a fully-functional evaluation version of
Steel Belted Radius Server from Funk Software that will be installed on a
computer running Windows NT 4.0 or Windows 2000.
The difference between this sample and the backend example in Chapter 18, is
as follows:
• This example illustrates how to manually configure profiles on the Steel-Belted
Radius server. In the backend sample they are automatically created using
predefined scripts.
• The backend sample uses an OBDC database to store profile properties. In
this example, all properties are stored in Steel-Belted Radius. Dynamic
tracking of usage and accounting information is only possible when using an
OBDC database, therefore this example is best suited to installations that
require user authentication only.
Prerequisites Software
• Windows 2000 Professional, Server, or Advanced Server (with Service Pack
3), and all recommended updates
• Steel Belted Radius Server version 4 from Funk Software
• Internet Explorer 6.0 service pack 1, and all recommended updates
Hardware
• a network hub
• a second network hub or a cross-over cable
• two computers capable of running Windows 2000 Professional, Server or
Advanced Server
• a CN3200
• a third computer with a JavaScript-enabled web browser, with or standard
Ethernet adapter
Skills
• Familiarity with the installation and operation of TCP/IP-based networks.
• Basic knowledge of Windows 2000, including how to use a Windows
command-line session.

Chapter 18: Sample setup - Steel-Belted Radius 273
DRAFT
Equipment setup
This section illustrates the hardware setup that was used to create the sample
configuration described in this chapter. If you duplicate this setup, you will not
have to change any of the IP addresses supplied in the example.
Topology The goal of this setup is to simulate a working environment with the least amount
of equipment. To this end, the ‘public network’ is considered to be any device
connected to the LAN port on the CN3200. The ‘protected network resources’
are connected to the Internet port on the CN3200. In this example, both Server 1
and Server 2 are on the protected network. Server 1 hosts the RADIUS server.
Server 2 is used to simulate an external web server.
See “Wiring details” on page 358 for information on how to build a x-over cable.
To test the setup when installation and configuration is complete, you will use the
client station to browse the web server installed on Server 2. The CN3200 will
intercept the request and display public access login page. Your login information
will be validated using the the Funk Steel Belted Radius Server installed on
Server 1. After you are authenticated, the CN3200 will display the welcome page.
This page will contain the URL of the originally requested web server (Server 2).
You can then click the URL to reach Server 2.
About the
components
Server 1
Server 1 hosts the Funk Steel Belted Radius Server.
Server 2
Server 2 is required to test the setup once it is complete. You should install a web
server on this computer. This example uses IIS running on Windows 2000
professional.
Client station
The client station is required to test the setup once it is complete. It requires a
web browser. The DHCP server on the CN3200 will assign an IP address to this
computer.
Chapter 18: Sample setup - Steel-Belted Radius 274
DRAFT
Step 1: Install software on Server 1
Windows 2000 1. Install Windows 2000 Professional, Server, or Advanced Server and then
install Service Pack 3. Make sure you also install all recommended updates.
2. Disable the IAS and IIS services on Windows 2000 Server, or Advanced
Server. This is required to avoid conflicts with Steel-Belted Radius and
Apache.
3. Connect Server 1 to the hub and assign a static IP address to it. For this
example, use the address 192.168.2.99.
4. Shut down and restart Server 1.
Steel-Belted Radius 1. Retrieve Funk Steel Belted Radius Server v4 Evaluation version, from
funk.com.
2. Run the executable installation file and accept all default installation settings.
When prompted, select the 30 day trial.
Important
If you encounter the following error message when trying to start the Steel-Belted
Radius NT Service:
Services: Error 1068: The dependency service or group failed to
start.
Refer to Tech Note RD230 on the Funk web site for a solution.
Internet Explorer Install Internet Explorer 6 SP1 on the server. The support files included with this
application are required for proper operation.

Chapter 18: Sample setup - Steel-Belted Radius 275
DRAFT
Step 1: Add support for Colubris Networks attributes
Note: If you do not want to modify the files yourself, modified versions are
available in the Colubris Backend archive which can be found on the CD or on
the Colubris Networks web site.
Do the following on server 1:
1. Create an file named colubris.dct in the folder: c:\radius\service
2. Edit the file so that it contains the following entries.
@radius.dct
ATTRIBUTE Colubris-AVPAIR 26 [vid=8744 type1=0 len1=+2 data=string] RO
For more information on the format of this file, see
c:\radius\service\readme.dct.
3. Edit c:\radius\service\dictiona.dcm. Add the following line to the end of this
file, just after the last line beginning with an '@'.
@colubris.dct
4. Edit c:\radius\service\vendor.ini. Add the following lines to the end of the
file.
vendor-product = Colubris CN3200
dictionary = Colubris
ignore-ports = no
port-number-usage = per-port-type
help-id = 0
5. Restart Steel-Belted Radius. For example, start a command line session and
then issue the commands:
net stop "Steel-Belted RADIUS"
net start "Steel-Belted RADIUS"
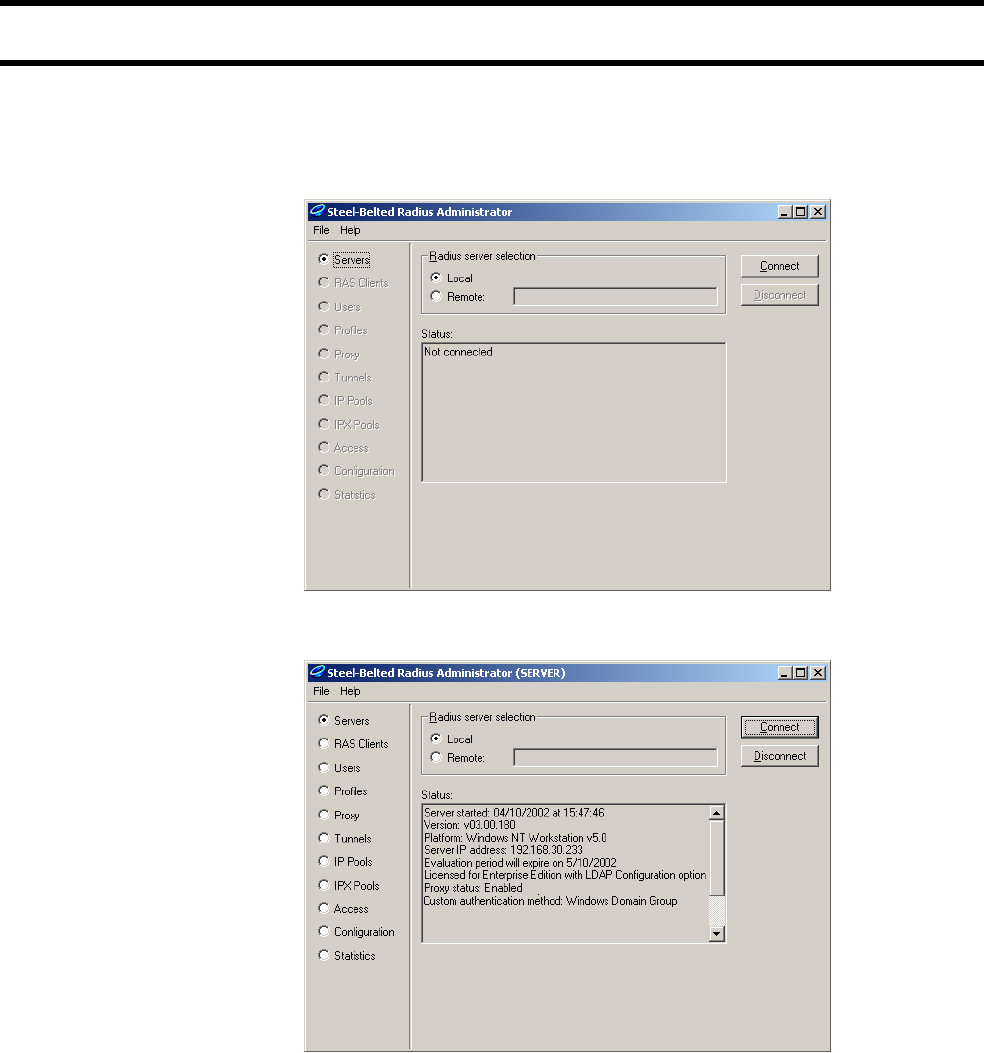
Chapter 18: Sample setup - Steel-Belted Radius 276
DRAFT
Step 2: Connect to the Steel-Belted Radius server
Do the following on server 1:
1. On the Start menu, click Steel-Belted Radius, then click Steel-Belted
Radius Administrator. The following window opens.
2. Click Connect. This connects you to the Steel-Belted Radius server.
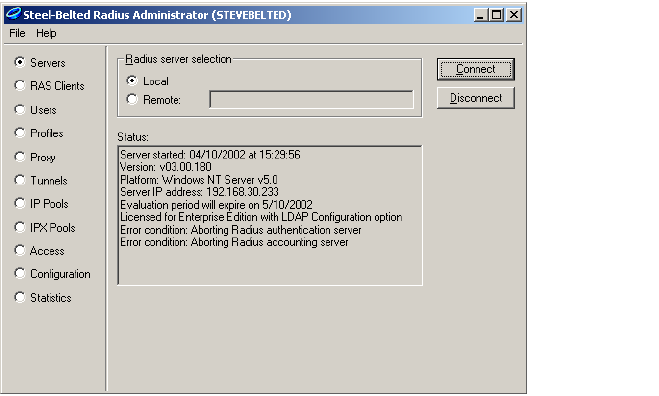
Chapter 18: Sample setup - Steel-Belted Radius 277
DRAFT
If you see any error messages in the Status window, you must resolve them
before continuing. For example:
A common cause for these errors is to forget to terminate the IAS and IIS
services and then reboot. These services will continue to interfere with the
Steel-Belted Radius server until you stop and terminate them, then reboot.
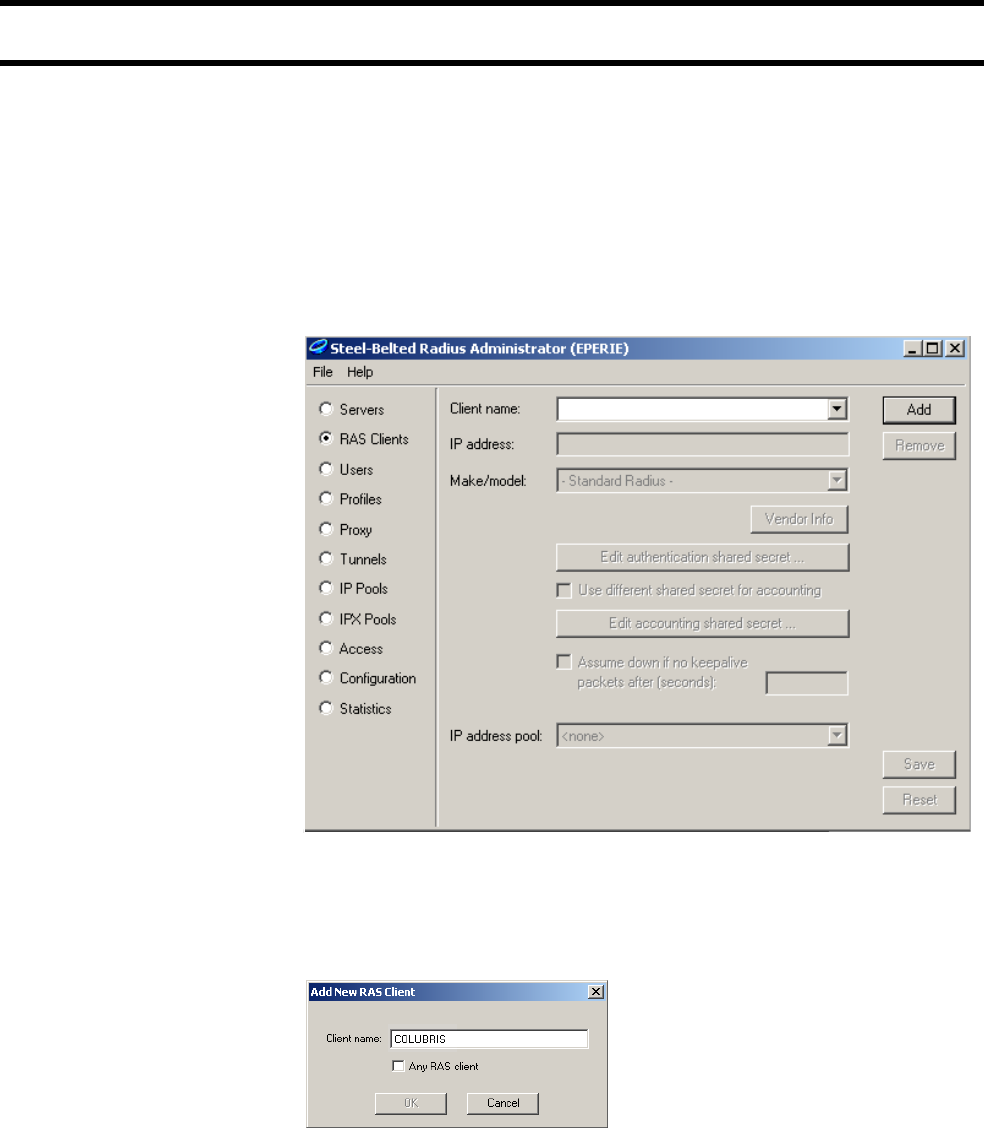
Chapter 18: Sample setup - Steel-Belted Radius 278
DRAFT
Step 3: Create a RADIUS client profile for the CN3200
Any device that uses the services of a RADIUS server to perform authentication
tasks is called a RADIUS client, and must have its own RAS Client profile.
Therefore, you must create a profile for the CN3200.
To complete this section you need to know the IP address assigned to the
Internet port on the CN3200. For this example, use the address 192.168.2.1.
Note: The configuration settings you make here will match the settings you make
on the CN3200 later.
1. Select RAS Clients.
2. Click Add.
3. Choose a name for the CN3200. For this example, use the name COLUBRIS.
This is a nickname that is used by Steel-Belted Radius to identify the client
and is not configured on the CN3200.
4. Click OK.
5. Specify the address of the CN3200’s Internet port. For this example, specify
192.168.2.1.
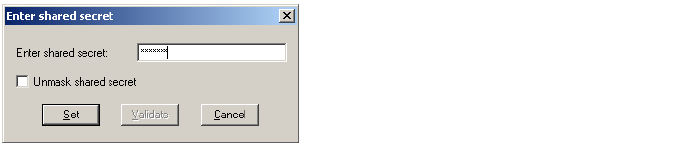
Chapter 18: Sample setup - Steel-Belted Radius 279
DRAFT
6. Set Make/model to Colubris CN3200.
7. Click Edit authentication shared secret.
8. Specify a carefully chosen shared secret. In a production environment you
should use a combination of at least eight uppercase/lowercase letters as
well as digits. For simplicity, this example uses the shared secret: secret.
9. Click Set.
10. Click Save.
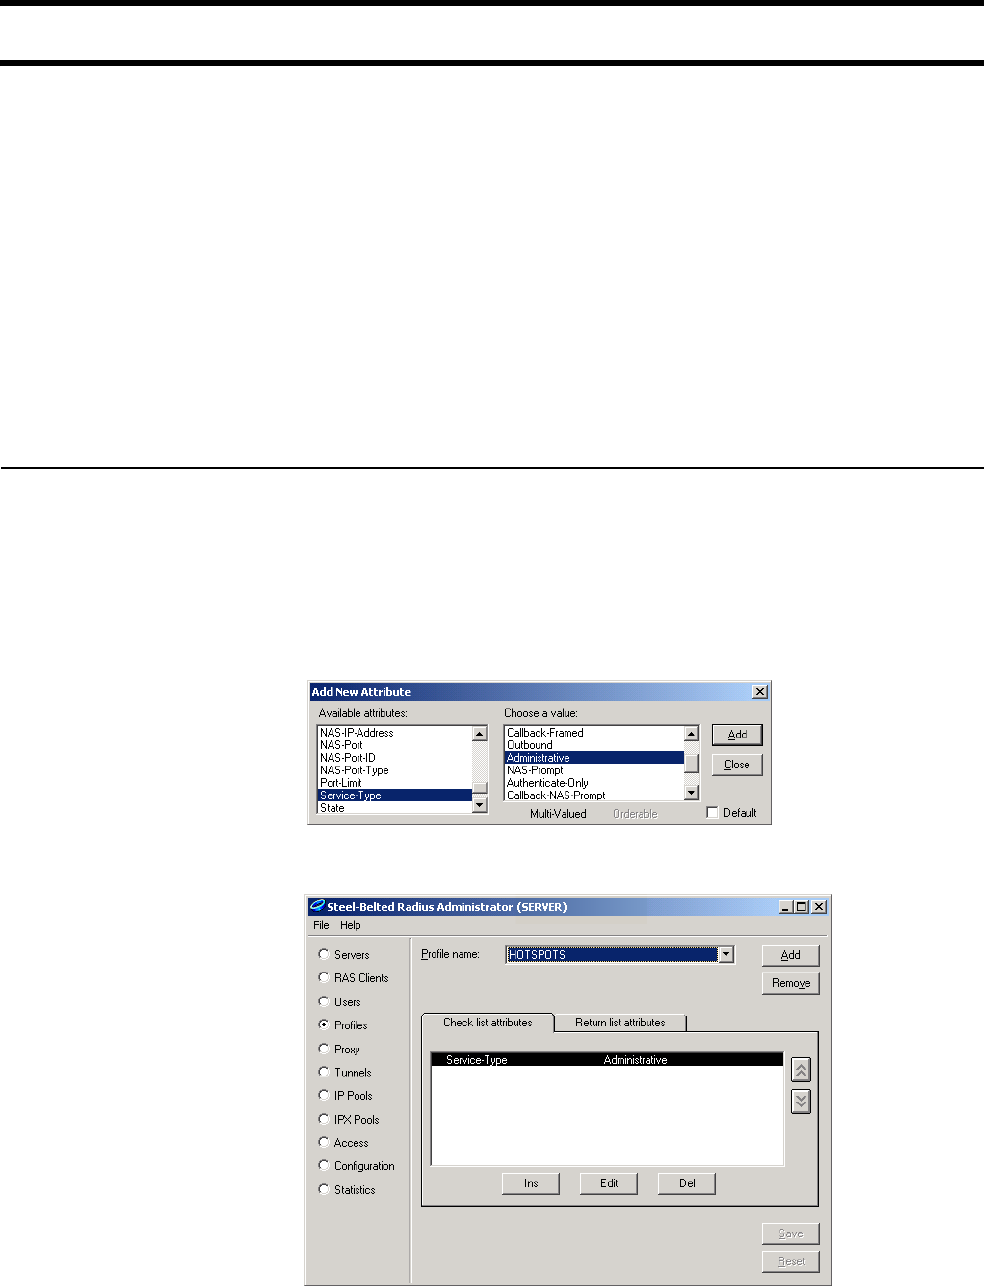
Chapter 18: Sample setup - Steel-Belted Radius 280
DRAFT
Step 4: Define RADIUS profiles
RADIUS profiles are used to manage and control all authentication tasks. Each
profile contains two sets of attributes:
• Check list attributes: These attributes must be contained in the user’s
authentication request for the authentication to be successful.
• Return list attributes: These attributes are returned once authentication is
successful.
For this example you will create a RADIUS profile for:
• the CN3200
• Public access customers subscribing to SMTP redirection
• Public access customers not subscribing to SMTP redirection
• CN3200 administrators
Defining a CN3200
profile
1. Click Profiles.
2. Click Add.
3. Specify a name for the profile. For this example, use the name HOTSPOTS.
Click OK.
4. Click the Check list attributes tab.
5. Click the Ins button. The Add New Attribute dialog box opens.
6. Select Service-Type and set it to the value Administrative. Click Add.
7. Click Close.
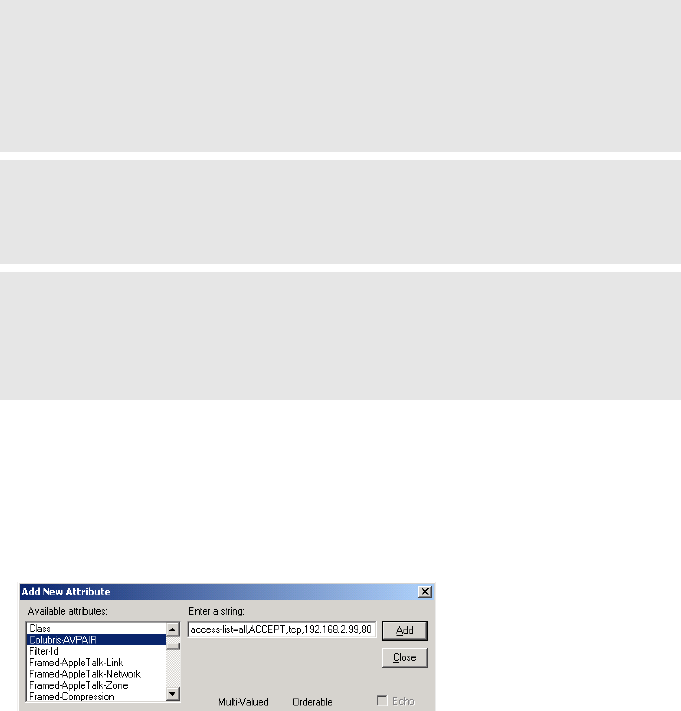
Chapter 18: Sample setup - Steel-Belted Radius 281
DRAFT
8. Click the Returned list attributes tab.
You can now specify the attributes that will be returned to the CN3200 after it
is successfully authenticated. This enables you to define a number of
important operating characteristics, including:
• The location of custom HTML pages that must be downloaded by the
CN3200.
• One or more access lists for specifying the set of network resources
customers have access to.
For this example, you should create the following three entries:
(Refer to “Creating a profile for the CN3200 on the RADIUS server” on
page 214 for a complete list of all supported attributes.)
To add each entry:
•Click Ins. Select Colubris-AVPair and enter the appropriate string. For
example:
• Once all entries are complete, the Return list attributes tab should look
like this:
Acolubris-AVPair access-list=all,ACCEPT,tcp,192.168.2.99,80
This access list permits all users on the public network to access the web
server at 192.168.2.99. The typical role of such a server would be to
display information about the public access network: how to get an
account, how to login, etc.
BColubris-AVPair access-list=cust,ACCEPT,tcp,192.168.2.100,80
This access list permits only authenticated customers to access the web
server at 192.168.2.100.
CColubris-AVPair use-access-list=all
This activates the access list all for the HOTSPOTS profile. The cust
access list will be activated in the CUSTOMERS-NO-SMTP and
CUSTOMERS-SMTP-REDIRECT profiles.
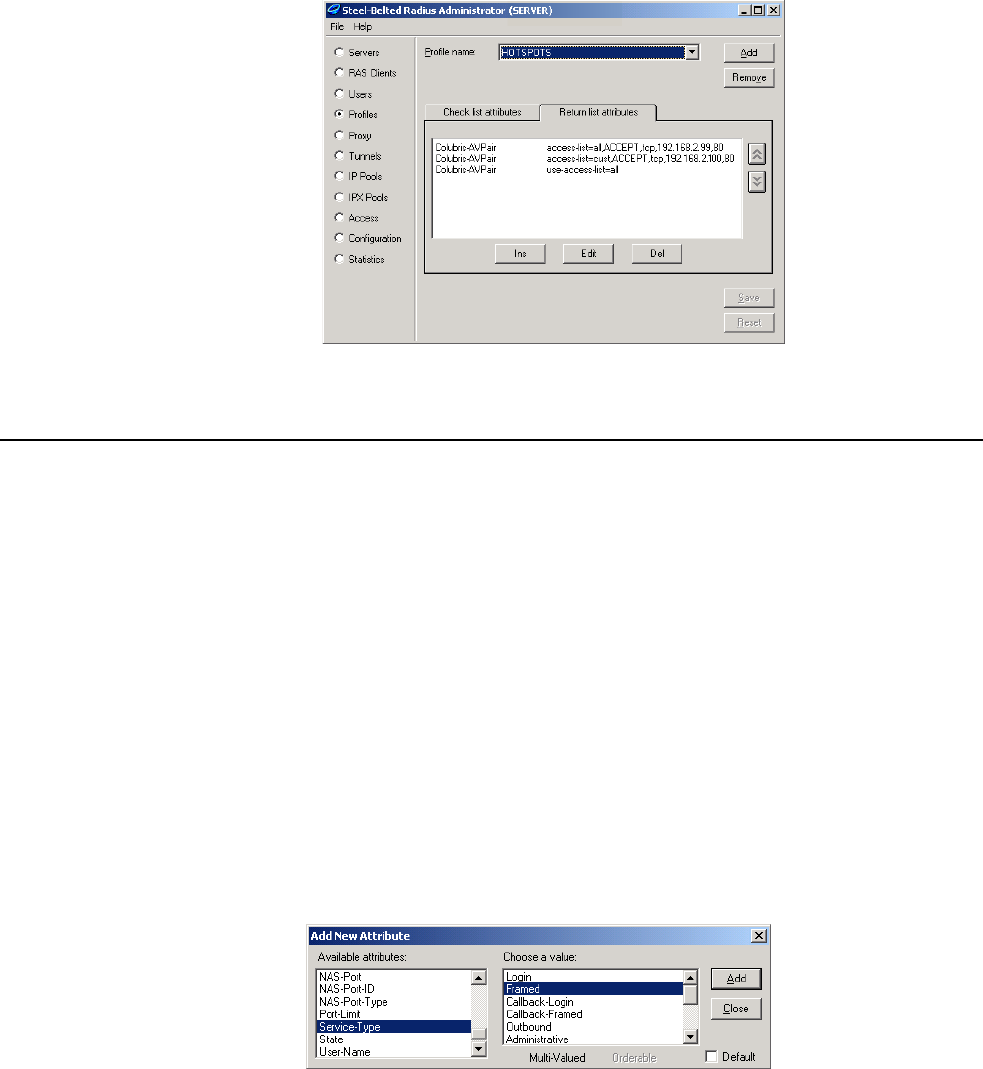
Chapter 18: Sample setup - Steel-Belted Radius 282
DRAFT
•Click Save.
Defining a
Customer profile
The CN3200 supports an SMTP redirection feature which enables customers to
send outgoing mail without being directly connected to their SMTP server.
To use this feature, the customer profiles need to be split into two types: those
with SMTP redirection and those without it. To this end, this example will create
two profiles: CUSTOMERS-SMTP-REDIRECT and CUSTOMERS-NO-SMTP.
Note: This example assumes the SMTP server is located on Server 2, although
no such software is actually installed.
To define the customer profiles, do the following:
1. Click Profiles.
2. Click Add. The Add New Profile dialog box opens.
3. Specify CUSTOMERS-NO-SMTP as the name and click OK.
4. Click Add.
5. Specify CUSTOMERS-SMTP-REDIRECT as the name and click OK.
6. Click the Check list attributes tab.
7. Click the Ins button. The Add New Attribute dialog box opens.
8. Select Service-Type and set it to the value Framed. Click Add.
9. Click Done.

Chapter 18: Sample setup - Steel-Belted Radius 283
DRAFT
10. Click the Returned list attributes tab.
You can now specify the attributes that will be returned after a customer is
successfully authenticated. This enables you to define a number of important
operating characteristics, including:
• The access list that is in use.
• Support for SMTP mail redirection.
• Settings for session timeouts and accounting updates.
For this example, you should create the following four entries:
(Refer to “Creating a profile for the CN3200 on the RADIUS server” on
page 214 for a complete list of all supported attributes.)
To create the entries:
•Click Ins. The Add New Attribute dialog box opens.
AIdle-Timeout 30
This causes the CN3200 to log the customer out if the session is idle for
more than 30 seconds
BSession-Timeout 360
This causes the CN3200 to log the customer out if the session is active
for more than 360 seconds.
CColubris-AVPair smtp-redirect=192.168.2.100
This provides access to the fictional SMTP server on 192.168.2.100.
Used for the CUSTOMERS-SMTP-REDIRECT profile only.
DColubris-AVPair use-access-list=cust
This access list was defined in the HOTSPOTS profile. It is activated here
to provide access to the web server on 192.168.2.100.
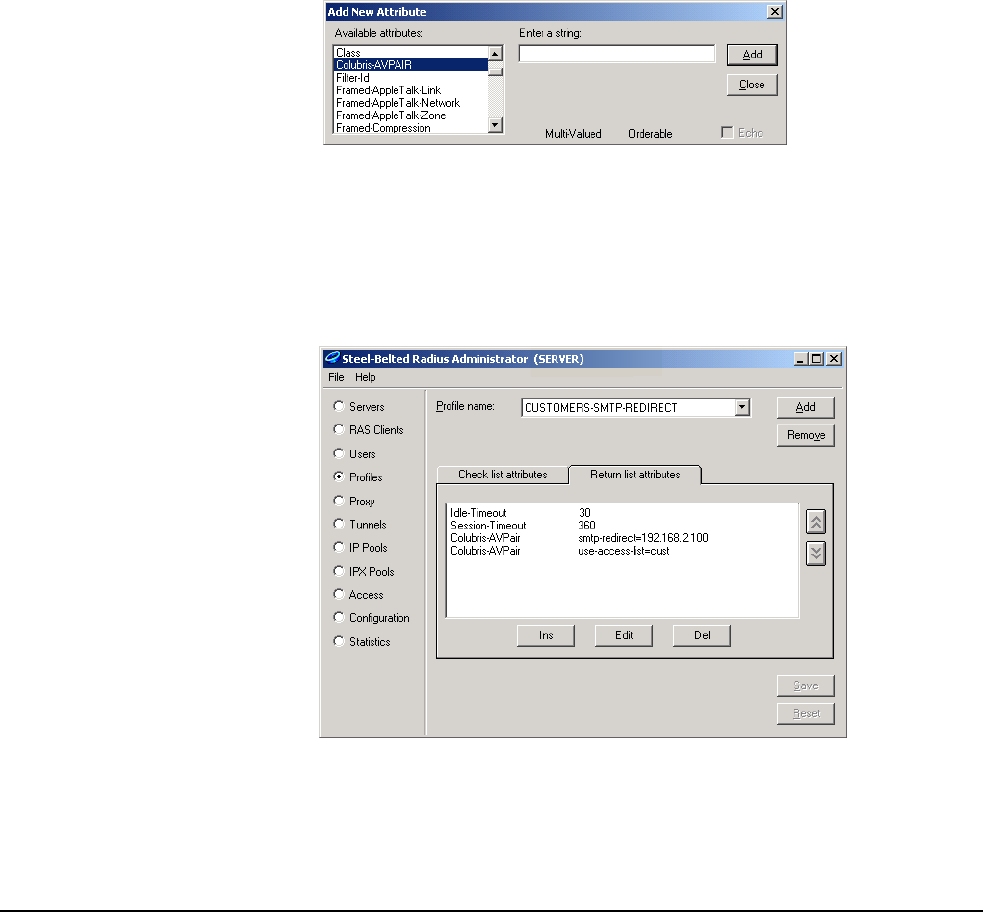
Chapter 18: Sample setup - Steel-Belted Radius 284
DRAFT
• Select Colubris-AVPAIR and enter the appropriate string.
•Click Add.
• Repeat until all entries are done, the click Close.
• Once all entries are complete, the Return list attributes tab should look
like this:
11. In the Profile Name box, select CUSTOMERS-NO-SMTP. Define the same
set of attributes, except for:
Colubris-AVPair smtp-redirect=192.168.2.100
Defining an
CN3200
administrator
profile
By defining an administrator profile you can enable multiple administrators to log
in to the management tool on the CN3200. Each administrator can have their
own login name and password. Refer to “Creating administrator profiles on the
RADIUS server” on page 232 for more information.
Note: Only one administrator can log in at a time.
Note: Setting up administrator profiles is optional and is not required for proper
operation of this sample.
To define the customer profiles, do the following:
1. Click Profiles.
2. Click Add. The Add New Profile dialog box opens.
3. Specify ADMIN as the name and click OK.
4. Click the Check list attributes tab.
5. Click the Ins button. The Add New Attribute dialog box opens.
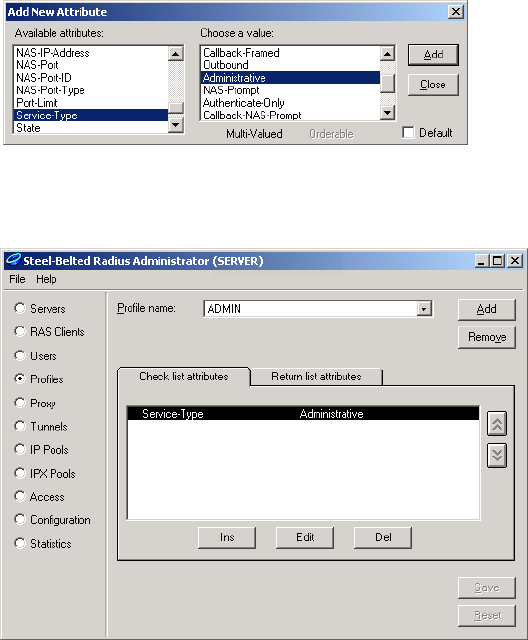
Chapter 18: Sample setup - Steel-Belted Radius 285
DRAFT
6. Select Service-Type and set it to the value Administrative. Click Add.
7. Click Close.
Return list attributes are not supported for administrators.
8. Click Save.

Chapter 18: Sample setup - Steel-Belted Radius 286
DRAFT
Step 5: Define user accounts
RADIUS user accounts need to be created for each individual user. The account
specifies the login name and password the user will use to login. All other
properties are obtained from one of the profiles that were just defined.
For this example you will create the following RADIUS user accounts:
Defining user
accounts
Repeat the following procedure to create each user account.
1. Click Users.
2. Click Add.
3. Specify the Username and click OK.
4. Click Set password. Define the password and click Set.
Username Password Associate with profile
customer1 customer1 CUSTOMERS-NO-SMTP
customer2 customer2 CUSTOMERS-SMTP-REDIRECT
hotspot hotspot Hotspots
admin admin ADMIN
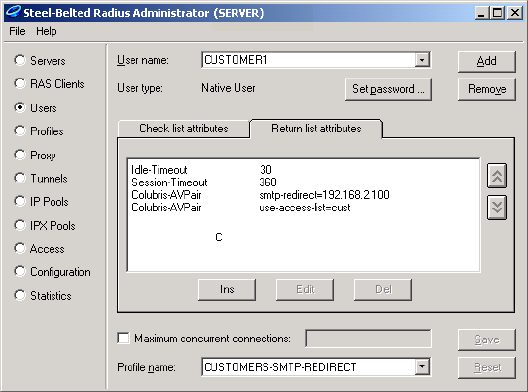
Chapter 18: Sample setup - Steel-Belted Radius 287
DRAFT
5. In the Profile name box, select the profile which will be used as the basis for
the account. The settings for the profile will appear. For example:
6. Click Save.
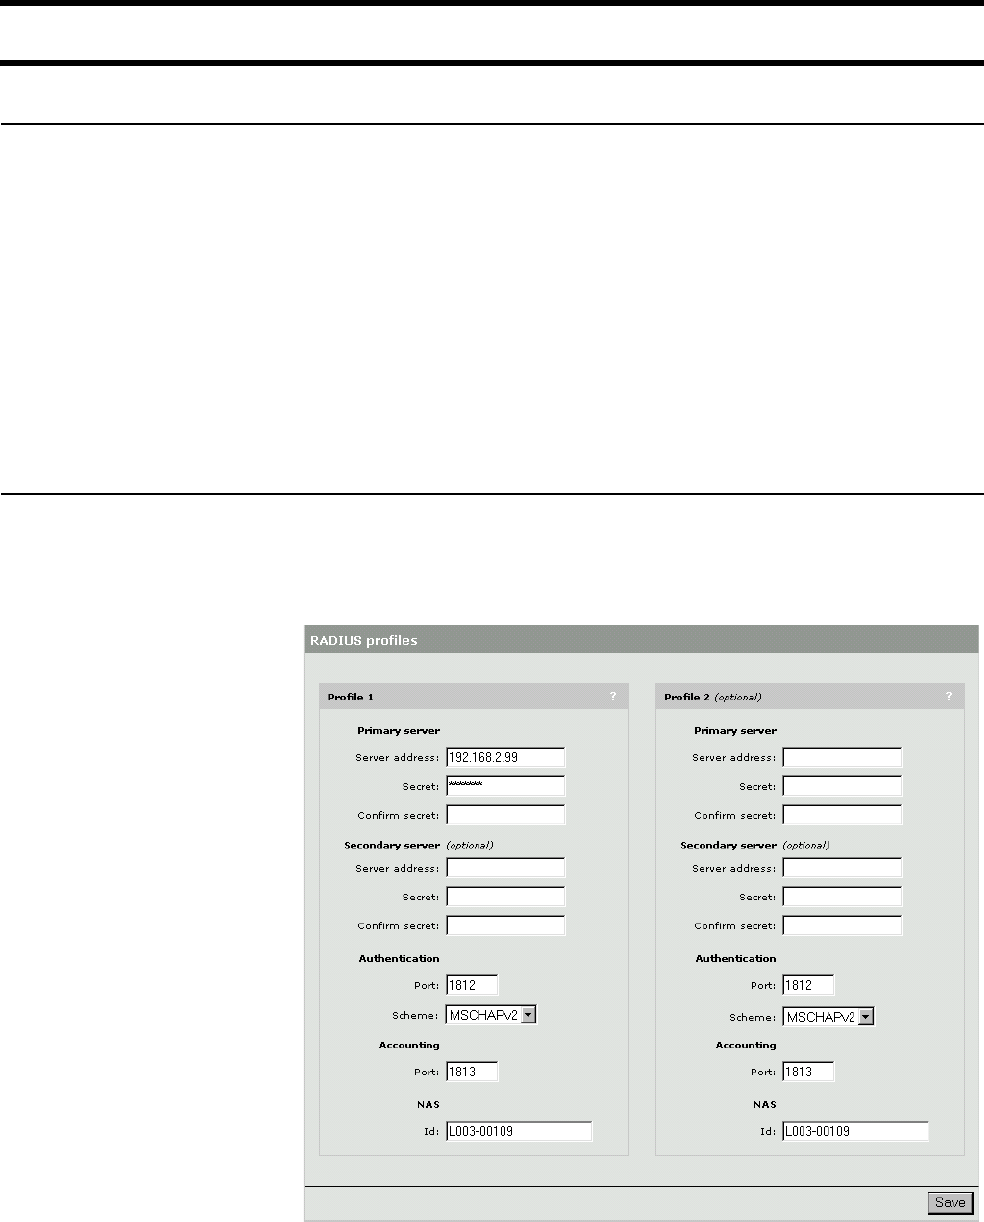
Chapter 18: Sample setup - Steel-Belted Radius 288
DRAFT
Step 6: Install and configure the CN3200
Assign a static
address
1. On the Network menu, click Ports.
2. Click Internet port in the table.
3. Select Static and then click Configure.
4. Make the following settings:
• IP address: Assign an address. For this example, use the address:
192.168.2.1
• Address mask: Assign an appropriate mask. For this example, use the
mask: 255.255.255.0.
• Default gateway: Leave blank. In a real setup this would be set to the
address of the router providing access to the Internet.
Configure RADIUS
settings
The CN3200 must be configured to communicate with the Steel-Belted Radius
server. For a detailed explanation of configuration issues, see Chapter 16:
“Customizing CN3200 and customer settings” on page 207.
1. On the Security menu, click RADIUS. The RADIUS settings page opens.
2. Configure the following parameters:
• Primary server address: Specify the address of Server 1. For this example,
use the address: 192.168.2.99
• Primary server secret: Specify the secret you defined on when configuring
Steel-Belted Radius. For this example, use the secret: secret
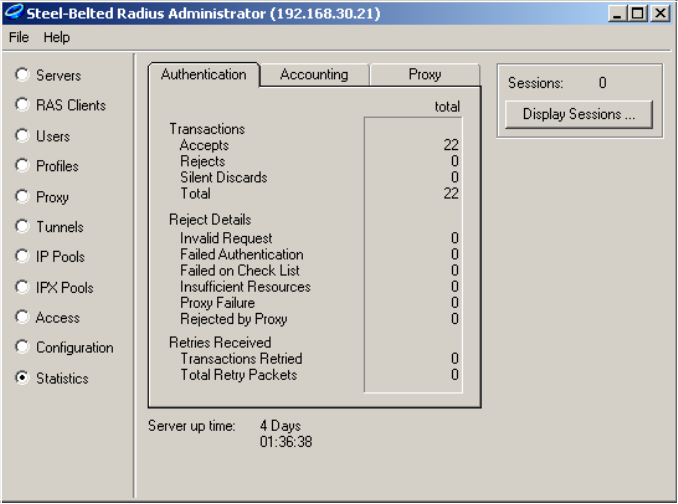
Chapter 18: Sample setup - Steel-Belted Radius 289
DRAFT
3. Click Save.
4. Click Authentication. The Authentications settings page opens.
5. In the Customers box, set Authenticate via to RADIUS profile 1.
6. Configure the CN3200 box as follows:
•Authenticate via: Set to RADIUS profile 1.
•Login name: Set to hotspot.
•Password: Set to hotspot.
7. Enable Authenticate customers with 802.1x.
8. Click Save. The CN3200 will attempt to connect to the Steel-Belted Radius
server. If successful, the status light will change from red to green.
Note: You can use the Statistics page on the Steel-Belted Radius Administrator to
view progress of the connection.
When you click the Save button in the management tool on the CN3200, the
number of Accepts should be incremented. That means that all settings are
properly configured on the CN3200 and Steel-Belted Radius.
If the number of Rejects is incremented instead, there may be a problem with
a badly set username and/or password. Check the log file in
c:\radius\service. It is named 2001mmdd.log, where mm is the month and
dd the day. For example, 20011022.log for October 22, 2001.
If the number of Silent Discards is incremented, it probably means that
either the IP address of the CN3200 and/or the shared secret has not been
properly configured on the RAS client tab.
You can increase the amount of information in the log file by changing the
following values in the c:\radius\service\radius.ini file, and restarting Steel-
Belted Radius:
[Configuration]
LogLevel = 0
TraceLevel = 0
Change both values from 0 to 2.
Chapter 18: Sample setup - Steel-Belted Radius 290
DRAFT

Chapter 18: Sample setup - Steel-Belted Radius 291
DRAFT
Step 7: Install Server 2
This example assumes Windows 2000 and IIS are installed on Server 2. You can
any another operating system and web server.
1. Install Windows 2000 Professional, Server, or Advanced Server and then
install Service Pack 3.
2. Make sure that IIS is running.
3. Connect Server 2 to the LAN and assign a static IP address to it. For this
example, use the address 192.168.2.100.
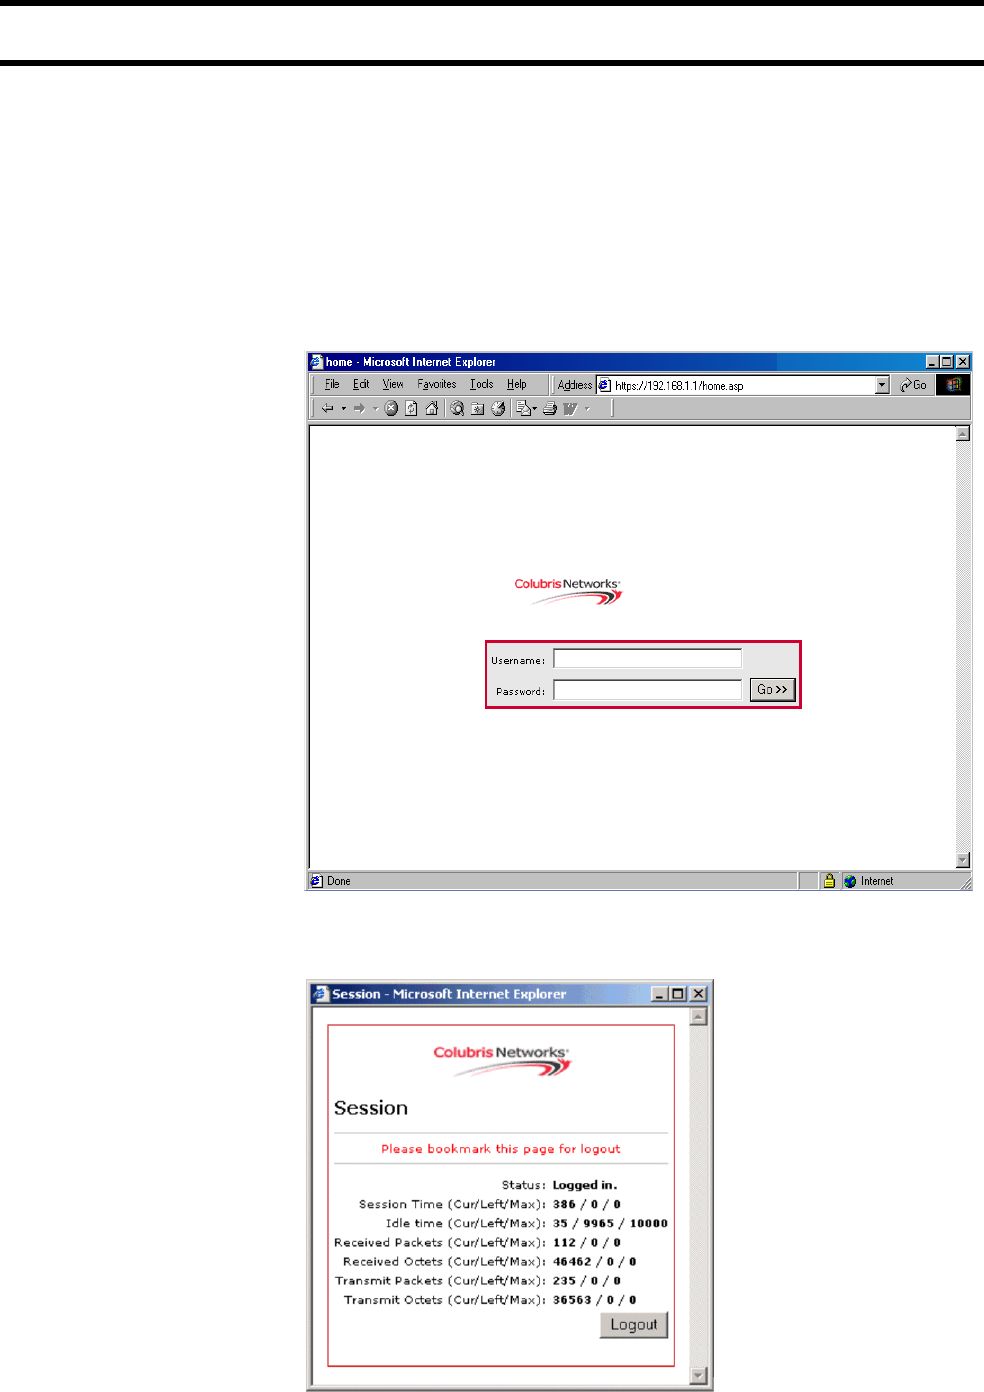
Chapter 18: Sample setup - Steel-Belted Radius 292
DRAFT
Step 8: Test the installation
To test the installation, use the client station to log onto the public access
interface. For this to work, the CN3200 must be configured as the client’s default
gateway. If you set up your equipment to match the setup of this example, this is
automatic. If not, adjust the configuration of the client accordingly.
1. Start the client station’s web browser and enter the IP address (or domain
name) of Server 2 in the address bar.
2. The CN3200 should intercept the HTTP request and display the login page.
Depending on the type of certificate that is installed on the CN3200 you may
see a security warning first.
3. To login, specify customer1 as both the username and password. The
CN3200 session page should open.
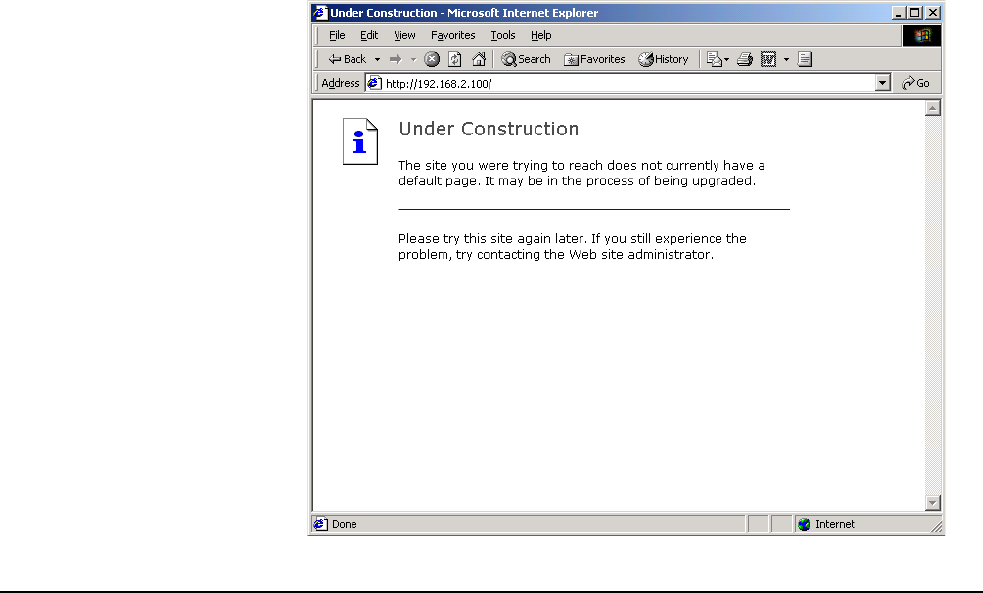
Chapter 18: Sample setup - Steel-Belted Radius 293
DRAFT
4. You should automatically be redirected to the web server on Server 2.
Testing
administrator
logins
If you configured administrator accounts on the RADIUS server, you can test
them now as follows:
1. Open the CN3200 management tool with your web browser.
2. On the main menu, click Management. The Management tool configuration
page opens.
3. For Authenticate via select RADIUS profile 1.
4. Click Save.
5. Logout.
6. Login with username and password admin.
Chapter 18: Sample setup - Steel-Belted Radius 294
DRAFT

Chapter 19: Sample setup - Microsoft RADIUS 295
DRAFT
Chapter 19: Sample setup - Microsoft RADIUS
Chapter 19
Sample setup - Microsoft RADIUS
This chapter provides a walkthrough of a sample RADIUS configuration
using Microsoft's RADIUS server (called Internet Authentication
Service), that comes with Windows 2000 server and Windows 2000
Advanced server.
The CN3200 is compliant with RFC 2865 and RFC 2866 and will work
with a variety of RADIUS servers. This example is for illustrative purposes
only and does not imply that you need to use Microsoft’s RADIUS server
over any other brand.
IMPORTANT: Before reading this chapter you should familiarize
yourself with the concepts discussed in Chapter 15 and Chapter 16.

Chapter 19: Sample setup - Microsoft RADIUS 296
DRAFT
Overview
The sample setup in this chapter illustrates how to use IAS (Internet
Authentication Service) to authenticate customer logins on the CN3200.
Prerequisites Software
• Windows 2000 Server or Advanced Server (with Service Pack 3), and all
recommended updates
• Internet Explorer 6.0 service pack 1
Hardware
• a network hub
• a second network hub or a cross-over cable
• two computers capable of running Windows 2000 Professional, Server or
Advanced Server
• a CN3200
• a third computer with a JavaScript-enabled web browser, with or standard
Ethernet adapter
Skills
• Familiarity with the installation and operation of TCP/IP-based networks
• Basic knowledge of Windows 2000, including how to use a Windows
command-line session.

Chapter 19: Sample setup - Microsoft RADIUS 297
DRAFT
Equipment setup
This section illustrates the hardware setup that was used to create the sample
configuration described in this chapter. If you duplicate this setup, you will not
have to change any of the IP addresses supplied in the example.
Topology The goal of this setup is to simulate a working environment with the least amount
of equipment. To this end, the ‘public network’ is considered to be any device
connected to the LAN port on the CN3200. The ‘protected network resources’
are connected to the Internet port on the CN3200. In this example, both Server 1
and Server 2 are on the protected network. Server 1 hosts the IAS server. Server
2 is used to simulate an external web server.
See “Wiring details” on page 358 for information on how to build a x-over cable.
About the
components
Server 1
Server 1 is the computer that you install Windows 2000 server and IAS on.
Server 2
Server 2 is required to test the setup once it is complete. You should install a web
server on this computer. The client station will attempt to access this web server
via the CN3200.
Client station
The client station is required to test the setup once it is complete. The DHCP
server on the CN3200 will assign an address to this computer.
Chapter 19: Sample setup - Microsoft RADIUS 298
DRAFT
Step 1: Install software on Server 1
Windows 2000 1. Install Windows 2000 Server or Advanced Server and then install Service
Pack 3 and all recommended updates.
2. Make sure that IAS is also installed.
3. Connect Server 1 to the hub and assign a static IP address to it. For this
example, use the address 192.168.2.99.
4. Shut down and restart Server 1.
Internet Explorer Install Internet Explorer 6 SP1 on the server. The support files included with this
application are required for proper operation.
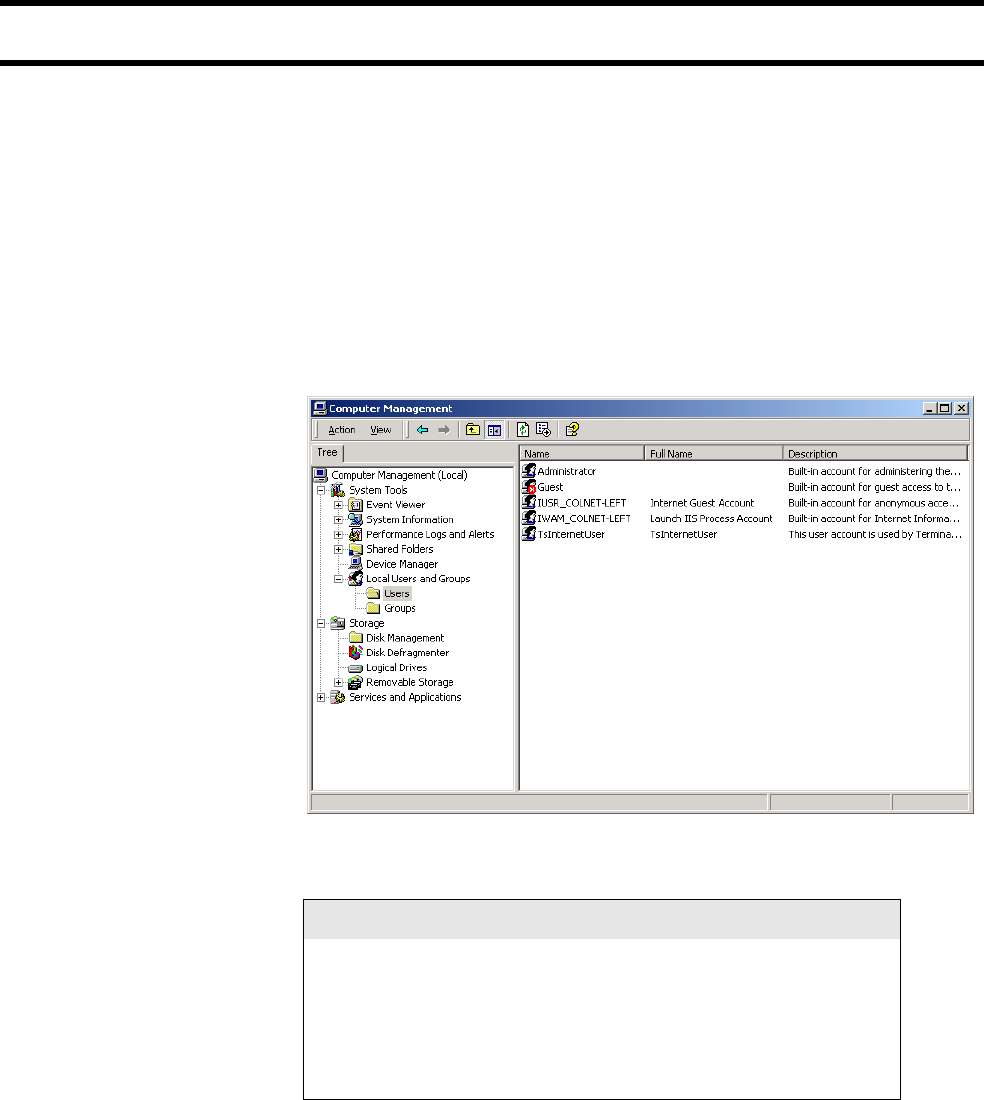
Chapter 19: Sample setup - Microsoft RADIUS 299
DRAFT
Step 2: Define user accounts
On server 1, accounts need to be created in Windows for three types of users as
follows:
• each CN3200 must have its own account
• each administrator must have their own account
• each customer must have their own account
To create the accounts
1. Click Start > Programs > Administrative Tools > Computer Management.
2. Double click Local Users and Groups.
3. Click Users.
4. Create the following user accounts by clicking New User on the Action
menu:
Username Password
customer1 customer1
customer2 customer2
hotspot hotspot
admin admin1
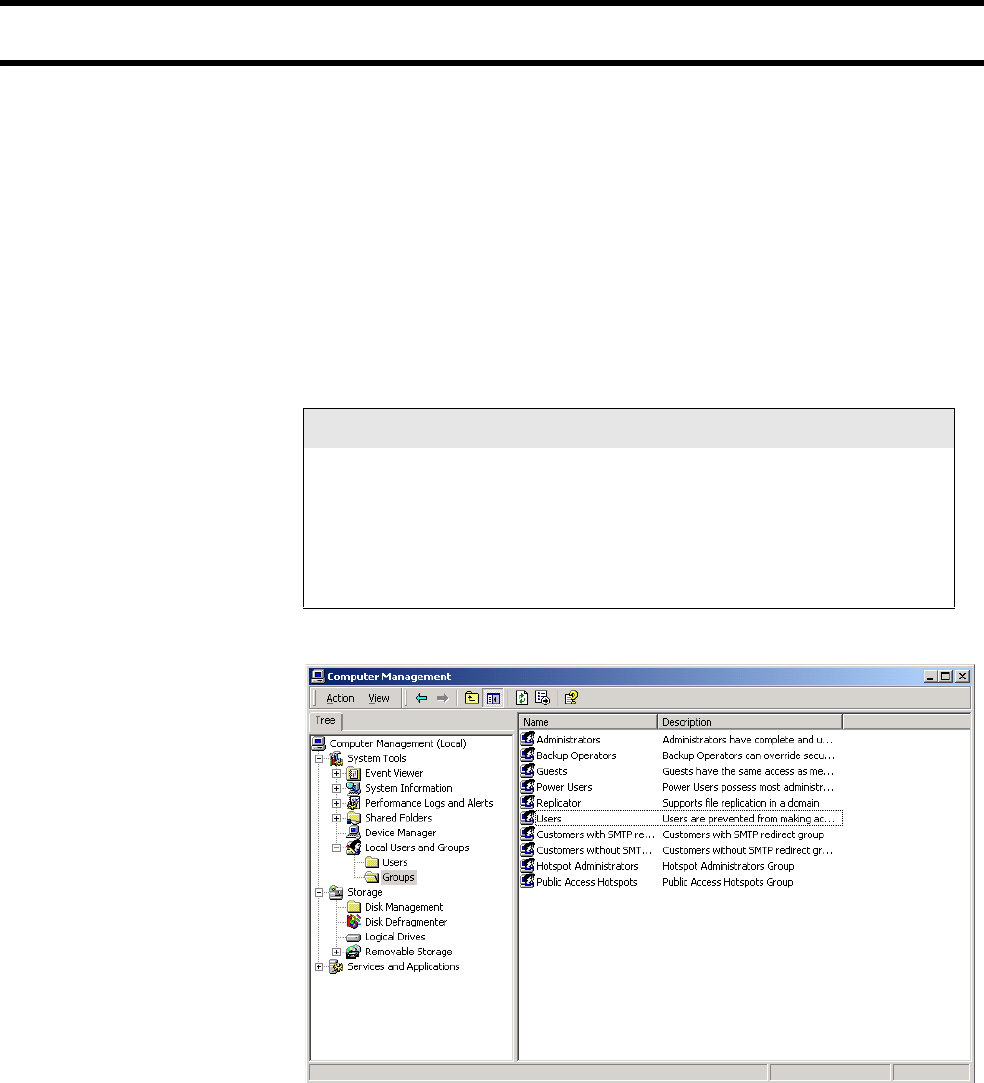
Chapter 19: Sample setup - Microsoft RADIUS 300
DRAFT
Step 3: Define groups and add users to them
Groups let you define a set of common attributes for one or more users. You will
need to create at least four groups:
• CN3200 devices
• CN3200 administrators
• Customers with SMTP redirection
• Customers without SMTP redirection
To create the groups
1. Click Groups.
2. Create the following groups by clicking New Group on the Action menu.
After you create each group you will be prompted to add users.
3. Click Users.
Group to create Add these users
Public Access Hotspots hotpspot
Customers with SMTP redirect customer1
Customers without SMTP redirect customer2
Hotspot Administrators admin
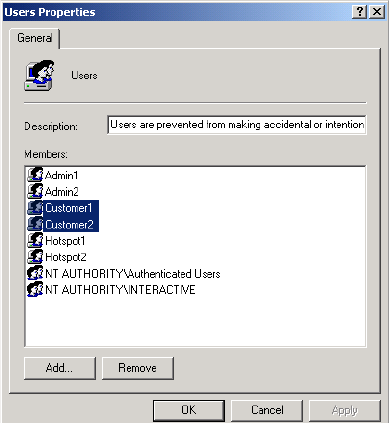
Chapter 19: Sample setup - Microsoft RADIUS 301
DRAFT
4. All users are automatically added to the Users group. Select customer1 and
customer2 and click Remove. You need to remove these users so they do
not have access to Server 1.
5. Click OK.
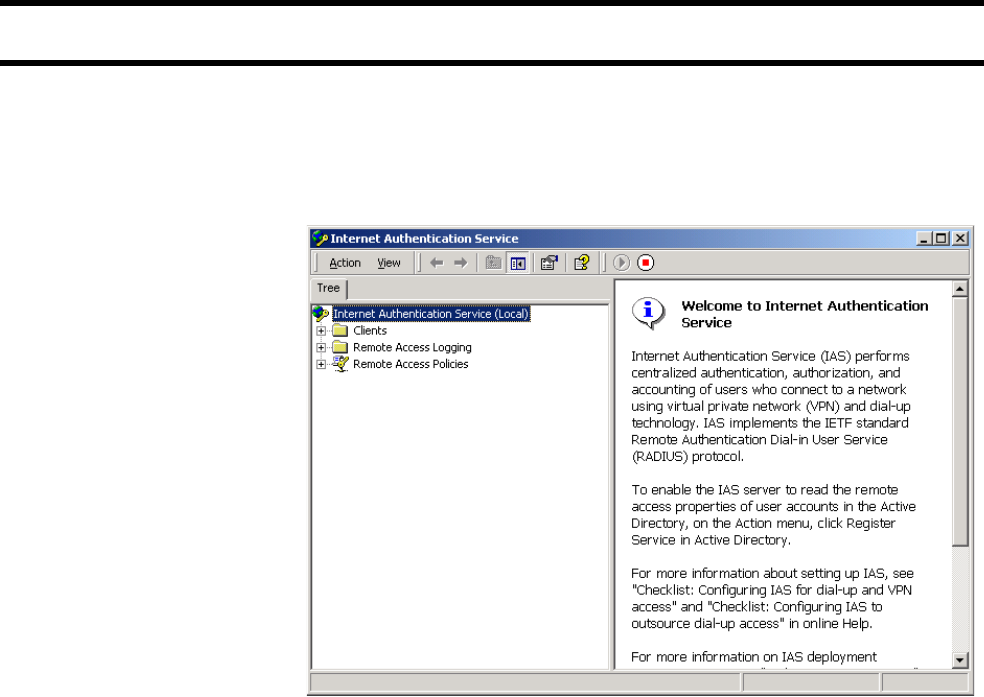
Chapter 19: Sample setup - Microsoft RADIUS 302
DRAFT
Step 4: Start the RADIUS server
Start the RADIUS server configuration by selecting Start Menu/Programs/
Administrative Tools/Internet Authenticating Service. The following window will
open.
1. Click Start > Programs > Administrative Tools > IAS.
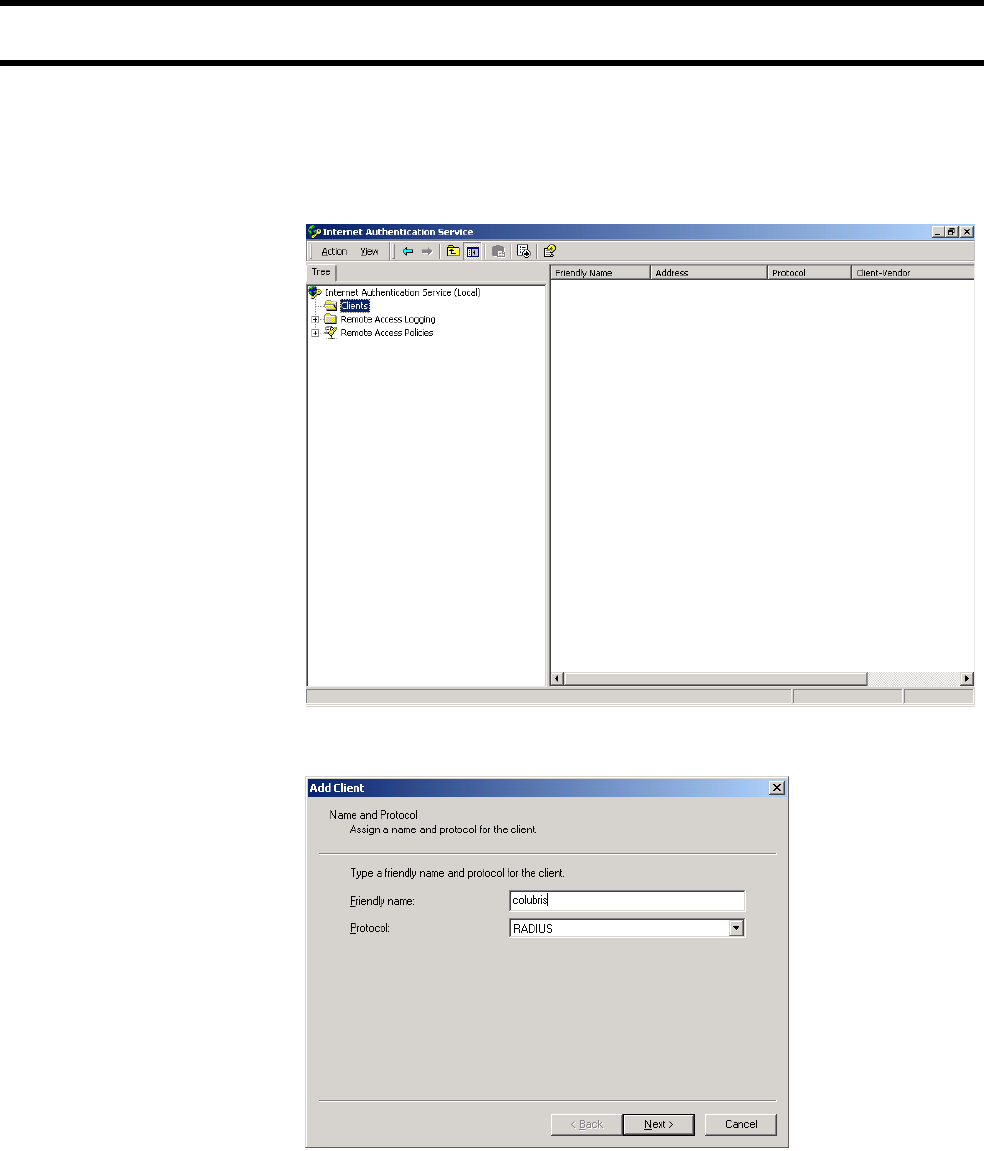
Chapter 19: Sample setup - Microsoft RADIUS 303
DRAFT
Step 5: Create a RADIUS client account
A RADIUS client is any device that uses the services of a RADIUS server.
Therefore, each CN3200 is considered to be a RADIUS client and must have its
own client account.
1. Click Clients.
2. On the Action menu, click New client. The Add Client dialog box opens.
3. Specify a Friendly name for the CN3200. For this example, use colubris.
This value is used by the RADIUS server only. It is not configured on the
CN3200.
4. Choose RADIUS as the Protocol.
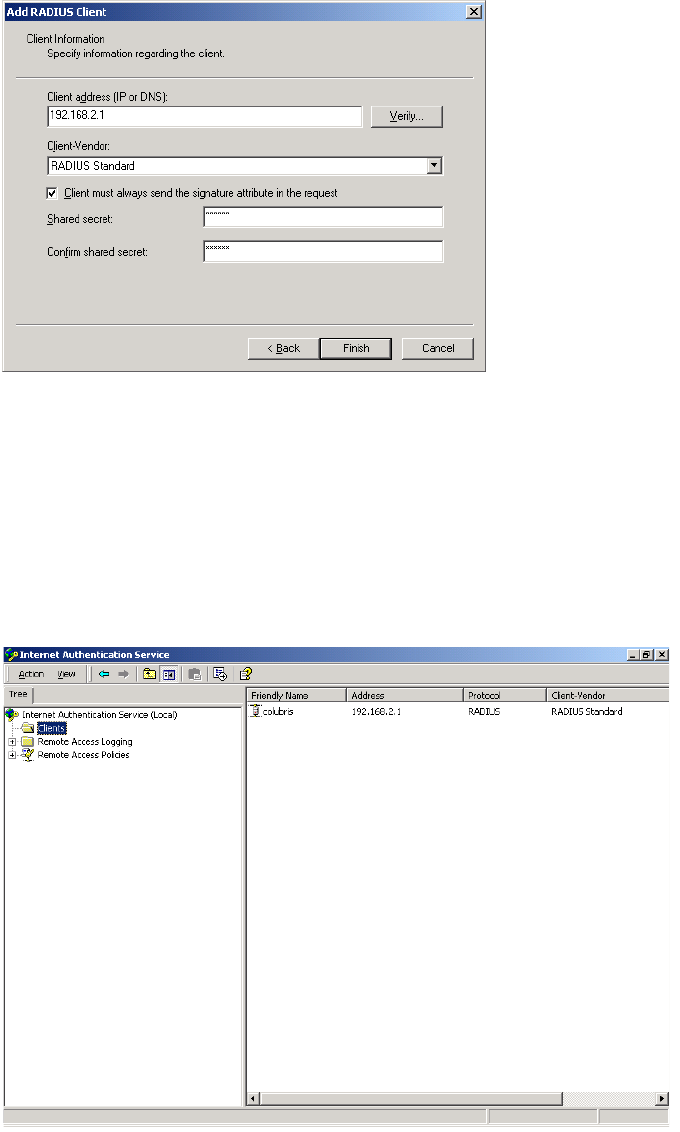
Chapter 19: Sample setup - Microsoft RADIUS 304
DRAFT
5. Click Next. The Add RADIUS Client dialog box opens.
6. In Client address specify the IP address of the CN3200’s Internet port. For
this example, specify 192.168.2.1.
7. Leave Client-Vendor set to RADIUS Standard.
8. Leave Client must always send the signature attribute in the request
checked. The CN3200 always sends the signature attribute.
9. Define a unique Shared secret for the CN3200. For this example, use the
secret secret.
10. Click Finish.
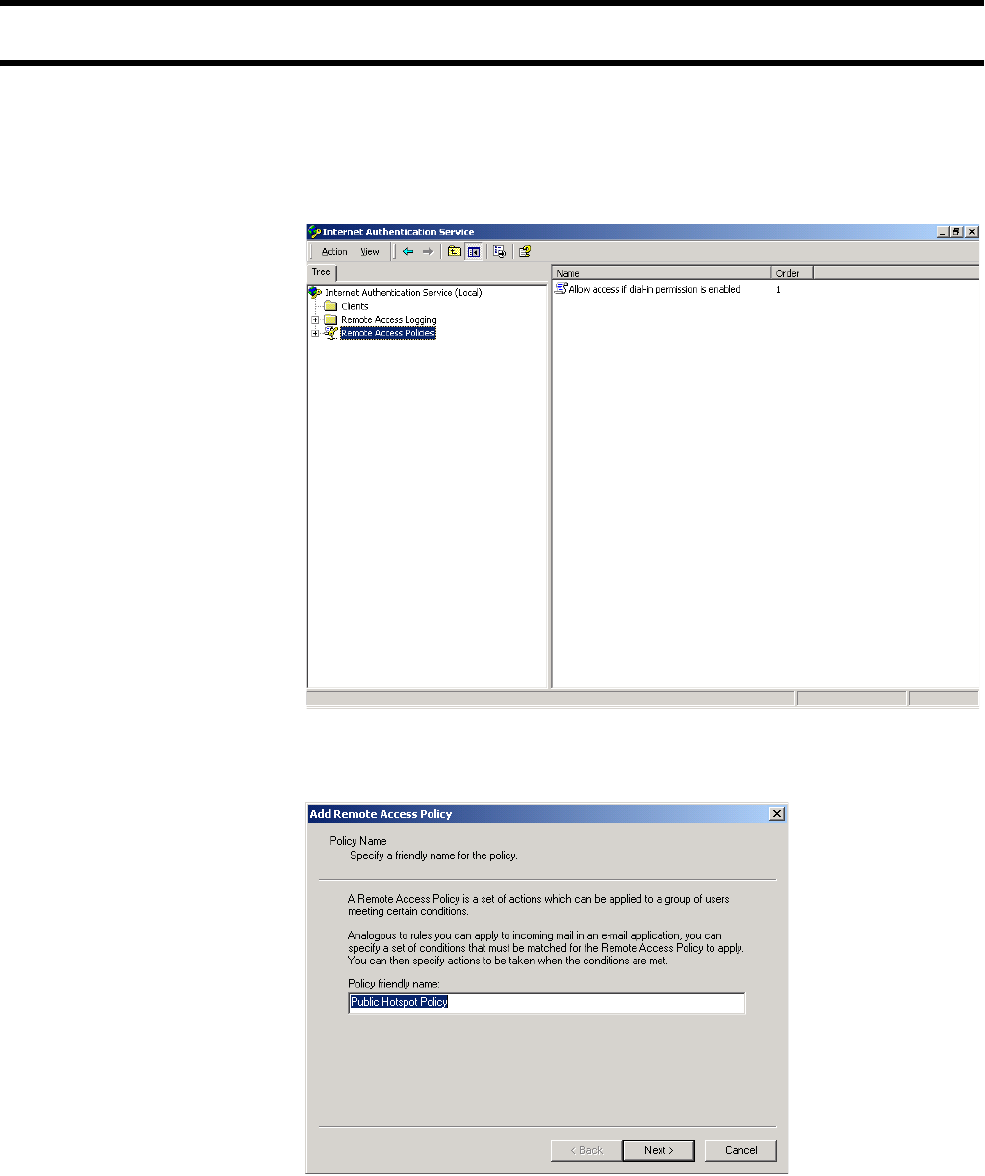
Chapter 19: Sample setup - Microsoft RADIUS 305
DRAFT
Step 6: Create an access policy for the CN3200
A remote access policy is a set of actions that apply to a group of RADIUS users.
This section shows how to define an access policy for the Public Access
Hotspots group.
1. Click Remote Access Policies.
2. On the Action menu, click New remote access policy. The Add Remote
Access Policy dialog box opens.
3. Specify a Policy friendly name. For this example, specify Public Hotspot
Policy.
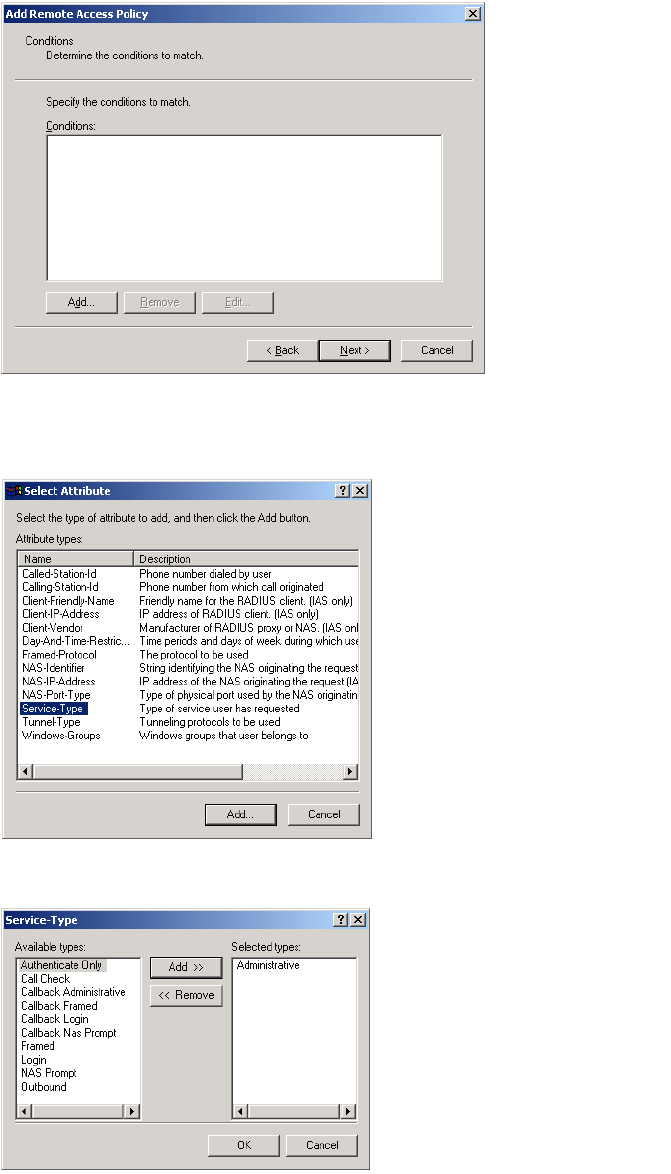
Chapter 19: Sample setup - Microsoft RADIUS 306
DRAFT
4. Click Next. The Add Remote Access Policy dialog box opens.
5. Click Add. The Select Attribute dialog box opens.
6. Select Service type and click Add.
7. Select Administrative, click Add, and then click OK.

Chapter 19: Sample setup - Microsoft RADIUS 307
DRAFT
8. Yo u r e t u r n Add Remote Access Policy dialog box.
9. Click Add. The Select Attribute dialog box opens.
10. Select Windows-Groups and click Add.
11. The Groups dialog box opens. Click Add.
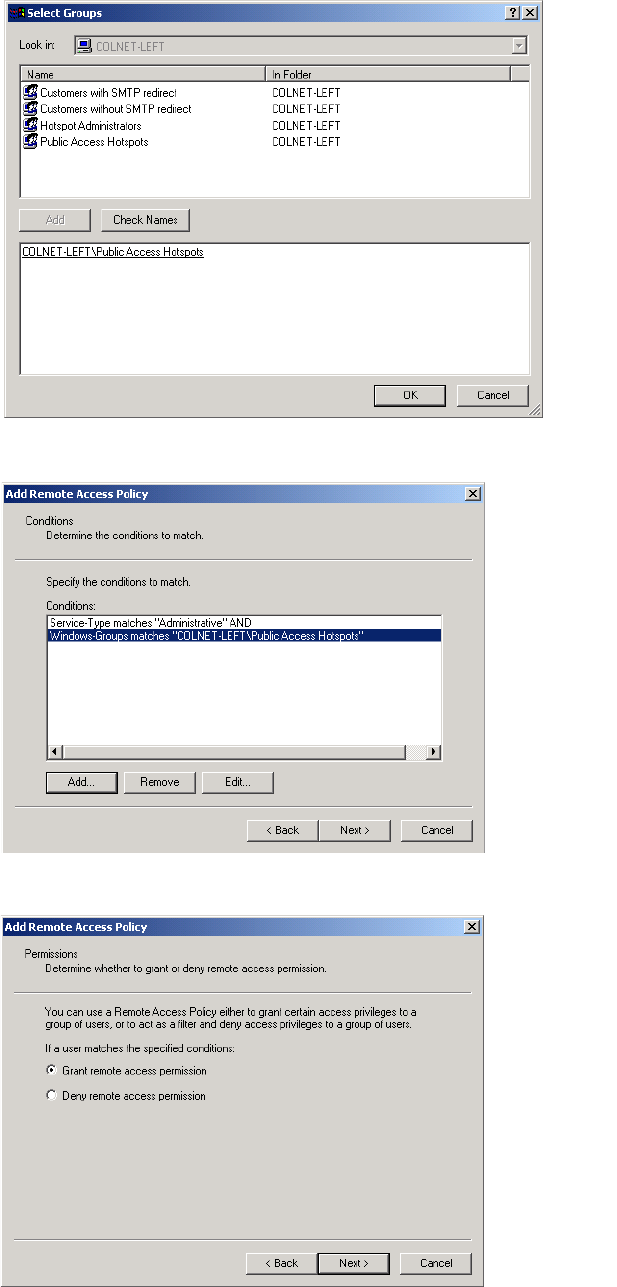
Chapter 19: Sample setup - Microsoft RADIUS 308
DRAFT
12. The Select Groups dialog box opens. Select Public Access Hotspots and
then click Add and then OK.
13. Return to the Add Remote Access Policy dialog box and click Next.
14. Select Grant remote access permission and click Next.
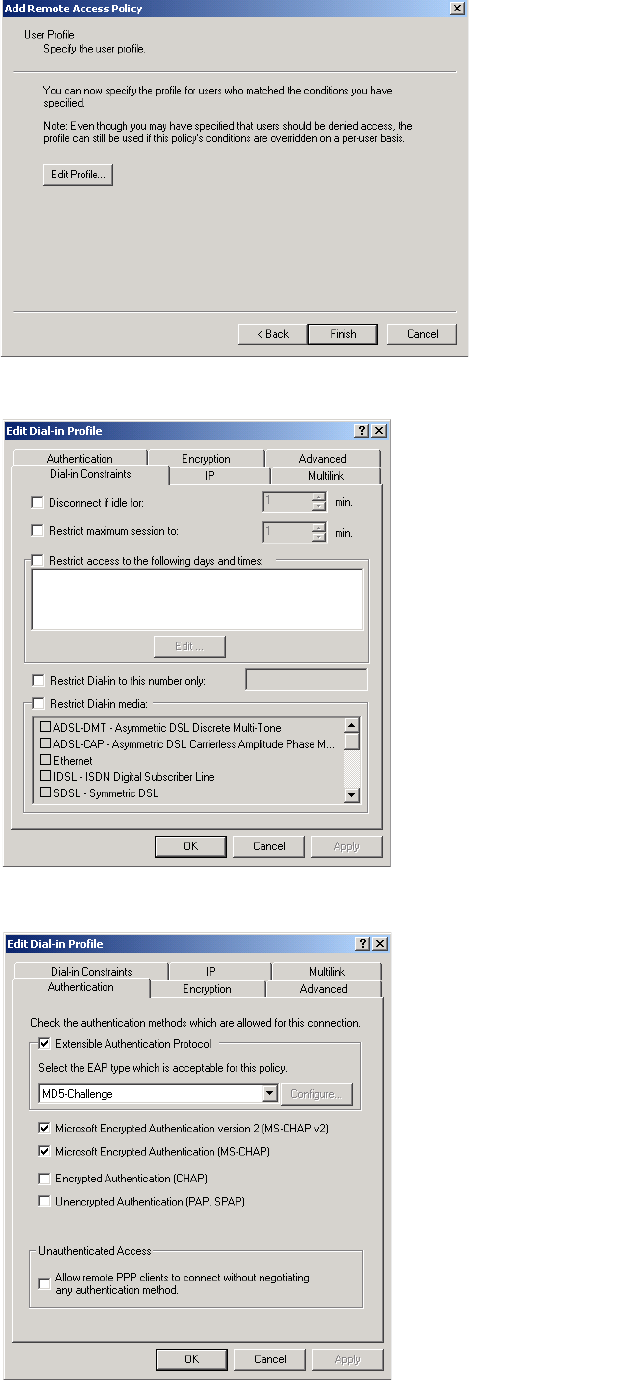
Chapter 19: Sample setup - Microsoft RADIUS 309
DRAFT
15. Click Edit Profile.
16. The Edit-Dial-in Profile window opens.
17. Click the Authentication tab and enable the options as shown.
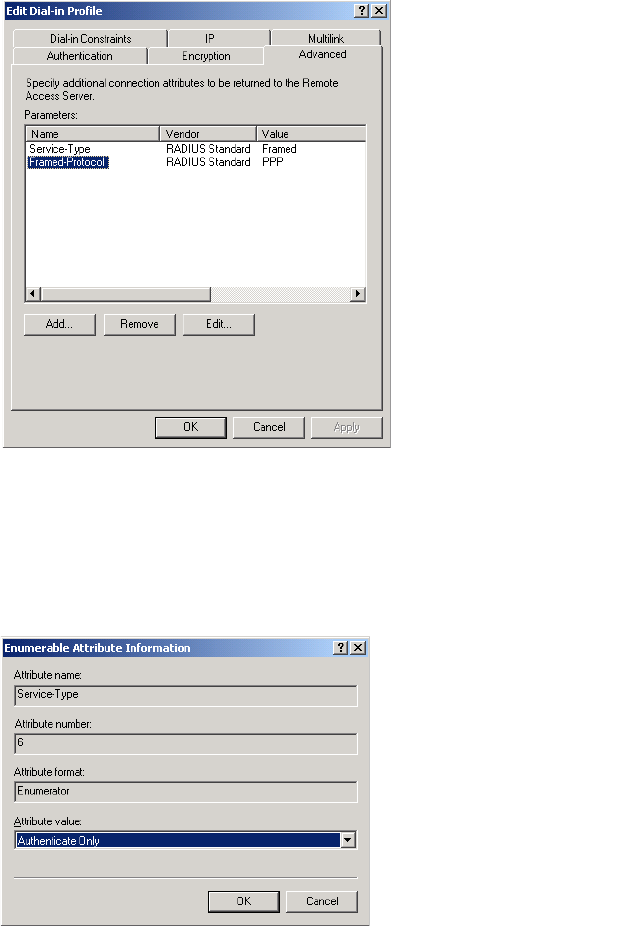
Chapter 19: Sample setup - Microsoft RADIUS 310
DRAFT
18. Click the Advanced tab.
This tab is where you specify the values that are returned to the CN3200
when it logs into the RADIUS server.
19. Select Framed-Protocol and click Remove.
20. Select Service-Type and click Edit. The Enumerable Attribute Information
dialog box opens.
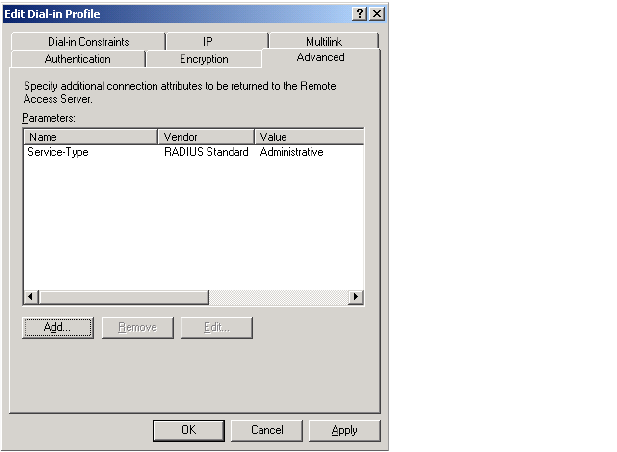
Chapter 19: Sample setup - Microsoft RADIUS 311
DRAFT
21. Select Administrative for Attribute value and click OK.
You can now specify the attributes that will be returned to the CN3200 after it
is successfully authenticated. This enables you to define a number of
important operating characteristics, including:
• The location of custom HTML pages that must be downloaded by the
CN3200.
• One or more access lists for specifying the set of network resources
customers have access to.
For this example, you should create the following entry:
Colubris-AVPair access-list=cust,ACCEPT,tcp,192.168.2.100,80
This access list permits only authenticated customers to access the web
server at 192.168.2.100.
(Refer to “Creating a profile for the CN3200 on the RADIUS server” on
page 214 for a complete list of all supported attributes.)
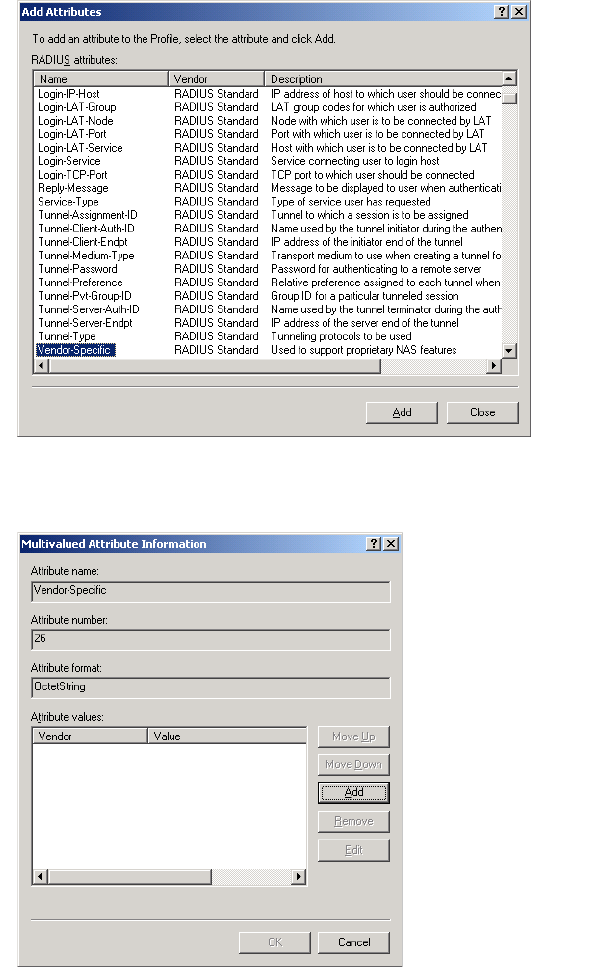
Chapter 19: Sample setup - Microsoft RADIUS 312
DRAFT
To add this entry:
•Click Add. The Add Attributes dialog box opens.
• Select Vendor-Specific and click Add. The Multivalued Attribute
Information dialog box opens.
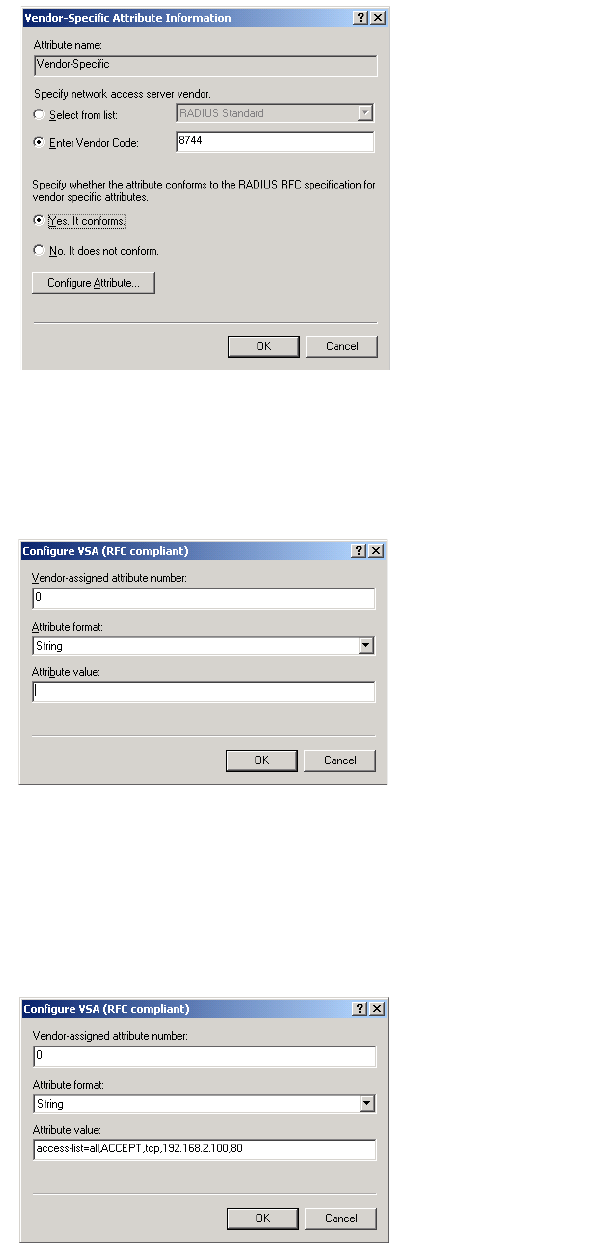
Chapter 19: Sample setup - Microsoft RADIUS 313
DRAFT
•Click Add to add a new attribute.
• Specify the Colubris Networks vendor code 8744 in Enter Vendor Code.
• Select Yes. It conforms.
•Click Configure Attribute. The Configure VSA (RFC compliant) dialog box
opens.
•For Vendor-assigned attribute number, specify 0.
•For Attribute format, select String.
•For Attribute value, specify the following attribute:
• access-list=all,ACCEPT,tcp,192.168.2.100,80
For example:
22. When done, click OK on all dialog boxes to return to the Add Remote
Access Policy dialog box.
23. Click Finish.
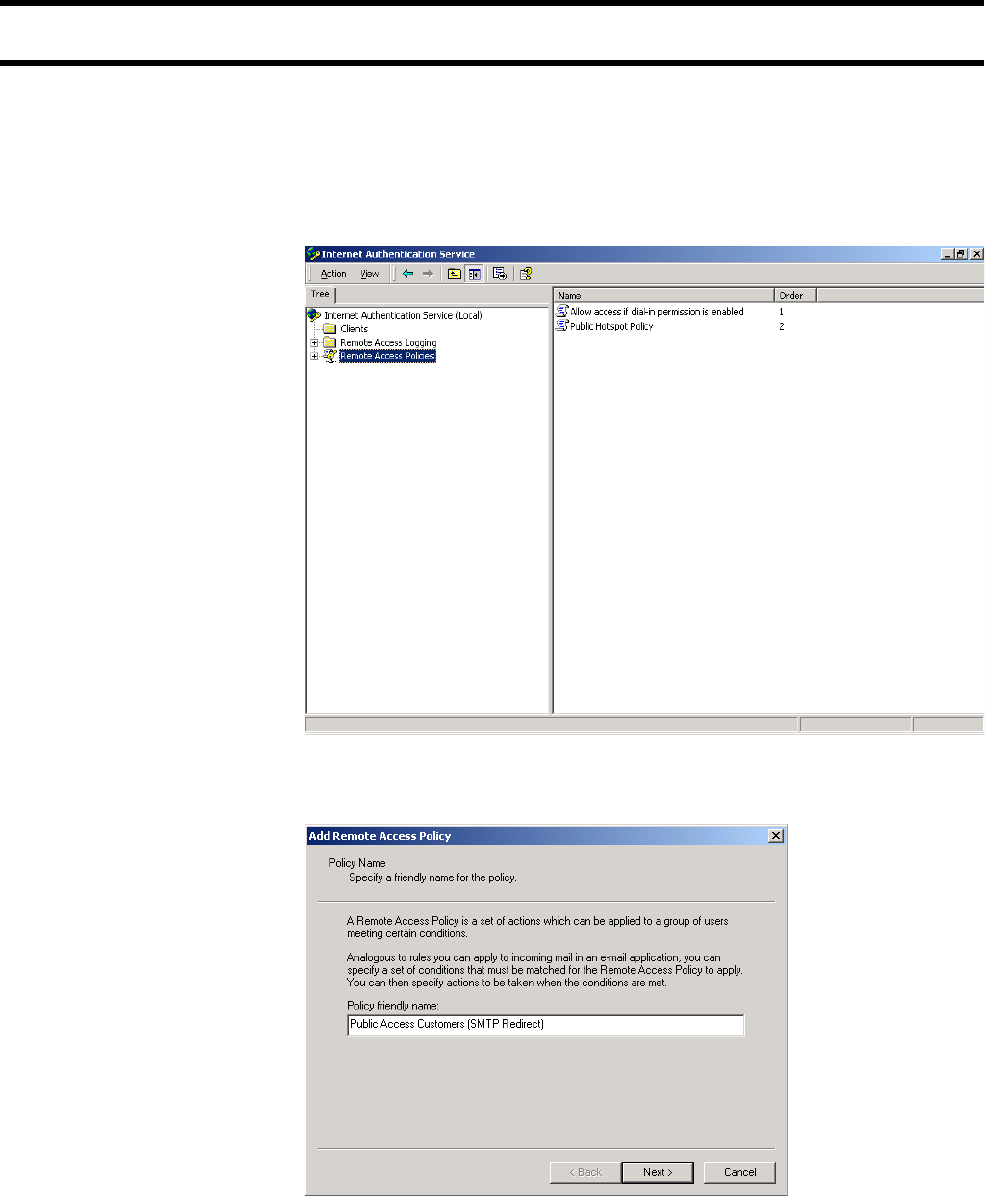
Chapter 19: Sample setup - Microsoft RADIUS 314
DRAFT
Step 7: Create an access policy for customers
This section explains how to create a remote access policy for both Public
Access Customers (SMTP Redirect) and Public Access Customers (no SMTP
Redirect). Creation of both policies is identical expect for a few steps at the end of
the procedure. So repeat this procedure to create both policies.
1. Click Remote Access Policies.
2. On the Action menu, click New remote access policy. The Add Remote
Access Policy dialog box opens.
3. Specify a Policy friendly name for the policy. The first time you execute this
procedure specify Public Access Customers (SMTP Redirect) and the
second time specify Public Access Customers (no SMTP Redirect).
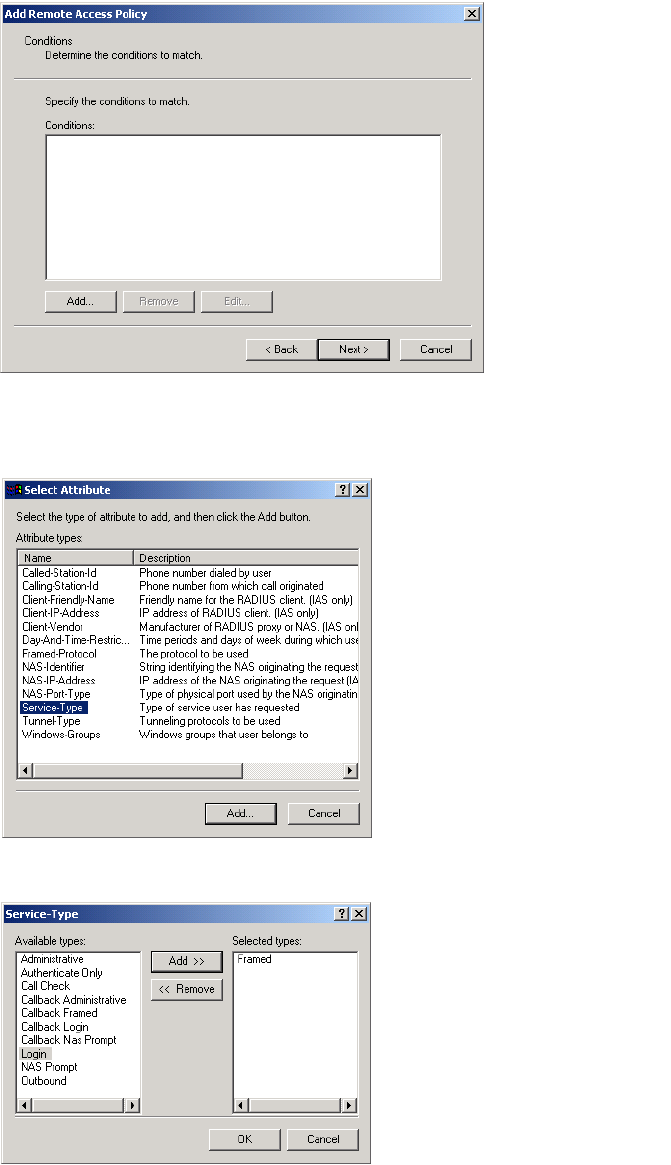
Chapter 19: Sample setup - Microsoft RADIUS 315
DRAFT
4. Click Next. The Add Remote Access Policy dialog box opens.
5. Click Add. The Select Attribute dialog box opens.
6. Select Service-Type and click Add.
7. Select Framed, click Add, then click OK.
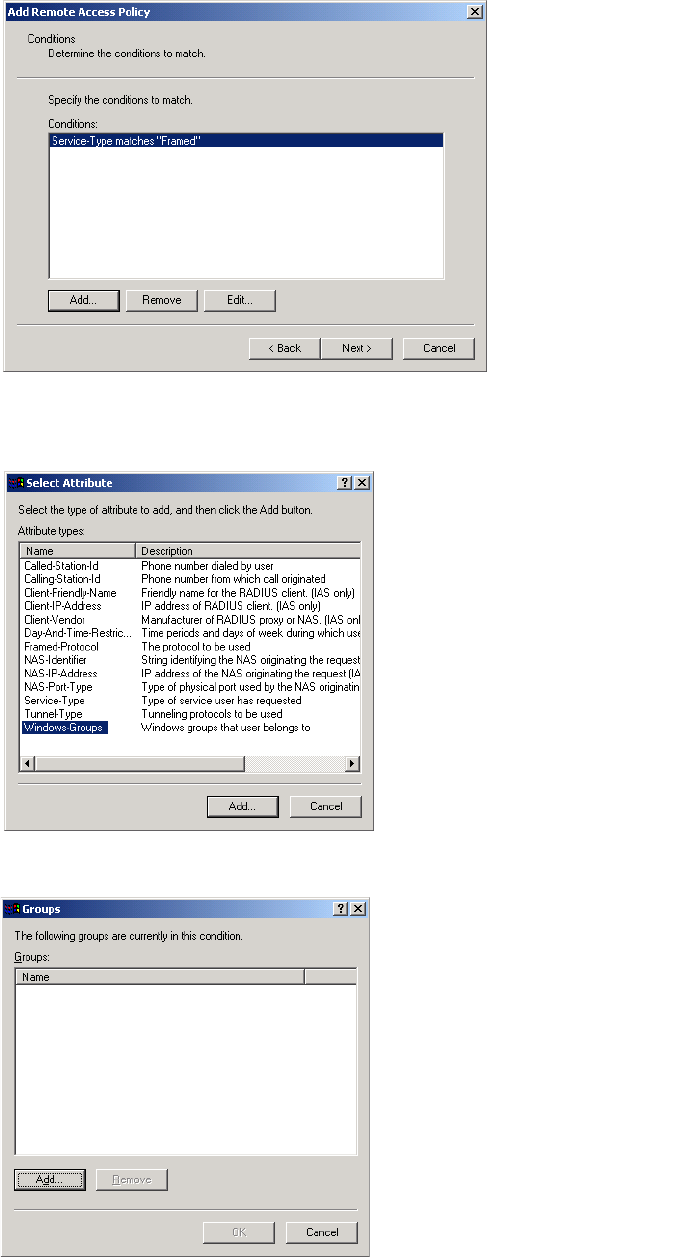
Chapter 19: Sample setup - Microsoft RADIUS 316
DRAFT
8. Return to the Add Remote Access Policy dialog box.
9. Click Add. The Select Attribute dialog box opens.
10. Select Windows-Groups and click Add.
11. The Groups dialog box opens. Click Add.
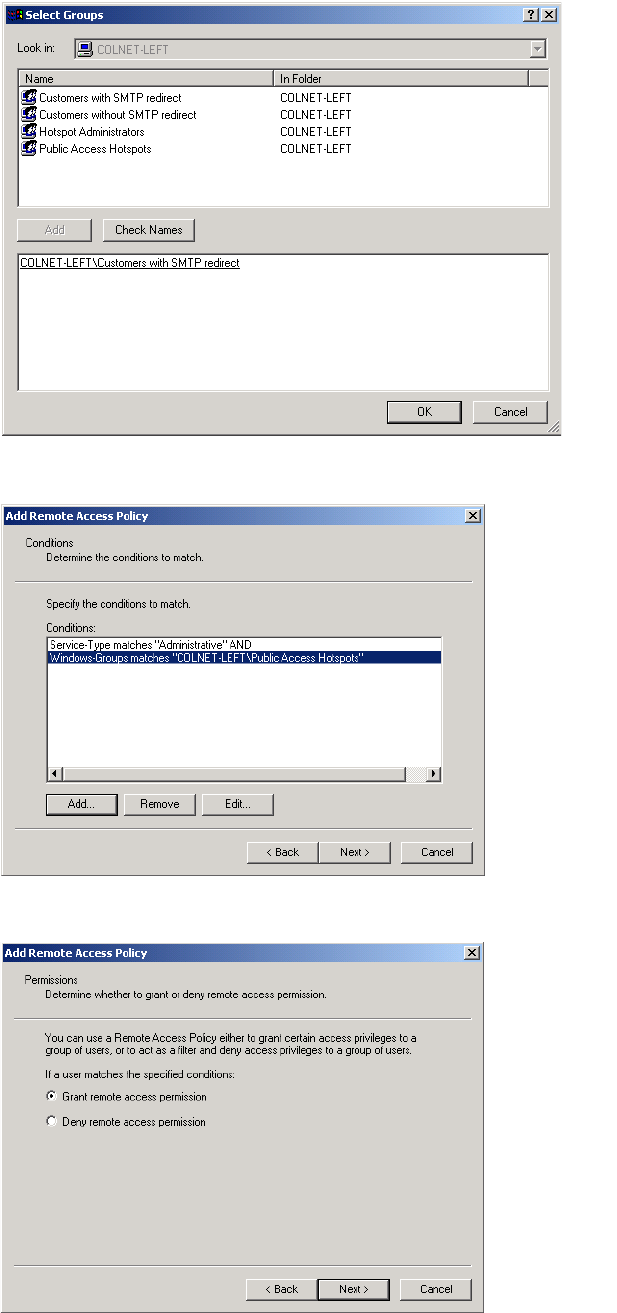
Chapter 19: Sample setup - Microsoft RADIUS 317
DRAFT
12. The Select Groups dialog box opens. Select Customers with SMTP
redirect, click Add, and then OK.
13. Return to the Add Remote Access Policy dialog box and click Next.
14. Select Grant remote access permission and click Next.
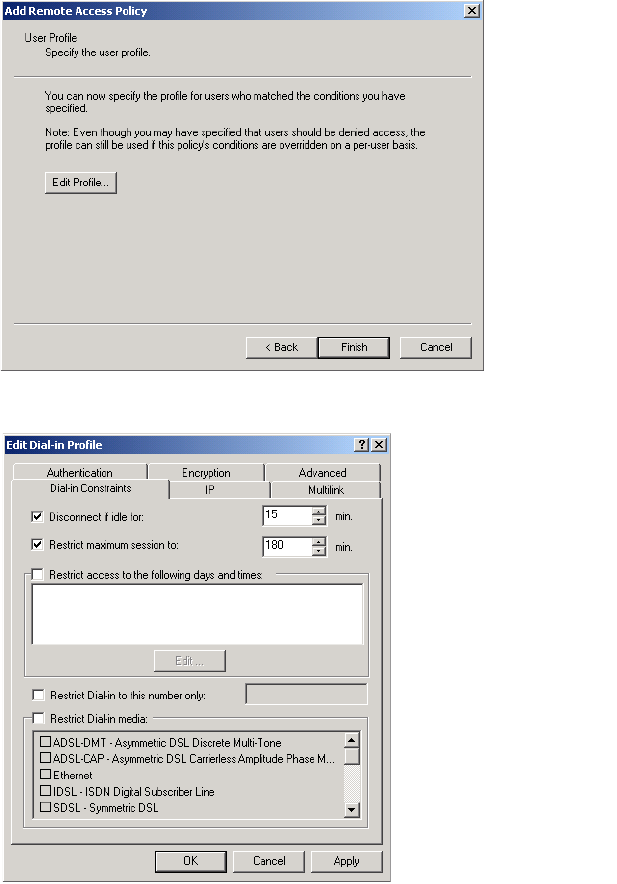
Chapter 19: Sample setup - Microsoft RADIUS 318
DRAFT
15. Click Edit Profile.
16. The Edit-Dial-in Profile window opens.
17. Define the maximum idle time for customer sessions by selecting
Disconnect if idle for and setting an appropriate time.
18. Define the maximum duration for customer sessions by selecting Restrict
maximum session to and setting an appropriate time.
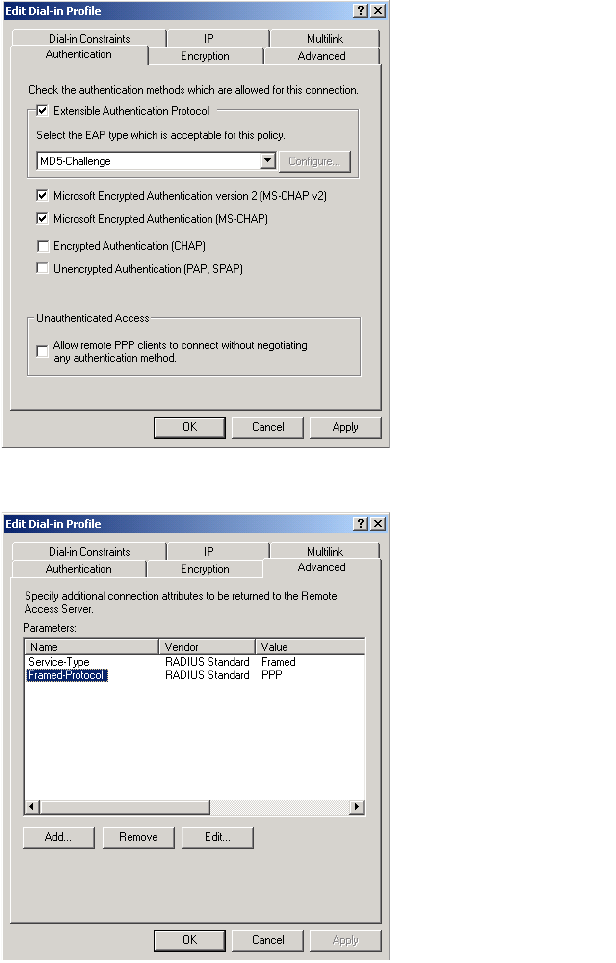
Chapter 19: Sample setup - Microsoft RADIUS 319
DRAFT
19. Click the Authentication tab and enable the options as shown.
20. Click the Advanced tab.
This tab is where you specify the values that are returned to the CN3200
when a customer is authenticated by the RADIUS server.
21. Remove all entries.
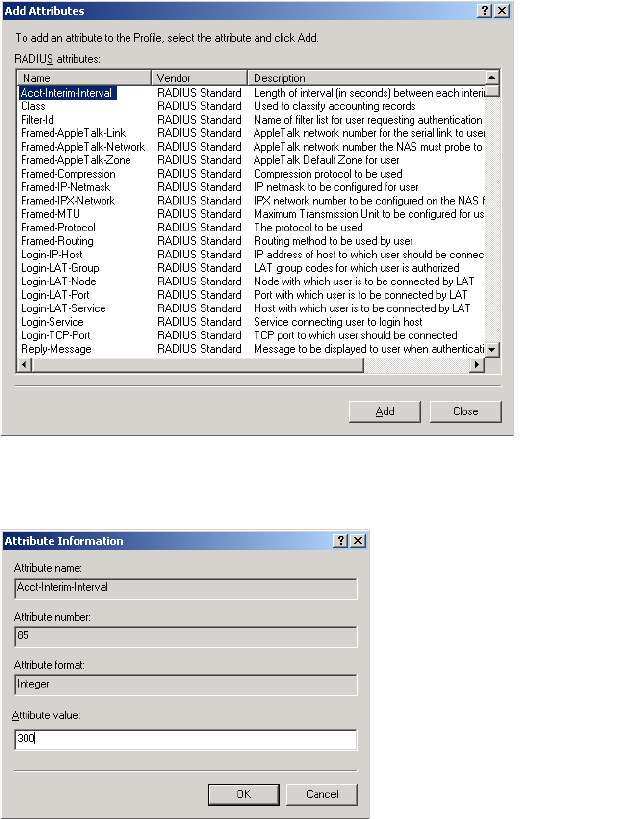
Chapter 19: Sample setup - Microsoft RADIUS 320
DRAFT
22. If you want to enable support for interim accounting updates, click Add. The
Add Attributes dialog box opens.
23. Select Acct-Interim-Interval and click Add. The Attribute Information dialog
box opens.
24. In the Attribute value field, specify the reporting interval (in seconds) that the
CN3200 will use to send accounting information to the RADIUS server.
25. Click OK.
You can now specify the attributes that will be returned after a customer is
successfully authenticated. This enables you to define a number of important
operating characteristics, including:
• The access list that is in use.
• Support for SMTP mail redirection.
Refer to “Creating customer profiles on the RADIUS server” on page 225 for
a complete list of supported attributes.

Chapter 19: Sample setup - Microsoft RADIUS 321
DRAFT
For this example, you should create the following entries:
smtp-redirect=192.168.2.100
This provides access to the fictional SMTP server on 192.168.2.100. Add this
when defining the Public Access Customers (SMTP Redirect) access
policy.
use-access-list=cust
This access list was defined in the Public Hotspot Policy. It is activated here
to provide access to the web server on 192.168.2.100.
To add each entry:
•Click Add. The Add Attributes dialog box opens.
• Select Vendor-Specific and click Add. The Multivalued Attribute
Information dialog box opens.
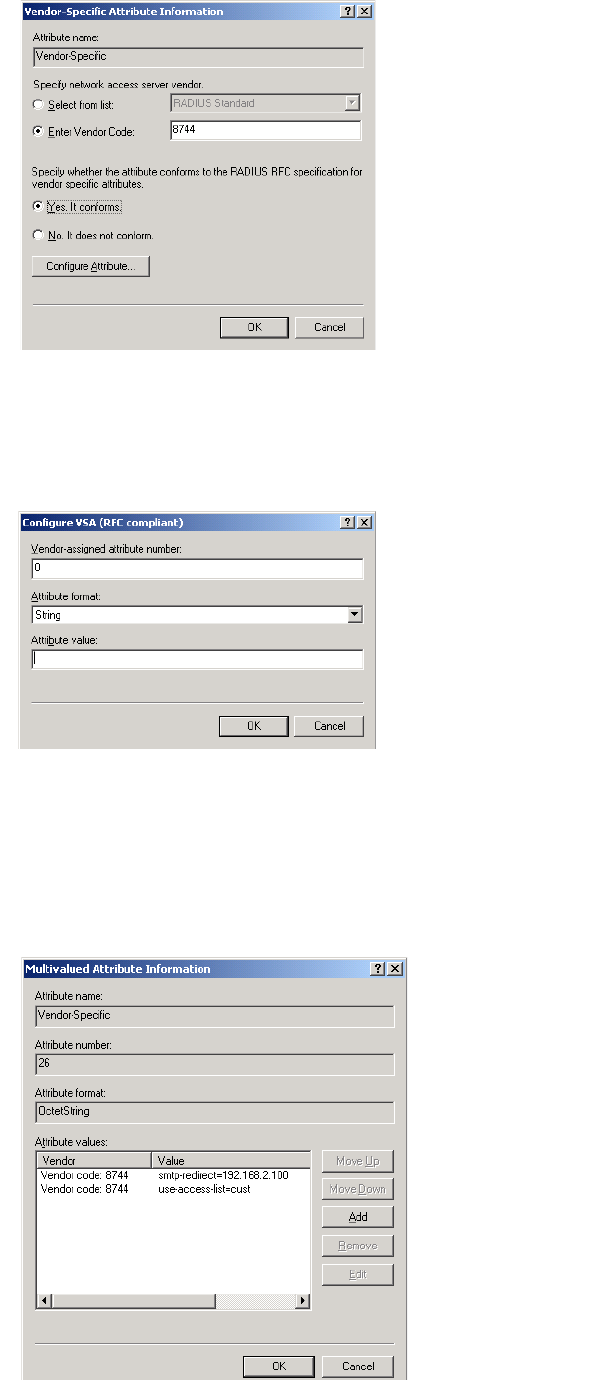
Chapter 19: Sample setup - Microsoft RADIUS 322
DRAFT
•Click Add to add a new attribute.
• Specify the Colubris Networks vendor code 8744 in Enter Vendor Code.
• Select Yes. It conforms.
•Click Configure Attribute. The Configure VSA (RFC compliant) dialog box
opens.
•For Vendor-assigned attribute number, specify 0.
•For Attribute format, select String.
•For Attribute value, specify each of the following attributes in turn:
• smtp-redirect=192.168.2.100
• use-access-list=cust
Chapter 19: Sample setup - Microsoft RADIUS 323
DRAFT
26. When done, click OK on all dialog boxes to return to the Add Remote
Access Policy dialog box.
27. Click Finish.
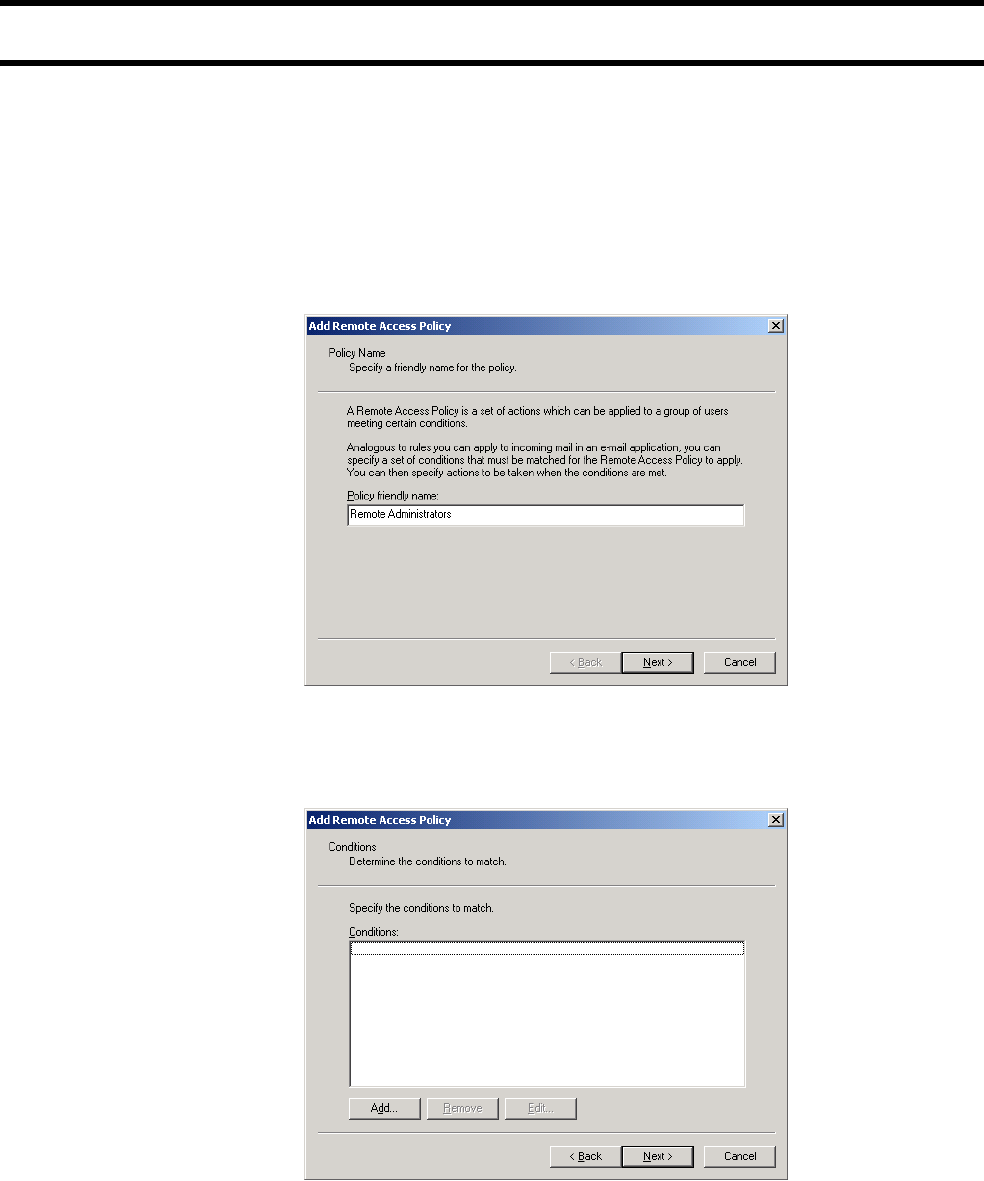
Chapter 19: Sample setup - Microsoft RADIUS 324
DRAFT
Step 8: Create an access policy for CN3200 admins
This section explains how to create a remote access policy to centrally validate
administrator logins via the RADIUS server instead of locally on each CN3200.
Note: Setting up administrator profiles is optional and is not required for proper
operation of this sample.
1. Click Remote Access Policies.
2. On the Action menu, click New remote access policy. The Add Remote
Access Policy dialog box opens.
3. Specify a Policy friendly name for the policy. For example you could use
“Remote Administrators”.
4. Click Next. The Add Remote Access Policy dialog box opens.

Chapter 19: Sample setup - Microsoft RADIUS 325
DRAFT
5. Click Add. The Select Attribute dialog box opens.
6. Select Service-Type and click Add.
7. Select Administrative, click Add, then click OK.
8. Return to the Add Remote Access Policy dialog box.
9. Click Add. The Select Attribute dialog box opens.
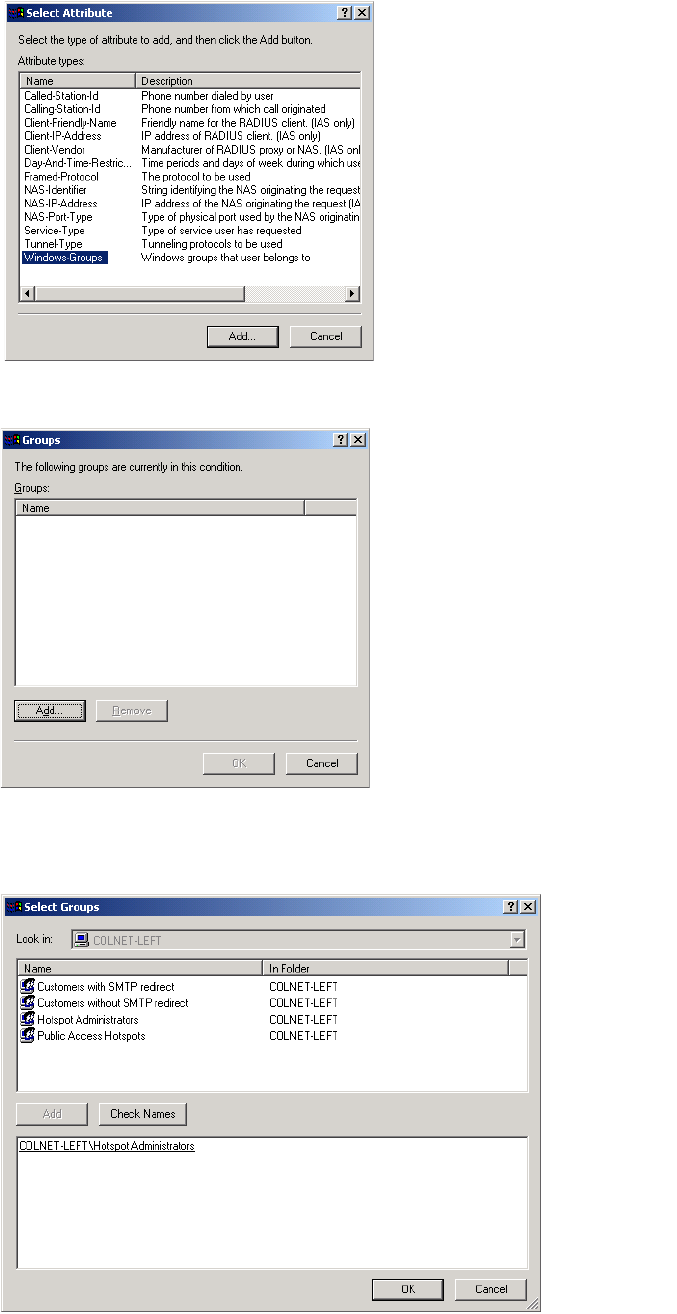
Chapter 19: Sample setup - Microsoft RADIUS 326
DRAFT
10. Select Windows-Groups and click Add.
11. The Groups dialog box opens. Click Add.
12. The Select Groups dialog box opens. Select Hotspot Administrators, click
Add and then OK.
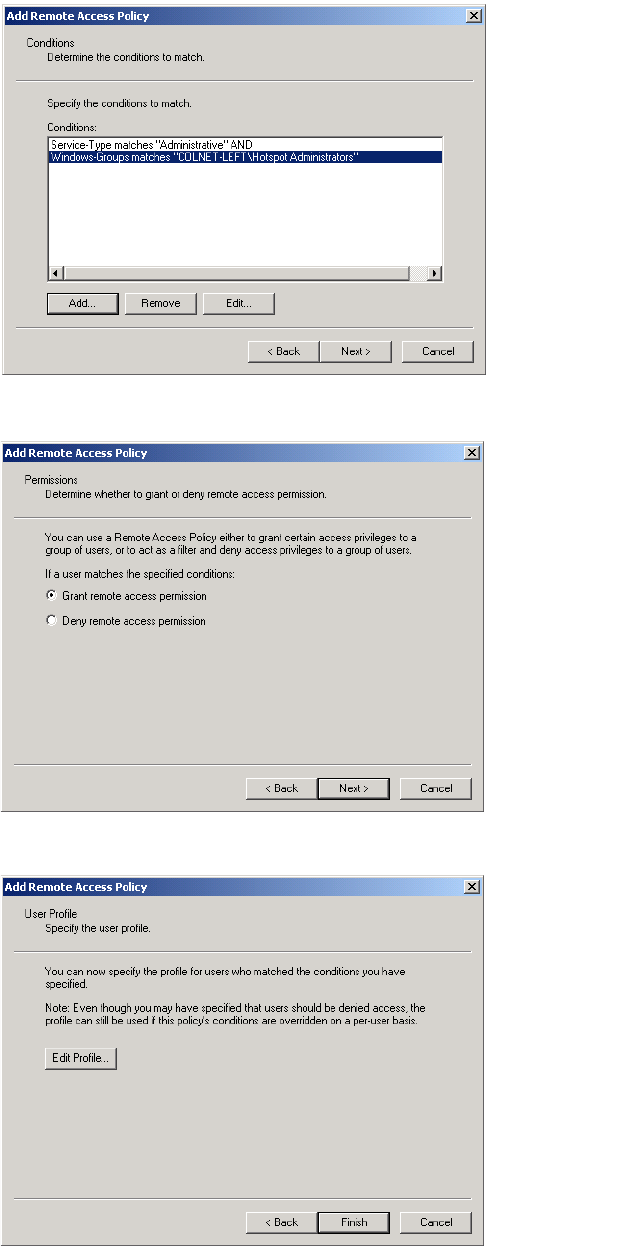
Chapter 19: Sample setup - Microsoft RADIUS 327
DRAFT
13. Return to the Add Remote Access Policy dialog box and click Next.
14. Select Grant remote access permission and click Next.
15. Click Edit Profile.
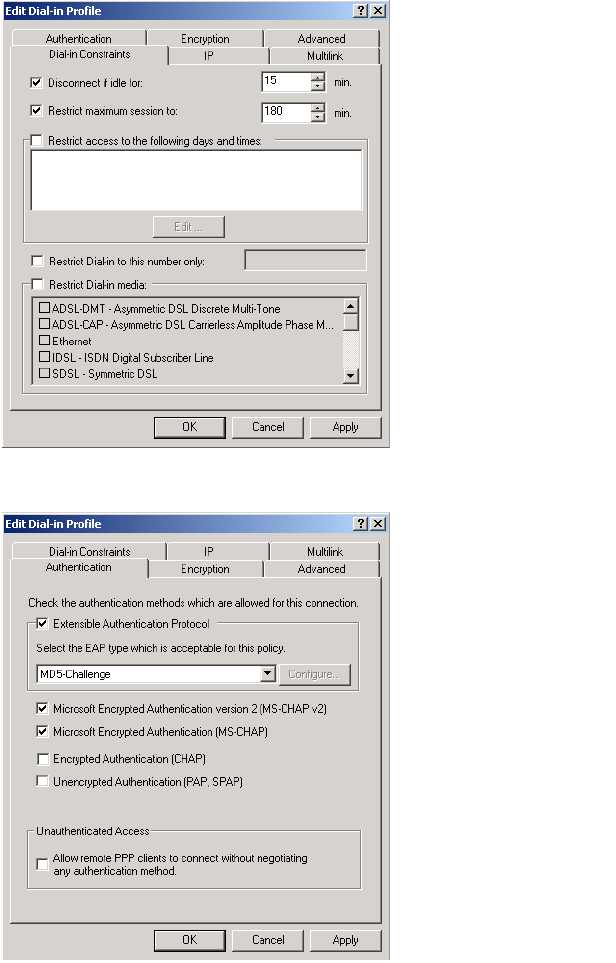
Chapter 19: Sample setup - Microsoft RADIUS 328
DRAFT
16. The Edit-Dial-in Profile window opens.
17. Click the Authentication tab and enable the options as shown.
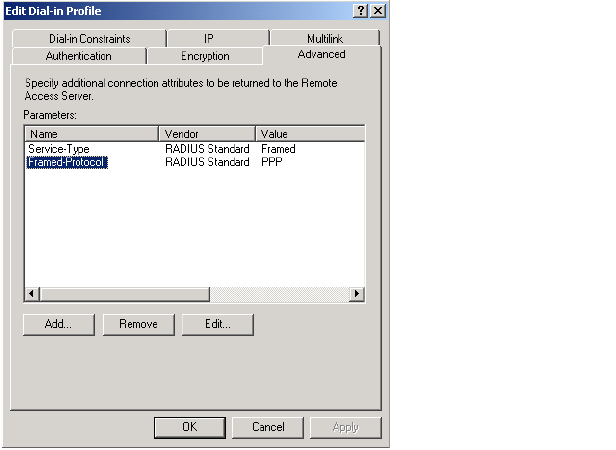
Chapter 19: Sample setup - Microsoft RADIUS 329
DRAFT
18. Click the Advanced tab.
19. Remove all entries.
20. Click OK.
21. Click Finish.
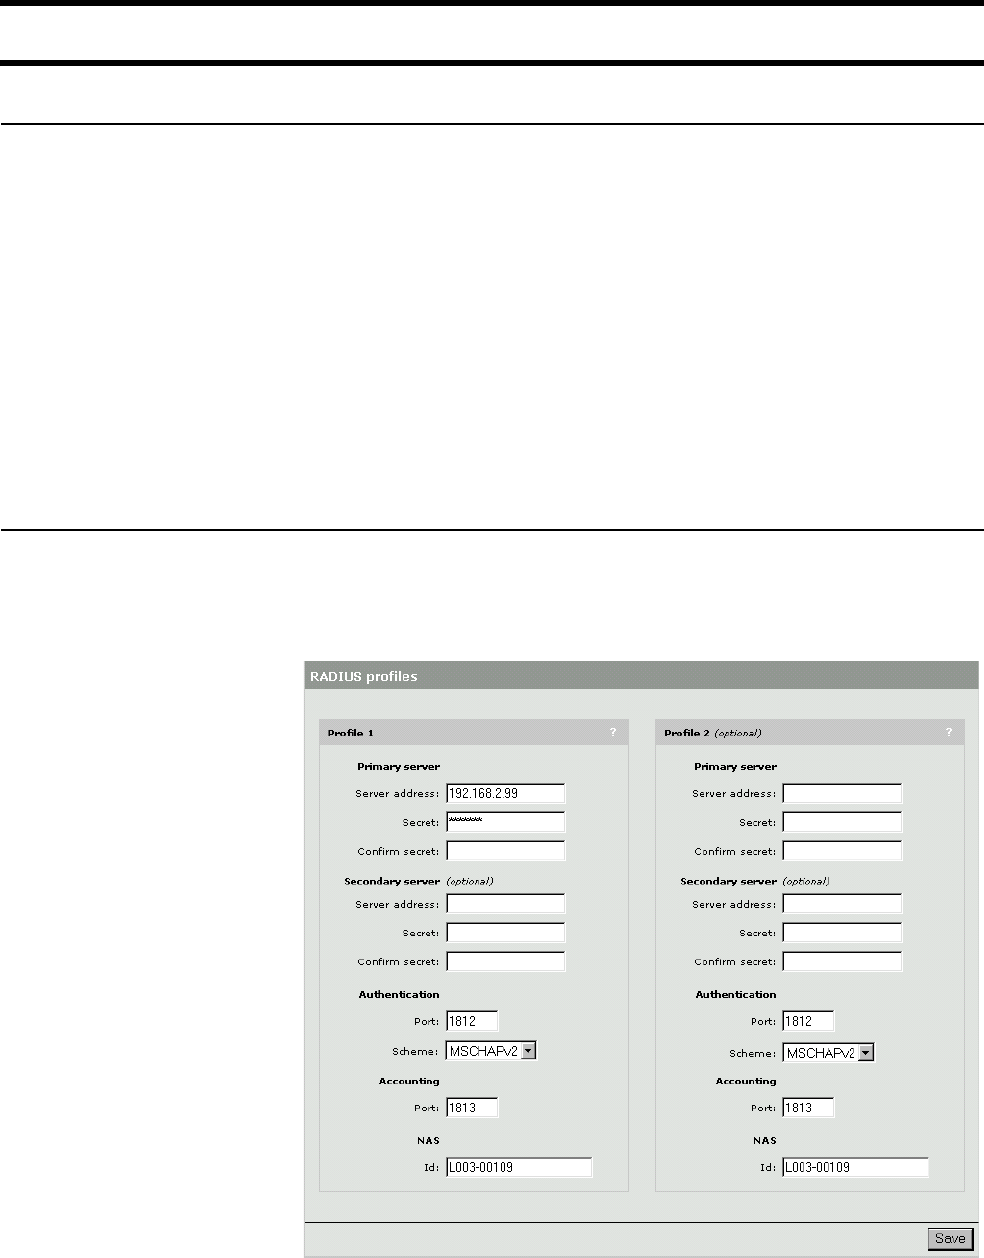
Chapter 19: Sample setup - Microsoft RADIUS 330
DRAFT
Step 9: Install and configure the CN3200
Assign a static
address
1. On the Network menu, click Ports.
2. Click Internet port in the table.
3. Select Static and then click Configure.
4. Make the following settings:
• IP address: Assign an address. For this example, use the address:
192.168.2.1
• Address mask: Assign an appropriate mask. For this example, use the
mask: 255.255.255.0.
• Default gateway: Leave blank. In a real setup this would be set to the
address of the router providing access to the Internet.
• In a real setup you would also need to define DNS settings.
Configure RADIUS
settings
The CN3200 must be configured to communicate with the RADIUS server. For a
detailed explanation of configuration issues, see Chapter 16: “Customizing
CN3200 and customer settings” on page 207.
1. On the Security menu, click RADIUS. The RADIUS settings page opens.
2. Configure the following parameters:
• Primary server address: Specify the address of Server 1. For this example,
use the address: 192.168.2.99
Chapter 19: Sample setup - Microsoft RADIUS 331
DRAFT
• Primary server secret: Specify the secret you defined on when configuring
Steel-Belted Radius. For this example, use the secret: secret
3. Click Save.
4. Click Authentication. The Authentications settings page opens.
5. In the Customers box, set Authenticate via to RADIUS profile 1.
6. Configure the CN3200 box as follows:
•Authenticate via: Set to RADIUS profile 1.
•Login name: Set to hotspot.
•Password: Set to hotspot.
7. Enable Authenticate customers with 802.1x.
8. Click Save. The CN3200 will attempt to connect to the Microsoft Radius
server. If successful, the status light will change from red to green.

Chapter 19: Sample setup - Microsoft RADIUS 332
DRAFT
Step 10: Install Server 2
This example assumes Windows 2000 and IIS are installed on Server 2. You can
any another operating system and web server.
1. Install Windows 2000 Professional, Server, or Advanced Server and then
install Service Pack 3.
2. Make sure that IIS is running.
3. Connect Server 2 to the hub and assign a static IP address to it. For this
example, use the address 192.168.2.100.
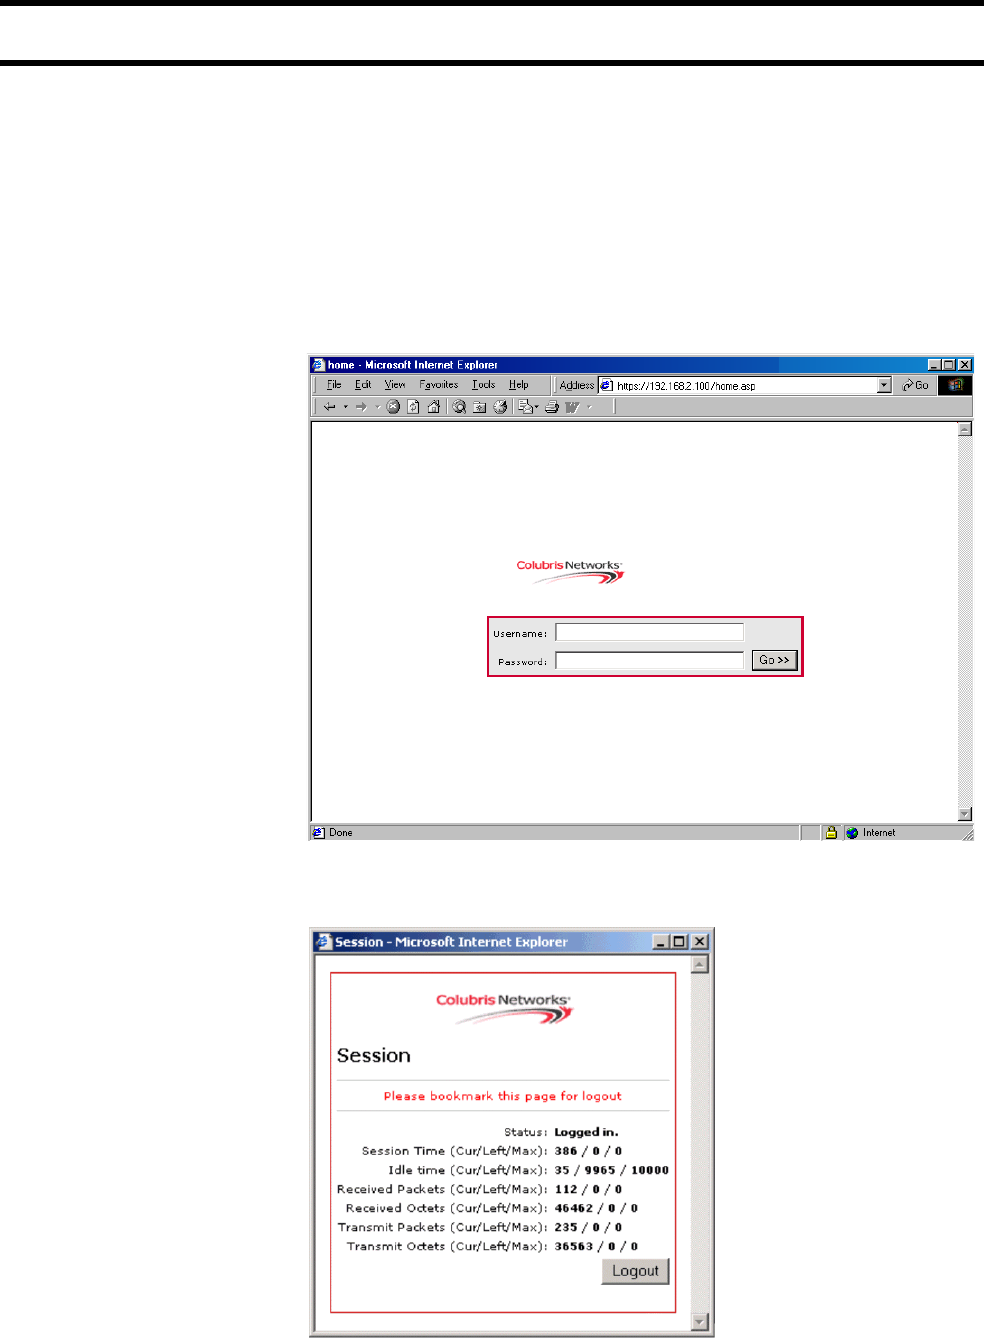
Chapter 19: Sample setup - Microsoft RADIUS 333
DRAFT
Step 11: Test the installation
To test the installation, use the client station to log onto the public access
interface. For this to work, the CN3200 must be configured as the client’s default
gateway. If you set up your equipment to match the setup of this example, this is
automatic. If not, adjust the configuration of the client accordingly.
1. Start the client station’s web browser and enter the IP address of Server 2
(192.168.2.100).
2. The CN3200 should intercept the HTTTP request and display the login page.
Depending on the type of certificate that is installed on the CN3200 you may
see a security warning first.
3. To login, specify customer1 as both the username and password. The
CN3200 session page should open.
4. You should automatically be redirected to the web server on Server 2.

Chapter 19: Sample setup - Microsoft RADIUS 334
DRAFT
Testing
administrator
logins
If you configured administrator accounts on the RADIUS server, you can test
them now as follows:
To test the accounts that were setup to validate administrator logins using the
RADIUS server, do the following:
1. Open the CN3200 management tool with your web browser.
2. On the main menu, click Management. The Management tool configuration
page opens.
3. For Authenticate via select RADIUS profile 1.
4. Click Save and then Logout.
5. Login with username and password admin1.

Chapter 20: Experimenting with NOC authentication 335
DRAFT
Chapter 20: Experimenting with NOC authentication
Chapter 20
Experimenting with NOC authentication
This chapter provides a sample setup that illustrates how the NOC
authentication feature works and lets you experiment with it. This sample
is not a complete working implementation, but rather a test setup that
you can use to become familiar with the feature.
The sample setup in this chapter functions from the command-line using
VPScript. The ASP version of the script can be used as a starting point
for porting or integrating the NOC authentication code into the remote
access page on a production system.
IMPORTANT: Before reading this chapter you should familiarize
yourself with the concepts discussed in Chapter 15 and Chapter 16.
Pay special attention to all topics related to the remote login page and
NOC authentication.

Chapter 20: Experimenting with NOC authentication 336
DRAFT
Overview
This chapter lets you use the sample setup presented in Chapter 17 to evaluate
the NOC authentication feature. For a description of this feature see page 176.
Evaluation of the NOC authentication feature is accomplished using a VBScript
program that lets you send authentication requests to the CN3200 using an SSL
session. This program demonstrates the functionality that would be required in a
remote login page.
A command line interface is used to run the program. No remote login page is
provided.
About the
certificates
To use NOC authentication you need the following three certificates that are
already generated and included with the backend files.
•www.noc-cn3000.com.pfx: Installed on the CN3200 and used to secure the
session it establishes with the VBScript application on the web server. It is
signed by noc-ca.crt.
•noc-ca.crt: Installed on the web server.
•noc-client.pfx: Installed on the web server and used by the VBScript program
to secure the session it establishes with the CN3200. It is signed by noc-
ca.crt.
Requirements • Windows 2000 Server, Advanced Server (with Service Pack 3) or Windows XP,
and all recommended updates
• Internet Explorer 6.0 service pack 1
Hardware
• a network hub
• a second network hub or a cross-over cable
• two computers capable of running Windows 2000 Professional, Server or
Advanced Server with Service Pack 3, or Windows XP with Service Pack 1
• a CN3200
• a third computer with a JavaScript-enabled web browser, with or standard
Ethernet adapter
Skills
• Familiarity with the installation and operation of TCP/IP-based networks.
• Basic knowledge of Windows 2000, including how to use a Windows
command-line session.
Skills
• Familiarity with the installation and operation of TCP/IP-based networks.
• Basic knowledge of Windows 2000, including how to use a Windows
command-line session.

Chapter 20: Experimenting with NOC authentication 337
DRAFT
Equipment setup
This section illustrates the hardware setup that was used to create the sample
configuration described in this chapter. If you duplicate this setup, you will not
have to change any of the IP addresses supplied in the example.
Topology This example uses the same equipment setup presented in Chapter 17. You
should follow the instructions in Chapter 17 to install this sample and get it
working.
For your reference th topology is:

Chapter 20: Experimenting with NOC authentication 338
DRAFT
Step 1: Configure the CN3000
In this step you will install an SSL certificate on the CN3200 and enable NOC
authentication. The certificate has already been created and can be found in the
backend folder.
Install an SSL certificate on the CN3200
1. Login to the management tool and go to Security > Certificates.
2. In the [SSL] Web Server Certificates box, click Browse.
3. Select the following folder on the CN3200 CD-ROM:
\backend\winhttpauth\www.noc-cn3000.com.pfx
4. In the Password field, specify www.noc-cn3000.com.
5. Click Install.
6. The CN3200 will install the certificate. The CN3200 will now be reachable as
www.noc-cn3000.com. (This is an alias to the IP address of the CN3200’s
Internet port.)
Enable NOC authentication
1. Click Security, then click Authentication.
2. Click the Advanced Settings button.
3. Enable the NOC authentication feature.
4. Add the IP address of the Server 1 (192.168.2.99) to the Allowed
Addresses box.
5. Click Save.
Chapter 20: Experimenting with NOC authentication 339
DRAFT
Step 2: Configure the RADIUS profile for the CN3200
Define the profile In the RADIUS profile for the CN3200, define the following:
ssl-noc-certificate= https://192.168.2.99/demo-php/upload/noc-
client.crt
ssl-noc-ca-certificate= https://192.168.2.99/demo-php/upload/noc-
ca.crt
These files are included as part of the backend example.
Force
authentication
For the CN3200 to authenticate to the RADIUS server so it can retrieve the new
settings youjust added to the profile.
1. Open the management tool.
2. Go to Security > Authentication.
3. Click the Force Authentication button. The CN3200 will authenticate itself
and retrieve the newly configured settings.
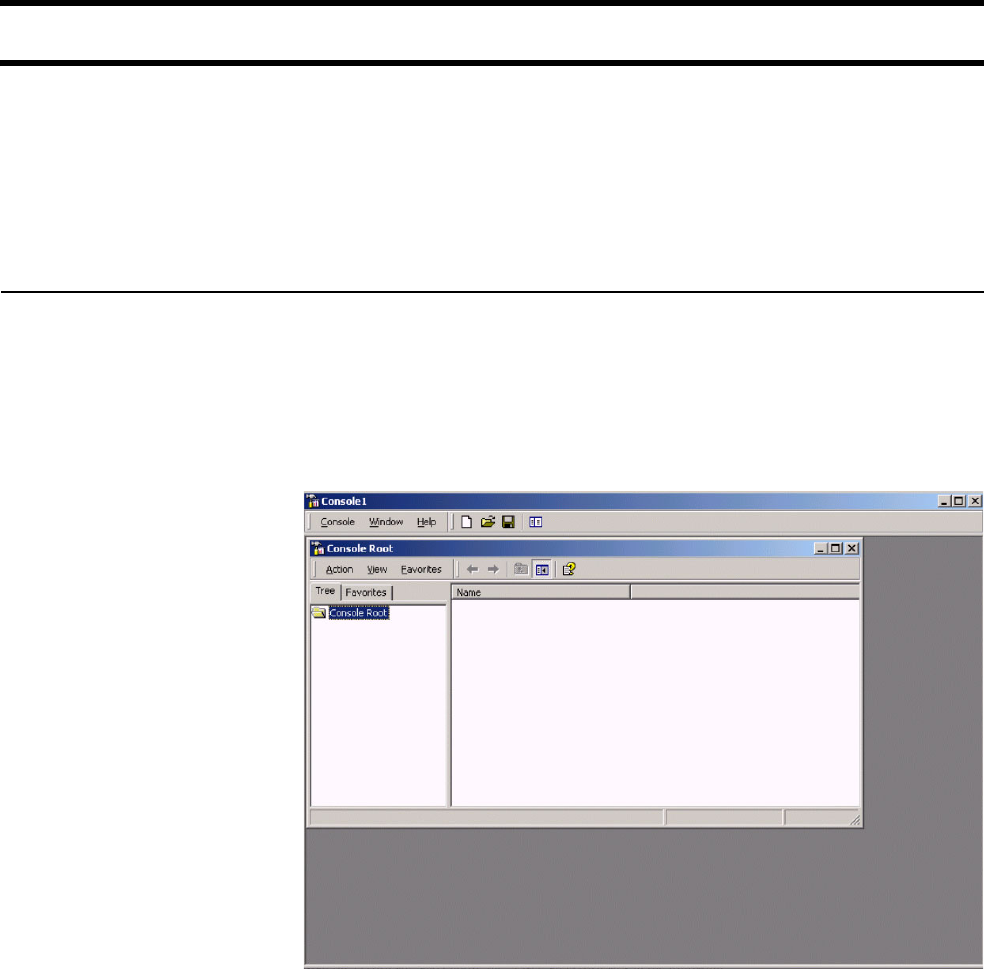
Chapter 20: Experimenting with NOC authentication 340
DRAFT
Step 3: Configure Server 1
Important: Do not use the certificates supplied with this example as part of a
production system. You should replace these certificates with your own, or
remove them from the list of Trusted Root Certificate Authorities to prevent your
computer from trusting web sites using certificates signed by the private key
present in noc-ca.pfx. As this key is provided as an part of an example, it should
not be considered as a secret key.
Install certificates The certificate noc-ca.crt must be imported into the Trusted Root Certification
Authorities certificate store on Server 1. This is done using Microsoft
Management Console:
1. Login to Windows as administrator.
2. Click Start, then click Run.
3. Specify mmc and press enter.

Chapter 20: Experimenting with NOC authentication 341
DRAFT
4. On the Console menu, click Add/Remove Snap-in.
5. Click Add.
6. Click Certificates, then click Add.
7. Then select Computer account.
8. Click Next.
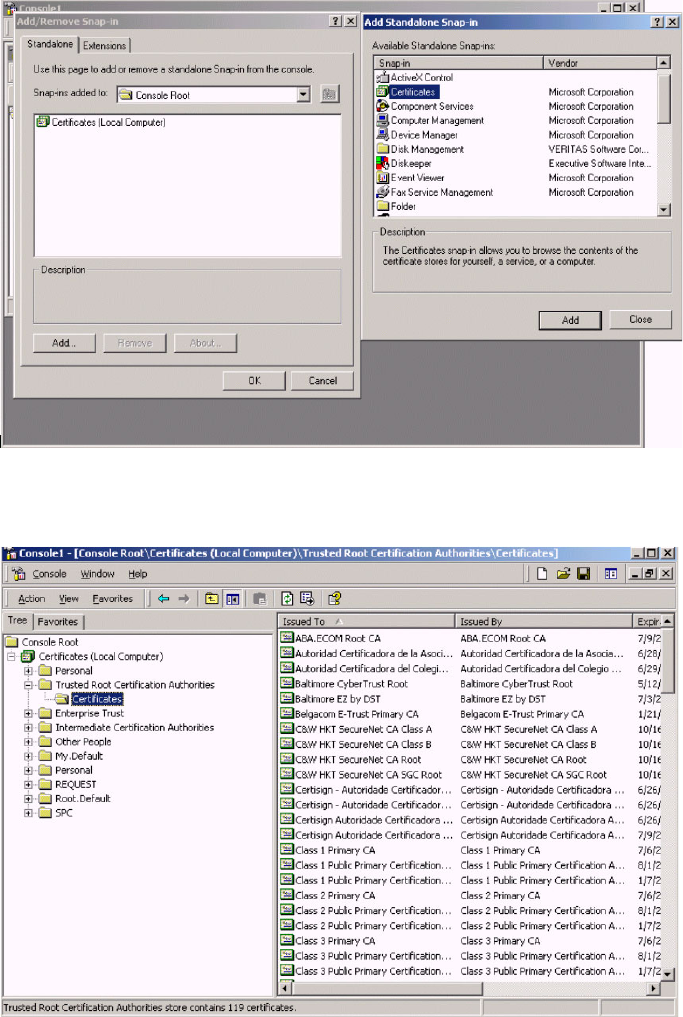
Chapter 20: Experimenting with NOC authentication 342
DRAFT
9. Choose Local Computer and click Finish.
10. Click Close and OK to return to the mmc console window.
11. Open Certificates under Trusted Root Certification Authorities.
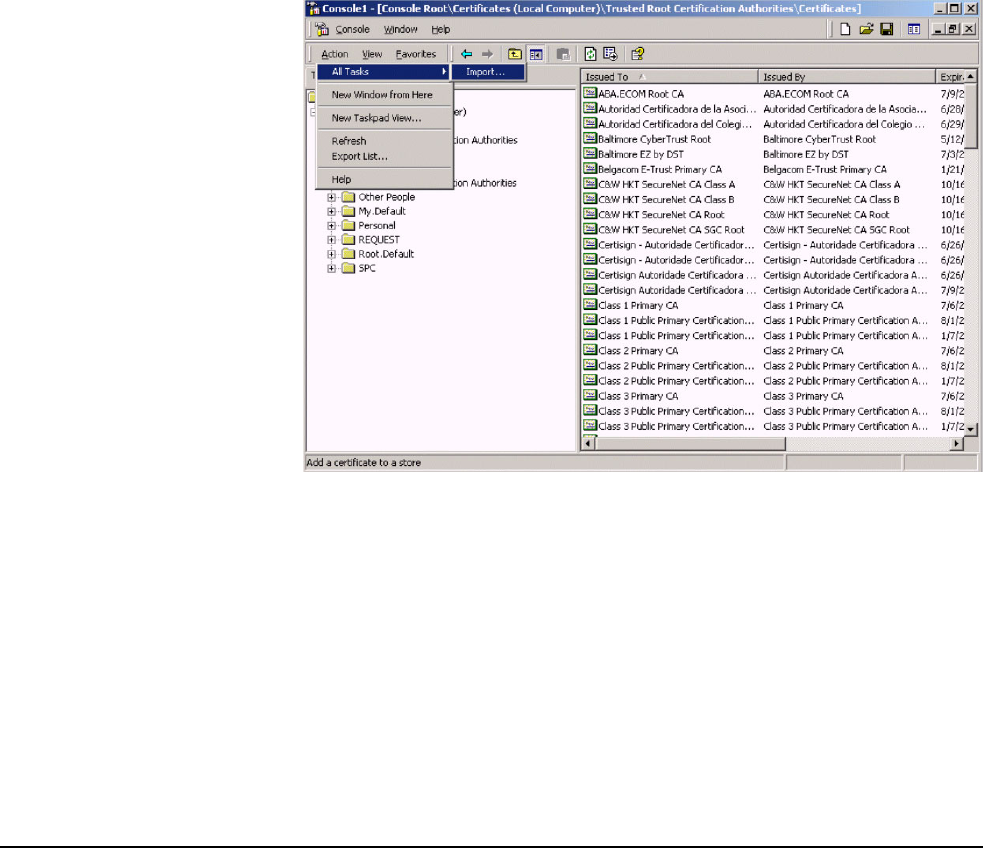
Chapter 20: Experimenting with NOC authentication 343
DRAFT
12. On the Action menu, click All Tasks > Import.
13. Click Next.
14. Click Browse, the open the following file on the CN3200’s CD-ROM:
\backend\winhttpauth\noc-ca.pfx
15. Click Next.
16. Specify the following password to unlock the file: noc-ca.
Next
Import noc-client.pfx into the Personal certificate store using the same
procedure. The password to unlock noc-client.pfx file is noc-client.
When done, click Exit on the console and save the settings of mmc.
Verifying that
winhttpcertcfg.exe
is installed
Users do not automatically gain access to the private key imported from noc-
client.pfx. To grant access, winhttpcertcfg.exe must be executed on a per user
basis.
To check if winhttpcertcfg.exe is installed on the server, do the following:
1. Open a command line session.
2. Execute winhttpcrtcfg.exe.
3. If you get an error, it means winhttp management tools are not installed, or
are not in your path. If you cannot find them on your computer, you can
download the Windows 2003 Server Resource Kit Tools at:
http://www.microsoft.com/downloads/details.aspx?familyid=9d467a69-57ff-
4ae7-96ee-b18c4790cffd&displaylang=en
Note: This resource kit will only install on Windows XP SP1 or Windows 2003 Server.
Use the procedure that follows to install on Windows 2000 SP3.
4. One the Winhttp SDK has been installed, launch a console-mode session,
and go into the following folder:
C:\Program Files\WinHTTP 5.0 SDK\tools

Chapter 20: Experimenting with NOC authentication 344
DRAFT
Installing on Windows 2000 SP3
To complete this task you must have the Microsoft Windows Installer
(msiexec.exe) installed on your system. If it is not present, you can download
it here:
http://www.microsoft.com/downloads/details.aspx?FamilyID=4b6140f9-2d36-
4977-8 fa1-6f8a0f5dca8f&DisplayLang=en#filelist
1. Open a win32 console session.
2. Go into the directory that rktools.exe was downloaded into.
3. Run the command:
rktools /C
You will be prompted for a temporary directory name.
Once the extraction process is complete, the following files will be available in
the temporary directory:
rktools.msi
rktools_p.cab
rktools_s.cab
4. Go to the temporary directory.
5. Run the command:
msiexec /a rktools.msi
You will be prompted for a destination directory name.
Once the command will be completed, all the files from the ressource kit will
be present in the Program Files\Windows Resource Kits\Tools directory that
is created in the destination directory, including winhttpcertcfg.exe and
winhttptracecfg.exe.
Granting access to
the private key for
noc-client
Using winhttpcertcfg.exe, you need to grant access to the private key imported
from noc-client.pfx to the application that will send customer login information to
the CN3200. In this example, access needs to be granted to two accounts
• The VBscript application will be run under the administrator account, so access
needs to be granted to the administrator.
• (This step only applies if you are using IIS.) The account used to run IIS also
needs access to the certificate. This account is IWAM_COMPUTER, where
COMPUTER is replaced by the windows network name assigned to Server 1.
• Create access by running the command:
winhttpcertcfg -g -c LOCAL_MACHINE\My -s "Test-Only client
certificate for demo" -a Administrator
Microsoft (R) WinHTTP Certificate Configuration Tool
Copyright (C) Microsoft Corporation 2001.
Matching certificate:
E=support@colubris.com
CN=Test-Only Client certificate for demo
OU=Research & Development
O=Colubris Networks Inc.
L=Laval
S=Quebec
C=CA
Granting private key access for account:
COMPUTER\Administrator
To see the list of accounts that have been granted access to the privare key:
winhttpcertcfg -l -c LOCAL_MACHINE\My -s "Test-Only client
certificate for demo"

Chapter 20: Experimenting with NOC authentication 345
DRAFT
Microsoft (R) WinHTTP Certificate Configuration Tool
Copyright (C) Microsoft Corporation 2001.
Matching certificate:
E=support@colubris.com
CN=Test-Only Client certificate for demo
OU=Research & Development
O=Colubris Networks Inc.
L=Laval
S=Quebec
C=CA
Additional accounts and groups with access to the private key
include:
\Everyone
NT AUTHORITY\SYSTEM
BUILTIN\Administrators
COMPUTER\Administrator
Access for the three other accounts is automatically added by winhttpcertcfg.
Use the same procedure to add access for IWAM_COMPUTER.
Configuring the hosts
file on Server 1
Now that a new SSL certificate is installed on the CN3200, the domain name
assigned to its Internet port is www.noc-cn3000.com. In order for requests from
the VBScript application to successfully reach the CN3200, this name must be
added to the WINNT\system32\drivers\etc\hosts file. This ensures that the
CN3200’s domain name will be resolved to the actual IP address of the Internet
port on the CN3000. The host file is located in:
\winnt\system32\drivers\etc\hosts.
Another option
An alternative to updating the hosts file or to adding the name of the CN3000 into
your DNS server would be to uncomment the following line in the script:
HttpsSession.Option(WinHttpRequestOption_SslErrorIgnoreFlags)=4096
This will prevent the script from exiting on error when attempting to connect to a
CN3000 using its IP address instead of its DNS name."
Chapter 20: Experimenting with NOC authentication 346
DRAFT
Experimenting with noc-authenticate.vbs
Now you are ready to use noc-autenticate.vbs to test the NOC authentication
feature.
Retrieve noc-
authenticate.vbs
Retrieve noc-authenticate.vbs from \backend\vb and put it into a working folder.
You will also need cscript, which is a Microsoft tool that enables you to run
VBScript from the command line. If cscript is not installed on your system, go to
the Microsoft site and download it. It is part of Windows 2000 SP3.
Running the
program
The program runs from a command line session with the syntax:
cscript noc-authenticate.vbs "CN3200_domain_name" "username"
"password" “user_IP” “client certificate”
The program posts the information you specify to the following URL:
https://www.noc-cn3000.com:8090/goform/HtmlNocLoginRequest
The CN3200 will answer the post with the results of the RADIUS authentication.
The program will print these results so you can view them. For a complete
description of all possible return values, see “Authentication results” on
page 348.
Examples Example 1 - successful authentication
In this example, authentication is requested for a valid customer account that was
defined during creation of the backend sample with Login name = user and
Password = user.
cscript noc-authenticate.vbs "www.noc-cn3000.com" "user" "user" "192.168.1.10"
"LOCAL_MACHINE\Test-Only client certificate for demo"
Microsoft (R) Windows Script Host Version 5.6
Copyright (C) Microsoft Corporation 1996-2001. All rights
reserved.
result: 10
status: 100
url: https://206.162.167.226:8888/cebit-php/
welcome.php?site=eperie-cn3000&u
Parameter Description
CN3200_domain_name Specify the domain name or IP address of the CN3200.
For this example, use the domain name www.noc-
cn3000.com.
usename Specify the name of an existing user account.
password Specify the password for the user account.
user_IP Specify the the IP address of the client station you want
to grant access to.
client_certificate Specify the name of client certificate. For this example,
the name of the client certificate is Test-Only client
certificate for demo. This is the distinguished name that
was specified when the certificate noc-client.pfx was
created.

Chapter 20: Experimenting with NOC authentication 347
DRAFT
ser=user02&wantedurl=&nasipaddress=&nasid=L003-00069
session-url: http://192.168.1.1:8080/session.asp
A result of 10 with a status of 100 means that authentication was successful. For
a description of this and other return codes, refer to “Authentication results” on
page 348.
Since authentication was successful, the CN3200 returns the welcome page
URL that the customer should be redirected to.
The session page URL is also returned, so that the customer’s web browser can
be asked to open the session window.
Example 2 - successful authentication, already logged-in:
This example re-executes the previous command, resulting in an error because
the customer is already logged in.
cscript noc-authenticate.vbs "www.noc-cn3000.com" "user" "user" "192.168.1.10"
"LOCAL_MACHINE\Test-Only client certificate for demo"
Microsoft (R) Windows Script Host Version 5.6
Copyright (C) Microsoft Corporation 1996-2001. All rights
reserved.
result: 10
status: 400
A result of 10 with a status of 400 means that the customer is already logged in.

Chapter 20: Experimenting with NOC authentication 348
DRAFT
Authentication results
The file noc.h contains the definitions used by the CN3200 when building the
authentication results that are sent in reply to a customer authentication request.
noc.h contents
/******************************************************************************
* noc.h - Definition of messages and constants used for NOC authentication
*
* Copyright (c) Colubris Networks Inc. 2002
*
* This code is provided "as is", without any warranty of any kind, either
* expressed or implied, including but not limited to, any implied warranty
* of merchantability or fitness for any purpose.
* In no event will Colubris Networks Inc. or any party who distributed
* the code be liable for damages or for any claim(s) by any other party,
* including but not limited to, any lost profits, lost data or data rendered
* inaccurate, losses sustained by third parties, or any other special,
* incidental or consequential damages arising out of the use or inability to
* use the program, even if the possibility of such damages has been advised
* against.
* The entire risk as to the quality, the performance, and the fitness of the
* program for any particular purpose lies with the party using the code.
*
* This file should be usable on both win32 and Unix platforms.
*
******************************************************************************/
#ifndef _NOC_H_
#define _NOC_H_
// Codes that will be returned by the authentication function
#define ERR_NOC_AUTHENTICATION_BASE 0x1000
#define ERR_NOC_AUTHENTICATION_SUCCESS (ERR_NOC_AUTHENTICATION_BASE + 1)
#define ERR_NOC_AUTHENTICATION_FAILURE (ERR_NOC_AUTHENTICATION_BASE + 2)
#define ERR_NOC_AUTHENTICATION_DISABLED (ERR_NOC_AUTHENTICATION_BASE + 3)
#define ERR_NOC_AUTHENTICATION_LOGGED_IN (ERR_NOC_AUTHENTICATION_BASE + 4)
// Messages that will be sent to the client in reply to an authentication
// request.
#ifdef _WIN32
// Using UNICODE constants
#define NOC_HTML_BEGIN L"<html>"
#define NOC_HTML_END L"</html>"
#define NOC_INFO_STATUS L"status"
#define NOC_INFO_WELCOME_URL L"welcome-url"
#define NOC_INFO_LOGIN_ERR_URL L"login-err-url"
#define NOC_INFO_ERR_MESSAGE L"external-err-msg"
#define NOC_INFO_INT_ERR_MESSAGE L"local-err-msg"
#define NOC_INFO_SESSION_URL L"session-url"
// Possible values for NOC_INFO_STATUS
#define NOC_STATUS_SUCCESS L"success"
#define NOC_STATUS_FAILURE L"failure"
#define NOC_STATUS_DISABLED L"disabled"
#define NOC_STATUS_LOGGED_IN L"already-logged-in"

Chapter 20: Experimenting with NOC authentication 349
DRAFT
Returned values The following examples show the information returned for various authentication
conditions.
NOC authentication mode is not enabled:
<HTML>
NOC_INFO_STATUS=NOC_STATUS_DISABLED
</HTML>
The CN3200 did not receive the login application’s SSL certificate
The login application did not send its certificate. Therefore, the request was
rejected.
<HTML>
NOC_INFO_STATUS=NOC_STATUS_FAILURE
NOC_INFO_INT_ERR_MESSAGE=NOC_CANNOT_GET_PEER_CERT
</HTML>
Certificate mismatch
The login application sent an SSL certificate that does not match the one defined
by ssl-noc-certificate in the RADIUS profile for the CN3200.
<HTML>
NOC_INFO_STATUS=NOC_STATUS_FAILURE
NOC_INFO_INT_ERR_MESSAGE=NOC_CANNOT_GET_PEER_CERT
</HTML>
// Possible values for NOC_INFO_INT_ERR_MESSAGE
#define NOC_CANNOT_GET_PEER_CERT L"cannot-get-peer-cert"
#define NOC_MISSING_USERNAME_OR_PASSWORD L"missing-username-or-password"
#define NOC_CERT_EXPIRED L"cert-expired"
#define NOC_CERT_NOT_YET_VALID L"cert-not-yet-valid"
#define NOC_CERT_NOT_IDENTICAL L"cert-not-identical"
#define NOC_CERT_NOT_SIGNED_BY_AUTHORIZED_CA L"cert-not-signed-by-authorized-ca"
#else
#define NOC_HTML_BEGIN "<html>"
#define NOC_HTML_END "</html>"
#define NOC_INFO_STATUS "status"
#define NOC_INFO_WELCOME_URL "welcome-url"
#define NOC_INFO_LOGIN_ERR_URL "login-err-url"
#define NOC_INFO_ERR_MESSAGE "external-err-msg"
#define NOC_INFO_INT_ERR_MESSAGE "local-err-msg"
#define NOC_INFO_SESSION_URL "session-url"
// Possible values for NOC_INFO_STATUS
#define NOC_STATUS_SUCCESS "success"
#define NOC_STATUS_FAILURE "failure"
#define NOC_STATUS_DISABLED "disabled"
#define NOC_STATUS_LOGGED_IN "already-logged-in"
// Possible values for NOC_INFO_INT_ERR_MESSAGE
#define NOC_CANNOT_GET_PEER_CERT "cannot-get-peer-cert"
#define NOC_MISSING_USERNAME_OR_PASSWORD "missing-username-or-password"
#define NOC_CERT_EXPIRED "cert-expired"
#define NOC_CERT_NOT_YET_VALID "cert-not-yet-valid"
#define NOC_CERT_NOT_IDENTICAL "cert-not-identical"
#define NOC_CERT_NOT_SIGNED_BY_AUTHORIZED_CA "cert-not-signed-by-authorized-ca"
#endif
#endif
Chapter 20: Experimenting with NOC authentication 350
DRAFT
Certificate not valid yet
The login application sent an SSL certificate that matches the one defined by ssl-
noc-certificate in the RADIUS profile for the CN3200. However, the certificate
that was sent is not yet valid.
<HTML>
NOC_INFO_STATUS=NOC_STATUS_FAILURE
NOC_INFO_INT_ERR_MESSAGE=NOC_CERT_NOT_YET_VALID
</HTML>
Certificate not valid anymore
The login application sent an SSL certificate that matches the one defined by ssl-
noc-certificate in the RADIUS profile for the CN3200. However, the certificate
that was sent is not valid anymore.
<HTML>
NOC_INFO_STATUS=NOC_STATUS_FAILURE
NOC_INFO_INT_ERR_MESSAGE=NOC_CERT_EXPIRED
</HTML>
Certificate not signed by proper CA
The login application sent a valid SSL certificate that matches the one defined by
ssl-noc-certificate in the RADIUS profile for the CN3200. However, it the
certificate is not signed by the CA defined by noc-ca-certificate in the RADIUS
profile for the CN3200
<HTML>
NOC_INFO_STATUS=NOC_STATUS_FAILURE
NOC_INFO_INT_ERR_MESSAGE=NOC_CERT_NOT_SIGNED_BY_AUTHORIZED_CA
</HTML>
Missing username and/or password
The customer’s username or password was not supplied.
<HTML>
NOC_INFO_STATUS=NOC_STATUS_FAILURE
NOC_INFO_INT_ERR_MESSAGE=NOC_MISSING_USERNAME_OR_PASSWORD
</HTML>
The specified IP address is already logged in
<HTML>
NOC_INFO_STATUS=NOC_STATUS_LOGGED_IN
</HTML>
Authentication was successful
<HTML>
NOC_INFO_STATUS=NOC_STATUS_SUCCESS
NOC_INFO_WELCOME_URL=<welcome url>
NOC_INFO_SESSION_URL=<session url>
</HTML>
Authentication failed
<HTML>
NOC_INFO_STATUS=NOC_STATUS_FAILURE
NOC_INFO_ERR_MESSAGE=<error message>
NOC_INFO_LOGIN_ERR_URL =<login error url>
</HTML>
Logout succeeded
<HTML>
NOC_INFO_STATUS=NOC_STATUS_SUCCESS
</HTML>
Logout failed
<HTML>
NOC_INFO_STATUS=NOC_STATUS_FAILURE
NOC_INFO_INT_ERR_MESSAGE=<error message>
</HTML>

Chapter 20: Experimenting with NOC authentication 351
DRAFT
Examples The following examples show the actual HTML code returned file for various
authentication conditions.
Customer was successfully authenticated by the RADIUS server
<HTML>
status=success
welcome-url=https://206.162.167.226:8888/cebit-php/
welcome.php?site=www.noc-
CN3200.com&user=user00&wantedurl=&nasipaddress=&nasid=L003-00069
session-url=http://192.168.1.1:8080/session.asp
</HTML>
Customer’s IP address is already in use by an active session
<HTML>
status=already-logged-in
</HTML>
Customer authentication was refused by the RADIUS server.
This could be due to an unknown username, or invalid username or password.
<HTML>
status=failure
external-err-msg=Your login was refused.
login-err-url=https://206.162.167.226:8888/cebit-php/login-
error.php?site=eperie-cn3000&user=user12&nasipaddress=
</HTML>
Customer could not be authenticated
The CN3200 could not contact a RADIUS server.
<HTML>
status=failure
external-err-msg=You cannot be logged in at this time. Please try
again later.
login-err-url=https://206.162.167.226:8888/cebit-php/login-
error.php?site=eperie
-cn3000&user=user12&nasipaddress=
</HTML>
Chapter 20: Experimenting with NOC authentication 352
DRAFT

Chapter 21: The configuration file 353
DRAFT
Chapter 21: The configuration file
Chapter 21
The configuration file
This chapter provides an overview of the configuration file and explains
how to edit it.

Chapter 21: The configuration file 354
DRAFT
Manually editing the config file
The configuration file contains the settings for all customizable parameters on the
CN3200. Almost all of these parameters can be set using the web-based
management tool. However, certain infrequently-used parameters can only be
set by manually editing the configuration file.
Retrieving/
restoring the
configuration file
To edit the configuration file, you must first retrieve it from the CN3200. Once
edited, it then needs to be restored. There are several ways to do this:
• The easiest way to accomplish both tasks is via the management tool. Use the
Config file management page on the Maintenance menu to download/upload
the configuration file.
• HTTPS: The configuration file can be downloaded and uploaded via HTTPS.
Using a tool like cURL makes this easy. See “Configuration management” on
page 53 for details.
• Many configuration file parameters are also accessible via SNMP. For details
see the comments inside the Colubris-Maintenance-MIB which is available on
the the Colubris Networks web site.
Important: The local username and password for the administrator is not saved
when you use the Backup Configuration option. If you upload a configuration file,
the old username and password are therefore not updated.
Important: If you upload a configuration file with an invalid structure, it is
possible to put the CN3200 into an unstable state. To return to normal operation,
do a factory reset.

Chapter 21: The configuration file 355
DRAFT
Configuration file structure
The configuration file is an ASCII file and can be edited in a standard text editor.
Key components in the file are:
•Block: A block contains sections, sub-sections, and parameters. Blocks start
with:
%begin block_name
and end with
%end block_name
•Section: A section contains sub-sections and parameters. Sections start with:
[SECTION_NAME]
and end with another block or section name. Section names are not case
sensitive.
•Sub-section: A sub-section contains parameters. Sub-sections start with:
<SUB-SECTION_NAME>
and end with another block, section, or sub-section name. Sub-section names
are not case sensitive.
•Parameter: A parameter takes the form: parameter = value
Each parameter and value pair must appear on its own line. Parameter names
are not case sensitive. Parameter values are case-sensitive.
•Comments: Comments begin with the pound sign (#) and continue until the
end of the line.
• Dash (-) and underscore (_) characters can be used in section names, sub-
section names, and parameter names, and are strictly equivalent.
• Blank lines are ignored and may be added in to make the file easier to read.
• Strings containing spaces must be contained in double-quotes.
Chapter 21: The configuration file 356
DRAFT

Chapter 22: Building a cross-over cable 357
DRAFT
Chapter 22: Building a cross-over cable
Chapter 22
Building a cross-over cable
This chapter explains how to build a cross-over cable.
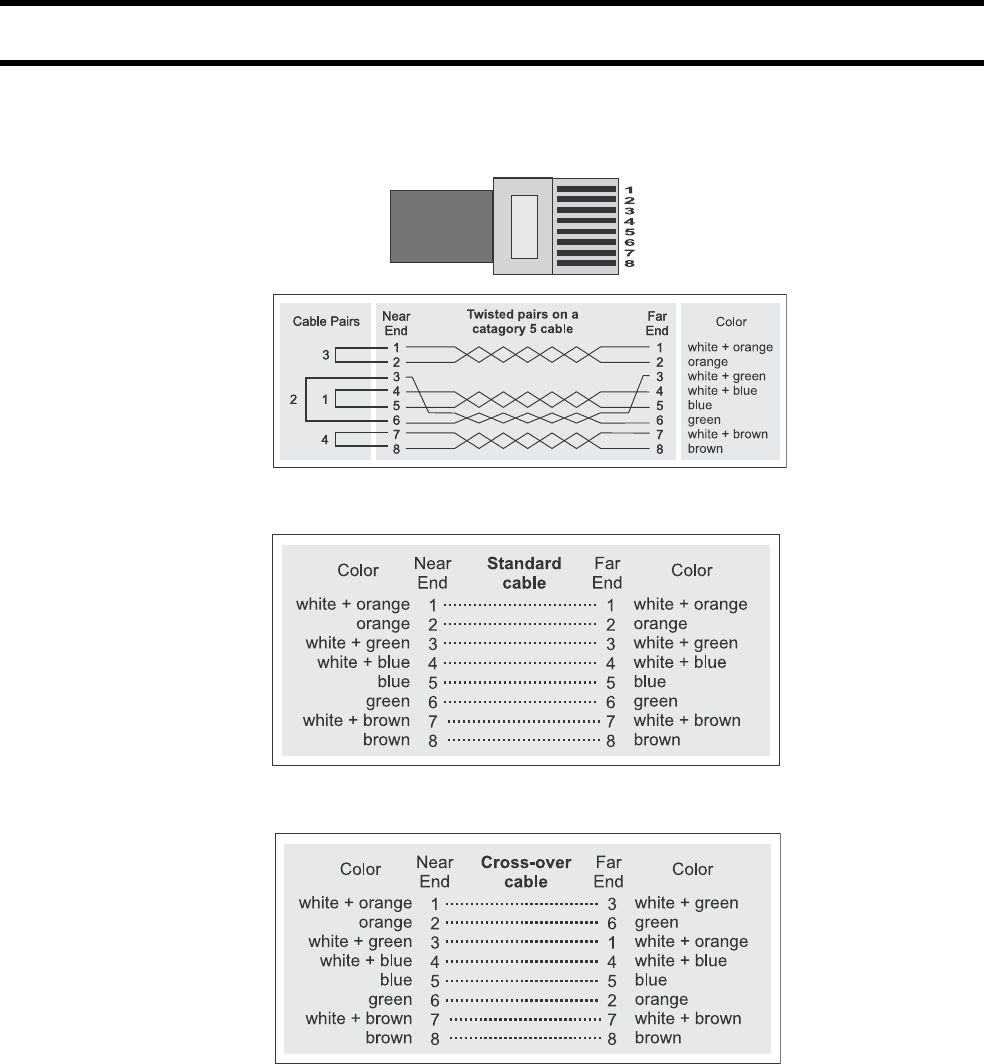
Chapter 22: Building a cross-over cable 358
DRAFT
Wiring details
Use the information in the following diagrams to build a cross-over cable.
Construction details for a standard category 5 cable.
Wiring diagram for a standard cable.
Wiring diagram for a cross-over cable.
Note: Some cable manufacturers may use different color codes for their wiring.
Pin numbers

Chapter 23: Troubleshooting 359
DRAFT
Chapter 23: Troubleshooting
Chapter 23
Troubleshooting
This chapter provides troubleshooting tips for a variety of common
problems.

Chapter 23: Troubleshooting 360
DRAFT
CN3200 issues
1 CN3200 cannot connect to the Internet (ISP)
Symptoms
• The current Internet address field on the home page is blank.
• CN3200 cannot contact RADIUS server.
Causes on the CN3200
• Wrong client (PPPoE, DHCP) selected to obtain IP address.
• Wrong username or password specified for PPPoE.
• Cable or xDSL modem was not restarted after connecting it to the CN3200.
• Cable or xDSL modem is not working.
• ISP is not working.
• Ethernet cable plugged into the wrong port on CN3200 or modem.
• Wrong Ethernet cable was used to connect CN3200 to modem.
• DNS settings are not correct or the DNS server is not reachable.
2 CN3200 fails to connect to the RADIUS server
Before you troubleshoot this problem, make sure that condition #1 does not exist.
Symptoms
• Red light on the Security > Authentication page does not change to green.
• Home page shows message “Authentication system is down”.
• Custom public access interface pages do not appear.
• MAC authenticated devices cannot reach Internet.
• Locally authenticated users cannot login.
Causes on the RADIUS server
Check the RADIUS server log file for the specific cause. Common causes are:
• No user profile is defined for the CN3200 or the profile is misconfigured.
Causes on the CN3200
Check the CN3200 log file for the specific cause. Common causes are:
• Wrong shared secret set on the Security > RADIUS page.
• Wrong username and password set on the Security > Authentication page.
• Old RADIUS servers may use a different UDP port or authentication scheme.
Check the settings on the Security > RADIUS page.
• There may be routing issues preventing the CN3200 from reaching the
RADIUS server.
• If you are using a VPN, make sure that it is properly configured on both sides.
• Custom firewall rules were added that block RADIUS packets (by default: 1812
and 1813 for accounting).
3 Lost administrator password
Reset the CN3200 to factory defaults. This sets username and password to
admin.

Chapter 23: Troubleshooting 361
DRAFT
Client station issues
4 Wireless client station cannot establish a wireless link with
the CN3200
Symptoms
• The CN3200 is not visible in the wireless client’s status display.
• The client station is unable to access to access the login page or public
resources on the wireless network.
Causes on the CN3200
• The wireless card on the back of the CN3200 is loose or missing.
• A brown out occurred. Restart theCN3200.
Causes on the client station
• Wireless adapter is not properly installed (wrong drivers, conflicts with other
cards in the system).
• Wireless adapter software is not active.
• Incorrect network name (ESSID). Make sure it matches the setting on the
CN3200.
• Incorrect WEP keys. Make sure that the keys match those set on the CN3200.
• Customer is out of operating range of the access point.
• Client station is using shared network authentication and WEP keys do not
match those configured on the CN3200.
Other causes
• Signal quality to one or more stations is poor or being subject to interference
(interference caused by 2.4 GHz cordless phone, or microwave oven for
example). This can cause excessive retransmissions of data and collisions.
5 Wireless client station cannot get an IP address
Before you troubleshoot this problem, make sure that condition #4 does not exist.
Symptoms
The client station is unable to access the login page or public resources on the
wireless network.
Causes on the CN3200
• DHCP services are not properly configured or reachable.
• WEP configuration does not match on CN3200 and client station.
Causes on the client station
• 802.1x support (if being used), is improperly configured.

Chapter 23: Troubleshooting 362
DRAFT
6 Authenticated customers cannot use the public access network
Symptoms
• Customer’s web browser times out when trying to open an external web page.
Although the session page will appear in most cases.
Causes on the CN3200
• Custom firewall rules are in place to block outgoing traffic.
• The target network resource is blocked by an access list definition.
Causes on the client station
DNS server is down.
7 Authenticated customer using 802.1x cannot use the public
access network
Before you troubleshoot this problem, make sure that condition #4 does not exist.
Symptoms
The client station was authenticated via 802.1x, and may even display an IP
address. However, it is unable to use the features of the public access network.
Causes on the CN3200/client station
• WEP configuration does not match settings on the CN3200.
8 Login page does not appear to unauthenticated wireless
customers
Before you troubleshoot this problem, make sure that conditions #2 and #5 do not
exist.
Symptoms
• Customer’s web browser times out when trying to open an external web page.
Causes on the CN3200
• DNS settings are not correct.
• If a remote login page is being used, then access to this page has not been
defined (using the appropriate access list) for authenticated customers.
Causes on the client station
• Customer’s browser is not installed or configured properly (set to use dial-up
connection instead of LAN).
• Client station has two network adapters and they are not properly configured.
9 Login page does not appear to unauthenticated wired
customers
Before you troubleshoot this problem, make sure that condition #2 does not exist.
Symptoms
• Customer’s web browser times out when trying to open an external web page.
Causes on the CN3200
• If a remote login page is being used, then access to this page has not been
defined (using the appropriate access list) for authenticated customers.

Chapter 23: Troubleshooting 363
DRAFT
• The CN3200 is not assigned an address on the same subnet as the wired LAN.
• The connection to the wired LAN was made on the wrong port (Internet port
was used instead of the LAN port), or with the wrong type of cable.
Causes on the client station
• Customer’s browser is not installed or configured properly (set to use dial-up
connection instead of LAN).
• Client station has two network adapters and they are not properly configured.
10 Login information must be specified manually when using
802.1x
Symptoms
Customers using 802.1x are not automatically logged in. Instead, they must
supply login information manually.
Causes on the CN3200
Support for 802.1x is not enabled on the Security > Authentication page.
11 Customer login is refused
Before you troubleshoot this problem, make sure that condition #2 does not exist.
Symptoms
Customers get the login error page after submitting their login information.
Causes on the CN3200
The settings for the RADIUS profile being used for customer authentication
(Security > RADIUS page) are improperly configured.
Causes on the client station
• Wrong username and/or password was supplied.
• 802.1x client settings configured improperly.
On the RADIUS server
• Customer is not properly configured.
• RADIUS server is not reachable.
12 Customer is automatically logged out.
Symptoms
Customers session is terminated by the CN3200.
Causes on the RADIUS server
• Customer exceeded an upload, or download quota, or session time.
• Customer was out of range of an access point for too long. (Controlled by the
Client station query setting on the Security > Authentication > Advanced
Settings page.)
• Customer session was idle for too long.
• Customer is using the same IP address as another customer. Both customers
are automatically logged out.
• CN3200 was restarted.

Chapter 23: Troubleshooting 364
DRAFT
13 Low wireless throughput
Symptoms
Client computers are experiencing delays when transmitting. One or more of
following statistics on the wireless status page are excessively high: Tx multiple
retry frames, Tx single retry frames, Tx deferred transmissions
Causes
• Too many client stations are using the network, or one or more clients is
monopolizing the bandwidth with excessively large transfers.
• Signal quality to one or more stations is poor or being subject to interference
(which can be caused by 2.4 GHz cordless phone or a microwave oven). This
can cause excessive retransmissions of data and collisions. Both create
overhead that will slow down overall throughput.
• One or more access points are sharing the same operating frequency. This can
cause excessive retransmissions to occur, especially if the units are physically
located close together and are on the same channel.
14 Specific Internet application does not work
Both the firewall and NAT can interfere with the operation of certain applications.
See “Firewall” on page 83 and “Network address translation” on page 89 for
more information.

Chapter 23: Troubleshooting 365
DRAFT
Management issues
15 Web browser cannot connect to management tool
Before you troubleshoot this problem, make sure that condition #1 does not exist.
Symptoms
Management tool home page does not open.
Causes on the CN3200
• Local access
• Web port was changed from default setting (Management > Management tool
page).
• Management tool is set to block access on the LAN port.
• Remote access
• Firewall is blocking HTTPS access.
• Management tool is set to block access on the Internet port or VPN.
• Another client station is currently logged in.
• A web server is running on the internal network using a static mapping for
HTTPS port 443.
Causes on a local client station
• Wrong IP address was specified. Default is 192.168.1.1 on the wireless/LAN
port, but this may have been changed.
• HTTP was specified instead of HTTPS.
• Wrong web port was specified. This will only occur if the web port was changed
from its default setting on the Management Tool configuration page.
Causes on a remote client station (via Internet)
• Wrong IP address was specified. Do not use 192.168.1.1., instead use the
address visible on the Internet port, (visible on the home page). This address
may change if you restart the CN3200 or your modem.
• Wrong web port was specified. This will only occur if the web port was changed
from its default setting on the Management Tool configuration page.
• HTTP was specified instead of HTTPS.
16 Firmware or configuration upload failed
Symptoms
Log file indicates that the upload failed via web or RADIUS profile.
Causes on the CN3200
• Firmware or configuration file is invalid.
• Wrong address was specified when using automatically firmware upload or
RADIUS server to upload the configuration file.
Other causes
• Remote server hosting the firmware is unreachable or down.
Chapter 23: Troubleshooting 366
DRAFT

Chapter 24: Regulatory, wireless interoperability, and health information 367
DRAFT
Chapter 24: Regulatory, wireless interoperability, and health information
Chapter 24
Regulatory, wireless interoperability,
and health information

Chapter 24: Regulatory, wireless interoperability, and health information 368
DRAFT
Regulatory information
The CN3200 complies with the following radio frequency and safety standards.
Canada - Industry Canada (IC)
This device complies with RSS 210 of Industry Canada.
Cet appareil numérique de la classe B est conforme à la norme NMB-003 et
CNR 210 d’Industrie Canada.
Europe - EU Declaration of Conformity
This device is for indoor use only.
Important: Users must select the proper country of operation in the
management tool to ensure wireless operational settings conform to local
regulations.
Important: If more than one unit is deployed users must ensure that the
operating frequencies are spread amoung different channels (according to
channel availability).
USA - Federal Communications Commission (FCC)
The CN3200 complies with Part 15 of FCC Rules. Operation of the CN3200 in a
system is subject to the following two conditions:
• This device may not cause harmful interference.
• This device must accept any interference that may cause undesired operation.
Caution: Exposure to Radio Frequency Radiation
The radiated output power of the CN3200 is far below the FCC radio frequency
exposure limits. Nevertheless, the CN3200 should be used in such a manner as
to minimize the potential for human contact during normal operation. When using
this device in combination with Colubris Networks antenna products, a certain
separation distance between the antenna and nearby persons has to be kept to
ensure FR exposure compliance.
Refer to the Regulatory Statements as identified in the documentation that
comes with those products for additional information.
When an external antenna is connected to the CN3200 it shall be placed in such
a manner as to minimize the potential for human contact during normal
operation. To avoid the possibility of exceeding the FCC radio frequency
exposure limits, human proximity to the antenna shall not be less than 20 cm (8
inches) during normal operation.
When no external antenna is connected, the RF output power of the CN3200 is
far below the FCC radio frequency exposure limits. Nevertheless, it is advised to
use the CN3200 in such a manner that human contact during normal operation is
minimized.
Interference Statement
The CN3200 has been tested and found to comply with the limits for a Class B
digital device, pursuant to Part 15 of the FCC Rules. These limits are designed to
provide reasonable protection against harmful interference in a residential
installation.
The CN3200 generates, uses, and can radiate radio frequency energy. If not
installed and used in accordance with the instructions, it may cause harmful
Chapter 24: Regulatory, wireless interoperability, and health information 369
DRAFT
interference to radio communications. However, there is no guarantee that
interference will not occur in a particular installation.
If the CN3200 causes harmful interference to radio or television reception, which
can be determined by turning the CN3200 on and off, the user is encouraged to
try and correct the interference by one or more of the following measures:
• Reorient or relocate the receiving antenna.
• Increase the distance between the CN3200 and the receiver.
• Connect the CN3200 to an outlet on a circuit different from that which the
receiver is connected.
• Consult your dealer or an experienced radio/TV technician for help.
Colubris Networks Inc. is not responsible for any radio or television interference
caused by unauthorized modification of the CN3200, or the substitution or
attachment of connecting cables and equipment other than that specified by
Colubris Networks Inc.
The correction of interference caused by such unauthorized modification,
substitution or attachment is the responsibility of the user.

Chapter 24: Regulatory, wireless interoperability, and health information 370
DRAFT
Health Information
The CN3200, like other radio devices, emits radio frequency electromagnetic
energy. The level of energy emitted by the CN3200 is much less than the
electromagnetic energy emitted by other wireless devices, such as mobile
phones.
Because the CN3200 operates within the guidelines found in radio frequency
safety standards and recommendations, Colubris Networks believes that the
CN3200 is safe for use by consumers. These standards and recommendations
reflect the consensus of the scientific community and result from deliberations of
panels and committees of scientists who continually review and interpret the
extensive research literature.
In some situations or environments, the use of the CN3200 may be restricted by
the proprietor of the building or responsible representatives of the organization.
These situations may, for example, include:
• Using the CN3200 on board airplanes or,
• In any other environment where the risk of interference to other devices or
services is perceived or identified as harmful.
If you are uncertain of the policy that applies to the use of wireless devices in a
specific organization or environment (e.g. airports), you are encouraged to ask
for authorization to use the CN3200 prior to turning it on.
Chapter 24: Regulatory, wireless interoperability, and health information 371
DRAFT
Important
Ports LAN port
Do not connect this port directly to a metropolitan area network (MAN) or wide area network
(WAN).
Internet port
Do not connect this port directly to a metropolitan area network (MAN) or wide area network
(WAN).
Serial port
For future use. Do not connect this port to telecommunications equipment or a phone line.
Installation Important: Installation must be performed by a professional installer familiar with
local regulations governing wireless devices.
CAUTION: Changes or modifications not expressly approved by Colubris
Networks for compliance could void the user's authority to operate the
equipment.
The installation and operating configurations of this transmitter, including the
antenna gain and cable loss, must satisfy MPE Categorical Exclusion Limits of
2.1091. The antenna(s) used for this transmitter must be installed to provide a
separation distance of at least 20 cm from all persons and must not be co-located
or operating in conjunction with any other antenna or transmitter. Installers and
end users must be provided with operating instructions and antenna installation
conditions for satisfying RF exposure compliance requirements.
Chapter 24: Regulatory, wireless interoperability, and health information 372
DRAFT