Hewlett Packard Enterprise WCB-200 Wireless Client Bridge User Manual 43 10 0201 04 5 2 0 AG WCB en
Hewlett-Packard Co Wireless Client Bridge 43 10 0201 04 5 2 0 AG WCB en
User Manual

WCB-200
Admin Guide

Release 5.2 (October 2007) 43-10-0201-04
Copyright © 2007 Colubris Networks, Inc. All rights reserved, including those to reproduce this
document or parts thereof in any form without written permission from Colubris Networks, Inc.
Colubris is a registered trademark, and the Colubris Networks logo, the tag line The Intelligent
Wireless Networking Choice and TriPlane are trademarks of Colubris Networks, Inc., in the United
States and other countries.
All other product and brand names are the service marks, trademarks, registered trademarks, or
registered service marks of their respective owners.
Changes are periodically made to the information herein; these changes will be incorporated into
new editions of the document.
Colubris Networks, Inc.
200 West Street Suite 300
Waltham, Massachusetts 02451-1121
UNITED STATES
Phone: +1 781 684 0001
Fax: +1 781 684 0009
Sales Information: sales@colubris.com
Customer Support: support@colubris.com
Training: training@colubris.com
www.colubris.com
The WCB-200 is a Wi-Fi Alliance authorized Wi-Fi CERTIFIED product.

WCB-200 Admin Guide 3 Contents
Contents
Chapter 1
Introduction 5
About this guide................................................................................6
Important terms..........................................................................6
Conventions ................................................................................6
Related documentation ...............................................................7
Product overview ..............................................................................7
Key capabilities ...........................................................................7
Typical deployment .....................................................................8
Product registration ..........................................................................9
Contacting Colubris Networks...........................................................9
Chapter 2
WCB-200 hardware 11
The WCB-200..................................................................................12
Package contents......................................................................12
Antennas...................................................................................12
Ports .........................................................................................12
Console port .......................................................................13
Reset button .............................................................................13
Status lights..............................................................................13
Installation ................................................................................14
Chapter 3
Getting started 15
Overview .........................................................................................16
Configuration procedure .................................................................16
A. Configure your computer................................................16
B. Start the WCB-200..........................................................16
C. Perform these initial login tasks .....................................16
D. Configure the wireless network ......................................17
E. Accessing the WCB.........................................................18
Chapter 4
Working with the WCB-200 19
Using the management tool ............................................................20
Starting the management tool...................................................20
Customizing management tool settings ....................................20
Administrator authentication...............................................20
Login control ......................................................................21
Web server..........................................................................21
Security...............................................................................21
Auto-refresh........................................................................22
Web inactivity logout ..........................................................22
IP address configuration.................................................................22
Management IP address .................................................................23
Radio configuration ........................................................................24
Wireless range ..........................................................................24
Configuration ............................................................................25
Using station profiles to establish a connection..............................28
Adding or editing a profile.........................................................28
General ...............................................................................29
Wireless security ................................................................29
Key source ..........................................................................30
Encryption type...................................................................31
Viewing APs in the neighborhood...................................................31
Field descriptions......................................................................31
Handling unsupported traffic ..........................................................32
Connecting serial devices ...............................................................33
Configuring serial over TCP ......................................................33
TCP connection...................................................................34
Serial port ...........................................................................34
Port control.........................................................................35
Status .................................................................................35
DNS configuration ..........................................................................35
DNS servers........................................................................35
DNS advanced settings .......................................................35
Ethernet MAC cloning .....................................................................36
Act like a DHCP relay agent ......................................................37
IP forwarding ...........................................................................38
Using wireless security filters to restrict traffic...............................38
SNMP .............................................................................................39
Configuring SNMP settings.......................................................39
...........................................................................................39
Attributes ............................................................................39
Agent ..................................................................................40
Security...............................................................................40
Traps...................................................................................40
Managing certificates......................................................................40
802.1X certificates ....................................................................41
802.1x — Install TLS client certificate ................................41
802.1x — Manage TLS client certificates ...........................41
802.1x — Trusted CA certificates .......................................41
802.1x — Manage CA certificates.......................................42
Certificate stores.......................................................................42
Trusted CA certificate store .................................................42
Certificate and private key store ..........................................43
Certificate usage .......................................................................44
Changing the certificate assigned to a service ....................45
About certificate warnings ..................................................45
Configuration file management .......................................................46
Manual configuration file management.....................................46
Backup configuration ..........................................................46
Reset configuration.............................................................47
Restore configuration .........................................................47
Scheduled operations ...............................................................47
Managing the configuration file with cURL ...............................48
Uploading the configuration file ..........................................48
Downloading the configuration file .....................................49
Resetting the configuration to factory defaults ...................49
Firmware updates ...........................................................................50
Immediate update .....................................................................50
Scheduled update .....................................................................50
Updating firmware with cURL...................................................51
Appendix A
Regulatory information 53
Regulatory information ...................................................................54
USA: Federal Communications Commission (FCC)...................54
Caution! Exposure to Radio Frequency Radiation ...............54
Interference Statement .......................................................54
Canada: Industry Canada (IC) ...................................................55
Europe ......................................................................................55

WCB-200 Admin Guide 4 Contents
Information for the user............................................................58
Health information ....................................................................58
Declarations of conformity........................................................59
Appendix B
Resetting to factory defaults 61
Introduction ....................................................................................62
Using the reset switch ..............................................................62
Using the management tool ......................................................62

Chapter 1: Introduction
1
Introduction
Contents
About this guide - - - - - - - - - - - - - - - - - - - - - - - - - - - - - 6
Product overview - - - - - - - - - - - - - - - - - - - - - - - - - - - - - 7
Product registration- - - - - - - - - - - - - - - - - - - - - - - - - - - - 9
Contacting Colubris Networks- - - - - - - - - - - - - - - - - - - - - - - 9

WCB-200 Admin Guide 6 1 Introduction
About this guide
This guide explains how to install, configure, and operate the Colubris Networks WCB-200
(wireless client bridge) product.
Important terms
The following terms are used in this guide.
Conventions
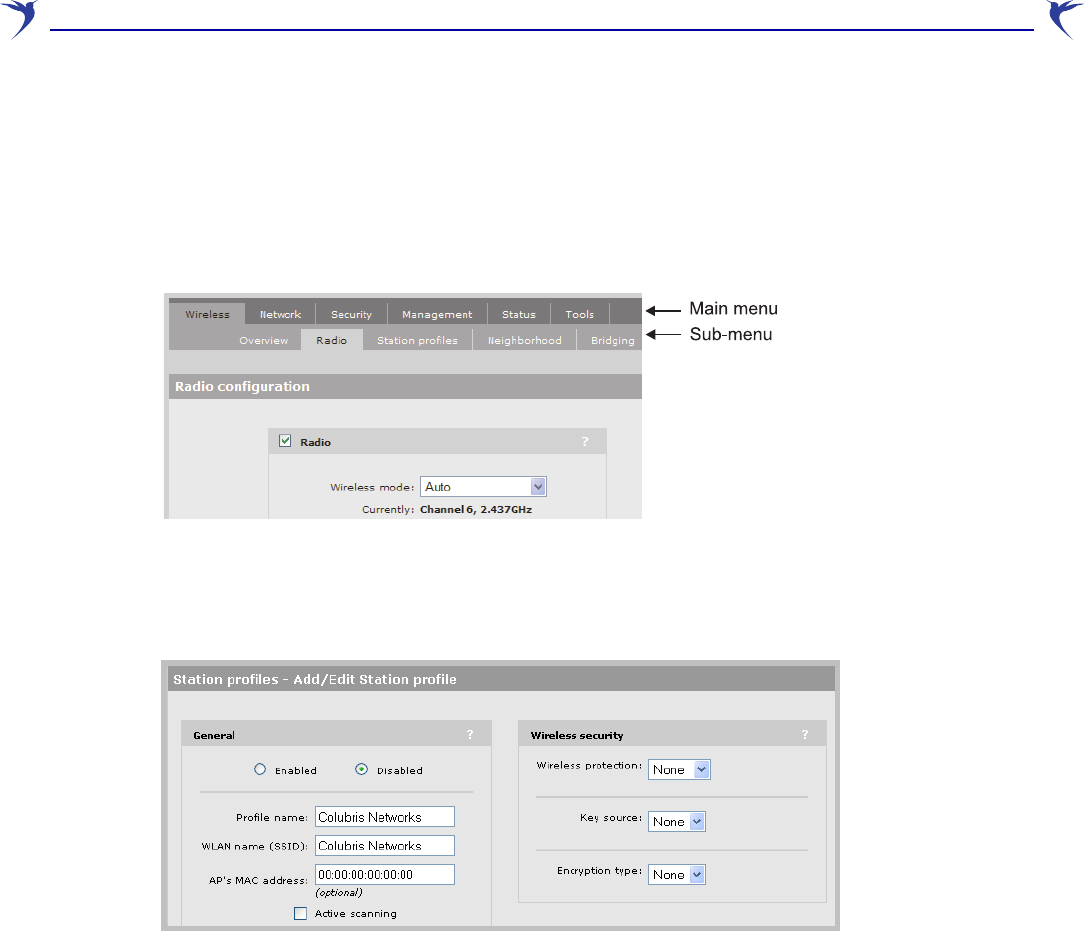
This guide uses specific syntax when directing you to interact with the management tool user
interface. Refer to this image for identification of key user-interface elements and then the table
below showing example instructions:
WARNING: Warnings must be heeded to avoid death or physical injury and to avoid
hardware damage.
Caution: Cautions must be heeded to avoid loss of data or configuration
information and to avoid improperly-configured networks.
Term Description
AP Refers to access points including the Colubris MultiService Access Points
such as the MAP-630, MAP-320, and MAP-330.
Service controller Refers to the Colubris MSC-5000 and MSC-3000 series of controllers.
COS Colubris devices such as the WCB run the Colubris Operating System
(COS). References to specific versions of COS are made in the form “at
COS x.x” as in “WCB-200 at COS 5.2.”
Example directions in this guide What to do in the user interface
Select Wireless > Radio On the main menu select Wireless and
then select Radio on the sub-menu.
For Password specify secret22. In the field Password enter the text
secret22 exactly as shown.

WCB-200 Admin Guide 71 Introduction
Related documentation
For information on related documentation, see the Colubris Networks Technical Documentation
Road Map, available on the Colubris Networks Documentation CD and for download on the
Colubris Networks extranet at http://extranet.colubris.com.
Product overview
The WCB-200 connects legacy Ethernet or serial communications stations to a wireless local area
network (WLAN) with simplicity and security. The WCB-200 enables you to deploy electronic cash
registers, servers, printers, and other devices in any location where a WLAN signal is available,
eliminating the time and expense of installing Ethernet cables for network access.
The WCB-200 integrates into a Colubris Intelligent Mobility Solution and is interoperable with any
IEEE 802.11 network infrastructure. The WCB-200 is not managed by a service controller.
Legacy client devices can be easily integrated into a WLAN using the WCB-200. The WCB-200
can bridge to the WLAN any Ethernet client device that runs a legacy networking protocol, thereby
extending wireless network access to a wide range of DECnet, IPX, Appletalk, and other devices.
An integrated serial-to-TCP/IP converter enables a TIA-232 asynchronous terminal device to
communicate with a compatible station on the network.
The WCB-200 includes support for all 2.4 GHz or 5 GHz channels that are available within your
regulatory domain. High-output power and antenna diversity ensure the best possible range and
throughput. External antenna connectors can be used to attach high-gain antennas for specialized
applications.
Strong enterprise-class layered security features protect the network from intrusions. The WCB-
200 radio interface includes an 802.1x supplicant for authentication by an access point and
RADIUS server. Hardware-accelerated encryption provides high performance when using WPA2
(AES), WPA, or WEP security. The Management Tool web interface is protected using SSL.
Bidirectional Layer 2 and Layer 3 filters enable you to control access to WCB-200 interfaces and
UDP port filtering controls access to network services.
The WCB-200 features comprehensive remote manageability, including full support as a managed
node in the Colubris Networks Management System (CNMS). For ease of deployment and
operation, you can configure the WCB-200 by way of an intuitive web user interface. Secure file
transfer protocols simplify software maintenance. Support for SNMP enables integrated
management using any enterprise network management system.
A rugged metal enclosure and mounting bracket provide installation flexibility. Its small size and
plenum-rated enclosure enable the WCB-200 to be installed on a desktop, or it can be hidden from
view in a ceiling.
Key capabilities
The Colubris Networks WCB-200 wireless client bridge offers the following key capabilities:
•Bridges an Ethernet LAN segment and a serial interface to a wireless network.
•Bridges Ethernet segments with up to 20 client stations.
•Converts a TIA-232 serial data stream to TCP/IP over WLAN.
WCB-200 Admin Guide 8 1 Introduction
•Provides enhanced security using configurable Ethernet MAC and protocol filters.
•Ensures wireless network privacy using WPA2, WPA, and WEP security and high performance
hardware-assisted AES, TKIP, WEP, encryption.
•Provides 802.1x PEAP, TLS, EAP-FAST, and TTLS authentication.
•Offers a configurable 802.11 a/b/g radio with external antenna connectors.
•Provides excellent distance performance from its 100mw radio and capability for antenna
diversity.
•Managed as a node on the Colubris Network Management System (CNMS)
•Can be included as part of a Colubris Intelligent Mobility Solution.
•Features a plenum-rated metal enclosure.
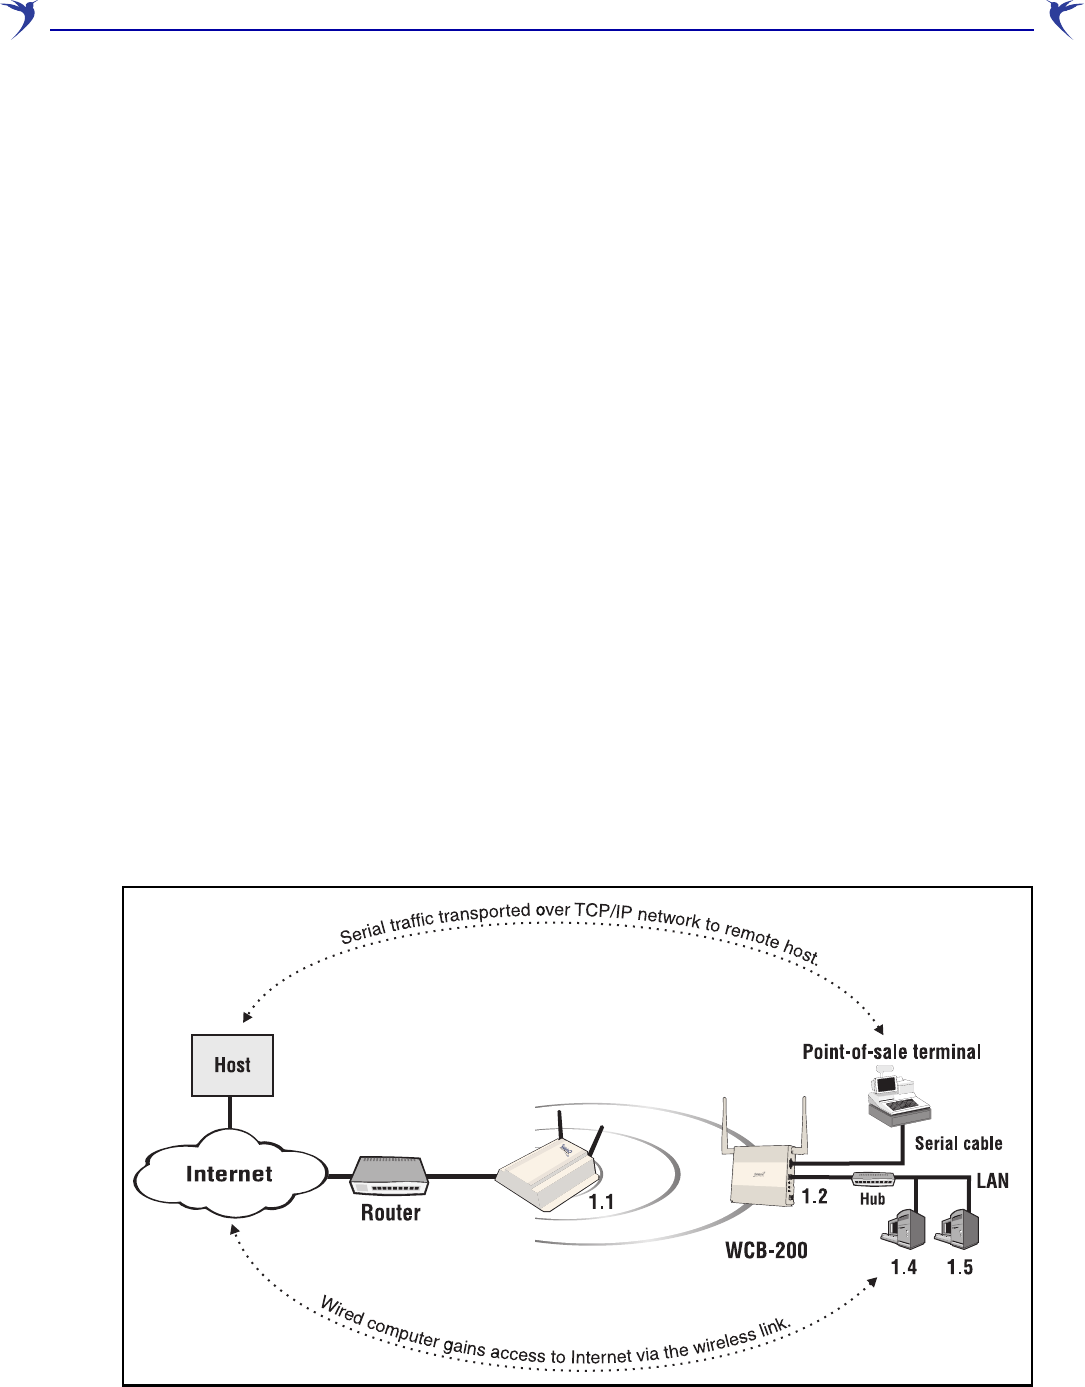
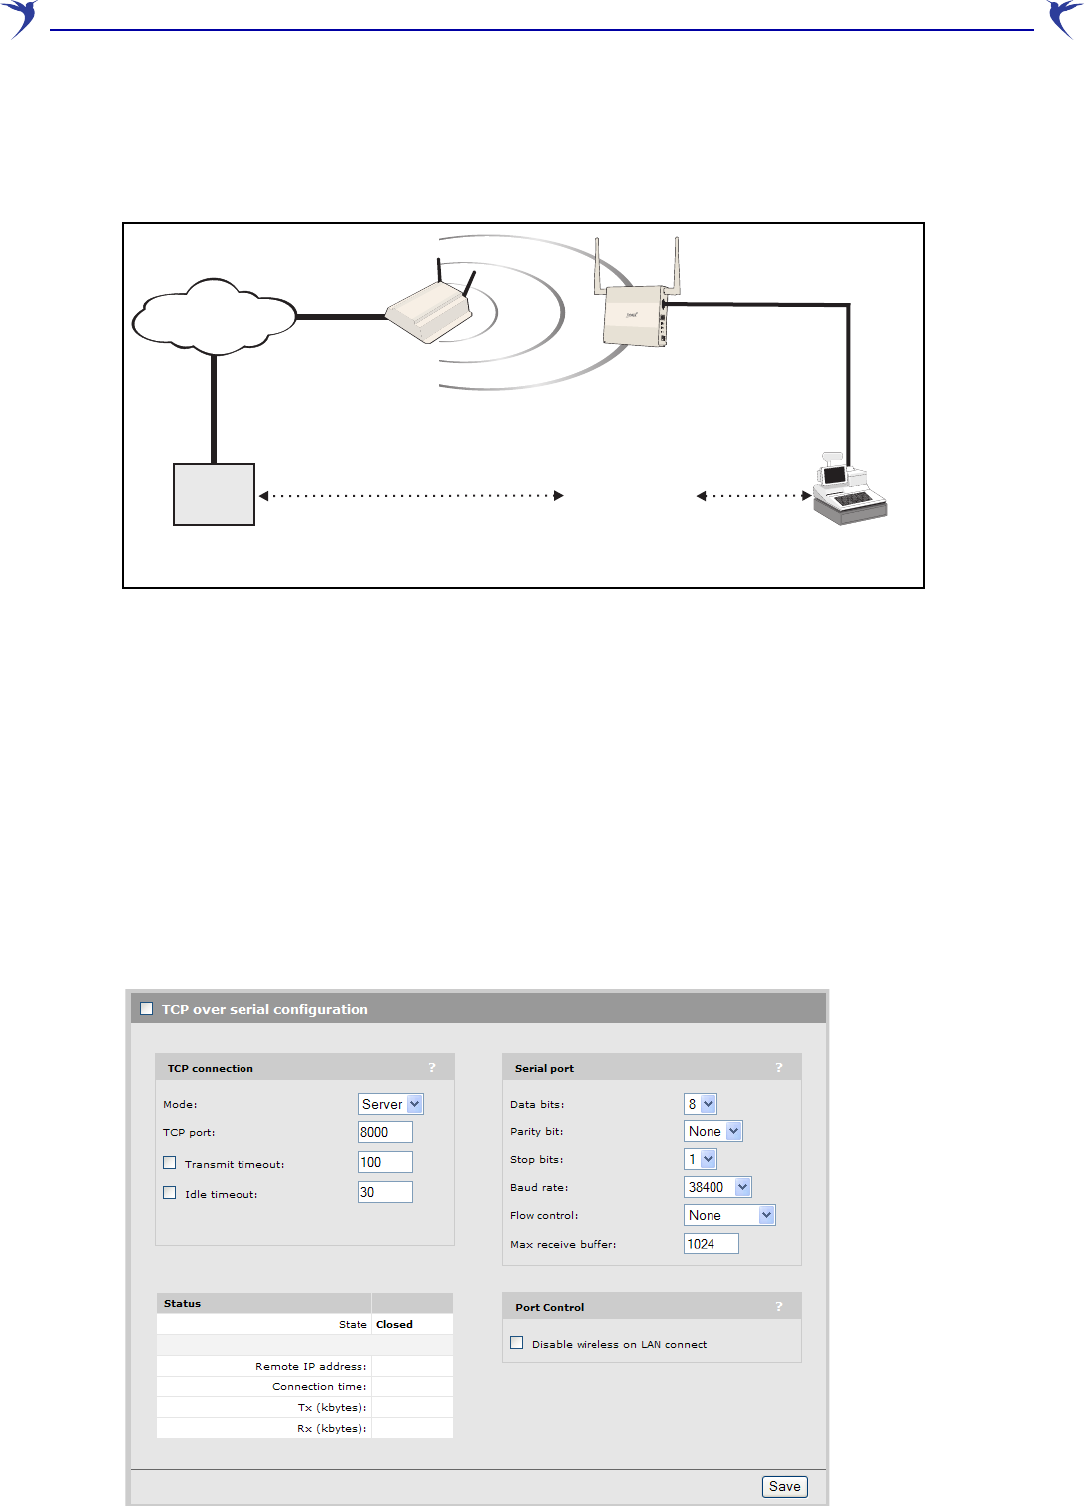
Typical deployment
The WCB-200 provides a wireless bridge to an AP such as a MAP-630, MAP-320, or MAP-330.
This bridge can be used to:
•Connect up to 20 wired Ethernet devices to a wireless network. The WCB-200 provides MAC
address translation for all traffic, enabling each wireless station to have its own IP address and
to communicate across the network.
•Connect a serial device to a wireless network. The WCB-200 encapsulates the serial traffic in
TCP packets for transport across the wireless bridge to a remote device.
Note: The Point-of-Sale terminal to Internet access is managed by a third-party application
You can use both options at the same time, as shown in the following diagram.
AP

WCB-200 Admin Guide 91 Introduction
In this deployment, the WCB-200 provides a wireless link for several Ethernet devices and a serial
Point-of-Sale terminal. An AP is used to provide the wireless network and the connection to a
router. The router provides access to the Internet and also acts as the DHCP server. It assigns IP
addresses to the WCB-200 and the two computers on the LAN. These addresses are all on the
same subnet, 192.168.1.x.
Product registration
To register your product, go to www.colubris.com. On the home page select Support > Product
Registration and follow the directions.
Contacting Colubris Networks
Customer support
support@colubris.com
1-866-241-8324 (toll-free) United States and Canada
+1 781-684-0001 All other locations
Training
training@colubris.com
Sales
sales@colubris.com

WCB-200 Admin Guide 10 1 Introduction

WCB-200 Admin Guide 12 2 WCB-200 hardware
The WCB-200
This chapter describes the WCB-200 hardware features and its installation.
Before permanently installing devices, it is recommended that you first become familiar with their
basic functionality as described in “Chapter 3: Getting started” on page 15.
Caution: You must use shielded Ethernet cables for all connections.
Package contents
WCB-200, two 2.4-GHz (2-dBi) / 5-GHz (2-dBi) dual-band omnidirectional antennas,
Documentation CD, power supply, mounting bracket, spring clip. The WCB-200 ships fully
assembled and ready to operate.
Antennas
The WCB-200 has a single radio with two antennas for diversity. The Main antenna connector is
located on the front panel and the Auxiliary antenna connector is located on the back panel.
The antenna connectors are reverse-polarity SMA jacks. Antennas or cable connectors must use
RP-SMA plugs. Antennas can be mounted directly on the WCB-200 or an external antenna can be
connected to the Main antenna connector.
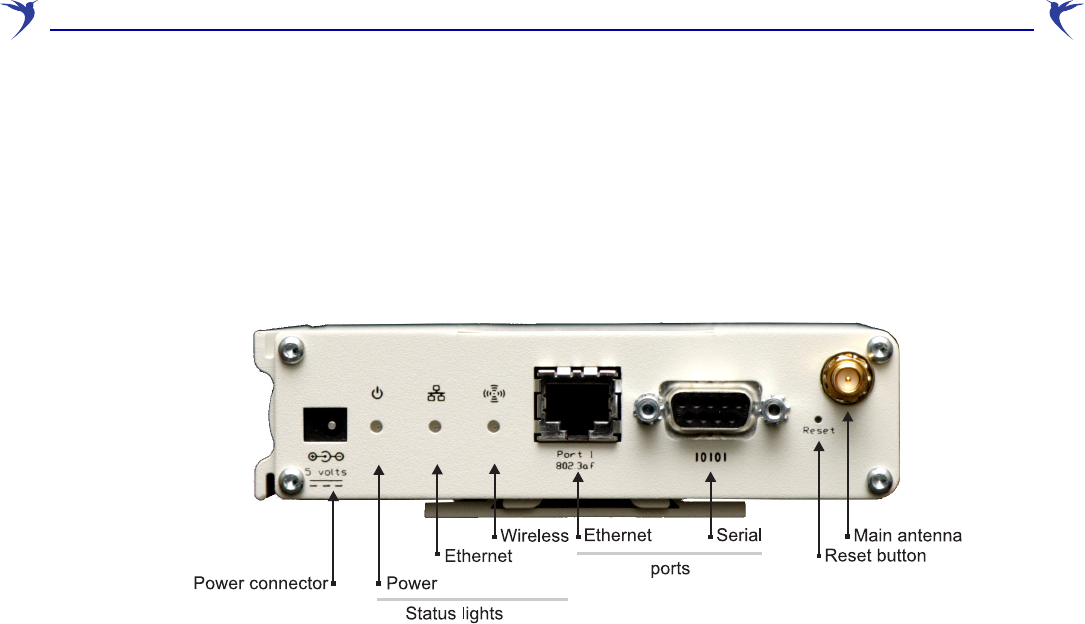
Ports
The WCB-200 has a single 10/100 Mbps Ethernet port with an RJ-45 connector and a serial
(Console) port with a DB-9 connector.
WCB-200 Admin Guide 13 2 WCB-200 hardware
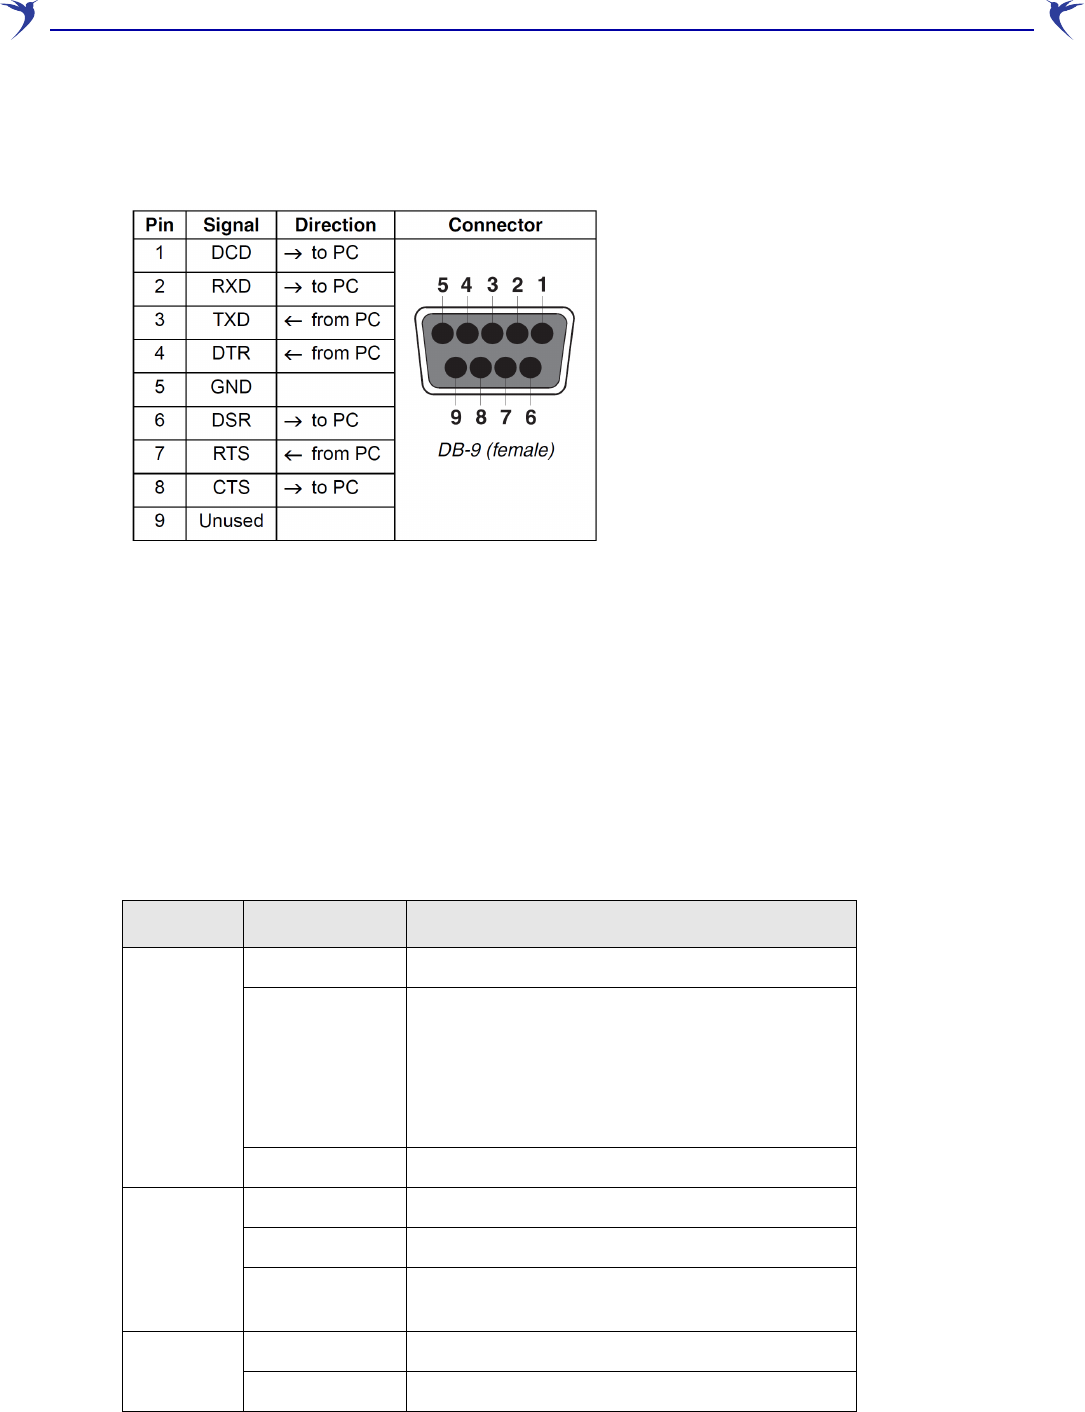
Console port
The WCB-200 provides a DB-9 (female) Console (serial) port connector. The DB-9 connector
(DCE) has pin assignments as follows:
To connect to a computer, use a standard (straight through) serial cable (male-to-female).
Reset button
Press and quickly release the button to reset the WCB-200. To reset to factory default settings,
press and hold the reset button until the status lights flash three times, then release. For more
information, see “Resetting to factory defaults” on page 61.
Status lights
The status lights provide the following information:
Light State Description
Power
Off The WCB-200 has no power.
Flashing The WCB-200 is starting up. If the power light
continues to flash after several minutes, it
indicates that the firmware failed to load. Reset
or power cycle the WCB-200. If this condition
persists, contact Colubris Customer Support at
www.colubris.com.
Solid The WCB-200 is fully operational.
Ethernet
Off Port is not connected or there is no activity.
Flashing Port is transmitting or receiving data.
On Stays on for a short period when the link is
established.
Wireless
Blinking rapidly The WCB-200 is searching for an access point.
Flashing Wireless port is transmitting or receiving data.
WCB-200 Admin Guide 14 2 WCB-200 hardware
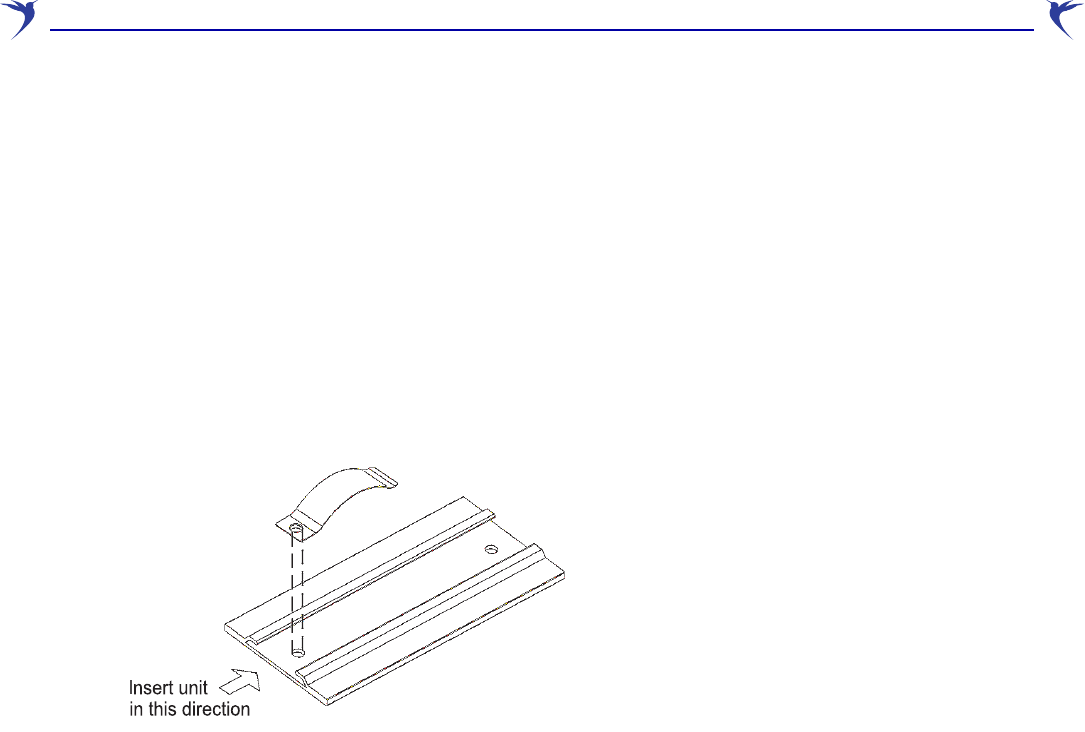
Installation
WARNING: SURGE PROTECTION AND GROUNDING: If you plan on connecting an
outdoor antenna to the WCB-200 make sure that proper lightning surge
protection and grounding precautions are taken according to local electrical
code. Failure to do so may result in personal injury, fire, equipment damage,
or a voided warranty.
When mounting the WCB-200 on a wall or ceiling, ensure that the surface to which you attach the
WCB-200 and the fasteners you use can support at least .9 kg (2 pounds). Allow extra weight for
cables.
If needed, insert the spring clip into one of the screw holes in the mounting bracket as shown to
provide a tighter fit.
If the WCB-200 is installed inside a plenum, plenum-rated cables and attachment hardware must
be used. Only the WCB-200 and appropriate cabling can be located in the plenum.
Caution: Power supplies and PoE injectors available separately from Colubris
Networks cannot be installed inside a plenum.


WCB-200 Admin Guide 16 3 Getting started
Overview
This chapter walks you through the steps needed to initially configure the WCB-200.
Configuration procedure
Note: Do not power on Colubris Networks hardware until directed.
Caution: WIRELESS SECURITY: The WCB-200 ships with all wireless security options disabled.
Colubris strongly recommends that once the WCB-200 is installed, you enable a wireless
security option to properly safeguard the wireless network from intruders.
A. Configure your computer
1. Connect the LAN port on your computer to the port on the WCB-200.
Note: The WCB-200 supports automatic crossover detection. However, problems can
occur when connected to older 10BaseT-only interfaces. Therefore a crossover
cable may be needed when connecting to older network interface cards (NICs).
2. Configure your computer to use a static IP address in the range 192.168.1.2 to 192.168.1.254.
The subnet mask of 255.255.255.0 is entered automatically. Set the default gateway to
192.168.1.1, and DNS server to 192.168.1.1.
For example, in Windows XP, use Control Panel > Network Connections > Local Area
Connection > Properties > Internet Protocol (TCP/IP) > Properties.
3. Disable any wireless connection.
B. Start the WCB-200
Connect the power supply or use an 802.3af PoE injector to power on the WCB-200.
C. Perform these initial login tasks
Note: The following procedure assumes that you the have a Colubris AP set to factory
default accessible to the WCB-200. If you are using a third-party AP, make sure that
the parameters match those of the Colubris AP factory default, i.e.: SSID, open no
security, etc.
1. In a web browser, open page: https://192.168.1.1.
2. You are prompted to accept a security certificate. To continue, proceed as follows: At the
security certificate prompt, in Microsoft Internet Explorer 7, select Continue to this website; in
Firefox, select OK.
For information on how you can replace the Secure Sockets Layer (SSL) certificate that ships
with the WCB-200 with one of your own, see “Managing certificates” in the WCB-200 Admin
Guide.
3. On the Login page, specify admin for Username and Password and then select Login. The
WCB-200 management tool home page opens.
4. On the License Agreement page, read and then select Accept License Agreement.
5. On the registration page, select Register Later. You can register by selecting Maintenance >
Registration.
WCB-200 Admin Guide 17 3 Getting started
6. If presented with a Country prompt, choose the country in which this product will be used and
select Save.
7. At the password prompt it is recommended that you change the password. Specify the new
password and select Save. The management tool home page opens. In the illustration below,
the Wireless > Radio menu and sub-menu have been selected. Key elements of the
management tool user interface are defined as follows:
D. Configure the wireless network
1. Select Wireless > Station Profiles and click the Colubris Networks link. The Add/Edit
Stations profile page opens.
2. Select General > Enabled.
3. Change the WLAN name (SSID) to match that of the wireless network to which you want to
connect.
Note: The Profile name is just a friendly name used for display purposes.
4. Under Wireless security, select the Authentication type and Encryption type that are
required by the wireless network to which you want to connect.
Note: If the AP that you are trying to access does not broadcast its SSID, you will have
to select active scanning for the WCB-200 to connect to the AP.
5. Click Save. The WCB-200 should automatically establish a connection with the wireless
network and is now ready for operation.
By default, the WCB-200 operates as a DHCP client to obtain its IP address from a DHCP
server. The network must have a DHCP server. Broadband routers typically include a DHCP
server.
6. To check the connection to the wireless network, select Wireless > Overview. The Station
State should indicate Associated.

WCB-200 Admin Guide 18 3 Getting started
Note: With DHCP enabled, the IP address of the WCB-200 may change, and you will
lose connection to the management tool. To reestablish a connection, see
Accessing the WCB below.
E. Accessing the WCB
1. Configure your computer to obtain an IP address and DNS Server address automatically.
For example, in Windows XP, use Control Panel > Network Connections > Local Area
Connection > Properties > Internet Protocol (TCP/IP) > Properties, and make sure that
both the Obtain an IP address automatically and Obtain a DNS server address
automatically are both checked.
2. Connect your computer to the same network as the WCB-200.
3. Look in the DHCP server log for the Ethernet Base MAC address shown on the WCB-200 label
and take note of the corresponding IP address.
4. Relaunch the WCB-200 management tool, this time using: https://<IP address discovered in
previous step>, to access the WCB-200 management tool.
Note: It is also possible to assign a second, static, IP address to the WCB-200 for ease of
access to the management tool later. For information, see “Management IP address”
on page 23.

Chapter 4: Working with the WCB-200
4
Working with the WCB-200
Contents
Using the management tool- - - - - - - - - - - - - - - - - - - - - - - - 20
IP address configuration - - - - - - - - - - - - - - - - - - - - - - - - - 22
Management IP address - - - - - - - - - - - - - - - - - - - - - - - - - 23
Radio configuration - - - - - - - - - - - - - - - - - - - - - - - - - - - - 24
Using station profiles to establish a connection - - - - - - - - - - - - - - 28
Viewing APs in the neighborhood - - - - - - - - - - - - - - - - - - - - - 31
Handling unsupported traffic - - - - - - - - - - - - - - - - - - - - - - - 32
Connecting serial devices- - - - - - - - - - - - - - - - - - - - - - - - - 33
DNS configuration - - - - - - - - - - - - - - - - - - - - - - - - - - - - 35
Ethernet MAC cloning - - - - - - - - - - - - - - - - - - - - - - - - - - 36
Using wireless security filters to restrict traffic - - - - - - - - - - - - - - - 36
SNMP - - - - - - - - - - - - - - - - - - - - - - - - - - - - - - - - - - 36
Managing certificates - - - - - - - - - - - - - - - - - - - - - - - - - - - 40
Configuration file management - - - - - - - - - - - - - - - - - - - - - - 46
Firmware updates - - - - - - - - - - - - - - - - - - - - - - - - - - - - 50
WCB-200 Admin Guide 20 4 Working with the WCB-200
Using the management tool
The management tool is a web-based interface to the WCB-200 that provides easy access to all
configuration and monitoring functions.
The management station is the computer that an administrator uses to connect to the management
tool. To act as a management station, a computer must have at least Internet Explorer 7.0 or
Mozilla Firefox 2.0.
Starting the management tool
To launch the management tool, point your web browser to the IP address of the WCB-200. By
default, the address is 192.168.1.1.
Customizing management tool settings
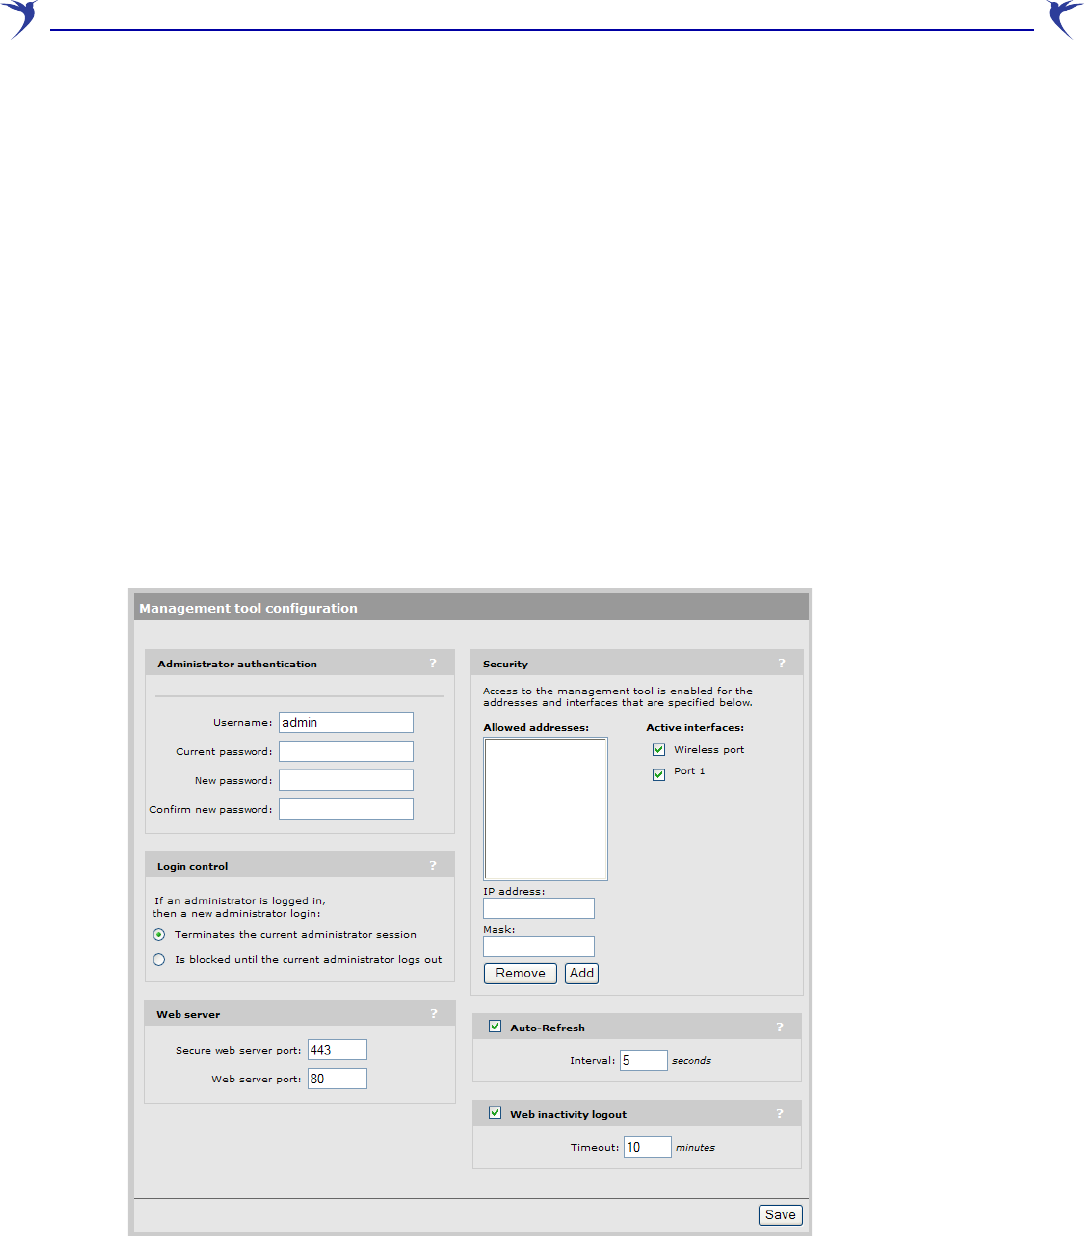
To customize management tool settings, select Management > Management tool.
Administrator authentication
Access to the management tool is protected by a username and password. The factory default
setting for both is admin. It is recommended that you change both at initial setup, and then
regularly thereafter.
Caution: If you forget the administrator password, the only way to access the
management tool is to reset the WCB-200 to factory default settings. For
information see “Resetting to factory defaults” on page 61.

WCB-200 Admin Guide 21 4 Working with the WCB-200
Login control
To maintain the integrity of the configuration settings, only one administrator can be connected to
the management tool at a given time. To prevent the management tool from being locked by an idle
administrator, two mechanisms are in place:
•If an administrator’s connection to the management tool remains idle for more than ten
minutes, the WCB-200 automatically terminates the administrator’s session. You can configure
this mechanism on the management tool configuration page.
•If a second administrator connects to the management tool and authenticates with the correct
username and password, the first administrator’s session terminates. You can configure this
mechanism on the management tool configuration page.
•If login to the management tool fails five times in a row (bad username and/or password), login
privileges are blocked for five minutes. Once five minutes expires, login privileges are once
again enabled. However, if the next login attempt fails, privileges are again suspended for five
minutes. This cycle continues until a valid login occurs. This option is not configurable.
Web server
You can also configure the web server ports from which access to the management tool is
permitted.
• Secure web server port: Specify a port number for the WCB-200 to use to provide secure
HTTPS access to the management tool. Default is 443.
• Web server port: Specify a port number for the WCB-200 to use to provide standard HTTP
access to the management tool. These connections are met with a warning, and the browser is
redirected to the secure web server port. Default is 80.
Security
The management tool is protected by the following security features:
• HTTPS: Communications between a management station and the WCB-200 is protected using
the Secure Hypertext Transport Protocol. Before logging on to the management tool, you must
accept a security certificate. A default certificate is provided with the service controller. You can
replace this certificate with your own. For more information, see “Managing certificates” on
page 40.
• Port blocking: You can enable or disable access to the management tool for each of the
following:
•LAN port 1
•Wireless port
• Allowed IP address: You can configure a list of subnets from which access to the
management tool is permitted.
Note: These security settings also apply when SSH is used to access the command line
interface.
WCB-200 Admin Guide 22 4 Working with the WCB-200
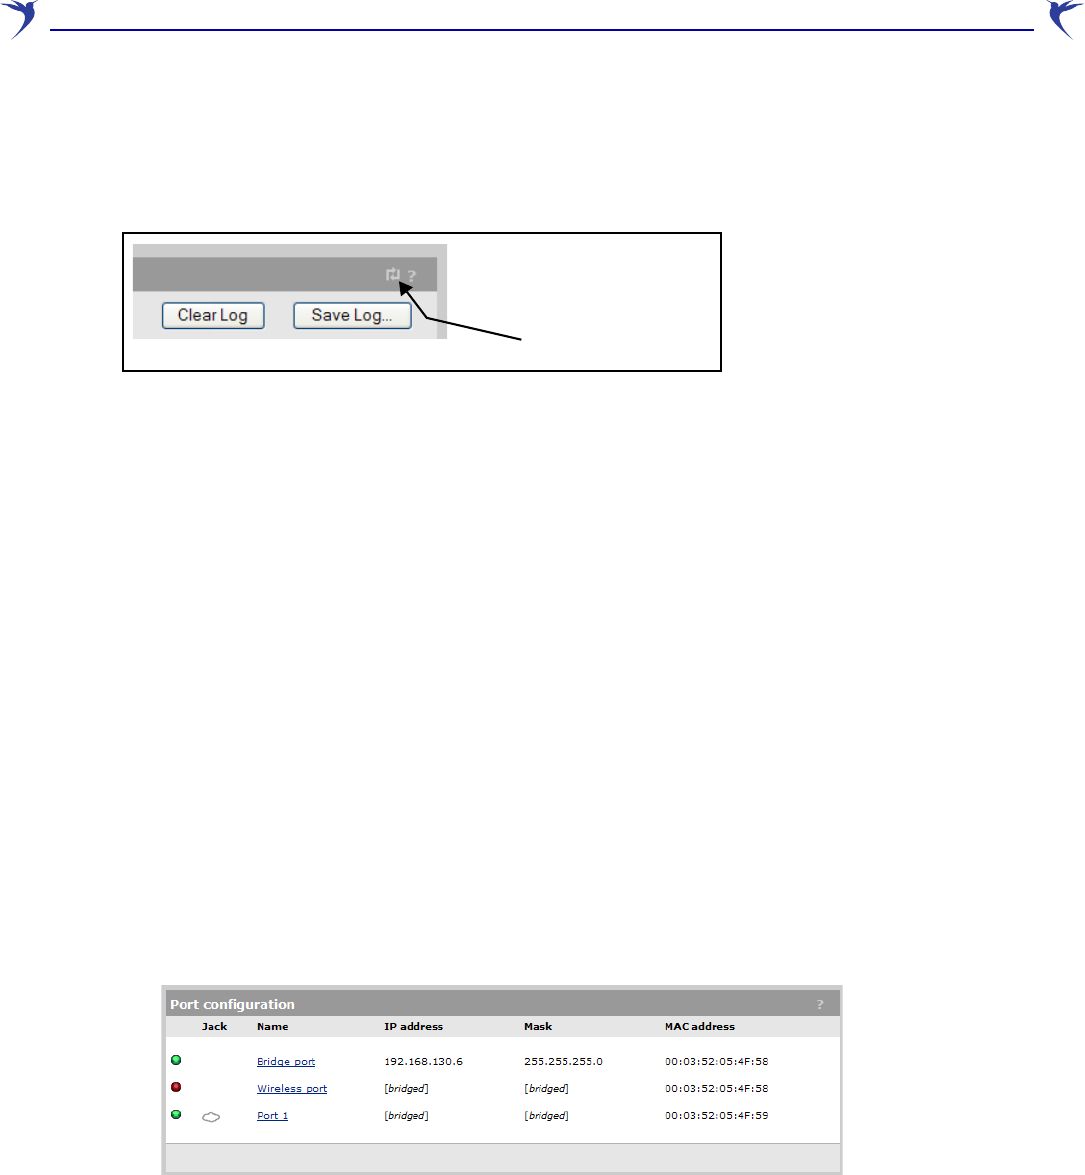
Auto-refresh
This option controls how often the WCB-200 updates the information in group boxes that show the
auto-refresh icon in their title bar. Under Interval, specify the number of seconds between
refreshes.
Web inactivity logout
When this option is enabled, an administrator will automatically be logged out if their session is idle
for the specified number of minutes.
IP address configuration
The WCB-200 is a wireless bridge, which means that port 1 and the wireless port share the same
IP address.
By default, the WCB-200 is configured as a DHCP client on the port 1. If no DHCP server is found
at startup, the WCB-200 assigns the address 192.168.1.1 to port 1 and the wireless port.
The WCB-200 provides MAC address translation to all devices connected to port 1 as their traffic is
forwarded across the wireless bridge. This enables up to 20 Ethernet devices to share the wireless
link, yet at the same time have their own unique IP addresses.
Addressing settings are configured using the bridge port (which is a logical port). To verify and
possibly adjust bridge port configuration, do the following:
1. Select Network > Ports.
Auto-refresh icon
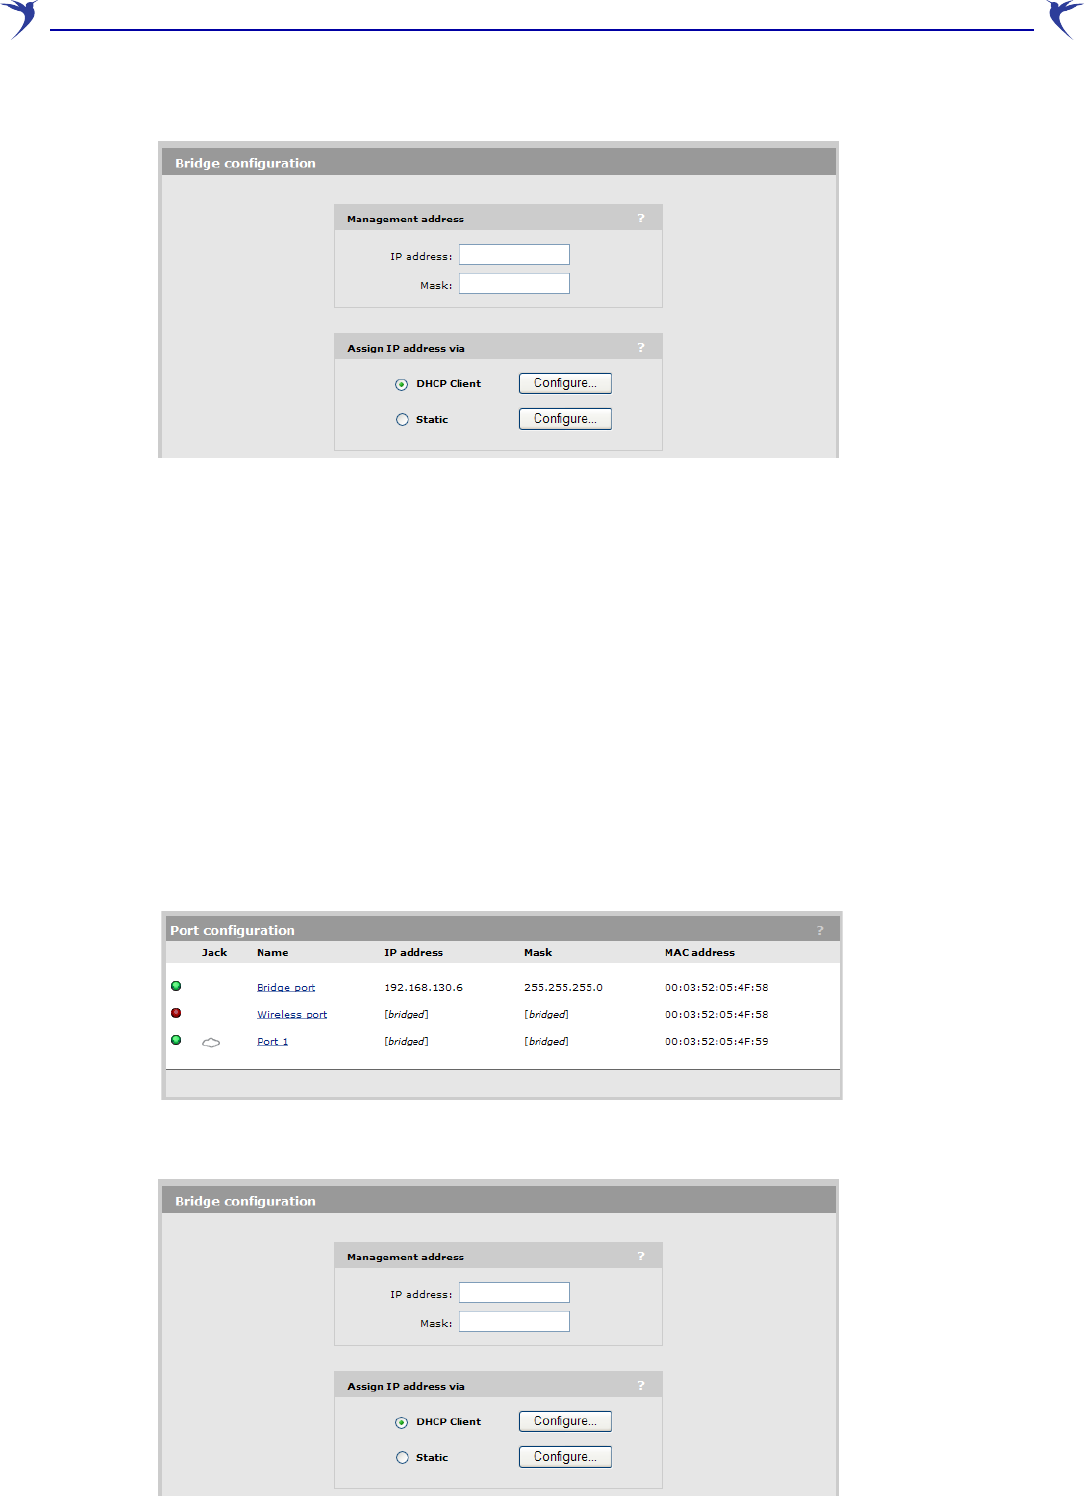
WCB-200 Admin Guide 23 4 Working with the WCB-200
2. Click Bridge port in the table.
3. Under Assign IP address via, select the option you want to use. and click Configure.
4. Define addressing settings are required.
Management IP address
The WCB-200 lets you assign a second, static, IP address to port 1. This provides easy access to
the management tool when using a DHCP server.
Note: This address must not be on the same subnet as the address already assigned to
port 1.
To assign a static IP address to the WCB-200:
1. Select Network > Ports.
2. Click Bridge port in the table.

WCB-200 Admin Guide 24 4 Working with the WCB-200
3. In the Bridge configuration page, enter a new IP address for the WCB-200 and select Static.
4. Select Save.
Radio configuration
The WCB-200’s wireless radio is an RF direct sequence spread spectrum (DSSS) device that
operates in the Industrial, Scientific, Medical (ISM) frequency spectrum. It provides the link
between the WCB-200 and a wireless access point.
Wireless range
At high power the WCB-200 can communicate with access points within a wireless cell that has a
diameter of up to 300 feet (100 meters).
The following factors can affect wireless coverage:
•Radio power: More radio power means better signal quality and the ability to create bigger
wireless cells. However, cell size should generally not exceed the range of transmission
supported by client stations. If it does, client stations are able to receive signals from the
access point, but they are not able to reply, rendering the connection useless.
Governmental regulations in different parts of the world determine the maximum power output
of the WCB-200’s radio.
•Antenna configuration: Antennas play a large role in determining the shape of the wireless cell
and transmission distance. Consult the specifications for the antennas you are using to
determine how they affect wireless coverage.
•Interference: Interference is caused by other access points or devices that operate in the same
2.4 Ghz frequency band as the WCB-200—such as cordless phones or microwaves. Such
interference can substantially affect throughput.
•Physical characteristics of the location: Radio waves cannot penetrate metal: instead, they are
reflected. This means that the WCB-200 is able to transmit through wood or plaster walls and
closed windows. However, the steel reinforcing found in concrete walls and floors may block
transmissions or reduce signal quality. To maximize the range of the wireless cell, the
WCB-200 is best installed in an open area with as few obstructions as possible.
WCB-200 Admin Guide 25 4 Working with the WCB-200
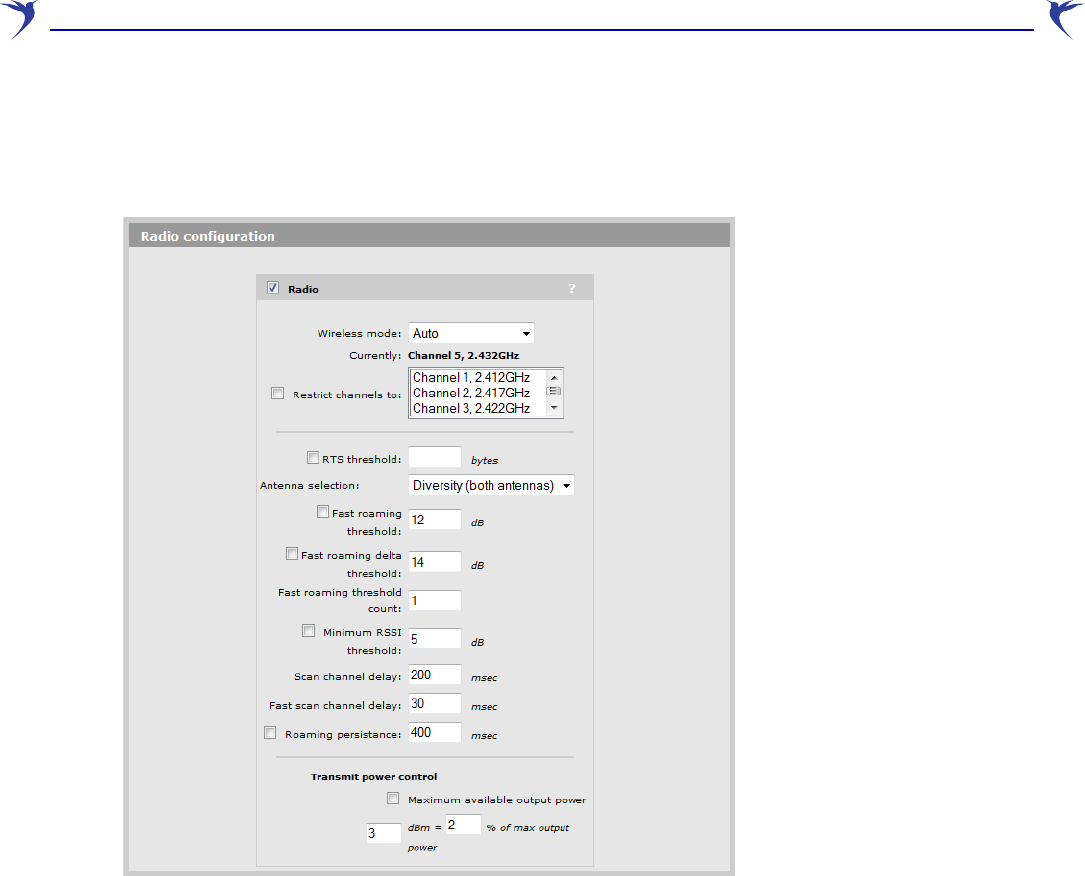
Configuration
To define configuration settings for the radio, select Wireless > Radio. This opens the Radio
configuration page:
Wireless mode
Select the transmission speed and frequency band. The permitted frequencies and channels are
determined by the country of operation, and may include:
•Auto: The WCB-200 automatically selects the correct frequency band (a, b, g) depending on
the AP it is connecting to.
•802.11b: up to 11 Mbps in the 2.4 GHz frequency band.
•802.11b + 802.11g: up to 11 and 54 Mbps in the 2.4 GHz frequency band.
•802.11g: up to 54 Mbps in the 2.4 GHz frequency band.
•802.11a: up to 54 Mbps in the 5 GHz frequency band.
Restrict channels to
Select the channels that the WCB-200 will scan. By limiting the channels that are scanned, the
speed at which the WCB-200 switches to a new AP can be increased.
To select more than one channel, hold down the CTRL key as you click the channel names.

WCB-200 Admin Guide 26 4 Working with the WCB-200
RTS threshold
Use this parameter to control collisions on the link that can reduce throughput. If the Status >
Wireless page shows increasing values for Tx multiple retry frames or Tx single retry frames, you
should adjust this value until the errors clear up. Start with a value of 1024 and then decrease to
512 until errors are reduced or eliminated. Note that using a small value for RTS threshold can
affect throughput. Range: 128 to 1540.
If a packet is larger than the threshold, the WCB-200 will hold it and issue a request to send (RTS)
message to the client station. Only when the client station replies with a clear to send (CTS)
message will the WCB-200 send the packet. Packets smaller than the threshold are transmitted
without this handshake.
Antenna selection
Select the antenna on which the radio will transmit and receive.
If a single antenna is used, it can be connected to either Main or Aux.
• Diversity: In this mode both antennas are used to transmit and receive. The WCB-200
supports both transmit and receive diversity.
•Transmit diversity: For a given connection, the WCB-200 always transmits on the antenna it
receives. If transmission fails, the WCB-200 automatically switches antennas and retries.
•Receive diversity: In 802.11b, the WCB-200 does selection diversity, which means
selecting the antenna for receive based on the SNR calculated while receiving the
preamble, on a per frame basis.
For 802.11a and 802.11g, including mixed 802.11b and 802.11g, the receiver switches
antennas when the signal quality goes below a certain threshold.
• Main antenna: Select this option to use the Main antenna to transmit and receive.
• Auxiliary antenna: Select this option to use the Auxiliary antenna to transmit and receive.
Fast roaming threshold
Fast roaming delta threshold
(These two options function in a similar manner. The only difference is how they determine when
roaming will occur.)
Fast roaming enables the WCB-200 to quickly switch between two APs with the same SSID
operating on the same channel (frequency) without a degradation in wireless service. Without fast
roaming, the WCB-200 may take as much as 5 seconds to determine that the AP it is connected to
is no longer available or out of range. Once this occurs, the WCB-200 scans for a new connection
according to the settings on the Wireless > Station profiles page.
When fast roaming is enabled, the WCB-200 continuously monitors the SNR (signal to noise ratio)
of all wireless beacons with the same SSID and frequency as that of the current connection to
determine if it should roam to a new AP. This decision is made as follows:
• Fast roaming threshold: The WCB-200 will only switch to a new AP if the SNR of the new AP
is greater than the setting for Fast roaming threshold (for the number of beacons specified for
Fast roaming threshold count) and the SNR of the current AP is less than the Fast roaming
threshold. For example, if set to 10, then the WCB-200 will only switch to a new AP if its SNR is
greater than 10 dB and the AP it is currently connected to has an SNR less than 10 dB. Once
switched, Roaming persistence (if enabled) will take effect.

WCB-200 Admin Guide 27 4 Working with the WCB-200
• Fast roaming delta threshold: If the difference in SNR between the current and new AP is
greater than the Fast roaming delta threshold (for the number of beacons specified for Fast
roaming threshold count), then the WCB-200 automatically switches over to the new AP. Once
switched, Roaming persistence (if enabled) will take effect.
If both options are enabled at the same time, whichever option is triggered first takes precedence.
Note: If 802.1x/ WPA/WPA2 is enabled, this can add an unpredictable delay based on
network topology. For example, if a RADIUS server is being used for authentication
as opposed to preshared keys.
Note: SNR is expressed in decibels (dB). The higher the number the stronger the signal.
Fast roaming threshold count
Sets the number of contiguous beacons that must be received satisfying the Fast roaming
threshold for the WCB-200 to switch over to a new AP.
Minimum RSSI threshold
Use this parameter to speed up roaming between two APs with the same SSID and operating on
different channels (frequencies)
When the value of RSSI (Received Signal Strength Indication) falls below the set threshold, the
WCB-200:
•Disassociates from the current AP (it does not wait until the connection is lost).
•Performs a wireless scan.
•Selects a new AP to connect to.
Note: RSSI is expressed in decibels (dB). The higher the number the stronger the signal.
Scan channel delay
(Only applies when connecting using a station profile for which active scanning is disabled)
Sets the length of time (in milliseconds) that the WCB-200 will scan a channel. By default, this is
set to 200 milliseconds which is double the value of the standard beacon interval (100
milliseconds) used by most APs.
Fast scan channel delay
(Only applies when connecting using an active station profile)
Sets the length of time (in milliseconds) that the WCB-200 will scan a channel. By default, this is
set to 30 milliseconds which is much less than the value of the standard beacon interval (100
milliseconds) used by most APs.
Roaming persistence
Sets the amount of time (in milliseconds) that the WCB-200 waits before it uses any of the following
roaming features: fast roaming threshold, fast roaming delta threshold, or minimum RSSI
threshold.
Transmit power control
Sets the transmission power of the wireless radio. You can specify transmission power by selecting
a percentage of the maximum available power. The maximum supported power setting varies
according to the radio that is installed.
The actual transmit power used may be less than the value specified. The WCB-200 determines
the power to be used based on the settings you make for regulatory domain and wireless mode.

WCB-200 Admin Guide 28 4 Working with the WCB-200
Using station profiles to establish a connection
A station profile contains the configuration settings that the WCB-200 uses to establish a wireless
connection with an access point. The WCB-200 supports multiple station profiles, enabling it to
automatically connect with different wireless networks.
Station profiles are defined on the Wireless > Station profiles page. Initially, this page contains
the default profile named Colubris Networks.
The profile list is split into two sections according to the setting of the Active Scanning option.
Station profiles that have the Active Scanning option enabled have priority over profiles that do not
have this option enabled.
Each profile contains the definitions for a wireless connection. When the WCB-200 attempts to
establish a wireless link, it uses the profile definitions as follows:
1. Profiles with Active scanning enabled are checked in the order that they are listed from top to
bottom. (Profiles with a status of “N/A” are skipped.)
2. Profiles with Active scanning disabled are checked in the order that they are listed from top to
bottom. (Profiles with a status of “N/A” are skipped.)
In the following example, profiles are checked in the following order: Office-1, Office-2, and Office-3
followed by CN330, Office-4, and Colubris Networks.
If multiple profiles are defined in the list, you change profile priority by clicking the up/down
arrows in the Priority column.
Adding or editing a profile
On the Station profiles page, do the following:
•To add a new profile, click Add New Profile.
•To edit a profile, click its name in the list.
WCB-200 Admin Guide 29 4 Working with the WCB-200
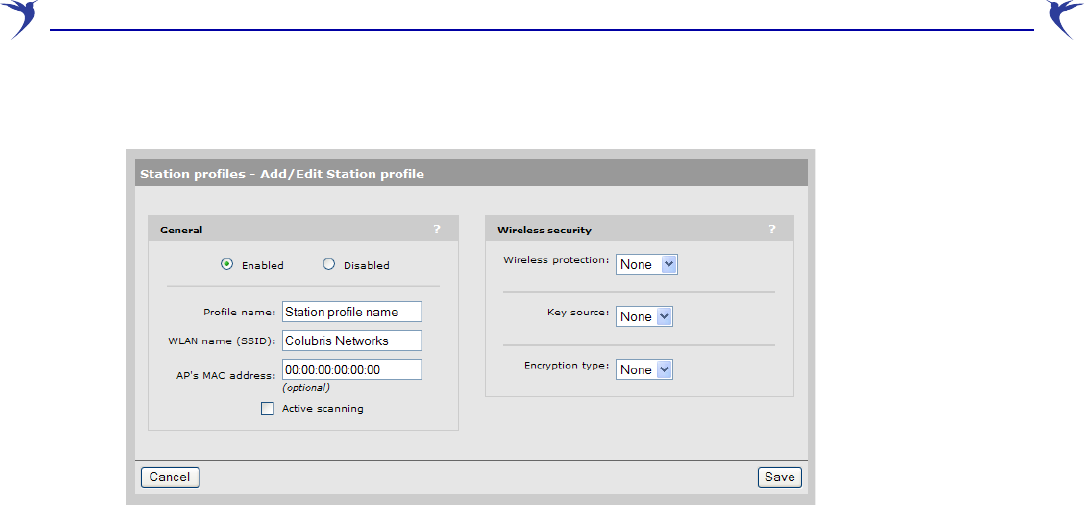
In either case, the Station profiles - Add/Edit Station profile page opens.
Configure parameter settings as follows:
General
Profile name
Specify a name to uniquely identify the profile.
WLAN name (SSID)
Specify the SSID of the wireless network that this profile will connect with.
AP's MAC address
Specify the MAC address of the AP (BSSID) with which this profile will connect.
Active scanning
In active scanning mode, the WCB-200 sends out probe request frames in an attempt to solicit
responses from APs that are within range. This enables the WCB-200 to establish a connection
with an AP that does not broadcast an SSID.
Some countries prohibit active scanning on some channels. In these countries, probe requests are
not sent on prohibited channels.
When this option is enabled, this profile takes priority over profiles without active scanning. The
WCB-200 attempts to connect with active profiles first before trying other profiles in the list.
Wireless security
Wireless protection
The WCB-200 supports several authentication and encryption options for protection of wireless
transmissions. To make use of these options, the remote AP to which the WCB-200 connects must
be configured appropriately.
Note: Options that need support from a RADIUS server require that the connection to the
RADIUS server is configured on the remote AP and not on the WCB-200.
The following wireless protection options are available:
• None: No authentication.

WCB-200 Admin Guide 30 4 Working with the WCB-200
• 802.1x: This option enables support for 802.1x with or without WEP. Must be used with a
RADIUS server.
•WPA: This option enables support for WPA with TKIP, supporting either a RADIUS server or a
pre-shared key (PSK).
•WPA2: This option enables support for WPA2 with AES/CCMP, supporting either a RADIUS
server or a pre-shared key (PSK).
Key source
PSK
Only available if Wireless protection is set to WPA or WPA2.
•Key: The WCB-200 uses the key you specify in the Key field to generate the TKIP or
AES/CCMP keys that encrypt the wireless data stream. Since this is a static key, it is not as
secure as the RADIUS option. Specify a key that is between 8 and 63 alphanumeric characters
in length. It is recommended that the preshared key be at least 20 characters long, and be a
mix of letters and numbers. The double quote character (") should not be used.
RADIUS
The WCB-200 obtains the Microsoft Point-to-Point Encryption (MPPE) keys from a RADIUS server
(via the remote AP). This is a dynamic key that changes each time the WCB-200 logs in and is
authenticated by the AP. The MPPE key is used to generate the WEP, TKIP or AES/CCMP keys
that encrypt the wireless data stream.
• EAP method: Select the Extensible Authentication Protocol (EAP) authentication method the
WCB-200 will use when connecting to the AP.
•PEAP version 0 / PEAP version 1: These two options have the same configuration settings.
PEAP version 0 only supports MS-CHAP V2 as the inner EAP protocol. PEAP version 1
only supports EAP-GTC (generic token card) as an inner EAP protocol. Both require the
use of a RADIUS server by the remote AP.
•Username: Specify the username assigned to the WCB-200 on the remote AP's
RADIUS server.
•Password: Specify the password assigned to the WCB-200 on the remote AP's
RADIUS server.
•Anonymous: Specify the outer authentication username for the TLS tunnel.
• TLS: Requires that a TLS certificate is installed on the WCB-200 and that the remote AP
provides support for authentication via a RADIUS server.
•TLS identity: Specify the name that was used when creating the TLS certificate.
•TLS certificate: Select the Transport Layer Security certificate to send to the AP for
authentication. (The certificate must first be installed on the Security > 802.1X
certificates page before you can select it.)
• TTLS: This option requires that the remote AP provides support for authentication via a
RADIUS server. Only supports MS-CHAP V2 as the inner EAP protocol.
•Username: Specify the username assigned to the WCB-200 on the remote AP's
RADIUS server.
WCB-200 Admin Guide 31 4 Working with the WCB-200
•Password: Specify the password assigned to the WCB-200 on the remote AP's
RADIUS server.
• Anonymous: Specify the outer authentication username for the TLS tunnel.
•FAST: EAP-FAST uses an encrypted tunnel to distribute preshared keys.
•Username: Specify the username assigned to the WCB-200 on the remote AP’s
RADIUS server.
•Password: Specify the password assigned to the WCB-200 on the remote AP’s
RADIUS server.
•Anonymous: Specify the outer authentication username for the TLS tunnel.
• Validate server certificate: Enable this checkbox to validate the RADIUS server's certificate
before establishing the connection. Used for TLS, TTLS, and PEAP. Requires that an 802.1X
Trusted CA certificate is installed on the Security > 802.1X certificates page.
Encryption type
WEP
Uses Wired Equivalent Privacy to secure traffic on the wireless link.
TKIP
Uses Temporal Key Integrity Protocol encryption to secure traffic on the wireless link.
AES
Advanced Encryption Standard is used by the U.S. Government and defined by the National
Institute of Standards and Technology (NIST). This is the most secure method to secure traffic on
the wireless link. It uses AES with CCMP encryption.
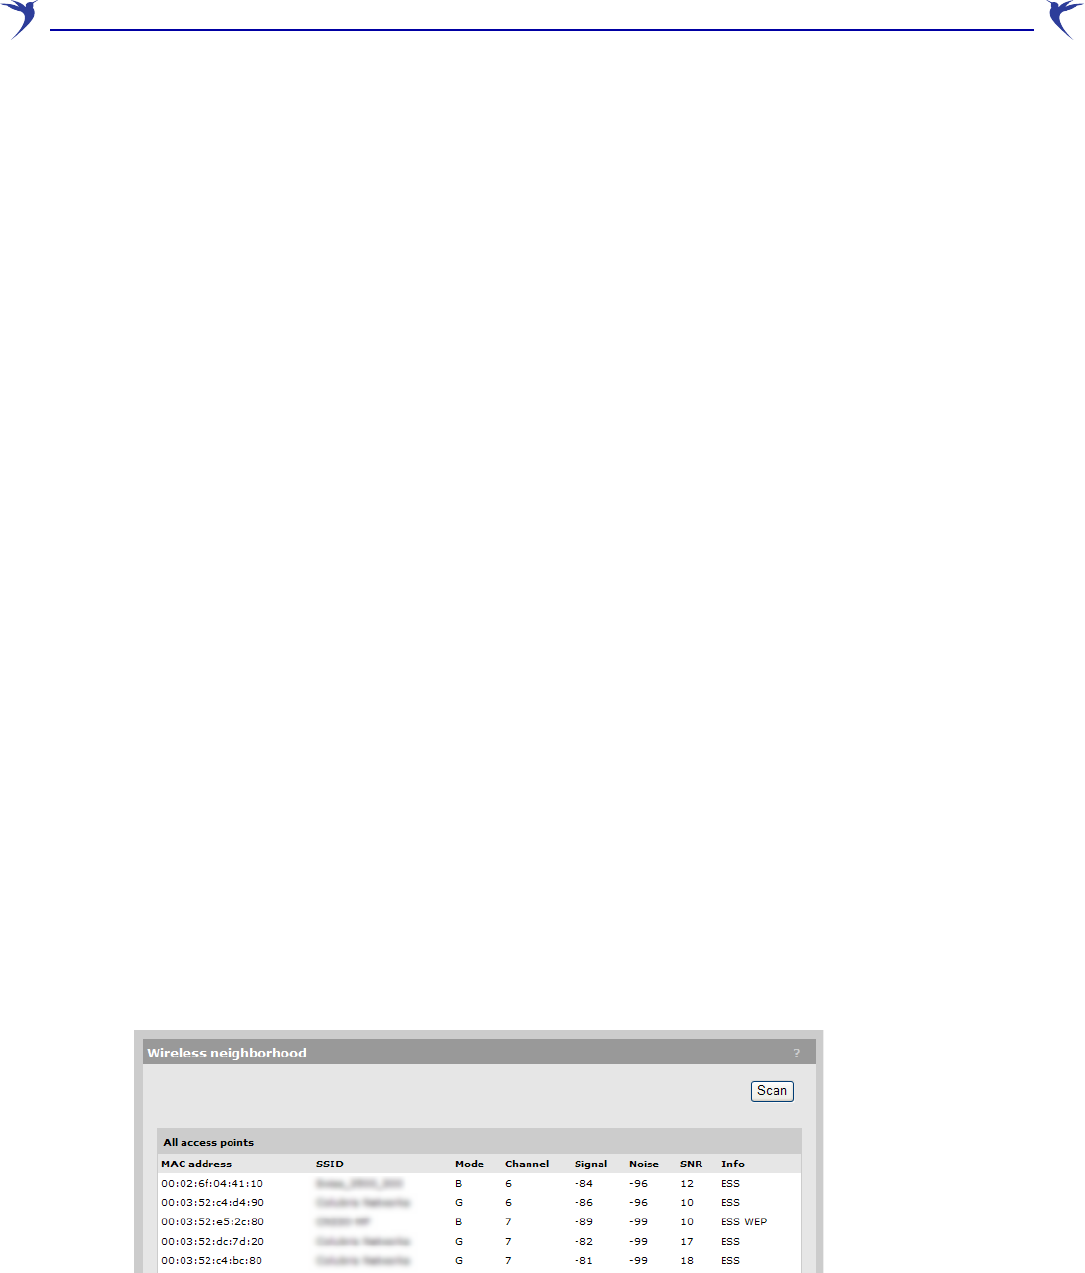
Viewing APs in the neighborhood
The Wireless > Neighborhood page provides a list of all APs that are operating nearby.
Click Scan to refresh the list.
Field descriptions
• MAC address: MAC address of the AP.
•SSID: SSID assigned to the AP.
WCB-200 Admin Guide 32 4 Working with the WCB-200
•Mode: Indicates the operating mode of the AP: A, B, or G.
• Channel: Channel the AP is operating on.
• Signal: Signal strength.
• Noise: Amount of noise.
• SNR: Signal to noise ratio.
• Info: Additional information about the AP, such as:
•WEP: Some type of security (like WEP) is enabled on the AP.
•ESS: Operating in AP mode. Also lists security being used if enabled (WEP, WPA).
•IBSS: Operating in Ad-Hoc mode.
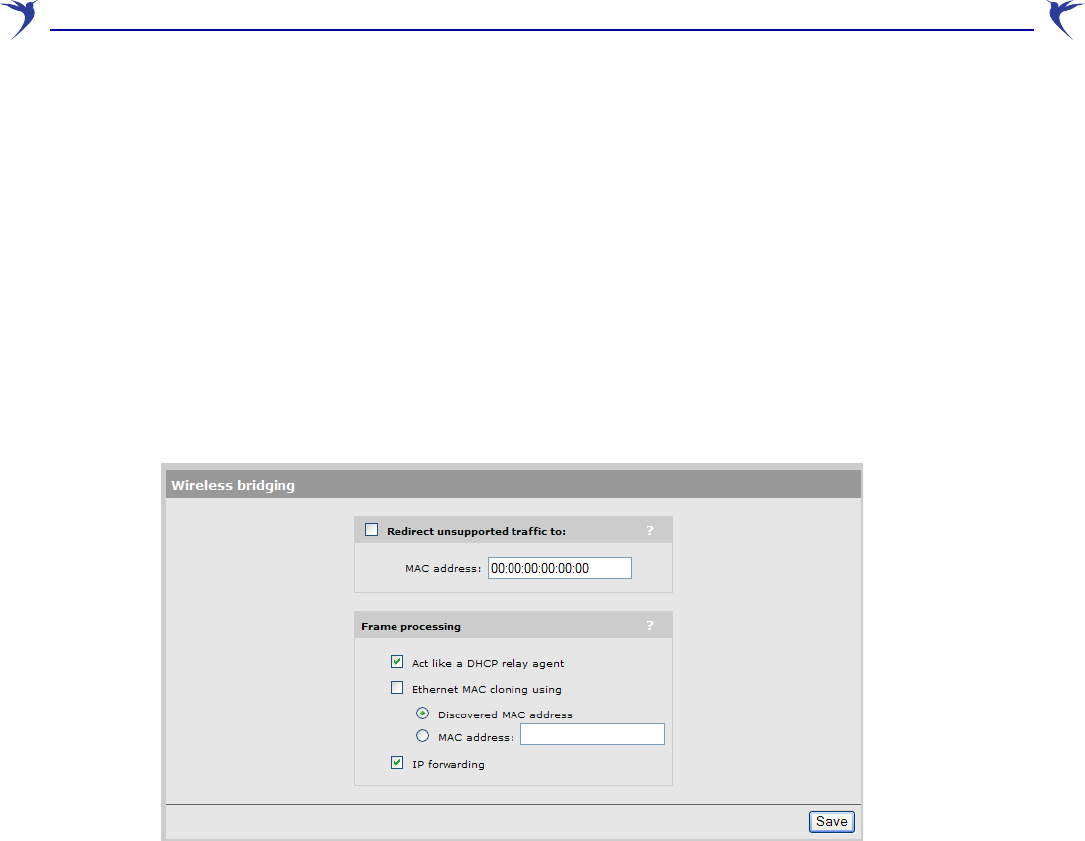
Handling unsupported traffic
The WCB-200 only sends and receives IPv4 traffic on the wireless connection. By default, all other
traffic is discarded.
Note: The WCB-200 never forwards 802.1X frames to the LAN port. 802.1X traffic is
always handled by the WCB-200 in its negotiation with the access point.
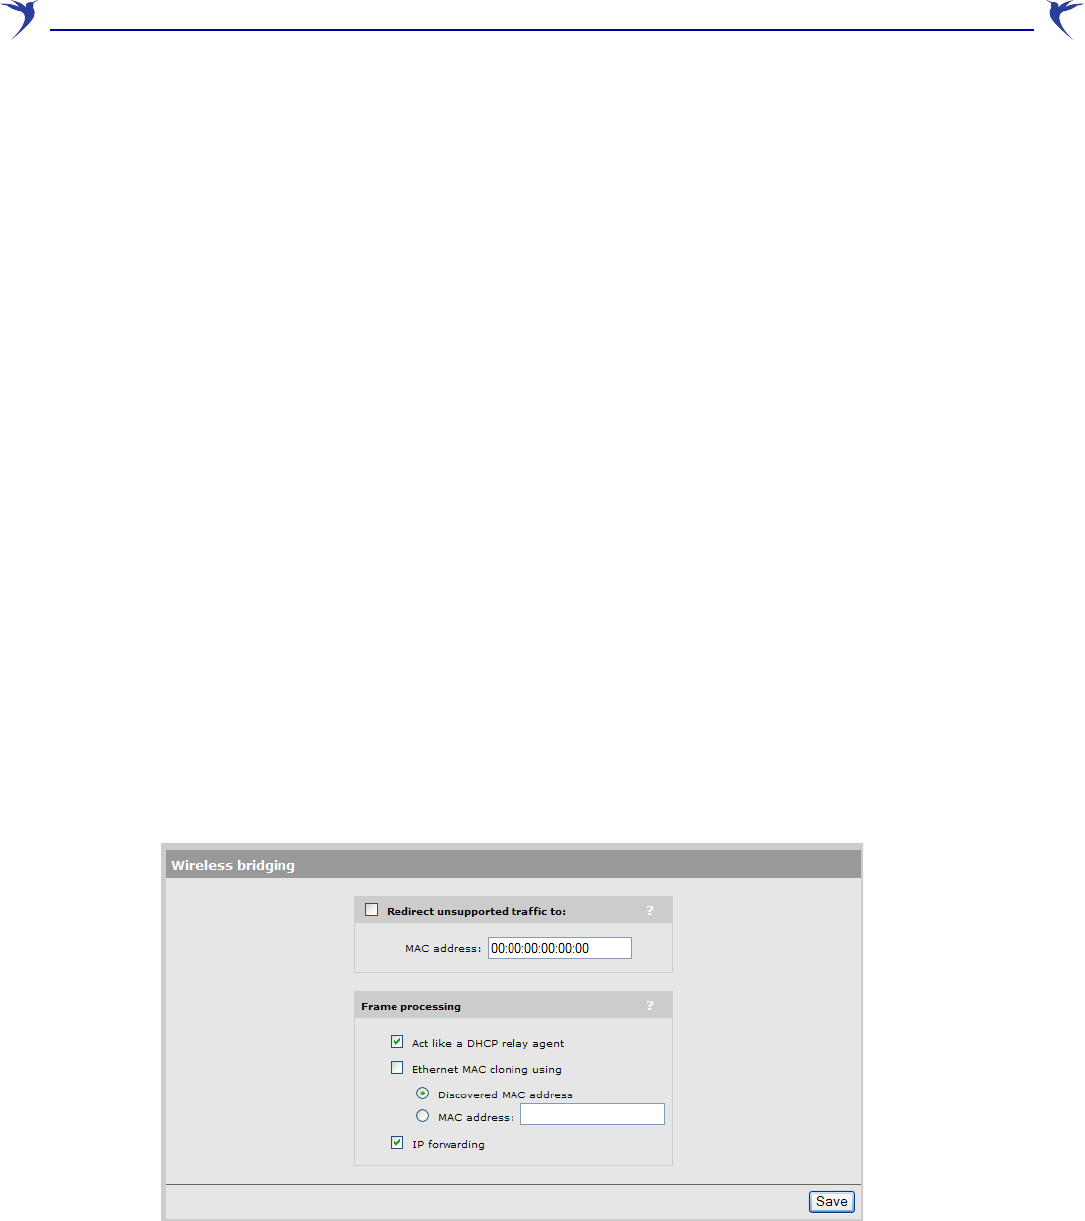
If required, all unsupported traffic can be forwarded to a network device connected to port 1 as
follows:
1. Select Wireless > Bridging. The Wireless bridging page opens.
2. Enable the Redirect unsupported traffic to option.
3. Specify the MAC address of the network station to which you want to forward traffic. The
device must be connected to port 1.
4. Click Save.
WCB-200 Admin Guide 33 4 Working with the WCB-200
Connecting serial devices
The Serial over TCP feature enables traffic from a local serial device to be sent to a remote site
using the Transmission Control Protocol. For example:
This scenario shows serial traffic from a point-of-sale terminal being forwarded to a remote host via
a TCP/IP network. In this scenario:
•A serial device is connected to the serial port on the WCB-200.
•The WCB-200 packs and unpacks the serial traffic in TCP packets for exchange with a remote
device by way of the wireless bridge.
•The WCB-200 acts as a TCP server/client. This means that to initiate the connection between
the local and remote serial devices, the remote device must act as a TCP client and establish a
session with the WCB-200. The port number used for this connection is configurable.
Configuring serial over TCP
Select Network > TCP Serial. The TCP over serial configuration page opens.
Reset
AP
WCB-200
Serial cable
Point-of-sale
terminal
Host
Serial over TCP Serial
WCB-200
TCP server
TCP/IP
Network

WCB-200 Admin Guide 34 4 Working with the WCB-200
Enable the TCP over serial configuration option and configure parameters as follows:
TCP connection
Mode
Two modes are supported: client and server.
•Client: The WCB-200 acts as a TCP client and initiates a connection on the wireless bridge to
the specified Remote IP address using the specified TCP port.
•Server: The WCB-200 acts as a TCP server/client and will listen for an incoming connection
from a TCP client on the specified TCP port. The incoming connection must come via the
wireless bridge.
Note: Only one TCP connection is supported.
Remote IP address
IP address of the remote device the WCB-200 will attempt to connect to when operating in Client
mode.
TCP port
Sets the TCP port number that the WCB-200 will use.
Transmit timeout
Specifies the length of time, in milliseconds, that traffic on the serial port will be buffered.
Idle timeout
Sets the amount of time, in seconds, that the TCP connection can remain idle before it is
disconnected by the WCB-200.
Serial port
Use these parameters to configure the serial port on the WCB-200 to match the settings of your
terminal emulation software.
Data bits
Number of data bits.
Parity bit
Sets the parity.
Stop bits
Number of stop bits.
Baud rate
Baud rate in bps.
Flow control
• None: Flow Control is done end-to-end by the remote TCP client and the local serial device.
• XON/XOFF: Flow control is performed locally using XON/XOFF. In this case, the remote TCP
client must also support Local Flow Control.
Max receive buffer
Receive buffer size in bytes. If the buffer becomes full, data is discarded until space can be freed
up.
WCB-200 Admin Guide 35 4 Working with the WCB-200
Port control
Disable wireless on LAN connect
(This feature is available only when a device is connected to the WCB-200 via the serial port, and
should only be used when port 1 and the wireless port connect the WCB-200 to the same
network.)
Specifies whether the WCB-200 will forward traffic using port 1 instead of using the wireless port. It
works as follows:
•When port 1 is connected to an Ethernet network, the WCB-200 drops the wireless connection
and sends all traffic via port 1.
•When port 1 is disconnected from the Ethernet network, the WCB-200 attempts to re-establish
the wireless connection via the appropriate station profile. Traffic is then sent on the wireless
port.
Status
Provides an overview of the connection.
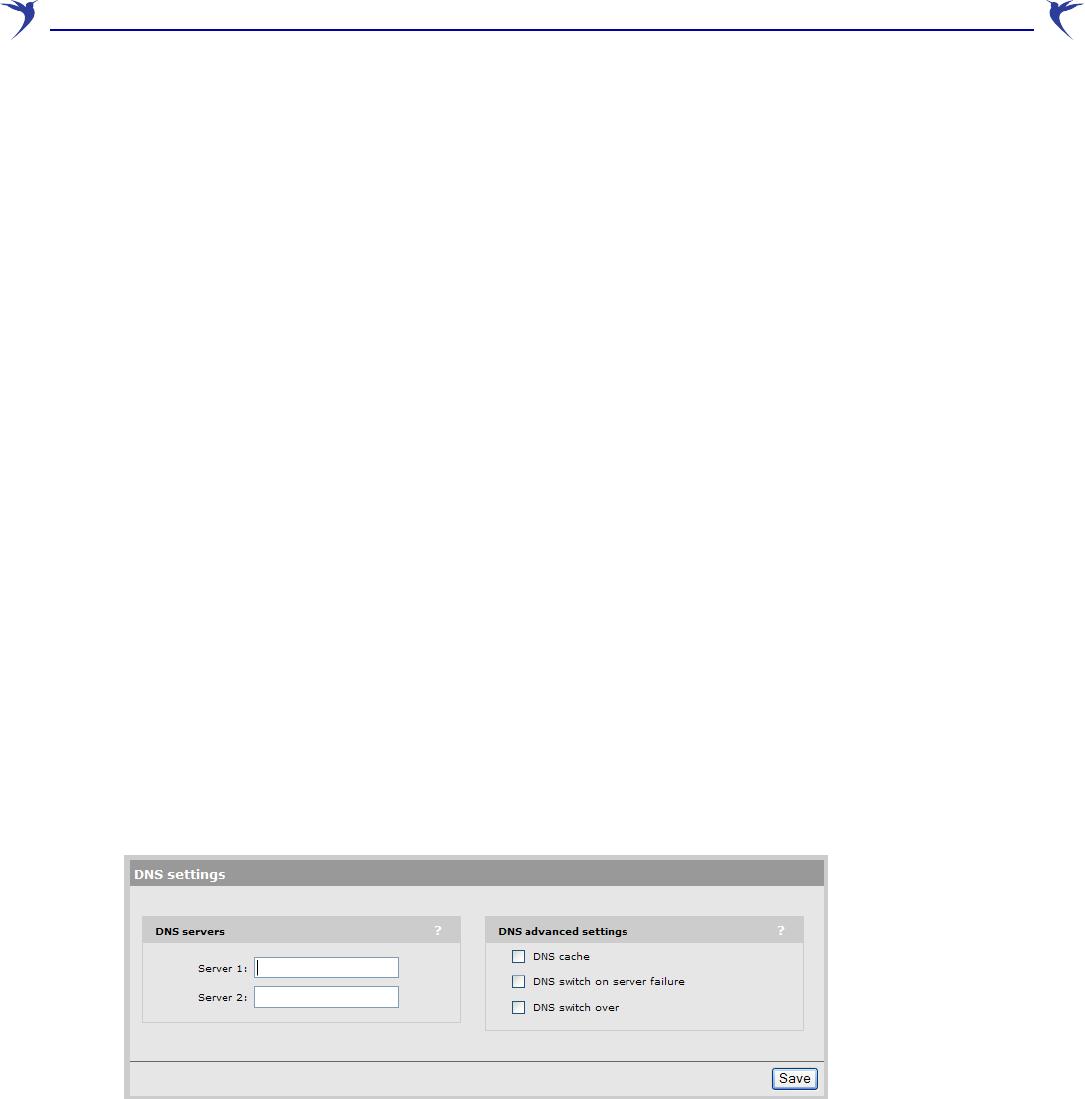
DNS configuration
When the WCB-200 is configured to use the DHCP client, the WCB-200 uses the DNS name
returned by the server. You can override this with static settings if required on the Network > DNS
page.
This page also provides access to advanced DNS functions
DNS servers
Server 1
Specify the IP address of the first DNS server that the WCB-200 will use.
Server 2
Specify the IP address of the second DNS server that the WCB-200 will use.
DNS advanced settings
DNS cache
Enables the DNS cache. Once a host name has been successfully resolved to an IP address by a
remote DNS server, it is stored in the cache. This speeds up network performance, as the remote
DNS server now does not have to be queried for subsequent requests for this host.

WCB-200 Admin Guide 36 4 Working with the WCB-200
The entry stays in the cache until:
•an error occurs when connecting to the remote host
•the time to live (TTL) of the DNS request expires
•the WCB-200 is restarted.
DNS switch on server failure
This setting controls how the WCB-200 switches between the primary and secondary DNS
servers.
•When enabled, the WCB-200 switches servers if the current server replies with a DNS server
failure message.
•When disabled, the WCB-200 switches servers if the current does not reply to a DNS request.
DNS switch over
This setting controls how the WCB-200 switches back to the primary DNS server after it has
switched to the secondary DNS server because the primary was unavailable.
•When enabled, the WCB-200 switches back to the primary server after it becomes available
again.
•When disabled, the WCB-200 switches back to the primary server only if the secondary server
becomes unavailable.
The next two options enable easy logout from the public access network. Users can logout by
pointing their browsers to a host name or IP address.
Ethernet MAC cloning
Enable this option to change the MAC address assigned to the wireless port.
Note: Only one wired device can be connected to the WCB-200 when this feature is
enabled.
Two options are available
• Discovered MAC address: When this option is selected, as soon as the WCB-200 detects a
wired device it re-associates with the current station profile using the wired device's MAC
address.
Because the WCB-200 clones the MAC address of the wired device and assigns it to the
wireless port, it enables remote devices to access the wired device by its MAC address, which
is useful for tracking, security, or management tasks.
• MAC address: When this option is selected, the WCB-200 re-associates with the current
station profile using the specified MAC address.
Limitations
A limitation of this feature is that once the cloned MAC address is used to establish the wireless
connection, the WCB-200 itself no longer has access to the wireless network, and is also not
accessible through the wireless connection. This means that the following features will not work:
•Firmware updates
WCB-200 Admin Guide 37 4 Working with the WCB-200
•Config file backup and restore
•TCP serial feature
•System time with a time server
•DHCP client cannot obtain an IP address via the wireless port.
•A management IP address (if assigned) is not reachable through the wireless port.
Note: Management of the WCB-200 cannot occur through the wireless port but is still
possible through port 1.
Configure Ethernet MAC cloning as follows:
1. Select Wireless > Bridging. The Wireless bridging page opens.
2. Enable the Ethernet MAC cloning using option.
3. Select the appropriate MAC address option.
4. Click Save.
Act like a DHCP relay agent
Certain DHCP servers respond to DHCP requests using the MAC address of the requesting
station. This can cause DHCP requests from client stations connected to the WCB-200 to be
discarded by the AP that the WCB-200 is associated with since the MAC addresses of these client
stations are not known to the AP.
To resolve the problem, enable this option. The WCB-200 will then modify all DHCP requests so
that they appear to come from a DHCP relay agent.
Note: When this option is enabled the AP to which the WCB-200 is associated must
support multiple relays.
Note: When this option is disabled, the WCB-200 modifies all DHCP requests by setting
the broadcast flag to ON.
WCB-200 Admin Guide 38 4 Working with the WCB-200
IP forwarding
Ethernet devices do not send any IP packets at start up will have no entry in the WCB-200's
wireless to MAC translation table. As a result, the WCB-200 will not be able to route incoming traffic
on the wireless port to these devices.
When this option is enabled, the WCB-200 sends an ARP request on port 1 whenever a packet
with unknown destination IP address is received. After receiving an ARP response, the WCB-200
is able to send the packet to the intended target device.
Note: This option is enabled by default, and is automatically activated when upgrading
from a previous release.
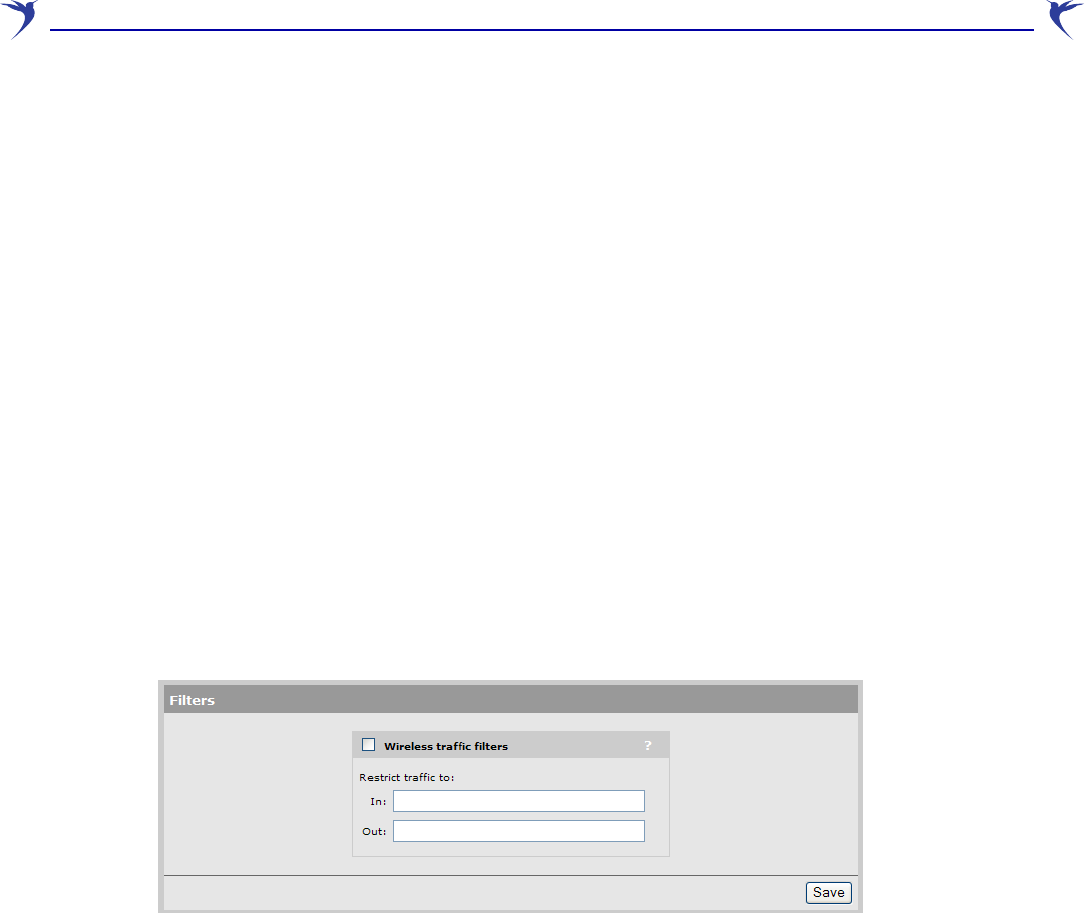
Using wireless security filters to restrict traffic
The WCB-200 features an intelligent bridge that can apply security filters to safeguard the flow of
wireless traffic. You can use filters to limit both incoming and outgoing traffic.
Configure security filters as follows:
1. Select Security > Filters. The Filters page opens.
2. Enable the Wireless traffic filters option.
3. Specify a filter for In and/or Out. Define the filters using standard pcap syntax with the addition
of a few Colubris-specific placeholders. Use the following placeholders to refer to specific MAC
addresses.
•%b - MAC address of the bridge
•%g - MAC address of the default gateway assigned to the WCB-200
•%w - MAC address of wireless port
These placeholders are expanded by the WCB-200 when the filter is activated. Once
expanded, the filter must respect the pcap syntax.
The pcap syntax is documented in the tcpdump man page at:
http://www.tcpdump.org/tcpdump_man.html
4. Click Save.
WCB-200 Admin Guide 39 4 Working with the WCB-200
SNMP
The WCB-200 supports both industry standard and Colubris-specific SNMP MIBs. For complete
information on supported MIBs, see the Colubris Networks MIB Reference Guide.
Configuring SNMP settings
Select Management > SNMP to open the SNMP configuration page. This page enables you to
configure SNMP attributes, agents, traps, and security.
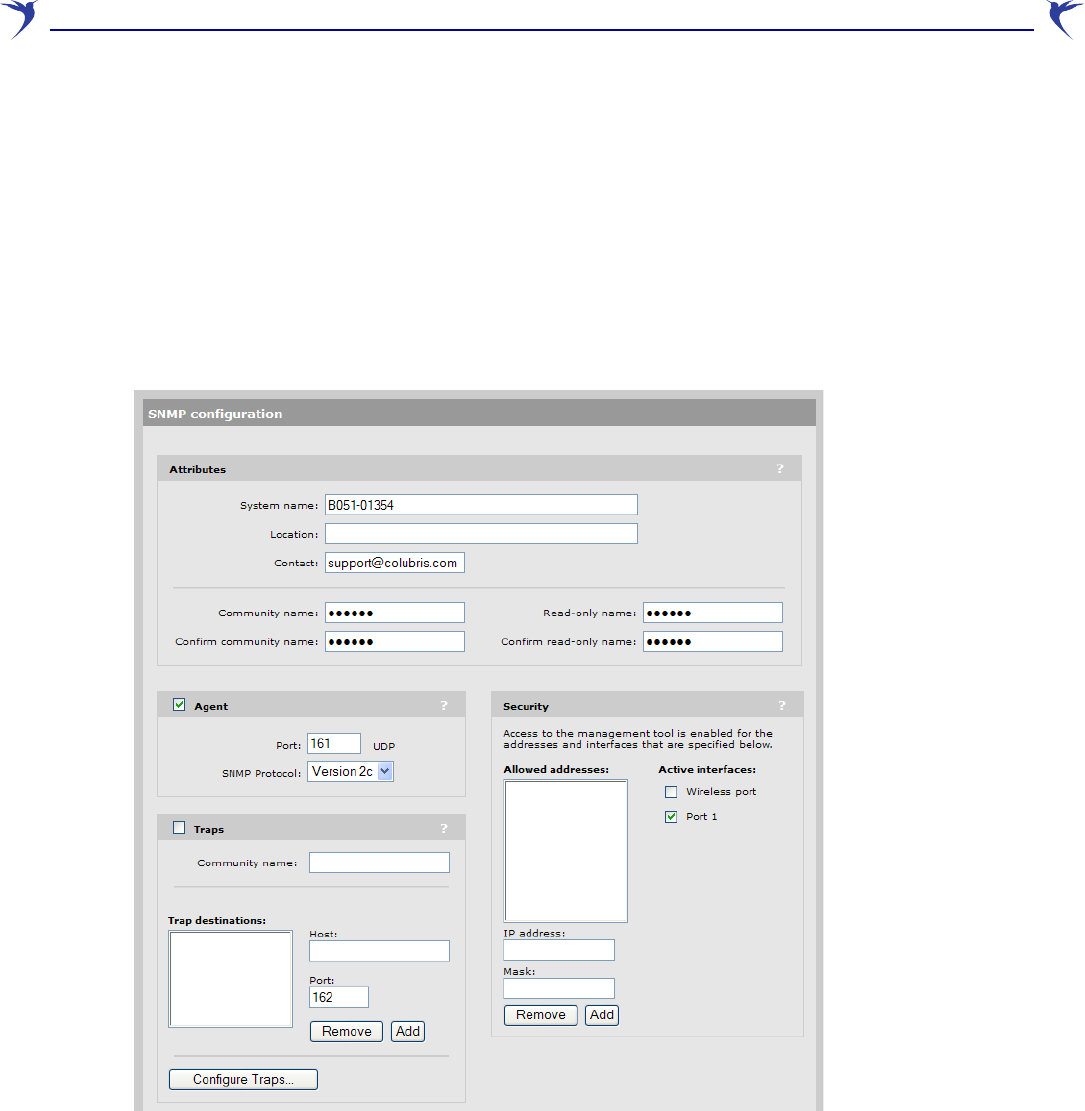
Attributes
• System name: Specify a name to identify the WCB-200. Default is the WCB-200 serial
number.
• Location: Specify a descriptive name for the location where the WCB-200 is installed.
• Contact: Specify information about a contact person for the WCB-200.
• Community name: Specify the password that controls read/write access to SNMP information.
A network management program must supply this password when attempting to set or get
SNMP information from the WCB-200. By default, this is set to private.
• Confirm community name: Reenter the Community name.

WCB-200 Admin Guide 40 4 Working with the WCB-200
• Read-only name: Specify the password that controls read-only access to the SNMP
information. A network management program must supply this password when attempting to
get SNMP information from the WCB-200. By default the Read-only name is public.
• Confirm read-only name: Reenter the Read-only name.
Agent
The SNMP agent is active by default. If you disable the agent the WCB-200 will not respond to
SNMP requests.
•Port: UDP port and protocol the WCB-200 uses to respond to SNMP requests. Default port is
161.
• SNMP Protocol: SNMP version supported. Default is Version 2c which also supports
requests from agents using version 1.
Security
Use these settings to control access to the SNMP interface.
• Allowed addresses: List of IP address from which access to the SNMP interface is permitted.
To add an entry, specify the IP address and appropriate Mask, and then select Add.
When the list is empty, access is permitted from any IP address.
• Active interfaces: Enable the checkboxes that correspond to the interfaces from which to
allow access to the SNMP interface.
Traps
When this feature is enabled, the WCB-200 sends traps to the hosts that appear in the Traps
destinations list.
The WCB-200 supports the following MIB II traps:
•coldStart
•linkUp
•linkDown
•authenticationFailure
In addition, the WCB-200 supports a number of Colubris-specific traps. Select Configure Traps.
For a descriptions of these traps, see the online help.
Managing certificates
Digital certificates are electronic documents that are used to validate the end parties or entities
involved in data transfer. Various features on the WCB-200 make use of certificates for
authentication and/or encryption of data exchanged with peers.
WCB-200 Admin Guide 41 4 Working with the WCB-200
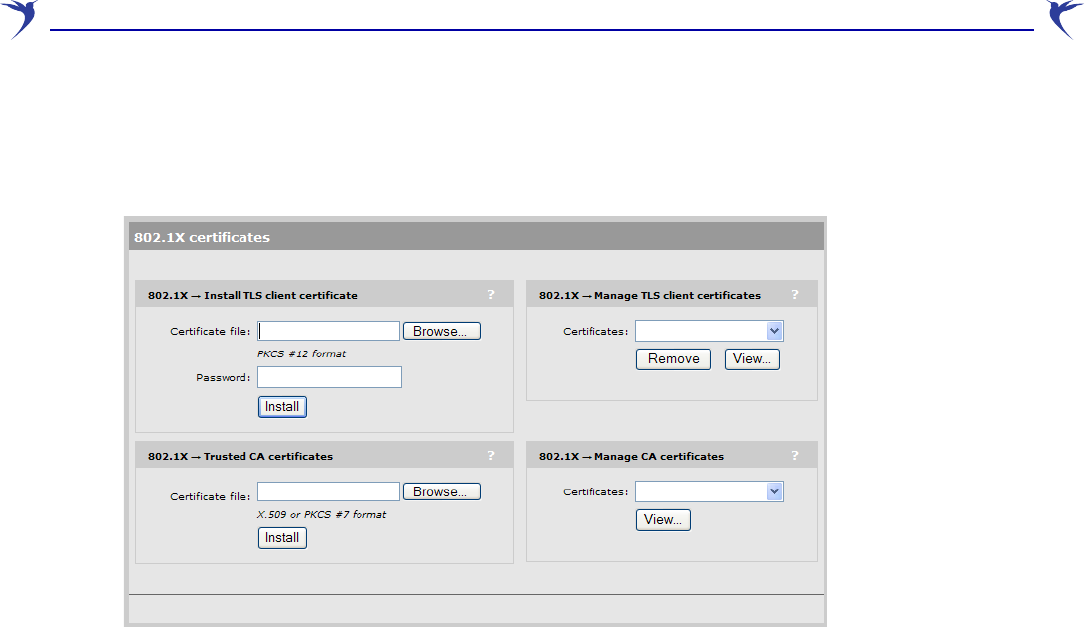
802.1X certificates
Select Security > 802.1X to manage TLS client and trusted CA certificates. These certificates are
required when 802.1X is configured in a station profile.
802.1x — Install TLS client certificate
Use this option to install a certificate for TLS authentication.
The certificate must:
•be in PKCS #12 format.
•contain a private key. (The password is used to access the private key.)
•not have a name that is an IP address. The name should be a domain name containing at least
one dot.
Certificate file
Specify the name of the certificate file or click Browse to select it.
Password
Specify the certificate password.
Install
Click this button to install the certificate.
802.1x — Manage TLS client certificates
The Certificate field shows the contents of the CN field in the certificate. This is the domain name
of the certificate.
Click View to see the contents of the certificate.
802.1x — Trusted CA certificates
The WCB-200 uses the CA certificates to validate the certificates supplied by peers during the
authentication process. Multiple CA certificates can be installed to support validation of peers with
certificates issued by different CAs.
WCB-200 Admin Guide 42 4 Working with the WCB-200
Certificate file
Enter the name of the certificate file or click Browse to select it. CA certificates must be in X.509 or
PKCS #7 format.
Install
Click this button to install the certificate.
802.1x — Manage CA certificates
Use this box to manage the root CA certificate.
Certificate
This box shows the list of installed certificates.
Remove
Select a certificate in the list and click this button to remove it.
View
Select a certificate in the list and click this button to view it.
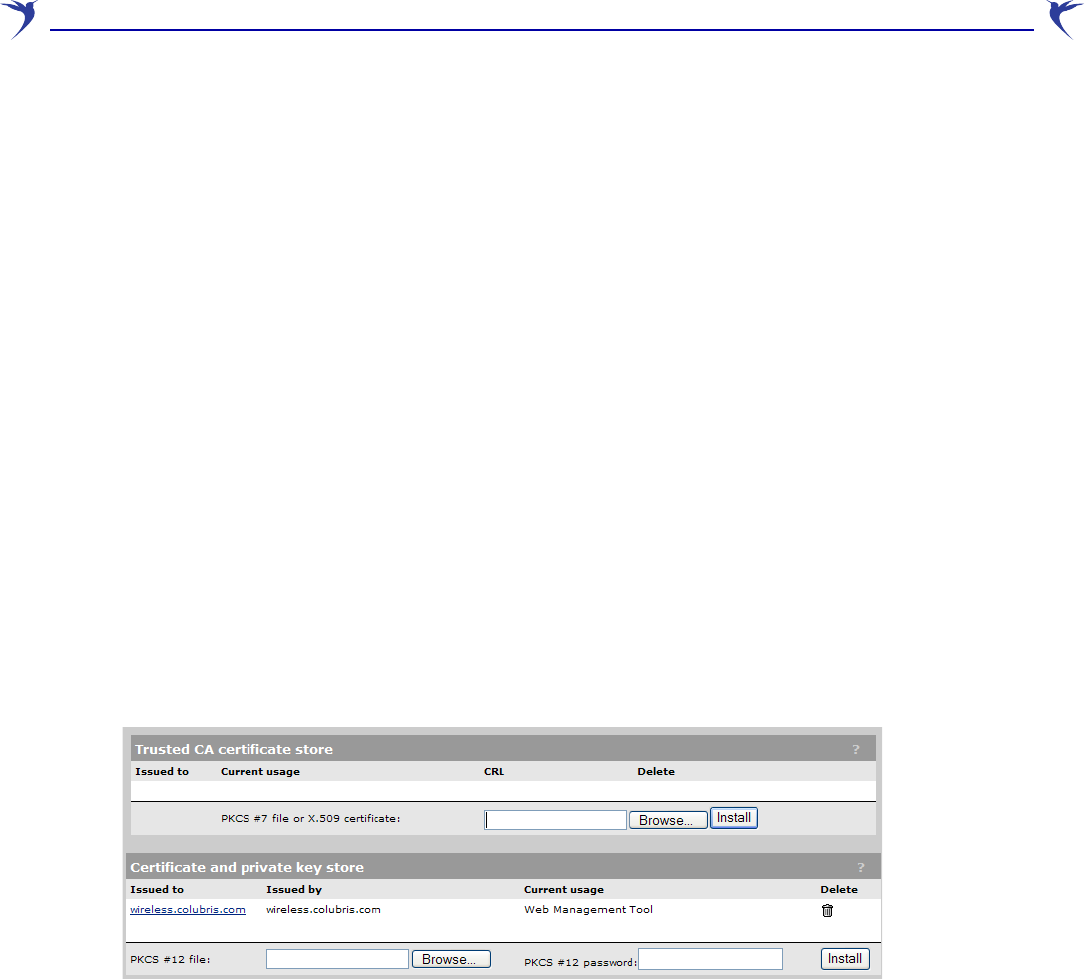
Certificate stores
The certificate stores provide a repository for managing all non-802.1X certificates. To view the
certificate store, select Security > Certificate stores.
Trusted CA certificate store
This list displays all CA certificates installed on the WCB-200. The WCB-200 uses the CA
certificates to validate the certificates supplied by peers during authentication. Multiple CA
certificates can be installed to support validation of peers with certificates issued by different CAs.
The WCB-200 uses the CA certificates to validate certificates supplied by administrators accessing
the WCB-200’s management tool.
The following information is displayed for each certificate in the list:
• Issued to: Name of the certificate holder. Click the name to view the contents of the certificate.
• Current usage: Lists the services that are currently using this certificate.
• CRL: Indicates if a certificate revocation list is bound to the certificate. An X.509 certificate
revocation list is a document produced by a certificate authority (CA) that provides a list of
serial numbers of certificate that have been signed by the CA but that should be rejected.
• Delete: Select to remove the certificate from the certificate store.

WCB-200 Admin Guide 43 4 Working with the WCB-200
Installing a new CA certificate
1. Specify the name of the certificate file or select Browse to choose from a list. CA certificates
must be in X.509 or PKCS #7 format.
2. Select Install to install a new CA certificate.
CA certificate import formats
The import mechanism supports importing the ASN.1 DER encoded X.509 certificate directly or as
part of two other formats:
•PKCS #7 (widely used by Microsoft products)
•PEM, defined by OpenSSL (popular in the Unix world)
•The CRL can be imported as an ASN.1 DER encoded X.509 certificate revocation list directly
or as part of a PEM file.
Certificate and private key store
This list displays all certificates installed on the WCB-200. The WCB-200 uses these certificates
and private keys to authenticate itself to peers.
The following information is displayed for each certificate in the list:
• Issued to: Name of the certificate holder. Select the name to view the contents of the
certificate.
• Issued by: Name of the CA that issued the certificate.
• Current usage: Lists the services that are currently using this certificate.
• Delete: Select to remove the certificate from the certificate store.
Content and
file format Items carried in the file Description
ASN.1 DER encoded
X.509 certificate
One X.509 certificate This is the most basic format
supported, the certificate without any
envelope.
X.509 certificate in
PKCS #7 file
One X.509 certificate Popular format with Microsoft products.
X.509 certificate in
PEM file
One or more X.509 certificate Popular format in the Unix world.
X.509 DER certificate is base64
encoded and placed between
"-----BEGIN CERTIFICATE-----"
and
"-----END CERTIFICATE-----"
lines. Multiple certificates can be
repeated in the same file.
ASN.1 DER encoded
X.509 CRL
One X.509 CRL Most basic format supported for CRL.
X.509 CRL in PEM file One X.509 CRL Same format as X.509 certificate in
PEM format, except that the lines
contain BEGIN CRL and END CRL.

WCB-200 Admin Guide 44 4 Working with the WCB-200
Installing a new private key/public key certificate chain pair
Note: RADIUS EAP certificates must have the X.509 extensions. Information about this is
available in the Microsoft knowledgebase at:
http://support.microsoft.com/kb/814394/en-us
The certificate you install must:
•Be in PKCS #12 format.
•Contain a private key (a password controls access to the private key).
•Not have a name that is an IP address. The name should be a domain name containing at least
one dot. If you try to add a certificate with an invalid name, the default certificate is restored.
The name in the certificate is automatically assigned as the domain name of the WCB-200.
1. Specify the name of the certificate file or select Browse to choose one from a list. Certificates
must be in PKCS #7 format.
2. Specify the PKCS #12 password.
3. Select Install to install the certificate.
Default installed private key/public key certificate chains
The following private key/public key certificate chains are installed by default:
• wireless.colubris.com: Default certificate used by the management tool.
Note: When a web browser connects to the WCB-200 using SSL, the WCB-200 sends only
its own SSL certificate to the browser. This means that if the certificate has been
signed by an intermediate certificate authority, and if the web browser only knows
about the root certificate authority that signed the public key certificate of the
intermediate certificate authority, the web browser does not get the whole certificate
chain it needs to validate the identity of the WCB-200. Consequently, the web
browser issues security warnings.
To avoid this problem, install an SSL certificate on the WCB-200 only if it is directly signed
by the root certificate authority or if you have appended all certificates that make up the
chain.
Consequently, the web browser issues security warnings.
To avoid this problem, make sure that you install the entire certificate chain when you install
a new certificate on the WCB-200.
Note: An SNMP trap is sent to let you know when the WCB-200’s SSL certificate is about
to expire.
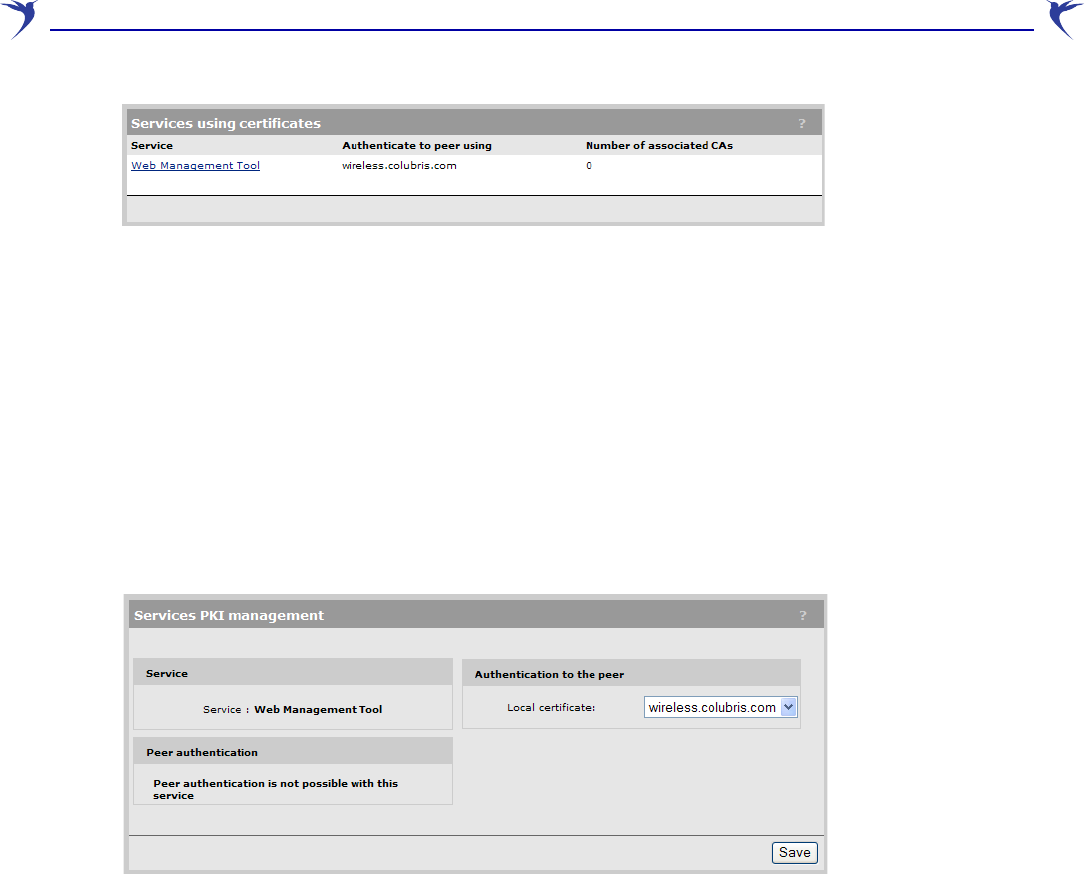
Certificate usage
To see the services that are associated with each certificate, select Security > Certificate usage.
With the factory default certificates installed, the page will look like this:
WCB-200 Admin Guide 45 4 Working with the WCB-200
• Service: Name of the service that is using the certificate. To view detailed information on the
certificate select the service name.
• Authenticate to peer using: Name of the certificate and private key. The WCB-200 is able to
prove that it has the private key corresponding to the public key in the certificate. This is what
establishes the WCB-200 as a legitimate user of the certificate.
• Number of associated CAs: Number of CA certificates used by the service.
Changing the certificate assigned to a service
Select the service name to open the Certificate details page. For example, if you select Web
management tool, you will see:
Under Authentication to the peer, select a new Local certificate and then select Save.
About certificate warnings
Access to the management tool must occur through a secure connection (SSL). Until a certificate
is installed, certificate warnings will appear at login.
To continue to work with the management tool without installing a certificate, proceed as follows: At
the security certificate prompt, in Microsoft Internet Explorer 6, select Yes; in IE 7, select Continue
to this website; in Firefox, select OK. You can also choose to view the Colubris Networks
certificate.
To eliminate these warnings you can purchase a valid SSL certificate (from a source such as
Verisign) that will work with the default configuration of your web browser, and install it on the
WCB-200.
WCB-200 Admin Guide 46 4 Working with the WCB-200
The following is an example of a security warnings displayed by Internet Explorer 7:
Configuration file management
The configuration file contains all the settings that customize the operation of the WCB-200. You
can save and restore the configuration file manually, automatically, or with a tool like cURL.
Select Maintenance > Config file management.
Manual configuration file management
The following options are available for manual configuration file management.
Backup configuration
The Backup configuration group box enables you to back up your configuration settings so that
they can be easily restored in case of failure. You can also use this option if you want to directly edit
the configuration file.

WCB-200 Admin Guide 47 4 Working with the WCB-200
Before you install new firmware, you should always back up your current configuration. Select
Backup to start the process. You are prompted for the location in which to save the configuration
file.
If you specify a Password, the configuration file is protected by encrypting sensitive fields
(example, passwords, secrets, and certificates) with a key based on the password. See also
Restore configuration below.
Note: Even without a password, the certificates are still encrypted but with a key that is
identical on all devices.
Note: The local username and password for the administrator are not saved to the backup
configuration file. If you upload a configuration file, the current username and
password are not overwritten.
Reset configuration
See “Resetting to factory defaults” on page 61.
Restore configuration
The Restore configuration group box enables you to reload a previously saved backup
configuration file.
This feature enables you to maintain several configuration files with different settings, which can be
useful if you must frequently alter the configuration of the WCB-200 or if you are managing several
WCB-200s from a central site.
Use the following steps to restore a saved configuration file.
1. Select Maintenance > Config file management. The Config file management page opens.
2. In the Restore configuration group box under Manual restore, select Browse to navigate to
and select the configuration file that you want to restore.
3. If the configuration file is protected with a password (see Backup configuration) you must
supply the correct password to restore the complete configuration. If you supply an invalid
password, all settings are restored except the certificates.
4. To upload the selected file to the WCB-200, select Restore.
Note: The WCB-200 automatically restarts when the upload is complete.
Scheduled operations
The Scheduled operations group box enables you to schedule unattended backups or
restorations of the WCB-200’s configuration file. See also “Scheduled update” on page 50.
Use the following steps to schedule a backup or restoration of the WCB-200’s configuration file.
1. Select Maintenance > Config file management. The Config file management page opens.
2. At lower right, select the Scheduled operations checkbox.
3. Under Operation, select Backup or Restore.
4. Under Day of week, select Everyday, or select a specific day of the week on which to perform
the backup or restoration.

WCB-200 Admin Guide 48 4 Working with the WCB-200
5. Under Time of day, specify the hour and minute on which to perform the backup or restoration.
Use the format hh mm, where
•hh ranges from 00 to 23
•mm ranges from 00 to 59
6. Under URL, specify the path that leads to the local or remote directory in which to save the
configuration file or from which to load the configuration file. For example
• ftp://username:password@192.168.132.11/new.cfg
• http://192.168.132.11/new.cfg
7. To confirm that the specified URL is correct, select Validate.
8. To commit the schedule that you have configured, select Save.
Managing the configuration file with cURL
Note: This is an advanced topic. It is recommended that you perform configuration file
management as described in the immediately-previous sections Manual
configuration file management or Scheduled operations.
You can perform configuration-file-related tasks using the free tool cURL (http://curl.haxx.se/),
version 7.1.0 or higher.
The following cURL commands shows you how to manage the configuration file. The following
setup is assumed:
•IP address of the port 1 is 24.28.15.22.
•Management access to the port 1 is enabled.
•Configuration file is new.cfg.
These examples are not secure—that is, no certificates are used for authentication—but data traffic
is encrypted.
Note: To secure the connection with the WCB-200 using certificates, use the --cacert
option to specify where the CA certificates are located on your computer. You must
also specify the host name wireless.colubris.com instead of using an IP address.
The host name must be resolved either by using a DNS server or using the hosts file
on your computer.
Note: The first time an WCB-200 is started up after a factory reset, the end user license
agreement must be accepted and the country of operation must be set. This must be
done manually or by modifying the sample cURL scripts in this section.
Uploading the configuration file
1. Prepare the WCB-200 to receive the login.
curl -s -k "https://24.28.15.22/home.asp"
2. Log in to the management interface.
curl -s -k --dump-header cookie.txt "https://24.28.15.22/goform/
Logout" -d username=admin -d pw=admin

WCB-200 Admin Guide 49 4 Working with the WCB-200
3. Prepare the WCB-200 to receive the configuration update.
curl -s -k --cookie cookie.txt "https://24.28.15.22/script/
config_init.asp"
4. Upload the configuration file.
curl -s -k --cookie cookie.txt -F config=@new.cfg -F backup=Restore
"https://24.28.15.22/goform/ScriptUploadConfig"
5. Reset the WCB-200 to activate the new configuration.
curl -s -k --cookie cookie.txt "https://24.28.15.22/script/reset.asp"
Downloading the configuration file
1. Prepare the WCB-200 to receive the login.
curl -s -k "https://24.28.15.22/home.asp"
2. Log in to the management interface.
curl -s -k --dump-header cookie.txt "https://24.28.15.22/goform/
Logout" -d username=admin -d pw=admin
3. Prepare the configuration file for download.
curl -s -k --cookie cookie.txt "https://24.28.15.22/goform/
FormBackupConfig" -d backup=Backup
4. Download the configuration file.
curl -s -k --cookie cookie.txt "https://24.28.15.22/download/new.cfg"
-o new.cfg
5. Log out.
curl -s -k --cookie cookie.txt “https://24.28.15.22/goform/Logout -d
logout=Logout
Resetting the configuration to factory defaults
See also “Resetting to factory defaults” on page 61.
1. Prepare the WCB-200 to receive the login.
curl -s -k "https://24.28.15.22/home.asp"
2. Log in to the management interface.
curl -s -k --dump-header cookie.txt "https://24.28.15.22/goform/
Logout" -d username=admin -d pw=admin
3. Reset configuration to factory defaults.
curl -s -k --cookie cookie.txt "https://24.28.15.22/goform/
ScriptResetFactory?reset=Reset+to+Factory+Default"
4. Reset the WCB-200 to activate the new configuration.
curl -s -k --cookie cookie.txt "https://24.28.15.22/script/reset.asp"
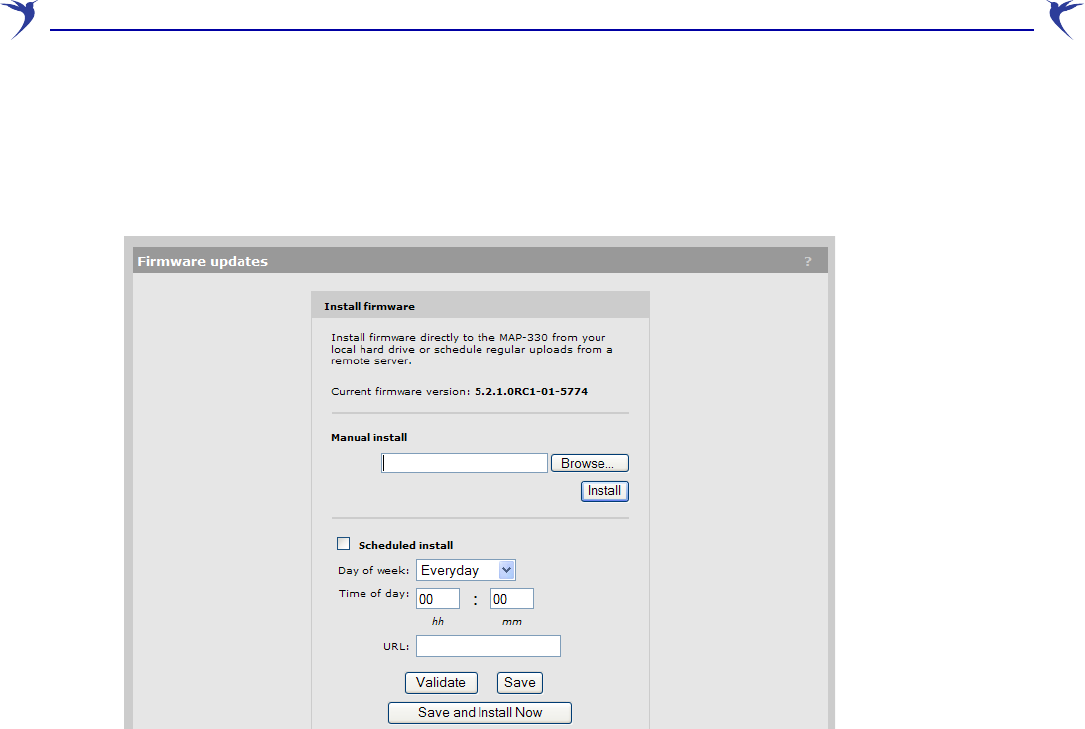
WCB-200 Admin Guide 50 4 Working with the WCB-200
Firmware updates
Caution: Be sure to check for update issues in the new firmware Release Notes.
To update WCB-200 firmware, select Maintenance > Firmware updates.
Note: Configuration settings are preserved during firmware upgrades.
Immediate update
To update the WCB-200 firmware now, Browse to the firmware file (extension .cim) and then select
Install.
Note: At the end of the firmware-update process, the WCB-200 automatically restarts,
causing all users to be disconnected. Once the WCB-200 resumes operation, all
users must reconnect.
Scheduled update
The WCB-200 can automatically retrieve and install firmware from a local or remote web site
identified by its URL.
To schedule firmware installation, follow this procedure:
1. Enable Scheduled install.
2. For Day of week select a specific day or Everyday and set Time of day.
3. For URL, specify an ftp or http address like this:
• ftp://username:password@192.168.132.11/newfirmware.cim
• http://192.168.132.11/newfirmware.cim
4. Validate the URL.
5. To commit the schedule, select Save.

WCB-200 Admin Guide 51 4 Working with the WCB-200
6. Or, to commit the schedule and also update the firmware immediately, select Save and Install
Now.
Note: At the end of the firmware-update process, the WCB-200 automatically restarts,
causing all users to be disconnected. Once the WCB-200 resumes operation, all
users must reconnect.
Note: Before a scheduled firmware update is performed, only the first few bytes of the
firmware file are downloaded to determine if the firmware is newer than the current.
If it is not, the download stops and the firmware is not updated at this time.
Updating firmware with cURL
Note: This is an advanced topic. It is recommended that you upgrade firmware as
described in the immediately-previous sections Immediate update or Scheduled
update.
You can perform firmware-update-related tasks using the free tool cURL (http://curl.haxx.se/),
version 7.1.0 or higher.
The following cURL commands shows you how to manage the firmware file. The following setup is
assumed:
•IP address of the port 1 is 24.28.15.22.
•Management access to port 1 is enabled.
•Firmware file is WCB.cim.
Upload the firmware as follows:
1. Prepare the WCB-200 to receive the login.
curl -s -k "https://24.28.15.22/home.asp"
2. Log in to the management interface.
curl -s -k --dump-header cookie.txt "https://24.28.15.22/goform/
Logout" -d username=admin -d pw=admin
3. Prepare the WCB-200 to receive the firmware update.
curl -s -k --cookie cookie.txt "https://24.28.15.22/script/
firmware_init.asp"
4. Upload the firmware. Once the upload is complete the WCB-200 will automatically restart.
curl -s -k --cookie cookie.txt -F firmware=@WCB.cim -F backup=Install
"https://24.28.15.22/goform/ScriptUploadFirmware"

WCB-200 Admin Guide 52 4 Working with the WCB-200


WCB-200 Admin Guide 54 Regulatory information
Regulatory information
The information in this Regulatory information appendix applies to the WCB-200.
USA: Federal Communications Commission (FCC)
The WCB-200 complies with Part 15 of FCC Rules. Operation of the WCB-200 in a system is
subject to the following two conditions:
•This device may not cause harmful interference.
•This device must accept any interference that may cause undesired operation.
This equipment is compliant with FCC Part 15 DFS (Radar Avoidance).
Caution! Exposure to Radio Frequency Radiation
The radiated output power of the WCB-200 is far below the FCC radio frequency exposure limits.
Nevertheless, the WCB-200 should be used in a manner that minimizes the potential for human
contact during normal operation. When using this device in combination with Colubris Networks
antenna products, a certain separation distance between the antenna and nearby persons has to
be kept to ensure RF exposure compliance.
When an external antenna is connected to the WCB-200, the antenna shall be placed in a manner
that minimizes the potential for human contact during normal operation. To avoid the possibility of
exceeding the FCC radio frequency exposure limits, human proximity to the antenna shall not be
less than 20 cm (8 inches) during normal operation.
When no external antenna is connected, the RF output power of the WCB-200 is far below the FCC
radio frequency exposure limits. Nevertheless, it is advised to use the WCB-200 in a manner that
minimizes human contact during normal operation.
Interference Statement
The WCB-200 has been tested and found to comply with the limits for a digital device, pursuant to
Part 15 of the FCC Rules. These limits are designed to provide reasonable protection against
harmful interference in a residential installation.
The WCB-200 generates, uses, and can radiate radio frequency energy. If not installed and used in
accordance with the instructions, it may cause harmful interference to radio communications.
However, there is no guarantee that interference will not occur in a particular installation.
If the WCB-200 causes harmful interference to radio or television reception, which can be
determined by turning the WCB-200 on and off, the user is encouraged to try to correct the
interference by one or more of the following measures:
•Reorient or relocate the receiving antenna
•Increase the distance between the WCB-200 and the receiver
•Connect the WCB-200 to an outlet that is on a different circuit than the circuit to which the
receiver is connected
•Consult your dealer or an experienced radio/TV technician for help
Colubris Networks Inc. is not responsible for any radio or television interference caused by
unauthorized modification of the WCB-200, or the substitution or attachment of connecting cables
and equipment other than that specified by Colubris Networks Inc.

WCB-200 Admin Guide 55 Regulatory information
Correction of interference caused by such unauthorized modification, substitution, or attachment is
the responsibility of the user.
Canada: Industry Canada (IC)
This digital apparatus complies with Industry Canada Standard ICES-003 and
RSS210 Annex 9.
Cet appareil numérique est conforme à la norme NMB-003 et CNR-210 Annexe 9 d'Industrie
Canada.
This device may not cause interference, and this device must accept any interference, including
interference that may cause undesired operation of the device.
This device is designed to operate with the antennas listed below, which have a maximum gain of
5.6 dBi @ 2.4 GHz, 6.0 dBi @ 5.3 GHz, and 6.0 dBi @ 5.7 GHz. Antennas not included in this list
or having a gain that is greater than those listed are strictly prohibited for use with this device. The
required antenna impedance is 50 ohms.
To reduce potential radio interference to other users, antenna type and gain should be chosen so
that the equivalent isotropically radiated power (EIRP) is not more than that permitted for
successful communication.
Europe
•Colubris Networks products sold in Europe use a technique called Dynamic Frequency
Selection (DFS) to automatically select an operating channel. The European
Telecommunications Standard Institute (ETSI) requires that 802.11a devices use DFS to
prevent interference with radar systems and other devices that already occupy the 5 GHz band.
In order to comply with specific spectrum allocations, Colubris Networks products must be set
to the correct country of operation prior to use. Failure to do so may violate national
requirements.
•Les produits de Colubris Networks vendus en Europe utilisent une technique dénommée
Sélection de fréquence dynamique (Dynamic Frequency Selection, DFS) pour qu’un canal de
fonctionnement soit automatiquement choisi. L'ETSI (European Telecommunications Standard
Institute) exige que les périphériques 802.11a utilisent DFS pour empêcher toute interférence
avec les systèmes radar et d’autres périphériques qui occupent déjà la bande des 5 GHz.
•Gli apparati di Colubris Networks vendute in Europa impiegano una tecnologia denominata
Selezione di frequenza dinamica (Dynamic Frequency Selection, DFS) per la selezione
Manufacturer
Part Number
Gain
2.4 GHz 5.3 GHz 5.7 GHz
Nearson T614AH-2.4/5.X-S 4 dBi 5 dBi 4.5 dBi
Cushcraft S5153WBPX36RS
M
n/a 6 dBi 6 dBi
Mini-Box Outdoor Omni 5.5 dBi n/a n/a
Centurion WTS2450-RPSMA 2.5 dBi 3.0 dBi 3.4 dBi

WCB-200 Admin Guide 56 Regulatory information
automatica del canale operativo. L'Istituto Europeo di normalizzazione delle telecomunicazioni
(European Telecommunications Standard Institute, ETSI) sancisce che tutti i dispositivi
802.11a devono usare la DFS per prevenire eventuali interferenze con sistemi radar ed altri
dispositivi che già occupano la banda di 5 GHz.
•Die in Europa vertreibenen Colubris Networks verwenden die so genannte dynamische
Frequenzauswahl (Dynamic Frequency Selection, DFS), um automatisch einen gültigen
Betriebskanal auszuwählen. Das European Telecommunications Standard Institute (ETSI)
shreibt vor, dass 802.11a-Geräte DFS verwenden, um Störungen in Radarsystemen und
anderen Geräten, die das 5-GHz Band verwenden, zu vermeiden.
•Las unidades Colubris Networks vendidas en Europa usan una técnica llamada Selección
dinámica de frecuencias (Dynamic Frequency Selection, DFS) para seleccionar
automaticamente un canal de operación. El Instituto Europeo de Normas de
Telecomunicaciones (European Telecommunications Standard Institute, ETSI) requiere que los
dispositivos 802.11a usen DFS para evitar las interferencias con sistemas de radar y otros
dispositivos que ya ocupan la banda de 5 GHz.
•Products labeled with the CE mark comply with EMC Directive 89/336/EEC and the Low
Voltage Directive 72/23/EEC, implying conformity to the following European Norms.
•Tous les produits portant la marque CE sont conformes à la directive EMC (89/336/EEC) et à la
directive sur les basses tensions (Low Voltage Directive - 72/23/EEC) qui impliquent la
conformité aux normes de la Commission de la Communauté Européenne.
•Tutti i prodotti con il marchio CE sono conformi alle direttive “Compatibilità elettromagnetica”
(EMC Directive - 89/336/EEC) e “Bassa tensione” (Low Voltage Directive - 73/23/EEC) così
rispettando le norme della Commissione della Comunità Europea.
•Produkte mit der CE-Kennzeichnung erfüllen die EMC-Richtlinie (89/336/EEC) sowie die
Niederspannungsrichtlinie (72/23/EEC), implizierend die Erfüllung der Normen der EU-
Kommission.
•Todos los productos con la marca CE cumplen con la directiva de compatibilidad
electromagnética EMC (89/336/EEC) y la directiva de baja tensión (72/23/EEC), que implica
conformidad con las normas de la Comisión de la Unión Europea.
•Products labeled with the CE 0470 mark and optional alert sign “!” contain a radio transmitter
that complies with the R&TTE Directive 1999/5/ED, implying conformity to the following
European Norms.
•Les produits portant la marque d’alerte CE 0470 avec la marque ‘!’ contiennent un émetteur
radio conforme à la directive R&TTE (1999/5/EC) qui implique la conformité aux normes de la
Commission de la Communauté Européenne.
•I prodotti che recano l'avvertenza CE 0470 o CE contengono un trasmettitore radio conforme
alla Direttiva R&TTE (1999/5/EC) emessa dalla Commissione della Comunità Europea.
Funkprodukte mit der CE 0470 und der CE-Kennzeichnung ‘!’ enthalten einen Funktransmitter, der
die von der Kommision der EU verabschiedete Richtlinie R&TTE (1999/5/EC) erfüllt.
Los productos con la marca CE 0470 con la Alerta CE ‘!’ contienen un tranmisor de radio que
cumple con la Directiva R&TTE (1999/5/EC) emitada por la Comisión Europea.
•EN 60950 (IEC60950): Product Safety
•EN 300328: Radio LAN equipment operating in the 2.4 GHz band
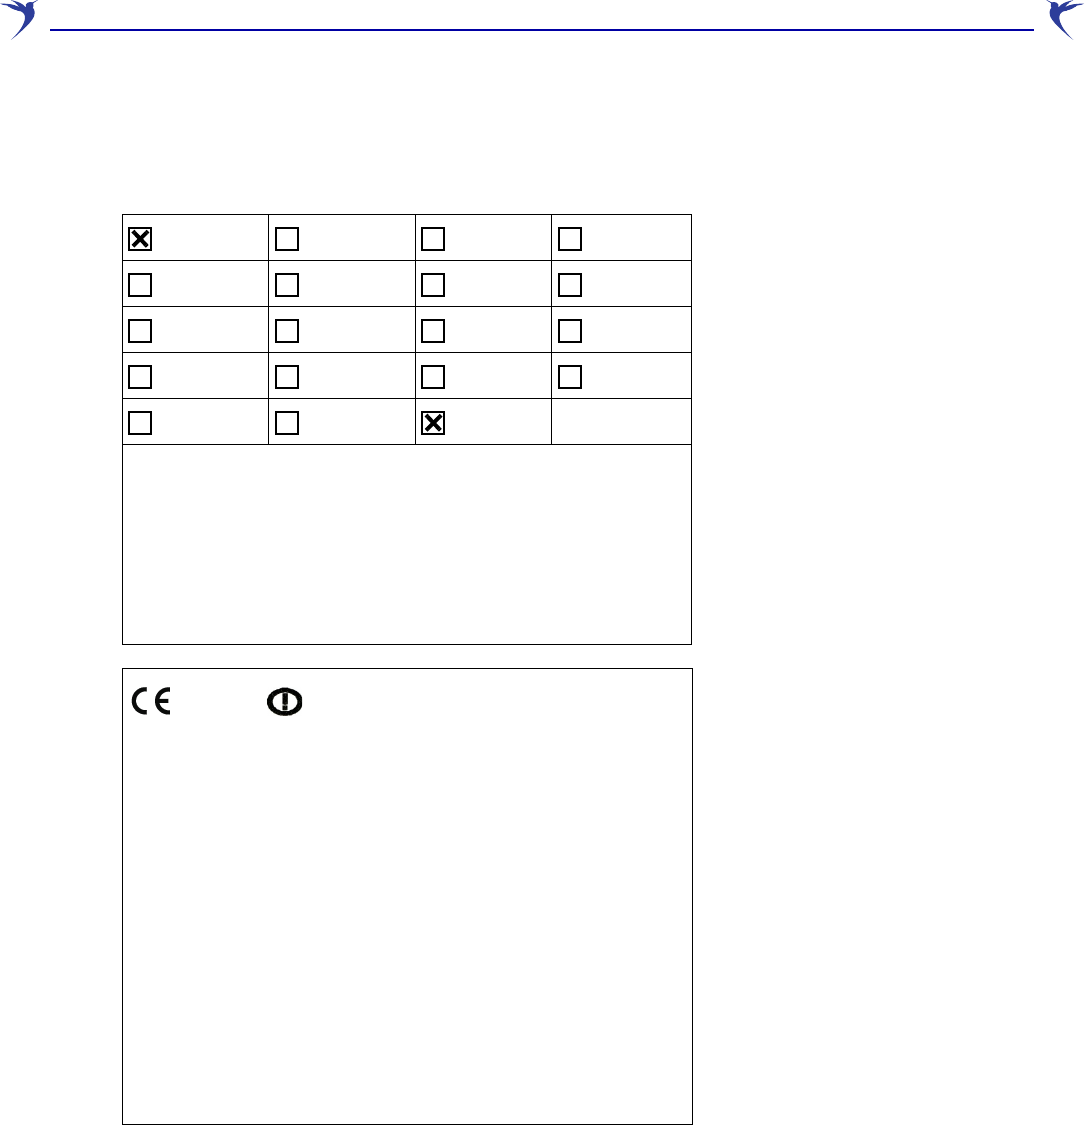
WCB-200 Admin Guide 57 Regulatory information
•EN301893: Radio LAN equipment operating in the 5 GHz band
•ETS 300826 and/or ETS 301489-17: General EMC requirements for radio equipment
A B DK FI
D GR IRL I
LI LUX NL N
P E S CH
IS GB FR
EU member states with restrictive use for this product are crossed out.
Les états membres de l’Union Européenne avec utilisation restrictive de ce
produit sont rayés.
Mitgliedsstaaten der EU mit eingeschrankten Nutzungsrechten für dieses
Produkt sind herausgestrichen.
Gli Stati membri nella Comunità Europea (EU) con restrizioni sull'uso di questi
prodotti sono contrassegnati di seguito.
0470
Important Notice
Low power radio LAN product operating in 5 GHz band for Home and Office
environments. Selection of proper country of operation satisfies national
requirements.
Notice Importante
Produit réseau local radio basse puissance opérant dans la bande fréquence
5 GHz pour les environnements bureaucratiques et résidentiels. Merci de vous
référer au manuel pour les détails des restrictions.
Wichtige Mittellung
Low Power FunkLAN Produkt für den Home- und Office-Bereich, das im 5 GHz
Band arbeitet. Weitere informationen über bezüglichen Einschrankungen finden
Sie im Datanblatt/Handbuch.
Nota Importante
Apparati Radio LAN a bassa potenza, operanti a 5 GHz, per ambienti domestico ed
ufficio. Fare riferimento alla Guida d'Utente (User Guide) per avere informazione
dettagliata sulle restrizioni.

WCB-200 Admin Guide 58 Regulatory information
Information for the user
This document provides regulatory information for the WCB-200. This is a wireless network
product based on the IEEE 802.11 standards for wireless LANs defined and approved by the
Institute of Electrical and Electronics Engineers. Products designed according to the IEEE 802.11a
standard use Orthogonal Frequency Division Multiplexing (OFDM) radio technology. Products
designed according to the IEEE 802.11b standard use Direct Sequence Spread Spectrum (DSSS)
radio technology. These products are designed to be interoperable with any other wireless product
that complies with the corresponding standard.
Wireless Fidelity (Wi-Fi) certification is defined by the WECA Wireless Ethernet Compatibility
Alliance.
Health information
The WCB-200, like other radio devices, emits radio frequency electromagnetic energy. The level of
energy emitted by the WCB-200 is much less than the electromagnetic energy emitted by other
wireless devices, such as mobile phones.
Because the WCB-200 operates within the guidelines found in radio frequency safety standards
and recommendations, Colubris Networks believes that the WCB-200 is safe for use by
consumers. These standards and recommendations reflect the consensus of the scientific
community and result from deliberations of panels and committees of scientists who continually
review and interpret the extensive research literature.
In some situations or environments, use of the WCB-200 may be restricted by a proprietor of a
building or responsible representatives of an organization. For example, these situations may
include using the WCB-200
•On board airplanes
•In any other environment where the risk of interference to other devices or services is
perceived or identified as harmful
If you are uncertain about the policy that applies to the use of wireless devices in a specific
organization or environment (for example, airport) you are encouraged to ask for authorization to
use the WCB-200 prior to turning it on.
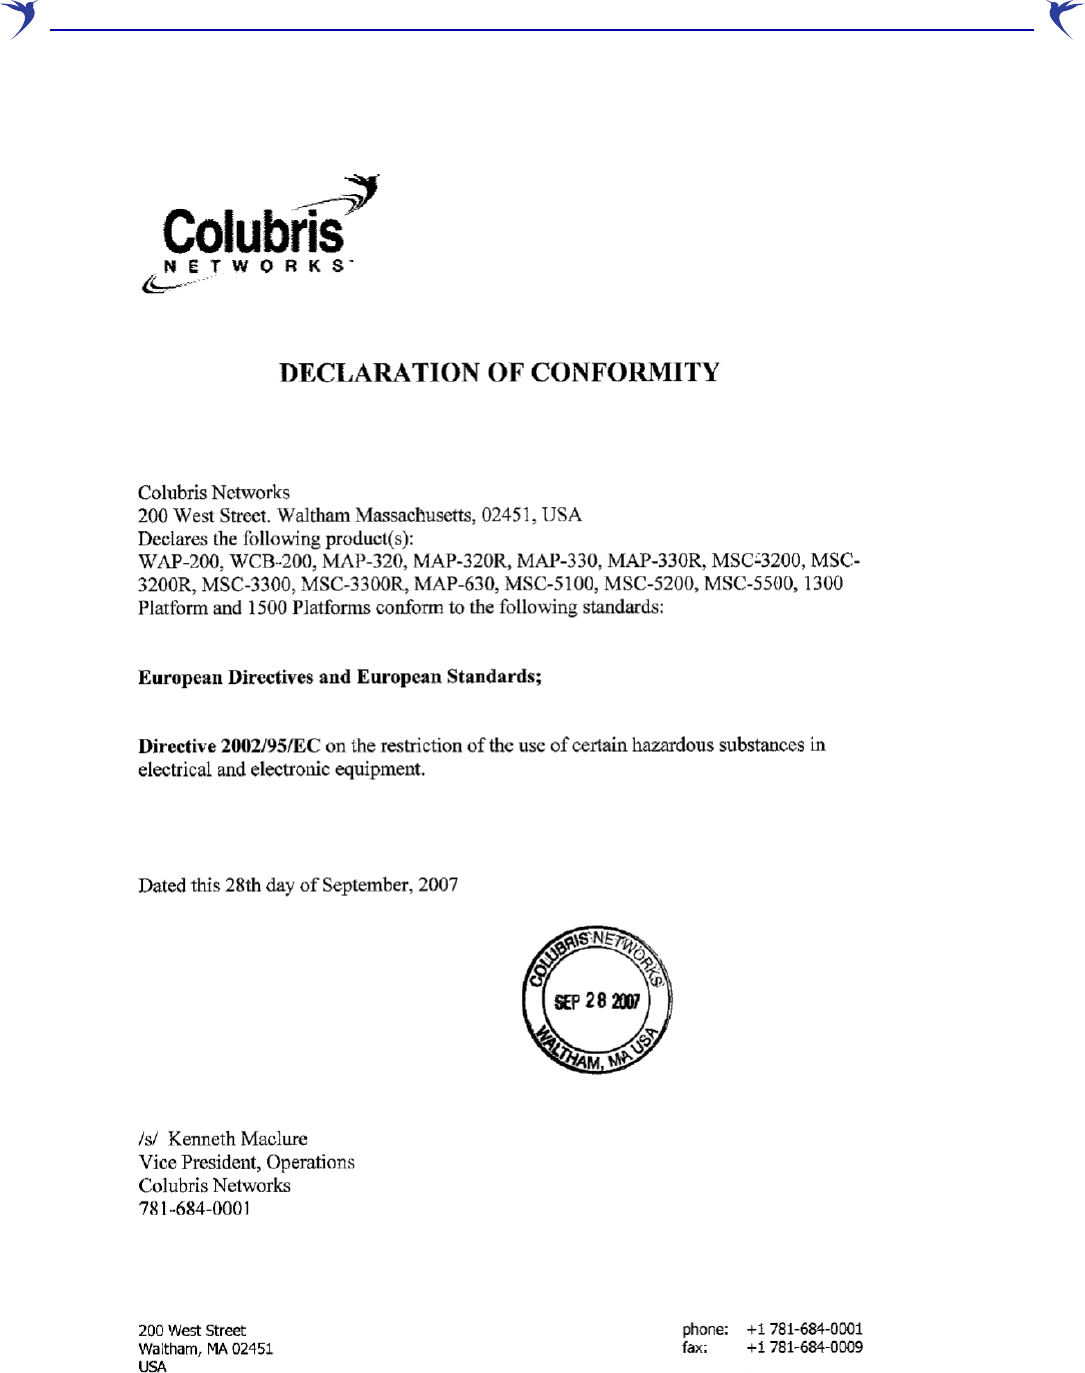
WCB-200 Admin Guide 59 Regulatory information
Declarations of conformity

WCB-200 Admin Guide 60 Regulatory information
Colubris Networks
200 West Street, Waltham, Massachusetts 02451, USA
Declares that the WCB-200 conforms to the following standards:
European Directives and European Standards
North American Standards
Dated this 28th day of September, 2007
John Czyzewicz
Principle Regulatory Engineer
Colubris Networks
•EMC Directive 89/336 EEC
•Low Voltage Directive 73/23 EEC
•Radio and Telecommunication Terminal
Equipment Directive 1999/5/EEC
•EN 60950-1 Safety
•EN 300 328 V1.3.1 Data Transmission equipment operating in the 2.4 GHz
ISM band
• 301 893 V1.2.3 5 GHz high performance RLAN
•EN 301 489-1 V1.4.1 EMC Standard for radio equipment and services; Part 1
•EN 301 489-17 V1.2.1 EMC Standard for radio equipment and services; Part
17; Specific conditions for 2.4 GHz wideband
transmission systems and 5 GHz high performance
RLAN equipment
•FCC Part 15-Subpart C-Title 47
•FCC Part 15-Subpart E-Title 47
•FCC Part 15-Subpart B Radiated Emission
•UL60950-1, CAN/CSA C22.2
No. 60950-1-03
Safety

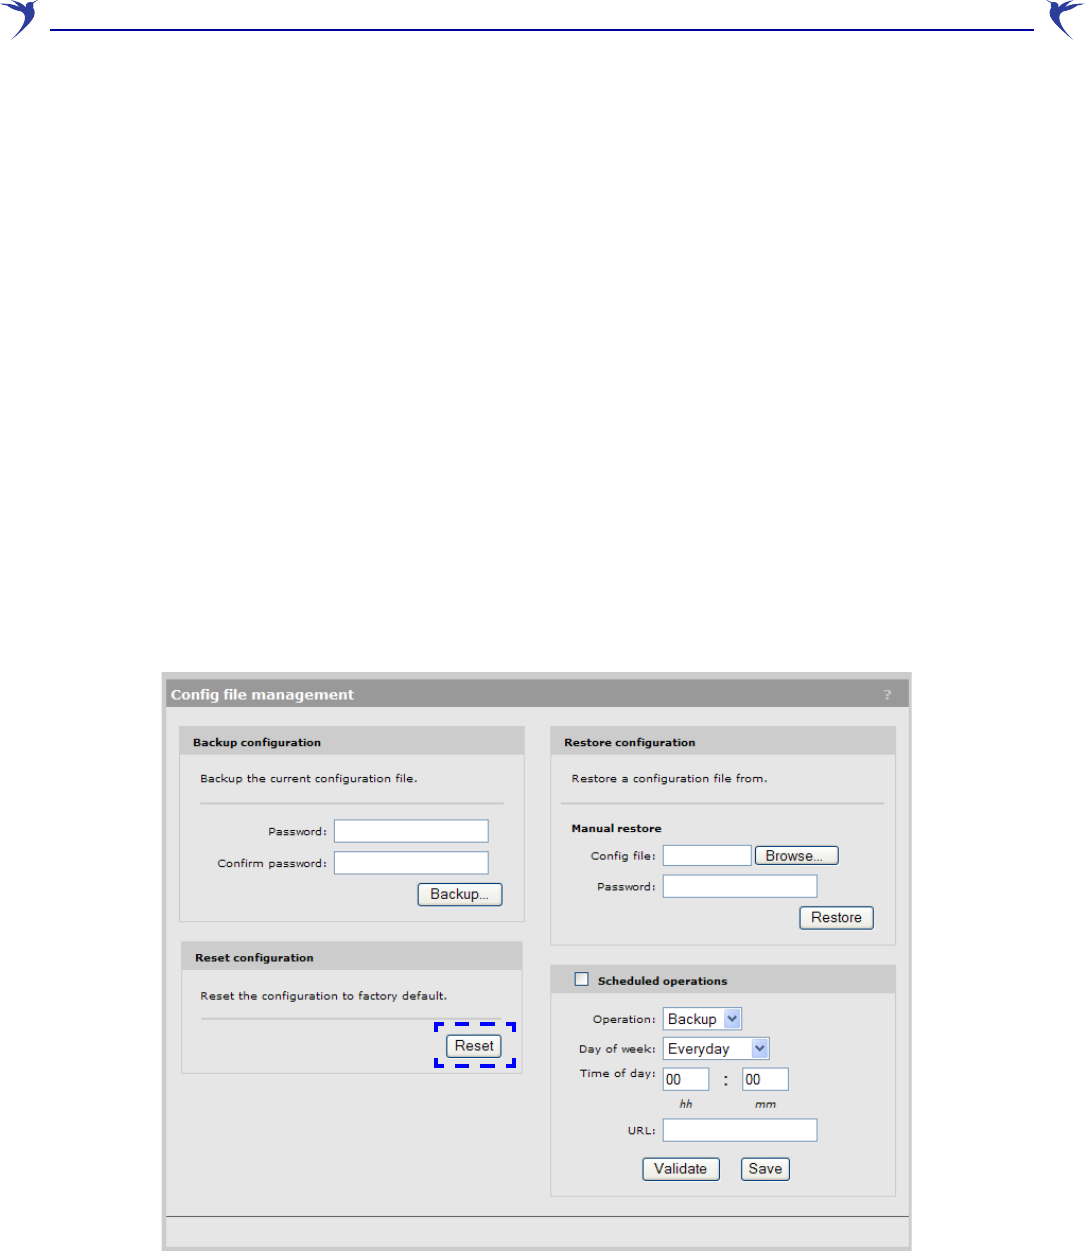
WCB-200 Admin Guide 62 Resetting to factory defaults
Introduction
To force a WCB-200 into its factory default state, follow the procedures in this section.
Caution: Resetting an WCB-200 to factory defaults deletes all configuration
settings, resets the administrator username and password to admin,
enables the DHCP client on port1, sets the IP address of the port(s) to
192.168.1.1.
Using the reset switch
Using a tool such as a paper clip, press and hold the reset switch for a few seconds until the front
status lights flash three times.
Using the management tool
1. Launch the management tool (default https://192.168.1.1).
2. Select Maintenance > Config file management.
3. Under Reset configuration, click Reset.