Hisense Communication HISENSEC306 CDMA 1X Mobile TelePhone User Manual C306
Hisense Communication Co., Ltd. CDMA 1X Mobile TelePhone C306
User Manual

CDMA 1X Mobile TelePhone
HS-C306
User’s Manual

2
CONTENTS
Safety information………………………………….5
Welcome To Your C306 ........................................... 4
Part name and functions................................... 4
Performing basic functions .............................. 7
Menu Map........................................................ 8
Understanding screen icons ........................... 10
1 GETTING STARTED......................................... 12
Installing your Battery ................................... 12
Caring for the battery..................................... 13
2 MAKING AND RECEIVING CALLS............... 15
Making a call.................................................. 15
Answering a call ............................................ 16
Dealing with missed calls .............................. 17
Erase All Recent Call List.............................. 19
Setting up speed dial ...................................... 19
Supp. Services................................................ 20
Silencing an incoming call............................. 21
Adjusting the volume during a call................ 21
Locking the keypad........................................ 22
Emergency numbers....................................... 23
3 ENTERINGL ETTERS, NUMBERS, AND
SYMBOLS............................................................. 24
Text entry modes............................................ 24
4 STORING CONTACTS...................................... 29
Saving a phone number.................................. 29
Saving email address...................................... 30
Editing or erasing a contact............................ 31
3
Editing a phone number................................. 31
Finding contact information........................... 32
Viewing Memory Status................................. 33
5 SENDING AND RECEIVING TEXT MESSAGES
............................................................................... 34
Sending text messages ................................... 34
Receiving text messages ................................ 36
Erasing messages ........................................... 37
Setting message alerts.................................... 38
Sending and editing preformatted messages.. 38
Multisending a message................................. 39
Viewing multisend reports ............................. 40
6 CUSTOMIZING YOUR PHONE....................... 41
Setting vibration mode................................... 41
Keypad Lock.................................................. 42
Adjusting volume........................................... 42
Alert Type ...................................................... 43
Setting the Ringer Type.................................. 43
Personalizing the screen................................. 44
Setting Alerts.................................................. 46
Creating a secure environment....................... 46
7 USING EXTRAS................................................ 50
Stopwatch....................................................... 50
Alarm ............................................................. 50
Scheduler........................................................ 51
Calculator....................................................... 52
8 PLAYING GAMES ............................................ 54
9 GETTING HELP ................................................ 56
4
Customer support........................................... 56
10 SAR INFORMATION ...................................... 57
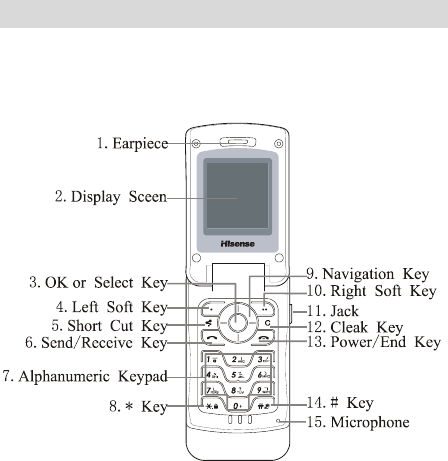
Welcome To Your C306
Part name and functions

5
Name Functions
1.Earpiece Hear voices here during a
talk
2. Display Screen Display information
3.OK or Select key
From the Home Screen,
press to enter Main Menu.
Within a menu or a
function, press to choose a
menu or accept an
operation.
4.Left soft keys From the Home Screen,
press to enter Contacts.
Within a menu, press to
return to previous display.
5.Shortcut Key Enter some menu directly

6
6.Send/Receive key Dials a number or
answers a call. Press to
view “Dialed Numbers”
from idle screen.
7.Alphanumeric
Keypad Enter numbers, letters, or
symbols. Press 0 key to
enter ‘+’ from idle screen
8.* key
From idle screen, press and
hold to lock your phone.
You need to press 1,2,3,key
to lock down.
9. Navigation Key 4-way navigation for
scrolling through lists and
positioning the cursor. Also
accesses Shortcuts from
the home screen.
10.Right soft keys
From the Home Screen,
press to enter Uni.
11.Jack for AC adapter (included).
12.Clear key
Erases the last character in
text entry, or returns to the
previous menu.
13.End/Power key
Press to end a call or return
to Home Screen. Press
and hold to power phone
on/off.
14.# key Press to enter courtesy
7
model from idle screen.
15.Microphone Transmit your voice.
16.Indicator Light Indicate calling, charging,
message
17.Speaker Let you hear phone tones
and ringtones.
Warning: Inserting an accessory into the incorrect
jack will damage the phone.
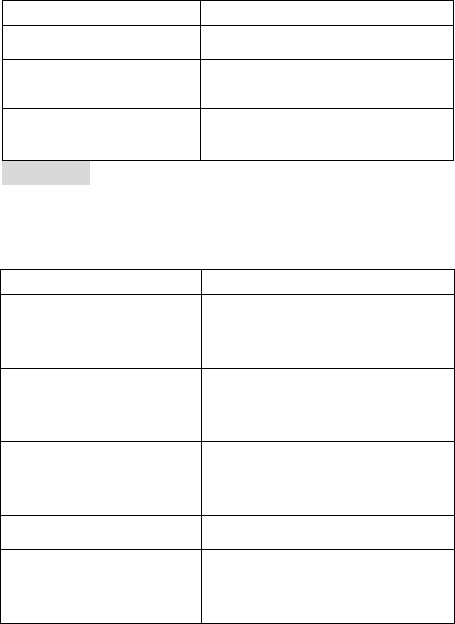
Performing basic functions
To... From the Home Screen...
Switch on the phone Press and hold the End/
Power key for
approximately 3 seconds.
Switch off the
phone Press and hold the
End/Power key for
approximately 3 seconds.
Make a call Enter the number using the
alphanumeric keypad then
press the Call/Send key.
End a call Press the End/Power key.
Answer a call or
Access Outgoing
Calls list
Press the Call/Send key.

8
Verify Own
Number Press the OK key to enter
the Menu and scroll to
Contacts-->Own Phone
Number.
Lock the keypad Press and hold the * key.
Unlock the keypad Press 123.
Access SMS Press the UP Navigation
Key.
Mute all sounds Press and hold the # Key.
Access Incoming
Calls list Press the LEFT Navigation
Key.
Access Missed
Calls list Press the RIGHT
Navigation Key.
Menu Map
Main Menu
Settings Contacts Recent Calls
Auto Key Guard Find Missed Calls
Supp. Services View All Incoming Calls
Rapid App.Setting Business Outgoing calls
Sound Personal
Display Add New
Alert Add to R-UIM
Call Timers Memory Status
Security Speed Dial List
Input Mode Own Phone Number
9
Accessories R-UIM
Sys/Network
Messages Extra Explorer
InBox Stop Watch Picture
Create Message Alarm Music
Preformatted Messages Scheduler Space Info
OutBox Calculator
R-UIM Game
Erase Messages
Message Settings
Multisend Report
Navigating Menus:
z From the home screen, press the OK key to enter
the Menu.
z Use the UP, DOWN, LEFT and RIGHT
Navigation Keys to browse through the menus.
z To access soft keys located at the bottom of the
display screen, press the DOWN Navigation key
and use the LEFT and RIGHT Navigation Keys
to select a soft key function. The display texts
relating to soft key functions are indicated with a
reverse blue text in yellow background.
z Press the OK key to select a menu or menu item.
z Press the C key or Left soft keys to return to the
previous screen.
z Press the End/Power key to return to the idle
10
screen.
Note: This guide shows you how to select a menu
feature as follows: Menu --> Settings --> Auto Key
Guard. This example shows that you must select
Menu, scroll to then select Settings, then scroll to
then select Auto Key Guard.
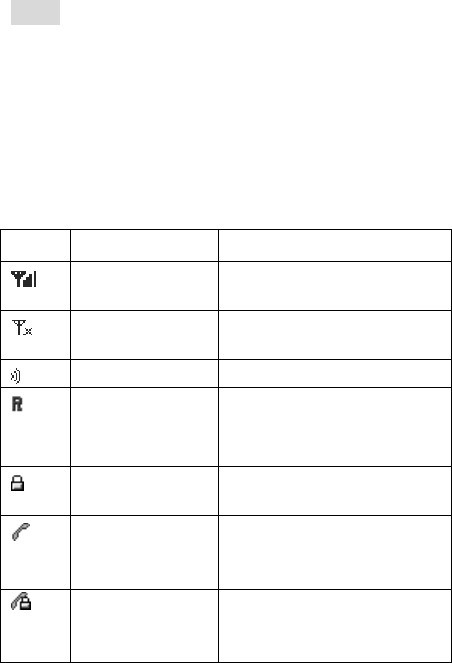
Understanding screen icons
These icons may appear on the screen of your phone.
Icon Function Description
Signal
Strength The more bars, the
stronger the signal.
Network
Unavailable No available service
network.
Speech box Transmit speech letter
Roaming
Indicates roaming when
home network is not
available.
Keypad Lock Indicates the keypad is
locked
In Use
Indicates the phone is
using the network’s
service.
In Use
Encrypt Indicates the phone is
using the network’s
service and encrypt.
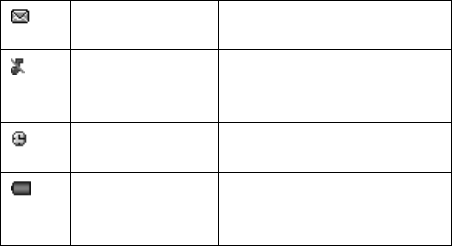
11
MESSAGES You have received one or
more text messages
Vibrator Indicates that the ringing
tone is muted and
vibrating alert is active.
Alarm Alarm or Scheduler has
been set.
Battery Battery power indicator.
More bars indicate a
higher power level.
12
1 GETTING STARTED
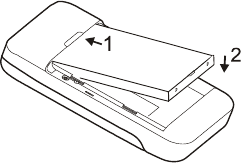
Installing your Battery
You must install
and charge the
battery to use your
phone. Insert the
ridge at the bottom
of the battery into
the base of the
phone, then push
the battery down and snap it into place.
Charging the battery
The battery is not fully charged when you purchase
your phone. Fully charge the new battery for
approximately 12 hours before using the phone for
the first time.
To charge the battery, connect the AC adapter to the
jack located at the side of the phone , then connect the
adapter’s plug to an AC wall outlet.
The battery icon at the top-right corner of the screen
tells you whether the phone is:
z Charging (animated icon)
z Partially charged
13
z Fully charged
Recharging the battery
You can safely recharge the battery at any time, even
if it has a partial charge.
Caring for the battery
This section describes important safety information
and tips for improving battery performance.
General safety guidelines
This phone contains an integrated Li-Ion battery.
z Do not attempt to open the battery compartment
and dismantle, puncture, or short-circuit the
battery.
z If you have not used the battery for more than a
month, recharge it before using your phone.
z Avoid exposing the phone to extreme
temperatures, direct, sunlight, or high
humidity.
z Never dispose of used batteries in or near a fire.
It could lead to explosion. Check with your local
regulations for proper disposal instructions.
Common causes of battery drain
The following operations drain the battery more
quickly and thereby adversely affect talk and standby
14
times:
z Playing games frequently.
z Frequent use of the backlights.
z Using data cables or accessories, such as the
Hands-free headset.
z Operating when no service is available, or
service is available intermittently.
z High earpiece and ringer volume settings.
z Unacknowledged text message alerts.
Battery performance
900mAh(standard battery)
Standby time* 70~85hours
Talking time* 100~130minutes

15
2 MAKING AND RECEIVING CALLS
Making a call
1. Make sure you are in an area where the signal
can be received. Look for the symbol on the
home screen.
Note: The more bars you see in this symbol, the
stronger the reception. If there are no bars, try to
move to where the reception is better. In some
cases, this can be as simple as changing the
direction you are facing.
2. Enter the phone number.
3. To dial the number, press the Send/Receive
key.
4. To end the call, press the End/Power key .
Redialing a number
To redial the last number called, press the Send/
Receive key twice.
Calling a saved number
If you have already saved a phone number, you can
use the All Contacts list to find it quickly.
1. Select Menu -->Contacts --> View All.
2. Scroll down the list, find the contact you want,

16
then press the Send/Receive key to dial the
number.
3. If the number has been added to the Speed Dial
list, you can dial it directly by pressing its
Speed Number then the Send/Receive key.
Answering a call
When you receive a call, the phone rings, vibrates,
and/or lights up, and an animated phone icon appears.
The number of the caller also appears if it is not
restricted. If the number is stored in your Contacts
directory, the contact name appears.
To answer the call, press the Send/Receive key.
Note: To mute the ringer or stop the vibration when
there is an incoming call, select Silence.
Note: If you have Call Waiting as part of your service,
you can answer incoming calls when you are already
on a call. When on a call, you will hear a beep tone.
Select Answer to put the current call on hold and
answer the new call.
Setting Any Key Answer
1. Select Menu -->Settings -->Accessories
-->Any Key Answer.
2. Select On or Off then press OK to confirm.
All incoming calls can now be answered by pressing
any key except END key, or OK key .
17
Answering calls hands-free
If your phone is attached to an accessory such as a
hands-free headset (sold separately), you can set your
phone to answer your calls automatically in 2, 5 or 10
seconds.
1. Select Menu-->Settings -->Accessorie
-->Headset Autoanswer.
2. Select Off, 2 seconds, 5 seconds or 10
seconds then press OK to confirm.
Dealing with missed calls
When you have missed a call, “Missed 1 call” appears
on your screen.
z To clear the screen, press OK key or End/Power
key .
z To view the caller’s number or name, press the
Right navigation key to access the Missed
Calls.
Setting missed call alerts
To set an alert to beep when you have missed a call:
1. Select Menu -->Settings -->Alert
-->Missed Call.
2. Select Enable or Disable then press OK to
confirm your selection.
18
Viewing recent call details
Details on the last 10 calls you have missed, made or
received are stored in the Recent Calls list. You can
get details on the caller’s name and phone number,
along with the time and length of the call.
Viewing recent calls:
1. Select Menu -->Recent Calls.
2. Select an option from the list: Missed Calls,
Incoming Calls or Outgoing Calls.
3. To confirm, press OK.
4. Select a phone entry, Press OK to confirm.
5. Select an option from the list.
z Call Number dials the phone number
z Time displays the time and duration of
call
z View Number to view the phone
number
z Edit Number to edit the phone
number(Except Outgoing call List)
z Delete Entry to delete the phone number
z Send SMS Message to send SMS
messages to the phone Number
z Save New to add the phone number to
the Contacts
z Save To Existing to add the phone
number to an existing Contact.
z Save To R-UIM to add the phone
19
number to R-UIM card.
Erase All Recent Call List
To erase all recent call list from the Recent Calls
menu:
1. Select Menu -->Settings -->Security.
2. Enter your PIN code.
3. Select Erase All Recent Call List then press
OK to confirm.
4. A message appears: “Erase All Recent Call
List”
5. Select Yes to erase all.
Setting up speed dial
Speed dialing allows you to quickly dial a stored
phone number by entering a one- or two-digit speed
dialing location. To save a number to speed dial:
1. Locate a saved contact from the Contacts list.
2. Scroll to the phone number then press OK to
select.
3. Select Add to Speed Dial.
4. Scroll down to select the speed dial number to
which you wish to assign the phone number to
then press OK to confirm. (Available speed
dial numbers for assignment are marked as
-empty-)
.
20
Using 1-Touch Dialing
To dial a phone number, simply press and hold the
assigned speed dial number for the phone number.
For example, if the Speed dialing number is 5, press
and hold 5.
Supp. Services
Let you enable/disable some supplement services
provided by your network operator. Consult your
local network service provider for more information
about these services.
Call Waiting
When Call Waiting is activated, if you are in a call
and another call is incoming, there will be an alert and
the new calling number will be displayed on the
screen. You can choose to answer it or reject it. If the
new call is answered, the former one will be hold and
you can toggle between the two calls by Send key.
1. Select Menu -->Settings -->Supp. Services
-->Call Waiting.
2. Select an option from the list.
Activate Open the Call Waiting
Deactivate Close the Call Waiting
Back Back to the previous display
21
3. To confirm, press OK .
Call Forwarding
To forward your calls to another phone number:
1. Select Menu -->Settings -->Supp. Services
-->Call Forwarding.
2. Enter the number you wish to forward all your
calls to.
3. To confirm, press OK twice.
Silencing an incoming call
To mute the ringer or stop the vibration when there is
an incoming call, select Silence. This action silences
the current call only. The next call will ring as normal.
Adjusting the volume during a call
To adjust the earpiece volume during a call, press the
UP or DOWN Navigation Key.
Call Timer
Your phone includes three timers that count the
duration of the calls you have made and received. To
view call timers:
1. Select Menu -->Settings -->Call Timers.
2. Select an option from the list:
z Outgoing Calls — The duration of outgoing
calls made by the phone since the timer was last
22
reset.
z Incoming Calls — The duration of incoming
calls received by the phone since the timer was
last reset.
z All Calls— The duration of all outgoing and
incoming calls since the phone was
manufactured.
Resetting the timer
To reset the call timer:
1. Select Menu -->Settings -->Calls Timer.
2. Select Incoming Calls, Outgoing Calls or All
Calls.
3. Select Reset using the Navigation Key then
press OK to reset the call timer.
Locking the keypad
The Keyguard locks your keypad to prevent
accidental key presses when the phone is turned on
and a call is not in progress. When activated, you can
still answer or silence an incoming call.
z To lock the keypad from the home screen, press
and hold the * key.
z To unlock the keypad, from the home screen
press 123.
23
Emergency numbers
Calling emergency numbers
You can call 111,,
112 113 and other three-digit
emergency numbers even if your phone is locked or
your account is restricted. However, when you call,
your phone enters Emergency mode.
Call Roaming
To enable or disable call roaming:
1. Select Menu -->Settings -->Sys/Network
-->Roaming Opt.
2. Select either No Roaming or Automatic
then press OK to confirm.

24
3 ENTERINGL ETTERS, NUMBERS,
AND SYMBOLS
You may enter letters, numbers, and symbols in the
Contacts, SMS and other menu functions.
Text entry modes
There are fore text entry modes:
Multitap
Numbers
eZiText
Symbols
Note: The mode you start in depends on the task you
are performing. For example, when entering a phone
number in the Contacts menu, the default text mode is
Numbers. When entering a name for a contact, the
default text mode is the Input Mode.
Entering numbers
To enter a number while in Numbers mode, press a
number key once.
To enter a number while in Multitap mode, press a
number key more times until the number appears on
the screen.
25
Entering words letter by letter
Multitap mode:
1. Press the appropriate alphanumeric key once
to display the first letter that appears on the
keypad, twice for the second letter, and so on.
2. Wait for the cursor to move to the right before
you enter the next letter.
Entering words quickly
eZiText mode:
When you press a series of keys using eZiText, it
checks the built-in dictionary for common words and
predicts the word you are trying to spell.
1. For each letter of the word you wish to spell,
press the appropriate alphanumeric key once.
For example, to enter the word “any” press
the alphanumeric keys 2 -->6 -->9.
2. If the word suggested by eZiText does not
match what you want, press the UP or
DOWN Navigation Key to view other word
matches.
3. When you see the word you want, to confirm
your choice press OK.
Entering symbols
Use Symbols mode:
1. Press the DOWN Navigation Key to access

26
the soft key located at the bottom of the
display screen.
2. Scroll with the LEFT and RIGHT
Navigation Keys to locate the current input
mode.
3. To access the text input options press OK.
4. Scroll down to Symbols then press OK to
enter the menu. You will be presented with a
list of symbols, such as :
- . @ ' ( ) _ ! ? * # % " : + < > =/
\ & ,~ { } $ [ ] ^ ;。、…‘ ’ “ ” ¥《 》
5. Press the number corresponding to the symbol
of your choice.
Changing input modes
To change input modes, while in any text editor do the
following:
1. Press the DOWN Navigation Key to access
the soft key located at the bottom of the
display screen.
2. Scroll with the LEFT and RIGHT
Navigation Keys to locate the input mode.
3. Press OK to access the text input options.
4. Scroll to select your desired input mode then
press OK to confirm.

27
Quick reference to text entry
This table gives general instructions for entering
letters, numbers, and symbols.
To... Do this...
Enter a letter
Press the appropriate
alphanumeric key repeatedly
until the letter you want
appears on the display.
Enter a
number
Press and hold the appropriate
number key until it appears on
the display. If you are in
Numbers mode, then press the
number key once.
Enter a
symbol Enter the Symbol mode then
enter the number
corresponding to the symbol
you want.
Enter a space Press the # key.
Erase a
character Press C.
Erase all
characters Press and hold C.
Move the
cursor right or
left
Use the RIGHT or LEFT
Navigation Keys.
Change text
entry modes Press DOWN to highlight the
current input mode then press

28
OK to access Text Mode.
Scroll to the desired input
mode then press OK.
Enter letters
in upper case
In ABC mode, press * and
then enter a letter in upper
case. In ENG mode, after
entering a word, press * to
cycle the highlighted word in
three states: all in lower case
--> first in upper case --> all in
upper case.
Highlight an
option at the
bottom of the
screen
Press DOWN to highlight an
option then press LEFT or
RIGHT to scroll through the
other options available. To
confirm your selection, press
OK.
29
4 STORING CONTACTS
The Contacts menu of your phone is like a set of
phone index cards for you to store information about
a person or a company. Your phone can hold, on
average, about 200 phone numbers.
Saving a phone number
To save a phone number, do the following:
1. From the home screen, enter the phone
number you wish to save.
2. Press the OK key to select New.
3. Enter the name of the contact then press OK.
4. Press OK to choose Next. Select Options or
the number.
Select options for the following:
z Add New to add a new contact.
z Edit name to edit the name of this contact.
z Assign group to classify the new contact as
Personal, Business, or Neither.
z Erase Contact to erase the new contact.
-or-
Choose the number for the following:
z Edit to edit the new contact.
z Erase to erase the new contact.
z Save on R-UIM to add the number to R-UIM
30
card.
z Add to Speed Dial to add the number to your
Speed Dial list.
z Send SMS Message to send the SMS Message
to the number.
Adding a pause
When you save the phone number of an automated
service, you may include a pause where you need to
select an option or enter a Password. You can enter
multiple pauses in a phone number. A Pause will
cause the phone to stop dialing until you select the
Release key. To enter a phone number with a pause:
1. Enter the first portion of the phone number.
2. Press Left Navigation Key to Pause then press
OK. A letter P will appear at the end.
3. Enter the remaining part.
4. Save the number. (See “Saving a phone
number page 20 if needed”).
Saving email address
To save an email address follow these steps. To add
the item to a saved contact, see “Editing or erasing a
contact”.
1. Select Menu -->Contacts -->Add New.
2. Scroll to Email then press OK to select.
3. Enter the information. (See “Quick reference to
31
text entry” on page 19.)
4. To go to the next screen, press OK twice.
5. Enter a contact name.
6. To Save press OK twice .
Editing or erasing a contact
1. Select Menu -->Contacts.
2. Select View All or Find to locate the contact you
wish to edit.
3. Highlight the contact you wish to edit then press
OK.
4. Select Options.
5. Highlight an option then press OK to select it:
z Add New to add a phone number1,phone
number2, home number,work number,email .
z Edit Name of the contact.
z Assign group as personal, business or neither.
z Erase Contact to erase the entire contact.
6. Follow the screen prompts to enter new
information or delete the Contact.
7. Press OK to confirm your choice or Save where
necessary.
Editing a phone number
1. Select Menu -->Contacts.
2. Select View All or Find to locate the contact you
want to edit.
32
3. Highlight the contact you wish to edit then press
OK.
4. Press DOWN to highlight the phone number
you wish to edit and press OK.
5. Highlight an option for the phone number then
press OK:
z Edit phone number
z Erase phone number
z Save on R-UIM to add the number to
R-UIM card.
z Add to Speed Dial to add the number to
your Speed Dial list.
z Send SMS Message to send the SMS
Message to the number.
6. Follow the screen prompts to enter new
information or erase the phone number.
7. Press OK to confirm your choice or to Save .
Finding contact information
Quick Dial using All Contacts list
1. Select Menu -->Contacts.
2. Select View All to locate the contact you want to
dial.
3. Highlight the contact you wish to call then press
the Call key to dial the number.
Otherwise, press OK to edit the contact’s
information.
33
Viewing Memory Status
1. Select Menu -->Contacts -->Memory
Status.
2. Press OK to view the memory status of
Phone or UIM card.

34
5 SENDING AND RECEIVING TEXT
MESSAGES
This chapter describes how to send, receive, and erase
text messages from your phone.
Important: The features and menus described in this
chapter may vary depending on services available in
your area. In addition, usage charges may apply to
each message. For clarification on these issues, check
with your service provider.
Sending text messages
Check with your service provider to find out if you
are able to send text messages from your phone. You
can only send text messages to phones that are
capable of receiving them.
Sending a simple message
To send a plain text message to a single recipient:
1. Select Menu -->Messages -->Create
Message.
2. Select a saved number from the All Contacts
List or enter the number manually.
3. To enter your message, select continue.
4. When you have completed the message, select
35
Continue, press ok to send, save or multisend
the message.
Forwarding a saved message
You can reuse a message you have stored in your
OutBox. The OutBox contains all sent messages,
messages for which send attempts have been made as
well as messages with failed send attempts.
To view OutBox messages:
1. Select Menu -->Messages -->OutBox.
2. Scroll through the list of messages then
press OK to select.
3. Select an option from the list:
z Done to go back to previous screen
z Erase the message
z Send the message
z Forward the message to another
recipient
z Edit the message.
4. Enter the phone number manually or select
from the All Contacts List.
5. To continue press OK.
6. To send the message as it is, press OK
again.
-or-
To edit the message, enter your text
accordingly.
36
When you have finished editing, press OK to
send the message.
If you cannot send messages
You may not be able to send or receive messages if
your phone’s memory is nearly full, or if digital
service is not available at the time. To free up memory,
erase old messages. See “Erasing messages” on page
Receiving incoming calls while creating messages
If you don’t wish to answer the call, press End/Power
key.
To answer the call, press Call/Send key. The message
you were working on will be saved in the OutBox
folder. To return to the message, select Menu
-->Messages -->OutBox and select it.
Viewing the OutBox
You can check the status of messages you have sent as
long as they have been saved to the OutBox.
1. Select Menu -->Messages -->OutBox.
2. Scroll through the list of messages then press
OK to read the message.
Receiving text messages
When a text message is received, your screen will
display text similar to: “MESSAGE!”. Look for the
37
symbol at the top of your screen. The symbol flashes
if the message is full.
Reading the message
You may read the message on the display and call
back the number in the message. The screen will auto
scroll page by page unless the UP or DOWN
Navigation Key is pressed.
Erasing messages
Your phone is designed to store up to 50 text
messages . It is a good idea to erase old messages, as
messages take up memory in your phone.
You have the option of erasing text messages as you
send or read them, erasing them one-at-a-time from
the list in the OutBox or InBox, or erasing them all at
once.
Erasing single messages
1. Select Menu -->Messages.
2. Scroll down to select the type of text message
you want to erase (InBox, or OutBox).
3. To select the message to erase, press OK .
4. Select Erase to erase the message. A
notification appears: “Erase this message?”
5. To erase the message, select Yes .
Auto Erase Inbox
1. Select Menu -->Messages -->Message
38
Settings -->Auto Erase Inbox.
2. Scroll to Enable then press OK to confirm.
Setting message alerts
To choose how you want be alerted of text
messages:
1. Select Menu -->Messages -->Message
Settings –> Message Alert
2. Select an option from the list:
z None - no alert
z Vibrate Once - phone will vibrate once
when you receive a message
z Vibrate & Remind - phone will vibrate
every minute until you read the message
z Alert Once - phone will beep once when you
receive a message
z Alert & Remind - phone will beep every
minute until you read the message
3. Scroll to type of alert you want then press OK
to select.
Sending and editing preformatted messages
Your phone comes with preformatted messages, such
as “Call me”, “Emergency”, “I’ll be there in 15
minutes”, etc. which you can insert into the body of a
text message. You can edit these messages and create
new ones. Your phone can store up to 20 preformatted
39
messages, with up to 100 characters per message.
1. Select Menu -->Messages -->Preformatted
Messages.
2. Scroll through the list of preformatted
messages then press OK to select.
3. Enter the phone number manually or select
from the All Contacts list then press OK to
continue.
4. Enter or edit the text then press OK to continue.
For help entering text, see page 16.
5. Select Send then press OK to send the message
or Save to save the message to the OutBox or
Mutisend to enter more phone numbers to
send the message.
Multisending a message
Select Multisend to send the message to multiple
receivers at one time.
1. Firstly enter the No.1 receiver's number, then
press OK key twice to continue with No.2
receiver.
2. Enter the No.2 receiver's number, and so on.
3. After finishing all the receiver's numbers, press
Down and then Right navigation key to highlight
OK and press OK key.
4. From Multisend list screen, press Right
navigation key to highlight Send and press OK
to send the message.
40
Viewing multisend reports
1. Select Menu -->Messages -->Multisend
Report.
2. Press OK to view the last multisend report.
41
6 CUSTOMIZING YOUR PHONE
The contents of the Settings menu are as follows.
Auto Key Guard Cancel/30 sec/2 mins/5 mins
Supp. Services Call Waiting/Call Forwarding
Rapid App.Setting Ringer Type/Display/Stopwatch/
Clock/ Scheduler/ Calculator/
Game
Sound Volume/Alert Type/Ringer Type/
Key Tone Length
Display Wallpaper/Backlighting/Language
/Contrast/Time Format
Alert Misse dCall/Roaming/Minute Alert
Call Timers Outgoing Calls/Incoming Calls/All
Calls
Security Enter PIN: Erase All Handset
contacts/Erase All Recent call list/
Phone Reset/PIN lock/PIN change
Input Mode Miltitap/eZiText/Numbers
Accessories Ext Power Backlight/Headset
Autoanswer/ Answer Method
Sys / Network Roaming Opt
Setting vibration mode
You can set your phone to vibrate or to vibrate and
then ring when you receive an incoming call.

42
1. Select Menu -->Settings -->Sound -->Alert
Type.
2. Select Vibration or Vibe + Ringer (vibration
for 10 seconds then followed by ringer) then
press OK to confirm your choice.
Note: When phone is charging, vibration is disabled.
Keypad Lock
To lock the keypad to protect the phone from
accidental key presses:
1. Select Menu -->Settings -->Auto Key Guard.
2. Select an option from the list:
z Cancel: Disables the KeyGuard.
z 30 Sec.: Locks the keypad after 30 seconds of
inactivity.
z 2 mins: Locks the keypad after 2 minutes of
inactivity.
z 5 mins: Locks the keypad after 5 minutes of
inactivity. Pressing and holding the * key
shall also lock the keypad, which then can be
unlocked by pressing 123.
Adjusting volume
To adjust the volume of the ringer, earpiece and the
key beeps:
1. Select Menu -->Settings -->Sound
-->Volume.
43
2. You can adjust the volume of the Ringer,
Earpiece or Key Beep.
3. Press the UP Navigation Key to increase
the volume or press the DOWN Navigation
Key reduce the volume.
4. Press OK to confirm your choice.
Alert Type
To choose the alert type as Off, Ringer, Vibration or
Vibe+Ringer:
1. Select Menu -->Settings -->Sound -->Alert
Type.
2. Select an option from the list:
z Off— The phone will not ring.
z Ringer — The phone will ring during the
entire alert.
z Vibration — The phone will vibrate during the
entire alert.
z Vibe + Ringer — The phone will vibrate
during the first half of the alert, and ring
afterwards, during the second half of the alert.
Setting the Ringer Type
There are 15 different programmed ringer types
including the default ringer.
1. Select Menu -->Settings -->Sound -->Ringer
Type.
44
2. Scroll through the list to hear the different rings
tones.
3. To select a ringer from the list press OK.
Changing Key Tone Length
To change the duration of the key tone length:
1. Select Menu -->Settings -->Sound
-->Key Tone Length.
2. Select an option from the list:
z Normal — A short fixed length DTMF burst
will sound.
z Long — A longer DTMF burst will sound. The
DTMF burst will be determined by the key
press.
Personalizing the screen
Setting the wallpaper
You can choose from four pre-loaded pictures and set
it as the wallpaper.
1. Select MenuÆSettingsÆDisplayÆWallpaper.
2. Select one wallpaper with Up/Down navigation
key.
3. Press OK to confirm your choice.
Adjusting the backlighting
Your screen lights up while you are on a call or when
you press a key on the keypad. To change when and

45
how backlighting lights up:
1. Select Menu -->Settings -->Display
-->Backlighting.
2. Select an option from the list:
z 10s
z 30s
z 10s and after call
z 30s and after call
3. Press OK to confirm your choice.
Note: Keeping backlighting on during a call
consumes more energy and thereby drains the battery
more quickly, reducing talk as well as standby times.
Choosing a different language
Your phone may support Russian in addition to
English. To view language options:
1. Select Menu -->Settings -->Display
-->Language.
2. Select a language, then press OK to
confirm.
Changing the display contrast
1. Select Menu -->Settings -->Display
-->Contrast.
2. Use the LEFT or RIGHT Navigation Keys
to increase or reduce the Contrast.
46
Choosing a different time format
1. Select Menu -->Settings -->Display
-->Time Format.
2. Select an option from the list:
z AM/PM
z 24 HR
3. Press OK to confirm your choice.
Setting Alerts
To choose to Enable or Disable alert tones during
various circumstances.
1. Select Menu -->Settings -->Alert.
2. Select an option from the list:
z Missed Call: If set to Enable, the phone
will sound an alert tone when there is a
missed call.
z Roaming: If set to Enable, the phone will
sound an alert when it is roaming
z Minute Alert: If set to Enable, the phone
will sound an alert tone every 10 seconds
before the end of a minute during a call.
Creating a secure environment
This section describes all the features involved in
securing your phone and preventing access to
personal information. All security features are
shielded by a lock code.
47
Changing your PIN code
1. Select Menu -->Settings -->Security.
2. Enter your PIN code then press OK to
confirm.
3. Scroll to PIN Change then enter your new
PIN code then press OK to confirm.
Erasing all Handset contacts
To erase all Handset contacts from the Contacts
directory:
1. Select Menu -->Settings -->Security.
2. Enter your lock code.
3. Select Erase All Handset Contacts.
4. A message appears: “Erase All Handset
contacts”
5. Select Yes to erase all Handset contacts.
Restoring Factory Default
1. Select Menu -->Settings -->Security.
2. Enter your PIN code.
3. Select Phone Reset.
4. A message appears: “Restore Factory
Default”
5. Select Yes to restore factory default.
Setting power backlighting
To set backlighting to remain on when an external
48
power source, such as the AC adapter, is used with the
phone:
1. Select Menu ÆSettingsÆAccessories
ÆExt Power Backlight.
2. Select On to keep backlighting on. (The
battery charges more slowly when power
backlighting is on.)
Setting headset
Setting headset Autoanswer
When a headset (sold separately) is attached to the
phone, you can set the headset to autoanswer when
there is an incoming call.
1. Select Menu -->Settings -->Accessories
-->Headset Autoanswer.
2. You can choose switch off autoanswer, 2
seconds, 5 seconds or 10 seconds.
3. Scroll to your desired option then press OK
to select.
Shortcut Setting
You can customize the right soft key's function as a
shortcut.
1. Select Menu -->Settings -->Rapid
App.setting.
2. Select an option from the list:
z Display
z Stopwatch
49
z Clocka
z Scheduler
z Calculator
z Game
3. Press OK to confirm your choice.
50
7 USING EXTRAS
Stopwatch
Stopwatch allows you to use your phone as a
stopwatch.
1. Select Menu -->Extra -->Stop watch.
2. Select Start to have the stopwatch begin
counting.
3. Select Stop to stop counting.
4. Select Reset to set the counter back to zero
and begin counting again.
Alarm
You can set the phone to sound an alarm at a specified
time. The alarm clock will only trigger an alert if the
phone is switched on.
To access this menu, digital service is required.
To set an alarm:
1. Select Menu -->Extras -->Alarm -->Set.
2. Use the UP and DOWN Navigation Keys
to set the time for the alarm.
3. Select Once, Daily, or Weekdays.
When the alarm triggers, select Off to turn off the
alarm or Snooze to silence the alarm for 10 minutes.
51
Scheduler
The Scheduler allows you to schedule events, such as
meetings or appointments, and keep track of special
occasions, such as birthdays or wedding
anniversaries.
To access this menu, digital service is required.
Adding an event
1. To find the day of the event.
2. Select Menu -->Extra -->Scheduler
z For a day in the current month, select
View Day. Press the LEFT or RIGHT
Navigation Keys to scroll through days.
z For a day in a different month, select
View Month. Press the UP or DOWN
Navigation Keys to scroll through
months, and LEFT or RIGHT to scroll
through days.
3. Press the OK key to confirm the day and
month then add new event information for
it.
4. Enter event name. For help on entering text,
see page 16.
5. When you are done entering the letters
press the OK key twice.
6. Select Next to set the event Start time,
Duration, and Alarm frequency.
52
z Press the UP or DOWN Navigation
Keys to set alarm fields.
z Press LEFT or RIGHT Navigation
Keys to move between fields.
7. When you are done press the OK key
twice.
8. To add a Note select Next.
9. When you are done Press the OK key
twice.
Options
You can view settings about Set Work Hours, Auto
Delete, and Default Alarm here.
Calculator
Use the calculator for basic math calculations.
1. Select Menu -->Extra -->Calculator.
2. Use the keypad to enter numbers.
3. Select the arithmetical or memory
operators using the LEFT/RIGHT
Navigation Keys.
= equal + add x multiply
÷ divide - subtract . decimal point
z C Clear all numbers entered and display
a zero.
z MR Display the value currently stored
in memory.
53
z M+ Add the displayed digit to the value
stored in memory.
z MC Clear the value currently stored in
memory.
z ± Change the sign of the displayed
number.
4. Continue to enter the second number.
5. To display the result, select = then press
OK.
54
8 PLAYING GAMES
Your phone offers you 2 enjoyable games.
BlackJack
Black Jack is a card game. Your goal is to beat the
dealer by getting more points than him but not more
than 21.
1. Select Menu -->Game -->Black Jack.
2. Press OK to enter. The game rules are
displayed, which can be scrolled with Up
and Down navigational keys. Press OK to
skip.
3. To continue press OK.
4. Select Continue to continue last game, or
New to star a new game.
a) Select Start to start a new game.
b) Select Bet to change your bet number.
c) Select Hit to get a new card. The sums
of the cards are displayed in the screen
right side, with the dealer’s on the
above and yours below.
d) Select Double to double the bet.
e) Select Stand if you don't want another
card.

55
The game will judge who wins by the sums of each
side and change your cash accordingly.
Note: 1. You can get up to five cards.
2. Your default cash is $5,000, and default
bet $20.
Video Poker
This is also a card game.
1. Select Menu -->Game -->VIDEO
POKER.
A temporary greeting screen will be
displayed followed by the rules of the
game when the game is selected.
2. To start the game select OK.
56
9 GETTING HELP
Customer support
Your service provider’s customer support department
may be accessible directly from your phone when you
dial a number (check with your service provider).
They can answer questions about your phone, phone
bill, call coverage area, and specific features available
to you, such as call forwarding.
Before requesting support, please try to reproduce
and isolate the problem. When you contact the
Customer Care Center, be ready to provide the
following information:
z The name of your service provider.
z The actual error message or problem you are
experiencing.
z The steps you took to reproduce the problem.
z The phone’s electronic serial number (ESN).
z To find the ESN:
a) Remove the battery.
b) Locate the white label on the back of the phone.
Your phone’s ESN is located on the label.
57
10 SAR INFORMATION
THIS MODEL PHONE MEETS THE
GOVERNMENT’S REQUIREMENTS FOR
EXPOSURE TO RADIO WAVES.
The SAR limit of USA (FCC) is 1.6 W/kg averaged
over one gram of tissue. Device types C306 (FCC ID:
SARHISENSEC306) has also been tested against this
SAR limit. The highest SAR value reported under this
standard during product certification for use at the ear
is 1.03W/kg and when properly worn on the body is
0.373W/kg.This device was tested for typical
body-worn operations with the back of the handset
kept 1.5cm from the body. To maintain compliance
with FCC RF exposure requirements, use accessories
that maintain a 1.5cm separation distance between the
user's body and the back of the handset. The use of
belt clips, holsters and similar accessories should not
contain metallic components in its assembly. The use
of accessories that do not satisfy these requirements
may not comply with FCC RF exposure requirements,
and should be avoided.