Hisense Electric LCDC0020 LED TV User Manual ES G130803 1
Hisense Electric Co., Ltd. LED TV ES G130803 1
UserManual.wiki
>
Hisense Electric
>
LCDC0020 User Manual
User Manual
Navigation menu
Upload a User Manual
Namespaces
Wiki Guide
HTML
PDF
Info
Views
User Manual
Discussion / Help
Navigation

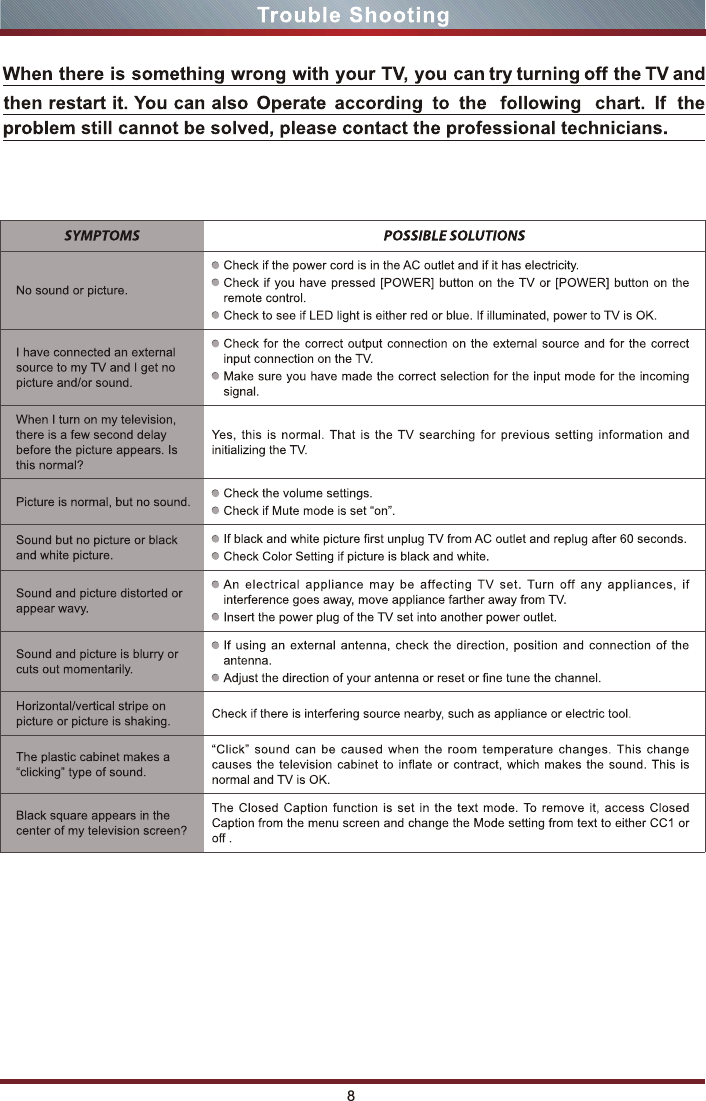
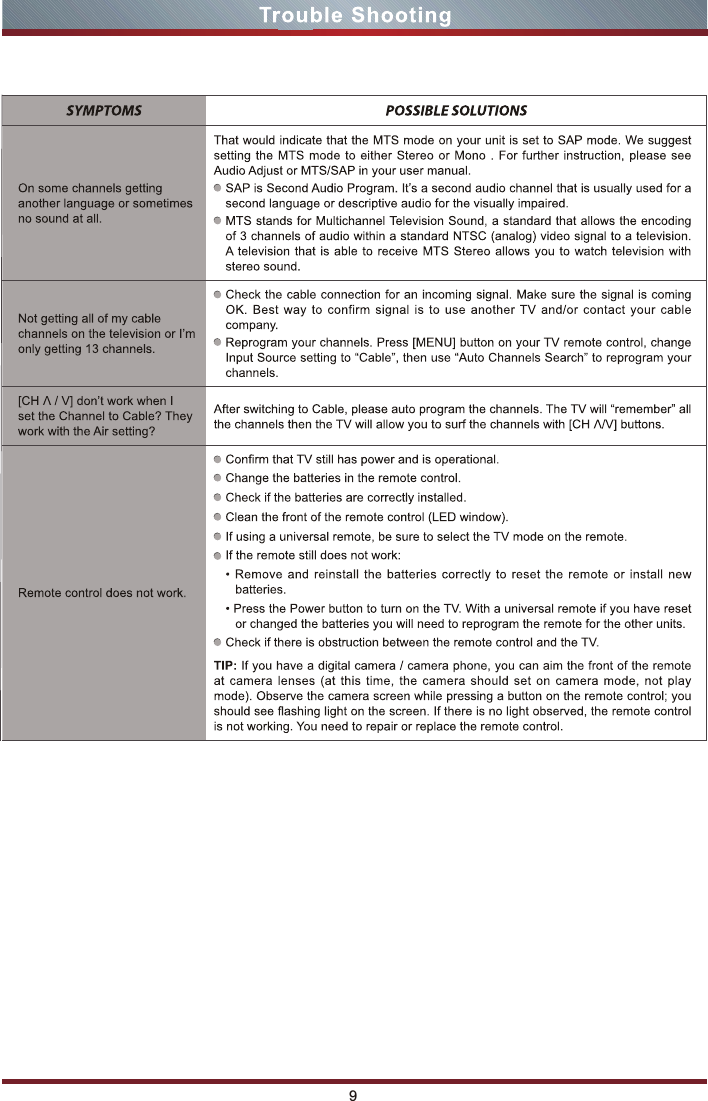
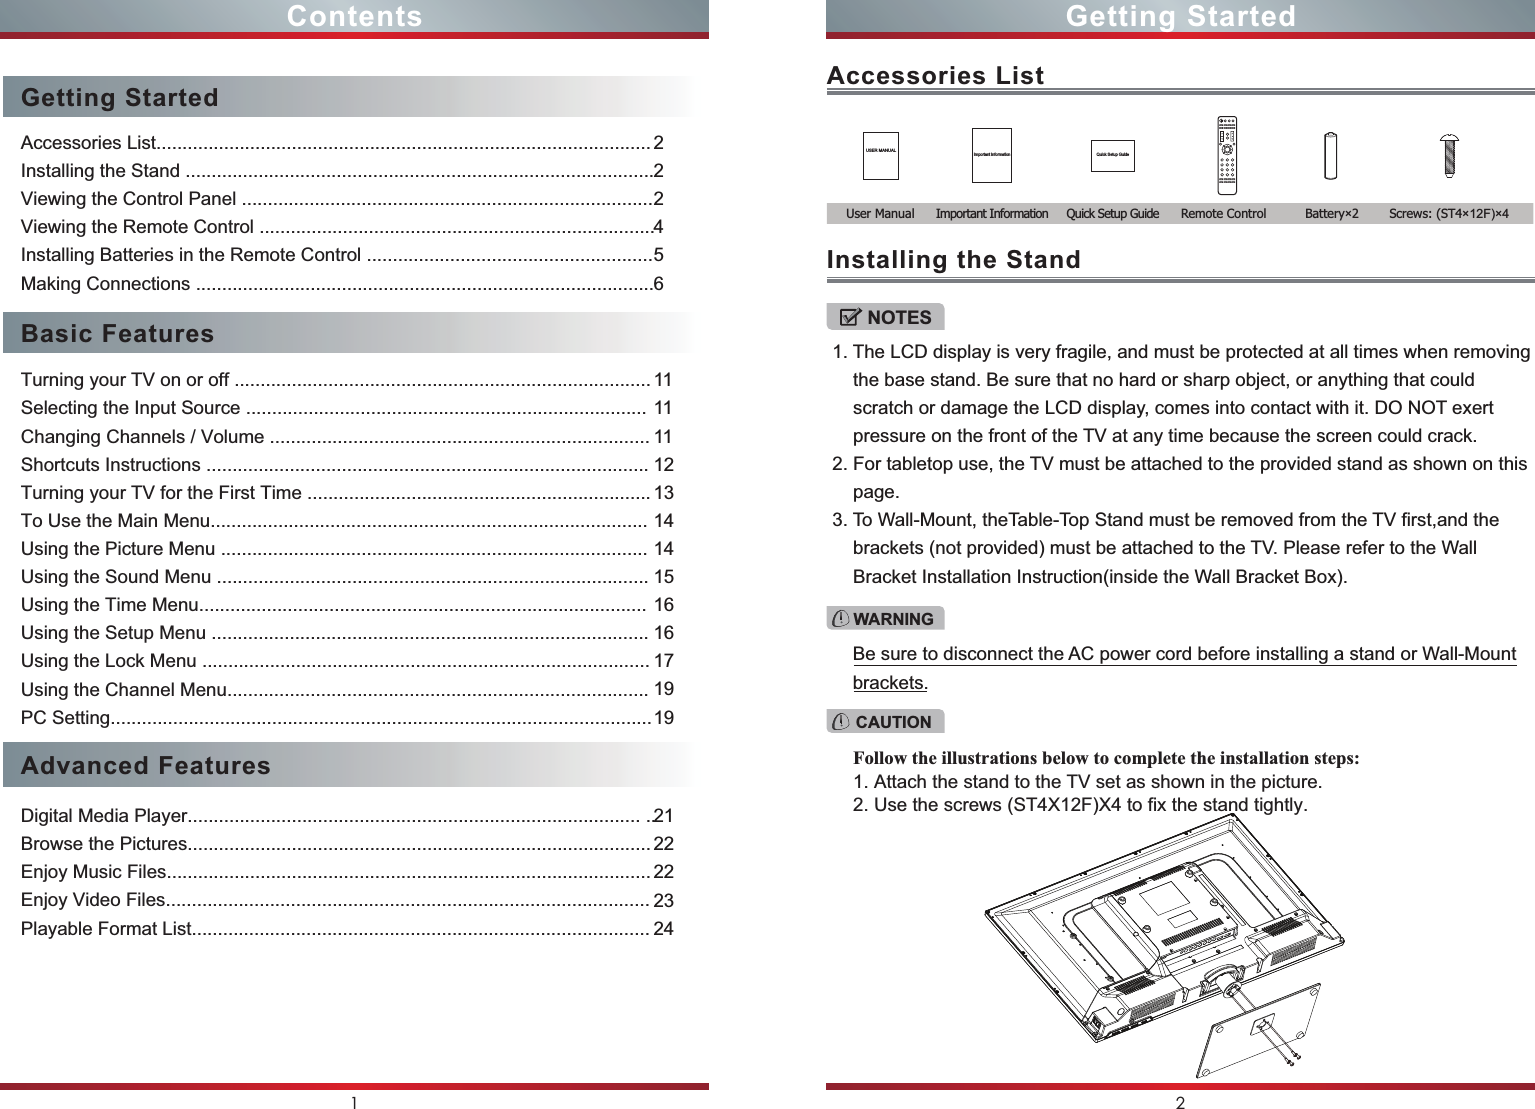
![VIEWING THE REMOTE CONTROL5TROUBLE SHOOTING7Turning the TV On for the First Time6Features, appearance and specifications are subject to change without notice.HDMI INAvailable devices: DVD, Blu-ray player, Audio Video Receiver, cable box, satellite receiver, game station.BESTCOMPONENT INBETTERAvailable devices: DVD, Blu-ray player, Audio Video Receiver, cable box, satellite receiver, game station.AV INGOODConnect the composite video and audio output jacks of your legacy A/V equipment, such as a VCR.CHANGE THE BATTERIES 1. Push the back cover to open the battery compartment of the remote control.2. Insert two AAA size batteries. Make sure to match the (+) and ( - ) ends of the batteries with the (+) and ( - ) ends indicated in the battery compartment.3. Close the battery compartment cover.If you would like to program your other household remote controls to your new Hisense television, please consult the User’s Manual supplied by your Cable or Satellite provider. The Cable or Satellite providers’ User’s Manuals should include instructions on how to program their remote to your television. 1 2 3Press [▲/▼] to select your Tuner Mode: Antenna or Cable, press [ENTER] button to confirm.1. Press [▲/▼] to select your Picture Mode: Home Mode or Retail Mode, press [ENTER] button to confirm. 2. For energy saving, we kindly suggest you select the Home Mode.Connect headphone or analog sound system using RCA Y-cable (1/8"-stereo mini to L/R phono-not provided).HEADPHONEPower on/offDirect channel selectionMute buttonSelect input sourceGo to the previous channelIncrease volumeDecrease volumeNext channelPrevious channelAdjust CC modeDisplay the information banner▲/▲/▲/▲Move Up/Down/Left/Rightor adjust settingsMenu buttonClose the menuAuto ajust buttonZoom buttonSleep timer buttonMake the screen stopFavorite program controlling button& Media player buttonMedia player buttonSelect picture modeSelect sound mode Channel listSelect TV AV VGA USB sourceOpen the DTV program guide(if available)Audio select buttonMono/Stereo/SAP operationDash buttonSelect a digital sub-channelINPUTLASTSAPDISPLAYMTS CCDCH.OKVOLEXIT MENUAUTOTV AV VGA MEDIAPICTUREFAVLISTADD/ERASEFAV+ASPECT STILL SLEEPMUTE123456789--FAV--++0SOUNDCHLISTGUIDEProgram Your Universal Cable or Satellite Remote Control to Operate Your New Hisense Television!Gently lift up Insert the batteries Gently push downSetup WizardGo to next stepPlease select your preferred modeSelect Move ExitSetup WizardGo to next stepSelect Move ExitSelect the antenna type then auto scanNo sound or picture.Check if the power cord is in the AC outlet and if it has electricity.Check if you have pressed [POWER] button on the TV or [POWER] button on the remote control.Check to see if LED light is either red or blue. If illuminated, power to TV is OK.I have connected an external source to my TV and I get no picture and/or sound.Check for the correct output connection on the external source and for the correct input connection on the TV.Make sure you have made the correct selection for the input mode for the incoming signal.[CH V / V] don’t work when I set the Channel to Cable? They work with the Air setting?After switching to Cable, please auto program the channels. The TV will “remember” all the channels then the TV will allow you to surf the channels with [CH V/V] buttons.Remote control does not work.Confirm that TV still has power and is operational.Change the batteries in the remote control.Check if the batteries are correctly installed.Clean the front of the remote control (LED window).If using a universal remote, be sure to select the TV mode on the remote.If the remote still does not work:• Remove and reinstall the batteries correctly to reset the remote or install new batteries.• Press the Power button to turn on the TV. With a universal remote if you have reset or changed the batteries you will need to reprogram the remote for the other units.Check if there is obstruction between the remote control and the TV.TIP: If you have a digital camera / camera phone, you can aim the front of the remote at camera lenses (at this time, the camera should set on camera mode, not play mode). Observe the camera screen while pressing a button on the remote control; you should see flashing light on the screen. If there is no light observed, the remote control is not working. You need to repair or replace the remote control. Picture is normal, but no sound. Check the volume settings.Check if Mute mode is set “on”.Sound but no picture or black and white picture.If black and white picture first unplug TV from AC outlet and replug after 60 seconds.Check Color Setting if picture is black and white.Sound and picture distorted or appear wavy.An electrical appliance may be affecting TV set. Turn off any appliances, if interference goes away, move appliance farther away from TV.Insert the power plug of the TV set into another power outlet.Sound and picture is blurry or cuts out momentarily.If using an external antenna, check the direction, position and connection of the antenna.Adjust the direction of your antenna or reset or fine tune the channel.SYMPTOMS POSSIBLE SOLUTIONS1. Press [◄ / ►] to select the language to be used for menus and message.2. Press [▼ / ▲] to select go to next step and press [OK /►] button to go.1. Press [▼ / ▲] to select the time zone, daylight saving time and time format you want to.2. Press [◄ / ►] to adjust.3. Press [▼ / ▲] to select go to next step and press [OK /►] button to go.CY-M131006HDMIVIDEOAV INLRLBPRRCOMPONENT IN/AUDIO OUTSpeakerOR](https://usermanual.wiki/Hisense-Electric/LCDC0020/User-Guide-1960949-Page-14.png)

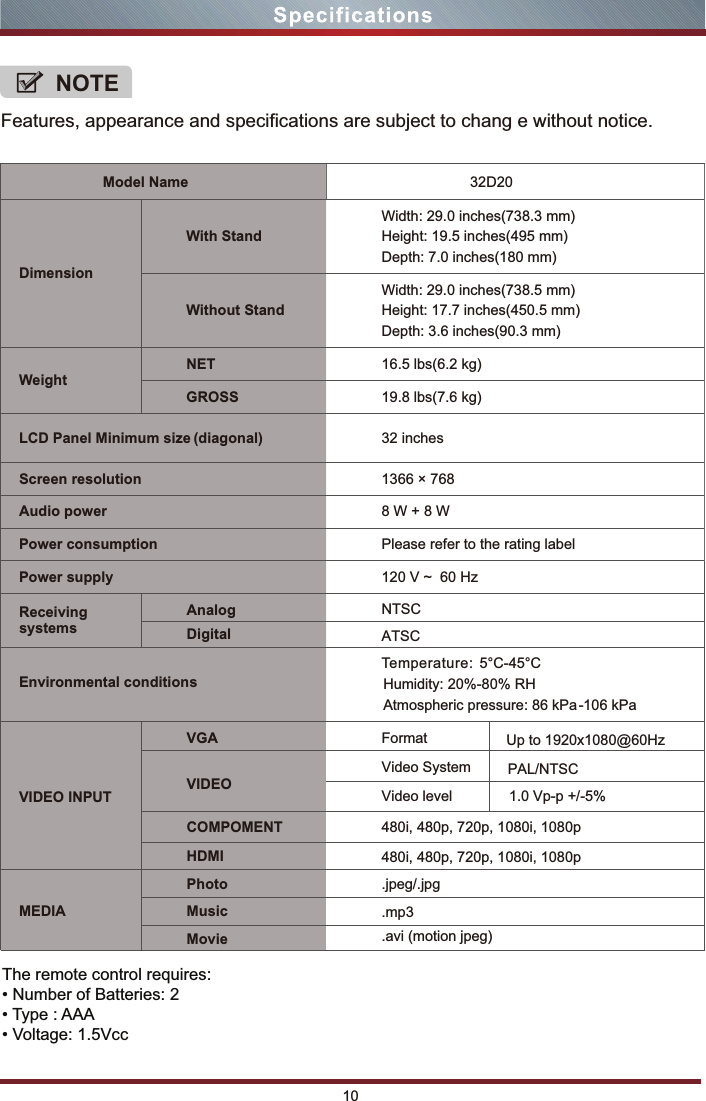
![11 12Basic Features Basic FeaturesTo turn your TV on or off (standby mode):1. Plug the power cord into an AC power outlet.2. Press [POWER] button. Your TV turns on.3. Press [POWER] button again to turn off your TV. When you turn off your TV, it goes into standby mode.Aspect - Select the screen aspect ratio from Normal, Wide, Zoom and Cinema.Turning your TV on or off Shortcuts InstructionsSelecting the Input SourceWARNINGNOTENOTEWhen your TV is in standby mode, it is still receiving power. To completely disconnect power, unplug the power cord.Normal: The original 4:3 aspect ratio (1.33:1 signal) is preserved,so black bars are added to the left and right of the image. Standard TV broadcasts are displayed with a 4:3 aspect ratio.Wide: When watching a standard broadcast or full-frame movie inthis mode, the display image is stretched proportionately to fill the TV screen. When watching a widescreen (1.78:1 signal) programor movie, the display image fills the TV screen.Zoom: Stretch the 4:3 aspect ratio image vertically and horizontally to fill the screen at 1:1.78 aspect ratio.Cinema: Stretch the 4:3 aspect ratio image vertically and horizontally to fill the screen at 1:2.35 aspect ratio.Point to Point: Use the function to see the full image without anycutoff, when VGA signal is inputted.If your TV does not receive an input signal for several minutes, it automatically goes into standby mode.Changing the channels can also be achieved by directly entering the channel number using the numeric keys on the remote control. If you are entering a two or three digit channel number, the time between key presses should be less than 3 seconds.To select the video input source:The first time you turn on your TV, you must select the TV signal source. Your TV stores this information, so you do not need to change the TV signal source unless it changes. For example, you change from an outside antenna to cable TV.Changing Channels / Volume1. Turn on your TV, then press [INPUT] button on the remote or on the TV. The Input Source menu opens.2. Press [▲/▼] button to highlight the input source, then press [OK] button.1. Press the [CH /V] (or [CH +/-]) on the TV/remote control to change the channel.2. Press the [VOL /V] (or [VOL +/-]) on the TV/remote control to adjust the volume.3. Press the numeric buttons on the remote control to display the corresponding channels.VVPicture - Press to set the picture mode. It can be set as Standard, Cinema, User and Vivid. This mode achieves a certain image display effect by setting the brightness,contrast and color etc.Sound - Press to set the sound mode. It can be set as Standard, Speech, User and Music.Mute - Press to turn the sound off, press this button again to turn the sound back on. This function is used to switch off sound temporarily.Sleep - It can set the TV to let it enter into the Standby state automatically. Press this button repeatedly to select the proper sleeping clock mode, and the clock tells you the remaining time before the TV enters Standby state.Display - Display the information banner. The information including channel number, channel name, current system time, tuner mode, audio stream, video format, audiolanguage, closed caption mode, parental locks rated,program details, etc.](https://usermanual.wiki/Hisense-Electric/LCDC0020/User-Guide-1960949-Page-21.png)
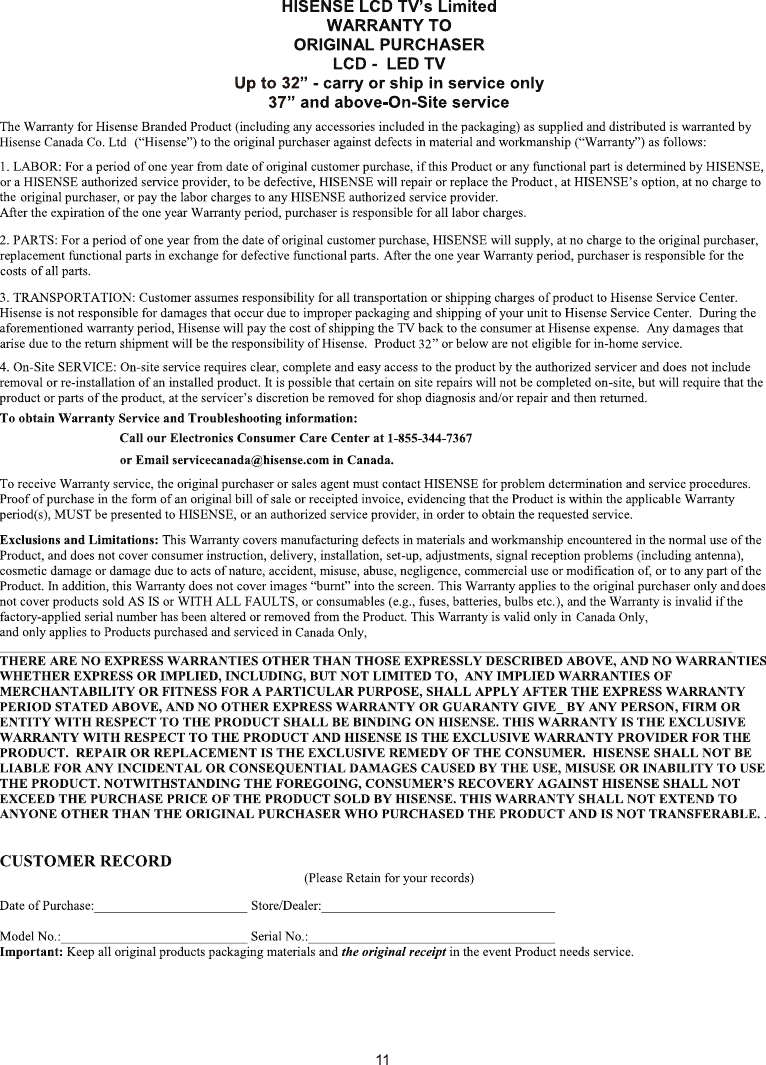
![Turning your TV for the First TimeUsing the Picture MenuPress [MENU] to display the main menu or return to the previous menu or close the main menu.Press [◄/►] to highlight the desired menu icon, and press [OK] to select.NOTEIf no buttons are pressed,the menu will close automatically after about 10 seconds.Picture Mode - Adjust the Picture Mode. You can select Standard,Vivid,Soft,User,Ene rgy saving.Brightness - Increase or decrease the brightness of the picture. Increasing the brightness can add more light to dark areas of the picture, while decreasing the brightness can add more darkness to light areas of the picture.Contrast - Increase or decrease the contrast of the picture.Increase the contrast to adjust the white areas of the picture or decrease the contrast to adjust the black areas of the picture.Color - Adjust the intensity of the colors.Tint - Adjust the hue(Red,Green,Blue) of the picture.Sharpness - You can increase the sharpness level for clearer images or decrease the sharpness level for smoother images.Color Temperature - Adjust the overall color of the picture.Advanced Settings - Access advanced video settings such as Aspect Ratio,Noise Reduction,and Dynamic Contrast.You can adjust:13 14Basic Features Basic FeaturesThe Initial Setup menu appears the first time you turn on the TV. It will assist you to specify the Energy Saving mode.Connect your TV’s power cord to a power outlet, then press power. The Initial Setup screen opens.Press [◄ / ►] button on the remote control to select the language to be used for menus and message.Press [▼ / ▲] button on the remote control to select go to next step and press [OK /►] button to go.Select LanguagePress [▼ / ▲] button on the remote control to select the time zone, daylight saving time and time format you want to.Press [◄ / ►] button on the remote control to adjust.Press [▼ / ▲] button on the remote control to select go to next step and press [OK /►] button to go.Select TimePress [◄ / ►]button on the remote control to select Home Mode or Retail Mode.Press [▼ / ▲] button on the remote control to select go to next step and press [OK / ►] button to go.Select Picture ModePress [◄ / ►] button on the remote control to select the antenna type,Air or Cable.Press [▼ / ▲] button on the remote control to select go to next step and press [OK /►] button to start auto scan.Auto ScanTo Use the Main Menu](https://usermanual.wiki/Hisense-Electric/LCDC0020/User-Guide-1960949-Page-22.png)