Hisense Electric LCDC0028 LED LCD TV User Manual manual
Hisense Electric Co., Ltd. LED LCD TV manual
User Manual

English

9
The lightning flash with arrowhead symbol,within an equilateral triangle is
intended to alert the user to the presence of uninsulated dangerous
voltage within the product’s enclosure that may be of sufficient magnitude
to constitute a risk of electric shock.
The exclamation point within an equilateral triangle is intended to alert the
user to the presence of important operating and maintenance(servicing)
instructions in the literature accompanying the appliance.
1. Read these instructions.
2. Keep these instructions.
3. Heed all warnings.
4. Follow all instructions.
5. Do not use this apparatus near water.
6. Clean only with dry cloth.
7. Do not block any ventilation openings.Install in accordance with the manufacturer’s
instructions.
8. Do not install near any heat sources such as radiators,heat registers,stoves,or other
apparatus (including amplifiers) that produce heat.
B
12
11
10.
13
A
23
22
21
20
19
14
C
15. To reduce the risk of fire or electric shock,do not expose this apparatus to rain or
moisture.
16. The battery(battery or batteries or battery pack)shall not be exposed to excessive
heat such as sunshine,fire or the like.
17. The mains plug is used as disconnect device,the disconnect device shall remain
readily operable.
18. This equipment is a Class II or double insulated electrical appliance.It has
been designed in such a way that it does not require a safety connection to
electrical earth.
27
26
25
24
D
E
F
ATTENTION :
POUR RÉDUIRE LE RISQUE DE CHOC
ÉLECTRIQUE, NE PAS ENLEVER LE
COUVERCLE OU LE DOS. AUCUNE PIÈCE À
ÊTRE ENTRETENUE PAR L'UTILISATEUR NE
SE TROUVE À L'INTÉRIEUR. POUR
L’ENTRETIEN, CONSULTER LE PERSONNEL
DE SERVICE QUALIFIÉ.
L'éclair accompagné d'une flèche dans des triangles équilatéraux
avertit l'utilisateur de la présence d'une tension dangereuse non isolée,
dans l'enveloppe du produit, suffisante pour poser un risque de choc
électrique.
Le point d’exclamation dans les triangles équilatéraux avertit
l'utilisateur de la présence d’importantes instructions d'utilisation et
d'entretien dans la documentation qui accompagne l'appareil.
1. Lire ces instructions.
2. Conserver ces instructions.
3. Respecter tous les avertissements.
4. Suivre toutes les instructions.
5. Ne pas utiliser ce dispositif près de l’eau.
6. Nettoyer seulement avec un chiffon sec.
7. Ne bloquez pas les ouvertures de ventilation. Installez conformément aux
instructions du fabricant.
8. Ne pas installer près de sources de chaleur telles que radiateurs, registres de
chaleur, poêles ou d’autres appareils (y compris les amplificateurs) qui
produisent de la chaleur.
9. Ne contournez pas le dispositif de sécurité d'une fiche polarisée. Une fiche
polarisée possède deux lames dont l'une est plus large que l'autre. Une fiche de
type mise à la masse possède deux lames et une fourche de mise à la masse. La
lame large ou la troisième fourche sont conçues pour assurer votre sécurité. Si la
fiche fournie ne s'insère pas dans la prise murale, consultez un électricien pour le
remplacement de la prise désuète.
10. Protégez le cordon d'alimentation pour éviter qu'on ne marche dessus, ou qu'il
ne soit pincé, en particulier au niveau des prises, des prises de courant et au
point où il sort de l'appareil.
11. Utiliser seulement des accessoires spécifiés par le fabricant.
12. Utilisez uniquement un chariot, support, trépied, fixation ou
table recommandés par le fabricant ou vendus avec
l'appareil. Lorsque le chariot est utilisé, fait attention lors du
déplacement de la combinaison chariot/appareil afin d'éviter
des blessures causées par son renversement.
13. Débranchez cet appareil durant les orages électriques ou
lorsqu'il est inutilisé pendant de longues périodes.
ATTENTION
RISQUE DE CHOC
ÉLECTRIQUE NE PAS OUVRIR
G
14. Pour toute réparation, consultez un personnel de service qualifié. Des
réparations sont requises lorsque l'appareil a été endommagé d'une façon ou
d'une autre, par exemple lorsque le cordon d'alimentation est endommagé, si
du liquide a été renversé ou si des objets sont tombés dans l'appareil, si
l'appareil a été exposé à la pluie ou à l'humidité, s'il ne fonctionne pas
normalement, ou s'il a été échappé.
15. Afin de réduire le risque d'incendie ou de choc électrique, n'exposez pas cet
appareil à la pluie ou à l'humidité.
16. Les piles (ou le bloc-piles) installées ne doivent pas être exposées à une
chaleur intense, comme la lumière du soleil, le feu et d’autres sources de
chaleur semblables.
17. Lorsque la fiche d’alimentation est utilisée comme dispositif de débranchement
de l’appareil, elle doit rester facilement accessible.
18. Cet appareil est un appareil électrique à double isolation, de classe II. Il a été
conçu de telle sorte qu'il ne nécessite pas une connexion de sécurité à la terre
électrique.
19. L’appareil ne doit pas être exposé à des égouttements ou éclaboussures, ni des
objets remplis de liquides, tels que des vases, ne doivent être placés sur
l’appareil.
20. Un système d'antenne extérieure ne doit pas être placé à proximité des lignes
électriques aériennes non plus que de tout autre circuit électrique, ou à un
endroit d'où il pourrait tomber dans de telles lignes ou circuits électriques. Lors
de l'installation d'un système d'antenne extérieure, vous devez être
extrêmement prudent et faire attention de ne pas toucher les lignes ou circuits
électriques car leur contact pourrait être fatal.
21. Ne surchargez pas les prises murales et les cordons d'extension car cela
pourrait entraîner un risque d'incendie ou de choc électrique.
22. Ne poussez jamais aucun objet d'aucune sorte dans les fentes de l'appareil car
il pourrait toucher des points de tension élevée ou causer un court-circuit qui
pourrait entraîner un incendie ou un choc électrique. Ne renversez jamais et ne
vaporisez aucun type de liquide sur l'appareil.
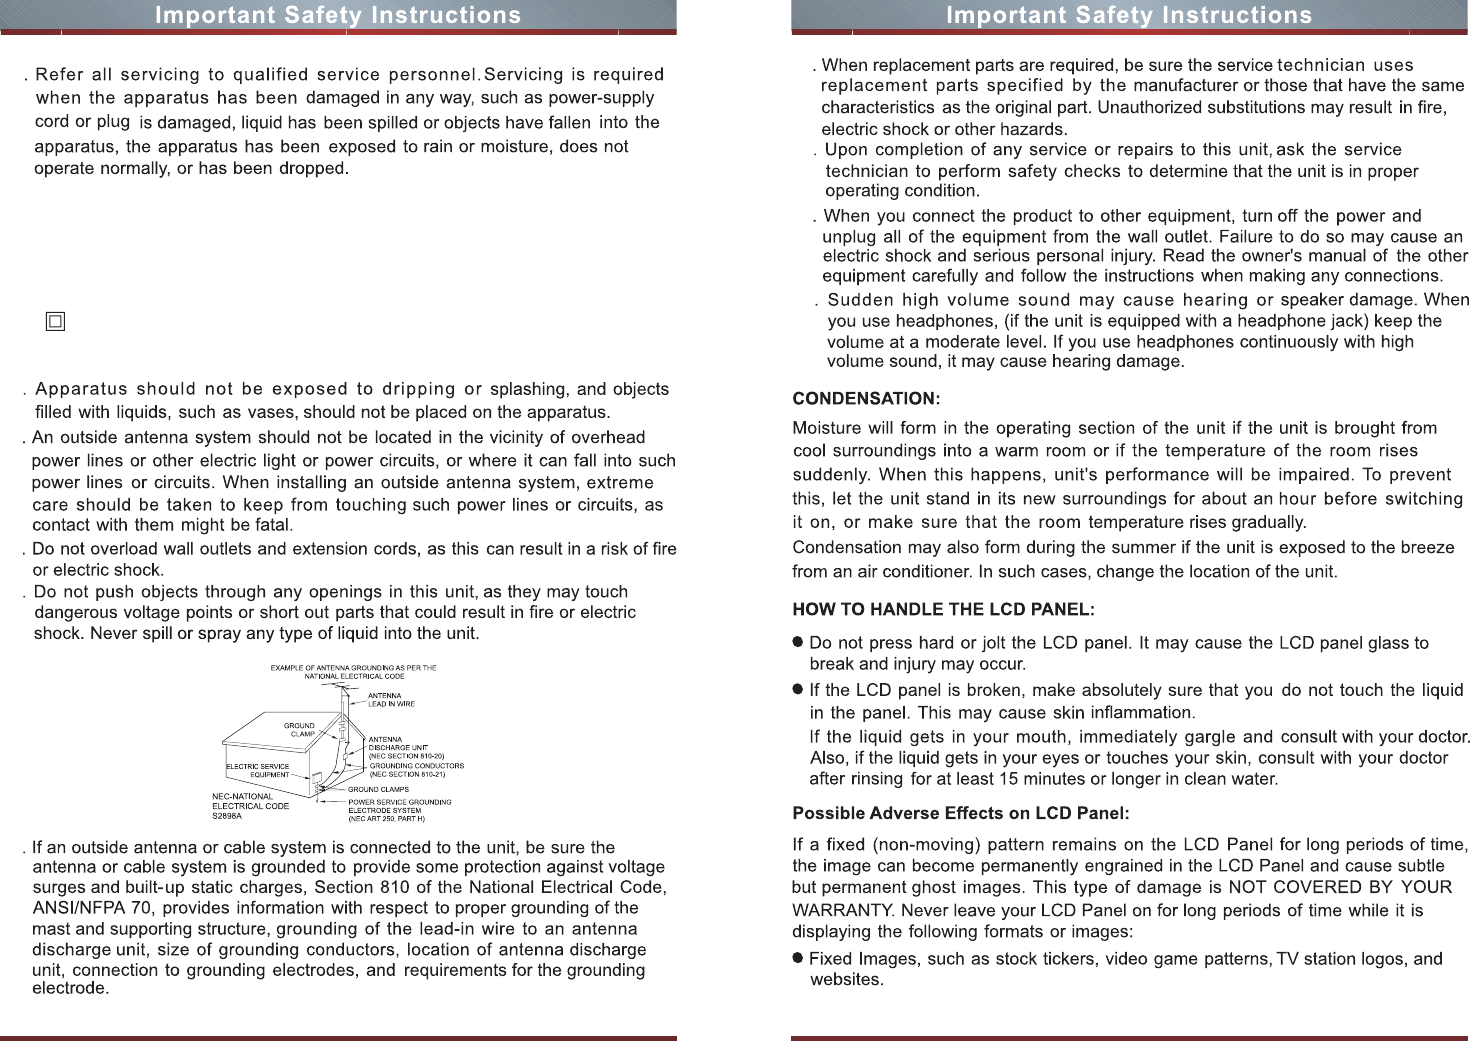
23. Si une antenne ou un système de câble extérieur est branché à l’appareil,
assurez-vous que l’antenne ou le système est relié à la terre afin de protéger
contre la surtension ou les décharges électrostatiques. La section 810 du Code
national de l’électricité, ANSI/NFPA 70, renseigne sur la mise à la terre
appropriée du mât et de la structure de soutien, la mise à la terre du fil
conducteur à une unité de décharge d’antenne, la taille des conducteurs de
terre, l’emplacement de l’unité de décharge d’antenne, la connexion aux
électrodes de terre et les exigences concernant l’électrode de terre.
EXEMPLE DE MISE À LA TERRE D’ANTENNE SELON LE
CODE NATIONAL DE L’ÉLECTRICITÉ
UNITÉ DE DÉCHARGE D’ANTENNE (NEC SECTION 810-20)
CONDUCTEURS DE MISE À LA TERRE (NEC SECTION
810-21)
CÂBLE D'ENTRÉE D'ANTENNE
CONDUCTEURS DE TERRE
SYSTÈME D’ÉLECTRODE DE MISE À LA TERRE DU SECTEUR
(NEC ART. 250, PARTIE H)
COLLIER DE MISE
À
LA TERRE
ÉQUIPEMENT ÉLECTRIQUE
NEC - CODE NATIONAL DE
L’ÉLECTRICITÉ S2898A
H
24. Lorsque des pièces de rechange sont requises, assurez-vous qu'un technicien
de service utilise des pièces de rechange spécifiées par le fabricant ou celles
qui ont les mêmes caractéristiques que la pièce d'origine. Des substitutions non
autorisées peuvent entraîner un incendie, un choc électrique ou autres risques.
25. Une fois l’entretien ou la réparation terminée, demandez au technicien
d’effectuer une vérification de sécurité afin d’établir si l’appareil fonctionne
correctement.
26. Si vous connectez le produit à un autre appareil, éteignez-le et débranchez-le
de la prise de courant. Autrement vous risquez un choc électrique ou des
blessures graves. Lisez le manuel de l’utilisateur de l’autre appareil et suivez les
directives de connexion.
27. Un son soudain d’intensité élevée peut endommager l’ouïe ou les haut-parleurs.
Si vous utilisez des écouteurs (appareil doté d’une prise d’écouteurs), tenez
l’intensité sonore à un niveau moyen. L’utilisation continue d’écouteurs à
intensité sonore élevée peut endommager l’ouïe.
CONDENSATION :
De l’humidité peut se former dans la partie fonctionnelle de l’appareil si celui-ci
passe d’un endroit frais à un endroit chaud ou si la température de la pièce s’élève
subitement. Dans pareil cas, le rendement de l’appareil peut diminuer. Pour éviter
une telle situation, laissez l’appareil s’ajuster au niveau milieu pendant une heure
environ avant de l'allumer ou assurez-vous que la température de la pièce s’élève
graduellement.
Une condensation peut aussi se former en été si l’appareil est exposé au courant
d’air d’un climatiseur. Dans pareil cas, changez l’emplacement de l’appareil.
MANIPULATION DU PANNEAU ACL :
N’appuyez pas fort sur l’ACL et ne le secouez pas. Vous risqueriez de briser le
verre de l’ACL et de vous blesser.
Si l’ACL est brisé, assurez-vous de ne pas toucher le liquide dans le panneau.
Le liquide peut irriter la peau.
Si vous avalez du liquide, gargarisez-vous immédiatement et consultez un
médecin. Si le liquide entre en contact avec les yeux ou la peau, rincez-les
pendant au moins 15 minutes à l’eau claire et consultez un médecin.
Effets nocifs possibles de l’écran ACL :
Si un motif fixe reste à l’écran pendant une longue durée, l’image peut devenir
imprégnée en permanence sur l’écran ACL et former une image fantôme subtile
mais permanente. Ce type de dommage n’est PAS COUVERT PAR LA GARANTIE.
Ne laissez jamais l’écran ACL allumé pendant une longue durée quand il affiche
des images des types suivants :
Images fixes comme les résultats de la Bourse, les motifs de jeu vidéo, les logos
de stations de télévision et les sites Web.
I
Formats spéciaux qui ne couvrent pas l’écran entier. Par exemple, visualiser le
format boîte aux lettres (16:9) sur écran normal
(4:3) (barres noires en haut et en bas de l'écran) ou vue normale (4:3) sur grand
écran (16:9) (barres noires sur la gauche et la droite de l'écran).
Les symptômes suivants ne sont pas des signes de dysfonctionnement,
mais de limitation technique. Par conséquent, nous déclinons toute
responsabilité quant à ces symptômes.
Les écrans ACL sont fabriqués avec un niveau extrêmement élevé de précision
mais certaines parties de l’écran peuvent ne pas avoir d’éléments d’image ou
présenter des points lumineux.
Il ne s'agit pas d'un signe de mauvais fonctionnement.
N’installez pas l’écran ACL près d’un équipement électronique qui génère des
ondes électromagnétiques. Certains équipements sont placés trop près de
l'appareil peuvent provoquer des interférences.
Effet sur les appareils à infrarouge - Il peut y avoir des interférences quand on
utilise un appareil à infrarouges comme un téléphone sans fil à infrarouges.
Directives de fin de vie
Votre téléviseur contient des matériaux qui peuvent être recyclés et réutilisés. Pour
de l'information en rapport avec la mise au rebut et le recyclage, contactez les
autorités locales ou Electronic Industries Alliance : www.eia.org.
Pixels non actifs
L’écran ACL compte près de 3 millions de transistors en couches minces
fournissant une qualité d’image extrêmement élevée. À l’occasion, des pixels
inactifs peuvent apparaître à l’écran sous forme de point fixe noir (pixel mort), bleu,
vert ou rouge. Ces pixels inactifs ne nuisent pas au rendement de votre téléviseur et
ne sont pas considérés un vice.
Source d’alimentation
POUR UTILISER L'ALIMENTATION C.A.
1. Le cordon d’alimentation est branché au téléviseur à l’usine.
2. Branchez le cordon dans une prise de courant.
AVERTISSEMENT
Ne branchez pas l’appareil à l’aide d’un dispositif autre que le cordon fourni car
cela présenterait un risque d’incendie, de choc électrique ou de dommage.
N’utilisez pas une tension autre que celle spécifiée pour l’appareil car cela
présenterait un risque d’incendie, de choc électrique ou de dommage.
ATTENTION
Pour des raisons de sécurité, débranchez l’appareil de la prise de courant si
vous prévoyez ne pas l’utiliser pendant une période prolongée (ex. : voyage).
Ne branchez/débranchez pas le cordon d’alimentation si vous avez les mains
mouillées car cela pourrait provoquer un choc électrique.
J
Base
FCC ID:W9HLCDC0028
This device complies with Part 15 of the FCC Rules. Opera-tion is subject to the following
two conditions: (1) this device may not cause harmful interference, and (2) this device must
accept any interference received, including interference that may cause undesired operation.
K
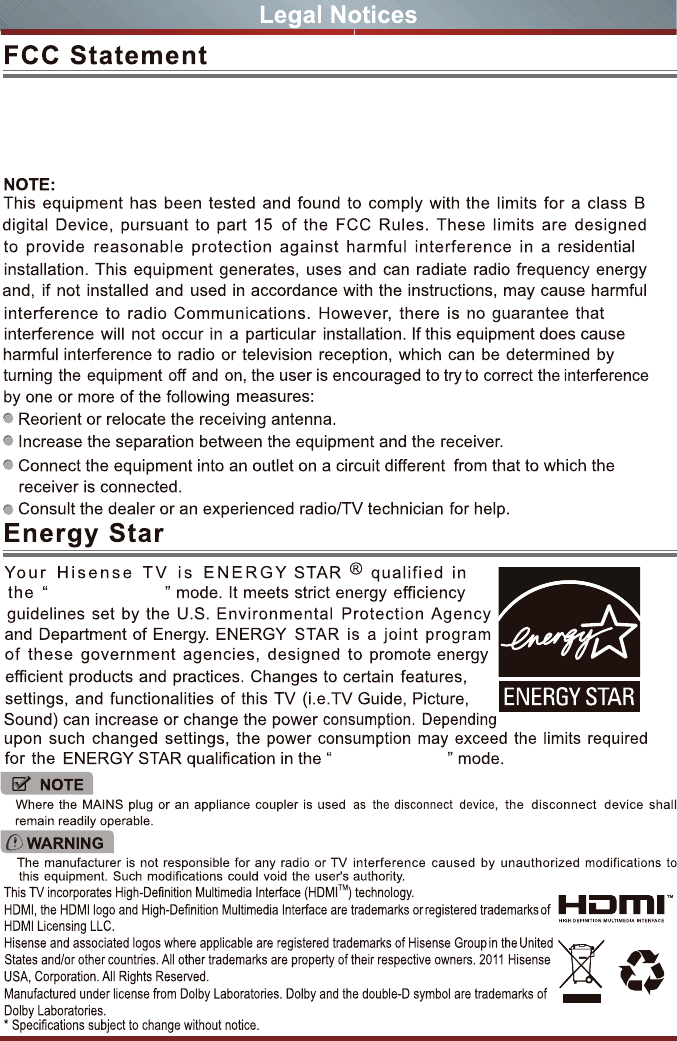
Energy Savings
Energy Savings
1
Contents
Getting Started
Accessories List...............................................................................................
Installing the Base ..........................................................................................
Viewing the Control Panel ...............................................................................
Viewing the Remote Control ............................................................................
Installing Batteries in the Remote Control .......................................................
Making Connections ........................................................................................
Digital Media Player....................................................................................... ..
Browse the Pictures.........................................................................................
Enjoy Music Files.............................................................................................
Enjoy Video Files.............................................................................................
Playable Format List........................................................................................
Trouble Shooting..............................................................................................
Turning your TV on or off ................................................................................
Selecting the Input Source .............................................................................
Changing Channels / Volume .........................................................................
Shortcuts Instructions .....................................................................................
Turning your TV for the First Time ..................................................................
To Use the Main Menu....................................................................................
Using the Picture Menu ..................................................................................
Using the Sound Menu ...................................................................................
Using the Time Menu......................................................................................
Using the Setup Menu ....................................................................................
Using the Lock Menu ......................................................................................
Using the Channel Menu.................................................................................
PC Setting........................................................................................................
Basic Features
Advanced Features
2
Getting Started
Accessories List
Installing the Base
USER MANUAL Quick Setup GuideWarranty Card
User Manual Quick Setup GuideWarranty Card Remote Control Battery×2
Follow the illustrations below to complete the installation steps:
2
2
3
4
5
6
21
22
22
23
24
25
11
11
11
12
13
14
14
15
16
16
17
19
19
NOTES
WARNING
CAUTION
1. The LCD display is very fragile, and must be protected at all times when removing
the Table-Top Stand. Be sure that no hard or sharp object, or anything that could
scratch or damage the LCD display, comes into contact with it. DO NOT exert
pressure on the front of the TV at any time because the screen could crack.
2. For tabletop use, the TV must be attached to the provided base as shown on this
page.
3. To Wall-Mount, the Table-Top Stand must be removed from the TV first,and the
brackets (not provided) must be attached to the TV. Please refer to the Wall
Bracket Installation Instruction(inside the Wall Bracket Box).
Be sure to disconnect the AC power cord before installing a base or Wall-Mount
brackets.
Screws: (M4×20)×4
20 mm
1. Attach the stand to the TV set as shown in the picture.
2. Use the screws (M4 × 20) × 4 to fix the stand tightly.
3 4
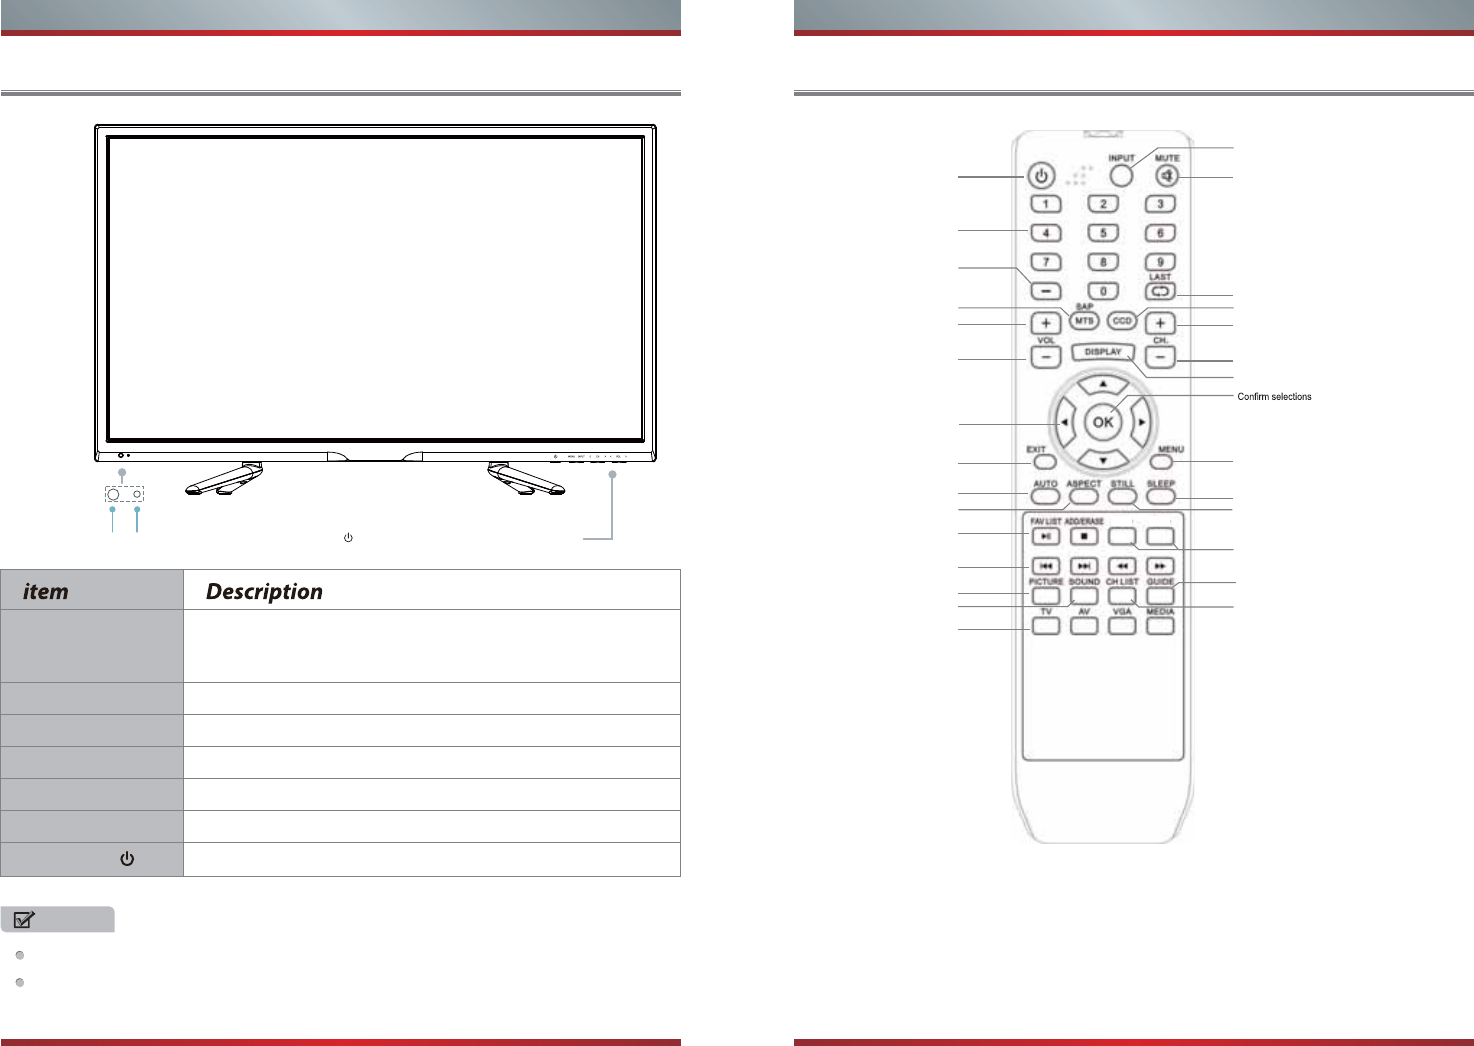
Viewing the Control Panel Viewing the Remote Control
NOTES
Program Your Universal Cable or Satellite Remote Control to Operate Your New
Hisense Television!
If you would like to program your other household remote controls to your new
Hisense television, please consult the User’s Manual supplied by your Cable or
Satellite provider. The Cable or Satellite providers’ User’s Manuals should include
instructions on how to program their remote to your television.
Getting Started Getting Started
FOR ILLUSTRATION ONLY.
Powering up or down the TV requires several seconds of processing time.
Do not rapidly turn the TV on/off as abnormal operation may occur.
Remote Sensor Receive remote signals from the remote control.
Do not put anything near the sensor, as its function may
be affected.
Remote Indicator Red light up in standby mode. Blue light up in power on mode
MENU Open the OSD menu
INPUT Select among the different signal sources.
ͷCH
ͷVOL
Select the channel
Adjust the volume.
STANDBY Turn on the TV or put the TV in standby mode.
Remote Sensor
Remote Indicator
STANDBY MENU INPUT
V
V
V
V
CH VOL
Power on/off
Direct channel selection
Mute button
Select input source
Go to the previous channel
Increase volume
Decrease volume
Next channel
Previous channel
Adjust CC mode
Display the information banner
▲/
▲
/
▲
/
▲
Move Up/Down/Left/Right
or adjust settings
Menu button
Close the menu
Auto ajust button
Zoom button
Sleep timer button
Make the screen stop
For Roku Ready
Favorite program controlling button
& Media player button
Media player button
Select picture mode
Select sound mode Channel list
Select TV AV VGA USB source
Open the DTV program guide
(if available)
Audio select button
Mono/Stereo/SAP operation
Dash button
Select a digital sub-channel
HOME
*
Installing Batteries in the Remote Control
1. Push the back cover to open the battery compartment of the remote control.
2. Insert two AAA size batteries. Make sure to match the (+) and ( - ) ends of the
batteries with the (+) and ( - ) ends indicated in the battery compartment.
3. Close the battery compartment cover.
2Insert the batteries
NOTES
Change the batteries
1 Gently lift up 3Gently push down
NOTE
DIRECTV............................................................................................................................0178 or 10019.
Time Warner Cable...................................................................................................386,0178 or 10178
Comcast ..........................................................................................................................0178 or 10178
Cox Communications ......................................................................................................0178 or 10178
Dish Network .........................................................................................................................627 or 505
AT&T U-verse ....................................................................................................................1346 or 1041.
Making Connections
NOTE
Some external devices impossible insert to this set for individual difference. Please
replace with appropriate external signal cable or increase the adapter to match with
the port in such case.
Item
Description
ANT/CABLE IN Connect an antenna or cable TV to this jack.
HDMI/DVI
COMPONENT IN Connect to a DVD player, Digital Set-Top-Box, or other
A/V devices with component (YPBPR) video and audio
output jacks. Component audio Jack share with AV IN
audio Jack.Support: 480i\480p\720p\1080i\1080p.
AV IN Connect to the composite video and audio (L/R) output
jacks on external video devices.
VGA
PC/DVI AUDIO IN
Connect to a PC or other devices with a VGA interface.
Connect headphone or analog sound system using RCA
Y-cable(1/8"-stereo mini to L/R phono-not provided).
DIGITAL AUDIO OUT Connect to an external digital audio device.
USB Photo, Music, Movie play and software update.
HDMI (High-Definition Multimedia Interface)provides an
uncompressed,all digital audio/video interface between
this TV and any HDMI-device,such as a set-top box,Blu
-ray disc player,or A/V receiver.
/AUDIO OUT
5 6
Getting Started Getting Started
Below is a list of Hisense codes for the most common Cable and Satellite providers. Use the
Hisense code that is associated with your Cable or Satellite provider(if applicable).
If the Hisense code associated with your Cable or Satellite provider is not listed above,
if the code above does not work, or if you cannot locate the instructions for
programming your household remote to your television, call your local Cable or
Satellite provider’s customer service center.If your Cable or Satellite provider does not
have an Hisense code available, please visit http://www.hisense-usa.com for
additional codes.
1. Dispose of your batteries in a designated disposal area. Do not throw the batteries into fire.
2. Remove depleted batteries immediately to prevent battery acid from leaking into the battery
compartment.
3. If you do not intend to use the remote control for a long time, remove the batteries.
4. Battery chemicals can cause a rash. If the batteries leak, clean the battery compartment
with a cloth. If chemicals touch your skin, wash immediately.
5. Do not mix old and new batteries.
6. Do not mix alkaline, standard (carbon-zinc) or rechargeable (ni-cad, ni-mh, etc.) batteries.
7. The batteries shall not be exposed to excessive heat such as sunshine,fire or the like.
Getting Started
NOTES
Check the jacks for position and type before making any connections. Loose
connections can result in image or color problems. Make sure that all
connections are tight and secure.
Not all A/V devices have the ability to connect to a TV, please refer to the
user’s manual of your A/V device for compatibility and connections procedure.
Always unplug the power cord when connecting external equipment.
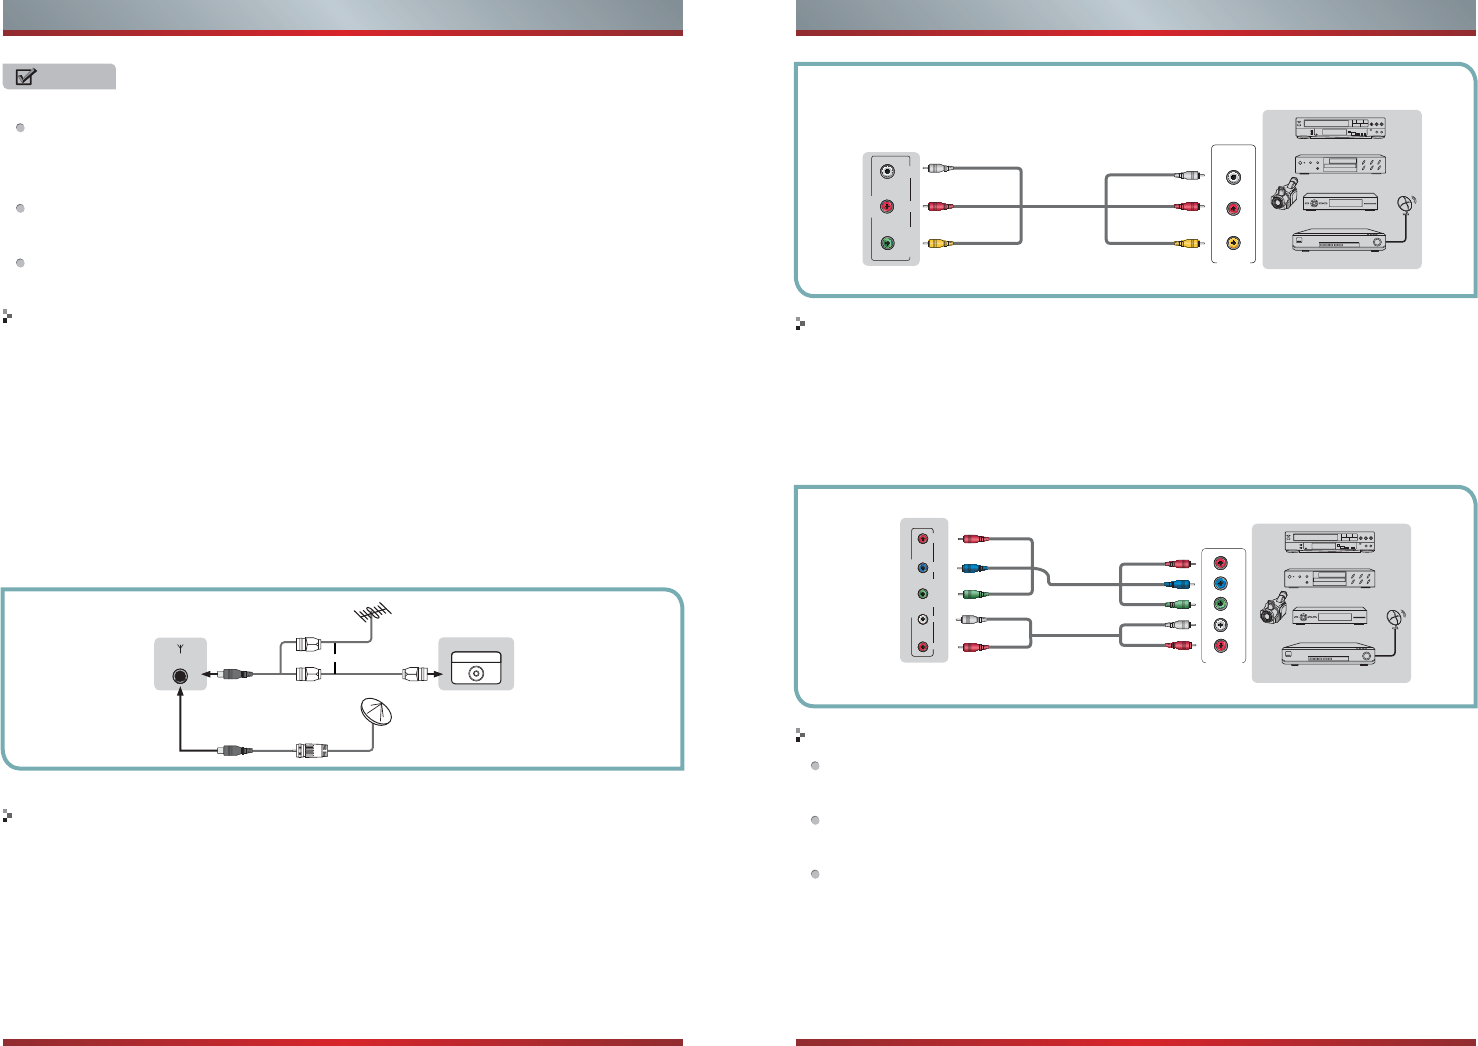
Connecting an antenna, cable or cable/satellite box
1. Turn off the TV before connecting the antenna.
2. Connect one end of a coaxial cable (not included) to the RF OUT jack on the
antenna, cable or cable/satellite box. If you are using an antenna with twin-lead
cable, you may need a 300-75 ohm adapter (not provided) to connect it to the
back of your TV. Likewise, if you are using several antennas, you may need a
combiner (not provided).
3. Connect the other end of the cable to the ANT/CABLE IN jack on the side of your
TV.
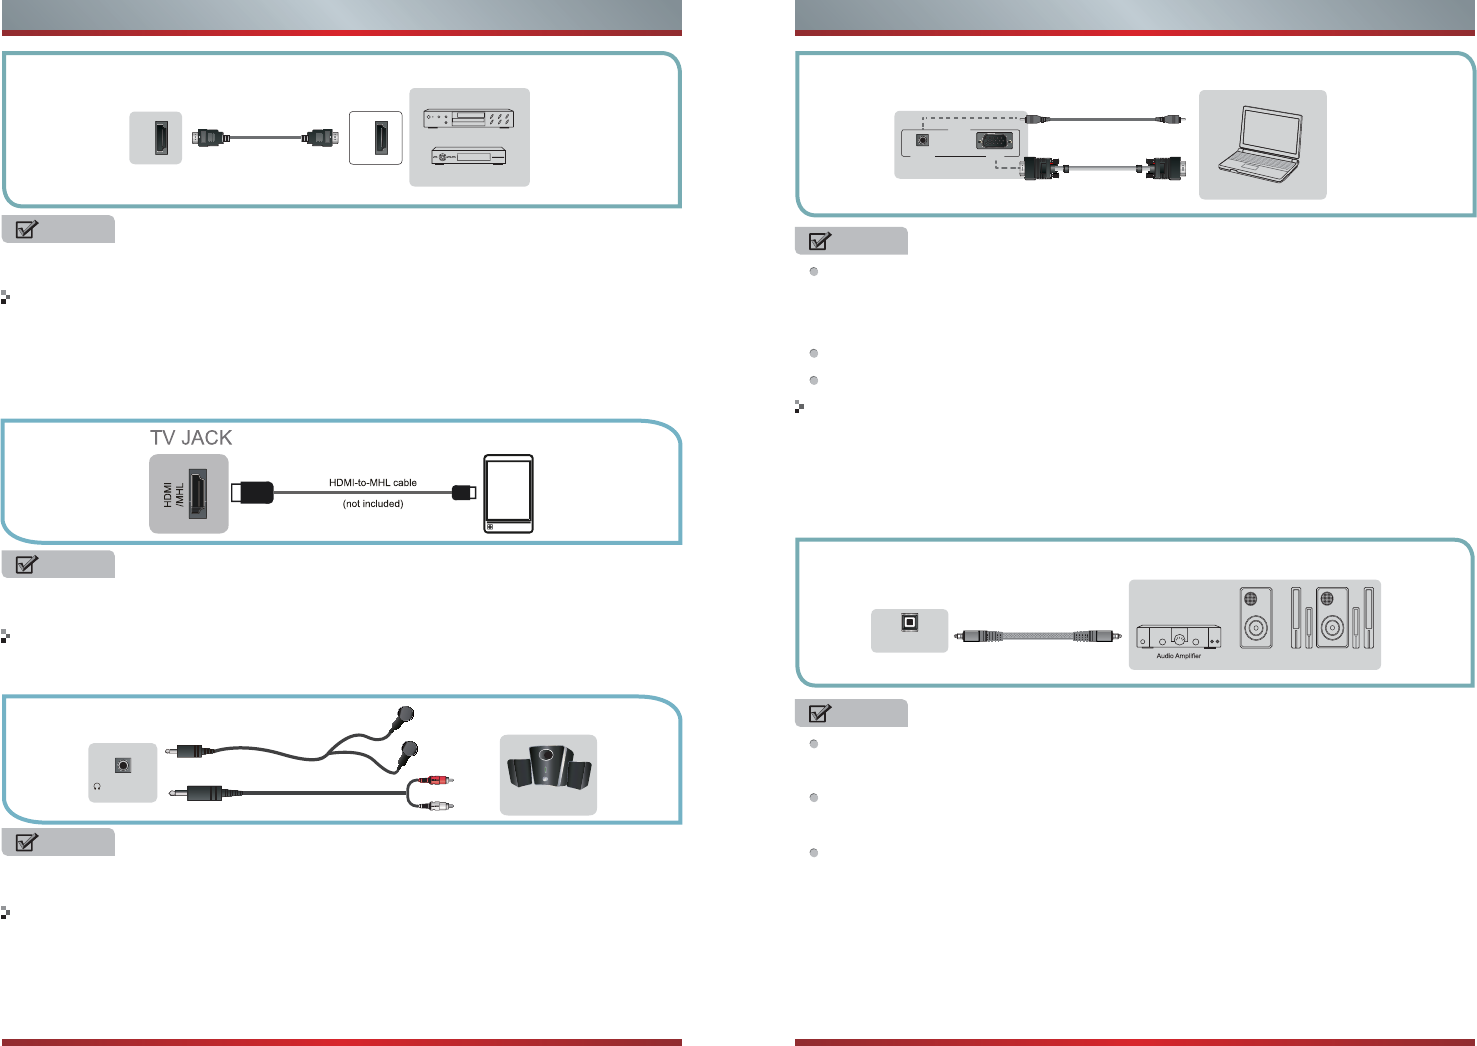
Connecting an A/V Device with Composite Cable
1. Use the audio and video cables to connect the external A/V device’s composite
video/audio jacks to the TV’s jacks. (Video = yellow, Audio Left = white, and
Audio Right = red)
2. Plug the connected devices into the mains socket before switching on the TV.
3. Select the corresponding source from the TV.
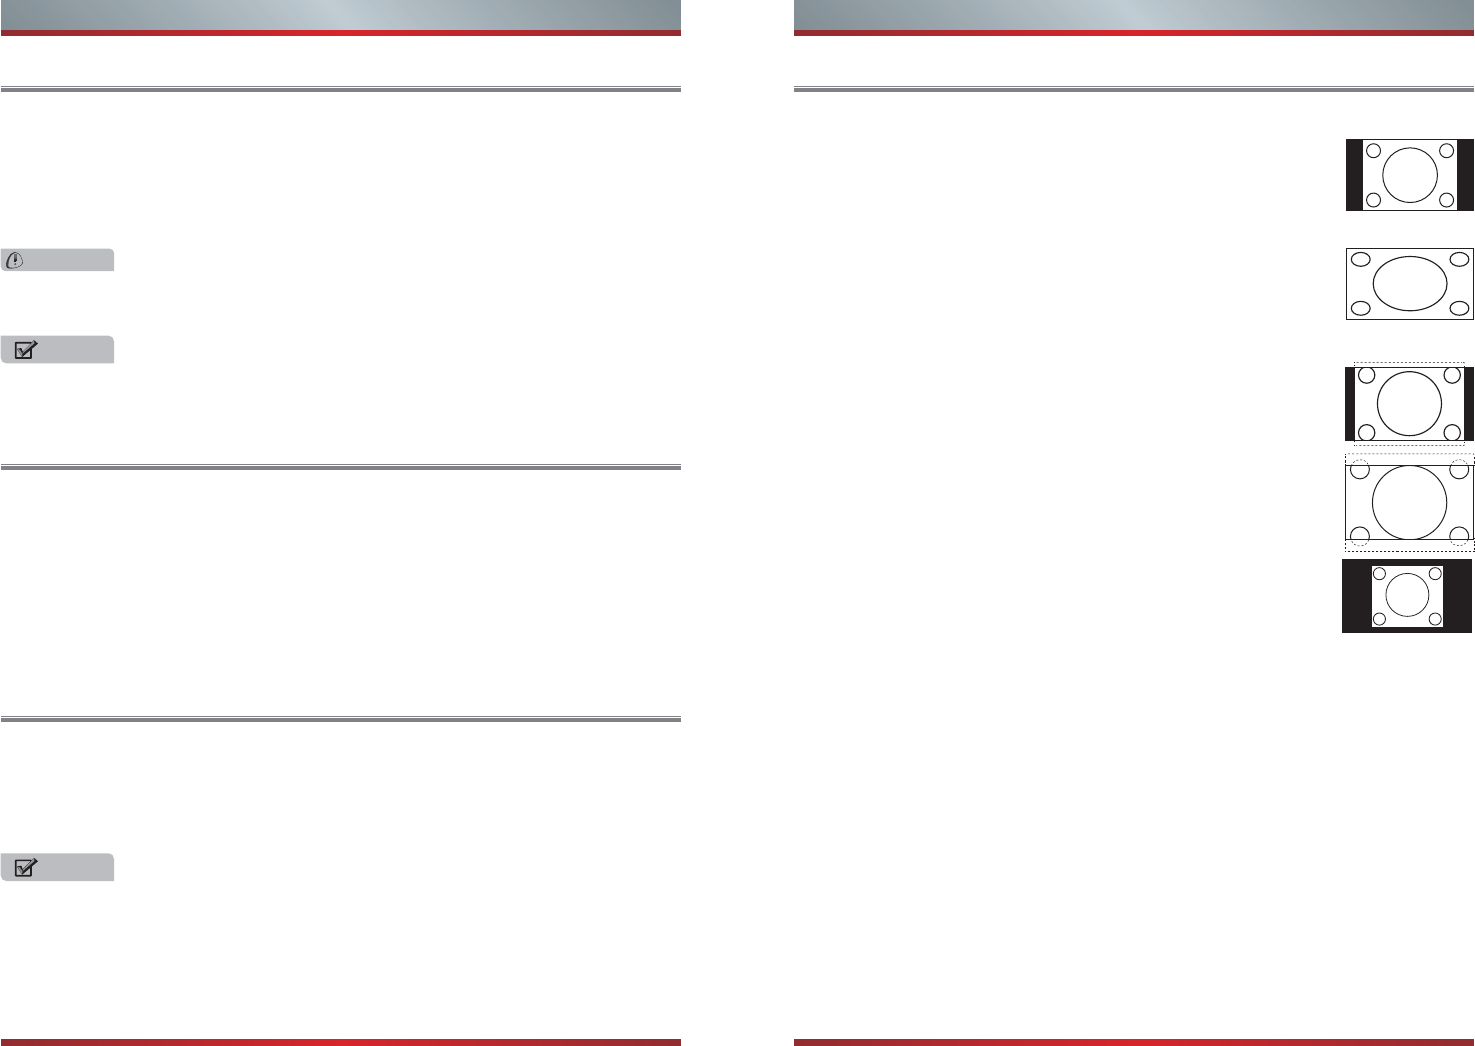
Connecting an A/V Device with Component (YPBPR) Cable
1. Use a component cable to connect the external A/V device’s component output
jacks to the TV’s YPBPR jacks. Use an audio cable to connect the external A/V
device’s component audio jacks to the TV’s AUDIO (L/R) jacks.
2. Plug the connected devices into the mains socket before switching on the TV.
3. Select the corresponding source from the TV.
Connecting an A/V Device with HDMI Cable
Support digital connections between HDMI - enabled AV devices such as PVR,
DVD, Blu-ray, AV receiver and digital devices.
Some devices such as PVR or DVD player require HDMI signal to be set to
output in the device's settings.
Please consult your device user manual for instructions.
1. Use an HDMI cable to connect the A/V device’s HDMI output jack to the TV’s
HDMI jack.
2. Plug the connected devices into the mains socket before switching on the TV .
3. Select the corresponding source from the TV.
78
Getting Started Getting Started
or ANT OUT
Cable
VHF/UHF Antenna
EXTERNAL DEVICESTV JACK
ANT
CABLE IN
Equipment with A/V jacks
DVD Player/Recorder
Video
Camera
EXTERNAL DEVICES
Set-top box
Satellite Receiver
Satellite
antenna
cable
VCR
A/V OUT
Video
L
R
White(L)
White(L)
Yellow(Video)Yellow(Video)
Red(R)
Red(R)
TV JACK
AV Cable
(not included)
LRY/VIDEO
AV IN
Equipment with A/V jacks
DVD Player/Recorder
Video
Camera
EXTERNAL DEVICES
Set-top box
Satellite Receiver
Satellite
antenna
cable
VCR
White(L)
White(L)
Red(R)
Red(R)
Component
TV JACK
Component
R
L
PR
PB
Y
PR/CR
PR/CR
P
Y
B/CB
PB/CB
Y
(not included)
Y/VIDEO
COMPONENT IN
PR
L
RPB
Connecting a headphone
Connecting an MHL-enabled device
Connecting a PC with VGA Cable
Connecting an Audio Receiver with Digital Audio out cable
Primarily this unit is intended for use as an LCD TV. If you want to use it as a
monitor, please contact the manufacturer of the PC Video/Graphic's card for
further support. Perfect compatibility is not warranted.
The VGA cable will not supplied with the product.
We strongly recommend to use VGA cable with 2 cores as shown in the figure.
1. Use a Optical fiber cable to connect the A/V device’s digital audio in jack to the
TV’s DIGITAL AUDIO OUT jack.
2. Plug the connected devices into the mains socket before switching on the TV.
3. Select the corresponding source from the TV.
NOTE NOTES
When a digital audio system is connected to the DIGITAL AUDIO OUT (COAXIAL)
jack, decrease the volume of both the TV and the system.
5.1 CH (channel) audio is available when the TV is connected to an external
device supporting 5.1 CH.
When the receiver (home theater) is set to on, you can hear sound output from
the TV’s digital audio out jack. When the TV is receiving a DTV signal, the TV will
send 5.1 CH sound to the home theater receiver. When the source is connected
to the TV via HDMI, only 2 CH audio will be heard from the home theater receiver.
If you want to hear 5.1 CH audio, connect the digital audio out jack from your
DVD/Blu-ray player/cable box/STB satellite receiver directly to an amplifier or
home theater.
NOTES
910
Getting Started Getting Started
HDMI
HDMI
TV JACK
EXTERNAL DEVICES
DVD Player/Recorder
Set-top box
Equipment with HDMI jacks
HDMI Cable
(not included)
TV JACKS
EXTERNAL DEVICES
Powerless
Bass Speaker Speaker
DIGITAL
AUDIO OUT
Optical fiber Cable
(not included)
EXTERNAL DEVICES
Computer
TV JACK
Audio Cable
(not included)
VGA Cable
(not included)
VGA
PC IN
PC/DVI
AUDIO IN
The HDMI connector provides both video and audio signals, it’s not necessary to
connect the audio cable.
NOTE
This feature may not be available,depending on your TV series.
Not all cell phones support MHL feature as this only works with MHL-enabled phone.
You can connect an MHL-enabled device,such as a cell phone or Roku Streaming
Stick™,and view your device’sscreen on the TV.
1. Connect one end of an HDMI-to-MHL cable to the micro USB port on the device.
2. Connect the other end of the cable to the HDMI / MHL jack.
3.Select the corresponding source from the TV.
NOTE
To prevent possible hearing damage, do not listen at high volume levels for long
periods.
1. Use a VGA cable to connect the PC’s VGA output jack to the TV’s VGA jack.
Use an audio cable to connect the PC’s audio output jack to TV’s PC/DVI AUDIO
IN jack.
2. Plug the connected devices into the mains socket before switching on the TV.
3. Select the corresponding source from the TV.
Headphones can be connected to the HEADPHONE output on your set. (While the
headphone is connected, the sound from the built-in speakers will be disabled.)
/AUDIO OUT
Speaker
OR
(not included)
(not included)
11 12
Basic Features Basic Features
To turn your TV on or off (standby mode):
1. Plug the power cord into an AC power outlet.
2. Press [Power] button. Your TV turns on.
3. Press [Power] button again to turn off your TV. When you turn off your TV, it
goes into standby mode.
Aspect - Select the screen aspect ratio from Normal, Wide, Zoom and Cinema.
Turning your TV on or off Shortcuts Instructions
Selecting the Input Source
WARNING
NOTE
NOTE
When your TV is in standby mode, it is still receiving power. To completely
disconnect power, unplug the power cord.
Normal: The original 4:3 aspect ratio (1.33:1 signal) is preserved,
so black bars are added to the left and right of the image.
Standard TV broadcasts are displayed with a 4:3 aspect ratio.
Wide: When watching a standard broadcast or full-frame movie in
this mode, the display image is stretched proportionately to fill the
TV screen. When watching a widescreen (1.78:1 signal) program
or movie, the display image fills the TV screen.
Zoom: Stretch the 4:3 aspect ratio image vertically and
horizontally to fill the screen at 1:1.78 aspect ratio.
Cinema: Stretch the 4:3 aspect ratio image vertically and
horizontally to fill the screen at 1:2.35 aspect ratio.
Point to Point: Use the function to see the full image without any
cutoff, when VGA signal is inputted.
If your TV does not receive an input signal for several minutes, it automatically
goes into standby mode.
Changing the channels can also be achieved by directly entering the channel
number using the numeric keys on the remote control. If you are entering a two or
three digit channel number, the time between key presses should be less than 3
seconds.
To select the video input source:
The first time you turn on your TV, you must select the TV signal source. Your TV
stores this information, so you do not need to change the TV signal source unless
it changes. For example, you change from an outside antenna to cable TV.
Changing Channels / Volume
1. Turn on your TV, then press [Input] button on the remote or on the TV. The
Input Source menu opens.
2. Press [▲/▼] button to highlight the input source, then press [OK] button.
1. Press the [CH /V] (or [CH +/-]) on the TV/remote control to change the channel.
2. Press the [VOL /V] (or [VOL +/-]) on the TV/remote control to adjust the volume.
3. Press the numeric buttons on the remote control to display the corresponding
channels.
V
V
Picture - Press to set the picture mode. It can be set as Standard, Cinema, User and
Vivid. This mode achieves a certain image display effect by setting the brightness,
contrast and color etc.
Sound - Press to set the sound mode. It can be set as Standard, Speech, User and
Music.
Mute - Press to turn the sound off, press this button again to turn the sound back on.
This function is used to switch off sound temporarily.
Sleep - It can set the TV to let it enter into the Standby state automatically. Press this
button repeatedly to select the proper sleeping clock mode, and the clock tells you
the remaining time before the TV enters Standby state.
Display - Display the information banner. The information including channel number,
channel name, current system time, tuner mode, audio stream, video format, audio
language, closed caption mode, parental locks rated,program details, etc.
Turning your TV for the First Time
Using the Picture Menu
Press [Menu] to display the main menu or return to the previous menu or close the
main menu.
Press [◄/►] to highlight the desired menu icon, and press [OK] to select.
NOTE
If no buttons are pressed,the menu will close automatically after about 10 seconds.
Picture Mode - Adjust the Picture Mode. You can
select Standard,Vivid,Soft,User,Energy saving.
Brightness - Increase or decrease the brightness
of the picture. Increasing the brightness can add
more light to dark areas of the picture, while
decreasing the brightness can add more
darkness to light areas of the picture.
Contrast - Increase or decrease the contrast of the picture.Increase the contrast to
adjust the white areas of the picture or decrease the contrast to adjust the black
areas of the picture.
Color - Adjust the intensity of the colors.
Tint - Adjust the hue(Red,Green,Blue) of the picture.
Sharpness - You can increase the sharpness level for clearer images or decrease the
sharpness level for smoother images.
Color Temperature - Adjust the overall color of the picture.
Advanced Settings - Access advanced video settings such as Aspect Ratio,Noise
Reduction,and Dynamic Contrast.
You can adjust:
13 14
Basic Features Basic Features
The Initial Setup menu appears the first time you turn on the TV. It will assist you to
specify the Energy Saving mode.
Connect your TV’s power cord to a power outlet, then press power. The Initial Setup
screen opens.
Press [◄ / ►] button on the remote control to
select the language to be used for menus and
message.
Press [▼ / ▲] button on the remote control to
select go to next step and press [OK /►] button
to go.
Select Language
Press [▼ / ▲] button on the remote control to
select the time zone, daylight saving time and
time format you want to.
Press [◄ / ►] button on the remote control to
adjust.
Press [▼ / ▲] button on the remote control to
select go to next step and press [OK /►] button to go.
Select Time
Press [◄ / ►]button on the remote control to
select Home Mode or Retail Mode.
Press [▼ / ▲] button on the remote control to
select go to next step and press [OK / ►] button
to go.
Select Picture Mode
Press [◄ / ►] button on the remote control to
select the antenna type,Air or Cable.
Press [▼ / ▲] button on the remote control to
select go to next step and press [OK /►] button
to start auto scan.
Auto Scan
To Use the Main Menu
Using the Sound Menu
Using the Time Menu
Using the Setup Menu
NOTES
NOTES
NOTES
Transparent
OSD Timeout
Closed Caption
Input Label
Other Settings
Restore Default
Setup Wizard
CEC
15 16
Basic Features Basic Features
Aspect Ratio: Adjust how the picture fills the
screen.
Noise Reduction: Select to reduce the noise
level of connected equipment: Off, Low,
Medium or High.
Dynamic Contrast: Automatically adjust
picture detail and brightness.
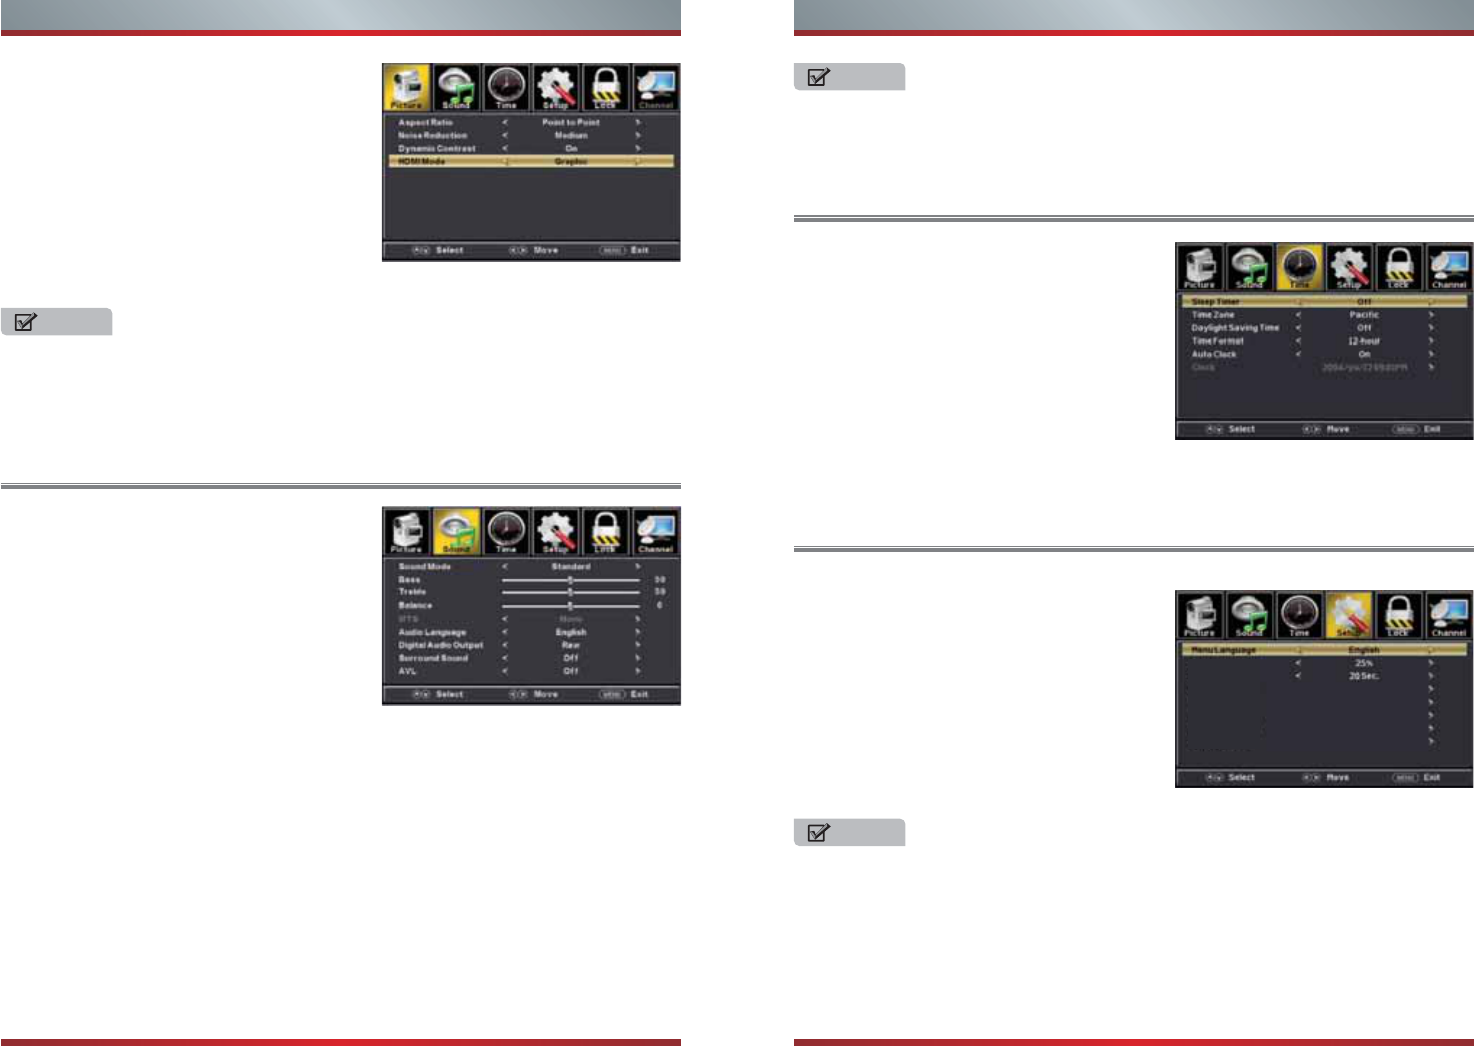
HDMI Mode: Adjust the HDMI output mode.
You can select Graphic or Video.
1. The option of “Aspect Ratio” is different in different input source. (For more
information, see “Shortcuts Instructions”)
2. Only select the “Graphic” in “HDMI Mode”,you can just adjust Aspect Ratio is the
Point to Point mode.
1,The option of “MTS” is only available in ATV.
2,The option of “Audio Language”is only available in DTV.
3,When “AVL” is “On”, that means audio out control is activated.
1. The option of “Closed Caption” is Only available under TV and AV source.
2. The option of “Over Scan” is Only available under DTV and Component Source.
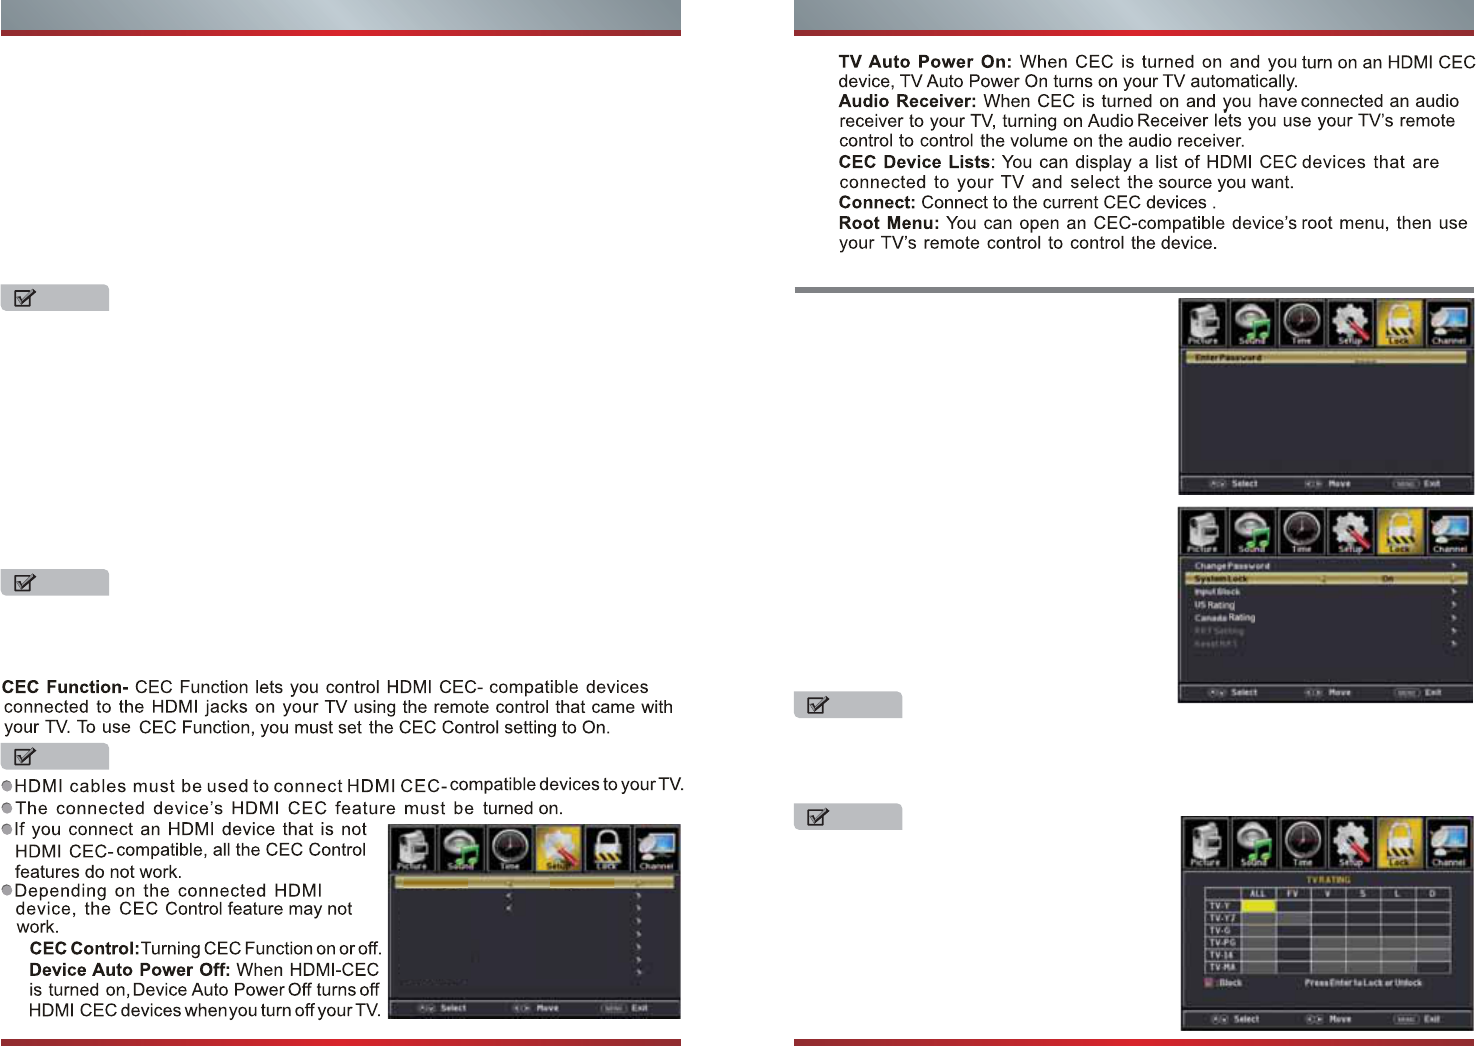
You can adjust:
Sound Mode - Adjust the Sound Mode. You
can select Stan-dard,Music,Movie,Sports,User.
Bass - Adjust the low frequency sounds.
Treble - Adjust the high frequency sounds.
Balance - Adjust the balance between the left
and right speakers.
MTS - Configures the multi-track sound.
You can adjust:
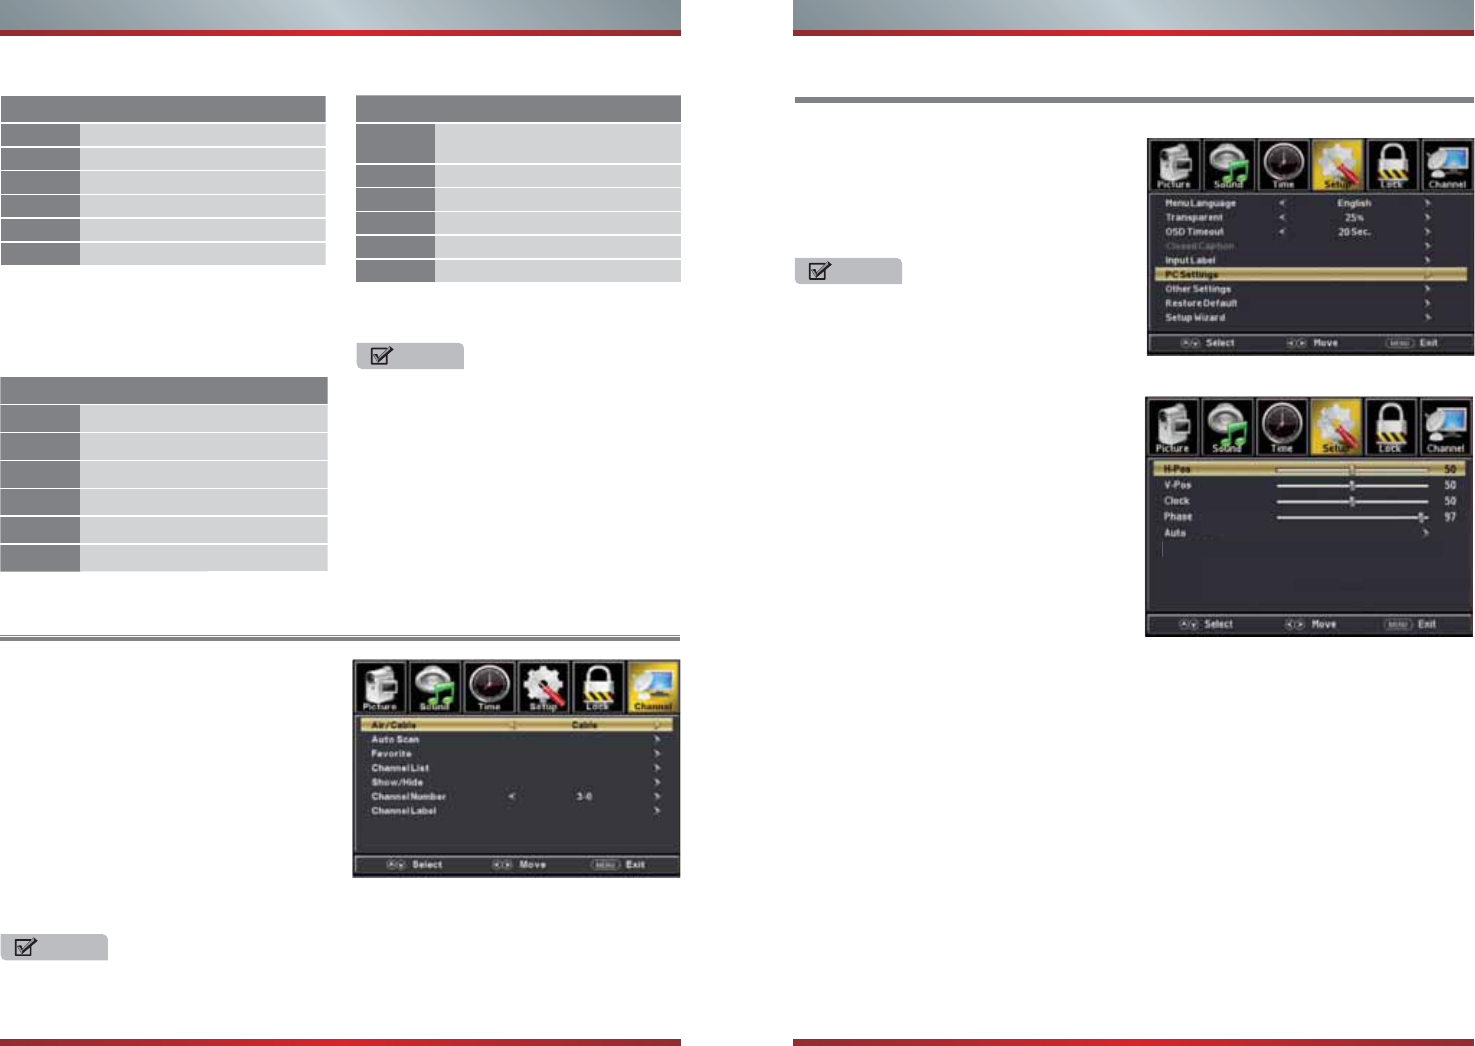
Sleep Timer - Set a timer for the TV to turn off
automatically.
Time Zone - Select your time zone.
Daylight Saving Time - Set the daylight saving
time for your area.
Time Format - Select your time format.
Auto Clock - Select “On” for automatic date
and time setting using information from broadcast stations in your area.
Clock - Set the time manuslly when “Auto Clock” is “Off“.
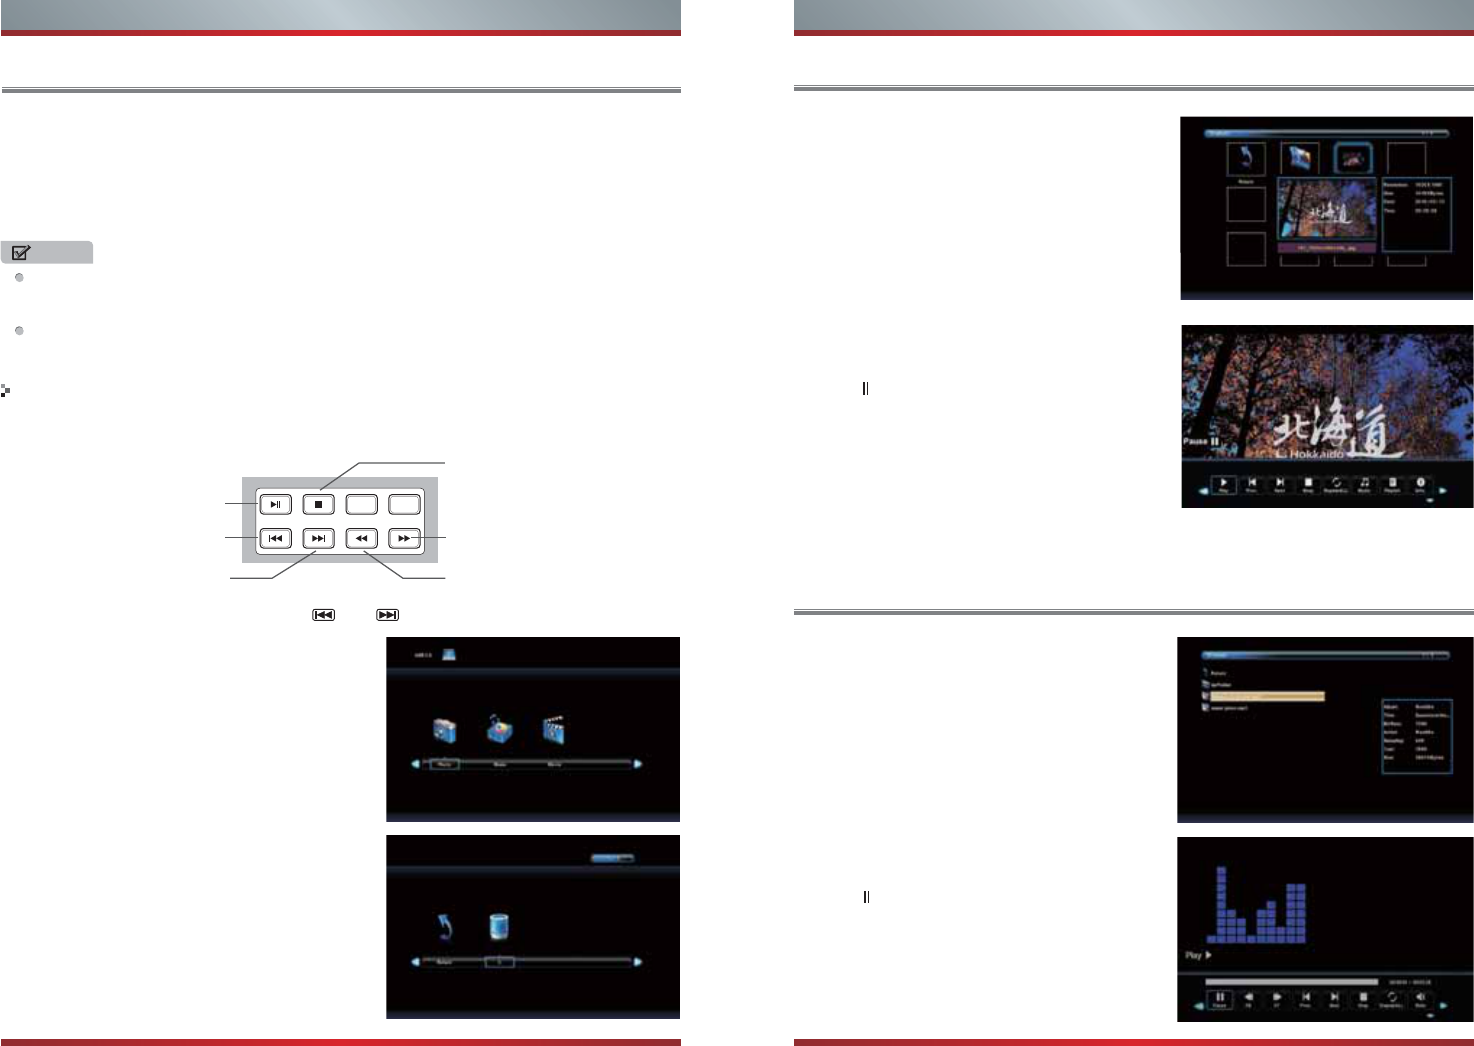
You can adjust:
Menu language - Select TV Menu language .
Transparent - Adjust the transparency of the
OSD (on screen display) menu.
OSD Time Out - Adjust the duration of the
OSD (on screen display) menu.
Closed Caption - Adjust Closed Captioning
settings.
Mono: Sets the sound to mono.
Stereo: Sets the sound to stereo when stereo is not available, the sound is
automatically switched to mono.
SAP: Sets the sound to the second audio program.
Audio Language - Select the language supported by the chosen digital channel.
Digital audio output - Adjust the form of the digital audio output.You can select
“Raw”,”PCM” or close it by select “Off“.
CC Mode - Turn Closed Captioning on/off.
Analog CC - Set Closed Captioning for standard (analog) program.
Digital CC - Set Closed Captioning for digital program.
Option - Adjust the digital Closed Captioning setting.
Surround Sound - Simulates surround sound and enhances bass response.
AVL - Automatically adjusts volume to a consistent level;attenuates loud passages.
Raw:Source code,the digital audio code is directly outputted,unprocessed.
PCM: A form of code, pulse code modulation.
NOTE
NOTE
NOTE
NOTES
17 18
Basic Features Basic Features
Using the Lock Menu
Enter your 4-digital password. Default
password is 0000,and if forget what you set,
please call the service center.
Mode - Set the look of digital Closed Captioning. Automatic uses broadcaster’s style.
Font Style - Select from 8 font styles(Default / Font 0 / Font 1 / Font 2 /Font 3 / Font 4
/ Font 5 / Font 6 / Font 7).
Font Size - Adjust the size of the digital Closed Captioning font.
Font Edge Style - Adjust the edge of the digital Closed Captioning box.
Font Edge Color - Adjust the color of the digital Closed Captioning box.
FG Color - Adjust the color of the digital Closed Captioning font.
BG Color - Adjust the digital Closed Captioning background color.
FG Opacity - Adjust the transparency of the digital Closed Captioning font.
BG Opacity - Adjust the digital Closed Captioning background transparency.
Input Labels - Create labels for the devices connected to your TV.
Other Settings - Set the parameter of blue screen and audio only.
Blue screen - Set the background when there is no signal. The background will
show blue screen when it’s on and show noise when off.
Audio Only - Play the audio with the picture turned off. When you turn the Audio
Only on and exit the OSD menu, the panel will be dark; and then press any key to
exit the Audio Only status.
Software Update(USB) - Update the TV software.Select the software in the root
of your USB memory.
System Info - You can find the system information in this menu.
All the options can not be adjust while the mode is Default.
“US Rating” and “Canada Rating” is available only when “System Lock” is “On”.
NOTE
If you choose the “Reset RRT” function,
all the programs you preset in “RRT
Setting” will be lost.
RRT Setting - Display an advance V-Chip rating table for digital channels.
Reset RRT - Reset the RRT to default.
For the United States, the rating setting
basically include the following options: TV,
MPAA.
TV - The TV rating compose of two aspects:
age-based and content-based.
Restore Default - Change power on options or reset TV to factory default.
Setup Wizard - Set the first time installation.
You can adjust:
Change Password - Enter a new 4-digital
password then reenter it to confirm.
System Lock - Lock or unlock the buttons on
the TV.
Input Block - Block or unblock the input
sources.
US Rating - Restrict movie and TV programs
by US Ratings
Canada Rating - Restrict movie and TV
programs by Canadian Ratings.
The item is available only When current stream has downloadable rating data.
CEC Control
Device Auto Power Off
Audio Receiver
Device Lists
Connect
Root Menu
Off
On
On
On
19 20
Rating Defined as
G General audience
PG Parental Guidance suggested
PG-13 Parents strongly cautioned
R Restricted
NC-17 No one 17 and under admitted
X Adult audience only
U.S. Movie Ratings NOTE
NOTE
Using the Channel Menu
Basic Features Basic Features
The content ratings will increase
depending on the level of the age-based
rating. For example, a program with a
TV-PG V rating may contain moderate
violence, while a TV-14 V rating may
contain intense violence. So locking a
higher level option will automatically
cause locking the options that has more
sensitive level.
You can adjust:
Air/Cable - Select signal type.
Auto Scan - Automatically search for
channels.
Favorites - Add channels to create a
favorite list.
Show/Hide - Show or hide the channels
in your program list.
Channel No. - Show the channel number.
Channel Label - Create label for channel,up to 7 characters.
You can adjust:
H-Pos - Adjust the horizontal position of
the picture.
V-Pos - Adjust the vertical position of the
picture.
Clock - Minimize vertical stripes in the
screen image.
Phase - Minimize horizontal distortion.
Auto - Adjust to the PC signal timing
automatically.
When the input source is AV / COMPONENT / HDMI / VGA/ MEDIA, the
CHANNEL MENU is unavailable.
NOTE
PC Setting
Press [Input] to select VGA source.
Press [Menu] to enter the main menu,
Press [◄ / ►] button to select Setup menu.
Press [▼] to select PC Settings.
The item is available only When a
PC signal is inputted to your TV.
Age Defined as
TV-Y All children
TV-Y7 Directed to older children
TV-G General audience
TV-PG Parental Guidance suggested
TV-14 Parents Strongly cautioned
TV-MA Mature Audience only
MPAA - This system defines the rating control which come from MPAA rules
Contents Defined as
AAll of the ratings below that
rating set blocked automatically
D Suggestive dialogue
L Strong language
S Sexual situations
V Violence
FV Fantasy Violence
U.S. TV Ratings
21 22
Digital Media Player
NOTES
Please note that Hisense will not assume any responsibility for any lost data and
cannot guarantee perfect compatibility with all mass storage devices. Be sure to
insert the USB disk with standard USB 2.0 port. Data Input from USB Memory Stick
only. Do not connect any device to this terminal such as digital camera, keyboard,
mouse, etc.
Browse the Photos
Enjoy Music Files
When viewing video/music/photo, you can press these buttons on the remote
control to control video/music/photo.
Press [◄ / ►] button to select the option you
want to adjust in the main Media menu,then
press [OK] button to enter.
Press [◄ / ►] button to select drive disk you
want to watch, then press [OK] button to enter.
Press [◄ / ►] button to select return option to
back .
Press [◄ / ►] button to select the file folder you
want to search in the file selecting menu, then
press [OK] button on your remote control to
enter sub-menu.
Press [◄ / ►] button to select “Return” option and press [OK] to back to the previous
menu.
Press [◄ / ►]button to select drive disk, then
press [OK] button to enter.
Press [◄ / ►] button to select return option to
back.
Press [◄ / ►] button to select the file you want
to watch in the file selecting menu, then press
[OK or ] button to display and operate file
details.
◄
Press [◄ / ►] button to select the file you want
to watch in the file selecting menu, then press
[OK or ] button to display picture.
◄
Never remove the USB flash drive or turn off your TV while viewing video/music/
photo.
Before operating Media menu,Plug in USB device, then press [Input] button to
set the Input Source to Media .
Media content control function buttons
When browsing the photos, only the and buttons are available.
◄
►
Press[ / ]button to select MEDIA in the
Source menu,then press [OK] button to enter.
Fast forward
Stop
Fast backward
The previous
one
The next one
Play
Advanced Features Advanced Features
NOTES
The unit recognizes only a USB Memory Stick.
Do not use a USB hub or an extension cable to connect an external hard disk
drive to the unit. (Not supported)
A USB Memory Stick is always inserted to this unit directly.
A USB Memory Stick is not supplied with this unit.
We do not guarantee that all USB Memory Sticks can be supported by this unit.
Be sure to keep a backup copy of the original files on your device before you
play them back on this unit. We have no responsibilities for damage or loss of
your stored data.
To protect your USB Memory Stick files from being erased place the write protect
sliding tab in the protect position.
When you are ready to remove a USB Memory Stick, set the unit to go into
Standby mode to avoid any damage to your data and the unit.
A USB Memory Stick that requires its own driver or the device with a special
system such as fingerprint recognition are not supported.
This unit is not allowed to use the USB Memory Stick which requires an external
power supply (500mA or more).
23 24
Press [◄ / ►] button to select drive disk,
then press [OK] button to enter.
Press [◄ / ►] button to select return option
to back.
Press [ ] button to hide the menu in the
bottom. When you press [DISPLAY], the
menu in the bottom will appear again.
◄
NOTE
When highlighting the option you select, the file information will appear on the
right and the picture of photo and movie will be previewed in the center.
Enjoy Video Files
Playable format list
◄
Press [◄ / ►] button to select the file you
want to watch in the file selecting menu.
Press [OK or ] button to display and
operate file details.
̷
Press [◄ / ►] button to select the file folder and press [OK] button to enter sub-menu.
Press [◄ / ►] button to select menu in the bottom you want to run,then press [OK]
button to operate.
Press [Exit] button to back to the previous menu.
Press[ ] button to hide the menu in the bottom.
Advanced Features Advanced Features
Press [◄ / ►] button to select menu in the bottom you want to run,then press [OK]
button to operate.
Press [Exit] button to back to the previous menu .
Press [▼] button to hide the menu in the bottom.
Files Format Playable format
Photo
Music
Video
JPG
MP3
MPEG1(.dat/.mkv),MPEG2(.mpg/.ts/.vob),MPEG4(.mp4/
.mov/.mkv),XviD(.avi),H.264(.avi/.mp4/.mov/.mkv/.ts/.FLV),
Motion JPEG(.avi/.mov)
25 26
NOTE
Features, appearance and specifications are subject to chang e without notice.
Dimension
With Base
Width: 29 inches(738 mm)
Height: 19.2 inches(487 mm)
Depth: 8.2 inches(209 mm)
Without Base
Width: 29 inches(738 mm)
Height: 17.4 inches(443 mm)
Depth: 2.8 inches(72 mm)
Weight
NET 10.8 lbs(4.9 kg)
GROSS 15 lbs(6.8 kg)
LCD Panel Minimum size (diagonal) 31.5 inches
Screen resolution 1366 × 768
Audio power 6 W + 6 W
Power consumption Please refer to the rating label
Power supply 120 V 60 Hz
Receiving
systems
Analog
Digital
NTSC
ATSC
Environmental conditions
VIDEO INPUT
VGA Format Up to 1920x1080@60Hz
Video System PAL/NTSC
Video level 1.0 Vp-p +/-5%
480i, 480p, 720p, 1080i, 1080p
480i, 480p, 720p, 1080i, 1080p
VIDEO
COMPOMENT
HDMI
Temperature: 5°C-45°C
Humidity: 20%-80% RH
Atmospheric pressure: 86 kPa - 106 kPa
The remote control requires:
• Number of Batteries: 2
• Type : AAA
• Voltage: 1.5Vcc
27