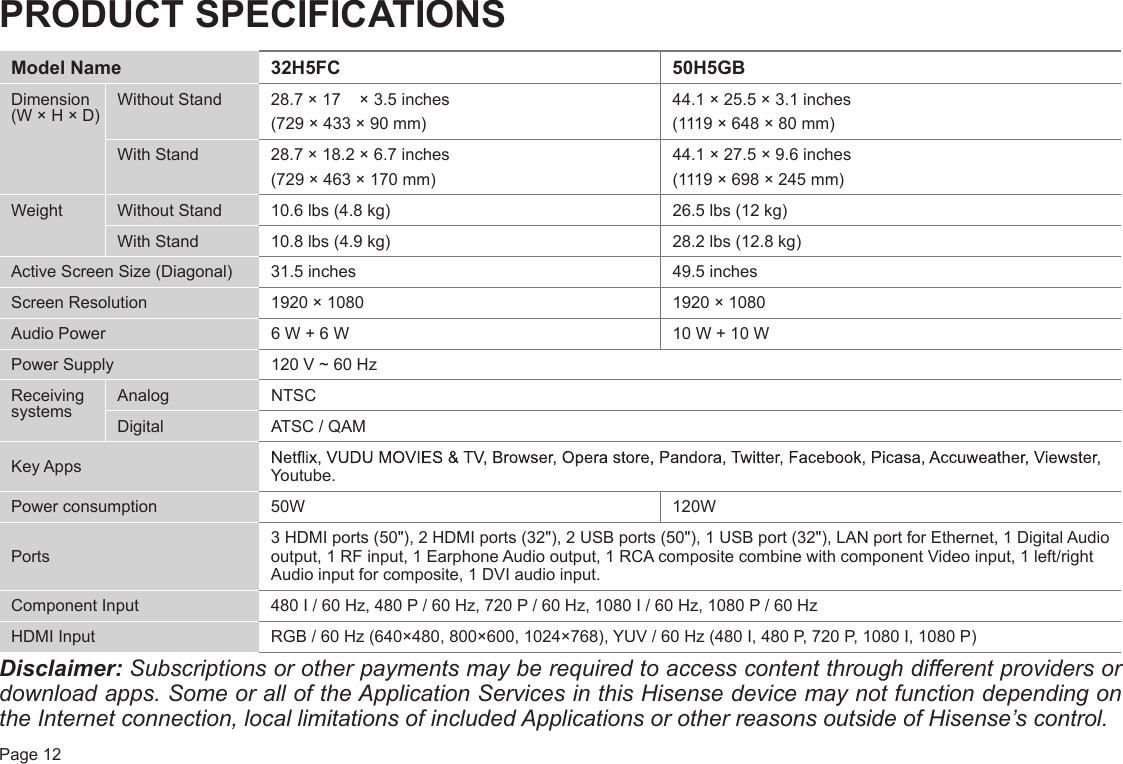
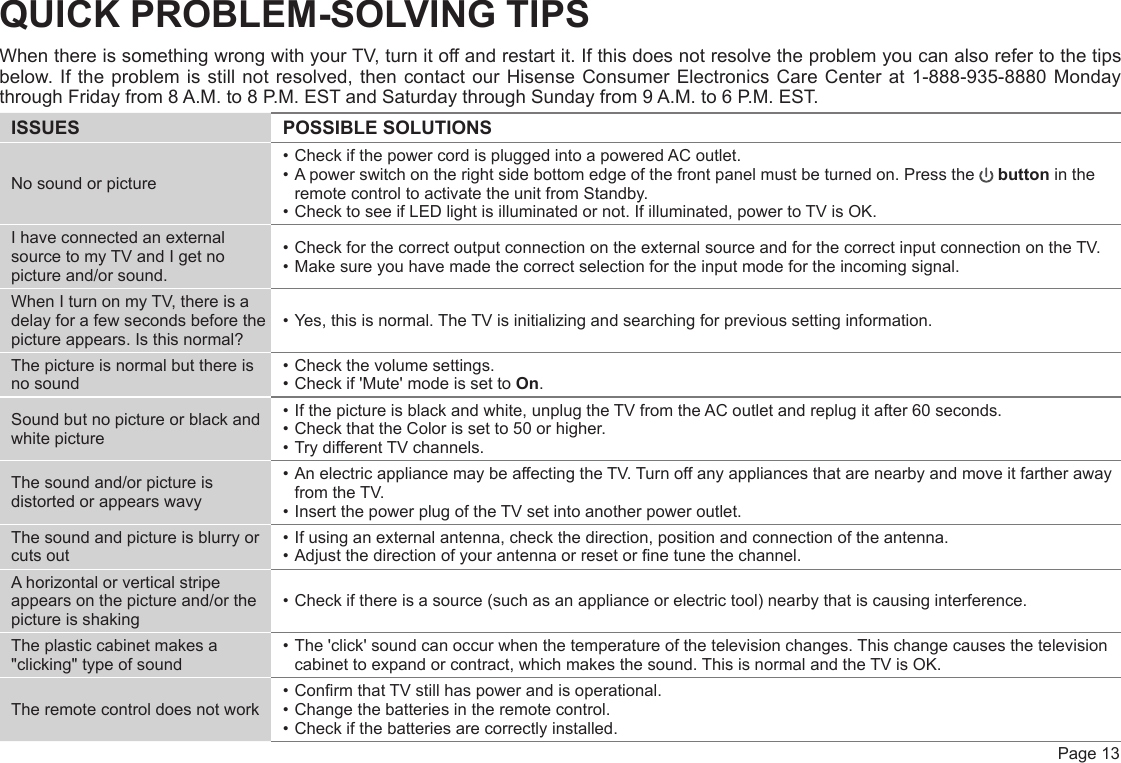
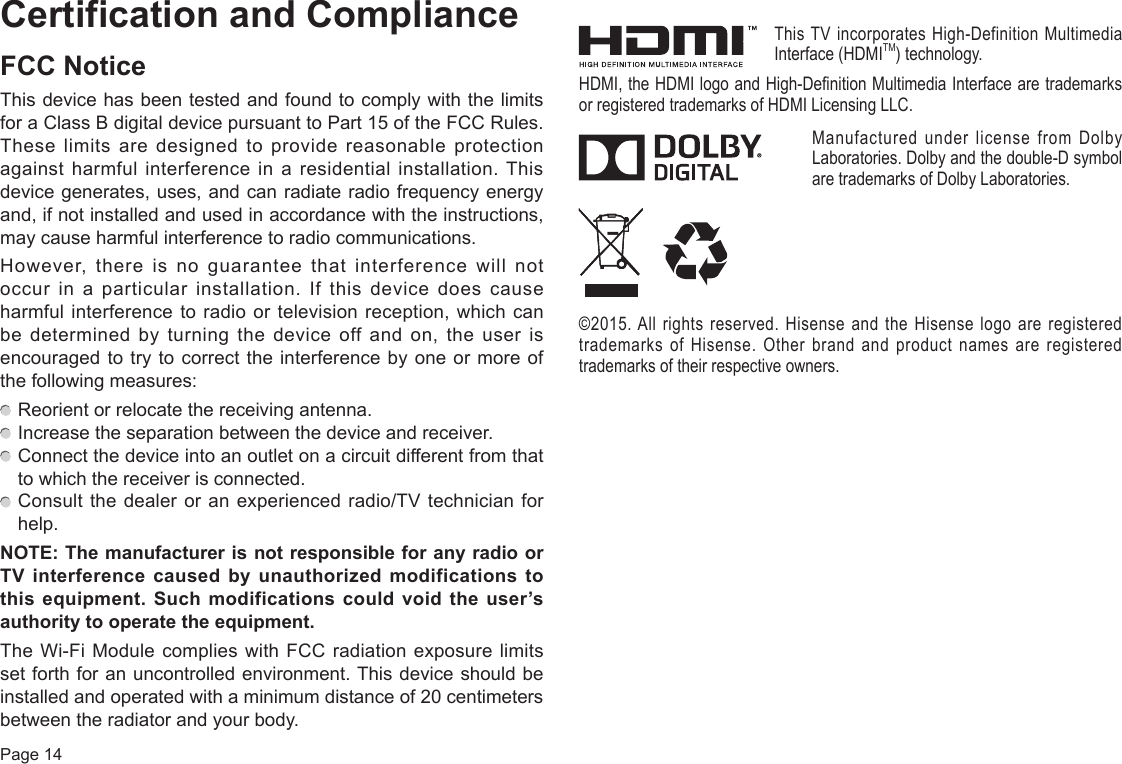
Hisense Electric LCDC0034 LED LCD TV User Manual W9HLCDC0034 1

Hisense Electric Co., Ltd. LED LCD TV W9HLCDC0034 1

W9HLCDC0034_User Manual 1

Quick Start GuideH5 Series Smart TV32H5FCHelp Hisense improve the environment by reducing paper waste.  For detailed instructions and feature descriptions,  access the full User Manual online at www.hisense-usa.com/support.H5 SeriesES-
 Page 1© 2015 Hisense Company Ltd. All Rights Reserved.All material in this Quick Start Guide is the property of Hisense Company Ltd. and its subsidiaries, and is protected under US and International copyright and/or other intellectual property laws. Reproduction or transmission of the materials, in whole or in part, in any manner, electronic, print, or otherwise, without the prior written consent of the Hisense Company Ltd. is a violation of Hisense Company Ltd. rights under the aforementioned laws.No part of this publication may be stored, reproduced, transmitted or distributed, in whole or in part, in any manner, electronic or otherwise, whether or not for a charge or other or no consideration, without the prior written permission of Hisense Company Ltd.Requests for permission to store, reproduce, transmit or distribute materials may be made to the following address:Hisense CorporationPO Box 3289Suwanee, GA 30024Hisense, and any and all other Hisense product names, logo’s, slogans or marks are registered trademarks of Hisense Company Ltd. and its subsidiaries. All other trademarks are the property of their respective holders.
Page 2GET THE MOST OUT OF YOUR TVFor easy-to-follow instructions and beneficial information to help you maximize the features of your TV, access the online User Manual at www.hisense-usa.com/support.To access the user manual, you will need to enter your model number (located on the side and back of the TV). You can also find the model number on the outside of the box.From the Support page, you can also:  Access Frequently Asked Questions  Download the latest software for your product and  Order AccessoriesTo speak to a representative in our Consumer Electronics Care Center, call 1-888-935-8880 Monday through Friday from 8 A.M. to 8 P.M. EST and Saturday through Sunday from 9 A.M. to 6 P.M. EST.You can also send an email to Service@hisense-usa.com.Disclaimer: This Quick Start Guide is intended as a general guideline to help you set up your Hisense TV. Images throughout this document are for illustrative purposes only and may differ from the actual product.
 Page 3REGISTER YOUR TV TO RECEIVE HISENSE NEWSUsing your mobile phone, scan the first QR code to register your TV and the second QR code to access the Support page. Depending on the make and model of your phone, you may need to download a QR code scanning application. Although we encourage you to register your TV, it is optional and will not impact the Warranty or level of service that we provide.PACKAGE CONTENTSYour package in which you purchased this TV contains the following items: TV   Quick Start Guide (this document) 2 legs that form the stand   Important Safety Information and Warranty Card Remote Control   1 set of AAA batteries 4 Phillips screws (M4×12)(40")   Power Cord(for 50") 4 Phillips screws (M4×20)(50")IMPORTANT: Look inside the styrofoam (within the upper and bottom parts of the box) to make sure that you have removed all items that come with the TV.Required Tools to Install the TV StandPhillips screwdriver (not included)Registration QR code Support page QR code
Page 4INITIAL SETUP STEPSStep 1. Attach the TV Stand or Wall Mount BracketAttach the TV Stand Please check foam for accessories before discarding.Follow the illustrations and textual instructions below to complete the installation steps:1. Carefully place your TV facing upward on a soft, flat surface to prevent damage to the TV or scratching to the screen.2.  Remove the two legs (that form the stand) from the accessory bag and then insert them into the bottom slots of the TV.3. Secure the legs to the TV with the 4 screws in the accessory bag.Disclaimer: This Quick Start Guide is intended as a general guideline to help you set up your Hisense TV. Images throughout this document are for illustrative purposes only and may differ from the actual product. Screws: M4×12(40H5B) M4×20(50H5B)Leg
 Page 5Attach the Wall Mount Bracket (not included)Before you begin the third-party manufacturer instructions, be sure to do the following things:1. Remove the TV stand if you already attached it. 2. Place the TV face down on a clean, safe and cushioned surface. 3. Place the spacers (not included) in the corresponding bracket holes. CAUTION:• Whenyouattachthe mount,besuretousethespacers(providedbythethird-partymanufacturer)betweentheTVand the bracket.• TopreventinternaldamagetotheTVandensureitismountedsecurely,besuretousefixingscrews(notprovided) that are 8 - 9.5 mm(40") / 9.5 - 11.5 mm(50") in length when measured from the attaching surface of the mounting hook.Wall-mount hole pattern VESA (mm)100 × 100 (for 40")200 × 400 (for 50")Wall-mount screw size (mm) M4(40")M6(50")Follow instructions provided with the Wall-Mount bracket.  To complete the installation, please contact the wall-mount manufacturer or the retailer from which you purchased the TV.  The selected screws are 8 - 9.5 mm(40") / 9.5 - 11.5 mm (50")in length when measured from the attaching surface of the rear TV cover. The diameter and length of the screws differ depending on the Wall-Mount Bracket model.NOTE: The diameter and length of the screws differ depending on the wall mount bracket model.Rear cover of the TV SpacerScrewWall-mount bracket8 - 9.5 mm(40")9.5 - 11.5 mm(50")Screw (not provided)Bracket (not provided)Spacer (not provided)
Page 6Step 2. Connect Devices to the TV PortsCheck to ensure that you have selected the right cables for the ports and that they are connected securely.TV label Port Cable External Equipment Brief DescriptionANT/CABLEAntenna      VHF/UHF AntennaANT OUTConnect an outdoor VHF/UHF antenna.HDMIDVD Player/RecorderSet-top BoxSatellite ReceiverSatellite antenna cableVCRVideo CameraConnect a High Denition Multimedia Inter-face (HDMI) cable from an external device.COMPO-NENT INYGreenConnect a component video cable and left-right audio cables from an external AV device.PBBluePRRedLWhiteRRedAV INVIDEO YellowConnect a composite video cable and left-right audio cables from an external AV device.LWhiteRRedPC IN DVI AUDIO INPCConnect an audio cable from the PC audio out.
 Page 7TV label Port Cable External Equipment Brief DescriptionDIGITAL AUDIO OUTSpeakerAudio AmplierConnect an optical cable from an external digital audio system.AUDIO OUT / Connect headphone for audio out of the TV.SpeakerAudio AmplierConnect an audio adapter (not provided) from an external analog audio system.USBDC 5V   0.5A(MAX)Connect a USB device for browsing photos, music and movies.LANLANConnect an Ethernet cable to access a network or the Internet. The TV also has a wireless connectivity feature.WhiteRed
Page 8Step 3. Place Batteries in the Remote ControlInfra-red transmitterPower on / offDirect channel selection / input numbersMedia content control function buttonsDash button Select a digital sub-channelNavigate Up/Down/Left/Right or adjust OnScreenDisplay settingsAdjust the volumeLaunch VUDU HD MoviesSelect picture / sound modeSet the sleep timerDisplay the favorite channel listMENU buttonReturn to the previous menuLaunch NetixMUTE buttonEnter TV sourceSelect input sourceGo to the previous channelHiMedia (Digital Media Player)Select a channelClose the menuDisplay the information bannerAdjust Closed Caption modeAudio select buttonSelect VGA / HDMI sourceASPECT buttonOpen the DTV program guide (if available)Special function buttonsConrm selectionsLaunch YouTube AppEnter HiSmart Home Menu1. Press the release button on the back of the remote control to remove the battery compartment cover.2. Insert two AAA size batteries. Make sure to match the (+) and ( - ) ends of the batteries with the (+) and ( - ) ends indicated in the battery compartment.3. Replace the battery compartment cover.NOTES:• Disposeofyourbatteriesinadesignateddisposalarea. Do not throw the batteries into a fire.• Removeoldbatteriesimmediatelytopreventthemfromleakingintothebatterycompartment.• Ifyoudonotintendtousetheremotecontrolforalongtime,removethebatteries.• Batterychemicalscancausearash.Ifthebatteriesleak,cleanthebatterycompartmentwithacloth.Ifchemicalstouchyourskin,washimmediately.• Donotmixoldandnewbatteries.• Donotmixalkaline,standard(carbon-zinc)orrechargeable(ni-cad,ni-mh,etc.)batteries.Insert the batteriesRemove the battery com-partment cover
 Page 9Remote Control Range Information The remote control can work at a distance of up to 26 feet in front of the TV set. It can work at a 30 degree horizontal or vertical angle.Program Your Universal Cable or Satellite Remote Control to Operate Your New Hisense TelevisionIf you would like to program your other household remote controls to your new Hisense television,please refer to the User's Manual supplied by your Cable or Satellite provider. The Cable or Satellite providers' User's Manuals should include instructions on how to program their remote to your television.A list of Hisense codes for the most common Cable and Satellite providers are listed below. Use the Hisense code that is associated with your Cable or Satellite provider (if applicable).DIRECTV ........................................ 0178, 10178, 10019, 10748, 11314, 11660, 11710, 11780, 12049, 10171, 11204, 11326, 11517, 11564, 11641, 11963, 12002, 12183Time Warner Cable ......................... 386, 0178, 10178, 400, 450, 461, 456, 0748, 1463, 0463, 10463Comcast ......................................... 0178, 10178, 10463, 11463, ,10748, 11314, 11660, 10171, 11204, 11326, 11517, 11641, 11780, 11785, 11892, 11963, 12002Cox Communications ..................... 0178, 10178, 1326, 1463Dish Network .................................. 505, 627, 538, 720, 659If the Hisense code associated with your Cable or Satellite provider is not listed, does not work or you cannot locate the instructions to program your remote, call your local Cable or Satellite provider's customer service center.If your Cable or Satellite provider does not have a Hisense code available, please visit http://www.hisense-usa.com for additional codes.Step 4. Turn the TV on for the First Time If the TV is a 50" model, then connect the power cord to the back of it. Plug the power cord into an AC outlet.Wall OutletPower CordWall OutletPower Cord(for 50") (for 40")
Page 10TurningyourTVon Press the   button. Your TV turns on. Press the   button again to turn off your TV. When you turn off your TV, it goes into standby mode.Step5.TurntheTVontoCustomizeSettingsFollow the on-screen instructions to complete the first-time setup menu. Menu TaskLanguage setting• Choose your language: English, Spanish or French and then select Next. • The Welcome page displays and shows the available devices and interfaces. Country setting • Select the country where you will operate the TV.Time zone setting• Select the local time zone according to your region.• Daylight Saving: Set the Daylight Saving time for your area.Use Mode • Select your Mode Setting: Home Mode or Retail Mode.• Retail mode should only be selected by retailers who plan to demonstrate the TV.• Home Mode is the recommended setting which offers full functionality of the television. If you selected Retail Mode, Energy Savings is not realized.Next1. Language setting Next: Country SettingLanguage settingsEnglishEspañolFrançais
 Page 11Select Network• The Select Network : Connect your TV to access the network.• When the Network Setting menu opens, Hisense Service Terms and Conditions will appear. Press ◄/►button to scroll through the pages. Please read it carefully. If you want to access the Internet, select Agree to set your network connection for the TV.  Otherwise, select Disagree to enter the Channel search menu.• You can set up the network conguration in this menu. For more information, please refer to the section titled "Network Connection" and "Network Setup" in the user manual online.Channel Search• Select your Tuner Mode: Antenna or Cable, press ENTER button to conrm.• Set the Channel Installation: Scan or Skip Scan. If you select Scan, your TV automatically starts Channel Installation available in your viewing area; If you select Skip Scan, your TV does not scan for channels; Depending on the reception condition, it may take up to 30 minutes or more to complete memorizing channels. Please allow the process to complete without interruption.• After the TV has completed scanning for channels, select Go to exit the  wizard.NOTE:IfyouareusingacableorsatelliteboxandyouhaveconnectedittotheTVusingacoaxialcable,youshouldselectthe cableoption.Besurethecableorsatelliteboxisturnedonbeforestartingthechannelscan.IfyouuseacableorsatelliteboxconnectedtoAV,ComponentorHDMI,youdon'tneedtoscanforchannels.Selecting the Input SourceWhen you finish the first-time setup, you must select the TV signal source. Because your TV stores this information, you do not need to change the TV signal source unless it changes. An example of when to do this is if you change from using an outside antenna to cable TV. Turn on your TV, then press INPUT button on the remote or on the TV. The INPUT menu opens. Press ▲/▼ button to highlight the input source, and then press ENTER button.INPUTTVAVComponentHDMI 1HDMI 2HDMI 3HiMedia
Page 12PRODUCT SPECIFICATIONSModel Name 32H5FC 50H5GBDimension (W × H × D)Without Stand 28.7 × 17  × 3.5 inches (729 × 433 × 90 mm)44.1 × 25.5 × 3.1 inches (1119 × 648 × 80 mm)With Stand 28.7 × 18.2 × 6.7 inches (729 × 463 × 170 mm)44.1 × 27.5 × 9.6 inches (1119 × 698 × 245 mm)Weight Without Stand 10.6 lbs (4.8 kg) 26.5 lbs (12 kg)With Stand 10.8 lbs (4.9 kg) 28.2 lbs (12.8 kg)Active Screen Size (Diagonal) 31.5 inches 49.5 inchesScreen Resolution 1920 × 1080 1920 × 1080Audio Power 6 W + 6 W 10 W + 10 WPower Supply 120 V ~ 60 HzReceiving systemsAnalog NTSCDigital ATSC / QAMKey Apps Youtube.Power consumption 50W 120WPorts3 HDMI ports (50"), 2 HDMI ports (32"), 2 USB ports (50"), 1 USB port (32"), LAN port for Ethernet, 1 Digital Audio output, 1 RF input, 1 Earphone Audio output, 1 RCA composite combine with component Video input, 1 left/right Audio input for composite, 1 DVI audio input.Component Input 480 I / 60 Hz, 480 P / 60 Hz, 720 P / 60 Hz, 1080 I / 60 Hz, 1080 P / 60 HzHDMI Input RGB / 60 Hz (640×480, 800×600, 1024×768), YUV / 60 Hz (480 I, 480 P, 720 P, 1080 I, 1080 P)Disclaimer: Subscriptions or other payments may be required to access content through different providers or download apps. Some or all of the Application Services in this Hisense device may not function depending on the Internet connection, local limitations of included Applications or other reasons outside of Hisense’s control.
 Page 13QUICK PROBLEM-SOLVING TIPSWhen there is something wrong with your TV, turn it off and restart it. If this does not resolve the problem you can also refer to the tips below. If the problem is still not resolved, then contact our Hisense Consumer Electronics Care Center at 1-888-935-8880 Monday through Friday from 8 A.M. to 8 P.M. EST and Saturday through Sunday from 9 A.M. to 6 P.M. EST.ISSUES POSSIBLE SOLUTIONSNo sound or picture• Check if the power cord is plugged into a powered AC outlet.• A power switch on the right side bottom edge of the front panel must be turned on. Press the   button in the remote control to activate the unit from Standby.• Check to see if LED light is illuminated or not. If illuminated, power to TV is OK.I have connected an external source to my TV and I get no picture and/or sound.• Check for the correct output connection on the external source and for the correct input connection on the TV.• Make sure you have made the correct selection for the input mode for the incoming signal.When I turn on my TV, there is a delay for a few seconds before the picture appears. Is this normal?• Yes, this is normal. The TV is initializing and searching for previous setting information.The picture is normal but there is no sound• Check the volume settings.• Check if 'Mute' mode is set to On.Sound but no picture or black and white picture• If the picture is black and white, unplug the TV from the AC outlet and replug it after 60 seconds.• Check that the Color is set to 50 or higher. • Try different TV channels.The sound and/or picture is distorted or appears wavy• An electric appliance may be affecting the TV. Turn off any appliances that are nearby and move it farther away from the TV.• Insert the power plug of the TV set into another power outlet.The sound and picture is blurry or cuts out• If using an external antenna, check the direction, position and connection of the antenna.• Adjust the direction of your antenna or reset or ne tune the channel.A horizontal or vertical stripe appears on the picture and/or the picture is shaking• Check if there is a source (such as an appliance or electric tool) nearby that is causing interference.The plastic cabinet makes a "clicking" type of sound• The 'click' sound can occur when the temperature of the television changes. This change causes the television cabinet to expand or contract, which makes the sound. This is normal and the TV is OK.The remote control does not work• Conrm that TV still has power and is operational.• Change the batteries in the remote control.• Check if the batteries are correctly installed.
Page 14Certification and ComplianceFCC NoticeThis device has been tested and found to comply with the limits for a Class B digital device pursuant to Part 15 of the FCC Rules. These limits are designed to provide reasonable protection against harmful interference in a residential installation. This device generates, uses, and can radiate radio frequency energy and, if not installed and used in accordance with the instructions, may cause harmful interference to radio communications.However, there is no guarantee that interference will not occur in a particular installation. If this device does cause harmful interference to radio or television reception, which can be determined by turning the device off and on, the user is encouraged to try to correct the interference by one or more of the following measures:  Reorient or relocate the receiving antenna.  Increase the separation between the device and receiver.  Connect the device into an outlet on a circuit different from that to which the receiver is connected.  Consult the dealer or an experienced radio/TV technician for help.NOTE:ThemanufacturerisnotresponsibleforanyradioorTVinterference causedbyunauthorizedmodificationstothis equipment. Such modifications could void the user’s authoritytooperatetheequipment.The Wi-Fi Module complies with FCC radiation exposure limits set forth for an uncontrolled environment. This device should be installed and operated with a minimum distance of 20 centimeters between the radiator and your body.This TV incorporates High-Definition Multimedia Interface (HDMITM) technology.HDMI, the HDMI logo and High-Definition Multimedia Interface are trademarks or registered trademarks of HDMI Licensing LLC.Manufactured under license from Dolby Laboratories. Dolby and the double-D symbol are trademarks of Dolby Laboratories.©2015. All rights reserved. Hisense and the Hisense logo are registered trademarks of Hisense. Other brand and product names are registered trademarks of their respective owners.

Navigation menu