Hisense Electric LCDD0018 LCD Monitor User Manual
Hisense Electric Co., Ltd. LCD Monitor
W9HLCDD0018_User Manual

42K316DW
46K316DW
50K316DW
English
www.hisense-usa.com
service@hisense-usa.com
ES-G121352
I
The lightning flash with arrowhead symbol, within an
equilateral triangle is intended to alert the user to the
presence of uninsulated dangerous voltage within the
to constitute a risk of electric shock.
The exclamation point within an equilateral triangle is
intended to alert the user to the presence of important
operating and maintenance (servicing) instructions in
the literature accompanying the appliance.
FCC Statement Energy Star
NOTE:
This equipment has been tested and found to comply with
the limits for a class B digital Device, pursuant to part 15
of the FCC Rules. These limits are designed to provide
reasonable protection against harmful interference in a
residential installation. This equipment generates, uses and
can radiate radio frequency energy and, if not installed and
used in accordance with the instructions, may cause harmful
interference to radio Communications. However, there is
no guarantee that interference will not occur in a particular
installation. If this equipment does cause harmful interference
to radio or television reception, which can be determined by
turning the equipment off and on, the user is encouraged to
try to correct the interference by one or more of the following
measures:
Reorient or relocate the receiving antenna.
Increase the separation between the equipment and the
receiver.
Connect the equipment into an outlet on a circuit different
from that to which the receiver is connected.
Consult the dealer or an experienced radio/TV technician
for help.
FCC ID Number WiFi Module: WWMMN421V1
WARNING
The manufacturer is not responsible for any radio or TV
interference caused by unauthorized modifications to
this equipment. Such modifications could void the user's
authority.
NOTE
Where the MAINS plug or an appliance coupler is used
as the disconnect device, the disconnect device shall
remain readily operable.
Hisense and associated logos where applicable are registered trademarks of Hisense Group in the United States and/or other
countries. All other trademarks are property of their respective owners. 2011 Hisense USA, Corporation. All Rights Reserved.
Manufactured under license from Dolby Laboratories. Dolby and the double-D symbol are trademarks of Dolby Laboratories.
owners.
TM) technology.
trademarks or registered trademarks of HDMI Licensing LLC.
Your Hisense TV is ENERGY STAR
qualified in the “energy saving” mode. It
meets strict energy efficiency guidelines
set by the U.S. Environmental Protection
Agency and Department of Energy.
ENERGY STAR is a joint program of
these government agencies, designed to
promote energy efficient products and practices. Changes
to certain features, settings, and functionalities of this TV
(i.e. TV Guide, Picture, Sound) can increase or change the
power consumption. Depending upon such changed settings,
the power consumption may exceed the limits required for
the ENERGY STAR qualification in the “energy saving”
mode.
Caution:
The Equipment complies with FCC radiation exposure limits
set forth for an uncontrolled environment.

II
III
Important Safety Instructions
1. Read these instructions.
2. Keep these instructions.
3. Heed all warnings.
4. Follow all instructions.
5. Do not use this apparatus near water.
6. Clean only with dry cloth.
7. Do not block any ventilation openings. Install in accordance
with the manufacturer's instructions.
8. Do not install near any heat sources such as radiators,
heat registers, stoves, or other apparatus (including
amplifiers) that produce heat.
9. Do not defeat the safety purpose of the polarized or
grounding-type plug. A polarized plug has two blades with
one wider than the other. A grounding type plug has two
blades and a third grounding prong. The wide blade or the
third prong are provided for your safety. If the provided
plug does not fit into your outlet, consult an electrician for
replacement of the obsolete outlet.
10. Protect the power cord from being walked on or pinched
particularly at plugs, convenience receptacles, and the
point where they exit from the apparatus.
11. Only use attachments/accessories
specified by the manufacturer.
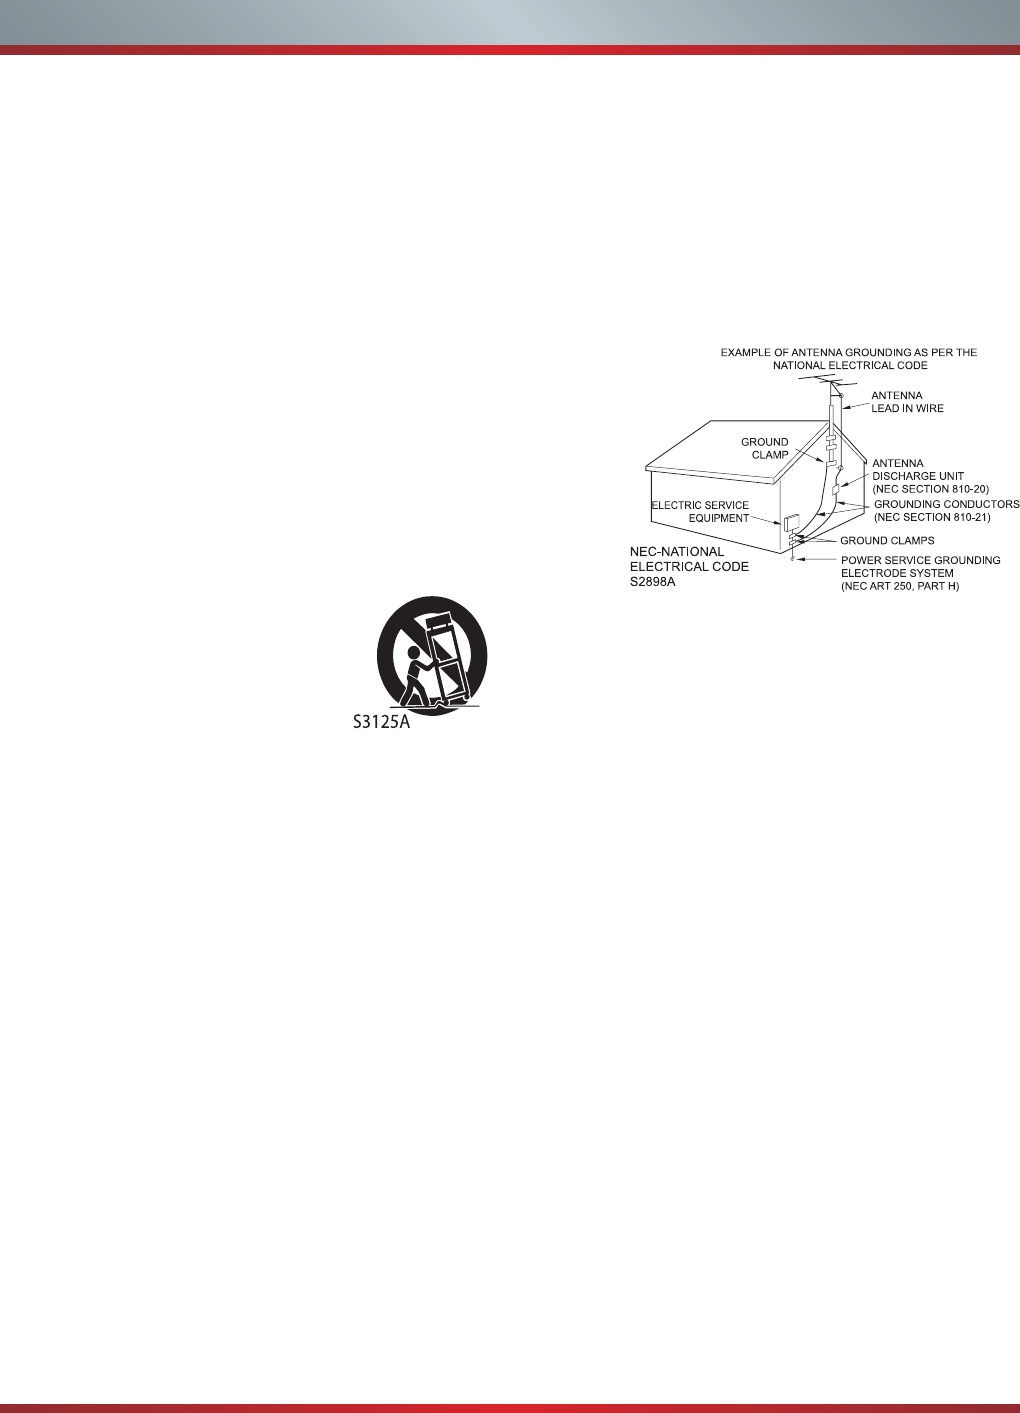
12. Use only with cart, stand, tripod,
bracket, or table specified by the
manufacturer, or sold with the
apparatus. When a cart is used,
use caution when moving the cart/
apparatus combination to avoid injury from tip-over.
13. Unplug this apparatus during lightning storms or when
unused for long periods of time.
14. Refer all servicing to qualified service personnel.
Servicing is required when the apparatus has been
damaged in any way, such as power-supply cord or plug
is damaged, liquid has been spilled or objects have fallen
into the apparatus, the apparatus has been exposed to
rain or moisture, does not operate normally, or has been
dropped.
15. Apparatus should not be exposed to dripping or
splashing, and objects filled with liquids, such as vases,
should not be placed on the apparatus.
16. An outside antenna system should not be located in the
vicinity of overhead power lines or other electric light or
power circuits, or where it can fall into such power lines
or circuits. When installing an outside antenna system,
extreme care should be taken to keep from touching
such power lines or circuits, as contact with them might
be fatal.
17. Do not overload wall outlets and extension cords, as this
can result in a risk of fire or electric shock.
18. Do not push objects through any openings in this unit,
as they may touch dangerous voltage points or short out
parts that could result in fire or electric shock. Never spill
or spray any type of liquid into the unit.
19. If an outside antenna or cable system is connected to the
unit, be sure the antenna or cable system is grounded to
provide some protection against voltage surges and built-
up static charges, Section 810 of the National Electrical
Code, ANSI/NFPA 70, provides information with respect
to proper grounding of the mast and supporting structure,
grounding of the lead-in wire to an antenna discharge
unit, size of grounding conductors, location of antenna
discharge unit, connection to grounding electrodes, and
requirements for the grounding electrode.
20. When replacement parts are required, be sure the service
technician uses replacement parts specified by the
manufacturer or those that have the same characteristics
as the original part. Unauthorized substitutions may result
in fire, electric shock or other hazards.
21. Upon completion of any service or repairs to this unit,
ask the service technician to perform safety checks to
determine that the unit is in proper operating condition.
22. When you connect the product to other equipment, turn
off the power and unplug all of the equipment from the
wall outlet. Failure to do so may cause an electric shock
and serious personal injury. Read the owner's manual of
the other equipment carefully and follow the instructions
when making any connections.
23. Sudden high volume sound may cause hearing or
speaker damage. When you use headphones, (if the unit
is equipped with a headphone jack) keep the volume at a
moderate level. If you use headphones continuously with
high volume sound, it may cause hearing damage.
CONDENSATION:
Moisture will form in the operating section of the unit if the
unit is brought from cool surroundings into a warm room or
if the temperature of the room rises suddenly. When this
happens, unit's performance will be impaired. To prevent
this, let the unit stand in its new surroundings for about an
hour before switching it on, or make sure that the room
temperature rises gradually.
Condensation may also form during the summer if the unit is
exposed to the breeze from an air conditioner. In such cases,
change the location of the unit.

IV
Important Safety Instructions
HOW TO HANDLE THE LCD PANEL:
Do not press hard or jolt the LCD panel. It may cause the
LCD panel glass to break and injury may occur.
If the LCD panel is broken, make absolutely sure that you
do not touch the liquid in the panel. This may cause skin
inflammation.
If the liquid gets in your mouth, immediately gargle and
consult with your doctor. Also, if the liquid gets in your eyes
or touches your skin, consult with your doctor after rinsing
for at least 15 minutes or longer in clean water.
Possible Adverse Effects on LCD Panel:
If a fixed (non-moving) pattern remains on the LCD Panel
for long periods of time, the image can become permanently
engrained in the LCD Panel and cause subtle but permanent
ghost images. This type of damage is NOT COVERED BY
YOUR WARRANTY. Never leave your LCD Panel on for long
periods of time while it is displaying the following formats or
images:
Fixed Images, such as stock tickers, video game patterns,
TV station logos, and websites.
Special Formats that do not use the entire screen. For
example, viewing letterbox style (16:9) media on a normal
(4:3) display (black bars at top and bottom of screen); or
viewing normal style (4:3) media on a widescreen (16:9)
display (black bars on left and right sides of screen).
The following symptoms are not signs of malfunction
but technical limitation. Therefore we disclaim any
responsibility for these symptoms.
LCD Panels are manufactured using an extremely high
level of precision technology, however sometimes parts
of the screen may be missing picture elements or have
luminous spots.
This is not a sign of a malfunction.
Do not install the LCD Panel near electronic equipment that
produces electromagnetic waves. Some equipment placed
too near this unit may cause interference.
Effect on infrared devices - There may be interference
while using infrared devices such as infrared cordless
headphones.
Declaration of Conformity
This device complies with part 15 of the FCC Rules.
Operation is subject to the following two conditions:
(1) This device may not cause harmful interference and (2)
This device must accept any interference received, including
interference that may cause undesired operation.
Your TV also contains material that can be recycled and
reused. For disposal or recycling information, contact your
local authorities or the Electronic Industries Alliance at
www.eia.org to find a recycler in your area.
The LCD panel contains almost 3 million thin film transistors,
which provide exceptionally sharp video quality. Occasionally,
a few non-active pixels may appear on the screen as a
fixed black (in the case of a dead pixel), blue, green, or red
point. These non-active pixels do not adversely affect the
performance of your TV, and are not considered defects.
TO USE AC POWER
1. The power cord is attached to the TV at the factory.
2. Connect the AC cord into an AC outlet.
End of life directives
Non-active pixels
Power source
WARNING
Do not connect this unit to the power using any device
other than the supplied AC cord. This could cause fire,
electrical shock, or damage.
Do not use with a voltage other than the power voltage
specified. This could cause fire, electrical shock, or
damage.
CAUTION
When this unit is not used for a long time, (e.g., away on
a trip) in the interest of safety, be sure to unplug it from
the AC outlet.
Do not plug/unplug the AC cord when your hands are
wet. This may cause electrical shock.

V
Important Safety Instructions
Disclaimer: Hisense USA companies ("Hisense"). A wired
or wireless Internet connection is required for certain features
and is not included with the television; please contact a
local Internet Service Provider for assistance. Content
suppliers may require a subscription to activate or use their
services which is not included with the television and is sold
separately. The Hisense TV web browser supports a variety
of multimedia platforms however it does not support all
players nor does it support every player version, therefore,
access to certain web content may be limited or unavailable.
INTERNET CONNECTION, ACCEPTANCE OF END USER
LICENSE AGREEMENT (EULA) AND REGISTRATION
OF YOUR HISENSE TELEVISION SERIAL NUMBER IS
REQUIRED. YOU MUST BE AT LEAST 13 YEARS OF AGE
TO REGISTER ONLINE. HISENSE MAY ADD, DELETE,
MODIFY, OR TERMINATE ONLINE SERVICES WITHOUT
NOTICE.
Consent to Use of Data: To facilitate the provision of
software updates, any dynamically served content, product
support and other services you agree that Hisense and its
affiliates may collect, use, store and transmit technical and
related information that identifies your television (including an
Internet Protocol Address), its operating system, application
software and any connected devices. Hisense and its
affiliates may also use this information in the aggregate, in
a form which does not personally identify you, to improve
our products and services and we may share anonymous
aggregate data with our third party service providers.
Internet Performance Issues: A broadband Internet
connection is required for access to Internet Apps and
Content. To avoid poor performance while accessing Internet
Apps and Content, be sure other devices on the same
Internet connection are not running file sharing applications,
streaming audio or video content and are not logged in
to chat-rooms. These applications may consume your
connection’s bandwidth, causing lag or other undesirable
effects. This television uses TCP and UDP port(s) to access
Internet Apps and Content. Please consult your router or
personal firewall documentation for information on how to
allow access to these ports. If you are installing this television
on a corporate Internet connection, contact your network
administrator for information and assistance.
Liability: The Hi-Smart portal may be linked to other
sites on the World Wide Web or Internet which are not
under the control of or maintained by Hisense. Such
links do not constitute an endorsement by Hisense. You
acknowledge that Hisense is providing these links to you
only as a convenience; you further agree that Hisense is not
responsible for the content of such sites.
INFORMATION ACCESSED OR OBTAINED VIA Hi-
Smart IS PROVIDED "AS IS" WITHOUT WARRANTY
OF ANY KIND, EITHER EXPRESS OR IMPLIED,
INCLUDING BUT NOT LIMITED TO, THE IMPLIED
WARRANTIES OF MERCHANTABILITY, FITNESS FOR
A PARTICULAR PURPOSE, OF NON INFRINGEMENT.
SOME JURISDICTIONS DO NOT ALLOW FOR THE
EXCLUSION OF IMPLIED WARRANTIES, SO THE ABOVE
EXCLUSIONS MAY NOT APPLY TO YOU.
Access to certain areas of the Hi-Smart portal is restricted
and requires a password for entry. If you are an authorized
password holder, you agree that you are entirely responsible
for the confidentiality of your password and account
information, and agree to notify Hisense immediately if your
password is lost, stolen, disclosed to an unauthorized third
party, or other wise may have been compromised. You agree
that you are entirely responsible for any and all activities
which occur under your account, including any fees which
may be incurred under your password protected account
whether or not you are the individual who undertakes such
activities. You agree to immediately notify Hisense of any
unauthorized use of your account or any other breach of
security in relation thereof known to you.
You acknowledge that Hi-Smart may include certain
inaccuracies or typographical errors which may affect the
quality of materials and third-party content. You acknowledge
that the materials or any third-party content have not been
independently verified or authenticated in whole or in part
by Hisense, and agree that Hisense does not warrant the
accuracy or timeliness of materials or the third-party content,
and further agree that Hisense has no liability for any
omissions in the materials and content, whether provided by
Hisense or any third-party.
To the maximum extent permitted by applicable law, Hisense
shall not be liable to you or a third-party claiming through
you for any damage suffered as a result of your displaying,
copying or downloading information or material accessed or
obtained via Hi-Smart. In no event shall Hisense be liable
to you or any third-party for any indirect, extraordinary,
exemplary, punitive, special incidental or consequential
damages (including loss of data, revenue, profits or other
economic advantage) however arising, whether for breach
or in tort even if HISENSE has previously advised of the
possibility of such possible damage.
Technical Support: If you have questions regarding
installation, configuration or operation of this product, please
telephone a Hisense Customer Care representative who
will be happy to assist you with any difficulties you may be
experiencing.
Dial: 1-888-935-8880 (Toll Free)
Email: service@hisense-usa.com

1
Contents
Getting Started
Accessories List...............................................................................................3
Installing the Stand ..........................................................................................3
Installing a Wall-Mount Bracket .......................................................................4
When Installing the TV Against a Wall or Enclosed Area ................................ 5
Viewing the Control Panel ............................................................................... 6
Viewing the Remote Control ............................................................................7
Installing Batteries in the Remote Control ....................................................... 8
Making Connections ........................................................................................9
Basic Features
Turning the TV on or off ..................................................................................13
Turning the TV On for the First Time ..............................................................13
Selecting the Input Source .............................................................................13
Changing Channels / Volume ......................................................................... 14
Shortcuts Instructions .....................................................................................14
To Use the Menu ............................................................................................15
Using the Picture Menu .................................................................................. 15
Using the Audio Menu ....................................................................................16
Using the Screen Menu ..................................................................................17
Using the Channels Menu .............................................................................. 17
Using the Settings Menu ................................................................................18
Using the Lock Menu ......................................................................................19
Advanced Features
Network Connection ....................................................................................... 20
DLNA Settings ................................................................................................23
Media Share Settings in Computer.................................................................24
Settings to Share Files ...................................................................................24

2
Contents
Advanced Features
Network Function............................................................................................25
Enter the Network Applications....................................................................... 26
VUDU HD Movies ...........................................................................................26
VUDU Apps ....................................................................................................28
..............................................................................................................28
Opera..............................................................................................................29
YouTube .........................................................................................................31
Other Apps......................................................................................................32
Other Information............................................................................................33
Digital Media Player ........................................................................................34
Enjoy Video Files ............................................................................................34
Enjoy Music Files............................................................................................35
Browse the Pictures........................................................................................35
Browse the Text Files .....................................................................................36
Other Information
Trouble Shooting ............................................................................................37
General ...........................................................................................................39
Illustrations are for your reference only!
3
Getting Started
Accessories List
Installing the Stand
USER MANUAL Quick Setup Guide Warranty Card
User Manual Quick Setup Guide Warranty Card Remote Control Battery × 2 Spacer × 4
NOTES
1. The LCD display is very fragile, and must be protected at all times when removing the base stand. Be sure that no hard or
sharp object, or anything that could scratch or damage the LCD display, comes into contact with it. DO NOT exert pressure
on the front of the TV at any time because the screen could crack.
2. For tabletop use, the TV must be attached to the provided stand as shown on this page.
3. To Wall-Mount, brackets (not provided) must be attached to the TV as shown on next page.
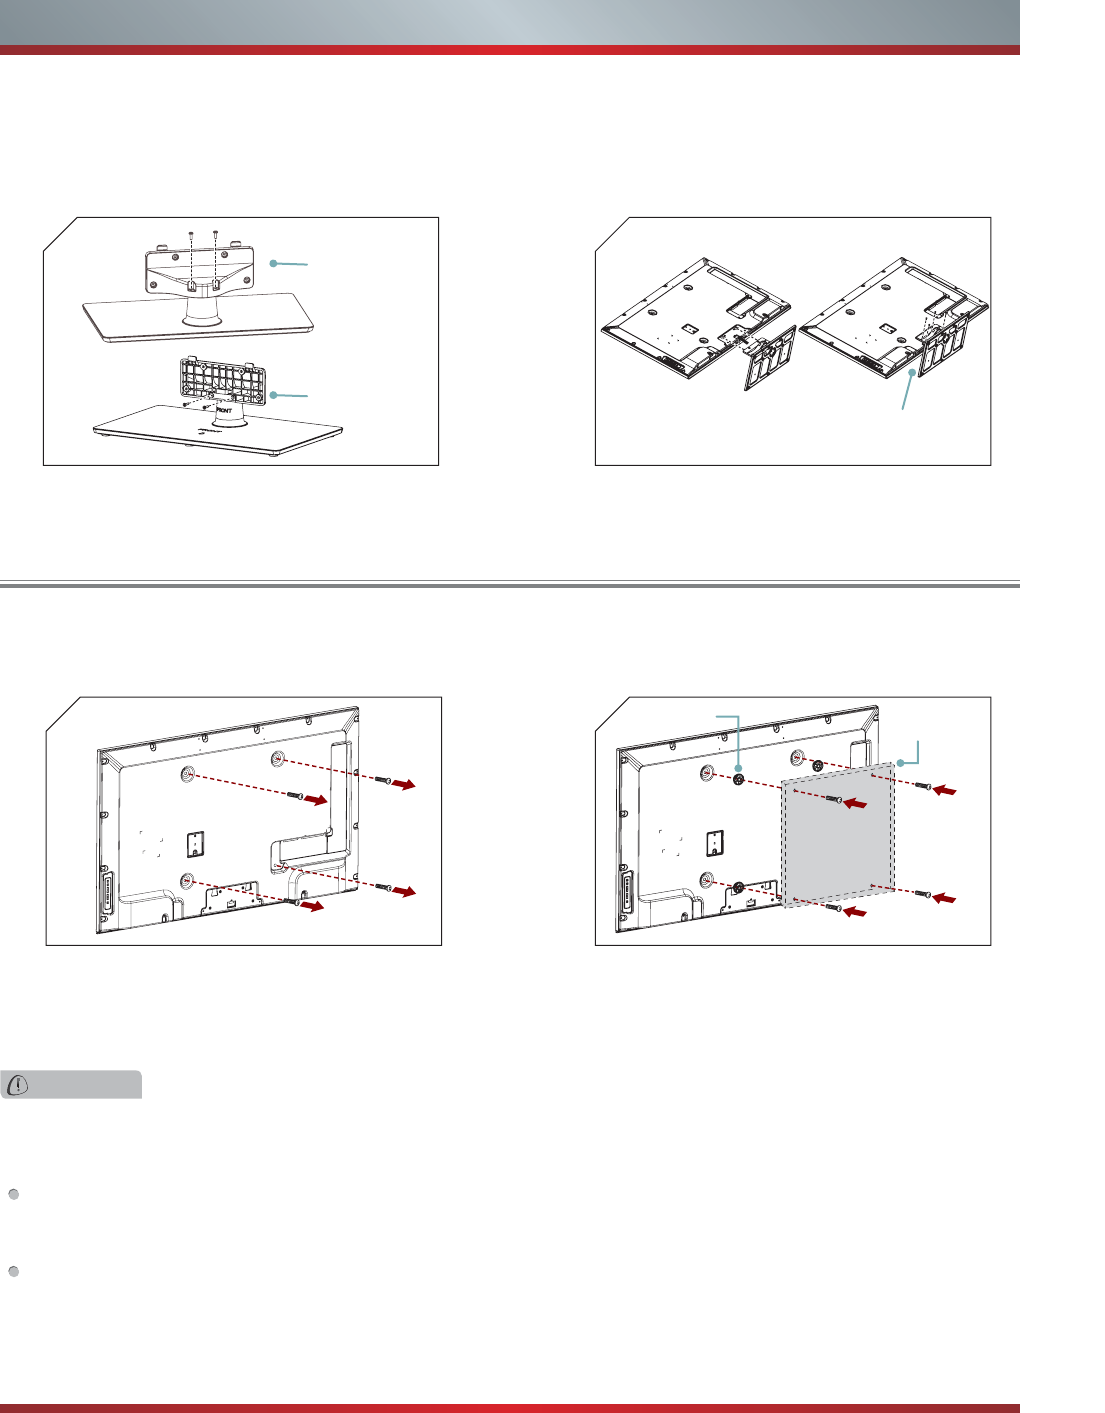
Follow the illustrations below to complete the installation steps:
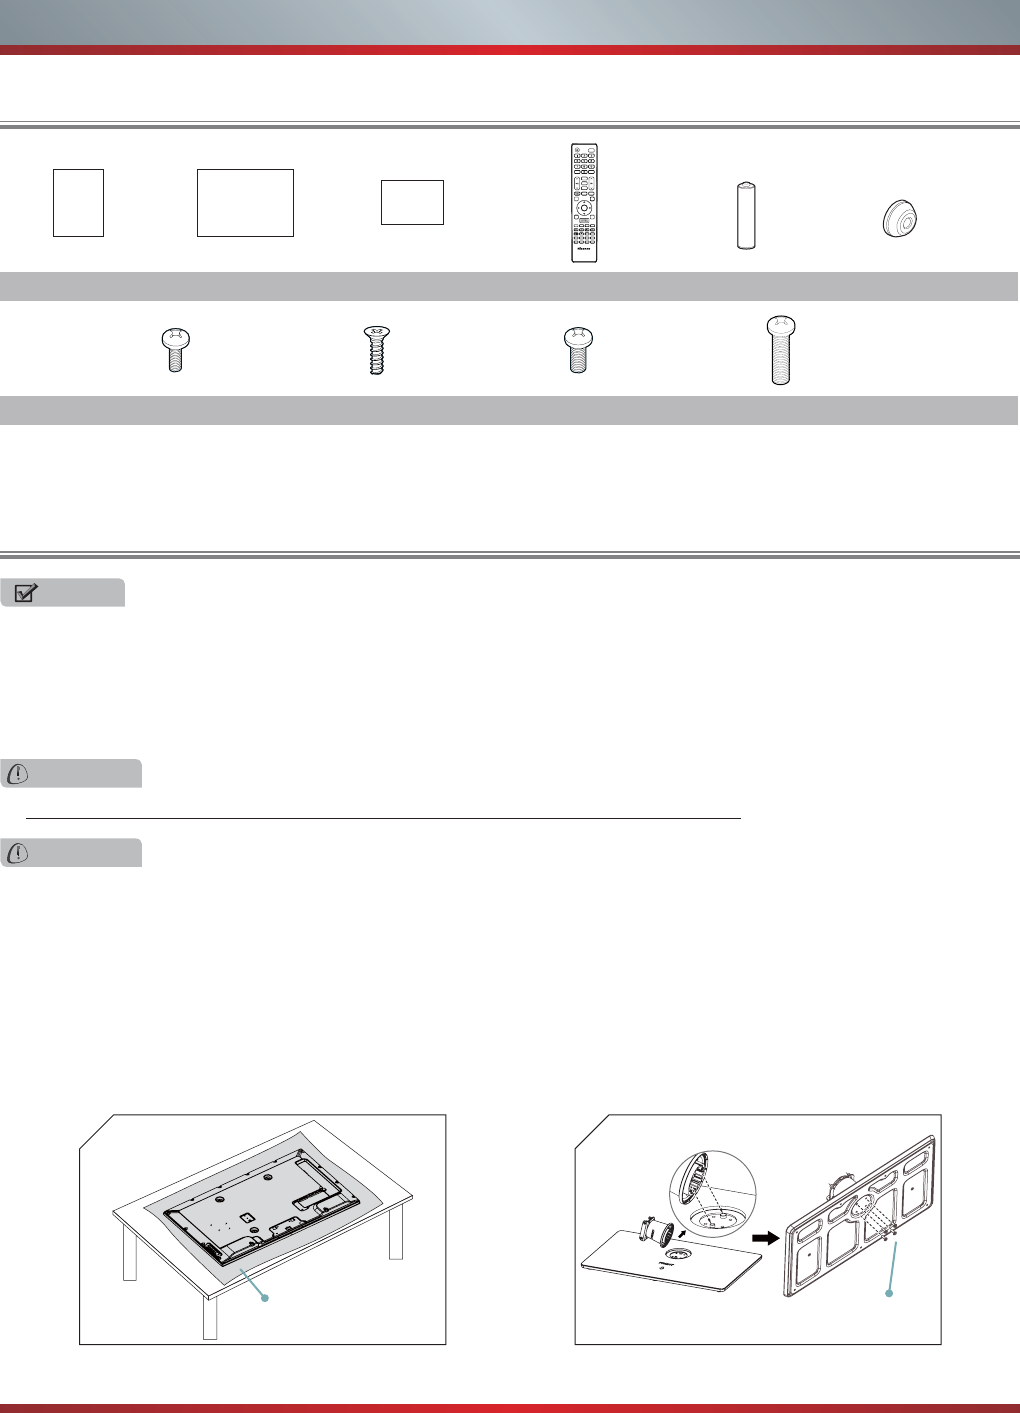
1. Place your TV on a soft cushioned surface carefully to prevent the screen from scrathing as shown in Figure 1.
2. Align the ridge on the column with the groove in the base plate, then insert the stand column into the base plate, make
sure the FRONT of stand column match the FRONT of base plate. Secure the stand column to the base plate with the four
provided Screws A. See Figure 2.
WARNING
Be sure to disconnect the AC power cord before installing a stand or Wall-Mount brackets.
CAUTION
Use a covered table or bench to lay the TV on and handle the TV carefully to prevent damage to the TV screen or cabinet
during assembly.
Screw A (M4 × L12)
1
Screws: ScrewA (M4×L12)×6 ScrewB (ST4×L14)×2 ScrewC (M5×L12)×4 ScrewD (M6×L25)×4
soft cloth
2
EN-33921A
MMTTSS//SSAAPP
DDIISSPPLLAAYY
SSOOUUNNDD
MMUUTTEE
CCCCDD
EEXXIITT
CCOOMMPPOONNEENNTT
HHDDMMII
RREETTUURRNN
GGUUIIDDEE
MMEENNUU
HHii--DDMMPP
VVGGAA
-
IINNPPUUTT
PPIICCTTUURREE
33DD
LLAASSTT
FFAAVV
®
Hii--Smmaarrtt
AASSPPEECCTT
SSLLEEEEPP
EENNTTEERR
4
Getting Started
34
Installing a Wall-Mount Bracket
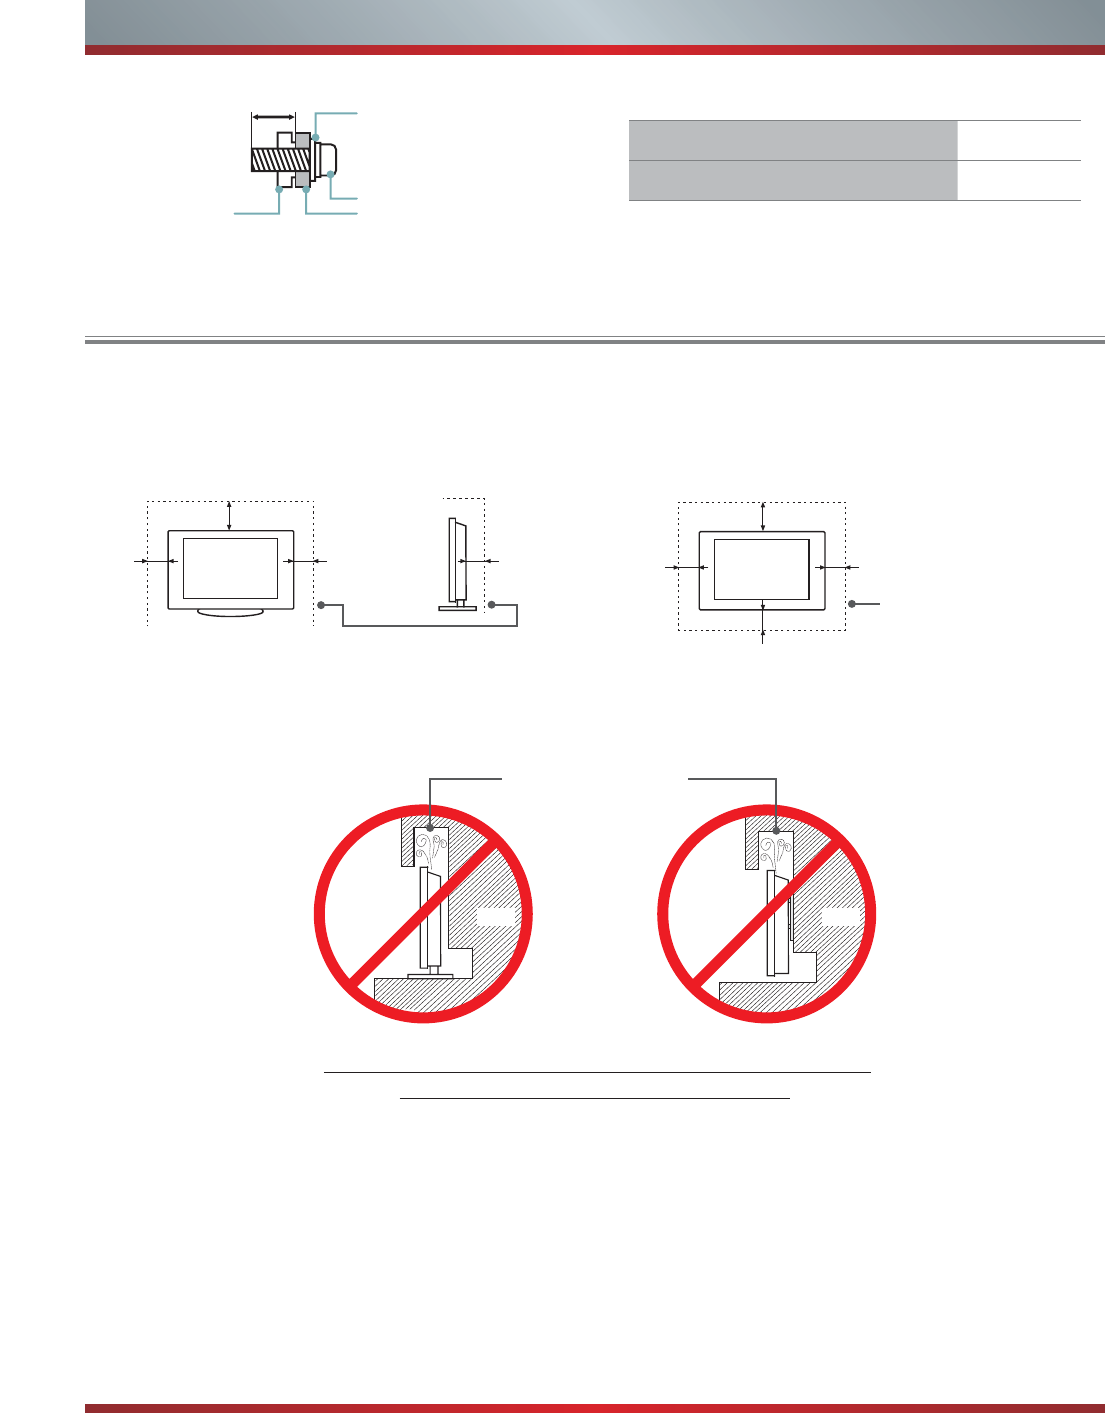
If you want to attach the TV to a Wall-Mount bracket (not provided), you should first remove the stand if it is pre-attached (see
Step 1).
1. Make sure the TV is laid face-down on a clean, safe,
and cushioned space, remove the original screws in the
bracket holes on the TV back over.
3. Follow instructions provided with the Wall-Mount bracket.
If you are not sure of your ability to do complete the installation, contact a professional installer or service technician for
assistance. The manufacturer is not responsible for any damages or injuries that occur due to mishandling or incorrect
assembly.
The selected screws are 6.5 ~ 7.5 mm in length when measured from the attaching surface of the TV's rear cover. The
diameter and length of the screws differ depending on the Wall-Mount Bracket model.
2. tekcarb gnidnopserroc eht ni srecaps dedivorp eht ecalP
holes. Attach purchased bracket (1.5 ~ 2.5 mm thickness)
on the TV with 4 screws (M6 × L25) which in accessories
bag. Follow instructions provided with the wall bracket.
1
WARNING
Use only the 4 screws (M6 × L25) provided with the TV to prevent internal damage to the TV set or cause it to fall.
2
3. Align the stand cover with the stand column, then secure the stand column to the stand cover vertically with the two provided
Screws A and horizontally with the two provided Screws B. See Figure 3.
4. Align the stand cover with the screw holes on the bottom of TV back, secure the stand to the TV with the four provided
Screws C. See Figure 4.
Screw A (M4 × L12)
Screw C (M5×L12)
Screw B (ST4×L14)
Screw D (M6 × L25)
Spacer × 4 Bracket
(1.5~2.5mm)
5
Getting Started
When Installing the TV Against a Wall or Enclosed Area
Install with stand
Never install the TV set as follows:
Install on the wall
Wall-Mount Bracket
6.5 ~ 7.5 mm
Screw
Spacerthe TV's rear cover
Wall-Mount hole pattern VESA (mm) 400 × 400
Wall-Mount screw size (mm) M6
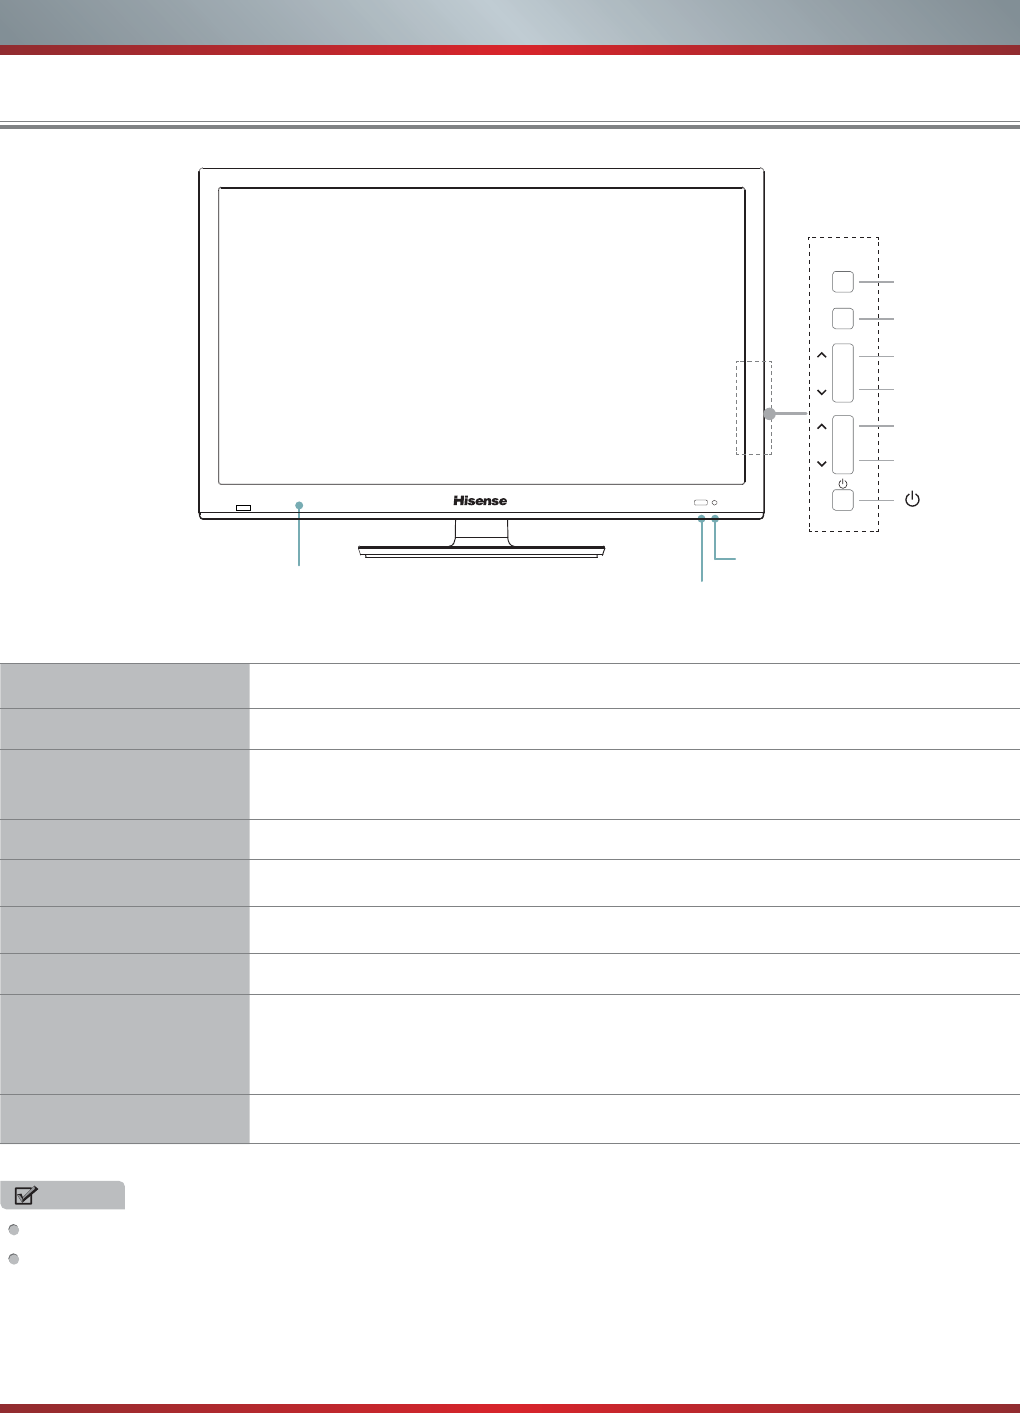
Make sure that your TV has adequate air circulation. Allow enough space around the TV as shown below. Avoid operating the
TV at temperatures below Inadequate air 41°F (5°C).
Leave at least this much
space around the set.
Leave at least this much
space around the set.
4 inches
(10cm)
4 inches
(10cm) 4 inches
(10cm)
4 inches
(10cm)
4 inches
(10cm)
23»8 inches
(6cm)
12 inches
(30cm) 12 inches
(30cm)
Wall Wall
Air circulation is blocked.
Inadequate air circulation can lead to overheating of the TV and
PD\FDXVHGDPDJHWR\RXU79RUFDXVHD¿UH
6
Viewing the Control Panel
Getting Started
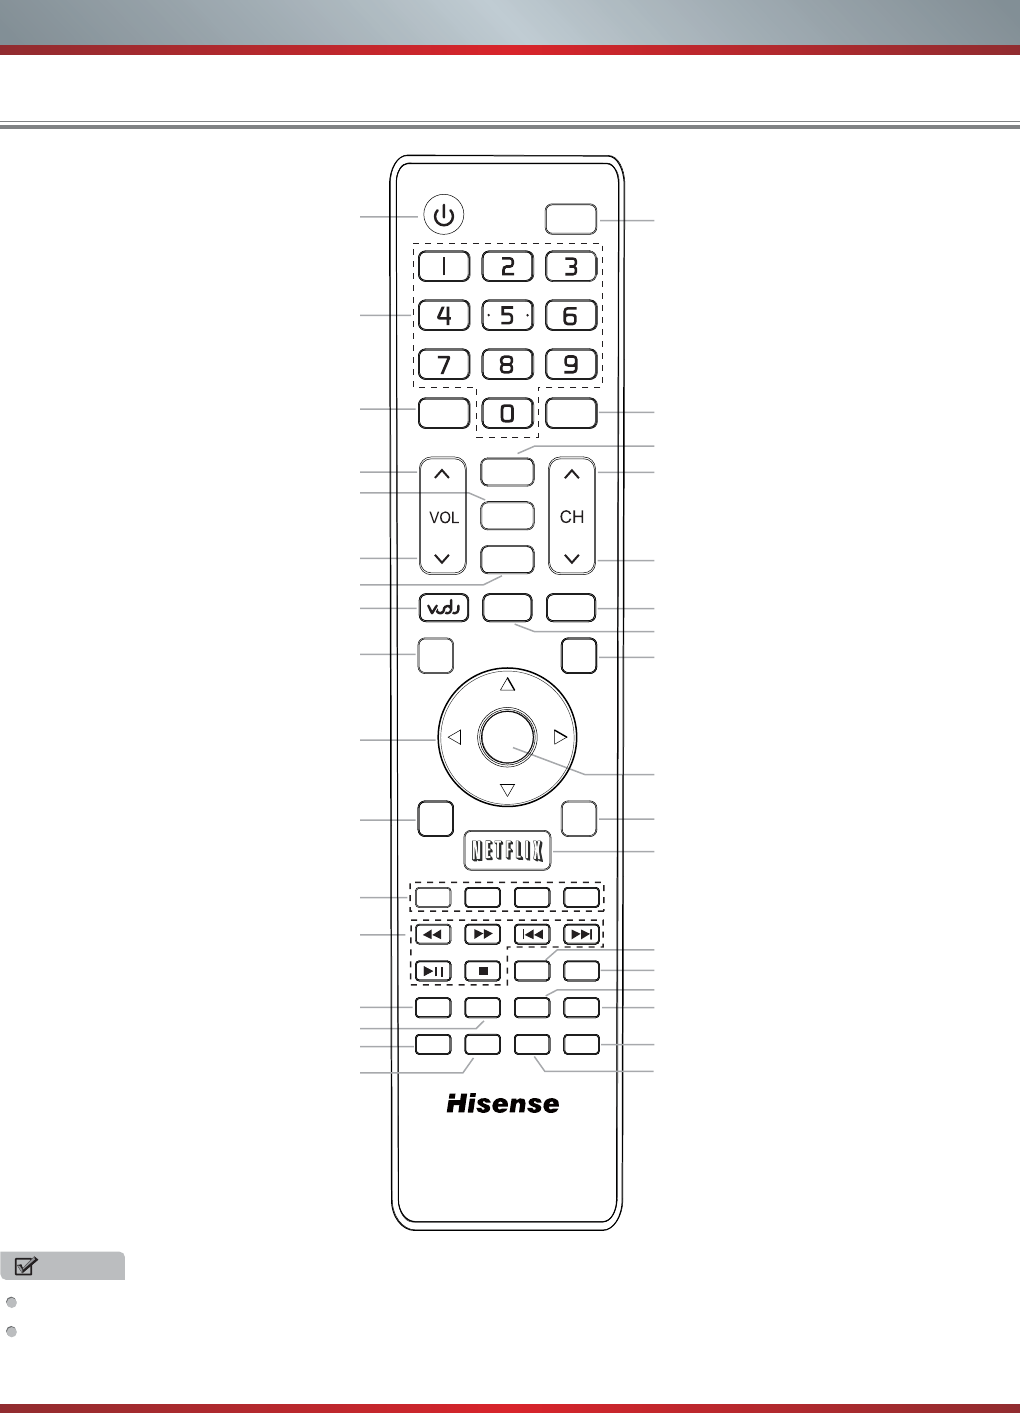
Power indicator
Item Description
Power indicator Light up when the power is on.
Remote sensor Receives remote signals from the remote control.
Do not put anything near the sensor, as its function may be affected.
MENU Display an on-screen menu to setup your TV’s features.
INPUT Select among the different input signal sources.
VOL
V
/ V Adjust the volume.
CH
/V
VSelect the channel.
Power button
3D emitter
Turn on the TV or put the TV in standby mode.
Caution: The TV continues to receive power even in standby mode.
Unplug the power cord to disconnect power.
Sends signals to 3D glasses during playback of 3D movies and TV shows.
NOTES
FOR ILLUSTRATION ONLY.
Powering up or down the TV requires several seconds of processing time. Do not rapidly turn the TV on/off as abnormal
operation may occur.
Remote sensor
3D emitter
MENU
VOL
CH
INPUT
Menu
INPUT
Volume
V
Channel
V
Volume V
Channel V
7
Viewing the Remote Control
Getting Started
NOTES
FOR ILLUSTRATION ONLY.
[RED/GREEN/YELLOW/BLUE] buttons are used for Electronic Program Guide (EPG), Hi-Smart Hub and Digital Media Player
(DMP). After pressing the [GUIDE], [Hi-Smart] or [Hi-DMP] button, the same color buttons will appear with explanations in the
on-screen display (OSD). Follow the steps shown in the OSD.
Power on/off
Increase Volume
Select sound mode
Decrease Volume
Return to the previous menu
Select picture mode
Mute button
Menu button
Dash button
(use when entering a digital sub-channel
▲/
▲
/
▲
/
▲
Navigate Up/Down/Left/Right or
adjust on-screen menu settings
Displays the information banner
Open the DTV program guide
Confirm selections
(if available)
3D button
Display the favorite channel list
Zoom Button
Set the sleep timer
Enter the VUDU HD Movie
Close the menu
Next channel
Previous channel
Select input source
Adjust Closed Caption (CCD) mode
Audio select button
Direct channel selection
Special function buttons
Media content control function buttons
Go to the previous channel
Enter the NETFLIX instant streaming
Open the Hi-Smart Hub
EN-33921A
MMTTSS//SSAAPP
DDIISSPPLLAAYY
SSOOUUNNDD
MMUUTTEE
CCCCDD
EEXXIITT
CCOOMMPPOONNEENNTT
HHDDMMII
RREETTUURRNN
GGUUIIDDEE
MMEENNUU
HHii--DDMMPP
VVGGAA
-
IINNPPUUTT
PPIICCTTUURREE
33DD
LLAASSTT
FFAAVV
®
Hii--Smmaarrtt
AASSPPEECCTT
SSLLEEEEPP
EENNTTEERR
Hi-DMP (digital multimedia player) button
Select COMPONENT input source
Select HDMI input source
Select VGA input source
8
Installing Batteries in the Remote Control
Getting Started
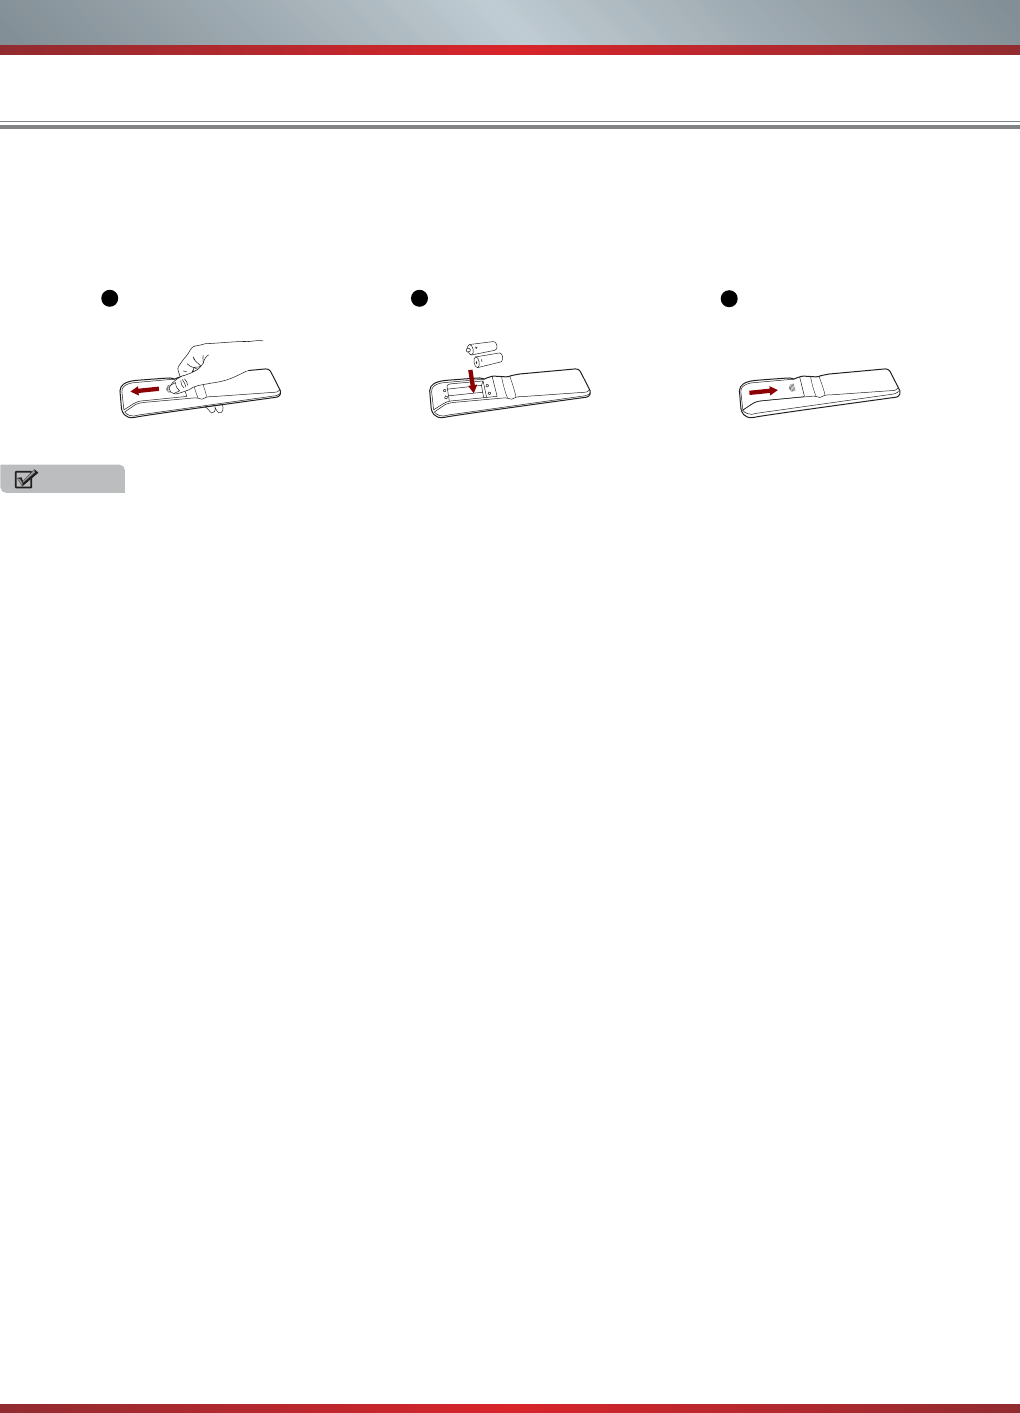
1. Slide the back cover to open the battery compartment of the remote control.
2. Insert two AAA size batteries. Make sure to match the (+) and ( - ) ends of the batteries with the (+) and ( - ) ends indicated in
the battery compartment.
3. Close the battery compartment cover.
1Gently push and slide 2Insert the batteries 3Gently push and slide
NOTES
1. Dispose of your batteries in a designated disposal area. Do not throw the batteries into a fire.
2. Do not mix battery types or combine used batteries with new ones.
3. Remove depleted batteries immediately to prevent battery acid from leaking into the battery compartment.
4. If you do not intend to use the remote control for a long time, remove the batteries.
5. Batteries should not be exposed to excessive heat, such as sunshine, heat registers, or fire.
6. Battery chemicals can cause a rash. If the batteries leak, clean the battery compartment with a cloth. If chemicals touch your
skin, wash immediately.
7. Do not mix old and new batteries.
8. Do not mix alkaline, standard (carbon-zinc) or rechargeable (ni-cad, ni-mh, etc.) batteries.
Program Your Universal Cable or Satellite Remote Control to Operate Your New Hisense Television!
If you would like to program your other household remote controls to your new Hisense television, please consult the User’s
Manual supplied by your Cable or Satellite provider. The Cable or Satellite providers’User’s Manuals should include instructions
on how to program their remote to your television.
Below is a list of Hisense codes for the most common Cable and Satellite providers. Use the Hisense code that is associated
with your Cable or Satellite provider(if applicable).
DIRECTV ..............................................0178 or 10019
Time Warner Cable .............................. 386 or 0178
Comcast................................................ 0178 or 10178
Cox Communications ........................... 0178
Dish Network ........................................ 627 or 505
If the Hisense code associated with your Cable or Satellite provider is not listed above, if the code above does not work, or if
you cannot locate the instructions for programming your household remote to your television, call your local Cable or Satellite
provider’s customer service center.
If your Cable or Satellite provider does not have an Hisense code available, please visit http://www.hisense-usa.com for
additional codes.
9
HDMI2 HDMI1
DI
G
ITA
L
AUDI
O
O
U
T
A
NT
/
CABLE
IN
H
EADPH
O
NE
Y
P
B
B
P
R
R
V
IDE
O
A
V I
N
CO
MP
L
R
C/
DVI
D
I
O
IN
H
DMI4 HDMI
3
M
akin
g
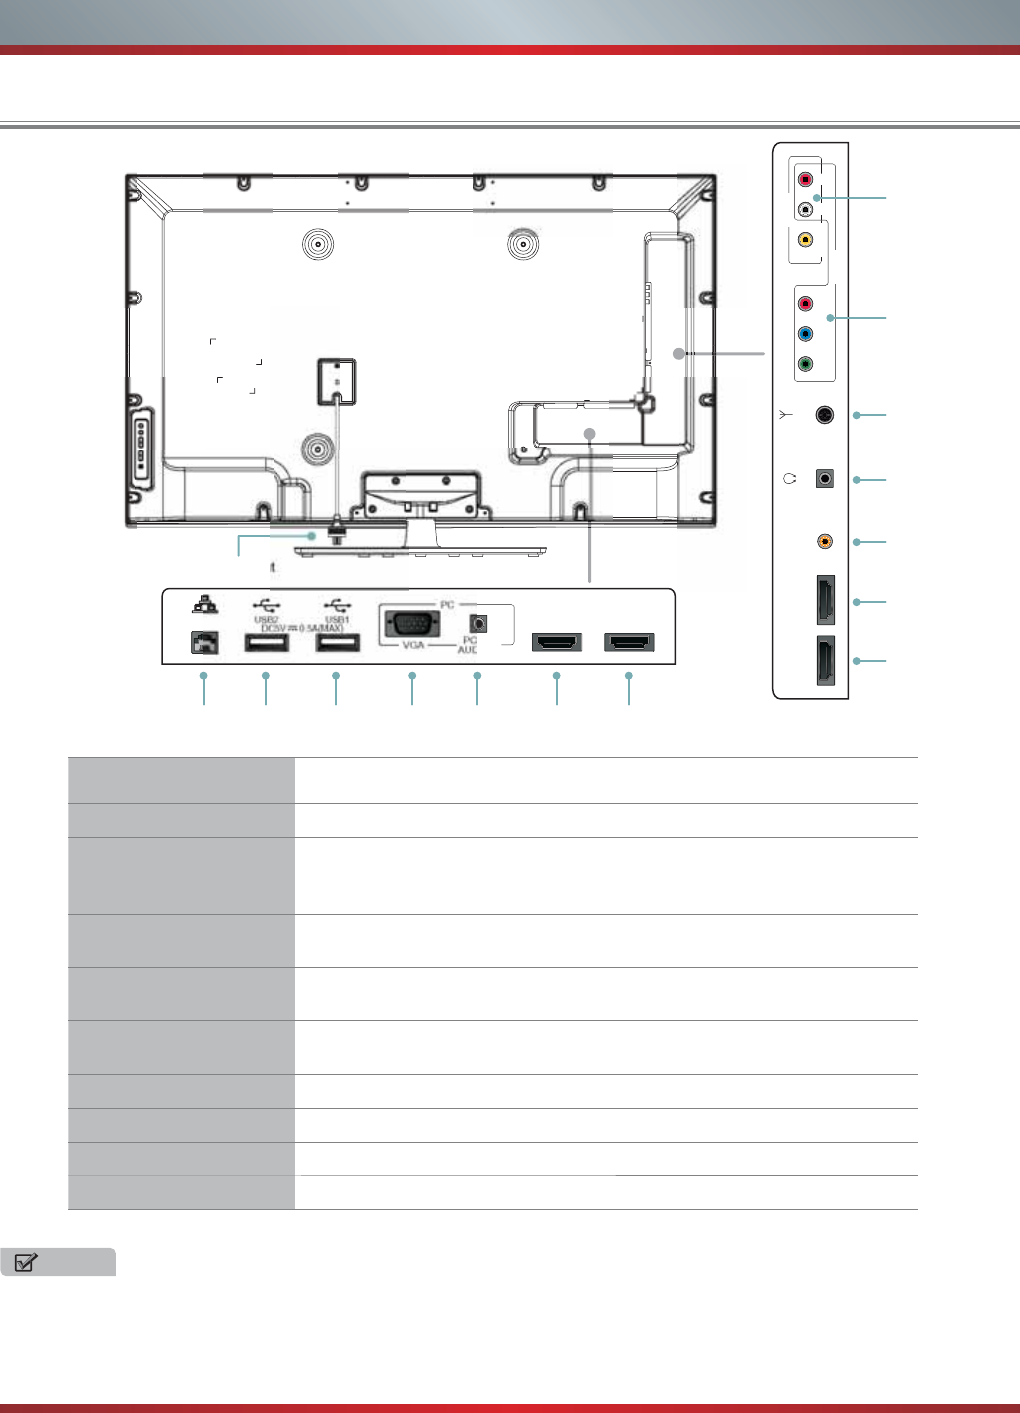
Connections
Getting Started
L
AN USB USB VG
A
HDMI HDMI
AV
H
EADPHONE
A
NT
/
CABL
E
COMPONENT
P
ower
i
n
p
u
HDMI
HDMI
D
IGITAL
AU
DI
O
OU
T
P
C
/
DV
I
A
UDIO I
N
I
te
m
Descri
p
tion
A
NT/
C
ABLE
C
onnect an antenna or cable TV to this jack.
HDMI
H
DMI
(
High-De
f
inition Multimedia Inter
f
ace
)
provides an uncompressed,
a
ll digital audio/video inter
f
ace between this TV and any HDMI-device,
s
uc
h
as a set-top
b
ox,
Bl
u-ray
di
sc p
l
ayer or
A/V
rece
i
ver.
CO
MP
O
NENT
C
onnect to a DVD player, Digital
S
et-Top-Box or other A/V devices with
c
omponent
(
YP
B
P
R
)
video and audio output jacks.
V
IDEO/AUDIO
(
L,R
)
C
onnect to the composite video and audio
(
L/R
)
output jacks on external
v
i
deo
de
vi
ces
.
VG
A
P
C/DVI A
U
DI
O
IN
Co
nn
ec
t t
o
a
P
C
o
r
o
th
e
r
de
vi
ces
with
a
V
G
A int
e
rf
ace
.
H
EADPH
O
NE
C
onnect headphone for private listenin
g
.
D
I
G
ITAL A
U
DI
O
OU
T
C
onnect to an external di
g
ital audio device.
US
B
P
ort for Di
g
ital Media Pla
y
er and for char
g
in
g
3D
g
lasses.
LAN
Co
nn
ec
t
a
n
e
th
e
rn
e
t
cab
l
e
t
o
access
a
n
e
tw
o
rk
o
r th
e
Int
e
rn
e
t.
NOT
E
S
ome external devices impossible insert to this set
f
or individual di
ff
erence. Please replace with appropriate external signal
c
a
bl
e or
i
ncrease t
h
e a
d
apter to matc
h
w
i
t
h
t
h
e port
i
n suc
h
case.
10
Getting Started
N
O
TE
S
C
heck the
j
acks for position and t
y
pe before makin
g
an
y
connections. Loose connections can result in ima
g
e or color
p
ro
bl
ems.
M
a
k
e sure t
h
at a
ll
connect
i
ons are t
i
g
h
t an
d
secure.
N
ot all A
/
V devices have the ability to connect to a TV, please re
f
er to the user’s manual o
f
your A
/
V device
f
or compatibility
a
nd connections procedure.
Al
ways unp
l
ug t
h
e power cor
d
w
h
en connect
i
ng externa
l
equ
i
pment.
C
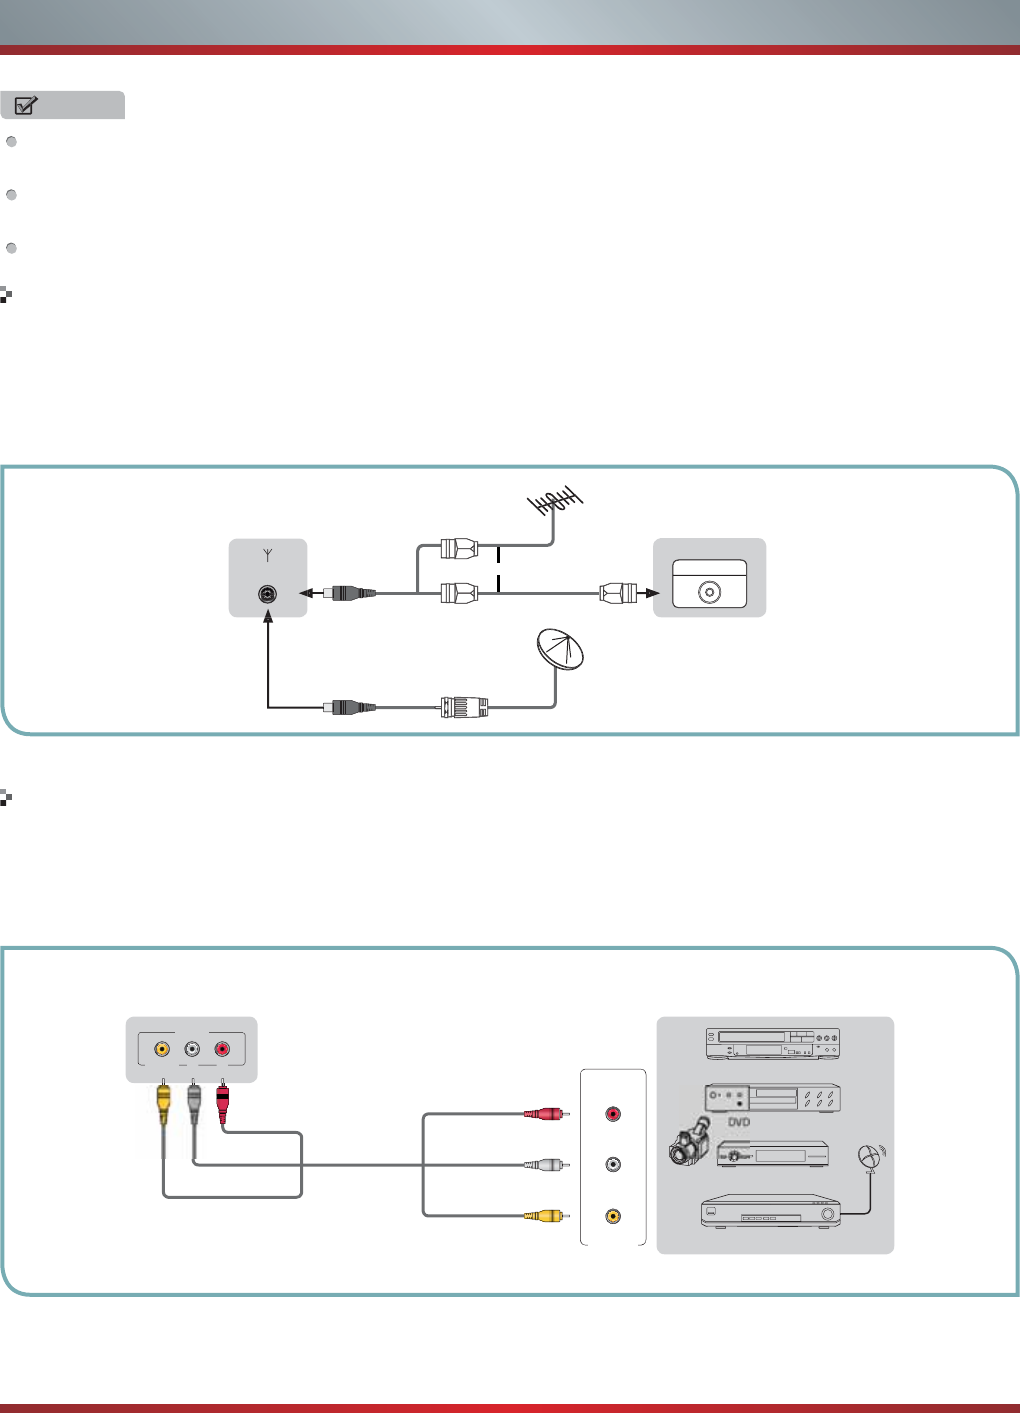
onnecting an antenna, cable or cable/satellite bo
x
C
onnectin
g
an A/V Device with
C
omposite
C
able
o
rANT OU
T
C
abl
e
V
HF
/U
HF Antenn
a
EXTERNAL DEVICESTV JACK
1.
T
urn off the TV before connectin
g
the antenna.
2
.
C
onnect one end of a coaxial cable (not included) to the RF OUT jack on the antenna, cable or cable/satellite box. If you are
u
sing an antenna with twin-lead cable, you may need a 300-75 ohm adapter (not provided) to connect it to the back of your
T
V. Likewise, if
y
ou are usin
g
several antennas,
y
ou ma
y
need a combiner
(
not provided
)
.
3
.
C
onnect the other end of the cable to the ANT/CABLE IN jack on the side of your TV.
1
.
U
se the audio and video cables to connect the external A/V device’s composite video/audio jacks to the TV’s jacks. (Video =
y
ellow, Audio Left = white, and Audio Right = red)
2.
P
lu
g
the connected devices into the mains socket before switchin
g
on the TV.
3
.
S
elect the correspondin
g
source from the TV.
A
NT/CABLE
IN
E
quipment with A
/
V jacks
D
Player
/
Recorde
r
Vi
deo
C
amer
a
EXTERNAL DEVICES
S
et-to
p
bo
x
S
atellite Receive
r
S
atellit
e
a
nt
e
nn
a
ca
bl
e
VC
R
A/
V
OUT
Vi
deo
L
R
W
hite
(
L
)
W
hite
(
L
)
()
Y
ellow
(
Video
)
Yellow
(
Video
)
R
ed
(
R
)
Red
(
R
)
TV JACK
V
IDEO
AV IN
L
R
A
V
C
able
(not included
)
11
Getting Started
C
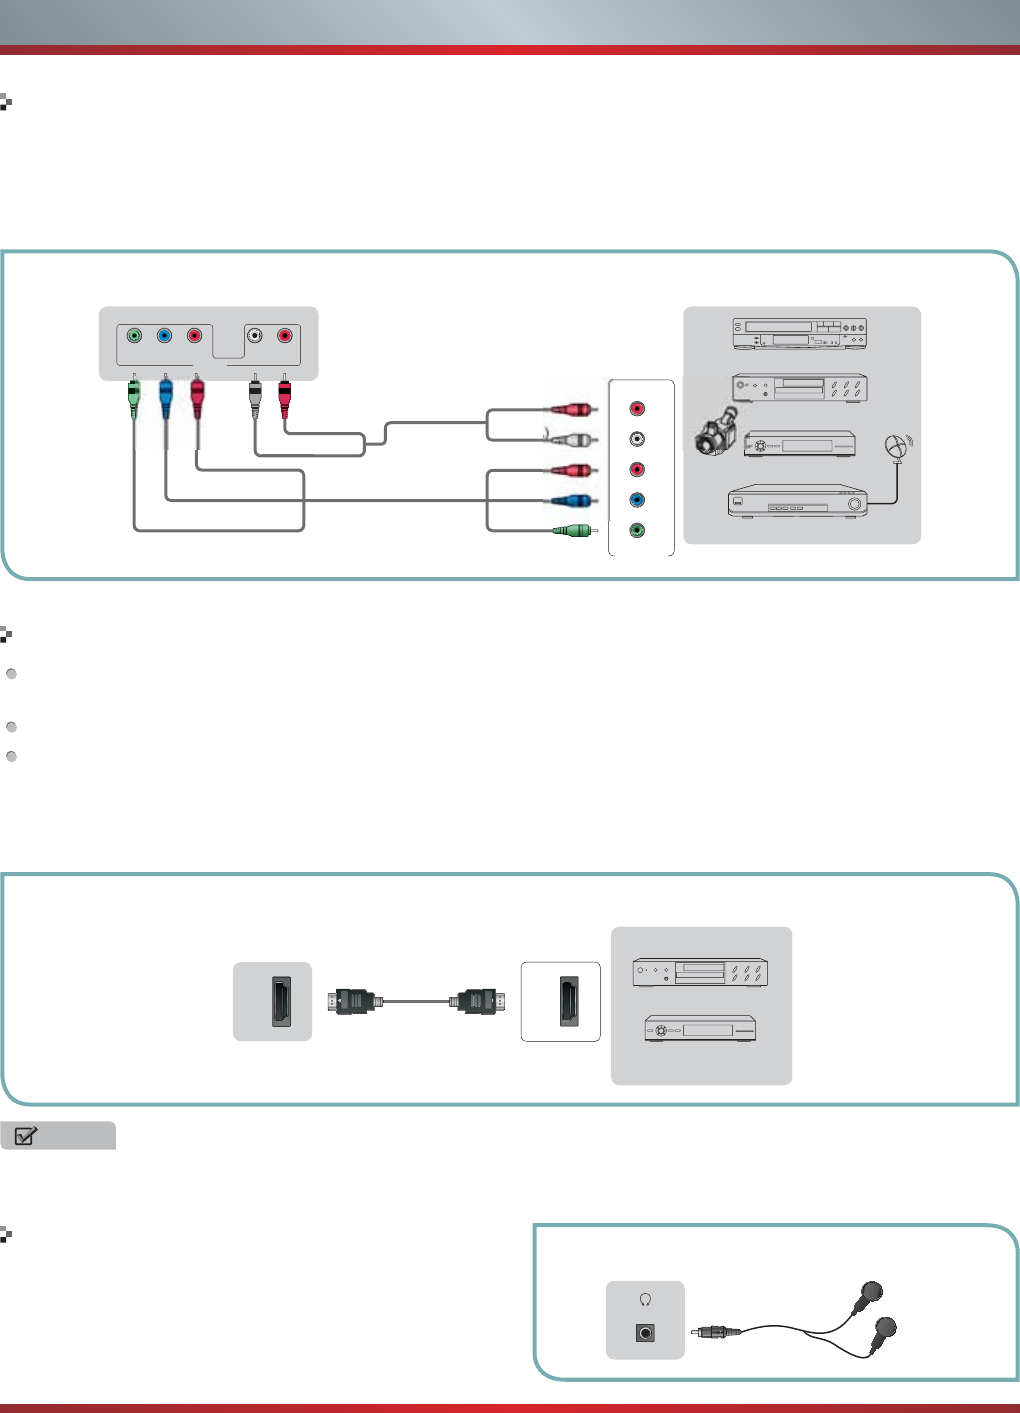
onnecting an A/V Device with Component (YP
B
P
R
)
Cable
Connecting an A/V Device with HDMI Cable
Connectin
g
a headphon
e
1.
U
se a component cable to connect the external A/V device’s component output
j
acks to the TV’s YP
B
P
R
j
acks. Use an audio
cable to connect the external A/V device’s component audio
j
acks to the
TV
’s AUDIO
(
L/R
)
j
acks.
2.
Plu
g
the connected devices into the mains socket before switchin
g
on the TV.
3.
Select the correspondin
g
source from the TV.
S
upport digital connections between HDMI - enabled AV devices such as PVR, DVD, Blu-Ray, AV receiver and digital
de
vi
ces
.
S
ome devices such as PVR or DVD player require HDMI signal to be set to output in the device's settings.
P
lease consult your device user manual
f
or instructions.
1
.
U
se an HDMI cable to connect the A
/
V device’s HDMI output jack to the TV’s HDMI jack.
2
.
P
lug the connected devices into the mains socket be
f
ore switching on the TV .
3
.
S
elect the corresponding source
f
rom the TV.
H
ea
d
p
h
ones or an ana
l
og soun
d
b
ar can
b
e connecte
d
to
t
he HEADPH
O
NE output on your set.
(
While the headphone
i
s connected, the sound
f
rom the built-in speakers will be
d
isabled.
)
Y
P
B
B
P
R
R
CO
MP
L
R
Equipment with A/V
j
ack
s
DVD Pla
y
er/Recorder
Vid
eo
C
amera
EXTERNAL DEVICES
S
et-top box
Satellite Receiver
S
atellit
e
a
n
t
enn
a
cab
l
e
V
CR
W
hite
(L
White
(
L
)
()
R
ed
(
R
)
Red(R)
()
A
udio Cable
(
not included
)
C
om
p
onent Cable
(
not included
)
TV JACK
p
Com
p
onen
t
R
L
P
R
PB
Y
P
R
/C
R
P
R
P
B
/C
B
P
B
Y
Y
HDMI
HDMI
TV JACK
EXTERNAL DEVICES
DVD
Set-to
p
Bo
x
H
EADPH
O
N
E
EXTERNAL DEVICESTV JACK
N
O
T
E
T
he HDMI connector provides both video and audio si
g
nals, it’s not necessar
y
to connect an audio cable.
12
Getting Started
C
onnecting a PC with VGA Cabl
e
C
onnectin
g
an Audio Receiver with Di
g
ital Audio out cabl
e
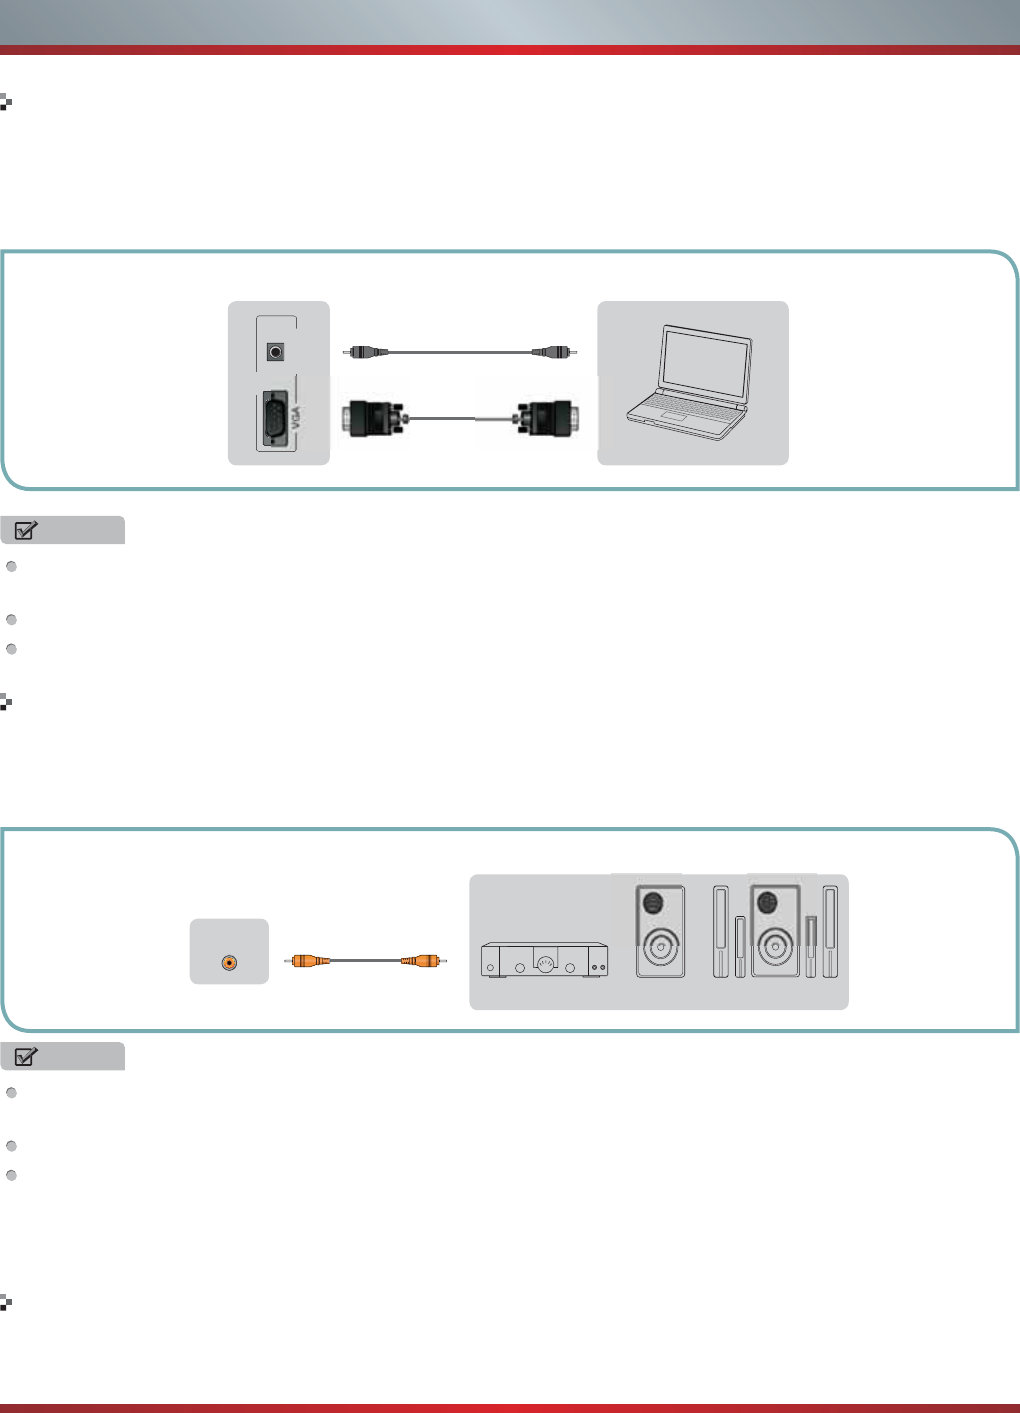
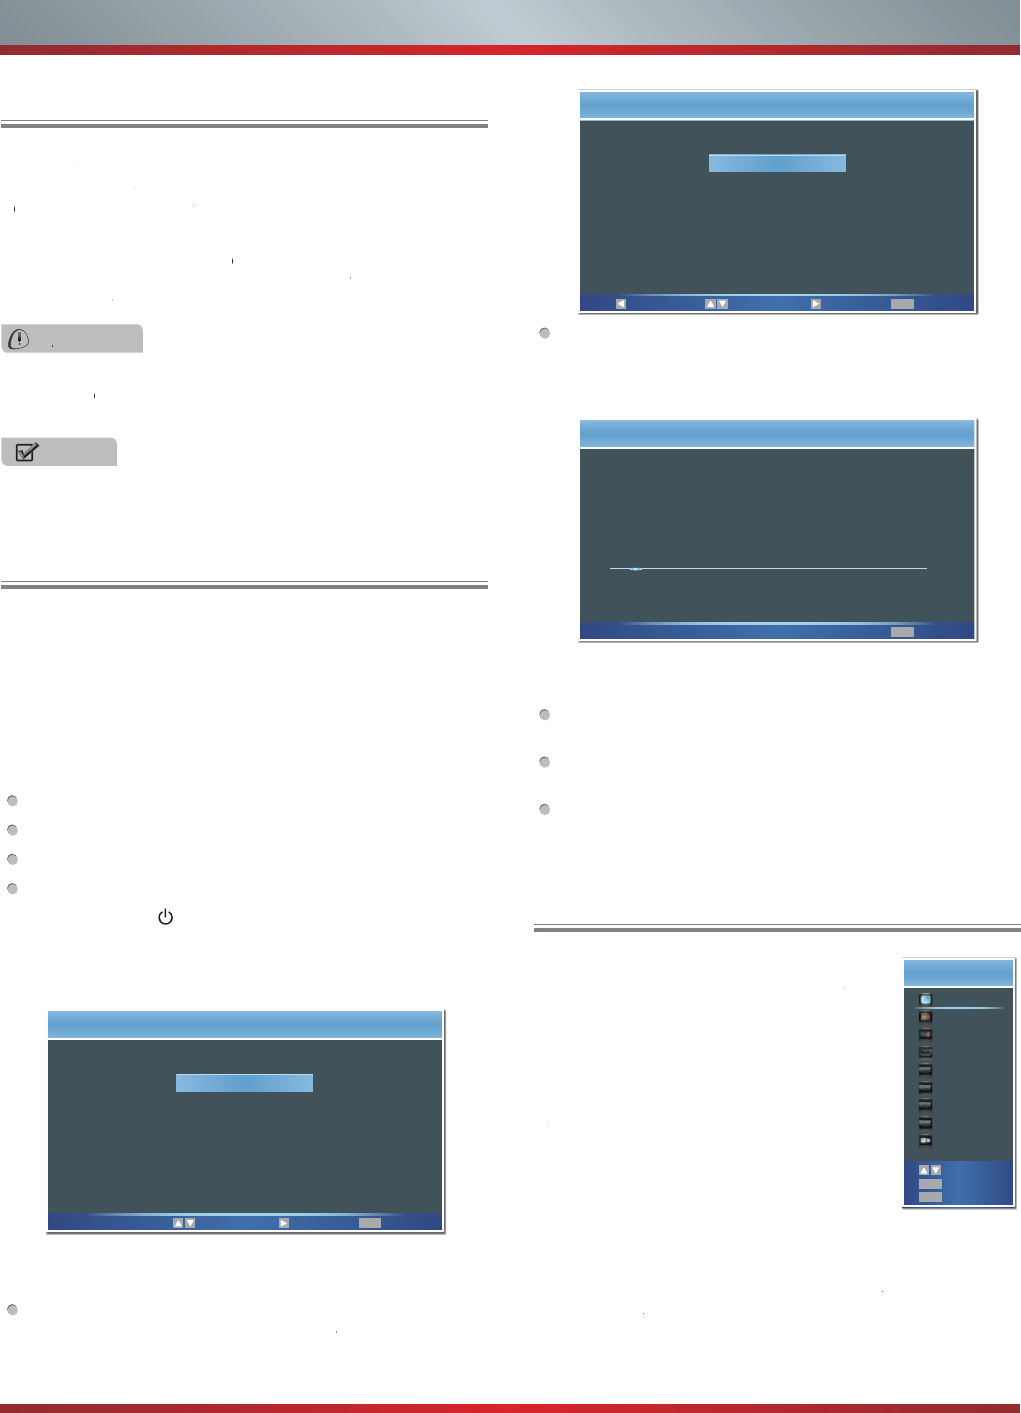
1.
U
se a VGA cable to connect the PC’s VGA output
j
ack to the TV’s VGA
j
ack. Use an audio cable to connect the PC’s audio
o
utput
j
ack to TV’s PC/DVI AUDIO IN
j
ack.
2.
P
lu
g
the connected devices into the mains socket before switchin
g
on the TV.
3
.
S
elect the correspondin
g
source from the TV.
1.
U
se a coaxial cable to connect the A/V device’s di
g
ital audio in
j
ack to the TV’s DIGITAL AUDIO OUT
j
ack.
2.
P
lu
g
the connected devices into the mains socket before switchin
g
on the TV.
3
.
S
elect the correspondin
g
source from the TV.
NOTES
P
rimarily this unit is intended
f
or use as an L
C
D TV. I
f
you want to use it as a monitor, please contact the manu
f
acturer o
f
the
PC
Video
/G
raphic's card
f
or
f
urther support. Per
f
ect compatibility is not guaranteed.
T
he V
G
A cable will not supplied with the product.
W
e strongly recommend to use V
G
A cable with 2
f
errite cores as shown in the
f
igure.
NOTES
W
hen a digital audio system is connected to the DI
G
ITAL AUDI
O
O
UT
(CO
AXIAL
)
jack, decrease the volume o
f
both the TV
a
nd the s
y
stem.
5
.1 CH
(
channel
)
audio is available when the TV is connected to an external device supportin
g
5.1 CH.
W
hen the receiver (home theater) is set to on, you can hear sound output from the TV’s digital audio out jack. When the TV
i
s receivin
g
a DTV si
g
nal, the TV will send 5.1 CH sound to the home theater receiver. When the source is connected to the
T
V via HDMI, onl
y
2 CH audio will be heard from the home theater receiver. If
y
ou want to hear 5.1 CH audio, connect the
d
i
g
ital audio out
j
ack from
y
our DVD/Blu-ra
y
pla
y
er/cable box/STB satellite receiver directl
y
to an amplifier or home theater.
TV JACKS
EXTERNAL DEVICES
P
ower
l
ess
Bass
S
peaker
S
p
eaker
$XGLR$P
S
OL¿H
U
DI
G
ITA
L
A
UDI
O
O
UT
C
onnecting an ethernet cable to access a network or the Internet
C
onnect an ethernet cable to access a network or the Internet. TV also features wireless connectivit
y
. For more information,
s
ee “Network
C
onnection”.
EXTERNAL DEVICES
Com
p
ute
r
TV JACK
PC
P
C/
DVI
A
U
DI
O
I
N
13
Basic Features
1
.
M
a
k
e sure t
h
at you
h
ave:
I
nsta
ll
e
d
t
h
e remote contro
l
b
atter
i
es.
C
onnected an antenna or cable.
C
onnected the
p
ower cord.
Ma
t
c
h
ed
th
e
r
e
m
o
t
e
co
ntr
o
l with
T
V
.
2.
P
r
ess
[
POWER
]
bu
tt
on
t
o
t
u
r
n
on
y
ou
r
T
V
.
Th
e
Setu
p
W
iz
a
r
d
menu displa
y
s
.
3.
P
r
ess
[
▲
/
▲
/
▲
/
▲
]
t
o
se
l
ec
t
y
ou
r
m
e
n
u
lan
g
ua
g
e
:E
n
g
l
i
s
h
,
S
p
anish or French,
p
ress
[
ENTER
]
button to confirm.
4.
Pr
ess
[
▲
/
▲
]
to
se
l
ec
t
y
o
u
r
Pi
cture
M
o
d
e
:
H
ome
M
o
d
e
or
Retail Mode, press [ENTER] button to con
f
irm.
If
yo
u
s
e
l
ect
R
eta
il
M
od
e,
a
m
e
s
sage
appea
r
s
“
Ar
e
yo
u
s
ure
yo
u
wan
t
re
t
ail
m
ode
?
”
S
ele
ct
“
Y
e
Y
Y
s
”
t
o
c
on
t
i
nu
e
,
o
r
s
elect
“
No” to change your selection.
I
M
P
O
R
T
AN
T
T
T
:
A
t
f
irst,
yo
u
h
ave
t
o
m
atch
t
he
r
emot
e
c
ontrol with T
V
.
V
V
T
o turn your
T
T
T
V
o
n
o
r
o
f
f (standby mode):
f
f
1
.
P
lu
g
the power cord into an
A
C
p
ower outlet.
2
.
P
r
ess
[
POWER
]
b
utton
,
Y
our
Y
Y
T
V t
u
rn
s
o
n.
3
.
P
res
s
[
POWE
R
]
bu
t
t
o
n
a
gain
t
o
t
u
rn
o
f
f
f
f
y
our
T
V
.
W
he
n
y
ou
t
urn o
f
f your
f
f
T
V
,
i
t goes
i
nto stan
db
y mo
d
e.
T
he
S
e
t
up
W
i
z
a
r
d
me
n
u
app
ears
t
he
f
i
r
st
t
i
m
e
y
ou
t
u
r
n
o
n
th
e
T
V
.
I
t
will
a
s
s
i
s
t
y
ou
t
o
s
p
e
c
if
y
ff
th
e
m
enu
l
anguage
,
Pi
cture
M
o
d
e,
T
u
ner Mode and
C
hannel Installation.
I
M
P
O
R
T
AN
T
T
T
:
M
a
k
e
s
u
re
t
h
at
t
h
e
a
n
t
e
nn
a
o
r
ca
bl
e
i
s
co
nn
ected
a
n
d
a
w
ir
ed
o
r
w
ir
e
l
ess
I
n
te
rn
et
co
nn
ect
i
o
n
is
a
va
il
a
bl
e.
T
urnin
g
the TV
O
n
f
or the First
T
i
me
T
u
r
ning
t
h
e
TV
o
n
o
r
o
f
f
I
f
y
ou
se
le
c
t
e
d
Re
t
a
il
M
o
de
,
E
nerg
y
S
a
v
i
n
g
is
no
t
rea
li
ze
d.
5.
P
r
e
s
s
[
▲
/
▲
]
t
o
se
l
ect
y
our
T
u
n
er
M
ode:
A
nt
e
nn
a
o
r
C
able,
p
ress
[
ENTER
]
button to confirm.
6
.
P
r
ess
[
▲
/
▲
]
to
se
t
t
h
e
C
h
a
nn
e
l
I
n
s
t
a
ll
a
ti
o
n:
Sca
n
o
r
S
ki
p
S
can,
p
ress
[
ENTER
]
button to confirm.
I
f
y
ou
se
l
ec
t
“S
can”
,
y
o
u
r
TV
automat
i
ca
lly
s
t
ar
ts
C
hanne
l
Installation available in
y
our viewin
g
area.
I
f
y
ou
s
e
le
c
t
“
Sk
ip
Sc
an
”
,
y
o
u
r
TV
d
oe
s
no
t
scan
f
o
r
ch
anne
l
s.
Dependin
g
on
t
h
e
rece
p
t
i
on
co
n
di
t
i
on
,
i
t
ma
y
t
a
k
e
u
p
t
o
2
5
min
u
t
e
s
or
m
o
r
e
t
o
com
p
l
e
t
e
m
e
m
o
r
i
z
in
g
c
h
a
nn
e
l
s
.
Please allow the
p
rocess to com
p
lete without interru
p
tion
.
W
ARNING
W
W
W
he
n
y
ou
r
TV
i
s
in
s
t
a
n
db
y
mode
,
i
t
i
s
s
t
ill
rece
ivin
g
p
owe
r
.
T
o
T
T
c
om
p
le
t
e
l
y
d
i
sco
nn
ec
t
p
ow
e
r
,
u
nplu
g
t
he
p
owe
r
co
r
d
.
N
O
T
E
If
yo
u
r
TV
d
oe
s
no
t
re
c
ei
v
e
an
i
npu
t
s
i
gna
l
f
or
se
v
era
l
mi
nutes,
i
t automat
i
ca
ll
y goes
i
nto stan
db
y mo
d
e.
EXIT
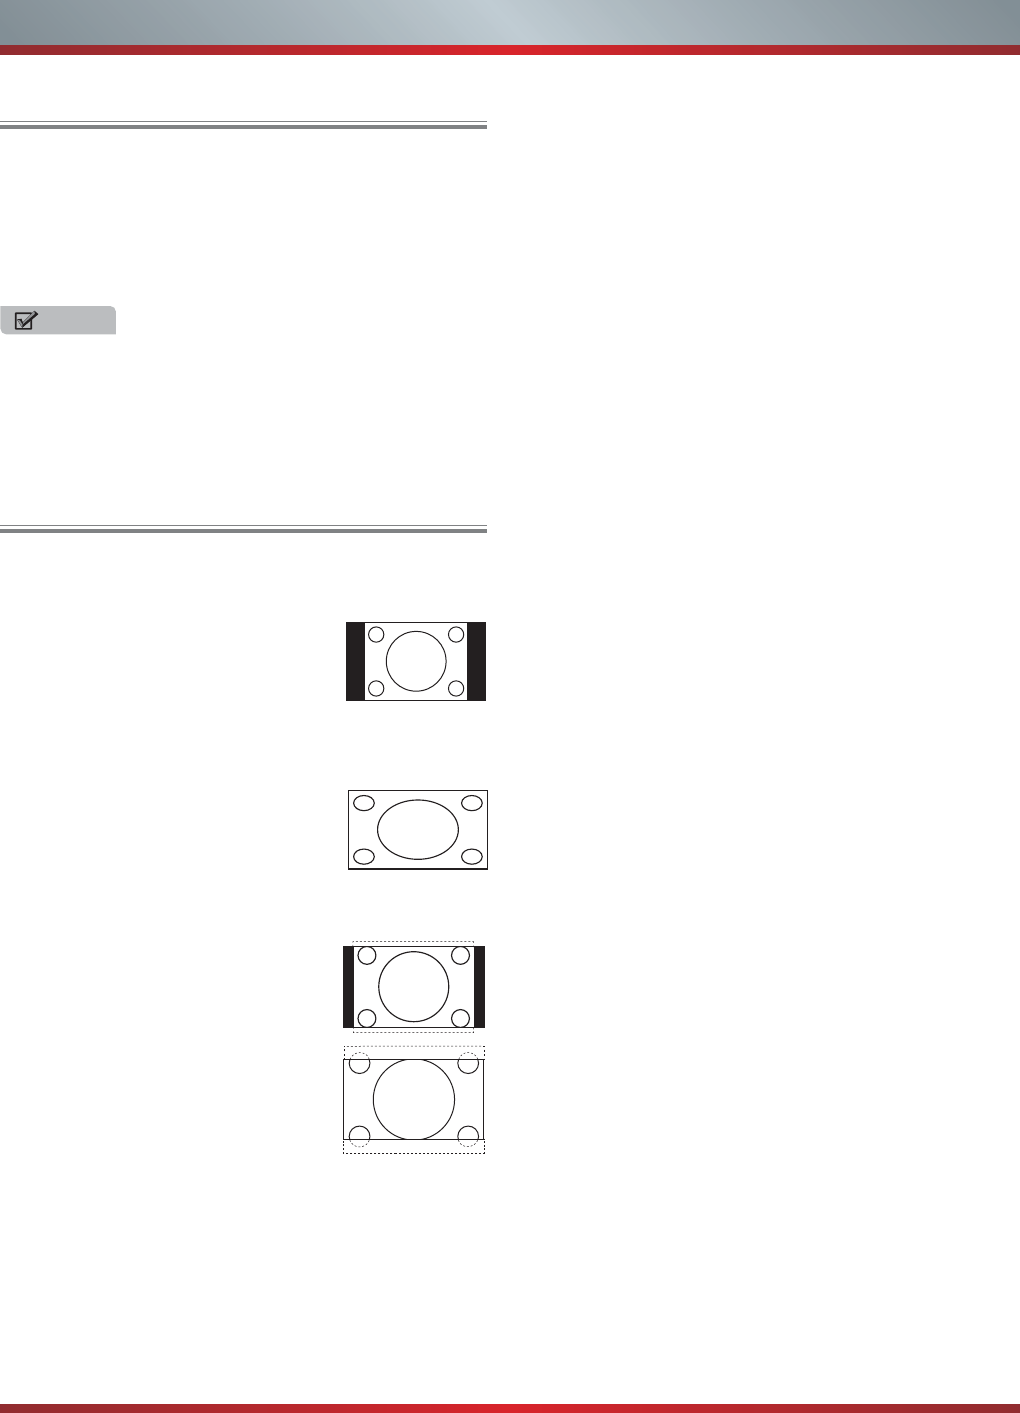
Choose your menu Language
English
Español
Français
Select Next Exit
Back Select Next Exit
EXIT
Choose your Picture Mode
Home mode
Retail mode
Home mode default settings are recommended for in-home use.
ENERGY STAR® qualied.
Retail mode is intended for in-store display and resets video
settings at Power On.
EXIT
Please connect cable or antenna
Channel Installation
Status: Scanning...
ATV Program Installed: 3
DTV Program Installed: 2
Cancel
8%
T
he
f
i
r
s
t
t
i
m
e
y
ou
t
u
rn
on
y
o
u
r
T
V
,
y
o
u
m
u
s
t
s
e
le
c
t
t
he
TV
s
i
gna
l
so
u
rce
.
Y
ou
Y
Y
r
TV
s
t
ore
s
t
hi
s
in
f
orma
t
i
o
n
,
s
o
y
ou
do
no
t
nee
d
t
o
c
h
ang
e
t
he
TV
s
i
gna
l
so
u
r
c
e
un
l
e
s
s
i
t
c
h
ang
e
s.
F
or
e
x
amp
le
,
y
o
u
c
h
ang
e
f
ro
m
an
outs
ide
an
t
enn
a
to
ca
ble
T
V
.
T
o select the video input source:
TT
1.
T
u
rn
on
y
o
u
r
T
V
,
t
h
en
p
res
s
[I
N
PUT
]
butto
n
o
n
th
e
remot
e
o
r
o
n
th
e
T
V
.
Th
e
Input Source menu opens
.
2.
P
res
s
[
▲
/
▲
]
bu
tt
on
t
o
hi
g
hli
g
h
t
t
h
e
i
np
u
t
so
u
rce
,
t
h
e
n
press
[E
N
TE
R
]
b
utton
.
3.
P
ress
[P
O
W
E
R
]
bu
tt
on
aga
in
t
o
t
u
rn
o
f
f
f
f
y
o
u
r
T
V
.
W
he
n
you
t
urn
o
f
f your
f
f
T
V
,
i
t goes
i
nto stan
db
y mo
d
e
.
S
e
l
ect
i
ng
t
h
e
In
p
u
t
Sou
rc
e
INPUT
TV
AV
Component
VGA
HDMI 1
HDMI 2
HDMI 3
HDMI 4
Hi-DMP
EXIT
OK
Select
Enter
Exit
14
Basic Features
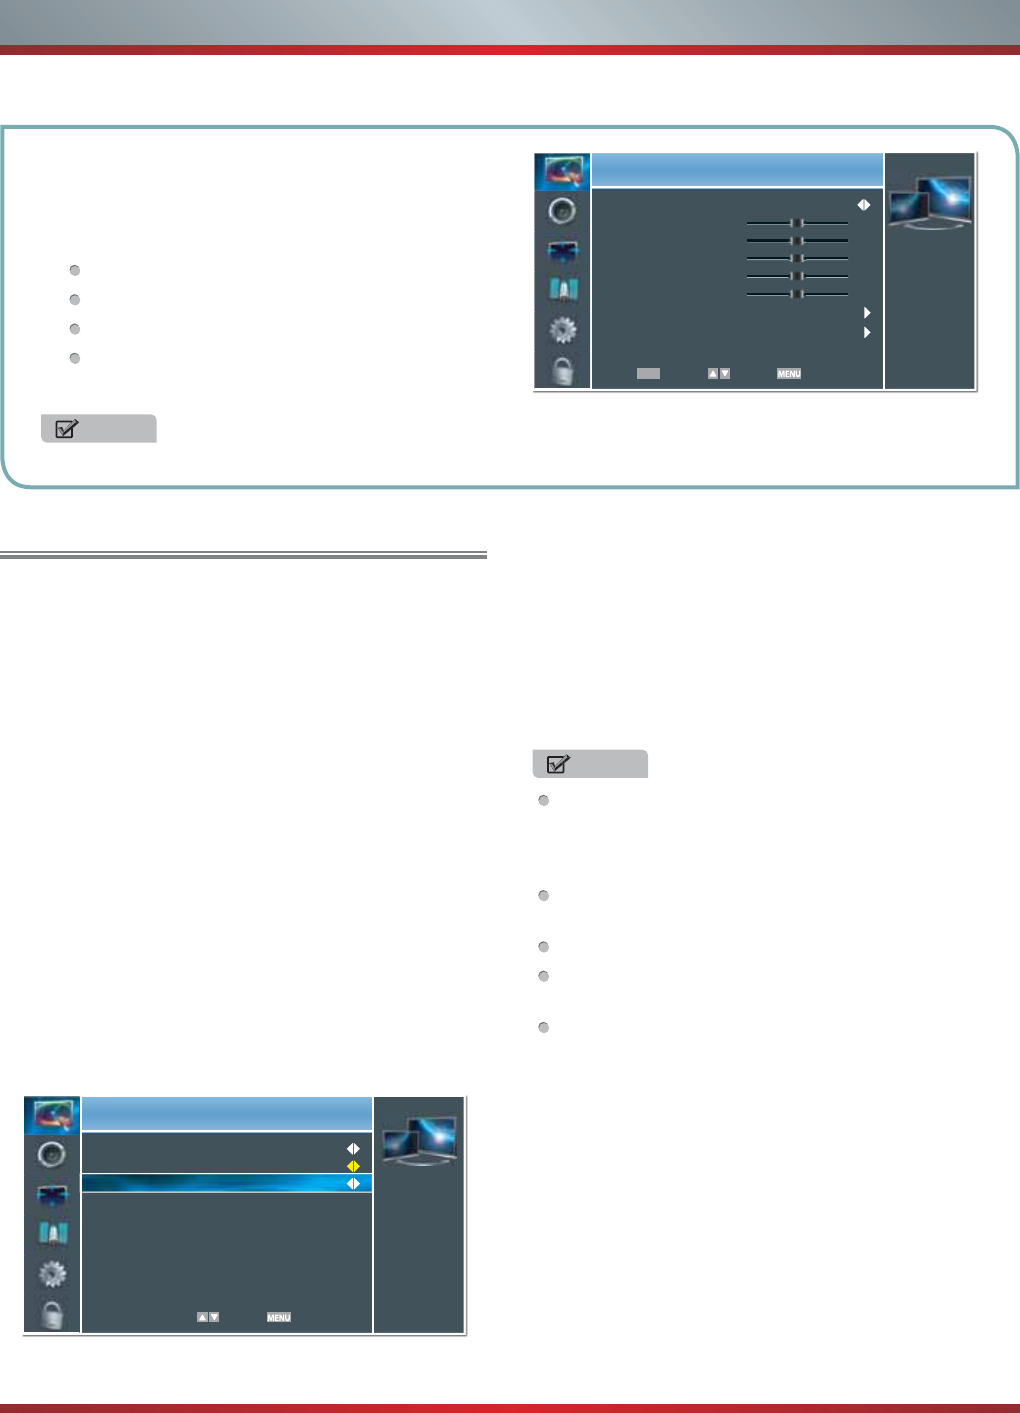
Aspect - Select the screen aspect ratio from Normal, Wide,
Zoom and Cinema.
Normal: The original 4:3 aspect
ratio (1.33:1 signal) is preserved,
so black bars are added to the left
and right of the image. Standard TV
broadcasts are displayed with a 4:3
aspect ratio.
Wide: When watching a standard
broadcast or full-frame movie in
this mode, the display image is
stretched proportionately to fill
the TV screen. When watching a
widescreen (1.78:1 signal) program
or movie, the display image fills the
TV screen.
Zoom: Stretch the 4:3 aspect ratio
image vertically and horizontally to
fill the screen at 1:1.78 aspect ratio.
Cinema: Stretch the 4:3 aspect ratio
image vertically and horizontally to
fill the screen at 1:2.35 aspect ratio.
Shortcuts Instructions
DISPLAY - Display the information banner. The information
including channel number, channel name, current system
time, tuner mode, audio stream, video format, audio
language, closed caption mode, parental locks rated,
program details, etc.
GUIDE - Open the DTV program guide. The program guide
information is provided by the broadcasting company.
FAV - Display your Favorite List. You can add or delete
channels to create your favorite list.
Cursor up/down: Press [▲/
▲
] button to select the
option.
Add/Erase: Press [YELLOW] button to add or delete the
channel from Favorite List.
Page up/down: Press [RED/GREEN] button to page up
or down.
VUDU - VUDUTM is an on-demand, pay-per-view, service
that offers high-definition movies via the Web. You can
access the VUDU service by pressing this button.
Hi-Smart - Press to open the Hi-Smart Hub. The Hi-Smart
Hub provides convenient access to Services and Apps
which let you watch movies, TV shows, listen to music, and
much more.
NETFLIX - Press to open the Netflix interface. Netflix is an
online DVD and Blu-ray Disc rental service, offering instant
access to movies and TV shows to Netflix members. Netflix
unlimited membership required (subscription not included).
1. Press the [CH
V
/V] (or [CH +/-]) on the TV/remote control
to change the channel.
2. Press the [VOL
V
/V] (or [VOL +/-]) on the TV/remote
control to adjust the volume.
3. Press the numeric buttons on the remote control to
display the corresponding channels.
Changing Channels / Volume
NOTE
Changing the channels can also be achieved by directly
entering the channel number using the numeric keys on
the remote control. If you are entering a two or three digit
channel number, the time between key presses should be
less than 3 seconds.
15
Basic Features
T
o
U
se t
h
e
M
en
u
1Press the
[
Menu
]
button to o
p
en the main menu
.
2Press
[
▲
/
▲
]
to select a menu o
p
tion, then
p
ress
[
▲
/ENTER
]
to enter the menu
.
3In each menu,
y
ou can:
Press
[
▲
/
▲
]
to select an item,
Press
[
▲
/
▲
]
to ad
j
ust the value, or
Press
[
▲
/ENTER
]
to enter the submenu,
Press
[
RETURN
]
to exit the submenu.
4Press
[
EXIT
]
button to exit the menu
.
NO
TE
F
O
R ILL
US
TRATI
O
N
O
NLY
.
U
s
i
ng t
h
e
Pi
cture
M
en
u
Y
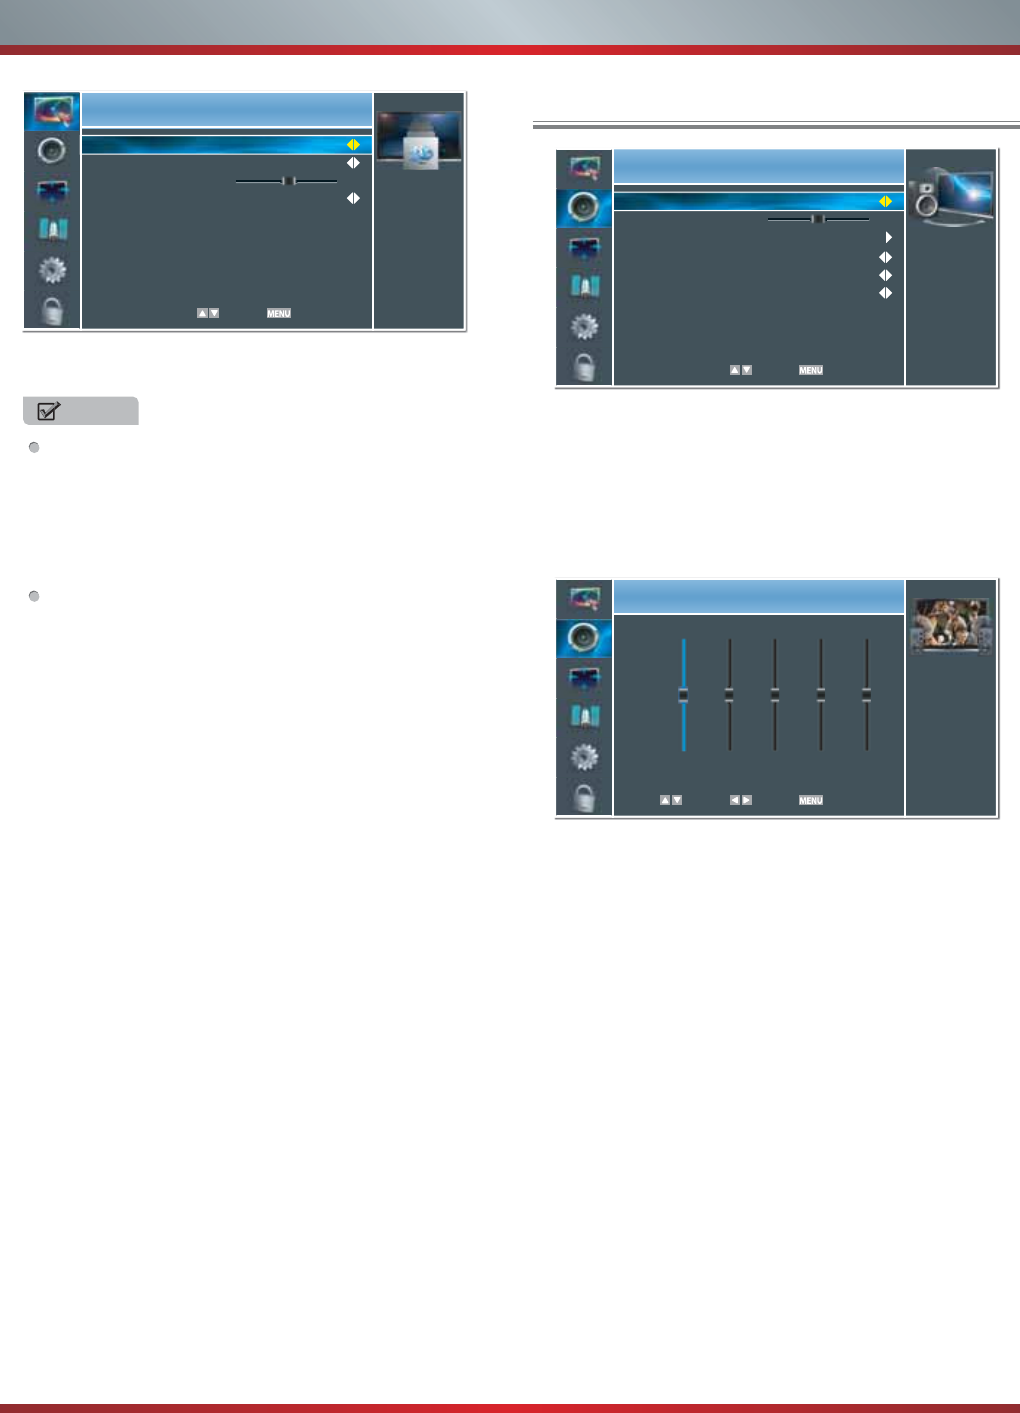
ou can ad
j
ust:
P
i
ctu
r
e
M
ode
- Ad
j
ust the Picture Mode. You can select
S
tandard, Theater, Ener
gy
Savin
g
, Game, Custom or Vivid.
B
ri
g
htness - Increase or decrease the bri
g
htness of the
p
icture. Increasin
g
the bri
g
htness can add more li
g
ht to dark
a
reas of the picture, while decreasin
g
the bri
g
htness can
a
dd more darkness to li
g
ht areas of the picture.
Co
n
t
r
ast
- Increase or decrease the contrast of the
p
icture.
I
ncrease the contrast to ad
j
ust the white areas of the picture
o
r decrease the contrast to ad
j
ust the black areas of the
p
icture.
Co
l
o
r - Ad
j
ust the level of color in the picture.
T
in
t
- Adjust flesh tones so the
y
appear natural.
S
har
p
ness - You can increase the shar
p
ness level for
c
learer ima
g
es or decrease the sharpness level for smoother
i
ma
g
es.
Ad
v
a
n
ced
Vi
deo
- Access advanced video settin
g
s such as
C
olor Tem
p
erature,Noise Reduction and Ada
p
tive Contrast .
C
olor Tem
p
erature: Chan
g
e the color
t
em
p
erature. You
c
an select a
p
reset color tem
p
erature: Cool, Standard
a
n
d
W
a
rm.
No
i
se
R
educt
i
o
n: Optimize the picture qualit
y
b
y
filterin
g
s
i
g
nal interference. You can select Off, Low, Medium or
H
i
g
h.
A
da
p
tive Contrast: Automaticall
y
adjusts the con
t
r
as
t
l
evel of the selected in
p
ut source.
Picture
Select Back
Automatically adjust
picture detail and
Color Temperature
Noise Reduction
Adaptive Contrast
Warm
Medium
On
N
O
T
E
W
hen 3D video is watched under the
f
luorescent lamp
(
50~60 Hz
)
or tri-band
f
luorescent tube, there may be
s
light
f
licker, so please adjust the illumination downward
o
r switch o
ff
the light.
Certain functions, such as change aspect ratio,
are
n
o
t
t ratio,
are
a
vailable when watchin
g
3D movies and TV
s
h
o
w
s.
O
ther brands 3D
g
lasses ma
y
not be supported.
Sit upri
g
ht facin
g
the TV when watchin
g
3D movies and
T
V
s
h
o
w
s
.
T
his TV su
pp
orts automatic identification of common
3D formats when connected to HDMI V1.4 com
p
atible
s
ources. Other 3D sources re
q
uire manual setu
p
.
Enter Select Exit
Picture
Adjust image to suit
personal preferences.
Picture Mode
Brightness
Contrast
Color
Tint
Sharpness
Advanced Video
3D
50
50
50
0
10
StandardStandard
OK
brightness.
16
Basic Features
3
D - Enables playback of 3D movies and TV shows (requires
c
ompatible 3D glasses).
3
D M
ode
:Format may be set to: Off, 2D-to-3D, Side-by-
S
ide or To
p
-and-Bottom.
L
-R Switch: Flips the le
f
t and right
f
rames in
S
ide-by-
S
i
de
f
o
rm
a
t.
D
e
p
th of Field: Adjusts the ran
g
e of distance
(
focus
)
that
a
ppears acceptabl
y
sharp in a 3D ima
g
e.
3
D-
to
-2D: Di
sab
l
es
au
t
o
m
a
ti
c
i
de
ntifi
ca
ti
o
n
o
f
3
D f
o
rm
a
t
d
urin
g
pla
y
back; forces 2D pla
y
back usin
g
onl
y
the Left
o
r Ri
g
ht frame.
Picture
Select Back
3D Mode.
3D Mode
L-R Switch
Depth of Field
3D-to-2D
Side-by-Side
LR
O
16
N
O
T
E
W
hen 3D si
g
nal format is Frame Packin
g
, the ima
g
e
w
ill be displa
y
ed accordin
g
to the resolution of the
i
ncomin
g
si
g
nal.
F
or example: when the input si
g
nal is 1280×720, a
7
20p ima
g
e will be displa
y
ed. A 1920×1080 input
s
i
g
nal will be displa
y
ed in 1080p.
W
hen 3D si
g
nal format is Side-b
y
-Side, Top-and-
B
ottom, the ima
g
e is displa
y
ed full screen in half
r
esolution
(
960× 1080 or 1920×540 respectivel
y)
.
U
s
i
ng t
h
e
A
u
di
o
M
en
u
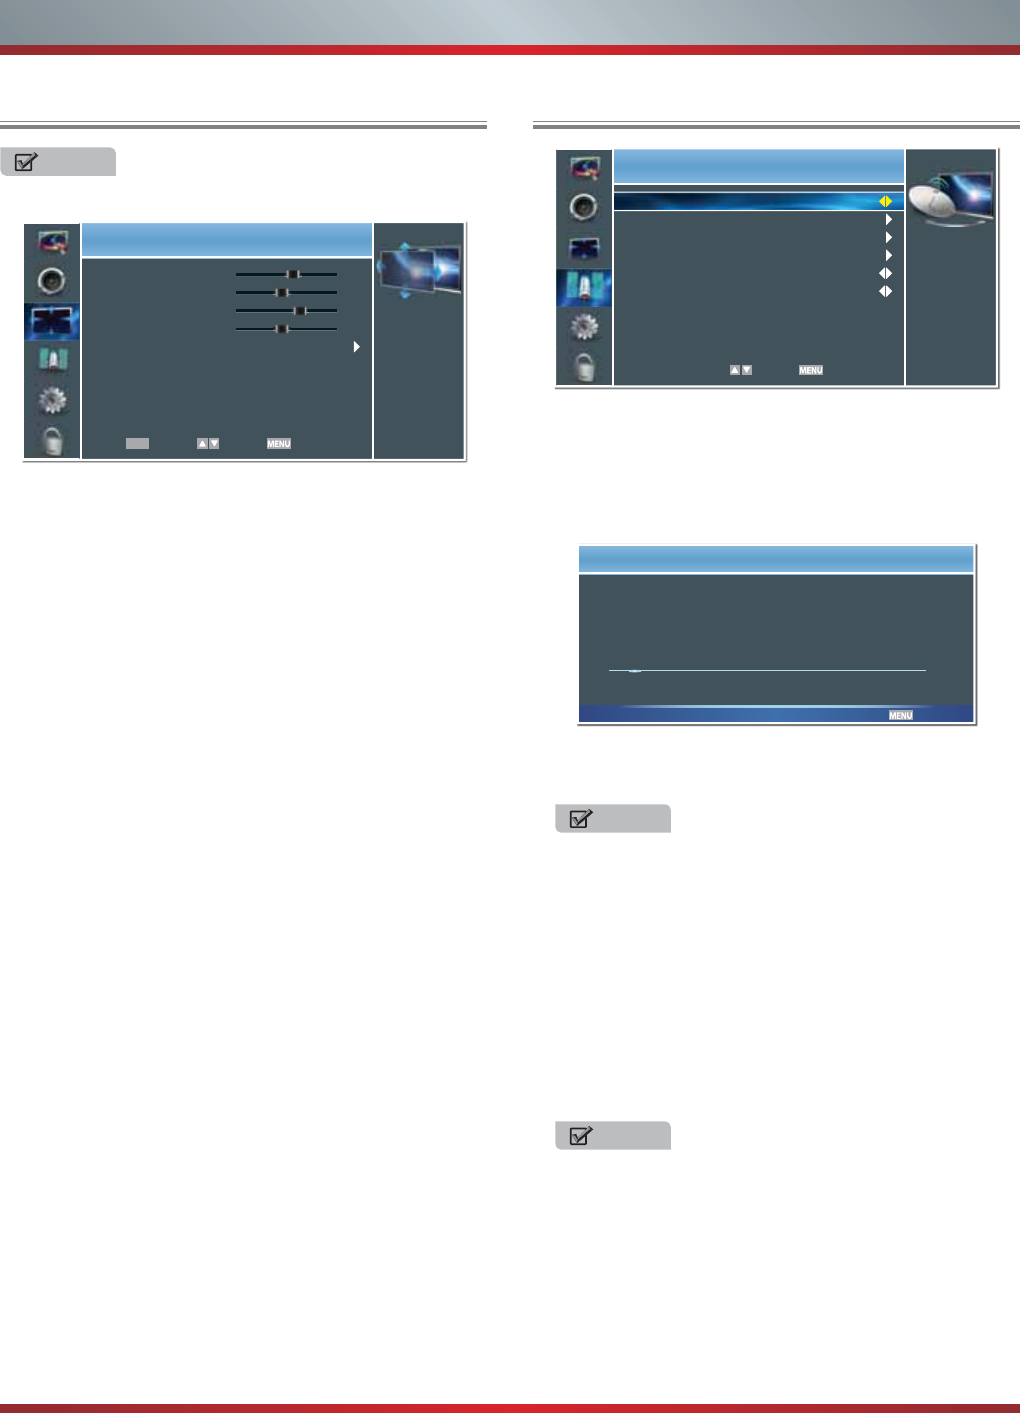
You can adjust:
S
ound Mode
-
S
elect the
S
ound Mode:
S
tandard,
S
peech,
U
ser or
M
us
i
c
.
B
a
l
ance
-
Adjust the volume o
f
the le
f
t and right speakers
.
E
qua
li
zer
-
S
o
f
ten or enhance the sound at speci
f
ic
f
requency points
.
Sound Surround -
S
imulates surround sound and enhances
-
b
ass response
.
Digital Audio
O
utput
-
S
end digital audio to an external
audio system. You can select P
C
M, RAW or
Off.
P
C
M
:
P
C
M outputs two channel audio regardless o
f
the
input
f
ormat
.
RAW:
Passes through
(
output = input
)
the incoming audio
signal without decoding. E.g. incoming Dolby Digital, DT
S
or P
C
M data stream is simply output as it is without any
process
i
ng
.
Auto Volume
C
ontrol
-
A
utomat
i
ca
ll
y a
dj
usts vo
l
ume to a
cons
i
stent
l
eve
l
; attenuates
l
ou
d
passages
.
Audio
Select Back
Standard
O
PCM
O
0
Select a Sound mode
to achieve ideal sound.
Sound Mode
Balance
Equalizer
Sound Surround
Digital Audio Output
Auto Volume Control
Audio
Adjust Select Back
10DB
0DB
-10DB
0
120Hz
0
500Hz
0
1.5KHz
0
5KHz
0
10KHz
17
Basic Features
U
sing the Screen Menu
U
sing the Channels Men
u
Y
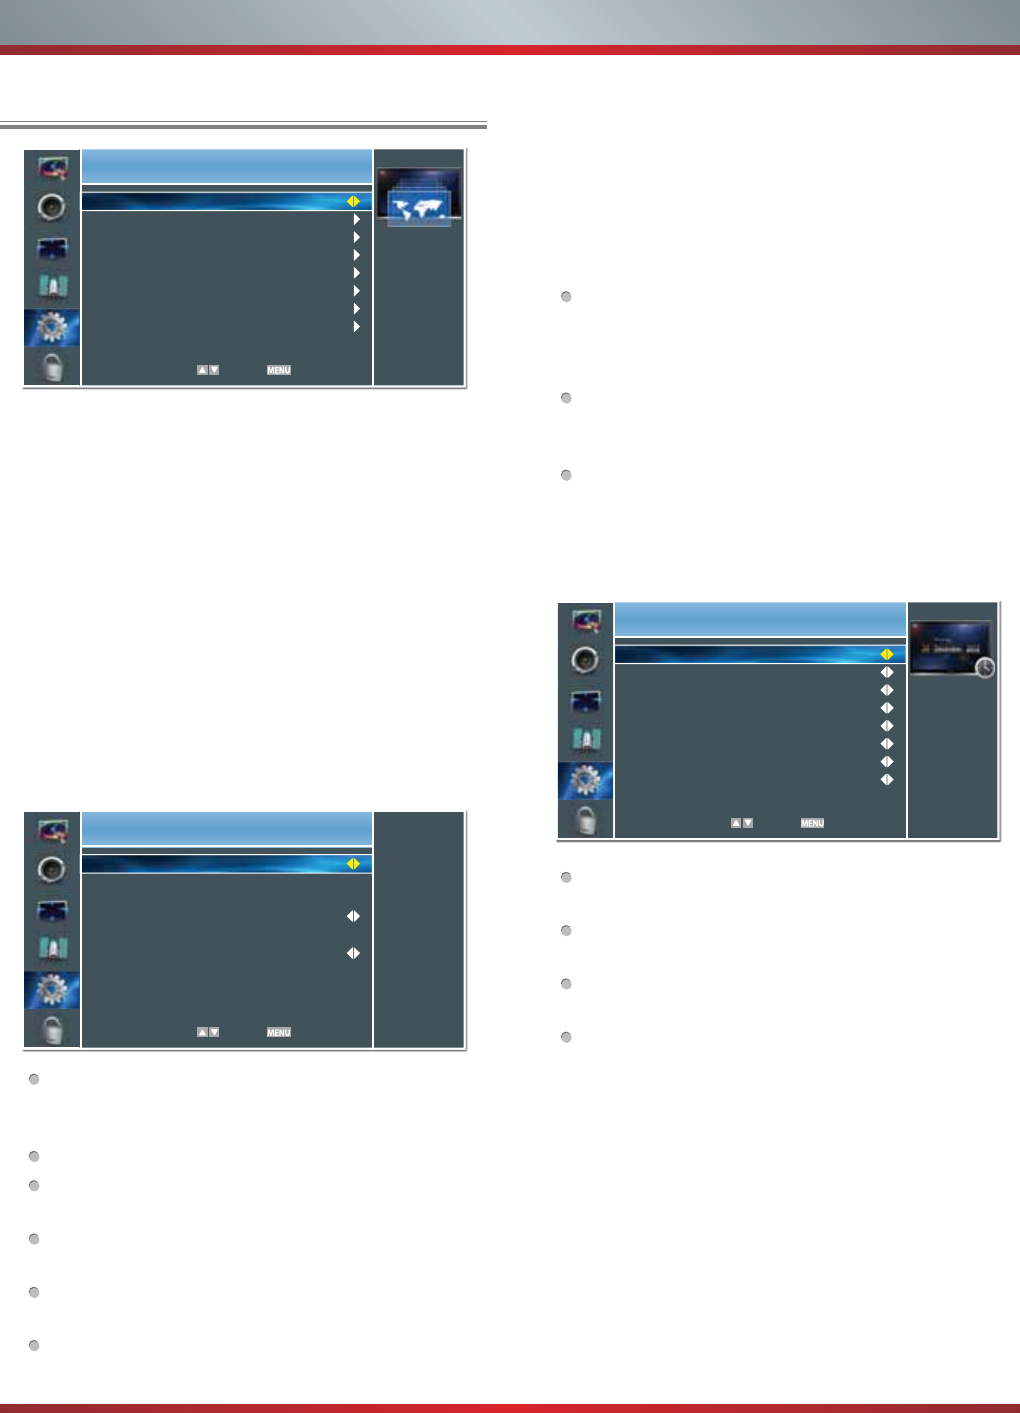
ou can ad
j
ust:
H
.P
os
i
t
i
o
n - Move the ima
g
e ri
g
ht or left.
V
.P
os
i
t
i
o
n - Move the ima
g
e up or down.
P
h
ase
- Ad
j
ust the focus of stable ima
g
es.
C
l
oc
k - Ad
j
ust the sample frequenc
y
.
A
uto Ad
j
ust - Detects input si
g
nal clock, phase and position
a
nd ad
j
usts TV displa
y
accordin
g
l
y
.
You can adjust:
T
uner
M
o
d
e
-
S
elect TV source: Antenna or
C
able
.
Auto
C
hannels
S
earch
-
S
cans
f
or channels that have
signals and stores the channels in
f
ormation in the channel
li
st
.
C
hannel
S
kip
-
Y
ou can cance
l
a c
h
anne
l
store
d
i
n t
h
e
c
h
anne
l
li
st
.
F
avor
i
te L
i
st
-
Add or delete channels to create a
f
avorite
li
st.
Y
ou can press
[FAV]
b
utton to
di
sp
l
ay your
F
avor
i
te
Li
st
.
MT
S
-
S
elect the de
f
ault audio stream: Mono,
S
tereo o
r
S
AP
.
A
u
di
o Language
-
S
elect the audio language: English,
E
spaño
l
or
F
rança
i
s.
NOT
E
O
nly available in VGA mode.
Screen
Enter Select Exit
39
30
23
127 Image positioning
and PC settings.
H.Position
V.Position
Phase
Clock
Auto Adjust
OK
Channels
Select Back
Select tuner connect
mode.
Tuner Mode
Auto Channel Search
Channel Skip
Favorite List
MTS
Audio Language
Antenna
Stereo
English
Cancel
Auto Scan
Status: Scanning... Antenna
Analog Channels: 0
Digital Channels: 0
8%
N
O
T
E
W
hen
y
ou press [CH
V
/ V] button,
y
our TV skips
the channel
y
ou cancelled. You can still tune to the
channel usin
g
the number buttons on the remote
co
ntr
o
l
.
N
O
T
E
O
nl
y
available in TV mode.
18
S
leep Timer
:
S
peci
f
y the amount o
f
time be
f
ore your TV
a
utomatically turns o
ff
:
Off
-10-...-120 minutes
.
C
aption - Adjust
C
losed
C
aptioning settings.
C
aption
C
ontrol
:
S
elect the
C
losed
C
aption mode:
CC
Off
,
CC
O
n or
CC
O
n When Mute.
A
nalog
C
losed
C
aption
:
S
elect an Analog
C
aption
s
ett
i
ng:
CC
1~
CC
4: Closed captionin
g
appears in a small
b
anner across the bottom of the screen. CC1 is usuall
y
t
he “printed” version of the audio. CC2~CC4 displa
y
c
ontent are provided b
y
the broadcaster.
Te
x
t
1~T
e
x
t
4: Closed captionin
g
that covers half o
r
all of the screen. Text1~Text4 displa
y
content are
provided b
y
the broadcaster
.
Off
:To turn o
ff
the Analog
C
aption.
D
igital
C
losed
C
aption:
S
elect a Digital
C
aption setting:
S
ervice1~
S
ervice6 or
Off
.
D
igital
C
aption
S
tyle:
C
ustomize the look o
f
digital
C
losed
C
aptioning.
C
aption
S
tyle:
S
et the look o
f
Digital
CC
.
“
As
Broadcaster
”
uses broadcaster
’
s style
.
F
ont
S
ize/
S
tyle/
C
olor/
O
pacity:
S
elect the size
/
style
/
color
/
opacity level o
f
f
ont
.
B
ack
g
round Color/Opacit
y
: Select the color/opacit
y
level of the background
.
W
in
do
w C
o
l
o
r:
S
elect the color of the window.
Net
w
o
rk - You can setup the network confi
g
uration in this
m
enu. For more information
,
see “Network Connection” and
“
Network Setu
p
”.
De
m
o
M
ode
- Displa
y
s a banner at the bottom of the screen
which describes the ke
y
features of the TV.
Ve
r
s
i
o
n Inf
o
- Displa
y
the software version information.
Y
ou ma
y
need to reference this information when contactin
g
C
ustomer Care or up
g
radin
g
the firmware online.
Reset
D
e
f
au
l
t
- Restores the TV confi
g
uration to factor
y
s
ettin
g
s. You will need to complete the setup for such thin
g
s
a
s Tuner/Channel settin
g
s, Network connection, Date/Time
a
nd other user
p
references.
Basic Features
Settings
Select Back
Clock, date and timers
settings.
Caption Style
Font Size
Font Style
Font Color
Font Opacity
Background Color
Background Opacity
Window Color
Custom
Large
Style 1
White
Solid
Black
Solid
Black
U
sing the Settings Men
u
Y
ou can adjust:
L
anguage - You can select the menu
’
s language to English,
E
spaño
l
or
F
rança
i
s.
M
enu
S
ettings - You can set
O
n-screen menu system.
Ti
meout:
S
elect the display time o
f
the menu: 10-20-...-
60
seconds.
T
ime
S
etup -
S
et the time zone, daylight saving, time and
sl
eep t
i
mer.
Ti
me
Z
one:
S
elect your local time zone: Eastern Time,
I
ndiana,
C
entral Time, Mountain Time, Arizona, Paci
f
ic
Ti
me,
Al
as
k
a or
H
awa
ii
.
D
aylight
S
aving:
S
et the Daylight
S
aving time
f
or your
area
.
Ti
me: You can set time manually or select automatic i
f
th
e
TV
i
s connecte
d
to an antenna or ca
bl
e source.
A
uto
S
ynchronization
:
S
elect
“O
n”
f
or automatic
d
ate and time setting using in
f
ormation
f
rom broadcast
s
tat
i
ons
i
n your area.
Date
/Tim
e
:Set the current
y
ear/month/da
y
/time.
Po
w
e
r
O
n Tim
e
r: When “On”,
y
ou can set the time
when the TV turns on automaticall
y.
Ti
me:
S
et the desired time
f
or the TV to turn on
a
utomat
i
ca
ll
y.
P
ower
Off
Timer: When
“O
n”, you can set the time
when the TV turns o
ff
automatically.
T
im
e
:
S
et the desired time for the TV to turn of
f
automaticall
y.
Settings
Select Back
Adjust OSD language.
Language
Menu Settings
Time Setup
Caption
Network
Demo Mode
Version Info
Reset Default
English
Settings
Select Back
Obtain date and time
from broadcaster.
Auto Synchronization
Date
Time
Power On Timer
Time
Power Off Time
Time
On
2012/01/01
01:01 PM
Off
12:00 AM
Off
12:00 AM
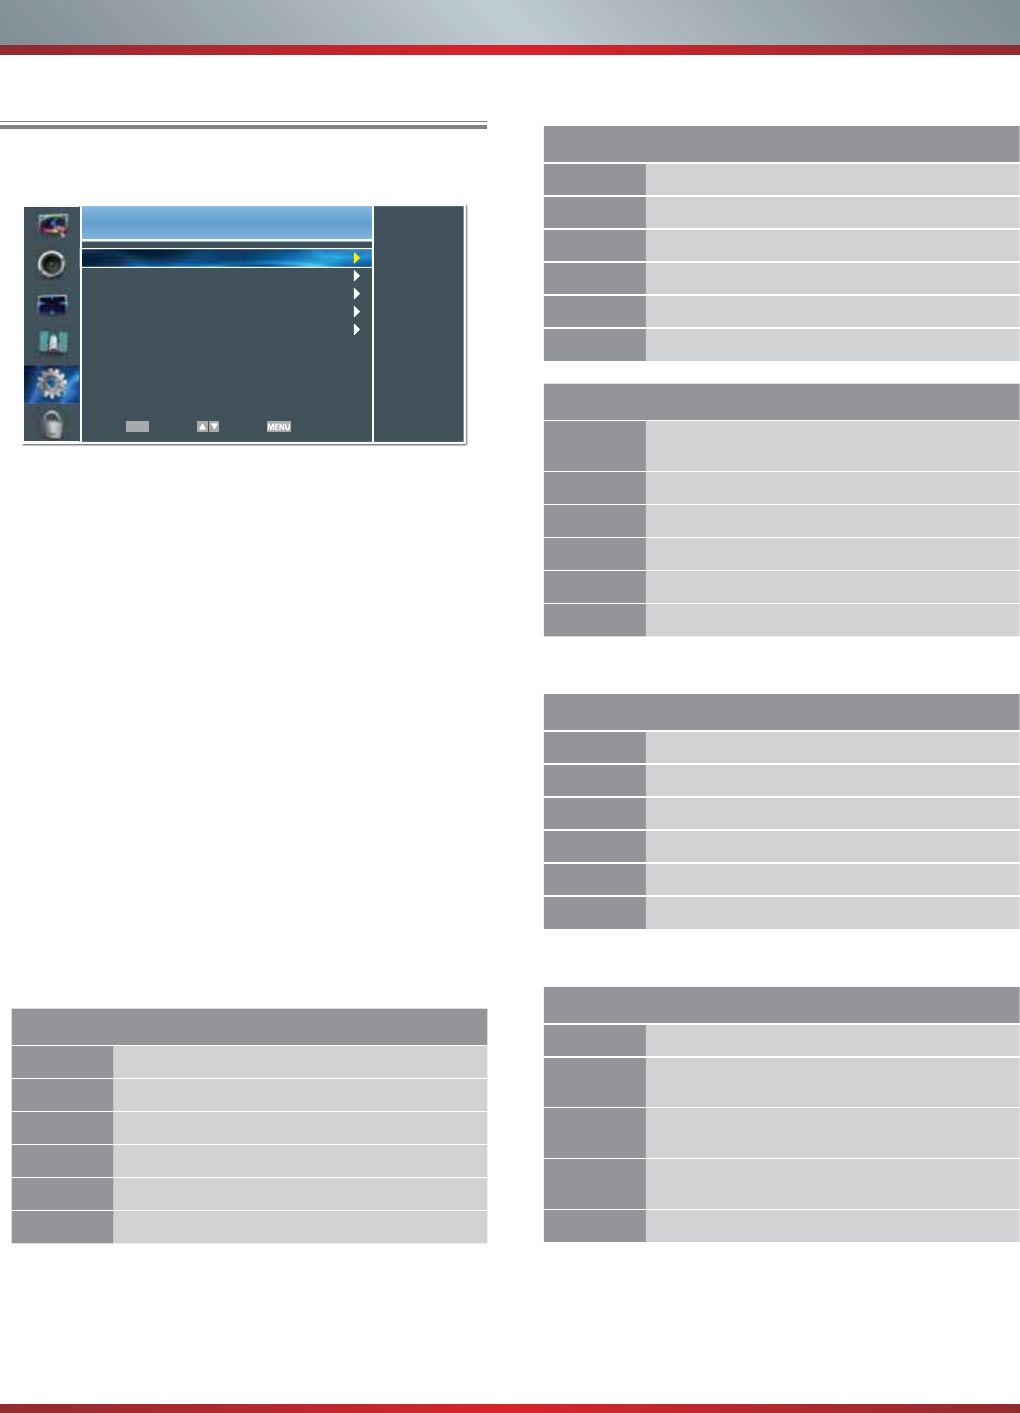
19
Basic Features
U
s
i
ng t
h
e Loc
k
M
en
u
W
hen
y
ou first use this function, the default password is
[
0000]. Once
y
ou input this password,
y
ou can set options.
Y
ou can ad
j
ust:
C
h
a
nn
e
l Bl
oc
k - Block selected Channels on the TV.
P
rogram Block - Block selected Programs on the TV.
R
at
i
ng
E
na
bl
e:
Bl
oc
k
or un
bl
oc
k
TV
rat
i
ngs.
U
.
S
. TV Ratings: Restrict TV programs by U
S
A Ratings.
U
.S. Movie Ratings: Restrict movie by U
S
A Ratings.
C
anadian English/French Ratings:
R
estr
i
ct mov
i
e an
d
T
V programs by Canadian Ratings.
O
pen V-Chip: Display an advanced V-
C
hip ratings table
f
or digital channels
(
U
S
A only
)
.
Bl
oc
k
U
nrate
d
:
Bl
oc
k
unrate
d
TV
programs.
I
n
p
ut Block - Block selected In
p
ut source on the TV.
C
hange Password - If you want to change the default
p
assword, first enter the new
p
assword then enter the same
p
assword a
g
ain.
C
l
ea
n All - You can reset all locks to factory mode.
F
ollowin
g
is the description of these ratin
g
s.
U
.S. Mov
i
e Rat
i
ngs
Rat
i
ng De
f
ined a
s
G
G
eneral audienc
e
PG
Parental
G
uidance suggested
P
G
-1
3
Parents stron
g
l
y
cautione
d
R
Res
tri
c
t
ed
N
C
-17 N
o
o
n
e
17
a
n
d
u
n
de
r
ad
mitt
ed
X
Ad
u
l
t au
di
ence on
l
y
Lock
Enter Select Back
Prevent access to TV
services.
Channel Block
Program Block
Input Block
Change Password
Clean All
OK
U.S. TV Rat
i
n
gs
Ag
e
Defined as
TV
-
Y
All
c
hild
ren
T
V-Y7
D
irected to older childre
n
TV-
G
G
eneral audienc
e
TV-P
G
P
arental Guidance suggested
TV
-
14
P
arents
S
trongly cautioned
TV-MA Mature Audience only
Co
ntent
s
D
e
f
ine
d
as
A
A
ll o
f
the ratings below that rating set blocked
a
utomat
i
ca
lly
D
S
u
gg
estive dialo
g
u
e
L
S
tron
g
lan
g
ua
ge
S
S
exual situation
s
V
Vi
o
l
enc
e
F
V
F
antasy Violenc
e
Canadian English Ratings
R
at
i
n
g
D
escr
i
pt
i
o
n
C
Children
C
8+
C
hildren 8 years and olde
r
G
G
eneral Pro
g
rammin
g
, suitable
f
or all audiences
PG
Parents
G
uidanc
e
14+
V
iewers 14
y
ears and older
18
+
Ad
u
l
t
P
rogramm
i
n
g
Cana
d
ian Frenc
h
Ratin
gs
R
atin
g
D
escri
p
tio
n
G
G
enera
l
8
ans
+
8+
G
eneral; Not recommended
f
or
y
oun
g
children
1
3 ans
+
Pro
g
rammin
g
ma
y
not be suitable
f
or children
u
nder the a
g
e o
f
1
3
16
ans
+
Pro
g
rammin
g
is not be suitable for children
u
nder the age of 1
6
1
8 ans
+
P
rogramm
i
ng restr
i
cte
d
to a
d
u
l
ts
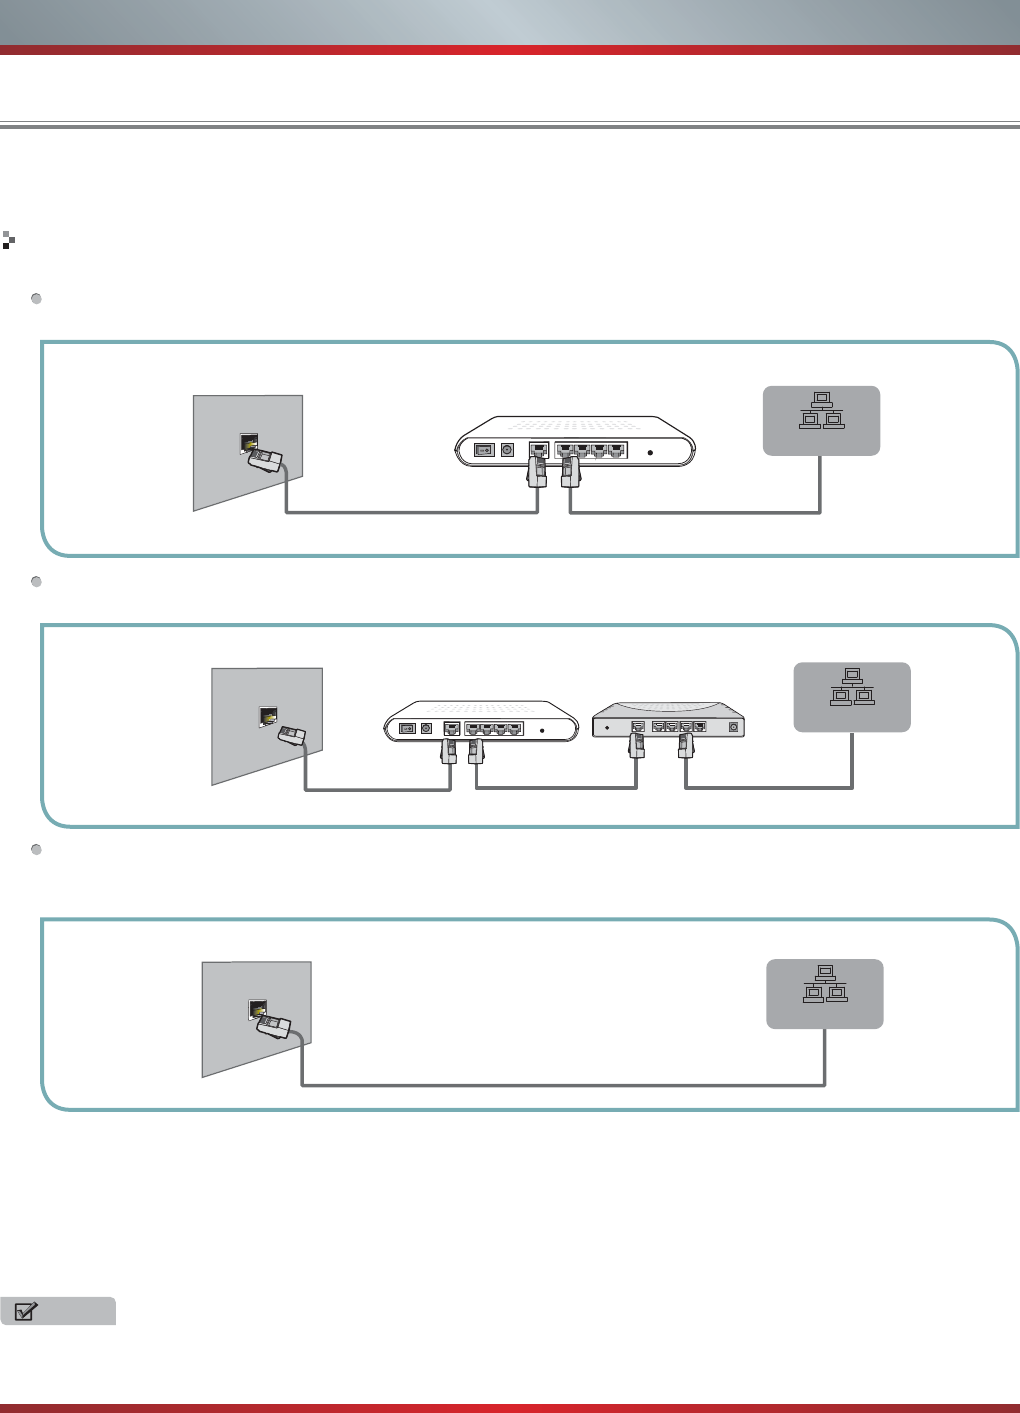
20
Advanced Features
Network Connection
You can set up your TV so that it can access the Internet through your local area network (LAN) with a Ethernet or wireless
connection.
Connecting to a Wired Network
You can attach your TV to your LAN by one of the three following ways:
You can attach your TV to your LAN by connecting the LAN port on the back of your TV to an external modem using a Cat
5 LAN cable. See the diagram below.
You can attach your TV to your LAN by connecting the LAN port on the back of your TV to an IP Sharer which is
connected to an external modem. Use LAN cable for the connection. See the diagram below.
Depending on how your network is configured, you may be able to attach your TV to your LAN by connecting the LAN
port on the back of your TV directly to a network wall outlet with a Cat 5 cable. See the diagram below. Note that the wall
outlet is attached to a modem or router elsewhere in your house.
If you have a Dynamic Network, you should use an ADSL modem or router that supports Dynamic Host Configuration
Protocol (DHCP). Modems and routers that support DHCP automatically provide the IP address, subnet mask, gateway,
and DNS, so you don’t have to enter them manually. Most home networks are Dynamic Networks.
Some networks require a Static IP address. If your network requires a Static IP address, you must enter the IP address,
subnet mask, gateway, and DNS values manually on your TV’s Cable Setup Screen when you set up the network
connection. To get the IP address, subnet mask, gateway, and DNS values, contact your Internet Service Provider (ISP).
If you have a Windows computer, you can also get these values through your computer.
The Modem Port on the Wall
Modem Cable LAN Cable
LAN Port on TV
External Modem
(ADSL / VDSL / Cable TV)
LAN
The Modem Port on the Wall
Modem Cable LAN Cable LAN Cable
LAN Port on TV
External Modem
(ADSL / VDSL / Cable TV)
IP Sharer (Router)
(with DHCP server)
LAN
The LAN Port on the Wall LAN Port on TV
LAN Cable
LAN
NOTE
You can use ADSL modems that support DHCP if your network requires a Static IP address. ADSL modems that support
DHCP also let you use Static IP addresses.
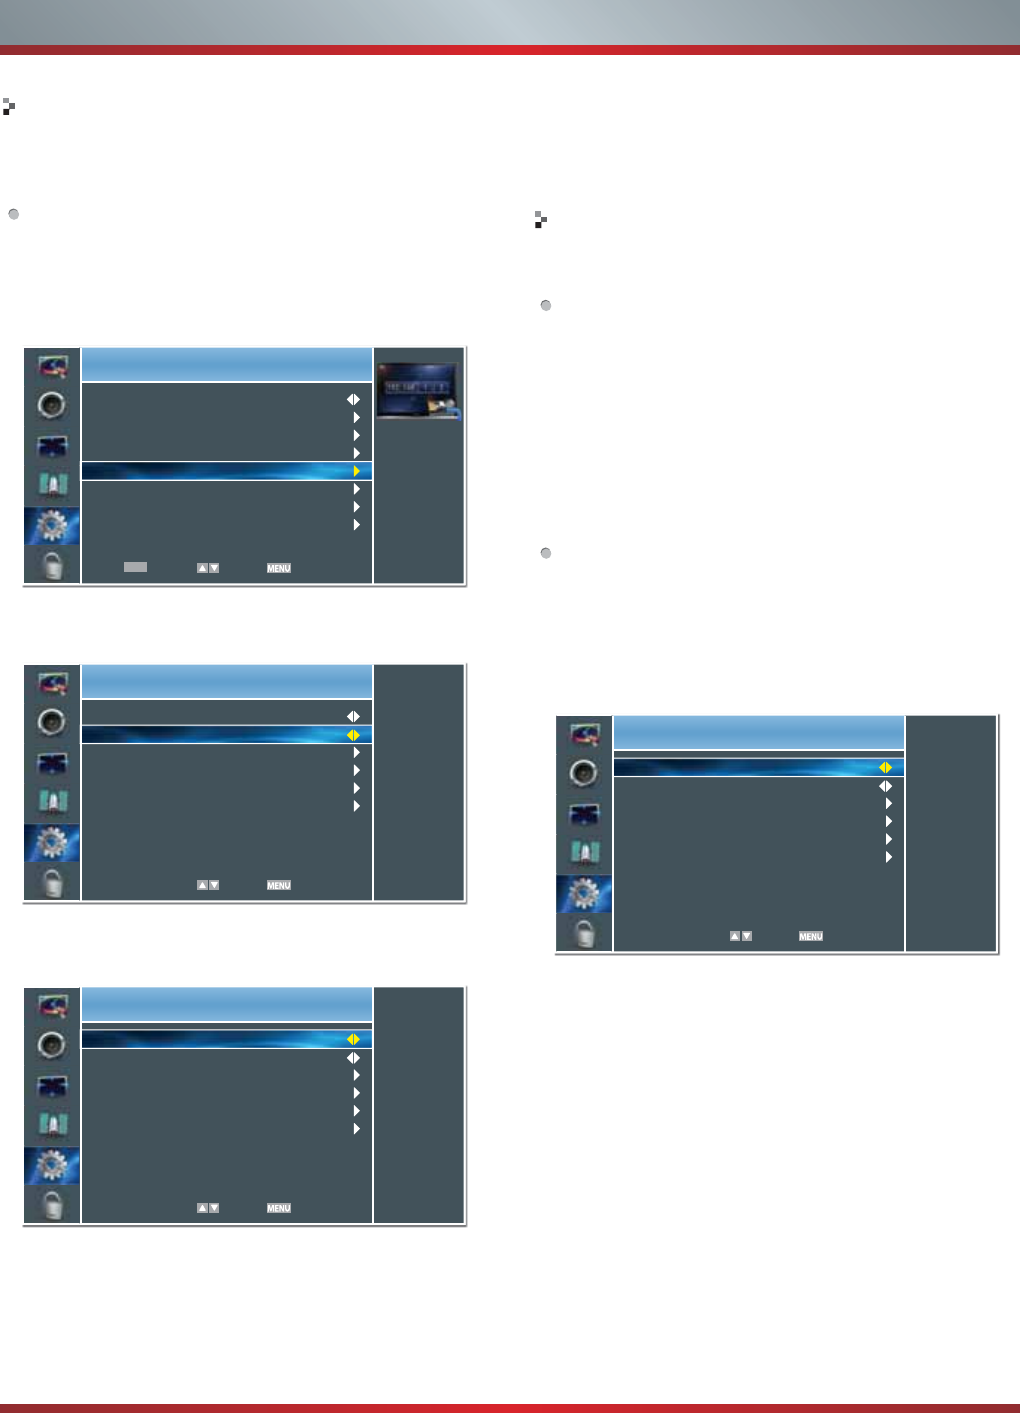
21
Advanced Features
N
etwork Setup (Auto)
U
se the Automatic Network Setup while
y
our connectin
g
the
T
V to a network that supports DHCP. To set up
y
our TV’s
c
able network connection automaticall
y
, follow these steps:
H
ow to set up automaticall
y
1.
C
onnect
y
our TV to
y
our LAN as described in the
p
revious section.
2.
T
urn on
y
our TV, operate accordin
g
to the description in
t
he Settin
g
s menu until the Network screen appears.
3
.
O
n the Network screen, select Confi
g
uration and press
[
ENTER
]
button to enter the submenu.
4.
S
et Internet
C
onnection to
O
n and Interface to Ethernet.
5
.
S
elect IP Settin
g
and press [ENTER] button to enter it.
6
.
S
et Address T
y
pe to Auto.
7.
A
uto acquires and enters the necessar
y
connection
v
alues automaticall
y
.
8
.
I
f the connection values are not automaticall
y
entered,
p
lease check
y
our modem and router manuals for
Network Setup (Manual)
Use the Automatic Network Setup when connectin
g
y
our TV
to a network that re
q
uires a Static IP address
.
G
ettin
g
the Network Connection Values
T
o
g
et the network connection values on most windows
c
om
p
uters, follow these ste
p
s:
1.
R
i
g
ht click the Network icon on the bottom ri
g
ht of the
sc
r
ee
n.
2.
I
n the
p
o
p
-u
p
menu that a
pp
ears, click Status.
3.
O
n the dialo
g
that appears, click the Support tab.
4.
O
n the Su
pp
ort tab, click the Details button. The network
c
onnection values are displa
y
ed.
H
ow to set up manua
ll
y
T
o set up your TV’s network connection manually,
f
ollow
th
ese steps:
1.
F
ollow
S
teps 1 through 5 in the
“
How to set up
a
utomatically
”
procedure.
2.
S
et Address Type to Manual.
3.
3
UHVV>Ÿ
ź@EXWWRQWRVHOHFW,3$GGUHVVDQGSUHVV>Ż
Ź@
button to move the cursor to the entry
f
ield. Then press
0
~
9
buttons to enter the numbers.
4.
3
UHVV>0(18@EXWWRQWRH[LW,3$GGUHVVDQGSUHVV>Ÿ
ź@
b
utton to se
l
ect t
h
e next opt
i
ons to enter t
h
e num
b
ers.
5
Wh
en
d
one, press
[MENU]
b
utton to return to t
h
e
p
rev
i
ous menu.
6.
S
elect
C
onnection Test to check the internet connectivity.
Settings
Select connection type
Internet Connection
Interface
Wireless Setting
Information
IP Setting
Connection Test
On
Ethernet
Select Back
Settings
Address Type
IP Address
Subnet Mask
Default Gateway
Primary DNS
Secondary DNS
Auto
176. 16. 0. 0
255. 255. 255. 255
172. 16. 0. 0
172. 16. 2. 2
0. 0. 0. 0
Select Back
Settings
Address Type
IP Address
Subnet Mask
Default Gateway
Primary DNS
Secondary DNS
Manual
0. 0. 0. 0
0. 0. 0. 0
0. 0. 0. 0
0. 0. 0. 0
0. 0. 0. 0
Select Back
Settings
Initiate network
connection
Language
Menu Settings
Time Setup
Caption
Network
Demo Mode
Version Info
Reset Default
English
Enter Select Exit
OK
d
irections to enable automatic IP addressing by DH
C
P.
O
r,
f
ollow the steps listed to the
f
ollow to manually
c
on
f
igure the network connection.
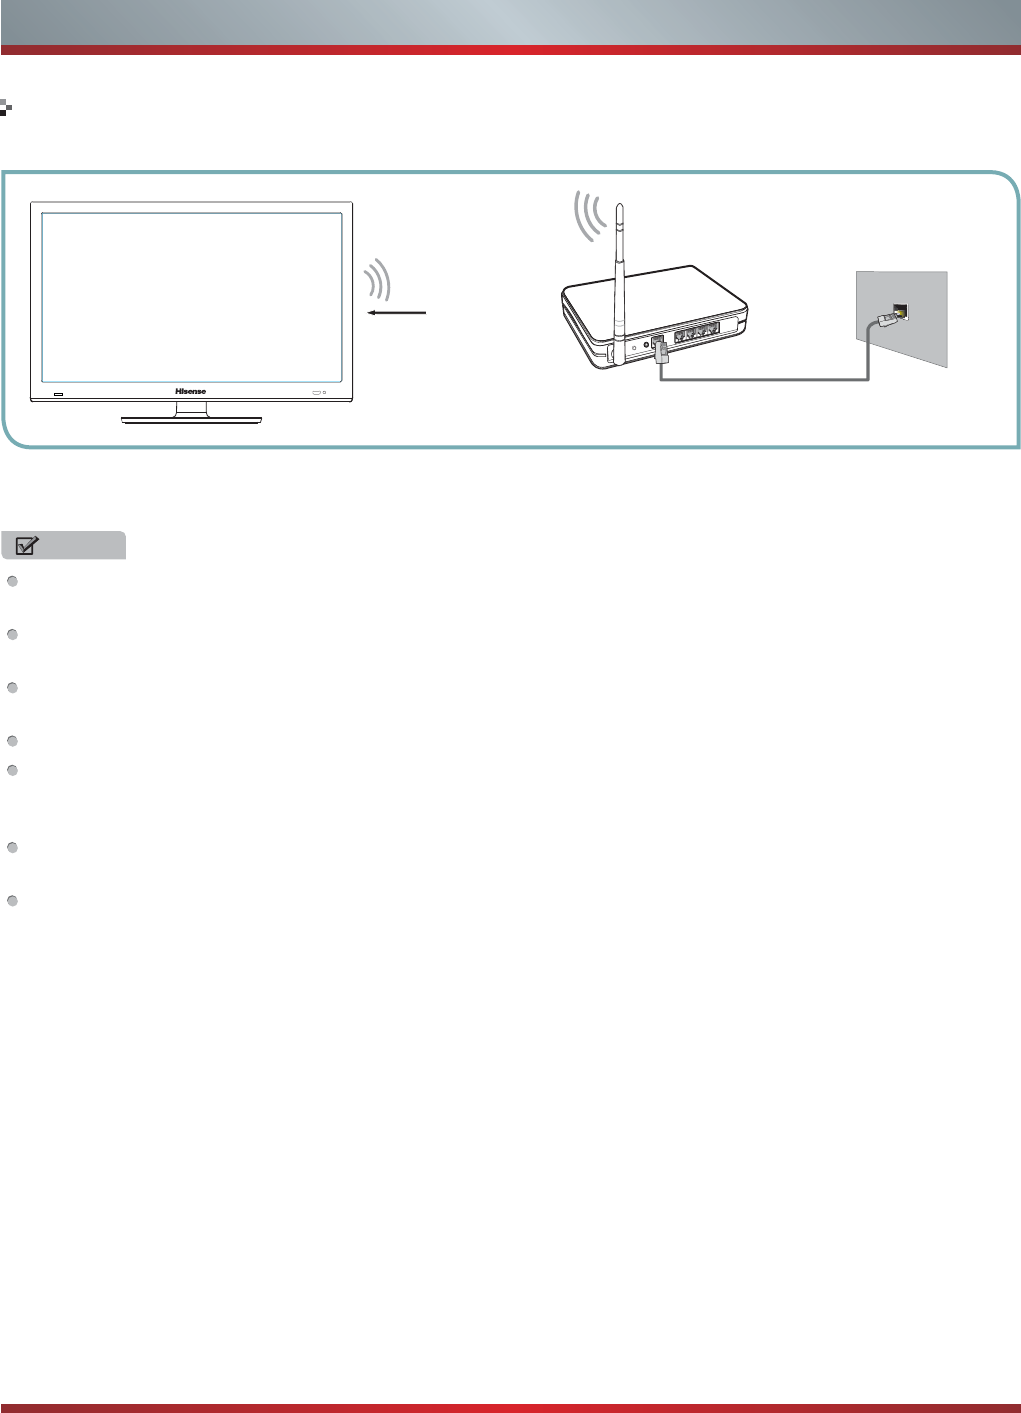
22
Advanced Features
Connecting to a Wireless Network
To connect your TV to your network wirelessly, you need a wireless router or modem. See the illustration below.
Hisense’s built-in Wireless LAN Adapter supports the IEEE 802.11 b/g/n communication protocols. Hisense recommends using
IEEE 802.11n router. When you play the video over a IEEE 802.11b/g connection, the video may not play smoothly.
NOTES
You must use the Hisense’s built-in Wireless LAN Adapter to use a wireless network, the set doesn’t support external USB
network adapter.
To use a wireless network, your TV must be connected to a wireless IP sharer. If the wireless IP sharer supports DHCP, your
TV can use a DHCP or static IP address to connect to the wireless network.
Select a channel for the wireless IP sharer that is not currently being used. If the channel set for the wireless IP sharer is
currently being used by another device nearby, this will result in interference and communication failure.
If you apply a security system other than the systems listed below, it will not work with the TV.
If Pure High-throughput (Greenfield) 802.11N mode is selected and the Encryption type is set to WEP, TKIP or TKIP-
AES (WPS2 Mixed) for your Access Point (AP), Hisense TVs will not support a connection in compliance with new Wi-Fi
certification specifications.
If your AP supports WPS (Wi-Fi Protected Setup), you can connect to the network via PBC (Push Button Configuration) or
PIN (Personal Identification Number). WPS will automatically configure the SSID and WPA key in either mode.
Connection Methods: You can setup the wireless network connection three ways.
-Scan
-Manual
-Auto
Wireless IP Sharer(Router)
(with DHCP Server)
LAN Cable
Wireless LAN Adapter
built-in TV set
The LAN Port on
the Wall
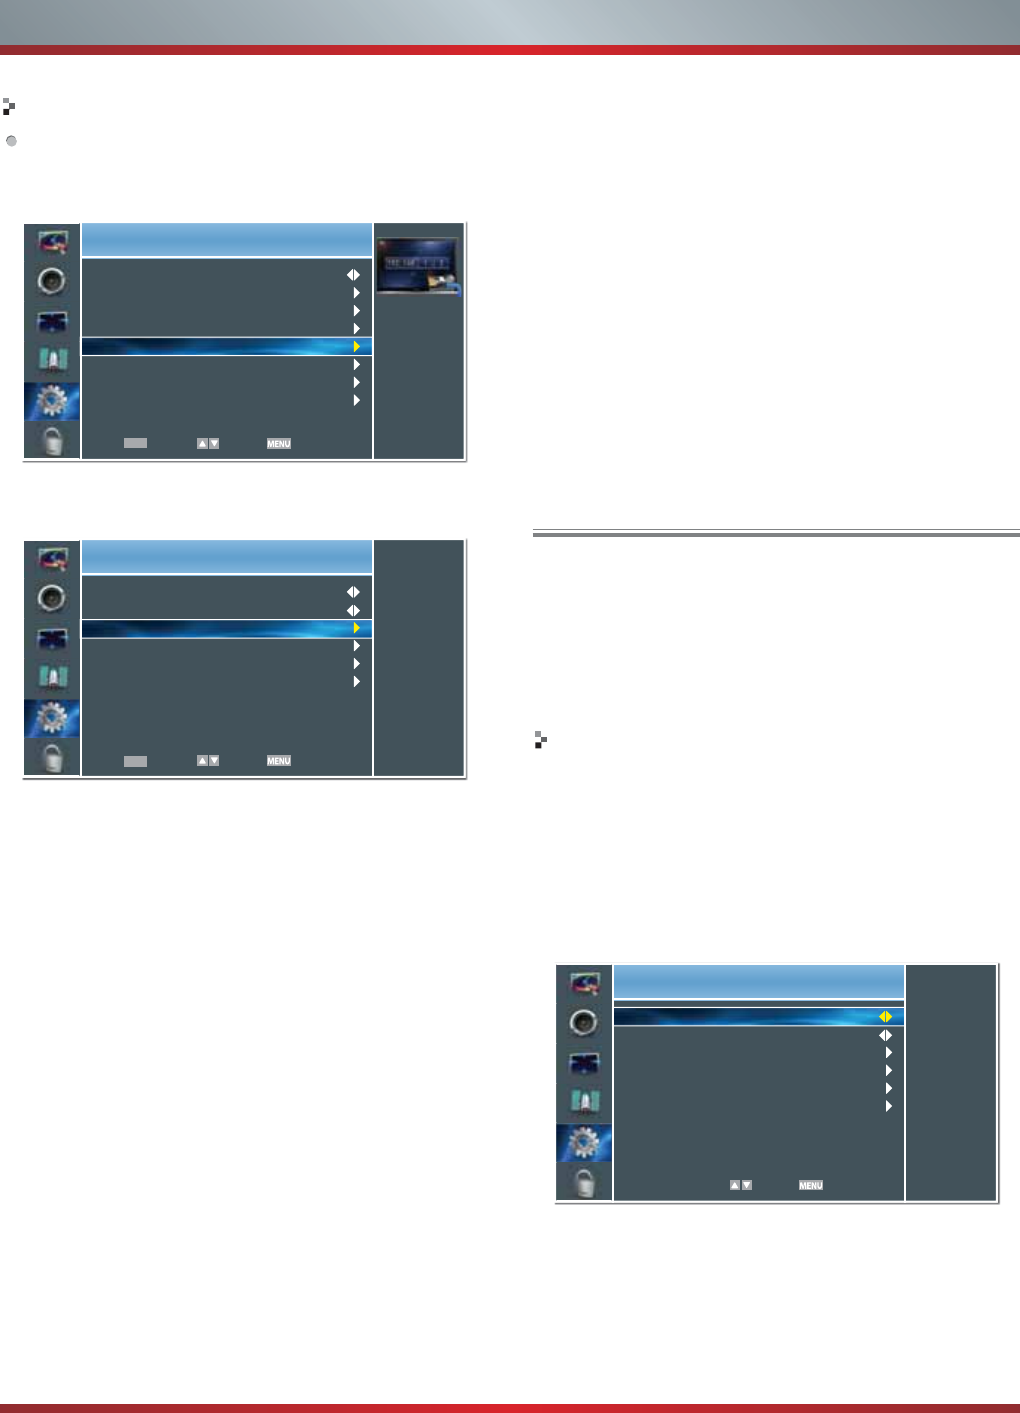
23
Advanced Features
Wireless Setting
H
ow to set u
p
1
.
T
urn on your
TV
, operate accor
di
ng to t
h
e
d
escr
i
pt
i
on
i
n
t
he
S
ettings menu until the Network screen appears.
2
.
O
n the Network screen, select
C
on
f
iguration and press
[ENTER]
b
utton to enter t
h
e su
b
menu.
3
.
S
et Internet
C
onnection to
O
n and Inter
f
ace to Wireless.
4
.
S
elect Wireless
S
etting and press [ENTER] button to
e
nter
i
t.
Y
ou can select:
S
can
\
Manual
\
Auto.
5
.
If
you select
S
can, a screen will appear listing all o
f
the
ZLUHOHVVQHWZRUNVZLWKLQUDQJHR
I
WKH798VHWKH>Ÿ
ź@
k
eys to se
l
ect t
h
e w
i
re
l
ess networ
k
w
i
t
h
your router
SS
ID and press [ENTER] to con
f
irm. Proceed to
S
tep 7.
6
.
If
you select Manual, a screen will appear prompting
y
ou to enter the
SS
ID o
f
your wireless network. Press
[ENTER]
an
d
an on-screen
k
ey
b
oar
d
w
ill
pop up.
E
nter
t
he
SS
ID and select
O
K. Press [ENTER] to con
f
irm and
a
screen w
ill
appear prompt
i
ng you se
l
ect t
h
e secur
i
ty
P
RGH
I
RU\RXUZLUHOHVVQHWZRUN8VHWKH>Ÿ
ź@NH\V
t
o se
l
ect t
h
e proper secur
i
ty mo
d
e an
d
press
[ENTER]
t
o con
f
irm. I
f
you selected None
f
or the security mode,
p
roceed to step
9
.
7
.
A
screen w
ill
appear prompt
i
ng you to enter t
h
e
p
assword
f
or the selected security mode. Press [ENTER]
a
n
d
an on-screen
k
ey
b
oar
d
w
ill
pop up.
E
nter t
h
e
p
assword and select
O
K. Press [ENTER] to con
f
irm.
P
roceed to
S
tep 9.
8
.
If
you select Auto, a screen will appear prompting you to
s
elect PIN
(
personal identi
f
ication number
)
or PB
C
Settings
Setup wireless
connection.
Internet Connection
Interface
Wireless Setting
Information
IP Setting
Connection Test
On
Wireless
Enter Select Exit
OK
Settings
Initiate network
connection
Language
Menu Settings
Time Setup
Caption
Network
Demo Mode
Version Info
Reset Default
English
Enter Select Exit
OK
DLNA
S
ettin
g
s
Computer, TV and other di
g
ital devices can be connected
via DLNA and the
y
can share files with each other. You
can use the TV set as a DLNA DMP
(
Di
g
ital Media Pla
y
er
)
device to en
j
o
y
movies, pictures, music and other multimedia
materials in
y
our computer throu
g
h DLNA connection
.
DLNA Settin
g
needs to be set on TV and compute
r
Respectivel
y.
N
etwork
S
etup:
1.
Turn on
y
our TV, operate accordin
g
to the description in
the Settin
g
s menu until the Network screen appears
.
2.
On the Network screen, select Confi
g
uration and press
[
ENTER
]
button to enter the submenu
.
3.
S
et Internet
C
onnection to
O
n and Interface to Ethernet
.
4.
Select IP Settin
g
and press [ENTER] button to enter it
.
5.
Set Address T
y
pe to Auto
.
6.
A
uto acquires and enters the necessar
y
connection
values automaticall
y.
7.
If the connection values are not automaticall
y
entered,
please check
y
our modem and router manuals fo
r
directions to enable automatic IP addressin
g
b
y
DHCP.
Or, follow the steps below to manuall
y
confi
g
ure the
n
e
tw
o
rk
co
nn
ec
ti
o
n
.
Settings
Address Type
IP Address
Subnet Mask
Default Gateway
Primary DNS
Secondary DNS
Auto
176. 16. 0. 0
255. 255. 255. 255
172. 16. 0. 0
172. 16. 2. 2
0. 0. 0. 0
Select Back
(
push button con
f
iguration
)
setup.
C
hoose the method
supporte
d
b
y your w
i
re
l
ess access po
i
nt.
8
a
.
I
f
you choose PIN, an identi
f
ication number will appea
r
on the screen
f
or you to enter into the access point. A
f
te
r
HQWHULQJWKH3,1SUHVVWKH>Ź@NH\,
I
WKH3,1LVLQXVH
by another device, select [REFRE
S
H] to obtain a new
PIN and enter it into the access point. A
f
ter entering the
3,1
SUHVVW
K
H
>
Ź
@
N
H\
8
b
.
I
f
you choose PB
C
, a screen will appear prompting to
SUHVV>Ź@NH\$
I
WHUSUHVVLQJWKH>Ź@NH\\RXKDYHWZR
m
i
nutes to
l
ocate an
d
press t
h
e
P
us
h
B
utton on you
r
access po
i
nt to connect to t
h
e
TV.
9.
P
ress t
h
e
[MENU]
k
ey to return to t
h
e prev
i
ous menu
.
10.
S
elect
C
onnection Test to check the Internet connectivity
.
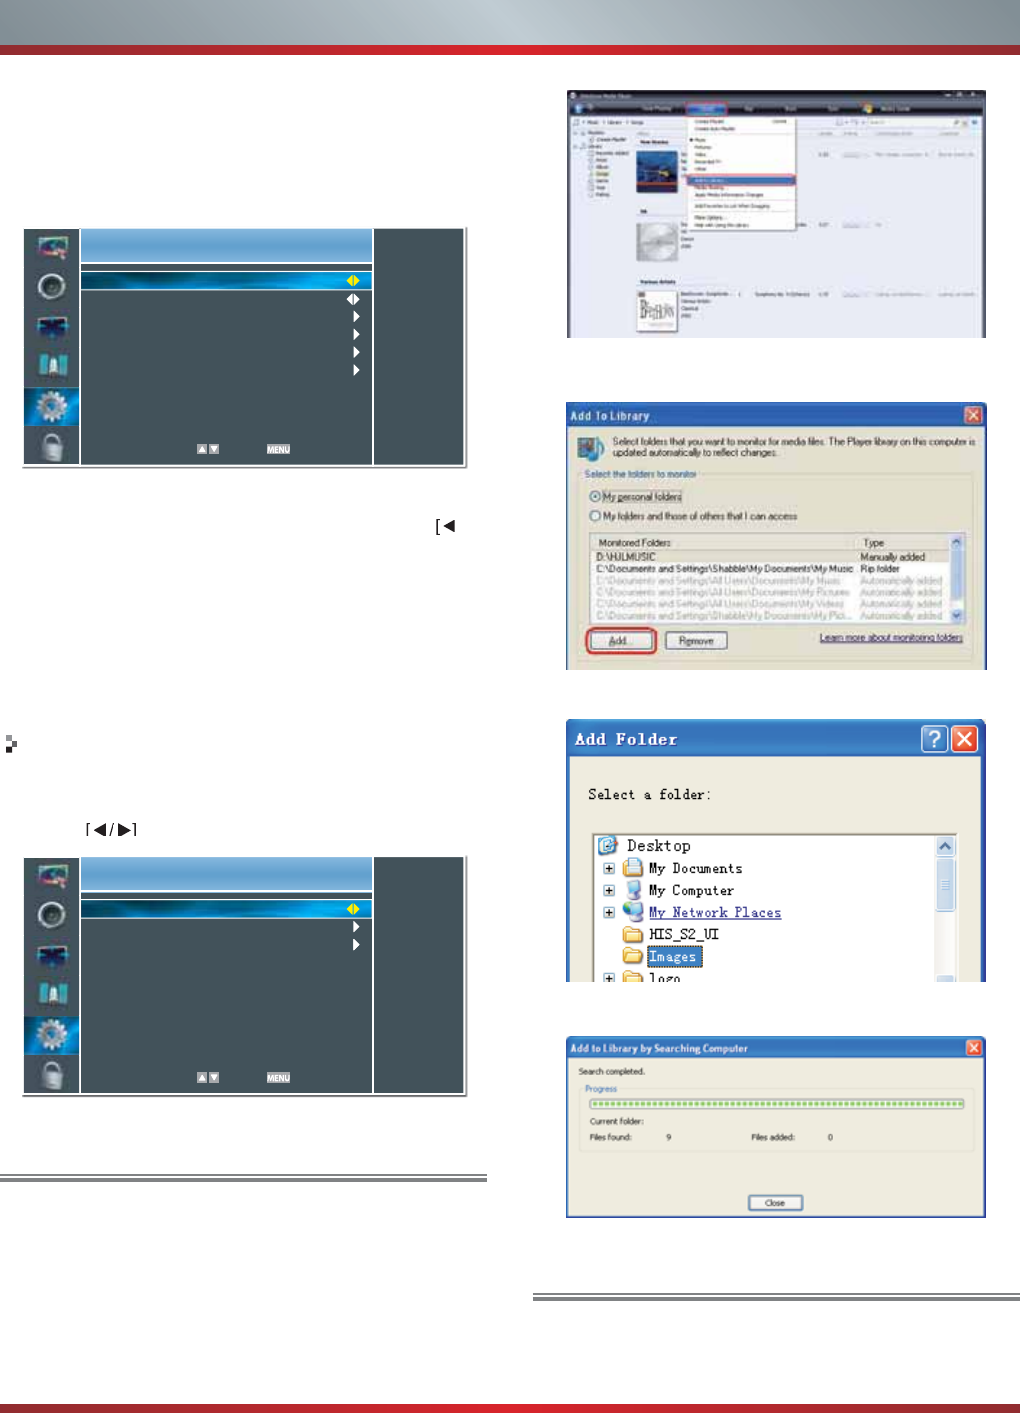
24
Advanced Features
T
o set up your
TV’
s networ
k
connect
i
on manua
ll
y,
f
ollow these steps
:
1
)
. Follow
S
teps 1 through 5 in the
“
How to set up
automat
i
ca
ll
y
”
proce
d
ure
.
2
)
.
S
et Address Type to Manual
.
8.
S
et Address Type to Manual, enter IP
S
etting. Then
press
[
▲
/
▼
] button to select IP Address and press [
button to move the cursor to the entry
f
ield. Then press
0
~
9
buttons to enter the numbers
.
9
. Press [MENU] button to exit IP Address and press
[
▲
/
▼
]
b
utton to se
l
ect t
h
e next opt
i
ons to enter t
h
e num
b
ers.
10
. When done, press [MENU] to return to the previous
men
u
.
11.
S
elect
C
onnection Test to check the Internet connectivity
.
Set
DLNA
to
O
n
:
1
.
O
n the Network screen, select Applications and press
[ENTER]
b
utton to enter t
h
e su
b
menu.
2. Press button to set DLNA to On.
Settings
Set DLNA on or o
DLNA
Netix
VUDU
On
Select Back
M
edia Share Settings in Compute
r
S
ettings to Share Files
llatsni yam uoy ,ANLD troppus ton seod retupmoc ruoy
fI
s
o
f
tware that supports DLNA such as TVersity or Windows
M
e
di
a
Pl
ayer.
W
e recommen
d
Wi
n
d
ows
M
e
di
a
Pl
ayer as t
h
e
i
nsta
ll
at
i
on an
d
setup
i
s eas
i
er.
1
.
S
tart the Windows Media Player 11 or later version.
2
.
C
lick
“
Library” and then
“
Add to Library...”.
3
.
T
he
“
Add To Library” will pop up on the screen.
C
lick
“
Add”.
4
.
S
elect a
f
older and click
O
K button.
5
.
C
lick
“C
lose” to close the dialog.
1.
C
lick
“
Library” and move the cursor to select
“
Media
S
haring...
”
Settings
Address Type
IP Address
Subnet Mask
Default Gateway
Primary DNS
Secondary DNS
Manual
0. 0. 0. 0
0. 0. 0. 0
0. 0. 0. 0
0. 0. 0. 0
0. 0. 0. 0
Select Back
[
press
[
[
▲
/
▲
]
[
2
.
P
ress
▲
/
▲
]
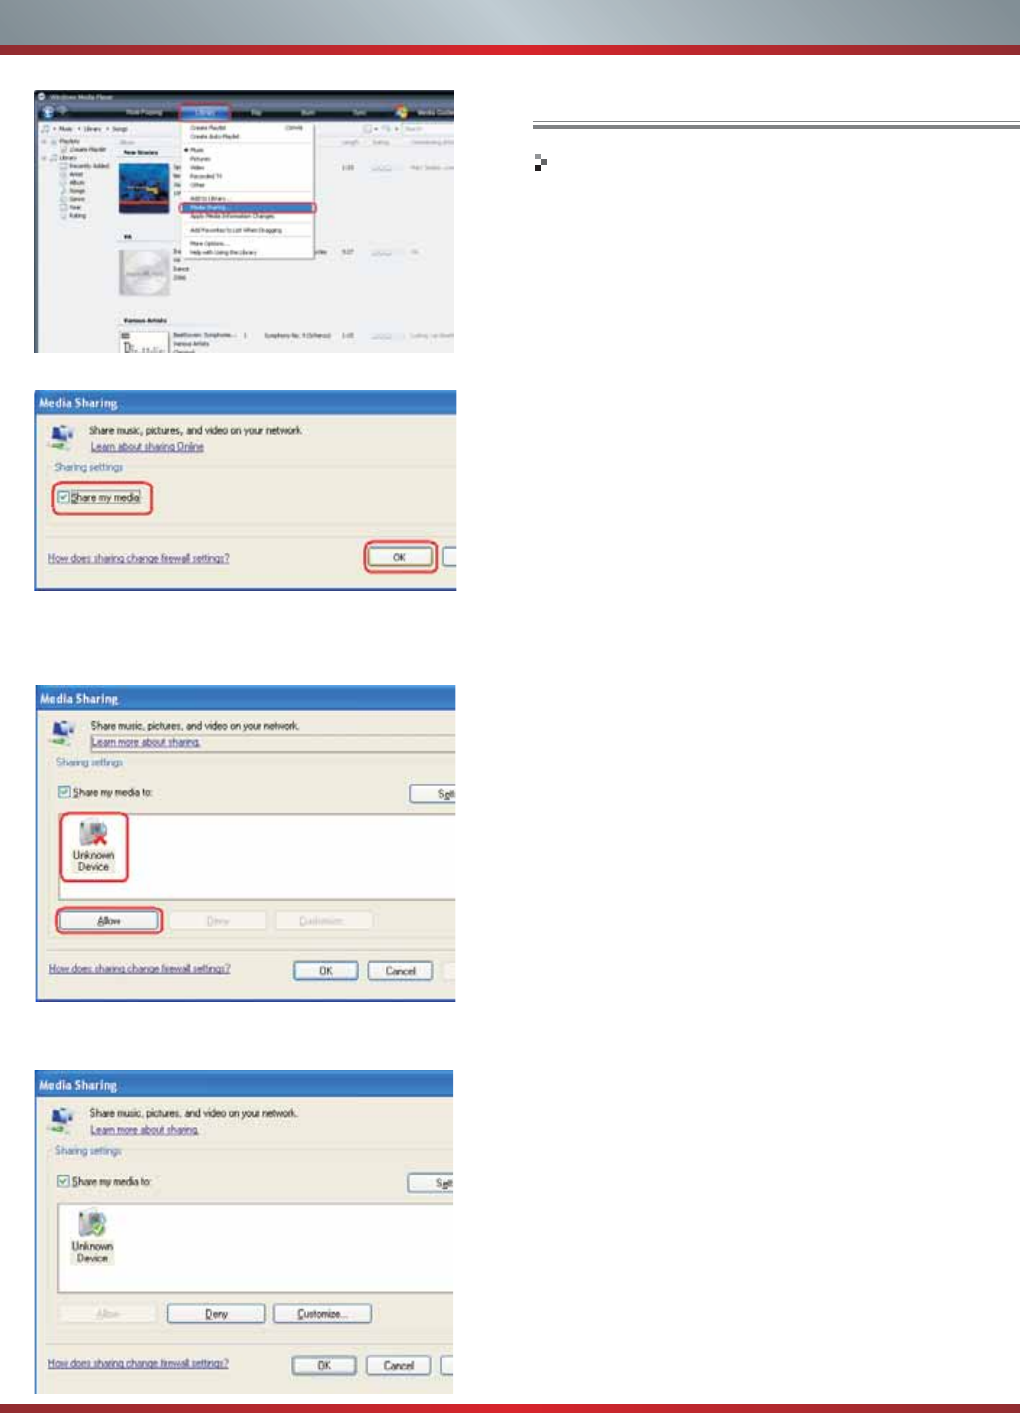
25
Advanced Features
Network Function
NOTICE FOR USE
If you use VUDU services, see the following note before
using it.
1. Use of Internet services requires a working broadband
Internet connection (1 to 2 Mbps for SD video, 2.25 to 4.5
Mbps for HD video and 4.5 to 9 Mbps for HDX video).
2. VUDU and other Internet-based services are not provided
by Hisense, may change or be discontinued at any
time and may be subject to restrictions imposed by
your Internet service provider. The quality, functionality,
or availability of such services may be affected by the
capacity of your Internet connection. Use of VUDU video-
on-demand and other Internet services may require the
creation of a separate account through a computer with
internet access.
3. Certain VUDU services may not be available for this TV
model.
4. VUDU video-on-demand and other Internet services may
require payment of one-time and/or recurring charges.
5. You are solely responsible for any charges incurred as a
result of using Internet-based content, including, without
limitation, communications charges for the provision of
Internet or network services and any charges incurred
for third-party Internet content services, such as video on
demand or subscription services. All third-party services
are provided in accordance with whatever terms and
conditions are established between such third-party
providers and you.
6. HISENSE MAKES NO REPRESENTATIONS OR
WARRANTIES ABOUT THE CONTENT, AVAILABILITY
OR FUNCTIONALITY OF THE VUDU SERVICE OR
OTHER INTERNET DELIVERED THIRD-PARTY
SERVICES AND DOES NOT WARRANT THAT ANY
OF THEM WILL BE UNINTERRUPTED, ERROR FREE
OR SATISFACTORY. ANY IMPLIED WARRANTY,
INCLUDING BUT NOT LIMITED TO ANY IMPLIED
WARRANTY OF MERCHANTABILITY OR FITNESS
FOR A PARTICULAR PURPOSE OF ANY THIRD PARTY
CONTENT OR SERVICE, IS EXPRESSLY EXCLUDED
AND DISCLAIMED. UNDER NO CIRCUMSTANCES
WILL HISENSE BE LIABLE IN CONTRACT, TORT OR
UNDER ANY OTHER THEORY FOR ANY DAMAGES
ARISING OUT OF OR IN CONNECTION WITH YOUR
USE OF ANY CONTENT OR SERVICE PROVIDED
BY ANY THIRD PARTY, EVEN IF ADVISED OF THE
POSSIBILITY OF SUCH DAMAGES.
2. Click the box to select “Share my media” and click [OK].
3. An equipment icon will appear on the white area if
the DLNA Settings has been correctly set. Select the
appropriate icon and then click “Allow”.
4. The TV now has access to the shared files on the
computer.
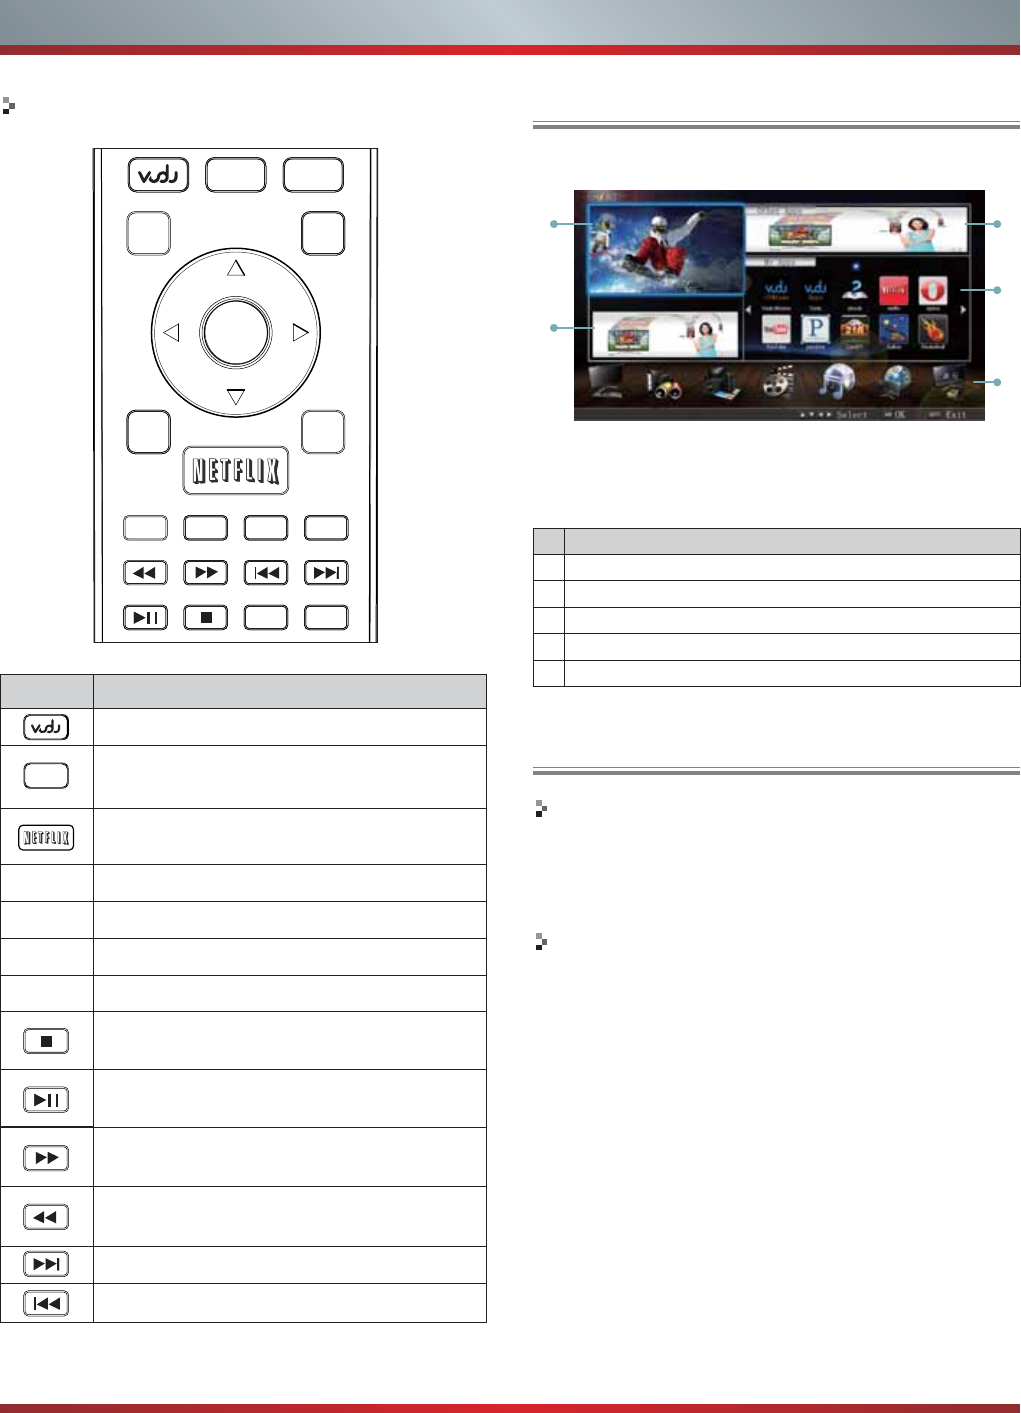
26
Advanced Features
Operational buttons
Buttons Description
Press to launch VUDU Movies App directly.
Opens the Hi-Smart Hub with links to various
Internet Services.
Press to launch Netflix App directly.
▲/▼/ / Selects the on-screen menu items.
ENTER Confirms selections.
EXIT Closes the menu.
RETURN Returns to the previous menu.
Stops playback and displays the movie title
screen.
Pauses playback. Press the button to return to
playback.
Displays the TrickPlay screen and fast forwards
playback.
Displays the TrickPlay screen and fast reverses
playback.
Plays the next video.
Plays the previous video.
1. Press the [Hi-Smart] button to display Hi-Smart Hub.
2. Press [▲
▲
▲
▲▲
/▼/ / ]buttontoselecttheinterfaceyou
want to view and press [ENTER] to enter the following
description.
No Interface description
1Live TV
2Information
3Apps Market
4My Applications
5Quick Launcher Bar
Enter the Network Applications
▲
▲
VUDU HD Movies
Brief introduction
VUDU is an on-demand service that offers high-definition
movies on Web.
For enjoying more movies, please register and log in to
your account.
Operation instructions
You can access the VUDU HD Movies by the following
method:
1. Press the [Hi-Smart] button to display network main
menu.
2. Press [▲/▼/ / ] button to select the VUDU HD Movies
icon and press [ENTER] to enter it (Refer to “Enter the
network application”), or press [VUDU] button to enter
directly.
3. Select the Sign Up Now icon on the VUDU HD Movies
interface, and press [ENTER] to enter.
TV Input Picture Video Music Network DLNA
1
2
3
4
5
DDIISSPPLLAAYY
EEXXIITT
RREETTUURRNN
GGUUIIDDEE
MMEENNUU
HHii--DDMMPP
Hii--Smmaarrtt
AASSPPEECCTT
EENNTTEERR
Hii--Smmaarrtt
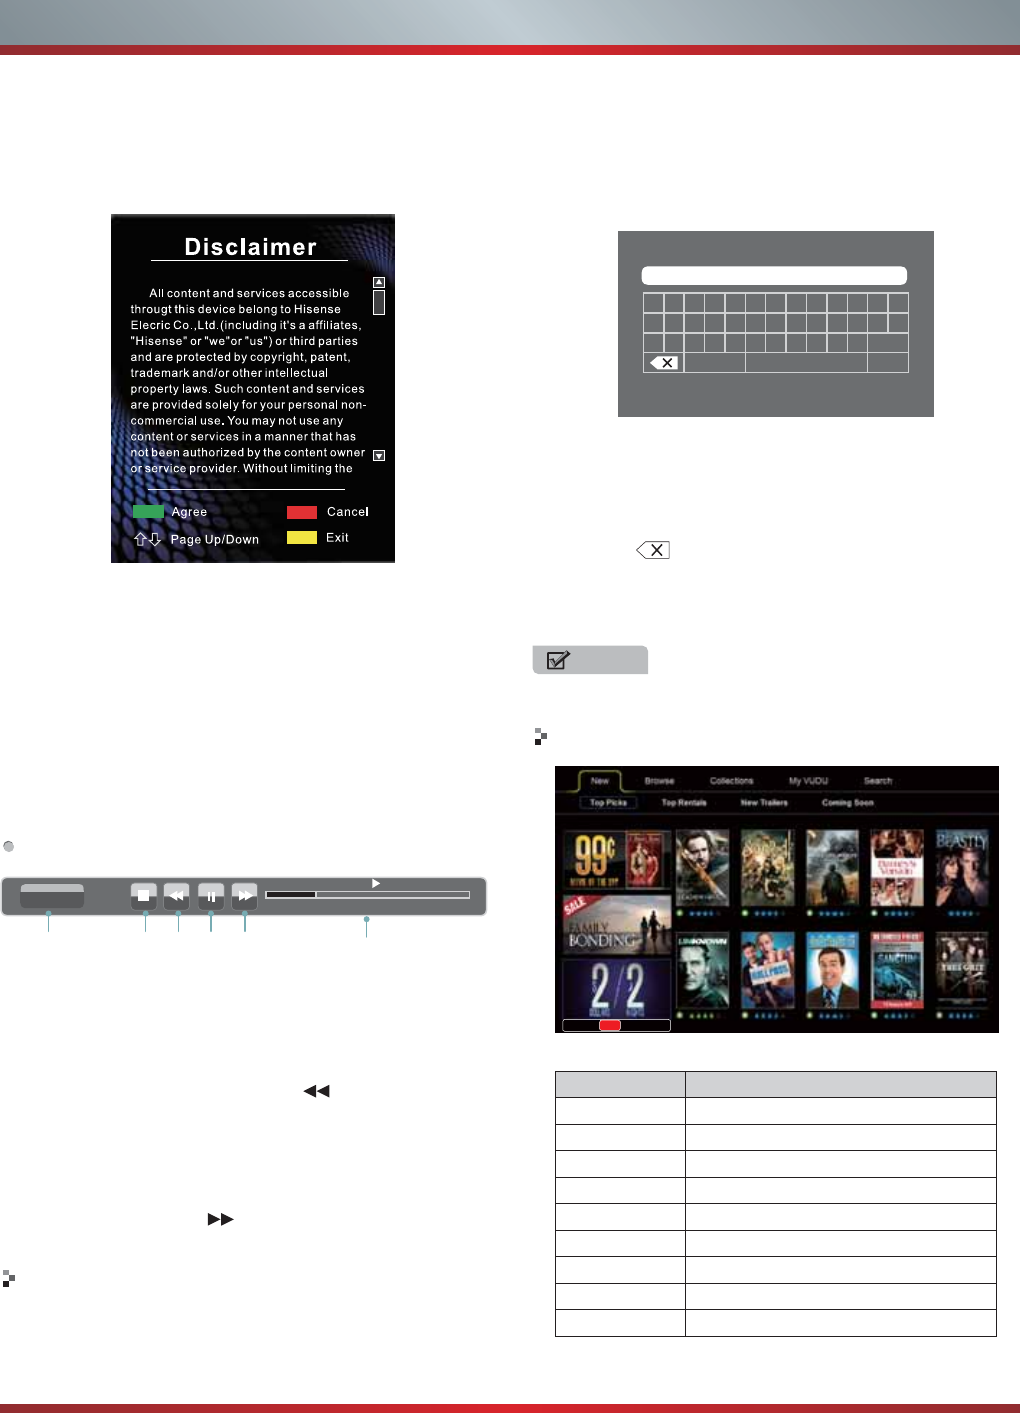
27
Advanced Features
4. Please read the content of the Disclaimer first. If agree,
press [Green] button and then access the network main
menu. If disagree, press [Red] button or [Yellow] button
to cancel or exit Disclaimer menu, then network cannot
be used.
5. Enter your email address to start your VUDU experience.
( Refer to “How to Input the Email Address” )
6. Press button to move the cursor to select
service items in the VUDU HD Movies home page, and
press [ENTER] button to confirm.
7. In the process of watching a movie, press [ENTER] button
to display/exit the tool bar, press [ / ] button to select
the function icon, and press [ENTER] button to confirm.
8. Press [RETURN] button to return the upper menu, or
press [EXIT] button to close the menu.
Tool Bar
1. Press [ENTER] button to enter and press [ / ] button to
select the chapter.
2. Stop playback.
3. Fast backward. Press [ENTER] button to select the
backward speed. You can press [ ] button to achieve
the function.
4. Play/Pause. You can press [ II] button to play/pause
directly when there is no control bar on the screen.
5. Fast forward. Press [ENTER] button to select the forward
speed. You can press [ ] button to achieve the function.
6. Progress bar. The progress bar when playing.
How to Input the Email Address
1. Press [ button to move the cursor to the
address bar and press [ENTER] button to confirm.
0:00:34 0:02:32
Chapters
23451
2. Press [ENTER] button to display the keyboard.
There are some shortcuts on the bottom of the keyboard
so that you can input part of the address often used
directly.
Other keys are used as the keyboard of your computer.
3. Press [ button to move the cursor to the
characters you want to select and then press [ENTER]
button to confirm.
If you want to delete one character, move the cursor to
Back key and press [ENTER] button to confirm.
4. Move the cursor to Done key and press [ENTER] button
to confirm if you have completed the address input. Then
the new address will appear on the address bar.
VUDU HD Movies home page
abcde fghi j k lm
nopq r s t uvwxyz
0123456789@.com
Symbols Space Shift
Enter email address
Back Done
Enter email address
Enter email address to begin enjoying VUDU!
NOTE
TV screen may be difference with picture.
6
Press for help
Title Function
New The latest movies
Top Picks Mostly picked up movies
Top Rentals Mostly rented movies
New Trailers Latest trailers
Coming Soon The movies can be picked soon
Browse Browse all the movies in VUDU
Collections Browse the classified movies
My VUDU The movies user bought or rented
Search Search movies in VUDU
///]
▲/▼//]
▼
▼
▲▼
▼
▼
▲▼
▼
▼
▼
▼
▼
▼
▼
[///]
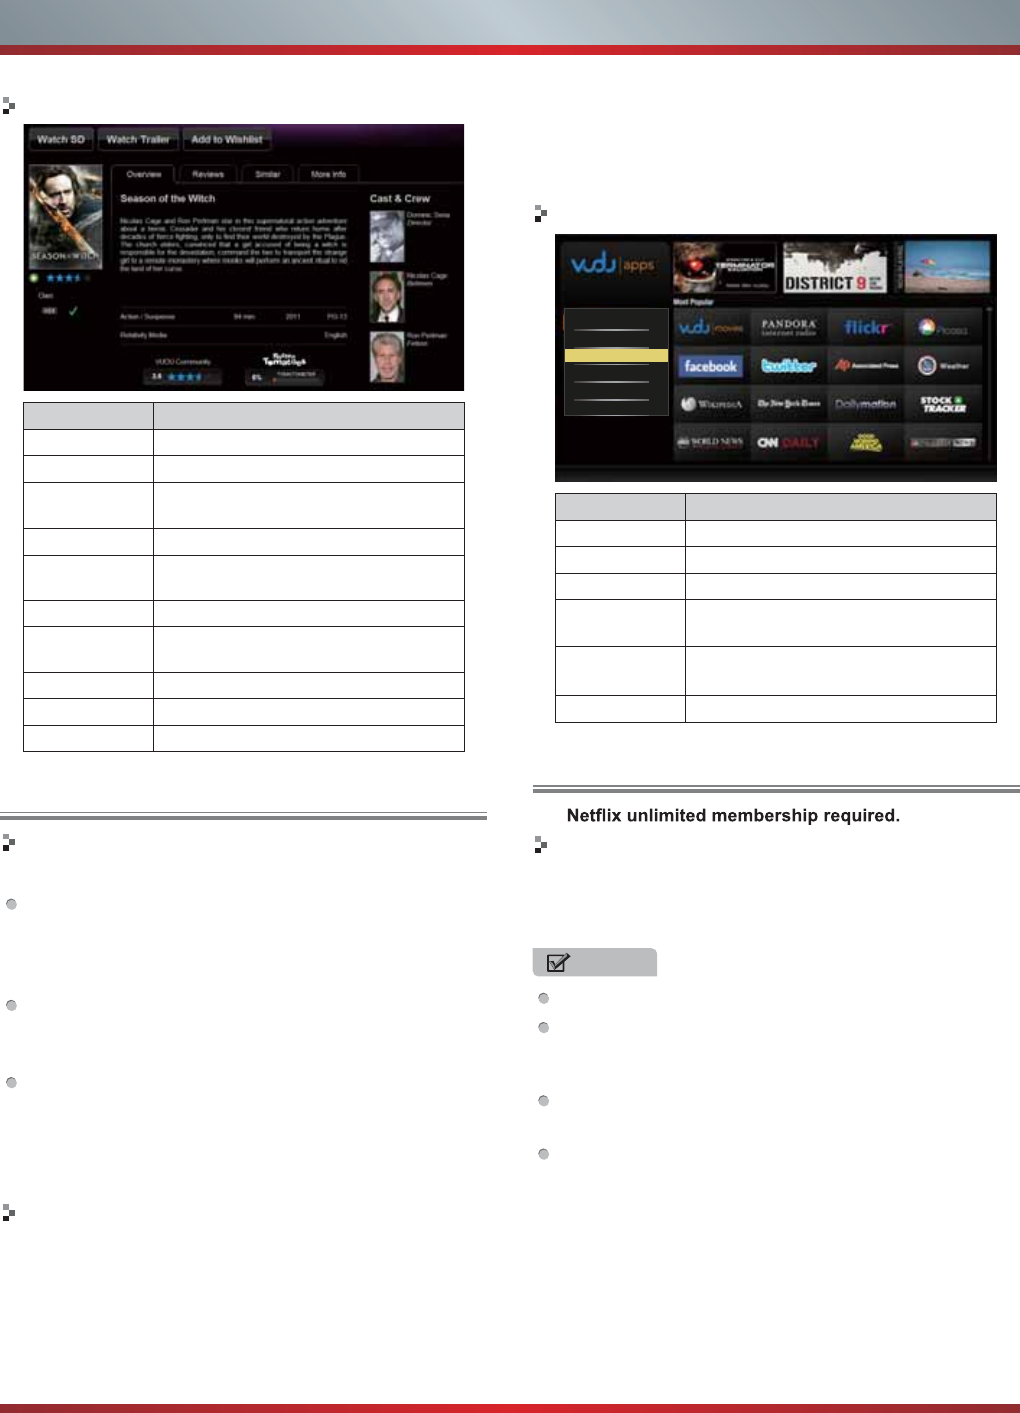
28
Advanced Features
VUDU HD Movies subpage
Title Function
Rent/Own To rent or buy current movie
Watch Trailer To watch trailer of the current movie
2 Minute
Preview
To preview current movie for 2
minutes
Add to Wishlist Add current movie to your wishlist
Rate/share To rate current movie or share it to
your friends in Facebook or Twitter
Overview The overview of current movie
Cast&Crew The cast and crew of current movies
and find their related movies
Reviews The reviews of current movie
Similar The similar types of movies
More Info The detail information of current movie
VUDU Apps
Brief introduction
The applications platform for connected TVs.
VUDU Apps provides customers with access to a wide
range of Internet services and applications including
streaming video, music on demand, photo browsing,
social networking and more.
VUDU Apps supports the development of responsive
apps designed specifically for use on home HD
televisions.
VUDU Apps uses a unique, cloud-based architecture
optimized for consumer electronics devices, including
delivering the latest applications to consumers without
the need for software downloads or frequent firmware
updates.
Operation instructions
You can access the VUDU Apps by the following
methods:
1. Press the [Hi-Smart] button to display network main
menu.
2. Press [ button to select the VUDU Apps icon
and press [ENTER] to enter it.
3. Press [ button to select the widget you want to
access, and press [ENTER] to enter it.
4. You can press [RETURN] to return the upper menu or
press [EXIT] button to close the Widgets display.
VUDU Apps home page
MY FAVORITES
MOST POPULAR
NEWEST
BROWSE BY GENRE
SHOW TICKER
INFO&SETTINGS
Title Function
My favorites The user’s favorite applications
Most popular The most popular applications
Newest The newest applications in VUDU
Browse by
genre Browse applications by genre
Show Ticker Show the applications at the bottom of
screen while watching TV
Info&settings VUDU Apps system information
Netflix
Brief introduction
Instantly watch thousands of TV episodes & movies
streaming over the Internet from Netflix. Unlimited
membership required.
NOTES
TV screen may be difference with picture.
For more information on Netflix visit http://www.netflix.
com/help or login to your Netflix account and click “Help”
at the top of the page.
Your broadband fluency and picture quality depend on
the network speed and original bit rate.
Illustrations are examples and may differ from the actual
Netflix screens. The display and operations may change
as a result of a software update. Use Netflix without
configuring a proxy server. Part or all of Netflix may not
be available when connecting to the Internet via a proxy
server.
[▲/
▲
/
▲
/
▲
]
▲/
▲
/
▲
/
▲
]
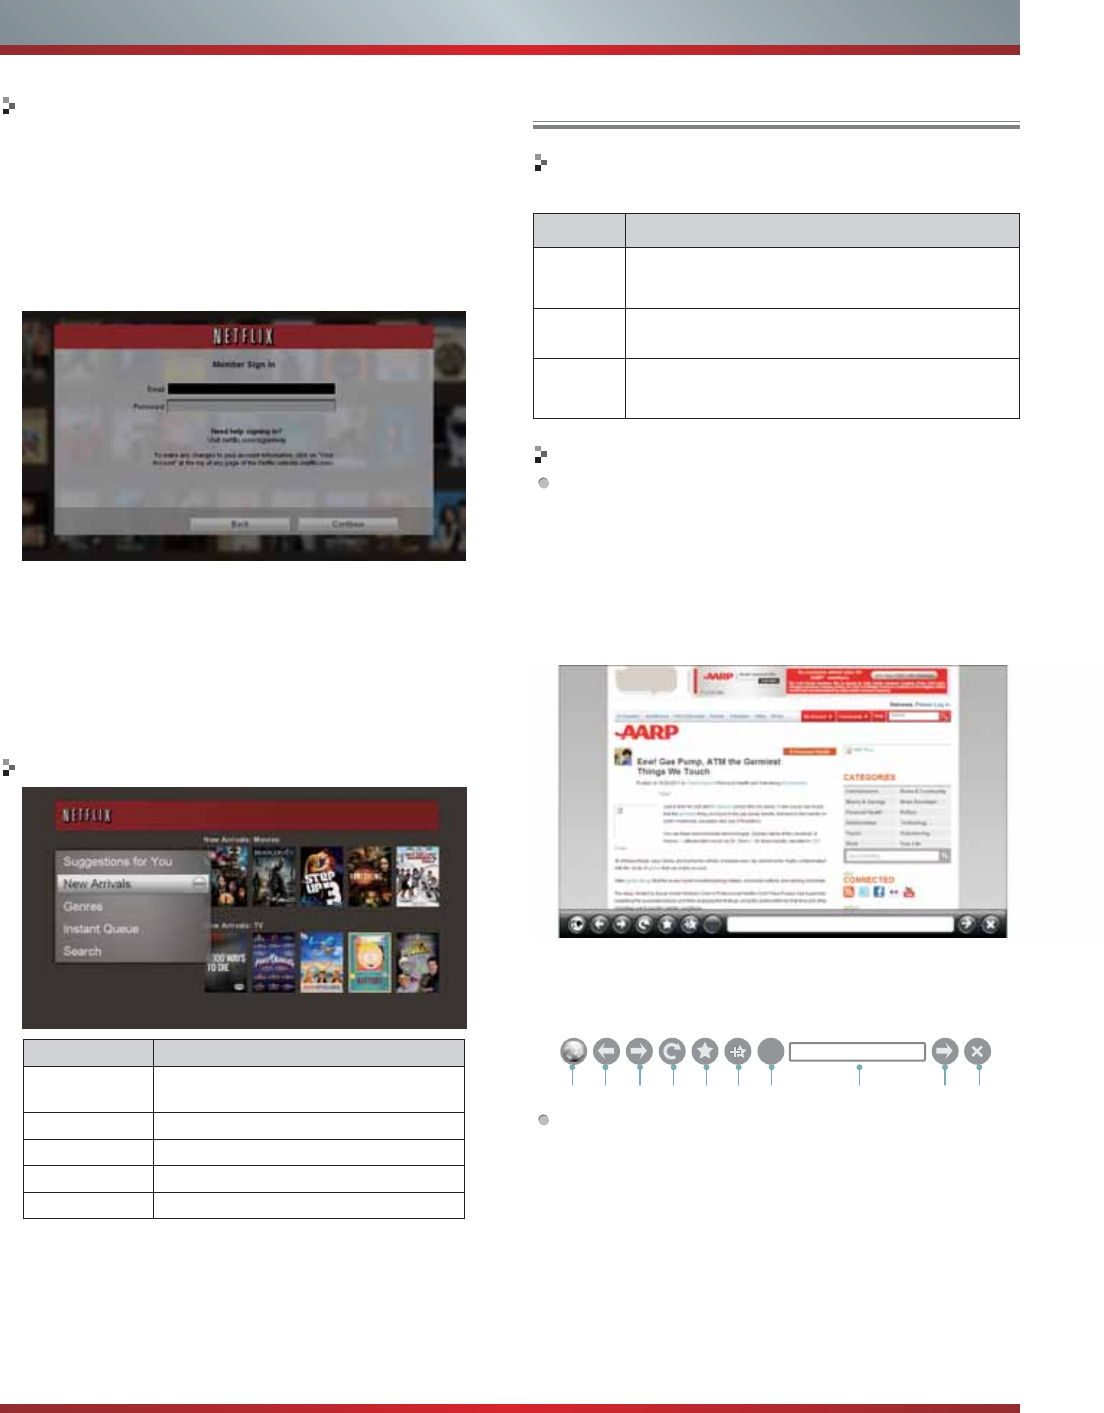
29
Advanced Features
Operation instructions
1. Press the [Hi-Smart] button to display network main
menu.
2. Press [ button to select the Netflix icon and
press [ENTER] to enter it, or press [NETFLIX] button to
enter Netflix website directly.
3. Input Email and Password in following window to sign in. (
Refer to “How to Input the Email Address” )
4. Press [ button to move the cursor to select
service items in the Netflix home page, and [ENTER]
button to confirm.
5. In the process of watching a movie, press operational
buttons to control the movie.
6. Press [RETURN] button to return the upper menu, or
press [EXIT] button to close the menu.
Netflix Movies home page
Title Function
Suggestions for
you
The movies suggested for you by
Netflix
New Arrivals The new arrivals
Genres Browse movies in different genres
Instant Queue Your list of movies
Search Search for available titles
Opera
The function of the buttons on the remote
control
Operation instructions
How to enter the Opera Browser
The Network setup must be correct. Then you can use
the network.
1. Press the [Hi-Smart] button to display network main
menu.
2. Press [ button to select the opera icon and
press [ENTER] to enter it.
3. Then the default interface will appears on the screen.
There are some function icons on the bottom of the
screen:
The function of the buttons on the screen:
1. Back to main page.
Move the cursor to the icon and press [ENTER] button to
return to the default interface.
2. Back to previous page.
Move the cursor to the icon and press [ENTER] button to
return to the previous viewed web page.
3. Return a page.
Move the cursor to the icon and press [ENTER] button to
go forward to the previous viewed web pages.
Buttons Description
Press these buttons to move the cursor on the
screen as the mouse of the computer.
MENU Press the button to display/cancel the keyboard
on the screen.
ENTER Press the button to confirm the selection. Press
the button twice to search the new website.
213456 910
78 Address bar
▲/
▲
/
▲
/
▲
]
▲/
▲
/
▲
/
▲
▲/
▲
/
▲
/
▲
]
▲/
▲
/
▲
/
▲
]
"
?
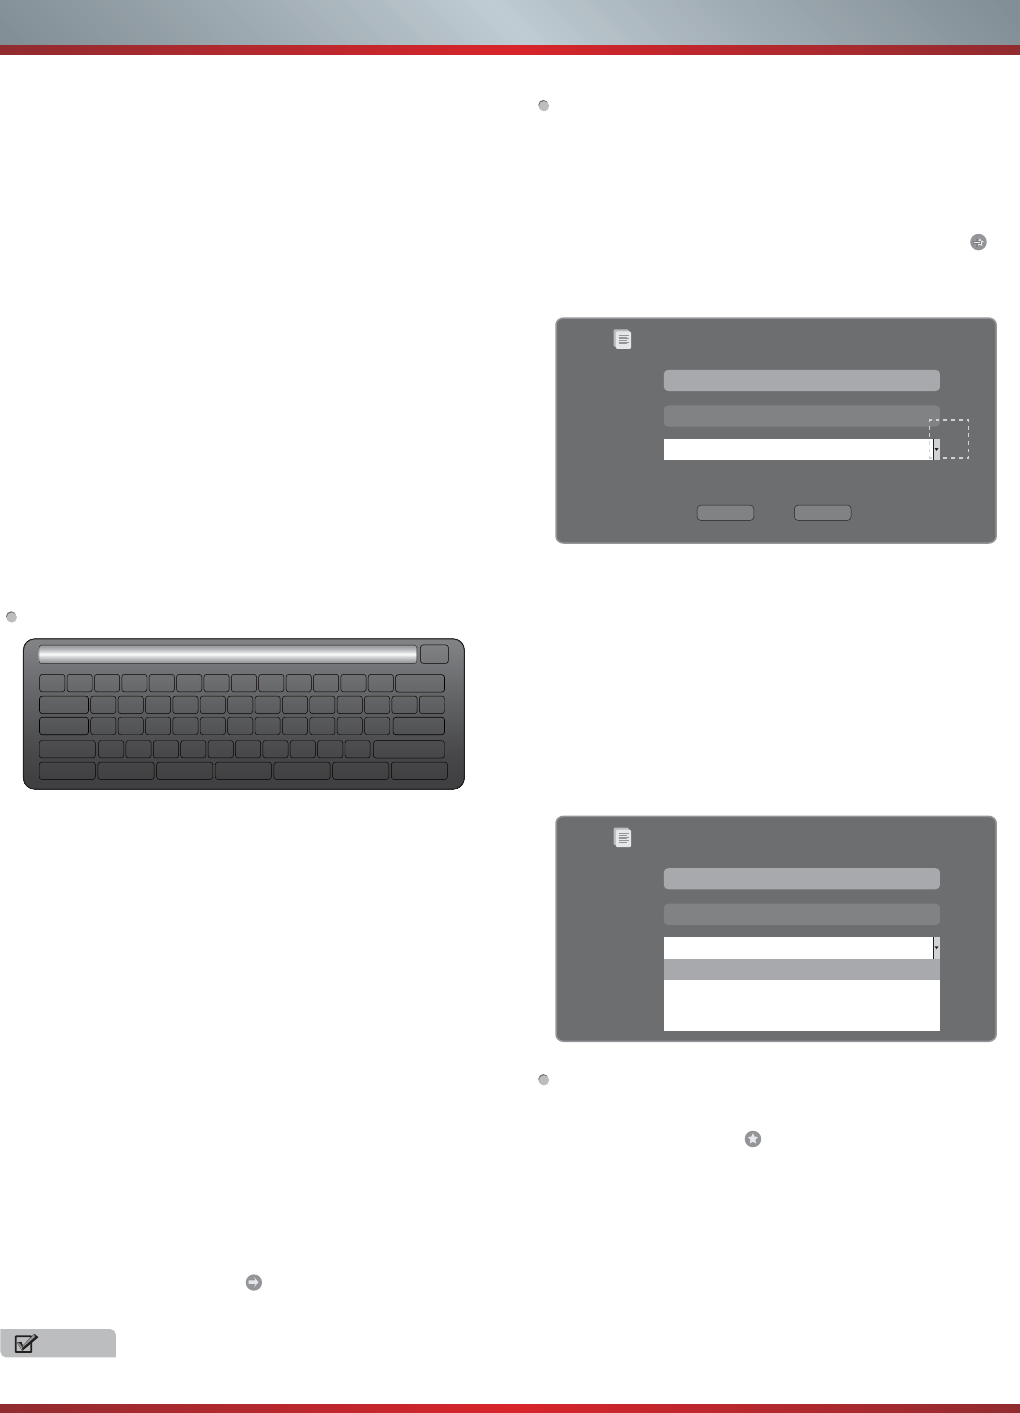
30
Advanced Features
4. Refresh page.
Move the cursor to the icon and press [ENTER] button to
refresh the current page.
5. Folder.
Move the cursor to the icon and press [ENTER] button to
enter the favorite folder.
6. Add Folder.
Move the cursor to the icon and press [ENTER] button to
add the website to the favorite folder.
7. Help.
Move the cursor to the icon and press [ENTER] button
for help.
8. Address bar.
Input the website you want to view.
9. Sure to enter the Address of the page
Move the cursor to the icon and press [ENTER] button to
search the website.
10. Exit Opera.
Move the cursor to the icon and press [ENTER] button to
close the page.
How to Input the New Address
1. Press button to move the cursor to the
address bar and press [ENTER] button to confirm.
2. Press [MENU] to display the keyboard.
There are some shortcuts on the bottom of the keyboard
so that you can input part of the address often used
directly.
Other keys are used as the keyboard of your
3. eht ot rosruc eht evom ot nottubsserP
characters you want to select and then press [ENTER]
button to confirm.
If you want to delete one character, move the cursor to
Back key and press [ENTER] button to confirm. Or if you
want to re-enter all the characters, move the cursor to
Reset key and press [ENTER]button to confirm.
4. Move the cursor to Enter key and press [ENTER] button
to confirm if you have completed the address input.
Then the new address will appear on the address bar.
5. Move the cursor to the address bar and press [ENTER]
button twice to enter the website.
Or move the cursor to the and press [ENTER] button
to search.
CN
12
w
s
x
e
d
c
r
f
v
t
g
b
y
h
n
u
j
m
i
k
,
o
l
.
p
;
/
[
‘
]
Enter
Space
\q
a
z
Tab
Caps L
Shift
http:// www. .com .org .gov .net Reset
3 4 5 6 7 8 9 0 - = Back
ǃ
NOTE
There is only recommend to open the English website.
[▲
▲
▲
/▼//]
[▲
▲
▲
/▼//]
How to Add a Bookmark
If you want to find the often viewed website from the
favorite folder, you can follow the steps to add it to the
folder.
1. Input the address on the address bar and enter it.
2. 3UHVV>ŸźŻŹ@EXWWRQWRPRYHWKHFXUVRUWRWKH and
press [ENTER] button to confirm.
The menu will pop up on the screen.
3. 3UHVV>ŸźŻŹ@EXWWRQWRPRYHWKHFXUVRUWRWKHLFRQ
marked with dashed box on the right screen. Then press
[ENTER] button to confirm to display all the folders.
4. 3UHVV>Ÿź@EXWWRQWRVHOHFWWKHIROGHU\RXZDQWWRDGG
the bookmark to. And press [ENTER] button to confirm.
5. Move the cursor to the Add button and then press [ENTER]
button to confirm.
If you do not want to add the book mark, move the cursor
to the Cancel button and press [ENTER] button to confirm.
How to Add a Folder
You can add a folder to the favorite as follows:
1. Move the cursor to the icon and press [ENTER] button
to confirm. The menu will pop up on the screen.
2. Move the cursor to Add a folder button and press [ENTER]
button to confirm.
A pop-up menu appears on the screen.
3. Move the cursor to Name bar and press [ENTER] button
to confirm. Follow the steps 2~4 in “How to Input the New
Address” to input the name.
4. Move the cursor to Add button and press [ENTER] button
to confirm and the new folder has been added.
Add a bookmark
Are you sure to add it?
Name:
URL:
Folder:
Add Cancel
HISENSE
Http://www.hisense.com.au/
Root folder
Add a bookmark
Are you sure to add it?
Name:
URL:
Folder:
HISENSE
Http://www.hisense.com.au/
Root folder
Root folder
Opera Software
GOGI SDK
Opera technology
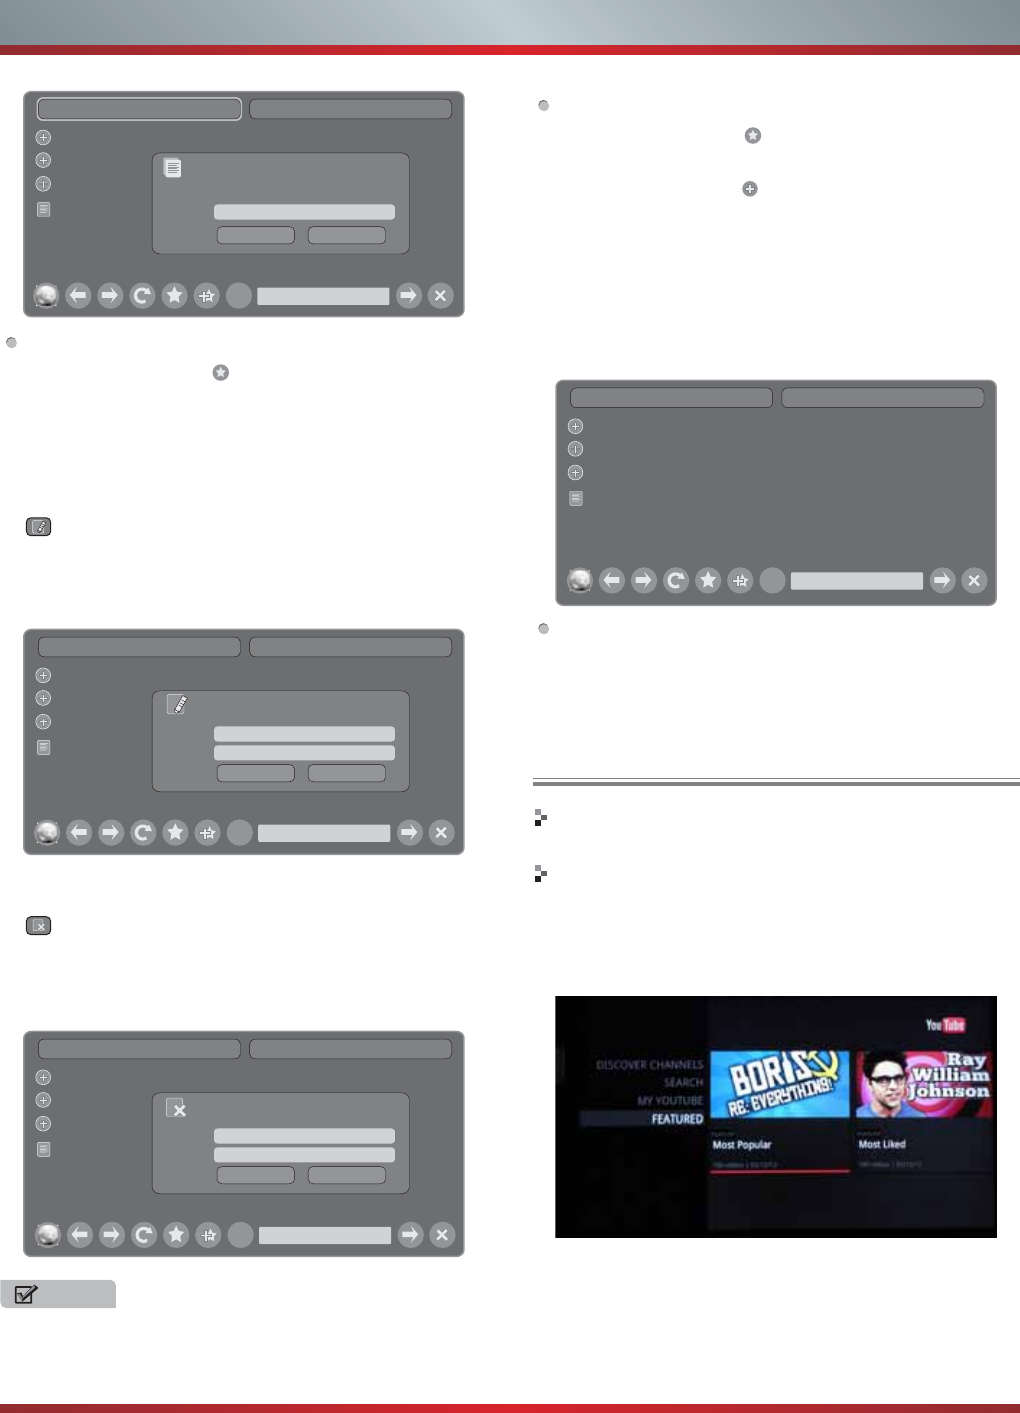
31
Advanced Features
How to Edit/Delete a Folder/Bookmark
1. Move the cursor to the icon and press [ENTER] button
to confirm. The menu will pop up on the screen.
2. Move the cursor to the folder /bookmark directly and there
will be two icons on the right of it. Move the cursor to one
of the icons and press [ENTER] button to display a pop-
up menu.
: Edit button.
1).Move the cursor to the Name/URL bar and press
[ENTER] button to confirm. Follow the steps 2~4 in
“How to Input the New Address” to edit it.
2).Move the cursor to Edit button , then press [ENTER] to
confirm and the folder/bookmark will be saved.
: Delete button.
Move the cursor to the Delete button and press [ENTER]
button to confirm. Then the folder/bookmark will be
deleted from the favorite folder.
Add a folder Close bookmark manager
Opera Software
GOGI SDK
Opera technology
HISENSE Name:
Add Cancel
Add a bookmark
Are you sure to add it?
Http://www.hisense.com.au/
"
Add a folder Close bookmark manager
Opera Software
GOGI SDK
Opera technology
HISENSE
Name: HISENSE
Edit Cancel
Edit this bookmark
Are you sure to edit it?
URL: http://www.hisense.com.au/help/warranty
Http://www.hisense.com.au/
"
Add a folder Close bookmark manager
Opera Software
GOGI SDK
Opera technology
HISENSE
Name: HISENSE
Delete Cancel
Delete this bookmark
Are you sure to delete it?
URL: http://www.hisense.com.au/help/warranty
Http://www.hisense.com.au/
"
NOTE
There is only Name bar on the pop-up menu for folder.
How to select the Website from the favorite folder
1. Move the cursor to the icon and press [ENTER] button
to confirm. The menu will pop up on the screen.
2. Move the cursor to the icon before the folder name and
press [ENTER] button to confirm.
The websites in the folder will appear in the following
lines.
3. Move the cursor to the website you want to view and
press [ENTER] button to confirm.
If the website is in the root folder, you can select it
directly . And do not need operate as step 2.
How to exit the manager
Add a folder Close bookmark manager
Opera Software
GOGI SDK
Opera technology
HISENSE
Http://www.hisense.com.au/
"
Move the cursor to the Close bookmark manager icon
and press [ENTER] button to confirm.
Brief introduction
Watches the video via YouTube.
Operation introduction
1. Press the [Hi-Smart] button to display network main
menu.
2. 3UHVV>ŸźŻŹ@EXWWRQWRVHOHFWWKH<RX7XEHLFRQDQG
press [ENTER] to enter it.
YouTube
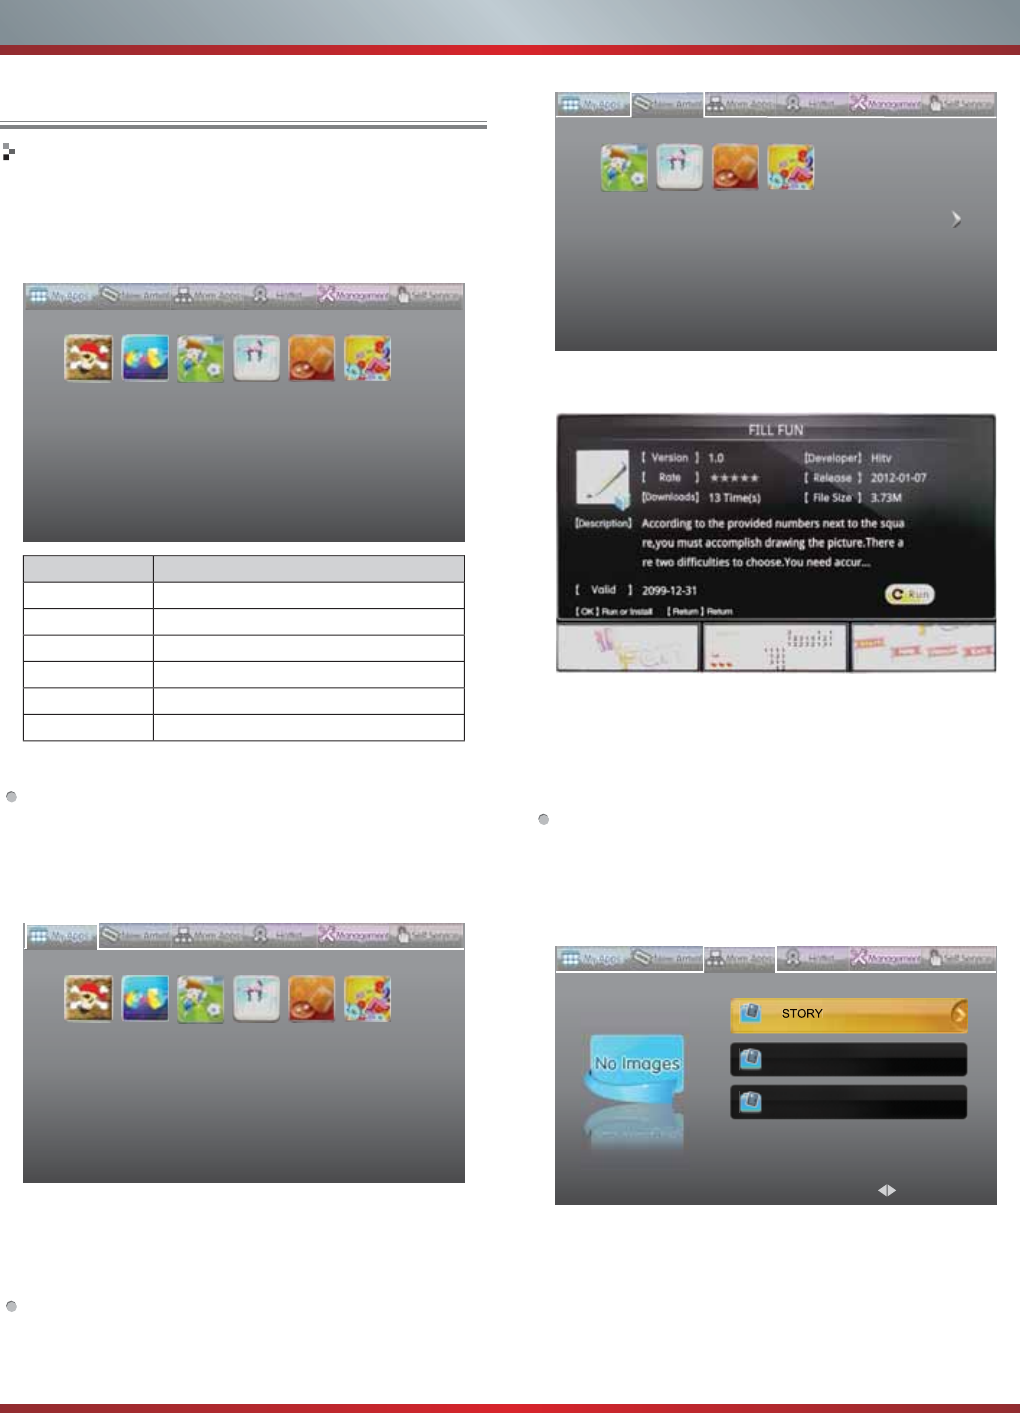
3
2
O
p
eration introduction
1
.
P
ress the [Hi-
S
mart] button to display network main
men
u.
2
.
3
UHVV>Ÿ
ź
Ż
Ź@EXWWRQWRVHOHFWWKH
2
WKHU$SSVDQG
p
ress
[ENTER]
to enter
i
t.
3
.
F
ollow the steps as
f
ollowing.
My
Apps
:
D
ispla
y
the applications of downloaded and installed on
t
h
e
l
oca
l.
1)
3
UHVV>ŻŹ@WRVHOHFWWKHWLWOHRI0
\
$SSVDQGSUHVV>ź
E
NTER
]
to enter it.
2)
3
UHVV>ŸźŻŹ@WRVHOHFWWKHDSSOLFDWLRQV
\
RXZDQWWR
e
nter and
p
ress
[
Enter
]
to confirm.
3)
P
ress
[
RETURN
]
to return to the title.
N
ew
A
rr
i
va
l
:
1
)
3UHVV>Ż
Ź@WRVHOHFWWKHWLWOHR
I
1HZ$UULYDODQGSUHVV>ź
ENTER]
to enter
i
t
.
Other App
s
T
i
t
l
e
Fu
n
ct
i
o
n
My
Apps. Your local a
pp
lications
Ne
w Arriv
a
l
T
he a
pp
lications of the latest online
M
ore A
pp
s.
App
lications classification to download
Ho
tli
s
t
T
he pop rankin
g
applications
M
ana
g
ement
D
elete the local a
pp
lications
S
elf
S
ervice
V
i
e
w th
e
se
rvi
ce
inf
o
rm
a
ti
o
n
Advanced Features
2
)
3UHVV>Ÿ
ź
Ż
Ź@WRVHOHFWWKHDSSOLFDWLRQV\RXZDQWWR
install and press [ENTER] to con
f
irm
.
3
)
P
ress
[ENTER]
to
i
nsta
ll
t
h
e app
li
cat
i
ons or press
[RETURN]
to return to t
h
e new arr
i
va
l
h
ome page
.
I
f
installed, the application will be shown in My Apps
inter
f
ace
.
4
)
P
ress
[RETURN]
to return to t
h
e t
i
t
l
e
.
M
ore A
pp
s:
C
lassif
y
the applications b
y
stor
y
, knowled
g
e and funn
y
g
ame.
1)
3
UHVV
>
ŻŹ
@
WRVHOHFWWKHWLWOHRI0RUH$
SS
VDQG
S
UHVV
>
ź
E
NTER
]
to enter it.
2)
3
UHVV
>
Ÿź
@
WRVHOHFW WKHFODVVLILFDWLRQDQG
S
UHVV
[
ENTER
]
to confirm.
3
)
3
UHVV>ŸźŻŹ@WRVHOHFWWKHDSSOLFDWLRQV
\
RXZDQWWR
i
nstall and
p
ress
[
ENTER
]
to confirm.
4)
P
ress
[
ENTER
]
to install the a
pp
lications or
p
ress
[
RETURN] to return to the More Apps home pa
g
e.
KNOWLEDGE
FUNNY GAME
Page 1/2
Navy Bat... Tetris Penalty dress-up DICE GUESS NU
Navy Bat... Tetris Penalty dress-up DICE GUESS NU
Penalty dress-up DICE GUESS NU
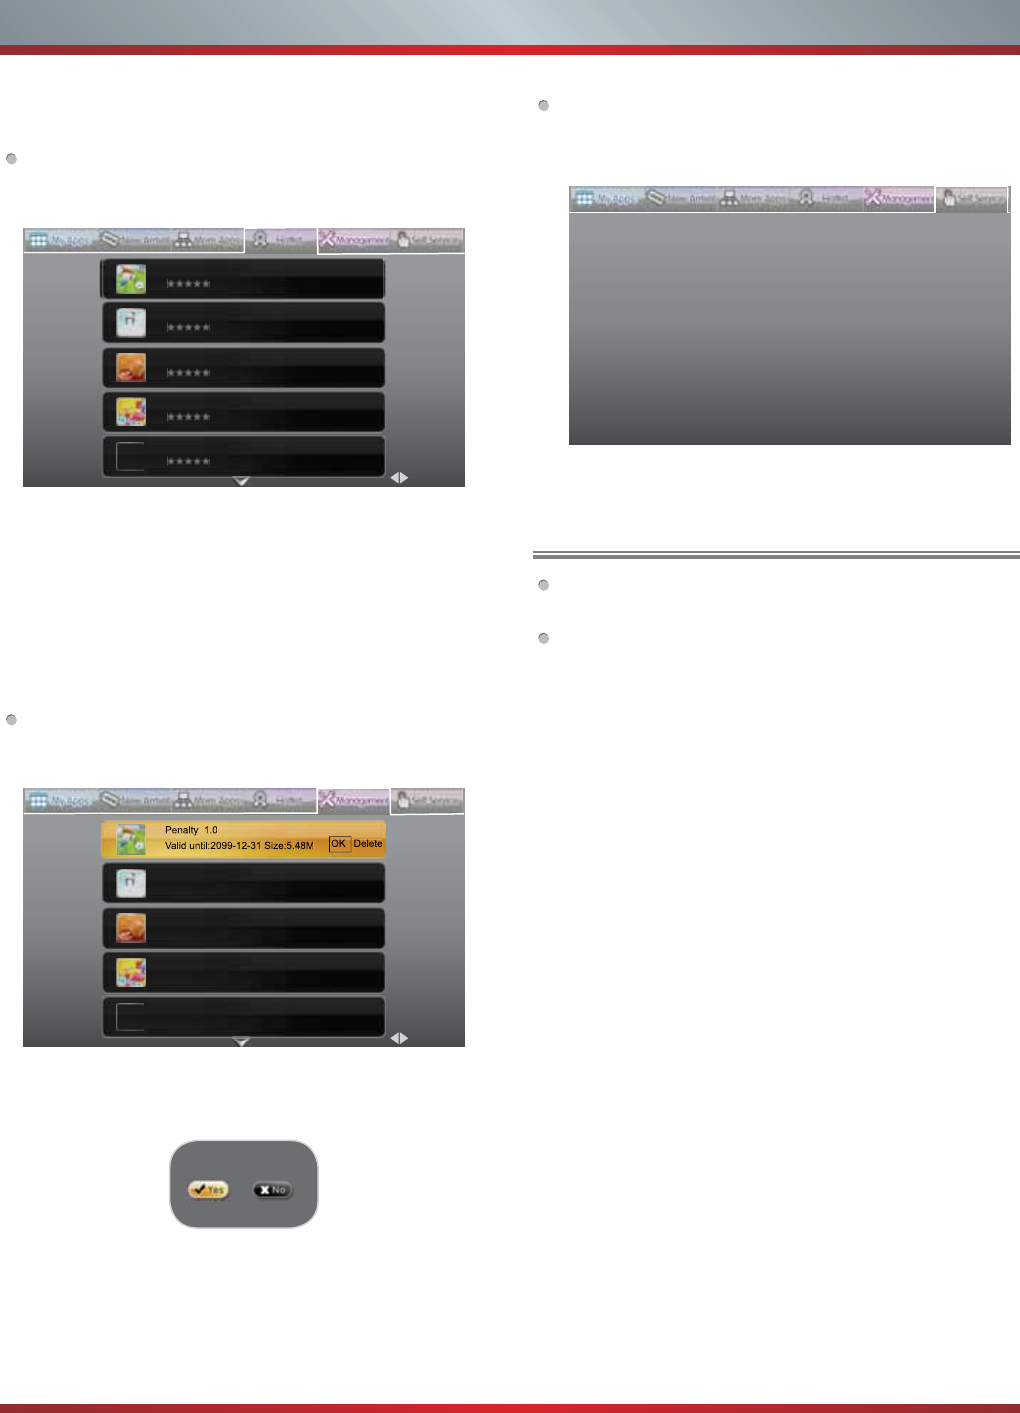
33
Advanced Features
If
installed, the applications will be shown in My Apps
i
nter
f
ace.
H
ot
li
st:
1)
3
UHVV>Ż
Ź@WRVHOHFWWKHWLWOHR
I
+RWOLVWDQGSUHVV>ź
ENTER]
to enter
i
t.
2)
3
UHVV>Ż
Ź@WRSDJHXS
GRZQDQGSUHVV>Ÿ
ź@WRVHOHFW
th
e app
li
cat
i
ons you want to
i
nsta
ll
an
d
press
[ENTER]
to
c
on
f
irm.
3)
P
ress
[ENTER]
to
i
nsta
ll
t
h
e app
li
cat
i
ons or press
[RETURN]
to return to t
h
e
H
ot
li
st
h
omepage.
If
installed, the applications will be shown in My Apps
i
nter
f
ace.
4)
P
ress
[RETURN]
to return to t
h
e t
i
t
l
e.
M
ana
g
ement:
1)
3
UHVV>ŻŹ@WRVHOHFWWKHWLWOHRI0DQD
J
HPHQWDQGSUHVV
>
ź(17(5
@
WRHQWHULW
2)
3
UHVV>ŻŹ@WRSD
J
HXSGRZQDQGSUHVV>Ÿź@WRVHOHFW
t
he applications
y
ou want to delete.
3)
P
ress [ENTER] to displa
y
the menu.
4)
3
UHVV
>
ŻŹ
@
WRVHOHFW<HV1RDQG
S
UHVV
>
(17(5
@
WR
de
l
e
t
e
.
5)
P
ress
[
RETURN
]
to return to the title.
Are you sure?
S
el
fS
ervice
:
3
UHVV>Ż
Ź@WRVHOHFW WKH WLWOHR
I
6
HO
I6
HUYLFHDQGSUHVV
[
ENTER] to view the service in
f
ormation.
V
U
D
U
custo
m
e
r
ca
r
e
: To learn more about VUDU
,
visit
t
he frequentl
y
Asked questions at www.vudu.com/support.
1
HW
À
L[FXVWRPHUVHUYLF
H
:
U
S
:
(
866
)
716-0414
C
anada:
(
866
)
348-235
3
O
ther Information
Our Promise
Thanks for you and your family choose Hisense Smart TV, we will
continue to provide better and more services.
Service Information
If your TV meet quality problem, please kindly let us know, we will
make every effort to serve you.
Appstore Version
1.0.29.0
Device ID
861003009000006000000150FE1FC402
Penalty 1.0
Hitv Issued In 2012-01-07 1
Dress-up 1.0
Hitv Issued In 2012-01-07 2
DICE 1.0
Hitv Issued In 2011-12-13 3
Guess nu 1.0
Hitv Issued In 2012-01-12 4
Penalty 1.0
Hitv Issued In 2011-12-13 5
Page 1/2
Dress-up 1.1
Valid until:2099-12-31 Size:2.73M
DICE 1.0
Valid until:2099-12-31 Size:5.48M
Guess nu 1.0
Valid until:2099-12-31 Size:5.88M
Penalty 1.0
Valid until:2099-12-31 Size:1.66M
Page 1/2
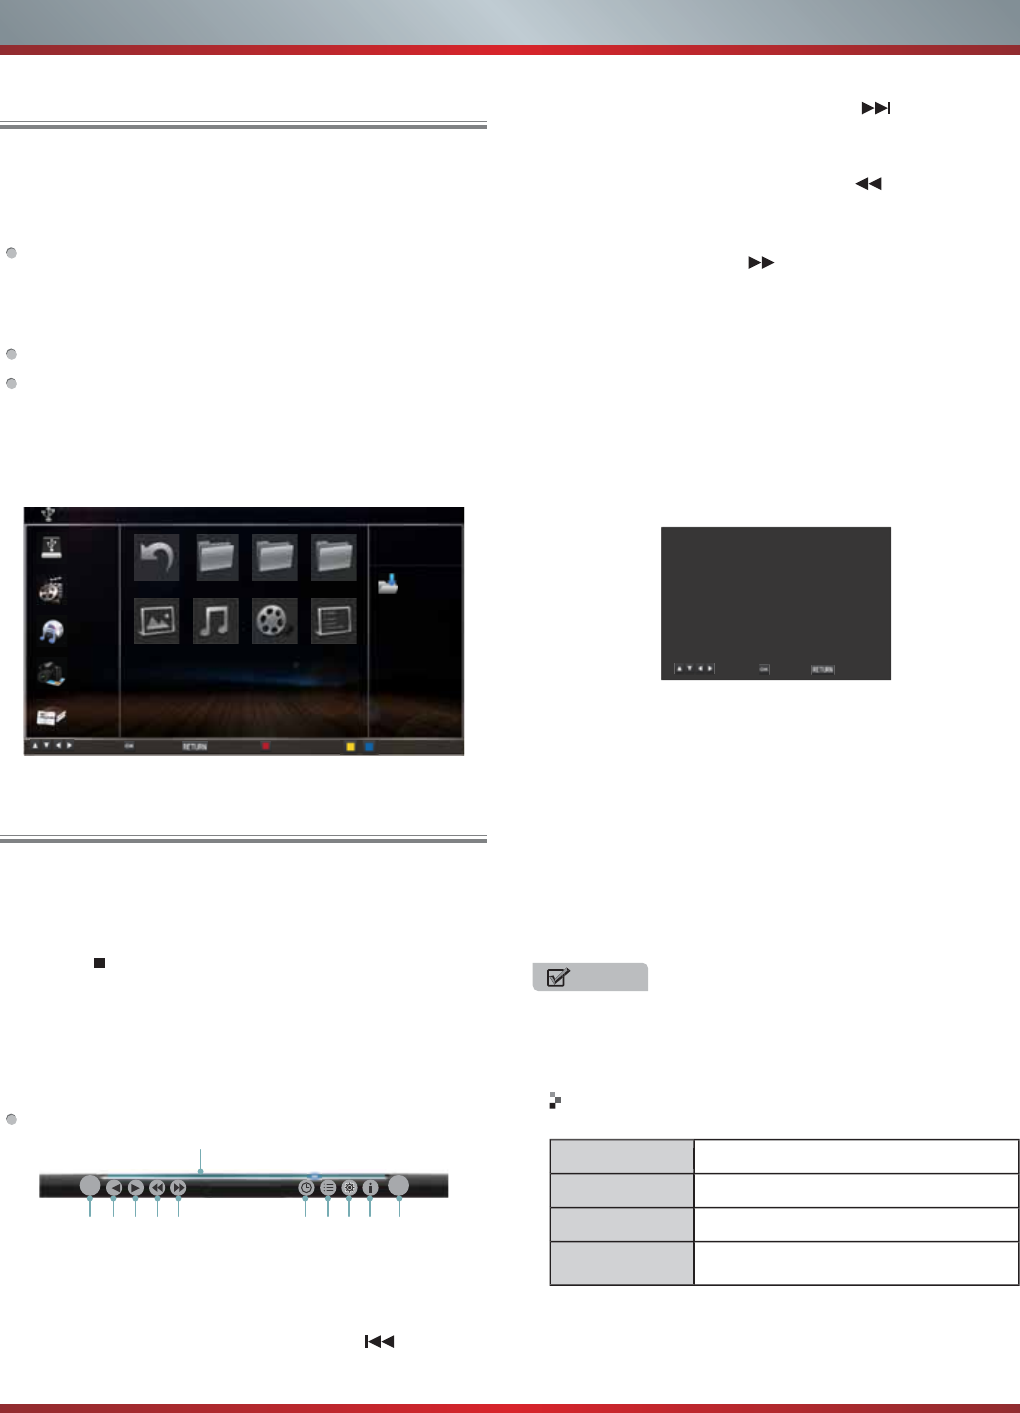
3
4
Advanced Features
1.
P
r
ess
[
RED
]
bu
tt
o
n t
o
s
wit
c
h t
o
All
o
r Vi
deo
.
2.
P
ress
[
Ÿ
Ÿ
/
Ÿ
/
Ÿ
]
to select the video
y
ou want to vie
w
.
3
.
P
ress [ENTER] to pla
y
the video.
4.
P
r
ess
[
/RETURN
]
to exit the video and return to the
prev
i
ous
di
rectory
.
5.
Press [ENTER] button to display/exit the video control
ba
r
.
6.
3UHVV>ŻŹ@EXWWRQWRVHOHFWWKHIXQFWLRQLFRQDQGWKHQ
press [ENTER] to confirm
.
Tool ba
r
1.
T
he pro
g
ress bar when pla
y
in
g
.
2.
3
OD
\
3DXVH<RXFDQSUHVV>Ź,,@GLUHFWO
\
WRSOD
\
SDXVH
wh
e
n th
e
r
e
i
s
n
o
co
ntr
o
l
ba
r
o
n th
e
sc
r
ee
n.
3
.
P
la
y
the previous video. You can press [
]
directl
y
to
a
chieve the function when no control bar displa
y
on the
sc
r
ee
n.
P
lease note that Hisense will not assume an
y
responsibilit
y
f
or an
y
lost data and cannot
g
uarantee perfect compatibilit
y
with all mass stora
g
e devices. Be sure to insert the USB
d
isk or mobile hard disk with standard USB2.0
p
ort.
P
ress
[INPUT]
b
utton to
di
sp
l
ay t
h
e
INPUT
menu, press
>
Ÿź@EXWWRQWRKL
J
KOL
J
KWWKH+L'03VRXUFHWKHQSUHVV
[
ENTER] button to confirm.
(
If
y
ou want to exit Hi-DMP,
y
ou can press [INPUT] button to switch to other sources
)
.
P
ress
[RED]
b
utton to sw
i
tc
h
t
h
e me
di
a type
I
LOWHU
.
P
ress [YELL
O
W
/
BLUE] to turn to the previous
/
next page.
1
.
3
UHVV>Ÿ
ź
Ż
Ź@EXWWRQWRVHOHFWWKH
I
ROGHU
I
LOH\RXZDQW
t
o open and then press [ENTER] to enter
/
play the
f
older
/
f
ile.
2
.
P
ress
[RETURN]
to return to t
h
e prev
i
ous
di
rectory.
Di
g
i
ta
l
M
e
di
a
Pl
ay
HU
E
n
j
o
y
Vid
eo
Fil
es
NO
T
E
Y
ou can press [ASPECT] button to chan
g
e the aspect
ratio
(
Normal, Full Screen, Ori
g
inal Size
)
while pla
y
in
g
t
h
e
vi
deo
.
DMP C:
Information
m.mp3
Select Enter Return Type Filter Page up/down
Return F1 F2 F3
P.jpg m.mp3 v.dat t.txt
All
Video
Music
Picture
Book
4.
Pl
ay t
h
e next v
id
eo.
Y
ou can press
[
]
to ac
hi
eve t
h
e
f
unction when no control bar display on the screen.
5
.
F
ast
b
ac
k
war
d
.
Th
en press
[ENTER]
to se
l
ect t
h
e
b
ac
k
war
d
spee
d
.
Y
ou can press
[
]
to achieve the
f
u
n
c
ti
o
n
.
6.
Fast forward. Then
p
ress
[
ENTER
]
to select the forward
s
p
eed. You can
p
ress
[
]
to achieve the
f
unction.
7
.
S
elect time to play
3UHVV>Ż
Ź@WRVHOHFWWKHSRVLWLRQ\RXZDQWWRVHW
3UHVV>a@WRVHWWKHWLPHDQGSUHVV>Ÿ
ź
Ż
Ź@WR
adj
ust
i
t.
3)
Press [ENTER] to con
f
irm and the video will to play at
th
e t
i
me you
h
ave set.
8
.
Pl
ay
li
st
3UHVV<HOORZ
%OXHEXWWRQWRSDJHDQGSUHVV>Ÿ
ź@WR
s
e
l
ect t
h
e v
id
eo.
2)
Press [ENTER] to con
f
irm. And press [Exit] to exit the
men
u.
9
.
O
ptions
3UHVV>Ÿ
ź@WRVHOHFWWKHRSWLRQVLQWKHPHQX
3UHVV>Ż
Ź@WRVHOHFWWKHVHWWLQJV
3)
Press [ENTER] to con
f
irm.
10
.
P
rogram in
f
o
A
llows you to view the program in
f
ormation.
11
.
S
top playback
Option Set
Repeat
Picture Mode
Subtitle Selection
AUDIO
Once
User
NO
I/I
Select Enter Exit
Pla
y
able format lis
t
Playable format
F
iles Format
Ph
o
t
o
J
P
G
M
us
i
c
M
p3
Vi
deo
Divx 3.11/4.x/5.1/6.0
,
Window
s
-
ED
I
A
Video v9
,
MPEG
2
1
2
3
4
5
6
7
8
9
1
0
11
00:00:36/00:20:01
I
II
I
̰
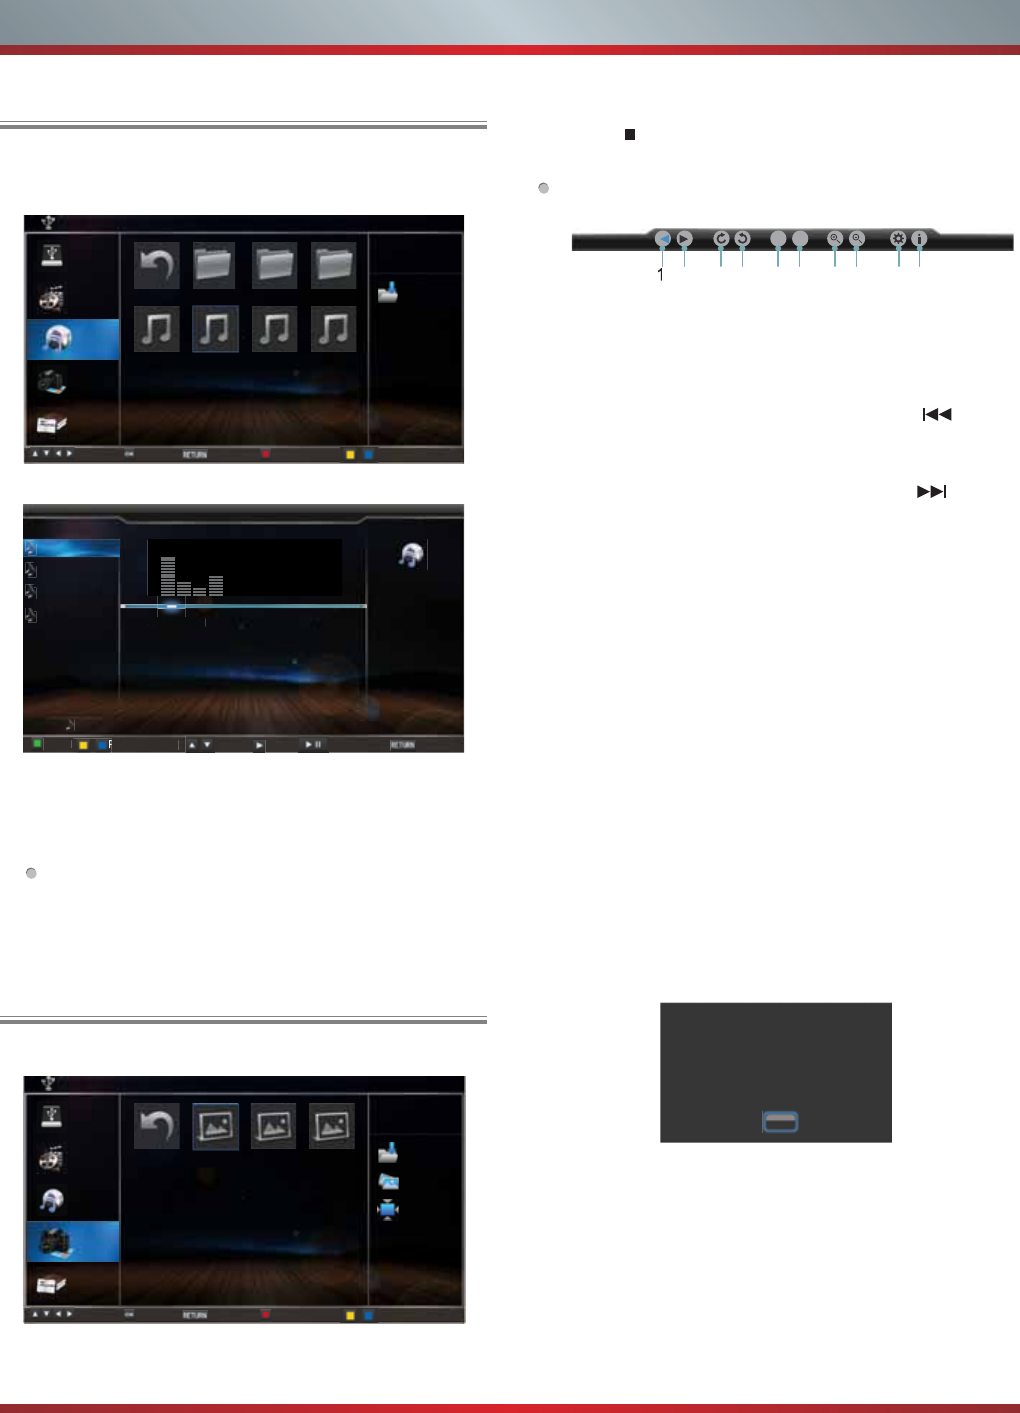
35
1.
P
r
ess
[
RED
]
bu
tt
o
n t
o
s
wit
c
h t
o
All
o
r M
us
i
c
.
2.
3
UHVV
>
Ÿ
/
Ÿ
/
Ÿ
/
Ÿ
]
to select the music
y
ou want to vie
w
.
3
.
P
ress [ENTER] to pla
y
the music.
4.
$
OOWK
H
V
RQ
J
VDUH OLVWHGRQWKHOHIW3UHVV
>
Ÿź
@
EXWWRQWR
VH
O
HF
WWK
H
VRQ
J
DQG
S
UHVV
>
Ź
@
EXWWRQWRPDUNLW<RXFDQ
p
ress
[
YELLOW/BLUE
]
button to turn to the
p
revious
/
n
ext pa
g
e.
Press [
G
REEN] button to select the Mode: Mark
/
All
/
S
ingle
.
5.
Press [RETURN] to exit the music playback inter
f
ace.
1.
P
res
s
[RED]
b
utton to sw
i
tc
h
to
All
or
Pi
cture
.
2.
3
UHVV
>Ÿ
/
Ÿ
/
Ÿ
/
Ÿ
]
to select the picture
y
ou want to view.
Advanced Features
E
n
j
oy
M
us
i
c
Fil
e
s
B
r
o
w
se
t
h
e
Pi
ctu
r
es
Current Playing: a3.mp3
a1.mp3
m.mp3
a2.mp3
a3.mp3
01/01
Mode: None
Status: Play
Title: a1
Artist:
Album:
Genre: Other
Year:
Duration:00:04:13
Next:
00:00:24/00:04:13
Mode Select Return
Mark Play/PausePage up/down
DMP C:\ music
Information
music
Select Enter Return Type Filter Page up/down
Return F1 F2 F3
a1.mp3 m.mp3 a2.mp3 a3.mp3
All
Video
Music
Picture
Book
DMP C:\ Picture
Information
Picture
jpg
257:383
Select Enter Return Type Filter Page up/down
Return 1.jpg 2.jpg 3.jpg
All
Video
Music
Picture
Book
3.
P
ress
[ENTER]
to
b
rowse t
h
e p
i
cture
.
4.
P
ress
[
/
RETURN] to exit the picture and return to the
prev
i
ous
di
rectory
.
T
oo
l
b
a
r
When browsin
g
the picture
s
Press [ENTER] button to displa
y
/exit the picture control
EDUDQG
S
UHVV
>
ŻŹ
@
EXWWRQWRVHOHFWWKHIXQFWLRQ LFRQ
and then
p
ress
[
ENTER
]
button to confirm
.
1.
Browse the
p
revious
p
icture. You can
p
ress
[
] button
directl
y
to achieve the function when no control ba
r
displa
y
s on the screen
.
2
.
Browse the next
p
icture. You can
p
ress
[
]
b
utton
directly to achieve the
f
unction when no control ba
r
di
sp
l
ays on t
h
e screen
.
3.
A
llows the picture to rotate
90
degrees clockwise.
4.
A
llows the picture to rotate
90
degrees anti-clockwise
.
5.
Play
/
pause. You can press [ENTER] button directly
w
h
en no contro
l
b
ar on t
h
e screen
.
6.
6
WRSEURZVLQJWKH SLFWXUH<RXFDQSUHVV>Ŷ@EXWWRQ
di
rect
l
y w
h
en no contro
l
b
ar on t
h
e screen
.
7.
Z
oom
i
n t
h
e p
i
cture.
8.
Z
oom out t
h
e p
i
cture.
9.
2
SWLRQ
6
HW3UHVV>Ÿ
ź@EXWWRQWRVHOHFWWKHRSWLRQVDQG
SUHVV>Ż
Ź@EXWWRQWRVHWWKHP
S
peed - Allows you to browse the picture at di
ff
erent
spee
d.
E
ff
ect - Allows you to set how the picture appears on
t
h
e screen
.
B
ac
k
groun
d
M
us
i
c -
All
ows you to en
j
oy t
h
e mus
i
c w
h
en
browsing the pictures i
f
it is set
O
n
.
10.
Picture in
f
o. Allows you to view the picture in
f
ormation.
Option Set
Speed
Effect
Background Music
Fast
None
Off
Enter
III ̰
2
3
4
5
6
7
8
9
1
0
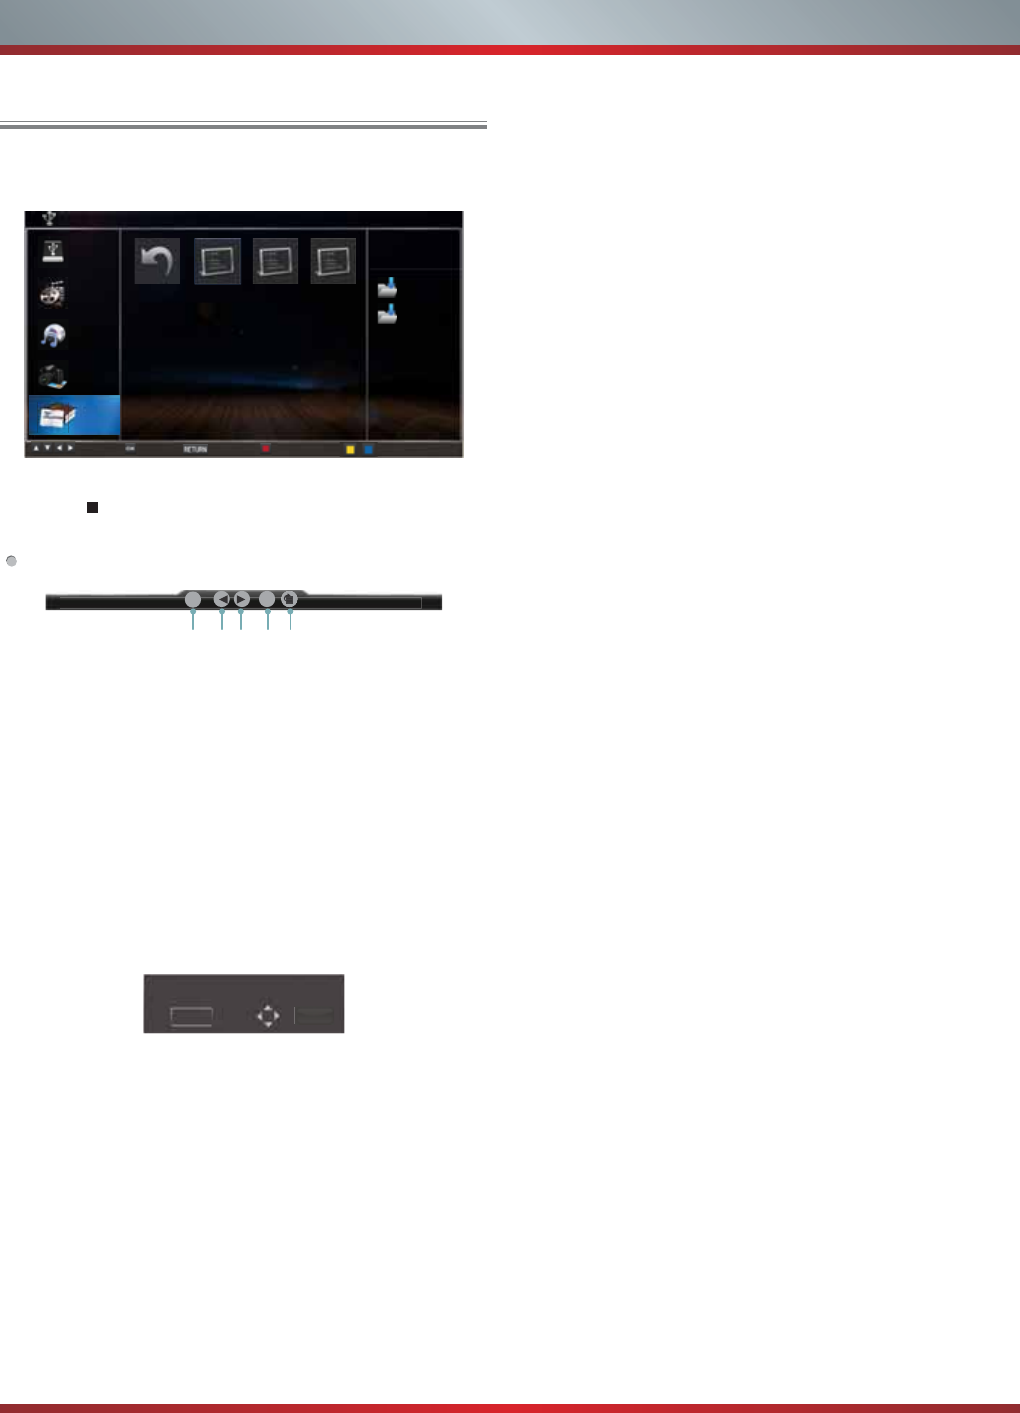
36
B
rowse t
h
e
T
ext
Fil
es
Advanced Features
1.
P
ress
[
RED
]
button to switch to All or Book.
2.
3
UHVV
>
Ÿ
Ÿ
/
Ÿ
/
Ÿ
]
to select the text
y
ou want to view.
3
.
P
ress
[
ENTER
]
button to confirm.
4.
P
ress
[
/RETURN
]
to exit the text and return to the
previous director
y
.
T
oo
l
b
ar
:
KHQEURZVLQ
J
WKHWH[W¿OHV
W
hen no tool bar appears on the screen,
y
ou can press
>
Ÿź
@
WRPRYHWKHWH[WOLQHVX
S
GRZQ
3
UHVV>(17(5@WRGLVSOD
\
H[LWWKHWRROEDU3UHVV>ŻŹ@
t
o select the correspondin
g
icons and then press
[
ENTER
]
to confirm.
1.
S
top/resume automatic pa
g
e
2.
V
iew the previous pa
g
e.
3
.
V
iew the next pa
g
e.
4.
S
top browsin
g
.
5
.
A
llows
y
ou to select pa
g
e to view.
3UHVV>a@EXWWRQVWRLQSXWWKHSD
J
HRUSUHVV>Ÿź@
t
o ad
j
ust it.
3UHVV>ŻŹ@ WR VHOHFW (QWHUDQGSUHVV>(17(5@WR
co
nfirm.
DMP C:\TXT
Information
TXT
Select Enter Return Type Filter Page up/down
Return 1.txt 2.txt t.txt
All
Video
Music
Picture
Book
Goto Page
0000 Enter
1.txt 1/16 Status:Play
2
1
3
4
5
I
I
̰
II
37
Other Information
Trouble Shooting
When something appears wrong with your TV refer to below chart. If the proposed remedy’s do not work , then unplug
the AC cord from wall, wait at least 60 seconds, plug AC back in and then turn on the TV. If the problem still cannot be
solved, please contact the help line provided on the warranty card or a professional technician.
SYMPTOMS POSSIBLE SOLUTIONS
No sound or picture.
Check if the power cord is plugged into AC outlet and if it has electricity.
Check if you have pressed [POWER] button on the TV or [POWER] button on the remote
control.
Check to see if LED light is either red or blue. If illuminated, power to TV is OK.
I have connected an external source
to my TV and I get no picture and/or
sound.
Check for the correct output connection on the external source and for the correct input
connection on the TV.
Make sure you have made the correct selection for the input mode for the incoming signal.
When I turn on my television, there
is a few second delay before the
picture appears. Is this normal?
Yes, this is normal. That is the TV searching for previous setting information and initializing the
TV.
Picture is normal, but no sound. Check the volume settings.
Check if Mute mode is set “on”.
Sound but no picture or black and
white picture.
If black and white picture first unplug TV from AC outlet and re-plug after 60 seconds.
Check Color Setting if picture is black and white.
Sound and picture distorted or
appear wavy.
An electrical appliance may be affecting TV set. Turn off any appliances, if interference goes
away, move appliance farther away from TV.
Insert the power plug of the TV set into another power outlet.
Sound and picture is blurry or cuts
out momentarily.
If using an external antenna, check the direction, position and connection of the antenna.
Adjust the direction of your antenna or reset or fine tune the channel.
Horizontal/vertical stripe on picture
or picture is shaking. Check if there is interfering source nearby, such as appliance or electric tool.
The plastic cabinet makes a “clicking”
type of sound.
“Click” sound can be caused when the room temperature changes. This change causes the
television cabinet to expand or contract, which makes the sound. This is normal and the TV is OK.
Black square appears in the center
of my television screen?
The Closed Caption function is set in the text mode. To remove it, access Closed Caption from
the menu screen and change the Mode setting from text to either CC1 or off .
On some channels getting another
language or sometimes no sound at
all.
That would indicate that the MTS mode on your unit is set to “SAP” mode. We suggest setting
the MTS mode to either “Stereo” or “Mono”. For further instruction, please see “MTS” in your user
manual.
SAP is Second Audio Program. It’s a second audio channel that is usually used for a second
language or descriptive audio for the visually impaired.
MTS stands for Multichannel Television Sound, a standard that allows the encoding of 3
channels of audio within a standard NTSC (analog) video signal to a television. A television that
is able to receive MTS Stereo allows you to watch television with stereo sound.
Not getting all of my cable channels
on the television or I'm only getting
13 channels.
Check the cable connection for an incoming signal. The best way to confirm signal is to use another
TV and/or contact your cable company.
[CH
V
/ V] don't work when I set the
Channel to Cable? They work with
the Air setting?
After switching to Cable, please auto program the channels. The TV will “remember” all the
channels then the TV will allow you to surf the channels with [CH
V
/ V] buttons.
38
Other Information
SYMPTOMS POSSIBLE SOLUTIONS
Remote control does not work.
Confirm that TV still has power and is operational.
Change the batteries in the remote control.
Check if the batteries are correctly installed.
If using a universal remote, be sure to select the TV mode on the remote.
If the remote still does not work:
-remove and reinstall the batteries correctly to reset the remote or install new batteries.
-press TV and then Power to turn on the TV. With a universal remote if you have reset or
changed the batteries you will need to reprogram the remote for the other units.
Network connection fail.
Check network physical connection, make sure connection is correct.
Enter “Menu”,”Settings”,”Network”,”Configuration” , make sure configuration is correct according
to your network service provider.
Enter “Menu”, “Settings”, “Network”, “Configuration”, “Connection Test” to make sure that
network connection test is successful.
Connect VUDU/Netflix fail.
Check network connection is correct, both physically and configuration.
Enter “Menu”, “Settings”, “Network”, “Configuration”, “Connection Test” to make sure that
network connection test is successful.
For VUDU: Enter “Menu”, “Settings”, “Network”, “Configuration”, “Applications”, “VUDU”,
“Deactivation” to reset VUDU account.
For Netflix: Enter “Menu”, “Settings”, “Network”, “Configuration”, “Applications”, “Netflix”,
“Deactivation” to reset Netflix account.
Log out VUDU/Netflix or change log
in account.
For VUDU:
1. Press [EXIT] button on remote to exit VUDU.
2. Enter “Menu”, “Settings”, “Network”, “Configuration”, “Applications”, “VUDU”, “Deactivation”
to reset VUDU account.
For Netflix:
1. Press [EXIT] button on remote to exit VUDU.
2. Enter “Menu”, “Settings”, “Network”, “Configuration”, “Applications”, “Netflix”, “Deactivation”
to reset Netflix account.
DLNA does not work.
Check network connection is correct, both physically and configuration.
Make sure DLNA server (PC or Mac) has shared media content and TV has permission to
access shared media.
Enter “Menu”, “Settings”, “Network”, “Applications”, turn on “DLNA”.
Select Hi-DMP source to find shared contents. Select “Hi-DMP” source by using [INPUT] button
on remote or press [Hi-Smart] button and then select “Multi-Media” Icon.
How do I get the Hi-Smart Hub to
work on my TV?
You need a broadband (high speed) Internet service with a speed of no less than 1.5 Mbps.
Connect the TV to the Internet through your router by an ethernet cable or wireless connection.
If the connection fails, check with your internet service provider or router manufacturer to
determine if there is a firewall, content filter, or proxy settings that may block the TV from
accessing the Internet.
After connecting the TV to the Internet, press the [Hi-Smart] button on the remote to access the
Hi-Smart Hub.
Caution: Do not try to repair the TV yourself. Refer all servicing to qualified repair personnel.
39
Other Information
General
NOTE
Features, appearance and specifications are subject to change without notice.
Model Name 42K316DW 46K316DW 50K316DW
Dimension
Without
Stand (986×600×58 mm)
38.8×23.6×2.3 in. 42×25.6×2.3 in.
(1075×649.5×59.5 mm)
45×27×2.2 in.
(1150×688×56 mm)
With
Stand
38.8×25.9×9.8 in.
(986×657×250 mm)
42×27.9×9.8 in.
(1075×708×250 mm)
45×29×11 in.
(1150×745×285 mm)
Weight
Without
Stand 34 lbs. (15.5 kg) 45 lbs. (20.5 kg) 46.2 lbs. (21 kg)
With
Stand 39.7 lbs. (18 kg) 50.7 lbs. (23 kg) 53 lbs. (24 kg)
LCD Panel Minimum size
(diagonal) 42 inches 46 inches 50 inches
Screen resolution 1920 × 1080 1920 × 1080 1920 × 1080
Audio power 8 W + 8 W 8 W + 8 W 10 W + 10W
Power consumption Please refer to the rating label.
Power supply AC 120 V ~ 60 Hz
Receiving
systems
Analog NTSC
Digital NTSC / ATSC / QAM
Environmental conditions
Temperature: 41°F ~ 95°F (5°C~ 35°C)
Humidity: 20%-80% RH
Atmospheric pressure: 86 kPa - 106 kPa
Component Input 480 I / 60 Hz, 480 P / 60 Hz, 720 P / 60 Hz, 1080 I / 60 Hz, 1080 P / 60 Hz
VGA Input VGA (640×480 / 60 Hz), SVGA (800×600 / 60 Hz), XGA (1024×768 / 60 Hz)
HDMI Input RGB / 60 Hz (640×480, 800×600, 1024×768)
The remote control requires:
Number of Batteries: 2
Type: AAA
YUV / 60 Hz (480 I, 480 P, 720 P, 1080 I, 1080 P)