Hisense Electric LCDD0027 Part15 Subpart B-LCD Monitor User Manual W9HLCDD0027
Hisense Electric Co., Ltd. Part15 Subpart B-LCD Monitor W9HLCDD0027
UserManual.wiki
>
Hisense Electric
>
LCDD0027 User Manual
W9HLCDD0027_User Manual
Navigation menu
Upload a User Manual
Namespaces
Wiki Guide
HTML
PDF
Info
Views
User Manual
Discussion / Help
Navigation


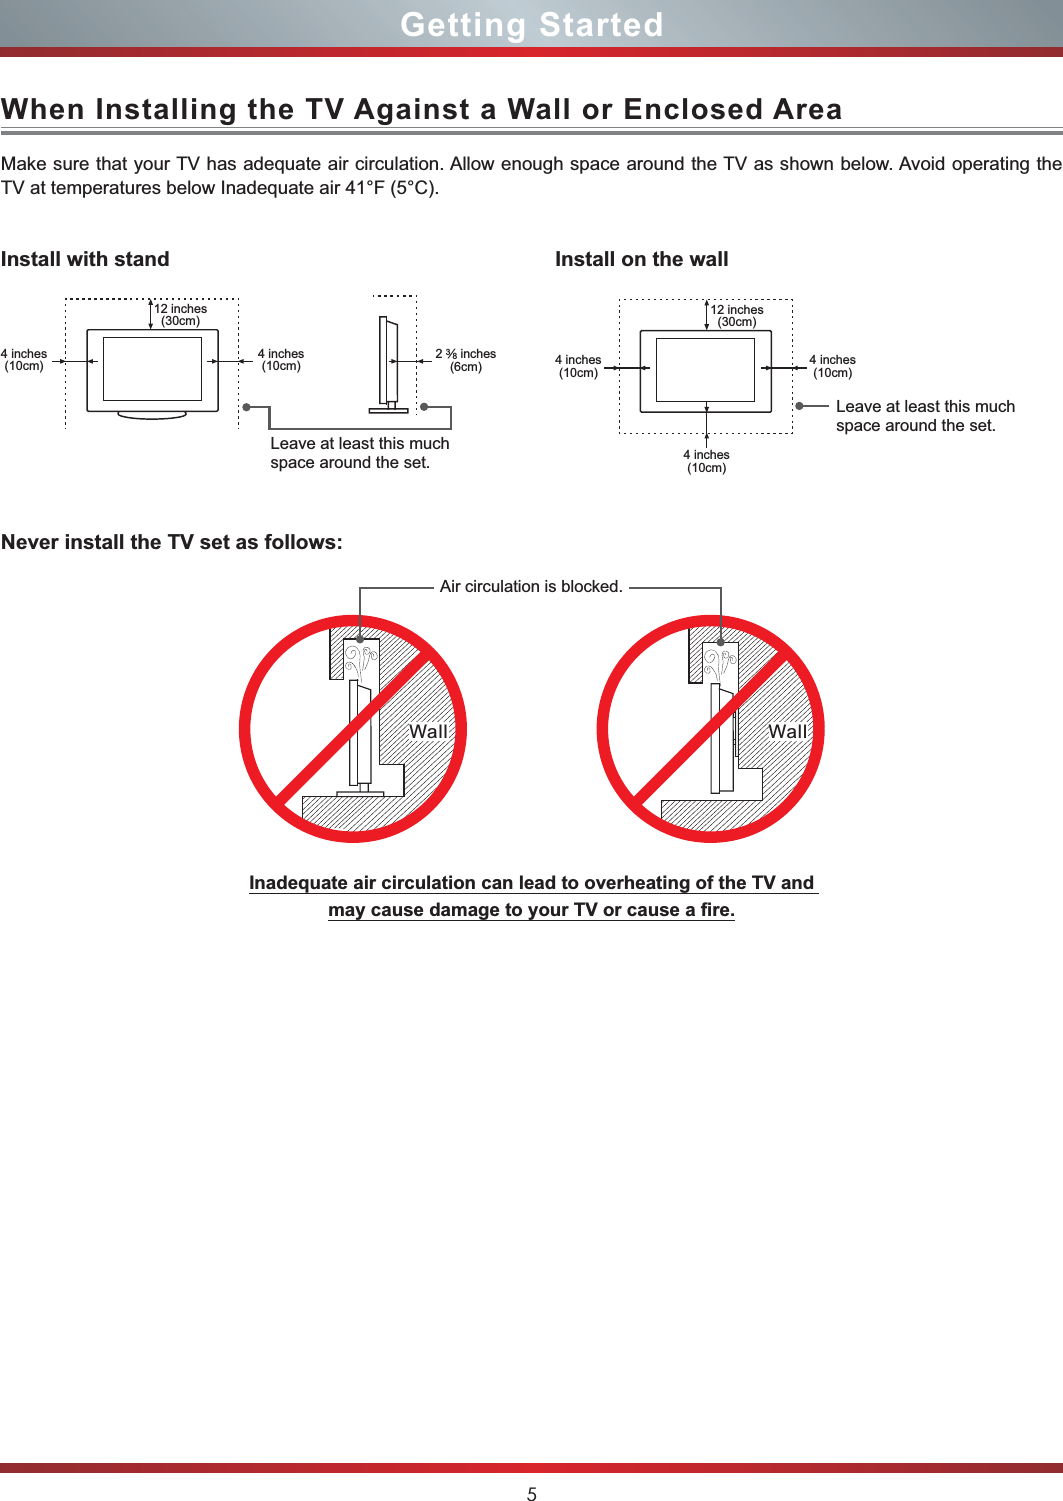
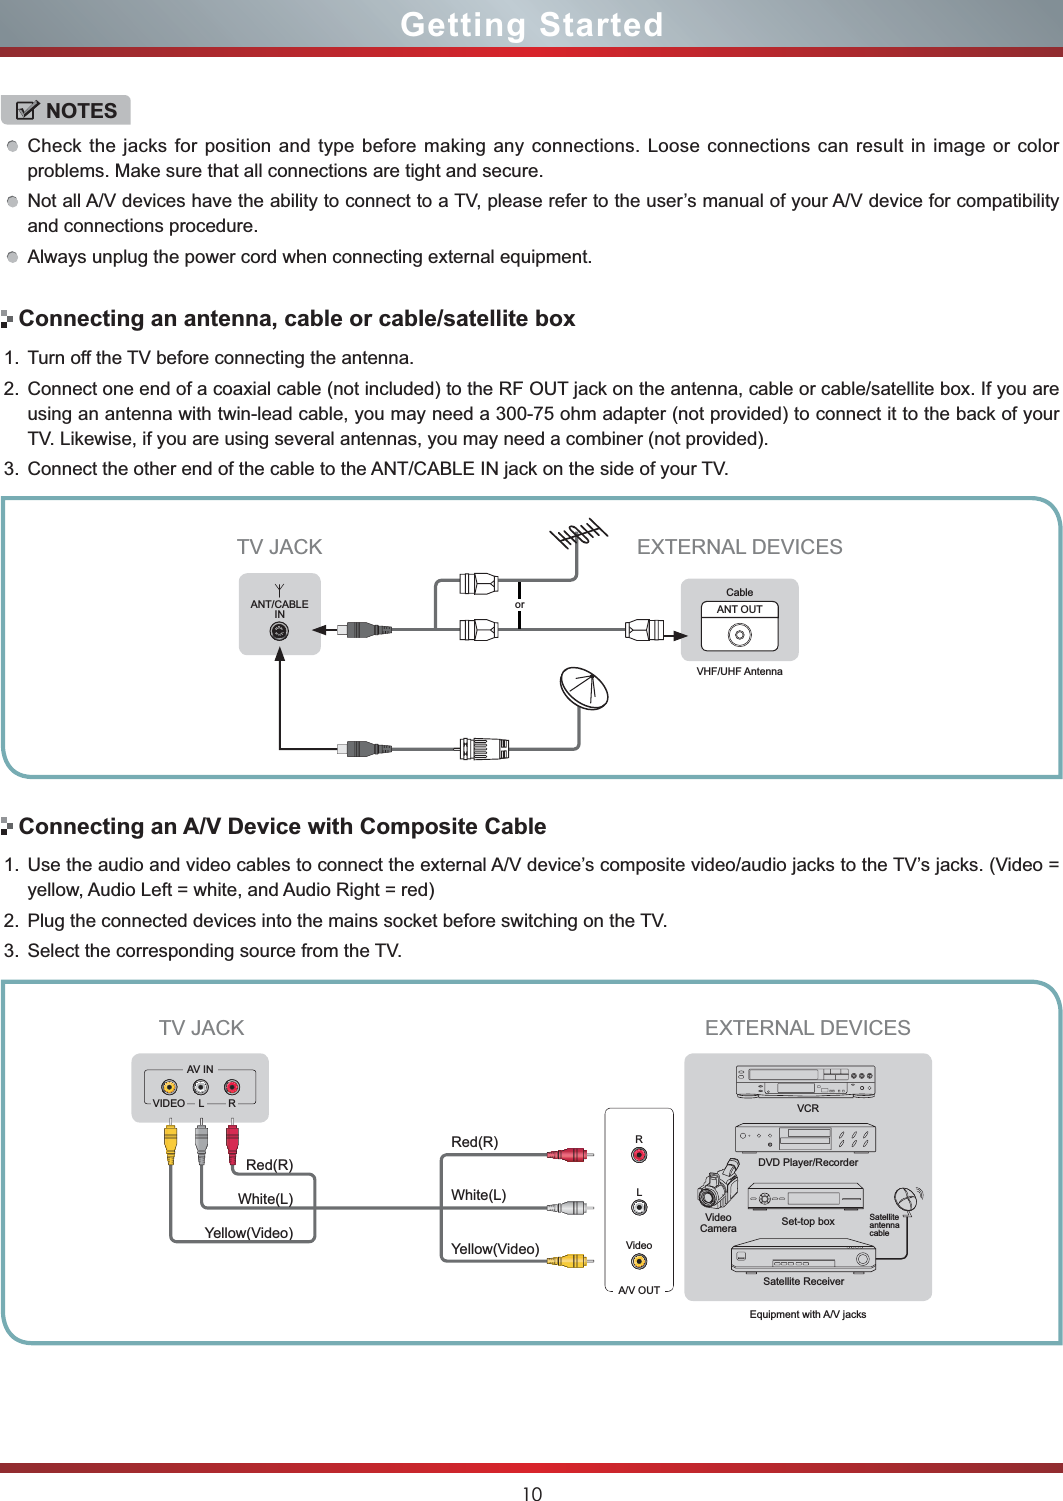
![8Getting StartedViewing the Remote ControlPairing the RemoteKeys at the back of the remote controlLaunch the ‘Favorite’ application to access your favorite channels and apps. For details, to see the following part of this VSHFL¿FDWLRQ)DYRULWHOLVWSome of the buttons on the remote control support the IR remote and the Bluetooth remote, and some buttons only supports the Bluetooth remote. The buttons that only support the Bluetooth remote (e.g., the touch pad and the buttons on the back) should not be used before code matching. For convenience in using these buttons, you should carry out code matching operations during startup navigation. When these keys are not available and other buttons are available, you need to carry out code matching again. The code matching methods are shown as follows.If the remote failed to automatically pair with the TV, you can manually pair the devices by following the steps below: Functions keys printed in orange are accessed by pressing the ‘Fn’ (Function) key.Launch Google Chrome Launch the Quick Search1. Press [POWER] button, your TV turns on.2. Press and hold the red color [A] and [OK] remote control buttons simultaneously for 3 seconds. 3. When the green LED lights, release the buttons and wait for the TV to pair with the remote. 7KHJUHHQ/('RQWKHUHPRWHFRQWUROZLOOÀDVKWKUHHWLPHVZKHQWKHSDLULQJLVVXFFHVVIXOO\completed.1. Press [Home] button. 2. Use [ŻŹ] buttons to highlight Settings and press [OK] button. 3. Use [ŸŸ] buttons to highlight Network and press [OK] button.4. Use [ŸŸ] buttons to highlight Bluetooth settings and press [OK] button.5. Use [ŸŸ] buttons to highlight Remote (if the remote had been previously paired) or Find nearby devices (if the remote has not previously been paired) and press [OK] button.+Q`W~T[Y]U{I}O\P|ASGHJ=-+ˈZXCVM;:/?FnEscέ1@2#3$45%^6&78*(9 0 )Tab'Enter-.FnCapsShiftWeb .comShift<PgUp PgDnOK<VOL-VOL+Zoom+Zoom-ήEXT3WRCtrlEXT23WRFavEXT EXTREDFBNKL](https://usermanual.wiki/Hisense-Electric/LCDD0027/User-Guide-1936523-Page-13.png)
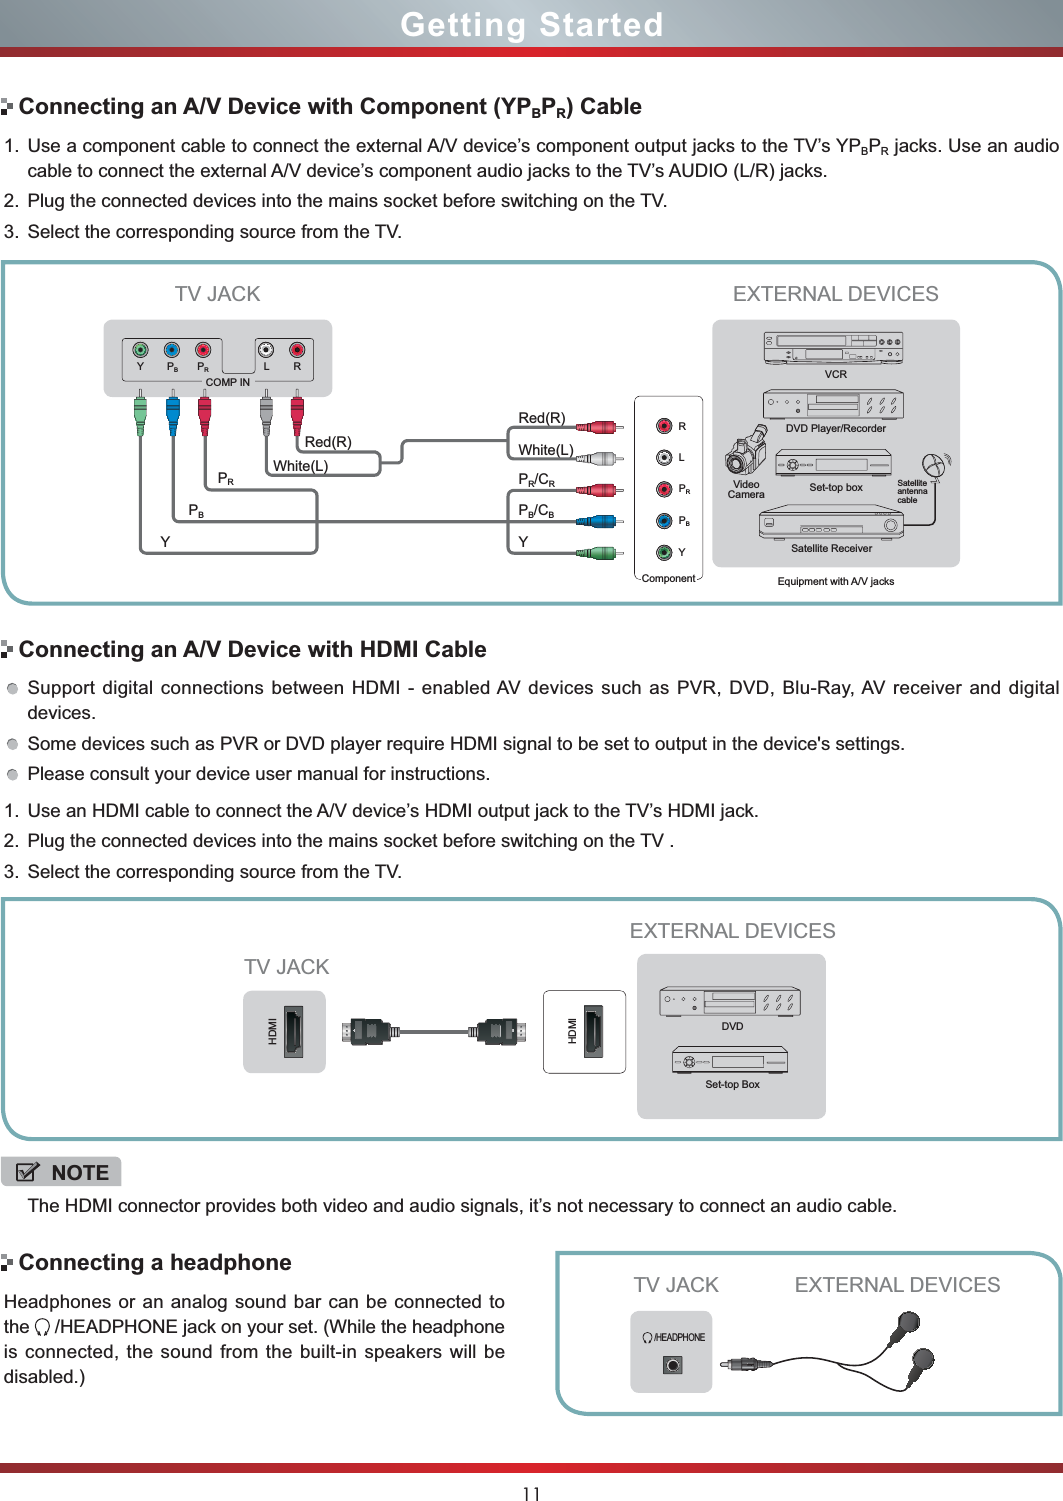
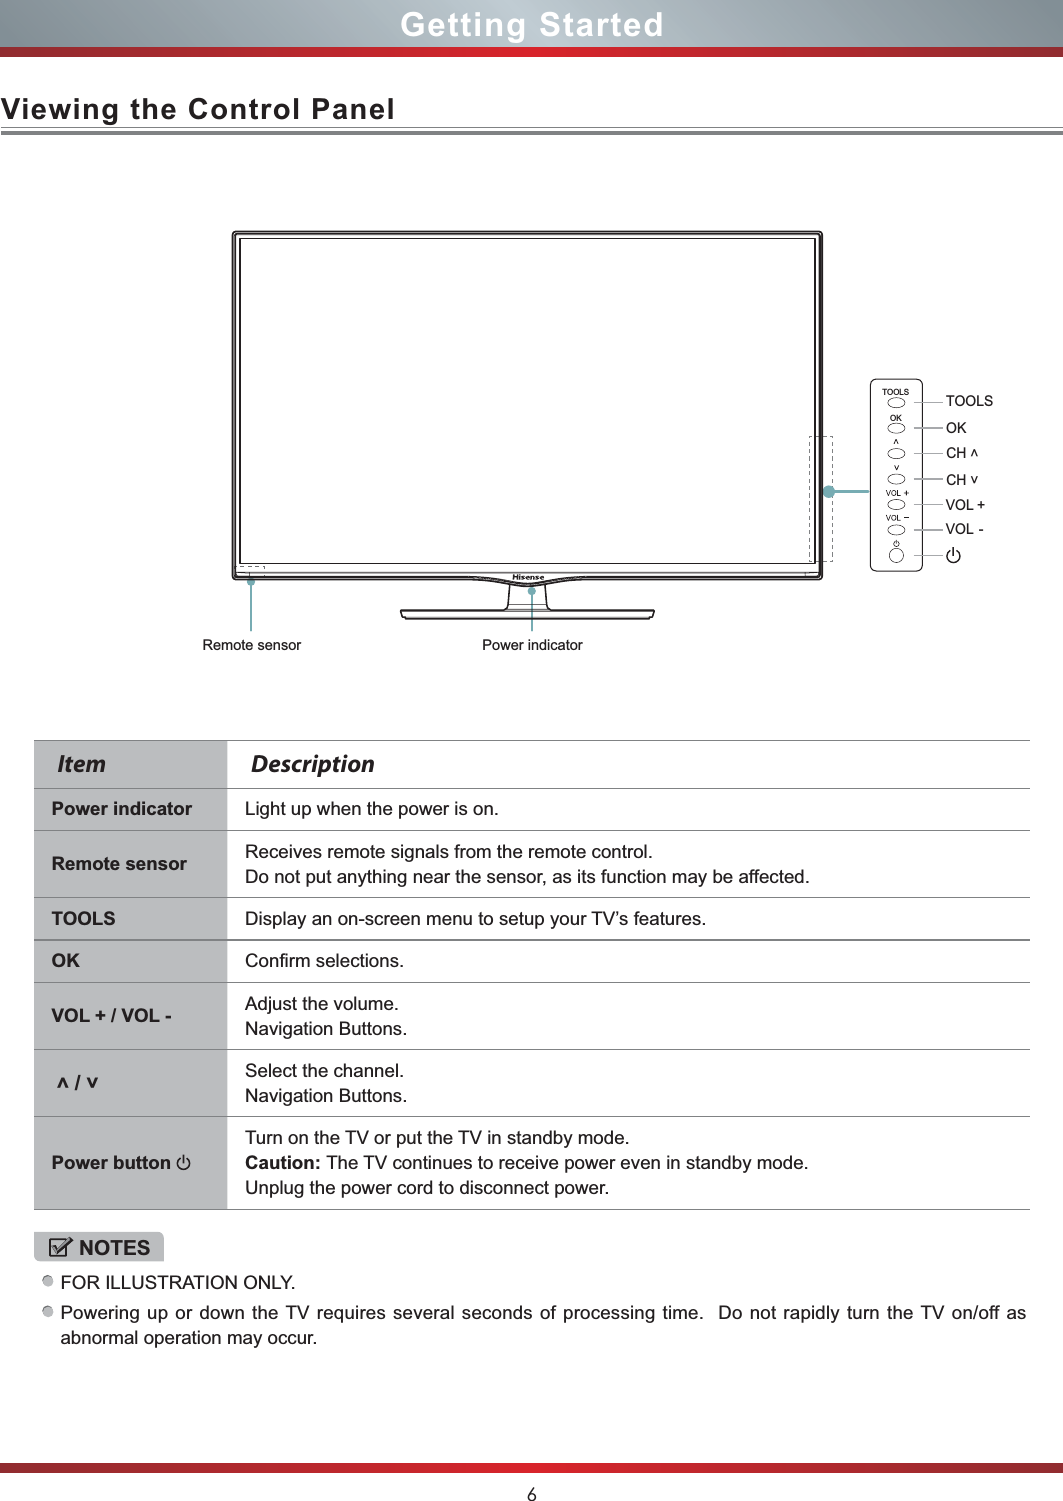
![14Getting StartedTo connect your TV to your network wirelessly, you need a wireless router or modem. See the illustration below. Hisense’s built-in Wireless LAN Adapter supports the IEEE 802.11 b/g/n communication protocols. Hisense recommends using IEEE 802.11n router. When you play the video over a IEEE 802.11b/g connection, the video may not play smoothly. NOTESYou must use the Hisense’s built-in Wireless LAN Adapter to use a wireless network, the set doesn’t support external USB network adapter.To use a wireless network, your TV must be connected to a wireless IP sharer. If the wireless IP sharer supports DHCP, your TV can use a DHCP or static IP address to connect to the wireless network.Select a channel for the wireless IP sharer that is not currently being used. If the channel set for the wireless IP sharer is currently being used by another device nearby, this will result in interference and communication failure.If you apply a security system other than the systems listed below, it will not work with the TV. If Pure High-throughput (Greenfield) 802.11N mode is selected and the Encryption type is set to WEP, TKIP or TKIP-AES (WPS2 Mixed) for your Access Point (AP), Hisense TVs will not support a connection in compliance with new Wi-Fi certification specifications.If your AP supports WPS (Wi-Fi Protected Setup), you can connect to the network via PBC (Push Button Configuration) or PIN (Personal Identification Number). WPS will automatically configure the SSID and WPA key in either mode.Connection Methods: You can setup the wireless network connection three ways. -Scan -Manual -AutoConnecting to a Wireless NetworkTo control other deviceWireless IP Sharer(Router)(with DHCP Server)LAN CableWireless LAN Adapterbuilt-in TV setThe LAN Port on the WallYou can control connected devices with TV remote control without using the remote control of each individual device.You can use CEC function or connect an IR Blaster to do this. We recommend the second way. CEC function can only use when your device is compatible with Control for HDMI. CEC1. Connect the TV to the AV receiver with HDMI connections.2. Set the CEC function of the Connected device. 3. Enter Settings < Local settings < HDMI settings.4. Press [OK] button to set Control for HDMI enabled.Device auto power off: To turn the AV Receiver off when turning off the TVTV auto power on: To turn the TV on when turning the AV Receiver onSystem audio control: Control the volume of the AV receiver with the volume key of TV remote control.Device list: List HDMI-controllable devices.](https://usermanual.wiki/Hisense-Electric/LCDD0027/User-Guide-1936523-Page-19.png)
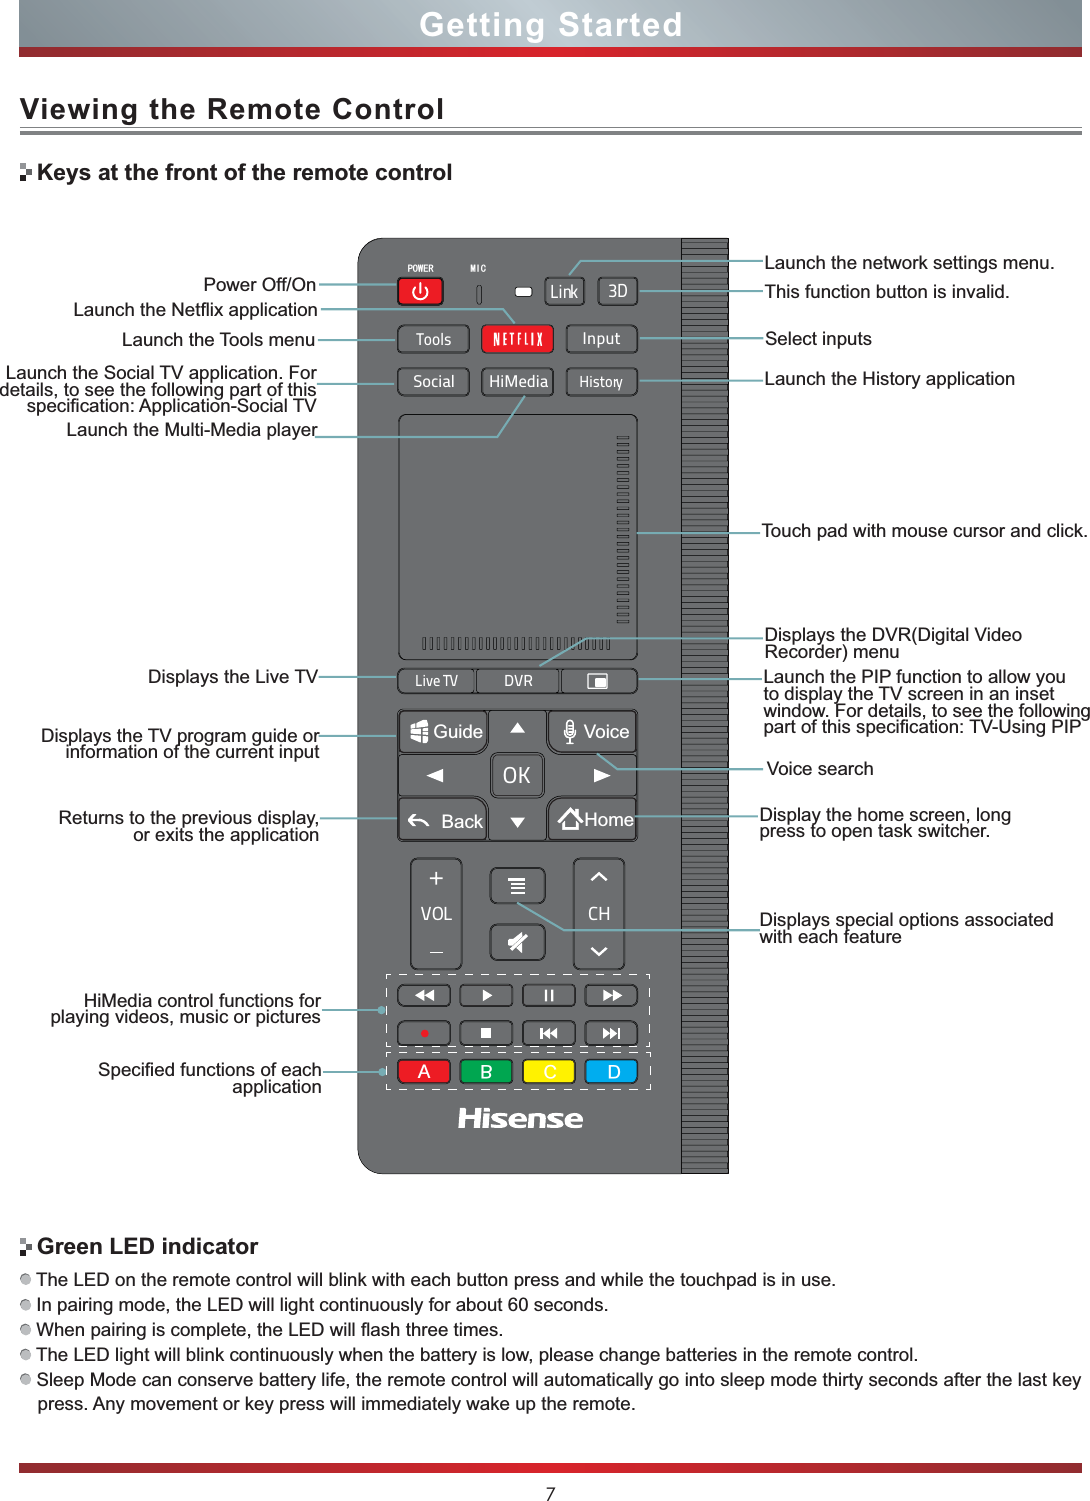
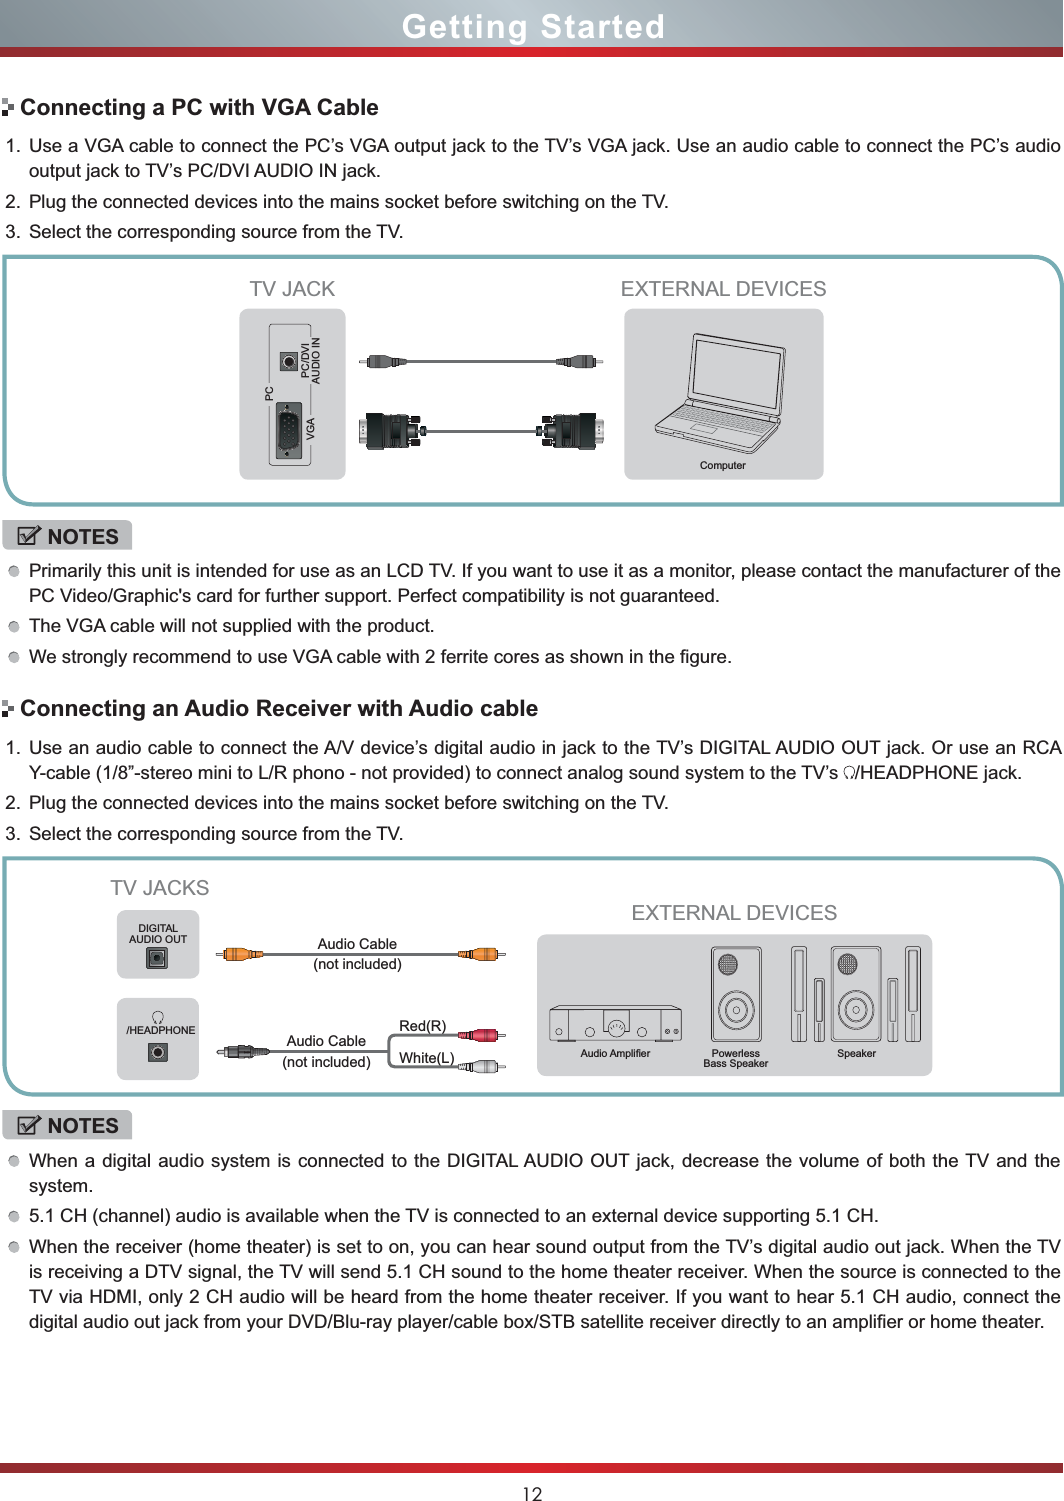
![15Getting StartedIR BLASTER5. Enter Settings < Video input < Configure the device, Select the input corresponding to the device and press the [OK] button, selecting make default TV. Or press the [input] button on the remote control, selecting the input corresponding to the device and then press the [menu] button and selecting set Live TV.IR BlasterYou can connect an IR Blaster to control the video input and audio amplifierTo control video input1. Connect an IR Blaster to the TV and place it properly on the device. 2. Enter Settings < Video input.3. Select Add device manually, then follow the on-screen instructions.4. Enter Settings < Video input < Configure the device, Select the input corresponding to the device and press the [OK] button, selecting make default TV. Or press the [input] button on the remote control, selecting the input corresponding to the device and then press the [menu] button and selecting set Live TV.5. Then, you can control the connected device with the remote control of the TV.To control audio amplifier1. Connect an IR Blaster to the TV and place it properly on the AV receiver.2. Enter Settings < Local settings < AV Receiver setting.3. Then you can set the IR Blaster to control your AV Receiver. The details will show on the options below. NOTETwo or more video input devices or two or more audio amplifiers/AVRs cannot be controlled simultaneously with IR Blaster. If you want to control a video input device and an audio amplifier/AVR simultaneously, please place the two devices close to each other.Device implementations MUST support at least one external IR blaster, so that the Google TV device may control upstream devices, such as DVRs, PayTV set-top-boxes and A/V receivers. Google TV devices SHOULD have an integrated IR blaster to simplify the user experience by avoiding the complexities of configuring an external IR blaster. Device implementations MUST have an IR code library able to provide Universal Remote Control functionality, and able to control PayTV set-top-boxes, TVs, AVRs, BD/DVDs and other devices prevalent in the geography where the Google TV device is sold. Device implementations SHOULD have an IR receiver to enable learning IR codes that are missing in the built-in IR code library.](https://usermanual.wiki/Hisense-Electric/LCDD0027/User-Guide-1936523-Page-20.png)
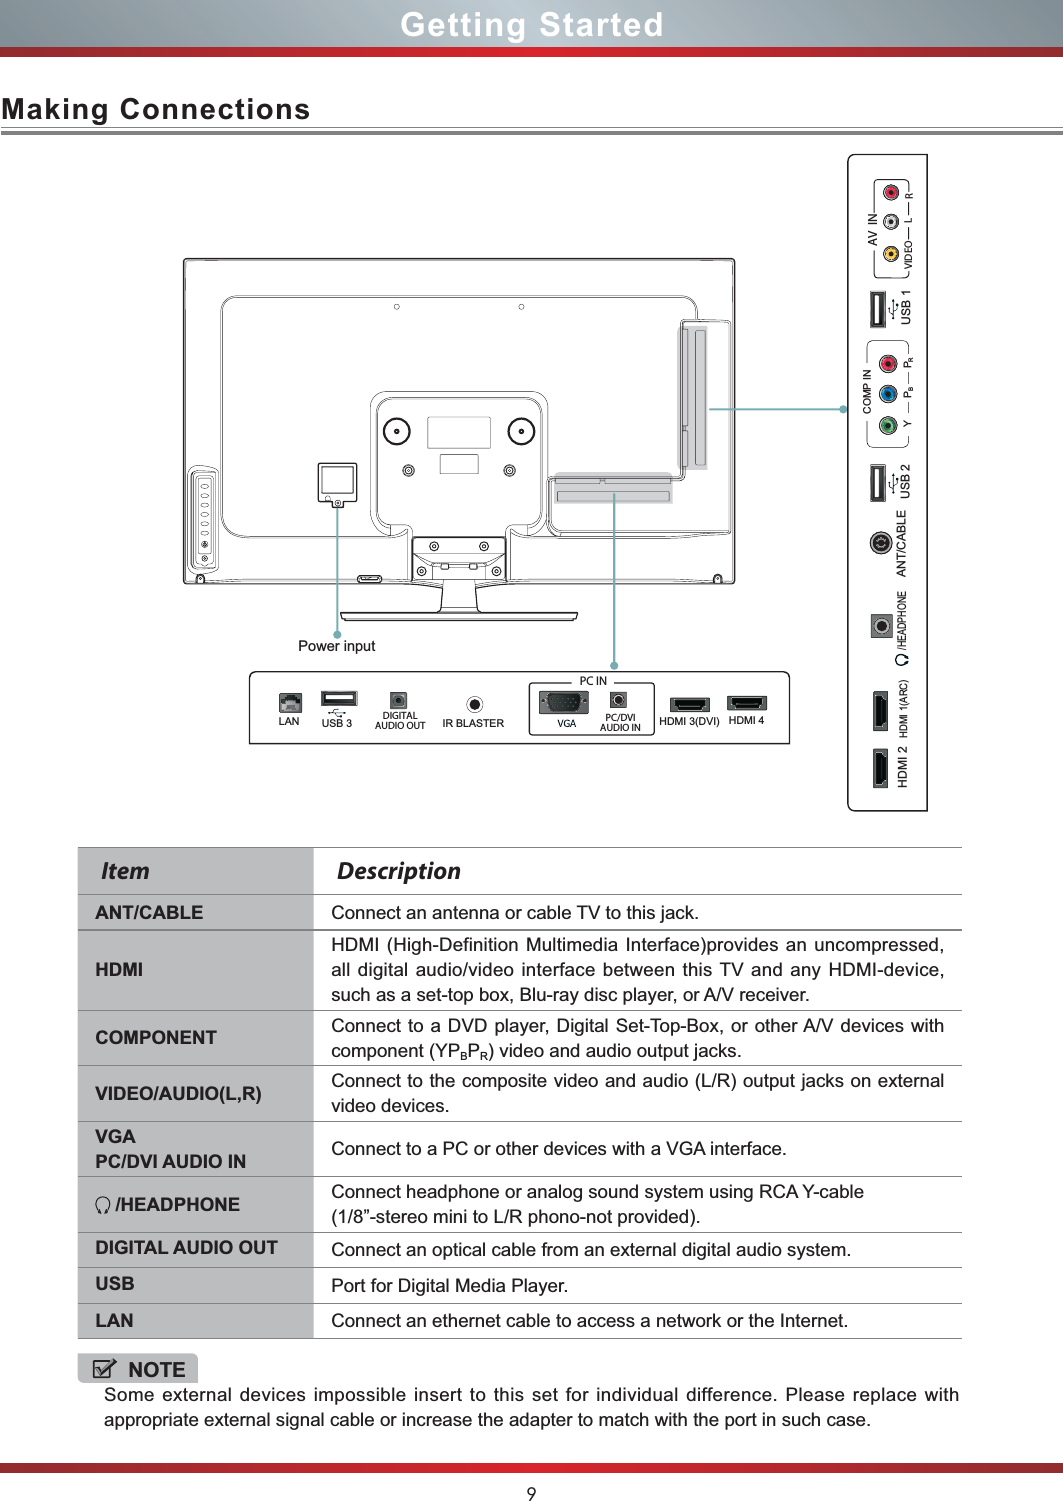
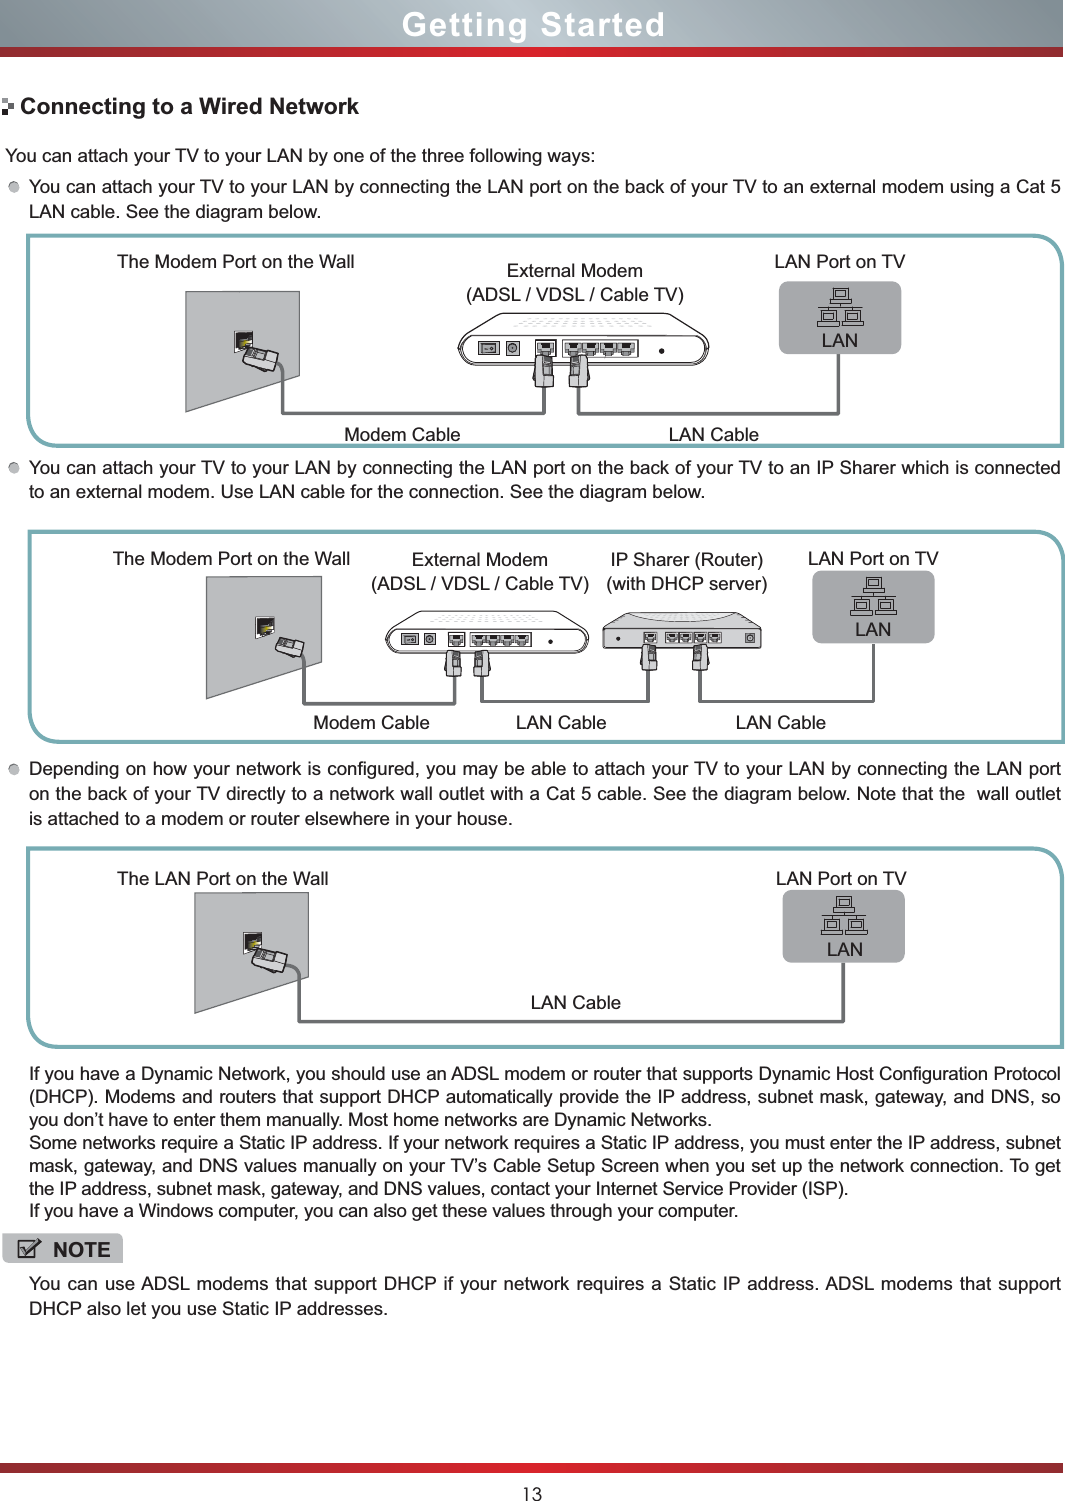
![16Basic Features1. Make sure that you have: Installed the remote control batteries.Connected an antenna or cable.Connected the power cord.Matched the remote control with TV.2. Press [POWER ] button to turn on your TV. 3. The Setup Wizard menu displays. Follow Step 1 through 10 in the Setup Wizard menu procedure.IMPORTANT: At first, you have to match the remote control with TV.To turn your TV on or off (standby mode):1. Plug the power cord into an AC power outlet.2. Press [POWER] button, your TV turns on. 3. Press [POWER] button again to turn off your TV. When you turn off your TV, it goes into standby mode.The Setup Wizard menu appears the first time you turn on the TV. It will assist you to specify the menu language, Picture Mode, Tuner Mode and Channel Installation.IMPORTANT: Make sure that the antenna or cable is connected and a wired or wireless Internet connection is available.Turning the TV On for the First TimeTurning the TV on or offWARNINGWhen your TV is in standby mode, it is still receiving power. To completely disconnect power, unplug the power cord.1. Press the [CH V/V] button on the TV/remote control to change the channel.2. Press the [VOL + / -] button on the TV/remote control to adjust the volume.3. Press the numeric buttons on the remote control to display the corresponding channels.Changing Channels / VolumeNOTEChanging the channels can also be achieved by directly entering the channel number using the numeric keys on the remote control. If you are entering a two or three digit channel number, the time between key presses should be less than 3 seconds.Follow the on-screen instructions to customize your TV settings according to your preferences.Pairing the remote controlStep 1Step 2Step 3Step 4Step 5Step 6Step 7Step 8Step 9Step 10Selecting Home or Store.Selecting menu language.Hisense legal informationConnecting to the Internet to Ethernet cable or wireless.Signing in with your Google AccountCheck the box to send the usage statistics and crash reports to Google automatically.Enter ZIP code so that you receive accurate programming information.Select the video input you use to connect your TV service to your TV.Select your Audio amplifier manufacturer. To control your receiver, connect the IR blaster.The initial settings are completed.Pairing remote controllerSelect usage patternsSelect menu languageLegal noticeConnect to the InternetGoogle AccountHelp make Google TV betterEnter ZIP codeSet up TV serviceSet up Audio Receiver controlThat’s it!Setup Wizard](https://usermanual.wiki/Hisense-Electric/LCDD0027/User-Guide-1936523-Page-21.png)
![17There are two modes of the home screen: Hisense Home and Google Bar. Press the [Home] button to call either of the two modes and select the Home Widget to switch between them.You can adjust:Home Widget - Click the icon to switches between Google Bar and Hisense Home.Notifications - Click on the notifications icon to display information about downloading applications, software updates, notifications regarding your account, etc.All Apps - All Apps contains all pre-loaded and downloaded items as well as Channel shortcuts (saved as ‘favorites’), Settings, and Downloads. For details, please refer to the part of this manual: Application.Settings - Change various settings for your Google TV. For details, please refer to the part of this manual: Settings.Weather - Display the weather information of the currently set city and select it to see the details.Time - Display the current time information and click to enter [Settings]- [Date, time & location]. Network State - Display the network connection and click to enter [Settings]- [Network]Live TV - Display the contents of Live TV. Click the window or press the Live TV key on the remote control to watch with full screen.AD - Display the AD informationApplications (shortcuts) - Select one to launch an application. You can customize the applications.Widgets - Widgets are an easy way to access some of your favorite apps. You can add/move/remove widgets in the Widgets area.Basic FeaturesHisense HomeGoogle barHome screenAccessing Home MenuPress [Home] button to access the Home menu.Live TVWidgetFrequently Used AppsRecommendationsApplications (shortcuts)TimeSettingsAll AppsNotificationsNetwork StateHome BarAD](https://usermanual.wiki/Hisense-Electric/LCDD0027/User-Guide-1936523-Page-22.png)
![18Basic FeaturesRecommendations - Display the recommended application and click each application icon to launch the application.Frequent used Applications - Display the first 10 applications that you use most and click each application icon to launch the application. The application in this area cannot be repeated with applications in other areas on the Home screen, which means the applications appearing in Recommendations / Home Bar will not appear in this area. When you add, remove or replace applications in the Home Bar, this area may be adjusted in accordance with the principle of not repeatable.Home Bar - As the same of Google Bar.When on Home, Pressing the [Menu] button brings up the Menu options.Customize home items - On Google Bar screen, you can customize home bar items, add/remove/move widgets. On Hisense Home screen, you can only customize home bar items. The items of Home Widget, Notifications, All Apps and Settings can’t be modified.Home and All Apps settings - Customize Home Background, app to launch at startup, etc.System settings - Settings such as Network, Picture, Sound, Applications, Accounts & sync, Privacy & safety, Accessibility, etc.Home Menu Options1. Press [MENU] button when the Home screen is displayed.2. Select Customize home items.To replace applicationsSelect the item you want to replace.Select Replace.Select the item you want to add instead.Select done.Customize home itemsTo remove an item / widget from the Home menuSelect the item / widget you want to remove.Select Remove from Home.Select done.To add items to the Home menuSelect an empty slot where you want to add the new item.Select the item you want to add.Select done.To change the position of menu itemsSelect the item you want to move.Select Move.Press [Ÿ/Ÿ] button to change the position.Select done.To add widgets to the Home screenSelect + add widget.Select the widget you want to add.Select done.To change the position of a widgetSelect the widget you want to move.Press [Ÿ/ŸŸŸ] button to change the position.Select done.You can select a wallpaper pattern.1. Press [Menu] button when the Home screen is displayed.2. Select Home and All Apps settings, then select Home Background.3 Select a Background pattern.If you register a startup application, that application launches when the Internet TV is turned on.1. Press [MENU] button when the Home screen is displayed.2. Select Home and All Apps settings, then select Startup application.3 Select an application.Changing the wall paperSelecting a startup application](https://usermanual.wiki/Hisense-Electric/LCDD0027/User-Guide-1936523-Page-23.png)

![20Setting up channels NetworkYou need to connect Cable / Antenna or the cable / satellite box to watch TV, then press [Input] button to set the TUNER source.To store channels automatically.1. Press [Home] button to access the Home menu. 2. 3UHVV>ŸźŻŹ@WRVHOHFWLive TV.3. Press [Tools] button to display the Tools menu.4. Go to Settings > Channel > Cable / Antenna / Box.5. Press [OK] button to start automatic tuning.The TV scans and saves available channels automatically.6. When you want to return to the previous menu, press [Back] button.NOTEWhen you press [CHV / V] button, your TV skips the channel you cancelled. You can still tune to the channel using the number buttons on the remote control.EthernetNot connectedWi-FiNot connectedBluetooth settingsAanage connections, set device name & discoverabilityStatusView detailed network statusNetflixCheck Esn or Reset NetflixNetworkSettingsUse the Automatic Network Setup while your connecting the TV to a network that supports DHCP. To set up your TV’s cable network connection automatically, follow these steps:How to set up automatically 1. Connect your TV to your LAN as described in the previous section. 2. Press [Home] button to access the Home menu.3. Go to Settings > Network > Ethernet.4. Set IP settings to Dynamic.Auto acquires and enters the needed Internet values automatically.5. When done, select Status to check the Internet connectivity. If the Network Function has not acquired the network connection values, go to the directions for Manual.Use the Automatic Network Setup when connecting your TV to a network that requires a Static IP address. To get the network connection values on most windows computers, follow these steps:Getting the Network Connection Values1. Press [Home] button to access the Home menu.2. Go to Settings > Network > Ethernet > Static.3. Set IP settings to Static, then pUHVV>Ÿź@EXWWRQWRVHOHFWLWHPDQGSUHVV>ŻŹ@EXWWRQWRPRYHWKHFXUVRUto the entry field. Then press 0~9 buttons to enter the numbers.4. When done, press [OK] button to confirm.EthernetGetting startedDigital auto scanChannel Number: 2Frequency : 57.0MHzAnalog Channels: 0Digital Channels: 0Auto channel search1%Press Back to stop current channel scanBackChannelAuto channel searchCablesearch from cableAntennaSearch from antennaBoxSwitch to box inputChannel ManagementSkip ChannelsManually skip channels in your program listFavorite ListAdd channel to favorite list](https://usermanual.wiki/Hisense-Electric/LCDD0027/User-Guide-1936523-Page-25.png)
![21You can select an available Wi-Fi network from the list of Wi-Fi networks found in your area or set up a new Wi-Fi network.How to set up1. Press [Home] button to access the Home menu.2. Go to Settings > Network > Wi-Fi3. A screen will appear listing all of the wireless networks ZLWKLQUDQJHRIWKH79 8VH WKH >Ÿź@ EXWWRQ WR VHOHFWthe wireless network with your router SSID and press [OK] button to confirm. 4. A screen will appear prompting you to enter the password for the selected security mode. Press [OK] button and an on-screen keyboard will pop up. Enter the password and select OK. Press [OK] to confirm.5. If you need to add Wi-Fi network, a screen will appear prompting you to enter the SSID of your wireless network. Press [OK] button and an on-screen keyboard will pop up. Enter the SSID and select OK. Press [OK] to confirm and a screen will appear prompting you select the security PRGHIRU\RXUZLUHOHVVQHWZRUN8VHWKH>Ÿź@EXWWRQto select the proper security mode and press [OK] to confirm.6. When done, press [OK] button to comfirm.Wi-FiSettingsDLNA SettingsComputer, TV and other digital devices can be connected via DLNA and they can share files with each other. You can use the TV set as a DLNA DMP (Digital Media Player) device to enjoy movies, pictures, music and other multimedia materials in your computer through DLNA connection.DLNA Setting needs to be set on TV and computer Respectively.1. To use DLNA to enjoy movies, pictures, music, you have to connect the TV into a network first.2. For more information on how to configure your network, refer to “Network”.- You are recommended to locate both the TV and the PC in same subnet. The first 3 parts of the subnet address of the TV and the PC IP addresses should be the same and only the last part (the host address) should be changed. 3. Using a LAN cable, connect between the external modem and the PC onto which Windows Media Player Manager Program will be installed.- You can connect the TV to the PC directly without connecting it through a Sharer (Router).Network SetupMedia Share Settings in ComputerIf your computer does not support DLNA, you may install software that supports DLNA such as TVersity or Windows Media Player. We recommend Windows Media Player as the installation and setup is easier.1. Start the Windows Media Player(V11 or higher).2. Click “Library” and then “Add to Library...”.3. The “Add To Library” will pop up on the screen. Click “Add”.4. Select a folder and click “OK”.5. Click “Close” to close the dialog.Set DLNA to On1. Press [Home] button to access the Home menu.2. Go to Settings > Network > DLNA switch.3. Press [OK] button to set DLNA enabled.](https://usermanual.wiki/Hisense-Electric/LCDD0027/User-Guide-1936523-Page-26.png)
![22Adjusting aspect ratioResize an image to view its optimal size while you are watching TV.1. Press [Home] button to access the Home menu.2. Go to Settings > Picture > Aspect ratio3. Press >Ÿź@EXWWRQWRVHOHFWWKHWRDVSHFWUDWLRPRGHthen press [OK] button to confirm.Zoom: Stretch the 4:3 aspect ratio image vertically and horizontally to fill the screen at 1:1.78 aspect ratio.Normal: The original 4:3 aspect ratio (1.33:1 signal) is preserved, so black bars are added to the left and right of the image. Standard TV broadcasts are displayed with a 4:3 aspect ratio.Wide: When watching a standard broadcast or full-frame movie in this mode, the display image is stretched proportionately to fill the TV screen. When watching a 16:9 widescreen program or movie, the display image fills the TV screen.Cinema: Stretch the 4:3 aspect ratio image vertically and horizontally to fill the screen at 1:2.35 aspect ratio. 1:1 Pixel Map: Displays the native signal format pixel-by-pixel without any video processing or scaling. In this mode, 1920 x 1080 resolution sources fill the screen while all other resolutions are centered and surrounded by black bars. Auto: Detects the incoming signal format and automatically selects the proper aspect ratio.1. Click “Library” and move the cursor to select “Media Sharing...”2. Click the box to select “Share my media” and click “OK”.3. An equipment icon will appear on the white area if the DLNA Settings has been correctly set. Select the appropriate icon and then click “Allow”.4. The TV now has access to the shared files on the computer.Settings to Share FilesSettings](https://usermanual.wiki/Hisense-Electric/LCDD0027/User-Guide-1936523-Page-27.png)
![23The first time you turn on your TV, you must select the TV signal source. Your TV stores this information, so you do not need to change the TV signal source unless it changes. For example, you change from an outside antenna to cable TV.1. Press [Home] button to access the Home menu.2. Go to Settings > Channel > Select Device.3. You can also access the input source by selecting [Input] button.4. 3UHVVWKH>Ÿź@EXWWRQVWRVHOHFWRQHRIWKHGHYLFHVDQGpress [OK] button.Edit the device name so that you can easily identify a device connected to each input source.1. Press [Home] button to access the Home menu.2. Go to Settings > Channel > Select Device.3. You can also access the input source by selecting [Input] button.4. 3UHVVWKH>Ÿź@EXWWRQVWRVHOHFWRQHRIWKHGHYLFHV\RXwant to edit.5. You should press [ ] button to Rename or Set Live TV.6. Press the [OK] button to confirm.Selecting the Input SourceSelecting an input sourceEditing input nameSettingsSelect DeviceTUNERCOMPOSITECOMPONENTVGAHDMI-1HDMI-2HDMI-3HDMI-4](https://usermanual.wiki/Hisense-Electric/LCDD0027/User-Guide-1936523-Page-28.png)
![24Google AccountThe TV uses Google ChromeTM as its web browser. You can access all your favorite websites with the Google Chrome web browser.1. Select the Google Chrome in Home or in All Apps, or simply type a URL or search query directly into the search bar. Use the SEARCH key to open the search bar.2. While using Google Chrome, press the [Menu] button to manage your browser windows, bookmarks, history, and more. Select Settings to configure your browser settings.To open a new window, press the [Menu] button, go to Windows > New window,or press [Ctrl + T] on your controller.To view all open windows,press the [Menu] button and select Windows.To reload a browser window,press the [Menu] button and then Reload or press [Ctrl + R] on your controller.A Google Account is a unified sign-in system that gives users access to free Google products such as Gmail, Reader, and YouTube.1. To set up Google TV, you will need to sign in with a Google Account. The account username is the email address you entered when you created your account. If you use Gmail, you can sign in with your Gmail username. .2. If you don’t have a Google Account, you can create one during the Google TV set-up process, or you can create one on computer and then use on Google TV.Changing Google Accounts1. To add or remove a Google Account from Google TV, go to Settings > Accounts & sync.2. To add a new account, select Add Account.3. To remove an account, click the account show in Manage Accounts , and then select Remove Account.4. Additional accounts can be used by applications like Photos and the Google Play.Additional Google Accounts added to the Google TV may be used to make purchases in the Google Play.All downloaded items are accessible in All Apps, regardless of the account used to download the item.Purchased items may be sent to other Android devices synced with the same Google Account.Getting startedBrowser windowsWhat is a Google AccountHow to use Google accountsGoogle Account detailsGoogle ChromeApplicationsNOTENote: A Google Account can, but does not have to be created with a Gmail address.pressselectororGoogle Account syncing can also be enabled forPersonalized recommendations in TV & MoviesBookmarks in Google ChromeThe Photos AppThe Podcasts App (Formerly Queue) does not support multiple accounts. Only the primary account on the Google TV will sync with Podcasts.](https://usermanual.wiki/Hisense-Electric/LCDD0027/User-Guide-1936523-Page-29.png)
![25Play StoreThe Google Play offers easy access to Android applica-tions available on Google TV. These have been created by developers all around the world, and have been rated by your fellow users.Google Accounts and Google Play1. Select the Play Store in Home or in All Apps. You can download applications and instantly use them on your TV. Downloaded applications are stored in All Apps.2. The first time you open the Play Store, you’ll be prompted to select your Google Account in case there’re more than two accounts. This will be the default Google Account for Play Store purchases and downloads.3. All items downloaded to your Google TV will be accessible under All Apps (press the [Home] button and select All Apps), regardless of which Google Account was used to download them.Downloading AppsFree Apps1. Navigate to an item you want to install and select. The item details screen will appear and you can read more about the item and its developer.2. If you want to install the item, select the INSTALL. Allow access appears.3. Select install to accept the permissions for the app, the item will start downloading immediately.Bookmarking allows you to save websites without hav-ing to remember URLs. Your web bookmarks are located within your Google Chrome browser for easy access while you’re surfing the web.To Bookmark a Webpage1. Open Google Chrome.2. Navigate to the webpage you want to bookmark.3. Press the [Menu] button and select Save.4. From the following menu, select Add to bookmarks. You can name your bookmark on the next screen.5. Select [OK] to save changesTo access your Google Chrome browsing history, press the [Menu] button and select History. To clear your history, select Clear history.To clear all browsing data, including clearing your cache, history and cookie data, press the [Menu] button and select Settings.If you don’t want your website visits to be recorded in your browser history, you can browse in incognito mode. To open a new incognito window, press the [Menu] button, select Windows, then select New incognito window or press [Ctrl + Shift + T] on your controller.Getting startedHow to download or remove appsGoogle Chrome shortcutsBrowsing historyBookmarksIncognito BrowsingApplicationsCtrl + R Reloads the current tab.&WUOŸ Zooms in&WUOź Zooms outCtrl + 0 Resets zoom level to 100%Ctrl + T Opens a new tabCtrl + Shift + T Opens a new tab in an incognito windowCtrl + W Closes the current tabCtrl + D Adds to Bookmarks or Home ScreenCtrl + F Opens the find on page barSpace bar Scrolls down the current web pageTo Delete a Bookmark1. Open your bookmarks using the steps above.2. Navigate to the bookmark you’d like to delete, then long-press (press and hold) the [OK] button on your remote.3. Select Delete bookmark.select selectorpress](https://usermanual.wiki/Hisense-Electric/LCDD0027/User-Guide-1936523-Page-30.png)
![26ApplicationsPaid Apps1. Navigate to an item you want to install and select. The item details screen will appear and you can read more about the item and its developer.2. If you want to install the item, select the BUY button.3. Press Continue to accept the permissions for the app.Removing Applications1. On your Android device, open the Google Play app and select My apps from the Google Play home screen. (On some devices, press [Menu] button and then select My apps)2. Select the item you’d like to uninstall.3. On the application home screen, select the Uninstallbutton.SearchTV & MoviesGoogle TV allows you to search Across Applications, Bookmarks, TV content, Web video, Web pages and Third-party content. You can also search for help infor-mation in this Help Guide.1. Press the [ Search] button on your remote control.2. Clicking on the search key opens Google TV search, and then input keywords to begin your search, then a drop-down list will display a selection of results.3. Navigate search results using the directional arrow keys, then press [OK] to select an option. You can also enter a URL into Google TV search to navigate directly to a website.Customize Search ResultsIt’s easy to configure your Google TV search experience to include results from TV & Movies, Apps, Podcasts, and more.1. Press the [ Search] button, type ‘Settings’, and select the Settings application.2. Select Search > Searchable items to customize what appears when you search.Safe SearchUse Safe Search to block adult content from appearing in search results.1. Press the [ Search] button, type ‘Settings’, and select the Settings application.2. Select Privacy & safety, navigate to Safety, and select SafeSearch.TV & Movies is the simplest way to find shows and movies to watch instantly. In addition to live TV, you can browse and search for video on demand options, and filter results by price (Free vs. All) and streaming quality (HD vs. all).1. Press the [Home] button and select TV & Movies.2. Once in TV & Movies, use the left navigation bar to filter by On TV,Shows and Movies.On TV: Use the top toolbar to filter live TV listings by time and quality (All or HD).Shows: Use the top toolbar to filter show by price (Free or All) and quality.Movies: Use the top toolbar to filter movie by price and quality.Getting startedTo access TV & Movies7R¿OWHUDYDLODEOH790RYLHV](https://usermanual.wiki/Hisense-Electric/LCDD0027/User-Guide-1936523-Page-31.png)
![27Basic FeaturesEnterring the HiMedia MenuThis function enable you to enjoy photos, music and/or movie files saved on a USB device.Connecting a USB DeviceConnect a USB device containing photo, music and/or movie files to the USB jack on the TV.Connecting to PC through a networkGetting startedHiMediaHiMedia1. 3UHVVWKH>+RPH@EXWWRQDQGSUHVVWKH>ŸźŻŹ@button to select HiMedia, then press the [OK] to enter.2. 3UHVV>Ÿź@EXWWRQWRVHOHFWDQLFRQPhoto, Video, MusicWKHQSUHVVWKH>Ź@EXWWRQWRHQWHU3. 3UHVV>Ÿź@EXWWRQWRVHOHFWWKH79PHPRU\RU86%memory. Press the [OK] button.This function differs depending on the Local / Home Network / Photo Apps (Only for Photo file type).Local - Show the content in USB devices.Home Network - Show the content in DLNA devices.Photo Apps - Start photo applications, such as Google Photo.HiMediaLocalVideoMusicHome NetworkStart photo applications, such as Google Photo.Show the content in DLNA devices.Show the content in USB devices.Photo AppsPhoto4. 3UHVV>ŸźŻŹ@EXWWRQWRVHOHFWWKHIROGHUILOH\RXZDQWto open and then press [ENTER] to enter/play the folder/file.5. Press [Back] to return to the previous directory.6. Press [OK] to play the file.7. Press [OK] button to display/exit the video control bar.Buttons available during playbackButton OperationsStarts or re-starts playback (video/music playback). Starts Slideshow or starts moving a panoramic photo (photo playback).Pauses playback (video/music playback). Fast forwards the title/track.Fast rewinds the title/track.Exit play mode and return to the previous menu.Stops playback. Stops Slide show or Image viewer, and returns to the file list (photo playback).Skips to the previous title (video playback)/track (music playback)/file (photo playback).Skips to the next title (video playback)/track (music playback)/file (photo playback).Playable format listFiles Format Playable formatPhoto JPGMusic MP3Video MPEG1(.dat), MPEG2(.mpg/.ts), XVID(.avi), H.264(.mov/.ts/.mkv)](https://usermanual.wiki/Hisense-Electric/LCDD0027/User-Guide-1936523-Page-32.png)
![29Advanced FeaturesNetflix1HWÀL[XQOLPLWHGPHPEHUVKLSUHTXLUHGInstantly watch thousands of TV episodes & movies streaming over the Internet from Netflix. Unlimited membership required.NOTESTV screen may be difference with picture.For more information on Netflix visit http://www.netflix.com/help or login to your Netflix account and click “Help” at the top of the page.Your broadband fluency and picture quality depend on the network speed and original bit rate.Illustrations are examples and may differ from the actual Netflix screens. The display and operations may change as a result of a software update. Use Netflix without configuring a proxy server. Part or all of Netflix may not be available when connecting to the Internet via a proxy server.Brief introduction1. Press the [Home] button to display home menu.2. 3UHVV>ŻŹ@EXWWRQWRVHOHFWWKH1HWIOL[LFRQDQGSUHVV[OK] to enter it, or press [NETFLIX] button to enter Netflix website directly. 3. Input Email and Password in following window to sign in.Operation instructions1HWÀL[0RYLHVKRPHSDJHTitle FunctionSuggestions for you The movies suggested for you by NetflixNew Arrivals The new arrivalsGenres Browse movies in different genresInstant Queue Your list of moviesSearch Search for available titlesWith YouTube you can watch original videos, music videos, feature length movies, shorts, and trailers on your TV screen. Search or browse the recommendations with the TV remote control.1. Press the [Home] button to display network hub.2. 3UHVV>ŻŹ@EXWWRQWRVHOHFWWKH<RX7XEHLFRQDQGSUHVV[OK] to enter it. YouTubeBrief introductionOperation introduction4. 3UHVV>ŸźŻŹ@EXWWRQWRPRYHWKHFXUVRUWRVHOHFWservice items in the Netflix home page, and [OK] button to confirm.5. In the process of watching a movie, press operational buttons to control the movie. 6. Press [Back] button to return the upper menu, or press [Home] button to close the menu.](https://usermanual.wiki/Hisense-Electric/LCDD0027/User-Guide-1936523-Page-34.png)
![301HWÀL[FXVWRPHUVHUYLFH:US: (866) 716-0414 Canada: (866) 348-2353Network Apps Service Information3. 3UHVV>ŸźŻŹ@EXWWRQWRPRYHWKHFXUVRUWRVHOHFWservice items in the YouTube home page, and [OK] button to confirm.4. Press [Back] button to return the upper menu, or press [Home] button to close the menu.](https://usermanual.wiki/Hisense-Electric/LCDD0027/User-Guide-1936523-Page-35.png)
![31Other InformationTrouble ShootingWhen something appears wrong with your TV refer to below chart. If the proposed remedy’s do not work , then unplug the AC cord from wall, wait at least 60 seconds, plug AC back in and then turn on the TV. If the problem still cannot be solved, please contact the help line provided on the warranty card or a professional technician.SYMPTOMS POSSIBLE SOLUTIONSNo sound or picture.Check if the power cord is plugged into AC outlet and if it has electricity.Check if you have pressed [POWER] button on the TV or [POWER] button on the remote control.Check to see if LED light is either red or blue. If illuminated, power to TV is OK.I have connected an external source to my TV and I get no picture and/or sound.Check for the correct output connection on the external source and for the correct input connection on the TV.Make sure you have made the correct selection for the input mode for the incoming signal.When I turn on my television, there is a few second delay before the picture appears. Is this normal?Yes, this is normal. That is the TV searching for previous setting information and initializing the TV.Picture is normal, but no sound. Check the volume settings.Check if Mute mode is set “on”.Sound but no picture or black and white picture.If black and white picture first unplug TV from AC outlet and re-plug after 60 seconds.Check Color Setting if picture is black and white.Sound and picture distorted or appear wavy.An electrical appliance may be affecting TV set. Turn off any appliances, if interference goes away, move appliance farther away from TV.Insert the power plug of the TV set into another power outlet.Sound and picture is blurry or cuts out momentarily.If using an external antenna, check the direction, position and connection of the antenna.Adjust the direction of your antenna or reset or fine tune the channel.Horizontal/vertical stripe on picture or picture is shaking. Check if there is interfering source nearby, such as appliance or electric tool.The plastic cabinet makes a “clicking” type of sound.“Click” sound can be caused when the room temperature changes. This change causes the television cabinet to expand or contract, which makes the sound. This is normal and the TV is OK.Black square appears in the center of my television screen?The Closed Caption function is set in the text mode. To remove it, access Closed Caption from the menu screen and change the Mode setting from text to either CC1 or off .On some channels getting another language or sometimes no sound at all.That would indicate that the MTS mode on your unit is set to “SAP” mode. We suggest setting the MTS mode to either “Stereo” or “Mono”. SAP is Second Audio Program. It’s a second audio channel that is usually used for a second language or descriptive audio for the visually impaired.MTS stands for Multichannel Television Sound, a standard that allows the encoding of 3 channels of audio within a standard NTSC (analog) video signal to a television. A television that is able to receive MTS Stereo allows you to watch television with stereo sound.Not getting all of my cable channels on the television or I'm only getting 13 channels.Check the cable connection for an incoming signal. The best way to confirm signal is to use another TV and/or contact your cable company.[CHV / V] don't work when I set the Channel to Cable? They work with the Air setting?After switching to Cable, please auto program the channels. The TV will “remember” all the channels then the TV will allow you to surf the channels with [CHV / V] buttons.](https://usermanual.wiki/Hisense-Electric/LCDD0027/User-Guide-1936523-Page-36.png)
![32Other InformationSYMPTOMS POSSIBLE SOLUTIONSRemote control does not work.Confirm that TV still has power and is operational.Change the batteries in the remote control.Check if the batteries are correctly installed.Confirm the remote control is matched with the TV (see “Match the Remote Control with TV”).If using a universal remote, be sure to select the TV mode on the remote.If the remote still does not work:-Remove and reinstall the batteries correctly to reset the remote or install new batteries.-Press TV and then Power to turn on the TV. With a universal remote if you have reset or changed the batteries you will need to reprogram the remote for the other units.MATCH: Turn on your TV using the Tap Pad located on the TV (see “Viewing the Control Panel). Aim your remote control within 6 inches of the lower left corner of your TV. Press the [OK] and [A] buttons on the remote control simultaneously for at least 3 seconds. The LED at the top of your remote will light for one second and blink slowly three times to indicated the remote has paired with the TV.Network connection fail. Check network physical connection, make sure connection is correct.Make sure configuration is correct according to your network service provider.Connect Netflix fail.Check network connection is correct, both physically and configuration.Make sure that network connection test is successful.For Netflix: Enter “Netflix” to reset Netflix account.Log out Netflix or change log in account.For Netflix:1. Press [Home] button on remote to exit VUDU.2. Enter “Netflix” to reset Netflix account.DLNA does not work.Check network connection is correct, both physically and configuration.Make sure DLNA server (PC or Mac) has shared media content and TV has permission to access shared media.Enter “Home”, “Settings”, “Network”, set “DLNA switch” enabled.Press [HiMedia] button and then select “Multi-Media” Icon.How do I get the Applications to work on my TV?You need a broadband (high speed) Internet service with a speed of no less than 1.5 Mbps.Connect the TV to the Internet through your router by an ethernet cable or wireless connection. If the connection fails, check with your internet service provider or router manufacturer to determine if there is a firewall, content filter, or proxy settings that may block the TV from accessing the Internet.After connecting the TV to the Internet, press the [Home] button on the remote to access the Applications.Caution: Do not try to repair the TV yourself. Refer all servicing to qualified repair personnel.](https://usermanual.wiki/Hisense-Electric/LCDD0027/User-Guide-1936523-Page-37.png)