Hisense Electric LCDD0033 Part15 Subpart B-LED LCD TV User Manual W9HLCDD0033 1
Hisense Electric Co., Ltd. Part15 Subpart B-LED LCD TV W9HLCDD0033 1
UserManual.wiki
>
Hisense Electric
>
LCDD0033 User Manual
>
W9HLCDD0033_ User Manual 1
Contents
1.
W9HLCDD0033_ User Manual 1
2.
W9HLCDD0033_ User Manual 2
W9HLCDD0033_ User Manual 1
Navigation menu
Upload a User Manual
Namespaces
Wiki Guide
HTML
PDF
Info
Views
User Manual
Discussion / Help
Navigation


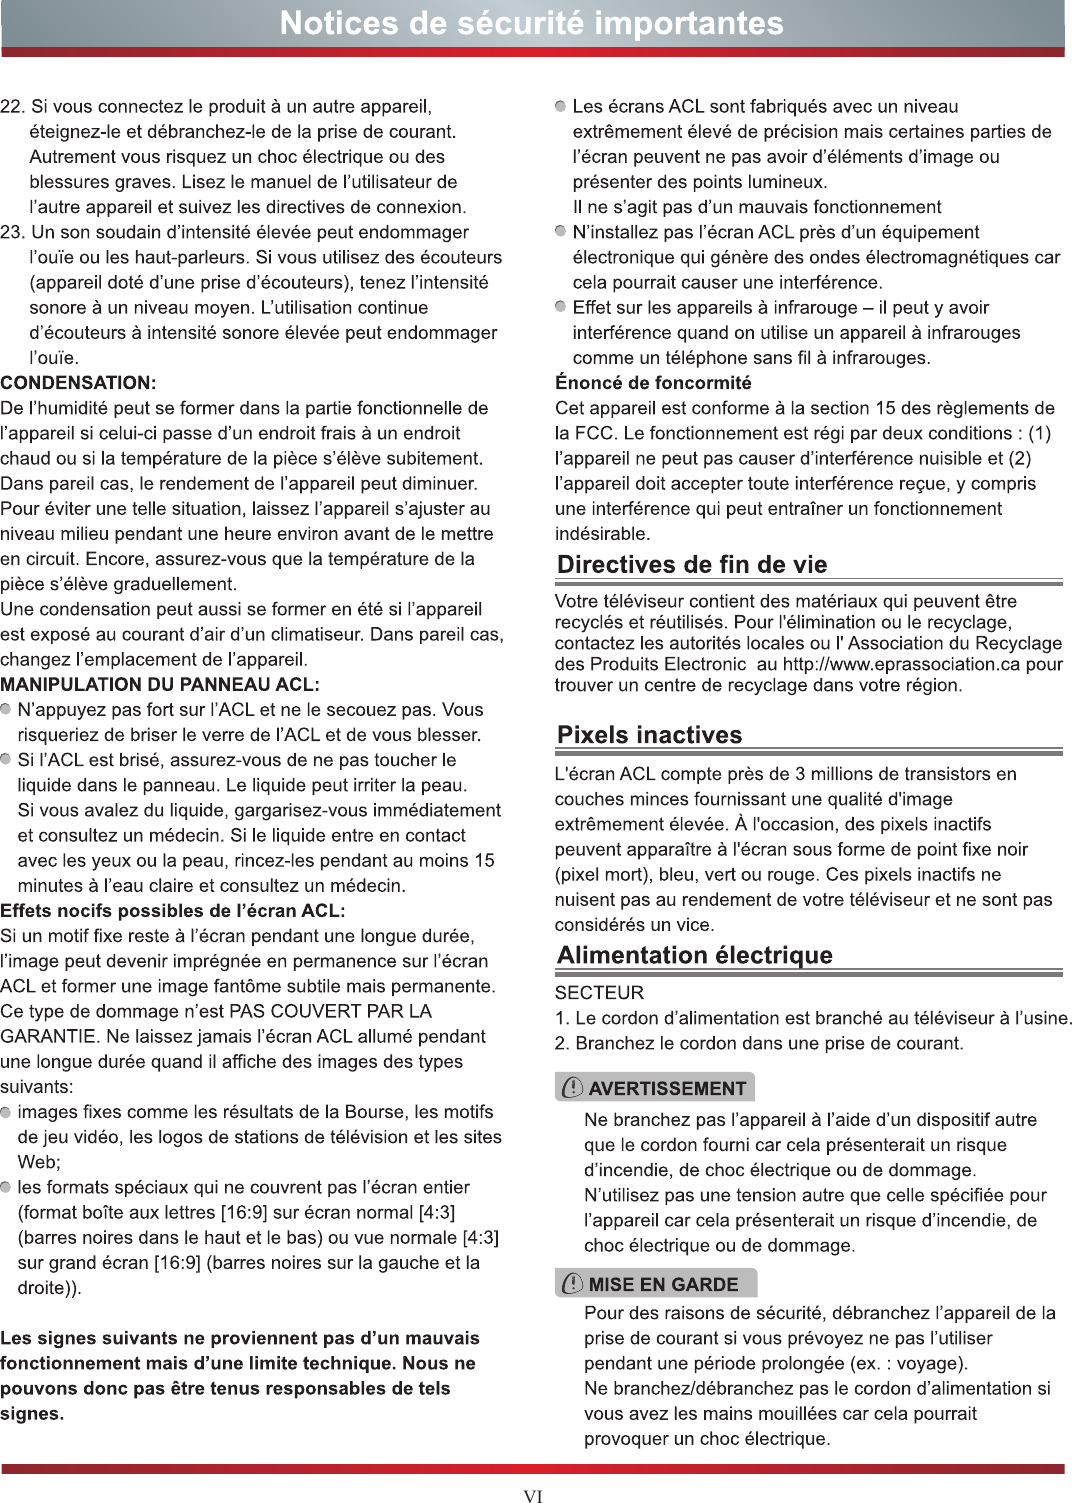
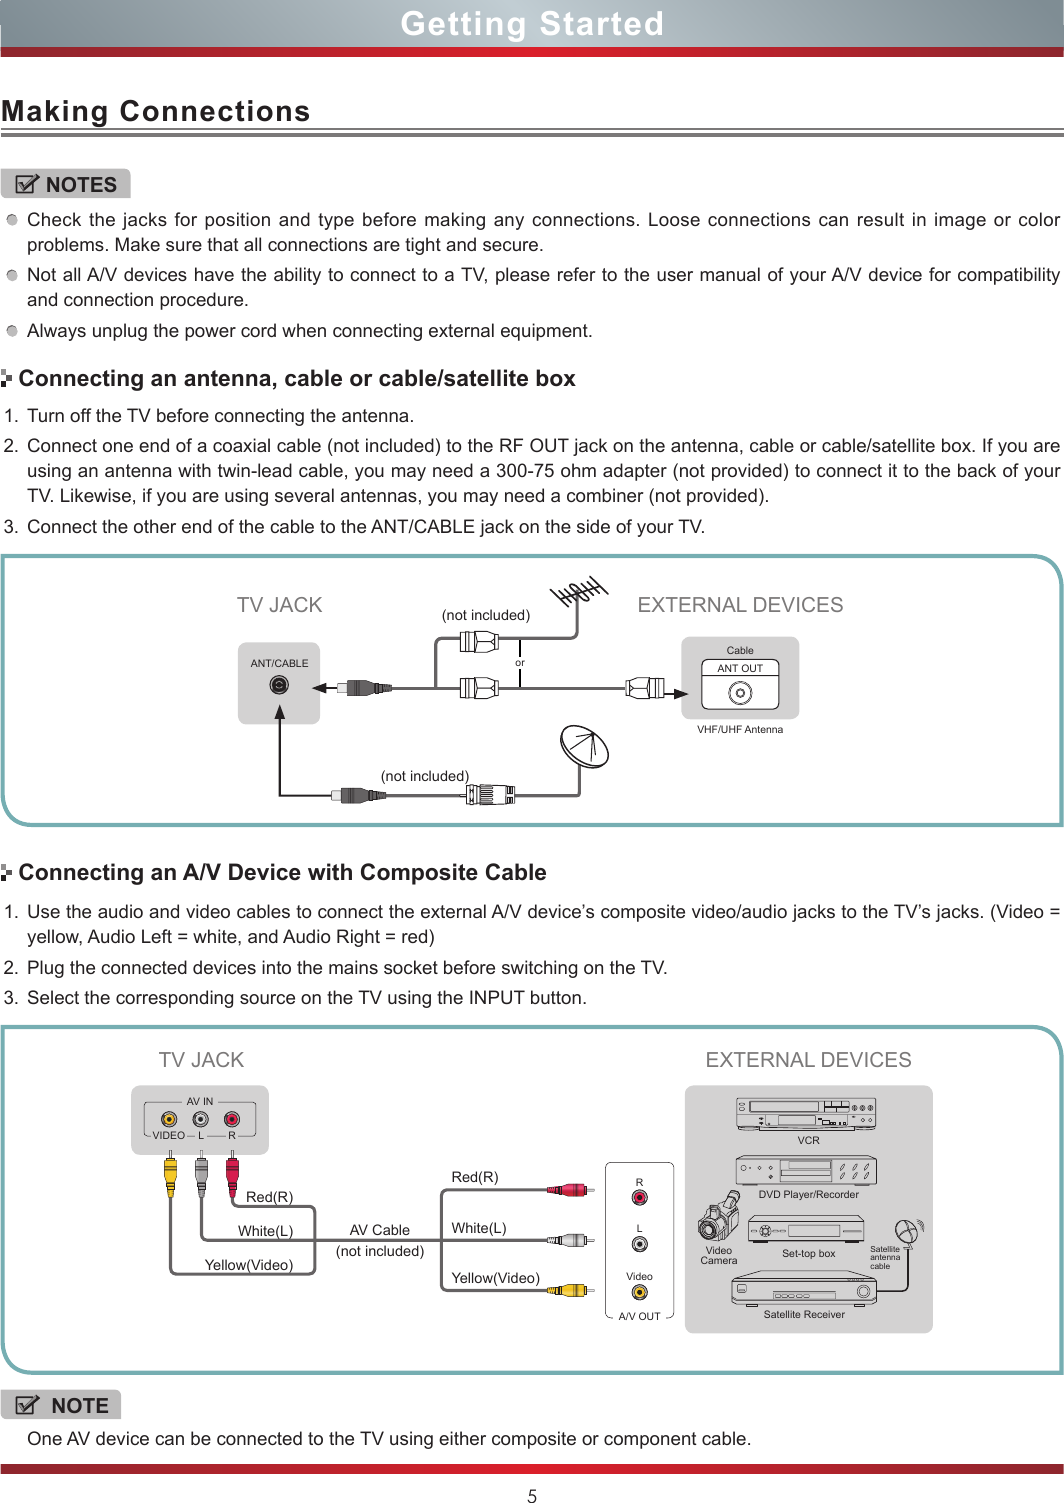
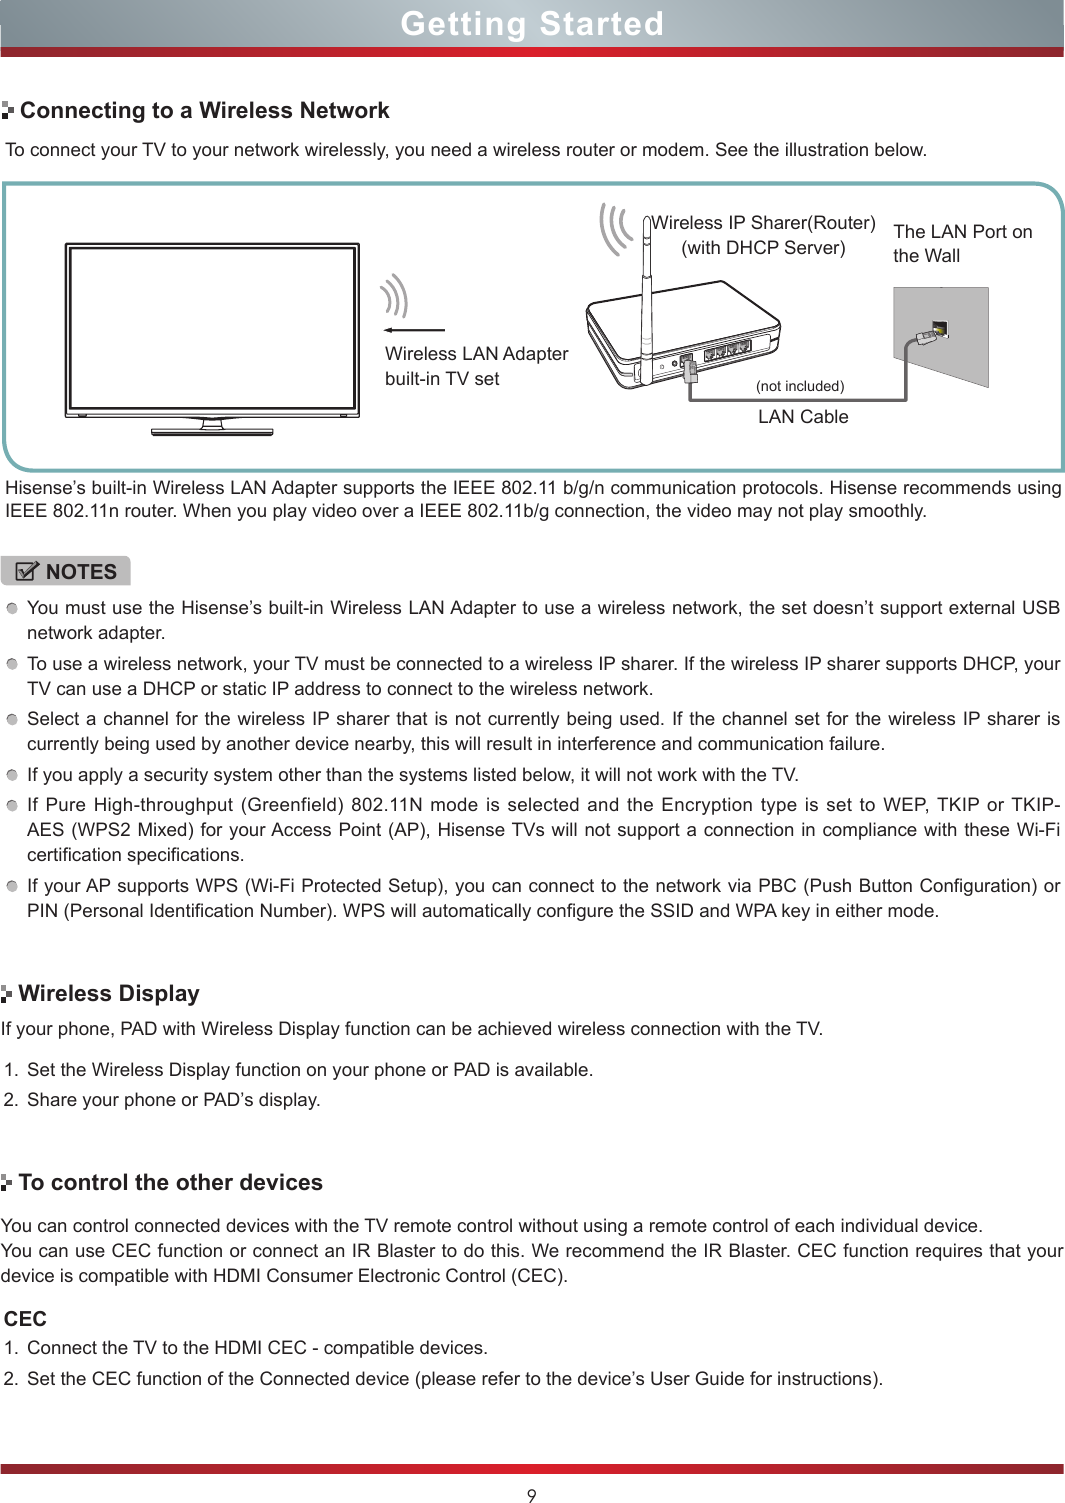
![4Getting StartedPairing the RemoteUsing the Air Mouse and Voice InputInstalling Batteries in the Remote ControlInsert batteries into the remote control as shown.1. To open the battery cover, push the latch in the direction of the Arrow and lift off the cover.2. Insert two AA size batteries. Make sure to match the (+) and ( - ) ends of the batteries with the (+) and ( - ) ends indicated in the battery compartment.3. Close the battery cover.The air mouse and microphone functions are available after the remote control is paired. The First MethodThe Setup Wizard menu appears the first time you turn on the TV. Step of the remote pairing, press and hold down the [Red]and [OK] buttons simultaneously until the red LED turns on. When the red LED lights, release the buttons and wait for the TV to pair with the remote. The blue LED on the remote control will flash three times when the pairing is successfully completed. The Second Method1. Enter Settings > Bluetooth to turn on Bluetooth.2. Press and hold the [Red] button and [OK] button for three seconds simultaneously.3. Select Find nearby devices to search the remote control, and the remote control will appear in available devices, then press [▲/▼] button to select the Hisense Vision Remote Control and press [OK] to pair.+The remote control supports air mouse and voice input (requires remote control pairing).Shake the remote control to turn on air mouse function, and press the direction key to turn off the function.Press the Voice key to start Google Voice Search. You can input voice via the microphone of the remote control.NOTEThe batteries shall not be exposed to excessive heat such as sunshine, fire or the like.](https://usermanual.wiki/Hisense-Electric/LCDD0033.W9HLCDD0033-User-Manual-1/User-Guide-2120878-Page-11.png)
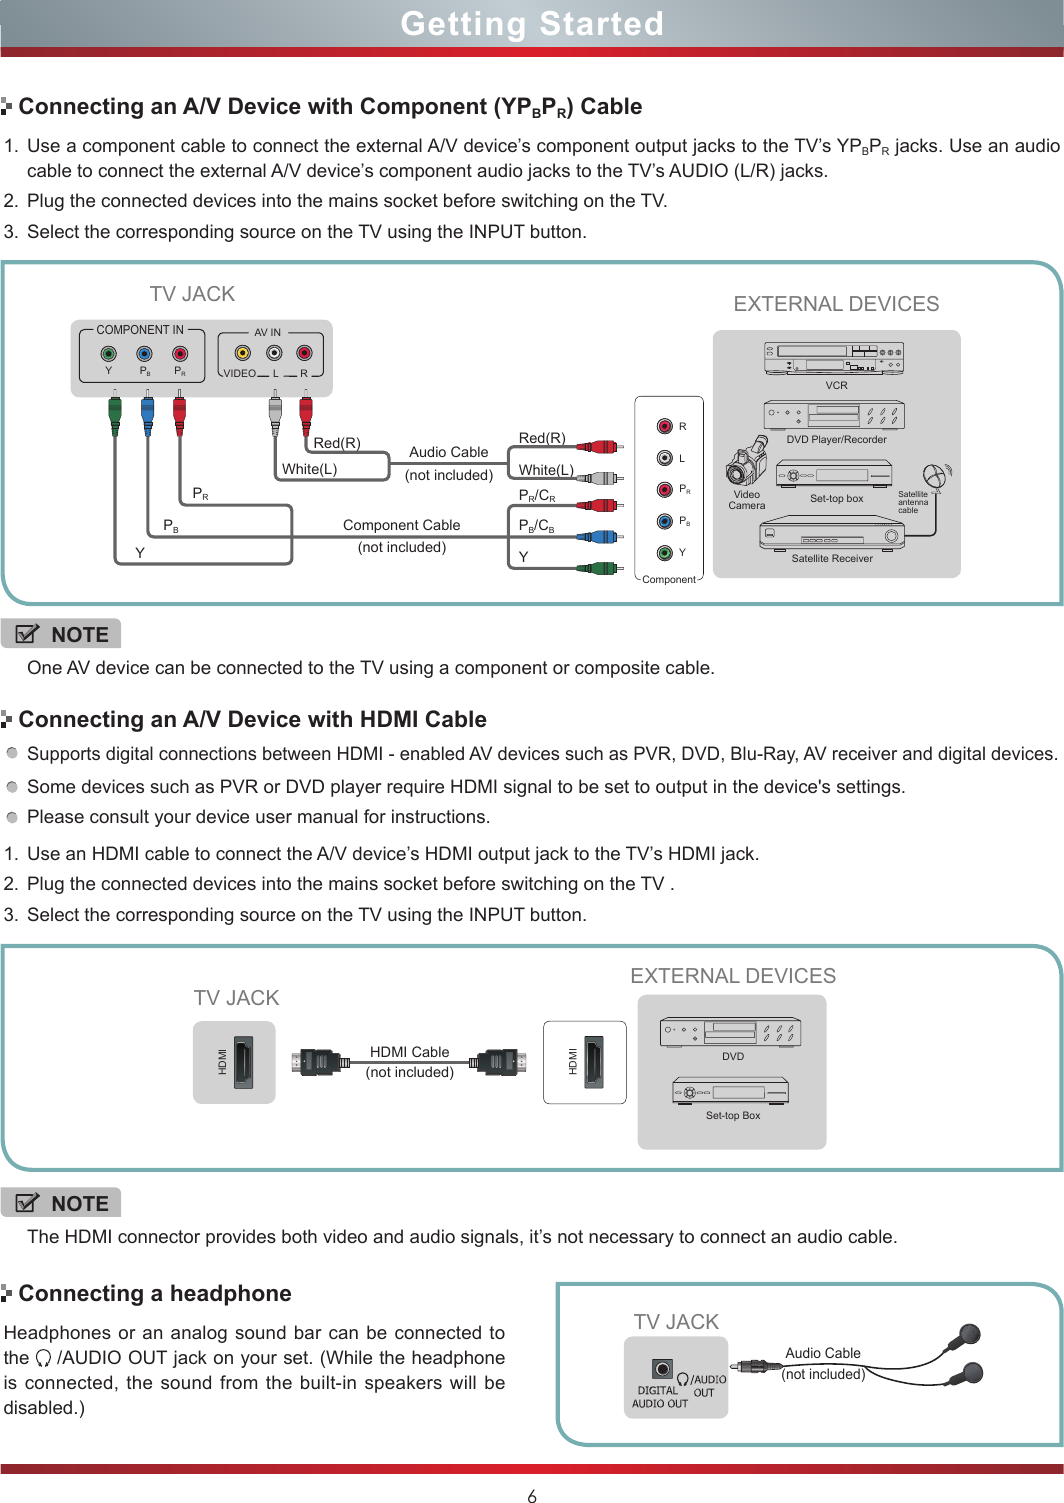
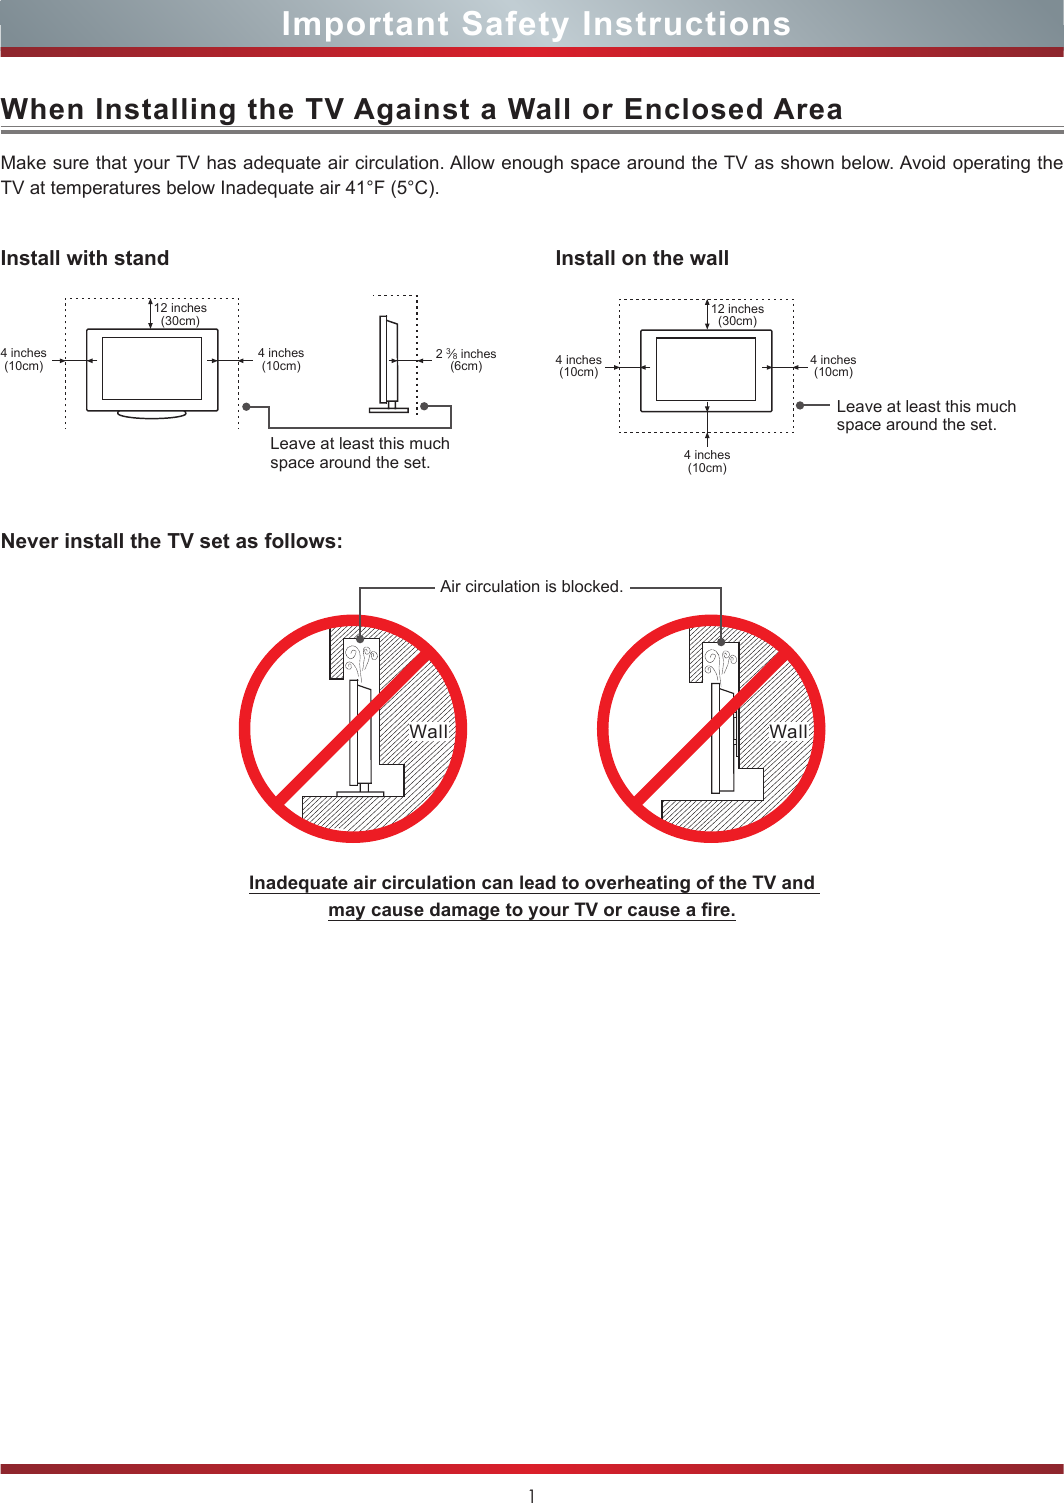
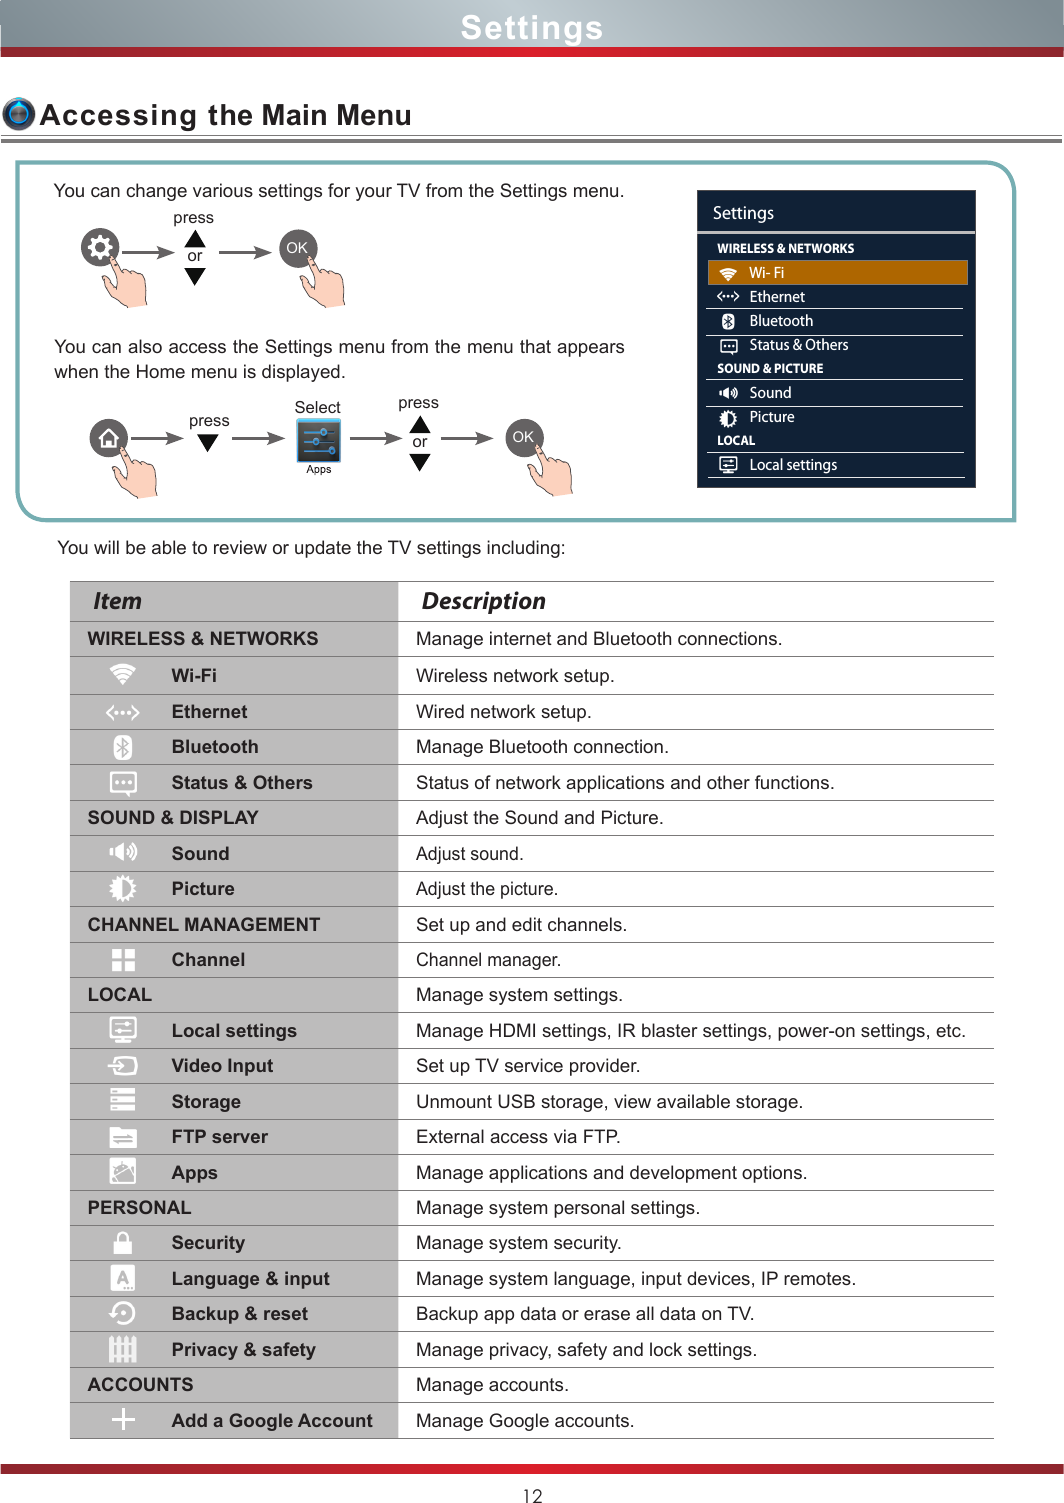
![10Getting StartedIR BlasterYou can connect an IR Blaster to control many popular video input devices, AV receivers and audio amplifiers.- To control video input1. Connect the IR Blaster to the TV via the rear panel connector and place it properly on the device to be controlled. 2. Press button, go to Settings > Video input. 3. Enter Video input option, Select Add device manually, then follow the on-screen instructions.4. When the setup is finished, press [INPUT] button to display the Select Device menu, Use the [▲/▼] button to select your add device, press [OK] button to set live TV.5. Then, you can control the connected device with the remote control of the TV.- To control audio amplifier1. Connect an IR Blaster to the TV and place it properly on the AV receiver.2. Press button, go to Settings > Local settings > AVR3. Select AV Receiver setting, then follow the on-screen instructions.3. Then, you can set the IR Blaster to control your audio amplifier. NOTETwo or more video input devices or two or more audio amplifiers/AVRs cannot be controlled simultaneously with IR Blaster. If you want to control a video input device and an audio amplifier/AVR simultaneously, please place the two devices close to each other. or purchase on IR Blaster cable with multiple emitters.3. Press button, go to Settings > Local Settings > HDMI settings to configure the HDMI CEC function.Control for HDMI: Allow the TV to control compatible HDMI devices.Device auto power off: When HDMI CEC is enabled, this function turns off HDMI CEC devices when you turn off your TV.TV auto power on: When HDMI CEC is enabled and you turn on an HDMI CEC device, this function turns on your TV automatically.System Audio control: Control the volume of the AV receiver with the volume key of TV remote control.Device list: Display a list of HDMI CEC devices that are connected to your TV.NOTESHDMI cables must be used to connect HDMI CEC - compatible devices to your TV.The connected device’s HDMI CEC feature must be turned on.If you connect an HDMI device that is not HDMI CEC - compatible, none of the HDMI CEC Control features will work.Depending on the connected HDMI device, the HDMI CEC Control feature may not work.After choosing control for HDMI, you may select device auto power off and/or TV auto power on and/or system audio control.IR BLASTERHDMIHDMITV JACK EXTERNAL DEVICESDVDSet-top Box(not included)HDMI CableNear the remote sensor](https://usermanual.wiki/Hisense-Electric/LCDD0033.W9HLCDD0033-User-Manual-1/User-Guide-2120878-Page-17.png)
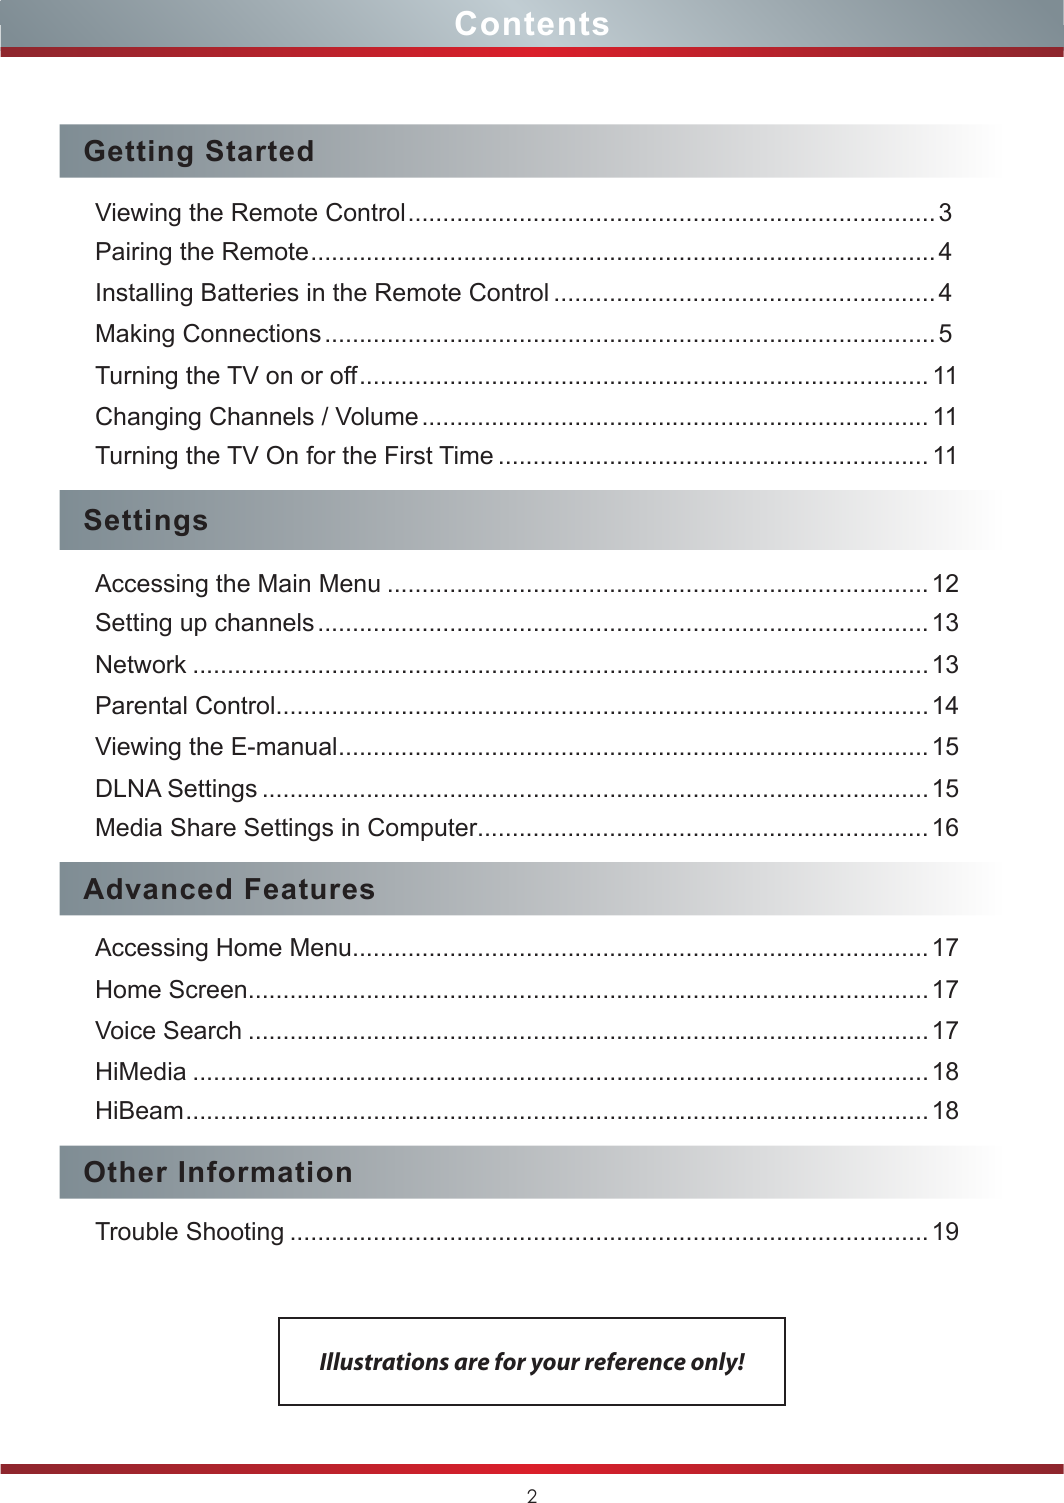
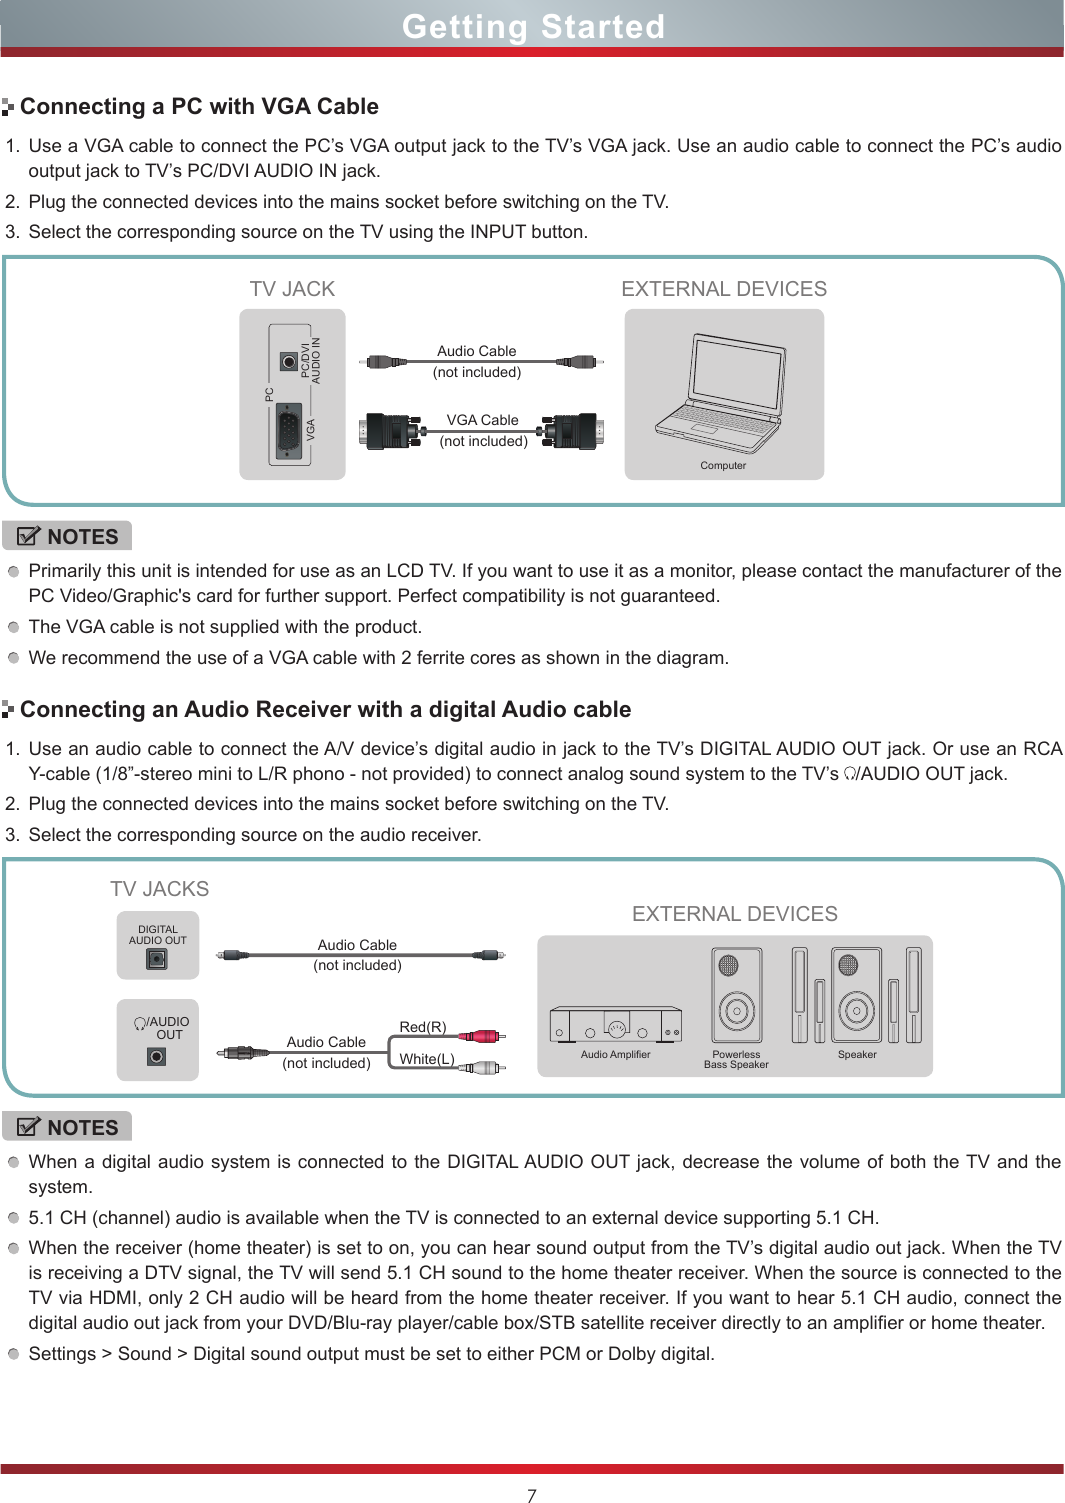
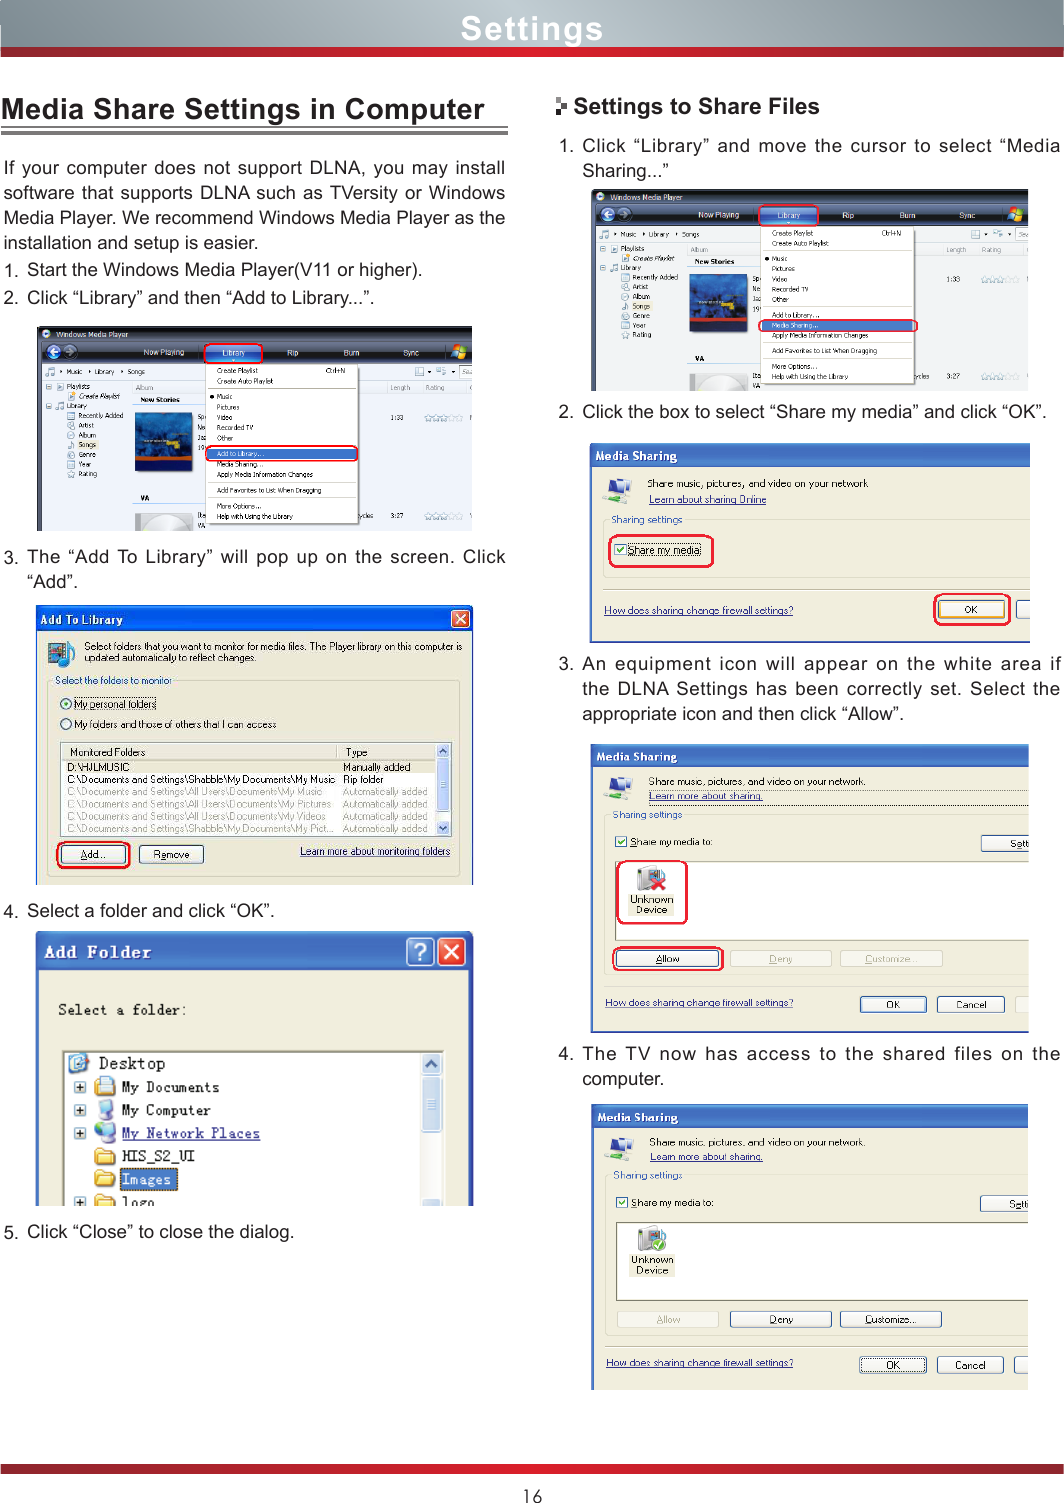
![11Getting Started1. Make sure that you have: Installed the remote control batteries.Connected an antenna, cable or CATV/SAT set-top-box PVR.Connected the power cord.2. Press [POWER ] button to turn on your TV. 3. The Setup Wizard menu displays. Follow Step 1 through 11 in the Setup Wizard menu procedure.IMPORTANT: If you have not yet paired the remote to the TV, please refer to the section titled Pairing the Remote in this manual.To turn your TV on or off (standby mode):1. Plug the power cord into an AC power outlet.2. Press button, your TV turns on. 3. Press button again to turn off your TV. When you turn off your TV, it goes into standby mode.The Setup Wizard menu appears the first time you turn on the TV. The wizard will guide you step-by-step through the initial setup and configuration of your television.IMPORTANT: Make sure that the antenna or cable is connected and a wired or wireless Internet connection is available.Turning the TV On for the First TimeTurning the TV on or offNOTESWhen your TV is in standby mode, it is still receiving power. To completely disconnect power, unplug the power cord.It may take 15-20 seconds for the TV to be ready after pressing the power button.NOTE[CH +/-] button can be used in ANT/CABLE mode only.1. Press the [CH +/-] button on the TV/remote control to change the channel.2. Press the [VOL + / -] button on the TV/remote control to adjust the volume.3. Press the [...] button to display numeric menu, then select digit channel number to display the corresponding channels.Changing Channels / VolumeFollow the on-screen instructions to customize your TV settings according to your preferences.Pairing the remote control.Step 1Step 2Step 3Step 4Step 5Step 7Step 6Step 8Step 9Step 10Step 11Selecting Home or Retail.Connecting to the DLNA device.Selecting menu language.Hisense legal information.Connecting to the Internet via Ethernet cable or WiFi.Signing in with your Google Account.Check the TV to send the usage statistics and crash reports to Google automatically.Enter ZIP code so that you receive accurate programming information.Select the video input you use to connect your TV service to your TV.Select your Audio amplifier manufacturer. To control your receiver, connect the IR blaster.The initial settings are completed.Pairing remote controllerSelect usage patternsDLNA settingSelect menu languageLegal noticeConnect to the InternetGoogle AccountHelp make Google TV betterEnter ZIP codeSet up TV serviceSet up AV Receiver controlThat’s it!Setup Wizard](https://usermanual.wiki/Hisense-Electric/LCDD0033.W9HLCDD0033-User-Manual-1/User-Guide-2120878-Page-18.png)
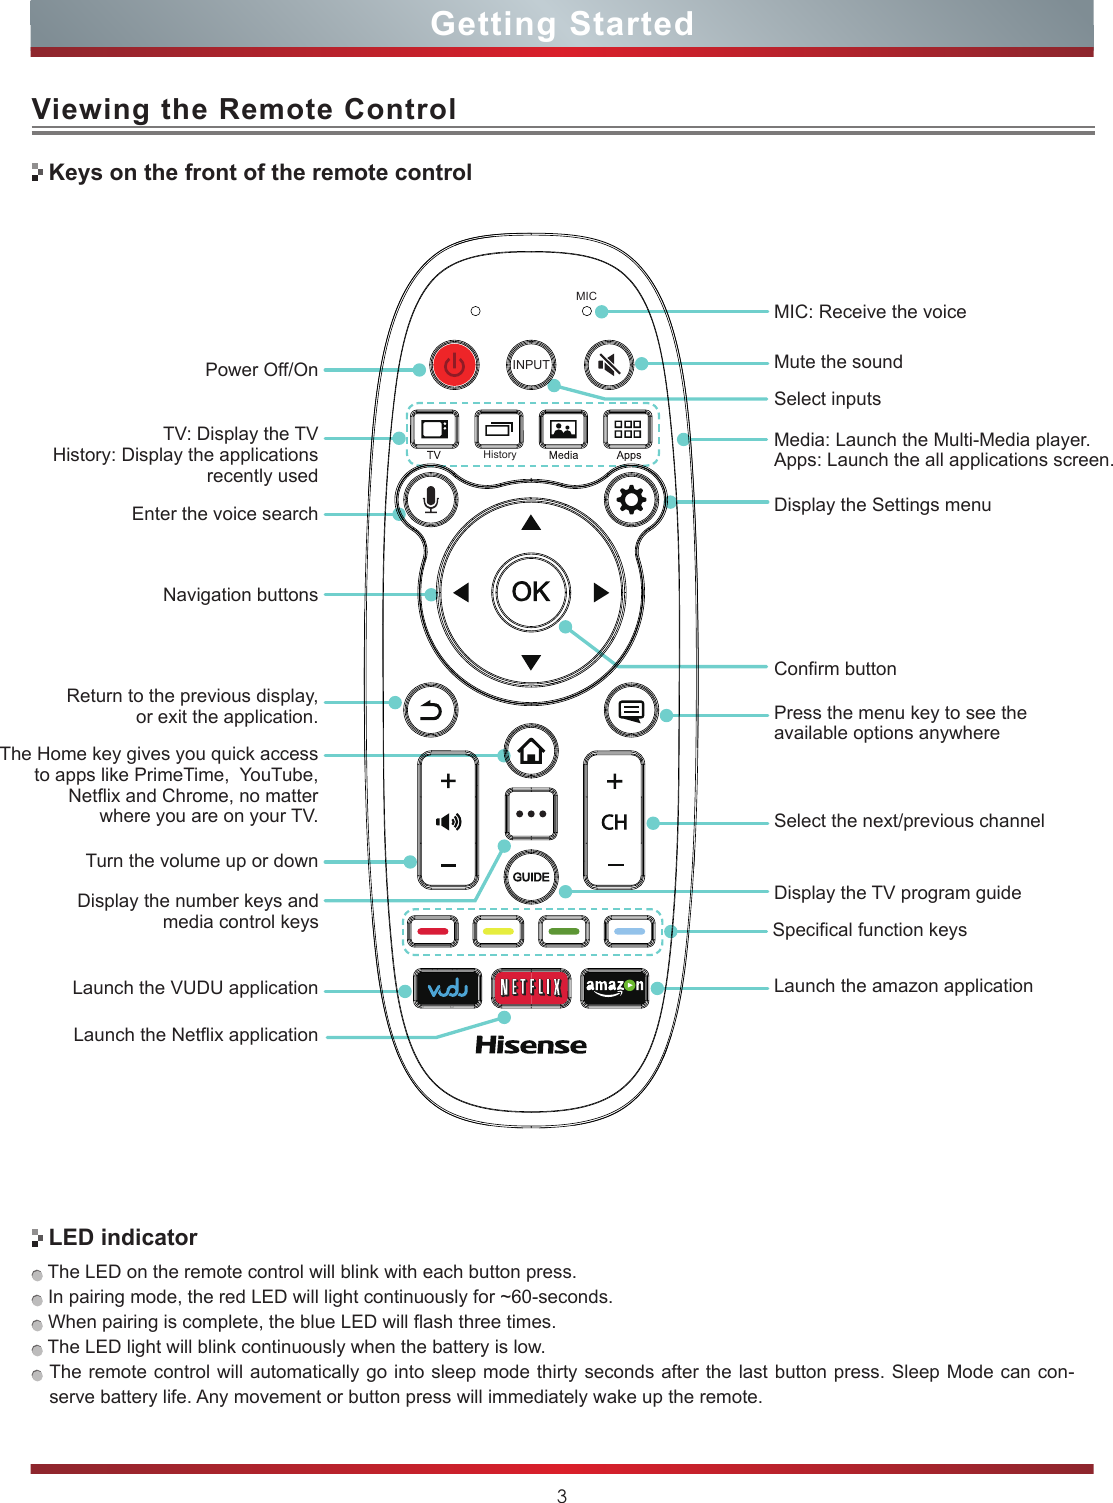
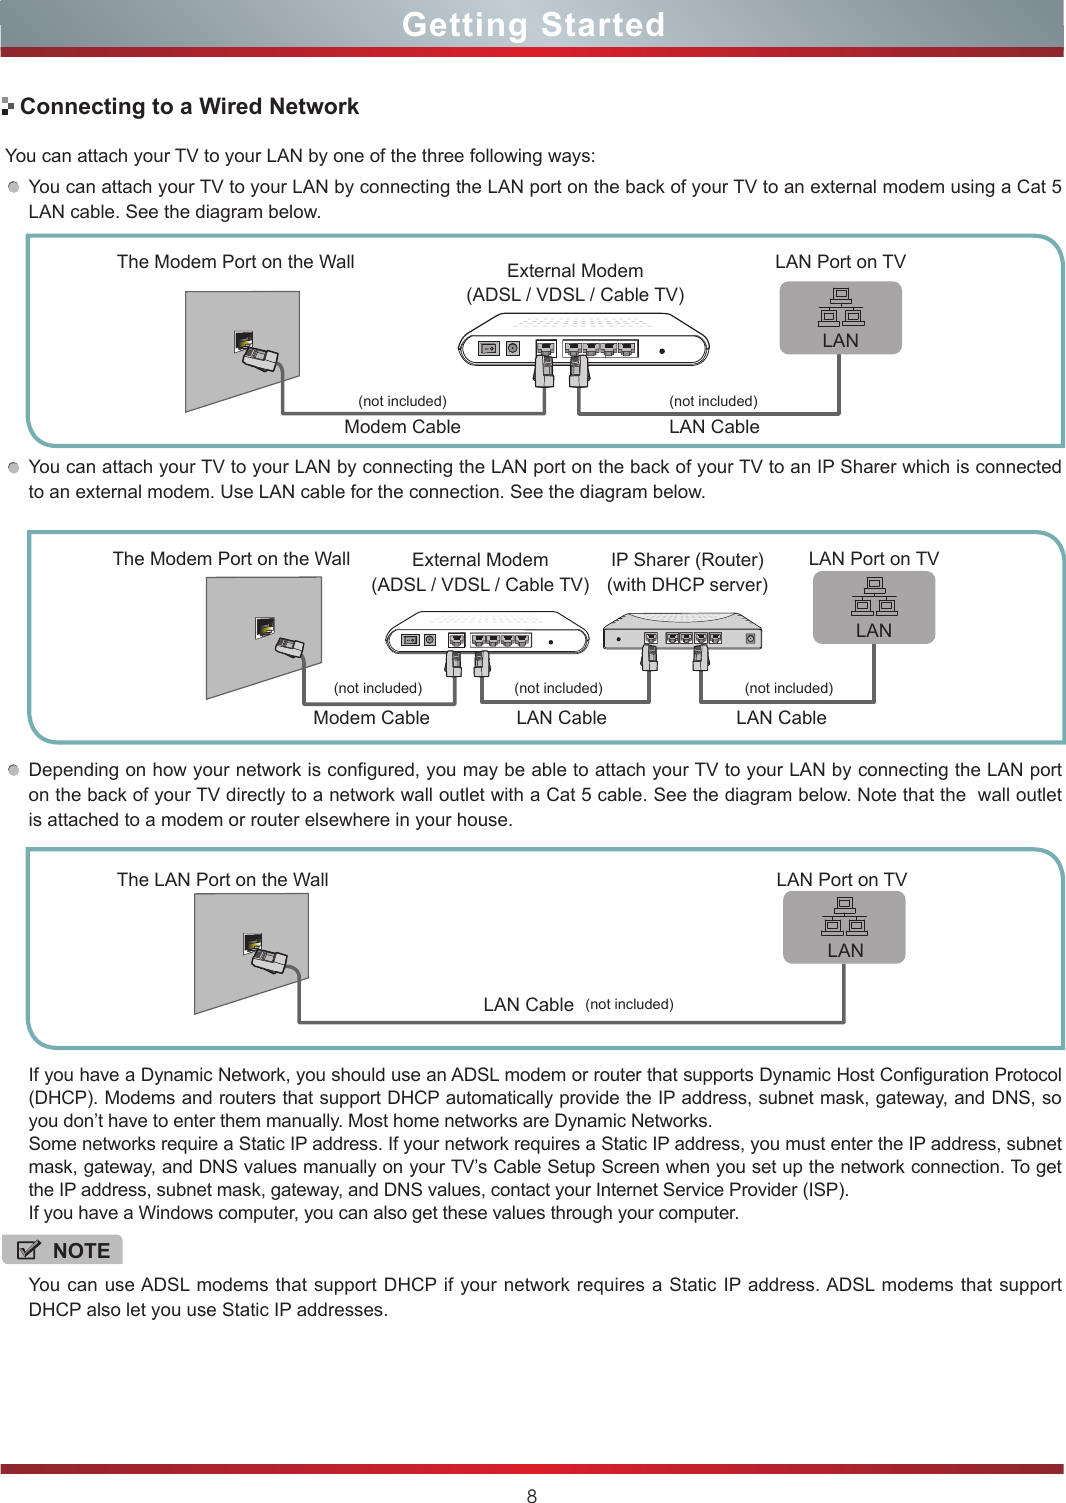
![13Setting up channels NetworkYou need to connect Cable / Antenna or the cable / satellite box to watch TV. To scan channels automatically.1. Press [INPUT] button to set the ANT/CABLE source.2. Press button to display the Settings menu.3. Go to Settings > Channel > Cable / Antenna.4. Press [OK] button to start automatic tuning.The TV scans and saves available channels automatically.5. When you want to return to the previous menu, press button.SettingsYou can select an available Wi-Fi network from the list of Wi-Fi networks found in your area or set up a new Wi-Fi network.How to set up 1. Press button to display the Settings menu.2. Go to Settings > Wi-Fi.3. Press [OK] button to set Wi-Fi enabled.3. A screen will appear listing all of the wireless networks within range of the TV. Use the [▲/▼] button to select the wireless network and press [OK] button to confirm. 4. A screen will appear prompting you to enter the password for the selected security mode. Using the remote control to enter the password. Use [◄/►] buttons to highlight Connect and press [OK] button to confirm.5. If you need to add network, a screen will appear prompting you to enter the Network SSID of your wireless network. Using the remote control to enter the SSID and select the security mode for your wireless network. 6. When done, Use [▲/▼] buttons to highlight Save and press [OK] button.Wi-FiGetting startedChannelTuner modeAntennaAUTO CHANNEL SEARCHCableCableAntennaAntennaBoxBoxCHANNEL MANAGEMENTSkip ChannelsManually skip channels in your program listDigital auto scanChannel Number: 2Frequence : 57.0MHzAnalog Channels: 0Digital Channels: 0Auto channel search1%Press Back to stop current channel scanIt takes about forty minutes to search channels. WIRELESS & NETWORKS Wi- Fi Ethernet Bluetooth Status & OthersSOUND & PICTURE Sound PictureLOCAL Local settingsSettingsSYSTEM System information.Date, time & location Set date, time, time zone and formats.Accessibility Manage accessibility options.Developer options Developer use options.About TV System information.](https://usermanual.wiki/Hisense-Electric/LCDD0033.W9HLCDD0033-User-Manual-1/User-Guide-2120878-Page-20.png)
![14SettingsParental Control5. When done, select Status to check the Internet connectivity. If the Network Function has not acquired the network connection values, go to the directions for Manual.Use the Automatic Network Setup when connecting your TV to a network that requires a Static IP address. To get the network connection values on most windows computers, follow these steps:Getting the Network Connection Values1. Press button to display the Settings menu.2. Go to Settings > Ethernet > Static.3. Set IP settings to Static, then press [▲/▼] button to select item and press [◄/►] button to move the cursor to the entry field. Then press 0~9 buttons to enter the numbers.4. When done, press [OK] button to confirm.Use the Automatic Network Setup while your connecting the TV to a network that supports DHCP. To set up your TV’s cable network connection automatically, follow these steps:How to set up automatically 1. Connect your TV to your LAN as described in the previous section. 2. Press button to display the Settings menu.3. Go to Settings > Ethernet.4. Set IP settings to Dynamic.Auto acquires and enters the needed Internet values automatically.EthernetPrevent unauthorized users, such as children, from watching unsuitable programs.You can adjust: 1 Press button to display the Settings menu.2. Go to Settings > Privacy & Control > Parental Control. Enter password: When you first use this function, the default password is [0000]. Once you press [OK] button to open soft keyboard, input this password, you can set options.Parental Control: Press [OK] button to set Parental Control enabled.Modify Password: If you want to change the default password, first enter the new password then enter the same password again.Block Channel: Block selected Channels on the TV.Program Rating : Block selected Programs ratings on the TV.You can set Program Rating: Press [OK] button to set Program Rating enabled.U.S. TV Rating: Restrict TV programs by USA Ratings.U.S. Movie Rating: Restrict movies by USA Ratings.Canadian English/French Rating: Restrict movies and TV programs by Canadian Ratings.Open V-Chip: Display an advanced V-Chip ratings table for digital channels (USA only).Parental ControlParental ControlModify PasswordYou can set new passwordBlock ChannelYou can set choose Block Channel LockProgram RatingProgram RatingInput LockInput LockClearClear all locked settingsParental Control](https://usermanual.wiki/Hisense-Electric/LCDD0033.W9HLCDD0033-User-Manual-1/User-Guide-2120878-Page-21.png)
![15DLNA SettingsComputer, TV and other digital devices can be connected via DLNA. You can use the TV set as a DLNA DMP (Digital Media Player) device to enjoy movies, pictures, music and other multimedia materials stored on your home network devices through DLNA connection.DLNA Setting needs to be set on TV and computer Respectively.1. To use DLNA to enjoy movies, pictures, music, you have to connect the TV into a network first.2. For more information on how to configure your network, refer to “Network”.- It is recommended to locate both the TV and the PC in same subnet. The first 3 parts of the subnet address of the TV and the PC IP addresses should be the same and only the last part (the host address) should be changed. 3. Using a LAN cable, connect between the external modem and the PC onto which Windows Media Player Manager Program will be installed.Network SetupSet DLNA to On1. Press [Home] button to access the Home menu.2. Go to Settings > Status & Other > DLNA switch.3. Press [OK] button to set DLNA enabled.Viewing the E-manualThis TV has a built-in E-manual that contains information about your TV’s key features and instructions for using them. How to view the E-manual1. Press button to access the Home menu. 2. Press [▼] button to access the Apps menu.3. Press [▲/▼/◄/►] button to select the E-manual App, and press [OK] button to open the E-manual.4. Press [▲/▼] button to select the E-manual option, then press [OK] button to view it.5. Press [◄/►] button to switch the page. 6. When you want to return to the previous menu, press button.Settings](https://usermanual.wiki/Hisense-Electric/LCDD0033.W9HLCDD0033-User-Manual-1/User-Guide-2120878-Page-22.png)
![17You can access various content and applications from the Home screen. The home screen contains Notifications, All Apps, and shortcuts to select applications and websites.You can adjust: 1. Press button to access the Home menu. 2. Press [▲/▼/◄/►] to access various content and applications on the Home screen.Notifications - Click on the notifications icon to display information about downloading applications, software updates, notifications regarding your account, etc.All Apps - All Apps contains all pre-loaded and downloaded items as well as Channel shortcuts (saved as ‘favorites’), Settings, and Downloads.Navigate bar - Select one to launch an application. You can customize the applications.Accessing Home MenuPress [Home] button to access the Home menu. WeatherRecommendationsNavigate barTimeAll AppsNotificationsNetwork StateHome WidgetADThe wall paper of the Home screen can be customized to suit your preferences.1. Press [ ] button when the Home screen is displayed.2. Press [◄/►] to select the theme of the wall paper.Changing the wall paperAdvanced FeaturesHome ScreenVoice SearchThe TV allows you to find TV shows and movies, launch apps, open webpages, and more by voice search function.Simply press the button and start speaking to the MIC on the remote control.NOTEFunction icons on the main screen can not be adjusted.NOTEPlease connect to the network and Bluetooth before using the voice search feature.](https://usermanual.wiki/Hisense-Electric/LCDD0033.W9HLCDD0033-User-Manual-1/User-Guide-2120878-Page-24.png)
![18Advanced FeaturesWith the Digital Media Receiver you do not have to crowd around a small tablet PC or smartphone screen to share video, music or pictures with friends and family. Simply browse, discover and beam media files stored on your Android or iOS device to your TV using the Twonky Beam application.1. TV sideConfirm the TV is connected to a local area network.Set DLNA enabled.2. Device SetupDownload the Twonky Beam application using the link found on the Hisense website at www.hisense-usa.com.Confirm the device is connected to the same local area network as the TV.Launch the Twonky Beam application, select the video, music or picture you want to share and beam it to the TV.You can control the playback using the TV remote or from the device application.HiBeam (Digital Media Receiver)Brief introductionOperation introductionEntering the Media MenuThis function enable you to enjoy photos, music and/or video files saved on a USB device.- Connecting a USB DeviceConnect a USB device containing photo, music and/or video files to the USB jack on the TV.- Connecting to PC through networkGetting startedHiMedia1. Press the [Media] button to display HiMedia menu.2. Press [▲/▼] button to select an icon(Photo, Video, Music), then press the [ ►] button to enter. 3. Press [▲/▼] button to select the devices of saved files. Press the [OK] button.This function differs depending on the Local / Home Network / Cloud (Only for Photo file type).Local - Show the content on USB devices.Home Network - Show the content on DLNA devices.Photo Apps - Start photo applications, such as Google Photo.4. Press [▲/▼/◄/►] button to select the folder/file you want to open and then press [OK] to enter/play the folder/file.5. Press to return the previous directory.6. Press [OK] to play the file.7. Press button to display/exit the options menu.Icons available during playingIcon OperationsStarts or re-starts playback (video/music playback). Starts Slideshow or starts moving a panoramic photo (photo playback).Pauses playback (video/music playback). Fast forwards the video.Fast rewinds the video.Exit play mode and return to the HiMideia menu.Skips to the previous file (video playback)/track (music playback)/file (photo playback).Skips to the next file (video playback)/track (music playback)/file (photo playback).Playable format listFiles Format Playable formatPhoto JPGMusic MP3Video MPEG1(.dat), MPEG2(.mpg/.ts), XVID(.avi), MPEG4H.264(.mov/.ts/.mkv/.mp4)1. Press button to display/exit the options menu.2. Press [▲/▼/◄/►] button to select an icon, then press the [OK] button to confirm. VideoMusicPhoto LocalHomeNetworkCloudShow the content in cloud accounts.Show the content in DLNA devices.Show the content in USB devices.](https://usermanual.wiki/Hisense-Electric/LCDD0033.W9HLCDD0033-User-Manual-1/User-Guide-2120878-Page-25.png)
![19Other InformationTrouble ShootingWhen something appears wrong with your TV refer to below chart. If the proposed remedy’s do not work , then unplug the AC cord from wall, wait at least 60 seconds, plug AC back in and then turn on the TV. If the problem still cannot be solved, please contact the help line provided on the warranty card or a professional technician.SYMPTOMS POSSIBLE SOLUTIONSNo sound or picture.Check if the power cord is plugged into AC outlet and if it has electricity.Check if you have pressed [POWER] button on the TV or [POWER] button on the remote control.Check to see if LED on. If illuminated, power to TV is OK.I have connected an external source to my TV and I get no picture and/or sound.Check for the correct output connection on the external source and for the correct input connection on the TV.Make sure you have made the correct selection for the input mode for the incoming signal.When I turn on my television, there is a few second delay before the picture appears. Is this normal?Yes, this is normal. That is the TV searching for previous setting information and initializing the TV.Picture is normal, but no sound.Check the volume settings.Check if Mute mode is set “on”.Check if headphones are connected.Check if the audio output is set to AV receiver (if so, be sure the AVR is powered on and set to the proper input).If using a cable / satellite set top box, check if Mute is set to On.Sound and picture distorted or appear wavy.An electrical appliance may be affecting TV set. Turn off any appliances, if interference goes away, move appliance farther away from TV.Insert the power plug of the TV set into another power outlet.Sound and picture is blurry or cuts out momentarily.If using an external antenna, check the direction, position and connection of the antenna.Adjust the direction of your antenna or reset or fine tune the channel.Horizontal/vertical stripe on picture or picture is shaking. Check if there is interfering source nearby, such as appliance or electric tool.The plastic cabinet makes a “clicking” type of sound.“Click” sound can be caused when the room temperature changes. This change causes the television cabinet to expand or contract, which makes the sound. This is normal and the TV is OK.Black square appears in the center of my television screen?The Closed Caption function is set in the text mode. To remove it, access Closed Caption from the menu screen and change the Mode setting from text to either CC1 or off .On some channels getting another language or sometimes no sound at all.That would indicate that the MTS mode on your unit is set to “SAP” mode. We suggest setting the MTS mode to either “Stereo” or “Mono”. SAP is Second Audio Program. It’s a second audio channel that is usually used for a second language or descriptive audio for the visually impaired.MTS stands for Multichannel Television Sound, a standard that allows the encoding of 3 channels of audio within a standard NTSC (analog) video signal to a television. A television that is able to receive MTS Stereo allows you to watch television with stereo sound.Not getting all of my cable channels on the television or I'm only getting 13 channels.Check the cable connection for an incoming signal. The best way to confirm signal is to use another TV and/or contact your cable company.](https://usermanual.wiki/Hisense-Electric/LCDD0033.W9HLCDD0033-User-Manual-1/User-Guide-2120878-Page-26.png)
![20Other InformationSYMPTOMS POSSIBLE SOLUTIONSRemote control does not work.Confirm that TV still has power and is operational.Change the batteries in the remote control.Check if the batteries are correctly installed.Confirm the remote control is paired with the TV (see “Pairing the Remote”).If using a universal remote, be sure to select the TV mode on the remote.If the remote still does not work:-Remove and reinstall the batteries correctly to reset the remote or install new batteries.-Press TV Power to turn on the TV. With a universal remote if you have reset or changed the batteries you will need to reprogram the remote for the other units.Network connection fail. Check network physical connection, make sure connection is correct.Make sure configuration is correct according to your network service provider.Connect Netflix fail.Check network connection is correct, both physically and configuration.Make sure that network connection test is successful.For Netflix: Enter “Netflix” to reset Netflix account.DLNA does not work.Check network connection is correct, both physically and configuration.Make sure DLNA server (PC or Mac) has shared media content and TV has permission to access shared media.Enter Home > Settings > Status & Others, set “DLNA switch” enabled.How do I get the Applications to work on my TV?You need a broadband (high speed) Internet service with a speed of no less than 1.5 Mbps.Connect the TV to the Internet through your router by an ethernet cable or wireless connection. If the connection fails, check with your internet service provider or router manufacturer to determine if there is a firewall, content filter, or proxy settings that may block the TV from accessing the Internet.After connecting the TV to the Internet, press the [Home] button on the remote to access the Applications.Caution: Do not try to repair the TV yourself. Refer all servicing to qualified repair personnel.I can’t nd my TV channel after the rst boot setting.That may because you didn’t set your TV device for the rst time. Enter Settings > Video input > Add device manually to congure the TV device.I enter my ZIP code, but can’t nd my place.Make sure your zip code is correct .Check your network connection, make sure your network is connected. No output from one of the speakers. Adjust Balance in the settings.The power is on but the screen appears extremely dark. Adjust the brightness and contrast in the menu option.“No Signal” appears on the screen. Check if the signal cable is connected between the TV and products properly.The reception on some channels is poor.Scroll to other channels. There may a problem with the broadcast.The station signal may be weak. Aim the antenna to the proper direction.Check if there is local interferences such as an electrical appliance or power tool.Message is displayed saying “Unsupported Audio (Video)” or the video (audio) is working normally but the audio (video) is not working normally.Check whether the le is playing normally on a PC (Check whether the le is damaged.). Check whether the audio (video) code is supported.Check whether the bit rate is supported.Check whether the sample rate is supported.Thin lines appear in the background of the screen. Check the video cable connections.](https://usermanual.wiki/Hisense-Electric/LCDD0033.W9HLCDD0033-User-Manual-1/User-Guide-2120878-Page-27.png)
![21SYMPTOMS POSSIBLE SOLUTIONSThe TV turns off suddenly.Check the power control settings. The power supply may be interrupted.Check if the Auto sleep feature is activated in the Time settings. The image can’t be shown on the full screen.Check if the movie aspect ratio is different form TV. Go to Settings > Picture > Aspect ratio to set the aspect ratio.Can’t connect an IR Blaster to control the device.Go to Tools > Settings > Video input to check if the setting is right.Check if your IR Blaster is placed in the right place. Press [INPUT] button to display the Select Device menu,check if you choose the device you add.Can’t use CEC function to control the device.Go to Settings > Local settings > HDMI settings to check if the setting is right.Check if your device is compatible with Control for HDMI. If you connect an HDMI device that is not HDMI CEC - compatible, all the HDMI CEC Control features will not work.Other Information](https://usermanual.wiki/Hisense-Electric/LCDD0033.W9HLCDD0033-User-Manual-1/User-Guide-2120878-Page-28.png)