Hisense Electric LCDD0051 Part15 Subpart B-LED LCD TV User Manual Roku TV User Guide
Hisense Electric Co., Ltd. Part15 Subpart B-LED LCD TV Roku TV User Guide
Contents
W9HLCDD0051_User Manual 2
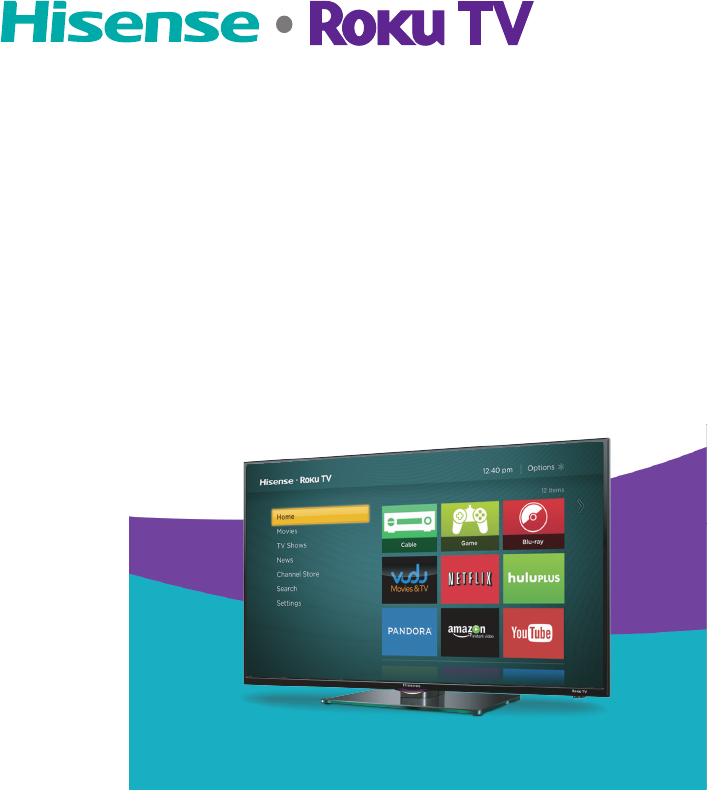
Hisense • Roku TV
H4 Model Series
User Manual
This user manual contains all of the informaon that you need to
set up, use, maintain and enjoy your TV.
Copyright Statement
Portions © 2014 Hisense Company Ltd. All rights reserved. Material in this User Manual is the property of Hisense
Company Ltd. and its subsidiaries, and is protected under US and International copyright and/or other intellectual
property laws. Reproduction or transmission of the materials, in whole or in part, in any manner, electronic, print,
or otherwise, without the prior written consent of the Hisense Company Ltd. is a violation of Hisense Company Ltd.
rights under the aforementioned laws.
No part of this publication may be stored, reproduced, transmitted or distributed, in whole or in part, in any
manner, electronic or otherwise, whether or not for a charge or other or no consideration, without the prior
written permission of Hisense Company Ltd.
Requests for permission to store, reproduce, transmit or distribute materials may be made to the following
address:
Hisense USA Corporation
7310 McGinnis Ferry Road
Suwanee, GA 30024.
Hisense, and any and all other Hisense product names, logos, slogans or marks are registered trademarks of
Hisense Company Ltd. and its subsidiaries. All other trademarks are the property of their respective holders.
Portions © 2014 Roku, Inc.
All rights reserved. ROKU, the ROKU Logo, ROKU READY, the ROKU READY Logo, “STOP DREAMING. START
STREAMING.”, “HAPPY STREAMING.”, “THERE'S A TON OF ENTERTAINMENT IN THIS LITTLE BOX.”, “STREAMING
STICK”, and “NOW THIS IS TV.” are trademarks and/or registered trademarks of Roku, Inc. in the United States and
other countries.

Disclaimers
**Notwithstanding anything to the contrary, including in any or all descriptions, representations, statements or
other communications related to this Hisense device (hereinafter “Device”) made in any form whatsoever and at
any time, some or all of the pre-installed, or subsequently installed Application Services may not be available or
capable of functioning as intended by the provider of the Application Services in any or all usage areas for reasons
outside of Hisense’s control, including but not limited to, Internet access, local service limitations, etc. Any
purchase or use of the Device, including any Application Services, is purely at the user’s risk. Application Services
are provided on an as-available basis without warranties of any kind, either expressed or implied, that the
Application Service will be uninterrupted or error-free, including but not limited to vagaries of weather, disruption
of Service, acts of God, warranties of title, local or regional limitations, no infringement, NOR IMPLIED
WARRANTIES OF MERCHANTABILITY OR FITNESS FOR A PARTICULAR PURPOSE. No advice or information given by
Hisense, providers, affiliates, or contractors or their respective employees shall create such a warranty. Hisense
specifically disclaims responsibility for any or all Application Services from functioning at any time, and by
purchasing the Device, you accept such disclaimer without any claim on Hisense. You are solely responsible for
providing an active and working connection to the Internet, along with any and all hardware and/or software
necessary to use the Hisense Device as intended.
**Illustrations in this User Manual are provided for reference only and may differ from actual product appearance.
Product design and specification may be changed without notice.

2
Table of Contents
Register Your TV to Receive Hisense News ................................................................................................... 4
Package Contents ...................................................................................................................................... 4
REQUIRED TOOLS AND DEVICES ............................................................................................................... 4
Lifting and Moving the TV ......................................................................................................................... 5
Installing the Stand ................................................................................................................................... 5
Installing a Wall Mount Bracket (not included) ........................................................................................ 7
Locating Ports and Buttons on Your TV ........................................................................................................ 8
Buttons and Ports on the Hisense•Roku TV ............................................................................................. 8
Connecting Devices to Your TV ................................................................................................................. 9
Guided Setup ............................................................................................................................................... 12
Starting Guided Setup ............................................................................................................................. 12
Connected TV Home Screen ................................................................................................................... 18
Non-connected TV Home screen ............................................................................................................ 19
Benefits of connecting ................................................................................................................................ 20
Connecting brings out your TV’s full potential! ...................................................................................... 20
What is streaming? ................................................................................................................................ . 20
But what if I didn’t connect my TV? ........................................................................................................ 21
Setting up Antenna TV ................................................................................................................................ 22
Why do I have to set up the TV tuner? ................................................................................................... 22
How do I set up the TV tuner? ................................................................................................................ 22
Using your TV .............................................................................................................................................. 26
TV status light .......................................................................................................................................... 26
TV panel buttons ..................................................................................................................................... 26
Remote control ....................................................................................................................................... 27
Getting around ........................................................................................................................................ 27
Watching broadcast TV channels............................................................................................................ 30
Switching TV inputs ................................................................................................................................. 31
Playing content from USB storage devices ............................................................................................. 32
Playing content from local network media servers ................................................................................ 32
Adjusting TV settings ................................................................................................................................... 33
Settings menu ......................................................................................................................................... 33
Options menu .......................................................................................................................................... 33
Advanced picture settings ....................................................................................................................... 35
Searching for movies and shows ................................................................................................................. 37
How do I search? ..................................................................................................................................... 37

3
I found a show, now what? ..................................................................................................................... 38
Using the Roku Channel Store .................................................................................................................... 39
Customizing your TV ................................................................................................................................ ... 40
Rearrange tiles ........................................................................................................................................ 41
Edit broadcast TV channel lineup ........................................................................................................... 40
Rename inputs ........................................................................................................................................ 41
Remove unwanted tiles .......................................................................................................................... 42
Change themes ....................................................................................................................................... 42
Change sound effects volume ................................................................................................................. 42
Configure automatic power off ............................................................................................................... 43
Configure parental controls .................................................................................................................... 43
More settings .............................................................................................................................................. 49
Changing network settings ...................................................................................................................... 49
Changing caption settings....................................................................................................................... 50
Changing time settings ............................................................................................................................ 51
Scanning for broadcast TV channels again ............................................................................................. 51
Using the TV in a home theater .............................................................................................................. 52
Restarting the TV ..................................................................................................................................... 54
Resetting the TV ...................................................................................................................................... 55
Getting system updates .......................................................................................................................... 55
Other devices .............................................................................................................................................. 58
Getting and using the Roku mobile app .................................................................................................. 58
Using a Universal Remote ....................................................................................................................... 58
Quick Problem-Solving Tips ........................................................................................................................ 60
4
Register Your TV to Receive
Hisense News
Thank you for choosing this Hisense • Roku TV. This User Manual provides information about the
numerous features and easy-to-understand connect devices to your TV, attach the TV stand, complete
the Guided Setup, configure your settings, stream content and much more.
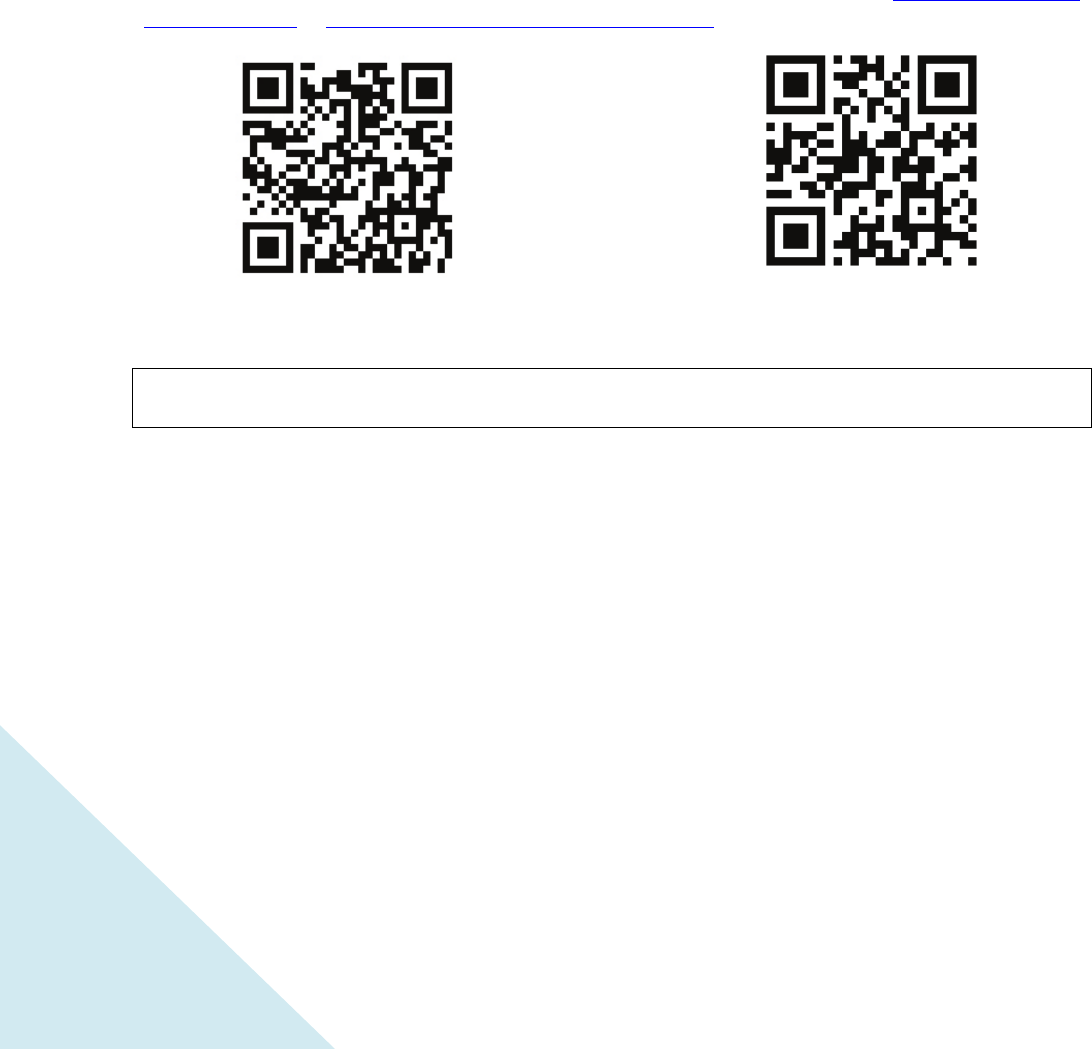
Because we value your business, we want to keep you in the know of ‘all things Hisense’. Using your
mobile phone, scan the first QR code to register your TV and the second QR code to access the Support
page. Depending on the make and model of your phone, you may need to download a QR code scanning
application.
You can also access the Product Registration or Support page by visiting http://www.hisense-
usa.com/support or www.hisense-usa.com/support/productreg
Package Contents
IMPORTANT: Look inside the styrofoam (within the upper and bottom parts of the box) to make sure
that you have removed all items that come with the TV.
Your package in which you purchased this Hisense Roku TV contains the following items:
REQUIRED TOOLS AND DEVICES
• Phillips screwdriver (not included) to attach the TV stand
• Wi-Fi device or Wireless router (not included) for Internet connectivity
Product Support QR Code
Product Registration QR Code
• Stand cover
• Power cord
• TV base
• Hisense Roku TV Quick Start Guide
• Important Safety Information and Warranty Card leaflet
• 2 AAA batteries
• Hisense • Roku TV Remote
• 8 Phillips screws (total): 4 (M5x12mm); 4 (ST4x16 mm)
5
Lifting and Moving the TV
• We recommend that at least 2 people are available to lift and transport the TV.
• Before moving or lifting the TV, disconnect the power cord and all cables.
• When holding the TV, face the screen away from you to avoid damage.
• Hold the top and bottom of the TV firmly.
Installing the Stand
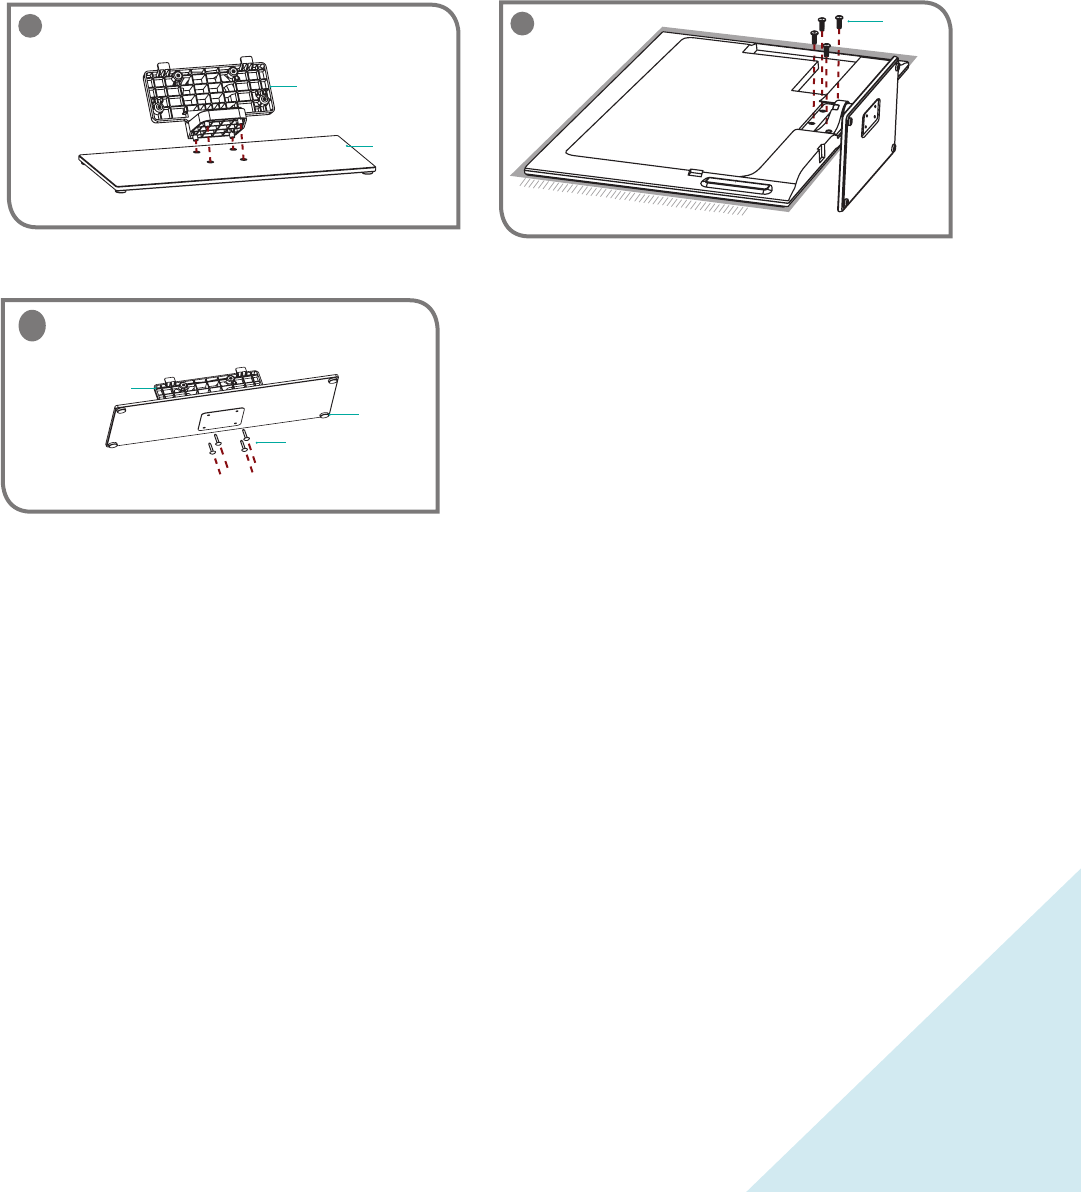
Follow the steps and illustrations below to install the stand.
1
Base
Stand cover
Screw (ST4×16)
Base
Stand cover
2
Insert the stand cover into the base as shown.
Secure the stand cover to the base with 4 screws (ST4×16).
Place the TV face down on a soft surface and secure the
stand to the TV with the 4 (M5x12) screws.
3 Screw
(M5×12)
6
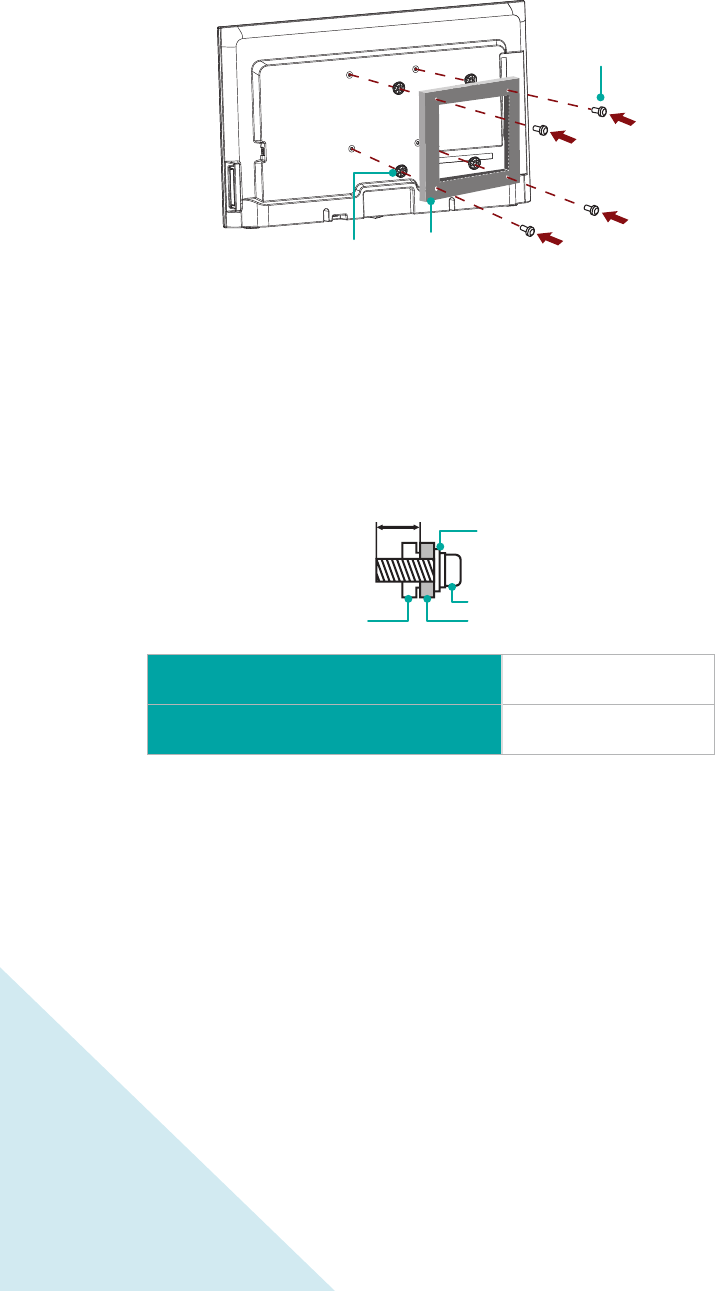
If you wish to mount the TV on a wall, you must purchase a wall mount bracket separately. However,
before you begin the manufacturer's instructions be sure to:
1. Remove the TV stand if you already attached it.
2. Place the TV face down on a clean, safe and cushioned surface.
3. Place the spacers (not included) in the corresponding bracket holes.
CAUTION:
When attaching the wall mount, use the spacers (provided by the third-party manufacturer)
between the TV and the bracket.
To prevent internal damage to the TV and ensure it is mounted securely, use fixing screws (not
provided) that are 9.5-11.5 mm in length when measured from the attaching surface of the
mounting hook
Wall mount hole pattern VESA (mm) 200 x 200 (for 40″)
Wall mount screw size (mm) M6
Follow instructions provided with the wall mount bracket.
If you are not sure of your ability to complete the installation, contact a professional installer or
service technician for assistance. Hisense is not responsible for any damages or injuries that occur
due to mishandling or incorrect assembly.
The selected screws are 9.5-11.5 mm in length when measured from the attaching surface of the TV
rear cover.
Note: The diameter and length of the screws differ depending on the wall mount bracket model.
Bracket
(not provided)
Screw
(not provided)
Spacer
(not provided)
The rear cover of the TV Spacer
Screw
Wall mount bracket
9.5 - 11.5 mm
7
Installing a Wall Mount Bracket (not included)
Your TV can be mounted on a wall using a wall mount bracket (not supplied) that can be purchased
separately. Before you begin the installation instructions provided by the wall mount manufacturer, we
suggest that you do the following things:
Remove the TV stand if you already attached it.
Place the TV face down on a clean, safe and cushioned surface.
Place the spacers (not included) in the corresponding bracket holes.
CAUTION
• Be sure to use the provider spacers between the TV and the bracket when attaching the mount.
• To prevent internal damage to the TV and ensure it is mounted securely, be sure to use fixing
screws (not provided) that are 9.5 - 11.5 mm in length when measured from the attaching
surface of the mounting hook
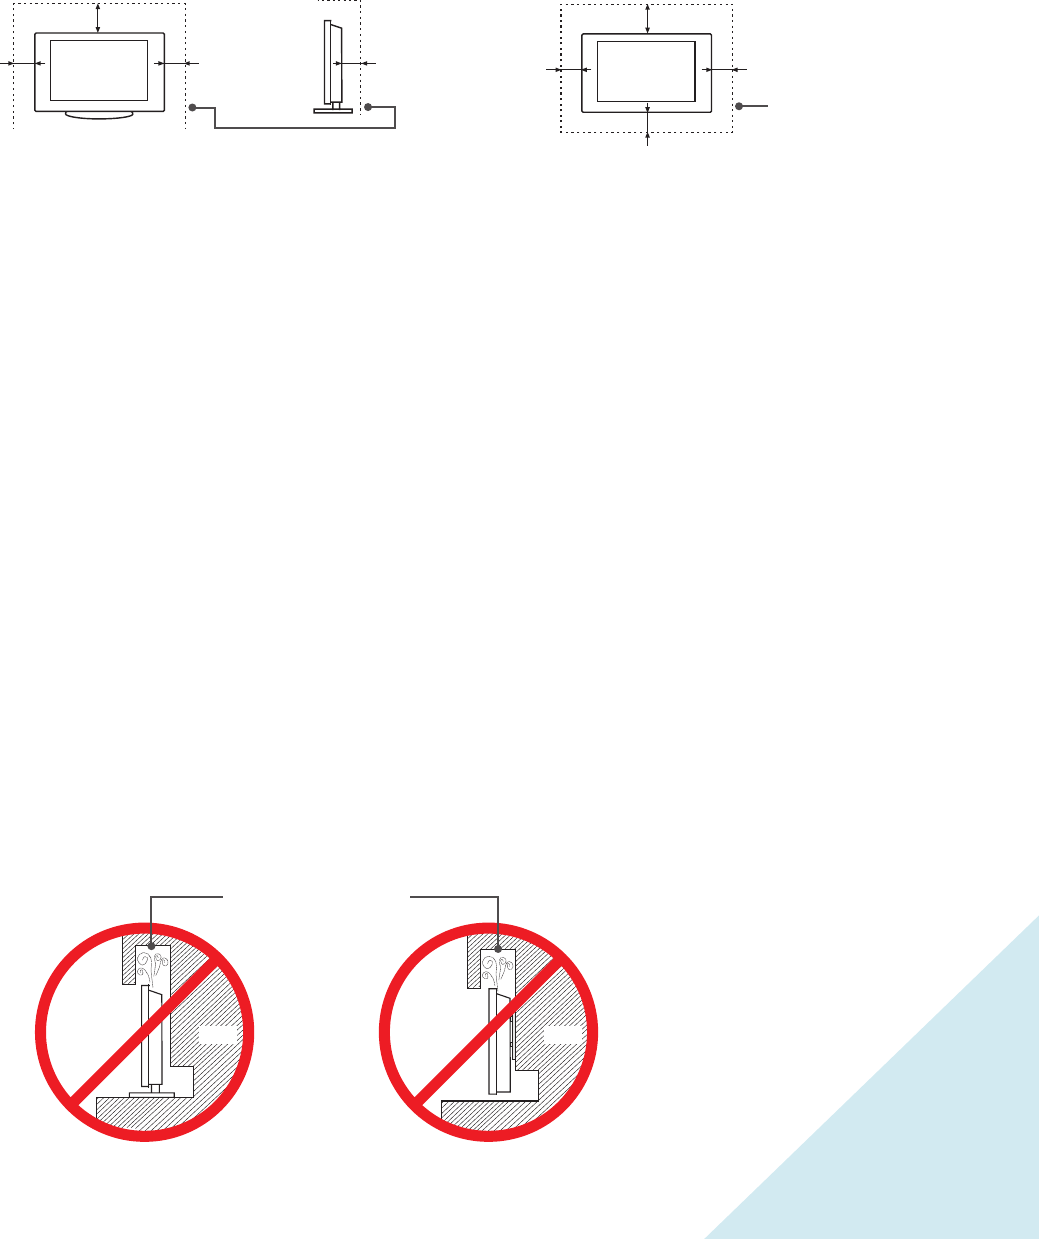
• When you mount your TV on the wall or place it on furniture, maintain a distance of at least 4
inches between the TV and other objects (walls, cabinet sides, and so on) to ensure proper
ventilation andd prevent the TV from overheating.
• Do not mount the TV at more than a 12 degree tilt.
• Do not use screws that differ from the length and diameter that we have recommended.
• Do not fasten the screws too firmly. This may damage the TV or cause it to fall, leading to
personal injury. Hisense is not liable for these kinds of accidents.
• Be careful when you touch the TV. Some parts may be warm or hot.
• Do not place any type of fabric or papers underneath, on top of, or beside the TV. This can block
ventilation and cause a fire.
• For detailed information about installing the wall mount bracket, see the third-party
manufacturer’s instructions or contact a professional installer for assistance.
• Do not operate or handle the TV with wet hands
Follow instructions provided with the Wall-Mount bracket.
• If you are not sure of your ability to complete the installation, contact a professional installer for
assistance. Hisense is not responsible for any damages or injuries that occur due to mishandling
or incorrect assembly.
• The screws that we recommend are 9.5-11.5 mm in length when measured from the attaching
surface of the TV rear cover. The diameter and length of the screws differ depending on the
Wall-Mount Bracket model.
Leave at least this much
space around the set.
Leave at least this much
space around the set.
4 inches
(10cm)
4 inches
(10cm) 4 inches
(10cm)
4 inches
(10cm)
4 inches
(10cm)
2 3⁄8 inches
(6cm)
12 inches
(30cm) 12 inches
(30cm)
Correct way to attach the TV stand Correct way to attach the wall mount bracket
Wall Wall
Air circulation is blocked.
Inadequate air circulation can make the TV overheat and cause a re.
8
Locating Ports and Buttons
on Your TV
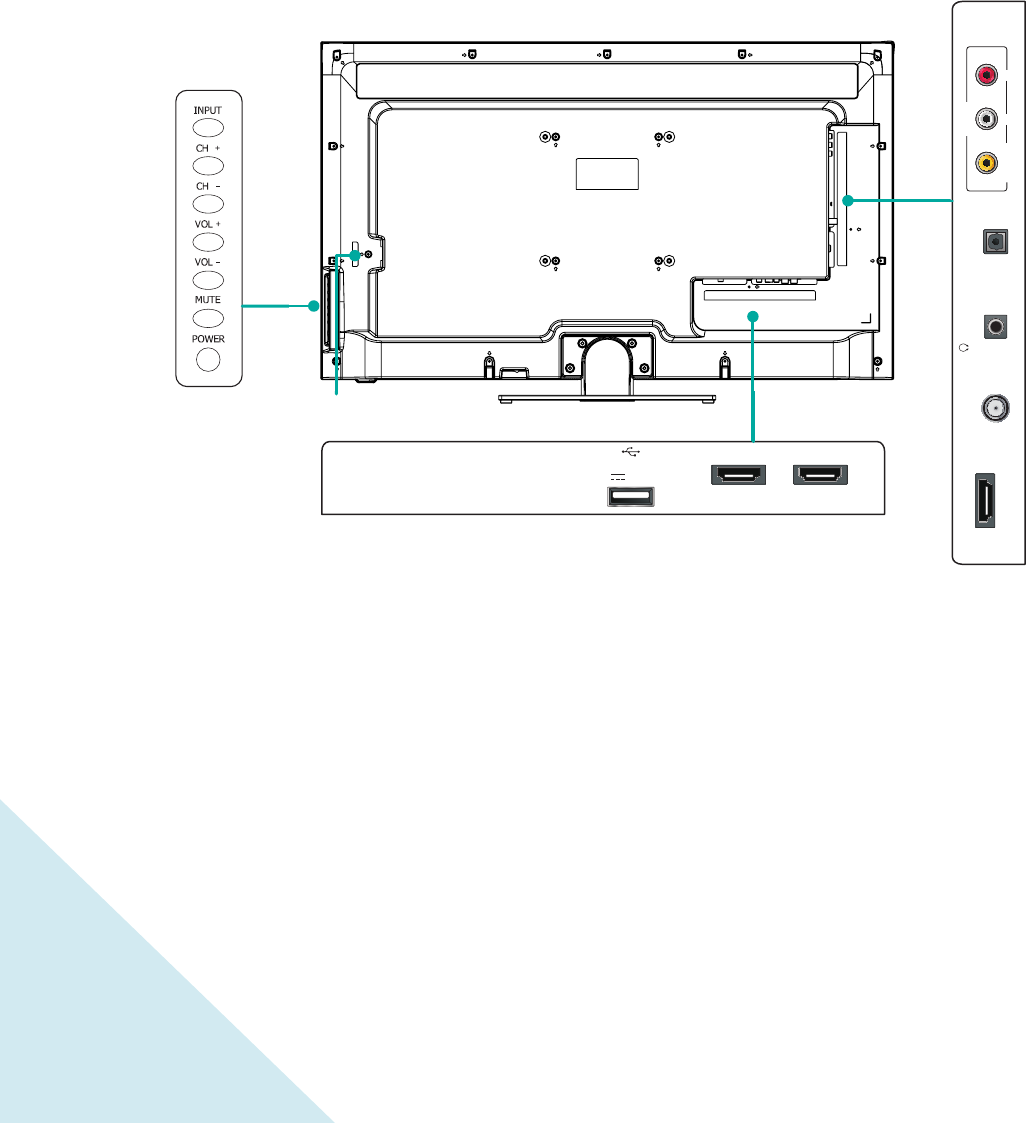
Buttons and Ports on the Hisense•Roku TV
USB
HDMI 3
DC 5V 0.5A(MAX)
HDMI 2
TV Bottom View
TV Side View
Button View
HDMI 1(ARC) VIDEO L
AV IN
R
Ant/Cable /AUDIO
OUT
DIGITAL
AUDIO OUT
AC power cord
AC power cord
9
Connecting Devices to Your TV
This section provides the steps to connect various types of devices to the TV.
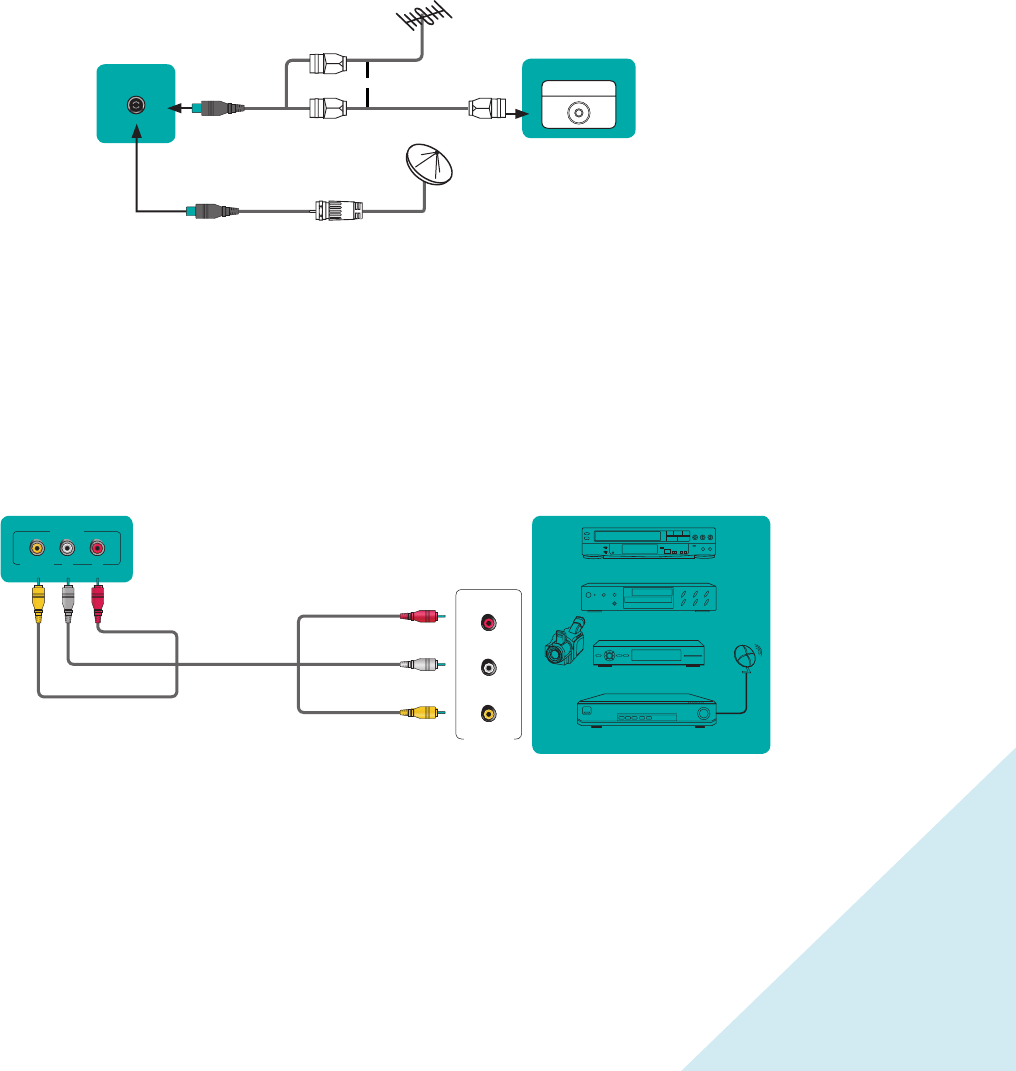
Connecting an antenna, cable or satellite box
1. Connect one end of a coaxial cable (not included) to the [RF OUT] jack on the antenna, cable or
satellite box. If you are using an antenna with twin-lead cable, you may need a 300-75 Ohm adapter
(not provided) to connect it to the back of your TV. Likewise, if you are using several antennas, you
may need a combiner (not provided).
2. Connect the other end of the cable to the [ANT/CABLE IN ] jack on the side of the back panel.
3. Select TV as the input source using the [INPUT] button.
Connecting an Audio Visual (AV) device with a composite cable
1. Use the audio and video cables to connect the composite video/audio jacks (of the external AV
device) to the AV IN jacks of the TV. (Video = yellow, Audio Left = white, and Audio Right = red).
2. Plug the connected devices into the main socket before switching on the TV.
3. Select AV as the input source using the [INPUT] button.
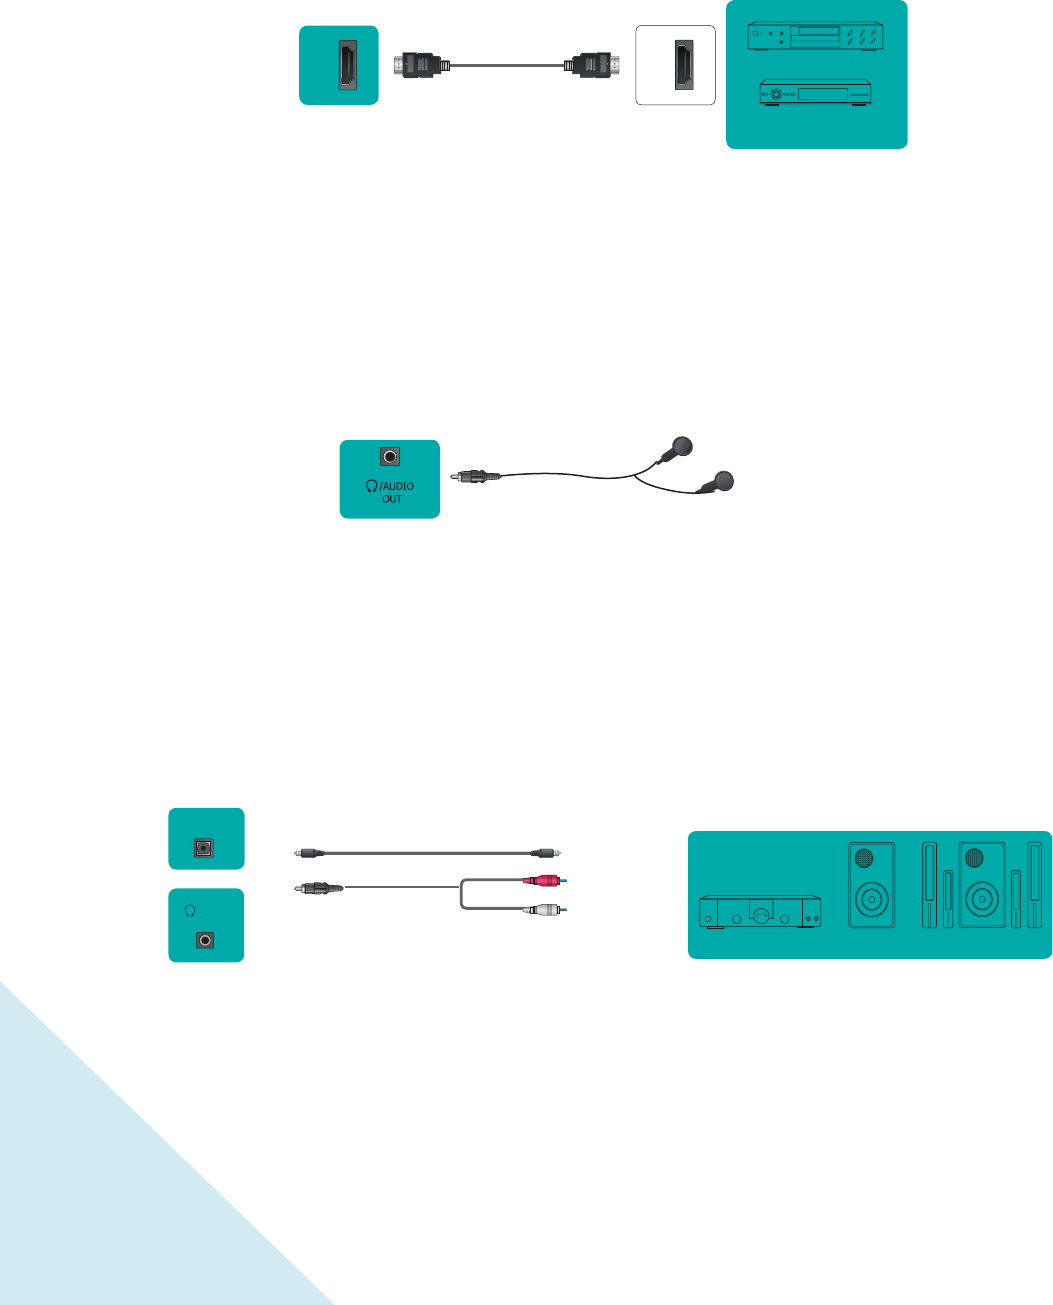
Connecting an AV device with an HDMI cable
This type of connection supports digital connections between HDMI-enabled AV devices such as a
Personal Video Recorder (PVR), DVD, Blu-Ray, AV receiver and digital devices. In addition, some devices
(such as a PVR or DVD player) require an HDMI signal to be set to Output in the settings of the device.
or ANT OUT
Cable
VHF/UHF Antenna
EXTERNAL DEVICESTV JACK
ANT/CABLE
(not included)
(not included)
DVD Player/Recorder
Video
Camera
EXTERNAL DEVICES
Set-top box
Satellite Receiver
Satellite
antenna
cable
VCR
A/V OUT
Video
L
R
White(L)
White(L)
Yellow(Video)
Yellow(Video)
Red(R)
Red(R)
TV JACK
VIDEO
AV IN
L R
AV Cable
(not included)
10
For instructions, please refer to the User Manual for the device.
1. Use an HDMI cable to connect the [HDMI] output jack of the AV device to the [HDMI] jack on
the TV.
2. Plug the connected devices into the main socket before switching on the TV.
3. Select one of the HDMI sources as the input source using the [INPUT] button.
Note: The HDMI connector provides video and audio signals. It is not necessary to connect an audio
cable.
Connecting a Headphone
You can connect headphones or an analog sound bar to the [AUDIO OUT] jack on your set. While the
headphone is connected, the sound from the built-in speakers will be disabled.
Connecting an Audio Receiver with a digital audio cable
1. Use an audio cable to connect the digital [AUDIO IN] jack of the AV device to the [DIGITAL AUDIO
OUT] jack of the TV. Another option is to use an RCA Y-cable (1/8”-stereo mini to L/R phono - not
provided) to connect analog sound system to the [AUDIO OUT] jack of the TV.
2. Plug the connected devices into the main socket before switching on the TV.
3. Select the corresponding source on the audio receiver.
Connecting a USB device to the USB port
1. Browse photos, music and movies by inserting your USB device into the [USB] port.
2. Select the Roku Media Player tile from the Home screen
HDMI
HDMI
TV JACK
EXTERNAL DEVICES
DVD
Set-top Box
HDMI Cable
(not included)
TV JACK
Audio Cable
(not included)
TV JACKS EXTERNAL DEVICES
Powerless
Bass Speaker
Speaker
Audio Amplier
DIGITAL
AUDIO OUT
/AUDIO
OUT White(L)
Red(R)
Audio Cable
(not included)
11
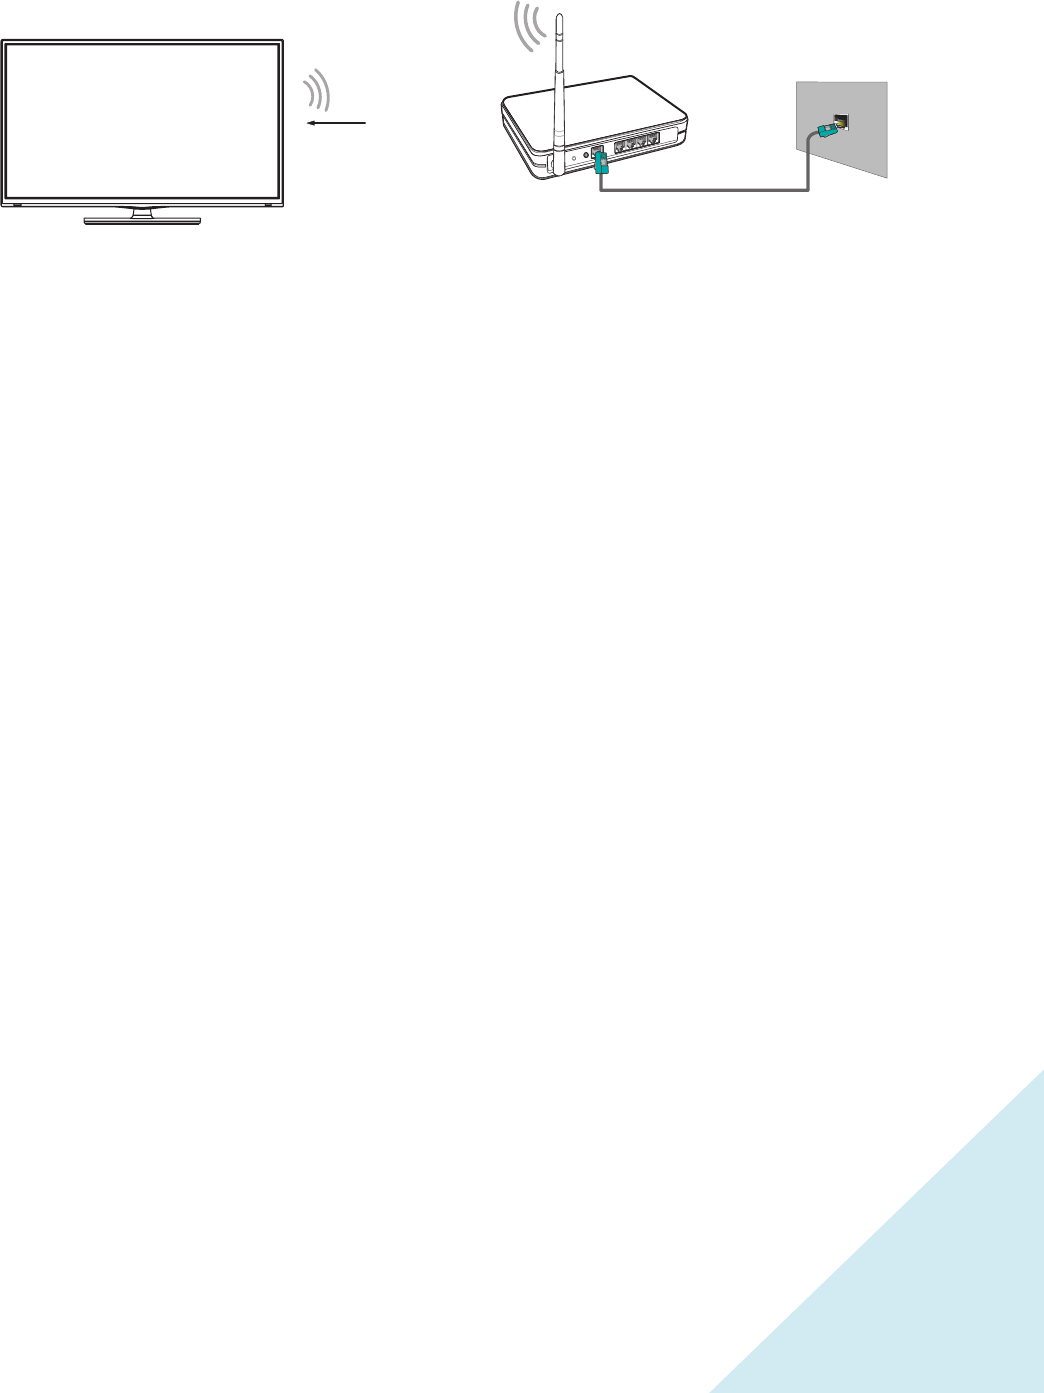
Connecting to the Internet through a Wireless (WiFi) Device
This section shows how to establish a wireless Internet connection for your TV.
Our built-in wireless LAN adapter supports the IEEE 802.11 b/g/n communication protocols and we
recommend that you use an IEEE 802.11n router. When you play a video over an IEEEE 802.11 b/g
connection, the video may not play smoothly.
Note
• You must use the Hisense built-in Wireless LAN Adapter to use a wireless network because the
TV does not support an external USB network adapter.
• To use a wireless network, your TV must be connected to a wireless IP sharer. If the wireless IP
sharer supports Dynamic Host Configuration Protocol (DHCP), your TV can use a DHCP or static
IP address to connect to the wireless network.
• Select a channel for the wireless IP sharer that is not currently being used. If the channel set for
the wireless IP sharer is currently being used by another device nearby, this will result in
interference and communication failure.
• If you apply a security system other than the systems listed below, it will not work with the TV.
• If Pure High-throughput (Greenfield) 802.11N mode is selected and the Encryption type is set to
WEP, TKIP or TKIP-AES (WPS2 Mixed) for your Access Point (AP), then the Hisense TV will not
support a connection in compliance with these Wi-Fi certification specifications.
• If your access point (AP) supports Wi-Fi Protected Setup (WPS), you can connect to the network
via Push Button Configuration (PBC) or PIN (Personal Identification Number). WPS will
automatically configure the SSID
Wireless Wi-Fi device or
Wireless IP sharer
LAN Cable
Wireless Adapter
built-in the TV set
The LAN Port on
the Wall
(not included)

12
Guided Setup
With the preliminaries out of the way, it’s time to turn on your TV. As the TV starts for the first time, it
leads you through Guided Setup, which configures the TV before you start to use it.
During Guided Setup, you’ll:
• Answer a few questions
• Provide network connection information
• Get a software update
• Link the TV to your Roku account
• Connect devices such as a DVD player, game console, or cable box
Note: Guided Setup only runs the first time you turn on your TV. If you need to run Guided
Setup again, you’ll have to perform a factory reset, as explained in “Factory reset everything” on
page 55.
Starting Guided Setup
To start Guided Setup, press the red [POWER] button on the remote control to turn on your TV.
When you first turn on your TV, it will take a few seconds to get itself ready. You’ll notice the following
things happening:
• The status light blinks every time the TV is busy doing something; in this case it’s powering up
and getting ready for you.
• The Power-on screen appears and the status light blinks slowly for a few more seconds. The
Power-on screen displays a TV logo while the TV starts up.
• After a few seconds, the Guided Setup starts.
• If the TV prompts you for a language, press the DOWN arrow on the remote control to highlight
your preferred language.
13
Setting up your TV
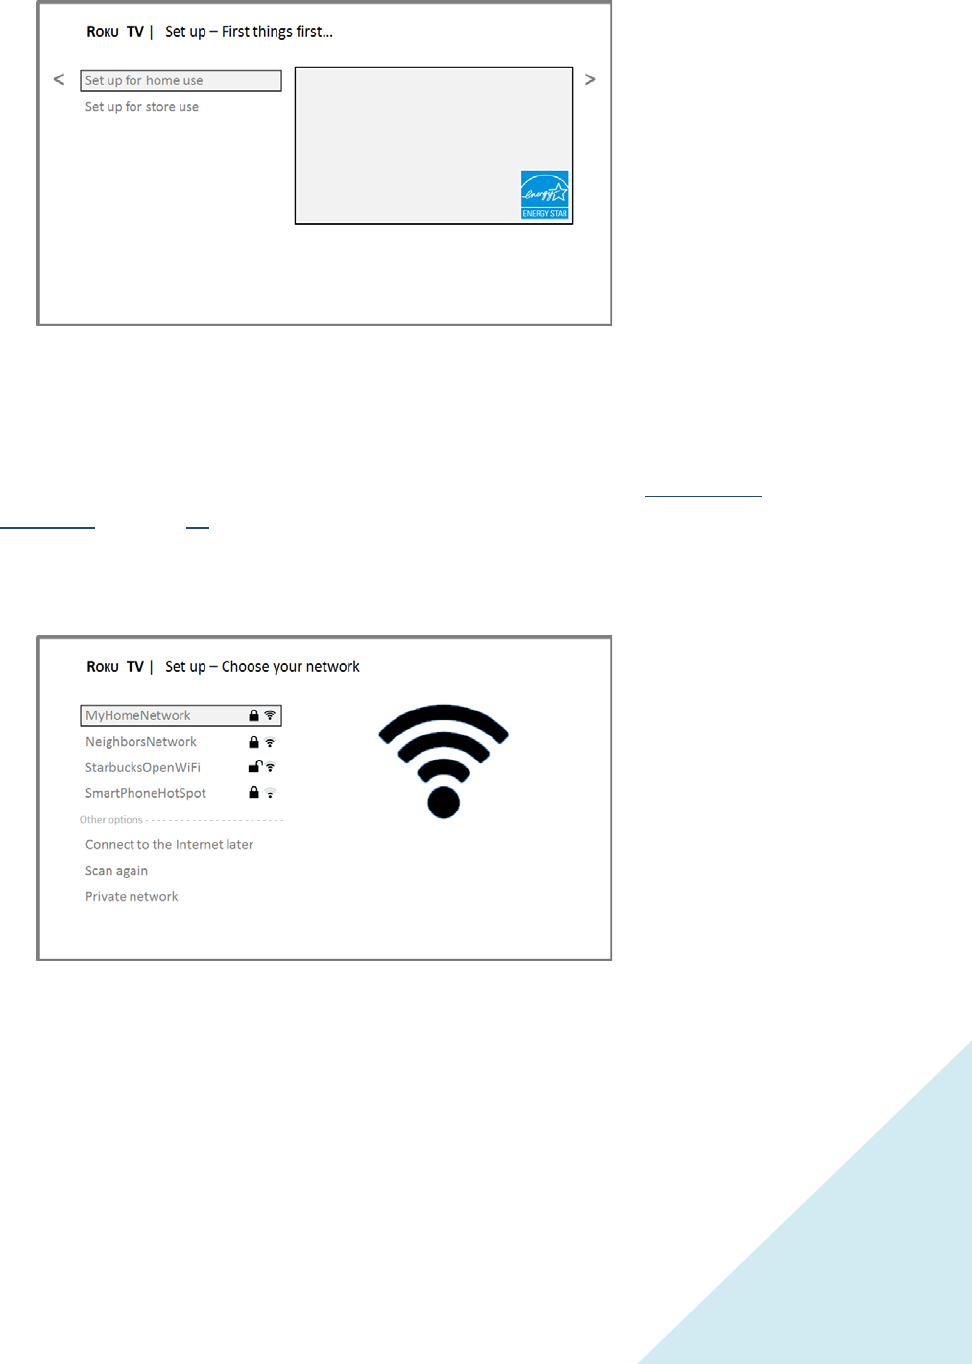
With the first Guided Setup screen on your TV, follow these steps to set up your TV:
1. Press the [OK] or [RIGHT] buttons on the remote control to go to the next screen:
2. Press OK to select Set up for home use. Home mode is the right choice for enjoying your TV. It
provides energy- saving options as well as access to all features of the TV.
Note: ‘Store’ mode configures the TV for retail display and is not recommended for any
other use. In store mode, some features of the TV are missing or limited. To switch from one
mode to the other, you have to perform a factory reset as explained in “Factory reset
everything” on page 55, and then repeat Guided Setup.
After you select Set up for home use, the TV scans for the wireless networks within range and
displays them in order, with the strongest signals first. In addition to your own wireless signal,
the TV might pick up signals from your neighbors.
3. Press [UP] or [DOWN] to highlight the name of your wireless network, and then press [OK] to
select it.
Note: Some wireless networks, such as those often found in dorm rooms, hotels, and other public
places, may require you to read and agree to terms, enter a code, or provide identifying
information before letting you connect to the Internet. If the Roku TV detects that you are
connecting to such a network, it prompts you through the connection process using your
compatible smartphone or tablet to provide the needed information. For more
information, see “Using your TV in a hotel or dorm room” on page
14
DVDs. If you want to connect later, it’s easy. We’ll show you how in “Benefits of
connecting” on page20.
Note: If you decide not to connect, Guided Setup skips ahead to setting up the
devices that you’ve connected to your TV. See “Non-connected TV Home screen” on
page 19 to get started using your non-connected TV.
• Scan again / Scan again to see all networks – This option depends on the number of
wireless networks within range:
o Scan again appears if the list already shows all available wireless networks
within range. If you don’t see your wireless network name in the list, you
might need to adjust the location of your wireless router or the TV, turn on
your router, or make other changes. When everything is ready, select Scan
again to see if your network name now appears in the list.
o Scan again to see all networks appears if the TV finds more than seven
wireless networks, because the TV initially displays only the strongest seven
networks. If you don’t see your wireless network name in the list, this
option displays the complete list. If you still don’t see your network name,
you might have your router configured to provide wireless service as a
“private network.”
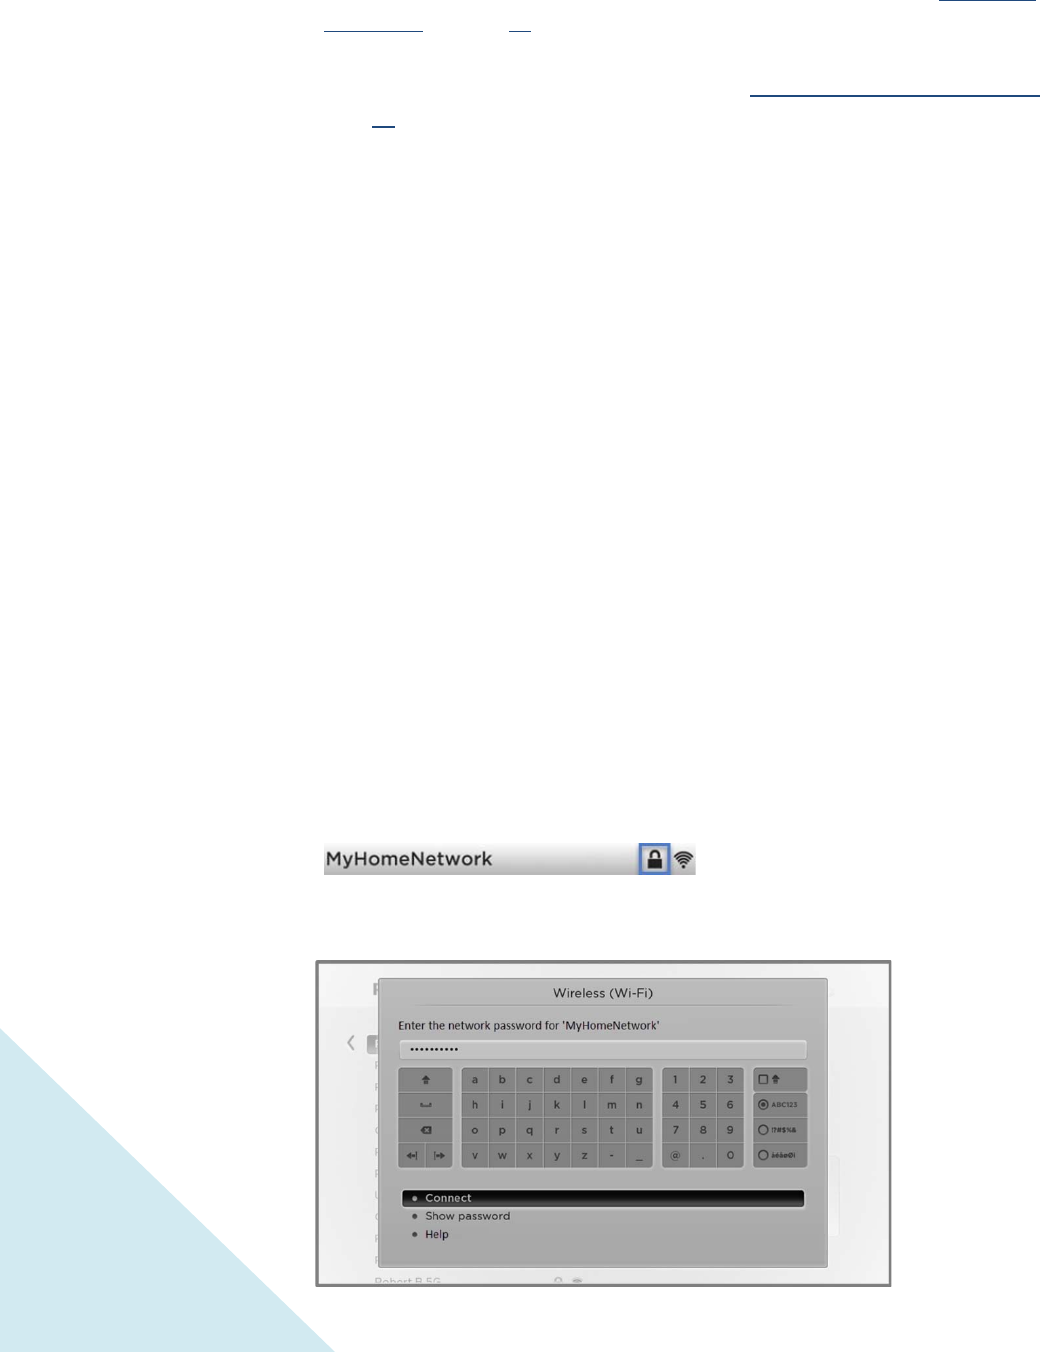
• Private network – If your wireless network name is hidden, it won’t appear in the
list. Select Private network to display an on-screen keyboard, and use it to enter
your network name. Unless you changed the factory-set network name, you can
find the name (also called SSID) on a label on the router.
4. If your network is password-protected, an on-screen keyboard appears. Use the keyboard to
enter the network password.
Other options:
• Connect to the Internet later – If you’re unable to connect to the Internet, that’s OK.
You can skip this step and use the TV to watch broadcasts, play games, and watch
Note: Highlighting either of these options displays an informational panel with the
unique media access control (MAC) address of your Roku TV. You will need the MAC
address if your wireless router is configured to use MAC address filtering.
15
5. After you submit your network password, the TV displays progress messages as it connects to
your wireless network, your local network, and the Internet.
7. As soon as the TV is able to connect to the Internet, it downloads and installs its first software
update, and then restarts.
Tip: Your TV automatically checks for updates periodically. These updates provide new
features and improve your overall experience with the TV. After an update, you might notice
that some options have moved, and that there are new options or features.
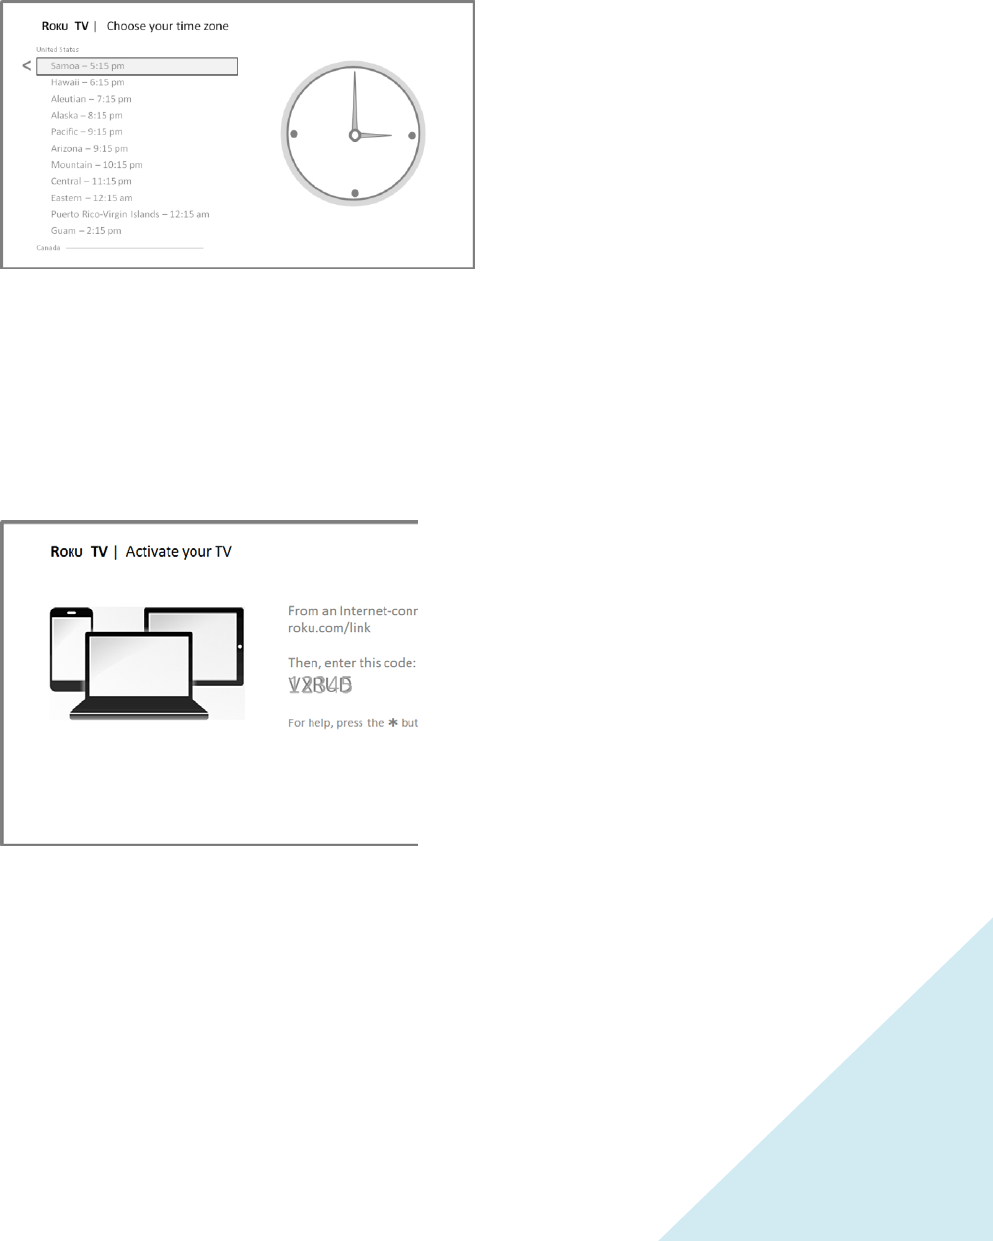
After the TV restarts, it displays the Activation screen:
6. Your TV needs to know the local time zone so that it can correctly display time information
about the program you are currently watching. If the TV is unable to automatically determine
the local time zone, it prompts you to choose your time zone from a list. Use the UP and DOWN
arrows to highlight your time zone, and then press OK.
16
Aer you log in or create your Roku account, the TV
gets an acknowle dgement and adds your
pre-exisng streaming channels, if any, to your TV. This process is automac and takes a few
moments—a lile longer if you already have a lot of streaming channels to add.
Tip: Streaming channels from all Roku devices associated with your account are
synchronized periodically, so all of your Roku devices have the same streaming channels
(subject to compability with the device).
Aer it adds your selected streaming channels, the TV helps you set up the devices that you’re
connecng to it, such as a cable box, Blu-ray player, or game console:
9. Press OK or RIGHT to proceed:
8. Using a computer, tablet, or smartphone with an
Internet connecon, go to the web address
displayed on the screen and enter the code that
appears on your screen.
You need a Roku account to complete this step. If
you already have a Roku account, you’ll be asked to
log in. If you don’t, you’ll be asked to create one.
You’ll have the opon to create a Roku PIN code
that can be used to authorize any purchases or
payments.
Why do I need a Roku Account?
You need a Roku account for several reaons.
• It links you, your TV, your other Roku devices,
the Roku web site, and a payment method.
• Fees associated with adding certain channels are
paid for by the payment method you have
specified.
• Streaming content providers know that it’s OK to
send content you request to your TV.
• Roku can automacally send updates to your
device.
Important: It doesn’t cost anything to use your TV,
and there are lots of free channels. If you choose to
add a streaming channel or other applicaon with
associated fees (most have none), it’s paid for by
the payment method you have specified
.
17
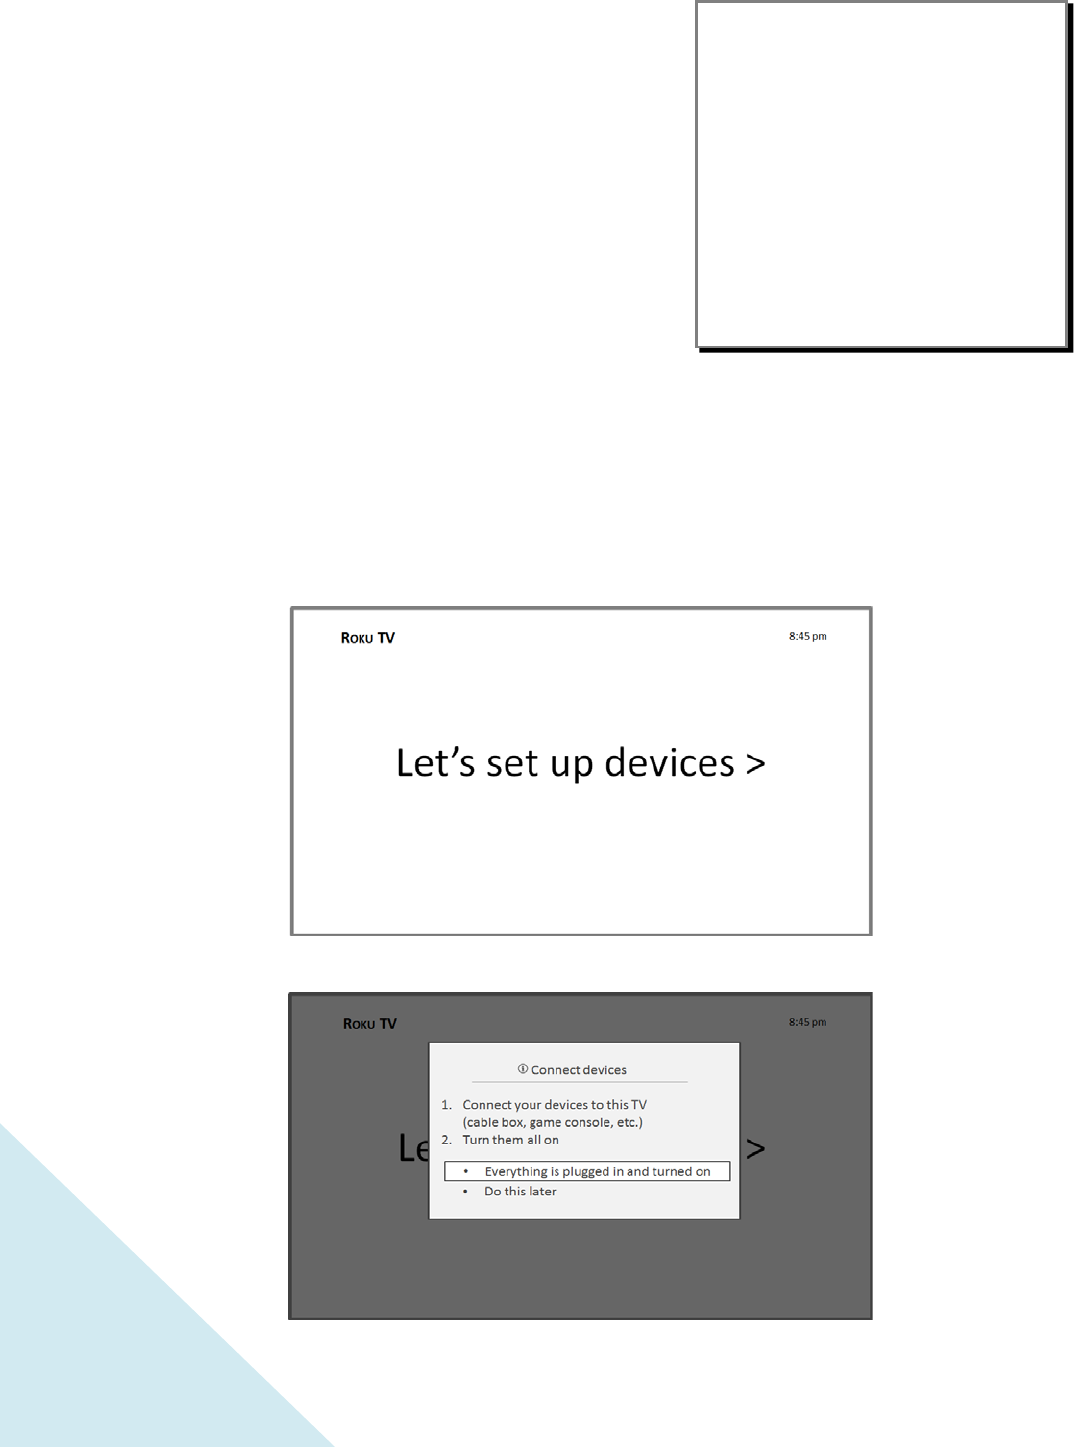
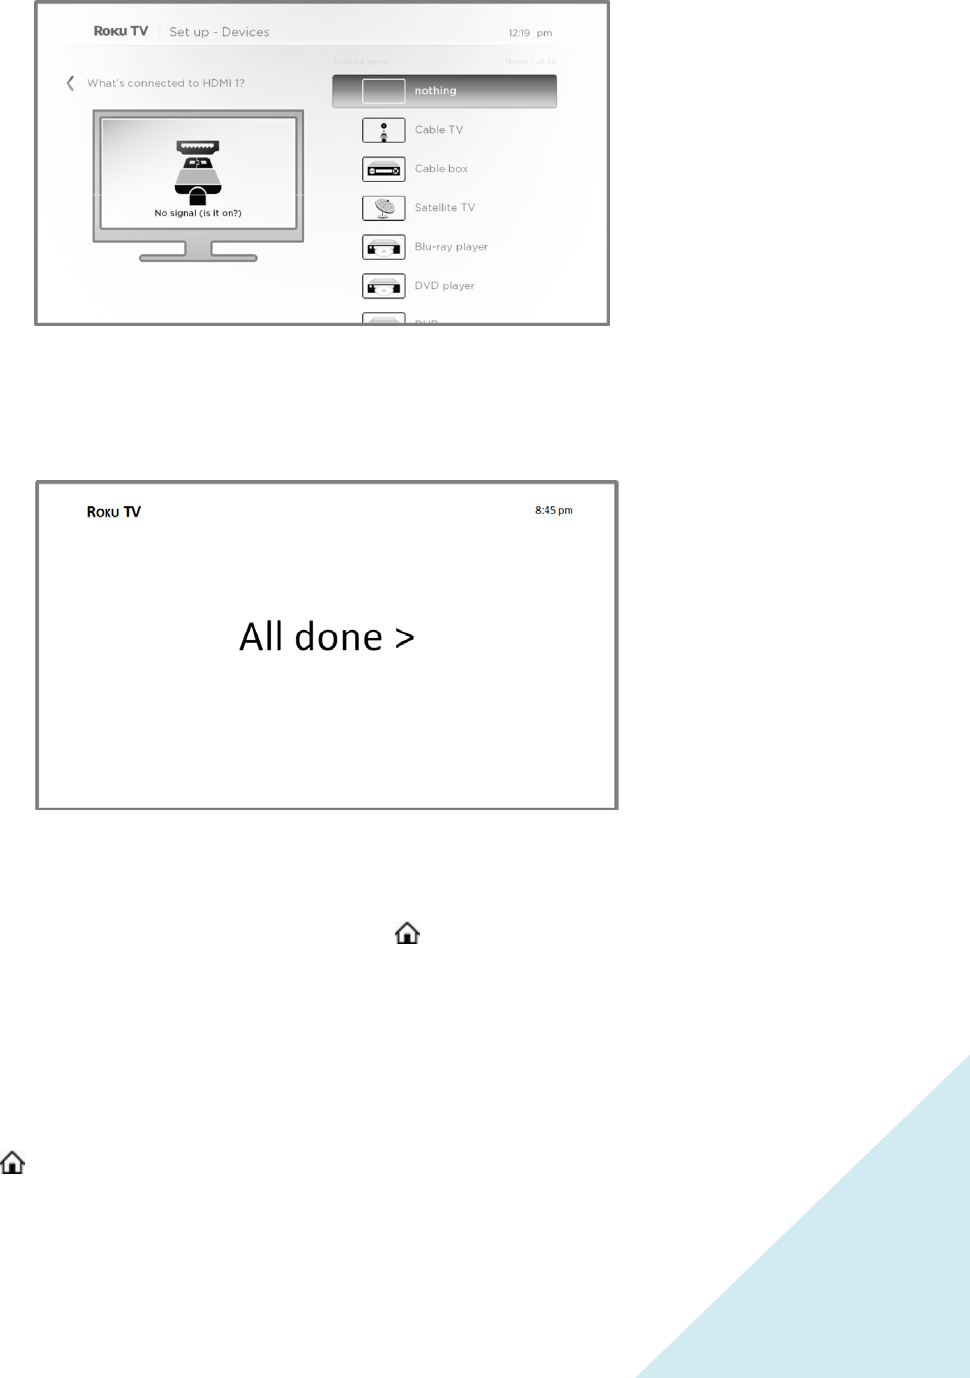
10. Connect all the devices you plan to use to the TV, turn them all on, and then select Everything is
plugged in and turned on. The TV now takes you step by step through each of its inputs and
asks what kind of device you have connected. On each input that has a connected and active
device, you can see its picture and hear its sound.
11. Press UP or DOWN to highlight the label you want to associate with the input, and the press OK
to move on to the next input.
You’re done with Guided Setup.
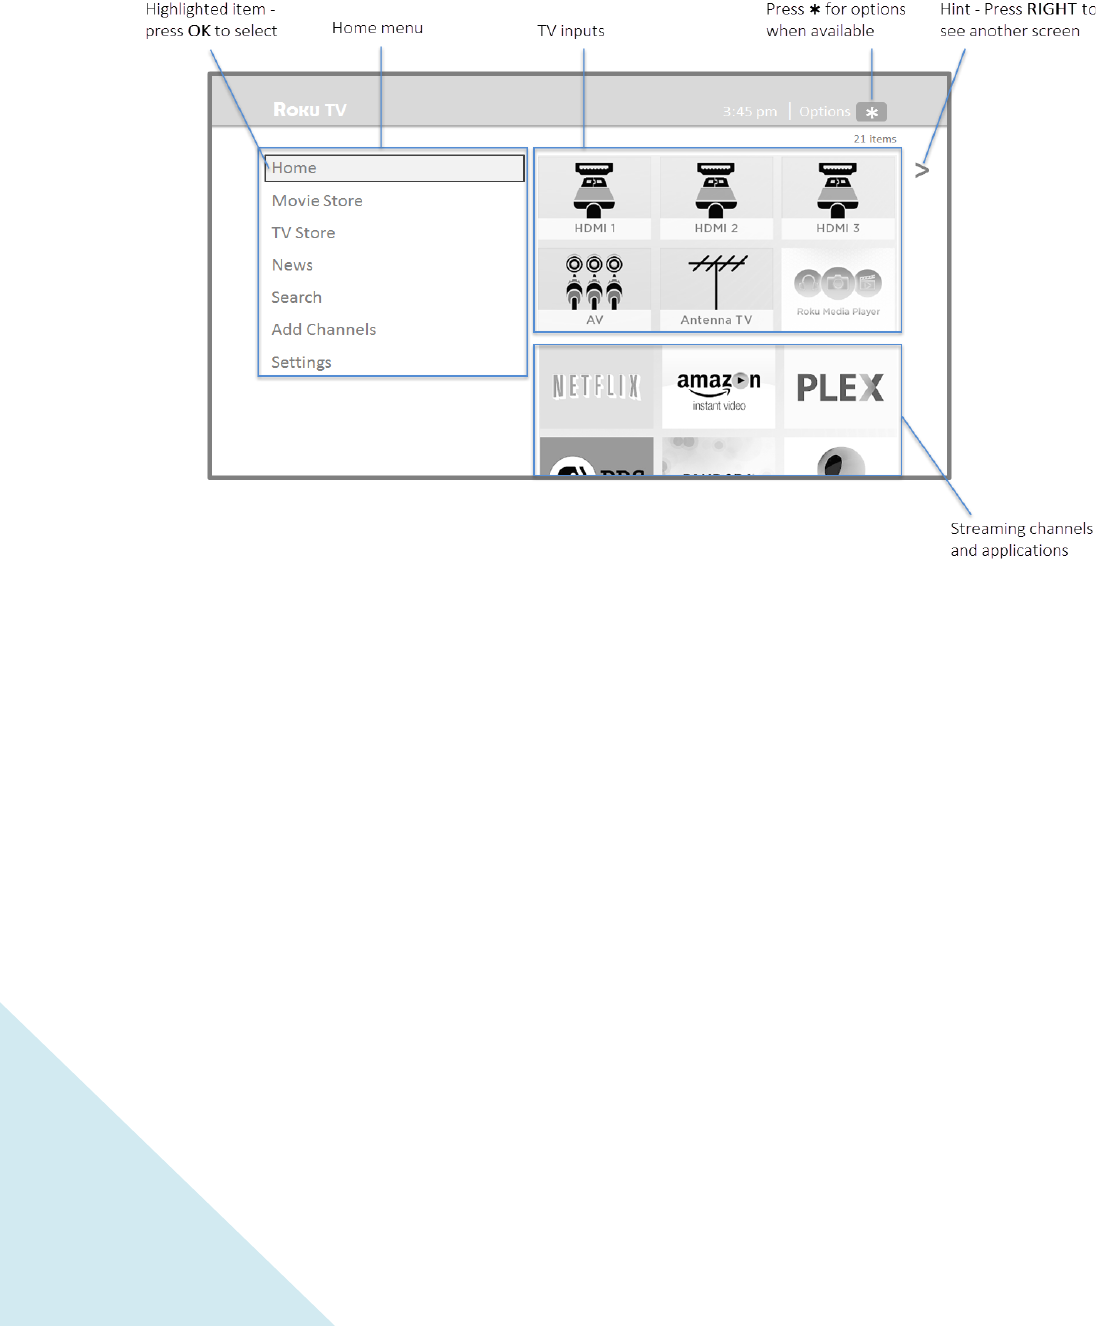
When you finish Guided Setup, and whenever you press on the remote control, the Home screen
greets you.
From here, you can explore everything your TV has to offer. Press the arrow buttons to move around,
and press OK to select a highlighted item. We’ve designed the TV to encourage you to explore, and you
can probably figure out most of the capabilities and settings on your own. If you have any questions or
difficulties, you can find answers and solutions in this guide.
If you find yourself a long way from the Home screen, you can always get back right away by pressing
one button: .
Tip: The appearance of the Home screen varies depending on whether you decided to connect
your TV to the Internet.
Note: Some Roku TVs, depending on where you live and other factors, show you an introductory video
filled with some great hints and tips. If you’re not interested in viewing this video, press on the
remote control to exit to the Roku TV Home screen.
18
Connected TV Home Screen
Here is a typical Home screen from a TV that’s connected to the Internet and paired with a Roku
account.
Personalize your Home screen
You can do a lot to personalize your Home screen and make it just right for you and your family:
• Add streaming channels by using the Add Channels menu option to browse the Roku Channel
Store.
• Remove a tile by highlighting it and pressing .
• Reposition a tile by highlighting it and pressing .
• Rename a TV input tile by highlighting it and pressing .
• Change the screen theme to suit your mood.
19
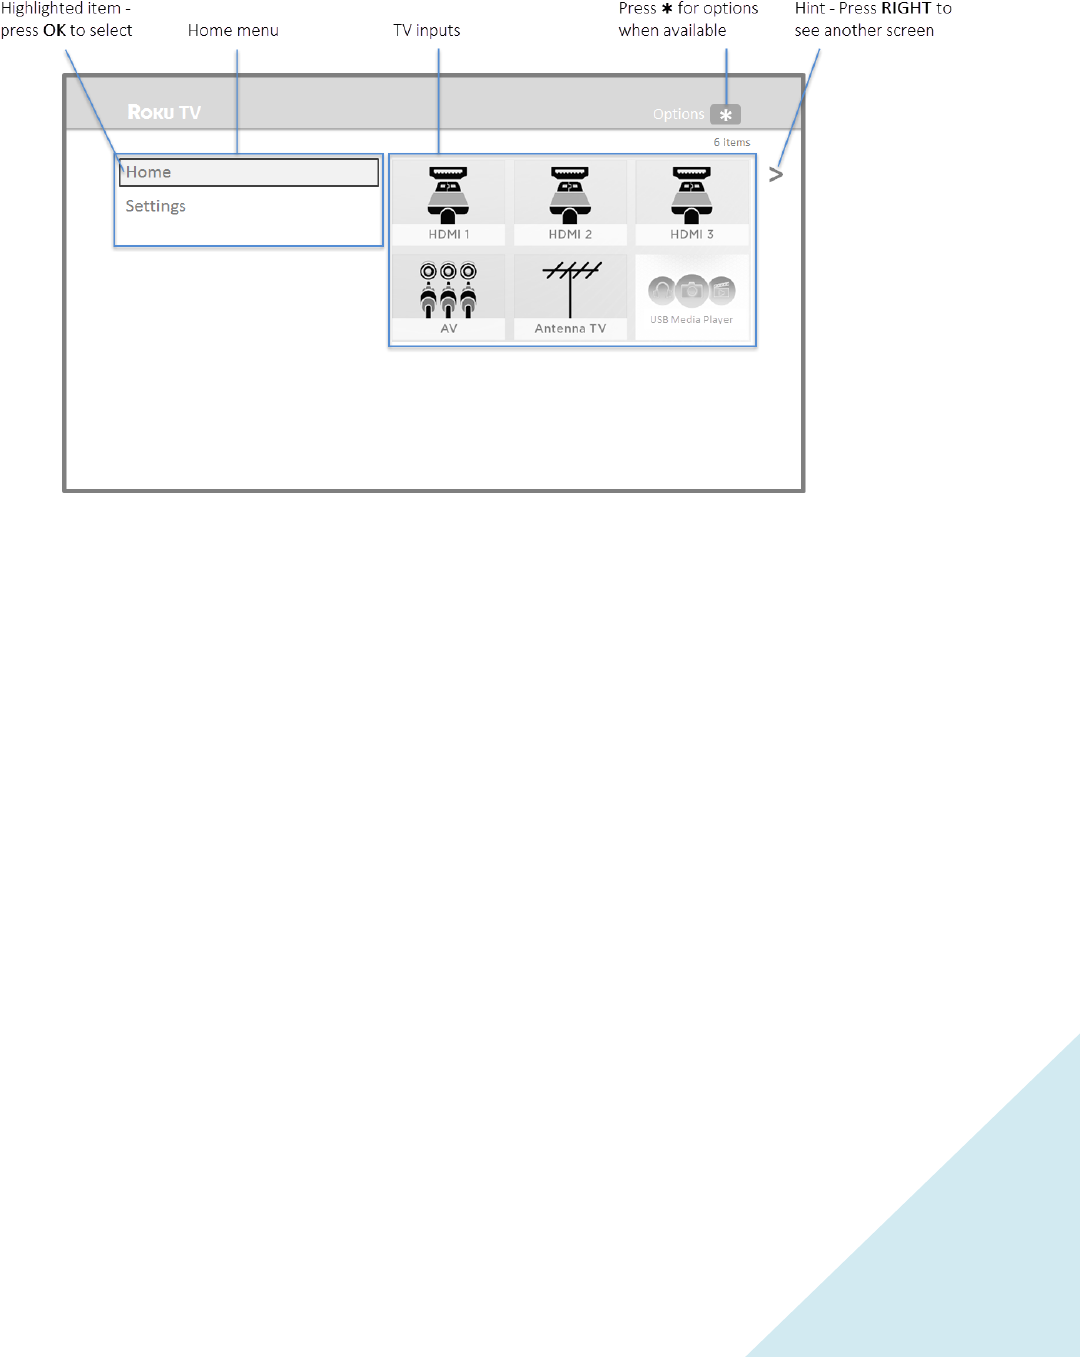
Non-connected TV Home screen
Here is a typical Home screen from a TV that is not connected to the Internet.
Personalize your Home screen
You can do a lot to personalize your Home screen and make it just right for you and your family:
• Remove a tile by highlighting it and pressing .
• Reposition a tile by highlighting it and pressing .
• Rename a tile by highlighting it and pressing .
• Add streaming channels by browsing the Roku Channel Store (after connecting the TV to the
Internet to add the Add Channels option to the menu).

20
Benefits of connecting
Connecting brings out your TV’s full potential!
Make any night a movie night
Your TV offers more than 200,000 movies and TV episodes to choose from, across major streaming
movie channels like Netflix, Amazon Instant Video, Hulu Plus, Redbox Instant, VUDU, and more.*
Get in the groove
Stream on-demand or live music from any of more than 85 music channels like Pandora, VEVO, Spotify,
iHeartRadio, and more. Access your entire MP3 collection instantly with Amazon Cloud Player or the
Roku Media Player.
Explore loads of free trials
Your TV comes packed with special offers, often including free trials from popular streaming channels
like Amazon Instant Video, Netflix, Redbox Instant, Spotify, and DailyBurn.
Rule the water cooler
Binge on the most buzzworthy shows on streaming channels like FOXNOW, HBO GO, Hulu Plus, and
Netflix.* Live stream your sports team with the biggest selection of streaming sports packages out there,
including WATCH ESPN, MLB.TV, NBA League Pass Broadband, NHL GameCenter, MLS LIVE, UFC, WWE,
and more. International sports offerings on Dishworld include Indian Premier League cricket and
Brazilian pro soccer.
What is streaming?
Streaming is viewing or listening to video or audio content that is sent over the Internet, or located on a
network-connected media server or on a USB device plugged into the TV’s USB port.
With streaming, you can watch most programs on demand, when it’s convenient for you. When
streaming, you can play, pause, rewind, and fast forward whatever you are watching. You can also
replay the last few seconds again, or turn on closed captions.
Tip: Some content cannot be paused or skipped. For example, if you are viewing live
programming or a program that is supported by ads, you generally are not allowed to skip the
ads.
* Subscriptions or other payments may be required to access content on certain channels. For example, Netflix
requires a paid subscription, which gives you access to movie and TV show titles in the Netflix streaming catalog.
Some channels may not be available to all households in every market or in all countries where Roku players or
other products with the Roku platform are sold.

21
Your TV lets you choose from over 1,500 streaming channels that offer a huge selection of
entertainment:
• Over 200,000 movies and TV episodes
• Unlimited music, live and on-demand
• Tons of live and on-demand sports
• Commercial-free kids programming
• International language programming in 22 languages
• 24x7 news and in-depth news commentary
• Games
Most streaming channels are free. Some streaming channels like Amazon Instant Video, Redbox Instant,
and VUDU, let you purchase or rent the latest movie releases or popular TV series. Some channels such
as Netflix or Hulu Plus charge a monthly subscription fee. Some channels are free if you subscribe to a
companion service through your cable or satellite provider. For example, HBO subscribers with
participating TV providers can add the HBO Go channel and watch it for free.
If you have an existing subscription to a service like Netflix or Hulu Plus, or if you are an Amazon Prime
member, you can just sign in with your existing user name and password.
To play streaming content that is available on the Internet, you add streaming channels to your Home
screen. To add a streaming channel to your Home screen, use the Add Channels option on the Home
screen menu to go to the Roku Channel Store, and then select the streaming channel you want to play.
The streaming channel is then added to your Home screen, and you can watch it at any time.
For more information on using the Roku Channel Store, see “Using the Roku Channel Store” on page 39.
Note: Some channels may not be available to all households in every market or in all countries
where Roku TVs are sold.
But what if I didn’t connect my TV?
What if you went through Guided Setup and chose Connect to the Internet later? No worries. Your TV
makes it easy to connect whenever you want. As you move around the Home screen, you’ll see several
places where you can start the connection process. For example:
• Every now and then you’ll see a message appear on the panel to the right of the Home screen
offering a Connect Now option. Simply highlight and select the Connect Now option to get
started.
• Use the Connect and activate now option in the Settings menu. From the Home menu, select
Settings, then Network, and then Connect and activate now.
• If you want to start over from the beginning, use the Settings menu to do a Factory reset, and
then go through Guided Setup again. This time, choose your home network when prompted.
Regardless of how you connect, the process is the same. If you need details, see Step 3 on page 13
under “Setting up your TV.”

22
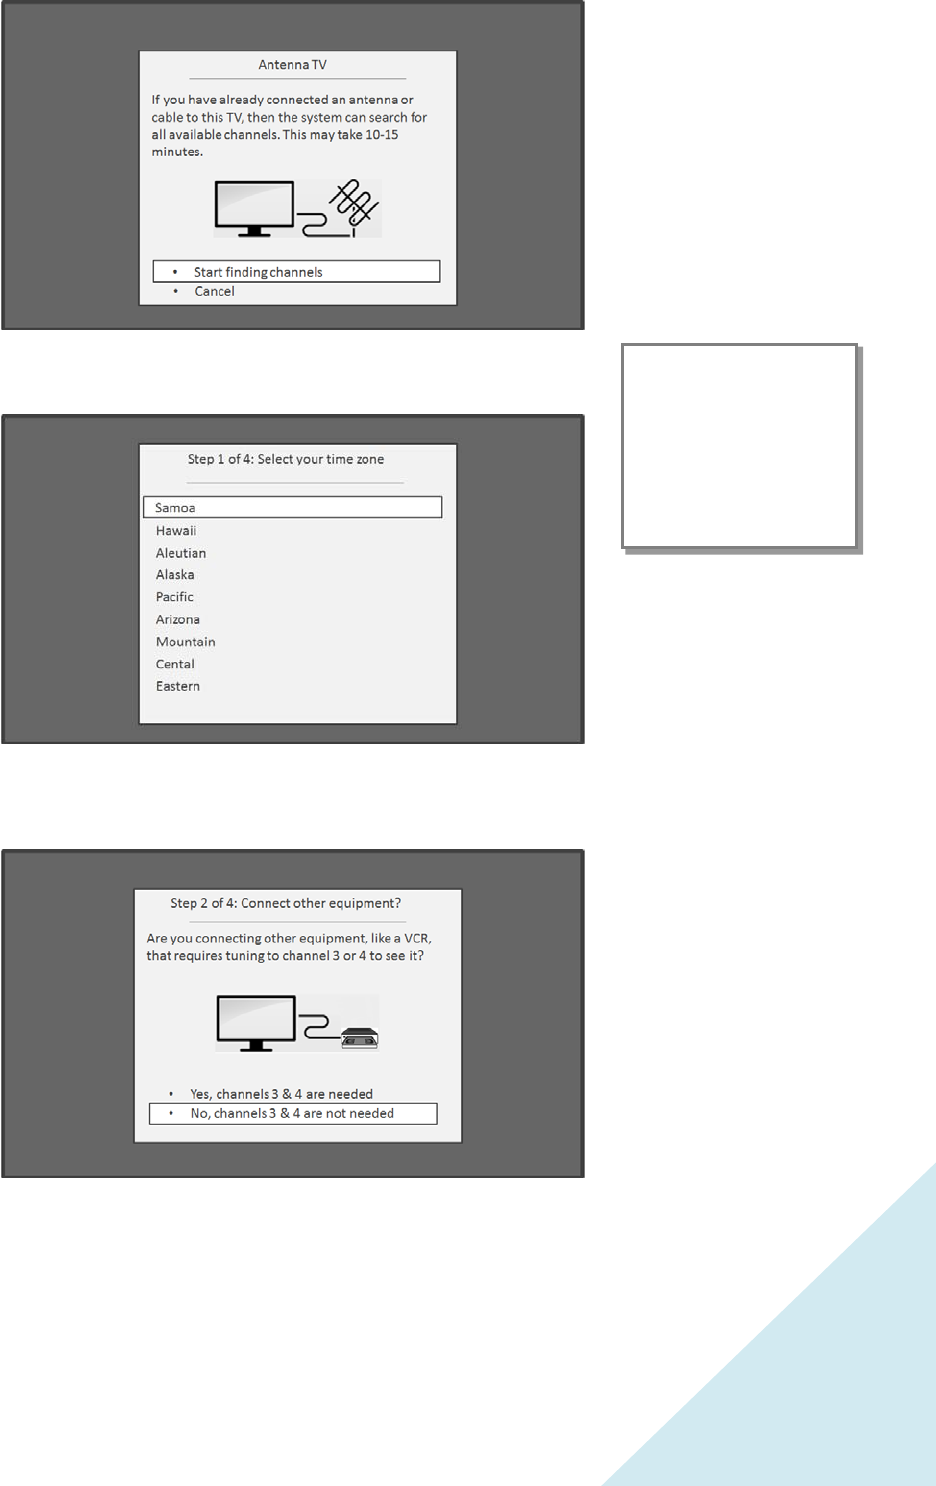
Setting up Antenna TV
Despite all of the entertainment possibilities of your TV, you may also want to watch broadcast TV. You
watch broadcast TV in much the same way you watch other entertainment choices. You select a tile—
the Antenna TV tile—from the Home screen.
The first time you select the Antenna TV tile, you have to set up the TV tuner. Setting up the TV tuner
scans for active channels and adds them to your channel list.
Why do I have to set up the TV tuner?
You might be asking, “Why is this step necessary?” Good question.
Not everyone needs to use the TV tuner. For example, you might have a set top box provided by a cable
or satellite company that receives all of your channels. Most of these set top boxes use an HDMI®
connection.
More and more people are watching only streaming TV and do not have a TV antenna or cable/satellite
service. If you don’t need the TV tuner, you can bypass setting it up and instead remove it from the
Home screen as explained in “Remove unwanted tiles” on page 42.
The TV scans the signals on its antenna input for channels with a good signal, and adds those to the
channel list, skipping dead channels and channels with a very weak signal.
The TV will, however, let you add channels with no signal if you have an older set top box, VCR, or game
console that can only output a signal on analog channel 3 or 4. These are the only channels that can be
added regardless of whether they have a good signal. Typically, you’ll only need one of these channels,
but both are provided to make setup simpler. You can hide the one you don’t want as explained in “Edit
broadcast TV channel lineup” on page 40.
How do I set up the TV tuner?
Setting up the TV tuner is easy—your TV does most of the work. You just have to answer a couple of
questions.
1. Make sure your antenna or other device is connected to the TV’s ANT/CABLE input.
2. On the Home screen, select the Antenna TV tile.
3. Read the simple on-screen instructions and select Start finding channels.
23
4. If prompted, select your time zone. You’ll only need to do this if the TV
can’t figure out your time zone from your Internet connection.
5. When prompted, select whether to add analog channels 3 and 4 (to enable you to connect older
set top boxes, VCRs, or game consoles).
Why does the TV need
my time zone?
The TV needs to know your
time zone so that it can
correctly display information
about the program you are
currently watching.
24
6. Wait while your TV scans for broadcast (antenna TV) stations…
… and then cable TV channels.
Tip: Cable TV channels are channels from a cable TV provider that you can receive by
connecting their cable directly to your TV (unscrambled NTSC, ATSC, and QAM channels, if
you’re interested in the details). In many cases, your cable provider probably requires you to
use their set-top box and connect it to a different input, and then use the set-top box to
tune your cable stations. In that case, you can skip scanning for cable channels
7. When the channel scans finish, the TV shows the number of channels it added.

25
Scanning for channels can take several minutes.
Note: You should plan to repeat the channel scan periodically to make sure you are receiving all
of the latest channels. Broadcasters add and remove channels, move channels to different parts
of the spectrum, and change the power levels of their channels periodically. You’ll also have to
repeat the channel scan if you remove the Antenna TV tile from the Home screen or perform a
factory reset. To repeat the channel scan at any time, go to Settings > Antenna TV > Scan again
for channels.
Now, you’re ready to watch broadcast TV! While you’re watching, try the following:
• Press [UP] or [DOWN] to change channels.
• Press [LEFT] to display the channel list and then use UP and DOWN to select a channel to watch.
Or press [REVERSE] or [FORWARD] to jump a page at a time.
• Press [OK] to display information about the current program.
• Press [ ] to switch to the previously tuned channel.
• Press [] to see options for picture and sound settings.
“Remote control” on page 27 has more information on using the remote control buttons while watching
TV.
26
Using your TV
This section provides information on using the day-to-day features of your TV.
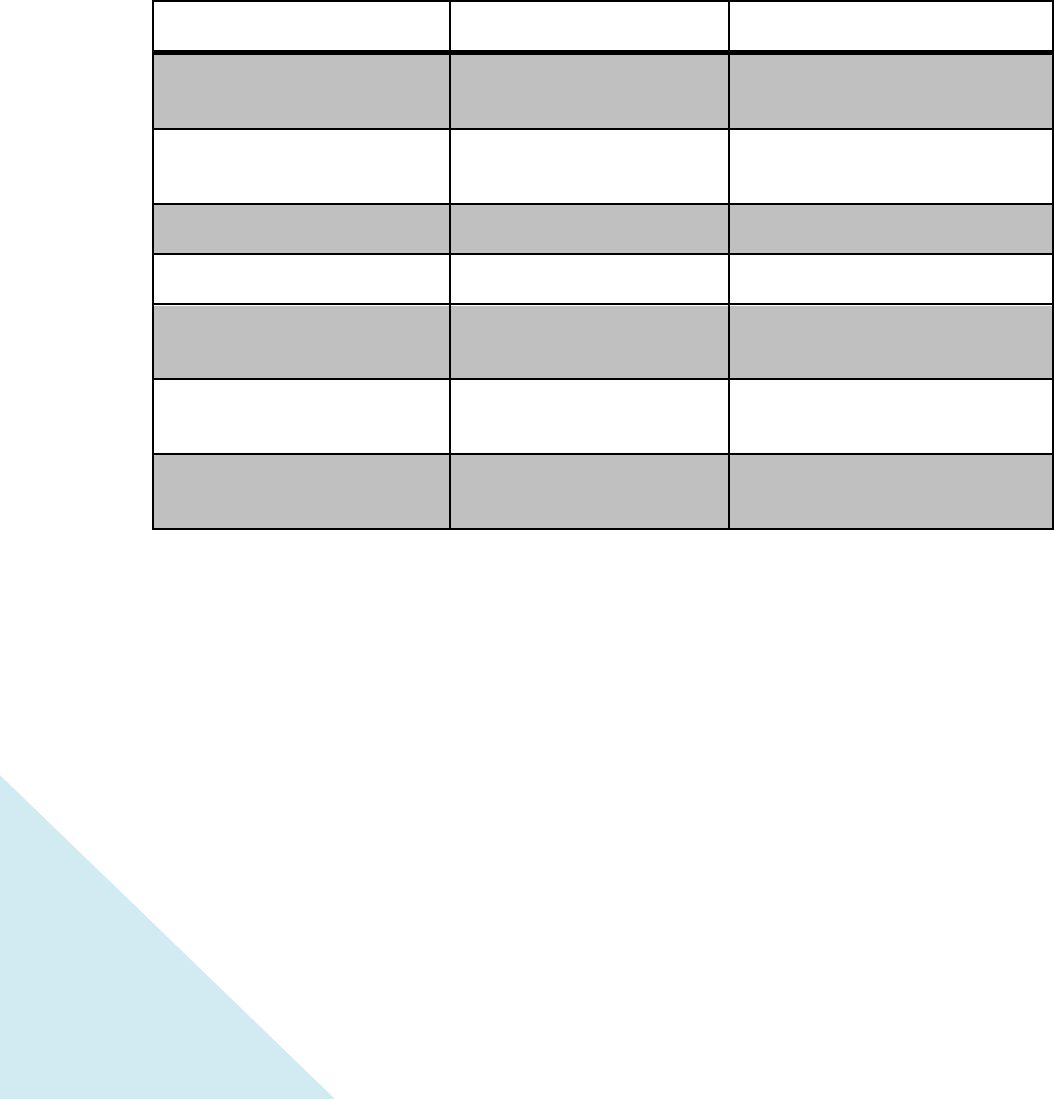
TV status light
Your TV has a single status light on the front panel. It goes on and off and blinks in different ways
depending on the status of the TV, as shown in the following table:
TV condition Status indicator Meaning
On (screen is active) Off Screen is communicating that TV is
on.
Screensaver (screen is active) Off Screen is communicating that TV is
on.
Off (no power) Off TV does not have power.
Off (standby) On TV has power and is ready to use.
Starting up from off state Slow pulsing blink until startup
completes TV is doing something.
On (receiving update from USB) Slow pulsing blink until update
completes TV is doing something.
Remote control command
received Dims on/off once TV has received your command.
TV panel buttons
The controls on the TV enable you to perform simple functions, but are not a substitute for the remote
control.
Your TV has seven buttons on the right edge of the screen. From top to bottom, they perform the
following functions:
• Input
• Channel +
• Channel –
• Volume +
• Volume –
• Mute
• Power
27
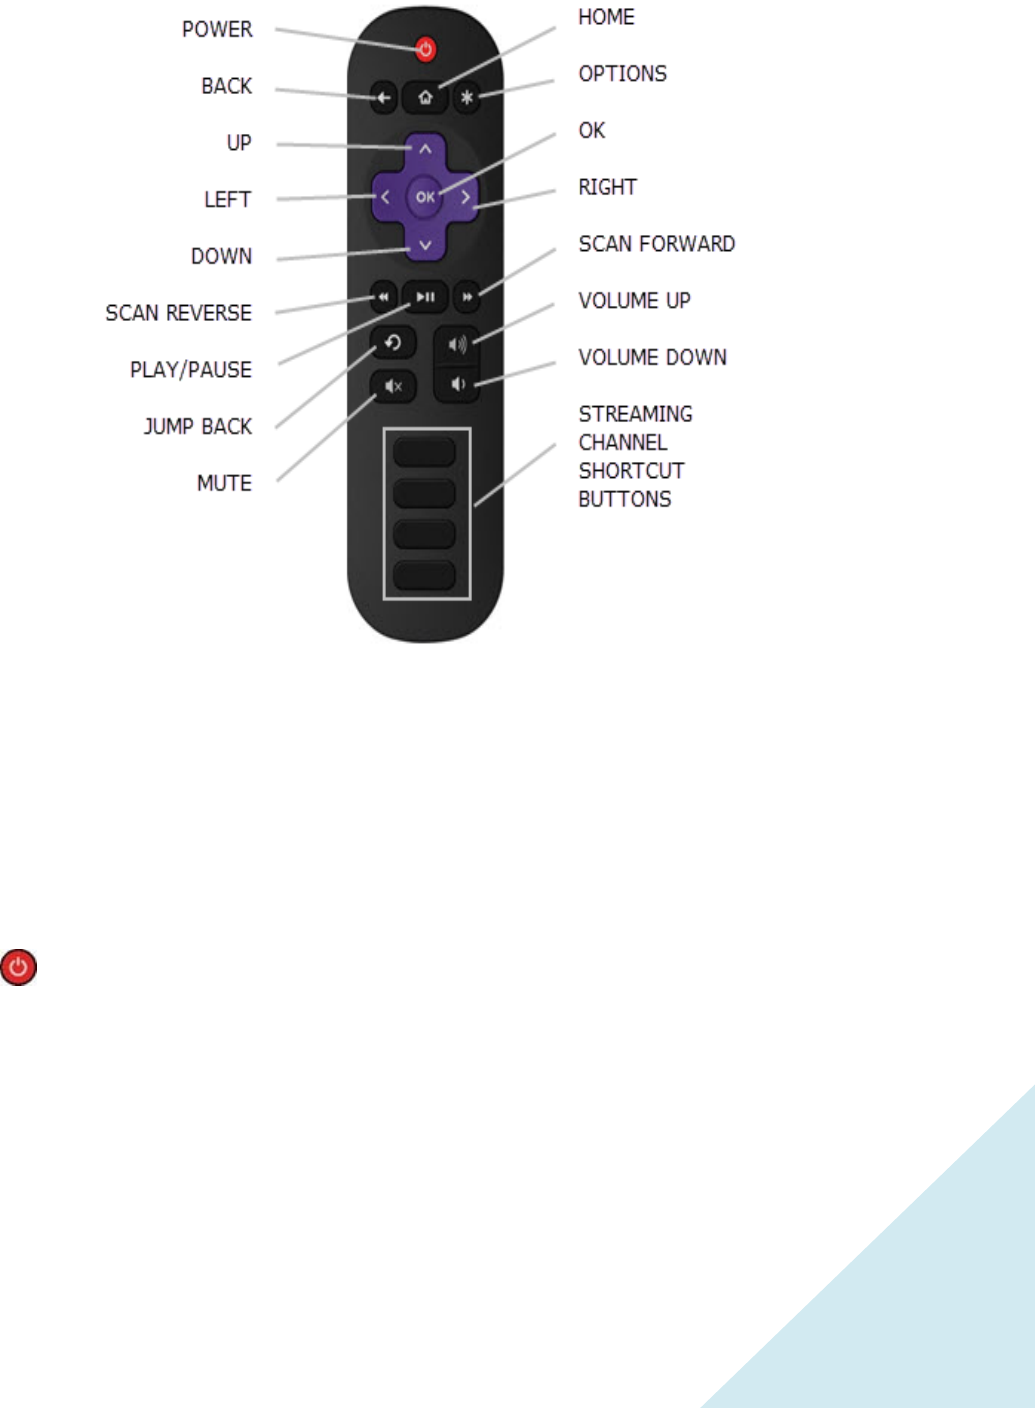
Remote control
TV IR remote control
Getting around
You’ve already done a bit of navigating with the remote control when you completed the Guided Setup
and when you set up Antenna TV. This section explains how to use the remote control for everyday TV
use.
POWER If the TV is in ‘Standby’ mode, turns power on.
If the TV is on, puts TV in ‘Standby’ mode.

28
BACK The action depends on what you are doing with the TV:
• Menu: Goes back to previous menu/screen.
• Home screen tile: Moves highlight back to the Home menu option.
• Watching Antenna TV or a TV input: Returns to the screen from
which the input was selected.
• Playing streaming content: Stops playing stream and returns to
the previous menu or screen.
• Browsing streaming content: Goes to the previous level in the
content tree.
HOME Immediately returns to the Home screen menu.
OPTIONS When the Options hint in the upper right corner of the screen is not
dimmed, displays an Options menu. The menu you see varies depending
on what you are doing with the TV.
Also, in most cases, pressing while a video is playing displays an
Options menu over part of the screen where you can adjust various
picture and sound settings.
UP Moves the highlight up one item.
DOWN Moves the highlight down one item.
LEFT Moves the highlight left, if possible (if a < hint appears).
When watching TV, displays your channel list.
When playing most streaming videos, skips backward in the video.
RIGHT Moves the highlight to the right, if possible (if a > hint appears).
When watching TV with the channel list displayed, dismisses the channel
list.
When playing most streaming videos, skips forward in the video.
OK Selects the highlighted option.
When watching TV, this button displays information for the current TV
program.

29
SCAN
REVERSE
When playing streaming video that supports this feature:
• First press scans backward at 1x speed.
• Second press scans backward at 2x speed.
• Third press scan backward at 3x speed.
• Subsequent presses cycle through 1x, 2x, and 3x reverse speed.
When playing streaming audio, jumps to the previous track/selection.
When any menu, tile, or channel in the channel list is highlighted, jumps
up one page.
When using a virtual keyboard, jumps to the character at the top of the
current column.
PLAY/
PAUSE
When playing streaming content, alternately pauses and plays the
content.
SCAN
FORWARD
When playing streaming video that supports this feature:
• First press scans forward at 1x speed.
• Second press scans forward at 2x speed.
• Third press scan forward at 3x speed.
• Subsequent presses cycle through 1x, 2x, and 3x forward speed.
When playing streaming audio, jumps to the next track/selection.
When any menu, tile, or channel in the channel list is highlighted, jumps
down one page.
When using a virtual keyboard, jumps to the character at the bottom of
the current column.
JUMP BACK When playing streaming video that supports this feature, jumps back 7
seconds with each press and resumes playing. In some channels, if
Closed captioning is set to Instant Replay, captions are displayed during
the duration of the jump back period only.
When watching broadcast TV, jumps to previous channel.
When using an on-screen keyboard, backspaces in the text you are
entering.
VOLUME
UP
Turns volume up one setting with each press. Press and hold to turn
volume up rapidly. A volume indicator shows the volume level while you
are adjusting the volume and for a few seconds afterward.
Note: If the TV is muted, pressing VOLUME UP unmutes the sound.

30
VOLUME
DOWN
Turns volume down one setting with each press. Press and hold to turn
volume down rapidly. A volume indicator shows the volume level while
you are adjusting the volume and for a few seconds afterward.
Note: If the TV is muted, pressing VOUME DOWN does not unmute the
sound.
MUTE Mutes the TV sound. A volume indicator shows the current volume level
and a mute icon when you press MUTE and for a few seconds afterward.
If Closed captioning is set to When Mute, captions are displayed while
the TV is muted.
STREAMING
CHANNEL
SHORTCUT
Dedicated buttons show the logo of a featured streaming content
provider. Pressing a button turns on the TV, and if the TV is connected to
the Internet, performs one of the first two following actions:
• Displays the main page of the streaming channel if you have
already added the channel to your Home screen.
• Displays the sign-up page for the streaming channel if you have not
already added the channel so that you can agree to any terms and
fees for the service.
• If the TV is in ‘Standby’ mode (off), turns the TV on. And, if it is
connected to the Internet, the TV performs one of the first two
actions listed above.
Note: For information about using a Universal Remote, refer to the ‘Other Devices’ section on page 57.
Watching broadcast TV channels
To watch broadcast TV, select the Antenna TV tile in the Home screen. Your TV remembers the last
channel you watched and starts with that channel playing.
Tip: You also can use the buttons on the TV panel to select Antenna TV, as explained in "TV
panel buttons” on page 26.
Changing channels
To change channels, you can do any of the following:
• Press [UP] to change to the next higher channel.
• Press [DOWN] to change to the next lower channel.
• Press [LEFT] to display the channel list, and then press [UP] and [DOWN] to move the highlight
through the list one channel at a time. Or press [REVERSE SCAN] and [FORWARD SCAN] to move
the highlight through the list one page at a time. When you’ve highlighted the channel you want
to watch, press [OK]. (If you decide you don’t want to change channels, press RIGHT or BACK).
• Press [ ] to jump to the previous channel. Press again to return to the channel you were
watching before you pressed [ ].

31
Viewing program information
To view information about the current program, press OK. The TV displays a banner at the bottom of the
screen with as much information as is available in the program data stream.
Program information banner
Program information, subject to availability, includes:
• Channel number
• Channel call sign
• Signal strength
• Program title
• Start time, end time, and graph of program length showing current position
• Content rating
• Video resolution (480i, 480p, 720p, 1080i, 1080p)
• Audio quality (Mono Dolby Digital, Stereo Dolby Digital, 5.1 Dolby Digital, Dolby Digital+)
• Audio features (SAP/MTS)
• Closed captioning (CC)
• Current time
• Program description. If the entire description does not fit, press OK to expand the size of the
banner and see the entire description.
Adjusting settings
Press [] to display the Options menu. Press UP and DOWN to highlight an option, and then press LEFT
and RIGHT to change the setting. “Adjusting TV settings” on page 33 explains each of the settings in
detail.
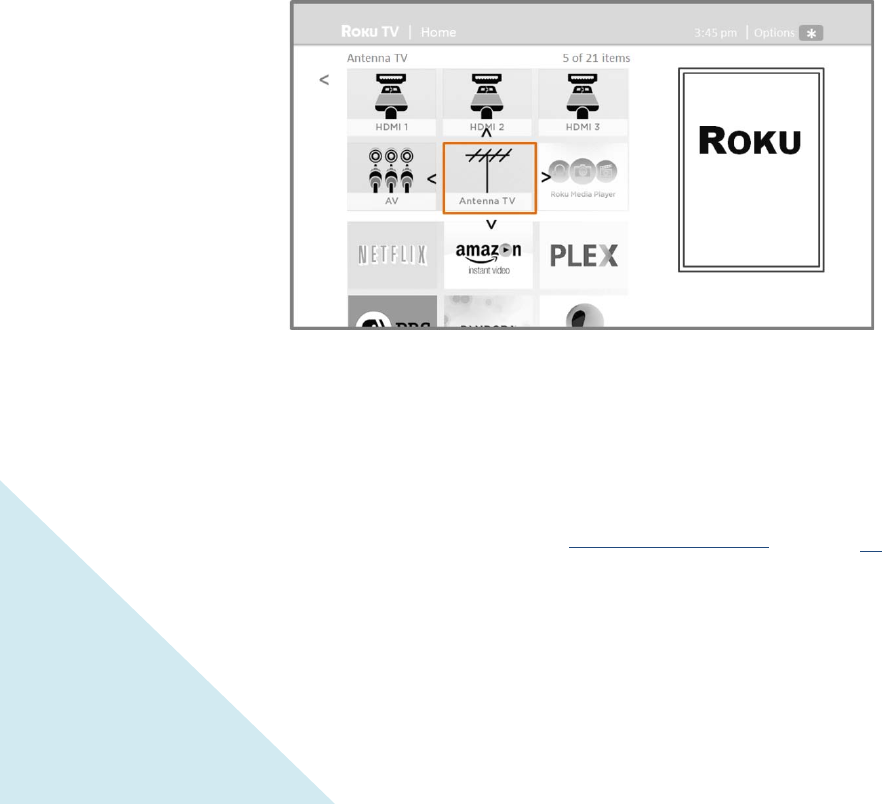
Switching TV inputs
Switch to a TV input to access the device connected to that input (for example, a Blu-ray player).
Switching inputs is as simple as highlighting the input’s tile in the Home screen, and pressing OK. The
video signal on the input, if any, appears on the screen.
Tip: You also can use the buttons on the TV panel to select a TV input, as explained in "TV panel
buttons” on page 26.
“Customizing your TV” on page 40 explains how to rename and remove inputs.

32
Auto-detecting devices
Your TV automatically detects when you connect a new device to an HDMI input and turn on its power.
The input is automatically added to the Home screen if it isn’t already present.
Adjusting audio/video settings
While watching video content on any input, press[ ] to display the Options menu. Press UP and DOWN
to highlight an option, and then press LEFT and RIGHT to change the setting. “Adjusting TV settings” on
page 33 explains each of the settings in detail.
Playing content from USB storage devices
Your TV has a USB port that can be used to play personal music, video, and photo files from a USB flash
drive or hard disk. If your TV is connected to the Internet, your Home screen has the Roku Media Player
tile. If your TV has not been connected to the Internet, the Home screen has the USB Media Player tile.
To use this feature, first make sure your media files are compatible with the Roku/USB Media Player. As
of the publication date of this guide, the following media file formats are supported:
• Video –MKV (H.264), MP4, MOV (H.264), TS (H.264)
• Music – AAC, MP3, WMA, WAV (PCM), AIFF, FLAC, AC3, and DTS*
• Photo – JPG, PNG, GIF
To see the latest list of supported formats, view Help in the Media Player.
The Roku/USB Media Player displays supported file types only, and hides file types it knows it cannot
play.
Playing content from local network media servers
If you have connected your TV to a network, it can play personal video, music, and photo files from a
media server on your local network. Media servers include personal computers running media server
software such as Plex or Windows Media Player, network file storage systems that have built-in media
server software, and other devices that implement the specifications of the Digital Living Network
Alliance. Some servers do not fully implement the DLNA specification but are UPNP (Universal Plug and
Play) compatible. The Roku Media Player will connect to them as well.
Some media servers can convert files into Roku compatible formats. DRM-protected content is not
supported.
* DTS audio, whether in music or video files, is supported only by pass-through, meaning that the TV
cannot directly output the sound of a DTS file, but can pass it through to a DTS-compatible receiver that
is connected to the HDMI ARC or S/PDIF connector on the TV.

33
Adjusting TV settings
You can adjust most picture and sound settings while you are watching a program by pressing []. If
you don’t find what you need, there are additional picture and sound settings in the Settings menu.
In most cases, the setting changes you make apply only to the input you are using. Antenna TV, each
separate HDMI input, and the AV input each has its own settings that the TV remembers when you
return to that input. The TV also remembers the settings that you specify while viewing streaming
content.
Settings menu
Use the Settings menu to adjust overall TV settings. Press to go to the Home screen, and then
navigate to Settings > TV picture settings.
You can adjust the following overall TV picture settings from the Settings screen:
• TV brightness – If the lighting level in your TV room changes, use this setting to help provide a
better viewing experience; set to darker for a darker room, and brighter for a brighter room.
Choose among Normal and four other settings to make the overall picture brighter or darker. So
that you don’t have to make this type of change for each TV input one at a time, this setting
increases or decreases the TV’s general brightness across all TV inputs. This setting is identical to
the TV brightness setting you can access in the Options menu while watching a program.
• 120 Hz – Available in certain models. Enables a higher picture refresh rate.
o On – the TV uses a higher refresh rate, which produces less motion blur.
o Off – the TV uses a standard 60Hz refresh rate, which produces more motion blur.
Note: The 120 Hz setting is also available in each input’s Options menu, but is not an input-
specific setting. The current setting of the control applies to all inputs.
• Settings per input – This section of options lists each TV input. Select an input to switch to that
input. Then press [] to display the Options menu, where you can adjust the input’s settings
while watching a live picture and listening to the sound from that input.
Tip: You don’t have to go to the Settings menu first—you can display an input’s Options
menu and adjust its settings whenever you are watching the input by pressing [].
Options menu
The Options menu for each TV input provides settings for controlling the appearance of the picture and
the quality of the audio.

34
To view the Options menu, press [] whenever you are watching a TV input or streaming a video. The
Options menu is a panel that appears over the left side of the screen:
To adjust the settings on the Options menu, press UP or DOWN to highlight a setting, and then press
LEFT or RIGHT to change the setting. You’ll notice the changes you make right away in picture
appearance or audio quality.
Tip: When you highlight a setting, the header text explains the effect of its current value. When
you begin to adjust a setting, the other options are hidden so you can see more of the screen.
Even though the other settings are hidden, you can move the highlight up or down to adjust the
other settings.
Options menu settings
• TV brightness – Affects the overall brightness of the picture. This setting applies across the
entire TV; that is, to all TV inputs and is identical to the TV brightness setting in the TV picture
settings menu.
• Picture mode – Provides picture presets for various viewing preferences. This setting applies to
the currently-selected input only.
• Audio effect – Adjusts the sound quality output from the TV speakers. This setting applies across
the entire TV; that is, to all TV inputs. It does not affect the sound quality from the HDMI (ARC)
or SPDIF (TOSLINK) connector.
• Sleep timer – Sets a timer that turns off the TV after the specific amount of time. This setting
remains in effect even if you stop watching the current input.
• Closed captioning – Controls when you see captions. This setting is only offered for Antenna TV,
the AV input, and streaming videos. Any set value remains in effect across only these inputs.
o Antenna TV – Turn captions on or off, or set them to appear only when the TV sound is
muted.
o AV input – Turn captions on or off, or set them to appear only when the TV sound is
muted.
o Streaming video channel – Turn captions on or off, set them to appear only when the
TV sound is muted, or only during instant replay (for streaming content that supports
instant replay).
35
Note: Additional captioning options are provided in the Captions screen in Settings.
• Captioning track – Selects which caption track to display when Closed Captioning is on. This
setting remains in effect on all inputs that provide captions.
• SAP – Selects whether to play a secondary audio program or multichannel television sound, and
which choice to play. This setting applies only to Antenna TV on digital channels.
• 120 Hz – Available in certain models. Enables a higher picture refresh rate that reduces motion
blur. If Off, refresh rate is 60 Hz. This setting applies across the entire TV; that is, to all TV inputs.
Note: The 120 Hz setting is also available in the main Settings menu on the TV picture settings
screen. The current setting of the control is identical in both places.
Tip: To dismiss the Options menu, just wait a few seconds without pressing any buttons. Or press
again to dismiss the menu immediately.
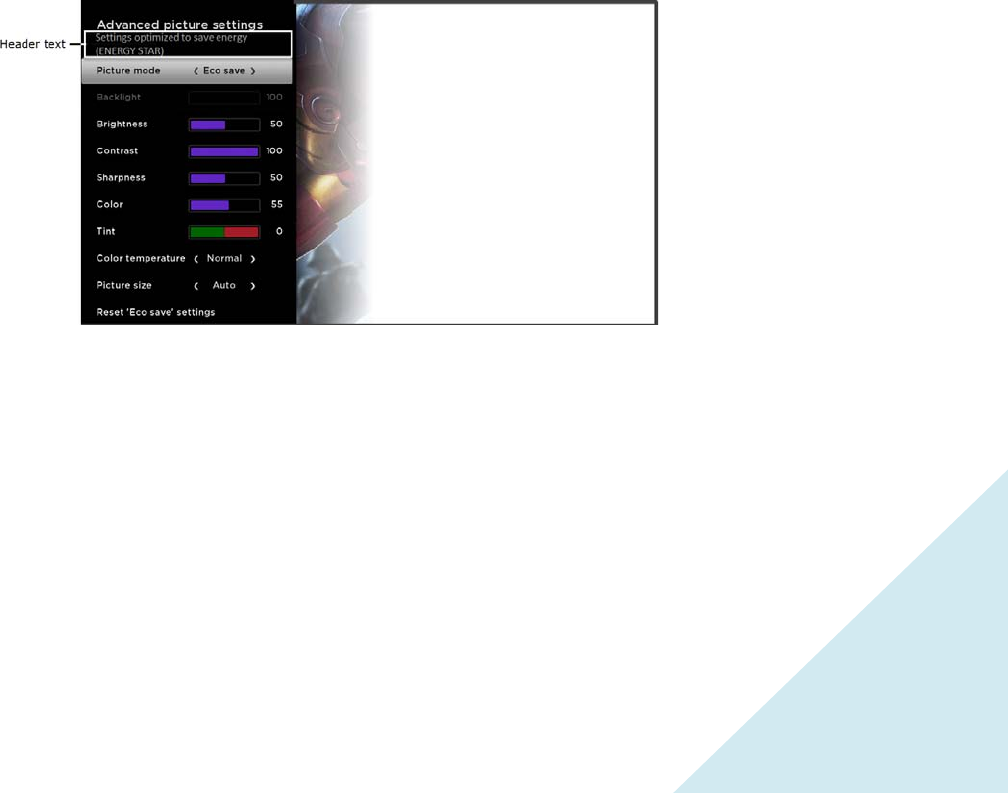
Advanced picture settings
The Advanced picture settings menu for each TV input provides settings for fine tuning the appearance
of the picture. All of the settings in this menu apply only to the currently-selected input.
To use the Advanced picture settings menu, first press [] to display the Options menu. Then select
Advanced picture settings.
To adjust the settings on the Advanced picture settings menu, press UP or DOWN to highlight a setting,
and then press LEFT or RIGHT to change the setting. You’ll notice the changes you make right away in
picture appearance.
Tip: When you highlight a setting, the header text explains the effect of its current value. When
you begin to adjust a setting, the other options are hidden so you can see more of the screen.
Even though the other settings are hidden, you can move the highlight up or down to adjust the
other settings.

36
Advanced picture settings menu options
• Picture mode – Provides picture presets for various viewing preferences. This setting duplicates
the one on the Options menu. When you change the Picture mode, other picture settings adjust
accordingly. For example, setting the Picture mode to Vivid sets Brightness, Contrast,
Sharpness, and other values to produce a very vibrant picture. Setting Picture mode to Movie
changes these same settings to produce a picture suitable for enjoying movies in a darkened
room. If you make changes to the individual picture settings—for example, Contrast, or
Sharpness—these settings are saved for the current input and the current picture mode. In this
way, the HDMI 1 input’s Movie picture mode can be different than the HDMI 2 input’s Movie
picture mode and Antenna TV’s Movie picture mode. Use Reset picture settings, described
below, to return the input’s current picture mode to its original values.
• Backlight - Adjusts the overall brightness of the screen.
• Brightness – Adjusts the dark level of the black areas of the picture.
• Contrast – Adjusts the white level of the light areas of the picture.
• Sharpness – Adjusts the sharpness of the edges of objects in the picture.
• Color – Adjusts the intensity of colors in the picture. A setting of 0 removes all color and displays
a black and white picture.
• Tint – Adjusts the color balance from green to red to obtain accurate colors in the picture.
• Color temperature – Adjusts the overall colors in the picture from Normal to slightly more
bluish (Cool) to slightly more reddish (Warm).
• Picture size – Adjusts the aspect ratio of the picture, enabling you to view a picture in its original
format, or zoom or stretch it to fill the screen. The Auto setting produces the best picture in
most cases.
• Game mode – Controls whether ‘Game’ mode is on or off. When On, the TV performs less
image processing and has less input lag. When Off, the TV performs more image processing and
has more input lag, which is less desirable for action games. Available only for HDMI inputs.
• Reset picture settings – Returns all picture settings for the input’s currently-selected Picture
mode to their original values.
Tip: To dismiss the Advanced picture settings menu, just wait a few seconds without pressing
any buttons; or, press [ ] again to dismiss the menu immediately.

37
Searching for movies and
shows
Searching for movies and shows across multiple streaming channels is one of the unique features of
your TV. Within a single search operation, you can search by:
• Movie name
• TV show name
• Actor or director name
• Streaming channel name
• Game name
Tip: Roku Search is available only if your TV is connected to the Internet.
Note: Roku Search doesn’t search across all streaming channels, but searches across lots of
popular streaming channels. The actual channels it searches vary by locale, but include popular
providers such as Netflix, Hulu Plus, Amazon Instant Video, VUDU, and several others, with more
being added all the time.
You can check which streaming channels are included in Roku Search by going to the Search screen,
clearing all previous searches to reveal the search instructions, and then watching the channel tiles cycle
at the bottom of the screen.
To search, select Search on the Home menu. The Search screen has a keyboard grid and initially displays
instructions—a set of icons representing search categories and a list of participating provider tiles.
Tip: If you don’t see the instructions, navigate to the end of the list of recent searches and select
Clear recent search selections.
How do I search?
To search, use the arrow buttons to enter a few characters of the search term. With each additional
character you enter, you narrow down the search and the search results become more relevant.
Tip: Use the Roku mobile app on your smartphone or tablet to make typing and searching even
faster.
An icon next to each search result shows the category of the result.
Press RIGHT to highlight the search results.
Press UP and DOWN to scroll through the list of search results to highlight the item you want to view.

38
I found a show, now what?
Now that you’ve highlighted the show, movie, actor, game, or streaming channel you were looking for,
press RIGHT. If your search result was an actor, director, or other item that does not represent a single
item of content, you’ll see another list to narrow down your search. Continue highlighting results and
pressing RIGHT until you find a single, viewable content item.
When you narrow down your search to a game or streaming channel, you’ll see detailed information,
images or screenshots, and available actions such a list of streaming channels and the cost of getting the
item on each channel.
An HD logo means that the content is available in high-definition. The checked circle adjacent to the title
indicates streaming channels you already have installed.
The next time you use the search feature, the Search screen displays a list of recent search selections in
place of the search instructions.
Using the recent search selections list makes it easy to quickly get to a previously found item (for
example, to find another movie with the same actor, or another TV show in the same series).

39
Using the Roku Channel
Store
The Add Channels menu option takes you to the Roku Channel Store, where you can add new streaming
channels and applications to your TV.
Tip: The Add Channels menu option is available only if your TV is connected to the Internet.
Tip: You also can search for streaming channels by using the Search option, as explained in
“Searching for movies & shows” on page 37.
To make it easier to find what you want, the streaming channels in the Roku Channel Store are
categorized by topic. Press UP and DOWN to highlight the category you want, and then press RIGHT to
move the highlight into the grid of streaming channel tiles.
When you find a streaming channel you want to add or learn more about, highlight it and press [OK] to
display more details.
• If the streaming channel you are adding is free, you can start watching it immediately.
• If there is a one-time or recurring fee associated with using the streaming channel, you must
agree to the terms and conditions, accept the fee, and—if you created one when you activated
your TV— enter your Roku PIN code to authorize the charges.
• If you already have a subscription to the streaming channel—for example, you already subscribe
to Netflix or you receive HBO through your cable TV provider—you must complete a different,
simple authorization step to add the streaming channel.
You only have to complete the authorization or activation step one time, when you initially add the
streaming channel. After that, you simply select the streaming channel tile from your Home screen to
start watching.
Tip: New streaming channels and apps are being added weekly, so be sure to check back every
now and then.
40
Customizing your TV
There are several things you can do to personalize your TV.
Rearrange tiles
Whenever you add a TV input tile, it’s added at the top of your Home screen. Whenever you add a new
streaming channel from the Roku Channel Store, it’s added at the bottom of your Home screen.
You can easily rearrange the order of the tiles on the Home screen to suit your viewing preferences. For
example, you might want Antenna TV to be the first tile in your Home screen. But, if you mostly watch
one streaming channel, you might want its tile to be the first one on your Home screen.
Rearranging tiles is easy:
1. From the Home screen, highlight one of the tiles you want to move.
2. Press [] to display a list of options for the type of tile you selected.
3. Select Move input. The list of options disappears and the highlighted tile shows arrows
indicating how it can be moved
4. Use the arrow buttons to move the highlighted tile to its new position. As you move the tile, it
pushes other tiles out of its way.
5. Press OK to lock the tile into its new position.
6. Repeat these steps to move other tiles until you have arranged your Home screen to your liking.
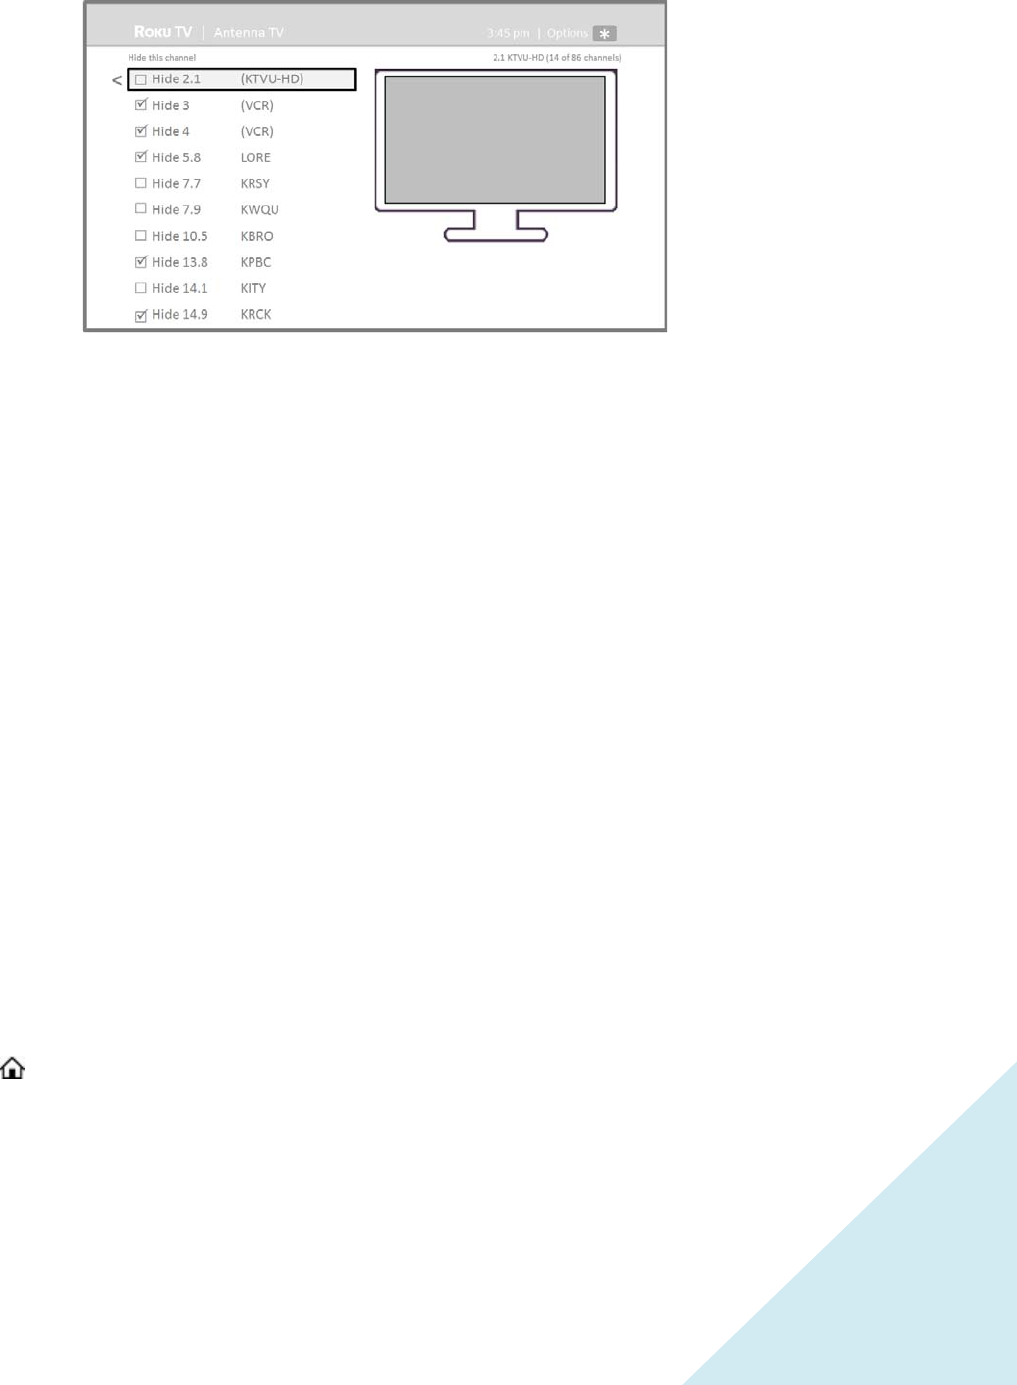
Edit broadcast TV channel lineup
When you set up the TV tuner as described in “Setting up Antenna TV” on page 22, the TV adds all the
channels with good signals that it could detect in your area. It’s likely that you now have more channels
than you want in your channel list.
41
To edit the channel lineup, from the Home screen, navigate to Settings > TV inputs > Antenna TV > Edit
channel lineup. You’ll see a screen listing all of your channels. Adjacent to the list of channels is a
miniature TV screen playing the highlighted channel’s picture and sound.
Highlight each channel you want to hide, and then press OK to hide the channel.
Tip: If you need to see or hear the highlighted channel, wait a couple of seconds for the TV to
start playing the channel’s picture and sound. Also note that if you’ve enabled Parental Controls
and the program on the current channel is blocked, you won’t see a picture or hear sound while
editing the channel lineup.
Rename inputs
Rather than trying to remember that your Blu-ray player is connected to HDMI1 and your game console
is connected to HDMI 3, you can rename the TV inputs to match the connected component.
Note: Renaming an input also changes the icon associated with it.
To rename an input, you can either:
• Highlight the input tile in the Home screen, and then press [] to display a list of options. From
the list of options, select Rename input. Then select a new name and icon.
or
• From the Home screen, navigate to Settings > TV inputs. On the TV inputs screen, select the
input you want to rename, select Rename, then choose a new name and icon from the provided
list.
Press [ ] to return to the Home screen. The new name and icon are now in effect.

42
Remove unwanted tiles
It’s easy to remove unused TV inputs and unwanted channel or app tiles. For example, if you never use
the HDMI 3 input, or if you don’t like the weather app you added from the Roku Channel Store, you can
remove them from your Home screen.
You also can remove the Antenna TV tile if you never use the TV tuner. However, be aware that
removing the Antenna TV tile also deletes the broadcast TV channel list. You’ll have to set up the TV
tuner again next time you add Antenna TV. Instructions for setting up the TV tuner can be found in
“Setting up Antenna TV” on page 22.
• To remove any tile, highlight the input tile in the Home screen, and then press [] to display a
list of options. From the list of options, select Remove input. In the screen that follows, confirm
you want to remove the input.
• Alternatively, to remove a TV input tile from the Home screen, navigate to Settings > TV inputs.
On the TV inputs screen, select the input you want to remove, and then select Remove >
Confirm. Then, press [ ] to return to the Home screen.
Change themes
Another way to customize your TV is to change its theme. The theme establishes the look and feel of the
TV through colors, designs, and fonts.
Tip: Themes are available only when your TV is connected to the Internet.
To change the theme, in the Home screen menu navigate to Settings > Themes. In the Themes screen,
choose from the following options:
• My themes – Highlight a theme, and then press [OK] to switch to that theme.
• Custom settings – Turn Featured themes on or off. When Featured themes is on, the TV
automatically switches to featured themes—like 4th of July or Holidays—for a limited time
whenever Roku makes them available, and then switches back to your selected theme when the
featured theme expires. When off, the TV always uses your selected theme.
Tip: You can get new themes by using the Roku Channel Store.
Change sound effects volume
Sound effects are the noises the TV makes to let you know it received your command. You can change
the volume of sound effects or turn them off.
To adjust the sound effects volume, in the Home screen menu, navigate to Audio > Menu volume.
Navigate to the right and then change the setting to High, Medium, Low, or Off.
43
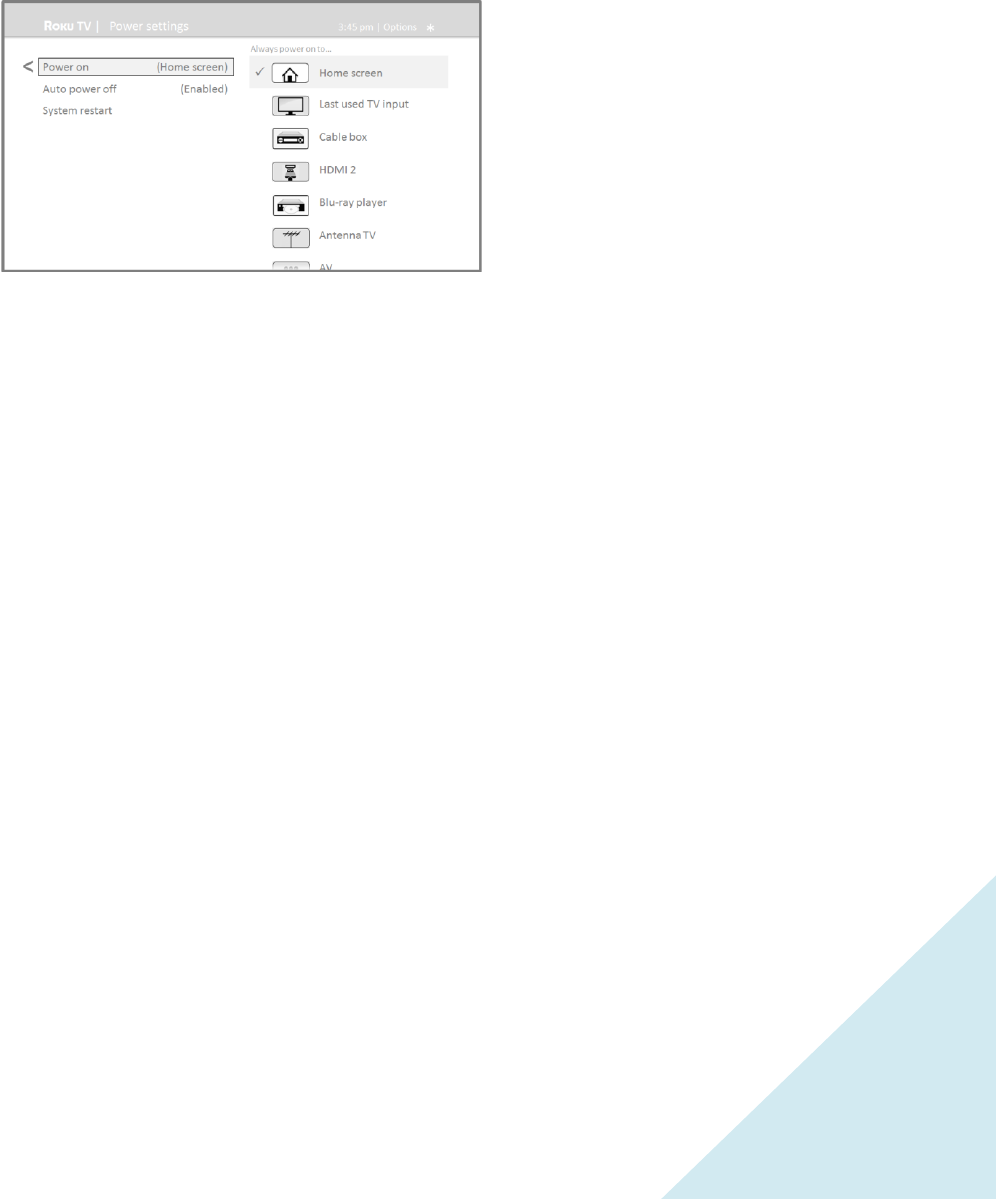
Configure power settings
Power settings let you set up your TV so that it turns on to the location you choose. Power settings also
help your TV save energy by automatically turning it off under certain conditions.
Power on settings tell the TV what to do when you turn on the power. To configure the power on settings,
from the Home screen menu, navigate to Settings > System > Power > Power on. Highlight the power on
location from the list, and then press OK to select it.
Creating a Parental Control PIN
Auto power off settings
To help you save energy, your TV can automatically turn itself off after a period of inactivity or a period
during which no signal has been detected. It is factory-configured to do both of these things, but you can
change these settings if needed.
To configure automatic power off, from the Home screen menu navigate to Settings > System > Power >
Auto power off. In the Power settings screen, highlight the following options and press OK to turn them
on or off:
• After 15 mins of no signal – If no signal is detected on a TV input for 15 minutes, the TV
automatically powers off.
• After 4 hours of no interaction – If no remote control or panel button is pressed for 4 hours and
the TV is not displaying a TV signal or streaming a video, the TV is automatically powered off.

43
Configure parental controls
Parental controls enable you to control whether the members of your household can view certain kinds
of broadcast TV programs. When a program or feature is blocked, you can unblock it by entering a
parental control PIN that only you know.
Note: The Parental Control feature does not block streaming videos or content from inputs
other than Antenna TV.
Creating a Parental Control PIN
The first time you access the Parental controls screen, you must create a new parental control PIN.
Thereafter, whenever you want to change parental control settings, unblock programming that has been
blocked, change the PIN, or disable parental controls, you must enter your parental control PIN.
Tip: Your parental control PIN has nothing to do with your Roku PIN. You can make them the
same if you want—this is entirely your choice.
To create a new parental control PIN, from the Home screen menu navigate to Settings > Parental
controls. The screen displays a numeric keypad. Use the arrow buttons and the OK button to enter a
four digit code. Then, repeat the process to enter the same PIN again, just to make sure you correctly
entered the PIN you want to use.
Important: If you forget your PIN, the only way to recover is to perform a factory reset
operation, as explained in “Factory reset everything” on page 56. Be sure to write it down in a
safe place just in case.

44
Blocking Movie Store, TV Store, and News
One of the parental control options is to completely hide the entertainment options that are available
directly on the Home screen menu.
To hide Home screen entertainment options:
1. From the Home screen menu, navigate to Settings > Parental controls, and then enter your PIN.
2. In the Parental controls screen, highlight Home screen and then select or clear either of these
options:
• Hide “Movie Store and TV Store” – Removes the Movies Store and TV Store options from
the Home screen menu.
• Hide “News” – Removes the News option from the Home screen menu.
Tip: To use either of these options after you’ve hidden them, you must return to this screen and
remove the check mark from the corresponding Hide command.
Blocking Broadcast TV shows
For broadcast TV, parental controls use information embedded in the broadcast signal to determine
whether to allow a program to be displayed. Parents can configure parental controls to block broadcast
TV programs that meet or exceed a specific rating, so they cannot be viewed or heard unless the correct
parental control PIN is entered.
Enabling parental control of TV shows
The first step in blocking TV shows is to enable parental control of TV shows.
This setting is provided separately to make it easier for you to turn parental control of TV shows on and
off without disturbing their settings. For example, your kids are going to summer camp for two weeks,
and while they are gone, you don’t want to have to deal with unblocking shows that you want to watch
by entering your PIN. All you need to do is clear Enable parental controls, and all TV shows are
unblocked. When the kids return, select Enable parental controls again, and all of your parental control
settings are restored in a single operation.
To enable parental control of TV shows:
1. In the Home screen menu, navigate to Settings > Parental controls, and then enter your PIN.
2. In the Parental controls screen, navigate to Antenna TV > Parental control of TV shows.
3. Make sure the check box next to Enable parental controls is checked. If not, highlight it and
press OK.
Blocking based on US TV ratings
Most broadcast US TV shows—other than movies—contain rating data that enables parental controls to
block shows that parents don’t want others to view. The ratings are divided into two groups that
function independently:
• Youth group – TV-Y, TV-Y7

45
• Main group – TV-G, TV-PG, TV-14, TV-MA
Within each of these groups, the ratings interact such that if you block a particular level of content, the
TV also blocks all content with a higher rating. Conversely, if you unblock a particular level of content,
the TV also unblocks all content with a lower rating. For example, if you block TV-PG programs, the TV
also blocks TV-14 and TV-MA programs. If you subsequently unblock TV-14 programs, TV-PG programs
are also unblocked, but TV-MA programs remain blocked.
Similarly, within the main group, content types can be individually blocked. For example, you can block
just coarse language in shows with a TV-PG rating. If you do, then the TV also blocks shows with coarse
language in the higher ratings (TV-14 and TV-MA). Subsequently unblocking coarse language in TV-14
ratings does not unblock coarse language in TV-MA programs, but it does unblock coarse language in TV-
PG programs.
To block TV shows based on US television ratings:
1. From the Home screen menu, navigate to Settings > Parental controls, and then enter your PIN.
2. In the Parental controls screen, navigate to Antenna TV > TV ratings. Choose among the
following settings:
• Entire ratings – Highlight the rating you want to block, and then navigate to the right and
select the first option that blocks the entire rating level (and all higher rating levels).
• Individual content types – Highlight the rating that contains the content type you want to
block, and then select the content types you want to block from among those listed.
Remember that blocking a content type in one rating blocks the equivalent content type in
all higher rating levels.
Blocking based on US movie ratings
Most movies in the US are rated by the Motion Picture Association of America, or MPAA, so the ratings
are known as MPAA ratings. TV broadcast signals carry movie rating data that enables parental controls
to block shows that parents don’t want others to see. The ratings are:
• G – General audiences
• PG – Parental guidance suggested
• PG-13 – Parents strongly cautioned for children age 13 or younger
• R – Restricted
• NC-17 – Not for age 17 or younger
Unlike US TV ratings, there are no individual content types within the ratings. But like TV ratings,
blocking movies with a particular rating also blocks movies with a higher rating, and unblocking movies
with a particular rating also unblocks movies with a lower rating.
Tip: Blocking movies with an NC-17 rating also blocks programs with the now-obsolete X rating,
which can still occur in the program data of older movies.
To block movies based on MPAA ratings:
1. From the Home screen menu, navigate to Settings > Parental controls, and then enter your PIN.

46
2. In the Parental controls screen, navigate to Antenna TV > Movie ratings. Choose among the
following settings:
3. Select the rating level you want to block. You need only select one rating level, and all higher
levels are automatically blocked.
Blocking based on other ratings
Your TV can block programs having ratings that had not been defined when the TV was manufactured. It
does this by detecting a new Rating Region Table in a program and then downloading the new table and
displaying its rating in the Parental controls.
When the TV downloads a new Rating Region Table, it adds a new option to the list of rating types:
Other ratings. If you see this option in the Parental controls screen, you have tuned to a station that has
implemented a new rating table. Once the new rating table has been downloaded to the TV, it remains
in the TV until it is factory reset, and you can configure blocking based on the new ratings.
New Region Rating Tables can have independent rating levels, or rating levels that interact in the same
ways as the built-in US TV and MPAA Movie ratings.
Tip: If your TV downloads a new Region Rating Table, you’ll have to experiment with its settings
to understand how to use it.
Blocking unrated programs
Some broadcast TV shows and movies are assigned a rating of “Unrated”. Whether or not such
programs contain content that is objectionable to you cannot be determined. However, you can choose
to block such programs.
To block all unrated broadcasts:
1. From the Home screen menu, navigate to Settings > Parental controls, and then enter your PIN.
2. In the Parental controls screen, navigate to Antenna TV > Block all unrated programs.
3. Highlight Block and press OK. When blocking is enabled, the adjacent padlock icon changed
from unlocked to locked.
Tip: Blocking programs that have been assigned a rating of “Unrated” does not block programs that
have no rating assigned to them (for example a broadcast of a local town council meeting).
Programs that do not have an assigned rating display Rating NA (for “not applicable, meaning a
rating is not needed). Programs that have no assigned rating are considered “safe”; therefore, there
is no need to block them.
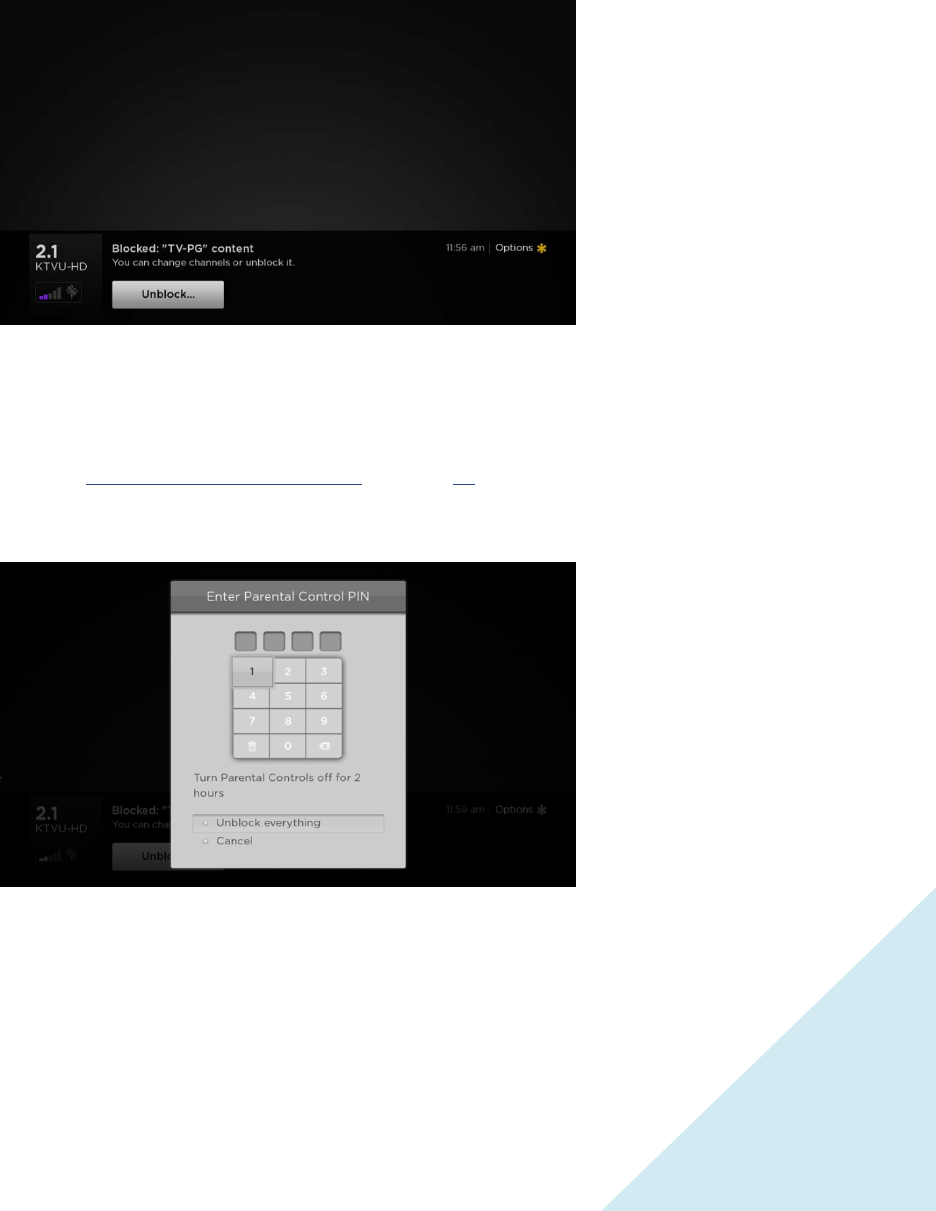
47
What happens when a TV show is blocked?
After you’ve set up parental controls, TV shows and movies can be blocked:
• When you change channels and the new channel is playing a program whose rating exceeds
your settings.
• When a new show comes on the channel you are watching and its rating exceeds your settings.
When a program is blocked by parental control settings, the TV displays a blocked message:
Whenever this blocked message appears, both the video and audio of the show are blocked, as well as
program data that would normally appear in the area at the bottom of the screen.
To watch the blocked program, you need to know the PIN code defined when you enabled parental
controls, as explained in “Creating a parental control PIN” on page 43.
1. Press OK to select Unblock and display a PIN pad.
2. Use the arrow buttons to enter your PIN code, and then press OK to select Unblock everything.
After unblocking shows that have been blocked, all blocking is disabled for two hours or until you turn
off the TV.

48
Changing the parental control PIN
To change your parental control PIN:
1. From the Home screen menu, navigate to Settings > Parental controls, and then enter your PIN.
2. In the Parental controls screen, highlight Change PIN.
3. Move the highlight into the adjacent keypad, and then use the arrow buttons and the OK button
to enter a four digit code. Then repeat the process to enter the same PIN again, just to make
sure you correctly entered the PIN you want to use.
Resetting parental controls
So now your kids have grown up and gone away to college, and you no longer want to deal with blocked
programs.
To erase all parental control settings:
1. From the Home screen menu, navigate to Settings > Parental controls, and then enter your PIN.
2. In the Parental controls screen, highlight Reset parental controls.
3. Follow the instructions on the screen to confirm that you want to erase all parental control
settings.
Tip: Resetting parental controls also erases your parental control PIN.

49
More settings
This section describes the features and settings of the TV that were not covered in the other parts of this
manual.
Changing network settings
If needed, you can change your network settings at any time. For example, if you change the name of
your wireless network (its SSID) or its password, you will need to change your TV’s settings so that it can
continue to connect. Also, if you decided not to connect to the Internet in “Guided Setup” on page 12,
you can use Network settings to connect at a later time.
To change network settings, from the Home screen menu, navigate to Settings > Network, and then
press RIGHT. At this point, you can choose the following options:
• Update connection – Press OK to start the update process. The TV uses your current wireless
network name and password to reconfirm the Wi-Fi connection, the local network connection,
and the Internet connection.
• Set up new Wi-Fi connection – Press OK to start a scan for wireless networks. The TV scans for
the wireless networks within range and displays the first few it finds in order, with the strongest
signals first. In addition to your own wireless signal, the TV might pick up signals from your
neighbors. Now you can do one of the following:
o Select your network name – Select the name of your network and then enter your
wireless password if requested.
o Scan again – If you don’t see your wireless network name in the list, select Scan again to
list all networks in range. The first scan listed only the first few, strongest wireless
signals. The second scan sometimes results in a longer list. If you still don’t see your
network name, you might need to adjust the location of the wireless router or the TV,
turn on your router, or make other changes. When everything is ready, select Scan
again to repeat the network scan.
o Private network – If your wireless network name is hidden, it won’t appear in the list.
Select Private network to display an on-screen keyboard, and use it to enter your
network name. Unless you changed the factory-set network name, you can find the
name (also called SSID) on a label the router.
Tip: Wireless networks that are password-protected display a “padlock” icon adjacent to
the name.

50
Changing caption settings
You can change many different settings that affect the appearance of captions.
To change caption settings, from the Home screen menu, navigate to Settings > Captions, and then
press RIGHT. At this point, you can choose the following options:
• Captions mode – Choose Off, On, When mute, or Instant replay.
o If you choose On, the TV displays captions whenever they are available in the program
information. This setting applies to Antenna TV, the AV input, and streaming channels.
o If you choose When mute, the TV displays captions only when the sound is muted. This
setting applies to Antenna TV, the AV input, and streaming channels.
o If you choose Instant Replay, the TV displays captions only during a replay operation;
that is, after pressing to jump back a few seconds in streaming video. This setting
applies only to streaming channels when the program being streamed supports instant
replay.
This setting reflects the Closed captioning settings in the Options menu for certain TV inputs, as
explained in “Options menu settings” on page 34. Note that, once enabled, the captions mode
remains set for all applicable inputs until you turn it off.
Tip: Some streaming channels require you to enable captions through a setting within their
channel even though you have turned on captions everywhere else.
• Text style – Choose from a list of fonts. As you move the highlight to each font, you can see a
sample of the result in an adjacent panel.
• Text edge effect – Choose from a list of edge effect styles, such as raised, depressed, and
various shadows. As you move the highlight to each effect, you can see a sample of the result in
an adjacent panel.
• Text size – Choose from a list of sizes. As you move the highlight to each size, you can see a
sample of the result in an adjacent panel.
• Text color - Choose from a list of colors for the text. As you move the highlight to each color,
you can see a sample of the result in an adjacent panel.
• Text opacity - Choose from a list of opacity settings for the text. This setting determines how
much the area behind the text shows through the text. A value of 100% blocks all of the content
behind the text. As you move the highlight to each setting, you can see a sample of the result in
an adjacent panel.
• Background color - Choose from a list of colors for the background area behind the text. As you
move the highlight to each color, you can see a sample of the result in an adjacent panel. Note
that you won’t see any change unless you set the Background opacity to a value other than Off.
• Background opacity - Choose from a list of opacity settings for the background of the caption.
This setting determines how much the area behind the caption background shows through the
background. A value of 100% blocks all of the content behind the background. As you move the
highlight to each setting, you can see a sample of the result in an adjacent panel.

51
• Window color - Choose from a list of colors for the window rectangle surrounding the entire
caption. As you move the highlight to each color, you can see a sample of the result in an
adjacent panel. Note that you won’t see any change unless you set the Window opacity to a
value other than Default or Off.
• Window opacity - Choose from a list of opacity settings for the window rectangle surrounding
the entire caption. This setting determines how much the area behind the caption window
shows through the window. A value of 100% blocks all of the content behind the window. As
you move the highlight to each setting, you can see a sample of the result in an adjacent panel.
Changing time settings
You can change time settings to suit your preferences. You can find the following settings by navigating
from the Home screen menu to Settings > System > Time:
• Sleep timer – Set a time delay after which the TV will automatically shut off. This setting reflects
the setting you can make in the Options menu from any TV input, as explained in “Options
menu settings” on page 34. Note that the sleep timer setting is not input specific.
• Time zone – Select whether to set the time zone automatically or manually, and if set manually,
select your current time zone. Typically, a TV connected to the Internet can discover its own
time zone automatically, and a TV that is not connected to the Internet must be set manually.
Initially, this setting is made when you set up the TV tuner, as explained in “Setting up Antenna
TV” on page 22. Correct time zone information is needed to correctly display program data.
• Clock format – Select whether to display time in a 12-hour or 24-hour format, or to turn off time
display. This setting is available only on TVs that are connected to the Internet. Non-connected
TVs do not display time.
Scanning for broadcast TV channels again
There will be times when you need to create a new channel list. For example, you:
• Change cable providers
• Reorient your TV antenna
• Move to a different city with different channels
Whenever you need to update your TV channel list, the TV can repeat the channel scan.
To repeat the channel scan, from the Home screen menu, navigate to Settings > TV inputs > Antenna
TV > Scan again for channels. Then select Start finding channels to begin the channel scan process. The
screens and options that appear during this process are identical to those described in “How do I set up
the TV tuner?” on page 22.
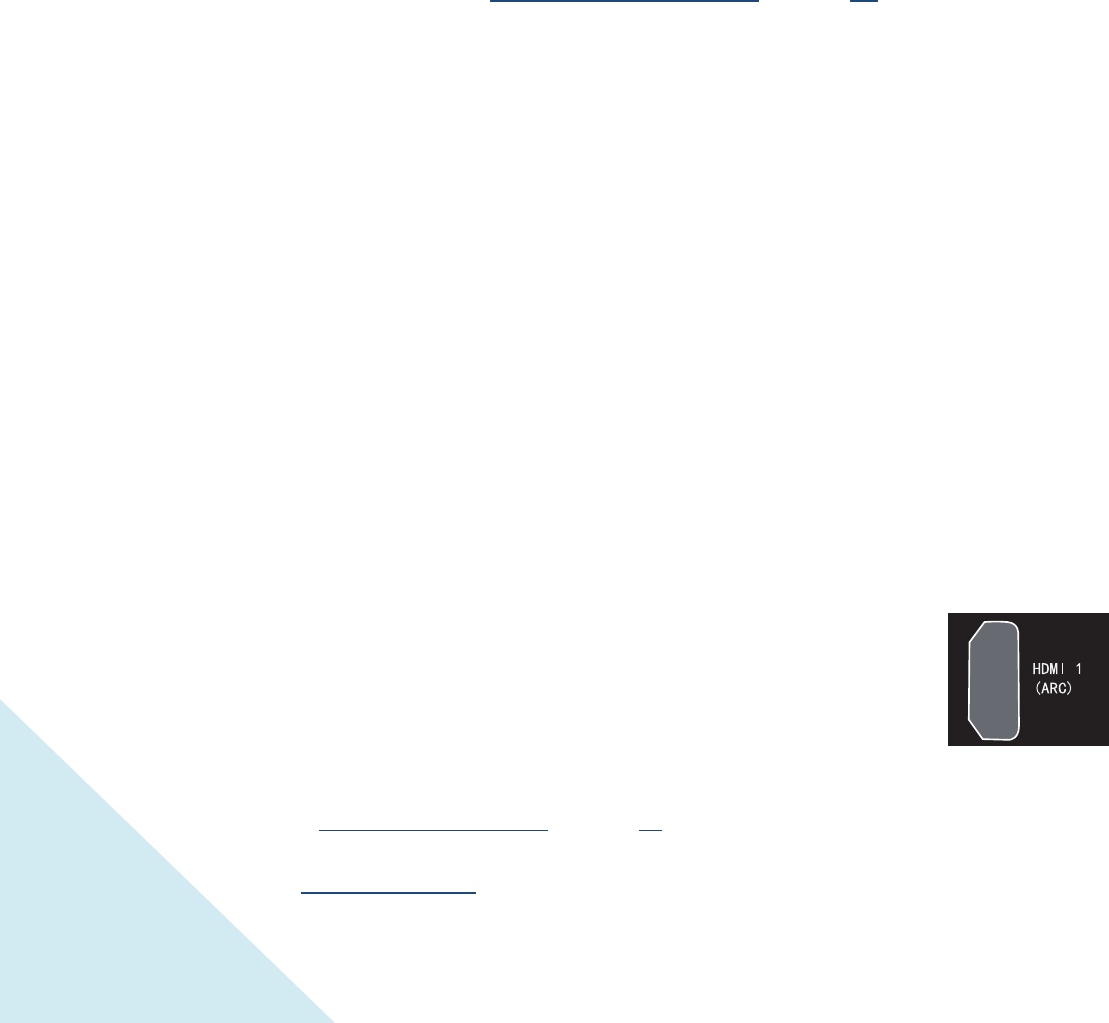
52
Using the TV in a home theater
Your TV has several features that make it an ideal TV for a home theater. But you might not notice them
because they remain in the background until you decide to use them.
Turning off TV speakers
When you use your TV with a sound bar or an external amplifier and speakers, you’ll probably want to
turn off the internal TV speakers.
To turn off the TV’s built-in speakers, in the Home screen menu, navigate to Settings > Audio > TV
speakers. Then highlight TV speakers on and press OK to change the settings to TV speakers off.
Tip: The TV’s internal speakers can be turned off and on automatically as needed by system
audio control, as described in “Enabling system audio control” on page
Changing the audio mode
53.
The TV has two audio modes, accessed by navigating in the Home screen menu to Settings >Audio >
Audio mode:
• Stereo – Use this setting for internal speakers, headphones, and external stereo amplifiers
connected through HDMI ARC, SPDIF optical, or headphone jack.
• Auto – Use this setting to automatically detect the best audio setting based on the audio stream
in the content you are watching. If you have connected the TV to an external Dolby Digital or
Dolby Digital Plus compatible amplifier, receiver, or sound bar through HDMI® ARC or SPDIF
optical, the TV automatically selects the appropriate surround sound capabilities of the device
based on the characteristics of the current program.
Note: Dolby Digital Plus format is only passed through the HDMI ARC connection.
Setting up a digital audio connection
You can connect the TV to an external amplifier, receiver, or sound bar by using either of these two
connections:
• HDMI ARC – The HDMI Audio Return Channel enables the TV to output digital
audio on one of its HDMI connectors. The connected amplifier can also function
simultaneously as an input source to the TV, if needed. To use the ARC capability,
you must connect an HDMI cable from your amplifier’ HDMI ARC connector to
the HDMI ARC connector on the TV. You also must:
o Be sure your HDMI cable is certified by HDMI.
o Select the appropriate setting under Settings > Audio > Digital audio out, as explained
in “Changing the audio mode” on page 52.
o Enable HDMI ARC under Settings > System > Control other devices (CEC), as explained in
“Enabling HDMI ARC” on page 53.

53
• SPDIF optical – The TV has an SPDIF optical connector that outputs a digital
audio signal. To use the optical output, connect a TOSLINK optical cable from the
amplifier to the Optical or SPDIF connector on the TV. You also must:
o Select the appropriate setting under Settings > Audio > Digital audio out, as explained
in “Changing the audio mode” on page 52.
Controlling other devices through CEC
Consumer Electronics Control (CEC) enables your TV and other CEC-compatible home entertainment
components to control one other in various ways. First, the CEC-compatible devices must “discover” one
another and report their capabilities. After this, one device can control another according to the
features you enable. For example, playing a disc on a Blu-ray player could switch the TV to the Blu-ray
player’s input. Or, powering off the TV could also power off the Blu-ray player and the home theater
receiver.
Discovering connected CEC devices
To discover CEC devices:
1. Make sure that your CEC-compatible components are connected to the TV with a suitable high-
speed HDMI cable that supports HDMI ARC and CEC control.
2. Turn on each component and make sure all components have CEC enabled.
Tip: Some manufacturers have their own branded names for CEC functionality, so you might
need to read the product documentation to correctly identify the CEC features of the device.
3. On the TV’s Home screen menu, navigate to Settings > Control other devices (CEC) > Search for
CEC devices, and then press OK to start the discovery process.
When finished, the TV displays a list of CEC devices that are connected to each HDMI input, as well as
any devices that had previously been connected. The TV remembers the names of multiple CEC devices
even when they are no longer connected. If the list is longer than the allowed space, press to see a
complete list in a scrollable window.
Enabling HDMI ARC
HDMI ARC is the audio return channel that is available on one of the TV’s HDMI ports. The audio return
channel enables you to send a Dolby Digital audio signal back to a home theater receiver that is also
sending an audio and video signal into the TV. Using HDMI ARC reduces the number of cables needed
and optionally lets you control the volume and mute state of the receiver by enabling system audio
control.
HDMI ARC is disabled by default. To enable HDMI ARC, in the Home screen menu, navigate to Settings >
System > Control other devices (CEC), and then highlight HDMI ARC. Press OK to check the adjacent check box.
Enabling system audio control
System audio control enables the TV remote control to change the volume and mute state of an
amplifier or sound bar connected through HDMI, and to display the external device’s volume and mute
status in the TV’s on-screen display.

54
The TV automatically turns off its internal speakers and sends volume and mute control signals to an
external amplifier when all of the following are true:
• System audio control is enabled on the TV.
• A CEC-compatible amplifier is powered on and CEC discoverability is enabled.
• The CEC-compatible amplifier’s HDMI ARC connector is connected to the TV’s HDMI ARC
connector with a suitable HDMI cable.
When the CEC-compatible amplifier is off, the TV automatically turns on its speakers (unless you have
turned them off as described in “Turning off TV speakers” on page 52) and resumes local control of
volume and mute state.
System audio control is disabled by default. To enable system audio control, in the Home screen menu,
navigate to Settings > System > Control other devices (CEC) and highlight System audio control. Press
OK to check the adjacent check box.
Enabling 1-touch play
1-touch play enables a component to control which TV input is active. For example, pressing Play on
your Blu-ray player switches the TV to the Blu-ray input.
1-touch play is disabled by default. To enable 1-touch play, in the Home screen menu, navigate to
Settings > System > Control other devices (CEC) and highlight 1-touch play. Press OK to check the
adjacent check box.
Enabling system standby
The system standby feature causes other components to power off when you power off your TV.
Depending on the CEC System Standby implementation, it also might enable connected components to
power off your TV when you power off the component.
System standby is disabled by default. To enable system standby, in the Home screen menu, navigate to
Settings > System > Control other devices (CEC) and highlight System standby. Press OK to check the
adjacent check box.
Restarting the TV
You can restart the TV when necessary. Restarting has the same effect as unplugging the TV power and
then plugging it in again.
To restart the TV, navigate to Settings > System > Power and then move right to System restart and
then Restart. Press OK to confirm restart.
While the TV restarts, the screen goes dark for a few seconds, and then displays the startup screen for a
few more seconds. When the restart operation is complete, you’ll see the familiar Home screen.

55
Resetting the TV
You can choose to reset only the TV picture and audio settings to their original values, or perform a full
factory reset to return the TV to the state it was in when you first unpacked and turned it on.
Reset TV settings
To reset only the TV picture and audio settings to their original values, navigate to Settings > System >
Advanced system settings > Factory reset, and then highlight Reset TV settings. Read the information
on the screen to make sure you understand what the reset operation does.
To proceed with the reset operation, press PLAY/PAUSE three times in a row.
Factory reset everything
A full factory reset returns the TV to its original, out-of-the-box state. When finished, you must repeat
Guided Setup, reconnecting to the Internet, re-linking your Roku account, and reloading any streaming
channels. You also must repeat Antenna TV setup and input configuration.
Factory reset is the recommended choice if you want to transfer the TV to another owner, and is the
only choice if you want to switch from store mode to home mode (if you inadvertently selected store
mode during Guided Setup).
To perform a factory reset, navigate to Settings > System >Advanced system settings > Factory reset,
and then highlight Factory reset everything. Read the information on the screen to make sure you
understand what this reset operation does.
To proceed with the full factory reset, press PLAY/PAUSE three times in a row.
Getting system updates
If your TV is connected to the Internet and linked with a Roku account, it will automatically get updates
from time to time. You don’t need to do anything. But if you are aware that an update is available and
you don’t want to wait until the TV updates itself, you can manually check for updates.
If your TV is not connected to the Internet, you can still get updates by using a USB flash drive.
Checking for updates on a connected TV
If you’re one of those people who has to have the latest, most up-to-date gadgets the moment they are
available, you can check for updates as often as you want.
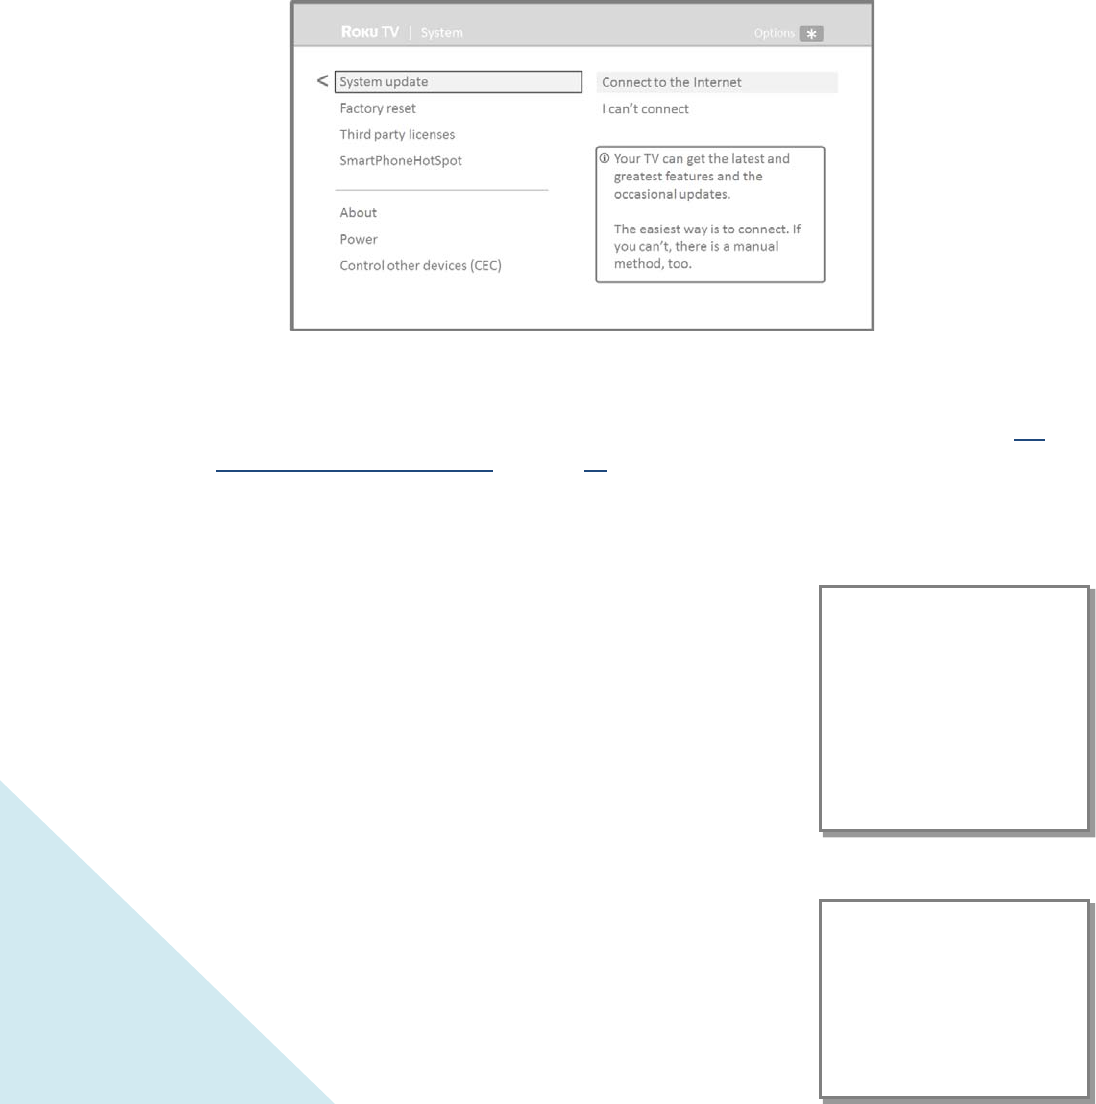
56
To check for updates, navigate to Settings > System > System update, and then select Check now. The
TV responds either with a message saying that your TV is up to date, or with a message saying that an
update is available.
Follow the instructions on the screen to install the system update.
Getting updates on a non-connected TV
If your TV is not connected to the Internet, you can still get system updates by using a USB flash drive
and a computer with an Internet connection.
To get a system update, navigate to Settings > System > System update:
The System update screen on a non-connected TV gives you the opportunity to connect your TV
to the Internet to automatically update your TV. We recommend this option if it is possible in
your situation. To proceed, select Connect to the Internet and follow the instructions in “But
what if I didn’t connect my TV?” on page 21.
Otherwise, if you can’t connect to the Internet, select I can’t connect, and then follow the
instructions on the screen. Here’s a summary:
1. On an Internet-connected computer, go to the web site
displayed on the System update screen.
2. On the USB Update web page, select the correct TV model
and then click Download. Save the file to the root folder of a
standard USB flash drive.
3. When the download finished, take the USB flash drive to the
TV and plug it into the USB port. When you do, the TV
validates the files on the flash drive and displays a 12-digit
code.
4. Write down the code and the web address, and take this information back to your Internet-
connected computer.
5. On the 12-digit code page, enter the code your TV displayed,
and then click Next.
USB flash drive
Any normal USB flash drive will work,
provided it has a FAT-16 or FAT-32
file system format. (This is the
default for most flash drives.)
The size of the download is small—
usually less than 100 MB—and so
will fit on any size flash drive you
might have.
12- and 6-digit codes
The USB update process uses a pair
of codes to validate that you are
authorized to install an update, and
to ensure you are not attempting to
install an old, unsupported version of
the system software.

57
6. On the 6-digit code page, write down the 6-digit code that appears, and then take it back to
your TV.
7. Using the TV remote control, select Next to move to the next screen, and then use the on-
screen keyboard to enter the 6-digit code. When finished, select OK. The system update
begins. Do not remove the USB flash drive until the TV restarts.
When the update finishes, the TV restarts. You can check the new version number by navigating to
Settings > System > About.
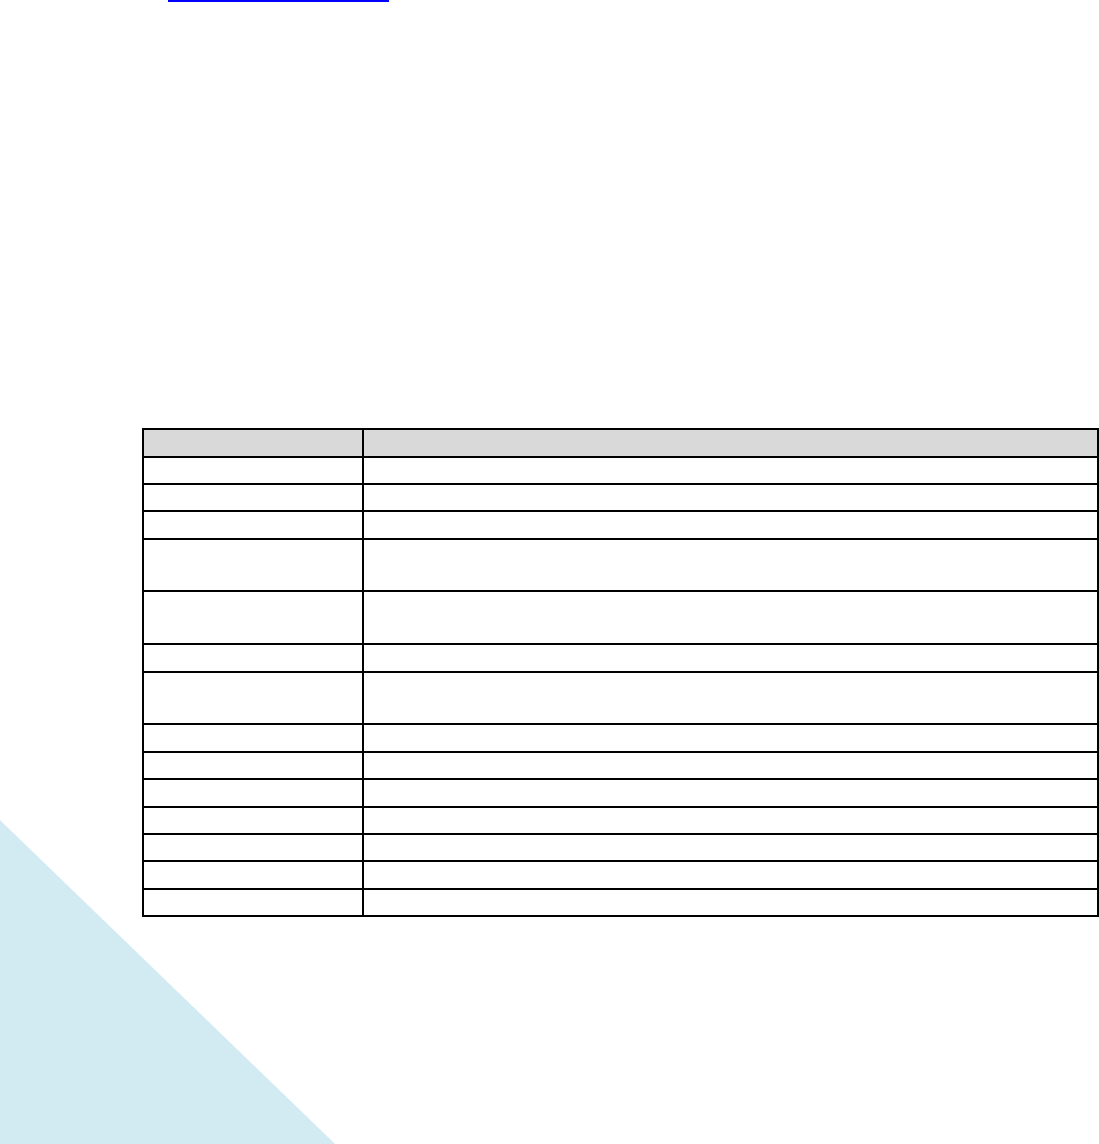
58
Other devices
Getting and using the Roku mobile app
Roku makes the Roku mobile app free for iOS, Android, and Microsoft Windows 8/8.1 devices. With a
Roku mobile app, you can control your Roku device, find and add new Roku Channels, search and find
something to watch, and much more. You can find more information by going
to support.roku.com/home and searching for “mobile app.”
Using a Universal Remote
Certain universal remote controls manufactured after your TV can be programmed to operate the TV.
One compatible family of remote controls is the Logitech Harmony series. For information on other
brands that can be used with your TV, contact Roku support.
Using your Cable Box or Satellite Receiver Remote as a ‘Universal’ remote
For details on how to set up the TV to work with your cable set top box or satellite receiver remote
controls, refer to the User Manual that your cable or satellite service provided. It will include
instructions on how to program their remote to your television.
Codes for the most common cable and satellite providers
Use the Hisense code that is associated with your cable or satellite provider (if applicable)
Service Provider Hisense Code
AT&T U-Verse 1346, 1013, 1041, 1327, 1363, 1004
Bright House Cable 0748
Cablevision 068, 069, 078, 096, 100, 164, 168, 229, 026
Charter 12355, 2002, 1204, 1423, 1517, 0171, 1963, 0463, 1463, 0842, 1326, 167, 415, 424,
450, 456, 461, 507, 523, 567, 577, 586
Comcast 0178, 10178, 10463, 11463, ,10748, 11314, 11660, 10171, 11204, 11326, 11517, 11641,
11780, 11785, 11892, 11963, 12002
Cox Communication 0178, 10178, 1326, 1463,
DirecTV 0178, 10178, 10019, 10748, 11314, 11660, 11710, 11780, 12049, 10171, 11204, 11326,
11517, 11564, 11641, 11963, 12002
Dish Network 505, 627, 538, 720, 659
Time Warner 386, 0178, 10178, 400, 450, 461, 456, 0748, 1463, 0463, 10463
Tivo 0091
ONN 4671, 0371, 2891
RCA 12049
UEI
2183, 3519
Verizon 0198, 0490, 0775, 3264, 0205, 0532

59
Note: If the Hisense code associated with your Cable or Satellite provider is not listed above, does not
work or you cannot locate the instructions for programming your remote to your television, call your
service provider’s Customer Service center. If your service provider does not have a Hisense code
available, then locate additional codes in the FAQ section at www.hisense-usa.com/support or call the
Hisense Electronic Consumer Care Center at 1-888-935-8880 Monday – Friday from 8 a.m. to 8 p.m. EST,
Saturday and Sunday from 9 a.m. to 6 p.m. EST.
60
Quick Problem-Solving Tips
When you experience an issue with your TV, turn it off and on again. If this does not resolve the problem,
then refer to the tips below. If the problem is still not resolved, then contact our Hisense Electronics
Consumer Care Center at 1-888-935-8880 Monday through Friday from 8 A.M. to 8 P.M. EST and
Saturday through Sunday from 9 A.M. to 6 P.M. EST.
Customers that are located in Canada should call 1-855-344-7367.
SOUND OR PICTURE ISSUES POSSIBLE SOLUTIONS
You do not hear any sound or see a picture
• Check if the power cord is plugged into a powered
AC outlet.
• A power switch on the TV must be turned on.
Press the [Power] button on the remote control to
activate the unit from Standby.
• Check to see if the LED light is either red or blue. If
it is on, then there is power to the TV.
You have connected an external source to your TV and
do not see a picture and/or hear sound
• Check for the correct output connection on the
external source and for the correct input
connection on the TV.
• Make sure you have made the correct selection for
the input mode for the incoming signal
When you turn on your TV, there is a delay for a few
seconds before the picture appears
•
This is normal. If you have already set up your TV,
it is initializing and searching for previous setting
information.
You see a normal picture but do not hear any sound •
Check the volume settings.
• Check if ‘Mute’ mode is set to “On
You hear sound but do not see a picture or it is in
black and white
• If the picture is black and white, first unplug the TV
from the AC outlet and replug it after 60 seconds.
• Check that the Color is set to 50 or higher.
•
Try different TV channels.
Your sound and picture is distorted or appears wavy •
An electric appliance may be affecting the TV. Turn
off any appliances that are nearby and move them
farther away from the TV.
• Insert the power plug of the TV set into another
power outlet.
Your sound and picture is blurry or cuts out •
If you are using an external antenna, check the
direction, position and connection of it.
• Adjust the direction of your antenna or reset or
fine tune the channel.
CONNECTIVITY ISSUES
POSSIBLE SOLUTIONS
61
You cannot connect to my wireless home network
during the guided setup
•
If you are getting 3 or more signal-strength bars
above your wireless network, change the location
of your TV or adjust the wireless router.
• Make sure there are no obstructions (for example,
cement walls) between your TV and the wireless
router.
• Make sure you have selected the correct wireless
router on the Choose wireless network screen.
• If your network is secured (passwords are case
sensitive) make sure that you entered the correct
password.
• If you have turned off SSID broadcasting on your
wireless router, you can add your network by
selecting Add network from the Select wireless
network screen
• If security is enabled on your network, temporarily
disable it on your router and try connecting again
Remote Control Issues
Your remote control is not working •
Try moving closer to the TV.
• Make sure that the batteries are working and
inserted properly.
• Make sure nothing is blocking the front of your TV.
• If the status light on the front of your TV flashes
once each time you press a button, then the
problem is not with the remote.