Hisense Electric LCDD0053 Part15 Subpart B-LED LCD TV User Manual W9HLCDD0053 1
Hisense Electric Co., Ltd. Part15 Subpart B-LED LCD TV W9HLCDD0053 1
Contents
- 1. W9HLCDD0053_User Manual 1
- 2. W9HLCDD0053_User Manual 2
- 3. W9HLCDD0053_User Manual 3
W9HLCDD0053_User Manual 1

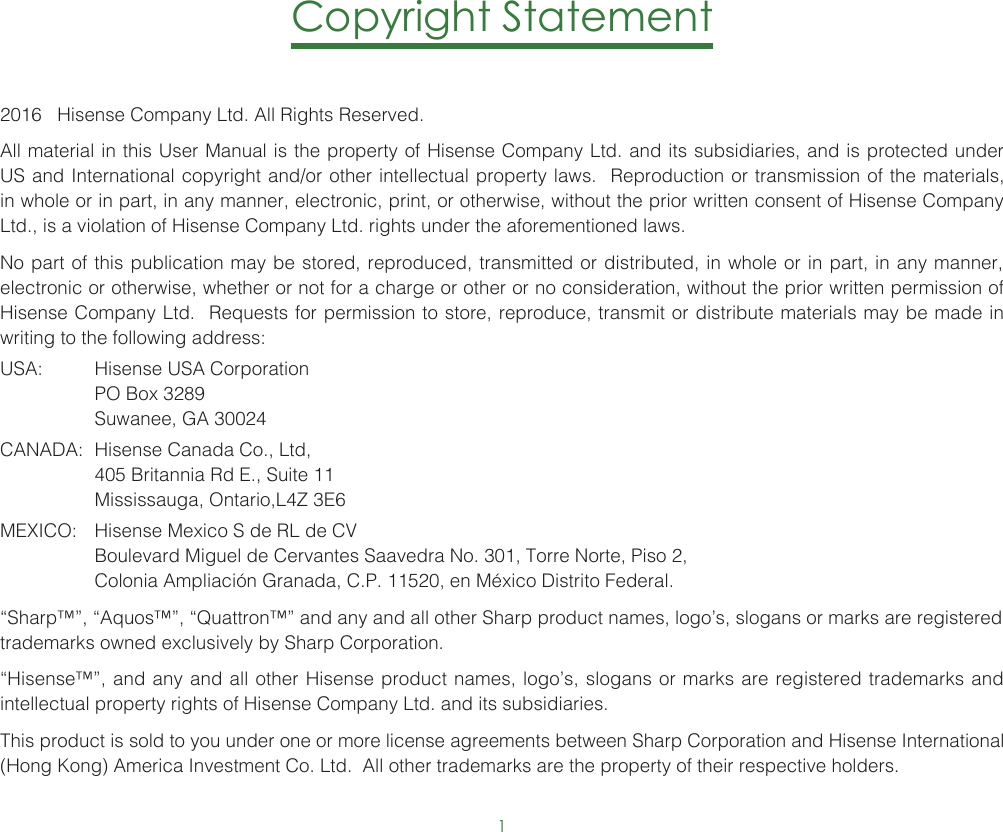
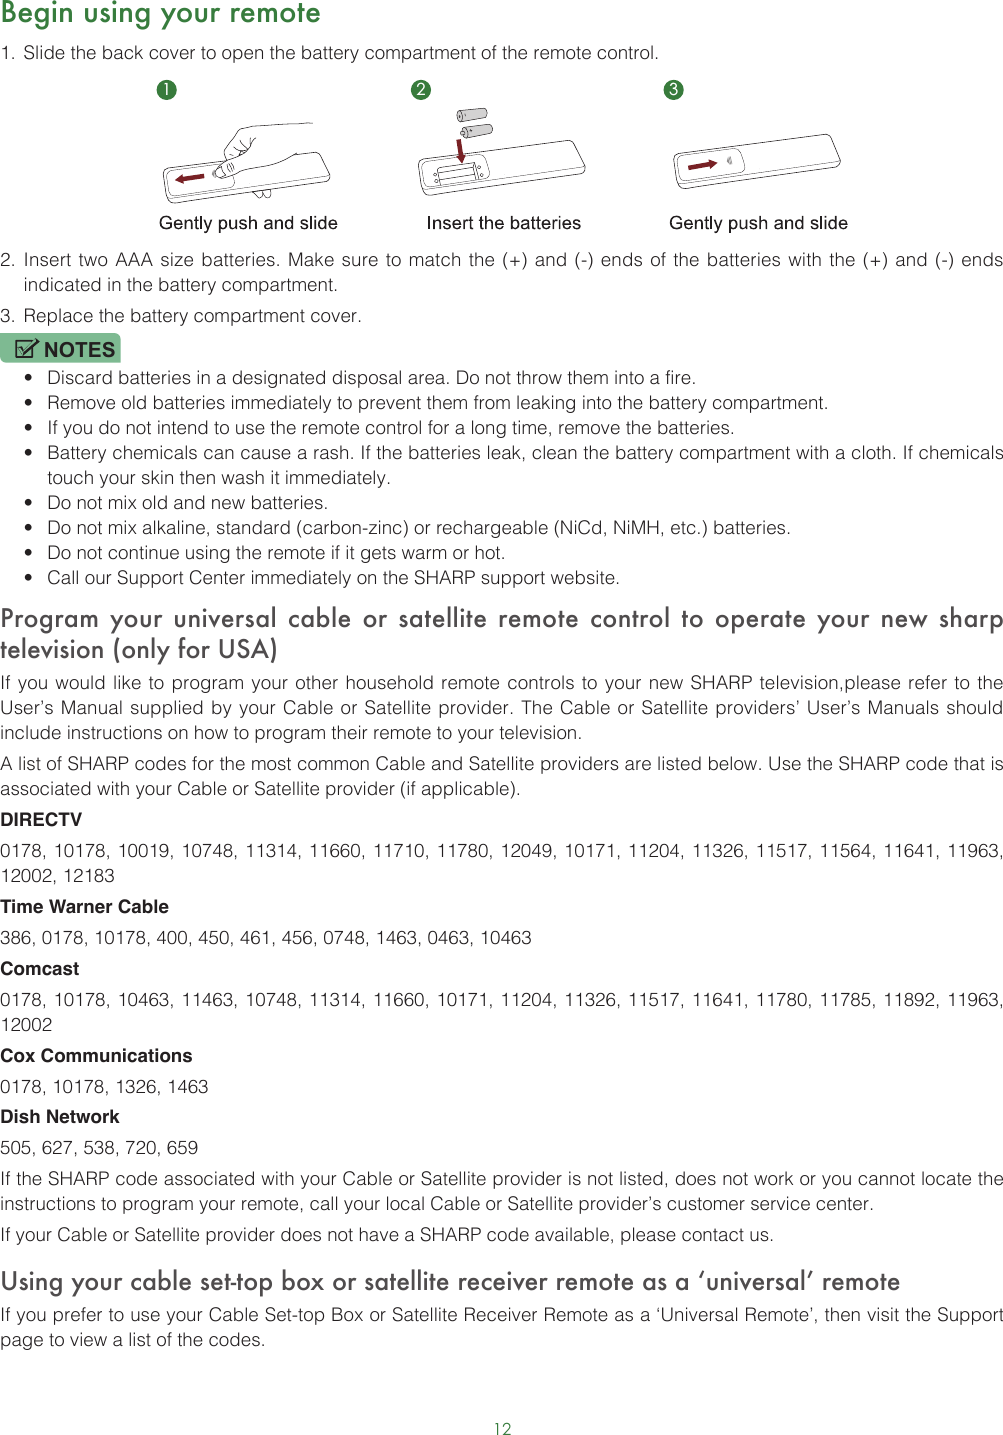
![5Connecting Devices to your TV You have several options for connecting your TV to different devices. The method in which you connect will be based upon the type of cables you have and the available outputs on your device.Connecting an antenna, cable set-top box or satellite receiverTo connect an antenna,cable set-top box or satellite receiver: 1. Connect one end of a coaxial cable (not included) to the RF OUT port on the antenna, cable or satellite box. If you are using an antenna with twin-lead cable, you may need a 300-75 Ohm adapter (not provided) to connect it to the back of your TV. Likewise, if you are using several antennas, you may need a combiner (not provided).2. Connect the other end of the cable to the ANT/CABLE port on the side of TV.3. Using your remote, press the [INPUT] button and select TV as the input source. Connecting a satellite receiver, DVD player or other audio visual (AV) device with a composite video cable (yellow/red/white)To connect an AV device with a composite video cable (not provided):1. Use the audio and video cables to connect the composite video/audio ports of the external AV device to the AV IN ports of the TV. (Video = yellow, Audio Left = white, and Audio Right = red)2. Plug the connected devices into the AV connectors on the TV before switching it on.3. Using your remote, press the [INPUT] button and select AV as the input source.or ANT OUTCable Set top boxRF OutEXTERNAL DEVICETV PORTANT/CABLE(not included)AV OUTVideoLRWhite (L)White (L)Yellow (Video)Yellow or Green (Video)Red (R)Red (R)Audio Cable TV PORTSVIDEO LRAV INEXTERNAL DEVICESDVD Player/RecorderVideo Camera Set-top boxSatellite ReceiverSatellite antenna cableVCR](https://usermanual.wiki/Hisense-Electric/LCDD0053.W9HLCDD0053-User-Manual-1/User-Guide-2908331-Page-6.png)
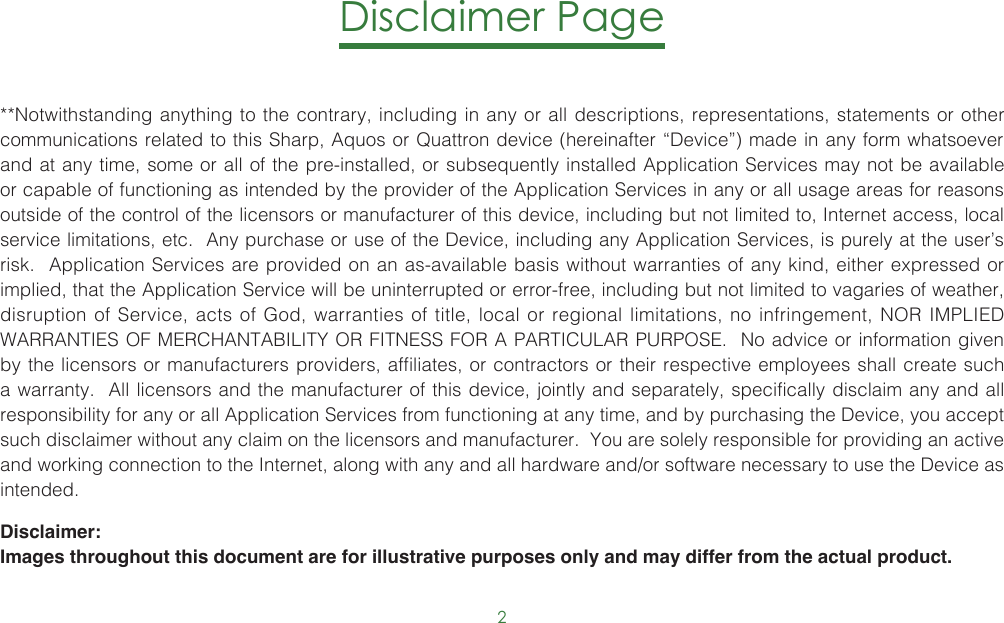
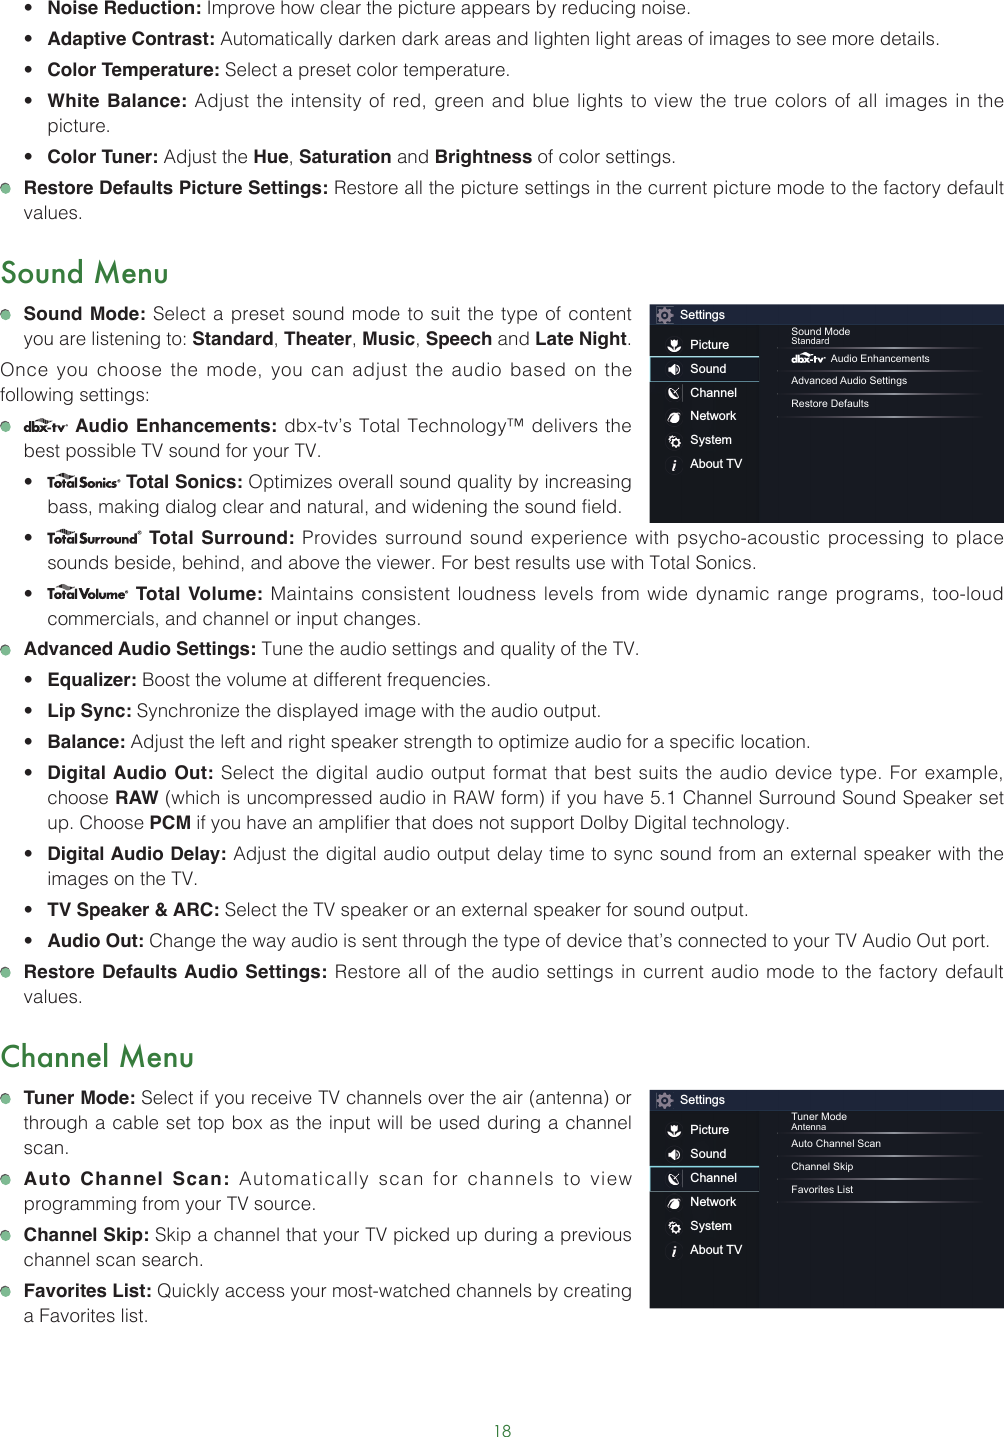
![6Connecting an AV device with a component video cable (red/blue/green) To connect an AV device with a component cable (not provided):1. Use a component video cable to connect the component output ports of the external device to the YPBPR ports for the TV. (Y = green, PB = blue, and PR = red). Use an audio cable to connect the component audio ports of the external device to the TV AUDIO (L/R) ports.2. Plug the connected devices into the YPBPR and L/R ports on the TV before switching it on.3. Using your remote, press the [INPUT] button and select COMPONENT as the input source.NOTE• One AV device can be connected to the TV using a component video or composite video cable.Connecting an AV device with an HDMI cableThis type of connection supports digital connections between HDMI-enabled AV devices such as a Personal Video Recorder (PVR), DVD, Blu-Ray, AV receiver and digital devices. In addition, some devices (such as a PVR or DVD player) require an HDMI signal to be set to Output in the settings of the device.Please refer to the User Manual that came with your device for step-by-step instructions.To connect an AV device with an HDMI cable (not provided):1. Use an HDMI cable to connect the HDMI output port of the AV device to the HDMI port of the TV.2. Plug the connected devices into the HDMI port on the TV before switching it on.3. Using your remote, press the [INPUT] button and select the corresponding HDMI input. NOTES• Because the HDMI connector provides video and audio signals, it is not necessary to connect an audio cable.• The HDMI cable will not supplied with the product.• We strongly recommend to use HDMI Cable with 2 cores as shown in the figure.EXTERNAL DEVICESDVD Player/RecorderVideo Camera Set-top boxSatellite ReceiverSatellite antenna cableVCRComponentRLPRPBYWhite(L) White(L)Red(R) Red(R)Audio Cable Component Cable Red(PR/CR) Red(PR/CR)Blue(PB/CB) Blue(PB/CB)Green(Y) Green(Y)YPBPRCOMPONENT INL RTV PORTSHDMIHDMIEXTERNAL DEVICESDVDSet-top BoxTV PORTHDMI Cable](https://usermanual.wiki/Hisense-Electric/LCDD0053.W9HLCDD0053-User-Manual-1/User-Guide-2908331-Page-7.png)
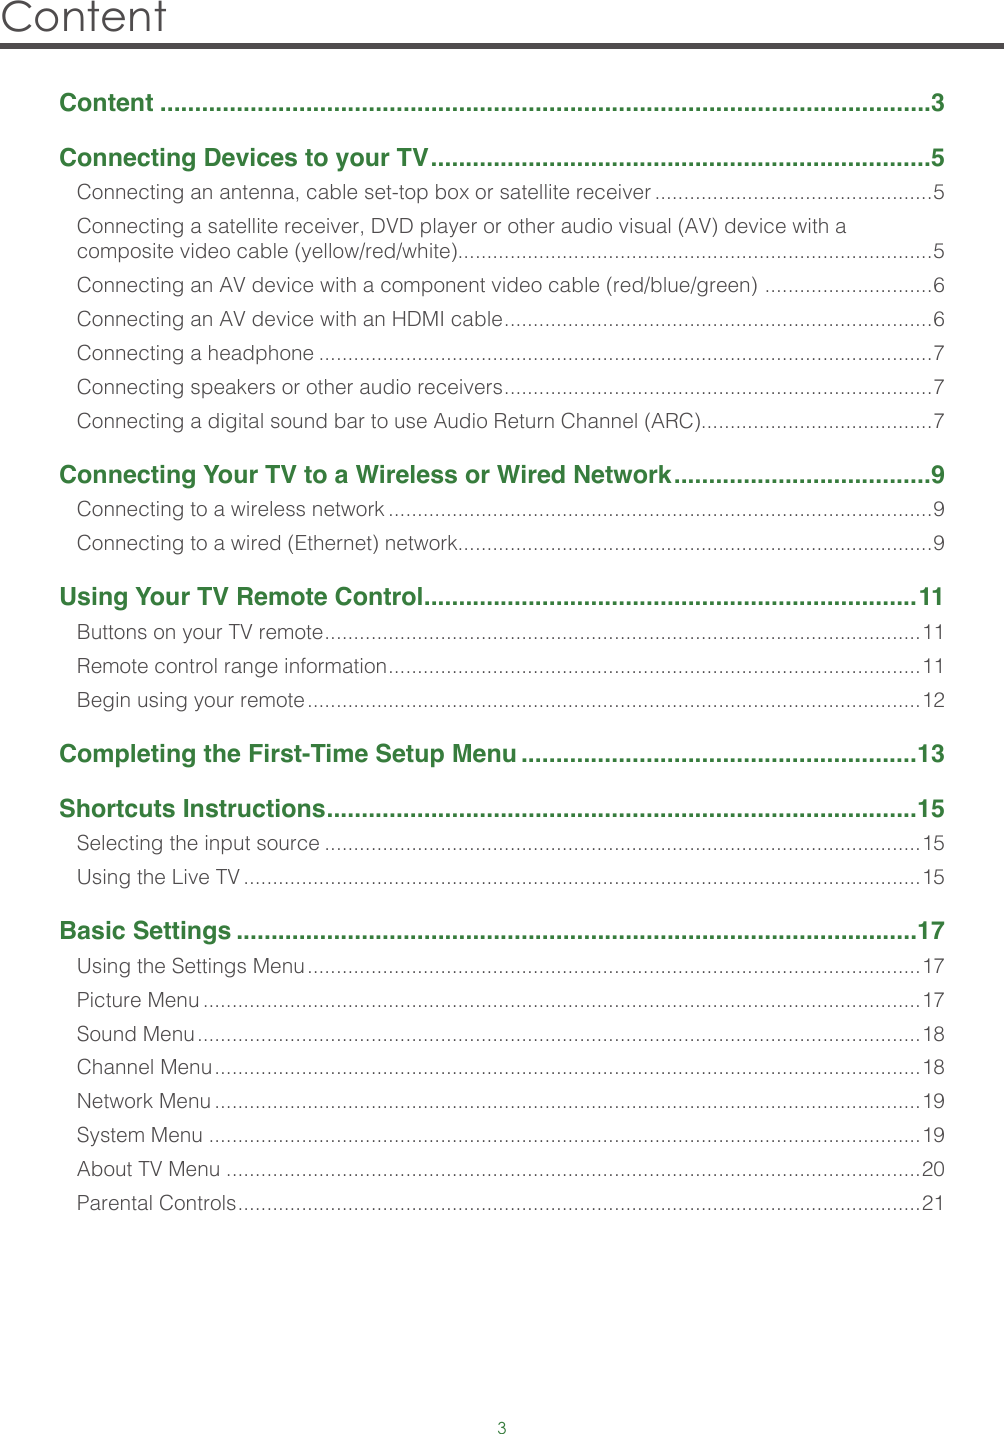
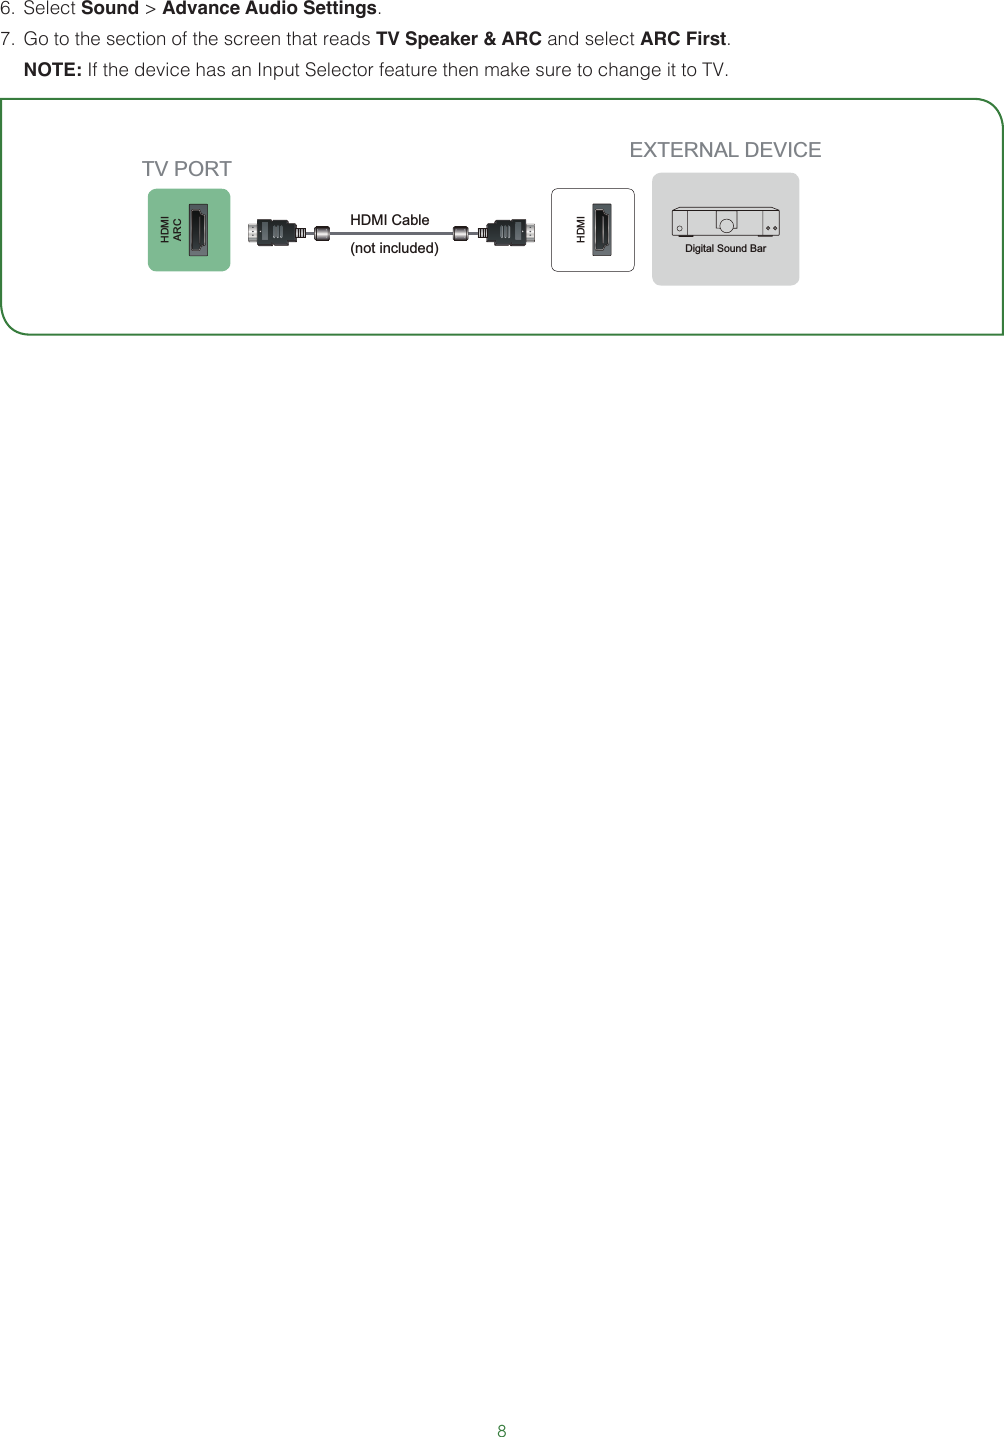
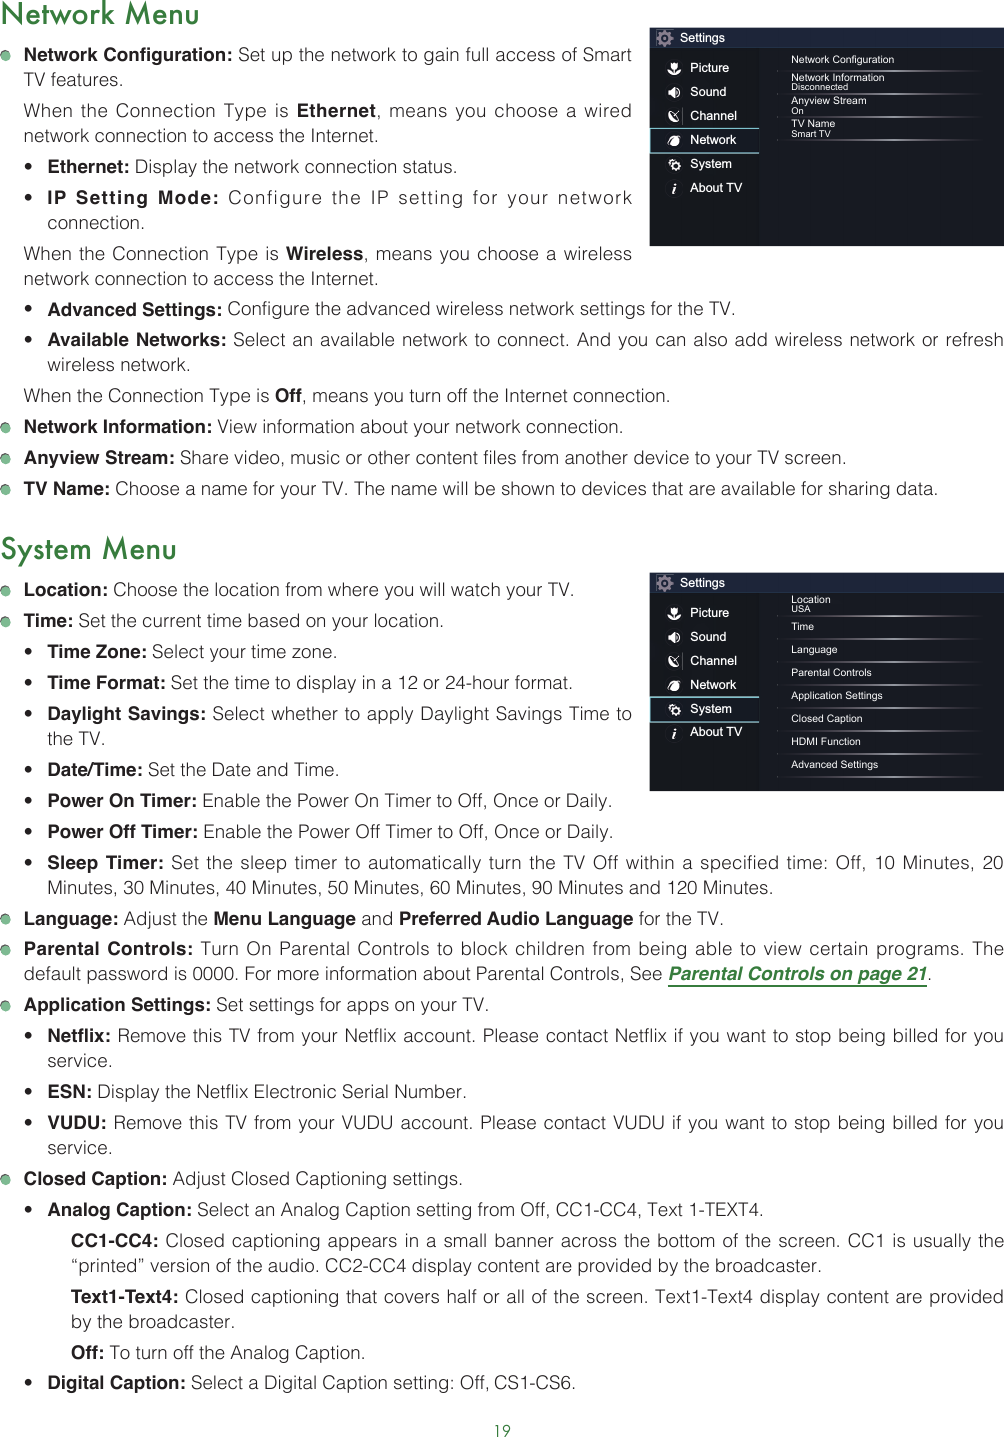
![7Connecting a headphoneYou can connect headphone (not provided) to the AUDIO OUT port on your TV. While the headphone is connected, the sound from the built-in speakers will be disabled.Connecting speakers or other audio receiversTo connect speakers or other audio receivers with an audio cable (not provided):1. Use an audio cable to connect the digital audio in port of the audio receiver device to the DIGITAL AUDIO OUT port of the TV. Another option is to use an RCA Y-cable (1/8”-stereo mini to L/R phone) to connect an analog sound system to the AUDIO OUT port of the TV.2. Plug the connected devices into the main power socket before switching on the TV.• TIP: If you prefer to use Audio Return Channel, then see Connecting a digital sound bar to use Audio Return Channel (ARC) on page 7.NOTES• When a digital audio system is connected to the DIGITAL AUDIO OUT port, decrease the TV and system volume. • 5.1 CH (channel) audio is available when the TV is connected to an external device that supports a 5.1 channel surround sound • You can receive 5.1 channel audio in one of two ways. The first way is to connect the DIGITAL AUDIO OUT port from the device to the Amplifier. The second way is to connect the DIGITAL AUDIO OUT port on the back of the TV to the Optical port on the Amplifier.After you’ve completed one of the two methods then be sure to go into the Advanced Audio Settings of the TV and select RAW to receive the 5.1 channel audio. You will need to also go into the sound or audio settings of your device to ensure it is set to 5.1 Channel output. It may read ‘Bitstream’, ‘RAW’ or ‘Digital’.Connecting a digital sound bar to use Audio Return Channel (ARC)If you’d like to use the Audio Return Channel (ARC) feature to have sound sent from the TV back down an HDMI cable to a digital soundbar, then you will need to connect the cable to the HDMI / ARC port. By using this feature, you will also be able to control the soundbar with your TV remote instead of having to use multiple remotes for each device. To connect a digital sound bar with an HDMI cable:1. Connect the cable that’s attached to the soundbar to the HDMI / ARC port on the TV.2. Turn on the sound bar by pressing the Power button.3. Press the [ ] button on your remote and press the [ > ] button of your remote to display the Settings Menu and go to System > CEC Function.4. Turn on the CEC Control setting.5. Return the Settings Menu by re-pressing the [BACK] button.EXTERNAL DEVICESPowerless Bass Speaker SpeakerDigital Sound BarAudio AmplifierDIGITALAUDIO OUT /AUDIO OUTTV PORTSAudio Cable White(L)Red(R)Audio Cable](https://usermanual.wiki/Hisense-Electric/LCDD0053.W9HLCDD0053-User-Manual-1/User-Guide-2908331-Page-8.png)
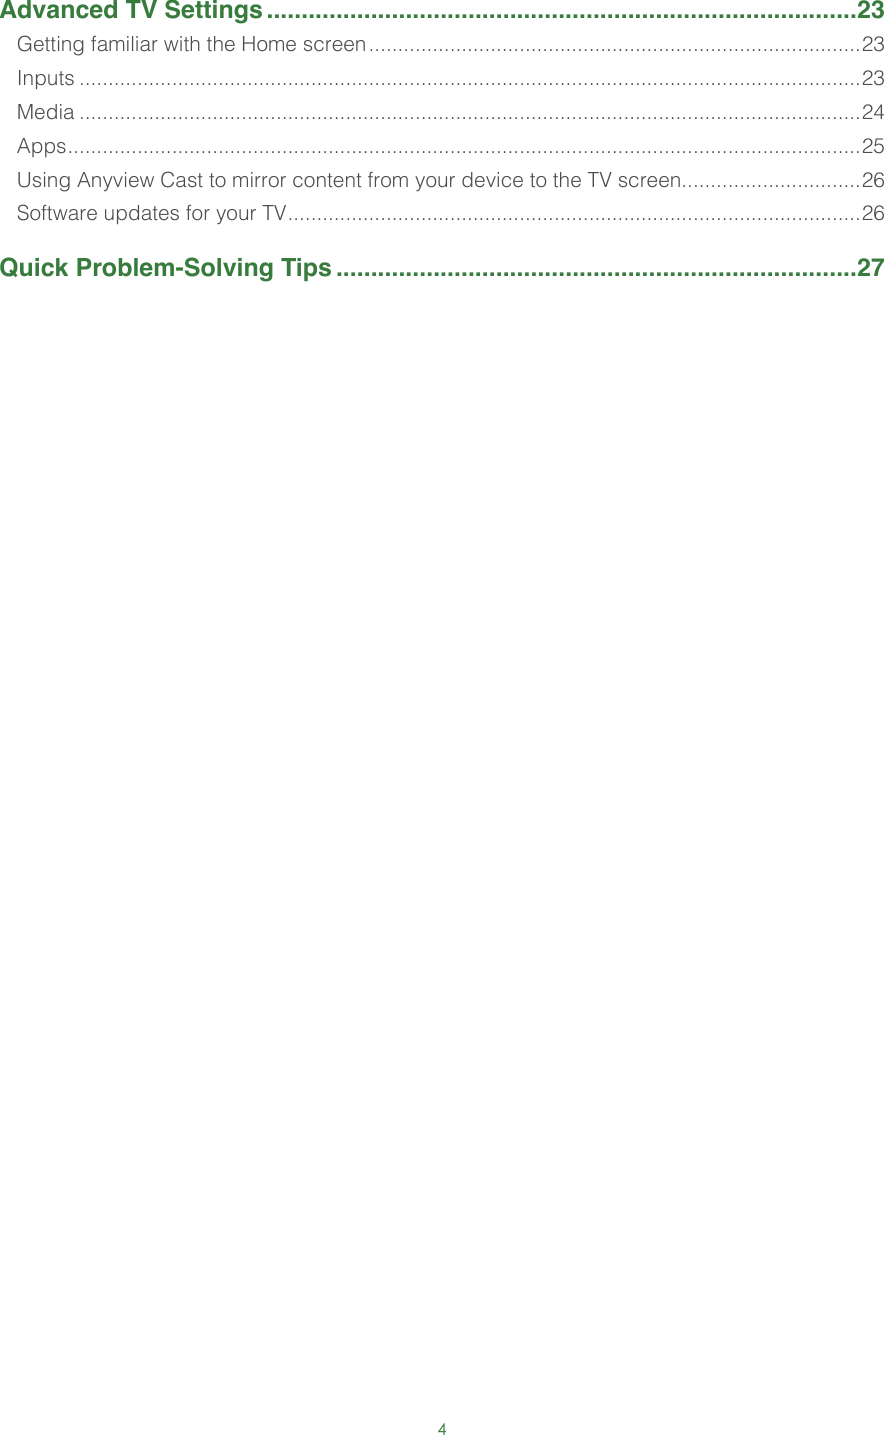
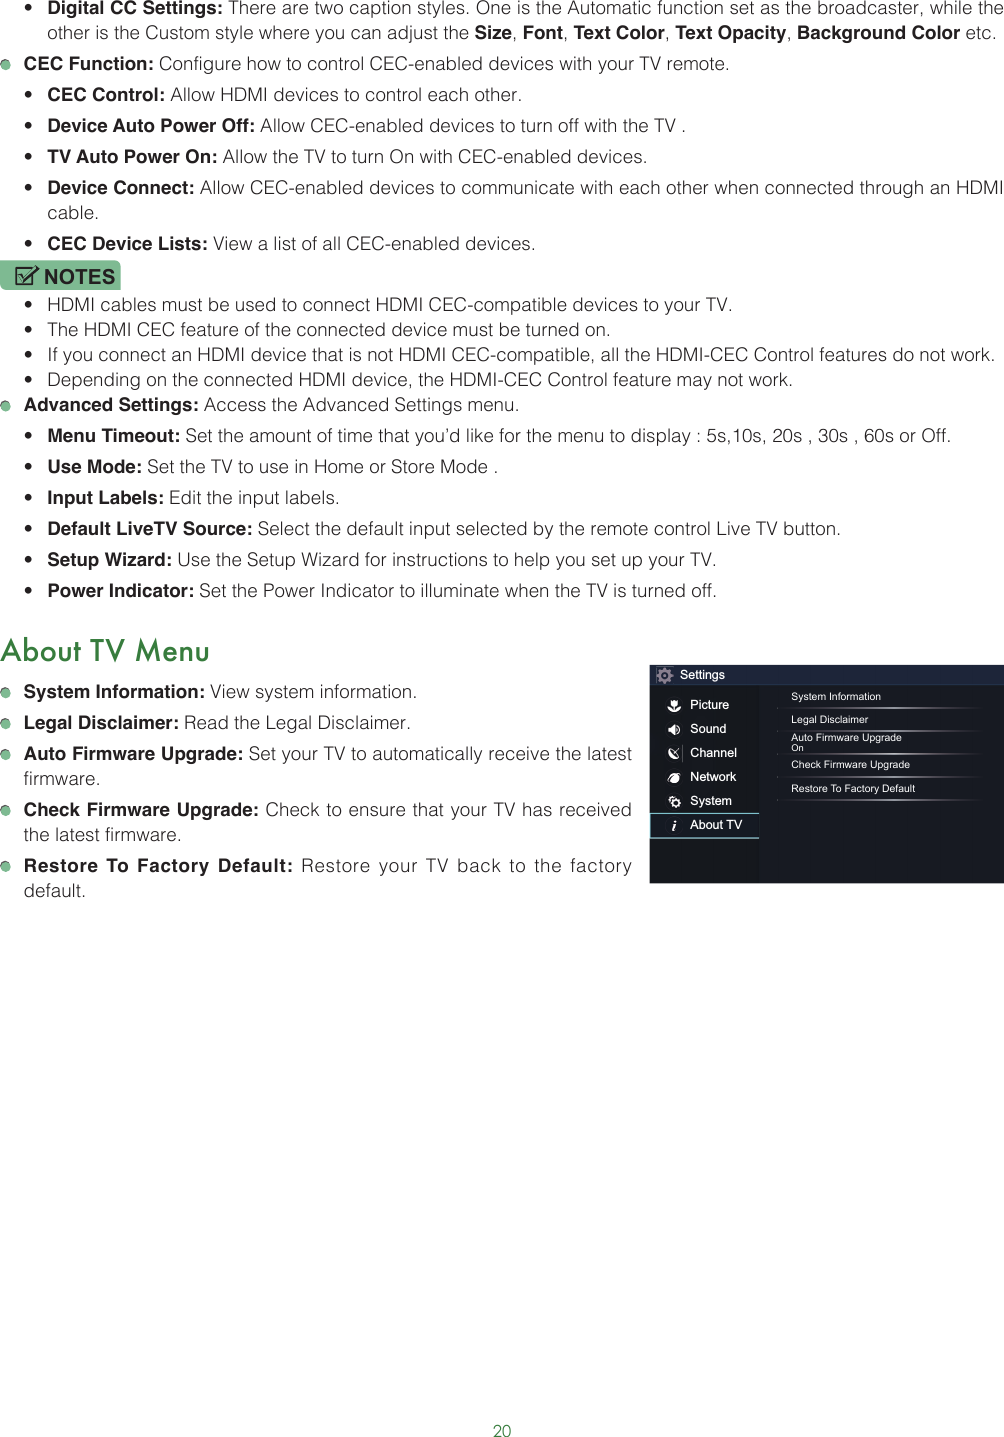
![13Completing the First-Time Setup Menu Press the [ ]] button on the remote to turn on the TV. After the splash screen that displays the SHARP logo appears, begin the first-time setup menu.Screen Task1. Using the D-pad arrows of your remote, choose your Language, Country and Time Zone. 2. Navigate to the Forward arrow and press [OK].TIP: The edge of the drop-down boxes and the back and forward arrows change to blue when you select them.1. Press [OK] on your remote to select Accept All. 2. When you’re done, then navigate to the Forward arrow and press [OK]. Select Home (which appears by default) and then navigate to the Forward arrow to press [OK].NOTE• Store Mode should only be selected by Retailers who plan to demonstrate the TV.LANGUAGE AND LOCATIONLanguage Country Time ZoneUnited StatesEasternEnglish Language Terms Mode Network Input DoneTERMS OF SERVICEAccept EULAAccept Terms of...Accept allThe EULA and Terms must be accepted in order to cont inue. Language Terms Mode Network Input DoneTV USAGE MODETV ModeHomeHome ModeIn Home Mode, your TV will automat ically adjust the brightness of your screen based on the ambient light in the room. This mode uses less energy. Language Terms Mode Network Input Done](https://usermanual.wiki/Hisense-Electric/LCDD0053.W9HLCDD0053-User-Manual-1/User-Guide-2908331-Page-14.png)
![14Screen TaskIf your TV does not automatically detect an Ethernet connection, then select WiFi. When you’re done, select your network from the list that displays and move to the next screen.Select how you receive your TV channels. Choose from one of the following sources below and then move to the next screen.• TV• AV• COMPONENT• HDMINOTE• If you use an antenna to receive channels, then you must complete the first-time setup menu in order to run a channel scan.Press the [OK] button on your remote if you are fine with the selections that appear on the screen. Otherwise, navigate to the back arrow on the screen to change your selection.NETWORK CONNECTIONSelect a NetworkEthernet WiFiA2F4-05A3F6-01A6F5-19A1F2-02A2F4-03A2F5-01R22 Language Terms Mode Network Input DoneLIVE TV INPUT SOURCEHDMI 2HDMI 1 HDMI 3TV AV COMPONENT Language Terms Mode Network Input DoneCONGRATULATIONS! Language Terms Mode Network Input DoneHome Mode WiFi TVEnglish United States EasternYour TV is now ready to useOK](https://usermanual.wiki/Hisense-Electric/LCDD0053.W9HLCDD0053-User-Manual-1/User-Guide-2908331-Page-15.png)
![15Shortcuts Instructions You can use shortcuts on the remote control for fast operation. Turning your TV on or off To turn your TV on:1. Connect the power cord to the back of the TV, then plug the power cord into an AC outlet.2. When the TV is powered on, press the [ ] button on the remote to turn TV. To turn your TV off, press the [ ] button on the remote.NOTES• When your TV is in standby mode, it is still consuming power. To completely disconnect power, please remove the plug from the AC outlet.• If your TV does not receive an input signal for several minutes, it automatically goes into standby mode.Selecting the input sourceSelect the Input Source depending on the video device you have connected to your TV.To select the input source:1. Turn on your TV, then press the [INPUT] button on the remote, the list of Source appears.2. Press the [< / >] buttons to select the input source.3. Press the [OK] button to confirm your selection.Using the Live TVTo view broadcast programs, press the [Live TV] button on your remote.Channel search guideWhen you select TV as input, if no TV channels were saved before, you will be prompted to do a channel search. Before channel tuning could start, you must specify the Tuner Mode, Antenna or Cable. You can also go to Setting menu > Channel to change the channel settings.Launch Live TVAfter channel tuning is done for the first time, the screen will display Live TV operating tips, including: how to start the channel list, how to start channel info and so on. [OK] Show channel list [ v ] View channel info [Back] View recent channelsView channel infoPRE-CHShow channel list](https://usermanual.wiki/Hisense-Electric/LCDD0053.W9HLCDD0053-User-Manual-1/User-Guide-2908331-Page-16.png)
![16Viewing channel informationAs you use the [CH+/CH-] button on your remote to scroll through channels, an information banner appears on the top of the screen.The information banner displays the following information:1. Channel number2. Lock status3. Input4. Program name5. Show identification6. Channel name7. Current date and time8. Prompt9. Beginning and end time of the next program10. Start/Stop time progress bar of the current programIf you are watching a particular channel, you can also press the up arrow button of your remote to view channel information.Viewing a channel listAfter you have done an automatic channel scan (if you’re using an antenna) or are receiving your channels through a cable provider, you can view your list of channels by pressing [OK] on your remote.You will see the channel list display on the right side of the screen.Creating a Favorites ListTo quickly access your most-watched channels, you can create a Favorites List.To create your Favorites List:1. Press the [ ] button on your remote.2. Press the [ > ] button to display the Settings Menu.3. Select Channel > Favorites List.4. Using the [ v / v ] buttons of your remote, select a channel and press [OK] button.A heart-shaped indicator will appear beside the channel as confirmation that it has been successfully added.Viewing your Favorite listTo view channels that you’ve added to your Favorites List simply press [OK] on your remote to call out the channel list.The channel list appears on the right side of the screen and heart-shaped icons are shown next to the channels that make up your Favorites List. You can press [ < / > ] buttons to switch the channel list (Antenna or Cable) and Favorite list.12:09 AM Thu. 30 Jun.Antenna│ 1/1 unknown 5.1CH│ 4:3│ 480i │ CC1:00 AM - 4:00 AM AT05 480iAT05 480i10:00 PM 1:00 AM1672 3 4 59108AT05-25-2](https://usermanual.wiki/Hisense-Electric/LCDD0053.W9HLCDD0053-User-Manual-1/User-Guide-2908331-Page-17.png)
![17Basic Settings Your SHARP TV comes with many TV setting features to allow you to customize the picture based on your viewing preference and environment. As you navigate throughout different screens to access settings, some of the indicators appear as words On and Off and some are open and closed symbols. An indicator signifies a feature that is disabled.Using the Settings MenuYou can press the [ ] button to access the Quick Settings Menu, then press the [ > ] button on the D-pad to view the Settings Menu. The Settings Menu consists of the following settings: • Picture• Sound• Channel• Network• System• About TVIn each menu, you can: Press the [ v / v ] buttons to select an item. Press the [OK] buttons to enter the submenu. Press the [ < / > ] buttons to adjust the value. Press the [BACK] button to return to the previous menu. Press the [EXIT] button to exit the menu.Picture Menu Picture Mode: If you’d like to configure the settings for your picture, then there are six types of picture modes available: Vivid, Standard, Theater, Energy Saving, Game and Sport. Once you choose the mode, you can adjust the picture based on the following settings: Brightness: Adjust the Brightness level to generate lighter or darker images. Contrast: Adjust the Contrast level to increase or decrease how bright images appear. Color: Adjust the color intensity of the picture for a more vibrant image. Aspect Ratio: Adjust the Aspect Ratio to stretch or zoom in on your picture. You can choose from the following settings: Normal, Zoom, Wide, Cinema, 1:1 PIXEL MAP, Panoramic, Direct and Auto. Backlight: Some models have a Dynamic Backlight Control setting that you can turn Off and set to High or Low. The Backlight setting enables you to adjust how bright you want images to appear. In addition, an ECO Sensor setting is available that will enable the TV to automatically adjust the picture settings according to the amount of ambient light in your room. The Minimum Backlight setting enables you to adjust how bright you want images to appear. This is a money-saving feature because it reduces power consumption. Advanced Picture Settings: Adjust advanced picture settings based on your viewing preference.• Display: Adjust advanced picture settings in the component source.• Overscan: Change the video size settings slightly crop the edges of the displayed image.• Tint: Adjust the colors from a green to magenta tint to view the natural skin tones of people on the screen.• Sharpness: Adjust how sharp or soft edges of images appear.SettingsPictureSoundChannelNetworkSystemAbout TVPicture ModeStandardBrightness50Contrast50Color50Aspect RatioAutoBacklightAdvanced Picture SettingsRestore Defaults Picture SettingsSettingsPictureSoundChannelNetworkSystemAbout TVPicture ModeStandardBrightness50Contrast50Color50Aspect RatioAutoBacklightAdvanced Picture SettingsRestore Defaults Picture Settings](https://usermanual.wiki/Hisense-Electric/LCDD0053.W9HLCDD0053-User-Manual-1/User-Guide-2908331-Page-18.png)
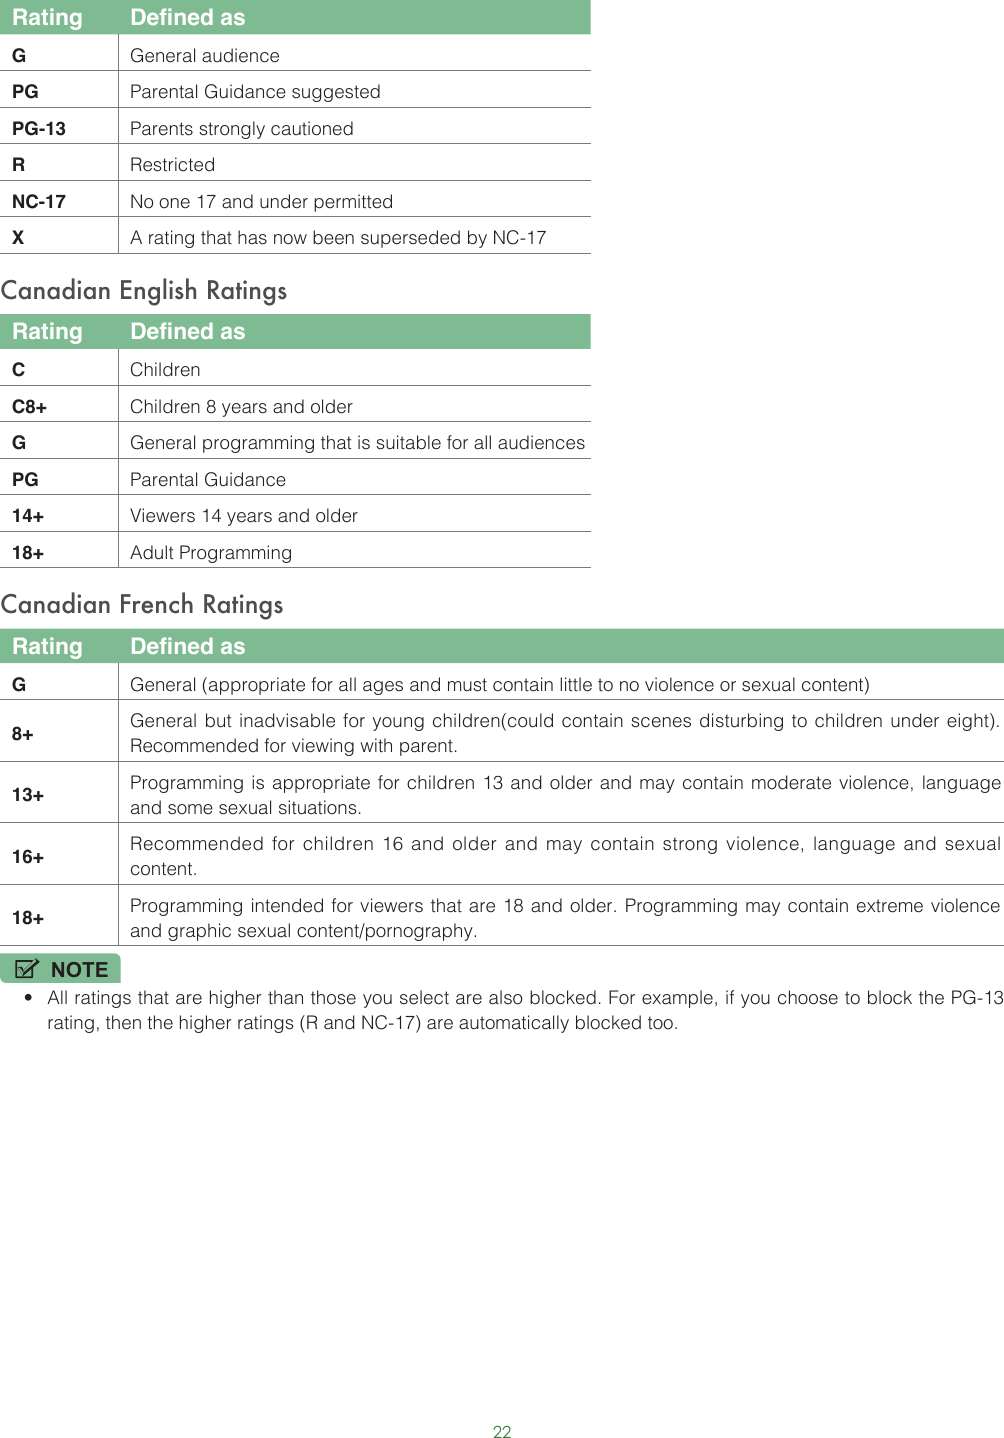
![21Parental ControlsThe Parental Controls setting allows you to block content that is not appropriate for children to watch. You can do this by creating a 4-digit password. The factory-default password is 0000.Turning Parental Controls On1. Press the [ ] button on your remote.2. Press the [ > ] button to display the Settings Menu. 3. Select System > Parental Controls.4. Press the [OK] button on your remote, an Enter PIN window displays. Using the numerical keypad on your remote, enter the factory-default password 0000 and press [OK].5. Go to Locks.6. Press the [OK] button to turn the locks On.You will see the other Parental Control settings change from a greyed out state and become highlighted. When this occurs, begin adding other settings to the Block Time, Channel Block, Program Block, Input Block, Change PIN or Restore Parental Control Defaults features. Block Time: Block certain channels and programs during certain periods of time. Channel Block: Block programs by channels when you turn on the Parental Controls feature. Program Block: Block certain programs according to their TV or MPAA (movie) rating when you turne on the Parental Controls feature. Input Block: Block content from devices that are connected to certain TV ports. Change PIN: Change your PIN that you use to access Parental Controls. If you want to change your parental control password, first enter the new password then enter the same password again.NOTE• If you forget your password, call the SHARP Consumer Electronics Care Center . Restore Parental Control Defaults: Restore Parental Controls back to the factory setting.Description of U.S. TV RatingsContent Defined asAAllDSuggestive dialogLCourse or crude languageSSexual situationsVViolenceFV Fantasy ViolenceDescription of Age-based RatingsAge Defined asTV-Y All childrenTV-Y7 Directed to older childrenTV-G General audienceTV-PG Parental Guidance SuggestedTV-14 Parents strongly cautionedTV-MA Mature Audiences OnlyU.S. Movie Ratings](https://usermanual.wiki/Hisense-Electric/LCDD0053.W9HLCDD0053-User-Manual-1/User-Guide-2908331-Page-22.png)
![23Advanced TV Settings Getting familiar with the Home screenThe simple design of the Home screen menu makes it easy to navigate. It serves as the central location to access Top Apps, Recommendation, History, Inputs, Media or Apps on the back of the TV that you’ve connected external devices to.To access the Home screen, press the [ ] button on your remote control and use the arrows on the D-pad to make your selection. Indicators and Icons on the top of the Home screenYou can always view the current time in the top right corner of the Home screen.If your TV is connected to the Internet through a wireless connection, then an icon will display in the top right corner of the screen. This location makes it very convenient for you to determine if you still have Internet connectivity as you use the TV. If your TV is connected to the Internet, then the weather current conditions will display in the top right conner of the screen.In addition, if you have connected a device (such as a thumb drive) to a USB port and your TV recognizes it, then a device icon will also display in the same area.Names of sections that appear on the Home screenThe Home screen displays the following section names:• Top Apps • Recommendation• History• Inputs• Media• AppsInputsEach time you access the Home screen, the icons for your inputs will display on the screen. Inputs that you have connected an external device to will be highlighted. Inputs that do not have an external device connected to are greyed out.](https://usermanual.wiki/Hisense-Electric/LCDD0053.W9HLCDD0053-User-Manual-1/User-Guide-2908331-Page-24.png)
![24MediaMedia is a central location for you to view or listen to different types of content (for example, your photos, music and movies) through the following methods:• A USB thumb drive or hard drive• Compatible mobile phone, tablet or other personal device: You can stream movies, music and photos that are stored on Compatible personal device and play or view the content on your TV.When you connect your thumb drive or other personal device to the TV, the TV automatically detects it and displays a device icon in the top right corner of the Home screen.Panels that appear on the Media screenThe Media screen displays four panels: Picture, Video, Music and All.File formats that may be supportedNOTE• Due to differences in programming tools and other factors, some of the file formats that are listed may or may not be supported.Medium File FormatVideo .avi (MPEG2, Divx), .mkv (Divx), .mpeg (MPEG2), .wmv (Divx, XviD)Picture .JPGMusic .mp3Browsing ContentTo browse through content based on the type that you wish to access:1. Navigate to the appropriate menu tab on the left side of the screen and select Music, Video, Picture or All. The library of items displays on the right side of the screen.2. Navigate to the right side of the screen and click on the name of the folder that contains your content.3. Make your selection to play or view the content.If you want to close out of the Media center, then press the [EXIT] button on your remote.Viewing Pictures as a SlideshowTo view pictures in a slideshow:1. Navigate to the Picture tab.2. Click on Start the Slideshow.The slideshow of your pictures begins to play. To stop the slideshow, press the [OK] button on your remote and press it again to restart it.Viewing VideoWhile viewing video you will see a number of icons appear at the bottom of the screen. You can use the navigation buttons of your remote to select these icons that will control the video.](https://usermanual.wiki/Hisense-Electric/LCDD0053.W9HLCDD0053-User-Manual-1/User-Guide-2908331-Page-25.png)
![25AppsNumerous factory-installed apps are available for you to choose from for your entertainment preferences.Installing an AppEven though your TV has numerous factory-installed apps, there may be others that you’d like to download.To install an app:1. From the Home screen, click on the Opera TV Store icon.2. Navigate to the Search tab at the top of the screen.3. Begin typing the name of the app. As you begin typing the first two to three letters the Opera Store suggests words to quicken your search time.4. Use the navigation buttons of your remote to select the app. A page displays that shows a written description of the app.5. Click on OPEN or ADD TO FAVORITES.Removing an AppYou can only delete apps that you’ve downloaded to the TV. Factory-installed apps can not be deleted.To delete an app:1. From the Apps screen, click on the Edit icon.2. Use the navigation buttons on your remote to select the app that you want to remove. NOTE• The app which has a icon at the upper right conner can be removed.3. Press the [OK] button on your remote. A dialog message displays that asks if you’re sure you want to remove the app.4. Click on OK. A confirmation message displays and the icon is removed from the Apps list screen.NOTE• If an app is deleted,the information related to that app is also removed.5. Use the navigation buttons to select the Complete icon.Moving App Icons aroundApps can not be moved around on the screen.Customizing the name of your TVIf you have several TV’s in your home then you may want to customize the name of your TV. By giving your TV a name, it will make it easier for you to identify it when connecting devices to the TV to stream or mirror content.To customize the name of your TV: 1. Press the [ ] button on your remote.2. Press the [ > ] button to display the Settings Menu.3. Go to Network > TV Name.4. Select User Input to bring up the keyboard and begin typing the name.5. When you are finished, power off the TV and power it back on for the change to take effect.](https://usermanual.wiki/Hisense-Electric/LCDD0053.W9HLCDD0053-User-Manual-1/User-Guide-2908331-Page-26.png)
![26Using Anyview Cast to mirror content from your device to the TV screenThe Anyview Cast is an app that enables you to share (or cast) a video, audio or image from your Android-based device to the TV.From your tablet or phoneTo mirror content from your tablet or phone to the TV:1. Using your remote, press the [ ] button, then press the [ > ] button to display the Settings Menu. Go to Network > Network Configuration and select Wireless.2. Press the [ ] button on your remote and select the Anyview Cast app. 3. Turn on the wireless display function on your Android-based device.NOTE• Some Android-based devices may not support casting.4. Find your TV in the list of devices that displays and select it.5. Wait for the Creating Connection progress bar to complete on the TV screen and the video or image will display in a moment.Software updates for your TVThe software (also referred to as firmware) is part of what powers your TV. We will provide software updates to continuously enhance your TV and correct any issues that may impact your user experience; therefore, we recommend that you keep your TV connected to the Internet to automatically receive updates when they are available.You can choose to receive updates automatically or check for software updates and install them manually.NOTE• While your TV is updating, please don’t interrupt the progress (including turn off the Internet connection or the TV).Checking for updates automaticallyIn order for your TV to receive software notification updates automatically, it must be turned On and connected to the Internet. The Auto Firmware Upgrade setting (which enables your TV to receive the updates automatically) is turned to On by factory default. NOTE• While your TV is on and checking for updates, the program that you are watching will not be interrupted.Disabling the Auto Firmware Upgrade featureIf you do not want your TV to automatically check for updates and to receive notifications when they are available, then:1. Using your remote, press the [ ] button.2. Press the [ > ] button to display the Settings Menu.3. Go to About TV > Auto Firmware Upgrade and turn the feature Off.By doing this, you will have to manually check to see if you have the latest software update.Checking for the latest firmwareTo manually check for the latest firmware:1. Using your remote, press the [ ] button.2. Press the [ > ] button to display the Settings Menu.3. Go to About TV > Check Firmware Upgrade.Manually installing software updatesIf you turned the Auto Firmware Upgrade feature Off then you’ll need to manually install the software.1. If the Check Firmware Upgrade screen shows there is the latest version, select the Update icon.2. After the software downloaded, select the OK icon to start the update progress.](https://usermanual.wiki/Hisense-Electric/LCDD0053.W9HLCDD0053-User-Manual-1/User-Guide-2908331-Page-27.png)
![27Quick Problem-Solving Tips When you experience an issue with your TV, turn it off and on again. If this does not resolve the problem, then refer to the tips below. If the problem is still not resolved, then contact us. ISSUES POSSIBLE SOLUTIONSNo sound or picture• Check if the power cord is plugged into a powered AC outlet.• Press the [ ]] button on the remote control to activate the unit from ‘Standby’ mode.• Check to see if the LED light is on or not. If it is, then the TV is receiving power.I have connected an external source to my TV and I get no picture and/or sound• Check for the correct output connection on the external source and for the correct input connection on the TV.• Make sure you have made the correct selection for the input mode for the incoming signal.When I turn on my TV, there is a delay for a few seconds before the picture appears. Is this normal?• Yes, this is normal. The TV is initializing and searching for previous setting information.The picture is normal but there is no sound• Check the volume settings.• Check if ‘Mute’ mode is set to On.Sound but no picture or black and white picture• If the picture is black and white, unplug the TV from the AC outlet and replug it after 60 seconds.• Check that the Color is set to 50 or higher. • Try different TV channels.The sound and/or picture is distorted or appears wavy• An electric appliance may be affecting the TV. Turn off any appliances that are nearby and move it farther away from the TV.• Insert the power plug of the TV set into another power outlet.The sound and picture is blurry or cuts out• If using an external antenna, check the direction, position and connection of the antenna.• Adjust the direction of your antenna or reset or fine tune the channel.A horizontal or vertical stripe appears on the picture and/or the picture is shaking• Check if there is an appliance or electric tool nearby that is causing interference.The plastic cabinet makes a “clicking” type of sound• The ‘click’ sound can occur when the temperature of the television changes. This change causes the television cabinet to expand or contract, which makes the sound. This is normal and the TV is OK.The remote control does not work• Confirm that TV still has power and is operational.• Change the batteries in the remote control.• Check if the batteries are correctly installed.NOTE• For usage in Mexico , operation of this equipment is subject to the following two conditions : 1 ) it is possible that this device doesn’t cause any detrimental interference and 2 ) this device must take any kind of interference, including that which may cause its malfunctioning.](https://usermanual.wiki/Hisense-Electric/LCDD0053.W9HLCDD0053-User-Manual-1/User-Guide-2908331-Page-28.png)