Hisense Electric LCDE0011 Part15 Subpart B-LCD Monitor User Manual W9HLCDE0011 2
Hisense Electric Co., Ltd. Part15 Subpart B-LCD Monitor W9HLCDE0011 2
UserManual.wiki
>
Hisense Electric
>
LCDE0011 User Manual
>
W9HLCDE0011_User Manual 2
Contents
1.
W9HLCDE0011_User Manual 1
2.
W9HLCDE0011_User Manual 2
W9HLCDE0011_User Manual 2
Navigation menu
Upload a User Manual
Namespaces
Wiki Guide
HTML
PDF
Info
Views
User Manual
Discussion / Help
Navigation


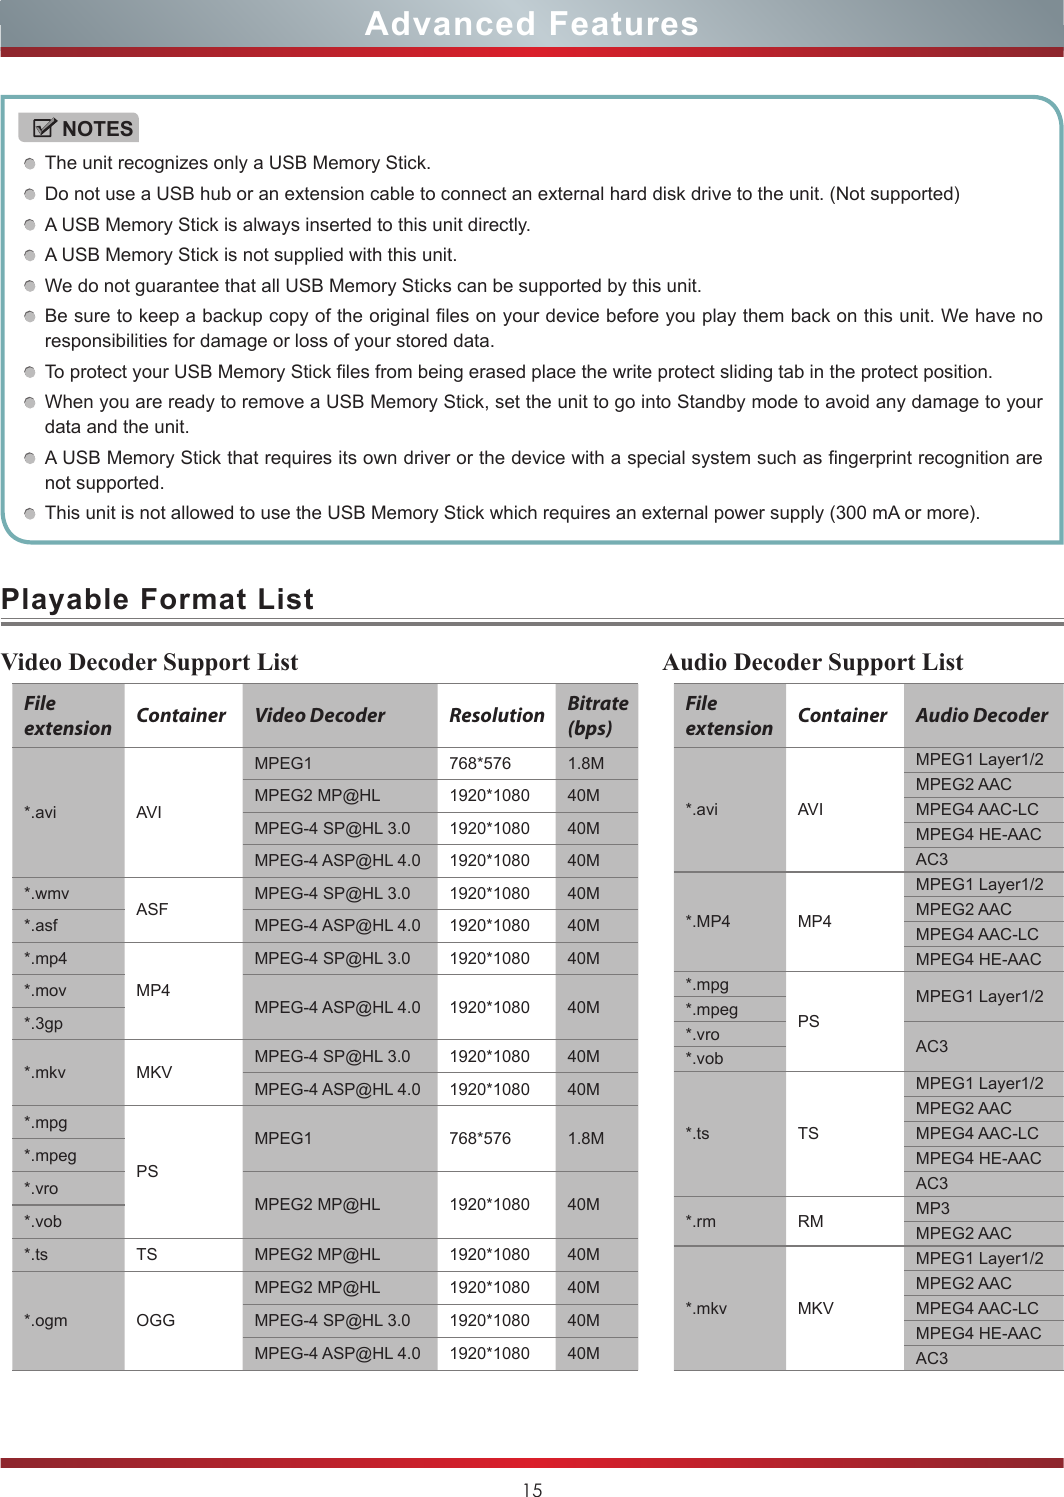
![7Basic FeaturesTo turn your TV on or off (standby mode):1. Plug the power cord into an AC power outlet.2. Press [POWER] button. Your TV turns on. 3. Press [POWER] button again to turn off your TV. When you turn off your TV, it goes into standby mode.Turning your TV on or offTurning the TV On for the First TimeWARNINGWhen your TV is in standby mode, it is still receiving power. To completely disconnect power, unplug the power cord.NOTEIf your TV does not receive an input signal for several minutes, it automatically goes into standby mode.The Setup Wizard menu appears the first time you turn on the TV. It will assist you to specify the menu language, Picture Mode, Tuner Mode and Channel Installation.IMPORTANT: Make sure that the antenna or cable is connected.1. Make sure that you have:Installed the remote control batteries.Connected an antenna or cable.Connected the power cord.2. Connect your TV’s power cord to a power outlet, then press power. The Initial Setup screen opens.3. Please press [ENTER] to start the wizard, then press [▲/▲] button to select your language, press [ENTER] button to confirm.4. Press [▲/▼] to select your Picture Mode: Home Mode or Retail Mode, press [ENTER] button to confirm.If you select Retail Mode, a message appears “If you select Retail Mode, then Energy saving is not realized. Are you sure?” Select “Yes” to continue, or select “No” to change your selection.5. Press [▲/▼] to select your Tuner Mode: Antenna or Cable, press [ENTER] button to confirm.6. Press [▲/▼] to set the Channel Installation: Scan or SkipScan, press [ENTER] button to confirm.If you select “Scan”, your TV automatically starts ChannelInstallation available in your viewing area.If you select “Skip Scan”, your TV does not scan forchannels.Depending on the reception condition, it may take several minutes to scan channels. Please allow the process to complete without interruption.Initial Setup WelcomeWelcome to use the Wizard forInitial Setup!!Please press [ ENTER ] to start thewizard.Initial Setup LanguagePlease select your language: Back Select Next EXIT ExitEnglishEspañolFrançaisInitial Setup Picture ModeChoose Your Picture Mode: Home ModeRetail Mode Back Select Next EXIT ExitInitial Setup TunerPlease select your tuner mode: AntennaCable Back Select Next EXIT ExitInitial Setup Channel ScanFirst, please connect cable and/or antenna.Start channel scan now?If you skip this step, the channel scan could be performed in Menu.ScanSkip Scan Back Select Next EXIT Exit](https://usermanual.wiki/Hisense-Electric/LCDE0011.W9HLCDE0011-User-Manual-2/User-Guide-1880585-Page-9.png)
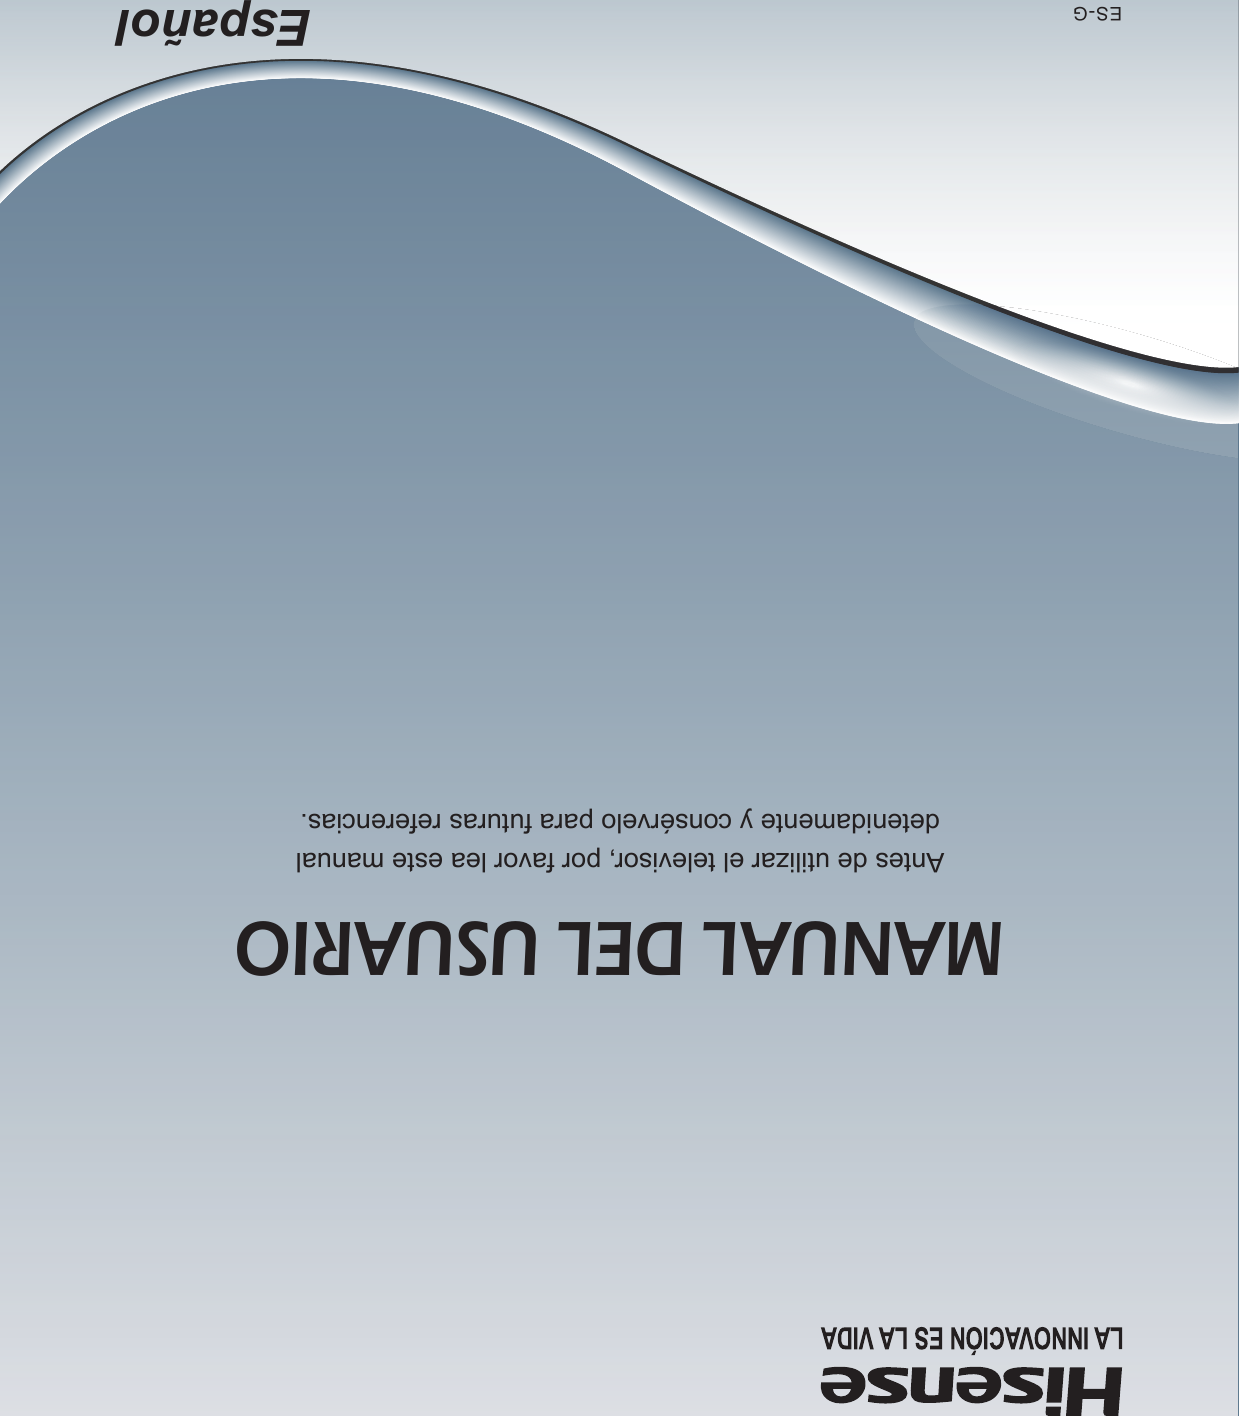
![8Basic Features1. Press the [CH V/V] (or [CH +/-]) on the TV/remote control to change the channel.2. Press the [VOL V/V] (or [VOL +/-]) on the TV/remote control to adjust the volume.3. Press the numeric buttons on the remote control to display the corresponding channels.Changing Channels / VolumeThe first time you turn on your TV, you must select the TV signal source. Your TV stores this information, so you do not need to change the TV signal source unless it changes. For example, you change from an outside antenna to cable TV.To select the video input source:1. Turn on your TV, then press [INPUT] button on the remote or on the TV. The Input Source menu opens.2. Press [▲/▲] button to highlight the input source, then press [ENTER] button.Selecting the Input SourceNOTEChanging the channels can also be achieved by directly entering the channel number using the numeric keys on the remote control. If you are entering a two or three digit channel number, the time between key presses should be less than 3 seconds.Aspect - Select the screen aspect ratio from Normal, Wide, Zoom and Cinema.Normal: The original 4:3 aspect ratio (1.33:1 signal) is preserved, so black bars are added to the left and right of the image. Standard TV broadcasts are displayed with a 4:3 aspect ratio.Wide: When watching a standard broadcast or full-frame movie in this mode, the display image is stretched proportionately to fill the TV screen. When watching a widescreen (1.78:1 signal) program or movie, the display image fills the TV screen.Shortcuts InstructionsAuto: Automatically adjusts the image based on the screen size and the TV program.Zoom: Stretch the 4:3 aspect ratio image vertically and horizontally to fill the screen at 1:1.78 aspect ratio.Cinema: Stretch the 4:3 aspect ratio image vertically and horizontally to fill the screen at 1:2.35 aspect ratio. Picture - Press to set the picture mode. It can be set as Vivid, Standard, Energy Savings, Theater or Custom. This mode achieves a certain image display effect by setting the brightness, contrast and color etc.Sound - Press to set the sound mode. It can be set as Standard, Theater, News, Music and Custom.Mute - Press to turn the sound off, press this button again to turn the sound back on. This function is used to switch off sound temporarily.Sleep - It can set the TV to let it enter into the Standby state automatically. Press this button repeatedly to select the proper sleeping clock mode, and the clock tells you the remaining time before the TV enters Standby state. Display - Display the information banner. The information including channel number, channel name, current system time, tuner mode, audio stream, video format, audio language, closed caption mode, parental locks rated, program details, etc.NOTEThe Game mode is not available in TV and USB source.](https://usermanual.wiki/Hisense-Electric/LCDE0011.W9HLCDE0011-User-Manual-2/User-Guide-1880585-Page-10.png)
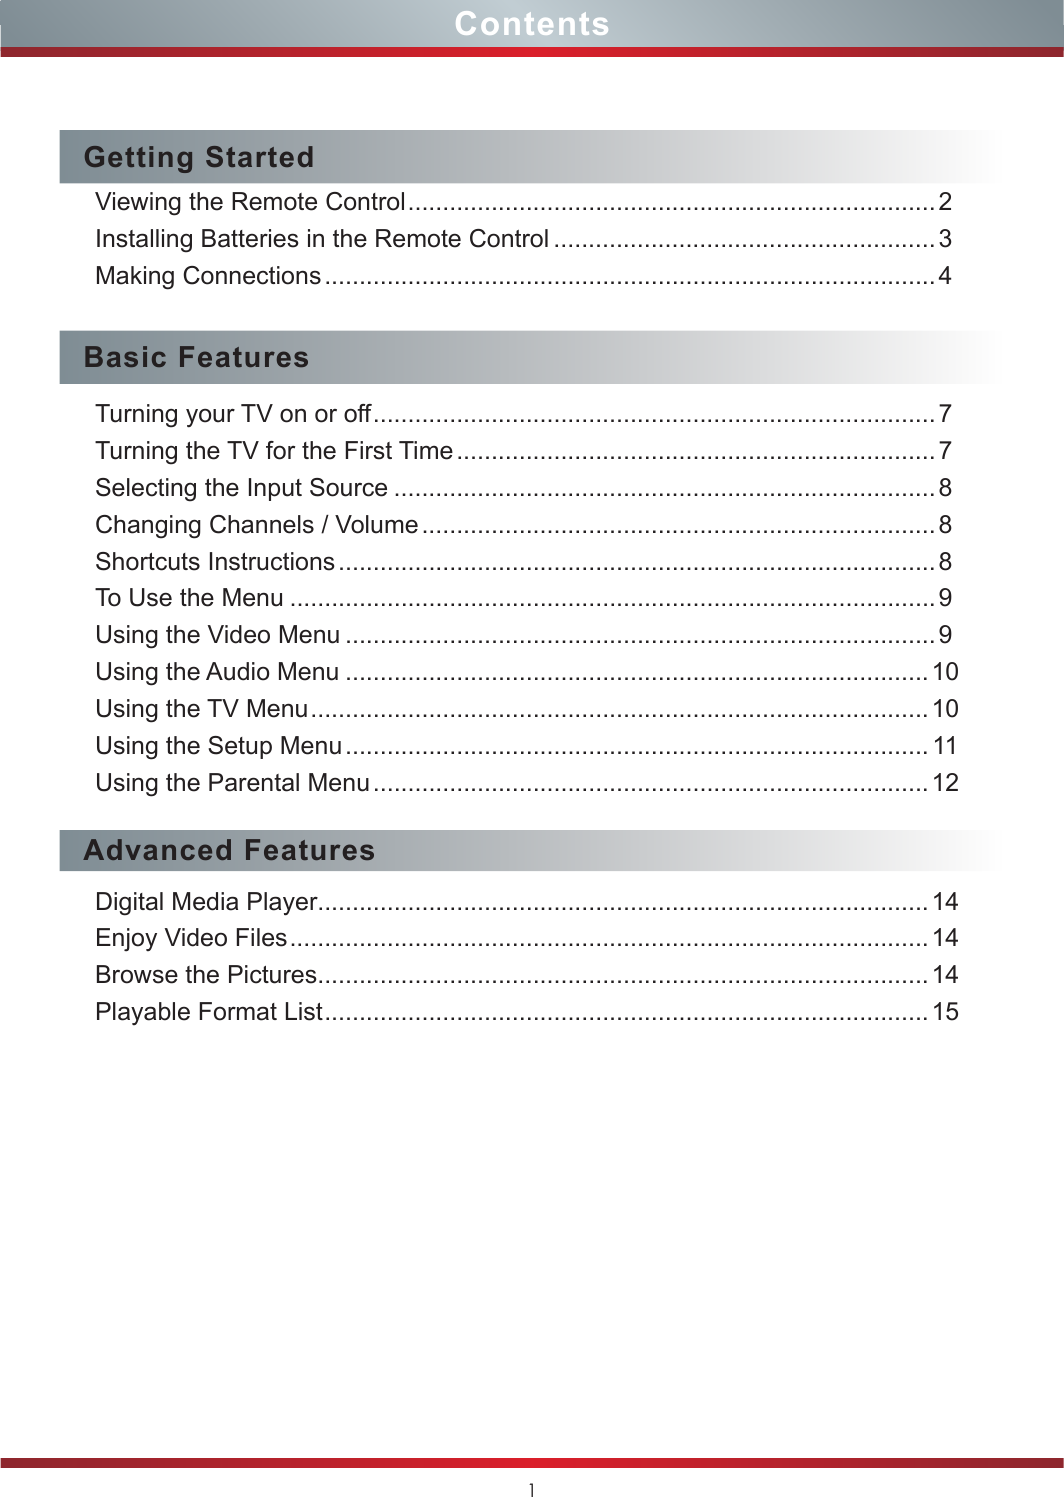
![9Using the Video Menu You can adjust: Picture Mode - Adjust the Picture Mode. You can select Vivid, Standard, Energy Savings,Game, Theater or Custom.Brightness - Increase or decrease the brightness of the picture. Increasing the brightness can add more light to dark areas of the picture, while decreasing the brightness can add more darkness to light areas of the picture.Contrast - Increase or decrease the contrast of the picture. Increase the contrast to adjust the white areas of the picture or decrease the contrast to adjust the black areas of the picture.Saturation - Adjust the intensity of the colors.HUE - Adjust the overall color of the picture.Sharpness - You can increase the sharpness level for clearer images or decrease the sharpness level for smoother images.Basic FeaturesTo Use the Menu1Press the [MENU] to open the main menu.2Press [▲/▲] to select a menu option, then press [▲/ENTER] button to enter the menu.3In each menu, you can: Press [▲/▲] to select an item, Press [▲/▲] to adjust the value, orPress [▲/ENTER] to enter the submenu, Press [MENU] to back the previous menu. 4Press [EXIT] to exit the menu.NOTEThe menus in the user manual may vary slightly from the actual screen.Picture Mode StandardBrightnessContrastSaturationHUESharpnessAdvanced VideoReset Video Settings5050505050 Select MENU BackVideoPicture Mode StandardBrightnessContrastSaturationHUESharpnessAdvanced VideoReset Video Settings5050505050 Select MENU BackVideoAdvanced Video - Access advanced video settings such as Back Light, Color Temperature and DNR.Back Light: Sets the overall brilliance of the screen. When the option of Adaptive Back Light sets Low or High, you cannot change the Back Light setting.120HZ Smooth Effect: Inserts frames to reduce judder in fast action scenes. You can select On or Off.Aspect Ratio: To choose the screen aspect ration from Wide, Auto, Normal, Zoom and Cinema.Color Temperature: Change the color temperature. You can select the color temperature from three options: Cool, Standard or Warm.Overscan: Adjusts the picture’s reproduction rate. You can select On or Off.DNR: Select to reduce the noise level of connected equipment: off, Low, Medium, Strong, Auto.Adaptive Luma Control: According to the content of picture, it can adjust brightness automatically.Adaptive Back Light: Enhances the contrast ratio between light and dark areas of the picture. You can select Off, Low, or High.Reset Video Settings - Resets all Video Settings to the factory defaults.NOTEThe option of the screen Aspect Ration is different in different inputs. (For more information, see “Shortcuts Instructions”)NOTEOnly available in DTV and Component source.NOTEOnly Model 50” has this function.NOTEThe option of the Picture Mode is different indifferent inputs. (For more information, see “Shortcuts Instructions”)](https://usermanual.wiki/Hisense-Electric/LCDE0011.W9HLCDE0011-User-Manual-2/User-Guide-1880585-Page-11.png)
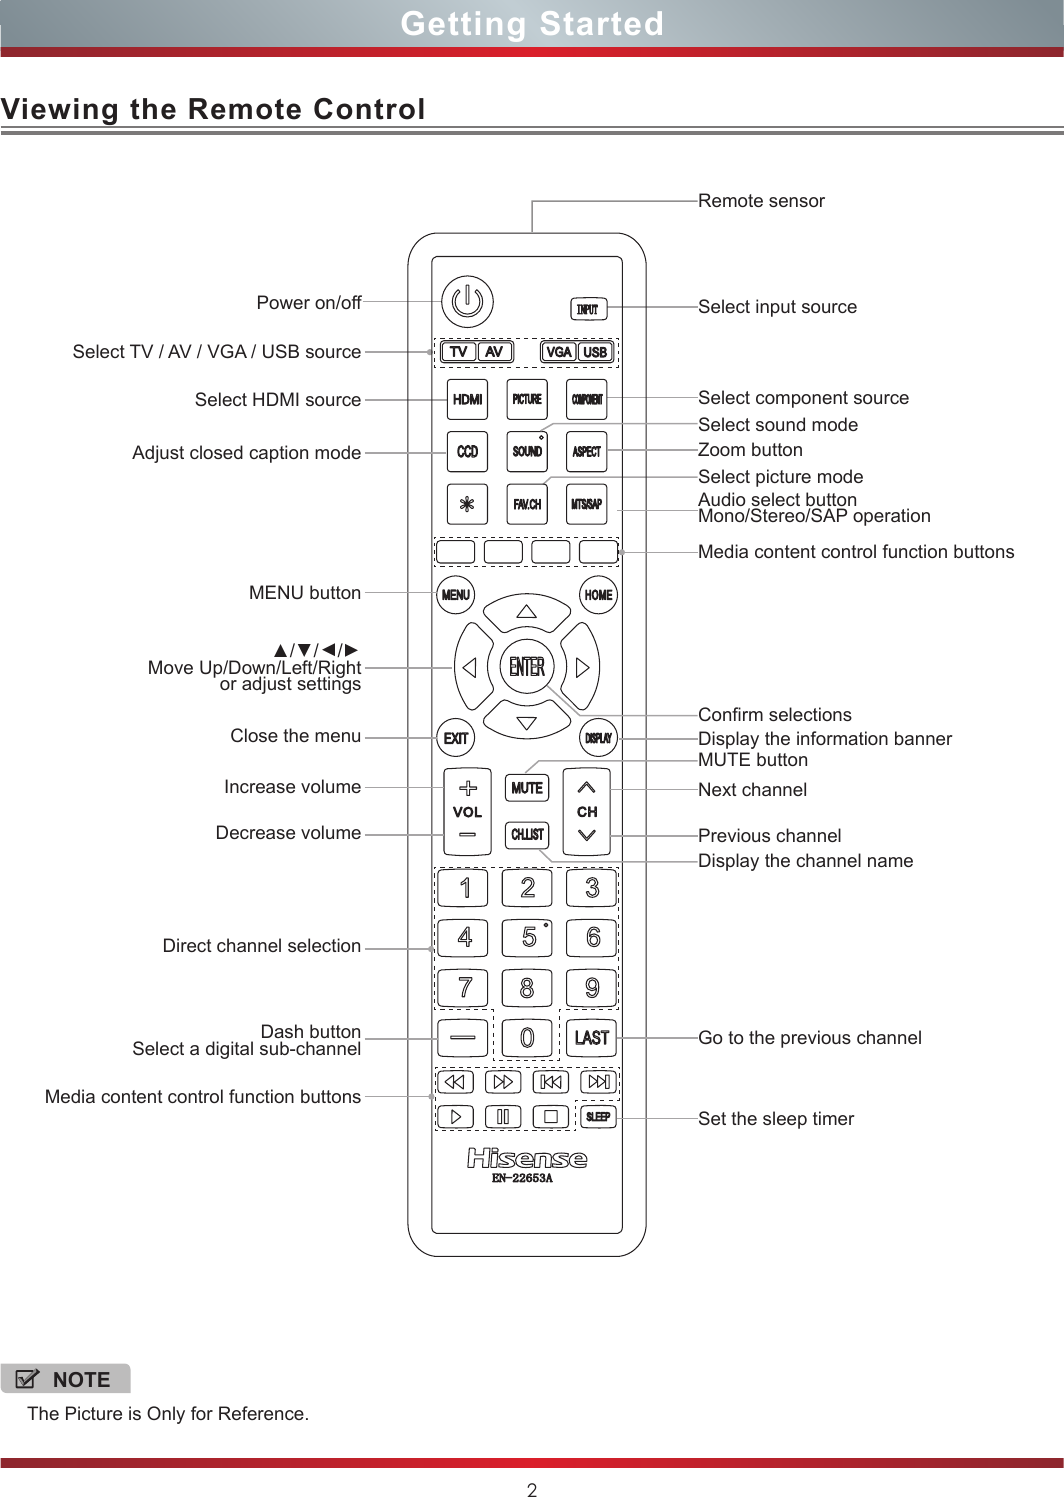
![10Basic FeaturesYou can adjust: Tuner Mode - Select the TV signal source. You can select Antenna or Cable.Channel Scan - Scans for channels that have signals and stores the channels information in memory.Digital Channels: The scanned TV program in digital signals.Analog Channels: The scanned TV program in analog signals.Channel Skip - You can cancel a channel stored in memory.Using the TV MenuTuner ModeChannel ScanChannel SkipFavorite ListAudio OnlyCableOffTV Select MENU BackChannel Scan EXIT CannelStatus: Scanning... AntennaAnalog Channels: 0Digital Channels: 11%Using the Audio MenuYou can adjust: Sound Mode - Select the Sound Mode: Standard, Theater, News, Music or Custom.Balance - Adjust the volume of the left and right speakers.Equalizer - Soften or enhance the sound at specific frequency points.Speaker - Selects where to play TV audio. You can select On (default setting) to play audio through TV speakers, or select Off to play audio through the speakers on an external audio system.Auto Volume Control - Automatically adjusts volume to a consistent level; attenuates loud passages.Advanced Audio - Access Advanced Audio settings such as SPDIF Type, MTS, Audio Language. SPDIF Type: Send digital audio to an external audio system. You can select PCM, RAW or Off.PCM: PCM outputs two channel audio regardless of the input format.RAW: When the data stream carries Dolby signal, digital SPDIF outputs Dolby data stream. When the data stream carries no Dolby signal, it transports PCM data stream.MTS: Select the default audio stream, you can select Mono, Stereo or SAP (Second Audio Program). MONO: Select this option if there is noise or static on weak stereo broadcasts.Sound ModeBalanceEqualizerSpeakerAuto Volume ControlAdvanced AudioReset Audio Settings0MusicOnOffAudioENTER Adjust Select MENU BackSPDIF TypeMTSAudio LanguagePCMStereoEnglishAdvanced Audio Select MENU BackSTEREO: Select this option for programs broadcast in stereo.SAP: Depending on the particular program being broadcast, you can listen to a foreign-language translation.Audio Language - Change the default value for audio language. (Digital channels only)Reset Audio Settings - Resets all Audio Settings to the factory defaults.NOTEWhen you press [CH V/V] (or [CH +/-]) button, your TV skips the channel you cancelled. You can still tune to the channel using the number buttons on the remote control.](https://usermanual.wiki/Hisense-Electric/LCDE0011.W9HLCDE0011-User-Manual-2/User-Guide-1880585-Page-12.png)
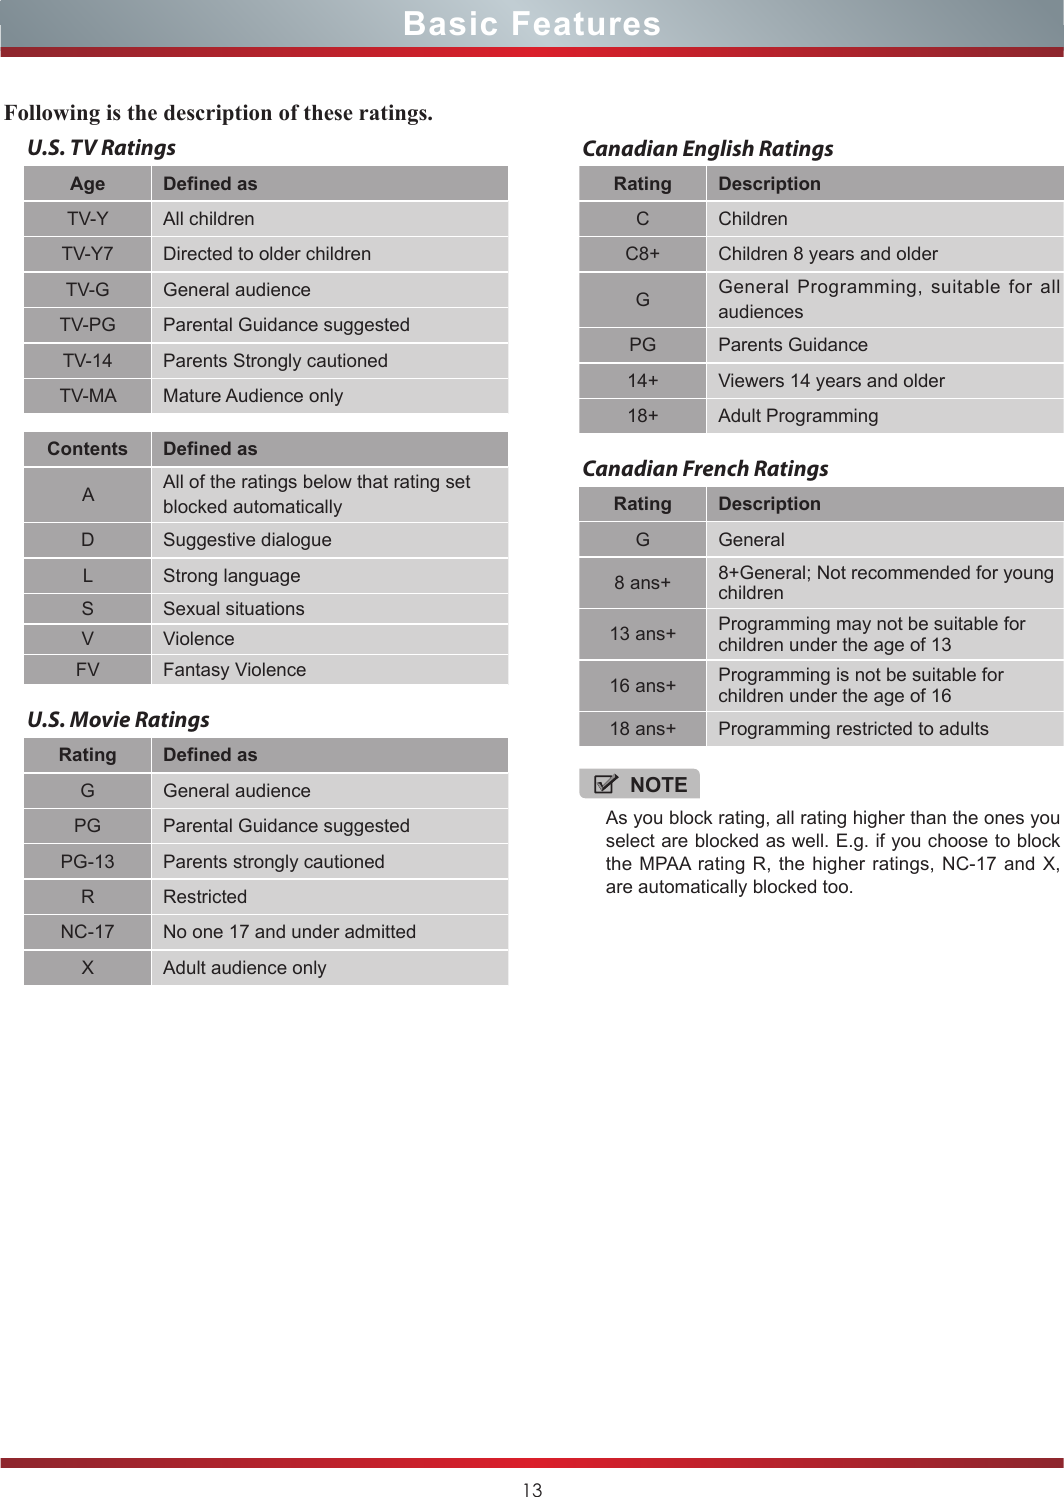
![12Using the Parental MenuWhen you first use this function, the default password is [0000]. Once you input this password, you can set options.You can adjust: Button Lock - Block or unblock the button of remote control. Rating Enable - Block or unblock TV ratings.Block Unrated - Block unrated TV programs.U.S. TV Ratings - Restrict TV programs by USA Ratings.Open V-Chip: Display an advanced V-Chip ratings table for digital channels (USA only).Block Unrated: Block unrated TV programs.U.S. Movie Ratings - Restrict movie by USA Ratings.Canadian English/French Ratings - Restrict movie and TV programs by Canadian Ratings.Change Password - If you want to change the default password, first enter the new password then enter the same password again.Basic FeaturesButton LockRating EnableBlock UnratedU.S. TV RatingsU.S. Movie RatingsCanadian English RatingsCanadian French RatingsChange PasswordOffOffOffParental Select MENU BackNOTESHDMI cables must be used to connect HDMI CEC-compatible devices to your TV.The connected device’s HDMI CEC feature must be turned on.If you connect an HDMI device that is not HDMI CEC-compatible, all the HDMI-CEC Control features do not work.Depending on the connected HDMI device, the HDMI-CEC Control feature may not work.HDMI-CEC Control: Turning HDMI-CEC function on or off. Device Auto Power Off: When HDMI-CEC is turned on, Device Auto Power Off turns off HDMI CEC devices when you turn off your TV.TV Auto Power On: When HDMI-CEC is turned on and you turn on an HDMI CEC device, TV Auto Power On turns on your TV automatically.Audio Receiver: When HDMI-CEC is turned on and you have connected an audio receiver to your TV, turning on Audio Receiver lets you use your TV’s remote control to control the volume on the audio receiver.Root Menu: You can open an HDMI-CEC-compatible device’s root menu, then use your TV’s remote control to control the device.HDMI-CEC Device Lists: You can display a list of HDMI CEC devices that are connected to your TV.Computer Settings (Only available in VGA mode.)- Access Computer Settings such as H.Position, V.Position, Phase, Phase and Auto Adjust.H.Position: Move the image right or left.V.Position: Move the image up or down.Phase: Adjust the focus of stable images.Clock: Adjust the sample frequency.Auto Adjust: Detects input signal clock, phase and position and adjusts TV display accordingly.HDMI-CEC ControlDevice Auto Power OffTV Auto Power OnAudio ReceiverRoot MenuHDMI-CEC Device ListsOnOffOffOffHDMI-CEC Select MENU BackComponent Settings (Only available in Component mode.) - Access Component Settings such as phase, Reset Component Settings.Phase: Adjust the focus of stable images.Reset Component Settings: This function can help you restore the component settings.Reset Default - Every TV has its original setting before leaving the factory. This function can help you restore these settings.PhaseReset Component Settings12Component SettingsENTER Adjust Select MENU Back](https://usermanual.wiki/Hisense-Electric/LCDE0011.W9HLCDE0011-User-Manual-2/User-Guide-1880585-Page-14.png)
![14Digital Media PlayerAdvanced FeaturesPlease note that Hisense will not assume any responsibility for any lost data and cannot guarantee perfect compatibility with all mass storage devices. Be sure to insert the USB disk with standard USB 2.0 port. Data Input from USB Memory Stick only. Do not connect any device to this terminal such as digital camera, keyboard, mouse, etc.Press [INPUT] button to display the INPUT menu, press [▲/▼] button to highlight the USB source, then press [ENTER] button to confirm. (If you want to exit DMP, you can press [INPUT] button to switch to other sources).Press [RED] button to switch the media type.Press [CH V/V] button to turn to the previous/next page.When viewing video/photo, you can press these buttons on the remote control to control video/photo.Media content control function buttonsNOTENever remove the USB flash drive or turn off your TV while viewing video/photo.NOTEWhen browsing the photos, only the and buttons are available.Enjoy Video FilesBrowse the Photos1. Press [RED] button to switch the media type to Video.2. Press [▲/▲/▲/▲] to select the video you want to view.3. Press [ENTER] to play the video.4. Press [EXIT] to exit the video and return to the previous directory.5. When enjoying the video, press [MENU] button to display/exit the menu. Press [▲/ENTER] to enter the submenu and press [▲/EXIT] to return to the upper menu.Play/Pause: You can play/pause the video.Repeat: Adjust the loop mode of video.Show Info: View the video information.Picture Mode: Select the picture mode from Vivid, Standard, Theater, Energy Savings and Custom.Screen Mode: Select the screen aspect ratio from Normal, Zoom, Wide, Cinema and Auto.Audio Mode: Select the audio mode from Standard, Theater, News, Music and Custom.6. You can press [MTS/SAP] button one or more times to select the sound track. Press [ASPECT] button one or more times to enlarge the image by 1X, 2X, 4X and 8X. 1. Press [RED] button to switch the media type to Photo.2. Press [▲/▲/▲/▲] to select the photo you want to view.3. Press [ENTER] to browse the photo.4. Press [EXIT] to return to the previous directory.5. When browsing photos, press [MENU] button to display /exit the menu. Press [▲/ENTER] to enter the submenu and press [▲/EXIT] to return to the upper menu.Play/Pause: You can browse/pause the photo.Repeat: Repeats the slide show when it reaches the end. Shufe: Displays the slide show photo in random order. Duration: Allows you to browse the photo at different speed. You can also press [GREEN] button to select it.Effect: Set how the photo appears on the screen. You can also press [YELLOW] button to select it.Rotate: Allows the photo to rotate 90 degrees.Show Info: View the photo information.GUIDEFast forwardPlayPauseFast backwardThe previous oneThe next oneStopNOTEWhen the photos in browsing or pausing, the menu will be different.Media Type01/01050680 PhotoFolderFolderFolder Folder Folder FolderJPEG 050680 JPEG](https://usermanual.wiki/Hisense-Electric/LCDE0011.W9HLCDE0011-User-Manual-2/User-Guide-1880585-Page-16.png)