Hisense Electric LCDE0013 LED LCD TV User Manual W9HLCDE0013 1
Hisense Electric Co., Ltd. LED LCD TV W9HLCDE0013 1
UserManual.wiki
>
Hisense Electric
>
LCDE0013 User Manual
>
W9HLCDE0013_User Manual 1
Contents
1.
W9HLCDE0013_User Manual 1
2.
W9HLCDE0013_User Manual 2
W9HLCDE0013_User Manual 1
Navigation menu
Upload a User Manual
Namespaces
Wiki Guide
HTML
PDF
Info
Views
User Manual
Discussion / Help
Navigation


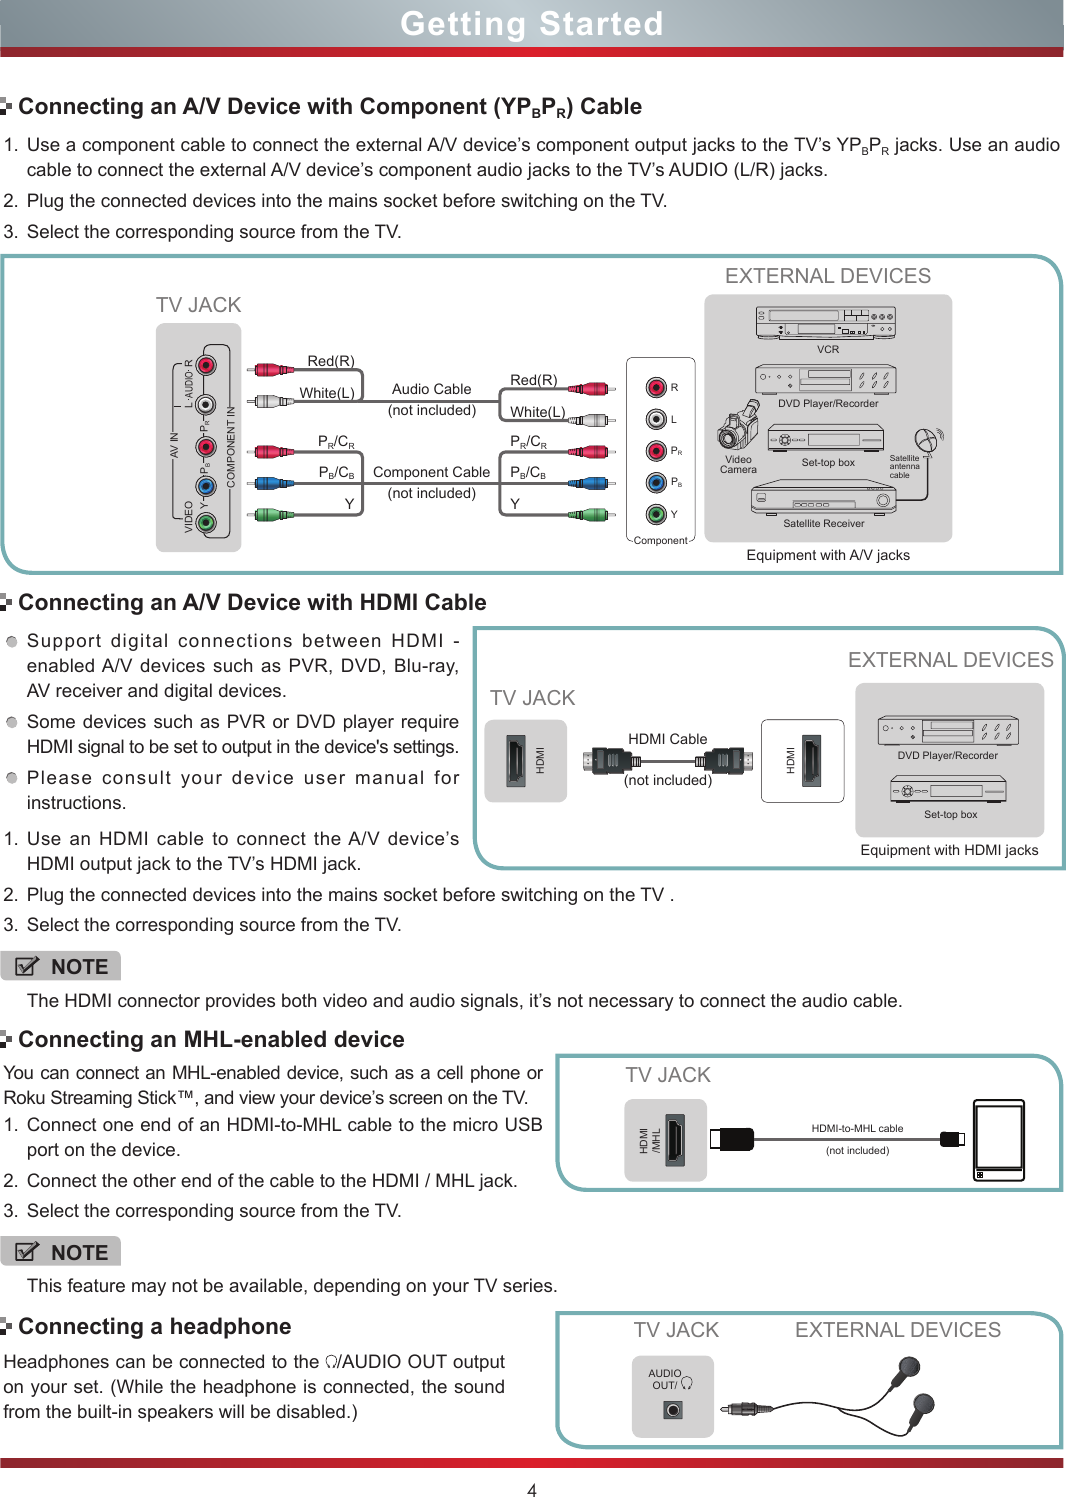
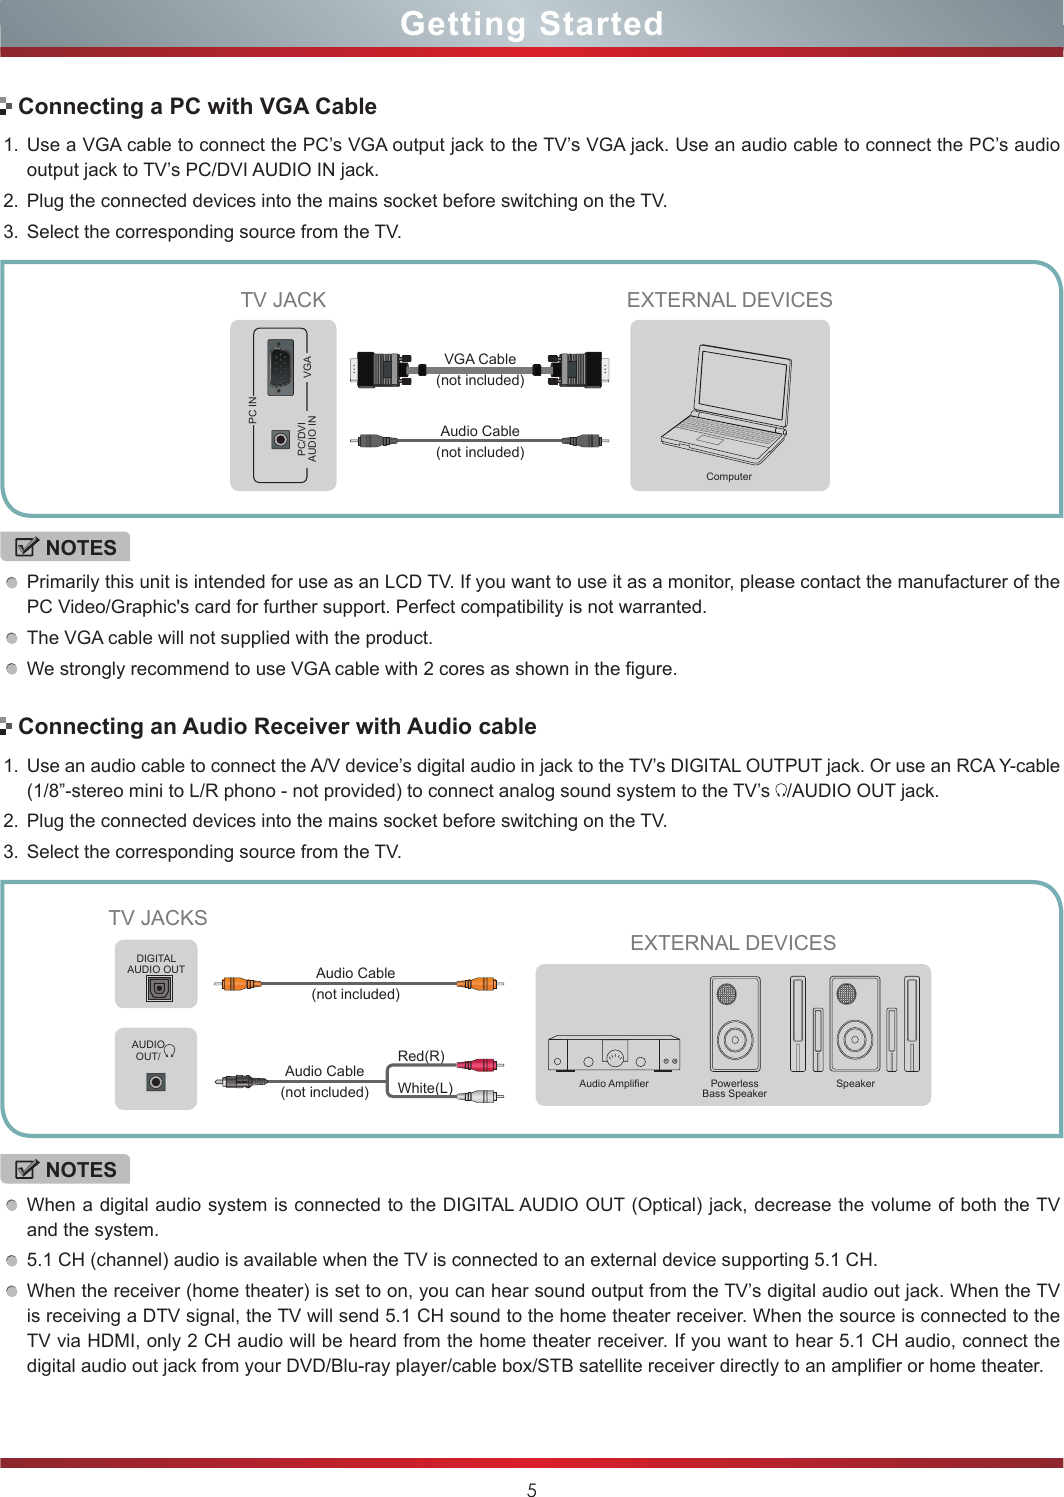
![6Basic FeaturesTo turn your TV on or off (standby mode):1. Plug the power cord into an AC power outlet.2. Press [POWER] button. Your TV turns on. 3. Press [POWER] button again to turn off your TV. When you turn off your TV, it goes into standby mode.Turning Your TV On or OffTurning the TV On for the First TimeWARNINGWhen your TV is in standby mode, it is still receiving power. To completely disconnect power, unplug the power cord.NOTEIf your TV does not receive an input signal for several minutes, it automatically goes into standby mode.The Setup Wizard menu appears the first time you turn on the TV. It will assist you to specify the menu language, Picture Mode, TV Source and Channel Installation.IMPORTANT: Make sure that the antenna or cable is connected.1. Make sure that you have:Installed batteries into the remote control .Connected an antenna or cable.Connected the power cord.2. Connect your TV’s power cord to a power outlet, then press power. The initial setup screen opens. Press [▲/▲] button to select your language, press [ENTER] button to confirm.3. Press [▲/▼] to select your options and press [▲/▲] to set the options.If Auto selected, the options of Year/Month/Day/Time are not available.Setting the Time: Press [▲/▲] to select the number you want to set and press [▲/▼] to set.4. Press [▲/▼] to select your Picture Mode: Home Mode or Retail Mode, press [ENTER] button to confirm.Choose Your Picture Mode ENTER Enter Select MENU Return EXIT ExitHome ModeRetail ModeReduces total power consumptionHome mode default settings are recommended for in-homeuse. ENERGY STAR® qualied. Retail mode is intended forin-store display and resets video settings at Power On.If you select Retail Mode, a message appears “Are you sure you want retail mode?” Select “Yes” to continue, or select “No” to change your selection.5. Press [▲/▼] to select your TV Source: Antenna or Cable, press [ENTER] button to confirm.Choose Your TV Source ENTER Enter Select MENU Return EXIT ExitAntennaCableSelect if using an antenna for standard or HD TVThen your TV automatically starts Channel Installation available in your viewing area.Scanning for Channels EXIT Exit0 Digital Channels0 Analog ChannelsThe channel scan may take a while to completeDepending on the reception condition, it may take several minutes to scan channels. Please allow the process to complete without interruption.If you press [EXIT] to exit the scanning, a message appears “Please Run Channel Auto Scan”, you should scan channels from the menu of ChannelsChoose Your Menu Language ENTER Enter Select MENU Return EXIT ExitEnglishFrançaisEspañolSet menu language to English,Français, or EspañolChoose Your Time Setting ENTER Enter Select MENU Return EXIT ExitIf Automatic, options are automatically set by TV sourceModeTime ZoneDaylight SavingsYearMonthDayTimeAuto Pacic Off 2012 January 01 01:10 AM](https://usermanual.wiki/Hisense-Electric/LCDE0013.W9HLCDE0013-User-Manual-1/User-Guide-2009935-Page-13.png)
![7Basic Features1. Press the [CH V/V] (or [CH +/-]) on the TV/remote control to change the channel.2. Press the [VOL V/V] (or [VOL +/-]) on the TV/remote control to adjust the volume.3. Press the numeric buttons on the remote control to display the corresponding channels.Changing Channels / VolumeThe first time you turn on your TV, you must select the TV signal source. Your TV stores this information, so you do not need to change the TV signal source unless it changes. For example, you change from an outside antenna to cable TV.To select the video input source:1. Turn on your TV, then press [INPUT] button on the remote or on the TV. The Input source menu opens.2. Press [▲/▲] button to highlight the input source, then press [ENTER] button.Selecting the Input SourceNOTEChanging the channels can also be achieved by directly entering the channel number using the numeric keys on the remote control. If you are entering a two or three digit channel number, the time between key presses should be less than 3 seconds.Aspect - Select the screen aspect ratio from Normal, Wide, Auto, Zoom, Cinema and 1:1 PIXEL MAP.Normal: The original 4:3 aspect ratio (1.33:1 signal) is preserved, so black bars are added to the left and right of the image. Standard TV broadcasts are displayed with a 4:3 aspect ratio.Wide: When watching a standard broadcast or full-frame movie in this mode, the display image is stretched proportionately to fill the TV screen. When watching a widescreen (1.78:1 signal) program or movie, the display image fills the TV screen.Shortcuts InstructionsAuto: Automatically adjusts the image based on the screen size and the TV program.Zoom: Stretch the 4:3 aspect ratio image vertically and horizontally to fill the screen at 1:1.78 aspect ratio.Cinema: Stretch the 4:3 aspect ratio image vertically and horizontally to fill the screen at 1:2.35 aspect ratio. 1:1 PIXEL MAP(VGA and HDMI(RGB) only): Detect the resolution of the signal and display an image with the same number of pixels.Picture - Press to set the picture mode. It can be set as Vivid, Standard, Theater, Energy Savings or Custom. This mode achieves a certain image display effect by setting the brightness, contrast and color etc.Sound - Press to set the sound mode. It can be set as Standard, Theater, Music, Speech and Custom.Mute - Press to turn the sound off, press this button again to turn the sound back on. This function is used to switch off sound temporarily.Sleep - It can set the TV to let it enter into the Standby state automatically. Press this button repeatedly to select the proper sleeping clock mode, and the clock tells you the remaining time before the TV enters Standby state. Display - Display the information banner. The information including channel number, channel name, current system time, tuner mode, audio stream, video format, audio language, closed caption mode, parental locks rated, program details, etc.NOTEThe aspect ratio varies with different sources.](https://usermanual.wiki/Hisense-Electric/LCDE0013.W9HLCDE0013-User-Manual-1/User-Guide-2009935-Page-14.png)
![8Using the Picture Menu You can adjust: Picture Mode - Adjust the Picture Mode. You can select Vivid, Standard, Theater, Energy Savings or Custom.Brightness - Increase or decrease the brightness of the picture. Increasing the brightness can add more light to dark areas of the picture, while decreasing the brightness can add more darkness to light areas of the picture.Contrast - Increase or decrease the contrast of the picture. Increase the contrast to adjust the white areas of the picture or decrease the contrast to adjust the black areas of the picture.Color - Adjusts the color intensity of the picture. A low setting may make the color look faded. A high setting may make the color look artificial.Tint - Adjusts the color balance of the picture.Use this control to make skin tones look more natural.Sharpness - You can increase the sharpness level for clearer images or decrease the sharpness level for smoother images.Advanced Video - Access advanced video settings such as Backlight, Color Temperature and Noise Reduction.Basic FeaturesTo Use the Menu1Press [MENU] to open the main menu.2Press [▲/▲] to select a menu option, then press [▲/ENTER] button to enter the menu.3In each menu, you can: Press [▲/▲] to select an item, Press [▲/▲] to adjust the value, orPress [▲/ENTER] to enter the submenu, Press [MENU] to back the previous menu. 4Press [EXIT] to exit the menu.NOTEThe menus in the user manual may vary slightly from the actual screen.Dynamic Backlight Control: Enhances the contrast ratio between light and dark areas of the picture. You can select Off, Low, or High.Backlight: Sets the overall brilliance of the screen. When the option of Dynamic Backlight Control is turned Low or High, you cannot change the Back Light setting.Aspect Ratio: To choose the screen aspect ration from Wide, Cinema, Auto, Normal, 1:1 PIXEL MAP and Zoom .Color Temperature: Change the color temperature. You can select the color temperature from three options: Cool, Normal or Warm.Overscan: Adjusts the picture’s reproduction rate. You can select On or Off.Noise Reduction: Select to reduce the noise level of connected equipment: off, Low, Medium and High.Adaptive Contrast: Automatically adjusts picture detail and brightness. You can select On or Off.120Hz Effect: Inserts frames to reduce judder in fast action scenes. You can select On or Off.Reset Picture Settings - Resets all Picture Settings to the factory defaults.NOTEThe option of the screen Aspect Ration is different in different inputs. (For more information, see “Shortcuts Instructions”)NOTEOnly available in DTV, Component and HDMI(YUV) source.NOTEOnly available in the models that support 120 Hz.Picture ModeBrightnessContrastColorTintSharpnessAdvanced VideoReset Picture SettingsStandard 505050 050 Picture ENTER Enter Select MENU Previous EXIT ExitAdjust settings to affect picture qualityPicture ModeBrightnessContrastColorTintSharpnessAdvanced VideoReset Picture SettingsStandard 505050 050 Picture ENTER Enter Select MENU Previous EXIT ExitAdjust settings to affect picture quality](https://usermanual.wiki/Hisense-Electric/LCDE0013.W9HLCDE0013-User-Manual-1/User-Guide-2009935-Page-15.png)
![9Basic FeaturesYou can adjust: Tuner Mode - Select the TV signal source. You can select Antenna or Cable.Auto Channel Search - Scans for channels that have signals and stores the channels information in memory.Digital Channels: The scanned TV program in digital signals.Analog Channels: The scanned TV program in analog signals.Channel Skip - You can hide channels in the channel list. Press [▲/▲] to select the channels you want to hide and press [ENTER] to confirm.Using the Channels MenuUsing the Audio MenuYou can adjust: Sound Mode - Select the Sound Mode: Standard, Theater, Music, Speech or Custom.Balance - Adjust the volume of the left and right speakers.Equalizer - Soften or enhance the sound at specific frequency points.Auto Volume Control - Automatically adjusts volume to a consistent level; attenuates loud passages.TV Speakers - Selects where to play TV audio. You can select On (default setting) to play audio through TV speakers, or select Off to play audio through the speakers on an external audio system.Advanced Audio - Access Advanced Audio settings such as Digital Audio Out, MTS/SAP, Audio Language. Digital Audio Out: Send digital audio to an external audio system. You can select PCM or RAW.PCM: PCM outputs two channel audio regardless of the input format.RAW: When the data stream carries Dolby signal, digital SPDIF outputs Dolby data stream. When the data stream carries no Dolby signal, it transports PCM data stream.MTS/SAP (Analog channels only): Select the default audio stream, you can select Mono, Stereo or SAP (Second Audio Program). Mono: Select this option if there is noise or static on weak stereo broadcasts.Stereo: Select this option for programs broadcast in stereo.SAP: Depending on the particular program being broadcast, you can listen to a foreign-language translation.Audio Language (Digital channels only) - Change the default value for audio language. Reset Audio Settings - Resets all audio settings to the factory defaults.Tuner modeAuto Channel SearchChannel SkipFavorite ListChannel LabelsSignal StrengthAudio OnlyChannels ENTER Enter Select MENU Previous EXIT ExitAdjust channel OptionsAntennaAT05-1OffScanning for Channels MENU ExitStatus: Scanning AntennaDigital Channels : 0Analog Channels : 0 5-1-AT05-1 5-2-AT05-2 5-3-AT05-3 5-4-AT05-4 17 29 45Channel Skip ENTER Enter Select MENU Previous EXIT ExitManual add and skip channels in your program listSound ModeBalanceEqualizerAuto Volume ControlTV SpeakersAdvanced AudioReset Audio SettingsAudio ENTER Enter Select MENU Previous EXIT ExitAdjust settings to affect sound qualityStandard0OnOnDigital Audio OutMTS/SAPAudio LanguageAdvanced Audio ENTER Enter Select MENU Previous EXIT ExitSelect digital audio output formatPCMStereoEnglish](https://usermanual.wiki/Hisense-Electric/LCDE0013.W9HLCDE0013-User-Manual-1/User-Guide-2009935-Page-16.png)
![10Using the Settings MenuBasic FeaturesFavorite List - Display your Favorite List. You can add or delete channels to create your favorite list. 5-1-AT05-1 5-2-AT05-2 5-3-AT05-3 5-4-AT05-4 17 29 45Favorite List ENTER Enter Select MENU Previous EXIT ExitAdd channels to create a favorite listChannel Labels - Change the channel name. Press [▲/▲] to select the character you want to change, then press [▲/▲] to set the character.Signal Strength (Digital channels only)- You can check the digital signal strength to determine if you need to adjust your antenna or digital cable input.Audio Only - Listen to the program audio only, when you turn off the picture on your TV.You can adjust: Closed Caption - Adjust Closed Caption settings.Closed Caption: To select CC Off (turns off closed caption), CC On (turns on closed caption), or CC on when Mute (turns on closed caption when the sound is muted).Analog Caption: Select an Analog Caption setting from CC1~CC4, TEXT1~TEXT4, Off.Digital Caption: Select a Digital Caption setting: Service1~Service6, Off.Digital Caption Settings: There are two Caption Styles. One is the automatic function set as the broadcaster, while the other is the custom style where you can adjust the font size, color, opacity, background color etc..Time - Access Time settings such as Time Zone, Date/Time, Sleep Timer.Time Zone: Select your local time zone: Pacific, Alaska, Hawaii, Newfoundland, Atlantic, Eastern, Central and Mountain.Daylight Savings:Press [▲/▲] to highlight Daylight Savings, then press [▲/▲] to select On (if your viewing area observes Daylight Savings Time) or Off (if your viewing area does not observe Daylight Savings Time).Date/Time: You can set time manually or select automatic if the TV is connected to an antenna or cable source.Auto synchronization: Select Manual (to set the date and time manually) or Auto (to set the date and time automatically from a TV signal source based on the time zone you select).If you selected Manual, set the following options.Date: Set the current year/month/day.Time: Set the current time.Sleep Timer: Specify the amount of time before your TV automatically turns off.Menu Language - You can select the menu’s language to English, Spanish or French.NOTEWhen you press [CH V/V] (or [CH +/-]) button, your TV skips the hidden channels. You can still tune to the channel by pressing the number buttons on the remote control.NOTESAudio Only works only when the input source is TV, and your TV is receiving a broadcast signal.To exit audio only mode, press any button. When you exit audio only mode, the Audio Only option is automatically reset to Off.EnglishOnClosed CaptionTimeMenu LanguageInput LabelsCEC FunctionPower LEDComputer SettingsComponent SettingsVersion InfoReset to DefaultSettings ENTER Enter Select MENU Previous EXIT ExitSet various TV optionsClosed Caption ENTER Enter Select MENU Previous EXIT ExitAdjust Closed Captioning settingsCaption ControlAnalog CaptionDigital CaptionDigital Caption SettingsCC OffCC1Service1Time ENTER Enter Select MENU Previous EXIT ExitSelect your Time ZoneTime ZoneDaylight SavingsDate/TimeSleep TimerPacicOffOff](https://usermanual.wiki/Hisense-Electric/LCDE0013.W9HLCDE0013-User-Manual-1/User-Guide-2009935-Page-17.png)
![11Using the Parental Controls MenuWhen you first use this function, the default password is [0000]. Once you input this password, you can set options.You can adjust: Button Lock - Block or unblock the button of the TV. Block Unrated TV - Block unrated TV programs.USA Parental Locks - Restrict movie and TV programs for USA Ratings.Canadian Parental Locks - Restrict movie and TV programs for Canadian Ratings.Change Password - If you want to change the default password, first enter the new password then enter the same password again.Open V-Chip - Display an advanced V-Chip ratings table for digital channels (USA only).Reset Parental Control Settings - Resets all parental control settings to factory mode.Clean All - Reset all your settings to factory mode. Basic FeaturesInput Labels - Press [▲/▲] to select the input source you want to label, then press [▲] to move to the custom label field and then press [▲/▲] to select the character you want. When you have completed the label, The next time you press INPUT, your label will appear in the Input source list.CEC Function- CEC Function lets you control HDMI CEC-compatible devices connected to the HDMI jacks on your TV using the remote control that came with your TV. To use CEC Function, you must set the CEC Control setting to On.CEC Function ENTER Enter Select MENU Previous EXIT ExitAllow the TV to automatically control CEC devicesconnected to the TV via HDMICEC ControlDevice Auto Power OffTV Auto Power OnAudio ReceiverCEC Device ListConnectRoot MenuOnOffOffOffNOTESHDMI cables must be used to connect HDMI CEC-compatible devices to your TV.The connected device’s HDMI CEC feature must be turned on.If you connect an HDMI device that is not HDMI CEC-compatible, all the CEC Control features do not work.Depending on the connected HDMI device, the CEC Control feature may not work.CEC Control: Turning CEC Function on or off. Device Auto Power Off: When HDMI-CEC is turned on, Device Auto Power Off turns off HDMI CEC devices when you turn off your TV.TV Auto Power On: When CEC is turned on and you turn on an HDMI CEC device, TV Auto Power On turns on your TV automatically.Audio Receiver: When CEC is turned on and you have connected an audio receiver to your TV, turning on Audio Receiver lets you use your TV’s remote control to control the volume on the audio receiver.CEC Device Lists: You can display a list of HDMI CEC devices that are connected to your TV and select the source you want.Connect: Connect to the current CEC devices . Root Menu: You can open an CEC-compatible device’s root menu, then use your TV’s remote control to control the device.Power LED - To turn on or off the standby indicatior.Computer Settings (Only available in VGA mode.)- Access Computer Settings such as H.Position, V.Position, Clock, Phase and Auto Adjust.Auto Adjust: Detects input signal clock, phase and position and adjusts TV display accordingly.H.Position: Move the image right or left.V.Position: Move the image up or down.Clock: Adjust the sample frequency.Phase: Adjust the focus of stable images.Reset Computer Settings: Resets all computer settings to factory mode.Component Settings (Only available in Component mode.) - You can adjust the horizontal distortion that mayoccur when watching video from a component video device.Phase: Minimizes horizontal distortion.Reset Component Settings: Resets all component video settings to factory mode.Version Info - Display the software version information.Reset to Default - Every TV has its original setting before leaving the factory. This function can help you restore these settings.Parental Controls ENTER Enter Select MENU Previous EXIT ExitLock or unlock the buttons on the TVButton LockBlock Unrated TVUSA Parental LocksCanadian Parental LocksChange PasswordOpen V-ChipReset Parental Control SettingsClean AllOffOff](https://usermanual.wiki/Hisense-Electric/LCDE0013.W9HLCDE0013-User-Manual-1/User-Guide-2009935-Page-18.png)
![13Digital Media PlayerAdvanced FeaturesPlease note that Hisense will not assume any responsibility for any lost data and cannot guarantee perfect compatibility with all mass storage devices. Be sure to insert the USB disk with standard USB 2.0 port. Data Input from USB Memory Stick only. Do not connect any device to this terminal such as digital camera, keyboard, mouse, etc.Press [INPUT] button to display the INPUT menu, press [▲/▼] button to highlight the USB source, then press [ENTER] button to confirm. (If you want to exit DMP, you can press [INPUT] button to switch to other sources).Press [RED] button to switch the media type.Press [YELLOW/BLUE] button to turn to the previous/next page.When viewing video/photo, you can press these buttons on the remote control to control video/photo.Media content control function buttonsNOTENever remove the USB flash drive or turn off your TV while viewing video/photo.Enjoy Movie Files1. Press [RED] button to switch the media type to MOVIE.2. Press [▲/▲/▲/▲] to select the movie you want to view.3. Press [ENTER] to play the movie.4. Press [EXIT] to exit the video and return to the previous directory.5. When enjoying the video, press [MENU] button to display/exit the tool bar. Press [▲/ENTER] to enter the submenu and press [EXIT] to return to the upper menu.Tool bar 1Progress bar.2Play/Pause the video. 3Play the previous video. 4Play the next video. 5Fast backward. Press [ENTER] to select the backward speed. 6Fast forward. Press [ENTER] to select the forward speed. 7Options. Adjust Repeat Mode, Zoom Mode, Audio Track, and Subtitle.8Play list. You can select the video you want to view, then press [ENTER] to play.9Select time to play. Press [◄/►] to select the position you want to set, press [0~9] to set the time (or press [▲/▼] to adjust it), then press [ENTER] to confirm and the video will to play at the time you have set.10Video Info. Displays details on image resolution, audio and video code, subtitle, audio track, program and time.11Stop playback.6. Press [ASPECT] button one or more times to enlarge the image by Wide and Normal. USBAllMOVIEPHOTOMove Select Return Exit Media Page Up/Down Return C: 1/112 3 4 5 6 7 8 900:03:08 / 00:06:1810 11Fast forwardPlayPauseFast backwardThe previous oneThe next oneStop](https://usermanual.wiki/Hisense-Electric/LCDE0013.W9HLCDE0013-User-Manual-1/User-Guide-2009935-Page-20.png)
![14Advanced FeaturesThe unit recognizes only a USB Memory Stick.Do not use a USB hub or an extension cable to connect an external hard disk drive to the unit. (Not supported)A USB Memory Stick is always inserted to this unit directly.A USB Memory Stick is not supplied with this unit.We do not guarantee that all USB Memory Sticks can be supported by this unit.Be sure to keep a backup copy of the original files on your device before you play them back on this unit. We have no responsibilities for damage or loss of your stored data.To protect your USB Memory Stick files from being erased place the write protect sliding tab in the protect position.When you are ready to remove a USB Memory Stick, set the unit to go into Standby mode to avoid any damage to your data and the unit.A USB Memory Stick that requires its own driver or the device with a special system such as fingerprint recognition are not supported.This unit is not allowed to use the USB Memory Stick which requires an external power supply (500mA or more).NOTESBrowse the Photos1. Press [RED] button to switch the media type to PHOTO.2. Press [▲/▲/▲/▲] to select the photo you want to view.3. Press [ENTER] to browse the photo.4. Press [EXIT] to return to the previous directory.5. When browsing photos, press [MENU] button to display /exit the tool bar. Press [▲/ENTER] to enter the submenu and press [EXIT] to return to the upper menu.Tool bar 1Play/Pause the photo. 2Stop browsing the photo.3Browse the previous photo.4Browse the next photo.5Allows the photo to rotate 90 degrees clockwise.6Allows the photo to rotate 90 degrees anti-clockwise.7Zoom in the photo.8Zoom out the photo.9Options. You can adjust Show Speed.10Photo Info. Allows you to view the photo information.NOTEWhen the photos in browsing or pausing, the menu will be different.34 5 6 1 2 7 8 910](https://usermanual.wiki/Hisense-Electric/LCDE0013.W9HLCDE0013-User-Manual-1/User-Guide-2009935-Page-21.png)
![16Trouble ShootingWhen there is something wrong with your TV, you can try turning off the TV and then restart it. You can also Operate according to the following chart. If the problem still cannot be solved, please contact the professional technicians.SYMPTOMS POSSIBLE SOLUTIONSNo sound or picture.Check if the power cord is in the AC outlet and if it has electricity.Check if you have pressed [POWER] button on the TV or [POWER] button on the remote control.Check to see if LED light is either red or blue. If illuminated, power to TV is OK.I have connected an external source to my TV and I get no picture and/or sound.Check for the correct output connection on the external source and for the correct input connection on the TV.Make sure you have made the correct selection for the input mode for the incoming signal.When I turn on my television, there is a few second delay before the picture appears. Is this normal?Yes, this is normal. That is the TV searching for previous setting information and initializing the TV.Picture is normal, but no sound. Check the volume settings.Check if Mute mode is set “on”.Sound but no picture or black and white picture.If black and white picture first unplug TV from AC outlet and replug after 60 seconds.Check Color Setting if picture is black and white.Sound and picture distorted or appear wavy.An electrical appliance may be affecting TV set. Turn off any appliances, if interference goes away, move appliance farther away from TV.Insert the power plug of the TV set into another power outlet.Sound and picture is blurry or cuts out momentarily.If using an external antenna, check the direction, position and connection of the antenna.Adjust the direction of your antenna or reset or fine tune the channel.Horizontal/vertical stripe on picture or picture is shaking. Check if there is interfering source nearby, such as appliance or electric tool.The plastic cabinet makes a “clicking” type of sound.“Click” sound can be caused when the room temperature changes. This change causes the television cabinet to inflate or contract, which makes the sound. This is normal and TV is OK.Black square appears in the center of my television screen?The Closed Caption function is set in the text mode. To remove it, access Closed Caption from the menu screen and change the Mode setting from text to either CC1 or off .](https://usermanual.wiki/Hisense-Electric/LCDE0013.W9HLCDE0013-User-Manual-1/User-Guide-2009935-Page-23.png)
![17SYMPTOMS POSSIBLE SOLUTIONSOn some channels getting another language or sometimes no sound at all.That would indicate that the MTS mode on your unit is set to SAP mode. We suggest setting the MTS mode to either Stereo or Mono . For further instruction, please see Audio Adjust or MTS/SAP in your user manual.SAP is Second Audio Program. It’s a second audio channel that is usually used for a second language or descriptive audio for the visually impaired.MTS stands for Multichannel Television Sound, a standard that allows the encoding of 3 channels of audio within a standard NTSC (analog) video signal to a television. A television that is able to receive MTS Stereo allows you to watch television with stereo sound.Not getting all of my cable channels on the television or I’m only getting 13 channels.Check the cable connection for an incoming signal. Make sure the signal is coming OK. Best way to confirm signal is to use another TV and/or contact your cable company.Reprogram your channels. Press [MENU] button on your TV remote control, change Input Source setting to “Cable”, then use “Auto Channels Search” to reprogram your channels.[CH V / V] don’t work when I set the Channel to Cable? They work with the Air setting?After switching to Cable, please auto program the channels. The TV will “remember” all the channels then the TV will allow you to surf the channels with [CH V/V] buttons.Remote control does not work.Confirm that TV still has power and is operational.Change the batteries in the remote control.Check if the batteries are correctly installed.Clean the front of the remote control (LED window).If using a universal remote, be sure to select the TV mode on the remote.If the remote still does not work:• Remove and reinstall the batteries correctly to reset the remote or install new batteries.• Press the Power button to turn on the TV. With a universal remote if you have reset or changed the batteries you will need to reprogram the remote for the other units.Check if there is obstruction between the remote control and the TV.TIP: If you have a digital camera / camera phone, you can aim the front of the remote at camera lenses (at this time, the camera should set on camera mode, not play mode). Observe the camera screen while pressing a button on the remote control; you should see flashing light on the screen. If there is no light observed, the remote control is not working. You need to repair or replace the remote control.Trouble Shooting](https://usermanual.wiki/Hisense-Electric/LCDE0013.W9HLCDE0013-User-Manual-1/User-Guide-2009935-Page-24.png)