Hisense Electric LCDF0005 Part15 Subpart B-LCD Monitor User Manual W9HLCDF0005 1
Hisense Electric Co., Ltd. Part15 Subpart B-LCD Monitor W9HLCDF0005 1
UserManual.wiki
>
Hisense Electric
>
LCDF0005 User Manual
>
W9HLCDF0005_user Manual 1
Contents
1.
W9HLCDF0005_user Manual 1
2.
W9HLCDF0005_user Manual 2
W9HLCDF0005_user Manual 1
Navigation menu
Upload a User Manual
Namespaces
Wiki Guide
HTML
PDF
Info
Views
User Manual
Discussion / Help
Navigation


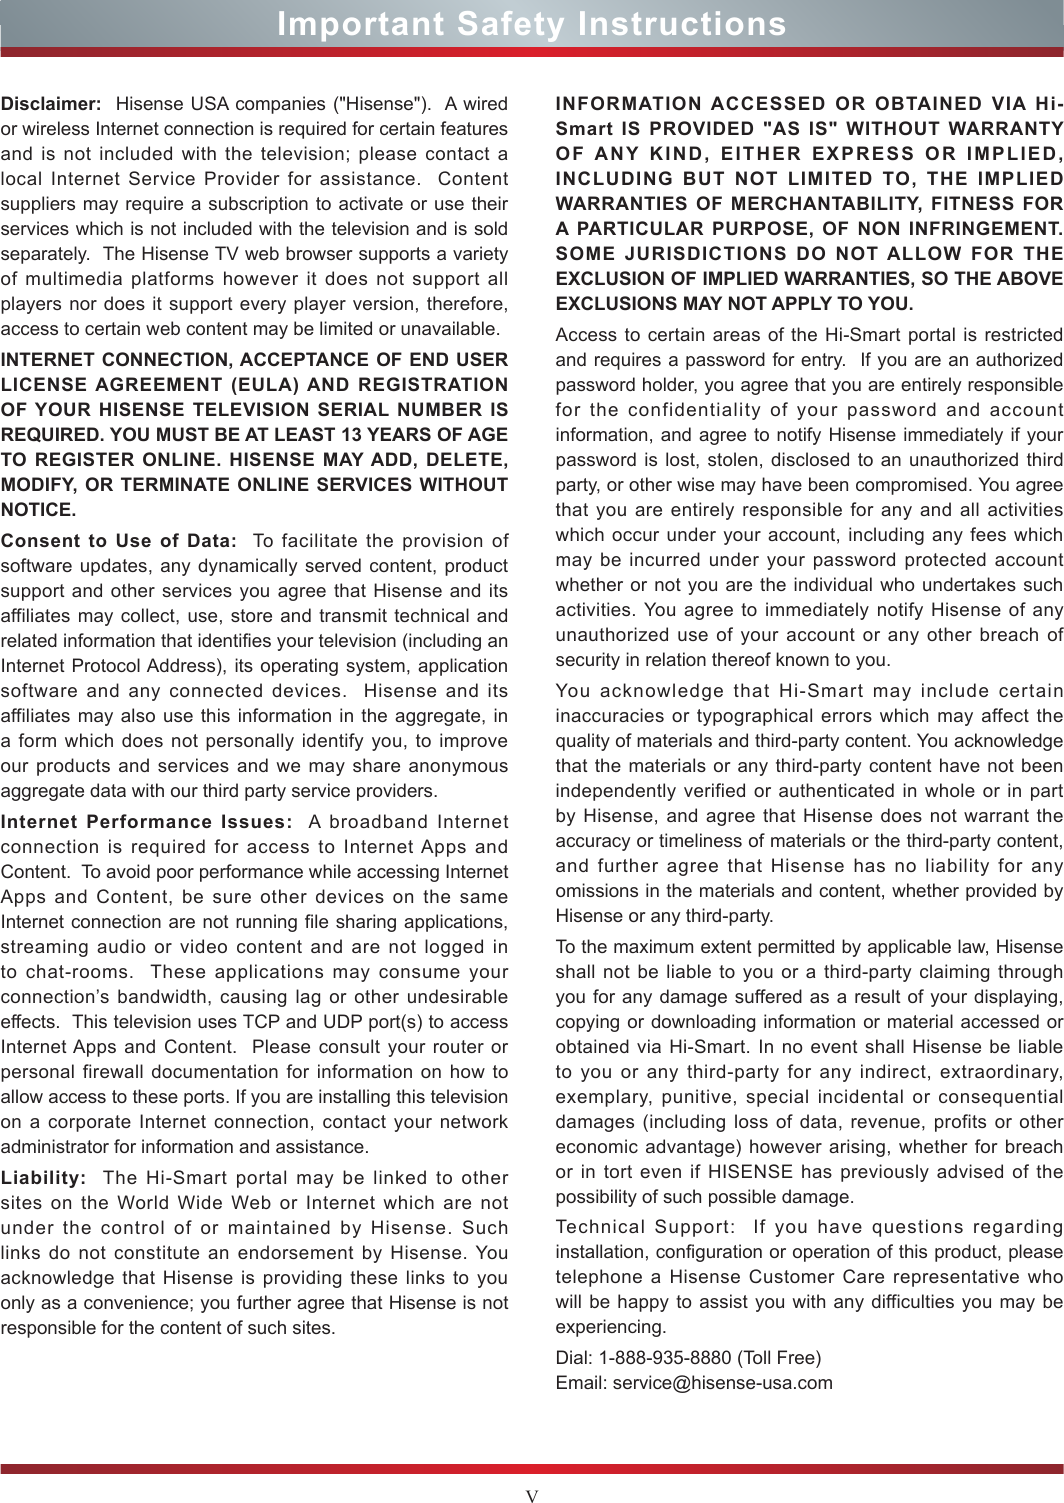
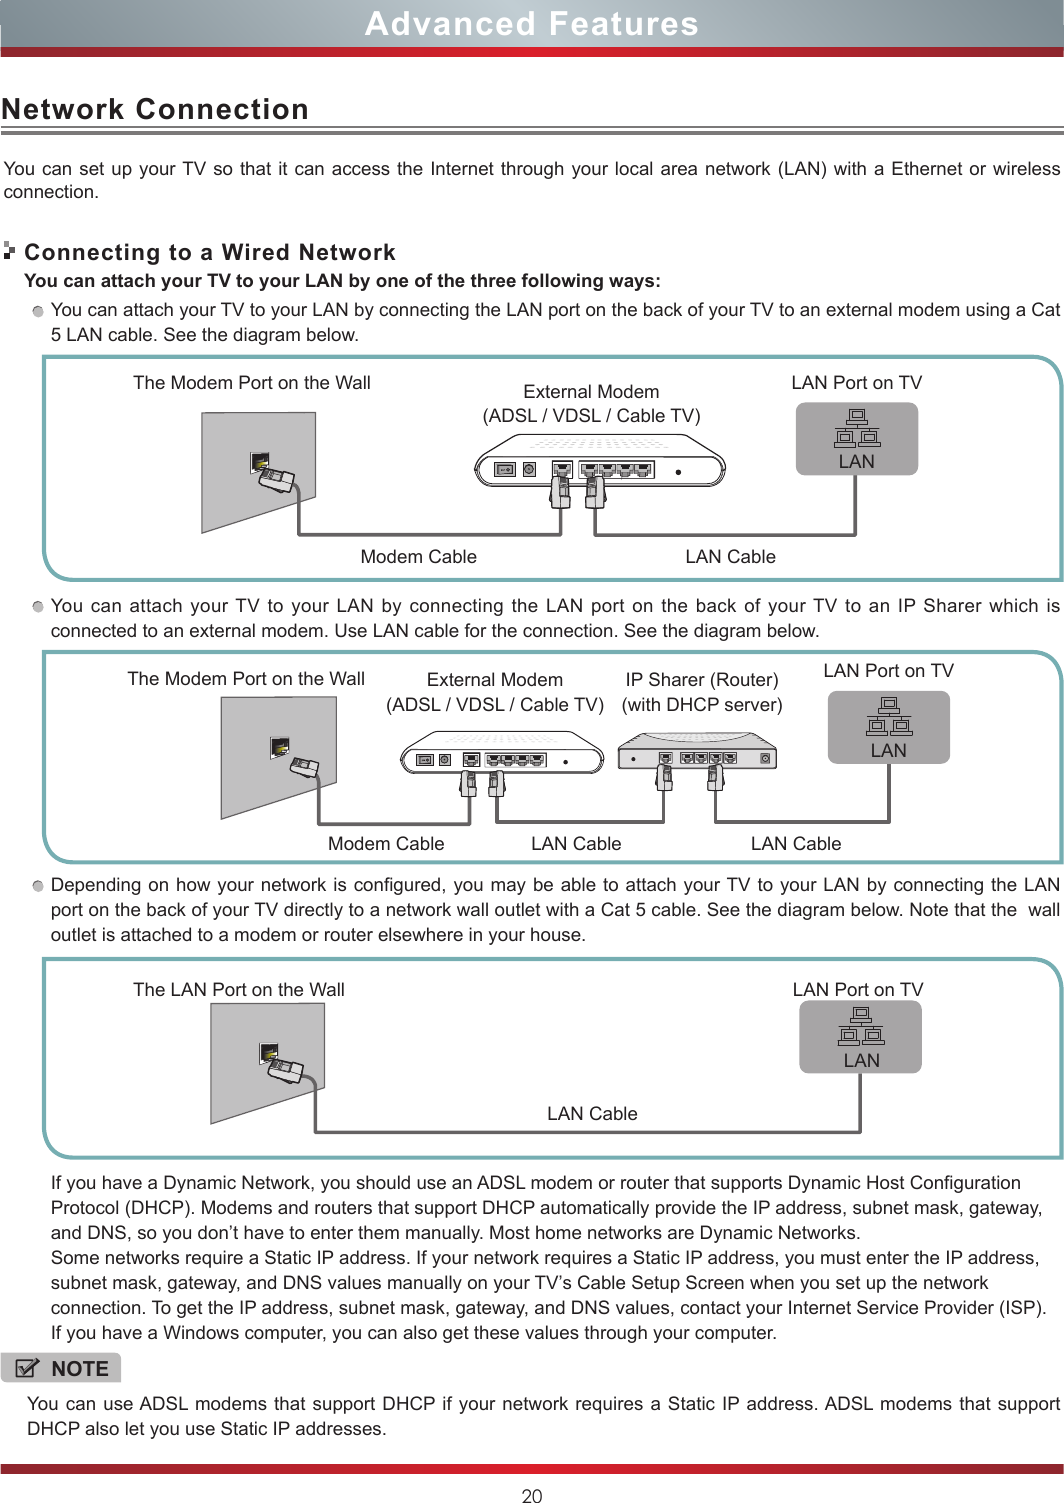
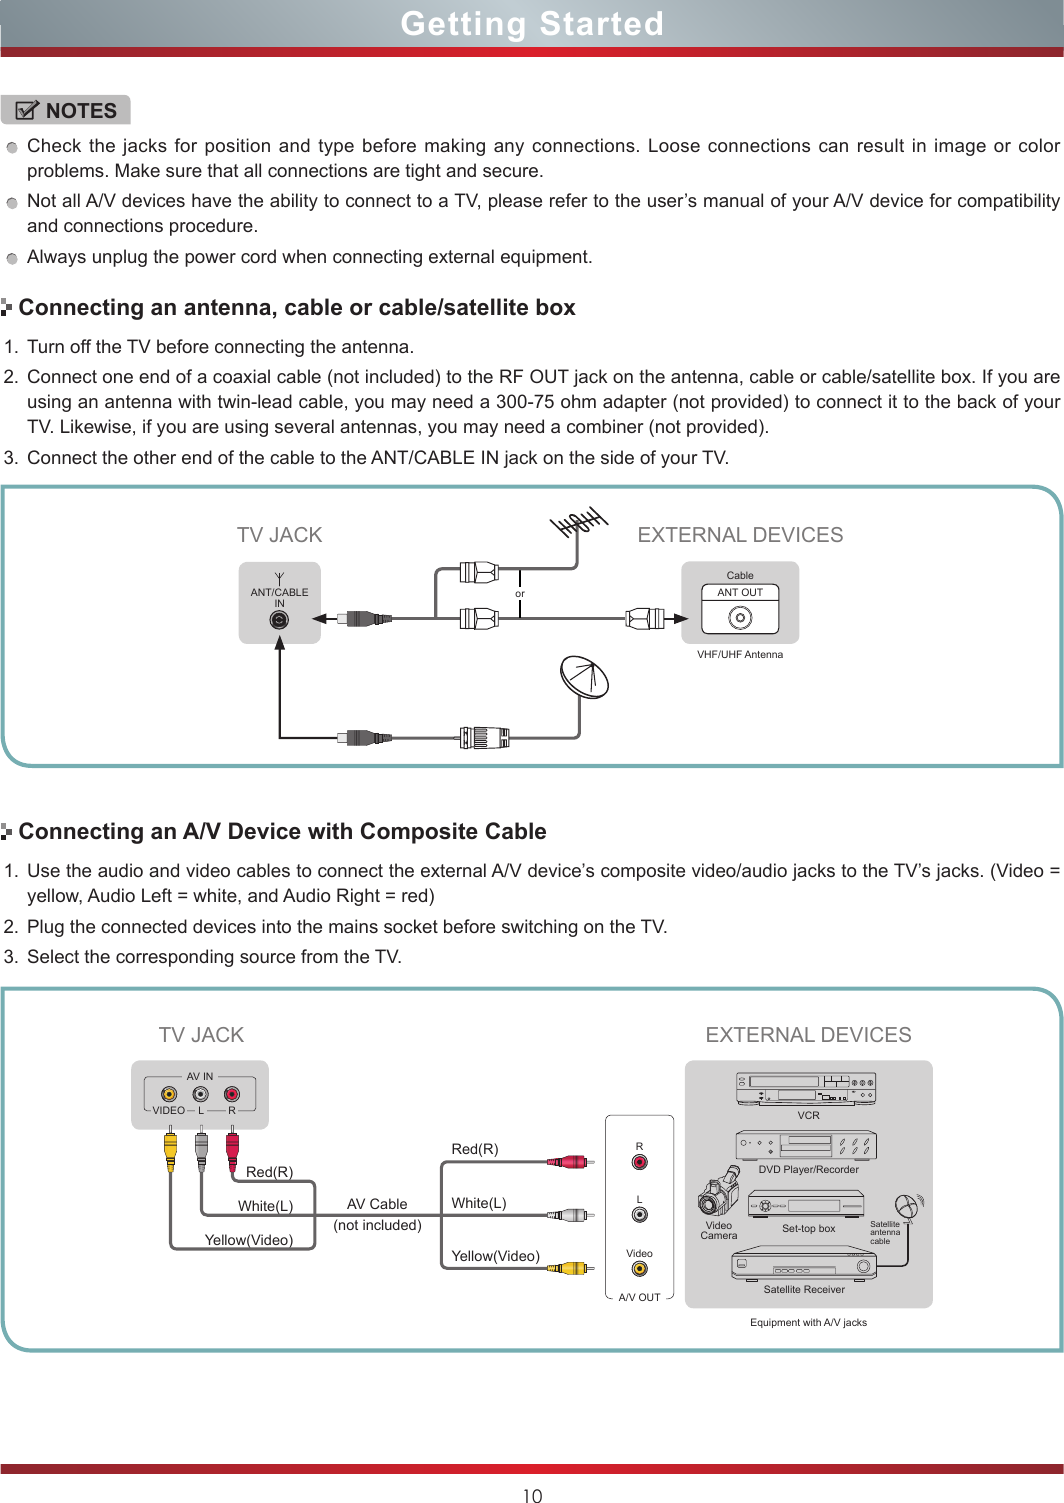
![7Viewing the Remote ControlGetting StartedNOTESFOR ILLUSTRATION ONLY. [RED/GREEN/YELLOW/BLUE] buttons are used for Electronic Program Guide (EPG), Hi-Smart Hub and Digital Media Player (DMP). After pressing the [GUIDE], [Hi-Smart] or [Hi-DMP] button, the same color buttons will appear with explanations in the on-screen display (OSD). Follow the steps shown in the OSD.Power on/offIncrease VolumeSelect sound modeDecrease VolumeLaunch Vudu Movies AppReturn to the previous menuLaunch Netix AppSelect picture modeMenu buttonDash button(use when entering a digital sub-channel and when match the remote control with TV)▲/▲/▲/▲Navigate Up/Down/Left/Right or adjust on-screen menu settingsDisplays the information bannerSleep timer buttonSelect HDMI input sourceSelect VGA input sourceOpen the Hi-Smart HubOpen the DTV program guide(if available)Hi-DMP (digital multimedia player) button3D buttonDisplay the favorite channel listConrm selectionsAudio Mute buttonClose the menuChannel UpChannel DownGo to the previous channel and use when match the remote control with TVSelect input sourceAdjust Closed Caption Decoder (CCD) modeAudio select buttonRemote sensorSelect COMPONENT input sourceZoom buttonDirect channel selectionSpecial function buttonsMedia content control function buttons](https://usermanual.wiki/Hisense-Electric/LCDF0005.W9HLCDF0005-user-Manual-1/User-Guide-1700097-Page-14.png)
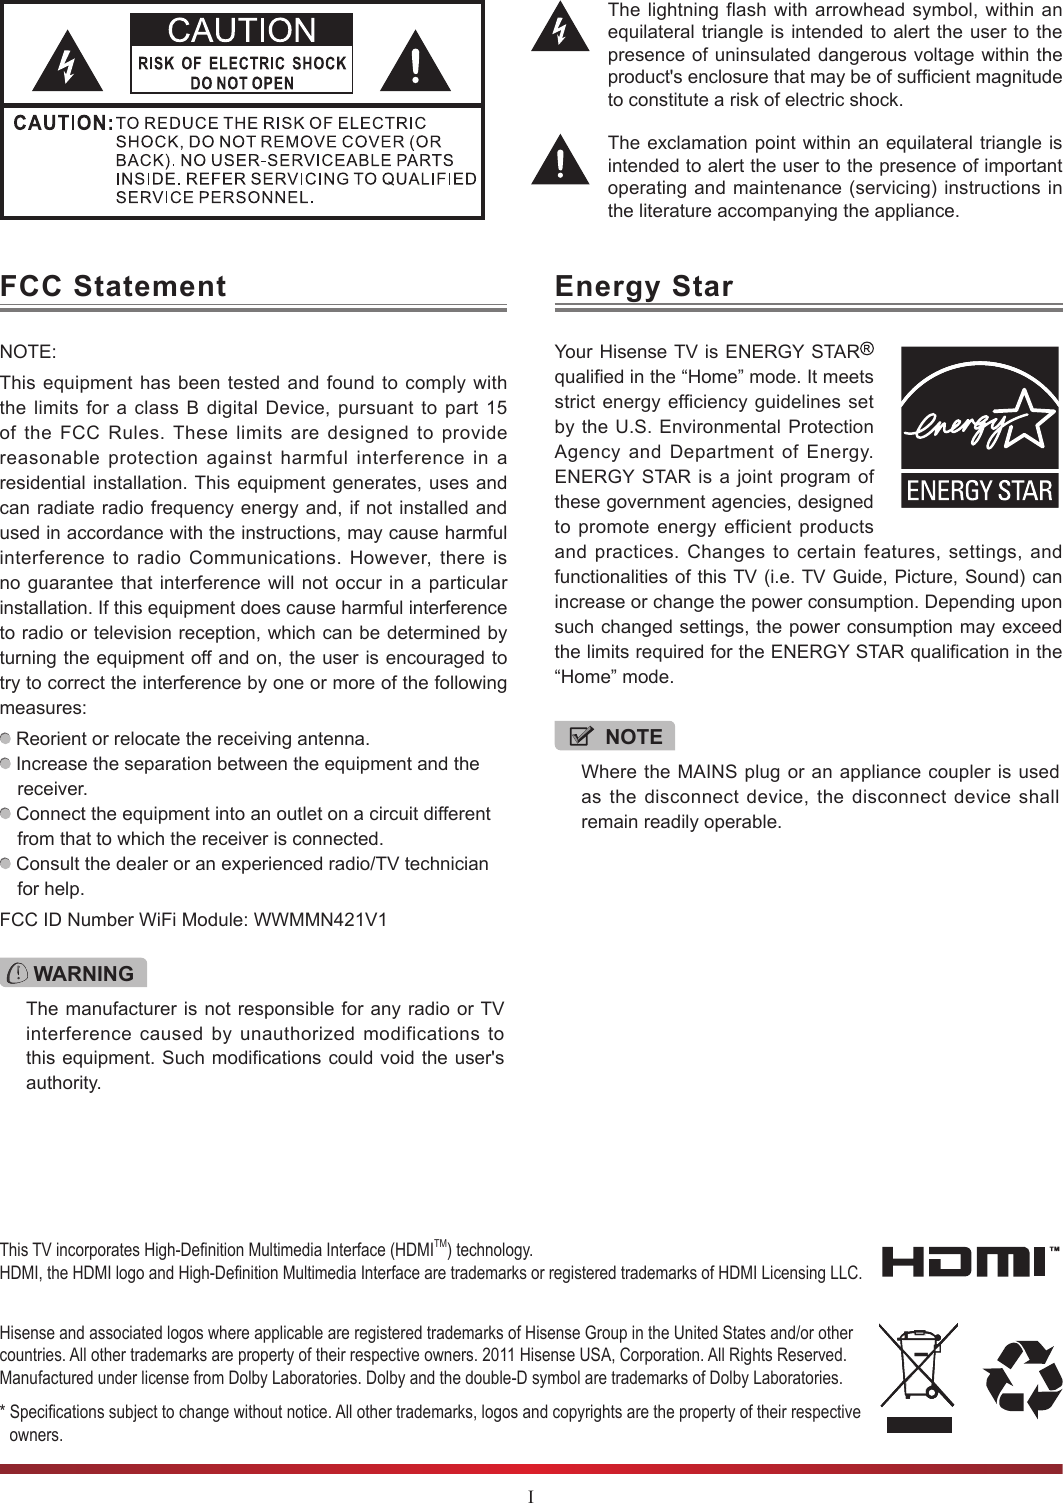
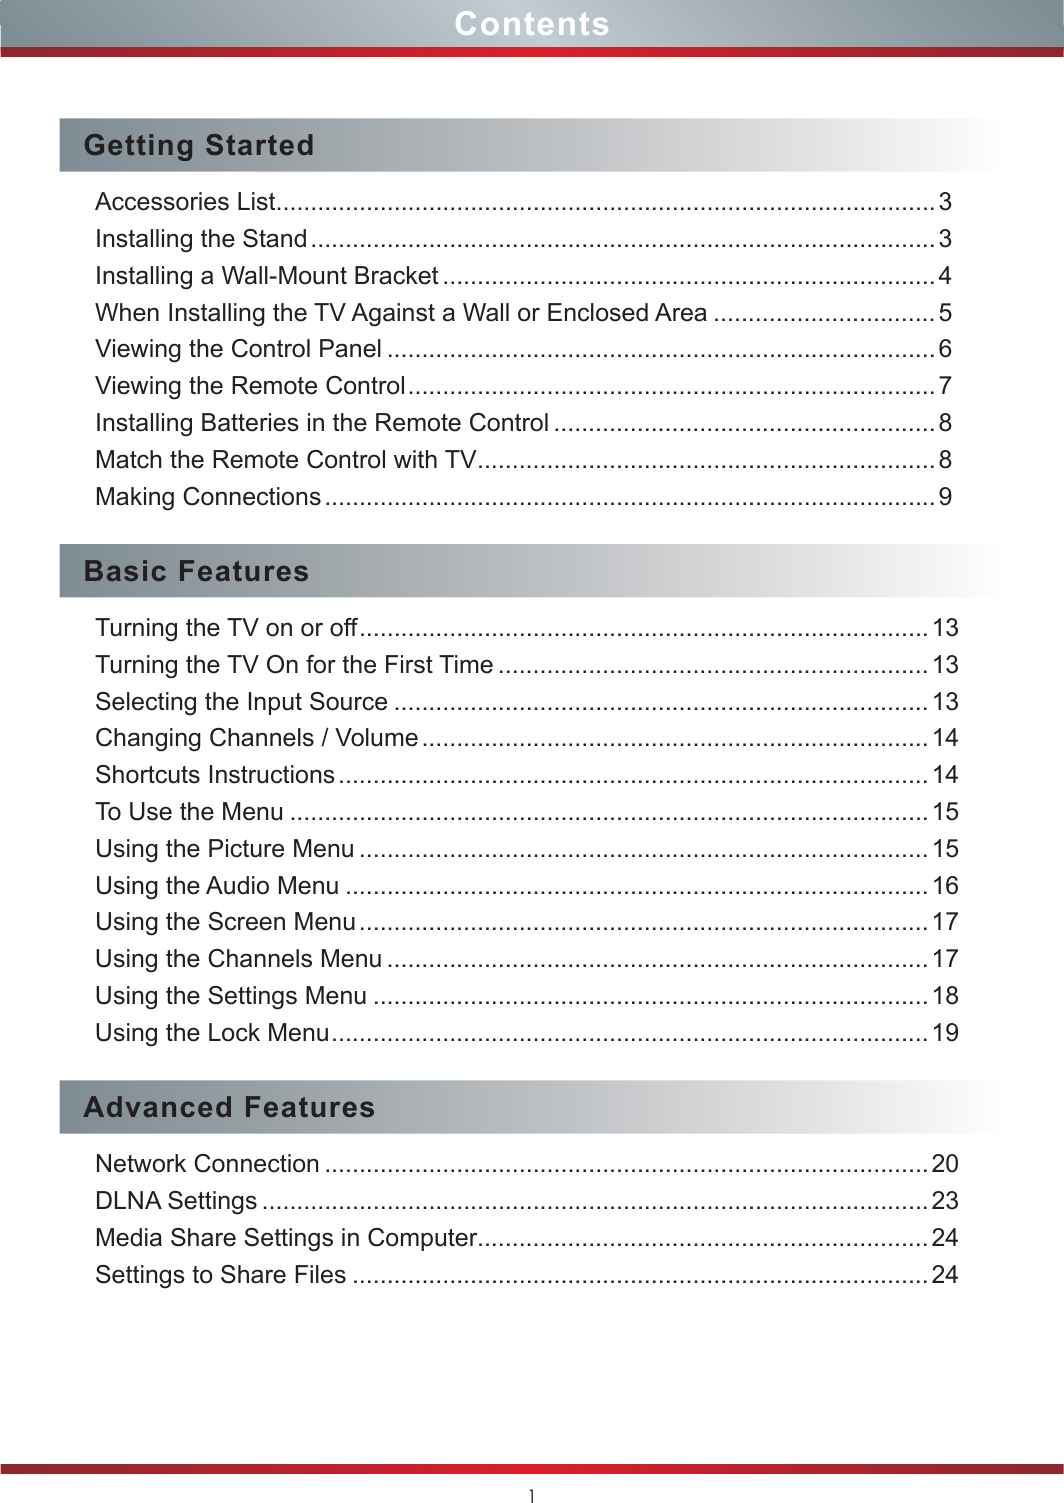
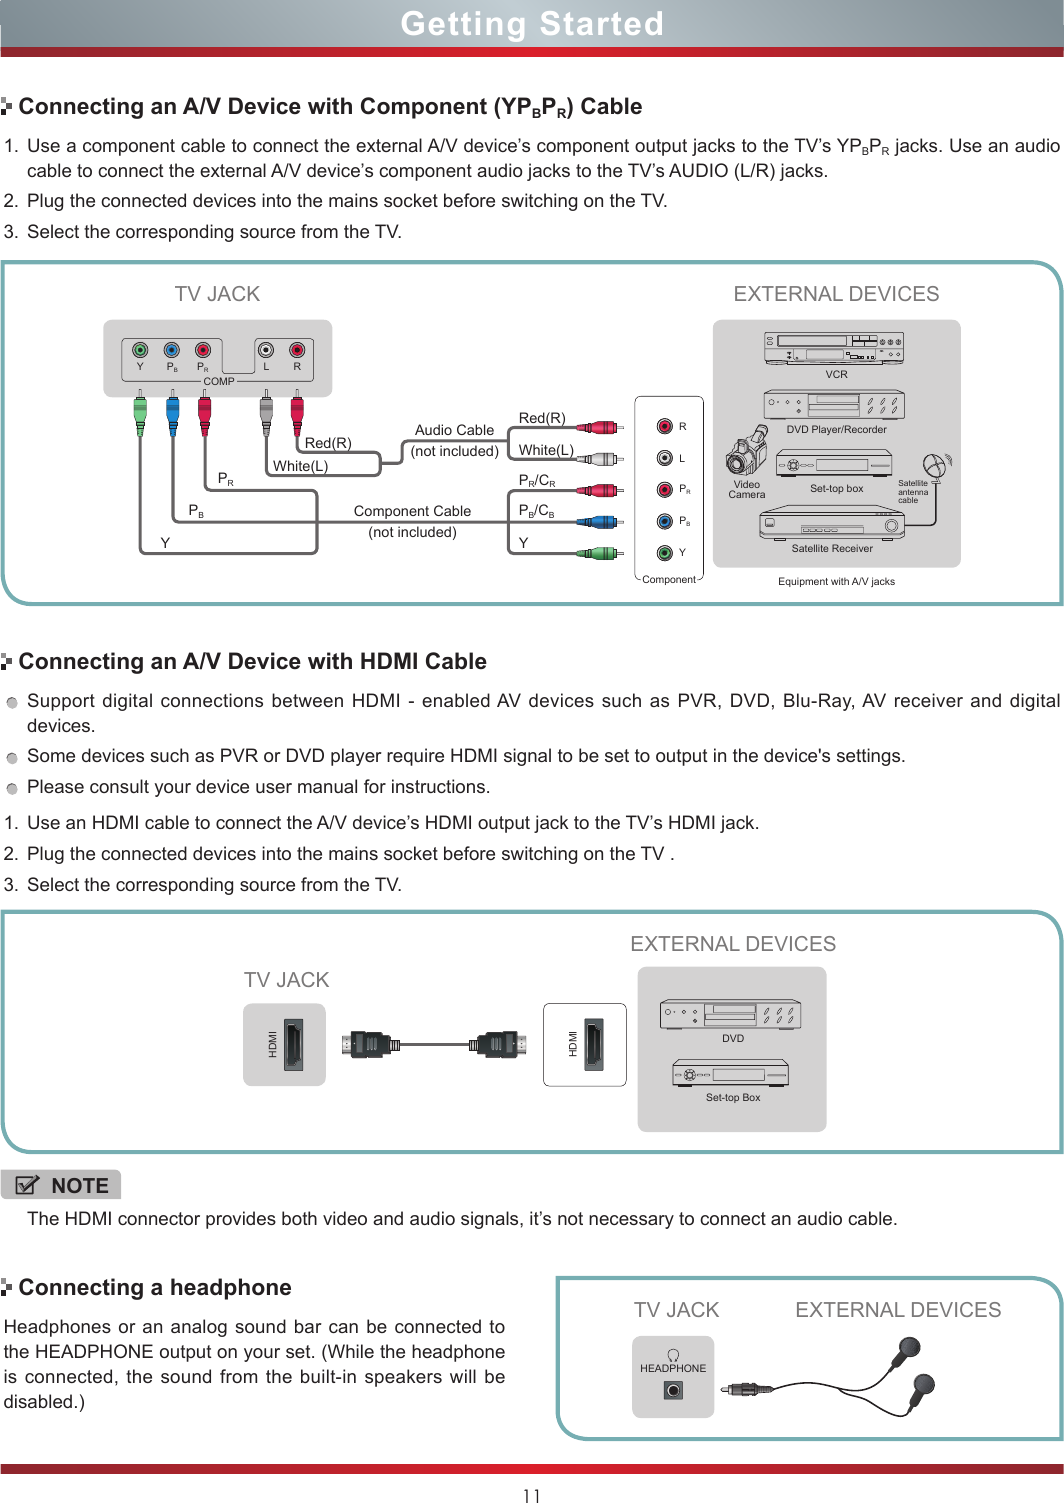
![8Installing Batteries in the Remote ControlMatch the Remote Control with TVGetting StartedNOTEIf the LED blinks rapidly, the remote has failed to pair with the TV, repeat the pairing procedure.1. Slide the back cover to open the battery compartment of the remote control. 2. Insert two AAA size batteries. Make sure to match the (+) and ( - ) ends of the batteries with the (+) and ( - ) ends indicated in the battery compartment.3. Close the battery compartment cover.Aim your remote control within 6 inches of the lower left corner of your TV. Press the [-] and [LAST] buttons simultaneously for at least 3 seconds. The LED at the top of your remote will light for one second and blink slowly three times to indicated the remote has paired with the TV. 1Gently push and slide 2Insert the batteries 3Gently push and slideNOTES1. Dispose of your batteries in a designated disposal area. Do not throw the batteries into a fire.2. Do not mix battery types or combine used batteries with new ones.3. Remove depleted batteries immediately to prevent battery acid from leaking into the battery compartment.4. If you do not intend to use the remote control for a long time, remove the batteries.5. Batteries should not be exposed to excessive heat, such as sunshine, heat registers, or fire.6. Battery chemicals can cause a rash. If the batteries leak, clean the battery compartment with a cloth. If chemicals touch your skin, wash immediately.7. Do not mix old and new batteries.8. Do not mix alkaline, standard (carbon-zinc) or rechargeable (ni-cad, ni-mh, etc.) batteries.](https://usermanual.wiki/Hisense-Electric/LCDF0005.W9HLCDF0005-user-Manual-1/User-Guide-1700097-Page-15.png)
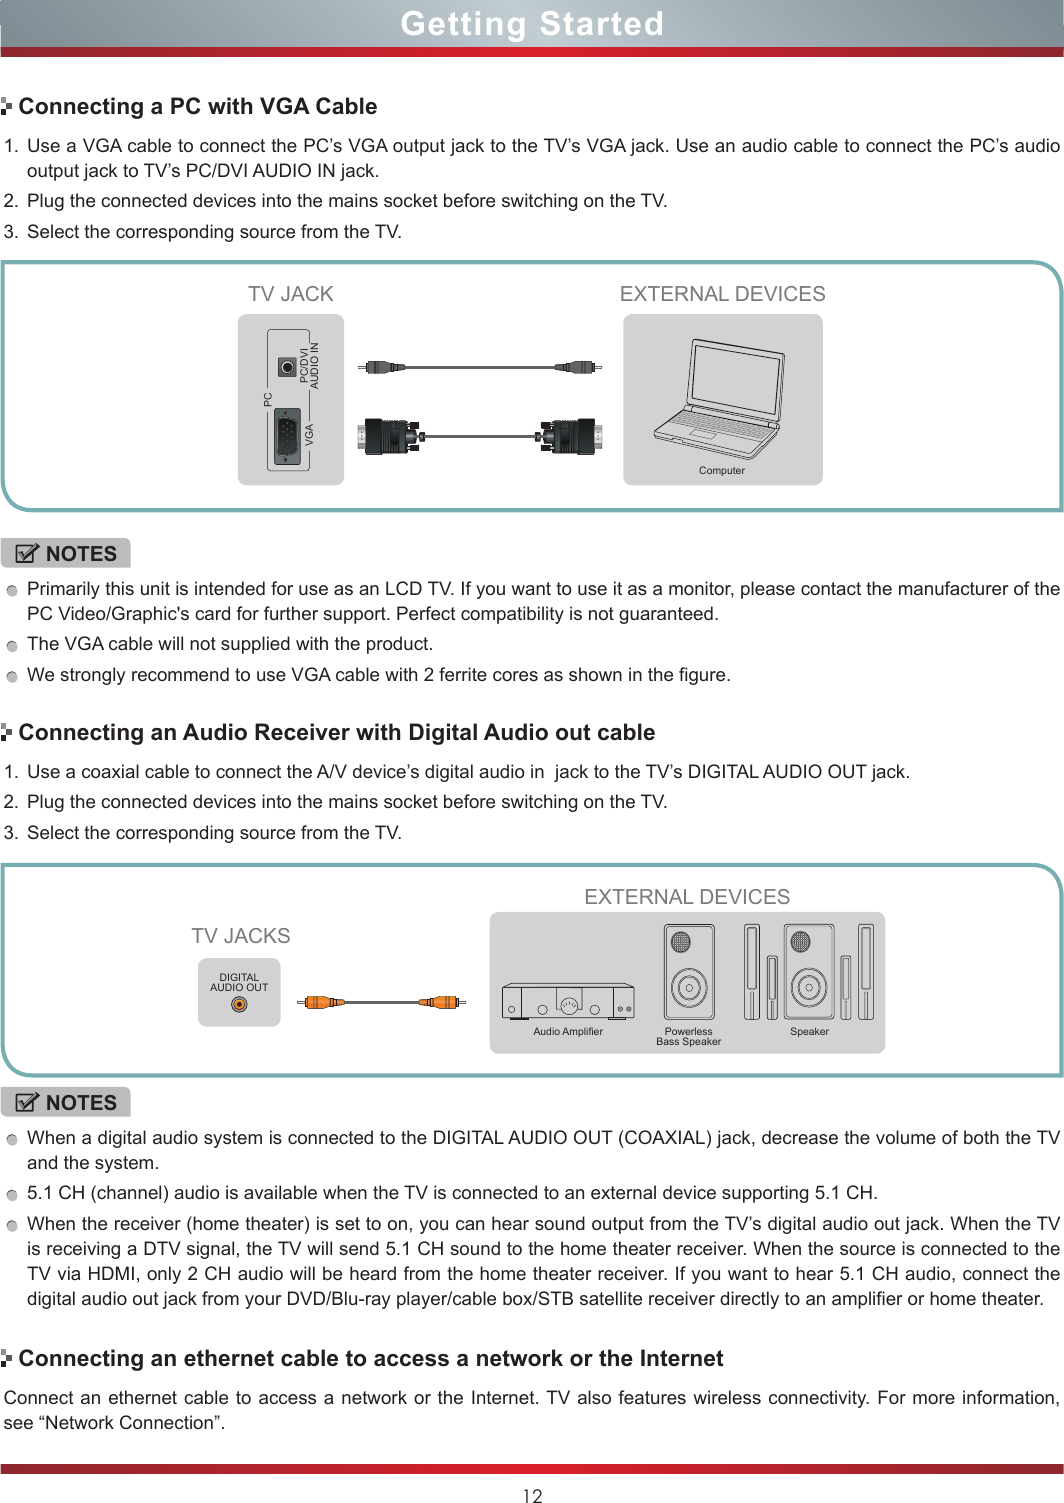
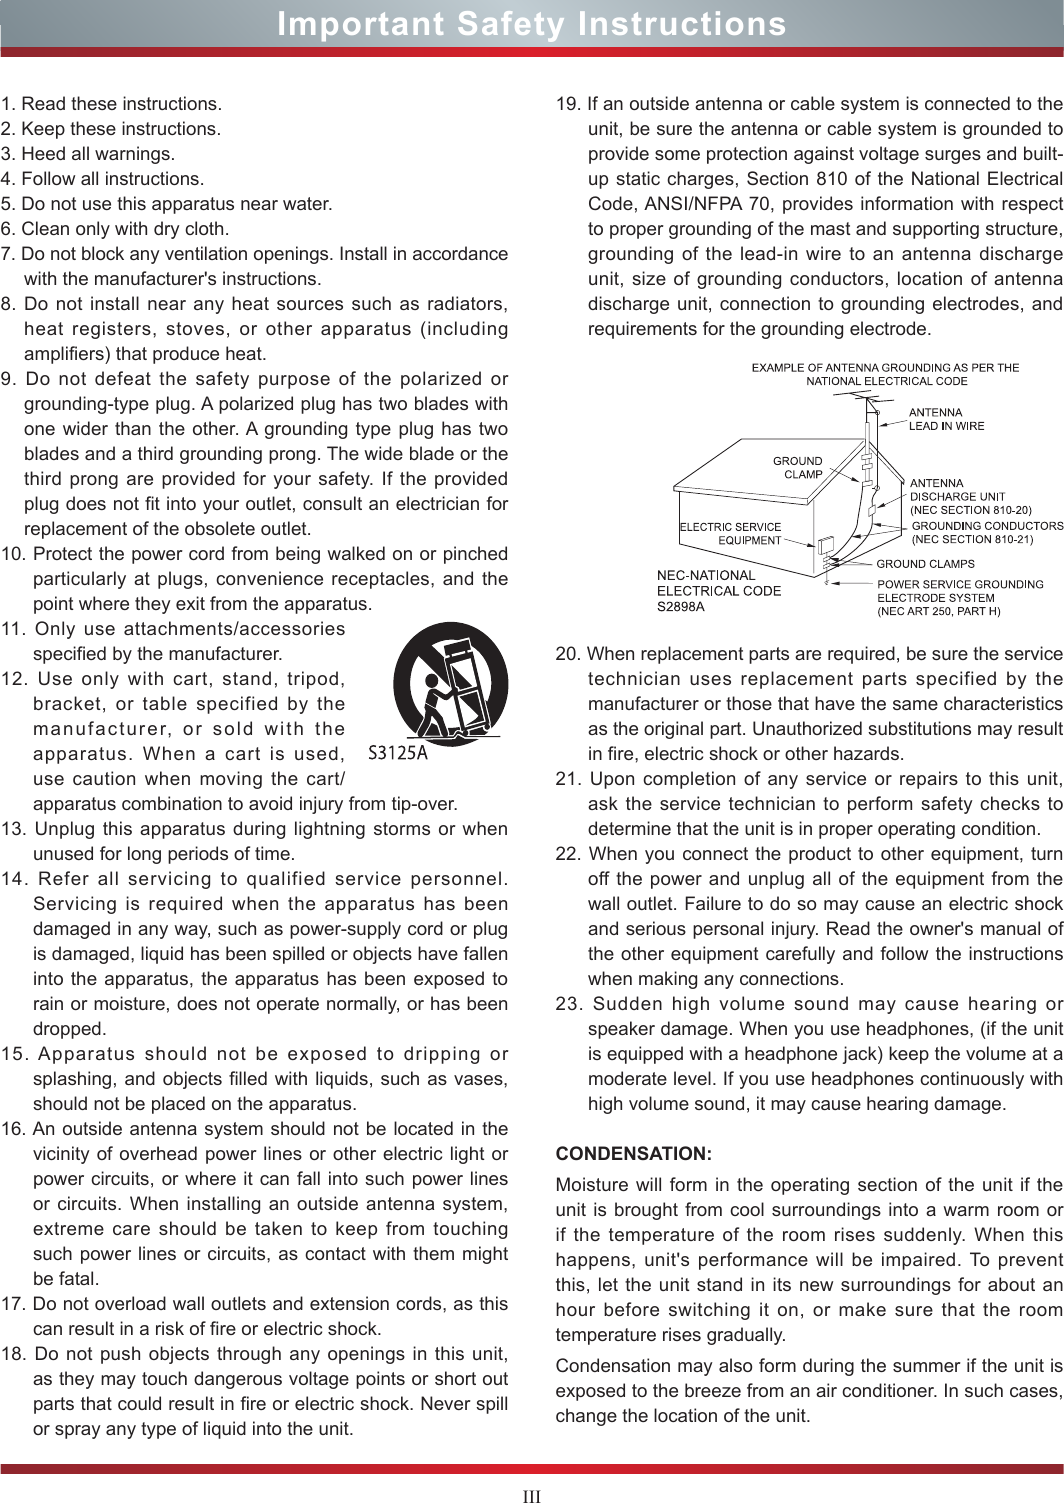
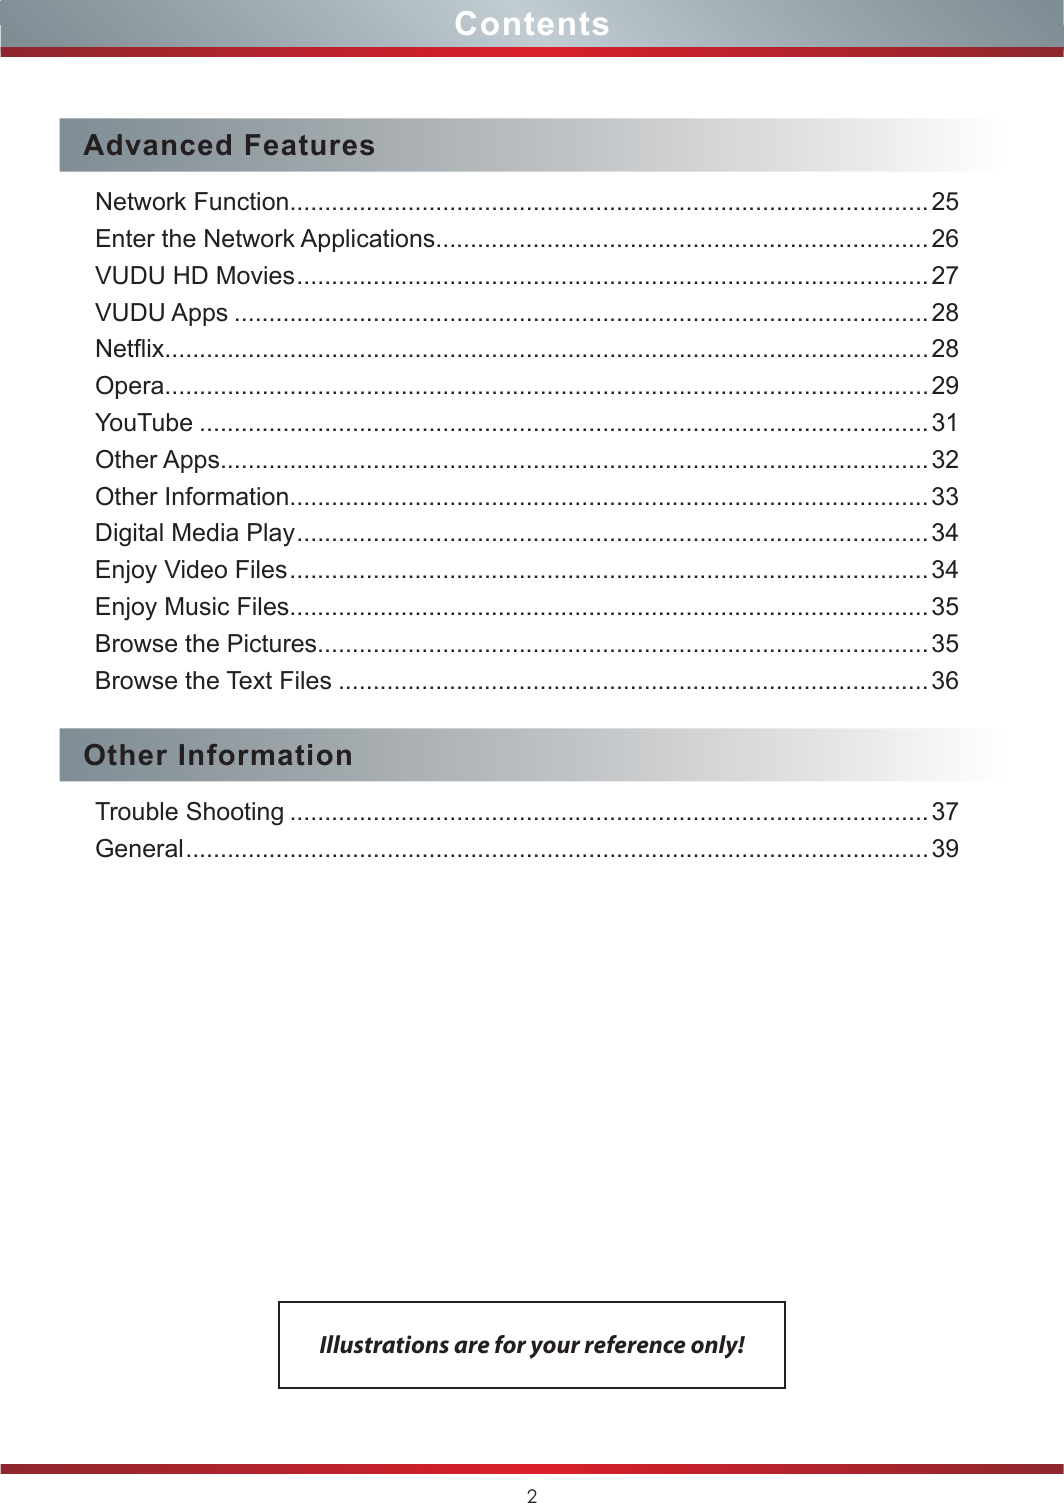
![13Basic Features1. Make sure that you have: Installed the remote control batteries.Connected an antenna or cable.Connected the power cord.Matched the remote control with TV.2. Press [POWER ] button to turn on your TV. The Setup Wizard menu displays.3. Press [▲/▲/▲/▲] to select your menu language: English, Spanish or French, press [ENTER] button to confirm. 4. Press [▲/▲] to select your Picture Mode: Home Mode or Retail Mode, press [ENTER] button to confirm. If you select Retail Mode, a message appears “Are you sure you want retail mode?” Select “Yes” to continue, or select “No” to change your selection.IMPORTANT: At first, you have to match the remote control with TV.To turn your TV on or off (standby mode):1. Plug the power cord into an AC power outlet.2. Press [POWER] button or use the Tap Pad located on the TV (see “viewing the control panel”). Your TV turns on. 3. Press [POWER] button again to turn off your TV. When you turn off your TV, it goes into standby mode.The Setup Wizard menu appears the first time you turn on the TV. It will assist you to specify the menu language, Picture Mode, Tuner Mode and Channel Installation.IMPORTANT: Make sure that the antenna or cable is connected and a wired or wireless Internet connection is available.Turning the TV On for the First TimeTurning the TV on or offIf you selected Retail Mode, Energy Saving is not realized.5. Press [▲/▲] to select your Tuner Mode: Antenna or Cable, press [ENTER] button to confirm. 6. Press [▲/▲] to set the Channel Installation: Scan or Skip Scan, press [ENTER] button to confirm. If you select “Scan”, your TV automatically starts Channel Installation available in your viewing area. If you select “Skip Scan”, your TV does not scan for channels.Depending on the reception condition, it may take up to 25 minutes or more to complete memorizing channels. Please allow the process to complete without interruption.WARNINGWhen your TV is in standby mode, it is still receiving power. To completely disconnect power, unplug the power cord.NOTEIf your TV does not receive an input signal for several minutes, it automatically goes into standby mode.EXITChoose your menu LanguageEnglishEspañolFrançais Select Next Exit Back Select Next ExitEXITChoose your Picture ModeHome modeRetail modeEXITPlease connect cable or antennaChannel InstallationStatus: Scanning...ATV Program Installed: 3DTV Program Installed: 2 Cancel8%The first time you turn on your TV, you must select the TV signal source. Your TV stores this information, so you do not need to change the TV signal source unless it changes. For example, you change from an outside antenna to cable TV.To select the video input source:1. Turn on your TV, then press [INPUT] button on the remote or on the TV. The Input Source menu opens.2. Press [▲/▲] button to highlight the input source, then press [ENTER] button.3. Press [POWER] button again to turn off your TV. When you turn off your TV, it goes into standby mode.Selecting the Input SourceINPUTTVAVComponentVGAHDMI 1HDMI 2HDMI 3HDMI 4Hi-DMPEXITOKSelectEnterExit](https://usermanual.wiki/Hisense-Electric/LCDF0005.W9HLCDF0005-user-Manual-1/User-Guide-1700097-Page-20.png)
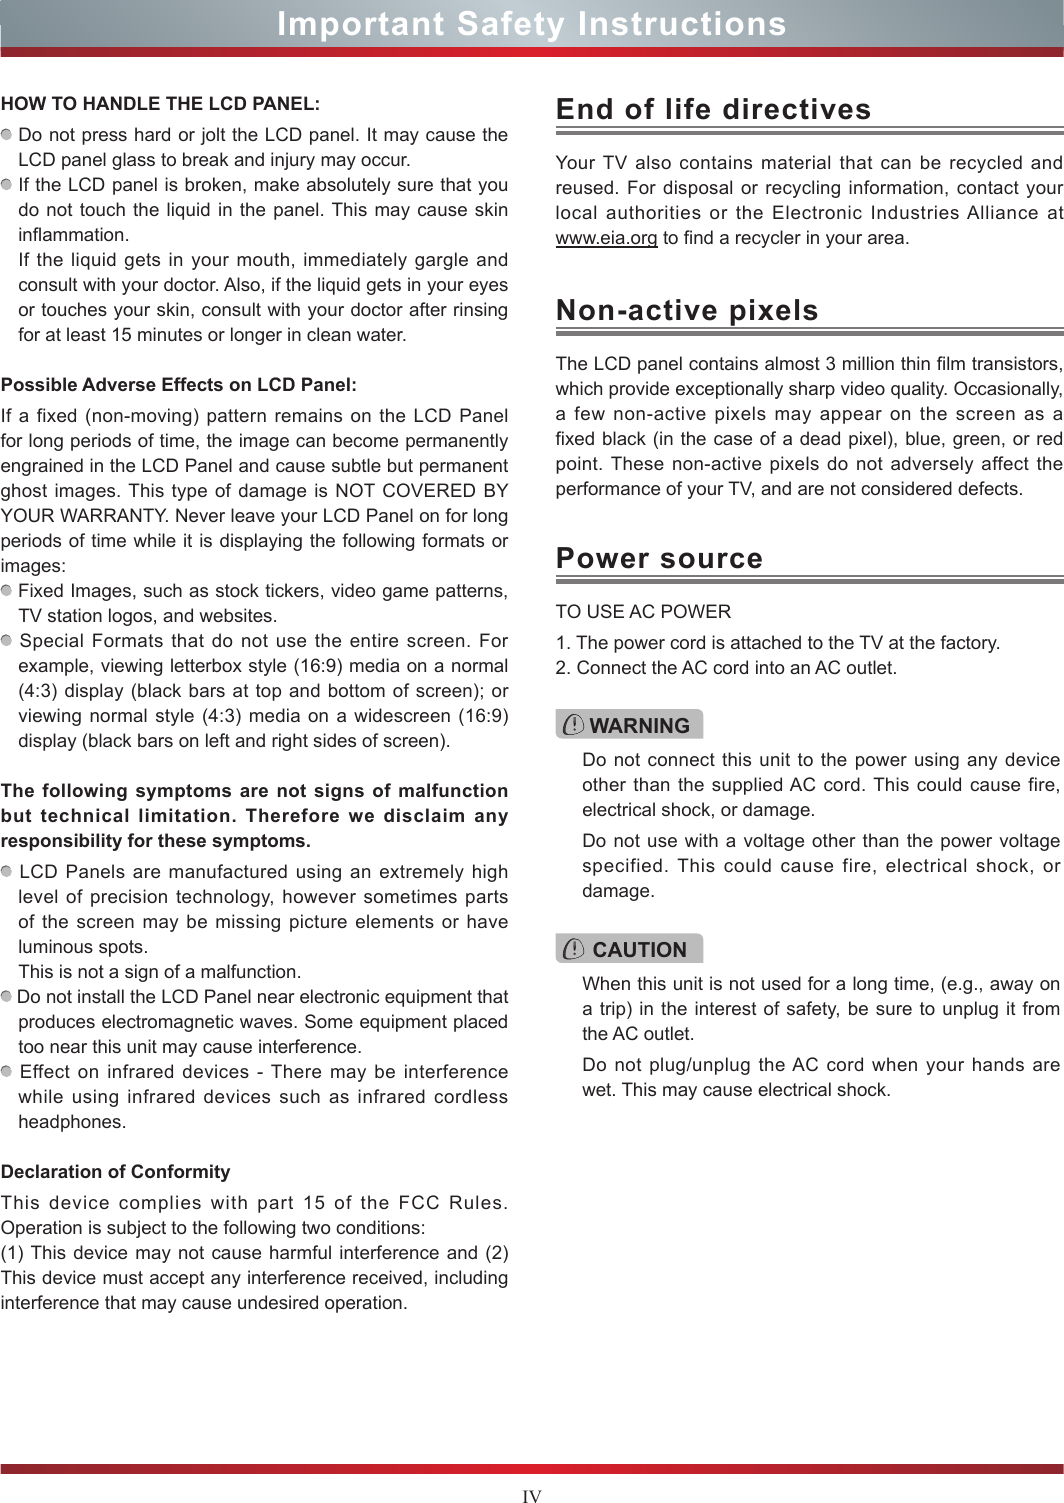
![14Basic FeaturesAspect - Select the screen aspect ratio from Normal, Wide, Zoom and Cinema.Normal: The original 4:3 aspect ratio (1.33:1 signal) is preserved, so black bars are added to the left and right of the image. Standard TV broadcasts are displayed with a 4:3 aspect ratio.Wide: When watching a standard broadcast or full-frame movie in this mode, the display image is stretched proportionately to fill the TV screen. When watching a widescreen (1.78:1 signal) program or movie, the display image fills the TV screen.Zoom: Stretch the 4:3 aspect ratio image vertically and horizontally to fill the screen at 1:1.78 aspect ratio.Cinema: Stretch the 4:3 aspect ratio image vertically and horizontally to fill the screen at 1:2.35 aspect ratio. Shortcuts InstructionsDISPLAY - Display the information banner. The information including channel number, channel name, current system time, tuner mode, audio stream, video format, audio language, closed caption mode, parental locks rated, program details, etc.GUIDE - Open the DTV program guide. The program guide information is provided by the broadcasting company.FAV - Display your Favorite List. You can add or delete channels to create your favorite list. Cursor up/down: Press [▲/▲] button to select the option.Add/Erase: Press [YELLOW] button to add or delete the channel from Favorite List.Page up/down: Press [RED/GREEN] button to page up or down. VUDU - VUDUTM is an on-demand, pay-per-view, service that offers high-definition movies via the Web. You can access the VUDU service by pressing this button. Hi-Smart - Press to open the Hi-Smart Hub. The Hi-Smart Hub provides convenient access to Services and Apps which let you watch movies, TV shows, listen to music, and much more.NETFLIX - Press to open the Netflix interface. Netflix is an online DVD and Blu-ray Disc rental service, offering instant access to movies and TV shows to Netflix members. Netflix unlimited membership required (subscription not included).1. Press the [CH V/V] (or [CH +/-]) on the TV/remote control to change the channel.2. Press the [VOL V/V] (or [VOL +/-]) on the TV/remote control to adjust the volume.3. Press the numeric buttons on the remote control to display the corresponding channels.Changing Channels / VolumeNOTEChanging the channels can also be achieved by directly entering the channel number using the numeric keys on the remote control. If you are entering a two or three digit channel number, the time between key presses should be less than 3 seconds.](https://usermanual.wiki/Hisense-Electric/LCDF0005.W9HLCDF0005-user-Manual-1/User-Guide-1700097-Page-21.png)
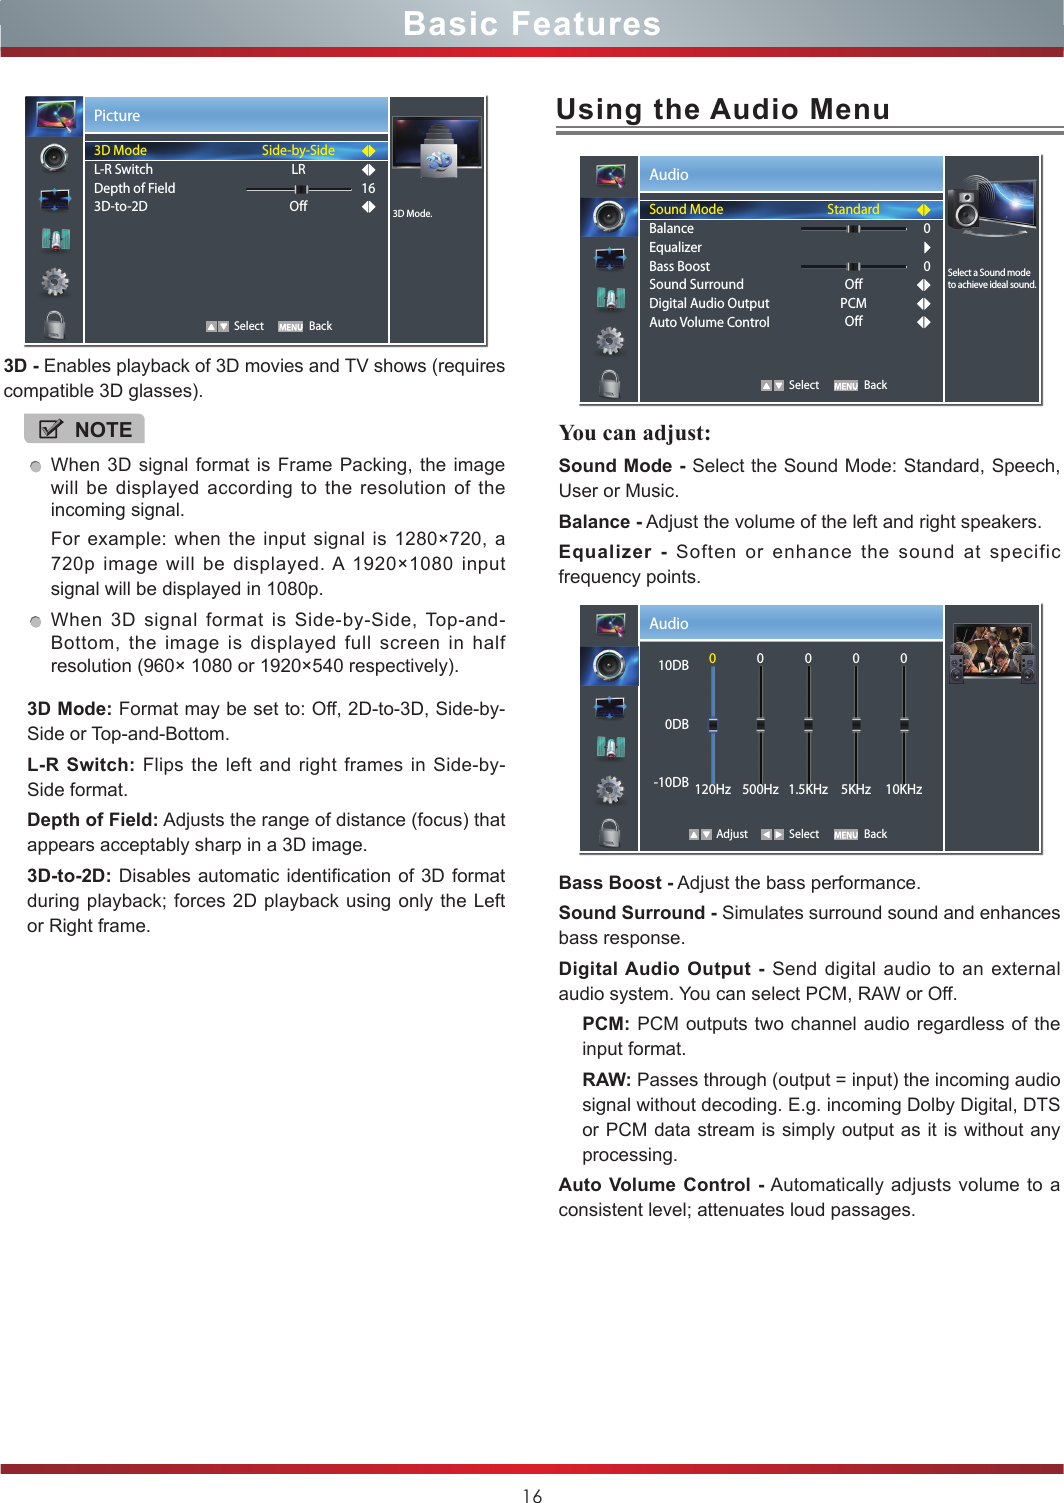
![15Basic FeaturesTo Use the Menu1Press the [Menu] button to open the main menu.2Press [▲/▲] to select a menu option, then press [▲/ENTER] to enter the menu.3In each menu, you can: Press [▲/▲] to select an item, Press [▲/▲] to adjust the value, orPress [▲/ENTER] to enter the submenu, Press [RETURN] to exit the submenu. 4Press [EXIT] button to exit the menu.NOTEFOR ILLUSTRATION ONLY.Using the Picture MenuYou can adjust: Picture Mode - Adjust the Picture Mode. You can select Standard, Theater, Energy Saving, Game, Custom or Vivid.Brightness - Increase or decrease the brightness of the picture. Increasing the brightness can add more light to dark areas of the picture, while decreasing the brightness can add more darkness to light areas of the picture.Contrast - Increase or decrease the contrast of the picture. Increase the contrast to adjust the white areas of the picture or decrease the contrast to adjust the black areas of the picture.Color - Adjust the level of color in the picture.Tint - Adjust flesh tones so they appear natural.Sharpness - You can increase the sharpness level for clearer images or decrease the sharpness level for smoother images.Advanced Video - Access advanced video settings such as Color Temperature, Noise Reduction, Adaptive Contrast and 120Hz Smooth Effect.Color Temperature: Change the color temperature. You can select a preset color temperature: Cool, Standard and Warm.Noise Reduction: Optimize the picture quality by filtering signal interference. You can select Off, Low, Medium or High.Adaptive Contrast: Automatically adjusts the contrast level of the selected input source.120Hz Smooth Effect: Inserts frames to reduce judder in fast action scenes. You can select Off, Low, Middle or High.Picture Select BackAdjust advanced video features DNR.Color TemperatureNoise ReductionAdaptive Contrast120Hz Smooth EffectStandardMediumOffOffNOTEWhen 3D video is watched under the fluorescent lamp (50~60 Hz) or tri-band fluorescent tube, there may be slight flicker, so please adjust the illumination downward or switch off the light.Certain functions, such as Zoom, are not available when watching 3D movies and TV shows.Other brands 3D glasses may not be supported.Sit upright facing the TV when watching 3D movies and TV shows.This TV supports automatic identification of common 3D formats when connected to HDMI V1.4 compatible sources. Other 3D sources require manual setup.Two pair of 3D glasses are included with your TV. To obtain additional pairs of Hisense 3D glasses, please contact customer service at 1-800-935-8880 for details and purchase. Enter Select ExitPictureAdjust image to suit personal preferences.Picture ModeBrightnessContrastColorTintSharpnessAdvanced Video3D505050010StandardStandardOK](https://usermanual.wiki/Hisense-Electric/LCDF0005.W9HLCDF0005-user-Manual-1/User-Guide-1700097-Page-22.png)
![17Basic FeaturesUsing the Screen Menu Using the Channels MenuYou can adjust: H.Position - Move the image right or left.V.Position - Move the image up or down.Phase - Adjust the focus of stable images.Clock - Adjust the sample frequency.Auto Adjust - Detects input signal clock, phase and position and adjusts TV display accordingly.You can adjust: Tuner Mode - Select TV source: Antenna or Cable.Auto Channels Search - Scans for channels that have signals and stores the channels information in the channel list.Channel Skip - You can cancel a channel stored in the channel list.Favorite List - Add or delete channels to create a favorite list. You can press [FAV] button to display your Favorite List.MTS - Select the default audio stream: Mono, Stereo or SAP.Audio Language - Select the audio language: English, Español or Français. NOTEOnly available in VGA mode.Screen Enter Select Exit393023127 Image positioning and PC settings.H.PositionV.PositionPhaseClockAuto AdjustOKChannels Select BackSelect tuner connect mode.Tuner ModeAuto Channel SearchChannel SkipFavorite ListMTSAudio LanguageAntennaStereoEnglish CancelAuto ScanStatus: Scanning... AntennaAnalog Channels: 0Digital Channels: 08%NOTEWhen you press [CHV / V] button, your TV skips the channel you cancelled. You can still tune to the channel using the number buttons on the remote control.NOTEOnly available in TV mode.](https://usermanual.wiki/Hisense-Electric/LCDF0005.W9HLCDF0005-user-Manual-1/User-Guide-1700097-Page-24.png)

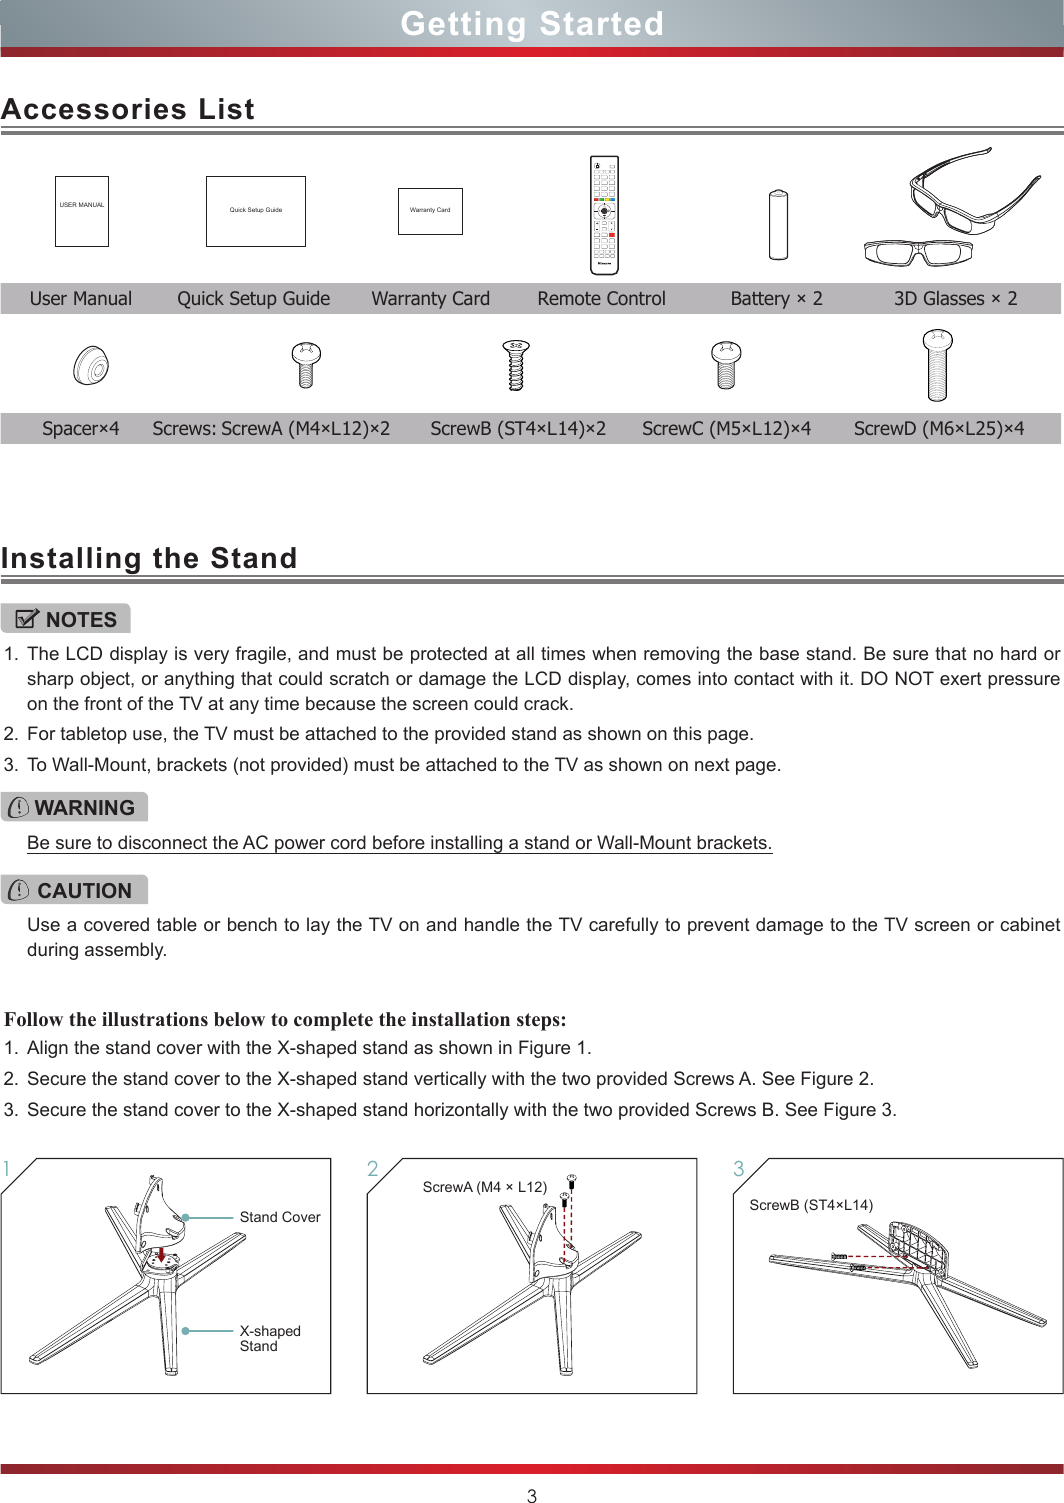
![19Basic FeaturesUsing the Lock MenuWhen you first use this function, the default password is [0000]. Once you input this password, you can set options.You can adjust: Channel Block - Block selected Channels on the TV.Program Block - Block selected Programs on the TV.Rating Enable: Block or unblock TV ratings.U.S. TV Ratings: Restrict TV programs by USA Ratings.U.S. Movie Ratings: Restrict movie by USA Ratings.Canadian English/French Ratings: Restrict movie and TV programs by Canadian Ratings.Open V-Chip: Display an advanced V-Chip ratings table for digital channels (USA only).Block Unrated: Block unrated TV programs.Input Block - Block selected Input source on the TV.Change Password - If you want to change the default password, first enter the new password then enter the same password again.Clean All - You can reset all locks to factory mode.Following is the description of these ratings.U.S. Movie RatingsRating Defined asG General audiencePG Parental Guidance suggestedPG-13 Parents strongly cautionedR RestrictedNC-17 No one 17 and under admittedX Adult audience onlyLock Enter Select BackPrevent access to TV services.Channel BlockProgram BlockInput BlockChange PasswordClean AllOKU.S. TV RatingsAge Defined asTV-Y All childrenTV-Y7 Directed to older childrenTV-G General audienceTV-PG Parental Guidance suggestedTV-14 Parents Strongly cautionedTV-MA Mature Audience onlyContents Defined asAAll of the ratings below that rating set blocked automaticallyD Suggestive dialogueL Strong languageS Sexual situationsV ViolenceFV Fantasy ViolenceCanadian English RatingsRating DescriptionC ChildrenC8+ Children 8 years and olderGGeneral Programming, suitable for all audiencesPG Parents Guidance14+ Viewers 14 years and older18+ Adult ProgrammingCanadian French RatingsRating DescriptionG General8 ans+ 8+General; Not recommended for young children13 ans+ Programming may not be suitable for children under the age of 1316 ans+ Programming is not be suitable for children under the age of 1618 ans+ Programming restricted to adults](https://usermanual.wiki/Hisense-Electric/LCDF0005.W9HLCDF0005-user-Manual-1/User-Guide-1700097-Page-26.png)