Hisense Electric LCDF0036 Part15 Subpart B-LED LCD TV User Manual QSG English VIDAA V0 9
Hisense Electric Co., Ltd. Part15 Subpart B-LED LCD TV QSG English VIDAA V0 9
Contents
- 1. W9HLCDF0036_User Manual 1
- 2. W9HLCDF0036_User Manual 2
W9HLCDF0036_User Manual 2
55H7G
ctual product.
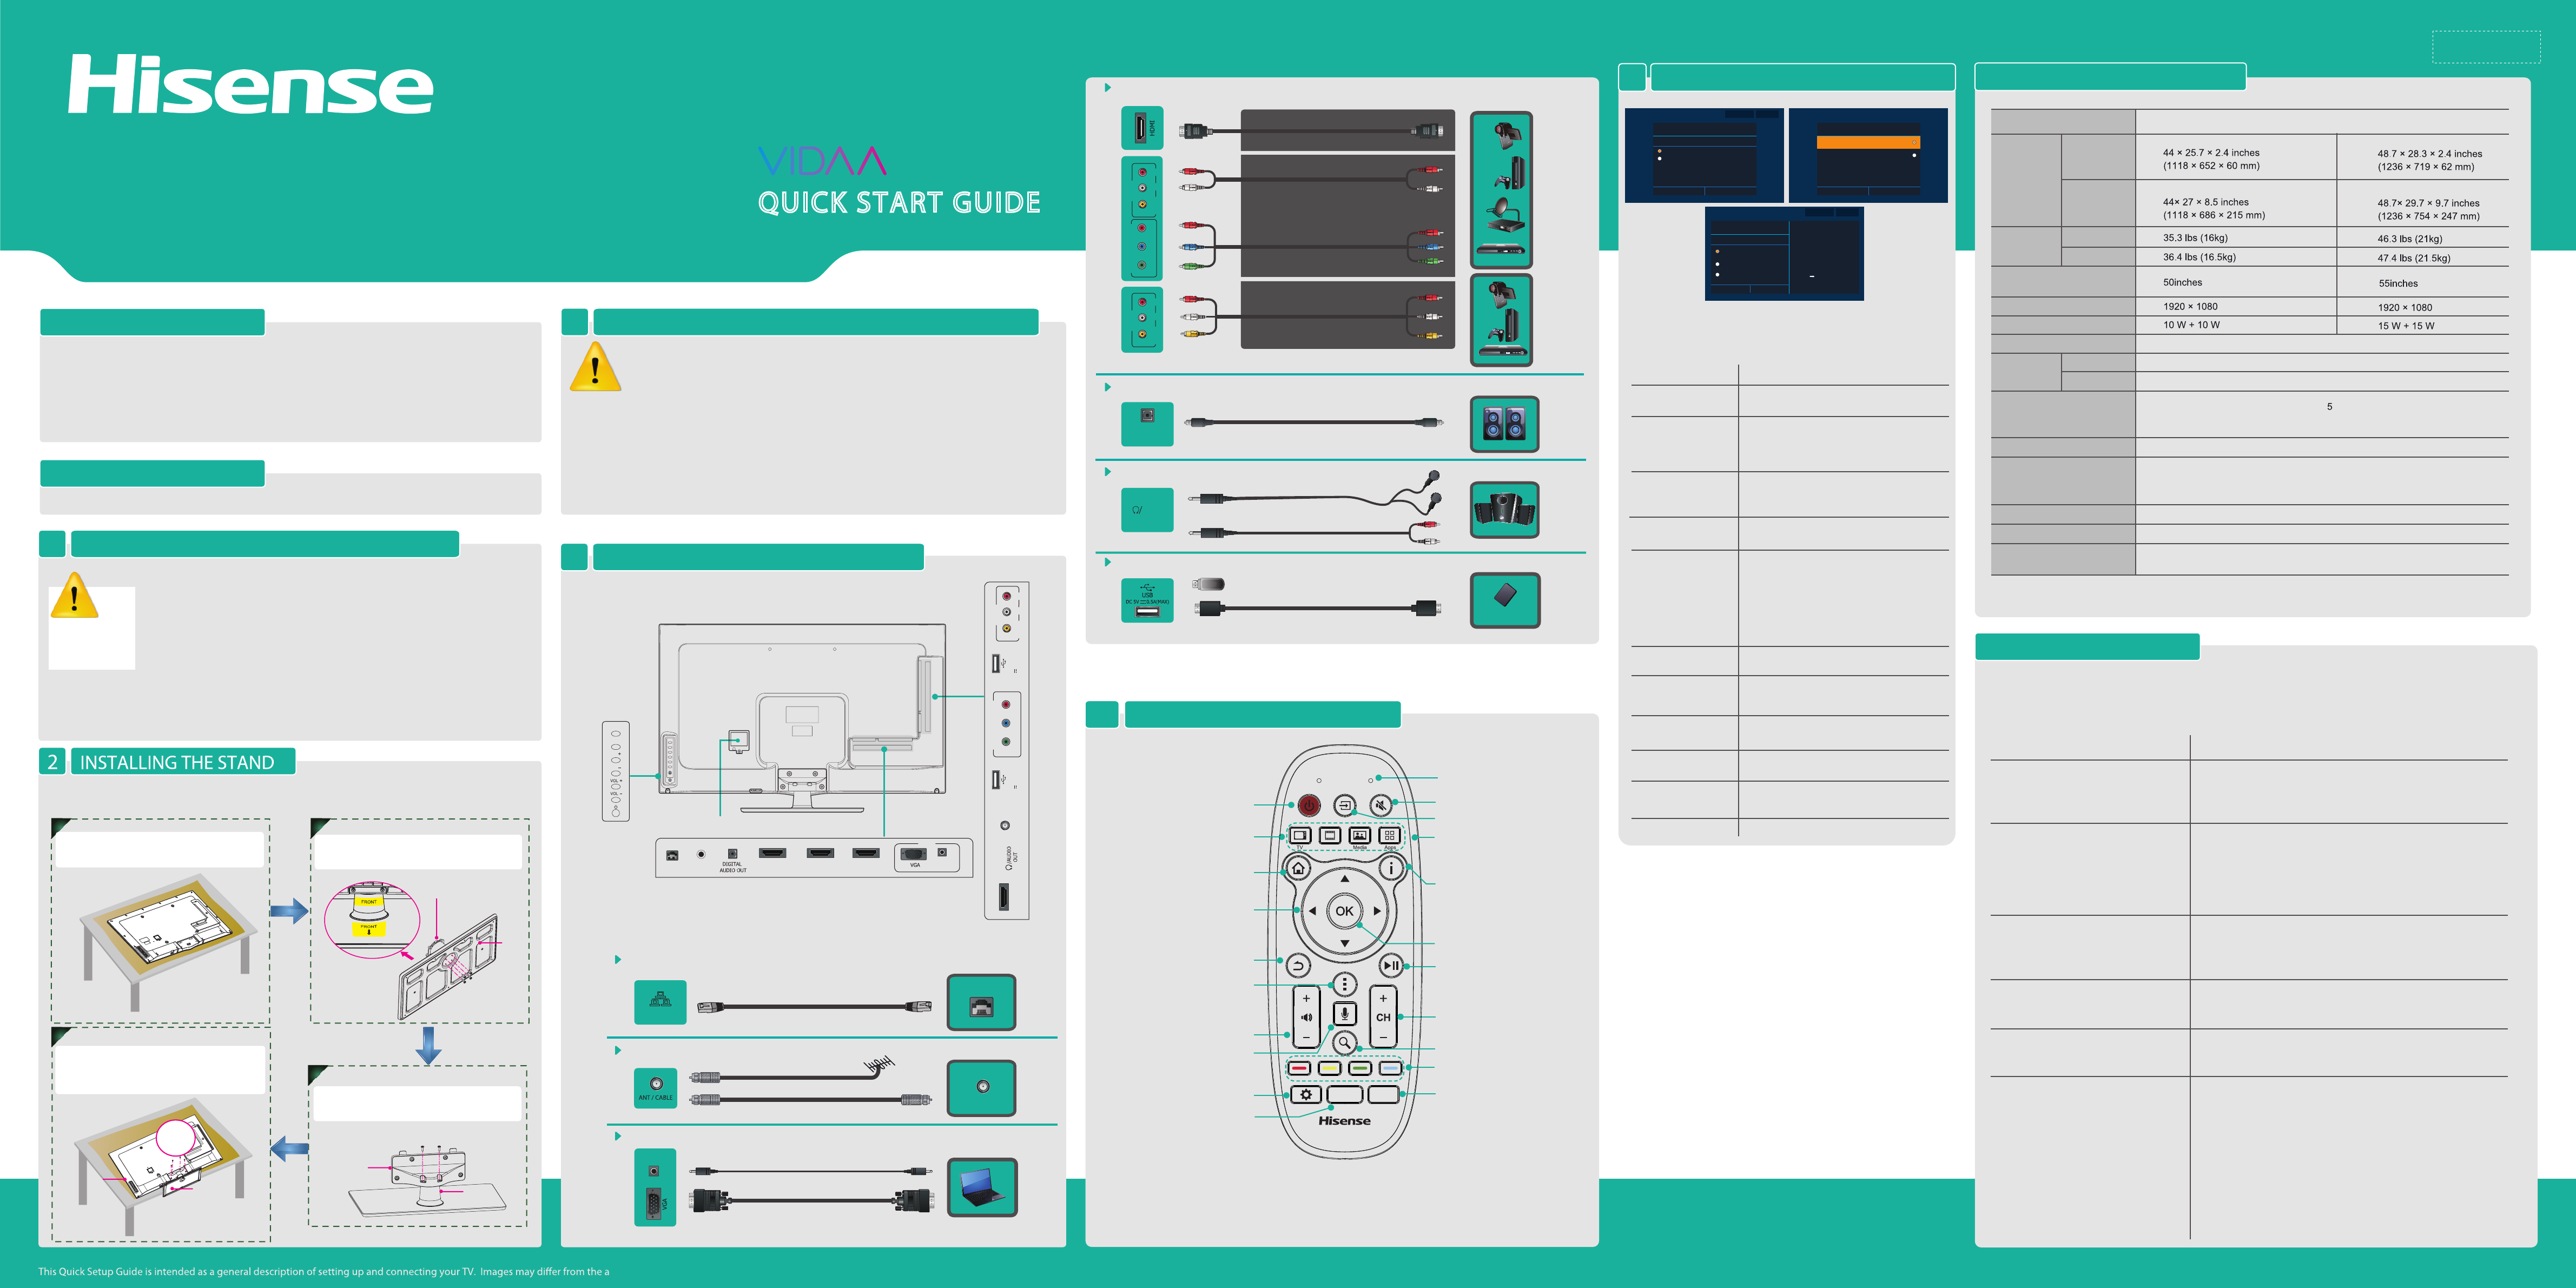
Connect a USB device for browsing photos, music and movies.
USB
Mobile Hard Disk
SPECIFICATIONS
INSTALLING A WALL-MOUNT BRACKET (optional and not included)
3
PACKAGE CONTENTS
• User manual
• Quick setup guide
• Warranty card
• 2 sets of batteries (AAA and AA)
• 4 Phillips screws (M4 x 8mm) 0.341 inches
• Infrared blaster
• 4 spacers
• 2 remote controls
Standard infrared (Model EN-33927A)
Bluetooth® and infrared (Model ERF6C11)
CY-
Connect an optical cable to an external digital audio system.
DIGITAL AUDIO OUT
DIGITAL
AUDIO OUT
Weight
LCD Panel Minimum size
(diagonal)
Screen resolution
Model Name
Dimension
Without Stand
Audio power
Power supply
Receiving
systems
120 V ~ 60 Hz
Receiving channels
Tuner type
Environmental conditions
VHF: 2~13 UHF: 14~69 CATV: 1 ~ 125
Digital Terrestrial Broadcast (8VSB): 2 ~ 69
Digital cable (64/256 QAM): 1 ~ 135
NTSC
ATSC / QAM
Component Input
VGA Input VGA (640×480 / 60 Hz), SVGA (800×600 / 60 Hz), XGA (1024×768 / 60 Hz)
480 I / 60 Hz, 480 P / 60 Hz, 720 P / 60 Hz, 1080 I / 60 Hz, 1080 P / 60 Hz
HDMI Input RGB / 60 Hz (640×480, 800×600, 1024×768)
YUV / 60 Hz (480I, 480P, 720P, 1080I, 1080P)
Frequency synthesized
Temperature: 41°F ~ 95°F (5°C ~ 35°C)
Humidity: 20% ~ 80% RH
Atmospheric pressure: 86 kPa ~ 106 kPa
With Stand
Analog
Digital
Without Stand
With Stand
When there is something wrong with your TV, you can try turning o the TV and restarting it. You can
also refer to the following chart for problem and solution tips. If you're unable to resolve the problem,
contact Hisense at 1-888-935-8880 .
• Check if the power cord is plugged into AC outlet and if it has electricity.
• Check if you have pressed POWER button on the TV or POWER
button on the remote control.
• Check to see if LED on. If illuminated, power to TV is OK.
• Check the network physical connection to make sure it is correct.
• Make sure the configuration is correct according to your network
service provider.
• Check the volume settings.
• Check if Mute mode is set ON .
• Check if headphones are connected.
• Check if the audio output is set to AV receiver. If it is, be sure the AVR
is powered on and set to the proper input.
• If using a cable / satellite set top box, check if Mute is set to ON.
• Check network physical connection, make sure connection is correct.
• Make sure configuration is correct according to your network service
provider.
• You need a broadband (high speed) Internet service with a speed of
no less than 1.5 Mbps.
• Connect the TV to the Internet through your router by an ethernet
cable or wireless connection. If the connection fails, check with your
internet service provider or router manufacturer to determine if there is
a firewall, content filter, or proxy settings that may block the TV from
accessing the Internet.
• After connecting the TV to the Internet, press the [Home] button on the
remote to access the applications.
POSSIBLE SOLUTIONS
SYMPTOMS
No sound or picture
Picture is normal, but no sound
Unable to establish a network connection
Unable to connect to Netix
I have connected an external source to
my TV and I get no picture and/or sound.
How do I get the applications to work
on my TV?
• Check to ensure the physical network connection and configuration is correct.
• Make sure that network connection test is successful.
• For Netflix: Enter Netflix to reset Netflix account.
Barcode
35*10.5mm
Connect headphone for audio out of the TV.
HEADPHONE
OR
AUDIO
OUT
CONNECTING COMPONENTS TO THE TV
4
TROUBLESHOOTING TIPS
B. Use the diagrams shown in gure [5] below to apply the appropriate connector to your TV.
A. Use the diagram in gure [4] to establish proper connections.
Connect an outdoor VHF/UHF antenna.
ANT
OR
HDMI / COMP / AV Connect an HDMI cable or Comp/AV Adapter from an external A/V equipment.
Video Eect:
BEST (HDMI)
BETTER
(COMPONENT)
GOOD
(AV)
VGA & VGA AUDIO Connect a VGA cable and an audio cable from the PC.
PC/DVI
AUDIO IN
LAN Connect an ethernet cable to access a network or the Internet. TV also features wireless
connectivity.
LAN
LAN
VIDEO
AV IN
L R VIDEO
AV IN
L R
Y PBPR
COMPONENT IN
VHF/UHF Antenna
Cable
ANT OUT
Power input TV Bottom View
TV Side View
Button View
VIDEO
AV IN
L R
HDMI1(ARC)
HDMI2(DVI)HDMI3HDMI4
ANT/CABLE
IR BLASTER
LAN
DC 5V 0.5A(MAX)
USB2
DC 5V 0.5A(MAX)
USB1
Y PBPR
COMPONENT IN
PC/DVI
AUDIO IN
PC IN
INPUT
CH
CH
OK
TOOLS REQUIRED
PROVIDE ADEQUATE VENTILATION FOR THE TV
•
1 Phillips screwdriver
We recommend that you maintain a distance of at least four inches between the TV and
other objects (for example, walls and cabinet sides) to ensure proper ventilation. Failing
to maintain proper ventilation may result in a re or problem with the TV that is caused
by an increase in its internal temperature.
When you install your TV (using a stand or wall mount bracket), we strongly recommend that you
use screws and other parts provided by Hisense only. If you use parts provided by another
manufacturer, Hisense is not responsible for any damage to the TV, problems with the TV or bodily
injury.
Follow the instructions that are provided with the manufacturer's wall mount bracket.
If you choose to have this TV mounted to the wall, then we strongly recommend that
you hire a professional installer for assistance. Unless it is correctly mounted, the TV may slide or fall
and cause serious injury to a child or adult.
If you choose to install the wall mount on your own, then Hisense is not responsible for any damage
to the TV or injury to yourself or others.
1
If you want to install a wall-mount bracket, then skip to step 3. Otherwise,
follow the step below to install the stand.
C
Secure the STAND COVER to the STAND
COLUMN with two screws.
STAND COVER
STAND COLUMN
M4 × 12mm
SCREWS
D
a. Align the BASE STAND with the screw
holes located on the bottom of the TV.
b. Secure the BASE STAND to the TV with
the four screws tightly
BASE STAND
TV BACK
M5×12mm
SCREWS
A B
Carefully place your TV on a soft, cushioned,
surface to prevent damage to the screen.
M4 x 12mm
Secure the STAND COLUMN to the BASE
with four screws.
BASE
STAND COLUMN
SCREWS
Figure 1
Figure 4
Figure 2
Figure 4
Figure 3
MERLIN™ THE REMOTE CONTROL
5
NOTE:
1. The LED on the remote control will blink with each key press.
2. In pairing mode, the red LED will light continuously for ~60-seconds.
3.When pairing is complete, the blue LED will ash three times.
4.The LED light will blink continuously when the battery is low.
5.The remote control will automatically go into sleep mode thirty seconds after the last key press. Sleep Mode can conserve
battery life. Any movement or key press will immediately wake up the remote.
Select input
Active voice command
Special function keys
Edit settings
Enter channels
Power On/Off
Microphone for voice control
Mute audio
TV: select TV source
VOD:
Play/Pause
Select the next/previous channel
Search Google™ TV
Display the TV program guide
Display the application panel
Display the global panel
Up/Down/Left/Right
navigation buttons
Turn the volume up or down
Return to the previous display
or exit the application
Launch a menu based on where you
are on the TV
Confirm button
Media: Launch Multi-media player.
Apps: Launch the app center
VOD
0 - 9 GUIDE
MIC
TURNING THE TV ON FOR THE FIRST TIME
6
Connect to the Internet
How do you connect to the Internet?
Ethernet cable(connected)
Wireless
Back Next
Step 4 of 11 Explain step Skip step
Select Usage patterns
Retail Mode
Back Next
Step 6 of 11
Home Mode
Home Mode default settings are recommended for in-home use. ENERGY
STAR qualified
Retail Mode is intended for in-store display and reset video settings at
Power on
Set up TV service
How do you watch TV?
I have cable,satellite or other TV service
with a set-top box.
I have over-the-air other TV service
using my built-in TV tuner.
I do not have a TV service.
Back Next
Step 10 of 11 Explain step Skip step
HDMI out
to Google TV
Set-top box
Cable, satellite,
or other TV service
Follow the on-screen instructions to customize your TV settings.
• Please press [▲/
▲
] button to select your
language: English, Spanish or French.
• Press and hold down [RED] and [OK] buttons
simultaneously until the Red LED turns on.
Wait for a moment until the remote pairs
automatically.
OPERATIONSMENU
Language setting
Bluetooth® Remote
pairing
• Read the Hisense legal information. If you do
not accept the agreement, Internet functions
and services will not be available.
Hisense legal notice
• Connect to the Internet via Ethernet cable
or WiFi.
Connect to the Internet
• Select your Mode Setting: Home Mode or
Retail Mode.
• Home Mode default settings are
recommended for in-home use. ENERGY
STAR qualified.
Retail Mode is intended for in-store display
and reset video settings at Power on.
Select Usage patterns
• Sign in with your Google™ Account.
Google™ Account
• Check the TV to send the usage statistics and
crash reports to Google™ automatically.
Report data
• Enter ZIP code so that you receive accurate
programming information.
Enter ZIP code
• Select the video input you use to connect
your TV service to your TV.
Set up TV service
• Select your audio amplifier manufacturer. To
control your receiver, connect the IR blaster.
Set up AV receiver
control
Figure 5
QUICK START GUIDE
50H7G 55H7G50H7G