Hisense Electric LCDF0049 Part15 Subpart B-LED LCD TV User Manual LTDN50 55K390GWUS
Hisense Electric Co., Ltd. Part15 Subpart B-LED LCD TV LTDN50 55K390GWUS
Contents
W9HLCDF0049_User Manual 2
IMPORTANT: Be sure to look inside the styrofoam (within the upper and bottom parts of the box)
as you remove items
PACKAGE CONTENTS
PROVIDE ADEQUATE VENTILATION FOR THE TV1
CONNECTING COMPONENTS TO THE TV4
INSTALLING A WALL MOUNT BRACKET ( not provided)
3
USING MERLIN™ THE REMOTE CONTROL5
TURNING THE TV ON FOR THE FIRST TIME
6SPECIFICATIONS
TROUBLESHOOTING TIPS
Using your mobile phone, scan the first QR code to
register your product and the second QR code to access
support. Depending on the make and model of your
phone, you may need to download a QR Code scanning
application.
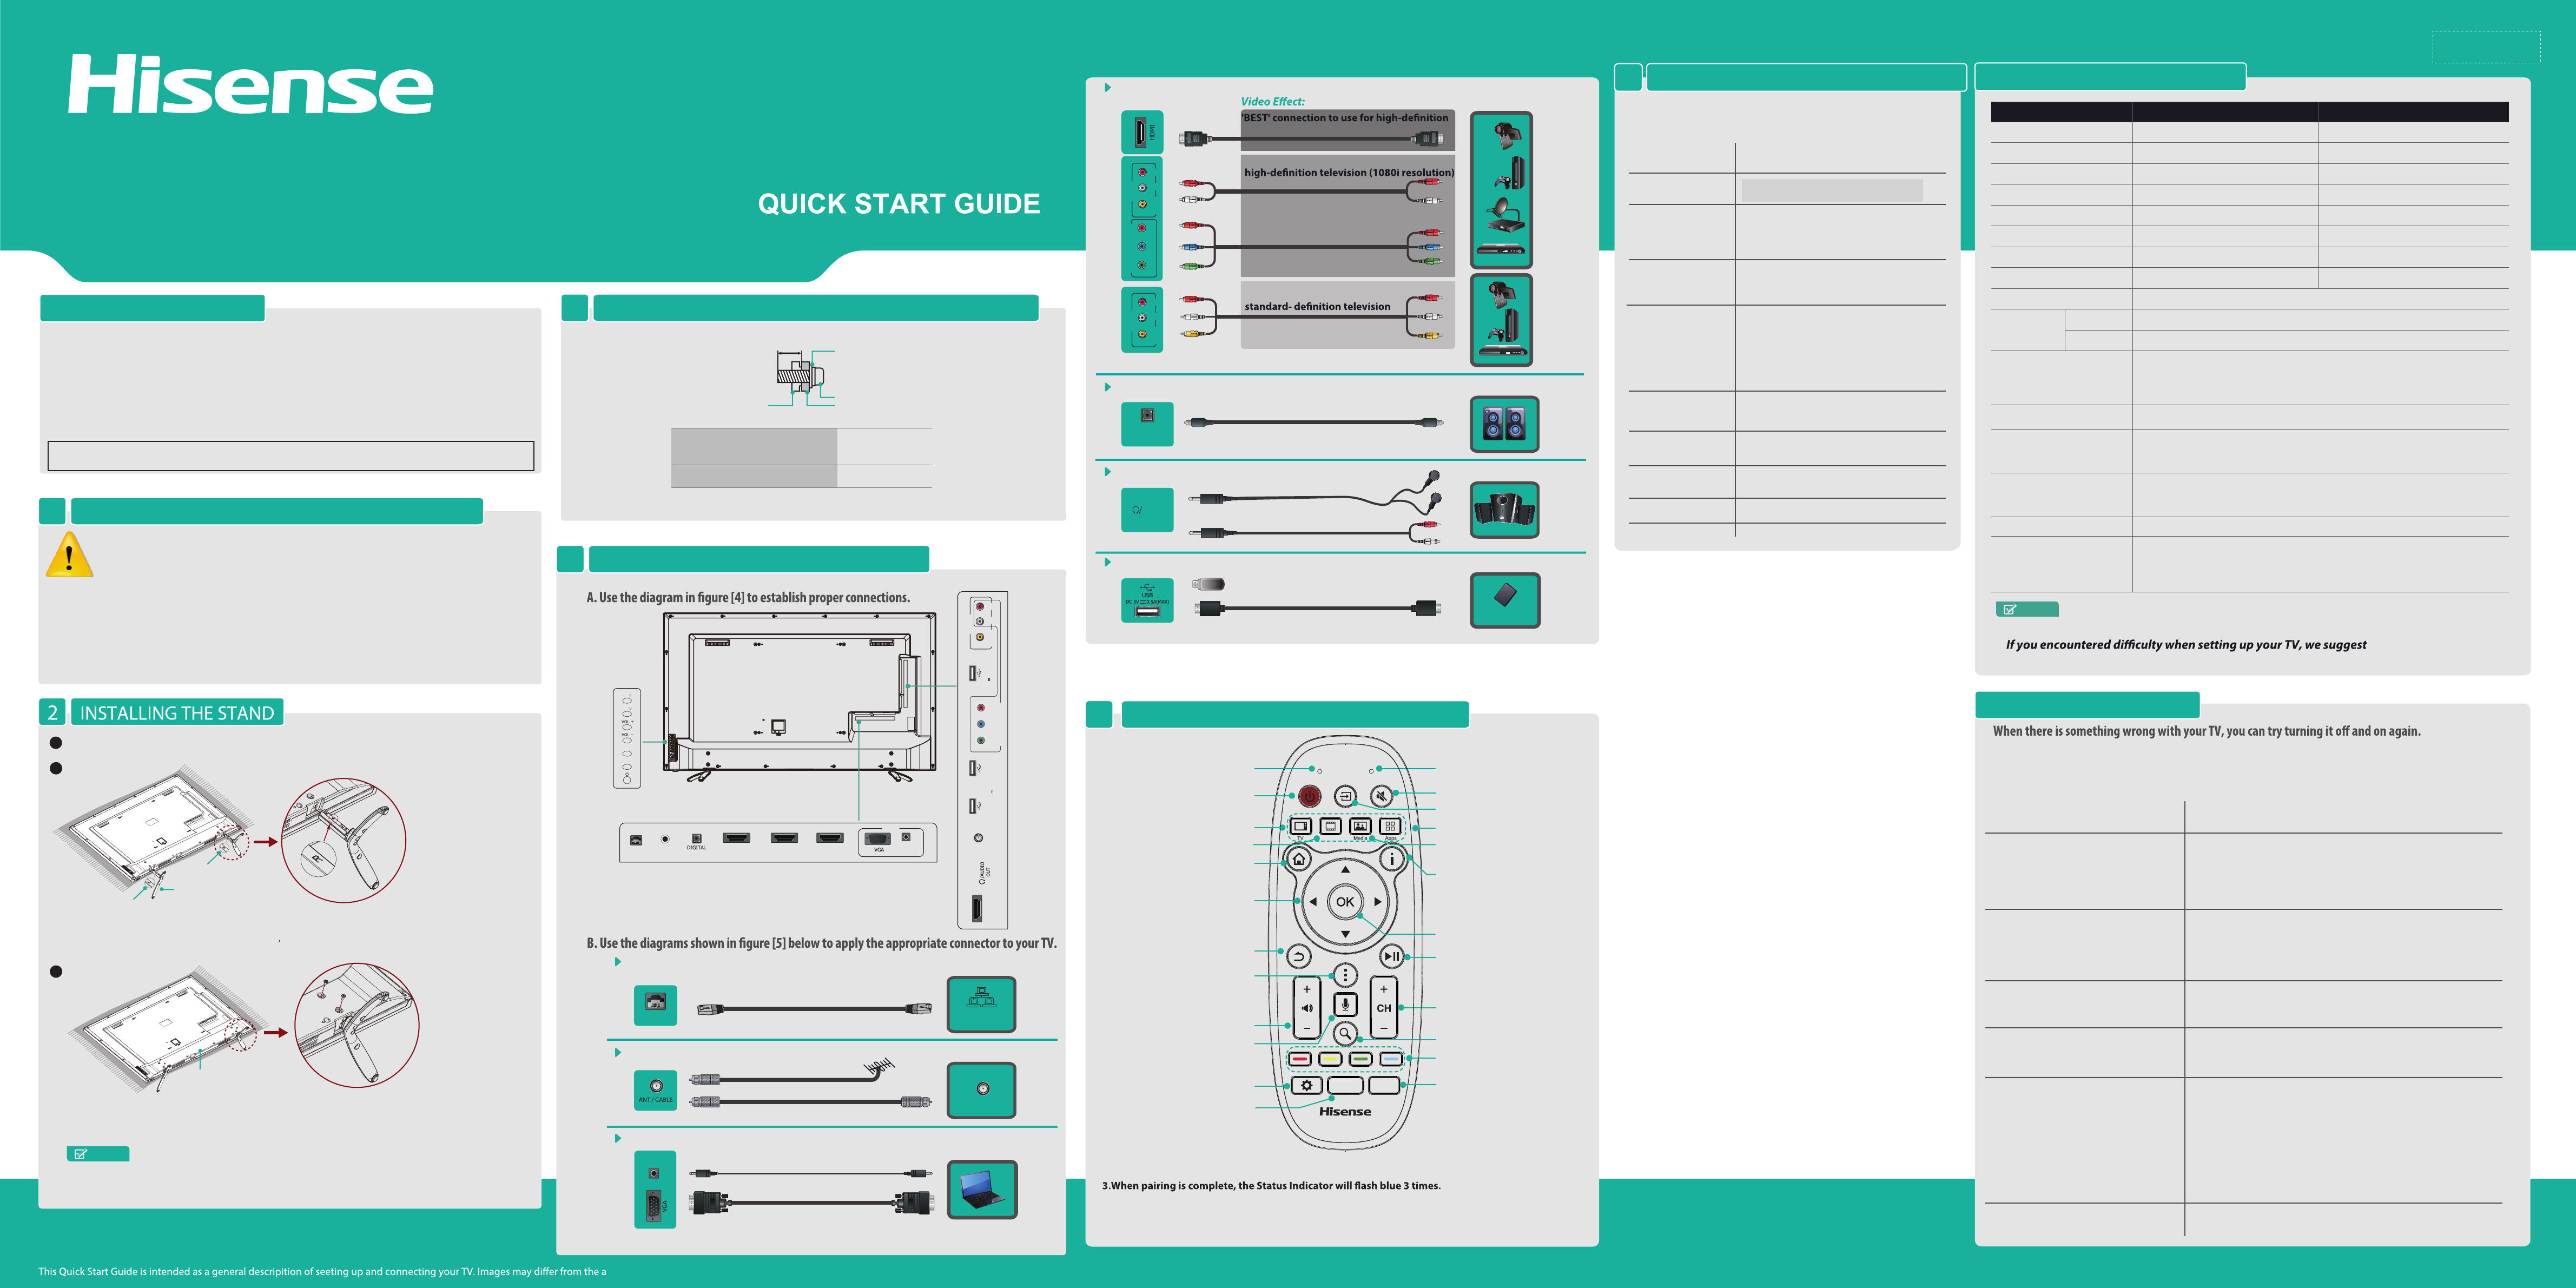
Connect a USB device for browsing photos, music and movies.
USB
Mobile Hard Disk
• Hisense VIDAA User Manual
• Hisense VIDAA Quick Start Guide
• Warranty card
• 2 Sets of batteries (AAA and AA)
• screws (M4 x 12mm) x 4
• Infrared (IR) blaster cable
• 2 Remote controls
Standard infrared (Model EN-33927A)
Bluetooth® and infrared (Model ERF6C11)
CY-
Connect an optical cable to an external digital audio system.
DIGITAL AUDIO OUT
DIGITAL
AUDIO OUT
You can also refer to the chart for troubleshooting tips. If you are unable to resolve the problem,
contact Hisense Customer Support at 1-888-935-8880.
Our business hours are Monday through Friday from 8-8 p.m. EST and Saturday-Sunday from 9-6 p.m. EST.
• Check if the power cord is plugged into an AC outlet and if it has electricity.
• Check if you have pressed the [Power] button the TV or on the remote
control.
• Check to see if the Status LED indicator light is on. If it is, then there is
power to the TV.
• Check the network physical connection to make sure it is correct.
• Make sure the configuration is correct according to your network
service provider.
• Check the volume settings.
• Check to see if the ‘Mute’ mode is set to On.
• Check to see if headphones are connected to the TV.
• Check to see if the [Audio] output is set to the AV receiver.
• If using a cable / satellite set top box, check if ‘Mute’ is set to On .
• Check the network physical connection to make sure it is correct.
• Make sure the configuration is correct according to your network
service provider.
• You need a broadband (high speed) Internet service with a speed of
no less than 1.5 Mbps.
• Connect the TV to the Internet through your router by an Ethernet
cable or wireless connection. If the connection fails, check with your
Internet service provider or router manufacturer to determine if there is
a firewall, content filter, or proxy settings that may block the TV from
accessing the Internet.
• After connecting the TV to the Internet, press the [Apps] button on the
remote to access the applications.
POSSIBLE SOLUTIONS
SYMPTOMS
No sound or picture
Picture is normal, but no sound
Unable to establish a network connection
• Check to make sure that there are batteries in the remote.
• Check to make sure that the remote is paired.
Unable to use the Air Mouse or Voice
Search
I have connected an external source to
my TV and I get no picture and/or sound.
How do I get the applications to work
on my TV?
Barcode
35*10.5mm
Connect a headphone to hear audio from the TV.
HEADPHONE
OR
AUDIO
OUT
Connect an outdoor VHF/UHF antenna.
ANT
OR
HDMI / COMP / AV Connect an HDMI cable or Comp/AV Adapter from an external A/V equipment.
television (1080p resolution)
'BETTER' connection to use for
'GOOD' connection to use for
VGA & VGA AUDIO Connect a VGA cable and an audio cable from the PC.
PC/DVI
AUDIO IN
LAN Connect an Ethernet cable to access a network or the Internet. The TV features wireless
connectivity.
VIDEO
AV IN
L R VIDEO
AV IN
L R
YPBPR
COMPONENT IN
VHF/UHF Antenna
Cable
ANT OUT
We recommend that you maintain a distance of at least four inches between the TV
and other objects (for example, walls and cabinet sides) to ensure proper ventilation.
Failing to maintain proper ventilation may result in overheating or other problems
with the TV that is caused by an increase in its internal temperature.
When you install your TV, we strongly recommend that you only use screws and other
parts provided by Hisense. If you use parts provided by another manufacturer, Hisense is not
responsible for any damage to the TV, problems with the TV or bodily injury.
Follow the on-screen instructions to customize your TV settings.
Please press [▲/] button to select your
language: English, Spanish or French.
Pair with your TV to get the most out of your
remote control.
OPERATIONSMENU
Language setting
Pair the Remote
Control
Read the Hisense legal information. If you do not
accept the agreement, Internet functions and
services will not be available.
Accept the Hisense
License Agreement
• Select the environment (Home or Retail)
from which you are setting up your TV.
• ‘Home’ mode default settings are
recommended for in-home use. This TV is
ENERGY STAR qualified.
• ‘Retail’ mode is intended for in-store display
Select the TV
Environment
Connect the TV to your network in order
to access online media and apps
Select a Network
Connection
Enter your zip code to receive accurate
programming information
Enter ZIP code
Select the video input you use to connect
your TV service to your TV.
Set up TV service
Scan for channels
Scan for channels
Figure 5
ctual product
LAN
LAN
NOTE:
1. The Status Indicator on the remote control will blink with each key press.
2. In ‘pairing’ mode, the Status Indicator will light red continuously for 60 seconds.
4.The Status Indicator will blink continuously when the battery is low.
5.The remote control will automatically go into sleep mode 30 seconds after the last key
press. Sleep Mode can conserve battery life. Any movement or key press will immediately
wake up the remote.
Select input
Activate voice command
Special function keys
Edit settings
Enter channels
Power On/Off
Microphone for voice searchStatus Indicator
Mute audio
TV: Select TV
VOD: Select On Demand
Play/Pause
Select the next/previous channel
Search Content and Web
Launch TV Guide or PrimeTime
Mini-Guide
Display the Information Panel
Display the Home Panel
Up/Down/Left/Right
navigation buttons
Turn the volume up or down
Return to the previous display
or exit the application
Launch a Menu
Confirm button
Media: Select the Media center
Apps: Select the App center
VOD
0 - 9 GUIDE
MIC
50K390GW/55K390GW
1Carefully place your TV facedown on a soft, flat surface to prevent damage to the TV
or scratching to the screen.
2
Insert the stands into the bottom slots of the TV.
Attention: The stands need to be installed according to the direction mark on the
stand surface. When face toward the back of the TV insert the base stand marked
“L” into the left slot and insert the base stand marked “R” into the right slot.
L
R
BASE STAND
NOTE
Product image is only for reference, actual product may vary in appearance.
3
Align the BASE STAND with the screw holes on the bottom of TV BACK, secure the
BASE STAND to the TV with the 4 screws M4×12 in accessary tightly.
TV BACK
9.5 ~ 11.5 mm Wall-Mount Bracket
Screw
SpacerThe TV's rear cover
400 × 200 (50")
400 × 400 (55")
M6
Wall-Mount hole pattern VESA (mm)
Wall-Mount screw size (mm)
(not provided)
(not provided)
TV Bottom Panel
TV Side View
Button View
you refer to the Trouble Shooting tips in the User Manual.
Weight without base (kg) 16
Weight with base (kg) 16.5
Size with base (mm) 1117.8×690.7×226
Size without base (mm) 1117.8×645.8×60
Active Screen Size(Diagonal) 50 inches
NOTE
Features, appearance and specifications are subject to change without notice.
Receiving
Systems
HDMI mode
Environmental
Conditions
Temperature: 5°C - 45°C
Humidity: 20% - 80% RH
Atmospheric pressure: 86 kPa - 106 kPa
480I/60Hz, 480P/60Hz, 576I/50Hz, 576P/50Hz,
720P/50Hz, 720P/60Hz, 1080I/50Hz, 1080I/60Hz,
1080P/50Hz, 1080P/60Hz
640×480, 800×600, 1024×768
Component mode
480I/60Hz, 480P/60Hz, 576I/50Hz, 576P/50Hz,
720P/50Hz, 720P/60Hz, 1080I/50Hz, 1080I/60Hz,
1080P/50Hz, 1080P/60Hz
VGA mode 640×480, 800×600, 1024×768, 1280×1024 60Hz
Screen Resolution 1920 × 1080
Sound Output (RMS) 10 W + 10 W
Model 50K390GW 55K390GW
Power Consumption 135 W
20.9
21.3
1235.4×763.8×258.4
1235.4×714.1×61.8
55 inches
1920 × 1080
12 W + 12 W
150 W
Power Supply 120V ~ 60Hz
▲
Analog
Digital
NTSC
ATSC / QAM
VIDEO
AV IN
L R
HDMI1 ANT/CABLE IN DC 5V 0.5A(MAX)
USB
USB
DC 5V 0.5A(MAX)
USB
YPBPR
COMPONENT
HDMI2HDMI3HDMI4
IR BLASTER
LAN PC/DVI
AUDIO IN
PC IN
Mute
Input
CH
CH
Figure 5
Receiving channels
VHF: 2~13 UHF: 14~69 CATV: 1 ~ 125
Digital Terrestrial Broadcast (8VSB): 2 ~ 69
Digital cable (64/256 QAM): 1 ~ 135
Tuner type Frequency synthesized
(Optical)
OUTPUT