Hisense Electric LCDF0050 LED LCD TV User Manual
Hisense Electric Co., Ltd. LED LCD TV
UserManual.wiki
>
Hisense Electric
>
LCDF0050 User Manual
>
W9HLCDF0050_User Manual 1
Contents
1.
W9HLCDF0050_User Manual 1
2.
W9HLCDF0050_User Manual 2
W9HLCDF0050_User Manual 1
Navigation menu
Upload a User Manual
Namespaces
Wiki Guide
HTML
PDF
Info
Views
User Manual
Discussion / Help
Navigation

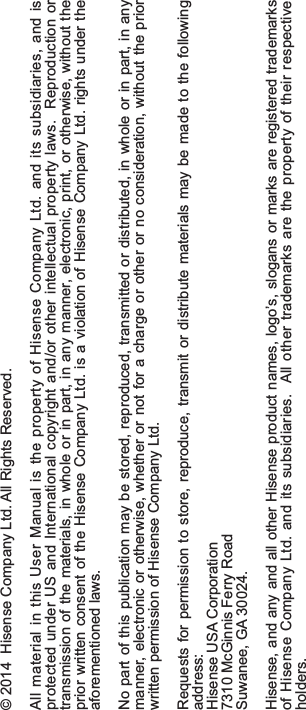
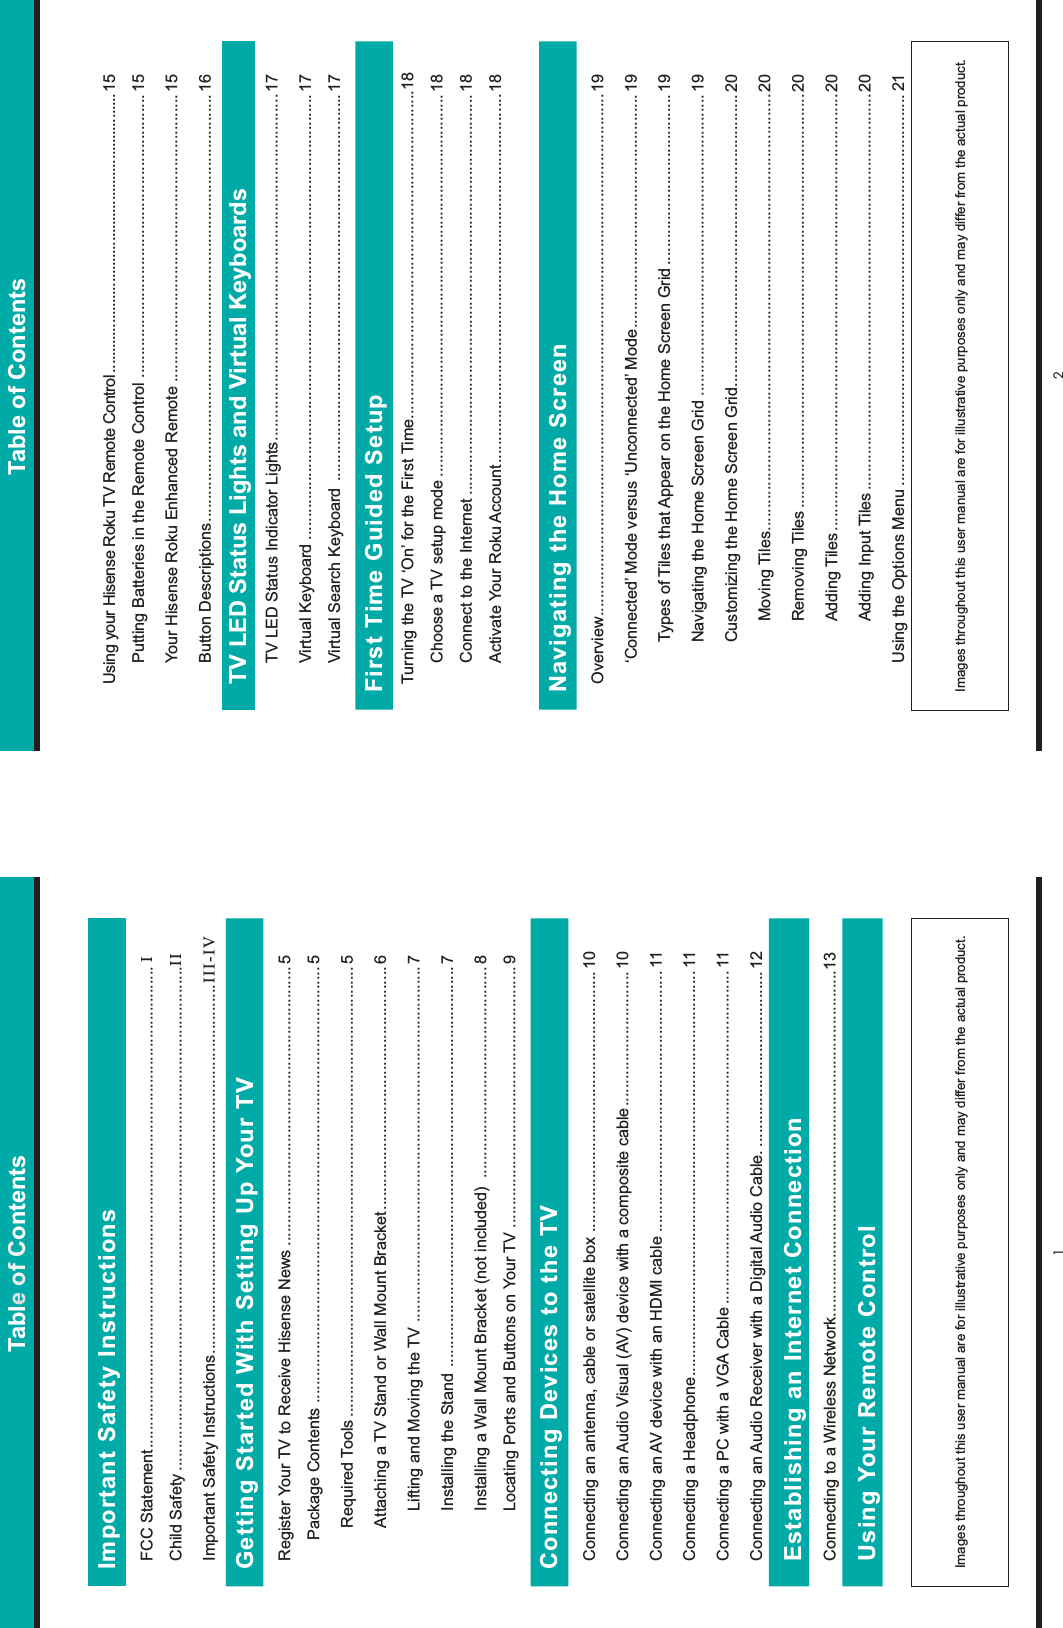
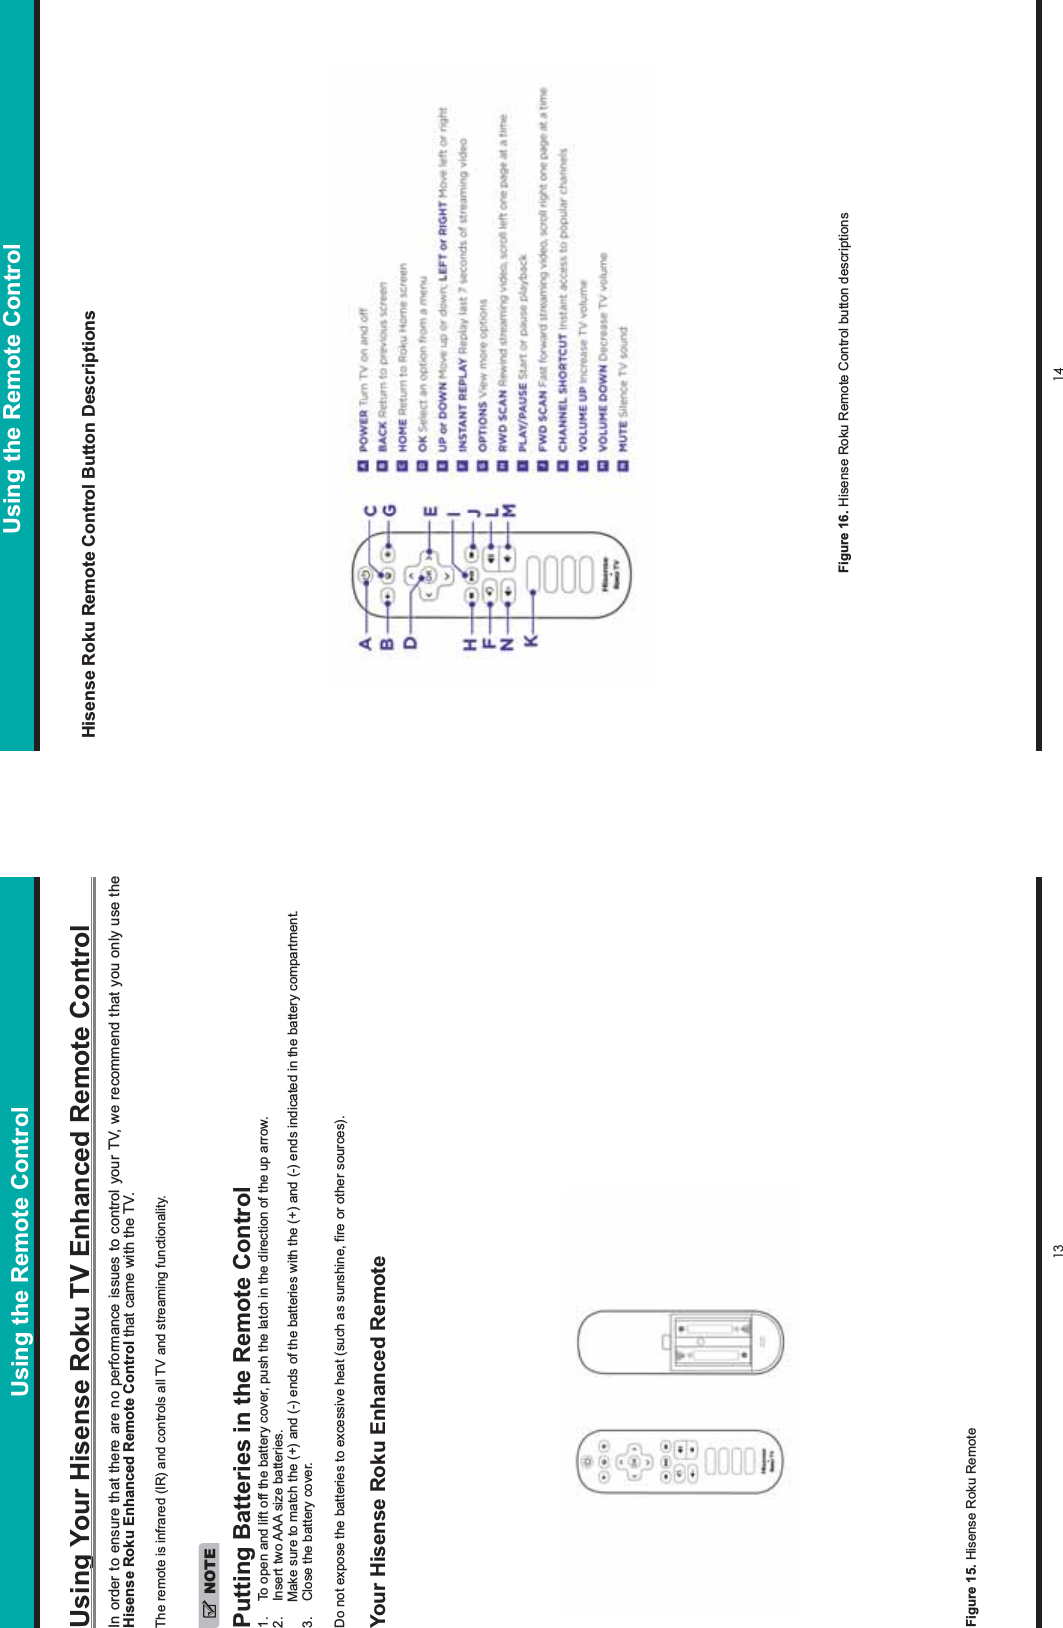
![9 10Connecting Devices to Your TV Connecting Devices to Your TVConnecting an antenna, cable or satellite boxConnecting an Audio Visual (AV) device with a composite cableThis section provides the steps to connect various types of devices to the TV.Connecting Devices to the TV1. Connect one end of a coaxial cable (not included) to the [RF OUT] jack on the antenna, cable or satellite box. If you are using an antenna with twin-lead cable, you may need a 300-75 Ohm adapter (not provided) to connect it to the back of your TV. Likewise, if you are using several antennas, you may need a combiner (not provided).2. Connect the other end of the cable to the [ANT/CABLE IN ] jack on the side of the back panel.3. Select TV as the input source using the [INPUT] button.1. Use the audio and video cables to connect the composite video/audio jacks (of the external AV device) to the AV IN jacks of the TV. (Video = yellow, Audio Left = white, and Audio Right = red).2. Plug the connected devices into the main socket before switching on the TV.3. Select AV as the input source using the [INPUT] button.Figure 9. Connect an antenna to the TVor ANT OUTCableVHF/UHF AntennaEXTERNAL DEVICESTV JACKANT/CABLE(not included)(not included)Figure 10. Connect an AV device with a composite cableDVD Player/RecorderVideo CameraEXTERNAL DEVICESSet-top boxSatellite ReceiverSatellite antenna cableVCRA/V OUTVideoLRWhite(L)White(L)Yellow(Video)Yellow(Video)Red(R)Red(R)TV JACKVIDEOAV INL RAV Cable (not included)Connecting an AV device with an HDMI cableThis type of connection supports digital connections between HDMI-enabled AV devices such as a Personal Video Recorder (PVR), DVD, Blu-Ray, AV receiver and digital devices. In addition, some devices (such as a PVR or DVD player) require an HDMI signal to be set to Output in the settings of the device.For instructions, please refer to the User Manual for the device.1. Use an HDMI cable to connect the [HDMI] output jack of the AV device to the [HDMI] jack on the TV.2. Plug the connected devices into the main socket before switching on the TV.3. Select one of the HDMI sources as the input source using the [INPUT] button.HDMIHDMITV JACKEXTERNAL DEVICESDVDSet-top BoxHDMI Cable (not included)Figure 11. Connect an AV device with an HDMI cableThe HDMI connector provides video and audio signals. It is not necessary to connect an audio cable.NOTEConnecting a HeadphoneYou can connect headphones or an analog sound bar to the [AUDIO OUT] jack on your set. While the headphone is connected, the sound from the built-in speakers will be disabled.TV JACKAudio Cable (not included)Figure 12. Connecting a headphone](https://usermanual.wiki/Hisense-Electric/LCDF0050.W9HLCDF0050-User-Manual-1/User-Guide-2363345-Page-10.png)
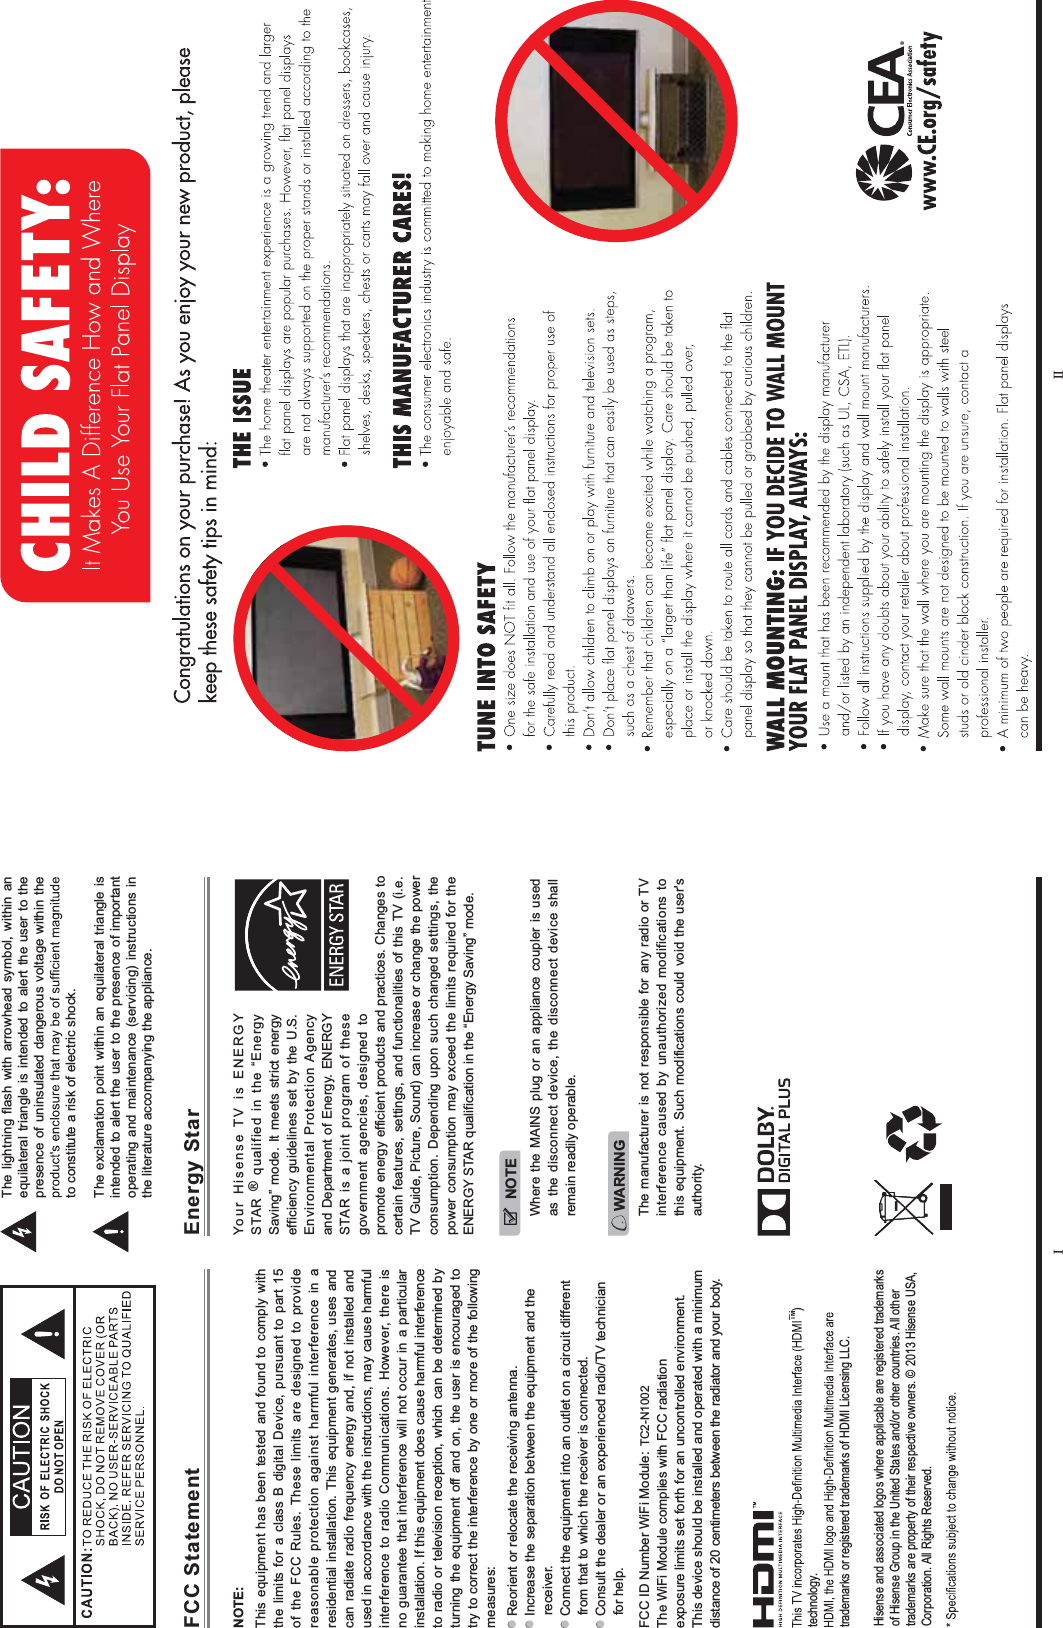
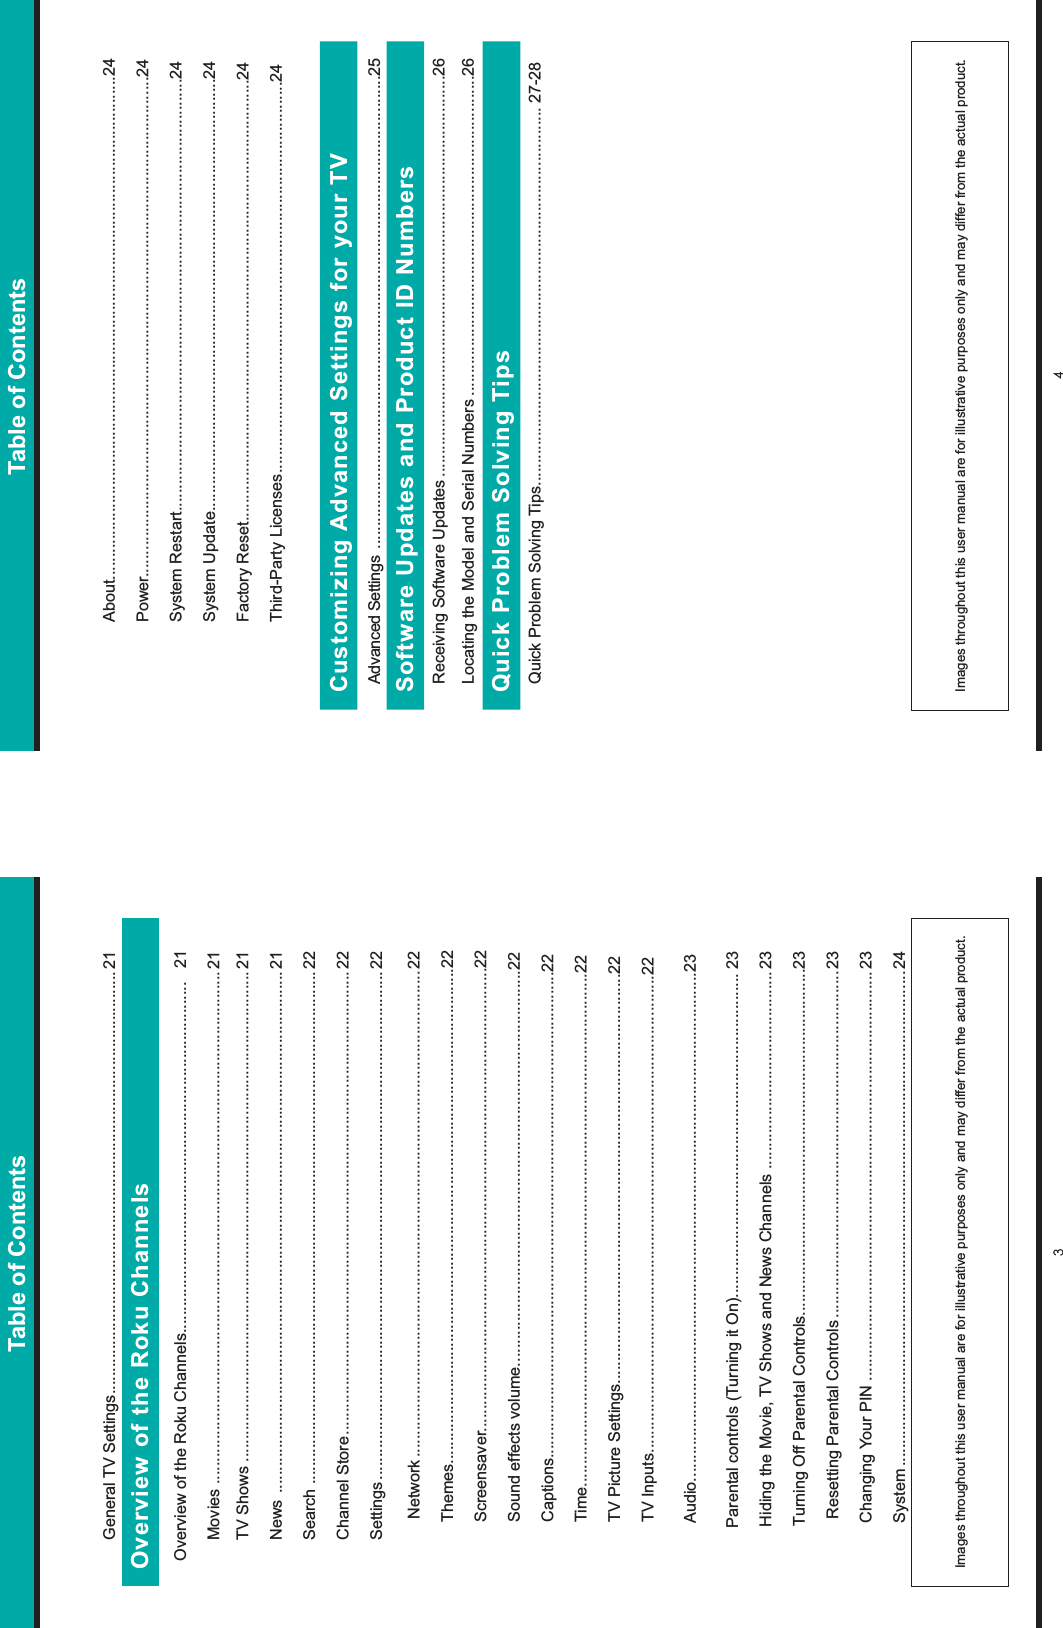
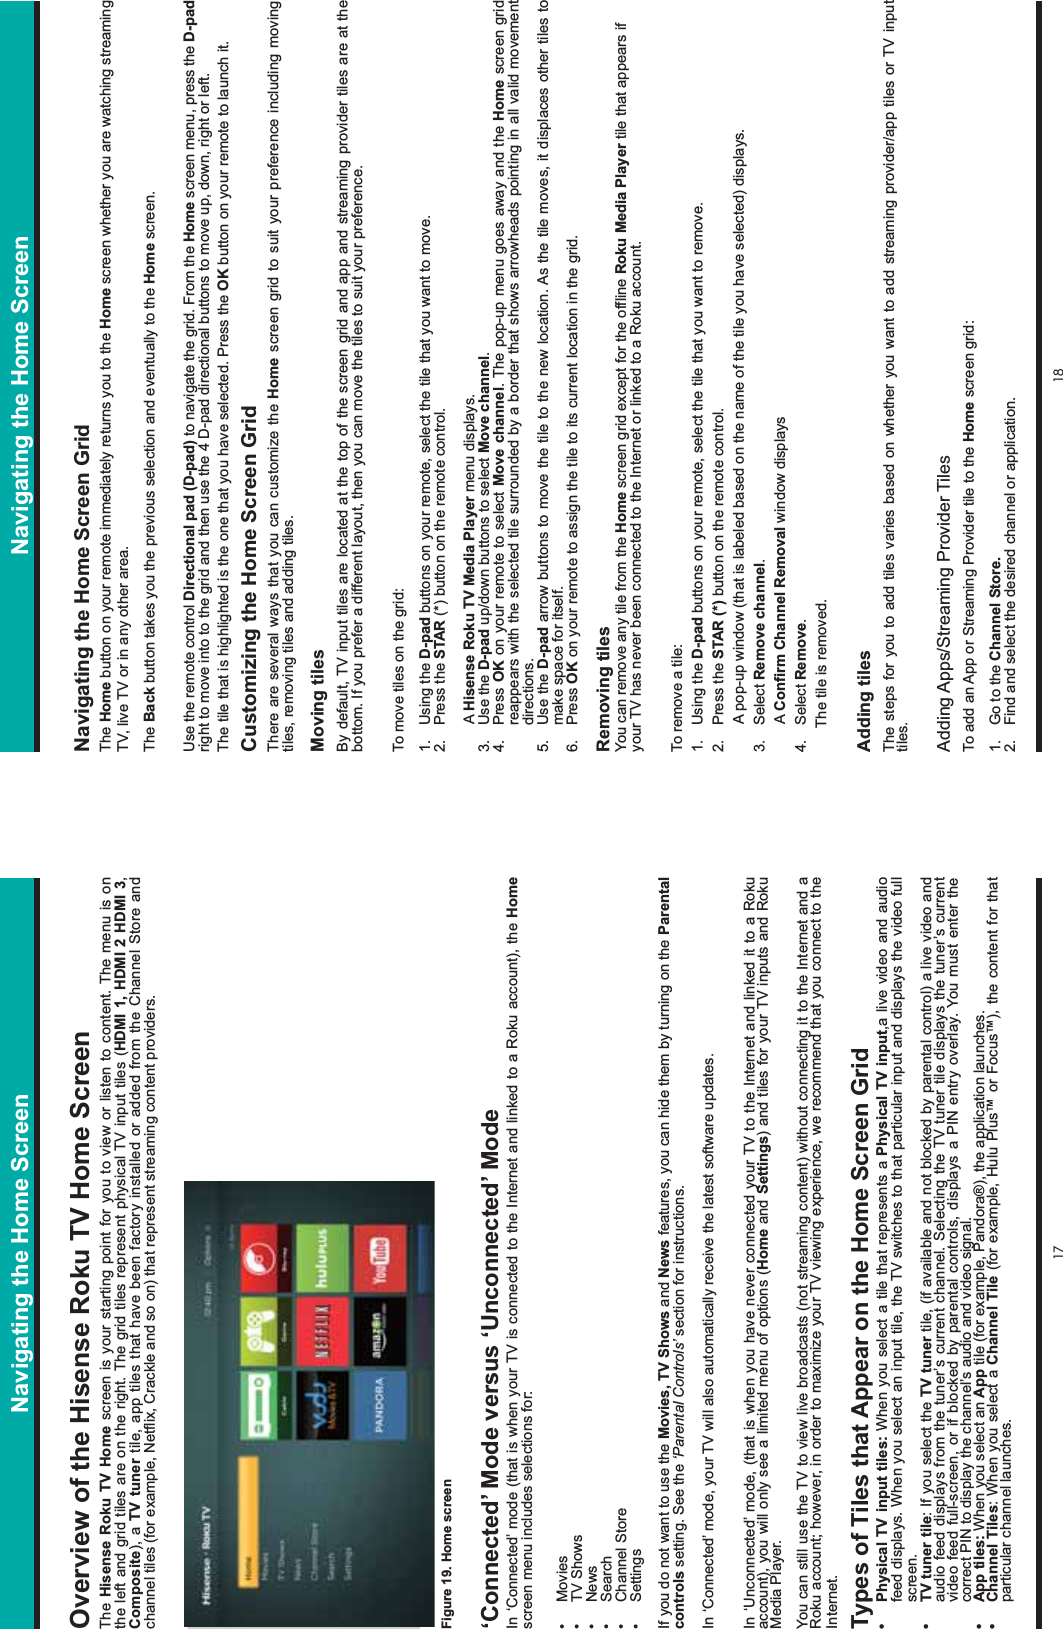
![11 12Connecting Devices to Your TVConnecting an Audio Receiver with a Digital Audio Cable1. Use an audio cable to connect the digital [AUDIO IN] jack of the AV device to the digital [AUDIO OUT] jack of the TV. Another option is to use an RCA Y-cable (1/8”-stereo mini to L/R phono - not provided) to connect analog sound system to the [AUDIO OUT] jack of the TV.2. Plug the connected devices into the main socket before switching on the TV.3. Select the corresponding source on the audio receiver.TV JACKS EXTERNAL DEVICESPowerless Bass SpeakerSpeakerDIGITALAUDIO OUT/AUDIO OUTWhite(L)Red(R)Audio Cable (not included)Figure 13. Connecting an audio receiver with a digital audio cableConnecting a USB device to the USB port1. Browse photos, music and movies by inserting your USB device into the [USB] port.2. Select the Roku Media Player tile from the Home screen.Establishing an Internet ConnectionConnecting to the Internet through a Wireless (Wi-Fi) DeviceThis section shows how to establish a wireless Internet connection for your TV.Button Configuration (PBC) or PIN (Personal Identification Number). WPS will automatically configure the SSID. Our built-in wireless LAN adapter supports the IEEE 802.11 b/g/n communication protocols and we recommend that you use an IEEE 802.11n router. When you play a video over an IEEEE 802.11 b/g connection, the video may not play smoothly.• You must use the Hisense built-in Wireless LAN Adapter to use a wireless network because the TV does not support an external USB network adapter.• To use a wireless network, your TV must be connected to a wireless IP sharer. If the wireless IP sharer supports Dynamic Host Configuration Protocol (DHCP), your TV can use a DHCP or static IP address to connect to the wireless network.• Select a channel for the wireless IP sharer that is not currently being used. If the channel set for the wireless IP sharer is currently being used by another device nearby, this will result in interference and communication failure.• If you apply a security system other than the systems listed below, it will not work with the TV.• If Pure High-throughput (Greenfield) 802.11N mode is selected and the Encryption type is set to WEP, TKIP or TKIP-AES (WPS2 Mixed) for your Access Point (AP), then the Hisense TV will not support a connection in compliance with these Wi-Fi certification specifications.• If your access point (AP) supports Wi-Fi Protected Setup (WPS), you can connect to the network via Push Wireless Wi-Fi device or Wireless IP sharerLAN CableWireless Adapterbuilt-in the TV setThe LAN Port on the Wall(not included)Figure 14. Connect the TV to a wireless networkNOTE](https://usermanual.wiki/Hisense-Electric/LCDF0050.W9HLCDF0050-User-Manual-1/User-Guide-2363345-Page-11.png)
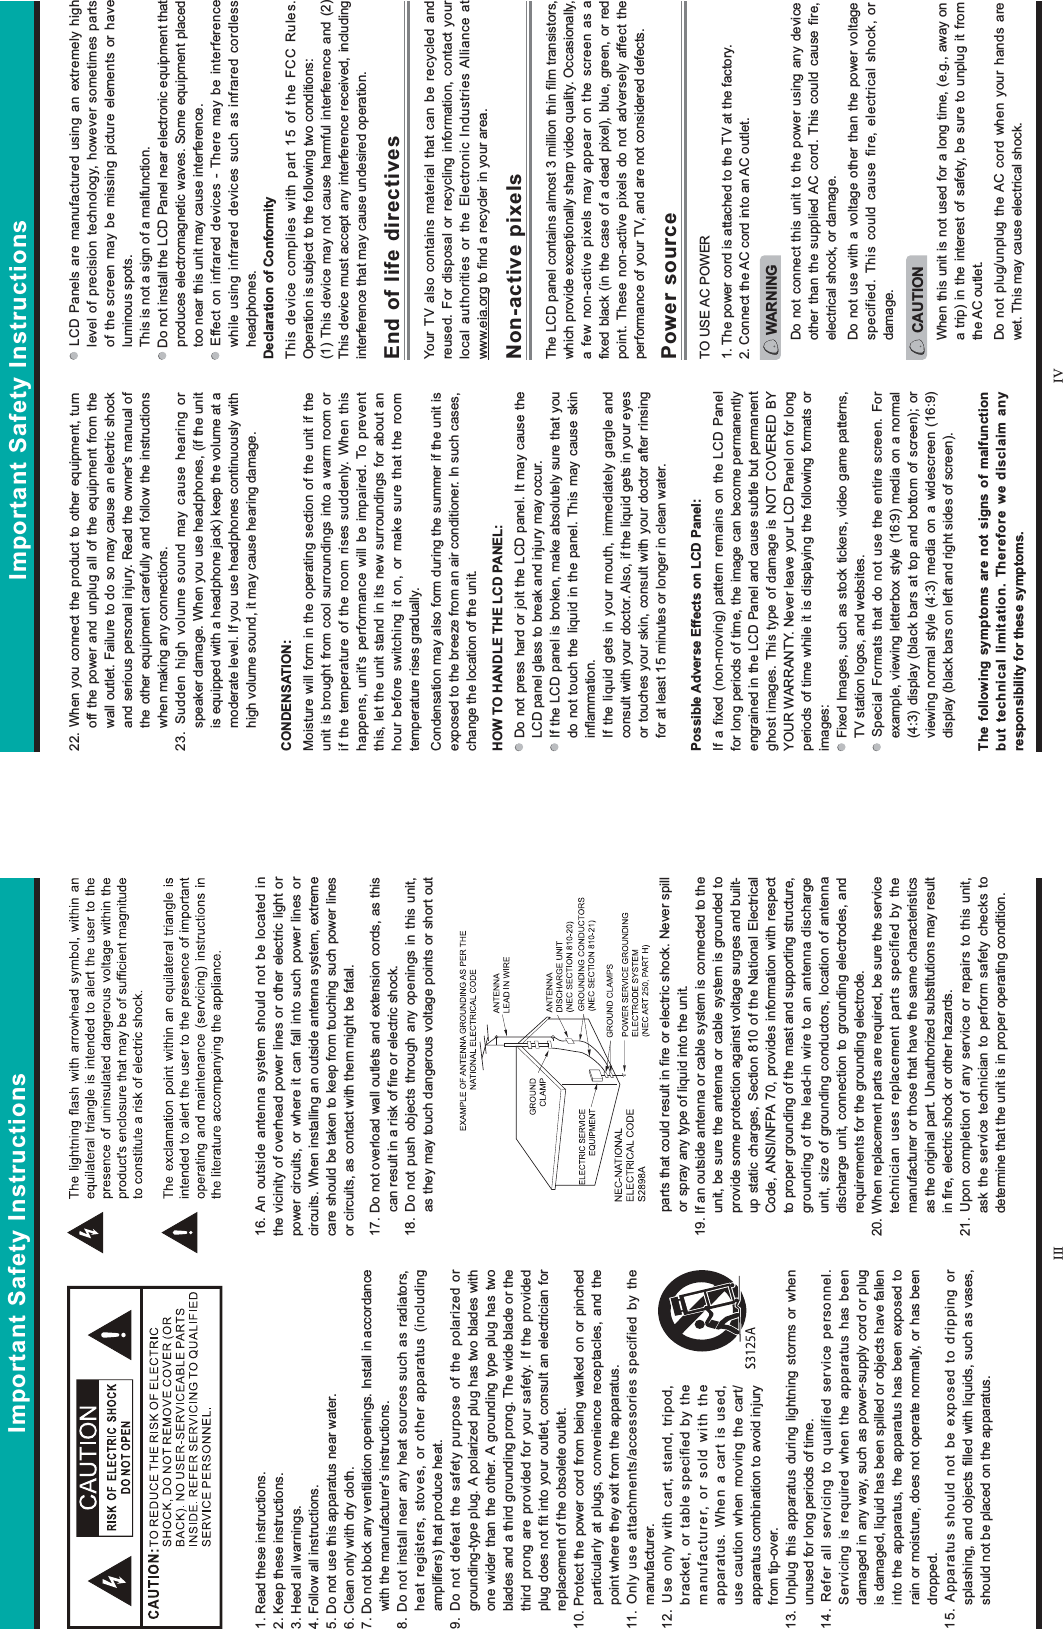
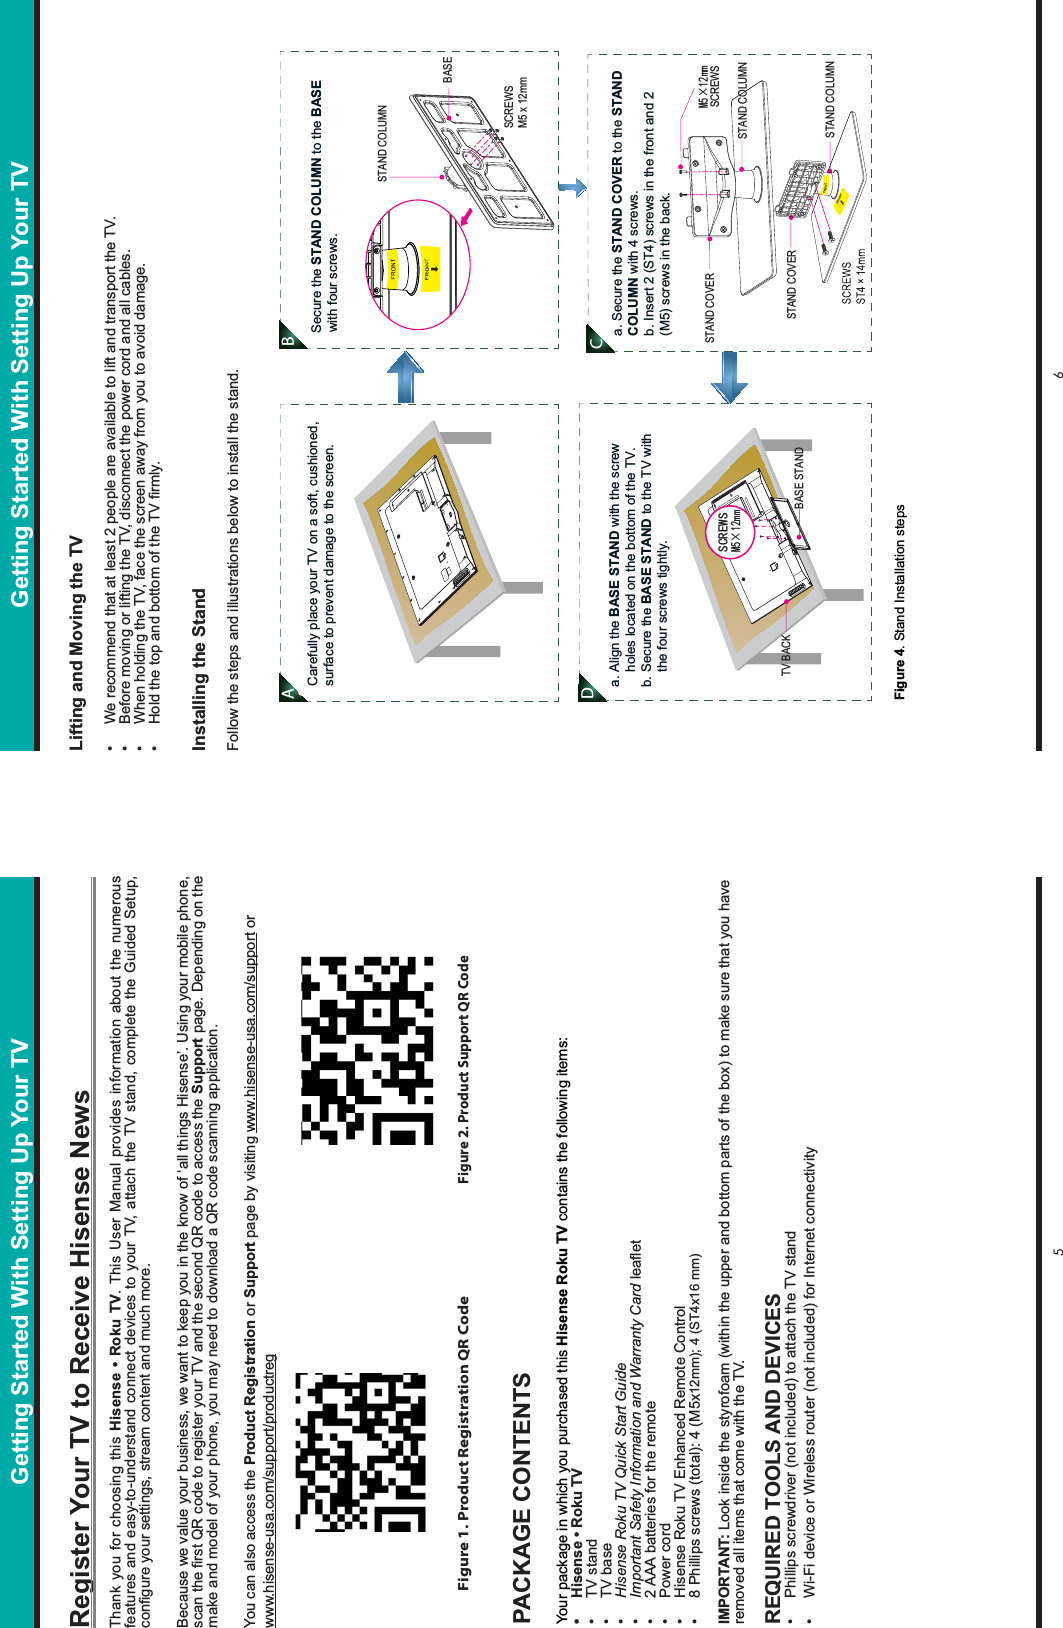
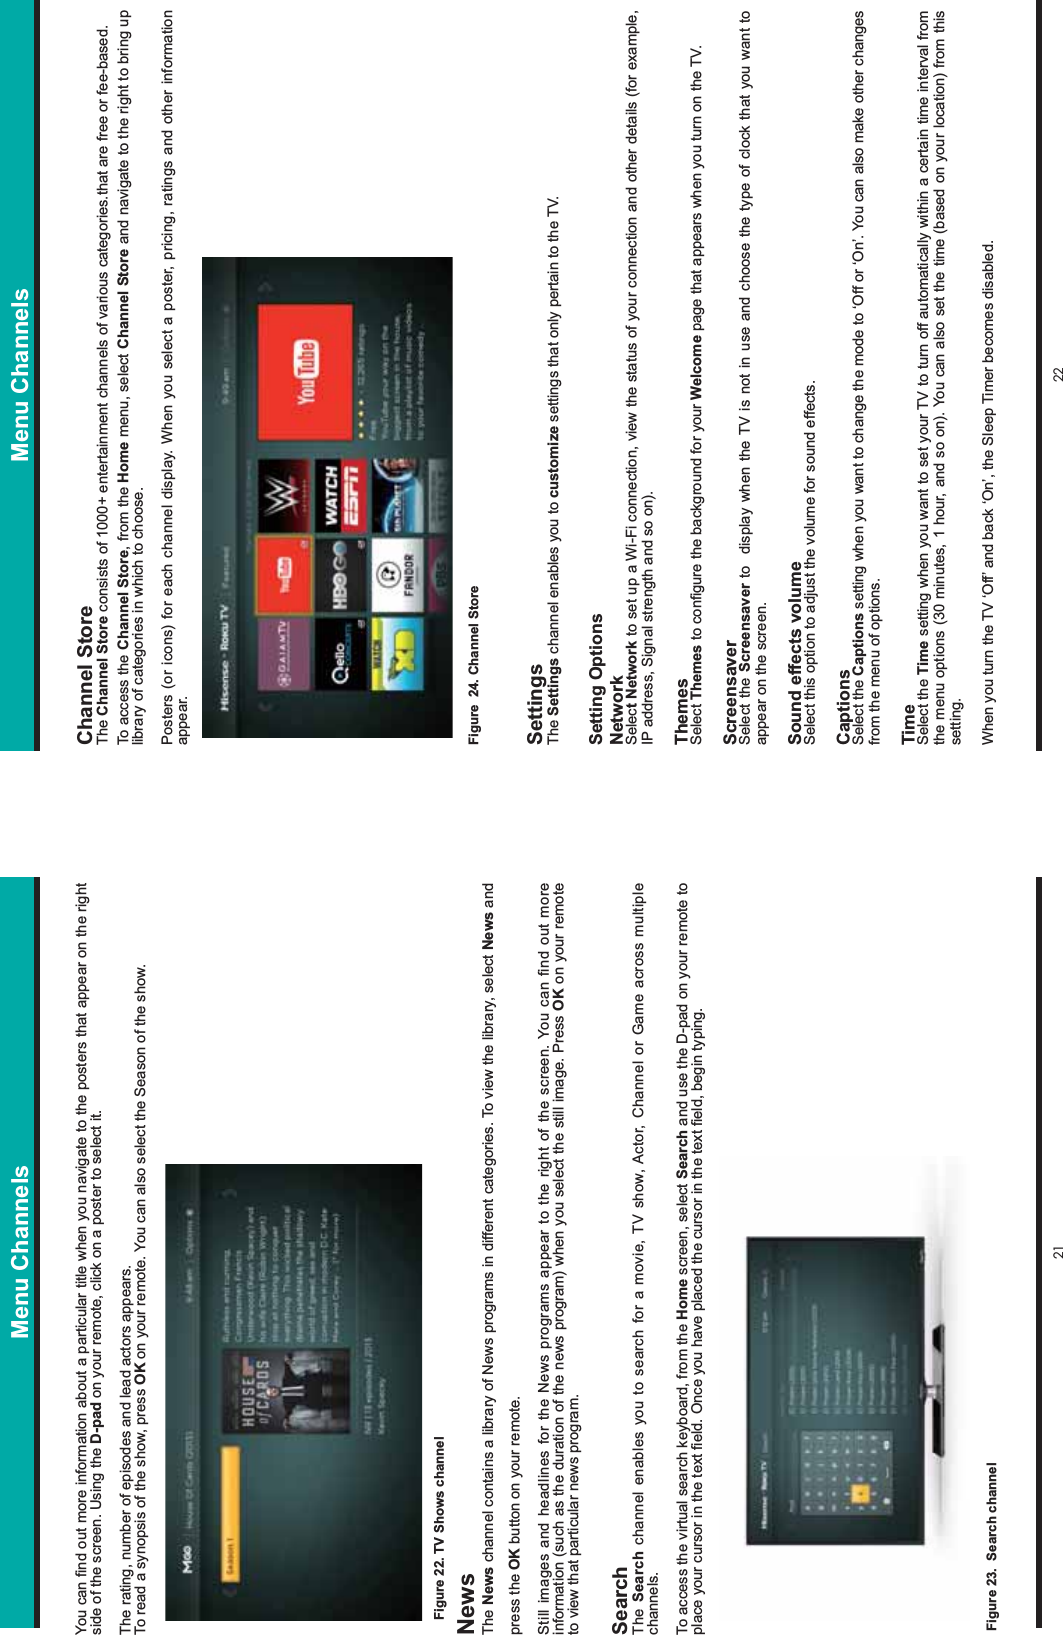
![15 16TV LED Status Lights and Virtual KeyboardsTV LED Status Indicator LightsTable 1 provides a status description of the TV LED lights.TV State TV LED action What this meansOn (you are viewing content) Off The screen is communicating that the TV is on.Screensaver Off The screen is communicating that the TV is on.Off (no power) Off The TV does not have power.Off (active standby) Off The TV has power and is ready for you to enjoy.Starting up after it has been turned offSlow pulsing blink until it has completely started upThe TV is initializing.On (you are receiving an update from a USB)Slow pulsing blink until the update completesThe TV is updating.IR received from the remote Dims on and off once The TV is responding to what you have pressed on the remote.On (The TV is on but your Wi-Fi connection has disconnected)Patterned blink The TV has lost Wi-Fi connectivity.Virtual KeyboardThe Virtual Keyboard enables you to type in text fields as you navigate throughout different areas of your TV.To type a character using the remote control, you must be on a TV screen (for example, the Network channel) where you are prompted to type information. To launch the keyboard, press the OK button on your remote and use the left/right/up/down navigation buttons to move your cursor.Virtual Search KeyboardThe Virtual Search Keyboard enables you to search for movies, TV shows and other types of content by typing in a keyword.Figure 17. Virtual search keyboard screenshot First Time Guided SetupThe Guided Setup Wizard appears the first time you turn on the TV. It guides you step-by-step through the initial setup and configuration of your television.Choose a mode from where you will use the TVTo get started with the setup process:1. Press the red [POWER] button on your remote to turn on your TV. After you power on the TV, a Startup page appears that displays a Power On image along with the Hisense and Roku logos. Next, the boot up splash page appears that displays a themed background and Welcome. Figure 18. Hisense Roku TV Welcome Page2. Press OK to start the guided setup.3. Select Setup for home use or (if you’re a retailer that will set up the TV to display) Setup for store use. Connect to the InternetNOTE If you chose not to connect to the Internet and create a Roku account, then you will only see tilesfor each of your inputs and a limited menu of options. 1. Select Connect to the Internet.2. Choose the Wi-Fi connection. The TV begins to search for local Wi-Fi networks and lists the networks it finds in order, from the strongest to the weakest signal. After an Internet connection is established, the TV will attempt to determine the time zone in which it is operating. If it is unable to, then you are prompted to manually choose your time zone.Activate your Roku Account1. From your mobile phone, tablet, laptop or other Internet-connected device, go to roku.com/link and then enter the code that displays. NOTE The code displayed on the screen is only valid for a limited amount of time. If it expires before you are able to enter it on the Roku website, then another one must be generated. 2. Create a Roku account.Once you have completed creating an account, a confirmation message displays on the screen of your Internet-connected device. The TV now takes a few moments to update the Home screen with the set of streaming content that you purchased. Once this has completed, a confirmation message displays on the TV screen and prompts you to start streaming.The Hisense Roku TV page appears and shows tiles for each of your TV inputs and apps that you have added to your Roku account. In addition, you will also see the full set of menu options. Turning the TV On for the First-Time](https://usermanual.wiki/Hisense-Electric/LCDF0050.W9HLCDF0050-User-Manual-1/User-Guide-2363345-Page-13.png)
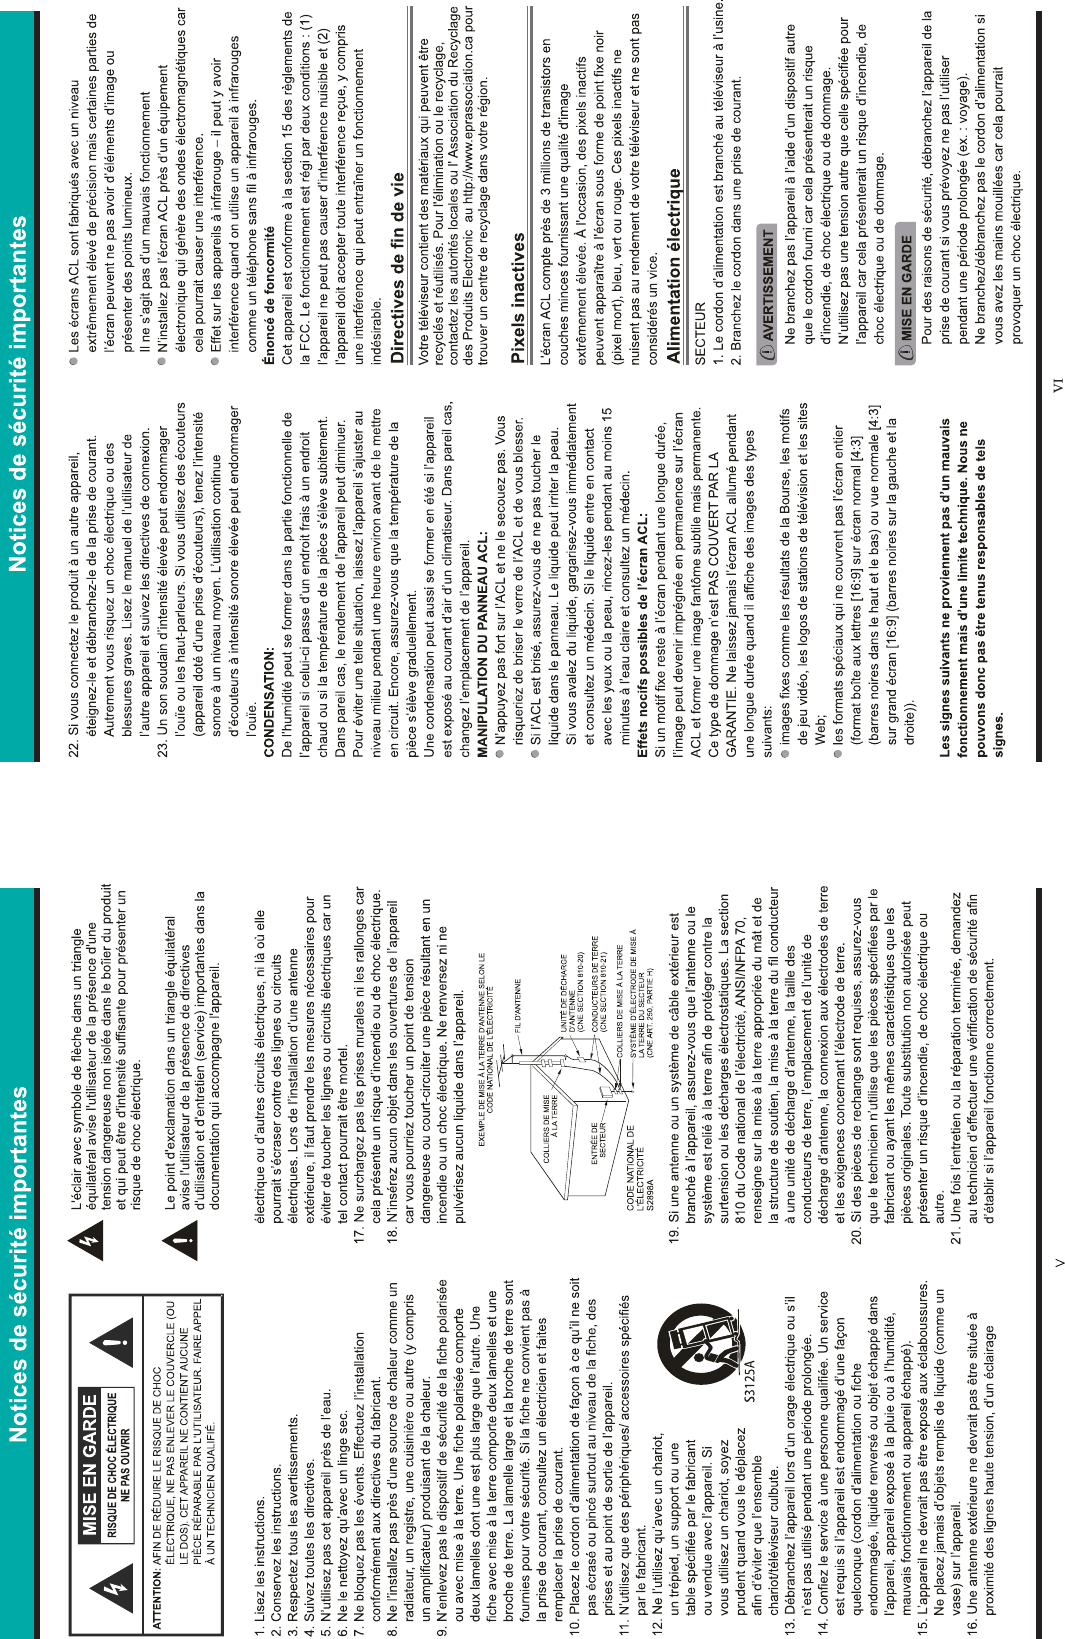
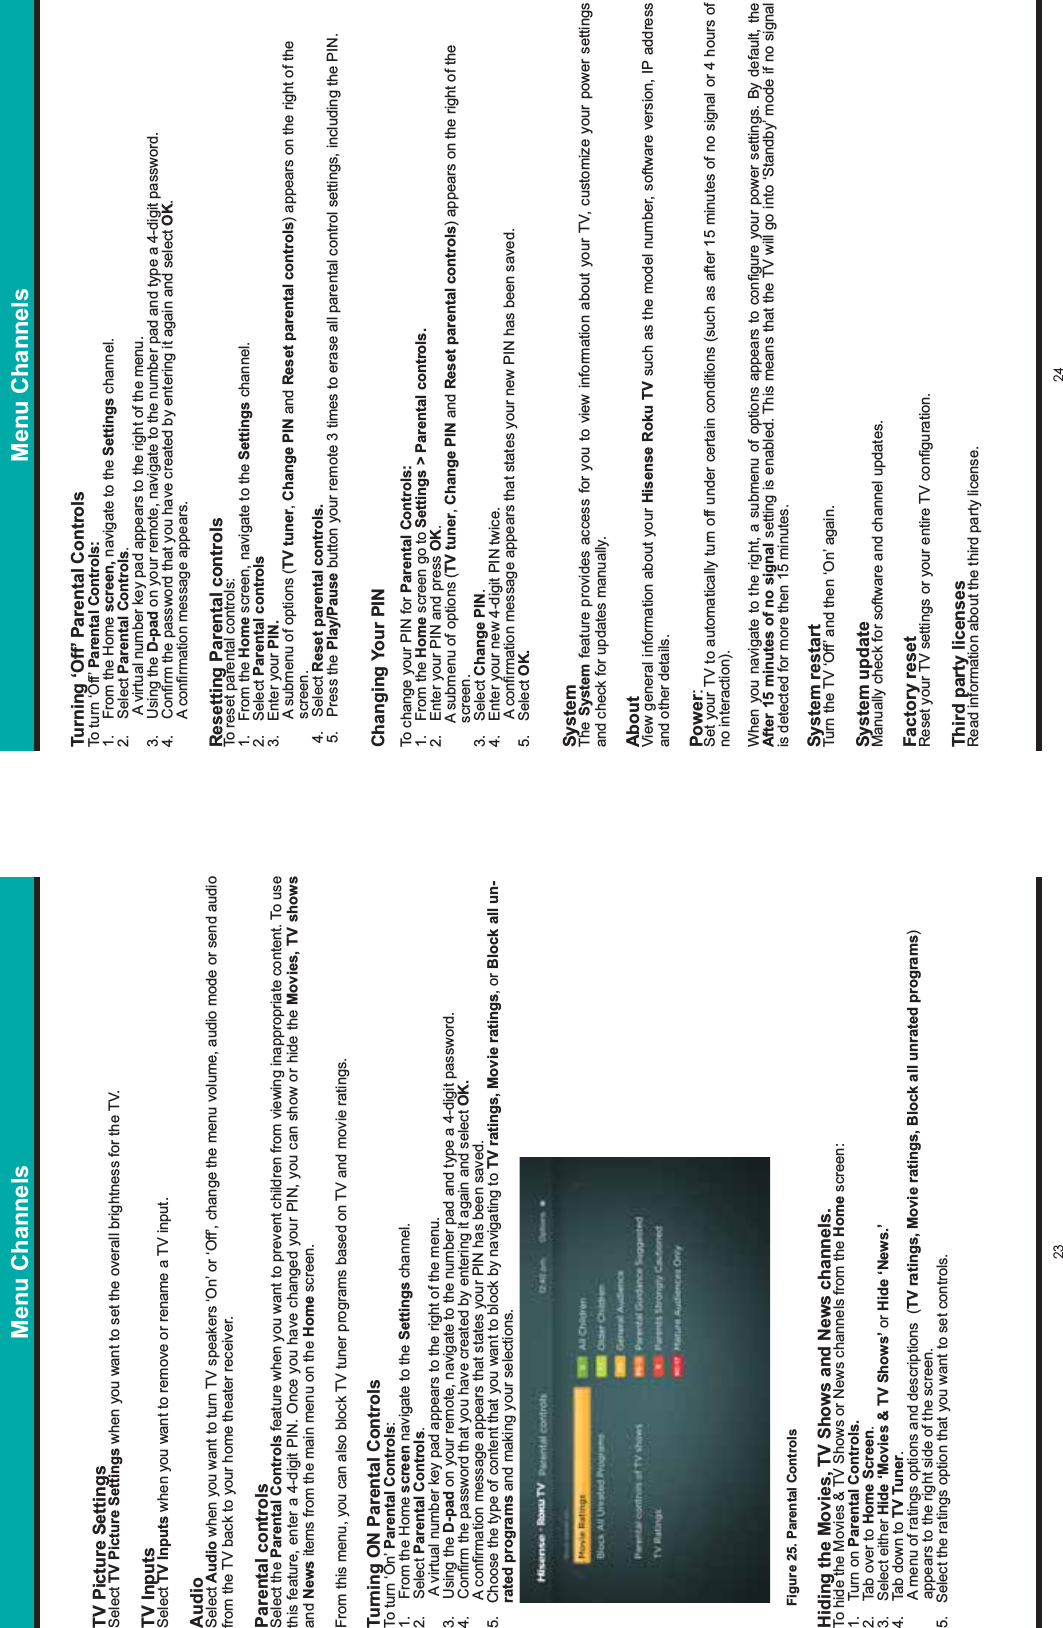
![19 203. Add the channel/application and select any other options to complete the addition.The channel/application is added to the end of the Home screen grid.Adding Input TilesBy default, tiles for your TV inputs and tuner appear in the Home screen grid. You can always remove them and add them back to the grid manually or automatically.To manually add an Input tile to the Home screen grid:1. Go to Settings > TV Inputs.2. Select the input you want to add.3. Set up the input.To automaticaly add an HDMI input tile to the Home screen grid:1. Connect a device to any of the HDMI input ports.2. Turn on the device. The input and TV tuner tiles appear at the topmost position in the Home screen grid. When possible, the TV will recognize that a device has been connected to the port and add the HDMI tile to the beginning of the Home screen. The system will also identify the device type and automatically change the default tile label to a device name that is more user-friendly. Using the Options menuThe Options feature is only available when you are viewing or listening to live TV content. To access the Options menu, press the Asterisk [ ] button on the remote control.When the Options menu appears, selecting Advanced Picture Settings, displays the Advanced Settings menu.The menu of options that display will differ based on whether you are viewing a live TV broadcast from the TV tuner,video content from an HDMI input, video from the composite input or watching streaming video from a content provider. General TV Settings• TV brightness: This setting adjusts the brightness of the images on the TV screen. You can adjust the TV brightness from the following options:• Darker: This option is available if you are viewing a darker picture in a dark room.• Dark: This option is available if you want a slightly dimmer picture that saves energy.• Normal: This option is for general everyday viewing.• Bright: This option provides a slightly brighter picture that will be viewed in a light room.• Brighter: This option makes pictures brighter for bright rooms.• Picture mode: This setting provides the following options:• Eco save: This option enables you to save energy.• Movie: This option is available if you are going to dim the lights to watch a movie. • Normal: This option is great for general everyday viewing.• Sports: This option enables you to maximize your viewing experience while watching sports.• Vivid: This option is available if you want an intense and bright picture.• Custom: This option enables you to personalize settings for one of your physical TV inputs.• Audio mode: This setting adjusts the sound quality output from your TV speakers.• High treble: This option brightens high tones.• Speech: This option is available to make the dialog clearer.• Normal: This is great for everyday use.• Music: This option is available if you are listening to music.• Theater: This option is tuned for movies.• Big Bass: This option enables you to hear a deeper base/boom.• Sleep timer: This setting allows you to program your TV to turn off automatically within different time intervals.• Closed captioning: This setting provides text on the screen that describe what the speakers are saying. It can be turned ‘On’ or ‘Off’ and is for the hearing impaired. Various options are also available to customize the text style, text size, background color and more. • 120 Hz: You can turn this setting ‘On’ or ‘Off’ to affect the refresh rate (that is, the number of times per second moving images— such as athletic or video games —on your TV screen is refreshed). Navigating the Home Screen Menu ChannelsThe Home screen menu contains ‘channels’ (Movies, TV Shows, Music, News) for you to select from for your entertainment or settings preferences. Figure 20. Home screenMoviesThe Movies channel contains a library of numerous titles from various genres.To view the library, select Movies and press the OK button on your remote. You can find out more information about a particular title when you navigate to the posters that appear on the right side of the screen. Using the D-pad on your remote, click on a poster to select it.The price of the movie, rating information and length appears. If you want to view the trailer for the movie, press OK on your remote. Figure 21. Movies channel A synopsis of the movie appears along with a menu of options from which to choose. You can select ‘Watch trailer, Add to watchlist, or a rental amount.TV ShowsThe TV Shows channel contains a library of numerous TV show titles from different genres and categories.To view the library, select TV Shows and press the OK button on your remote. Posters for the TV shows appear to the right. Overview of the Menu Channels](https://usermanual.wiki/Hisense-Electric/LCDF0050.W9HLCDF0050-User-Manual-1/User-Guide-2363345-Page-15.png)
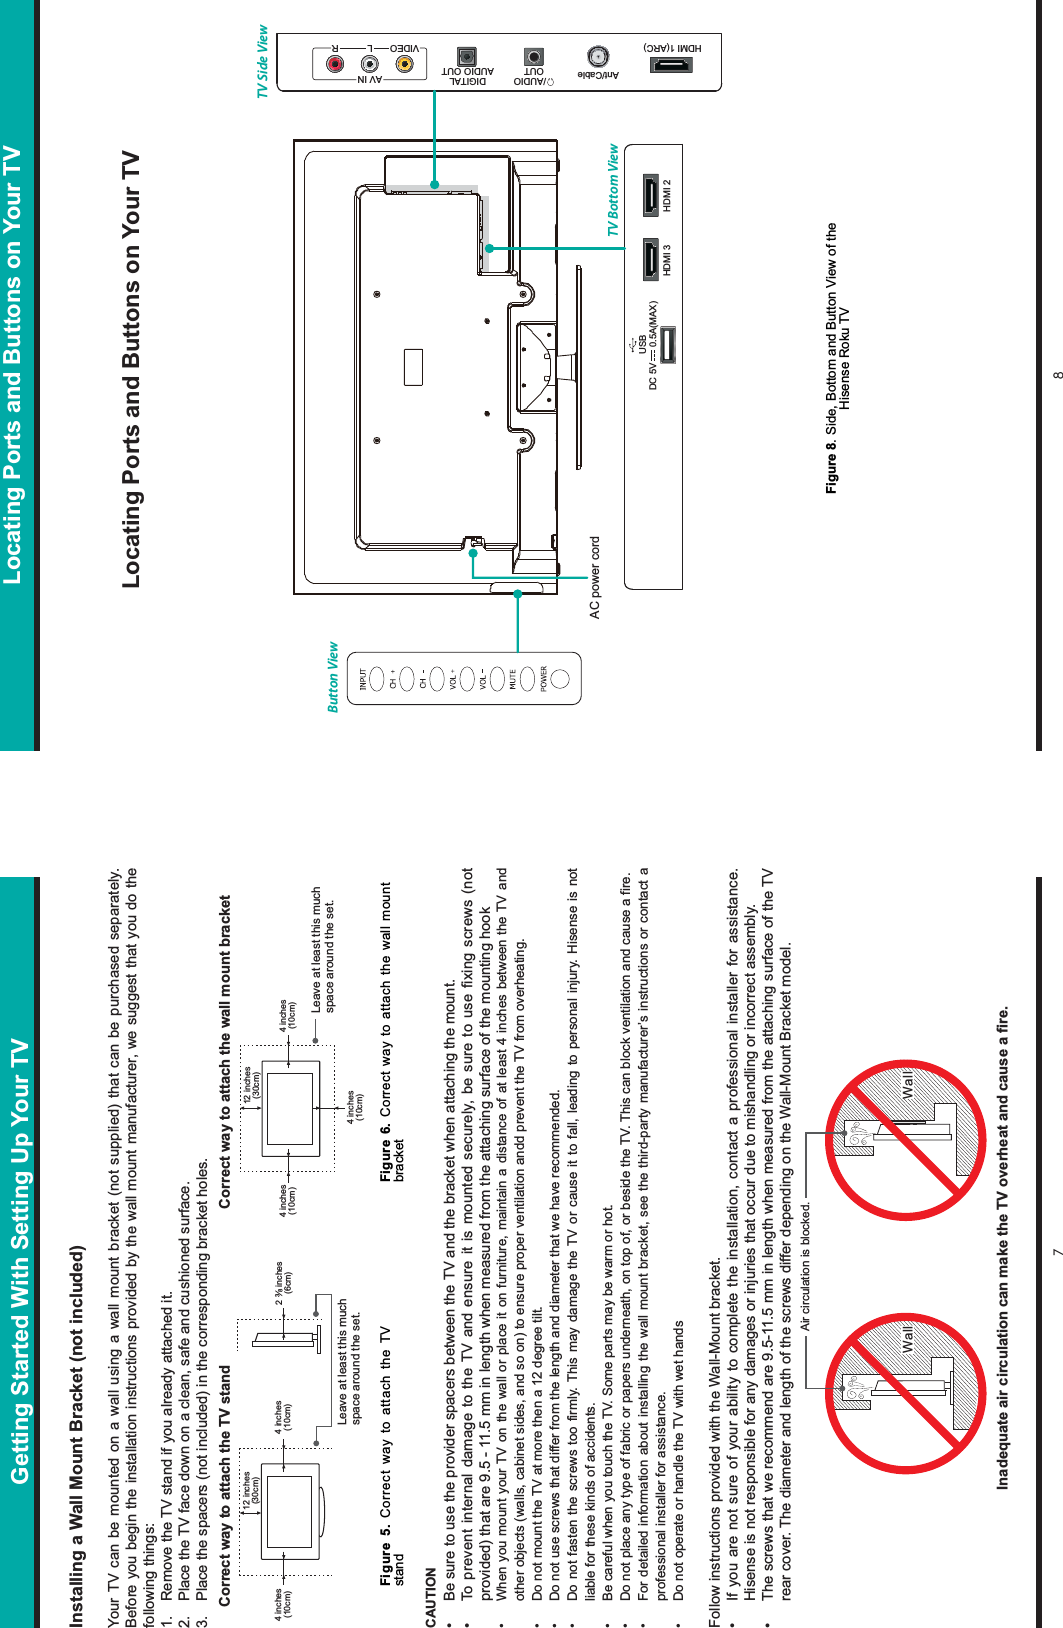
![27 28 Quick Problem-Solving TipsWhen you experience an issue with your TV, turn it off and on again. If this does not resolve the problem, then refer to the tips below. If the problem is still not resolved, then contact our Hisense Electronics Consumer Care Center at 1-888-935-8880 Monday through Friday from 8 A.M. to 8 P.M. EST and Saturday through Sunday from 9 A.M. to 6 P.M. EST.Customers that are located in Canada should call 1-855-344-7367.Quick Problem-Solving TipsSOUND OR PICTURE ISSUES POSSIBLE SOLUTIONSYou do not hear any sound or see a picture ・ Check if the power cord is plugged into a powered AC outlet.・ A power switch on the TV must be turned on. Press the Power [ ] button on the remote control to activate the unit from Standby.・ Check to see if the LED light is either red or blue. If it is on, then there is power to the TV.You have connected an external source to your TV and do not see a picture and/or hear sound ・ Check for the correct output connection on the external source and for the correct input connection on the TV.・ Make sure you have made the correct selection for the input mode for the incoming signalWhen you turn on your TV, there is a delay for a few seconds before the picture appears ・ This is normal. If you have already set up your TV, it is initializing and searching for previous setting information.You see a normal picture but do not hear any sound ・ Check the volume settings.・ Check if ‘Mute’ mode is set to “OnYou hear sound but do not see a picture or it is in black and white ・ from the AC outlet and replug it after 60 seconds.・ Check that the Color is set to 50 or higher. ・ Try different TV channels.Your sound and picture is distorted or appears wavy ・ An electric appliance may be affecting the TV. Turn off any appliances that are nearby and move them farther away from the TV.・ Insert the power plug of the TV set into another power outlet.Your sound and picture is blurry or cuts out ・ If you are using an external antenna, check the direction, position and connection of it.・ tune the channel.CONNECTIVITY ISSUES POSSIBLE SOLUTIONSYou can not connect to my wireless home network during the guided setup ・ If you are getting 3 or more signal-strength bars above your wireless network, change the location of your TV or adjust the wireless router. ・ Make sure there are no obstructions (for example, cement walls) between your TV and the wireless router.・ Make sure you have selected the correct wireless router on the Choose wireless network screen.・ If your network is secured (passwords are case sensitive) make sure that you entered the correct password.・ If you have turned off SSID broadcasting on your wireless router, you can add your network by selecting Add network from the Select wireless network screen・ If security is enabled on your network, temporarily disable it on your router and try connecting againQuick Problem-Solving Tips (continued)When you experience an issue with your TV, turn it off and on again. If this does not resolve the problem, then refer to the tips below. If the problem is still not resolved, then contact our Hisense Electronics Consumer Care Center at 1-888-935-8880 Monday through Friday from 8 A.M. to 8 P.M. EST and Saturday through Sunday from 9 A.M. to 6 P.M. EST.Customers that are located in Canada should call 1-855-344-7367.REMOTE CONTROL ISSUES POSSIBLE SOLUTIONSYour remote control is not working ・ Try moving closer to the TV.・ Make sure that the batteries are working and inserted properly. ・ Make sure nothing is blocking the front of your TV.・ !each time you press a button, then the problem is not with the remote. Quick Problem-Solving Tips](https://usermanual.wiki/Hisense-Electric/LCDF0050.W9HLCDF0050-User-Manual-1/User-Guide-2363345-Page-19.png)