Hisense Electric LCDF0051 Part15 Subpart B-LED LCD TV User Manual W9HLCDF0051 1
Hisense Electric Co., Ltd. Part15 Subpart B-LED LCD TV W9HLCDF0051 1
Contents
- 1. W9HLCDF0051_User Manual 1
- 2. W9HLCDF0051_User Manual 2
- 3. W9HLCDF0051_User Manual 3
- 4. W9HLCDF0051_User Manual 4
W9HLCDF0051_User Manual 1
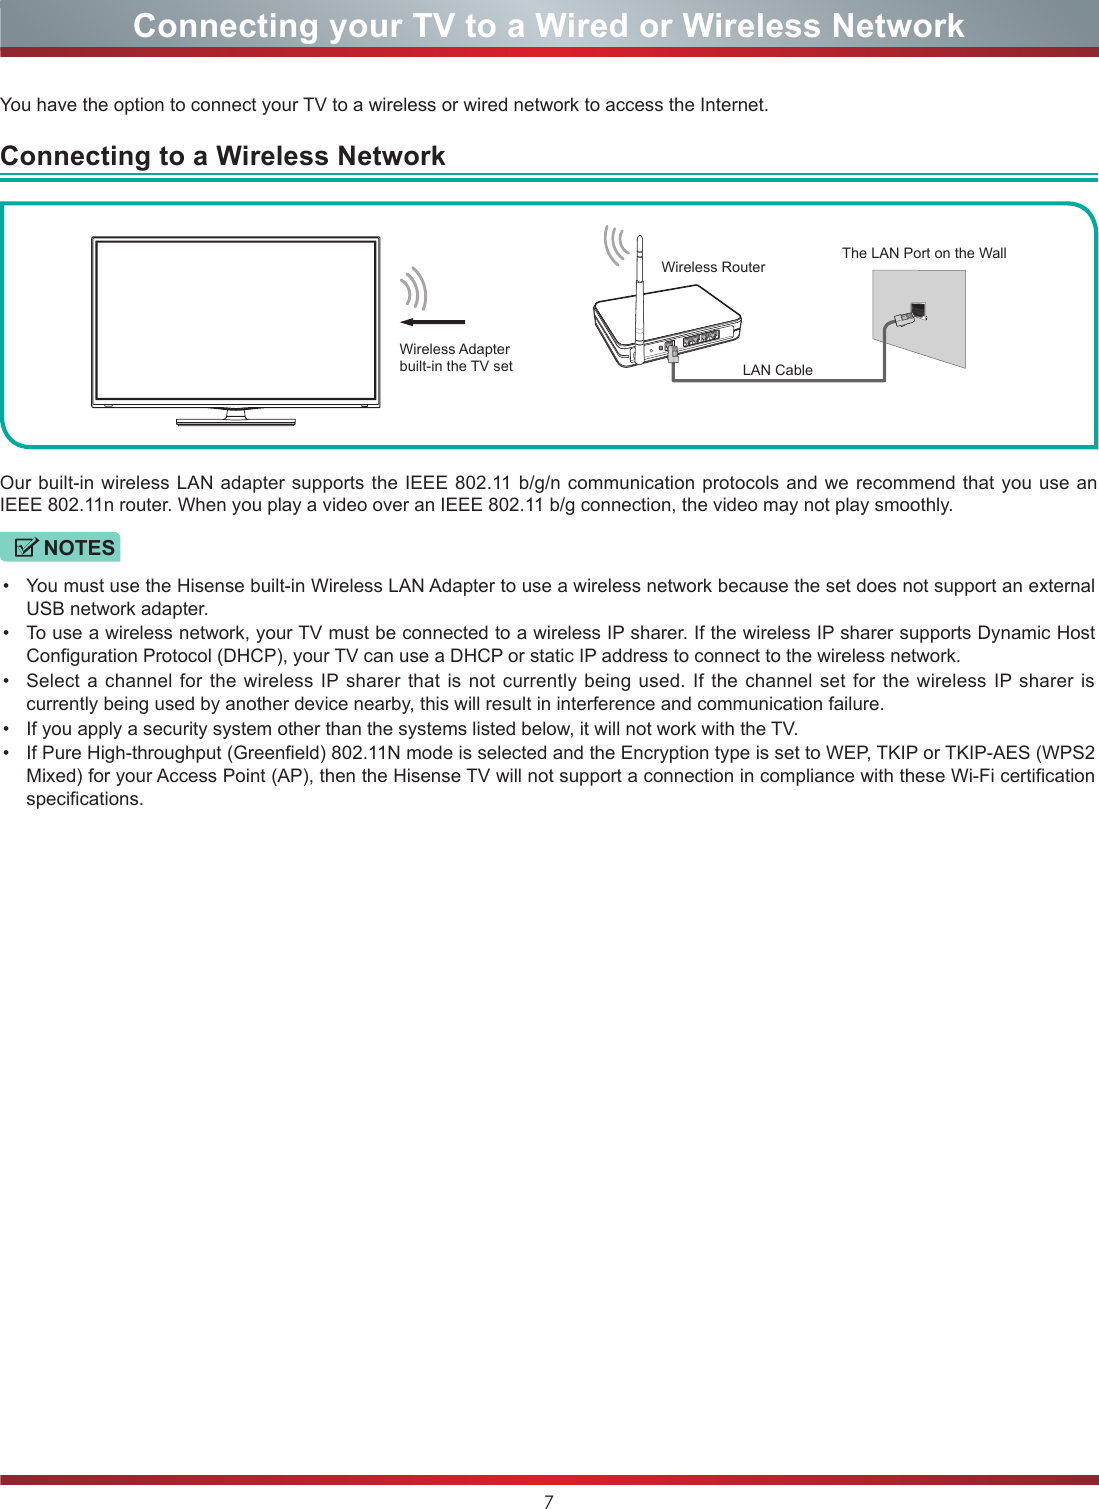
![3Connecting Devices to your TVConnecting Devices to your TVYou have several options for connecting your TV to different devices. The method in which you connect will be based upon the type of cables you have and the available outputs on your device.To connect an antenna,cable set-top box or satellite receiver: 1. Connect one end of a coaxial cable (not provided) to the RF OUT port on the antenna, cable or satellite box. If you are using an antenna with twin-lead cable, you may need a 300-75 Ohm adapter (not provided) to connect it to the back of your TV. Likewise, if you are using several antennas, you may need a combiner (not provided). 2. Connect the other end of the cable to the ANT/CABLE port of your TV.To connect an AV device with a composite video cable (not provided):1. Use the audio and video cables to connect the composite video/audio ports (of the external AV device) to the AV IN ports of the TV. (Video = yellow or green, Audio Left = white, and Audio Right = red).2. Plug the connected devices into the AV connectors on the TV before switching it on.3. Using your remote, press the [INPUT] button and select AV as the input source.Connecting an antenna, cable set-top box or satellite receiverConnecting an AV device with a composite video cableANT OUTCable Set-top BoxorVHF/UHF AntennaEXTERNAL DEVICESTV PORTANT/CABLEDVD Player/RecorderVideo CameraEXTERNAL DEVICESSet-top boxSatellite ReceiverSatellite antenna cableVCRAV OUTVideoLRWhite(L)White(L)Yellow(Video)Yellow or Green(Video)Red(R)Red(R)TV PORTAudio Cable VIDEO L RAV IN](https://usermanual.wiki/Hisense-Electric/LCDF0051.W9HLCDF0051-User-Manual-1/User-Guide-2508508-Page-6.png)
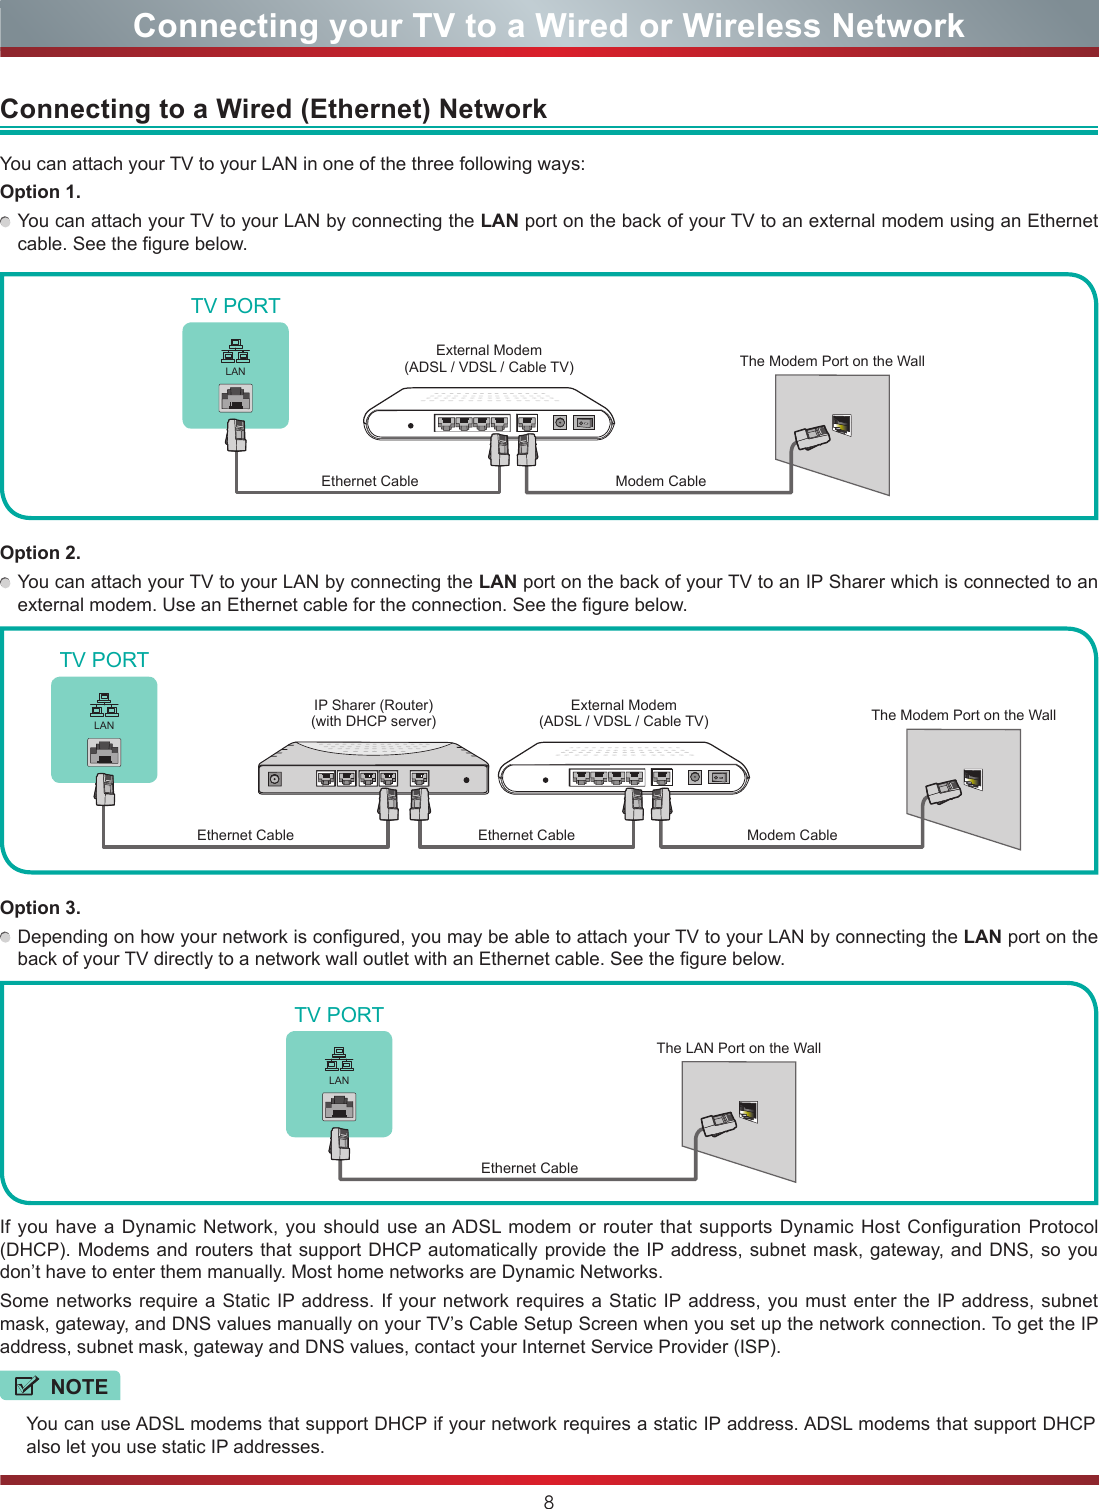
![4Connecting Devices to your TV1. Use a component video cable (not provided) to connect the component output ports of the external device to the YPBPR ports for the TV. Use an audio cable to connect the component audio ports of the external device to the TV AUDIO (L / R) ports.2. Plug the connected devices into the YPBPR and L/R ports on the TV before switching it on.3. Using your remote, press the [INPUT] button and select COMPONENT as the input source.This type of connection supports digital connections between HDMI-enabled AV devices such as a Personal Video Recorder (PVR), DVD, Blu-Ray, AV receiver and digital devices. In addition, some devices (such as a PVR or DVD player) require an HDMI signal to be set to Output in the settings of the device.Please refer to the User Manual that came with your device for step-by-step instructions.To connect an AV device with an HDMI cable:1. Use an HDMI cable to connect the HDMI output port of the AV device to the HDMI port of the TV.2. Plug the connected devices into the power socket.3. Using your remote, press the [INPUT] button and select the corresponding HDMI input.Connecting an AV device with a component video cableConnecting an AV device with an HDMI cableY PBPRCOMPONENT INL RDVD Player/RecorderVideo CameraEXTERNAL DEVICESSet-top boxSatellite ReceiverSatellite antenna cableVCRWhite(L) White(L)Red(R) Red(R)Audio Cable Component Cable TV PORTComponentRLPRPBYRed(PR/CR) Red(PR/CR)Blue(PB/CB) Blue(PB/CB)Green(Y) Green(Y)HDMIHDMITV PORTEXTERNAL DEVICESDVDSet-top BoxHDMI Cable NOTEBecause the HDMI connector provides video and audio signals, it is not necessary to connect an audio cable.NOTEOne AV device can be connected to the TV using a component video or composite video cable.](https://usermanual.wiki/Hisense-Electric/LCDF0051.W9HLCDF0051-User-Manual-1/User-Guide-2508508-Page-7.png)
![5Connecting Devices to your TVYou can connect headphones to the /AUDIO OUT port on your TV. While the headphone is connected, the sound from the built-in speakers will be disabled.Connecting headphones /AUDIO OUTEXTERNAL DEVICESTV PORTTo connect speakers (or other audio receivers) with an audio cable: 1. Use an audio cable (not provided) to connect the DIGITAL AUDIO IN port of the audio receiver device to the DIGITAL AUDIO OUT port of the TV. Another option is to use an RCA Y-cable (1/8”-stereo mini to L/R phone - not provided) to connect an analog sound system to the AUDIO OUT port of the TV.2. Plug the connected devices into the main power socket before switching on the TV.3. Using your remote, press the [INPUT] button and select the corresponding source on the audio receiver.Connecting speakers (or other audio receivers)NOTES•The AUDIO OUT port only applies for some TV models.•If you prefer to use ARC (Audio Return Channel), then follow the steps on the following page under ‘Connecting a digital sound bar to use Audio Return Channel’.•When a digital audio system is connected to the DIGITAL AUDIO OUT port, decrease the TV and system volume.•5.1 CH (channel) audio is available when the TV is connected to an external device that supports a 5.1 channel surround sound (5.1 CH).•When the receiver (home theater) is set to ‘ON’, you can hear sound output from the DIGITAL AUDIO OUT port of the TV. When the TV is receiving a Digital Television (DTV) signal, the TV will send 5.1 CH sound to the home theater receiver. When the source is connected to the TV via HDMI, you will only hear 2 CH audio from the home theater receiver. If you want to hear 5.1CH audio, connect the DIGITAL AUDIO OUT port from your DVD/Blu-ray player/cable box/STB satellite receiver directly to an amplifier or home theater.•TV SETTINGS > Audio > Advanced Audio > Digital Audio Out must be set to either PCM or Dolby Digital / Bitstream.NOTEThe AUDIO OUT port only applies for some TV models.TV PORTEXTERNAL DEVICESPowerless Bass SpeakerSpeakerAudio AmplierDigital Sound BarDIGITALAUDIO OUTWhite(L)Red(R)Audio Adapter Audio Cable /AUDIO OUTAUDIO OUTRL](https://usermanual.wiki/Hisense-Electric/LCDF0051.W9HLCDF0051-User-Manual-1/User-Guide-2508508-Page-8.png)
![6Connecting Devices to your TVIf you’d like to use the ARC (Audio Return Channel) feature to have sound sent from the TV back down an HDMI cable to a digital soundbar, then you will need to connect the cable to the HDMI (ARC) port. By using this feature, you will also be able to control the soundbar with your TV remote instead of having to use multiple remotes for each device.To connect a digital sound bar with an HDMI cable:1. Connect the cable that’s attached to the sound bar to the HDMI (ARC) port on the TV.2. Press the [POWER] button on the Soundbar to turn it on.3. Using your remote, press the [INPUT] button and select the corresponding HDMI input.4. Next, press the [ ] button on your remote and go to Sound > Advanced Audio Settings.5. Press the [OK] button on your remote to enable the Sound function and select ARC First.Once you have completed these steps, then proceed to complete the first time set up menu (see the ‘First Time Setup Menu ‘section of this User Manual) to configure your TV settings. After you’re done completing the first time set up, then you will hear audio from live TV (or other content) from your sound bar.Connecting a digital sound bar to use ARC (Audio Return Channel)NOTEOnly digital sound bars that require a wired connection are compatible with the Smart TV.EXTERNAL DEVICESDigital Sound BarHDMI(ARC)HDMI(ARC)TV PORTHDMI Cable](https://usermanual.wiki/Hisense-Electric/LCDF0051.W9HLCDF0051-User-Manual-1/User-Guide-2508508-Page-9.png)
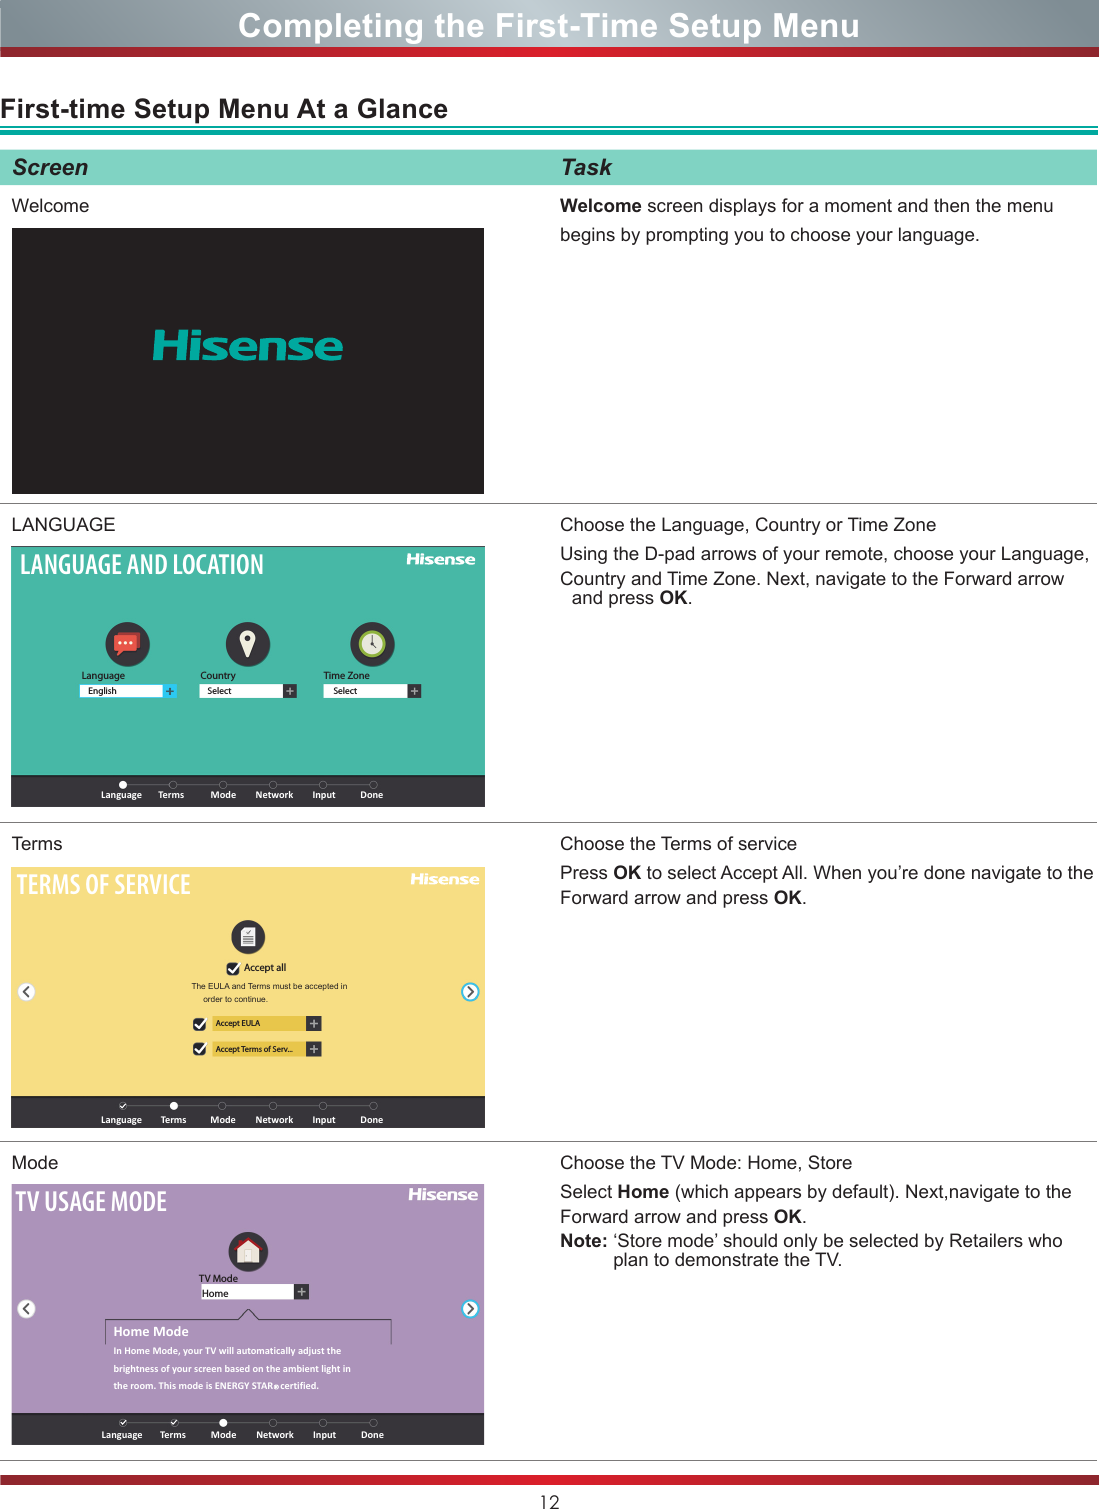
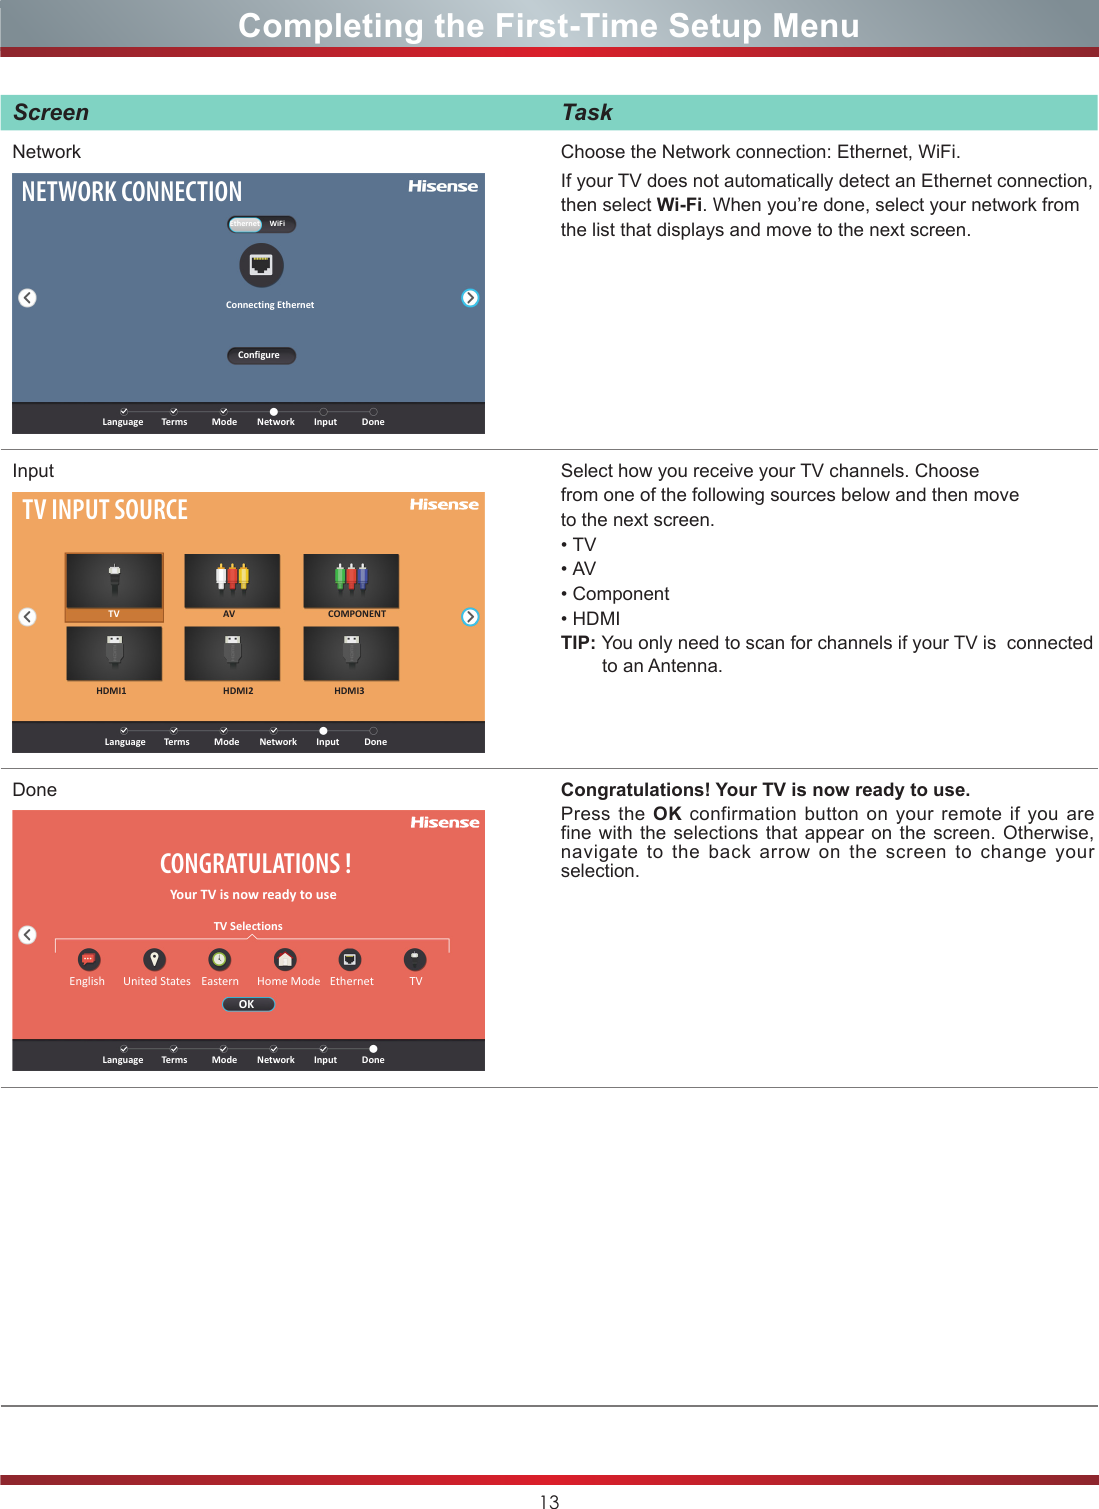
![11Completing the First-Time Setup MenuNow that you’ve attached your TV to the TV stand (or wall mount) and done the other necessary tasks, it’s time to turn the TV on to complete the first-time setup menu. To get started with the first-time setup menu:1. Press the [POWER] button to turn on your TV. A Welcome screen displays for a moment and then the menu begins by prompting you to choose your language.2. Using your remote, press the [OK] button to select your LANGUAGE AND LOCATION . Choose the Language, Country or Time Zone, after when you choose the Time Zone, that can appear on the right arrow, press [OK] to enter the next page.3. Move to the TERMS OF SERVICE screen and choose Accept all.4. From the TV USAGE MODE screen, press the [OK] button on your remote to select for Home, Store.5. When the NETWORK CONNECTION screen appears, need to manually set an Ethernet connection or Wi-Fi.7. From the TV INPUT SOURCE screen, select TV, HDMI1, HDMI2, HDMI3, AV or COMPONENT .8. Begin enjoying your TV when the following confirmation message displays ‘CONGRATULATIONS! Your TV is now ready to use”.](https://usermanual.wiki/Hisense-Electric/LCDF0051.W9HLCDF0051-User-Manual-1/User-Guide-2508508-Page-14.png)
![14Top-of-mind InformationThis section is written to provide you top-of-mind information early in this user manual and reduce your search time to find the answer. Connecting to the Internet after you’ve completed the first-time setup menuIf you chose to set up your TV without connecting to the Internet, then it only requires a few short steps.Establishing a wireless connection1. Using your remote, press [ ]. The TV SETTINGS menu displays on the left side of the screen.2. From TV SETTINGS go to Setup >Network > Configuration > Wireless Setting.3. Wait to make sure the connection status that appears beside your network name displays the word ‘Connected’.Establishing a wired connectionPlug an Ethernet cable into the LAN port (located on the back of the TV).To confirm that your TV is connected, press the [HOME] button on your remote and look for an LCD icon in the top right corner of the Home screen.TV ViewingThis section provides information to switch inputs and resize your picture.Switching InputsSwitching to devices plugged into other input connectors on the TV can be done at the push of a single button on your remote. It also does not matter what screen you are currently viewing when you want to switch inputs.1. Using your remote, press [INPUT]. A list of input sources displays on the top of the screen.2. Use the [ / ] of the D-pad of your remote to select the input you want to switch to.Resizing your pictureTo change the picture size on your TV:1. Using your remote, press [ ]. The TV SETTINGS menu displays on the left side of the screen.2. Select Picture > Aspect Ratio. The picture sizes (aspect ratios) displays on the bottom of the screen. Normal Zoom Wide Cinema 1:1 PIXEL MAP (Only available in DVI) Panoramic Direct AutoNOTEIf you have an external device (such as a satellite receiver) that is plugged into the TV inputs. It may have aspect ratios on the menu or the remote that came with the device.](https://usermanual.wiki/Hisense-Electric/LCDF0051.W9HLCDF0051-User-Manual-1/User-Guide-2508508-Page-17.png)
![15Top-of-mind InformationSoundIf you prefer to listen to audio through a soundbar (not provided) instead of the built-in TV speakers, then you will need to select a soundbar that requires a wired connection.Energy SavingYour TV will automatically enter standby mode after 15 minutes without video or audio input on the selected input mode.All televisions manufactured on or after January 1, 2011 must meet this federal law requirement.It is not possible for you to disable or reconfigure this design feature.Entering data (typing) on your TV screenTo ensure that you do not experience any performance issues, please only use the onscreen keyboard (instead of a wired keyboard) when menus, websites or other interactive elements require you to respond by typing information.Depending on the screen that you’re on while enjoying your TV, the onscreen keyboard will display when you press [OK] on your remote.Navigating on your TV screenTo ensure that you do not experience any performance issues, please only use the D-pad on the remote that came with the TV to navigate on the screen.](https://usermanual.wiki/Hisense-Electric/LCDF0051.W9HLCDF0051-User-Manual-1/User-Guide-2508508-Page-18.png)
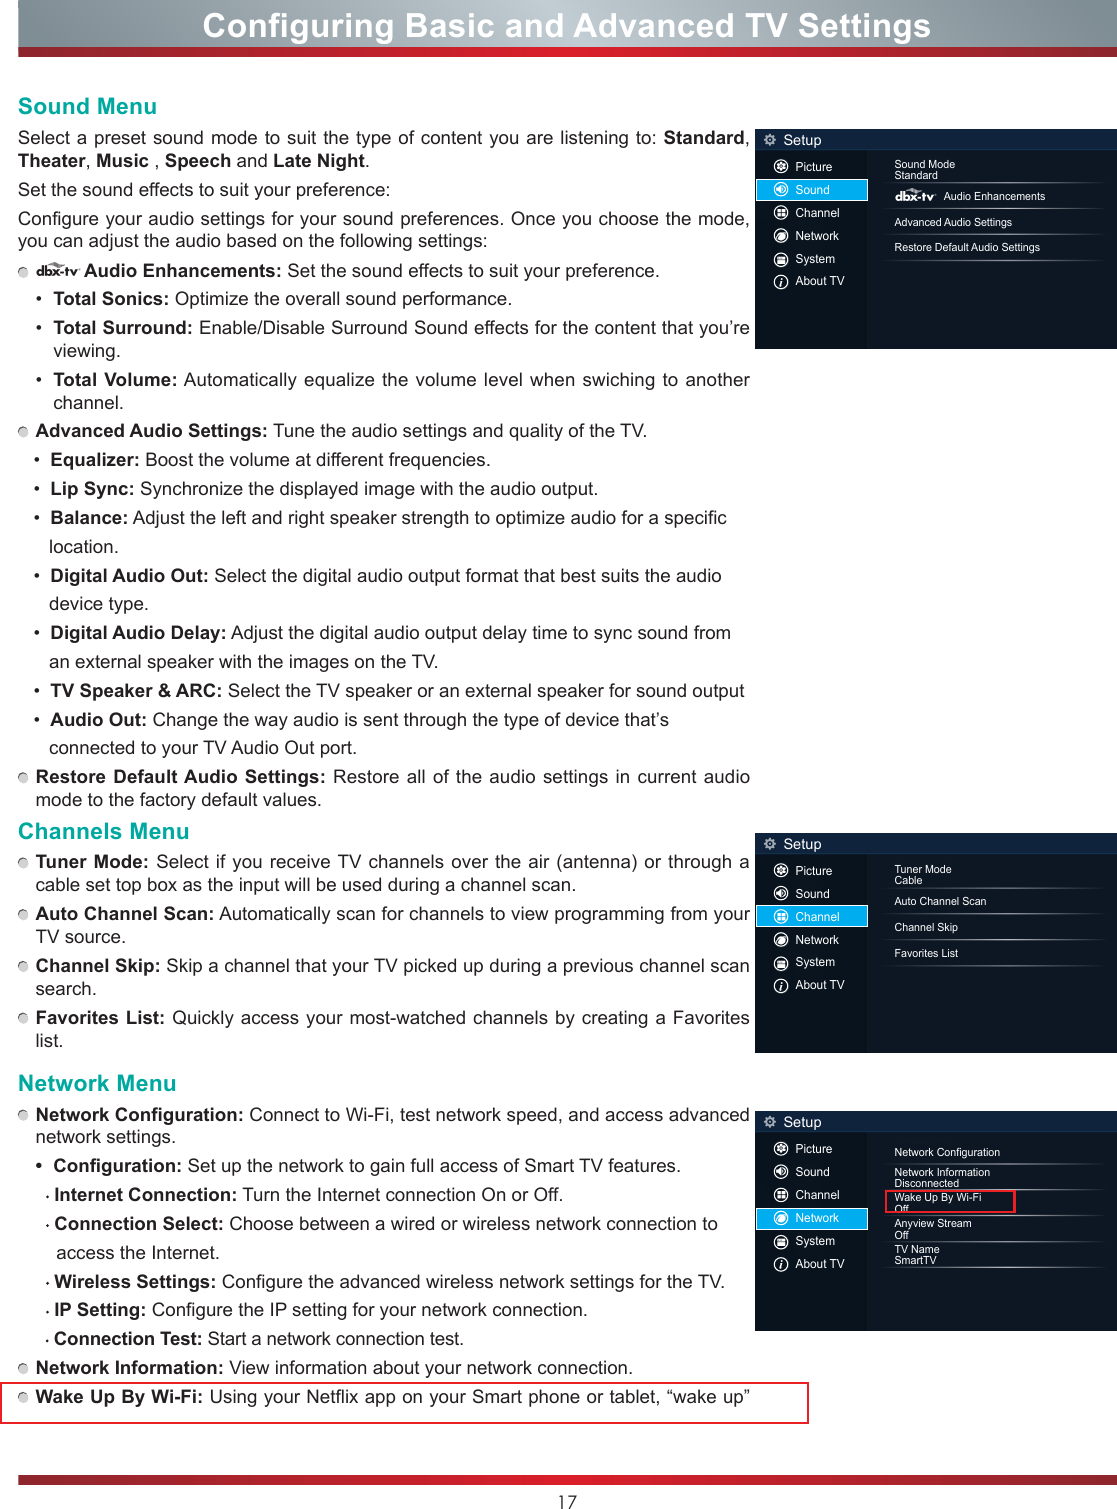
![16Configuring Basic and Advanced TV SettingsAccessing TV SETTINGS1. Press the [ ] button to open the Quick Setup menu.2. Press the [ ] buttons to enter the Setup menu.3. In each menu, you can: Press the [ / ] buttons to select an item, Press the [ ] buttons to enter the submenu, Press the [BACK] buttons to return to the previous menu. 4. Press the [EXIT] button to exit the menu.Your TV settings menu consists of the following submenus: Picture Sound Channel Network System About TVEach of the categories contain basic (or commonly used settings) and advanced settings that you can configure based on your preference.Picture MenuIf you’d like to configure the settings for your picture, there are four types of picture modes available: Vivid, Standard, Theater, Energy saving, Game and Sports.Once you choose the mode, you can adjust the picture based on the following settings: Brightness: Adjust the Brightness level to generate lighter or darker images. Contrast: Adjust the Contrast level to increase or decreae how bright images appear. Color: The color intensity of the picture for a more vibrant image. Aspect Ratio: Adjust the Aspect Ratio to stretch or zoom in on your picture. Backlight: Set the overall brightness of the screen. Advanced Picture Settings: Adjust advanced picture settings based on your viewing preference. • OverScan: Change the video size settings to slightly crop the edges of the displayed image. • Tint: Adjust the colors from a green to magenta tint to view the natural skin tones of people on the screen. • Sharpness: Adjust how sharp or soft edges of images appear. • Ultra Smooth Motion: Reduce seeing afterimages that are left on the screen when viewing fast-moving objects. • Noise Reduction: Improve how clear the picture appears by reducing noise. • Adaptive Contrast: Automatically darken dark areas and lighten light areas of images to see more details. • Color Temperature: Select a preset color temperature. • White Balance: Adjust the intensity of red, green and blue lights to view the true colors of all images in the picture. • Color Tuner: Adjust the Hue, Saturation and Brightness of color settings. Restore Default Picture Settings: Restore all the picture settings in the current picture mode to the factory default values.Your Hisense Smart TV comes with many TV setting features to allow you to customize the picture based on your viewing preference and environment.SetupPicture ModeStandardBrightness50Contrast50Color50BackLightLowAspect RatioNormal Advanced Picture SettingsRestore Default Picture SettingsPictureSoundChannelNetworkSystemAbout TV](https://usermanual.wiki/Hisense-Electric/LCDF0051.W9HLCDF0051-User-Manual-1/User-Guide-2508508-Page-19.png)
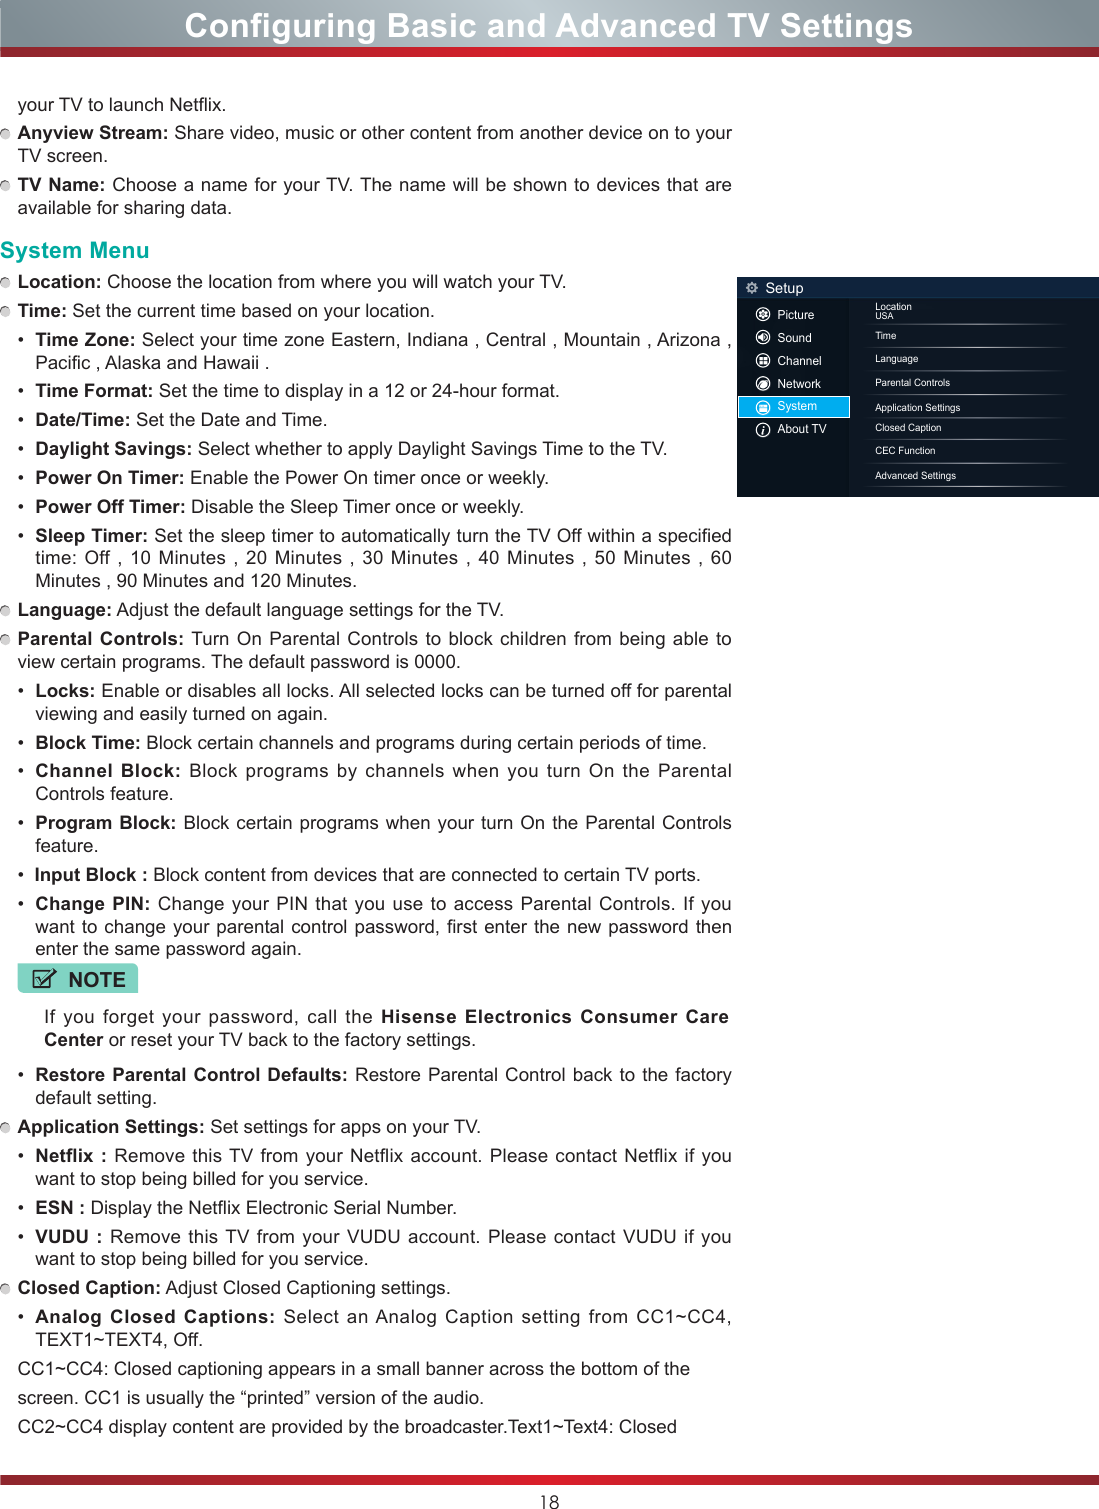
![20No SignalHDMI2HDMI210:41AM 60°F-71°FComponentTVLiveTV VOD Media AppsHDMI1Navigating the Home Screen MenuYou can always view the current date, time the weather temperature and in the top right corner of the Home screen.•Time setting: Press [OK] to time setting, if this function is available in setting.•Weather : weather+city, press [OK] open weather application.The AccuWeather app provides accurate local and national weather forecasts every minute and hour to help you plan. This app also delivers up-to-date reports, video presentations and much more content.To navigate through the AccuWeather center, press the [ / ] buttons on the D-pad of your remote to move the cursor and make your selection.In addition, if you have connected a device (such as a thumb drive) to a USB port and your TV recognizes it, then a device icon will also display in the same area.•USB disk, Press [OK] open Media application.If your TV is connected to the Internet through Wi-Fi®, then an icon will display in the top right corner of the screen. This location makes it very convenient for you to determine if you still have Internet connectivity as you use the TV. If your TV is connected to the Internet through Ethernet, then an LCD screen icon will display instead.•Network: SSSID+network status(wifi/ethernet/unconnect), press [OK] to network setting, if this function is available.Accessing the Home ScreenTo access the Home screen:1. Press the [HOME] button on your remote control.2. Press the [ / / / ] buttons on your remote to make your selection.112233Navigating the top of the Home screenNavigating the middle of the Home screenNavigating the bottom of the Home screenThe middle of the home screen consists of poster images for Vudu-recommended (top picks) movies and TV shows that you can rent or purchase.The poster images that appear in this section of the home screen are dynamic (meaning they will change) as long as your TV is connected to the Internet. The poster images of the recommended movies and TV shows will change based on the latest movies that have been released or popular TV shows.Navigating the bottom of the Home screen you can switch category(LiveTV, VOD, Media and Apps).](https://usermanual.wiki/Hisense-Electric/LCDF0051.W9HLCDF0051-User-Manual-1/User-Guide-2508508-Page-23.png)
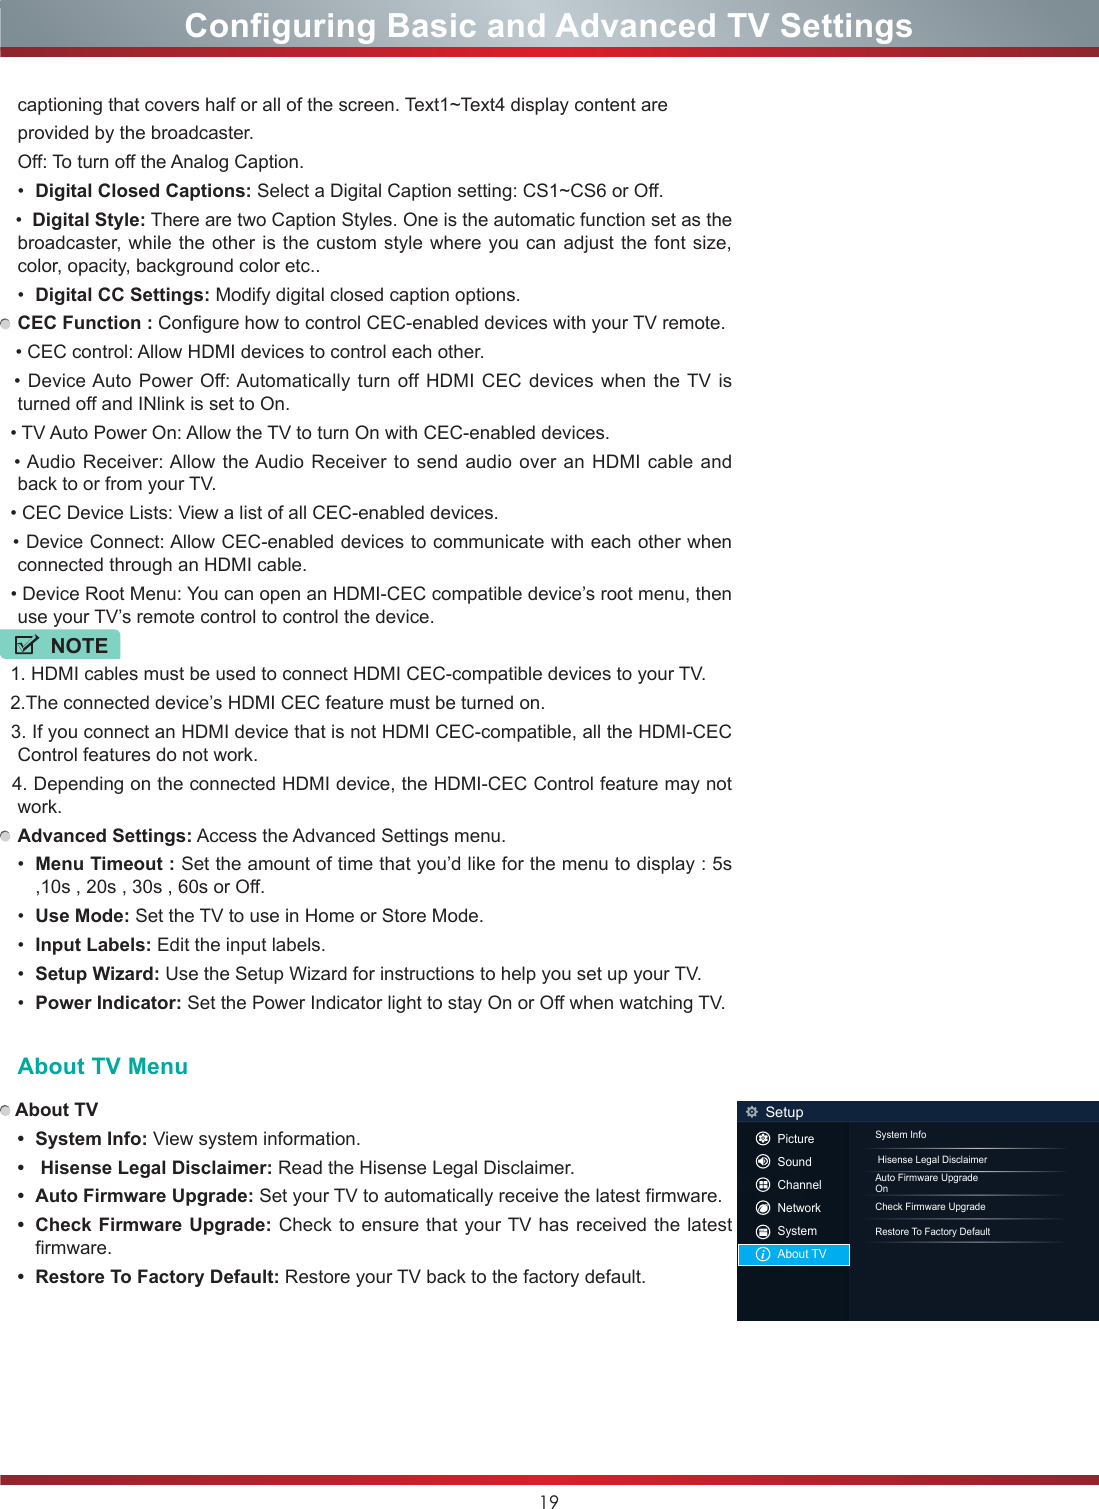
![21No SignalHDMI2HDMI210:41AM 60°F-71°FComponentTVLiveTV VOD Media AppsHDMI1Navigating the Home Screen Menu2LiveTVYou can browse the LiveTV category, start watching channel recently, and watch the video content of the current channel.To return to the last channel, press [BACK] on your remote.1. Current input, press “OK”button to open current input.2. Current input information or progame information.3. Recent input, If video is available the icon should highlight. input name should be follow settings definition or default name.Users in the LiveTV full screen mode, press the [ ] button or change channels, display screen information automatically.1. The user can according to the [ ] button to breathe out the introduction of the current program interface, to view the summary of the current program, such as screen can’t do, show by the [BLUE] button to see the complete information of the current program.2. Press the [ ] button to return to the default Info bar, press [BACK ] Info bar disappears.After you enter into LiveTV channel, the terminal detects the presence of the channel list information (station search has been completed). If you do not complete the scan, the user is prompted to start search. Press the jump button, you can directly enter the settings/channel search interface.If you are first used, the screen will display LiveTV operating tips, including: how to start the channel list, how to start channel info and so on.Operation hints tips only once, the next into the LiveTV no longer display the prompt, unless the user restore factory Settings.View channel infoShow channel listPRE-CHBACKOK Show channel listView channel infoPRE-CHBACK13Info BarInfo Bar](https://usermanual.wiki/Hisense-Electric/LCDF0051.W9HLCDF0051-User-Manual-1/User-Guide-2508508-Page-24.png)
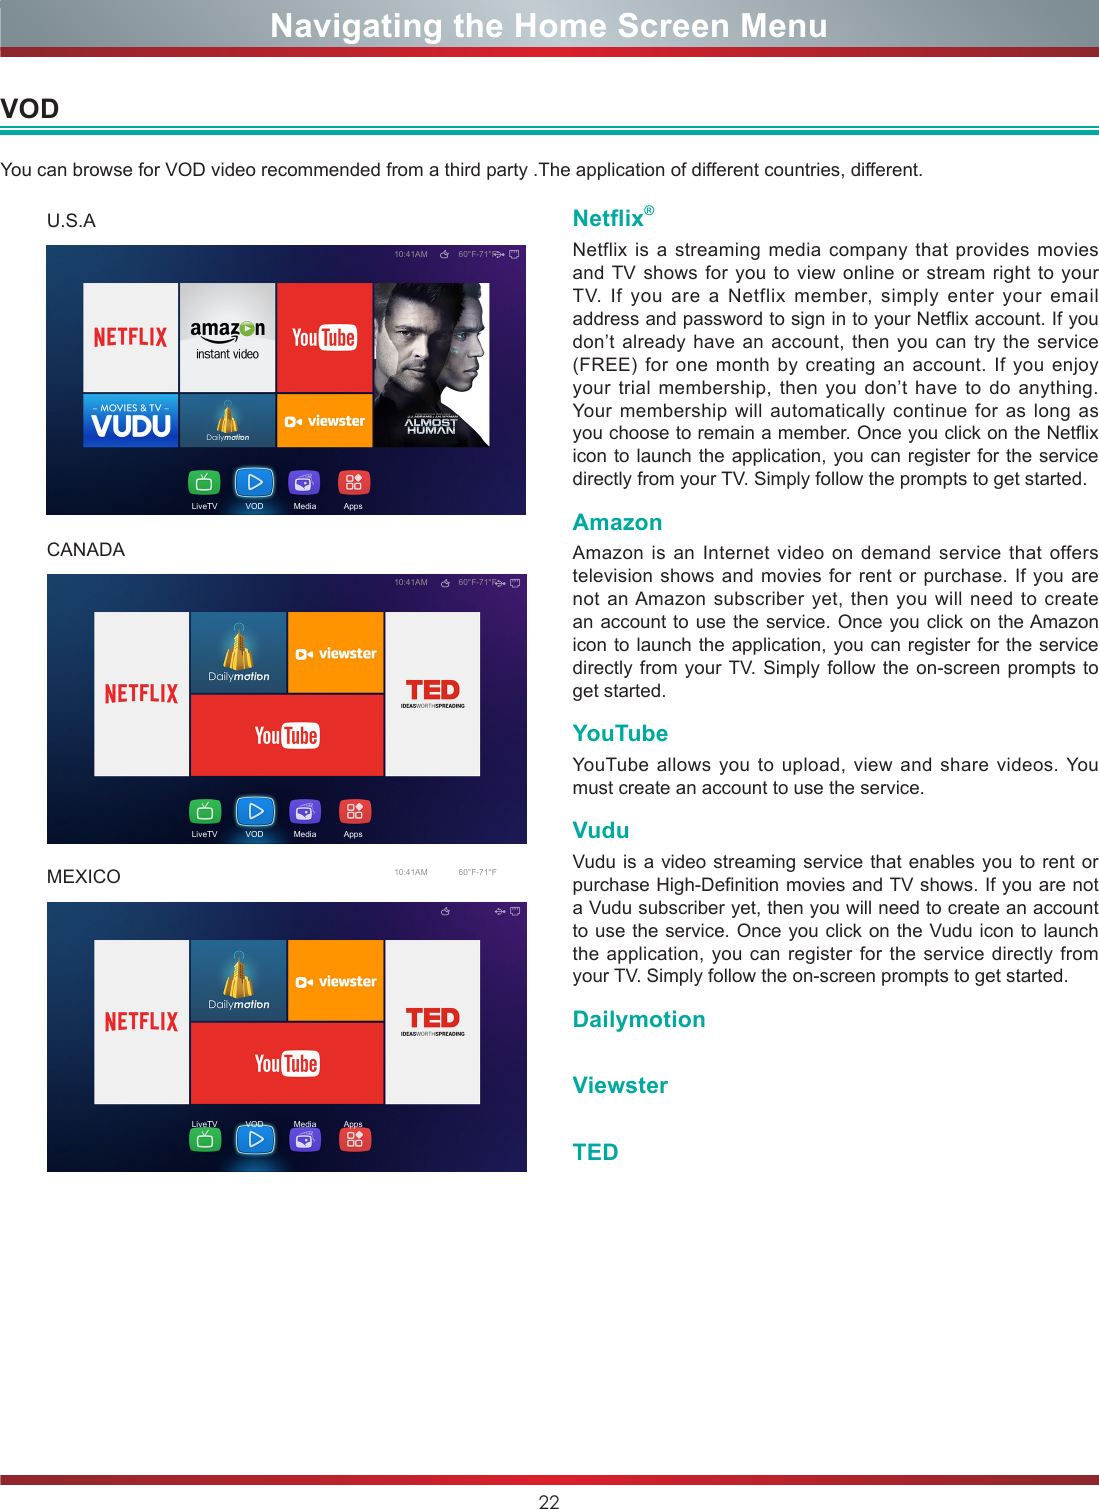
![23Navigating the Home Screen MenuPress [HOME] button to enter the HiSmart hub, then press the [ / ] buttons to select the Media option. 1. Press the [ / ] buttons to switch the media type.2. Press the [ / / / ] buttons to select the folder/file you want to open and then press the [OK] button to enter/play the folder/file.3. Press the [BACK] button to return to the previous directory.Playable formats listFiles Format Playable formatPicture JPG /JPEG /PNG /BMPMusic MP3 / AC3 / FLAC/ AAC /MP2 /Wav /WmaVideo MPEG2(.mpg) / MPEG4(.mp4) / AVC(.avi,.mkv,.ts,.tp)You can browse the images, listen to music, and enjoy such files as .AVI,.MKV,.MP4,.DAT,.MPG,.MPEG,.TS,etc. NOTEWe cannot promise that this unit would support all the formats listed above, as the programming tools are different. Buttons for the media playback controlThe figure below shows the buttons on the remote you can control media content. NOTEThe displayed figure may differ depending on the model. Fast rewindPlayPauseFast forwardStopMediaMake sure to insert the USB disk/mobile hard disk with standard port or to connect the TV with other digital devices via DLNA.There are few options to start the Media: AllMusicPhotoVideoUSBReturn10:41AM 60°F-71°FLiveTV VOD Media AppsPicture Video Music](https://usermanual.wiki/Hisense-Electric/LCDF0051.W9HLCDF0051-User-Manual-1/User-Guide-2508508-Page-26.png)
![24Navigating the Home Screen Menu1. Press the [HOME] button to enter Media and press the [ ] button to switch to the left hand side menu bar, select media type to Video or ALL by pressing the two-way directional [ / ] button on the remote.2 Press [ ] button on the remote control to select the USB or PVR source and then Press the [OK] button to enter.3. Press the [ / / / ] buttons to select the folder that contains the video you want to view.4. Press the [OK] button to play the video.5. Press the [ BACK] buttons to exit and return to the previous directory.6. Press the [ / ] buttons to select the function icon and then press the [OK] button to confirm.00:42:13 01:42:502 3 4 5 617 8 910Function of icons:1The progress bar when playing.2Play/Pause. You can press the [►]/[II] button directly to play/pause when there is no control bar on the screen.3Play the previous video. You can press the [ ] button directly to achieve the function when no control bar displayed on the screen.4Play the next video. You can press the [ ] button to achieve the function when no control bar displayed on the screen.Playing Video Files5Fast rewind. Press the [OK] button to select the backward speed. You can press the [◄◄] button to achieve the function.6Fast forward. Press the [OK] button to select the forward speed. You can press the [►►] button to achieve the function.7Select time to play.・Press the [ / ] buttons to set hour, minutes and seconds.・Press the [0~9] buttons to set the time.・Press the [OK] button to confirm and the video will play at the time you have set or press the [BACK] button to exit.8Play list・Press the [ / ] buttons to select the video.・Press the [OK] button to confirm. 9Options.Press the [ / ] buttons to select the options in the menu, press the [OK] button to select the settings.・Repeat mode - You can change the repeat mode. All: Repeats all files contained in the folder. Once: Plays the current file once. Single: Repeats the current file only.・Zoom mode - You can change the zoom mode. 10Program infoAllows you to view the program information.](https://usermanual.wiki/Hisense-Electric/LCDF0051.W9HLCDF0051-User-Manual-1/User-Guide-2508508-Page-27.png)
![25Navigating the Home Screen MenuBrowsing Pictures1. Press the [HOME] button to enter Media and press the [ ] button to switch to the left hand side menu bar, Select All or Picture by pressing the two-way directional [ / ] button on the remote.2. Press [ ] button on the remote control to select the USB or PVR source and then Press the [OK] button to enter.3. Press the [ / / / ] buttons to select the folder that contains the picture you want to view.4. Press the [OK] button to display picture.5. Press the [BACK] buttons to exit or return to the previous directory. When browsing the pictures.Press the [ / ] buttons to select the function icon and then press the [OK] button to confirm. 1 2 3 4 5 6 7 8 91Play/pause.2Browse the previous picture. 3Browse the next picture. 4Shrink. Zoom out the picture. 5Enlarge. Zoom in the picture. 6 7 Rotate Rotate the picture 90 degrees anticlockwise. Rotate the picture 90 degrees clockwise. This function is not available for dynamic pictures.8Option Set. Press the [[ / ] buttons to select the options and press the [ / ] buttons to set them.・Playback modes - Select loop playback modes.・Speed Control - Allows you to browse the picture at different speed, such as 2S, 3S, 5S, 10S and 20S.9Picture info. Displays information about the pictures.Playing Music Files1. Press the [HOME] button to enter Media and press the [ ] button to switch to the left hand side menu bar, select All or Music by pressing the two-way directional [ / ] button on the remote.2. Press [ ] button on the remote control to select the USB or PVR source and then Press the [OK] button to enter.3. Press the [ / / / ] buttons to select the folder that contains the music file you want to listen.4. Press the [OK] button to play the music.5. All the music is listed on the left. Press the [ / ] buttons to select the music. You can press the [CH /CH ] buttons to move page up/down. Press the [RED] button to select the Playback Mode.6. Press the [BACK] button to exit the music playback interface.](https://usermanual.wiki/Hisense-Electric/LCDF0051.W9HLCDF0051-User-Manual-1/User-Guide-2508508-Page-28.png)
![26The Apps list contains icons of numerous pre-installed apps in different categories (games, social media, video, music) from which to choose.The application of different countries, different.To navigate to the Apps list from the Home screen, press Apps >VIEW ALL APPS > Hot Apps, All Apps or press button to enter the Apps .The first section of the Apps list page is labeled as ‘Hot Apps’ due to their popularity. The apps are Browser, Opera Store, Amazon and Netflix, YouTube and Pandora.The second section of the page is labeled as ‘All Apps’ and provides a collective view of them to browse.Installing and Launching an AppAlthough your TV came with numerous pre-installed apps, there may be a few that are not on the Apps list page that you’d like to download.To install an app:1. From the Home screen, click on the Opera Store icon.2. Navigate to the Search tab at the top of the screen.3. Press the [OK] button on your remote to bring up the on-screen keyboard and begin typing the name of the app. As you begin typing the first two to three letters the Opera Store suggests words to quicken your search time.4. Use your remote to select the app. A page displays that shows a written description of the app.5. Click on Open or Add to Favorites.Deleting an AppYou can only delete apps that you downloaded to the TV.To delete an app:1. Select the app that you want to uninstall.2. Press the [RED] button on your remote. A dialog message displays that asks if you’re sure you want to remove the app.3. Select OK. A confirmation message displays and the icon is removed from the Apps list screen.Viewing information about an appTo view a description about a pre-installed app, go to Opera TV Store. Once you’re there, you can browse for the app icon and press [OK] on your remote.A window will display that provides a description and rating.NOTEIf an app is deleted,the information related to that app is also removed.Apps10:41AM 60°F-71°FLiveTV VOD Media Apps](https://usermanual.wiki/Hisense-Electric/LCDF0051.W9HLCDF0051-User-Manual-1/User-Guide-2508508-Page-29.png)
![27Connecting your devices to stream contentStreaming Content Between Your Mobile Phone or Laptop and the TVDue to the advancement of technology, different types of devices can connect, discover and communicate with each other over a home network. For more details about this technology, refer to the Digital Living Network Alliance®.If you want to stream your personal content (music, videos, photos) stored on your mobile phone or laptop to the TV, then you can do it through a few simple steps.From a laptopTo stream content between most Windows-based laptops and your TV:1. Download the free TwonkyTM Beam app to your laptop. This app enables users to transfer content from their laptop or mobile phone to a television. For more information about the app, visit www.twonky.com.2. After you’ve completed step 1, make sure that your TV and the laptop are connected to the same wireless network.3. From your laptop, go to Windows Media Player.4. From the menu bar of your laptop, click on Stream > Turn on Media Streaming. A Media Streaming options window displays on your laptop screen.5. Click on the Turn on Media Streaming tab.6. Look for the name of your laptop computer in the list of devices that appears and select the Allowed checkbox. If you’ve customized the name of your TV, go to Setup > Network > TV Name.7. Click on OK at the bottom of the Media Streaming Options window.8. Go to the Media center on your TV. Your Media list from your computer will display. Begin browsing to select the content you want to stream.From a mobile phoneTo stream content from your mobile phone to the TV:1. Download the free TwonkyTM Beam app to your phone.2. Make sure that your TV and your phone are connected to the same wireless network.3. From your mobile phone, enable file sharing. To find the file sharing feature in your phone, check your Settings.4. After you’ve enabled file sharing on your phone, the app will begin to stream the content to the television.Customizing the name of your TV to identify itIf you have several TV’s in your home then you may want to customize the name of your Hisense Smart TV. By giving your TV a name, it will make it easier for you to identify it when connecting devices to the TV to stream or mirror content.To customize the name of your TV:1. Press [ ] on your remote. The TV Settings menu displays on the left side of the screen.2. From Setup go to Network > TV Name.3. Press [OK] on your remote to bring up the onscreen keyboard.4. Begin typing the name.5. When you are finished, press [OK] again for the change to take effect.](https://usermanual.wiki/Hisense-Electric/LCDF0051.W9HLCDF0051-User-Manual-1/User-Guide-2508508-Page-30.png)
![28Software updates for your TVThe software (also referred to as firmware) is part of what powers your TV. Because Hisense will provide software updates to continuously enhance your TV and correct any issues, we recommend that you update your TV software when a new version is available.You have two options to update the software for your TV. You can choose to receive software notification updates for your TV automatically or check for software updates manually.Checking for updates automaticallyTo receive software notification updates automatically, your TV must be turned ‘On’ and connected to the Internet. The Auto Upgrade setting (which enables your TV to receive the updates automatically) is turned to ‘On’ by factory default. If you turn the Auto Upgrade setting ‘Off’, it will disable this functionality of your TV. More information about this setting and how to locate it is explained later in this section.While your TV is on, it automatically checks for updates. If an update is available, a notification (in the form of a dialog message) will appear in the middle of the screen. If you choose to view notes about what is included in the update, then click on OK and you will be taken to a View update details screen. After you view the notes, click on OK and the software update will begin to download.If the download is completed successfully, then a confirmation message will display and you will be prompted to restart the TV by clicking on OK.If you choose to wait until later to begin the update then click on Cancel and you will see this notification the next time you turn on your TV.Checking for updates manuallyIf (for some reason) you do not want your TV to automatically check for updates and to receive notifications when they are available, then:1. Using your remote, press [ ].2. Go to Setup > About TV > Auto Firmware Upgrade.3. Press [OK] to turn the Auto Upgrade setting ‘Off’.By doing this, you will have to manually check to see if you have the latest software update.To manually check for the latest firmware:1. Using your remote, press [ ].2. Go to Setup > About TV > Check Firmware Upgrade.Using a USB flash drive (also called a ‘Thumb Drive’, ‘Jump Drive’ or ‘Memory Stick’) to install software updatesIf you have not kept your TV connected to the Internet or turned the Auto Upgrade feature ‘Off’ then dowload the new software to your USB drive from www.hisense-usa.com/support/firmware.asp.You will need your Model Number to search for available firmware. Once you’re on the firmware page of the Hisense website, follow the steps that display.An Update is available, would you like to begin?View update contentNotification Cancel OKNOTEIf you don’t click on OK, then the TV system will time out after 10 seconds and restart itself.](https://usermanual.wiki/Hisense-Electric/LCDF0051.W9HLCDF0051-User-Manual-1/User-Guide-2508508-Page-31.png)