Hisense Electric LCDF0058 Part15 Subpart B-LED LCD TV User Manual W9HLCDF0058 1 Part1 Rev1
Hisense Electric Co., Ltd. Part15 Subpart B-LED LCD TV W9HLCDF0058 1 Part1 Rev1
Contents
- 1. W9HLCDF0058_User Manual 1-Part1_Rev1
- 2. W9HLCDF0058_User Manual 1-Part2
- 3. W9HLCDF0058_User Manual 1-Part3
- 4. W9HLCDF0058_User Manual 2
W9HLCDF0058_User Manual 1-Part1_Rev1

ES-

English

1
Contents
Getting Started
Installing Batteries in the Remote Control .......................................................3
Making Connections ........................................................................................4
Network Connection ........................................................................................7
Basic Features
Turning your TV on or off .................................................................................9
Turning the TV On for the First Time ...............................................................9
Changing Channels / Volume .........................................................................10
Selecting the Input Source .............................................................................10
Shortcuts Instructions ..................................................................................... 11
To Use the Menu ............................................................................................12
Using the Picture Menu ..................................................................................12
Using the Audio Menu ....................................................................................13
Using the TV Menu .........................................................................................14
Using the Setup Menu ....................................................................................14
Using the Network Menu ................................................................................16
Advanced Features
DLNA Setting ..................................................................................................18
Media Share Settings in Computer.................................................................18
Setting to Share Files .....................................................................................19
Network Function............................................................................................20
Using the Home Menu ....................................................................................21
Movies ............................................................................................................21
Apps ...............................................................................................................21
AccuWeather ..................................................................................................21
YouTube .........................................................................................................21
22
VUDU MOVIES & TV ..........................................................................................

2
Contents
Advanced Features
Netflix..............................................................................................................23
Opera Apps.....................................................................................................23
Viewster ..........................................................................................................23
WFD ...............................................................................................................24
Facebook ........................................................................................................24
Browser .......................................................................................................... 24
Pandora ..........................................................................................................26
Twitter ............................................................................................................. 26
Picasa .............................................................................................................26
Digital Media Player (HiMedia) .......................................................................27
Browse Pictures..............................................................................................27
Enjoy Video Files ............................................................................................28
Enjoy Music Files............................................................................................28
Other Information
Troubleshooting ..............................................................................................29
3
Installing Batteries in the Remote Control
1. Press the release button on the back of the remote control to remove the battery compartment cover.
2. Insert two AAA size batteries. Make sure to match the (+) and ( - ) ends of the batteries with the (+) and ( - ) ends indicated in
the battery compartment.
3. Replace the battery compartment cover.
NOTES
1. Dispose of your batteries in a designated disposal area. Do not throw the batteries into a fire.
2. Remove depleted batteries immediately to prevent leakage into the battery compartment.
3. If you do not intend to use the remote control for a long time, remove the batteries.
4. Batteries should not be exposed to excessive heat, such as sunshine, heat registers, or fire.
5. Battery chemicals can cause a rash. If the batteries leak, clean the battery compartment with a cloth. If chemicals touch your
skin, wash immediately.
6. Do not mix old and new batteries.
7. Do not mix alkaline, standard (carbon-zinc) or rechargeable (ni-cad, ni-mh, etc.) batteries.
Program Your Universal Cable or Satellite Remote Control to Operate Your New Hisense Television!
If you would like to program your other household remote controls to your new Hisense television, please consult the User’s
Manual supplied by your Cable or Satellite provider. The Cable or Satellite providers’ User’s Manuals should include instructions
on how to program their remote to your television.
Below is a list of Hisense codes for the most common Cable and Satellite providers. Use the Hisense code that is associated
with your Cable or Satellite provider(if applicable).
DIRECTV ................................................... 0178, 10178, 10019, 10748, 11314, 11660, 11710, 11780, 12049, 10171, 11204,
11326, 11517, 11564, 11641, 11963, 12002, 12183
Time Warner Cable 386, 0178, 10178, 400, 450, 461, 456, 0748, 1463, 0463, 10463
Comcast ....................................................
...................................
.................................
0178, 10178, 10463, 11463, ,10748, 11314, 11660, 10171, 11204, 11326, 11517,
11641, 11780, 11785, 11892, 11963, 12002
Cox Communications 0178, 10178, 1326, 1463
Dish Network .............................................505, 627, 538, 720, 659
AT&T U-verse ............................................1346, 1013, 1041, 1327, 1363, 1004, 1040
If the Hisense code associated with your Cable or Satellite provider is not listed above, if the code above does not work, or if
you cannot locate the instructions for programming your household remote to your television, call your local Cable or Satellite
provider’s customer service center.
If your Cable or Satellite provider does not have a Hisense code available, please contact us.
Change the batteries
1Remove the battery compartment cover 2Insert the batteries
1. The remote control distance: up to 26 feet in front of the TV set.
2. The remote control angle: +/- 30-degrees (horizontal and vertical).
The effective range of remote control
Getting Started
4
Making connections
Getting Started
NOTES
•Check the jacks for position and type before making any connections. Loose connections can result in image or color
problems. Make sure that all connections are tight and secure.
•Not all A/V devices have the ability to connect to a TV, please refer to the user manual of your A/V device for compatibility
and connections procedure.
•Always unplug the power cord when connecting external equipment.
Connecting an antenna, cable or cable/satellite box
Connecting an A/V Device with Composite Cable
or ANT OUT
Cable
EXTERNAL DEVICESTV JACK
1. Turn off the TV before connecting the antenna.
2. Connect one end of a coaxial cable (not included) to the RF OUT jack on the antenna, cable or cable/satellite box. If you are
using an antenna with twin-lead cable, you may need a 300-75 ohm adapter (not provided) to connect it to the back of your
TV. Likewise, if you are using several antennas, you may need a combiner (not provided).
3. Connect the other end of the cable to the ANT/CABLE jack on the side of your TV.
1. Use the audio and video cables to connect the external A/V device’s composite video/audio jacks to the TV’s jacks. (Video =
yellow, Audio Left = white, and Audio Right = red)
NOTE
Connect the yellow video plug to the Green Y-input jack on the TV.
2. Plug the connected devices into the mains socket before switching on the TV.
3. Select the corresponding source from the TV.
ANT/CABLE
DVD Player/Recorder
Video
Camera
EXTERNAL DEVICES
Set-top box
Satellite Receiver
Satellite
antenna
cable
VCR
A/V OUT
Video
L
R
White(L)
White(L)
Yellow(Video)
Yellow(Video)
Red(R)
Red(R)
TV JACK
AV Cable
(not included)
YPBPR
L -AUDIO- RVIDEO
AV IN
COMPONENT IN
5
Getting Started
Connecting an A/V Device with Component (YPBPR) Cable
Connecting an A/V Device with HDMI Cable
1. Use a component cable to connect the external A/V device’s component output jacks to the TV’s YPBPR jacks. Use an audio
cable to connect the external A/V device’s component audio jacks to the TV’s AUDIO (L/R) jacks.
2. Plug the connected devices into the mains socket before switching on the TV.
3. Select the corresponding source from the TV.
Support digital connections between HDMI - enabled A/V devices such as PVR, DVD, Blu-ray, AV receiver and digital
devices.
Some devices such as PVR or DVD player require HDMI signal to be set to output in the device's settings.
Please consult your device user manual for instructions.
1. Use an HDMI cable to connect the A/V device’s HDMI output jack to the TV’s HDMI jack.
2. Plug the connected devices into the mains socket before switching on the TV .
3. Select the corresponding source from the TV.
NOTE
The HDMI connector provides both video and audio signals, it’s not necessary to connect the audio cable.
DVD Player/Recorder
Video
Camera
EXTERNAL DEVICES
Set-top box
Satellite Receiver
Satellite
antenna
cable
VCR
White(L)
White(L)
Red(R)
Red(R)
Audio Cable
(not included)
Component Cable
(not included)
HDMI
HDMI
TV JACK
EXTERNAL DEVICES
DVD Player/Recorder
Set-top box
Equipment with HDMI jacks
TV JACK
Component
R
L
PR
PB
Y
PR/CR
PR/CR
PB/CB
PB/CB
Y
Y
Connecting a headphone
Headphones can be connected to the AUDIO OUT/ output
on your set. (While the headphone is connected, the sound
from the built-in speakers is disabled.)
EXTERNAL DEVICESTV JACK
YPBPR
L -AUDIO- RVIDEO
AV IN
COMPONENT IN
AUDIO
OUT
HDMI Cable
•
•
The HDMI cable will not supplied with the product.
• We strongly recommend to use HDMI Cable with 2 cores as shown in the figure.
6
Getting Started
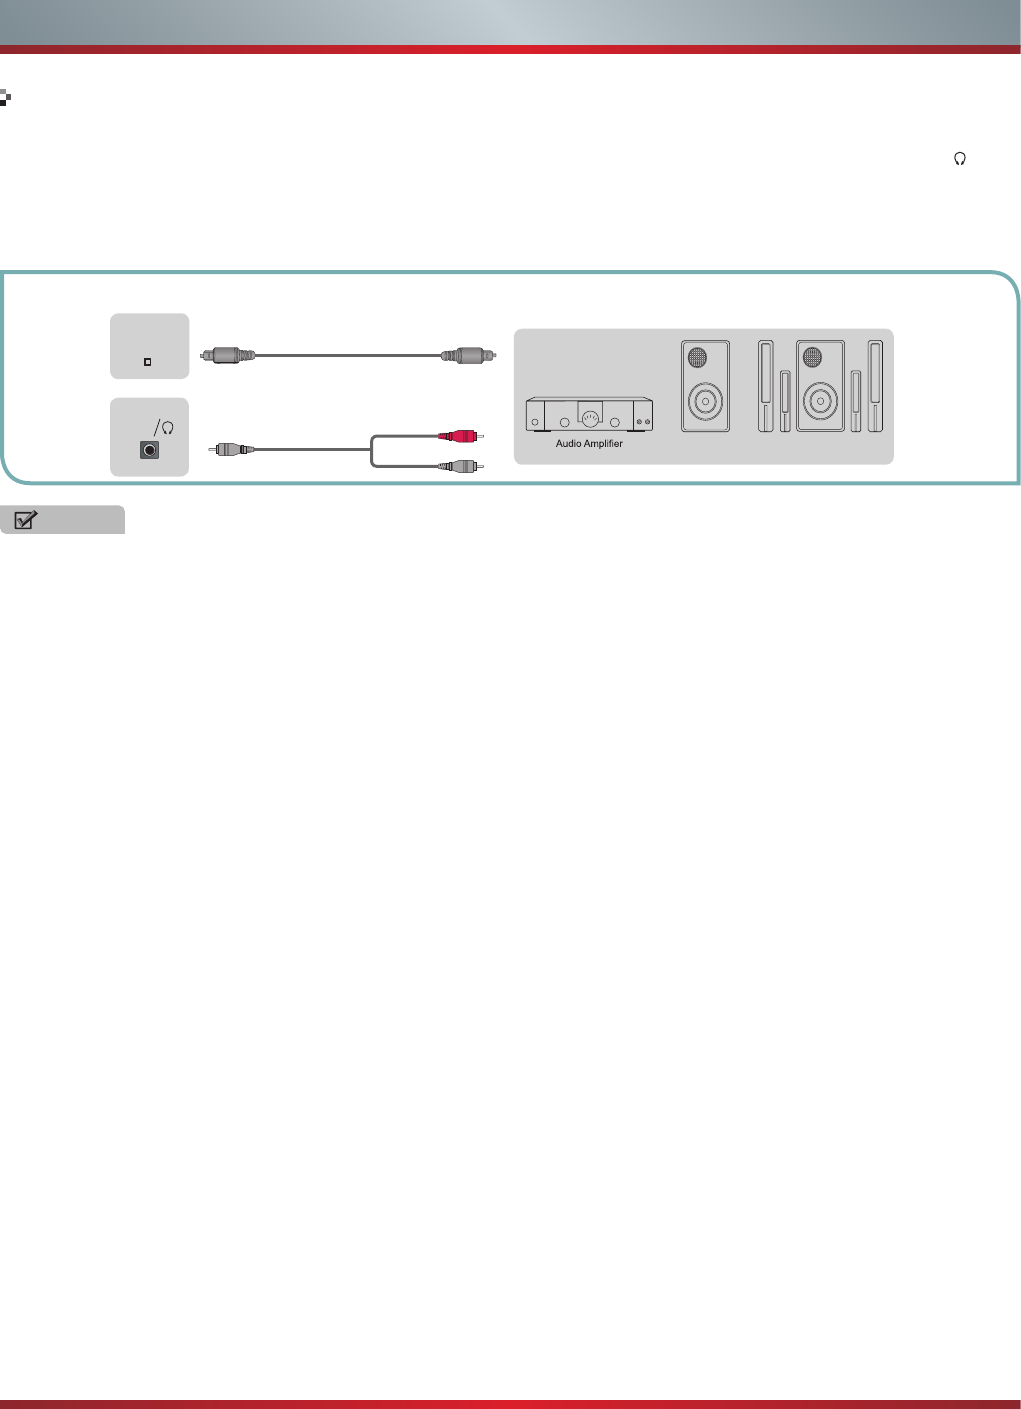
Connecting an Audio Receiver with Audio cable
1. Use an audio Optical cable to connect the A/V device’s digital audio in jack to the TV’s DIGITAL AUDIO OUT jack. Or use an
RCA Y-cable (1/8”-stereo mini to L/R phono - not provided) to connect analog sound system to the TV’s AUDIO OUT/ jack.
2. Plug the connected devices into the mains socket before switching on the TV.
3. Select the corresponding source from the TV.
NOTES
•When a digital audio system is connected to the DIGITAL AUDIO OUT jack, decrease the volume of both the TV and the
system.
•5.1 CH (channel) audio is available when the TV is connected to an external device supporting 5.1 CH.
•When the receiver (home theater) is set to on, you can hear sound output from the TV’s digital audio out jack. When the TV
is receiving a DTV signal, the TV will send 5.1 CH sound to the home theater receiver. When the source is connected to the
TV via HDMI, only 2 CH audio will be heard from the home theater receiver. If you want to hear 5.1 CH audio, connect the
digital audio out jack from your DVD/Blu-ray player/cable box/STB satellite receiver directly to an amplifier or home theater.
TV JACKS EXTERNAL DEVICES
Powerless
Bass Speaker
Speaker
White(L)
Red(R)
Audio Cable
(not included)
Audio Cable
(not included)
DIGITAL
AUDIO OUT
AUDIO
OUT
7
Getting Started
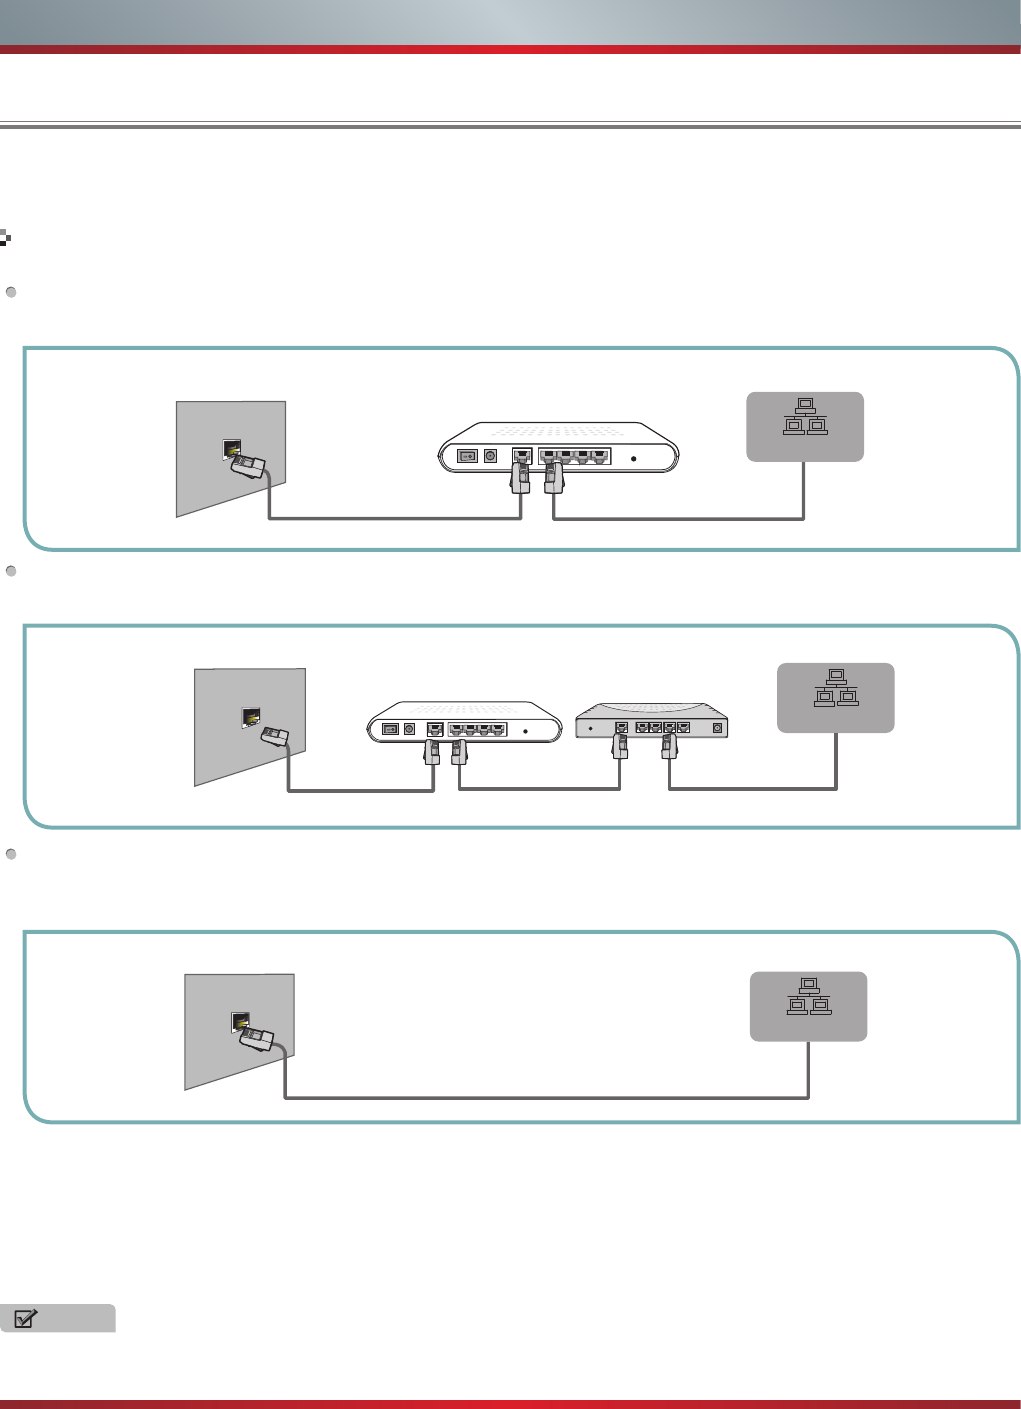
Network Connection
You can set up your TV so that it can access the Internet through your local area network (LAN) with a Ethernet or wireless
connection.
You can attach your TV to your LAN by one of the three following ways:
You can attach your TV to your LAN by connecting the LAN port on the back of your TV to an external modem using a Cat 5
LAN cable. See the diagram below.
You can attach your TV to your LAN by connecting the LAN port on the back of your TV to an IP Sharer which is connected
to an external modem. Use LAN cable for the connection. See the diagram below.
Depending on how your network is configured, you may be able to attach your TV to your LAN by connecting the LAN port
on the back of your TV directly to a network wall outlet with a Cat 5 cable. See the diagram below. Note that the wall outlet
is attached to a modem or router elsewhere in your house.
If you have a Dynamic Network, you should use an ADSL modem or router that supports Dynamic Host Configuration Protocol
(DHCP). Modems and routers that support DHCP automatically provide the IP address, subnet mask, gateway, and DNS, so
you don’t have to enter them manually. Most home networks are Dynamic Networks.
Some networks require a Static IP address. If your network requires a Static IP address, you must enter the IP address, subnet
mask, gateway, and DNS values manually on your TV’s Cable Setup Screen when you set up the network connection. To get
the IP address, subnet mask, gateway, and DNS values, contact your Internet Service Provider (ISP).
If you have a Windows computer, you can also get these values through your computer.
The Modem Port on the Wall
Modem Cable LAN Cable
LAN Port on TV
External Modem
(ADSL / VDSL / Cable TV)
LAN
The Modem Port on the Wall
Modem Cable LAN Cable LAN Cable
LAN Port on TV
External Modem
(ADSL / VDSL / Cable TV)
IP Sharer (Router)
(with DHCP server)
LAN
The LAN Port on the Wall LAN Port on TV
LAN Cable
LAN
NOTE
You can use ADSL modems that support DHCP if your network requires a Static IP address. ADSL modems that support
DHCP also let you use Static IP addresses.
Connecting to a Wired Network
8
To connect your TV to your network wirelessly, you need a wireless router or modem. See the illustration below.
Hisense’s built-in Wireless LAN Adapter supports the IEEE 802.11 b/g/n communication protocols. Hisense recommends using
IEEE 802.11n router. When you play the video over a IEEE 802.11b/g connection, the video may not play smoothly.
NOTES
•You must use the Hisense’s built-in Wireless LAN Adapter to use a wireless network, the set doesn’t support external USB
network adapter.
•To use a wireless network, your TV must be connected to a wireless IP sharer. If the wireless IP sharer supports DHCP, your
TV can use a DHCP or static IP address to connect to the wireless network.
•Select a channel for the wireless IP sharer that is not currently being used. If the channel set for the wireless IP sharer is
currently being used by another device nearby, this will result in interference and communication failure.
•If you apply a security system other than the systems listed below, it will not work with the TV.
•If Pure High-throughput (Greenfield) 802.11N mode is selected and the Encryption type is set to WEP, TKIP or TKIP-AES
(WPS2 Mixed) for your Access Point (AP), this player will not support a connection in compliance with new Wi-Fi certification
specifications.
•If your AP supports WPS (Wi-Fi Protected Setup), you can connect to the network via PBC (Push Button Configuration) or
PIN (Personal Identification Number). WPS will automatically configure the SSID and WPA key in either mode.
•Connection Methods: You can setup the wireless network connection three ways.
-Scan
-Manual
-Auto
Connecting to a Wireless Network
Wireless IP Sharer(Router)
(with DHCP Server)
LAN Cable
Wireless LAN Adapter
built-in TV set
The LAN Port on
the Wall
Getting Started
9
Basic Features
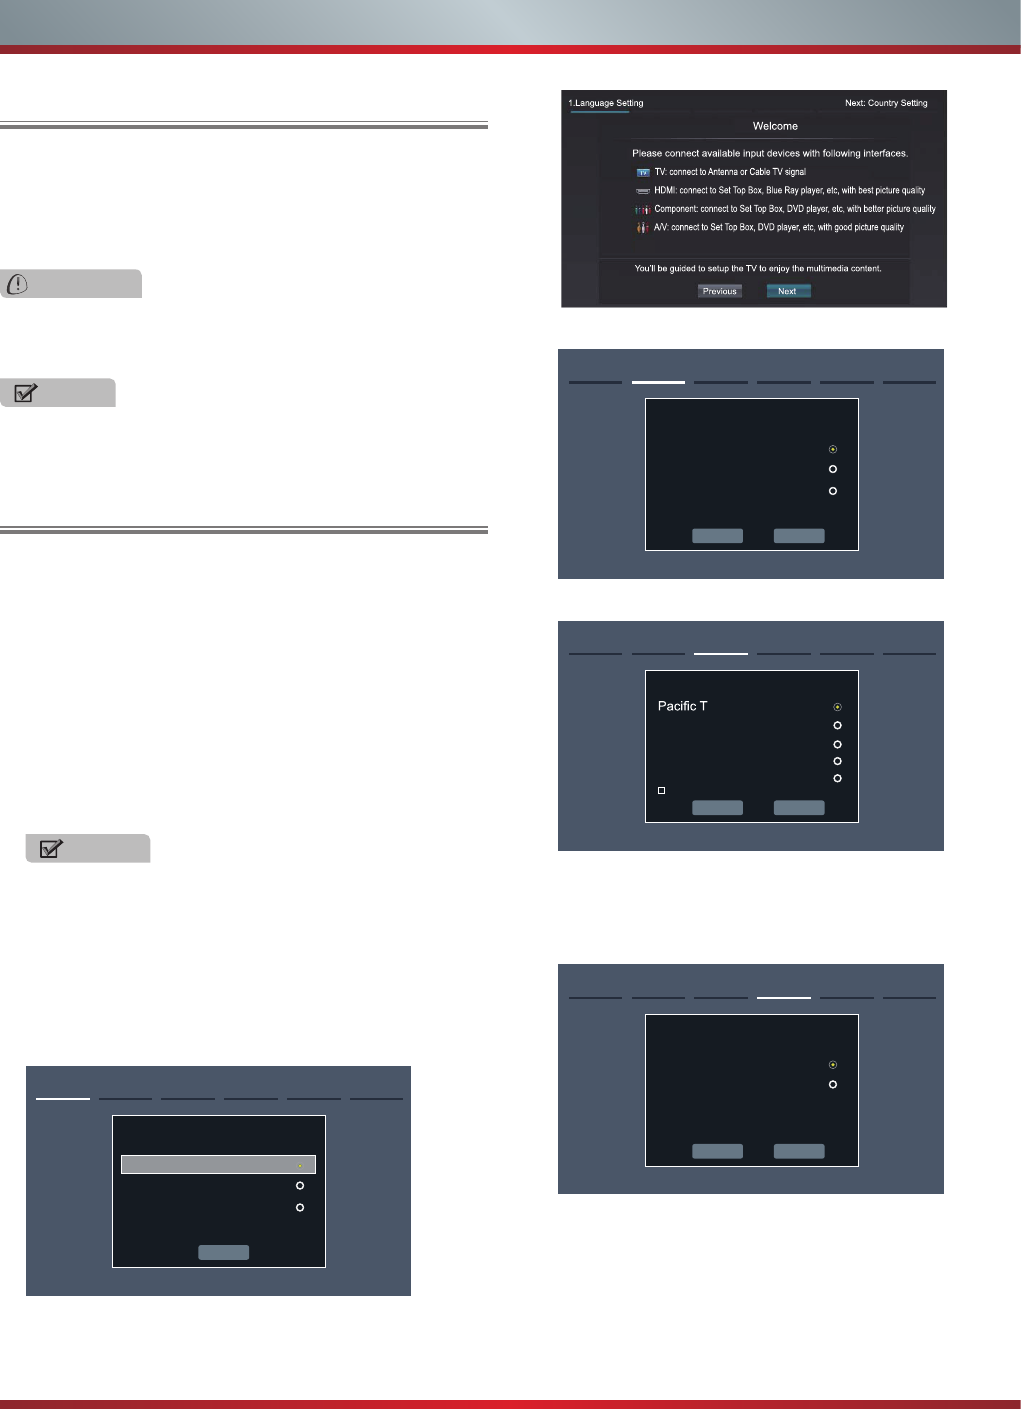
Turning the TV On for the First Time
The Setup Wizard menu appears the first time you turn
on the TV. It will assist you to specify the menu language,
country setting, Use Mode, Network Setting and Channel
Installation.
IMPORTANT: Make sure that the antenna or cable is
connected and a wired or wireless Internet connection
is available.
1. Make sure that you have:
Installed the remote control batteries.
Connected the power cord.
Connected to an antenna or cable TV signal.
NOTE
The customer will be prompted to connect a Network
cable in the Select Network wizard screen.
2. Connect your TV’s power cord to a power outlet, then
press power. The Initial Setup screen opens.
3. Please press [ENTER] to start the wizard, then press
[▲/
▲
] button to select your language: English, Spanish
or French, select [Next] to confirm and move to the
Welcome screen.
Next
1. Language setting Next: Country Setting
Language setting
English
Español
Français
The Welcome screen displays the available input devices
and interfaces.
4. Select the country where you will operate the TV.
Previous Next
2.Country setting Next: Time Zone Setting
Country setting
USA
Canada
Mexico
5. Select the local time zone according to your region.
Previous Next
3.Time zone setting Next: Use Mode
Time Zone setting
ime
Mountain Time
Central Time
Eastern Time
Hawaii
Daylight Saving Time
Daylight Saving: Set the Daylight Saving time for your area.
6. Select Use Mode Setting: Home Mode or Retail Mode.
Home Mode is the recommended setting which offers full
functionality of the television.
Previous Next
4.Use Mode Next: Network Setting
Use Mode
Home mode
Retail mode
Home mode default settings are recommended
for in-home use.
If you select Retail Mode, a message appears “Are you
sure to change to retail mode?” Select “OK” to continue,
or select “Cancel” to change your selection.
Home Mode is the recommended setting which offers full
functionality of the television. If you selected Retail Mode,
Energy Savings are not realized.
To turn your TV on or off (standby mode):
1. Plug the power cord into an AC power outlet.
2. Press [POWER] button. Your TV turns on.
3. Press [POWER] button again to turn off your TV. When
you turn off your TV, it goes into standby mode.
Turning your TV on or off
WARNING
When your TV is in standby mode, it is still receiving
power. To completely disconnect power, unplug the power
cord.
NOTE
If your TV does not receive an input signal for several
minutes, it automatically goes into standby mode.
10
Basic Features
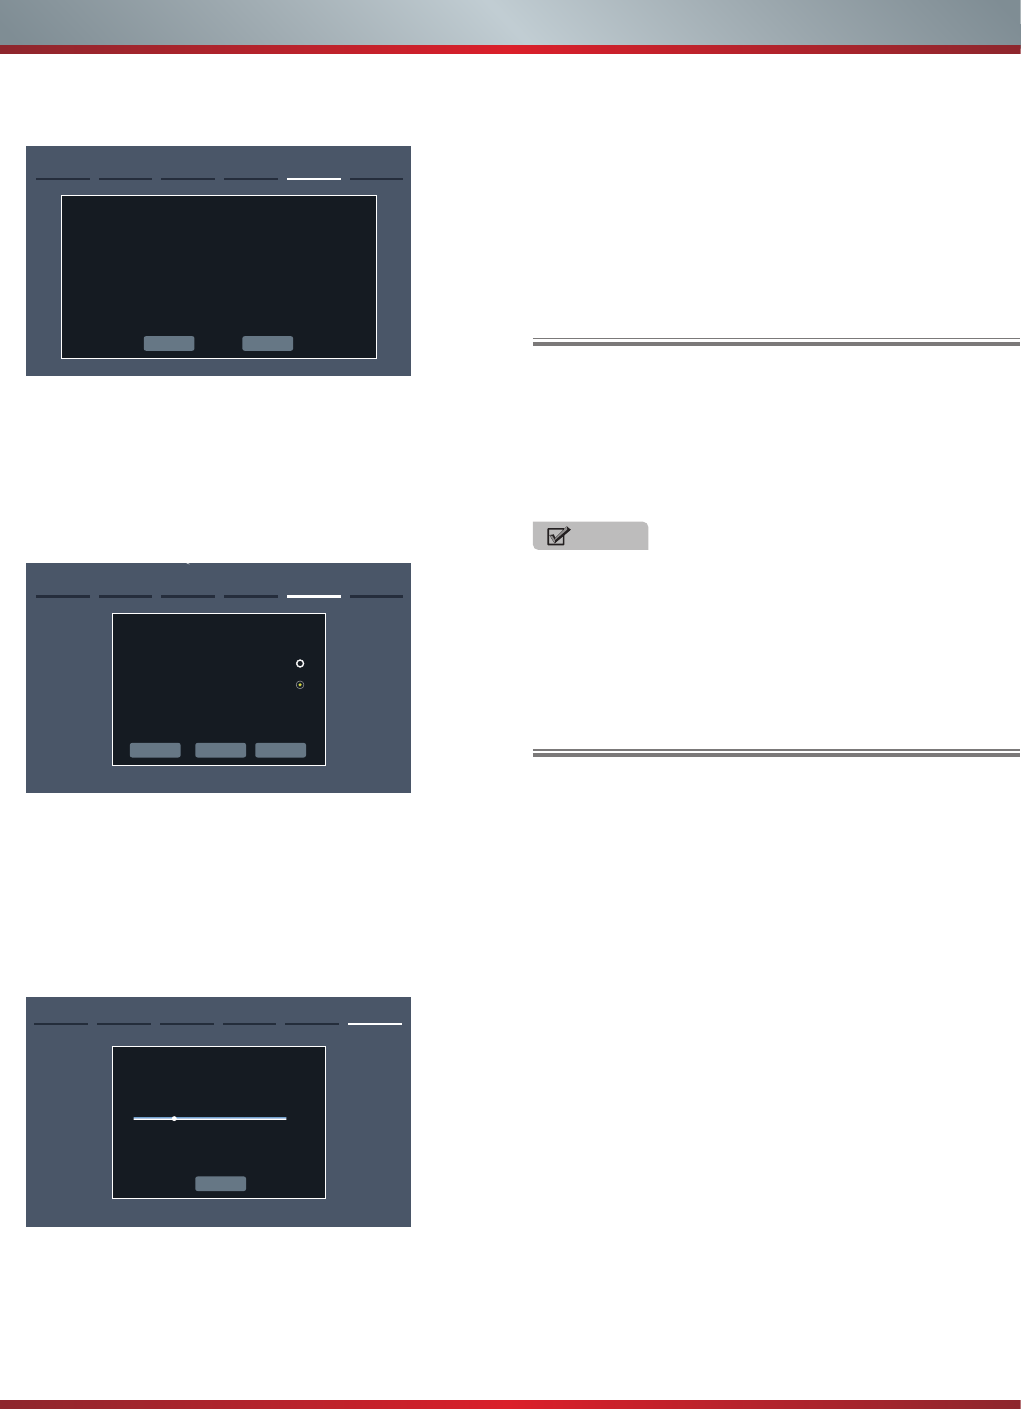
8. The Channel Search.
Press [▲/
▲
] to select your Tuner Mode: Antenna or
Cable, press [ENTER] button to confirm.
Channel Search
Please allow 30 minutes to complete.
30%
Stop
6. Channel Search
ATV Channels added:0
DTV Channels added:0
Press [
▲
/
▲
] to set the Channel Installation: Scan or Skip
Scan, press [ENTER] button to confirm.
If you select “Scan”, your TV automatically starts
Channel Installation available in your viewing area.
If you select “Skip Scan”, your TV does not scan for
channels.
1. Press the [CH
V
/V] (or [CH +/-]) on the TV/remote control
to change the channel.
2. Press the [VOL
V
/V] (or [VOL +/-]) on the TV/remote
control to adjust the volume.
3. Press the numeric buttons on the remote control to
display the corresponding channels.
Changing Channels / Volume
The first time you turn on your TV, you must select the TV
signal source. Your TV stores this information, so you do not
need to change the TV signal source unless it changes. For
example, you change from an outside antenna to cable TV.
To select the video input source:
1. Turn on your TV, then press [INPUT] button on the remote
or on the TV. The Input Source menu opens.
2. Press [▲/
▲
] button to highlight the input source, then
press [ENTER] button.
Selecting the Input Source
NOTE
Changing the channels can also be achieved by directly
entering the channel number using the numeric keys on
the remote control. If you are entering a two or three digit
channel number, the time between key presses should be
less than 3 seconds.
7. Select Network : Connect your TV to access the
network.
5.Network Next: Channel Search
END USER TERMS AND CONDITIONS AND PRIVACY POLICY FOR
HISMART SERVICES. The product/device you have purchased from Hisense
USA Corp., or its Parent Company, afliates and/or Subsidiary Company, its
successors and/or assigns (hereinafter referred to as “Hisense”) provides direct
access to the internet through one or more internet provider services (hereinafter
referred “Web Service(s)”).All content and services accessible through this
device belong to Hisense USA Corp., “Hisense” is sometimes also referred to
herein as “we” or “us”) or third parties and are protected by copyright, patent,
trademark and/or other intellectual property laws. Such content and services
are provided solely for your personal non-commercial use. You may not use
Service Statement
AgreeDisagree
When the Network Setting menu opens, Hisense Service
Terms and Conditions will appear. Press [◄/►] to scroll
through the pages. Please read it carefully.
If you want to access the internet, press the [Agree]
button to set your TV’s network connections. Otherwise,
press the [Disagree] button to enter the Channel search
menu.
Previous Next
5.Network Next: Channel Search
Select Network
Wired Network
Wireless Network
Connect a wireless network with Wi-Fi
Skip
You can select the network conguration in this menu
or choose to skip network conguration. For more
information or to setup the network conguration later, see
“Network Connection” and “Network Setup”.
Depending on the reception condition, it may take
up to 30 minutes or more to complete memorizing
channels. Please allow the process to complete
without interruption.
After the Channel Search, a summary of the current
settings will be displayed. Select “go” to exit the wizard.
11
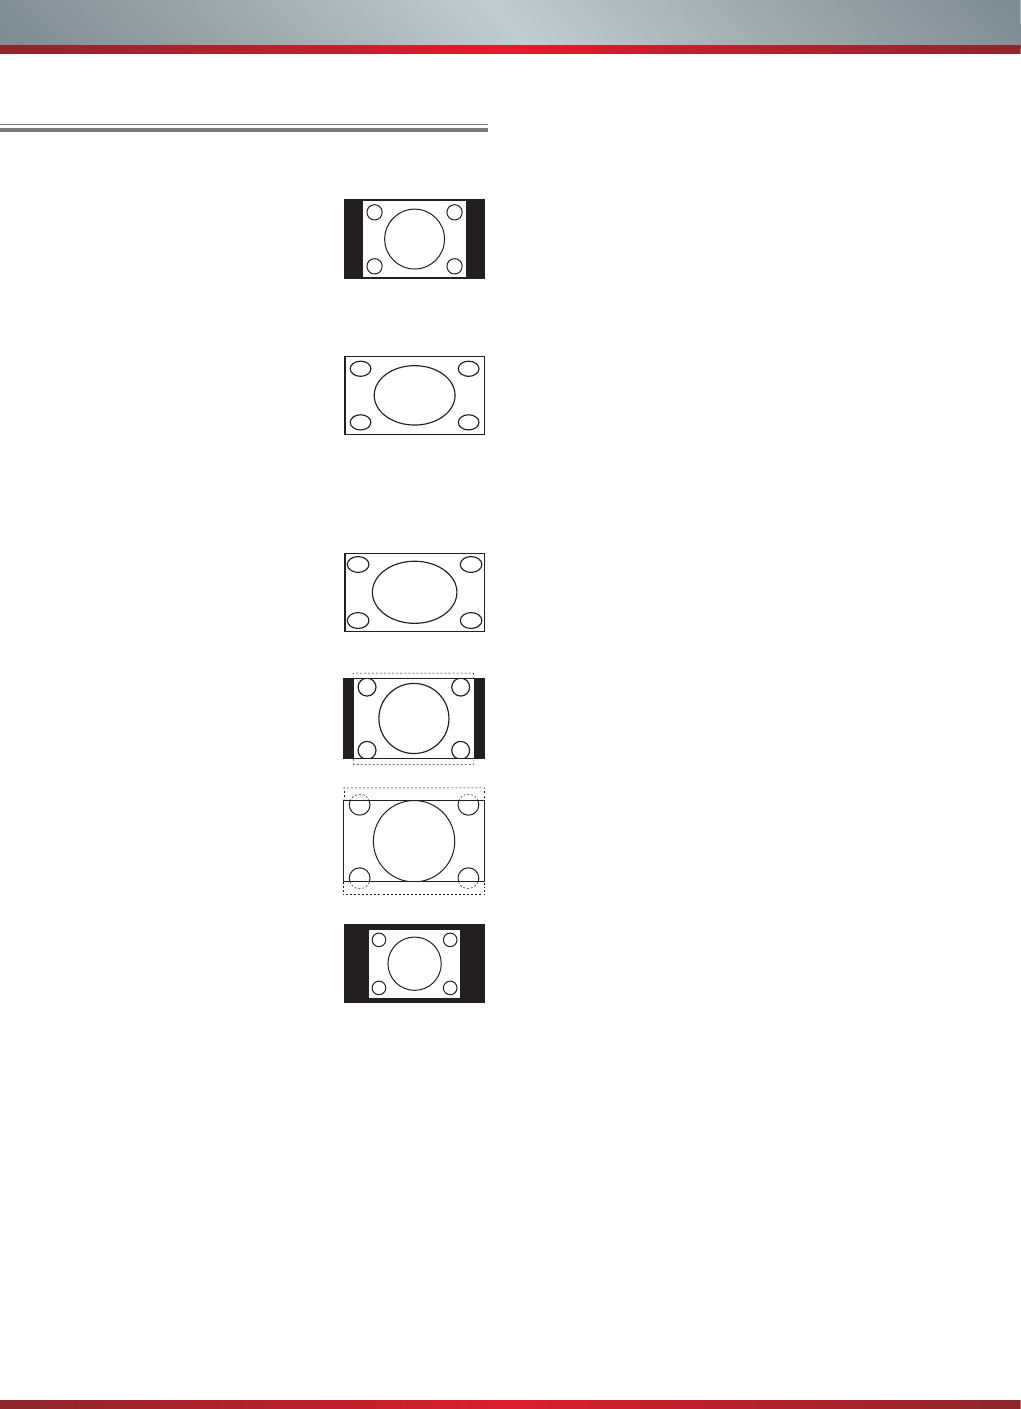
Aspect - Select the screen aspect ratio from Normal, Wide,
Zoom, Cinema , 1:1 Pixel Map, and Auto.
Normal: The original 4:3 aspect
ratio (1.33:1 signal) is preserved,
so black bars are added to the left
and right of the image. Standard TV
broadcasts are displayed with a 4:3
aspect ratio.
Wide: When watching a standard
broadcast or full-frame movie in
this mode, the display image is
stretched proportionately to fill
the TV screen. When watching a
widescreen (1.78:1 signal) program
or movie, the display image fills the
TV screen.
Auto: Automatically adjusts the
image based on the screen size and
the TV program.
Zoom: Stretch the 4:3 aspect ratio
image vertically and horizontally to
fill the screen at 1:1.78 aspect ratio.
Cinema: Stretch the 4:3 aspect ratio
image vertically and horizontally to
fill the screen at 1:2.35 aspect ratio.
1:1 Pixel Map: Displays the native
signal format pixel-by-pixel without
any video processing or scaling. In
this mode, 1920 x 1080 resolution
sources fill the screen while all
other resolutions are centered and
surrounded by black bars.
Picture - Press this button to set the picture mode. It can be
set as Vivid, Standard, Energy Savings, Game, Theater or
Custom. This mode achieves a certain image display effect
by setting the brightness, contrast and Speech.
Sound - Press this button to set the sound mode. It can be
set as Standard, Speech, Music and Custom.
Mute - Press this button to turn the sound off, press this
button again to turn the sound back on. This function is used
to switch off sound temporarily.
Shortcuts Instructions Sleep - It can set the TV to let it enter into the Standby
state automatically. Press this button repeatedly to select
the proper sleeping clock mode, and the clock tells you the
remaining time before the TV enters Standby state.
Display - Press this button to display the information
including channel number, channel name, current system
time, tuner mode, audio stream, video format, audio
language, closed caption mode, parental lock rating,
program details, etc.
CCD - Press the [CCD] button to the Closed Caption mode:
CC Off, CC On or CC On When Mute.
MTS - Press the [MTS] button to selec the default audio
stream: Mono, Stereo or SAP.
Basic Features
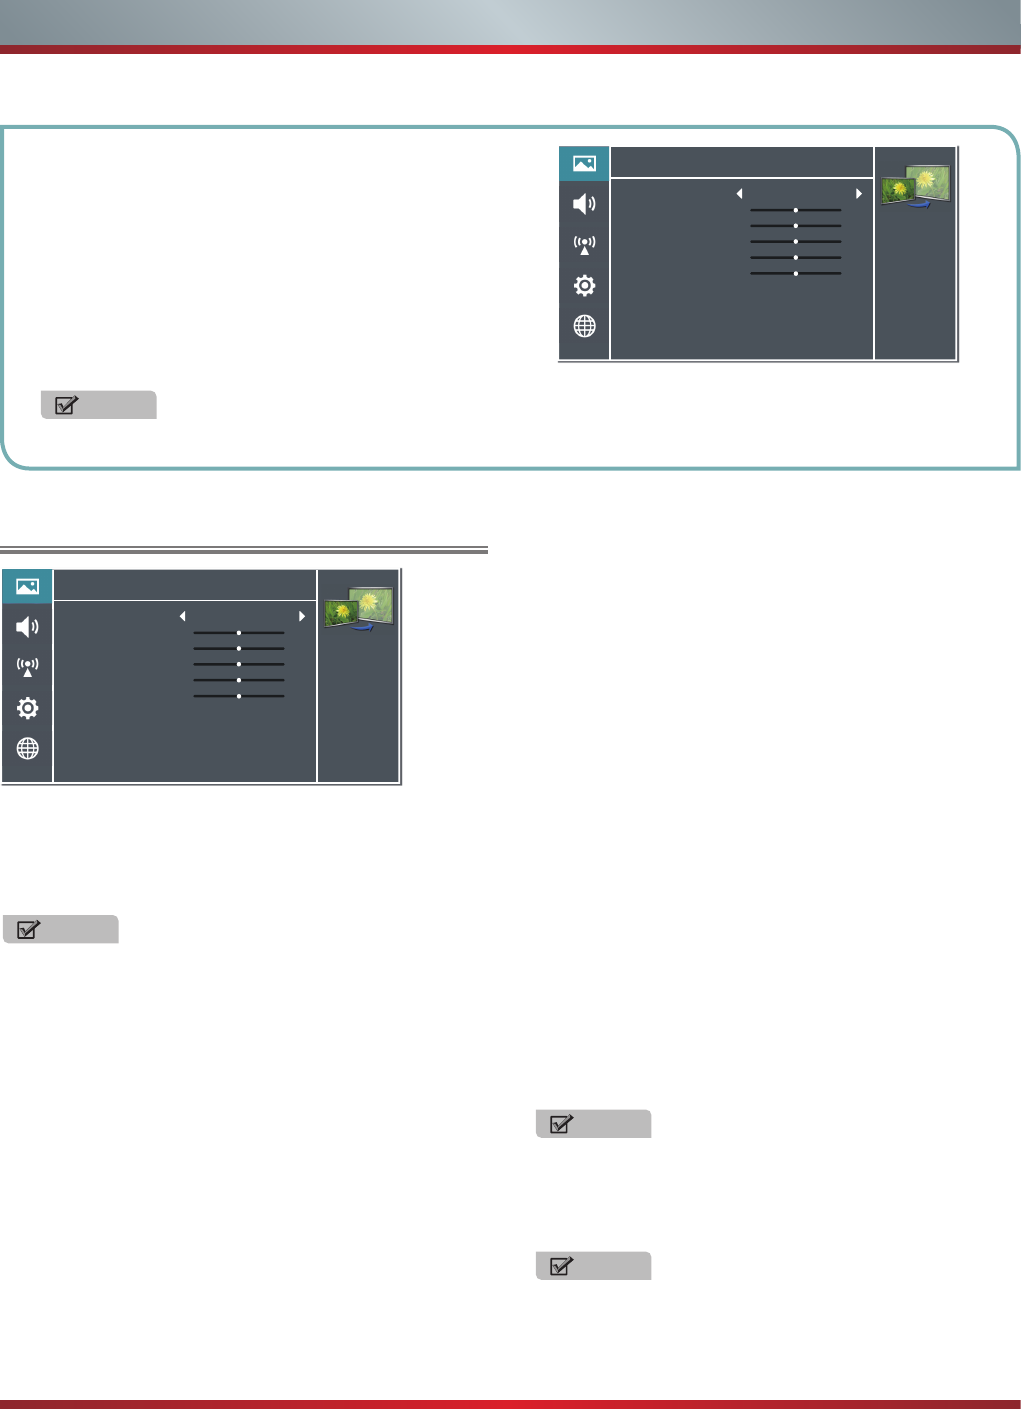
12
Using the Picture Menu
You can adjust:
Picture Mode - Adjust the Picture Mode. You can select
Vivid, Standard, Energy Savings, Theater, Custom or Game
mode.
NOTE
The option of the Picture Mode is different in different
inputs. (For more information, see “Shortcuts
Instructions”)
Brightness - Increase or decrease the brightness of the
picture. Increasing the brightness can add more light to dark
areas of the picture, while decreasing the brightness can
add more darkness to light areas of the picture.
Contrast - Increase or decrease the contrast of the picture.
Increase the contrast to adjust the white areas of the picture
or decrease the contrast to adjust the black areas of the
picture.
Color - Adjust the level of color in the picture.
Tint - Adjust the hue of the picture.
Sharpness - You can increase the sharpness level for clearer
images or decrease the sharpness level for smoother images.
Basic Features
To Use the Menu
1Press the [MENU] button to open the main menu.
2Press [▲/
▲
] to select a menu option, then press [
▲
/
ENTER] button to enter the menu.
3In each menu, you can:
Press [▲/
▲
] to select an item,
Press [
▲
/
▲
] to adjust the value, or
Press [
▲
/ENTER] to enter the submenu,
Press [MENU] to back the previous menu.
4Press [EXIT] to exit the menu.
NOTE
The menus in the user manual may vary slightly from the actual screen.
Advanced Video - Access advanced video settings such
as Color Temperature, Noise Reduction, Dynamic Backlight
Control (DCR) and Adaptive Contrast.
Color Temperature: Change the color temperature. You
can select a preset color temperature: Cool, Normal and
Warm (when set to cool, whites are bluer; when set to
warm, whites are yellower)
UltraSMR or True 120Hz Refresh Rate: Inserts frames
to reduce judder in fast action scenes. You can select
High, Low or Off. (May not be accessible, depend on your
TV series and size.)
Noise Reduction: Optimize the picture quality by filtering
signal interference. You can select Off, Low, Auto,
Medium or High.
Dynamic Backlight Control (DCR): Enhances the
contrast ratio between light and dark areas of the picture.
You can select Off, Low or High.
Backlight: Adjust the backlight level to select the
optimum levels of illumination.(May not be accessible,
depend on you TV series and size. )
Adaptive Contrast: Automatically adjusts the contrast
level of the selected input source.
Aspect Ratio: To choose the screen aspect ration from
Normal, Wide, Zoom, Cinema , Auto and 1:1 Pixel Map.
NOTE
The option of the screen Aspect Ration is different in
different inputs.
Overscan: In DTV mode, Select ON to extend the image
beyong the display so the picture edges are not visible.
NOTE
Only available in DTV, HDMI (Except Game mode) and
Component source.
Reset Picture Settings - Resets all Picture settings to the
factory defaults.
Picture
Personalize the
picture to suit your
preferences and
viewing conditions.
Picture Mode
Brightness
Contrast
Color
Tint
Sharpness
Advanced Video
Reset Picture Settings
50
50
50
0
10
>
>
Energy Savings
Picture
Personalize the
picture to suit your
preferences and
viewing conditions.
Picture Mode
Brightness
Contrast
Color
Tint
Sharpness
Advanced Video
Reset Picture Settings
50
50
50
0
10
>
>
Energy Savings
13
Basic Features
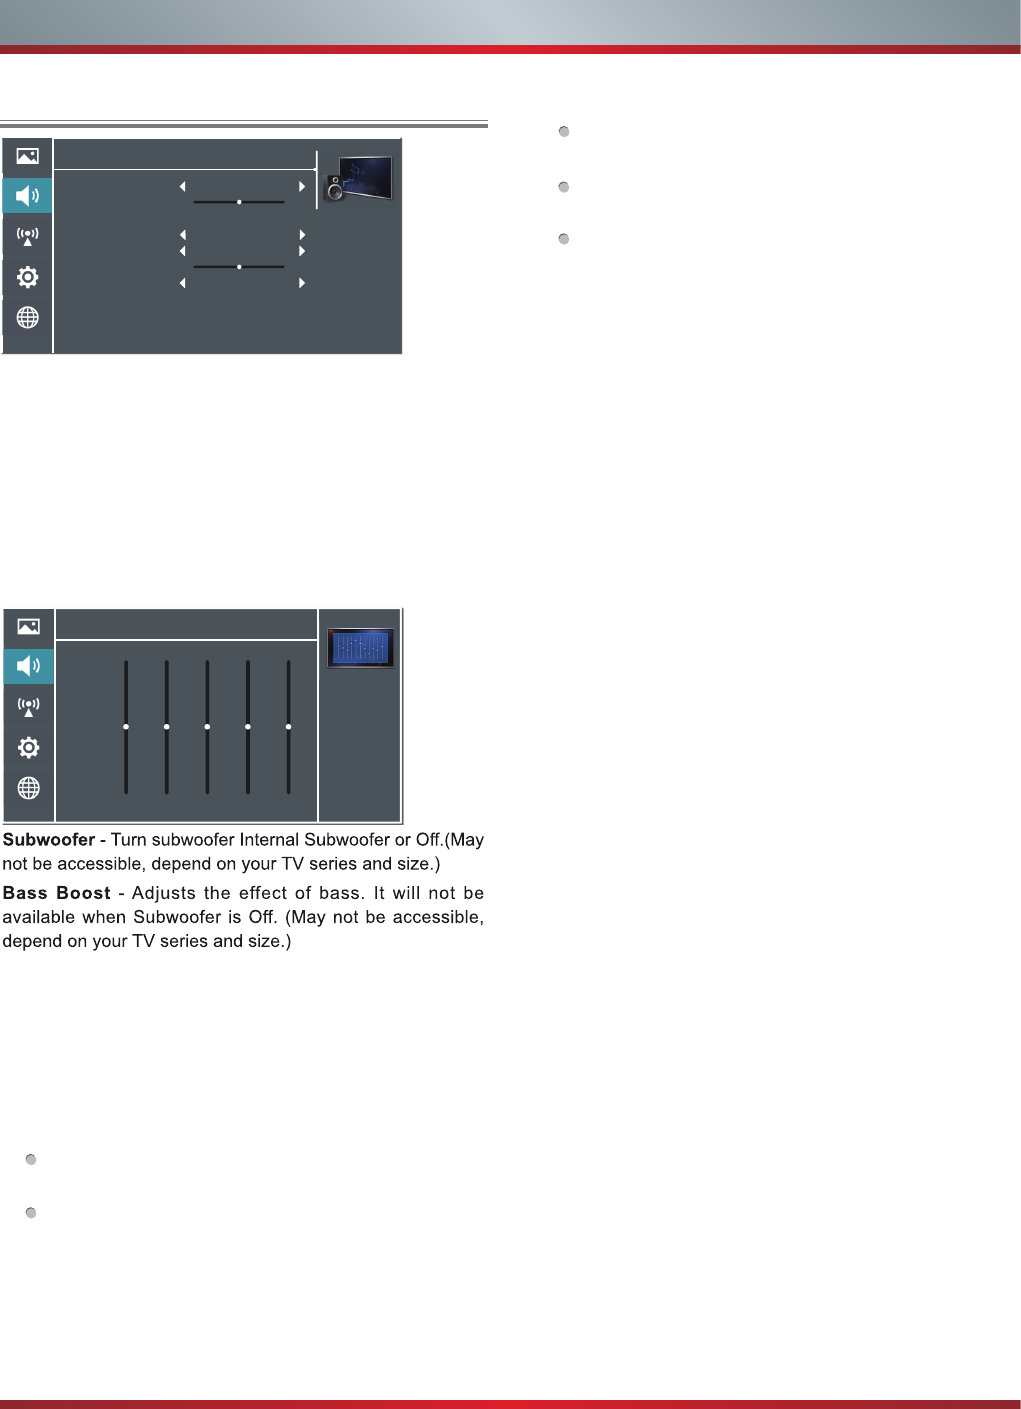
Using the Audio Menu
You can adjust:
Sound Mode - Select the Sound Mode: Standard, Speech,
Custom or Music .
Balance - Adjust the volume of the left and right speakers.
Equalizer - Soften or enhance the sound at specific
frequency points.
DTS TruSurround - Select ON to simulate surround
sound for an immersive experience.(May not be
accessible,depend on your TV series and size.)
Auto Volume Control - Automatically adjusts volume to a
consistent level; attenuates loud passages.
Advanced Audio - Access Advanced Audio settings such
as Digital Audio Output, MTS/SAP, Audio Language, TV
Speaker.
Digital Audio Output: Send digital audio to an external
audio system. You can select PCM, RAW or Off.
PCM: PCM outputs two channel audio regardless of
the input format.
RAW: When the data stream carries Dolby signal,
digital SPDIF outputs Dolby data stream. When the
data stream carries no Dolby signal, it transports PCM
data stream.
MTS/SAP: Select the default audio stream, you can
select Mono, Stereo or SAP (Second Audio Program).
MONO: Select this option if there is noise or static on
weak stereo broadcasts.
STEREO: Select this option for programs broadcast in
stereo.
SAP: Depending on the particular program being
broadcast, you can listen to a foreign-language
translation.
Audio Language - Change the default value for audio
language. (Digital channels only)
TV Speaker - Selects where to play TV audio. You can
select On (default setting) to play audio through TV
speakers, or select Off to play audio through the speakers
on an external audio system.
Reset Audio Settings - Resets all Audio Settings to the
factory defaults.
Audio - Equalizer
10 DB
0 DB
-10 DB
0
120Hz 500Hz 1.5KHz 5KHz 10KHz
0 00 0
Audio
Personalize the audio
to suit your prefer-
ences and listening
conditions.
Sound Mode
Balance
Equalizer
DTS TruSurround
Subwoofer
Bass Boost
Auto Volume Control
Advanced Audio
Reset Audio Settings
Standard
Off
0
>
0
>
>
Internal subwoofer
Off
14
You can adjust:
Tuner Mode - Select the TV signal source. You can select
Antenna or Cable.
Auto Channel Search - Scans for channels that have
signals and stores the channels information in memory.
Digital Channels: The scanned TV program in digital signals.
Analog Channels: The scanned TV program in analog
signals.
Channel Skip - You can cancel a channel stored in memory.
NOTE
When you press [CH V/V] (or [CH +/-]) button, your TV
skips the channel you cancelled. You can still tune to the
channel using the number buttons on the remote control.
Favorite List - Display your Favorite List. You can add or
delete channels to create your favorite list.
NOTE
When you press [CH V/V] (or [CH +/-]) button, your TV
skips the channel you cancelled. You can still tune to the
channel using the number buttons on the remote control.
Signal Strength - This menu is used to check the signal
strength of your antenna system. Usually strengths of above
75% indicates an acceptable signal for your TV to display
correct image. Each channel may vary in signal / quality
strengths and its common for broadcast strengths to change
in your area. The signal strength of the channel on the
screen is displayed.
NOTE
If lower than 75% we advise to have your antenna system
checked by qualified personnel.
Audio Only - Listen to the program audio only, when you
turn off the picture on your TV. (May not be accessible,
depend on your TV series and size.)
NOTE
Audio Only works only when the input source is TV, and
your TV is receiving a broadcast signal.
To exit audio only mode, press any button. When you exit
audio only mode, the Audio Only option is automatically
reset to Off.
Using the TV Menu
Channels
Personalize the local
television services
settings.
Tuner Mode
Auto Channel Search
Channel Skip
Favorite List
Signal Strength
Audio Only
>
>
>
5
Antenna
Off
Using the Setup Menu
You can adjust:
Menu Settings - You can set On-screen menu system.
Language: You can select the menu’s language to
English,Español or Français.
Timeout: Select the display time of the menu: 10-20-...-
60 seconds.
Time Setup - Set the Country, Time Zone, Daylight Savings,
Date/Time, Sleep Timer.
Country: Select your local Country.
Time Zone: Select your local time zone.
Eastern, Central, Mountain, Pacific, Alaska or Hawaii (for
USA).
Eastern, Newfoundland, Atlantic, Pacific, Mountain or
Central (for Canada).
Pacific, Mountain or Central (for Mexico).
Daylight Savings: Set the Daylight Saving time for your
area.
Date/Time: Set the current year/month/day/time.
Sleep Timer: Select the amount of time before the TV to
turns off automatically.
Parental Controls - Prevent unauthorized users, such as
children, from watching unsuitable programs.
When you first use this function, the default password is
[0000]. Once you input this password, you can set options.
You can change password in the Lock submenu.
Channel Block: Block selected Channels on the TV.
Program Block: Block selected Programs on the TV.
Rating Enable: Block or unblock TV ratings.
U.S. TV Ratings: Restrict TV programs by USA
Ratings.
U.S. Movie Ratings: Restrict movies by USA Ratings.
Canadian English/French Ratings: Restrict movies
and TV programs by Canadian Ratings.
Open V-Chip: Display an advanced V-Chip ratings
table for digital channels (USA only).
Block Unrated: Block unrated TV programs.
Settings
Personalize the
general TV setting.
Menu Settings
Time Setup
Parental Controls
Caption
CEC Function
Demo Mode
Power Indicator
Version Info
Reset Settings
>
>
>
>
>
>
>
Off
On
Basic Features
15
Caption - Adjust Closed Captioning settings.
Caption Control: Select the Closed Caption mode: CC Off,
CC On or CC On When Mute by press the CCD button.
Analog Closed Caption: Select an Analog Caption setting:
CC1~CC4: Closed captioning appears in a small banner
across the bottom of the screen. CC1 is usually the
“printed” version of the audio. CC2~CC4 display content
are provided by the broadcaster.
Text1~Text4: Closed captioning that covers half or all of
the screen. Text1~Text4 display content are provided by
the broadcaster.
Off: To turn off the Analog Caption.
Digital Closed Caption: Select a Digital Caption setting:
Service1~Service6 or Off.
Digital Caption Style: Customize the look of digital Closed
Captioning.
Caption Style:
Set the look of Digital CC. “As
Broadcaster” uses broadcaster’s style.
Font Size/Style/Color/Opacity:
Select the size/style/
color/opacity level of font.
Basic Features
Following is the description of these ratings.
U.S. Movie Ratings
Rating Defined as
G General audience
PG Parental Guidance suggested
PG-13 Parents strongly cautioned
R Restricted
NC-17 No one 17 and under admitted
X Adult audience only
U.S. TV Ratings
Age Defined as
TV-Y All children
TV-Y7 Directed to older children
TV-G General audience
TV-PG Parental Guidance suggested
TV-14 Parents Strongly cautioned
TV-MA Mature Audience only
Contents Defined as
AAll of the ratings below that rating set blocked
automatically
D Suggestive dialogue
L Strong language
S Sexual situations
V Violence
FV Fantasy Violence
Canadian English Ratings
Rating Description
C Children
C8+ Children 8 years and older
GGeneral Programming, suitable for all audiences
PG Parents Guidance
14+ Viewers 14 years and older
18+ Adult Programming
Canadian French Ratings
Rating Description
G General
8 ans+ 8+General; Not recommended for young
children
13 ans+ Programming may not be suitable for children
under the age of 13
16 ans+ Programming is not be suitable for children
under the age of 16
18 ans+ Programming restricted to adults
NOTE
As you block rating, all rating higher than the ones you
select are blocked as well. E.g. if you choose to block
the MPAA rating R, the higher ratings, NC-17 and X,
are automatically blocked too.
Input Block - Block selected Input source on the TV.
Button Lock(On/Off) - Block or unblock use of the
remote control.
Change Password - If you want to change the default
password, first enter the new password then enter the
same password again.
Reset Parental Control - You can reset all locks to
factory mode.
Reset to Factory Default - Restores the TV configuration
to factory settings. You will need to complete the setup
for such things as Tuner/Channel settings, Network
connection, Date/Time and other user preferences.
16
You can adjust:
Configuration - Select On or Off. When On mode is select-
ed, the following options are available.
Internet Connection: Setting the Internet Connection.
Interface: You can set up your TV so that it can access
the Internet through your local area network (LAN) with a
Ethernet or wireless connection.
Wireless Setting: You can set up your TV’s wireless
connection.
Information: Display network configuration information.
IP Setting: Allows you to set IP address, subnet mask,
gateway, primary and secondary DNS.
Connection Test: Press the [
ENTER
] button to test
network status.
Basic Features
Background Color/Opacity:
Select the color/opacity
level of the background.
Window Color/Opacity:
Select the color of the window.
CEC Function:
Turn the HDMI-CEC function ON or OFF.
Device Auto Power Off:
When HDMI-CEC is turned on,
Device Auto Power Off turns off HDMI CEC devices when
you turn off your TV.
TV Auto Power On: When HDMI-CEC is turned on and
you turn on an HDMI CEC device, TV Auto Power On turns
on your TV automatically.
Audio Receiver: When HDMI-CEC is turned on and you
have connected an audio receiver to your TV, turning on
Audio Receiver lets you use your TV’s remote control to
control the volume on the audio receiver.
Device Root Menu: You can open an HDMI-CEC
compatible device’s root menu, then use your TV’s remote
control to control the device.
Device Discovery: You can display a list of HDMI-CEC
devices that are connected to your TV.
NOTES
•HDMI cables must be used to connect HDMI CEC-
compatible devices to your TV.
•The connected device’s HDMI CEC feature must be
turned on.
•If you connect an HDMI device that is not HDMI CEC-
compatible, all the HDMI-CEC Control features do not
work.
•Depending on the connected HDMI device, the HDMI-
CEC Control feature may not work.
Demo Mode -
Displays a banner at the top of the screen
which describes the key features of the TV.
Power Indicator - Select this feature to turn off or On the
Power LED indicator on the front panel on your TV.
Version Info - View the software version information.
Reset Settings - Restores the TV configuration to factory
settings.
Using the Network Menu
Auto Upgrade - Update the software using the Internet.
Configure your network. For detailed procedures on using
the Network Setup, refer to the “Connecting to the Internet
or a network” instructions. If you want the Network Update
to work automatically, please select Auto Updates (On).
If you want to do the Network Update manually, please
select Auto Updates (Off).
If the Internet connection doesn’t operate properly, check
the Network Configuration settings and try again. If the
problem persists, use the USB method below to update.
Network Upgrade - Check the process and it will prompt
you to upgrade the software.
NOTES
•Software Update can also be performed via downloading
the latest software to a USB memory device.(www.
hisense-usa.com or www.hisense-canada.com).
•Please be careful not to disconnect the power or remove
the USB drive until updates are complete. The TV will
be turned on automatically after completing the software
update. When software is updated, video and audio
settings you made will return to their default settings and
your personal settings will be deleted. We advise you to
write down your settings so that you can easily reset them
after the update.
Applications - Network application.
Network
Personalize the
network connection
settings.
Configuration
Auto Upgrade
Network Upgrade
Applications
>
>
>
Off
17
Basic Features
Connecting to a Wired Network
Network Setup (Auto)
Use the Automatic Network Setup to connect the TV to a
network that supports DHCP. To set up your TV’s network
connection automatically, follow these steps:
How to set up automatically
1. Connect your TV to your LAN as described in the
previous section.
2. Turn on your TV, operate according to the description in
the Settings menu until the Network screen appears.
3. On the Network screen, select Configuration and press
[ENTER] button to enter the submenu.
4. Set Internet Connection to On and Interface to Ethernet.
5. Select IP Setting and press [ENTER] button to enter it.
6. Set Address Type to Auto.
7. Auto acquires and enters the necessary connection
values automatically.
8. If the connection values are not automatically entered,
please check your modem and router manuals for
directions to enable automatic IP addressing by DHCP.
Or, follow the steps listed in the following section,
Network Setup (Manual), to manually configure the
network connection.
Network Setup (Manual)
Use the Manual Network Setup when connecting your TV to
a network that requires a Static IP address.
Getting the Network Connection Values
To get the network connection values on most windows
computers, follow these steps:
1. Right click the Network icon in the bottom right of the
screen.
2. In the pop-up menu that appears, click Status.
3. On the dialog that appears, click the Support tab.
4. On the Support tab, click the Details button. The network
connection values are displayed.
How to manually setup the network connection
To set up your TV’s network connection manually, follow
these steps:
1. Follow Steps 1 through 5 in the “How to set up
automatically” procedure.
2. Set Address Type to Manual.
3. Press [▲/▼] button to select IP Address and press [◄/►]
button to move the cursor to the entry field. Then press
0~9 buttons to enter the numbers.
4. Press [MENU] button to exit IP Address and press [▲/▼]
button to select the next options to enter the numbers.
5When done, press [MENU] button to return to the
previous menu.
6. Select Connection Test to check the internet connectivity.
Wireless Setting
How to set up
1. Turn on your TV, press Menu and select Settings Network.
2. On the Network screen, select Configuration and press
the [ENTER] button to enter the submenu.
3. Set Internet Connection to On and Interface to Wireless.
4. Select Wireless Setting and press the [ENTER] button
you can select: Scan / Manual / Auto.
5. If you select Scan, a screen will appear listing all of the
wireless networks within range of the TV. Use the [▲/▼]
button to select the wireless network with your router SSID
and press the [ENTER] to confirm. Proceed to Step 7.
6. If you select Manual, a screen will appear prompting
you to enter the SSID of your wireless network. Press
[ENTER] and an on-screen keyboard will pop up. Enter
the SSID and select OK. Press [ENTER] and a screen
will appear prompting you select the security mode for
your wireless network. Use the [▲/▼] button to select
the proper security mode and press [ENTER] to confirm.
If you selected None for the security mode, proceed to
step 9.
7. A screen will appear prompting you to enter the password
for the selected security mode. Press [ENTER] and an
on-screen keyboard will pop up. Enter the password and
select OK. Press [ENTER] to confirm. Proceed to Step 9.
DLNA: Digital Media Player (HiMedia) feature of Digital
Living Network Alliance. Press the [◄/►] buttons to set
DLNA to On.
Netflix: Deactivate Netflix and display the exclusive
Netflix ESN.
VUDU: Deactivate VUDU. (If available.)
My Shared Devices:
Allow or deny content sharing from
other devices on your network.
NOTES
•Software Update can also be performed via downloading
the latest software to a USB memory device.
•Please be careful not to disconnect the power or remove
the USB drive until updates are complete. The TV will
be turned on automatically after completing the software
update. When software is updated, video and audio
settings you made will return to their default settings and
your personal settings will be deleted. We advise you
to write down your settings so that you can easily reset
them after the update.
Network
Personalize the
network connection
settings.
Configuration
Auto Upgrade
Firmware Upgrade
Applications
>
>
>
Off
18
Advanced Features
You can use DLNA Certified computers, TVs, and other
devices to play or transfer the videos, pictures, and music
stored on your phone , tablet or other devices connected to
your network. For more about DLNA (Digital Living Network
Alliance), visit www.dlna.org. Make sure your phone and TV
are both connected to the same Wi-Fi network.
Set DLNA to On:
1. On the Network screen, select Applications and press
the [ENTER] button to enter the submenu.
2. Press the [◄/►] buttons to set DLNA to On.
DLNA Setting
If your computer does not support DLNA, you may install
software that supports DLNA such as TVersity or Windows
Media Player (Version V11 or higher). We recommend
Windows Media Player as the installation and setup is
easier.
1. On the PC taskbar, click Start.
2. Point to All Programs, and then click Windows Media
Player.
3. Click “Library” tab and then “Add to Library...” as shown in
the following screen shot.
4. In the Add To Library dialog box, click “Add” as shown in
the following screen shot.
Media Share Settings in Computer
8. If you select Auto, a screen will appear prompting you
to select PIN (personal identification number) or PBC
(push button configuration) setup. Choose the method
supported by your wireless access point.
If you choose PIN, an identification number will
appear on the screen for you to enter into the access
point. After entering the PIN, press the [►] button. If
the PIN is in use by another device, select [REFRESH]
to obtain a new PIN and enter it into the access point.
After entering the PIN, press the [►] button.
If you choose PBC, a screen will appear prompting
to press [►] button. After pressing the [►] button you
have two minutes to locate and press the Push Button
on your access point to connect to the TV.
9. Press the [MENU] button to return to the previous menu.
10. Select Connection Test to check the Internet connectivity.