Hisense Electric LCDF0072 Part15 Subpart B-LED LCD TV User Manual W9HLCDF0072 1
Hisense Electric Co., Ltd. Part15 Subpart B-LED LCD TV W9HLCDF0072 1
Contents
W9HLCDF0072_User Manual 1

ES-G155265-1

Help SHARP improve the environment by reducing paper waste.
For detailed instructions and feature descriptions, access the full User Manual online.
Model LC-65N9000U
Quick Start Guide
4K Smart TV
© 2016 Hisense Company Ltd. All Rights Reserved.
All material in this Quick Start Guide is the property of Hisense Company Ltd. and its subsidiaries, and is protected under US and
International copyright and/or other intellectual property laws. Reproduction or transmission of the materials, in whole or in part, in any
manner, electronic, print, or otherwise, without the prior written consent of Hisense Company Ltd., is a violation of Hisense Company Ltd.
rights under the aforementioned laws.
No part of this publication may be stored, reproduced, transmitted or distributed, in whole or in part, in any manner, electronic or
otherwise, whether or not for a charge or other or no consideration, without the prior written permission of Hisense Company Ltd.
Requests for permission to store, reproduce, transmit or distribute materials may be made in writing to the following address:
USA: Hisense USA Corporation
PO Box 3289
Suwanee, GA 30024
CANADA: Hisense Canada Co., Ltd,
405 Britannia Rd E., Suite 11
Mississauga, Ontario,L4Z 3E6
MEXICO: Hisense Mexico S de RL de CV
Boulevard Miguel de Cervantes Saavedra No. 301, Torre Norte, Piso 2,
Colonia Ampliación Granada, C.P. 11520, en México Distrito Federal.
“Sharp™”, “Aquos™”, “Quattron™” and any and all other Sharp product names, logo’s, slogans or marks are registered trademarks
owned exclusively by Sharp Corporation.
"Hisense™", and any and all other Hisense product names, logo’s, slogans or marks are registered trademarks and intellectual property
rights of Hisense Company Ltd. and its subsidiaries.
This product is sold to you under one or more license agreements between Sharp Corporation and Hisense International (Hong Kong)
America Investment Co. Ltd. All other trademarks are the property of their respective holders.

1
4K Smart TV: An unforgettable entertainment experience
Multiple Connection Methods
• Built-in wireless connection
0.3 BSU 1 dna srotcennoC 0.2 BSU 2( srotcennoC BSU 3 •
Connector)
• 4 HDMI Connectors (2 HDMI 1.4 Connectors and 2 HDMI 2.0
Connectors)
• 1 LAN (Ethernet) port
High-Quality Picture and Sound
• Vibrant contrast and brightness to display images accurately
• dbx-tv® Award-winning sound
• 4K technology that supports 4K online streaming, 4K USB
content, HDMI 2.0 devices and much more to maximize
your entertainment experience
Smart LED TV with Popular Features
• Ultra-fast access to launch Netflix®
• Numerous built-in social media, gaming and movie apps
• Thousands of movie titles and streaming content to view
• 4K Media Player and Receiver
• App Store and Web Browser
• Many other cool features
Easy Setup Menu and Simple Design
• Short and easy-to-follow first-time setup menu
• With a simple user interface (UI) design to navigate
• AquoMotion™
• AquoDimming™
• Descriptive features to help make your selections
2
Register Your TV!
Congratulations on the purchase of your new SHARP 4K Smart TV! This Quick Start Guide will walk you through a few
easy steps to set up your TV. For detailed instructions, access the User Manual on the support pages listed below.
Because we value your business, we want to keep you in the know of 'all things SHARP'. Using your mobile phone, scan the Registration
page QR code to register your TV. Depending on the make and model of your phone, you may need to download a QR code scanning
app.
Country Customer Care Center SHARP Support Page REGISTER YOUR TV
U.S.A • Phone: 1-888-935-8880
• Hours of Operation:
Monday - Friday: 9 AM to 9 PM EST
Saturday - Sunday: 9 AM to 6 PM EST
• Service Email: support@sharptvusa.com
http:// www.sharptvusa.com
/support
www.sharptvusa.com/
support/productreg.asp
No need to register
CANADA • Phone: 1-855-271-6271
• Hours of Operation:
Monday - Friday: 8 AM to 8 PM EST
• Service Email: Canadasupport@sharp-canada.ca
http://www.sharp-canada.
ca/support/
MEXICO • Phone: 01-800-999-7277
• Hours of Operation: Monday-Friday 9:00-18:00
• Service Email: servicio@SHARPTV.com.mx
http://www.SHARPTV.com.
mx/support/
http://www.SHARPTV.
com.mx/support/product
Reg.asp
Disclaimer: This Quick Start Guide is intended as a general guideline to help you set up your SHARP TV. Images
throughout this document are for illustrative purposes only and may differ from the actual product.

3
PACKAGED CONTENTS
Your package in which you purchased your new TV contains the following items:
● TV ● QuickStartGuide(thisdocument)
● PowerCord ● ImportantSafetyInformationandWarrantyCard
● RemoteControl ● 1setofAAAbatteries
● 1curvedbasestand ● 2rearbasestands
● 8screws(M4×12)
IMPORTANT:
To prevent accidentally discarding items that came with your TV, be sure to check ALL of the foam in the carton box.
· Please check foam for accessories before discarding.
· Veuillez vérifier la mousse pour qu'il n'y ait pas d'accessoires avant de la jeter.
· Antes de desechar la espuma, asegúrese de retirar todos los accesorios.
Required tools and devices
● Wirelessrouter(notincluded)forInternetconnectivity
● Phillipsscrewdriver(notincluded)tosecuretheTVstand
● HDMIandothertypesofcables(notincluded)toconnectexternaldevicestotheTV
● Wallmountbracket(notincluded)ifyouprefertomounttheTVtothewall
4
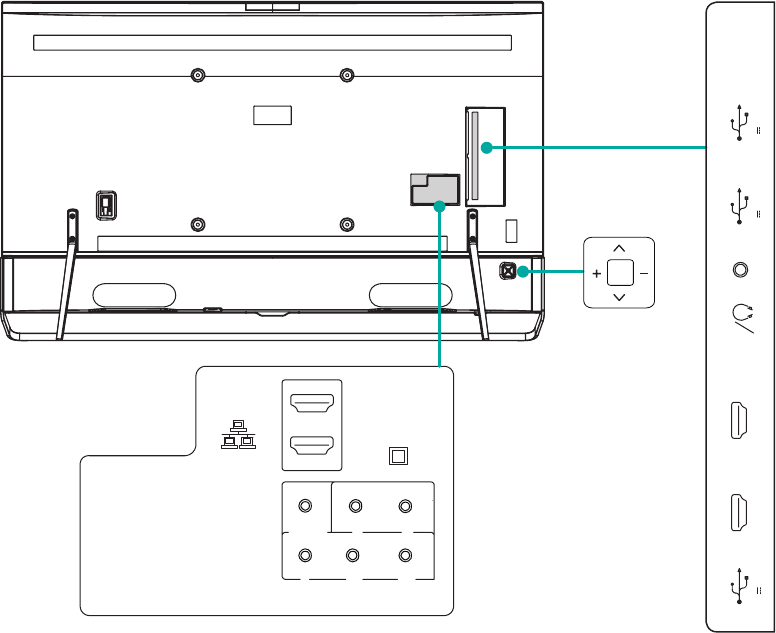
BUTTONS AND PORTS ON THE TV
Back View of the TV
TV Side View
TV Bottom View
OK
ANT/CABLE
USB 2 USB 1 SERVICE
AUDIO
OUT
ARC
HDMI 2(4K@30Hz)
MHL(DC 5V 900mA)
HDMI 1(4K@30Hz)
DC 5V 0.5A(MAX) DC 5V 0.5A(MAX)
USB 3
DC 5V 1A(MAX)
HDMI 3(4K@60Hz)
HDMI 4(4K@60Hz)
AV IN
COMPONENT IN
VIDEO L
YPBPR
R
DIGITAL
AUDIO OUT
LAN

5
STEP 1. Attach the TV Stand or Wall Mount Bracket
Attach the TV Stand
Follow the illustrations and instructions below to complete the installation steps:
CAUTION:
• BesuretodisconnecttheA/CpowercordbeforeinstallingastandorWall-Mountbrackets.
• TheLEDdisplayisveryfragileandmustbeprotectedatalltimeswheninstallingthelegsthatformthestand.Besureto
protectthe TVscreenfromgettingscratchedordamagedbyanyhardobjects.Inaddition,DONOTexertpressureonthe
frontoftheTVatany timebecauseitcouldcrack.
To attach the left and right leg that forms the stand:
1. Remove the package protection material from each side of
the TV to begin taking the TV out of the carton.
Note: In order to protect the TV panel, we recommend that you
place the TV on the curved foam that came inside the box.
Make sure to face protect the screen by placing the TV face
down on the curved foam.
The curved front foam
TV
2. Take off the two side covers by removing the screws.
The curved front foam
Screws(M4×12)
Screws(M4×12)
The side cover
The side cover
TV
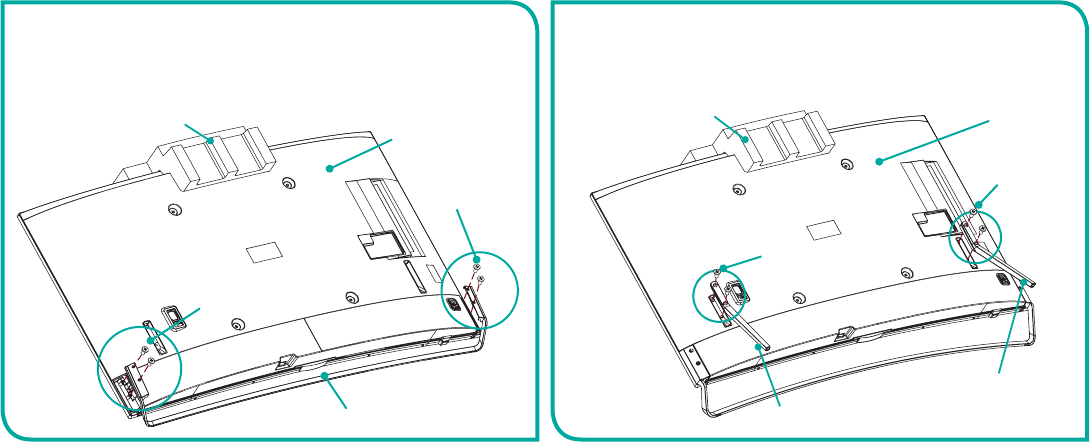
6
The curved front foam
The curved base stand
TV
3. Take the curved base stand out of the top foam and
secure it to the TV with the 4 screws that are provided in
the accessory bag.
Attention: You should have another person assist you with this.
Screws(M4×12)
Screws(M4×12)
4. Take the two rear base stands out of the top foam and
secure them to the TV with the screws that are provided in
the accessory bag.
The curved front foam TV
Screws
(M4×12)
Screws
(M4×12)
The rear base stand
The rear base stand
7
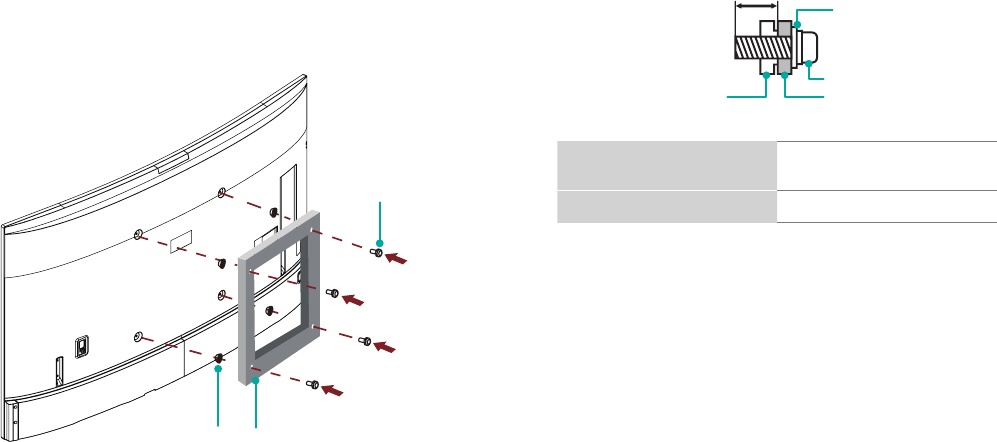
Attach the Wall Mount Bracket (not included)
Before you begin the third-party manufacturer instructions, be
sure to do the following things:
1.Place the TV face down on a clean, safe and cushioned surface.
2.Remove the TV stand if you already attached it.
3.Place the spacers (not included) in the corresponding bracket
holes.
CAUTION:
• Whenyouattachthemount,besuretousethespacers
(providedbythethird-partymanufacturer)betweentheTV
and the bracket.
Screw
(not provided)
Spacer
(not provided) Bracket
(not provided)
• TopreventinternaldamagetotheTVandensureitis
mountedsecurely,besuretousexingscrews(not
provided)thatare 9.5-11.5mminlengthwhenmeasured
from the attaching surface of the mounting hook.
FollowinstructionsprovidedwiththeWallmountbracket.
●Tocompletetheinstallation,pleasecontactthewall-mount
manufacturer or the retailer from which you purchased the TV.
●Theselectedscrewsare9.5-11.5mminlengthwhen
measured from the attaching surface of the rear cover. The
diameter and length of the screws differ depending on the
Wallmountbracketmodel.
NOTE:Thediameterandlengthofthescrewsdiffer
dependingonthewallmountbracketmodel.
Rear cover of the TV Spacer
Screw
Wall mount bracket
9.5 - 11.5 mm
Wall mount hole pattern
VESA (mm) 400 × 400
Wall mount screw size (mm) M6
8
STEP2.ConnectdevicestoyourTV
Check to ensure that you have selected the right cables for the ports and that they are connected securely. Loose connections can affect
the quality of the picture image and color.
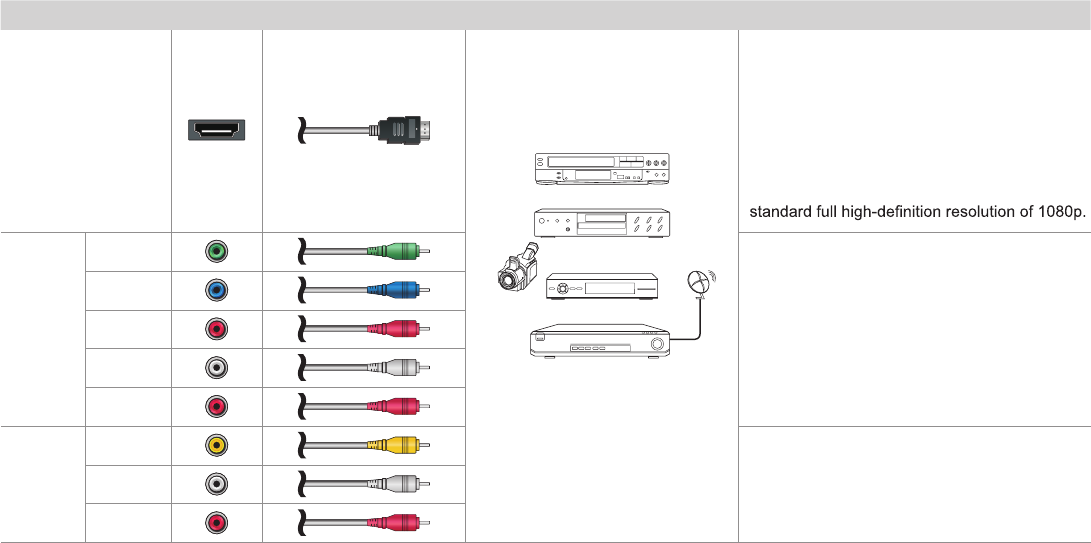
TV labelPortCable External Equipment Brief Description
HDMI
DVD Player/Recorder
Set-top Box
Satellite Receiver
Satellite
antenna
cable
VCR
Video
Camera
This 4K TV has two different software versions
of HDMI ports to connect HDMI-enabled
devices. The two high-powered HDMI version
2.0(HDMI 3, HDMI 4) inputs enable you to
connect 4K Ultra-HD external devices that
require more bandwidth to transmit to the TV
screen. For example, if you have an X-box or
Blu-ray player that supports the 2.0 standard.
The two HDMI version 1.4 inputs are great for
any of your external devices that support a
COMPO-
NENT IN
YGreen
Connect a component video cable and left-right
audio cables from an external AV device.
PBBlue
PRRed
LWhite
RRed
RRed
AV IN
VIDEO Yellow
Connect a composite video cable and left-right
audio cables from an external AV device.
LWhite
9
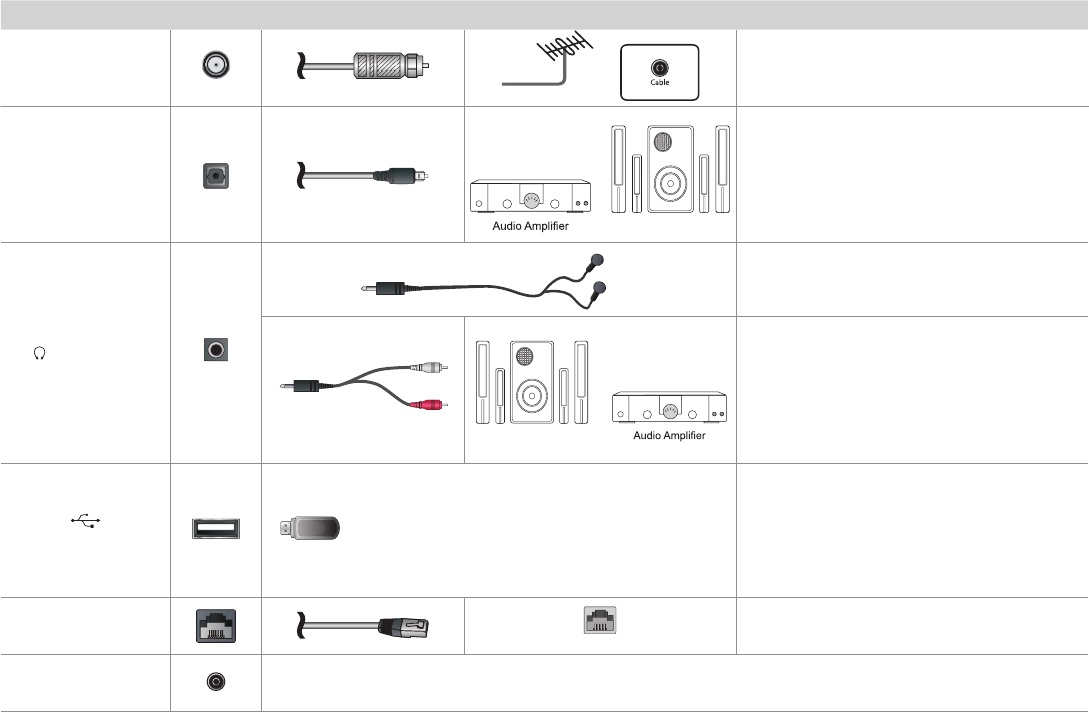
TV label Port Cable External Equipment Brief Description
DIGITAL AUDIO OUT
Speaker
Connect an optical cable from an external
digital audio system.
AUDIO OUT
Connect headphones to hear audio from the
TV.
Connect an audio adapter (not provided) from
an external analog audio system.
USB
Connect a USB 3.0 device to transfer photos,
music and movies to your TV at a rate that's 10
times faster than the USB 2.0 port
NOTE: You can still plug a USB 2.0 device into
a USB 3.0 port; however, the rate of speed will
not be as fast. USB 3.0 devices are also back-
wards compatible with USB 2.0 ports.
LAN
LAN
Connect an Ethernet cable to access a network
or the Internet. The TV also has a wireless
connectivity feature.
SERVICE This port is not available for you to connect an external device. It can only be used by our factory for testing
purposes.
White
Red
Speaker
ANT/CABLE
Antenna
VHF/UHF Antenna
ANT OUT
Connect an outdoor VHF/UHF antenna.
10
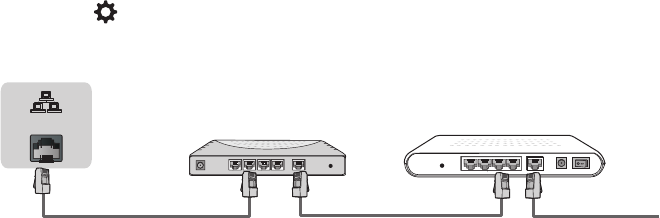
STEP3.Establishanetworkconnection
1.Press the button on the remote control and then press > to enter the Settings menu.
2.Select Network→NetworkConguration.
TV JACK
Modem CableLAN CableLAN Cable
External Modem
(ADSL / VDSL / Cable TV)
IP Sharer (Router)
(with DHCP server)
LAN
Establishawirednetworkconnection
AutomaticallyobtainanIPaddress
1.Select Ethernet. The TV will automatically obtain an IP address and connect to the network.
NOTE:ThedefaultoptionofIPSettingModeisDHCP.
2.If the connection fails then "Disconnected" will display for the Ethernet status. Retry or select Manual to input the information again.
ManuallyentertheIPaddress
1.Select Manual.
2.Enter the IP Address, Subnet Mask, Default Gateway, Preferred DNS and Alternative DNS in the menu. Next, select Connect.
11
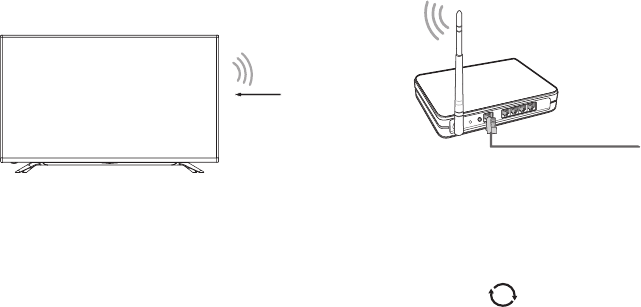
Establishawirelessnetworkconnection
Wireless router with DHCP
LAN Cable
Wireless LAN Adapter
built-in TV set
The TV can directly receive network signals via wireless router
1.Select Wireless. The list of networks will be displayed in AvailableNetworks automatically.
2.Select a wireless network from the list, input password and select Connect.
3.If the network connection does not appear in the list, select to refresh the list or select + to manually enter SSID and Security mode
selection, select Add.
Closethenetworkconnection
Select Off. The network connection will close.