Hisense Electric LCDF0079 Part15 Subpart B-LED LCD TV User Manual W9HLCDF0079 2
Hisense Electric Co., Ltd. Part15 Subpart B-LED LCD TV W9HLCDF0079 2
UserManual.wiki
>
Hisense Electric
>
LCDF0079 User Manual
>
W9HLCDF0079_User Manual2
Contents
1.
W9HLCDF0079_User Manual1
2.
W9HLCDF0079_User Manual2
3.
W9HLCDF0079_User Manual3-Part1
4.
W9HLCDF0079_User Manual3-Part2
5.
W9HLCDF0079_User Manual3-Part3
W9HLCDF0079_User Manual2
Navigation menu
Upload a User Manual
Namespaces
Wiki Guide
HTML
PDF
Info
Views
User Manual
Discussion / Help
Navigation


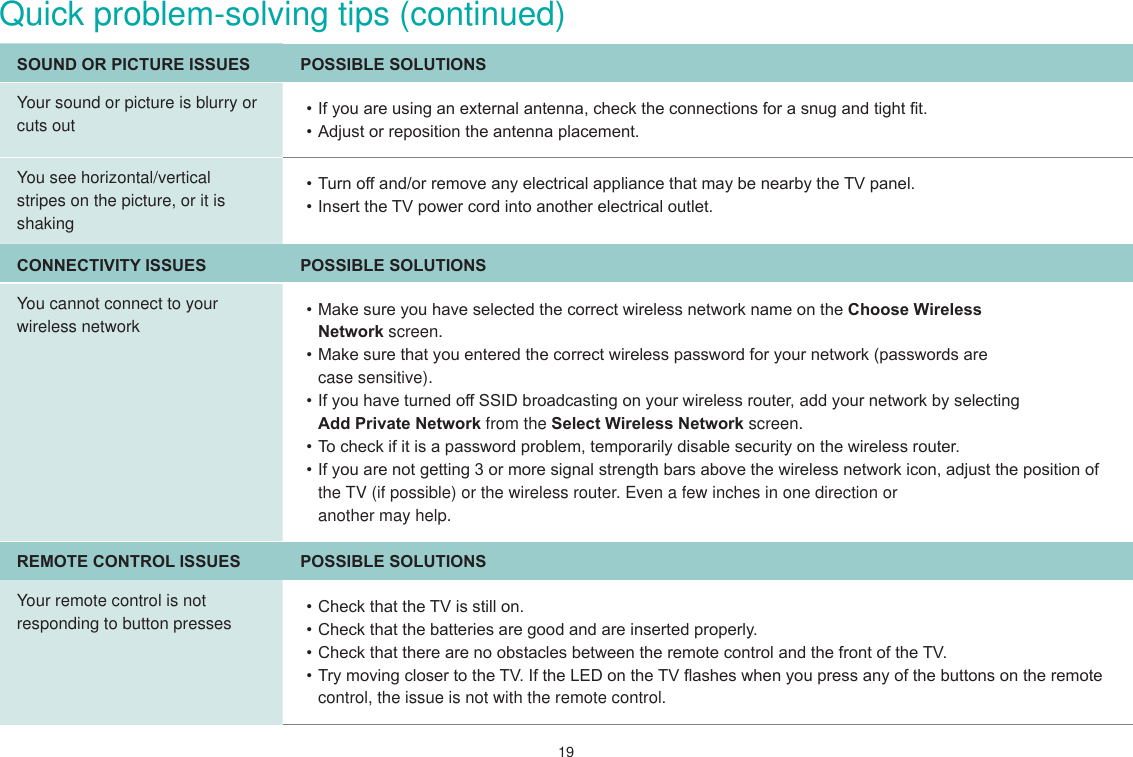
![18Quick problem-solving tips When you experience an issue with your TV, turn it off and on again. If this does not resolve the problem, then refer to the tips below. If the problem is still not resolved, then contact us at one of the phone numbers on Page 2. SOUND OR PICTURE ISSUES POSSIBLE SOLUTIONSYou do not see a picture when turning on the TV&KHFNLIWKH/('OLJKWLVRQ,ILWLVWKHQWKHUHLVSRZHUWRWKH797KH79PD\EHLQ6WDQGE\PRGH3UHVVWKHPower button on the remote control to activate the unit from Standby.&KHFNLIWKHSRZHUFRUGLVSOXJJHGLQWRDQDFWLYHHOHFWULFDORXWOHWYou have connected an external VRXUFHWR\RXU79EXWFDQQRW¿QGit on the Home screenMake sure your external source is turned on.&KHFNWRVHHLIWKHFRUUHFWLQSXWWLOHLVVHOHFWHGRQWKHHome Screen for the external source you want to view.&KHFNWRVHHLIWKHH[WHUQDOVRXUFHGHYLFHFRQQHFWLRQLVVQXJDQGIXOO\LQVHUWHGLQWRWKH79SRUWWhen you turn on your TV, there is a delay for a few seconds before the picture appears7KLVLVQRUPDO,I\RXKDYHDOUHDG\VHWXS\RXU79LWLVLQLWLDOL]LQJDQGVHDUFKLQJIRUSUHYLRXVVHWWLQJinformation.You see a normal picture but do not hear any sound&KHFNWKDWYROXPHLVWXUQHGXS&KHFNLI³0XWH´PRGHLV217XUQRIIPXWHE\SUHVVLQJWKHMute button again, or pressing volume up.You hear sound but picture color is faded or in black and white&KHFNWKDWWKH&RORUYDOXHLVVHWWRRUJUHDWHU&KHFNWKHFRORURQDQRWKHUFKDQQHORULQSXWWLOHYour sound or picture is distorted or appears wavy 7XUQRIIDQGRUUHPRYHDQ\HOHFWULFDODSSOLDQFHWKDWPD\EHQHDUE\WKH79SDQHO,QVHUWWKHSRZHUSOXJRIWKH79VHWLQWRDQRWKHUSRZHURXWOHW](https://usermanual.wiki/Hisense-Electric/LCDF0079.W9HLCDF0079-User-Manual2/User-Guide-2940155-Page-20.png)