Hisense Electric LCDF0081 Part15 Subpart B-LED LCD TV User Manual W9HLCDF0081 1
Hisense Electric Co., Ltd. Part15 Subpart B-LED LCD TV W9HLCDF0081 1
Contents
- 1. W9HLCDF0081_User Manual 1
- 2. W9HLCDF0081_User Manual 2
- 3. W9HLCDF0081_User Manual 3
W9HLCDF0081_User Manual 1

![4ENGLISH FRANÇAIS ESPAÑOLConnecting Devices to your TV You have several options for connecting your TV to different devices. The method in which you connect will be based upon the type of cables you have and the available outputs on your device.Connecting an antenna, cable set-top box or satellite receiverTo connect an antenna,cable set-top box or satellite receiver: 1. Connect one end of a coaxial cable (not included) to the RF OUT port on the antenna, cable or satellite box. If you are using an antenna with twin-lead cable, you may need a 300-75 Ohm adapter (not provided) to connect it to the back of your TV. Likewise, if you are using several antennas, you may need a combiner (not provided).2. Connect the other end of the cable to the ANT/CABLE port on the side of TV.3. Using your remote, press the [INPUT] button and select TV as the input source. Connecting a satellite receiver, DVD player or other audio visual (AV) device with a composite video cable (yellow/red/white)To connect an AV device with a composite video cable (not provided):1. Use the audio and video cables to connect the composite video/audio ports of the external AV device to the AV IN ports of the TV. (Video = yellow, Audio Left = white, and Audio Right = red)2. Plug the connected devices into the AV connectors on the TV before switching it on.3. Using your remote, press the [INPUT] button and select AV as the input source.or ANT OUTCable Set top boxRF OutEXTERNAL DEVICETV PORTANT/CABLEAV OUTVideoLRWhite (L)White (L)Yellow (Video)Yellow or Green (Video)Video CableRed (R)Red (R)Audio Cable TV PORTSEXTERNAL DEVICESDVD Player/RecorderVideo Camera Set-top boxSatellite ReceiverSatellite antenna cableVCRVIDEO LRAV IN](https://usermanual.wiki/Hisense-Electric/LCDF0081.W9HLCDF0081-User-Manual-1/User-Guide-2966513-Page-6.png)
![5ENGLISH FRANÇAIS ESPAÑOLConnecting an AV device with a component video cable (red/blue/green) To connect an AV device with a component cable (not provided):1. Use a component video cable to connect the component output ports of the external device to the YPBPR ports for the TV. (Y = green, PB = blue, and PR = red). Use an audio cable to connect the component audio ports of the external device to the TV AUDIO (L/R) ports. 2. Plug the connected devices into the YPBPR and L/R ports on the TV before switching it on.3. Using your remote, press the [INPUT] button and select COMPONENT as the input source.NOTE• One AV device can be connected to the TV using a component video or composite video cable.Connecting an AV device with an HDMI cableThis type of connection supports digital connections between HDMI-enabled AV devices such as a Personal Video Recorder (PVR), DVD, Blu-Ray, AV receiver and digital devices. In addition, some devices (such as a PVR or DVD player) require an HDMI signal to be set to Output in the settings of the device.Please refer to the User Manual that came with your device for step-by-step instructions.To connect an AV device with an HDMI cable (not provided):1. Use an HDMI cable to connect the HDMI output port of the AV device to the HDMI port of the TV.2. Plug the connected devices into the HDMI port on the TV before switching it on.3. Using your remote, press the [INPUT] button and select the corresponding HDMI input. NOTES• Because the HDMI connector provides video and audio signals, it is not necessary to connect an audio cable.• We strongly recommend to use HDMI Cable with 2 cores as shown in the figure.EXTERNAL DEVICESDVD Player/RecorderVideo Camera Set-top boxSatellite ReceiverSatellite antenna cableVCRComponentRLPRPBYWhite(L) White(L)Red(R) Red(R)Audio Cable Component Cable Red(PR/CR) Red(PR/CR)Blue(PB/CB) Blue(PB/CB)Green(Y) Green(Y)YPBPRCOMPONENT INL RTV PORTSHDMIHDMIEXTERNAL DEVICESDVDSet-top BoxTV PORTHDMI Cable](https://usermanual.wiki/Hisense-Electric/LCDF0081.W9HLCDF0081-User-Manual-1/User-Guide-2966513-Page-7.png)
![7ENGLISH FRANÇAIS ESPAÑOLConnecting a digital sound bar to use Audio Return Channel (ARC)If you’d like to use the Audio Return Channel (ARC) feature to have sound sent from the TV back down an HDMI cable to a digital sound bar, then you will need to connect the cable to the HDMI / ARC port. By using this feature, you will also be able to control the sound bar with your TV remote instead of having to use multiple remotes for each device. To connect a digital sound bar with an HDMI cable (not provided):1. Connect the cable that’s attached to the sound bar to the HDMI / ARC port on the TV.2. Turn on the sound bar by pressing the Power button.3. Press the [MENU] button on your remote and go to System > CEC Function.4. Turn on the CEC Control setting.5. Turn on the Audio Receiver setting.NOTES• Only digital sound bars that require a wired connection are compatible with the TV.• If the device has an Input Selector feature then make sure to change it to TV.HDMIARCHDMIEXTERNAL DEVICETV PORTHDMI Cable Digital Sound Bar](https://usermanual.wiki/Hisense-Electric/LCDF0081.W9HLCDF0081-User-Manual-1/User-Guide-2966513-Page-9.png)
![10ENGLISH FRANÇAIS ESPAÑOLCompleting the First-Time Setup Menu Now that you have attached the TV stand and connected your external devices, it’s time to complete the first-time setup menu.The Setup Wizard menu appears the first time you turn on the TV. It will assist you to specify the menu language, Picture Mode, TV Source and Channel Installation.NOTE• Before you get started, make sure that the antenna or cable is connected, batteries are in the remote control, and the power cord is connected.Screen TaskConnect your TV’s Power cord to a power outlet, then press power. The initial setup screen opens. Press [ / ] button to select your language, press [ENTER] button to confirm.Press [ / ] to select your options and press [ / ] to set the options.• If Auto selected, the options of Year/Month/Day/Time are not available.• Setting the Time: Press [ / ] to select the number you want to set and press [ / ] to set.Press [ / ] to select your Picture Mode: Home Mode or Retail Mode, press [ENTER] button to confirm.If you select Retail Mode, a message appears “Are you sure you want retail mode?” Select “Yes” to continue, or select “No” to change your selection. ENTER MENUEXITChoose Your Menu LanguageEnglishFrançaisEspañolEnter Select Return ExitSet menu language to English, Français, or Español ENTER MENUEXITChoose Your Time SettingMode Auto Time Zone Pacific Daylight Savings Off Year 2016 Month May Day 01 Time 01:10 AM Enter Select Return ExitIf Automatic, options are automatically set by TV source ENTER MENUEXITChoose Your Picture ModeHome ModeRetail ModeHome mode default settings are recommended for in-home use. Retail mode is intended for in-store display and resets video settings at Power On.Enter Select Return ExitReduces total power consumption](https://usermanual.wiki/Hisense-Electric/LCDF0081.W9HLCDF0081-User-Manual-1/User-Guide-2966513-Page-12.png)
![11ENGLISH FRANÇAIS ESPAÑOLScreen TaskPress [ / ] to select your TV Source: Antenna or Cable, press [ENTER] button to confirm.• Your TV will automatically start scanning for available channels in your viewing area.• Depending on the reception condition, it may take several minutes to scan channels. Please allow the process to complete without interruption.• If you press [EXIT] to exit the scanning, a message appears “Please Run Channel Auto Scan”, scan channels from the menu. ENTER MENUEXITChoose Your TV SourceAntennaCableEnter Select Return ExitSelect if using an antenna for standard or HD TVEXITScanning for Channels0 Digital Channels0 Analog ChannelsExitThe channel scan may take a while to complete](https://usermanual.wiki/Hisense-Electric/LCDF0081.W9HLCDF0081-User-Manual-1/User-Guide-2966513-Page-13.png)
![12ENGLISH FRANÇAIS ESPAÑOLShortcuts Instructions Selecting the input sourceThe first time you turn on your TV, you must select the TV signal source. Your TV stores this information, so you do not need to change the TV signal source unless it changes. For example, you change from an outside antenna to cable TV.To select the input source:1. Turn on your TV, then press the [INPUT] button on the remote. The Input source menu opens.2. Press [ / ] button to highlight the input source, then press [ENTER] button.Changing Channels / Volume1. Press the [CH V / V] on the remote control to change the channel.2. Press the [VOL + / -] on the remote control to adjust the volume.3. Press the numeric buttons on the remote control to display the corresponding channels.NOTE• Changing the channels can also be achieved by directly entering the channel number using the numeric keys on the remote control. If you are entering a two or three digit channel number, the time between key presses should be less than 3 seconds.Channel search guideWhen you select TV as input, if no TV channels were saved before, you will be prompted to do a channel search. Before channel tuning could start, you must specify the Tuner Mode, Antenna or Cable. You can also go to Setting menu > Channel to change the channel settings.Shortcuts InstructionsPicturePress to set the picture mode. It can be set as Vivid, Standard, Theater, Energy Savings or Custom. This mode achieves a certain image display effect by setting the brightness, contrast and color etc.SoundPress to set the sound mode. It can be set as Standard, Theater, Music, Speech and Custom.MutePress to turn the sound off, press this button again to turn the sound back on. This function is used to switch off sound temporarily.SleepIt can set the TV to let it enter into the Standby state automatically. Press this button repeatedly to select the proper sleeping clock mode, and the clock tells you the remaining time before the TV enters Standby state.DisplayDisplay the information banner. The information including channel number, channel name, current system time, tuner mode, audio stream, video format, audio language, closed caption mode, parental locks rated, program details, etc.](https://usermanual.wiki/Hisense-Electric/LCDF0081.W9HLCDF0081-User-Manual-1/User-Guide-2966513-Page-14.png)
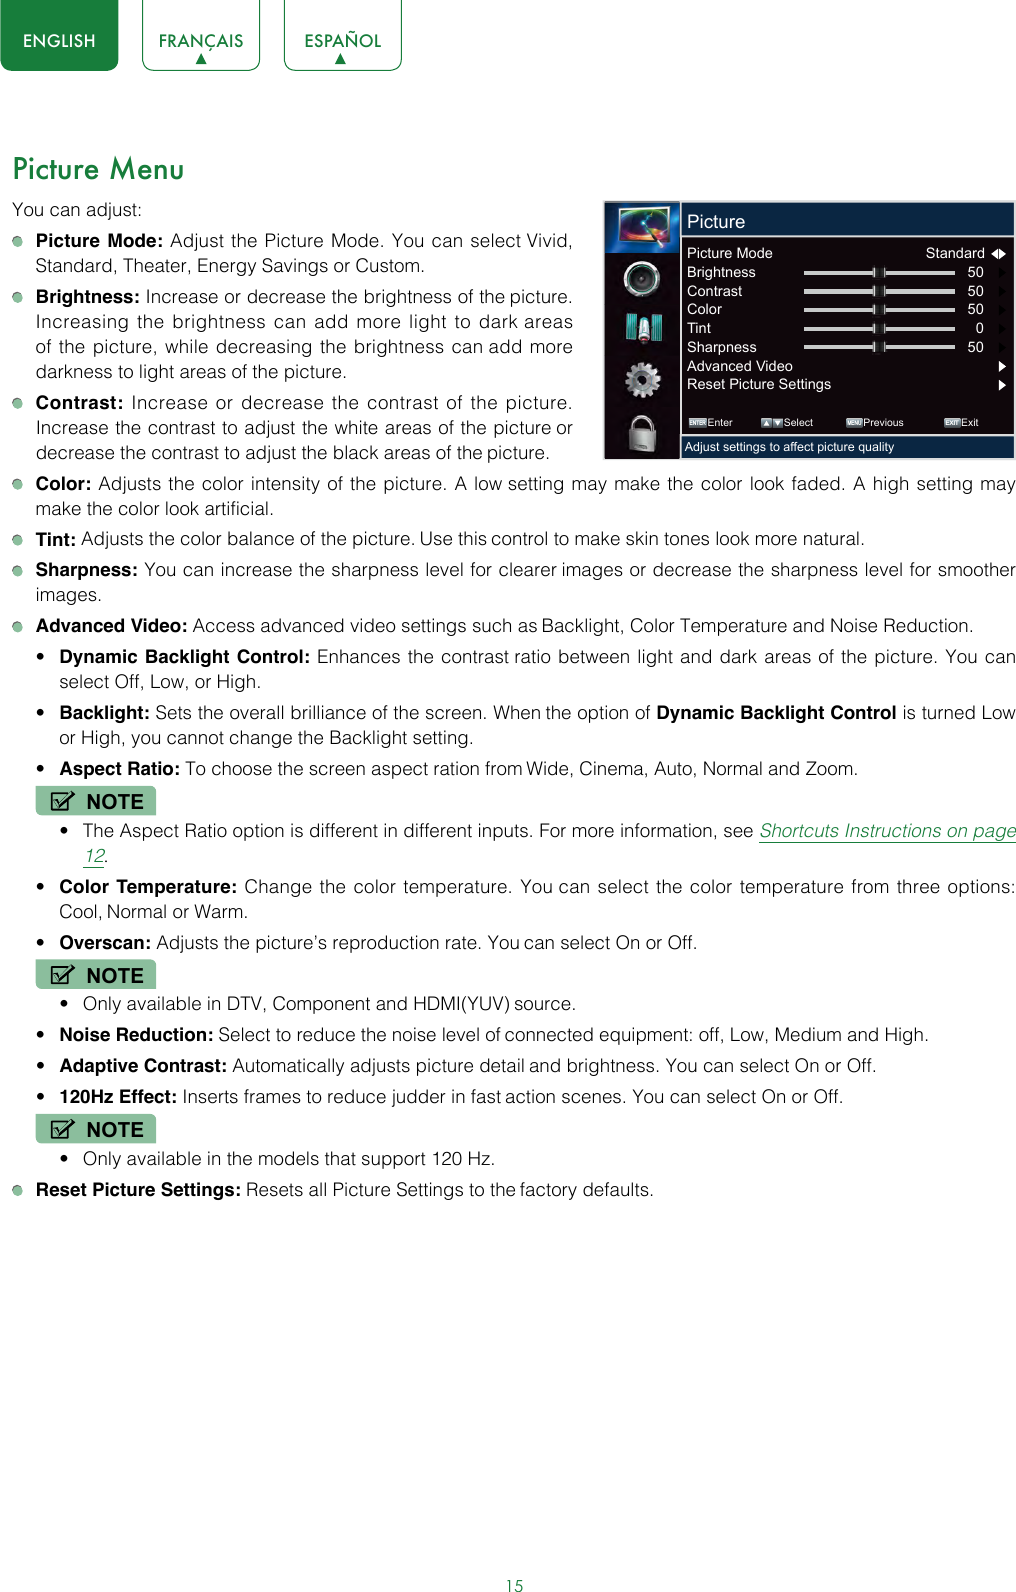
![14ENGLISH FRANÇAIS ESPAÑOLBasic Settings Your SHARP TV comes with many TV setting features to allow you to customize the picture based on your viewing preference and environment.Using the Menu1. Press [MENU] to open the main menu.2. Press [ / ] to select a menu option, then press [ /ENTER] button to enter the menu.3. In each menu, you can: Press [ / ] to select an item, Press [ / ] to adjust the value, Press [ /ENTER] to enter the submenu, Press [MENU] to back the previous menu.4. Press [EXIT] to exit the menu.NOTE• The menus in the user manual may vary slightly from the actual screen. ENTER MENUEXITEnter Select Previous ExitAdjust settings to affect picture qualityPicturePicture Mode Standard Brightness 50 Contrast 50 Color 50 Tint 0 Sharpness 50 Advanced Video Reset Picture Settings](https://usermanual.wiki/Hisense-Electric/LCDF0081.W9HLCDF0081-User-Manual-1/User-Guide-2966513-Page-16.png)
![17ENGLISH FRANÇAIS ESPAÑOLChannels MenuYou can adjust: Tuner Mode: Select the TV signal source. You can select Antenna or Cable. Auto Channel Scan: Scans for channels that have signals and stores the channels information in memory.• Digital Channels: The scanned TV program in digital signals.• Analog Channels: The scanned TV program in analog signals. Channel Skip: You can hide channels in the channel list. Press [ / ] to select the channels you want to hide and press [ENTER] to confirm.NOTE• When you press [CH V / V] (or [CH + / - ]) button, your TV skips the hidden channels. You can still tune to the channel by pressing the number buttons on the remote control. Favorite List: Display your Favorite List. You can add or delete channels to create your favorite list. Channel Labels: Change the channel name. Press [ / ] to select the character you want to change, then press [ / ] to set the character. Signal Strength: You can check the digital signal strength to determine if you need to adjust your antenna or digital cable input.NOTE• Only available in Digital channels. Audio Only: Turn off the screen and only listen to the audio of a program.NOTES• Audio Only works when the input source is TV and you are receiving a broadcast signal.• To exit audio only mode, press any button. When you exit audio only mode, the Audio Only option is automatically reset to Off. ENTER MENUEXITEnter Select Previous ExitAdjust channel OptionsChannelsTuner mode Antenna Auto Channel Search Channel Skip Favorite List Channel Labels AT05-1 Signal Strength Audio Only Off](https://usermanual.wiki/Hisense-Electric/LCDF0081.W9HLCDF0081-User-Manual-1/User-Guide-2966513-Page-19.png)
![18ENGLISH FRANÇAIS ESPAÑOLSettings MenuYou can adjust: Closed Caption: Adjust Closed Caption settings.• Caption Control: To select CC Off (turns off closed caption), CC On (turns on closed caption), or CC on when Mute (turns on closed caption when the sound is muted).• Analog Caption: Select an Analog Caption setting from CC1~CC4, TEXT1~TEXT4, Off.• Digital Caption: Select a Digital Caption setting: Service1 ~ Service6, Off.• Digital Caption Settings: There are two Caption Styles. One is the automatic function set as the broadcaster, while the other is the custom style where you can adjust the font size, color, opacity, background color etc. Time: Access Time settings such as Time Zone, Date / Time, Sleep Timer.• Time Zone: Select your local time zone: Pacific, Alaska, Hawaii, Newfoundland, Atlantic, Eastern, Central and Mountain.• Daylight Savings: Press [ / ] to highlight Daylight Savings, then press [ / ] to select On (if your viewing area observes Daylight Savings Time) or Off (if your viewing area does not observe Daylight Savings Time).• Date / Time: You can set time manually or select automatic if the TV is connected to an antenna or cable source.Auto synchronization: Select Manual (to set the date and time manually) or Auto (to set the date and time automatically from a TV signal source based on the time zone you select). If you selected Manual, set the following options.Date: Set the current year / month / day.Time: Set the current time.• Sleep Timer: Specify the amount of time before your TV automatically turns off. Menu Language: You can select the menu language to English, Spanish or French. Input Labels: Press [ / ] to select the Input Source that you want to label and then press [ ] to move to the custom label field. Press [ / ] to select the character that you prefer. After you have completed the label, the next time you press INPUT, your label will appear in the Input Source list. CEC Function: CEC Function lets you control HDMI CEC-compatible devices connected to the HDMI ports on your TV using the remote control that came with your TV. To use CEC Function, you must set the CEC Control setting to On.• CEC Control: Turning CEC function on or off.• Device Auto Power Off: When HDMI-CEC is turned on, Device Auto Power Off turns off HDMI CEC devices when you turn off your TV.• TV Auto Power On: When CEC is turned on and you turn on an HDMI CEC device, TV Auto Power On turns on your TV automatically.• Audio Receiver: When CEC is turned on and you have connected an audio receiver to your TV, turning on Audio Receiver lets you use your TV’s remote control to control the volume on the audio receiver.• CEC Device Lists: You can display a list of HDMI CEC devices that are connected to your TV and select the source you want.• Connect: Connect to the current CEC devices.• Root Menu: You can use your TV remote to control a CEC-compatible device when you open the root menu.NOTES• HDMI cables must be used to connect HDMI CEC-compatible devices to your TV.• The HDMI CEC feature of the connected device must be turned on.• If you connect an HDMI device that is not HDMI CEC-compatible, all the CEC Control features do not work.• Depending on the connected HDMI device, the CEC Control feature may not work. ENTER MENUEXITEnter Select Previous ExitSet various TV optionsSettingsClosed Caption Time Menu Language English Input Labels CEC Function Power LED On Component Settings Version Info Reset to Default](https://usermanual.wiki/Hisense-Electric/LCDF0081.W9HLCDF0081-User-Manual-1/User-Guide-2966513-Page-20.png)
![19ENGLISH FRANÇAIS ESPAÑOL Power LED: To turn on or off the standby indicator. Component Settings: You can adjust the horizontal distortion that may occur when watching video from a component video device.• Phase: Minimizes horizontal distortion.• Reset Component Settings: Resets all component video settings to factory mode.NOTE• Only available in Component mode. Version Info: Display the software version information. Reset to Default: This feature will restore the TV back to the original factory settings.Parental Controls MenuWhen you first use this function, the default password is [0000]. Once you input this password, you can set options.You can adjust: Button Lock: Block or unblock the button of the TV. Block Unrated TV: Block unrated TV programs. USA Parental Locks: Restrict movie and TV programs for USA Ratings. Canadian Parental Locks: Restrict movie and TV programs for Canadian Ratings. Change Password: If you want to change the default password, first enter the new password then enter the same password again. Open V-Chip: Display an advanced V-Chip ratings table for digital channels (USA only). Reset Parental Control Settings: Resets all parental control settings to factory mode. Clean All: Reset all your settings to factory mode.Following is the description of these ratings.U.S. TV RatingsAge Defined asTV-Y All childrenTV-Y7 Directed to older childrenTV-G General audienceTV-PG Parental Guidance suggestedTV-14 Parents strongly cautionedTV-MA Mature Audience onlyContent Defined asALL All of the ratings below that rating set blocked automaticallyDSuggestive dialogueLStrong languageSSexual situationsVViolenceFV Fantasy Violence ENTER MENUEXITEnter Select Previous ExitLock or unlock the buttons on the TVParental ControlsButton Lock Off Block Unrated TV Off USA Parental Locks Canadian Parental Locks Change Password Open V-Chip Reset Parental Control Settings Clean All](https://usermanual.wiki/Hisense-Electric/LCDF0081.W9HLCDF0081-User-Manual-1/User-Guide-2966513-Page-21.png)
![21ENGLISH FRANÇAIS ESPAÑOLMedia Digital Media playerPlease note that SHARP will not assume any responsibility for any lost data and cannot guarantee perfect compatibility with all mass storage devices. Be sure to insert the USB flash drive into the USB 2.0 port. Data Input from USB Memory Stick only. Do not connect any device to this terminal such as digital camera, keyboard, mouse, etc.NOTE• Never remove the USB flash drive or turn off your TV while viewing video / photo. Press [INPUT] button to display the INPUT menu, press [ / ] button to highlight the USB source, then press [ENTER] button to confirm. (If you want to exit DMP, you can press [INPUT] button to switch to other sources). Press [RED] button to switch the media type. Press [YELLOW / BLUE] button to turn to the previous / next page.Media content control function buttonsWhen viewing video / photo, you can press these buttons on the remote control to control video / photo.ENTER MENUEXITUSBAllReturn C:1/1MOVIEPHOTOMove Select Return Exit Media Page Up / DownFast forward The previous oneThe next oneStopFast backwardPlayPause](https://usermanual.wiki/Hisense-Electric/LCDF0081.W9HLCDF0081-User-Manual-1/User-Guide-2966513-Page-23.png)
![22ENGLISH FRANÇAIS ESPAÑOLEnjoy Movie Files1. Press [RED] button to switch the media type to MOVIE.2. Press [ / / / ] to select the movie you want to view.3. Press [ENTER] to play the movie.4. Press [EXIT] to exit the video and return to the previous directory.5. When enjoying the video, press [MENU] button to display / exit the tool bar. Press [ /ENTER] to enter the submenu and press [EXIT] to return to the upper menu.6. Press [ASPECT] button one or more times to enlarge the image by Wide and Normal.Tool bar1 Progress bar.2 Play / Pause the video.3 Play the previous video.4 Play the next video.5 Fast backward. Press [ENTER] to select the backward speed.6 Fast forward. Press [ENTER] to select the forward speed.7 Options. Adjust Repeat Mode, Zoom Mode, Audio Track, and Subtitle.8 Play list. You can select the video you want to view, then press [ENTER] to play.9 Select time to play. Press [ / ] to select the position you want to set, press [0~9] to set the time (or press [ / ] to adjust it), then press [ENTER] to confirm and the video will to play at the time you have set.10 Video Info. Displays details on image resolution, audio and video code, subtitle, audio track, program and time.11 Stop playback.12 3 4 5 6 7 8 910 11](https://usermanual.wiki/Hisense-Electric/LCDF0081.W9HLCDF0081-User-Manual-1/User-Guide-2966513-Page-24.png)
![23ENGLISH FRANÇAIS ESPAÑOLBrowse the Photos1. Press [RED] button to switch the media type to PHOTO.2. Press [ / / / ] to select the photo you want to view.3. Press [ENTER] to browse the photo.4. Press [EXIT] to return to the previous directory.5. When browsing photos, press [MENU] button to display / exit the tool bar. Press [ /ENTER] to enter the submenu and press [EXIT] to return to the upper menu.Tool barNOTE• The menu will change while you are browsing through or pausing your photos.1 Play / Pause the photo.2 Stop browsing the photo.3 Browse the previous photo.4 Browse the next photo.5 Allows the photo to rotate 90 degrees clockwise.6 Allows the photo to rotate 90 degrees anti-clockwise.7 Zoom in the photo.8 Zoom out the photo.9 Options. You can adjust Show Speed.10 Photo Info. Allows you to view the photo information.1 23 4 5 6 7 8 910](https://usermanual.wiki/Hisense-Electric/LCDF0081.W9HLCDF0081-User-Manual-1/User-Guide-2966513-Page-25.png)
![25ENGLISH FRANÇAIS ESPAÑOLQuick Problem-Solving Tips When you experience an issue with your TV, turn it off and on again. If this does not resolve the problem, then refer to the tips below. If the problem is still not resolved, then contact us. ISSUES POSSIBLE SOLUTIONSNo sound or picture• Check if the power cord is plugged into a powered AC outlet.• Press the [ ] button on the remote control to activate the unit from ‘Standby’ mode.• Check to see if the LED light is on or not. If it is, then the TV is receiving power.I have connected an external source to my TV and I get no picture and/or sound• Check for the correct output connection on the external source and for the correct input connection on the TV.• Make sure you have made the correct selection for the input mode for the incoming signal.When I turn on my TV, there is a delay for a few seconds before the picture appears. Is this normal?• Yes, this is normal. The TV is initializing and searching for previous setting information.The picture is normal but there is no sound• Check the volume settings.• Check if ‘Mute’ mode is set to On.Sound but no picture or black and white picture• If the picture is black and white, unplug the TV from the AC outlet and replug it after 60 seconds.• Check that the Color is set to 50 or higher. • Try different TV channels.The sound and/or picture is distorted or appears wavy• An electric appliance may be affecting the TV. Turn off any appliances that are nearby and move it farther away from the TV.• Insert the power plug of the TV set into another power outlet.The sound and picture is blurry or cuts out• If using an external antenna, check the direction, position and connection of the antenna.• Adjust the direction of your antenna or reset or fine tune the channel.A horizontal or vertical stripe appears on the picture and/or the picture is shaking• Check if there is an appliance or electric tool nearby that is causing interference.The plastic cabinet makes a “clicking” type of sound• The ‘click’ sound can occur when the temperature of the television changes. This change causes the television cabinet to expand or contract, which makes the sound. This is normal and the TV is OK.The remote control does not work• Confirm that TV still has power and is operational.• Change the batteries in the remote control.• Check if the batteries are correctly installed.NOTE• For usage in Mexico , operation of this equipment is subject to the following two conditions : 1 ) it is possible that this device doesn’t cause any detrimental interference and 2 ) this device must take any kind of interference, including that which may cause its malfunctioning.](https://usermanual.wiki/Hisense-Electric/LCDF0081.W9HLCDF0081-User-Manual-1/User-Guide-2966513-Page-27.png)