Hisense Electric LCDF0121 Part15 Subpart B-LED LCD TV User Manual 22WFQ
Hisense Electric Co., Ltd. Part15 Subpart B-LED LCD TV 22WFQ
UserManual.wiki
>
Hisense Electric
>
LCDF0121 User Manual
>
TempConfidential_W9HLCDF0121_User Manual 6
Contents
1.
TempConfidential_W9HLCDF0121_User Manual 1
2.
TempConfidential_W9HLCDF0121_User Manual 2
3.
TempConfidential_W9HLCDF0121_User Manual 3
4.
TempConfidential_W9HLCDF0121_User Manual 4
5.
TempConfidential_W9HLCDF0121_User Manual 5
6.
TempConfidential_W9HLCDF0121_User Manual 6
TempConfidential_W9HLCDF0121_User Manual 6
Navigation menu
Upload a User Manual
Namespaces
Wiki Guide
HTML
PDF
Info
Views
User Manual
Discussion / Help
Navigation
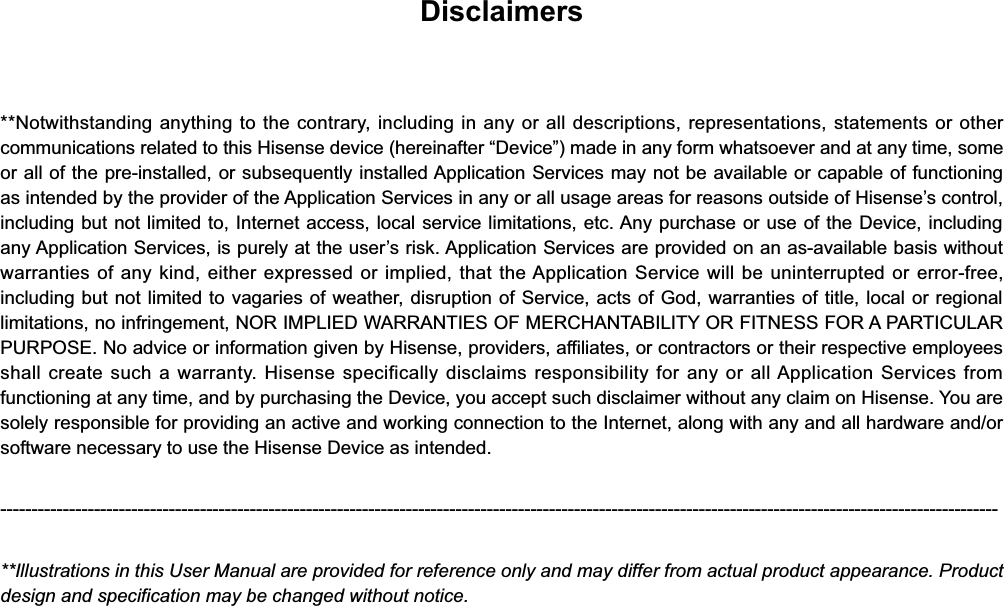
![9Connections and setupConnecting to a Wired (Ethernet) Network – You can attach your TV to your LAN in one of the three following ways:Option 1. You can attach your TV to your LAN by connecting the LAN port on the back of your TV to an external modem using a Cat 5 LAN cable. Option 2 You can attach your TV to your LAN by connecting the [LAN] port on the back of your TV to an IP Sharer which is connected to an external modem. Use an Ethernet cable for the connection.Option 3 Depending on how your network is configured, you may be able to attach your TV to your LAN by connecting the LAN porton the back of your TV directly to a network wall outlet with an Ethernet cable. If you have a Dynamic Network, you should use an ADSL modem or router that supports Dynamic Host Configuration Protocol (DHCP). Modems and routers that support DHCP automatically provide the IP address, subnet mask, gateway, and DNS, so you don’t have to enter them manually. Most home networks are Dynamic Networks.Some networks require a Static IP address. If your network requires a Static IP address, you must enter the IP address, subnet mask, gateway, and DNS values manually on your TV’s Cable Setup Screen when you set up the network connection. To get the IP address, subnet mask, gateway and DNS values, contact your Internet Service Provider (ISP).NOTESYou can use ADSL modems that support DHCP if your network requires a static IP address. ADSL modems that support DHCP also let you use static IP addresses.The Modem Port on the WallModem Cable Ethernet Cable Ethernet CableLAN Port on TVExternal Modem(ADSL / VDSL / Cable TV)IP Sharer (Router)(with DHCP server) External Modem(ADSL / VDSL / Cable TV)Ethernet CableModem Cable The Modem Port on the WallLAN Port on TVThe LAN Port on the Wall LAN Port on TVEthernet Cable](https://usermanual.wiki/Hisense-Electric/LCDF0121.TempConfidential-W9HLCDF0121-User-Manual-6/User-Guide-3423110-Page-12.png)
![12With the preliminaries out of the way, it’s time to turn on your TV. As the TV starts for the first time, it leads you through Guided Setup, which configures the TV before you start to use it.During Guided Setup, you’ll: Answer a few questions Provide network connection information Get a software update Link the TV to your Roku account Connect devices such as a DVD player, game console, or cable boxNOTE Guided Setup only runs the first time you turn on your TV. If you need to run Guided Setup again, you’ll have to perform a factory reset, as explained in Factory reset everything on page 55.Starting Guided SetupTo start Guided Setup, press the red [POWER] button on the remote control to turn on your TV.When you first turn on your TV, it will take a few seconds to get itself ready. You’ll notice the following things happening:The status light blinks every time the TV is busy doing something; in this case it’s powering up and getting ready for you.The Power-on screen appears and the status light blinks slowly for a few more seconds. The Power-on screen displays a TV logo while the TV starts up.After a few seconds, the Guided Setup starts.TIP: On TVs sold in the United States, if you are blind or visually impaired, you can activate the Audio Guide, a text-to-speech screen reader to help you navigate the TV’s menus and commands. To enable the Audio Guide, press the button on the remote control four times in rapid succession. Repeat to disable the Audio Guide. (The button is located directly below the directional pad on the right side of the Roku remote control.)For more information on using the Audio Guide and adjusting its settings, see Configure accessibility on page 46.If the TV prompts you for a language, press the [DOWN] on the remote control to highlight your preferred language.Guided Setup](https://usermanual.wiki/Hisense-Electric/LCDF0121.TempConfidential-W9HLCDF0121-User-Manual-6/User-Guide-3423110-Page-15.png)
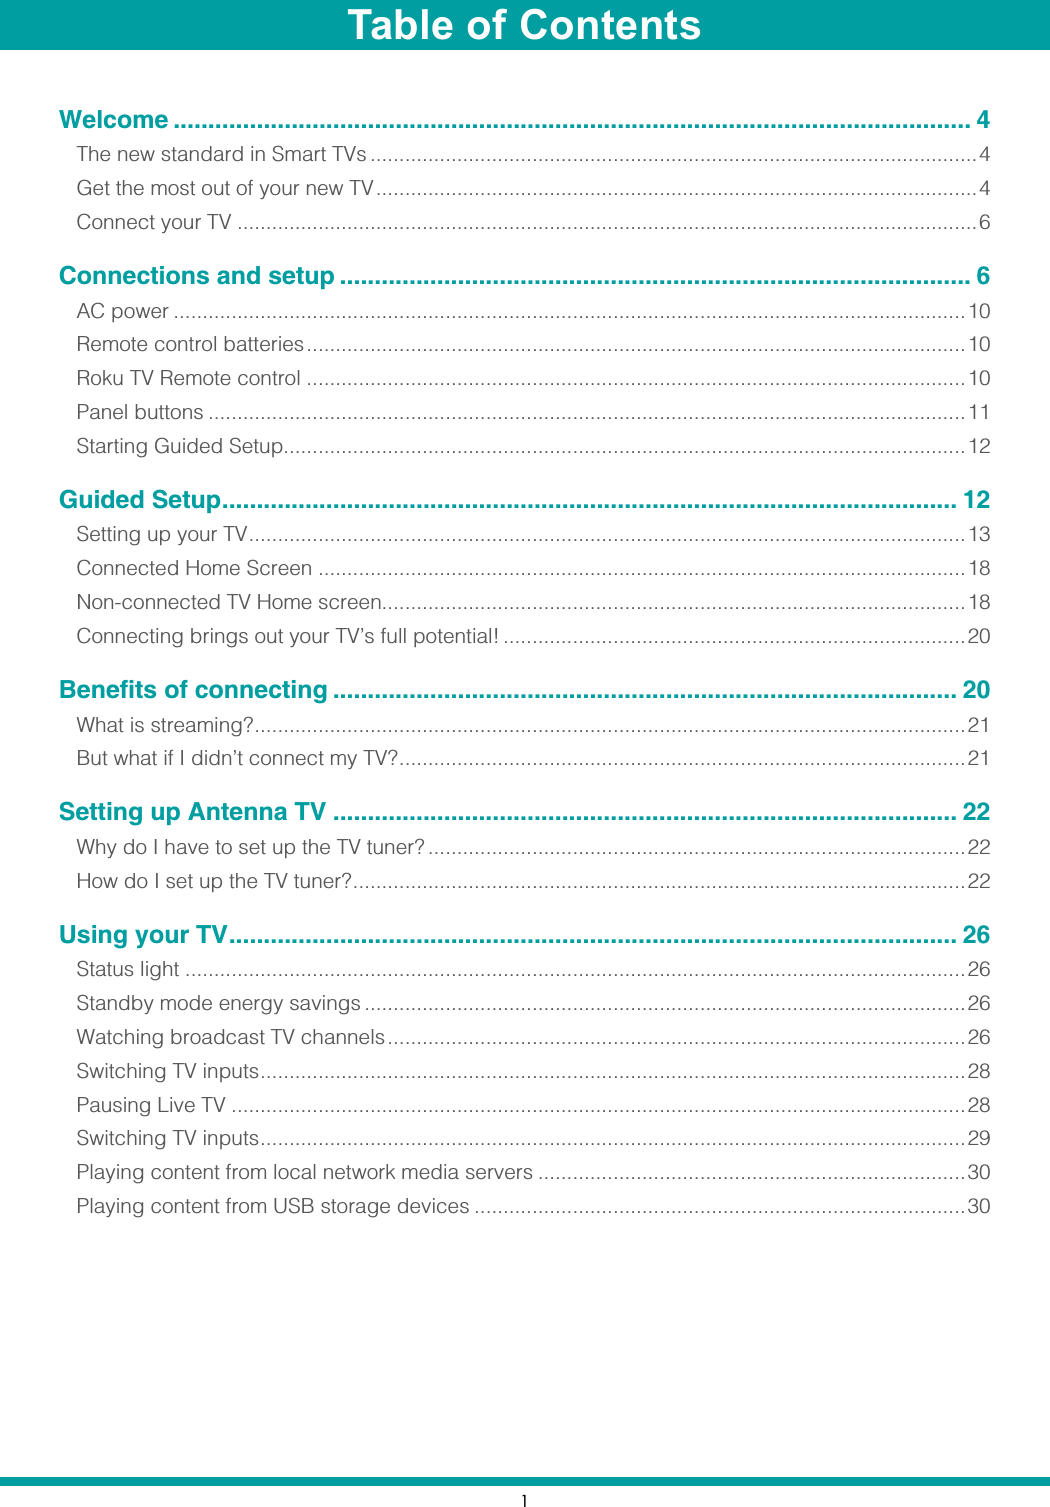
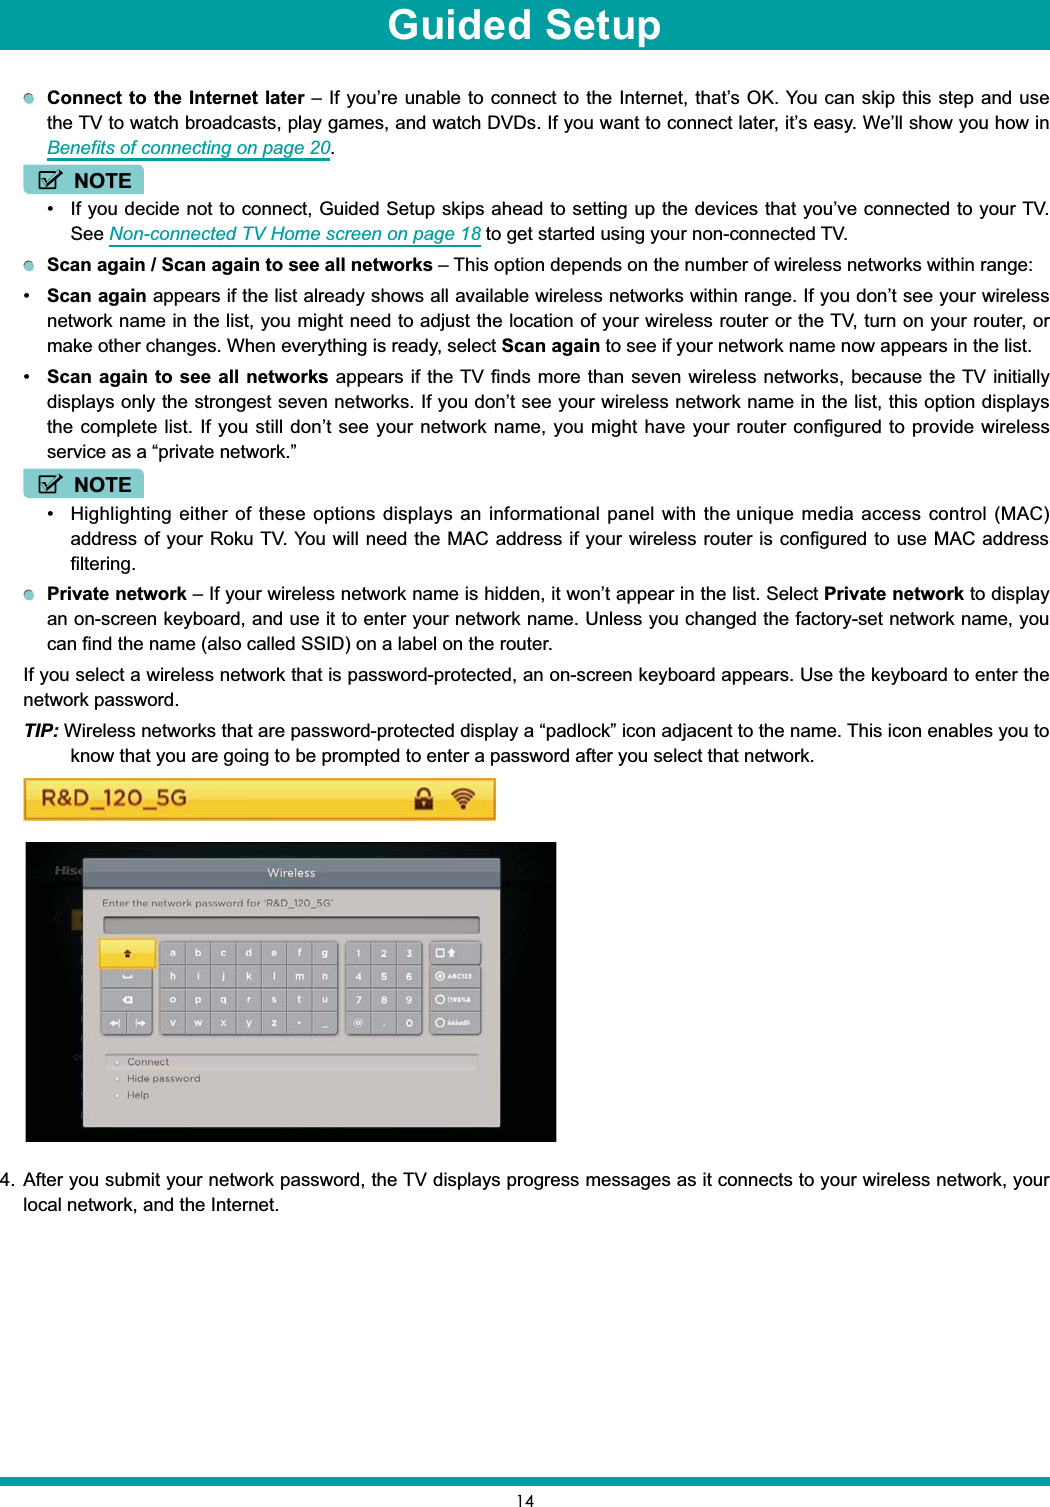
![13Setting up your TVWith the first Guided Setup screen on your TV, follow these steps to set up your TV:1. Press the [OK] or [RIGHT] buttons on the remote control to go to the next screen:2. Press [OK] to select Set up for home use. Home mode is the right choice for enjoying your TV at home. It provides energy saving options as well as access to all features of the TV.NOTE ‘Store’ mode configures the TV for retail display and is not recommended for any other use. In store mode, some features of the TV are missing or limited. To switch from one mode to the other, you have to perform a factory reset as explained in Factory reset everything on page 55, and then repeat Guided Setup.After you select Set up for home use, the TV scans for the wireless networks within range and displays them in order, with the strongest signals first. In addition to your own wireless signal, the TV might pick up signals from your neighbors.3. Press [UP] or [DOWN] to highlight the name of your wireless network, and then press [OK] to select it.NOTE Some wireless networks, such as those often found in dorm rooms, hotels, and other public places, may require you to read and agree to terms, enter a code, or provide identifying information before letting you connect to the Internet. If the Roku TV detects that you are connecting to such a network, it prompts you through the connection process using your compatible smartphone or tablet to provide the needed information. For more information, see Using your TV in a hotel or dorm room on page 30.Other options:Wired (Ethernet) – Sign in to your wired network. Your TV is currently not connected to a wired network. To set up a wired connection: Plug an Ethernet cable into your TV. Select ‘Connect to wired network’.Guided Setup](https://usermanual.wiki/Hisense-Electric/LCDF0121.TempConfidential-W9HLCDF0121-User-Manual-6/User-Guide-3423110-Page-16.png)
![166. Using a computer, tablet, or smartphone with an Internet connection, go to the web address displayed on the screen and enter the code that appears on your screen. After you log in or create your Roku account, the link page suggests that you select some streaming channels. After you confirm your selections, the TV gets an acknowledgement, and then adds your preexisting and newly-selected streaming channels to your Roku TV. This process is automatic and takes a few moments—a little longer if you already have a lot of streaming channels to add.TIP: Streaming channels from all Roku streaming devices associated with your account are synchronized periodically, so all of your Roku streaming devices have the same streaming channels (subject to compatibility with the device). After it adds your selected streaming channels, the TV helps you set up the devices that you’re connecting to it, such as a cable box, Blu-ray player, or game console:7. Press [OK] or [RIGHT] to proceed:Why do I need a Roku Account?You need a Roku account for several reasons. It links you, your Roku TV and your other Roku streaming devices to the Roku Channel Store and billing service. Streaming content providers know that it’s OK to send content you request to your TV. Roku can automatically send updates to your device. You need a Roku account to activate your device and access entertainment across thousands of streaming channels. Roku accounts are free, and while a valid credit card number is not required to create your account, providing your credit card information makes renting and purchasing entertainment from the Roku Channel Store fast and convenient.Guided Setup](https://usermanual.wiki/Hisense-Electric/LCDF0121.TempConfidential-W9HLCDF0121-User-Manual-6/User-Guide-3423110-Page-19.png)
![178. Connect all the devices you plan to use with your TV, turn them all on, and then select Everything is plugged in and turned on. The TV now takes you step by step through each of its inputs and asks what kind of device you have connected. On each input that has a connected and active device, you can see its picture and hear its sound.9. Press [UP] or [DOWN] to highlight the label you want to associate with the input, and then press [OK] to move on to the next input.You’re done with Guided Setup.NOTE Some Roku TVs, depending on where you live and other factors, show you an introductory video filled with some great hints and tips. If you’re not interested in viewing this video, press [ ] on the remote control to exit to the Roku TV Home screen.When you finish Guided Setup, and whenever you press [ ] on the remote control, the Home screen greets you.From here, you can explore everything your TV has to offer. Press the arrow buttons to move around, and press [OK] to select a highlighted item. We’ve designed the TV to encourage you to explore, and you can probably figure out most of the capabilities and settings on your own. If you have any questions or difficulties, you can find answers and solutions in this guide.If you find yourself a long way from the Home screen, you can always get back right away by pressing one button: [ ].Guided Setup](https://usermanual.wiki/Hisense-Electric/LCDF0121.TempConfidential-W9HLCDF0121-User-Manual-6/User-Guide-3423110-Page-20.png)
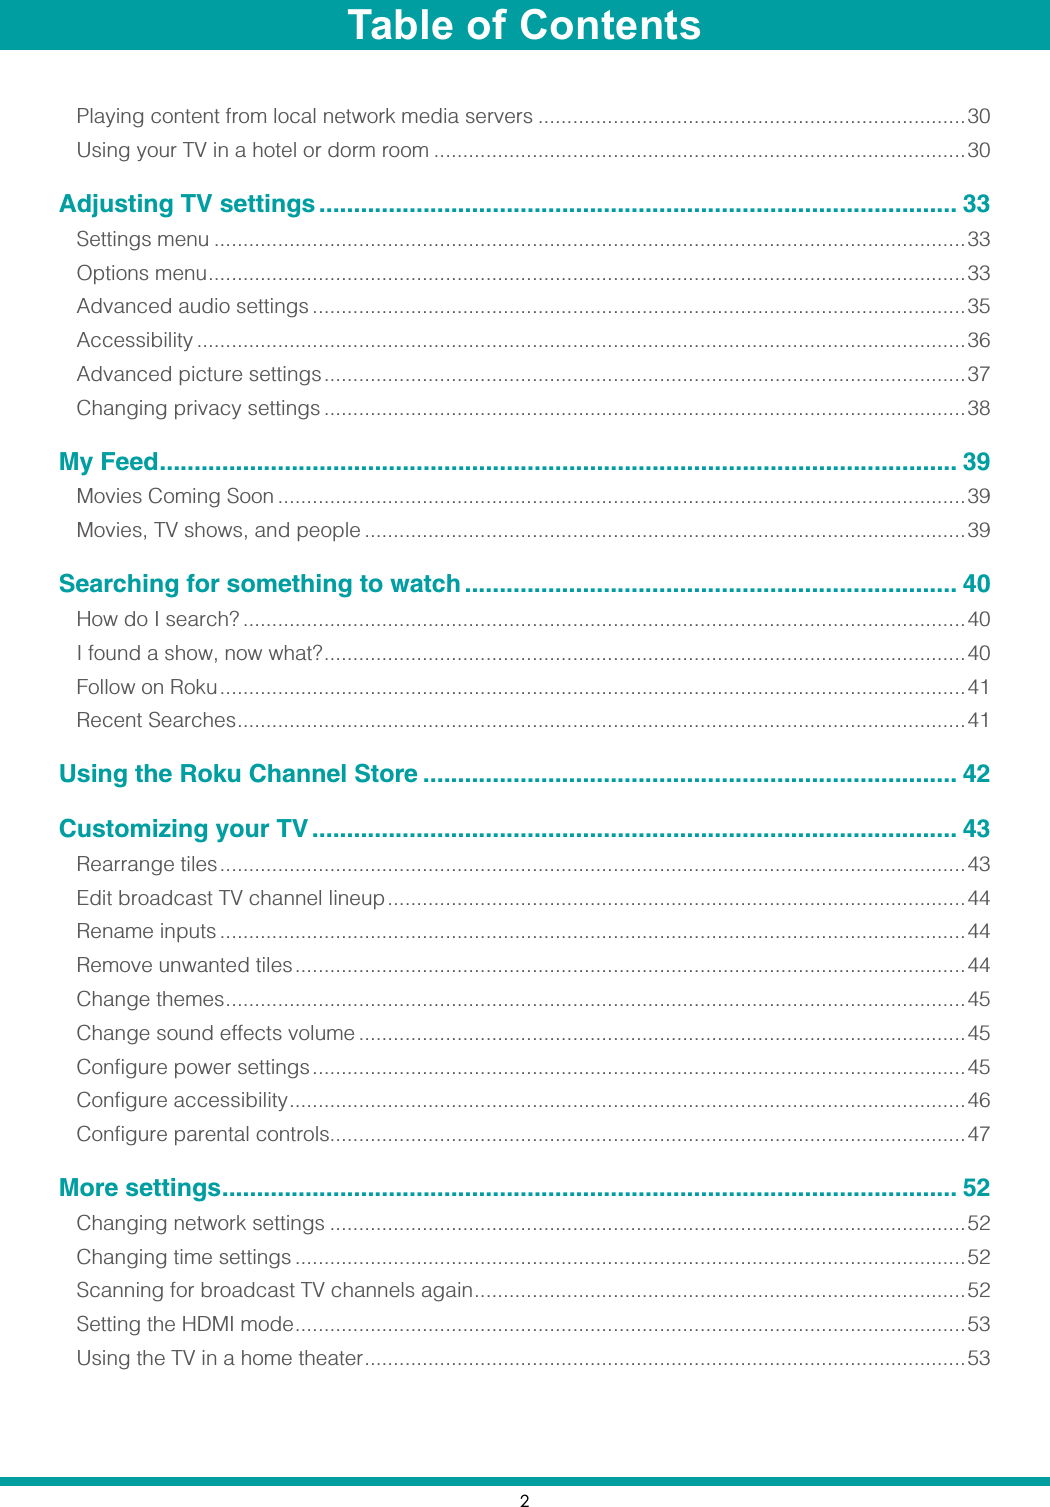
![18Connected Home ScreenHere is a typical Home screen from a TV that’s connected to the Internet and paired with a Roku account.NOTE A paid subscription or other payments may be required for some channels. Channel availability is subject to change and varies by country. Not all content is available in countries or regions where Roku® products are sold.Personalize your Home screenYou can do a lot to personalize your Home screen and make it just right for you and your family:Add streaming channels by using the Streaming Channels menu option to browse the Roku Channel Store.Remove a tile by highlighting it and pressing [ ]. Then highlight Remove input or Remove channel and press OK.Reposition a tile by highlighting it and pressing [ ]. Then highlight Move input or Move channel and press OK. Use the arrow buttons to move the tile, and then press OK to lock it in its new location.Rename a TV input tile by highlighting it and pressing [ ]. Then highlight Rename input and press OK. Highlight a new name in the list, and then press OK to assign that name to the tile.Change the screen theme by going to Settings > Themes to find and pick one to suit your mood.Non-connected TV Home screenHere is a typical Home screen from a TV that is not connected to the Internet.Highlighted item - press [OK] to selectPress [ ] for options when availableHint - Press [RIGHT] to see another screenStreaming channels and applicationsHome menuTV inputsHighlighted item - press [OK] to selectPress [ ] for options when availableHint - Press [RIGHT] to see another screenHome menuTV inputsGuided Setup](https://usermanual.wiki/Hisense-Electric/LCDF0121.TempConfidential-W9HLCDF0121-User-Manual-6/User-Guide-3423110-Page-21.png)
![19Personalize your Home screenYou can do a lot to personalize your Home screen and make it just right for you and your family:Remove a tile by highlighting it and pressing [ ]. Then highlight Remove input and press OK.Reposition a tile by highlighting it and pressing [ ]. Then highlight Move input and press OK. Use the arrow buttons to move the tile, and then press OK to lock it in its new location.Rename a tile by highlighting it and pressing [ ]. Then highlight Rename input and press OK. Highlight a new name in the list, and then press OK to assign that name to the tile.Add streaming channels by browsing the Roku Channel Store (after connecting the TV to the Internet to add the StreamingChannels option to the menu).Guided Setup](https://usermanual.wiki/Hisense-Electric/LCDF0121.TempConfidential-W9HLCDF0121-User-Manual-6/User-Guide-3423110-Page-22.png)

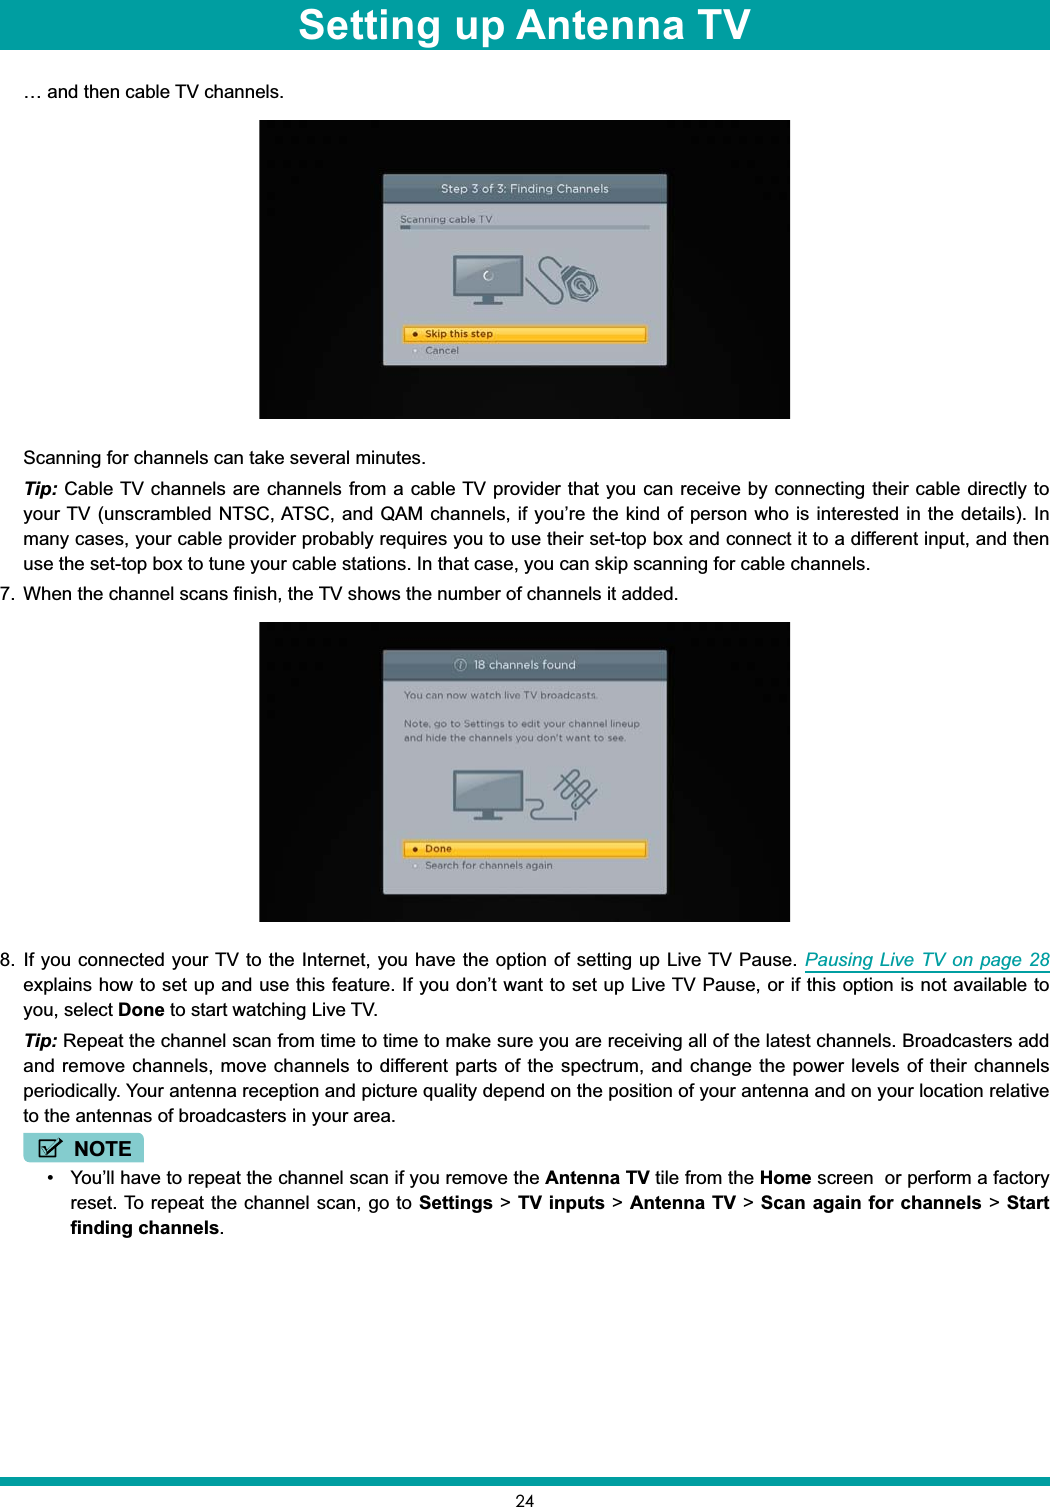
![25Now, you’re ready to watch broadcast TV! While you’re watching, try the following:Press [UP] or [DOWN] to change channels.Press [LEFT] to display the channel list and then use the [UP] and [DOWN] to select a channel to watch. Or press [REWIND]or [FAST FORWARD] to jump through the channel list a page at a time.Press [OK] to display information about the current program.Press [ ] to switch to the previously tuned channel.Press [ ] to see options for picture and sound settings.NOTE If [ ] is not available on your remote control, you can use [ ] on the Roku App or [BACK] on a universal remote. For more information, see Other devices on page 59.Setting up Antenna TV](https://usermanual.wiki/Hisense-Electric/LCDF0121.TempConfidential-W9HLCDF0121-User-Manual-6/User-Guide-3423110-Page-28.png)
![26This section provides information on using the day-to-day features of your TV.Status lightYour TV has a single status light on the front panel. It goes on and off and blinks in different ways depending on the status of the TV, as shown in the following table:TV condition Status indicator MeaningOn (screen is active) Off Screen is communicating that TV is on.Screensaver (screen is active) Off Screen is communicating that TV is on.Off (no power) Off TV is not connected to power.Off (standby) On TV is connected to power and is ready to use.Starting up from off state Slow pulsing blink until startup completes TV is doing something.On (receiving update from USB) Off TV is doing update.Remote control command received Dims on/off once TV has received your command.Powering down to standby mode Slow pulsing blink until the TV reaches standbyTV is doing something.Standby mode energy savingsWhen you turn off your TV, it may remain in a higher power mode for a few minutes, after which it goes into a very low power standby mode. If you turn on the TV again before it has entered the very low power mode, it turns on immediately. After the TV goes into the lower power standby mode, it takes a bit longer to start up.Watching broadcast TV channelsTo watch broadcast TV, select the Antenna TV tile in the Home screen. Your TV remembers the last channel you watched and starts with that channel playing. Tip: You also can use the buttons on the TV panel to select Antenna TV, as explained in Panel buttons on page 11.Changing channelsTo change channels, you can do any of the following:Press [UP] to change to the next higher channel.Press [DOWN] to change to the next lower channel.Press [LEFT] to display the channel list, and then press [UP] and [DOWN] to move the highlight through the list one channel at a time. Or press [REWIND] and [FAST FORWARD] to move the highlight through the list one page at a time. When you’ve highlighted the channel you want to watch, press [OK]. (If you decide you don’t want to change channels, press [RIGHT] or [BACK]).Press [ ] to jump to the previous channel. Press again to return to the channel you were watching before you pressed [ ].Using your TV](https://usermanual.wiki/Hisense-Electric/LCDF0121.TempConfidential-W9HLCDF0121-User-Manual-6/User-Guide-3423110-Page-29.png)
![27NOTE If [ ] is not available on your remote control, you can use [ ] on the Roku App or [BACK] on a universal remote. For more information, see Other devices on page 59.Viewing program informationTo view information about the current program, press [OK]. The TV displays a banner at the bottom of the screen with as much information as is available in the program data stream, as shown in the following example.Program information, subject to availability within the broadcast information, includes: Channel number Channel call sign Signal strength Program title Start time, end time, and graph of program length showing current position Content rating Video resolution (480i, 480p, 720p, 1080i, 1080p, 2160p) Dolby Audio™ Audio features (SAP) Closed captioning (CC) Current time Program description. If the entire description does not fit, press [OK] to expand the size of the banner and see the entire description.Tip: If you’ve set up Live TV Pause, and you’re watching broadcast TV, you’ll also see a progress bar showing the current playback position within the rolling 90-minute pause time. For more information, see Pausing Live TV on page 28.Adjusting settingsPress [ ] to display the Options menu. Press [UP] and [DOWN] to highlight an option, and then press [LEFT] and [RIGHT]to change the setting. Adjusting TV settings on page 33 explains each of the settings in detail.Program information bannerUsing your TV](https://usermanual.wiki/Hisense-Electric/LCDF0121.TempConfidential-W9HLCDF0121-User-Manual-6/User-Guide-3423110-Page-30.png)
![28Switching TV inputsPausing Live TVUsing Live TV Pause, your Roku TV gives you the ability to pause, play, fast forward, and rewind digital broadcast TV. You can pause live TV for up to 90 minutes.RequirementsTo use this feature, you need to:1. Connect your TV to the Internet. If you didn’t connect during Guided Setup, see But what if I didn’t connect my TV? on page 21.2. Provide your own dedicated USB drive with the following minimum specifications. 16 GB 15 Mbps read/write speed USB 2.0 compliantA USB flash drive (thumb drive) meeting the minimum requirements is highly recommended. However, using a larger drive does not extend the 90 minute pause time.IMPORTANT: All existing content on your USB drive is erased when you enable this feature.3. Enable Live TV Pause.Enabling Live TV PauseYou can enable Live TV Pause in several ways:Go to Settings > TV inputs > Antenna TV > Live TV Pause, and then select Enable.After completing a channel scan, select Set up Live TV Pause from the available options.Press the Play/Pause button on the Roku remote while watching a digital broadcast TV channel.Highlight the Antenna TV tile on the Home screen, press [ ] on the remote control, and then select Enable Live TV Pause.After starting Live TV Pause setup in any of these ways, the TV prompts you through the steps needed to enable this feature. Setup takes only a few moments.NOTE Use of a USB hub is not supported.Using Live TV PauseIf you have used the Roku remote control to watch streaming channels, using Live TV Pause should be very familiar to you.While watching a digital broadcast TV channel, press [ PLAY / PAUSE ] to pause or play the content. After the TV program has been paused for 90 minutes, the TV resumes playing.After watching a channel for a while, press [ REWIND ] to jump back up to the point where you first started watching the channel, up to 90 minutes.After pausing or rewinding, press [ FAST FORWARD ] to jump ahead up to the point where you are once again watching the live TV program.Press [ FAST FORWARD ] or [REWIND] repeatedly to cycle through 1x, 2x, and 3x skip speeds. Press [ ] to play back the last several seconds of the program.NOTE If [ ] is not available on your remote control, you can use [ ] on the Roku App or the [Back] on a universal remote. For more information, see Other devices on page 59. Additional captioning options are provided in Settings > Accessibility.Using your TV](https://usermanual.wiki/Hisense-Electric/LCDF0121.TempConfidential-W9HLCDF0121-User-Manual-6/User-Guide-3423110-Page-31.png)
![29Whenever you use any of the Live TV Pause features, the TV momentarily displays a progress bar:1. Time at current playback position.2. Current playback position3. Extent of pause time, representing the amount of time this channel has been buffered, up to 90 minutes.4. 90 minute mark, representing the maximum extent of pause time.5. Current time.The progress bar also displays tick marks at each half hour point, to help you locate the boundaries where one show ends and a new one begins. Notes about Live TV PauseYou can use Live TV Pause only with digital broadcast and cable channels received through the TV’s Antenna input (ATSC and Clear QAM channels).Changing channels, erases and restarts the Live TV Pause buffer.Returning to the Home screen, selecting another input, or turning off the TV erases and resets the Live TV Pause buffer.Removing the USB drive erases the Live TV Pause buffer.Switching TV inputsSwitch to a TV input to access the device connected to that input, for example, a Blu-ray player. Switching inputs is as simple as highlighting the input’s tile in the Home screen, and pressing [ OK ]. The video signal on the input, if any, appears on the screen.Tip: You also can use the buttons on the TV panel to select a TV input, as explained in Panel buttons on page 11.Customizing your TV on page 43 explains how to rename and remove inputs.Auto-detecting devicesYour TV automatically detects when you connect a new device to an HDMI® input and turn on its power. The input is automatically added to the Home screen if it isn’t already present.Adjusting audio / video settingsWhile watching video content on any input, press [ ] to display the Options menu. Press [ UP ] and [ DOWN ] to highlight an option, and then press [ LEFT ] and [ RIGHT ] to change the setting. Adjusting TV settings on page 33 explains each of the settings in detail.Using your TV](https://usermanual.wiki/Hisense-Electric/LCDF0121.TempConfidential-W9HLCDF0121-User-Manual-6/User-Guide-3423110-Page-32.png)
![33You can adjust most picture and sound settings while you are watching a program by pressing [ ] to display the Optionsmenu. If you don’t find what you need, there are additional picture and sound settings in the Settings menu.In most cases, the changes you make apply only to the input you are using. Antenna TV, each separate HDMI® input, and the AV input have their own settings that the TV remembers when you return to that input. The TV also remembers the settings you specify while viewing streaming content.Settings menuUse the Settings menu to adjust overall TV settings. Press [ ] to go to the Home screen, and then navigate to Settings > TV picture settings.You can adjust the following overall TV picture settings from the Settings screen:TV brightness – If the lighting level in your TV room changes, use this setting to help provide a better viewing experience; set to darker for a darker room, and brighter for a brighter room. Choose among Normal and four other settings to make the overall picture brighter or darker. So that you don’t have to make this type of change for each TV input one at a time, this setting increases or decreases the TV’s general brightness across all TV inputs. This setting is identical to the TV brightness setting you can access in the Options menu while watching a program.HDR notification – Settings per input – This section of options lists each TV input. Select an input to switch to that input. Then press [ ] to display the Options menu, where you can adjust the input’s settings while watching a live picture and listening to the sound from that input.Tip: You don’t have to go to the Settings menu first—you can display an input’s Options menu and adjust its settings whenever you are watching the input by pressing [ ].Options menuThe Options menu for each TV input provides settings for controlling the appearance of the picture and the quality of the audio.To view the Options menu, press [ ] whenever you are watching a TV input or streaming a video. The Options menu is a panel that appears over the left side of the screen:To adjust the settings on the Options menu, press [UP] or [DOWN] to highlight a setting, and then press [LEFT] or [RIGHT] to change the setting. You’ll notice the changes you make right away in picture appearance or audio quality.Tip: When you highlight a setting, the header text explains the effect of its current value. When you begin to adjust a setting, the other options are hidden so you can see more of the screen. Even though the other settings are hidden, you can move the highlight up or down to adjust the other settings.Adjusting TV settings](https://usermanual.wiki/Hisense-Electric/LCDF0121.TempConfidential-W9HLCDF0121-User-Manual-6/User-Guide-3423110-Page-36.png)
![34Options menu settingsTV brightness – Affects the overall brightness of the picture. This setting applies across the entire TV; that is, to all TV inputs and is identical to the TV brightness setting in the TV picture settings menu.Picture mode – Provides picture presets for various viewing preferences. This setting applies to the currently-selected input only.Picture size – Adjusts the aspect ratio of the picture, enabling you to view a picture in its original format, or zoom or stretch it to fill the screen. The Auto setting produces the best picture in most cases.Audio effect – Adjusts the sound quality output from the TV speakers. This setting applies across the entire TV; that is, to all TV inputs. It does not affect the sound quality from the HDMI (ARC) or SPDIF (TOSLINK) connector.Sleep timer – Sets a timer that turns off the TV after the specific amount of time. This setting remains in effect even if you stop watching the current input.Closed captioning – Controls when you see captions. This setting is only offered for Antenna TV, the AV input, and streaming videos. Any set value remains in effect across only these inputs. Antenna TV – Turn captions on or off, or set them to appear only when the TV sound is muted. AV input – Turn captions on or off, or set them to appear only when the TV sound is muted. Streaming video channel – Turn captions on or off, set them to appear only when the TV sound is muted, or only during instant replay (for streaming content that supports instant replay).NOTE If the Instant Replay [ ] button is not available on your remote control, you can use [ ] on the Roku App or [Back]on a universal remote. For more information, see Other devices on page 59. Additional captioning options are provided in Settings > Accessibility.SAP – Selects whether to play a secondary audio program or multichannel television sound, and which choice to play. This setting applies only to Antenna TV on digital channels.Tip: To dismiss the Options menu, just wait a few seconds without pressing any buttons. Or press [ ] again to dismiss the menu immediately.Adjusting TV settings](https://usermanual.wiki/Hisense-Electric/LCDF0121.TempConfidential-W9HLCDF0121-User-Manual-6/User-Guide-3423110-Page-37.png)
![35Adjusting TV settingsAdvanced audio settingsTo use the Advanced audio settings menu, first press [ ] to display the Options menu. Then select Advanced audio settings.Advanced audio settingsAudio effect – Audio tuned for everyday use.DTS TruSurround – DTS TruSurround effect is on speaker output .Dialog Clarity – Set up Dialog Clarity.TruVolume – Set up DTS TruVolume .Reset audio settings– Return audio effect to original values .](https://usermanual.wiki/Hisense-Electric/LCDF0121.TempConfidential-W9HLCDF0121-User-Manual-6/User-Guide-3423110-Page-38.png)
![36AccessibilityThe settings on the Accessibility menu enable you to change the TV’s accessibility settings without leaving the program you are watching. These settings are also available on the Home screen under Settings > Accessibility.Models sold in US only: To enable the Audio Guide, press the [ ] on the remote control four times in rapid succession. Repeat to disable the Audio Guide. (The [ ] button is located directly below the directional pad on the right side of the Roku remote control.)Accessibility menu settingsAudio Guide – Turn the Audio Guide on or off. The Audio Guide is a text-to-speech screen reader that helps blind and low-vision users navigate the Roku user interface and on screen menus. When enabled, the Audio Guide reads out text, menus, and other on-screen items.Tip: If Shortcut is enabled, you can enable or disable the Audio Guide by pressing [ ] four times in quick succession.Speech rate – Choose the speed at which the TV speaks Audio Guide prompts.Volume – Set the volume of the Audio Guide in relation to the main TV volume.Shortcut – Enable or disable the shortcut feature. When disabled, pressing [ ] four times in quick succession does not enable or disable the Audio Guide.Closed captioning – Controls when you see captions. This setting is only offered for Antenna TV, the AV input, and streaming videos. Any set value remains in effect across only these inputs. Antenna TV – Turn captions on or off, or set them to appear only when the TV sound is muted. AV input – Turn captions on or off, or set them to appear only when the TV sound is muted. Streaming video channel – Turn captions on or off, set them to appear only when the TV sound is muted, or only during instant replay (for streaming content that supports instant replay).NOTE If the Instant Replay [ ] button is not available on your remote control, you can use [ ] on the Roku App or [Back]on a universal remote. For more information, see Other devices on page 59. Additional captioning options are provided in the Captions screen in Settings.Captioning track – Selects which caption track to display when Closed Captioning is on. This setting remains in effect on all inputs that provide captions.SAP – Selects whether to play a secondary audio program or multichannel television sound, and which choice to play. This setting applies only to Antenna TV on digital channels.Adjusting TV settings](https://usermanual.wiki/Hisense-Electric/LCDF0121.TempConfidential-W9HLCDF0121-User-Manual-6/User-Guide-3423110-Page-39.png)
![37Advanced picture settingsThe Advanced picture settings menu for each TV input provides settings for fine tuning the appearance of the picture. All of the settings in this menu apply only to the currently-selected input.To use the Advanced picture settings menu, first press [ ] to display the Options menu. Then select Advanced picture settings.To adjust the settings on the Advanced picture settings menu, press [UP] or [DOWN] to highlight a setting, and then press [LEFT] or [RIGHT] to change the setting. You’ll notice the changes you make right away in picture appearance.Tip: When you highlight a setting, the header text explains the effect of its current value. When you begin to adjust a setting, the other options are hidden so you can see more of the screen. Even though the other settings are hidden, you can move the highlight up or down to adjust the other settings. As soon as you press [UP] or [DOWN], the other settings become visible againAdvanced picture settings menu optionsPicture mode – Provides picture presets for various viewing preferences. This setting duplicates the one on the Optionsmenu. When you change the Picture mode, other picture settings adjust accordingly. For example, setting the Picture mode to Vivid sets Brightness,Contrast,Sharpness, and other values to produce a very vibrant picture. Setting Picturemode to Movie changes these same settings to produce a picture suitable for enjoying movies in a darkened room. If you make changes to the individual picture settings—for example, Contrast, or Sharpness—these settings are saved for the current input and the current picture mode. In this way, the HDMI 1 input’s Movie picture mode can be different than the HDMI 2 input’s Movie picture mode and Antenna TV’s Movie picture mode. Use Reset picture settings, described below, to return the input’s current picture mode to its original values.Backlight - Adjusts the overall brightness of the screen.Brightness – Adjusts the dark level of the black areas of the picture.Contrast – Adjusts the white level of the light areas of the picture.Sharpness – Adjusts the sharpness of the edges of objects in the picture.Color – Adjusts the intensity of colors in the picture. A setting of 0 removes all color and displays a black and white picture.Tint – Adjusts the color balance from green to red to obtain accurate colors in the picture.Color temperature – Adjusts the overall colors in the picture from Normal to slightly more bluish (Cool) to slightly more reddish (Warm).Game mode – Controls whether ‘Game’ mode is on or off. When On, the TV performs less image processing and has less input lag. When Off, the TV performs more image processing and has more input lag, which is less desirable for action games. Available only for HDMI inputs.Reset picture settings – Returns all picture settings for the input’s currently-selected Picture mode to their original values.Tip: To dismiss the Advanced picture settings menu, just wait a few seconds without pressing any buttons; or, press [ ]again to dismiss the menu immediately.Adjusting TV settings](https://usermanual.wiki/Hisense-Electric/LCDF0121.TempConfidential-W9HLCDF0121-User-Manual-6/User-Guide-3423110-Page-40.png)
![38Changing privacy settingsBy default, when connected to the Internet and activated with your Roku account, the TV uses an advertising identifier to track your usage behavior. You can change the privacy settings on your TV in two ways: resetting the advertising identifier and limiting ad tracking.NOTE Privacy settings are not present on TVs operating in non-connected mode.Resetting the advertising identifierResetting the advertising identifier has the effect of clearing your prior usage history and starting over. From that point forward, your new usage patterns affect the advertisements you see on your TV.To reset the advertising identifier:1. From the Home screen menu, navigate to Settings > Privacy.2. Highlight Reset advertising identifier. Press [ ] to view more information about this option. When you finishing reading the information, press [ OK ] to close the More Information window.3. Press [ OK ] to reset the advertising identifier, and then press [ OK ] again to dismiss the verification message.Limiting ad trackingYou can limit Roku’s tracking of your usage behavior by limiting ad tracking. When you do, your TV will display ads that are not personalized based on your TV’s advertising identifier. To limit ad tracking:1. From the Home screen menu, navigate to Settings > Privacy.2. Highlight Limit ad tracking. Press [ ] to view more information about this option. When you finishing reading the information, press [ OK ] to close the More Information window.3. Press [ OK ] to select the Limit ad tracking option.NOTE If you perform a factory reset and then reconnect your TV, ad tracking is restored until you repeat these steps.Adjusting TV settings](https://usermanual.wiki/Hisense-Electric/LCDF0121.TempConfidential-W9HLCDF0121-User-Manual-6/User-Guide-3423110-Page-41.png)

![40Searching for movies and shows across multiple streaming channels is one of the unique features of your TV. Within a single search operation, you can search by: Movie name TV show name Actor or director name Streaming channel name Game nameTip: Roku Search is available only if your TV is connected to the Internet.NOTE Roku Search doesn’t search across all streaming channels, but searches across lots of popular streaming channels. The actual channels it searches vary by locale, but include popular providers such as Netflix, Hulu Plus, Amazon Instant Video, VUDU, and several others, with more being added all the time.You can check which streaming channels are included in Roku Search by going to the Search screen, clearing all previous searches to reveal the search instructions, and then watching the channel tiles cycle at the bottom of the screen.To search, select Search on the Home menu. The Search screen has a keyboard grid and initially displays instructions—a set of icons representing search categories and a list of participating provider tiles.Tip: If you don’t see the instructions, navigate to the end of the list of recent searches and select Clear recent search selections.How do I search?To search, use the arrow buttons to enter a few characters of the search term. With each additional character you enter, you narrow down the search and the search results become more relevant.Tip: Use the free Roku mobile app on your compatible smartphone or tablet to make searching even faster. Not only can you use your device’s keypad to type, you can search simply by touching the voice search icon and saying the name of the movie, TV show, actor or director, channel, or game.An icon next to each search result shows the category of the result.Press [RIGHT] to move the highlight into the list of search results.Press [UP] and [DOWN] to scroll through the list of search results to highlight the item you want to view.I found a show, now what?Now that you’ve highlighted the show, movie, actor, game, or streaming channel you were looking for, press [RIGHT].If your search result was an actor, director, or other item that does not represent a single item of content, you’ll see another list to narrow down your search. Continue highlighting results and pressing [RIGHT] until you find a single, viewable content item.An HD logo means that the content is available in high-definition. The checked circle adjacent to the title means you have already added the streaming channel.If your search result was a game or a streaming channel, you’ll see detailed information, images, and available actions, such as a list of streaming channels and the cost of getting the item or channel.NOTE Some channels may require a paid subscription.Searching for something to watch](https://usermanual.wiki/Hisense-Electric/LCDF0121.TempConfidential-W9HLCDF0121-User-Manual-6/User-Guide-3423110-Page-43.png)

![42The Streaming Channels menu option takes you to the Roku Channel Store, where you can add new streaming channels and applications to your TV.Tip: The Streaming Channels menu option is available only if your TV is connected to the Internet.Tip: You also can search for streaming channels by using the Search option, as explained in Searching for something to watch on page 40.To make it easier to find what you want, the streaming channels in the Roku Channel Store are categorized by topic. Press [UP] and [DOWN] to highlight the category you want, and then press [RIGHT] to move the highlight into the grid of streaming channel tiles.When you find a streaming channel you want to add or learn more about, highlight it and press [OK] to display more details.If the streaming channel you are adding is free, you can select Go to channel to start watching it immediately. If there is a one-time or recurring fee associated with using the streaming channel, you must agree to the terms and conditions, accept the fee, and—if you created one when you activated your Roku TV, enter your Roku PIN code to authorize the charges.If you already have a subscription to the streaming channel—for example, you already subscribe to Netflix or you receive HBO through your cable TV provider—you must complete a different, simple authorization step to add the streaming channel.You only have to complete the authorization or activation step one time, when you initially add the streaming channel. After that, you simply select the streaming channel tile from your Home screen to start watching. (Channel and content availability is subject to change. Charges may apply to your selection.)Tip: New streaming channels are added continuously, so be sure to check back every now and then.NOTE If you don’t remember your PIN, or if want to change whether you need to use a PIN to make purchases on your Roku account, see Changing your Roku Channel Store PIN preference on page 56.Using the Roku Channel Store](https://usermanual.wiki/Hisense-Electric/LCDF0121.TempConfidential-W9HLCDF0121-User-Manual-6/User-Guide-3423110-Page-45.png)
![43There are several things you can do to personalize your TV.Rearrange tilesWhenever you add a TV input tile, it’s added at the top of your Home screen. Whenever you add a new streaming channel from the Roku Channel Store, it’s added at the bottom of your Home screen.You can easily rearrange the order of the tiles on the Home screen to suit your viewing preferences. For example, you might want Antenna TV to be the first tile in your Home screen. But, if you mostly watch one streaming channel, you might want its tile to be the first one on your Home screen.Rearranging tiles is easy:1. From the Home screen, highlight one of the tiles you want to move.2. Press [ ] to display a list of options for the type of tile you selected.3. Select Move input or Move channel. The list of options disappears and the highlighted tile shows arrows indicating how it can be moved.NOTE A paid subscription or other payments may be required for some channels. Channel availability is subject to change and varies by country. Not all content is available in countries or regions where Roku® products are sold4. Use the arrow buttons to move the highlighted tile to its new position. As you move the tile, it pushes other tiles out of its way.5. Press [OK] to lock the tile into its new position.6. Repeat these steps to move other tiles until you have arranged your Home screen to your liking.Customizing your TV](https://usermanual.wiki/Hisense-Electric/LCDF0121.TempConfidential-W9HLCDF0121-User-Manual-6/User-Guide-3423110-Page-46.png)
![44Edit broadcast TV channel lineupWhen you set up the TV tuner as described in Setting up Antenna TV on page 22, the TV adds all the channels with good signals that it could detect in your area. It’s likely that you now have more channels than you want in your channel list.To edit the channel lineup, from the Home screen, navigate to Settings > TV inputs > Antenna TV > Edit channel lineup.You’ll see a screen listing all of your channels. Adjacent to the list of channels is a miniature TV screen playing the highlighted channel’s picture and sound.Highlight each channel you want to hide, and then press [OK] to hide the channel.Tip: If you need to see or hear the highlighted channel, wait a couple of seconds for the TV to start playing the channel’s picture and sound. Also note that if you’ve enabled Parental Controls and the program on the current channel is blocked, you won’t see a picture or hear sound while editing the channel lineup.Rename inputsRather than trying to remember that your Blu-ray player is connected to HDMI1 and your game console is connected to HDMI 3, you can rename the TV inputs to match the connected component.NOTE Renaming an input also changes the icon associated with it.To rename an input, you can either:Highlight the input tile in the Home screen, and then press [ ] to display a list of options. From the list of options, select Rename input. Then select a new name and icon.orFrom the Home screen, navigate to Settings > TV inputs. On the TV inputs screen, select the input you want to rename, select Rename, then choose a new name and icon from the provided list.Press [ ] to return to the Home screen. The new name and icon are now in effect.Remove unwanted tilesIt’s easy to remove unused TV inputs and unwanted channel or app tiles. For example, if you never use the HDMI 3 input, or if you don’t like the weather app you added from the Roku Channel Store, you can remove them from your Home screen.You also can remove the Antenna TV tile if you never use the TV tuner. However, be aware that removing the Antenna TV tile also deletes the broadcast TV channel list. You’ll have to set up the TV tuner again next time you add Antenna TV. Instructions for setting up the TV tuner can be found in Setting up Antenna TV on page 22.To remove any tile, highlight the input tile in the Home screen, and then press [ ] to display a list of options. From the list of options, select Remove input. In the screen that follows, confirm you want to remove the input.Customizing your TV](https://usermanual.wiki/Hisense-Electric/LCDF0121.TempConfidential-W9HLCDF0121-User-Manual-6/User-Guide-3423110-Page-47.png)
![45Alternatively, to remove a TV input tile from the Home screen, navigate to Settings > TV inputs. On the TV inputs screen, select the input you want to remove, and then select Remove > Confirm. Then, press [ ] to return to the Home screen.Change themesAnother way to customize your TV is to change its theme. The theme establishes the look and feel of the TV through colors, designs, and fonts.Tip: Themes are available only when your TV is connected to the Internet. Some themes require payment.To change the theme, in the Home screen menu navigate to Settings > Themes. In the Themes screen, choose from the following options:My themes – Highlight a theme, and then press [ OK ] to switch to that theme.Custom settings – Turn Enable featured themes on or off. When Enable featured themes is on, the TV automatically switches to featured themes—like certain holiday-inspired themes —for a limited time whenever Roku makes them available, and then switches back to your selected theme when the featured theme expires. When off, the TV always uses your selected theme. Change sound effects volumeSound effects are the noises the TV makes to let you know it received your command. You can change the volume of sound effects or turn them off.To adjust the sound effects volume, in the Home screen menu, navigate to Settings > Audio > Menu volume. Navigate to the right and then change the setting to High,Medium,Low, or Off.Configure power settingsPower settings let you set up your TV so that it turns on to the location you choose. Power settings also help your TV save energy by automatically turning it off under certain conditions.Power on settingsPower on settings tell the TV what to do when you turn on the power. To configure the power on settings, from the Homescreen menu, navigate to Settings > System > Power > Power on. Highlight the power on location from the list, and then press [OK] to select it.Customizing your TV](https://usermanual.wiki/Hisense-Electric/LCDF0121.TempConfidential-W9HLCDF0121-User-Manual-6/User-Guide-3423110-Page-48.png)
![46Auto power savingsTo help you save energy, your TV can automatically turn itself off after a period of inactivity or a period during which no signal has been detected. It is factory-configured to do both of these things, but you can change these settings if needed.To configure automatic power off, from the Home screen menu navigate to Settings > System > Power > Auto power savings. In the Power settings screen, highlight the following options and press [OK] to turn them on or off:Reduce power after 15 minutes – If no video or audio activity and no user interaction occur for 15 minutes, the TV automatically turns off the screen and sound. Turn off after 4 hours – If no video or audio activity and no user interaction occur for 4 hours, the TV goes into standby mode.Standby LED On/OffNormally, the status LED on the front of your TV is lit whenever the TV is in standby mode. If you prefer the status LED to not be lit in standby mode, you can turn it off. To do so, from the Home screen, navigate to Settings > System > Power > Standby LED, and then select Off.After making this change, the status LED still performs all other indication functions.System restartFrom the Home screen, navigate to Settings > System > Power > System restart, and then select Restart.Confirm restart to turn your TV off and then on again.Configure accessibilityAccessibility settings enable users with vision or hearing impairment to use the TV more effectively. Accessibility settings are located under Settings > Accessibility.Captions modeCaptions mode specifies when closed captions appear. Access caption settings from the Home screen by selecting Settings > Accessibility > Captions mode. At this point, you can choose among the following options:Off – No captions appear.On always– Captions appear whenever they are available from the program source.On replay – Captions appear only when you use the replay option, and only when you are watching a streaming program that supports instant replay.On mute – Captions appear only when the TV is muted.Tips: You can change the captions mode while watching a program. To do so, press [ ] to display the Options menu, and then select Closed Captioning. Some streaming channels require you to enable captions through a setting within their channel even though you have turned on captions everywhere else.NOTE Once enabled, the captions mode applies to all inputs that support captions and remains enabled until you turn it off.Captions styleCaptions style lets you control how closed captions look when displayed on your TV. Access caption style settings from the Home screen by selecting Settings > Accessibility > Captions style. At this point, you can choose among the following options:Customizing your TV](https://usermanual.wiki/Hisense-Electric/LCDF0121.TempConfidential-W9HLCDF0121-User-Manual-6/User-Guide-3423110-Page-49.png)
![47Text style – Choose from a list of fonts. As you move the highlight to each font, you can see a sample of the result in an adjacent panel.Text edge effect – Choose from a list of edge effect styles, such as raised, depressed, and various shadows. As you move the highlight to each effect, you can see a sample of the result in an adjacent panel.Text size – Choose from a list of sizes. As you move the highlight to each size, you can see a sample of the result in an adjacent panel.Text color - Choose from a list of colors for the text. As you move the highlight to each color, you can see a sample of the result in an adjacent panel.Text opacity - Choose from a list of opacity settings for the text. This setting determines how much the area behind the text shows through the text. A value of 100% blocks all of the content behind the text. As you move the highlight to each setting, you can see a sample of the result in an adjacent panel.Background color - Choose from a list of colors for the background area behind the text. As you move the highlight to each color, you can see a sample of the result in an adjacent panel. Note that you won’t see any change unless you set the Background opacity to a value other than Off.Background opacity - Choose from a list of opacity settings for the background of the caption. This setting determines how much the area behind the caption background shows through the background. A value of 100% blocks all of the content behind the background. As you move the highlight to each setting, you can see a sample of the result in an adjacent panel.Window color - Choose from a list of colors for the window rectangle surrounding the entire caption. As you move the highlight to each color, you can see a sample of the result in an adjacent panel. Note that you won’t see any change unless you set the Window opacity to a value other than Default or Off.Window opacity - Choose from a list of opacity settings for the window rectangle surrounding the entire caption. This setting determines how much the area behind the caption window shows through the window. A value of 100% blocks all of the content behind the window. As you move the highlight to each setting, you can see a sample of the result in an adjacent panel.Audio Guide settings (U.S. only)On TVs sold in the United States, the Audio Guide settings help users who are blind or visually impaired to configure the text-to-speech reader, enabling them to operate their TV more easily. The Audio Guide uses voice prompts that speak volume and channel changes, menu options, and setting changes. Access Audio Guide settings from the Home screen by navigating to Settings > Accessibility, and then select from the following options in the Audio Guide section:Audio Guide – Turn the Audio Guide on or off.Speech rate – Select one of four speeds at which to hear spoken guide information: Slow, Normal, Fast, or Very Fast.Volume – Select the volume at which to hear spoken guide information, relative to the main TV volume.Shortcut – Enable or disable the shortcut feature. When enabled (the default), pressing [ ] four times in quick succession enables or disables the Audio Guide.Configure parental controlsParental controls enable you to control whether the members of your household can view certain kinds of broadcast TV programs. When a program or feature is blocked, you can unblock it by entering a parental control PIN that only you know.NOTE Parental controls block content from the TV tuner and from streaming options, if any, on the Home screen menu. Parental controls do not block content on other TV inputs or content from streaming channels you add to your TV.Creating a Parental Control PINThe first time you access the Parental controls screen, you must create a new parental control PIN. Thereafter, whenever you want to change parental control settings, unblock programming that has been blocked, change the PIN, or disable parental controls, you must enter your parental control PIN.Customizing your TV](https://usermanual.wiki/Hisense-Electric/LCDF0121.TempConfidential-W9HLCDF0121-User-Manual-6/User-Guide-3423110-Page-50.png)
![48Tip: Your parental control PIN has nothing to do with your Roku PIN. You can make them the same if you want—this is entirely your choice.To create a new parental control PIN, from the Home screen menu navigate to Settings > Parental controls. The screen displays a numeric keypad. Use the arrow buttons and the [OK] button to enter a four digit code. Then, repeat the process to enter the same PIN again, just to make sure you correctly entered the PIN you want to use. Important: If you forget your PIN, the only way to recover is to perform a factory reset operation, as explained in Factoryreset everything on page 55. Be sure to write it down in a safe place just in case.Blocking Movie Store, TV Store, and NewsOne of the parental control options is to completely hide the entertainment options that are available directly on the Home screen menu.To hide Home screen entertainment options:1. From the Home screen menu, navigate to Settings > Parental controls, and then enter your PIN.2. In the Parental controls screen, highlight Home screen and then select or clear either of these options:Hide “Movie Store and TV Store” – Removes the Movies Store and TV Store options from the Home screen menu.Hide “News” – Removes the News option from the Home screen menu.Tip: To use either of these options after you’ve hidden them, you must return to this screen and remove the check mark from the corresponding Hide command.Blocking Broadcast TV showsFor broadcast TV, parental controls use information embedded in the broadcast signal to determine whether to allow a program to be displayed. Parents can configure parental controls to block broadcast TV programs that meet or exceed a specific rating, so they cannot be viewed or heard unless the correct parental control PIN is entered.NOTE Rating standards differ by country.Enabling parental control of TV showsThe first step in blocking TV shows is to enable parental control of TV shows.This setting is provided separately to make it easier for you to turn parental control of TV shows on and off without disturbing their settings. For example, your kids are going to summer camp for two weeks, and while they are gone, you don’t want to have to deal with unblocking shows that you want to watch by entering your PIN. All you need to do is clear Enable parental controls, and all TV shows are unblocked. When the kids return, select Enable parental controls again, and all of your parental control settings are restored in a single operation.To enable parental control of TV shows:1. In the Home screen menu, navigate to Settings > Parental controls, and then enter your PIN.2. In the Parental controls screen, navigate to TV tuner > Parental control of TV shows.3. Make sure the check box next to Enable parental controls is checked. If not, highlight it and press [OK].Blocking based on US TV ratingsMost broadcast US TV shows—other than movies—contain rating data that enables parental controls to block shows that parents don’t want others to view. The ratings are divided into two groups that function independently: Youth group – TV-Y, TV-Y7 Main group – TV-G, TV-PG, TV-14, TV-MAWithin each of these groups, the ratings interact such that if you block a particular level of content, the TV also blocks all content with a higher rating. Conversely, if you unblock a particular level of content, the TV also unblocks all content with a lower rating. For example, if you block TV-PG programs, the TV also blocks TV-14 and TV-MA programs. If you subsequently unblock TV-14 programs, TV-PG programs are also unblocked, but TV-MA programs remain blocked.Similarly, within the main group, content types can be individually blocked. For example, you can block just coarse language in Customizing your TV](https://usermanual.wiki/Hisense-Electric/LCDF0121.TempConfidential-W9HLCDF0121-User-Manual-6/User-Guide-3423110-Page-51.png)
![49shows with a TV-PG rating. If you do, then the TV also blocks shows with coarse language in the higher ratings (TV-14 and TV-MA). Subsequently unblocking coarse language in TV-14 ratings does not unblock coarse language in TV-MA programs, but it does unblock coarse language in TV-PG programs.To block TV shows based on US television ratings:1. From the Home screen menu, navigate to Settings > Parental controls, and then enter your PIN.2. In the Parental controls screen, navigate to TV tuner > TV ratings. Choose among the following settings:Entire ratings – Highlight the rating you want to block, and then navigate to the [RIGHT] and select the first option that blocks the entire rating level (and all higher rating levels).Individual content types – Highlight the rating that contains the content type you want to block, and then select the content types you want to block from among those listed. Remember that blocking a content type in one rating blocks the equivalent content type in all higher rating levels.Blocking based on US movie ratingsMost movies in the US are rated by the Motion Picture Association of America, or MPAA, so the ratings are known as MPAA ratings. TV broadcast signals carry movie rating data that enables parental controls to block shows that parents don’t want others to see. The ratings are: G – General audiences PG – Parental guidance suggested PG-13 – Parents strongly cautioned for children age 13 or younger R – Restricted NC-17 – Not for age 17 or youngerUnlike US TV ratings, there are no individual content types within the ratings. But like TV ratings, blocking movies with a particular rating also blocks movies with a higher rating, and unblocking movies with a particular rating also unblocks movies with a lower rating.Tip: Blocking movies with an NC-17 rating also blocks programs with the now-obsolete X rating, which can still occur in the program data of older movies.To block movies based on MPAA ratings:1. From the Home screen menu, navigate to Settings > Parental controls, and then enter your PIN.2. In the Parental controls screen, navigate to TV tuner > Movie ratings.3. Select the rating level you want to block. You need only select one rating level, and all higher levels are automatically blocked.Blocking based on other ratingsYour TV can block programs having ratings that had not been defined when the TV was manufactured. It does this by detecting a new Rating Region Table in a program and then downloading the new table and displaying its rating in the Parental controls.When the TV downloads a new Rating Region Table, it adds a new option to the list of rating types: Other ratings. If you see this option in the Parental controls screen, you have tuned to a station that has implemented a new rating table. Once the new rating table has been downloaded to the TV, it remains in the TV until it is factory reset, and you can configure blocking based on the new ratings.New Region Rating Tables can have independent rating levels, or rating levels that interact in the same ways as the built-in US TV and MPAA Movie ratings.Tip: If your TV downloads a new Region Rating Table, you’ll have to experiment with its settings to understand how to use it.Blocking based on Canadian English ratingsCanadian-English language and third-language programs that are broadcast in Canada are rated by the Action Group on Violence on Television, or AGVOT. TV broadcast signals carry rating data that enables parental controls to block shows that parents don’t want others to view based on content containing violence, language, sex, or nudity. The ratings are: C – Children under 8 years C8 – Children 8 years and olderCustomizing your TV](https://usermanual.wiki/Hisense-Electric/LCDF0121.TempConfidential-W9HLCDF0121-User-Manual-6/User-Guide-3423110-Page-52.png)
![50 G – Generally suitable for all age groups PG – Parental guidance suggested for viewers under 14 years 14+ – Generally not suitable for viewers under 14 years 18+ – Generally not suitable for viewers under 18 yearsBlocking content with a particular rating also blocks content with a higher rating, and unblocking content with a particular rating also unblocks movies with a lower rating.To block programs based on AGVOT ratings: 1. From the Home screen menu, navigate to Settings > Parental controls, and then enter your parental control PIN. 2. In the Parental controls screen, navigate to TV tuner > Canadian English ratings.3. Select the rating level you want to block. You need only select one rating level, and all higher levels are automatically blocked.Blocking based on Canadian French ratingsCanadian-French language programs that are broadcast in Canada are rated by the Régie du cinéma du Québec. TV broadcast signals carry rating data that enables parental controls to block shows that parents don’t want others to view based on content containing violence, language, sex, or nudity. The ratings are: G – Generally suitable for all age groups 8+ – Viewers 8 years and older 13+ – Viewers 13 years and older 16+ – Viewers 16 years and older 18+ – Adults onlyBlocking content with a particular rating also blocks content with a higher rating, and unblocking content with a particular rating also unblocks movies with a lower rating.To block programs based on Canadian-French ratings: 1. From the Home screen menu, navigate to Settings > Parental controls, and then enter your parental control PIN. 2. In the Parental controls screen, navigate to TV tuner > Canadian French ratings.3. Select the rating level you want to block. You need only select one rating level, and all higher levels are automatically blocked.Blocking unrated programsSome broadcast TV shows and movies are assigned a rating of “Unrated”. Whether or not such programs contain content that is objectionable to you cannot be determined. However, you can choose to block such programs.To block all unrated broadcasts:1. From the Home screen menu, navigate to Settings > Parental controls, and then enter your PIN.2. In the Parental controls screen, navigate to TV tuner > Block all unrated programs.3. Highlight Unrated programs and press [OK]. When blocking is enabled, the adjacent padlock icon changed from unlocked to locked.Tip: Blocking programs that have been assigned a rating of “Unrated” does not block programs that have no rating assigned to them (for example a broadcast of a local town council meeting). Programs that do not have an assigned rating display Rating NA (for “not applicable”, meaning a rating is not needed). Programs that have no assigned rating are considered “safe”; therefore, there is no need to block them.What happens when a TV show is blocked?After you’ve set up parental controls, TV shows and movies can be blocked:When you change channels and the new channel is playing a program whose rating exceeds your settings.When a new show comes on the channel you are watching and its rating exceeds your settings.Customizing your TV](https://usermanual.wiki/Hisense-Electric/LCDF0121.TempConfidential-W9HLCDF0121-User-Manual-6/User-Guide-3423110-Page-53.png)
![51When a program is blocked by parental control settings, the TV displays a blocked message:Whenever this blocked message appears, both the video and audio of the show are blocked, as well as program data that would normally appear in the area at the bottom of the screen.To watch the blocked program, you need to know the PIN code defined when you enabled parental controls, as explained in Creating a Parental Control PIN on page 47.1. Press [OK] to select Unblock and display a PIN pad.2. Use the arrow buttons to enter your PIN code, and then press [OK] to select Unblock everything.After unblocking shows that have been blocked, all blocking is disabled for two hours or until you turn off the TV.Changing the parental control PINTo change your parental control PIN:1. From the Home screen menu, navigate to Settings > Parental controls, and then enter your PIN.2. In the Parental controls screen, highlight Change PIN.3. Move the highlight into the adjacent keypad, and then use the arrow buttons and the [OK] button to enter a four digit code. Then repeat the process to enter the same PIN again, just to make sure you correctly entered the PIN you want to use.Resetting parental controlsSo now your kids have grown up and gone away to college, and you no longer want to deal with blocked programs.To erase all parental control settings:1. From the Home screen menu, navigate to Settings > Parental controls, and then enter your PIN.2. In the Parental controls screen, highlight Reset parental controls.3. Follow the instructions on the screen to confirm that you want to erase all parental control settings.Tip: Resetting parental controls also erases your parental control PIN.Customizing your TV](https://usermanual.wiki/Hisense-Electric/LCDF0121.TempConfidential-W9HLCDF0121-User-Manual-6/User-Guide-3423110-Page-54.png)
![52This section describes the features and settings of the TV that were not covered in the other parts of this guide.Changing network settingsIf needed, you can change your network settings at any time. For example, if you change the name of your wireless network (its SSID) or its password, you will need to change your TV’s settings so that it can continue to connect. Also, if you decided not to connect to the Internet in Guided Setup on page 12, you can use Network settings to connect at a later time.To change network settings, from the Home screen menu, navigate to Settings > Network, and then press [RIGHT]. At this point, you can choose the following options:Update connection – Press [OK] to start the update process. The TV uses your current network information to reconfirm the wireless network connection, the local network connection, and the Internet connection.Set up new wireless connection – Press [OK] to start a scan for wireless networks. Follow the on-screen instructions to complete the network connection. For help with setting up a new connection, see Setting up your TV on page 13.NOTE Some networks, such as those found in dorm rooms, hotels, and other public places, may require you to read and agree to terms, enter a code, or provide identifying information before letting you connect to the Internet. If the TV detects that you are connecting to such a network, it prompts you through the connection process using your smartphone or tablet to provide the needed information. For more information, see Using your TV in a hotel or dorm room on page 30.Changing time settingsYou can change time settings to suit your preferences. You can find the following settings by navigating from the Home screen menu to Settings > System > Time:Sleep timer – Set a time delay after which the TV will automatically shut off. This setting reflects the setting you can make in the Options menu from any TV input, as explained in Options menu settings on page 34.Note that the sleep timer setting is not input specific.Time zone – Select whether to set the time zone automatically or manually, and if set manually, select your current time zone. Typically, a TV connected to the Internet can discover its own time zone automatically, and a TV that is not connected to the Internet must be set manually. Initially, this setting is made when you set up the TV tuner, as explained in Setting up Antenna TV on page 22. Correct time zone information is needed to correctly display program data.Clock format – Select whether to display time in a 12-hour or 24-hour format, or to turn off time display. This setting is available only on TVs that are connected to the Internet. Non-connected TVs do not display the time.Scanning for broadcast TV channels againThere will be times when you need to create a new channel list. For example, you:Change cable providersReorient your TV antennaMove to a different city with different channelsWhenever you need to update your TV channel list, the TV can repeat the channel scan.Tip: Repeat the channel scan, from the Home screen menu, navigate to Settings > TV inputs > Antenna TV > Scan again for channels. Then select Start finding channels to begin the channel scan process. The screens and options that appear during this process are identical to those described in How do I set up the TV tuner? on page 22.More settings](https://usermanual.wiki/Hisense-Electric/LCDF0121.TempConfidential-W9HLCDF0121-User-Manual-6/User-Guide-3423110-Page-55.png)
![53Setting the HDMI modeYou can independently configure each HDMI® input to match the capabilities of the connected device. From the Home screen menu, navigate to Settings > TV inputs, and then select an enabled HDMI® input. Next, select HDMI mode and then select one of the following settings:Auto – Let the TV determine the best setting. Use this option unless your HDMI® device does not correctly communicate its HDMI® version compatibility.HDMI 1.4 – Configure the input for compatibility with HDMI® version 1.4, which supports a maximum refresh rate of 30 Hz at full UHD resolution. Most HDMI® devices will work correctly with the TV in this mode.HDMI 2.0 – Configure the input for compatibility with HDMI® version 2.0, which supports a maximum refresh rate of 60 Hz at full UHD resolution. Many older HDMI® devices will not work correctly if the TV’s HDMI® input is configured for this mode.Using the TV in a home theaterYour TV has several features that make it an ideal TV for a home theater. But you might not notice them because they remain in the background until you decide to use them.Turning off TV speakersWhen you use your TV with a sound bar or an external amplifier and speakers, you’ll probably want to turn off the internal TV speakers.TV speakers is enabled by default. To disable the TV’s built-in speakers, in the Home screen menu, navigate to Settings > Audio > TV speakers. Then highlight TV speakers and press [OK] to cancel the in the adjacent check box.Tip: The TV’s internal speakers can be turned off and on automatically as needed by system audio control, as described in Enabling system audio control on page 54. The internal speakers are also turned off when you use the headphone jack.Changing the audio modeThe TV has two audio modes, accessed by navigating in the Home screen menu to Settings >Audio > Audio mode:Stereo – Use this setting for internal speakers, headphones, and external stereo amplifiers connected through HDMI® ARC, SPDIF optical, or headphone port.Auto – Use this setting to automatically detect the best audio setting based on the audio stream in the content you are watching. If you have connected the TV to an external Dolby Audio™ compatible amplifier, receiver, or sound bar through HDMI® ARC or SPDIF optical, the TV automatically selects the appropriate surround sound capabilities of the device based on the characteristics of the current program.Setting up a digital audio connectionYou can connect the TV to an external amplifier, receiver, or sound bar by using either of these two connections:HDMI ARC – The HDMI® Audio Return Channel enables the TV to output digital audio on one of its HDMI® connectors. The connected amplifier can also function simultaneously as an input source to the TV, if needed. To use the ARC capability, you must connect an HDMI® cable from your amplifier’ HDMI® ARC connector to the HDMI ARC connector on the TV. You also must: Be sure your HDMI® cable is certified by HDMI® . Enable HDMI ARC under Settings > System > Control other devices (CEC), as explained in Enabling HDMI ARC on page 54.SPDIF optical – The TV has an SPDIF optical connector that outputs a digital audio signal. To use the optical output, connect a TOSLINK optical cable from the amplifier to the Optical or SPDIF connector on the TV.More settings](https://usermanual.wiki/Hisense-Electric/LCDF0121.TempConfidential-W9HLCDF0121-User-Manual-6/User-Guide-3423110-Page-56.png)
![54NOTE Dolby Audio™ supporting Dolby Digital Plus™ format is not available through the SPDIF optical output. This format is only available through the HDMI® ARC connection.After making the required HDMI® ARC or SPDIF optical connection, go to Settings > Audio > S/PDIF and ARC option and select the audio format to use. NOTE In most cases, Auto detect is the best option. Other settings can result in no sound when the content you are viewing does not contain the audio stream type you selected.Controlling other devices through CECConsumer Electronics Control (CEC) enables your TV and other CEC-compatible home entertainment components to control one another in various ways. First, the CEC-compatible devices must “discover” one another and report their capabilities. After this, one device can control another according to the features you enable. For example, playing a disc on a Blu-ray player could switch the TV to the Blu-ray player’s input. Or, powering off the TV could also power off the Blu-ray player and the home theater receiver.Discovering connected CEC devicesTo discover CEC devices:1. Make sure that your CEC-compatible components are connected to the TV with a suitable high-speed HDMI® cable that supports HDMI® ARC and CEC control.2. Turn on each component and make sure all components have CEC enabled.Tip: Some manufacturers have their own branded names for CEC functionality, so you might need to read the product documentation to correctly identify the CEC features of the device.3. On the TV’s Home screen menu, navigate to Settings > System > Control other devices (CEC) and then select Searchfor CEC devices. Press [ OK ] to repeat the discovery process, if necessary.When finished, the TV displays a list of CEC devices that are connected to each HDMI® input, as well as any devices that had previously been connected. The TV remembers the names of multiple CEC devices even when they are no longer connected. If the list is longer than the allowed space, press [ ] to see a complete list in a scrollable window.Enabling HDMI ARCHDMI® ARC is the audio return channel that is available on one of the TV’s HDMI® ports. The audio return channel enables you to send a Dolby Audio™ signal back to a home theater receiver that is also sending an audio and video signal into the TV. Using HDMI® ARC reduces the number of cables needed and optionally lets you control the volume and mute state of the receiver by enabling system audio control.HDMI® ARC is disabled by default. To enable HDMI® ARC, in the Home screen menu, navigate to Settings > System > Control other devices (CEC), and then highlight HDMI ARC. Press [ OK ] to enable or disable the feature.NOTE Enabling HDMI ARC also enables System audio control. After enabling HDMI ARC, you can disable System audio control if you prefer.Enabling system audio controlSystem audio control enables the TV remote control to change the volume and mute state of an amplifier or sound bar connected through HDMI®, and to display the external device’s volume and mute status in the TV’s on-screen display. The TV automatically turns off its internal speakers and sends volume and mute control signals to an external amplifier when all of the following are true:System audio control is enabled on the TV.The TV is connected to a CEC-compatible amplifier, it is powered on, and CEC discoverability is enabled.The CEC-compatible amplifier’s HDMI® ARC connector is connected to the TV’s HDMI ARC connector with a suitable HDMI® cable.When the CEC-compatible amplifier is off, the TV automatically turns on its speakers (unless you have turned them off as More settings](https://usermanual.wiki/Hisense-Electric/LCDF0121.TempConfidential-W9HLCDF0121-User-Manual-6/User-Guide-3423110-Page-57.png)
![55More settingsdescribed in Turning off TV speakers on page 53) and resumes local control of volume and mute state.To enable or disable system audio control, in the Home screen menu, navigate to Settings > System > Control other devices (CEC) and highlight System audio control. Press [OK] to enable or disable the feature.Enabling 1-touch play1-touch play enables a component to control which TV input is active. For example, pressing Play on your Blu-ray player switches the TV to the Blu-ray input.1-touch play is disabled by default. To enable 1-touch play, in the Home screen menu, navigate to Settings > System > Control other devices (CEC) and highlight 1-touch play. Press [OK] to check the adjacent check box.Enabling system standbyThe system standby feature causes other components to power off when you power off your TV. Depending on the CEC System Standby implementation, it also might enable connected components to power off your TV when you power off the component.System standby is disabled by default. To enable system standby, in the Home screen menu, navigate to Settings > System>Control other devices (CEC) and highlight System standby. Press [OK] to enable or disable the feature.Restarting the TVYou can restart the TV when necessary. Restarting has the same effect as unplugging the TV power and then plugging it in again.To restart the TV, navigate to Settings > System > Power, and then select System restart. Highlight Restart, and then press [OK] to confirm restart.While the TV restarts, the screen goes dark for a few seconds, and then displays the startup screen for a few more seconds. When the restart operation completes, the TV displays the activity you selected in Power on settings on page 45.Resetting the TVYou can choose to reset only the TV picture and audio settings to their original values, or perform a full factory reset to return the TV to the state it was in when you first unpacked and turned it on.Reset audio/video settingsTo reset only the TV picture and audio settings to their original values, navigate to Settings > System > Advanced system settings > Factory reset, and then highlight Reset TV audio/video settings. Read the information on the screen to make sure you understand what the reset operation does.To proceed with the reset operation, press [PLAY/PAUSE] three times in a row.Factory reset everythingA full factory reset returns the TV’s settings to their original state and removes all personally identifiable information from the TV. When finished, you must repeat Guided Setup, reconnecting to the Internet, re-linking your Roku account, and reloading any streaming channels. You also must repeat Antenna TV setup and input configuration. Factory reset is the recommended choice if you want to transfer the TV to another owner, and it is the only choice if you want to switch from store mode to home mode (if you inadvertently selected store mode during Guided Setup).To perform a factory reset, navigate to Settings > System > Advanced system settings > Factory reset, and then highlight Factory reset everything. Read the information on the screen to make sure you understand what this reset operation does.To proceed with the full factory reset, use the arrow buttons to enter the code displayed on the screen, and then select [OK] to proceed.When the factory reset operation completes, the TV restarts and displays the first Guided Setup screen.](https://usermanual.wiki/Hisense-Electric/LCDF0121.TempConfidential-W9HLCDF0121-User-Manual-6/User-Guide-3423110-Page-58.png)
![56What if I can’t access the Factory Reset option?It is possible that your TV might get into a state where you cannot access the various menus, including the menu option that lets you perform a factory reset operation. If that happens, you can force the TV to reset by following these steps:1. On the TV panel (not the remote control) press and hold down the MUTE and POWER buttons.2. Unplug the TV power, and then plug it in while continuing to hold down the MUTE and POWER buttons.3. When you see the startup screen appear on the TV, release the buttons.4. Turn on the TV and proceed through Guided Setup. See Setting up your TV on page 13.Network connection resetIf you want to remove your network connection information without disturbing other settings, navigate from the Home screen to Settings > System > Advanced systems settings, and then select Network connection reset.When you select this option, the TV removes your wireless network information, including the name of the connection (its SSID) and your wireless password, if any, and then it restarts. After restarting, your TV retains all of its other settings and its association with your Roku account. After resetting your network connection, navigate from the Home screen to Settings > Network > Set up new connection to continue enjoying all of the benefits of your connected TV.Changing your Roku Channel Store PIN preferenceWhen you created your Roku account, you were given the opportunity to create a PIN code and to specify when it must be used. If you created a Channel Store PIN and want to change it, or you don’t remember your PIN, or if you didn’t create a Channel Store +PIN and want to add one, you can easily make these changes.1. On a computer, tablet, or smartphone, use your web browser to go to https://my.roku.com.2. Enter your email address and password to sign in. After signing in, the My Account page appears.3. Under PIN Preference, click Update to open the Choose Your PIN Preferences page.4. Skip this step if you just want to change your PIN. Otherwise, choose the option your prefer from among those listed: Require a PIN to make purchases or to add any item from the Channel Store. Require a PIN to make purchases. Do not require a PIN to make purchases.5. If you choose either of the first two options, enter your PIN twice in the appropriate boxes. 6. Click Save Changes to save your changes and return to the My Account page. Note that your current setting is described under PIN Preference.Getting system updatesIf your TV is connected to the Internet and linked with a Roku account, it will automatically get updates from time to time. You don’t need to do anything. But if you are aware that an update is available and you don’t want to wait until the TV updates itself, you can manually check for updates.If your TV is not connected to the Internet, you can still get updates by using a USB flash drive.You can download an updated User Guide that matches your Roku TV software version from the web site at: www.hisense-usa.com/support/To determine your current Roku TV software version, go to Settings > System > About, and then press [ OK ] or navigate to the right.More settings](https://usermanual.wiki/Hisense-Electric/LCDF0121.TempConfidential-W9HLCDF0121-User-Manual-6/User-Guide-3423110-Page-59.png)
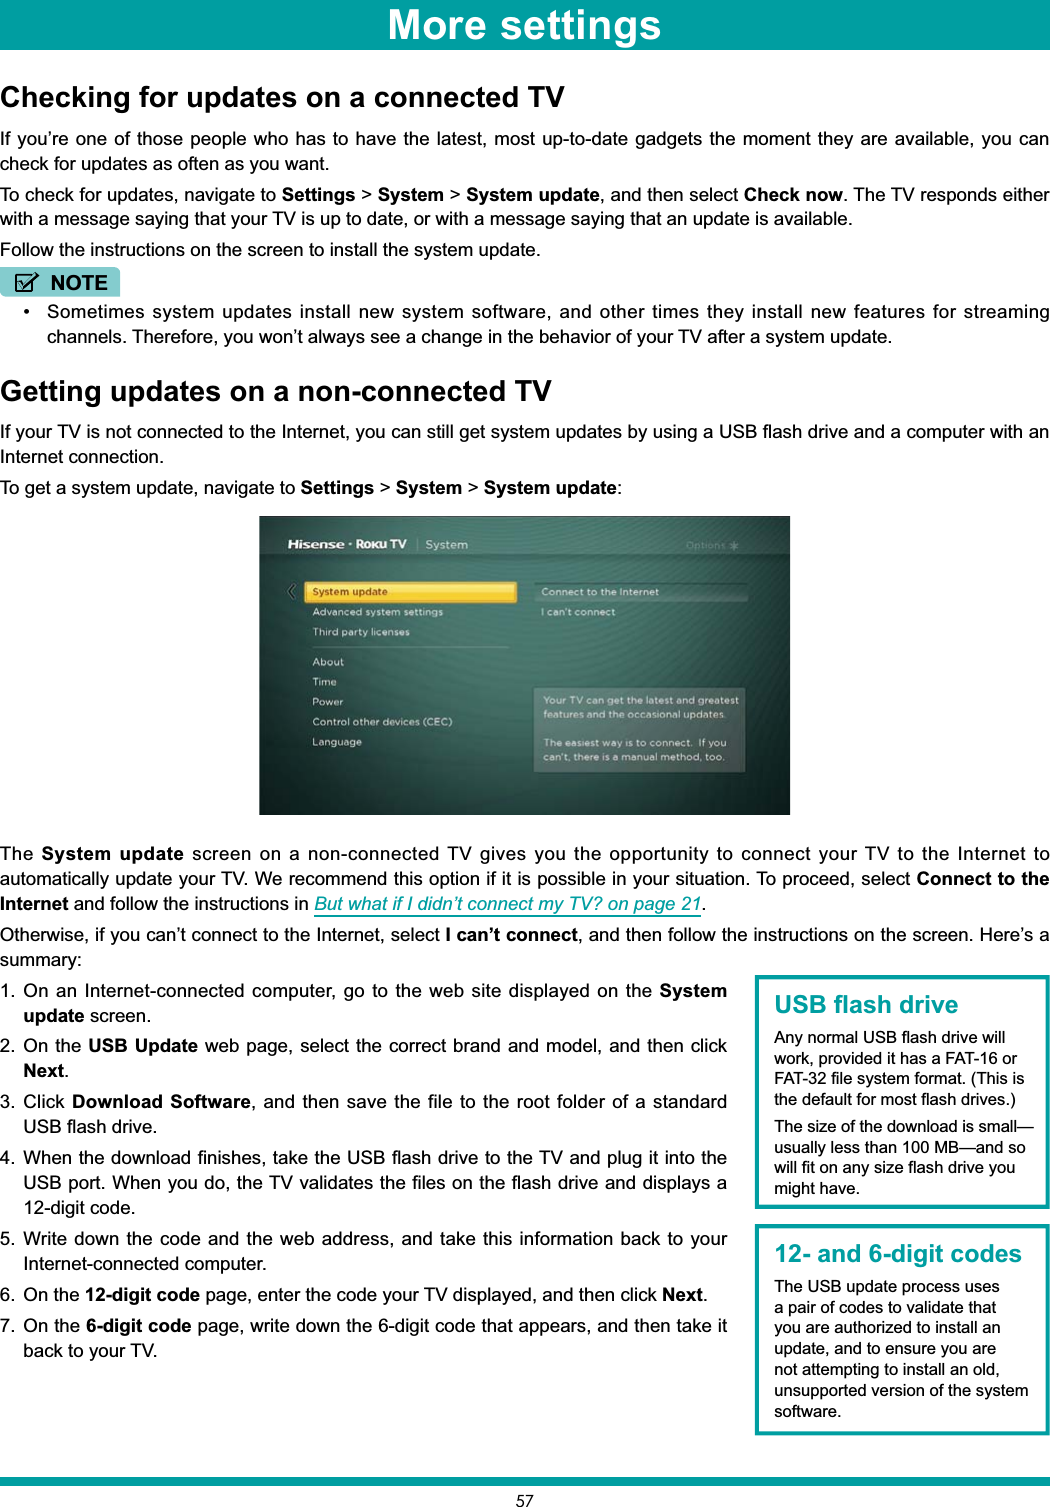
![588. Using the TV remote control, select Next to move to the next screen, and then use the on-screen keyboard to enter the 6-digit code. When finished, select [ OK ]. The system update begins. Do not remove the USB flash drive until the TV restarts.When the update finishes, the TV restarts. You can check the new version number by navigating to Settings > System > About.More settings](https://usermanual.wiki/Hisense-Electric/LCDF0121.TempConfidential-W9HLCDF0121-User-Manual-6/User-Guide-3423110-Page-61.png)