Hisense Electric LCDF0133 Part15 Subpart B-LED LCD TV User Manual TempConfidential W9HLCDF0133 6
Hisense Electric Co., Ltd. Part15 Subpart B-LED LCD TV TempConfidential W9HLCDF0133 6
Contents
- 1. TempConfidential_W9HLCDF0133_User Manual 1
- 2. TempConfidential_W9HLCDF0133_User Manual 2
- 3. TempConfidential_W9HLCDF0133_User Manual 3
- 4. TempConfidential_W9HLCDF0133_User Manual 4
- 5. TempConfidential_W9HLCDF0133_User Manual 5
- 6. TempConfidential_W9HLCDF0133_User Manual 6
- 7. TempConfidential_W9HLCDF0133_User Manual 7
- 8. TempConfidential_W9HLCDF0133_User Manual 8
TempConfidential_W9HLCDF0133_User Manual 6

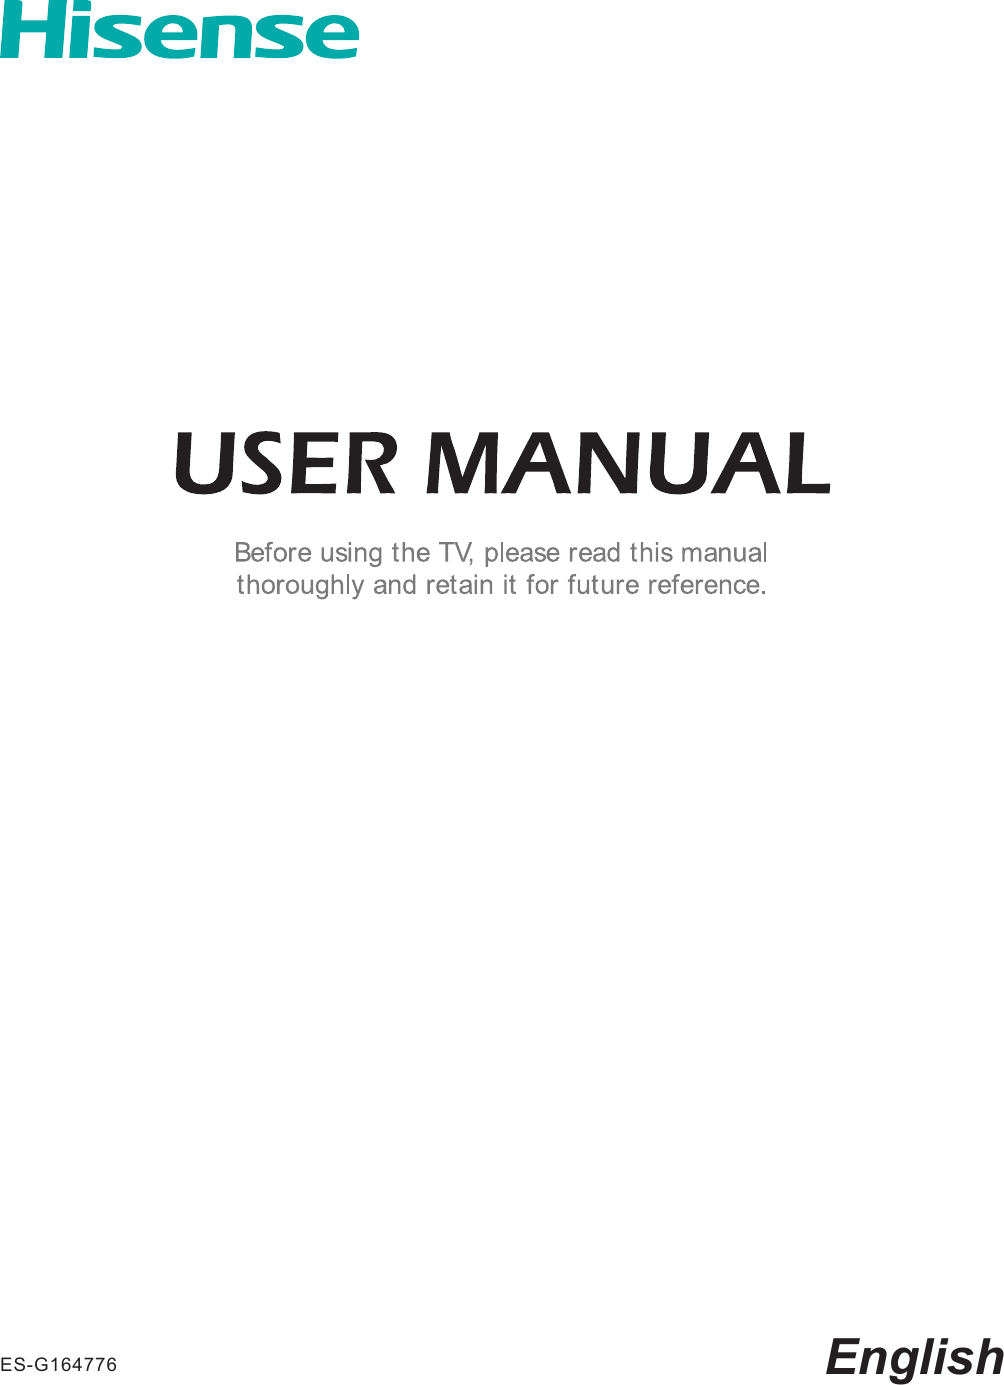

![3Connecting Devices to your TVConnecting an antenna, cable set-top box or satellite receiverTo connect an antenna,cable set-top box or satellite receiver:Connecting an AV device with a composite video cable (yellow/red/white)You have several options for connecting your TV to different devices. The method in which you connect will be based upon the type of cables you have and the available outputs on your device.Connecting Devices to your TV1. Connect one end of a coaxial cable (not included) to the [RF OUT] jack on the antenna, cable or satellite box. If you are using an antenna with twin-lead cable, you may need a 300-75 Ohm adapter (not provided) to connect it to the back of your TV. Likewise, if you are using several antennas, you may need a combiner (not provided).2. Connect the other end of the cable to the [ANT/CABLE] jack on the side of TV.3. Using your remote, press the [INPUT] button and select TV as the input source.To connect an AV device with a composite video cable (not provided):1. Use the audio and video cables to connect the composite video/audio jacks (of the external AV device) to the [AV IN] jacks of the TV. (Video = yellow, Audio Left = white, and Audio Right = red).2. Plug the connected devices into the AV connectors on the TV before switching it on.3. Using your remote, press the [INPUT] button and select AV as the input source.Figure 1. Antenna, cable set-top box or satellite receiver to the TVFigure 2. AV device with a composite video cableor ANT OUTCable Set top boxRF OutEXTERNAL DEVICETV JACKTV JACKANT/CABLE(not included)(not included)(not included)DVD Player/RecorderVideo CameraEXTERNAL DEVICESSet-top boxSatellite ReceiverSatellite antenna cableVCRAV OUTVideoLRWhite(L)White(L)Yellow(Video)Yellow or Green(Video)Red(R)Red(R)Audio Cable VIDEO L RAV IN](https://usermanual.wiki/Hisense-Electric/LCDF0133.TempConfidential-W9HLCDF0133-User-Manual-6/User-Guide-3458645-Page-7.png)
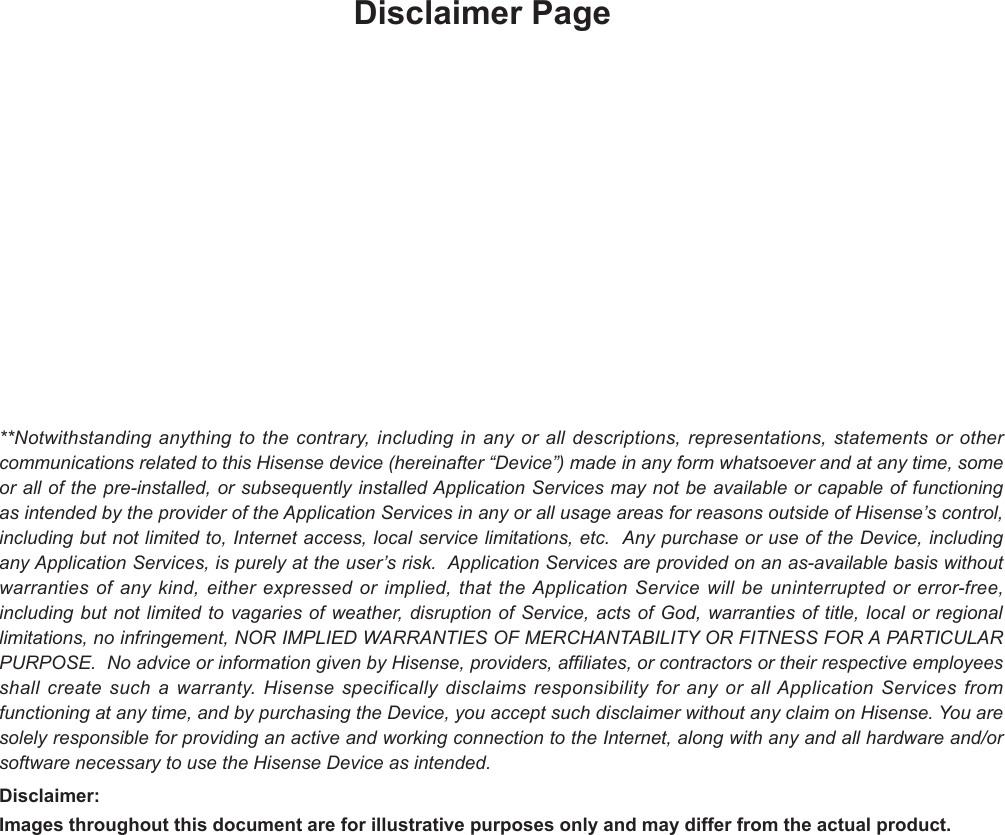
![4Connecting Devices to your TVY PBPRCOMPONENT INL RDVD Player/RecorderVideo CameraEXTERNAL DEVICESSet-top boxSatellite ReceiverSatellite antenna cableVCRWhite(L) White(L)Red(R) Red(R)Audio Cable Component Cable ComponentRLPRPBYRed(PR/CR) Red(PR/CR)Blue(PB/CB) Blue(PB/CB)Green(Y) Green(Y)HDMIHDMIEXTERNAL DEVICESDVDSet-top BoxHDMI Cable NOTES•Because the HDMI connector provides video and audio signals, it is not necessary to connect an audio cable.•The HDMI cable will not supplied with the product.•We strongly recommend to use HDMI Cable with 2 cores as shown in the figure.NOTEOne AV device can be connected to the TV using a component video or composite video cable.TV JACKTV JACKConnecting an AV device with a component video cable (red/blue/green) To connect an AV device with a component cable (which is red/blue/green):1. Use a component video cable (not provided) to connect the component output jacks of the external device to the YPBPR jacks for the TV. Use an audio cable to connect the component audio jacks of the external device to the TV AUDIO (L/R) jacks.2. Plug the connected devices into the YPBPR and L/R ports on the TV before switching it on.3. Using your remote, press the [INPUT] button and select COMPONENT as the input source.Figure 3. AV device with a component video cableConnecting an AV device with an HDMI cableThis type of connection supports digital connections between HDMI-enabled AV devices such as a Personal Video Recorder (PVR), DVD, Blu-Ray, AV receiver and digital devices. In addition, some devices (such as a PVR or DVD player) require an HDMI signal to be set to Output in the settings of the device.Please refer to the User Manual that came with your device for step-by-step instructions.To connect an AV device with an HDMI cable:1. Use an HDMI cable to connect the [HDMI] output port of the AV device to the [HDMI] jack of the TV.2. Plug the connected devices into the power socket.3. Using your remote, press the [INPUT] button and select the corresponding HDMI input.Figure 4. AV device with an HDMI cable(not included)(not included)](https://usermanual.wiki/Hisense-Electric/LCDF0133.TempConfidential-W9HLCDF0133-User-Manual-6/User-Guide-3458645-Page-8.png)
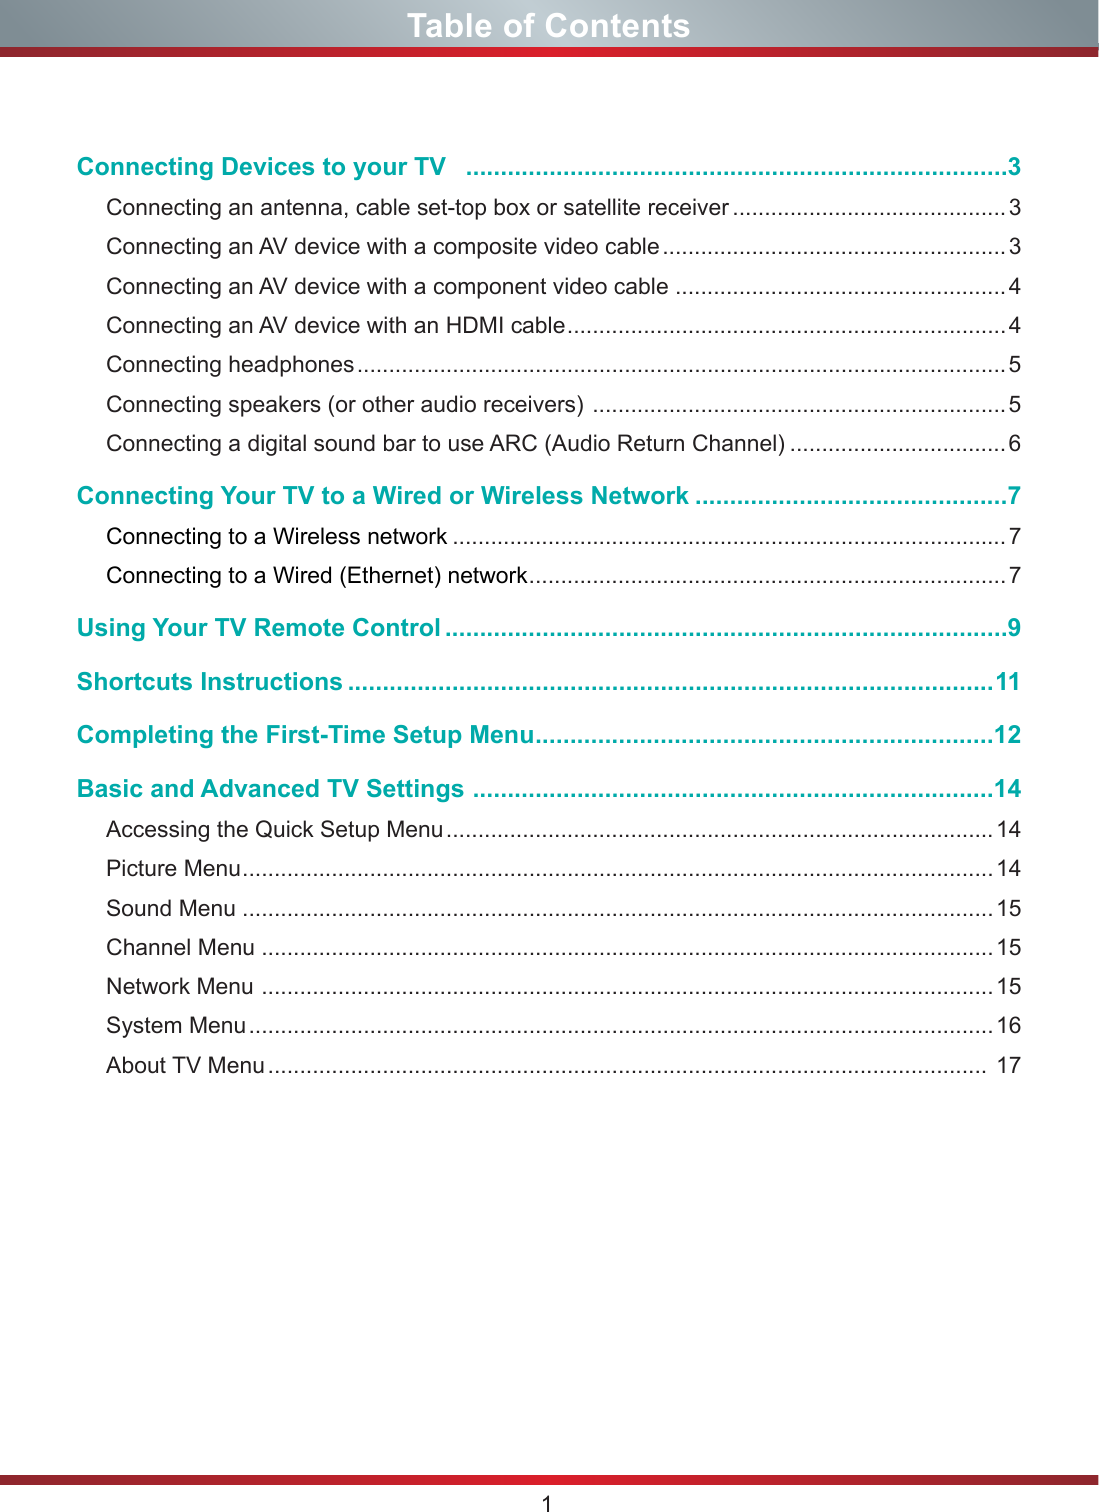
![5Connecting Devices to your TV /AUDIO OUTEXTERNAL DEVICESEXTERNAL DEVICESPowerless Bass SpeakerSpeakerAudio AmplierDigital Sound BarDIGITALAUDIO OUT /AUDIO OUTConnecting speakers (or other audio receivers)To connect speakers (or other audio receivers) with an audio cable:Connecting headphones 1. Use an audio cable (not provided) to connect the [DIGITAL AUDIO IN] jack of the audio receiver device to the [DIGITAL AUDIO OUT] jack of the TV. Another option is to use an RCA Y-cable (1/8”-stereo mini to L/R phono) to connect an analog sound system to the [AUDIO OUT] jack of the TV.2. Plug the connected devices into the main power socket before switching on the TV.You can connect headphones to the [AUDIO OUT] port on your TV. While the headphone is connected, the sound from the built-in speakers will be disabled.Figure 5. Headphones to the TVFigure 6. Audio receiver with audio cableTV JACKAudio Cable (not included)TV JACKSWhite(L)Red(R)Audio Cable (not included)Audio Cable (not included)If you prefer to use Audio Return Channel, then follow the steps on the next page under 'Connecting a digital sound bar to use Audio Return Channel'.NOTE• When a digital audio system is connected to the [DIGITAL AUDIO OUT] jack, decrease the TV and system volume. • 5.1 CH (channel) audio is available when the TV is connected to an external device that supports a 5.1 channel surround sound • You can receive 5.1 channel audio in one of two ways. The first way is to connect the [DIGITAL AUDIO OUT] jack from the device to the Amplifier. The second way is to connect the [DIGITAL AUDIO OUT] jack on the back of the TV to the [Optical] port on the Amplifier. After you’ve completed one of the two methods then be sure to go into the Advanced Audio Settings of the TV and select RAW to receive the 5.1 channel audio. You will need to also go into the sound or audio settings of your device to ensure it is set to 5.1 Channel output. It may read ‘Bitstream’, ‘RAW’ or ‘Digital’.NOTES](https://usermanual.wiki/Hisense-Electric/LCDF0133.TempConfidential-W9HLCDF0133-User-Manual-6/User-Guide-3458645-Page-9.png)
![6Connecting Devices to your TVConnecting a digital sound bar to use ARC (Audio Return Channel)If you'd like to use the Audio Return Channel (ARC) feature to have sound sent from the TV back down an HDMI cable to a digital sound bar, then you will need to connect the cable to the [HDMI (ARC)] port. By using this feature, you will also be able to control the sound bar with your TV remote instead of having to use multiple remotes for each device. Only digital sound bars that require a wired connection are compatible with the H6 Series Smart TV.To connect a digital sound bar with an HDMI cable:1. Connect the cable that’s attached to the soundbar to the HDMI (ARC) port on the TV.2. Turn on the sound bar by pressing the Power button.3. Press the [Quick Setup menu] button on your remote and go to System > CEC Function4. Turn on the CEC Control setting.5. Select Sound > Advance Audio Settings > TV Speaker & ARC and select ARC First.6. If the device has an ‘Input Selector’ feature then make sure to change it to ‘TV’.EXTERNAL DEVICESDigital Sound BarHDMIFigure 7. Digital Sound Bar to the HDMI (ARC) port TV JACKHDMI Cable (not included)NOTE](https://usermanual.wiki/Hisense-Electric/LCDF0133.TempConfidential-W9HLCDF0133-User-Manual-6/User-Guide-3458645-Page-10.png)
![8Connecting your TV to a Wired or Wireless Network• You can attach your TV to your LAN by connecting the [LAN] port on the back of your TV to an IP Sharer which is connected to an external modem. Use an Ethernet cable for the connection. See figure 16.• Depending on how your network is configured, you may be able to attach your TV to your LAN by connecting the [LAN] port on the back of your TV directly to a network wall outlet with an Ethernet cable. See the diagram below. If you have a Dynamic Network, you should use an ADSL modem or router that supports Dynamic Host Configuration Protocol (DHCP). Modems and routers that support DHCP automatically provide the IP address, subnet mask, gateway, and DNS, so you don’t have to enter them manually. Most home networks are Dynamic Networks.Some networks require a Static IP address. If your network requires a Static IP address, you must enter the IP address, subnet mask, gateway, and DNS values manually on your TV’s Cable Setup Screen when you set up the network connection. To get the IP address, subnet mask, gateway and DNS values, contact your Internet Service Provider (ISP).Figure 10. Connect a LAN port on the TV to an IP sharerFigure 11. Connect a LAN port on the TV to a network wall outletYou can use ADSL modems that support DHCP if your network requires a static IP address. ADSL modems that support DHCP also let you use static IP addresses.Option 2Option 3The LAN Port on the Wall LAN Port on TVEthernet CableLANThe Modem Port on the WallModem Cable Ethernet Cable Ethernet CableLAN Port on TVExternal Modem(ADSL / VDSL / Cable TV) IP Sharer (Router)(with DHCP server) LANNOTE](https://usermanual.wiki/Hisense-Electric/LCDF0133.TempConfidential-W9HLCDF0133-User-Manual-6/User-Guide-3458645-Page-12.png)
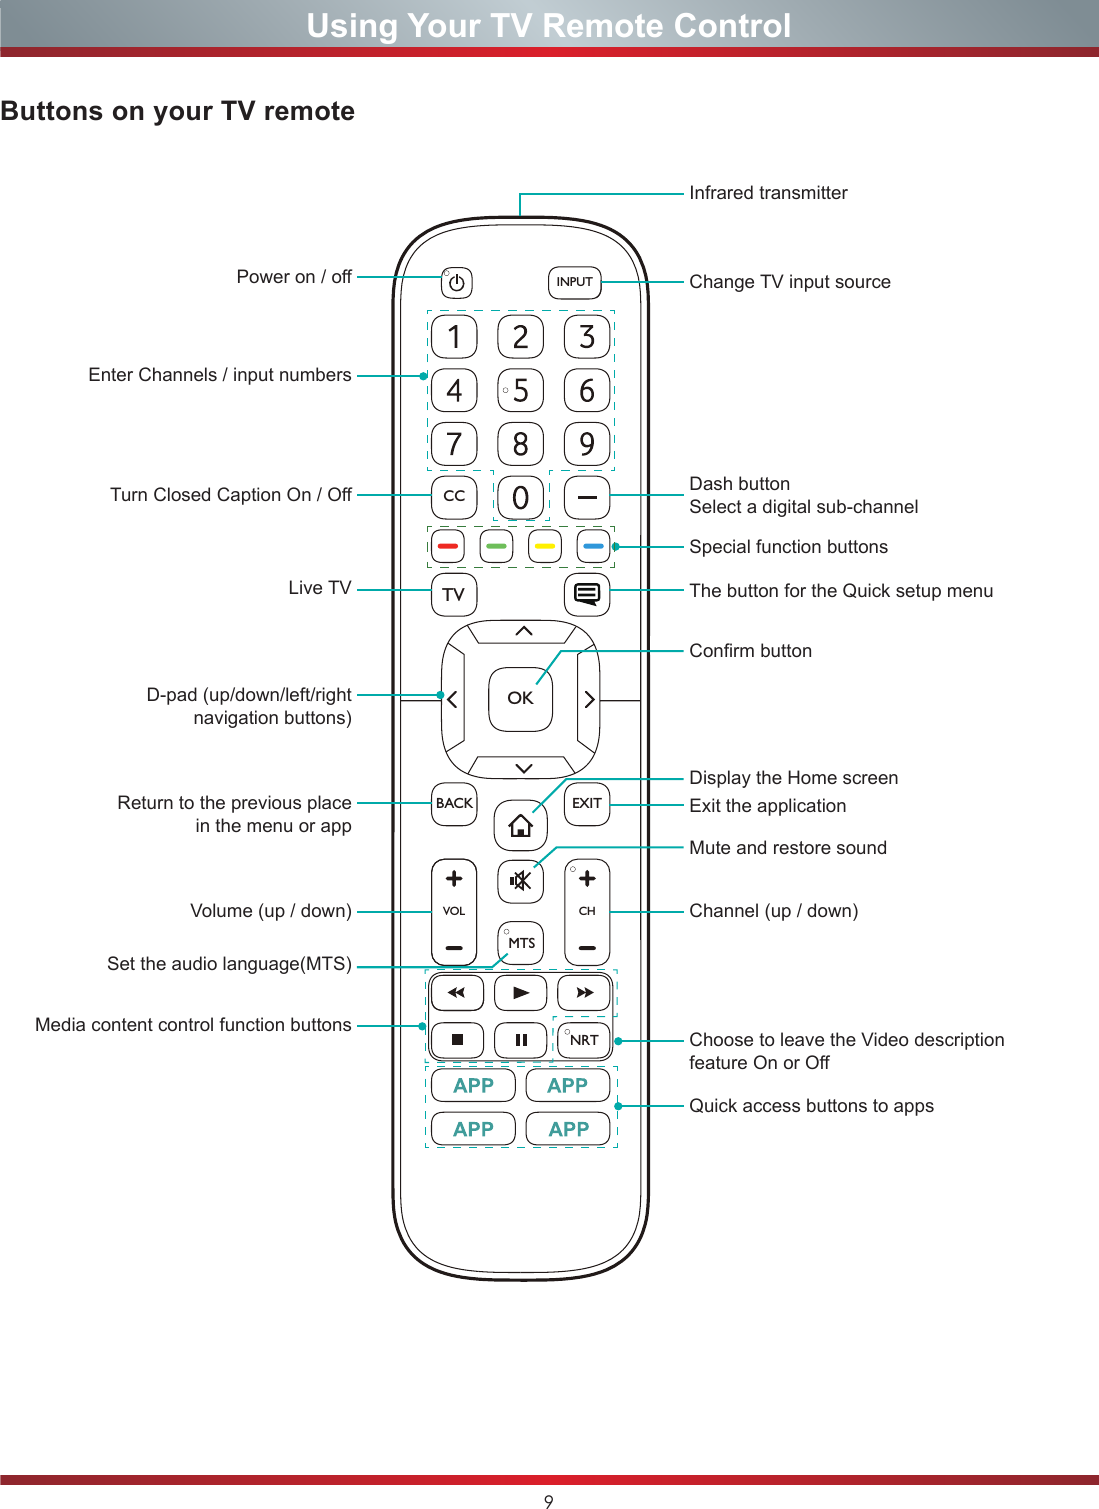
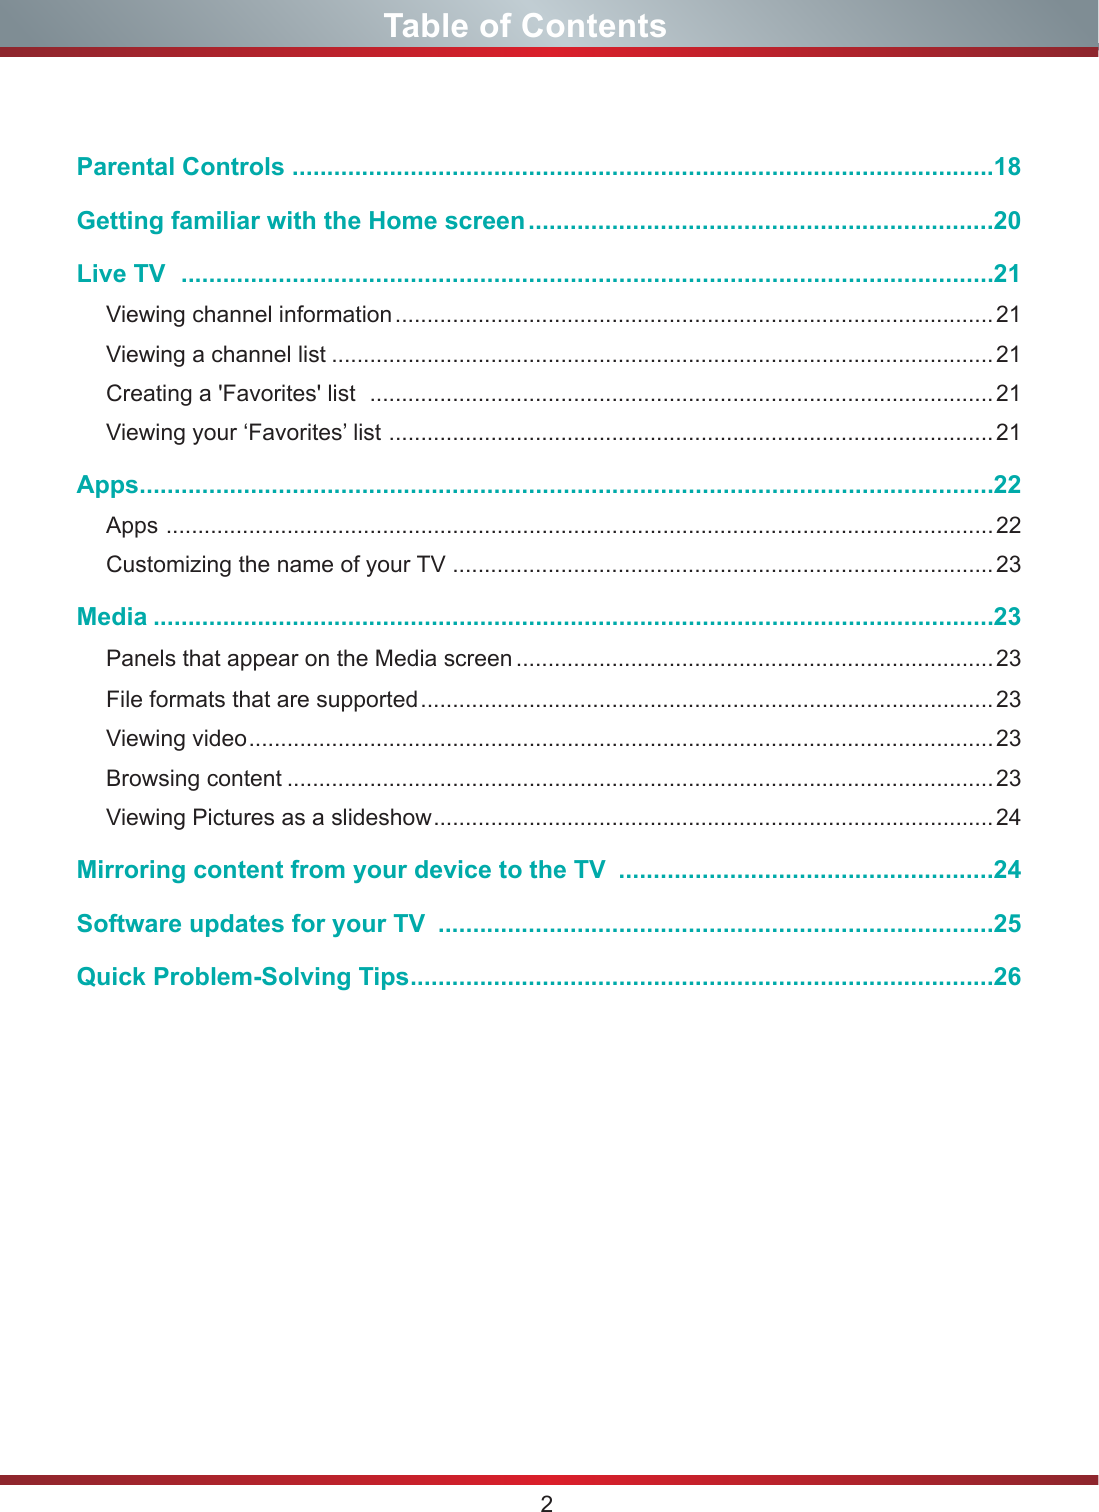
![11Shortcuts InstructionsShortcuts InstructionsYou can use shortcuts on the remote control for fast operation. For more information about your TV remote, refer to the Quick Start Guide in accessories.Turning your TV on or offTo turn your TV on:1. Connect the power cord to the back of the TV, then plug the power cord into an AC outlet.2. When the TV is powered on, press the [ ] button on the remote to turn TV.To turn your TV off, press the [ ] button on the remote.NOTES• When your TV is in standby mode, it is still consuming power. To completely disconnect power, please remove the plug from the AC outlet.• If your TV does not receive an input signal for several minutes, it automatically goes into standby modeSelecting the Input SourceSelect the Input Source depending on the video device you have connected to your TV.To select the input source:1. Turn on your TV, then press the [INPUT] button on the remote, the list of Source appears.2. Press the [< / >] buttons to select the input source.3. Press the [OK] button to confirm your selection.Using the Live TVTo view broadcast programs, press the [TV] button on your remote.Channel search guideWhen you select TV as input, if no TV channels were saved before, you will be prompted to do a channel search. Before channel tuning could start, you must specify the tune mode, Antenna or Cable. You can also go to Settings > Channel to change the channel settings.Launch Live TVAfter channel tuning is done for the first time, the screen will display Live TV operating tips, including: how to show the channel list, how to view channel info and so on. [OK] Show channel list [ v ] View channel info [Back] View recent channelsView channel infoPRE-CHShow channel list](https://usermanual.wiki/Hisense-Electric/LCDF0133.TempConfidential-W9HLCDF0133-User-Manual-6/User-Guide-3458645-Page-15.png)