Hisense Electric LCDX0001 LCD TV User Manual Cor1
Hisense Electric Co., Ltd. LCD TV Cor1
Contents
- 1. USERS MANUAL
- 2. Users Manual
- 3. USER MANUAL
USERS MANUAL

:817+8
:817+8
3/4:/2
3/4:/2
0?@GH? KICFA JB? 9;,6D?<I? H?<> JBCI E<FK<D
JBGHGKABDL,<F> H?J<CF CJ @GH @KJKH? H?@?H?F=?-
6<HJ 45-.
19" LCD TV/DVD Combo
LCD19W57DCA
ENG
IES090430

1
Important to user
FCC Statement
NOTE:
The manufacturer is not responsible for any radio or TV interference
caused by unauthorized modifications to this equipment. Such
modifications could void the user's authority.
NOTE:
This equipment has been tested and found to comply with the limits for a class B digital
Device, pursuant to part 15 of the FCC Rules. These limits are designed to provide
reasonable protection against harmful interference in a residential installation. This
equipment generates, uses and can radiate radio frequency energy and, if not installed
and used in accordance with the instructions, may cause harmful interference to radio
Communications. However, there is no guarantee that interference will not occur in a
particular installation. If this equipment does cause harmful interference to radio or
television reception, which can be determined by turning the equipment off and on, the
user is encouraged to try to correct the interference by one or more of the following
measures:
1.Reorient or relocate the receiving antenna.
2.Increase the separation between the equipment and the receiver.
3.Connect the equipment into an outlet on a circuit different from that to which the
receiver is connected.
4.Consult the dealer or an experienced radio/TV technician for help.
2
Important safety precautions
Safeguards
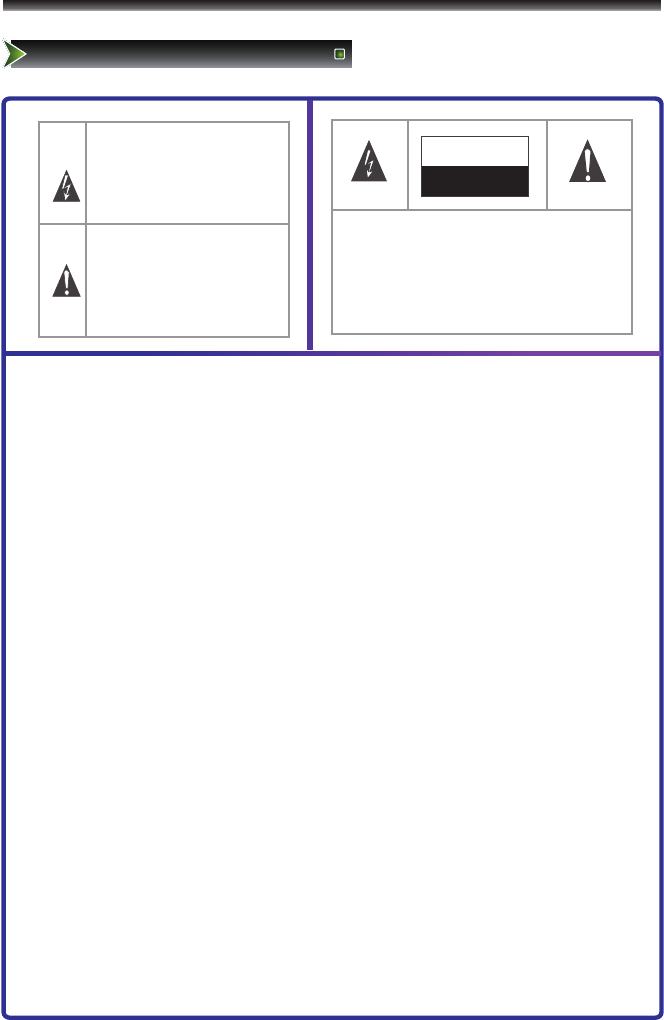
The flash with the symbol of arrowhead,
inside an equilateral triangle alerts the
user about the presence of a dangerous
tension not isolated inside the product
which can be sufficiently powerful to
constitute a risk of electrocution.
ATTENTION
RISK OF SHOCK
ELECTRIC
The point of exclamation inside an
equilateral triangle alerts the user about
the presence of important operating
instructions and maintenance in the
document enclosed in the package.
Do not open the back cover
In no case the user is allowed to operate
inside the TV set.
Only a qualified technician from the
manufacture is entitled to operate.
CAUTION: CHANGES OR MODIFICATIONS NOT EXPRESSLY APPROVED BY THE
PARTY RESPONSIBLE FOR COMPLIANCE WITH THE FCC RULES
COULD VOID THE USERS AUTHORITY TO OPERATE THIS EQUIPMENT.
WARNING: TO PREVENT FIRE OR SHOCK HAZARD, DO NOT EXPOSE THIS
APPLIANCE TO RAIN OR MOISTURE.
Important safety instructions
1. Read these instructions
2. Keep these instructions
3. Heed all warnings
4. Follow all instructions
5. Do not use this apparatus near water
6. Clean only with dry cloth
7. Do not block any ventilation openings
8. Do not install near any heat sources
9. Do not defeat the safety purpose of the polarized or grounding-type plug
10. Protect the power cord from being damaged particularly at plugs, convenience
receptacles, and at points in which they exit from the apparatus.
11. Only use attachments/accessories specified by the manufacturer.
12. Use only with cart, stand, tripod, bracket, or table specified by the manufacturer or
sold with the apparatus. When a cart is used, use caution when moving the
cart/apparatus combination to avoid injury from tip-over.
13. Unplug this apparatus during lightning storms or when unused for long periods of
time.
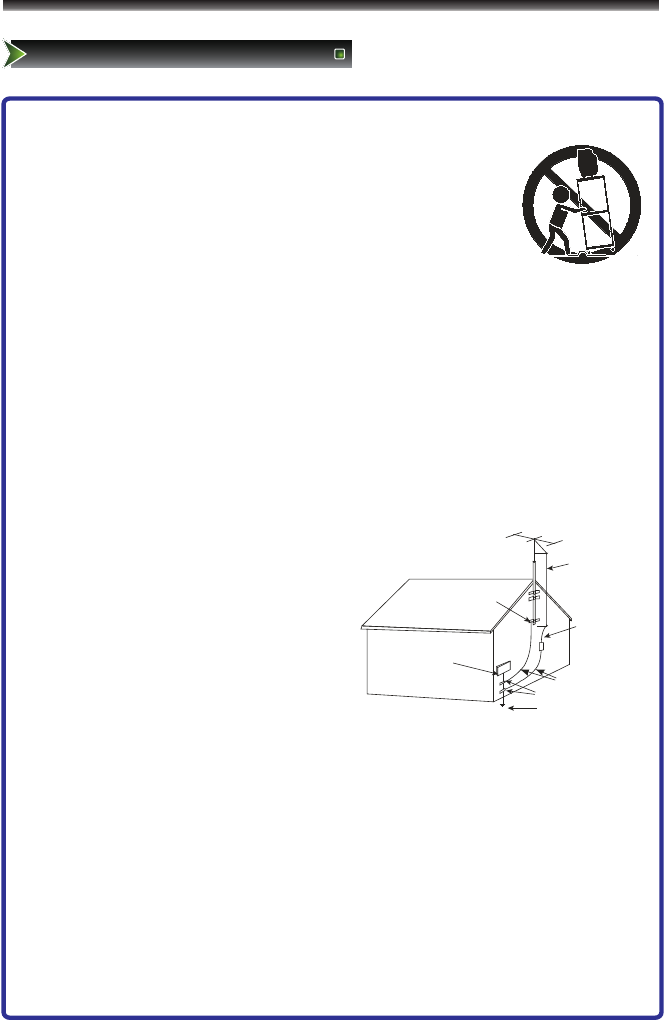
ANTENNA LEAD
IN WIRE
ANTENNA
DISCHARGE UNIT
GROUND CLAMPS
POWER SERVICE GROUNDING
ELECTRODE SYSTEM
ELECTRIC
SERVICE
EQUIPMENT
G R OU N D
C LA MP
EXAMPLE OF ANTENNA GROUNDING AS PER
NATIONAL ELECTRICAL CODE
FIGURE A
S2898A
GROUNDING WIRES
S3126A
3
Important safety precautions
Safeguards
14. Refer all servicing to qualified service personnel. Servicing is required when the
apparatus has been damaged in any way, such as when the
power-supply cord or plug is damaged, when liquid has been
spilled or when objects have fallen into the apparatus, or when
the apparatus has been exposed to rain or moisture, does not
operate normally, or has been dropped.
15. POWER SOURCE: This TV should be operated only from the type of
power source indicated on the marking label. If you are not sure of the type of power
supply to your home, consult your appliance dealer or local power company . For TVs
intended to operate from battery power, or other sources, refer to the operating
instructions.
16. POWER CORD PROTECTION: Power-supply cords should be routed so that they are
not likely to be walked on or pinched by items placed upon or against them, paying
particular attention to cords at plugs, convenience receptacles, and the point where
they exit from the appliance.
17. OUTDOOR ANTENNA GROUNDING : If an outside antenna or cable system is
connected to the TV, be sure the antenna or cable system is
grounded to provide some protection against
voltage surges and built-up static charges.
Section 810 of the National Electrical Code,
ANSI/NFPA NO.70, provides information
with respect to proper grounding of the
mast and supporting structure, grounding
of the lead-in wire to an antenna discharge
unit , size of grounding conductors, location
of antenna discharge unit, connection to
grounding electrodes, and requirements for
the grounding electrode. (Fig.A)
18. LIGHTNING: For added protection for this TV receiver during a lightning storm, or
when it is left unattended and unused for long periods of time, unplug it from the wall
outlet and disconnect the antenna or cable system. This will prevent damage to the
TV due to lightning and power line surges.
19. POWER LINES: An outside antenna system should not be located in the vicinity of
overhead power lines, or other electric light or power circuits, or where it can fall into
such power lines or circuits. When installing an outside antenna system, extreme care
should be taken to keep from touching such power lines or circuits as contact with
them might be fatal.

4
Important safety precautions
Safeguards
20. OVERLOADING: Do not overload wall outlets and extension cords as this can result
in a risk of fire or electric shock.
21. OBJECT AND LIQUID ENTRY: Never push objects of any kind into this TV through
openings as they may touch dangerous voltage points or short out parts that could
result in fire or electric shock. Never spill liquid of any kind into the TV.
22. SERVICING: Do not attempt to service this TV yourself as opening or removing
covers may expose you to dangerous voltage or other hazards. Refer all servicing to
qualified service personnel.
23. REPLACEMENT PARTS: When replacement parts are required, be sure that the
service technician uses replacement parts with the same characteristics as the
original parts specified by the manufacturer. Unauthorized substitutions may result in
fire, electric shock, injury to persons or other hazards.
24. SAFETY CHECK: Upon completion of any service or repairs to this TV, ask the
service technician to perform routine safety checks to determine that the TV is in
proper operating condition.
25. The apparatus should not be exposed to any dripping or splashing, and no objects
filled with liquids (such as a vase) should be placed on the apparatus.
26. WARNING: Plug the power cord into a power outlet where access to a power cord
connector is readily accessible, in case if the power needs to be immediately
disconnected.
27. ATTENTION: This device complies with Part 15 of the FCC Rules. Operation is
subject to the following two conditions: (1) this device may not cause harmful
interference, and (2) this device must accept any interference received, including
interference that may cause undesired operation.

5
Table of Contents
Table of Contents
1.Important to user......................................................................................1
2.Important safety precautions....................................................................2
Safeguards.......................................................................................2
3.Table of Contents.....................................................................................5
4.Setting Up.................................................................................................6
Accessories......................................................................................6
Installing the Stand...........................................................................6
TV Front...........................................................................................7
TV Rear............................................................................................8
Connect to other devices..................................................................9
5.Using the Remote Control......................................................................12
Installing the remote control batteries..............................................12
Remote control range......................................................................12
The Remote Control Panel..............................................................13
Quick starts......................................................................................14
6.Changing the TV Settings.......................................................................16
Using the Channel Menu..................................................................16
Using the Picture Menu....................................................................17
Using the Sound Menu....................................................................18
Using the Screen menu.......................................................... .........19
Using the Function menu.................................................................20
7.Using the DVD player.............................................................................22
Function Introduction.......................................................................22
General setup page.........................................................................23
Audio setup page.............................................................................24
Video setup page.............................................................................25
Preference page...............................................................................26
Password setup page.......................................................................27
8.Appendix.................................................................................................28
Trouble shooting..............................................................................28
Specifications...................................................................................29
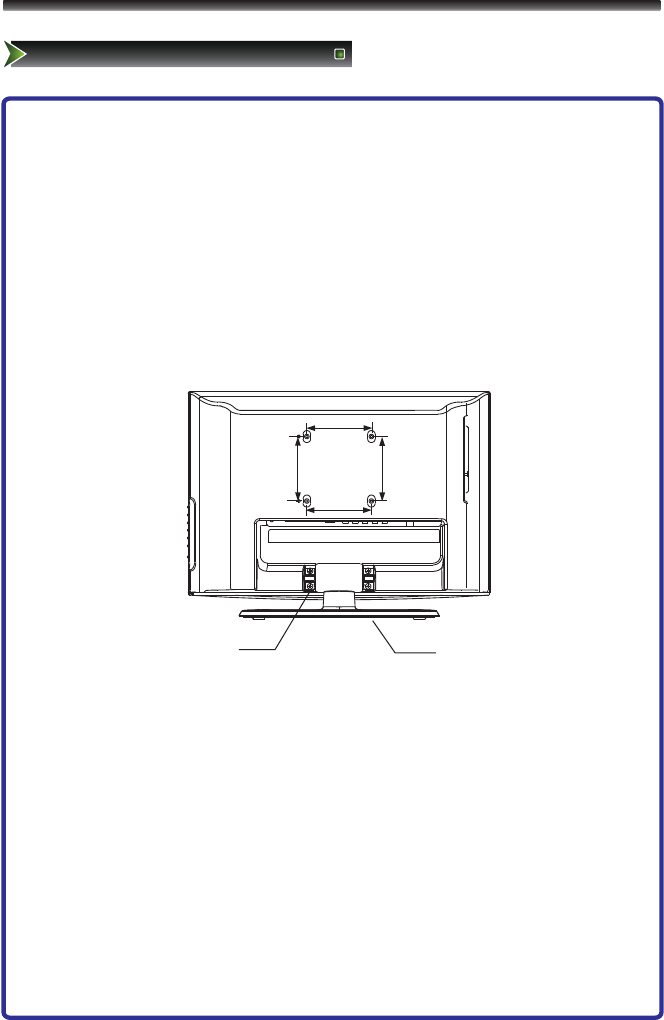
screw pedestal
100mm
100mm
6
Setting Up
Accessories/Installing the Stand
Accessories list
Manual Book ................................1
Remote........................................1
Batteries......................................2
Power cord..................................1
Installing the Stand
1. Lay the soft froth on the table which can hold enough weight of the whole
TV in case of causing damage to TV or person.
2. Put the TV on the froth ,with its back upwards and the LCD downwards.
3. Take out the pedestal, and insert the pedestal into the TV suitably, then put
the pedestal to relevant position of the TV set until all the holes match each
other completely.
4. Erect the TV set, and put it on the proper position for watching.
Note:
The above figures are for reference only, please refer to the actual units to
determine the appearances.
Every hole of the pedestal must be fastened with screws!
1
7
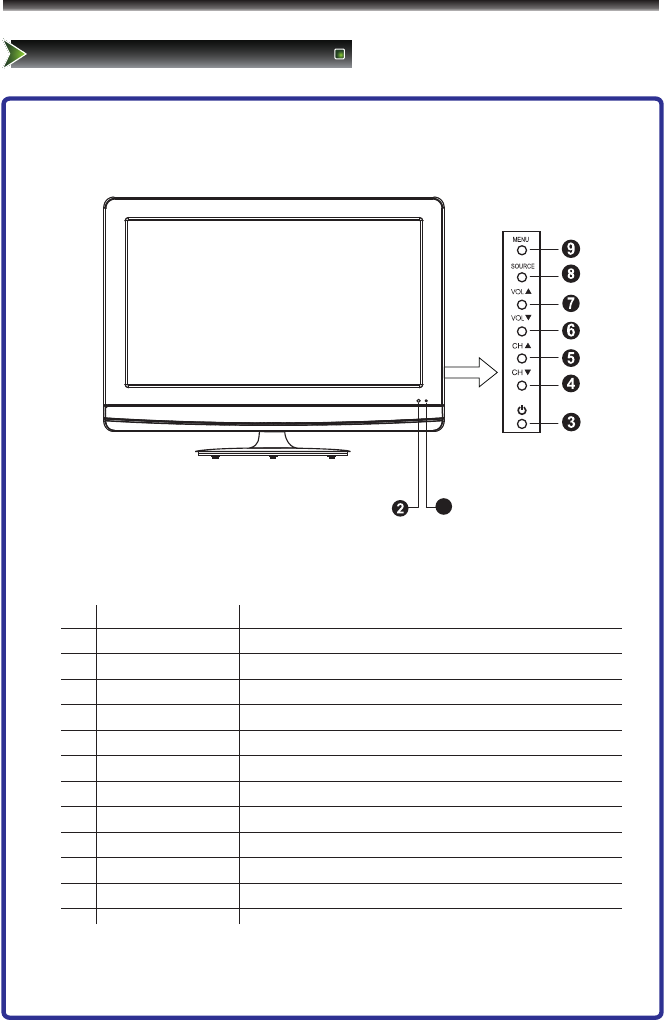
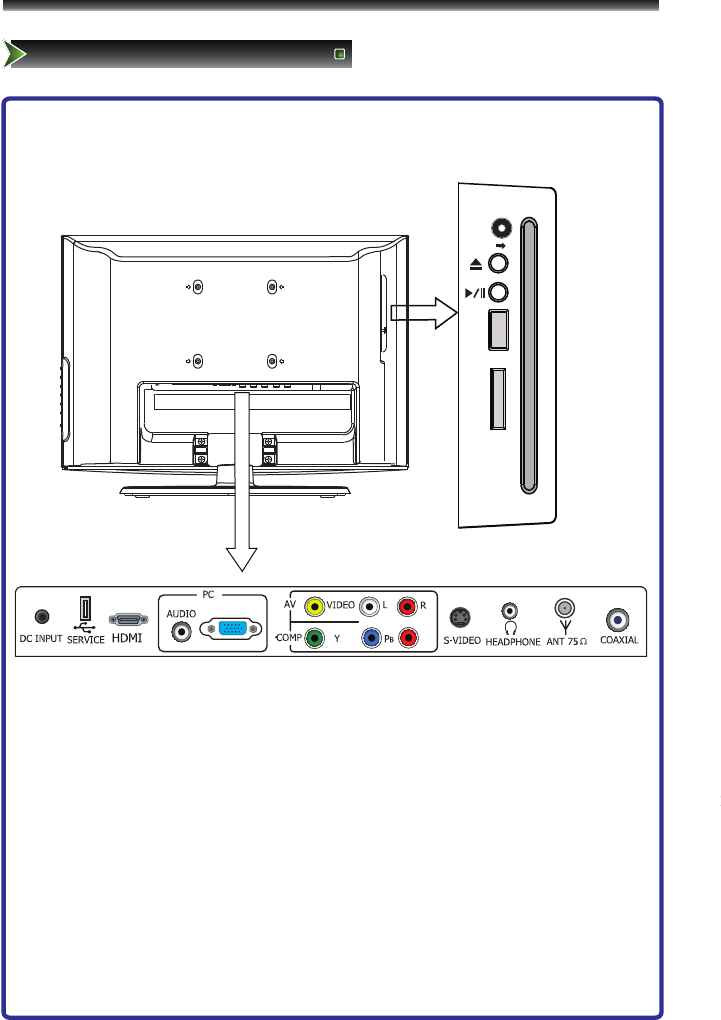
Setting Up
TV Front
TV Front
No.
Component
Component Description
1
POWER Indicator
Red indicates standby mode. Blue shows that the
unit is on.There will be no light when the power
switch is in the off position.
2
Remote sensor
Receives signals from the remote control. Do not block.
3
Standby button
Press to turn your TV on or off (standby mode).
4
CH▼
Press to go to the previous channel.
5
CH▲
Press to go to the next channel.
6
VOL▼
Press to decrease the volume.
7
VOL▲
Press to increase the volume.
8
SOURCE button
Press to select the signal source for your TV.
9
MENU button
Press to activate the on-screen display (OSD).
Note:
1.The figures are for reference only, please refer to the actual set.
2.For some sets, there is no light when the power is on.
VGA
PR
B
E
A
L
L
USB
SD/MS
/MMC
2
SCART1 SCART2
VGA
PC AUDIO
COMP1COMP2
COAXIAL
2
VGA
8
Setting Up
TV Rear
TV Rear
LR
VIDEO
AV
Red
White
Yellow
S VIDEO-
LR
Red
White
9
Setting Up
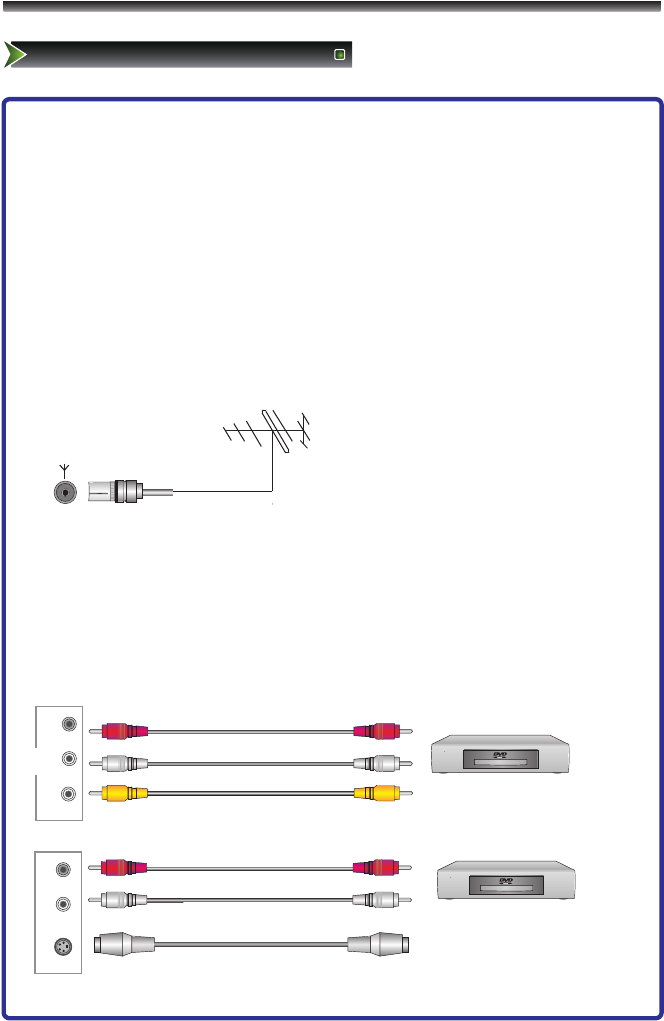
Connect to other devices
Warning: Before connecting the TV to any other electronic device,
unplug the TV and electronic device AC cords from the AC input.
Note: Not all following terminals are included on your TV. The actual
one refer to "TV Rear".
1. Connect to broadcast antenna or the cable TV
To have an optimal picture quality, it is strongly recommended to have an external
antenna or a cable TV.
Note:
- It is recommended that coaxial cable (75Ω ) be used to eliminate the interference
caused by the mismatched impedance.
- The antenna cable should not be bound together with the power cord.
- When using the cable TV, please insert the plug of the coaxial cable (75 Ω) directly
into the antenna outlet.
2. Connect to AV devices
- Connect a Video RCA or S-VIDEO cable to an appropriate external A/V device such
as a VCR, DVD or Camcorder.
- Connect RCA audio cables to “R -AUDIO - L” and Video/S-Video on your set and the
other ends to corresponding audio and Video/S-Video out connectors on the A/V
device.
Note: For some sets the audio of S-Video share with AV.
ANT 75Ω
Video
VCD, DVD, set-top boxes, etc.
Audio R
Audio L
Audio R
Audio L
S-VIDEO
The equipment with S-Video
output function ( such as VCD,
DVD, set-top boxes, etc.).
10
Setting Up
Connect to other devices
L R
Red
White
Audio R
Audio L
PR/CR
PB/CB
Red
Y
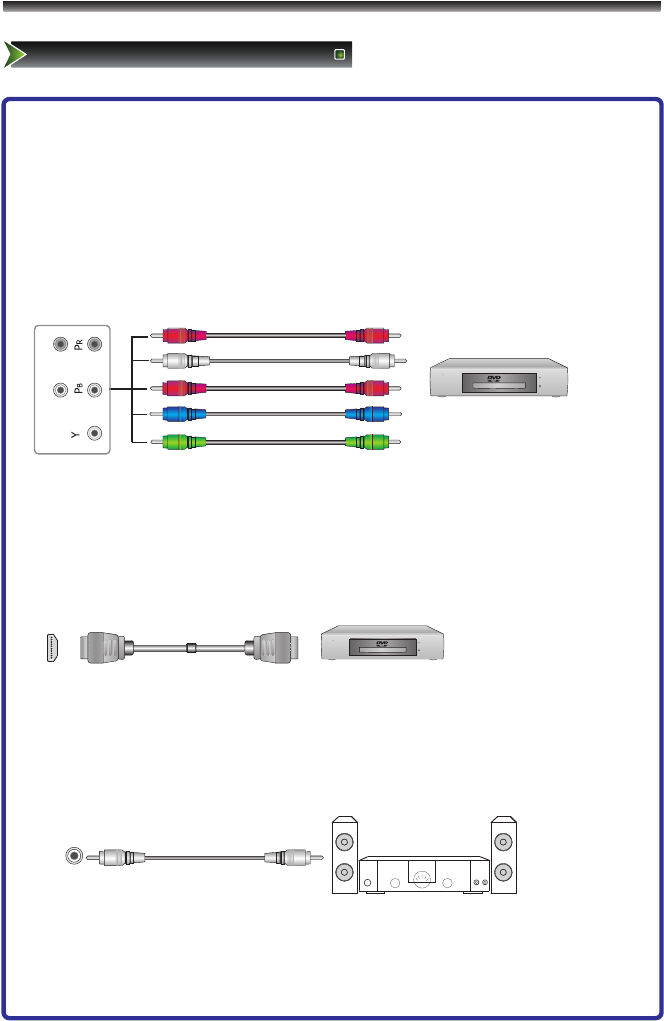
3. Connecting Component Devices (DVD/PVR)
Component video(Y, Pb, Pr)transmits video as separate Y, Pb, Pr signals. Use this
connection for high-definition video signals from a DVD or other equipment.
- Connect Component video and audio cables to Component inputs (“PR/CR”,
“PB/CB”, “Y”) of your set and the other ends to corresponding component
video out connectors on the PVR or DVD.
- The "Y, PB/CB and PR/CR” connectors on your component devices (PVR or DVD)
are sometimes labeled Y, B-Y and R-Y or Y, CB and CR. (Colors for inputs and
cables must correspond on both devices.)
Blue
4. Connect to devices with HDMI interface
HDMI:High Definition Multimedia Interface
HDMI transmits an all-digital signal and is the recommended choice for playback
from a digital DVD or DVR. No sound connection is needed for HDMI to HDMI
connection.
- HDMI cable connected to the HDMI connector on the TV.
5. Optical audio
Connect an optical audio device to this jack (Toslink optical cable is needed).
Note: DTV and HDMI output only.
Green
DVD With Component jacks
HDMI
The equipment with HDMI
output jack ( such as DVD
players, set-top boxes, etc.).
COAXIAL
(OPTICAL)
Red
White
OR
SD/MS/MMC
card
11
Setting Up
Connect to other devices
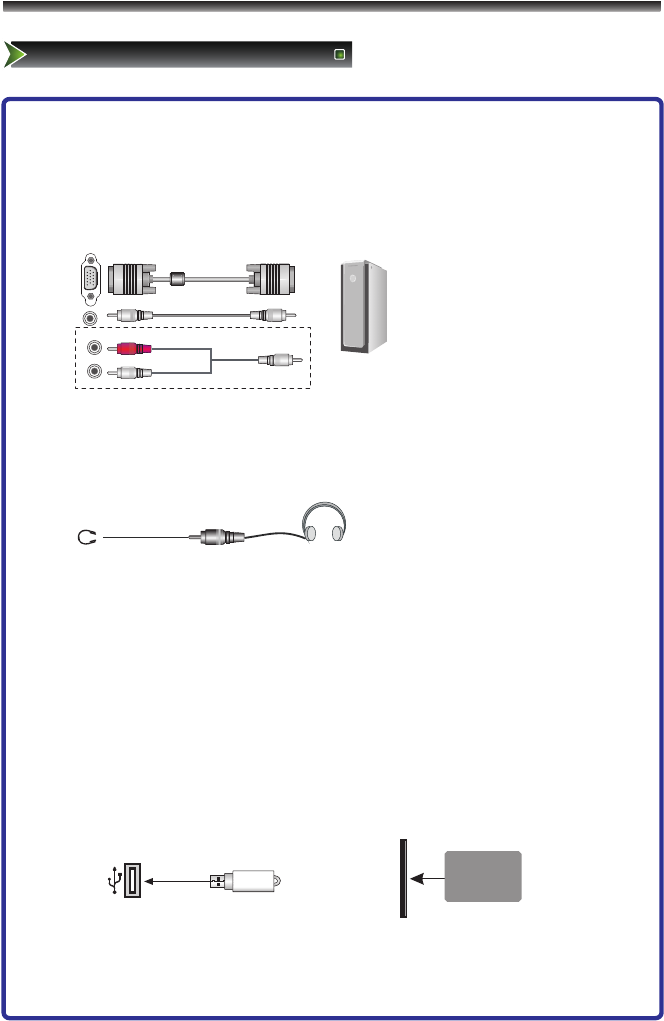
6. Connect to PC
- Connect the D- Sub cable to “VGA” on the rear of your set and the other end to the
Video Card of your computer.
- Connect the stereo audio cable to “PC AUDIO ” on the rear of your set and the other
end to “Audio Out” of the sound card on your computer.
Note: For some sets "PC AUDIO" share with component.
7. Connect to headphone
- Connect the headphone jack of the TV set.
The volume of the headphone is automatically adjusted with the main volume of the
TV set.
8. DVD slot
- The set can play DVD/CD/VCD disc. Please see the detailed specification
below.(P22-27)
9. Connect to devices with USB and SD/MS/MMC card slot
- When you insert the SD/MS/MMC card or connect the standard USB1.1 and USB2.0
U disks, you can see the JPEG files of card and disks(First select the DVD source,
then press P-Scan key to select USB or SD/MS/MMC).
PCAUDIO VGA
Computer
HEADPHONE
SD/MS/MMC
Headphone
USB

12
Using the remote Control
Installing batteries
Installing the remote control batteries
1. Open the battery cover on the back of the remote control.
2. Install two AAA size(1.5V) batteries. Match the “+” and “-” signs on the batteries to
the signs on the battery compartment.
3. Close the battery cover.
Note:
1. Dispose of your batteries in a designated disposal area. Do not throw the batteries
into fire.
2. Do not mix battery types or combine used batteries with new ones.
3. Remove depleted batteries immediately to prevent battery acid from leaking into
the battery compartment.
4. If you do not intend to use the remote control for a long time, remove the batteries.
5. The effective range of remote control is suggested below.
Remote control range
1. The remote control distance: 8 meters in front of the TV set.
2. The remote control angle: taking the television infrared light receiver window as an
apex, 6 meters away, its controlled angle (left to right) is within 30 degrees, while
the vertical angle (up to down)is within 30 degrees.
13
19
20
18
1
2
5
6
8
13
15
17
21
4
9
10
11
12
14
16
3
7
13
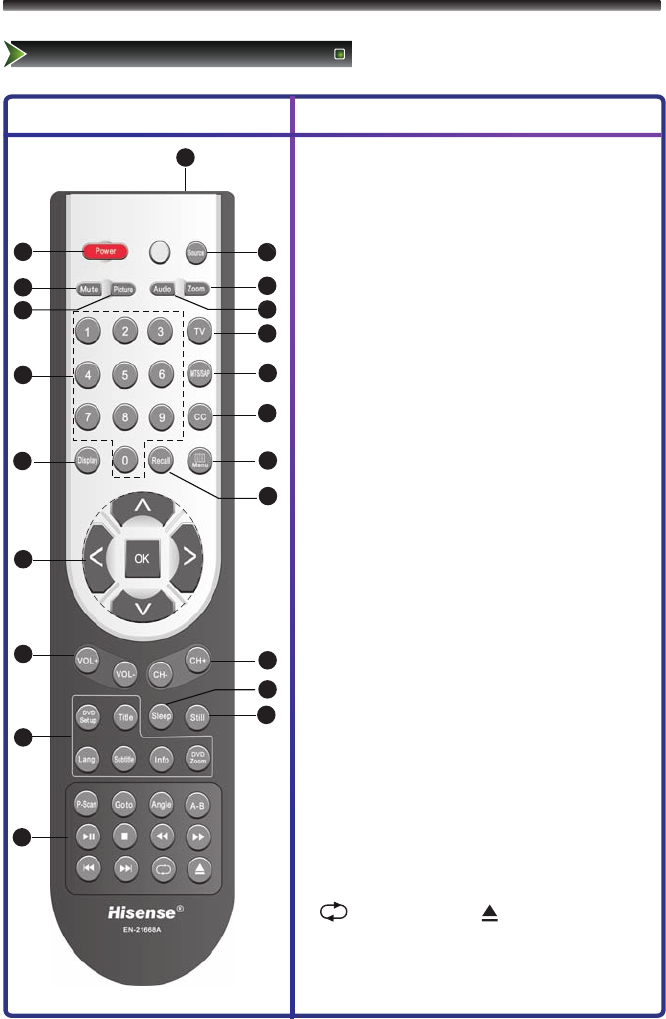
Using the Remote Control
The Remote Control Panel
Remote Control Panel Buttons instructions
(1) Remote sensing Window.
(2) Power Standby: Power button.
(3) Source: Available source selection.
(4) Mute: Mute the sound.
(5) Zoom:Zoom image.
(6) Picture: Picture Mode selecting.
(7) Audio: Sound Mode selecting.
(8) 1,2,... numbers: For direct channel access.
(9) TV: Analog source input.
(10) MTS/SAP: Audio select button.
(11) CC: Adjust CC mode.
(12) Display: Display current program informations.
(13) Menu:Display the main menu/Back menu
display.
(14) Recall:To return to the last view program.
(15) OK: Enter or confirm the operation
Λ /V /</>: Up/Down/Left/Right operation
(16) VOL+/VOL-: Volume increase/Volume decrease.
(17) CH+/CH-: Next channel/Previous channel.
(18) Sleep:Set the sleep time.
(19) Still: Freeze picture.
(20) DVD function buttons
● DVD Set up: Display the main DVD menu
● Title: Get DVD title menu
● Lang.: Select Audio language.
● Subtitle: Display the subtitle content of the signal.
● Info: Display DVD basic information
● DVD Zoom: Zoom DVD image
(21) DVD function buttons
● P-Scan:Available DVD source selection.
● Goto: Get DVD Goto menu
● Angle: To select various angle to view the same
image (works only for the disc with multi angle
encoded)
● A-B: A-B repeat
● ►II: Play/Pause ■: Stop
● ◄◄: Fast backward ►►: Fast forward
● I◄◄: Previous ►►I: Next
● : Repeat : Open/Close
Note:The design of the remote control is subject to
change and may be different from the actual one.
Those buttons without comment have no relations with
this TV.

14
Using the Remote Control
Quick starts
■ Turning your TV on and off
To turn your TV on: Connect the TV set to an AC power outlet with the power
adapter , the TV set would be standby mode.
Press [Power Standby] on the front panel or on the remote control to activate the unit.
A few seconds later an image will appear on the screen.
Turning off to standby mode: Press [Power Standby] on the front panel or on the
remote control to switch to standby mode. You can activate the unit again by pressing
[Power Standby].
Notes:
Remove the connection from the wall power outlet if you do not intend to use the unit
for longer periods, for example if you plan to be away a few days. Wait at least 5
seconds after turning off if you want to re-start the TV.
■ Selecting the video source
Choose the current input signal of the main picture. First press this [source] button to
display the signal inputs. Press [Λ / V] button to select the source you wanted to enter,
then press [>/ OK] button to confirm.
■ Adjusting the volume
To adjust the volume:
Press [VOL + / - ] to increase or decrease the volume. Press [Mute] to turn the sound
off. Press [Mute] again to turn the sound back on.
■ Changing channels
To change channels:
Press [CH + / - ] to go to the next higher or lower channel. Or, Press the number
buttons to select a channel. For example, to select channel 12, press 1, then 2. Or,
press [Recall] to go to the last viewed channel.
■ Selecting the sound mode
To select the sound mode:
Press [Audio] one or more times to select the sound mode you want. You can set as
Music, Standard, Speech and User. This mode achieves a special sound effect by
setting equalizer.

15
Using the Remote Control
Quick starts
■ Selecting the picture mode
To select a picture mode:
Press [Picture] one or more times to select the picture mode you want. You can select
as Bright, Standard, Soft and User. This mode achieves a certain image display effect
by setting the brightness, contrast and color etc.
■ Selecting the aspect ratio
For the various Sources, this unit has set various display modes. Press Zoom button
to display Zoom menu, and then press [∧/∨] button to select the proper display
mode, including ''Auto", ''Full Screen", "Normal", "Zoom 1", "Zoom 2", "Smart
Zoom","Dot to dot". Finally press[>/OK] button to confirm the selected display mode.
◇ Full Screen: This mode display the picture of input source expanded to fill the
screen.
◇ Normal Mode: Shows the standard 4:3 ratio picture image in the center of the TV
with dark bars on the left and right.
◇ Zoom1: Proportionally stretches the TV picture, but clips the top and bottom of the
image to fit the screen. Eliminates black bars.
◇ Zoom2: Zooms further into the middle of the screen and clips off more from the top
and bottom.
◇ Smart Zoom: Similar to 16:9 mode, but shows more of the horizontal sides and clips
off a little from the top and bottom.
◇ Dot to dot: Display 1:1 ratio pixel on the TV set from the source signal, without
stretching or compression the original signal.
Note: The option of zoom mode is different in different sources.
■ Freezing a picture
To freeze a picture:
Press [Still] repeatedly to access or quit Freeze.
■ Setting the sleep timer
You can specify the amount of time you want your TV to wait before it automatically
turns off.
To set the sleep timer:
Press [Sleep] one or more times until the remaining time you want appears. You can
select Off, 10 minutes, 20 minutes, 30 minutes, 40 minutes, 50 minutes, 60 minutes,70
minutes, 80 minutes, 90 minutes, 100 minutes,110 minutes, 120 minutes. You can
also setup sleep timer in the time submenu.

16
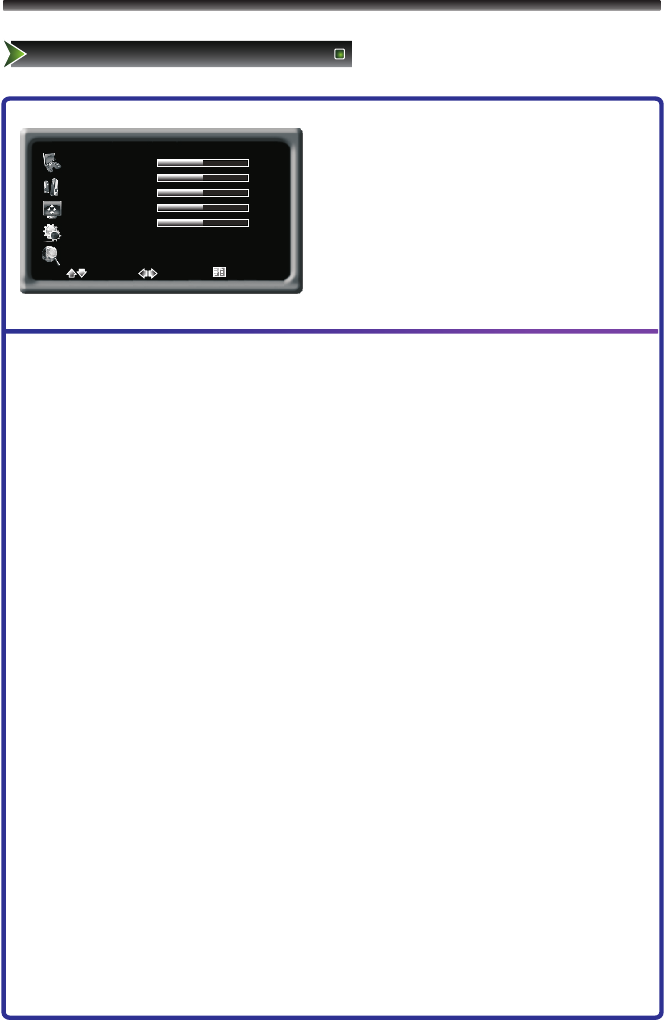
Changing the TV Settings
Using the Channel Menu
Channel
Channel 3
Fine Tune 0
Skip On
Tuner Mode Air
Color System AUTO
MTS Stereo
Auto Install ►
Select Adjust Return
1 Press [Menu] button to display the main
menu.
2 Press [∧/∨] button to select Channel item.
3 Press [>/OK] button to enter Channel
menu.
4 Press [∧/∨] button to select the option,
press [>/OK] button to enter or press
[</>] button to adjust the option.
5 Press the [Menu] button to close the menu.
The options are:
■ Channel: Adjusts the current channel number.
■ Fine Tune: Fine adjusts frequency to achieve a perfect effect.
■ Skip: Press Right/Left button to set skip function On or Off.
■ Tuner Mode: Select the source: Air, Cable.
■ Colour System: Adjusts the colour system, including Auto, NTSC.
■ MTS: Adjusts the sound system, including Mono,Stereo,Sap.
Irrelevancy colour or MTS may cause the picture and sound to be abnormal.
■ Auto Install: Searches the channels automatically.
17
Changing the TV Settings
Using the Picture Menu
Picture
Brightness 50
Contrast 50
Colour 50
Sharpness 5
Hue 50
Colour Temp. Standard
Enhanced Settings ►
Select Adjust Return
1 Press [Menu] button to display the main
menu.
2 Press [∧/∨] button to select Picture item.
3 Press [>/OK] button to enter Picture
menu.
4 Press [∧/∨] button to select the option,
press [>/OK] button to enter or press
[</>] button to adjust the option.
5 Press the [Menu] button to close the menu.
The options are:
■ Brightness: Increases the brightness to add more light to dark areas of the picture.
Decreases the brightness to add more dark to light areas of picture.
■ Contrast: Increases the picture level to adjust the white areas of the picture.
Decreases the picture level to adjust the black areas of the picture.
■ Colour: Adjusts the intensity of the colour.
■ Sharpness: Increases the sharpness level to show cleaner and cleaner image.
Decreases the level to show a smoother picture.
■ Hue: The option is only available under N system. It adjusts the overall colour of the
picture.
■ Colour Temp.: Selects the colour temperature. You can select Standard, Warm,
Warmer, Cooler or Cool.
■ Enhanced Settings: Accesses advanced video settings, Including:
◇ DNR(Digital Noise Reduce) - it can optimize the picture signal from time and space;
reduce the outside noise interference and return the pure initial signal. It has four
ratings: Minimum, Medium, Maximum and off.

18
Changing the TV Settings
Using the Sound Menu
Sound
Balance 0
Equalizer ►
AVC On
Select Adjust Return
1 Press [Menu] button to display the main
menu.
2 Press [∧/∨] button to select Screen item.
3 Press [>/OK] button to enter Screen
menu.
4 Press [∧/∨] button to select the option,
press [>/OK] button to enter or press
[</>] button to adjust the option.
5 Press the [Menu] button to close the menu.
The options are:
■ Balance: Adjusts the volume from the left and right speakers.
■ Equalizer: Weaken or enlarge the sound of the main frequency points.
■ AVC: Auto volume control, turns automatic volume control on or off. The option keeps
the audio in a preset range to eliminate large spikes in volume.

19
Changing the TV Settings
Using the Screen Menu
Screen
Image Position ►
H Size 50
V Size 50
Auto Adjust ►
HDMI Ratio ZOOM
Select Adjust Return
1 Press [Menu] button to display the main
menu.
2 Press [∧/∨] button to select Screen item.
3 Press [>/OK] button to enter Screen menu.
4 Press [∧/∨] button to select the option,
press [>/OK] button to enter or press
[</>] button to adjust the option.
5 Press the [Menu] button to close the menu.
The options are:
■ Image Position: Adjusts the position of image on screen by press ∧/∨/</> button.
■ H-Size: Adjusts the horizontal size of the image.
■ V-Size: Adjusts the vertical size of the image.
■ Phase: Adjusts the phase of the clock used for synchronizing the image.
■ Clock: Adjusts the clock used for synchronizing the image.
■ Auto Adjust: Adjusts the position and the size of the image automatically.
Note:
HDMI interface transmits whole digital signal and Geometry Adjust function is not used,
so Screen cannot be selected under HDMI. H-Size and V-Size are not available under
VGA source, Phase and Clock are only available under VGA source.
Take Windows2000 as an example, and the Windows system display setting is as
illustrated:
1 Click "Setting" on the Windows Start menu and select "Setting" to move the mouse
horizontally
to click "Control Panel".
2 The control panel window appears; click "Display" to display a dialogue box.
3 Find the "Settings" item on the dialogue box, set the screen Resolution.
4 Click "OK" to exit.
20
Changing the TV Settings
Using the Function Menu
Function
OSD Language English ►
Blue Screen Off
OSD Setting ►
Sleep Timer Off
Factory Reset ►
CC CC1
Parental Control ►
Software Update Off
Select Adjust Return
1 Press [Menu] button to display the main
menu.
2 Press [∧/∨] button to select Function item.
3 Press [>/OK] button to enter Function
menu.
4 Press [∧/∨] button to select the option,
press [>/OK] button to enter or press [</>]
button to adjust the option.
5 Press the [Menu] button to close the menu.
The options are:
■ OSD Language: Sets the menu language.
■ Blue Screen: Turns on or off display of a blue screen as the image when there is no
video signal.
■ OSD Setting: It including OSD Timer and Transparency, sets the time and
transparency of menu separately.
■ Sleep Timer: Sets the sleep time.
■ Factory Reset: Resets your TV to the factory defaults. You can use this function when
this unit is in an abnormal state or you want to make it return to the factory reset.
■ CC: sets the CC mode. It including CC,CC1, CC2,CC3,CC4,T1,T2,T3,T4,XDS , the
CC closed temporarily when the OSD menu appears.
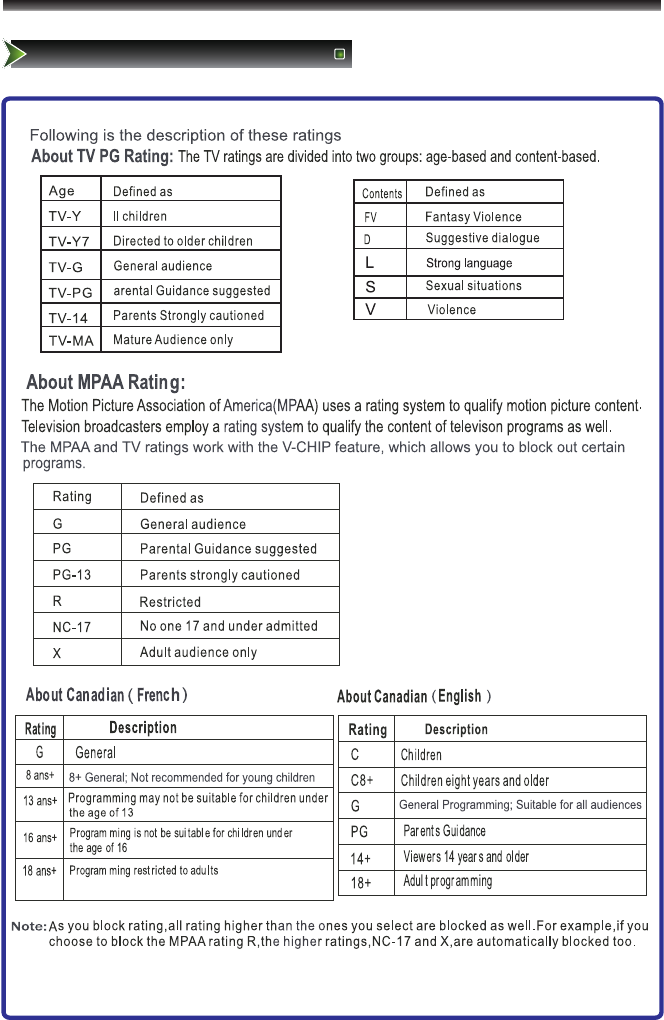
■ Parental Control: Set the rating of program, When you first use this function, it
including the default Password is [0000], Once you input this password, you can
continue to the next operation.
1. Change Password
At the first time, you can use the default password. If you need to change the
password, use this function. First enter the new password then enter the same password
again. You will get the new password.
2. V-CHIP
Press the Right button to change state between on/off. When setting the V-CHIP in
an on state, the RATING function can enable.
3.TV RATING
Press the up/down button to select the RATING and press the right button to choose
the TV RATING according to the illustrations on the screen.
The setting for Movie Rating, English Rating, and French Rating follow the steps
mentioned above.
■ Software Update: For software update only. It should be set to “On” when software
update needed. It is strongly recommended that this item be set to “Off” during
day-to-day applications, otherwise the startup speed will slow down.
21
Changing the TV Settings
Using the Function Menu

22
Prior to play, make sure to complete the following preparatory operations.
1. Switch on TV and select DVD source.
2. insert the CD in the DVD slot, it will come into the slot automatically.
Using the DVD player
Function Introduction
Basic operation
Play disc
Once it has read the disc, this machine will start playing automatically.
If it is a DVD, the machine will show the DVD menu or title menu.
If it is a VCD2.0 disc, the machine will activate PBC playback control status.
If it is a CD, this machine will start playing in the sequence.

-- GENERAL SETUP PAGE --
TV DISPLAY PS
23
Using the DVD player
GENERAL SETUP PAGE
-- GENERAL SETUP PAGE --
TV DISPLAY LB
OSD LANGUAGE ENG
SCREEN SAVER ON
LAST MEMORY ON
GOTO GENERAL SETUP PAGE
1 Press [DVD Setup] button to enter DVD main
interface.
2 Press [</>]button to select item.
3 Press [∨/OK ] button to enter.
4 Press [∧/∨] button to select the option,
press [>/OK] button to enter, then press
[∧/∨] button to adjust the option.
5 Press the [OK] button to confirm.
6 Press the [DVD Setup] button to close the menu.
TV DISPLAY
OSD LANGUAGE
SCREEN SAVER
LAST MEMORY
TV DISLAY is used only when the TV/DVD is connected to another TV. Choose one of
the following options:
● 4:3 PANSCAN: Select this option when the TV/DVD is connected to a standard 4:3
aspect ratio TV. 16:9 wide screen picture is shown with some of picture partly cut off.
● 4:3 LETTERBOX: Select this option when the TV/DVD is connected to a standard 4:3
aspect ratio TV. A full 16:9 wide screen picture is shown with black bars on the top and
bottom.
● 16:9 Wide: Select this option when the TV/DVD is connected to a wide screen TV.
The OSD LANGUAGE controls the language used to display text in the DVD system
menus. The default setting is English. Language options available are ENGLISH,
FRENCH, SPANISH,GERMAN, ITALIAN, DUTCH.
The SCREEN SAVER is a graphic that randomly moves around the screen to guard
against screen burn-in.
● ON: Screen saver turned on.
● OFF: Screen saver turned off.
The LAST MEMORY feature enables you to resume play at the same point at which you
stopped playback, even if the disc is removed and re-inserted.
● ON: Resumes play from where the disk was last stopped.
● OFF: Plays from the beginning.

-- GENERAL SETUP PAGE --
TV DISPLAY PS
24
Using the DVD player
AUDIO SETUP PAGE
-- AUDIO SETUP PAGE --
ANALOG AUDIO SETUP
DOLBY DIGITAL SETUP
GOTO AUDIO SETUP PAGE
1 Press [DVD Setup] button to enter DVD main
interface.
2 Press [</>]button to select item.
3 Press [∨/OK ] button to enter.
4 Press [∧/∨] button to select the option,
press [>/OK] button to enter, then press
[∧/∨] button to adjust the option.
5 Press the [OK] button to confirm.
6 Press the [DVD Setup] button to close the menu.
ANALOG AUDIO SETUP
DOLBY DIGITAL SETUP
DOWNMIX allows you to DOWNMIX audio to a receiver and generate a multi-channel or
stereo sound.
● LT/RT: Select this option when connecting the TV/DVD to an audio system with Dolby
Pro-Logic.
● STEREO: Select this option when connecting the TV/DVD to an audio system that
does not have Dolby Pro-Logic.
Dual Mono give you a fuller, better balance of audio based on the disc that you are
playing.
● STEREO: Select this option to output audio from the left and right channels to the left
and right speakers.
● L-MONO: Select this option to output audio from the left channel to the two front
speakers.
● R-MONO: Select this option to output audio on the right channel to the two front
speakers.

-- GENERAL SETUP PAGE --
TV DISPLAY PS
25
Using the DVD player
VIDEO SETUP PAGE
-- VIDEO SETUP PAGE --
COLOR SETTING
GOTO VIDEO SETUP PAGE
1 Press [DVD Setup] button to enter DVD main
interface.
2 Press [</>]button to select item.
3 Press [∨/OK ] button to enter.
4 Press [∧/∨] button to select the option,
press [>/OK] button to enter, then press
[∧/∨] button to adjust the option.
5 Press the [OK] button to confirm.
6 Press the [DVD Setup] button to close the menu.
COLOR SETTING
The options are:
● BRIGHTNESS: Increases the brightness to add more light to dark areas of the picture.
Decreases the brightness to add more dark to light areas of picture.
● CONTRAST: Increases the picture level to adjust the white areas of the picture.
Decreases the picture level to adjust the black areas of the picture.
● HUE: It adjusts the overall color of the picture.
● SATURATION: Adjusts the intensity of the color.

-- GENERAL SETUP PAGE --
TV DISPLAY PS
26
Using the DVD player
PREFERENCE PAGE
-- PREFERENCE PAGE --
TV TYPE NTSC
AUDIO ENG
SUBTITLE OFF
DISC MENU ENG
PARENTAL
DEFAULT
GOTO PREFERENCE PAGE
1 Press [DVD Setup] button to enter DVD main
interface.
2 Press [</>]button to select item.
3 Press [∨/OK ] button to enter.
4 Press [∧/∨] button to select the option,
press [>/OK] button to enter, then press
[∧/∨] button to adjust the option.
5 Press the [OK] button to confirm.
6 Press the [DVD Setup] button to close the menu.
Some discs are recorded with different languages. You can select a default language so
discs will play in the language of your choice, if the disc was recorded with multiplet
racks. Language choices are: ENGLISH, FRENCH, GERMAN, SPANISH, GERMAN,
ITALIAN, DUTCH.
Notes: Discs are created differently and not all discs are recorded with multiple
languages. The DVD player cannot override some language preferences. If a disc‘s
software was created to play the movie(title) in a preferred language, the preference you
set might be ignored.
Also, if the language isn't available on the movie you're playing, the disc's default
language is chosen.
AUDIO
SUBTITLE
DISC MENU
This option allows you to select a language used to display subtitles (if subtitles are
turned on and are available on the disc). Language choices are: ENGLISH, FRENCH,
SPANISH, GERMAN, ITALIAN, DUTHC OFF.
Note: Not all discs offer subtitles with multiple languages.
This option allows you to select a default language for the disc's menu. Language
choices are: ENGLISH, FRENCH, SPANISH, GERMAN, ITALIAN, DUTCH.
-- GENERAL SETUP PAGE --
TV DISPLAY PS
27
Using the DVD player
PREFERENCE PAGE
PARENTAL
DEFAULT
You can control access to the player and the type of discs your family watches with the
Parental Control feature. DVD viewing is blocked if its rating exceeds the level that you
selected. A four-digit password is required to change the level, disable the feature, or
view the DVD.
The DEFAULT option restores the setup options to the factory settings, with the
exception of Password. This option is available only in the stop mode or when the disc
tray is open.
PASSWORD
-- PASSWORD SETUP PAGE --
PASSWORD MODE OFF
PASSWORD
GOTO PASSWORD SETUP PAGE
1 Press [DVD Setup] button to enter DVD main
interface.
2 Press [</>]button to select item.
3 Press [∨/OK ] button to enter.
4 Press [∧/∨] button to select the option,
press [>/OK] button to enter, then press
[∧/∨] button to adjust the option.
5 Press the [OK] button to confirm.
6 Press the [DVD Setup] button to close the menu.
You must enter a valid password to gain access to Parental Controls and can change
the password at any time. The default password is "3308".
To change the password, enter the current four digit pass word in the Old Password
box. Then enter the new password in the New Password box and again in the Confirm
Password and press OK.

28
Appendix
Trouble shooting
When there is something wrong with your TV, you can try turning off the TV and then
restart it. You can also operate according to the following chart. If the problem still
cannot be solved,please contact the professional technicians.
Symptom
Remedy
● No sound or picture
1. Check if the power line is in the outlet and if it has electricity.
2. Check if you have pressed Power button on the TV or Power
button on the remote control.
3. Check the setting of picture brightness and contrast.
4. Check the volume.
● The picture is normal,
but there is no sound.
● No picture and white
or black picture.
● The sound and picture
1. Check the volume.
2. Check if Mute mode is set.
1. Adjust Picture Setting.
2. Check Colour System.
1. Try to find the appliance affecting TV set, and move it far away
are interfered.
● Unclear picture or
picture with snow
from the TV set.
2. Try to insert the power plug of the TV set into another outlet.
1. Check the direction, position and connection of your antenna.
2. Adjust the direction of your antenna or reset or fine tune the
channel.
● The remote control does
not work
1. Change the batteries in the remote control.
2. Clean the upper side of the remote control (radiating window)
3. Check the contacting points of the batteries.
4. Check if there is obstruction between the remote control and the
monitor.
● H/V strip or the picture
shaking
● The cabinet of the TV
makes “Click” sound
5. Check if the batteries are correctly installed.
Check if there is interfering source nearby, such as appliance or
electric tools.
makes "Click" sound ''Sometimes the room temperature change
can cause the television cabinet to inflate or contra, which makes
the sound. This does not mean the TV breaks down.
29
Appendix
Specifications
Note: It is committed to continued product improvement which may result in changes to
specifications and appearance without previous notice.
19"
Screen Diagonal Size
Screen Resolution
Power Consumption
Power Supply
Colour System
Sound System
Sound Output (RMS)
18.5 inches LCD
1366×768 Pixels
40W
DC 12V 5A
NTSC
M
2W+2W
480I/60Hz, 480P/60Hz, 576I/50Hz,576P/50Hz,720P/50Hz
Component mode
720P/60Hz,1080I/50Hz,1080I/60Hz
VGA mode
640×480/60Hz, 800×600/60Hz, 1024×768/60Hz
480I/60Hz, 480P/60Hz, 576I/50Hz,576P/50Hz,720P/50Hz
HDMI mode
720P/60Hz,1080I/50Hz,1080I/60Hz
640×480/60Hz, 800×600/60Hz, 1024×768/60Hz
Size without base
466(mm)×75(mm)×334(mm)
Size with base
466(mm)×180(mm)×381(mm)
Weight without base
4.4 Kg
Weight with base
4.8Kg

LVVTKJJWWWIOPUNRUNIMSQ