Hitachi Important Info 4K Roku TV 65R8 Owners Guide
Important Info 4K Hitachi Roku TV 50R8 Owners Guide Consumer Products : Digital Solutions Division : Hitachi America, Ltd.
User Manual: Hitachi Important Info Consumer Products : Digital Solutions Division : Hitachi America, Ltd.
Open the PDF directly: View PDF ![]() .
.
Page Count: 88

Serial No.
Models:
Thank you for purchasing this Hitachi product.
Please read these instructions carefully.
For additional assistance please call Toll Free 800.HITACHI (800.448.2244)
or visit our website at www.hitachi.us/tv.
Keep this Guide for future reference.
Record the model name and serial number of your LCD Television for future reference.
This information is located on the back of the television.
CONGRATULATIONS
Owner’s Guide
Illustrations in this guide are provided for reference only and
may dier from actual product appearance. Product design
and specication may be changed without notice.
50R8
50” Class (49.50” Diag.)
Version 7.5
65R8
65” Class (64.53” Diag.)

ii
Copyright
© 2016 Hitachi America, Ltd. and Roku, Inc.
All material in this Owner’s Guide is provided by Hitachi America, Ltd. and Roku, Inc. and their respecve subsidiaries, aliates and licensors and is protected under
U.S. and internaonal copyright and/or other intellectual property laws. Reproducon or transmission of the materials, in whole or in part, in any manner, electronic,
print, or otherwise, without the prior wrien consent of Hitachi America, Ltd. and Roku, Inc. is a violaon of the rights of Hitachi America, Ltd. and Roku, Inc. under
the aforemenoned laws. Roku, Roku TV, and the Roku logo are the trademarks or registered trademarks of Roku, Inc. Hitachi is a trademark or registered trademark
of Hitachi, Ltd. All other trademarks are the property of their respecve owners.
Requests for permission to reproduce or transmit these materials shall be made to both of the following addresses:
Hitachi America, Ltd.
2420 Fenton Street Suite 200
Chula Vista, CA 91914
and
Roku, Inc.
150 Winchester Circle
Los Gatos, CA 95032
Product name: Hitachi Roku TV
Document name: Hitachi Roku TV Owner’s Guide UHD
Document revision: 7.5.0
Publicaon date: 18 Nov. 2016

iii
Table of Contents
IMPORTANT SAFETY INSTRUCTIONS .........................................................................................vi
Child Safety Notice ...................................................................................................................xi
SAFETY PRECAUTIONS .............................................................................................................. xii
Welcome ..................................................................................................................................... 1
The new standard in Smart TVs ....................................................................................................................................... 1
Get the most out of your new TV .................................................................................................................................... 1
Connections and setup ............................................................................................................. 3
Set up your new TV ......................................................................................................................................................... 3
What’s in the box ....................................................................................................................................................................... 4
Connect your TV .............................................................................................................................................................. 5
Connecting an antenna, cable, or satellite box ..................................................................................................................... 5
Connecting a device with a composite AV video cable ........................................................................................................ 6
Connecting a device with an HDMI cable .............................................................................................................................. 7
Connecting headphones or analog sound bar ...................................................................................................................... 7
Connecting an AV receiver or digital sound bar .................................................................................................................... 8
Preparing for Internet connectivity .......................................................................................................................................... 8
AC power ......................................................................................................................................................................... 8
Remote control baeries ................................................................................................................................................. 9
How to install batteries ............................................................................................................................................................. 9
Roku TV Remote control ................................................................................................................................................ 10
Geng around .............................................................................................................................................................. 10
Panel buons ................................................................................................................................................................. 12
Guided Setup ............................................................................................................................ 13
Starng Guided Setup ................................................................................................................................................... 13
Seng up your TV ......................................................................................................................................................... 14
Connected Home screen ............................................................................................................................................... 20
Personalize your Home screen ............................................................................................................................................. 20
Non-connected Home screen ........................................................................................................................................ 21
Personalize your Home screen ............................................................................................................................................. 21
Benets of connecting ............................................................................................................ 22
Connecng brings out your TV’s full potenal! ............................................................................................................. 22
What is streaming? ........................................................................................................................................................ 23
But what if I didn’t connect my TV? .............................................................................................................................. 24
Setting up Antenna TV ............................................................................................................ 25
Why do I have to set up the TV tuner? .......................................................................................................................... 25
How do I set up the TV tuner? ....................................................................................................................................... 25
Using your TV ........................................................................................................................... 29
Status light ..................................................................................................................................................................... 29
Standby mode energy savings ....................................................................................................................................... 29
Watching broadcast TV channels ................................................................................................................................... 29
Changing channels ................................................................................................................................................................. 30
Viewing program information ................................................................................................................................................. 30
Adjusting settings ................................................................................................................................................................... 31
Pausing Live TV .............................................................................................................................................................. 31
Requirements .......................................................................................................................................................................... 31
Enabling Live TV Pause ......................................................................................................................................................... 31
Using Live TV Pause .............................................................................................................................................................. 32
Notes about Live TV Pause ................................................................................................................................................... 33
Switching TV inputs ....................................................................................................................................................... 33
Auto-detecting devices .......................................................................................................................................................... 33
Adjusting audio/video settings .............................................................................................................................................. 33
Playing content from USB storage devices .................................................................................................................... 33
Auto player launch .................................................................................................................................................................. 34
Playing content from local network media servers ....................................................................................................... 34
Using your TV in a hotel or dorm room ......................................................................................................................... 35

iv
Adjusting TV settings .............................................................................................................. 37
Sengs menu ................................................................................................................................................................ 37
Opons menu ................................................................................................................................................................ 37
Options menu settings ........................................................................................................................................................... 38
Accessibility ................................................................................................................................................................... 39
Accessibility mene settings ................................................................................................................................................... 39
Advanced picture sengs ............................................................................................................................................. 40
Advanced picture settings menu options ............................................................................................................................. 40
Expert Picture Settings .......................................................................................................................................................... 41
Changing privacy sengs .............................................................................................................................................. 42
....................................................................................................................................... 42
Limiting ad tracking ................................................................................................................................................................ 42
My Feed ..................................................................................................................................... 43
Movies Coming Soon ..................................................................................................................................................... 43
Movies, TV shows, and people ...................................................................................................................................... 43
Searching for something to watch ........................................................................................ 44
How do I search? ........................................................................................................................................................... 44
I found a show, now what? ............................................................................................................................................ 45
Follow on Roku .............................................................................................................................................................. 45
Recent Searches ............................................................................................................................................................ 45
Using the Roku Channel Store ............................................................................................... 46
Customizing your TV .............................................................................................................. 47
Rearrange les ............................................................................................................................................................... 47
Edit broadcast TV channel lineup .................................................................................................................................. 48
Rename inputs ............................................................................................................................................................... 48
Remove unwanted les ................................................................................................................................................. 48
Change themes .............................................................................................................................................................. 49
Change sound eects volume........................................................................................................................................ 49
Congure power sengs ............................................................................................................................................... 49
Power on settings ................................................................................................................................................................... 49
Auto power savings ................................................................................................................................................................ 50
............................................................................................................................................................... 50
Captions mode ........................................................................................................................................................................ 50
Captions style .......................................................................................................................................................................... 51
Audio Guide settings .............................................................................................................................................................. 52
Congure parental controls ........................................................................................................................................... 52
Creating a parental control PIN ............................................................................................................................................. 52
Blocking Movie Store, TV Store, and News ......................................................................................................................... 53
Blocking Broadcast TV shows ............................................................................................................................................... 53
What happens when a TV show is blocked? ....................................................................................................................... 56
Changing the parental control PIN ....................................................................................................................................... 57
Resetting parental controls .................................................................................................................................................... 57
More settings ............................................................................................................................ 58
Changing network sengs ............................................................................................................................................ 58
Changing me sengs .................................................................................................................................................. 58
Scanning for broadcast TV channels again .................................................................................................................... 59
Seng the HDMI mode ................................................................................................................................................. 59
Using the TV in a home theater ..................................................................................................................................... 59
......................................................................................................................................................... 59
Changing the audio mode ..................................................................................................................................................... 60
Setting up a digital audio connection ................................................................................................................................... 60
Controlling other devices through CEC ................................................................................................................................ 60
Restarng the TV ........................................................................................................................................................... 62
Reseng the TV ............................................................................................................................................................ 62
Reset audio/video settings .................................................................................................................................................... 62
Factory reset everything ........................................................................................................................................................ 62
What if I can’t access the Factory Reset option? ................................................................................................................ 63
Network connection reset ...................................................................................................................................................... 63
Changing your Roku Channel Store PIN preference ...................................................................................................... 63

v
Geng system updates ................................................................................................................................................. 64
Checking for updates on a connected TV............................................................................................................................ 64
Getting updates on a non-connected TV ............................................................................................................................. 64
Other devices ........................................................................................................................... 66
Screen Mirroring your phone or tablet.......................................................................................................................... 66
Geng and using the Roku mobile app ........................................................................................................................ 66
Private Listening on the Roku mobile app ........................................................................................................................... 66
Using a universal remote ............................................................................................................................................... 66
FAQ ............................................................................................................................................. 67
Specications ........................................................................................................................... 73
Service & Warranty ................................................................................................................. 74
vi
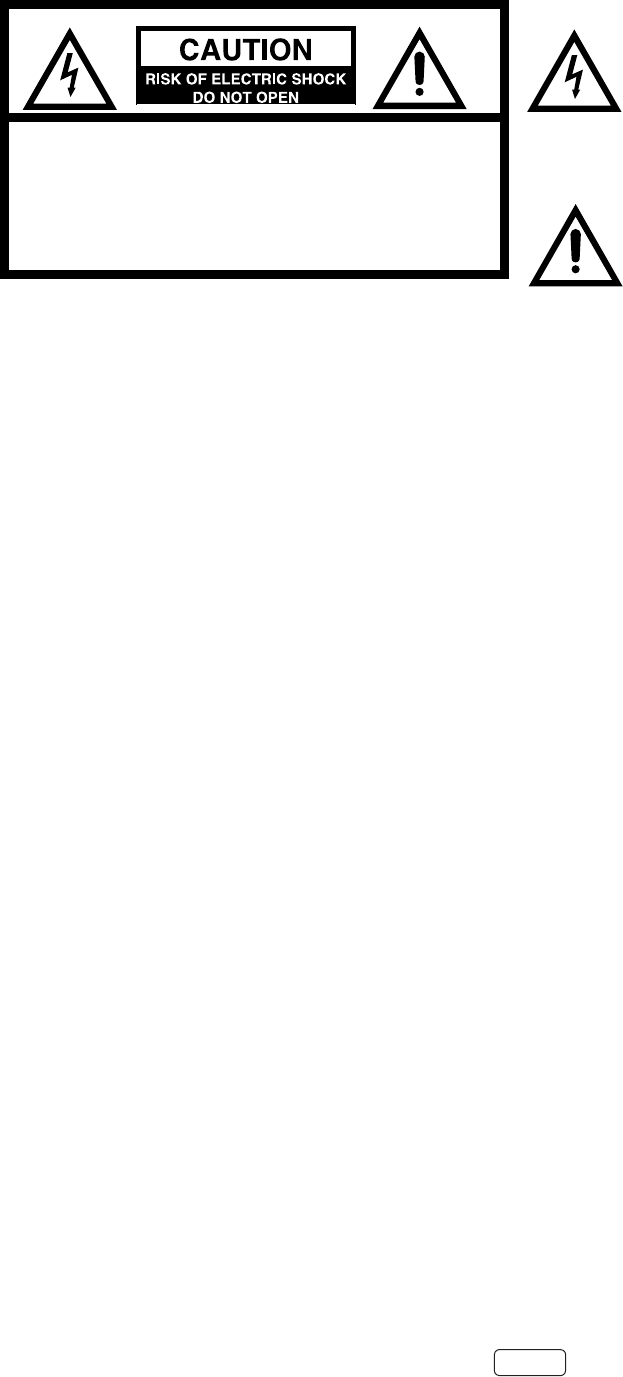
The lightning ash with arrowhead symbol,
within an equilateral triangle is intended to
alert the user to the presence of uninsulated
dangerous voltage within the product's
enclosure that may be of sucient magnitude
to constute a risk of electric shock.
The exclamaon point within an equilateral
triangle is intended to alert the user to
the presence of important operang and
maintenance (servicing) instrucons in the
literature accompanying the appliance.
WARNING: TO PREVENT FIRE OR SHOCK HAZARD, DO NOT EXPOSE THIS
APPLIANCE TO RAIN OR MOISTURE.
TO PREVENT THE SPREAD OF FIRE, KEEP CANDLES OR OPEN
FLAMES AWAY FROM THIS PRODUCT AT ALL TIMES.
CAUTION: TO PREVENT ELECTRIC SHOCK, DO NOT USE THIS TELEVISION’S
AC PLUG WITH AN EXTENSION CORD, RECEPTACLE OR OTHER
OUTLET UNLESS THE BLADES CAN BE FULLY INSERTED TO PRE
VENT BLADE EXPOSURE.
CAUTION: TO REDUCE THE RISK OF ELEC-
TRIC SHOCK, DO NOT REMOVE
COVER (OR BACK). NO USER
SERVICEABLE PARTS INSIDE.
REFER SERVICING TO QUALIFIED
SERVICE PERSONNEL.
WARNING: This equipment has been tested and found to comply with the limits for a Class B digital device,
pursuant to Part 15 of the FCC Rules. These limits are designed to provide reasonable protecon
against harmful interference in a residenal installaon. This equipment generates, uses and can
radiate radio frequency energy and, if not installed and used in accordance with the instrucons, may
cause harmful interference to radio communicaons.
However, there is no guarantee that interference will not occur in a parcular installaon. If this
equipment does cause harmful interference to radio or television recepon, which can be determined
by turning the equipment o and on, the user is encouraged to try to correct the interference by one or
more of the following measures:
- Reorient or relocate the receiving antenna.
- Increase the separaon between the equipment and receiver.
- Connect the equipment to an outlet on a circuit dierent from that to which the receiver is
connected.
Never place a television set in an unstable locaon. A television set may fall, causing serious personal
injury or death. Many injuries, parcularly to children, can be avoided by taking simple precauons
such as:
- Using cabinets or stands recommended by the manufacturer of the television set.
- Only using furniture that can safely support the television set.
- Ensuring the television set is not overhanging the edge of the supporng furniture.
IMPORTANT SAFETY INSTRUCTIONS
vii
This equipment is a Class II or double insulated electrical appliance. It has been designed in such a way that it
does not require a safety connecon to electrical earth.
- Not placing the television set on tall furniture (for example, cupboards or bookcases) without
anchoring both the furniture and the television set to a suitable support.
- Not placing the television set on cloth or other materials that may be located between the television
set and supporng furniture.
- Educang children about the dangers of climbing on furniture to reach the television set or its
controls.
- Consult the dealer or an experienced radio/TV technician for help.
CAUTION: - Changes or modicaons not expressly approved by the party responsible
for compliance with the FCC Rules could void the user’s authority to operate
this equipment.
- To comply with FCC RF exposure compliance requirements, a separaon
distance of at least 8 inches must be maintained between this device and all
persons.
The rang sheet and the safety cauon are on the rear of the unit.
viii
1) Read these instrucons.
2) Keep these instrucons.
3) Heed all warnings.
4) Follow all instrucons.
5) Do not use this apparatus near water.
6) Clean only with dry cloth.
7) Do not block any venlaon openings. Install in accordance with the manufacturer’s instrucons.
8) Do not install near any heat sources such as radiators, heat registers, stoves, or other apparatus (including
ampliers) that produce heat.
9) Do not defeat the safety purpose of the polarized or grounding-type plug. A polarized plug has two blades with
one wider than the other. A grounding type plug has two blades and a third grounding prong. The wide blade
or the third prong are provided for your safety. If the provided plug does not t into your outlet, consult an
electrician for replacement of the obsolete outlet.
10) Protect the power cord from being walked on or pinched parcularly at plugs, convenience receptacles, and the
point where they exit from the apparatus.
11) Only use aachments/accessories specied by the manufacturer.
12) Use only with cart, stand, tripod, bracket, or table specied by the
manufacturer, or sold with the apparatus. When a cart is used, use cauon
when moving the cart/apparatus combinaon to avoid injury from p-over.
13) Unplug this apparatus during lightning storms or when unused for long periods of me.
14) Refer all servicing to qualied service personnel. Servicing is required when the apparatus has been damaged
in any way, such as power-supply cord or plug is damaged, liquid has been spilled or objects have fallen into the
apparatus, the apparatus has been exposed to rain or moisture, does not operate normally, or has been dropped.
15) Apparatus should not be exposed to dripping or splashing, and objects lled with liquids, such as vases, should not
be placed on the apparatus.
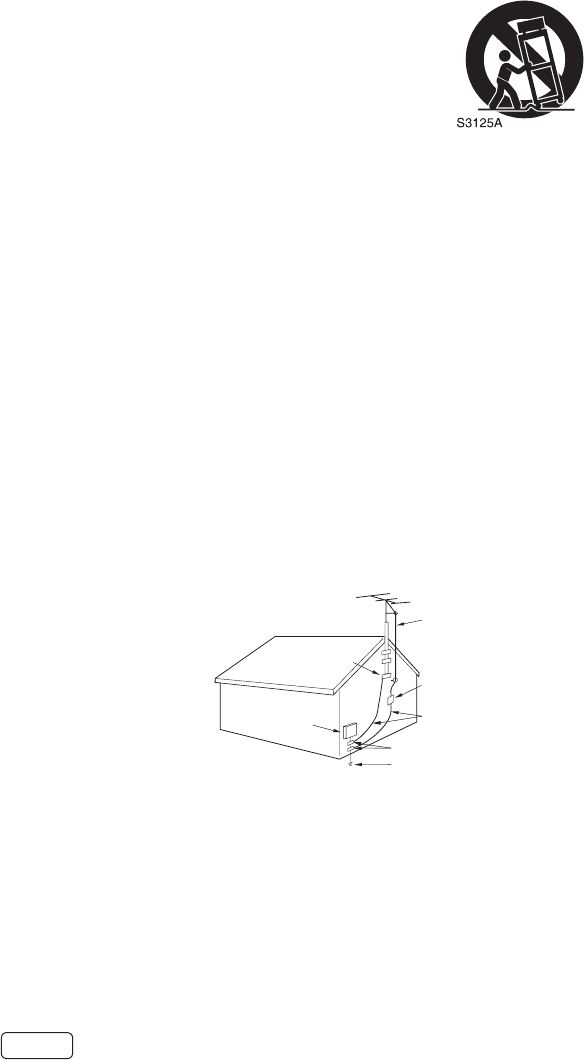
16) An outside antenna system should not be located in the vicinity of overhead power lines or other electric light or
power circuits, or where it can fall into such power lines or circuits. When installing an outside antenna system,
extreme care should be taken to keep from touching such power lines or circuits, as contact with them might be
fatal.
17) Do not overload wall outlets and extension cords, as this can result in a risk of re or electric shock.
18) Do not push objects through any openings in this unit, as they may touch dangerous voltage points or short out
parts that could result in re or electric shock. Never spill or spray any type of liquid into the unit.
19) If an outside antenna or cable system is connected to the unit, be sure the antenna or cable system is grounded to
provide some protecon against voltage surges and built-up stac charges, Secon 810 of the Naonal Electrical
Code, ANSI/NFPA 70, provides informaon with respect to proper
grounding of the mast and supporng structure, grounding of the
lead-in wire to an antenna discharge unit, size of grounding conductors,
locaon of antenna discharge unit, connecon to grounding electrodes,
and requirements for the grounding electrode.
20) When replacement parts are required, be sure the service technician
uses replacement parts specied by the manufacturer or those that
have the same characteriscs as the original part.
Unauthorized substuons may result in re, electric shock or other
hazards.
21) Upon compleon of any service or repairs to this unit, ask the service
technician to perform safety checks to determine that the unit is in proper operang condion.
22) When you connect the product to other equipment, turn o the power and unplug all of the equipment from the
wall outlet. Failure to do so may cause an electric shock and serious personal injury. Read the owner’s manual of
the other equipment carefully and follow the instrucons when making any connecons.
23) Do not allow the product to output distorted sound for an extended period of me. It may cause speaker
overheang and re.
ANTENNA
DISCHARGE UNIT
(NEC SECTION 810-20)
ANTENNA
LEAD IN WIRE
GROUNDING CONDUCTORS
(NEC SECTION 810-21)
GROUND CLAMPS
POWER SERVICE GROUNDING
ELECTRODE SYSTEM
(NEC ART 250, PART H)
GROUND
CLAMP
ELECTRIC SERVICE
EQUIPMENT
NEC-NATIONAL
ELECTRICAL CODE
ELECTR
EXAMPLE OF ANTENNA GROUNDING AS PER THE
NATIONAL ELECTRICAL CODE

ix
24) This reminder is provided to call the cable TV system installer’s aenon to Arcle 820-40 of the NEC that
provides guidelines for proper grounding and, in parcular, species that the cable ground shall be connected to
the grounding system of the building, as close to the point of cable entry as praccal.
25) Sudden high volume sound may cause hearing or speaker damage. When you use headphones, (if the unit is
equipped with a headphone jack) keep the volume at a moderate level. If you use headphones connuously with
high volume sound, it may cause hearing damage.
26) The mains plug is used as the disconnect and shall remain readily operable.
CONDENSATION
Moisture will form in the operang secon of the unit if the unit is brought from cool surroundings into a warm room
or if the temperature of the room rises suddenly. When this happens, unit's performance will be impaired. To prevent
this, let the unit stand in its new surroundings for about an hour before switching it on, or make sure that the room
temperature rises gradually.
Condensaon may also form during the summer if the unit is exposed to the breeze from an air condioner. In such
cases, change the locaon of the unit.
HOW TO HANDLE THE LCD PANEL
• Do not press hard or jolt the LCD panel. It may cause the LCD panel glass to break and injury may occur.
• If the LCD panel is broken, make absolutely sure that you do not touch the liquid in the panel. This may cause skin
inammaon.
If the liquid gets in your mouth, immediately gargle and consult with your doctor. Also, if the liquid gets in your eyes
or touches your skin, consult with your doctor aer rinsing for at least 15 minutes or longer in clean water.
If a xed (non-moving) paern remains on the LCD Panel for long periods of me,
the image can become permanently engrained in the LCD Panel and cause subtle but permanent ghost images. This
type of damage is NOT COVERED BY YOUR WARRANTY. Never leave your LCD Panel on for long periods of me while it is
displaying the following formats or images:
• Fixed Images, such as stock ckers, video game paerns, TV staon logos, and websites.
• Special Formats that do not use the enre screen. For example, viewing leerbox style (16:9) media on a normal (4:3)
display (black bars at top and boom of screen); or viewing normal style (4:3) media on a widescreen (16:9) display
(black bars on le and right sides of screen).
• LCD Panels are manufactured using an extremely high level of precision technology, however somemes parts of the
screen may be missing picture elements or have luminous spots.
• Do not install the LCD Panel near electronic equipment that produces electromagnec waves. Some equipment placed
too near this unit may cause interference.
• Eect on infrared devices – There may be interference while using infrared devices such as infrared cordless
headphones.

x
This television is designed to operate on 120 volts 60 Hz, AC current. Insert the power cord
into a 120 volts 60 Hz outlet.
To prevent electric shock, do not use the television’s (AC) plug with an extension cord,
receptacle, or other outlet unless the blades can be fully inserted to prevent blade exposure.
Never connect the television to 50 Hz, direct current, or anything other than the specied
voltage.
To reduce the risk of re or electric shock, do not expose this apparatus to rain or moisture.
Never remove the back cover of the television as this can expose you to very high voltages and
other hazards. If the television does not operate properly, unplug the television and call your
authorized dealer or service center.
Adjust only those controls that are covered in the instrucons, as improper changes or
modicaons not expressly approved by Hitachi could void the user’s warranty.
This device complies with Part 15 of the FCC Rules. Operaon is subject to the following two condions:
(1) This device may not cause harmful interference and (2)This device must accept any interference received, including
interference that may cause undesired operaon.
For quesons regarding this declaraon, contact:
Hitachi America, Ltd.
2420 Fenton Street, Suite 200
Chula Vista, CA 91914-3556
Tel: 800.HITACHI (800.448.2244)
ATTN: Customer Relaons
LEAD NOTICE
This product contains lead. Dispose of this product in accordance with applicable environmental laws. For product
recycling and disposal informaon, contact your local government agency or www.eRecycle.org (in California), the
Electronic Industries Alliance at www.ecyclingcentral.com (in the U.S.) or the Electronic Product Stewardship Canada at
www.epsc.ca (in Canada). .

xi
Child Safety Notice
xii
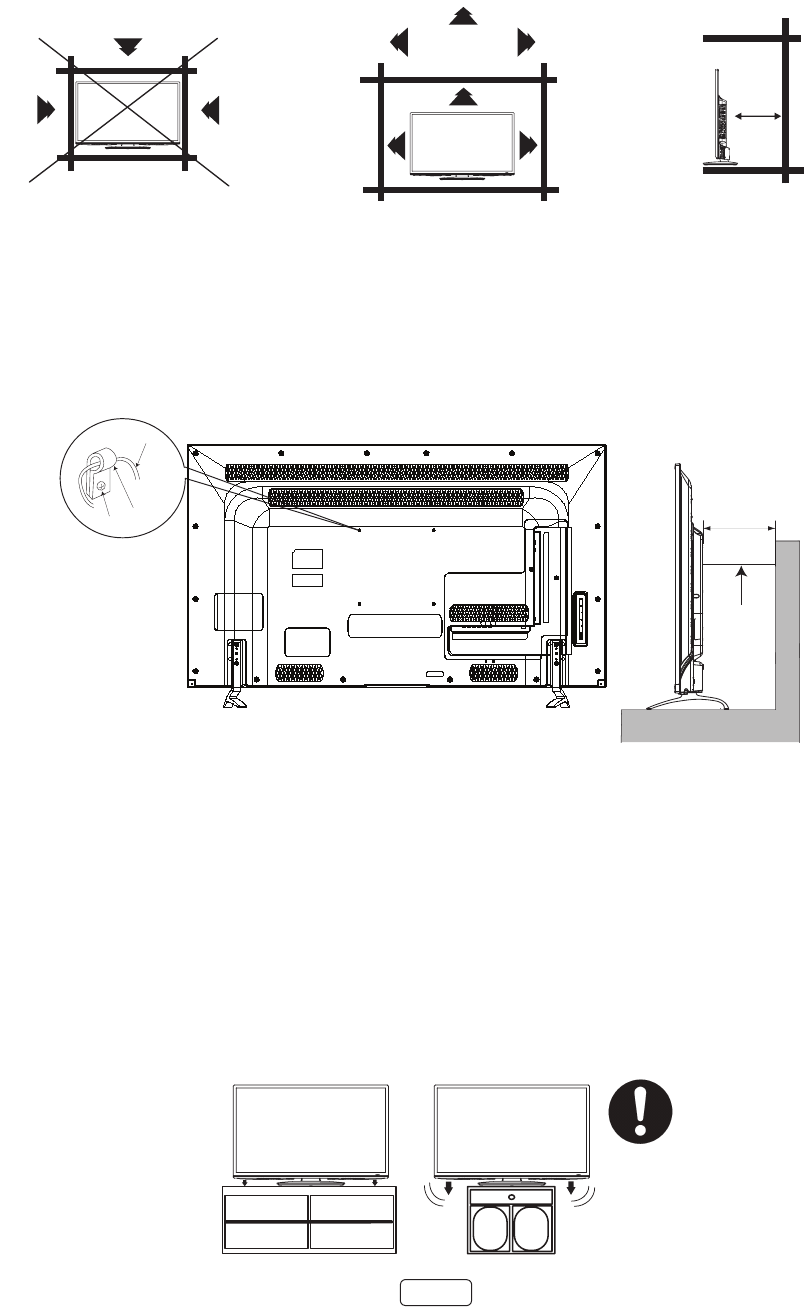
The unit emits heat when in operaon. Do not place any covers or blankets on the unit, this may cause overheang. Do
not block venlaon holes, or set up near radiators. Do not place in direct sunlight. When placing on a shelf leave 4 inches
(10 cm) free space around the enre unit.
1 Use metallic wire (not provided), clamp (not provided) and screw on the rear of the TV as shown below.
2 Keep the TV 4 inches away from the wall, except when mounted using the wall mount bracket, and secure to the wall as
shown below:
NOTICE FOR TV CABINET
If the unit is placed on a cabinet smaller than the length of the unit, it could result in instability and the unit may tumble
over, making a risk of personal, possibly fatal injury. Also, this would seriously damage the product. Accordingly, Hitachi
accepts no responsibility or liability for any injuries or property damage resulng from the improper installaon.
Wire
4 inches
Wire
Clamp
Screw
NO !!YES !!
SAFETY PRECAUTIONS
4 inches
4 inches
Y(VIDEO)
4 inches
4 inches
Y(VIDEO)
4 inches
4 inches
Y(VIDEO)

1
Welcome
Congratulaons on the purchase of your new Hitachi Roku TV! Discover the joy of endless entertainment. Aer it’s set
up, you’ll be able to access a world of streaming content channels that may include Nelix, YouTube, Crackle, CNET and
literally thousands more.
: Your TV receives automac updates from me to me, enabling new content and features. This
Owner’s Guide describes Roku TV version 7.5. To determine the current version of your Roku TV, go to Sengs >
System > About aer you complete Guided Setup.
The new standard in Smart TVs
Welcome to TV like you’ve most likely never seen before—a home screen that you can personalize with your favorite
devices and streaming channels. Choose from hundreds of thousands of streaming movies and TV episodes, plus music,
sports, kids, family, internaonal and much more. You should never run out of things to watch.
: A paid subscripon or other payments may be required for some channels. Channel availability is subject to
change and varies by country. Not all content is available in countries or regions where Roku® products are sold.
Get the most out of your new TV
Follow these simple steps to get the most out of your new TV.
1. Connect to the Internet
• It’s simple, it’s easy, and it will unlock a world of entertainment. All you need is a network connecon.
There are hundreds of free streaming channels, paid subscripon services like Nelix and Spofy, conve-
nient ways to rent or buy a favorite lm or show with Google Play and Cineplex and more.
2. Pick your favorite streaming channels
• Find the entertainment you love. From the latest blockbuster movies to your favorite TV shows, with
tons of live sports, a broad selecon of music streaming channels, popular programming in a dozen in-
ternaonal languages, 24x7 live news and so much more, your new Roku TV has your sweet spot. A paid
subscripon or other payments may be required for some channels.
3. Personalize your screen
• Put your favorite broadcast TV, streaming channels, gaming console and other devices front-and-center
on the screen. No more ipping through inputs or wading through complicated menus. You can
even personalize the names of each input and move les around so your most-oen used devices and
streaming channels are only a click away.
4. Search for your favorite movie, TV show, actor, or director
• Once you’re connected to the internet, you can easily search across top streaming channels by movie
or TV show tle, actor or director—all from one place. Search results are organized by price so you can
always see the best priced opon. A paid subscripon or other payments may be required for some
channels.

2
5. Pause live TV
• Pause, resume, fast forward, and rewind TV shows. Simply connect your own USB drive with 16GB or
bigger capcity to the TV and pause live TV for up to 90 minutes.
: Live TV Pause is available on digital TV shows received on the TV’s antenna input only, and
only when the TV is linked to a valid Roku account.
6. Send your personal media to the big screen
• Send personal photos, videos, and music from your compable smartphone or tablet to the TV screen
in just a few taps. Plus, with certain channels, such as Nelix and YouTube, you can send movies, shows,
sport highlights, and more directly to your TV.
: The Roku app for Microso Windows® mobile devices does not cast videos.
7. Follow movies coming soon
• Use My Feed to choose from and follow a list of upcoming movies, and then watch for alerts each me
one of your followed movies becomes available or changes price.
: My Feed is not available in the Roku App for Windows mobile devices.
8. Take charge with a smartphone or tablet
• Control your TV with the included remote or from your compable smartphone or tablet with the free
mobile app for iOS®, Android™, and Windows mobile devices*. Browse channels, view My Feed, listen to
audio from streaming programs, and even search with voice via the free mobile app.
: Voice search, Mobile listening, and My Feed are not available in the Roku app for Windows mobile
devices.
• Mirror your compable smartphone or tablet on your TV. Share videos, photos, web pages, and more
from compable devices.
• Use your compable smartphone or tablet to connect your Roku TV to the types of networks found in
hotels and college dorms, where you may have to agree to terms, enter codes, or provide idenfying
informaon.
: Using your Roku TV on a restricted public network requires wireless availability and use of your network-con-
nected smartphone, tablet, or computer to authencate access to your account. You must use your Roku TV remote
control to iniate the connecon process. Streaming content might be limited due to your geographic locaon or
because of restricons imposed by the wireless network host.
Go to support.roku.com for device compability informaon.
Let’s get started.
* IOS® is a trademark or registered trademark of Cisco in the U.S. and other countries and is used under license.
Android™ is a trademark of Google Inc.
Windows® is a registered trademark of Microso Corporaon in the United States and other countries.
3
Connections and setup
Set up your new TV
Remove your TV from the box
Be careful, it’s heavy!
To mount on a wall
Before wall mounting, please carefully check the location of the TV’s mounting-holes.
Follow the instructions that come with the wall mount.
Contact the retailer where you purchased the TV for advice, and have the equipment professionally installed.
Incomplete or improper installation may cause injury to you, and/or damage to the TV. ISO M6 x12 thread type
screws should be used. The insertion length must be within 10~13mm. If the insertion length is less than or more
than specified above, the weight can not be maintained or a space is created between the Wall Mount Bracket
and the Television.
(Insertion Length) = (Screw Length) - (Washers Thickness) - (Mounting Bracket Thickness)
: The wall mount bracket and the screws are not included.
: Store the stand and stand screws in a safe place in case you decide to use the stand in the future.
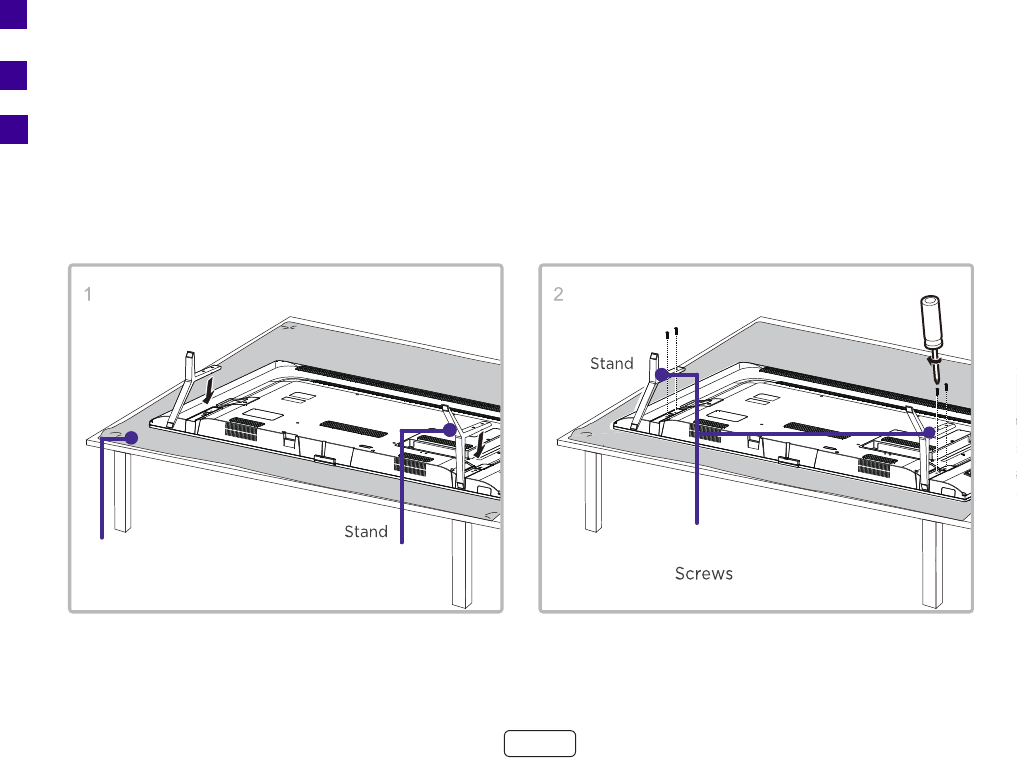
To use the stand
To prevent damage to the screen, carefully place your TV on a soft, cushioned surface.
Put the column of the stands into the TV, align the stands with the screw holes located on the TV.
Secure the stands to the TV with four (4) screws.
A
B
C
ABC
4
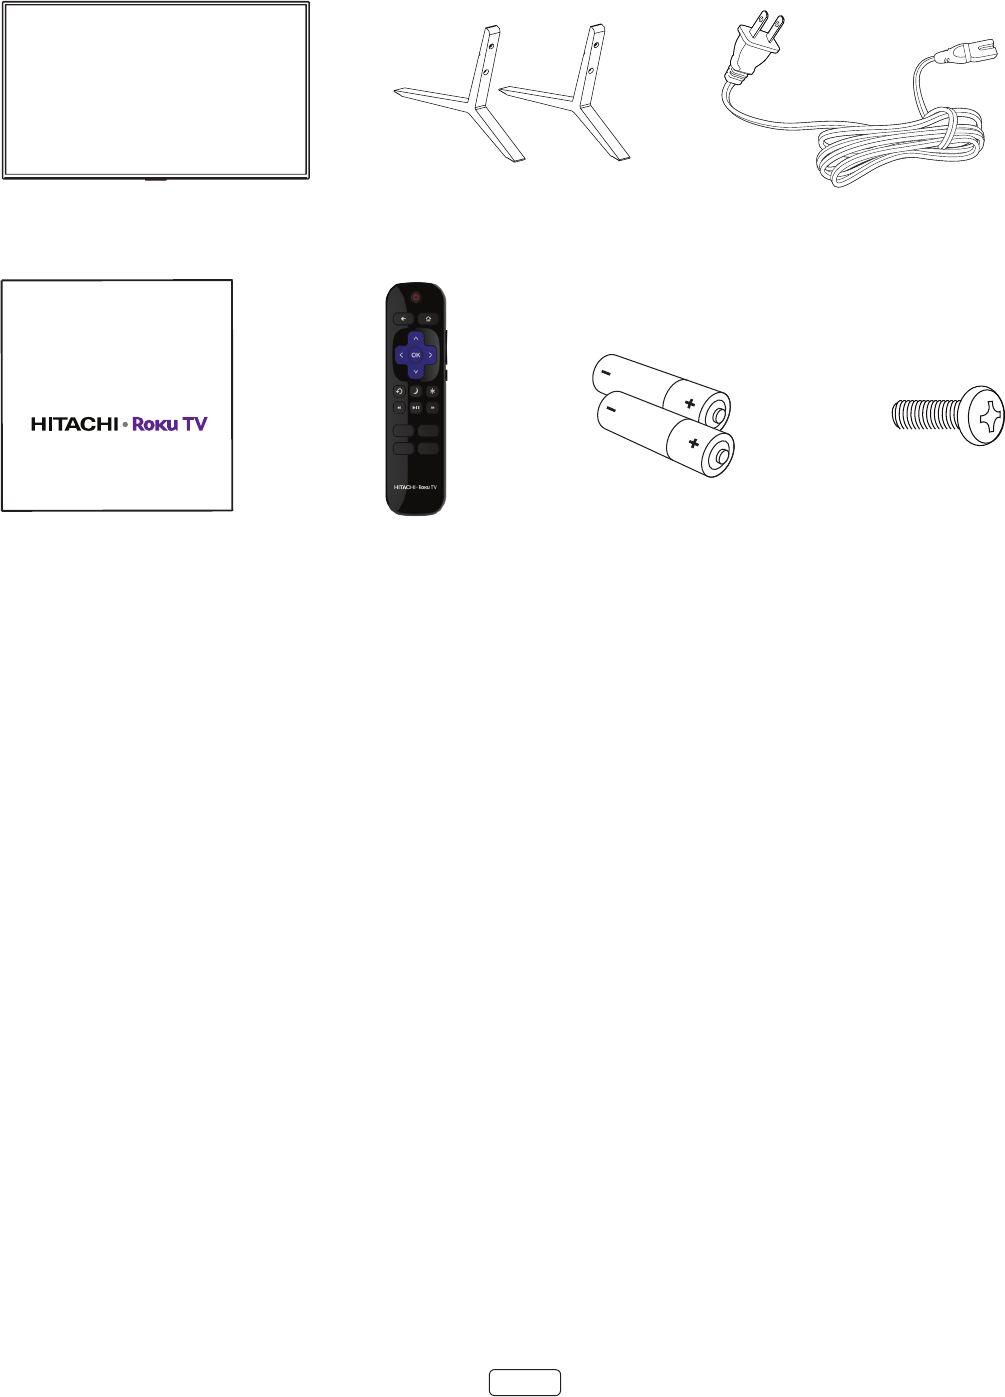
What’s in the box
HITACHI Roku TV
Hitachi Roku TV Power cord
TV remote
TV stand
2 x AAA batteries
for remote
4 Screws
Quick Start Guide
Hi! Let’s get started.
5
Connect your TV
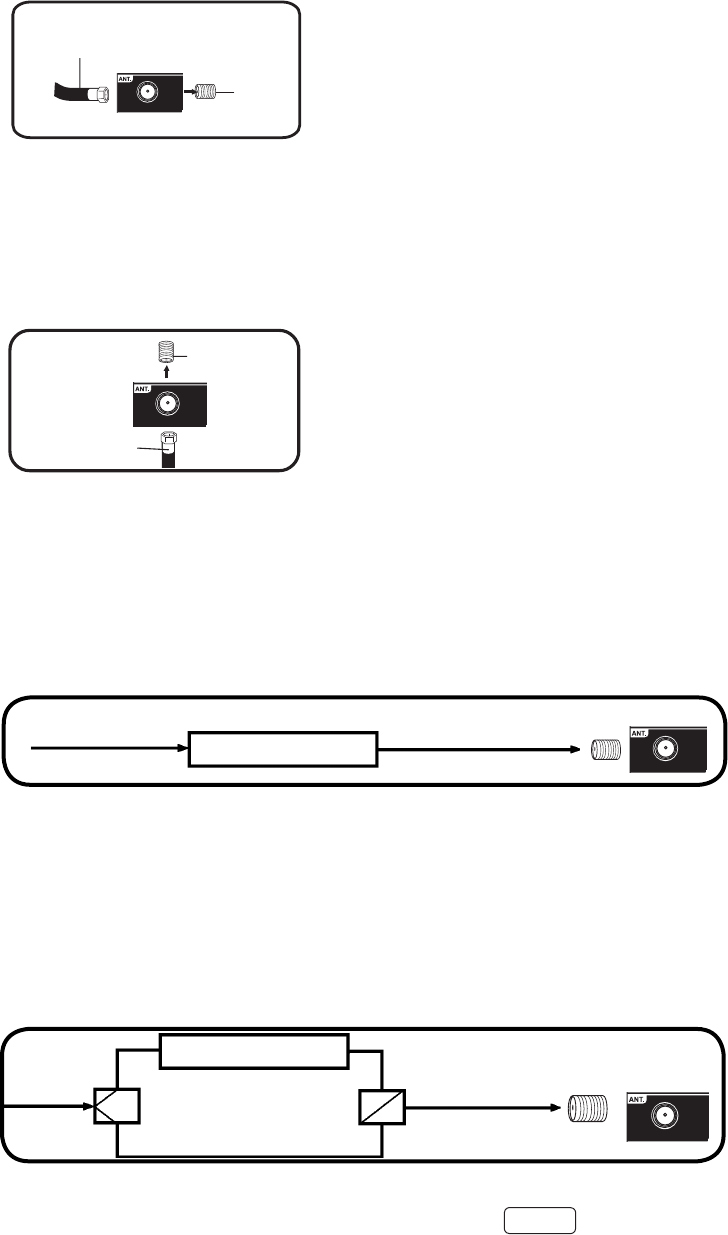
Connecting an antenna, cable, or satellite box
Antenna connections
If you are using an indoor or outdoor antenna, follow the instrucons below that correspond to your antenna system. If
you are using a Cable TV service, see Cable TV connecons.
Cable TV connections
This TV has an extended tuning range and can tune most cable channels without using a Cable TV Converter box. Some
cable companies oer “premium pay channels” where the signal is scrambled. Descrambling these signals for normal
viewing requires the use of a descrambler device which is generally provided by the Cable TV company.
For subscribers to basic Cable TV service
For subscribers to scrambled Cable TV service
If you subscribe to a Cable TV service which requires the use of a Converter/Descrambler box, connect the incoming 75
ohm Coaxial Cable to the Converter/Descrambler box. Using another 75 ohm Coaxial Cable, connect the output jack of
the Converter/Descrambler box to the Antenna Jack on the TV. Follow the connecons shown below. Set the TV to the
output channel of the Converter/Descrambler box (usually channel 3 or 4) and use the Converter/Descrambler box to
select channels.
For subscribers to unscrambled Cable TV service with scrambled premium channels
If you subscribe to a Cable TV service in which basic channels are unscrambled and premium channels require the use of
a Converter/Descrambler box, you may wish to use a signal Splier and an A/B Switch box (available from the Cable TV
company or an electronics supply store). Follow the connecons shown below. With the switch in the “B” posion, you
can directly tune any non-scrambled channels on your TV. With the switch in the “A” posion, tune your TV to the output
of the Converter/Descrambler box (usually channel 3 or 4) and use the Converter/Descrambler box to tune scrambled
channels.
Connect the 75 ohm cable from the combination VHF/UHF antenna to the Antenna Jack.
75 ohm
Coaxial
Cable
Antenna
Jack
Incoming 75 ohm
Cable TV Cable 75 ohm Cable to TV
Antenna
Jack
Converter/
Descrambler
Splitter B
A
Incoming
75 ohm
Cable TV
Cable A/B Switch
75 ohm Cable
to TV
Converter/
Descrambler Antenna
Jack
75 ohm
Coaxial Cable
Antenna
Jack
75 ohm
Coaxial Cable
Antenna
Jack
For basic Cable TV service not requiring a Converter/Descrambler box, connect the 75 ohm
Coaxial Cable directly to the Antenna Jack on the back of the TV.
75 ohm
Coaxial Cable
Antenna
Jack

6
: If you are using an antenna with a 300 ohm twin-lead cable, you need to use a 300-75 ohm adapter (not
provided) to adapt the cable to a connecon that is compable with the TV’s antenna input.
: If you receive your TV staons through a set top box from a cable or satellite TV provider, connect it to the TV
using the best connecon method available. From most to least desirable:
• ® – Digital HD and SD video
• – analog SD video
• – analog SD video using NTSC
Connecting a device with a composite AV video cable
If the best connecon available on your device is AV or composite video output, connect it to the TV using a composite
AV cable (not provided). Composite AV cables typically have three RCA-type plugs on each end, color coded as follows:
• Yellow: Video
• Red: Audio, right channel
• White or black: Audio, le channel
Connect each plug to the corresponding connector on the component and on the TV.
VIDEO L R
- AUDIO -
AV IN
RESET
L
R- AUDIO -HEADPHONE
AIR/CABLE
HDMI 4
HDMI 3
HDMI 2
LAN HDMI 1
ARC)SPDIF
USB
VIDEO L R
- AUDIO -
AV IN
RESET
L
R- AUDIO -HEADPHONE
AIR/CABLE
HDMI 4
HDMI 3
HDMI 2
LAN HDMI 1
ARC)SPDIF
USB
7
Connecting a device with an HDMI cable
If possible, connect your devices using HDMI cables (not provided). They help to provide the best video quality and also
carry audio signals, so that only one cable is needed. For beer picture quality, we recommend that you use cables desig-
nated as High Speed HDMI cables.
: You might need to congure the component to send its signal through its HDMI connector.
The connector labeled has the addional ability to use the Audio Return Channel to send digital audio to
a receiver or sound bar, as explained in “Connecng an AV receiver or digital sound bar” on page 8
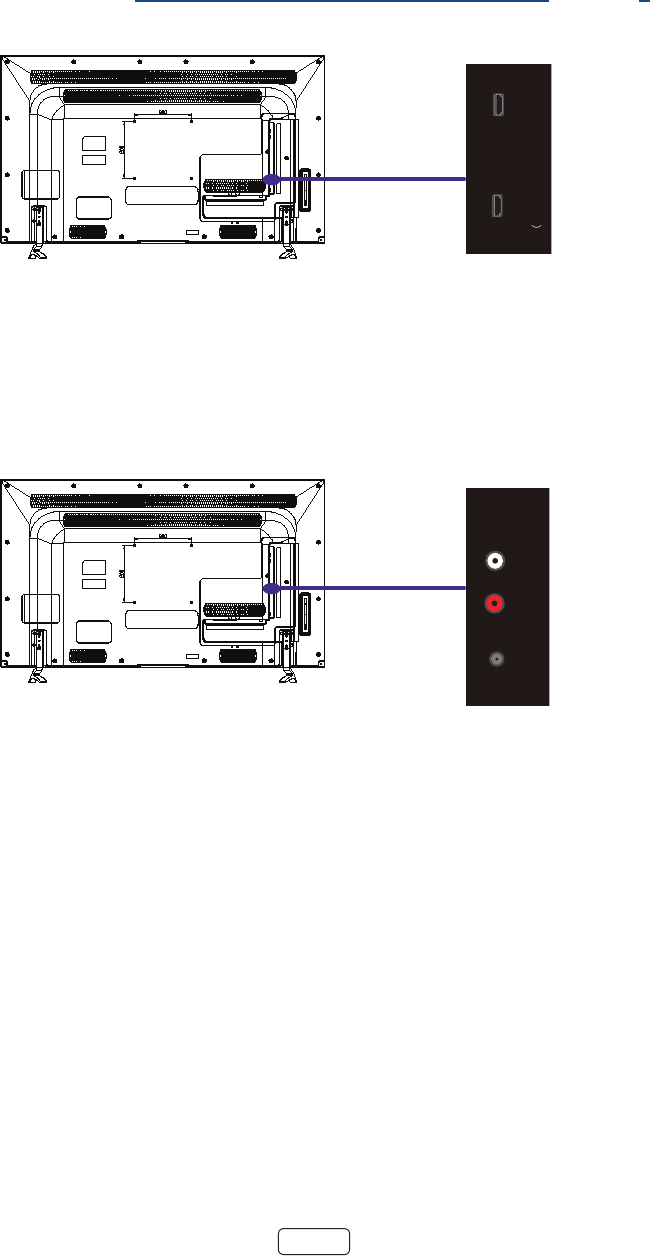
Connecting headphones or analog sound bar
You can connect headphones or an analog sound bar (not provided) to the TV’s headphone jack.
: Inserng a plug in the headphone jack disables the sound from the TV’s built-in speakers.
Loud noise can damage your hearing. When using headphones, use the lowest volume seng on your
headphones that sll lets you hear the sound.
Select models also have an audio line out connecon that is not aected by TV volume or mute sengs and does not
disable the TV speakers. Use this connecon when you want to use your amplier or sound bar to control the TV volume.
To turn o the TV’s built-in speakers, in the screen menu, navigate to and change
the seng.
VIDEO L R
- AUDIO -
AV IN
RESET
L
R- AUDIO -HEADPHONE
AIR/CABLE
HDMI 4
HDMI 3
HDMI 2
LAN
HDMI 1
ARC)
SPDIF
USB
VIDEO L R
- AUDIO -
AV IN
RESET
L
R- AUDIO -HEADPHONE
AIR/CABLE
HDMI 4
HDMI 3
HDMI 2
LAN HDMI 1
ARC)SPDIF
USB
8
Connecting an AV receiver or digital sound bar
You can enjoy Dolby Audio™ mulchannel sound from your TV if you connect a digital amplier or sound bar (not provid-
ed) in either of two ways:
• – Connect a TOSLINK opcal cable (not provided) from the TV to the Opcal
input on your receiver or sound bar.
• – Connect an HDMI cable (not provided) from the HDMI (ARC) connector to the HDMI input on your
receiver or sound bar. This connecon uses the Audio Return Channel (ARC) feature of the HDMI specicaon to
output sound from the TV to a compable device. To use this feature, you must congure the TV to enable HDMI
ARC, as explained in “Enabling HDMI ARC” on page 61.
Preparing for Internet connectivity
If you want to connect your TV to the Internet to watch streaming content, you can choose either a wireless or a wired
connecon.
• – To use a wireless connecon, make sure you know the name (SSID) and password you use
to connect to your wireless modem/router or wireless access point.
• – To use a wired connecon, plug your Ethernet cable into the RJ-45 jack on the back of the
TV. The wired connecon supports both 10 and 100 Base-T Ethernet
For wireless operaon, the TV connects through a built-in wireless LAN adapter. The TV does not support the use of a
USB network adapter.
: We recommend that your wireless connecon support IEEE 802.11 dual band capability for the best expe-
rience.
AC power
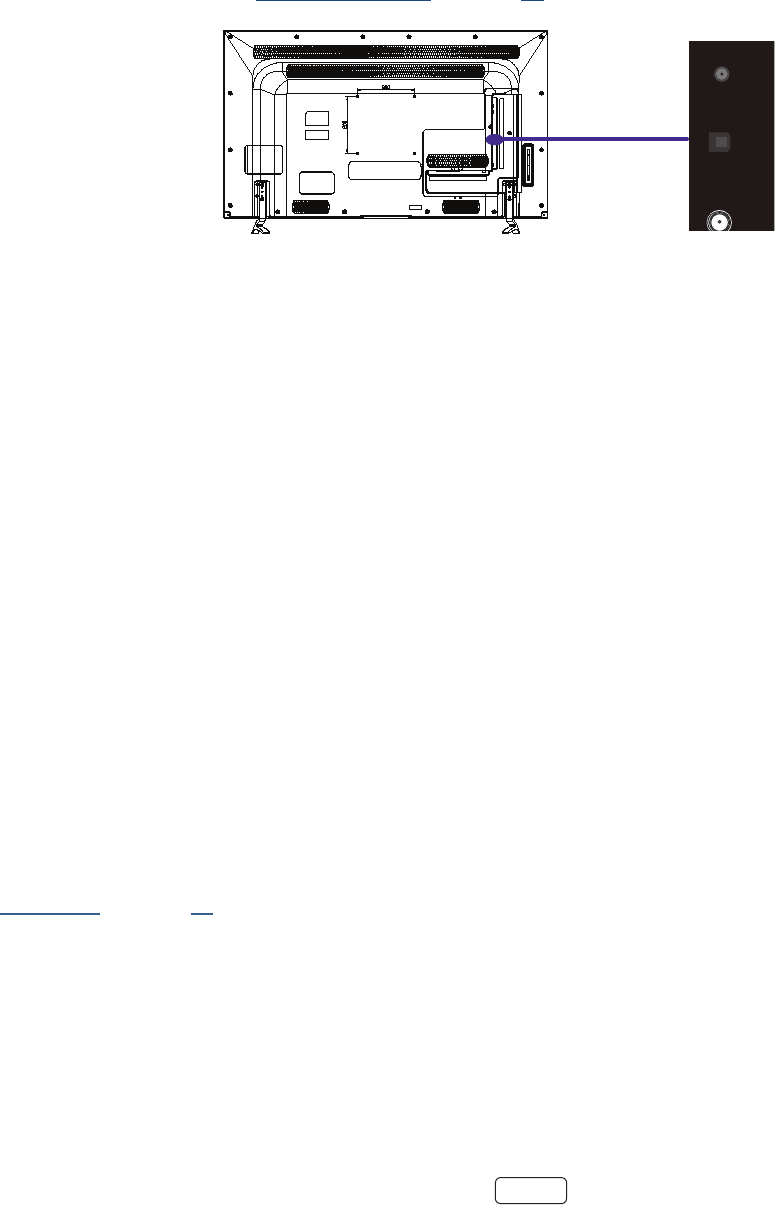
Plug your TV into a power outlet. You can tell that the TV has power because the status light on the front of the TV lights
up.
“Status light” on page 29 explains how the status indicator shows what is happening with the TV.
VIDEO L R
- AUDIO -
AV IN
RESET
L
R- AUDIO -
HEADPHON
E
AIR/
CABLE
HDMI 4
HDMI 3
HDMI 2
LAN HDMI 1
ARC)
SPDIF
USB

9
Remote control batteries
Open the back of your Roku TV remote control and insert the included baeries, observing the proper orientaon as
indicated in the baery compartment. Reaach the back cover.
“Watching broadcast TV channels” on page 29 explains how to use the remote control in each of the TV’s operang
modes.
How to install batteries
1. Open the baery compartment cover.
2. Install two “AAA” baeries (supplied).
3. IMPORTANT NOTE: Carefully match (+) and (-) indicaon
on the baery with the (+) and (-) inside the baery
compartment.
4. Replace the baery compartment cover.
BATTERY PRECAUTIONS
These precauons should be followed when using baeries in this device:
• The baeries may last approximately one year depending on how much the remote control is used. Replace baeries
when the remote operaon becomes errac.
• Use only the size and type of baeries specied.
• Be sure to follow the correct polarity when installing the baeries as indicated in the baery compartment. Reversed
baeries may cause damage to the device.
• Do not mix dierent types of baeries together (e.g. Alkaline, Carbon-zinc or Rechargeable) or old baeries with fresh
ones.
• If the device is not to be used for a long period of me, remove the baeries to prevent damage or injury from possible
baery leakage.
• Do not try to recharge baeries not intended to be recharged; they can overheat and rupture. (Follow baery
manufacturer’s direcons.)
• Please use cauon when inserng baeries to avoid baery damage. If the spring terminal in the remote control
remains in contact with a side of a damaged baery it can cause a short circuit. Never use damaged baeries as they
can become very hot and are dangerous.
• Never expose baeries (baery pack or baeries installed) to excessive heat such as sunshine, re or the like.
10
Roku TV Remote control
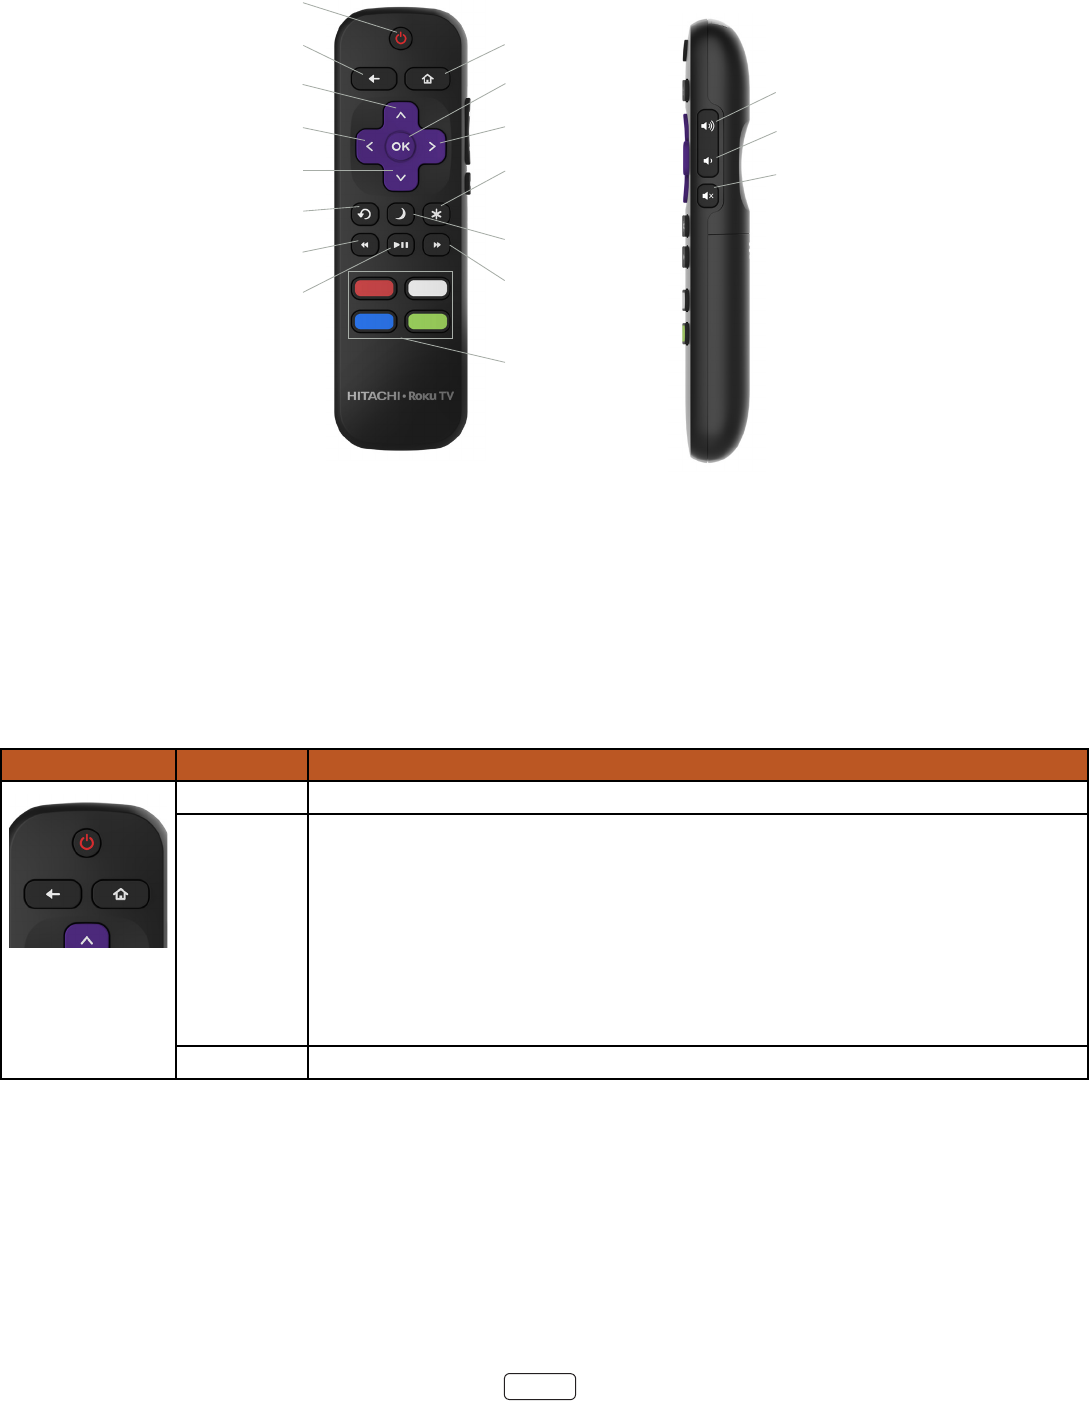
POWER
BACK
PLAY/PAUSE
REWIND
INSTANT REPLAY
DOWN
LEFT
UP
HOME
PRESET
FEATURED
CHANNEL
SHORTCUT
BUTTONS
FAST FORWARD
SLEEP TIMER
OPTIONS
RIGHT
OK VOLUME UP
MUTE
VOLUME DOWN
Getting around
You’ve already done a bit of navigang with the remote control when you completed the Guided Setup and when you set
up Antenna TV. This secon explains how to use the remote control for everyday TV use.
POWER
BACK
PLAY/PAUSE
REWIND
INSTANT REPLAY
DOWN
LEFT
UP
HOME
PRESET
FEATURED
CHANNEL
SHORTCUT
BUTTONS
FAST FORWARD
SLEEP TIMER
OPTIONS
RIGHT
OK VOLUME UP
MUTE
VOLUME DOWN
POWER Turns TV on and o.
BACK • : Goes back to previous menu/screen.
• : Moves highlight back to the menu opon.
• : Returns to the screen from which the
input was selected.
• : Stops playing stream and returns to the previous
menu or screen.
• : Goes to the previous level in the content tree.
Immediately returns to the screen menu.
11
POWER
BACK
PLAY/PAUSE
REWIND
INSTANT REPLAY
DOWN
LEFT
UP
HOME
PRESET
FEATURED
CHANNEL
SHORTCUT
BUTTONS
FAST FORWARD
SLEEP TIMER
OPTIONS
RIGHT
OK VOLUME UP
MUTE
VOLUME DOWN
PAD • moves the highlight in the corresponding direcon.
• OK selects the highlighted opon. While watching TV:
While watching TV:
• changes channel.
• LEFT displays your channel list.
• RIGHT dismisses channel list.
• OK displays program informaon banner.
POWER
BACK
PLAY/PAUSE
REWIND
INSTANT REPLAY
DOWN
LEFT
UP
HOME
PRESET
FEATURED
CHANNEL
SHORTCUT
BUTTONS
FAST FORWARD
SLEEP TIMER
OPTIONS
RIGHT
OK VOLUME UP
MUTE
VOLUME DOWN
INSTANT
REPLAY
Streaming programs that support this feature and broadcast TV if Live TV Pause is
enabled, jumps back a few seconds with each press and resumes playing.
Broadcast TV if Live TV Pause is disabled, jumps to previous channel.
When using an on-screen keyboard, backspaces in the text you are entering.
POWER
BACK
PLAY/PAUSE
REWIND
INSTANT REPLAY
DOWN
LEFT
UP
HOME
PRESET
FEATURED
CHANNEL
SHORTCUT
BUTTONS
FAST FORWARD
SLEEP TIMER
OPTIONS
RIGHT
OK VOLUME UP
MUTE
VOLUME DOWN
SLEEP Displays a banner showing the remaining sleep me, if any, or .
Subsequent presses cycle among the preset sleep me intervals. Once set, the sleep
mer remains in eect regardless of what you are watching.
POWER
BACK
PLAY/PAUSE
REWIND
INSTANT REPLAY
DOWN
LEFT
UP
HOME
PRESET
FEATURED
CHANNEL
SHORTCUT
BUTTONS
FAST FORWARD
SLEEP TIMER
OPTIONS
RIGHT
OK VOLUME UP
MUTE
VOLUME DOWN
PLAYBACK
CONTROLS
Rewind, pause, play, and fast forward streaming content and broadcast TV (if Live TV
Pause is enabled).
Press REWIND or FAST FORWARD one, two, or three mes to control the speed of
the operaon.
REWIND and FAST FORWARD also jump backward and forward one page at a me
when viewing long lists, such as your channel list.
POWER
BACK
PLAY/PAUSE
REWIND
INSTANT REPLAY
DOWN
LEFT
UP
HOME
PRESET
FEATURED
CHANNEL
SHORTCUT
BUTTONS
FAST FORWARD
SLEEP TIMER
OPTIONS
RIGHT
OK VOLUME UP
MUTE
VOLUME DOWN
OPTIONS Displays addional opons when available.
POWER
BACK
PLAY/PAUSE
REWIND
INSTANT REPLAY
DOWN
LEFT
UP
HOME
PRESET
FEATURED
CHANNEL
SHORTCUT
BUTTONS
FAST FORWARD
SLEEP TIMER
OPTIONS
RIGHT
OK VOLUME UP
MUTE
VOLUME DOWN
PRESET
FEATURED
CHANNEL
SHORTCUT
Dedicated buons show the logo of a preset streaming content provider. Pressing a
buon:
• Displays the streaming channel’s main page if you have already added the chan-
nel to your screen.
• Displays the streaming channel’s sign-up page if you have not already added the
channel.
Increases/decreases volume and mutes the TV sound.
: If the TV is muted, pressing VOLUME UP unmutes. Pressing VOLUME DOWN
does not unmute the sound.

12
Panel buttons
The controls on the TV enable you to perform simple funcons, but are not a substute for the
remote control. Your TV has seven buons on the side. From top to boom, they perform the
following funcons:
• : Moves the highlighted item up in the current menu.
• : Moves the highlighted item down in the current menu.
• : Increases the volume.
• : Decreases the volume.
• : Mutes and unmutes the sound.
• : Selects among the congured TV inputs. Each press moves down one item. Pressing Channel + or Channel
– moves the highlight up or down. Pausing for a few moments selects the highlighted input.
• : Turns the power on and o.
13
Guided Setup
With the preliminaries out of the way, it’s me to turn on your TV. As the TV starts for the rst me, it leads you through
Guided Setup, which congures the TV before you start to use it.
During Guided Setup, you’ll:
• Answer a few quesons
• Provide network connecon informaon
• Get a soware update
• Link your TV to your Roku account.
• Connect devices such as a DVD player, game console, or cable box.
: Guided Setup runs only once, the rst me you turn on your TV. If you need to run Guided Setup again,
you’ll have to perform a factory reset, as explained in “Factory reset everything” on page 62.
Starting Guided Setup
To start Guided Setup, press the POWER buon on the remote control to turn on your TV.
When you rst turn on your TV, it will take a few seconds to get itself ready. You’ll noce the following things happening:
1. The status light blinks every me the TV is busy doing something; in this case it’s powering up and geng ready
for you.
2. The power-on screen appears and the status light blinks slowly for a few more seconds. The power-on screen
displays the Hitachi Roku TV logo while the TV starts up.
3. Aer a few seconds, Guided Setup starts:
: On TVs sold in the United States, if you are blind or visually impaired, you can acvate the Audio Guide, a
text-to-speech screen reader to help you navigate the TV’s menus and commands.
To enable the Audio Guide, press the buon on the remote control four mes in rapid succession. Repeat
to disable the Audio Guide. (The buon is located directly below the direconal pad on the right side of the
Roku remote control.)

14
For more informaon on using the Audio Guide and adjusng its sengs, see Congure accessibility on page
47.
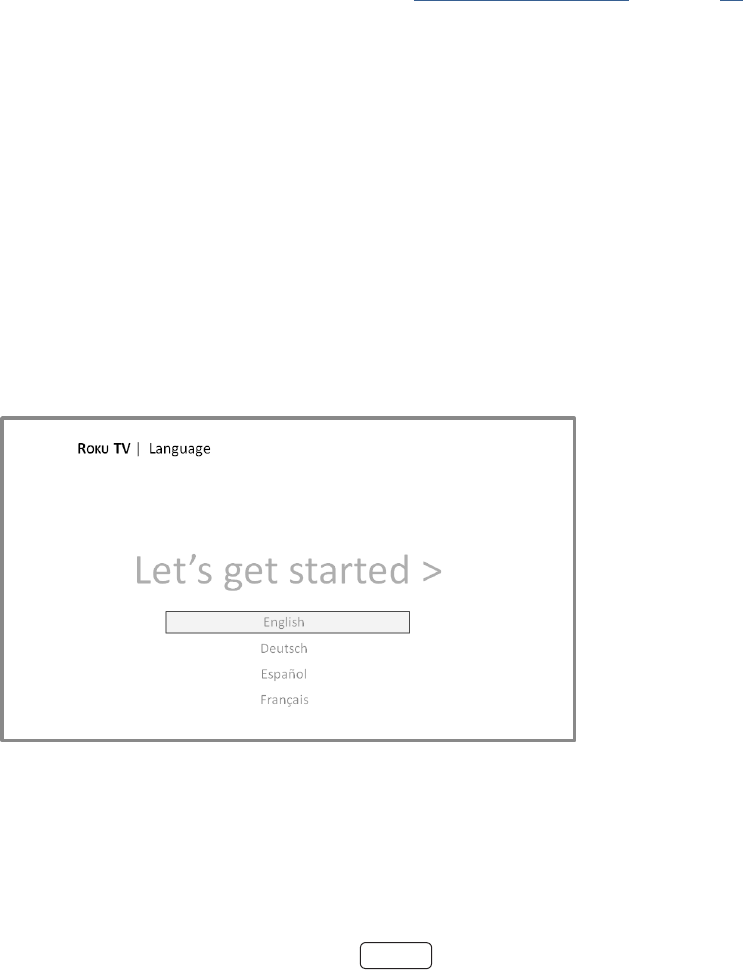
4. Press the DOWN buon on the remote control to highlight your preferred language.
Setting up your TV
With the rst Guided Setup screen on your TV, follow these steps to set it up:
1. Press OK or the RIGHT arrow on the remote control to go to the next screen:
2. Press OK to select . Home mode is the right choice for enjoying your TV at home. It provides
energy saving opons as well as access to all features of the TV.
: Store mode congures the TV for retail display and is not recommended for any other use. In store
mode, some features of the TV are missing or limited. To switch from one mode to the other, you have to per-
form a factory reset as explained in “ Factory reset everything” on page 62 , and then repeat the Guided
Setup.
Aer you select , the TV prompts you to select the way you want to connect to the Internet.
3. Make a selecon:
• – Highlight and press OK. The TV prompts you through
wireless setup. Go to Step 4 for help with the process.
• – Highlight and press OK. The TV immediately aempts to con-
nect to your wired network, your local network, and then the Internet. Go to Step 8 to connue with Guided
Setup.
15
• – If you’re unable to connect to the Internet, that’s OK. You can skip this step
and use the TV to watch broadcasts, play games, and watch DVDs. If you want to connect later, it’s easy. We’ll
show you how in “Benets of connecng” on page 22.
: If you decide not to connect, Guided Setup skips ahead to seng up the devices that you’ve con-
nected to your TV. See “Non-connected Home screen” on page 21 to get started using your non-con-
nected TV.
: Some networks, such as those oen found in dorm rooms, hotels, and other public places, may
require you to read and agree to terms, enter a code, or provide idenfying informaon before leng
you connect to the Internet. If the Roku TV detects that you are connecng to such a network, it prompts
you through the connecon process using your compable smartphone or tablet to provide the needed
informaon. For more informaon, see “Using your TV in a hotel or dorm room“ on page 35.
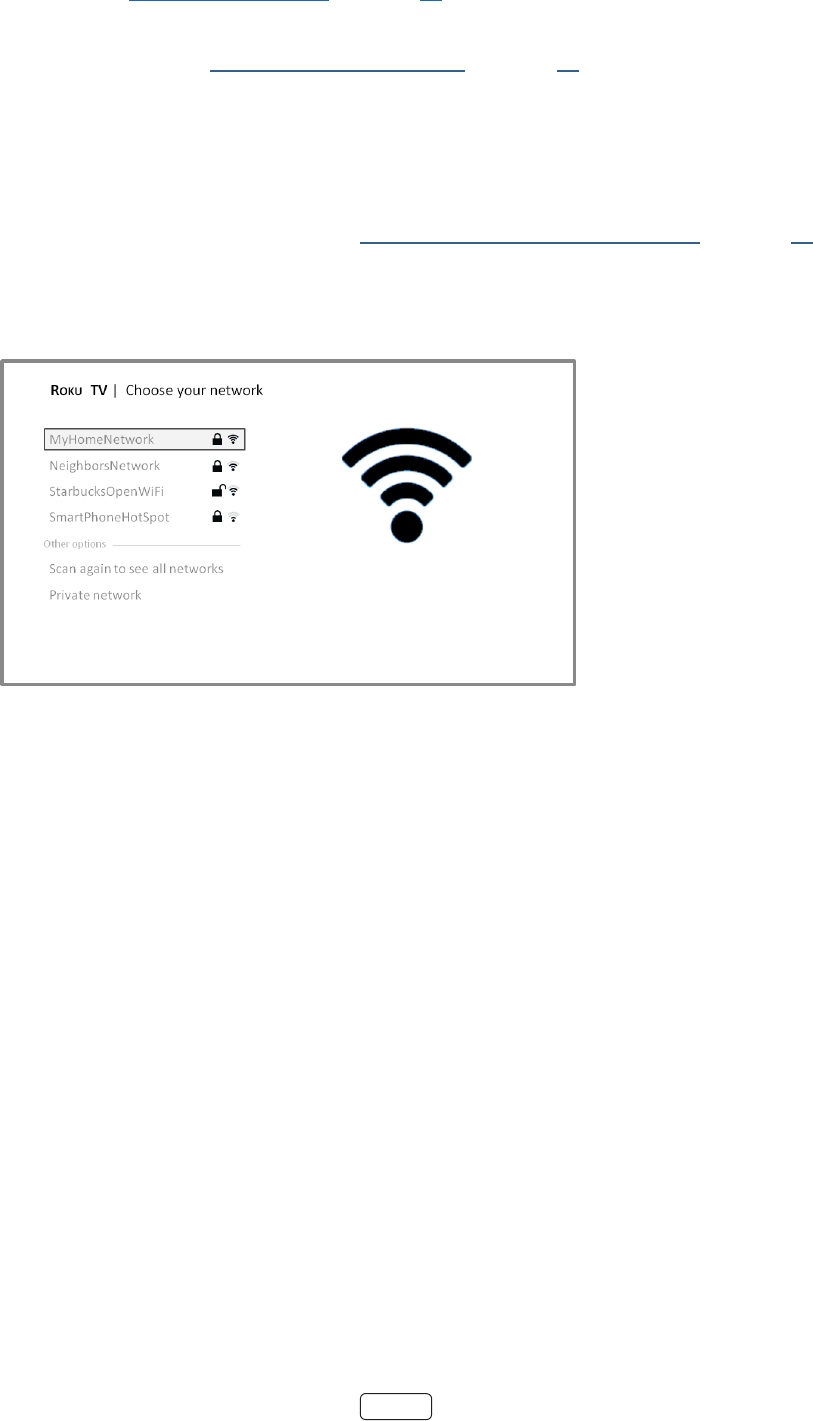
4. Aer you select , the TV scans for the wireless networks within range and dis-
plays them in order, with the strongest signals rst. In addion to your own wireless signal, the TV might pick up
signals from your neighbors.
5. Press the UP or DOWN arrows to highlight the name of your wireless network, and then press OK to select it.
Other options:
• – This opon depends on the number of wireless networks with-
in range.
o appears if the list already shows all available wireless networks within range. If you don’t
see your wireless network name in the list, you might need to adjust the locaon of your wireless
router or the TV, turn on your router, or make other changes. When everything is ready, select
to see if your network name now appears in the list.
o appears if there are more wireless networks than the strongest ones
it inially listed. If you don’t see your wireless network name in the list, this opon displays the com-
plete list. If you sll don’t see your network name, you might have your router congured to provide
wireless service as a “private network.”
: Highlighng either of these opons displays an informaonal panel with the unique media
access control (MAC) address of your Roku TV. You will need the MAC address if your wireless router
is congured to use MAC address ltering.
• – If your wireless network name is hidden, it won’t appear in the list. Select
to display an on-screen keyboard, and use it to enter your network name. Unless you changed the factory-set
network name, you can nd the name (also called SSID) on a label on the router.
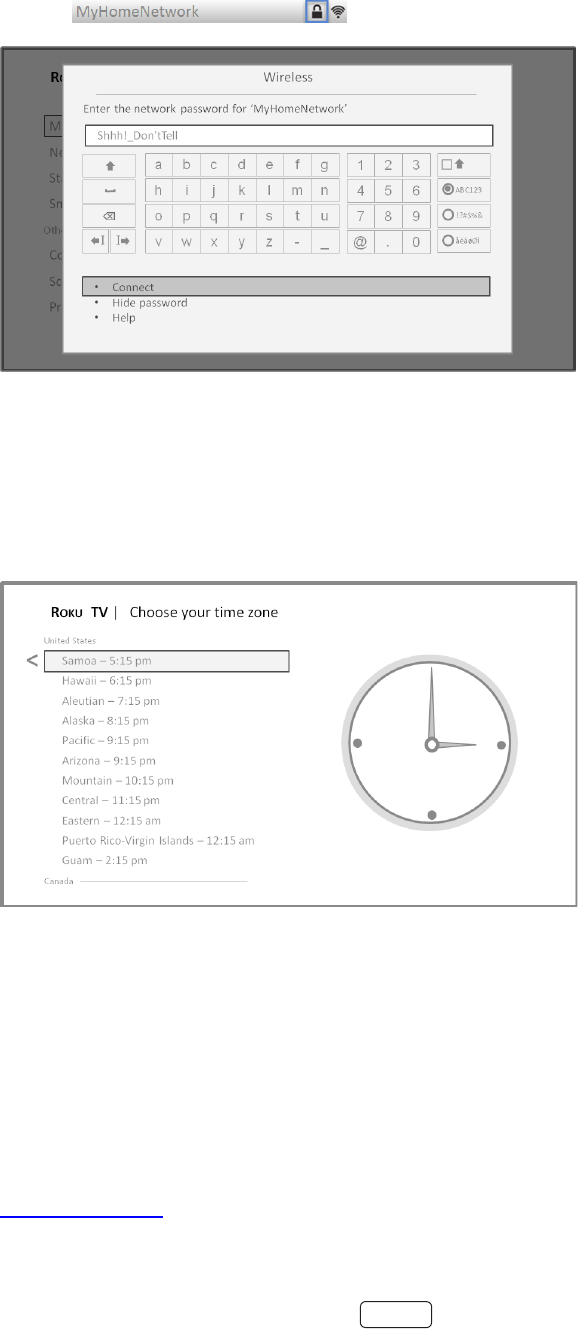
16
6. If you select a wireless network that is password-protected, an on-screen keyboard appears. Use the keyboard to
enter the network password.
: Wireless networks that are password-protected display a “padlock” icon adjacent to the name. This
icon enables you to know that you are going to be prompted to enter a password aer you select that
network.
7. Aer you submit your wireless network password, the TV displays progress messages as it connects to your wire-
less network, your local network, and the Internet.
8. Your TV needs to know the local me zone so that it can correctly display me informaon about the program
you are currently watching. If the TV is unable to automacally determine the local me zone, it prompts you to
choose your me zone from a list. Use the UP and DOWN arrows to highlight your me zone, and then press OK.
9. As soon as the TV is able to connect to the Internet, it downloads and installs its rst soware update, and then
restarts.
: Your TV automacally checks for updates periodically. These updates provide new features and improve
your overall experience with the TV. Aer an update, you might noce that some opons have moved, and
that there are new opons or features. This Owner’s Guide describes version 7.5. To determine your current
Roku TV soware version, go to Sengs > System > About aer you complete Guided Setup.
You can download an updated Owner’s Guide that matches your Roku TV soware version from the Hitachi
Roku TV web site at:
www.hitachi.us/tv
17
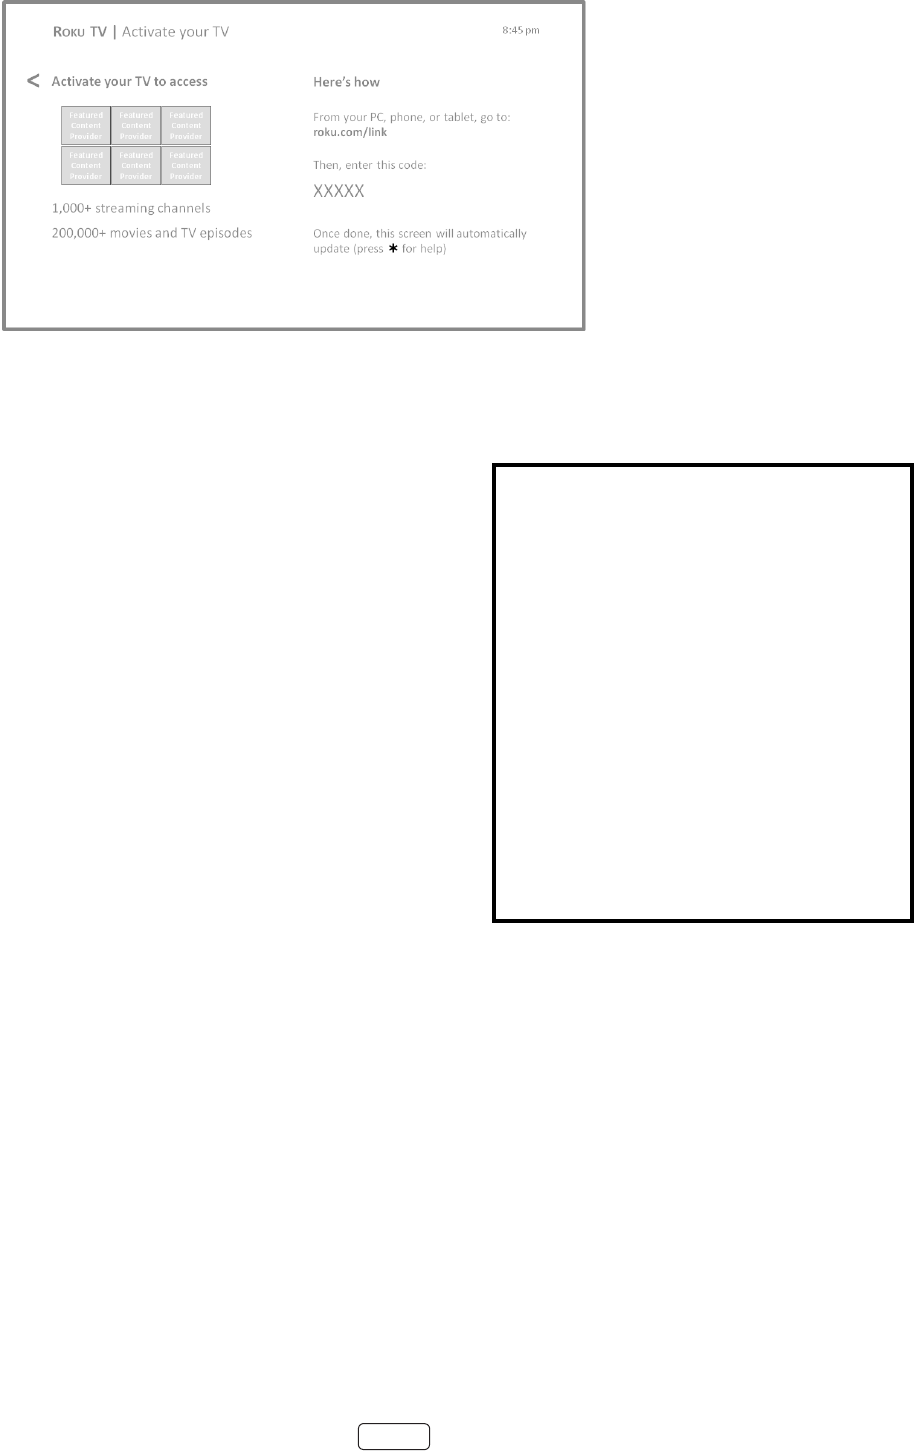
Aer the TV restarts, it displays the screen:
: A paid subscripon or other payments may be required for some channels. Channel availability is sub-
ject to change and varies by country. Not all content is available in countries or regions where Roku products
are sold.
10. Using a compable computer, tablet, or
smartphone with an Internet connecon, go to the web
address displayed on the screen and en-
ter the code that appears on your screen.
Aer you log in or create your Roku account,
the link page suggests that you select some
streaming channels. Aer you conrm your
selecons, the TV gets an acknowledgement,
and then adds your preexisng and new-
ly-selected streaming channels to your Roku
TV. This process is automac and takes a few
moments—a lile longer if you already have a lot of stream-
ing channels to add.
: Streaming channels from all Roku
streaming devices associated with your
account are synchronized periodically, so
all of your Roku streaming devices have
the same streaming channels (subject to
compability with the device).
Aer it adds your selected streaming channels, the TV helps you set up the devices that you’re connecng to it,
such as a cable box, Blu-ray player, or game console:
Why do I need a Roku Account?
You need a Roku account for several reasons.
• It links you, your Roku TV and your other Roku
streaming devices to the Roku Channel Store and
billing service.
• Streaming content providers know that it’s OK to
send content you request to your Roku TV.
• Roku can automacally send updates to your device.
When you set up a Roku account, you must
register a payment method. Adding a payment method
now lets you easily rent or buy movies on demand,
or try popular paid subscripon or transacon-based
streaming channels. You won’t be charged unless you
agree to the terms and cost of the content. If you are
concerned about unauthorized charges, you can set up
a PIN that you must enter to authorize each charge.
18
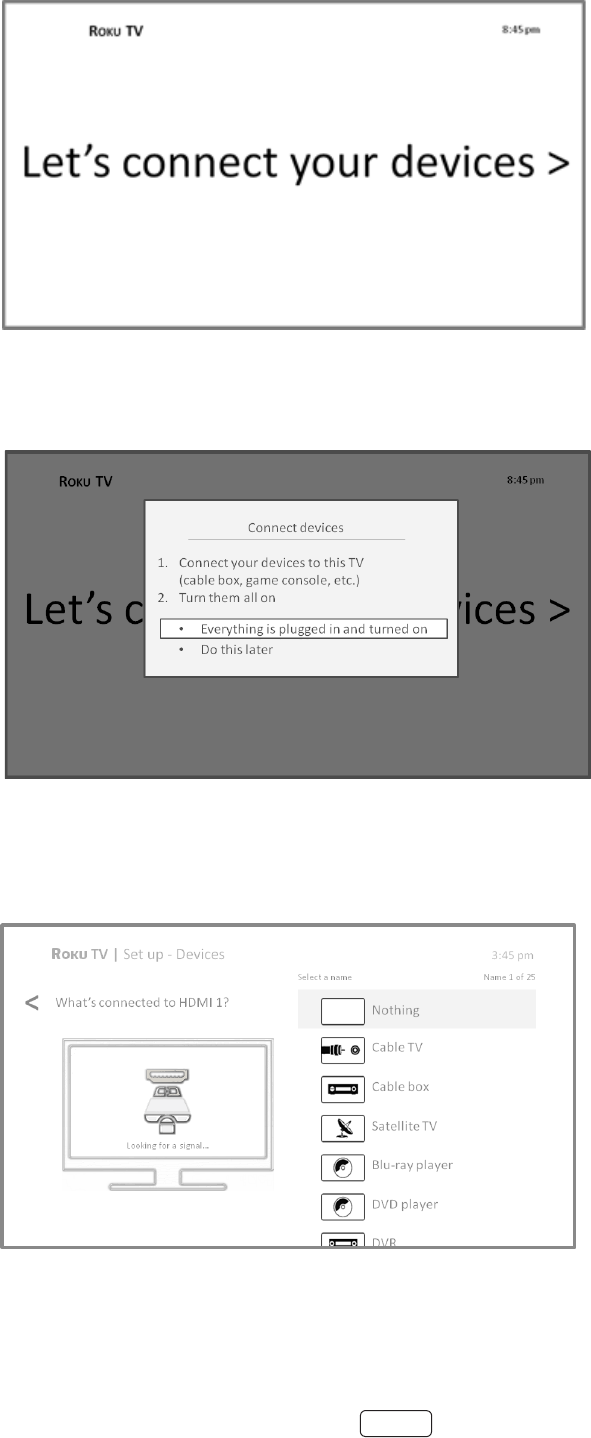
11. Press the OK or RIGHT arrow to proceed:
12. Connect all the devices you plan to use with your TV, turn them all on, and then select
. The TV now takes you step by step through each of its inputs and asks what kind of device you
have connected. On each input that has a connected and acve device, you can see its picture and hear its
sound.
19
13. Press the UP or DOWN arrows to highlight the label you want to associate with the input, and then press OK to
move on to the next input.
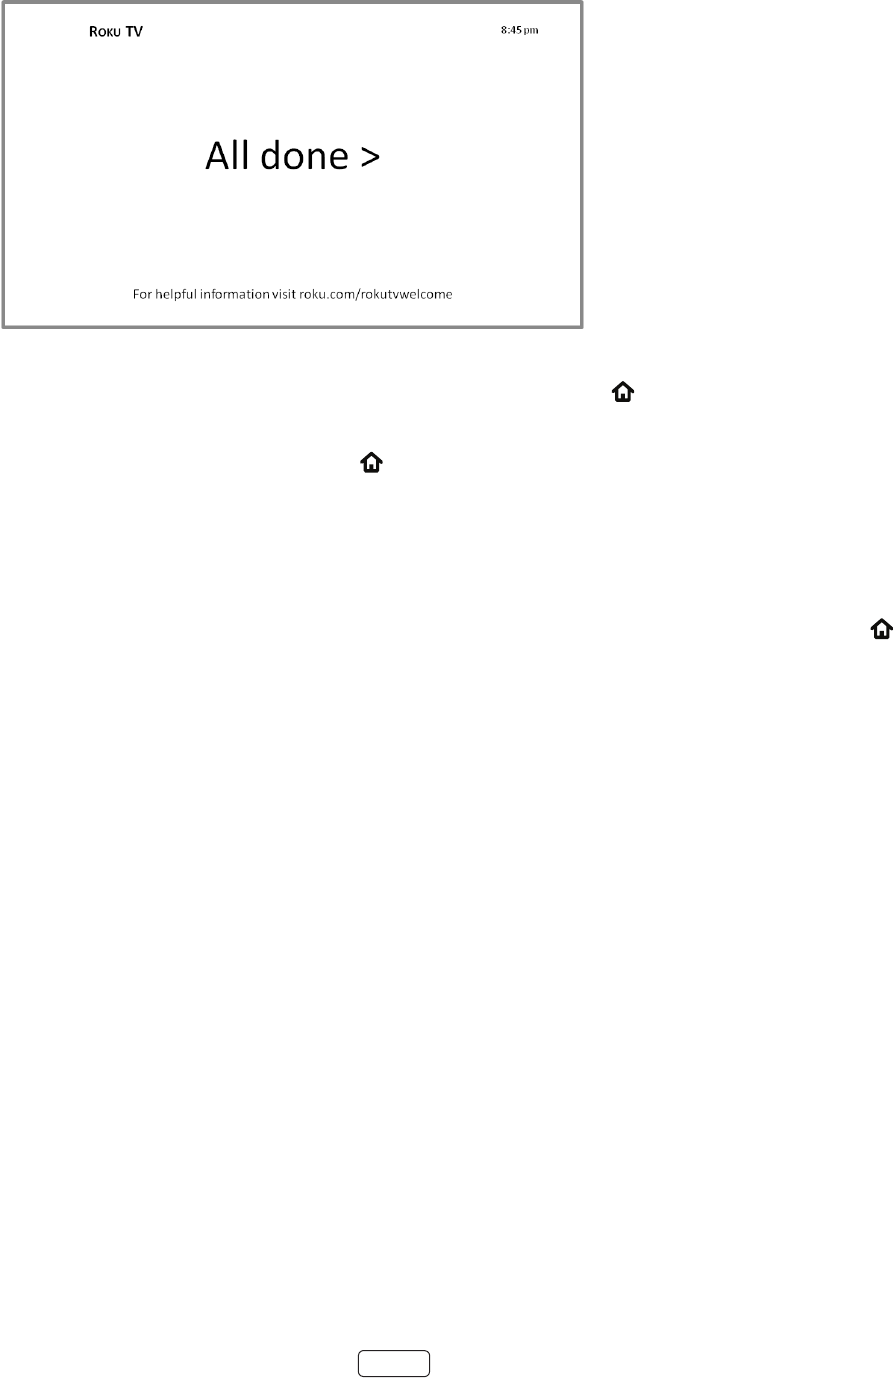
You’re done with Guided Setup.
Some Roku TVs, depending on where you live and other factors, show you an introductory video lled with
some great hints and ps. If you’re not interested in viewing this video, press
on the remote control to exit to
the Roku TV Home screen.
When you nish Guided Setup, and whenever you press
on the remote control, the screen greets you.
From here, you can explore everything your TV has to oer. Press the arrow buons to move around, and press OK to
select a highlighted item. We’ve designed the TV to encourage you to explore, and you can probably gure out most of
the capabilies and sengs on your own. If you have any quesons or dicules, you can nd answers and soluons in
this guide.
If you nd yourself a long way from the screen, you can always get back right away by pressing one buon:
.
20
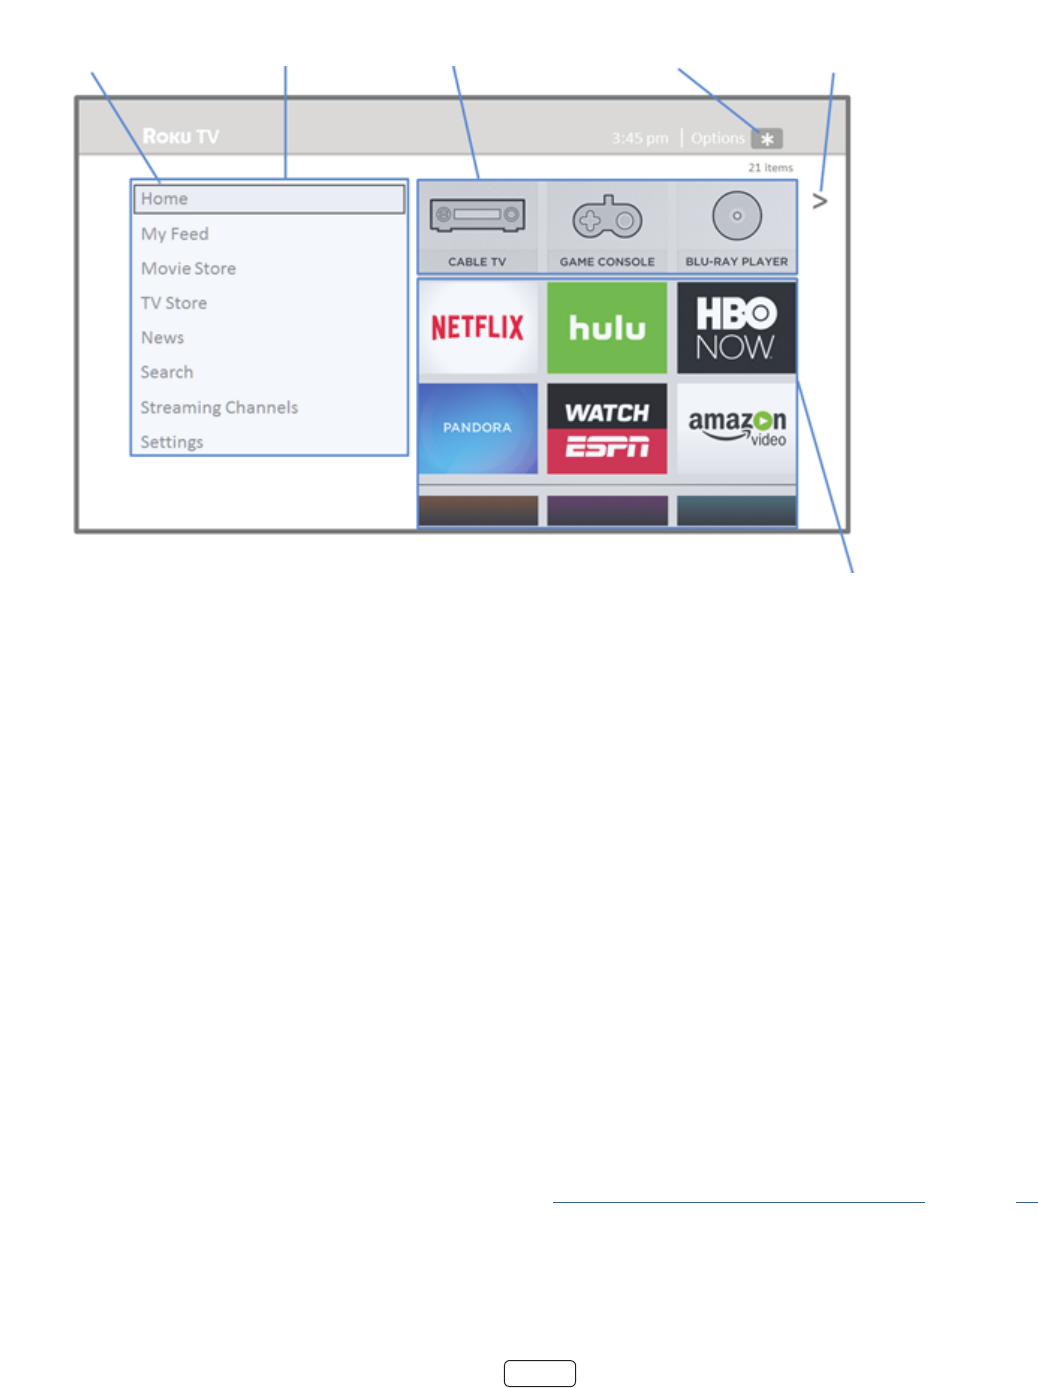
Connected Home screen
Here is a typical screen from a Roku TV that’s connected to the Internet and linked to a Roku account.
Highlighted item -
Press OK to select Home menu TV inputs Press for options
when available
Hint - Press RIGHT to
see another screen
Streaming channels
and apps
: A paid subscripon or other payments may be required for some channels. Channel availability is sub-
ject to change and varies by country. Not all content is available in countries or regions where products with
Roku OS are sold.
Personalize your Home screen
You can do a lot to personalize your screen and make it just right for you and your family:
• Add streaming channels by using the menu opon to browse the Roku Channel Store.
• Remove a le by highlighng it and pressing . Then highlight or and press OK.
• Reposion a le by highlighng it and pressing . Then highlight or and press OK.
Use the arrow buons to move the le, and then press OK to lock it in its new locaon.
• Rename a TV input le by highlighng it and pressing . Then highlight and press OK. Highlight a
new name in the list, and then press OK to assign that name to the le.
• Change the screen theme by going to to nd and pick one to suit your mood.
• Hide Movie Store, TV Store, or News, as explained in “Blocking Movie Store, TV Store, and News” on page 53.
21
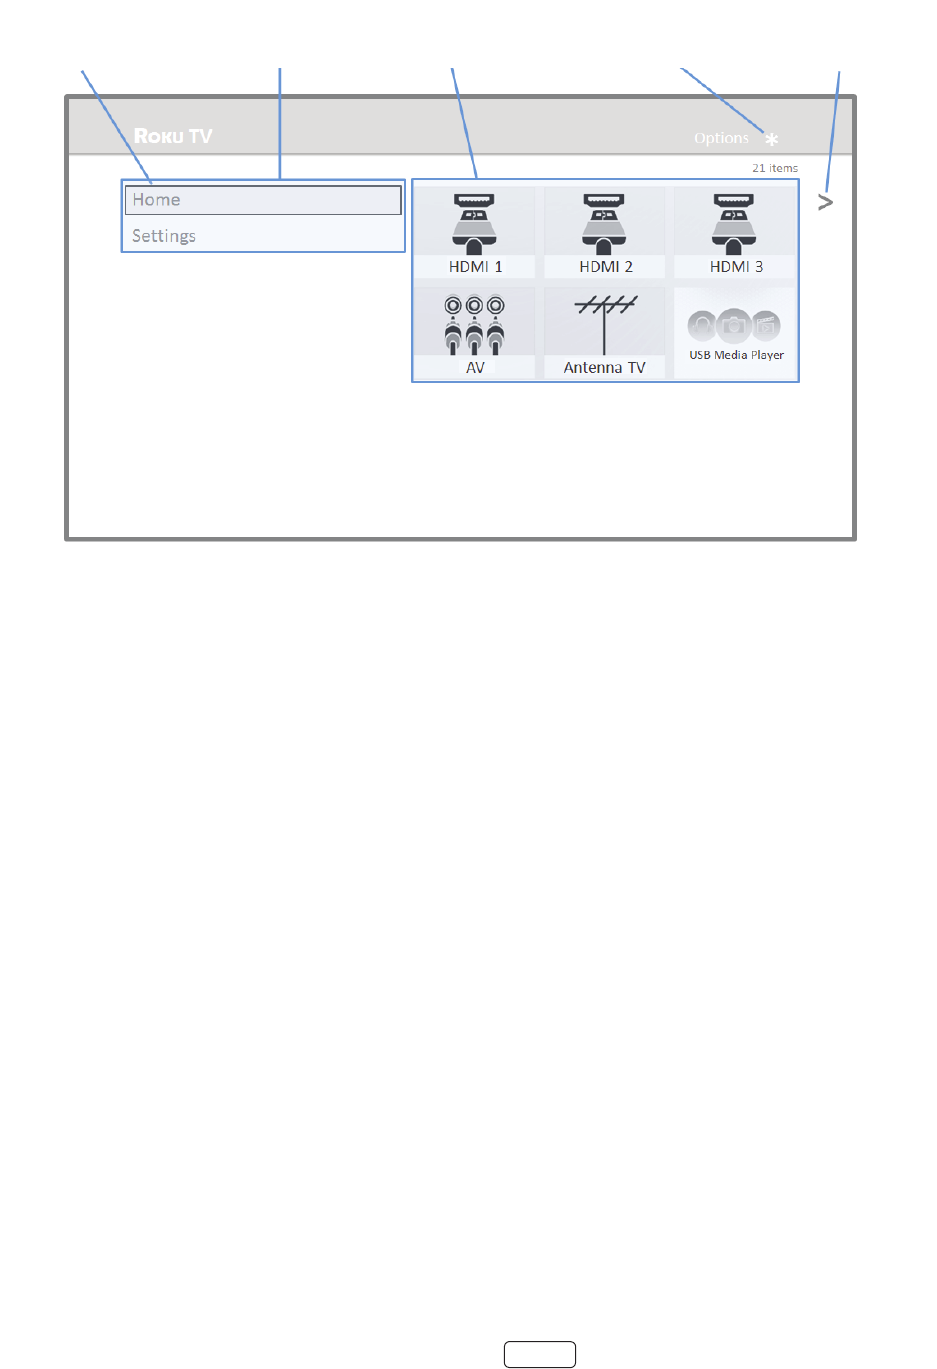
Non-connected Home screen
Here is a typical screen from a Roku TV that is not connected to the Internet.
Highlighted item -
Press OK to select Home menu TV inputs Press for options
when available
Hint - Press RIGHT to
see another screen
Streaming channels
and apps
Personalize your Home screen
You can do a lot to personalize your screen and make it just right for you and your family:
• Remove a le by highlighng it and pressing . Then highlight and press OK.
• Reposion a le by highlighng it and pressing . Then highlight and press OK. Use the arrow but-
tons to move the le, and then press OK to lock it in its new locaon.
• Rename a le by highlighng it and pressing . Then highlight and press OK. Highlight a new
name in the list, and then press OK to assign that name to the le.
• Add streaming channels by browsing the Roku Channel Store (aer connecng the TV to the Internet to add the
opon to the menu).

22
Benets of connecting
Connecting brings out your TV’s full potential!
Thousands of movies to choose from, across all major streaming movie channels like Nelix, Cineplex Store, Crackle, and
more*. You’ll never run out of something new to watch.
Stream endless hours of music from free and subscripon-based channels like Spofy and VEVO. With almost instant
access to thousands of music arsts, your favorite beats are just as close as your remote.
In addion to popular streaming channels like YouTube, NHL, Sky News and Cineplex Store, your Roku TV also oers hun-
dreds of streaming channels to fuel your passions—including tness, cooking, religion, outdoors, Internaonal program-
ming and much more.
Your Roku TV comes loaded with special oers, including free trials (if eligible) from popular streaming channels Net-
ix, Spofy, DailyBurn Fitness, and many more. REMEMBER THAT YOU MUST CANCEL BEFORE THE FREE TRIAL ENDS TO
AVOID SUBSCRIPTION FEES.
lets you connect a USB drive (not provided) and pause live TV for up to 90 minutes. Aer pausing, you can
play, fast-forward, rewind, and pause again to any point within the rolling 90 minute window.
on the Roku app lets you listen to streaming programs on headphones (not provided) plugged
into your mobile device .†
automacally starts the Roku Media Player when you insert a USB drive (not included)
with a recognizable le system (such as FAT16/32, NTFS, HFS+ or EXT2/3).
*A paid subscripon or other payments may be required for some channels. Channel availability is subject to change and varies by
country. Not all content is available in countries or regions where Roku products are sold.
† Available only on Roku mobile app for IOS® and Android™. This feature works with streaming content only. It is not available when
watching Antenna TV or HDMI inputs.

23
What is streaming?
Streaming is viewing or listening to video or audio content that is sent over the Internet, or located on a network-con-
nected media server or on a USB device plugged into the TV’s USB port.
With streaming, you can buy or rent most programs on demand, when it’s convenient for you. When streaming, you can
play, pause, rewind, and fast forward whatever you are watching. You can also replay the last few seconds again, or turn
on closed capons.
: Some content cannot be paused or skipped. For example, if you are viewing live programming or a program
that is supported by ads, you generally are not allowed to skip the ads.
Your Roku TV lets you choose from thousands of streaming channels that oer a huge selecon of entertainment:
• Thousands of movies and TV episodes
• Unlimited music, live and on-demand
• Tons of live and on-demand sports
• Commercial-free kids programming
• Internaonal programming in 22 languages
• 24x7 news and in-depth news commentary
Many streaming channels are free. Some streaming channels, like Cineplex and Amazon Video, let you purchase or rent
the latest movie releases or popular TV series. Some channels such as Nelix or Spofy charge a monthly subscripon
fee and others are available at no addional cost if you subscribe to a companion service through your cable or satellite
provider. For example, HBO subscribers with parcipang broadcast TV provider accounts can add the HBO Go channel
and watch it at no addional cost.
If you have an exisng subscripon to a service like Nelix or Spofy, you can just sign in with your exisng user name
and password.
To play streaming content that is available on the Internet, you add streaming channels to your screen. To add
a streaming channel to your screen, use the opon on the screen menu to go to the
Roku Channel Store, and then select the streaming channel you want to add. The streaming channel is then added to
your screen, and you can watch it at any me.
For more informaon on using the Roku Channel Store feature, see “Using the Roku Channel Store” on page 46.
: A paid subscripon or other payments may be required for some channels. Channel availability is subject to
change and varies by country. Not all content is available in countries or regions where Roku products are sold.

24
But what if I didn’t connect my TV?
What if you went through Guided Setup and chose ? No worries. Your Roku TV makes it
easy to connect whenever you want. As you move around the screen, you’ll see several places where you can start
the connecon process. For example:
• Now and then you’ll see a message appear on the panel to the right of the screen oering a
opon. Simply highlight and select the opon to get started.
• Use the opon in the menu. From the screen menu, select ,
then , and then .
• If you want to start over from the beginning, use the menu to do a , and then go through
Guided Setup again. This me, choose your home network when prompted.
Regardless of how you connect, the process is the same. If you need details, see “Seng up your TV” on page 14.

25
Setting up Antenna TV
Despite all of the entertainment possibilies of your Roku TV, you may also want to watch broadcast TV. You can watch
broadcast TV in much the same way you watch other entertainment choices. You select a le—the le—
from the screen.
The rst me you select the le, you have to set up the TV tuner. Seng up the TV tuner scans for acve
channels and adds them to your broadcast TV channel list.
Why do I have to set up the TV tuner?
You might be asking, “Why is this step necessary?” Good queson.
Not everyone needs to use the TV tuner. For example, you might have a set top box provided by a cable or satellite com-
pany that receives all of your channels. Most of these set top boxes use an HDMI connecon.
More and more people are watching only streaming TV and do not have a TV antenna or cable/satellite service. If you
don’t need the TV tuner, you can bypass seng it up and instead remove it from the screen as explained in “Re-
move unwanted les” on page 48.
When you set up Antenna TV, the TV scans the signals on its antenna input for channels with a good signal, and adds
those to the channel list, skipping dead channels and channels with a very weak signal.
The TV will, however, let you add two analog channels, even if they have no signal. You might need to add these channels
if you have an older set top box, VCR, or game console that can only output a signal on analog channel 3 or 4. These are
the only channels that can be added regardless of whether they have a good signal. Typically, you’ll only need one of
these channels, but both are provided to make setup simpler. You can hide the one you don’t want as explained in “Edit
broadcast TV channel lineup” on page 48.
How do I set up the TV tuner?
Seng up the TV tuner is easy—your TV does most of the work. You just have to answer a couple of quesons.
1. Make sure your antenna (sold separately) or TV cable is connected to the TV’s input.
2. On the screen, select the le.
3. Read the simple on-screen instrucons and select .
26
4. If prompted, select your me zone. You’ll only need to do this if the TV can’t gure out your me zone from your
Internet connecon.
5. When prompted, select whether to add analog channels 3 and 4 (to enable you to connect older set top boxes,
VCRs, or game consoles).
Why does the TV
need my time
zone?
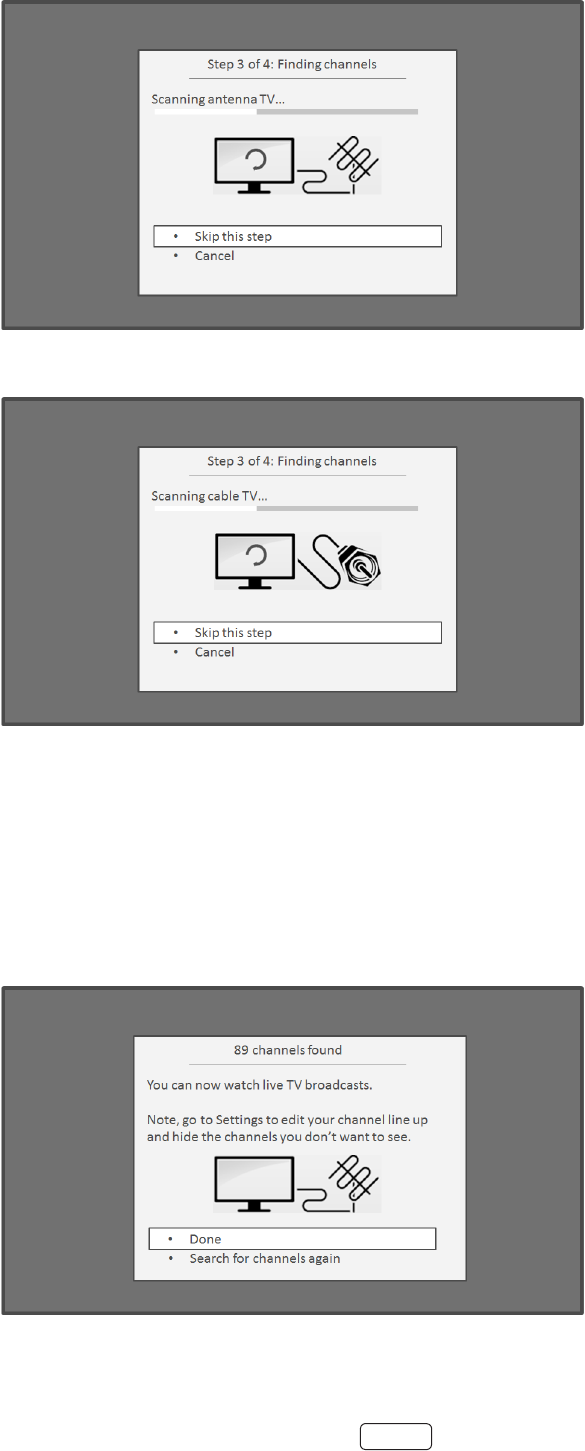
27
6. Wait while your TV scans for broadcast (antenna TV) staons…
… and then cable TV channels.
Scanning for channels can take several minutes.
: Cable TV channels are channels from a cable TV provider that you can receive by connecng their cable
directly to your TV (unscrambled NTSC, ATSC, and QAM channels, if you’re the kind of person who is inter-
ested in the details). In many cases, your cable provider probably requires you to use their set-top box and
connect it to a dierent input, and then use the set-top box to tune your cable staons. In that case, you can
skip scanning for cable channels.
7. When the channel scans nish, the TV shows the number of channels it added.

28
8. If you connected your TV to the Internet, you have the opon of seng up Live TV Pause. “Pausing Live TV“ on
page 31 explains how to set up and use this feature. If you don’t want to set up Live TV Pause, or if this opon
is not available to you, select to start watching Live.
: Repeat the channel scan from me to me to make sure you are receiving all of the latest channels. Broad-
casters add and remove channels, move channels to dierent parts of the spectrum, and change the power levels
of their channels periodically. Your antenna recepon and picture quality depend on the posion of your antenna
and on your locaon relave to the antennas of broadcasters in your area.
: You’ll have to repeat the channel scan if you remove the Antenna TV le from the Home screen or perform
a factory reset. To repeat the channel scan at any me, go to Sengs > TV inputs > Antenna TV > Scan again for
channels > Start nding channels.
Now, you’re ready to watch broadcast TV! While you’re watching, try the following:
• Press the UP and DOWN arrows to change channels.
• Press the LEFT arrow to display the channel list and then use the UP and DOWN arrows to select a channel to
watch. Or press REWIND or FAST FORWARD to jump through the channel list a page at a me.
• Press OK to display informaon about the current program.
• Press to switch to the previously tuned channel.
• Press to see opons for picture and sound sengs.
If is not available on your remote control, you can use on the Roku App or the Jump Back buon on a
universal remote. For more informaon, see “Other devices” on page 66.
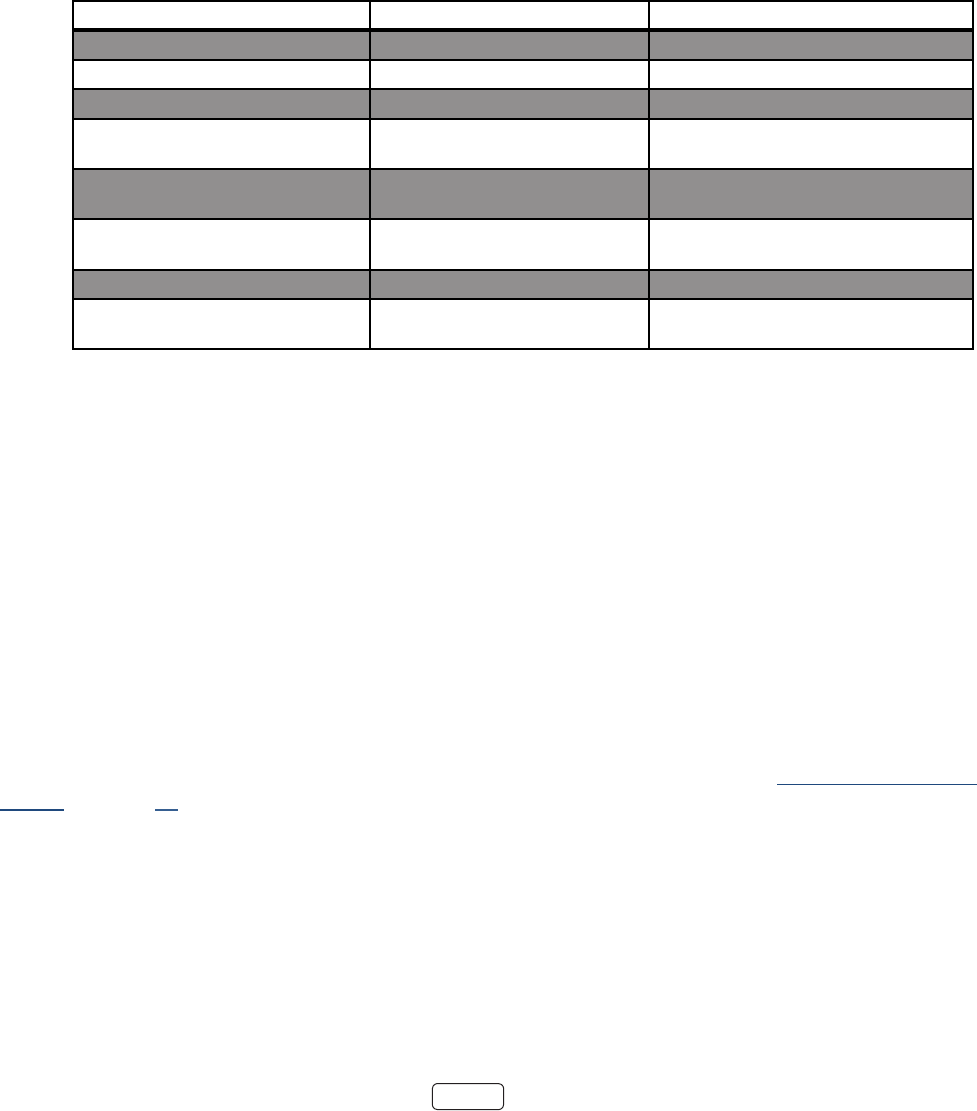
29
Using your TV
This secon provides informaon on using the day-to-day features of your TV.
Status light
Your TV has a single status light on the front panel. It goes on and o and blinks in dierent ways depending on the status
of the TV, as shown in the following table:
On (screen is acve) O Screen is communicang that TV is on.
Screensaver (screen is acve) O Screen is communicang that TV is on.
O (no power) O TV is not connected to power.
O (standby) On TV is connected to power and is ready to
use.
Starng up from o state Slow pulsing blink unl startup
completes TV is doing something.
On (receiving update from USB) Slow pulsing blink unl update
completes TV is doing something.
Remote control command received Dims on/o once TV has received your command.
Powering down to standby mode Slow pulsing blink unl the TV
reaches standby. TV is doing something.
Standby mode energy savings
When you turn o your TV, it may remain in a higher power mode for a few minutes, aer which it goes into a very low
power standby mode. If you turn on the TV again before it has entered the very low power mode, it turns on immediate-
ly. Aer the TV goes into the lower power standby mode, it takes a bit longer to start up.
Watching broadcast TV channels
To watch broadcast TV, select the le in the screen. Your TV remembers the last channel you watched
and starts with that channel playing.
: You also can use the buons on the TV panel to select Antenna TV, as explained in “Standby mode energy
savings” on page 29.
Changing channels
To change channels, you can do any of the following:

30
• Press the UP arrow to change to the next higher channel.
• Press the DOWN arrow to change to the next lower channel.
• Press the LEFT arrow to display the channel list, and then press the UP and DOWN arrows to move the highlight
through the list one channel at a me. Or press REWIND and FAST FORWARD to move the highlight through the
list one page at a me. When you’ve highlighted the channel you want to watch, press OK. (If you decide you
don’t want to change channels, press the RIGHT arrow or BACK buon).
• Press to jump to the previous channel. Press again to return to the channel you were watching before you
pressed .
If is not available on your remote control, you can use on the Roku App or the Jump Back buon on a
universal remote. For more informaon, see “Other devices” on page 66.
Viewing program information
To view informaon about the current program, press OK. The TV displays a banner at the boom of the screen with as
much informaon as is available in the program data stream, as shown in the following example.
Program informaon, subject to availability within the broadcast informaon, includes:
• Channel number
• Channel call sign
• Signal strength
• Program tle
• Start me, end me, and graph of program length showing current posion
• Content rang
• Video resoluon (480i, 480p, 720p, 1080i, 1080p, 2160p(4K))
• Dolby Audio™
• Audio features (SAP)
• Closed caponing (CC)
• Current me

31
• Program descripon. If the enre descripon does not t, press OK to expand the size of the banner and see the
enre descripon.
: : If you’ve set up Live TV Pause, and you’re watching broadcast TV, you’ll also see a progress bar showing the
current playback posion within the rolling 90-minute pause me. For more informaon, see “Pausing Live TV”
on page 31.
Adjusting settings
Press to display the menu. Press the UP and DOWN arrows to highlight an opon, and then press the LEFT
and RIGHT arrows to change the seng. “Adjusng TV sengs” on page 37 explains each of the sengs in detail.
Pausing Live TV
Using Live TV Pause, your Roku TV gives you the ability to pause, play, fast forward, and rewind digital broadcast TV. You
can pause live TV for up to 90 minutes.
Requirements
To use this feature, you need to:
1. Connect your TV to the Internet. If you didn’t connect during Guided Setup, see “But what if I didn’t connect my
TV?” on page 24.
2. Provide your own dedicated USB drive with the following minimum specicaons.
• 16 GB
• 15 Mbps read/write speed
• USB 2.0 compliant
A USB ash drive (thumb drive) meeng the minimum requirements is highly recommended. However, using a larger
drive does not extend the 90 minute pause me.
: All exisng content on your USB drive are erased when you enable this feature.
3. Enable Live TV Pause
Enabling Live TV Pause
You can enable Live TV Pause in several ways:
• Go to , and then select .
• Aer compleng a channel scan, select from the available opons
• Press the buon on the Roku remote while watching a digital broadcast TV channel.
• Highlight the Antenna TV le on the Home screen, press on the remote control, and then select
.
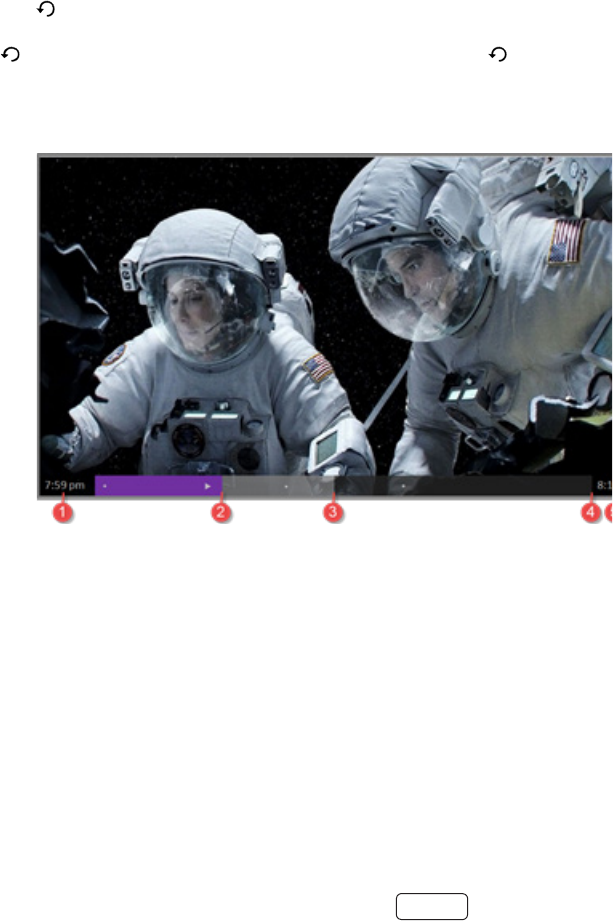
32
Aer starng Live TV Pause setup in any of these ways, the TV prompts you through the steps needed to enable this fea-
ture. Setup takes only a few moments.
: Use of a USB hub is not supported.
Using Live TV Pause
Your TV automacally detects when you connect a new device to an HDMI input and turn on its power. The input is auto-
macally added to the screen if it isn’t already present.
You can enable Live TV Pause in several ways:
• While watching a digital broadcast TV channel, press the buon to pause or play the content. Aer
the TV program has been paused for 90 minutes, the TV resumes playing.
• Aer watching a channel for a while, press REWIND to jump back up to the point where you rst started watch-
ing the channel, up to 90 minutes.
• Aer pausing or rewinding, press FAST FORWARD to jump ahead up to the point where you are once again
watching the live TV program.
• Press FAST FORWARD or REWIND repeatedly to cycle through 1x, 2x, and 3x skip speeds. Press the INSTANT
REPLAY buon to play back the last several seconds of the program
: If is not available on your remote control, you can use on the Roku App or the Jump Back buon on a
universal remote.
Whenever you use any of the Live TV Pause features, the TV momentarily displays a progress bar:
1. Time at current playback posion.
2. Current playback posion
3. Extent of pause me, represenng the amount of me this channel has been buered, up to 90 minutes.
4. 90 minute mark, represenng the maximum extent of pause me.
5. Current me.
The progress bar also displays ck marks at each half hour point, to help you locate the boundaries where one show
ends and a new one begins.

33
Notes about Live TV Pause
• You can use Live TV Pause only with digital broadcast and cable channels received through the TV’s Antenna
input (ATSC and Clear QAM channels).
• Changing channels, erases and restarts the Live TV Pause buer.
• Returning to the screen, selecng another input, or turning o the TV erases and resets the Live TV Pause
buer.
• Removing the USB drive erases the Live TV Pause buer.
Switching TV inputs
Switch to a TV input to access the device connected to that input, for example, a Blu-ray player. Switching inputs is as
simple as highlighng the input’s le in the screen, and pressing OK. The video signal on the input, if any, appears
on the screen.
: You also can use the buons on the TV panel to select a TV input, as explained in “Standby mode energy sav-
ings” on page 29. “Customizing your TV” on page 47 explains how to rename and remove inputs.
Auto-detecting devices
Your TV automacally detects when you connect a new device to an HDMI input and turn on its power. The input is auto-
macally added to the screen if it isn’t already present.
Adjusting audio/video settings
While watching video content on any input, press to display the menu. Press the UP and DOWN arrows to
highlight an opon, and then press the LEFT and RIGHT arrows to change the seng. “Adjusng TV sengs” on page
37 explains each of the sengs in detail.
Playing content from USB storage devices
Your TV has a USB port that can be used to play personal music, video, and photo les from a personal USB ash drive or
hard disk. If your TV is connected to the Internet, your screen has the le. If your TV has not
been connected to the Internet, the Home screen has the le.
To use this feature, rst make sure your media les are compable with the Roku/USB Media Player. To see the latest list
of supported formats, view in the Media Player*.
The Roku/USB Media Player displays supported le types* only, and hides le types it knows it cannot play.
For more informaon about playing back your personal videos, music, and photos, see:
hps://support.roku.com/arcle/208754908-Roku-Media-Player-Playing-your-personal-videos-music-photos
* There are many variants of each supported media format. Some variants may not play at all or may have issues or inconsistencies
during playback..

34
Auto player launch
If your TV is connected to a Roku account, you can set it to automacally open the Roku Media Player when you connect
a USB drive with a recognizable le system (such as FAT16/32, NTFS, HFS+ or EXT2/3). To congure this seng, from the
screen, navigate to. At this point, the following opons are available:
• – Choose , , or , as desired
o – (default) Display a prompt each me a recognized USB drive is connected. The prompt pro-
vides opons to launch the Roku Media Player as well as to change future auto-play behavior.
o – Always launch the Roku Media Player whenever you connect a recognized USB drive.
o – Never launch the Roku Media Player automacally
• – Choose the app you want to use to play back media les.
Playing content from local network media servers
If you have connected your TV to a network, it can play personal video, music, and photo les from a media server on
your local network. Media servers include personal computers running media server soware such as Plex or Windows
Media Player, network le storage systems that have built-in media server soware, and other devices that implement
the specicaons of the Digital Living Network Alliance. Some servers do not fully implement the DLNA specicaon but
are UPNP (Universal Plug and Play) compable. The Roku Media Player will connect to them as well.
Some media servers can convert les into Roku compable formats. DRM-protected content is not supported.
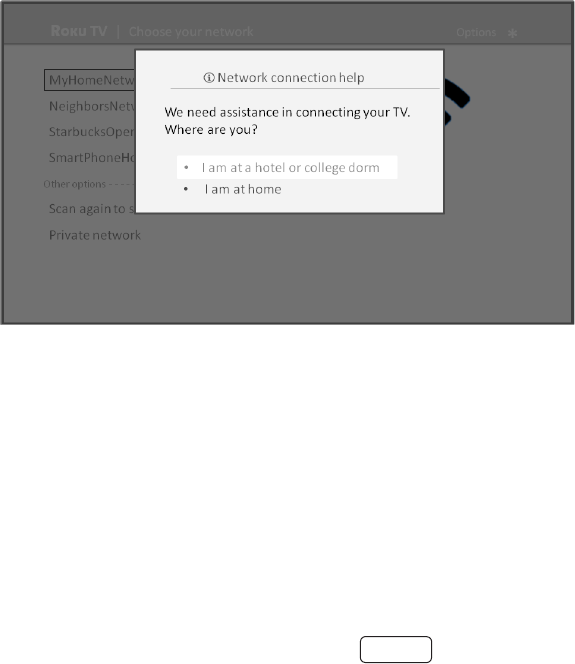
35
Using your TV in a hotel or dorm room
Hotels, school dorms, conference facilies, and similar locaons with public wireless Internet access oen require you to
interact with a web page to authencate your access. These restricted public networks are commonly known as capve
portal networks. When you select a network of this type, the TV automacally detects that addional informaon is
needed and prompts you through using another wireless device to supply the requested informaon.
• Using your Roku TV on a hotel or dorm room network requires wireless availability and use of your net-
work-connected smartphone, tablet, or computer to authencate access to your wireless access point
• Your TV must already be running soware version 7.0 or later. You can nd the version number by nav-
igang from the Home screen to > System > About. If it is running an earlier soware version,
you must use a non-restricted network to link and acvate the TV, and then update the soware to
version 7.0.
• Be sure to bring your Roku TV remote control, because the Remote feature of the Roku mobile app may
not work when connected to a hotel or dorm room network.
• Content might be limited or unavailable if you try to connect outside your home country due to geo-lter-
ing.
1. Either during Guided Setup or aer using the
2. menu to set up a new connecon, the TV automacally detects that you are connecng to a restricted network
and displays the following prompt:
: Your TV can connect to a restricted network only if Device connect is enabled in Sengs > System >
Advanced system sengs. (Device connect is enabled by default, but if you have disabled it, the TV cannot
complete the connecon.)
Device connect is not present if the TV is in non-connected mode.
3. Aer selecng the correct network, highlight , and then press OK. The TV
prompts you to use your smartphone, tablet, or laptop to complete the connecon.
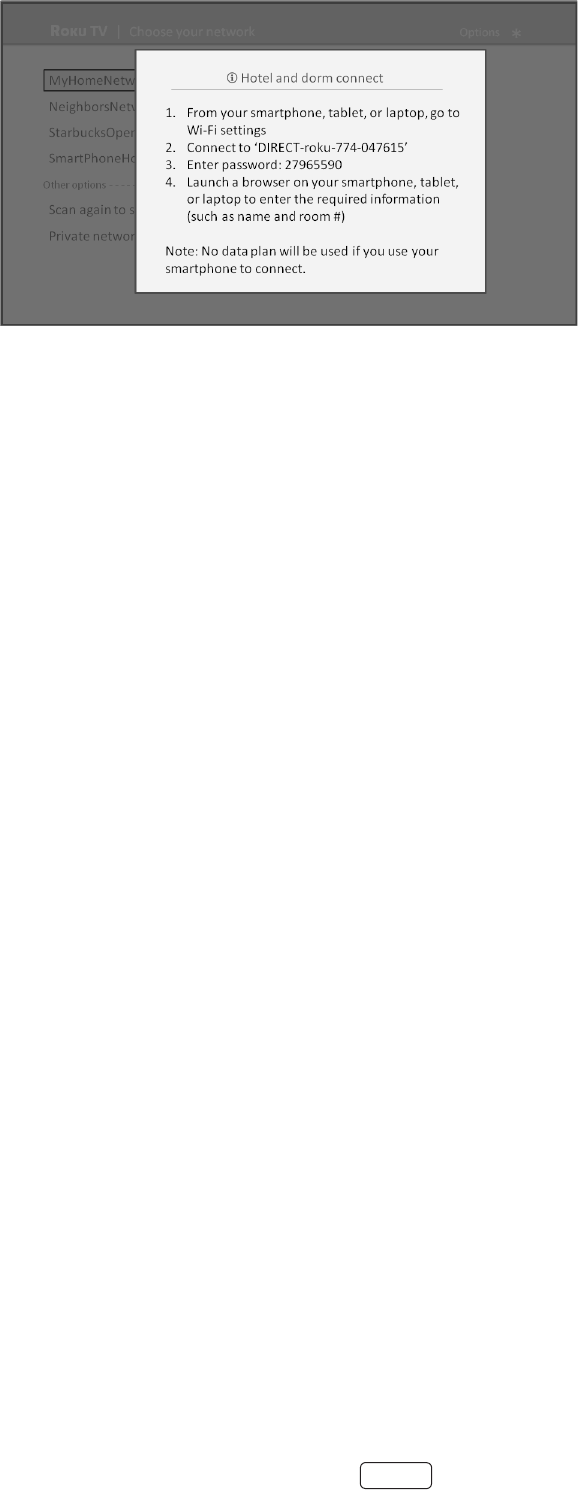
36
4. Use a phone, tablet, or wireless-enabled computer to detect wireless networks. In most cases, you can simply
open the device’s Wi-Fi Sengs or Network Sengs screen to start scanning.
The phone, tablet, or computer must be on the same wireless network to which you are connecng the
TV.
5. Connect to the network named on your TV screen. The actual network name varies.
The previous step connects your smartphone, tablet, or computer directly to the TV. No connecon
charges apply and the connecon does not impact your device’s data plan.
6. The wireless connecon process prompts you for a password. Enter the password as shown on the TV screen.
The actual password varies.
7. Start the web browser on your smartphone, tablet, or computer. When you aempt to open any web page, the
restricted connecon will prompt you for whatever informaon it needs. In most cases, you must agree to terms
and condions, provide idenfying informaon, or enter a password, PIN, or room number to proceed. The infor-
maon requested depends on the organizaon that controls the wireless connecon.
8. Aer you enter the requested informaon, the TV automacally proceeds to complete its connecon and re-
sumes normal operaon.
9. If the TV prompts you to link to your Roku account, use your smartphone, tablet, or computer to complete the
pairing operaon and acvate your Roku TV.

37
Adjusting TV settings
You can adjust most picture and sound sengs while you are watching a program by pressing to display the
menu. If you don’t nd what you need, there are addional picture and sound sengs in the menu.
In most cases, the changes you make apply only to the input you are using. Antenna TV, each separate HDMI input, and
the AV input have their own sengs that the TV remembers when you return to that input. The TV also remembers the
sengs you specify while viewing streaming content.
Settings menu
Use the menu to adjust overall TV sengs. Press
to go to the screen, and then navigate to
.
You can adjust the following overall TV picture sengs from the :
• – If the lighng level in your TV room changes, use this seng to help provide a beer viewing
experience; set to darker for a darker room, and brighter for a brighter room. Choose among and four
other sengs to make the overall picture brighter or darker. So that you don’t have to make this type of change
for each TV input one at a me, this seng increases or decreases the TV’s general brightness across all TV
inputs. This seng is idencal to the TV brightness seng you can access in the Opons menu while watching a
program.
• – This secon of opons lists each TV input. Select an input to switch to that input. Then press
to display the menu, where you can adjust the input’s sengs while watching a live picture and lis-
tening to the sound from that input.
: You don’t have to go to the Sengs menu rst—you can display an input’s Opons menu and adjust its
sengs whenever you are watching the input by pressing .
Options menu
The menu for each TV input provides sengs for controlling the appearance of the picture and the quality of the
audio.
To view the menu, press whenever you are watching a TV input or streaming a video. The menu is a
panel that appears over the le side of the screen:

38
To adjust the sengs on the menu, press the UP or DOWN arrow to highlight a seng, and then press the LEFT
or RIGHT arrow to change the seng. You’ll noce the changes you make right away in picture appearance or audio
quality.
: When you highlight a seng, the header text explains the eect of its current value. When you begin to ad-
just a seng, the other opons are hidden so you can see more of the screen. Even though the other sengs are
hidden, you can move the highlight up or down to adjust the other sengs.
Options menu settings
• – Aects the overall brightness of the picture. This seng applies across the enre TV; that is, to
all TV inputs and is idencal to the TV brightness seng under Sengs > TV picture sengs.
• – Provides picture presets for various viewing preferences. This seng applies to the currently-se-
lected input only.
• – Adjusts the aspect rao of the picture, enabling you to view a picture in its original format, or zoom
or stretch it to ll the screen. The seng has been found to produce the best picture in most cases.
• – Adjusts the sound quality output from the TV speakers. This seng applies across the enre TV;
that is, to all TV inputs. It does not aect the sound quality for headphones, HDMI (ARC), or SPDIF (TOSLINK)
connectors.
• – Sets a mer that turns o the TV aer the specic amount of me. This seng remains in eect
even if you stop watching the current input.
• – Controls when you see capons. This seng is only oered for Antenna TV, the AV input, and
streaming videos. Any set value remains in eect across only these inputs.
o – Turn capons on or o, or set them to appear only when the TV sound is muted.
o – Turn capons on or o, or set them to appear only when the TV sound is muted.
o – Turn capons on or o, set them to appear only when the TV sound is mut-
ed, or only during instant replay (for streaming content that supports instant replay).
If the Instant Replay buon is not available on your remote control, you can use on the Roku
App or the Jump Back buon on a universal remote. For more informaon, see “Other devices” on page
66. Addional caponing opons are provided in Sengs > Accessibility.
• SAP – Selects whether to play a secondary audio program or mulchannel television sound, and which choice to
play. This seng applies only to Antenna TV on digital channels.
: To dismiss the Opons menu, just wait a few seconds without pressing any buons. Or press again to dismiss
the menu immediately.

39
Accessibility
The sengs on the menu enable you to change the TV’s accessibility sengs without leaving the program
you are watching. These sengs are also available on the Home screen under .
Models sold in US only: To enable the Audio Guide, press the buon on the remote control four mes in rapid succes-
sion. Repeat to disable the Audio Guide. (The buon is located directly below the direconal pad on the right side of
the Roku remote control.)
Accessibility mene settings
• – Turn the Audio Guide on or o. The Audio Guide is a text-to-speech screen reader that helps blind
and low-vision users navigate the Roku user interface and on screen menus. When enabled, the Audio Guide
reads out text, menus, and other on-screen items.
: If Shortcut is enabled, you can enable or disable the Audio Guide by pressing the Opon buon four mes in
quick succession.
• – Choose the speed at which the TV speaks Audio Guide prompts.
• – Set the volume of the Audio Guide in relaon to the main TV volume.
• – Enable or disable the shortcut feature. When disabled, pressing the buon four mes in
quick succession does not enable or disable the Audio Guide.
• – Controls when you see capons. This seng is only oered for Antenna TV, the AV input,
and streaming videos. Any set value remains in eect across only these inputs.
o – Turn capons on or o, or set them to appear only when the TV sound is muted.
o – Turn capons on or o, or set them to appear only when the TV sound is muted.
o – Turn capons on or o, set them to appear only when the TV sound is mut-
ed, or only during instant replay (for streaming content that supports instant replay).
If the Instant Replay buon is not available on your remote control, you can use on the Roku
App or the Jump Back buon on a universal remote. For more informaon, see “Other devices” on page
66. Addional caponing opons are provided in the Capons screen in Sengs.
• – Selects which capon track to display when Closed Caponing is on. This seng remains in
eect on all inputs that provide capons.
• SAP – Selects whether to play a secondary audio program or mulchannel television sound, and which choice to
play. This seng applies only to Antenna TV on digital channels.

40
Advanced picture settings
The menu for each TV input provides sengs for ne tuning the appearance of the picture. All
of the sengs in this menu apply only to the currently-selected input.
To use the menu, rst press to display the menu. Then select
.
To adjust the sengs on the menu, press the UP or DOWN arrow to highlight a seng, and
then press the LEFT or RIGHT arrow to change the seng. You’ll noce the changes you make right away in picture ap-
pearance.
: When you highlight a seng, the header text explains the eect of its current value. When you begin to
adjust a seng, the other opons are hidden so you can see more of the screen. Even though the other sengs
are hidden, you can move the highlight up or down to adjust the other sengs. As soon as you press the UP or
DOWN arrow, the other sengs become visible again.
Advanced picture settings menu options
• – Provides picture presets for various viewing preferences. This seng duplicates the one on the
menu. When you change the , other picture sengs adjust accordingly. For example, set-
ng the to sets , , , and other values to produce a very vibrant
picture. Seng to changes these same sengs to produce a picture suitable for enjoying
movies in a darkened room. If you make changes to the individual picture sengs—for example, , or
—these sengs are saved for the current input and the current picture mode. In this way, the HDMI
1 input’s picture mode can be customized and dierent than the HDMI 2 input’s picture mode and
Antenna TV’s picture mode. Use , described below, to return the input’s current
picture mode to its original values.
• – Automacally adjusts the backlight level to achieve the opmum contrast and prevent
excessive dierences between light and dark areas of the screen. The Backlight opon is disabled when Dynamic
Contrast is enabled.
• - Adjusts the overall light intensity of the screen.
• – Adjusts the black level of the dark areas of the picture.
• – Adjusts the white level of the light areas of the picture.
• – Adjusts the sharpness of the edges of objects in the picture.
• – Adjusts the intensity of colors in the picture. A seng of 0 removes all color and displays a black and
white picture.

41
• – Adjusts the color balance from green to red to obtain accurate colors in the picture.
• – Adjusts the overall colors in the picture from to slightly more bluish () to slight-
ly more reddish ().
• – Controls whether Game mode is on or o. When , the TV performs less image processing and
has less input lag. When , the TV may perform more image processing and has more input lag, which is less
desirable for acon games. Available only for HDMI and AV inputs.
• – Returns all picture sengs for the input’s currently-selected to their origi-
nal values.
: To dismiss the Advanced picture sengs menu, just wait a few seconds without pressing any buons. Or
press again to dismiss the menu immediately.
Expert Picture Settings
Your Roku TV has addional picture sengs for demanding home theater enthusiasts, including gamma, noise reducon,
11 point white balance adjustment, and extended color management. You can access Expert Picture Sengs only by
using the Roku Mobile App on an iOS or Android mobile device.
For more informaon, go to “Using Expert Picture Sengs in the Roku Mobile App.”

42
Changing privacy settings
By default, when connected to the Internet and acvated with your Roku account, the TV uses an adversing idener to
track your usage behavior. You can change the privacy sengs on your TV in two ways: reseng the adversing idener
and liming ad tracking.
: Privacy sengs are not present on TVs operang in non-connected mode.
Resetting the advertising identier
Reseng the adversing idener has the eect of clearing your prior usage history and starng over. From that point
forward, your new usage paerns aect the adversements you see on your TV.
1. From the screen menu, navigate to .
2. Highlight . Press to view more informaon about this opon. When you nishing
reading the informaon, press OK to close the More Informaon window.
3. Press OK to reset the adversing idener, and then press OK again to dismiss the vericaon message.
Limiting ad tracking
You can limit Roku’s tracking of your usage behavior by liming ad tracking. When you do, your TV will display ads that
are not personalized based on your TV’s adversing idener.
1. From the screen menu, navigate to .
2. Highlight . Press to view more informaon about this opon. When you nish reading the
informaon, press OK to close the More Informaon window.
3. Press OK to select the opon.
: If you perform a factory reset and then reconnect your TV, ad tracking is restored unl you repeat these steps.

43
My Feed
Use My Feed to nd out when you can watch movies coming soon, and to get updates on movies, TV shows, and actors
that you are following.
Movies Coming Soon
My Feed gives you updates on your list of movies that are coming soon to theaters. With My Feed, you’ll know when
your favorite movie is ready to stream, the channels it is on, and how much it will cost.
Select the movies you want to follow by going to . You’ll then see a list of newly released
movies that are not yet available for streaming. Select a movie, and then select . When you
return to the main screen, you’ll see banners for each of your newly-followed movies along with banners for
movies and TV shows you’re already following.
Movies, TV shows, and people
In addion to following movies coming soon, you can follow any movie, TV show, or actor across top streaming channels.
To follow a program, use the Search feature to nd the movie, TV show, or name that you want to follow, and then select
. For more informaon, see “Searching for something to watch” on page
44.
: The TV takes a bit of me to update your newly-followed shows. Unl it nds at least one channel oering
the movie, the content banner in My Feed shows Check back later for updates.
My Feed alerts you any me a movie or TV show you are following becomes available on another channel and whenever
its price changes. A number in parentheses next to in the menu means that My Feed has updated infor-
maon that you haven’t viewed yet. For example, you if three of your followed shows have updates, you’ll see
.
When a movie or TV show you are following becomes available, the streaming channel oering the movie
might require that you subscribe or pay a fee to view it.
My Feed is available only if your TV is connected to the Internet.

44
Searching for something to
watch
Searching for movies and shows across mulple streaming channels is one of the unique features of your Hitachi Roku
TV. Within a single search operaon, you can search by:
• Movie name
• TV show name
• Actor or director name
• Streaming channel name
• Game name
Roku Search is available only if your TV is connected to the Internet.
: Roku Search doesn’t search across all streaming channels, but searches across lots of popular streaming
channels. The actual channels it searches vary by locale, but include popular providers such as Nelix and several
others, with more being added all the me.
You can check which streaming channels are included in Roku Search by going to the screen, clearing all previous
searches to reveal the search instrucons, and then watching the channel les cycle at the boom of the screen.
To search, select on the screen menu. The screen has a keyboard grid and inially displays instruc-
ons—a set of icons represenng search categories and a list of parcipang provider les.
: If you don’t see the instrucons, navigate to the end of the list of recent searches and select Clear recent
search selecons.
How do I search?
To search, use the arrow buons to navigate the on-screen keyboard, entering a few characters of the search term. With
each addional character you enter, you narrow down the search and the search results become more relevant.
: Use the free Roku mobile app on your compable smartphone or tablet to make searching even faster. Not
only can you use your device’s keypad to type, you can search simply by touching the voice search icon and saying
the name of the movie, TV show, actor or director, channel, or game.
An icon next to each search result shows the category of the result (movie, TV show, actor).
• Press the RIGHT arrow to move the highlight into the list of search results.
• Press the UP and DOWN arrows to scroll through the list of search results to highlight the item you want to view.

45
I found a show, now what?
Now that you’ve highlighted the show, movie, actor, game, or streaming channel you were looking for, press the RIGHT
arrow.
If your search result was an actor, director, or other item that does not represent a single item of content, you’ll see an-
other list to narrow down your search. Connue highlighng results and pressing the RIGHT arrow unl you nd a single,
viewable content item.
• An HD logo means that the content is available in high-denion.
• The checked circle adjacent to the tle means you have already added the streaming channel.
If your search result was a game or a streaming channel, you’ll see detailed informaon, images, and available acons,
such as a list of streaming channels and the cost of geng the item or channel.
: Some channels may require a paid subscripon.
Follow on Roku
Rather than watch the show you found in Search, you can add it to My Feed and wait unl it’s available on a parcular
streaming channel or available at a beer price. From the search results screen, select . Then go to
periodically to check for updates to each of your followed movies, TV shows, or people. For more informaon, see
“My Feed” on page 43.
Recent Searches
The next me you use Roku Search, the screen displays a list of recent search selecons in place of the search
instrucons.
Using the recent search selecons list makes it easy to quickly get to a previously found item, for example, to nd anoth-
er movie with the same actor, or another TV show in the same series.

46
Using the Roku Channel Store
The menu opon takes you to the Roku Channel store, where you can add new paid and free
streaming channels to your TV.
:
• The Streaming Channels menu opon is available only if your TV is connected to the Internet.
• You also can search for streaming channels by using the Search opon, as explained in “Searching for
something to watch” on page 44.
To make it easier to nd what you want, the streaming channels in the Roku Channel Store are categorized by topic. Press
the UP and DOWN arrows to highlight the category you want, and then press the RIGHT arrow to move the highlight into
the grid of streaming channel les.
When you nd a streaming channel you want to add or learn more about, highlight it and press OK to display more de-
tails.
• If the streaming channel you are adding is free, you can select to start watching it immediately.
• If there is a one-me or recurring fee associated with using the streaming channel, you must agree to the terms
and condions, accept the fee, and—if you created one when you acvated your Roku TV, enter your Roku PIN
code to authorize the charges.
• If you already have a subscripon to the streaming channel—for example, you already subscribe to Nelix or you
receive HBO through your cable TV provider—you must complete a dierent, simple authorizaon step to add
the streaming channel.
You only have to complete the authorizaon or acvaon step one me, when you inially add the streaming channel.
Aer that, you simply select the streaming channel le from your screen to start watching. (Channel and content
availability is subject to change. Charges may apply to your selecon.)
: New streaming channels are added connuously, so be sure to check back every now and then.
If you don’t remember your PIN, or if want to change whether you need to use a PIN to make purchases on
your Roku account, see “Changing your Roku Channel Store PIN preference” on page 63.
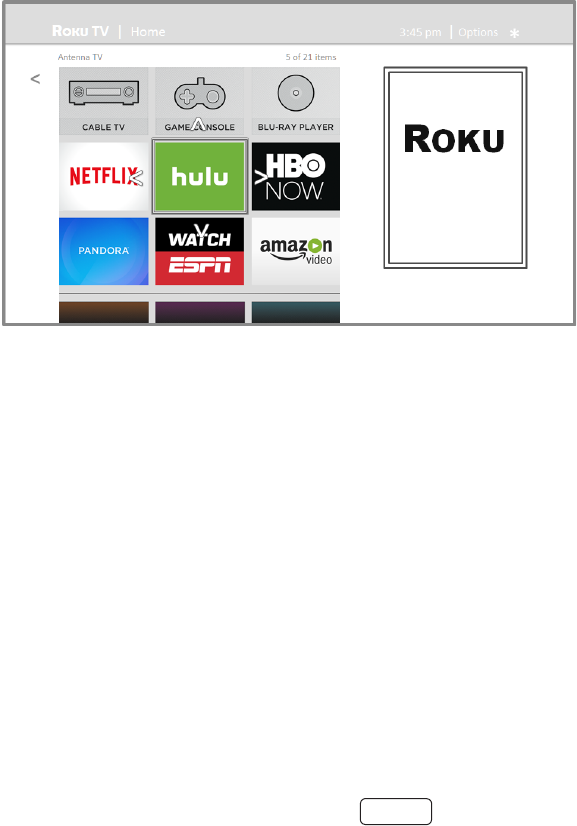
47
Customizing your TV
There are several things you can do to personalize your TV.
Rearrange tiles
Whenever you add a TV input le, it’s added at the top of your screen. Whenever you add a new streaming chan-
nel from the Roku Channel Store, it’s added at the boom of your screen.
You can easily rearrange the order of the les on the screen to suit your viewing preferences. For example, you
might want to be the rst le in your screen. But if you mostly watch one streaming channel, you
might want its le to be the rst one on your screen.
Rearranging les is easy:
1. From the screen, highlight one of the les you want to move.
2. Press to display a list of opons for the type of le you selected.
3. Select or . The list of opons disappears and the highlighted le shows arrows indicat-
ing how it can be moved
Note: A paid subscripon or other payments may be required for some channels. Channel availability is
subject to change and varies by country. Not all content is available in countries or regions where prod-
ucts with Roku OS are sold.
4. Use the arrow buons to move the highlighted le to its new posion. As you move the le, it pushes other les
out of its way.
5. Press OK to lock the le into its new posion.
6. Repeat these steps to move other les unl you have arranged your screen to your liking.
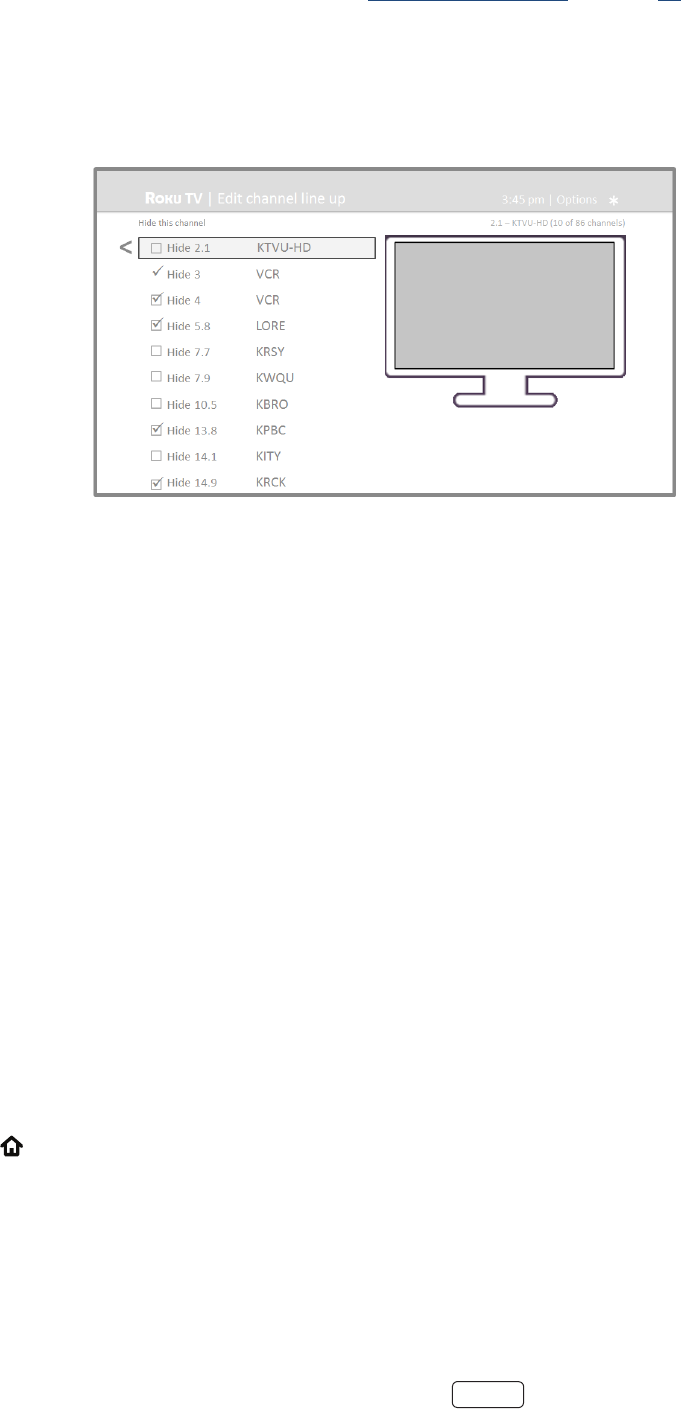
48
Edit broadcast TV channel lineup
When you set up the TV tuner as described in “Seng up Antenna TV” on page 25, the TV adds all the channels with
good signals that it could detect in your area. It’s likely that you now have more channels than you want in your channel
list.
To edit the channel lineup, from the screen, navigate to .
You’ll see a screen lisng all of your channels. Adjacent to the list of channels is a miniature TV screen playing the high-
lighted channel’s picture and sound.
Highlight each channel you want to hide, and then press OK to hide the channel.
: If you need to see or hear the highlighted channel, wait a couple of seconds for the TV to start playing the
channel’s picture and sound. Also note that if you’ve enabled parental controls and the program on the current
channel is blocked, you won’t see a picture or hear sound while eding the channel lineup.
Rename inputs
Rather than trying to remember that your Blu-ray player is connected to HDMI 1 and your game console is connected to
HDMI 3, you can rename the TV inputs to match the connected component.
: Renaming an input also changes the icon associated with it.
To rename an input, you can either:
• Highlight the input le in the screen, and then press to display a list of opons. From the list of opons,
select . Then select a new name and icon.
or
• From the screen, navigate to . On the screen, select the input you want to
rename, select , and then choose a new name and icon from the provided list.
Press
to return to the screen. The new name and icon are now in eect.
Remove unwanted tiles
It’s easy to remove unused TV inputs and unwanted channel or app les. For example, if you never use the HDMI 3 input,
or if you don’t like the weather app you added from the Roku Channel Store, you can remove them from your
screen.

49
: You also can remove the Antenna TV le if you never use the TV tuner. But be aware that removing the Anten-
na TV le also deletes the broadcast TV channel list. You’ll have to set up the TV tuner again next me you want to
view broadcast TV. Instrucons for seng up the TV tuner can be found in “Seng up Antenna TV” on page 25.
• To remove any le, highlight the input le in the screen, and then press to display a list of opons. From
the list of opons, select . In the screen that follows, conrm you want to remove the input.
• Alternavely, to remove a TV input le from the screen, navigate to . On the
screen, select the input you want to remove, and then select . Then press
to return to the
screen.
Change themes
Another way to customize your TV is to change its theme. The theme establishes the look and feel of the TV through
colors, designs, and fonts.
: Themes are available only when your TV is connected to the Internet. Some themes require payment.
To change the theme, in the screen menu navigate to . In the screen, choose from the
following opons:
• – Highlight a theme, and then press OK to switch to that theme.
• – Turn on or o. When is on, the TV automacally switches
to featured themes—like certain holiday-inspired themes —for a limited me whenever Roku makes them avail-
able, and then switches back to your selected theme when the featured theme expires. When o, the TV always
uses your selected theme.
Change sound effects volume
Sound eects are the noises the TV makes to let you know it received your command. You can change the volume of
sound eects or turn them o.
To adjust the sound eects volume, in the screen menu, navigate to . Navigate to
the right and then change the seng to , , , or .
Congure power settings
Power sengs let you set up your TV so that it turns on to the locaon you choose. Power sengs also help your TV save
energy by automacally turning it o under certain condions.
Power on settings
Power on sengs tell the TV what to do when you turn on the power. To congure the power on sengs, from the
Home screen menu, navigate to . Highlight the power on locaon from the list,
and then press OK to select it.
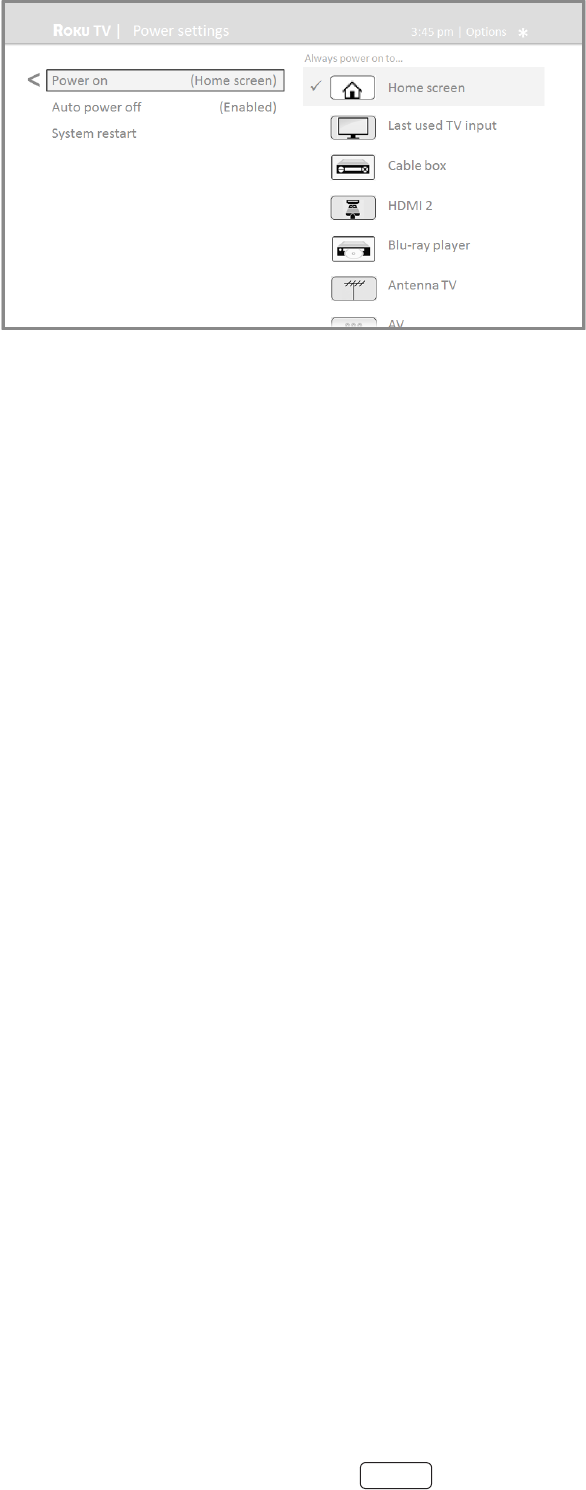
50
Auto power savings
To help you save energy, your TV can automacally turn itself o aer a period of inacvity or a period during which no
signal has been detected. It is factory-congured to do both of these things, but you can change these sengs if needed.
To congure automac power o, from the screen menu navigate to
. In the screen, highlight the following opons and press OK to turn them on or o:
• – If no video or audio acvity and no user interacon occur for 15 minutes, the
TV automacally turns o the screen and sound.
• – If no video or audio acvity and no user interacon occur for 4 hours, the TV goes into
standby mode.
Standby LED On/Off
Normally, the status LED on the front of your TV is lit whenever the TV is in standby mode. If you prefer the status LED to
not be lit in standby mode, you can turn it o. To do so, from the Home screen, navigate to
, and then select .
Aer making this change, the status LED sll performs all other indicaon funcons
Congure accessibility
Accessibility sengs enable users with vision or hearing impairment to use the TV more eecvely. Accessibility sengs
are located under .
Captions mode
Capons mode species when closed capons appear. Access capon sengs from the Home screen by selecng
. At this point, you can choose among the following opons:
• – No capons appear.
• – Capons appear whenever they are available from the program source.
• – Capons appear only when you use the replay opon, and only when you are watching a
streaming program that supports instant replay.

51
• – Capons appear only when the TV is muted.
: Themes are available only when your TV is connected to the Internet. Some themes require payment.
• You can change the capons mode while watching a program. To do so, press to display the Opons
menu, and then select Closed Caponing.
• Some streaming channels require you to enable capons through a seng within their channel even
though you have turned on capons everywhere else.
: Once enabled, the capons mode applies to all inputs that support capons and remains enabled unl you turn
it o.
Captions style
Capons style lets you control how closed capons look when displayed on your TV. Access capon style sengs from
the screen by selecng . At this point, you can choose among the following
opons:
• – Choose from a list of fonts. As you move the highlight to each font, you can see a sample of the re-
sult in an adjacent panel.
• – Choose from a list of edge eect styles, such as raised, depressed, and various shadows. As
you move the highlight to each eect, you can see a sample of the result in an adjacent panel.
• – Choose from a list of sizes. As you move the highlight to each size, you can see a sample of the result
in an adjacent panel.
• - Choose from a list of colors for the text. As you move the highlight to each color, you can see a sam-
ple of the result in an adjacent panel.
• - Choose from a list of opacity sengs for the text. This seng determines how much the area be-
hind the text shows through the text. A value of 100% blocks all of the content behind the text. As you move the
highlight to each seng, you can see a sample of the result in an adjacent panel.
• - Choose from a list of colors for the background area behind the text. As you move the high-
light to each color, you can see a sample of the result in an adjacent panel. Note that you won’t see any change
unless you set the to a value other than
• - Choose from a list of opacity sengs for the background of the capon. This seng de-
termines how much the area behind the capon background shows through the background. A value of 100%
blocks all of the content behind the background. As you move the highlight to each seng, you can see a sample
of the result in an adjacent panel.
• - Choose from a list of colors for the window rectangle surrounding the enre capon. As you
move the highlight to each color, you can see a sample of the result in an adjacent panel. Note that you won’t
see any change unless you set the to a value other than or .
• - Choose from a list of opacity sengs for the window rectangle surrounding the enre capon.
This seng determines how much the area behind the capon window shows through the window. A value of
100% blocks all of the content behind the window. As you move the highlight to each seng, you can see a sam-
ple of the result in an adjacent panel.

52
Audio Guide settings
On TVs sold in the United States, the Audio Guide sengs help users who are blind or visually impaired to congure the
text-to-speech reader, enabling them to operate their TV more easily. The Audio Guide uses voice prompts that speak
volume and channel changes, menu opons, and seng changes. Access Audio Guide sengs from the screen by
navigang to , and then select from the following opons in the secon
• – Turn the Audio Guide on or o.
• – Select one of four speeds at which to hear spoken guide informaon: , , , or
.
• – Select the volume at which to hear spoken guide informaon, relave to the main TV volume
• – Enable or disable the shortcut feature. When enabled (the default), pressing the Opon buon
four mes in quick succession enables or disables the Audio Guide.
Congure parental controls
Parental controls enable you to control whether the members of your household can view certain kinds of broadcast
TV programs. When a program or feature is blocked, you can unblock it by entering a parental control PIN that only you
know.
: Parental controls block content from the TV tuner and from streaming opons, if any, on the Home screen
menu. Parental controls do not block content on other TV inputs or content from streaming channels you add to
your TV.
Creating a parental control PIN
The rst me you access the screen, you must create a new parental control PIN. Thereaer, whenever
you want to change parental control sengs, unblock programming that has been blocked, change the PIN, or disable
parental controls, you must enter your parental control PIN.
: Your parental control PIN has nothing to do with your Roku PIN. You can make them the same if you want—
this is enrely your choice.
To create a new parental control PIN, from the screen menu navigate to . The screen
displays a numeric keypad. Use the arrow buons and the OK buon to enter a four digit code. Then repeat the process
to enter the same PIN again, just to make sure you correctly entered the PIN you want to use.
: If you forget your parental control PIN, the only way to recover is to perform a factory reset opera-
on, as explained in “Factory reset everything” on page 62. Be sure to write it down in a safe place just in case.

53
Blocking Movie Store, TV Store, and News
One of the parental control opons is to completely hide the entertainment opons that are available directly on the
screen menu.
To hide screen entertainment opons:
1. From the screen menu, navigate to , and then enter your parental control PIN.
2. In the screen, highlight screen and then select or clear either of these opons:
• – Removes the and opons from the Home screen
menu.
• – Removes the opon from the screen menu.
: To use either of these opons aer you’ve hidden them, you must return to this screen and remove the
check mark from the corresponding command.
Blocking Broadcast TV shows
For broadcast TV, parental controls use informaon embedded in the broadcast signal to determine whether to allow a
program to be displayed. Parents can congure parental controls to block broadcast TV programs that meet or exceed a
specic rang, so they cannot be viewed or heard unless the correct parental control PIN is entered.
: Rang standards dier by country.
Enabling parental control of TV shows
The rst step in blocking TV shows is to enable parental control of TV shows.
This seng is provided separately to make it easier for you to turn parental control of TV shows on and o without
disturbing their sengs. For example, your kids are going to summer camp for two weeks, and while they are gone, you
don’t want to have to deal with unblocking shows that you want to watch by entering your parental control PIN. All you
need to do is clear , and all TV shows are unblocked. When the kids return, select
again, and all of your parental control sengs are restored in a single operaon.
To enable parental control of TV shows:
1. In the screen menu, navigate to , and then enter your parental control PIN.
2. In the screen, navigate to .
3. Make sure the check box next to is checked. If not, highlight it and press OK.
Blocking based on US TV ratings
Most broadcast US TV shows—other than movies—contain rang data that enables parental controls to block shows that
parents don’t want others to view. The rangs are divided into two groups that funcon independently:
• – TV-Y, TV-Y7
• – TV-G, TV-PG, TV-14, TV-MA
Within each of these groups, the rangs interact such that if you block a parcular level of content, the TV also blocks all
content with a higher rang. Conversely, if you unblock a parcular level of content, the TV also unblocks all content with
a lower rang. For example, if you block TV-PG programs, the TV also blocks TV-14 and TV-MA programs. If you subse-
quently unblock TV-14 programs, TV-PG programs are also unblocked, but TV-MA programs remain blocked.

54
Similarly, within the main group, content types can be individually blocked. For example, you can block just coarse lan-
guage in shows with a TV-PG rang. If you do, then the TV also blocks shows with coarse language in the higher rangs
(TV-14 and TV-MA). Subsequently unblocking coarse language in TV-14 rangs does not unblock coarse language in TV-
MA programs, but it does unblock coarse language in TV-PG programs.
To block TV shows based on US television rangs:
1. From the screen menu, navigate to , and then enter your parental control PIN.
2. In the screen, navigate to . Choose among the following sengs:
• – Highlight the rang you want to block, and then navigate to the right and select the rst
opon that blocks the enre rang level (and all higher rang levels).
• – Highlight the rang that contains the content type you want to block, and then
select the content types you want to block from among those listed. Remember that blocking a content type
in one rang blocks the equivalent content type in all higher rang levels.
Blocking based on US movie ratings
Most movies in the US are rated by the Moon Picture Associaon of America, or MPAA, so the rangs are known as
MPAA rangs. TV broadcast signals carry movie rang data that enables parental controls to block shows that parents
don’t want others to see. The rangs are:
• G – General audiences
• PG – Parental guidance suggested
• PG-13 – Parents strongly cauoned for children age 13 or younger
• R – Restricted
• NC-17 – Not for age 17 or younger
Unlike US TV rangs, there are no individual content types within the rangs. But like TV rangs, blocking movies with
a parcular rang also blocks movies with a higher rang, and unblocking movies with a parcular rang also unblocks
movies with a lower rang.
: Blocking movies with an NC-17 rang also blocks programs with the now-obsolete X rang, which can sll
occur in the program data of older movies.
To block movies based on MPAA rangs:
1. From the screen menu, navigate to , and then enter your parental control PIN.
2. In the screen, navigate to .
3. Select the rang level you want to block. You need only select one rang level, and all higher levels are automa-
cally blocked.
Blocking based on Other ratings
Your TV can block programs having rangs that had not been dened when the TV was manufactured. It does this by
detecng a new Rang Region Table in a program and then downloading the new table and displaying its rang in the
Parental controls.
When the TV downloads a new Rang Region Table, it adds a new opon to the list of rang types: . If you
see this opon in the screen, you have tuned to a staon that has implemented a new rang table.
Once the new rang table has been downloaded to the TV, it remains in the TV unl it is factory reset, and you can con-
gure blocking based on the new rangs.

55
New Region Rang Tables can have independent rang levels, or rang levels that interact in the same ways as the built-
in US TV and MPAA Movie rangs.
: If your TV downloads a new Region Rang Table, you’ll have to experiment with its sengs to understand
how to use it.
Blocking based on Canadian English ratings
Canadian-English language and third-language programs that are broadcast in Canada are rated by the Acon Group on
Violence on Television, or AGVOT. TV broadcast signals carry rang data that enables parental controls to block shows
that parents don’t want others to view based on content containing violence, language, sex, or nudity. The rangs are:
• C – Children under 8 years
• C8 – Children 8 years and older
• G – Generally suitable for all age groups
• PG – Parental guidance suggested for viewers under 14 years
• 14+ – Generally not suitable for viewers under 14 years
• 18+ – Generally not suitable for viewers under 18 years
Blocking content with a parcular rang also blocks content with a higher rang, and unblocking content with a parcu-
lar rang also unblocks movies with a lower rang.
To block programs based on AGVOT rangs:
1. From the screen menu, navigate to , and then enter your parental control PIN.
2. In the screen, navigate to .
3. Select the rang level you want to block. You need only select one rang level, and all higher levels are automa-
cally blocked.
Blocking based on Canadian French ratings
Canadian-French language programs that are broadcast in Canada are rated by the Régie du cinéma du Québec. TV
broadcast signals carry rang data that enables parental controls to block shows that parents don’t want others to view
based on content containing violence, language, sex, or nudity. The rangs are:
• G – Generally suitable for all age groups
• 8+ – Viewers 8 years and older
• 13+ – Viewers 13 years and older
• 16+ – Viewers 16 years and older
• 18+ – Adults only
Blocking content with a parcular rang also blocks content with a higher rang, and unblocking content with a parcu-
lar rang also unblocks movies with a lower rang.
To block programs based on Canadian-French rangs:
1. From the screen menu, navigate to , and then enter your parental control PIN.
2. In the screen, navigate to .
3. Select the rang level you want to block. You need only select one rang level, and all higher levels are automa-
cally blocked.

56
Blocking unrated programs
Some broadcast TV shows and movies are assigned a rang of “Unrated”. Whether or not such programs contain content
that is objeconable to you cannot be determined. However, you can choose to block such programs.
To block all unrated broadcasts:
1. From the screen menu, navigate to , and then enter your parental control PIN.
2. In the screen, navigate to .
3. Highlight and press OK. When blocking is enabled, the adjacent padlock icon changes from
unlocked to locked.
: Blocking programs that have been assigned a rang of “Unrated” does not block programs that have no rang
assigned to them (for example a broadcast of a local town council meeng). Programs that do not have an assigned
rang display Rang NA (for “not applicable”, meaning a rang is not needed).
What happens when a TV show is blocked?
Aer you’ve set up parental controls, TV shows and movies can be blocked:
• When you change channels and the new channel is playing a program whose rang exceeds your sengs.
• When a new show comes on the channel you are watching and its rang exceeds your sengs.
When a program is blocked by parental control sengs, the TV displays a blocked message:
Whenever this blocked message appears, both the video and audio of the show are blocked, as well as program data that
would normally appear in the area at the boom of the screen.
To watch the blocked program, you need to know the PIN code dened when you enabled parental controls, as explained
in “Creang a parental control PIN” on page 52.
1. Press OK to select and display a PIN pad.
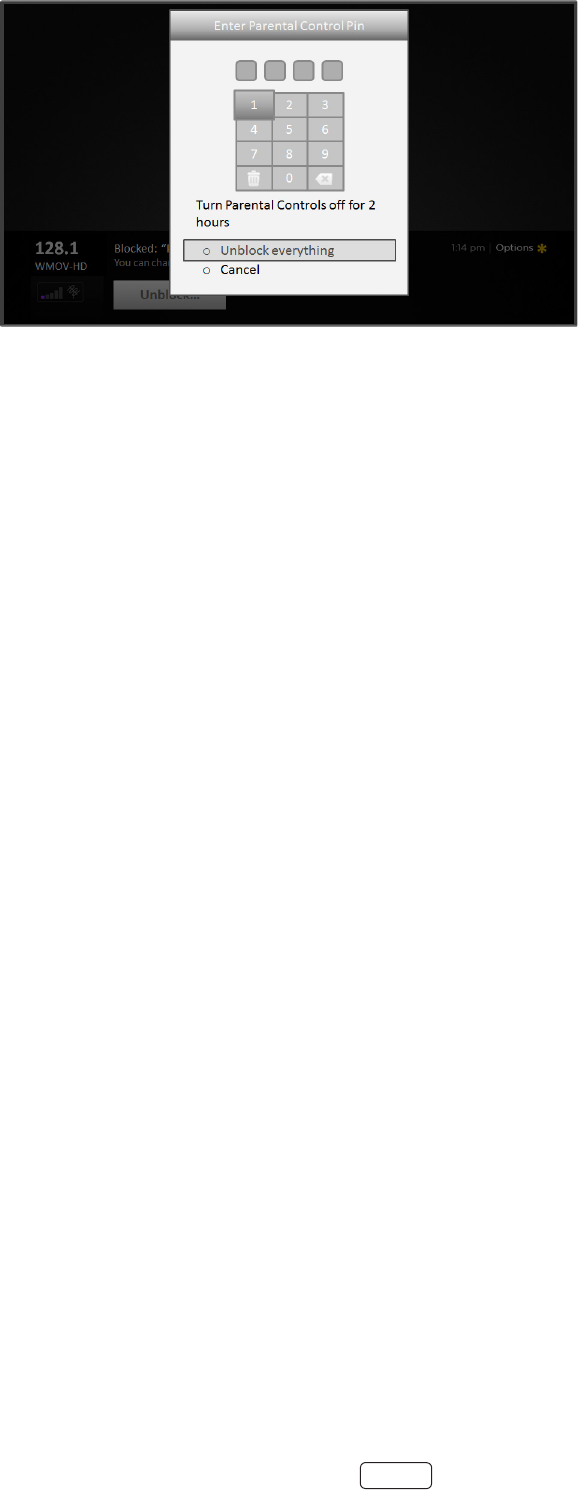
57
2. Use the arrow buons to enter your parental control PIN code, and then press OK to select .
Aer unblocking shows that have been blocked, all blocking is disabled for two hours or unl you turn o the TV.
Changing the parental control PIN
To change your parental control PIN:
1. From the screen menu, navigate to , and then enter your parental control PIN.
2. In the screen, highlight .
3. Move the highlight into the adjacent keypad, and then use the arrow buons and the OK buon to enter a four
digit code. Then repeat the process to enter the same PIN again, just to make sure you correctly entered the PIN
you want to use.
Resetting parental controls
So now your kids have grown up and gone away to college, and you no longer want to deal with blocked programs.
To erase all parental control sengs:
1. From the screen menu, navigate to , and then enter your parental control PIN.
2. In the screen, highlight .
3. Follow the instrucons on the screen to conrm that you want to erase all parental control sengs.
: Reseng parental controls also erases your parental control PIN.

58
More settings
This secon describes the features and sengs of the TV that were not covered in the other parts of this guide.
Changing network settings
If needed, you can change your network sengs at any me. For example, if you change the name of your wireless
network (its SSID) or its password, you will need to change your TV’s sengs so that it can connue to connect. Also, if
you decided not to connect to the Internet in “Guided Setup” on page 13, you can use Network sengs to connect at
a later me.
To change network sengs, from the screen menu, navigate to , and then press the RIGHT
arrow. At this point, you can choose the following opons:
• – Select your exisng network connecon type ( or ), and then press OK to
start the update process. The TV uses your current network informaon to reconrm the wireless or wired net-
work connecon, the local network connecon, and the Internet connecon.
• – Select a dierent network connecon types ( or ), and then select the
opon to set up a new connecon. Follow the on-screen instrucons to complete the network connecon. For
help with seng up a new connecon, see “Seng up your TV” on page 14.
Note: Some networks, such as those found in dorm rooms, hotels, and other public places, may require
you to read and agree to terms, enter a code, or provide idenfying informaon before leng you con-
nect to the Internet. If the TV detects that you are connecng to such a network, it prompts you through
the connecon process using your smartphone or tablet to provide the needed informaon. For more
informaon, see “Using your TV in a hotel or dorm room” on page 35.
Changing time settings
You can change me sengs to suit your preferences. You can nd the following sengs by navigang from the
screen menu to :
• – Set a me delay aer which the TV will automacally shut o. This seng reects the seng you
can make in the menu from any TV input, as explained in “Opons menu sengs” on page 38. Note
that the sleep mer seng is not input specic.
• – Select whether to set the me zone automacally or manually, and if set manually, select your cur-
rent me zone. Typically, a TV connected to the Internet can discover its own me zone automacally, and a TV
that is not connected to the Internet must be set manually. Inially, this seng is made when you set up the TV
tuner, as explained in “Seng up Antenna TV” on page 25. Correct me zone informaon is needed to correct-
ly display program data.
• – Select whether to display me in a 12-hour or 24-hour format, or to turn o me display. This
seng is available only on TVs that are connected to the Internet. Non-connected TVs do not display the me.

59
Scanning for broadcast TV channels again
There will be mes when you need to create a new channel list. For example, you:
• Change cable providers
• Reorient your TV antenna
• Move to a dierent city with dierent channels
Whenever you need to update your TV channel list, you can repeat the channel scan.
: Repeat the channel scan from me to me to make sure you are receiving all of the latest channels. Broad-
casters add and remove channels, move channels to dierent parts of the spectrum, and change the power levels
of their channels periodically.
To repeat the channel scan, from the screen menu, navigate to
. Then select to begin the channel scan process. The screens and opons that appear
during this process are idencal to those described in “How do I set up the TV tuner?” on page 25.
Setting the HDMI mode
You can independently congure each HDMI input to match the capabilies of the connected device. From the
screen menu, navigate to , and then select an enabled HDMI input. Next, select and
then select one of the following sengs:
• – Let the TV determine the best seng. Use this opon unless your HDMI device does not correctly com-
municate its HDMI version compability.
• – Congure the input for compability with HDMI version 1.4, which supports a maximum refresh rate
of 30 Hz at full UHD resoluon. Most HDMI devices will work correctly with the TV in this mode.
• – Congure the input for compability with HDMI version 2.0, which supports a maximum refresh rate
of 60 Hz at full UHD resoluon. Many older HDMI devices will not work correctly if the TV’s HDMI input is cong-
ured for this mode.
Using the TV in a home theater
Your TV has several features that make it an ideal TV for a home theater. But you might not noce them because they
remain in the background unl you decide to use them.
Turning off the speakers
When you use your TV with a sound bar or an external amplier and speakers, you’ll probably want to turn o the inter-
nal TV speakers.
To turn o the TV’s built-in speakers, in the screen menu, navigate to and change
the seng.
: The TV’s internal speakers can be enabled and disabled automacally as needed by system audio control, as
described in “Enabling system audio control” on page 61. The internal speakers are also turned o when you
use the headphone jack.
60
Changing the audio mode
The TV has two audio modes, accessed by navigang in the screen menu to :
• – Use this seng for internal speakers, headphones, and external stereo ampliers connected through
HDMI ARC, SPDIF opcal, or headphone jack.
• – Use this seng to automacally detect the best audio seng based on the audio stream in the content
you are watching. If you have connected the TV to an external Dolby Audio compable amplier, receiver, or
sound bar through HDMI ARC or SPDIF opcal, the TV automacally selects the appropriate surround sound
capabilies of the device based on the characteriscs of the current program.
Setting up a digital audio connection
You can connect the TV to an external amplier, receiver, or sound bar by using either of these two connecons:
• – The HDMI Audio Return Channel enables the TV to output digital audio on one of its
HDMI connectors. The connected amplier can also funcon simultaneously as an input source to the TV, if
needed. To use the ARC capability, you must connect an HDMI cable from your amplier’s HDMI ARC connector
to the HDMI ARC connector on the TV. You also must:
o Be sure your HDMI cable is cered by HDMI.
o Enable under , as explained in “Enabling
HDMI ARC” on page 61.
•
SPDIF
– The TV has an SPDIF opcal connector that outputs a digital audio signal. To use the
opcal output, connect a TOSLINK opcal cable from the amplier to the Opcal or SPDIF connector on the TV.
• : Dolby Audio supporng Dolby Digital Plus format is not available through the SPDIF opcal output. This
format is only available through the HDMI ARC connecon.
Aer making the required HDMI ARC or SPDIF opcal connecon, go to opon and
select the audio format to use.
In most cases, is the best opon. Other sengs can result in no sound when the content you
are viewing does not contain the audio stream type you selected.
Controlling other devices through CEC
Consumer Electronics Control (CEC) enables your TV and other CEC-compable home entertainment components to
control one another in various ways. First, the CEC-compable devices must “discover” one another and report their ca-
pabilies. Aer this, one device can control another according to the features you enable. For example, playing a disc on
a Blu-ray player could switch the TV to the Blu-ray player’s input. Or, powering o the TV could also power o the Blu-ray
player and the home theater receiver.

61
Discovering connected CEC devices
To discover CEC devices:
1. Make sure that your CEC-compable components are connected to the TV with a suitable High Speed HDMI
Cable that supports HDMI ARC and CEC control.
2. Turn on each component and make sure all components are CEC enabled.
: Some manufacturers have their own branded names for CEC funconality, so you might need to read the
product documentaon to correctly idenfy the CEC features of the device.
3. On the TV’s screen menu, navigate to and then select
. Press OK to repeat the discovery process, if necessary.
When nished, the TV displays a list of CEC devices that are connected to each HDMI input, as well as any devices that
had previously been connected. The TV remembers the names of mulple CEC devices even when they are no longer
connected. If the list is longer than the allowed space, press to see a complete list in a scrollable window.
Enabling HDMI ARC
HDMI ARC is the audio return channel that is available on one of the TV’s HDMI ports. The audio return channel enables
you to send a Dolby Audio signal back to a home theater receiver that is also sending an audio and video signal into the
TV. Using HDMI ARC reduces the number of cables needed and oponally lets you control the volume and mute state of
the receiver by enabling system audio control.
HDMI ARC is disabled by default. To enable HDMI ARC, in the screen menu, navigate to
, and then highlight . Press OK to enable or disable the feature.
: Enabling also enables . Aer enabling , you can disable
if you prefer.
Enabling system audio control
System audio control enables the TV remote control to change the volume and mute state of an amplier or sound bar
connected through HDMI, and to display the external device’s volume and mute status in the TV’s on-screen display.
The TV automacally turns o its internal speakers and sends volume and mute control signals to an external amplier
when all of the following are true:
• is enabled on the TV.
• The TV is connected to a CEC-compable amplier, it is powered on, and CEC discoverability is enabled.
• The CEC-compable amplier’s HDMI ARC connector is connected to the TV’s HDMI ARC connector with a suit-
able HDMI cable.
When the CEC-compable amplier is o, the TV automacally turns on its speakers (unless you have turned them o as
described in “Turning o the speakers” on page 59) and resumes local control of volume and mute state.
To enable or disable system audio control, in the screen menu, navigate to
and highlight . Press OK to enable or disable the feature.
Enabling 1-touch play
1-touch play enables a component to control which TV input is acve. For example, pressing on your Blu-ray player
switches the TV to the Blu-ray input.
1-touch play is disabled by default. To enable 1-touch play, in the screen menu, navigate to
and highlight . Press OK to enable or disable the feature.

62
Enabling system standby
The system standby feature causes other components to power o when you power o your TV. Depending on the CEC
System Standby implementaon, it also might enable connected components to power o your TV when you power o
the component.
System standby is disabled by default. To enable system standby, in the screen menu, navigate to
and highlight . Press OK to enable or disable the feature.
Restarting the TV
You can restart the TV when necessary. Restarng has the same eect as unplugging the TV power and then plugging it
in again.
To restart the TV, navigate to , and then select . Highlight , and then
press OK to conrm restart.
While the TV restarts, the screen goes dark for a few seconds, and then displays the startup screen for a few more sec-
onds. When the restart operaon completes, the TV displays the acvity you selected in “Power on sengs” on page
49.
Resetting the TV
You can choose to reset only the TV picture and audio sengs to their original values, or perform a full factory reset to
return the TV to the state it was in when you rst unpacked it and turned it on.
Reset audio/video settings
To reset only the TV picture and audio sengs to their original values, navigate to
, and then highlight . Read the informaon on the screen to make
sure you understand what the reset operaon does.
To proceed with the reset operaon, press three mes in a row.
Factory reset everything
A full factory reset returns the TV’s sengs to their original state and removes all personally idenable informaon
from the TV. When nished, you must repeat Guided Setup, reconnecng to the Internet, re-linking your Roku account,
and reloading any streaming channels. You also must repeat Antenna TV setup and input conguraon.
Factory reset is the recommended choice if you want to transfer the TV to another owner, and it is the only choice if you
want to switch from store mode to home mode (if you inadvertently selected store mode during Guided Setup).
To perform a factory reset, navigate to , and then highlight
. Read the informaon on the screen to make sure you understand what this reset operaon
does.
To proceed with the full factory reset, use the on-screen number pad to enter the code displayed on the screen, and then
select OK to proceed.
When the factory reset operaon completes, the TV restarts and displays the rst Guided Setup screen.

63
What if I can’t access the Factory Reset option?
It is possible that your TV might get into a state where you cannot access the various menus, including the menu opon
that lets you perform a factory reset operaon. If that happens, you can force the TV to reset by following these steps:
1. Using a straightened paper clip or ball-point pen, press and hold the recessed RESET buon on the TV connector
panel.
2. Connue to hold the RESET buon for approximately 12 seconds.
When the reset cycle completes, the status indicator comes on dim.
3. Release the RESET buon. The TV is now powered o.
4. Turn on the TV and proceed through Guided Setup. See “Seng up your TV” on page 14.
Network connection reset
If you want to remove your network connecon informaon without disturbing other sengs, navigate from the
screen to , and then select .
When you select this opon, the TV removes your wireless network informaon, including the name of the connecon
(its SSID) and your wireless password, if any, and then it restarts. Aer restarng, your TV retains all of its other sengs
and its associaon with your Roku account.
Aer reseng your network connecon, navigate from the screen to
to connue enjoying all of the benets of your connected TV.
Changing your Roku Channel Store PIN preference
When you created your Roku account, you were given the opportunity to create a PIN code and to specify when it must
be used. If you created a Channel Store PIN and want to change it, or you don’t remember your PIN, or if you didn’t cre-
ate a Channel Store +PIN and want to add one, you can easily make these changes.
1. On a computer, tablet, or smartphone, use your web browser to go to hps://my.roku.com.
2. Enter your email address and password to sign in. Aer signing in, the page appears.
3. Under , click to open the page.
4. Skip this step if you just want to change your PIN. Otherwise, choose the opon your prefer from among those
listed:
• Require a PIN to make purchases or to add any item from the Channel Store.
• Require a PIN to make purchases.
• Do not require a PIN to make purchases.
5. If you choose either of the rst two opons, enter your PIN twice in the appropriate boxes.
6. Click to save your changes and return to the page. Note that your current seng is
described under .
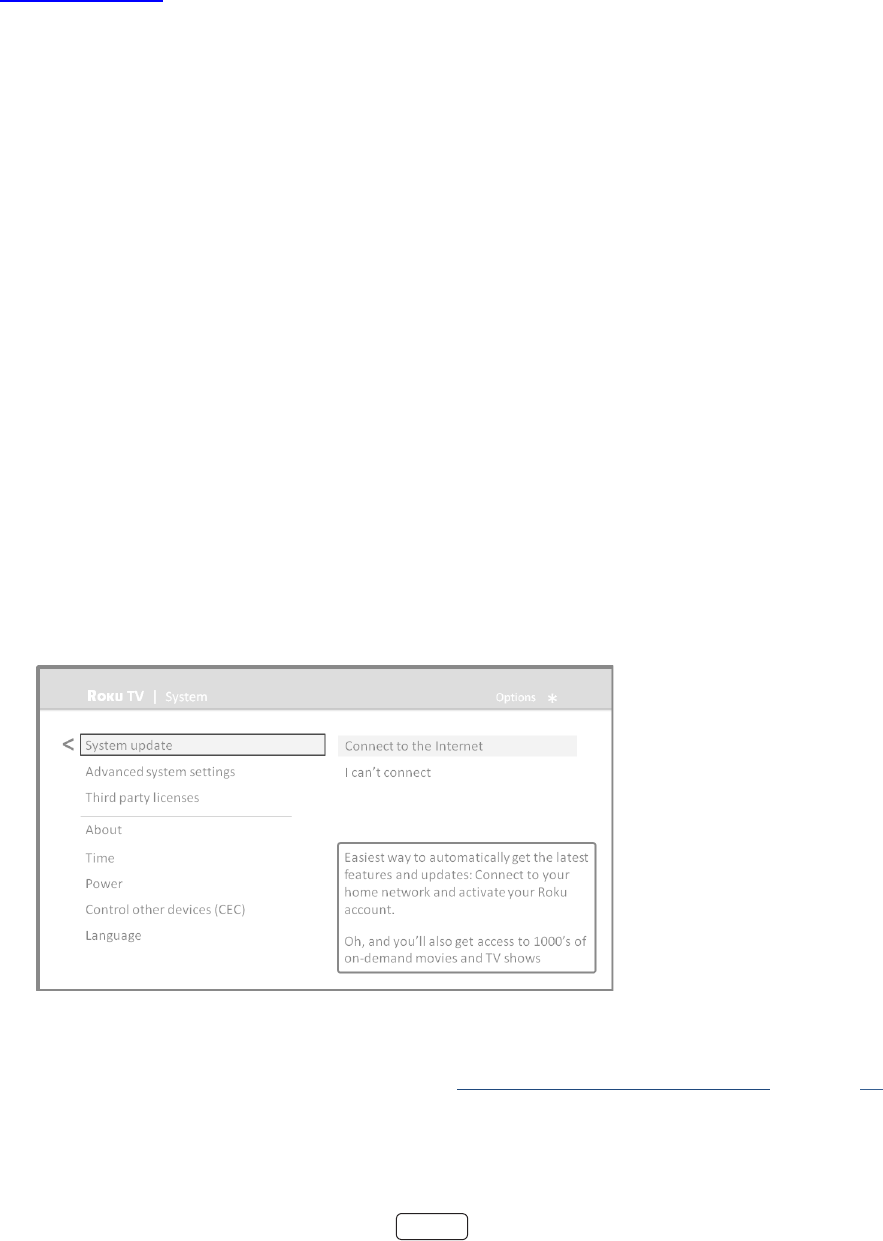
64
Getting system updates
If your TV is connected to the Internet and linked with a Roku account, it will automacally get updates from me to
me. You don’t need to do anything. But if you are aware that an update is available and you don’t want to wait unl the
TV updates itself, you can manually check for updates.
If your TV is not connected to the Internet, you can sll get updates by using a USB ash drive.
You can download an updated Owner’s Guide that matches your Roku TV soware version from the Hitachi America, Ltd.
web site at: www.hitachi.us/tv
To determine your current Roku TV soware version, go to , and then press OK or navigate to
the right.
Checking for updates on a connected TV
If you’re one of those people who has to have the latest, most up-to-date features the moment they are available, you
can check for updates as oen as you want.
To check for updates, navigate to , and then select . The TV responds ei-
ther with a message saying that your TV is up to date, or with a message saying that an update is available.
Follow the instrucons on the screen to install the system update.
: Somemes system updates install new system soware, and other mes they install new features for
streaming channels. Therefore, you won’t always see a change in the behavior of your TV aer a system update.
Getting updates on a non-connected TV
If your TV is not connected to the Internet, you can sll get system updates by using a USB ash drive and a computer
with an Internet connecon.
To get a system update, navigate to :
The screen on a non-connected TV gives you the opportunity to connect your TV to the Internet
to automacally receive updates. We recommend this opon if it is possible in your situaon. To proceed, select
and follow the instrucons in “But what if I didn’t connect my TV?” on page 24.
Otherwise, if you can’t connect to the Internet, select , and then follow the instrucons on the
screen. Here’s a summary:

65
1. On an Internet-connected computer, go to the web site
displayed on the screen.
2. On the web page, select the correct brand and
model, and then click .
3. Click , and then save the le to the root
folder of a standard USB ash drive.
4. When the download nishes, take the USB ash drive to
the TV and plug it into the USB port. When you do, the TV
validates the les on the ash drive and displays a 12-digit
code.
5. Write down the code and the web address, and take this
informaon back to your Internet-connected computer.
6. On the page, enter the code your TV dis-
played, and then click .
7. On the code page, write down the 6-digit code that
appears, and then take it back to your TV.
8. Using the TV remote control, select to move to the
next screen, and then use the on-screen keyboard to enter
the 6-digit code. When nished, select OK. The system
update begins. Do not remove the USB ash drive unl the
TV restarts.
When the update nishes, the TV restarts. You can check the new ver-
sion number by navigang to .
12- and 6-digit codes
USB ash drive

66
Other devices
Screen Mirroring your phone or tablet
Your TV has a feature called screen mirroring that lets you mirror your compable smartphone or tablet on your TV.
Share videos, photos, web pages, and more from compable devices*. This screen mirroring feature is in a ‘beta’ period,
which lets you try it out and allows Roku to learn what needs to be improved—so don’t be surprised if it doesn’t work
perfectly.
For informaon on which devices may work with screen mirroring and instrucons on how to use it, see
hps://support.roku.com/hc/en-us/arcles/208754928-Roku-screen-mirroring-overview.
: Your TV must be connected to the Internet and linked to a Roku account to use screen mirroring. The Screen
Mirroring opon is not available on non-connected TVs.
Getting and using the Roku mobile app
Roku makes the Roku mobile app free for compable iOS, Android, and Microso Windows mobile devices†.
The Roku mobile app is an alternave remote control for your Roku TV. The Roku mobile app also lets you nd and add
new Roku Channels, more easily search and nd something to watch, and even use your voice to search without typing.
Find more informaon by going to support.roku.com/home and searching for “mobile app.”
Private Listening on the Roku mobile app
Another feature of the Roku mobile app is the ability to listen to streaming programs on headphones connected to your
device (on compable Apple and Android devices only). To use this feature, you must be watching or listening to stream-
ing content (not live TV or other TV inputs), and you must have the latest version of the Roku mobile app.
For more informaon, see:
hps://support.roku.com/arcle/217478308-private-listening-on-the-roku-mobile-app-
Using a universal remote
In many cases, you can program your cable or satellite universal remote control to also control your TV. You will need to
have instrucons for programming the remote control handy. Check with your cable or satellite provider for instrucons.
For details on how to set up the TV to work with universal remote controls, visit www.roku.com/universalremote.
*Many features work with top mobile devices. Please see support.roku.com for compability informaon.
† Please see support.roku.com for compability informaon.


68
Legal statement
Please note—Use of the Hitachi Roku TV is governed by the End User Agreement (see below). In addion, an end user online prole and billing account with Roku, Inc.
(“Roku”) on Roku’s website (“Roku Account”) is required to stream content via the Internet using your Hitachi Roku TV. A Roku Account gives you access to movies,
television shows, and other audio-visual entertainment in the “Roku Channel Store,” a storefront of applicaons provided by Roku via your device’s on-screen menu.
Aer your Roku Account is created, you can link your Hitachi Roku TV to your account. By using the Hitacih Roku TV, you agree to the following disclaimer. For the
avoidance of doubt, the content disclaimer set forth herein shall refer to all content and channels accessible and available on the Hitachi Roku TV, including those
available via the Roku® streaming plaorm, as well as broadcast cable.
Due to the various capabilies of the Hitachi Roku TV, as well as limitaons in the available content available therein, certain features, applicaons, and services may
not be available on all Hitachi Roku TVs, or in all territories. Some features on the Hitachi Roku TV may also require addional peripheral devices or membership fees
that are sold separately. Please visit the Hitachi Roku TV or Roku, Inc. websites for more informaon on the Hitachi Roku TV and content availability. The services and
availability of content on the Hitachi Roku TV are subject to change from me to me without prior noce.
All content and services accessible through the Hitachi Roku TV belong to third pares and are protected by copyright, patent, trademark and/or other intellectual
property laws. Such content and services are provided solely for your personal noncommercial use. You may not use any content or services in a manner that has not
been authorized by the content owner or service provider. Without liming the foregoing, you may not modify, copy, republish, upload, post, transmit, translate, sell,
create derivave works, exploit, or distribute in any manner or medium any content or services displayed through the Hitachi Roku TV.
YOU EXPRESSLY ACKNOWLEDGE AND AGREE THAT YOUR USE OF THE HITACHI ROKU TV IS AT YOUR SOLE RISK AND THAT THE ENTIRE RISK AS TO SATISFACTORY QUALI-
TY, PERFORMANCE AND ACCURACY IS WITH YOU. THE HITACHI ROKU TV AND ALL THIRD PARTY CONTENT AND SERVICES ARE PROVIDED “AS IS” WITHOUT WARRANTY
OF ANY KIND, EITHER EXPRESS OR IMPLIED. HITACHI ROKU TV AND ROKU EXPRESSLY DISCLAIMS ALL WARRANTIES AND CONDITIONS WITH RESPECT TO THE HITACHI
ROKU TV CONTENT AND SERVICES, EITHER EXPRESS OR, IMPLIED, INCLUDING BUT NOT LIMITED TO, WARRANTIES OF MERCHANTABILITY, OF SATISFACTORY QUALITY,
FITNESS FOR A PARTICULAR PURPOSE, OF ACCURACY, OF QUIET ENJOYMENT, AND NON-INFRINGEMENT OF THIRD PARTY RIGHTS. HITACHI AMERICA, LTD. AND ROKU
DO NOT GUARANTEE THE ACCURACY, VALIDITY, TIMELINESS, LEGALITY, OR COMPLETENESS OF ANY CONTENT OR SERVICE MADE AVAILABLE THROUGH THE HITACHI
ROKU TV AND DO NOT WARRANT THAT THE HITACHI ROKU TV, CONTENT OR SERVICES WILL MEET YOUR REQUIREMENTS, OR THAT OPERATION OF THE HITACHI ROKU
TV WILL BE UNINTERRUPTED OR ERROR-FREE. UNDER NO CIRCUMSTANCES, INCLUDING NEGLIGENCE, SHALL HITACHI AMERICA, LTD. OR ROKU BE LIABLE, WHETHER
IN CONTRACT OR TORT, FOR ANY DIRECT, INDIRECT, INCIDENTAL, SPECIAL OR CONSEQUENTIAL DAMAGES, ATTORNEY FEES, EXPENSES, OR ANY OTHER DAMAGES ARIS-
ING OUT OF, OR IN CONNECTION WITH, ANY INFORMATION CONTAINED IN, OR AS A RESULT OF THE USE OF THE DEVICE, OR ANY CONTENT OR SERVICE ACCESSED BY
YOU OR ANY THIRD PARTY, EVEN IF ADVISED OF THE POSSIBILITY OF SUCH DAMAGES.
Third party content and services may be changed, suspended, removed, terminated or interrupted, or access may be disabled at any me, without noce, and Hitachi
America, Ltd. and Roku makes no representaon or warranty that any content or service will remain available for any period of me. Content and services are trans-
mied by third pares by means of networks and transmission facilies over which Hitachi America, Ltd. and Roku have no control. Without liming the generality of
this disclaimer, Hitachi America, Ltd. and Roku expressly disclaim any responsibility or liability for any change, interrupon, disabling, removal of or suspension of any
content or service made available through the Hitachi Roku TV. Hitachi America, Ltd., Roku, the content providers, or the service providers may impose limits on the
use of or access to certain services or content, in any case and without noce or liability. Any quesons or requests for service relang to the content or services made
available on the Hitachi Roku TV should be submied to the respecve cable content or service provider or as described in the Hitachi Roku TV Owner’s Guide.
In the event of a conict between the Hitachi Roku TV End User Agreement and the terms set forth in this Legal Disclaimer, the Hitachi Roku TV End User Agreement
shall prevail and control in all circumstances.
END USER LICENSE AGREEMENT (FOR ROKU TV)
IMPORTANT: READ THIS AGREEMENT CAREFULLY BEFORE YOU USE A ROKU TV. ALSO REVIEW THE IMPORTANT PROD-
UCT INFORMATION THAT MAY HAVE BEEN PROVIDED WITH YOUR ROKU TV.
Overview
This End User License Agreement (“EULA”) between you and Roku, Inc. (“”) governs the use of: (a) your television which uses the Roku plaorm to play digital
content over the Internet (“”), and (b) any rmware and soware that have been pre-installed on the Television and the rmware and soware updates
Roku provides to you for the Television (collecvely, the “”). By linking the Television to your account on Roku’s website (“”) or using the
Television, you are agreeing to this EULA. If you are a resident of the European Economic Area, by agreeing to this EULA, you expressly agree to waive your right to
withdraw.
If you do not agree to this EULA, you do not have the right to use the Television or the Soware. If you are within the allowable me period for returns under the
applicable return policy, you may return the Television to your seller for a refund, subject to the terms of such return policy. You should perform a factory reset before
you return it to erase data that may be stored on the Television. For instrucons on how to reset your Television, please visit www.roku.com/support.
In this EULA, “” means an applicaon in the Roku Channel Store; “” means movies, television shows, music and other audio and visual materials and
entertainment; “” means any provider of Content; and “” means the storefront of applicaons provided by Roku via the Televi-
sion’s on-screen menu.
Changes to This EULA
Roku may amend this EULA at any me in its discreon. Such amendments shall be eecve immediately upon posng of the amended EULA on Roku’s website or via
the Television or your Roku Account, whichever occurs rst. If you have a Roku Account that is linked to your Television, then in its opon, Roku may also nofy you
of the amended EULA by sending a noce to the last email address you have provided to Roku. You agree to provide accurate and complete informaon if and when
you set up your Roku Account, and you agree to promptly update your account informaon (including contact informaon) to keep it accurate and complete. You can
do this at any me by signing in to your Roku Account. Following such posng or noce by any of the methods described above, connued use of your Television or
Roku Account means you accept and agree to the amended EULA. If you do not agree to the amended EULA, Roku may not be able to provide updates, upgrades or
enhancements to your Television, and you may not be able to connue using your Television or Roku Account.

69
Permitted Use and Restrictions
The Television and the Soware are for personal, non-commercial use only. Copying or redistribuon of any Content delivered via the Television is strictly prohibited
and we may prevent or restrict you from copying or re-distribung any elements of the Soware or Content using digital rights management or other technologies.
The Television and the Soware are for use only in those countries where the manufacturer of your Television has authorized its sale. If you are using the Television
and the Soware outside of these countries, the rights granted under this EULA do not apply. Some of the Content Providers use technologies to verify your geograph-
ic locaon, and you may not be able to use the Television or the Soware to access any Content outside of the country or locaon authorized by Roku or the Content
Provider. Except as expressly provided under this EULA, you do not acquire any intellectual property or other proprietary rights in or to the Television, the Soware or
the Content, including any rights in patents, invenons, improvements, designs, trademarks, database rights or copyrights, nor do you acquire any rights in any con-
denal informaon or trade-secrets. All rights not expressly granted to you in this EULA are reserved by Roku or its applicable licensors. You may not remove, obscure,
alter or conceal any trademark, logo, copyright or other proprietary noce in or on any Television, Soware or Content.
The Soware is proprietary to Roku or its third party licensors and may be used only with the Television. Subject to this EULA and, where appropriate, the applicable
third party licenses, you have a non-exclusive, non-transferable license to run the Soware and any updated versions provided to you by Roku, only in and as incorpo-
rated in the Television. This is a license and not a sale. You may not (a) copy, assign, sublicense, lease, sell or rent the Soware, (b) distribute or otherwise transfer the
Soware except as incorporated in the Television, provided that, you do not retain any copies of the Soware and the recipient reads and agrees to this EULA (includ-
ing all amendments); (c) modify, adapt, translate, or create derivave works of the Soware (except only to the extent any of the foregoing restricon is prohibited by
applicable law or as may be permied by the license terms governing any Separately Licensed Code included with the Soware); (d) decompile, disassemble, reverse
engineer or otherwise derive source code from the Soware, except to the extent such acons cannot be prohibited under applicable law because they are essenal
to achieve inter-operability of the Soware with another soware program, and provided that the informaon obtained by you during such acvies is (i) used only
to achieve such inter-operability; (ii) not disclosed without Roku’s prior wrien consent; and (iii) not used to create any soware that is substanally similar to the
Soware; (e) defeat, bypass, circumvent or interfere with any security mechanism or access control measures, or (f) have any of the foregoing done for you by a third
party. This license does not include the right to receive Soware upgrades or updates. Your right to use the Television and the Soware will immediately terminate
upon your breach of this EULA.
Software Updates
IN ITS SOLE DISCRETION, ROKU MAY PROVIDE UPDATES TO YOUR TELEVISION VIA THE INTERNET, INCLUDING BUG FIXES AND UPDATES, CHANGES IN THE USER
INTERFACE OR HOW YOU ACCESS CONTENT, AND OTHER CHANGES THAT MAY ADD, ALTER OR REMOVE FUNCTIONALITIES AND FEATURES. YOU ACKNOWLEDGE THAT
THESE UPDATES: (A) MAY HAPPEN AUTOMATICALLY IN THE BACKGROUND AT ANY TIME (AND THAT THEY CANNOT BE DISABLED BY YOU); AND (B) WILL REQUIRE AN
INTERNET CONNECTION AND YOU MAY INCUR ADDITIONAL DATA CHARGES FROM THE PROVIDER OF THE INTERNECT CONNECTION. YOU UNDERSTAND THAT THESE
UPDATES ARE NECESSARY TO MAINTAIN COMPATIBILITY WITH OTHER UPDATES TO ROKU’S PRODUCTS OR SERVICES AND MAY BE REQUIRED FOR SECURITY REASONS.
BY USING THE TELEVISION, YOU HEREBY AGREE TO RECEIVE SUCH UPDATES.
Separately Licensed Code
Certain soware components of the Soware are provided under separate third party license terms () and your right to use such compo-
nents is governed by such license terms. Please visit hps://www.roku.com/separatelylicensedcode for more informaon.
Voice Search
If downloaded to your phone or mobile device, the Roku mobile app allows you to use your voice to search for content on your Television using voice search. When
you choose to use voice search, you agree that Roku and/or a third party vendor contracted by Roku have your consent to record, process and store your voice inputs
(e.g., a recording and the interpretaon of what was said), and use such voice inputs with other informaon about your Television (e.g., device idener) to provide
services related to voice search to you, to improve the accuracy and quality of the service, and as described in Roku’s Privacy Policy. To learn more about voice search,
visit the FAQ pages of Roku’s website at www.roku.com/support.
NO WARRANTY FROM ROKU; LIMITATION OF LIABILITY
YOUR warranty with respect to the Television is provided by THE TELEVISION’S MANUFACTURER, and not by Roku. ROKU OFFERS NO WARRANTY TO YOU UNDER THIS
EULA. WITHOUT LIMITING THE GENERALITY OF THE FOREGOING DISCLAIMER, TO THE MAXIMUM EXTENT PERMITTED BY APPLICABLE LAW:
(A) THE SEPARATELY LICENSED CODE AND THE SOFTWARE ARE PROVIDED “AS IS”, WITH ALL FAULTS AND WITHOUT WARRANTY OF ANY KIND. ROKU DISCLAIMS
ALL OTHER WARRANTIES AND CONDITIONS, INCLUDING THE IMPLIED WARRANTY OF MERCHANTABILITY, SATISFACTORY QUALITY, FITNESS FOR A PARTICU-
LAR PURPOSE AND NON-INFRINGEMENT. ROKU DOES NOT GUARANTEE, REPRESENT, OR WARRANT THAT THE TELEVISION, THE SEPARATELY LICENSED CODE
AND THE SOFTWARE WILL BE: (I) SECURE, VIRUS-FREE OR ERROR-FREE, OR (II) FREE FROM ATTACK OR SECURITY INTRUSION.
(B) IN NO EVENT SHALL ROKU, ITS DIRECTORS, OFFICERS OR EMPLOYEES BE LIABLE TO YOU FOR PERSONAL INJURY OR PROPERTY DAMAGE, OR ANY SPECIAL,
INCIDENTAL, EXEMPLARY, PUNITIVE, INDIRECT OR CONSEQUENTIAL DAMAGES OF ANY KIND ARISING OUT OF ANY TELEVISION, THE SEPARATELY LICENSED
CODE, THE SOFTWARE, OR YOUR USE THEREOF; AND
(C) YOU AGREE THAT (I) THE TOTAL CUMULATIVE LIABILITY OF ROKU, ITS DIRECTORS, OFFICERS AND EMPLOYEES UNDER THIS EULA, INCLUDING LIABIILTY
RELATING TO ALL TELEVISIONS LINKED TO YOUR ROKU ACCOUNT, AND THE SEPARATELY LICENSED CODE AND THE SOFTWARE IN SUCH TELEVISIONS, AND
YOUR USE THEREOF, SHALL NOT EXCEED THE AMOUNT SET FORTH IN THE ROKU ACCOUNT TERMS AND CONDITIONS YOU AGREED TO FOR YOUR ROKU
ACCOUNT, AND (II) ROKU, ITS DIRECTORS, OFFICERS AND EMPLOYEES SHALL NOT BE LIABLE TO YOU UNDER THIS EULA FOR ANY DIRECT DAMAGES ARISING
OUT OF, OR IN CONNECTION WITH THE TELEVISION. THE FOREGOING LIMITATIONS SHALL APPLY EVEN IF THE REMEDY PROVIDED HEREIN FAILS ITS ESSEN-
TIAL PURPOSE AND EVEN IF ROKU, ITS DIRECTORS, OFFICERS OR EMPLOYEES HAVE BEEN ADVISED OF THE POSSIBILITY OF SUCH LIABILITY.
SOME JURISDICTIONS DO NOT ALLOW EXCLUSIONS OF CERTAIN WARRANTIES OR LIMITATOINS OF LIABILITY FOR CERTAIN TYPES OF DAMAGES, SO SOME OF THE
ABOVE LIMITATIONS IN THIS SECTION MAY NOT APPLY TO YOU. NOTHING IN THESE TERMS OF USE SHALL AFFECT ANY NON-WAIVABLE STATUTORY RIGHTS THAT APPLY
TO YOU, AND YOU MAY ALSO HAVE OTHER RIGHTS THAT VARY FROM JURISDICTION TO JURISDICTION.

70
Export Controls
You agree not to download any Content or Soware, nor otherwise export or re-export any Television or the Soware into (or to a naonal or resident of) Cuba, Iraq,
Libya, North Korea, Iran, Syria or any other country as to which the United States or your country has embargoed goods, or to anyone on the U.S. Treasury Depart-
ment’s List of Specially Designated Naonals or the U.S. Commerce Department’s Table of Denial Orders or on similar restricted lists published by your government
from me to me. By using any Television or the Soware, you are represenng and warranng that you are not located in, under the control of, or a naonal or
resident of any such country or on any such list.
Choice of Law; Dispute Resolution
A. If you are a consumer and a resident in any country in the European Economic Area where the sale of the Television is expressly authorized by its manufac-
turer, this EULA does not apply to you.
B. In all other cases, including if you are a resident of the United States (and its possessions and territories) or Canada, you agree that this EULA shall be
governed by the laws of the State of California without regard to any conict of laws principles that may provide the applicaon of the law of another
jurisdicon; and:
1. You and Roku agree to be bound by the procedures set forth below to resolve any and all claims between you and Roku arising out of or relang to
any aspect of this EULA, whether based in contract, tort, statute, fraud, misrepresentaon or any other legal theory, including but not limited to,
claims between you and Roku related to the Television and the Soware. Each such claim is referred to individually as “” and collecvely as
“”.
TWEEN YOU AND ROKU SHALL BE FINALLY SETTLED BY BINDING ARBITRATION. The arbitraon shall take place in Santa Clara County, California
and shall be administered by the American Arbitraon Associaon (“AAA”) pursuant to the AAA’s then-current rules, including (if applicable) the AAA’s
Supplementary Procedures for Consumer-Related Disputes. Please be aware there is no judge or jury in arbitraon. Arbitraon procedures are sim-
pler and more limited than the rules applicable in court, and review of the arbitrator’s decision by a court is limited. YOU AND ROKU FURTHER AGREE
PURPORTED CLASS OR REPRESENTATIVE ACTION OR PROCEEDING
Notwithstanding any provision in these terms to the contrary, if the
class-acon waiver in this provision is deemed invalid or unenforceable, or if an arbitraon is allowed to proceed on a class basis, then neither you
nor Roku are entled to arbitrate the Claims. This arbitraon provision is subject to the Federal Arbitraon Act. The arbitrator’s award shall be binding
on you and Roku, and may be entered in any court of competent jurisdicon.
3. Informaon on AAA and how arbitraon is iniated can be found at www.adr.org or by calling 800-778-7879. For Claims between You and Roku of
$75,000 or less, you will be responsible for the inial arbitraon ling fee, up to the amount of the inial ling fee if you were to iniate a lawsuit
against Roku based on such Claims in court. If the arbitrator nds such Claims to be non-frivolous, Roku will pay any dierence in such ling fees plus
the arbitrator fees. For Claims between You and Roku in excess of $75,000, if you are able to demonstrate that the costs of arbitraon will be prohib-
ive as compared to the costs of ligaon, Roku will pay as much of your actual ling fees and the arbitrator fees for the arbitraon as the arbitrator
deems necessary to prevent the arbitraon from being cost-prohibive as compared to the cost of ligaon.
4. This agreement to arbitrate does not apply to any Claim (a) in which a party is aempng to protect its intellectual property rights (such as its patent,
copyright, trademark, trade secret, or moral rights, but not including its privacy or publicity rights), or (b) that may be brought in small-claims court.
5. If the agreement to arbitrate in this provision is found to be invalid, unenforceable or inapplicable to a given Claim between You and Roku, then any
and all proceedings to resolve such Claim must be brought exclusively in a federal court of competent jurisdicon in the Northern District of California
or in a state court in Santa Clara County, California. You hereby irrevocably consent to the exclusive jurisdicon and venue of such courts.
You have the right to opt out of this agreement to arbitrate by sending a wrien noce of your decision to opt out to the
following address: Legal Department, Roku, Inc., 150 Winchester Circle Los Gatos, CA 95032, USA; provided that, such noce must be postmarked on
or before the 30th day aer the rst to occur of the following events if you do not already have a Roku Account: (a) the date of purchase of Your Tele-
vision, or (b) the date you create your Roku Account. If you have an exisng Roku Account, all devices you choose to link to your Roku Account, and
all services provided by Roku which are accessed using these devices, will be subject to this agreement to arbitrate. Your noce should include your
full name, your current postal address, telephone number and email address, the product name and serial number for Your Television, and a copy of
the original proof of purchase for your Television. If you mely send a noce in compliance with this paragraph 6, the agreement to arbitrate will not
apply to either you or Roku. If you do not mely send this noce, then you agree to be bound by this agreement to arbitrate.
7. Notwithstanding any provision in this Agreement to the contrary, you agree that, if Roku seeks to delete or materially modify the agreement to
arbitrate described herein, any such deleon or modicaon will not apply to any individual Claim of which you have noed Roku prior to such
modicaon.
Miscellaneous
Roku may transfer its rights and obligaons under this EULA to another organizaon. You may only transfer your rights or your obligaons under this EULA to another
person if Roku agrees in wring. This EULA is between you and Roku. No other person shall have any rights to enforce these terms. Each of the paragraphs of this EULA
operates separately. If any court or relevant authority decides that any of them are unlawful, the remaining paragraphs will remain in full force and eect. If Roku fails
to insist that you perform any of your obligaons under this EULA, or if Roku does not enforce its rights against you, or if Roku delays in doing so, that will not mean
that Roku has waived its rights against you, or that you do not have to comply with those obligaons. If Roku does waive a default by you, Roku will only do so in writ-
ing, but that will not mean that Roku will automacally waive any later default by you.


72
Additional Hitachi Roku TV Legal Statements
Macrovision statement
This product incorporates copyright protecon technology that is protected by U.S. patents and other intellectual property rights. Use of this copyright protecon
technology must be authorized by Macrovision, and is intended for home and other limited viewing uses only unless otherwise authorized by Macrovision. Reverse
engineering or disassembly is prohibited.
U.S. Patent Nos. 5,583,936; 6,836,549; 5,315,448; 6,381,747; 6,501,842; and 7,050,698.
HDMI®
The terms HDMI and HDMI High-Denion Mulmedia Interface, and the HDMI Logo are trademarks or
registered trademarks of HDMI Licensing LLC in the United States and other countries.
Dolby Audio™
Manufactured under license from Dolby Laboratories. Dolby, Dolby Audio and the double-D symbol are
trademarks of Dolby Laboratories. Copyright 1992-2015 Dolby Laboratories. All rights reserved.
Roku®
Roku and the Roku logo are registered trademarks of Roku, Inc. in the United States and other countries.
Hitachi
Hitachi is a trademark or registered trademark of Hitachi, Ltd.
All other trademarks are the property of their respecve owners.
73
Specications
Model 50R8 65R8
Panel size
50” class 49.50” diagonal (1257.31mm) 65” class 64.53” diagonal (1638.96mm)
Display method Transmission TFT color LCD panel
Number of Pixels 3840(H) × 2160(V)
Broadcasting
system
US system M
ATSC standard (8VSB), QAM
Receiving
channels
VHF 2-13
UHF 14-69
CATV 14-36 (A)-(W)
37-59 (AA)-(WW)
60-85 (AAA)-(ZZZ)
86-94 (86)-(94)
95-99 (A-5)-(A-1)
100-135 (100)-(135)
01 (4A)
• Digital Terrestrial Broadcast(8VSB): 2-69
• Digital Cable (QAM): 1-135
Tuner type Frequency synthesized
Inputs Video: 1.0 V (p-p),75 ohms
Audio: 2Vrms Max.
Composite: 1.0 +/-0.2Vp-p, Input Impedance: 75 ohm
HDMI: HDMI compliant (type A connector)
HDCP compliant
E-EDID compliant
HDMI 2.0, ARC, CEC
Input Formats: 2160p (4K@60fps), 1080p, 1080i, 720p, 480p, 480i
Antenna: VHF/UHF In 75 ohms coaxial
Wi-Fi: 802.11a/b/g/n/ac
LAN: 10BASE-T/100BASE-TX
Outputs Digital audio: Optical
Audio Out: 470 mVrms, 1k ohms
Headphone: 3.5mm Stereo
Speakers
Audio output power 8.0W + 8.0W
Power supply AC 120V, 60Hz
Power
consumption
Operation: 155W
Standby: <1W
Operation: 260W
Standby: <1W
Weight 28.2lbs. (12.8kg) 52.9lbs. (24.0kg)
Dimensions Width: 44-7/16” (1128.3mm)
Height: 28-1/4” (715.8mm)
Depth: 9-5/8” (243.6mm)
Width: 57-5/8” (1462.5mm)
Height: 35-7/8” (911.2mm)
Depth: 12-15/16” (328.3)mm
Operating temp.
Operating humidity Less than 80% RH
Accessories Power cord
Remote control, Batteries (AAA) × 2
Stand x 2 (R, L), Stand Screws x 4
Quick Start Guide, Important Product Information Guide

74
800.HITACHI
(800.448.2244)
Monday ~ Friday
9:00 am - 6:00 pm EST
www.hitachi.us/tv
HITACHI AMERICA, LTD., DIGITAL MEDIA DIVISION
HITACHI has made every effort to assure you enjoy trouble free operation from your Hitachi
product. Should you require service assistance with OPERATIONAL, HOOK UP, TECHNICAL
ASSISTANCE OR WARRANTY SERVICE SUPPORT, please contact one of our knowledgeable
Customer Service Advocates at 800.HITACHI (800.448.2244).
Please be prepared to submit proof of purchase and/or delivery receipts to your 800.HITACHI
Customer Service Representative. Warranty coverage will be provided in accordance with the
provisions of your Limited Warranty (see the Limited Warranty page in this operating guide).
Pour de plus amples renseignements sur le service durant la periode couverte par la garantie,
sur le fonctionnement ou pour de l'assistance techniquie communiquez avec:
Au Canada: 800.HITACHI (800.448.2244)
Lundi ~ Vendredi 9:00 am - 6:00 pm HNE
Hitachi America, Ltd., Digital Media Division
Customer Service Support
P.O. Box 99652
Troy, MI 48099
customerservice.ce@hal.hitachi.com
Service & Warranty

75
Congratulations on your purchase of a new Hitachi display product.
LIMITED WARRANTY:
Hitachi America Ltd., warrants this product in accordance with the terms and conditions applicable to the products identified below:
Conditions of "Hitachi" Limited Warranty: This Hitachi display product (the “Product”) is warranted to be free from defects in materials and
workmanship beginning on the date of purchase by the original owner and continuing for the duration of the applicable time periods specified below.
If the Product is found to be defective, Hitachi will repair or replace (at Hitachi’s option) defective parts at no charge, subject to the conditions of this
Limited Warranty. If the original owner rejects, refuses or otherwise does not accept Hitachi’s offer to repair or replace such defective parts under
this Limited Warranty, this Limited Warranty shall be void and of no further force or effect. This Limited Warranty extends to the original owner
only and is not transferable, and such owner must provide a dated sales receipt for the Product to qualify for parts or service under this Limited
Warranty. T he original owner must notify Hitachi of a defect claim by calling 800-HITACHI during the applicable Limited Warranty period for
this Limited Warranty to be effective. This Limited Warranty is valid only in the U.S.A., Canada and Puerto Rico.
Hitachi Product: LCD Flat Panel Televisions PARTS : The Limited Warranty period for parts is 1 year from the date of original purchase. During the
Limited Warranty period for parts, Hitachi will replace defective parts with new or rebuilt parts (at Hitachi’s option) at no charge for such parts. Any
replacement part will be warranted for the remainder of the original warranty period applicable to the part replaced. LABOR : The Limited Warranty
period for labor is 1 year from the date of original purchase. During the Limited Warranty period for labor, Hitachi will repair or replace (at Hitachi’s
option) defective parts without charge for labor. SERVICE LOCATION : In-home warranty service, which includes either in-home repair or free
pick-up and delivery (at Hitachi’s option), applies to all Hitachi products except: (i) 43-inch and smaller LCD Flat Panel Televisions; (ii) Products
located outside the U.S.A., Canada or Puerto Rico; (iii) Products located more than seventy-five (75) driving miles from Hitachi’s nearest Authorized
Service Facility. If the foregoing clauses (i), (ii), (iii) apply, then the Product owner will be responsible for bringing/delivering the Product to a
Hitachi Authorized Service Facility and, following warranty service, retrieving the Product from such Authorized Service Facility.
IMPORTANT: Before using or installing your Product, please complete this form and attach your sales receipt and retain them for your records.
This will help facilitate proper warranty coverage.
MODEL NO. SERIAL NO.
DEALER NAME DATE OF PURCHASE
DEALER ADDRESS
CITY STATE / PROVINCE
Wa rranty Limitations. THIS HITACHI LIMITED WARRANTY DOES NOT COVER: A. Any Product that has been modified or repaired in a
manner not previously authorized by Hitachi in writing. B. Any Product, whose serial number has been removed, altered, replaced, defaced or
rendered illegible. C. Any defect, malfunction, or failure caused by or resulting from improper or unauthorized service, maintenance or repair. D.
Damage resulting from abuse, misuse, mishandling, neglect or damage caused by exposure to hostile operating environments such as areas
containing dust and/ or smoke. E. Damage caused by power surges, accidents, natural disasters or any other events or circumstances outside Hitachi’s
control. F. Any Product used in any manner inconsistent with the acceptable set-up, usage, safety or installation configurations identified in the
Product’s Operating Guide. G. Any Product used for purposes or applications, or subjected to operating conditions, other than those identified as
acceptable in the Product’s Operating Guide. H. Product repairs (including any product whose case has been opened), or part replacements
provided or installed, by any person other than an Authorized Hitachi Service Facility Representative. I. Improper uncrating, set-up or installation
or any misadjustments caused by user-operated controls. J. Any labor or costs associated with removing the Product from a custom cabinet or other
specialized product installation that impedes direct and immediate removal of the Product from the owner’s premises (must be arranged and paid
by the owner). K. Product cabinets, cabinet parts, knobs, batteries, accessories, or any third party's branded hardware or peripheral devices, including
any software incorporated therein, whether or not included within the Product's original packaging. L. Product screens that have been cleaned by any
method other than as specified in the Product’s Operating Guide. M. Normal usage, degraded brightness caused by backlight aging and/or cell
defects or ordinary wear and tear, including, without limitation, scratches or marks on the Product’s screen, cabinet or the appearance of bright or dark
screen pixels. N. Any Product returned for service that is damaged due to improper packaging, mishandling or shipping. (IMPORTANT: When
shipping any Product to a Hitachi Authorized Service Facility, Product owner must package it securely in the original shipping container or its
equivalent to prevent damage. The Product must be returned with the shipping charges prepaid and proof of purchases included in the shipping
container. Failure to properly package such product during such shipment will void all warranties.) O. Any Product purchased or serviced outside
the U.S.A., Canada and Puerto Rico. P. Any Product that has been used for commercial purposes.
NO PERSON, AGENT, DISTRIBUTOR, DEALER, SERVICE FACILITY, OR COMPANY IS AUTHORIZED TO CHANGE, MODIFY OR AMEND THE TERMS
OF THIS LIMITED WARRANTY IN ANY MANNER WHATSOEVER. EXCEPT AS PROVIDED IN THIS LIMITED WARRANTY, HITACHI MAKES NO
EXPRESS WARRANTY REGARDING THIS HITACHI PRODUCT. FURTHER, ALL IMPLIED WARRANTIES RELATING TO ANY PORTION OF THIS
PRODUCT, INCLUDING ANY WARRANTY OF MERCHANTABILITY OR FITNESS FOR A PARTICULAR PURPOSE, ARE LIMITED TO THE DURATION
SPECIFIED UNDER THIS LIMITED WARRANTY. HITACHI SHALL NOT BE LIABLE TO THE PURCHASER OR TO ANY OTHER PERSON FOR ANY
INCIDENTAL OR CONSEQUENTIAL DAMAGES OR LOSS OF PROFIT OR PRODUCT RESULTING FROM ANY DEFECT IN, OR MALFUNCTION OR
FAILURE OF, THIS HITACHI PRODUCT. BECAUSE SOME JURISDICTIONS DO NOT ALLOW LIMITATIONS ON HOW LONG AN IMPLIED WARRANTY
LASTS, OR THE EXCLUSION OF INCIDENTAL OR CONSEQUENTIAL DAMAGES, THE ABOVE LIMITATIONS MAY NOT APPLY TO YOU. THIS
LIMITED WARRANTY CONFERS SPECIFIC LEGAL RIGHTS, INCLUDING CERTAIN OTHER RIGHTS THAT MAY VARY DEPENDING ON YOUR
JURISDICTION. THIS LIMITED WARRANTY SHALL BE GOVERNED BY AND CONSTRUED IN ACCORDANCE WITH THE LAWS OF THE
JURISDICATION OF THE PRODUCT OWNER’S RESIDENCE.

76
................................................................................................................................................................
................................................................................................................................................................
................................................................................................................................................................
................................................................................................................................................................
................................................................................................................................................................
................................................................................................................................................................
................................................................................................................................................................
................................................................................................................................................................
................................................................................................................................................................
................................................................................................................................................................
................................................................................................................................................................
................................................................................................................................................................
................................................................................................................................................................
................................................................................................................................................................
................................................................................................................................................................
................................................................................................................................................................
................................................................................................................................................................
................................................................................................................................................................
................................................................................................................................................................
................................................................................................................................................................
................................................................................................................................................................
................................................................................................................................................................
................................................................................................................................................................
................................................................................................................................................................
................................................................................................................................................................
................................................................................................................................................................
................................................................................................................................................................
................................................................................................................................................................
................................................................................................................................................................
................................................................................................................................................................
................................................................................................................................................................
................................................................................................................................................................
................................................................................................................................................................
................................................................................................................................................................
................................................................................................................................................................
................................................................................................................................................................
................................................................................................................................................................
................................................................................................................................................................
................................................................................................................................................................
................................................................................................................................................................
................................................................................................................................................................
................................................................................................................................................................
Memo
