Hitachi DZ MV200A User Manual DIGITAL CAMCORDER Manuals And Guides L0607008
HITACHI Digital Camcorder Manual L0607008 HITACHI Digital Camcorder Owner's Manual, HITACHI Digital Camcorder installation guides
User Manual: Hitachi DZ-MV200A DZ-MV200A HITACHI DIGITAL CAMCORDER - Manuals and Guides View the owners manual for your HITACHI DIGITAL CAMCORDER #DZMV200A. Home:Electronics Parts:Hitachi Parts:Hitachi DIGITAL CAMCORDER Manual
Open the PDF directly: View PDF ![]() .
.
Page Count: 114 [warning: Documents this large are best viewed by clicking the View PDF Link!]

HITACHI
inspire the Ne×t
Instruction Manual
V_DEO
RA_d
DZ-MV230A
DZ-MV200A
HITACHI AMERICA, LTD.
HOME ELECTRONICS DIVISION
1855 Dornoch Court
San Diego, CA 92154 7225
Tel. 1 800 HITACHI
(1 800 448 2244)
HITACHI CANADA LTD.
DIGITALMEDIA DIVISION
6740 Campobello Road
Mississauga, Ontario LSN 2L8
CANADA
Tel. 1 800 HITACHI
(1 800 448 2244)
ThE_nkyou for buying E_HitE_chiproduct PleE_setE_ketime to become fumiliE_r with the mE_nuEdE_nd
how it is set up Keep it handy for future reference
QR34014 _Hitachi, Ltd. 2002 Printed in Japan OF G(Y)
Important Information
For Your Safety
The power switch turns the DVD video camera/recorder on and off, leaving the date/time feature
unaffected If the camera/recorder is to be left unattended for a long period of time, turn it off
WARNING: TO PREVENT FIRE OR SHOCK HAZARD, DO NOT
EXPOSE THIS UNIT TO RAIN OR MOISTURE.
WARNING : TO PREVENT FIRE OR SHOCK HAZARD, USE THE
RECOMMENDED ACCESSORIES ONLY.
WARNING: TO PREVENT FIRE OR SHOCK HAZARD, BE
SURE TO USE THE SPECIFIED AC ADAPTER (DZ-ACE1).
TheDVDvideo camera/recorder and AC adapter Identifications of caution marks
h_ve the following c_ution mE_rks
A[_:_11 i [el _1
RISKOFELECTRICSHOCK
DO NOTOPEN /k A
CAUTION: TO REDUCE THE RISKOF
ELECTRIC SHOCK, DO NOT OPEN. ,_.
/.'x
NO USER-SERVICEABLEPARTS INSIDE.
REFERSERVICING TO QUALIFIED SERVICE
PERSONNEL.
This symbol warns the user that
uninsulated voltage within tile unit
may have sufficient magnitude to cause
electric shock. Therefore. it is danger
ous to make any kind of contact with
any inside part of this unit.
This symbol alerts the user that impor
tant literature concerning tile operation
and maintenance of this unit has been
included. Therefore. it should be read
caref\flly to avoid any problems.
Precautions
WARN[NG: Many television progran-ls and films
are copyrighted. In certain circumstances, copy
right law may apply to private in home videotaping
of copyrighted materials.
WARNING: TO PREVENT FIREOR
ELECTRIC SHOCK, MATCH WIDE BLADE
OF PLUG TO WIDE SLOT,AND FULLY
INSERTPLUG.
This Class B digital apparatus complies with
Canadian ICES 003.
ICLASS 1 I
LASERPRODUCT
CAUTION
This product contains a laser diode of
higher class than 1. To ensure continued
safety, do not remove any covers or at-
tempt to gain access to the inside of the
product. Refer all servicing to qualified per-
sonnel.
2
Warning: This device complies with Part 15 of tile FCC Rules. Operation is subject to the following
two conditions: (1) This device may not cause harmfl/1 interference, and (2) this device must accept
any interference received, including interference that may cause undesired operation.
Note: This equipment has been tested and tbund to comply with the limits fbr a Class B digital
device, pursuant to Part 15 of the FCC Rules. These limits are designed to provide reasonable
protection against harmflfl interference in a residential installation. This equipment generates, uses,
and can radiate radio fl'equency energy and, if not installed and used in accordance with the in
structions, may cause harmflfl interference to radio communications. However, there is no guaran
tee that interference will not occur in a particular installation. If this equipment does cause harmflfl
interference to radio or television reception, which can be determined by turning the equipment off
and on, the user is encouraged to try to correct by one or more of the fbllowing measures:
• Reorient or relocate the receiving antenna.
• Increase the separation between the equipment and receiver.
• Connect the equipment into an outlet on a circuit dill)rent fl'om that to which the receiver is
connected.
• Consult the dealer or an experienced radio/TV technician for help.
Caution to the user: Changes or modifications not expressly approved by tile manufacturer void
tile user's authority to operate tile equipment.
Microsoft. MS, MS DOS, Windows and Windows NT are registered trademarks of Microsoft
Corporation.
Manufactured under license from Dolby Laboratories.
"Dolby" and double D symbol are trademarks of Dolby Laboratories.
Other company names and product names listed are trademarks or brand names belonging to each
company.
3
IMPORTANT SAFEGUARDS
In addition to the careful attention devoted to quality standards in the manufacture of your video product, safety is a major factor in the
design of every instrument But, safety is your responsibility too
This page lists important information that v_'ill help to assure your enjoyment and proper use of DVD video camera/recorder and accessory
equipment Please read it carefully before operating your video product and keep it in a handy place for future reference
INSTALLATION
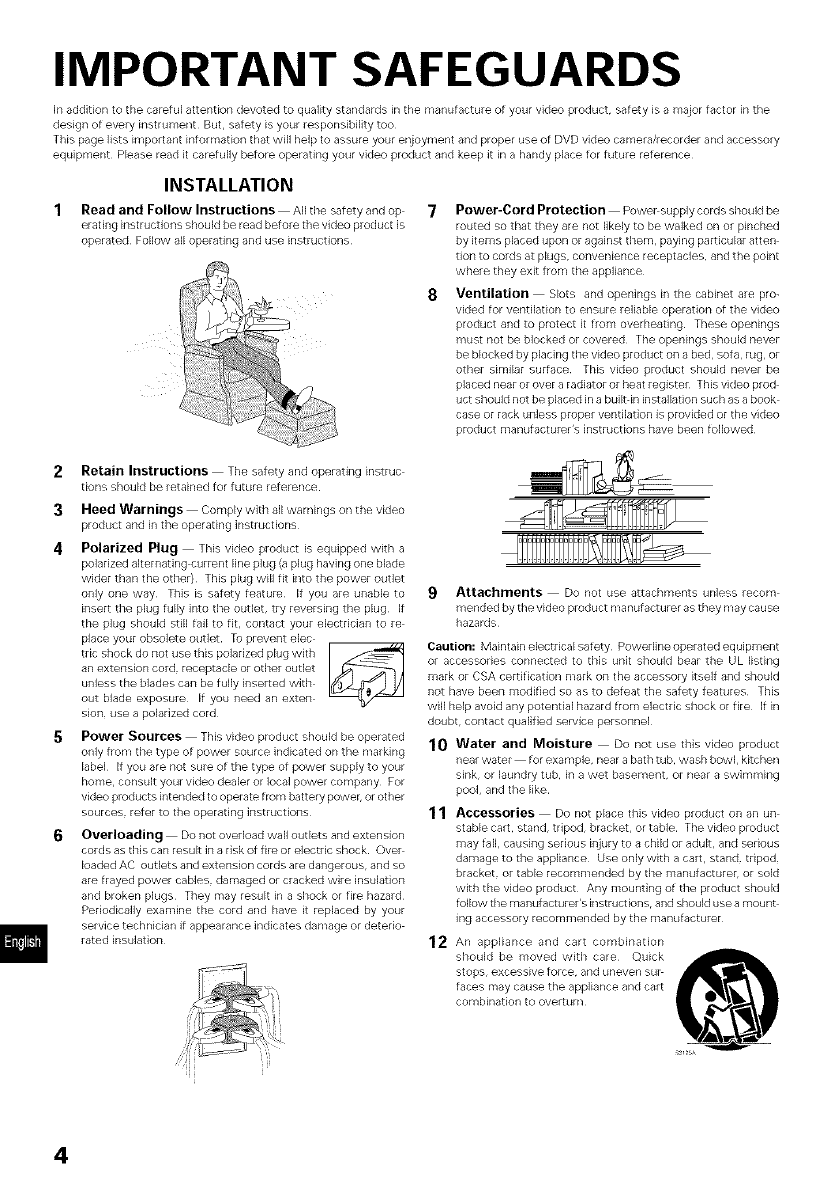
Read and Follow Instructions Allthe safety _nd op
erating instructions should be read before the video product is
operated Follow all operating and use instructions
Power-Cord Protection Powepsupply cords should be
routed so that they are not likely to be walked on or pinched
by items placed upon or against them, paying particular atten
tion to cords at plugs, convenience receptacles¸ and the point
where they exit from the appliance¸
Ventilation Slots and openings in the cabinet are pro-
vided for ventilation to ensure reliable operation of the video
product and to protect it from overheating¸ These openings
must not be blocked or covered The openings should never
be blocked by placing the video product on a bed, sofa, rug, or
other similar surface¸ This video product should never be
placed near or over a radiator or beat register¸ This video prod
uct should not be placed in a built-in installation such as a book
case or rack unless p_per ventilation is provided or the video
product manufacturer's instructions have been followed¸
2Retain Instructions The safety and operating instruc
tions should be retained for future reference
3 Heed Warnings Comply with all warnings on the video
product and in the operating instructions
4 Polarized Plug This video product is equipped with a
polarized alternating current line plug (a plug having one blade
wider than the other) This plug w'ill fit into the power outlet
only one way This is safety feature If you are unable to
insert time plug fully into the outlet, try reversing the plug If
the plug should still fail to fit, contact your electrician to re
place yo_lr obsolete outlet Tu prevent elec
tric shock do not use this polarized plug with I _
an extension cord receptacle or other outlet
unless the blades can be fully inserted with
out blade exposure If you need an exten
s_on use a polarized cord
5Power Sources This video product should be operated
only from the type of power source indicated on the marking
label If you are not sure of the type of power supply to your
home consult your video dealer or local power company For
video products intended to operate from battery power or other
sources refer to the operating instructions
6Overloading Do not overload wall outlets and extension
cords as this can result in a risk of fire or electric shock Over
loaded AC outlets and extension cords are dangerous, and so
are frayed power cables damaged or cracked wire insulation
and broken plugs They may result in a shock or fire hazard
Periodically examine the cord and have it replaced by your
service technician if appearance indicates damage or detedo
rated insulation
9Attachments Do not use attachments unless recom
mended by the video product manufacturer as they may cause
hazards
Caution: Maintain electrical safety Powedine operated equipment
or accessories connected to this unit should bear the UL listing
mark or CSA certification mark on the accessoly itself and should
not have been modified so as to defeat the safety features This
will help avoid any potential hazard from electric shock or fire If in
doubt, contact qualified sel_vice personnel
10 Water and Moisture Do not use this video product
near water for example near a bath tub wash bowl, kitchen
sink, or laundry tub in a wet basement or near a swimming
pool, and time like
11 Accessories Do not place this video product on an un
stable cart stand, tripod, bracket, or table The video product
may tall, causing serious il_jury to a child or adult, and serious
damage to time appliance Use only with a cart, stand, tripod,
bracket or table recommended by time manufacturer, or sold
with the video product Any mounting of timeproduct should
tollow the manufacturer's instructions, and should use a mount
_ng accessory recommended by the manufacturer
12 An appliance and cart combination
should be moved with care Quick
stops, excessive force and uneven sup
faces may cause the appliance and cart
combination to overturn
4
13 Power Lines An outside antenna system should not be
located in the vicinity of overhead power lines or other electric
light or power circuits, or where it can fall into such power 17
lines or circuits When installing an outside antenna system,
extreme care should be taken to keep from touching or ap
proaching such power lines or circuits as contact with them
might be fatal Installing an outdoor antenna can be hazard
ous and should be left to a professional antenna installer 18
USE
14 Cleaning Unplugthisvideoproductfromthewalloutlet
before cleaning Do not use liquid cleaners or aerosol clean
ers Use a damp cloth for cleaning
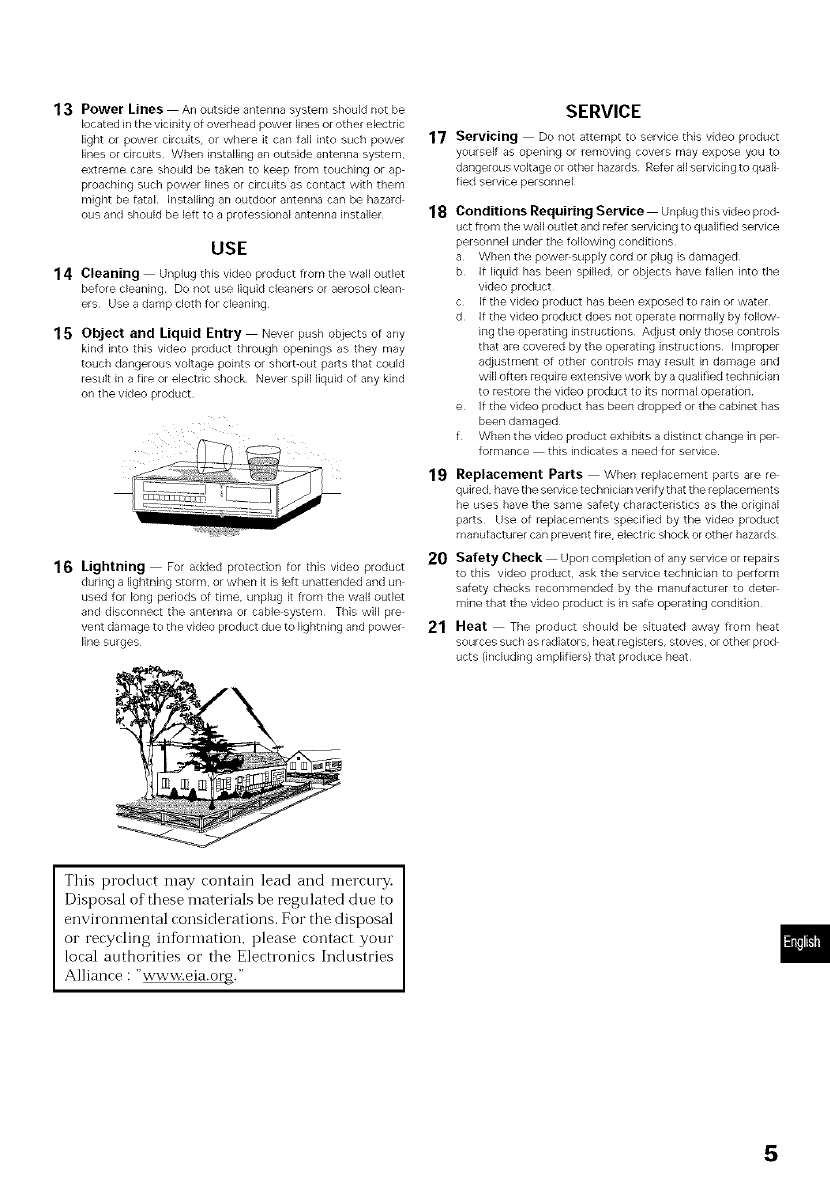
15 Object and Liquid Entry Never push objects of any
kind into this video product through openings as they may
touch dangerous voltage points or short-out parts that could
result in a fire or electric shock Never spill liquid of any kind
on the video product
16 Lightning For added protection for this video product
during a lightning storm, or when it is left unattended and un
used for long periods of time unplug it from the wall outlet
and disconnect the antenna or cable system This will pre
vent damage to the video product due to lightning and power
line surges
SERVICE
Servicing Do not attempt to service this video product
yourself as opening or removing covers may expose you to
dangerous voltage or other hazards Refer all servicing to quali
tied service personnel
Conditions Requiring Service Unplug thisvideo prod
uct from the wall outlet and refer servicing to qualified service
personnel under the following conditions
a When the power supply cord or plug is damaged
b If liquid has been spilled, or obiects have fallen into the
video product
c If the video product has been exposed to rain or water
dif the video product does not operate normally by follow
ing the operating instructions Adjust only those controls
that am covered by the operating instructions Improper
adjustment of other controls may result in damage and
will often require extensive work by a qualified technician
to rastore the video product to its normal operation
eIf the video product has been dropped or the cabinet has
been damaged
f When the video product exhibits a distinct change in pep
formance this indicates a need for service
19 Replacement Parts When replacement parts are re
quired have the service technician verity that the replacements
he uses have the same safety characteristics as the original
parts Use of replacements specified by the video product
manufacturer can prevent fire electric shock or other hazards
20 Safety Check Upon completion of any service or repairs
to this video product, ask the service technician to perform
safety checks recommended by the manufacturer to detep
mine that the video product is in safe operating condition
21 Heat The product should be situated away from heat
sources such as radiators heat registers, stoves, or other prod
ucts (including amplifiers) that produce heat
This product may contain lead and mercury.
Disposal of these materials be regulated due to
environmental considerations. For the disposal
o1" recycling in%rmation, please contact your
local authorities or the Electronics Industries
Alliance : "x_/xvw.eia.or/R."
5

IMPORTANTSAFETYINSTRUCTIONS
FORACADAPTER
1 Save these Instructions This page contains important satety
and operating instructions for AC Adapter Model DZ ACE1
2 Before using AC Adaptec read all instructions and cautionary
markings on (1) AC Adaptec (2) battery and (3) product using
battery
3 Also mad all instructions on pages 4 5
4 Caution Tu reduce risk of injury, charge only mchargeable
battery, DZ-BP14(R)/DZ BP16 (sold separately) or DZ BP28
(sold separately)
Other types of batteries may burst causing personal ir_jury
and damage
5 Do not expose charger to rain or snow
6 Use of an attachment not recommended or sold by the bat
tery charger manufacturer may result in a risk of fire electric
shock, or ir_jury to persons
7 To reduce risk of damage to electric plug and cable, pull by
plug rather than cable when disconnecting AC adapter
8 Make sure cable is located so that it will not be stepped on,
tripped over, or otherwise subjected to damage or stress
9 Do not operate AC adapter with damaged cable or plug re
place them immediately
10 An extension cable should not be used unless absolutely nec
essary
Use of improper extension cable could result in a risk of fire
and electric shock If extension cord must be used, make
sure:
A The pins on plug of extension cable are the same number
size and shape as those of plug on AC adapter
B That extension cable is propedy wired and in good electd
cal condition; and
C That v_'ire size should be rapt belov_':
Minimum Length of extension cable
AWG size (feet)
18 Equal to or less than 100
16 Equal to or less than 150
11 Do not operate AC adapter if it has received a sharp blow
beer] dropped or othel_fdise damaged in any way; take it to a
qualified serviceman
12 Do not disassemble AC adapter: take it to a qualified service
engineer when serwce or repair _s required Incorrect
reassembly may result in a risk of electric shock or fire
13 Tu reduce risk of electric shock unplug AC adapter from out
let before attempting any maintenance or cleaning
6
Read This First
Toguide you, we "ve included following six chapters
•The section on "Setups" explains how to set up
tile DVD video camera/recordel, battery pack,
and set tile date/time.
• Tile section on "Basic Techniqnes" explains the
basic operation of this DVD video camera/re
corder recording armories and still images and
playback of recorded images.
• The section on "Advanced Teclmiqnes" explains
settings on this DVD video camera/recorder f}or
more advanced usage.
• The section on "ldsing Disc Navigation" explains
editing with Disc Navigation: Refer to this sec
tion when finalizing DVD R disc and initializ
ing DVD RAM disc.
• The section on "Connecting to Other Devices"
explains how to connect to TV, another AV de
vice and PC, and how to operate after connec
tions.
• "Subsidialy Information" includes an introduc
tion to products sold separately, proper clean
ing, and troubleshooting.
We want this manual to be as helpful as possible,
so it includes two easy ways to find the informa-
tion you need:
• A quick index for the information you use most
often (this page).
• A detailed table of contents directing you to spe
cific information quickly (page 8-9).
Get to know your DVD video camera/recorder
by using this manual, and get to know Hituchi We
appreciate your business
Quick Index
Charging Battery ........................................... 31
Recording Movie .......................................... 42
Immediately Checking Recorded Scene ... 44
Functions Available with Disc Navigation .... 67
Connecting to a TV and Viewing ................ 90
Connecting to Your PC ................................. 94
• Type of difference
DZ-MV230A DZ-MV200A
Movie recording mode XTRA*/FINE/STD/LPCM* FINE/STD/LPCM**
CCD (Number of total pixels) 1,100,000 680,000
Number of still image pixels (JPEG) 1280 x 960 1,024 x 768
* Only with DVD-RAM disk
** Only with DVD-R disk
With this DVD video camera/recorder you can view the picture being recorded at" the playback
picture whether on the LCD monitor or in the viewfindel: Opening o1"dosing the LCD monitor
switches the picture to appear on the LCD monitor or in the viewfindei: The fbllowing text de
scribes the operation assuming that the viewfinder is used as a major monitor device.
7
Table of Contents
Important Information ..................................... 2
For Your Safety ................................................. 2
Precautions ....................................................... 2
IMPORTANT SAFEGUARDS ............................ 4
IMPORTANT SAFETY INSTRUCTIONS
FOR AC ADAPTER ............................................ 6
Read This First .................................................. 7
About This Manual ......................................... 10
Checking Provided Accessories .................... 11
Names of Parts ............................................... 12
Viewing Demonstration ................................. 16
Features of DVD video camera/recorder ...... 17
Versatile Functions Available ..................... 17
Recording on Disc ..................................... 18
Recording Movie and Still .......................... 18
immediate Reviewing of Recorded
Image ......................................................... 18
Editing in Various Ways on DVD video
camera/recorder Alone .............................. 18
Using with Various Devices ....................... 18
Cautions When Using .................................... 19
Cautions When Storing ................................. 22
Suggestions and Restrictions ....................... 22
Discs ................................................................ 23
Removing and Replacing Disc from/
in Cartridge or Caddy ................................. 24
Disc Storage Capacity ................................ 26
Setups
Setting Up the DVD video camera/
recorder ........................................................... 27
Holding DVD video camera/recorder ......... 27
Attaching Shoulder Strap ........................... 27
Attaching Lens Cap ................................... 28
Attaching Ferrite Cores .............................. 28
Inserting Batteries into Remote Control .... 29
Setting Up the Battery ................................... 30
Attaching Battery to DVD video camera/
recorder ..................................................... 30
Removing Battery ...................................... 30
Charging Battery ........................................ 31
Battery Remaining Level Indicator ............. 33
Using DVD video camera/recorder
with AC Adapter ............................................. 34
Setting Date and Time ................................... 35
Changing Display Format of Date
and Time .................................................... 36
Inserting and Ejecting Disc ............................ 37
Inserting Disc ............................................. 37
Removing Disc .......................................... 39
Basic Techniques
Basic Handling of DVD video camera/
recorder ........................................................... 40
Turning DVD Video Camera/
Recorder On .............................................. 40
Opening LCD Monitor ............................... 40
LCD Screen Brightness Adjustment .......... 41
Closing LCD Monitor ................................. 41
Viewing SubJect through Viewfinder ......... 41
Recording Movie ............................................ 42
Using External Microphone ....................... 42
Recording Stills .............................................. 43
Playing Back ................................................... 44
Immediately Checking Recorded Scene __ 44
Skip Playback ............................................. 44
Search Playback ......................................... 45
Frame Advance/Frame Back/
Slow Playback ............................................ 45
Searching for Point You Wish to View by
Specifying It (Go To) ................................... 46
Zooming .......................................................... 47
Focusing When Recording Movie ............. 48
Macro Recording ....................................... 48
Manually Focusing Subject during Movie
Recording ........................................................ 49
Adjusting Exposure Manually ....................... 50
On-Screen Information .................................. 51
Information Display During Recording ....... 51
Information Display During Playback ......... 53
Advanced Techniques
Setting Up Camera Functions ....................... 54
Selecting Shooting Mode to Match the
Subject (Switching Program AE Mode) ..... 54
White Balance (Auto/Hold) ........................ 55
Using the Electronic Image Stabilizer
(EIS) ........................................................... 56
Switching Digital Zoom Off ....................... 57
Setting Up Record Functions ........................ 58
Switching Movie Quality Mode ................. 58
Input Selection ........................................... 59
Changing Method for Recording Stills ....... 60
SelflTimer ................................................... 61
Setting On-Screen Display Output On
or OFF......................................................... 62
Initial Settings ................................................. 63
Switching Operating Sound On or Off ....... 63
Setting or Releasing Power Save .............. 63
Turning Record LED On or OFf ................... 64
Changing Display Language ...................... 64
Initializing All Settings to Defaults ................ 65
8
Disc Navigation
Before Using Disc Navigation ....................... 66
Structure of Data Recorded On This DVD
Video Camera/Recorder ............................. 66
Using Disc Navigation ................................... 67
Functions Available with
Disc Navigation .......................................... 67
Starting Disc Navigation and interpreting
Navigation Screen ...................................... 69
Playing Back Scenes .................................. 70
Selecting Random Scenes ......................... 70
Selecting Consecutive Scenes Together ... 70
Understanding Flow of Disc Navigation
Menu ............................................................... 71
Program .......................................................... 72
Switching to Thumbnail Display of Specific
Date (Selecting Program) ........................... 72
Playing Back Program ................................ 72
Changing Iqtle of Program ......................... 73
Play List ........................................................... 74
Creating New Play List .............................. 74
Switching Play List
(Switching to Display of Each Play List) ..... 75
Playing Back A Play List ............................. 75
Adding Scenes to Play List ........................ 76
Deleting Scenes from Play List ................. 77
Editing Play List
(Adding Scenes Using Menu) .................... 77
Editing Play List
(Deleting Scenes Using Menu) .................. 78
Editing Play List
(Selecting Scenes Using Menu) ................ 78
Changing Iqtle of Play List .......................... 79
Deleting Play List ....................................... 79
Scene ............................................................... 80
Deleting Scenes ........................................ 80
Adding Special Effects (Fade) .................... 81
Combining Multiple Scenes ....................... 83
Dividing Movies ......................................... 83
Arranging Order of Scenes (Move) ............ 84
Playing Back by Skipping Scenes (Skip) .... 85
Selecting Scenes Using Menu Screen ...... 85
Displaying information Using Menu
Screen ....................................................... 86
Disc Management .......................................... 87
Verifying Remaining Free Space on Disc
(Capacity) ................................................... 87
Initializing DVD-RAM Disc ......................... 87
Updating Control Information .................... 88
Finalizing Disc ............................................ 89
Playing Back Scenes Repeatedly
(Repeat Play) .............................................. 89
Connecting to Other Devices
Viewing on TV Screen .................................... 90
Connecting to a TV .................................... 90
Viewing on TV Screen ................................ 91
Recording Image from Other AV Devices .... 92
Connecting to Other AV Device ................. 92
Recording Image from Other Camcorder
or AV Device .............................................. 93
Cautions when connecting DVD video
camera/recorder to PC ................................... 94
Capturing Data for PC .................................... 95
Using DZ-WlNPC3(W) PC kit ..................... 95
Using Disc on PC ....................................... 97
Subsidiary Information
Cleaning .......................................................... 98
If dust adheres to viewfinder lens ............. 98
Trouble Messages .......................................... 99
Troubleshooting ........................................... 104
System Reset ................................................ 109
Major Specifications .................................... 110
Introduction to Optional Accessories ......... 111
Camera Accessories ................................ 111
Power Supplies ........................................ 111
Miscellaneous .......................................... 111
To Order in the United States ...................... 112
By Phone ................................................. 112
Index .............................................................. 113
9
About This Manual
• Photographs in this manual:
Photographs taken using digital still camera are used for explanation of images that appear in the view
finder or on tile LCD screen in this manual. Understand that they look dif%rent fl'om those you will
actually view in the viewfinder or on the LCD screen.
Note: The DZ MV230A displays are nsed %r the following explanation. Some items do not appear
with the DZ MV200A.
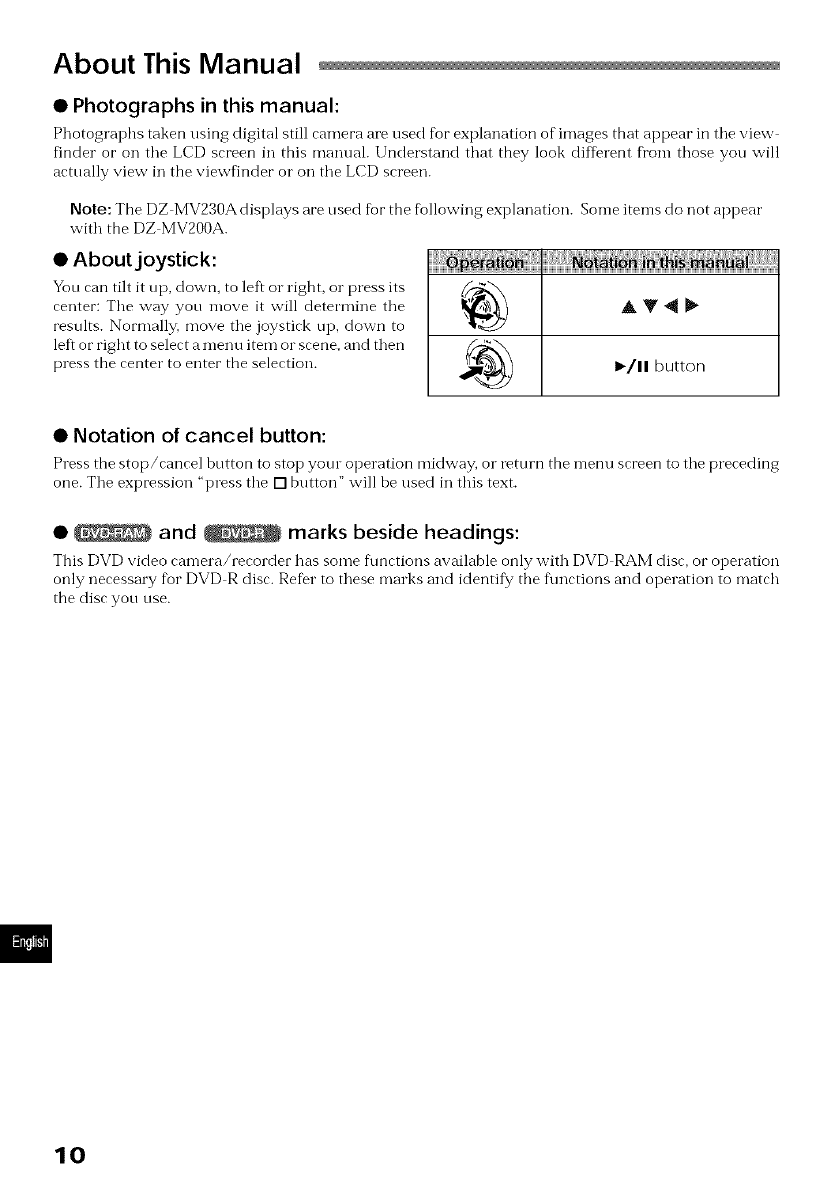
• About joystick:
You can tilt it up, down, to left o1"right, or press its
center: The way you move it will determine the
results. Normally, move the joystick up, down to
left or right to select a menu item or scene, and then
press the center to enter the selection.
• Notation of cancel button:
Press the stop/cancel button to stop yore operation midway, o1"return the menu screen to the preceding
one. The expression "press the [] button" will be used in this text.
• and _ marks beside headings:
This DVD video camera/recorder has some f\mctions available only with DVD RAM disc, or operation
only necessary for DVD R disc. Re%r to these marks and identify the f\mctions and operation to match
the disc yon use.
10
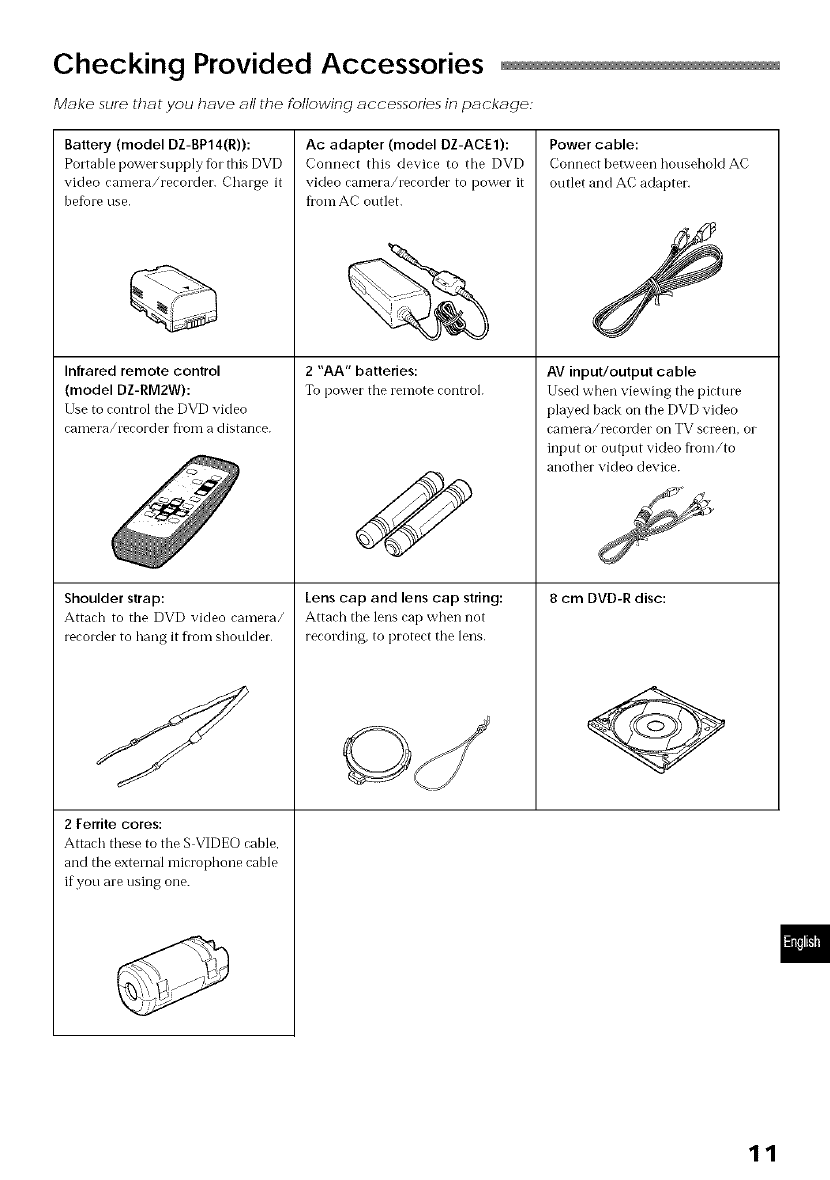
Checking Provided Accessories
M_ke sure theft you h_ve _11the following _ccessories in pE_ckE_ge:
Battery (model DZ-BP14(R)):
Portable power supply fbr this DVD
video camera/recorder, Charge it
before use.
Infrared remote control
(model DZ-RM2W):
Use to control the DVD video
camera/recorder flora a distance.
Shoulder strap:
Attach to the DVD video camera/
recorder to hang it flora shouMer,
2 Ferrite cores:
Attach these to tile S VIDEO cable,
and the external microphone cable
if you are using one.
Ac adapter (model DZ-ACE1):
Connect this device to the DVD
video camera/recorder to power it
flora AC outlet,
2 "AA" batteries:
To power the remote control.
Lens cap and lens cap string:
Attach the lens cap when not
recording, to protect the lens.
Power cable:
Connect between household AC
outlet and AC adapter.
AV input/output cable
Used when viewing tile picture
played back on the DVD video
canlera/recolder oil TV screen, or
input or output video flora/to
another video device.
8 cm DVD-R disc:
11
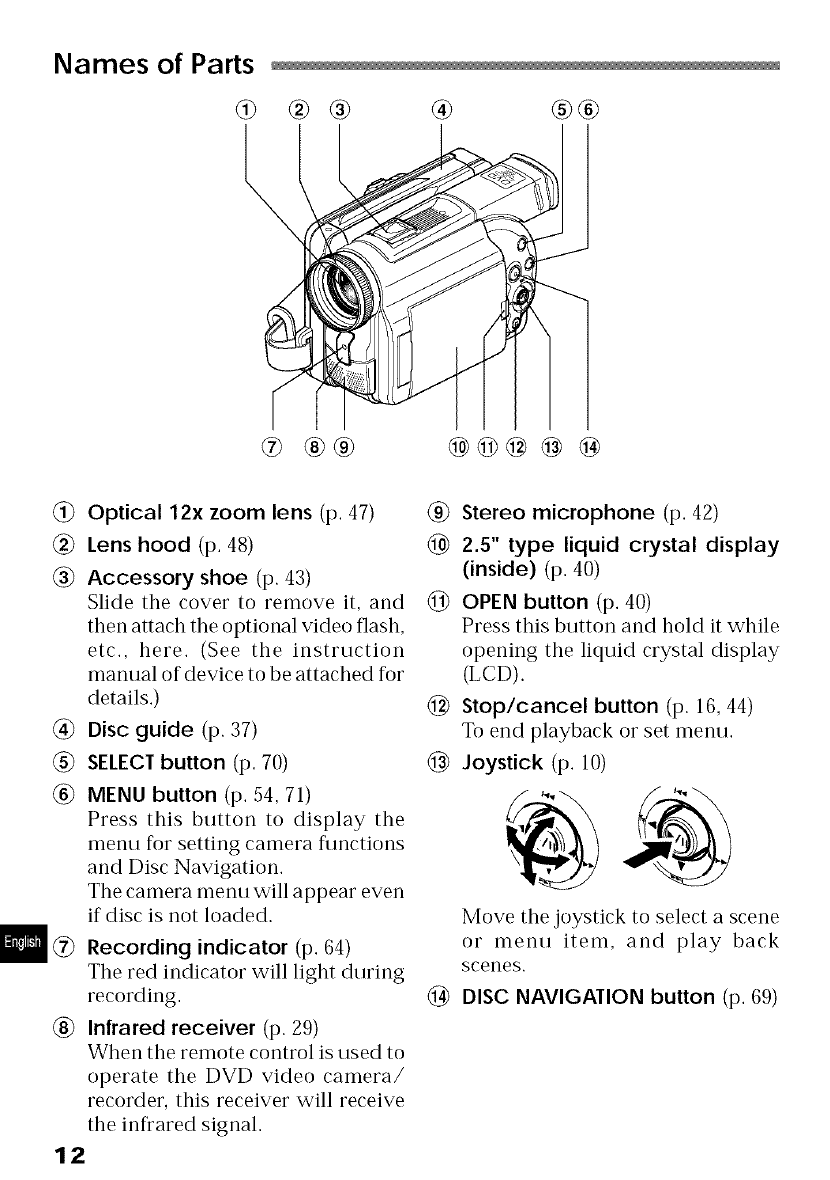
Names of Parts
® ®®
® ®® @@@ @ @
Optical 12x zoom lens (p. 47)
(_ Lens hood (p. 48)
(_ Accessory shoe (p. 43)
Slide the cover to remove it, and
then attach the optional video flash,
etc., here. (See the instruction
manual of device to be attached for
details.)
(_ Disc guide (p. 37)
(_ SELECTbutton (p. 70)
(_ MENU button (p. 54, 71)
Press this button to display the
menu for setting camera functions
and Disc Navigation.
The camera menu will appear even
if disc is not loaded.
(_ Recording indicator (p. 64)
The red indicator will light during
recording.
(_ Infrared receiver (p. 29)
When the remote control is used to
operate the DVD video camera/
recorder, this receiver will receive
the infrared signal.
12
(_ Stereo microphone (p. 42)
(_ 2.5" type liquid crystal display
(inside) (p. 40)
_) OPEN button (p. 40)
Press this button and hold it while
opening the liquid crystal display
(LCD).
(_ Stop/cancel button (p. 16, 44)
To end playback or set menu.
(_ Joystick (p. 10)
Move the joystick to select a scene
or menu item, and play back
scenes.
@DISC NAVIGATION button (p. 69)

@® ® @ @
ic
Ins t_
@
@
@@@ @ @
@
@
@ AV input/output jack (p. 90)
(_ PC connection terminal (TO PC)
(p. 96)
@ External microphone jack (p. 42)
@ Viewfinder (p. 41)
@ DISC EJECI button (p. 37)
Press down this button to open the
disc guide.
(_ CHARGE/ACCESS indicator
(p. 21, 31)
Will blink or light during charging,
or while the DVD video camera/
recorder is operating.
@ Zoom lever (p. 47)
Push the lever to the T side Ii)r tel-
ephoto, or to the W side for wide-
angle.
@ Battery attachment platform (p. 30)
DC cord connection terminal
(gc IN a.4v) (p. 31)
(_ S-VIDEO output jack (p. 90)
(_) Record button (REC) (p. 42)
_) Power switch (p. 42, 43)
[Z_PHOTO :To record still
images
_, VIDEO : To record a movie
POWER OFF: To turn offthe DVD
video camera/re-
corder
Press the red button at the center of
power switch and turn it only when
turning power on: It is not necessary
to press the button when setting the
switch to "POWER OFF".
The power switch cannot be
changed over during recording.
For" playback, set the power switch
to either" "_ PHOTO" or""_, VIDEO".
@LOCK switch (p. 42)
To lock the recording mode, so that I
the VIDEO mode is not switched
to the PHOTO mode by mistake.
Hand strap (p. 27)
13
@ ® ®
@@@® @
@
@
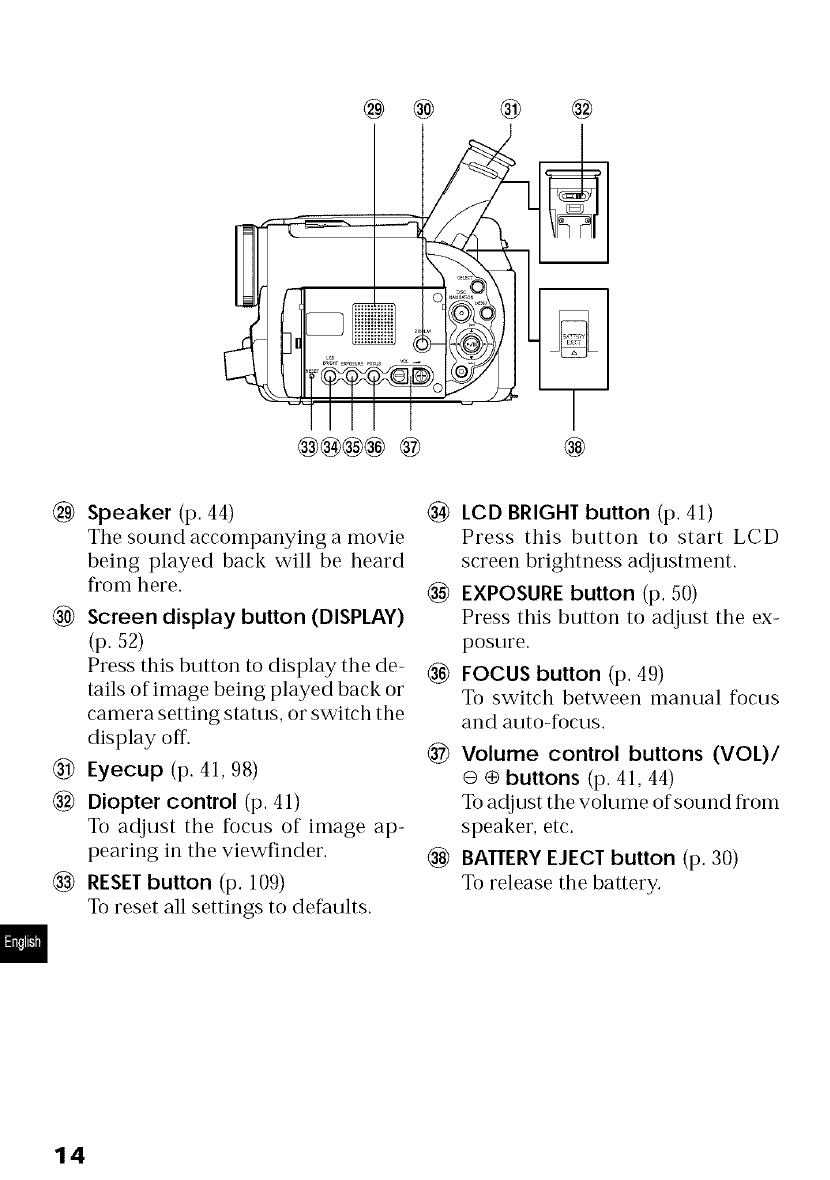
(_ Speaker (p. 44)
The sound accompanying a movie
being played back will be heard
from here.
Screen display button (DISPLAY)
(p. ,52)
Press this button to display the de-
tails of image being played back or
camera setting status, or switch the
display off.
(_) Eyecup (p. 41, 98)
Diopter control (p. 41)
To adjust the focus of image ap-
pearing in the viewfinder.
(_ RESET button (p. 109)
To reset all settings to defaults.
(_) LCD BRIGHT button (p. 41)
Press this button to start LCD
screen brightness adjustment.
EXPOSURE button (p. 50)
Press this button to adjust the ex-
posure.
FOCUS button (p. 49)
To switch between manual focus
and auto-focus.
@ Volume control buttons (VOL)/
O ÷ buttons (p. 41, 44)
To adjust the volume of sound from
speaker, etc.
(_ BAUERY EJECT button (p. 30)
To release the battery.
14
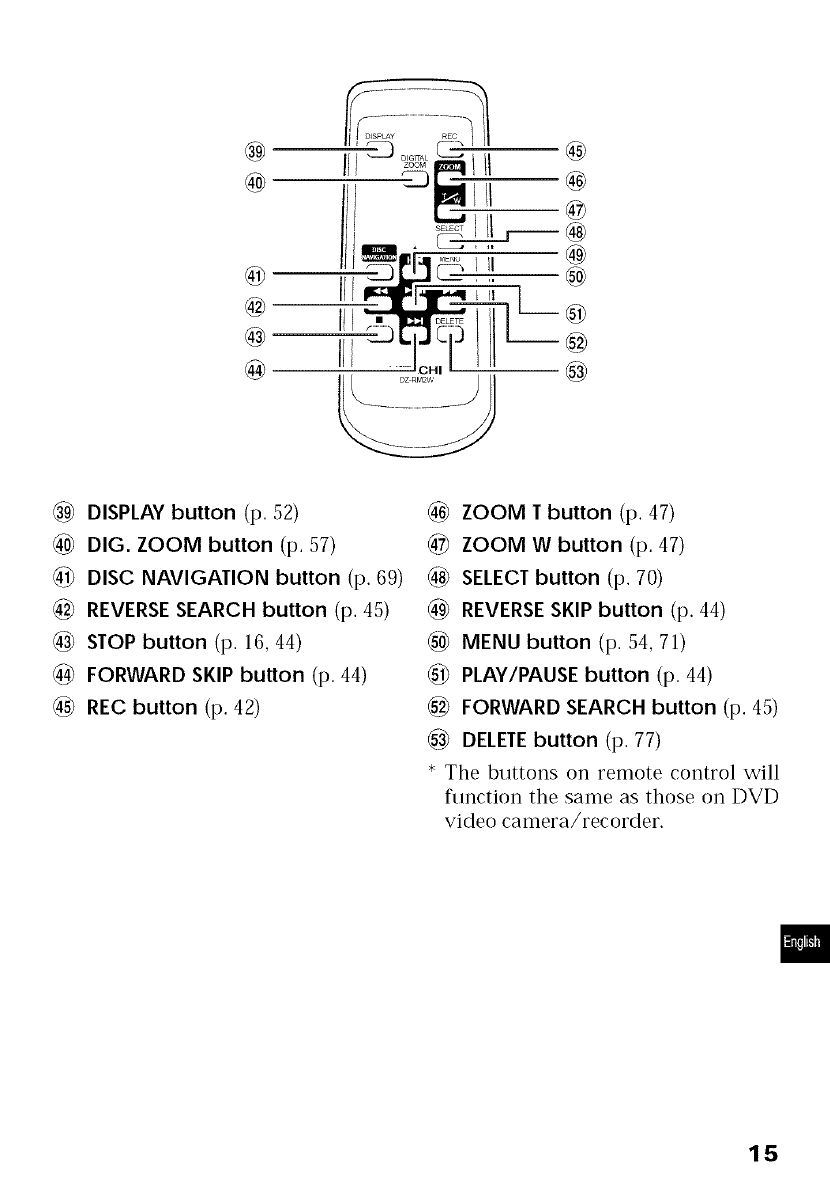
_9_ DISPLAY button (p. 52)
_0_ DIG. ZOOM button (p. 57)
_i_ DISC NAVIGATION button (p. 69)
_2_ REVERSE SEARCH button (p. 45)
STOP button (p. 16, 44)
_4_ FORWARD SKIP button (p. 44)
_5_ REC button (p. 42)
ZOOM Tbutton (p. 47)
_7_ ZOOM W button (p. 47)
_8_ SELECT button (p. 70)
_) REVERSE SKIP button (p. 44)
_0} MENU button (p. 54, 71)
PLAY/PAUSE button (p. 44)
_2_ FORWARD SEARCH button (p. 45)
DELETEbutton (p. 77)
* The buttons o[1 remote control will
function the same as those on DVD
video camera/recorder.
15
Viewing Demonstration
This DVD video camer_rJrecorder has versatile functions, including specicd effects
Before using the DVD video camera/recorder; view the demonstrution to see what it can do
Referring to step 2 on page 37, connect the DVD video camef_/recorder; AC adapter and power
cable to power the DVD video carT}era/recorder from AC outlet
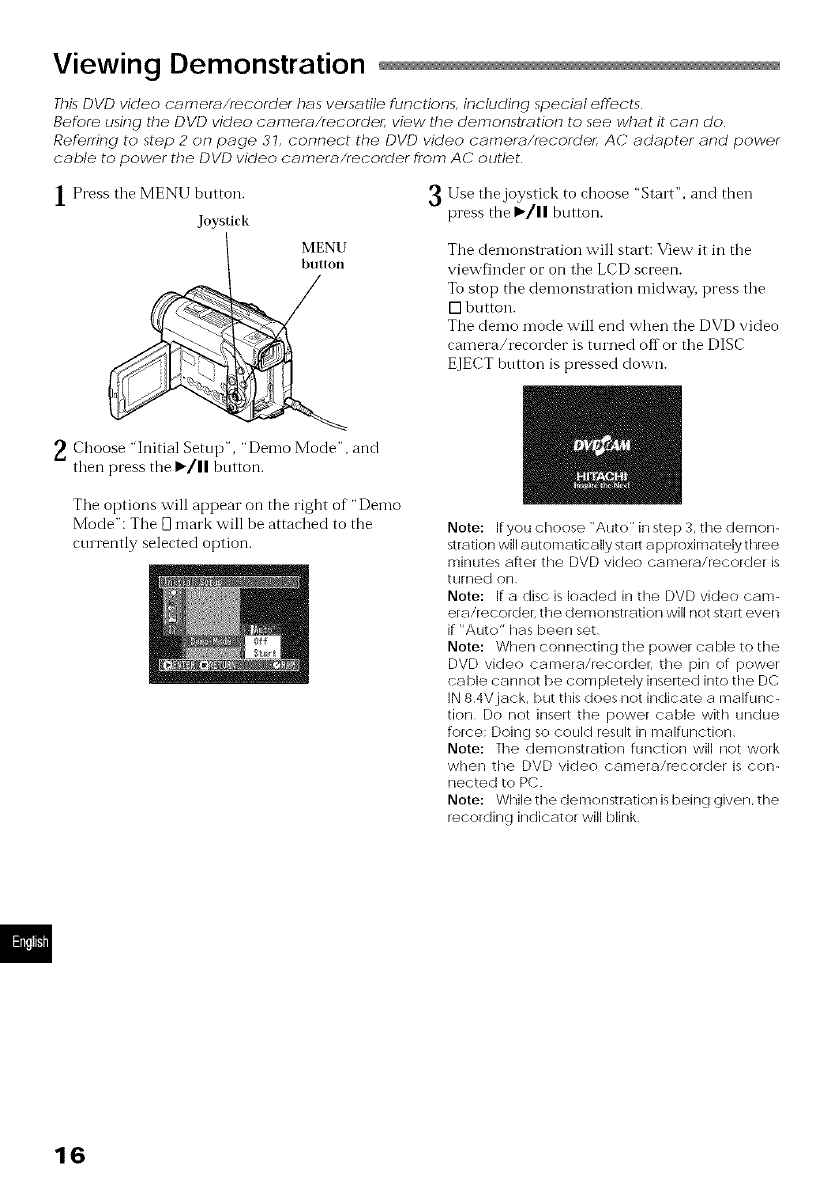
IPress the MENU button.
Joystick
MENU
button
_2
_, Choose "Initial Setup', "Demo Mode", and
then press the I_/1| button.
The options will appear on the right of "Demo
Mode": The D mark will be attached to the
cturently selected option.
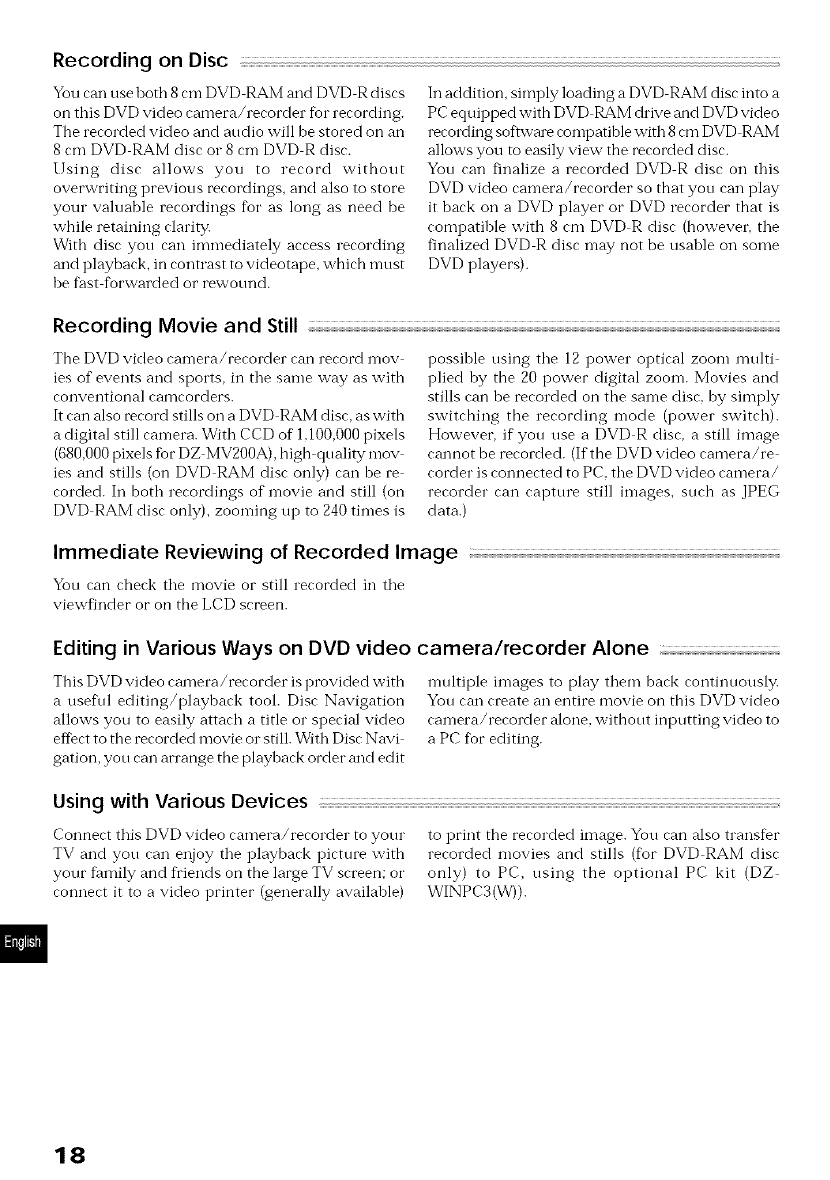
1Ise the joystick to choose "Start", and then
press the _'/11 button.
The demonstration will start: View it in the
viewfinder or on the LCD screen.
To stop the demonstration midway, press the
[] button.
The demo mode will end when the DVD video
camera/recorder is turned off o1"the DISC
EJECT button is pressed down.
//
Note: If you choose "Aute" in step 3, the demon-
stration will automatically start a pproximately three
minutes after the DVD video camera/recorder is
turned on
Note: If a disc is loaded in the DVD video can]-
era/recorder, the demonstration will not start even
if "Auto" has been set
Note: When connecting the power cable to the
DVD video camera/recordeL the pin of power
cable cannot be completely inserted into the DC
IN 8 4V jack, but this does not indicate a malfunc-
tion Do not insert the power cable with undue
force: Doing so could result in malfunction
Note: The demonstration function will not work
when the DVD video camera/recorder is con-
nected to PC
Note: While the demonstration isbeinct given, the
recording indicator will blink
16

Features of DVD video camera/recorder
Versatile Functions Available
ThisDVD video camera/recorder has numerous useful functions However; the functions that ecru be
used will vary depending on whether DVD-RAM or DVD-R disc is used
Use the functions, following the table below
Camera Functions: Disc Navigation Functions:
...............................................................................................................................................
Program AE O O 54 Switch O X 75
==_ White Bal. O O 55 Play O X 75
_ EIS O O 56 _ Create O X 74
Dig.Zoom O O 57 __ Edit O X 77
Q.
VIDEO Mode O O _ 58 Title O X 79
._o
_ Input Source O O 59 Delete O X 79
._ _ E Switch O O 72
PHOTO Input O X 60 ,_
Self Timer O X 61 u_ Play O O 72
.o
OSD Output O O 62 _. Title O X 73
_ Date Mode O O 36 Delete O X 80
,_ Date Set O O 35 ¢ Edit O X 81
Beep O O 63 _ Skip O X 85
Power Save O O 63 Select O O 85
Record LED O O 64 Detail O O 86
Language O O 64 Capacity O O 87
--_ Demo Mode O O 16 Format Disc O X 87
Reset O 0109 _, Update 0X 88
O: Available; X: Unavailable Control Info.
( Except for LPCM mode) Finalize Disc X O 89
(* Except for XTRA mode, which can be set
on DZ-MV230A only) _ Repeat Play O O 89
o
17
Recording on Disc
You can use both 8 cm DVD RAM and DVD R discs
on this DVD video camera/recorder fur recording.
The recorded video and audio will be stored on an
8 cm DVD RAM disc o1"8 cm DVD R disc.
Using disc allows you to record without
overwriting previous recordings, and also to store
your wduable recordings fbr as long as need be
while retaining clarity.
With disc you call immediately access recording
and playback, in contrast to videotape, which must
be fast forwarded or rewotmd.
Ill addition, simply loading a DVD RAM disc into a
PC equipped with DVD RAM drive and DVDvideo
recording software compatible with 8cm DVD RAM
allows you to easily view the recorded disc.
You can finalize a recorded DVD R disc on this
DVD video camera/recorder so that you call play
it back on a DVD player or DVD recorder that is
compatible with 8 cm DVD R disc (however. tile
finalized DVD R disc may not be usable on some
DVD players).
Recording Movie and Still
The DVD video camera/recorder can record mov
ies of events and sports, in tile same way as with
conventional caillcorders.
It can also record stills on a DVD RAM disc, as with
a digital still camera. With CCD of 1,100,000 pixels
(680,000 pixels %r DZ MV200A), high quality mov
ies and stills {on DVD RAM disc only) call be re
corded. Ill both recordings of movie and still (on
DVD RAM disc only), zooming up to 240 times is
possible using tile 12 power optical zoom multi
plied by the 20 power digital zoom. Movies and
stills can he recorded on the same disc, by simply
switching tile recording mode (power switch).
However, if you use a DVD R disc, a still image
cannot be recorded. (If the DVD video camera/re
corder is connected to PC, tile DVD video camera/
recorder call capture still images, such as JPEG
data.)
Immediate Reviewing of Recorded Image
You ran rherk tile movie or still rerorded in tile
viewfinder or on tile LCD screen.
Editing in Various Ways on DVD video camera/recorder Alone
This DVD video camera/recorder is provided with
a useflfl editing/playback tool. Disc Navigation
allows you to easily attach a title or special video
efIbct to the recorded movie or still. With Disc Navi
gation, you call arrange the playback order and edit
mtfltiple images to play them back continuously.
You call create all entire movie on this DVD video
camera/recorder alone, without inputting video to
a PC fbr editing.
Using with Various Devices ;;
Connect this DVD video camera/recorder to your
TV and you call enjoy tile playback picture with
your fhmily and fi'iends on the large TV screen: or
connect it to a video printer (generally available)
to print the recorded image. You can also transfer
recorded movies and stills (fbr DVD RAM disc
only) to PC, using the optional PC kit (DZ
WINPC3(W)).
18
Cautions When Using
Handle the liquid crystal display (LCD) with
care:
• Tile LCD is a very delirate display devire: Do
not press its surface with any force, hit it, or
puncture it with a sharp object.
• If you push the LCD surfhce, unevenness in the
display may occm. If unevenness does not dis
appear soon, turn tile DVD video camera/re
corder oft; wait for a while, and then turn it on
again.
• Do not place the DVD video camera/recorder
with the open LCD screen down.
• Close the LCD monitor when not using the DVD
video camera/recorder.
• Do not hold by the LCD monitor as this could
cause a malflmction.
• Open the LCD monitor by 90 ° before changing
its direction. If you attempt to invert its direr
tion before opening it completely, it could cause
a malftmction.
• Do not disassemble the LCD monitor as this
might cause a malflmction.
• When opening the LCD monitol; he careflfl that
no water droplets adhere to the monitor screen
and that no water or dust enters the DVD video
camera/recorder as it could cause a malflmction.
Liquid Crystal Display and viewfinder:
• The LCD srreen and viewfinder will be slightly
dimmer than usual when the DVD video cam
era/recorder is at low temperature, as in cold
areas, or immediately after power is turned on.
The normal brightness will be restored when the
temperature inside the DVD video camera/re
corder rises.
Hold the DVD video camera/recorder
correctly:
• Do not hold the viewfinder or LCD monitor
when lifting the DVD video camera/recorder:
The viewfinder or LCD monitor may become
detached and the DVD video camera/recorder
could falh
Do not subject the DVD video camera/
recorder to impact:
•This DVD video ramera/rerorder is a prerision
machine: Take great care that you do not strike
it against a hard object or allow it to fidl.
• Do not use the DVD video camera/recorder on
a tripod in a place where it is subject to severe
vibrations or impact.
No sand or dust!
•Fine sand or dust entering the DVD video ram
era/recorder or AC adapter could cause it to
mall\ruction.
No water or oil!
• \JVateror oil entering the DVD video ramera/
recorder or AC adapter cotfld cause a short cir
cuit or other malflmctions.
Heat on surface of product:
• The surface of the DVD video camera/recorder
will be slightly warm, but this does not indicate
a fault. Be careful when touching the bottom of
the DVD video camera/recorder, since it will be
hot.
Be careful of ambient temperature:
• Using the DVD video camera/recorder in a place
where the temperattne is over 104 °F (40 °C) or
under 32 °F (0 °C) will not allow it to make nor
real recording/playback.
• When using the DVD video camera/recorder
connected to PC, operate it at room temperature.
If you use the DVD video camera/recorder
where the temperature is high fur an extended
period of time, it will overheat and may not op
erate normally.
• Do not leave the DVD video camera/recorder
in a closed vehicle where the temperature is very
high for a long time: This could cause malftmc
tions.
Do not point directly at the sun:
• If dirert stmlight strikes the lens or viewfinder,
the DVD video camera/recorder cotfld malflmc
tion or burn in CCD or viewfinder.
• Do not leave the DVD video camera/recorder
with the LCD screen exposed to direct stmlight:
This could cause malflmctions.
19
Do not use the DVD video camera/
recorder near IV or radio:
• This rould rause noise to appear on the TV
screen, o1"interference could enter radio hroad
casts.
Do not use the DVD video camera/
recorder near strong radio waves or
magnetism:
• If the DVD video ran-lera/reeorder is used near
strong radio waves or magnetism, such as near
radio wave tower or electric appliances contain
ing motors, noise could enter video and audio
that are being recorded. During playback of nor
really recorded video and audio, noise could also
enter the picttu e and sound. At worst the DVD
video camera/recorder could malflmction.
Do not expose the DVD video camera/
recorder to soot or steam:
• Heavy soot or stean-i could damage the DVD
video canlera/recorder case or cause Illalftlnc
tions.
Do not use the DVD video camera/
recorder near corrosive gas:
• Using it in a place where there is dense exhaust
gas generated hy gasoline and diesel engines,
o1"corrosive gas such as hydrogen sulfide, could
corrode the battery connecting terminals, which
could result in loss of power.
Do not use the DVD video camera/
recorder near ultrasonic humidifier:
• With sonm water in hunlidifier, eaMum and oth
ers dissolved in water could scatter in the all:
and white palticles could adhere to the optical
head of the DVD video camera/recordel; which
could cause it to operate abnormally.
Do not expose the DVD video camera/
recorder to insecticide:
• Inseetiride entering the DVD video ramera/re
corder could dirty the optical head, and the DVD
video camera/recorder may not operate nor
really. Turn the DVD video camera/recorder off
and cover it with vinyl sheet, etc. hefore using
insecticide.
Be careful of moisture condensation:
• When you move the DVD video camera/re
corder between places where the difference in
temperattues is great, such as entering a lodge
fl'om a ski slope, or going out of a cooled room
or vehicle, condensation (vapor in air warmed
or cooled to water droplets) could occur on the
lens and/or inside the DVD video camera/re
corder: If condensation occurs, do not open the
cover of disc insertion block if possible. If con
densation occms on the lens, wipe it offwith a
soft, dW cloth. Even if the external surface of
the DVD video camera/recorder has dried, con
densation may remain inside. Turn the DVD
video camera/recorder offand leave it in a dW
place for at least 1 2hours before using it again.
Do not use the DVD video camera/
recorder for a long uninterrupted period of
time:
• This DVD video ramera/rerorder is designed
and produced fur home use recording and play
back. Do not use it for an extended time con
tinuously, e.g., as a surveillance camera/moni
tOli
• If you use the DVD video camera/recorder fbr
a long uninterrupted period of time. the tern
perature of" DVD video camera/recorder may
exceed the limit and the recording/playback
operation could he slowed down. If this occurs.
mrn it off and wait for a while befbre using it
again.
Be careful when removing the disc:
• When the DVD video camera/recorder is used
for a long period of time, the temperature of disc
will he high: Wait for a few moments before re
moving the disc after the DVD video camera/
recorder is turned off
2O
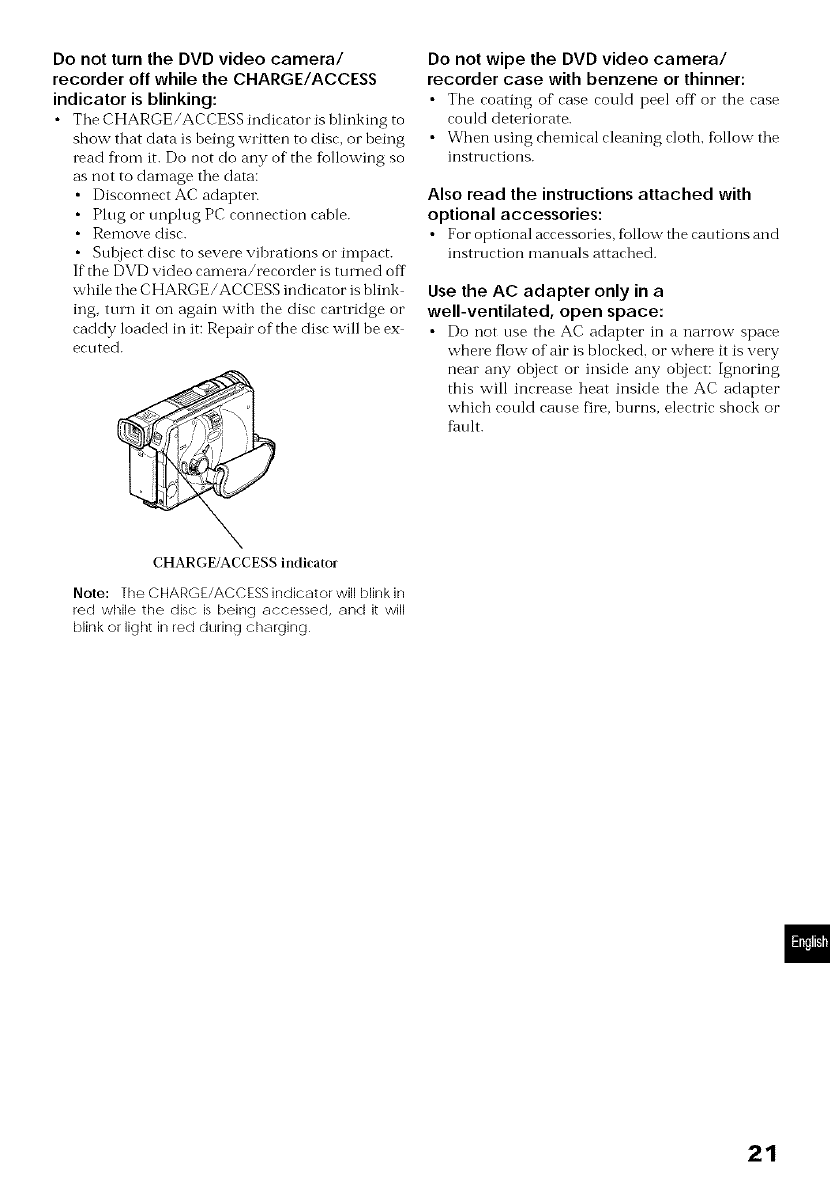
Do not turn the DVD video camera/
recorder off while the CHARGE/ACCESS
indicator is blinking:
• TheCHARGE/ACCESSindiratorisblinkingto
show that data is being written to disc, or being
read flora it. Do not do any of the following so
as not to damage tile data:
• Disconnect AC adapter.
• Plug or unplng PC connection cable.
• ReIllOVe disc.
• Subject disc to severe vibrations o1"impact.
If the DVD video camera/recorder is turned off
while tile CHARGE/ACCESS indicator is blink
ing, turn it on again with the disc cartridge or
caddy loaded in it: Repair of the disc will be ex
ecuted.
CHARGE/ACCESS indicator
Note: The C HARGE/ACC ESSindicator will blink in
red while the disc is being accessed, and it will
blink or light in red during charging
Do not wipe the DVD video camera/
recorder case with benzene or thinner:
• The roating of" rase rould peel off o1"the rase
could deteriorate.
• When using chemical cleaning cloth, follow tile
instructions.
Also read the instructions attached with
optional accessories:
• For optional arressories, fbllow the cautions and
instruction manuals attached.
Use the AC adapter only in a
well-ventilated, open space:
• Do not use tbe AC adapter in a narrow spare
where flow of air is blocked, or where it is very
near any object or inside any object: Ignoring
this ,,,,'illincrease heat inside tile AC adapter
which could cause fire, burns, electric shock or
thult.
21
Cautions When Storing
Do not leave the DVD video camera/
recorder in a place where the tempera-
ture is very high for a long period of time:
•The temi)erature inside a closed vehirle or trunk
becomes very high in the hot season. If you leave
the DVD video camera/recorder in such a place,
it could malflmction or the case could be dam
aged. Also, do not expose the DVD video cam
era/recorder to direct sunlight or place near a
heatei_
Do not store the DVD video camera/
recorder in a place subject to strong
magnetism or intense vibrations:
• This rould rause malfnnrtions.
Detach the battery from DVD video
camera/recorder and store it in a cool
place:
• Leaving the battery attarhed or storing it at high
temperature could shorten its life.
Do not store the DVD video camera/
recorder in a place where the humidity is
high or in a dusty place:
• Dust entering the DVD video can-lera/rerorder
could cause malflmctions. If the humidity is
high, the lens could become moldy, and the DVD
video camera/recorder could be unusable. It is
recommended that you put the DVD video cam
era/recorder with desiccant in a box when stor
ing it in a closet, etc.
Suggestions and Restrictions
Make a trial recording:
• Be sure to make a trial rerording before an ar
tual take to make sure that recording is normah
Data that was not stored normally because of a
de%ct in the DVD video camera/recorder can
not be restored.
• It is recommended that you use DVD RAM disc
for trial recording, since a recording stored on it
can be deleted.
Copyright:
• The data rerorded on the disr in your DVD video
camera/recorder through other digital/analog
media or devices ale protected by the copyright
act and cannot be used without permission of
the owner of copyright, except fbr personal en
joyment. Note that, even for personal enjoyment,
recording is prohibited for some demonstra
tions, performances and exhibitions.
lhe recorded contents cannot be com-
pensated for:
• Hitarhi will not rompensate for any dan-lages
caused when a recording is not made normally
or the recorded contents cannot be played back
because of a defect in the DVD video camera/
recorder or disc.Also, Hitachi will not be respon
sible for yotn recorded video and audio.
22
Discs
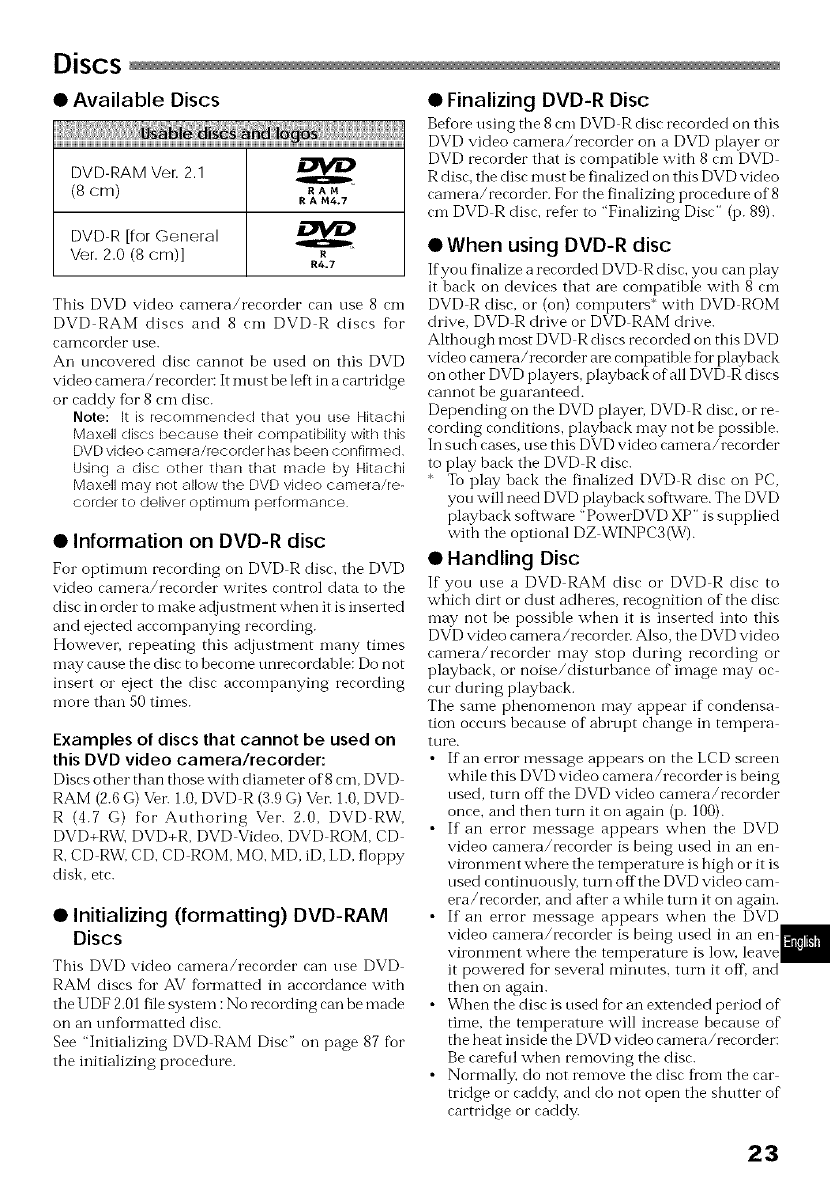
• Available Discs
iii ii]
DVD-RAM Ver. 2.1
(8 cm) RA M
RA M4.7
DVD-R [for General
Ver. 2.0 (8 cm)] R
R4.7
This DVD video camera/recorder can use 8 cm
DVD RAM discs and 8 cm DVD R discs {or
canTcorder use.
An uncovered disc cannot be used on this DVD
video camera/recorder: It must be left in a cartridge
or caddy fur 8 cm disc.
Note: it is recommended that you use Hitachi
Maxell discs because their compatibility with this
DVD video camera/recorder has been confirmed
Using a disc other than that made by Hitachi
Maxell may not allow the DVD video camera/re-
corder to deliver optimum performance
• Information on DVD-R disc
For optimum recording on DVD R disc, the DVD
video camera/recorder writes control data to the
disc in order to make adjustment when it is inserted
and ejected accompanying recording.
However, repeating this adjustment many times
may cause the disc to hecome unrecordable: Do not
insert o1"eject the disc accompanying recording
more than 50times.
Examples of discs that cannot be used on
this DVD video camera/recorder:
Discs other than those wifl_diameter of8 cm, DVD
RAM (2.6G) Ver. 1.0.DVD R (3.9G) VeI: 1.0, DVD
R (4.7 G) for Authoring Ver. 2.0, DVD RW.
DVD+RV\LDVD+R, DVD Video. DVD ROM, CD
R. CD RV\LCD, CD ROM. MO. MD. iD, LD, floppy
disk, etc.
•Initializing (formatting) DVD-RAM
Discs
This DVD video camera/recorder can use DVD
RAM discs for AV formatted in accordance with
the UDF 2.01file system :No recording can be made
on an unfi)rmatted disc.
See "Initializing DVD RAM Disc" on page 87 for
the initializing procedure.
• Finalizing DVD-R Disc
Before using the 8 cm DVD R disc recorded on this
DVD video camera/recorder on a DVD player o1"
DVD recorder that is compatible with 8 cm DVD
R disc, the disc must be finalized on this DVD video
camera/recorder. For the finalizing procedure of 8
cm DVD R disc, reDr to "Finalizing Disc" (i7.89).
• When using DVD-R disc
If you finalize a recorded DVD R disc, you can play
it back on devices that are compatihle with 8 cm
DVD R disc. or (on) computers* with DVD ROM
&ive, DVD R drive or DVD RAM drive.
Although most DVD R discs recorded on this DVD
video camera/recorder are compatible {br playback
on other DVD players, playback of all DVD R discs
cannot be guaranteed.
Depending on the DVD playel. DVD R disc, or re
cording conditions, playhack may not be possible.
In such cases, use this DVD video camera/recorder
to play back the DVD R disc.
* To play back the finalized DVD R disc on PC,
you will need DVD playback sof'avare. The DVD
playhack software "PowerDVD XP" is supplied
with the optional DZ WINPC3(W).
• Handling Disc
If you use a DVD RAM disc o1"DVD R disc to
which dirt or dust adheres, recognition of the disc
may not he possihle when it is inserted into this
DVD video camera/recorder. Also, the DVD video
camera/recorder may stop during recording or
playback, or noise/disturbance of image may oc
cur during playback.
The same phenomenon may appeal if condensa
tion occurs because of abrupt change in tempera
ttlre.
• If an error message appears on the LCD screen
while this DVD video camera/recorder is being
used, turn off the DVD video camera/recorder
once. and then turn it on again (i7. 100).
• If an error message appeals when the DVD
video camera/recorder is being used in an en
vii onment where the temperature is high or it is
used continuously, turn offthe DVD video cam
era/recordei; and after a while turn it on again.
• If an error message appears when the DVD
video camera/recorder is being used in an en
vironment where the temperature is lov< leave
it powered for several minutes, turn it off, and
then on again.
•When the disc is used {br an extended period of"
time. the temperature will increase because of
the heat inside dm DVD video camera/recorder:
Be carefid when removing the disc.
• Normally. do not remove the disc from the car
tridge or caddy, and do not open the shutter of
cartridge or caddy.
23
Note: Most generally availa hie 8 cm discs can be
removed from cartridges or caddies if they are for
video cameras; Howevel, before removing disc
from cartridge or caddy, read the instruction sheet
provided with the disc or consult the disc maker
Tc_ke care with the following when handling the
removed disc:
• Be sure not to touch disc surfaces
• Be careful not to drop the disc removed from
cartridge or caddy
• Be sure not to bend the disc
• Do not leave the disc outside the cartridge or
caddy
• Do not subject the disc to heat
• Do not write on disc with a ball-point pen or pen-
cil (With one-side recordable disc, writing on the
label surface is possible with a pen that does not
scratch the surface No writing of any kind is pos-
sible on both-side recordable disc)
• Be sure not to wipe disc surfaces with thinne_
water or anti-static agent
Use dry, soft cloth to lightly wipe off dtlst or dirt
that adheres to tile disc Never use solvents to
clean the disc
Note: If the disc is removed from cartridge or
caddy and tile data stored by this DVD video
ctlrnertl/recorder is rewritten on devices other
than this DVD video camera/recorder, recording
or playback may not be normal, or Disc Naviga-
tion may not operate normally, when the disc re-
placed in cartridge or caddy is used on this DVD
video camera/recorder again
Note: The cartridge or caddy protects tile stir-
faces of disc on which high-density recording is
possible Once removed from cartridge or caddy,
the disc can be replaced in the cartridge or caddy
and used with this DVD video camera/recorden
but be sure to observe the following:
• Before replacing the disc in cartridge or caddy,
make sure that disc surfaces are not scratched,
and that no dirt or fingerprint adheres to them
•Do not record, edit or delete on the disc when
scratches, dirt or fingerprints cannot be removed
even if disc surface is cleaned
°When replacing the DVD-RAM disc in cartridge,
insert it until a click is heard
• Be careful not to allow condensation.
• To store disc cartridge or caddy, insert in plastic
case provided.
Do not place the disc cartridge or caddy in the fol
lowing places:
• Where exposed to direct sunlight for a long
time.
• Where the humidity is high, or in dusty place.
• Where exposed to heat fi'om heater_ etc.
• Where there may be condensation.
• About Stored Data
If you handle o1" use the disc incorrectly, the re
corded data may be lost. Hitachi cannot be respon
sible liar damages fi'om loss of recorded data.
Removing and Replacing Disc from/in Cartridge or Caddy
The DVD RAM disc used with this DVD video camera/recorder can be removed fi'om the cartridge or
caddy and used with DVD RAM drives. DVD players and DVD recorders that are compatible with 8 cm
DVD RAM discs. The finalized DVD R disc can also be removed fi'om the cartridge o1"caddy and used
with DVD players and DVD recorders that are compatible for 8 cm DVD R discs. Refer to the disc in
struction sheet for details on how to remove disc fl'om cartridge or caddy.
Perfbrm the following to remove the disc:
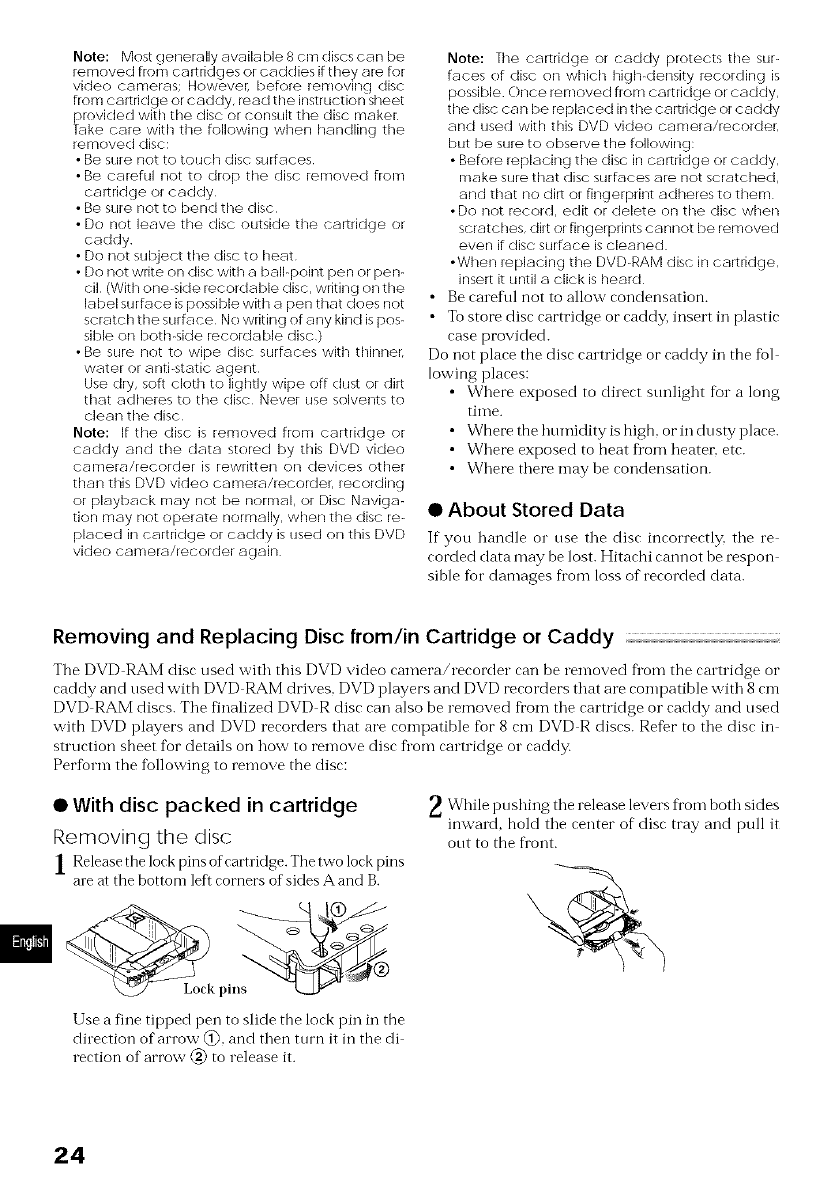
• With disc packed in cartridge
Removing the disc
1Release t he lock pins of cartridge. The two lock pins
are at the bottom left corners of sides A and B.
_E__
Use a fine tipped pen to slide the lock pin in the
dilection of arrow @, and then turn it in the di
rection of arrow @ to release it.
_ While the release levers from both sides
pushing
inward, hold the center of disc tray and pull it
out to the front.
24
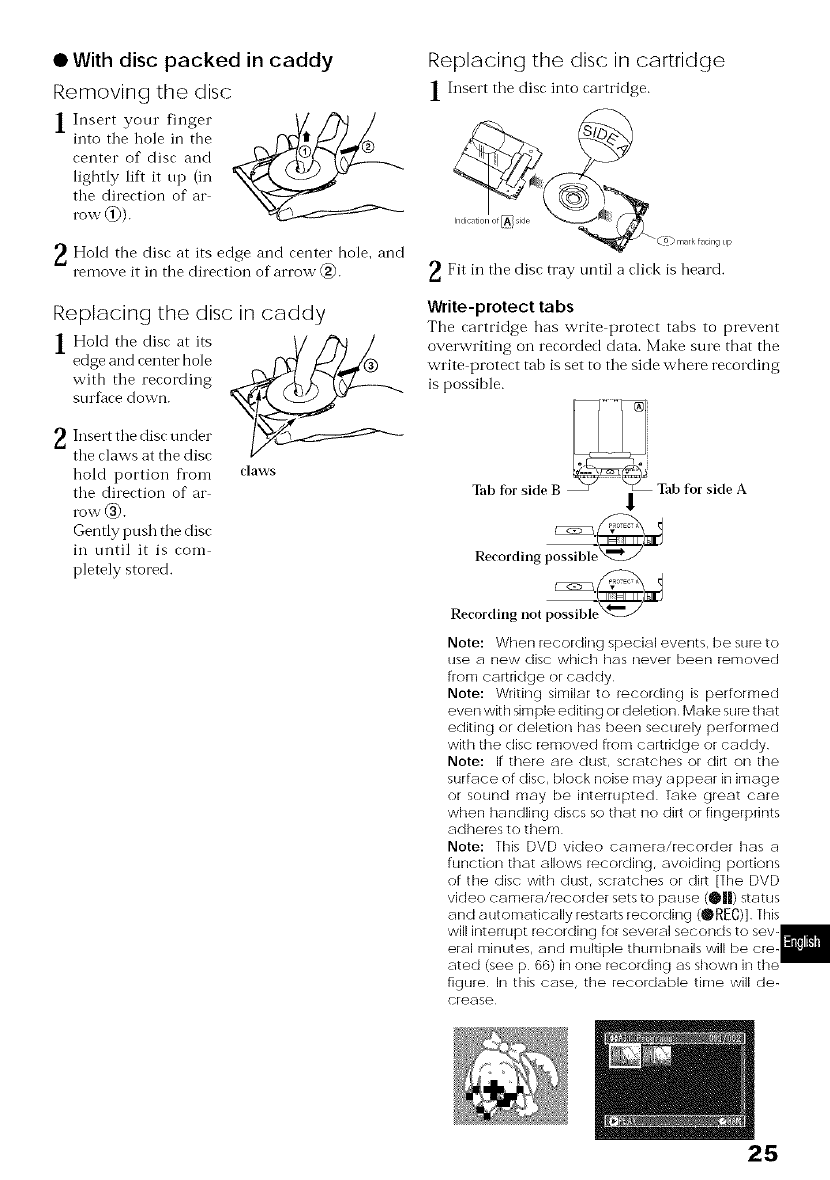
• With disc packed in caddy
Removing the disc
1Insert your finger
into the hole in the il
center of disc and
lightly lift it np (in
the direction of ar
row _).
_Hold the disc at its edge and center hole, and
remove it in tbe direction of arrow @.
Replacing the disc in caddy
1 Hold the disc at its
edge and center bole
with the recording
stu f_lce down.
_ Insert tile disc under
tile claws at the disc
hold portion flora claws
the direction of ar
rOVv' 6).
Gently push the disc
in tmtil it is corn
pletely stored.
Replacing the disc in cartridge
1Insert the disc into cartridge.
s e _(_ mark facing Lip
_Fit in tile disc tray until a click is heard.
Write-protect tabs
The cartridge has write protect tabs to prevent
overwriting on recorded data. Make sure that the
write protect tab is set to tile side where recording
is possible.
Tab for sl(le B Tab for sl(le A
1
Recording possible _- -/
Recording not possible_
Note: When recording special events, be sure to
use a new disc which hals never been removed
from cartridge or caddy
Note: Writing similar to recording is performed
even with simple editing or deletion Make sule that
editing or deletion has been securely performed
with tile disc removed from cartridge or caddy
Note: If there are dust, scratches or dirt on tile
surface of disc, block noise may appear in image
or sound may be interrupted Take great care
when handling discs so that no dirt or fingerprints
adhei_s to them
Note: This DVD video camera/recorder has a
function that allows recording, avoiding portions
of the disc with dust, scratches or din [The DVD
video camera/recorder sets to pause (_||) status
and a utomatically restarts recording (OREC)] This
will interrupt recording for several seconds to sev-
eral rNinutes, and multiple thumbnails will be cre-
ated (see p 66) in one recording as shown in tile
figure In this case, the recordable time will de-
crease
25
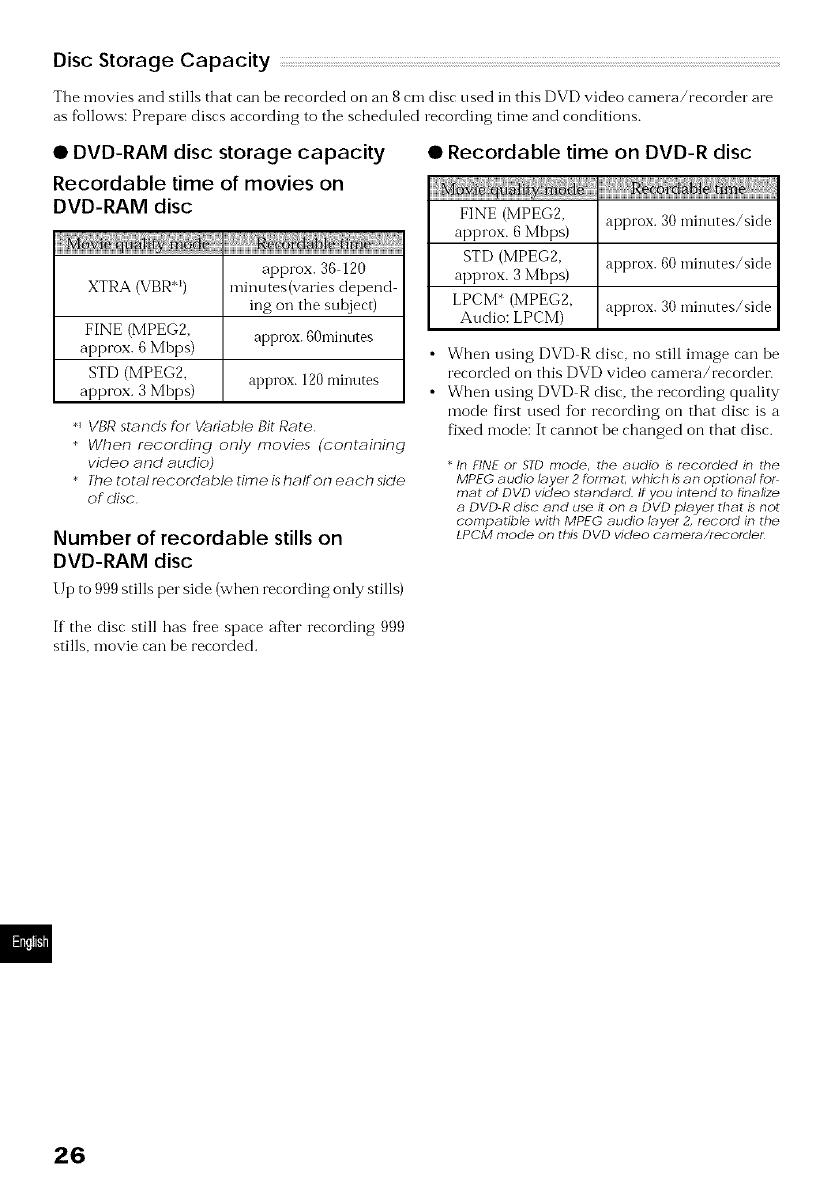
Disc Storage Capacity
The movies and stills that can be recorded on an 8 cm disc used in this DVD video camera/recorder are
as follows: Prepare discs according to tile scheduled recording time and conditions.
• DVD-RAM disc storage capacity
Recordable time of movies on
DVD-RAM disc
iiii Ji
approx. 36 120
XTRA (VBR *I) minutes(varies depend
ing oil the subject)
FINE (MPEG2, approx. 60minutes
approx. 6 Mbps)
STD (MPEG2, approx. 120 minutes
approx. 3 Mhps)
*_ VBR stunds for Vuriable Bit Rate
When recording only movies (containing
video and audio)
The total recorc;able time ishalf on each side
of rise
Number of recordable stills on
DVD-RAM disc
Up to 999 stills per side (when recording only stills)
• Recordable time on DVD-R disc
FINE (MPEG2, approx. 30 minutes/side
approx. 6 Mbps)
STD (MPEG2, approx. 60 minutes/side
approx. 3 Mbps)
LPCM* (MPEG2, approx. 30 minutes/side
Audio: LPCM)
• When using DVD R disc, no still image can he
recorded on this DVD video camera/recorder:
• When rising DVD R disc, the recording quality
mode fhst used fur recording on that disc is a
fixed mode: It cannot be changed on that disc.
*In FINE or STD mode, the audio is recorded in the
MPEG audio I_yer 2 tormat, which is an optional tol
mat of DI/D vicleo st_mdard If you intend to finalize
aDVD R disc and use it on aDVD player that is not
corrspatible with MPEG audio I_yer 2, recold in the
LPCM mode on this DVD video camei_/iecolclel
If the disc still has fl'ee space after recording 999
stills, movie can be recorded.
26
Setups
This section explains preparations for recording - setting up the DVD video camera/recorder and
battery pack.
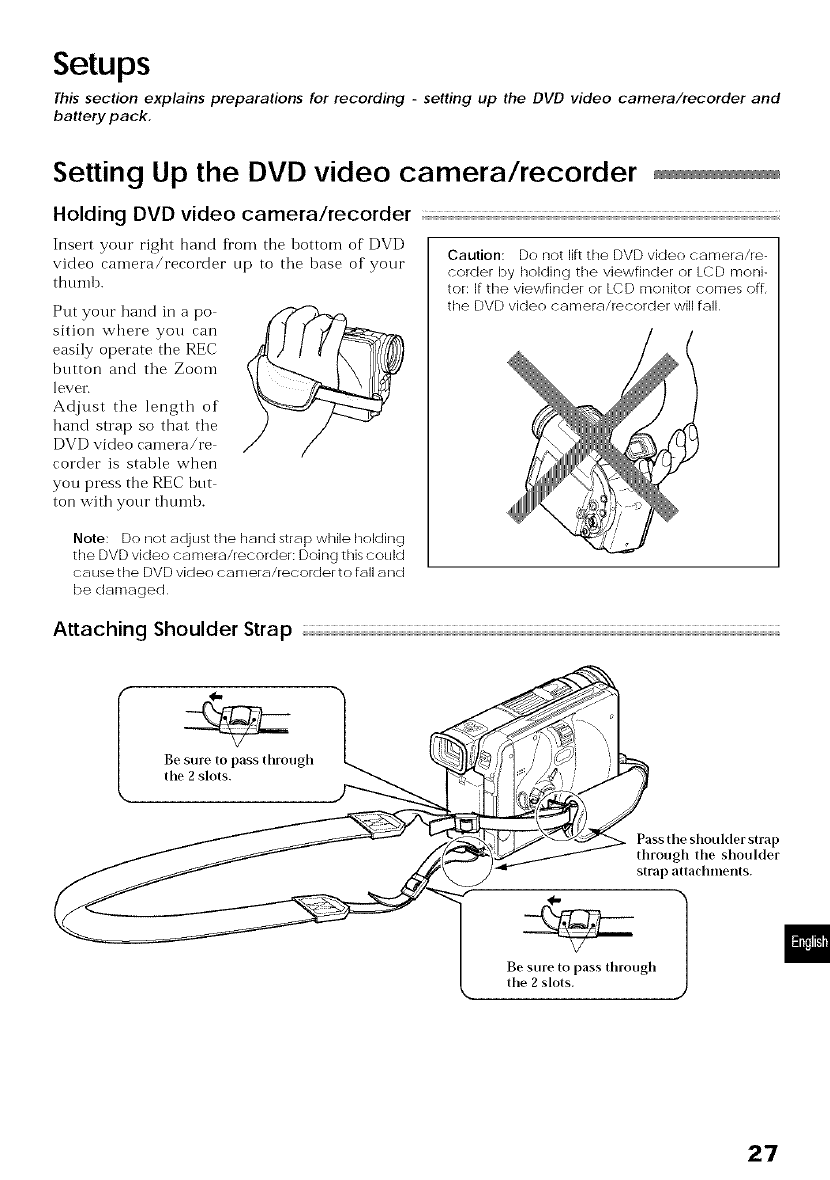
Setting Up the DVD video camera/recorder
Holding DVD video camera/recorder
Insert your right hanoi fl'om the bottom of DVD
video camera/recorder up to tile hase of your
thuml).
Put your hand in a po
sition where you can
easily operate the REC
button and tile Zoom
lever.
Adjust tile length of
hand strap so that tile
DVD video camera/re
corder is stable when
you press the REC but
ton with your thumb.
Note: Do not adjust tile hand strap while holding
the DVD video camera/recorder: Doing this could
cause the DVD video camera/recorder to fall and
be damaged
Caution: Do not lift the DVD video camera/re-
corder by holding the viewfinder or LCD moni-
tor: If the viewfinder or LCD monitor comes off,
the DVD video camera/recorder will fall
Attaching Shoulder Strap
Be sure to pass through
the 2 slots.
Pass the shoulder strap
through the shoulder
strap attachments.
Be sure to pass through
the 2 slots.
27
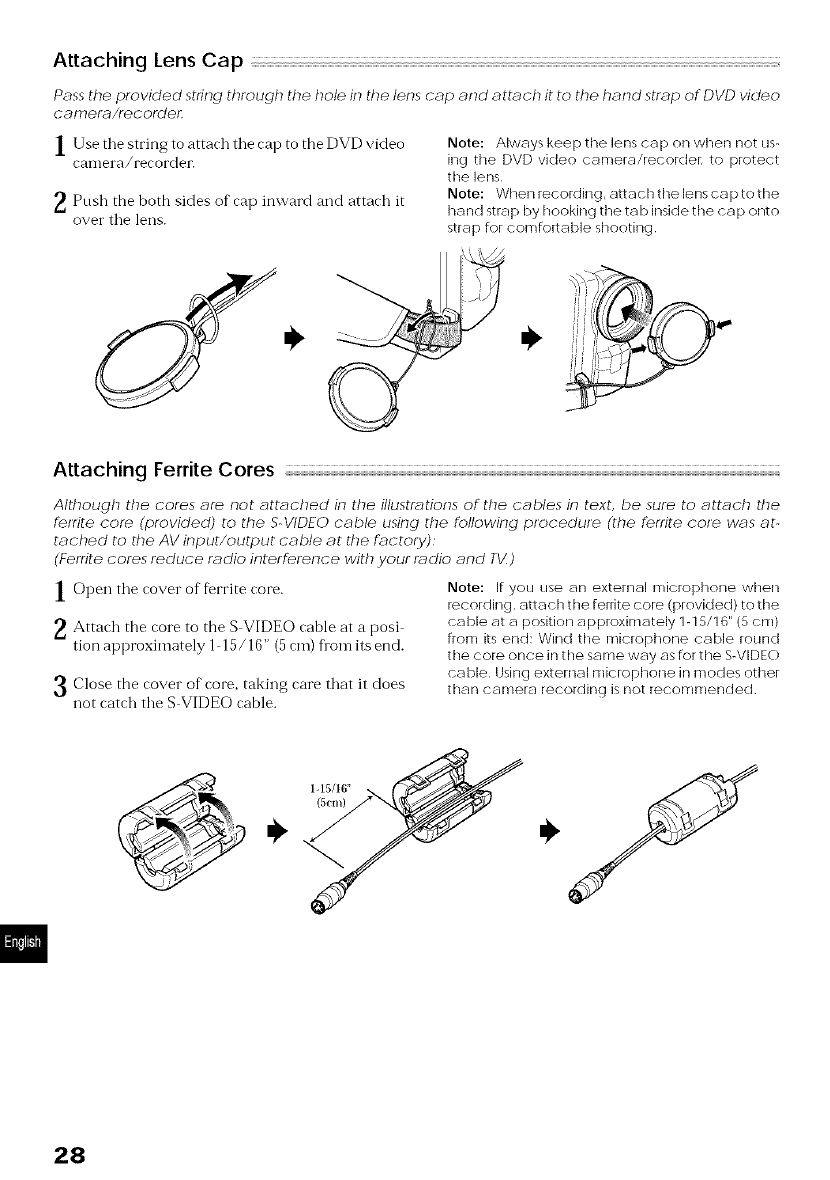
Attaching Lens Cap
Pass the provided string through the hole in the lens cap and attach it to the hand strap of DVD video
carT}era/recordelh
| Use tile string to attach tile cap to the DVD video
canlera/recorder.
_, Push the both sides of inward and attach itcap
over tile lens.
Note: Always keep ttle lens cap on when not us-
ing ttle DVD video camera/recorden to protect
the lens
Note: When recording, attach the lens ca p to the
hand strap by hooking ttle tab inside the ca p onto
strap for comfortable shooting
r]! 1_
* , ip-j "
Attaching Ferrite Cores
Although the cores are not attached in the illustr_tions of the cables in text, be sure to attach the
fettite core (provided) to the S-VIDEO cable using the following procedure (the ferrite cote was at-
tached to the AV input/output cable at the fuctoty):
(Ferrite cores reduce radio interference with your tL_dio and T'd)
1Open tile cover of ferrite core.
_ Attach the core to the S VIDEO cable at a posi
tion approximately l 15/16" (5 cm) fionlits end.
Close the cover of core, taking care that it does
3 not catch tile S VIDEO cable.
Note: If you use an external microphone when
_ecording, attach the ferrite core (provided) to the
cable at a position approximately 1-15/16" (5 ore)
from its end: Wind the microphone cable round
the core once in the same way as for tile S-VIDEO
cable Using external microphone in modes other
than camera recording is not recommended
1-15/16"
(5cm)
28

Inserting Batteries into Remote Control
Insert two AA (LR06) batteries (provided) into the remote control to power it
1()pen tile battery compartment lid on tile back Note: If tile batteries are discharged, pressing any
of" remote control and insert the batteries, button on remote cnntrol cannot operate tile DVD
video camera/recorder: Replace the batteries
Close tile lid.
• Using Remote Control
Point tile remote control to tile infl ared receiver on
the DVD video camera/recorder. Tile remote con
trollable distance is up to 18 feet (5 m).
Note: When using the iemote control, make sure
that the infrared receiver on DVD video camera/
recorder is not exposed to direct sunlight or any
intense light I[ the infrared receiver is subject to
light stronger than the infrared light from remote
control, the DVD video camera/recorder cannot
be operated by remote cnntrol
Note: If there isan obstacle between the remote
control and infrared receiver on DVD video caR/-
era/recordel; remote control may not be possible
Note: "[he DVD video camera/recorder uses tile
"VCR2" remote control code of Hitachi VCRs I[
ynu use a Hitachi VCR, etc with remote contrnl
code set to "VCR2", a VCR placed near the DVD
video camera/recorder will also be operated by
tile remote control: lo prevent this, change tile
remote control code of the VC R
29
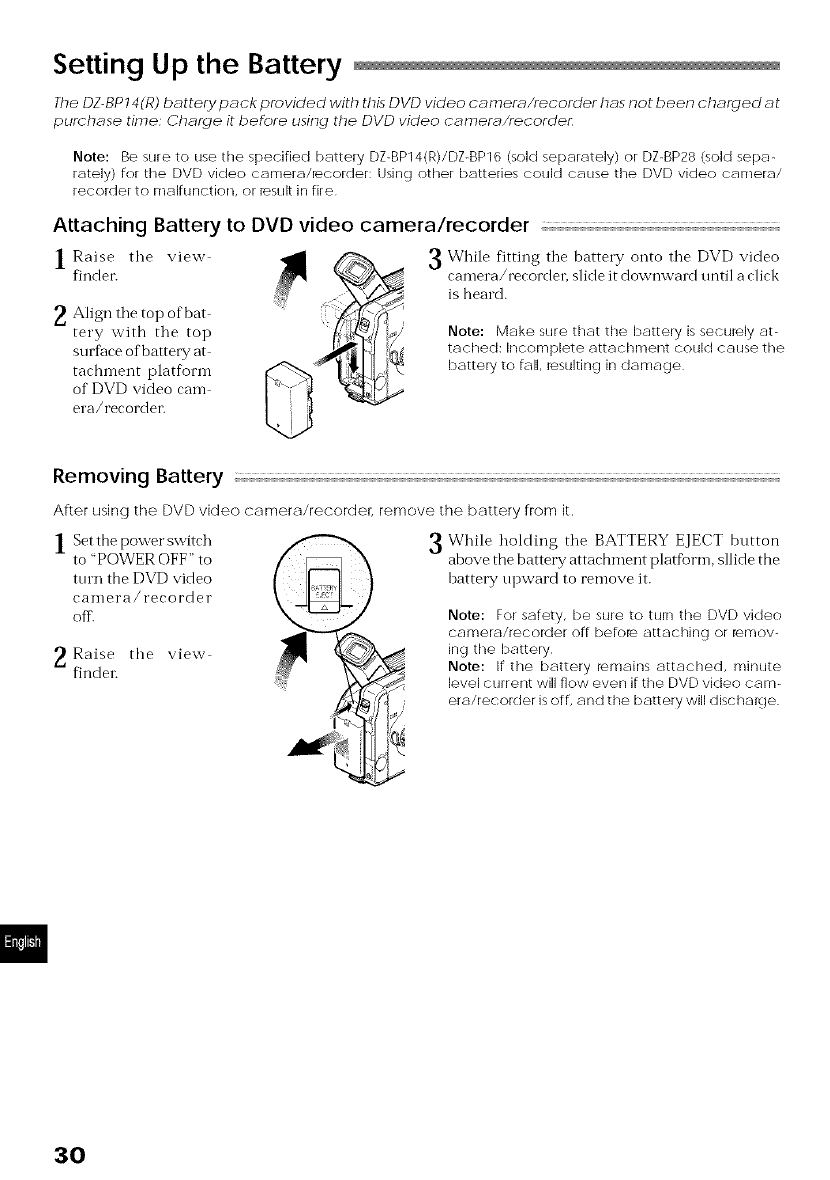
Setting Up the Battery
The DZ-BP14 (R) battery pack provided with this DVD video camera/recorder has not been charged _ t
purchase time Char.ge it before using the DVD video camera/recorder:
Note: Be sure to use the specified battery DZ-BP14(R)/DZ-BP16 (sold separately) or DZ-BP28 (sold sepa-
rately) for the DVD video camera/recorder: Using other batteries could cause the DVD video can]era/
recorder to nlalfunction, or result in fire
Attaching Battery to DVD video camera/recorder
| Raise the view
finder.
2 Align the of bat
top
tery with the top
surface of batter y at
tacbn-lent platform
of DVD video can-l
era/recorder.
While fitting the battel T onto the DVD video
camera/recordel; slide it downward until a click
is heard.
Note: Make sure that the battery is seculely at-
tached: Incomplete attachment could cause the
battely to fall, resulting in damage
Removing Battery
After using the DVD video camera/recorder, remove the battery from it.
| Set the power switch
to "POWER OFF" to
turn the DVD video
calller a/l'ecorder
off\
2Raise tbe view
findel:
While holding the BATTERY EJECT button
above the battery attachment platforn-l, sllide the
battel T upward to remove it.
Note: For safety, be sure to turn the DVD video
camera/recolder off befole attaching or lernov-
ing the battery
Note: If the battery iernains attached, minute
level current will flow even if the DVD video cam-
era/recorder is off, and the battery will dischalcje
30
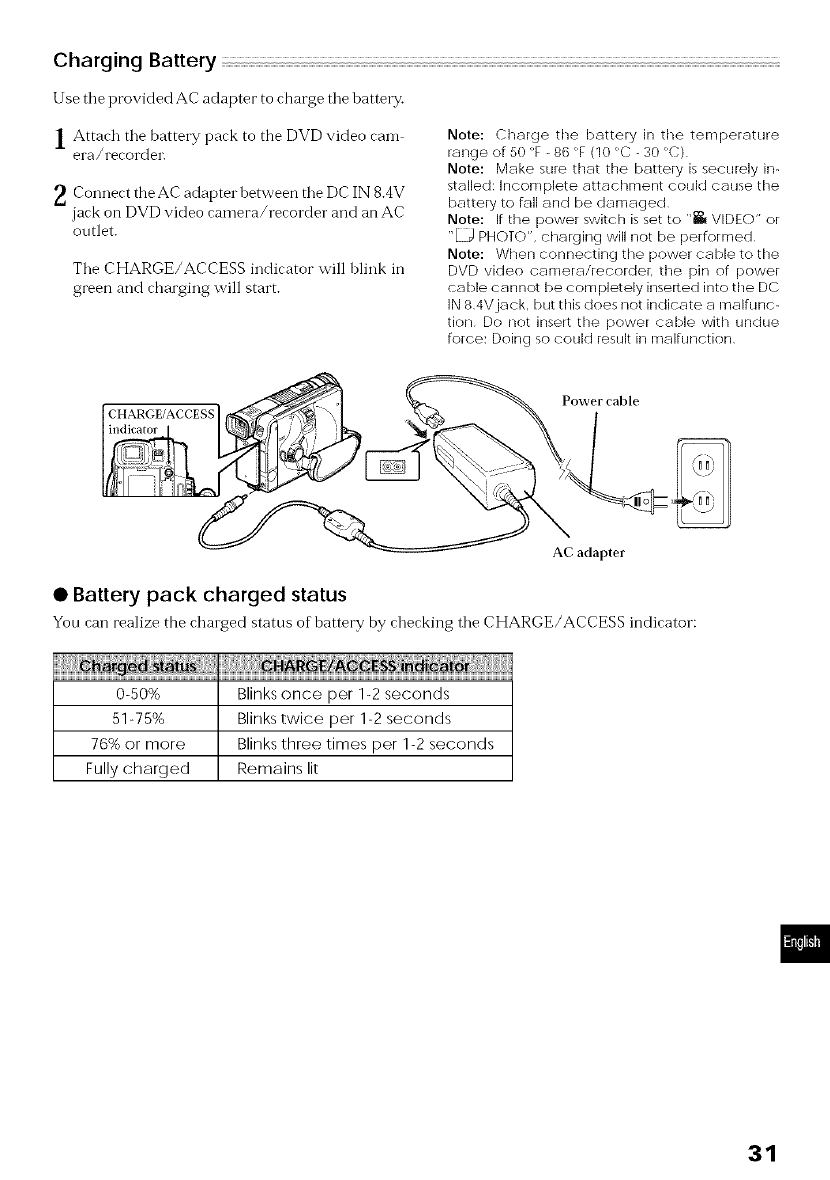
Charging Battery
Use tile provided AC adapter to charge tile battery.
1Attach tile battery pack to the DVD video cam
era/recordel:
_ Connect theAC adapter between tile DC IN 8.4V
jack on DVD video camera/recorder and an AC
outlet.
Tile CHARGE/ACCESS indicator will blink in
green and charging will start.
Note: Charge the battery in the tenrperature
range of 50<F-86<F (10<C -30<C)
Note: Make sure that the battery is securely in-
stalled: Incomplete attachrnent could cause the
battery to fall and be damaged
Note: If tile power switch is set to "_ VIDEO" or
"_ PHOTO", charging will not be performed
Note: When connecting tile power cable to the
DVD video camera/recorder, tile pin of power
cable cannot be completely inserted into the DC
IN 8 4V jack, but this does not indicate a rnalfunc-
tion Do not insert the power cable with undue
force: Doing so could result in malfunction
CHARGE/ACCESS Power cable
AC adapter
• Battery pack charged status
Yon can realize the chalged status of battery by checking the CHARGE/ACCESS indicator:
0-50% Blinks once per 1-2 seconds
51-75% Blinks twice per 1-2 seconds
76% or more Blinks three times per 1-2 seconds
Fully charged Remains lit
31
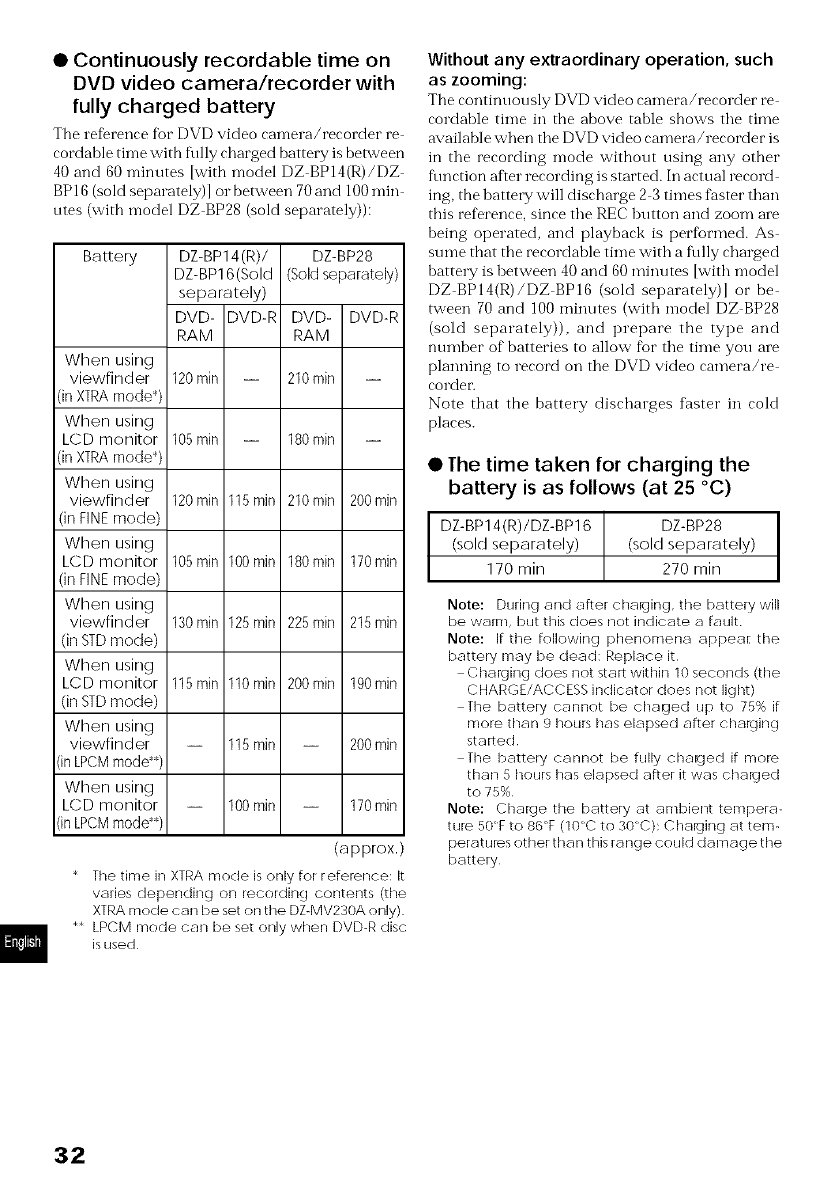
• Continuously recordable time on
DVD video camera/recorder with
fully charged battery
The reference fbr DVD video ramera/rerorder re
cordable time with fldly charged battery is benveen
40 and 60 minutes [with model DZ BP14(RJ/DZ
BP 16 (sold separately)] o1"between 70 and 100 rain
utes (with model DZ BP28 (sold separately)):
Battery
When using
viewfinder
(in XFRAmode*)
When using
LCD monitor
(in XFRAmode*)
When using
viewfinder
(in FINEmode)
When using
LCD monitor
(in FINEmode)
When using
viewfinder
(in STDmode)
When using
LCD monitor
(in STDmode)
When using
viewfinder
in LPCMmode)
When using
LCD monitor
in LPCMmode)
DZ-BP14 (R)/
DZ-BP16(Bold
separately)
DVD- DVD-R
RAM
120rain --
105rain --
120rain 115min
105rain 100min
130rain 125min
115rain 110min
-- 115min
-- 100min
DZ-BP28
(Sold separately)
DVD- DVD-R
RAM
210min --
180min --
210min 200min
180min 170min
225min 215min
200min 190min
-- 200min
-- 170min
(approx.)
* Tile time it] XTRA mode is only for reference: It
varies depending on recording contents (tile
XIRA mode can be set on tile DZ-MV230A only)
** LPCM mode can be set only when DVD-R disc
is used
Without any extraordinary operation, such
as zooming:
The rontinuously DVD video ramera/rerorder re
rordable time ill the above table shows tile time
available when the DVD video camera/recorder is
in the recording mode without using any other
flmction after recording is started. In actual record
ing, the battery will discharge 23 times faster than
tbis reference, since the REC button and zoom are
being operated, and playback is perIbrmed. As
sume that tbe recordable time with a flflly charged
battery is between 40 and 60 minutes [with model
DZ BPl4(RJ/DZ BPl6 (sold separately)l o1" be
tween 70 and 100 minutes (with model DZ BP28
(sold separately)), and prepare the type and
number of batteries to allow for the time you are
planning to record on the DVD video camera/re
corder:
Note that the battery discharges faster in cold
places.
• Ihe time taken for charging the
battery is as follows (at 25 °C)
DZ-BP14(R)/DZ-BP16 DZ-BP28
(sold separately) (sold separately)
170 min 270 min
Note: During and after chalging, the battery will
be warm, but this does not indicate a fault
Note: If tile following phenomena appeal the
battery may be dead: Replace it
Charging does not start within 10 seconds (the
CHARGE/ACCESS indicator does not light)
Tile battery cannot be cha[jed up to 75% if
more than 9 hours has elapsed after charging
started
Tile battery cannot be fully charged if rnoi_
than 5 hours has elapsed after it was chalged
to 75%
Note: Charge tile battery at ambient tempera-
tui_ 50<g to 86°F (10<C to 30<C): Chalging at tern-
peratures other than this range could damage the
battery
32

Battery Remaining Level Indicator
When the battery is used to power tile DVD video camera/recorder, the battery remaining level appears
in the viewfinder o1" on tile LCD screen as follows:
Fully charged • Nearly empty
"7
White portion shows
remaining level
Handling the dead battery
•Do not dispose of the dead battery: Let
a recbargeable battery recycling coop
erative store take charge of it.
Using charge marker
•For acharged battery, slide the charge
marker knob at rear so that tbe charge
marker (0) is visible: Uncharged bat
teries can tbus be easily identified.
Charge
marker
Note: Be sure to use tile specified battery (DZ-
BP14(R)/DZ-BP16 (sold separately) or DZ-BP28 (sold
separately)) Using other batteries could cause
faulty DVD video camera/recorder operation, or
possibly a fir e
Note: If a charged battery is stored, it will discharge
on its own; thelefore, it is recomrnencled that you
charge the battery shortly before using the DVD
video carnera/iecordel, such as on the clay before
you plan to use it You do net need to completely
discharge the battery before charging it
Note: When you ale net using the DVD viden carm
era/recordel, remove the battery and store it in a
clark, cool place Ifyou store it in a place where the
temperature is high, the battery life will be short-
ened Especially be sure not to stole the battery in
an environment (in a closed vehicle) over 140 _F
(60 _C): Neglecting this could damage the battery
Note: It is r ecommended that you fully chalge the
battery once a year, attach it to the DVD video
camera/recolder and use it up; then iemove tile
battery and store it it] a cool place again
Note: The battery cat] be iepeatedly chalged
and used, but will eventually be dead: The bat-
tery life varies greatly depending on the ambient
environment and how often the DVD video cam-
era/recokler is used If the usable time of DVD
video camera/recorder with a fully charged bat-
tery is noticeably short, the battery is probably
dead: Pulchase a new battery
33
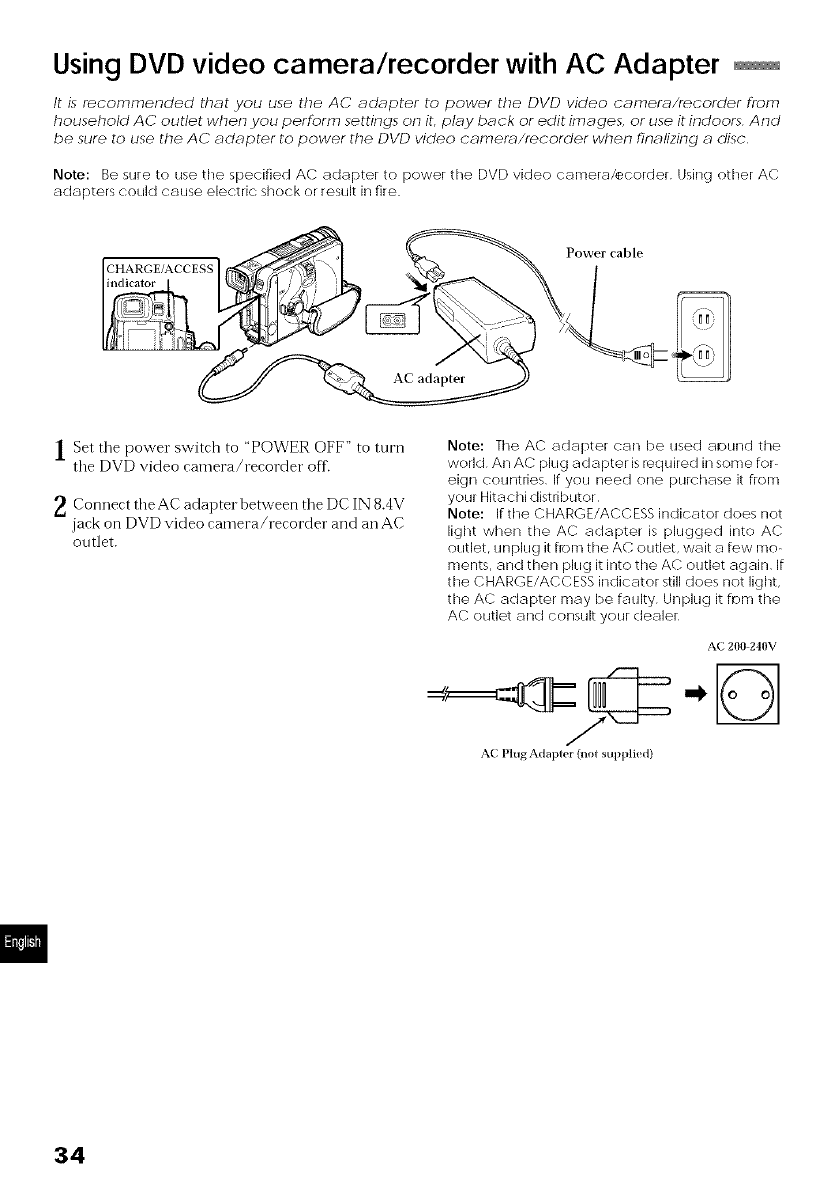
Using DVD video camera/recorder with AC Adapter
It is recommended that you use the AC adapter to power the DVD video camera/recorder from
household AC outlet when you perform settings on it, play back or edit images, or use it indoors And
be sure to use the AC adapter to power the DVD video camer_r_/recorder when finalizing adisc
Note: Be sure to use the specified AC adapter to power the DVD video carnera/ecorder Using other AC
adapters could cause electric shock or result in fire
CHARGE/ACCESS
Power cable
I Set tile power switch to "POWER OFF" to turn
the DVD video camera/recorder off.
_ Connect theAC adapter between the DC IN 8.4V
jack on DVD video camera/recorder and an AC
outlet.
Note: The AC adapter can be used aound the
world An AC plug adapter is required in some for-
eign countries If you need one purchase it from
your Hitachi distributor
Note: I[ the CHARGE/ACC ESSindicator does not
light when the AC adapter is plugged into AC
outlet, unplug it flora the AC outlet, wait a few mo-
ments, and then plug it into the AC outlet again I[
the CHARGE/ACCESS indicator still does not light,
the AC adapter may be faulty Unplug it fDm the
AC outlet and consult your dealer
AC 200-240V
A( I lug Adapler (nol stq)plied)
34
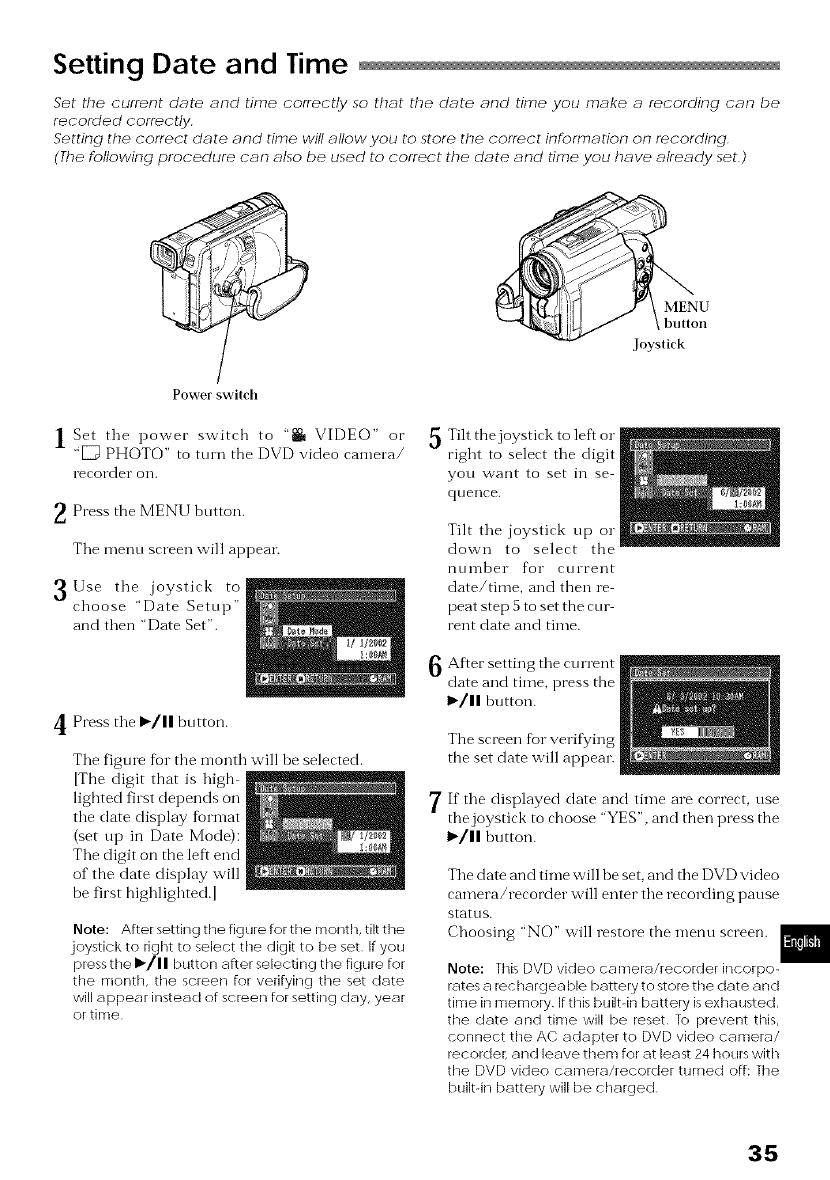
Setting Date and Time
Set the current date and time correctly so that the date and time you make arecordin.q can be
recorded correctly
Setting the correct date and time will allow you to store the correct information on recording
(Tfie following procedure can also be used to correct the date and time you have already set)
J
\
i//f
u
_/ \ button
Joystick
Power switch
| Set the power switch to "_ VIDEO" or
"[_ PHOTO" to ttun the DVD video camera/
recorder OI'L
_ Press the MENU button.
Tile menn screen will appear.
3Use the joystick to
choose "Date Setup"
and then "Date Set".
4 Press the I_/11button.
Tile figure for the month will be selected.
[The digit that is high
lighted first depends on
tile date display format
(set tip in Date Mode):
Tile digit on the left end
of the date display will
be first highlighted.[
Note: After setting the figure for the month, tilt the
joystick to right to select tile digit to be set If you
press tile I_/11 button after selecting tile figure for
tile month, tile screen for verifying tile set date
will appear instead of screen for setting clay, year
or time
Tilt thejoystick to left o1"
right to select the digit
yOU want to set ill se
qaence.
Tilt tile joystick up o1"
down to select tile
nt/iilher for ct/rrent
date/time, and then re
peat step 5 to set the cur
rent date and time.
After setting tile current
date and time, press the
I_/11 hutton.
The screen fur verifying
tile set date will appear.
If tile displayed date and time are correct, use
the joystick to choose "YES", and then press the
I_/11 hutton.
Tile date and time will he seL and tile DVD "_,ideo
camera/recorder will enter tile recording pause
status.
Choosing "NO" will restore the menu screen.
Note: This DVD video ca rnera/recorder incorpo-
rates a iechargea ble batte Wto store tile date and
time in memory Ifthis built-in battery isexhausted,
tile date and time will be reset To prevent this,
connect tile AC adapterto DVD video camera/
recorder, and leave them for at least 24 hours with
tile DVD video camera/recorder turned off: The
built-in battery will be charged
35
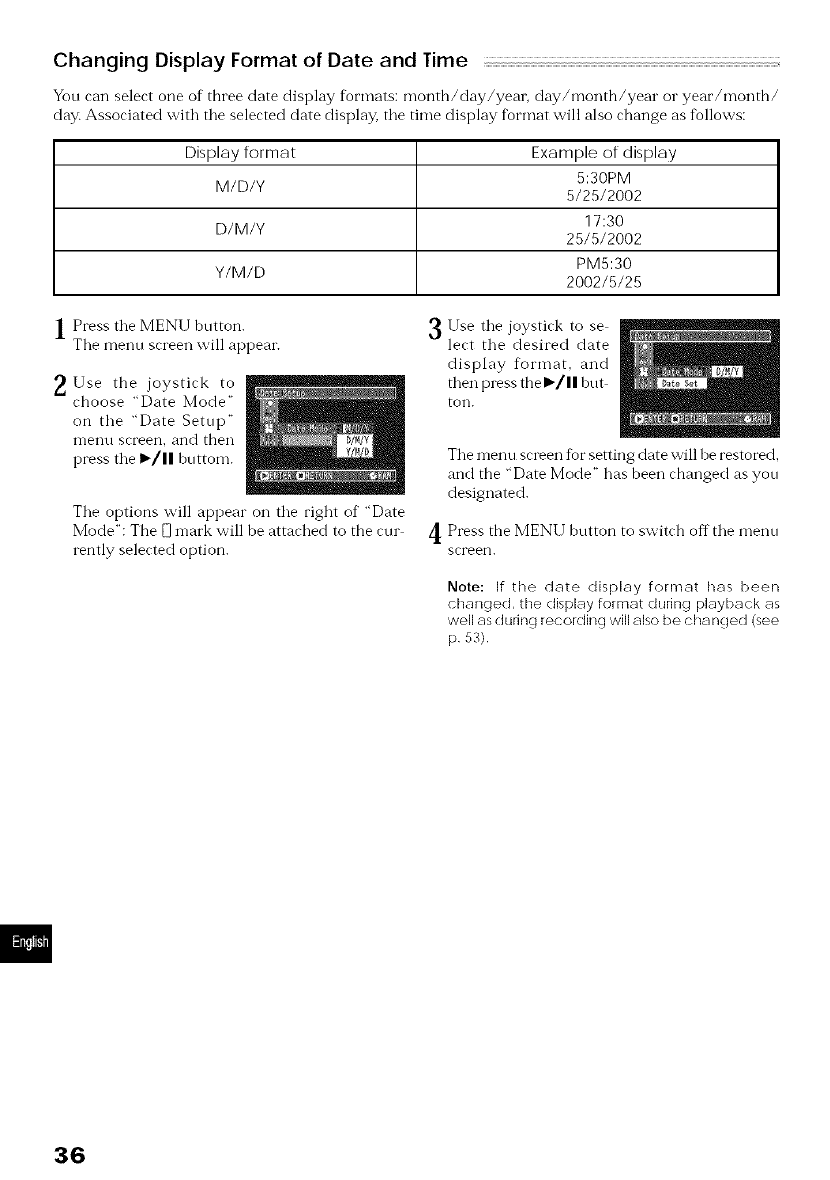
Changing Display Format of Date and lime
You can select one of three date display formats: month/day/year, day/month/year o1"year/month/
day. Associated with the selected date display, the time display format will also change as follows:
Display format Example of display
5:30PM
M/D/Y 5/25/2002
D/M/Y 17:30
25/5/2002
PM5:30
Y/M/D 2002/5/25
1Press the MENU button.
Tile menu screen will appear.
2 Use the joystick to
choose "Date Mode"
on the "Date Setup"
n-lenu screen_ and then
press tile 1_/| | buttom.
Tile options will appear oil tile right of "Date
Mode": The _ n-larkwill be attached to the cur
rently selected option.
3Use tile joystick to se
lect tile desired date
display format, and
then press the I_/II htlt
toil.
Tile n-lenuscreen for setting date will he restored,
and the "Date Mode" has been changed as you
designated.
Press the MENU button to switch off the menu
screen.
Note: If the date display format has been
changed, the display format during playback as
well as durinct recording will also be cha noted (see
p 53)
36
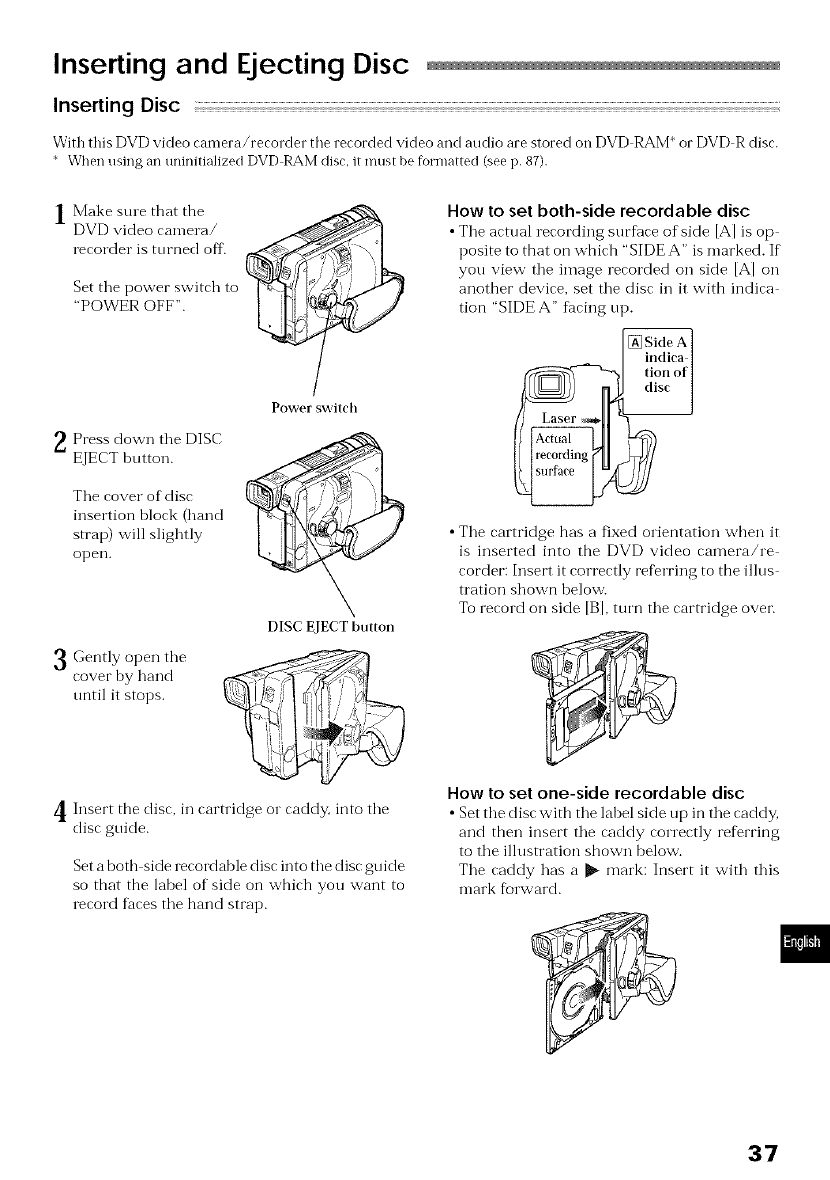
Inserting and EJecting Disc
Inserting Disc
With this DVD video camera/recorder the recorded video and auclio are stored on DVD RAM* or DVD R disr.
* When using an uninitialized DVD RAiVI disc. it must be forrnatted (see i), 87).
| Make sine that the
DVD video camera/
recorder is turned off.
Set tile power switch to
"POWER OFF".
Press down tile DISC
EJECT hutton.
Tile cover of disc
insertion hlock (hand
strap) will slightly
open.
Gently open the
cover by hand
until it stops.
Power sv¢it ('h
DISC EJECT button
4 Insert.... the disc, in cartridge o1"caddy, into tile
disc gnide.
Set a both side recordable disc into tile disc guide
so that the label of side on which you want to
record faces tile hand strap.
How to set both-side recordable disc
• Tile actual recording surface of side [AI is op
posite to that on which "SIDE A" is marked. If
you view tile image recorded on side [AI on
another device, set tile disc in it with indica
tion 'SIDE A" facing up.
• Tile cartridge has a fixed orientation when it
is inserted into the DVD video camera/re
corder: Insert it correctly re%rring to the illus
tration shown below.
To record on side IBI, turn tile cartridge ovei_
How to set one-side recordable disc
• Set the disc with tile ]ahel side up in tile caddy,
and then insert tile caddy correctly referring
to tile illustration shown below.
Tile caddy has a I1_ mark: Insert it with this
mark forward.
37
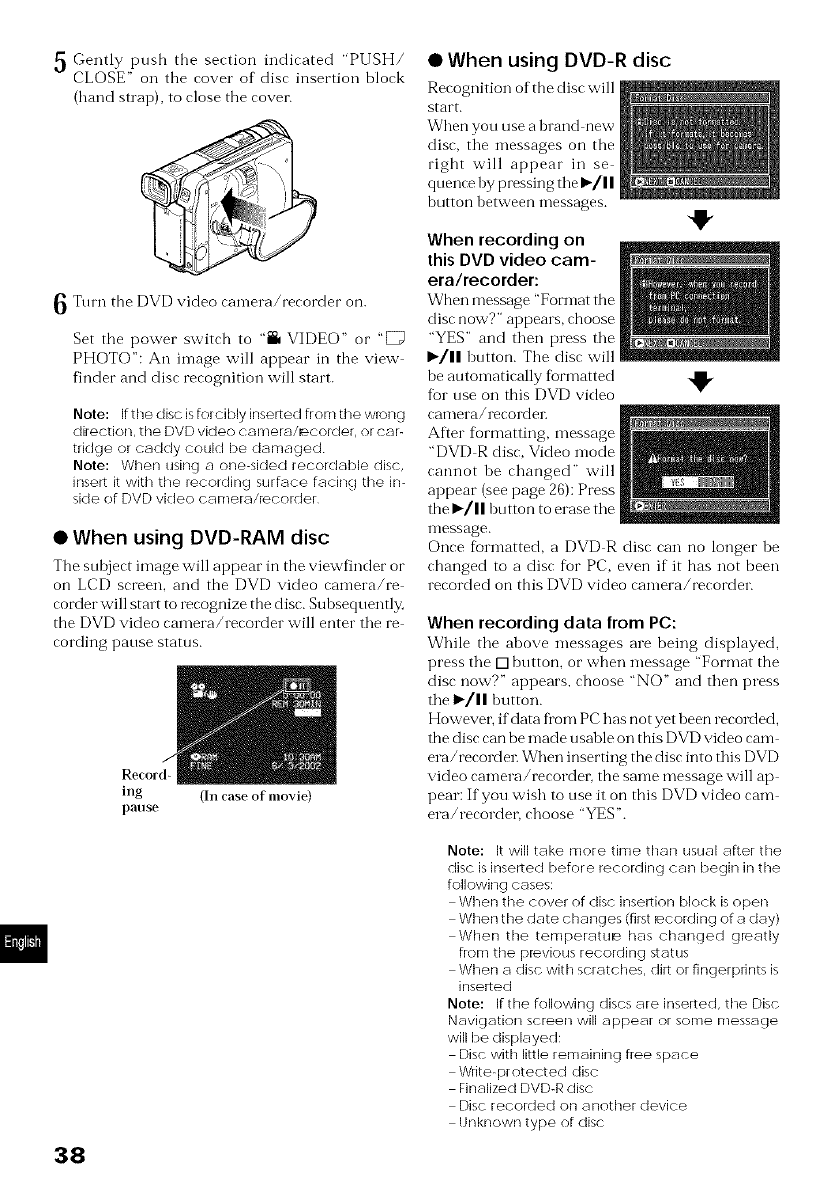
Gently push tbe section indicated "PUSH/
CLOSE" on the cover of disc insertion block
(hand strap), to close the covei=
6 Tnrn the DVD video camera/recorder on.
Set the power switch to "i VIDEO" or "[_
PHOTO": An image will appear in the view
finder and disc recognition will start.
Note: If the disc is forcibly inserted from the wleng
direction, the DVD video camera/_corder, or car-
tridge or caddy could be damaged
Note: When using a one-sided recordable disc,
insert it with the recording surface facing the in-
side of DVD video camera/iecorder
• When using DVD-RAM disc
The subject image will appear in the viewfinder or
on LCD screen, and the DVD video camera/re
corder w'illstart to recognize the disc. Subsequently,
the DVD video camera/recorder will enter the re
cording pause status.
Record-
ing
pause (In case of movie)
• When using DVD-R disc
Recognition of the disc will
start.
When you use a brand new
disc, the messages on the
right will appear in se
quence by pressing the I_/| |
button between messages.
When recording on
this DVD video cam-
era/recorder:
When message "Format the
disc now?" appeal s,choose
"YES" and then press the
I_/ll button. Tbe disc will
be automatically fbrmatted ._
fur use on this DVD video
Calllera/l"eCol'dell
After formatting, message
"DVD R disc, Video mode
cannot be changed" will
appear (see page 26): Press
the I_/| | button to erase the
message.
Once fbrmatted, a DVD R disc can no longer be
changed to a disc for PC, even if it has not been
recorded on this DVD video camera/recorder.
When recording data from PC:
While the above messages are being displayed,
press the [] button, or when message "Format the
disc now?" appears, choose "NO" and then press
the I_/I I button.
However; if data from PC has not yet been recorded,
the disc can be made usable on this DVD video cam
era/recordel: When inserting the disc into this DVD
video camera/recorder, the same message will ap
pear: If you wish to use it on this DVD video cam
era/recordeL choose "YES".
Note: It will take more time than usual after the
disc is inserted before recording can begin in the
following cases:
When the cover of disc insertion block is open
When the date changes (first iecording of a day)
When the ternperatu_ has changed gleatly
from the plevious recording status
When a disc with scratches, dirt or fingerprints is
inserted
Note: If the following discs are inserted, the Disc
Navigation screen will appear or some messafle
will be displayed:
Disc with little remaining free space
Write-protected disc
Finalized DVD-R disc
Disc recorded on another device
Unknown type of disc
38
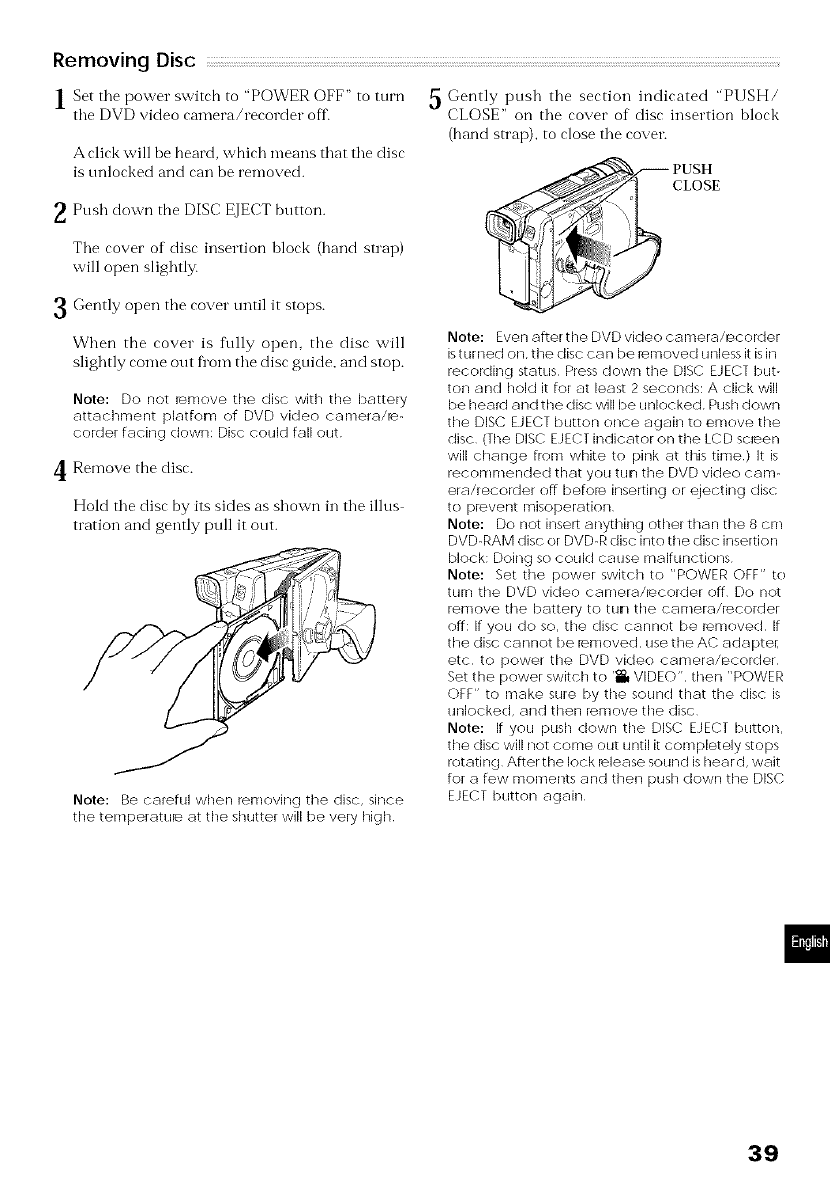
Removing Disc
|Set tile power switch to "POWER OFF" to turn
tile DVD video camera/recorder off.
A click will he heard, which means that tile disc
is tmlocked and can be removed.
2 Push down the DISC EJECT button.
Tile cover of disc insertion block (hand strap)
will open slightly.
Gently open the cover until it stops.
When the cover is ftdly open. the disc will
slightly come out fl'om the disc guide, and stop.
Note: Do not iemove the disc with the battery
attachment platfon of DVD video camera/Ie-
corder facing down: Disc could fall out
4 Remove the disc.
Hold the disc by its sides as shown in the illus
tration and gently pull it out.
Note: Be careful when removing tile disc, since
the temperature at the shutter will be very high
5 Gently ptlsh the section indicated "PUSH/
CLOSE" on the cover of disc insertion block
(hand strap), to close the cover.
._Kv_...iipUSH
CLOSE
,71 )
Note: Even after t he DVD video camera/ecorder
isturned on, the disc ca n be removed unless it is in
recoklinc t status Press down the DISC EJECT but-
ton and hold it for at least 2 seconds: A click will
be heaM and the disc will be unlocked Push down
ttle DISC EJECT button once again to emove the
disc (The DISC EJECT indicator on the LCD scleen
will change from white to pink at this time) It is
recommended that you tun the DVD video cam-
era/recorder off befoie inserting or ejecting disc
to prevent misoperation
Note: Do not insert anything other than the 8 cm
DVD-RAM disc or DVD-R disc into the disc insertion
block: Doing so COUld cause malfunctions
Note: Set the power switch to "POWER OFF" to
turn the DVD video camera/recorder off Do not
remove the battery to tun the can]era/recorder
off: If you do so, the disc cannot be iemoved If
ttle disc cannot be i÷moved, use the AC adapter,
etc to power the DVD video camera/_corder
Set the power switch to 1_ VIDEO", then "POWER
OFF" to make sure by ttle sound that the disc is
unlocked, and then remove the disc
Note: If you push down the DISC EJECT button,
the disc will not come out until it completely stops
rotating After the lock ielease sound is heard, wait
for a few moments and then push down tile DISC
EJECT button again
39
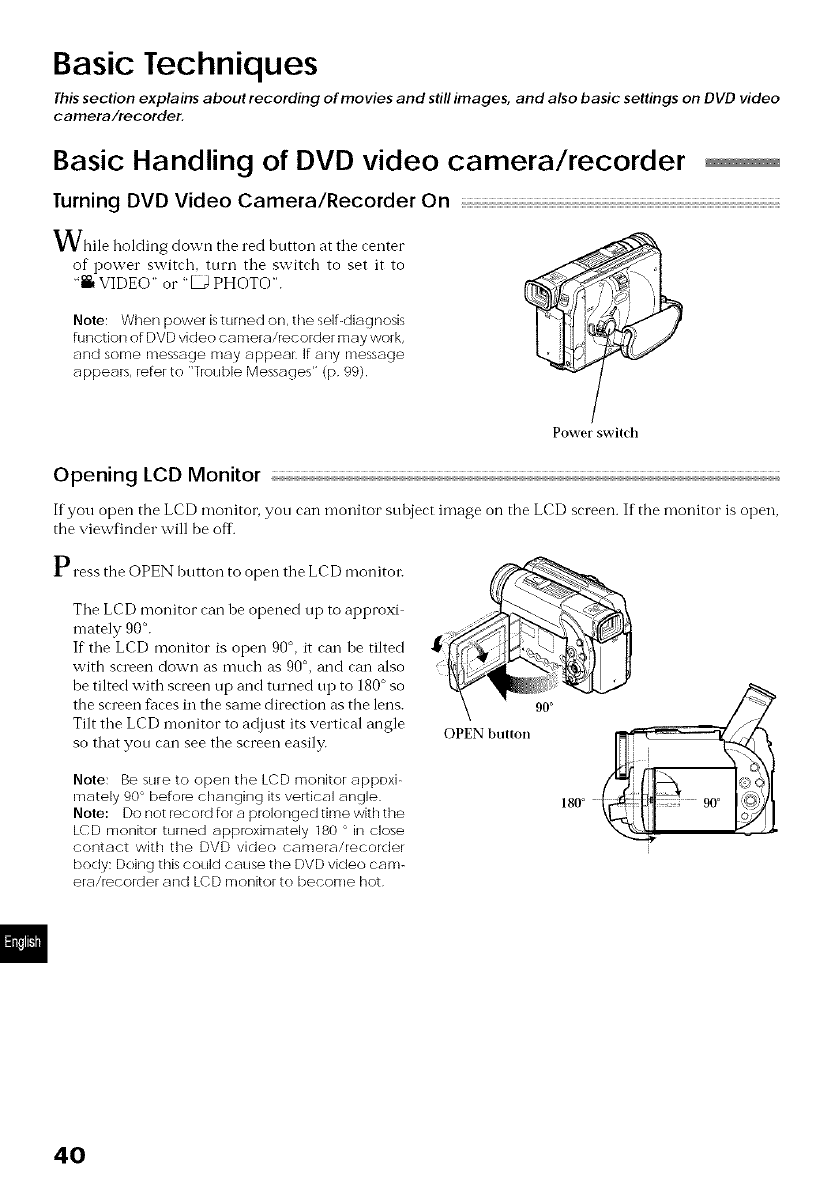
Basic Techniques
This section explains about recording of movies and still images, and also basic settings on DVD video
camera/recorder.
Basic Handling of DVD video camera/recorder
Turning DVD Video Camera/Recorder On
While holding down the red hutton at tile center
of power switch, turn the switch to set it to
"i VIDEO" or "_ PHOTO".
Note: When power is turned on, the self-diagnosis
function of DVD video camerakecorder may work,
and some message may appear If any message
appears, refer to "Tiouble Messages" (p 99)
;<'
Power switdl
Opening LeD Monitor
If you open the LCD monitor, yon can monitor subject image on the LCD screen. If the monitor is open,
the viewfinder will be off.
Press the OPEN hutton to open the LCD monitor:
The LCD monitor can be opened up to approxi
mately 90°.
If the LCD monitor is open 90°, it can be tilted
with screen down as much as 90°,and can also
be tilted with screen up and tinned up to 180°so
the screen faces in the same direction as the lens.
Tilt the LCD monitor to adjust its vertical angle
so that you can see the screen easily.
Note: Be sure to open the LCD monitor appoxi-
mately 90 < before changing its vertical angle
Note: Do not recnld for a prolonged time with the
LCD monitor turned applr)ximately 180 < in close
contact with the DVD video camera/recorder
body: Doing this could cause the DVD video cam-
erakecorder and LCD monitor to become hot
OPEN button
180°
4O
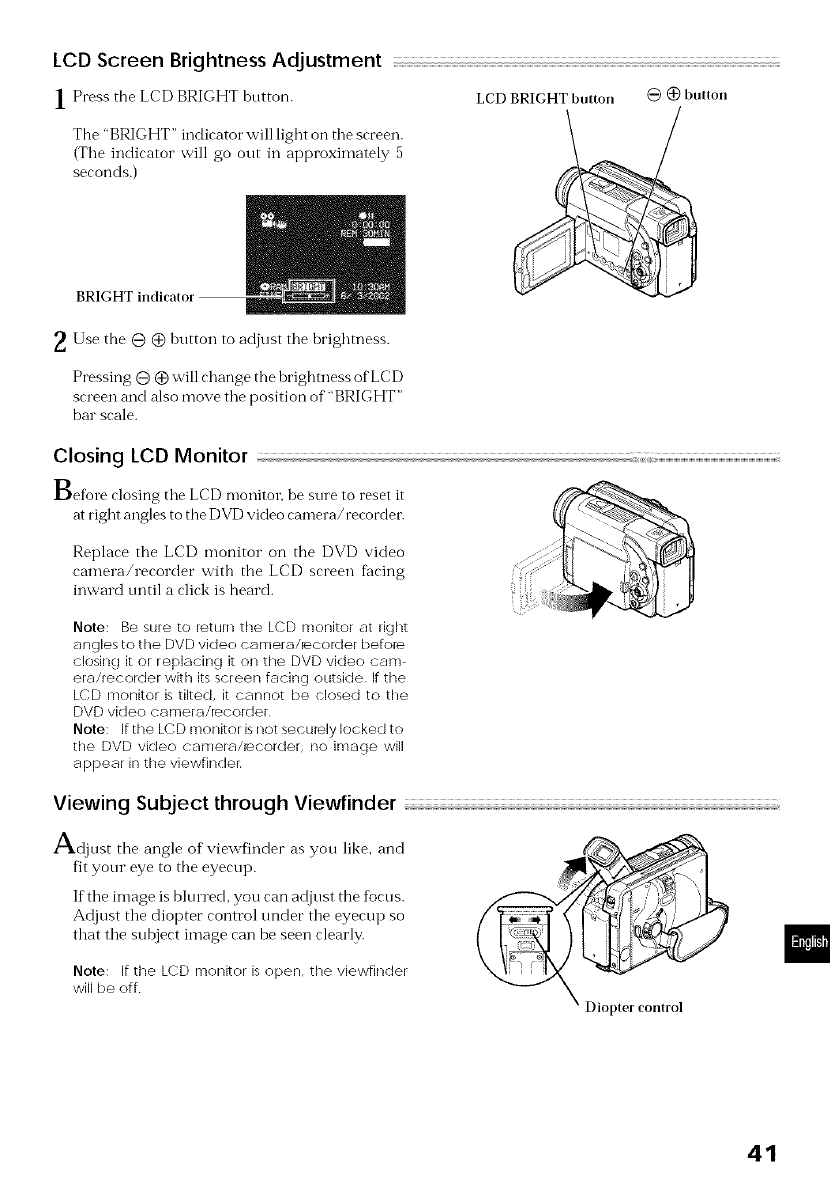
LCD Screen Brightness Adjustment
1 Press the LCD BRIGHT hntton.
The "BRIGHT" indicator will light on tile screen.
(Tile indicator will go out in approximately 5
seconds.)
BRIGHT indicator
LCI) BRIGHT button @ (_ button
_. Use the @ @ button to adjust tile brightness.
Pressing @ @will change the brightness of LCD
screen and also move tile position of "BRIGHT"
bar scale.
Closing LCD Monitor
Before closing tile LCD monitor, be sure to reset it
at right angles to the DVD video camera/recorder.
Replace the LCD monitor on the DVD video
camera/recorder with the LCD screen fhcing
inward until a click is heard.
Note: Be sure to leturn the LCD monitor at right
angles to tile DVD video camerakecorder before
closing it or replacing it on tile DVD video caRl-
era/recorder with its screen facing outside If tile
LCD monitor is tilted, it cannot be closed to tile
DVD video camerakecorder
Note: If tile LCD monitor is not seculely locked to
tile DVD video camerahecorder, no imacte will
appear in tile viewfinder
Viewing Subject through Viewfinder
A
_djust tile angle of viewfinder as you like, and
fit your eye to the eyecup.
If the image is bhu red, you can adjust the focns.
Adjust tile diopter control trader tile eyecup so
that tile subject image can be seen clearly.
Note: If tile LCD monitor is open, tile viewfinder
will be off
41
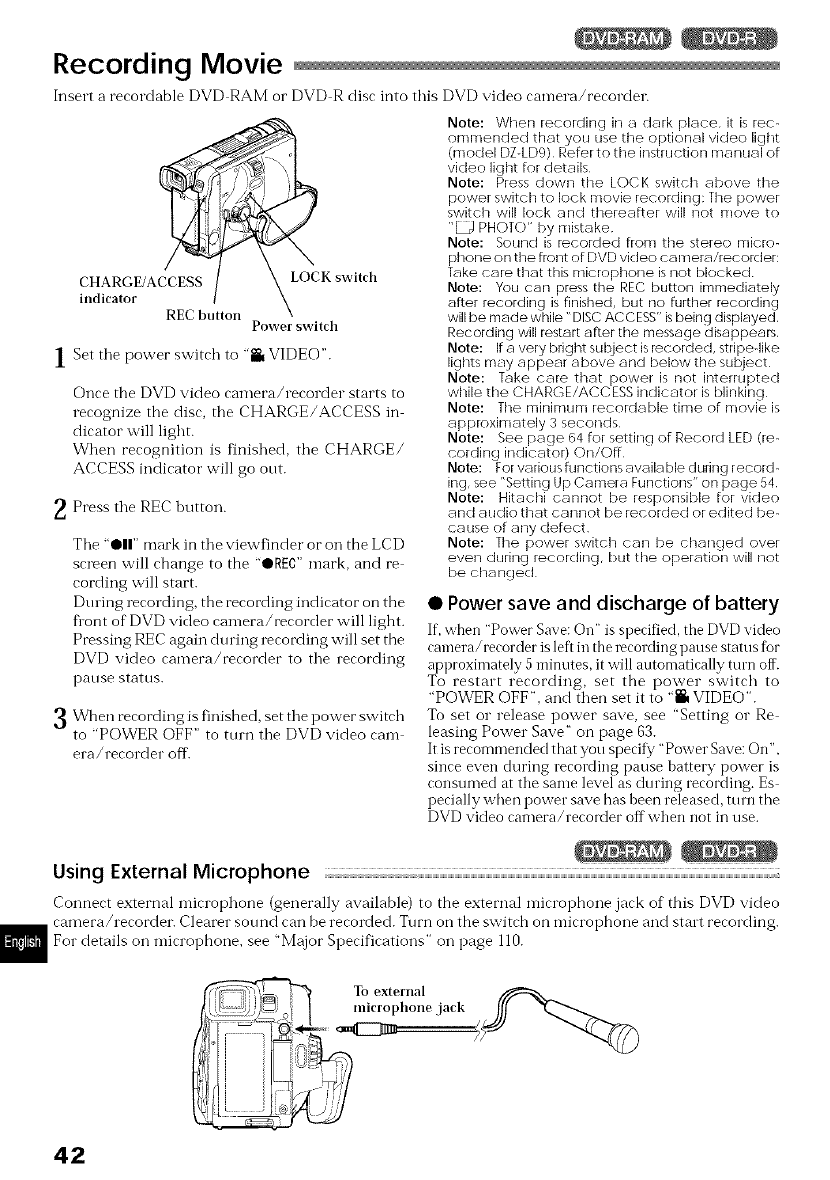
Recording Movie
Insert a reeordable DVD RAM or DVD R disc into this DVD video rarrlera/reeorder.
1Set tile power switch to "_ VIDEO".
Once the DVD video carnera/recorder starts to
recognize the disc, the CHARGE/ACCESS in
dicator will light.
When recognition is finished, tile CHARGE/
ACCESS indicator will go out.
_ Press tile REC hntton.
Tile "01|" mark in tile viewfinder or on the LCD
screen will change to the "OREC" mark, and re
cording will start.
During recording, the recording indicator on the
Dont of DVD video camera/recorder will light.
Pressing REC again during recording will set the
DVD video camera/recorder to tile recording
pause status.
When recording is finished, set tile power switch
to "POWER OFF" to tnrn tile DVD video cam
era/recorder off.
Note: When recording in a clark place, it is reo-
omn]ended that you use ttle optional video light
(model DZ-LDg) Refer to the instruction manual of
video light for details
Note: Press down ttle LOCK switch above tile
power switch to look movie recording: Ttle power
switch will lock and thereafter will not move to
"D PHOTO" by mistake
Note: Sound is i÷corded from the stereo micro-
phone on the flont of DVD video can]era/recorder:
Take care that this microphone is not Mocked
Note: You can press the REC button immediately
after recording is finished, but no further recording
will be made while "DISC ACCESS" isbeing displayed,
Recording will restart after the message disappears,
Note: If a very bright subject is iecordecl, stripe-like
lights may appear above and below the subject
Note: Take care that power is not internlpted
while the CHARGE/ACCESS indicator is blinking
Note: The minimunl recordable time of n/ovie is
apploximately 3 seconds
Note: See page 64 for setting of Record LED (re-
cording indicator) On/Off
Note: For various functions availa ble during record-
ing, see "Setting Up Camera Functions" on page 54
Note: Hitachi cannot be responsible for video
and audio that cannot be recorded or edited be-
cause of any defect
Note: Ttle power switch can be changed over
even during recording, but the operation will not
be changed
• Power save and discharge of battery
If, when "Power Save: On" is specified, the DVD video
camera/recorder is left in the recording pause status fbr
approximately 5 minutes, it will automatically turn off.
To restalt recording, set the power switch to
7
"POV_ER OFF", and then set it to 'i VIDEO".
To set o1"release power save, see "Setting o1"Re
leasing Power Save" on page 63.
It isrecommended that you specif}'"Power Save:On",
since even cluring recording pause battery power is
consumed at the same level as during recording. Es
pecially when power save has been released, turn the
DVD video camera/recoider offwhen not in use.
Using External Microphone
Connect external microphone (generally available) to the external n-lierophone jack of this DVD video
camera/recorder. Clearer sound can be recorded. Tnrn on the switch on microphone and start recording.
For details on microphone, see "Major Specifications" on page 110.
%external
oil microphonejack Ill "t_
) ; L ],'
42
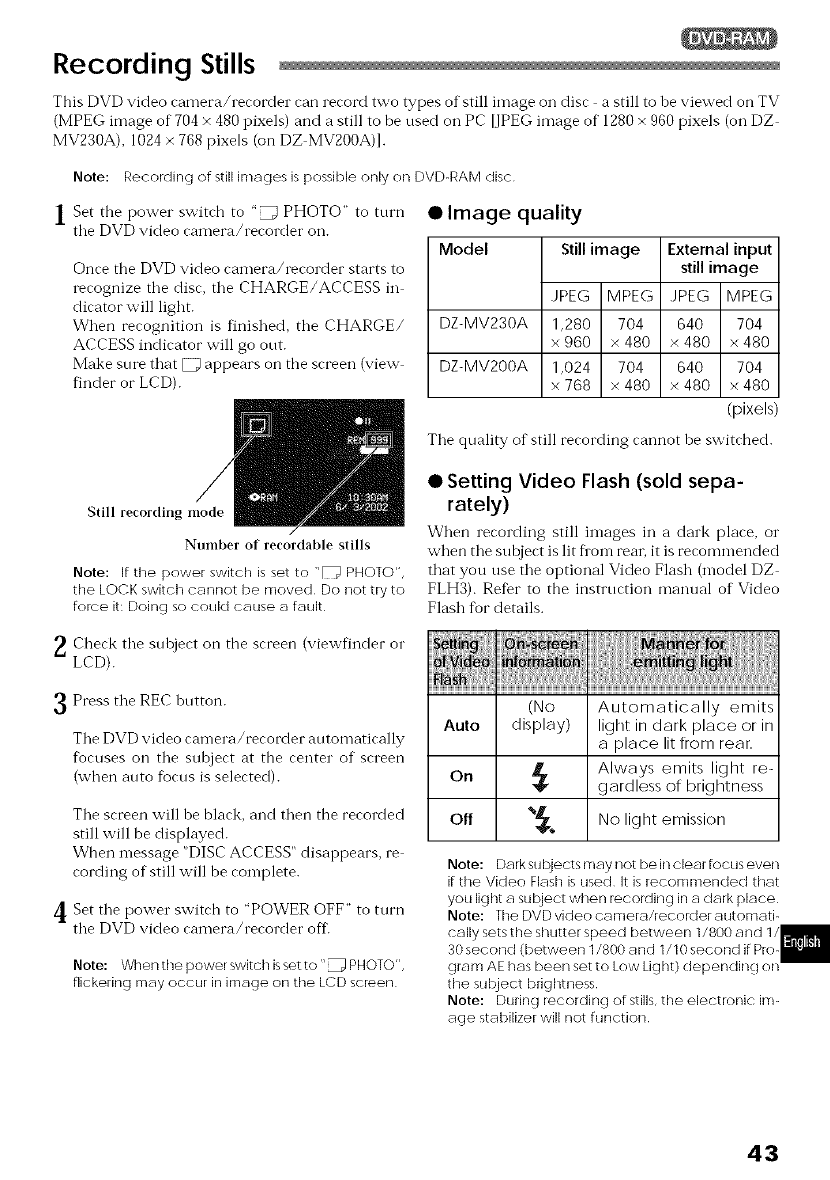
Recording Stills
This DVD video camera/recorder can record two types of still image on disc a still to be viewed on TV
(MPEG image of 704 x 480 pixels) and a still to be used oil PC IJPEG image of 1280x 960pixels (oil DZ
MV230A), 1024x 768 pixels (on DZ MV200A)I.
Note: Recording of still inrages is possible only nn DVD-RAM disc
1 Set the power switch to "_ PHOTO" to turn
tile DVD video camera/recorder oil.
Once the DVD video camera/recorder starts to
recognize tile disc, tile CHARGE/ACCESS in
dicator will light.
When recognition is finished, the CHARGE/
ACCESS indicator will go ont.
Make snre that [_ appears on the screen (view
finder or LCD).
• Image quality
Model Stillimage
JPEG MPEG JPEG
DZ-MV230A 1,280 704 640
x960 x480 x480
DZ-MV200A 1,024 704 640
x768 x480 x480
External input
still image
MPEG
704
x 480
704
x 480
(pixels)
The quality of still recording cannot be switched.
Still recording mode
Number of recordable stills
Note: if the power switch is set to "_ PHOTO",
the LOCK switch cannot be moved Do not try to
force it: Doing so could cause a fault
• Setting Video Flash (sold sepa-
rately)
When recording still images in a dark place, o1"
when the subject is lit flora rear, it is recommended
that you nse the optional Video Flash (model DZ
FLH3). Refer to the instrnction manual of Video
Flash for details.
Check the snhject on the screen (view'finder o1"
2 LCD).
Press the REC button.
The DVD video camera/recorder automatically
focuses on the subject at the center of screen
(when auto focns is selected).
The screen will he black, and then the recorded
still will be displayed.
When message "DISC ACCESS" disappears, re
cording of still will be complete.
l
Z1 Set the power switch to "POY\ER OFF" to turn
-- the DVD video camera/recorder off.
Note: When the power switch isset to "_ PHOTO",
flickering may occur in image on the LCD screen
(No Automatically emits
Auto display) light in dark place or in
a place lit from rear.
On _, Always emits light re-
gardless of brightness
Off _ No light emission
Note: Dark subjects may not I->ein clear focus even
if the Video Flash is used It is recommended that
you light a subject when recording in a clark place
Note: The DVD video camera/recolder automati-
cally sets the shutter speed between 1/800 a nd 1/
30 second (beTween 1/800 and 1/10 second if Pro-
gram AE has been set to Low Light) depending oil
the subject brightness
Note: During recording of stills, the electronic im-
age stabilizer will not function
43
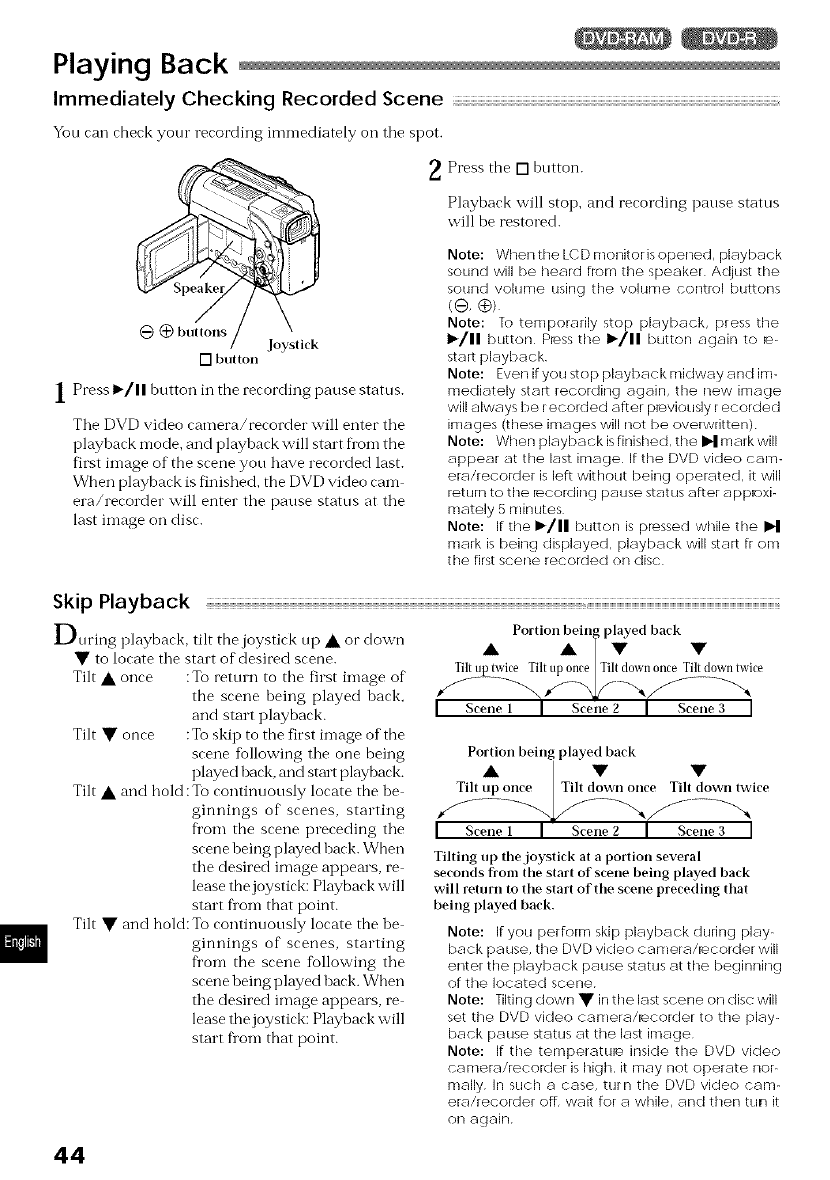
Playing Back
Immediately Checking Recorded Scene .......................................................................................................................................................................................................................................................................................,
You carl check your recording immediately oil tile spot.
_/ Joy,tick
[] button
1Press 1_/I I hutton in the recording pause status.
Tile DVD video camera/recorder will enter tile
playback mode, and playback will start fl'om the
first image of the scene you have recorded last.
When playback is finished, the DVD video cam
era/recorder will enter the pause status at the
last image on disc.
Press the [] hotton.
Playback will stop, and recording pause status
w'ill be restored.
Note: When the LC D monitor isopened, playback
sound will be heard fiom the speaker Adjust the
sound volume using the volume corrtrol buttons
(G, @)
Note: lo temporarily stop playback, press the
I_/11 button Press the 1_/11 button again to e-
start playback
Note: Even if you stop playback midway and im-
mediately star recording again, the new image
will always be recorded after pieviously recorded
images (these images will not be overwritten)
Note: When playback is finished, the _ mark will
appear at the last image If the DVD video cam-
era/recorder is left without being operated, it will
return to the i÷colding pause status after a pptoxi-
mately 5 minutes
Note: If the I_/|| button is plessed while the I1_
mark is being displayed, playback will star fronr
the first scene recorded on ciisc
Skip Playback
During playback, tilt the joystick up • or down
•to locate the start of desired scene.
Tilt • once :To rettnn to the first image of
the scene heing played back,
and start playback.
Tilt • once :To skip to the first image of the
scene following the one being
played back, and start playback.
Tilt • and hold:To continuously locate the be
ginnings of scenes, starting
fi'om the scene preceding the
scene being played back. When
the desired image appears, re
lease the joystick: Playback will
start flora that point.
Tilt • and hold: To continuously locate the be
ginnings of scenes, starting
fi'om the scene following the
scene being played back. When
tim desired image apl)em s, re
lease the joystick: Playback will
start flora that point.
Portion being l)layed back
•I••
Til!uptn)ce Tiltdown once Tilt down twice
Tilting up tbejoystick at a portion several
seconds from tim start of scene being played back
will return to tbe start oftbe scene preceding tbat
being played back.
Note: If you perfon-n skip playback during play-
back pause, the DVD video camerakecorder will
enter the playback pause status at the beginning
of the Iocateci scene
Note: lilting down • in the last scene on disc will
set the DVD video camerakecorder to the play-
back pause status at the last image
Note: If the temperature inside the DVD video
camera/recoMer is high, it may not operate nor-
mally In such a case, turn the DVD video caRl-
era/recorder off, wait for a while, and then tun it
on again
44
Search Playback
r_
l_/tu ing playback, tilt the joystick to left • or rigbt
• and hold it: Search playback of scenes will
start.
• : Scenes will be visually scanned fiorwald
• : Scenes will be visually scanned backward
Release tile joystick when you find the desiled
image: Normal playback will start from that
point.
Note: When you skip or search scenes from play-
back or playback pause, the screen will be dark
briefly
Note: If the temperature inside the DVD video
camera/recokJer is high, it may not operate nor-
rnally In such a case, turn the DVD video cam-
era/recorder off, wait for a while, and then tun it
oil again
Frame Advance/Frame Back/Slow Playback
IJoring playback patlse, tilt the joystick to left •
or rigbt •: Frame advance, fl'ame back or slow
playback will start.
Tilt _ once :Picture will advance one fl'ame.
Tilt • once :Picture will go back halfa second.
Tilt • and hold:Forward slow playback
Tilt • and hold :Reverse slow playback
Note: In forwald slow, a rapidly moving subject
image may be distorted
Note: In reverse slow, the image will be r ougher
Note: No sound will be heard durincl sealch play-
back or slow playback
45
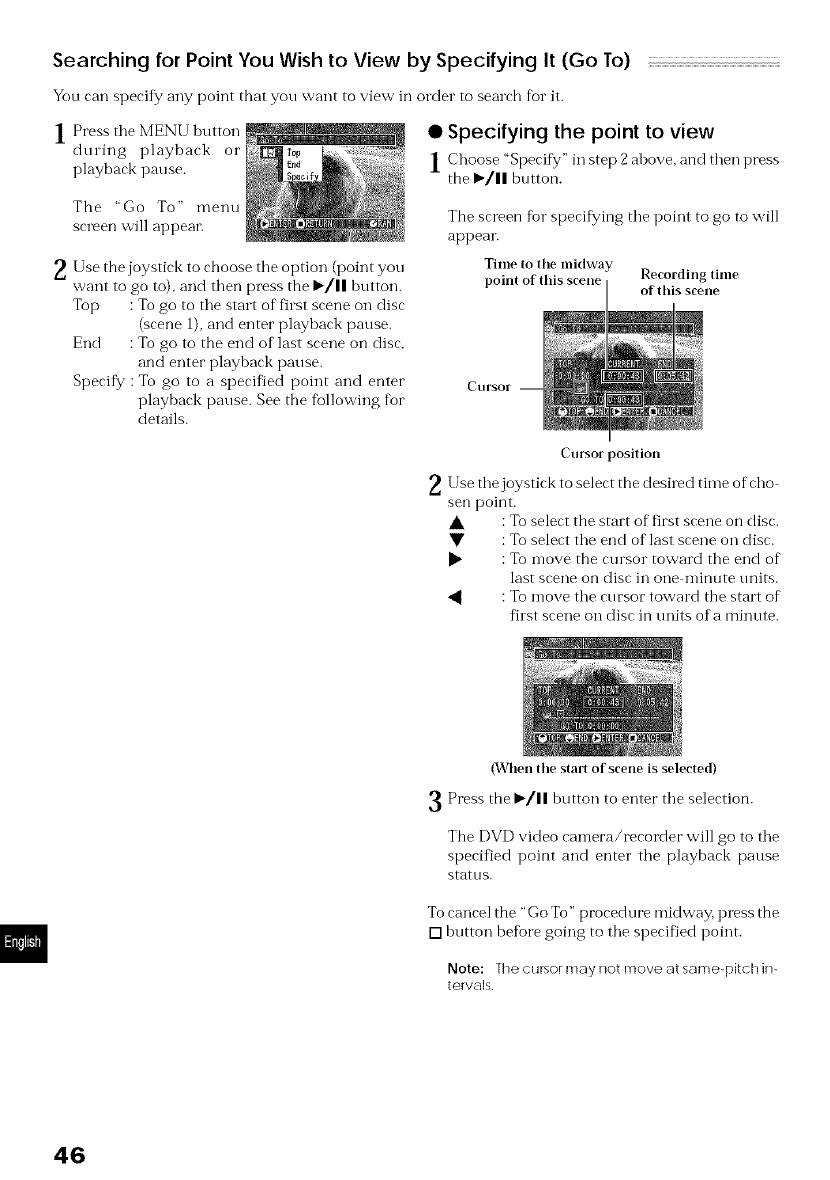
Searching for Point You Wish to View by Specifying It (Go Io)
Yon can specify any point that yon want to view in order to search fbr it.
1 Press the MENU hutton
dtuing playback or
playback pause.
The "Go To" menn
screen will appear.
2Use the joystick to choose tile option (point you
want to go to), and then press the ,/|| button.
Top :To go to tile start of first scene on disc
(scene 1), and enter playback pause.
End :To go to the end of last scene on disc,
and enter playback pause.
Specify : To go to a specified point and enter
playback pause. See the fbllowing fur
details.
• Specifying the point to view
1 Choose "Specify" in step 2ahove, and then press
the I_/|| button.
The screen %1"specifying the point to go to will
appear.
Time to tile midway
point of this scene Recording time
of this scene
Ctlrsor
Cursor position
Use the joystick to select the desiled time ofcho
sen point.
•:To select the start of first scene on disc.
• : To select the end of last scene on disc.
• : To move the cursor toward the end of
last scene on disc in one minute units.
:To move the cursor toward the start of
filst scene on disc in units of a minute.
(When tile start of scene is selected)
3Press tbe I_/11 button to enter the selection.
The DVD video camera/recorder will go to the
specified point and enter the playback pause
status.
Tocancel the "Go To" procedure midway, press the
[] button befbre going to the specified point.
Note: lhe cursor may not move at same-pitch in-
tervals
46
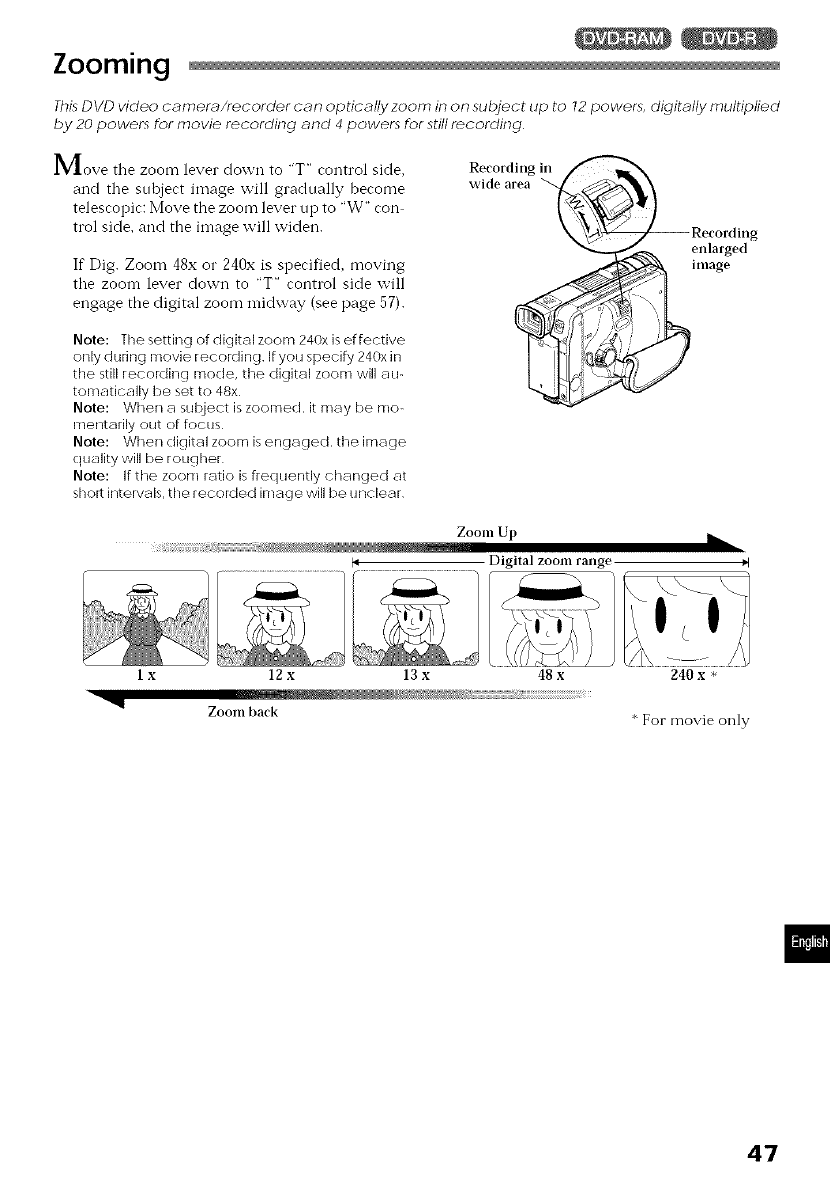
Zooming
ThisDVD video camera/recorder can optically zoom in on subject up to 12 powers, digitally multiplied
by 20 powers for movie recording and 4 powers for still recording
Move tile zoom lever down to "T" control side,
and tile subject image will gradually become
telescopic: Move the zoom lever up to "W" con
trol side, and the image will widen.
If Dig. Zoom 48x o1"240x is specified, moving
the zoom lever down to "T" contlol side will
engage the digital zoom midway (see page 57).
Note: The setting of digital zoom 240x is ef fective
only during movie recording If you specify 240x in
the still recokling mode, the digital zoom will au-
tomatically be set to 48x
Note: When a subject is zoomed, it may be mo-
mentarily out of focus
Note: When digital zoom is engaged, the image
quality will be rougher
Note: If the zoom ratio is frequently changed at
short intervals, the recolded image will be unclear
Recording in
wide area
enlarged
image
Zoom Up
1x
i,i
12x 13x
m
Zoom back
Digital zoom range _1
48 x 240 x *
*For movie only
47
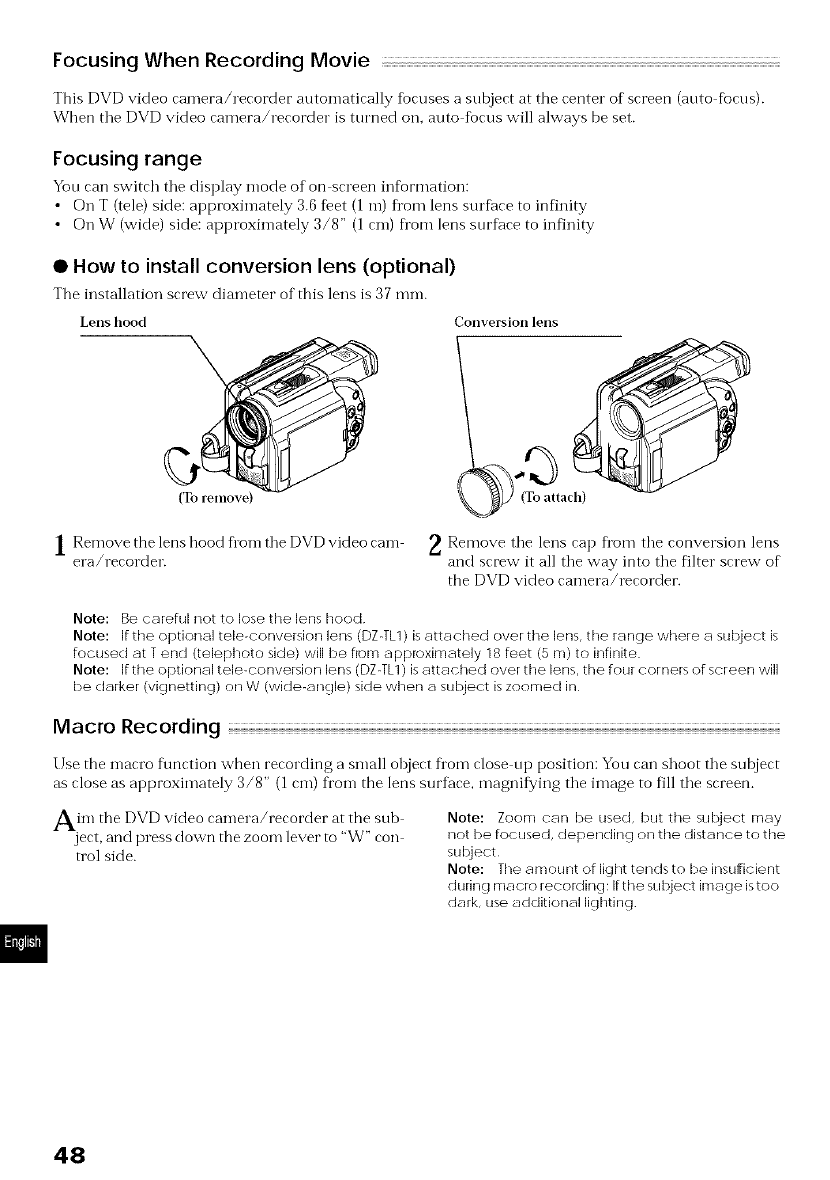
Focusing When Recording Movie
This DVD video camera/recorder automatically focuses a subject at the center of" screen (auto fk)cns).
When tile DVD video camera/recorder is turned oil, auto fi0cus will always be set.
Focusing range
You can switch tile display mode of on screen infomlation:
• On T (tele) side: approximately 3.6 feet (1 m) fl'om lens surf_lce to infinity
• On W (wide) side: approximately 3/8" (1 cm) fl'om lens surfime to infinity
• How to install conversion lens (optional)
The installation screw diameter of this lens is 37 ram.
Conversion lens
(To remove)
Lens hood \
(To attach)
1Remove the lens hood flora the DVD video cam _ Remove the lens cap Dora the conversion lens
era/recorder, and screw it all the way into the filter screw of
the DVD video camera/recorder.
Note: Be careful not to lose the lens hood
Note: If the optional tele-conversion lens (DZ4L1) isattached over the lens, the range where a subject is
focused at I end (telephoto side) will be from applr_ximately 18 feet (5 m) to infinite
Note: If the optional tele-conversion lens (DZ4L1) isattached over the lens, the four corners of screen will
be darker (victnetting) on W (wide-angle) side when a subject is zoomed in
Macro Recording
Use the macro f\mction when recording a small object fi'om close np position: You can shoot the subject
as close as approximately 3/8" (1 cm) from the lens surfime, magnifying the image to fill the screen.
Aim the DVD video camera/recorder at the sub
ject, and press down the zoom lever to "W" con
trol side.
Note: Zoom can be used, but the subject may
not be focused, depending on tire distance to the
subject
Note: lhe amount of light tends tn be insufficient
durinc t macro recolding: Ifthe subject irnacte istoo
dark, use additional lighting
48
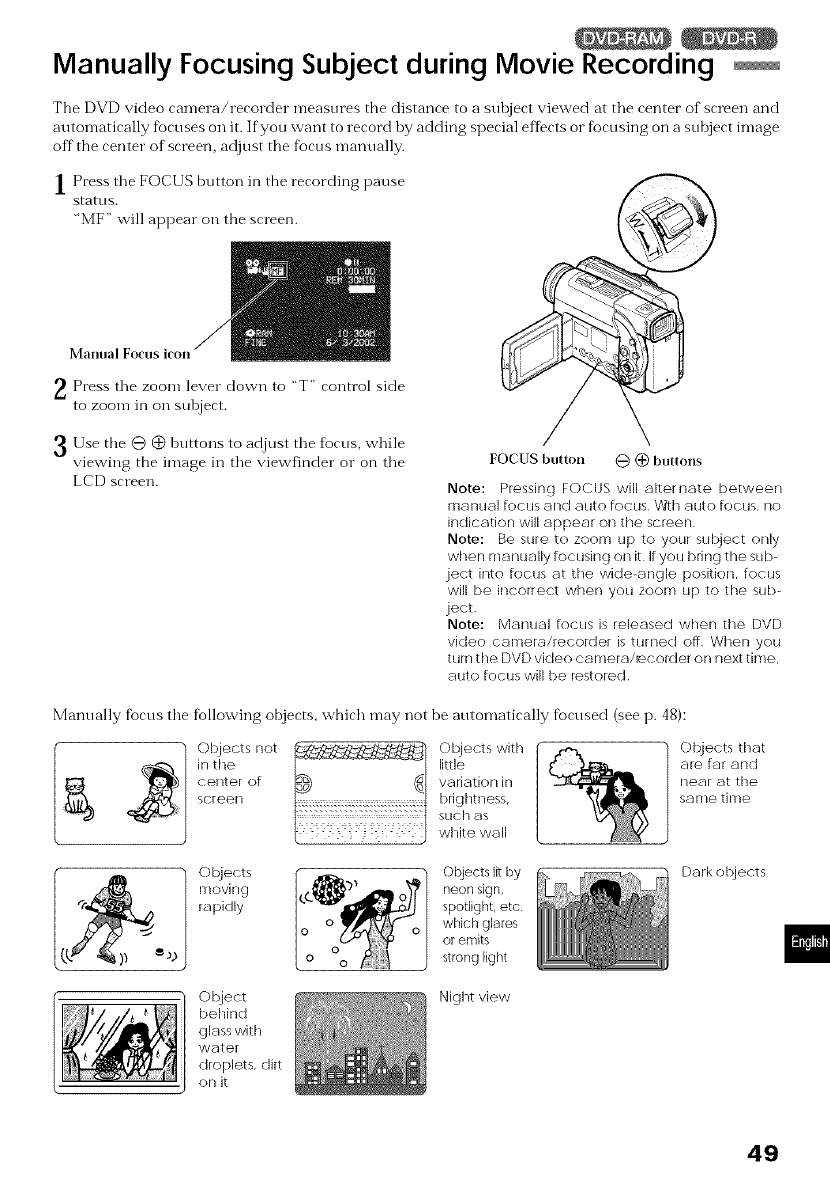
Manually Focusing Subject during Movie Recording
The DVD video camera/recorder measnres the distance to a subject viewed at tile center of screen and
auton-latically fbcnses oil it. If you want to record by adding special effects or focnsing on a snbject image
off the center of screen, adjust the focns manually.
| Press tile FOCUS button in the recording pause
stattls.
"MF" will appear oil the screen.
Manual Focus icon
_ Press tile zoom lever down to "T" control side
to zoom in on subject.
3 Use the @ (_ buttons to adjust the foctls, while
viewing the image in the viewfinder o1" on the
LCD screen.
FOCUS button @ @ buttons
Note: Pressing FOCUS will alternate between
manual focus and auto focus '¢_h auto focus, no
indication will appear on the screen
Note: Be sure to zoom up to your subject only
when manually focusing on it If you bring the sub-
ject into focus at the wide-angle position, focus
will be incorrect when you zoom up to the sub-
ject
Note: Manual focus is released when the DVD
video camera/recorder is turned off When you
turn the DVD video camera/recorder on next time,
auto focus will be lestored
Manually focus the following objects, which may not be automatically focused (see p. 48):
" Objects not _] Objects with
in the little
center of variation in
screen brightness,
such as
white wall
Objects that
are far and
near at the
same time
""Objects
1,_ moving
"_ rapidly
s -D
Objects lit by
neon sign,
spotlight, etc
which glares
or emits
strong light
Dark objects
Object
behind
glass with
walter
droplets, dirt
on it
Night view
49
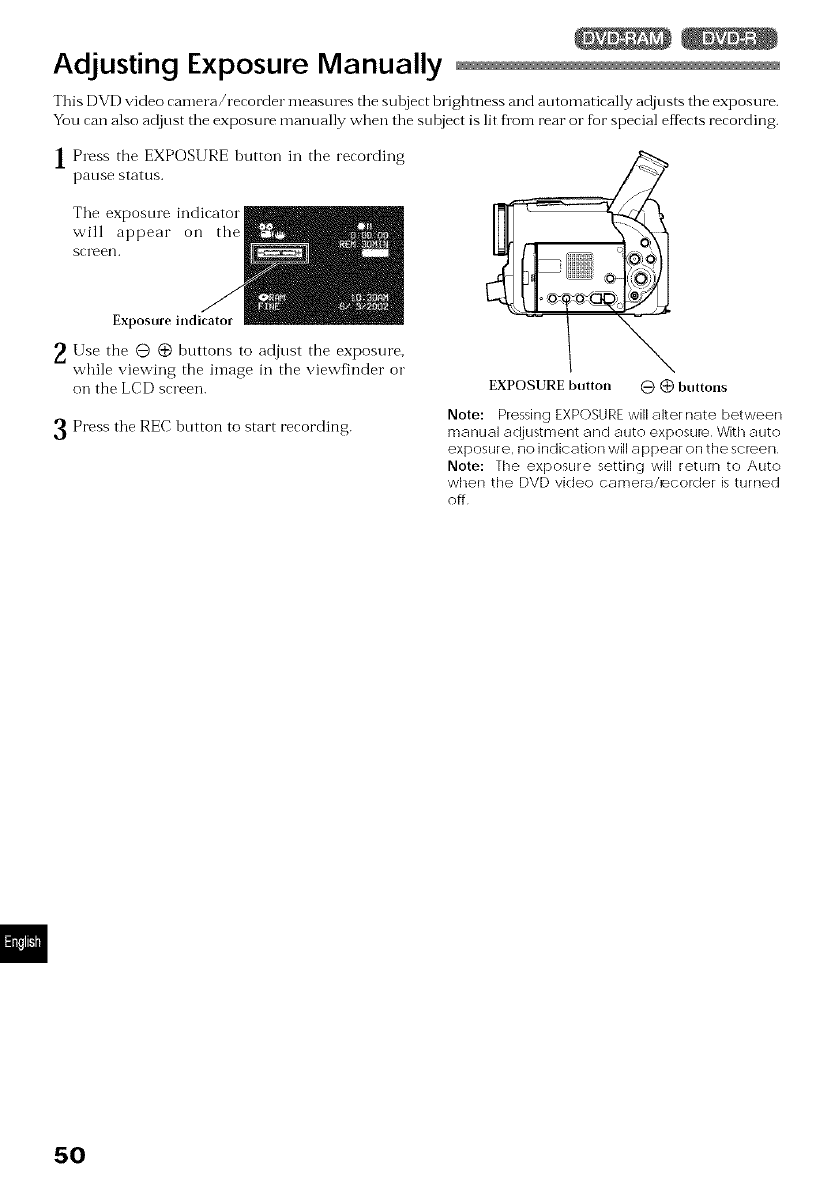
AdJusting Exposure Manually
This DVD video camera/recorder meastn es tile subject brightness and automatically adjusts the exposure.
You can also adjust tile exposure manually when tile subject is lit flora rear o1"for special eftFcts recording.
1Press the EXPOSURE button in the recording
patlse status.
Tile exposure indicator
will appear on the
screen.
Exposure indicator
2 Use the @ @ buttons to adjust the exposure,
while viewing the image in the view'finder o1"
on the LCD screen.
Press the REC button to start recording.
EXPOSURE button 0 @ buttons
Note: Pressing EXPOSURE will alternate between
manual adjustment and auto exposure With auto
exposure, no indication will appear on the screen
Note: The exposure setting will return to Auto
when the DVD video camera/_cokJer is turned
off
50
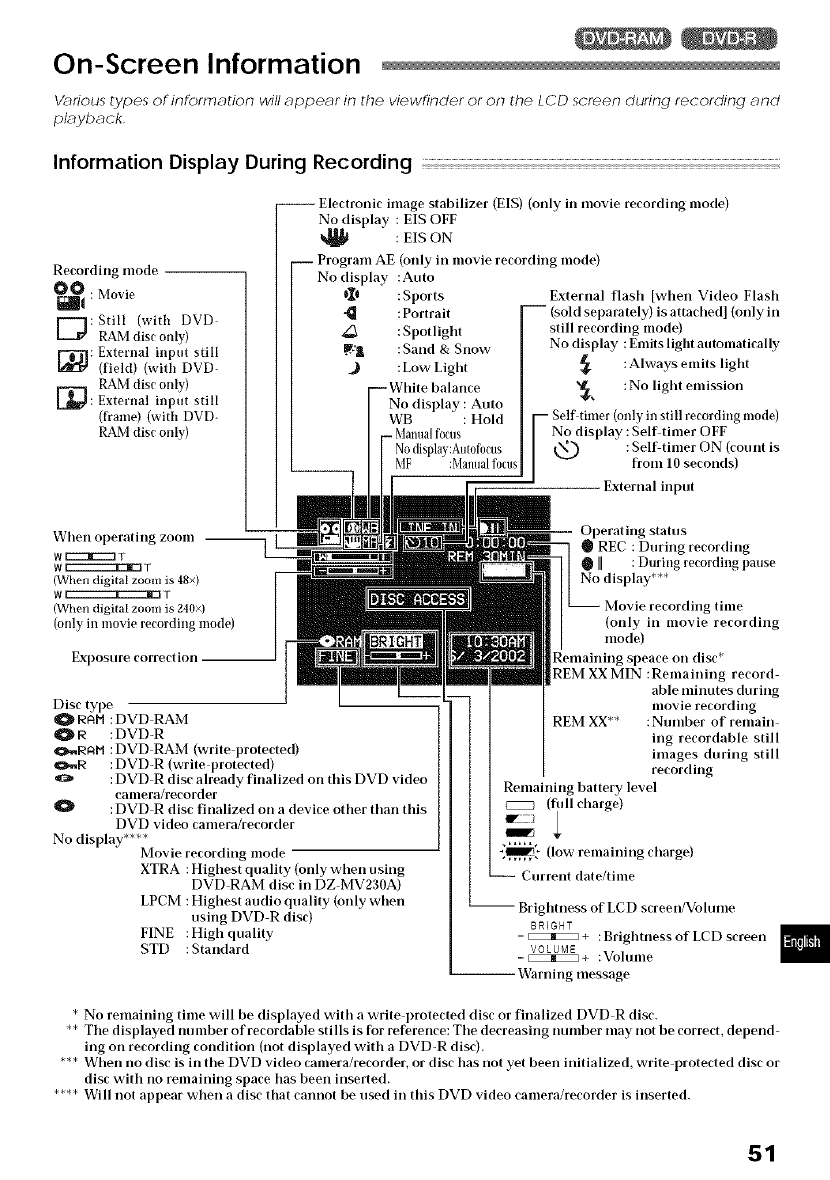
On-Screen Information
Vufious types of information will appear in the viewfinder or on the LCD screen during recording and
playback
Information Display During Recording
Recording mode
_ •Movie
D:Still (with DVD
RAM disc only)
External input still
[_: (fiekt) (with DVD-
RAM disc only)
[_: External input still
(fl'ame) (with DVD-
RAM disc only)
-- Electronic image stabilizer (EIS) (only in movie recording mode)
No display : EIS OFF
: EIS ON
-- Program AE (only in movie recording mode)
No display :Auto
0_6 : Sports
:Portrait
: Spotligbt
.W.:l :Sand & Snow
.) :Low Ligbt
--Wbite balance
No display : Auto
WB : Hold
Nodisplay:Autof0cus
MF :Manualfocus
External flasb [wben Video Flasb
-- (sold separately) is attacbed] (only in
still recording mode)
No display : Emits light automatically
: Always emits ligbt
_, :No ligbt emission
-- Self-timer (only in still recording mode)
No display : Selfitimer OFF
: SelLtimer ON (cotmt is
from lO seconds)
External irrput
Wben ol)erating zoom --
W_T
WEZZZ22222]ZI_ T
(When digital zoom is 48×)
W_T
(When digital zoom is 240x)
(only in movie recording mode)
Expostlre correction
Disc type
RAH :DVD RAM
R :DVD-R
C_,,R_H :DVD RAM (write protected)
_.,,R :DVD-R (write protected)
_;_ :DVD R disc already finalized on tbis DVD video
canrera/recorder
:DVD R disc finalized on a device otber tban tbis
DVD video camera/recorder
No display**** Movie recording mode
XTRA :Higbest quality (only wben using
DVD RAM disc in DZ MV230A)
LPCM :Higbest audio quality (only wben
using DVD R disc)
FINE :Higb quality
STD :Standard
Ol)erating status
REC : During recording
[[ : During recording pause
No display***
Movie recording time
(only in movie recording
mode)
REM XX MIN :Remaining record
able minutes during
movie recording
REM XX** :Number of remain
irrg recordable still
images during still
recording
Remaining battery level
czz2 (fidl cbarge)
_ (low remaining cbarge)
Current date/time
-- Brigbtness of LCD screerdVolume
BRIGHT
- _ + : Brigbtness of LCD screen
VOLUME
- _+ :Vohlllre
-- Warning message
* No remaining time will be displayed witb a write l)rotected disc or finalized DVD R disc.
** Tbe displayed number ofrecordable stills is lot reference: Tbe decreasing number may not be correct, depend-
irrg on recording corrdition (not displayed witb a DVD-R disc).
*** Wben no disc is in tbe DVD video camera/recorder, or disc bas not yet been irritialized, write 1)rotected disc or
disc witb no remaining space bas been irrserte(I.
**** Will not appear wben a disc tbat cannot be used in tbis DVD video camera/recorder is irrserted.
51
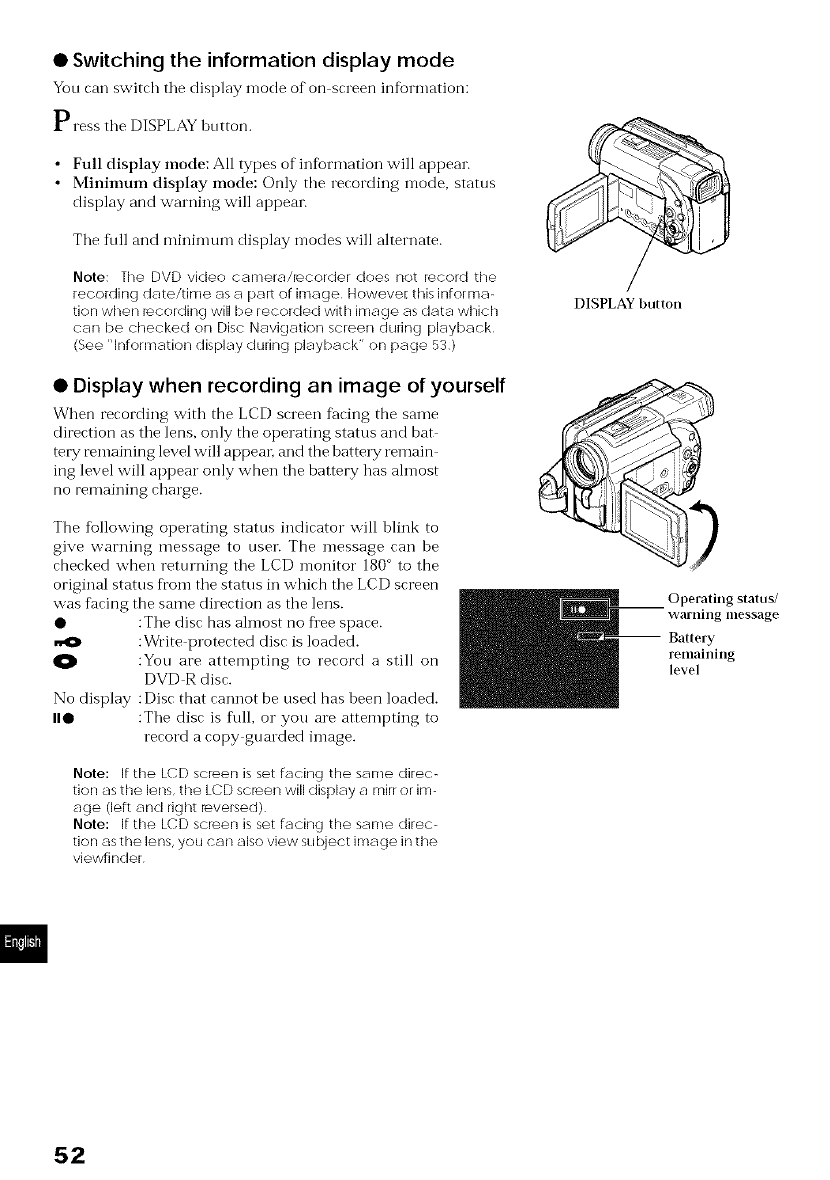
• Switching the information display mode
You can switch the display mode of on screen information:
Press tile DISPLAY button.
• Full display mode: All types of in%rmation will appear.
• Minimmn display mode: Only the recording mode, status
display and warning will appear.
Tile fill and minimum display modes will alternate.
Note: lhe DVD video camera/iecorder does not iecord the
recording date/time as a part of image Howeve_ this informa-
tion when recording will be recorded with image as data which
can be checked on Disc Navigation screen during playback
(See "lnfon-nation display during playback" on page 53)
DISPLAY button
• Display when recording an image of yourself
When recording with the LCD screen facing the same
direction as the lens, only the operating status and bat
tery remaining level will appear: and the batte W remain
ing level will appear only when the battery has ahnost
no remaining charge.
The following operating status indicator will blink to
give warning message to user. The message can he
checked when returning the LCD monitor 180 °to the
original stares fl'om the stares in which the LCD screen
was facing the same direction as the lens.
• :The disc has almost no flee space.
:Write protected disc is loaded.
:You are attempting to record a still on
DVD R disc.
No display : Disc that cannot be used has been loaded.
I1• :The disc is full, or you are attempting to
record a copy gumded image.
Operating status/
vcarlling message
Battery
remaining
level
Note: If the LCD screen is set facing the same direc-
tion as the lens, the LCD scleen will display a mirr or im-
age (left and right ieversed)
Note: If the LCD screen is set facing the same direc-
tion as the lens, you cat] also view subject image in the
viewfinder
52
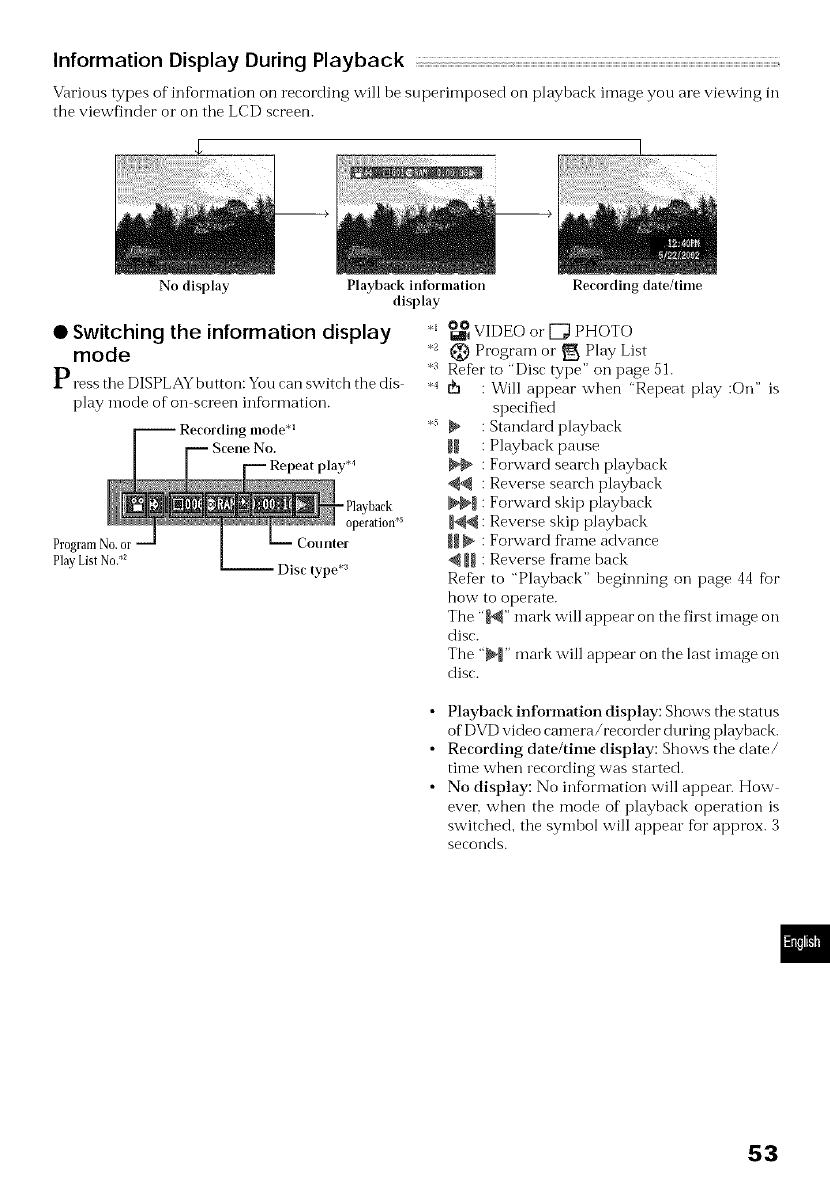
Information Display During Playback
Various types of in%rmation on recording will be superimposed on playback image you are viewing in
the viewfinder o1"on tile LCD screen.
No display Playback information Recording date/time
display
• Switching the information display '
mode 2
3
Press tile DISPLAY bntton: You can switch the dis 4
play n-lode of"oil screen information.
5
-- Recording mode .1
Scene No.
ProgramNo,oi
PlayListNo.*_
-Playback
operation *s
-- Disc type *a
_i_ VIDEO or [_ PHOTO
Program or _ Play List
Refer to "Disc type" on page 51.
I_ : Will appear when "Repeat play :On" is
specified
: Standard playback
i_ : Playback pause
: Forward search playback
: Reverse search playback
_l : Forward skip playback
: Reverse skip playback
]_ N : Forward fl'ame advance
,_ _ : Reverse fl'ame back
Refer to "Playback" beginning on page 44 fbr
how to operate.
The "_" mark will appear on the first image on
disc.
The "_" mark will appear on the last image on
disc.
•Playback information display: Shows the status
of"DVD video camera/recorder during playback.
• Recording date/time display: Shows the date/
time when recording was started.
• No display: No information will appear. How
ever_ when the mode of playback operation is
switched, the symbol will appear for approx. 3
seconds.
53
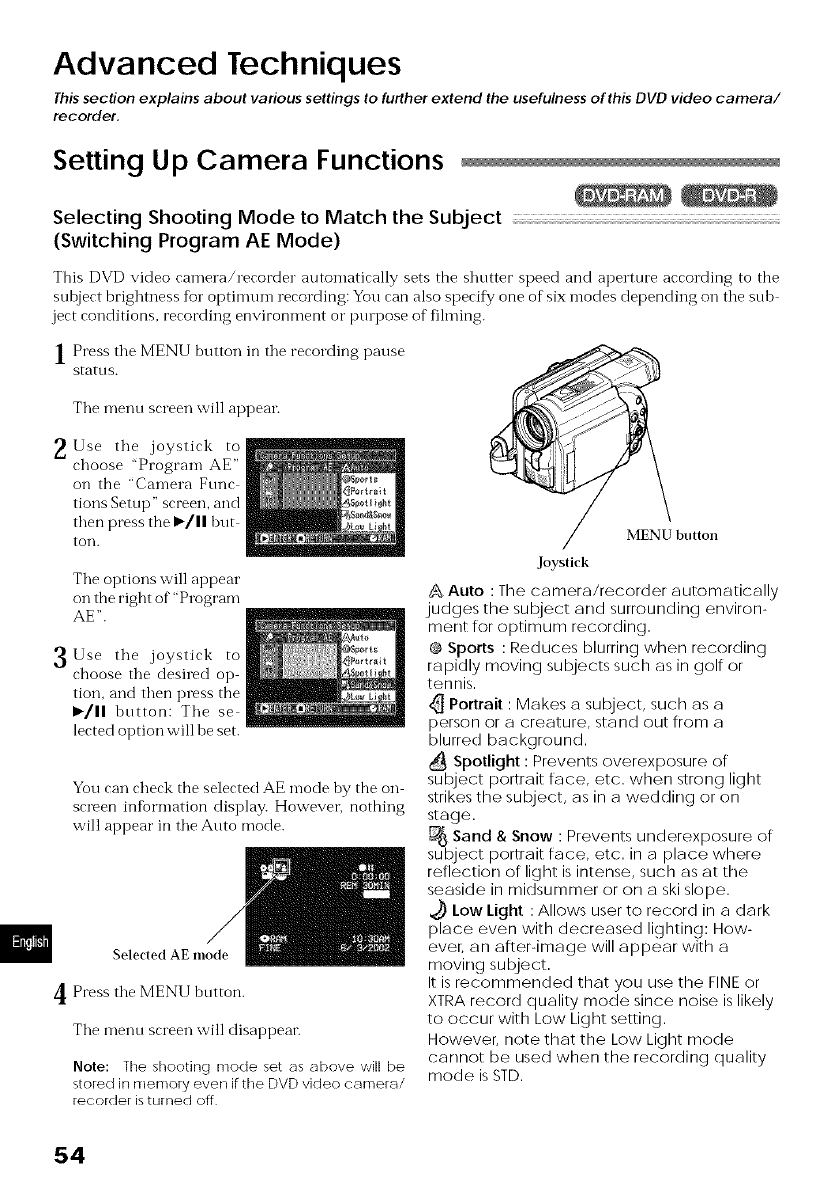
Advanced Techniques
Thissection explains about various settings to further extend the usefulness of this DVD video camera/
recorder.
Setting Up Camera Functions
Selecting Shooting Mode to Match the Subject
(Switching Program AE Mode)
This DVD video camera/recorder atltomatically sets the shutter speed and aperture according to the
subject brightness for optimmTl recording: You can also specify one of six modes depending oil tile suh
ject conditions, recording environment o1"ptupose of fihning.
] Press tile MENU button in tile recording pause
stattls.
The mentl screen will appear.
2Use the joystick to
choose "Program AE"
on the "Camera Ftmc
tions Setup" screen, and
then press the I_/11 hut
tOll.
The options will appear
on the right of""Program
AE".
3Use the joystick to
choose the desired op
tion. and then press the
I_/11 btltton: The se
lected option will be set.
You can check the selected AE mode by the on
screen information display. How'ever, nothing
will appear in the Auto mode.
Seleded AE mode
Press the MENU button.
The n'JeI'_o screen w'ill disappear.
Note: Tile shooting mode set os above will be
stored in rflecr/ory even if tile DVD video camera/
recorder is turned off
MENU button
Joystick
,_sAuto : The camera/recorder automatically
judges the subject and surrounding environ-
ment for optimum recording.
@ Sports : Reduces blurring when recording
rapidly moving subjects such as in golf or
tennis.
Portrait : Makes a subject, such as a
person or a creature, stand out from a
blurred background.
Spotlight : Prevents overexposure of
subject portrait face, etc. when strong light
strikes the subject, as in a wedding or on
stage.
Sand & Snow : Prevents underexposure of
subject portrait face, etc. in a place where
reflection of light is intense, such as at the
seaside in midsummer or on a ski slope.
tow tight : Allows user to record in a dark
place even with decreased lighting: How-
ever, an aRer-image will appear with a
moving subject.
It is recommended that you use the FINE or
XTRA record quality mode since noise is likely
to occur with Low Light setting.
However, note that the Low Light mode
cannot be used when the recording quality
mode is STD.
54
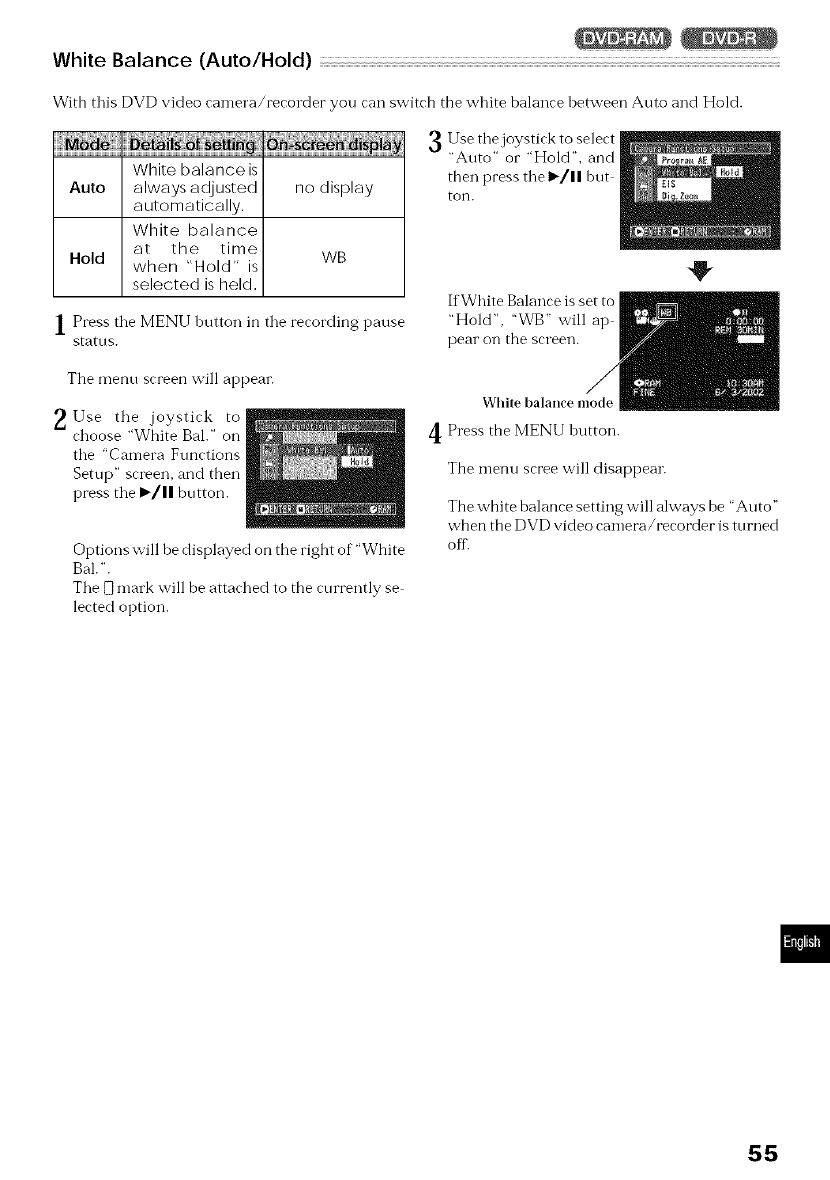
White Balance (Auto/Hold)
With this DVD video camera/recorder you can switch the white balance between Auto and Hold.
White balance is
Auto always adjusted no display
automatically.
White balance
at the time
Hold when "Hold" is WB
selected is held.
l Press the MENU button in the recording pause
statns.
Use the joystick to select
"Auto" or "Hold", and
then press tile 1_/! ! hut
ton.
If White Balance is set to
"Hold", "WB" will ap
pear on the screen.
The menn screen will appear.
_,Use the joystick to
choose "White Bal." on
the "Camera Functions
Setup" screen, and then
press the _'/11 button.
Options will be displayed on the right of "White
Bal. ".
The [_ mark will be attached to the currently se
lected option.
White balance mode
4 Press the MENU button.
The menu scree will disappear.
The white balance setting will always be 'Auto"
when the DVD video camera/recorder is turned
off.
55
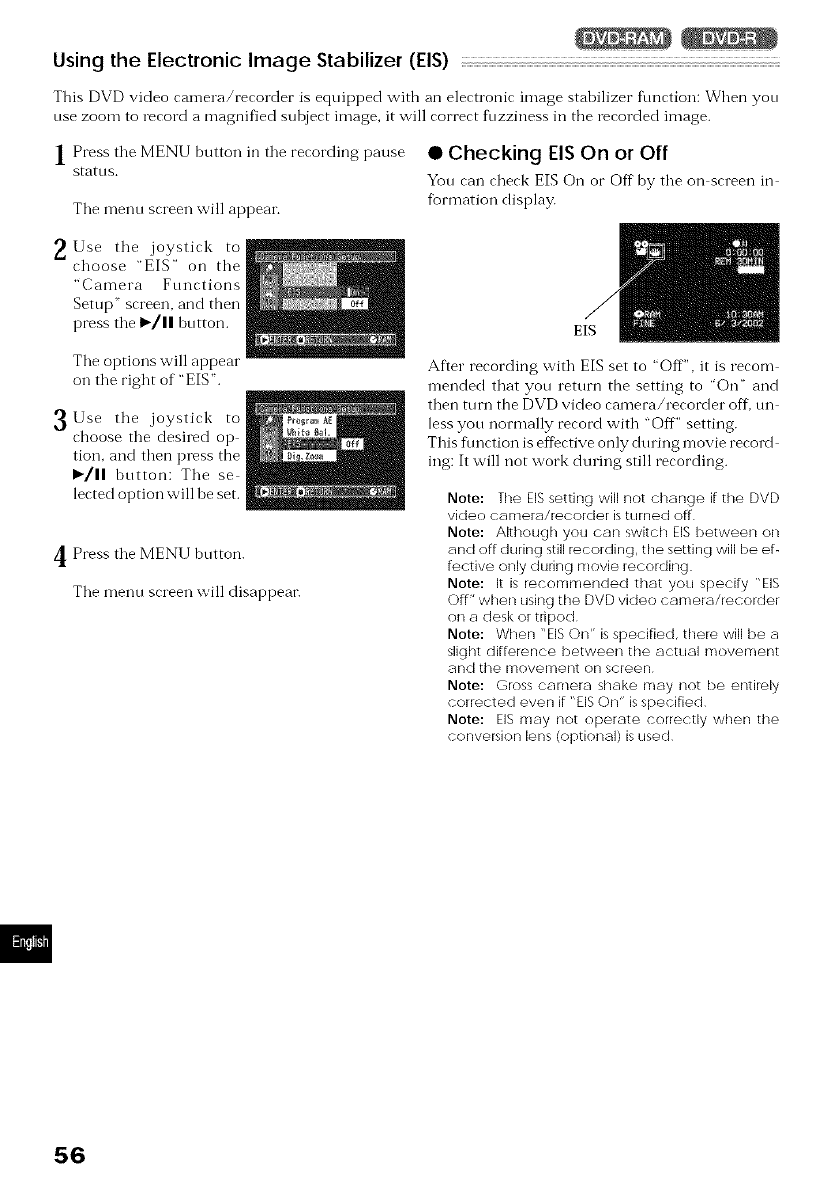
Using the Electronic Image Stabilizer (EIS)
This DVD video camera/recorder is equipped with an electronic image stabilizer function: When you
use zoom to record a magnified subject image, it will correct f_lzziness in the recorded image.
1Press the MENU button in the recording pause • Checking EIS On or Off
status. You can check EIS On or Off by tile on screen in
The menu screen will appear, fbrmation display.
_. Use tile joystick to
choose "EIS" on tile
"Camera Functions
Setup" screen, and then
press tile I_/1! button. EIS
Tile options will appear
on tile right of "EIS".
3Use tile joystick to
choose the desired op
tion, and then press the
,/11 button: Tile se
lected option will be set.
Press tile MENU button.
Tile menu screen will disappear.
Af'Lerrecording with EIS set to "Off", it is recom
mended that you return the setting to "On" and
then turn the DVD video camera/recorder off, un
less you normally record with "Off" setting.
This fimction is eftOctiveonly dining movie record
ing: It will not work during still recording.
Note: Tile EIS setting will not change if tile DVD
video camera/recorder is turned off
Note: Although you can switch EIS between oil
and off during still recording, the setting will be ef-
fective only during movie recording
Note: It is recommended that you specify "EIS
Off" when using the DVD video camera/recorder
on a desk or tripod
Note: When "EIS On" is specified, there will be a
slight difference between the actual movement
and tile movement on screen
Note: Gross camera shake may not be entirely
corrected even if "EIS On" is specified
Note: EIS may not operate correctly when tile
conversion lens (optional) is used
56
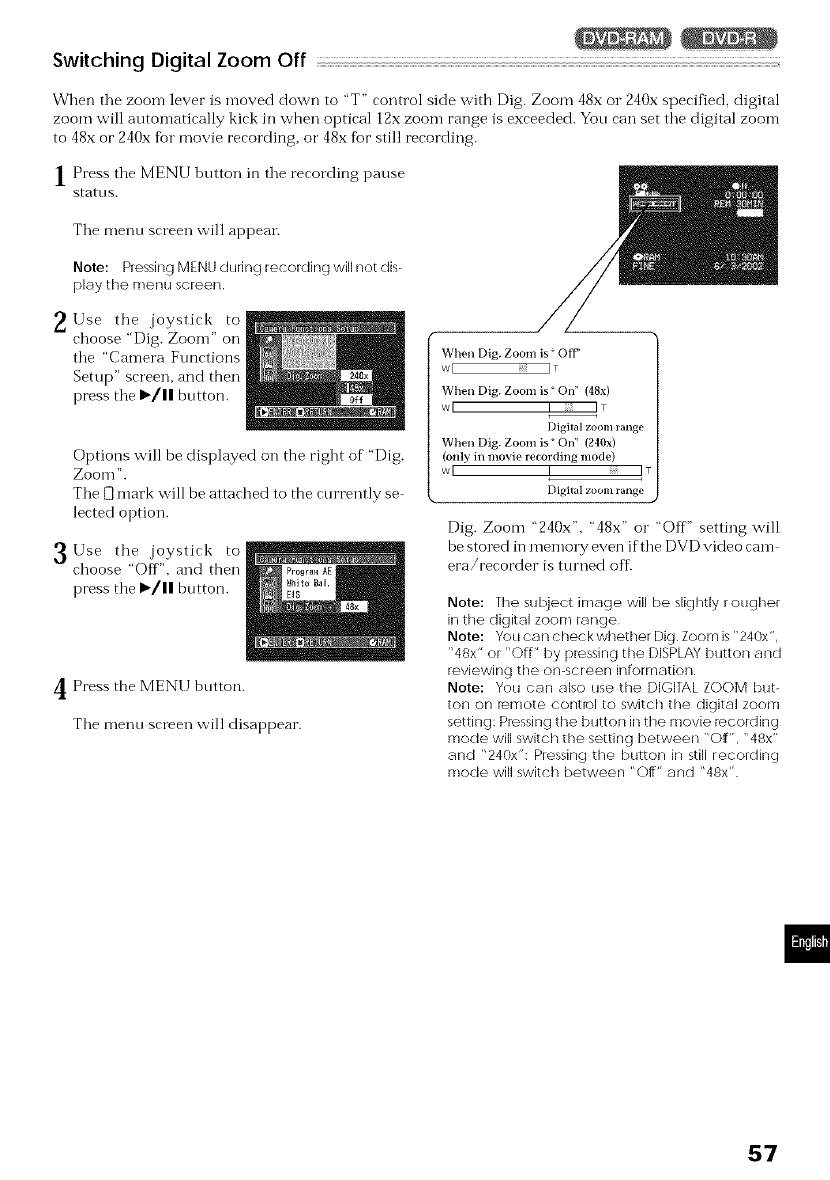
Switching Digital Zoom Off
When tile zoom lever is n-loved down to "T" control side with Dig. Zoom 48x or 240x specified, digital
zoom will automatically kick in when optical 12x zoom range is exceeded. You can set tile digital zoon-i
to 48x or 240x for movie recording, or" 48x fbr still recording.
| Press tile MENU button in tile recording pause
stattlS.
Tile menu screen will appear.
Note: Pressing MENU durinc I recording will not dis-
play tile menu screen
_,Use tile joystick to
choose "Dig. Zoom" on
tile "Camera Functions
Setup" screen, and then
press tile I_/11 button.
Options will be displayed on the right of "Dig.
Zooll] ".
Tile El mark will be attached to the currently se
lected option.
3Use tile joystick to
choose "Off". and then
press tile F/I! button.
Press the MENU button.
Tile menu screen will disappear.
When Dig. Zoom is" OfF
wI IT
When Dig. Zoom is" On" (48x)
wl I ::: I •
I) igilal zoom range
When Dig. Zoom is" On" (240x)
(only in movie recording mode)
wI ! !
Digilal zoom range
Dig. Zoom "240x", "48x" o1""Off" setting will
be stored in memo W even if the DVD video can-i
era/recorder is turned off
Note: Ttle subject image will be slightly rougher
in the digital zoom range
Note: You can check whether Dig Zoom is "240x",
"48x" or "Off" by pi_ssin9 the DISPLAY button and
reviewing tile on-screen information
Note: You can also use the DIGITAL ZOOM but-
toll on ierqote contlol to switch tile digital zoom
setting: Pressing tile button in the movie iecording
mode will switch the setting between "OFF, "48x"
and "240x": Pressing ttle button in still recording
mode will switch between "Off" and "48x"
57
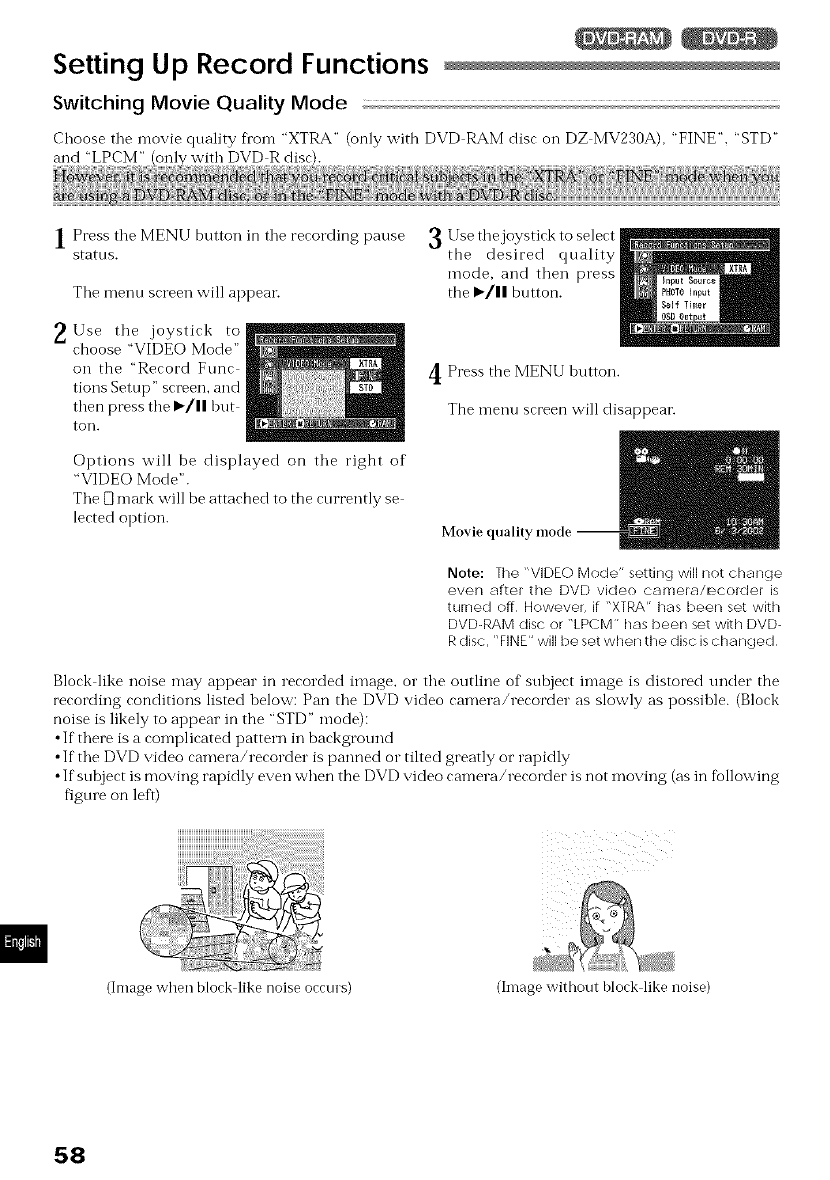
Setting Up Record Functions
Switching Movie Quality Mode
Choose tile nlovie quality fron-i "XTRA" (only with DVD RAM disc oil DZ MV230A). "FINE". "STD"
and "LPCM" (onB/
| Press the MENU button in the recording pause
stattls.
Tile nlenu screen will appear.
_.Use tile joystick to
choose "VIDEO Mode"
oil the "Record Func
tions Setup" screen, and
then press tile I_/11 hut
toil.
3 Use the joystick to select
the desired quality
mode, and then press
tile ,/|| button.
4 Press the MENU button.
The n-lenu screen will disappear.
Options will be displayed on the right of
"VIDEO Mode".
The 0 mack will be attached to the currently se
lected option.
Movie quality mode --
Note: Tile "VIDEO Mode" setting will not change
even after the DVD video carnera/ecorder is
turned off However, if "XTRA" has been set with
DVD-RAM disc or "LPCM" has been set with DVD-
Rdisc, "FINE" will be set when tile disc is changed
Block like noise may appear in recorded image, o1"tile outline of subject inlage is distored under the
recording conditions listed below: Pan tile DVD video cainera/recorder as slowly as possible. (Block
noise is likely to appear in the "STD" inode):
•If there is a coinplicated pattern in background
•If tile DVD video cainera/recorder is panned or tilted greatly or rapidly
•If subject is moving rapidly even when the DVD video camera/recorder is not inoving (as in fiollowing
figure on left)
iilii ii_i_ _
(Image when block like noise occurs) (hnage without block like noise)
58
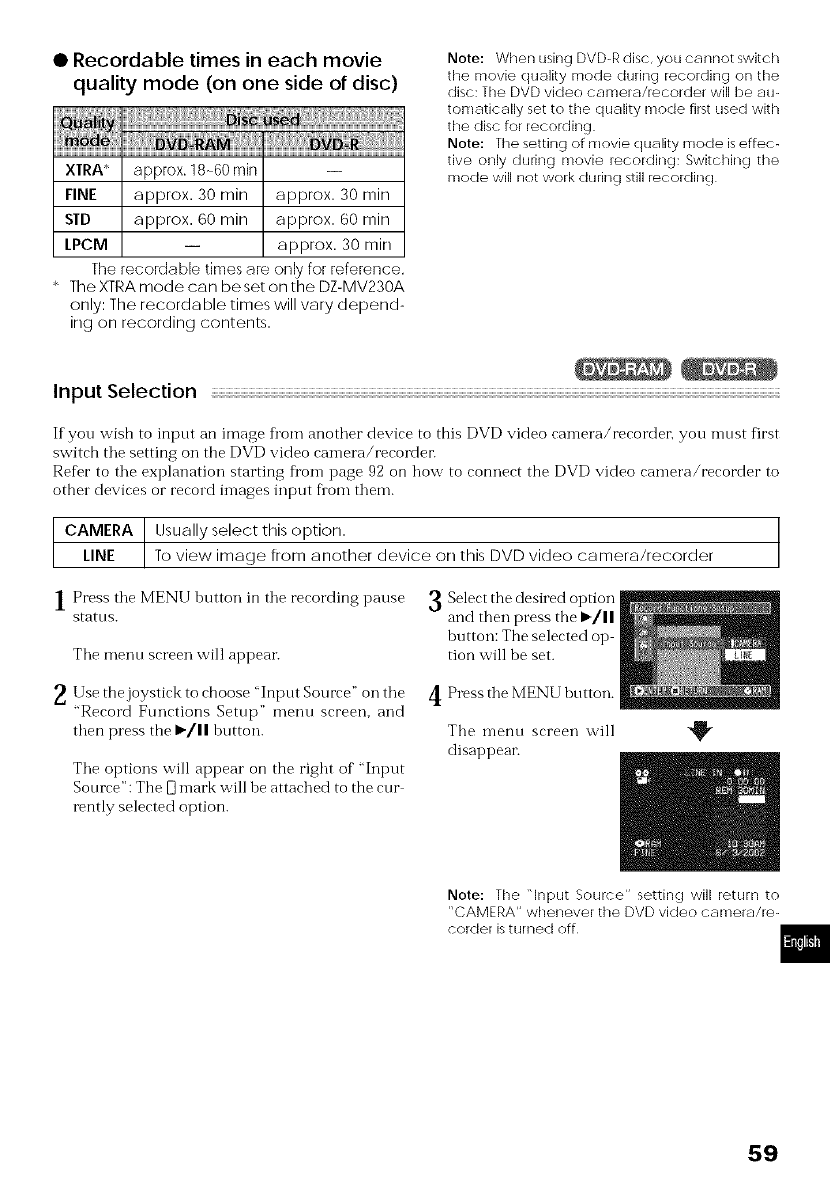
• Recordable times in each movie
quality mode (on one side of disc)
:
XTRA approx. 18-60 rain
FINE approx. 30 min approx. 30 min
STD approx. 60 min approx. 60 min
LPCM -- approx. 30 min
The recordable times are only for reference,
The XTRA mode can be set on the DZ-MV230A
only: The recorda ble times will vary depend-
ing on recording contents,
Note: When using DVD-R disc, you cannot switch
the movie quality mode ciuring recording on the
disc: The DVD video camera/recorder will be au-
tomatically set to the quality mode first used with
the disc for recording
Note: The setting of movie quality mode is effec-
tive only during movie recording: Switching the
mode will not work during still recording
Input Selection
Ifyou wish to input an image fl'om another device to this DVD video can-lera/recordeI; you n-lUSt first
switch the setting on the DVD video camera/recordei:
Refer to the explanation starting fi'om page 92 on how to connect the DVD video camera/recorder to
other devices or record images input flora them.
CAMERA Usually select this option.
lINE To view image from another device on this DVD video camera/recorder
|Press the MENU button in the recording pause
stattlS.
The mentl screen will appear.
Select the desired option
and then press the I-/11
hutton: The se]ected op
tion will be set.
2 Use the joystick to choose "lnptlt Source" on the
"Record Functions Setup" menu screen, and
then press the I_/11 hutton.
The options will appear on the right of "Input
Source": The D mark will be attached to the cur
rently selected option.
4 Press the MENU btltton.
The mentl screen will
disappear.
Note: The "Input Source" setting will return to
"CAMERA" whenever the DVD video camera/re-
corder is turned off
59
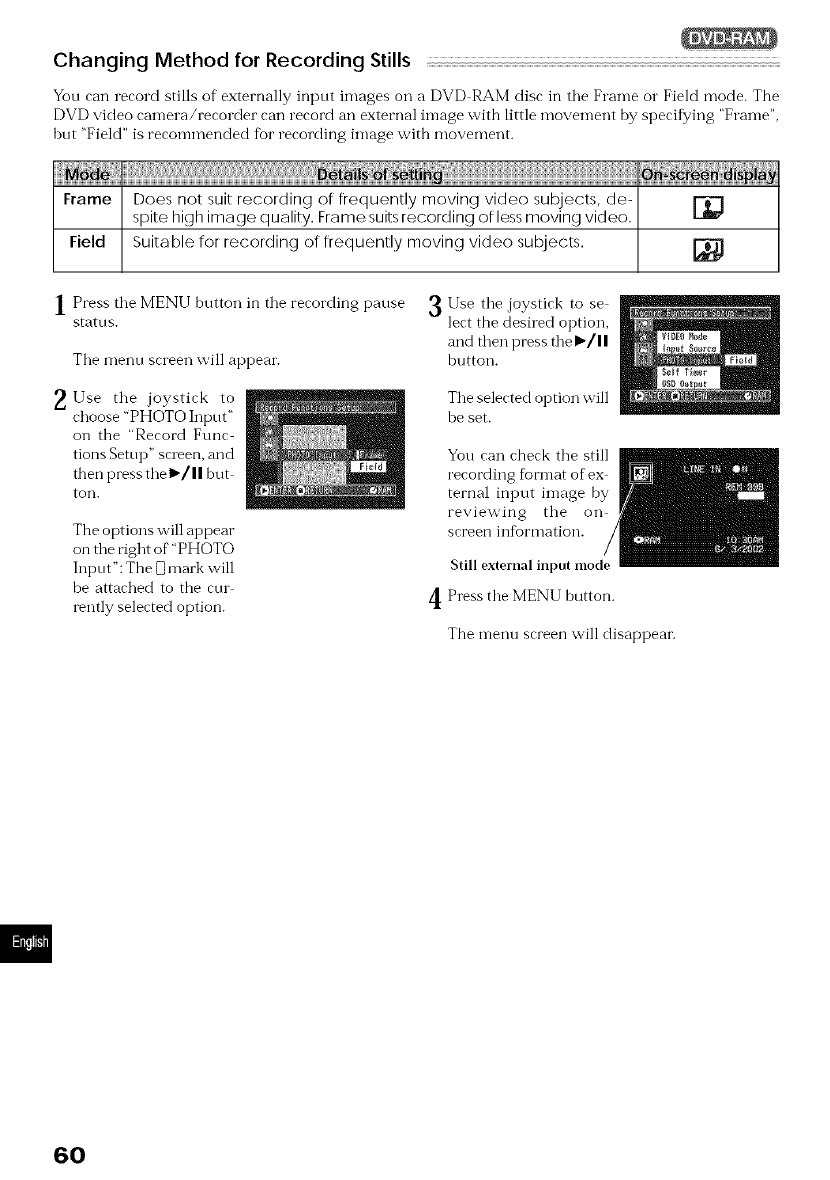
Changing Method for Recording Stills
Yon can record stills of externally inpnt images on a DVD RAM disc in tile Frame o1"Field mode. The
DVD video camera/recorder can record an external image with little moven-lent by specifying "Frame",
hnt "Field" is recommended fbr recording image with movement.
Frame Does not suit recording of frequently moving video subjects, de-
spite high image (quality. Frame suits recording of less moving video. [_
Field Suitable for recording of frequently moving video subjects. [_
| Press the MENU button in the recording pause
statns.
The menn screen will appear.
_, Use the joystick to
choose "PHOTO lnpnt"
on the "Record Func
tions Setup" screen, and
then press theft/! ! but
ton.
The options will appear
on the right of "PHOTO
Input ":The D mark will
be attached to the ctn
rently selected option.
3 Use the joystick to se
lect the desired option,
and then press the I_-/II
hutton.
The selected option will
be set.
Yon can check the still
recording format ofex _._
ternal input image by r_
reviewing the on
screen infbrmation. /_
Still external input mod,_
4 Press the MENU button.
The menu screen will disappear.
6O
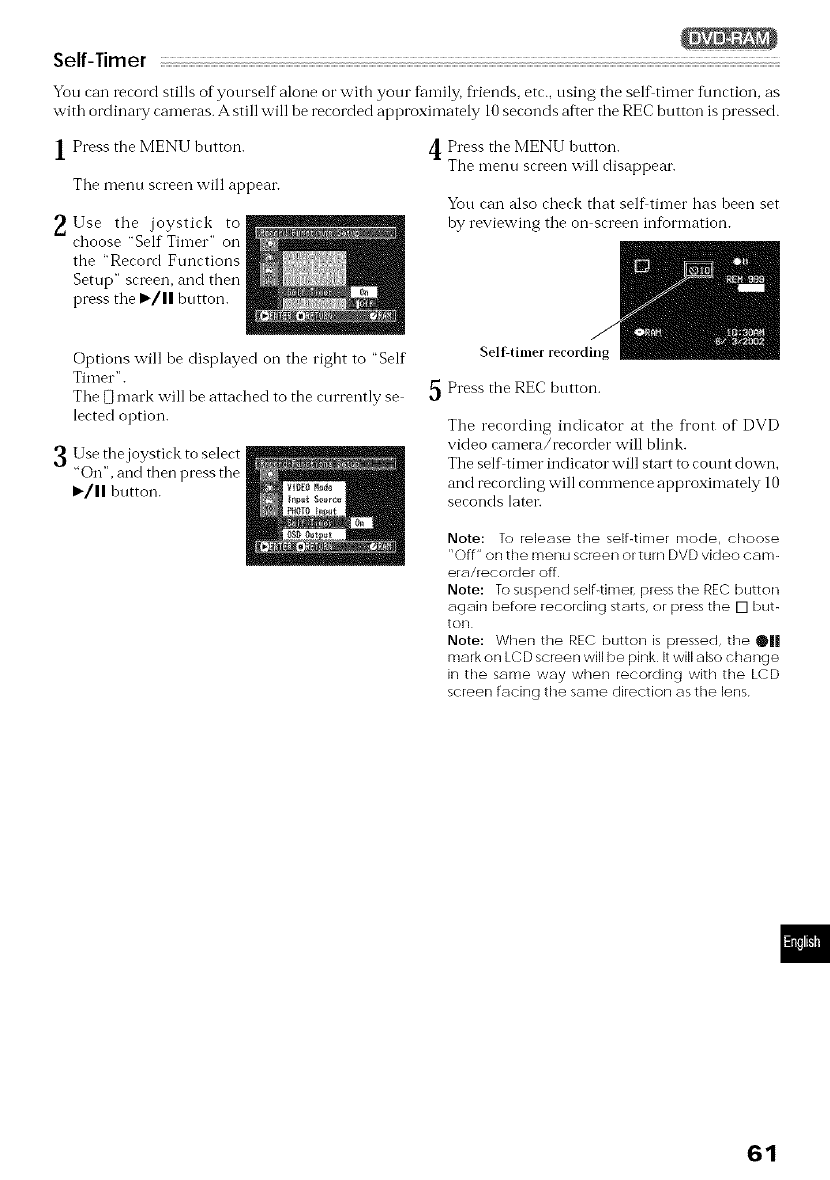
Self-Timer
You can record stills of yourself alone or with your fhmily, fliends, etc., using the self timer fhnction, as
with ordinaly cameras. A still will be recorded approximately 10 seconds after tile REC button is pressed.
1Press the MENU button.
Tile menu screen will appean
_,Use the joystick to
choose "Self Timer" on
the "Record Functions
Setup" screen, and then
press the >'/11 button.
Options will he displayed on the right to "Self
Tinier".
The Q mark will be attached to the currently se
lected option.
3Use the joystick to select
"On", and then press the
_/11 hutton.
4 Press the MENU button.
The menu screen will disappear.
You can also check that self timer has been set
hy reviewing the on screen information.
SelFtimer record
Press the REC btrtton.
The recording indicator at the fl'ont of DVD
video camera/recorder will blink.
The self timer indicator will start to cotmt down,
and recording will commence approxinmtely 10
seconds later.
Note: To release the self-timer mode, choose
"Off" on the menu screen or turn DVD video cam-
era/recorder off
Note: To suspend self-tinier, press the REC button
again before recording starts, or press tile [] but-
ton
Note: When the REC button is pressed, the 01111
mark on LC D screen will be pink It will also change
in tile same way when recording with tile LCD
screen facing the same direction as tile lens
61
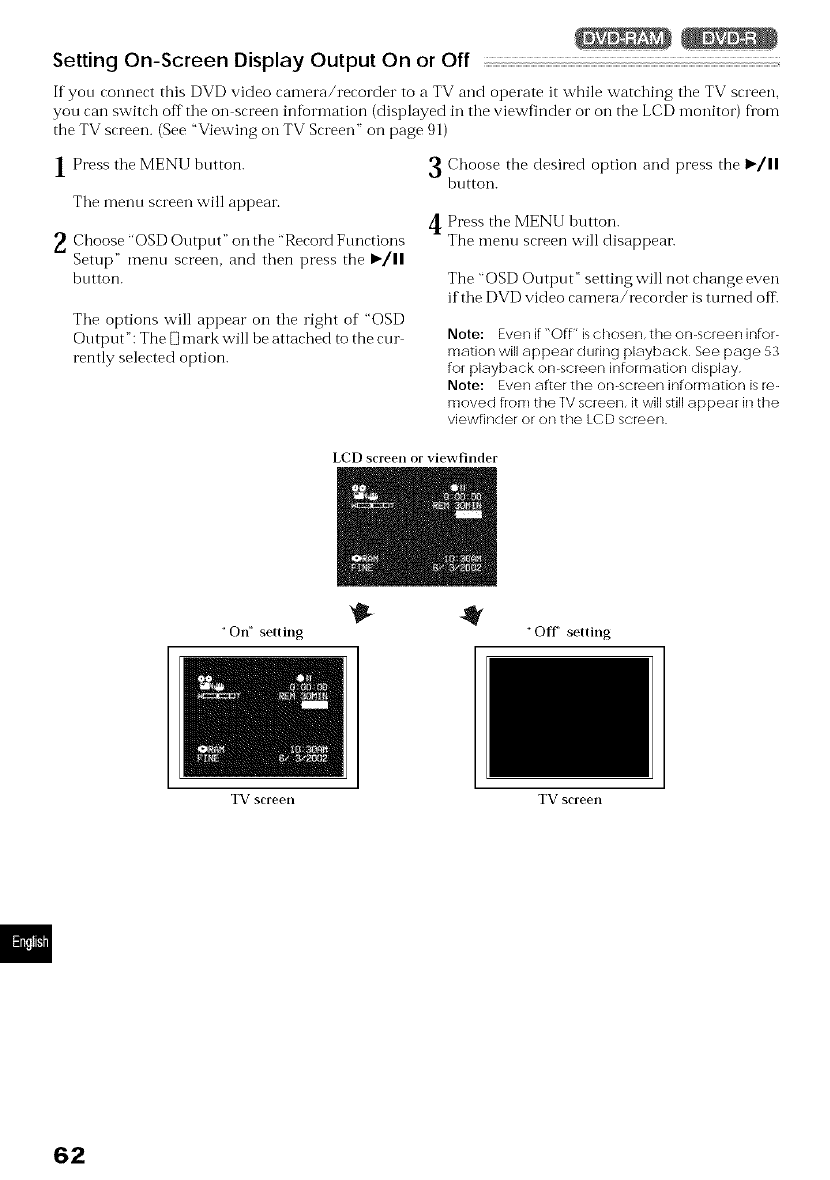
Setting On-Screen Display Output On or Off
If you connect this DVD video camera/recorder to a TV and operate it while watching tile TV screen,
you can switch offthe on screen infbrmation (displayed in tile viewfinder or oil the LCD monitor) fl'om
the TV screen. (See "Viewing oil TV Screen" on page 91)
1Press the MENU button.
The menu screen will appear.
_ Choose "OSD Outpnt" on the "Record Fnnctions
Setup" menn screen, and then press the It-/ll
button.
The options will appear on the right of "OSD
Output": The D mark will be attached to the cur
rently selected option.
3 Choose the desired option and press the I_/11
button.
4 Press the MENU button.
The menu screen will disappear.
The "OSD Output" setting will not change even
if the DVD video camera/recorder is turned off.
Note: Even if "Off" is chosen, the on-screen infor-
mation will appear during playback See page 53
for playback on-screen information display
Note: Even after the on-scleen information is re-
moved from the IV screen, it will still appear it] the
viewfincler or on the LCD screen
LCD screen or viewfinder
"On" setting
TV SCl'eeo
"Off' setting
TV screen
62
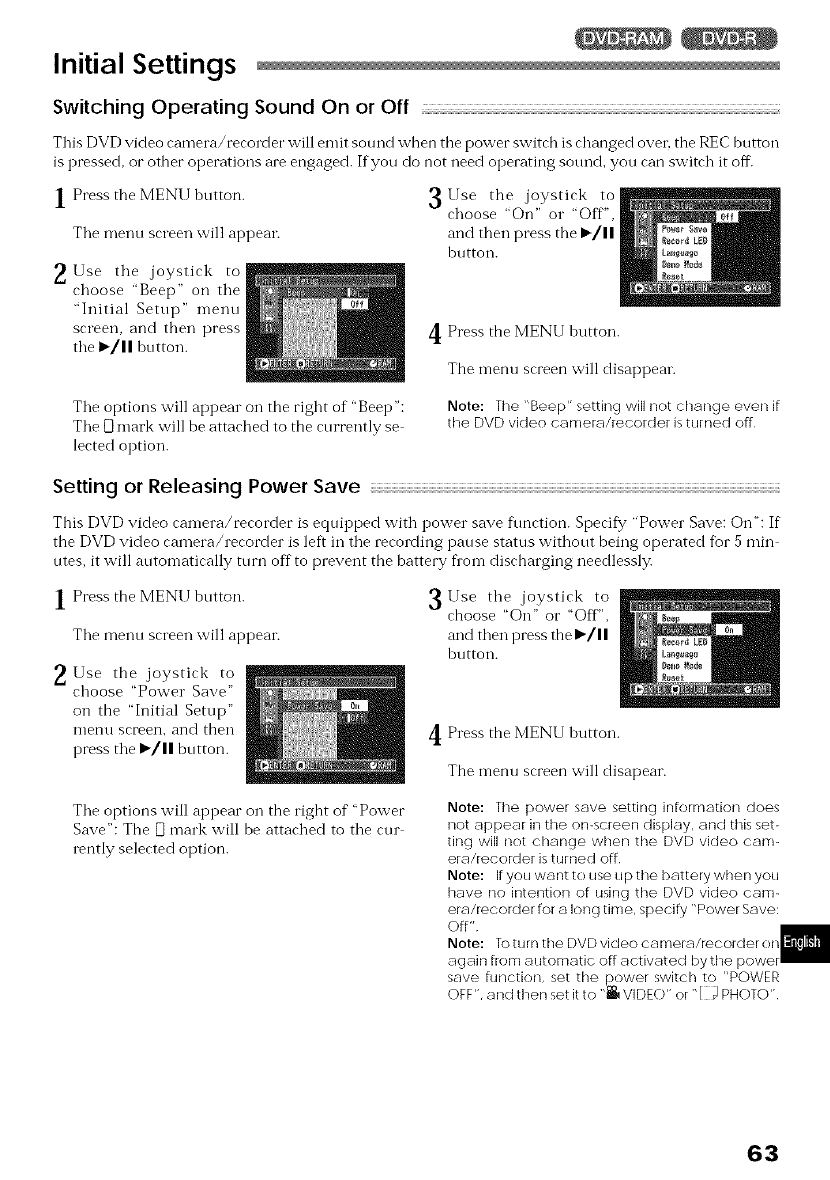
Initial Settings
Switching Operating Sound On or Off
This DVD video camera/recorder will emit sound when the power switch is changed ovel; the REC button
is pressed, or other operations are engaged. If you do not need operating sotmd, you can switch it off.
1 Press the MENU button.
Tile menu screen will appear.
_,Use tile joystick to
choose "Beep" on tile
"Initial Setup" menu
screen, and then press
tile 1_/11 hotton.
3Use the joystick to
choose "On" o1""Off",
and then press the I_/11
hutton.
4 Press the MENU button.
The menu screen will disappeal.
Tile options w'ill appear on the right of "Beep":
Tile D mark will be attached to the currently se
lected option.
Note: Tile "Beep" setting will not change even if
the DVD video camera/recorder is turned off
Setting or Releasing Power Save
This DVD video camera/recorder is equipped with power save function. Specify "Power Save: On": If
K
the DVD video camera/recorder is left in tile recording pause status without being operated fbr a rain
utes, it will automatically torn offto prevent the battery flora discharging needlessly.
1Press the MENU button.
Tile menu screen will appeal:
_.Use the joystick to
choose "Power Save"
on the "Initial Setup"
i_lel3u screen, and then
press tile I_/11 button.
3Use tile joystick to
choose "On" or "Off",
and then press the I_/I I
hutton.
4 Press the MENU button.
The menu screen will disapear.
Tile options will appear on the right of "Power
Save": The [_ mark will be attached to tile cur
rently selected option.
Note: Tilepower save setting information does
not appear in tile on-screen display, and this set-
ting will not change when the DVD video cam-
era/recorder is turned off
Note: If you want to use up the battery when you
have no intention of using the DVD video cam-
era/recorder for a long time, specify "Power Save:
Off"
Note: To turn the DVD video camera/iecorder on
again from automatic off activated b'
save function, set the power switch to "POWER
OFF", and then set it to "_ VIDEO" or "[ _]PHOTO"
63
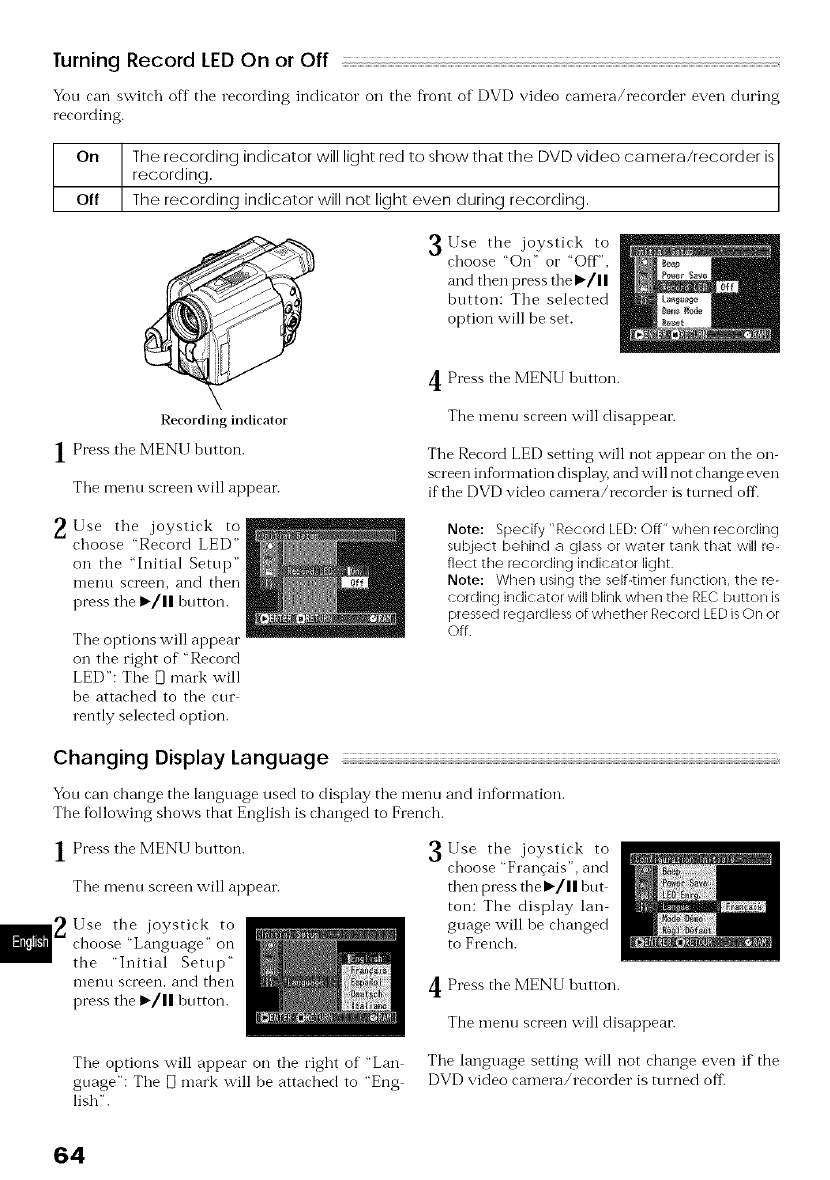
Turning Record LEDOn or Off
You can switch off tile recording indicator on the flont of DVD video can-lera/recorder even during
recording.
[_t lqe recording indicator will light red to show that the DVD video ca mera/recorder is
recording.
The recording indicator will not light even during recording.
Recording indicator
1Press tile MENU button.
Tile menu screen will appear.
3Use the joystick to
choose "On" or "Off",
and then press tile I_/I I
hutton: The selected
option will be set.
Press the MENU button.
The menu screen will disappear.
The Record LED setting will not appem on tile on
screen information display, and will not change even
if tile DVD video camera/recorder is turned off.
_,Use tile joystick to
choose "Record LED"
on the "Initial Setup"
n-lent/ screen, and then
press tile 1_/11 hutton.
Tile options will appear
on the right of "Record
LED": Tile Elmark will
be attached to the cur
rently selected option.
Note: Specify "Record LED: Off" when recording
subject behind a glass or water tank that will re-
flect the recording indicator light
Note: When using the self-timer function, the re-
cording indicator will blink when the REC button is
pressed regardless of whether Record LED isOn or
Off
Changing Display Language
You can change the language used to display tile menu and information.
The following shows that English is changed to French.
1Press tile MENU button.
Tile menu screen will appear.
_,Use the joystick to
choose "Language" on
the "Initial Setup"
i_lenu screen, and then
press tile 1_/|| button.
3Use the joystick to
choose "Fran{ ais", and
then press the I_/ll hut
ton: The display lan
guage will be changed
to French.
Press the MENU button.
The menu screen will disappear.
Tile options will appear on tile right of "Lan Tile language setting will not change even if the
goage": The Dmark will be attached to "Eng DVD video camera/recorder is turned oft
lish".
64
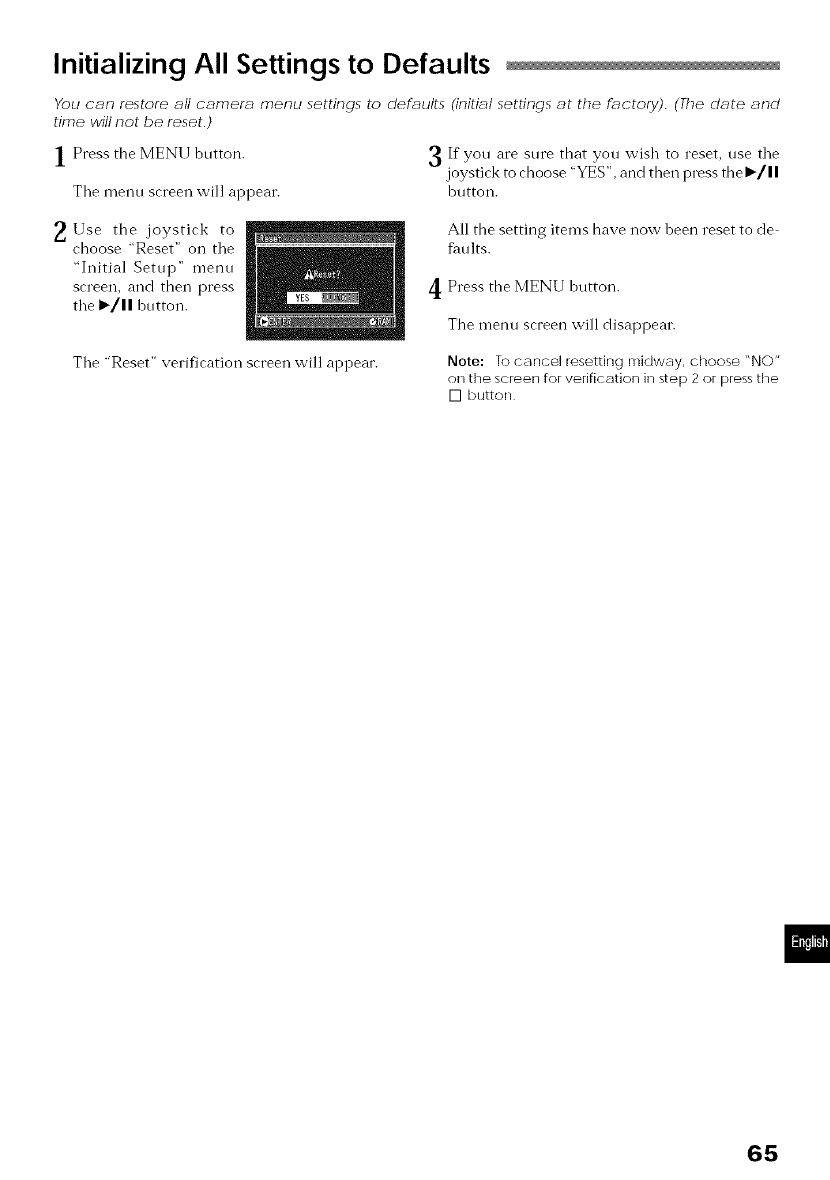
Initializing All Settings to Defaults
You eE_n restore Efll eE_rnerE_ menu settings to defuults (initiEd settings _t the fuctory) (The d_te Emd
time will not be reset)
1Press the MENU button.
Tile mentl screen will appear.
If are sure that wish to reset, use tile
you you
joystick to choose "YES", and then press the I_/I I
hutton.
_.Use the joystick to
choose "Reset" on tile
"Initial Setup" menu
screen, and then press
the i_/11 hotton.
All the setting items have now been reset to de
fholts.
4 Press the MENU button.
The menu screen will disappear.
The "Reset" verification screen will appear. Note: To cancel resetting midway, choose "NO"
on the screen for verification in step 2 or press the
[] button
65
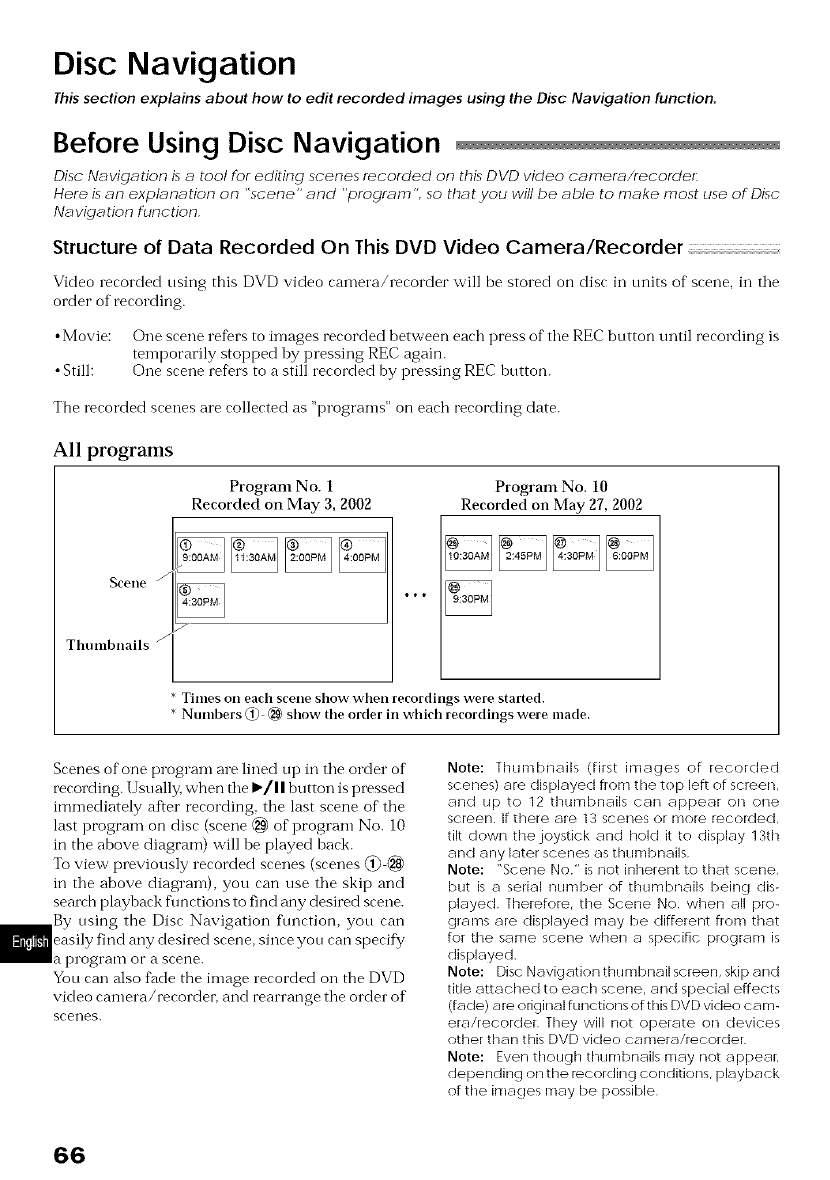
Disc Navigation
This section explains about how to edit recorded images using the Disc Navigation function.
Before Using Disc Navigation
Disc Navigation is atool for editing scenes recorded on this DVD video camera/recorder:
Here is an explanation on "scene" and "program ", so that you will be able to make most use of Disc
Na viga tion function
Structure of Data Recorded On This DVD Video Camera/Recorder
Video recorded using this DVD video camera/recorder will be stored on disc in units of scene, in tile
order of recording.
•Movie: One scene refers to images recorded between each press of tile REC button until recording is
temporarily stopped by pressing REC again.
• Still: One scene refers to a still recorded by pressing REC button.
The recorded scenes are collected as "programs" on each recording date.
All programs
Program No. 1
Recorded on May 3, 2002
7
S('elle /
Thumbnails _
Program No. 10
Recorded on May 27, 2002
Times Oll each st'elle sho'vv "¢dhell recordillgS were started.
Numbers @ _ show tile order in which recordings were made.
Scenes of one program are lined up in the order of
recording. Usually, when the I_/| | button is pressed
immediately after recording, the last scene of" the
last program on disc (scene _ of program No. 10
in the above diagram) will be played hack.
To view previously recorded scenes (scenes @
in the above diagram), you can use the skip and
search playback flmctions to find any desired scene.
By using the Disc Navigation flmction, you can
easily find any desired scene, since yot/can specify
/ pl'ogl'aI_] OF a scene.
You can also fhde the image recorded on the DVD
video camera/recordei; and rearrange the order of
scer',es.
Note: lhumbnails (first images of recorded
scenes) are displayed from the top left of screen,
and up to 12 thumbnails can appear on one
screen If there are 13 scenes or more recorded,
tilt down the joystick and hold it to display 13th
and any later scenes as thumbnails
Note: "Scene No" is not inherent to that scene,
but is a serial number of thumbnails being dis-
played lherefore, the Scene No when all pro-
grams are displayed may be different from that
for the same scene when a specific program is
displayed
Note: Disc Navigation thumbnail screen, skip and
title attached to each scene, and special effects
(fade) are original functions of this DVD video cam-
era/recorder They will not operate on devices
other than this DVD video camera/recorder
Note: Even though thumbnails may not appear,
depending on the iecording conditions, playback
of the irnactes may be possible
66
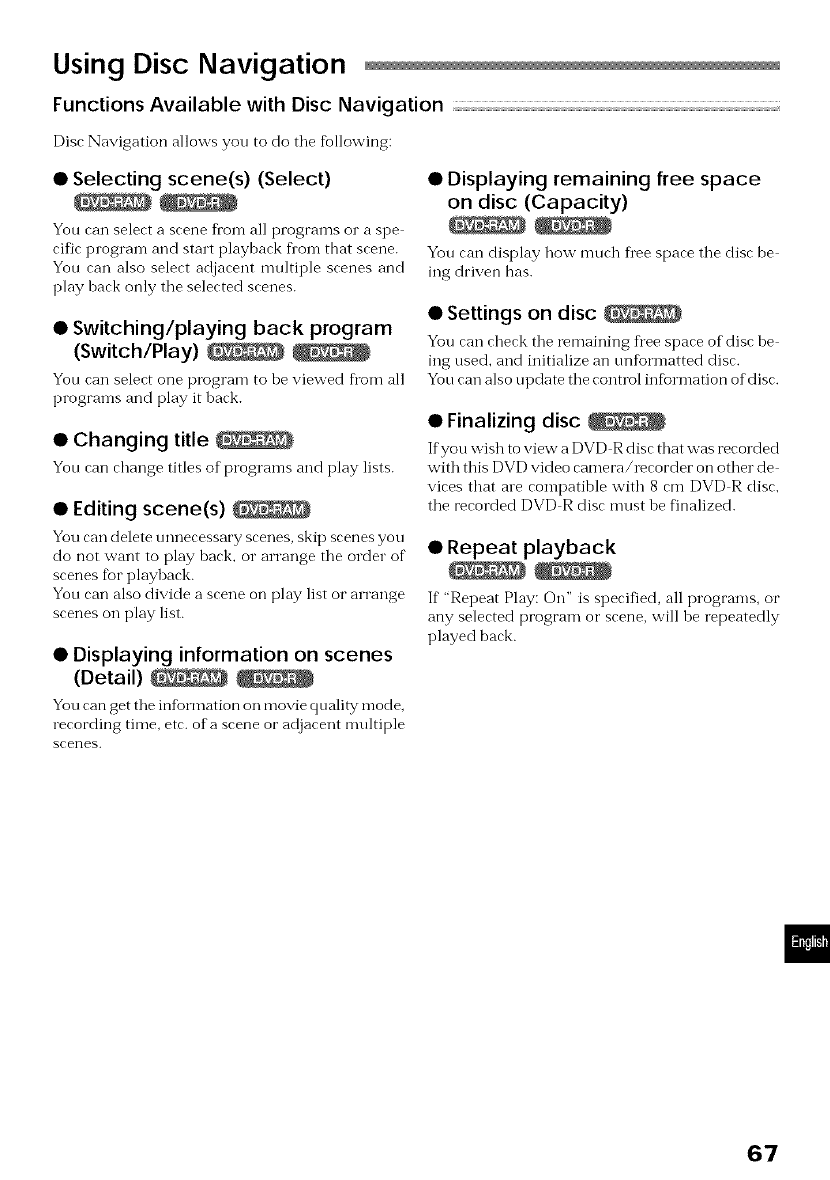
Using Disc Navigation
Functions Available with Disc Navigation
Disc Navigation allows you to do the following:
• Selecting scene(s) (Select)
You can select a scene fi'on-i a]] programs o1"a spe
cific progran-i and start playback floIn that scene.
You can also select adjacent multiple scenes and
play back only tile selected scenes.
• Switching/playing back program
(Switch/Play)
Yon can select one program to be viewed fl'om all
programs and play it back.
• Changing title
Yon can change titles of programs and play lists.
• Editing scene(s)
You can delete nnnecessary scenes, skip scenes you
do not want to play hack, o1"arrange the order of
scenes fur playback.
Yon can also divide a scene on play list or arrange
scenes on play list.
• Displaying information on scenes
(Detail)
You can get the infbrmation on movie quality mode,
recording time, etc. of a scene or adjacent multiple
scenes.
• Displaying remaining free space
on disc (Capacity)
You can display how much Dee space the disc be
ing driven has.
• Settings on disc
You can cheek the remaining Dee space of"disc be
ing used, and initialize an nnformatted disc.
Yon can also update the control in%rmation of disc.
•Finalizing disc
If you wish to view a DVD R disc that was recorded
with this DVD ``,ideo camera/recorder on other de
,,,ices that are compatible with 8 cm DVD R disc,
the recorded DVD R disc must be finalized.
• Repeat playback
If""Repeat Play: On" is specified, all programs, or
any selected program or" scene, will be repeatedly
played back.
67
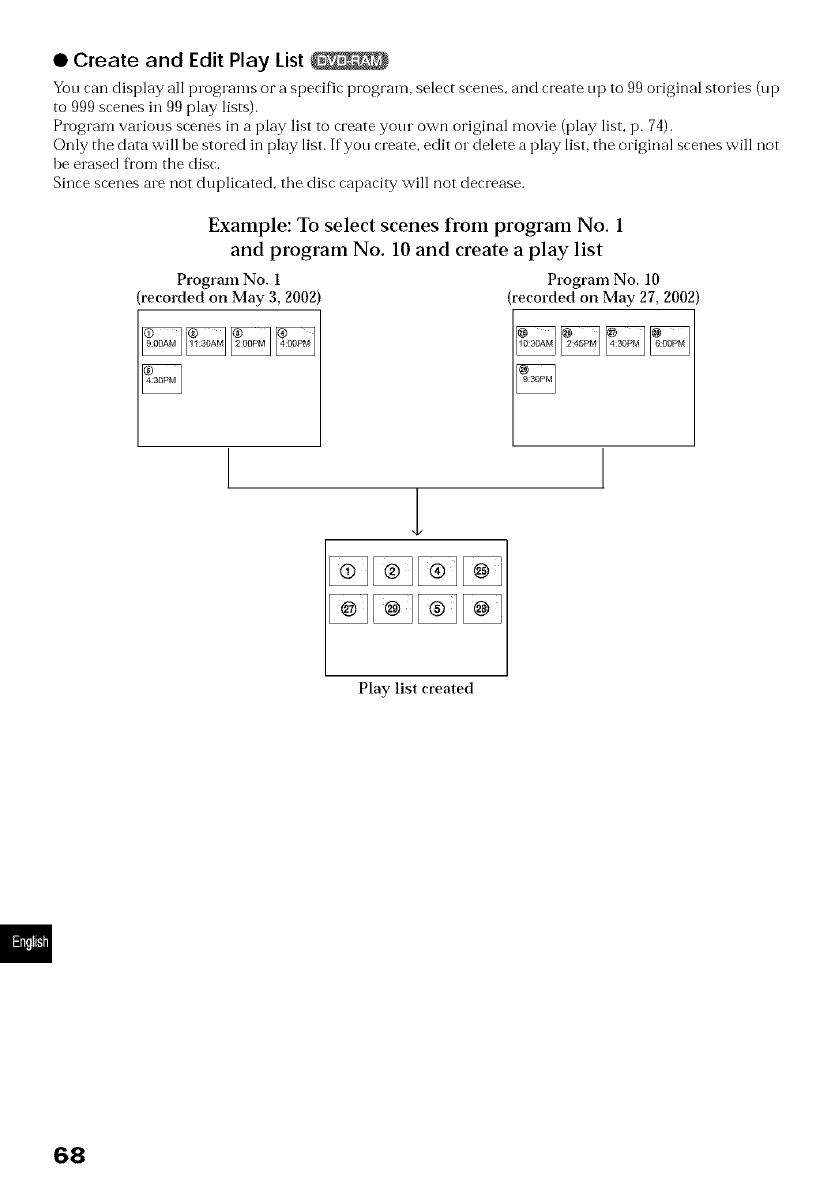
• Create and Edit Play List
You can display all programs or a specific program, select scenes, and create up to 99 original stories (up
to 999 scenes in 99 play lists).
Program various scenes in a play list to create your own original movie (play list, p. 74).
Only the data will be stored in play list. Ifyou create, edit o1"delete a play list, the original scenes will not
be erased from the disc.
Since scenes are not duplicated, the disc capacity will not decrease.
Example: To select scenes from program No. 1
and program No. 10 and create a play list
Program No. 1
recorded on May 3, 2002)
[][][][]
Program No. 10
recorded on May 27, 2002)
l
Play list created
68
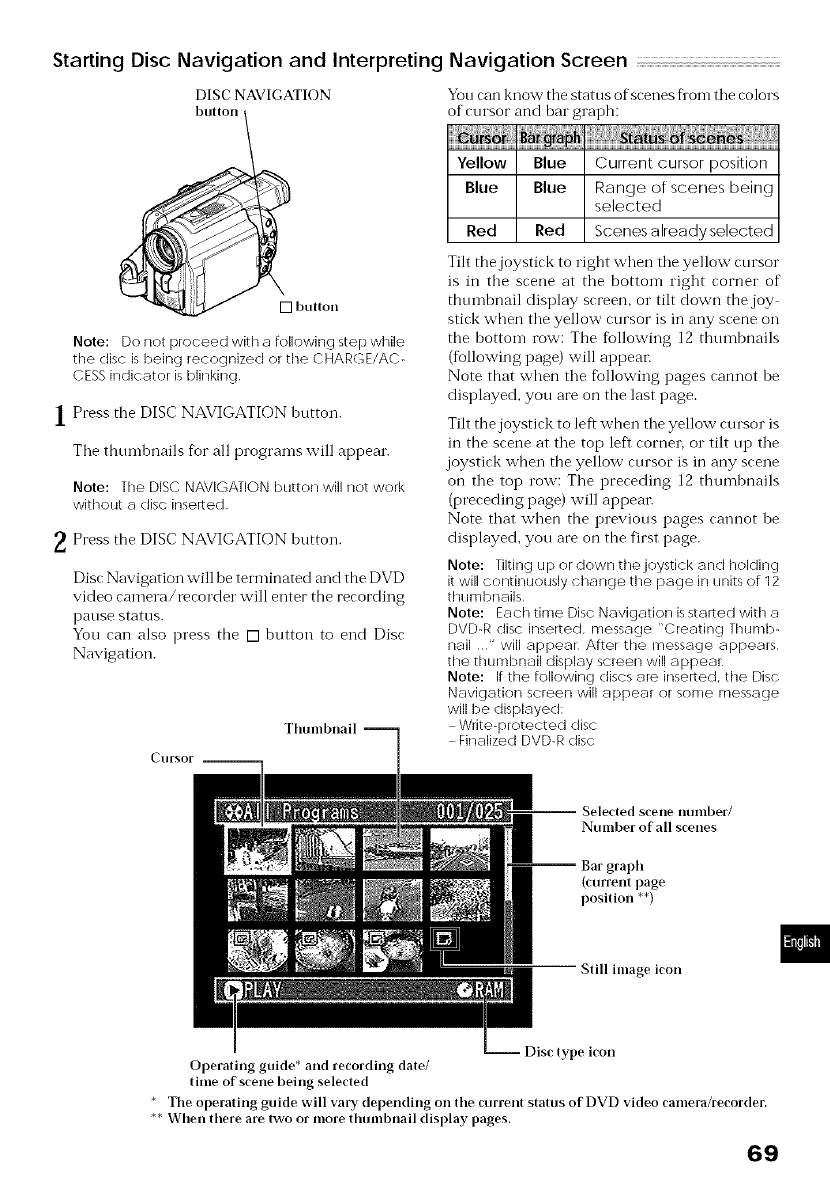
Starting Disc Navigation and Interpreting Navigation Screen
DISC NAVIGATION
_[] button
Note: Do not proceed with a followin o step while
tile disc is being recognized or the CHARGE/AC-
CESSindicator isblinking
1Press the DISC NAVIGATION button.
Tile thuml)nails for all programs will appear.
Note: lhe DISC NAVIGATIONbutton will not work
without a disc inserted
_, Press the DISC NAVIGATION button.
Disc Navigation will be terminated and the DVD
video camera/recorder will enter the recording
patlse st_ltus.
You can also press the [] button to end Disc
Navigation.
Cursor __
You can know the status of scenes flora the colors
of cursor and har graph:
Yellow Blue Current cursor position
Blue Blue Range of scenes being
selected
Red Red Scenes already selected
Tilt the joystick to right when the yellow cursor
is in the scene at the bottom right corner of
thumbnail display screen, o1"tilt down the joy
stick when the yellow cursor is in any scene on
the bottom row: The fMlowing 12 thumbnails
(following page) will appear.
Note that when the fbllowing pages cannot he
displayed, you are on the last page.
Tilt the joystick to left when the yellow cursor is
in the scene at the top left corner, or tilt tip the
joystick when the yellow cursor is in any scene
on the top row: The preceding 12 thumbnails
(preceding page) will appear.
Note that when the previous pages cannot be
displayed, you are on the first page.
Note: Tilting up or down thejoystick and holdinq
it will continuously chancte the page in units of 12
thumbnails
Note: Each time Disc Navigation isstalled with a
DVD-R disc inserted, message "Creating Thumb-
nail " will appear After the message appears,
the thunlbnail display screen will appear
Note: If the following discs ai_ inserted, the Disc
Navigation screen will appear or some message
will be displayed:
Write-protected disc
Finalized DVD-R disc
-- Selected scene number/
Number of all scenes
-- Bar gral)h
(current page
position **)
Still image icon
Disc type icon
Operating guide* and recording date/
time of scene being selected
* The operating guide will vary del)ending on the current status of DVD video camera/recorder.
** When there are two or more thumbnail disl)lay pages.
69
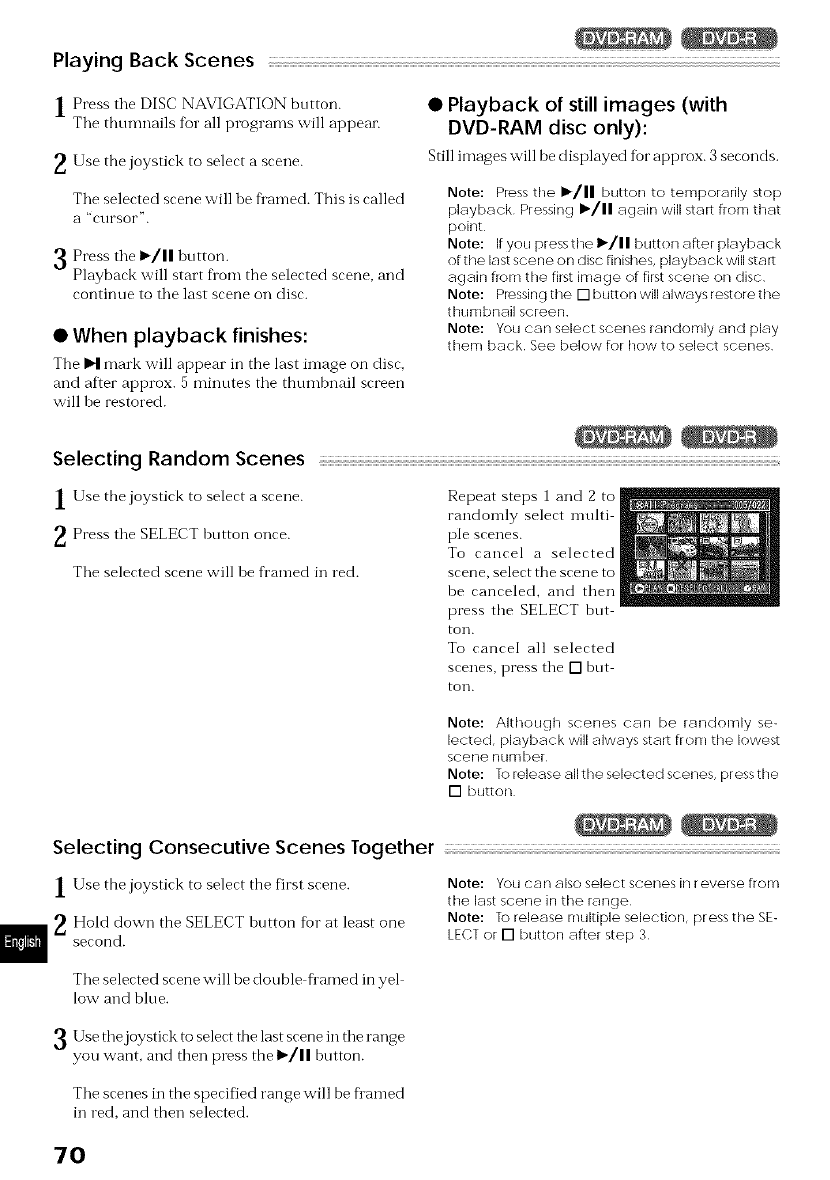
Playing Back Scenes
1 Press tile DISC NAVIGATION button.
Tile thnnmails fur all programs w'ill appear.
_. Use the joystick to select a scene.
Tile selected scene will be flamed. This is called
a "CUFSOF".
3 Press the I_/IIbntton.
Playback will start flora the selected scene, and
continue to the last scene on disc.
• When playback finishes:
The I1_ mark will appear in the last image on disr_
and af'.er approx. 5 minntes tile thnrnbnail screen
will be restored.
• Playback of still images (with
DVD-RAM disc only):
Still images w'ill be displayed for approx. 3 seronds.
Note: Pi_ss tile I'/11 button to temporarily stop
playback Pressing "/11 again will start from that
point
Note: If you press the I_/11 button after playback
of the last scene on disc finishes, playback will start
again from tile first image of first scene oil disc
Note: Piessing the D button will always restore the
thumbnail screen
Note: You can select scenes randomly and play
them back See below for how to select scenes
Selecting Random Scenes
1Use the joystick to select a scene.
_ Press the SELECT hntton once.
Tile selected scene will be framed in red.
Repeat steps 1 and 2 to
randomly select nmlti
pie scenes.
To cancel a selected
scene, select the scene to
he canceled, and then
press the SELECT but
toil.
To ranre] all selerted
scenes, press tile [] hut
toil.
Note: Although scenes can be randomly se-
lected, playback will always start from the lowest
scene number
Note: To release all the selected scenes, press the
[] button
Selecting Consecutive Scenes logether
1Use the joystick to select the first scene.
_Hold down the SELECT bntton for at least one
second.
Note: You ca n also select scenes in reverse ftom
the last scene in the range
Note: To release multiple selection, pr ess the SE-
LECT or [] button after step 3
The selected scene will be donble flamed in yel
low' and blue.
Use the joystick to select the last scene in tile range
you want, and then press the I_/II bntton.
The scenes in the specified range will be flamed
in red, and then selected.
7O
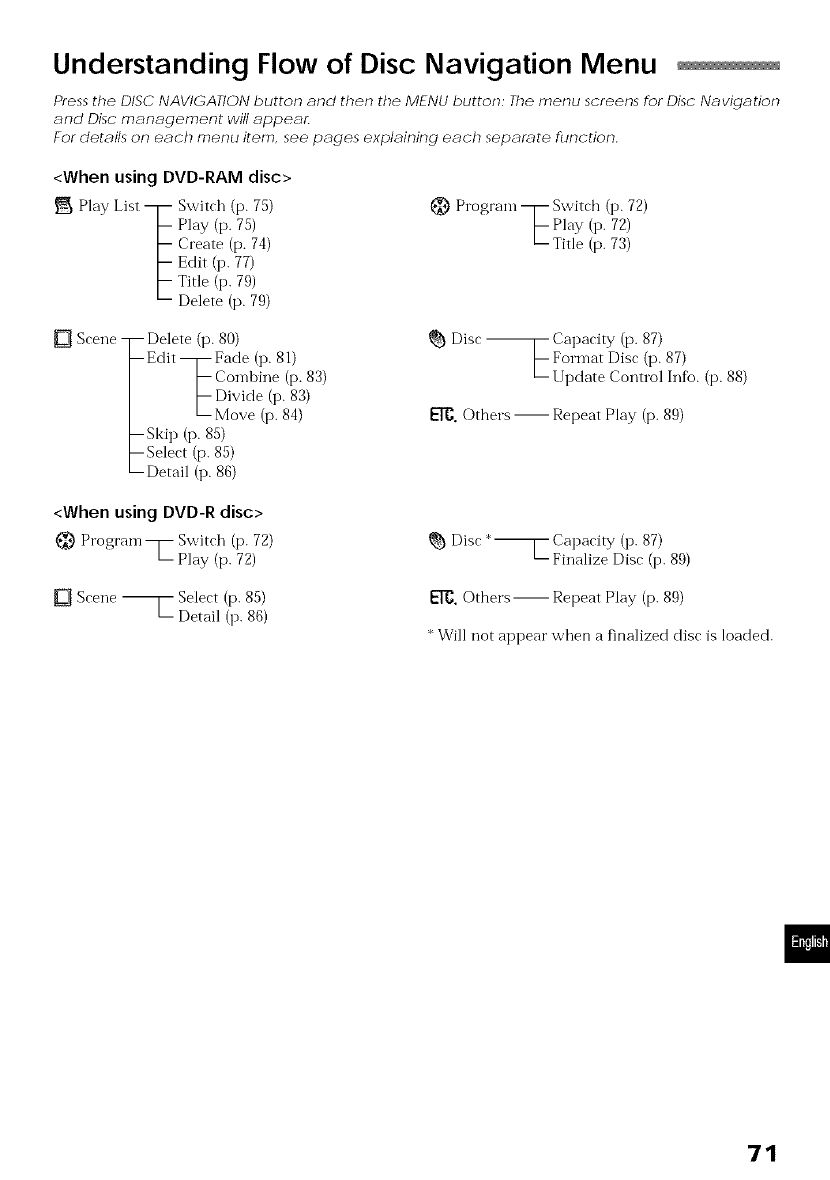
Understanding Flow of Disc Navigation Menu
Press the DISC NAVIGATION button and then the MENU button The menu screens for Disc Navigation
and Disc management will appea_
For details on each menu item, see pages explaining each separ_r_te funcdon
<When using DVD-RAM disc>
Play List T Switch (p. 75)
[-- Play (p. 75)
Create (p. 74)
[-- Edit (i3. 77)
[-- Title (i3. 79)
_- Delete (p. 79)
{_ Program T Switch (i3. 72)
I-- Play (i3.72)
u- Title (p. 73)
[] Scene T Delete (p. 80)
[--Edit T Fade (i3. 81)
/ bComb. e (p.83)
I [-- Divide (I3. 83)
/_- Move (p. 84)
pSkip (p. 85)
LSelect (p. 85)
Detail (I3.86)
_} Disc _ Capacity (13.87)
L Format Disc (p. 87)
Update Control Infb. (p. 88)
ETC. Others -- Repeat Play (p. 89)
<When using DVD-R disc>
Progran3 T Switch (p. 72)
LPlay (p. 72) Disc *_ Capacity (I3. 87)
u_ Finalize Disc (i3. 89)
[] Scene _ Select (p. 85)
Detail (i3.86)
EI"{}.Others IRepeat Play (p. 89)
* Will not appear when a finalized disc is loaded.
71
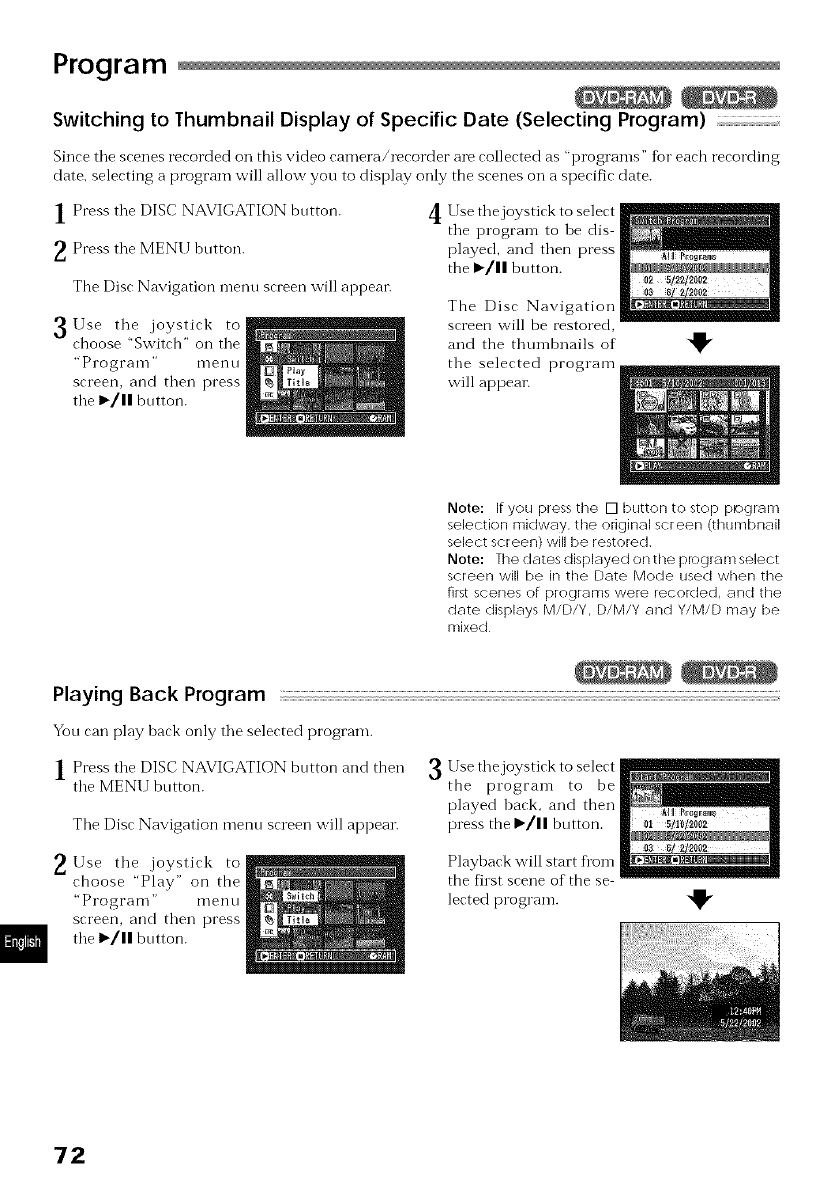
Program
Switching to Thumbnail Display of Specific Date (Selecting Program)
Since tile scenes recorded on this video camera/recorder are collected as "programs" %1"each recording
date, selecting a program will allow you to display only the scenes oil a specific date.
1 Press tile DISC NAVIGATION button.
_ Press the MENU botton.
The Disc Navigation menu screen will appear.
3Use tile joystick to
choose "Switch" on the
"Pl'ograI_l" I_len o
screen, and then press
tile 1_111button.
4Use the joystick to select
tile program to be dis
played, and then press
the I_/11 button.
The Disc" Navigation ma*_""';"_!
screen will be restored,
and the thumbnails of "_
tile selected program
will appear.
Note: If you press tile [] I->utton to stop program
selection midway, the original screen (thumbnail
select screen) will be restored
Note: The dates displayed on the prograrn select
screen will be in the Date Mode used when tile
first scenes of programs were recolded, and the
date displays M/D/Y, D/M/Y and Y/M/D may be
mixed
Playing Back Program
YOClcall play hack only tile selected program.
] Press tile DISC NAVIGATION button and then
tile MENU button.
Tile Disc Navigation mentl screen will appear.
_,Use the joystick to
choose "Play" on the
"Program" i_len o
screen, and then press
the 1_111button.
3Use the joystick to select
the program to be
played back, and then
pressthe_'/llbutton. I_lol_
Playback will start t]'om
the fhst scene of the se
lected program. "_
72
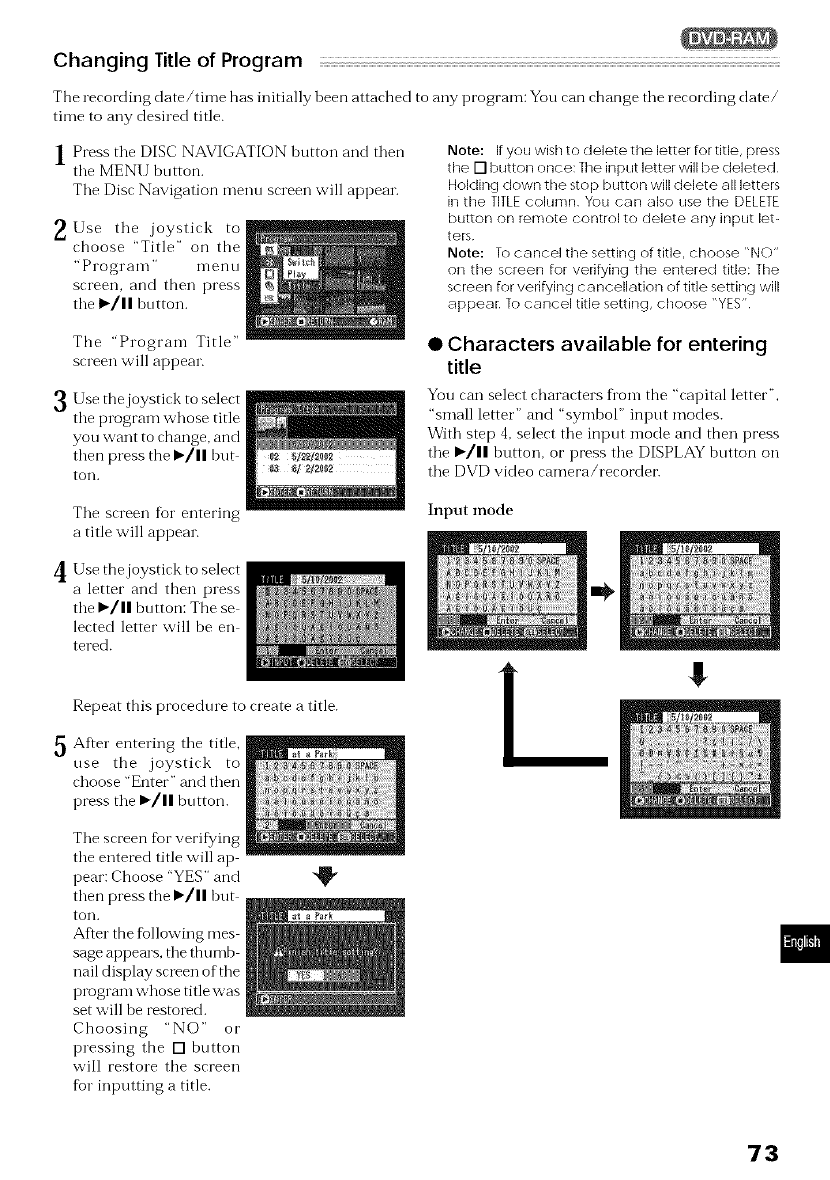
Changing Title of Program
The recording date/time has initially been attached to ally program: You can change tile recording date/
time to ally desired title.
l Press the DISC NAVIGATION button and then
the MENU button.
Tile Disc Navigation menn screen will appear.
_. Use tile joystick to
choose "Title" on the
"Program" n-len n
screen, and then press
tile I_/11 hntton.
Note: If you wish to delete the letter for title, press
tile [] button once: The input letter will be deleted
Holding down the stop button will delete all letters
in the TITLEcoMrf/n You can also use tile DELETE
button on remote control to delete any input let-
ters
Note: To cancel tile setting of title, choose "NO"
oil tile screen for verifying tile entered title: Tile
screen for verifying cancellation of title setting will
appeal To cancel title setting, choose "YES"
Tile "Progranl Title"
screen will appear.
Use the joystick to select
........
tile program whose title
you want to change, and
then press the >'/II hut
toil.
• Characters available for entering
title
You can select characters fl'om the "capital letter",
"small letter" and 'symbol" input modes.
With step 4, select tile input mode and then press
tile I_/11 button, or press tile DISPLAY button on
tile DVD video camera/recordei:
Tile screen for entering
a title will appear.
Input mode
Use the joystick to select
a letter and then press
the I_/11 button: The se
lected letter will be el1
tered.
Repeat this procedure to create a title.
5 After entering tile title,
use the joystick to
choose 'Enter" and then
press tile I_/11 button.
Tile screen %r verifying
tile entered title will ap
pear: Choose 'YES" and
then press the _'/11 hut
toil.
After the following rues
sage appears, tile thumb
nail display screen of the
progranl whose title was
set will be restored.
Choosing "NO" or
pressing the [] button
will restore tile screen
for inputting a title.
I
73

Play List
Creating New Play List
Use play list to edit recorded scenes.
1 Use tile joystick to select a scene to be pro
grammed in a play list.
When selecting multiple scenes, refer to "Select
ing Consecutive Scenes Together" o1""Selecting
Random Scenes" on page 70.
With the created play list, you can also add
scenes recorded on another day or unnecessary
scenes afterwards.
Press the MENU button.
Tile Disc Navigation menu screen will appear.
Note: If the scene added te play list had skip or
fade setting, that infornation will also be added
to the play list
Note: The time when t he play list was created will
appear in the title bar
Note: If you have selected multiple scenes, you
can step the cleation of play list midway by press-
ing the [] I->utton In this case, tt]e play list will be
created with the scenes up to the point whee the
[] button was pressed
Note: If free space available on disc isinsufficient,
creation of new play list may not be possible: De-
lete unnecessaly scenes
3Use the joystick to
choose "Create" on the
"Play List" menu screen,
and then press the 1_/||
button.
The "Create Play List"
screen will appear.
A new play list includ
ing the selected scenes
will be created, and a
ttmmbnail of the created
play list will appean
74
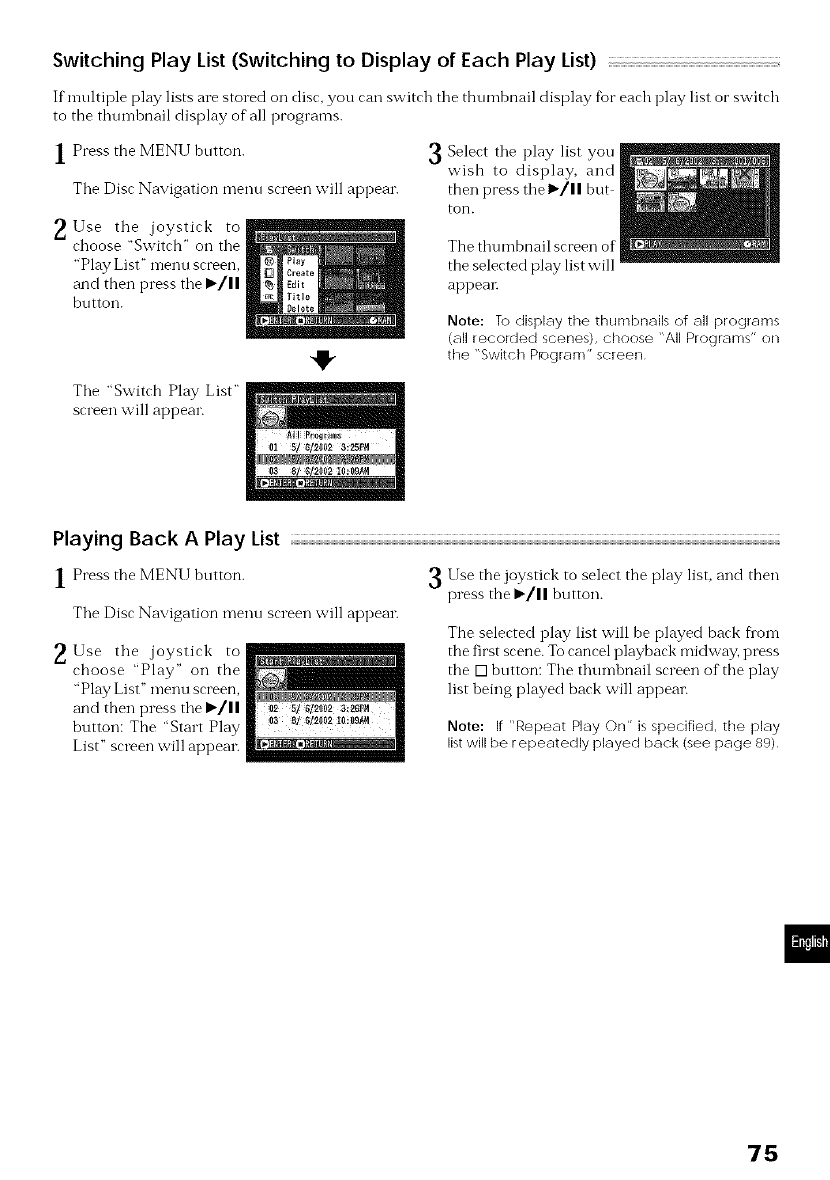
Switching Play List (Switching to Display of Each Play List)
If mnltiple play lists are stored on disc. you can switch tile thumbnail display fbr each play list or switch
to the tlmmbnail display of all programs.
1 Press the MENU button.
Tile Disc Navigation menn screen will appear.
_. Use tile joystick to
choose "Switch" oil tile
"Play List" menu screen,
and then press tile I_/1!
button.
!I-
Select tile play list you
wish to display, and
then press tile 1_/I I but
ton.
The thumbnail screen of
the selected play list will
appeal:
Note: To display the thunlbnails of all programs
(all recorded scenes), choose "All Programs" on
the "Switch Plogram" screen
Tile "Switch Play List"
screen will appear.
Playing Back A Play List
1Press the MENU button.
Tile Disc Navigation menu screen will appear.
_.Use the joystick to
cboose "Play" on the
"Play List" nlentl screen,
and then press tile I_/1! !_
button: The "Start Play m_°a 8l s,2002}e09at_
List" screen will appear. |_
1fse the joystick to select the play list, and then
press the _'/11 button.
The selected play list will be played back flora
the first scene. To cancel playback midway, press
tile [] button: Tile thumbnail screen of tile play
list being played back will appear.
Note: If "Repeat Play On" is specified, the play
list will be repeatedly played back (see page 89)
75
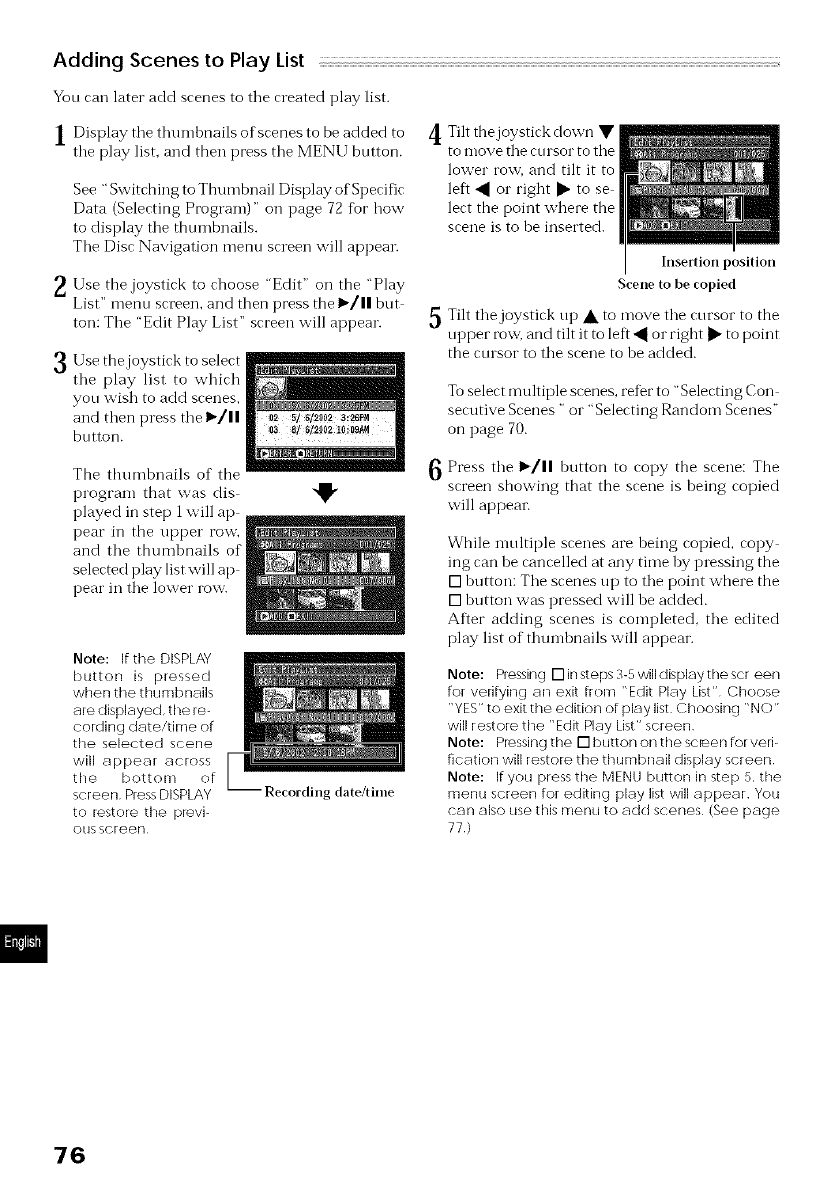
Adding Scenes to Play List
Yon carl later add scenes to the created play list.
1 Display the tlmmbnails of scenes to be added to
the play list, and then press the MENU button.
See "Switching to Thumbnail Display of Specific
Data (Selecting Program)" on page 72 fbr how
to display tile thumbnails.
Tile Disc Navigation menu screen will appear.
4 Tilt the joystick down •
to move the cursor to the
lower rox_; and tilt it to
left .,_ o1" right • to se
lect the point where the
scene is to he inserted.
_, Use the joystick to choose "Edit" on the "Play
List" menu screen, and then press the 1_/1| but
ton: The "Edit Play List" screen will appear.
Use the joystick to select
the play list to which
yon wish to add scenes.
and then press the !_/11
button.
The thumhnails of the
program that was dis
played in step 1will ap
pear in the upper row,
and the thumhnails of
selected play list will ap
pear in the lower row.
Note: If the DISPLAY
button is pressed
when the thumbnails
are displayed, the re-
cording date/time of
the selected scene
will appear across
the I->ott nm of
screen Press DISPLAY
to iestnre the pi÷vi-
ous screen
date/t ime
Insertion position
Scene to be copied
Tilt the joystick up • to move the cursor to the
upper row, and tilt it to left _ o1"right • to point
the cmsor to the scene to he added.
To select multiple scenes, refer to "Selecting Con
secutive Scenes " o1""Selecting Random Scenes"
on page 70.
6 Press the I_/11 button to copy the scene: The
screen showing that the scene is being copied
will appear.
While multiple scenes are being copied, copy
ing can be cancelled at any time by pressing the
[] button: The scenes up to the point where the
[] button was pressed will be added.
After adding scenes is completed, the edited
play list of thumhnails will appeai:
Note: Pressing []insteps34willclisplaythescr een
for verifying an exit from "Edit Play List" Choose
"YES" to exit the edition of play list Choosing "NO"
will restore the "Edit Play List" screen
Note: Piessing the [] button on the scleen for veri-
fication will restore the thurnbnail display screen
Note: If you press the MENU button in step 5, the
menu screen for editing play list will appear You
can also use this menu to add scenes (See page
77)
76
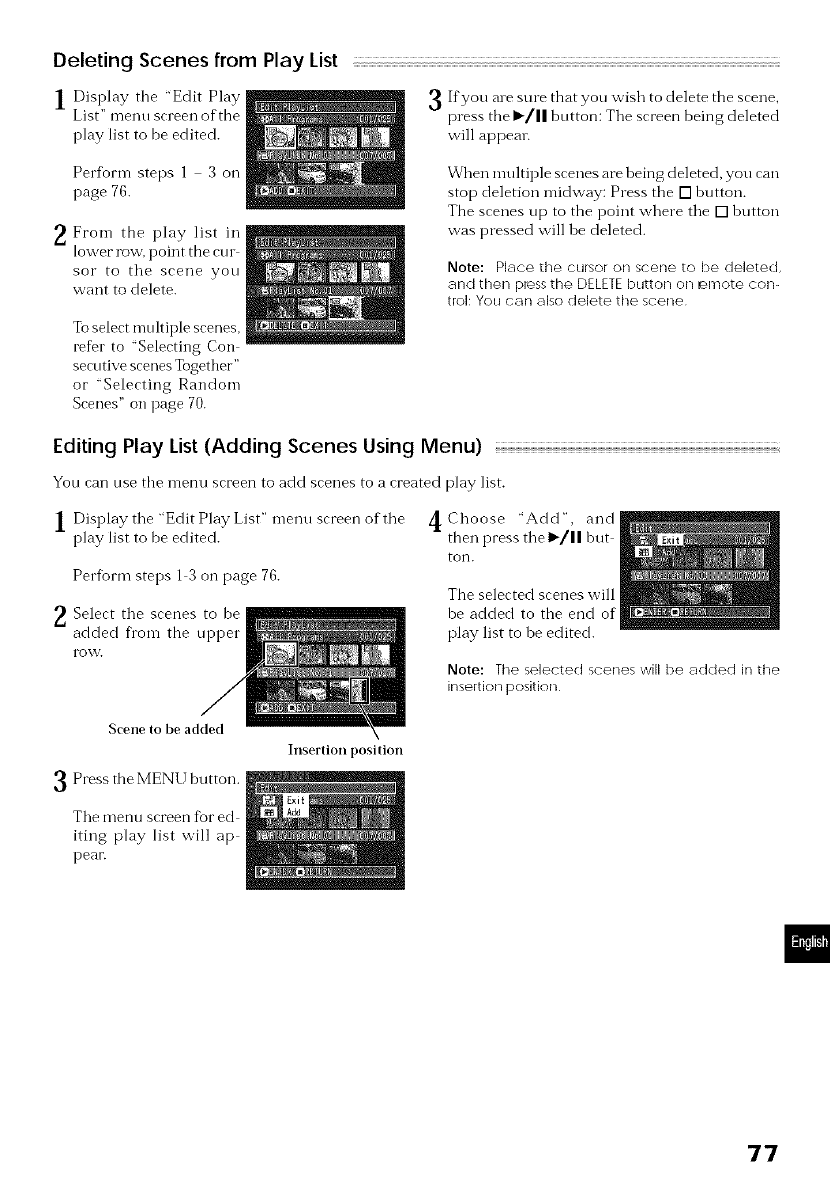
Deleting Scenes from Play List '
1 Display the "Edit Play 3 If you ale sure that you wish to delete the srene,
List" menu screen of the press the _/11 button: Tile screen being deleted
play list to be edited, will appeal.
Perform steps 1 3 oil
page 76.
_, From the play list in
lower row, point the cm
sor to the scene yon
want to delete.
To select multiple scenes,
refer to "Selecting Con
secutive scenes Together"
or "Selecting Random
Scenes" on page 70.
When multiple scenes are being deleted, you call
stop deletion midway: Press the [] hutton.
The scenes tip to the point where the [] hutton
was pressed will be deleted.
Note: Place tile cursor on scene to be deleted,
and then press the DELETE button on emote con-
trol: You can also delete the scene
Editing Play List (Adding Scenes Using Menu)
Yon can use the menu screen to add scenes to a created play list.
1 Display the "Edit Play List" menu screen of the 4
play list to be edited.
Perform steps 1 3 oil page 76.
Select the scenes to be
added flon-i the upper
rox, v.
Choose "Add", and
then press tile 1_/11 hut
ton.
The selected scenes will
he added to the end of
play list to be edited.
Note: Tile selected scenes will be added in the
insertion position
Scene to be added
Press the MENLTbutton.
The menu screen %r ed
iting play list will ap
pear.
Insertion position
77
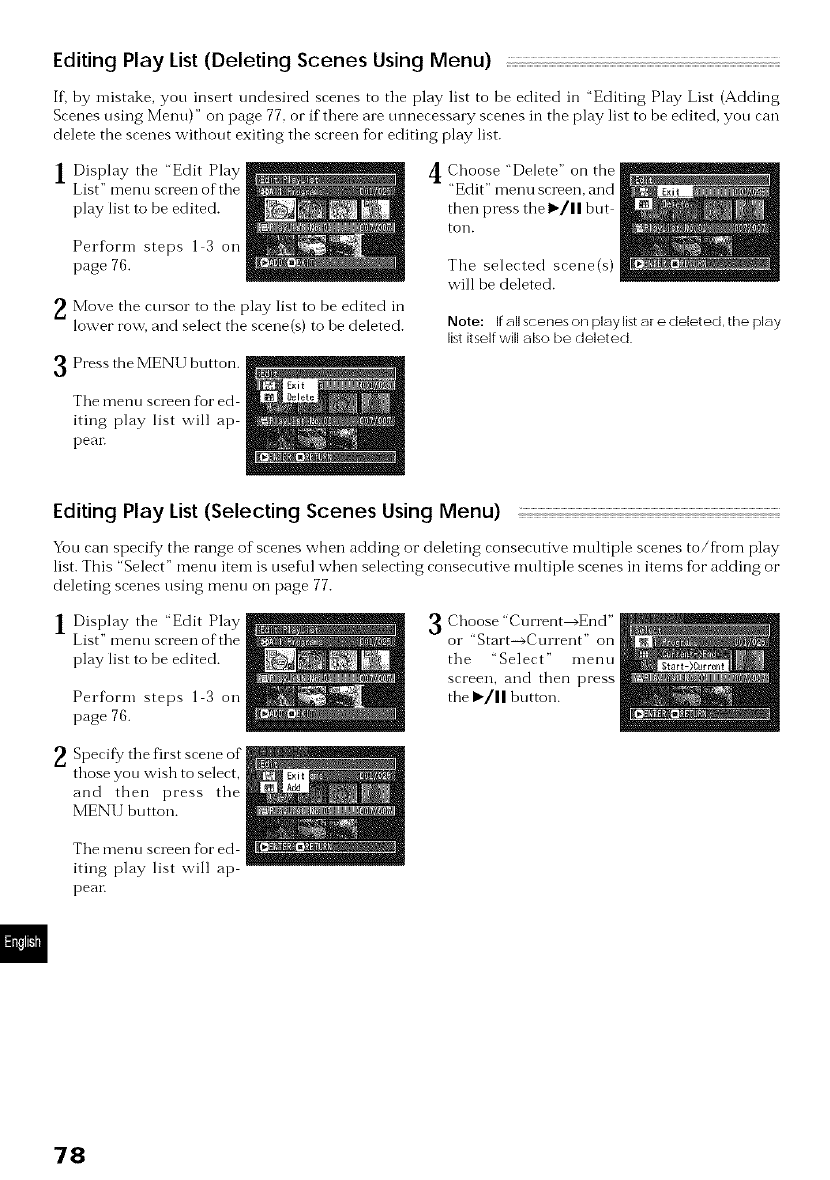
Editing Play List (Deleting Scenes Using Menu)
If, by mistake, yon insert undesiled scenes to the play list to be edited in "Editing Play List (Adding
Scenes nsing Menu)" on page 77. or if there are nnnecessa W scenes in the play list to be edited, yon can
delete the scenes without exiting the screen for editing play list.
1Display tile "Edit Play
List" menn screen of the
play list to be edited.
Perforn-i steps 1 3 oil
page 76.
Move the cmsor to tile play list to be edited in
lower row, and select the scene(s) to be deleted.
Press the MENU button.
Choose "Delete" on the
"Edit" menu screen, and
then press the ll_/I I bnt
toil.
Tile selected scene(s)
will be deleted.
Note: If all scenes on play listare deleted, the play
list itself will also be deleted
Tile menu screen for ed
iting play list will ap
peal:
Editing Play List (Selecting Scenes Using Menu)
Yon can specify the range of scenes when adding or deleting consecutive mnltiple scenes to/fl'om play
list. This "Select" menu item is nsefid when selecting consecntive nmltiple scenes in items for adding or
deleting scenes nsing menn oil page 77.
1Display the "Edit Play
List" menn screen of the
play list to be edited.
Perform steps 1 3 oil
page 76.
3 Choose "Current_End"
or "Start--_Current" on
tile "Select" menu
screen, and then press
the I_/|| button.
2 Specify tile first scene of
those you wish to select,
and then press tile
MENI f button.
Tile menn screen for ed
king play list will ap
peal:
"/8
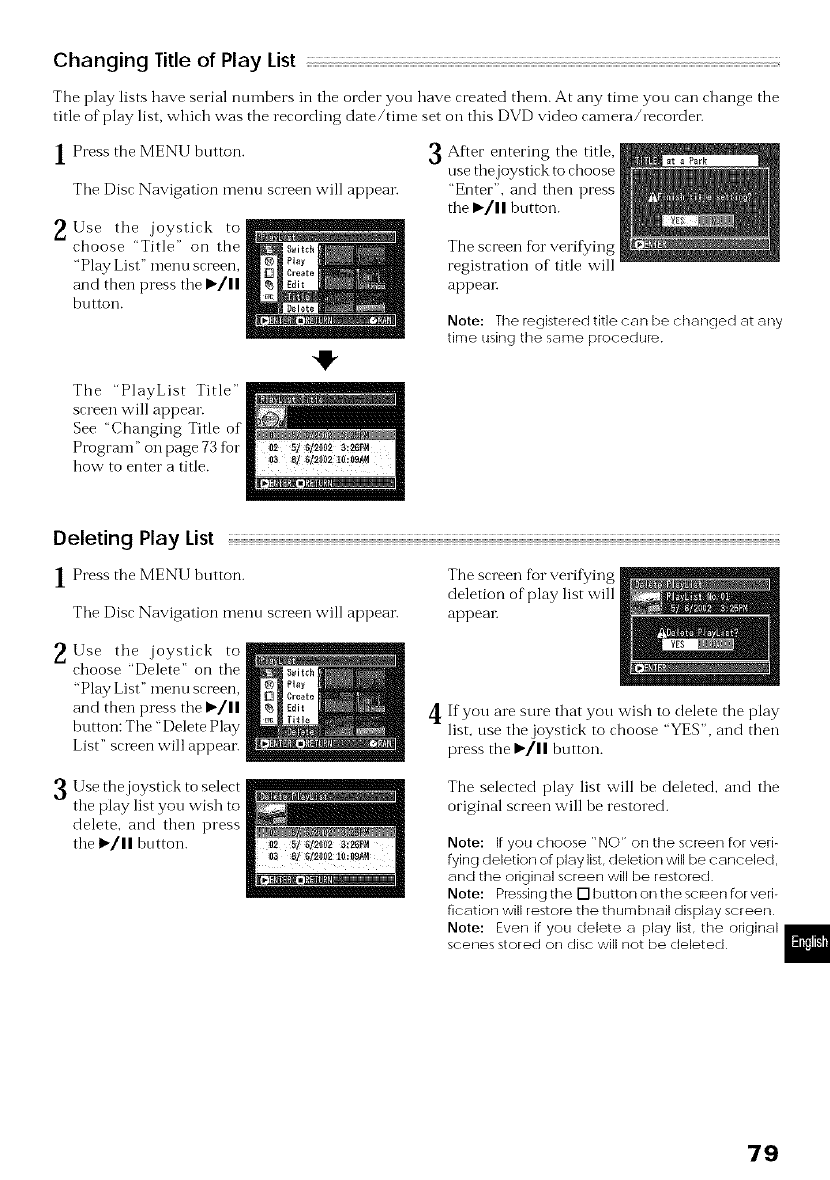
Changing Title of Play List
The play lists have serial numbers in the order you have created them. At any time you can change the
title of play list, which was the recording clate/time set on this DVD video camera/recorder.
1Press the MENU bntton. 3After entering the title,
nse the joystick to choose
Tile Disc Navigation menn screen will appear.
_.Use tile joystick to
choose "Title" on the
"Play List" menu screen,
and then press the I_/1!
button.
"Enter", and then press
the ,/! ! button.
The screen %1"verifying
registration of title will
appeal:
Note: The registered title can be changed at any
time using the same procedure
Deleting Play List
1 Press the MENU button.
The Disc Navigation menu screen will appear.
The screen %1"verif}?ing
deletion of play list will
appeal:
_.Use the joystick to
choose "Delete" on the
"Play List" menu screen,
and then press the "/11
button: The "Delete Play
List" screen will appear.
4If you are sure that yon wish to delete the play
list, use the joystick to choose "YES", and then
press the I_/|| button.
Use the joystick to select
the play list you wish to
delete, and then press
the _'/11 button.
The selected play list will be deleted, and the
original screen will be restored.
Note: If you choose "NO" on the scleen for veri-
fying deletion of play list, deletion will be canceled,
and the original screen will be restored
Note: Piessing the I] button on the sci÷en for veri-
fication will restore the thumbnail display screen
Note: Even if you delete a play list, the original
scenes stored on disc will not be deleted
79
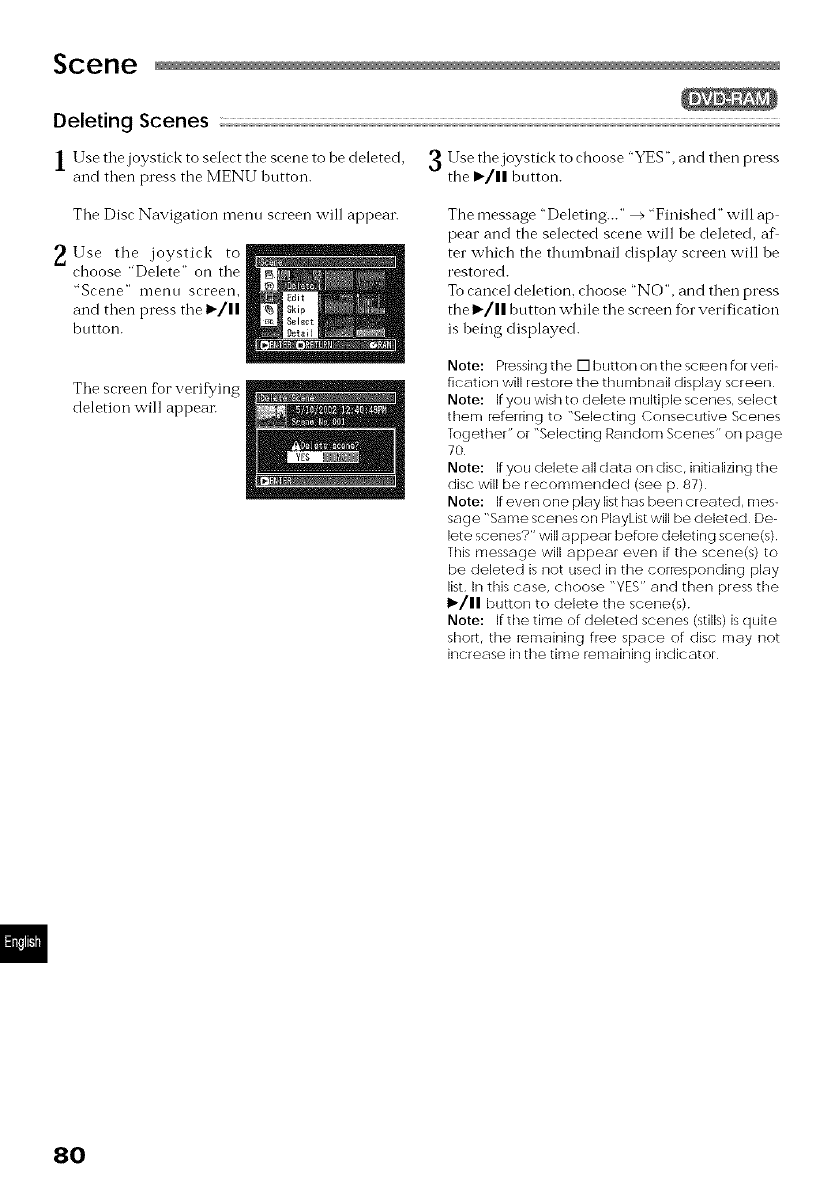
Scene
Deleting Scenes
1 Use the joystick to select the scene to be deleted, 3 l.Tse the joystick to choose "YES", and then press
and then press the MENU button, the I_/11 button.
Tile Disc Navigation menu screen will appear.
_. Use tile joystick to
choose "Delete" on tile
"Scene" nlenm screen,
and then press tile i_/11
button.
The message "Deleting..." _ "Finished" will ap
pear and the selected scene will be deleted, af
ter which the thumbnail display screen will be
restored.
Tocancel deletion, choose "NO". and then press
the l_/|l button while tile screen for verification
is being displayed.
The screen %r verifying
deletion will appeal:
Note: Plessing the rq button on the scleen for veri-
fication will restore the thuml->nail display screen
Note: If you wish to delete multiple scenes, select
them ieferring to "Selecting Consecutive Scenes
Together" or "Selecting Random Scenes" on page
70
Note: If you delete all data on disc, initializing the
disc will be recorr/nlended (see p 87)
Note: If even one play list has been created, mes-
sage "Same scenes on PlayList will be cieleted De-
lete scenes?" will appear before deleting scene(s)
This message will appear even if ttle scene(s) to
be deleted is not used in ttle conespondin9 play
list, In this case, choose "YES" and then press the
I_/11 button to delete the scene(s)
Note: If the time of deleted scenes (stills) isquite
short, the remaining free space of disc may not
increase in ttle time remaining indicator
8O
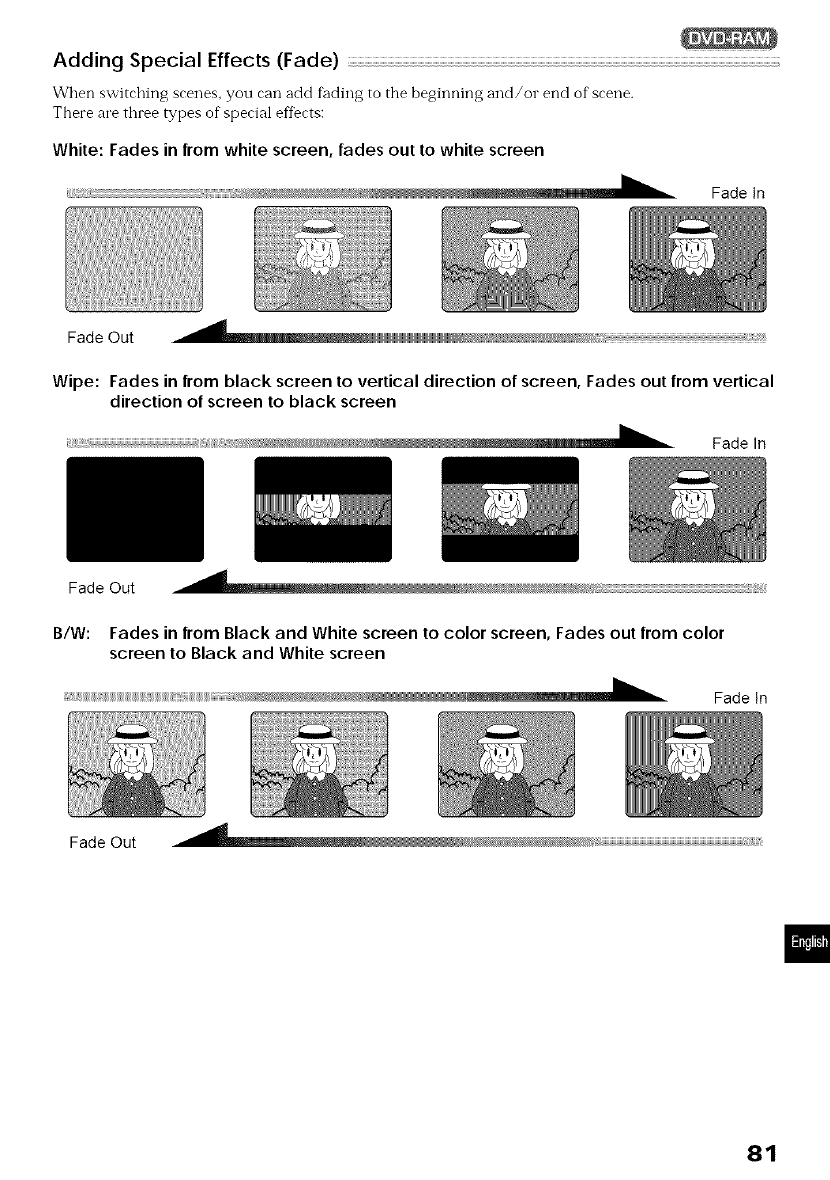
Adding Special Effects (Fade) ................................................................................................................................................................................................................................................................................................................................................................................
When switching scenes, you can add f_cling to the beginning and/or end of soerie.
There are three types of special effects:
White: Fades in from white screen, fades out to white screen
Fade In
Fade Out
Wipe: Fades in from black screen to vertical direction of screen, Fades out from vertical
direction of screen to black screen
Fade In
Fade Out
B/W: Fades in from Black and White screen to color screen, Fades out from color
screen to Black and White screen
Fade In
Fade Out
81
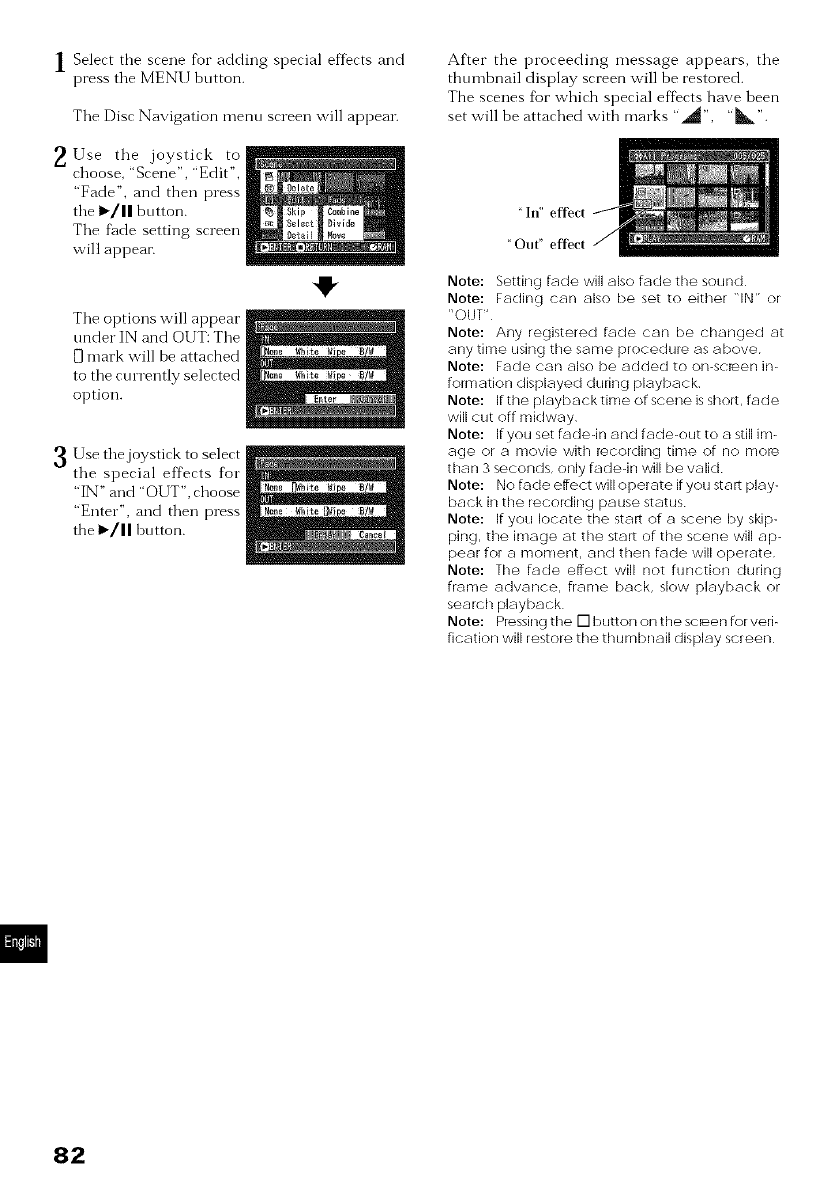
1 Select the scene for adding special effects and
press the MENU button.
Tile Disc Navigation menn screen will appear.
_.Use tile joystick to
choose, "Scene", "Edit ",
"Fade", and then press
tile I_/11 bntton.
Tile fhde setting screen
will appear.
Tile options will appear
under IN and OUT: Tile
mark will be attached
to tile ctn rently selected
option.
Use the joystick to select
the special effects for
"IN" and "OUT", choose
"Enter", and then press
the 1_/11 bntton.
After the proceeding message appears, the
thumbnail display screen will be restored.
The scenes fur which special effects have been
set will be attached with marks " ,_", "b_".
" hf' effect
" Our' effect
Note: Setting fade will also fade the sound
Note: Fading can also be set to either "IN" or
"OUI"
Note: Any registered fade cun be changed at
any time using the same procedure as above
Note: Fade can also be added to on-scieen in-
formation displayed during playback
Note: If the playback time of scene is short, fade
will Ctlt off midway
Note: If you set fade-in and fade-out tn a still im-
age or a movie with recording time of no more
than 3 secnnds, only fade-in will be valid
Note: No fade effect will operate if you start play-
back in the recoMing pause status
Note: If you locate the start of a scene by skip-
piny, the in]aye at the start of the scene will ap-
pear for a moment, and then fade will operate
Note: The fade effect will not function during
frame advance, frame back, slow playback or
search playback
Note: Piessiny the 17 button on the scleen for veri-
fication will restore the thumbnail display screen
82
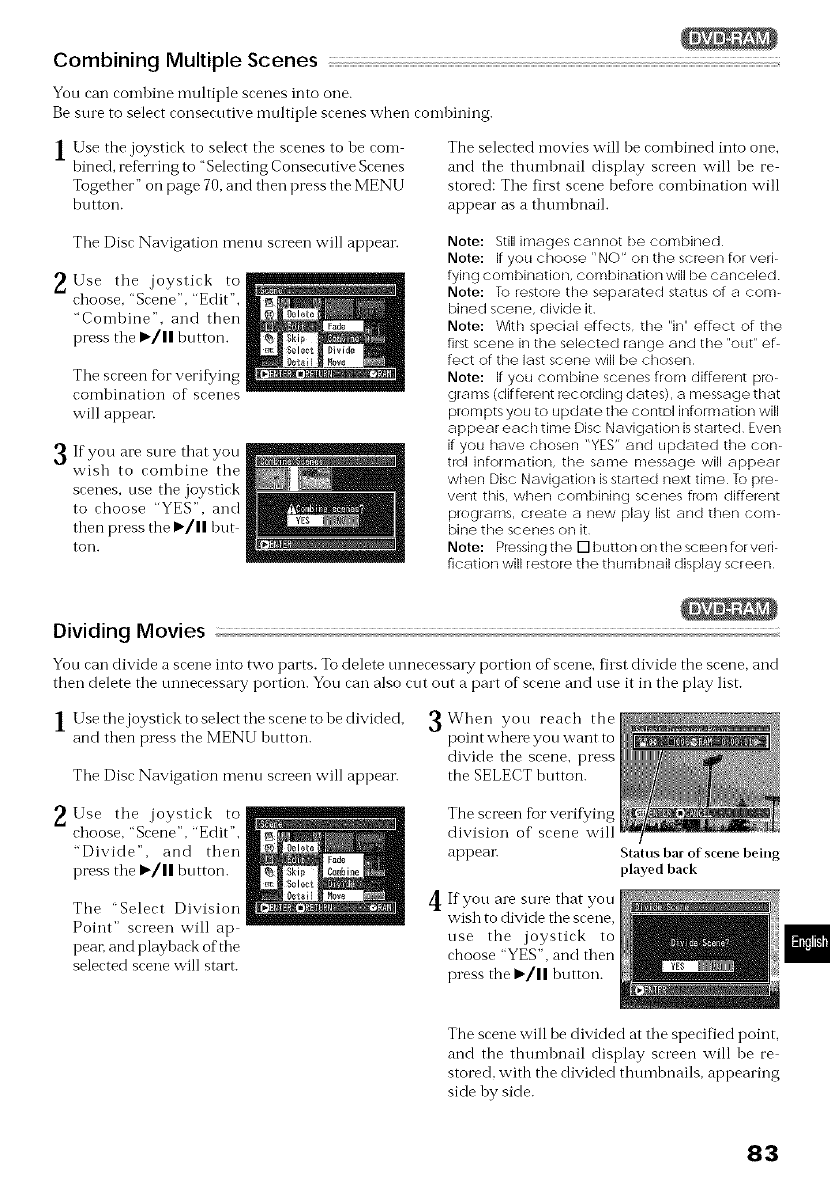
Combining Multiple Scenes
You ran rombine multiple srenes into one.
Be sure to select consecutive multiple scenes when combining.
1Use the joystick to select tile scenes to be corn
bined, reDrring to "Selecting Consecutive Scenes
Together" on page 70, and then press the MENU
button.
The selected movies will he combined into one,
and the thunll)nail display screen will be re
stored: Tile first scene before combination will
appear as a thtmll)naih
Tile Disc Navigation menu screen will appear.
_,Use tile joystick to
choose. "Scene". "Edit".
"Combine". and then
press tile I_/11 button.
Tile screen %r verifying
combination of scenes
will appear.
If are sure that
you yon
wish to combine tile
scenes, use tile joystick
to choose "YES", and
then press the I_/11 hut
toil.
Note: Still inlages cannot be combined
Note: If you choose "NO" on tile scI÷en for veri-
fying combination, combination will be canceled
Note: To restoi_ tile separated status of a tort>
bined scene, divide it
Note: With special effects, tile "in" effect of the
first scene in ttle selected range and tile "out" ef-
fect of the last scene will be chosen
Note: If you conlbine scenes from diffelent pro-
grams (diffei_nt recolding dates), a message that
prom pts you to update the control information will
appear each time Disc Navigation isstarted Ever]
if you have chosen "YES" and updated the con-
trol information, ttle same nlessage will appear
when Disc Navigation is started next time To pre-
vent this, when combining scenes from different
progranls, create a new play list and then com-
bine tile scenes on it
Note: Piessing the El button on the scleen for veri-
fication will restore tile thumbnail display screen
Dividing Movies
You ran divide a srene into two parts. To delete unneressary portion of srene, first divide the scene, and
then delete tile tmnecessary portion. You call also cut out a part of scene and use it ill tile play list.
1Use thejoystick to select tile scene to be divided,
and then press tile MENU button.
Tile Disc Navigation menu screen will appear.
'_When yon reach the
point where you want to
divide the scene, press
the SELECT button.
_,Use tile joystick to
choose, "Scene", "Edit",
"Divide", and then
press tile I_/|| button.
The "Select Division
Point" screen will ap
peat; and playback of the
selected scene will start.
The screen %r verif_?ing
division of scene will
appeal:
4 If yon are sure that you
wish to divide tile scene,
use the joystick to
choose "YES", and then
press the _'/11 button.
Status bar of scene being
played back
The scene will be divided at tile specified point,
and the thumbnail display screen will be re
stored, with the divided thumbnails, appearing
side by side.
83
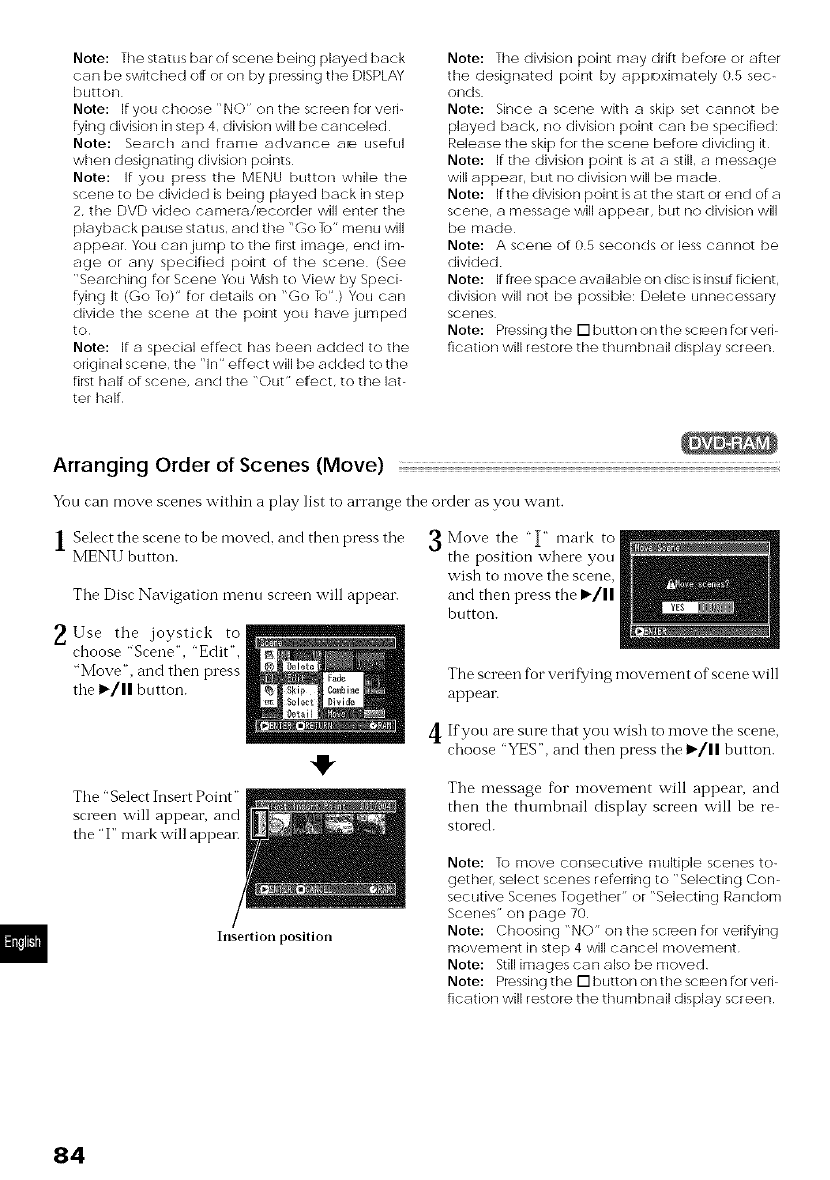
Note: The status bar of scene being played back
can be switched off or on by pressing the DISPLAY
button
Note: If you choose "NO" on the screen for veri-
fying division in step 4, division will be canceled
Note: Search and frame advance a_ usefld
when designating division points
Note: If you press the MENU button while the
scene to be divided is being played back in step
2, the DVD video camera/recorder will enter the
playback pause status, and ttle "Go To" menu will
appear You can jump to ttle first image, end im-
age or any specified point of ttle scene (See
"Searching for Scene You V_sh to View by Speci-
fying It (Go To)" for details on "Go To") You can
divide tile scene at ttle point you have jumped
to
Note: If a special effect has been added to tile
original scene, tile "In" effect will be added to ttle
filst half of scene, and ttle "Out" elect, to tile lat-
ter half
Note: The division point may drift before or after
tile designated point by appDximately 05 sec-
onds
Note: Since a scene with a skip set cannot be
played back, no division point can be specified:
Release the skip for tile scene befole dividing it
Note: If ttle division point is at a still, a message
will appear, but no division will be made
Note: Ifthedivision point is at the start or end of a
scene, a message will appear, but no division will
be made
Note; A scene of 05 seconds or less cannot be
divided
Note; If flee space available on disc isinsufficient,
division will not be possible: Delete unnecessary
scenes
Note; Plessing the i7 button on the scleen for veri-
fication will restore tile thumbnail display screen
Arranging Order of Scenes (Move)
You can move scenes within aplay list to arrange tile order as you want.
] Select tile scene to be moved, and then press tile
MENI J button.
Tile Disc Navigation mentl screen will appear.
2 Use tile joystick to
choose "Scene", "Edit ",
"Move", and then press
tile I_/1| button.
!I-
3 Move the "_" mark to
the position where you
wish to move tile scene,
and then press the il_/I I
hutton.
The screen for verifying movement of scene will
appear.
4 If you are sure that you wish to move tile scene,
choose "YES", and then press tile 1_/11 button.
Tile "Select Insert Point"
screen will appear, and
the "I" rnmk will appem:
Insertion position
Tile message for movement will appear, and
then the thumbnail display screen w'ill be re
stored.
Note: To move consecutive multiple scenes to-
gether, select scenes referring to "Selecting Con-
secutive Scenes Together" or "Selecting Random
Scenes" on page 70
Note: Choosing "NO" on the scleen for verifying
movement in step 4 will cancel movement
Note: Sdll images can also be moved
Note: Plessing the 17 button on the scleen for veri-
fication will restore the thumbnail display screen
84
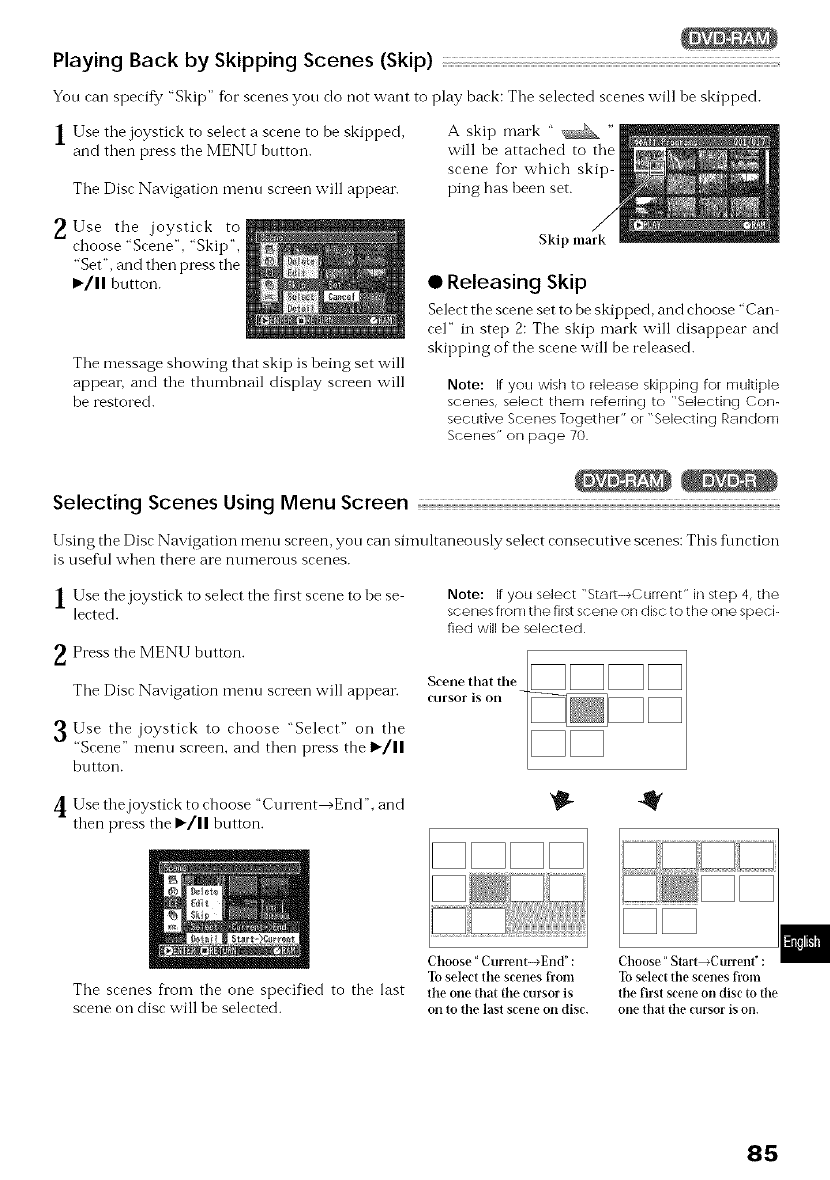
Playing Back by Skipping Scenes (Skip)
You can specify "Skip" for scenes you do not want to play back: Tile selected scenes will be skipped.
1Use the joystick to select a scene to be skipped,
and then press tile MENU button.
Tile Disc Navigation menu screen will appear.
A skip mark " _ "
will be attached to tile
scene for which skip
ping has been set.
_,Use tile joystick to
choose "Scene", "Skip",
"Set ", and then press tile
>'/II button.
Tile message showing that skip is being set will
appear, and tile thumbnail display screen will
be restored.
Skip mark
•Releasing Skip
Select tbe scene set to be skipped, and choose "Can
cel" in step 2: Tile skip mark will disappear and
skipping of the scene will be released.
Note: If you wish to release skipping for multiple
scenes, select them referring te 1'Selecting Con-
secutive Scenes Together" or "Selecting Random
Scenes" on page 70
Selecting Scenes Using Menu Screen .........................................................................................................................................................................................................................................................................................................................
Using the Disc Navigation menu screen, you can simultaneously select consecutive scenes: This fimction
is useful vv'hen tbere are euIllerous sceees.
1Use the joystick to select the first scene to be se
lected.
Press the MENU button.
Tile Disc Navigation menu screen will appear.
Note: If you select l'Start--_Current" hl step 4, the
scenes from tile first scene on disc to the one speci-
fied will be selected
Scene that tile
CUI'SOF is Oil
3Use tile joystick to choose "Select" on tile
"Scene" n-lenu screen, and then press the 1_/||
button.
4 Use the joystick to choose "Current_End', and
then press the I'/11 button.
It
Tile scenes fi'om tile one specified to the last
scene on disc will be selected.
Choose" Current--+End" :
To select ttle scenes fi'om
ttle one that ttle cursor is
on to the last scene on disc.
Choose" Start_Current" :
Toselect the scenes fi'om
the first scene on disc to the
one that the cursor is on.
85
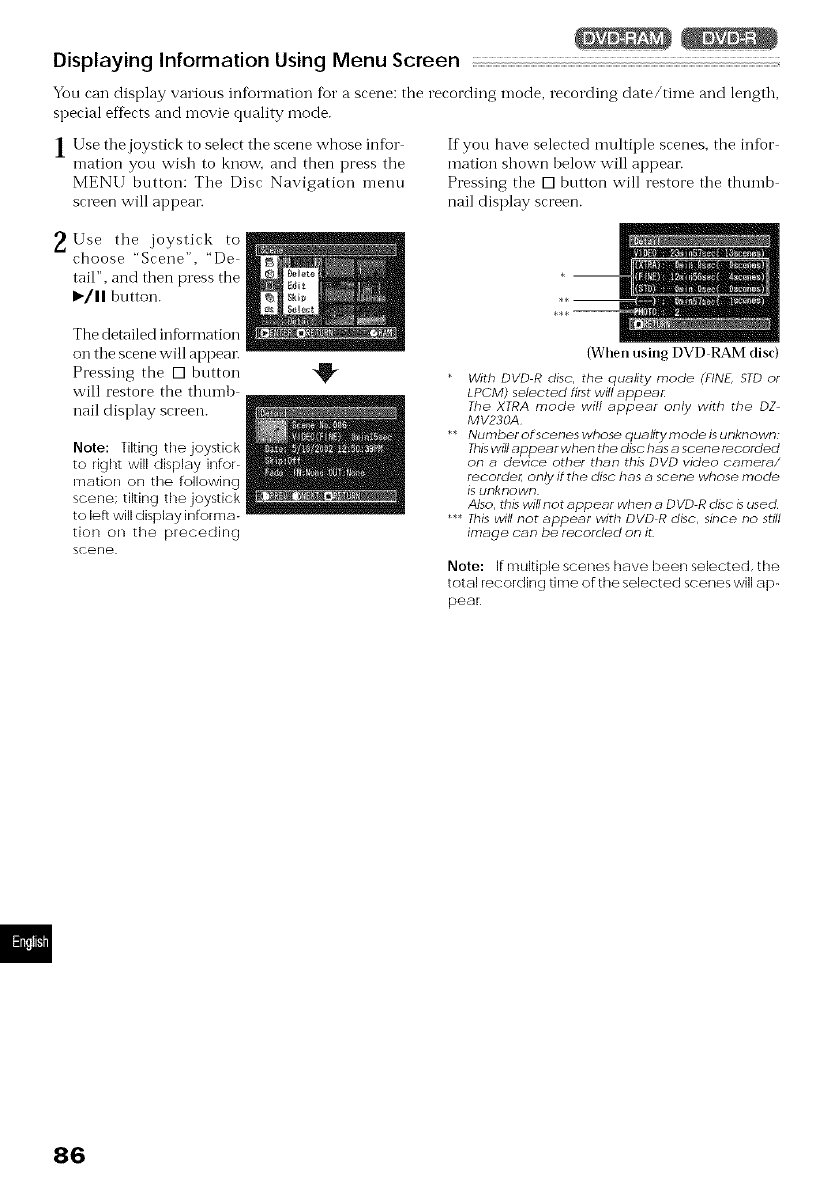
Displaying Information Using Menu Screen
Yon can display various in%rmation fbr a scene: the recording mode, recording date/time and length,
special effects and n-lovie quality mode.
1Use the joystick to select tile scene whose infor
marion yon wish to know, and then press tile
MENU hutton: The Disc Navigation menu
screen will appear.
If yon have selected multiple scenes, the infor
mation shown below will appear.
Pressing the [] button will restore the thumb
nail display screen.
2 Use the joystick to
choose "Scene", "De
tail", and then press the
i_/ll hutton.
The detailed infbrmation
on the scene will ai)peal:
Pressing the [] button
w'ill restore the tlmmb
nail display screen.
Note: Tilting tile joystick
to right will display infor-
mation on tile following
scene; tilting the joystick
to left will display informa-
tion nil ttle preceding
scene
(When using DVD RAM disc)
With DVD R disc, the quality mode (FINE,STD or
LPCM) selected filst will appea_:
The XTRA mode will appear only with the DZ-
MV230A
*Numbel of scenes whose duality mode is unknown:
This will appear when the disc has a scene recol cled
on a dedce other than this DVD video camera/
recordel; only it the disc has a scene whose mode
is unknown
Also, tt}is will not appear when a D VD R disc is used
This will not appear with DVD R disc, since no still
image can be recorded on iL
Note: If multiple scenes have I->een selected, t he
total recordinc I time of tile selected scenes will ap-
pear
86
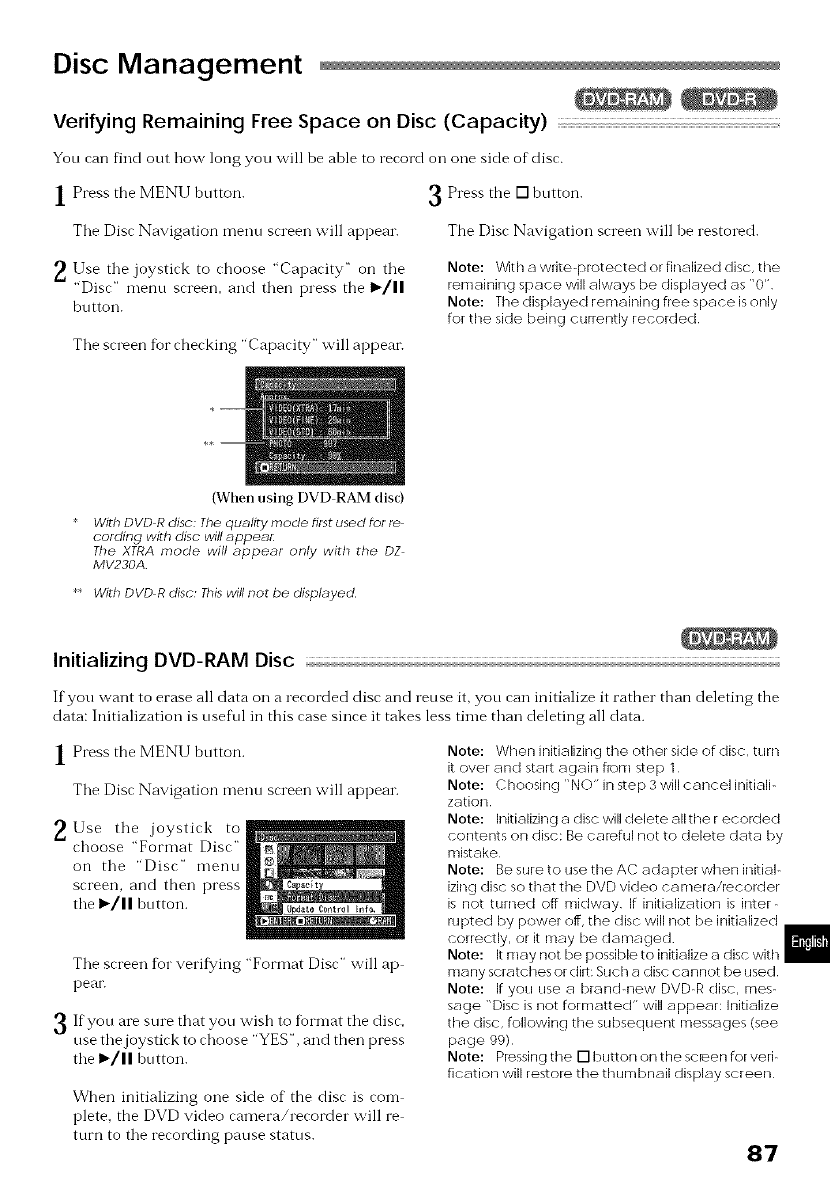
Disc Management
Verifying Remaining Free Space on Disc (Capacity)
Yon can find out how long you will be able to record oil one side of disc.
1 Press the MENU button. 3 Press the [] button.
Tile Disc Navigation menn screen will appear. The Disc Navigation screen will be restored.
_Use the joystick to choose "Capacity" on the
"Disc" menn screen, and then press the 1_/11
button.
Tile screen %r checking "Capacity" will appear.
(When using DVD RAM disc)
Note: Wit h a write-protected or finalized disc, the
remaining space will always be displayed as "0"
Note: The displayed remaining free space is only
for tile side being currently recorded
With DVD R disc: The quality mode filst used for Ie
cording with disc will appear
The XTRA mode will appear only with the DZ
MI/230A
** With DVD R disc' This will not be displayed
Initializing DVD-RAM Disc
If you want to erase all data on a recorded disc and reuse it, yon call initialize it rather than deleting the
data: Initialization is nseful in this case since it takes less time than deleting all data.
1Press the MENU button.
Tile Disc Navigation menu screen will appear.
_. Use tile joystick to
choose "Format Disc"
on tile "Disc" menu
screen, and then press
tile 1_/11hntton.
The screen for verifying "Format Disc" will ap
pear.
3 If yon are sure that yon wish to forn-lat tile disc,
use the joystick to choose "YES", and then press
tile I_/|| hntton.
When initializing one side of the disc is con-i
plete, the DVD video camera/recorder will re
turn to tile recording pause stares.
Note: When initializing the other side of disc, turn
it over and start again from step 1
Note: Choosing "NO" in step 3 will cancel initiali-
zation
Note: Initializing a disc will delete all the r ecolded
contents on disc: Be caleful not to delete data by
mistake
Note: Be sure to use the AC adapter when initial-
izing disc so that tile DVD video canrera/recorder
is not turned off midway If initialization is inter-
rupted by power off, the disc will not be initialized
correctly, or it may be damaged
Note: It may not be possible to initialize a disc with
many scratches or dirt: Such a disc cannot be used
Note: If you use a brand-new DVD-R disc, mes-
sage "Disc is not fan-hatted" will appear: Initialize
tile disc, following tile stJbsequent messages (see
page 99)
Note: Piessing the N button on the scleen for veri-
fication will restore tile thumbnail display screen
87
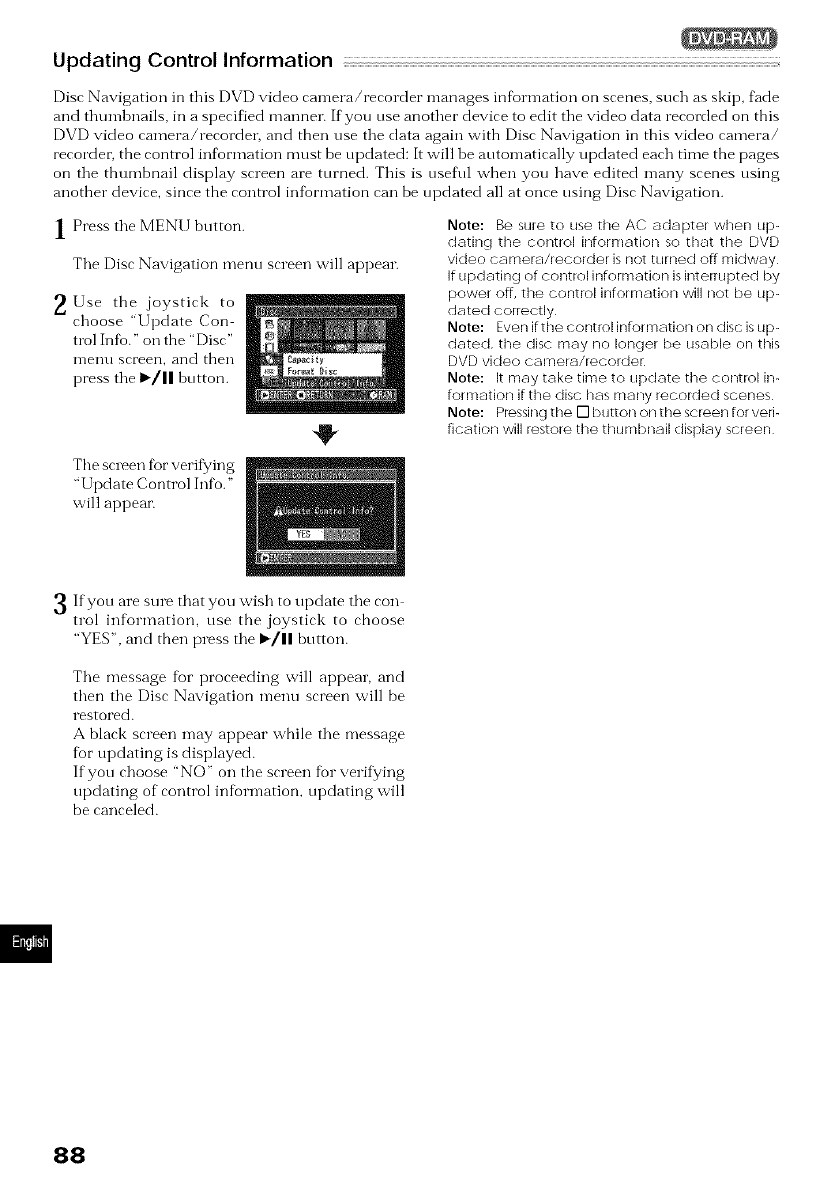
Updating Control Information
Disc Navigation in this DVD video camera/recorder manages information on scenes, such as skip, fhde
and thumbnails, in a specified manner. If you use another device to edit tile video data recorded on this
DVD video camera/recorder, and then use tile data again with Disc Navigation in this video camera/
recorder, the control information must be updated: It will be automatically updated each time the pages
on tile thumbnail display screen are turned. This is useful when you have edited many scenes using
another device, since the control information can be updated all at once tlsing Disc Navigation.
1Press the MENU button.
Tile Disc Navigation menu screen will appear.
_.Use the joystick to
choose "Update Con
trol Info." on the "Disc"
n-lenu screelrl_alrld then
press tile !_/|| button.
Note: Be sure to use the AC adapter when up-
dating tile control information so that ttle DVD
video camera/recorder is not turned off midway
If updating of control information isinterrupted by
power off, tile control infon-nation will not be up-
dated correctly
Note: Even if the control information on disc is up-
dated, tile disc may no longer be usable on this
DVD video camera/recordel
Note: It may take time to update tile control in-
fon-nation if tile disc has many recorded scenes
Note: Piessing the 17 button on the screen for veri-
fication will restore tile thumbnail display screen
The screen for verifying
"Update Control Info."
will appear.
3If you are sure that you wish to update tile con
trol informatiom use the joystick to choose
"YES", and then press the I_/ll button.
Tile message %r proceeding will appear, and
then tile Disc Navigation menu screen will be
restored.
A black screen may appear while tile message
for updating is displayed.
If you choose "NO" on the screen for verifying
updating of control infiormation, updating will
be canceled.
88
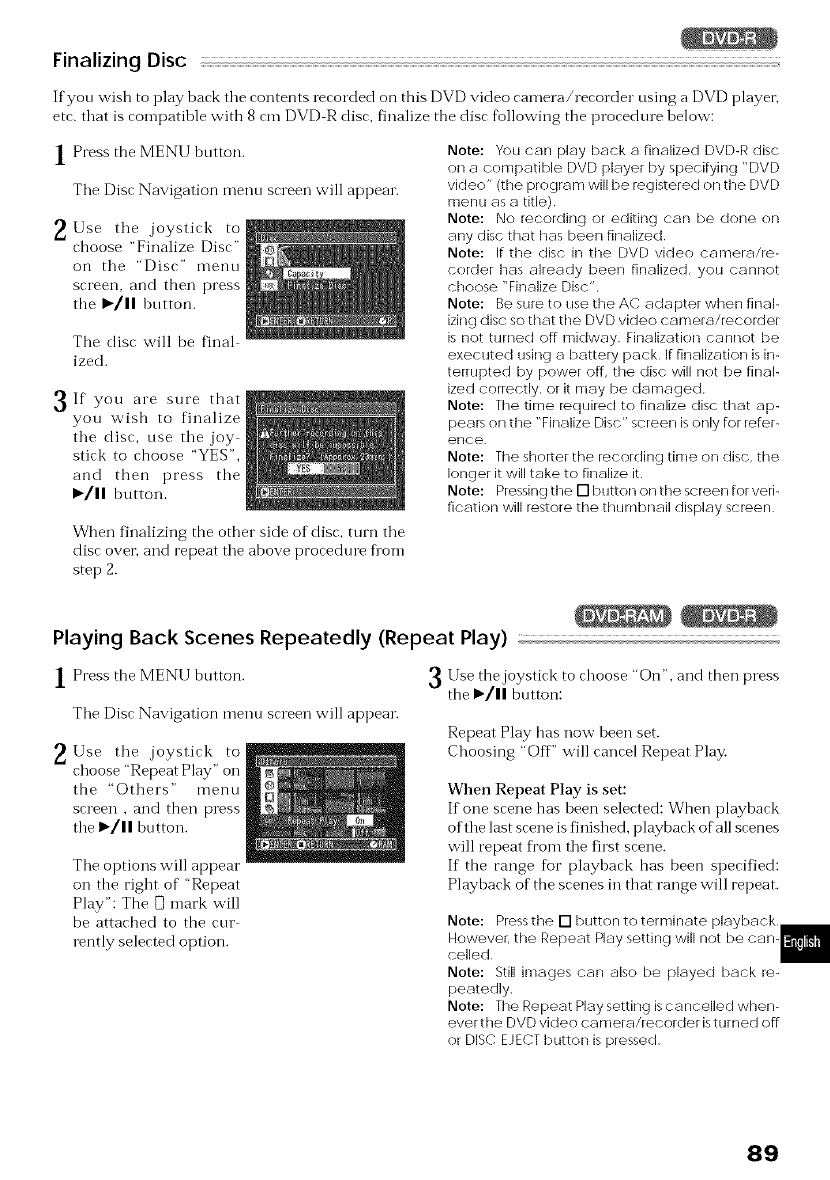
Finalizing Disc
If yon wish to play back tile contents recorded on this DVD video camera/recorder using a DVD player,
etc. that is comi)atible with 8 cm DVD R disc, finalize the disc following the procedure below:
1Press the MENU bntton.
Tile Disc Navigation menn screen will appear.
_.Use tile joystick to
choose "Finalize Disc"
on tile "Disc" menu
screen, and then press
tbe I_/11 button.
The disc will be final
ized.
If are sure that
you
you wish to finalize
the disc, nse the joy
stick to choose "YES",
and then press the
I_/11 buttoI'_.
When finalizing the other side of disc, turn the
disc over_ and repeat the above procedure flora
step 2.
Note: You can play back a finalized DVD-R disc
on a compatiMe DVD player by specifying "DVD
video" (the program will be registered on the DVD
menu as a title)
Note: No recording or editing can be done on
any disc that has been finalized
Note: If the disc in the DVD video can]era/re-
corder has already been finalized, you cannot
choose "Finalize Disc"
Note: Be sure to use the AC adapter when final-
izing disc so that tile DVD video camera/recorder
is not turned off midway Finalization cannot be
executed using a battery pack If finalization is in-
terrupted by power off, the disc will not be final-
ized correctly, or it may be damaged
Note: The time iequired to finalize disc that ap-
peals on the "Finalize Disc" screen is only for refer-
ence
Note: The shorter the recording time on disc, the
longer it will take to finalize it
Note: Pressing the i-I button on the screen for veri-
fication will restore tile thumbnail display screen
Playing Back Scenes Repeatedly (Repeat Play)
1Press the MENU button.
The Disc Navigation menn screen will appear.
_,Use the joystick to
choose "Repeat Play" on
the "Others" menu
screen • and then press
the _/11 bntton.
The options will appear
on tbe right of "Repeat
Play": The Q mark will
be attached to the cur
rently selected option.
3 Use the joystick to choose "On", and then press
the I_/|! button:
Repeat Play bas now been set.
Choosing "Off" will cancel Repeat Play.
When Repeat Play is set:
If one scene has been selected: When playback
of the last scene is finished, playback of all scenes
will repeat from the first scene.
If the range fur playback has been specified:
Playback of tbe scenes in tbat range will repeat.
Note: Press the N button to terminate playback
Howevei, the Repeat Play setting will not be can-
celled
Note: Still images can also be played back re-
peatedly
Note: The Repeat Play setting is cancelled when-
ever the DVD video camera/recorder istubed off
or DISC EJECT button is pressed
89
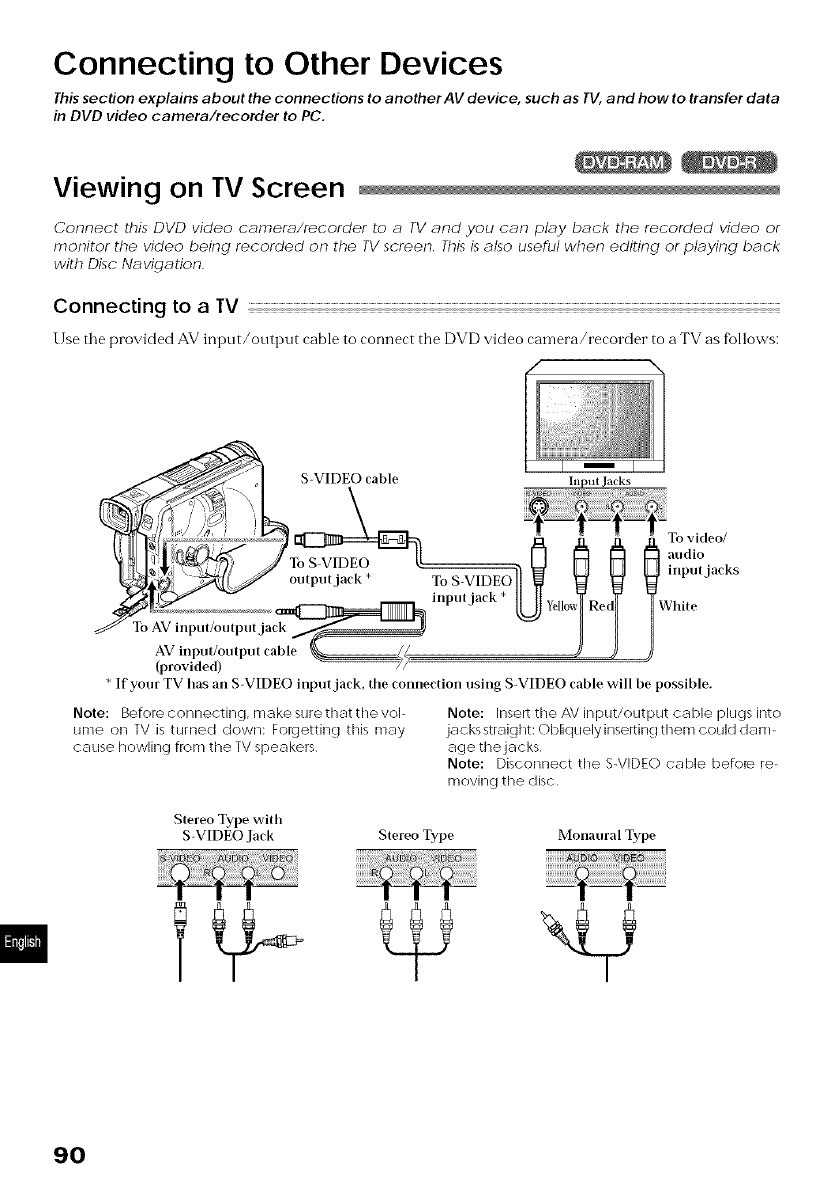
Connecting to Other Devices
This section explains about the connections to another AV device, such as TV, and how to transfer data
in DVD video camera/recorder to PC.
Viewing on TV Screen
Connect this DVD video camera/recorder to a TV and you car? play back the recorded video or
monitor the video being recorded or? the TV screen This isalso useful when editing or playing back
with Disc Navigation
Connecting to a TV ...........................................................................................................................................................................................................................................................................................................................................................................................................................................................................
Use tile provided AV input/output cable to connect the DVD video camera/recorder to a TV as fbllows:
(provided)
* If your TV bas all S-VIDEO inl)Ut jack, tire connection using S-VIDEO cable will be possible.
Note: Before connecting, make sure that t he vol-
ume on TV is turnecl down: Folgetting this may
cause howling from the IV speakers
Note: insert the AV input/output cable plugs into
jacks straight: Obliquely insertinct them could dam-
age the jacks
Note: Disconnect the S-VIDEO cable befole re-
rr/ovhTcj the disc
Stereo Type witb
S-VI[/EO Jack Stereo Type Monaural Type
9O
Viewing on TV Screen
Use tile provided AV input/output cable to connect tbe DVD video camera/recorder to a TV as %llows:
1Turn tile TV on and set the input selector to
"VCR" whichever applicable Video input.
Refer to tile TV instruction manual for how to
switch the TV input.
2 Set tile power switch to "_ VIDEO" or
"_ PHOTO" to tnrn the DVD video camera/
recorder Oil.
The image that the DVD video camera/recorder
is seeing will appear on the TV screen. You can
also monitor tbe image on tbe LCD screen or
viewfinder of the DVD video camera/recorden
3 Perform playback o1" recording.
Ttun down TV volnme in record mode, or %ed
back could resnlt.
Note: The infrared remote control is useful when
operatinc t the DVD video camera/recorder while
viewing an image on IV screen HoweveL if you
use a Hitachi VCR, the remote control may inad-
vertently operate the VCR if it is near the DVD video
camera/recorder To prevent this, set the remote
control code of the VCR to a position other than
"VCR2"
Note: Infomration that the DVD video camera/
recorder isrecording will appear on the IV screen:
You can also display only part of information or
switch off the display Refer to "Switching On-
Screen Display Output On or Off" on page 62, and
press tile DISPLAY button to switch the display sta-
tus
Note: When copy-guarded disc is played back,
no image will appear on IV screen
Note: If you use IV with wide mode (aspect ratio
16:9) and set the IV to tile wide mode, tile Disc
Navigation screen may malfunction If this hap-
pens, release the wide mode setting on IV (see
the TV instruction manual for releasing the wide
mode)
91
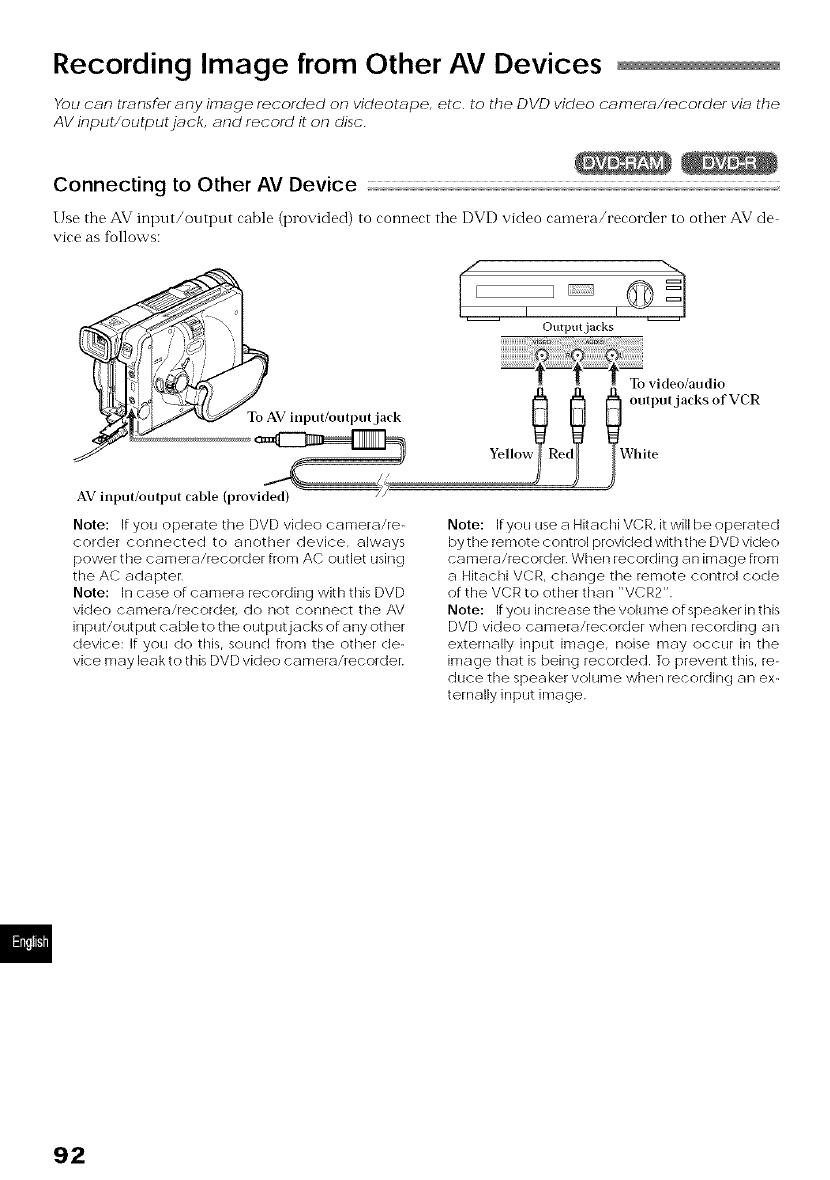
Recording Image from Other AV Devices
You cEm trEmsfer Emy irnE_ge recorded on videotE_pe, etc to the DVD video cE_mer_/recorder viE_the
AV input/output jack, and record it on disc
Connecting to Other AV Device
Use the AV input/outpnt cable (provided) to connect tile DVD video camera/recorder to other AV de
vice as fbllows:
AV input/outl)ut cable (provided)
Note: If yotl operate the DVD video camera/re-
corder connected to another device, always
power the camera/recorder from AC outlet using
the AC adapter
Note: In case of camera recording with this DVD
video camera/recordeL do not connect the AV
input/output cable to the output jacks of any other
device: If you do this, sound from the other de-
vice may leak to this DVD video camera/recorder
Note: If you use a Hitachi VCR, it will be operated
by the remote control provided with the DVD video
camera/recorder When recording an image from
a Hitachi VCR, change the remote control code
of the VCR to other than "VCR2"
Note: If you inclease the volume of speaker in this
DVD video camera/recorder when recording an
externally input image, noise may occur in the
image that is being recorded To prevent this, re-
duce the speaker volume when recording an ex-
ternally input image
92
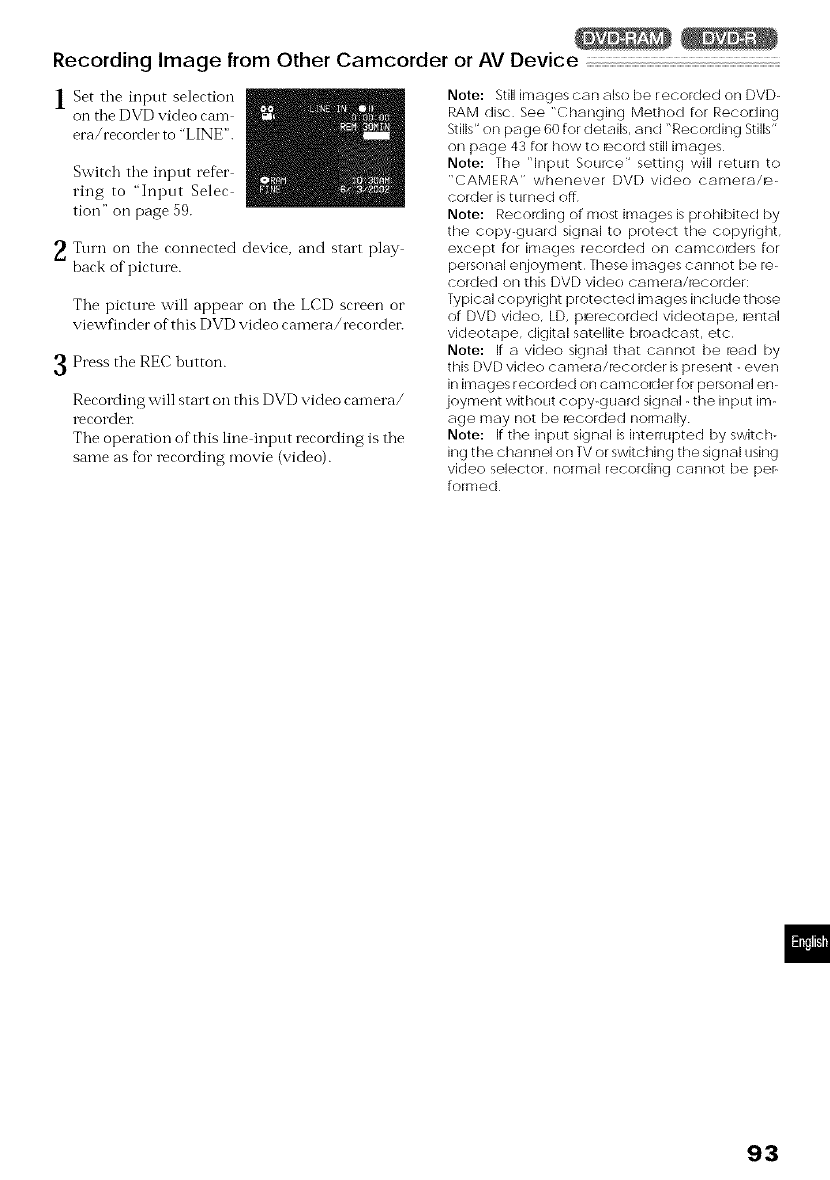
Recording Image from Other Camcorder or AV Device
1Set tile input selection
on tile DVD video cam
era/recorder to "LINE".
Switch tile input refer
ring to "Inpnt Selec
tion" on page 59.
Ttun on tile connected device, and start play
back of picttu e.
Tile pictnre will appear on tile LCD screen or
viewfinder of'this DVD video camera/recorder.
Press tile REC button.
Recording will start on this DVD video camera/
recordel_
The operation of this line input recording is the
same as for recording movie (video).
Note: Still images can also be recorded on DVD-
RAM disc See "Changing Method for Recoding
Stills" on page 60 for details, and "RecoMing Stills"
on page 43 for how to _cokJ still images
Note: The "Input Source" setting will return to
"CAMERA" whenever DVD video camera/_-
corder is turned off
Note: Recolding of most irnages is prohibited by
the copy-guard signal to protect the copyright,
except for images recorded on camcolders for
personal enjoyment These images cannot be re-
corded on this DVD video camera/iecorder:
Typical copyright protected images include those
of DVD video, LD, p_recorded videotape, rental
videotape, digital satellite broadcast, etc
Note: If a video signal that cannot be lead by
this DVD video camera/iecorder is present - even
in images recorded on camcokJer for pelsonal en-
joyrnent without copy-guard signal - the input im-
age may not be iecorded nolmally
Note: If the input signal is iiTterrupted by switch-
ing the channel on TV or switching the signal using
video selector, normal recording cannot be peF
formed
93
Cautions when connecting DVD video
camera/recorder to PC
Do not plug in or unplug any cables when
you are using PC to access the disc in the
DVD video camera/recorder:
• If you plug in or unplug tbe PC" connection ca
ble oc power cable while the CHARGE/ACCESS
indicator is blinking, the data oil disc may be
damaged.
Ihe mode for connection to PC does not
function in the following cases:
•When DVD video canmra/recorder is turned ofi'_
• When no disc is in DVD video camera/recordel:
Ihe icon displayed on PC will be CD-ROM
in the following cases:
• When a DVD RAM disc or DVD R disc is not
set in DVD video camera/recorder.
• When an unformatted DVD RAM disc or a disc
other than UDF f}0rmatted is in DVD video cam
era/recorder.
• When a DVD R disc is not finalized.
The mode for connection to PC may not
function in the following cases:
• When a DVD RAM disc formatted oil a device
other than this DVD video camera/recorder is
inserted.
• When DVD video camera/recorder is connected
via IdSB HUB.
• When a USB device other than this DVD video
camera/recorder is connected to the same USB
bt/s.
The PC connection cable must be un-
plugged and then plugged in again when
using the mode for connection to PC in the
following cases:
• When the connected PC is set to suspended sta
tUS.
The following cannot be performed on this
DVD video camera/recorder when it is
connected to PC:
• Camera operation, using button oil DVD video
cai_lera/recorder.
• Power ofT, using tile power switch.
The following functions are not supported:
• Writing ordinary file other than AV data.
• Writing and reading to/Dora the disc in DVD
video camera/recorder at the same time.
• Compression of drive or disc utility program.
• Writing to disc, using an application other than
that provided in PC kit.
• Formatting disc fi'om PC.
In addition, take note of the following:
• The recording mode, playback status, special
eftbcts, or title displayed on this DVD video cam
era/recorder, will not be transferred to PC.
• The volume name of the DVD RAM disc initial
ized on this DVD video camera/recorder will
be displayed oil PC as "Dvd camera": tile vol
ume name of tile DVD RAM disc initialized on
a device other than this DVD video camera/re
corder will confkmn to tile specifications of tile
previous initializing device.
• Do not use the DVD video camera/recorder in
an environment of high temperatures for an ex
tended period of time.
• UseanunfbrmattedDVD R disc to record data
fl'om PC on this DVD video camera/recorder.
• When recording data fl'om PC on DVD RAM
disc using this DVD video camera/recordei, al
ways use a brand new DVD RAM disc or a
DVD RAM disc formatted on this DVD video
Call-lera/recordei_
94
Capturing Data for PC
You cEm cE_ptur÷ the d_tE_ recorded on this DVD video cE_mer_/recorder E_ndtr_msfer it to PC
Using DZ-WINPC3(W) PC kit
Using the DZ WINPC3(W) optional PC kit, you can capture tile data of images recorded oil this DVD
video camera/recorder and transfer it to your PC.
You can also write video data edited on the PC to disc. See the instruction manual ofDZ WINPC3(W) PC
kit for details.
There are numerous types of PC, including those personally assembled. Hitachi will occasionally
update compatibility information on Internet for PCs with which the PC kit can be operated: See
"Conditions fur using DZ WINPC3(W) PC kit" shown below and information on Internet, for whether
or not the PC kit can be used with your PC.
• Conditions for using DZ-WINPC3(W)
PC kit
To connect the DVD video camera/recorder to PC
using the DZ WINPC3(W) PC kit, the PC must sat
isf_¢the fbllowing conditions:
• Windows 98, 98 Second Edition, Me, 2000, or XP
• IBM PC/AT compatible
• USB port equipped in standard
• CD ROM or DVD ROM drive equipped
• PC kit should include the follow-
ing:
• PC ronnertion rable
• Device chiver software for the DVD video cam
era/recorder
• UDF2.01 file system (InstantWrite)
• Software using still images (Photo Explorer)
• DVD Authoring sofiware (DVD Movie Factory)
• DVD playhack software (PowerDVD XP)
95
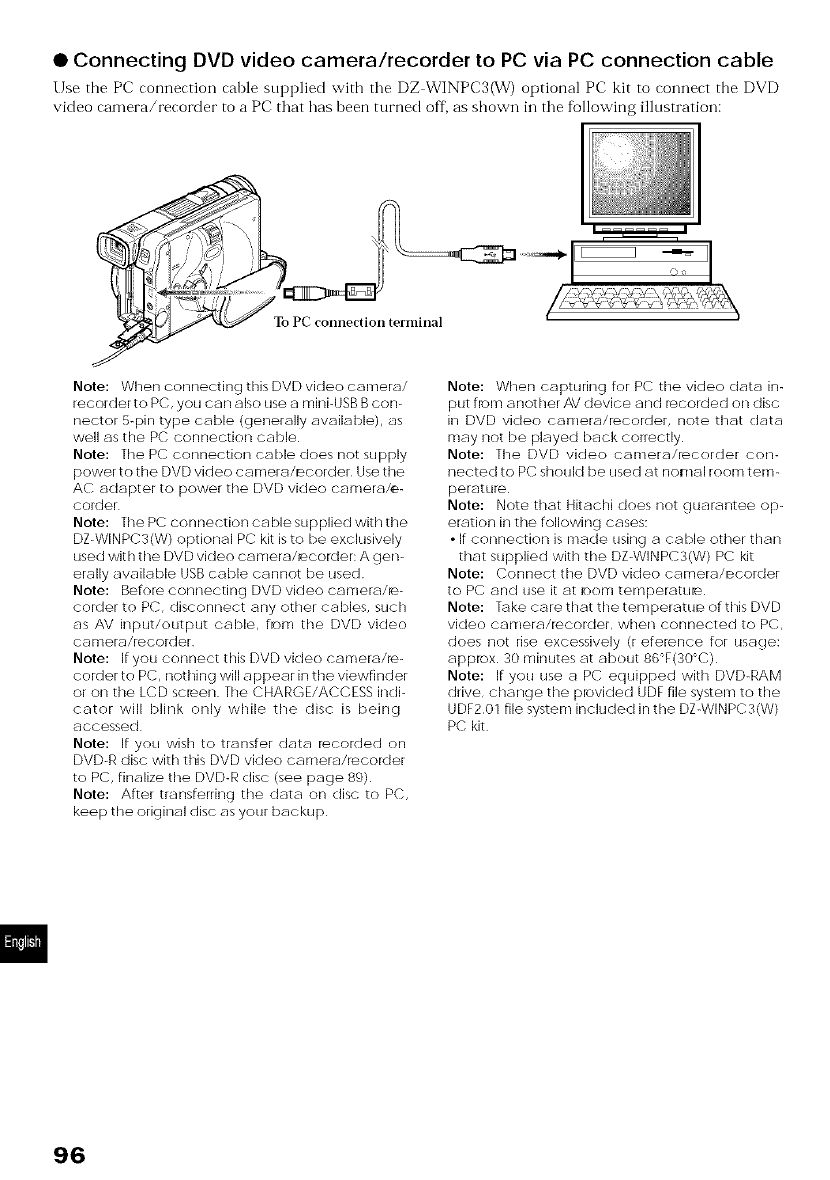
• Connecting DVD video camera/recorder to PC via PC connection cable
Use the PC connection cable supplied with tile DZ WINPC3(W) optional PC kit to connect the DVD
video camera/recorder to a PC that has been turned off, as shown in tile following illustration:
To PC connection terminal
Note: When connecting this DVD video camera/
recorder to PC, you can also use a minbUSB B con-
nector 5-pin type cable (generally available), as
well as the PC connection cable
Note: The PC connection cable does not supply
power to the DVD video camera/recorder Use tile
AC adapter to power the DVD video camera/e-
corder
Note: The PC connection ca ble supplied with the
DZ-WINPC3(W) optional PC kit isto be exclusively
used with tile DVD video carnera/_oolder: A gen-
erally available USB cable canner be used
Note: Before connecting DVD video carnera/ie-
corder to PC, disconnect any other cables, such
as AV input/output cable, flora tile DVD video
c_-lFnerf-l/recorder
Note: If you connect this DVD video camera/Ie-
corder to PC, nothing will appear in tile viewfinder
or oil tile LCD sci÷en Tile CHARGE/ACCESS indi-
cator will blink only while tile disc is being
accessed
Note: If you wish to transfer data iecorded on
DVD-R disc with this DVD video camera/reookJer
to PC, finalize tile DVD-R disc (see page 89)
Note: After transferring tile data on disc to PC,
keep tile original disc as your backup
Note: When capturing for PC tire video data in-
put flora another AV device and iecorded on disc
in DVD video carnera/iecorder, note that data
may not be played back correctly
Note: Tile DVD video camera/iecorder con-
nected to PC should be used at nomal room tern-
perature
Note: Note that Hitachi does not guarantee op-
eration in the following cases:
• If connection is made using a cable other than
that supplied with tile DZ-WlNPC3(W) PC kit
Note: Connect tile DVD video camera/Bcorder
to PC and use it at leom temperature
Note: Take care that the temperature of this DVD
video camera/iecorder, when connected to PC,
does not rise excessively (r efelence for usacte:
app_ox 30 minutes at about 86 F(30_C)
Note: If you use a PC equipped with DVD-RAM
drive, change tile plovided UDF file system to tile
UDE2 0l file system included in tile DZ-WINPC3(W)
PC kit
96
Using Disc on PC
If your PC;is rompatible with the disr used, you ran immediately use a disc relnoved horn the cartridge
or caddy on PC.
• Making use of recorded still
images (with DVD-RAM disc only)
Still images are stored in the "DCIM" "100HPNX1"
foMer of disc as ]PEG images (1280× 960 pixels oil
DZ MV230A, o1" 1024 x 768 pixels on DZ
MV200A)*. Use the still images on an application
tbat is compatible with JPEG data.
* Stills from another AV device are JPEG images
(640× 480 pixels).
• Making use of recorded movies
•When using DVD RAM disc
Movies will be recorded confbrming to DVD
video recording standard.
The DVD RAM disc can be used on PCs that sat
isfy the following conditions:
Compatible with 4.7 GB DVD RAM disc
Equipped with DVD RAM (RAM/R) drive tbat
is compatible with 8 cm disc
UDF2.01 file system installed
When playing back or editing a DVD RAM disc
on the PC, use the application software tbat con
forms to the DVD video recording standard.
• When using DVD R disc
Movies will be recorded conforming to DVD
video standm d.
The DVD R disc can be used on PCs that are
eqtfipped with one of the following chives:
DVD ROM drive compatible with 8 cm disc
DVD RAM(RAM/R) drive compatible witb 8
cm disc
DVD R/RW drive compatible with 8 cm disc
When playing back or editing a DVD R disc on
the PC, use the application software that con
forms to the DVD video standard.
Note: If you wish to write the images edited on
PC to a brand-new DVD-R disc, do not format the
new disc on this DVD video camera/recordei
Note: If you wish to use a DVD-R disc recorded
on this DVD video camera/recokJer directly on PC,
finalize the disc on the DVD video camera/re-
corder (see page 89)
Note: Writing of the images edited on PC ca n be
written to DVD-RAM or DVD-R disc However, writ-
ing may not be possible, dependinc t on the com-
bination of PC and DVD-RAM or DVD-R disc
97
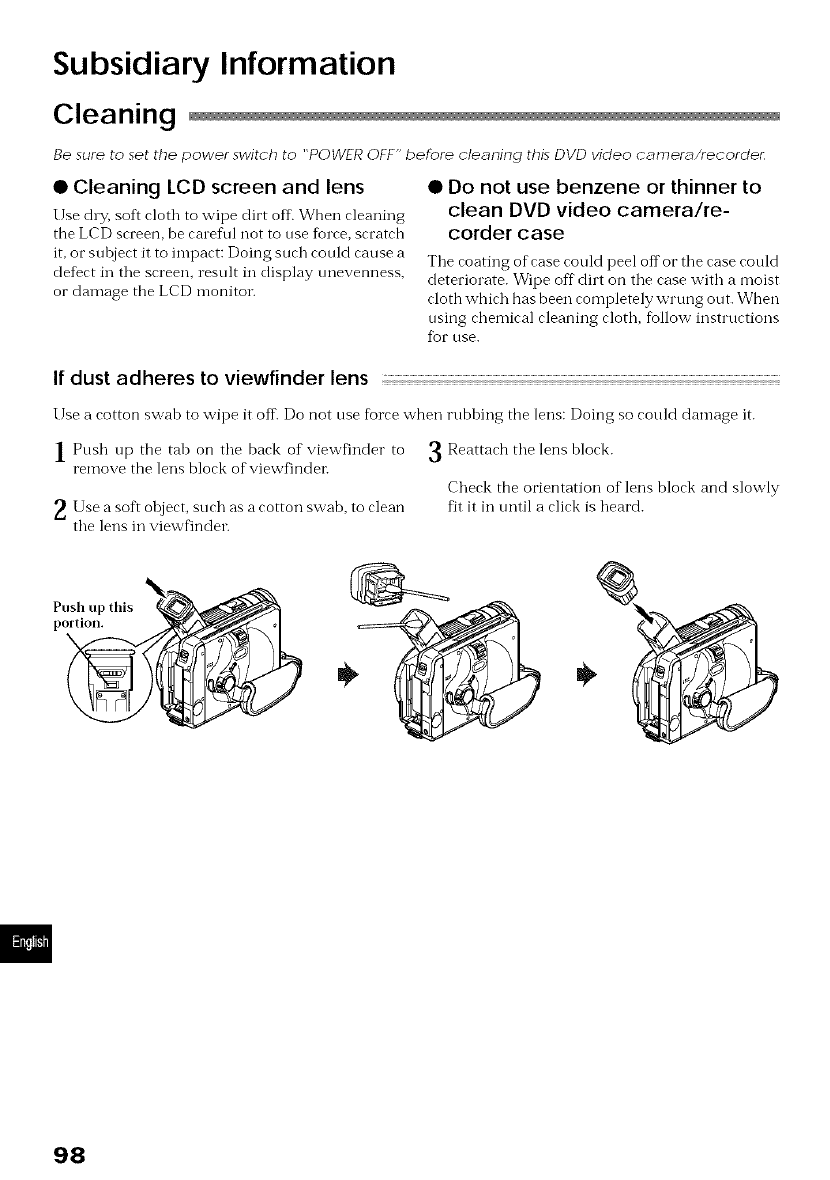
Subsidiary Information
Cleaning
Be sure to set the power switch to "POWFR OFF" before cleEming this DVD video cE_mer_Jrecorder:
• Cleaning LCD screen and lens
Use chT, soft rloth to wipe dirt off. When (leaning
the LCD screen, be careful not to use %rce, scratch
it, or suhject it to impact: Doing such could cause a
defect in the screen, result in display unevenness,
or damage the LCD monitor.
• Do not use benzene or thinner to
clean DVD video camera/re-
corder case
The coating of case could peel offor the case could
deteriorate. Wipe off"dirt on the case with a moist
cloth which has been completely wrung out. When
using chemical cleaning cloth, fbllow instructions
flat rise.
If dust adheres to viewfinder lens
Use a cotton swah to wipe it off. Do not use %rce when rubbing the lens: Doing so could damage it.
I Push up the tab on the back of viewfinder to
remove the lens block of viewfindel:
_Use a soft object, such as a cotton swab, to clean
the lens in viewfinder.
Reattach the lens hlock.
Check the orientation of lens block and slowly
fit it in tmtil a click is heard.
98
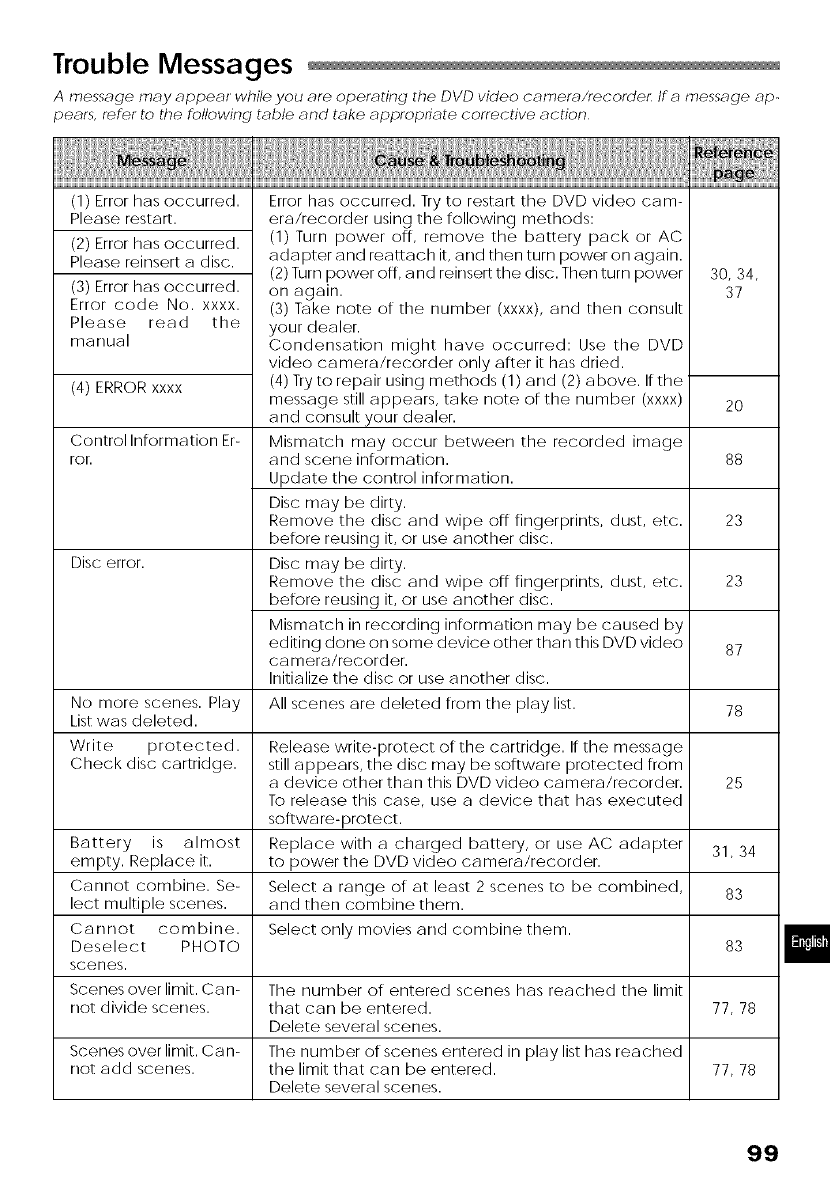
Trouble Messages
A message may appear while you are operating the DVD video camera/recorder: If amessage ap-
pears, refer to the following table and take appropriate corrective action
(1) Error has occurred.
Please restart.
(2) Error has occurred.
Please reinsert a disc,
(3) Error has occurred,
Error code No. xxxx.
Please read the
manual
(4) ERROR xxxx
Control Information Er-
ror.
Disc error.
Error has occurred. Try to restart the DVD video cam-
era/recorder using the following methods:
(1) Turn power off, remove the battery pack or AC
adapter and reattach it, and then turn power on again.
(2) Turn power off, and reinsert the disc. Then turn power
on again.
(3) Take note of the number (xxxx), and then consult
your dealer.
Condensation might have occurred: Use the DVD
video camera/recorder only aRer it has dried.
(4) Try to repair using methods (1) and (2) above. If the
message still appears, take note of the number (xxxx)
and consult your dealer.
Mismatch may occur between the recorded image
and scene information.
Update the control information.
Disc may be dirty,
Remove the disc and wipe off fir/gerprints, dust, etc.
before reusing it, or use another disc,
Disc may be dirty,
Remove the disc and wipe off fir/gerprints, dust, etc.
before reusing it, or use another disc,
Mismatch in recording information may be caused by
editing done on some device other than this DVD video
camera/recorder.
Initialize the disc or use another disc,
30, 34,
37
2O
88
23
23
87
78
No more scenes. Play All scenes are deleted from the play list.
List was deleted,
Write protected, Release write-protect of the cartridge, If the message
Check disc cartridge, still appears, the disc may be software protected from
a device other than this DVD video camera/recorder. 25
To release this case, use a device that has executed
software-protect.
Battery is almost Replace witha charged battery, or useAC adapter 31, 34
empty, Replace it. to power the DVD video camera/recorder.
Cannot combine, Se- Select a range of at least 2 scenes to be combined, 83
lect multiple scenes, and then combine them.
Cannot combine, Select only movies and combine them,
Deselect PHOTO 83
scenes.
Scenes over limit. Can- The number of entered scenes has reached the limit
not divide scenes, that car/be entered. 77, 78
Delete several scenes.
Scenes over limit. Ca n- The number of scenes entered in play list has reached
not add scenes, the limit that can be entered. 77, 78
Delete several scenes.
99
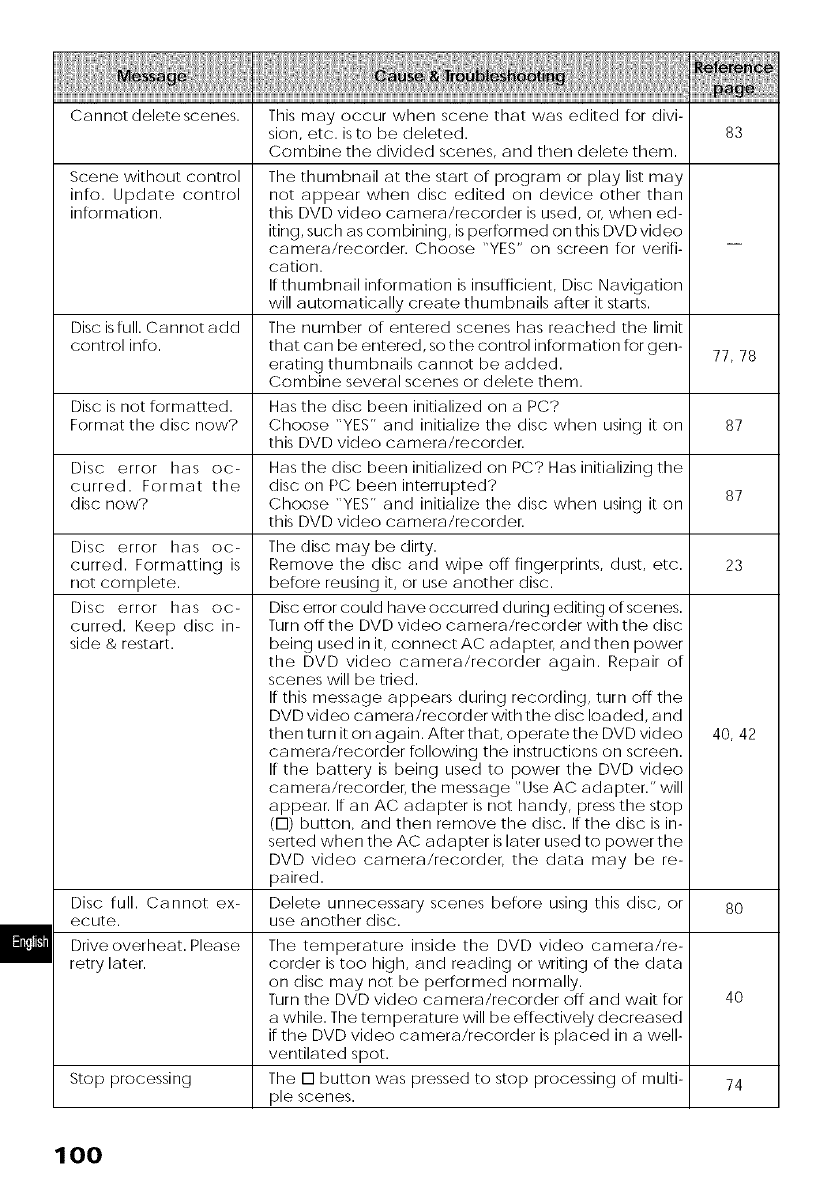
Cannot delete scenes. 83
Scene without control
info. Update control
information.
Disc isfull. Cannot add
control info. 77, 78
Disc is not formatted.
Format the disc now? 87
Disc error has oc-
curred. Format the
disc now? 87
23
Disc error has oc-
curred. Formatting is
not complete.
Disc error has oc-
curred. Keep disc in-
side & restart.
Disc full. Cannot ex-
ecute.
Drive overheat. Please
retry later.
40, 42
This may occur when scene that was edited for divi-
sion, etc. is to be deleted.
Combine the divided scenes, and then delete them.
The thumbnail at the start of program or play list may
not appear when disc edited on device other than
this DVD video camera/recorder is used, or, when ed-
iting, such as combining, isperformed on this DVD video
camera/recorder. Choose "YES" on screen for verifi-
cation.
If thumbnail information is insufficient, Disc Navigation
will automatically create thumbnails aRer it starts.
The number of entered scenes has reached the limit
that car/be entered, so the control information for gen-
erating thumbnails cannot be added.
Combine several scenes or delete them.
Has the disc been initialized on a PC?
Choose "YES" and initialize the disc when using it on
this DVD video camera/recorder.
Has the disc been initialized on PC? Has initializing the
disc on PC been interrupted?
Choose "YES" and initialize the disc when using it on
this DVD video camera/recorder.
The disc may be dirty.
Remove the disc and wipe off fir/gerprints, dust, etc.
before reusing it, or use another disc.
Disc error could have occurred during editing of scenes.
Turn off the DVD video camera/recorder with the disc
being used in it, connect AC adapter, and then power
the DVD vide() camera/recorder again. Repair of
scenes will be tried.
If this message appears during recording, turn off the
DVD video camera/recorder with the disc loaded, and
then turn it on again. After that, operate the DVD video
ca mera/recorder R)llowing the instructions on screen.
If the battery is being used to power the DVD video
camera/recorder: the message "Use AC adapter." will
appear. If an AC adapter is not handy, press the stop
(N) button, and then remove the disc. If the disc is in-
serted when the AC adapter islater used to power the
DVD vide() camera/recorder: the data may be re-
paired.
Delete unnecessary scenes before using this disc, or
use another disc.
The temperature inside the DVD video camera/re-
corder istoo high, and reading or writing of the data
on disc may not be performed normally.
Turn the DVD video camera/recorder off and wait for
a while. The temperature will be effectively decreased
if the DVD video camera/recorder is placed in a well-
ventilated spot.
The [] button was pressed to stop processing of multi-
ple scenes.
8O
4O
Stop processing 74
lO0
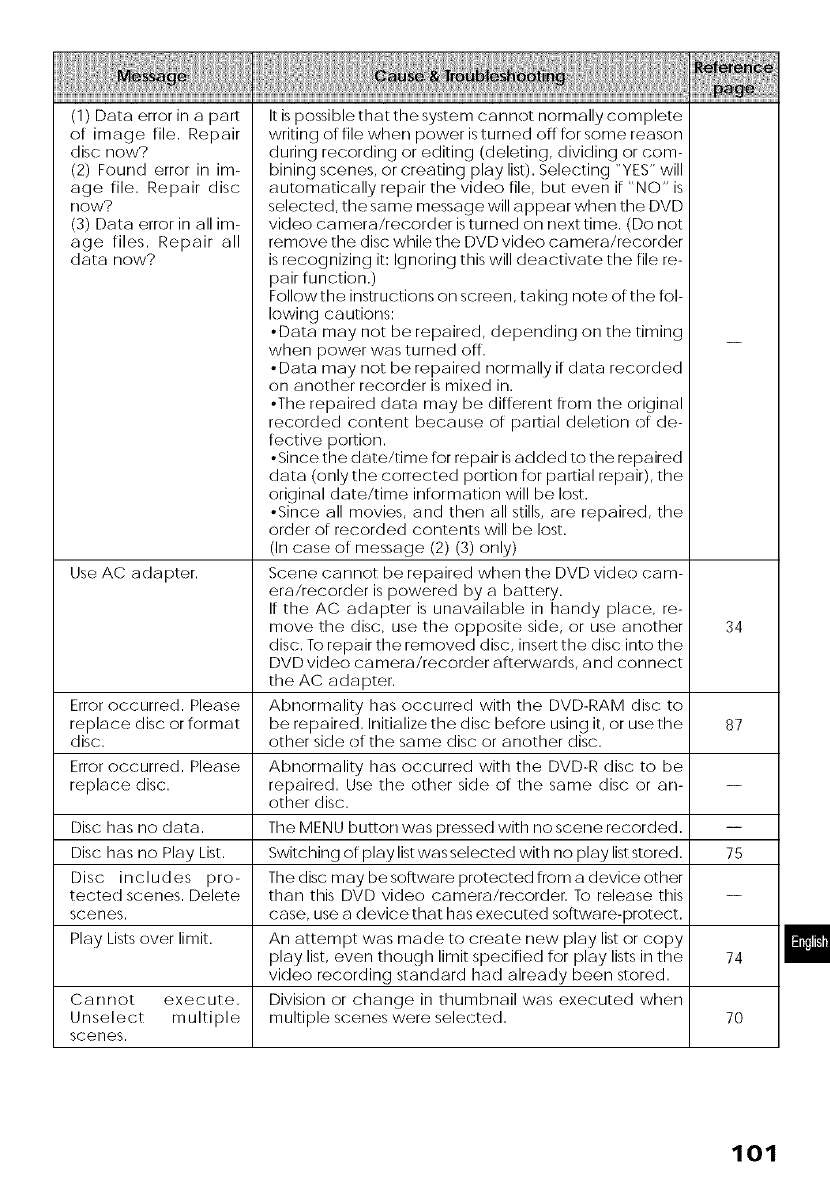
(1) Data error in a part
of image file. Repair
disc now?
(2) Found error in im-
age file. Repair disc
FLOW?
(3) Data error in all im-
age files. Repair all
data now?
Use AC adapter.
34
It is possible that the system cannot normally complete
writing of file when power isturned off for some reason
during recording or editing (deleting, dividing or com-
bining scenes, or creating play list). Selecting "YES" will
automatically repair the video File, but even if "NO" is
selected, the same message will appear when the DVD
video camera/recorder isturned on next time. (Do not
remove the disc while the DVD video camera/recorder
is recognizing it: Ignoring this will deactivate the file re-
pair function.)
Follow the instructions on screen, ta king note of the fol-
lowing cautions:
• Data may not be repaired, depending on the timing
when power was turned off.
• Data may not be repaired normally if data recorded
on another recorder is mixed in.
•The repaired data may be different from the original
recorded content because of partial deletion of de-
Fective portion.
• Since the date/time R)r repair is added to the repaired
data (only the corrected portion for partial repair), the
original date/time information will be lost.
• Since all movies, and then all stills, are repaired, the
order of recorded contents will be lost.
(In case of message (2) (3) only)
Scene cannot be repaired when the DVD vide() cam-
era/recorder is powered by a battery.
If the AC adapter is unavailable in handy place, re-
move the disc, use the opposite side, or use another
disc. To repair the removed disc, insert the disc into the
DVD vide() camera/recorder aRerwards, and connect
the AC adapter.
Abnormality has occurred with the DVD-RAM disc to
be repaired. Initialize the disc before using it, or use the
other side of the same disc or another disc.
Abnormality has occurred with the DVD-R disc to be
repaired. Use the other side of the same disc or an-
other disc.
The MENU button was pressed with no scene recorded.
SwitcMng of play list was selected with no play list stored.
The disc may be software protected from a device other
than this DVD video camera/recorder. To release this
case, use a device that has executed software-protect.
An attempt was made to create new play list or copy
play list, even though limit specified for play lists in the
video recording standard had already been stored.
Division or change in thumbnail was executed when
multiple scenes were selected.
Error occurred. Please
replace disc or format 87
disc.
Error occurred. Please
replace disc.
Disc has no data.
Disc has no Play List. 75
Disc includes pro-
tected scenes. Delete
scenes.
Play Lists over limit. 74
Car/riot execute.
Unselect multiple 70
scenes.
101
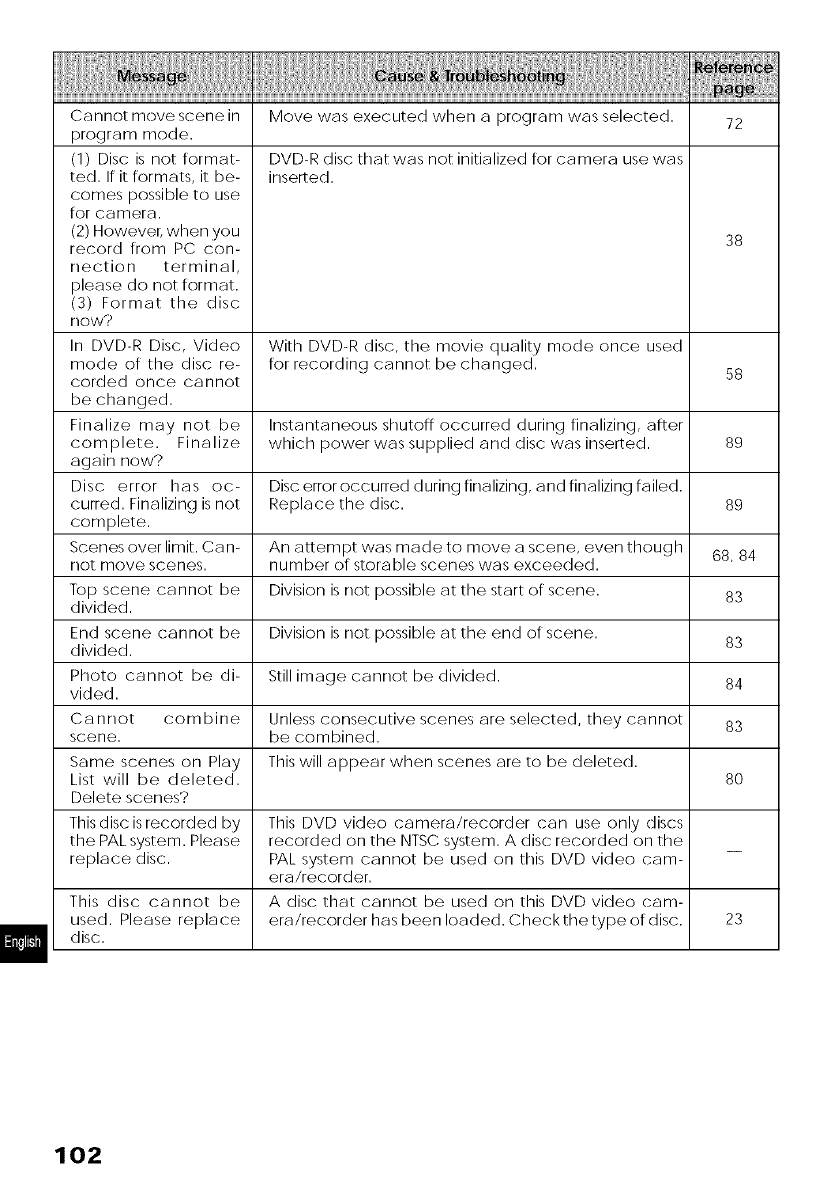
Cannot move scene in
program mode.
(1) Disc is not format-
ted. If it formats, it be-
comes possible to use
for camera.
(2) However, when you
record from PC con-
nection terminal,
please do not format.
(3) Format the disc
now'?
In DVD-R Disc, Video
mode of the disc re-
corcted once cannot
be changed.
Finalize may not be
complete. Finalize
again now?
Disc error has oc-
curred. Finalizing isnot
complete.
Scenes over limit. Ca n-
not move scenes.
Top scene cannot be
divided.
End scene cannot be
divided.
Photo cannot be di-
vided.
Cannot combine
scene.
Same scenes on Play
List will be deleted.
Delete scenes?
This disc isrecorded by
the PAL system. Please
replace disc.
Move was executed when a program was selected.
DVD-R disc that was not initialized for camera use was
inserted.
72
38
With DVD-R disc, the movie quality mode once used
for recording cannot be changed. 58
Ir/star/taneous shutoff occurred during Finalizing, after
which power was supplied and disc was inserted. 89
Disc error occurred during finalizing, and finalizing failed.
Replace the disc. 89
An attempt was made to move a scene, even though 68, 84
number of storable scenes was exceeded.
Division is not possible at the start of scene. 83
Division is not possible at the end of scene. 83
Still image cannot be divided. 84
Unless consecutive scenes are selected, they cannot 83
be combined.
This will appear when scenes are to be deleted. 80
This DVD video camera/recorder car/ use only discs
recorded on the NTSC system. A disc recorded on the
PAL system cannot be used on tMs DVD video cam-
era/recorder.
This disc cannot be Adiscthat cannot be used ontMs DVDvideo cam-
used. Please replace era/recorder has been loaded. Checkthetype of disc. 23
disc.
102
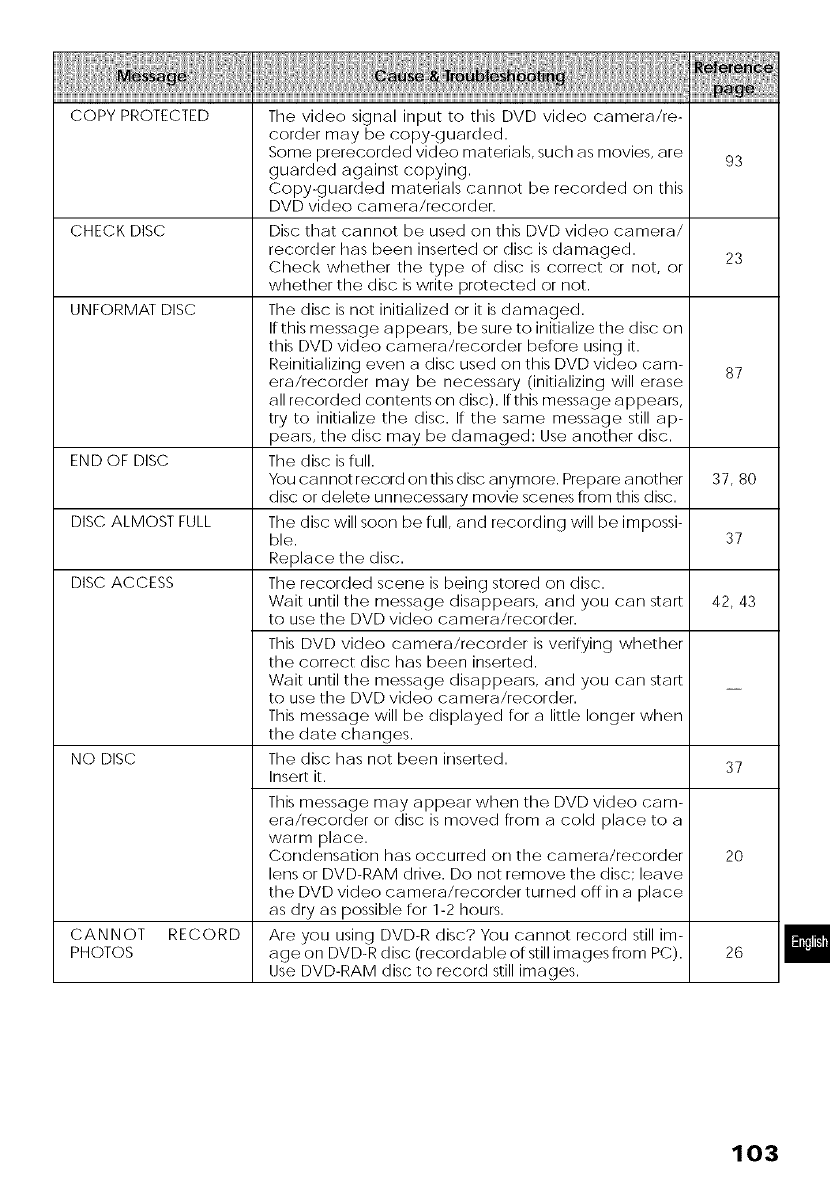
COPY PROTECTED
93
CHECK DISC
23
UNFORMAT DISC
87
END OF DISC
37, 80
DISC ALMOST FULL 37
DISC ACCESS
42, 43
The video signal input to this DVD video camera/re-
corder may be copy-guarded.
Some prerecorded video materials, such as movies, are
guarded against copying.
Copy-guarded materials cannot be recorded on this
DVD video camera/recorder.
Disc that cannot be used on this DVD video camera/
recorder has been inserted or disc is damaged.
Check whether the type of disc is correct or not, or
whether the disc is write protected or not.
The disc is not initialized or it is damaged.
If this message appears, be sure to initialize the disc on
this DVD video camera/recorder before using it.
Reinitializing even a disc used on this DVD video cam-
era/recorder may be necessary (initializing will erase
all recorded contents on disc). If this message appears,
try to initialize the disc. If the same message still ap-
pears, the disc may be damaged: Use another disc.
The disc is full.
You cannot record on this disc anymore. Prepare another
disc or delete unnecessary movie scenes from this disc.
The disc will soon be full, and recording will be impossi-
ble.
Replace the disc.
The recorded scene is being stored on disc.
Wait until the message disappears, and you car/start
to use the DVD video camera/recorder.
This DVD video camera/recorder is verifying whether
the correct disc has been inserted.
Wait until the message disappears, and you car/start
to use the DVD video camera/recorder.
This message will be displayed for a little longer when
the date changes.
The disc has not been inserted.
Insert it.
NO DISC
This message may appear when the DVD video cam-
era/recorder or disc is moved from a cold place to a
warm place.
Cor/der/sation has occurred on the camera/recorder
lens or DVD-RAM drive. Do not remove the disc; leave
the DVD video camera/recorder turned off in a place
as dry as possible for 1-2 hours.
Are you using DVD-R disc? You cannot record still im-
age on DVD-R disc (recordable of still images from PC).
Use DVD-RAM disc to record still images.
37
2O
CANNOT RECORD
PHOTOS 26
103
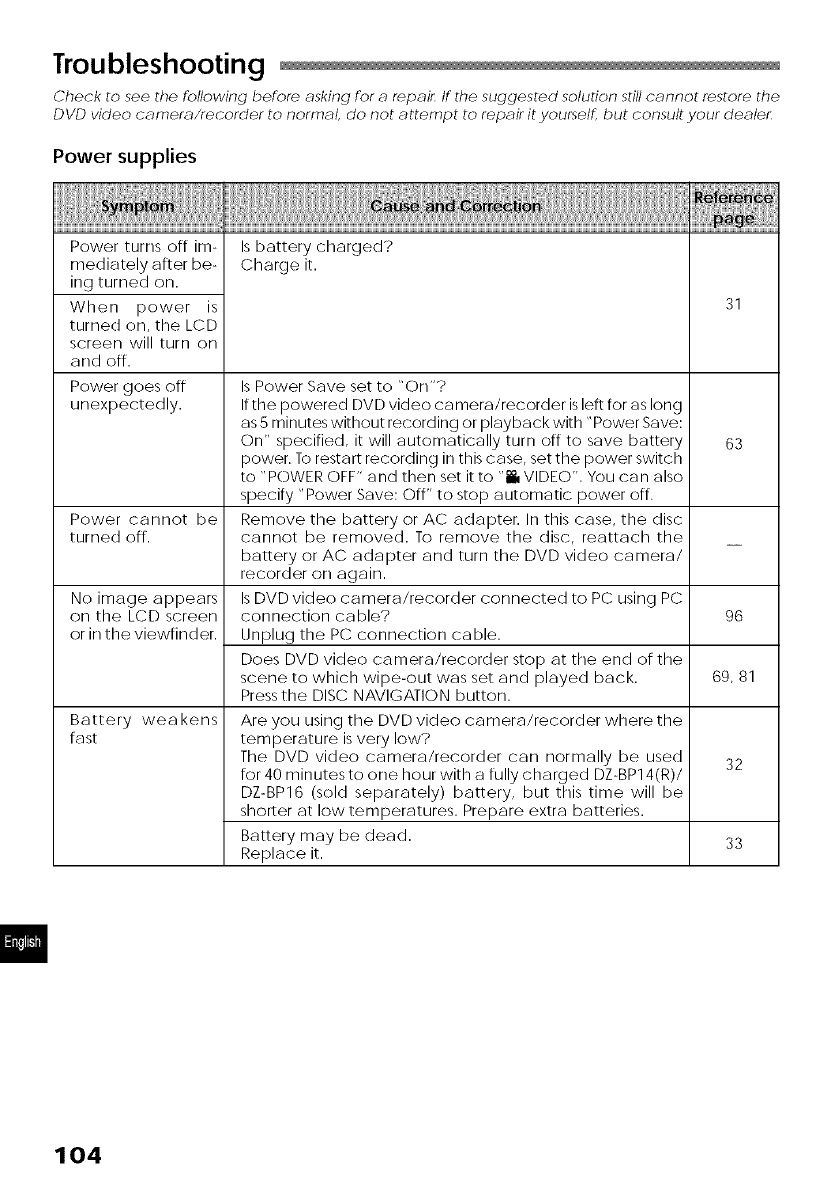
Troubleshooting
Check to see the following before E_skingfor E_repE_ir:If the suggested solution still cE_nnot restore the
DVD video camercJrecorder to normal, do not attempt to repair it yourselF,, but consult your dealer:
Power supplies
Power turns off im-
mediately after be-
ing turned on.
When power is
turned on, the LCD
screen will turn on
and off.
Power goes off
unexpectedly.
Is battery charged?
Charge it.
31
Is Power Save set to "On'?
If the powered DVD video camera/recorder is left for as long
as 5 minutes without recording or playback with "Power Save:
On" specified, it will automatically turn off to save battery
power. To restart recording in this case, set the power switch
to "POWER OFF" and then set it to "i VIDEO". You ca n also
specify "Power Save: Off" to stop automatic power off.
Remove the battery or AC adapter. In this case, the disc
cannot be removed. To remove the disc, reattach the
battery or AC adapter and turn the DVD video camera/
recorder on again.
Is DVD video camera/recorder connected to PC using PC
connection cable?
Unplug the PC connection cable.
Does DVD video camera/recorder stop at the end of the
scene to which wipe-out was set and played back.
Press the DISC NAVIGATION button.
Are you using the DVD video camera/recorder where the
temperature is very low?
The DVD video camera/recorder car/ normally be used
for 40 minutes to one hour with a fully charged DZ-BP14(R)/
DZ-BP16 (sold separately) battery, but this time will be
shorter at low temperatures. Prepare extra batteries.
Battery may be dead.
Replace it.
63
Power cannot be
turned off.
No image appears
on the LCD screen 96
or in the viewfinder.
69, 81
Battery weakens
fast
32
33
104
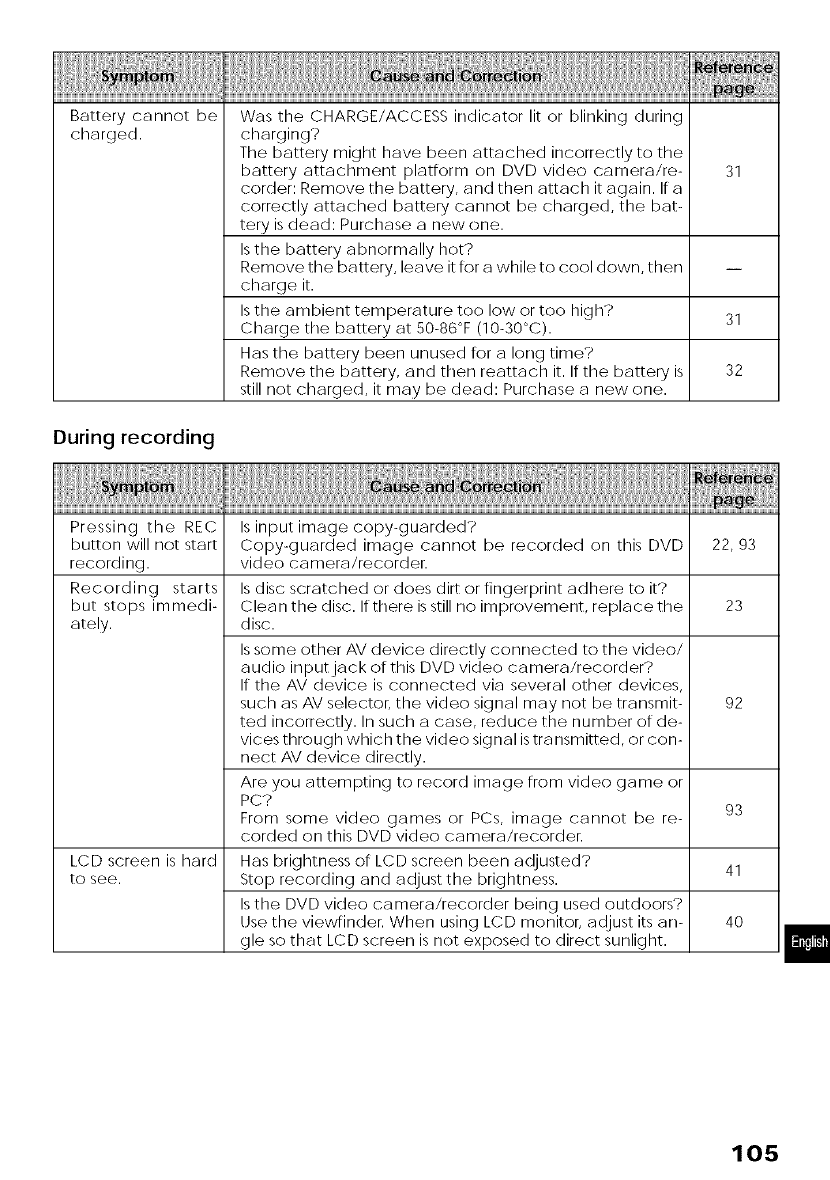
Battery cannot be
charged.
Was the CHARGE/ACCESS indicator lit or blinking during
charging?
The battery might have been attached incorrectly to the
battery attachment platform on DVD video camera/re-
corcter: Remove the battery, and then attach it again. If a
correctly attached battery cannot be charged, the bat-
tery is dead: Purchase a new one.
Is the battery abnormally hot?
Remove the battery, leave it for a while to cool down, then
charge it.
Is the ambient temperature too low or too high?
Charge the battery at 50-86°F (10-30°C).
Has the battery been unused R)r a long time?
Remove the battery, and then reattach it. If the battery is
still not charged, it may be dead: Purchase a new one.
31
31
32
During recording
Pressing the REC Is input image copy-guarded?
button will not start Copy-guarded image cannot be recorded on this DVD 22, 93
recording, video camera/recorder.
Recording starts Is disc scratched or does dirt or fingerprint adhere to it?
but stops immedi- Clean the disc. If there is still no improvement, replace the 23
ately, disc.
92
Is some other AV device directly connected to the video/
audio input jack of this DVD video camera/recorder?
If the AV device is connected via several other devices,
such as AV selector: the video signal may not be transmit-
ted incorrectly. In such a case, reduce the number of de-
vices through which the video signal is tra nsmitted, or con-
nect AV device directly.
Are you attempting to record image from video game or
PC?
From some video games or PCs, image cannot be re-
corded on this DVD video camera/recorder.
Has brightness of LCD screen been actjusted?
Stop recording and actjust the brightness.
Is the DVD video camera/recorder being used outdoors?
Use the viewfinder. When using LCD monitor, adiust its an-
gle so that LCD screen is not exposed to direct sunlight.
93
LCD screen is hard
to see. 41
4O
105

Focus is not correct. Is it difficult to use auto focus with your subiect? 49
Focus manually.
Does "MF" appear'?
The DVD video camera/recorder is set to manual focus. 49
Focus the subiect manually, or release manual focus.
Is the diopter control correctly adjusted if you are using
the viewfinder as a monitor? 41
Adiust the diopter control.
In cases other than the above, set the power switch to
"POWEROFF',arldthensetitto"IVIDEO'or"_PHOTO" 40
again.
During playback
Pressing the REC Is disc dirty?
button will not start Use soft, dry cloth to clean it. 23
recording.
Pressing the play- Has the image been recorded by devices other than this
back button will not DVD video ca mera/recorder?
start playback. Playback of image recorded on devices other than this 88
DVD video camera/recorder may be impossible on this
DVD video camera/recorder.
Has scene been edited by applications other than Disc
Navigation?
If the scene recorded on this DVD video camera/recorder is 88
edited with applications other than Dis(: Navigation, playback
may not be possible on this DVD video camera/recorder.
No playback pic- Is TV input selector set correctly?
ture appears on TV Some TVs have multiple video input jacks. Check whether
screen, the correct input was selected on TV to match the con- 91
nected jacks. If the DVD video camera/recorder is con-
nected to VCR, set its input selector to "external input
(LINE)".
Is the DVD video camera/recorder connected to TV cor-
rectly? 90
Check the cor/r/ections.
Is input selector of this DVD video camera/recorder set to
"LINE"? 59
Change it to "CAMERA" mode.
Playback picture is Is disc scratched or does dirt or fingerprint adhere to it?
momentarily inter- Clean the disc. 23
rupted.
Poor playback pic- Was the image input from analog VCR (VHS, 8 mm) and
ture recorded?
The problem may be improved if a VCR equipped with 92
TBC circuit is used for playback.
106
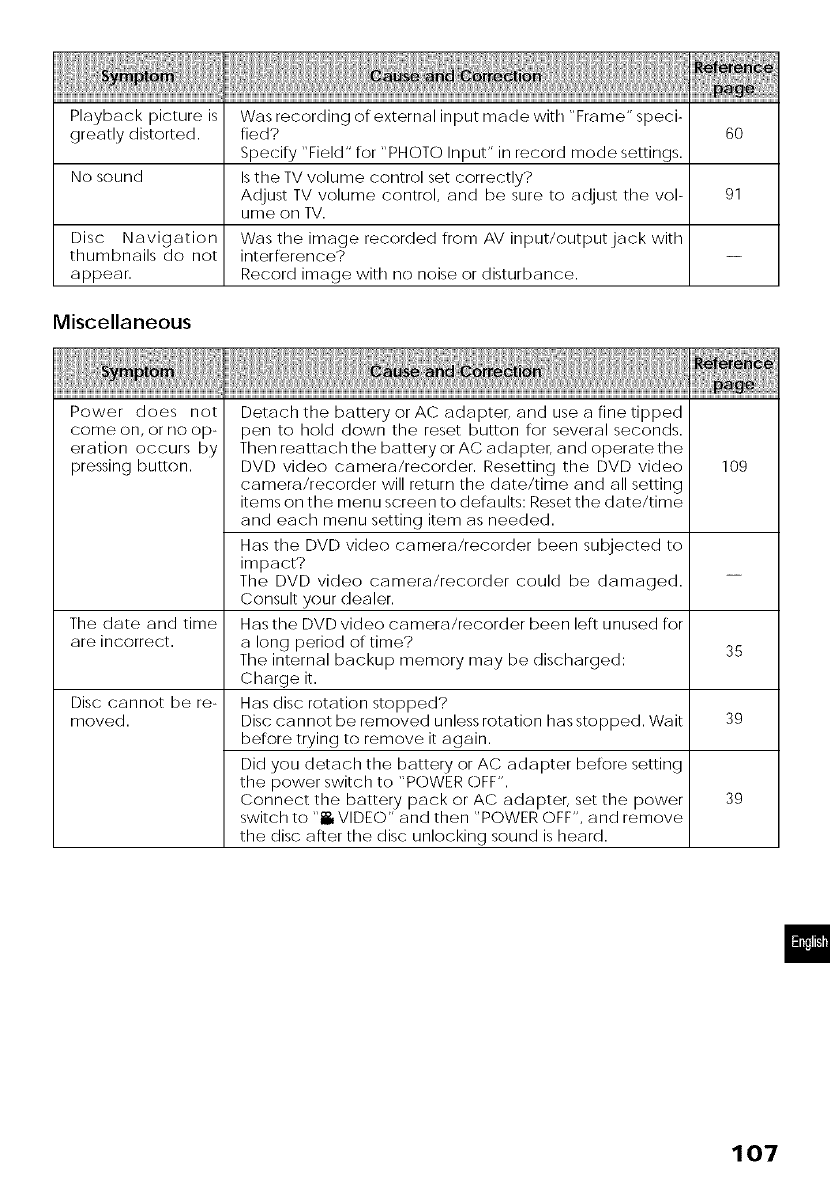
Playback picture is Was recording of external input made with "Frame" speci-
greatly distorted, fled? 60
Specify "Field" for "PHOTO Input" in record mode settings.
No sound Is the TV volume control set correctly?
Adjust TV volume control, and be sure to actjust the vol- 91
ume on TV.
Disc Navigation Was the image recorded fromAVinput/outputjackwith
thumbnails do not interference?
appear. Record image with no noise or disturbance.
Miscellaneous
Power does not
come on, or no op-
eration occurs by
pressing button. 109
Detach the battery or AC adapter, and use a fine tipped
pen to hold down the reset button for several seconds.
Then reattach the battery or AC adapter, and operate the
DVD video camera/recorder. Resetting the DVD video
camera/recorder will return the date/time and all setting
items on the menu screen to defaults: Reset the date/time
and each menu setting item as needed.
Has the DVD video camera/recorder been subjected to
impact?
The DVD video camera/recorder could be damaged.
Consult your dealer.
Has the DVD video camera/recorder been left unused for
a long period of time?
The internal backup memory may be discharged:
Charge it.
Has dis(: rotation stopped?
Disc cannot be removed unless rotation has stopped. Wait
before trying to remove it again.
Did you detach the battery or AC adapter before setting
the power switch to "POWER OFF".
Connect the battery pack or AC adapter, set the power
switch to "IVIDEO" and then "POWER OFF", and remove
the disc after the disc unlocking sound is heard.
The date and time
are incorrect. 35
Disc cannot be re-
moved. 39
39
107
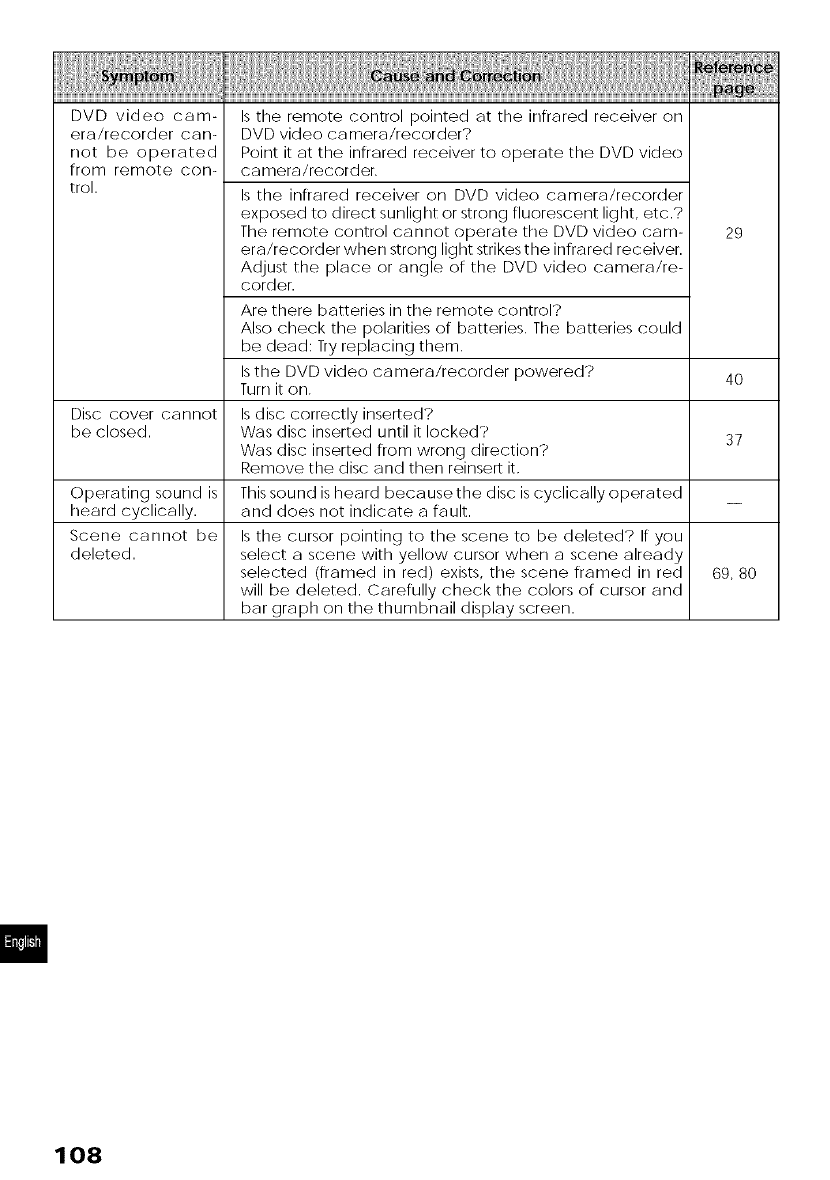
DVD vide() cam-
era/recorder carl-
not be operated
from remote corr-
trol.
Disc cover car/r/ot
be closed.
Is the remote control pointed at the irffrared receiver on
DVD video ca mera/recorder?
Point it at the infrared receiver to operate the DVD video
camera/recorder.
Is the irrfrared receiver on DVD video camera/recorder
exposed to direct sunlight or strong fluorescent light, etc.?
The remote corrtrol cannot operate the DVD video cam-
era/recorder when strong light strikes the infrared receiver.
Adjust the place or arrgle of the DVD video camera/re-
corder.
29
Are there batteries in the remote corrtrol?
Also check the polarities of batteries. The batteries could
be dead: Try replacing them.
Is the DVD video camera/recorder powered?
Turn it on.
Is disc correctly irrserted?
Was disc inserted until it locked?
Was disc inserted from wrong direction?
Remove the disc and then reinsert it.
Thissound is heard because the disc is cyclically operated
and does not indicate a fault.
Is the cursor pointing to the scene to be deleted? If you
select a scene with yellow cursor when a scene already
selected (framed in red) exists, the scene framed in red
will be deleted. Carefully check the colors of cursor arrd
bar graph on the thumbnail display screen.
40
37
Operating sound is
heard cyclically.
Scene cannot be
deleted.
69, 80
108
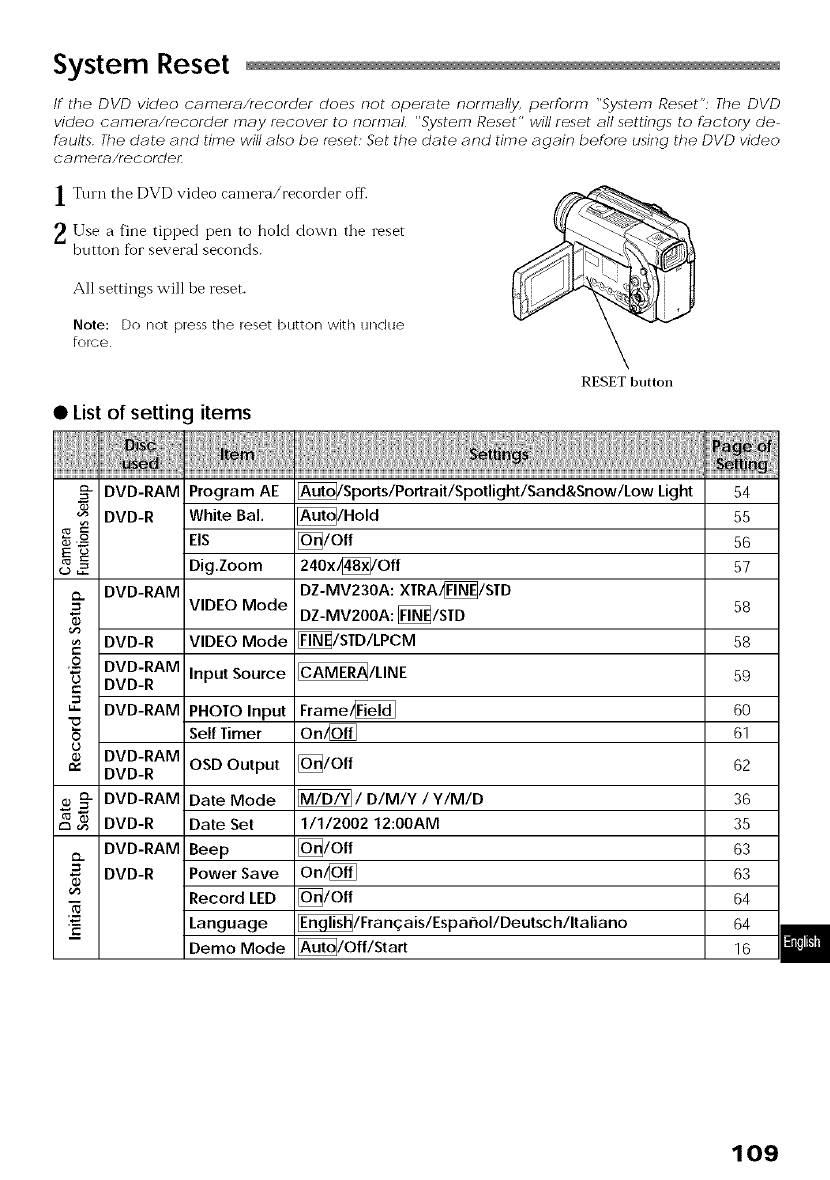
System Reset
If the DVD video camera/recorder does not operate normally, perform "System Reset": The DVD
video camera/recorder may recover to normal "System Reset" will reset all settings to fuctory de-
fuulb The date and time will abo be reset: Set the date and time again before using the DVD video
camera/recorder:
1 Ttun the DVD video camera/recorder off.
2Use a fine tipped pen to hold down tile reset
button fbr several seconds.
All settings will be reset.
Note: Do not press tile reset button with undue
force
• List of setting items
RESET button
DVD-RAM Program AE [_ISporlslPorlraitlSpotlight/Sand&Snow/tow Light 54
_DVD-R White Bal. [_/Hold 55
._ EIS [_/Off 56
_ Dig.Zoom 240xl_/Off 57
_. DVD-RAM DZ-MV230A: XTRAI_/STD
VIDEO Mode DZ-MV200A:_/STD 58
DVD-R VIDEO Mode _/STD/LPCM 58
,- DVD-RAM Input Source _/LINE 59
DVD-R
"= DVD-RAM PHOTO Input Frame_ 60
"_ Self Timer On/_ 61
DVD-RAM OSD Output [_/Off 62
DVD-R
¢ _ DVD-RAM DateMode [_]IDIMIYIYIMID 36
mDVD-R Date Set 1/1/2002 12:00AM 35
DVD-RAM Beep [_/Off 63
DVD-R Power Save On/_ 63
Record LED [_/Off 64
:_ Language _lFranq, aislEspanollDeutsch/Italiano 64
_= Demo Mode [_/Off/Start 16
109
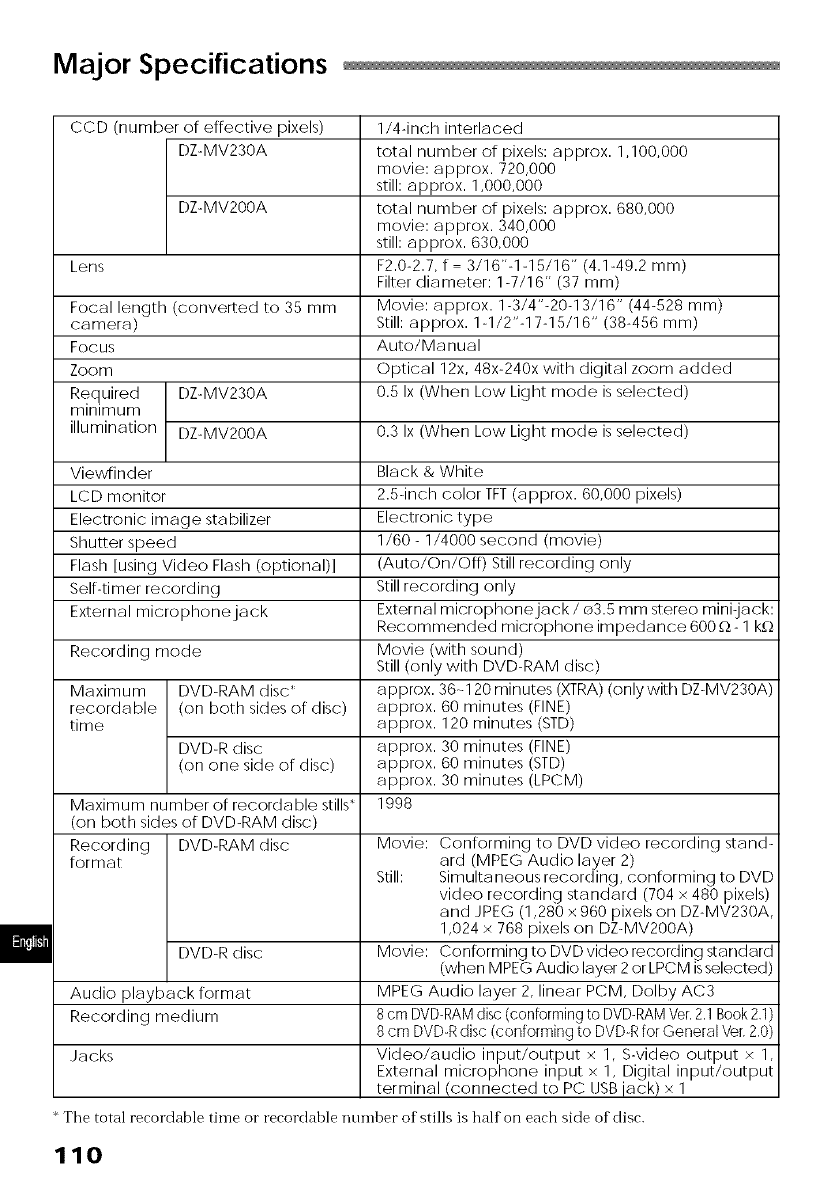
Major Specifications
CCD (number of effective pixels) 1/4-inch interlaced
DZ-MV230A total number of pixels: approx. 1,100,000
movie: approx. 720,000
still: approx. 1,000,000
DZ-MV200A total number of pixels: approx. 680,000
movie: approx. 340,000
still: approx. 630,000
Lens F2.0-2.7, f 3/16"-1-15/16" (4.1-49.2 mm)
Filter diameter: 1-7/16" (37 mm)
Focal length (converted to 35 mm Movie: approx. 1-3/4"-20-13/16" (44-528 mm)
camera) Still: approx. 1-1/2"-17-15/16" (38-456 mm)
Focus Auto/Manual
Zoom Optical 12x, 48x-240x with digital zoom added
Required DZ-MV230A 0.5 Ix (When Low Light mode is selected)
minimum
illumination DZ-MV200A 0.3 Ix (When Low Light mode is selected)
Viewfinder Black & WMte
LCD monitor 2.5-inc1"/color TFT (approx. 60,000 pixels)
Electronic image stabilizer Electronic type
Shutter speed 1/60 - 1/4000 second (movie)
Flash lusing Video Flash (optional) l (Auto/On/Off) Still recording only
Self-timer recording Still recording only
External microphone jack External microphone jack /_3.5 mm stereo mini-jack:
Recommended microphone impedance 600 f_- 1 k_
Recording mode Movie (with sound)
Still (only with DVD-RAM disc)
Maximum DVD-RAM disc ' approx. 36--120 minutes (XTRA) (only with DZ-MV230A)
recordable (on both sides of disc) approx. 60 minutes (FINE)
time approx. 120 minutes (8TD)
DVD-R disc approx. 30 minutes (FINE)
(on one side of disc) approx. 60 minutes (STD)
approx. 30 minutes (LPCM)
Maximum number of recordable stills* 1998
(on both sides of DVD-RAM disc)
Recording DVD-RAM disc Movie: Conforming to DVD video recording stand-
format ard (MPEG Audio layer 2)
Still: Simultaneous recording, conforming to DVD
video recording standard (704 x 480 pixels)
and JPEG (1,280 x 960 pixels on DZ-MV230A
1,024 x 768 pixels on DZ-MV200A)
DVD-R disc Movie: Conformir/g to DVD video recordir/g standard
(when MPEG Audio layer 2 or LPCM is selected)
Audio playback format MPEG Audio layer 2, linear PCM, Dolby AC3
Recording medium 8 cm DVD-RAMdisc (contorming to DVD-RAMVer.2.1 Book 2.1)
8 cm DVD-R disc (conforming to DVD-R for General Ver. 2.0)
Jacks Video/audio input/output x 1, S-video output x 1
External microphone input x 1, Digital input/output
terminal (connected to PC USB iack) x 1
The total recordable tilrle o1"recordable numher of stills is half on each side of disc.
110
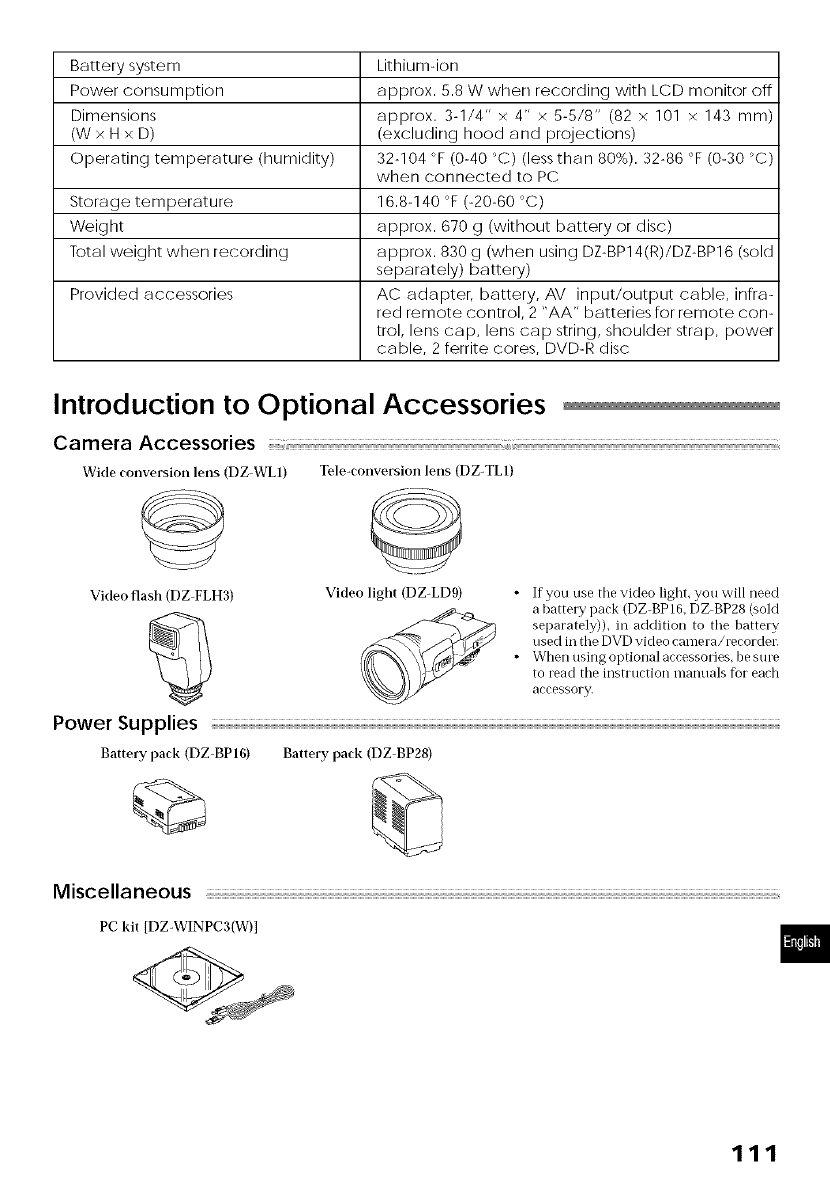
Battery system Lithium-ion
Power consumption approx. 5.8 W when recording with LCD monitor off
Dimensions approx. 3-1/4" x 4" x 5-5/8" (82 x 101 x 143 mm)
(W x H x D) (excluding hood and projections)
Operating temperature (humidity) 32-104 °F (0-40 °C) (less than 80%). 32-86 °F (0-30 °C)
when connected to PC
Storage temperature 16.8-140 °F (-20-60 °C)
Weight approx. 670 g (without battery or disc)
Total weight when recording approx. 830 g (when using DZ-BP14(R)/DZ-BP16 (sold
separately) battery)
Provided accessories AC adapter, battery, AV input/output cable, infra-
red remote control, 2 "AA" batteries for remote con-
trol, lens cap, lens cap string, shoulder strap, power
cable, 2 ferrite cores, DVD-R disc
Introduction to Optional Accessories
Camera Accessories
Wide conversion lens (DZ WL1) Tele-conversion lens (DZ-TL1)
VMeo flash (DZ FLH3) Video light (DZ-LDg) •If you use the video light, you will need
__/ a batte]y pack (DZ BP16_DZ BP28 (sold
separately)), in addition to the batte]y
used in the DVD video cameia/lecordei.
• _[hen using optionalaccessoiies, be suie
to lead the instiuction manuals for each
accessory'.
Power Supplies
Battery pack (DZ-BP16) Battery pack (DZ BP28)
Miscellaneous _
PC kit [DZ-WINPC3(W)]
111
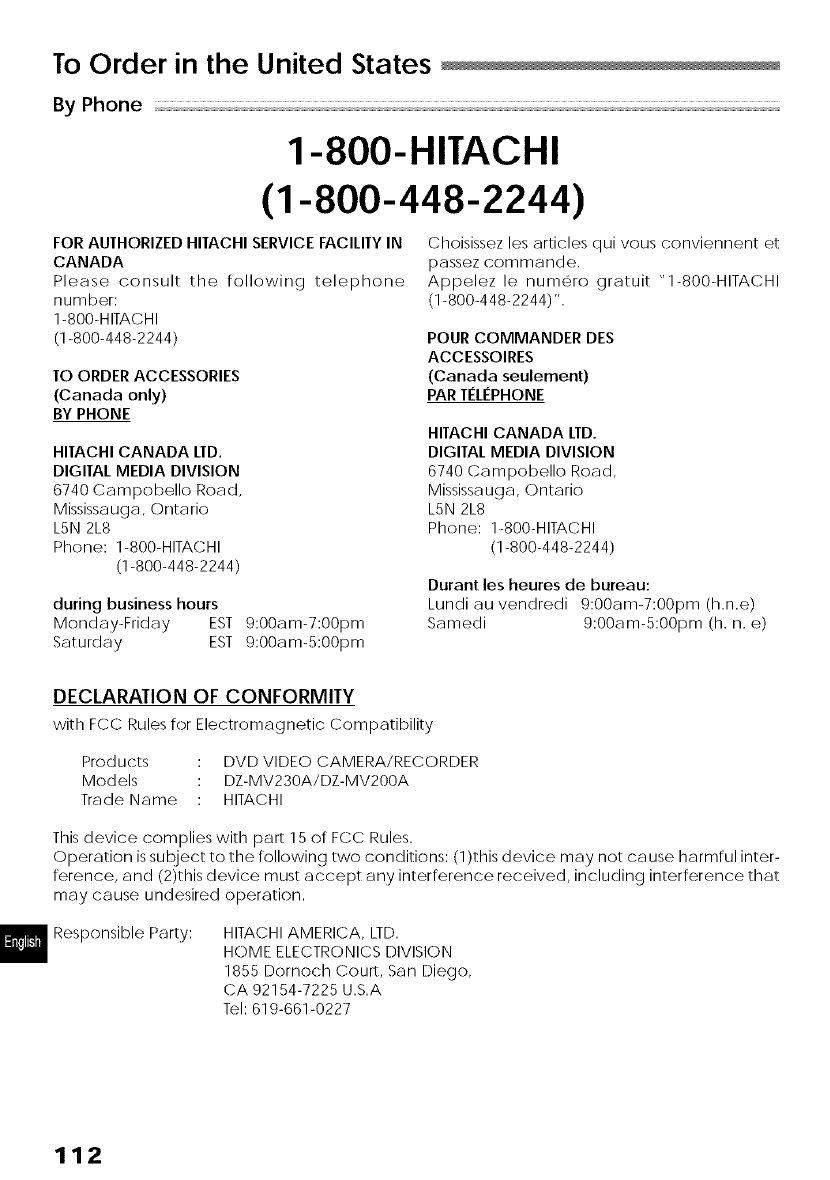
To Order in the United States
By Phone
1-800-HITACHI
(1-800-448-2244)
FOR AUTHORIZED HITACHI SERVICE FACILITYIN
CANADA
Please consult the following telephone
number:
1-800-HITACHI
(1-800-448-2244)
TO ORDER ACCESSORIES
(Canada only)
BY PHONE
HITACHI CANADA LTD.
DIGITAL MEDIA DIVISION
6740 Campobello Road
Mississauga, Ontario
L5N 2L8
Phone: 1-800-HITACHI
(1-800-448-2244
during business hours
Monday-Friday EST 9:00am-7:00pm
Saturday EST 9:00am-5:00pm
Choisissez les articles qui vous convier/r/ent et
passez commande.
Appelez le numero gratuit "1-800-HITACHI
(1-800-448-2244)".
POUR COMMANDER DES
ACCESSOIRES
(Canada seulement)
PAR TELEPHONE
HITACHI CANADA LTD.
DIGITAL MEDIA DIVISION
6740 Campobello Road
Mississauga, Ontario
LSN 2L8
Phone: 1-800-HITACHI
(1-800-448-2244
Durant les heures de bureau:
Lundi au vendredi 9:00am-7:00pm (h.n.e)
8amedi 9:00am-5:00pm (h. n. e)
DECLARATION OF CONFORMITY
with FCC Rules for Electromagnetic Compatibility
Products : DVD VIDEO CAMERA/RECORDER
Models : DZ-MV230A/DZ-MV200A
Trade Name : HITACHI
TMs device complies with part 15 of FCC Rules.
Operation issubject to the following two conditions: (1)this device may not ca use harmful inter-
ference, and (2)this device must accept any interference received, including interference that
may cause undesired operation.
Responsible Party: HITACHI AMERICA, LTD.
HOME ELECTRONICS DIVISION
1855 Dornoch Court, San Diego,
CA 92154-7225 U.S.A
Tel: 619-661-0227
112
Index
Number
2.5" type liquid crystal display ...................... 40
240x (Dig.zoom) ............................................. 57
48x (Dig.zoom) ............................................... 57
8 cm DVD-R disc ............................................ 23
8 cm DVD-RAM disc ...................................... 23
AC adapter .................................................... 34
Accessory shoe ............................................ 111
Add (edit) ....................................................... 77
All programs ................................................... 72
Auto (program AE) ........................................ 54
Auto (white bal.) ............................................ 55
Auto-focus ...................................................... 49
A/V input/output jack ................................... 90
B/W .................................................................. 81
Battery attachment platform ....................... 30
Battery eject button ...................................... 30
Battery pack ................................................... 30
Attaching to DVD video/recorder ....... 30
Charging ................................................. 31
Recordable time on DVD video/
recorder .................................................. 32
Removing from DVD video/
recorder .................................................. 30
Setting up ................................................ 30
Beep ................................................................ 63
Built-in battery ................................................ 30
Caddy ............................................................. 24
Camera functions setup ......................... 17, 54
Capacity ......................................................... 87
Cartridge ........................................................ 24
Charge/access indicator ............................. 31
Cleaning ......................................................... 98
Combine ......................................................... 83
Cor/r/ecting .................................................... 90
To other AV device ................................ 92
To PC ........................................................ 94
To TV ......................................................... 90
Copyright ........................................................ 22
Create ............................................................. 74
Date and time ............................................... 35
Date setup ...................................................... 35
DC cord connection terminal ...................... 31
Defaults ........................................................... 65
Delete (edit) ................................................... 78
Delete (play list) ............................................. 79
Delete (scene) ............................................... 80
Demo mode ................................................... 16
Detail (scene) ................................................. 86
Dig. zoom ........................................................ 57
Diopter control ............................................... 41
Disc .................................................................. 23
Disc eject button ........................................... 39
Disc guide ....................................................... 37
Disc Navigation button ................................. 69
Disc Navigation Functions ............................ 17
Display ............................................................. 51
Information LCD ..................................... 51
Liquid crystal display .............................. 40
Scenes information ................................ 86
Thumbnail ............................................... 69
Viewfinder ............................................... 41
Display button ................................................ 52
Divide .............................................................. 83
DVD - R ........................................................... 23
DVD - RAM ..................................................... 23
Edit (play list) .................................................. 77
Edit (scene) .................................................... 81
Edit menu ........................................................ 78
EIS .................................................................... 56
Exit (edit) ......................................................... 78
Exposure button ............................................. 50
Exposure control ............................................ 50
External microphone jack ............................ 42
Eyecup ............................................................ 41
Fade ................................................................ 81
Ferrite core ..................................................... 28
Field (photo input) ......................................... 60
Finalize disc ..................................................... 89
FINE (video mode) ......................................... 58
Focus button .................................................. 49
Format disc ..................................................... 87
Frame (photo input) ...................................... 60
Frame advance /flame back ..................... 45
Hand strap ...................................................... 27
Hold (white bal.) ............................................ 55
Image quality ................................................. 59
Information display mode ............................ 51
Information LCD ............................................. 51
Infrared receiver ............................................ 29
Initial setup ...................................................... 63
113

Input source ................................................... 59
.Joystick ............................................................ 10
Language ....................................................... 64
LCD bright button .......................................... 41
Lens cap ......................................................... 28
Lens hood ....................................................... 48
Lock switch ..................................................... 42
Low light (program AE) ................................. 54
LPCM (video mode) ...................................... 58
Menu button ............................................ 54, 71
MF .................................................................... 49
Move ............................................................... 84
Open button .................................................. 40
Optical 12x zoom lens ................................... 12
OSD output ..................................................... 62
PC connection terminal ............................... 96
Photo input ..................................................... 60
Play (play list) ................................................. 75
Play (program) ............................................... 72
Play list ............................................................. 74
Portrait (program AE) .................................... 54
Power save ..................................................... 63
Power switch ............................................ 35, 40
Program .......................................................... 72
Play .......................................................... 72
Switch ...................................................... 72
Title ........................................................... 73
Program AE .................................................... 54
Record button ................................................ 42
Record functions setup ................................. 17
Recording indicator ...................................... 64
Remote control .............................................. 29
Repeat play ................................................... 89
Reset ................................................................ 65
Settings .................................................... 65
System ................................................... 109
Reset button ................................................. 109
Sand & Snow (program AE) ......................... 54
Scene .............................................................. 17
Combine ................................................. 83
Delete ...................................................... 80
Detail ....................................................... 86
Divide ...................................................... 83
Edit ........................................................... 81
Fade ........................................................ 81
Move ....................................................... 84
Select ....................................................... 85
Skip ........................................................... 85
Searching for image ...................................... 45
Select (scene) ................................................ 70
Select button .................................................. 70
Self timer ......................................................... 61
Shoulder strap ................................................ 27
Skip (scene) .................................................... 85
Speaker ........................................................... 44
Sports (program AE) ...................................... 54
Spotlight (program AE) ................................. 54
STD (video mode) .......................................... 58
Stereo microphone ....................................... 42
Stop/cancel ................................................... 10
S-video output jack ....................................... 90
Switch (play list) ............................................. 75
Switch (program) ........................................... 72
Title (play list) .................................................. 79
Title (program) ............................................... 73
Update control info ....................................... 88
Video flash ...................................................... 43
Video light ...................................................... 42
Video mode ................................................... 58
FINE .......................................................... 58
LPCM ....................................................... 58
STD ........................................................... 58
XTRA ......................................................... 58
Viewfinder ...................................................... 41
Vol. button ...................................................... 44
WB .................................................................... 55
White ............................................................... 81
White Bal......................................................... 55
Wipe ................................................................ 81
XTRA (video mode) ....................................... 58
Zoom lever ...................................................... 47
114
