Hitachi DZ MV350A User Manual DVD VIDEO CAMERA Manuals And Guides L0311348
HITACHI Digital Camcorder Manual L0311348 HITACHI Digital Camcorder Owner's Manual, HITACHI Digital Camcorder installation guides
User Manual: Hitachi DZ-MV350A DZ-MV350A HITACHI DVD VIDEO CAMERA - Manuals and Guides View the owners manual for your HITACHI DVD VIDEO CAMERA #DZMV350A. Home:Electronics Parts:Hitachi Parts:Hitachi DVD VIDEO CAMERA Manual
Open the PDF directly: View PDF ![]() .
.
Page Count: 170 [warning: Documents this large are best viewed by clicking the View PDF Link!]
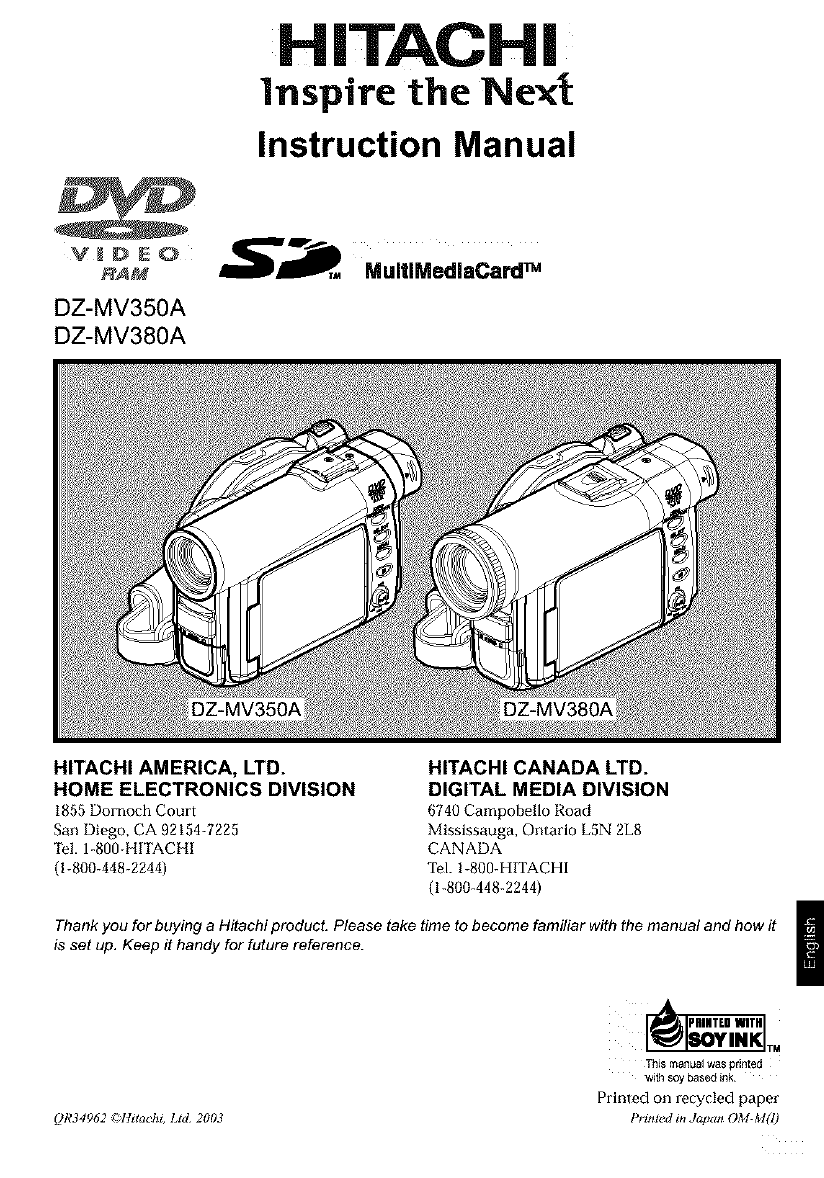
HITACHI
Inspire the Next
Instruction Manual
DZ-MV350A
DZ-MV380A
MuitiMedlaCard m
HITACHI AMERICA, LTD.
HOME ELECTRONICS DIVISION
1855 Dornoch Comt
San Diego, CA 92154-7225
TeL 1-800-1iITACI iI
(1-800-448-2244)
HITACHI CANADA LTD.
DIGITAL MEDIA DIVISION
6740 Campobello Road
Mississauga, Ontario L5N 2L8
CANADA
'I_l. 1-800-HITACHI
(1-800-448-2244)
Thank you for buying a Hitachi product. Please take time to become familiar with the manual and how it
is set up, Keep it handy for future reference.
QR34962 _;HitaLhi, Ltd 2003
ThLs manual was printed
with soy based ink.
Printed on recycled paper
Prinled in Jap_zn OM-M(I)
Important Information
For Your Safety
T#epow_rs_tch turnstheDVDvideo came_imcorder onand off, lea_#ngthedateltime #eatumunalloyed. If thecame_i
recorder i,_to be lelt unattended foratongperiotl ofUme,turn it off.
WARNING :TO PREVENT FIRE OR SHOCK HAZARD, DO NOT
EXPOSE THIS UNIT TO RAIN OR MOISTURE.
WARNING :TO PREVENT FIRE OR SHOCK HAZARD, USE THERECOMMENDED ACCESSORIES ONLY.
The DVD video cameralrecorder and AC adapter/
charger have the following caution marks.
WARNING: TO PREVENT FIRE OR SHOCK HAZARD, BE I
SURE TO USE THE SPECIFfED AC ADAPTEPJCHARGER
(DZ-ACS1).
CAUTION: TO REDUCE THE RSK OF
ELECTRIC SHOCK, DO NOT OPEN.
NO USER SERVICEABLE PARTS INS DE,
REFERSEI'<V CINGTOQUAL F EDSERV CE
PERSONNEL,
Identifications of caution marks
This symbol warns the usherthat
unlnsulated voltage: within the unlt
m a_ h ave,still Clellt ma_lHtu¢te t o cause
e l('_'[rII._sho(_k, ['her_br_, Ills dar Iget ous
to make any kind ol contact whh any
Inside, pari of"thls unlt,
This symbol ale[Ts the user that
hnporiant literature, voncemlng the
operatlorl and mahlterlanc_ of this ullJt
has been included. 'I'he_, It should
be _ad care_I]y to avold any problems.
Precautions
WARNING: Many mlevlslon programs and t'ihT_s
are copyrlgh_d, In certaln cl_umstances_ copy-
rlg_ law ]nay app_ to prlva_ in-home
videotaping of copyrighted m_edals.
This Class B dlgltal apparatus complies wlth
Canadian ICES-003.
l'he liquid crystal dls[Jay (LCD) pmiel Is made
by highly p[_cls_ technolo_. Mote than 99.99%
oflts plct_,tre el;_mon)_ (_>ixels) ax';_offectlve_ but
som_ (]_ than 0.01%) lnay appeai as colored
bright dots. ['hls does no[ Indle_m a fau It as the
I.CD panel stl"e fches the limits of currant
technoloKy.
I CLASS 1 I
LASERPRODUCT
CAUTION
This product contains a laser diode of hgher
class than 1. To ensure eont nued safely, do
not remove any covers or attempt to gain
access to the inside of the product. Refer all
sewicing to qualified personnel.
2
Wsming: ['hls d evlce complies wlth Part 15 of the }'CCr,Rules, Ope+ orlon Is su bjec_ to the Rfllowlng two
cond_ons: (I) This devlce may not cause harm_l In_ffemnce, and (2) this device must accept arw
Inter l'et_ce t_!ceIved, including in_!rfe, t_ce th_ m_y {_ttIse tI_deslt_d opet _o_+
Nets: This equipment has been/e, sted and fbund to comply wil}l IHe lJmi/s lbr a C]as813 digital device,
pursuant to Part 15 of th[_ FCC Rul_s. 'l'h_se lJrnl{s at_ designed Co pmwid _ reasonable protecrlon against
harrtl_t[ Int_r _,tz, llce Ill a residential Insttdlatloll This eqt Iprrtent getlerate, s, uses, and cart tadlate radio
K_que_lc:_ energy and, if not installed aY*d us_d in accoi_iance with the i nstructlons, may cause harm fu [
Inte_ [_ence 1_ radio ¢olt_rtlU rticalions, r ]+ow[wer; t hei-e 18 no guaratWe, e dlar Inte_e_ne_ will riot occur hi
a partleulay lnstallarlon, [f this equipment does cause h_'rn [u] inter _t_nce, to radio or television
_e,ceptio n, whlch can be d eterm Ined by turlflng the, equlpment off" an d oil,/h_ use, r is _ tmouraged to t W
to cor_{+:/hv orE, of mo[_ of the following measures:
ReorIe, tit o_ relocate i}m r_ceivlng antenna,
[nc+_ase the sepax'atioti beiw_le rI the equipment arid I_c_lveI;
Conne, cr the equipment Into all ou*Iet on a cir_:talt d ift'erent f_'om Chat to which gK_,rece, lver' Is conn_Eted+
C;onsu]t l_t:' dealer or' an exp_ _ R riced radio/['V technician %r help,
;astien te ths user: Changes or modiflcatkms not expressly appt oved by the manufactur*>r void the
user's au_or _ _ oper_e _e e_Ipment,
Mie_so{_ e_,Windows a+,Windows t¢ 98, Wktdows _>98 Second Edition, Windows ¢+Me, Windows _ 2(100
Pmih_ional, and Whldows ®XP are mglstered trademarks of M icrrasoft Cor'poratlorL
[rttel _, Perlilu rtl_ Proce_or, arid [_;_It?rort*aP[ oc_sgoI ax'[_Ie,glste, red tradernal ks of Intel Corporation,
IBM+vand PC;iA ['_ are mglstere, d trademm+ks of Irilemaiiona] Business Machines Cor'po_atlon+
Manu['actur_d under license flora Dolby Laboratories+
_l)olby + and the double-I) symbol am tradema_ ks of Dolby Laboratorles+
Other company names mM product name, s listed aye tr'adeltlarks or br'and name, s he,longing to each
indlvldual compan>
SD logo N a _ademax'k+
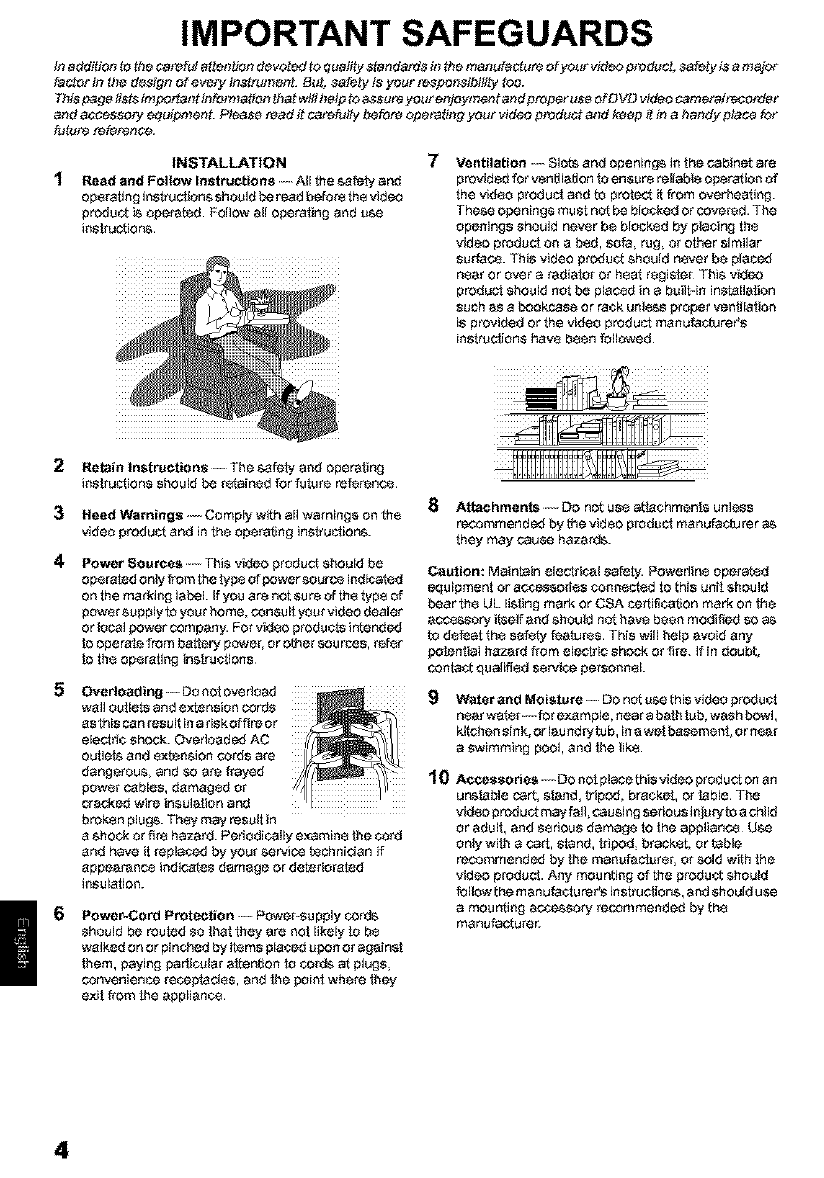
IMPORTANT SAFEGUARDS
fe additiotl to the careful atfen#on devoted to quality ,$_ndards #l the manufacture of your video p_duct, safety i,$a nle_or
factor #_the desi_tn of every inatrumenL B_ _afety is your re_po_sibilJty too.
T_ta l_ge tists inlpoKaof infemlafion _haf wil_h_ to assure yol_ enjoymeof and proper use ofD VD video c_rn efa_reco_ r
and accessory equip_enL Please read it carefully before opefafin_t your video p_duc_ and keep i_in a handy place for
future [efe_nce.
fNSTALLATION
Read and Follow instructions --- A_lthe safety and
operating instrJctions should be read befere tpe video
product is operafed. Follow all operating and use
instructions.
Ventilation --- Slots and odenin_ in the cabinet are
provided for venfJlatfen to ensure reliabte operation of
the video product and fe profect it from overheating.
These openings mast nat be blocked or covered. The
openings should never be blocked by placing fo÷
video product on a bsd, sofa_ rug_ or other similar
surfa_. This video product should never be placod
near or over a _diator or h÷at regisfer This video
product should not be plaid in a built-in installation
such as a bookcase or rack unlsss proper ven_Jlation
is provided or the video product manufe_rer's
instructions have bsen followed¸
2Retain instructions The safety and operating
instructions should be ratainod for future referen_
3Heed Warnings --- Comply with all warnings on the
video product and in the operating instructions.
4Power 8ources - This video product should be
operated only from the type of pewer source indicafed
on the marking lapel If y_u are not su re of fo÷ type of
power supply fe your home, ¢onsuit your video dester
or local pewer ¢ompan_ For video products ir_eodod
to operate from battery power, or o_er sou rces, refer
to the operating instructions¸
8 Attachments -- DO not use attachments unless
recommended by foe video product manutacturer as
they may cause hazards.
Caution: Maintain stectdcal safety. Poweflin8 opera_d
equipment or aooessodes connected to this unit should
odar th_ UL listing mark or CSA cedJfication mark on the
a_ssory _ef_ and should nat have been modified so as
fe defeat the sofaty features. This will help avoid any
peferdial hazard from electric shock Or _re. if in douat,
contact qualified service personnel.
Overfeading --- DOnct overlood _ 9
wall outlats and e_ension cords
as this can resuit in a riskof fire or
electric Shock. Overloadod AC
outlet, and ec{fension Cords are
dangerous, and so are frayed 10
power cables, damaged or
cra_ed wire insulation and
broken plug& Thay may result in
a shock or fire hazard. Periodicaily eT-_min_ the cord
and have it reptaced by your service fechnidan if
appea_n_ indi_es damage or datedorated
insulation.
Power-Cord Protection --- Power-su ppty cords
should be routed so that they are notlikely to be
walked On or pinched by ifems placed _pen Oragainst
_em, paying pe_cular at_er_ion to cords at plugs_
Convenience recep_ad÷s, and _e point where _ey
exit fi'om _e appliance.
Water and Moisture -- DO nct use this video product
near wafer ---far example, near a bath tub, waSh bowl,
kitchen sink, 0r lau ndrytub, in awat _sement_or near
a swimming pool, and _e like.
Accessories-- DO notplace this video product on an
unsfeble cart, stand, tripod, bracket, or _able The
video product may fall_causing serious inj_ryfe a child
or adult, and sedous damage to the agplian_ Use
onty with a cart, stand, triped_ bracket, or fable
recommended by _e manufacturer, or sold with the
video product. Any mourning of the p_duct should
follow the manufactu rat's instruc:_ons, and should use
a mou r'4ing a{_essory recommended by the
manufecture_
4
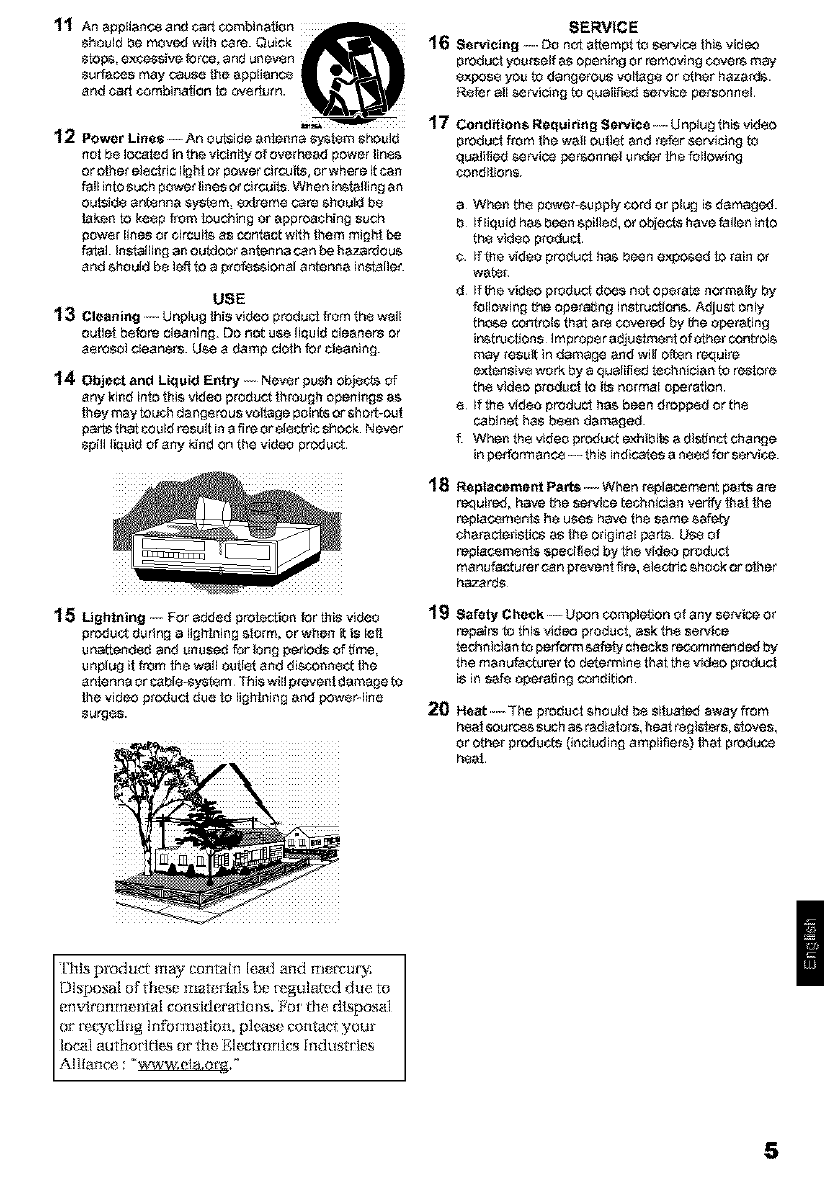
11 An edpNan_ and cart combinattsn
should be moved with care.Quick
stops, excessN_ force, and uneven
surfaces may cause the appltsnce
and cart combina_Jon to overturn.
12 Power Lines--An o_side antenna syatern should
not be tscated in the vicinity of overhead power lines
or _her etsctdc light Or power circuffs, or where it can
fa}l into such power lines Orcircuits. When irw,te]ling an
outside antenna sps_m_ _-'_re me care shourd be
token to keep from touching or appreavhing Such
power lines or ¢ircuite as contact with them might he
fatal. Ins'_alling an ourdoor antenna can he hazardous
and shourd be left tea professional antenna inataker.
USE
13 Cfaaning Unplugthis video product from the wall
outlet before cleaning. DOnot use fiquid cleaners or
aerosol cleaners. Use a damp cloth for cteaning.
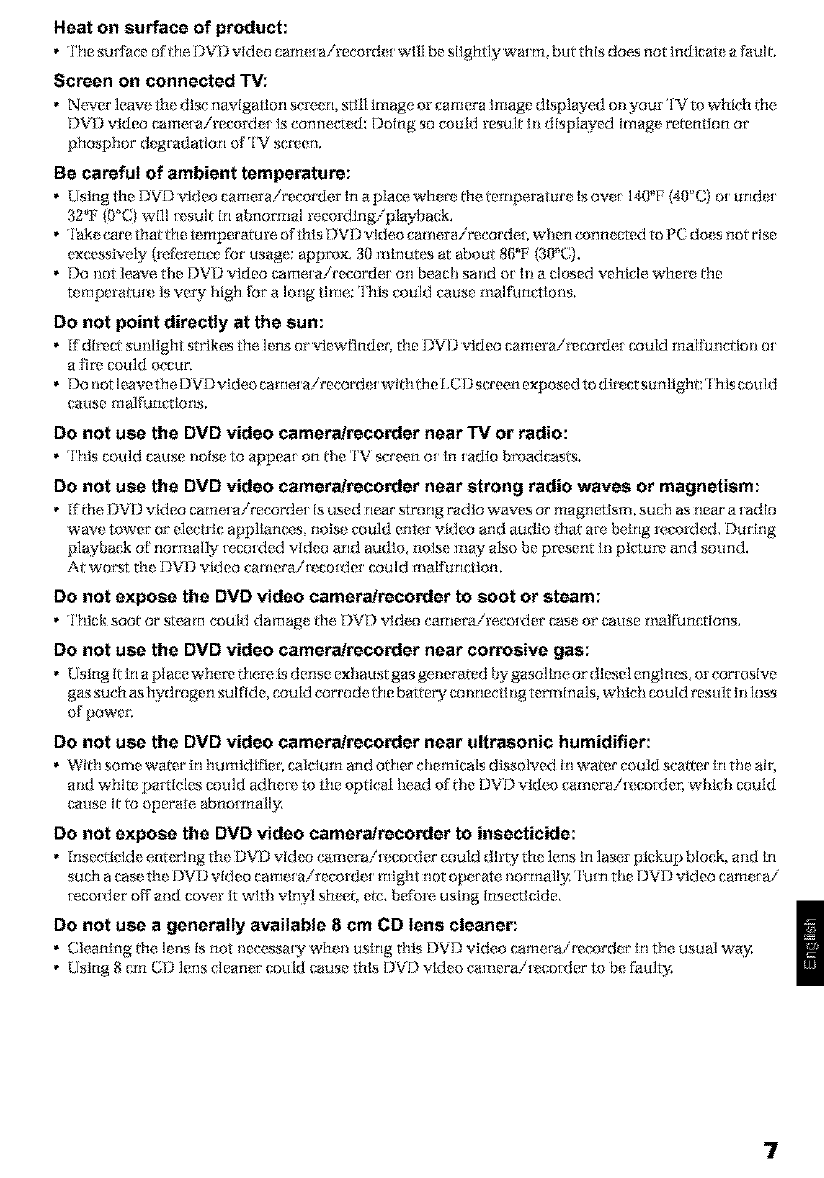
14, Object and Liquid Entry - Never push objects of
any kind into this video product through openings as
they may touch dangerous vokege painte or she÷out
parts that could resolt in a fire or ets_c shock. Never
spill liquid of any kind on the video product¸
16
17
18
15Lightning -- For added protection for this video 1 9
product during a lightning atorm, or when it is leit
una_ended and unused for tsng periods of t_me,
unplug it from the wall outlat and disconn÷ct the
antenna or cabts-system This will prevect damage te
the video p_du_ due to lightning and pawer4ine
surges. 20
SERVICE
Sewicin_ --- DO nat aKempt to servia this video
product yourself as opening or removing covers may
expose you to dangerous voltoge or Other hazards.
Refer all servicing to gualiftsd service personn÷l
Conditions Requiring Service Unplug this video
product from the wall outlat and refer servicing 83
qua]ifted service hersonnel under the following
conditions.
a When the power-supply cord or plug is damaged.
b If Nquid has been spilled, or objects have faltsn into
the v_deo product.
¢. If the video product has been eEoosed to _in or
wate_
d If the video product does not operate normally by
following the operating instructions. Adjust only
those COCt_ts that are covered by the operating
irw,tructtsns Improper adjuatrnent of uther controts
may result in damage and will often require
ex_ensive work by a gualifi÷d technician to restore
the v_deo product to its normal operation.
e If the video product has been d_ppad or the
cabinet has been damaged
f. When the video preduct exhibits a disfJnct change
in pe_rmance ---thi_ indicates a need for servfoe.
Repfacement Parts -- When replacement parts are
required, have the service technician ver'r_y that the
replac_menfa he uses have the same safe_
characteristics as the original parts. USe of
replacemenfa spedfied by the video produ_
manutecturer can prev_entfire, etscfoc shock or other
hazards¸
Safety Check -- Upon ¢ornptstion of any service or
repairs to this video product, ask the service
technician to perform safety checks recommended by
the manufacturer to datermin_ that the video product
is in safe operating condition¸
Heat The product should be situated away from
he_ Gour¢_ _uch as radiators, heat registers, stoves,
or Other products (including amplifiers) that produce
heat¸
'['hlsproduct may containleadand m_,r_ur_:
Disposal of these matei fa]s be [_gulated d[_e to
en_,,ironmelltal considerations. _'o_ the disposal
or' [_l_'_llng [nf"o[mation, please vontac_ your
lo('a] authodties or the Elecfaonics [ndustdes
Al]iance : "_,"
5
Cautions When Using
Handle the liquid crystal display (LCD) with care:
*rI'he I,Cf) Is a very de,ltcate display dew'ice: J)o not press itssurfa cx wi_h _bt_, )lit It or prl ek It with _Isharp
obje_L
turtl th_ 1)VL) vM_o _'_t_n_r_/I'_eOl'der o_ wal_ fl_r _t_ew _tlOl_rits, arid th_ll tHrll il _1_ag;/irL
. Do not place the DVD v'ldeo came)a/recorder wllh the open LCI) screen dowN,
,Close th_ LCD monltor when riot using the DVD voldeo camerair_cx_rfl_ _.
Liquid crystal display and viewfinder:
"rlltl_ [_C_}SCrd___and vlewflnd e_ _e the prod u_'ts of hlghly pt_L,clse technolog,}_ Among the total nurn bet'
of pbrets (approx. 120,000 pNels tbr I,CD monitor _nd approx.[ 111.0011plxe]s for viewflnder), 0,01% or
less plxels may be mlsslng (black dots) or may mm_in lit as colored dots {red, blue, green). '['his shows
the IImltaHo ns of the current technology, and does not Indicate a fault that will Inter f_e wi/h recording,
• The LCD screen and vlewflnder wlll be slightly dimmer than usual when the DVD video camera/
Iecorder Is _t low _empera_ure_ as IiI cold areas, or hnmedlamly after power Is turned on, Normal
brlghmess will be _estor_d when the temperature [nslde ¢_e DVD vld_o cam_ _a!mcorder _lses,
Hold the DVD video camera/recorder correctly:
* Do not hold _m vl_!wftndet or LCD monltor when tilling the I'?VD video camerair*ecorfler; The,
vlewflnder or LCD monitor could detach and the DVD video camerair_corder may NIL
Do not subject the DVD video camera/recorder to impact:
•rI'his DVD vM eo c_rrter aire_x_rde_ [sa p[_ cislon m ach[n_, 'l_tke great care that y_)u do Not st_ ike it against
a ha_d ol_iect or let it [_IL
DO not k!se,the _)V I) vlde,o c_me,rairecorde, ton a trlpod h_a place whe,re, It Iss_lt_le,ct to seve,te,vibrations
ot [rrtpacL
No sand or dust!
Pine san_t or dust ell_erltig the DVJ) _[dQ,o carne, tairecord_ t or AC _t(tapt_,rich_tr'g_ tc_)uld callse
malI_anctlons or tiereels,
No water or oill
• Vv_ate_or oH ent erI ngl_le DV D _lde,o _me, tairecord_ tor _.,C adapteril_h at get could c_u s_ e]eel_tc shoek_
mal_n_ions or de_cIs.
6
Heat on surface of product:
* The surface of the, f)VD video cam__airecord_ _will be slightly warm. bm this does not indk:a_ a _mlL
Screen on connected TV:
* Ne_er leave the dlsc navigation scre, en, srlll Image or vamera image dlsplayed on your 'l_v_to which the
DVD video came_ airecorde_ is conne_._ d: Doing so couht result in displayed Image retention or
phosphor degradation of TV sc_en.
Be careful of ambient temperature:
* LIsingtheDVf)_;*ldeocmrlerairecorderhlaplawwher_dle,_empe, ratur_Isov_ 140"P (40"C) or und_
32'*_ tO_C)wlJI _z,suIt In abnormal recording/playback,
* 'lake care/hal l_le temperature, of thls DVD video camera/recorder; when conmcred to PC do_s not rise
excessively 0"efhrence for usage: approx. 3I) minutes ar about 86"P t30_'C).
* Do not leave the DVD video camex airecordex orl beach sand or I_ a dosed ve|ligle, wher_ l}le
temperamr_ is very high for a long time: 'lhis couht cause malfimctkms,
Do not point directly at the sun:
a _ could occur',
Do ilo_ h_ve t he D VD vk_eocareer ai_"ecor'd_twll_l l_K,h(_l ) sl_"een e_posed to d_r_i;_su11]i_h_; Th iscoHhJ
callse trtal{t tn_-rlo tl_,
Do not use the DVD video camera/recorder near TV or radio:
* This cou]d cause noise to appem on lhe TV screen o_ in radio bmadcasls.
Do not use the DVD video camera/recorder near strong radio waves or magnetism:
* if ttl_ I')VL 3 video t*,_rll_Iilire('or'd_!I Is use(] t K_ar' strotl_ r'il d lo waves or' rll_l_tlt_iSlll, such as tlear' a Iad[o
wave tower' or' e]edrlc appllane_s, noise couht en/er v*ideo and audio treat are being re,vorded, Dur'h_g
pJaybaek o f"normally _eco_ded vMeo and audlo_ noise may al_o be present In pictur_ and sound.
At worst the DVD _*ldeo carnerai_;,co_xler could real:Function,
Do not expose the DVD video camera/recorder to soot or steam:
* rl'|lit;k SOO_or steam could damage the, DVD video ¢'alneraire,_order' case of ca_lse rnalf_lncrions.
Do not use the DVD video camera/recorder near corrosive gas:
, Using It b_a piece wher_ there Is dense exhaust gas generated by gasoline orx_iesehmg_ne_, or corrosive
gas such as hydrogen sulfide, could corrode, l_e battery co nn ectl ng terminals, which c_uld resuk hlloss
of power;
Do not use the DVD video camera/recorder near ultrasonic humidifier:
* _[i_l sollle wal _r itl |ltl/rtl¢] i_)er',c_h,lu rtl arid oth_r chertd(:als dissolv_d In water vould s('at_ er In the air,
a_ld white j')alTIc l_s co u h;1 ad heI_L, to the optI(_al head of lhe 1.3V _) video _a_lera/t_t*,or_ler; which could
cruise It m operate, abner malty;
Do not expose the DVD video camera/recorder to insecticide:
such a case the DVD vM eo came[airevorde[ might not operate noi malty; 'lurn the l)VI) vkk, o camera/
_e,corxt er off and cover it with vinyl sheet, ere, be[bre, using Insectidde,
Do not use a generally available 8 cm CD Iens cleaner:
* _leanhlg the I_ns Is not ile('e,ssaFy whell usltlg this DVI) video e_ftle,Iair_corder In the usual wa(;_
* k!sing 8 em _r,_)]t_'_l_CIt_l_l_r't?t)llid t?aUS_ this DVD VlChO camera/t_corller to be fhtdty.
7
Be careful of moisture condensation:
• When you move tim DVD vldeo camel a/recorder belween places whe[ e the diffT_,rence In/emperatures
Isgroat - such as entering a lodge {i'om a ski slope or goirlg out of a cooled room or vehlele - co ride rlsal{ on
(vapor In al[ wa_ reed or cooled to water droplersl couM occur on the lens and/or lnsM e ffm DVD video
camera/ r_c_r_e_; [f c_ndensatI_n _ccurs_ do n_t open the c_ver of disc _ ca_ _serr_on b_ock _po_b_e.
If condensation occurs on tile lens, wipe it off'wiffl a soft. dry c]oth. Even If the e_ternal suH_tve of DVD
video came, rairecordex has dtied, c,onde_satlon may re,main insMe: '['urn the I)VI) v'Me,o camera/
_e,co_der off and leave It in a dW place fbr at least 1-2 hours be[gre using it again.
Do not use the DVD video camera/recorder for along uninterrupted period of time:
• This DVD _.Meo camerairevorder canno_ beused _i_ra king time continuously as asurveillance comet ai
monitor: If you use the I?VD _'Meo vamerairecordet for a long vonthmous period of rlme, tim
texnperamm ofDVD _'ld eo cam era/mcorfler could exceed a limit and ffm _;,co_tingiplayhack op_ _atlon
cou]d be slowed down: [n this case, turn it off and wait for awhile be{2_re using it agaln.
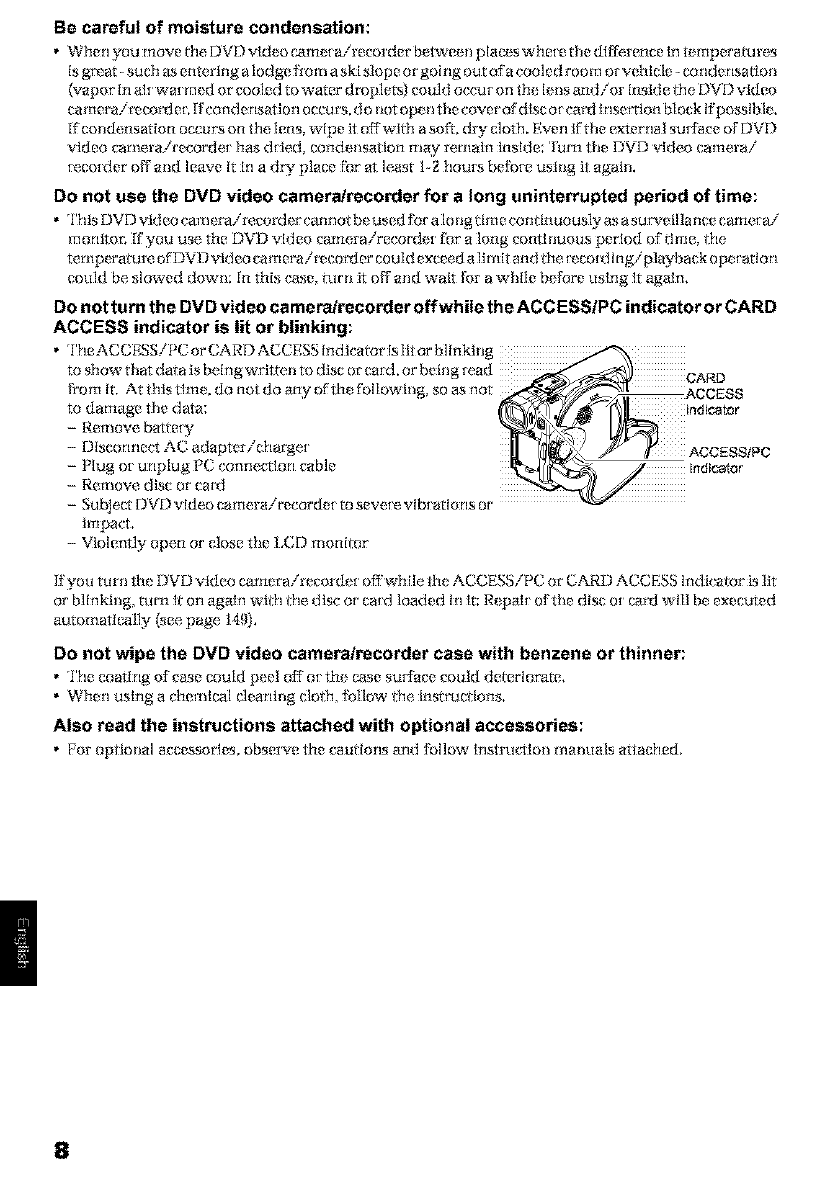
Do not turn the DVD video camera/recorder offwhile the ACCESSIPC indicator or CARD
ACCESS indicator is lit or blinking:
•TheACCP, SS/PC or CARD ACCP, SS lnd k'a_r isllt or blinking
to show that daia is being wrltten to disc or caId. or being Iead CARD
from It, At this tlme. do not do any ofth_ following, so as not
to damage the data:
- Remove batteD"
- Disconnect AC adapter/charge[
- Plug ot unplug PC connection cable
- Remove dNc or emit
- Subject DVD video camerairecorde_ to seve_ e,vib_ ations or
impact,
- Vlok:,nlly open or' close the I,CD monitor
gyou turn the DVD video camera/recorder off while the ACCESS/PC or CARD ACCESS Indicator is lit
or b]Inking, turn it on agaln with the disc or card loaded In it: R_palt of the disc ot i_trd will be executed
automatically _ee page, 149).
Do not wipe the DVD video camera/recorder case with benzene or thinner:
• The coating of vase could peel off" ot the case surface vould deteriorate.
• When using a vhemlc_l cleanhig clod1, _i_llow the, instructions.
Also read the instructions attached with optional accessories:
• Por opfloIla[ accessories, observe the cauliotls arid _i)I]ow l_l_trllc_tloll tslallllals attached.
8
Cautions When Storing
Do not leave the DVD video camera/recorder in a place where the temperature is very
high for a Iong period of time:
•rI'hetempe[arure lnsMe a _'losed veMcie or trunk can become vec_ high in a hot season. If'you leave the
DVI) video _.trtler'ait_eot d eI in st_c[1a p]ac_,_it could l_la]_ncLk_n o1'tile ease could be damag_ d. A]so_
do not expose l_le I)V]) video e,mtler'ai[_cot_ter' to dit_,cr sunlight or place, it _ear' a he,ater.
Do not store the DVD video camera/recorder in a place where the humidity is high or in
a dusty place:
• Du_t entering _le DVD video c_ne_i_co_der could cause mal_.mctions. KtFle htm_Mlt_ Is high, _le
lens could be mold_; and the DVI) video camerai[_eo[d ere, ouM beeome iliope[ able. It is re_'om m end ed
that you put th( _,DVD video camera!recor'der with desiccant In a box when star [ng it In a close& e,lc,
Do not store the DVD video camera/recorder in a place subject to strong magnetism or
intense vibrations:
rIl}l_S CO'lid Ca_e maK'unctlons,
Detach the battery from the DVD video camera/recorder and store it in a cool place:
• Leaving die bat_r_ attal;|led or storing It ;_l|figh t_ mpera_Llt_ could shorten i_; H_,
Suggestions and Restrictions
Make a trial recording:
_. lway_ make a t_"lal [eco[ d ln_ be I_lr_doi tl_ aert;;_]i"eco_"dhl_ to i_take sure d_a_[ ef._o[dln_ is ilo[ m _1.The
_;1ara t|l_t have riot been sl o[ _*,dtlor'_tla]ly because o['a d _,f_,¢_'t[tl ttl__,I)VD v_[d_,o e_r tier'a/r_,c_or d e r' e_tltlot
be restored.
[_ is tecomme_Med that you use T?VI)--I_%M dis<: from which r_corded contem_ can be de]e_ed ti_t lrla[
_eco_ding,
Do not use the DVD video camera/recorder for professional applications:
rIl}l_S _) _d_O 12_[l_I_/il'l?cord[ [ iN d¢_,s[g/'l_'d and pr'odu¢'ed for hOlIle--llge [(*,cold {11g/&lld pl_ty[')_ck,
The recorded contents cannot be compensated for:
corlterlts cannot lie played back because ofad et_ct in tile I)VL? video camera!record er, disc ot ca_, Also+
Hitachi cannot be responsible for your [eco_ded video and audio,
• Kynu o[ a third parry make a mistake when handling ¢fis DVD vldeo camerair_corder, dlsc_ ca[d, etc,,
the, r_cor_led e_ntents may be lost, We cannot be responsible [ix corn p_ nsation {)_rdamage due to loss
of I¢_,CO1ded eorlterlts,
Copyright:
•Da_arec_rded_nthed_sc_r`cardint_sDVD_deo_amera/rec_r_de_sIng_therdIgItai/anaI_gmedIa
or devices a_e, pmmcte, d by fl_e copyrlght act and tremor be used without permlsslon of the owner of
copyright, except for personal e_lJoyment, Be aware d_ar r_cor_ting Isrest_ Icl_ d fb_ som_ d_ monstratlor_
performances and e,xhlbitions, tTverl for p_ tsonal _t_loymetm
9
Read This First
To guide you, we_,e included fottowing six eheptere.
*rl'h[ I sectiol_ on _S_tl]pS" _Xp]aiN_ hOW to set Up
_e DV_ video camerairecorde_ ba_e_ and s_
_e dab/time.
* The se_ion on _'B&slcTe_mlques _ exi)ialns _!
b_slc open,ion of thls DVD vldee _merai
i_co_er - t_coI_Jlng of l_ovies, still images.
external h÷ut. arrd playback of _co_ ed Im_ges.
* The sectlon on _'Advanced'l_chnlques _'explains
se_tlngs on this DVD vldee e_m_ai_co_er _r
mo_ adv_r;eed Lk_a_.
* The se_lon on _'Dlsc Navlgatlon ° expialns
edMng wl_ Disc Navlg_lon: _fer to _Is
section when f[nallzlng DVD-R dL% and
In Rlallzing DVD_RAM disc.
*'l'he .se_lon o n '_[n_alllng Soflwa_ _expl_ ns _le
con_nts of provided CD-ROM and howto lnstai]
_e software included.
* '_Suh.sidla W [n:_rmation _' lnc]udes an
lntroductlon _ produ_s so]d separa_l_ proper
cleaning, and _oublesho_ng.
We went this manual to be as helpful as possible,
so it includes two eesy weye to rind the infermetien
you need:
• A quick index ['or dm In[_rmation you Use most
often (this page),
•A detailed table of comems d_r_cring you to
spedflc lnfbrmatgen qulckly _ee page 13-15),
Get to know yaur DVD video cemet_reco_der by
using this menaet, and get te know Hitachi. We
appreciate your business.
Quick Index
Available Discs ................................................ 22
Recording Movie .............................................. 50
Immediately Checki_N Recorded Scene ......... 67
Connecting to a TV .......................................... 72
Functions Available with Disc Navigation ........ 99
Installing Software ......................................... 132
With th_sI)VD vidt'o canmra/*_co_ der you can vk'w Ihe picture being rugc¢ ded o_ tim plajback pigtum
whether on I_ I,CD monitor or in tim viewfinden Opening or closing [he [ ,CI) moni tot _witc]ms ihe picture
I_ appear on t_ I_CD monitor or in the view[inden 'l_e _]]owi_ lexl desgribes tim opm _ion a_um_ Iha t
I_ viewfi_tt_ ¸ is/Is_d as a m_or monitor d_vi_.
10
Introduction
eYou can record even during playback
L-nlik_ tape d_vl_,s, )_oudo NotNc?_d_ sear'chfb_the,r_,co_t_ngs_a_positionor lactic?die,b_,glnnbig cff
blank portion.
You can start te,cot ding during playback; New recording will not oveFwrltc any pr_viously te,cotded data,
,................._ .......................................I:_. ............._,..,.<_...................
.%_ _ , _., i
_-,!_,_.'s-,._...................... _ ............................._". ............._ _...............
i , , ) i,_--_I ......."_'_........._'-' '_ '..................'_'_'..............
If youstoppla,]back midway and s_artrecording,ove_vd_ will n_ occur.
OYou can immediately play back desired recorded scenes
YOU do llot lleed to r_w[tld, tltll[k_ IefzQtcJer_ us[rig taX)e.
YOUcan select amy sc_ne you want and hrunediarely play It back (using Disc Navigation _lnclhm).
lUse Disc Navigation to create your original movie
YOUg_ delete 11tln_l?ess_try sg_,l_es, irtov_, _tllyscones_ _tc., and ('reare yo_t [ original] t_lov[e work (Play [.l_[).
Bdom editing
After editing
11
OYou can easily edit scenes, which is OCreata original DVDs on PC
quite difficult with tape ':ou cm_us__ r)VI-).,r,t_tiscto c_,at_,anotigma;
L-Mng _tlls 13VE) vlcl_o camerairecorde[, you carl E)V[), rising the pr'o v*Me_tso_Ywa['eCT)-[{OM,
collect scenes of your ch lid. for,exzunple_ o n plwflls t The created DVD disc can be p]ayed back on DVD
of Disc Na_'igutl_n fb net Ion and c__,a_/__,an orlg[natl p] atj_g I?VD-ROM drlve_ _rc.
illovle: '['hell sit rtply play batck the play Hst alld du b
¢ -_ x - , i _\ 5
rapeatedly press play back this DVD video j_p
bat!ons cameraZrecorder,and
prer_sthe record but!onon Original DVD baing Playbackof DVD
VCR created
12
Table of Contents
Important Informat on ......................................... 2
For Your Safety .................................................. 2
Precautions ........................................................ 2
iMPORTANT SAFEGUARDS ............................ 4
Cautions When Usng ......................................... 6
Cautions When Storing ....................................... 9
Suggest ons and Restrictions ............................. 9
Read Ths First ................................................. 10
Irdroduct on ....................................................... 11
Table of Contents ............................................. 13
Checking Prov ded Accessories ....................... 16
Names of Parts ................................................. 17
About This Manual ............................................ 21
Discs and Cards .............................................. 22
AVAILABLE DISCS ............................................... 22
INFORMATION ON DVD-R DISC ......................... 23
EXAMPLES OF DISCS THAT CANNOT
BE USED ON THIS DVD VIDEO CAMERA/
RECORDER: ...................................................... 23
HANDLING DISCS ................................................ 24
AVAILABLE CARDS .............................................. 25
Storage Capacity on Disc or Card .................... 26
RECORDABLE TIME OF MOVIE (VIDEO) ........... 26
RECORDABLE STILLS (PHOTOS) ON DISC.....27
RECORDABLE STILLS (PHOTOS) ON CARD ....27
Features of DVD Video CamerdRecorder ....... 28
VERSATILE FUNCTIONS AVAILABLE ................ 28
RECORDING ON DISC ......................................... 30
RECORDING MOVIE AND STILL ......................... 30
IMMEDIATE REVIEWING OF
RECORDED IMAGE ........................................... 31
EDITING IN VARIOUS WAYS ON DVD VIDEO
CAMERNRECORDER ALONE .......................... 31
USING WITH VARIOUS DEVICES ....................... 31
Setups
Setting Up the DVD Video Camera;Recorder... 32
HOLDING DVD VIDEO CAMERA/RECORDER .32
ATTACHING LENS CAP ....................................... 32
ATTACHING SHOULDER STRAP ........................ 33
INSERTING BATTERY INTO
REMOTE CONTROL ..........................................
REMOVING BATTERY FROM
REMOTE CONTROL ..........................................
Setting Up the Battery ....................................... 36
CHARGING BATTERY .......................................... 36
ATTACHING BATTERY TO DVD VIDEO CAME_
RECORDER ....................................................... 37
REMOVING BATTERY ......................................... 37
BAT[ERY REMAINING LEVEL INDICATOR. ,....39
EFFICIENT USE OF BATTERY ............................ 39
USING DVD VIDEO CAMERA/RECORDER
WITH AC ADAPTER/CH/%RGER ........................ 40
Inserting and Removing Disc ............................ 41
INSERTING DISC .................................................41
REMOVING DISC .................................................43
Inserting and Removing Cord ........................... 44
Basic Techniques
Basic Handing of DVD Video Camera/
Recorder ........................................................ 45
TURNING DVD VIDEO CAMERA/RECORDER
ON AND OFF ..................................................... 45
VIEWING SUBJECT THROUGH VIEWFINDER. 46
VIEWING IMAGE ON LCD MONITOR SCREEN.AS
CLOSING LCD MONITOR .................................... 47
Sell ng Date and Time ...................................... 48
CHANGING DISPLAY FORMAT OF
DATE AND TIME ................................................ 49
RecoffJ ng Movie ............................................... 50
USING EXTERNAL MICROPHONE ..................... 52
Recording Stills ................................................. 53
Zoom ng ............................................................ 55
MACRO RECORDING .......................................... 56
RECORDING SUBJECTS FOR STRONGER
WIDE-ANGLE OR TELEPHOTO EFFECT ........ 56
Manually Fecus ng Subject ............................... 57
FOCUSING DURING RECORDING ..................... 57
Adjusting Exposure Manually ........................... 59
Compensating for Becklight .............................. 60
Using Full Auto Function .................................. 61
On-Screen Information ..................................... 62
INFORMATION DISPLAY DURING
RECORDING ..................................................... 62
Record ng image from Other AV Devices ........ 65
CONNECTING TO OTHER AV DEVICE .............. 65
RECORDING IMAGE FROM AV DEVICE ............ 66
Playing Back ..................................................... 67
IMMEDIATELY CHECKING RECORDED
SCENE ............................................................... 67
PLAYBACK FROM START OF DISC OR CARD-68
SEARCH PLAYBACK OF MOVIE ......................... 68
FRAME ADVANCEtFRAME BACK/SLOW
PLAYBACK OF MOVIE ...................................... 68
SKIP PLAYBACK OF MOVIE ................................ 69
PLAYING BACK STILLS ....................................... 69
JUMPING TO SPECIFIED POINT (GO TO) ......... 70
On-Screen Information Display ........................ 71
INFORMATION DISPLAY DURING PLAYBACK. 71
Playback on Other Devices .............................. 72
CONNECTING TO A TV ....................................... 72
VIEWING ON TV SCREEN ................................... 73
PLAYBACK ON DVD PLAYER ............................. 74
REMOVING AND REPLACING FROMIIN
ROUND DVD HOLDER ...................................... 75
HOW TO REMOVE DISC ..................................... 75
13
REPLACING DISC IN ROUND DVD HOLDER ....76
WHEN THE HINGE OF ROUND DVD HOLDER
COMES OFF ...................................................... 76
DISC GLEANING ................................................... 76
Playback on DVD Video RecordedPlayer ........ 77
Advanced Techniques
Understanding Flow of Menu ............................ 78
Setting Up Camera Functions ........................... 80
SELECTING SHOOTING MODE TO MATCH
THE SUBJECT
(SWITCHING PROGI:_AM AE MODE) ................ 80
ADJUSTING COLOR (WHITE BALANCE) ............ 81
USING THE ELECTRONIC iMAGE STABILIZER
(EIS) .................................................................... 83
MAGNIFYING SUBJECT IMAGE (DIG. ZOOM) ...84
REDUCING WiND NOISE DURING
RECORDING (MIC FILTER) .............................. 85
Setting Uf._ Record Functions ............................ 86
SWITCHING MOVIE QUALITY (VIDEO MODE)..86
SWITCHING QUALITY OF STILL IMAGE
(QUALITY) .......................................................... 87
RECEIVING IMAGE FROM ANOTHER DEVICE
(INPUT SOURCE) .............................................. 88
SWITCHING EXTERNAL INPUT RECORDING
METHOD (PHOTO INPUT) ................................ 86
SELF-TIMER ......................................................... 89
SETTING ON_CREEN DISPLAY OUTPUT
ON OR OFF (OSD OUTPUT) ............................. £0
LCD Setu_._ ........................................................ 91
SETTING BRIGHTNESS OF LCD SCREEN
(BRIGHTNESS) .................................................. 91
SETTING COLOR DENSITY OF LCD SCREEN
(COLOR LEVEL} ................................................ 91
Initial Settings ................................................... 92
SWITCHING OPERATING SOUND ON OR OFF
(BEER} ................................................................ 92
TURNING DVD VIDEO CAMERA!RECORDER OFF
AUTOMATICALLY (POWER SAVE) .................. 92
TURNING RECORD LED ON OR OFF
(RECORD LED) .................................................. 93
CHANGING DISPLAY L#_4GUAGE
(LANGUAGE} ..................................................... 93
RESETTING MENU SETTINGS TO DEFAULTS
(RESET} ............................................................. 94
Disc Navigation
Using Dsc Navigation ....................................... 95
STARTING DISC NAVIGATION ............................ 95
TERMINATING DISC NAVIGATION ..................... 97
PLAYING BACK FROM DISC NAVIGATION
SCREEN ............................................................. 97
SELECTING MULTIPLE SCENES ........................ 98
SELECTING CONSECUTIVE SCENES
TOGETHER ........................................................ 98
Disc Navigation Menu ....................................... 99
FUNCTIONS AVAILABLE WITH
DISC NAVIGATION ............................................ 99
UNDERSTANDING FLOW OF
DISC NAVIGATION MENU .............................. 100
Scene ............................................................. 101
DELETING SCENES (DELETE) ......................... 101
CHANGING iMAGES FOR THUMBNAILS
(EDIT - THUMBNAIL) ....................................... 103
PLAYING BACK BY SKIPPING SCENES
(EDIT - SKIP} ................................................... 104
ADDING SPECIAL EFFECTS (EDIT - FADE) .... 105
ARRANGING ORDER OF SCENES
(EDIT _ MOVE} ................................................. 106
COMBINING MULTIPLE SCENES
(EDIT _ COMBINE) ........................................... 107
DIVIDING MOVIES (EDIT- DIVIDE) ................... 108
COPYING STILLS ON DVD_RAM DiSC
TO CARD (COPY) ............................................ 108
LOCKING SCENES ON CARD (LOCK') .............. 110
DESIGNATING SCENES TO BE PRINTED
(DPOF) ............................................................. 111
SELECTING SCENES USING MENU SCREEN
(SELECT) ......................................................... 112
DISPLAYING iNFORMATION USING MENU
SCREEN (DETAIL) .......................................... 113
Program .......................................................... 114
WHAT IS _PROGRAM"? ..................................... 114
SWITCHING TO THUMBNAIL DISPLAY OF
SPECIFIC DATE (SWITCH} ............................. 114
PLAYING BACK PROGRAM (PLAY) .................. 115
CHANGING TITLE OF PROGRAM (TITLE).... 115
Play List .......................................................... 117
WHAT IS "PLAY LIST'? ...................................... 117
CREATING NEW PLAY LIST (CREATE) ............ 117
SWITCHING TO DISPLAY OF EACH PLAY UST
(SWITCH) ......................................................... 118
PLAYING BACK A PLAY LiST (PLAY) ............... 119
ADDING SCENES TO PLAY LIST
(EDITING PLAY LIST) ...................................... 120
DELETING SCENES FROM PLAY LIST
(EDITNG PLAY LIST) ....................................... 121
ADDING SCENES USING SUBMENU FOR
EDITING (EDITING PLAY LIST) ...................... 121
DELETING SCENES USING SUSMENU FOR
EDITING (EDITING PLAY LIST) ...................... 122
SELECTING SCENES USING SUBMENU FOR
EDITING (EDITING PLAY LIST) ...................... 122
ARRANGING ORDER OF SCENES (MOVE}.... 123
CHANGING TITLE OF PLAY LIST (TITLE) ........ 124
DELETING PLAY LIST (DELETE) ...................... 124
GoTo .............................................................. 125
TOP (END) .......................................................... 125
Disc or Card Management .............................. 126
VERIFYING REMAINING FREE SPACE ON
DISC OR CARD (CAPACITY) .......................... 126
PROTECTING DISC FROM WRITING
(PROTECT DISC) ............................................ 126
INITIALIZING DVD-RAM DiSC OR CARD
(FORMAT DISC. FORMAT CARD) .................. 127
UPDATING CONTROL INFORMATION OF
DVD-RAM DISC ............................................... 128
FINALIZING DVD-R DISC ................................... 129
14

Others ............................................................. 130
DISPLAYING MOVIES OR STILLS
INDEPENDENTLY (CATEGORY) .................... 130
PLAYING BACK SCENES REPEATEDLY
(REPEAT PLAY) ............................................... 130
SLIDE SHOW (CONTINUOUS PLAYBACK OF
STILLS) ............................................................. 131
Installing Software
Contents on Provided CD_ROM ..................... 133
iNSTALLiNG USB DRIVER.................................135
iNSTALLiNG UDF DRIVER
(DVDq:_.M DRIVER) ........................................137
INSTALLING DVD-MovieAIbumSE .....................139
INSTALLING MyDVD ..........................................141
Creating DVD Video on PC from
DVD-RAM Disc R_orded on
DVD Video CemeFa/Recorder ...................... !43
Subsidiary Information
Cleanirlg .......................................................... 145
Changing Setting of Demonstration ................ 146
No DVD Video Camera/RecBrder Operation
Check the Follow ng: .................................... 147
Trouble Messages .......................................... 149
Troubleshooting .............................................. 156
System Reset ................................................. 163
Major Spec fications ........................................ 164
Irdreduction to O[._UonalAccessories .............. 166
CAMERAACCESSORIES ..................................166
POWER SUPPLY................................................I86
iNFORMATiON ON SQUARE ADAPTER ...........168
TO Order in the United States ......................... 167
BY PHONE ..........................................................167
index ............................................................... 168
Be sure to read the following before open ng
the package of CD_ROM .............................. !70
15
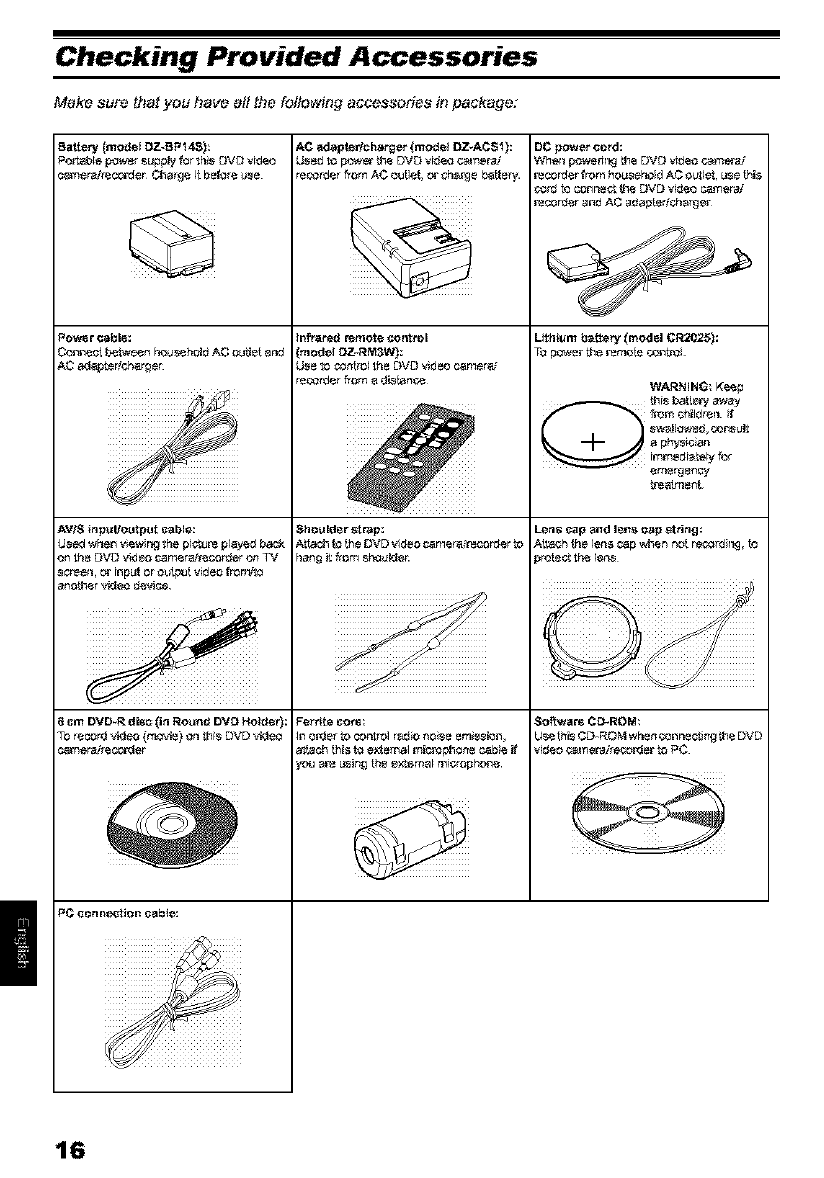
Make sure that you have a# the fattowing accessories i_tpackage:
Battery (model DZ_-BPt4S):
f_o_t.aJ_lepowerSupp_Zfor Shs DVD video
camerair_corden Ctla_ge it before Use
AC ad_pterlcha_er (model DZ_ACSI ):
l._sed _o po_et _e DVD Video _erai
_der _om A¢ ouUet, c_ _h_e battery.
Po_r _bl_:
_on_eo[ I_¢_een h_u_eh_ AC oLeJetarid
AC a_Jap_erlchar_en
8Crn DVD-R dis_ (in Rounif DVD Hairier):
TO record \43e0 (rn_.4_) or_ _is DVD \40_
PC _o_ne_ion cabte:
Infra_ remote control
mode( DZ_RM3W):
U_e 1o_nt_o_ _heDVD v_d_ocamer_
_der _om a _ii_tance
Shogld_r strap:
Agach to [heDVD vldeo camera_r_corder LO
hang i_ f_om s_uk,_e_
D_ power _oi'd:
Whel_ _e_l_ _e DVD Vi_eo _ad
i'_corder from hoL_eb_;d AO ou_et L_e this
_:_r_ to _onl_e_ _e _VD vilJe_ P,am e_a._
r_c_r_er and AC alJapte_h_rge_
Lithium if_e_ (mod_l CR2025):
WARNING: Keep
_)bhisI)aifewarray
f_l_, chi_drell f
il_mediB_y for
treatment.
Lens cap ;=J_dI_I1S P_apstritlg;
At_oh {he lel_s cap when not r_rd r_, to
Softwa_ GD_ROM;
Use thi_ _ROM when co_l_e_f_ _e DVD
vi_eo Gt_erairec,_p3e_ LOT_C
16
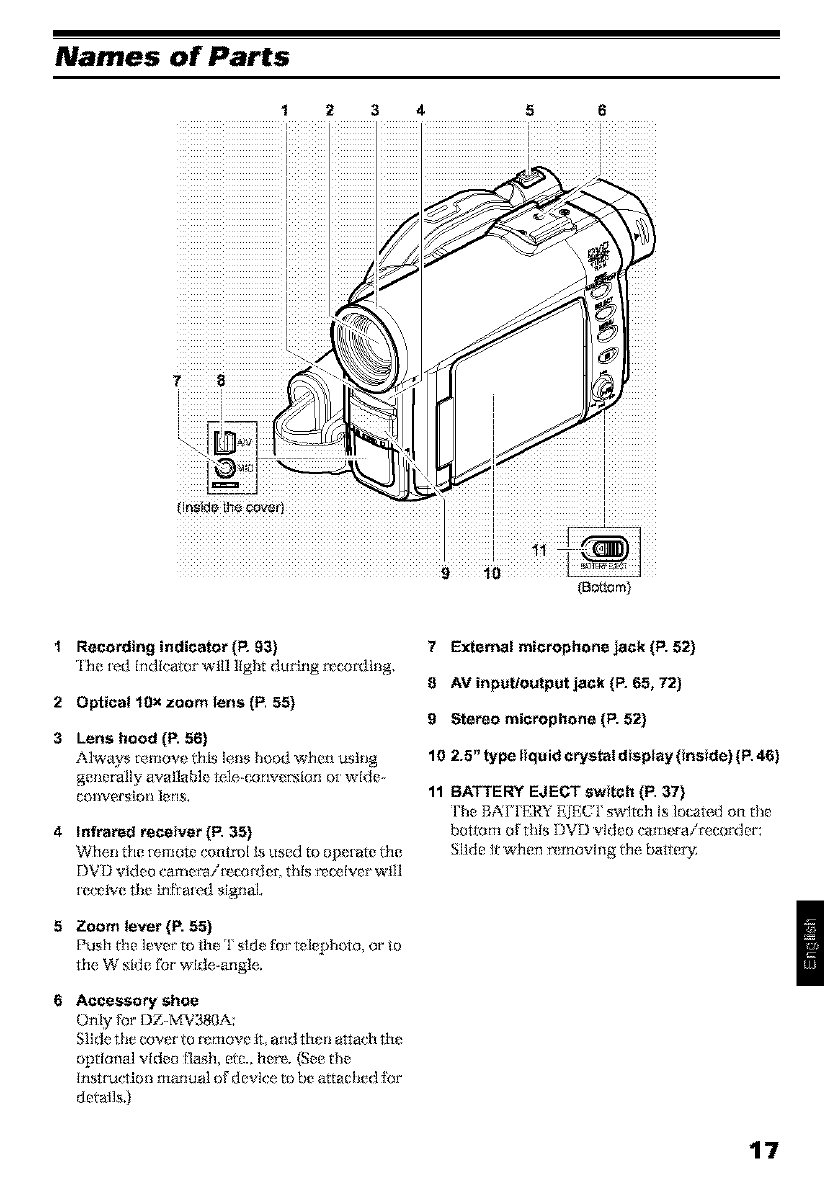
Names of Parts
12 3 4 5 6
(BoSom)
1 Recording indicator (P. 93)
rl'he ted indicator will liglir durfng r_cording.
2 Optical 10x zoom lens (P. 55)
3 Lens hood (P. 56)
Always remove ttlis lens hood when using
generally ava[lab]_ te,le,-conver._lon ot wide-
converslm_ lerl&
4 Infrared receiver(P. 35)
_¢_hei_ the [emote ('ont r_a[I_ used to ope[ _re ttil?
DVD vkleo camer'_tit_coi_ter, this r_ce, iver will
teceive the Lrl:[iate,d signal.
5 Zoom lever (P. 55)
Push t_m lever' to the T side fbr telephoto, or to
the, W ,side for wide-angle,.
6 Accessory shoe
Only for DZ-MV380A:
Slide the cover to r_move II. _nd then attach th_
optional video Ilash, ere.. her_. (See the
Irlstrtlct [oil rtlarltlal of device, to be attached fi_r
detal]s.)
7External microphone jack (P. 52)
8AV inpctioutpet jack (P. 65, 72)
9 Stereo microphone (P=52)
10 2.5" type liquid crystal dispTay (inside) (P.46)
11 BATTERY EJECT switch (P. 37}
The BATI'ERY E_EUI' switch Is loca_d on the
bot_v}m of this DVD vMeo camera/re, corder:
Slide it when rx moving era, battery
17
12 13 14 15 16 17
=
ii i
iiiiiiiiiiiiiiiiiiiiiliiiiiiiiiiiiiiiiiiiiiiiiiiiiiiiiiiiiiiiiiiiiiii_iiiiiiiiiiiiiiiiiiiiiiiiiiiiiiiiiiiiiiiiiiiiiiiiiiiiiiiiiiiiiiiiiiiiiiiiiii
18 19 20 21 22
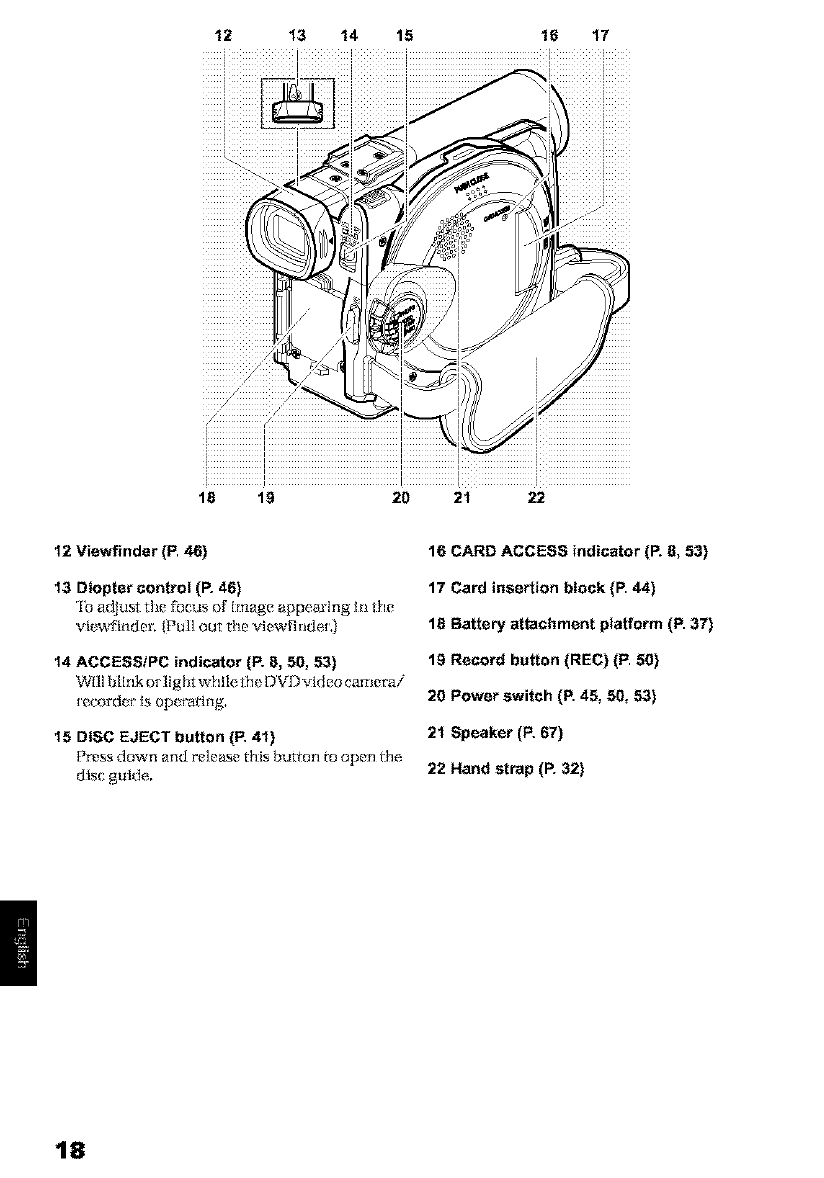
12 Viewfindcr (P. 46)
13 Diopter control (R 46)
rlb adjust the fi_e_s oF {mage appear{rig In the
_lewflnder, (Pull ou_ the _[ew{_ndeL)
14 ACCESS/PC indicator (P=8, 50, 53)
Wlllbllnkorlightwhilefllel)VDv*ldeocamera/
te¢'order Is operating,
15 DISC EJECT button (P. 41)
Pr_s down ;_ndre]ease this bu_orl _o open IJle
disc guide,
16 CARD ACCESS indicator (P. 8, 53)
17 Card insertion block (P. 44)
18 Battery attachment platform (P. 37)
19 Record button (REC) (P. 50)
20 Power switch (P. 45, 50, 53)
21 Speaker (P. 6T)
22 Hand strap (P. 32)
18
23 24 25 26 27
iiiiiiiiiiiiiiiiil
20 29
[
[
[
[
[
i
30 31 32 33 34 35
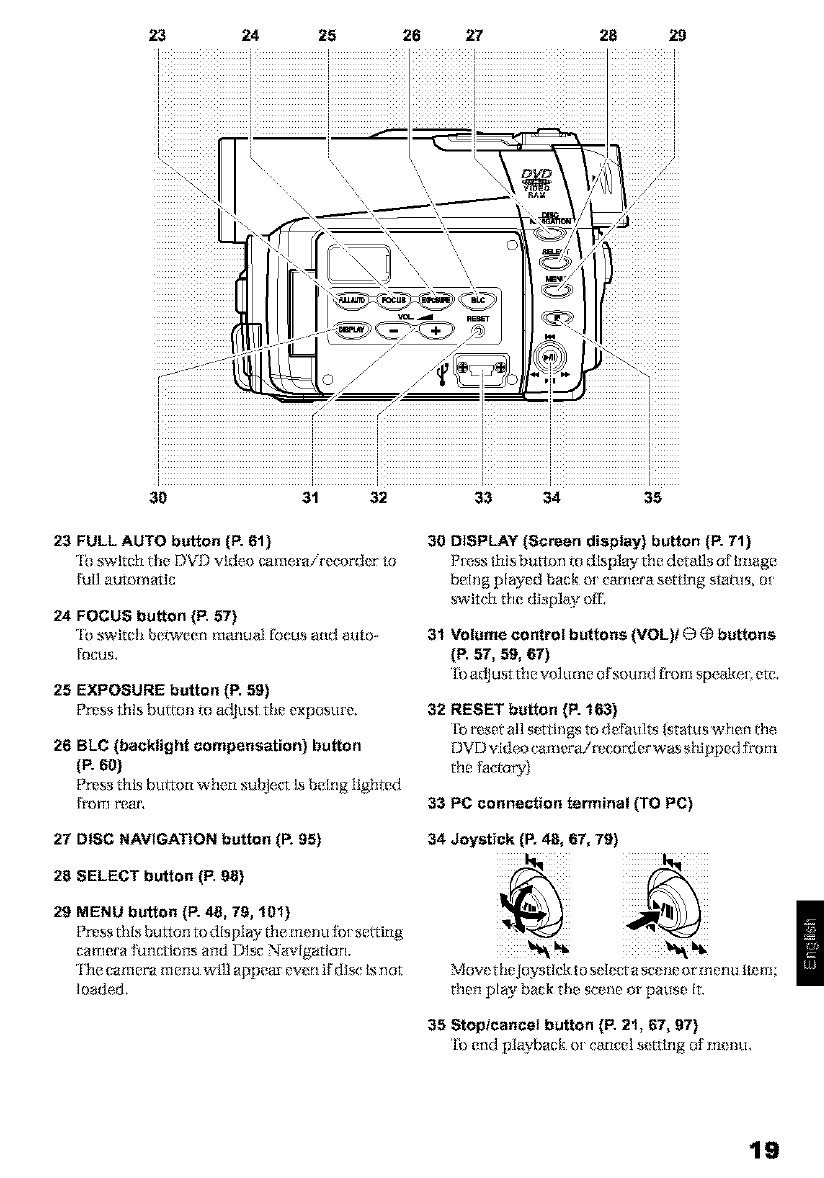
23 FULL AUTO button (P.61)
'[{)switchthe DVI) video camera/record*r to
ful]automatic
24 FOCUS button (P, 57)
'[b switch botweoll rrta_lual f_cu_ arid aLl,o-
fOCUS,
25 EXPOSURE button (P.59)
Press this bu_t o_ m adjust ti_e exposure,
26 BLC (backlight compensation) button
(P.60)
Press this bu_ron when sul{l¢ct is being lighted
from rear,
27 DISC NAVIGATION button (P. 95)
20 SELECT button (P. 08)
29 MENU button (P. 48, 70, 101)
Press this button to dlspla_ tim menu fbt sl?_ring
camora _1tl(:_iolls atld 1)Isc Na_cIgarIo tL
'I'|1_ camt?ra trtt?tltl Wl]l appt?al _ev_tl ffdlsc Is tlo_
Ioaded.
30 DISPLAY (Screen display) button (P. 71)
Press/his button m display t|m detalls of'Image
bNng played back ot _'ami?ra scrKng status, ot
switch the <tlspiay off,
31 Volume control buttons (VOL)t Q-)(.4)buttons
(P. 57, 59, 67)
'Ib adjllst t|l[3vo] LrfK, [so[ 11] f_'om spcakcL etc
32 RESET button (P.163}
'[b r'_s_t all settings to (tef_uJts (status w|mn th_
DVD _-ide,o camera!r,c, corder was shipped _'om
the facm£y)
33 PC connection terminal (TO PC)
34 Joystick (P. 40, 67, 79)
Mow, thejoystk'k to seIccr a scclle or men u lt_trt
then play back the scc_le or pause It,
35 Stoptcancel button (P,21, 67, 97)
'lb end playback ot cancel s_ttlng of m_ml,
19
36 42
37
38 43
39 44
45
46
==DISPLAY
40 47
iiiiiiiiiiiiiiiiiiiiiiiiiiiiiiiiiiiiiiiiiiiiiiiiiiiii i,,0
_1i_iiiiiiiiiiiiiiiiiiiiiiii_iiiiiiiiii_iii_°0
iiiiiiiiiiiiiiiiiiiiiiiiiiiiiiiiiiiiiiiiiiiiiiiii" ' iiiiiiiiiiiiiiiiiiiiiiiiiiiiiiiiiiiiiiiiiiiiiiii
iiiiiiiiiiiiiiiiiiiiiiiiiit iiiiiiiiiiiiiiiiiiiiiiiiiii
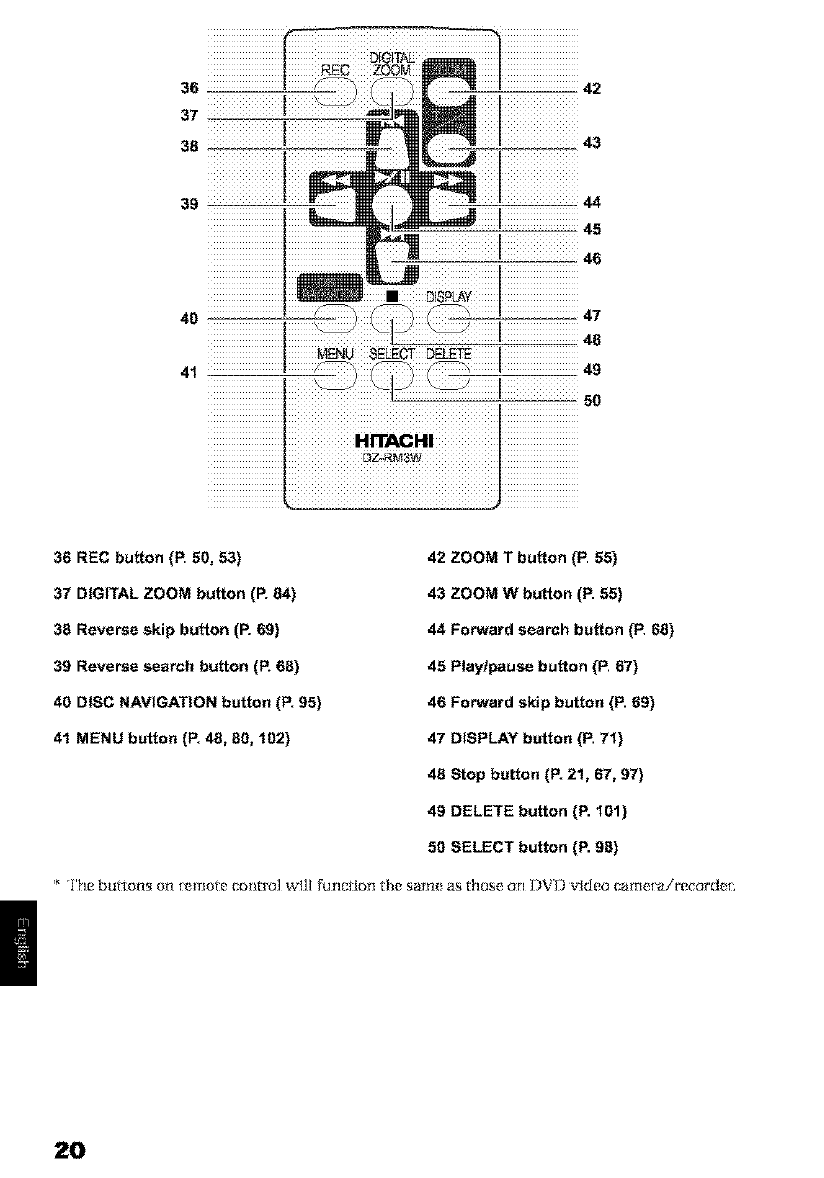
36 REC button (F_50, 53)
37 DIGITAL ZOOM button (P. 84)
30 Reverse skip button (P. 69)
39 Reverse search button (P. 60)
40 DISC NAVIGATION button (P. 95)
41 MENU button (P. 40, 00, 102)
42 ZOOM T button (P. 55)
43 ZOOM W button (P. 55)
44 Forward search button (P. 68)
45 Play/pause button (P. 07)
46 Forward skip button (P. 69)
47 DISPLAY button (P. 71)
48 Stop button (P. 21, 67, 97)
49 DELETE button (P. 101)
50 SELECT button (P. 90)
2O
About This Manual
ODisplays in this manual
L-nderstand thai file d lspiays _"e cgfl_!rxnt if'ore those you will a_tu ally se_ In d_e vie_;lt nd er or on d_e ]_CD
ONotation of cancel button
P_s the, stopi_'an_'e] button to stop your ope, ratlorl rrtldwa_ o1"r_tur_ the metal scree,_ m th_ pte, cedlng
one, The e×pre&sion °press the, C] button' will be used in dfis te_L
O.'li'_' :, ( _ ) and ( ca_L-_) marks beside headings
Some ihnct funs of this DVD video came_air r_col-de_a_z,unavaiJablr_ with disc or ca_xtusr_d, R_,{k,_to t|lc:,
ma_ks at right above each fbncrlon to identll_ywhether the disc or c_d N compatlbJe with the [u_lction,
14efh_lo these marks and [de_ltlf_fth_ f'unt_Ior_sal_d op__ation to ma_ch th_ disc or card you use,
OIIlustrations in this manual
Although it_e external appearances of DZ--MV350A and DZ-MV380A a_ dlfl_rent, th_ method of
operating bolt_ modeis is MenticaL
Ihe illustrations of DZ MVSb0A a_< used [or the explanation in this te_t.
21
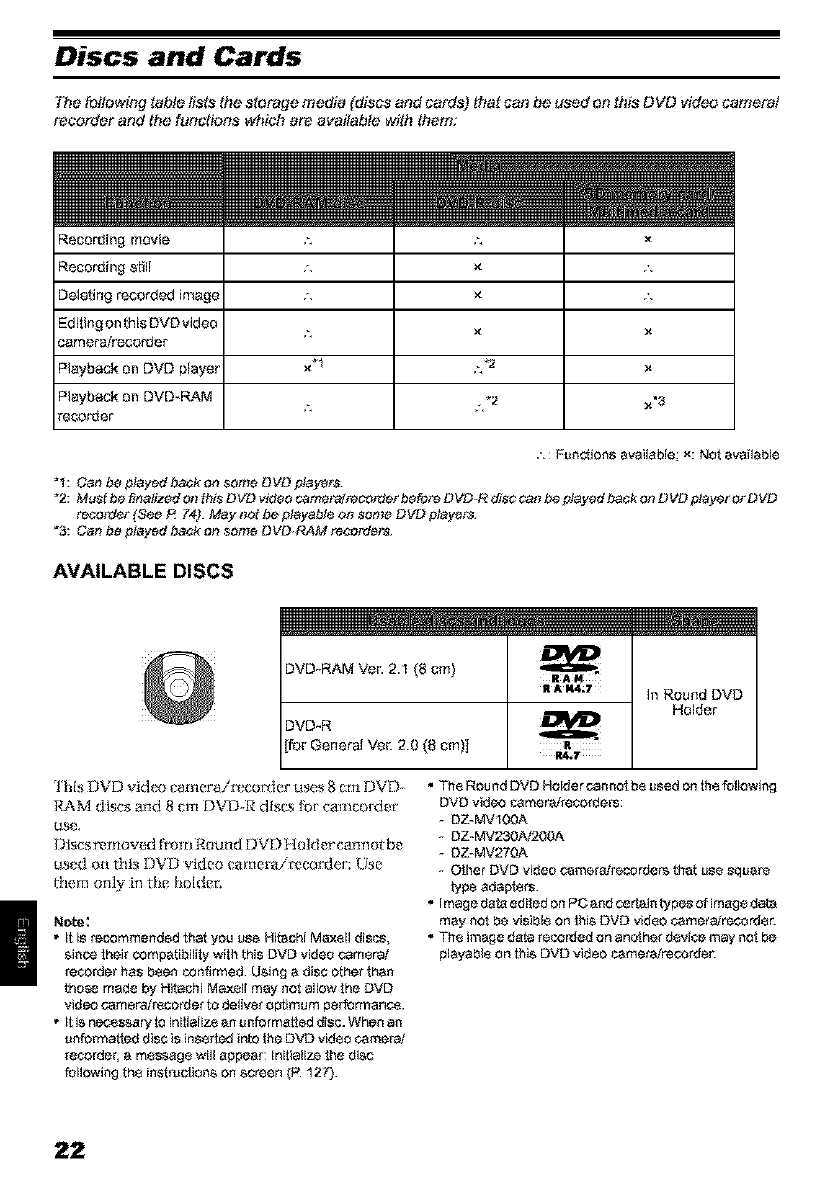
Discs and Cards
The _llewing table lists _e s_rage medic (discs and cards) that can be used on _ts DVD video camera/
recorder and the functions which ere available _vith them:
Recording movie :. x
Recordi_g still r. x:
Deleting recorded image r. x:
Editing ell this DVD video £. _ :4
camera/recorder
Playback on DVD ptayer x _1 . _2
Playback on DVD-RAM ._ _'3
£.
feoorder
,'_: Functions available; x: Net available
"1: Can be played back on some L)VD p_ayei_.
"2: Must be finalized on this DVD video carne$_recorder before D VD.R disc can be p_ayed back on D VD player or DVD
recorder {See R74). May t_o_be playebte ot_ some DVD players.
*3: Can be played ba_k on some L)VD-_M recerde_
AVAILABLE DISCS
DVD-RAM Ve_: 2.1 (8 cm)
DVD-R
for Generai Vel: 2.0 (8 cm)]
RAM
RA N4;7
RA.7
In Round DVD
Holder
[his DVD vida_ camera/rz, cor_ter uses 8 cm DVD-
16"_M discs and 8 cm DVD-R discs {br cmt_corder
USe*
Dlscsmmoved f}x_mRound DVD }tolder cannel be
used on this DVD video carneraimcorde[: Use
ltlem only in the hoider;
Note:
=it is recommended that you use Hitachi Maxell dis_,
since their compatibility with this DVD video camera/
recorder has been confirmed¸ Using a disc other _han
those made by Hitachi Maxell may not allow the DVD
video camerafrecordet to deliver Optimum performance.
It is necessary to ini_ializ_ an unformatled disc. When an
unformatled disc is inserted into _he DVD video camera/
recorder_ a message will appear: Inittalize _he disc
following the instructions on screen (P 127).
•The ROUnd DVD Holder cannot be used on the following
DVD video camera/recorders:
- DZ-MVIOOA
- DZ-MV23OAi2O0A
- DZ-MV27OA
-Other DVD video camer_Jtecorde_ that use square
type adapters.
• Image date edited on PC and certain types of image data
may not be visib!e on this DVD video cametatrecorder.
• The image data recorded on anther device may not be
playable on this DVD video camera/recorder.
22
INFORMATION ON DVD-R DISC
You camlot re,cord a stl]l on DVD-R disc, or delete
any _corded Images or data,
For o_imu m recordtag on DVD-R disc, _is DVD
video camerai_co_er writes control dat_ to _le
disc tn order to automatlcal_ make a_ustmen_
when It is inse_ed and ejected accompanying
recordhig, If the disc has rio al'ea to be written for
adjustment, _eo_lng may not be posslble, To
p_ve_ this, do n_ Insert or e]e_ a DVD-R disc
accompanying _c,o_tng more _lan 50 Ltmes, 'l_le
DVD video camera!recoVer will not perform
°w{:l_ a®ustme_t _ when _le DVD video camera/
recorder is tur_ed on again, from o_', for _co_lng
will _e disc trl it, o[¸wherl no _co_l_g Is _lade_
e,ve_ if_e disc _ _moved a_d therl retrlse_ed,
OFinalizing DVD-R disc
Befb_ ushig the 8 cm DVD-R disc provided ou this
DVD video camera/recorder on a DVD pIayer or
DVD _ldeo recorder that Is compallb]e with 8 ¢m
DVD-R dlsc, the disc must he Rnali_d on this DVD
_qdeo catrte_airecordeL For the Rnalizlng
proced are oF8 cm DVD-R disc, r_[_r to "Finalizing
DVI3-R I)[sc' (ll 129).
Note:
• DO not in_ a DVD-R disc recorded on this DVD video
_ameraireco_et bu_ not finalized, into a recordab]e
device, such a_ a DVD video recorder: The recorded data
may be damaged.
•DVD-Rdis_edit_dandfina[izedonPCorthosefina]ized
on another DVD vid_ recorder may not _=_playable on
lhis DVD video camer_i_c_rder, d_pending on _e
edi_n_ so, ware u_ed Or re_orded s_atu_ of DVD-R disc.
EXAM PLES OF DISCS THAT CAN NOT BE USED ON THIS DVD VIDEO CAM ERA/
RECORDER:
• DVD-I_M (Z8 GB} Ven 1,0 •DVD-ROM
• DVD-R (3,9 GB) Ven 1,0 •DVD_Vldeo
• DVD-R{4,TGB)fi)rAuthortngVenZ,O • CD-R
• DVD-RW • CD-RW
• DVD÷RW • CD
•DVD+R •LD
• MO
• MD
• iD
•Hoppy disk
• IJIscs oth_,[ t}larl those Wlth diarrteR _
of 8 cm
• CD-ROM
Note:
Discs recorded on PC or DVD video recorder may not be pieyab[e on this DVD video _metafrecorder: If so, message
"This disc cannot be used." will appear. AlSO_blue thumbnails will aedear {Fig. 1_ on page 24), or normal playback wi,
not be possiSie.
23
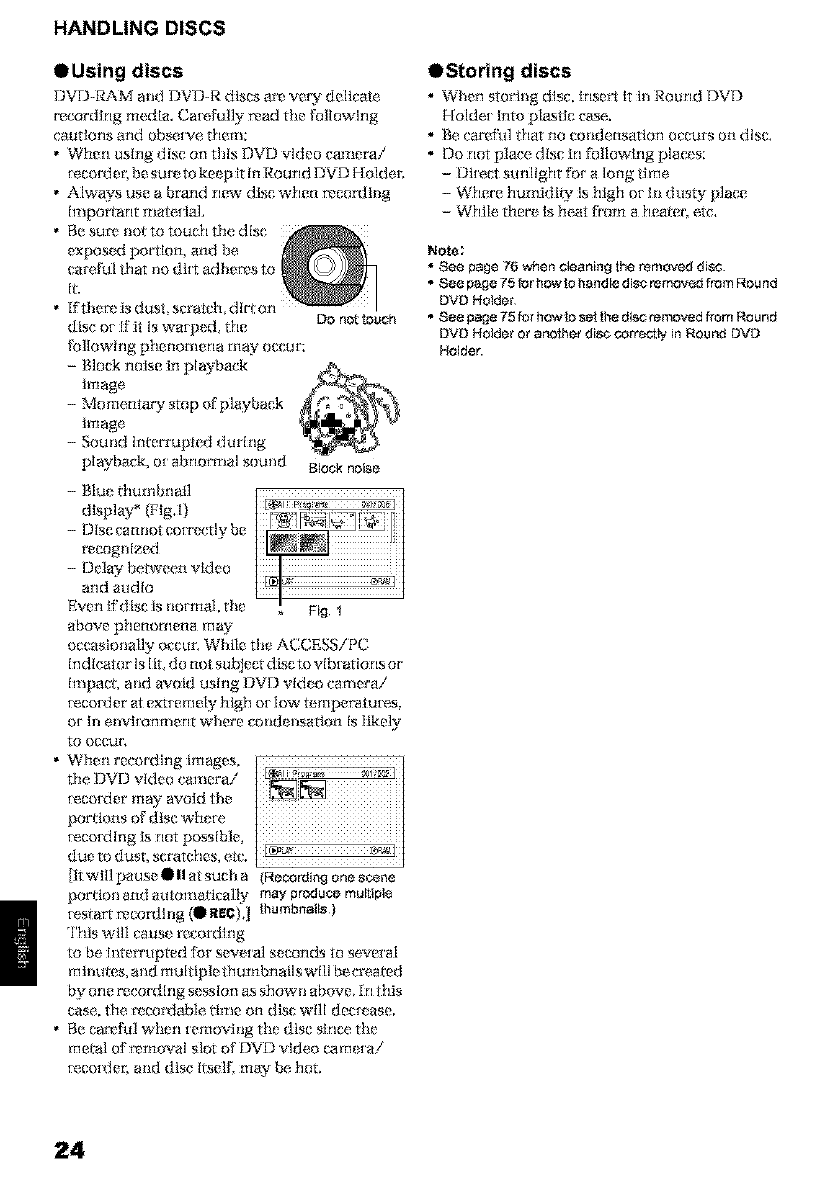
HANDLING DISCS
OUsing discs
DVD..RAIvl and I)V D--R disc_s are vet T delk'ate,
recording media, Ca[efully r_ad tile followfog
catltiorls arid obseI_Te t}l[_ltl:
• When using disc on this DVD video _amera!
_ecot_t er; be sut_ Wke_p it in Round DVI3 Holder,
• Alwa_ys use a brand nc_" disc when r_corvllllg
Illlpor[ _rlt mate.Hal,
•Besur_ notlotouchthedisc
exposed portion, and be
careful that no dirt adheres to
It.
• If tl_erz, is dust, sm'afoh+ dirt o n
disc or i:["it is warped+ the DOnot lOuch
following phenomena may occur:
- P_lock noise in piayback _,_._
image @
- Mo mentar'y stop of playback
lrrtag_
- Sound Interrupfod during
playback, o[ abnormal sound Block netse
- Blue thurnbnai]
dlsplay _ {Fig, I)
- Disc _annot co_rtY.'dy Ix:,
r*ecognized
- Delay between video
_nd audio
Even If disc is not real, the
above phenomena ma_
occasionally occur, While the AC,CESSiPC
Ind Icator Is lit, d o not subject disc to rib[ ations or
lmpach and avoid using DVD video camera!
_e,cot_ter at e_mm ely high or low ternpera/ut e,s,
or hi en_+[tollltlerl_ where _ond_ nsafion Is like]y
tO OCCttr',
• When recordfog Images,
the. I]VD video camera/
_e,corder may avoid the
portions of disc whe[ e,
_ecordIng is not possible,
due to dust, scratches, e,te. I _ + I
[RWII1 pause • II at such a (Recording one scene
por tion and automatk'a lly may proxJuoemulgple
[estart r_cor*tlng (ORECL] thumbnails}
This will cause reeordl rig
to be hlrerrupted {_)rseve[al seconds to se_geral
minutes, and multiple gm mbnailswIlI becreated
by one recording session as strewn a bore. In d_is
case, the r'ecord_fle time on disc wI]I dec[_ase,
• Be carefkd when t emoving tile disc sltlee tile
metal of r_moval slot of DVI) video carn_ [ai
[eco[der, and dis(: iltsel[, may be hot.
OStoring discs
• When storing dls_', Insert It in Round DVD
Holdex into plastic _'ase,,
• P_ecare_] _lat no condensation occurs on disc,
• Do not place, disc fo gfllowlng places:
- Dl+e,ct sunlight fbr a long time
- Where humidl W is high or in dusty p]ace
- While, there Is heat if'ore a hea*er, exc.
Note;
• See page 7'6 when cleaning the removed disc.
• See page 75 for how to handle disc removed from Round
DVD Hetde_
+ _ee page 75 for h_v to set _e disc removed from ROund
DVD Holder or another disc correctly in Round DVD
Holde_
24
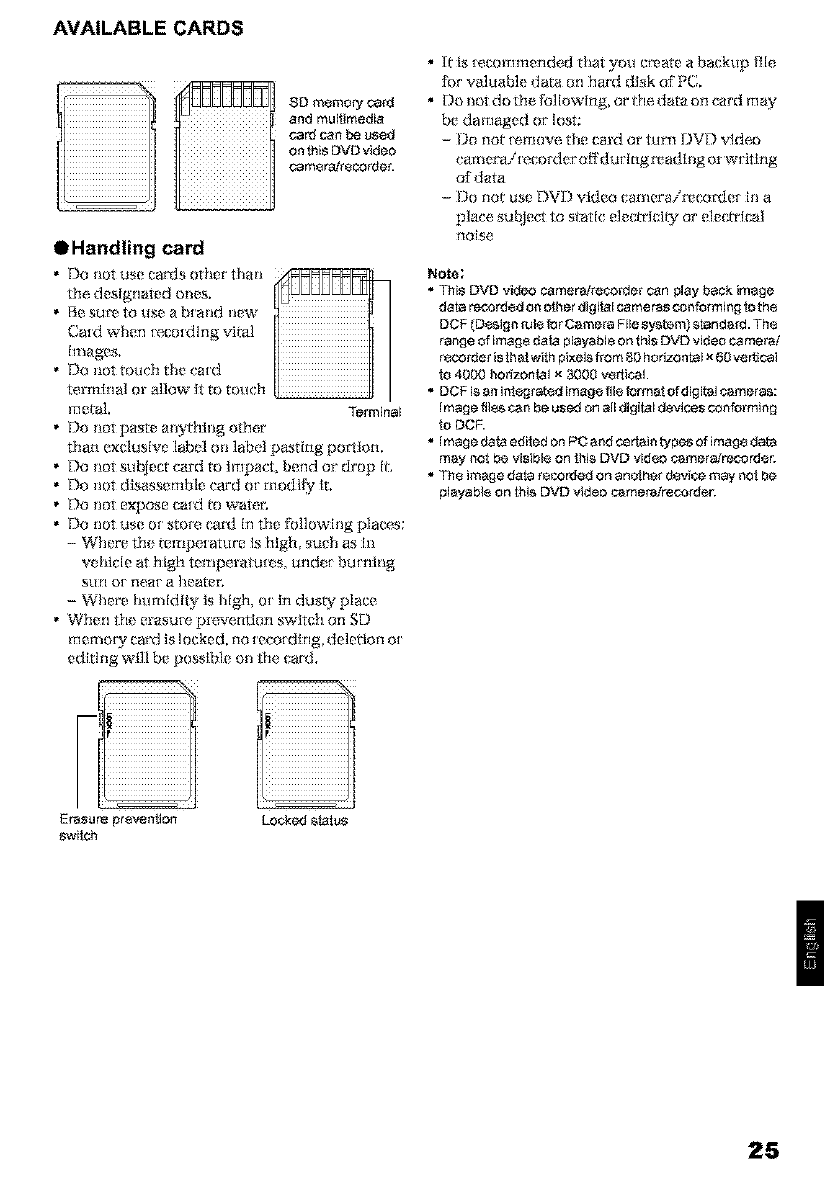
AVAILABLE CARDS
SO msmory card
and muliimedia
cardcan b_ used
on thisDVD video
cams_rscorder.
OHandling card
Do _lot use cads other tha_
the, designated ones.
•B_ sur_ to use a b{and new
Ca{d when _eco_ding vital
Imag_s.
• DO ItOt touch the ca{d
terminal or allow it tO touch
rrmtaL Terminal
• DO liot paste anythhig other
than e×dusive label on label pasting portion.
• Do lint st bleat cm'd to Impact. bend or drop It.
• Do not disassemble ca_'d o{ modify it.
Do ilot expose ca{d to water;
• Do not use o{ store c_ In the fbllowlng places:
- Where the tempe{ ature Is high_ suvh &s hi
vei_l_ie at high temperatu_ s, un J _ bucnh_g
sun or near a heater;
- Where humldliy is high o{ in dusw place
•When the erasure prevention switch on SD
rrt emoi_ card is locked, no [ eco[ dlng_ deletion o[
editing will be possible ou tFle card.
• [t Is recommended that you crvare a backup ftle
[br va]uable data on hard disk of PC,
• Do nm do the following, or Hie, data on card may
be damaged or lost:
-13o not remove the cm'd or turn DVD video
cmnerai_ e,corder oiTdu_ Ing r_adl ug or writ big
of data
- Do not use DVI3 vldr_o camr_rair_corge{ in a
place subject to stark: electrld W or electrfoal
nO[S( _,
Note:
• This DVD video camen_ire¢order can play back image
data recorded on olher digital cameras conforming Io th_
DCF (Design rata for Camera File system) standard. The
range of imag_ data playable on this DVD video camera/
r_co_er is lhatwifo pixeis from 80 horizontal x 60 vertical
ta 4000 horizontal x 3000 vsrtical.
• DCF i_,an in!_gratad imag8 fita form_ of digi_l camera_,:
Image fitae,_n be used on all digital devices _nforming
ta DCR
• image edta ediled on PC and _rtain b]pes of imag_ data
may not be visibta On _i_, DVD video r_mera/re,_ord_
• Th_ image data recorded on anther d_vic_e may no! be
ptayabta on ihi_ DVD video camera_reco_de_
Era_u re prevenitan Locked 8tatas
swifoh
25
Storage Capacity on Disc or Card
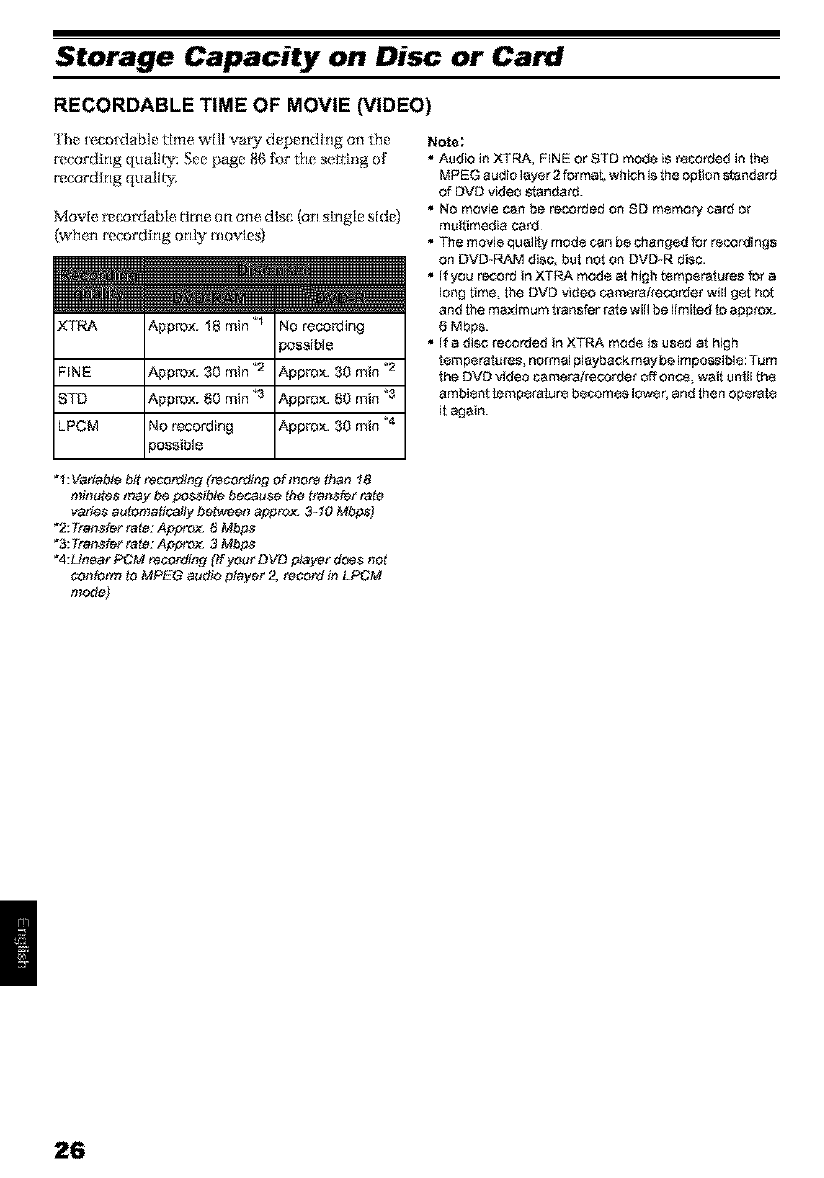
RECORDABLE TIME OF MOVIE (VIDEO)
The [e,co[dable tlme will vaD _depending on the
recording qual[vy: See page 86 _k_rthe setth_g of
recordklg qualIvy;
Movie r_e,orxla4}le time on one disc (on sklgle side)
(when recordklg only movies)
XTRA
FiNE
STD
LPCM
Approx. 18 rain "1 No recording
)ossible
Approx. 30 rain *_ Appm×. 30 rain *2
Approx. 80 rain *a Appm×. 80 rain "3
'40 recording Appm×. 30 rain *a
aossible
Note:
•Audio in XTRA, FINE or STD mode is rscorded in the
MPEG audio layor 2 format, which ksthe Option st;andarrJ
of DVD video standa_.
• NO movie can be reco_ed on _D m¢mory _ard Or
multimedia card
• The movie quality mod¢ _n be changed for recordings
on DVD-RAM disc, but not on DVD-R disc.
• If you reco_ in XTRA rood÷ at high tempsrature_ for a
long time_ the DVD video cam€m/recorder will got hot
and the maximum transfer _e will {3elimited to approx.
6 Mbp&
• If a disc recorded in XTRA mode ks used at high
tsmp¢roture_ normal playback may be impo_ib]¢: Turn
the DVD video camera/recorder Off on_ wait u ntil th8
am{3i¢nt temps_tur8 bs_Om¢_ Iowsr, and then ops_t8
it again.
"1 :Variable bit recording (n_cor_ing of more than 18
nlin_es may b_ possibte because the tfensfer rate
varies aufematica#y between approx. 3-10 Mbps_
_2:Tt_n_fer rate: Approx. _MbpS
_3:Tt_n_fer rate: Approx. 3 MbpS
:Linear PCM _cordit_g (if your DVD player do_s not
conferm fo MPEG au_te player "2, _aco_d in LPCM
mo_e_
26
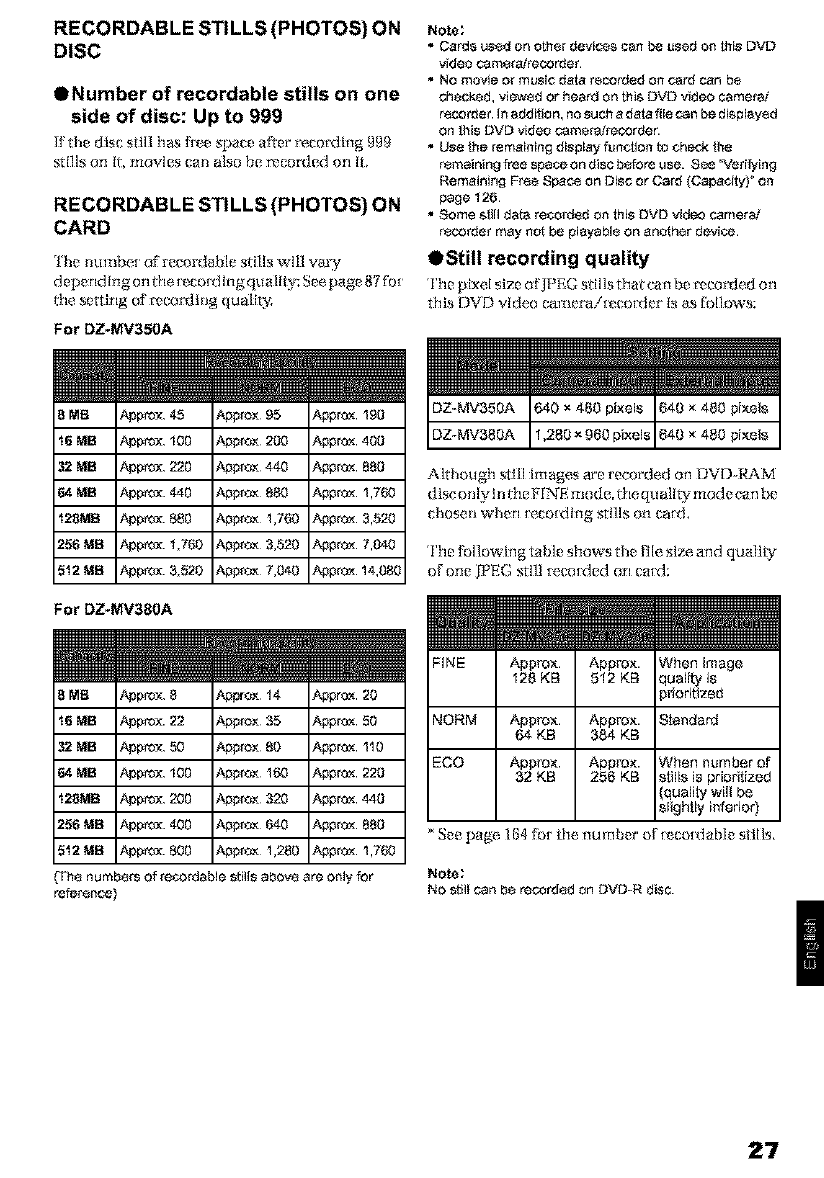
RECORDABLE STILLS (PHOTOS) ON
DISC
ONumber of recordable stills on one
side of disc: Up to 999
Kthe disc still has De space a_er reco_lng 999
stills on II,movies can also be r_corvled on It.
RECORDABLE STILLS (PHOTOS) ON
CARD
Ihe numbe[ of recordable stills will vm'y
depending on the [_co_ ing quality: See page 87 for
the setting of mco_h_g qualit_
For DZ-MV350A
Note:
• Cards ussd on otber devices can be used on thi_DVD
video ¢amsrah'_carder.
• NOmovie Or music data rec_ed on card canb_
checked, viewsd Or heard on thisDVD videocame_
rsco_er. In addRion,no _uch adata file _n be displaysd
on _is DVD video ¢ame_recorde_
• Use the remaining display function to Ch_ _e
rsmaining freesbe_eon disc b(_foreuse. See_Veri_ing
RemaimimgFr_e 8pa¢_ on Disc or Card {Cabedi_Y on
page 126
• Some still daf_ recorded on this DVD videocamera/
rsca_er may n_ be pla}_hi÷ on anoCherd_i_e.
OStill recording quality
rl'he pixel size o _'.]P F,G stills that can be r_cor_;led on
this DVD video eamerai_* co_der Is as follows:
DZ-MV350A 640 x480 pixels 640 x480 pi×els
DZ-MV380A 1,280 x960 pixels 640 x480 pi×els
Although still images are recorded on DVD -I6_,M
disc onty h_theFINE mode,the quall_ mode can be
chosell wherl [eco[dlllg ,sillIs oll cain,
The {_llowlng table shows the [liesl_ and quality
of one IT'EG still [eco_ded on card:
{The numbsfs of re_rdable stillsahoy8 are only for
reference)
FINE Appm×. Appm×. When image
12B KB 512 KB qualityis
pdoritized
NORM Appm×. Appm×. StandapJ
64 KB 384 KB
ECO Appm×. Appm×. When number of
32 KB 256 KB stills is priorilized
(quality will be
siighlly infedor}
See page 164 [br/he nu tuber of _ co_dable slllls,
Note;
NO still can be recorded on DVD-R disc.
27
Features of DVD Video Camera/Recorder
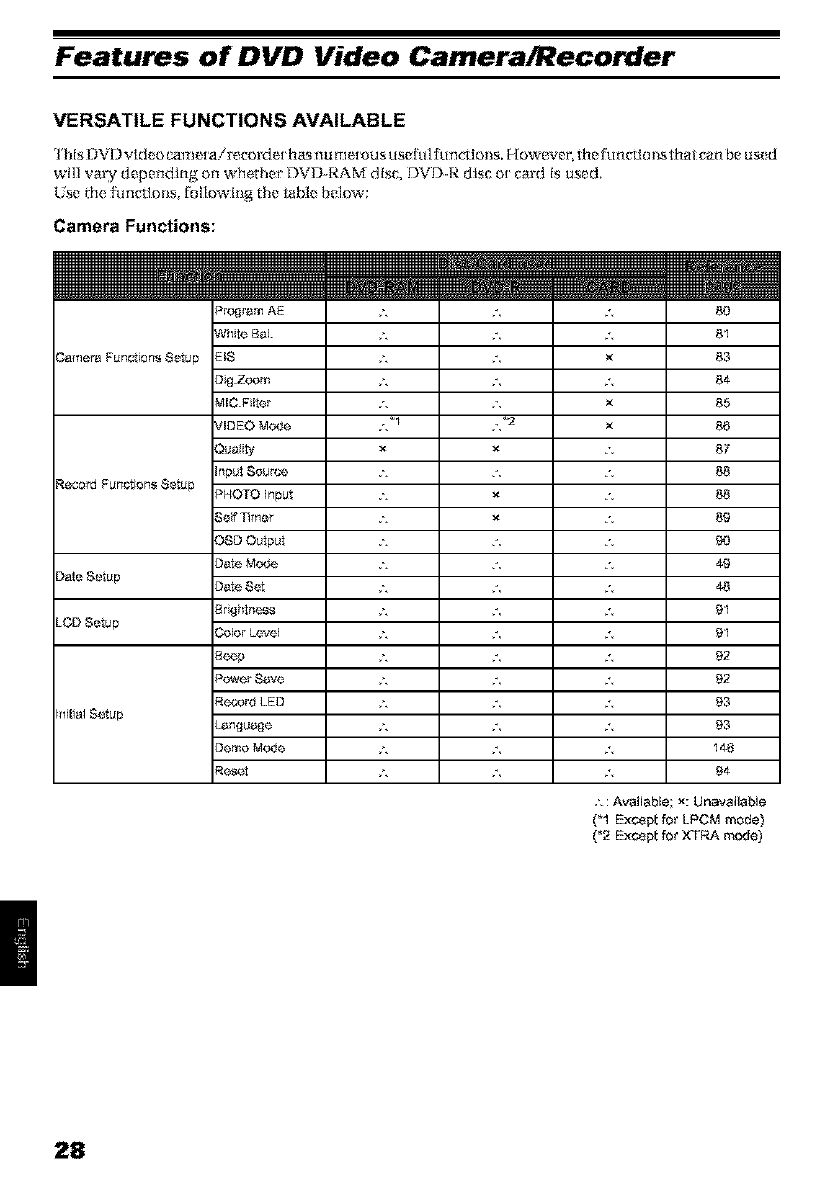
VERSATILE FUNCTIONS AVAILABLE
IhlsDVD vMeo _me_a/re_'orde_ha_snumemus usefulFuncdons, F[ow_ver_hefun_-_Io_tha__anbeus_d
well vauTfdepending on whether DV[?--RAMdisc, DVDR disc ot cm_dIs used,
Use the fim_-tlons_following the _ztbl_below:
Camera Functions:
=_JilP
_,amera Fun_ion_ Setup
Record Fun_ion_ Setup
)ate Setup
_CD Setup
_itial Setup
Pro_Irem AE
White 8al.
EIS
Dig Zoom
MIC.F Iter
VIDEO Mode
Quality
Ir_putSource
PHOTO Input
Sef Timer
OSD Output
Date Mode
Date Set
Br ghtn¢,_
Color Leve
8e4;,p
Power Save
R_'or0 LED
L_rlguefle
Demo Mode
R_t
,\ J,
,\ J,
,\ J,
,\ J,
,\ J,
,\ J,
,\ J,
,\ J,
,\ J,
,\ J,
,\ J,
,\ J,
,\ J,
,\ J,
,\ J,
,\ J,
J,
J,
X
J,
X
X
J,
J,
J,
J,
J,
J,
80
83
8¢
85
8,6
87
88
88
89
93
cg
4_3
92
92
93
93
9¢
:_ : Available; x: Unavailable
{_1 E×cept for LPCM mode)
{_2 Except for XTRA mode)
28
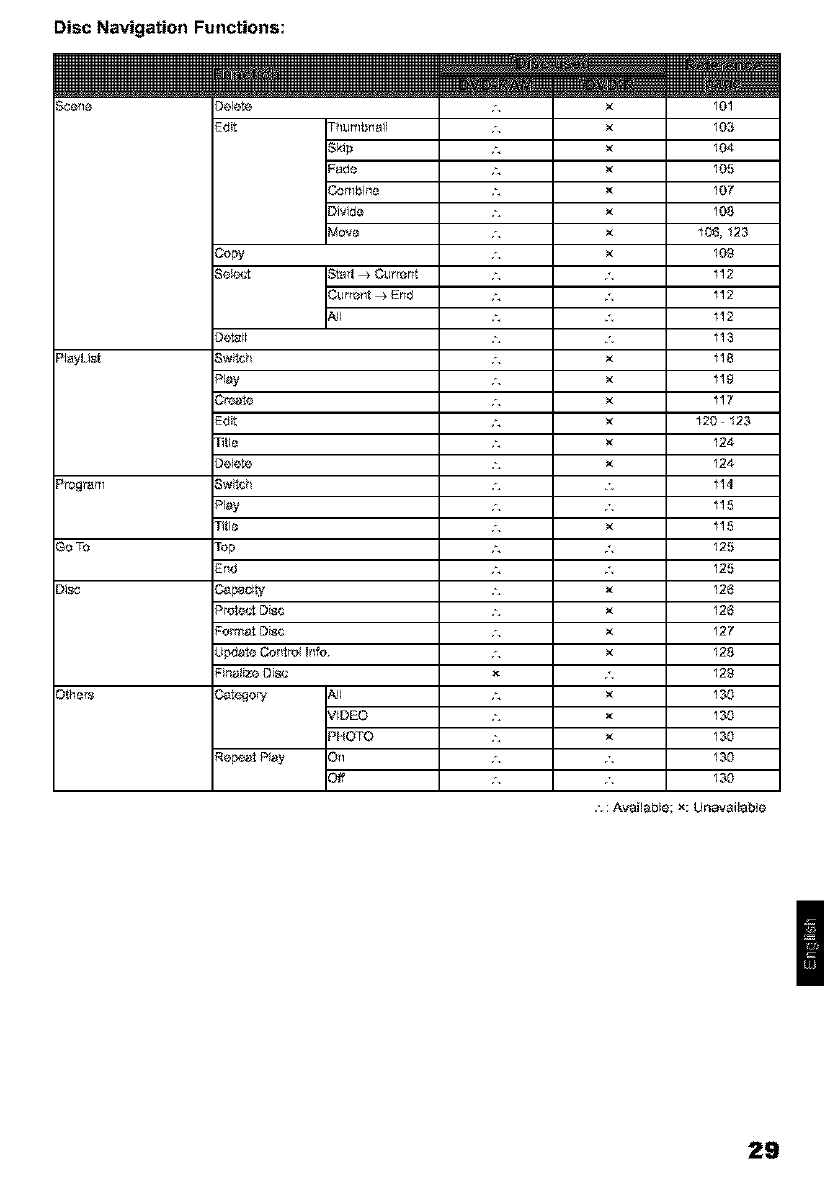
Disc Navigation Functions:
I#Y_
_cene Delete
_layLi_t
3e_
)i_c
_the_
Edit Th_mbnail
Skip
Fade
Combine
DMde
Move
Co_
See_l Staff _ C_irrent
C_lrrent _ End
Detail
Swtah
P_ey
Cr_te
Edit
Title
Deete
Swtah
P_ey
Title
Top
End
C_pacity
Protect Disc
Former Disc
Update Control Info.
F nelize Disc
VIDEO
PHOTO
f_epe_t PIey On
Off
,\
,\
,\
,\
,\
,\
,\
,\
,\
,\
,\
,\
,\
,\
,\
,\
,\
,\
,\
,\
,\
,\
,\
,\
,\
,\
,\
,\
,\
,\
,\
,\
7,
7,
7,
7,
7,
7,
7,
7,
7,
7,
7,
101
103
104
105
107
108
108, 123
109
112
112
112
113
118
11g
117
120 123
124
124
114
115
115
125
125
126
126
127
128
129
130
130
130
130
130
,'_: Available; x: Unavailable
29
Card Navigation Functions:
3oTo
3a_d
_]ide Show
]eete
]POF
_e_'t Sta_I_ Current
C_nant_ End
All
]etail
op
:;ar_cit,/
:or_nat_r+J
]POF
101
127
131
131
RECORDING ON DISC
You cam use both 8 cm DVD-RAM and DVD-R discs
on thls DVD video camerair_:.cor_te[ {br r_cor_tlng.
the recorded video and audio will be stored on an
8 cm IIVD-RJ\M disc or 8 cm DVDoR dlsc.
Using disc allows you to r_c.or*t without
ove_'HIlng previous recordlngs, and also to store
your va]uable +_cot_tings fi)r as long as need be
wN]e +ezalning clarib:
With d isc you can Immedlare]y access recording
and playback, in conn'ast m videotape+ whlch must
be fa_st-Ib_wa!'ded o_ rewound.
RECORDING MOVIE AND STILL
lhe I)VI? video camr:[airecorde.r can [eco[d
l_ovl_s of ev_tits and spor_+ Ill the same way as
will conventional carnco_eIs,
k can also re,cord srl]ls on a DVD- RAM disc or ca_,
as wiflt a digital still cm_era. With CCLI of 880,11(10
plxels (DZ-MVS5QA). 1,020,000 pi×els (DZ-
Mvgs{)A) _high qua]l Wmovies and stills (on DVD-
I,b'_M dlsc only) can be +e.co+ded. When recording
movies, sut_]e_'t knag_ s can be zoomed up m 240
In addltlon+ simply load inga DVD-RAM disc Into
aPC equipped wlth DVD -I_.%M drive and DVD
video teco[dlng soflwme, compatible wlff_ 8 cm
DVD-RAM allows you to easily' view the [e.co_ded
disc,
You call []nallze a recor(h d DVI)-R disc on this
DV ll video came,+airr_cordet so d_a you can play it
back on a DVD player or' I)VD v_ideo recorder that
is compatlbIe wl/t_ 8 cm DVD+R disc (however, fire
finalized DVI)-R disc may not be usabk*, on some
DVD p]aye[s),
times; whrm rz.cor_tlng stills, sutq]ecr images can be
zoomed up to 40 times. Movies and s_]ls can be
_corded on _e same disc. _ simply swlt_hing _e
[_co_ing mode (power swltcl'0. Howe_e_; if you
use a DVD-R d lsc. a stlll Im age cannot be reco_ ed.
{Ifthe DVD vldeo camera/recorder is conne_ed to
PC. _1_ DVD video camerai_co_Jer can capture
still images, such as ]PEG data.)
3O
IMMEDIATE REVIEWING OF RECORDED IMAGE
You canche_ktherecorded movie ot still In the
vlEwflnder or on the I,CD 8efl_{?fl.
EDITING IN VARIOUS WAYS ON DVD VIDEO CAMERA/RECORDER ALONE
]his DVD video career airevordEt is provided wlI}l
a usefhl edRingiplayback tool Disc Navlga/ion
allows you to easily a_ach a title or special video
etTect to tile recorded movie or still. With Disc
Navigation. you cm_ arrange ffm playback order
a_ld edI_ multiple ImagEs to play them back
corKirluotl**;l_ Yoglcall _ate all _rltire movie ORthi_
DVD video camerair_order alone, w_hout
illputtl_g video m a PC _r edging.
USING WITH VARIOUS DEVICES
Collnecr this DVD video camera/recorder to your
IV and you can enjoy the playback plcmre with
your {hmlly and fi lends on the large TV so.ell; or
connect it to avldeo pr illmr (gene_ ally avallable) to
print l_le rveor*ted Image. You call also tr _rlsfEr
re.corded movies and stills {{b_DVD-RAM dis<: or
card) m PC.
31
This section explains preparations for recording -setting up the DVD video cameratrecorder and
batt_
Setting Up the DVD Video Camera/Recorder
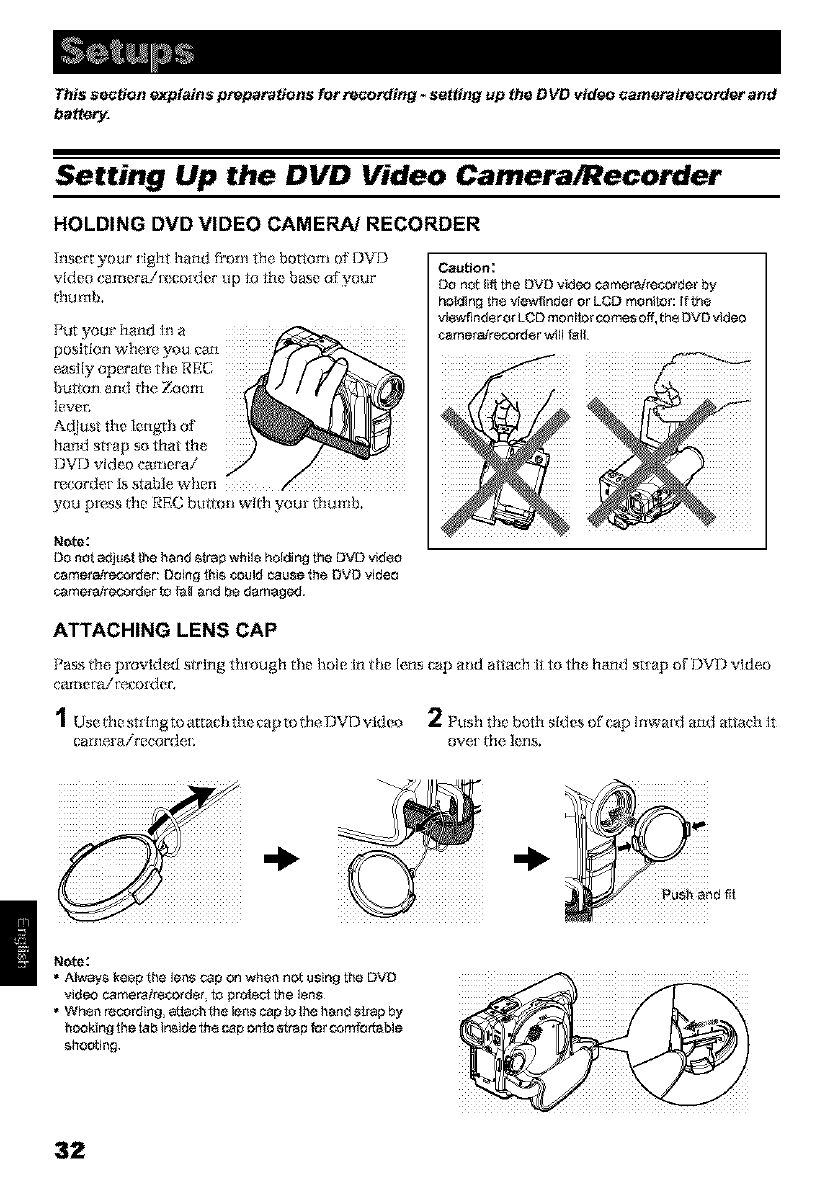
HOLDING DVD VIDEO CAMERA/RECORDER
Insert your tight hand f_'orn the bottom of DVD
video camera!_ co_ter up ta th_ base of your
fflumb,
Put yaur hand in a
position where you _'an
btlttorl and th_ Zoom
Adjust the lr_ngrh oF
hand st[ap so that the
I?VD video camera/
mcordeI is stable when
you press ltle REC bult on wIHI yaur dlumb,
Note:
Do not adjust the hand strap while holding the DVD video
_mefa/recorder: Doing this _uld cause _he DVD video
_t_mera/recorder _ fall and be damaged.
Caution:
DO not tiff the DVD video camer_2recorder by
hNding the viewffader or LCD monitor: If the
viev_ind_r or LOD monito_ comes off, the DVD video
_-3mefa/recorder will fall.
ATTACHING LENS CAP
Pass th_ i_rovlded s_r Lng through the hole In the lens cai_ mM attach it to the hand stlap of DVI) video
calt _e [ a! [ (_Jord (?1",
1Us_th_st_ hlgtoattachth_ captothe, r?Vl) _ldeo 2Push the both sides of'cai_ lnwa_ and at_ztch It
camerairecorde_; over die l_ns.
Note:
•A_vays keep _he lens cap on when not usin 8 the DVD
video camera_8¢order, to protect the len_
•When recording, a_ech _he lens cap to the han_ strap by
hooking the tab inside _h_ cap onto _p for comfoC_Ne
shooting¸
32
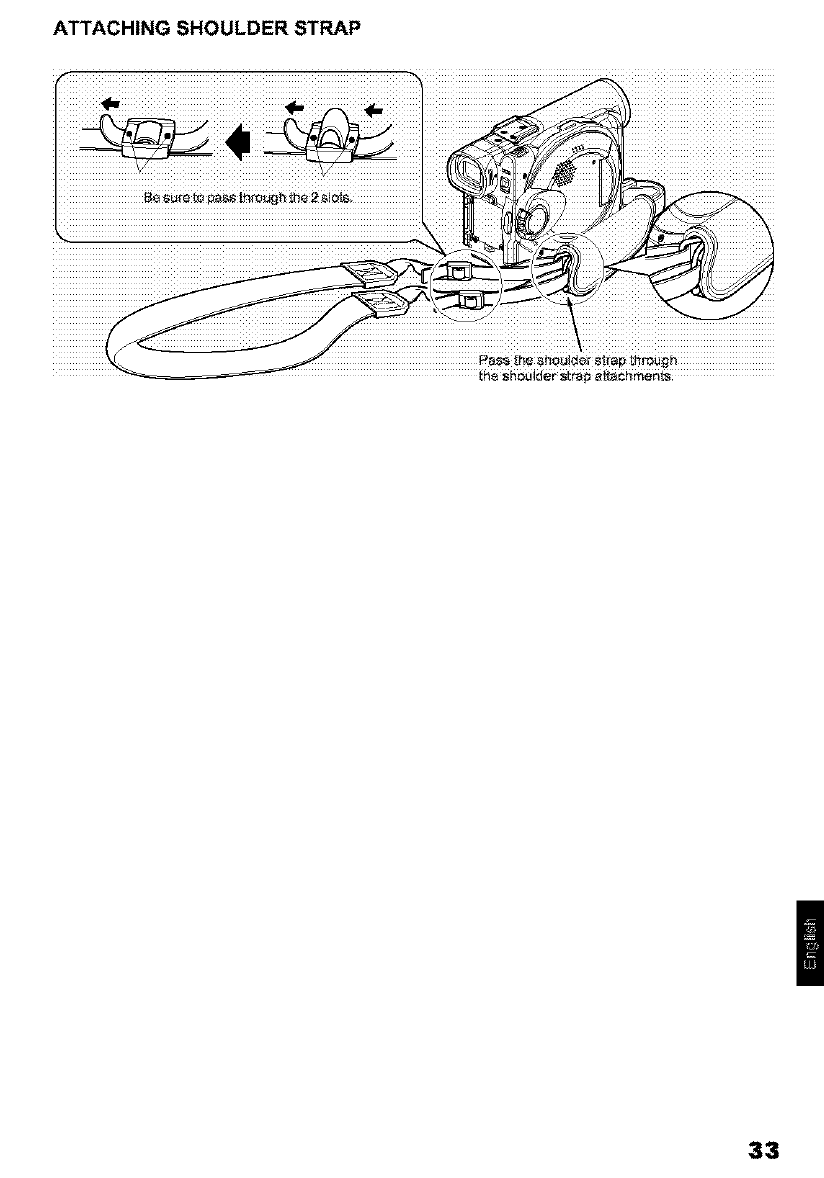
ATTACHING SHOULDER STRAP
33

INSERTING BATTERY INTO REMOTE CONTROL
InsertI_leprovided Hthlum ba_e_'intorx rtzote control
1s,de the cover to telnove it+ 3Slide th_ cover to close IE
2fnser[ the [ithlus_l batt_ t_, with th_ posltlw Q Note:
The life of Nthiu m batte Pt'is appro×im_ely one year. If [he
battery is discha_ed_ no opera[ion is possible wih remote
control: Replac_ he ba_r_
REMOVING BATTERY FROM REMOTE CONTROL
bakery ou_+
While pushing
battery stopper
Warning;
"KEEP THE BATTERY AWAY FROM CHILDREN AND
PETS.
"IF SWALLOWED CONelJLT A PHYSICIAN
IMMEDIATELY FOR EMERGENCY TREATMEN_
•BATTERY MAY EY,PLODE IF NOT HANDLED
PROPERLY. DO NOT RECHARGE_ DISASSEM 8LE OR
DISPOSE OF IN FIRE¸
Note:
•Replace the battery with a Hitachi Maxell, Sony,
PanaGoni¢_ Sanyo, _shiba CR2025, or Duracell
DL2025. Use of anoher battery may present a risk offi_
or eocplcsion
Dispo_e of battery safely in accordance with local law&
DO not dispose of in fir&
DO not short circuit the battery
•DO not hold the bat!ery with the me{_llic tweezers
•Keep he _l_ry in a dark, cool, dry place.
34
OUsing Remote Control
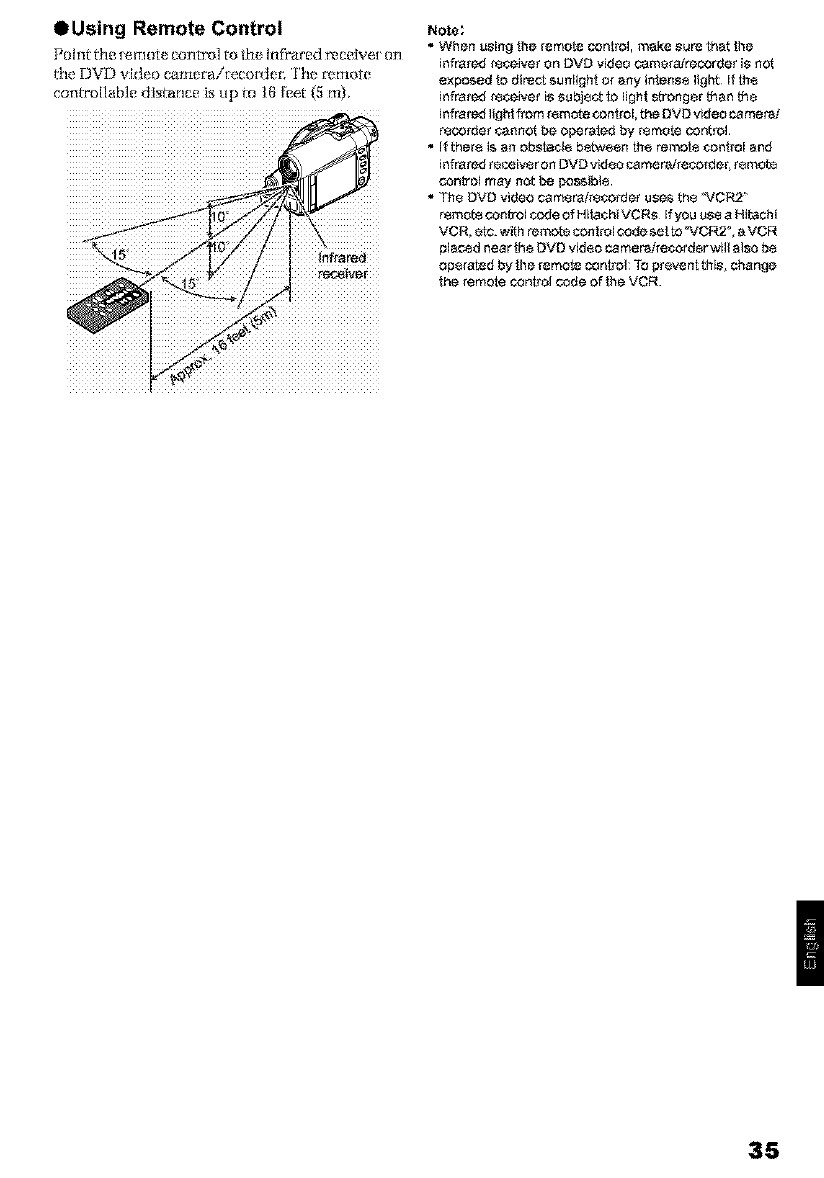
Po hit _|l_ [_lrtole coritro] to the, Inf_'_.f'od r_c_ivc[ oN
con_ollable distance is up to ] 6 _ (5 ru).
Note;
• When using the remote cont_'ol, make sure that the
infrared receiver on DVD video camerafrecorder is not
exposed to direot sunlighI or any intense light if the
iofrared receiver is subjeot to lighI stronger f_an f_e
infrared light from remote ¢onirol, the DVD video camereJ
recover cannot be operated by remote cor_rol.
• If there is an obs_¢18 between the remote ¢ootrol and
infrared receiveron DVD video camerairecorder_ remoto
control may not be possibte.
• Th÷ DVD video camera_re_rder use_ the _.tCR2 '_
remoto control code of Hitachi VCRs if you us_ a Hitachi
VCR, eto. wih reraoto control code set to _VCR2", a VCR
pte_d near he DVD vid÷o camer_.ire¢order will also b8
operated by he remote control TOprevent this_ change
the remote control code of he VCR.
35
Setting Up the Battery
The DZ-BP14S battery provided with this DVD video cameratmc_rder has not been ehaqled at purchase
time: Charge it berate using the DVD video eameratreeorder.
Note:
•Be sure to uc,e _e DZ-BP 14SW ba_ePj for the DVD video camer_recorder: Using _x_herbakeries could Cause the DVD
video camera_ordet to mal_n_ien, Or _sult in _i_.
•Be su _ _ use the DZ-ACS 1 AC _a_rl_arget to charg8 the barry: Using other chargers could _us8 ele_dc shock
or fire.
•Charge the battery at _mpera_re_ of 50 -P_F (10-30_0).
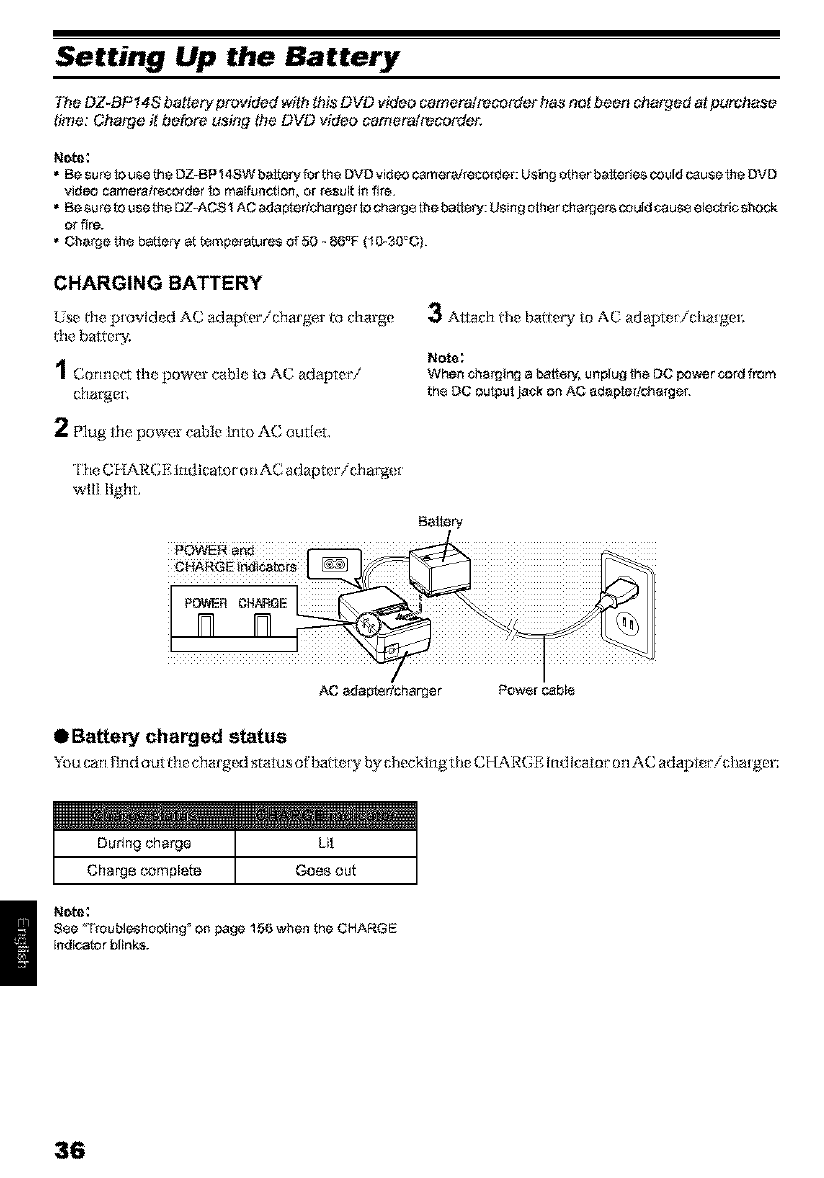
CHARGING BATTERY
Use the p_ovld_ d AC adapterichar'ger to charge
tile batter_
1Connect th_ power cabk to AC adapter/
charger,
2PJug the power cable kite AC outlet,
rl'heCHARGE Indicator ot_AC adaptericharg_ _
win light.
3Attach the bait et_g to AC adapter/charger,
Note:
When charging a patl8_; unpiug the DC power cord from
th8 DC output jack on AC adapter!charger.
Battery
AC adap_edcharpar Power cable
• Battery charged status
You cml fin d out the charged status ofba_t_ _y by checking the CHARGE lnd lcator on AC adapt_ r'icha_ger;
During charge LI!
Charge complete Goes out
Note:
See "TrouNeshooting ° on page 156 when the CHARGE
indica4or blink_.
36
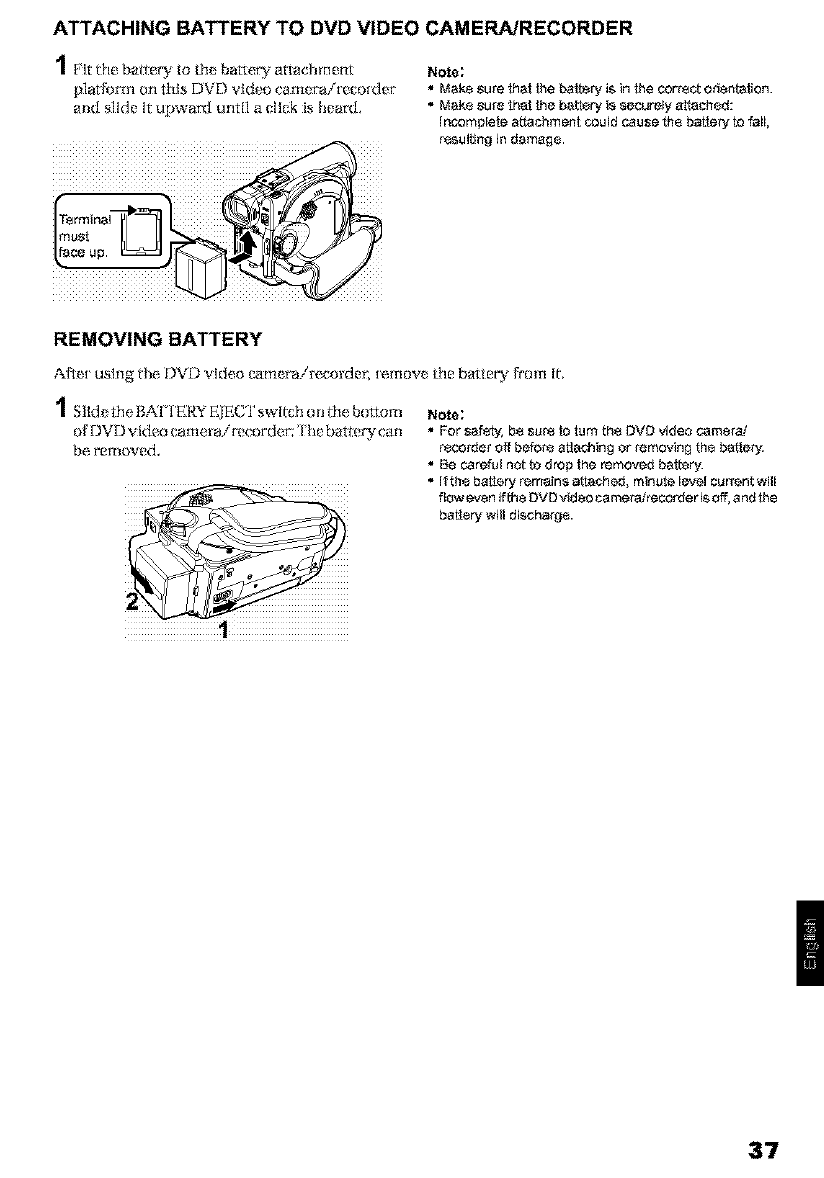
ATTACHING BATTERY TO DVD VIDEO CAMERA/RECORDER
1glt the balt er_y to die batteQ _attachment
platform on this DVD video camerai[eco[der
and s]ide it upwa_ until a click is head.
Note;
•Make _ure hat the {_att_fy Js in the _rrs_ orienta_Jon.
Mako _u_ that he b_ttory is _ecurely a_ch_t:
incomplete attachment _ould cause th_ batt_B_ _ fall,
r_ulting in d_mago
REMOVING BATTERY
AFte[ using the DVD _ideo _meraire_ol"der_ temow the b_tter_y from it.
1Slid e the B,,%[°I'E RY EIECT switch o n the bo_ol_l
of DVD _ldeo camel"airecorde4'; The batter_y can
be ren_oved,
Note:
• For safe:Y, b8 sur8 to turn th8 DVD video camera!
rscorrJer off before attaching or removing the battenj_
• Be careful not to drop the removed bat_er_
If tho battery remain_ a_ta_herJ_ minute level current will
flowevenJff_eDVDvideocarnerah'ecorderi_off, and_e
battery will discha_.
37
ORecordable time with fully charged
battery (with no zoom operation,
etc.}
The ref_rence for DVLI romeo c_me_aimcorde_
recordahle time with fldly charged battery is
between 40 and (i{) minutes.
For DZ*MV350A
XTRA*_
FINE
STD
LPCM _2
_hen u_[n 9
_,iewffnder _99rox 125 m[r
¢_hen u_[n 9
LCD monitor a99r°x 100r_W
_Vhen u_[n9
giewffmder _99rox 125 mir _pprox. 125 rain
_Vhen u_[n 9
LCDmon[tor a99r°x 'I00r_flr _pprox. 199min
_Vhen u_[n9
giewffr_der a99rox l¢5r_flr _pprox. 145 rain
_Vht3n u_[n 9
LCOmon[tor a99r°x 11Stair _pprox. l15min
_Vhsn u_[n 9 - _pprox. 125 _liY_
_i_wffnder
_Vht3n u_[n9 - _ppr_. 109 rain
LCD monitor
For DZ*MV380A
XTRA .I Nhen us[n9
_i_w_nder _99r_x 119 m[r
LCD monitor _99mx 95 rain
_i_w_der _99r_x 119 m[r _ppr_. 115 rain
LCD monitor _99mx 95 rain _ppr_.95 r_fl_
_i_w_der _99r_x 135 m[r _ppr_. 135 rain
LCDmo_[t_r _99mx 105m[r _ppr_.109min
LPCM _z ¢,/h_ _ u_[_9
_i_w_der
_Vht3# U_[_g
LCD monitor
Without anyextraordinary operation,such
as zooming:
T|m continuously [ecordabJr_ time uf I/VII vMeu
cam era/recorder In the above tan e shows the time
available when the DVD v'ldeo camera/recorder Is
in the rr_cordlrig mode without using _riy other
function at?or recording Is started, In actual
[ecording, the batte W wi]l discharge 2-3 times
faater tham this reference, since d_e REC button and
xoom am being operated, and playback is
perform ed, Assure e ¢_ar the record ab]e time with at
fully charged batre W is between 40 and 80 minutes,
and p[e, par'e ff_en umbe_ of barrel ies to allow Ior ff_e
time you am pla_ming to r_cord on the I)VD video
camera/recorder,
Note that the battet_ discharges f_ter in cold
places,
OThe time taken for charging the
battery is 165 minutes at 77°F (25°0).
Note:
• See page 156 when charging is not possible
• Th÷ charg8 tim8 ,MII vary depending on the bat[cry
tsmaining level
• Du ring and after charging, the battery _411be warm, b_
this does not indicate a faul_
• If the following phenomena appear, _e bettary may be
dead: Replace it.
Charging dose not start within I 0 seconds (the
CHARGE indicator does not ligh!).
Tbe battery cannot be charged up to 75% if more than
9 hours has 8tapssd a_et charging s_rtad
Tbe batterycannot be fullychargbe if morethan 5 hours
has 8lapsed after itwas charged to 75%.
• Charge the battery at ambierr[ tomberatu_ 50_F to 8_F
(I 0_C to 30_0): Charging at tomberatures other than this
range could damage the bat'_ry
"1 YheXTRAmotter._nbesatonlywhenaDVD-RAMdisc
i,$f-'sett. [he time i,$ only for _fe_tlce : It wgt vary
ttepen_#_ On recording contents.
*2 LPCM mode can be sat only when L)VD-R di_c _used.
38

BATTERY REMAINING LEVEL INDICATOR
Whe,t_ttte battery" is used to power' the DVD vl deo cam era!r'_,cor_ter, ltm, batte D, rema bling leNel appears
[rl ltle, vk/wftttder or on the [,GD sccben as follows:
Fully_harged _ # u _ __ _ _ _ # _ _ _ _ _ _ _ # u _ _ Nearb! emply
Note:
The remaining level indicator" _ "may _ displayed for an extended period, and" _'- +or" _w ,,may be displayod for
a _horter period
EFFICIENT USE OF BATTERY
Charge battery' immediately before using DVD
video camera/recorder:
Ihe ba_e_' will slightly discharge e_en if it is
detached from the DVD wideo c_tmerai+ ecorder; [f
ltle battery is left attached to DVD video came+a/
recorde+; it will l',orlSUJ_lEa slight alrtOUftt Of poweL
i her_fb_e, It is reeomtnend_t that you charge th_
I_attery shot+fly I_elk_reusing the DVD video
camera/+ e,co+der, usually on the day bef'om you
plan to use it,
Howe:ver, since the battery used for this DVI) video
camer'ait_coI_ter is f'r_e [_'om the memor T elt_cL
you do nm treed m compt_ety discharge the
I_attery before charging it,
When not using the DVD video camera/recorder
for an extended period:
It is mcom mEtMEd that you fully charge the battery
once a year+ attach Iz to DVD video camera/
record_ t and use it up; then reltlove the batt cry"_rld
stot_ it in a cool plav_ again,
8tore in cool, da,'k place:
Whe, n you are not uslng the DVD video camera/
[ _!CO['d ef_ re[[lov[_ the battery arid stove, it {rl a cool,
dark place, ffyou smm it h_ a place where the
temperature is hlgh, the batte W llfh will be
shortened, Be especially sure not to store the
battery' in an enviromnent (_rl a closed vehicle) over
I40°F ({10" Cr. } : Neglecthig this could damage ltle
battery',
Bailer,] life:
The batle W II_ va+ {es grea/ly depending on the
ambient Environmet_t arm how often the DVD
video camera/recorder Isused. If the usable tlme of
DVD video came+a/recorder wittt a {_.+llych_ged
batte W is noticeably short, the batie W Is probably
dead: Purvhase a neat ot_e,
Power save and discharge of battery:
it ls r_e,ommended that you turn/he DVD video
camerair_e, orvler offin status other than t_ cot_ting,
shine _en du+ ing recording pause battetypowerls
consllrtled at the same le_get as during I ecoi'dirlg,
if, when you specif}' Power Save O n, the rvcorvlh_g
paus* status continues f'u_ appmxlmat_dy 5
minutes, the DVI3 video carneraimcorvler will
automatically turn off'.
rlo ,set or r_lease powe+ save+ see °Fuming DVD
Video CameraiRecot_ter OFFAutomalleally
(Powe_ Save}" on pag_ 92.
39
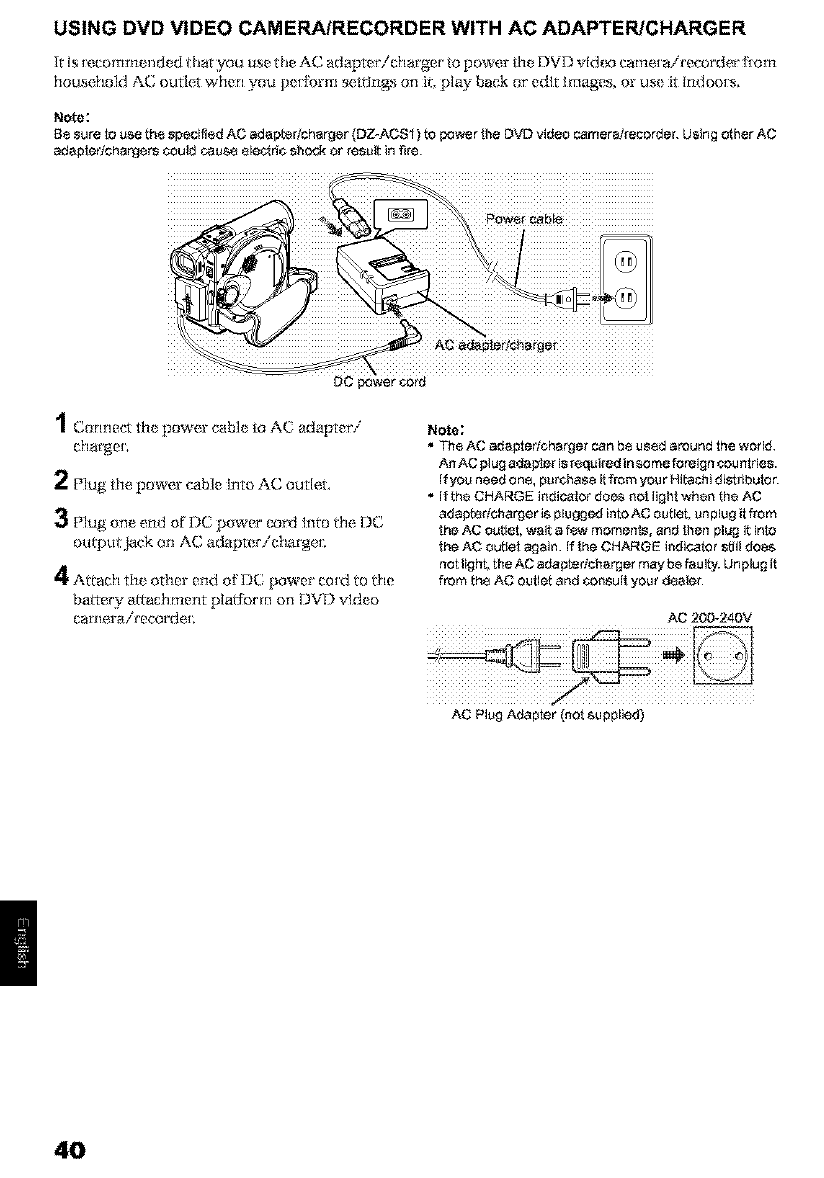
USING DVD VIDEO CAMERA/RECORDER WITH AC ADAPTER/CHARGER
Ir is _ecoln mended dlar you use die AC adapter/charger to power _he DVD vid_o eamex a/recorder _iom
house, hold AC outlet when you p_ t_rm settings on it, play back or' edit Images, or us_ it Indoor s,
Note:
Be sure to use th_ specified AC adaptertcharger (DZ_ACS1) to _=wer the DVD video camera2resorder. Using other AC
adapteffchargers could oa_u,_ 81e_rts shod_ or result in fire.
DC power cord
1Cor, r,ec, th_ power cab]_ to AC adapter/
charger,
2P]ug the power cable into AC outlet,
3[,]ugone end of DC power cord into the DC
ot tpt tjack on AC a tapter/cI arge
4Attach the other end of I)C power cord to the
battery attachment platform on DVD video
car_era/recordeL
Note;
•The AC adapteffcharser can be u_,_d around the world
An AC plug adapter isr_quired in some foreign sou ntries.
if you need ono, pure.ha_e it from you r Hi_echi distributo_
• if the CHARGE indicator doe_ n_ lighI when the AC
adapt_rtoharger is plugged into AC outlet, unplug it from
lhe AC outlet, wait a few moments, and _en plug it into
lhe AC outle! again, if the CH_GE indicator s_ill does
not light, the AC adapto_harger may be faul_ Unplug ff
from th8 AC outlet and con_uil you r dsatsr
AC 20_240V
AC Plug Adaptor (notsupplied)
4O
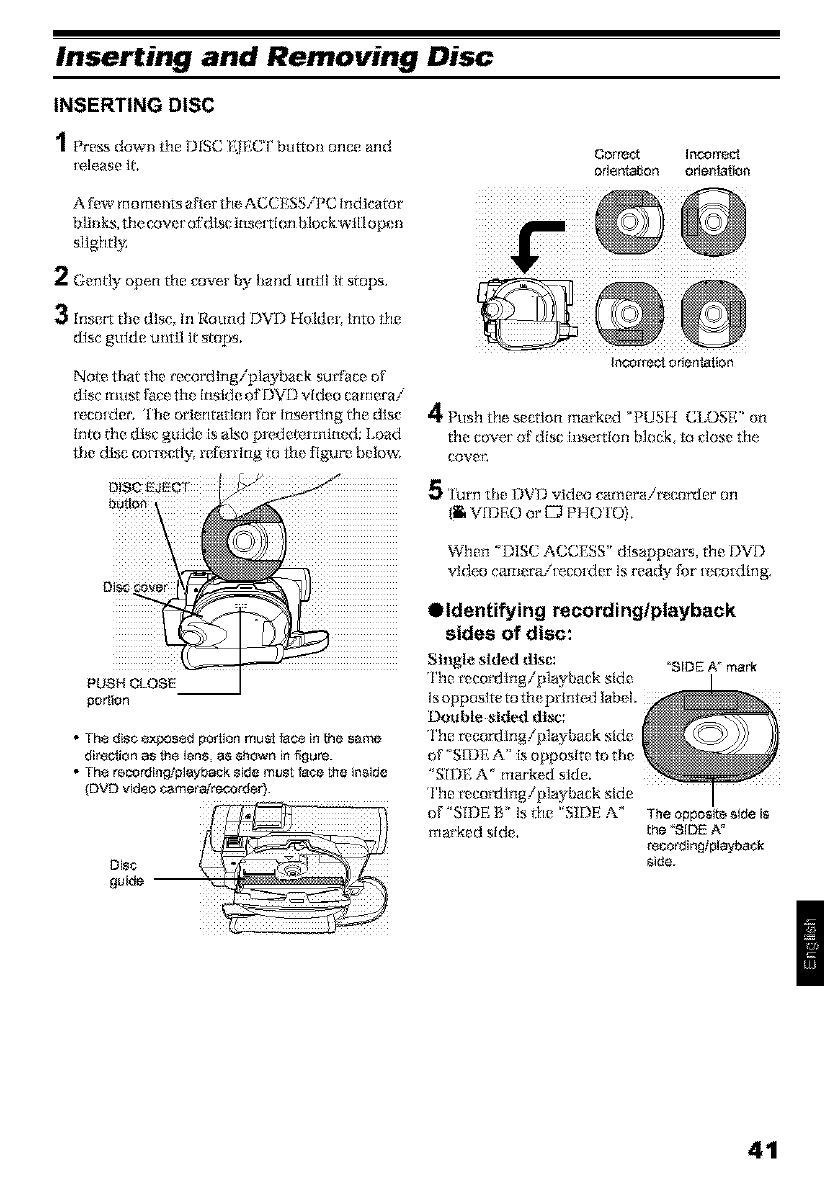
Inserting and Removing Disc
INSERTING DISC
1F,_.__ow.d,e_ISC/:J_:Crbtt_o.o.cea.
teiease it,
A few moments oiler tile ACCESS/PC Indicator
blitik8, the cow_ ofdlsc insertion block will op_ti
slightly:
2Gently open the cover by hand until It stops.
3insert the disc, In Rot nd DVD Holdei; into the
disc guide urit il it stops.
Correct incorre_
orierf{ation oden_lion
Note that the recordingiplayback surface of
disc must face the inside of DVD video camera/
tecoIder. The ork rltaSorl for [nserthlg l_le dlsv
Imo the disc guide is also pre,d eta!trained: Load
the disc corrt, al3_ referring to the figure below.
Incon'ec! orien_agon
Push the section marked _PUSH CLOSE" on
the cove_ of" disc [l_evrion block_ to close the
cover;
PUSH CLOSE
portion
*The disc exposed portion musi fa_ in _e same
dke_ion as the lens, as shown in figure.
* The recording!playback side must face the inside
{DVD video _merafreo_rder).
Disc
i iiiiiiiiiiiiiiiiiiiiiiiiiiiiiiiiiiiiiiiiiis,,u oDwvideoc ,,e oJ ,oo e
(_ VIDEO or EJ PHOTO).
When 'DISC ACCESS' disappears, the DVD
video cam_ raite, cotder Is ready for t_,cotding.
eldentifying recording/playback
sides of disc:
Single sided disc; "SIDE A mark
rl'tl_:mcor_ting/playback aide
Isopposite to th_ printed label
Double sided disc;
The mcor_ling/p]ay back side
of'SiDE A" is opposite to the
'SIDE A" mau'ked side,
The r_cording/p]ayback aide
of 'S_DE g' Is file "SIDE A"
marked side. The opposi_ side is
the "SIDE A _
recordingtpla,tback
side.
guide --
41
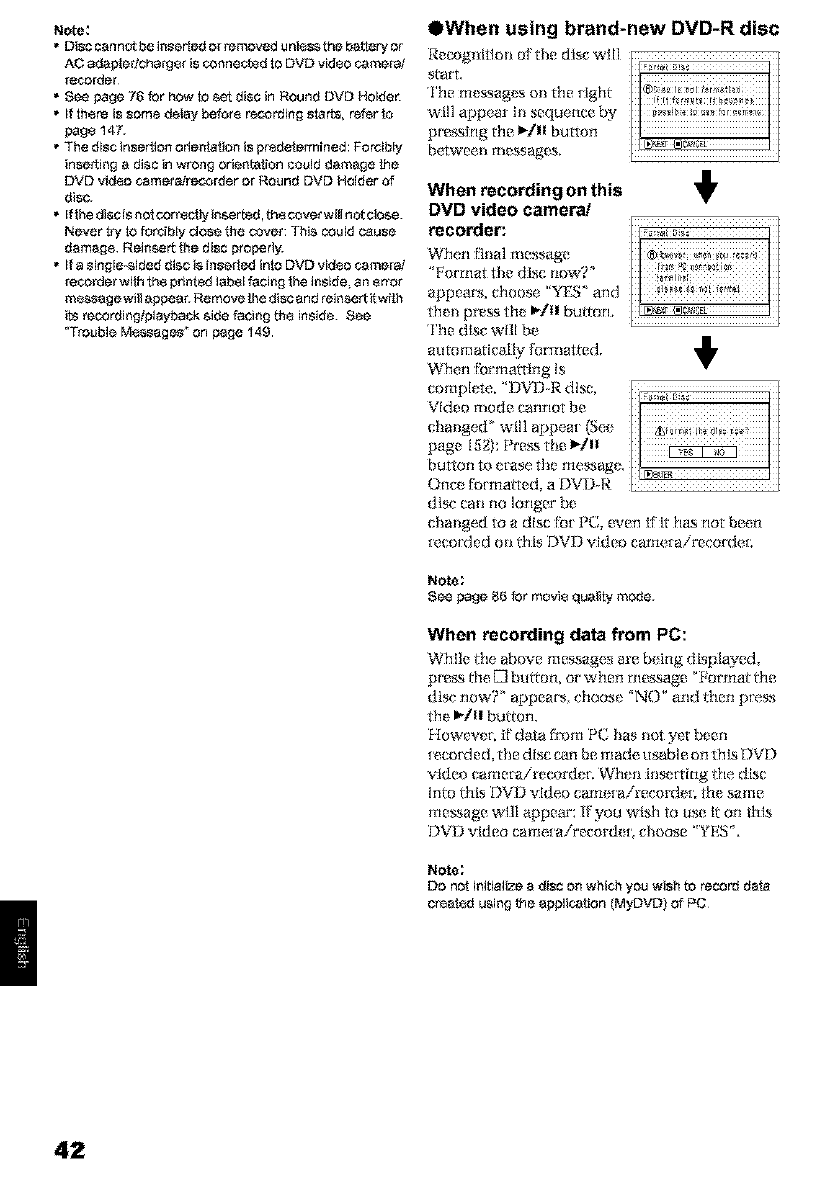
Note:
• Disc cannot be inserled or removed untsss the batter_' or
AC adaptedcha_sr is oonneoteq to DVD vid÷o camerat
reorder
• See page 78 for how to ae_ disc in Round DVD Holde_
• If there is some delay beret8 recording starts, refer te
pag8 147.
• The disc insertion orientsiion is predetermined: ForCibly
inserting a disc in wrong orientelion could damage the
DVD viqso ¢4_mera/recorder or Round DVD Holder of
disc.
• If the qi_cis not correctly inser tsd, th8 cover will not ctose.
Never try to fer¢ibly dose the cover: This could cause
damage¸ Reinser_ the disc proparl_
• If a single-sided disc is in_erted into DVD video camera/
reoorder with the printed label facing the inside_ an o_or
me&_age will appea_ Remove the qisc and reinsert it _4th
its recording/playback side facing th_ inside. See
"Troubts Ms,sages '_on page 149
OWhen using brand-new DVD-R disc
Recog_fltlon of the dis_ will
stavL
will @pear i_ se_ence
When recording on this
DVD video camera/
recorder:
_Format the disc now?"
appea_, choose "YES" and
then press the I_/II button.
The dlsv will be
automari_ally I'ormatted,
When fiFmatting is
disc can no longer be
changed to adisc lot PC, e_'en lilt has not been
[(*,cotded oil l_liS I_VD _[d(_'o came._ airecorde._;
Note:
See page 86 for movts quality mode.
When recording data from PC:
While l_e above messages are being displayetL
pre_ d_e El btdi on, or when message _ b'or'ma l_e
disc nowY appears, choose "NO" and l}_en pte.ss
the _/ll button,
Howeve[: if"data from PC; has not yet been
[ecorded, the disc can be made. usable on this DVD
_ldeo cametairecorde[; _Vhell inserting i}le dlsc
Into i}lis DVD video came[airecordeL the same
me.age will appear': If you wish to use it on this
DVi) _'ldeo carne.tairecord_ L choose 'YES _,
Note;
DO not initialize a disc on which you wish te record dats
created u_iag the application (MyDVD) of PC
42
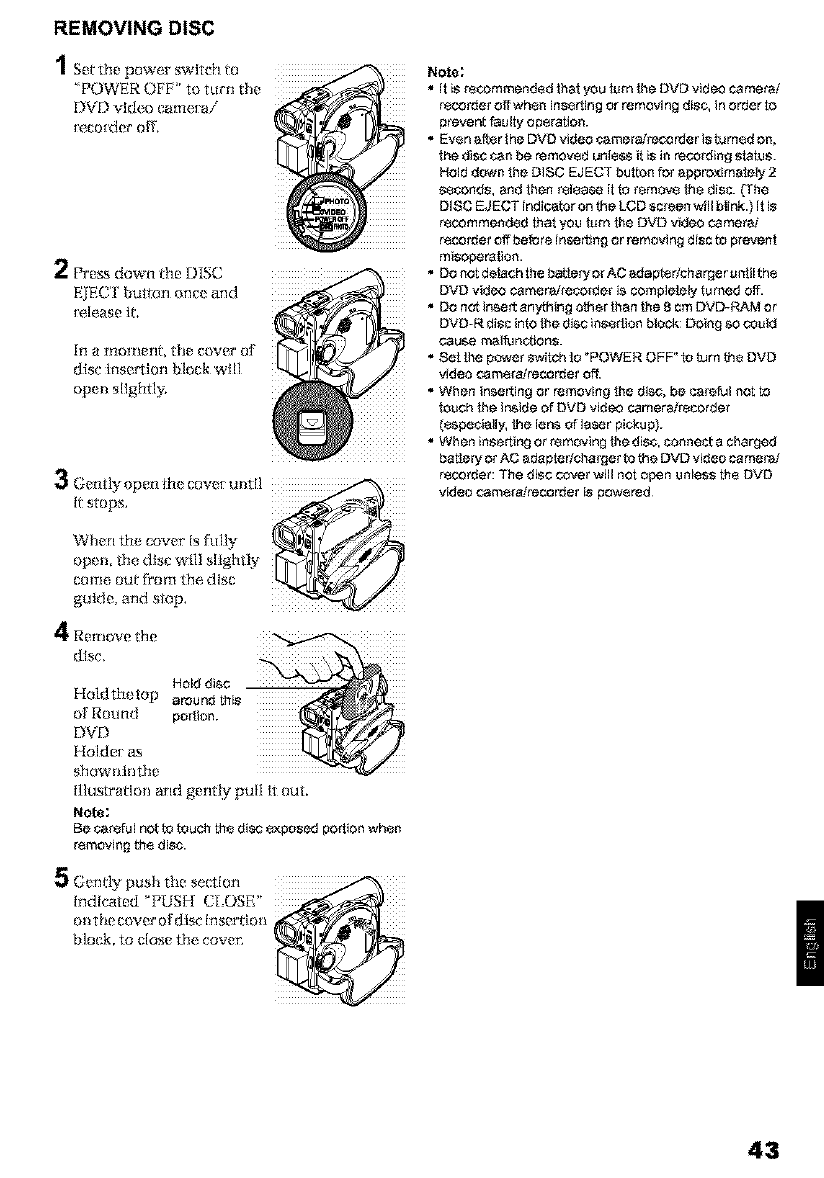
REMOVING DISC
1set the power switch to
'POWER OFF' to turn the
DVD _[deo tamer ai
_e,co_der oK,
/ Press down tile DISC
ESEC'I button onc_ and
_e,le,ase It,
Ill il rtlOltlerlI, the cover of
disc insertion block will
open slightly:
3Gentlyopen th_ cow tutitilltstops,
When the cover Is fully
open, the dlsc will slightly
cofrte out _ofrt the disc
guide, and stop,
4Rear,ova the
disc,
•It is recommended tha! you turn the DVD video camera/
" recorder o,_whell inserting or removing diS¢, in orper to
prevent faulty operation.
• Even after the DVD video cameraZrecorder is turned on,
the disc can be removed unless it is in recording status.
Hold down the DISC EJECT button for approximately 2
seconds, and then release it to remove _e disc. {The
DISC EJECT indicator on the LCD screen ,MII blink.) it is
recommended that you turn the DVD video cameraY
recorder off before inserting or removing disc to prevent
misoperation.
• DO not defach the petlery or AC adaplerlcharger unN the
DVD video camera/recorder is compieteiy turned off.
• DO not insert any_ing other than the 8 cm DVD-F_M or
DVD-R disc into the disc insertion block: Doing so could
cause malfunctions.
• Set the power S'MtCh fo "POWER OFF" to turn the DVD
video camera/recorder oft
When inserting or removing the disc, be careful not tO
touch the ir_ide of DVD video camera/recorder
(especially, the lena, of laser pickup).
• When inserting or removing the disc, connect a charged
batten] or AC adapter/charger to the DVD video camera/
rscorper: The disc cover will not open unless the DVD
video camera/recorder is powered
5Gently push the se(:tIorl
lndlc_ited _PUSH CLOSE'
o,,the co,'er ordisch,s_:rrlo,,_'_
block, to close the cover; _l_ i_=_
43
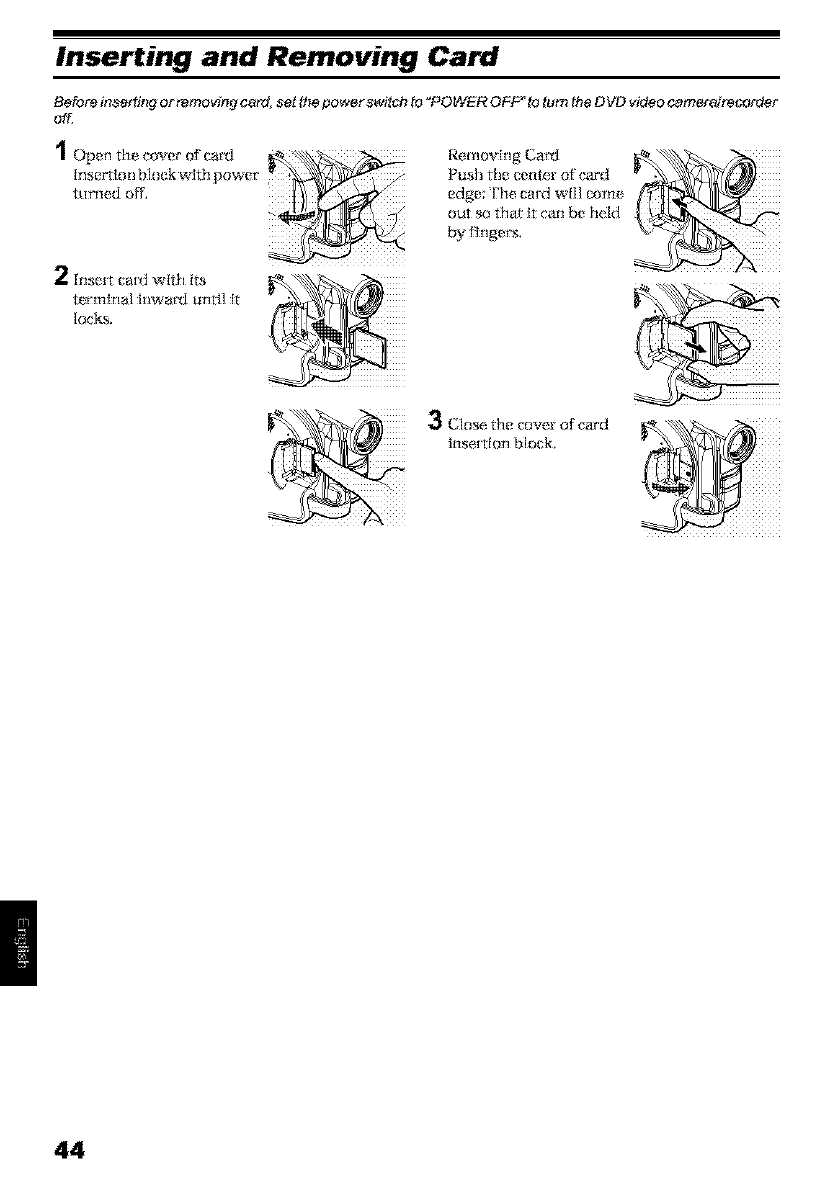
Inserting and Removing Card
Before inserting or removing card, set the power switch to "POWER OFV t_ turn the OVD video camera[t_cepJer
off.
1Open the cover of cad
Inset[Ion blo(_k with power'
tur'n_d off,
/ Insert ca[_I wilh its
terminal inwa_ until it
locks.
•_C]ose the _ovet o['ca_'d
insertion block,
44
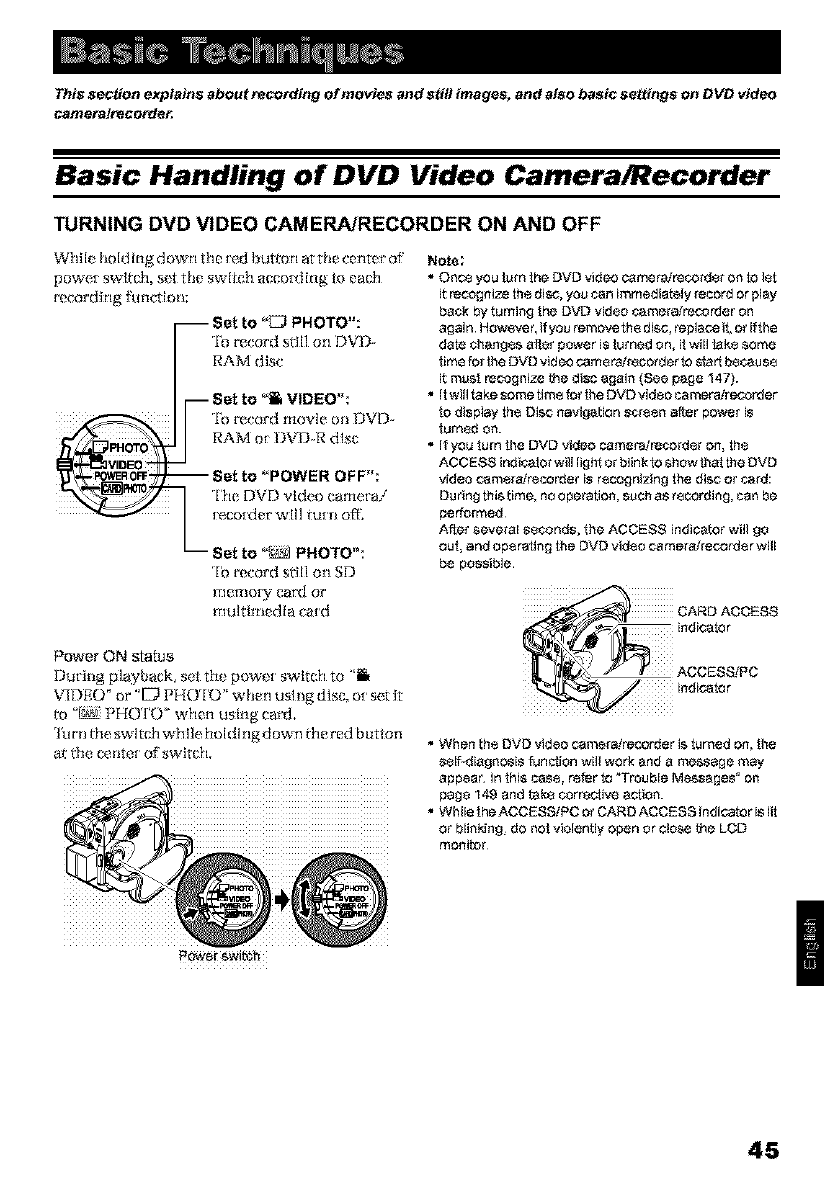
This section explains about reGording of movies and stiti images, and also basic settings on OVO video
cameralrecot_ter.
Basic Handling of DVD Video Camera/Recorder
TURNING DVD VIDEO CAMERA/RECORDER ON AND OFF
While hold {ng down the _ed button ar the center of
power swlt_l, s_ the swlt_l acco_{ng _ ea_l
recording _nclio_;
F-- Set to _KJ PHOTO":
|rFo record stiIl on DVD_
RAM dlsc
] I"-" Set to _ VIDEO":
"_3_I_'R_=_ _Set t o POWER OFF :
t._ The DVD video came[a/
Set to _-_ PHOTO"
rib J"(_('Or_[still on SD
memo W ea_ or
multimedia card
Note;
• Onc_ you [urn !he DVD video camereJrecorder on te tet
it reco£nize the disc, you can immedtetaty record or play
back by turning the DVD video camera/recorder on
again¸ However, #you remove th÷ disc, replace it, or if the
date change._ after power i_ [umed On, i! _4[I teke some
lime for _e DVD video ¢am÷rai_corder to _tert because
it must recogaize t_e disc again (See page 147).
• it will teke some tim8 for the DVD video careers/recorder
fo display th_ Disc navJgst[on s_r88_ after power is
[umed on.
• if you turn the DVD video came_recorder on, th÷
ACCK88 indicafor will ligP4or blink te show thai the DVD
video camera/recorder [_ tecognizin_t the disc Or card:
Du ring this time, no operation, SUCha_ recording, can be
performed¸
After seve_[ seconds, the ACCE88 indicator will _to
oul, and operating the DVD video cameraHecord_r will
be possible.
Power ON status
Duciiig playback_ set the power switch to '_
VIDEO _or 'D PHOTO" when usl ng disc, or set it
to _ P[ [0 ['0 'when using ca_.
l)rn ffm switch while holding d own ¢_e red button
al l}le e_nteI of switch, • When the DVD video cameraZrecorder is tamed on, the
self4iagnosis funOJon will work and a messa£e may
appear. In Ihi_ case, reter to _Troab[e Message_ _on
page I49 and take corrective actten.
• While the ACCESS/PC or CARD ACCESS indicator is lit
ot b[inldn_t_ do not vtetently open or c!ose l_e LCD
monitor
P_et gWi_h
45
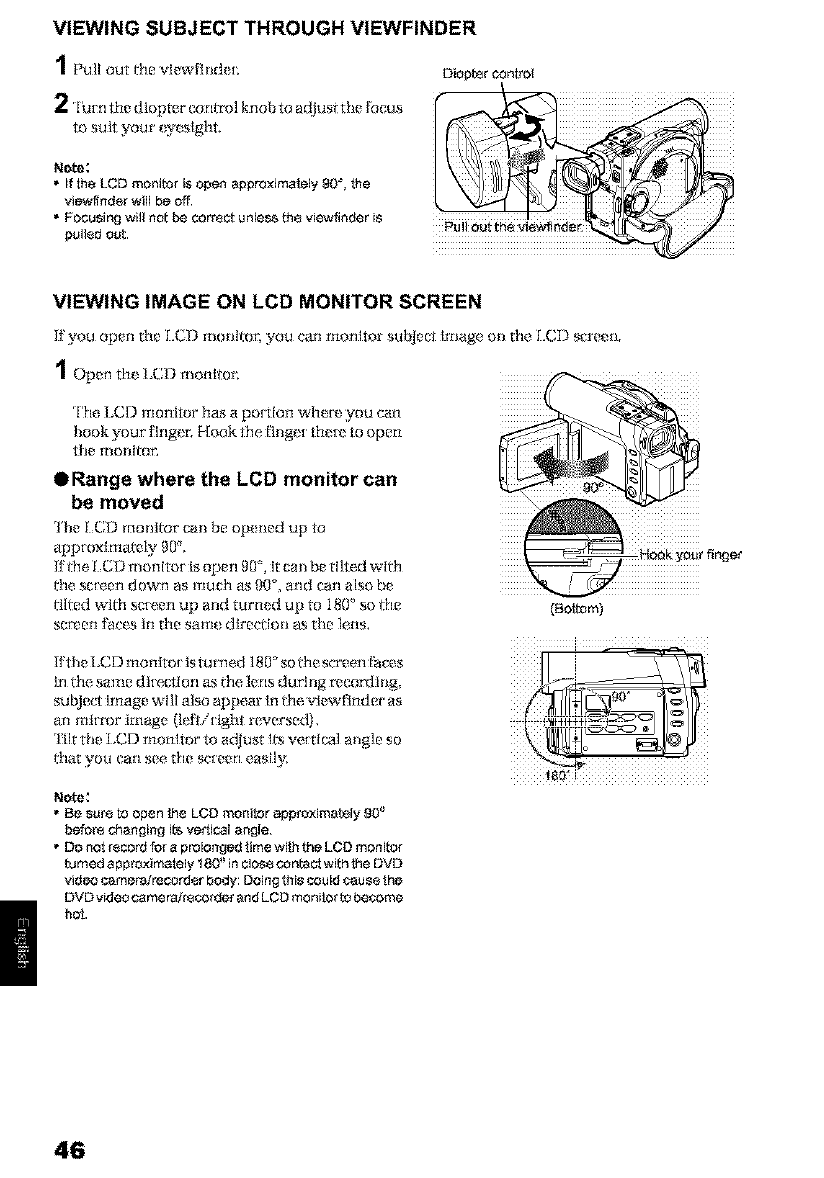
VIEWING SUBJECT THROUGH VIEWFINDER
2'lutn the diopter con_ro] knob to adjus_ the R_cus
to suit your _yeslght.
Note:
• if the LCD monitor is open approximately 90% the
view[foder will be off
• Focusing will not be correct unless th_ viewfinder is
pulted out
VIEWING IMAGE ON LCD MONITOR SCREEN
If you opetl the [=[r,T) l_iOll[_Or_ you can mordtor stlblect JJ_lage oil the LC]) s_ro_ IL
1ope,
The I.CD monitor has a pot[Ion whei_,:you cam
hook your' finger; Ffook the Bnge[ th_[_ to open
die ;_lollitol'.
ORange where the LCD monitor can
be moved
lhe LCD monitor call be op_ ned up to
@proximately 91P,
if"die _=CD mon itor is open 91l_, it can be tilted wiitl
I}K_set (!_ rl down as much as 90 _, arid carl also be
tilted wlffl sc[een up and turned up to I80" so lile
sc_(;,n _tces in the sam_ direction as the lens,
If the I,CD monitor is turned 180" sothe screen Faces
in _le same dif_ctlon &*;_le l_ns du_ _g _co_lng,
subJe_ _mag_ will _so appear in _le _l_w_nder as
an ml_r imag_ O_icight r_verse_,
Til_ th_ LCD ¸monitor _ a_u_ i_ vertical a_g]e so
_lat you Carl ,see the sc[eerl eas[t_
Note:
•Be sure to open iJle LCD monitor approximately 90"
before changing ite vertical angle.
• DO not record for a prOlonged lime with the LeD monifor
turned approximately 180 '_in clOSe con_ci with lhe DVD
video cameraYrecorder body: Doing this could _use the
DVD video came_rdet and LOD monifor fo he.me
h_.
(Bottem)
i
46
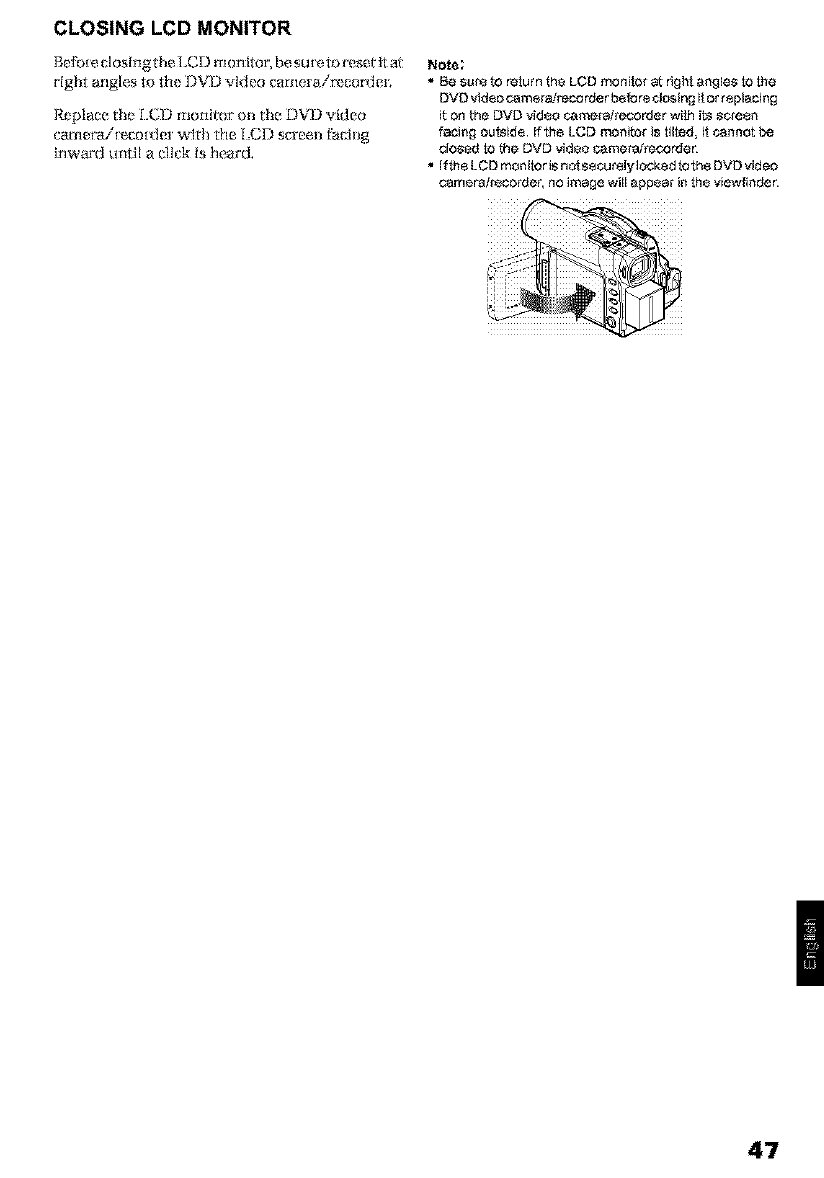
CLOSING LCD MONITOR
Be[hie c[osingthr_LCD monitor, be su[em resr_t Itat
rig_ angles _ tlae I]V_ ¸video camerai_!co_ei;
Replace the LCD monitor on the I]VD video
carneratit_cot_ter wlth tile LCD screen ['acing
inward until a dick is heard.
Note:
• Be sur8 to return the LCD monitor at right angle8 to the
DVD vidso camsrat_corrJer bsfore closing it or rsplacing
it on _he DVD video _merefrecorder with its _¢resn
facing ou_sid_ if the LCD monitor is tilted, it cannot be
dosed to f_e DVD videe came_atrecorde_
•If th_ LCD monitor is not sscursIylocked to th8 DVD video
camerairscordet, no image will appsar in th_ viewfinde_
47
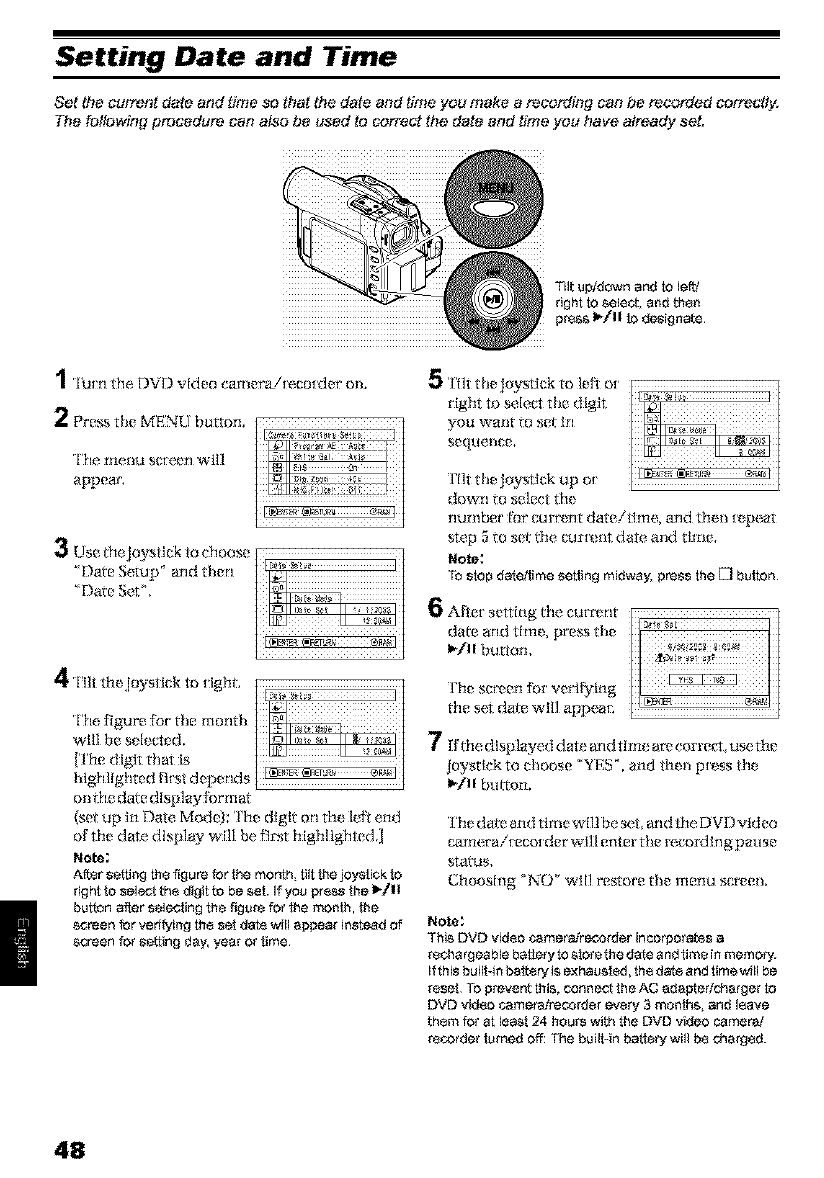
Setting Date and Time
Set the current date and time so that the date and time you make e recording can be recorded correctly.
The _ollawing procedure can also be used to correct the date and time you have already set.
Tilt upldown and to leffd
right to select, and then
press I_/11 to designate
d
•rI'u[:£1the DVD video camera!_eco_der o1_.
2Pre_s the MENU button.
The rue,_m screen will
appear',
onthe dale disp]aytbrmat
(set up in Date Model: The digit on the le_ end
of the date dlsp]ay will be fl_t highlighted,]
Na_:
After setting the figure for the mor_h, tilt the joystick to
right to select the digit _o be set. if you prg_s the I_/11
button after selec4ing the figure for the month, the
screen for verifying the set da_ will appear instead of
screen for se_ing day, ,fear or time
;5 Tilt tile joystick to let_ o[
right to select the digit
you WaiSt to _et It1
se(;[tle_ce,
Tilt the joystick up o_
down to select the
number For e,m_nt dare/tlme, and the_ [z,peat
step 5 to set die l;m'[_ _t date, m_d tlme,
Note:
TOstop d_4eNmesetting midway, press the El button
6After setting the cut rent
date _rld tittle, pre_ the
I_/11 button.
The se_en ibr verg'ylng
the set date will appean
7if the displayed date andtlme are corre_-t usethe
joystlck to choose _'YES _. and the_ p_ss the
I_/11 bu_on.
'['he date and rime will be set, and the DVD rid ea
e:am_aireco_ der will enter the _oi_Jlng pause
status,
Choosing _NO _ wlll re_ore the menu se_en.
Note;
This DVD videe camerafrecorder incorporates a
rechargeable batiery to stere the date and time in memm_y.
Ifthis built-in bathe P_'isexhausted, the da_e and time w_ll be
reset Te prevent this, connect the AC adaptedcharger to
DVD video camera/recorder every 3 months, and leave
them for at least 24 hours with the DVD video camer_t
recorder turned off: The built4n battery will be charged.
48
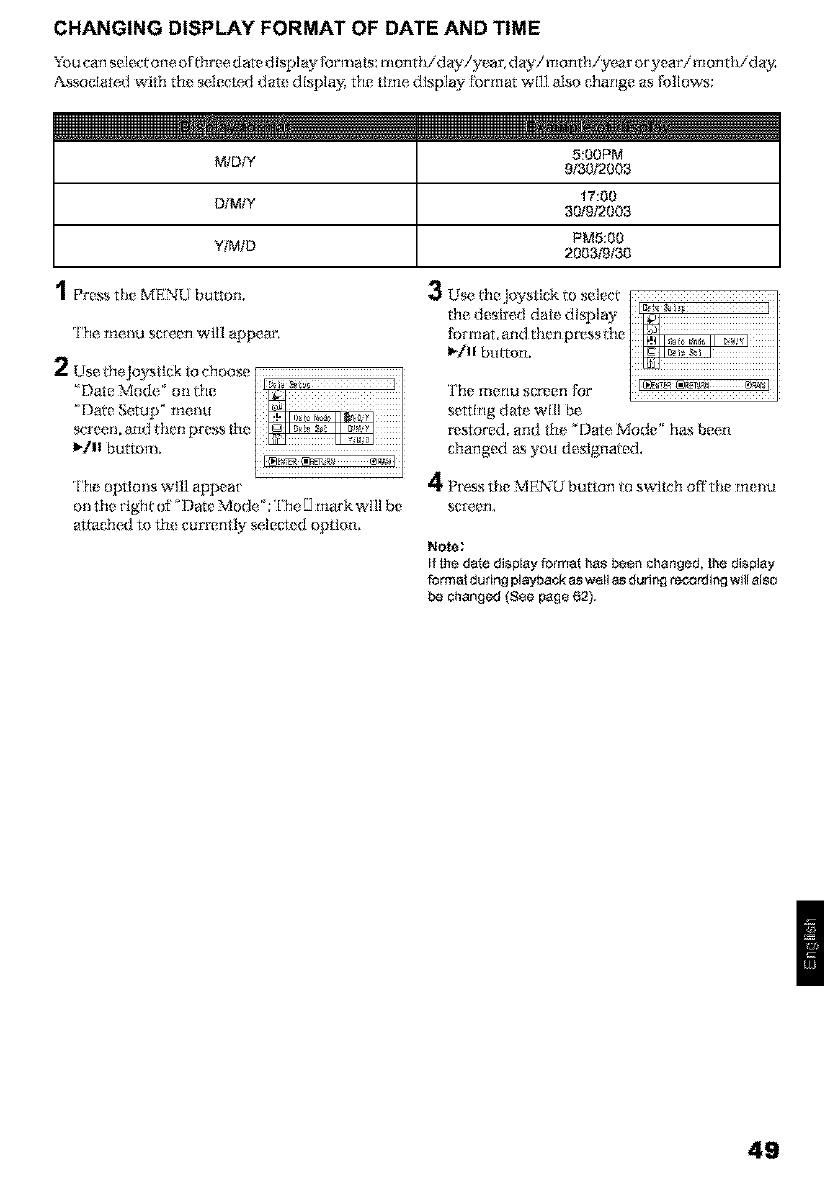
CHANGING DISPLAY FORMAT OF DATE AND TIME
Youcanselec_oneofffFee claredisplay format_: monthiday!_ear, d_y! month!year oryeari monfl_iday
;%soc[ate,d widl th{ selecte,d dat{ display, tile time display ti;rmar will also charige as follows:
- --m
MIDIY
DIMLY
YIMID
1['re,,theMENU button.
5:00PM
9130t2003
17:00
301912003
PMS:00
2003]9130
The menu screen will appeal',
The options will @peat
on the fight of _Dare Mode _:The ]£]ma_'k will be
attached to th{ currenlly select_ d option,
setting date Will be
r_stored, and the "Date Mode" ha*; been
changed as you designaed.
4P[_,SS the MENU button to switch o_'the [tl{ IIU
scteer],
Note:
Ifthe date dlsplayformathas been changed, the display
formaldurin_playbackaswellasdu_ng rec_rdingwillalso
_changed(Seepage 62).
49
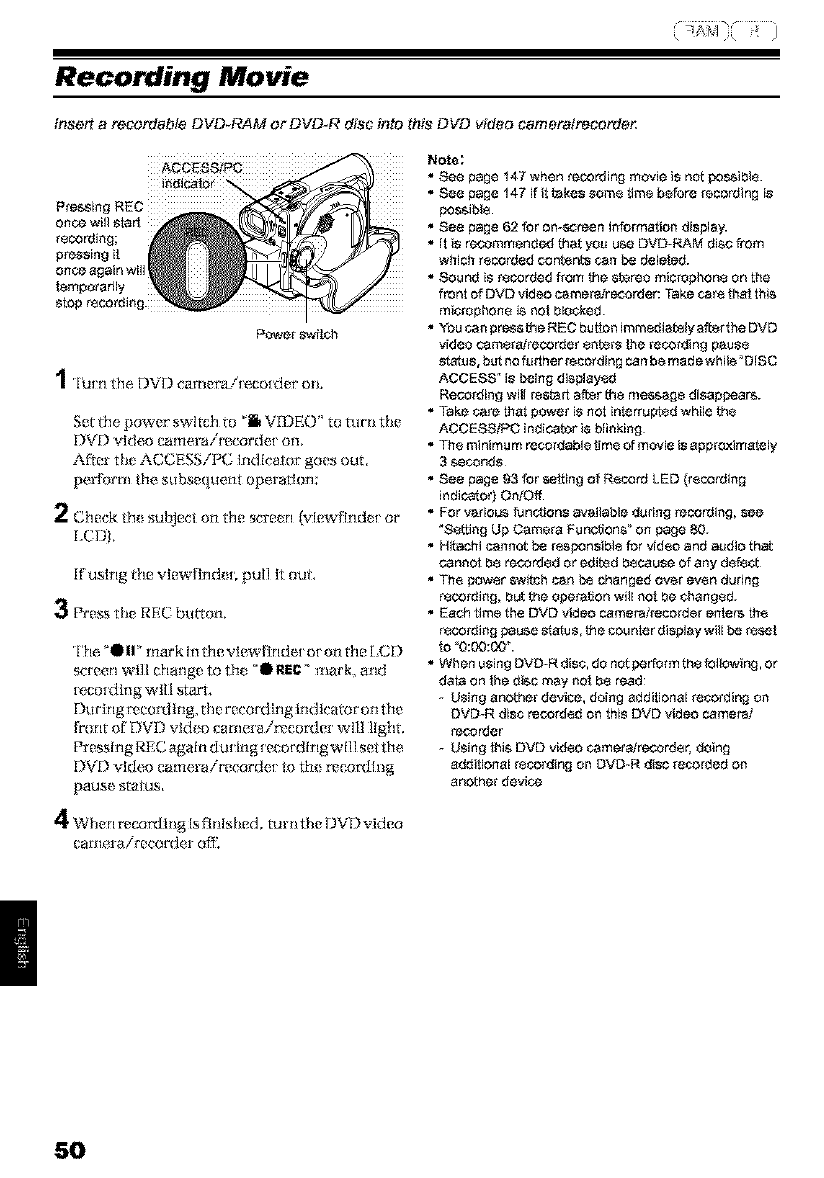
Recording Movie
insert a recordeble DVD-RAM or DVD-R disc into this DVD video eemeratrec_rder
Power sw_tch
1rlut:rl ttK¢ DVD cmner'a/tecotder o_.
Sr_tdie power switch to .,m, VIDEO '_to tutti the
DVD vMeo camerairr_corde, t on.
After the ACCESS/PC indicator goes out,
perform the, subsequent opcrarlorl;
2CtK_ck th_ suIilect oll tile scre_ n (vlew[Trld_ [ or
ECDL
Kuslng the vk_witnd_ [; pull it out.
3Prr_&sthe REC button.
rll}_e_l II' mark In ffm vlewRnde[ or on ffm LCD
screen wi]l change to th_ _l It_C '_ mark, and
[eco[dlng will sta_.
During r_cording,the rr_cord[ng indicator on the
front of DVD video _'a/nerair_corrler will light.
Pressing Rt;;C again during _ecordlng will set the
DVD video camerairecorde_ _o th_ r_cording
pause status.
4w.er, rvcor_lltig is R_llshed, turtithe DVD video
camera/recorder o_
Note:
*See page 147 when recording movie is not ber4ibte.
* See page 147 if it t_kes some time before reco_ing is
edssibte.
* See page 62 for on-_,creen information di_play.
* It i_ recommended f_at you uP.,eDVD-RAM di_c from
which reco_ed contents can be deleted.
* Sound is recorded from t_e sf_ereo microphone On the
front of DVD video camera/recorder: Take care _al this
microphone is no! blocked.
* YOUcan press f_e REC butbn immedte_ely after the DVD
video camerairecorde_ eoter_ ihe recordin_ paul8
ste_u_, but no further recording can be made white _DISC
ACCKSS _is being displayod
Recording will re_f_r_ aff_erf_e message disappears.
* Take care thai power is not interrupted while fo_
ACCESS/PC indicafor is btinking
* Th_ minimu m recordabte _Jm_of movie i_ approximately
3 seconds¸
* See page 93 for se_ing of R_cord LED (recording
indicator) OaiOff.
* For va_iou_ fu notion_ available during recording, _ee
"S_ing Up Camera Funcf_ons _'on page 80.
* Hkechi cannot be re¢,edn_ibte for video and audio _hot
cann_ be recorded or edi_ed because of any def_ot
* The power swi_h can be changed Over even during
recording, but the o_ena_ion will nol be changed.
* Eac_ time the DVD video camera/recorder enters the
recording _ause stetus, t_e counter disNay will be rese!
fo _0:00:00 '_.
* When using DVD-R di_¢, do not perform the tellowing, or
date on ihe disc may not be read:
- U_ing another device, doing additional recording on
DVD-R disc recorded on this DVD video camera2
recorder
- Using _is DVD video camera/recorder, doing
additional recording on DVD-R disc recorded on
another device
5O

•Power save and discharge of battery
{_\ wlmn 'Power' Save: On' is specil_ed, the DVD
video cam_ra/r'ueorfler Is h_ff ill _m r_eor_;ling
pause status for' approximat(_,ly 5 tnLnul_,s, it wLll
automariexdly t_tn of[_
Io r_star'r I_cot_l{tlg, set file power' switch to
_POWER OFF", and then set it to _t1_VrDEO '.
lb set or release power save_ see "'lurrfing UVD
Video Camera!!ecorder Off Automatical ly
(Power Save)" on page 92.
Ir is _e,commend_ d tha! you speclf_' "Power Say'e:
O rl", sirler_ r_verl during I_corxtlng paus_ battery
pow(_,I N consumed ar the same level as during
recordBlg. Especially when power save has been
released, turn the DVD ;*ldeo camera/recorder off
whc?n _ot in use,.
51
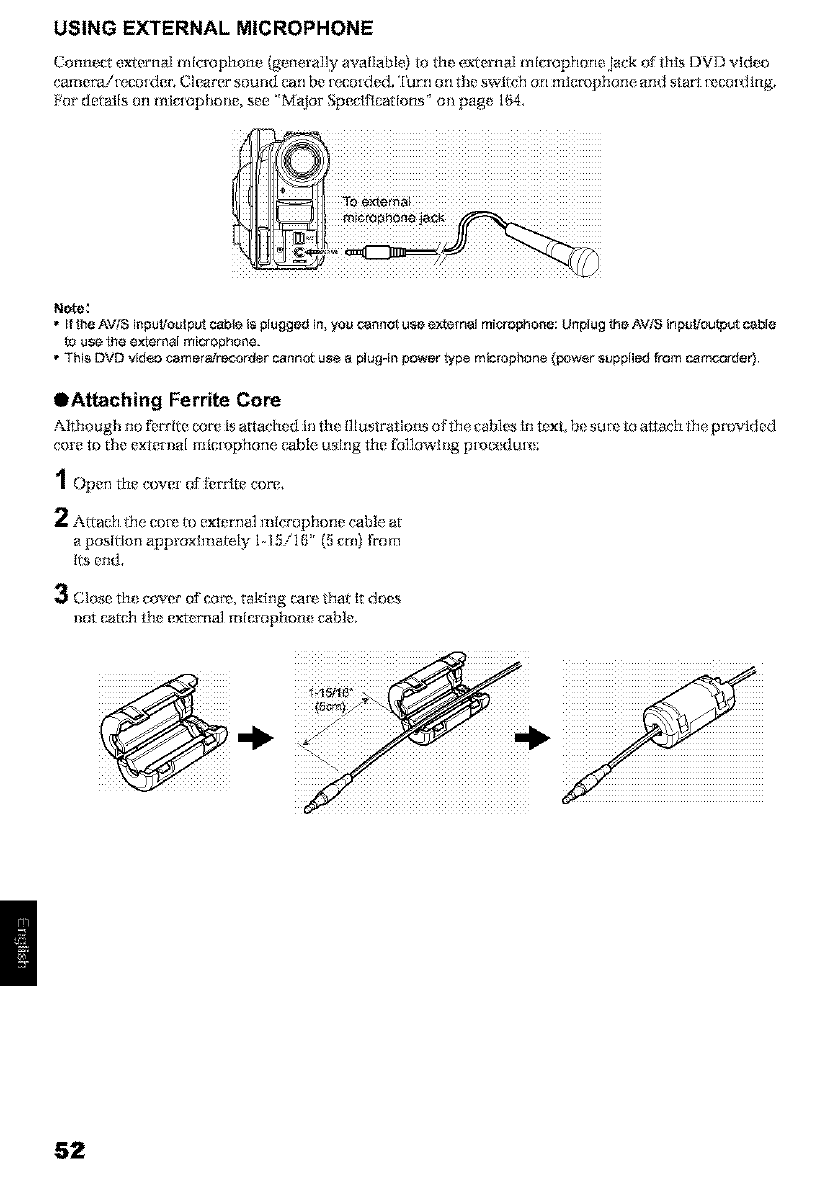
USING EXTERNAL MICROPHONE
Connect external microphone (generally available} to the ¢xlerna] microphone jack of thls DVD video
ca111era!IecoIder, Clc:,ar_r SOUlld carl be [ecotded. '['uyrl orl tile switch orl rtllCfl)pholl¢ and start _*co_dlng,
Pot details on microphone, see 'Major Specifications _ on page 164,
Note:
• if the AViS inpuWoulpul cane is plugged in, you cannot use exbernai microphone: Unplug the AVtS inpu_output cable
to use the external microphone.
• This DVD video _amera[recorder cannot u_e a plu_qa power type microphone (power _uppl]ed _m ca mcxt_rder)
OAttaching Ferrite Core
Although no f_,rr'it_ core is attached In the I]lustratlons of the, _ab]es in rex
core to the ext[?[ hal trtk;[_phon¢ (_bl¢ using the fb]lowing p[_')l?_ duI_ ;
Open the cover of [_rdte core,
2Attach the cot_ to r_xternal microphone cable at
a position approximately 1o15/16' (5 crn) from
Its end,
3Close th_ cover of cor_, taking ca[_ that it does
not catch the! ext_!rnal llllt_ophorl_! _able,
, b_ su_ to attach the provided
52
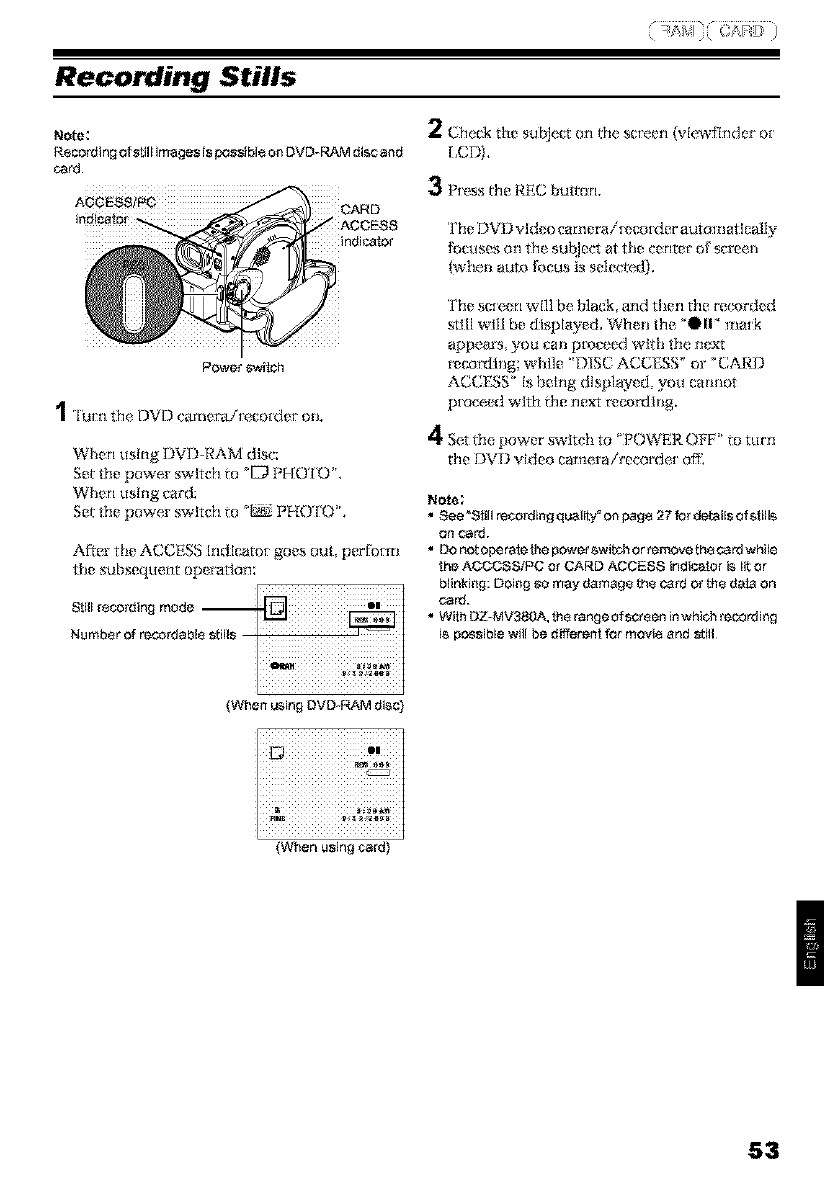
Recording Stills
2C.heckthe subjecton the sc[een (viewflnder o[
ECT)),
3P[ess the REC button.
The DVD video camera i[z, co[dcr automatically
fbcuses Oil the sulk]oct at the center of screen
(when auto focus is selected).
Power sw_tOh
1 'l_Ugl the DVD cm_ler'ai[eco[der' on.
When using I)VD-RAM dlsc;
Set the power swirdl to _D PHO ['0 %
When using card;
Set die power swlt&l to _ PHO ['0 L
After the ACCESS indlcatot goes out, perfom_
the subsequent op_ ration:
Slill recording mode --
Number of recordable _iils
The sc[e, en wi]l be b]ack, and then file record_ d
_11 will be dl_iayed. When the "OI1" ma_!k
appears, you can proceed wlth the next
_co_tog; while '_DISC ACCESS _ or _CARD
ACCESS _' is being displayed, you cann_
proceed w_h _le rlcxt _c,o_lng.
4Set the power switch to _POWER OFF' to turn
the DVD video camera/recorder o_
Note:
*See "Slill recording quality" on page 27 for delails ofsNIs
on card.
* DO not opara_e_he power switch or remove _hecard while
toe ACCCSS/PC or CARD ACCESS indicator i_ li_or
blinking: Doing so may damage the card ot the dala on
card.
* With DZ-MV380A, the range of screen in which recording
is possible will be different tot movie and sNI
(When using DVD-R/'@I disc)
(When using card)
53
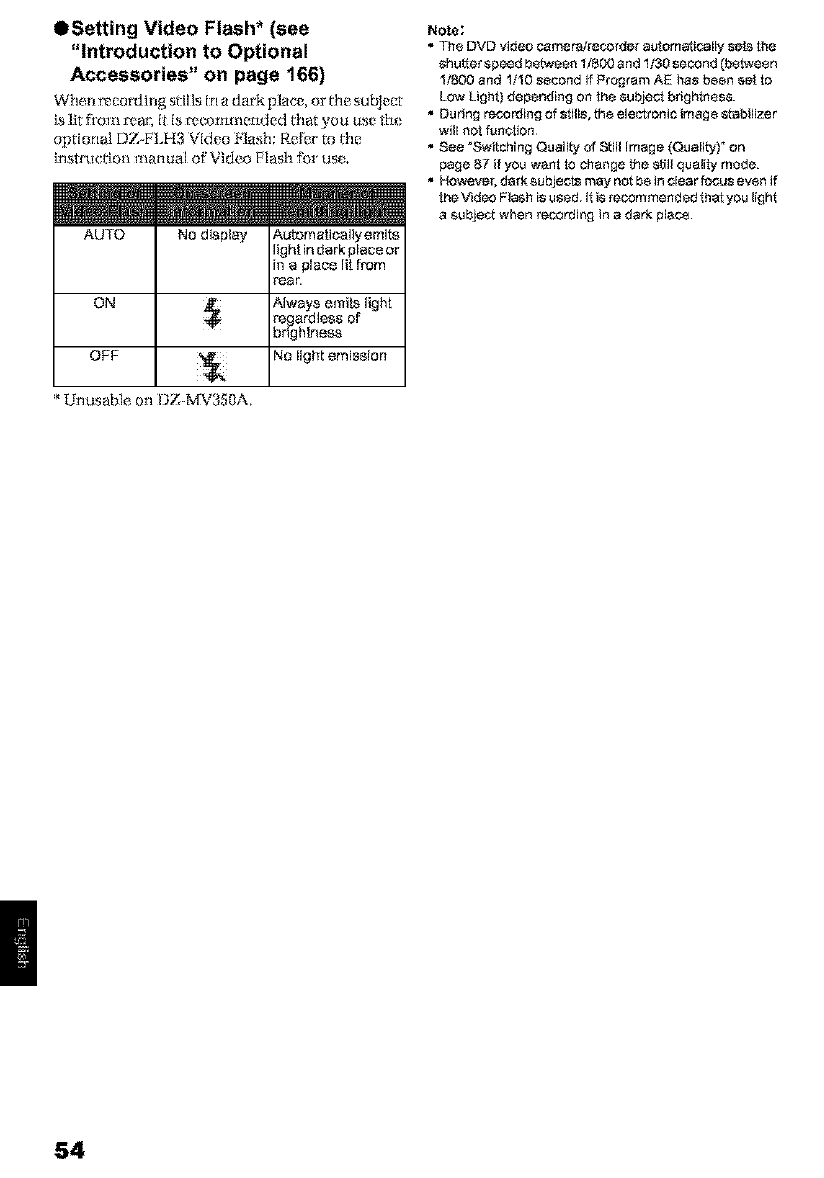
OSetting Video Flash* (see
"Introduction to Optional
Accessories" on page 166)
Whel_ _co_1 lllg stlIls In a da_k place, or _m sub jeer
optional DZ--FLf £3 Video Flash: Re{er to _tle
klstructimi manual of Video Plash fl)r us_,
AUTO No display Auk_maticaJly emif_
light in dark place or
m a place li! from
rear
ON Always emits light
re ardless of
br_hlne_
OFF No light emission
*Unusable on DZ MY350A,
Note;
•The DVD video cameratre_order automatically sets the
shutter speed beb_een 1_00 and I/30 second (batween
1/800 and 1/10 second if Program AK has been sat to
Low Light) depending on lhe subje_ brightness.
•Du ring recording of atill_, t_e electronic image sbabilize r
will n_ function¸
•See _Bwitohing Quality of SNI Image (Qu aliJ:yF on
page 87 if you want to change _e _lI gua!ity mode.
•However, dark subjects may nat be in clear f_us even if
ihe Video Fts_h is used. It is _commended that you light
a _ubject when recording in a dark ptsc_
54
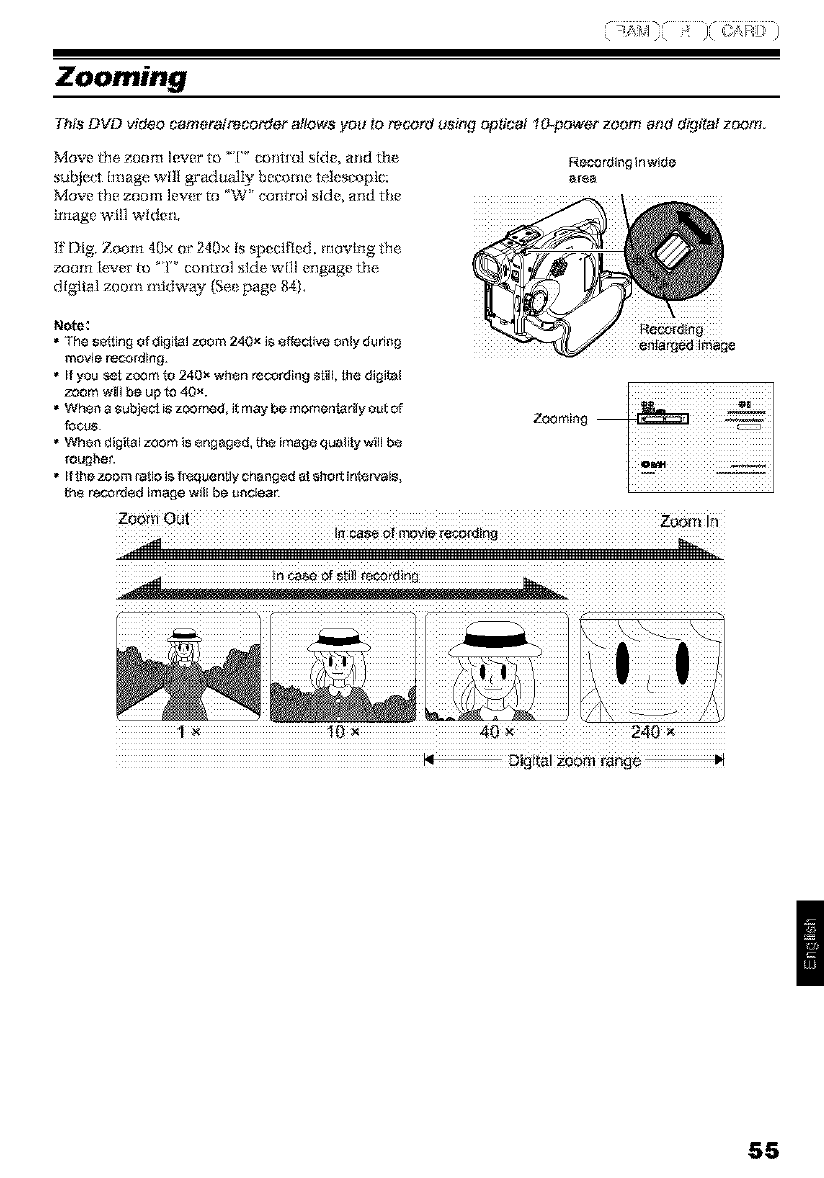
Zooming
This DVD video cameratrecorder allows yogi to roc_rd using optical lO_power zoom and digital zoom.
Move 111ezoom k_ver to _'1['_ contIol side, and the Recordiaginwide
su_ image wilt gradually b_com_ _lescopic: a_a
Move th_ zoom lew_ to _W _'con_ol side, and the
image will widen,
H"Dig. Zoom 40x or' 240x Is specified, moving the
z_om lever to _'1_ contl"o] side wilt engage the
dlgl_ztl zoom midway (Se_ page 84),
Note:
•The so,lag of digital zoom 240 x ig effective oNy dudng
movie reco_ing.
• If you _et zoom to 240× when recording still, the digital
zoom will be up _o 40 X.
•When a subjsct is zoomed, it may be momentarily out of
focu_ Zooming m
• When digftal zoom is 8ngagsd, the imag8 quality will b8
mughet.
•If _he zoom ratio is,f_equerdly changsd at _hor_ intervals,
th8 recorded image will be unc[ea_
zoomo
i2i_iiiii=_i2iiiiiiiiiiiiiiiiiiiiiiiiiiiiiiiiiiiiii!ili!iii!ill_i!!'i!iilii !i!!i iiiiiiiiiiiiiiiiiiiiiiiiiiiiiiiiiiii_ii_i_iii_iii_iii_i_i_i_i_i_i_i_i_i_i_i_i_i_i_i_i_i_i_i_i_i_i_i_i__iiiiiiiiiiiiiiiiiiiiiiiiiiiiiiiiiiiiiiiiiiiiiiiiiiiiii
1 x I 0_ 2#0
55
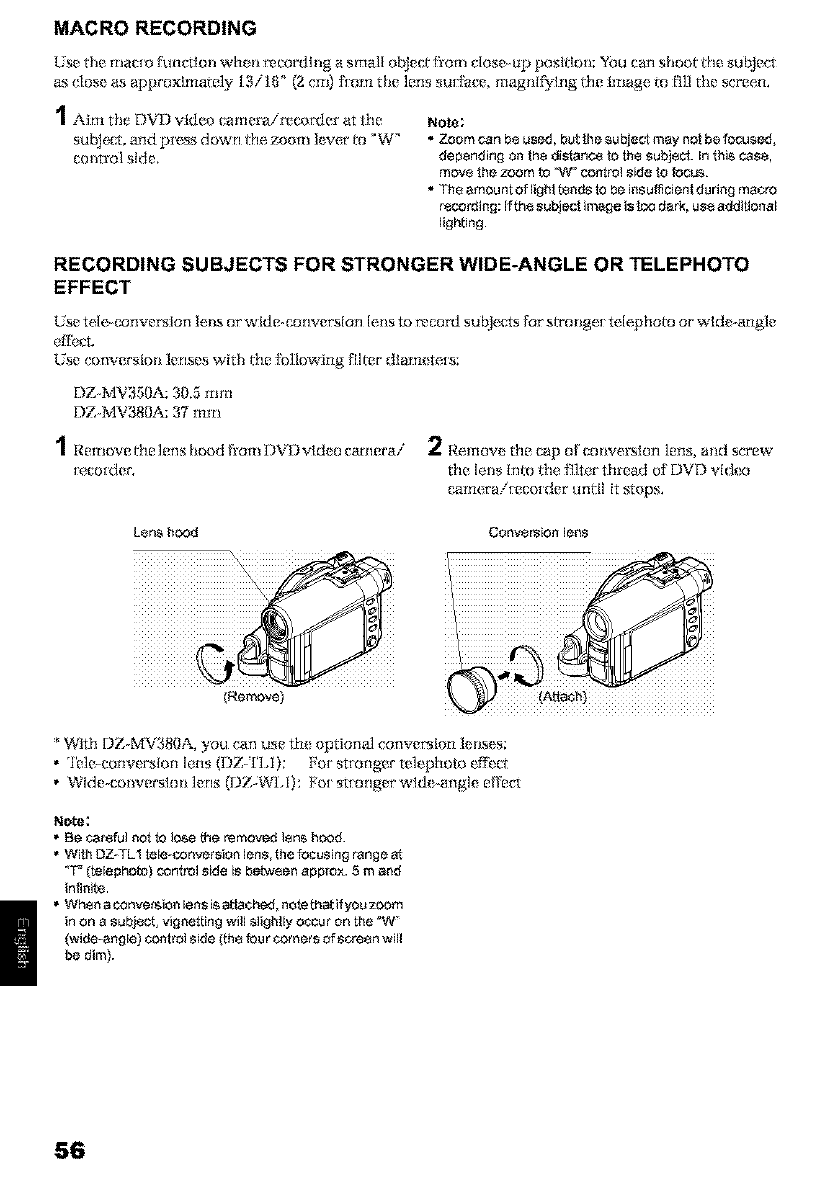
MACRO RECORDING
Use thr_ mac[Ya function wheli r_eordtug a small obJeffi from close up posidoll: You earl shoot dm subjr_ct
as clos_ as approxtmate]y 13/1 _i" (2 cm) flora the lens su_t_ce, magnl_dng l_le image, to R]I the screen.
1Aim the DVD _id_o carrterair_cor_l_r at !|m
su_ect, and pi_ss down _1_ zoom k_e,r to _W"
co_rol side.
Note;
• Zoom can be used, but the subje_ may not be focused,
depending on the dte_anco to the subject. In this case,
move the zoom to _W_ control ffide to tecu$.
•Th÷ amou ct of light toads to be insufficient durteg macro
recordffig: Ifthe subject image is too dark, us8 additional
lighting
RECORDING SUBJECTS FOR STRONGER WIDE-ANGLE OR TELEPHOTO
EFFECT
Use teIe_conver_ion le,[_ or wide conversion Ielis to r_cord su bje,_s Ik_rsffi'oligex te, Iephot o or wld_ _angle
effhcL
Use conversio_l lenses with l}le fl)llowing Rlter diametex s;
DZ-MV350A; 30.5 mm
DZ-MV380A: 37 rum
1Rr_ltlove l |le ]ens hood []'oltl t)V D vld_ o garrlerai 2Re,move tim cap o1 cowcerslon lens, altd screw
_e,co_der'. the lens Into lile tlJter thread of DVD vll;kx}
cam(_ai_eco_der until it stops.
Lsr_ hc{:_d ConvePNon lens
(Remove)
* With DZ-MN;380A, y_u can use th_ optional conve_lon ler_ses:
,'lrfl_-eonver'sIon lens (T)Z- ['LI): For stIongr_r telephoto effe(_
,Wlde--coriverslon lens (DZ-WI,I): }_o_stlonger wld_ -angle effect
Note:
• Be _reful not to lose f_e removed tens hood
•With DZ_TL1 te[e_conversten lens, the focusing range
"T_ (telephoto) control side is between approx. 5 m and
in_ffito
• Whe_ a conve_ten lens ise_teched, note that ifyo_ zoom
in on a subject, ffignettffig will slightly OCCUron the _W_
(wide_angle) _ctroI ffide (_h_ teu r _mers of s_'4*e_nwill
be dim).
56
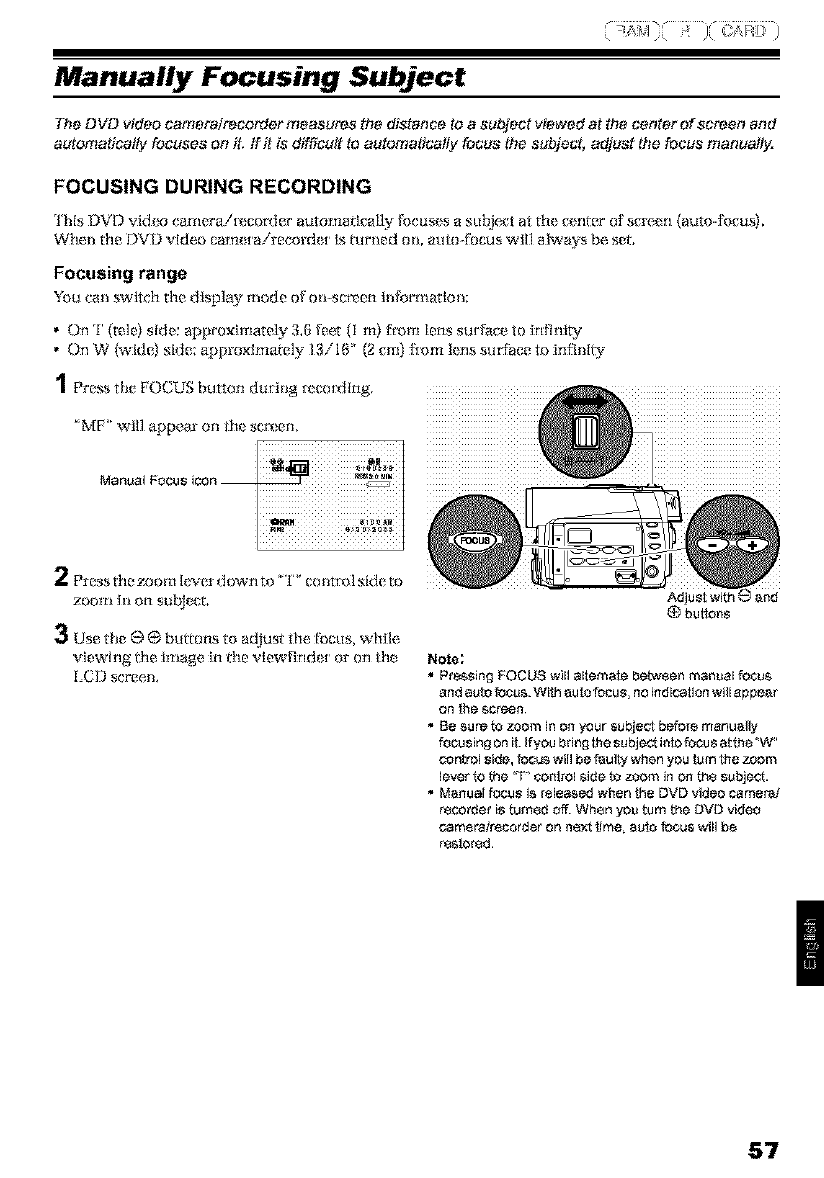
Manually Focusing Subject
The DVD video eamere/feeorder measu_s the distance to a subject viewed at the center ef se_en and
autamatics#y focuses on it, if it is difficuff to automatteall7 focus the subject, adjust the focus manual&:
FOCUSING DURING RECORDING
this DVD vidr_ carnera!{_cor_k_r automatically focuses a subject at the cenmr of scre_ n (auto4i_cusl,
When the DVD _Jde,o cam_ _airecord_ _ is _[irlled oil auto 4"ocus wIH always be ,set.
Focusing range
YOU ¢ali switch the display ]tlode o1 o ii=scl_?,en Ill for'r_l_tlo ii;
"On rl'(tele) side: approKimately 3.6 feet I m) from lens surt_ge to in}tnl W
• On W (wldel side: approximately 13/16' (2_ln) t_ru kns surface to infinity
1Pre_ the POCUS button din:big t_ cording.
"MF' wii] appear on th_ sc_ en,
Manual FOCIJSiCOn --
2Press ttl£ 7x]om Iever dowrl to _"I'" Collt[_)lside to
zool_l hi On subj_.
3Use the 0 0 buttons to adjust the Ibcus, while
_Jewhlg ltl_ i]tlage, in lhe viewlhldt [ Oron t}lt
f.CD screen.
Note:
•Pressing FOCUS will alternate between manual focus
and auto focu& With auto focu_ no indication will appear
on _e screen¸
• E_esure to zoom in on your _ubject before manual_
focusing on it. Ifyou bring the subjec_into focus _the "W"
control side, focus will be fau_ when you Ium the zoom
lever te f_e _T_control side to zoom in on tho su_e_.
• Manual focu_ is released when the DVD video camera/
roe.order i_ temod off. When you turn the DVD video
camsra]r_corder on n_ _Jme_auto focu_ will be
restored.
57
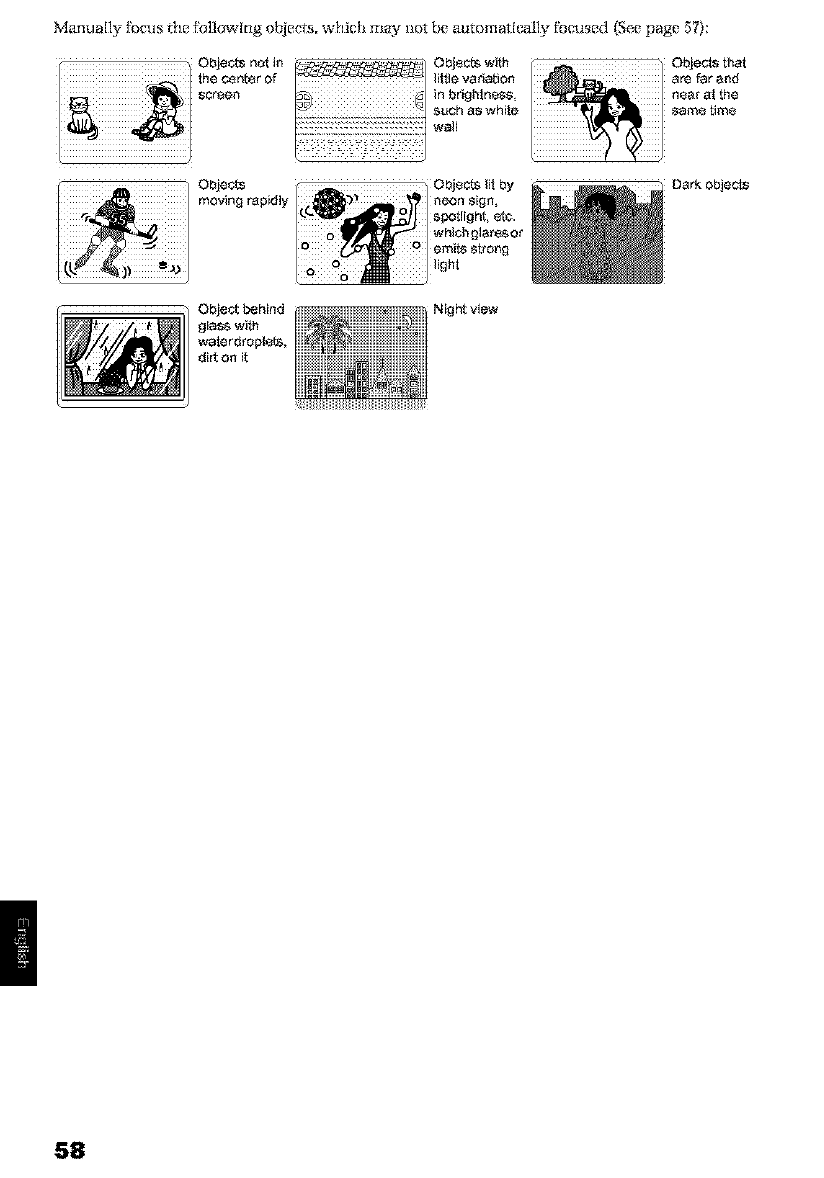
ManuaIly [i}gus tile fk?]l_lwlng oblect:s, which may 1mr be automatically Fclcused (,See page 57):
Objects
moving rapidly
ONect¢, with
little variation
_,uch a_ while
wall
I_l _Otli{jp4,')_ rleo_ _ig_,8,g%
£ o emits strong
Dark objects
ObjeSt behind
glass with
water droplsts,
dirt on it
Night view
58
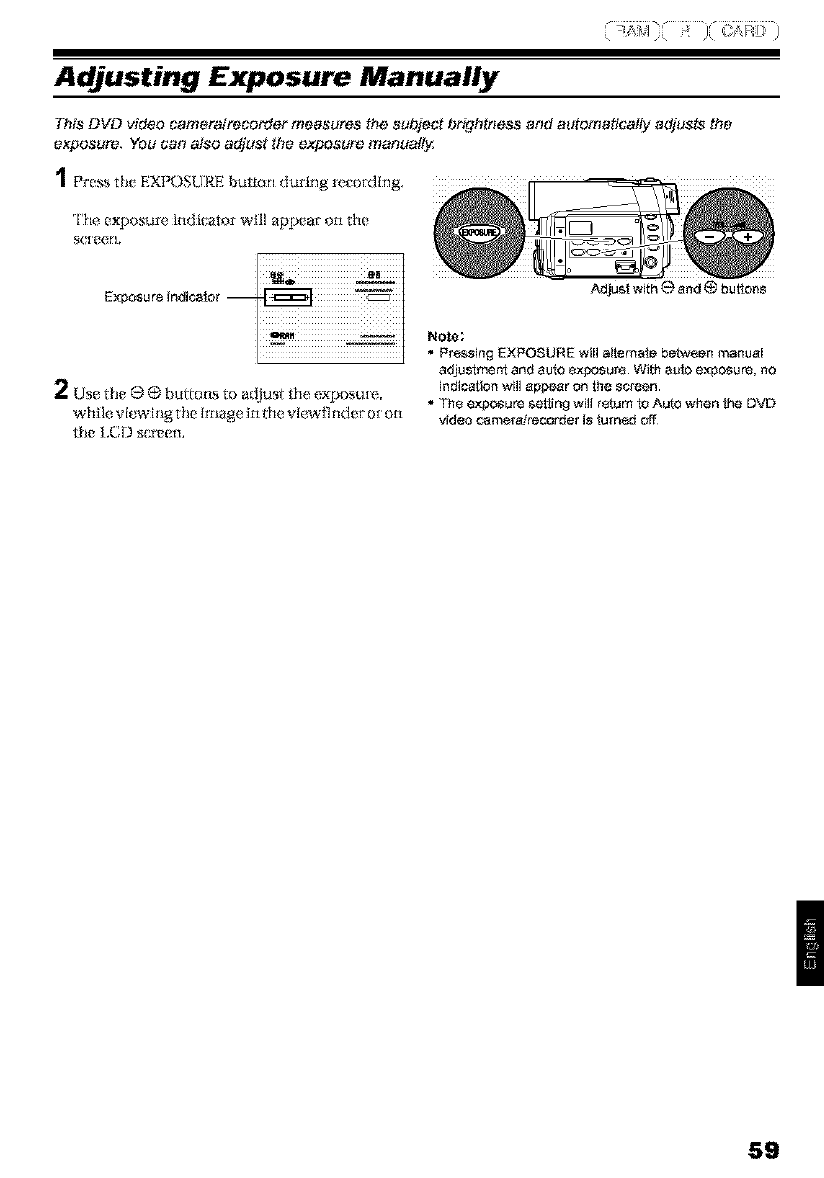
Adjusting Exposure Manually
This DVD video samere/recv3rder measures the subject brightness and automatically adjusts the
exposure. YOUcan also adjust the exposure manually.
5g
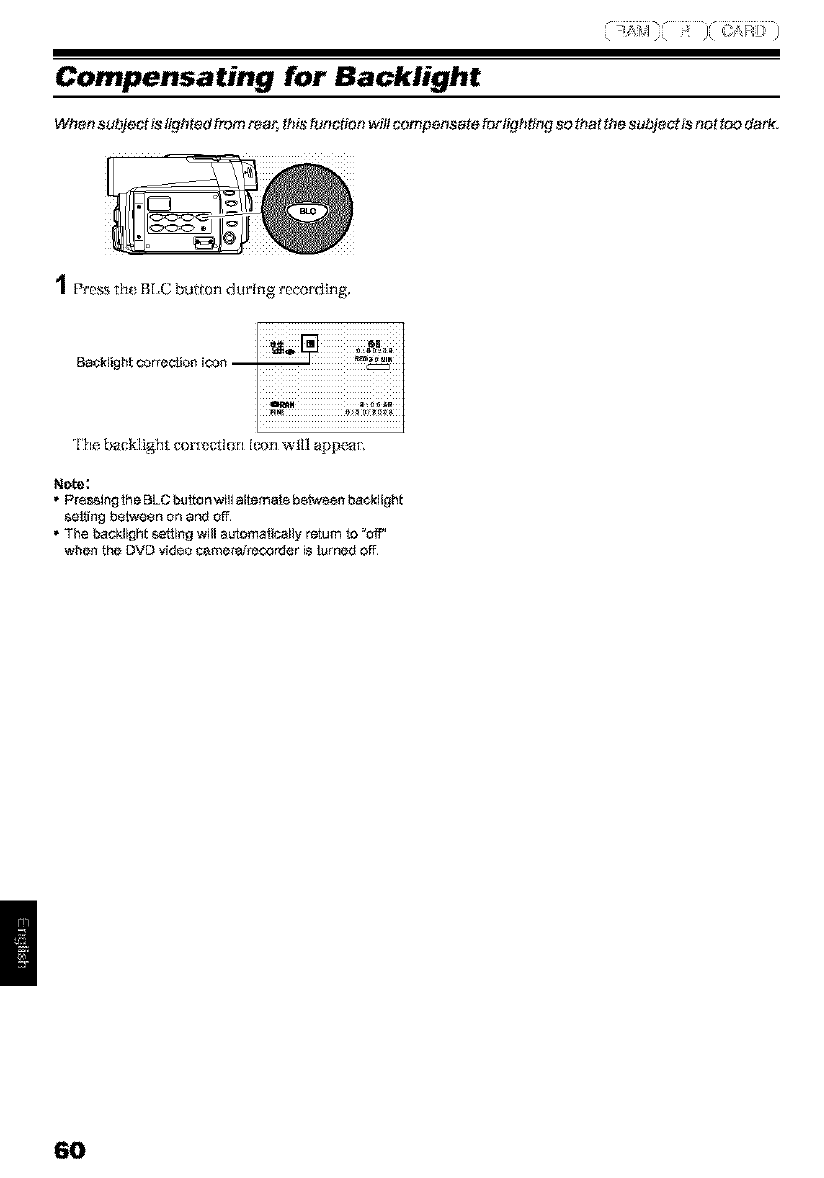
Compensating for Backlight
When subject is lighted from rear, this function will compensate fur lighting so that tbe subject is not too dark.
1Pre,_s th_ B[,C button during recording.
Backlight correction icon --
The backlight eor_z,ctIon II_m will appear,
Note:
• Pressing_heBLC buttonwillatternatebelween backlight
ge_ng b_twe_n on and off
• The backJightse_in_]willautomaticallyreturnto _off'
when the DVO videocamerafrecorderislumed off
60
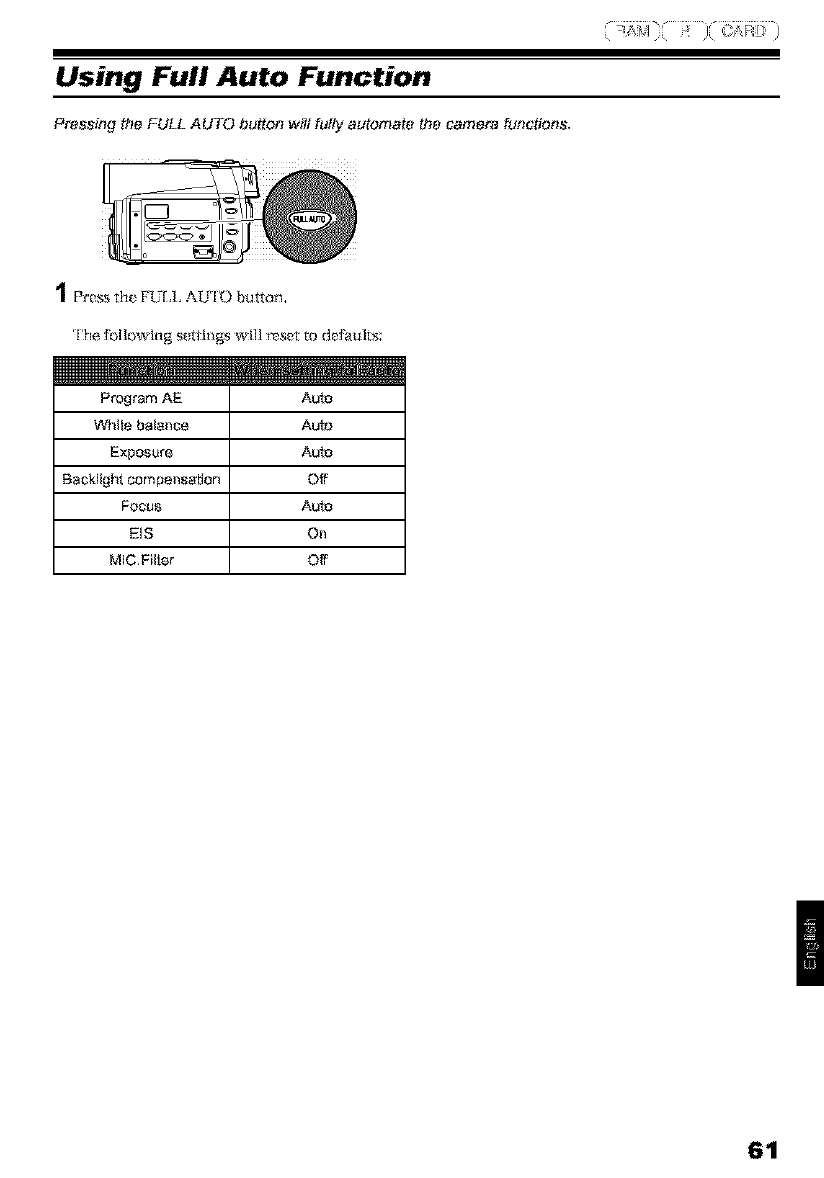
Using Full Auto Function
1Pre,_ the FL-[,]. AU'['© button,
rl'hefl}llowing s*_tl_gs will r_set to defaults:
Program AE
Whffebalance
Exposure
Backbight compensation
Foo_
EIS
MJCFil_er
Auto
Aut_
Auto
Off
Auto
On
Off
61
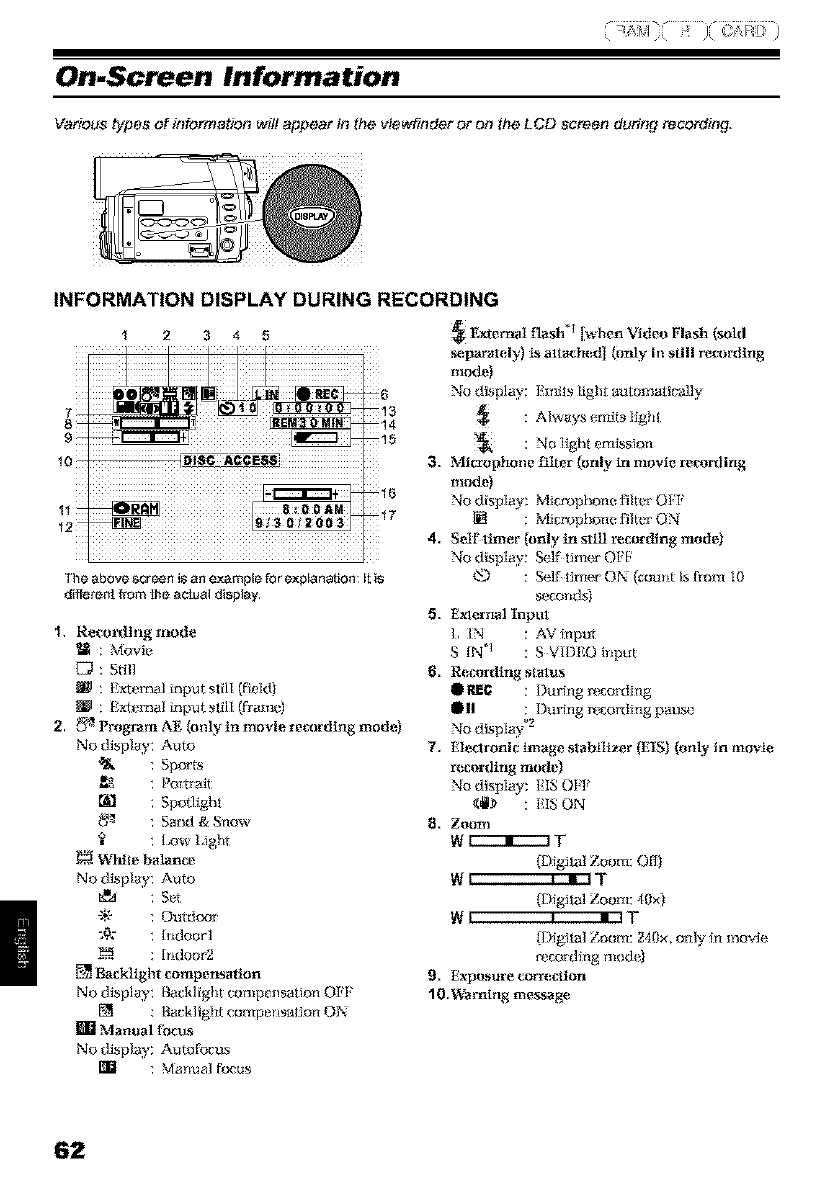
On-Screen Information
Various _ypee of information witt appear in the viewfinder or on the LCD screen during recording.
INFORMATION DISPLAY DURING RECORDING
1234 5
9
_ms¢ ACCESS
iiiiiiiiiiiiiiiiiiiiiiiiiiiiiiiiiiiiiiiiiiiiiiiiiiiiiiiiiii...............................i ii
6
13
14
15
16
17
The above screen is an example for explanation: btis
different from the actual display
1, Re_ordtng mode
O : Movie,
: Sdll
: Extemalinput sIill {fksld)
W : F,×temal input still (fram_)
2. ,'_# Ih_grarll z"_}{(only il! mUVle rt'ayrding nlode)
No display: Auto
: Sporla
• _ :Pov_ air
:Spotlight
_:Sand & Snow
,_ : I_w I,ight
Whim balance
No dbp/ay: Auto
_- : Ou_dooT
;,_ : hLdoorl
:Indoor2
[] Backlight compensation
No display: Backligh { co mpensation OFF
[] : liacklight compensalion ON
Mamlal Ibc_s
No display: Autorocus
[] : Manual f_us
_ Exlm'nal [when Video Flash (sold
flash*I
,_€,para t e,ly) is altached] tunly in still recol'_ling
I%lOd_)
No display: Ei_t_ l_ght automalic_]y
: Always emits lighl
_ : No ]_ght emission
3. Microphone I_lter _nly _ movie re_ing
I%lOd_)
No display: Mi_phon_ ril_t_¸OFF
: Mi_phon_ ril_t_¸ON
4. Self¸timer (only in sliU recording mod_
No display: S_F Iim_ OFF
8t_o_d_
5. External Inpul
I, IN : AVmpu_
S IN _ : S VIDEO inpu_
6. Rec'ardtng sixtus
•Itl[O : During rt_co_ding
OII : During recording pa_
"40 displa_ z
7. Eleclronic image slabilizer _ (only tn m_ie
recording mode)
No display: EIS OFI_
8. Zoom
Wr----'i----m T
_D_ital Zoom: O_
W' ' • 'T
_D_ital Zoom: 40_
W' ' • 'T
_D_iIa/Zoom: _40x, only m mov_
_co_diag c,_ixh_]
_= ExpoS_tl"_ .corregilon
10.Waming message
62
11,13i_]Cmxt lype
ID _a_tl : DVD RAM
O _ : DVD R
_NAN : DVD RAM (_te protected}
: DVDR disc aln;ady flr_]ized on this
DVD video v.amera .'recoT der
_ll DVD R dk_ fk_a]i_/ad on a d_wice
oilier [[_n fllis DVD video camera/
T_:ordL_
•SD menm D, v,a_I or mullim_d ia card
_m Lot;ked SI) memory card
No display _'3
12.Movie rera_rding qtlality (unly when _sing disl:}
XTRA : Highest qua[ily {orf[y when using
DVD RAM d_<)
LPCM : Highest audio qua]Ry (on]y when
using DVDR disc)
FINE : High quail W
STD : S_andard
S|iii rec_'dtng qtlalily (only when using card)
FINE : High qua]iU/
NORM : S_andard
ECO : Number of recoT dable slills is
pfJOl iliT,_d
13,Movte re(x_lxling time (only in movie rera_rdtng
mode)
• * ._4
14,Renaming space on dls_/card
REMXX M]N "5 : Remaining_ecordabhmlinules
duIing movie m_o_rJ inn
REM XX "€_ : Number of remaining
recordatl]e still imagt s during
still r_o_ ding
15.Remalnlng ba/tm_ level
c:n (full v,ha_ge)
:/_: (low _,maining c,harge}
16.Brlghtnes,s]Color de_stty of LC[I s_'reen or
Volume
The volume can be adjusted during t,_xlernal
input and playback,
17. Current da/e/ii me
"1 Not displayed on DZ-MV350A
"2 When no disc or _'_rd is in the OVD video Camer_recorder, or di_,c has not ye_ been ini_alized, a w(_e-pr_d
disc Or locked card, Or a di_¢ Or card with no r_maining spate, ha_ b_÷n inserted.
_3 When a di¢,c Or Card _a{ _nnot b_ used in _h[s DVD video camerahe_rder i¢,in_er_ed
_4 NO r_maining lime or humbler w_ll b_ displayed w_lh aprotected di_¢ or locked Card, ar finalized DVD-R disc.
_5 i_ XTFUk mode, possible recording lime may _e longer than the displayed time.
_6 Th_ di¢,played aumber of recordab[e _ill_ i¢,for reference: The decreasing number may not b_ correct_ depending
on _ecording conditions {not displayed w_lh a DVD_R disc,).
63
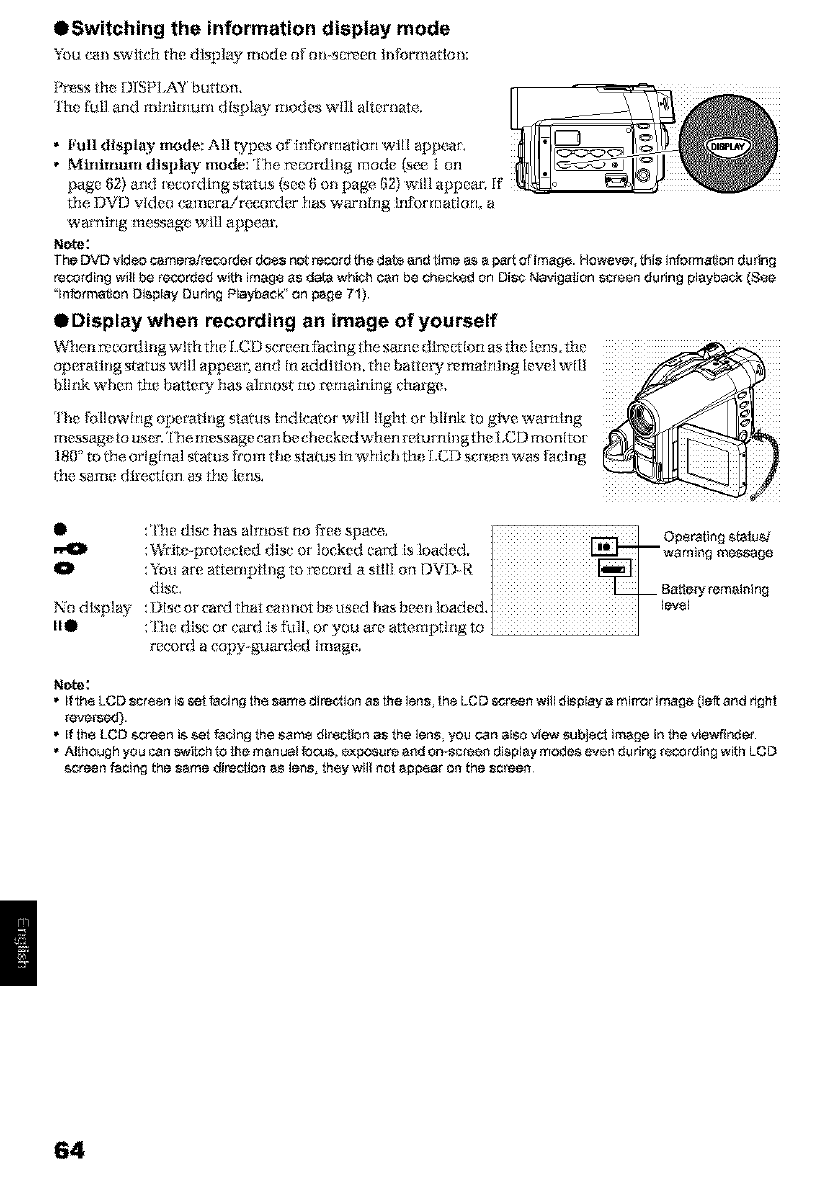
OSwitching the information display mode
YOU cal_ switch the d lspl_y mode o[ ol_-sc_en hl_or_latJol_;
Press th_ DISPLAY bu_mn,
The full and mlnlmum display modes will alter_late.
* Full display mode: All types of inibrmarion will appeal
* Minimum display mode; The r_e.or_lilig mode _ee I on
page 82) and [_co[ding status (se_ _1on page (_2) _;Ill appear. K
the DVD video camera/recorder has war'llirlg irl:l_)rrrlatiorl, a
warnkig messag_ will appean
Note:
The DVD video camer&irecorder does not record _e da_ and time as a part of image. However, this information du ring
recording will be recorded with image as dafa which can be checked on Disc NavigaiJon screen during pla,jback (See
"Information Display During Playback on page 71).
O Display when recording an image of yourself
Whe_ r_cording with the L C l ) screen fa_'lng the s_ne dir_ction as the lens. the
operat fag status _,'iI1 appear; and In addition, the battery r_malni_g level will
I_link when the batfa_ _has almost no r_malning charge.
lhe following operating status Indlcator will light or blink to give warning
]ilessag_, to user.The message can be checked wherl rett!i fling the I,CD ]llonltoÂ
180" to the original status [ro m the status In whid_ th_ l ,CI) s_ en was tit ci_g
dl(_ S_tlII(7 dlre_'tiorl as t}l_ lerl&
• :'Kle disc has almost no free apace.
:Write-prote_'ted disc or locked card is loaded.
O :_u are _mpting to _co_ a still on DVD_R
disc.
No dlsplay :Disc or _ard that _a_ be used has been loaded.
110 :il_e dlsc or card is _1I, or you are _mpting to
record a copwguarded image.
Note:
•if the LCD screen is ,set facing the same direr,lion as the lens_the LC D ,screen will display a mirror image (le_ and right
mver_ed).
• If th_ LCD screen is set facing the same direction as the len_, you can also view subject image in the viewfindet.
• Although you can switch to the manual focus, e;{po_ure and on-_creen display modes even du ring recording with LCD
screen facing the same direction as len_ they wNI not appear on the screen
64
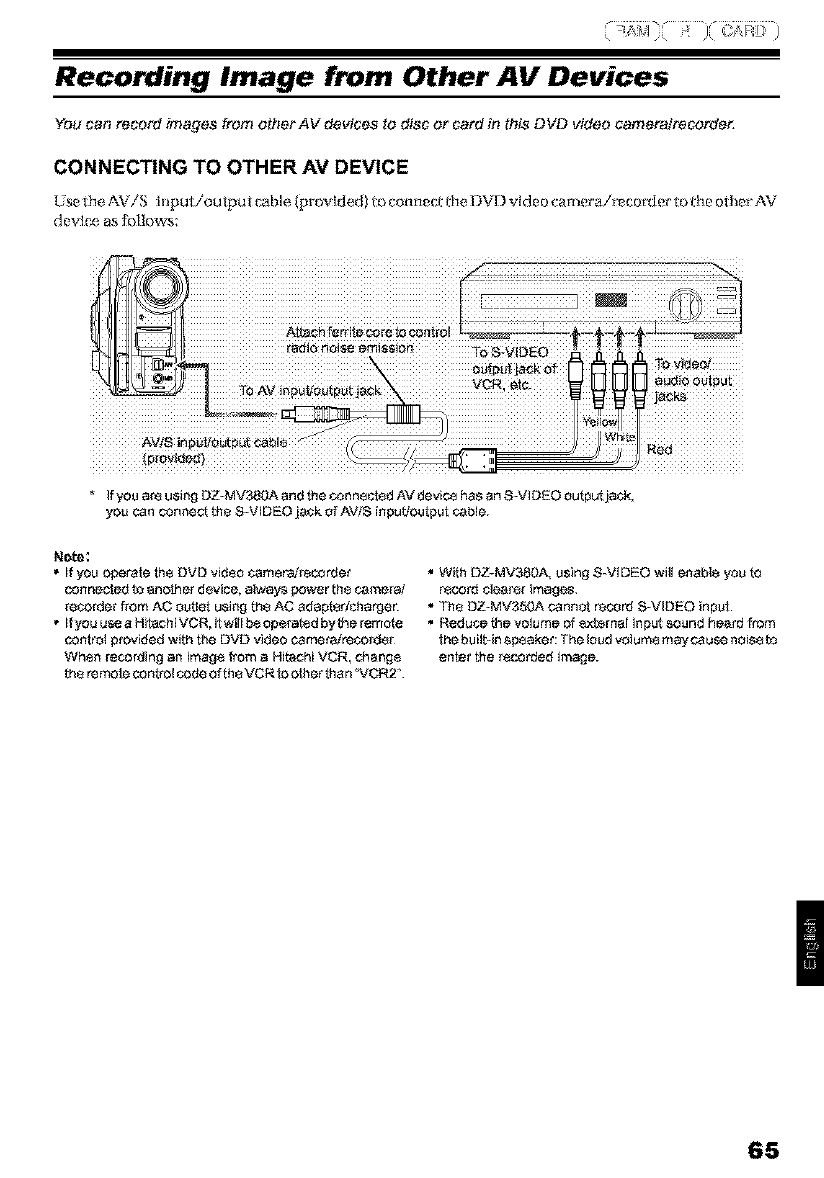
Recording Image from Other AV Devices
YO_can record images _om other AV devices to disc or card it_this DVD video cametalrecorde_
CONNECTING TO OTHER AM DEVICE
Use the AV/S input/oulputc_ble(prov[ded}to_onnec_theT)VDvideocamera/r_corrlertotheotherAV
devle_ as R}llows:
Ifyou are using DZ-MV38OA and the connected AV device has an S-VIDEO output jack,
you can ¢onne_ the S-VIDEO jack of AVtS inputJoutput Cable.
Note:
•if you operate the DVD video cameratrecorder
connected 53 anoiher device, always _i_wer tae Camerat
recorder from AC outlet using the AC adaptar_c'harge_
If you use a Hitachi VCR, it will t_eoperated by _e ramie
control provided with the DVD video camera/recorder
When recording an image from a Hitachi VCR, change
the remote cont.! code oftae VCR to other than _CR2 _.
• With DZ-MV38OA. using S-VIDEO wilt enable you ta
record clearer images
•The DZ-MV350A cann_ record S-VIDEO input
• Reduce t_e volume of ext;ernai inpu_ sound heard from
the buil_in €,peaker: The loud volume may cause noi_e ta
enter the recorded image.
65
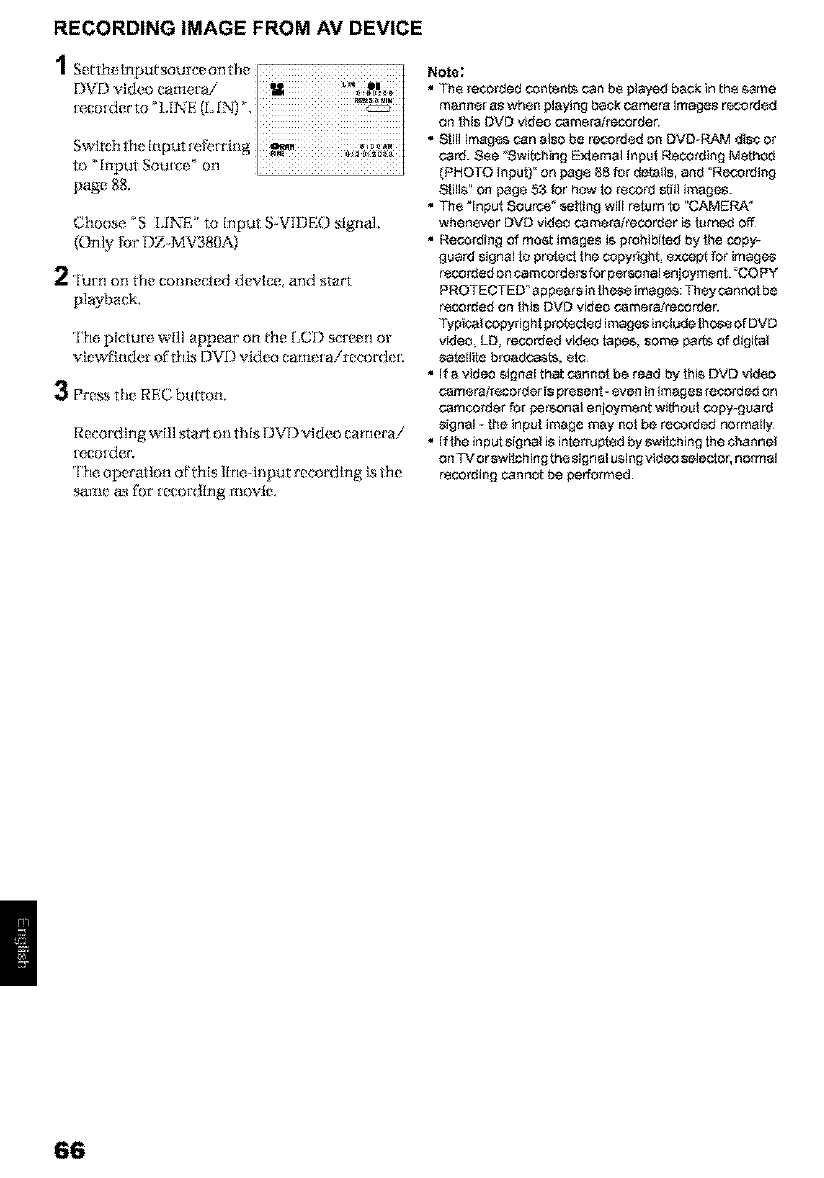
RECORDING IMAGE FROM AV DEVICE
page88.
Choose _S LINE' to Input S-VIDEO signah
(Only for DZ-MV381IA)
2'Iut n on tile cotmected device, and star't
pJaybac_k,
The picture w[]l appear on tile ILCD screen or
viewHnder offills l)VI') video camemirecord_ _1
3[_reKstile REC button.
Rr_cording will stat't on this DVD video cam era/
Iecofdf11L
'l'he operation oF ltlis line-input recording N the
saltle as f'(_r tocot dIrlg ]tlovle,
Note:
•Th_ re_ordedoon_on_,_n b_ playedback in th_ game
manner a_ when pl,3"fin_lba¢i_ e,ame_ image_ r_rd_d
on !l_is DVD video _m_vodrecorde_
• Slill imag_ can also be r_.tord_d on DVD-RAM _tis¢ Or
card. 8_e _wi_hing Ext_ma! Inpot R_ex_rding Mothod
(PHOTO Inpot)" on pag_ 88 for d_l_ils, and _Ft_X:Ordin_l
Still_" on pa0_ 53 for how to r_rd slill imag_.
• Th÷ "Input Sour_" sei_i_l will r_tum to "GAMERA"
whenever DVD video _movodrer;_3 rd_ r is fom_d off
•Recording of most image_ i_ prOhibitod by !l_e copy-
_Joard si_lnst fo profit! lh_ cop-fright, euxrSel__r imago*
r_corded o_ ¢,_m_rd_rs forp÷rsona[ _oym_nt."COPY
PROTECTEO _appears in !1_ ima_l_: Th÷ycannof be
r_cord_d On !l_is DVD video _mora]rers_3rd_
Typical COpyright prot_c!_d image_ in_Aud_ !1_ _ DVD
video, LD, recorded video tap_, som_ par_ of digital
sato[l_e broadest*, _to
•If avideo _igna[ that cann_ b_ r_ad by ihi_ DVD video
_4_m_radr_cord_r i$ pr_rd - _v_n in im,3g_ r_v,;3rd_d On
camcord_r for !_r_onal enjoyment wif_ou! copy-guard
_i_lnaI - lh_ impot im_g_ m,3"f _ot b_ r_cordod normally
•Ifthe input _i_lnal is intorruptod by swifohin_l the vA_ann_l
on TV or swifohin_l_h_ _i_lnal u_,ing vid_ s_l_or, normal
r_cording cannot b_ p_rformed
66

Playing Back
IMMEDIATELY CHECKING RECORDED SCENE
YOU ca_ ch_ l_k _OUr [(_lx)td[tlg irKl_edIat_ ly oll the SpQt,
lql! up/down and to left,'
right to setaet_ and then
press _*/I! to designat)_.
1 [_rr_,% I_/ll butt orl in the ['c,co[!] ing i)a use slatu&
rII}leDVD video caunerai[_coixter wltl ente[ 141e
playback mode, and ¢le scene you have
_eco_ded last will be played back.
When p]ayback is _]ttished, the DVD video
came,[ aimcorde[ will enter l_e, pause status at
the last image on disc.
[f¢leplayback pausesmtuscontinues f'uras long
as 5 mlnutes_ tho [)VD video came[a!recorder
willautomarlcally return to file rxcording paus_
status.
Note;
•If the LCD monitor ks open during pta,yback of movie,
playbacksound will pe heard from the speake_ Adjust the
sound votam_ using the volume cont_l buttor_ (O, _)).
• TOtompe_rily stop playback, press the I_fll butch.
Press the _/II button again to restart playback.
• Even t/you stop playback midway and immedi_ely start
reco_ing ,3gain, the new image ,MII be recorded after the
last s{_eneon dk_c or card (the previou_ images will not be
overwdttan)
• Depending on the amount of data to pe plaped back, it
may take some tim8 for the playback image to appear¸
• DO not operate the power switoh or remove the card while
the ACCCSS/PC or CARD ACCESS indicator i_ kitor
blinking: Doing so may damage the card Orth_ data on
card.
Notes when playing back stifle on card:
•This DVD video camer_Yrecorder can play back image
data recorded on SO memory card in other digkel
cameras ¢ontorming to the DCF (Design rata tot Camera
File system) standard. The range of image data normally
ptayabta on this DVD video camera/recorder ksthat with
pixels from 80 perizonta! × 00 vertical to 4000 horizontal
×3000 vertical If the pi×stdata is outside this range, bta_
thumbnails wi, appear (thumbnails _ in th_ figure),
meanin_ the ima0e ks unptayable.
2Pr (_._sthe _ button.
Playback will stop m_d rx cordlng paus_ status
wlll be rx stored. Fig I
• Even when the number of pixeis kswithin the above
range, playback may n_ be pessiNe, depending on the
recording st_us _ the digkel cam_s used.
• When playing bad< a s_ll, _Playback." will appea_ Stills
with a targe number of pixel_ will take _ome time to
appea_
67
PLAYBACK FROM START OF DISC OR CARD
Use _e go 'lb _n_ion _ 7(1)or D_c Navlg_on
l_mXion (T_951m play ha ck f_m l_lesta_ of disc oe
card,
SEARCH PLAYBACKOFMOVIE
During playback, till thejoystlck to right or'left an d
hold It: Search p]ayback will sta_,
_ ['lit and hold: Sc_mes will he.voisual]y se_nne.d
[b_ward
9?'['fit and hold: Scenes will be _oisuaI]y scanned
hackwa_
Release the joystick when you t]nd the desl[_d
image: Normal playback will stair t if'ore that point.
Note:
• When you skip or search scenes from playback or
playback pause, the screen will be dark brtefly.
• See page 147 if search playback dees n_ operate
normall_
FRAME ADVANCE/FRAME BACK/SLOW PLAYBACK OF MOVIE
During p]ayback pause, tilt the joy, tick: Framr_
advance, frame hack or slow playback will sta_.
['fit once : PkXur_ w|]l advance one frame.
9_Tilt onc_ : Picture will go back one frame,
['fit and hold : Fo_mrd slow playback
_Tilt and hold : Reverse slow playback
A_et Ir'mne advaxace, tl'am e back or slow playback.
ltle. DVI) video camerait_ cot_ter will _tit( [ t}l_
playback pause status.
Note:
•in forward slow, a rapidly moving subject image may be
distorted
• Th÷ intervals for playing back frames in frame advancer
frame bad-Jslow playback are as follows:
Frame advance and forward _tew: Approx. 0.03 second
Frame back and reveps¢ _low: Approx. 05 seCOnd
• NO _ound will ba heard during ssar_h playback or slow
playback¸
68
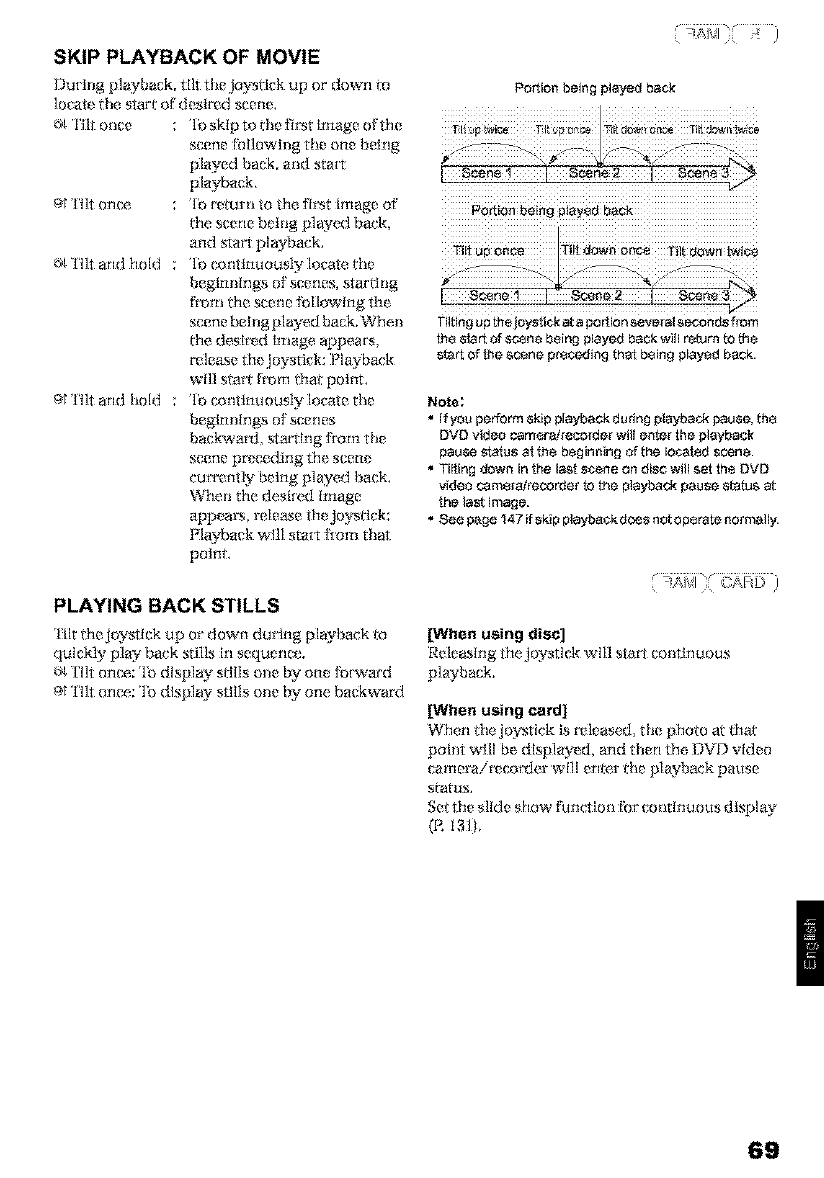
SKIP PLAYBACK OF MOVIE
I?u[llig playback, till the joystick up or down to
Ire'ate the start of desired scene.
N 'l lit once : 'lb skip to the fi_t Imatge of the
scene Nllowing the one being
played back. and start
playback.
_1 ['fit orm_ : 'lb return to the fl_t image of
tim scene being played back,
and start playback.
N'['l]tarldhokt :'lbc_ntinuouslylo_aethe
beginnings of scerms, starting
l_ln Cm scene bllowlng the
scene belng played back. When
era, deslr_d Imatge appears.
release the joystick: Playback
wI]l sta_ from ltla point,
_1 ['l]tarldhold ;'lbcontlntlouslylocat_the
b_ginnlngs of Eerms
backwa_, atart Lngfrom the
scene prz, cr_ding the same
currently being played back.
When the desl[¢d Image
appears, release/he joystick:
Playback will start flora that
point,
Portionbeing playedback
V
Tilt ur__n_ Tiff dOwn on_ T_Itdown twice
Tilting up the joyatick at a portion several_,econds #am
the start of sc_ne being played beck will return to the
start of the scene preceding that being plaYed back.
Note;
• If you perform skip pla!fback dudng playback pause, the
DVD video cam_r,3!recerder will enter the playback
pause status at_he beginning of the located sc_ne.
• Tilting down in the lasl _cene on disc will set th÷ DVD
video camerai_corder _ the playbad_ pause status at
lhe laat image.
• See page 147 if skip playback dces not operate normall'_
PLAYING BACK STILLS
Tilt thejo_flck up or down during playback m
quickly play back stills in sequence.
Tilt orm_: 'lb display stills one by one brwar'd
_1 TI]t orm_: 'lb display slflls one by one backward
[When using disc]
Releasing thejo_tlck will stztrt cmitlnuous
playback.
[When using card]
When tim joysrtck is released, the photo at fllat
point will be displayed, and then the lilV F) video
cameraime, orfler will em_,r the playback pause
status.
Set the slide show llmclion lbr cot_tlnuous display
(R I3]1,
69
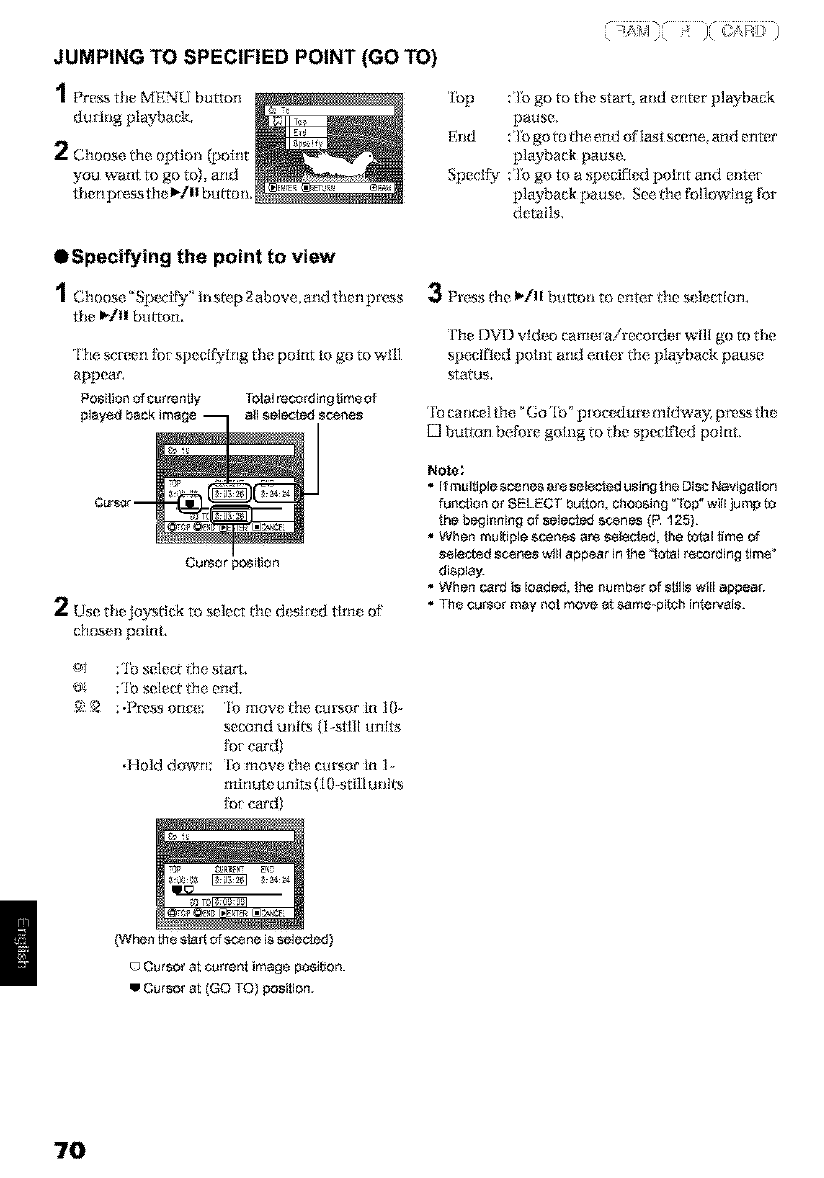
JUMPING TO SPECIFIED POINT (GO TO)
ducing playback.
2Choose the option (point
you want to go to), and
then p[essth_ I_111bu_ton, _Er_a_-T _
OSpecifying the point to view
the I_/II button,
The screen R}_sp{ cif}_ing the poim to go to w111
appear'.
Position of currently Totalrecordingtimeof
playedback image all selected scenes
Cu_orposi_on
2Use thejoystick to select the d* sl_* d tim* of
_losen point,
91 :'lb se]ec:tthe sta*'t,
o. :'lb select ffm end.
_ ; .i_r_ss on_e; 'lb move _le cursor tn lO-
second unl_ {I _1I units
_r card}
•Hold d_xwn: 'lo move 1tm cursor in 1..
rrdnute units (I 0--stillunit:s
fi}_ card}
'[bp :'1_ go to the start, and enter p]ayback
pause,
End :'1_ go to ffm end of last s_ene_ and enter
playback pa_use,
Specff_ :'17_go to a specified point and el_te[
playback pause. See ¢m following for
details,
3Press the I_III buttot_ to enter the s* Rction,
The DVD video came[a/recorder wi]l go to the
specified polt_t and ente, r ltm playback pause
staltls,
'Ib ca nce] dm° Go 'Ib" pmcedu p;,midway? press th(
button before going to the specified point,
Note;
•if multiple scenes are selected using the Disc Navigation
run.ion or SELECT button, choosing _Top" wiil jump to
lhe beginning of selected scenes {R 125).
•When multiple scene_ are ssieofed, the tof_al{Jme of
ssledoed scenes will appear in {he "I_al recording time"
diegla_
•When card is loaded, the number of stills will appea_
•Th_ cursor may no! move at same_pi_cb intervals.
{Whenthe sfartof ,_,cene is selected}
o Cursor at current image posibon.
w Cursor at {GO TO) position.
70
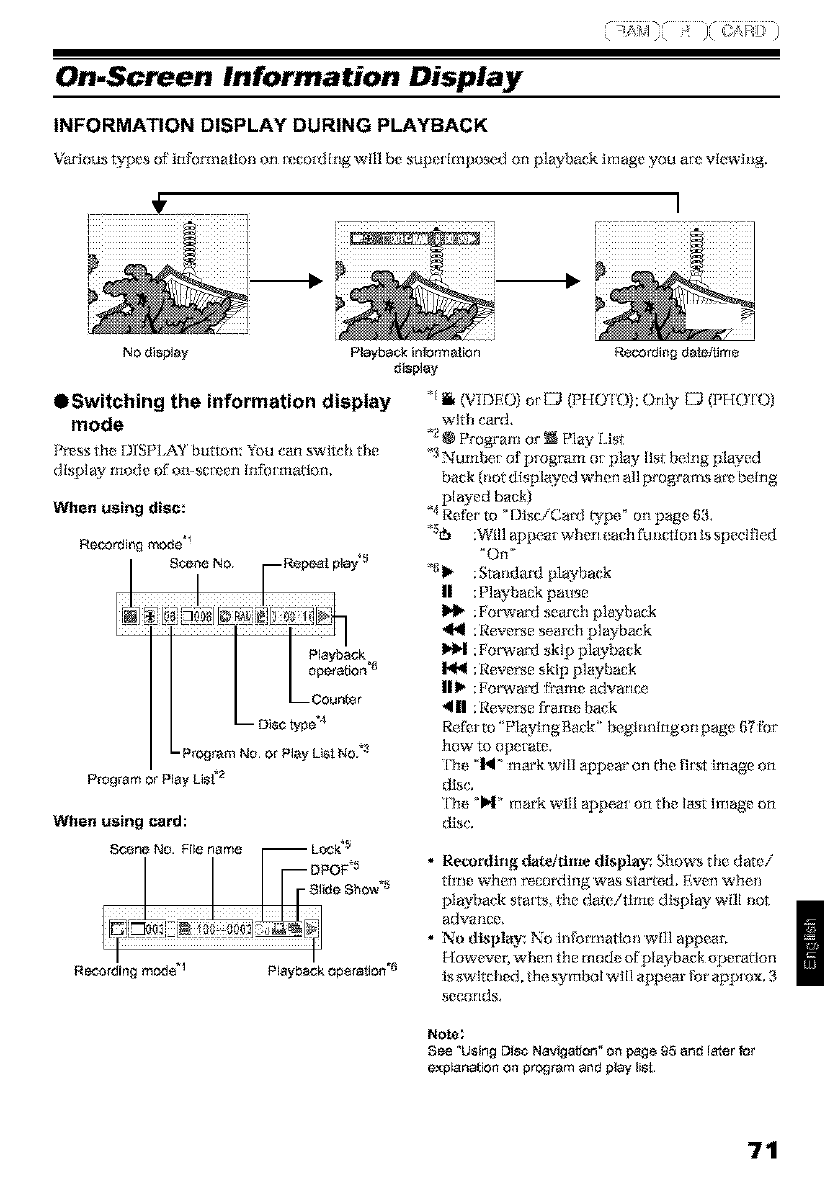
On-Screen Information Display
INFORMATION DISPLAY DURING PLAYBACK
VaPious types of i_lforr_l;_Hol_on 1_cording w{]| be sup_[k_lposed on p];_yback image you a[_ Vk:,wh_g,
NO disNay Playback information Rec_rding dafeNme
display
ttSwitching the information display
mode
Press th* D[SPI,AY button: You cam switch the
display triode of oIl-sc[_!erl ln_[:rtlation,
When using disc:
,b
Record ng mode
Scene NO. Repeat play%
/ L;:::::'
L Disc type.4
L program NO or Play LiatNO. .3
Program or PlayList"2
When using card:
S_ne NO.Fle name LOCk%
l j io ,
Slide Show.5
Recording mod,_.1 Playback OpSraton
*1_ (VIDEO) o_{2_ (PHUI'O): Only {_ (PHOTOI
with ¢'ax'd,
*2 Program or' _ P]ay f:ist
_3Numhe[ o['p[ogram o[ play Hst belng played
back {not d_splayed when all programs a_ being
played back)
4Refbr to _DiSc/Card _ype _ on page &3.
"5_ ;Will appea_ when _ach fb nctlon Is specified
'Ol 1 '
*_1_ :Standa_ playback
II :P]ayhack pause
;l:or_ard search playback
:Rever_e search pJayback
:Porwa_ skip playback
;Rever_e skip playback
II1_ :Porwa_ &ame advane_
_111 ;Rever3e ff'ame ]tack
Red'erto' PlaylngBa_k ' beghmlngon page I;7 Ibr
how to opet are,
The _'1_1"mar'k will appear on fl_e fhat image on
dlsc.
The _,l' mark will appear on the last image on
disc.
• Recording date/time display: Shows the dare/
thne when recording was ata_'l_d. F.yen when
playback starts, ff_e da_e!tlme display will lint
advmme.
• No dtNflay: No lnforrnatlon will appear.
However'. when the mode of playback operation
is switched, the. symbol will appear for approx. 3
seconds.
Note;
See "Using Disc Navigalon" o_ page g5 and later for
explanation on program and play liat.
'/1
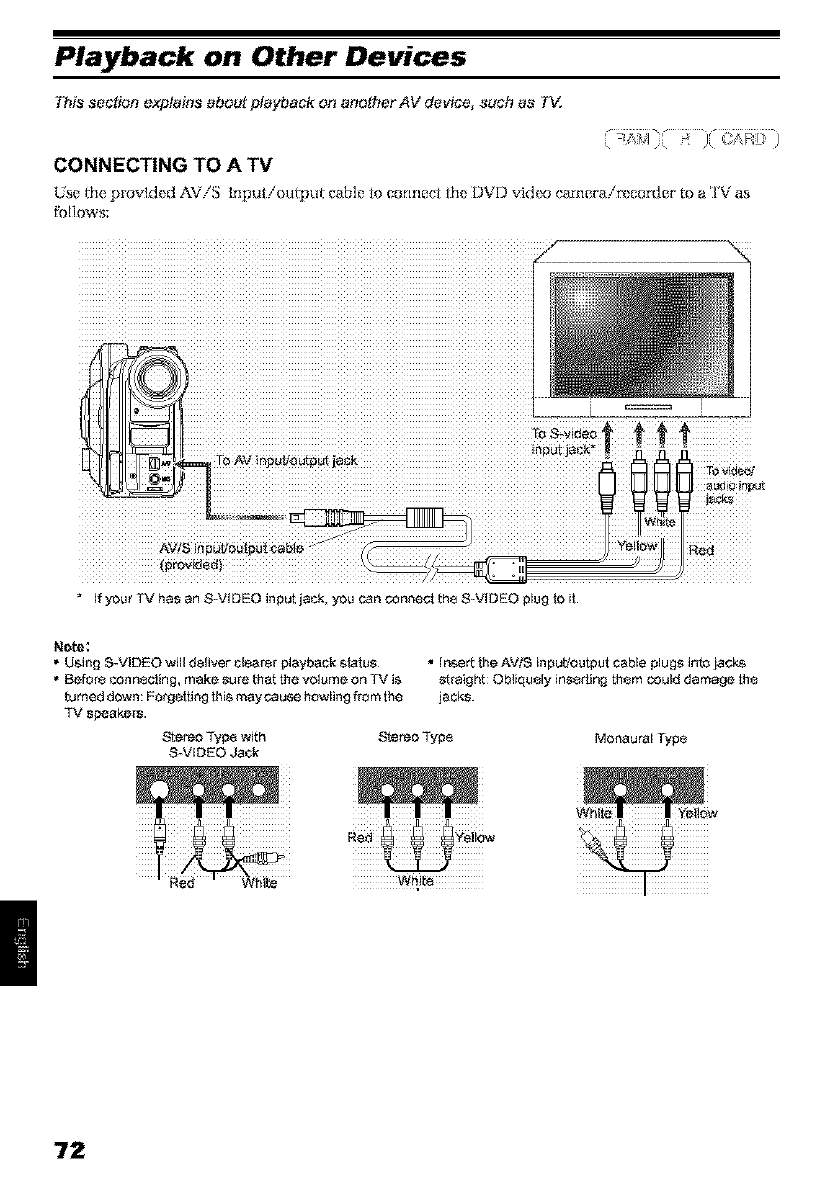
Playback on Other Devices
This section explains about playback on another AV device, such as TV.
CONNECTING TO A TV
Use thepmvlded AViS Input!ompu_ _abJeto connectthe l)_'f) vidi.N_¢'a_'_le_'a!r_,cor_lc_'to a 'iV as
follows:
If your TV has an S-VIDEO input jack, you can connect t;he S-VIDEO plug to it.
Note;
• Using S-VIDEO will deliver clearer playback s_atus
• Before connecting, make sure _ha_the volume on TV is
_umed down: Forgetting _is may cause howling from the
TV sFeakers.
•In_ert the AVtS input,toutput cable plugs into jacks
straighb Obliquely inserting them could damage the
jacks.
StereoType with
S-VIDEO Jack Stereo Type Monaural Typ8
zzzzzzzW_i_zzz zzzzz
72
VIEWING ON TV SCREEN
'VCR '_whichever appUcabk? Video Input,
Re[hr to thr_ 'Nv_hisFuctlon manual _i_rhow to
switch the TV hiput.
2'lucn the DVD video cmnera!recorder on.
'l'he Image {}larthe DVD video camerai_ ecorder
Is seeing wt]l appear on {he TV screen.
'{c_u carl atlso monitor the lrnagr_ o_ Jm LCD
screen otview[]haler of the DVD video camcrai
[oco[d(?r,
3[,,_,r,_, playback, tecot dlng or *>dlting.
You can pe_ [orm playback, edl*I ng or ed Iting on
Disc Navigation whl]* ch* eking on 'I5_ sere* n.
Note;
• AdjuN the volum8 of _)und on TV
• Th_ irff_r_dromol_ Controlisus_fulwh_ operatingthe
DVD video _msrak_*rsorderwhileviewfn_lan im_ On
TV$cr_n However, ifyou us_ _ Hi_ChiVCFI,_her_m01_
controlmay inadvarlonltyope_,_ theVCR ifitisn_a_th_
DVD vide) _amer_reoord_r TO preventthi_,_I the
r_mol_ cont_lCoda oflh_VGR to a p_itionolherthan
• Irfformatio_that_h_ DVD videoCam_r_#_rsord_ i_
_r_rding willappear On _h_ TV _,creen:YO_ e,an also
displayonlypar__ informalionor swish off_he display.
Refor Io _ettingOn-Scroen DisplayOulp_l On or Off
(OSD Output)_on page 90, a_d pr_ th_ DISPLAY
buIlo_to *wilchth_ displaystatus.
•When copy-g_a_d_l discisplay_lback, no image will
app_a_ on TV screen.
•ifyou usa TV with_da mod_ (aspa_ ratio_6:9}and sot
theTV toth_ wid_ mode, th_ _iro DiSCNavigation
displaymay not b_ displayedon the TV _or_en. Iflhi_
happ_n_, releasethewid_ mod_ settingon TV {_ealh_
TV ir_Iructionmanual forr_le_ing th_wide mode).
73
, )
PLAYBACK ON DVD PLAYER
You _axap]ay back RnaLi_d DVD--R discs on DVD ptaye_ or oi_mr decides _hat conf'om_ _o 8 _r_lI)VD-R
disc, However; DVD-R discs may not be usable on all fflose devices,
1Plnallze a recorrled DVD--R disc. 3Insert the disc Into the DVD player and play it
Yuu _leed to [[na[tze adIscto p]ayIt back on DV D
player: See page 129,
No tur¢ler da_a cain be record_ d on t)nallz_d
disc,
Note;
Use this DVD video camsra!recorder to finalize the
DVD_R disc recorded on the DVD vidso cameraY
rscorder.
2Remove the disc f_'orn Round DVD Holder;
back,
See the h_wucdon manual for DVD player;
Note:
DVD_R discs recoffJed on this DVD video 8amera,_recorder
can be played back on Other DVD players, but playback on
all DVD Nayers is nOt guaranteed
Playback may not b8 possible on some DVD Nayers, or it
may depsnd on the recorded status of DVD_R discs: in
SUCh cases, play back the DVD-R disc on this OVO video
camera]recordsr
See _Removlng and Replaoh_g flora/ill Round
DVf) Ho]der° on page 75,
74
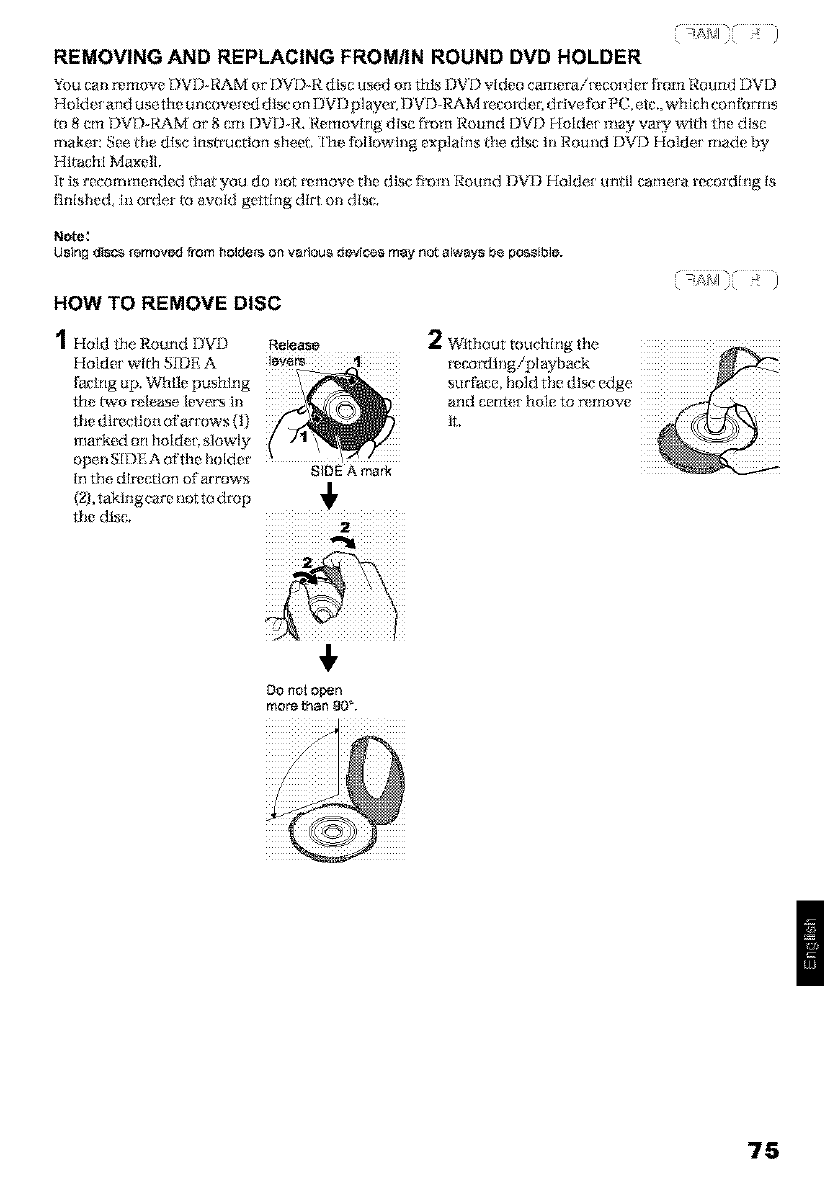
REMOVING AND REPLACING FROM/IN ROUND DVD HOLDER
You cmi r_move DVD- RAM or' DVD-R disc used on this DVD video camerai[_co[_ier from Round i)VD
Holde[ and use the u +mo'¢e+_d disc on I)VD plKge5 DVD+RAM record er; drive %r PC+ etc,, which conti+rms
Io 8 cm DVD+Pd_M or 8 atl DVD+R, Removing disc from Round DVD Holde+ may va W widl the disc
maker: See the disc insl_'ucdon sheet. '['he tbilowing exp]ains the disc in Round DVD Ho]de_ made by
Hitachi MaxelL
k is recommended tha you do not r_move the disc [}l)ltl Round DVD Ho]de_ until came[a recording Is
RnIshed+ hi order m avoid getting dirt oil disc,
Note:
Using discs removed fTom holders on vadous devices may not always be po_ib]e.
HOW TO REMOVE DISC
d
/Hold the Round DVD
f [olde+ with S_DE A
facing up. While pushing
the two r_lease levers ill
tile direction of at'rows (1)
marked on holdeq slowty
open SfDEA of the holder
In the dlr_ctlon of at'rows
(2),takingcare ilotto drop
tile disc.
Release
SIDE A mark
+
2Without touching the
r_cor_ihlg!playback
surNce, hokt the disc edge
arid cent_ t hole to rx move
it,
DO not open
more t;han gO°.
75
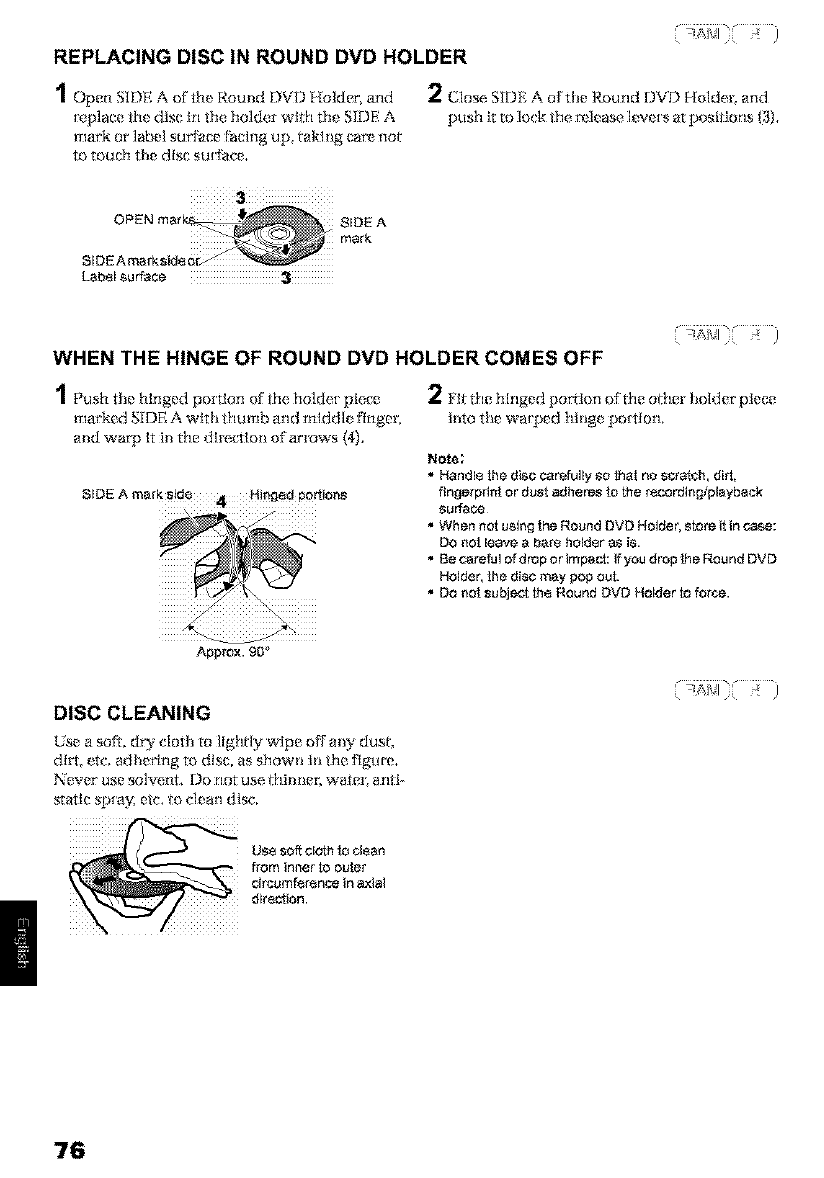
.... _1 t3
|
"!6
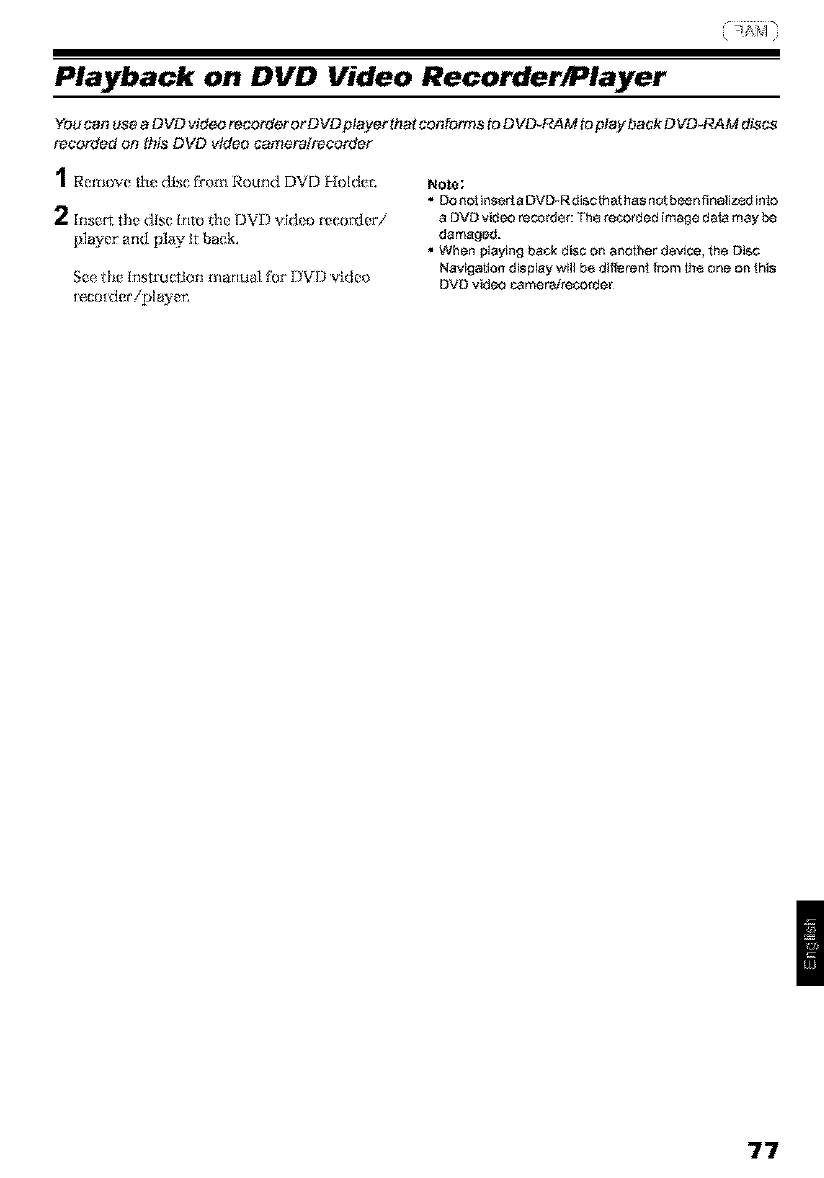
Playback on DVD Video Recorder/Player
Youcan use aD VD vid¢._ t_earder or DVD player that conforms to DVD-RA M to play back D VD_RAM discs
recorded on this DVD video eameratrecarder
1R(_move th_ disc f_'orn Round DVD Hoider;
2[nS_F[ th_ disc Into the DVD vld_o mcor_k:,ri
player' and play It back.
Sc_ethe instm_lon manual for I)V[3 v'k_eo
_eco_der!player;
Note:
• DO not inser t a DVD-R disct_at has not been finalizsrJ inlo
a OVD video recorder: Th_ recorded image da_amay
damaged.
• When playing back disc o_ another device, the Disc
Navigation display will b8 differen! _'om th_ ane on this
DVD video camera/recorder
77
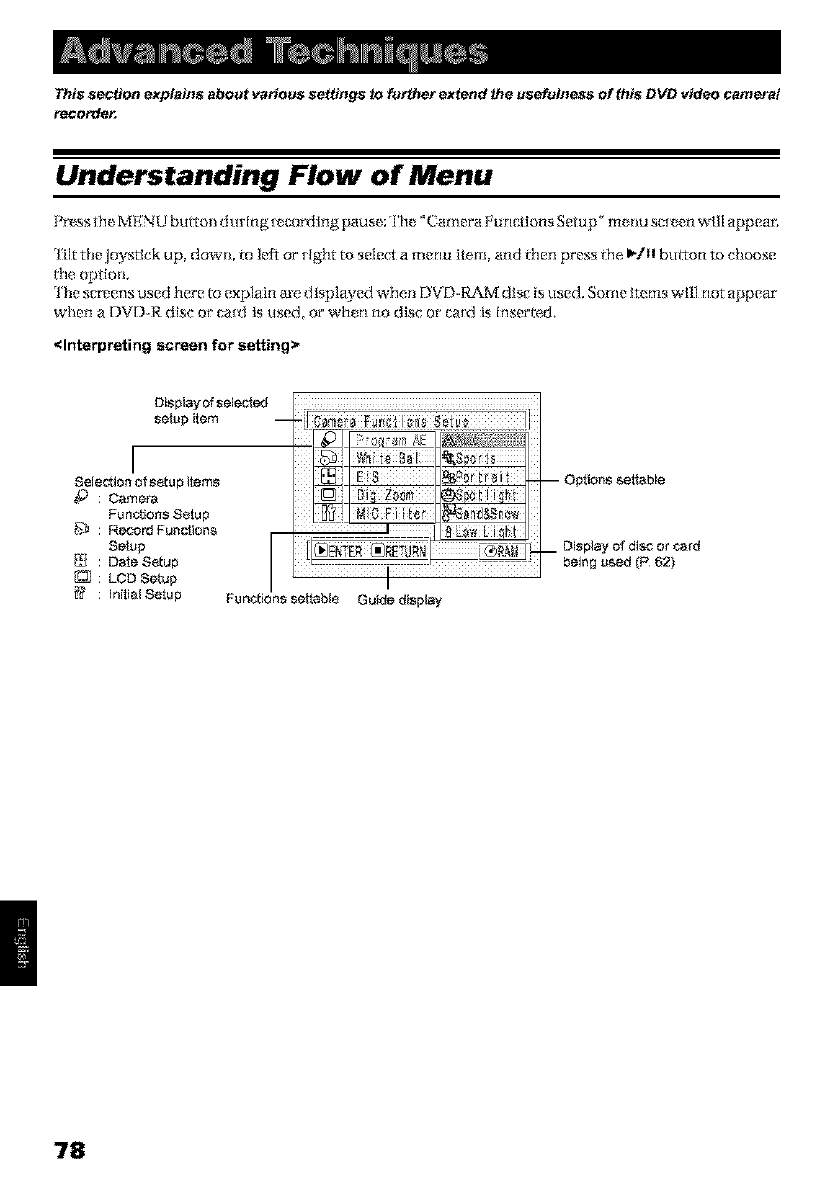
This section explains about various settings th further extend the usefulness of this DVD video camera/
_order.
Understanding Flow of Menu
Prz,ss the MENU bulroli d tiring _ corx]lng pause: rI'he"Cam era Eu nctlons Setup" meliu sc[z, en will appean
Tik the jo_tlck u p, dowll, to left or [lgh£ to select a men u item, and then press the I_tI! breton m choose
gle option.
The s_ens used here _ explain _e displayed when DVD-Pd%M dls_ is used. Sore e i_ms will not appear
when a DVD_R d_c or ca_ as used_ or wh_n no d_c or ca_J as lnser_d.
<Interpreting screen for setting>
Guide display
78
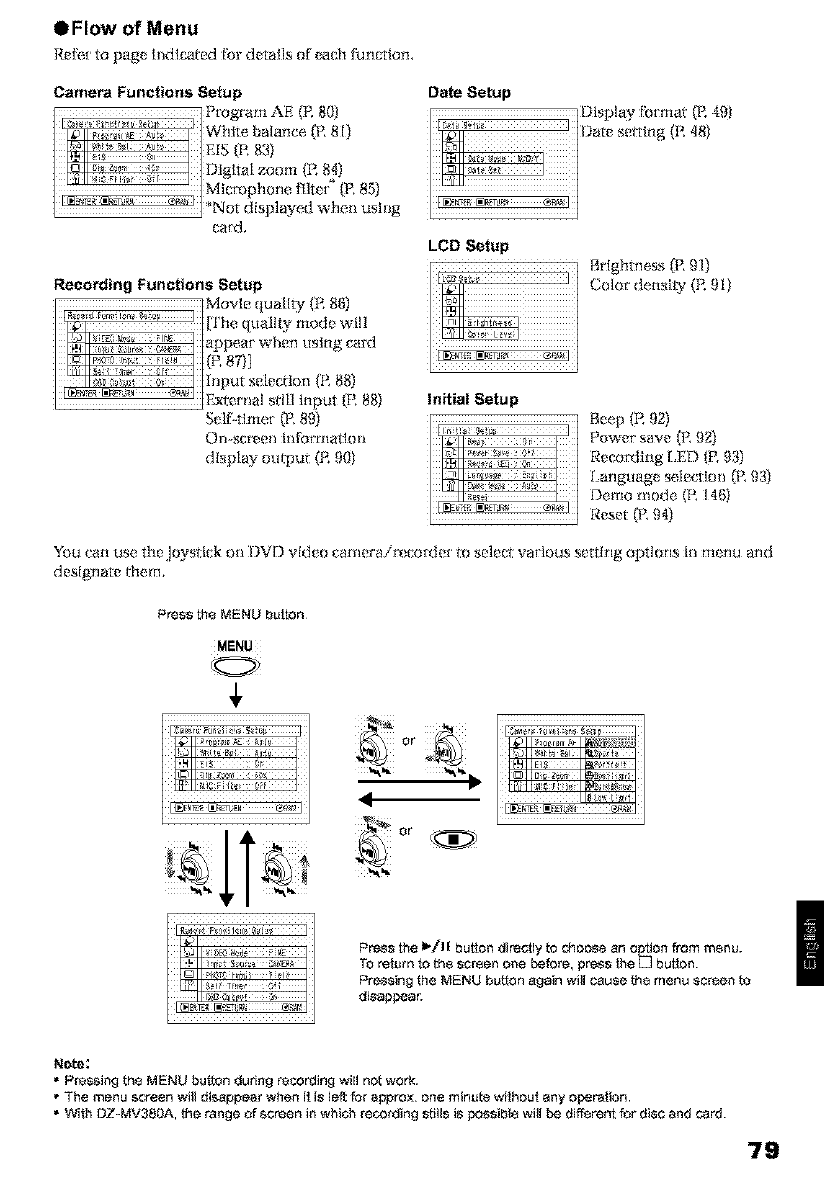
eFIow of Menu
Ref_t to page h_dk_ed f_r details of _ch flJnctttm,
Camera Functions Setup Date Setup
Program AE (P. 80 [DIsplay f_ mat (P. 49)
II te _a ace _, _ j Date s_tdng (R 48)
c _'_ c_ Dlgltal _'sxml R 84
Mmmphone fllte_ (I_ 8a)
card.
LCD Setup
_dghtness _ 91)
Recording Functions Setup IL_s_!i_ I Color denslty (R _I
Initial Setup
Self tlme_ (I_ 89)
() 11-8cf_(?_l hlforr_latlotl
display omt?ut (R 901
Beep tR 92)
Power save [I{ 92)
Recorlllng LED ff_ 93)
Language selection g{ 93)
Demo mode (R I46)
Reset (1_9-4)
You can use the joystick oil DVD video camerair_ corder m seJee_ various setting options hi m_rlu and
designate them,
Pressthe MENU button
MENU
x*,_. x*_, iI
<
Press the I_/11 button directly to choose an o_on from menu.
TO relum to the screen one b_tore, p_s lhe U butch.
Pr_ing the MENU button again will e.au_e l_e menu _creen to
disappean
Note:
•Pressing the MENU button during recording will not work.
• The menu screen will disappea_ when it i_ left for appro×, one minute without any Operation.
•WI_ DZ-MV38gA, t_e _nge of screen inwhich recording stills kspessib!_ will be different for disc and card.
79
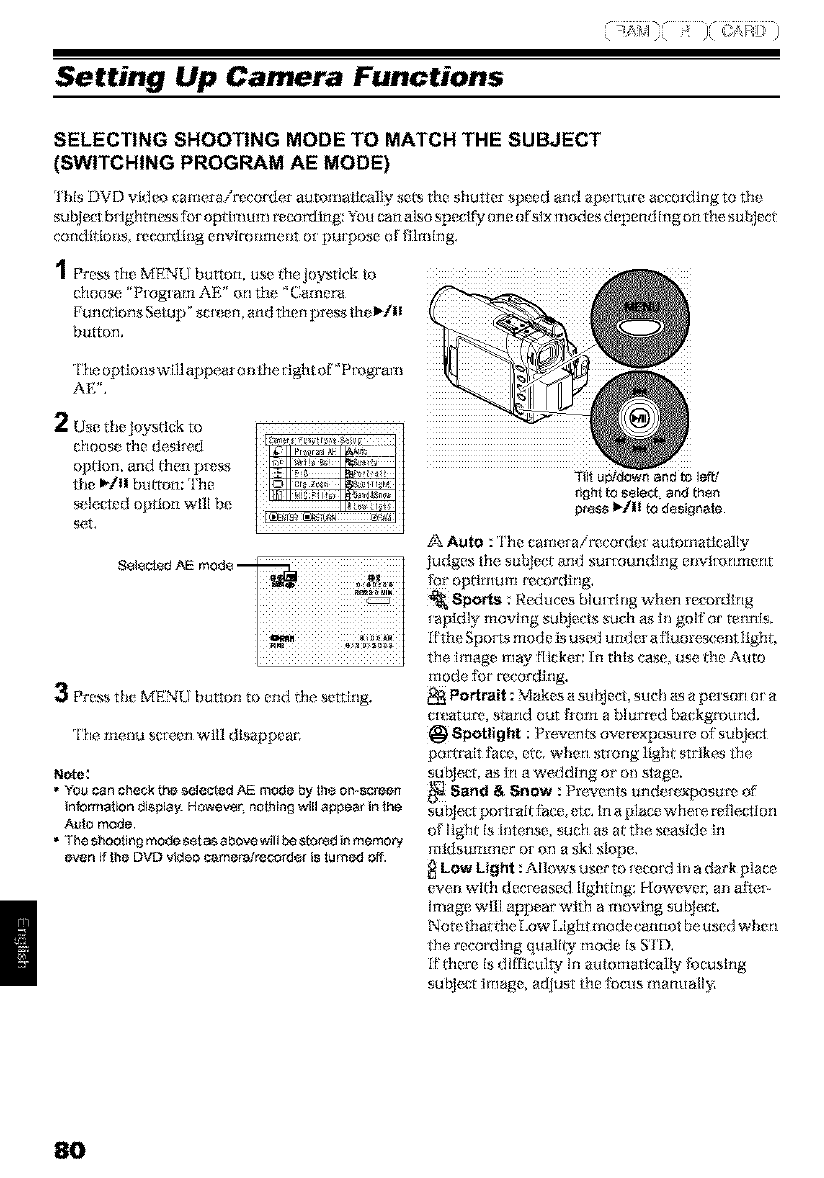
Setting Up Camera Functions
SELECTING SHOOTING MODE TO MATCH THE SUBJECT
(SWITCHING PROGRAM AE MODE)
lhls DVD _+ideo camera/retarder automat]_lly s_ts the shutter speed and aperture according ta the
su_ect bcighmess _r optimum _eo_lng: _u can also specl_ on e ofslx modes depend lng on the subJect
condi£1ons. _co_lng envlrol_m nt o_ ¸purpose of _ilmlng
1Pre_ the MENU button, use the joy,tick to
choose _'PtogI artl AE" orl the "Camera
Pu netions Setup" scr_ en. and then press the I_/11
bu_ton.
rl'heopt ions will appe.ar o n the. right of" Pmgrm n
AE".
2Use the joystlck to
ohoose t|m de.s [red
option, and then pr_.ss
the _/t| breton: The
selected option wlll be
S(_,t+
8818c{8dAE rood8 --
3['re,_,the MENU button to end the settlng.
r[l}le _(_1_ scteerl will dlsappear.
Note;
"YOU can check the _le_ed _ mode by the on-screen
informalion digp[a_ Howevs_ nothing will appear in the
AUto mode.
•The shooting mode _t a_ above will be _tor_d in memory
even iflhe DVD video _ameroirecord_r is turned Off.
Auto 2The camera/recorder automatlcally
Judges the su_ect and surr_urldl_;g envir_rlmerlt
for optimum recording.
Sports ;Reduces blurrlng when recordlng
rapidly moving su_ec_ such as in golf or tennls.
[RheSports mode isused under a_uo_sce_lJght.
_e image may [licker; In thls case. use _le Auto
mode for recording.
Portrait : Makes a su_ect, such as a person or¸a
cry!atilt, starld OL!t_ortl a b[tlr_d backgrollrld.
SpoUight :Pre_ents overexposure of subject
po_alt f_ce. etc. when strong light strikes the
su bjecr_ as in a wedding or' on stage.
Sand &Snow : Prevents under_,xposum of
subjecr portrait face.etg. In a placewhere, reflection
of Iight Is intense, such as at the seaside _n
midsummer or on a ski slope.
Low Light : Allows user to re,cord In a dark place
even wltt_ decreased lighting; However; an afte>
Image will appear with a moving subjecr.
Note that the Low Light modecamnot be used when
the recording quail W mode is STD.
[fltmre is difficulty in automattica]ly I}aeuslng
suNecr image, adjust the 1i}cus manuall>
8O
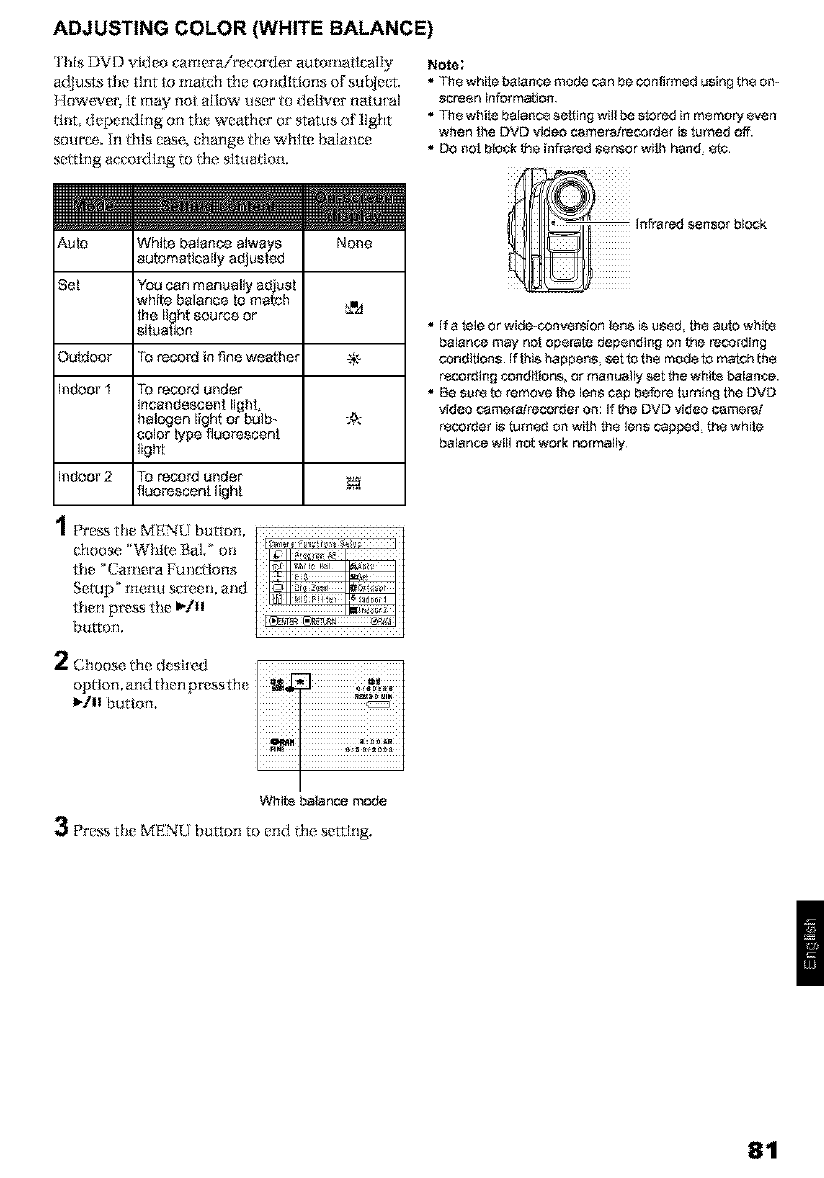
ADJUSTING COLOR (WHITE BALANCE)
INs DVD _'ldeo camera/recorder automatlcally
adjusts the tlnt/o match the conditions of stlbIecr.
Howe_'[_E it may not allow tlst?r to d[_ll_'or natu[al
tint, depending on the w{?ath{?r or' status oF light
s{}llPC(_, lrl _liS cast% ct ]_rlg_ I_K_ whlK. hal a_lc{:.
s{:.ltlng acgordlng to l_]e sl_uatlon.
Note;
• Th8 white balance mode can be confirmed using th8 on-
_cresn infot marten
Th÷ white balanoe setting will t3estored in msmory 8yen
when _e DVD video camerairecordsr is turned off.
DO not btock _e infrared ssnsor wi_ hand_ _.
mm __
Auto White balance always None
autx_matically adjusted
Set You can manually adjus!
white t_alance !o match 5mz1
[he light source or
situation
Outdoor ro recol_J in fine weather .,R-
indoor I To record under
inca_desce_t light
halogen light or bdlb- ;,_<
color lype fluol_scenI
llght
Indoor 2 To record ul_der
fluorescentlight
1Pre_ the MB:NU button,
choose "WhIl_ Bal,' on
th_ _Cal_Bra Fgilletlons
Setup _'rtle111is_re,_n, ;/_d
then p_ss the I_/I!
button.
• If a tale or wide-conversion tens is used, the auto wNte
balance may n_ opsrate depsndlng on the recording
conditions If this happens, _t to the mode te mateh the
recording conditions, or manually set the whit_ balance.
Be sure to remove _e ten_ cap before turning the DVD
video ¢amerah'ecorder on: fft_e DVD video cameP& t
rscorder i_ turned on wi_ th_ lens capped_ th_ white
balance will no_ work normally¸
Wh]t_balance mode
3Pre,_s the MBNU button to end the setting.
81
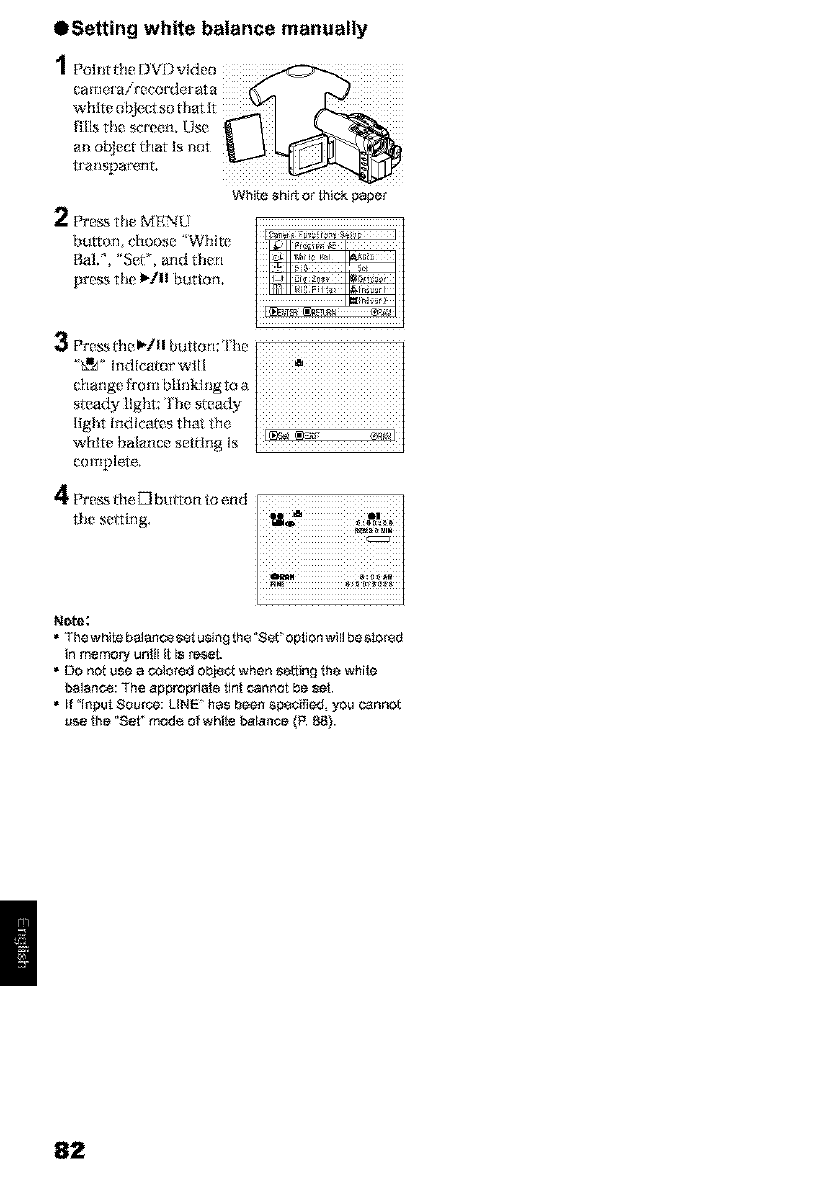
OSetting white balance manually
1Pohlt the DVI')video
came_ a/recorder at a
whlte obje_Xso that it I
tt mlsparent.
White shirt Or thick paper
2Pre_ the MENU
button, choose 'White
Bal, '_, "Set', and then
press the _/11 button,
complete.
4Pre_ the[Zlbmton to end
the selting.
Note:
•The white balance sat using the "Sst option will be stersd
in memory un!Jl it is _,et.
DO not use a colored objs_ when se_Jng the white
balance: The appropriate tin! cannot be sat.
If _J_put Source: LINE _ has been spscJfied, you cannot
use _e "Se_ mod_ of white _lance {R 88).
82
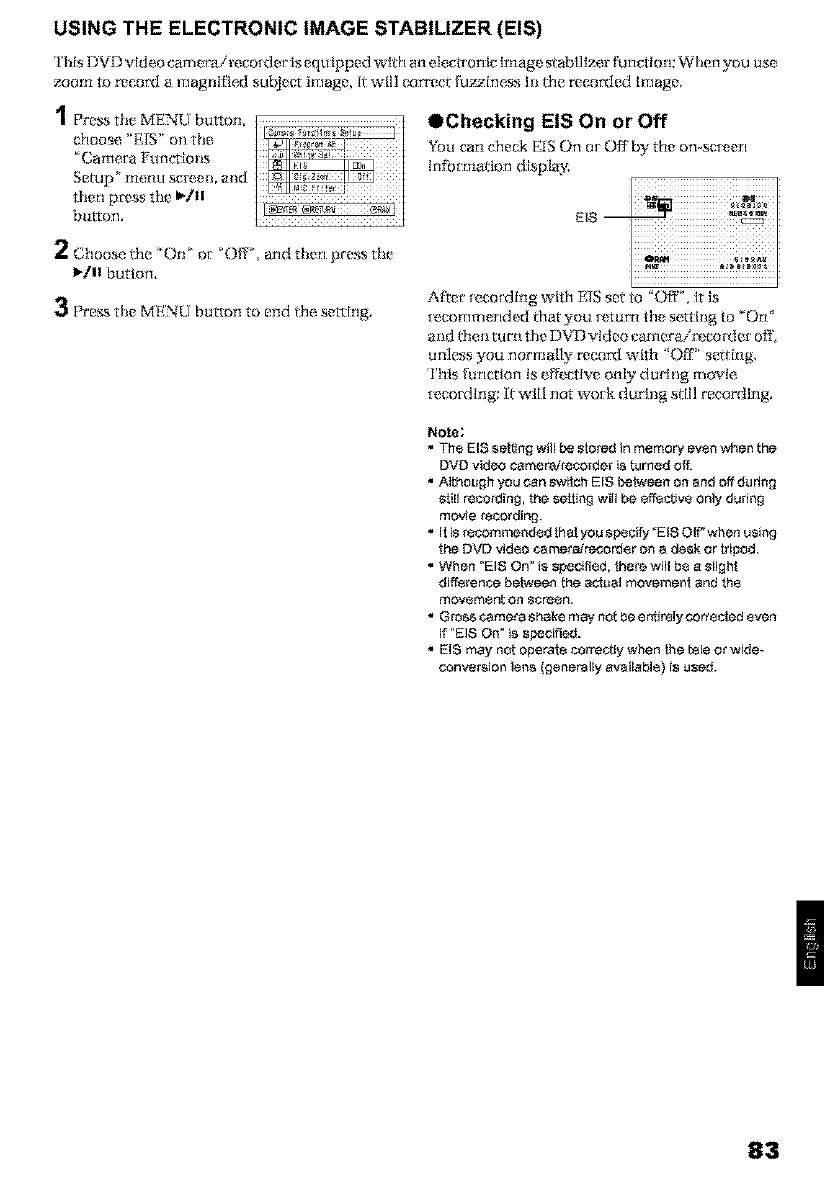
USING THE ELECTRONIC IMAGE STABILIZER (EIS)
This DVD _fdeo ¢ameraireco[der is equipped with an electron k' image s_abfliT_er fhnction: When you use
zaom m _co_ a magnified su_e_ image, it will correct _zliness in _le _co_ed Image.
1Pre_ the MENU button.
choose _'EIS ' o,_ the
_Camet ;IFun_[ons
Setup _'rtleilll s_re_n. ;/_d
then p_ss the I_/I!
button.
OChecking EIS On or Off
You can check E_SOil ot Off'by the on--sc[_,en
Infix:marion dlspiay.
El8 --
2Choose the "On' o[ _Off', an t tlien pre&_, tile
_/ll button,
3Pre._s the MENU button to end the setting. After [€cording with E1S set to "Off _. It is
[ecommended that you [z,turn the settit_g to _'On"
a_d _e_ turn the DVD "Tldeo camerai_co_ er o_
unless you normally _co_ wltla '_Off _'setting,
This [un_ion is e_c,t lye only durlng movie
_cord{ng; It will not work du_mg s£[I1recordklg.
Note;
•The EIS setting will be stored in memory even when the
DVD video camerat_e_rder is turned ell
• Although you can switch EIS _tween on and off during
still recording, the setting will be effective only during
movie recording.
• It is _ecommended that you specify _EI80fff when u_ing
the DVD video _metatrecorder on a de_k or tcp_d.
• When "El8 On" i_ specified, there will be a sligh!
difference between the actual movement and th_
movemer_ or_ _reerl.
G_O&S¢._3met a _hake may not be e_irely corrected ev_en
if "El8 On" is specified.
EIS may not ope_e correctly when _e tele ot wide-
conve_ion len_ (generally available) is used.
83
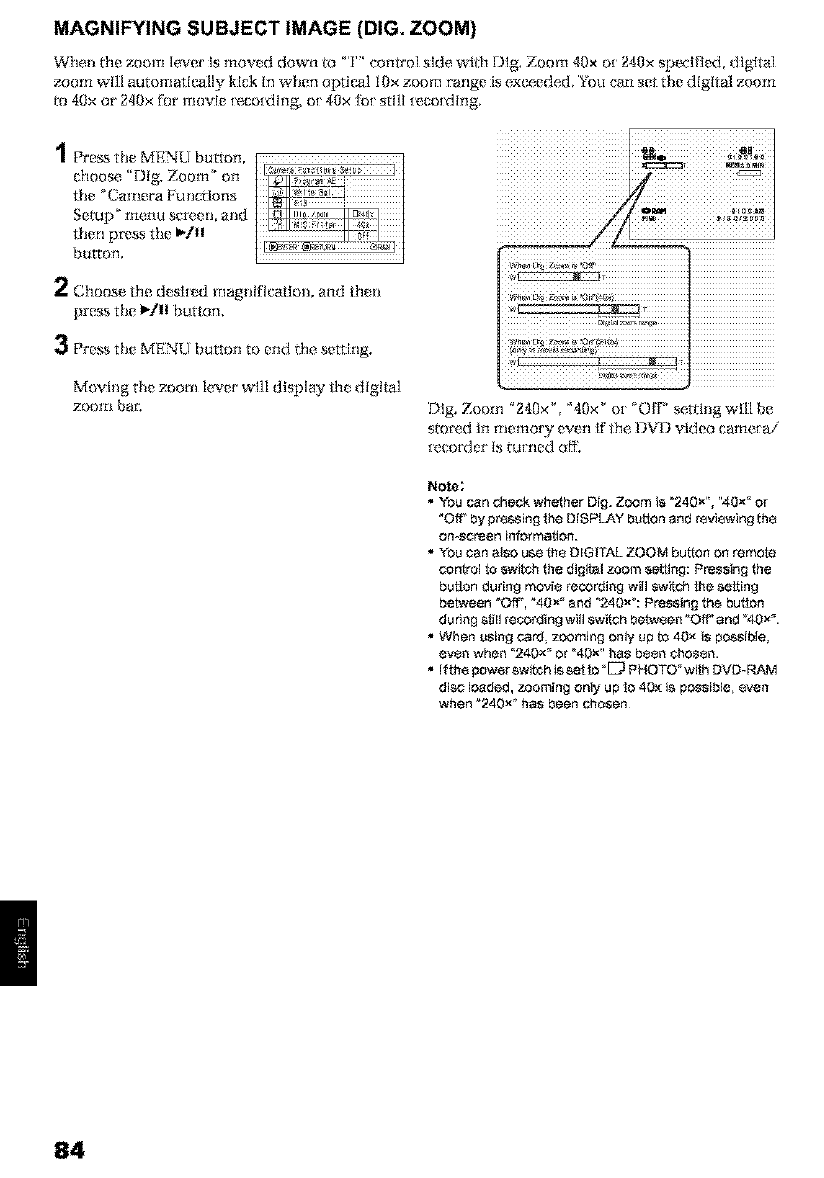
MAGNIFYING SUBJECT IMAGE (DIG. ZOOM)
Wheli tile zoom lever is ruowd down to _'1'" control side with Dig, Zoom 40x ot 240x speci[ied_ dlgltM
;'xx_m will automatiealJy kick in when optical iOx zoom range is exceeded, You can set die digitM zoom
to 40x or' 240x for rrto_qe _ecotding, o_ 4Ox fi)_ still _eco_ding,
1Pre_ the MENU button
QtlOOSe _'D[g, Zoortl _' On
the _Camera Functions
Semi)' menu screen, and
then press the I_/II
button.
2Choose the desl[_d mag_lificatJon, and tilth
press the _/11 button,
3Pre_ the MENU button to end the setUng,
Moving the zoorn lever wlE dlspiay th_ digital
xoom bar; Dig. Zoom _240x _, _40x _ ot _Off' setting wil[ be
stored in lllertlory everl If the [_V_ vl_eo e_rtlerai
recorder is tilt:fled o_'.
Note;
• You can check whether Dig. Zoom is "240 X' ,"40x _ or
_Ofr by pressing the DISPLAY button and reviewing the
on-screen intot marten.
• You can also use th_ DIGITAL ZOOM button on remote
control to _wi_ch the digital zoom _etting: Pressing the
but!on during movie _cording will _wfteh _e setting
between _Offf, _40x _ and "240x": Pre_ing the but[on
dudng _ll recording will _w_*h betwsen _OfF and '_40x_.
•When using card, zooming only up to 40x is possible.
evs_ when "240 x_ Or _40X" ha_ b88_ ¢Jlo_sn.
•If the powsr switoh isset to _E_ PHOTO_ wit_ DVD-RAM
di¢,¢ loaded, zooming only up to 40_ i_ po_sible_ _ven
when _240x _ ha_ bee_ Cho_e_
84
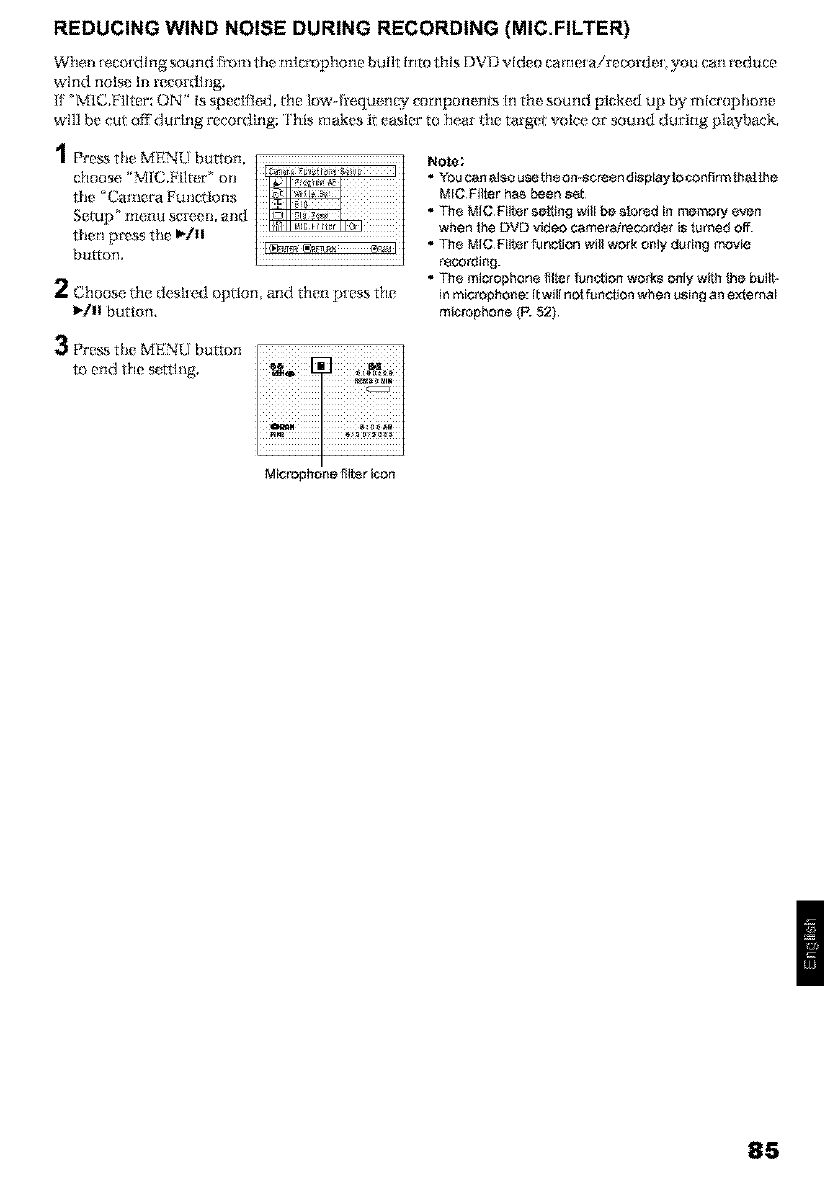
REDUCING WIND NOISE DURING RECORDING (MIC.FILTER)
When [ecotdIng sound f_m the mlcmphone bulk Into this DVD video comet airec_rdeL you carl r_duce
wind noise [l_ l_eco_dlng.
K _MIC.Filter: ON" is speclf]ed, l}le low--fl"equengy componenls in the sound picked up by microphone
will be cut offdurlng recording: This makes it easier to hem" l_m target voice or' somid dur'ing p]ayback.
1t.eMENU button,
choose "M[C,Iqlter ' on
the _C;_l_era Ftll_ctions
Setup _'rtle11u s_n, a_d
then p_ss the I_/II
button.
2Choose,he desired opIion, and then p_ess the
I_/11butch,
Note:
•Y0U can also use the on-screen displayto confirm that the
MIC Filter has been set
• Th÷ MIC Filter sef_ing will be stored in memory _v_n
when the DVD video camera/recorder is turned off.
• Th÷ MIC Filer tencffJon will work only during movie
r_cording.
• The microphone filter func_ten wor_ only wi_h lhe bui_
in microphone: Itwill not _n_ten when using an external
microphone (E 52)
3theM :n'Uburro,,
to end the s*tillig.
Microphonefilt_r i_n
85
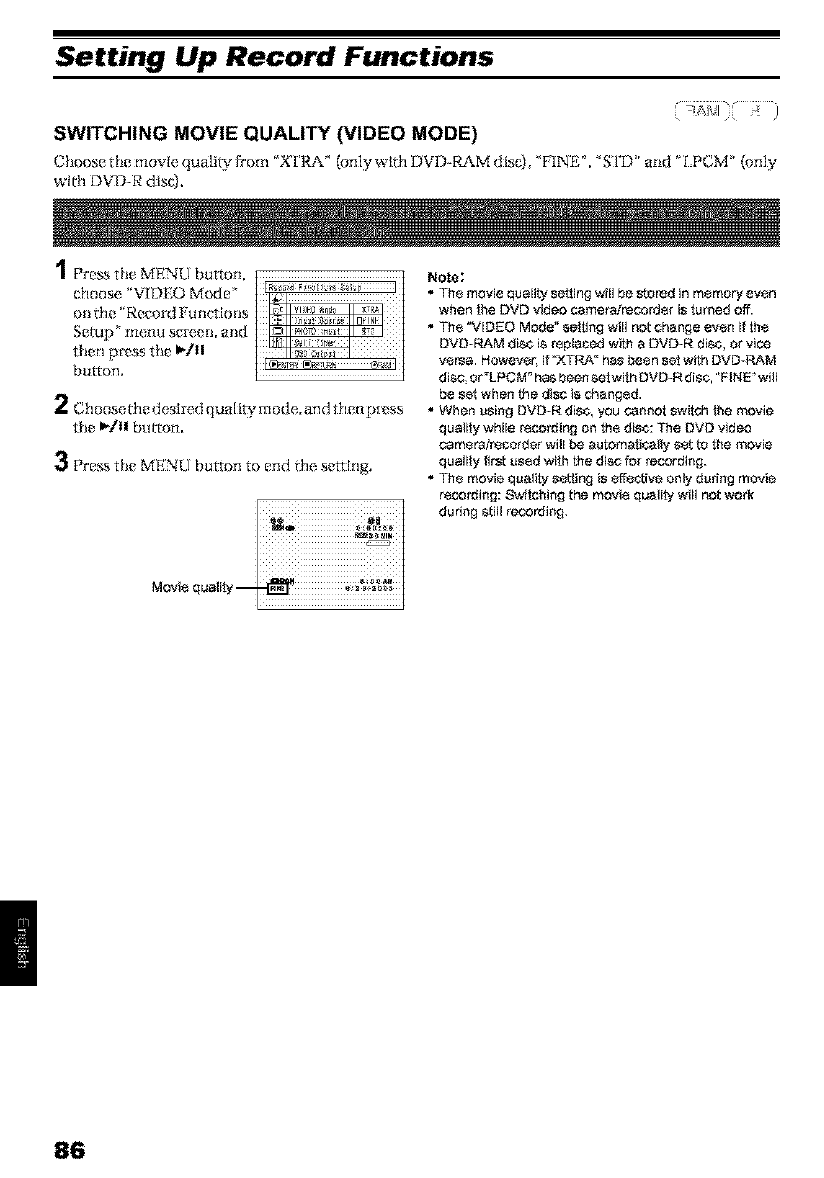
Setting Up Record Functions
SWITCHING MOVIE QUALITY (VIDEO MODE)
Choose the movie, quality if'ore _X['RA" (only wlth DVD..RAM disc) 'PINE". _STD' al_d _f,PCM' (only
with DVD-R disc).
1Pre_ the MENU button.
choose, WrDEO Mode'
onthe "Record Functlons
Setup' menu sgre4,,n. mM
then press the I_1II
button.
2Choosethe deslred quality mode,,and thenp[_ ss
the _1II bmrom
3Pre,_s the MENU button to end the setting.
Note:
_ _ • Th÷ movie quaNby setting _11 be stored in memopj even
when the DVD video camera/recor_tor is turned Off.
• Tho %qDKO Mode" _eiting will not change evon if th÷
DVD-RAM disc is rsplacbe with a DVD_R disc, or vice
I : ! { i!l v_rsa Howev_rl if_XTRA° has be_n seI with DVD-RAM
disc, or_LPCM _ ha_ been se with DVD-Ft disc, "FINE _will
be s_ when f_e disc i_ d_angsd.
• When using DVD-R disc, you cannot switch lhe movie
qualiiy while rscording on tbe disc: The DVD video
camo_irscorder will be automatically sot to the movie
qualiiy first ussd with the disc for _cording.
• Th÷ movie quality _o[Iing is 8ffoOtoe only during movie
roco_ing: S%vilching the movi8 qualily will not wo_
during still reo3rding
Movi8 qualily'-
86
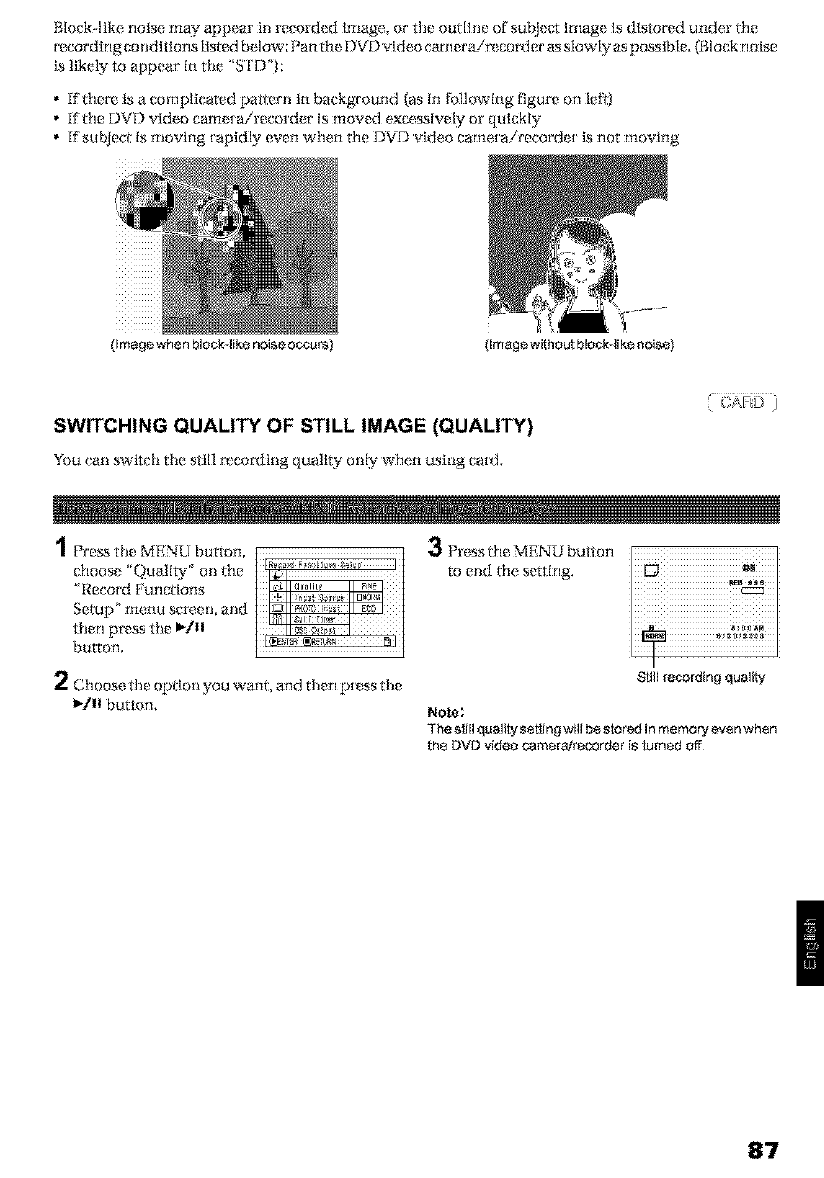
BMck--like noise may appear ill recorded Image, or the outline of subject knage Is dlstored under l_le
recording co ndttlons listed below; Pan the DVD v+ldeo cam era!rx corxJer assMwly aspossible, (Block n oise
is likely to appear' In the ' S'I'D"):
•Ifl_lere is a complicated pattern In background (as In [}alkxwlng figure on left)
•Ifl_le DVD video came[a/recorder is moved e×cesslvely or qulckly
•lfsuNect Is moving [aptdly even when file flVfl v'tdeo career a/record* _ is not moving
(Image without block-like noise)
SWITCHING QUALITY OF STILL IMAGE (QUALITY)
You can swlwh the still r_cordlng quality only when using card,
1Pre_ the MENU button,
choose _'Quallry ° on l_le
"Record Pu notions
Setup _menu screen, and
then press the _/I|
button.
3Press the MENU button
to end file setting.
2_hoose tile oprJotl you wahl and then press the
_/11 button,
8till ree,ordM_t quality
Not_;
The _,_ll quality _sNn£1will b8 _tored in memory ev_n whsn
th80VD video _mer&irecorder i_ lumed off
87
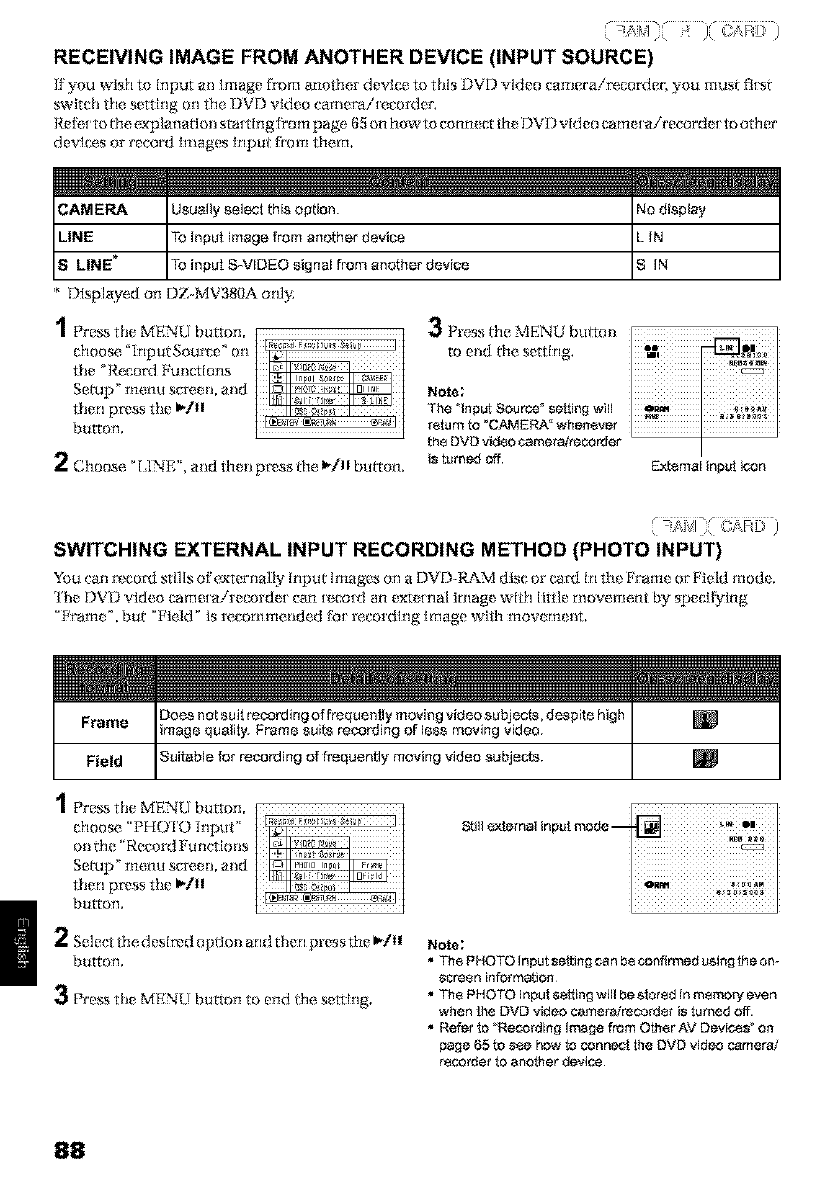
RECEIVING IMAGE FROM ANOTHER DEVICE (INPUT SOURCE)
if'you wish to input an bridge f_m another devtse to tiffs DVD vMeo vamer'a!_corder', you mus_ flts_
swltch the setting on the DVD video camera/[evorder,
I_=e[_!I to l_le e_pi;/flal'tsl_ staITlflg _Yo rtl p a p>_ 0_ OI1 how to _oll11_ l;t _h_ J_Vt') vl!] eo l_rtl_ [ ;/il"(?cor'd_ [ to other'
de'glc_s or record h_ages l_lpuf from them,
I oua,,yoe, tth,oopt'o°. I od'o0'a
LINE _ To i_put image from another device L IN
8 LINE To i_put S-VIDEO signal [rom another device S IN
* Dfsplayed on DZ-MV380A onl?¢
1Pre_ the MENU button,
choose "Irlpu_Sourx;e '_orl
the _Recor'd Eunc_tsns
Setup' menu sgre,en. and
then press the I_/I|
button.
2Choose _[ 3NE", and then press the I_/11 bm ton.
3Press the MENU breton
to end the setting.
Note;
The "lnpuf Source =seNng will
rstum to "CAM ERA =whenever
th8 DVD vidso cameretrecorder
is turned off. External inpuf icon
SWITCHING EXTERNAL INPUT RECORDING METHOD (PHOTO INPUT)
You can rz,cor_t stills of e_ernally Input {ma_,es on a DVD-RAM disc or carfl in the Frame or Field mode.
rtle DVD video career airecorde[ can _cot_t an external image with little movement by specifying
_Fram_ _, but _Field _ is r¢corflITtetld(_,{] f_l[ r¢cordlrlg Image wlth rtlov_ rtl_ tit.
Does no_suit recording of [requently moving videosubjects, despite high
Frame mage quality. Frame suits recording o[ less moving video.
Field guitsNe for recording of frequently moving video subjects.
1Pre_ the MENU button.
choose _'PHUFO Input"
onthe _'Record Funct tsns
Setup' menu sgre4,,II. and
then press the I_/II
button.
2Select the desired opttsn and then press the I_/I|
button.
3Pre,_s the MENU button to end the setting,
Still _tsrnN input mode --
Note;
•Th8 PHOTO InputseNng can be _onfirmed using the on-
_cre_n infer ma_ton
• Th÷ PHOTO input _e!ting will be stsrsd in msmofy even
when [he DVD video camerairecordsr is tamed off.
• Refer to _Recording Image from O[h÷r AV Devils" on
page 65 to s_e how to connec! the DVD video came_i
r_corrJer to another device¸
88
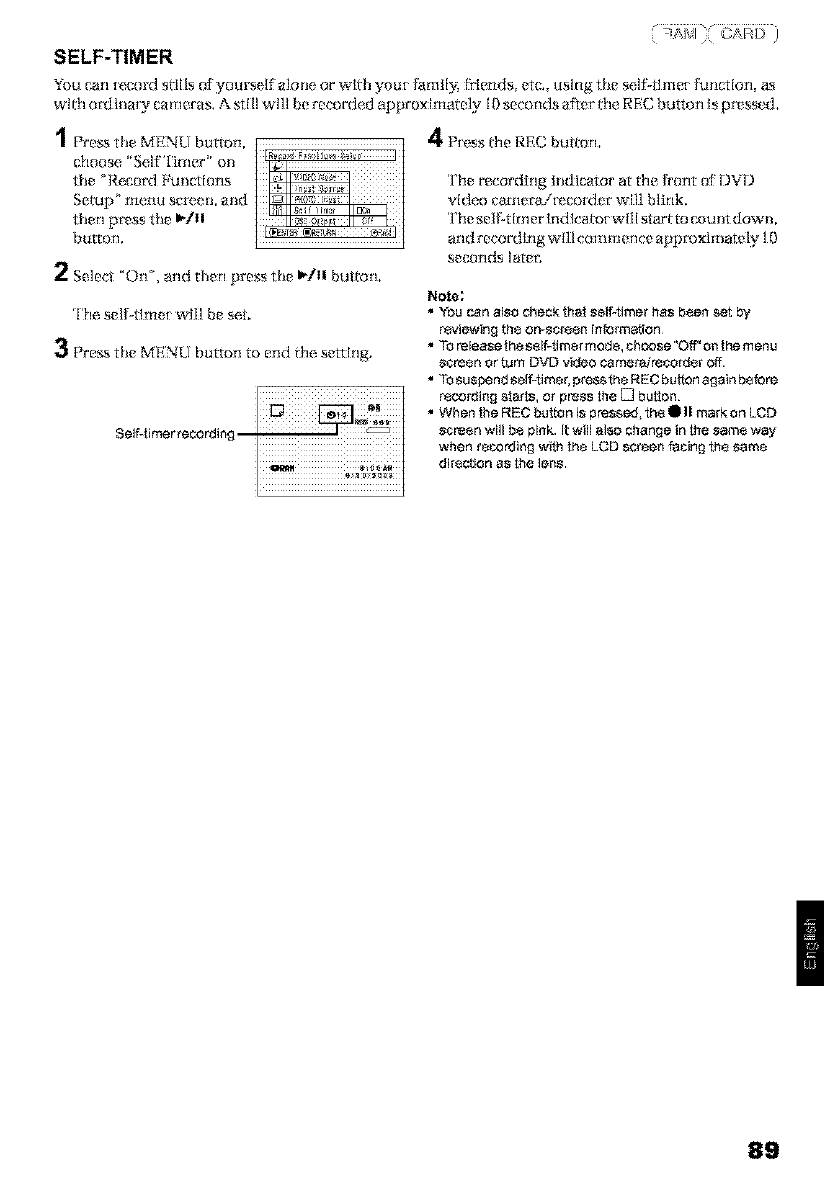
SELF-TIMER
You carl {ecord slills of yours_If alo_m or wlih you{ Ii_m ltN; l_'iend s_ etc., using the self:4ime{ [u_mtlon, a_
with o_h_aw c_mer_s. A still wl]I be recorded approximately IOseconds a_er the REC bu_arl Is p_ssed.
1 Pre_ the MENU button,
choose "Self'lkner ' on
the q{ecor'd Functions
Semi/menu screen, m_d
then press the _tI!
bu_ton,
2Select "On", and then press the _tI! button.
The seK41me_ will be set,
3Pre,_s the MENU button to end *|le setting.
Self4imer recording --
4P esst,,eREC button.
The recording hidlcator ar the fr'on_ of DVD
video _a*ne_i{_co_e_ w[11 blink.
The selbtlme_Indlcator will star t to e_unt down,
and recording wl]l commence appmximate_ I 0
secorlds latel;
Role:
• You can also check lha{ serf-timer has bse_ set by
rsviewin£ _;h8or_scr88n informetion
• TO*r_lease the _81f-tirner mode, cho.ose "Off" o{I the mer_u
scresn ortum DVD video camer,3Jre_o_sr off.
• TOsu_p_rTdself-timer, press_he IRECbt_Rorlagain bsfore
r_co_ing slarts, or pre_s the D button.
• When _e RKC but_an i_ pressed_ _h8 • II marR on LCD
scresn will b8 pink. It will al_o change in _he _am_ wsy
when recording with the LCD _creen facing th_ same
dirsction a_ tt_e len_
89
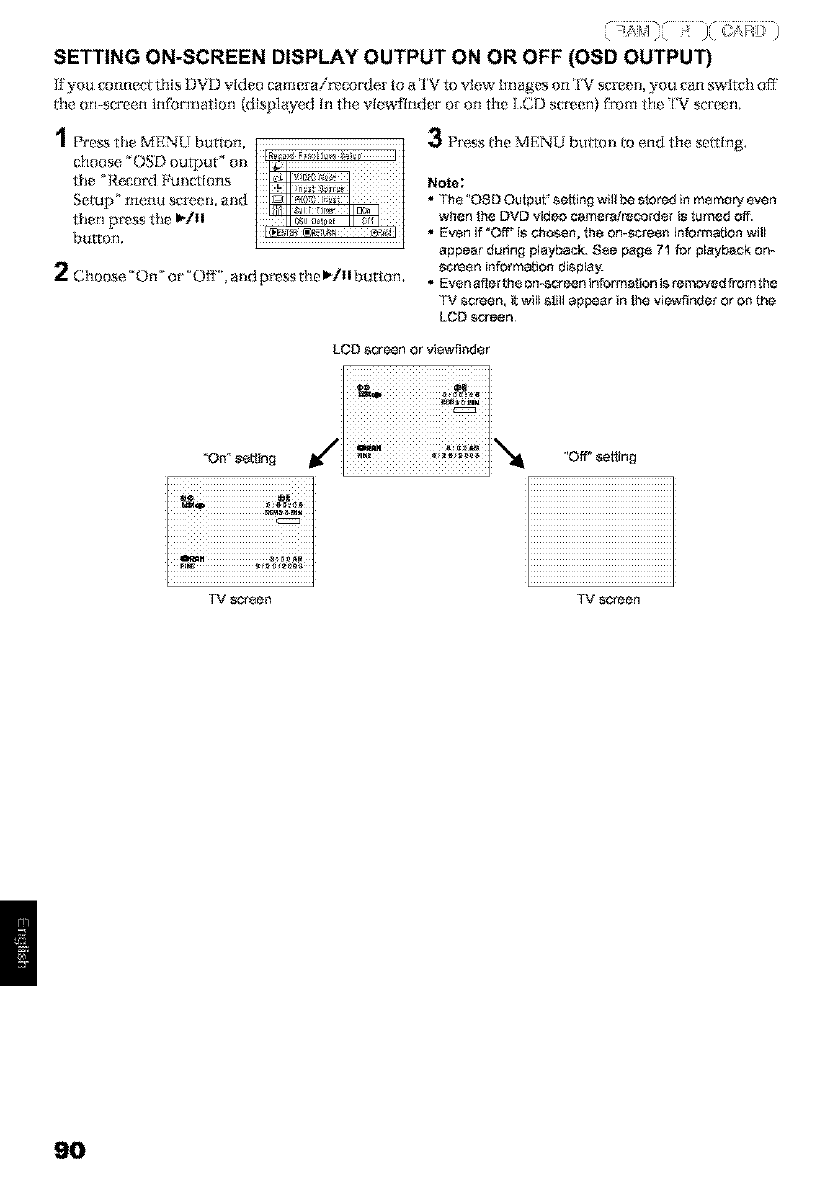
SETTING ON-SCREEN DISPLAY OUTPUT ON OR OFF (OSD OUTPUT)
If you connec_ this DVD video cmn m'air_cor'dex to _tTV to view images on TV screen, you van switc}_off
Hm omscr'ee,n infbrm_ttlon (dlsp]_tye,H In the, vlewftnder' o_ on the _,Cl) screen) from the 'l'V sc_ee..
Pre_ the MENU button,
choose _'OSDoutput" on
the qleeord Functions
Semi)' menu screen, a_ld
then press the _tlI
bu_ton.
2Choose _'On 'or'Off", a_ _press the _tlI button
3P_ess *|le MENU but rm_ *o end the set ring.
Rote:
• Th_ "08D Output" setting will be stored in memor¢ even
when the DVD video c;_meraireco_sr i_ turned Off.
• Even if _OiT_is cho_,en, the on-scresn information will
appear during playback. 88e pag8 71 for playback on_
scresn information displa_
• Even afler th_ omscreen information is removed from the
screen, it will atill ap_ar in _e viewifoder or on the
LCD screen¸
LCD screen or viewflnder
"On *s_tling "Off" 8atling
TV $Cree0
9O
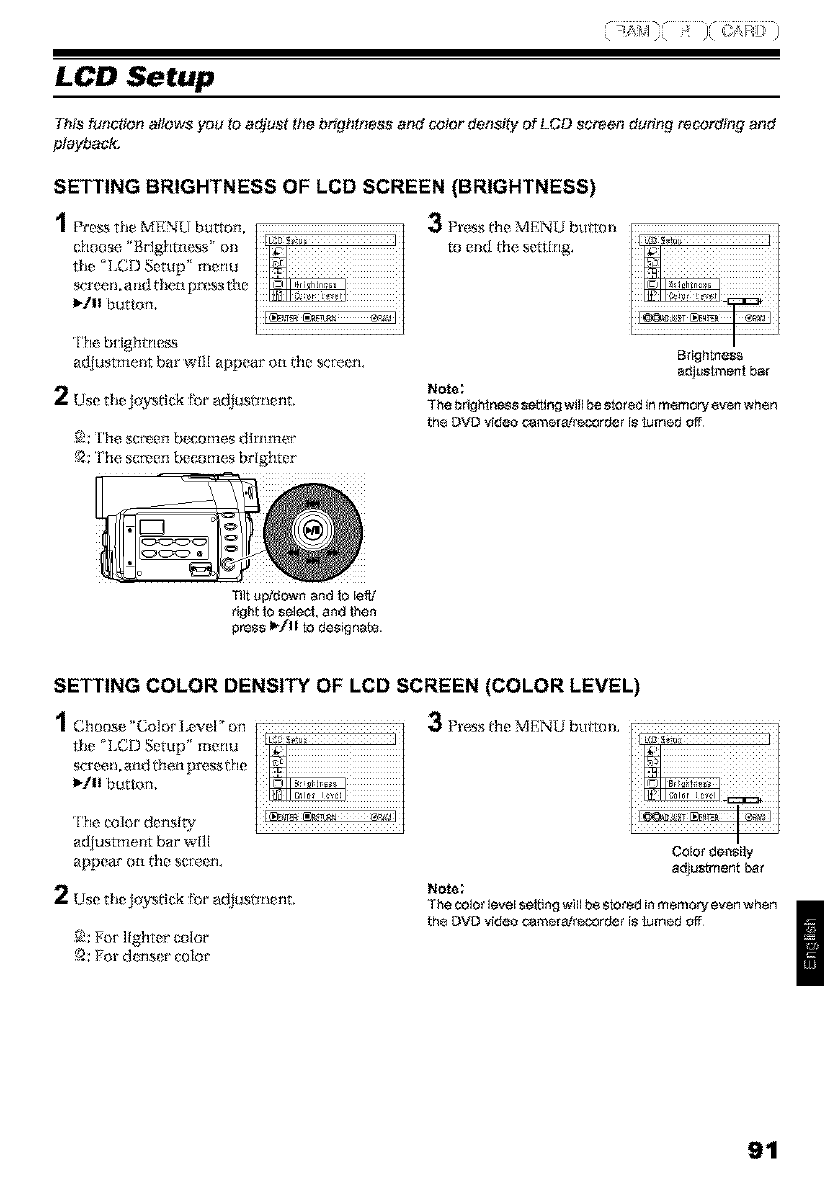
LCD Setup
This function aliaws you to adjust the brightness and color density of LCD screen during recording and
playback.
SETTING BRIGHTNESS OF LCD SCREEN (BRIGHTNESS)
1_',e_t.eMENU button,
choose _'}_Hghtn_.'ss _' o_l
the _I.CD Setup" menu
scFeell, a lid t hen p_s the
_ll button,
3Press the MENU butroli
to e_ld the setting.
The bdght'ne_
adjustme,_lt bar will appear on the sere,{ n.
2Use the joystick fbr adjusnt_ent.
_!; '['he scr_tm becomes dlrn met
{)_:The screen becomes brighter
Brightness
adjustment bar
Note;
The brightness setting witl be stored in memory even when
th8 DVD video camer&trecorder is turned off
lilt upid_n and to left/
right to select, and then
press I_/11 to designate.
SETTING COLOR DENSITY OF LCD SCREEN (COLOR LEVEL)
1 Choo__'Colo,'_.ewro,_ 3P._ssth,:,MENUb._,,..
the _LCD Setup" menu
screen, and dmn pre,ss the
I_/11 bu_hm.
The color denslW
adIustmelit bar will
appea*' on ffm sc[e,_ n,
2Use the joysdck fbr adjusnt_erlt.
_; },or lle_hter color
_2; t;or d* ns*r color
Color density'
adjustment bar
Note:
The COlorlevel setting will b8 stored in memory even when
th8 DVD video career&/recorder is turned off
91
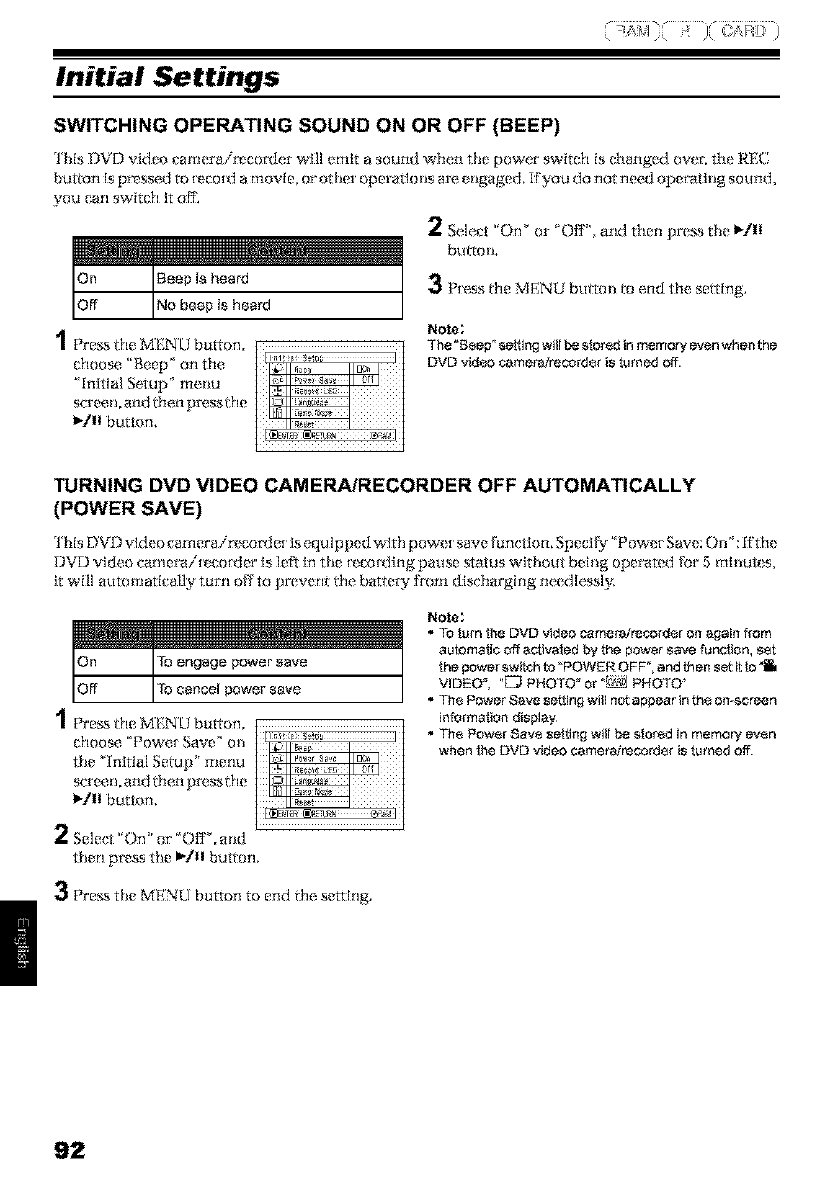
Initial Settings
SWITCHING OPERATING SOUND ON OR OFF (BEEP)
lhls DVD video _'amerair_cor_ler will emit a sound when the power switch is c_anged over. the REC
buttorl is pl_ssed to I_co[d a movle_ or other operatlo ns are engaged. If you do riot riced operating sound,
you carl switch it o_'.
Beep is heard
No beep is heard
1Pre_ tile MENU bulton.
choose _'geep _ on the
_[nltlal Setup ° menu
screen.and then pressthe
I_tll button.
2Select "On" or _O£", and then pre_ the I_/11
huron.
3P, ess tile MENU breton to end the seating.
Note:
The °Bead setting will ed stored in memory even when the
DVD video _amera]record_r is turned off.
TURNING DVD VIDEO CAMERA/RECORDER OFF AUTOMATICALLY
(POWER SAVE)
lhis DVD video camera irz, corzte[ is equ Ipped with pow_[ save function. SpeciFy ' Power Save: On _:Kthe
DVD video caxnera i_z, co_d er is left in the _z,cotxtlng pause status without beh_g operated for 5 mlnut_ s,
it will automatically turn off to prevent the battery if'ore discharging needlesst N
To engage power _ave
To cancel power save
1 Pre_ the MENU bulron,
choose _PoweI Save" oll
the _'[nitial Setup' menu
screen, and 1hen press lh e
Ib/ll button.
Note;
• TOturn the DVD video camecaJrec._order on again from
auiomalie off activated by the power save function, SSi
the power swish to _POWKR OFF _, and then set it to
VIDEO _, "[_ PHOTO _or "_&_] PHOTO _
• Th÷ Power Save setting will not appear in th8 on-screen
information display,
• Th÷ Powsr _av8 setting will be sloped in memory evsn
when the DVD video camero, irecordsr is turned Off.
2Select"On' or "O£ ", mM
then press the 1-tli button.
3Pre._s the MENU button to end the setting.
92

TURNING RECORD LED ON OR OFF (RECORD LED)
YOU _a_l switch ofi'ti_e [(_,lx)tdlflg hldk_ator of 1 the I_l)flt of J_VJ) _ld(?o l_al_t_,[ail"OCOl"d_,[ (_,v(?fldur'h_g
recording,
On
Off
2S¢[e,_'t _'On _ Or _Ofi "_,and then pr'e,% ti_e _/11
bu_o_L
d
l Pre_ tile MENU button
choose "Record LED" o_l
the _Inltlal Set_Jp' menu
screen, m M t hen prx_ssthe
_/11 button,
Note:
• Th_ Record LED se_ing willnot appear in the on-sctem_
informa_ion display
Th_ Re¢_ord LED se_ing will b8 taored in memory even
when lhe DVD video camereJrecorder is turned off.
• Specify "R_cord LED: Off" when recording a subject
behind a glass or w_er tank lha! reflects light: The
reflected light of the recording indicator will not be
recorded¸
When using the self-timer function, the recording
indicator will blink when f_e REC butlon i_ pressed
regardl_ of wh_her Record LED is On or Off.
CHANGING DISPLAY LANGUAGE (LANGUAGE)
YOU can change the laliguage used to display the merltl and itfformatlon,
'lhe following shows that E_@ish is (:hanged to Er_nch.
1Pre_ tile MENU button,
choose _'[.angtlag_ ° o_
the °[nitlal Setup _' menu
screell, a l_d t hen p_s tile
_ll button,
3P, oss the MENU bulrot_ to end the setting.
Note:
The language _8t!ing will be stared in msmory even when
the DVD video camer&trecordet i_ turned off
'English" has been s_t_
2Select °Erancals °. and
then p_ss the I_/II
button,
93
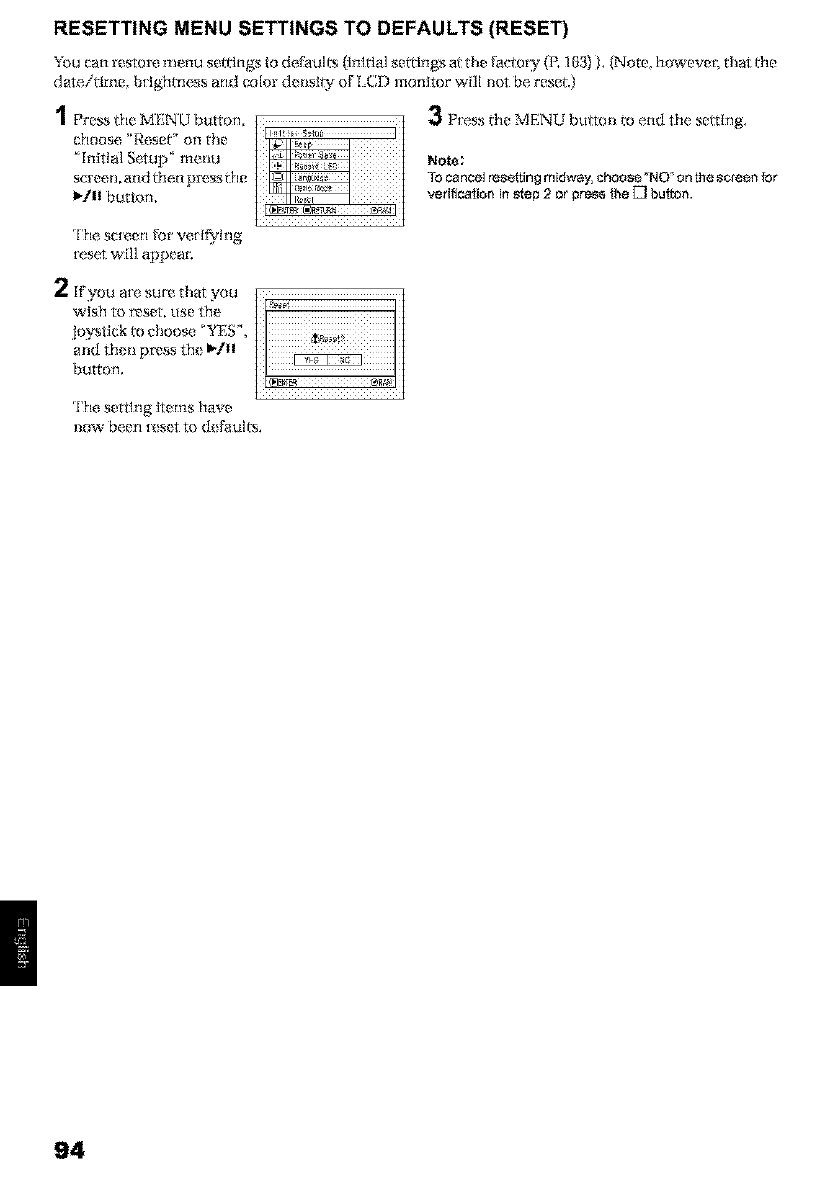
RESETTING MENU SETTINGS TO DEFAULTS (RESET)
You can restore menu selllngs to defaul_ _lnlrial setrings al the facto W {P. 163) 1. tNote_ however; that ltle
dateitkne, bfighmess and color d_nsl W of LCD monitor will not be reset3
d
! Pre_ tile MENU bu_mn,
choose _'Reset' on the
' _nltial Setup _ merm
screen, and t_e,n press the
_/11 button.
3P, oss the MENU bm roti to end the seating,
Note:
TO e,a ncel re_ing midway, _hoose _NO _ On the s_e_n for
vetifie,alion in _tep 2 ot pr_ lhe [3 button.
The screen [or veH_lng
_eset will appear.
2ffyou are sure that you
wlsh to _set, rise the
Joystick to choose _'fES",
and _e_ p_ss _! I_/II
huron.
'l'|le settlng items have
now been i_set to d_ [a_l(:s.
94
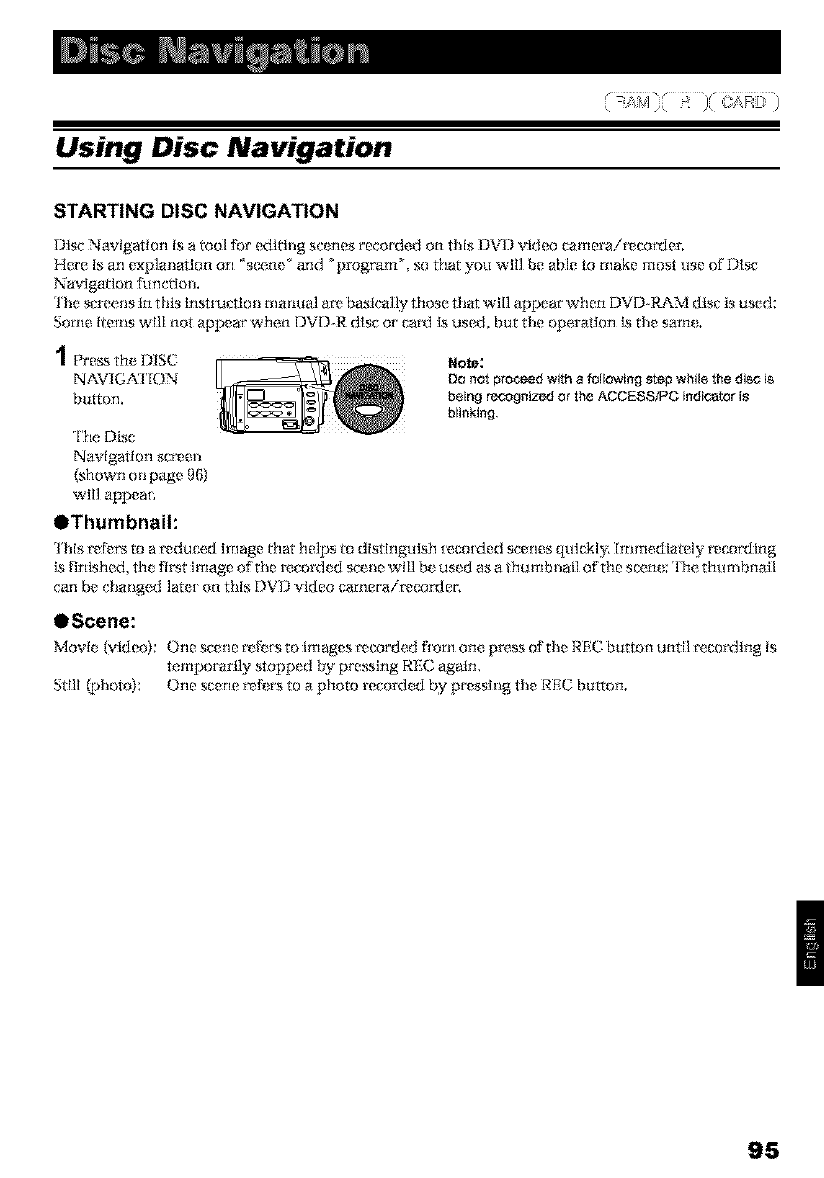
Using Disc Navigation
STARTING DISC NAVIGATION
Disc Navigation is a tool tier editing sc_ nes recorded on this DVD video camerair_cor_ten
¸Here is arl exp]im_l_ion orl _seine _ and _program _',so that yoll will be able to make most use of I)Isc
Navlg_lon _nctlon.
The screens in this In_ructlon manual are basic_l_ _ose thai will appear ¸when DVDoRAM disc is used:
Some items will not appear when DVD-R dlsc or card _ used, but the operation _ the same.
d
/Press the DISC
NAVIGAI'_ON
huron,
The Disc
Navigation scree_
(shown on page 9(;}
wH] appea_;
OThumbnail:
Note:
DO not pm_d with afollowing step wNl_ the disc is
b_ing r_nized or the ACCESS_PC indicator is
blinkin_
]his r_[_r3 to a r_du e_d image ltlar helps to distinguish _e,co_ded scenes quickly, immediately recoMing
N Finished, the t_rst image of the recorded scene will be used a_ a/hu mbnall of the se_n_ : The thumbnail
can be chm_ged lat*_ on this DVD video camerair_e, orvler,
eScene:
Movie (video); One scene rvt_s to Images recorded f_ram one press of the REC button until recording is
temporarily stopped by preying REC again,
Still {photo); One scene mhms to a photo recorch d by pressing the REC button,
95
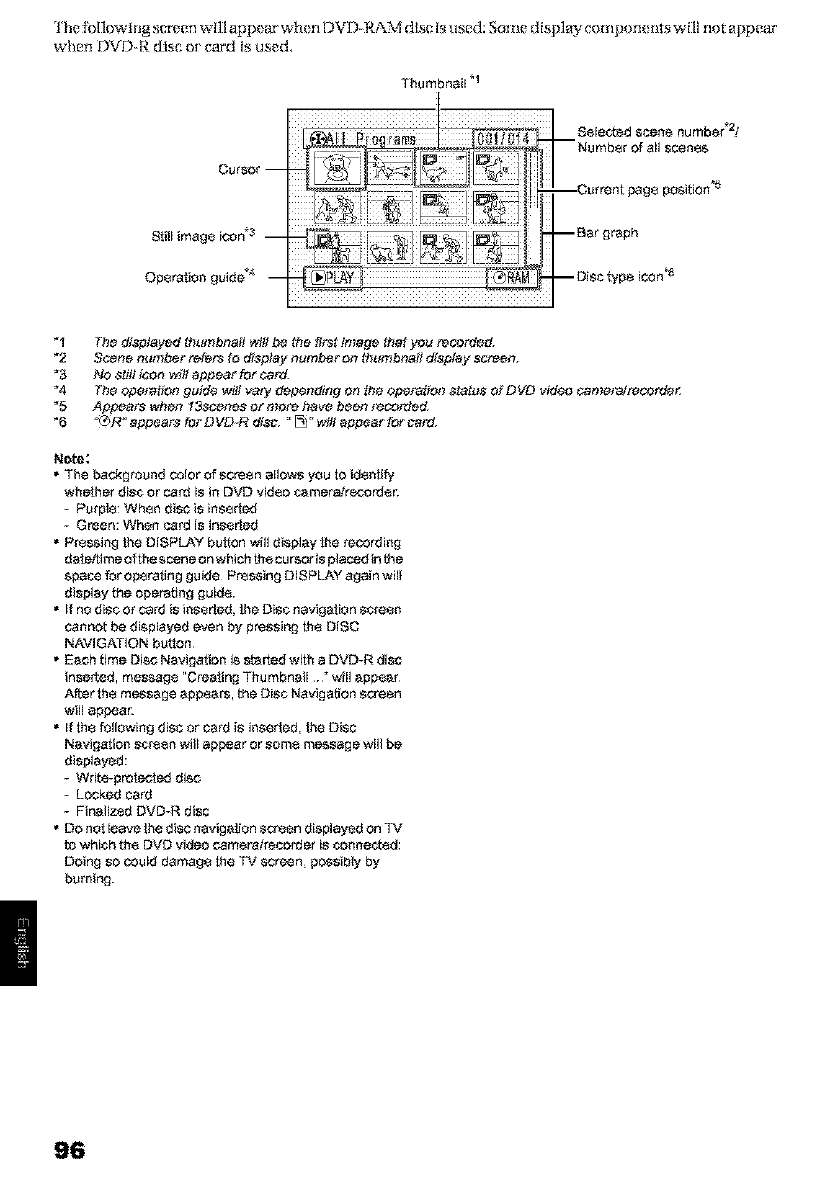
lhe tbllowing screen will appear when DVD-RAM disc Is used: Some disp]ay cam pon_ tits will not appear'
when UVD-R disc or car'd Is used,
Thumbnail _1
Cursor
Op,_miion guide "l
"1 f#e displayed thumbnail will be the first image that you rec_rded.
_2 Scene _l_mber ¢efers _display nurnbe¢ _n _tlmb_afl display screen.
_3 NO _ill ]co_ w_llapl_ea¢ for card.
_4 _e ope_tiot_ guide _1_ vary depending o_ _e opera_ot_ _tatus of DVD video came_afrecotde_
_5 Appears when _3scenes o¢ nlore hav_ b_en _c_rde_
_6 _R _al_pears for D VD.R disc. _ _ _v_ll at_pea_"for card.
Nete:
• The bad<ground color of screen allows you to identify'
whelhet disc or card is in DVD video _meta_record_
Purple: When disc is inserted
Green: When card is in_erbd
• Pressing _e DISPLAY button will di_lay _e _cording
data/time of_he scene Onwhich the cursori_ placed in f_e
spece for operating guide¸ Pressing DISPLAY again wilt
display _he o_e_,_ing guid_.
• if no disc ot card is ins_rbd, _e Disc nev_g_ion screen
canno_ be displayed even by pressing th_ DiSC
NAVIGATION button¸
• Each _ime Disc Navigation is started wi_h a DVD_R disc
inse_ed, messag_ "CreWing Thumbnail. _ will appear
After th÷ message appears, _he Disc Nav_ga_on screen
will appea_
• if tae foilo_ving disc or card is i_serted, Ihe Disc
Naviga_tan screen will ap_ar or som_ message will be
dis_tayed:
- Wd_e-protactad disc
- Locked card
- Finalized DVD_R disc
• De n_t leave Ihe disc navig_on screen displayed On TV
b3which _h÷ DVD video camera_recordet is Go,netted:
Doing so could damag_ the TV screen_ pessibty by
_uming.
96
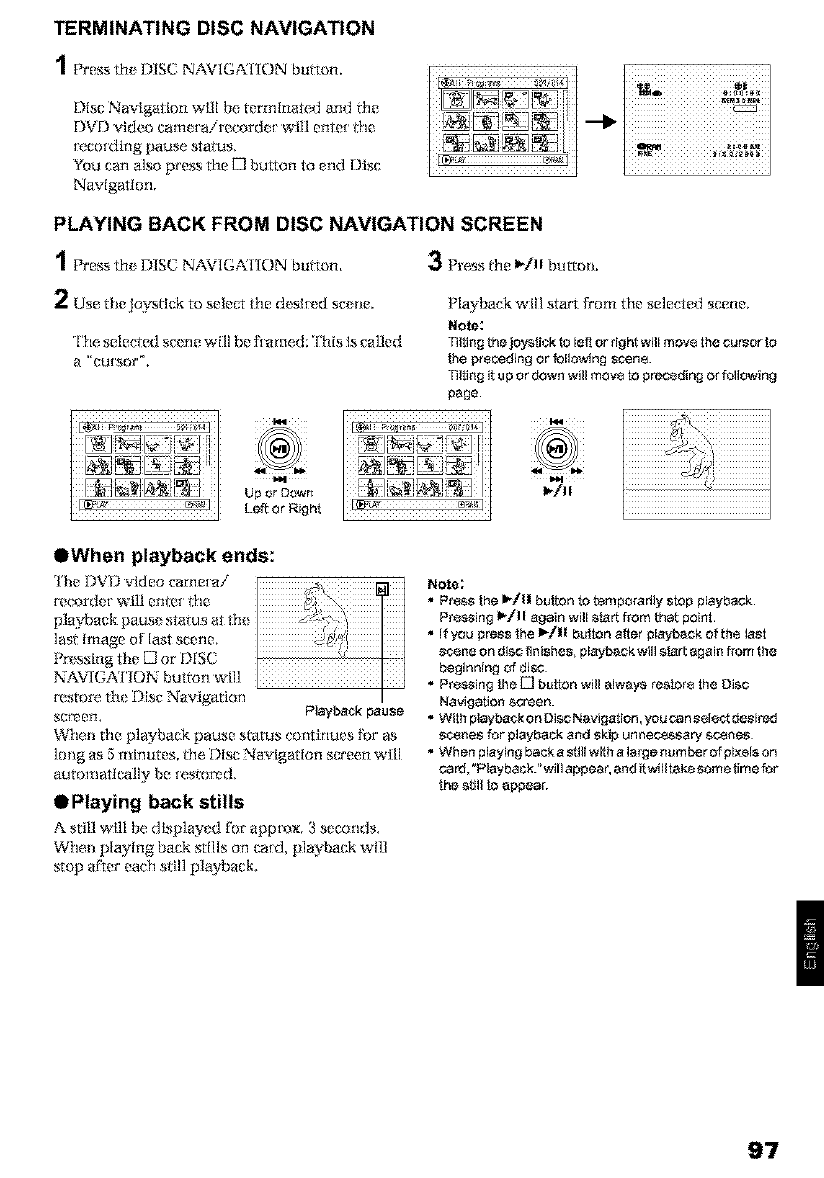
TERMINATING DISC NAVIGATION
1Press the DISC NAVIG_%I tON button,
Disc Naviga/ion will be terminate, d and file
DVD video cametairecord_ t will enter IHe
[_coI_]lng pause status,
You can also pre_ the I21button m end Disc
Navigation,
PLAYING BACK FROM DISC NAVIGATION SCREEN
1Press the DISC NAVIG,_XI K)N button, 3P_essthe l_/ll button,
2Use thejoystlck to select the des]tz, d scene,
The selected scene will be flamed; This is called
;{ _'C1_[SOF_,
Playback will stax't from the se]ected scene,
Note:
Tilting the joystick _ left or righ_ will mow the cursor te
ihe pr_r_din 9 or follo_ng stuns.
Tilting it u p or down will mow _ priding or tellowin9
page¸
Zl_lZ
Up or Down
Left or Right
OWhen playback ends:
The DV_ video _ame_ai
recorde[ will enter t|_e
playback pause status at th_
last image o1 last scene,
PPes_ing the D or DISC
NAV[GA ['iON button will
restore th_ i)isc Navigation
screen, Playback pause
When the playback pause status contkmes [l_ras
long as 5 minutes, file Disc Na_'igation s(_'een will
automatically be [estor_d,
OPlaying back stills
A still will be dlsp]ayed for appm×. 3 seconds.
Wheli playing back sti]ls on card, playback wI]l
stop after each still playback,
Note;
•Press the I_tll button to temporarily stop playback
Prsssing 1_/11 again will start from that point.
• If you press lhe I_fll buiten after playback of th÷ last
scene on disc finishes_ playback will start again from the
beginning of disc¸
• Prsssing _e _] button will alw_y_ rester_ the Disc
Navigation screen.
• With playback on Disc N_vigation, you can ssl_t desired
sce_e_ for playback and _kip u_nec_P_ary s_nes
• When playin9 back a atill with a large _um_r of pixel_ on
card, °Playback._'will appear, and _w411atkesome time tar
the still to abpea_
97
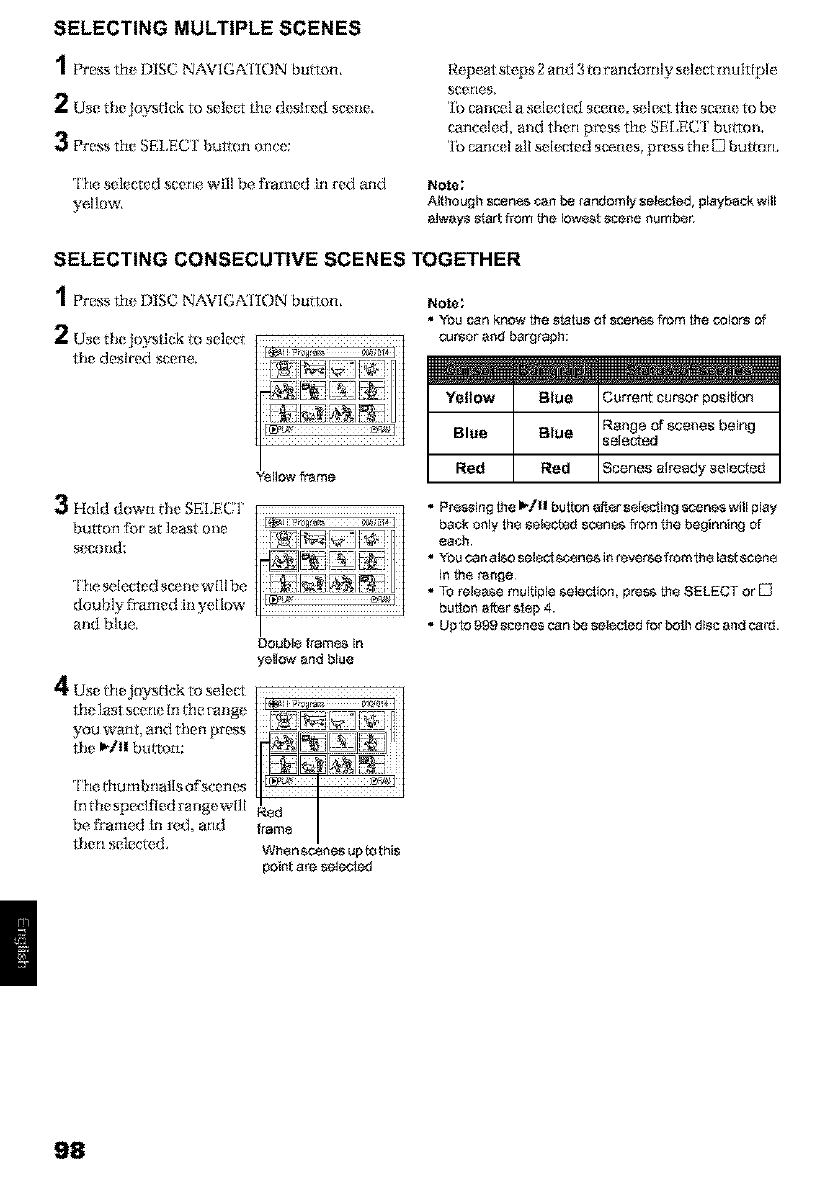
SELECTING MULTIPLE SCENES
2Use thejoysrlck to select die d_ slt_ d sc_ i_e,
3Pre,_s the SELEC'I hulton once:
The selected scene will be fl'amed [rl red and
yellow,
Repeat steps 2 and 3 to randomty s_lect mukiple
scerl_S+
'lb cancel a selected scene, setect the scene to be
canceled, and then p_ss the SEr.ECT huron.
'Ib e._ncelall sele_ed scenes_Q_ss the C] Imtton.
Note;
Although scene.e,_n b_ randomly sNec_ed, playback will
alway_ siart from t_e Icrw_t scene numben
SELECTING CONSECUTIVE SCENES TOGETHER
1Pre,% the DISC NAVIGA'I ION bu_[on,
Use to se]ecl
2thejoystlek I_ _!,_,_ 0_.i_ I
the desired scene,. /_:l_k_ oG_,1; r]
NVaIL ; E
I
Yellow frame
3Hold down the SELECT
button tbr at least role
secolld:
The selected scelie will be
doubly f_'amed iliyellow
and blue,
4Use thejoystlck to se]ect
tile, Iast scene In the failge
you want, and then press
the _/II breton:
Double frames in
7etlo_ and blue
Note;
• YOUcan know the _tstu8of scene._from the colors of
cursor and bargraph:
Yellow Blue Current cursor position
Range of scenes belng
selected
• Pre,_sing the I_/1| button after sele_ing _z_ene_will play
back only the selected soenes from the beginning of
each.
_u Con aloe Select Be.one8 in reverse from the last _¢ene
in the range¸
• TO_lease multiple selestion, pres_ the 8ELECT or D
butch after st_ b 4.
• Up _ 999 scene_ can be selected for be_ disc and card.
'['he ltltl rtlbrlalls ofscerles
In the sped:tied rangewHl
be Ik'amed in re,d, and
then se]ecl_xL When scenes uptothis
point are selecbd
98
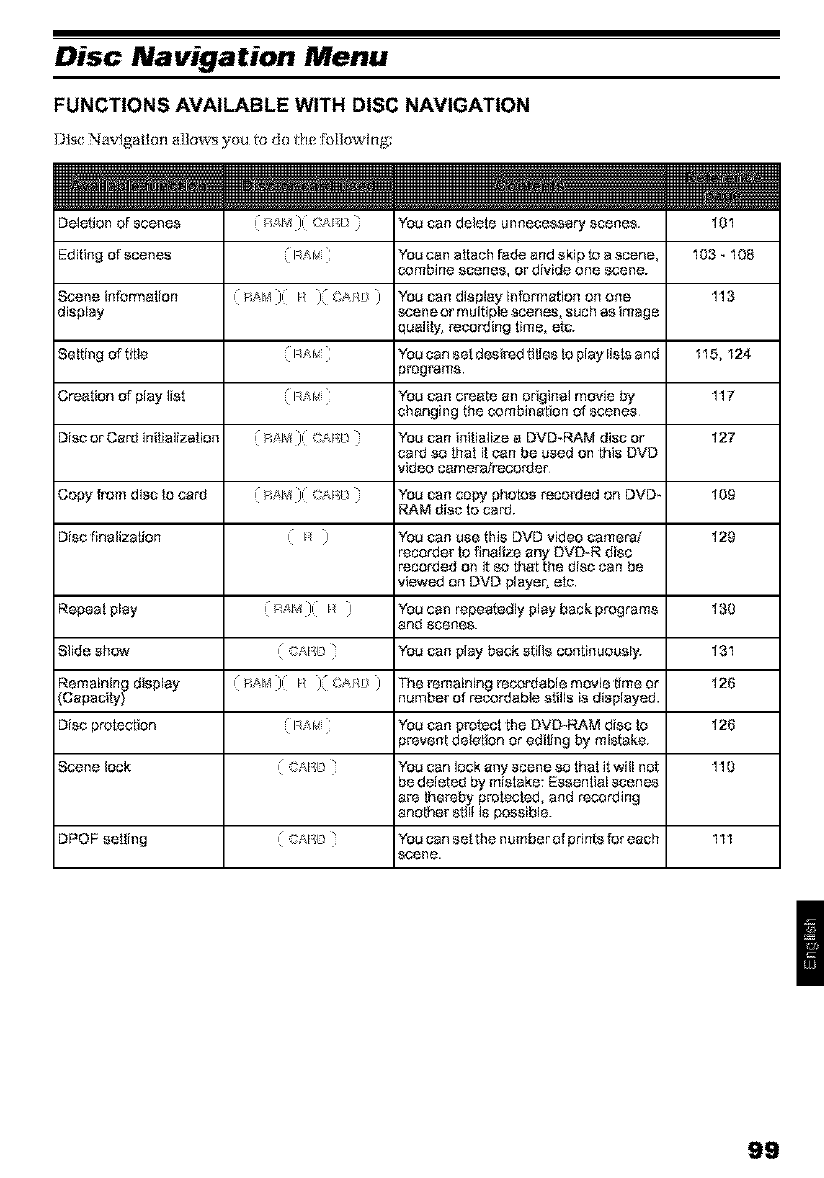
Disc Navigation Menu
FUNCTIONS AVAILABLE WITH DISC NAVIGATION
I)lsc Navlgallon a31ows you _ do lt_e g)llowIng:
Deletion ofscenes
Editing of scenes
Scene information
display
Setting of title
Creation of play list
Disc or Card initializalion
You can delete unnecessart scenes. 101
You can attach fade and skip to a scene, 103 _ 108
combine scenes, or divide one scene.
) You can display information on one 113
scene or multiple scenes, such as image
quality, recorYJingtime, etc.
Iqi_l_ ; You can set desk_d ti!les to play lists and 115, 124
pmgrams
lqi_i_; YOUcar create an original movie by 117
changing the combinedon of scenes
(F;Z'I%_)(CAIb YOUcan initialize a DVD-RAM disc or 127
card so [hat itcan be used on this DVD
video camera/recorder
::=
Copy from disc to card (RJH'4)( CAI L'_ YOUcan copy photos reco_Jed on DVD- 109
RAM discto card.
Disc flnalization ( t/ ) You can use this DVD video camepai 129
recorder lo finalize any DVD-R disc
recorded on it so that the disc can be
viewed on DVD playec etc
Repeatplay ( F;Z'I%¢](t/ ) Youcanrepeatedlyplaybackprograms 130
and scene&
Slide show ( C,_lb You can play back stills contlnuously. 131
Remaining display , RAI_ "1=I/ I" _/&J_DJ The remaining recotTJablemovie time or 126
(Capacity) number of recorYJablestills is displayed.
Disc protection lqi_f_; YOUcan protect the DVD-RAM disc to 126
_{_venLdel_Lion or edi!{ng by mistake.
Scene lock ( C,_lb You can lock any scene so that it will not 110
be deleted by mistake: Essential scenes
a_ #lm_by prelected, and recording
another still is possible.
DPOF set!ing ( C,_Ib You can set the number of pdnts for each 111
scene.
99
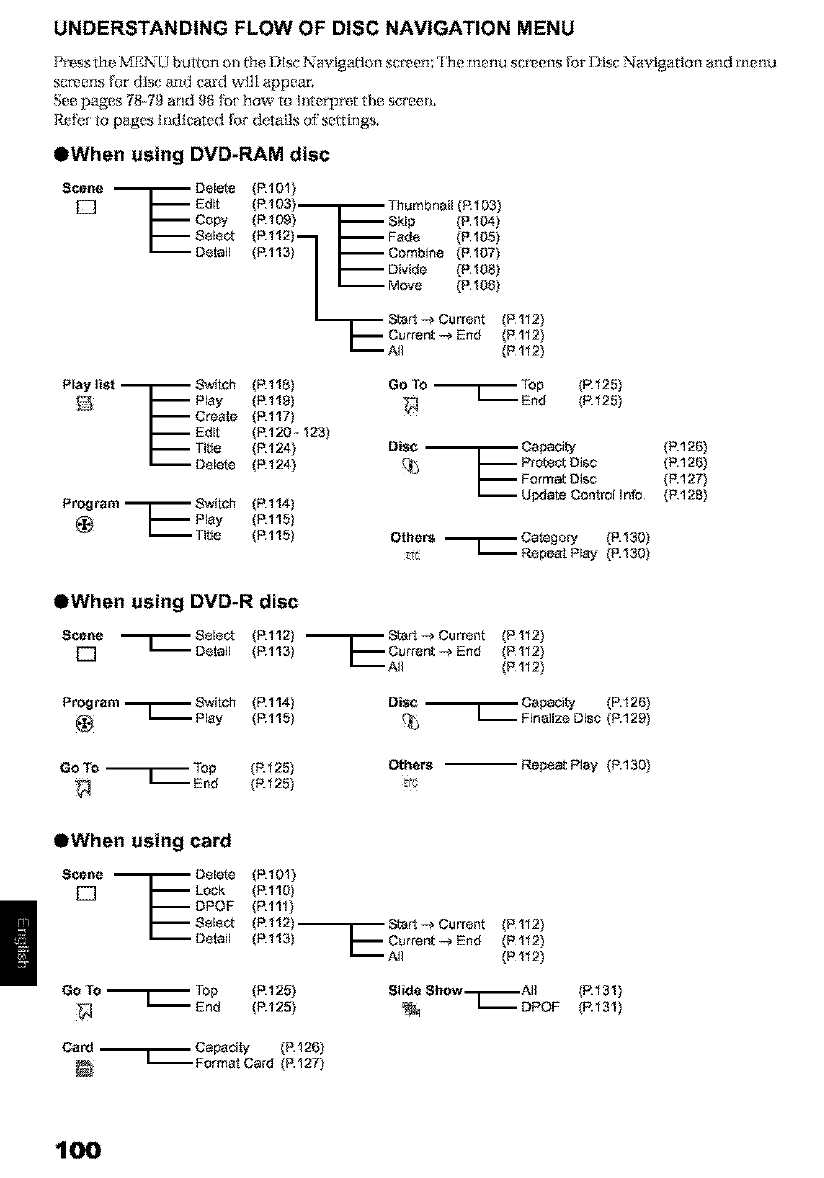
UNDERSTANDING FLOW OF DISC NAVIGATION MENU
PP_ssItte, MF,]%"U but_orl on i_le i_)isc IX*a_"lgaYloll sllf_oll; 'l'h o rn_flu set, oils __1"Dlsg _,_ra_"l_atiall arid tflerlk!
screens [cJr disc and _'au'd will app_ac
Se_ pages 78-79 and 98 tbr how to hirerprer th_ screen.
RefT_{to pages i_ldica[cd for details of soirings.
OWhen using DVD-RAM disc
Scene -_ Delete
E] Edit
Copy
Sels_
Detail
(R10'l)
(R103)_ Thumbnail (R103)
(R109) I,iSki p(P 104)
(P.112) "i I I,I Fade (P 105)
(PA131 I I.I Combine (P107)
I_ Move (P106)
Start-_ Current (Pl12)
p Current -_ End (P 112)
LI-- All (P 112)
Play list ---1-- &_itch (E118)
_ _ Play (P.118)
Create (P.117)
E Edit (P.120 - 123)
Title (P.124)
Delete (P.124)
Program ---_S_tch (E114)Play (R1'15)
Title (R115)
Go TO Top (P.125)
_-4 _End (P.125)
Disc _ Capaci_, (P.126)
[_ Protect Disc (P.126)
Format Disc (P.127)
_ Update Control Info (P.128)
Others Category (P.130)
_c _ Repeat Play (P.130)
OWhen using DVD-R disc
Scene Select (P.112)
[] _ Detail (PJ 13) -IE Start -) Current (P 112)
Current -) End (P 112)
All (P112)
Program Switch (R114)
_Play (P.115) Disc _ Capacibd (P.126)
Finalize Disc (P.129)
GoTo TOp (R125) Others Repeat Play (P.130)
OWhen using card
Scene
[]
-L Delete (R101)
Lock (R110)
DPOF (E111)
Select (Rl12)-_r_Stert-)Current (Pl12)
Detail (Ft113) I,iCurrent-_En d (Pl12)
_All (P 112)
Go TO _ Top (P.125) Slide Show All (P.131)
End (P.125) _ _DPOF (P.131)
Card _ Capadty (P.126)
-- Format Card (P.127)
1OO
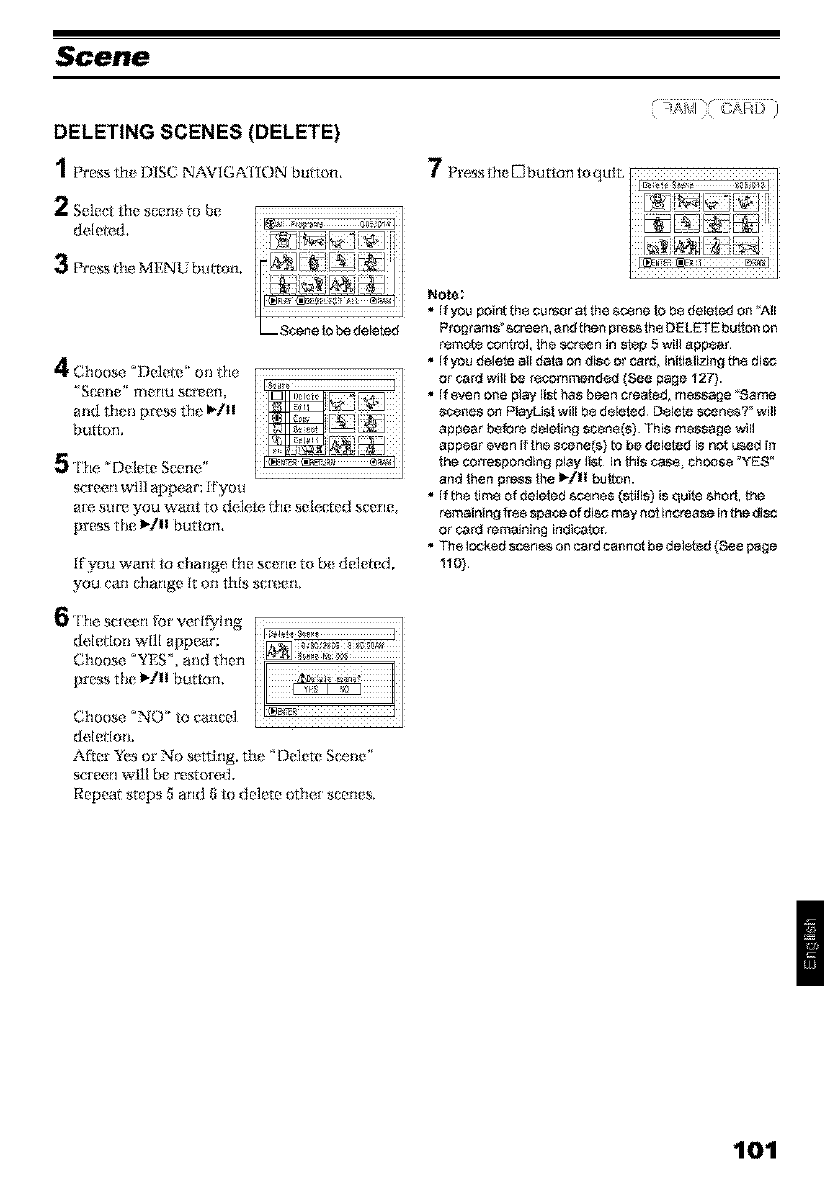
Scene
4Choose _Delete ' on the
and _en p_ss _e _I!
huron.
5The "Delete Scene"
screen will appear: IFyou
a[_ st_re you want to del_ _le sele_ed scerlc
press the _ll button,
Kyou want to change l}le scene to b_ deleted
you can C|l_rlg_ It on this SC[_ erl,
6 rI'_;e sc[een for ve[I_¢Ing
deletion will appear:
Choose °YES", and then
press the _/11 button,
Choose _NO' to cance]
deletion.
After Yes or No setting, the °Delete Sc_ne"
screen will be restore&
Repea_ steps 5 and [i to de]ete othe_ scenes.
Note;
•If you point th8 carsor at the sc_ne IO b8 deleted on _A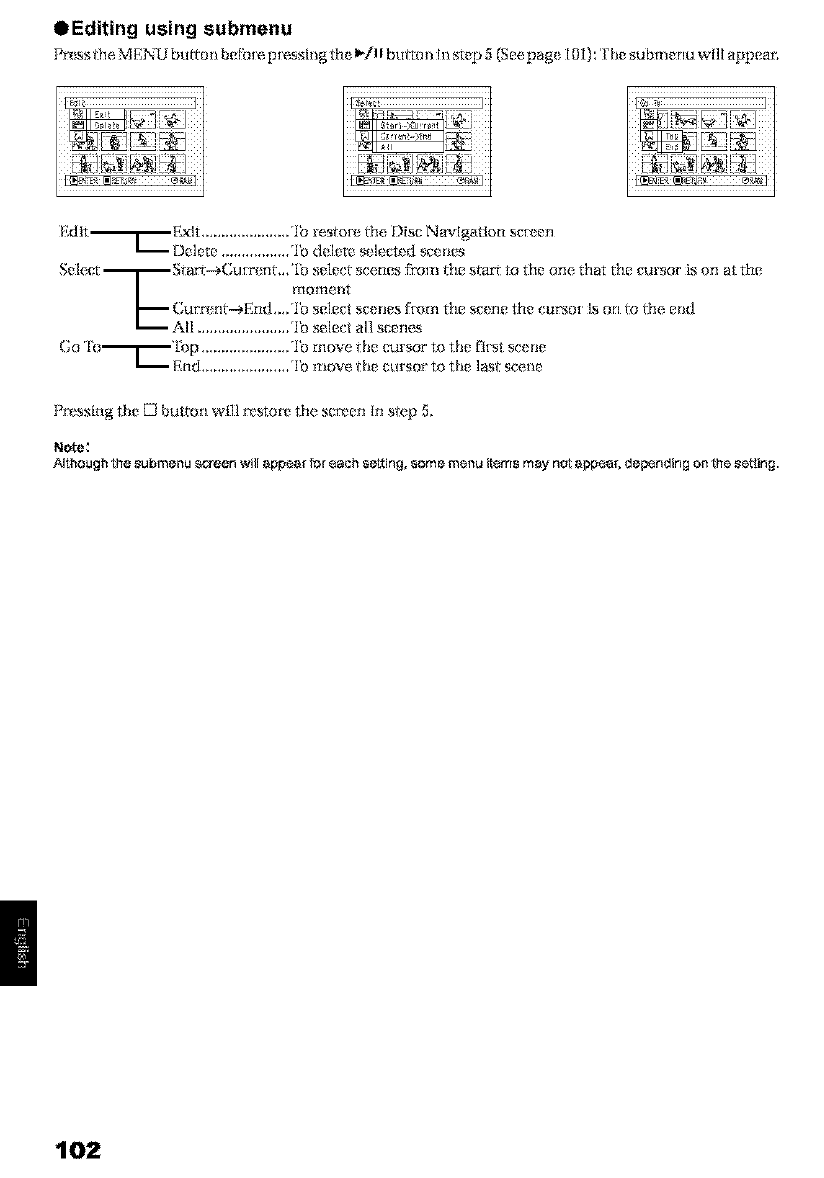
OEditing using submenu
P_;s,__heMEJX_Ubut'_on bcqbt_'_t_t_slng t_ _/_ t_';u_Tonhi step 5(See,pag_ I_I): 'lhe submenu will appear_
Edit'----T----Exit ...................... 'lb restot_ 1he Disc Navigation sc_* e:n
t---- Delete ................. 'lb delete s_lected steams
Sele_ mr---St_rr-eCu_ent.,'lo select scenes _o_r_ the sta_ to the one that the cursor is on at the
/mot r oit
i......._ All ....................... 'lb select all scenes
Go 'f'll-------T_'Lb p ...................... 'lb move *hecursor to the first sc_e
t'-'-End ...................... '1_1ltlove *he gtlrsof {o the last Scelle
Pr_,ss:lng the D button will r_stor_ the screen In step 5,
Note_
ARhouc_fi _he submenu sQ*een will _rape_r for 8_h _ett[ng, _ome m_nu item_ m_y no{ _pra_r, rJepenrJing on _h_ s_fling.
102
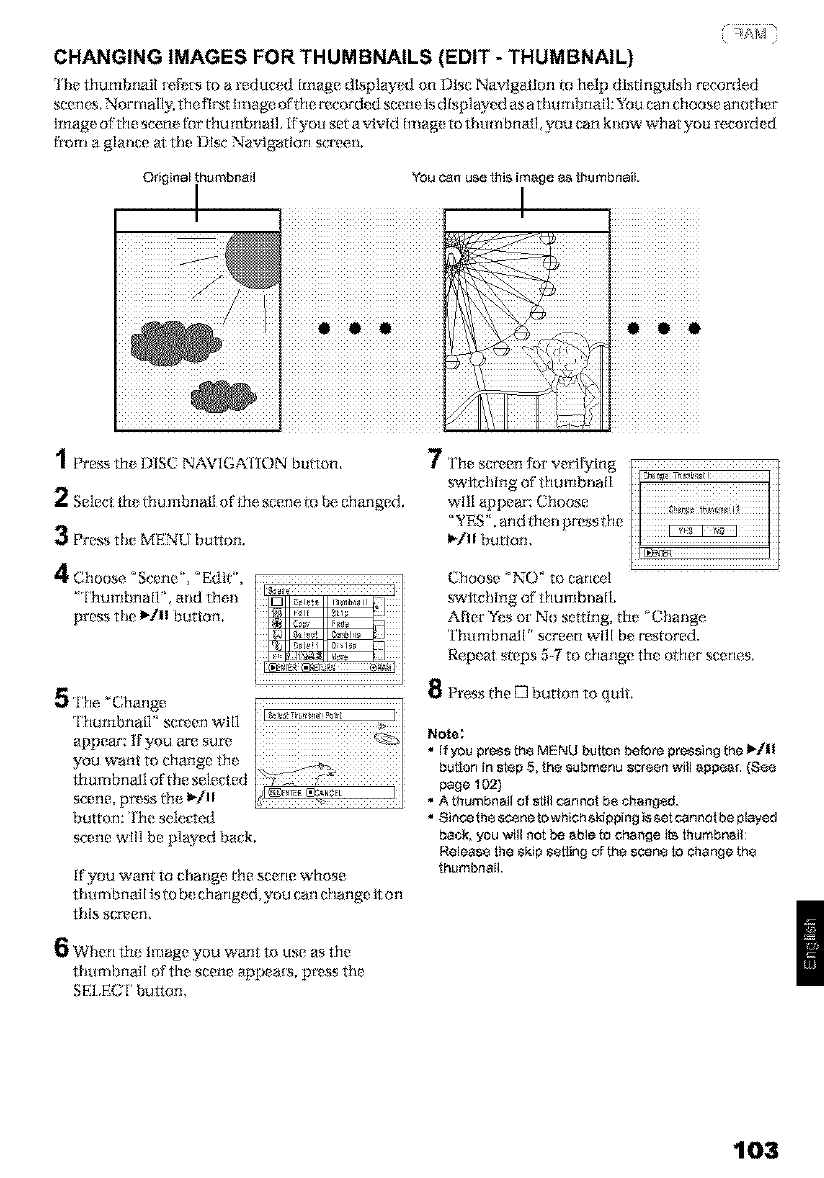
CHANGING IMAGES FOR THUMBNAILS (EDIT - THUMBNAIL)
lhe thumbnail [e[et s to a reduced Image dlsplayed on Disc Navigation m help distinguish recorded
scenes, Normall N the fl_t image of the recorded scene is displayed as a thumbnail: You can choose another
image of file scene Ibr fllumbnal]. IFyou set a vivid imag_ to thumbnail you can know what you re,cord_ d
fh}m a glance at the Disc Navigation screen.
Original thumbnail You can use this image as thumbnail.
1 Press the DISC NAVIG,,_2I tON button,
2Select the thu mbnall of the scene to be changed,
3 Pre_ the MENL! button,
4Choose°Scer,e',_Edit', I]
' Thumbnall'_ aim thel_ _ol
press the I_/ll button,
1
The _'Change I
ThumbnaiF se_en will t
appea': Kyou ar'e sur_
you want to change the
thumbnailscene,pmss°fthetheI_/llSelected[__!!i_ #ii_f! lj
button: 'lhe selec-ted
scene will be p]ayed back,
If you want to change the scene whose
t hum bnaiI is to b_ changed, you carl c|lange it orl
this s_en,
When the image you want to rise as the
thumbnail of the scene appea_s, press the
SEI,F,CI' button,
7The scrven _br verifying
switching of thumb_laIl t_ _ ]
will appear: Choose
"YES", and then press the
I_/11 button,
Choose 'NO _ to cancel
switching of thumbnail.
AIier Yes ot No setting, the °Change
'['hu mbnail' screen will be restored,
Repeat steps 5-7 to change th_ other scenes.
8Press the [3 button to quit,
Note;
•If you press the MENU button before pressing the I_tll
button in step 5, the _ubmenu screen will appear ($88
page 102)
• A thumbnail Of still cannoI be Changed.
• _ince the _ne _owhich skJpging i_ set cannot be ptayed
back, you will not be able to change its thumbnail
Releas_ the skip setting of the scene ts change the
thumbnail.
103
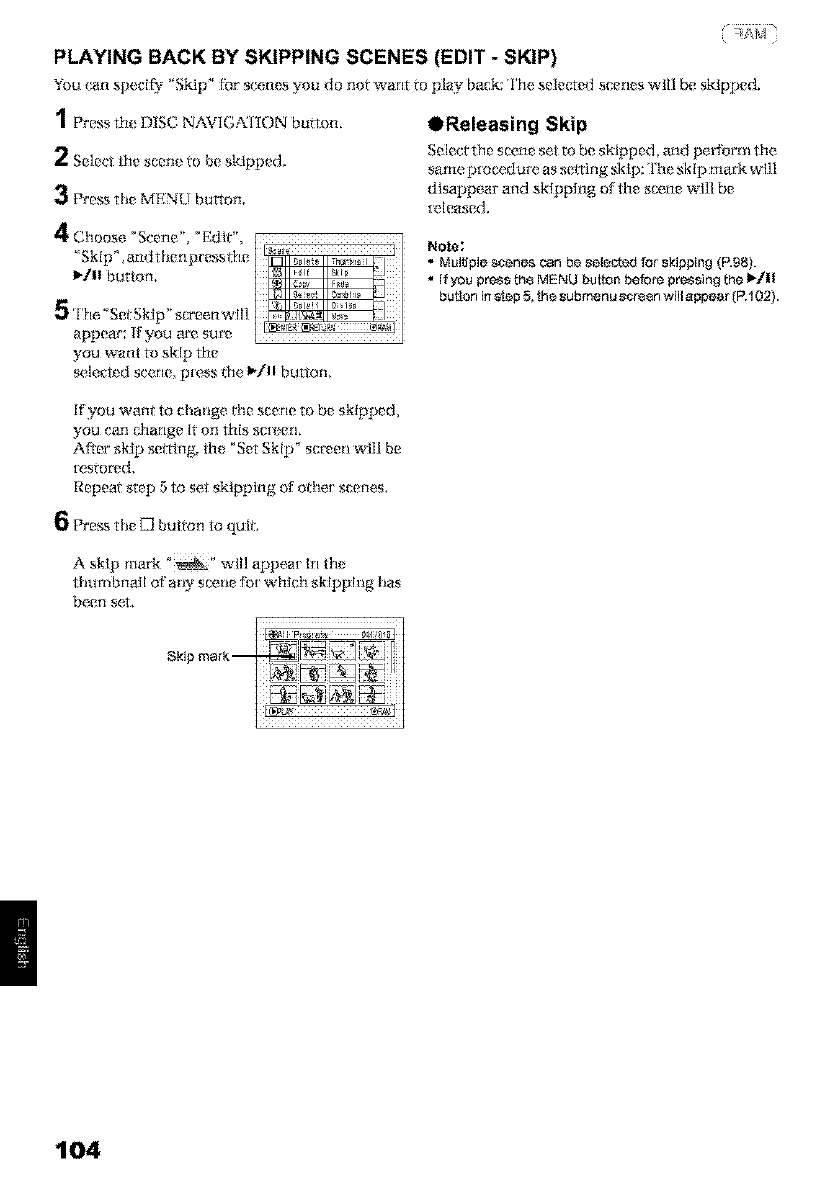
PLAYING BACK BY SKIPPING SCENES (EDIT -SKIP)
You can spe,ci_ _'Skip" f_r'scenes you do not want _oplay' back: The,selecte_t scen_s will be sMpped.
1 Press th_ DISC NAVIGKI ION bulton.
2Select the scene to be skipped.
3Pre_ the MENU button.
OReleasing Skip
Selec_the scenesetto beskipped_and perform the,
s_me p_ocedure, as seiring sklp: 'lhe skip mark will
disappear and sMpp_ng of the se_ne will be
_e,leased.
Note:
•Multiple sr,enes can be sele_rJ for skippin 8 (E98).
• If you pres_ th8 MENU button befo_ pressin_t the _!1
but!on in G_ep5, the _ubmenu scr88n will appear (E 102).
you want to sMp the
sele_te t scene, p[ess the I_/11 button
If you want to change l}le scene to be skipped,
you can c|l_rlge It on this scI_;,erl,
AtYer sklp se_ting_ the "Set Skip _ se_e_ will be
[estor_d,
Repeat step 5 to set skipping of othex scenes,
6PreKs the E3 button to quit.
A sklp mark _ will appeal In the
thulnbnaH of al_y scet_e fl)[ whlch sMpph_g has
been set,
104
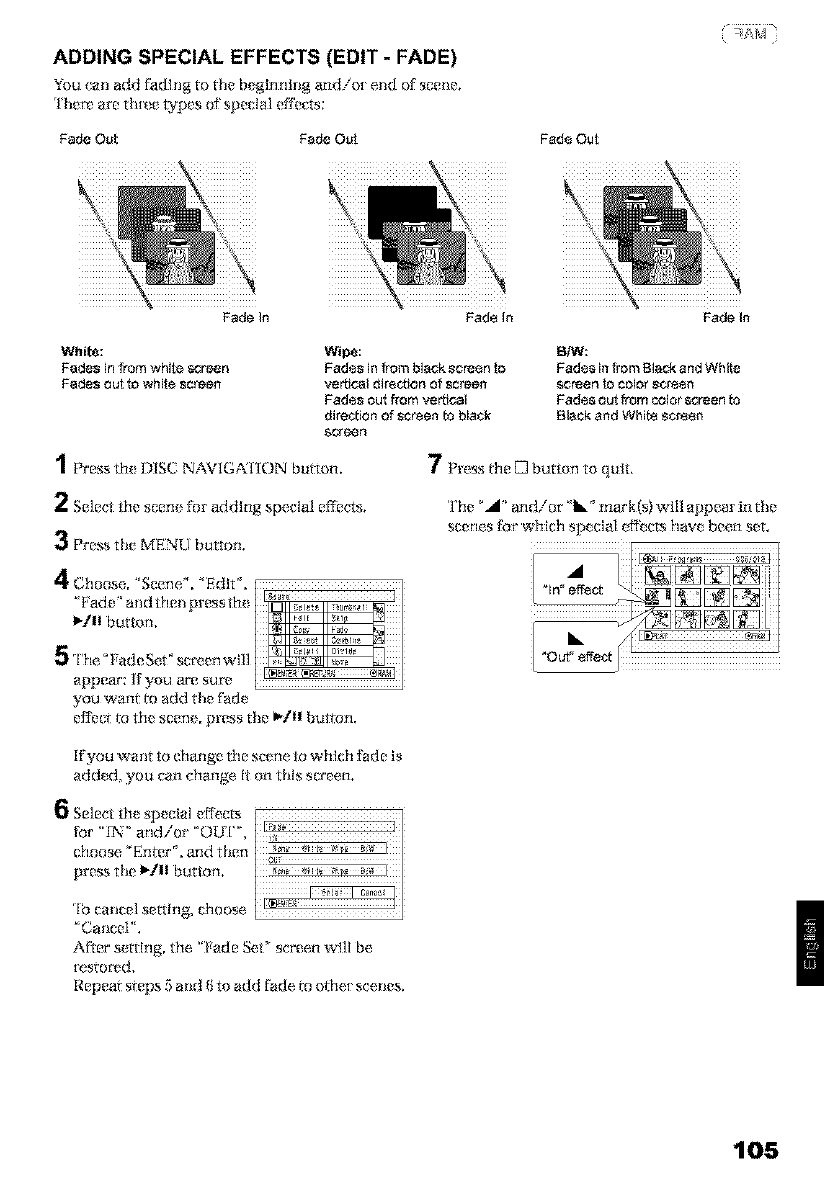
ADDING SPECIAL EFFECTS (EDIT - FADE)
You ca_ladd f_ding to the beginning andio_end of scene,
'l her_ are th_e types ofspecial effects:
Fade Out Fade Out Fade Out
Fade In Fade In Fade In
Whito:
Fades in from white sczeen
Fades out to white screen
Wipe:
Fades in from black screen to
vertical direction Of screen
Fades OUt from vertical
direction of screen to black
$_?£eerl
1 Press th_ DISC NAVIGKEK)N button.
2Select the scene [br addlng special effects.
3Pre_ the MENU button.
51W:
Fades in from Black and White
screen to color screen
Fades out from color screen to
Black and White screen
7Press the D button to quit.
The __1'_and/or '_illk_ mark (s) will appear in the
scerles fa_ whlctl special effects have been set.
you want to add the fade
eF{_ct to th_ scene, press the I_/II button.
If you want to change the scene to whlch t_de is
a_d Lyou canchange l¸ on thls screen
6Select the special eF{_cts
for _'_N" and/or "OIF[' '
choose _'F,nter ° , and then
press the Ib/ll button,
'Ib cancel setting, choose
'Cancel".
After serLing, the "Fade Set" screen will be
Repeat steps 5 and _ _ add fade to o_e_ ¸scenes.
105
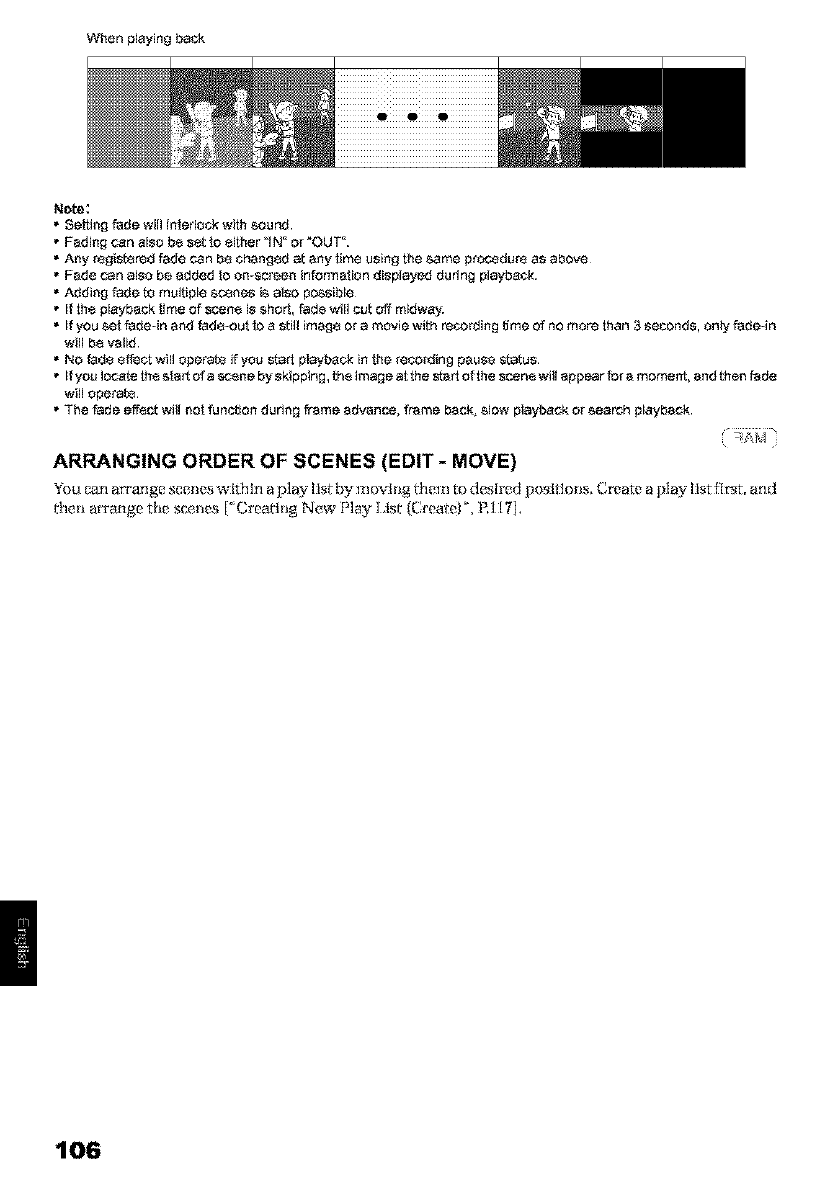
When playing back
Note:
• Setting fade will intoriock with sound.
• Fading can also b8 sst to adher "IN _or _OUT _.
• Any rsgi_red fade can b8 changsd at any time using the same ptoc_dur8 as above¸
• Fade can also be added to on-_creen infarmction distiiayod during tiiayback.
• Adding fade to multiple scenes is also possible¸
• if th÷ playback time Of scan÷ is short, fade will cut off midwa_
• If you set fadeqn and fad,-out to a ctilI imag8 or a movie with recording time of no more than 3second_, onty fade-in
will b8 valid
• NO fad8 8ffect will operat_ if you ctart tiiayback in Ihe recording pause _t_us.
• If you locate th_ cta_ of a _ne by skiading, th8 image at the start of the scan8 will appear for a mome_, and then fade
will otietat)_
•The fade effect wiiI not fu nctton during frame advance, f_ame back_ _low tiiayback Or search playback¸
ARRANGING ORDER OF SCENES (EDIT -MOVE)
You canarrange sceneswidlln aplay lis_by movll_g flleln to d_:slr_:dposlfl oils, Cr_at_aplay list _t, and
l_len arrange the sc_nes [' Crea_lng N(_wPlay list _;rea_e)', EI 17],
106
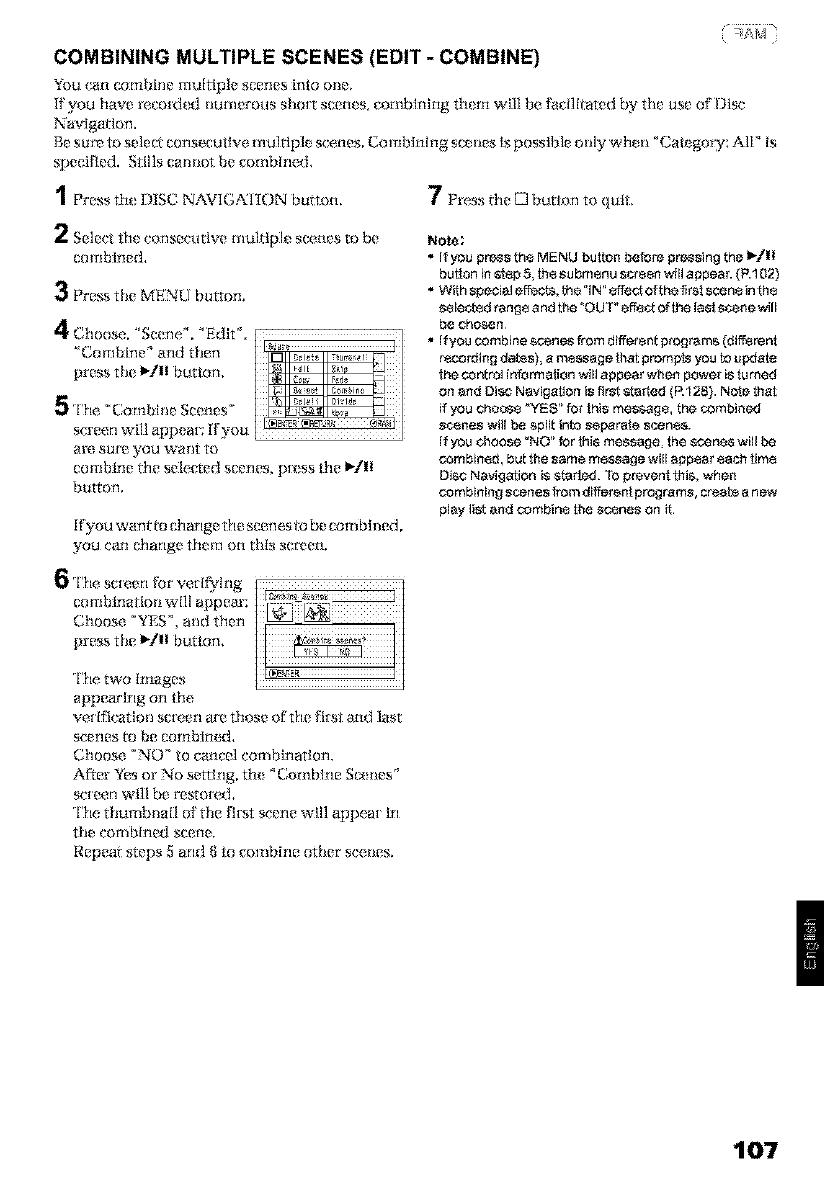
COMBINING MULTIPLE SCENES (EDIT -COMBINE)
_U can eortlbine tutti,pie _eenes into O_e,
[f you have re, cord_ d rlumerous short scenes, comblnlng them will be, _t_{ll_ared by the use of Disc
Navlgmton.
Be sur_ to selec_ consecutlve mulr|ple scenes, Comblning six nes Is possible only wh_n _Ca/_ gow: All" is
specified. Stills cannot be combine&
1 Press th_ DISC NAVIGNI tON bulton, 7Press the [3 button to quit,
2Select the consecutive multlpk scenes to be
combined,
3Pre_ file MENU button.
are sureyouwantto
combine _le selected scerles, _t_!ss the l_]ll
bu_on.
If you want to change tim scenes l_?be combined,
you can change them on this se_en.
Note;
•if you press the MENU butto_ before pressing the I_./!1
buflon in _ag 5, th_ su bm_nu screen will agpear. (R 102)
• With special effects, f_e "IN_'8ffeat ofthe fkst scen_ inth_
s_lec_ed rang_ and the "OUT" effe_ _ the la_ scene will
be Chosen
• Ifyou combine scenes from different prog_ms (different
r_co_ing dates), a m_ssage _at prompts you to update
the Control informa_on will appear when power is tureed
on and Disc Navigation is first _tar_ed (R 128). N_e that
if you ChOeS_ _YES _'for this message, the combined
s¢ene_ will be split into separate scen_.
If you choose _NO" for lhi_ message, the scene_ will be
combined, bu[ the s_me m_e will _pp_ _ach tim_
Disc Navigation i_ _arted. TOprevent this, whe_
combining _cenes from diffo_ent programs, cre_t_ anew
play list and combin_ the scones on it
6The sc[een {or vet l_,lrig
combinatio_l will appear:
Choose _YES", and then
press the !_./!1 button,
'l'|l(_,two {rtlageg
appearing on/he
veI [flcatlon scIeen are those of the {Itst and last
scerles to be eortlbined,
_boose _NO '_to _all_el colllb[rlattorL
Affor Yes or No settlng, th_ °Comblne Sixties °
screen will be restore,&
The thumbnail of the firat scene will appea_ [r_
the coltlbIrled scene.
Repea_ steps 5 and {ito comb{he other scenes.
107

DIVIDING MOVIES (EDIT -DIVIDE)
YOU ('an divk_e a sce_le hire two part**;.
lb de ]e_o u rir ie('essar'_ ,_poil:lon of scene, tlrs[ db,_ld e 1_1¢scene, and t|lcn delete l_le t tnliet'_ssa[_ _j)or florl.
You can also cut out a part of scene and use, it In the play llsL
1Press th_ DISC NAVIG;_21 ION bu_ton,
2Select the scene to be dl_'ided.
3Pre_ the MENU button,
are sure you want to
d%'lde the selected scene, press the _/II bm Fen;
The sele_ed scen_! will be pI_ed back,
Kyou want to change l}le scene to be divided,
you can C}l_rlge It on this 8cI_erL
The selected scen_ will be played back,
Note:
• If you press the MENU button before pressing the I_/!1
bu_on in _ep 5, the su bm÷nu screen will appear. (R 102)
• The _taius bar of _¢ene being played back can be
switched off or on by pressing the DISPLAY button.
• Search and fPame advance are useful when designating
division _irds.
• If aspecial effect has been added to the eriginel scene,
the "IN_effect will be added to f_e firs_ half of scene, and
ihe "OUT effect, to f_e lat_er half.
•Th_ division point may drif_ before or after the designated
paint by apare×imately 05 seconds.
• Since a scene with a skip set cannof b8 played back, no
division pctr_ can b_ spac_ed: Release the skip for the
scene before dividing it
•Ifthe division pctnt is at a still, a message will appea_, but
no division will be made.
• If the division point is at f_e _tar_ Or end of a _cene, a
message will appear, but no division will be made.
• A movie scene who_e recording time i_ 0.5 _econds o_
less cannof be divM_d.
• If free space available on disc is ins_mcient, division will
not be possible: Delete unnecessary scene&
• Pressing th_ E] button On t_e screen for red ficaiton will
_e¢_for8_e thumbnail display screen.
7The screen tbr re{ I_zing
division will appear:
Choose °YES", and then
press the _/!1 button,
lNafos bar of soene
being played back
Choose _NO' to cancel
division.
After d ['Tlslon_ th_ ' Dlvide Scene" se_en wI]l be
{estor_d,
Repea_ steps 5-7 to dWlde miother scenic.
8Pr'e&s the K] button to quit.
108
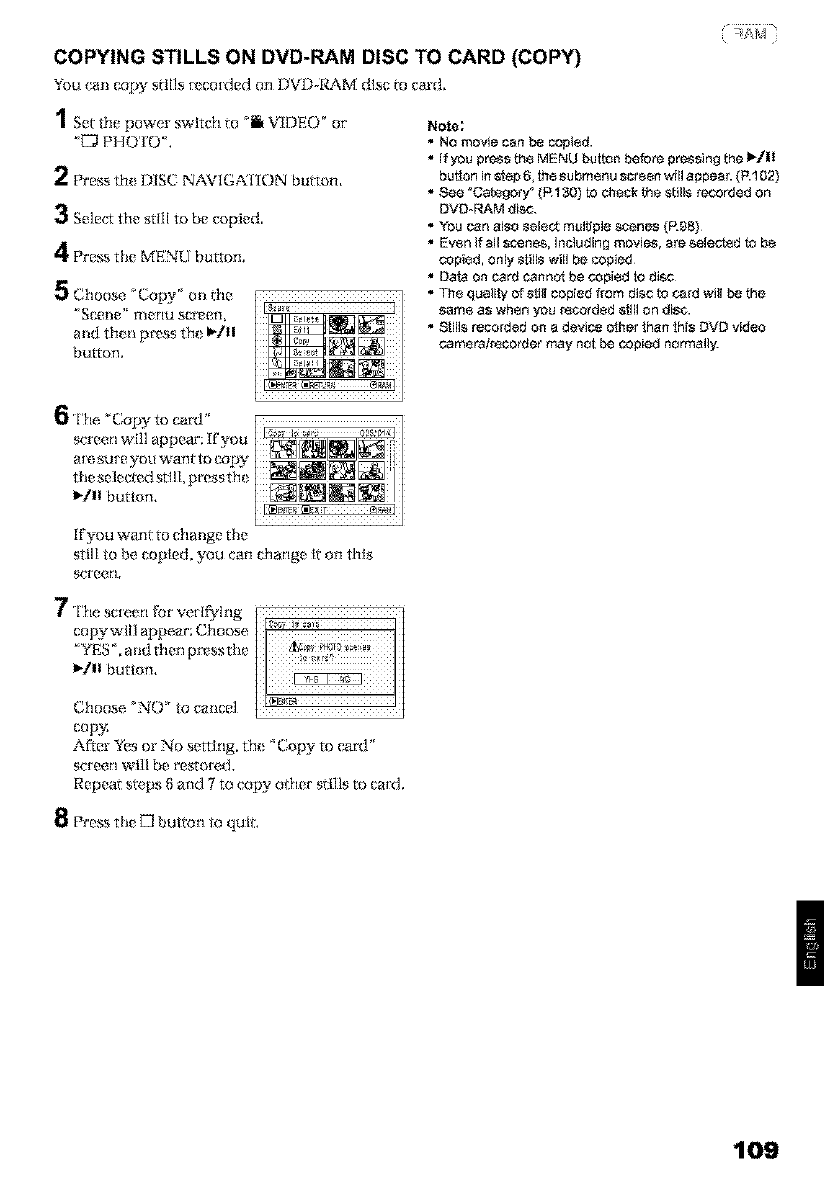
COPYING STILLS ON DVD-RAM DISC TO CARD (COPY)
You cm_copy stills _ corded cm f_VD--RAMdlsc _o cm_d,
1Set the power switch to _ VIDEO" or
'_ PHOTO'.
2Press th_ DISC NAVIGKI ION bulton.
3Sr_le_ the still to be copied,
4Pre,_s the MENU button.
5Choose _Copy _ oil t|m
' Servile" ill, flu S(ir_011_
and theti press th_ _/II
button.
Note;
•NO movie can be copied.
•If you press the MENU button before pressing the I_]!1
but!on in _ep 6, the su bmenu screen will appear. (R 102)
• See _Category" (R130) to check _e _tills recorded on
DVD-RAM disc.
• You can al_o seisct multiple scenes (F198}
• Evsn if all scenes, including movies, are sele_ff;ed to be
copisd, only stills will be copied¸
• Da_a on card canno_ be copied to disc.
• The quality of _till copied from disc to card will be f_e
sam_ as when you recorded _11 On disc.
• 81ills recorded On a device otller _han _his DVD video
cams_irecorder may not be copied normall_
6l,e %opy to caM"
screen will appear': If you
ate sum you want to copy
ttie selectr_d stl I1.press th_ _i
I_tll button.
if you want to change the
still to be copied, you can change it on this
scr_e.rl.
7rhesc[eer, orveH_qng
copy will appear; Choose
'YES _. and then pr_ssthe
I_/ll button.
Choose _NO' to cance]
cop}:
After Yr_sor No setting, th_ "Copy to caM"
screen wi]l be restored.
Repea_ s_.ps 8 and 7to copy oilier sti]ls to card.
8Pre&stile [3 button to quit,
109
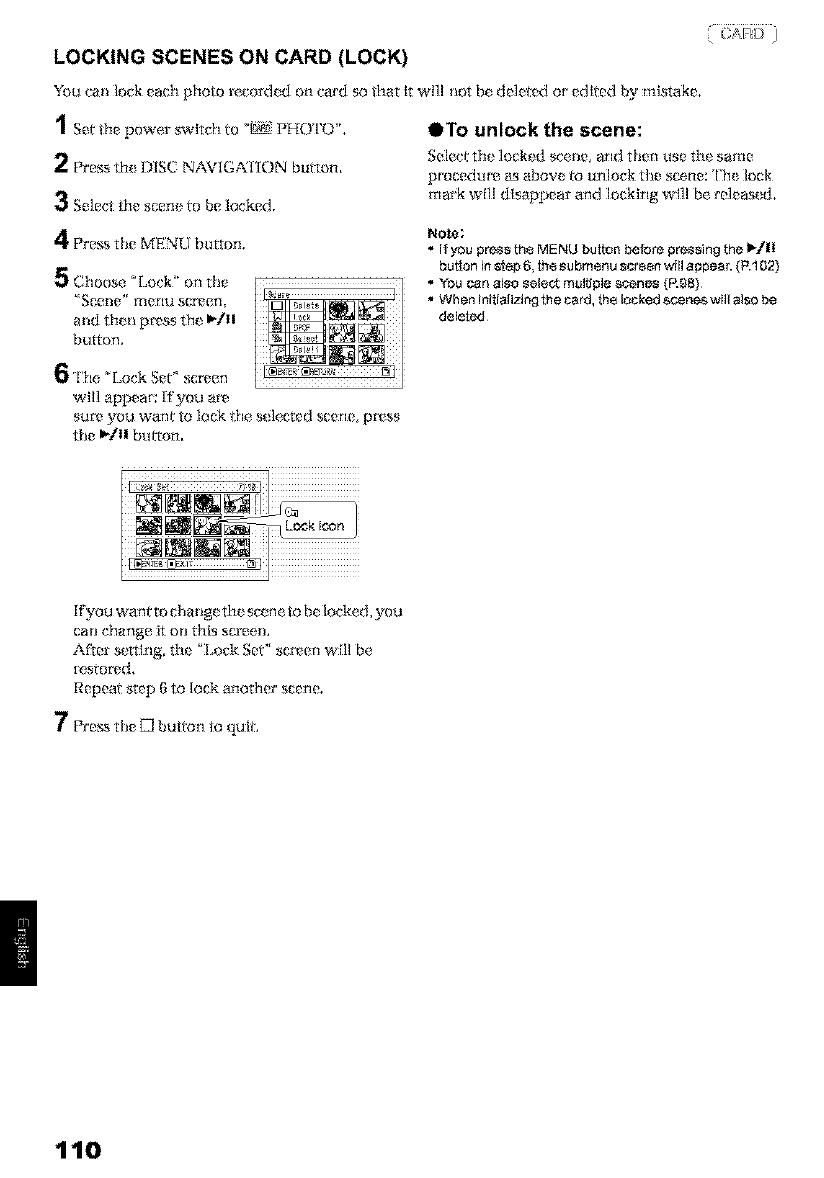
LOCKING SCENES ON CARD (LOCK)
You cmi lock each photo recorded on card so that It will _lot be de]eted or edlted by mistake,
1set the power swltgh to _ PHOTO +'. OTo unlock the scene:
2Press th_ DISC NAVIGA21 ION bulton. Select the locked sce,tm_ and then use the same
procedure as above to unlock tile scene: "l'h_ lock
3Select the scene to be locked, mark will disappear and locking will be re]eas* d,
4Pre,_s tile MENU button.
5Choose _Lock ' on the
'_Scelle " l_le tilt s{_f_en,
_nd then p_ss the _/I!
burton.
Note;
•If you press the MENU bugon befOre pressing the I_/!1
button in _p 6, fo_ _u bm÷nu screen will aedear. (R 102}
• You can also _el_ muRiple scenes (F[_8)
•When initializing the _a_l, fo_ locked _¢enes will also be
deleted¸
6'l'he_"Lock Set" screen
will appear: If you arv
sur_ you want to lock the, s_ le,cted scerlt?_ press
the _/II breton.
Kyou want to chmlge the scene to be locke, d, you
can change it on tills SCI'r_II.
Afmr sertlng, th_ _I.ock Set" screen will be
_esmmd,
Repea, step l}to lock another scene.
7Pre,_s the _ button to quit,
110
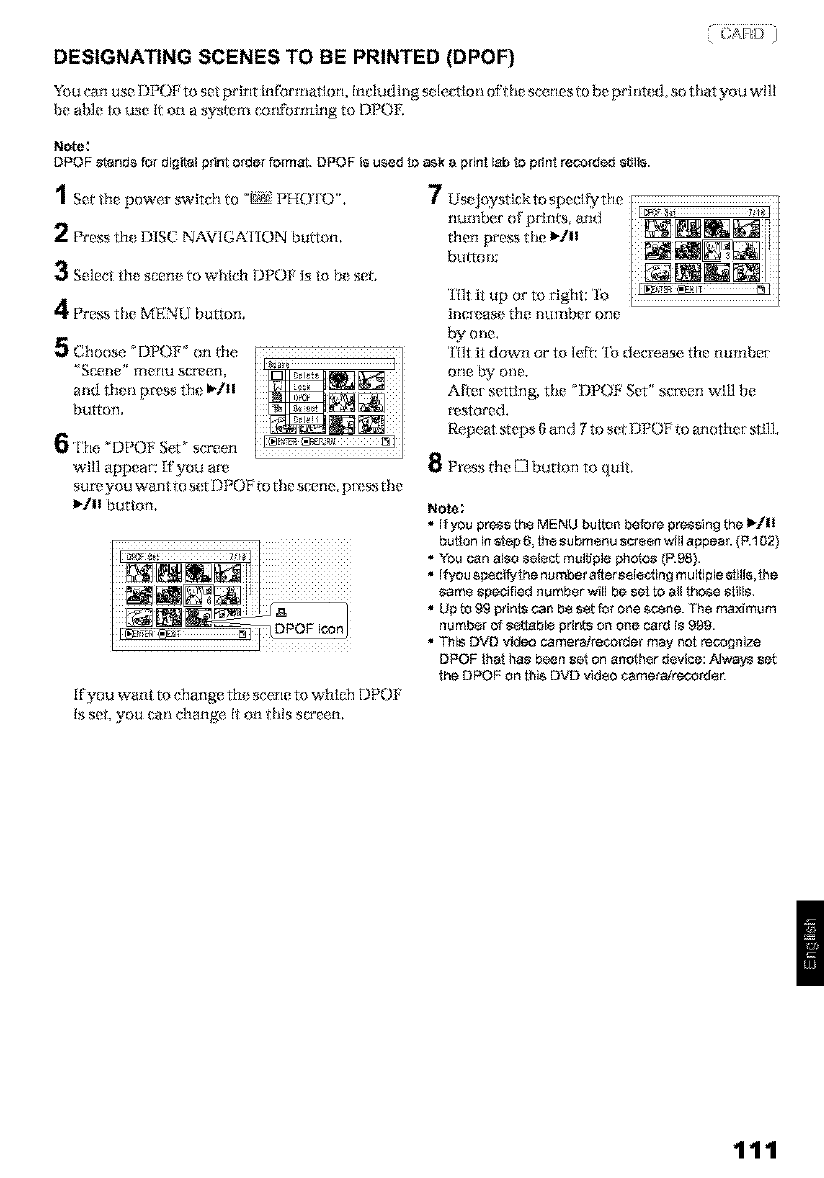
DESIGNATING SCENES TO BE PRINTED (DPOF)
You can use DPOP to set print infbrmatlon. Includilig sdectloti of the scenes to be prhit_ d_ so that you wI]l
be able _ use It on a system con:_rrutng to DPO_.
Note;
DPOF stands for digital print order formal. DPOF is u_,ed to ask a print lab to print recorded stills.
1s,t the power switch to _ PHOTO'.
2Press th_ DISC NAVIG._;I ION button.
3Select the scene to wltich DPO1a is to h_ set.
4Pre,_sthe MENU button.
5Choose _DPOF _ on the
'Scene" ]_eritl sltr_en.
and then press th_ I_./II
bulton.
6rIlt_e _' D [_()F Set' screen
wiI1 appear: If you am
sur_ you want to set DPOF to the scen_, p_ss the
_/11 button.
7Usejoyst ick to specl Iy the
number of prlm_, and
then pre_s the I_./|1
button:
'['fit it up or to right: '[b
inct_ilse the tlultlber one
by 011_I,
Afm_ settlng, the "DPOF Set" sc_en will be
restored.
Repeat steps 6 and 7 to set DPOF to _n oth_ stJ]l.
8Press the [3 button to quit.
If you want to change the scene to whlch DPOF
Is set. you can change. It on this slx'een.
Note;
•If you press the MENU button before pressing the I_/!1
but!on in _sp 6, fo_ su bm÷nu screen will appea_ (r_102}
• You can also select mulfJple photos {R98}.
•Ifysusr_scifylhenumberafterssIe_ingmultiplesNis,lfie
sam8 specified numbsr wJ[Ibe se! to all those stills¸
• Lip to g9 pdnts can b8 s_t for o_e scene. The maxJmu m
numbsr of s_b[8 prints on one ca_ i_ gg0.
• This DVD vJd_ camer_.!recorder may nof recognize
DPOF _h_ ha_ been sot On anof fi_r d_vi_e: Always se[
the DPOF on tfiis DVD video camera!_rd_n
111
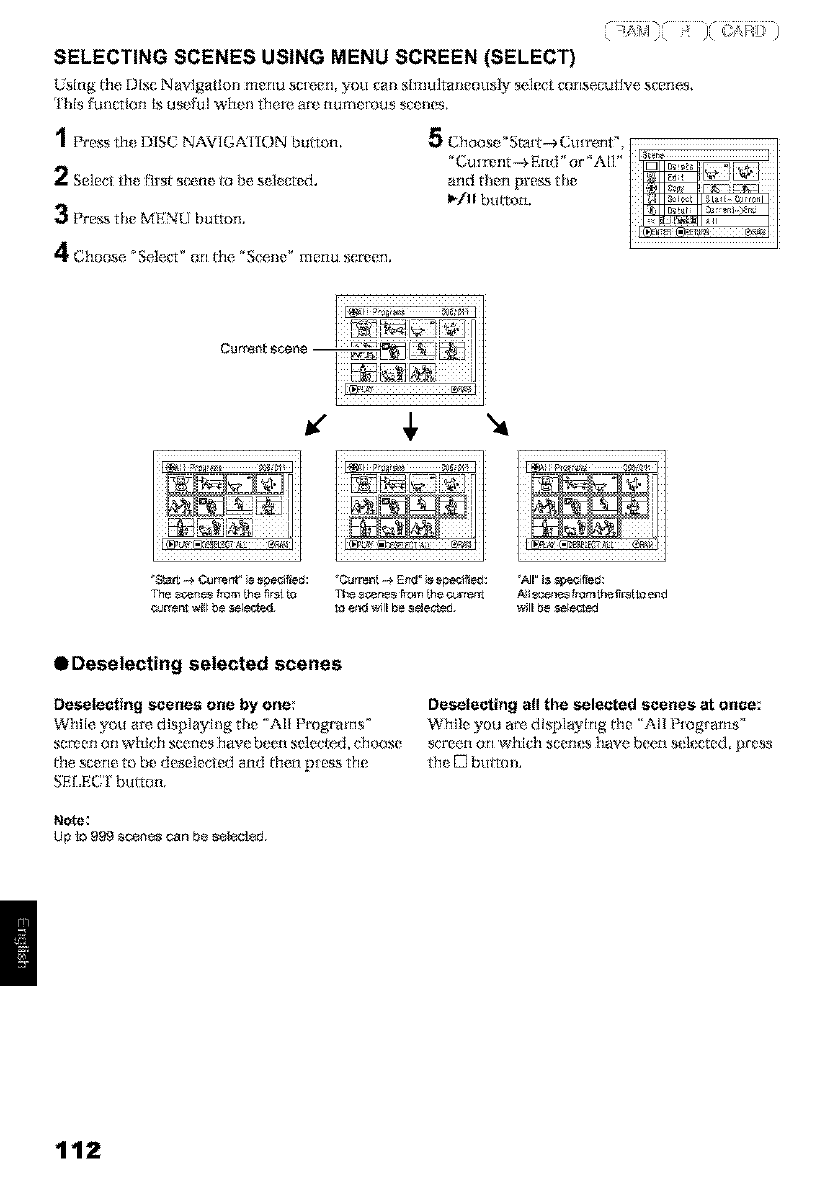
SELECTING SCENES USING MENU SCREEN (SELECT)
Using _le Disc Navlg_ttl oll rtlerlL! scIeeri, yolI va_l _llll_dtalleolisly se,h?ct _o rI_e,c!Jiive, s_elle, s,
Ihls fu_crio_3 I_ use[ul whel_/here am nu3t_ t_us sg_ _K'S.
2 Selectd_ef_rs_sc_ne_ he.sd_ cred.
3Pre,% the MENU button.
4Choose "Sele_F _ or1141e. "Scene" menu ,sc_en.
CU rfS_!: _ne --
•Deselecting selected scenes
Dsselecting scenes one by one:
While you are displaying the 'All Programs °
sc_ _n on whl('h sc(:nes have been seiec_'.d, choose
ff_e scerm to be d;_selected anti d_en press the
SE[,EC, T bulron.
Note;
Up to 9_ sennas can be selected.
Deselecting all the selected scenes at once:
While you ave displaying ffm "All Programs"
scr'(?en on which set?ll_!s have been s_ k err?d, press
th, C] bu_rolL
112
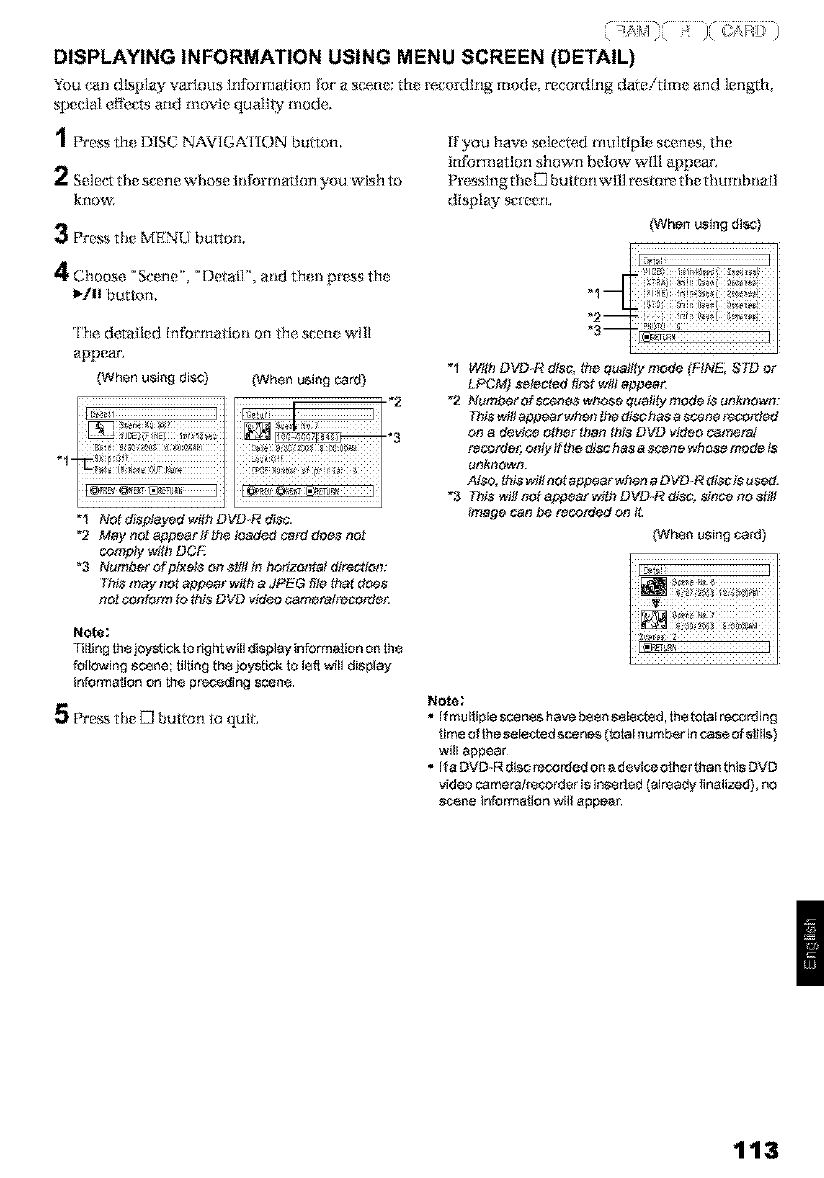
DISPLAYING INFORMATION USING MENU SCREEN (DETAIL)
YOU qall dls_]_,yVarious Iri_brmation }k_r_ scen_ ;th_ re_ordl_lg ]t_ode, recordhlg da_l?!tIl_ and ]l?ngF]%
special effk_,ctsand mo_fe quality mode.
1Press th_ DISC NAVIG,,XI:[ON bulton,
2 S_le(,t the scene whose bfforrnatJon you wish to
know.
3Pre_s the MENU button.
If you have selea_d mulgple scenes, the
infbrmation shown below wI]l appear.
P_sslng the D button will resto_ the thumbnail
display screen.
_¢Vhenusing diSC)
4Choose °Scene', _Det_l]", and th_li press th_
I_tll button,
The detailed intbrmatlot_ on the scene will
appear'.
(When using disc) (When using card)
"1-
_1 Nstdisp_ayedwithDVD.Rdisc.
*2 May not appearif_he teaped card does not
oomph/with DCE
_3 Number of pixels on still _ horizot#al directiot_:
Thi_ may not appearwith aJPEG file that does
not cordortn _o this DVD video cameta/recorder
_1 With D_,d_.R disc, the quality mode {FINE_ STD or
L_M) selected fipst will appear
_2 Nt_mper of scene_ whose quality mode is unknown:
This will appear when fhe disc has a scene recorded
on a device o#_er titan ##s DVD video _t_et_[
recorde£ only ff the disc has a scene whose mode is
Lttlknowtl.
ALSO,this will r_st appearwhen e D VD R disc is used.
"3 This will not appeal" w_h DVD.R disc, since no still
ill,aBe can be recorded on it.
(Whefi using card)
Note:
Tilting the joystick to right will display information On the
follOWing scene; tilting the joystick to left will display
informalJon on th_ preoeding scen_.
5Pre,_sthe [3 button to quit,
Note:
•If multiple scen_ have beo_ sele¢_ed, th÷ total recording
lime of the selected scenes (_tal number in case of _lls)
will appear¸
• if a DVD-R disc recorded o_ a device o_er than this DVD
video camera/recorder is inserted (aLready finalized), no
scene infi3rmaiJon will appeal
113
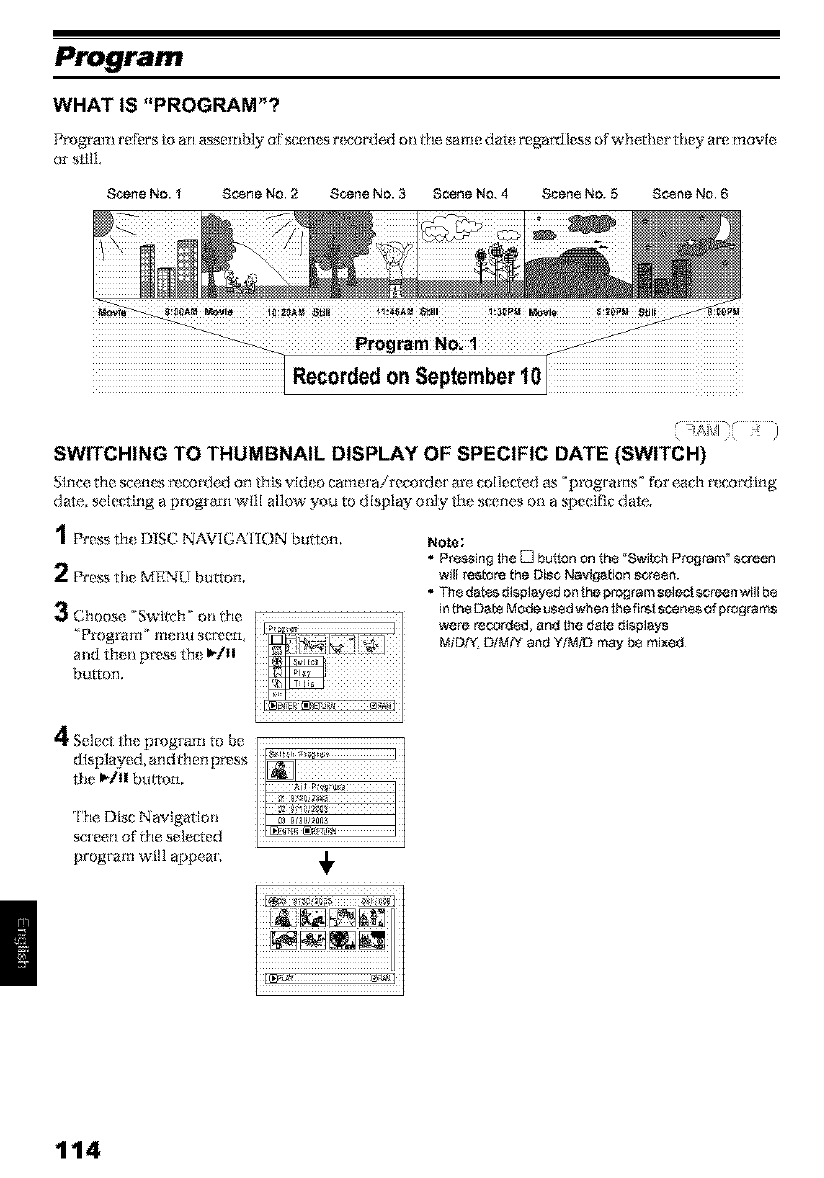
Program
Recordedon SeptemberI0
SWITCHING TO THUMBNAIL DISPLAY OF SPECIFIC DATE (SWITCH)
d at e,, se,lel_ing a pmgranl will al]ow you to display only the scene, s on a speci_i_ date,.
1Press th_ DISC NAVIGKI ION bur;on,
2Pre_ the MENU button,
3Chooso'switch'ooff,_
"Program' menu screen.
and then press ttu _tI!
button.
Note:
•Prsssing the [_] button on th8 "Switch Pro£ram" screen
wilt re_tore the DiSC NavJg_ion _¢rs_n.
• Th_ dat_, displaysd on the program selec!,_creen will b8
in th8 Date Mode i_ssd when _e first scenss of programs
we_ recorded, and the date displays
M]DZ'{ D/MIY and WM_D may b_ mixed¸
4Select the progrmn to be
displayed, and then press
the I_/I! bu_on.
The Disc Navigation
scI eerl of the selected
program will appear,
iiii_iiiiiiiiiiiiiiiiiiiiiiiiii_i_i!i
114
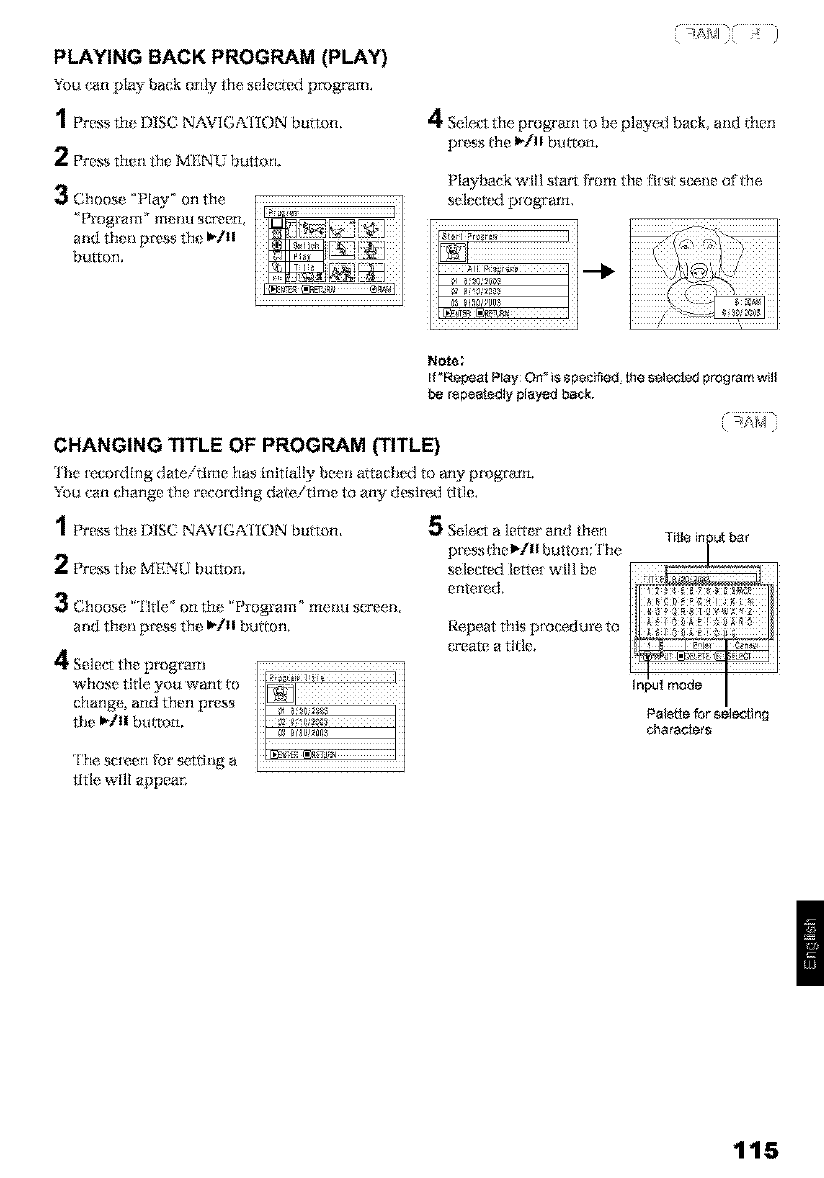
PLAYING BACK PROGRAM (PLAY)
You canplay back only the selecmd program,
1_,._ss the DISC NAVIG,%IiON button,
2Pre_ then the MENU bu_on,
3Choose "Play _ on the
'Program' rrtellu scr_en_
and then press th_ _[II
button. t 1
4Select the program to be played back, alid then
p_,ss the I_/11 bm ton,
Playback will start fr'om the R_st scene of the
select_ program,
I
I _;d! '_ I I
Note;
If"Repeat Play: On" ksspecified_ the sei_rled program will
be rspeatedly played back.
CHANGING TITLE OF PROGRAM (TITLE)
lhe teco_ding date/thne has inlti_lly been a_tached to any pmgra m,
You can change the recording date,/tlme to any desiredtitle,
1Press th_ DISC NAVIG*%I iON button, 5Sele_-t a letter and then
2Pre_ the MENU button.
3Choose "l'[tle _ on the "Program '>menu sc_'een,
arid the_l press the i_/II button+
4Select the program
whose title you want to
ch_rlge, and therl press
the I_/II bm ton,
p_z,ssthe_/ll button: The
selected lette_ will be
entered+
Repeat this procedure to
{_'eate a title+
The scfeerl {27rsetting a
title wi]l appean
Paletle for selecting
_harac!_ts
115
Aft_r_mt_rhlg the title,
choose _'En_e,[¸" arid then
press the _/11 button,
OCharacters available for entering
title
÷
Yuu c_n use fflejoystlck to sele,ct characters [tom the
'_caFtla] le_er _',_'srnall le_ _'_nd _mbol '_l_lput
mod_s,
Will step 5, sele_ _1_ ¸input ¸mode and then p[_ss
_e I_/II _on, o_¸p_ss _e ¸DISPLAY ¸button.
7l he screen t_r ve,Hfi¢ing input mode
the change in ttt]ewillappear.:Choosr_ 'YES". [] _'_I_,_
and thet_ press th_ I_]II
changlng of the title, I I
After Yes or No setdng, the Disc Navigation
scre(_,rl of l}le s_ lecr_ d program will appeal;
Note;
• If you wish to delete the letter for title, press the D button
OnCe:The i_put let_erwill be d÷l_ted Holding down the E]
but_3n will delet_ all let_ePs in the TITLE column You can
also u_e f_e DELETE bu_ton on remote control to delete
any i_put letters.
Pressing _h8_ELECT button on th8 t_lese_ng screen (in
step 5) will change the cursor position from t_e title input
ba_ to character _el_ paler[e, input mode number, and
_;h_n_ '_CanceF
TOcancel the se_ng of _;it_, choose "NO _on the screen
for verifying the entered _i_le:The sc_en for verifying
cancellation _ _Jtle_e4ting will appear TOcancel _Jtle
se_ng, choose "YES _.
If you p_ss lhe D button On _e screen for v_dfyin_
change in title, the tifJ÷ s_ng screen will be res_red
Double byte characters se! on o_h_ devices may be
displayod blank On this DVD video camera]recordor
Tit_,€,set on this DVD video camera/recorder may n_ b_
visible on O'_herdevices.
116

Play List
WHAT IS "PLAY LIST"?
You can create a play list on thls DVD vld*o cmtle_a!re, corder b'y gatherlng your favorites from rE*
recorded scenes.
Since the play list Is not created by copying data. you will consume little of file disc c@atHry by making
a play list. On th* other hand, deleting scenes on play list will not incr* ase th* r* matinfog disc capadry fbr
recordlng.
Example:
Program 1 (recorded on September 27, 2003) Program 2 (recorded on September 30, 2003)
Play list Icrsated
Play lists of tip to No. 99 can be created and 999 scenes call be Included in play llsts of No. 1 to No. ,99.
CREATING NEW PLAY LIST (CREATE)
Here we create a play list.
1Press th{ DISC NAVIGKI ION button.
2Select the scen r_sto be programm{ d In atplay list.
3Pre_ tile MENU button.
4Choose 'Create _ on the
'_P]ayList _]_lerltl screen,
and then p_ss the I_/II
button.
w111appear: If the
selected scerl(?s on the
play list a_e file ones you
w_nt, press the I_]|1
button.
If you want to change
the scr_nes with which
you want to create aplay
list, you c_tn changc them oil fflis scre_ tl.
With tile cr_,ated play list, you cain also add
scenes re,corded Oil another daty or d_ lofe,
ktlltlecessa[_ _ scerl_ s atforwards,
6Wh_n v_atlo n of a play llst is complete, the Disc
N_vigatIon screen will appear.
Note;
•You can also sele_ multiple scenes (P.98)
•If the added scene had skip or fade setting, that
information will also be added to _be play list.
•Th_ da_i_Jme when a play list was created will appear as
the _ibe for lbe play list.
•If free spa_ available on disc is insuIflcieot, creation of
new play Ii_ may not be possible: Delete unnecessary
•Only the data On scenes is recorded On play list: If you
creato or beleto playlists,the ori_inalscenes in programs
will nst b8 8rased.
EdPJng scene_ on play list will not affect the scenes in
programs.
117
OEditing on play list
_|lell rllakJllg setttllgs on [)la_y l{_t_ sticb as
changing tille, adding f'_de_ setting skip, etc,, use
_l_ s_lll'le proced_lre _'or settlrl_ orl pr_)grall_l or
sea, lies, P_fl"[o r'_ii tIK_se Se[l'lll_s, ie{'_i r'ill_ to the
fQI]O_,_?illg [_L'{_'t_L'llt?epa_es;
Setting sklp, R104
Adding lade, R105
Combining scenes, i_107
DMding a scene, R108
Changing title, RII5
SWITCHING TO DISPLAY OF EACH PLAY LIST (SWITCH)
Sele_r the desit ed _ie _f mu_dple p_ay _Ists_,_ he D_sc Navigar_n st_m _f Ihe se_ec_ed pIay _is_wi I_appear_
2Pre_ the MENU button, llst you wish to displa}; _=- i
and the,l press th, I_/II The l)ls¢ Navigation
button. _b_ _b _ screen of the selected play list wI]l be displayed.
i oo,o,
TO display the DIsc Navigation screen showing all
programs (all recorded _,cenes), ChOOSe"Atl Programs" on
the "Switch PlayLIs_' screen.
118
PLAYING BACK A PLAY LIST (PLAY)
2Pre_ the MENU button.
3Choose "Play _ on the
'PlayIdst _ menu screen.
and the_ press th_ I_1I|
button.
4use the ' Start Playllst _
scte, en to select the play
li_tobepl_ed backhand
then pre_ the _11
button,
'['he selected play llst wi]l
be played back [1nm the fl_t scene, 'lb cancel
playback m ldway_ pre_ the E] button: The Disc
navlgatlon sc_en of the play list b_lng played
back will appear.
Note;
If "Repeat Play On* i$ SpecifiC, the play lis_ will be
r_p_aledly plaid back (See page _30).
119
ADDING SCENES TO PLAY LIST (EDITING PLAY LIST)
You can la_x add sce,_es to ffm play llst,
1Press th_ DISC NA%qGA'I ION bu_mn,
2Pre_ the MENU button,
3Choose°Edit' onthe
' P]ayldsr _ menu scre,_rl,
and then press ttu I_/II
button.
5Tilt thejoystlck down to move the gumor to the
lower row, and tilt it to Ieff or rlght to select tile
polm where the scene is to be lnsermd,
4Use the play llst select
screen to select the play
INt to which you wish to
add scenes, and then
press the I_111button,
T|le scenes of the
program dla* was
displayed in step [ will
appear In the upper row,
and the sce_es ofselecmd
play list wlll appear in the
lOWer' [OtiS:
Note;
If the DISPLAY button is
pressed when the
thumbnails are displayed,
the recording pafeJtime of the
selected scene will appear
across the bottom of screen¸
Press DISPLAY again to
re,fore the previous screen.
_1: Number of scene before inser!_on position cursor
_2: Number of all scenes on play list
6Tilt thejoystlck up to move the cursor to the
upper row_ and tilt It to ¸left or right to polnt the
cursor to the scerle to be added.
7Press the I_/11 button to copy the scene.
After adding scenes is templet* d_the edited
play list will appear;
Re,peat steps 5-7 to add other scenes,
8Press tile [3 button: The screen for verlfying*xit
I I will appear;
I I Note:
_4,,1_rs!_ _ _ _ • The cursor shows the positionwhere the scen_ is to be
added.
"YOucan also selest mullJple scenes (R98)
•Pressing[3 inthe middleof adding sconeswilrdisplaythe
Recording dateNme screen for verifying an exit from "Edit Pla}4-isl".Choose
"YES"83exit lhe edition of playlist. ChoOSing_NO_:Nil
restore the "Edit PlayLisIf screen
• Ifyou pressthe MENU butioninslop 5 Or6, the submenu
s_reerl for editFig play" list Will apbeoL YOU {2ar181£4[* use
this submenu fo add scenes (See page 102)
120
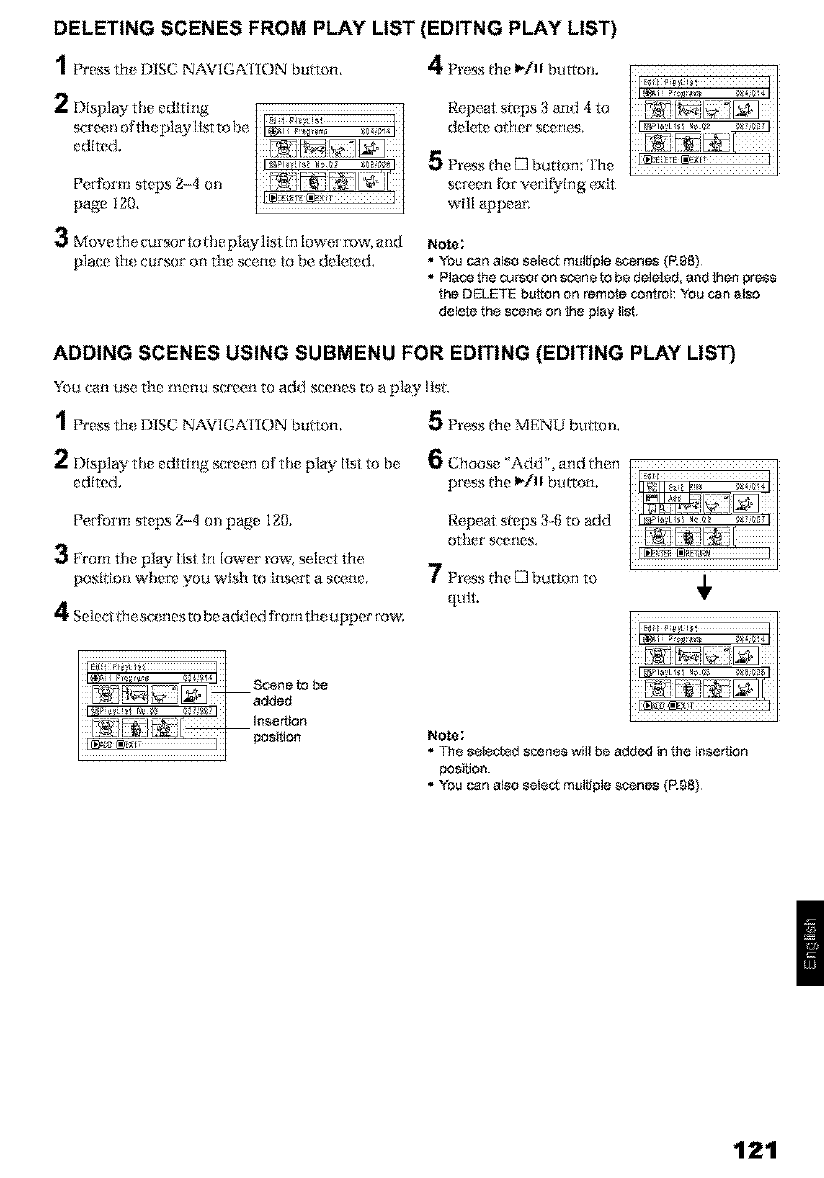
DELETING SCENES FROM PLAY LIST
2Display the editing
screen ofth_ play llst to be
edited.
Pe[_brm steps 2-4 ot_
page I20,
3Movethe_rsor totheplaylist {nlowe[ row mM
p]aee th_ cursor on the scene to be deleted.
(EDITNG PLAY LIST)
4P,.s t,,eI_/11 bul_oll,
Repeat steps 3 and 4 to
delete other scerles.
5Press tile D button: 'lhe
sc{een for vet:i_lng exit
will appear.
Note:
* You can also select multiple scenes (E98)
*Place the cursor on scene te be deleted, and then press
the DELETE butch on remote _ntrol: You _an also
delete the scene on the play list.
ADDING SCENES USING SUBMENU FOR EDITING (EDITING PLAY LIST)
You can use, the menu sl_'ee,n to add scl:mes to a play list.
1_,,_sth_D_SCNAV_;,_ttO_b_on. 5_es_theMF,N_b._to..
2Display the editing se_en of the play list to be 6Choose 'Add ', and t}mn
edited, p{_ss the I_/11 button.
Perform steps 2-4 ot_ page 120.
3Prom the play list In lower row select the
pOglttotl whef_ y011 wish tO insert a scene.
4Se]ect thesc* nesto be added fi omth* upper row:
Repeat steps 3-8 to add
other' See ties.
7Press the D button to
qtdL
Note:
*The sele_zed scenes will be added in the in_rtion
edsied_.
* You can al_o _ete_ multiple _,cenes (R_8)
121
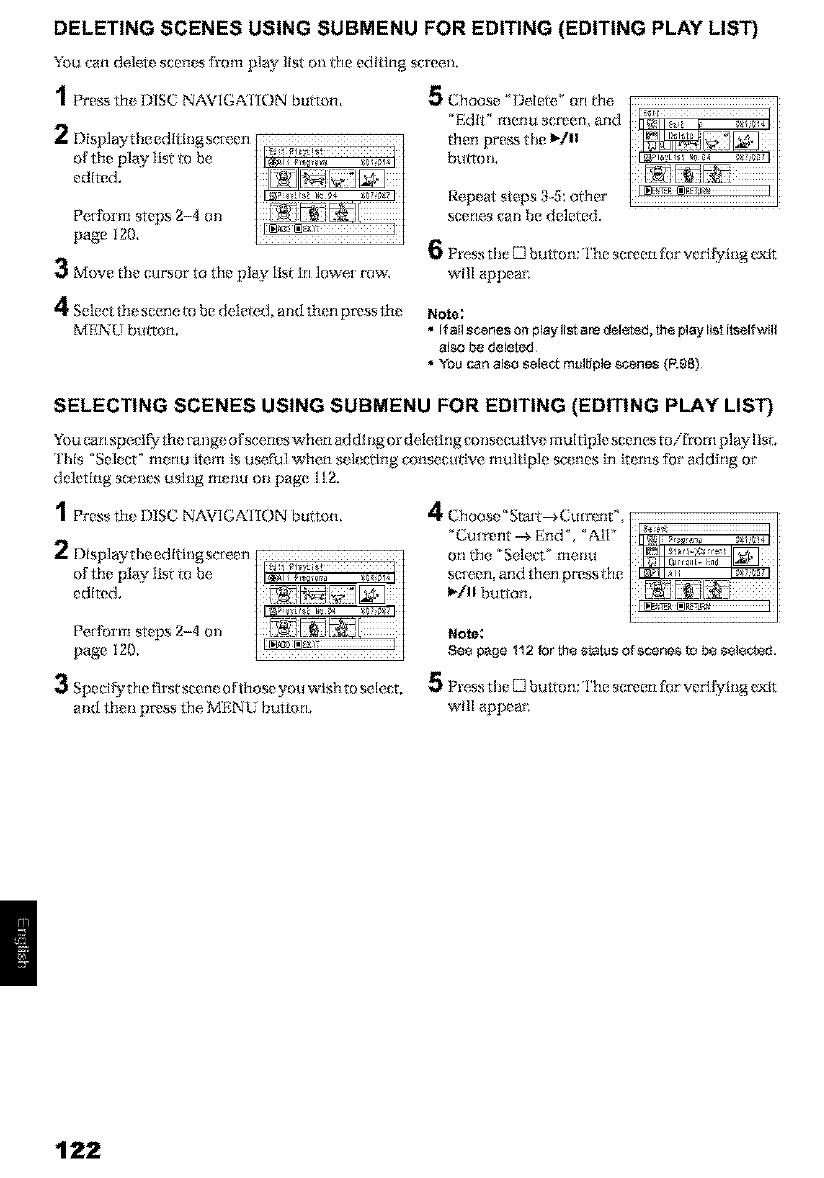
DELETING SCENES USING SUBMENU FOR EDITING (EDITING PLAY LIST)
You can delete scenes fl_om play list oil the editing seree_l.
1Press the DISC NAVIG.,XI_[ON button. 5Choose '_Deiete _ on the
2Displaythe edIilngsc_een
of the play list to be
edited.
Perform steps 2-4 oil
page I20.
3Move the cursor to the play list irl lower row.
4Select the scene to be deleted, mM th_n press th_
MENU btl_ron.
_'EdII" menu scrven, and
then pre_ the !_111
btltrOIL
Repeat steps 3-5: other
scenes em_ be de]e_e&
6Press the D button: The screen for verI Fylt_g _xlt
will appear;
Note;
• If all scenes on play lis_are dele'_ed, the pla_t list itself will
also be deleted
_u can also _1_¢_ mul_ple €,¢_ne,s (Ft _8)
SELECTING SCENES USING SUBMENU FOR EDITING (EDITING PLAY LIST)
You can specI_¢ the _allge of scenes when ad dl lig or deleting consecutive multiple scenes toif'r_om p] ay list.
this %elect _ menu item is useful when sek crlng colls(_,cu_tv( _,multiple sc_ rll?sirl items fbr adding or
deleting sc_,_es u sling mem_ o_ page l 12.
1Press the DISC NAVIG._21 [ON bulton.
3Specil_'the first scene of those you wish to selecL
mM th_tl press the MENU button.
Note;
See pagell 2 for the status of scenes to be sele_d.
5Press the D button; The screen for verI Fylt_g _xlt
will appear;
122
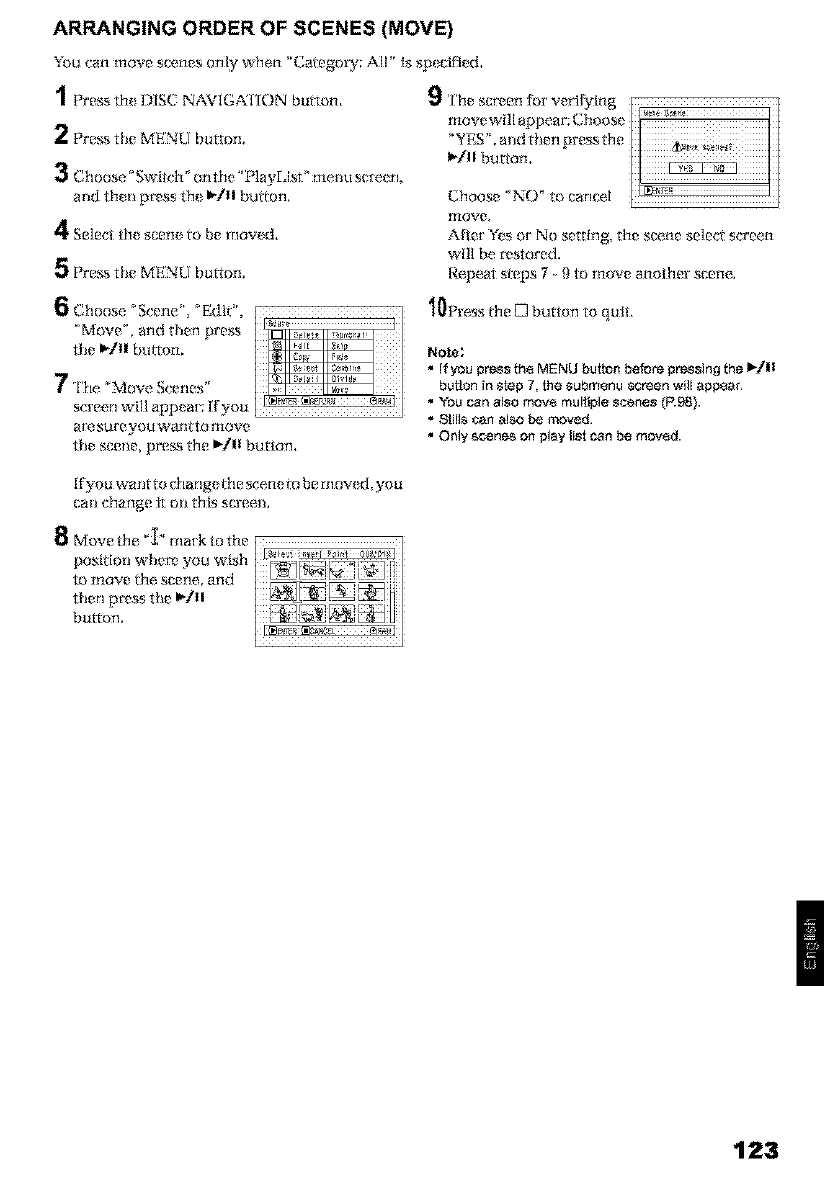
ARRANGING ORDER OF SCENES (MOVE)
You can move scenes only when "Category: ALE"is sp_ cif'led,
1['tess th_ DISC NAVIGKI ION buIton.
2Pre_ the MENU button.
Choose _Swit('h" orlthe ' Play[Jst ' [tie,flu set e,_rl
arid th_l press th_ I_]I! button,
4Select the scene to be moved,
5Pre_ the MENU button.
rGove.
Aflet Yes or No setting, the se_ne se]ect screen
will be r_stored.
Re,peat steps 7 - 9 to ruove another scene,
10Presstile D button to quit,
a[e stlrr:yoLl want to move
the sceJle, pre_ tile Ib/ll button,
Note;
•If you press the MENU button be_Fe pressing the I_./! I
button in step 7, the _ubmenu screen wJl[appsar
•You can also mov8 multiple scene_ (R98).
Stillg can also _ moved.
•Only _cenes on play li_t can be movsd.
If you walit to ghgrlgethe sceneto be r_ov_ d,you
call change it oil this sereeli.
8Move the '@' mark to the
position wherv you wish
to move lt_e scene, and
then press the I_/il
button.
123
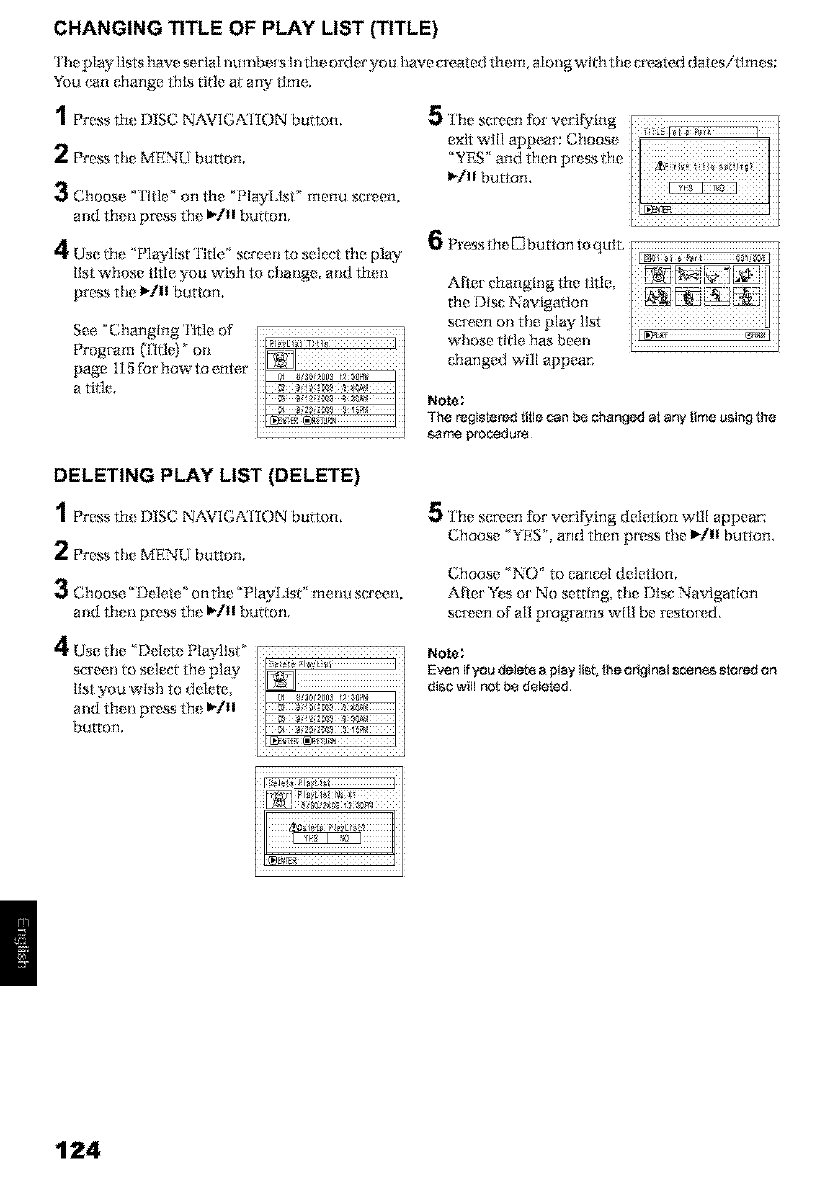
CHANGING TITLE OF PLAY LIST (TITLE)
lhepla_i llstshaveseilal iiultlbeIs h_theorder'you havecreate_tthem alol_gwiihthel_re, atex]datesitlrn_ s;
You can change thls title at any tlme,.
1Press th_ DISC NAVIG,A21iON bulton,
2Pre_ the MENU button.
3Choose°'Hde"or,the"PlayIJst _menu se en,
arm then p_ss the _]t! button.
4Use the ' Playlist Tide _ s{_'een to select the play
list whose title you ¸wish to chm_ge, arm then
press the _!1 button,
See °Changing'litle of
Program _[]lle)" ol_
page 115 for how to enter
a tiff e.
5The screen tigr veriPging
exit wil] appear: Choose
_'YES" and then press the
I_/11 button,
6Press the D button to qult,
AFte_ changing the tige,
the Disc Navigation
sc{een o_l the play llst
whose title has been
changed will appear,
Note;
The r_gistered title _a_n be changed at any time using the
_me procedur8
DELETING PLAY LIST (DELETE)
1_'_'_ssth,D_SCN:,Vl_;,_IrO_bu_on,
2Pre_ the MENU button.
Ghoose _'Delete" onthe _'PlayiAs_" me,ml s{_'een,
arm then press the _/tl bution,
4Use the 'Delete Playllst '
screen to select the play
list you wish to delete,
and then press th* _/II
button.
5The se_en tigr veri{_'ing deletion wllt appear:
Choose 'YES', an t then pre_s the _1!1 button
Choose 'NO _ to cancel deletion,
Afle{ Y*s o_ No setting, the Disc Navigation
sct_erl of all pt ogr_rtls ¸will be restore!d,
Note;
Even if you delete a play lisb the original se_ne._ stored On
disc will not b8 deleted
124
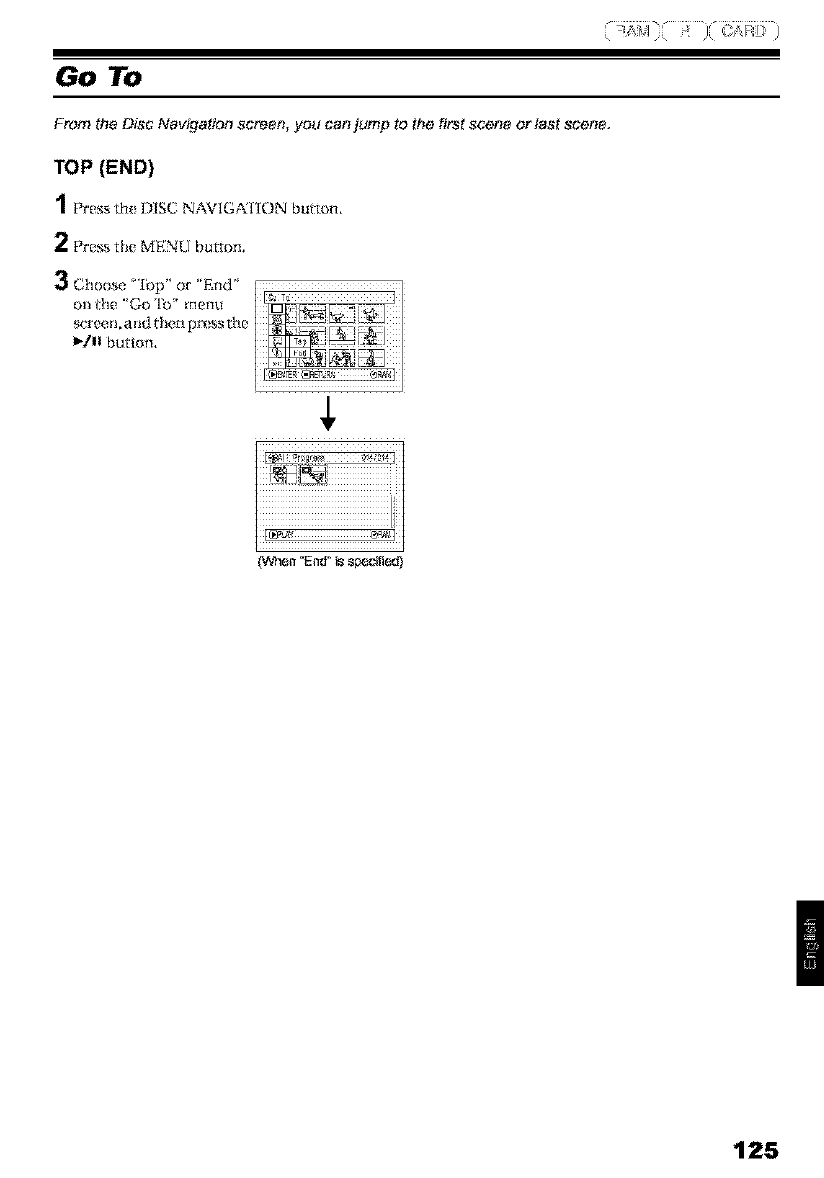
Go To
125

Disc or Card Management
VERIFYING REMAINING FREE SPACE ON DISC OR CARD (CAPACITY)
You ¢'_mfind out how long you will be able to r_corgi on one side of disc or on ca_.
1Press th* DISC NAVIG,XIION bu_on,
2Pre,_sthe MENU button.
3e},oose _ cr.e_paCll'i_ ' On the °Disc ° or _'cr.gtl'd"
menu screen_ and ttun press the _/ll breton.
(When using disc) (When using card)
4,,,esst,,eDbuttontoquit,
The Disc Navigation sc_'een will be r_stored.
Note;
Withawril_-pmtect_d disc or tecked card, the _emaining
space willalways be displaysd as _3¸_.
_1 Witi) DWD-R disc." Ihe quality nlode #r# used for
recot*ding wi#) disc will eppeaK
_2 Witi_ DV_R disc.- Thi_ w_itnot be displayed.
PROTECTING DISC FROM WRITING (PROTECT DISC)
You c_m proieci a DVD-R&M disc; in armlet' to prc_vent recorded imag_ s from being __ased at edit_ d by
]ilist;_ke,
1Presst_,_,IscNAVIG,XI ION bu_on,
2Pre_ the MENU button.
3choo,e.P,om,;rD,scoo°
the °Disc' menu screen,
and then press th_ I_tI!
button.
Note;
•TO retease disc prote_ten, pedorm the same procedure
as above: The screen for verifying th8 retea_ of
protsc_ten will appear.
Choose "YES _ to rstease the pmte_ten.
•Further recording will net be po_ibte on protected disc
until the protection ks released.
4rII_;e screen for verif}/1 ng
protection will appear;
Choose _YES ', and then
press the I_/11 button,
Choose _NO' m cancel
protection.
After _'YES"or' _NO _
seating,the Disc
Navigation se_en will
be resro_ed, i
Disc proteof icon
126

INITIALIZING DVD-RAM DISC OR CARD (FORMAT DISC. FORMAT CARD)
If you w_nt to erase all data on a t_cot_ted dlsc or cai_t, you _'an lnltializ_ it t_ther' than dele_ the d_ra;
hiitial_zatlon Is use_il] inthis ca_e, shlce,it takes ]ess time thm_d_ k!tlng all data. ['h_ i_ltlalized disc or ca_
canbe used again,
1_'ress th_ DISC NAVIG_21 tON bu_mn,
2Pre_ the Mb:NU button.
3Choose 'Forrnat I')is¢ ' or _Fo[ mat Cal"d" orl th_
' Disc" or' "Cal"d" menu s_r_,_rl, and th_n press
the _/I! bulron,
The sct_en for verifying _Forma_ Disc ° o_
' Portnat Card" _dll appear,
4Choose _Y}2S", mid then press the I_/I! button,
Choose _NO" to cancel Ittitlalization,
Note;
• Initialization will delete all the recorded con_ents on disc
or _rd: Be careful not _ delete daia by mistake
• Be sure _o use the AC adap_ha_r whs_ initializing
disc or _._3¢d_ _aithe DVD video came_re¢o_sr is n_
turned off midway If ini_alizetion is interrupted by power
Off,_he dis€or card will n_ b_ initializ_fl corre_iy, or itm_
be damaged.
• It may n_ b8 po_ible _ initialize a disc wRh many
sc_tch÷_ or dirt: Such e disc _nnot be used.
• Ify_u usea brand-new DVD_R disc, m_age _Di_c isn_
f_rmag_d _will appear: Iniliaiize the disc, f_llowing the
subsequent message_ (See page 42).
• This DVD video came_re¢o_er m,3_ aot _gnize
som_ d_ Orca_s that have bse_ initialized On PC or
a devi_ oth÷r than this DVD video came_¢o_dsr
•If YOu a_empt _o initialize a disc or card in ins DVD video
_msra_co_er wh÷n i! is _3nn_t_ to PC via PC
¢onn_ion cable, the disc Or _.ard may _ be initialized
and may b_ unu_ble On this DVD video came_
r_c_er.
(When using (When using card)
DVD_RAM disc)
When Initializing one side of the disc is
cornpl_te, the DVI? vld_o camerairecorde_ will
_e,_urn to the _eco_dIng pause status,
127
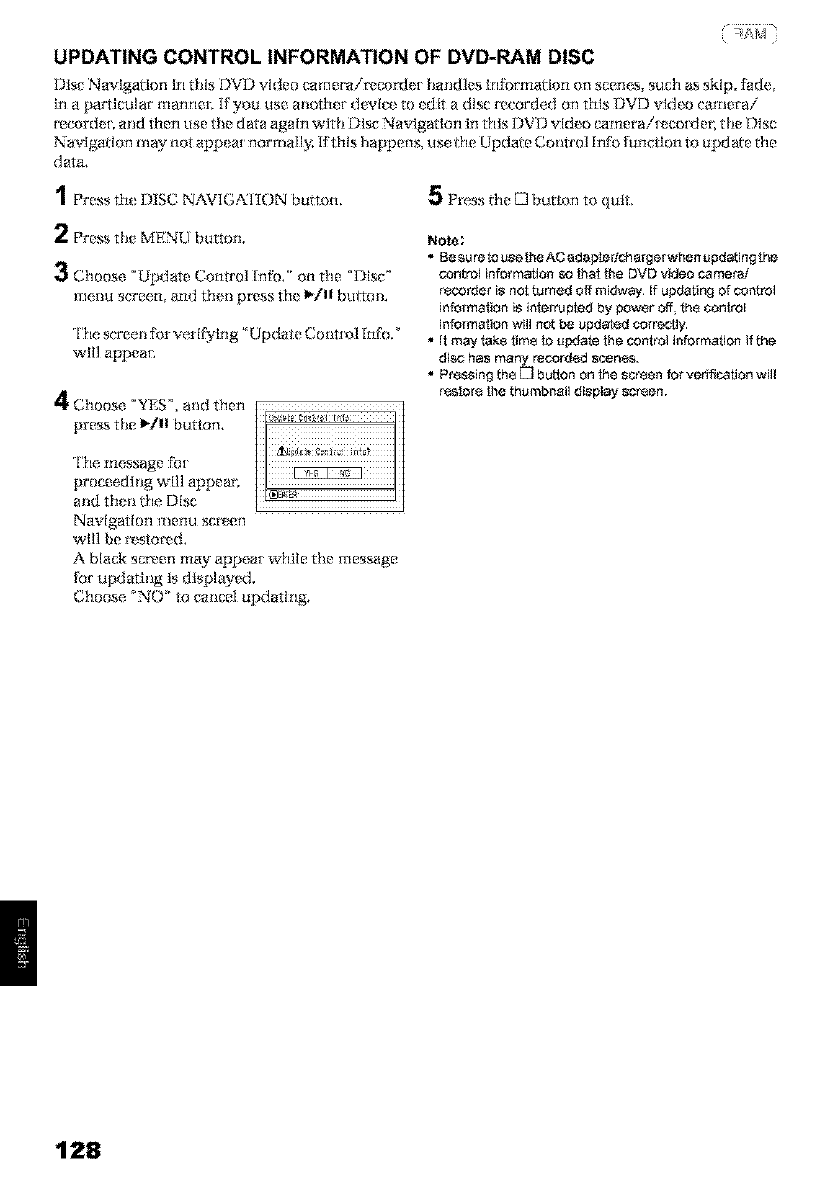
UPDATING CONTROL INFORMATION OF DVD-RAM DISC
Dls_"Na vlgatlon in this DVD video cameraime_Me_ handles In:Formatlon on scenes, such as skip. t_de_
kl a pastlcular manne_ Ify_u use another de_l_e to Edit a disc recorded on thls DVD vldeo camera/
recorde[_ and then use the d_a again with Dls_ Navig_lon in _lls DV_ video camerai[_co[_ e_ the Disc
Navi_ion m _ not appear normall_ If_ls happens, use _le ¸Update Control [n_ _nctlon m upd_e the
data.
1Press th_ DISC NAVIG,_I ION bul[on,
2Pre&s the MENU button.
3Chooso _Update Control [n_b. 'on tile "I)is_ "°
menu screen_ and then press ttu _/11 breton.
'l'he screen %r verifying 'Update Co ntml [nfo."
will appeal_
4c,,ooso _YES", and then
press the I_/11 bu$ton,
5Press the D button to quit,
Note:
• Be su re to use the AC adaptedcharger when updating the
control information so Ih_ _e DVD video camera/
rsco_er i_ not turned Off midway¸ if updating _ control
information is interrupted by power off_ _h8 conkoI
information will not be updaf_d correctly
• It may _ak_ tim8 to update Ihe control information if the
di8¢ hes many recordsd scen_8.
• Ptsssing th_ E] button On the sctsen for verification will
rsc_tor8 _e tht_mbnail display scrsen.
The message Ib[
proceeding well@year,
and then l}_eDisc
Navigation menu sc_.'en
will be restored,
A black se_en may appea_ while the message
for updaling Is dlsplwed,
Choose _NO' to creme1updating,
128
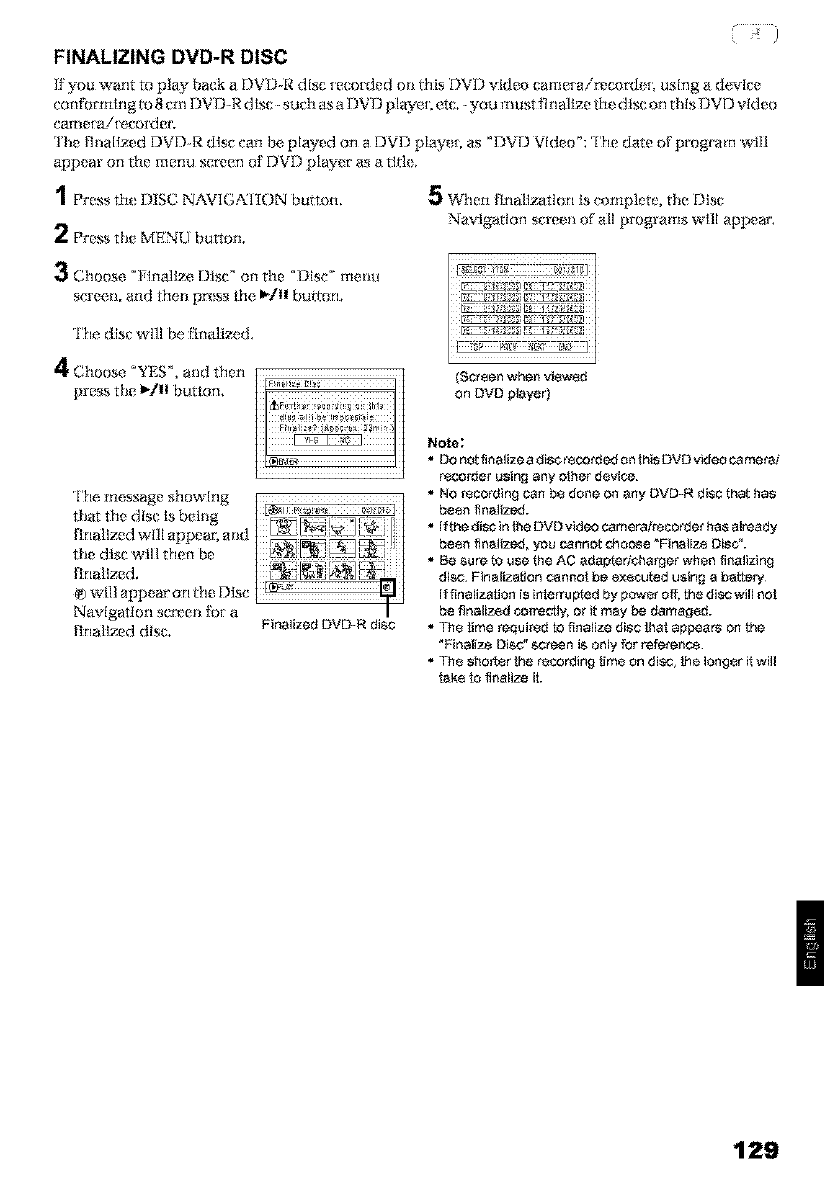
, )
FINALIZING DVD-R DISC
if _ou want to play back a DVD-R disc mcotded o1_ _his DVD _ldeo calrle[ air_cor_ieL using a device
conf_Fmln g 1o 8 cm DV I)-R disc such as a DVI) playcL e,tc. -you must 1] nallze the dis(; on this DVD video
came_a/[ecorder,
lhe flnallzed DVD-R disc can be played on a DVD play* L as "DVD Video _; The date of program t_,'ill
appear on the menu screen of DVD play_ r' as a tltl_.
1 Press th_ DISC NAVIGKI tON bu_ton, 5When tlnallzatIon is complete, tile Disc
2Pre_ the MENU button. Navigation screen of all programs wlll appear',
3Choose "Flnali]_ Disc" on the °Disc' ITI(¢ilLI _7_ k_
screctL and then pr_!ss the, _/II butlon, _:: _'r::_:r'c
The dlsc wI]l be [lngliTx_,d, r,_¢c;?7_ _T;Y ,'_._
Choose °YES", and then (Screen when viewed
press the _/11 button, on OVa Nayer)
Note:
* DO nat finalize a disc recorded on this DVD video came_J
recorder using any other device.
The message showing •NO recording can be done on any DVD-R disc that has
that the disc Is being I {i c _i been finalized.
_ _,r,i _ _]L_= * If the disc in the DVD video cameralrecorder has already
flnallzed will appear; mM been finalized, you cannot choose _Finalize Disc.
the disc will then be
[inallzed,
wI]l appear' on file Disc
Navlgallorl scl_en _[ a
final_ed disc.
*Be sure 53 use the AC eda_er/¢harger when finalizing
disc. FinMiza_on cannot be executed u_ing a battery¸
If finalization is interru p_ed by power off, the disc will not
be ffoalized correctly, or it may be damaged.
Finalized DVD-R disc * Th÷ lime required _ finalize disc [hat aN:_ars on the
"Finalize Disc" screen is only for reference¸
* Th_ shorter the _ecording lime on di,_c_[he longer it will
lake la finalize ili
129
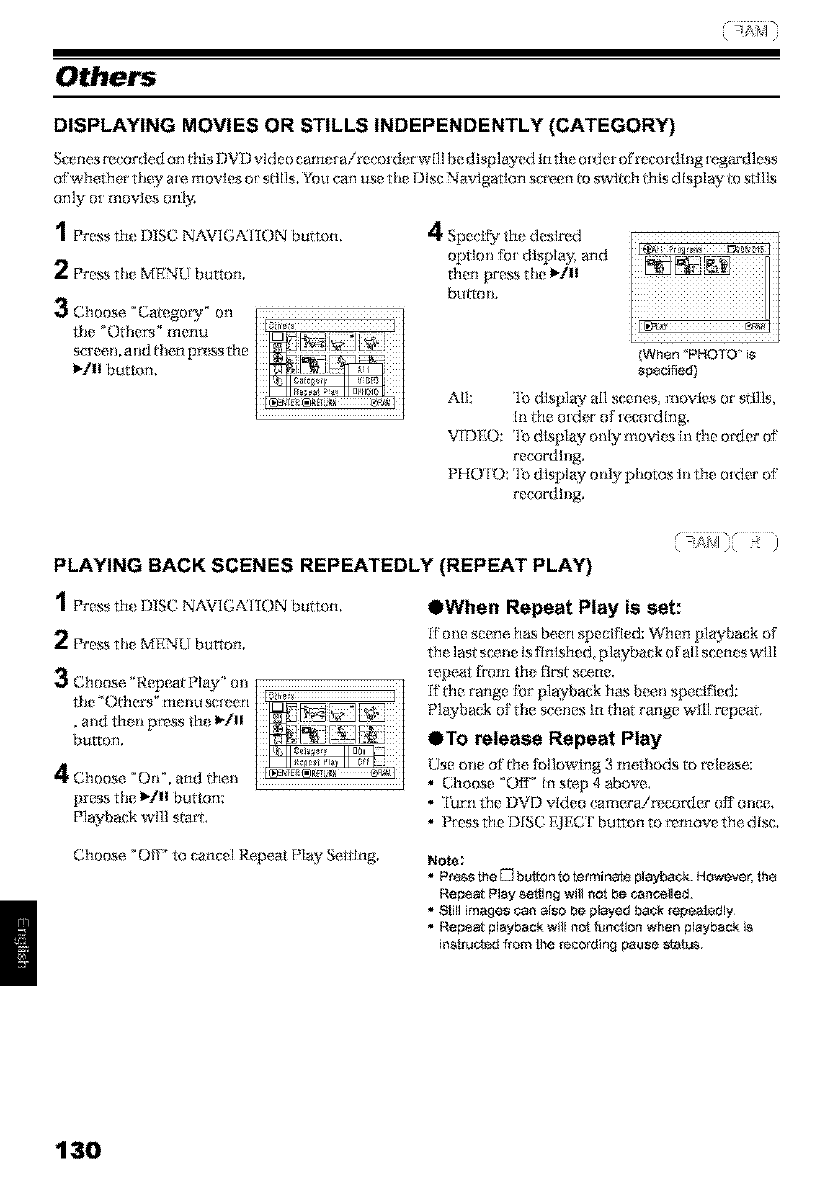
Others
DISPLAYING MOVIES OR STILLS INDEPENDENTLY (CATEGORY)
Scenes recorded on l_fisDVD video camel a/recorder will be displayed in the o[_terofrecordl ng [egar'dless
ofwheaher they a,e,movies or stills, Yuu can use the Disc Navigation screen *oswi*ch this display *ostills
only o_ movies only.
1_'ress th, DISC NAVIG;_21 ION bu*ton.
2Pre_ the MENU button.
3Choose _C.ategow _ on
the _Othem" menu
screen, and then prx_ss the
_/11 button,
4Specify the desired
option fo[ display; and
then pre_s the I.qll
bmron,
Nhen "PHOTO is
specified)
All: 'lb dlsplay all scenes, movies or stills.
iu ffm o_der of [e,co_dlng.
VrDEO: '1o display only movies in ¢le order of
recording.
PHOTO: 'lb display only photos In the o_der of
recording.
PLAYING BACK SCENES REPEATEDLY (REPEAT PLAY)
1Press th* DISC NAVIG;_2I ION buiton.
2Pre.% tile MENU button.
3Choose "Repeat Play" on
the' Offmrs_menu selden
•and then press _h_ I_/11
button.
4ci,ooseoor o,and Omn
press the _-/11 button:
P]ayback wl]l sta_,
@When Repeat Play is set:
[["olin scene, has been speckled: When pJayback of
the last sc_ne Is flnlshed_ playback of all scen_ swlll
tape, at if'ore the Rrst scene.
If era range Ii_rplayback h&s been specified:
P]aybaek of the scenes in €mr range will repeal
eTo release Repeat Play
Use one of fire tbllowing 3 ruedlods to r_lease,:
•Choose "OIT _ in s_.p 4 above,
• '['urn theDVD video camera/recorder off"once.
• P_ess the DISC KIEC [' button to remove the disc.
Choose _Off' to cangel Re,peat Play Setting. Note;
• Pre&s the [_ button to terminaf_ playback. However, the
Repeat Play seNng will not be canalled.
• 81ill images can also be played back repeatedly¸
• Repe_ playback will aot run.ion wfien playback i_
inslru_d #ore _e reco_ing pause stetu_.
130
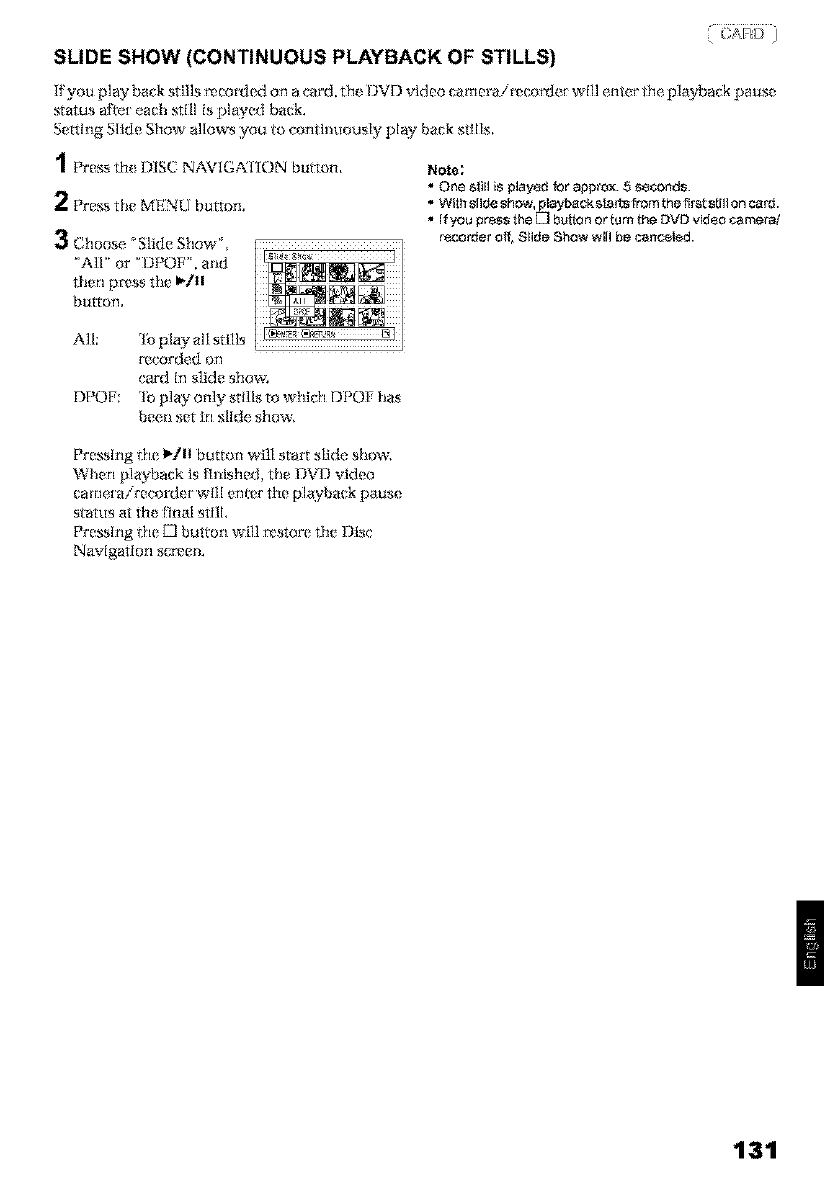
SLIDE SHOW (CONTINUOUS PLAYBACK OF STILLS)
If you play ba_k st ills rvcorlted on a card, the DVD video camera/r_c_rde_ will ente_ file playback pause
status aft_[ each still is played back.
Setting Slide Show allows you to continuously play back stllls,
1_'ress th_ DISC NAVIG,A21ION bulton,
2Pre_ the MENU button.
3Choose_Slide Show °
'All' or _I)POF". and
then press the I_.gII
button,
Note;
• One _,Iillis played for approx. 5sounds.
• With sfide show, playbackslarts from the first slill on card.
• if you pre_s the El bu!ton ortum the DVD video mamer_i
rscorder off, Slide Show will be _aneeled.
All: Io play all stills
recorded on
car'd In s]ide show.
DPOP: lb play only stills to which DPO}' has
been set [r_ slide show,
Preying file I_/ll button will start slide show,
When playback is t)nished, the DVD video
came_ a/recorder will enter the playback pause
status at the final still,
Preying the 121button will r_store the Disc
Navigation se_en.
131
Before insta#ing the UDF driver (DVD-RAM driver) on the CD-ROM provided with this DVD video camet at
tecofder_ make sure that another UDF driver _has not already been installed in your PC.
=* Irts_a_ttWr_t_.,_ or lnstart_Re_ad packard i_1 file *DZ WINPC1W", *I)Z WJNPC2W" O_'P(_ _mt_c_Jor_ Rit for
Hitachi DZ MVIOOA DVD video ¢ame_ra .'T_co_r3_% or i_l Ih_.' '_DZ WiNPC3W P_ editir tg kit f'o_' Hitachi DZ
M\,200A, D2', MV230A o_' [7/. MV27OA DVD video cam_.,ra,'_,_oT d_.,_:
If another UDF driver has already been installed, uninstafl i_ and then instafl the UDF d#ver bundled on
the provided CD-ROM. Uninstall the previous UDF driver by choosing "*AddlRemove Programs" or =Addt
Remove Applications" on W_ndows _Control Panel.
If any question messages appear that mean "This file is not used on another application= Do you wish to
delete it together?" during unthstallthg, click "No" for all such questions.
132
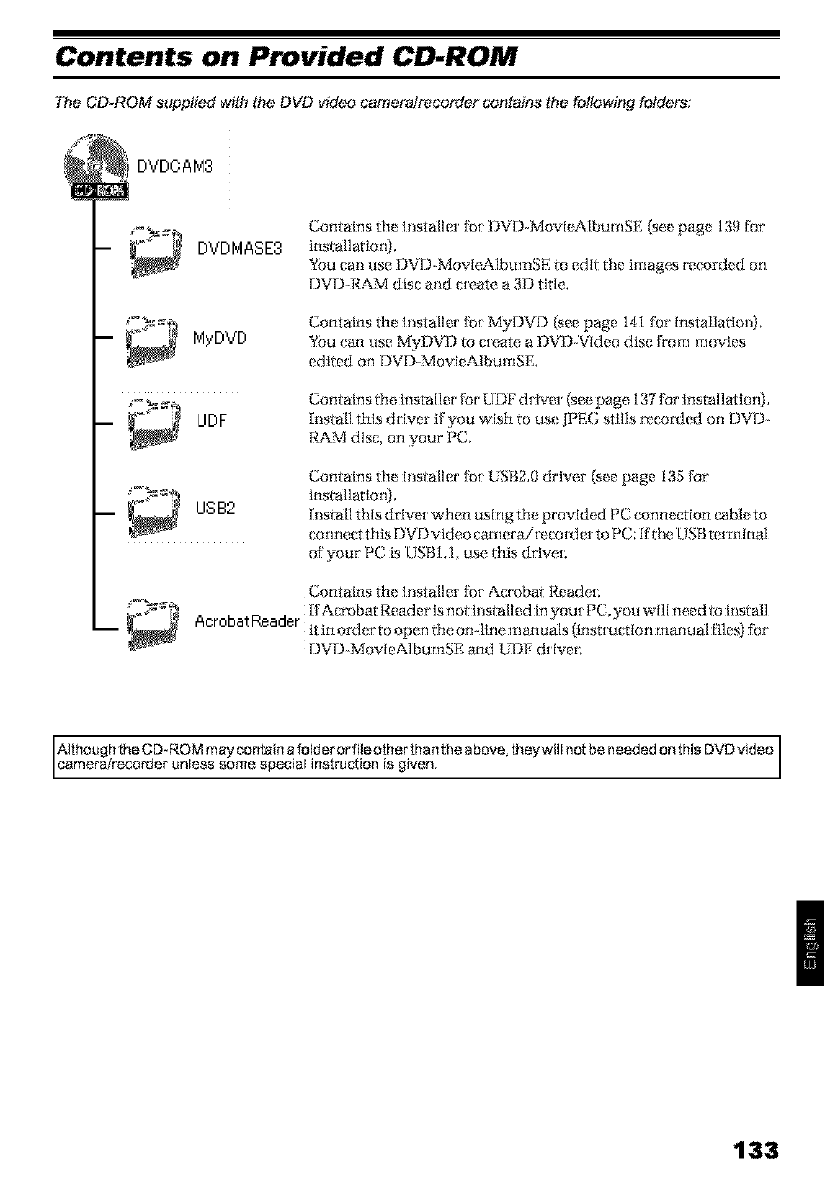
Contents on Provided CD-ROM
The CD_ROM supplied _ith the DVD video camera/recorder contains the following folders:
DVDOAN3
DVDMASE3
C,ontains the Installer f_)[ DVD-M_vI¢,AlbumSE _ee pag_ 139 fur
installaria@
You cal_ use DVD_MovIeAlbumSE to edit the ilrlag_s record_ d on
I)VI)-RAM disc mM c_eate a 30 title.
-- _ MyDVD
Contains the histaller fb[ MyDVD {see page 141 for Installation),
YOu cam use MyDVD to c_eate a DVDWldeo disc from movies
edited on DVD MovleAlbumSE.
Contains the Installer [or UDF delver (see page 137 tk?r Installation),
h_stall this delver Kyou wish to us* [PEG stills r_corfled on I)VI)-
RAM disc, on your PC.
Contains the h_staller fl)[ USB2,0 driver _see page I35 for
installarlor0,
h_stall this driver when using the provided PC connection cable to
connetXthis UVDvideo caunerai_cot_ter m PC: Kthe. USB terminal
of your PC is USBI.I, use l}fis dr%'e[;
Contains the Instalk_r fbr Acrobat Reader;
;_3x ¢_'_'_ IFAcrobat Reader is not install ed in gout PC, you will need to it_stall
-- _ Acr°batReader itinordertoopentheonqlnemamuals _instmcrlon manualR]es) tbr
l)Vl)-MogIeA]bumgE and Lq')F d_Iver;
[c€althr_Ur_ll le{l'_eCDr RnOaMmay mC(erlsta__a fo li_e[rr_r_lel_)iheg_t[_allthe above_ heywi,, not be needed on his DVD v,deo
133
•DVD-MovieAIbumSE
You _'an read die Irlstrut_Io n manual using ei_her o[
{tie {bllowing procedures:
• Open the PDE tlle in
DVDMA£_ 3\man_als \_n9 fish {blde_
conTakmd on the provided CD-ROM,
• AtYer Installing DVI) MovieAlbumSF,, open
' Programs"or 'All Programs" from the
Windows "Sta_" menu. choose "_Itach[
DVDCAivl ' and ° DVD-MovleAIbumSE ', and
then open °On-lirle Manual".
lb r_ad the above mmmal, you wlll need Adobe
Acrobai Reade[;
gAdobe Acrobat Reader has not been Installed in
your PC, start AC± obatReader \_nglish
\ARbOOENU. exe on the provided CDROM to
install It.
OMyDVD
• Afier blstalllng MyDVD open °PmgTams' or
"AllPmgrams" from theWlndows"Start" menu.
choose °Sonic" and qvlyDVl) ', and then open
the ete{rtronic Instruction mmmal In 'Doe, u ment'
[bider;
rib read rhe above manual, a Web browser {fntenmt
Exp]ot_L Netscape {],olt_munk:alor'. ere.) must be
set up in your PC.
If you cannot open tim elec_ronlc Instruction
manual of MyDVD. consult the ruaker of your PC
abou_ the sl_up m_hod I'_[ Web browser.
OUDF driver (DVD-RAM driver)
•Afier Installing the L-f)}rdriver (1)VDIL%M
driver'}, open _'Pmg[ams _or' _AIIPrograms _
['tom ffm Windows ' Start _ menu, ghoose _DVD-
RAM" and ' DVD-RAM Driver', and then open
%row to use DVD-165M disc',
No electronlc instruction manual is provided with
the USB driven
Note:
Although _e above software programs can be used on
Windows ® 98, Windows ® 98 Second Edition or later is
needsd te fully u_Jlizeall funct_on_ of DVD-MovIeAIbumSE.
134
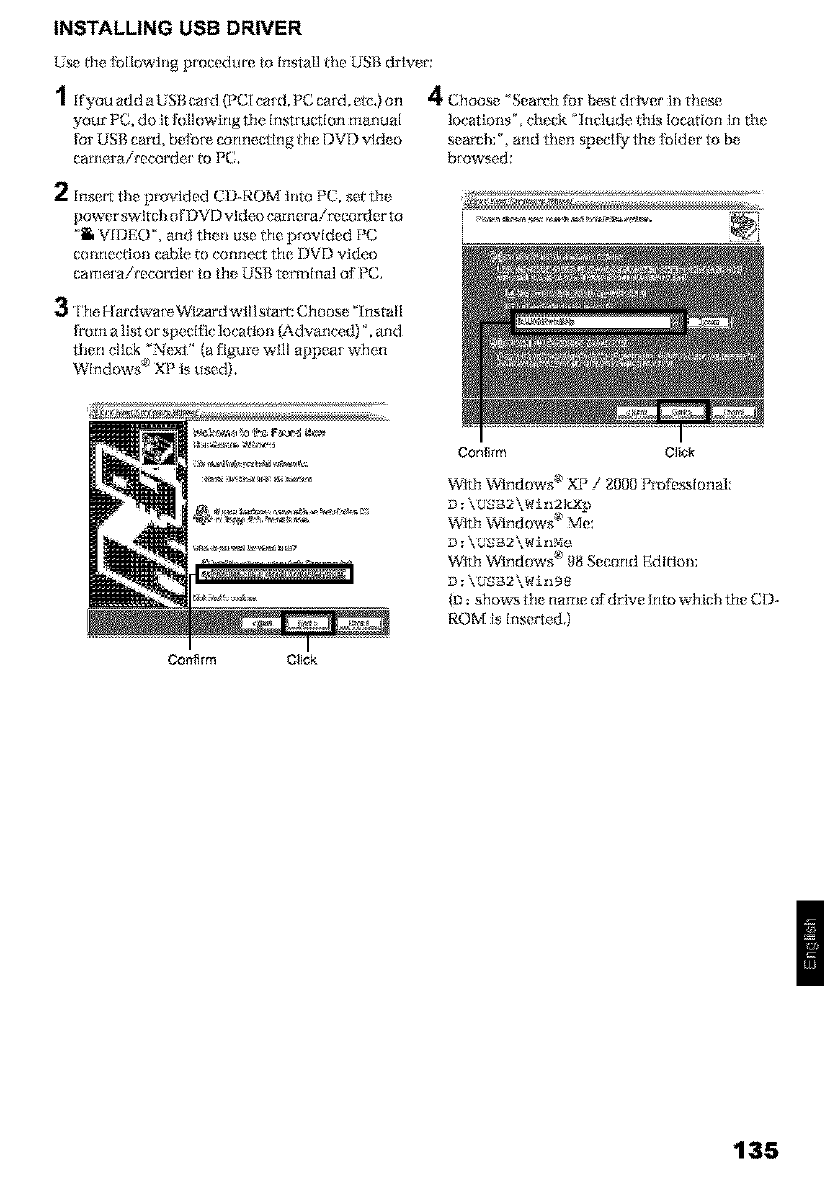
INSTALLING USB DRIVER
Use _hefl)IIowlngproceduretoInstall_heUSB driver:
1[fyouaddaUSBcmd (PC[cmd, PCcard,_tc,)on
your PC do it folIowing the, Instruction manual
forUSB cad, beibt_ co rme,ct ing thc DVD vld_o
carnerairccorde[ to PC,
t_ Choose 'Search ff)r best driver ill these
locatlons"_ check _Include this iocation in the
sea.h; °, and then specify the fblder' to be
bmwsed:
2Insert the provided CD-ROM Into PC, set the
power switch of DVD video cam_ra/f_cofJer to
,ll_ VIDEO", and then use t|m provided PC
colm_cl'ioti cable to connect tho I)VD video
camexairccordm to the USB terminal o["PC,
3'l'he Ha_'dwat e WiT_d willstar t Choose _'[nsta[l
from alist or specific location (Advanced) _,and
then click "Next" (a figure will app_a[ when
Windows _' XP is used),
Confirm Click
Wldl Windows a_XP /21100Pmff!_sional:
D :\U_B2 \_in2 kX_
With _Vlndovcs a_Mc:
D:\_B2 \Ni nNce
With _Vlndovcs a_98 Second Edltloti;
D: \b'aB2\_inee
([_: shows {h_ namc of drivc [nfio which the CD-
ROM is Inserted.)
Confirm Click
135
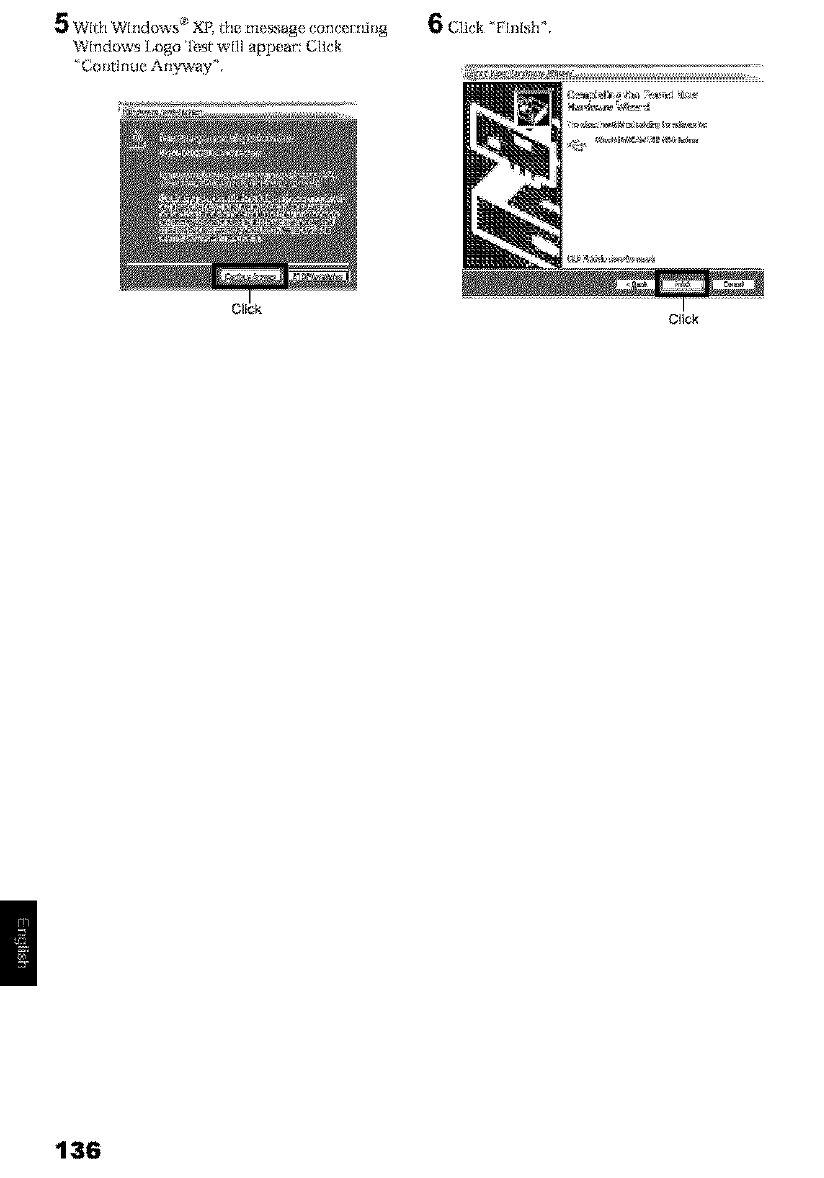
_WIth Windows _' XR file message, concern J_g
Windows Logo 'l_st will appear: Click
' Cot_tInue Anyway'L
6 C]ick' PlnIsh'L
Click
136
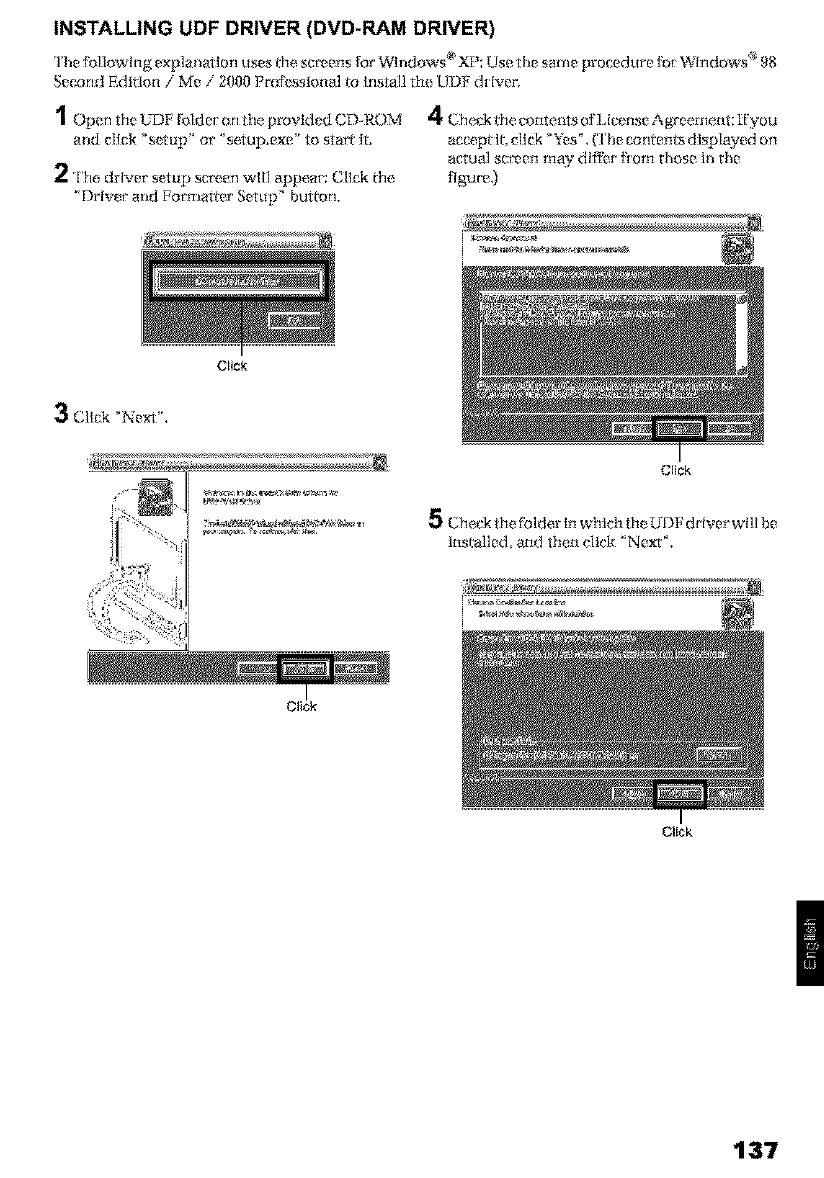
INSTALLING UDF DRIVER (DVD-RAM DRIVER)
lhefollowlngexp]a anor _ses_hescmens_rWu dows XF L!sefl esar_ epro edtrefo Wlr _ows 98
Second Edition /Me /2000 Profk!ssiona] 1o install th_ UDF &lver+
1 Open the UDF I)_ldet on tile provided CD-ROM
mM click "s* tup" or ' setup.exe ' to sta_ it.
2',,edriver setup screen will appear: Click the
' Driver alld Pormattr_r Setup" button,
4Che,ck the contet_ts of I.icense Agreement: IFyou
accept it, cl_ck _Yes _ The contents displayed on
actual sc_en rtlay dl_r _ortl tllose ill tile
Rgum,)
Click
3Click "Next ',
51
Click
5Check ihe folder in which the UDF driver will be
installed_ and then click '_Next _.
Click
Cl_¢k
137
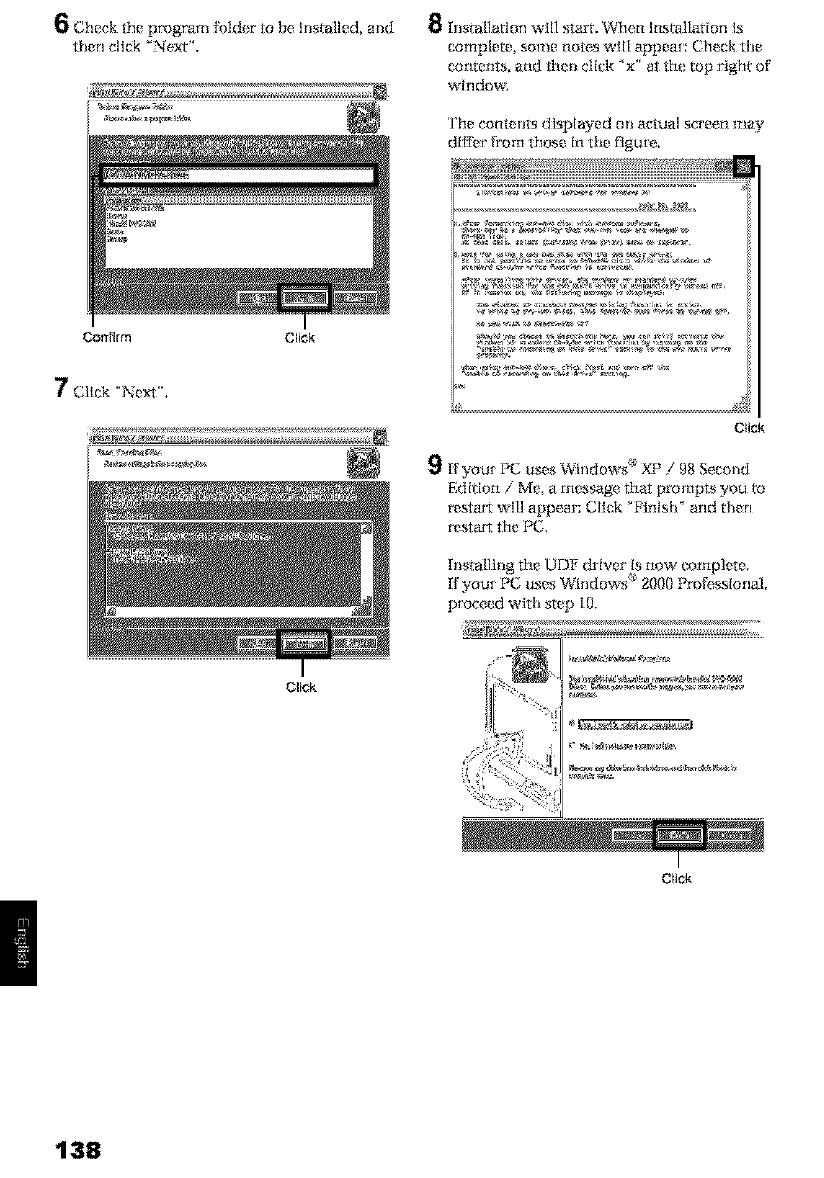
6 Check theprY3grm__31dertobe installed,mid
then dick _'Nexl",
Confirm Chick
7' Click °Next',
8 [r_stallation will starL When installation is
complete, some notes will appeal: Check the
contents, and th_n click 'x" at th_ top right of
wirldow.
The contents displayed on actual screen may
dltt_r from those In the figure.
Click
, . ® _/ •
If you[ PC uses Windows X[ .98 Second
Edition /Me, a message that prompts you to
r_star't will appear: Click °l_'inish ° and then
r_star't the PC;,
[ristalling the UDF driver Is now complete.
If your PC; uses Windows ® 2000 Pro_sslonal,
proceed with step [0.
Click
Click
138
10 ffyour PC uses WIndowJ; 2000 Pro[_ssional, a
message grlrlotltlcIng the star't for detecting
de,vice wi]l appear: Cl_c k _'Flnlsh° iFhe detecrlot_
of d_w,ice will start, _[rer which it will take
several minutes for PC to detect the device.
When detecting the d_woice is complete, a
messagethat pr omptsyou to restart will appear:
Cllck _Ye,s ' at_d then restart th_ PC,
Installing the UDF driver Is now complete,
INSTALLING DVD-MovieAIbumSE
Sof_,a*'e _'DVD-MovleAlbumSE" Is used to edit movies that co n:rocm to DVD video recording standarvl_
and stills _e_ed on DVDoRAM disc,
1insert the provided CD-ROM Into the CD-ROM
drive of PC.
2Use Windows My Computer or Y_rplorer to ope, t_
the folder where CD--ROM is slored,
5Car'eRdly mad the Software _.icet_seAgreement:
ifyou accept {t {:llck_Yes_,
3Open the DVDMASE3 folder, and th*n dotlble-
click _Setup" or' Setup.exe".
4The screen for InstaI]Ing _DVD--
MovleAlbumSE ° will appear': Click _Next".
Click
Click
6Choose the'['V broadcast system {N'{SC or PA L).
click 'Next".
Click
139
7 ffyou do not change the fl)lder where the 9 Check the _ontents. _nd then click "Nexff.
so,ware Is h_statl_d, click _'N_xt".
Click
8ffyou do not change tile program tblde[ name.
ellek _Next ',
Click
!i
Click
[nstallatlon will star'r.
¸Proceed wlth h_stallatlon. _l]owh_g the
illStrU CI'IOII_ On SC[_rl.
OA message [br verff]ying whether a shorlcut icon
is to be created on desktop wi]l appear:
If you wamt to create one, click _Yes', If not,
cl_oose _NoL
Click
1_ Choose the restart option, and the_l click
_'Flnlsh _',
Click
140
INSTALLING MyDVD
drive oF PC,
2Usr_WIndows My Computer or F_q')Iorer to ope, t_
the fMder where CD-ROM is store&
3Open the MyI)VD fMder, and theti double-cllck
' Setup.exe".
4l',,o_n*b, ll_stallllig _MyDVD" wlIlappear:
Cllck °Next'.
5Car'eRdly r_ad tile Software I,lcense Agreement:
If you accept it Click "Yes".
(This window may be omitted.) Click
6Ifyou do not wlsh to changr_thet_ldet wher_ thr_
softwm'_ Is Installed, Click °¸Next °.
Click
Click
141

7Check ih_ con_ents, and then c[lck _'Ne_".
[nstaIlatlon will sta_,
Click
Click _E'inish% and t|mn r_stact the PC.
i _ _ _
Note:
• if software that detects computer virus, etc. has been
ins!ailed, invalidate it
• If your PC uses Windows @XP or Windows @2000
Professional, se_ th_ user name !o _Adminislratot
(compuleCs mana98r) _(or user ham8 _4th equiva[en_
authorization), log on to PC, and th_n install f_e
sombre (if you do not have auihodzalion, consul_
your system manager.).
Contact the following for information on
MyDVD:
U.S.
Phone: 1-877-383[ [24
ht:tp://sup_o=t:,sonic,corn/login/
default,as_
(YuuWill needtope_or'memstome[
Europe (LondolO
Phone: 44 20--7437--1[(_0
ht:tp://sup_o=t:,sonic,corn/login/
default,as_
(Yuuwill needtope_or'memstome[
I
Click
Sonic Solutlons Corporation, which d_eloped
MyDVD, r_co[l_lilerlds 1.1set' Ieglstral'ion of
MyDV [] In or'd_r to oflbr appmpriate, support to
customer, The guMe for user rvgistrathm will
appea_'whenyau start MyI?VD fbr theflrst tkne,
ot you can do it any time by accessing d_
fo]lowlng URL;
http :i/_. mydvd,corn
(You will rmed the connection envirl)nmont to
the k_terne, t fbr user reglstrarlon,)
142
Creating DVD Video on PC from DVD-RAM Disc
Recorded on DVD Video Camera/Recorder
Using DVD-MovieAIbumSE end MyDVD, yeu can create a DVD video {DVD_R disc') from the images
recorded on this DVD video eameFatreeorder, following the procedure below:
d
/Insert a recorded DVD-RAM disc into the DVD
vldeo camerairecordeL and connect *};e DVD
video camerairecorde_ to the USB terminal of"
PC.
2Start DVD-MovieAlburnSE, and edit the Imag* s
o_ DVD-16_,M ¸disc as r_ecessa_
3Rlght-ctlck the thumbnail from which you wlsh
to c_ate a DVI) video on the DVD -
MovieAIbumSE s_en, and execute '_Expo_".
4The "Pmg[am Exporff' screen, shown below,
will appear: Choose _Smtm Resolutlon" and
check °Use DVD-Vldeo" in *he _'Export MadE"
setting box, Choose "704 x48{)(recommended}'
for _'Resolutlon '.
Note:
•Choose "Divide by Marke¢' in the "Option" box: Each
_cene of p_g_m recorded on _e DVD video came_
recorder will be saved a_ an independent movie file so
that exbort can be executed at high speed. If you do
not ChoOSe _Divide by Marker*, movie files may be
unified and re-en_ded, so it may take time to export
them or _e image quality may slightly dat_dora_.
DVD-MovieAIbumSE may automatically encode a
movie recorded in the XTRA mode containing rapidly
moving scenes (8 Mbps or higher}, regardless of the
_Divide by MarkeP setting¸
•DO not ChoOSe "Simple Exporff in _e _EEoort Mode"
_e_ing box: Choosing it may s_p export midway¸
5CJick th_ Start button to start exporl.
6When export is complete, message _'lhe fiIe
exporting was completed succe_Ily
Do you wlsh to create a _DV_-_ideo ' disc or an
'MPEG Ne' disc? ° will appea_; Check the small
box _r '_ect the disc being used % and then
Click '_Yes_,
Insert a brand mew I)V D-R disc Into the DVD
video camerai[e, co_de_;
7DVD-MovIeAIbumSE will automatlcally end,
and the '_Expo_ to Disc _ sc_!en will appear:
{:;lick the "Sta_" button.
"Program Export" ScPeen
143
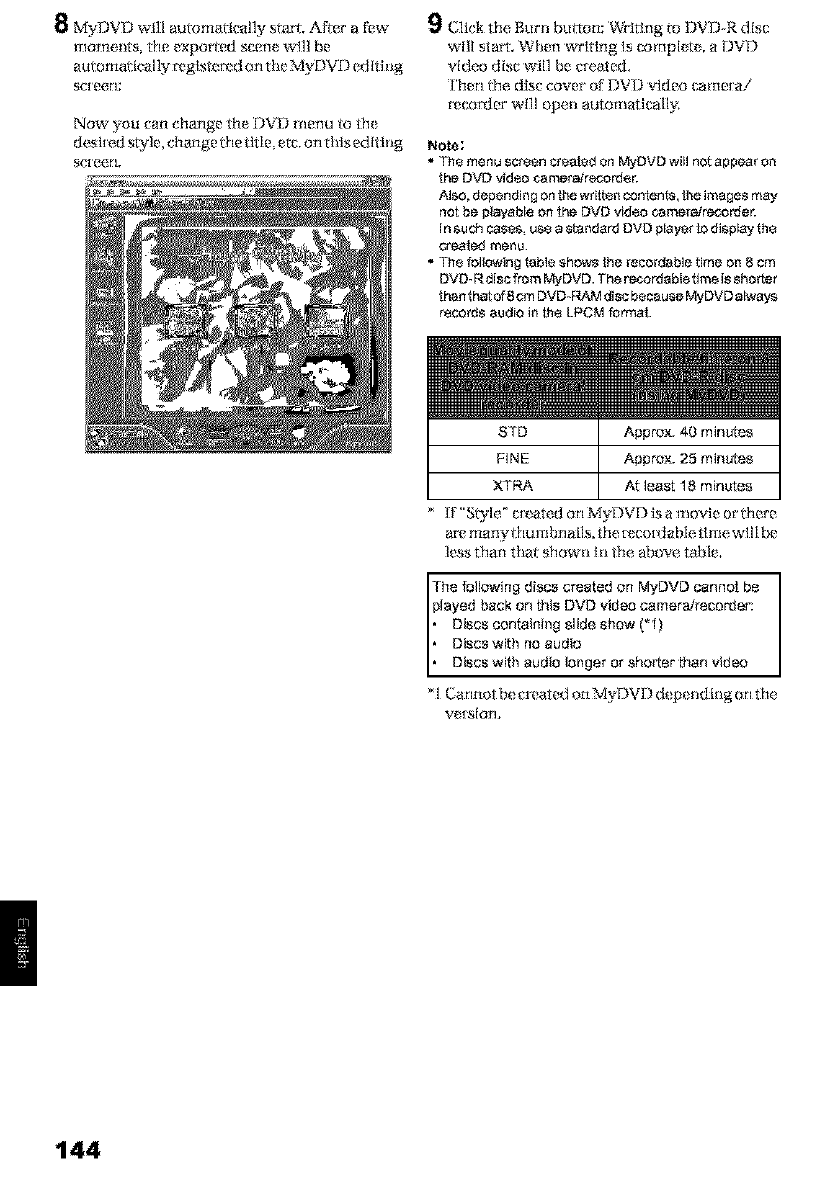
MyDVI) will automatlcalty sta_, Afmr a f_w
moments, file expocied scene will be
autom_lcal_ mglst_!d on the MyUVD ed ltlng
Now you van change the DVL) menu to tt1_
desl[ e,dstyle, change t}le tiff e etc, on this ed ltlng
SC[ C_rL
9 Click the Burn bulron: V@itlng to DVD-R disc
will start. When wrltlng Is complete, a DVD
video disc wilt be c_ated.
't'herl _e dlsc cover of DV_ vtdeo camera/
recover will open automallcall_
Note:
•The menu screen created on MyDVD will not appear on
the DVD video ¢amera_recorde_
Al_o, depending on Ihe writ_n contents, _e images may
not be ptsyaNe on the DVD video ¢amera/r_._orde_
In such cases, use a _tendard DVD player to display the
creaI_ menu¸
• Th_ following teble _how_ the recordable time on 8 cm
DVD- R disc from MyDVD. The rm_ordable time is shorter
than that of 8cm DVD-RAM disc because MyDVD alway_
reco_s audio in the LPCM format.
STD Approx. 40 minules
FINE Approx. 25 minules
XTRA At least 18 minutes
[t'_'S_Tfleo c[_,aTed on MyDVD ia a movle or _mr_
am many fflu m bn alia, the t_cotxtable, ti me wlIl be
leas than that shown In die, above table.
The folk,_wingdiscs I:realed on MyDVD _nnoI be
played back on this DVD video cameratrecorder:
DIscs containing slide show ('1)
• Discs with no audio
I Discs with audio longer or shor[er than video
I Cannot be _reated on MyDVI) d_ p_ ndlng on the
v_[aIorL
144
Cleaning
Be sure to set the power switch to "POWER OFF _before cleaning this DVD video cametalrec_rder.
OCleaning LCD screen and camera
lens
Use dr[_,_,soFl clod1 to wipe di[T ofT,When cleaning
l_le hCJ) _ur(!_Fl, be _i_[ (_,_u ] Hot to us( _,glrce, scr_tich
it. ot subject It to impact: l)o_ ng such could cause a
de{bcl in the screen. [_su]t in display uncwenness,
or damage the h[r,D monitor;
elf dust adheres to the viewfinder
lens, remove it using a cotton swab,
etc.
Do not [ub the lens wig1 force: Doing so could
scratchttu lens.
ODo not use benzene or thinner to
clean DVD video camera/recorder
case
The coa_lng of case could peel offor the case could
del_ loraie. Wipe off dlr't on the case with a moist
clo/h which has been completelywrung out. When
using chemical cleaning cloth, 1"_]low lr_st_u{;tions
for' use_
145
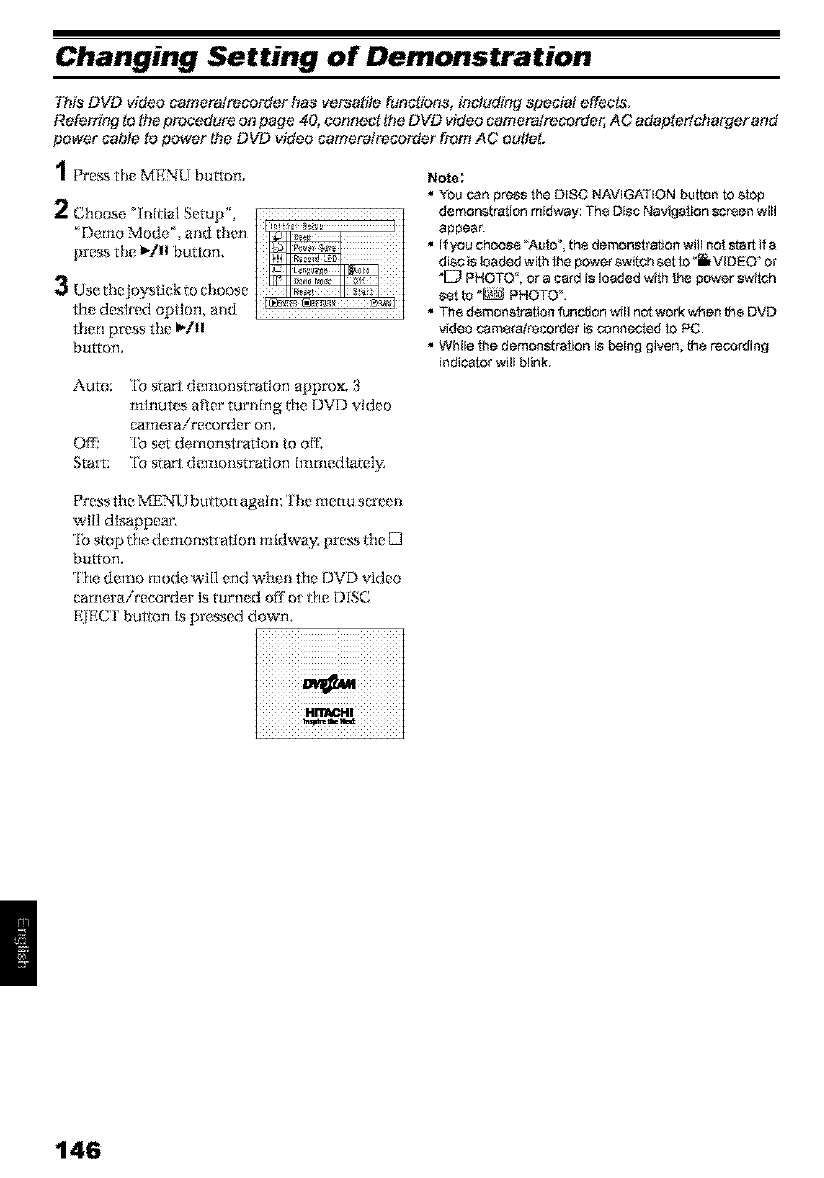
Changing Setting of Demonstration
This DVD video eameratreeorder has versat#e functions, including special effects.
Refertfng te the procedure on page 40, connect the DVD video cemera/recerder, AC adaptertcharger and
power cable to power the DVD video eameretreeorder fn:_mAC outlet.
d
/ Pre_ the MENU button. Note;
•You can pros the DISC NAVIGATION button to stop
Choose Setup",
oomo trat,oo ,o o,ThoO, oNo ,oat,oo o eowi,,
2 • "_ _, appear.
' Derr.o Mode _, mid then
press the _-tll button, •If you Choose"AUTO",the demonstration will not start if a
disc isloadedwith the power switchset to "II_VIDEO* or
•"_ "E_ PHOTO=,or a card is loaded with the power switch
Use thejoystlck to choose sotto_ PHOTO =.
the desked option, and • The dernonslration func_on wiBnat work winenthe DVD
then press the I_/II video cameratrecorber is connected to PC
button, • While the demonstration isbeing given, the recording
indicator will blink.
Auto; 'lb start demonstration appmx, 3
ruinutes after turning dm DVD video
camerairecorde_on,
O_ '[bs_ demonstx'atlontoo_
Sta_; 'I_startdemonstr_Ion Immedlate]_
Press the MF, NU but ton agaIn:'lhe menu s(a'een
will disappear',
rib SlOp itle demonstration midway, pre_ itle [3
button,
The demo mode will end when the DVD video
camera/recorder is tuf'n* d off" o[ {_e DISC
E[EC_I bulton is pressed down,
146
No DVD Video Camera/Recorder Operation -
Check the Following:
Movie can be recorded only on DVD-RAM or DVD*R
disc.
Check the foltowing:
Is DVD*RAM or DVD*R disc inserted?
Is power switch set to "il VIDEO?
Jsthe DVD*RAM disc in DVD vider_ camel,S
recorTJerwrile_protected? Release the wriie*
p_gtect
Does disc have remaining recording space?
' movie stillcannot be r_corded after the above check
is clear, tile disc may be damaged: Use another disc
Still can be recorTJedonly on DVD*RAM disc, SD
memory card or multimedia card
Check the following:
JsDVD*RAM disc, SD memory card o_"multimedia
card inserted?
Jspower switch set to match the recoF3ingmediu m?
- When using DVD*RAM disc:
Set to "E_ PHOTO '_
- When using SD memory or mullimedia car_J:
Set to _ PHOTO"
is loaded DVD-RAM disc wdta-p{_tactad?
When using SD memory card: Is it locked?
Does discor card have remaining recording space?
'still cannot be recorded after the above check is
clea_:the disc or card may be damaged: Use another"
disc or cal_t
In thetoltowing cases, itwill take mor_ time than usual
until operation is possible:
When disc or card is removed and lhen _inserted
When data changes (e.g._during lhe first recording
of the day)
When the _emperatu_ is g_edy different from the
status of p_vtous _cording
When disc with sc_hes_ dirt or f_ngerprlnls is
inserted
When disc is subjec! to seve_ vibrations
When the bakery or DC power co_ was
disconnected instaad of toltowing lhe correct
p_cedu_ using power swish to torn the DVD video
came_l_co_er off
147
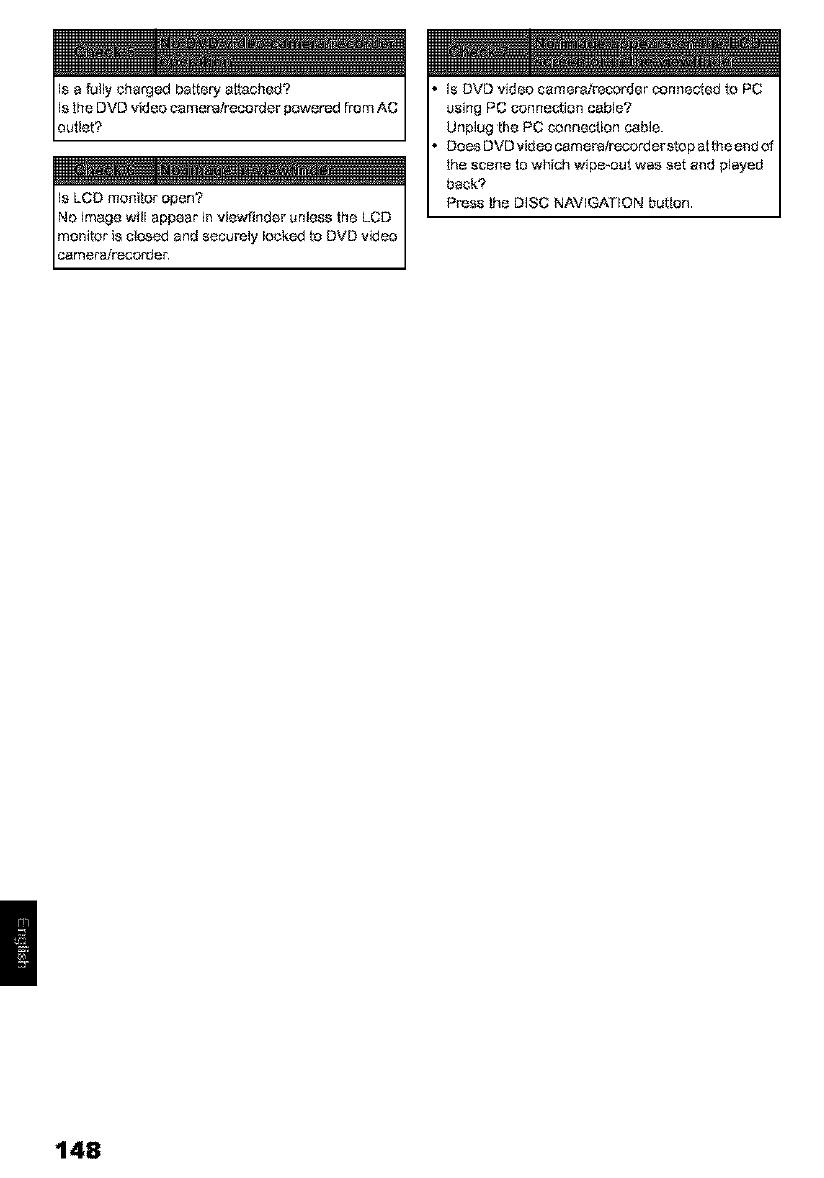
Is LCD monitor open?
No image will appear in viewfinder unless the LCD
monitor is c!osed and securely locked to DVD video
camera/recorder
148
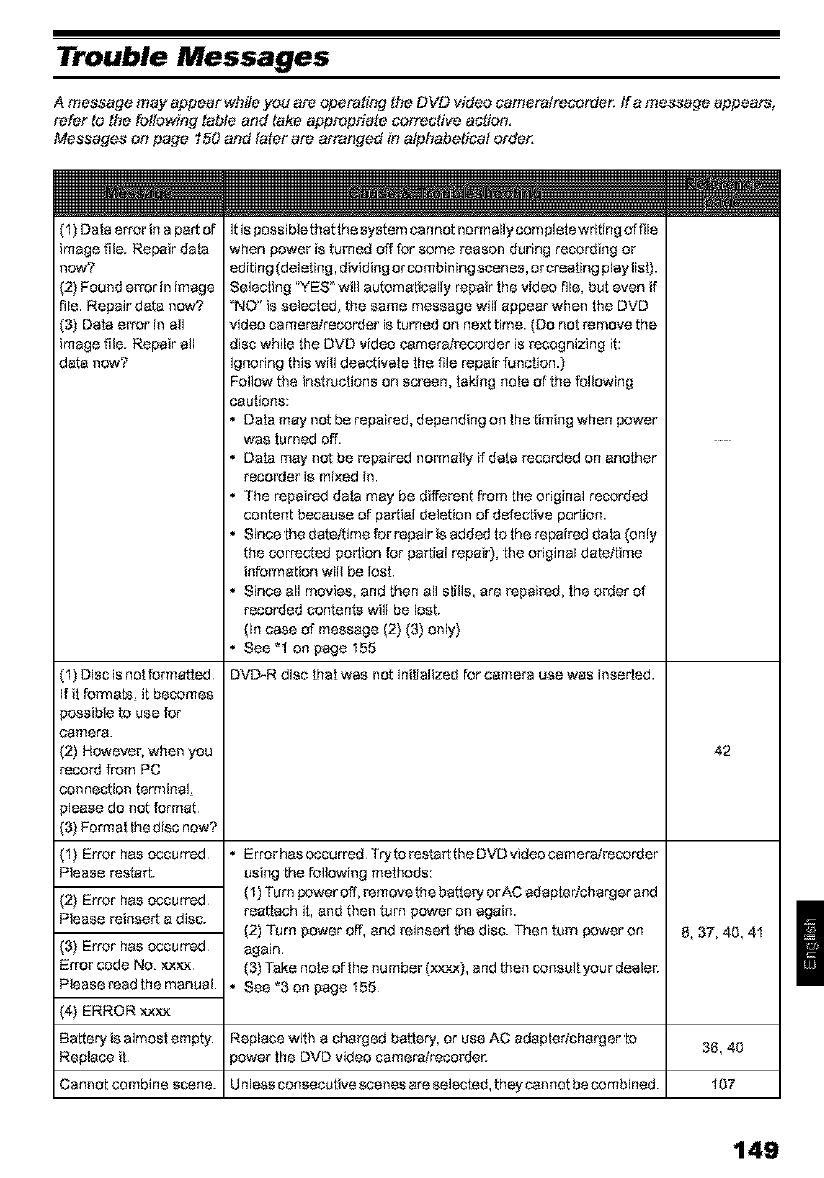
Trouble Messages
A message may appear while you are operating _e DVD video eameratre_er ffa me_age appeare,
refer to the following table and take appropriate corrective action.
Messages on page 150 and later are arranged in alphabetical order
(1) Dale error in a part of
image file. Repair dale
now?
(2) Found error in image
file Repair data now?
(3) Data error in all
image file. Repair all
data now?
(1) Disc is not formatted
If i! foiTnats_it becomes
)ossibte to use for
¢,_amera.
(2) Howevel_ when you
reco_t from PC
connection terminal
}lease do not format
(3} Format [hedisc now?
(f) Error has occurred
Please re.tart.
(2) Error has occurred
Please _insert a disc.
(3} Error has occurred
Error code No. xx_
Please read the manual
(4} ERROR _xx
B_ttary isalmost empty
Replace it
Cannel comblne scene.
It is possible that the system cannot normally corn platawriting _ file
when power is turned off for some reason during recording or
editing (deleting, dMding or combining scenes, orcreating play lis!).
Selecting "YES will automedcaliy repair the video file, but even if
"NO" is selected_ the same message will appear when the DVD
video camera/recorder is turned on next time. (Do not remove the
disc while the DVD video camera/recorder is recognizing it:
ignoring Lhiswill deactivate the file repair function.)
Follow the insL_cllons on screen, taking nota of Lhefollowlng
cautions:
• Dala may not be repaired, depending on the Limingwhen _wer
was turned off.
• Dala may not be i_paired nomlally if data i_corded on another
reco_.ter is mixed in.
• The repaired dala may be diffel_nt from the original recorded
content because of partial deletion of d_fecLive porgon.
•Since Lhedatattime for t_pair is edded to the repaired dala (only
the corrected portion for partial t_pair), the original date,_time
information will be lost
• Since all movies, and then all slills, are i_pail_d, the old.tarof
recorded contents wilt be IosL
0n case of message (2) (3) only)
• See "1 on page 155
DVD-R disc that was not inilialized for camera use was inserted.
• Error has occurred Try ta i_sLart LheDVD video camerali_corder
using the following methods:
(1) Turn power off, i_move the battery orAC edaptadcharger and
reattach it, and then Lurnpower on again.
(2) Turn power off, and reinsert the disc. Then turn power on
again
(3) Take note of lhe number (xxxx), and then consult your dealel:
•See *3 on page 155
Replace with a chal_ed battery, or use AC adapterlcharger to
power the DVD video camera/reco_YJe_:
Unless consecutive scenes are selected, they can not be combined.
42
g, 37, 40, 41
36, 40
107
149
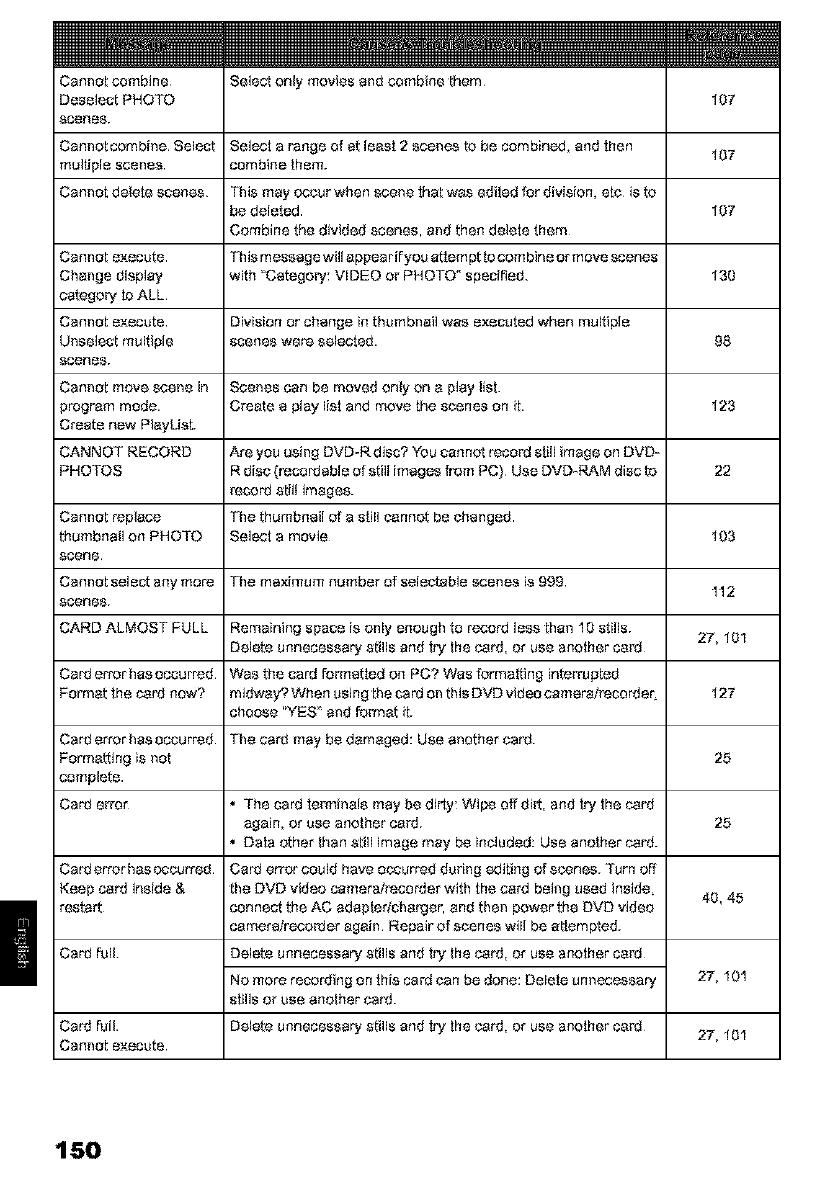
Cannot combine
Deselect PHOTO
scenes.
Cannot combine Select
multiple scenes.
Cannot delete scenes.
Select only movies and combine them
Select a range of at least 2 scenes to be combined, and khan
combine khem.
This may cccur when scene that was ediled for division, etc is to
be deleted.
Combine the divided scenes, and then delete them
Cannot execute This message will appear ifyou attain pt to corn bineor move scenes
Change display with "Category: VIDEO or PHOTO*' specified.
category to ALL
Cannot execute Division or change in thumbnail was executed when multiple
Unselect multiple scenes were selected.
scenes.
Cannot move scene in Scenes can be moved only on a play lls!
program mode. Create a play list and move the scenes on it.
Create new PlayList.
CANNOT RECORD Are you using DVD-R disc? You cannot record still image on DVD-
PHOTOS Rdisc (t_cordable _-:ffstilt images ft_._mPC) Use DVD*RAM disc t_
record stilt images.
Cannot replace The thumbnail of a still cannot be changed.
thumbnail on PHOTO Select a movie
scene
Cannot select any more The maximum number of select,able scenes is 999
scenes.
CARD ALMOST FULL Remaining space is only enough Lorecord less Lhan10 stills.
Delete unnecessary stills and Iry the card, or use another cant
Card error has occurred Was the card fomlatted on PC? Was formalting interrupted
Format khe card now? midway? When using the caFJ on this DMD video camerairecordec
choose "YES and &_lTnatit.
Card error has occurred The card may be damaged: Use another card.
Formatting is not
complete.
Card error
Card error has occurred.
Keep card inside &
restart 40, 45
Card full.
Card full.
Cannot execute¸
• The card terminals may be dirty: Wipe off dilt, and Iry khecard
again, or use anokher card.
•DaIa other khan_till image may be included: Use another card.
Card e_r could have occur_d during editing of scenes. Turn off
the DVD video camera/recorder with the card being used inside_
connect the AC edaptericharge_ and then power the DVD video
camera/recorder again¸ Repair of scenes will be at_m_d.
Delete..unnecessary _tills and Iry the card, or use another card¸
No more recording on this card can be done: DeleI8 unnec_sary
stills or use another card.
Delete..unnecessary _tills and Iry the card, or use another card¸
107
107
107
130
98
123
22
103
112
27, f01
127
25
25
27,101
27, f01
150
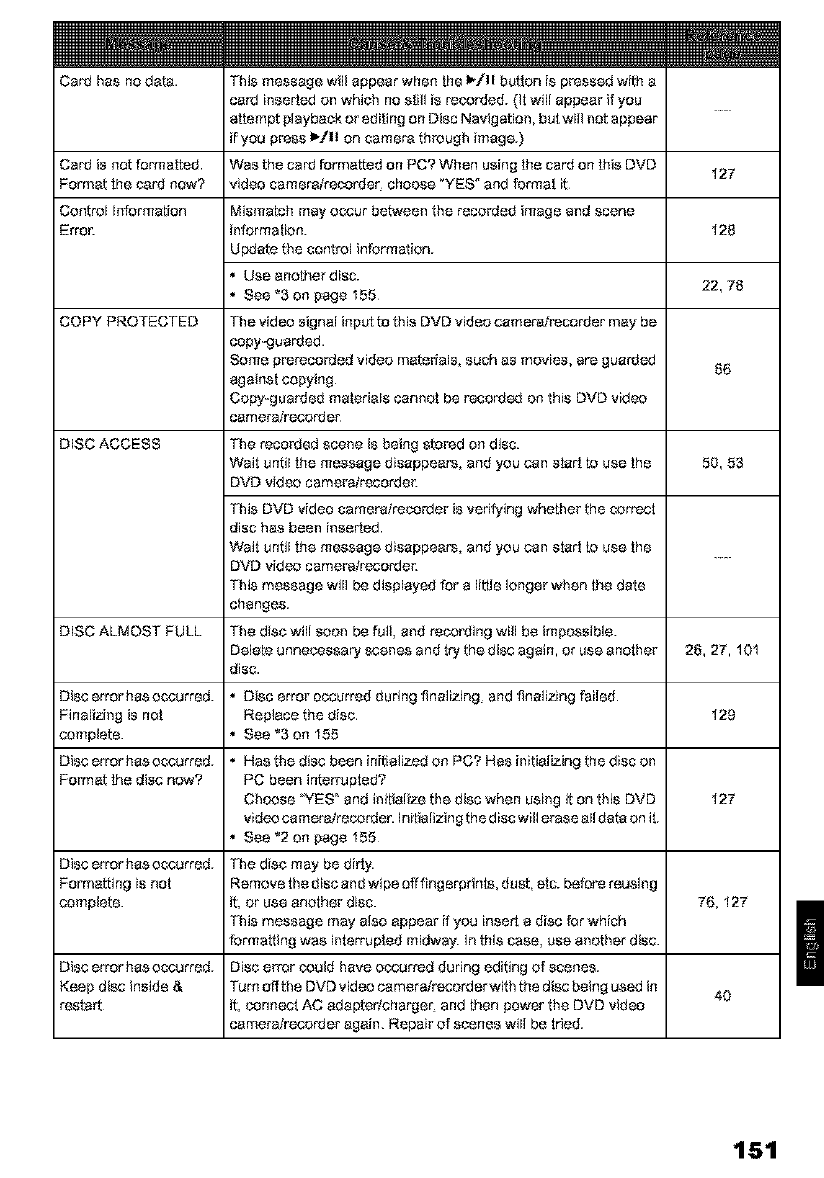
=
Card has no d_. This message will appear when the I_/11 but!on is pressed with a
card inserted on which no still is recorYJed.(it will appear if you
attempt playback or editing on Disc Navigation, but will not appear
if you press I_/11 on camera through image.)
Card is not formatted. Was the card formatted on PC7 When using the card on this DVD 127
Format the card now? video camerairecorTJer_choose _YES" and format it
Control Inforf_Lion Misfl_tch may occur between Lherecmled image and scene
Error: i_formalion. 128
Update the control information.
• Use another disc. 22, 76
•See "3 on page 155
COPY PROTECTED The rid er_ signal input to this DVD video camerdrecorder may be
copy-guarded.
Some prerecorded video matmfals, such as movies, are guarded 66
agains! copying
Copy*guarYJedmalertals cannot be recorded on this DVD vldeo
camera/recorder
DISC ACCESS The recmled scene is being stored on disc.
Wait until the message dlsappeam, and you can start to use the 50, 53
DVD video camemirecordm:
This DMD video camemlrecorder is verifying whether the correct
disc has been inserted.
Wait until the message dlsapbeam, and you cm_ start to use lhe
DVD video camemirecordel:
This message will be displayed for a little longer when the dale
changes.
DiSC ALMOST FULL The disc will som_ be full, m_drecorTJingwil] be impossible.
DetaLeunnecessary scenes and try the disc again, or use another 26, 27, 101
disc.
Disc errorhasoccurred. • Disc error occurred during finallzing_ and finallzlng failed
Finalizi_g is not Replace the disc 129
complete. • See *3 on 155
Disc error hasoccurred. • Nas the disc been initialized on PC? Has initializing the disc on
Format #m disc now? PC been intmTuptad?
Choose ">YES and iniLialize the disc when using iLon this DVD 127
video cameraireoordm; Initializing the disc will erase alldata on it.
•See *2 on page 155
Disc error hasoccurred. The disc may be dirty.
Formatting is not Remove the disc m_dwibe offfingerprints, dust, etc. before reusing
complete, it, or use another disc. 76, 127
This message may also appear if you insert a disc for which
formattiflg was interrupted midway. In this case, use another disc.
Disc error hasoccurred. Disc error gould have o_urred during editing of scene&
Keep disc inside & Turn off the OVO video camera/recorder with the disc being used in 40
restart it, connect AC edapterlcharger and then power the DVD video
camera/recorder again. Repair of scenes will be bied.
151
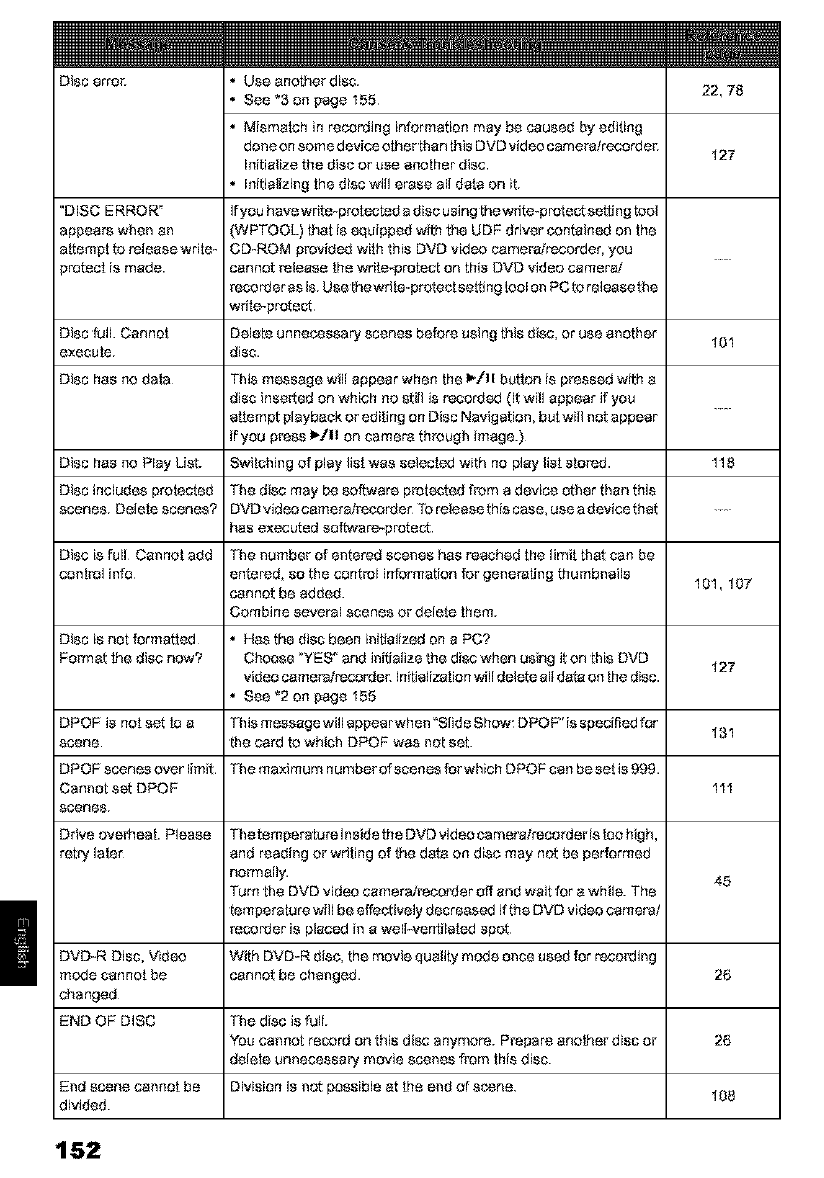
=
Disc error: * Use another disc. 22, 76
• See *3 on page 155
• Mismatch in recording information may be caused by editing
edna on some device other than this DMD video camei_airecordei: 127
Initialize the disc or use anolher disc.
• Initializing the disc will erase all data on IL
"DISC ERROR _ Ifyou have write*protactad a disc using thewrlte-protect setting tool
appears when an (WPTOOL) that is equipped with the UDF driver contained on lhe
attempt to release write- CD*ROM provided with this DVD rides camel_Wre_:order,you
}rotect is made. cannot release the write-prota_[ on this DVD video camerat
recorder asi& Use the writa-pt_tecI setting toolon POto releasethe
wlfie_protect
Disc full. Cannot Delete unnecessary scenes before using this disc, or use another 101
execute, disc.
Disc has no data This message will appear when the I_/If button is pl_ssed with a
disc inserted on which no still is recorded (It will appear if you
attempt playback or editing on Disc Navigation, but will not appear
if you pi_ss _/11 on camera th_T_ughimage.)
Disc has no Play LisL. Switching of piny list was selected w[Lh no play list sto_d. 118
Disc includes protected The disc may be so,ware pint.ted fiT_ma device other than this
scenes. Delete scenes? DVD video camera/recorder To release this case, use a device that ....
has e×ecuted sofNvare_protect
Disc is full Ca_mot add The number of entered scenes has reached the limit that can be
control i_fo entered, so the control information for genemti_g thumbnails 101, 107
cannot be added.
Combine several scenes or delete them.
Disc is not formatled •Has the disc been initialized on a PC?
FoiTnat #le disc now? Choose "YES_ and initialize the disc when using it on this DVD 127
video came_re{:or_te_: Initialization will delete all data on the disc.
• See *2 on page 155
DPOF is notset to a This message will appear when "Slide Sh_: DPOF"is eqecifled for 131
scene the card to which DPOF was not set.
DPOF scenes over limit The maximum number ofscenes forwfedh DPOF can be seUs 999.
Cannot set DPOF 111
scenes.
Drive overheat. Please Theten_peratureinsidetheDVDvideocamer_lreco_teristoohigh,
retry later and reading or wri!ing of the data on disc may not be performed
normally 45
Turn the DVD video camerairecorTJer off and wait for awhile. The
temperature will be effectively decreased if the DVD video camera/
recorder is placed in a wellwentilated eqot
DVD*R Disc, Video With DVD-R disc, the movie quality mode once used for re{:ording
mode cannot be cannot be changed. 26
changed
END OF DISC The disc is full.
You cannot record on this disc anymore. Prepare another disc or 26
delete unnecessary movie scenes from this dlsc.
End scene cannot be Divislon is not besslble a_ the end _f scene. 108
divided.
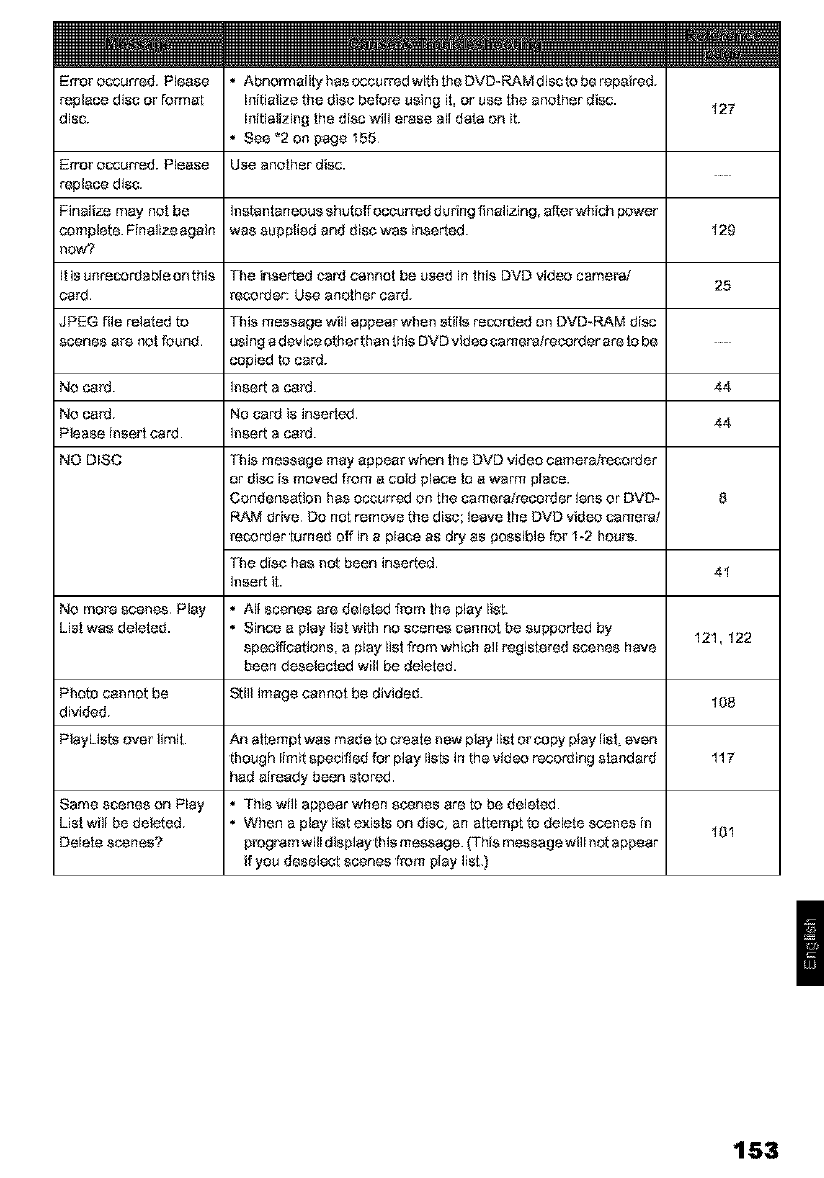
E_oroccurred.Please
replacediscorformat
disc.
• AbnormalityhasoccurredwithlheDVD*RAMdisctoberepaired.
filitializethediscbeforeusing it, or use the another disc.
initializing the disc wifl erase all data on it.
• See *2 on page 155
Error occurred. Please Use another disc.
replace disc.
Finalize may not be Insta_taneousshutoffoccurred during finallzlng, afterwhich power"
completo. Pinallze again was supptied and dlsc was inserted.
now?
Ilis unrecordable on this The inserted cat_Jcannot be used in this DVD video came_i
card. recorder: Use another card.
JPEG file relaLedto This message will appear whe_ stills recorded o_ DVD-RAM disc
scenes a_ not tound, using a device other than this DVD video camera/recorder are !o be
copied to card.
No ca_J. Insert a ca_J.
No card. No card is insertod
Please insert card Insert a cal_J.
NO DISC This message may appear when the DVD video camera/recorder
or disc is moved from a cold place !o a warm place.
Condens_tioll has occurred oil the camera/reco_ter lens or DVD* g
RAM drive Do not remove the disc; leave lhe DVD rid er) came_ai
recorder turned off in a place as dry as possible for 1-2 hours.
The disc has not been inserted 41
Insert it.
No mo_ scenes Play • All scenes are deleted figarolhe play list.
Lis! was deleted. • Since a play list with no scenes cannot be supported by 121, 122
specifications, a play lis! from which all t_gistered scenes have
been deselected will be deleted.
Photo cannot be Still image cannot be divided. 108
divided.
PlayLists over limit. An altemplwas made to create new play list or copy play lis!_even
though limlt specified for play lists in the video recordlng s[andatYJ 117
had already been stored
Same scenes on Play • This will appear when scenes are to be deleted
List wilt be deleted. • When a play list exisls on disc_ an attempt to delete scel_es in 101
Delete scenes? pmgr_amwill display this message. (This message will not appear
if you desele_t scenes from play list.)
127
129
25
44
44
153
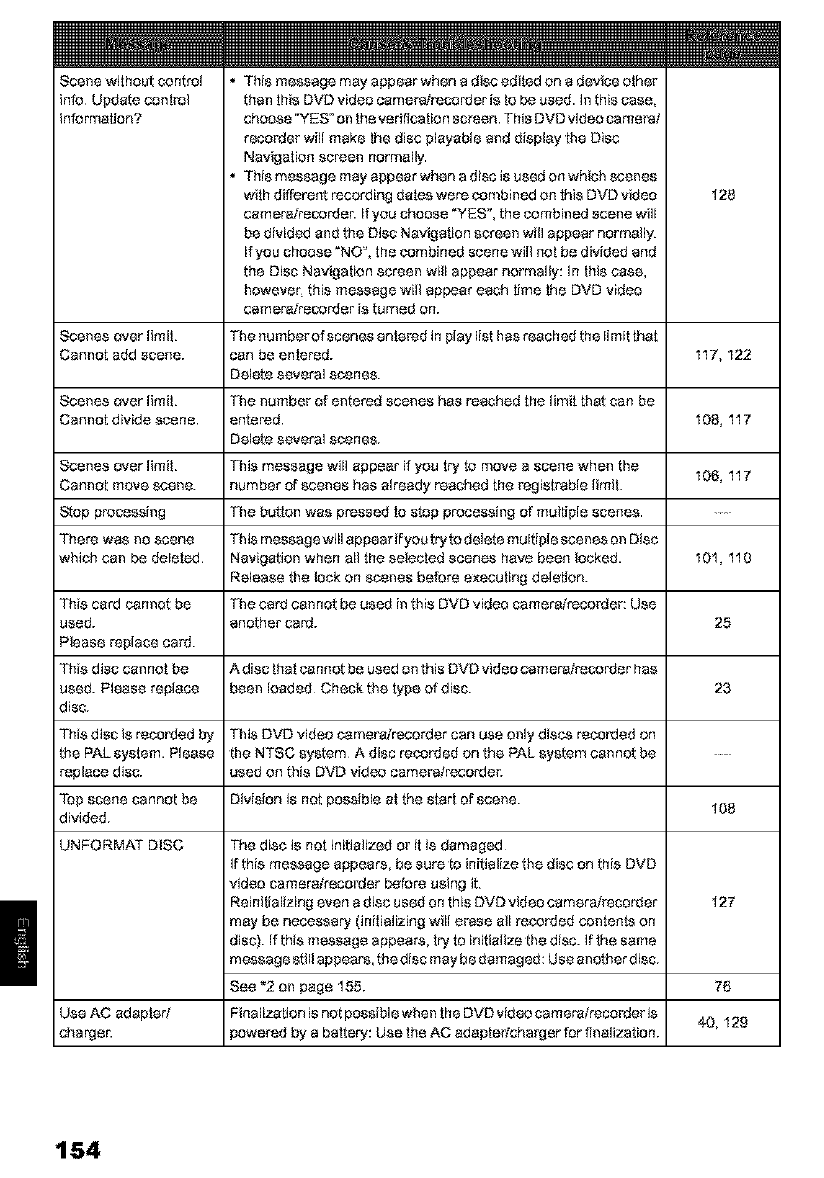
Scene without control
info Update cont_l
information?
• This message may appear when a disc edited on a device other
than thisDVD video camera]recorder is to be used. in this case,
choose"YES _on the verification screen This DVD video came_l
recorder will make the disc playable and disptsy the Disc
Navigation sc_en normal_.
• This message may appear when a disc is used on which scenes
wilh diffe_nt recording date_ were combined on this DVD video
camera]recorde_ if you choose "YES", the combined scene will
be divided and the Disc Navigation screen will appear normall_
if you choose"NO_, the combined scene wiil not be divided and
the Disc Navigation sc_en will appear normally: in this case,
howeveL this message will appear each time [he DVD video
camera]recorder is tunqed on.
The number of scenes entered inplay Itst has reached the limit that
can be entered.
Detste several scenes.
The number of ents_d scenes has reached the limit that can be
ente_d
Detste several scenes.
This message wi, appear if you try to move a scene when the
number of scenes has already reached the _glstrable limit.
The button was pressed to stop processing of multiple scenes.
This messagewillappearifyou tryto deiete muRipie scenes on Disc
Navigation when all the selec_d scenes have been tocked.
Release the tock on scenes before e×ecating del_tton.
The card cannot be used in ¸thisDVD video camera]recorder: Use
another can_.
128
Scenes over limiL
Cannot add scene. 117, 122
Scenes over limiL
Cannot dlvlde scene 108, 117
Scenes over limiL
Cannot move scene. 106, fl17
Stop processing ....
There was no scene
which can be deleted 101,110
This card cannot be
used. 25
Please replace card.
Thts disc cannot be A dtsc that cannot be used on this DVD video camera]recorder has
used. Please replace been loaded Check tile type of disc. 23
disc.
This disc is recot_Jedby This DVD video camera]recorder can use only discs recorded on
the PALsystem. Please the NTSC system A disc recorTJedon the PAL system cannot be ....
reptsce disc. used of] this DVD video camel_/recordel:
Top scene cannat be Division is not possible at the start of scene. 108
divided.
UNFORMAT DISC The disc is not initialized or it is damaged
If thts message appears, be sure to initialize the disc on this DVD
video camera]recorder before using it.
Relni_alizing even a disc used onthis DVD video camera]recorder 127
may be necessary (initializing will e_se all recorTJedcontents on
disc). If this message appears, tryto initialize the disc. If the same
message still appears, the disc may be damaged: Use another disc.
See *2 on page 155. 76
Use AC edapterl Finalizattonlsnatpossiblewhen[heDVDvider_camera]recorderis 40,129
cha_gen powered by a battery: Use the AC edaptellcharger for finalization.
154
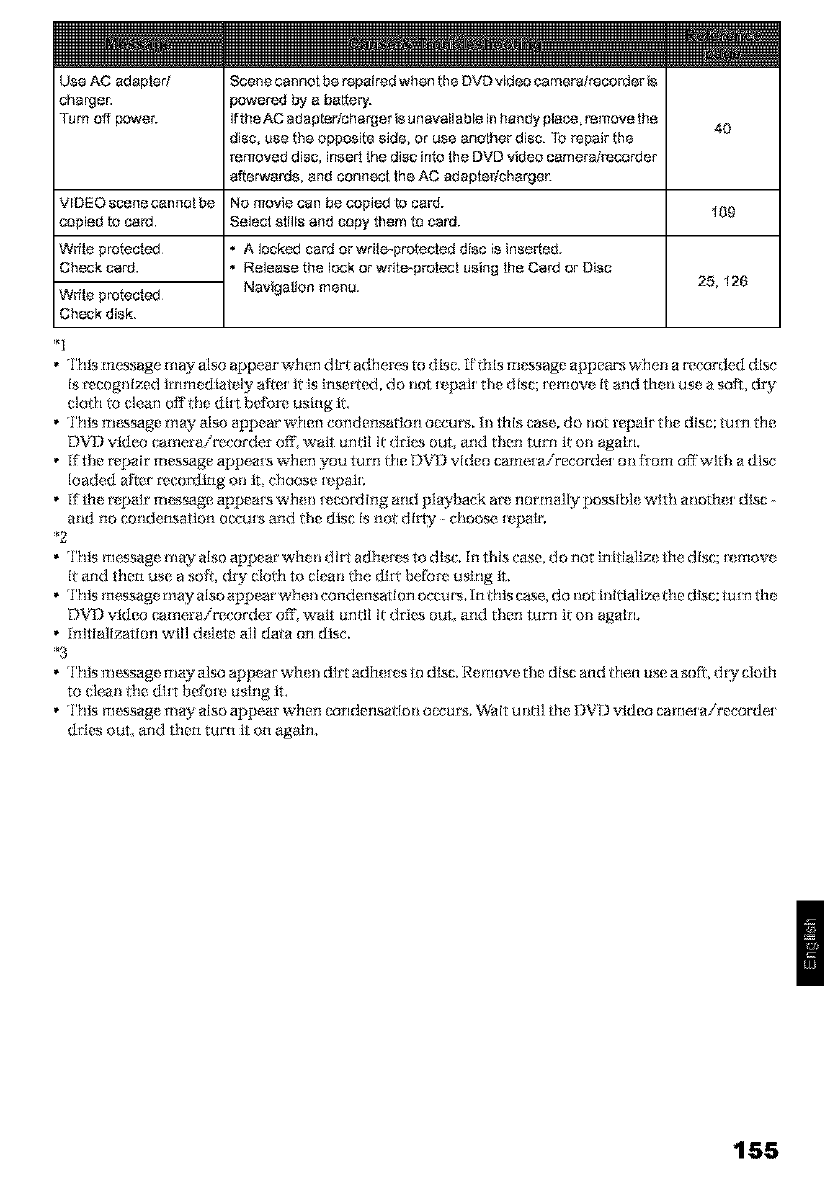
=
Use AC edapled
changer,
Turn off powen
VIDEO scenecannolbe
copied to card
Write protected
Check card.
Write pro_cted
Check disk.
Scene cannot be repaired when the DVD video camer_lreco_Jer is
powered by a battel-y.
Ifthe AC edaptedcharger isunavailable inhandy ptace_remove 1he
disc, use the opposite side, or use another disc. To mpa# tile
removed disc, insed the disc into the DVD video camera/recorder
afterwar_Js,and connect the AC adaptedchargen
No movie can be copied [o card.
Select stills and copy them tocarpi.
• A Jockedcard or wrile_protected disc is inserted.
• ReleAse the lock or write-protect using the Card or Disc
Navigalion menu.
4O
109
25,126
*l
• 'I'his message ma_ also appe_irwhen dirt adheres to disc, It'thls message appears when a recorded disc
is r_cognized immedia_ely a[le[ it is inserted, do not _,pai_ the d isc; _emova it an d th_n use a so_, dry
cloth i_ dean off'the dirt be t_re using It,
•rl'hismessage may also appear when condensation occurs, In this case, do no[ repair the disc; [ucn the
DVD video camera/recorder ofl'_ walt until it dr'lea out, and then turn It OR agaln,
• If'the r_pair message appea*s when you turn ltle DVD video camel airecorde[ on flora off'wlth a dis<:
loaded alter r_corfling on it, choose [*_,paic
• If the _pah' message appears when [*_,coi_ting an d plah4 rock a_ norms] ly possibR wlzh anoth_ [ disc -
and no condensation occu[,_ and the disc is not dirty - choose [_,pa#',
*2
• 'l'his message may also appear when dirt adhm_,s to disc. In this case_ d o not britializ_ gm disc; _ move
it and then use a so_'h dr}" clofll to clean tile dirt befbi_ using it.
• This message may also appear whe_lcondensarion occurs. [n this case,, do not initialiT_l_m dNc; turn th_
DVD video camera/recorder ofl'_ walt until it dales out, and then turn it on again.
•Initialization wli] d_ lete all da_a on disc.
• 1'his message may also appear when dirt adh_ _ s to disc. Rein ore the disc and ¢len use a soft, d W clod1
to clean ¢le dirt befu_ using it.
•'l'tlls message may also appe, au-Wl'lr_ncorldensation occur._. Wait u ntl] gm DVI) v'idl:.o came, t airecorde, t
ddcs out, and thcn turn it on ag_tJlI,
155

Troubleshooting
Check to see _e _#owing before asking for a _pa_ _the suggested solut_n sd# cannot ms_ the DVD
_deo came_tmco_er to no_a_ do not a#empt to repair _ _u_e_ but cons_ your dearer,
Power supplies
Battery cannot be
charged.
Is Lheambient tomperaLure too low or too high?
Charge the ba_el¥ aL 50_86_F(10-30_C)
is LhebaLlery abnormally hot?
Remove the ba_e_¥,leave it for a while to cool Gown, then charge it
IsLheDC power cord connected to AC adapter/charger? Unplug it
Has the battely been unused for a long time?
Remove the battery, and #_en reat{ach it. If the battery is sLillnot
charged, it may be dead: Purchase a new one.
* If the batter',/does not charge alter you LlyLheabove four
procedure_, it may be dead: Purchase a new b_ery.
36
Battery weakens Past Al_ you using LheDVD video camera/recorder where Lhe
Lempel_tureis very Iow_
The DVD video camera/recorder can normally be used for 40*60 38
minutes with a fully charged battery, but this Limewill be shorter at
low tompel_tures. Keep extra b_ttebes on hand.
Battery may be dead.
The performance of battery will deLerioraLe if it is used for an 39
e×tanded period of lime or frequently: Pumhase a new b_ttery.
The CHARGE indicator Is Lheambient tamperaLur_ too low or too high?
onACadaptedchargeris Charge the b_e_¥ in environmenL where the temperature is SO-
blinking 86_F (10_30_)
The b_to_y has possibly discharged e,,_cessively.Continue 36
charging: After a while, the battery will be chalged to LhespeciRed
voltage, and LheCHARGE indic_Lor will light. Then the batlery
charge will be completed normally.
Is battet_ cha_ged?
Charge it.
36
Power turns off
immediately alter being
Lurnedon.
When p_zweris turned
on, the LCD screen will
_urnon and off.
Power goes _ff
une,_pectadly.
Is Power Save seLto "On?
If the powel_d DVD video camera/recorder is left for as long as 5
minutes without reco_TJingor playback with "Power Save: On_
specified, it will autom_Lically turn off to save battery power: To 92
resLart i_cording inLhiscase, set the przwerswffch to "POWER OFF
and Lhenset i! to"_ Vl DEO". You can also specify "Power Save: Off'
Lostop automatic power off.
Power cannoL be turned Detoch the b_ely or AC edapier_'chalger once_and then press lhe
off. RESET button of DVD video camera#_co_ter: Reattach a power ....
supply LoDVD video cameralreco_3er before turning it on again.
156
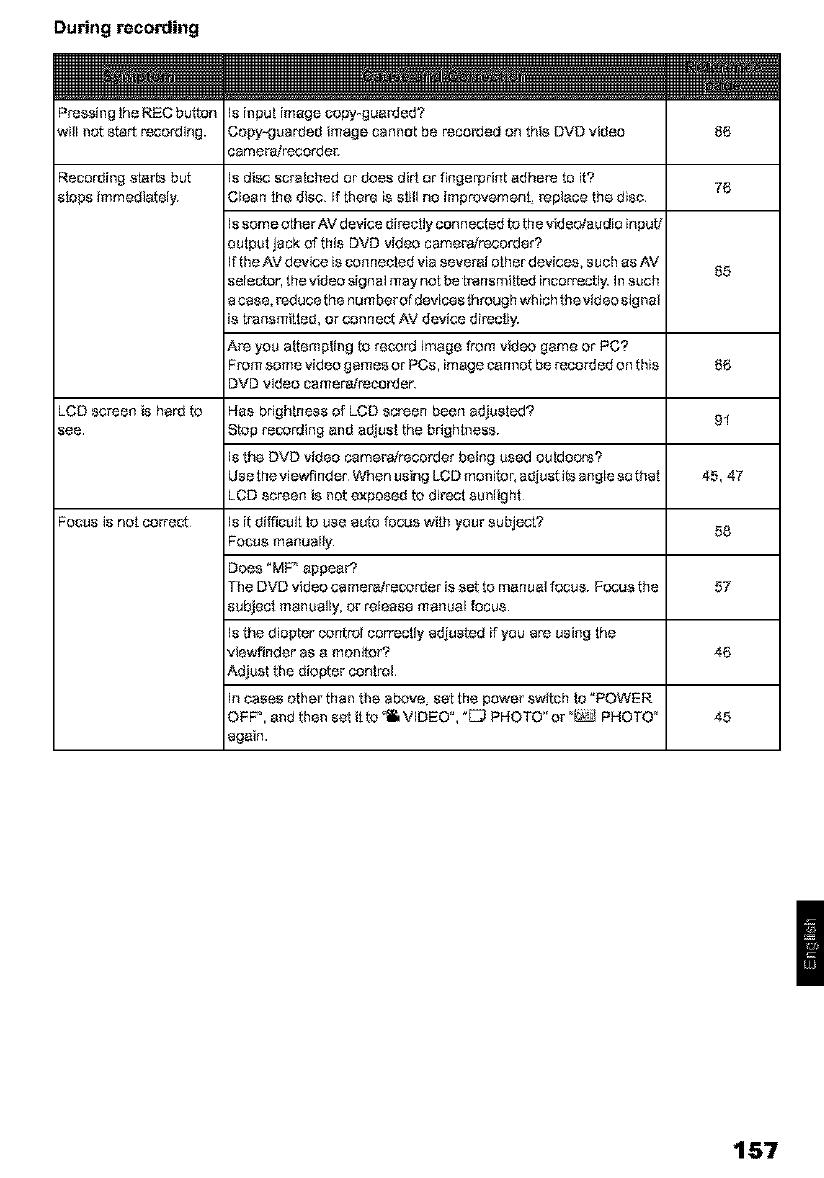
During recording
Pressing theREC button
will not start recording. 66
Recording s_rts but 76
stops immediately.
65
66
LCD screen is hard to 91
see
45, 47
Focus is not correct 58
57
46
45
Is input image copy*gun,gad?
Copy-guarded image cannot be recorded on this DVD video
came_irecorde_:
Is disc scraiched or does dirt or fingerprint edhe_mto it?
Cbean the disc. if thet_ is still no improvemenL replace the disc
Issome _ther AV device direclly connected to the videa]audio input/
output jack of this DVD rider) camera]recorder?
If [he AV device is con necled via several other devices, such as AV
selector', the video signal may not be transmitted incorrectly. In such
a case, _duce the numberdf devices through whlch the video signal
is transmitted, or connect AV device directly.
Are you attempting to record image from video game or PC?
From some video games or POs, image cannot be reco_TJedof] this
DVD video camera]recorTJet:
Has brightness of LCD screen been edjusled?
Stop recoF3ing and adjust the brighmess.
Is the DVD video camera]recorder being used outdoors?
Use the viewfi nder When using LCD monitor, adjust itsangle so that
LCD screen is not exposed to direct sunlight
Is it difficult to use auto focus with your subject?
Focus manually
Does "MP appear?
The DVD video camera]recorder isset to manuN focus. Fo_us the
subject manually, or release ['nanual focus
Is the diopter control correctly adjusted if you are using the
viewfinder as a monitor?
Adjust the diopter control
In cases other than theabove_ set the power switch to "POWER
OFF", and then s_t it to _'_ VIDEO", "[_ PHOTO" or "_ PHOTO
again.
157
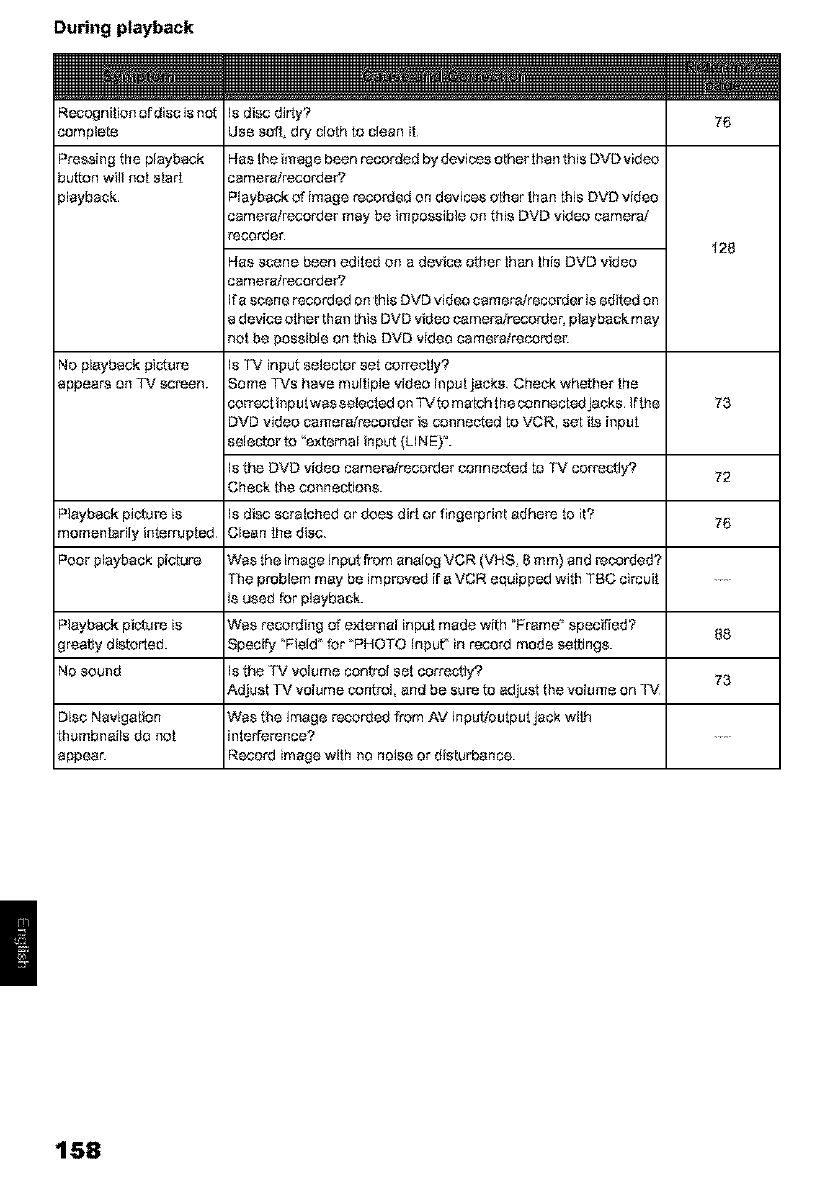
Du_ng playback
Recognition of disc is not
complete
Pressing the playback
button will not start
playback.
76
is disc dirty?
Use soft_dry cloth to clean it
Has the image been recorded by devices other than this DVD video
camerairecorde_
Playback of image recorded on devices other than this DVD video
camera/recorder may be irnpossibfo on this DVD video camera/
recorder¸
Has scene been edited on a device other than this DVD video
camerairecorde_
If a scene recorded on this DVD video camera/recorder is editod on
a device other ¸thanthis DVD video camera/recorder, playback may
not be possible on this DVD video came_l_corde_
Is TV input selector set correctly?
Some TVS have multiple video input jacks Check whcther the
co.act input was sefoctod on TV to ma _h t he connectod jacks If the
DVD video carnerai_corder is connected to VCR, sct tts input
selector to °extomaJ input (LINE?.
Is the DVD video camera/recorder connected to TV correctly_
Check the connections.
Is disc scratched or does dirt or fingerprint adhere to it?
Clean the disc.
Was the image input from analog VCR (VHS_ 8 ram) and recorded?
The problem may be improved if a VCR equipped with TBC clmuit
is used for playback.
Was recording of external input made with "Fram_ specified?
Specify _Field_ for _PHOTO Input° in record mode settings.
Is the TV volume control set correctly?
Adjust TV volume control, and be sure to adjust the volume on TV
Was the image recorded from AV inputloutput jack with
intertorence?
Record image with no noise or disturbance.
128
No playback picture
appears on TV screen.
73
72
Playback picture is 76
momentarily interrupted
Poor playback pictur_
Playback picture is 88
greatly distorted.
NOsound 73
Disc Navigation
thumbnaibsdo nof ....
appear.
158
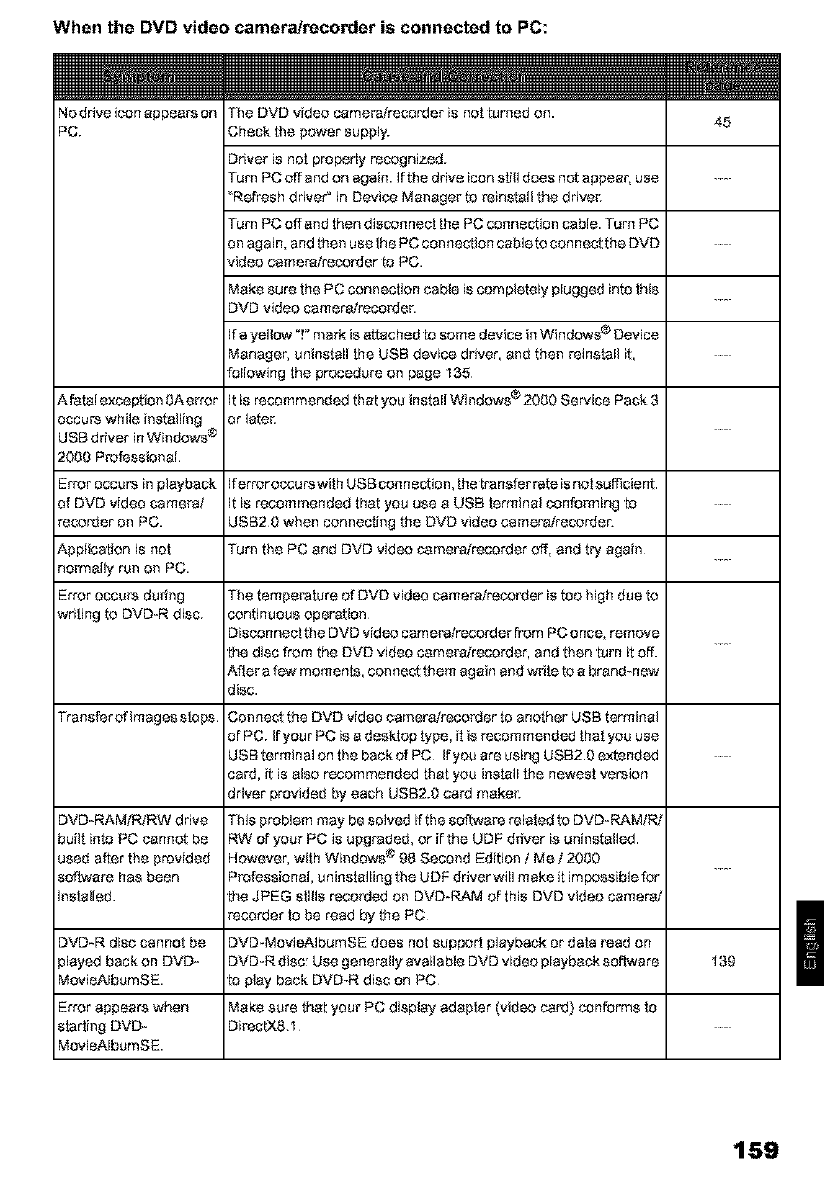
When the DVD video camera/recorder is connected to PC:
Nodrive icon appears on The DVD video camera/recorder is not turned on. 45
PC. Check the power supply.
Driver is no[ properly recognized.
Turn PC off and on again. If the drive icon st_lldoes not appear, use ....
"Refresh dMveP in Device Manager t_ relnsb_ll the d Mve_:
Turn PC off and then discon nect the PC connection cable. Turn PC
on again, and then use lhe PC connection cableto connect the DVD ....
video cameratrecorTJer to PC.
Make sure the PC connection cable is completely plugged into #fis
DVD video cameratreco_TJe_:
if a yellow "!" mark is attached LOsome device in Windows ® Device
Manager, uninstall the USB device driver, and then reinstall it,
following the procedure on page 135
A fab'-tlexception gAerror It is recommended thatyou installWindows®2000 Service Pack3
occurs while instoiling or late_:
USB ddver in Windows ® ....
2000 Professional
Error occur_ in playback Iferror oc'._urswilh USB connection Ahe transfer rate isnolsufficient
of DMDvideo came_; It is recommended that you use a USB lerminal confomling to ....
recorder on PC. USB2O when connec_Jngthe DVD video camer_recorder.
Apptic_Uon is not Turn the PC and DVD vide:_camera/recorder off, and try again
nof3_ally run on PC.
Error occu_ dudng The temperature of DVD vldeo cameralrecorder is too high due to
writing to DVD*R disc. continuous operation
Disconnec! the DVD rid e:_camef_lrecorder #_m PC once, remove
the disc from the DVD video cameron;recorder, and then turn it off.
After a few moments, connect them again and wdte to a bt_nd_ne;w
disc.
Transferofimagesstops Connect the DVD video camer_reco_Jer to another USB terminal
of PC. If your PC is a desktop type, it is recommended that you use
USB terminal on the back of PC If you are using USB2O extended ....
card, it is also recommended that you instil the newest ver_ion
driver provided by each USB2.O card make_:
DVD-RAMIRiRW drlve This problem may be solved if_he softwa_ related to DVD*RAM;R[
built into PC cannot be RW of your PC is upgraded, or if _he UDF driver is uninstolled
used after _he provided However, with Windows® 98 Second Edition t Me /2000
software has been P_fessional, uninslalling the UDF drlver will make it impossible for
ins[ailed. _he JPEG s!iils reco_Jed on DVD-RAM of this DVD video camera/
recorder to be read by the PC
DMD-R disc cannot be DVD*MovieAIbumSE does not support playback or data read on
played back on DVD_ DVD*R disc: Use generally available DVD video playbacksoftware 139
MovieAIbumSE. _o play back DVD-R disc on PC
Error appears when Make sure tha_ your PC display adapter (vide:_ card) conforms to
slar!ing DVD- Dil_cb_8.1
MovieAIbumSE.
159
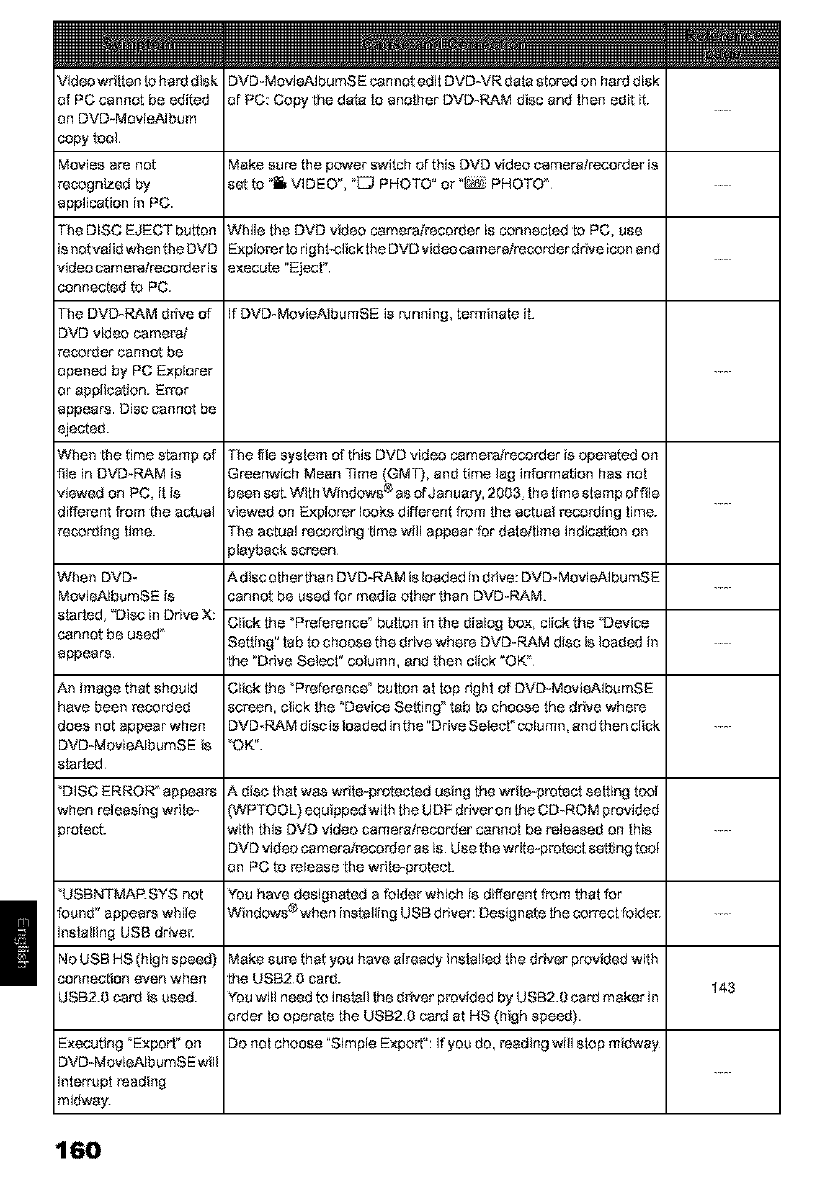
Video wrilton to hard disk
of PC cannot be edited
on DVD*MovieAIbum
copy tool
Movies are not
recognized by
application in PC.
The DISC EJECT button
is not valid when the DVD
video came_kecorder is
connected to PC.
The DVD-RAM drive of
DMDvideo camel_l
recorder cannot be
opened by PC Explorer
or application. Error
appears. Disc cannot be
ejected.
When the time stamp of
rile in DVD*RAM is
viewed on PC, it is
different from the actual
recording time.
DVD*MovJeAIbumSE cannot edit DVD_VR data stored on hard disk
of PC: Copy the data to another DVD-RAM disc and then edit it.
Make sure the power swffch ofthis DVD video camera/recorder is
set to "I VIDEO", "[_ PHOTO" or "_ PHOTO ....
While the DMD video camera/recorder is connected to PC, use
Explol_r !o dght<:lick the DVD video camera]recorder drive icon and
e×ecute "Eject".
If DVD-MovieAtbumSE is running, terminate it.
The file system dthis DVD video camera/recorder is open.ted on
Greenwich Mean qime (GMT), and time lag information has no!
been set With Windows ®as of January, 20O& the time stamp of file
viewed on Explorer looks different from the actual recording llme.
The actual t_cording time will appear for datedlime indication on
playback screen
When DVD- A disc other than DVD-RAM istaeded indrive: DVD-MovieNbumSE
MovieAIbumSE is cannot be used for media other than DVD*RAM.
star ted/"Disc in Drive X: Click the "Preference button in the dialog box_ click the "Device
cannot be used Setting" lab to choose the drive where DVD*RAM disc is taeded in ....
appears, the "Drive Select" column, and then click "OK"
An image that should Click the "Preterence _ bctton al top right of DVD*MovieAIbumSE
have been recorded screen, click the "Device Setting _tab to choose the drive whe_
does noLappear when DVD-RAM disc is taaded in the "Drive Selec!" colu ran, and then click ....
DVD*MovleAIbumSE is "OK".
started
"DISC ERROR_ appea_ A disc that was writa-pmLectad using the write-protect setting tool
when releasing wrile* (WPTOOL) equipped with the UDF ddver on the CD-ROM provided
_rotect. with this DMD vldeo cameratrecor_er cannot be released on this ....
DMDvideo camerakecorder as is Use the write*protect se_ing toot
on PC to release the writa-pmtect.
"USBNTMARSYS not You have designated a folder which is different from thai for
found" appears while Wind_s®when installing USB driver: Designate [he correct toldel: ....
installing USB drivel:
NoUSB HS (high speed) Make sul_ that you have alreedy installed the driver provided with
connection even when the USB20 card. 143
USB2.0 card is used. You will need to install #3edriver provided by USB2.0 card maker in
order to operate the USB2.O car_Jat HS (high speed).
E×ecuting "Export" on Do not choose "Simple E_qaort":If you do, reading will stop midway
DVD-MovieAIbumSE will
interrup! _ading
midway.
160
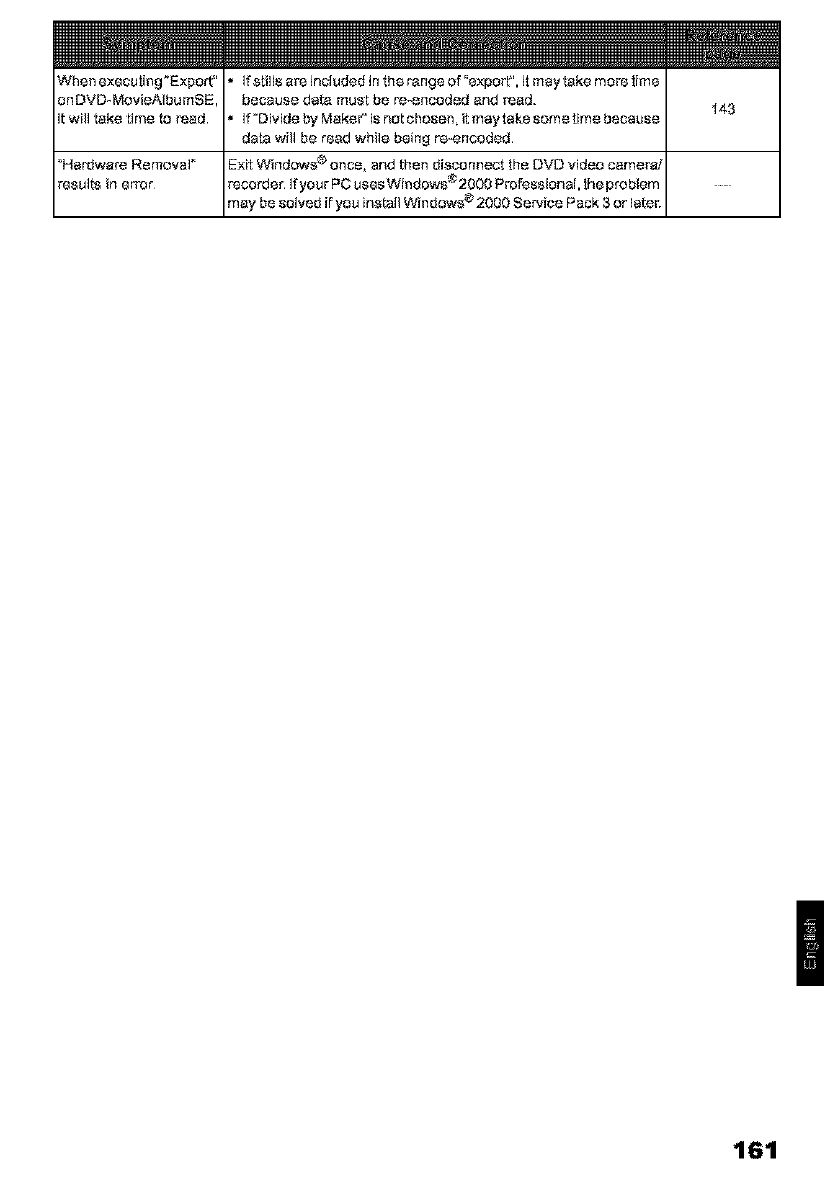
Whe_execu_g"Export*' •Ifstillsarsincludedintherangeof"export",Jtmay_kemo_tim8
on DVO_MovieAIbumSE because d_f_ mu_t b8 _-_ncod_d and read. 143
it will _ke time to _ad •If_DividebyMake_isn_tchos_n_itm_ytakssom_im_bec_use
data will be r_ad whil_ b_ing _ncoded
_Ha_wa_ Removal _ Exit Window,__ once, and th_n disconn_t lhe DVD vld_o camera/
_sul_ in _rror recordsr If your PC us_sWindow_2000 P_ssionaf, _h_problem ....
may b_ solved if you install Window_ ®2000 Servic_ Pack 3 or I_te_
161
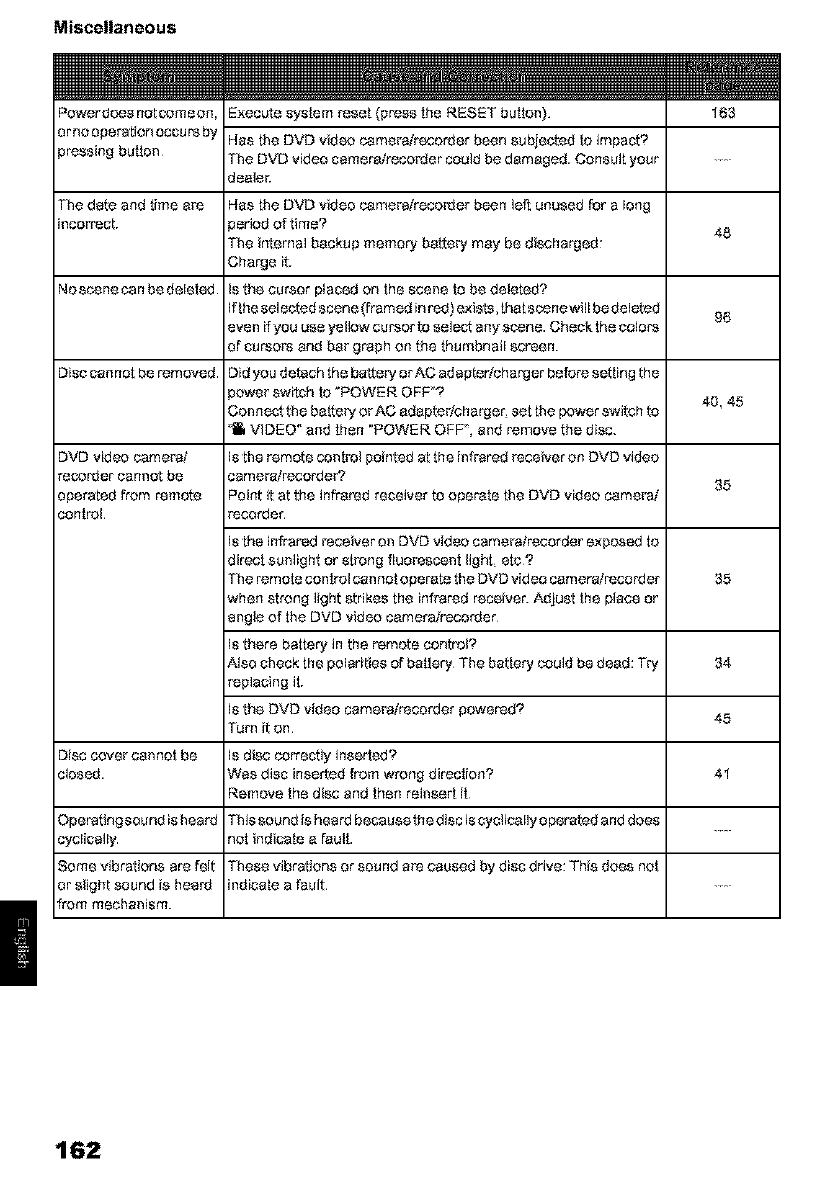
Miscellaneous
Powerdoes notcomeon Execute system reset (press the RESET bution). 163
ornooperationoccursby Has the DVD vider_camera/recorder been subjected to impact'_
pressing but!on The DVD video camera/recorder could be damaged. Consult your ....
deale_:
The date and time air Has the DVD video camera,_recolder be_n left unused for a Jong
incorrect. )eriod of time? 48
The internal backup memory battery may be discharged:
Charge it.
Noscene can be deJeled Is the cursor ptaced on the scene to be deleted?
If lhe selected scene (flamed inr_d) exists, that scene will be deletod 96
even if you use yellow cursor to select any scene. Check the colors
of cursors and bar graph on the thumbnail screen.
Disc cannot be removed Did you detach the bakery or AC edapterlcharger before set!ing the
)ower switch !o "POWER OFF? 40, 45
Connect the battery or AC adaptedcharger set the prier switch to
"tl_ VIDEO" and then "POWER OFF, and remove the dlsc.
DVD vider_came_i 18the remote con!_l pointed at the infrared _ceiver on DVD video
recorder cannot be camera/recorder7 35
operated from remote Point it at the infrared receiver to operate the DVD vldeo camel_
control recorder
Isthe infrared receiver on DVD video came_lrecorder exposed to
direr sunllght or sb_)ngfluorescent light_ etc?
The remote control canno! operate the DVD video camerWrecorder 35
when strong light strikes the infrared receiver. Adjust the place or
angle of the DVD video camera/recorder
Is there battery in the remote control?
Also check the poledties of batlery The battery could be dead: Try 34
replacing it.
Is the DVD video camera,_recorder powered? 45
Turn it on
Disc cover cannot be Is disc correctly inserted?
closed. Was disc inserted from wrong direction? 41
Remove the disc and then reinsert it
Operating sound is heard This sound isheard because the disc issyclically operated and does
cyclically not indicate a fault.
Some vibrationsare felt These vibrationsor sound a_ caused by dlsc drive: This does not
or slight sound is heard indicate a fault
frock]r_]echanisf'_].
162
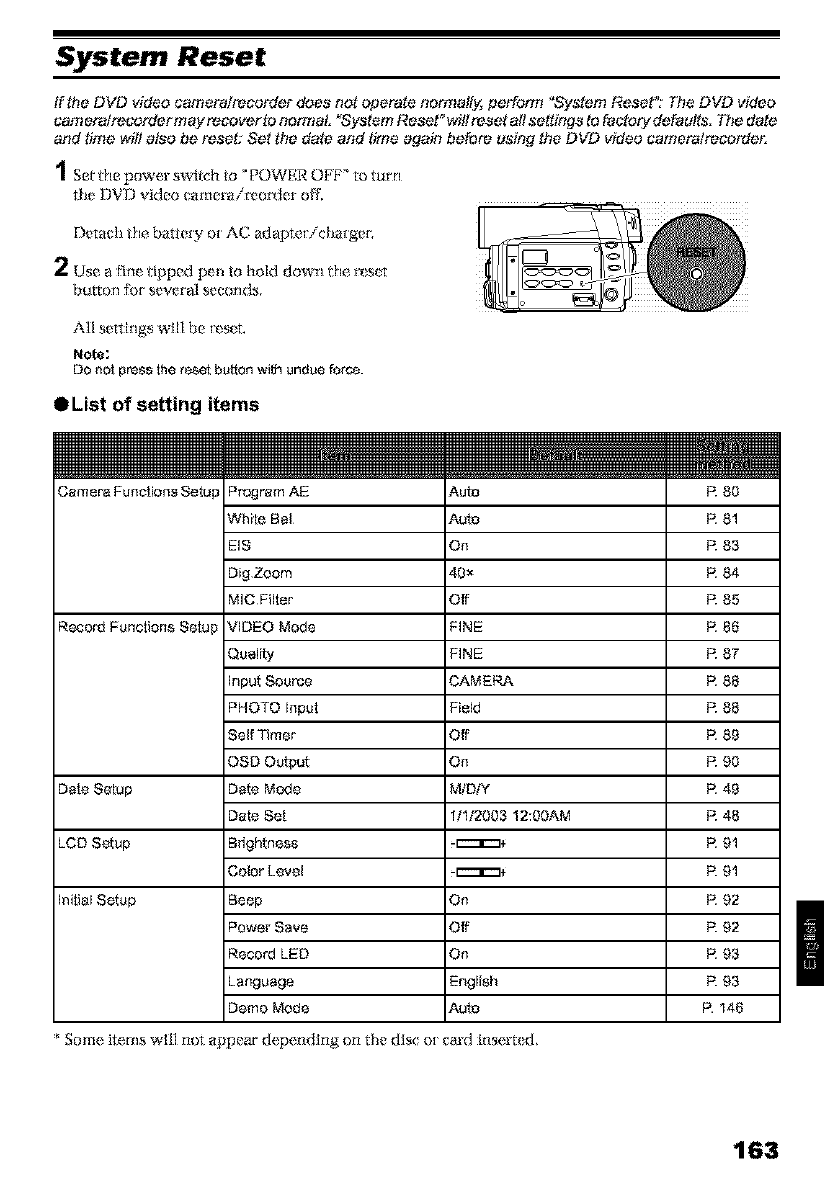
System Reset
If the DVD video eameretreeorde¢ does not operate nerma#y, perform "System Reset"," The DVD video
camerelrecorder may recoverto normal. "System Reset °will reset all settings te factory defaults. The date
and time wilt also be reset: Set the date and time again before using the DVD video cameratreeorder.
1 Set the power switch to _POWER OPF" to turn
the DVD video camerai_o_er o_
Detach the, batteiy or AC adapte[ icha[ger',
2Use a fine lipped pen to hold down tile r_!s_t
button fi_r several seconds,
All settings wlll be _z,s_,t.
Note:
DOnot press the res_ bu!_onwit_ undue force.
ttList of setting items
CameraFunctionsSetup ProgPamAE Auto R 80
While Bal Auto R 81
EIS On R 83
Dig Zoom 40* R 84
MiC Filter Off R 85
Record Functions Setup VIDEO Mode FINE R 86
Quality FINE R 87
Input Soume ,_AMERA P. 88
PHOTO input Field P. 88
Self Timer Off R 89
OSO Output On R 90
Date Setup Date Mode MIDY't R 49
Dale Set 1111200312:00AM R 48
LCD Setup Brightness 4:::::::z_÷ R 91
Color Level 4:zz:zz:3+ R 91
Initial Setup Beep On R 92
Power Save Off R 92
Record LED On R 93
Language English R 93
Dame Mode AUto R 146
* Some items w111not appear' depending on the dis(: or cm'd insert_ d,
163
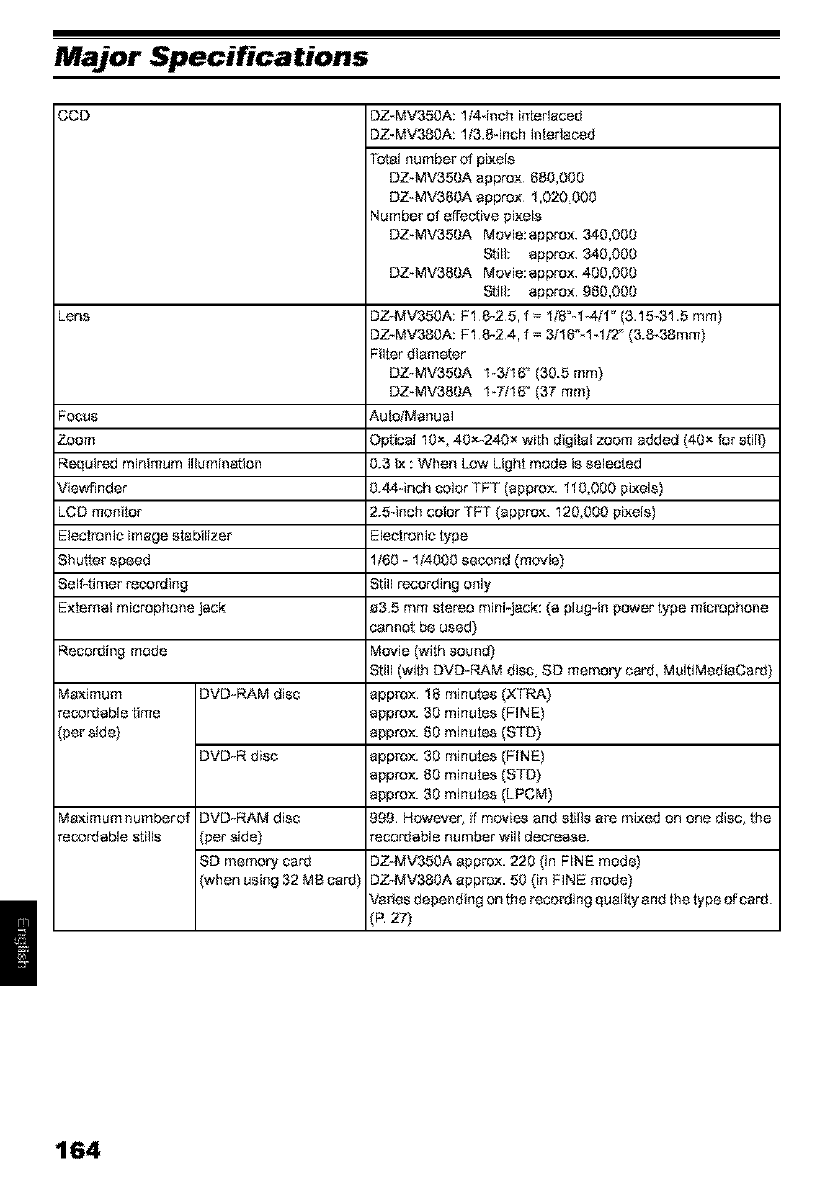
Major Specifications
COD
Lens
FOCUS
Zoom
Required minimum illumination
ViewRnder
LCD monitor
Electl_nic image stabilizer
Shutter speed
Self-timer recoFJing
E×ternal microphone jack
Recording mode
Ma×imum
recordabie time
(per side}
Ma×imum numberof
recordabie stllls
DVD-RAM disc
DVD-R disc
DVD-RAM disc
(per side)
SO memor T card
(when using 32 MB card)
DZ_MM350A: 1144nch interlaced
DZ-MM380A: ll3.Sqnch interlaced
Total number _f pixels
DZ_MV350A approx 680,000
DZ_MV380A approx 1,020_000
Number _f _ffectlve pixels
DZ_MV350A Movie:approx 340,000
Still: approx 340,000
DZ_MV380A Movie:approx 400,000
Still: approx 960,000
DZ-MV350A: F18-25, f = 1/8_1_411" (3.15_31.5 ram}
DZ-MV380A: F18-24, f = _16_1-1/2 _(3.8-38mm}
Filter diameter
OZ_MV350A 1_3/1_ (30.5 ram)
OZ_MV380A 1_7/1_ (37 ram}
Au!oiManual
Optical 10x, 40x_240_ with digital zoom added (40x for stiil)
0.3 I_ : When Low Light mode is setacted
0.44qnch color TFT (approx. 110,000 pi_els)
2.5-inch color TFT (appro×. 120,000 plxels)
Electronic type
1/60 _ 1/4000 second (movie)
Still recording only
_3.5 mm ste_o minFjack: (a plug-in power type mic_phone
cannot be used)
Movie (with sound)
Still (with DVD*RAM disc_SD memory card, MultiMediaCard)
applgx. 18 minutes (XTRA)
approx. 30 minutes (FINE}
approx. 60 minutes (STD)
applgx. 30 minutes (FINE}
approx. 60 minutes (STD)
approx. 30 minutes (LPCM)
999 However. if movies and stills am mixed on one disc_the
recordabl8 number will decrease.
DZ-MM350A app{gx. 220 (in FINE mode}
DZ-MM380A appl_. 50 (in FINE mode)
Varies depending on the t_cording quality and the type of card.
(R 27)
164
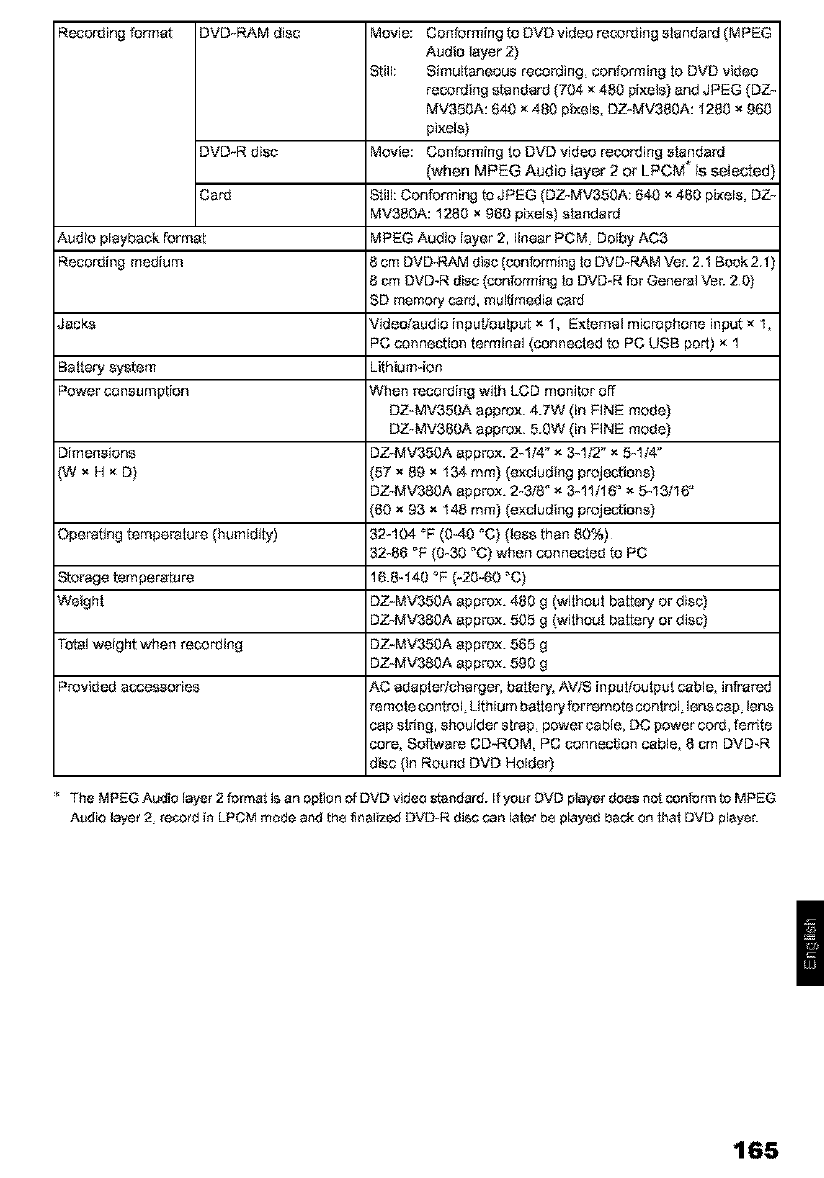
Recording for_nat DVD-RAM disc Movie: Conforming to DVD video t_cordlng slandaF3 (MFEG
Audio layer 2)
Stilk Simultaneous _co_ing_ conforming !o DVD video
reco_ing standard (704 _ 4_0 pi×el_ and JPEG (DZ-
MV350A: 640 _480 pixels, DZ_MV380A: 1280 _ 960
pi×els]
DVD_R dlsc Movie: Con forming to DVD vi_Jeo_cording s_an_Jard
(when MPEG Audio layer 2 or LF_CM* is selected)
Card Still: Conforming to JPEG (DZ-MV350A: 640 _ 480 pixeJs, DZ-
MV380A: 1280 _ 960 pi×els] slanda_
Audio pJayback format MF'EG Audio layer 2, Jine_r F'CM_DoJbyAC3
Recording medium 8 cm DVD-RAM disc (conforming !o DVD*RAM Ve_ 2.1 Book 2.1)
8 cm DVD_R_tisc(conforming lo DVD_R for General Ve,_20)
SD memory card, multJmsdla ca_
J_cks Video/audio inputloulput _ 1, E×lernal microf_hone input _ 1,
PC connection terminal (connected to PC USB port) _ 1
Baltery sS_e m Lithiumqon
Power consumFtion When recording with LCD monitor off
DZ_MV350A appro×. 4.7W (in FINE mode)
DZ_MV380A appro×. 5.0W (in FINE monte)
Dimensions DZ_MV350A app_x. 2_1/4" _ 3_112"_ 5_1/4"
(W _, H _ D] 57 x 89 _ 134 ram) (excluding projection_
DZ-MV380A appt_x. 2-3/8 __ 3_11116_ _ 5_13/1_
60 _ 93 _ 148 mm) (excluding projection_
Operating temt_eratu_ (humidity) 32_104 _F(04,0 _C] (less than 80%)¸
32_86 _F(0_30 _C)when connecte_t to PC
Stooge _mperatu_ 16.8_140 °F (_20_60_C]
Weight DZ_MV350A approx. 480 g (withou! battery or disc)
DZ-MV380A approx. 505 g (withou! battery or dis_
Total weight when recording DZ_MV350A approx. 585 g
DZ-MV380A approx. 590 g
Provided accessories AC adap_edcharger, ba_lery, AVIS inpu!_o_tp_t cable, infrare_
remole control Lithium battery forremote con_rol_lens cap_lens
cap s_ng, shoulder s_rap_power cable, DC power cord, ferrite
co_, Softwa_ CD_ROM, PC connection cabJe, 8 cm DVD_R
disc (in Round DVD HoJder)
'* The MPEG Audio layer 2 format is an option of DVD video s_andard. If your DVD ptayer does not conform _o MPEG
Audio layer 2_record in L_CM mode and th_ finalized DVD-R disc can later b_ played back on _at DVD playe_
165
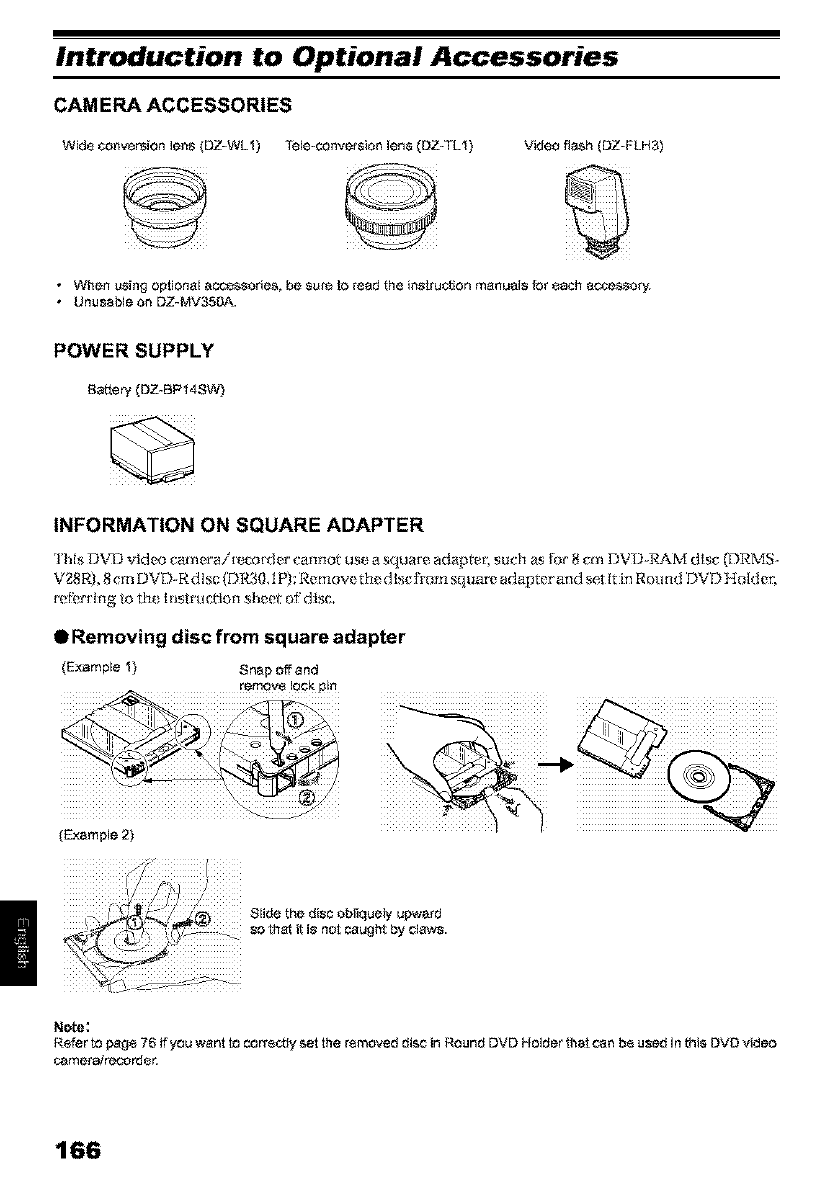
Introduction to Optional Accessories
CAMERA ACCESSORIES
Wide _onversion lens (DZ-WL1) Tele-¢onvmaion lens (DZ-TL1) Video flash (DZ-FLH3)
• When using optional accessories, be sure to read the instruction manuals for each ac_'.ssory.
• UnusaNe on DZ-MV350A.
POWER SUPPLY
Baite_ •(DZ-BP14SW)
INFORMATION ON SQUARE ADAPTER
ins I.)V [? video *'auneratit*_cot_ter €'an no1 use a square adapter; su('h as [or 8 crn I)V L?-RAM dis*" (DRMS
Vg8R), 8 cm DVD-RdIsc (DI_0,I P): Remow th_ dlsc_]'om squar_ adapter and set Itin Round DVD Holder;
refi_rdng to th_ I t_strucrion sl_eet of disc.
@Removing disc from sq uare adapter
(Ex_3mNe 1) Snap offand
(Example 2)
Slide the disc obliquely upward
so thai ff is not caught by claws.
Note;
Refer to page 76 if you want to correctly set the removed disc in Round DVD Holder that can be used in this DVD video
_,3merairecorde_
166
To Order in the United States
BY PHONE
1-800-HITACHI
(1-800-448-2244)
FOR AUTHORIZED HITACHI SERVICE
FACILITY IN CANADA
Please consult the follow ng tetaphone number:
1-SOO_HITACH I
(!_800-446-2244)
TO ORDER ACCESSORIES
{Canada only)
BYPHONE
HITACHI CANADA LTD.
DIGITAL MEDIA DIVISION
6740 Campobello Road,
Mississauga, Ontario
LSN 2L8
Phone: %800-HITACHI
(1-600446-2244)
during business hours
Monday_Friday EST 9:0Oam-7:O0pm
Satarday EST 9:0Oam-5:00pm
Chois ssaz les artJctas qui vous conviennent et
passez commande.
Appelez le numero gratait "1-80g-HITACHI
(1-600446-2244)'.
POUR COMMANDER DES
ACCESSOIRES
_ent)
HITACHI CANADA LTD.
DIGITAL MEDIA DIVISION
6740 Campobeilo Road,
Miss ssauga, Ontario
LSN 2L8
Phone: !-80O_HITACHI
(%800-448-2244)
Durant lea heurea de bureau:
Lur_diauvendred 9:OOam-7:0Opm (h.me)
Samedi £:OOam-5:0Opm (h.me)
DECLARATION OF CONFORMITY
withFCC Rules for Eler,ffromagnatiaCompatibility
Products: DVD VIDEO CAMEP, AfRECORDER
Models: DZ-MV350AfDZ-MV380A
Trade Name: HITACHI
This device complies with part 15 of FCC Rules.
Operation is subiect to the follow ng two cond tions: (1)_hisdevice may not cause harmful hterferenca, and
(2)_his device must accept ar_y interference received, including interference that may cause ur_des red
operation.
Responsible Party: HITACHI AMERICA, LTD,
HOME ELECTRONICS DIVISION
1855 Domech Court, Sar_ Diego,
CA 92154-7226 U.S.A
Tel: 619-661-0227
167
Index
Numerics
240 x {Dig.zoom) ............................................... 84
40x {Dig zoom) ................................................. 84
8 cm DVD-R disc .............................................. 22
8 cm OVOq:_a_M disc .......................................... 22
A
AC adapter/charger ........................................... 40
ACCESS/PC indicator ................................ 507 53
Add {edit) ....................................................... 121
All programs ................................................... 114
Auto {program AE} ............................................ 80
Adeo-tocus ....................................................... 57
AV inpulJout_ut jack .......................................... 72
B
Back_ight corrosion ........................................... 60
Battery ............................................................ 36
A_eching to DVD video camera#ecorder ...... 37
Charging .................................................. 36
Recordable time on DVD video camera!
recorder ................................................ 38
Removing from DVD video camera/
recorder ................................................ 37
Setling Up ................................................ 36
BATTERY EJECT button ................................... 37
Deep ............................................................... 92
Black & Whifa fade .......................................... !05
Bdghfoess ........................................................ 91
C
Camera Functions Setup .................................... 80
Capacity ........................................................ ! 26
Card Available .................................................. 25
Capacib] .......................................... 277 126
Category ................................................ 130
Format ................................................... ! 27
Handling .................................................. 25
QuaNb] ..................................................... 87
Card Access indicator ........................................ 53
CHARGE indicator ............................................ 36
Cleaning ........................................................ !45
Color Level ...................................................... 91
Connecting
to Ofoer AV Device .................................... 65
toT',,' ....................................................... 72
Copy ............................................................. 109
Create ........................................................... !17
D
Date and time ................................................... 48
Date setup ....................................................... 48
Defaults ........................................................... 94
De]efa{edit) ................................................... 122
De]eto(play list) .............................................. 124
Deleto{scene) ....................................... 10! 7 !21
Demo Mode ................................................... 146
Defail (so,one) ................................................. 1!3
Dig. zoom ........................................................ 84
Diopter control .................................................. 46
Disc ................................................................ 22
Available .................................................. 22
Capacity .................................................. 26
Finalize Disc ........................................... 129
Format ................................................... 127
Handling .................................................. 24
Protect ................................................... 128
Update Control Info ................................. 128
DISC EJECT bu_on .......................................... 43
Disc guide ........................................................ 41
Display ............................................................ 62
Information LCD ........................................ 62
So,enos information .................................. 113
Viewfinder ................................................ 46
Divide ........................................................... 108
DPOF ........................................................... 111
DVD_R ............................................................ 22
DVD-RAM ........................................................ 22
E
Edit {play Li_) ................................................ 121
EIS ................................................................. 83
EXPOSURE huron ........................................... 59
Ezposure e,ontrol ............................................... 59
Extornal microphone jack ................................... 52
F
Fade ............................................................. 105
Ferrifa core ...................................................... 52
FIELD (PHOTO Input} ....................................... 88
Finalize Disc .................................................. 129
FINE {VIDEO Mode) .......................................... 86
FOCUS button .................................................. 57
Format Disc ................................................... 127
FRJ',J£tE {PHOTO Input) ..................................... 88
Frame advance/Frame back ............................... 68
FULL AUTO button ........................................... 61
G
GO TO {dudng pla,jback} ..................................... 70
GO Te {on Disc Navigation) .............................. 125
H
Hand strap ....................................................... 32
I
Informationdisplay mode ................................... 62
Infrared receiver ............................................... 35
Ini_JalSetup ...................................................... 92
Input Source .................................................... 88
168
L
Language ........................................................93
Lens cap .......................................................... 32
Lock .............................................................. !10
Low Light(ProgramAE) ..................................... 80
LPCM (VIDEO Mode) ........................................ 86
M
MENU button .................................................... 79
MF .................................................................. 57
MIC.Filter ......................................................... 85
Move ............................................................. !23
O
OpticallO X zoom lens ....................................... 17
OSD Ou_ut ..................................................... 90
P
PHOTO input ................................................... 88
Play (play list) ................................................. 119
Play (program) ................................................ 115
Pray list .......................................................... 117
Add scenes ............................................ 120
Add scenes (submenu) ............................ 121
Create ................................................... 117
Delete .................................................... 124
Delete scones ......................................... 121
Delete scenes (suPmenu) ......................... 122
Move ..................................................... 123
Play ....................................................... 119
Select scenes (submenu) ......................... 122
Switch ................................................... 118
Title ....................................................... 124
Portrait (Program AE) ........................................ 80
Power Save ..................................................... 92
Power switehl .................................................... 45
Program ........................................................ 114
Play ....................................................... 115
Switch ................................................... 114
Title ....................................................... 115
Program AtE ..................................................... 80
Protect Disc ................................................... !26
Q
Qualitly (Card) ................................................... 87
R
Record button ................................................... 50
Rscording indicater ........................................... 93
Remote control ................................................. 34
Repeat Play ................................................... !30
Reset .............................................................. 94
se_lings .................................................... 94
system ................................................... 163
RESET button ................................................ !63
8
Sand & Snow (Program AE) ............................... 80
Scene
Combine ................................................ 107
Delete ................................................... 101
Dstail ..................................................... 113
Divide .................................................... 108
Fade ..................................................... 105
Move ..................................................... 123
Select .................................................... 112
Skip ...................................................... 104
Searching for image .......................................... 68
Selec{ (Scene) .................................................. 98
SELECT Putto_ ................................................ 98
Self Timer ........................................................ 89
Shloulder Strap ................................................. 33
Skip (Scene) .................................................. 104
Skip playback ................................................... 69
Slide Show ..................................................... 131
Sports (Program AE) ......................................... 80
Spotlight (Program AE) ...................................... 80
STD (VIDEO Mode) .......................................... 86
Stereo microgpone ............................................ 50
Submenu ....................................................... 102
Switch (play list) .............................................. 118
Switch (program) ............................................ 1!4
T
Tale-conversion lens ......................................... 56
Thumbnail ........................................................ 96
Title (play list) ................................................. 124
Title (program) ................................................ 1!5
U
Update Control Infc_......................................... 128
V
Video flash ....................................................... 54
VIDEO Mode .................................................... 86
FINE ....................................................... 86
LPCM ...................................................... 86
STD ........................................................ 86
XTRA ...................................................... 86
VOl. Putton ....................................................... 67
W
White Bal ......................................................... 81
White fade ..................................................... 105
Wide conversion lens ........................................ 56
Wipe fade ...................................................... 105
X
XTRA (VIDEO Mode) ........................................ 86
Z
zc<_m lever ....................................................... 55
169
Be sure to read the following before opening
the package of CD.ROM
Dtis Ag_enlent wilJ _ke _t a t tire nlomenl you o_en [he p_ckege ofihe s_oroge devil_e (L'D ROM) provided wilh ibis
prodt_ ]['yot_ ag_T_e to tt_ t_rms he_n.
[f y_l_ do noL a c¢_.p t the terttt9 o[" this Ag_msnl_ il:_tzt_di_ _ly tel lll_ the t_nopened package o[ _ol_ge medit]_t_ and
8n_osed ztxat_ri_ls _rin_ed zt_ t8r. externM p_tkege, _1_d _11 other_ _ your deMe_ or r_llrn on_.? the _kage o['_ or_
med_t_m to yo_]_ d_a]eL
(]o_11 yot_r d e_3]er for any _1 nd On the l_n_d prod_. However, if only _}_ package t)['s_ol_ge zt_edi_nl is r_llrned_
no _ nd is p_ible.
D_iSi,]_er_geAzi:eementcerli[]es0_91you we_.granted]k;ensei__hep_t
License Agreement
Article 1 Grant of License
H _(hi, t,+d+g_a_s you [he _blIo+_+ingrights f+_rth_fi_][ow ng products (m be r'eFe_,d I:eas "'i his Sei_war_+her'eaF_+_
[hat you have ohta _led _ifft ths Agre_,me_tt;
(a) Youmayuse_h_sS_ftwa_e_n_y_nash@ep_ece_fequ_pment`H_weve[_ff`_dseq_memtcann_
be used be_'atuse of ml?chanlcM pr'oMem_ you may teapot arily use '['h is So f[&,_4__[_[()tl another pll?c_ of
equipment,
(b) Air+tough rl'hls So[[waIe contains seveIal components that cgrt he run on computer as independent
Nnctlons, all components am licensed as a single product: "fi_u may noL hy rely m_ ans, us_ these
componems orI di_T¢tcn[ compul_xs at the sam_ time,
Article 2 Copyrights
I't_ _'vpyr'igh_s ol'7_is Sol_wa_, atl_(herl manl_al, _tc m'_ o.amed by [h_ fol[o.ad ng eopp;_rm orss a_td are prolee_d by
_'+_Vyr'ght [_ _ I_q_an a_td USA as well _ by o_he,r nt_,!lec_lJal property m_d ime, rr_ti_nM properlies
USB device drt,ter for DVDCAM Hitachi, Ltd.
DVD-Movi_bumSE
bumSE
M_ushita Electric Industrial Co., Ltd.
Melsushita EleCtric Industrial Co., Ltd.
Sonic Solutions
Article 3 Other Rights and Limitations
(h)
(<') Yau rnay net decornp le or d s_mble this Soi_war_
(d} I)llplit_til)_t _n_d/or d_4rih_ d_on ;if any _'_les oi_ ibis _I;lrage r'r_ed lln_ ['or cmumerei.31 t_s(_ is _r ehibil (_d_
Article 4 Quality Assurance
Ll_tder _to circumstances will i";ilach, LM. Matsu._hitu t'.l_tric [ndusl_l Co itd. or Sonic Solutions _'_pt m_y
ro.spo_ibi]J;)/for ;Jny d _ m ages y o _ may in tt_r fl_)ztt llsi ng or being ,J_hle to 14se 'lnis Sol_w_r_ (inclllding b t_ n ol ] rnt_d
tIL ]i_sg i_fbL_inegs pr efit interrupt iei_ O[ bl_iness k)_ of hll_i_/_ ]n['or tt/._lliei_, Or olher monetary rlatt/._lg_s).
Article 5 Termination of Agreement
fyou fh] t_ ¢omp]y wi[h [he Ier'rr_ of _his Agrt_erne_t Hitachi, Ltd. %4_t_s2hil a t'.]ecl r ic industrial Co, Lid. and Sonic
SO]I_tions r_er-¢e the r'ighl to t_r tu]n._ te the Agreern(mt. in su_9_ _ c_se, yoll w][] be ;_h[ig_d t_ di%ard a[] c;_pies ;_1"q_t]s
Sell ;'_a_ _n/d ]1._¢i_¢iponet'tl&
Article 6 Prioritized License Agreement
Wheat SOrne SOftWa_ p_gr'att_._ are _l a]l<_<J,lh e {i¢.e_(_ ag_e_;_ie n t_. v.i{I be d_s.p{ayed {lo be refer red lo as online I _,_nse
170
